1
!
Pachyderm 3.0 User Manual!
!
Revision 3.0 v1
!
!
!
!
!
Anne Leonard!
Lou Zweier!
Scott Sayre!
Joel Bennett!
Abbe Altman!
!
Revised for 3.0 by Lou Zweier!
!
Pachyderm 3.0 User Manual! !
Revision 3.0 v1 03.13.2014 ! !
!
!
page 2
!
!
!
!
!
!
!
!
!
!
!
!
!
!
!
!
!
!
!
!
!
!
!
!
!
!
!
!
!
!
First published 2005 by the New Media Consortium!
Revised 2010 by University of Minnesota for the release of Pachyderm 2.1!
Revised 2014 by The Hubert Project, UMN for the release of Pachyderm 3.0!
!
!
© 2010 California State University Center for Distributed Learning, New Media Consortium, University of Minnesota and Sandbox Studios © 2005 NMC: The New Media Consortium.!
Permission is granted under a Creative Commons Attribution-NonCommercial-NoDerivs license
to replicate and distribute this report freely for noncommercial purposes provided that it is distributed only in its entirety. To view a copy of this license, visit creativecommons.org/licenses/bync-nd/2.0/ or send a letter to Creative Commons, 559 Nathan Abbot Way, Stanford, California
94305, USA.!
!
!
ISBN 0-9765087-2-9!
!
!
Pachyderm 3.0 User Manual! !
Revision 3.0 v1 03.13.2014 ! !
!
!
page 3
!
Table of Contents
!
!
!
!
Table of Contents!...............................................................................................................4!
What is Pachyderm!...........................................................................................................6!
Pachyderm 3.0 — What’s New!..........................................................................................9!
Getting Started!................................................................................................................12!
Logging In!....................................................................................................................12!
Managing Your Account!...............................................................................................12!
Media Management!.........................................................................................................14!
Uploading Media Assets into Pachyderm!....................................................................14!
Media Metadata!...........................................................................................................17!
Browsing & Searching for Media!..................................................................................19!
Authoring in Pachyderm!..................................................................................................20!
The Authoring Environment!.........................................................................................20!
Starting a New Presentation!........................................................................................22!
Editing a Presentation Screen!.....................................................................................23!
Importing Media Into a Presentation Screen!...............................................................25!
The "Edit Presentation" Screen!...................................................................................26!
Adding a Screen to a Presentation!..............................................................................27!
Linking Screens Together!............................................................................................27!
Publishing!....................................................................................................................29!
Presentation Management!..............................................................................................30!
The Pachyderm Templates!..............................................................................................32!
Aspects Template!............................................................................................................34!
Commentary Template!....................................................................................................35!
Dual Comparison Template!.............................................................................................37!
Enlargement Template!.....................................................................................................39!
Exploration Entry Template!..............................................................................................40!
Full Screen SWF Template!..............................................................................................42!
Layers Template!..............................................................................................................43!
Media Focus Template!....................................................................................................44!
Phone Dial Template!.......................................................................................................46!
Series Template!...............................................................................................................48!
Slider Template!................................................................................................................50!
Zoom Template!................................................................................................................52!
Template Properties!.........................................................................................................54!
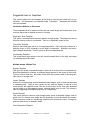
Suggested Uses for Templates!........................................................................................56!
Introductory Material or Overviews!..............................................................................56!
Multiple Images, Minimal Text!......................................................................................56!
Explanatory Material with Extensive Text!.....................................................................57!
Media - Images, Video, and Audio!...............................................................................57!
Quick Reference for Linking to Screens or URLs!............................................................58!
About Published Presentations!.......................................................................................59!
Navigating Pachyderm!.................................................................................................60!
Pachyderm 3.0 User Manual! !
Revision 3.0 v1 03.13.2014 ! !
!
!
page 4
Creating a .Zip Archive!.................................................................................................60!
Putting Presentations on a Website!.............................................................................60!
Accessibility Compliance!.............................................................................................61!
Pachyderm 3.0 User Manual! !
Revision 3.0 v1 03.13.2014 ! !
!
!
page 5
!
What is Pachyderm!
!
!
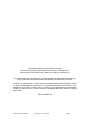
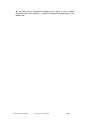
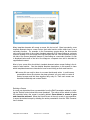
What is Pachyderm?!
Pachyderm is an open-source web-based multimedia authoring system that provides an
easy way to create highly engaging interactive web presentations. With Pachyderm,
you can combine text, images, video, and audio into a web-based multimedia story —
without being a programmer.
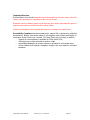
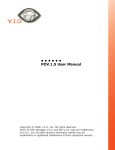
A Pachyderm presentation !
!
(based on the Phone Dial template)!
A Pachyderm presentation does not behave like a website, or PowerPoint presentation:
Instead, it offers a means to organize and present content in a compelling way that
takes advantage of nonlinear branching and user-driven choices.!
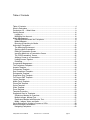
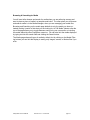
How it Works
!
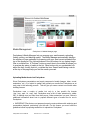
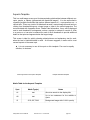
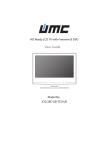
Commentary Template! !
!
Published Commentary Screen!
!Pachyderm authoring is based on a series of pre-designed templates that provide sound
information design, graphic design, and navigation design to create a presentation.
Pachyderm’s templates range from very simple - a single image with some text, to
Pachyderm 3.0 User Manual! !
Revision 3.0 v1 03.13.2014 ! !
!
!
page 6
very complex - multi-layered combinations of text, images, videos, and links. To create a presentation, an author uploads media files to the Pachyderm server, selects an
appropriate template, and then places media and text into the template to create a
presentation screen. Presentation screens can be linked to one another to create a
multi-screen interactive presentation. Links can also be made to external web pages
or documents (e.g. PDF). The resulting Pachyderm presentation is published to the
Web in HTML5 or Flash format for easy viewing in a web browser.
!
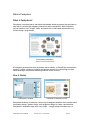
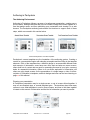
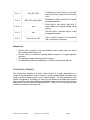
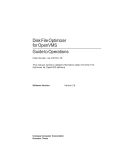
Planning is Important!
Creating a diagram of your pachyderm presentation is a good planning tool!
!
A Pachyderm presentation is like a plant, with twigs, layers, and leaves extending from a
single trunk. Like a plant, the structure of your presentation is best managed and pruned
for greatest beauty and strength. It is easy to put information into a template, and fun to
play around with different templates to see what arrangement of your content has the
most impact. However, creating a lot of screens without an overall plan often leads to a
tangled mess of branches and confused viewers. For more guidance on planning your
presentation, see xx of this guide.!
!
!
While many authors will be able to work with Pachyderm without a detailed set of instructions, this guide is intended to help authors focus their time and efforts more effectively. Some users may find that browsing is a better way to learn from this manual than
reading straight through. This will depend on the size and complexity of your project, as
well as your past experience with web-based multimedia authoring tools.!
!
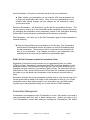
The ► indicates a tip or helpful point that might otherwise take trial and error to
find out, or be easily overlooked.!
!
!
The HTML5 indicates special information about the new HTML5 capabilities of
Pachyderm 3.0!
Pachyderm 3.0 User Manual! !
Revision 3.0 v1 03.13.2014 ! !
!
!
page 7
Sentences in bold type are key points or program limitations that should be kept in mind
during the authoring process.
Pachyderm 3.0 User Manual! !
Revision 3.0 v1 03.13.2014 ! !
!
!
page 8
!
Pachyderm 3.0 — What’s New!
!Pachyderm 3.0 has been vastly improved over version 2.1, the last major release. Ver-
sion 3 has both new features and a significantly improved code base. New features have
been added for everyone: authors, server administrators, and code developers. Pachyderm 3.0 works well with current versions of IE, Chrome, FireFox and Safari browsers.
Below are some of the highlights of what’s new in Pachyderm 3.0 for authors (benefits
for administrators and developers can be found in the Pachyderm Administrators Manual).
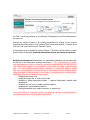
HTML5 Authoring/Publishing
Pachyderm 3 now supports creation of HTML5 presentations that play on mobile (nonFlash) devices like iOS and Android tablets and smartphones, as well as desktop and
laptop computers. All of the Pachyderm 2.1 templates have been translated into HTML5.
HTML5 presentations have been enlarged to 1024 x 768 pixels, filling the entire browser
window on an iPad tablet or typical computer screen. The Pachyderm authoring environment is also HTML5 compatible, so you can create your presentations on mobile devices as well. The only thing you have do differently when authoring an HTML5 presentation is that video files must be in .mp4 format.
Users with CSS skills can modify the look-and-feel of published HTML5 presentations by
using a CSS overrides file that is part of the HTML5 template architecture.
Link Directly to Individual Screens - Another new advantage of HTML5 presentations
is that each screen in the presentation has a unique url, so it is possible to link directly to
any screen in a presentation. And for screens with multiple “pages” like Layers, Slider,
and Series, you can link to any individual page within that screen. For example, you can
share a link with someone that goes directly to slider point 3 on the slider screen in your
presentation. Users have been requesting this capability for a long time and now it is
here with the HTML5 templates in Pachyderm 3!
Improved Media Playback Controls
HTML5 presentations also include a full featured media playback controller. This controller includes a timer, a progress bar with draggable playhead, and a zoom box for enlarging the video to full screen.
Flash Authoring Still Available - Flash authoring/publishing is still available in Pachyderm 3. You choose the format of your presentation when you first create it (HTML5 or
Flash). You can change the format of your presentation later if you wish. Just remember
that if you change the presentation format, you must also change the format of any video
files in the presentation: .mp4 files for an HTML5 presentation, and .flv files for a Flash
presentation
!
Expand/Collapse Editing
Now, when authoring a screen in Pachyderm, the entire header of each screen component is clickable to expand or collapse that screen component. This makes it very easy
to expand and collapse individual screen components as you author, and avoids you
Pachyderm 3.0 User Manual! !
Revision 3.0 v1 03.13.2014 ! !
!
!
page 9
having to scroll through a long list of components to find the one you want to edit. After
placing media or previewing a screen, the Expand/Collapse state is maintained, so no
more constantly scrolling down while authoring to re-find your place!
The Save button has been eliminated on the screen authoring page because Pachyderm
now automatically saves what you have entered after each authoring action. No more
accidental loss of data because of page refreshes!
Improved Media Manager
Pachyderm's Media Upload function now checks for valid file types and reports an error
when an invalid file upload is attempted. File extensions are used for validation, so making sure your files have their proper 3 letter extensions is a must
(e.g. .jpg, .png, .mp4, .flv, .mp3, .swf, etc.). The .mp4 video file type has been added to
Pachyderm to support video in HTML5 presentations.
The Media Manager page now automatically displays the media you have uploaded for
browsing, without having to do a search. And your most recent uploads will be displayed
at the top of the media list. A new "Preview" button on each item in the media list allows
you to preview any piece of media directly from the list. Browsing and Searching for media defaults to only the media you have uploaded, making it easier to find what you are
looking for. And an "All Media" selector allows you to toggle between seeing only your
own media, or the media shared by other Pachyderm users too.
Media filtering options have also been added to the Media Manager. By default the page
displays all types of media. New buttons at the top let you choose to see only images,
sound, or video files if you wish.
Publish Improvements
Pachyderm's Publish page now reports any missing or wrong format media files before it
builds your presentation. After your publish is completed it reports the time it took to build
your presentation.
HTML5 & Flash Templates Included in Presentation Folder
Regardless of the format you have chosen for your presentation when you publish
(HTML5 or Flash), Pachyderm 3 includes both the HTML5 and Flash templates in your
presentation folder. The presentation’s Index.html file is set to launch whichever set of
templates you have chosen for your format (HTML5 or Flash). Two other index files (an
indexF.html for Flash, and an index5.html for HTML5) are also included in the presentation folder so you can launch your presentation in the format you wish with either of
these.
Remember, however, that if your presentation includes video, a copy of each video in the
correct format must be added to the folder for the presentation to work (e.g. for a Flash
presentation with a video called myvideo.flv, you must add a new .mp4 video called:
myvideo.mp4 to the presentation folder for it to work with the HTML5 templates).
Known Issues in Pachyderm 3.0:
Pachyderm 3.0 User Manual! !
Revision 3.0 v1 03.13.2014 ! !
!
!
page 10
Versions of IE earlier than 10 have some screen layout issues when authoring and viewing presentations. Pachyderm 3 works well with current versions of IE, Chrome, FireFox
and Safari browsers.
Closed captions for videos are currently not implemented in the HTML5 templates. This
is due to lack of standards for implementing closed captions in HTML5 media players at
the time the HTML5 templates were developed. However, transcripts for mp4 videos do
work, and captions can be burned into video as an alternative until closed captions can
be implemented.
If you change the format of your presentation after you have begun authoring (from
Flash to HTML5 or visa versa), you must publish your presentation once to get screen
preview to switch formats.
Because of security restrictions in IE and Chrome browsers on Windows, HTML5 presentations cannot be played from a local hard disk with these browsers. However, FireFox on Windows can play presentations locally. On the Mac, Chrome and Safari cannot
play presentations from a local disk, but FireFox will play them fine. All four browsers
play HTML5 presentations fine from a web server.
Pachyderm 3.0 User Manual! !
Revision 3.0 v1 03.13.2014 ! !
!
!
page 11
!
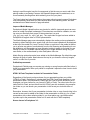
Getting Started!
!
All that is required to begin authoring with Pachyderm is an account on a Pachyderm
server. Record your information here:!
!
Server URL:!
Login:!
!
Record your password in a safe place.!
!
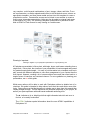
Logging In!
!
!
!
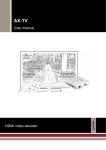
Pachyderm Login Screen!
!
!
!
Pachyderm Home Screen!
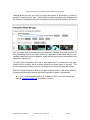
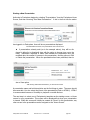
Pachyderm’s initial screen requires you to enter a user name and password to use the
system. Upon logging in, you are taken to the Pachyderm Home Screen where you
have the choice of: "Presentations," “Media Assets,” "Edit My Account," or "Log Out."
“Media Assets" allows you to upload, edit, or otherwise manage your media files for use
in presentations. "Presentations" allows you to create, edit, publish, and otherwise
manage your presentations.!
!
Managing Your Account!
Pachyderm users can manage basic information about their account. First and last
names, passwords, and e-mails can be changed with confirmation. Account information
Pachyderm 3.0 User Manual! !
Revision 3.0 v1 03.13.2014 ! !
!
!
page 12
is accessed by clicking the "Edit My Account" link on the Home screen in the authoring
system.
Pachyderm 3.0 User Manual! !
Revision 3.0 v1 03.13.2014 ! !
!
!
page 13
!
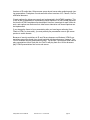
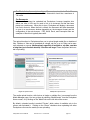
Media Management!
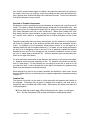
Pachyderm 3.0 Media Manager page
Pachyderm’s Media Manager lets you manage your media assets: uploading,
finding, editing, and deleting media. The Media Manager automatically displays
the media you have uploaded for browsing, with your most recent uploads at the
top of the media list. Two Upload buttons in the left column let you upload single
files or multiple files. A "Preview" button on each item in the media list allows you
to preview any piece of media in the list. Other buttons let you see detailed info
about the item, modify that info, or delete the item. Search and filtering controls
at the top of the page help you find the media you want.
!
Uploading Media Assets into Pachyderm!
!
Since Pachyderm presentations are largely composed of media (images, video, sound,
animations, etc.), it is helpful to gather and upload your media into Pachyderm as an
early step in the authoring process. This will give you some content to work with when
building screens. !
!
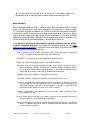
Pachyderm uses a variety of media, but only in a few specific file formats
(.jpg, .png, .mp4, .flv, .mp3, .swf). Pachyderm uses a file’s 3 letter extension for validation, so making sure your files have their proper 3 letter extensions is a must Below is
additional information about how to prepare different types of media files for use in
Pachyderm.!
!
> IMPORTANT: Files that are not prepared properly create problems with authoring and
presentation playback, particularly over the web. For this reason, you must follow the
guidelines below in preparing media files for upload into Pachyderm. !
Pachyderm 3.0 User Manual! !
Revision 3.0 v1 03.13.2014 ! !
!
!
page 14
!
!
!
!
Media File Preparation!
!
For images!
File Format - Images may be in .jpg, .png, or .gif format. !
!
Size - 2560 x 2548 pixels is the recommended size. This size will fill the Zoom
template. Pachyderm will automatically make a smaller size of the image when
needed for other templates or thumbnails. Uploading the full size image ensures
the best quality throughout your presentation. !
! !
For video !
Length - As a rule of thumb it is recommended that videos be 3-5 minutes in
length or shorter. This is based on user feedback about optimum information
consumption. Videos longer than this should be evaluated for more editing or
breaking into a series of short videos.!
!
File Format - HTML5 presentations require .mp4 format. Flash presentations require .flv format. Quicktime files (.mov) are supported but not recommended because they will play in a separate window above the presentation.!
!
Frame Size - Standard pixel dimensions for video is 320 x 240 pixels for all templates except the Enlargement and Media Focus templates, which are 300 x 400
pixels. Matching pixel dimensions exactly for each template will give you the best
quality playback. For HTML5 Presentations, doubling the pixel dimensions will
improve quality when users click the full screen zoom button in the HTML5 video
player.!
!
Data Rate - Videos will not play well if they are compressed (exported) at a data
rate that is is too high for the delivery medium. Since most Pachyderm presentations are delivered over the web, a data rate of 300 kbs is recommended for
video files. The H.264 codec is recommended for compression, however any
codec can be used as long as the 300 kbs data rate limit is observed.!
!
Aspect Ratio - The Pachyderm templates are designed for 4x3 (SD) video.
Users making 16x9 (HD) videos can either crop their video to 4x3, letterbox their
video with black bands at the top and bottom, or output their video in 16x9 format
with the long dimension matching the long dimension of the Pachyderm template
video slots (320, or 400 pixels for default size, or double that for HTML5 zoomed
videos).!
!
For Audio - Audio files must be in .mp3 format. A maximum of 300 kbs data
rate should also be observed for audio files.!
!
Pachyderm 3.0 User Manual! !
Revision 3.0 v1 03.13.2014 ! !
!
!
page 15
For Flash Animations or Interactives - These only work with the Flash Templates and must be in .swf format. Pixel dimensions should be a maximum of
740 x 454. !
!
For Documents!
Document files cannot be uploaded into Pachyderm, however template slots
which can take a URL can be used to link to a document file that has been
placed on a web server. When this is done, Pachyderm will display a document
icon link in that slot. When the link is clicked, the document will either download
or open in a new browser window depending on the document format and the
configuration of the web browser. PDF, Word, Excel, and Powerpoint files are
examples of files this is typically done with.!
!
!
!
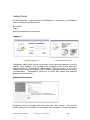
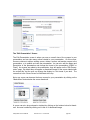
The upload functions in Pachyderm allow you to upload single media files or batches of
files. Batches of files can be combined as a single .zip file, or up to 5 files can be manually selected as a group. Media upload, especially of multiple or .zip files, can take
a long time (up to several minutes) if the files are large. Please be patient while media is uploading.!
!
!
Single file upload screen!
!
!
!
Multiple file upload screen!
The media upload function, with choices of single or multiple files, is accessed from the
Media Manager page. You can go there by selecting “Media Assets” from the Pachyderm
Home screen, or by clicking on the "Media" tab on the left side of the screen. !
!
By default, uploaded media is marked "Private," which makes it available only to the
person who uploaded it. Clicking on the “Share” checkbox when uploading lets other
Pachyderm users use the media you are uploading.!
Pachyderm 3.0 User Manual! !
Revision 3.0 v1 03.13.2014 ! !
!
!
page 16
!
► It is more efficient to upload all, or at least most, of the media needed for a
presentation prior to authoring than to upload during the authoring process.!
!
!!
Media Metadata!
!
When uploading media, the user is asked to enter basic information about the media
items. This information (e.g. title, owner, description, key words, etc.) is called “metadata.” The primary purpose of metadata is to provide a context for the media file being uploaded, and to assist in managing and locating media assets within Pachyderm. Sometimes, metadata is used to provide content for your presentation, for example the Media
Label and Accessibility fields. Metadata can be entered when media is uploaded, or it
can be entered later in the Media Manager, or during screen authoring.!
!
Each Institution will have its own criteria for entering information into the metadata fields. Pachyderm supports the full Dublin Core metadata element set (see http://
dublincore.org/documents/dces/). A subset of these fields and their possible uses is listed below. All fields are optional except title.!
!
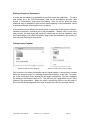
Title: The name or title of the item ("The Birth of Venus"; "Red-Tailed Hawk"; "Protein Molecule”). In Pachyderm, the filename is used as the default title.!
!
!
!
Description: A brief abstract or content description of what the item is.!
Rights: Who owns the copyright to works not in the public domain.!
Keywords: Your own keywords describing the topic of the resource, such as the type of
media (photograph, painting, concerto), any associated subjects (geography, Keynesian economics, Impressionism), significant dates, or other important identifying information that will be useful in searching for the particular media object.!
!
!
!
Publisher: The creator, publisher, or manufacturer of the work.!
Contributor: Name(s) of significant contributor(s) other than the creator, if any.!
Coverage: Spatial and/or temporal characteristics of the resource; for example, if the item
is a photograph of part of a building, this field could describe the part covered by the
photograph. Similarly, if the item is a song fragment or clip from a longer video, this
field might describe what part of the song or video is included.!
!
!
!
Relation: Relationship to other resources, in case someone wishes to search for other
items related to this one.!
Source: Unique string or number for a printed or digital work from which this resource is
derived; could be a URL or ISBN number, if applicable.!
!
Media Label “Tombstone”: A label that will be displayed with the media item in the presentation. The Media Label can be used for providing information about the media itself
such as credit and copyright. !
Pachyderm 3.0 User Manual! !
Revision 3.0 v1 03.13.2014 ! !
!
!
page 17
► All media slots in Pachyderm’s templates offer a place to enter a caption
about the media while authoring. Captions are displayed independently of the
Media Label
Pachyderm 3.0 User Manual! !
Revision 3.0 v1 03.13.2014 ! !
!
!
page 18
!
!
Browsing & Searching for Media!
!You will most often browse and search for media when you are authoring screens and
want to place a piece of media in a template media slot. The other place you will browse
and search media is in the Media Manager, when you are managing your media files.
Browsing and Searching on the media page defaults to only the media you have uploaded, making it easier to find what you are looking for. An "All Media" selector near the
top of the page allows you to toggle between seeing only your own media, or including
the media shared by other Pachyderm users too. You can also limit the media displayed
by typing text into the search field and clicking the Search button.
The Media page shows all types of media by default, but by clicking on the Media Filtering buttons you can limit the display to seeing only images, sounds, or Movies files if you
wish.
!
!
!
Pachyderm 3.0 User Manual! !
Revision 3.0 v1 03.13.2014 ! !
!
!
page 19
!
Authoring in Pachyderm!
!
The Authoring Environment!
!
Authoring in Pachyderm follows a process of creating new presentation, creating one or
more screens, adding media and text to those screens, linking the screens together in a
flow that makes sense, and then publishing your presentation and viewing it in a web
browser. The Pachyderm authoring environment has functions to support each of these
steps, which are covered in this section below.!
!
!
!
!Pachyderm’s
screen templates are the foundation of the authoring system. Creating a
Three of Pachyderm’s 12 screen templates!
screen for a presentation begins with selecting a template and then filling in the template
elements. Each of the templates has a different design to accommodate different kinds
and amounts of information; some have more links and are better as menu screens,
others hold lots of content and are good for presenting the meat of your topic; some are
better for sequential information, others for a non-linear exploration of information; still
others are very simple screens for the presentation of a single image or video. A full description of Pachyderm’s templates, and their designs and uses can be found starting on
page xx of this manual.!
!
!
Planning your presentation!
A Pachyderm presentation may be a single screen, or set of screens linked together. It
may use one template type, or several template types. The decisions about how many
screens to use, what templates to use for those screens, and how to link them together
is based on the amount of information and the kind of information you want to present. !
Pachyderm 3.0 User Manual! !
Revision 3.0 v1 03.13.2014 ! !
!
!
page 20
!
Laying out a plan for your Pachyderm presentation is a good idea!
Thinking about the story you want to tell and the amount of information you have to
present is a good place to start. Next, looking at various templates and learning about
the amount of information they can hold and how they present information will start to
give you ideas about what templates you might use. Planning an overall structure for
your presentation before you start to build it is a good way to make sure that your presentation doesn’t become too complex or make the user go too many levels down to get
information and get lost.!
!
For each screen, the author will need to think about how it is connected to the other
screens (first in a series, last in a series, reached from many points or just one). The
more screens that are likely to link to it, the higher the priority for finishing that screen. !
!
With the Template Workbook, authors can print template views of each screen and fill in
by hand what information goes where before beginning to author a presentation. !
!
!
!
!
► A copy of the template workbook is available in PDF form at the Pachyforge
website (www.pachyforge.org) in the Authors section.!
Pachyderm 3.0 User Manual! !
Revision 3.0 v1 03.13.2014 ! !
!
!
page 21
!
Starting a New Presentation!
!
Authoring in Pachyderm begins by selecting "Presentations" from the Pachyderm Home
Screen, and then choosing “Start New Presentation." If this is the first time the author
has logged in to Pachyderm, there will be no presentations displayed. !
!
The Presentations Screen, two presentations are in this account!
► If presentations already exist (as in the example above), they will be displayed in either list or thumbnail view, with the option to change from one to the
other. Information displayed in either view includes the presentation title, the
modified date, the number of screens in the presentation, and the options to Edit
or Delete the presentation. When the presentation has been published, there is
also a View option. !
After clicking “Start New Presentation, you will see this screen!
!
A presentation name and brief description are the first things to enter. The name should
be memorable. You also select the format of the presentation (Flash or HTML5). HTML5
is recommended because of it’s ability to playback on mobile devices.!
!
The next step is to select one of Pachyderm’s templates as the starting screen, or Home
screen for your presentation. This screen will be displayed first when your presentation
is viewed. While this screen will initially be created as “Home” for this presentation, any
other screen in the presentation can be assigned as the "Home Screen”.!
!
Pachyderm 3.0 User Manual! !
Revision 3.0 v1 03.13.2014 ! !
!
!
page 22
!
▶ Note: The Home Screen for a presentation is different than the Home screen
for Pachyderm itself.!
Editing a Presentation Screen!
!
!After a !template has been selected, the Edit Screen for that template is displayed and
Edit Screen for the Commentary Template. Section A is expanded for editing.!
you can begin authoring the screen. !
!
How Authoring in the Edit Screen Works!
In the upper-left of the display is a schematic representation, or legend, of the selected
screen with letters (A, B, C, etc.) and sub-elements (A1, A2, etc.) indicating where information and media will show when the screen is published. The legend is a static map of
the screen structure and will not change as material is added. !
!
Below the legend is a field for the screen name and a field for notes. Neither of these
will be a visible part of the presentation when viewed. The screen name functions as an
identifier for that screen and should be easily recognizable so it can be found when linking to other screens. The "notes" field is an ideal place to list screens that need to be
built and/or media that need to be uploaded in order to complete a given screen.!
!
!
On the right-hand portion of the page is are lettered sections for each of the major content areas in the legend (A, B, C, etc). Clicking anywhere in the grey bar of a section
header expands that section so you can see the sub-elements there and fill them in (e.g.
A1 Title, A2 Subtitle). To the right of each item are brief instructions of what to do (e.g.
"Display title goes here.”). When you are done filling in the elements you want in a sec-
Pachyderm 3.0 User Manual! !
Revision 3.0 v1 03.13.2014 ! !
!
!
page 23
tion, click the section header again to collapse it and open the next section by clicking on
it’s header. In this way, you author a screen by working your way down the lettered sections, opening each section and filling in the elements you want. You are not required to
fill in all the elements in every section.!
!
!
Overview of Template Components!
Pachyderm’s various templates have some elements in common and some that are different. For instance, almost all templates have a visible title (A1) and subtitle (A2). And
most have a place for a Background image (B1) for which you can set the transparency
(B2). Many templates have one or more “media slots”. Where these “media slots” exist,
they always have the same elements: a place for an image, a place for a video, a place
for a caption, and a place for a supplemental link to another pachyderm screen or web
url. !
!
Template components that have many sub-elements, like the media slot, are represented in both the legend and in the authoring window with letters and numbered sub-elements. For example, in the Commentary screen above, section "C" on the legend is a
standard media slot with its standard elements: C1 is where you can assign an image to
the slot, C2 is for assigning a video to the slot, C3 is for entering a caption that appears
beneath the slot, and C4 is for assigning a link to another presentation screen or entering a url to a web page or document file. All these elements have corresponding elements on the right to be filled in.!
!
For most multi-item components all the elements are optional, or all can be used together. However, there are some exceptions to this. For example in the media slot link element C4 (see above). For this element you can assign a screen link or enter a url, but
you cannot do both. Look to the help text to the right of the element for guidance about
which items are required or mutually exclusive.!
!
Each template also has its own unique capacities and limitations, which users should
become familiar with prior to authoring (see a complete explanation of templates starting
on page xx). !
!
Template Text!
The amount of text that can be used in a field varies with the template and location on
the template. Pachyderm has set fonts for display titles, captions, and body text, although this can be modified with HTML codes. Hard returns will display as a blank line
in the presentation.!
!
!
!
!
▶ All text fields can contain basic HTML including bold <b>, italics <i> and hyperlinks. See the Pachyderm HTML markup worksheet for detailed information.!
!
Pachyderm 3.0 User Manual! !
Revision 3.0 v1 03.13.2014 ! !
!
!
page 24
!
Importing Media Into a Presentation Screen!
!
!
C1 shows an image assigned to its slot. C2 has no movie assigned to its slot!
To import a media file into a template element, click on the "Browse" button located in
the desired element. This takes the you to the Media Manager where you can browse or
search for an appropriate media item (an upload button on that screen also allows to upload a new piece of media if needed). After successfully selecting or uploading the media you want, you are returned to the template Edit Screen where a thumbnail of the
media and its information is displayed in the element (see example above).!
!
!
!
!
!
!
Previewing Your Screen!
You can see how your screen is coming along by clicking "Preview," in the left-hand side
of the authoring window. This will show you what the screen will look like in the finished
presentation. Note however that links to other screens do not work when viewing a
screen Preview. When you are done viewing the Preview, click “Return to Authoring” at
the top of the preview screen to return to the Edit Screen.!
!
Saving your Work!
Pachyderm automatically saves your work as you enter information or make changes.!
When you are finished editing a screen, click "Done" to stop editing and go to the Edit
Presentation page. This is where all the screens in your presentation are listed and you
can make higher level changes to your presentation.!
!
!
Pachyderm 3.0 User Manual! !
Revision 3.0 v1 03.13.2014 ! !
!
!
page 25
The "Edit Presentation" Screen!
!
The Edit Presentation screen is where you see an overall view of the screens in your
presentation and can take many actions related to your presentation. On this screen,
there are choices to edit an existing screen, delete a screen, add another screen to the
presentation, or to publish and view the presentation. You can also edit the Name and
Description of the presentation and change the format of the presentation (HTML5 or
Flash). As screens are added to the presentation, they will appear on the "Edit Presentation" page. By default they will appear as thumbnail images of the screen labeled with
the screen title, but the user can change the display to a list format if you wish. The
screen that is the "Home Screen" will be listed at the top.!
!
Note: any screen can become the home screen for your presentation by clicking on the
“Make Home” button below the screen thumbnail.!
A screen can also be previewed or deleted by clicking on the buttons below its thumbnail. A screen is edited by clicking on it’s title or it’s thumbnail image.!
Pachyderm 3.0 User Manual! !
Revision 3.0 v1 03.13.2014 ! !
!
!
page 26
!
Adding a Screen to a Presentation!
!
A screen can be added to a presentation at any time, even after publishing. To add a
new screen, go to the "Edit Presentation" page for the presentation and click "Add
Screen to Presentation” (see screen shot above). Then you will be given the same
thumbnail array of templates to pick from as when beginning a new presentation. Select
a template and begin authoring the screen as before.!
!
A new screen must be linked to the home screen or some other linked screen in the presentation to become a functional part of the presentation. Without a link to one of the
other screens, the new screen will remain an orphan and can only be viewed by using
the Preview button on the Edit Presentation page (under the thumbnail of the screen), or
on the Screen Edit page for that screen.!
!
!
Linking Screens Together!
!
Screen link with no screen assigned!
Screen link with screen “zoom” assigned. !
Only screens in the same presentation can be linked together. A screen link is created
when you assign a screen to a template element that accepts a screen link. For example, in the screen shot above, element E4 will accept a screen link. The link is assigned
by clicking on the Browse button in E4. This will bring up a page which lists all of the
screens in the presentation. When you select a screen from that list, you will return to
E4 on the Edit Screen page with the screen assigned to the E4 slot (see right, above). !
Pachyderm 3.0 User Manual! !
Revision 3.0 v1 03.13.2014 ! !
!
!
page 27
!
Many template elements will accept a screen link, but not all. More importantly, some
template elements have a screen link as their main function, while others have it as a
secondary function. For example, in the Commentary screen above, the three media
slots on the right side of the screen (template elements E-G) have linking as a primary
function; clicking on on the image in the slot activates the link. But the media slot on the
left side of the screen (template element C) has linking as a secondary function; it’s link
is displayed below and to the left of the image as a separate icon and is intended for
supplemental content. !
!
Most of your screen links should be in template elements where screen linking is the element’s main function. See the detailed template descriptions in this manual to learn
which template elements are intended to have screen linking as their main function.!
!
!
!
!
▶A screen link can only be done to a screen that already exists. In multi-screen
presentation where the structure has been planned, you may wish to create all
desired screens and link them together fairly early on. Then each screen can
be edited individually and content filled in.!
!
Deleting a Screen!
A screen can be deleted from a presentation from the Edit Presentation window by clicking the "Delete" button below the screen thumbnail. The author will be asked to confirm
this operation before the screen is actually deleted. Once deleted, a screen is gone
and cannot be retrieved. When the Home Screen is the only screen in a presentation,
it cannot be deleted except by deleting the entire presentation from the "Edit Presentations" window.!
!
!
!
Pachyderm 3.0 User Manual! !
Revision 3.0 v1 03.13.2014 ! !
!
!
page 28
!
Publishing!
!
During authoring, you can only see your presentation one screen at a time using the
Preview function. Publishing is the process of creating a complete version of your presentation with all your screens linked together and media in place so it can be viewed in
a web browser. The publishing process assembles all of the templates, text, and media
files into a web directory and generates the necessary xml and other files to create a
completed presentation which you can then view or download.!
!
!
!
The publishing process is initiated from the Edit Presentation page by clicking on the
Publish button. Pachyderm then generates a page listing of all the screens and media
files in your presentation and reports an error if any of the elements are missing or are
the wrong format (e.g. .flv videos in an HTML5 presentation). !
Then, clicking on the Publish Now button generates the final presentation. During the
process, you will see a progress bar and some text feedback on the steps being taken. !
!
When the process is complete you will see buttons for View Presentation, Download
Presentation, and Edit Presentation. !
Pachyderm 3.0 User Manual! !
Revision 3.0 v1 03.13.2014 ! !
!
!
page 29
!
View Presentation - will open a new browser tab and load your presentation. !
!
!
► When viewing your presentation you can copy the URL from the address bar
to share your presentation with others. Note: if you are re-publishing your presentation after making changes and your changes are not showing up, empty
your browser cache. !
Download Presentation - will download a .zip file with the presentation directory. This
can be saved as a back up of the presentation and/or uploaded to another web server
for publishing the presentation more permanently outside of the Pachyderm Authoring
System (this is recommended for presentations that have been completed). !
!
Edit Presentation - will return you to the Edit Presentation page for that presentation to
continue authoring.!
! !
▶ After you have published your presentation for the first time, View Presentation
and Download Presentation buttons will appear on the Edit Presentation page
for that presentation. These buttons View or download the last published version of your presentation. Any changes you make to your presentation after
publishing won’t show up until you publish your presentation again.!
!
!
HTML5 & Flash Templates Included in Presentation Folder
Regardless of the format you have chosen for your presentation when you publish
(HTML5 or Flash), Pachyderm 3 includes both the HTML5 and Flash templates in your
presentation folder. The presentation’s Index.html file is set to launch whichever set of
templates you have chosen for your format (HTML5 or Flash). Two other index files (an
indexF.html for Flash, and an index5.html for HTML5) are also included in the presentation folder so you can launch your presentation in the format you wish with either of
these.
Remember, however, that if your presentation includes video, a copy of each video in the
correct format must be added to the folder for the presentation to work (e.g. for a Flash
presentation with a video called myvideo.flv, you must add a new .mp4 video called:
myvideo.mp4 to the presentation folder for it to work with the HTML5 templates).
!
Presentation Management!
!
Presentations are managed from the "Presentations" screen. Here authors can create a
new presentations and view, edit, or delete existing ones. Authors can return to the
"Your Presentations" screen while editing by selecting the "Presentations" Tab beside
Pachyderm 3.0 User Manual! !
Revision 3.0 v1 03.13.2014 ! !
!
!
page 30
the "Edit" or authoring window, or by choosing "Presentations" from the breadcrumbs in
the upper left.!
!
Authors can edit the screens of an existing presentation by clicking on the screen's
thumbnail in the Edit window, or by selecting "Edit" below the thumbnail. If viewing in list
view, the "Edit" option will be in the "Options" column.!
!
A presentation may be deleted by clicking "Delete." The author will be asked to confirm
that this action is intended. A deleted presentation is gone and cannot be retrieved.!
!
!
!
Modifying Presentations Modifications to a published presentation can be made without the use of the Pachyderm authoring environment . This is because most of a published presentation’s content is stored as standard image/media files and xml text files.
This means that changes to the presentation can be made by simply replacing media
files, or by using standard graphics/media programs or a simple text editor to modify
files. Also, many attributes of the look-and-feel of a presentation can be altered by simply
replacing images in the presentation’s icons folder, or by editing the root_border.xml file.
Modifications that can be made this way include:!
• Changing the border color!
• Adding an image, text, or a link to the border!
• Assigning a global background image — replaces Pachyderm’s default white
background!
• Swapping out link icons or media controller graphics!
• Swapping out a presentation media file!
• Editing presentation text, media transcripts, or caption files!
!
If you have HTML5 or Flash authoring skills, modifications can also be made manually to
the layout and behavior of a Pachyderm presentation.!
!
Pachyderm 3.0 User Manual! !
Revision 3.0 v1 03.13.2014 ! !
!
!
page 31
!
The Pachyderm Templates!
!
Pachyderm is a template-based authoring program. This means the author creates
screens in Pachyderm by selecting from a set of pre-designed templates and entering
text and media into the template. The pre-designed templates in Pachyderm provide
sound information design, graphic design, and navigation design to assist the author in
creating an effective interactive multimedia presentation that plays in a web browser.
Pachyderm’s templates range from very simple - a single image with some text, to very
complex - multi-layered combinations of text, images, videos, and links. By understanding what each template can and cannot do, the author can make decisions about what
will be the most effective way to present material, whether it is simple or complex. !
!
This section of the manual gives a brief overview of what each template does, what it
might be used for most effectively, and what some of the limitations of the particular
template are. It also explains the steps in authoring each screen. However, it is not a
prescription for how to select content or arrange screens. Practicing with the templates
will be an important part of learning how to use them; this section serves as an introduction to the templates and leaves the specific creative uses of them to the prospective author.!
!
Available templates:!
Aspects!
Commentary
Dual Comparison!
Enlargement!
Exploration Entry
Fullscreen SWF!
Layers!
Media Focus!
Phone Dial!
Series!
Slider!
Zoom!
!
!
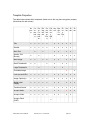
Common Template Features !
Some features are shared by all Pachyderm templates making selection easier and providing more flexibility for Pachyderm authors. All templates support the following: !
• Tiles and sub-titles!
• Standard Media Slots!
• HTML Support in Text Fields!
• A Background Image, with transparency setting!
• Accessibility Support!
!
A Standard Media Slot contains the following components - 1) an image, 2) a video or
sound file, 3) a caption, and 4) a link to another screen or a url. These 4 components
can be used individually or all together. Also, icons for the Media Label, transcript, and
closed captions (Flash only) will appear under the media if that information is available.!
Pachyderm 3.0 User Manual! !
Revision 3.0 v1 03.13.2014 ! !
!
!
page 32
!
!
Templates Behaviors:!
A Home Button in the border navigation has been added that will return users to the first
screen of the presentation, regardless of their current location. !
!
Distinctive Icons for different types of links will help users better understand the types of
material and locations to which these links will take them.!
!
Videos in all templates can be started and stopped by clicking in the video frame!
!
Accessibility Compliance has been enhanced to support 508 compliance for published
presentations. Buttons have been added for all templates and provide functionality for
Information, Audio (Flash only), Contrast, Font Size (Flash only), and Help. In addition, !
• Support for closed captions is available for Flash videos (FLV)!
• Transcripts can now be uploaded for audio or video.!
• Accessibility Metadata can now be entered or uploaded for each media asset.!
• Screen Reader and keyboard navigation Support has been added to standard
templates.!
!
!
Pachyderm 3.0 User Manual! !
Revision 3.0 v1 03.13.2014 ! !
!
!
page 33
!
Aspects Template!
!
This is a multi-image screen good for demonstrating relationships between different concepts, people, or objects (represented with thumbnail images). It is also well-suited to
organizing multiple media files that explore different aspects of – or perspectives on – a
central topic. There are a total of 6 thumbnails around a central image box and text box;
clicking on a thumbnail brings up a larger image or video in the central image box. The
text associated with it appears above. Media Label information, if any, will be displayed
next to each thumbnail or enlargement, unless a caption is entered to override it. A link
to a screen or url can also be entered for each of the 6 thumbnails to provide additional
detail for that point and appears below the larger image.!
!
This screen is ideal for quickly showing related pictures and explanatory text for each,
when the level of individual detail is small. As its name suggests, it works well to cover
several aspects of the same topic. !
!
!
► It is not necessary to use all six spots on this template. Four can be equally
effective, for instance.!
Authoring Scheme for Aspects Template
Sample Published Template
!
!
!
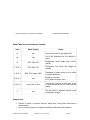
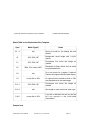
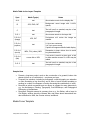
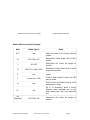
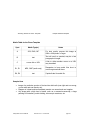
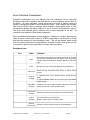
Media Table for the Aspects Template!
!
Spot
Media Type(s)
A1
text
About ten words for the display title.
A2
text
Up to two sentences for the subtitle or
quote.
B
JPG, GIF, PNG
Pachyderm 3.0 User Manual! !
Notes
Background image with 0-100% opacity
Revision 3.0 v1 03.13.2014 ! !
!
!
page 34
C-H: 1
JPG, GIF, PNG
Thumbnail and main image for each spot
may be the same image, but do not have
to be.
C-H: 2
MP4, FLV, (video), MP3
Remember to keep videos short to avoid
long download times.
C-H: 3-4
text
About eight or nine words, each spot. If
used, caption will suppress Media Label
display.
C-H: 5
text
Text will scroll as needed; may be a few
paragraphs in length.
C-H: 6
Screen link or URL
Link to another screen or to an external
URL or document on the web.
!
!
Sample Uses!
!
▪
▪
▪
▪
Several views or angles of the same building, statue, animal, plant, etc. with a
brief comment about each view.!
Several videos or animations showing different aspects of a single topic/phenomenon.!
Six sequential images showing growth or change.!
Six related items with text commentary on how they are alike and different.!
!
!
!
Commentary Template!
!
The Commentary Template is an ideal “Home Screen” to a simple presentation or a
"middle of the presentation" screen; it allows for a fairly detailed textual description of an
image, and then provides places to go to related material. The left-hand portion of the
screen is designed for an image or a video clip; the middle has scrollable text; and the
right hand side provides three additional thumbnails which can be linked to other Pachyderm screens or other media files (including URLs). There is room for a display title and
a subtitle or quotation in the upper left. !
!
!
Pachyderm 3.0 User Manual! !
Revision 3.0 v1 03.13.2014 ! !
!
!
page 35
Authoring Scheme for Commentary Template
!
!
!
!
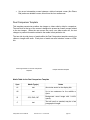
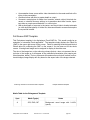
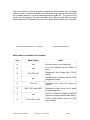
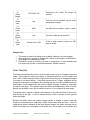
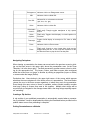
Media Table for the Commentary Template!
!
Sample Published Template
Spot
Media Type(s)
Notes
A1
text
About nine words for the display title.
A2
text
Up to two sentences for the subtitle or
quote.
B
JPG, PNG, GIF
Background round image with 0-100%
opacity
C, E-G: 1
JPG, PNG, GIF
Pachyderm will resize the image as
needed.
C, E-G: 2
MP4, FLV, (video), MP3
Remember to keep videos short to avoid
long download times.
B, D-F: 3
text
B, D-F: 4
screen link or URL
If no movie is used in a given spot, a link
to either another screen or a URL may be
added.
C
text
Text will scroll as needed; may be a few
paragraphs in length.
B3: About 13 words.!
D-F3: About six words each.
!
!
Sample Uses!
!
▪
▪
Present a variety of opinions about a single topic, using video interviews or
commentaries.!
Use as a Home Screen to a simple presentation with three main branches.!
Pachyderm 3.0 User Manual! !
Revision 3.0 v1 03.13.2014 ! !
!
!
page 36
▪
Use as an intermediary screen between a table-of-contents screen (like Phone
Dial) and more detailed screens, linked from the four media areas.!
!
!
!
Dual Comparison Template!
!
This template presents two medium size images or videos side by side for comparison.
The text block at the top of the screen is designed to present an overall concept related
to the two images. When the user moves the cursor over either media slot, the text
changes to present information related to the media in that particular slot. !
!
The two side by side pieces of media within the Dual Comparison template can also be
videos or images with audio. Each piece of media can also include a screen or HTML
link.!
!
Authoring Scheme for the Dual Comparison
Template
Sample Published Template
!
!
!
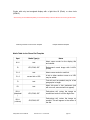
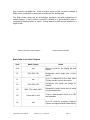
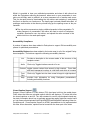
Media Table for the Dual Comparison Template!
!
Spot
Media Type(s)
A1
text
About nine words for the display title.
A2
text
Up to two sentences for the subtitle or
quote.
B
JPG, PNG, GIF
Background round image with 0-100%
opacity
C
text
Text will scroll as needed; may be a few
paragraphs in length.
Pachyderm 3.0 User Manual! !
Notes
Revision 3.0 v1 03.13.2014 ! !
!
!
page 37
D1 - 2
JPG, PNG, GIF
Pachyderm will resize the image as
needed.
D1-2
MP4, FLV, (video), MP3
Remember to keep videos short to avoid
long download times.
D1-2
Screen link or URL
Link to another screen or to an external
URL or document on the web.
!
!
Sample Uses!
!
!
!
!
▪
▪
▪
Comparing two images from the same artist or time period!
Comparison of two samples that support or contrast each other!
Displaying two examples of the same theme!
Pachyderm 3.0 User Manual! !
Revision 3.0 v1 03.13.2014 ! !
!
!
page 38
!
Enlargement Template!
!
This is the simplest Pachyderm screen, showing a static enlargement of an image or
video (or both), its Media Label data and a caption, and up to several paragraphs of associated text. The main image area can also have a link to another screen or a URL. It
is ideal for presenting large amounts of written information about a single subject. The
image on the Enlargement Template will be larger than images on any other screen except Zoom.!
!
The size of the image box on the authoring scheme (below) does not represent the actual size of the image as it will appear in the published presentation (see sample published template, below). The box represents the maximum area for both vertical and horizontal images; image display will vary based on the aspect ratio of the image selected.!
!
Authoring Scheme for Enlargement Template
!
!
!
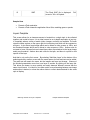
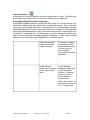
Media Table for the Enlargement Template!
!
Sample Published Template
Spot
Media Type(s)
A1
text
About nine words for the display title.
A2
text
Up to two sentences for the subtitle or
quote.
B
JPG, PNG, GIF
Background round image with 0-100%
opacity
C
JPG, PNG, GIF
Pachyderm will resize the image as
needed.
D
MP4, FLV, (video), MP3
Ideal video size is 300 x 400 Pixels.
Remember to keep videos short to avoid
long download times.
Pachyderm 3.0 User Manual! !
Notes
Revision 3.0 v1 03.13.2014 ! !
!
!
page 39
E
Text
F
Screen link or URL
Link to another screen or to an external
URL or document on the web.
G
text
Text will scroll as needed; may be a few
paragraphs in length.
!
!
Sample Uses!
!
▪
▪
▪
▪
▪
Caption
A book review accompanied by an image of the book cover.!
The text of a letter or speech accompanied by a photograph of the writer or
speaker.!
Study questions or thought-provoking statements about a topic, accompanied by
a relevant image or video.!
A recipe accompanied by a photograph or video of the prepared dish.!
A larger illustration and explanation of a thumbnail included on a Commentary or
Layers screen. !
!
!
!
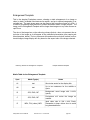
Exploration Entry Template!
!
This screen provides a place for a Title and subtitle, central Media Slot for a picture or
video (with all its standard elements), and up to 6 text/picture links to other presentation
screens or URLs. These links could be used for example, as a menu to 6 different topics, or as a series of short questions about the central image. Clicking on a link takes
the user to another screen or url which provides more information. When a user viewing
the presentation moves his or her mouse over one of the links, the text grows in size.!
!
A link can also be attached to the central image, so that clicking on it takes the user to
another screen (often a zoom or enlargement screen, though any screen may be used
here) or a URL. !
!
The Exploration Entry Template is more of a menu screen than a content screen because it primarily provides links to other screens. It can function as the introductory
screen to a presentation when a video, rather than text, provides the introductory context. It also functions well as an second or third level menu to provide links to more detail on a topic.!
!
Because further information is obtained through links to other screens and not directly on
the Exploration Entry Template itself, it is not ideal to use this screen when a single piece
of media and scrollable text can convey all that is necessary. In this situation, authors
would be better choosing a template such as the Enlargement Screen or Commentary
Screen.!
!
Pachyderm 3.0 User Manual! !
Revision 3.0 v1 03.13.2014 ! !
!
!
page 40
Authoring Scheme for Exploration Entry Template
!
!
!
Media Table for the Exploration Entry Template!
!
Sample Published Template
Spot
Media Type(s)
Notes
A1 - 2
text
About six words for the display title and
subtitle.
B
JPG, PNG, GIF
Background round image with 0-100%
opacity
C1
JPG, PNG, GIF
Pachyderm will resize the image as
needed.
C2
MP4, FLV, (video), MP3
Remember to keep videos short to avoid
long download times.
C3
text
Up to ten words for a caption, if desired.
Caption will suppress Media Label display.
C4
screen link or URL
An optional link to another screen or URL
may be attached to the main image.
C-H: 1
JPG, PNG, GIF
Pachyderm will resize the image as
needed.
C-H: 2
text
About eight or nine words max, each spot.
C-H:3
screen link or URL
If no link is attached, the text for the link
will not appear in the published
presentation.
!
!
Sample Uses!
Pachyderm 3.0 User Manual! !
Revision 3.0 v1 03.13.2014 ! !
!
!
page 41
!
▪
A presentation home screen with a video introduction in the center and links off to
topics in the presentation!
A midlevel menu with links to greater detail on a topic!
Surround a central piece of media of an invention, artwork, object, historical document, or scientific discovery with up to six questions about how it works, important dates or people associated with it, or other topics.!
With a photograph of a person in the center, use the six links to bracket a decade
(or other important phase) of his/her life; these would lead to screens that explore
those periods in detail.!
▪
▪
▪
!
!
Full Screen SWF Template!
!
This Pachyderm template is for displaying a Flash SWF file. This would usually be an
animation or interactive Flash application. The template simply displays the Flash file
(SWF) in the upper right corner of the screen. Fields for entering Horizontal and Vertical
Offsets allow for positioning the SWF on the screen if it’s size does not fill the whole
screen. A background image can be assigned to display in the white area.!
!
The size of the image box on the authoring scheme (below) does not represent the actual size of the image as it will appear in the published presentation (see sample published template, below). The box represents the maximum area for both vertical and horizontal images; image display will vary based on the aspect ratio of the image selected.!
!
Authoring Scheme for Full Screen SWF Template
!
!
!
Media Table for the Enlargement Template!
!
Sample Published Template
Spot
Media Type(s)
Notes
A
JPG, PNG, GIF
Background round image with 0-100%
opacity
Pachyderm 3.0 User Manual! !
Revision 3.0 v1 03.13.2014 ! !
!
!
page 42
B
SWF
!
!
Sample Uses!
!
▪
▪
The Flash SWF file is displayed.
screen is 740 x 454 pixels.
Full
Present a Flash animation!
Present a Flash interactive application like a Quiz, matching game or puzzle.!
!
!
Layers Template!
!
This screen allows for an immense amount of material on a single topic to be collected
together and sorted in layers. It is an ideal screen for an in-depth exploration of any topic, especially when a variety of media (video, images, and text) are available. The main
screen includes a place on the upper right for introductory text which will be constant on
all layers. It also has a large image which can be linked to other screens or URLs, and
two thumbnail images which can be linked to other screens or URLs. Authors who do
not want to have a screen link can instead have video clips attached to the larger image
and/or any thumbnail. Authors also add a title for the layer, and there is a place for text
specific to the layer.!
!
And that is only on the first screen. By selecting "Add New Layer" at the bottom of the
authoring window, another screen with the same spaces for links and text can be added.
The main text will remain the same, but the images and layer text change. Viewers of
the finished presentation move from one layer to another by clicking on the layer title.
This allows the viewer to move quickly and easily between different screens with the
same visual format. It is ideal for use when quick cross-referencing between one image
and another is desired, or when the author wants to collect related material in the same
style of display.!
!
!
!
!
!
Authoring Scheme for Layers Template
Pachyderm 3.0 User Manual! !
Revision 3.0 v1 03.13.2014 ! !
Sample Published Template
!
!
page 43
Media Table for the Layers Template!
!
Spot
Media Type(s)
A1-2
text
B
JPG, PNG, GIF
Background round image with 0-100%
opacity
C
text
Text will scroll as needed; may be a few
paragraphs in length.
C-G: 1
text
About seven words for the layer title.
C-G: 2-4!
(image)
JPG, GIF
Pachyderm will resize the image as
needed.
C-G: 2-4
(caption)
text
2: Up to two sentences. !
3-4: Up to seven words.!
Caption will suppress Media Label display.
C-G: 2-4!
(movie)
MP4, FLV, (video), MP3
Remember to keep videos short to avoid
long download times.
C-G: 2-4!
(link)
screen link or URL
If no movie is used in a given spot, a link
to either another screen or a URL may be
added.
C-G: 5
text
Text will scroll as needed; may be a few
paragraphs in length.
!
!
Sample Uses!
!
▪
▪
▪
▪
Notes
About twelve words for the display title.
Present a long-term project, such as the construction of a pyramid, broken into
phases (of time or of construction) – one phase per layer.!
Compare five scientists, including a photograph, a short biography, an animation
or video illustrating a key discovery, and a video of each scientist speaking or
working (or a video of colleagues or faculty discussing the contributions of each).!
Describe an artistic movement and use layers to suggest its many dimensions,
e.g., the Architecture, Painting, Typography, Craft Workshops, and Pedagogical
Philosophy of the Bauhaus.!
Describe a Zeitgeist moment in summary form, e.g., the Sixties, with a layer for
Civil Rights, another about the Vietnam War, and others about international student radicalism in 1968, the Counter-culture, and Music.!
!
!
Media Focus Template!
!
Pachyderm 3.0 User Manual! !
Revision 3.0 v1 03.13.2014 ! !
!
!
page 44
This screen allows for a title and subtitle, scrollable text, and an media slot for an image
and/or a movie. A caption and Media Label data for the image may be displayed, and a
link to another screen or url can be added beneath the media slot. This screen is very
similar to the Enlargement Template, described above, with the major difference being
that the Media Focus Template layout has text on the left and the media slot on the right.!
!
Authoring Scheme for Media Focus Template
!
!
!
Media Table for the Media Focus Template!
!
Sample Published Template
Spot
Media Type(s)
A1
text
About ten words for the display title.
A2
text
Up to two sentences for the subtitle or
quote.
B
JPG, PNG, GIF
Background round image with 0-100%
opacity
C
text
Text will scroll as needed; may be a few
paragraphs in length.
D
JPG, GIF
Pachyderm will resize the image as
needed.
E
MP4, FLV, (video), MP3
Remember to keep videos short to avoid
long download times.
F
text
Up to 16 words for a caption, if desired.
Caption will suppress Media Label display.
G
screen link or URL
A link to either another screen or a URL
may be added.
!
!
Pachyderm 3.0 User Manual! !
Notes
Revision 3.0 v1 03.13.2014 ! !
!
!
page 45
Sample Uses!
!
▪
▪
▪
▪
Include a video, a still photo from the video, and a discussion of the contents.!
Show a flash movie of plant growth and include descriptive text and/or questions.!
Display a still image only (no video) and include descriptive text and/or discussion questions.!
Use this screen for an "about the author" feature about the person who made the
presentation, including a photograph and a short biography.!
!
!
Phone Dial Template!
!
This screen, which looks like an old-fashioned phone dial beside text, functions as a
"visual Table of Contents" and serves as an excellent menu screen wherever many different paths away from the menu are needed. By using a series of images, it literally
provides a snapshot of the topics that will be covered. It is an ideal introductory screen
which does not present much content on its own; the content is all made available
through links to other screens which allow significantly more quantities and more varied
kinds of information to be presented.!
!
The template has a place on the left hand side for the screen display title, links to two
other template screens or URLs, and a space for the main text content, which is scrollable. Because of the large number of possible images and links, the Phone Dial Template has many more authoring steps in it than most of the other templates. !
!
The right hand ("dial") side holds up to ten images and their associated links (although
you don’t have to use all of them). The center area of the dial allows for short text which
is often used for instructions to the user. Because the images are arranged in a circle
and not in a vertical or left-to-right fashion, it also allows for non-linear exploration if the
user desires. Users might start at the top and go around the circle clock-wise, but there
is no sequential requirement that they do so. Rolling the mouse over a thumbnail image
allows an enlargement of that image to appear in the center area and a few words of text
(called "caption" in the authoring window) to appear in the phone dial; clicking on either
the thumbnail or the central image takes the user to the screen or URL, if any, that the
image is linked to. !
!
The image that appears in the center when a thumbnail is rolled over is not automatically
the same as the thumbnail image; the image needs to be selected individually for each,
and may be the same or different than the 1st thumbnail. Any captions for the thumbnail
images need to entered separately, as any associated Media Label data will not appear
on this screen.!
!
With twelve possible link locations, the Phone Dial Template offers the largest number
connections to other template screens or external web resources than any other template. !
!
Phone Dial circles are flexible in how they can be used. Circles with all attributes assigned behave as described above. Circles with media assigned but no link assigned
display the picture but are inactive when clicked.* Circles with no content are invisible.
Pachyderm 3.0 User Manual! !
Revision 3.0 v1 03.13.2014 ! !
!
!
page 46
Circles with only text assigned display with a light blue fill (Flash) or clear circle
(HTML5).!
!
!
* Due to a bug in the HTML5 templates you must enter   in the text field for the circle to get this effect.!
Authoring Scheme for Phone Dial Template
Sample Published Template
!
!
!
Media Table for the Phone Dial Template!
!
Spot
Media Type(s)
Notes
A1-2
text
About seven words for the display title
and subtitle.
B
JPG, PNG, GIF
Background round image with 0-100%
opacity
C1-2
text
C1-2
screen link or URL
A link to either another screen or a URL
may be added.
D
text
Text will scroll as needed; may be a few
paragraphs in length.
D1
text
About 40 words or four sentences (text
will not scroll; extra text will not appear).
D2-11!
(thumbnail
)
JPG, PNG, GIF
Pachyderm will resize the image as
needed and scale it to fill the digit circle.
D2-11!
(rollover)
JPG,PNG, GIF
Pachyderm will resize the image as
needed. This will appear in the center of
the dial.
Pachyderm 3.0 User Manual! !
About seven words for each link.
Revision 3.0 v1 03.13.2014 ! !
!
!
page 47
D2-11!
(caption)
text
Up to 8 words for a caption, if desired.
(Media Label data will not display in this
spot whether or not there is a caption).
D2-11!
(link)
screen link or URL
A link to either another screen or a URL
may be added.
!
!
Sample Uses!
!
▪
▪
▪
▪
Table of Contents/Home Screen for a presentation.!
Link to detail screens with examples of members of the animal kingdom, plant
kingdom, etc.!
Illustrate phases of growth or changes over time, with one digit for each phase,
linking to a detail screen describing that phase.!
Show how up to eleven different people contributed to a discovery or invention.!
!
!
!
!
Series Template!
!
The Series Screen is designed for displaying a series of images and information about
them. While the Series Screen is considered a single screen, it automatically generates
a thumbnail and an invisible zoom screen for each image included. The opening screen
provides a scrollable text overview, a main media area (which could be an image and/or
a video), and thumbnail links to subsequent zoom screens ("pages"). Each thumbnail
can be labeled with the name of the page it appears on, telling the viewer what page he
or she will go to when clicking on the thumbnail. Authors might use page numbers for
the names, but could also use image titles. When the thumbnails are clicked, the image
is brought up in enlarged format with pan and zoom features (like the Zoom Template).
A "Text" button can be clicked with the mouse and a small pop-up box displaying associated text will appear. Users can move from one page in the series to the next by means
of forward and backward arrows on each screen. From the main Series Screen, any
thumbnail can be clicked, so it is possible to view the series out of sequence.!
!
The Series Screen is also appropriate for looking at successive enlargements of related
images or material, with only brief written commentary. A popup text field, and a link to
another screen or url is also available on the Series zoom.!
!
The default the Series Screen has a page title and subtitle, main text area, standard media slot, and one section (H) for a thumbnail with a link to a zoom screen. To add more
thumbnails and zoom screens (I - …), the author must click on "Add New Series Page"
at the bottom of the authoring window.!
!
Other screen types cannot be selected in place of the zoom screens. All of the daughter
(zoom) screens are authored within the same window as the main page.!
!
Pachyderm 3.0 User Manual! !
Revision 3.0 v1 03.13.2014 ! !
!
!
page 48
Authoring Scheme for Series Template
Sample Published Template
!
!
!
!
Media Table for the Series Template!
!
Spot
Media Type(s)
Notes
A1-2
text
About ten words for the display title and
subtitle.
B
JPG, PNG, GIF
Background round image with 0-100%
opacity
C
JPG, GIF
Pachyderm will resize the image as
needed.
D
MP4, FLV, (video), MP3
Remember to keep videos short to avoid
long download times.
E
text
F
screen link or URL
A link to either another screen or a URL
may be added.
G
text
Text will scroll as needed; may be a few
paragraphs in length.
H1
text
Up to 15 characters, about 3 words.
Appears under thumbnail and on the
series detail page, and in the detail text
box.
H2!
(thumbnail
)
JPG, PNG, GIF
Pachyderm will resize the image as
needed.
Pachyderm 3.0 User Manual! !
caption
Revision 3.0 v1 03.13.2014 ! !
!
!
page 49
I2!
(Zoom
image)
JPG, PNG, GIF
Pachyderm will resize the image as
needed.
I3!
(Zoom
text)
text
Text will scroll as needed; may be a few
paragraphs in length.
I4!
(Zoom
audio)
MP3
An audio file for narration, music, or other
I5!
(Zoom
caption)
text
Provides a label for the audio file
I6!
(Zoom
Link)
Screen Link or URL
A link to either another screen or a URL
may be added.
!
!
Sample Uses!
!
▪
▪
▪
▪
This screen is ideal for showing close-up detail, because of the zoom pages. !
Show progression, growth or change with a series of photographs or illustrations.!
Show pages of a manuscript or book.!
Showcase a series of works by one artist or craftsperson, or show related works
in a single style (art deco, early American quilts, Shaker furniture).!
!
!
Slider Template!
!
The Slider screen allows the user to move through a series of up to 16 pages of text and
media. Each page has a title and subtitle, a standard media slot, and a scrollable text
area. A line of dots along the bottom of the screen allows the user to navigate the pages
in a linear or non-linear fashion. If the Slider has more then 7 pages, navigation arrows
will appear at the ends of navigation dots, allowing the user to scroll to additional dots for
those pages. Each navigation dot has a title to identify it’s page. Clicking on a dot takes
the user to that page. The standard media slot allows an image and/or video to be displayed, and a caption, and a link to another screen or url to be entered for each page.!
!
The image and its caption or Media Label appears on the left hand side of the screen,
with the text on the right. If a link to another screen or URL is present, its icon appears
below the image.!
!
Because the slider screen can contain a large number of images or videos, each with
numerous associated parts, authoring a Slider Screen takes time and care. After the
image and/or video is selected via the usual browse method, the author can input a short
label for the page (as it will appear on the slider bar), add a caption for the media, and
Pachyderm 3.0 User Manual! !
Revision 3.0 v1 03.13.2014 ! !
!
!
page 50
type or paste in scrollable text. A link to another screen or URL can also be added. A
Media Label (if available) for each piece of media will also be displayed. !
!
The Slider Screen works well for chronologies, typologies, and quick comparisons of
multiple images. It can be used to construct a narrative or to give instructions with accompanying sample pictures or videos. A large amount of data can be included on a
single screen.!
!
Authoring Scheme for Slider Template
Sample Published Template
!
!
!
Media Table for the Slider Template!
!
Spot
Media Type(s)
Notes
A1-2
text
About six words for the display title and
subtitle.
B
JPG, PNG, GIF
Background round image with 0-100%
opacity
C1
text
Up to 10 characters for the slider label.
For best results, use one short word.
C2
JPG, PNG, GIF
Pachyderm will resize the image as
needed.
C3
MP4, FLV, (video), MP3
Remember to keep videos short to avoid
long download times.
C4
screen link or URL
A link to either another screen or a URL
may be added.
C5
text
Up to 14 words for a caption, if desired.
Caption will suppress Media Label display.
Pachyderm 3.0 User Manual! !
Revision 3.0 v1 03.13.2014 ! !
!
!
page 51
C6
text
Text will scroll as needed; may be a few
paragraphs in length.
!
!
Sample Uses!
!
▪
▪
▪
▪
Tell a story with a series of pictures or video and text, with Slider points covering
different aspects of the story.!
Show progression, growth or change over time with a chronological series of
photographs or videos, and describe or ask questions about each one in the text
field.!
Showcase a series of works by one artist or craftsperson, or show related works
in a single style; include text or questions in the text field.!
The Slider Template can be used in the same ways as the Series Template, but
Slider is best when close-up detail is not important. Slider allows the author to
include several paragraphs of text with each image.!
!
!
!
Zoom Template!
!
The Zoom Template allows the user to zoom in on an image and inspect it in detail. This
screen can also have two audio files attached to it, which are typically used for recorded
commentary about the image. The Zoom Template has the same capabilities as the
zoom screen in the Series Template (described above), but is a separate screen designed for a visual focus on one image only. This is a good screen to link to from anywhere there is a thumbnail image and a larger look at the image is desired (e.g. the central image on an Exploration Entry Template, one of the stops on a Slider Template, or
one of the circles on the Phone Dial template, or one of the links on the Commentary
template). The Zoom Template is a "detail" screen.!
!
In a published HTML5 presentation, a user can click on the + or - magnifying glass at the
bottom of the image to to zoom in or out on the image (For Flash: move the circle on the
line right to enlarge the image, left to zoom out.) Users may view a different part of the
zoomed image by clicking on it and dragging the image up or down, left or right. !
!
When present, the optional audio files are controlled with start/stop/pause buttons in the
lower left. Icons for a popup text field, screen or url link, and Media Label appear when
these are entered. The arrow in the lower right-hand corner returns the user to the previous screen.!
!
!
!
► All other Pachyderm screens have arrows in the upper right for return to prior
screens; the Zoom Screen has its back arrow in the lower right-hand corner.!
Pachyderm 3.0 User Manual! !
Revision 3.0 v1 03.13.2014 ! !
!
!
page 52
Authoring Scheme for Zoom Template
Sample Published Template
!
!
!
Media Table for the Zoom Template!
!
Spot
Media Type(s)
Notes
A
JPG, PNG, GIF
For best results, prepare this image at
2560 x 2548 pixels or larger.
B
text
Text will scroll as needed; may be a few
paragraphs in length.
C
screen link or URL
A link to either another screen or a URL
may be added.
D1, E1
MP3, SWF (audio only)
Remember to keep audio files short to
avoid long download times.
D2, E2
text
Caption/Label for audio file.
!
!
Sample Uses!
!
▪
▪
▪
!
!
Image of a particular species of bird and two bird calls (one right and one wrong,
or one male and one female, etc).!
Diagram of a heart and two heartbeat sounds: one normal and one irregular.!
Any image with a high level of detail, such as a scanned manuscript, a large
painting or illustration, period clothing, microscopic creatures, etc.!
Pachyderm 3.0 User Manual! !
Revision 3.0 v1 03.13.2014 ! !
!
!
page 53
!
Template Properties!
!
The table below shows which templates (listed across the top) have any given property
(listed down the left column).!
!
!
As Co Du
pec m
al
ts me Co
nta mp
ry aris
on
Enl
arg
em
ent
Ex Full Lay Me Ph Ser Sli
plo Scr ers dia on ies der
rati ee
Fo
e
on
n
cus Dia
Ent SW
l
ry
F
Zo
om
Title
x
x
x
x
x
x
x
x
x
x
Subtitle
x
x
x
x
x
x
x
x
x
x
x
x
x
x
x
x
x
x
x
x
Main Text
x
Smaller Text
Block(s)
x
Main Image
x
x
Small Thumbnails
x
x
x
x
Large Thumbnails
x
x
x
x
x
x
x
x
x
x
x
x
Zoomable Image
x
x
x
Links (screen/URL)
x
x
x
x
x
x
x
x
x
x
x
Image Caption(s)
x
x
x
x
x
x
x
x
x
x
x
Media Label
Display
x
x
x
x
x
x
x
x
x
x
Transition Sound
x
x
x
x
x
x
x
x
x
x
Accepts Audio
x
x
x
x
x
x
x
x
x
x
Accepts Video
x
x
x
x
x
x
x
x
x
Accepts Flash
(SWF)
!
Pachyderm 3.0 User Manual! !
x
x
!
!
Revision 3.0 v1 03.13.2014 ! !
!
!
page 54
!
Pachyderm 3.0 User Manual! !
Revision 3.0 v1 03.13.2014 ! !
!
!
page 55
!
Suggested Uses for Templates!
!
This section briefly sorts the templates by the kind of work they are useful for in a presentation. Full descriptions are available under "Templates." Templates with multiple
uses are repeated.!
!
Introductory Material or Overviews!
!
These templates allow for numerous links and one central image and function best as an
overview rather than a detailed account of one idea.!
!
Exploration Entry Template!
This allows 6 text-based links that are related to a single image. The image can also be
linked to another screen for more detail. There is no significant space for text.!
!
Phone Dial Template!
Allows 2 text-based links and up to 10 image-based links. Each one may be linked to a
different screen or URL, allowing for more depth of exploration. Mousing over the images changes the display. There is space for brief accompanying text.!
!
Commentary Template!
This screen has a large image on the left, three thumbnail links on the right, and space
for scrollable text in the center.!
!
!
Multiple Images, Minimal Text!
!
Aspects Template!
This gives the viewer 6 thumbnail images, each with a small portion of associated text.
When the thumbnail is selected, an enlarged image appears in the center of the screen.
There is room for brief text. No further screen links are possible. Ideal for showing multiple videos on a single topic.!
!
Layers Template!
Allows for one large image and two thumbnail sized images, each of which can be linked
to something else. There is also a space for text, and the capacity to add up to four
more screens with identical format. The text on each layer scrolls, and each thumbnail
can be linked to an Enlargement screen, allowing ample room for text. This screen is
ideal for suggesting the multiple dimensions of a single topic. !
!
Series Template!
This screen gives the viewer a central image and a series of thumbnail images, each of
which links to a zoom-screen image with the possibility of short associated text content.
These screens are ideal for reproducing original books, documents, maps, or image sequences that need to be viewed in detail. ! !
!
Dual Comparison Template!
Pachyderm 3.0 User Manual! !
Revision 3.0 v1 03.13.2014 ! !
!
!
page 56
This template presents two medium size images or videos side by side for comparison.
The text block at the top of the screen is designed to present an overall concept related
to the two images. When the user moves the cursor over either media slot, the text
changes to present information related to the media in that particular slot. !
!
!
!
Explanatory Material with Extensive Text!
!
Commentary Template!
This screen has a large image on the left, three thumbnail links on the right, and space
for scrollable text in the center.!
!
Enlargement Template and Media Focus Template !
These two screens both provide a large image and space for a significant amount of
text. The main difference between them is that the Media Focus Template can accommodate video as well as still images; the Enlargement Template holds a larger image.!
!
Slider Template!
This screen has a movie or link, space for links to multiple other screens, and a large
area for scrollable text.!
!
!
Media - Images, Video, and Audio!
!
Below is a summary of how templates support images, video, and audio. Any standard
media slot in a template can take and image, and a video or audio file.!
!
Aspects Template!
This gives the viewer 6 thumbnail images, each with a small portion of associated text.
When the thumbnail is selected, an enlarged image and/or video appears in the center
of the screen. There is room for brief text.!
!
Enlargement Template and Media Focus Template!
These two screens both provide a large media slot and space for a significant amount of
text. The main difference between them is that the Media Focus Template can accommodate video as well as still images; the Enlargement Screen holds a larger image.!
!
Layers Template!
Has one large media slot and two thumbnail sized media slots, each of which can be
linked to something else. There is also a space for text, and the capacity to add up to
four more screens with identical format. The text on each layer scrolls, and each thumbnail can be linked to an Enlargement screen, allowing ample room for text. This screen is
ideal for suggesting the multiple dimensions of a single topic.!
!
!
Series Template!
This screen gives the viewer a central media slot and a series of thumbnail images, each
of which links to a zoom-screen image and the possibility of short associated text content. These screens are ideal for reproducing original books, documents, maps, or image sequences that need to be viewed in detail. !
Pachyderm 3.0 User Manual! !
Revision 3.0 v1 03.13.2014 ! !
!
!
page 57
!
Slider Template!
Allows user to move through a series of media and text to tell a linear story (e.g., a text
and slide show, or a series of videos). It is similar to the Series Screen but allows significantly more accompanying text and allows for video. These screens are ideal for quick
comparisons between images or ideas.!
!
Zoom Template!
The viewer can pan and zoom in on one part of an image and enlarge it. The only associated text is the name of the image. Audio links can be attached to supplement the image.!
!
!
Quick Reference for Linking to Screens or URLs!
!
Templates where linking to screens or URLs is a primary function!
!
Phone Dial— 12 (10 image links, 2 text links) !
!
Exploration Entry — 6 image/text links!
!
Commentary — 4 image links!
!
Layers— 3 image links for each layer, to a maximum of 5 layers (15 links)!
!
!
Templates where linking to screens or URLs is a secondary function!
!
Aspects !
!
Enlargement !
!
Media Focus !
!
Series (has built-in links to zoom-like screens which it creates)!
!
Slider— 1 main image link, plus one for each slider item!
!
Zoom !
!
Some templates work better for large, involved presentations and others are ideal for
smaller work. Authors can finish any of the "detail" screens, which do not have links to
other screens, as soon as they have all their media uploaded onto the server. Most detail screens cannot, however, serve as home screens for a multi-screen presentation. All
screens except the Home Screen must have a link to them from another screen to be
viewed in the published presentation.!
!
!
Pachyderm 3.0 User Manual! !
Revision 3.0 v1 03.13.2014 ! !
!
!
page 58
!
About Published Presentations!
!
Published presentations look very different from the schematics used in authoring.
Pachyderm has built-in dynamics that add interest to the presentation without labor for
the author. On some templates, moving the mouse over a title or phrase causes the
phrase to enlarge and appear to move toward the viewer. Other features are accompanied by sound (Flash only); for example, when viewing an image Media Label, a "click"
accompanies opening the Media Label box, and a "whoosh" accompanies closing it.
The Phone Dial template plays a different note for each thumbnail on the dial. All
screens are set against the Pachyderm background.!
!
When a published presentation is being loaded for viewing, an “loading” animation appears in center of the screen (a gear for HTML5 presentations, and an arrow for Flash)
and gives the progress as the presentation loads. This will also appear when moving
from one screen to another in the presentation. A number of other icons appear on various screens to give the viewer guidance on further actions available.!
!
Pachyderm Icons!
!
Icon
Name
Indicates…
Back
Goes back to the previous screen the user was on. Present
on all screens except the first one; always in the upper right
except on the Zoom template, where it appears in the lower
right.
Home
Returns the user to the home page of their presentation.
Show Text
Show the text associated with Zoom or Series Zoom
screen.
Scroll Up
Triangle
1. Indicates more text is present below; scrolls the text
down.!
2. Indicates Media Label text is present; pops open Media
Label window.
Scroll Both
Triangles
Indicates more text is present above and below; scrolls the
text up (top arrow) or down (bottom arrow).
Scroll Down
Triangle
Indicates more text is present above; scrolls the text up.
Layers
Triangles
General
Screen Link
Pachyderm 3.0 User Manual! !
Top: Active layer on Layers screen.!
Bottom: Inactive layer on Layers screen.
Indicates a link to another screen in the presentation.
Revision 3.0 v1 03.13.2014 ! !
!
!
page 59
Enlargement
URL
Indicates a link to an Enlargement screen.
Indicates a link to a Web URL
Doc URL
Video
Indicates link to a document on the web
(.pdf, .doc, .xls, .ppt)
Indicates a link to a video file
Video/audio
Controls
Flash only: Triangle toggles start/pause of clip, square
Video
Captions
Flash only: Toggles On/Off display of closed captions for
Transcript
Toggles On/Off display of transcript for FLV video or MP3
audio
Zoom
Zoom
!
!
!
Navigating Pachyderm!
!
stops it.
FLV video
Indicates a link to a Zoom screen.
Flash only: Controls a zoom image; blue circle may be
dragged along the line, or user may click anywhere on the
line with the mouse to pop the circle to that point.
When viewing a presentation, the viewer can move back to the previous screen by clicking on the back arrow in the upper right, above the presentation area. (In the Zoom
Template, it is in the lower right.) Forward movement to another screen occurs by clicking on the appropriate link. The Layers, Series, and Slider screens allow movement
within the screen from one "page" to another by clicking on page titles (Layers or Slider)
or arrows under the image (Series). !
!
Pachyderm has Home button in the upper right corner of the screen which appears
whenever the user navigates off of the home screen of a presentation. The Home button
returns the user to the home screen regardless of where they are in the presentation.
Even though this easy return to Home is available, authors should carefully consider
how long a string of screens they want to link together. Multiple short strings will be
more friendly to navigate for the average viewer than a few long strings requiring repeated "rewinding."!
!
Creating a .Zip Archive!
!
A .zip archive of your published presentation is automatically created when a presentation is published. It may be downloaded by clicking the Download button provided on the
publish status screen once publishing is complete. !
!
Putting Presentations on a Website!
Pachyderm 3.0 User Manual! !
Revision 3.0 v1 03.13.2014 ! !
!
!
page 60
!
While it is possible to view your published presentation and share it with others from
within the Pachyderm authoring environment, when work on your presentation is complete you will likely want to publish it at a more permanent url on another web server.
This can be easily done by downloading the .zip archive and unzipping it, and placing
the files in a directory on a web server. The home page is already named index.html, so
pointing a web browser at the directory should bring up the opening screen of the presentation.!
!
▶The .zip archive represents a single, published snapshot of the presentation. To
make changes to a presentation, the author will need to return to Pachyderm,
republish, download a new .zip archive, and upload the entire contents of the
archive into his or her web space again. !
▶
!
!
!
Accessibility Compliance!
A number of features have been added to Pachyderm to support 508 accessibility compliance for published presentations.!
!
Accessibility Buttons have been added to the border area for all of the original Pachyderm templates. The buttons support the following accessibility features:!
!
Info
Audio
Provides a description to the screen reader of the structure of the
template content.
Flash only: Toggles interface sounds off or on.
Contrast toggles screen contrast from normal to high contrast. Turns titles
and semi-transparent overlays to solid black and white to increase
contrast
for Toggles
the sightfont
impaired.
Font
Flash only:
size from normal to large for sight impaired.
Size
Help
provides help information for using Pachyderm presentations,
including accessibility functions.
!
!
!
Closed Caption Support (!
)!
Support Closed Captions in Flash videos (FLV) has been built into the media player.
Flash videos that have an uploaded caption data file will display a CC button that turns
the closed captions on and off. The .dxfp standard is used for synchronized closed caption data. Information about how to generate appropriate caption data files can be found
at: http://www.cdl.edu/uploads/Ug/J6/UgJ6PA5PPI03c9QQAjbfQQ/Captioning-Video-forPachyderm.pdf. Closed caption support for HTML5 presentations is not implemented at
this time. As an alternative, captions can be burned into the lower part of the video.!
!
Pachyderm 3.0 User Manual! !
Revision 3.0 v1 03.13.2014 ! !
!
!
page 61
Transcript Support (!
)!
A transcript can also be uploaded for a piece of media (audio or video). The media player will display a transcript button if a transcript is available for a media asset.!
!
Entering/Uploading Accessibility Information!
Accessibility metadata (transcripts, caption data files, alt text, etc.) can be entered or uploaded into Pachyderm for each media asset (see illustration below). This is most commonly done while making final edits to a presentation, and is accomplished using the
Edit Media Metadata link in the screen editor. Each piece of media in the presentation
has an Edit Media Metadata link, and it can be used to add alt text, long description text,
a transcript, a caption data file, or a Media Label to an asset. Adding accessibility metadata can also be done when uploading media into Pachyderm, or when using the Media
search function by clicking on the Edit Media link in the search results.!
!
Entering accessibility
data for media when
editing a template.
Each piece of media in
a template has a Edit
Media Metadata button.
Clicking it give you
access to enter
Accessibility information
(metadata)
Entering closed
captions and transcripts
for FLV video or MP3
audio.
In the Edit Media
Metadata Screen, Click
on the Upload/Edit
Caption or Transcript
buttons to enter or
upload caption or
transcript data. !
!
Media with captions or
transcript data show the
CC or Transcript Icon.
Pachyderm 3.0 User Manual! !
Revision 3.0 v1 03.13.2014 ! !
!
!
page 62
Adding Alt Text or Long
Description text to an
image.
In the Edit Media
Metadata screen of an
image file, fields are
present for entering Alt
Text or a Long
Description for
accessibility
compliance.
!
!
!
!
Screen Reader Support!
Support for screen reader functions is available in the standard Pachyderm templates in
both HTML5 and Flash. This includes appropriate read order of screen elements, access
to alternate text and long descriptions for media, and keyboard navigation and control of
screen functions. Testing and debugging of read order for screen readers and keyboard
navigation is still in progress.!
!
Guide for MP4 Video (.mp4) Conversion!
The following information for converting digital video files to MP4 Video format (.mp4) is
provided so that users can take advantage of the HTML5 templates in Pachyderm. If you
have existing videos in .mov or other formats, or cannot generate MP4 files from the application you use to edit videos, you can use the tools below to convert your files to MP4
format:!
!
Desktop Tools:!
iMovie (Mac only)!
MPEG StreamClip: http://mpeg-streamclip.en.softonic.com!
HandBrake: http://handbrake.fr!
!
Online Tools:!
Convert-to-MP4: http://video.online-convert.com/convert-to-mp4!
ClipConverter: http://www.clipconverter.cc!
!
!
Guide for Flash Video (FLV) Conversion!
The following information for converting digital video files to Flash Video format (FLV) is
provided so that users can take advantage of the Flash Video playback capabilities of
Pachyderm. If you have existing videos in .mov or other formats, or cannot generate flv
files from the application you use to edit videos, you can use the tools below to convert
your files to FLV format.!
!
Pachyderm 3.0 User Manual! !
Revision 3.0 v1 03.13.2014 ! !
!
!
page 63
Windows Users!
There is a free application on Windows called Super, which will convert most video file
types to Flash 7 format. If you want your videos in Flash 8 format, which is higher quality,
we recommend you purchase Flix Standard for $39. If you want to view a quality comparison between Flash 7 and Flash 8 compression, click on the link below.!
!
Mac Users!
Flix Standard, the application recommended above for converting to Flash 8 on Windows, is also available for Mac for $39. If you want to view a quality comparison between
Flash 7 and Flash 8 compression, click on the link below.!
http://130.157.145.22:8081/pachyderm_2_1/presentations/FLVcomparisonsorensonvp679/?wosid=RRaaOev7rOEKfUVZ4nQXrM!
!
Recommended Compression Settings for Videos!
Below are recommended compression settings for creating MP4 or Flash videos for
Pachyderm with tools like the ones mentioned above. MP4 videos are needed for an
HTML5 presentation, Flash (FLV) are needed for a Flash presentation.!
!
Frame size: 320 x 240, or 400 x 300 for Enlargement an Media Focus templates!
Frame rate: 15 fps!
Video bitrate: 230 or 330!
Audio bitrate: 64!
!
More detailed information on Flash video settings can be found at!
http://www.adobe.com/devnet/flash/articles/flv_encoding_02.html!
!
!
!Known Issues in Pachyderm 3.0:
Versions of IE earlier than 10 have some screen layout issues when authoring and viewing presentations. Pachyderm 3 works well with current versions of IE, Chrome, FireFox
and Safari browsers.
For HTML5 Authoring:
Because of security restrictions in IE and Chrome browsers on Windows, HTML5 presentations cannot be played from a local hard disk with these browsers. However, FireFox on Windows can play presentations locally. On the Mac, Chrome and Safari cannot
play presentations from a local disk, but FireFox will play them fine. All four browsers
play HTML5 presentations fine from a web server.
Closed captions for videos are currently not implemented in the HTML5 templates. This
is due to lack of standards for implementing closed captions in HTML5 media players at
the time the HTML5 templates were developed. However, transcripts for mp4 videos do
work, and captions can be burned into video as an alternative until closed captions can
be implemented.
If you change the format of your presentation after you have begun authoring (from
Flash to HTML5 or visa versa), you must publish your presentation once to get screen
preview to switch formats.
Pachyderm 3.0 User Manual! !
Revision 3.0 v1 03.13.2014 ! !
!
!
page 64
!
For Flash Authoring:
Leaving the main media or text slots blank in some templates can prevent the screen
from loading on preview or viewing the published presentation. Workaround: fill in the
blank elements.
Accessibility: Tab order for keyboard navigation and screen reader order still need adjustments.
Aspects, Layers and Commentary templates: require a thumbnail or
secondary image be present in order to play linked video.
Series template: item labels are not effected by the accessibility contrast settings.
Aspects template: Use of long, multi-line thumbnail image captions will make page display improperly.
Dual Comparison template: images will disappear of a user clicks back and forth on
them and they are not linked to any content.
Pachyderm 3.0 User Manual! !
Revision 3.0 v1 03.13.2014 ! !
!
!
page 65