1
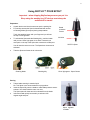
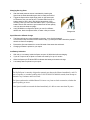
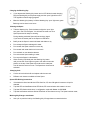
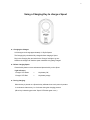
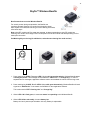
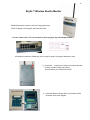
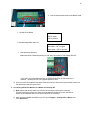
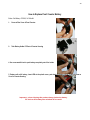
Wireless Liquor Management System
User
Guide
2 PREFACE The purpose of assembling this Skyflo User Manual is to provide basic information
required to use and configure our products.
This manual is a “work in progress” – if you see corrections, or would like to suggest
additions or other changes which will make this reference more useful to yourself
and others, please let us know.
Our products are being constantly improved and modified for extra functionality as
well as for individual clients specific needs. For this reason this manual will need to
be updated regularly.
This updated manual has been compiled and published by Linda Zhou & Andrew Ferrett
Updated 9/7/2010
3 INDEX
Page
4
Using SKYFLO Pour Spout
6
Using the Washing Key
7
Using a Charging Key
9
Calibration Key for SKYFLO Pour Spout
11
Beerflo – Wireless Beer Monitor
13
Beerflo Box – Wireless Beer Monitor
18
Optic pearl
21
Skytag
22
FAQ Frequently Asked Questions
4 Using SKYFLO™ POUR SPOUT
Important – when shipping Skyflo always ensure you put it to
Sleep using the washing key. RF devices must always be
switched off in transit!
Preparation
z
Unpack the box and check contents as per the packing list.
z
For security reasons the Spout is deactivated with access
to Cleaning Mode (Spout open) during transportation.
Bottle
presence
sensor
Touch the sensitive button with your finger and you will see
the top 2 LEDs light blue.
Air Valve
z
To activate the Spout take the Washing Key, push the button
until you see ‘Close’ light green, then within 4 seconds you
must put it on the top of the Spout with contact to the metal part.
You will hear the motor run once. The Spout then closes and is
activated.
z
SKYFLO Spout
Take the Spout and insert the air valve tube.
Cleaning Mode
Washing Key
‘Close’ light green - Spout Closes
Pouring
z
Take a bottle ensuring it contains liquid.
Nb. This Spout is not recommended for syrup product.
z
Insert the Spout fully onto the bottle to make bottle presence sensor
activate. You should hear the motor run once,
The Spout opens & closes and air is released from the bottle.
z
Incline the bottle quickly but smoothly to at least a 160
degree angle and pour.
Spout registers
on bottle
5 Changing Serving Sizes
z
After the bottle presence sensor is activated by inserting the
Spout into the bottle the default pour size is usually set as 30ml.
z
Trigger the Spout with a simple finger touch on the sensor pad
to choose the size you want to pour. The blue LEDs from top to
bottom stand for 50ml, 40ml, 30ml & 20ml respectively. After
choosing a size you can incline the bottle to pour. If you keep the
bottle inclined it will continue to pour measures of the set quantity
until you return the bottle to upright.
z
Using SKYMAN to configure the Spout, you can fix a different
default size, block the optional sizes, or select a free pour mode.
Change size
Liquid Detection & Bottle Change
z
The Spout will not pour when the bottle runs empty, as no liquid is detected.
4 LEDs blink in blue and flash off from bottom to top, if you keep the bottle inclined they repeat 2
times then flash off completely.
z
Remove the Spout and attach it to a new full bottle of the same size and brand.
z
Changing of bottles is printed on your report.
Low Battery Indication
z
With a tiny Li-ion battery inside the Spout can pour 10,000 drinks before recharging.
z
If you do not pour at all, a Spout on a bottle can stand by for up to 3 months.
z
When the Spout top LED blinks RED it indicates low battery and needs to charge.
z
Low battery status is printed on your report.
Technical Comments
The Skyflo Spout is currently designed to transmit pour data to the Master immediately, and if it
gets no response, to continue sending after 2/4/8/16/30/60/120/240/480 seconds, then attempt to
transmit every 8 minutes until it succeeds.
The Spout synchronises with the Master Unit once every hour to check connection, whether the
Spout is pouring or at rest.
If the Spout is unable to transmit the data immediately it is able to store more than 50 pours.
6 Charging the Washing Key
z
If you depress the Washing Key button and no LED blinks it needs charging.
Plug the Washing Key to the power supply and the ‘open’ light will turn red.
This signifies normal charging progress.
When the Washing Key battery is full the Washing Key ‘open’ light turns green.
z
Recharge can be done in two hours.
Cleaning the Spout
z
Take the Washing Key. Push the button to light the ‘open’ light
turn green. Put it on the Spout. You will hear the motor run once.
Spout opens and is ready for cleaning.
During cleaning mode the Spout will not send any signal.
If you touch the sensor pad on the Spout no LED blinks.
Open Spout
z
Briefly rinse the Spout in warm/cold water and shake to dry.
z
Do not keep the Spout submerged in water.
z
Do not wash the Spout more than once a day.
z
Do not wash with water that is too hot to touch.
z
Do not bleach or use abrasive cleaners.
z
Do not leave the Spout soaking in water.
z
Do not put the Spout in a dishwasher.
z
When cleaning is finished push the Washing Key button
until you see the ‘Close’ light turn green, then within 4 seconds
place it on the top of the Spout with contact to the metal part.
You will hear the motor run once. The Spout then closes and is
activated.
Close Spout
Changing Cork
z
Cut the old cork with a knife and replace with the new cork.
z
Different cork sizes are available to fit the Spout.
Spout LED Blinking Instructions
z
If the bottle is inclined and all blue LEDs flash On, Off, then ON again this means no liquid is
detected.
z
Top blue LED and last Bottom blue LED blinks; RF communication with master is in error.
z
Top blue LED flashes all the time, in configuration mode with Master via SKYMAN.
z
Top blue Led flashes and then all blue LEDs flash off from bottom to top, The Spout has been reset;
Washing Key/Charger reset button
z
Use a pin to push the hole by the Washing Key /Charger button to reset the device.
7 Using a Charging Key to charge a Spout
z Charging the Charger:
A full charger can charge approximately 1.5 Skyflo Spouts.
The Charging Key should be fully charged before charging a Spout.
Plug in the Charging Key and wait for the “Charger” red light to go out.
However the charger can feed the spout meanwhile it is getting charged.
z Before charging Spout:
Press the Key button once to activate and place the Key on the Spout.
Light reference;
“Charger” LED Green
=
Key battery OK;
“Charger” LED Red
=
Key battery empty.
z During charging:
When the key is placed on a Spout the key will detect how much power is present.
It continues to detect every 1 to 3 minutes during the charging process.
(When key is detecting spout the “Spout” LED blinks green once.)
8 z Signs of proper charging process:
¾ “Spout” LED blinks blue, meanwhile Spout “top LED” blinks red.
Nb. When the Spout runs completely out of power, the “top LED” will not immediately blink red
after the Key is placed on it. It wakes up the Spout = Spout “top LED” blinks blue and the motor
runs - opening and closing one time.
Take the Key off the Spout and re-place on it. The Spout will then immediately blink red.
¾ When Key battery becomes flat the Key “Charger” LED will turn red.
This alerts the operator to plug power to charge the Key.
¾
Error notice: If the Key loses contact with the Spout or a program error occurs the Key
“Charger” LED will turn green automatically.
After “Charger” LED turns green the Key stops charging.
This alerts the operator to take the Key off the Spout and re-place it back on the Spout.
If the error persists you can use a pin to push RST (Reset) to reset Key.
z Charging Complete:
Once the Charging Key detects that the Spout has enough power (more than 90%) the Key “Spout”
LED will turn green, and will then stop charging.
Take the Charging Key off the Spout and press the Key button to exit alert status.
9 Calibration Key for Skyflo™ Spout
The Calibration Key has the same housing as the Charger and Washing Key. It adjusts the pour
rate and refines the pour size. This can also be done through our Skyman software.
Push the Calibration Key button once and you will see both LEDs light Green.
decrease LED
increase LED
How to Use:
1.
Sit Skyflo Spout on the bottle, but ensure the bottle presence sensor is not depressed. Put the
Calibration Key on Spout.
2.
Adjust Pour size to smaller:
1)
Push the Key button for 1 second and the ‘decrease LED’ light will turn green; Push Key
button once and the same key light blinks once. This means the Spout pour rate is
reduced 0.5%; each push should follow with the ‘decrease LED’ blinking green once.
2)
When you have finished leave the key on Spout for about 3 seconds, you will then see
the ‘decrease LED’ light blink blue. Spout top LED will then blink blue and follows with 4
LEDs flashing from bottom to top twice. Spout saves the setting and exits. You may hear
the Spout open and close once with the motor running.
10 3.
Adjust Pour size bigger:
1)
Push the Key button for 1 second and ‘increase LED’ light will turn green. Push the Key
button once and see same key light blinks once. This means the Spout pour rate is
increased 0.5%; each push should follow with the ‘increase LED’ blinking green once.
2)
When you have finished leave the key on Spout for about 3 seconds, you will then see
the ‘decrease LED’ light blink blue. Spout top LED will then blink blue and follows with 4
LEDs flashing from bottom to top twice. Spout saves the setting and exits. You may hear
the Spout open and close once with the motor running.
Note:
1. The Calibration Key helps to adjust the pour size but it is based on the size previously set in
Skyman.
For example, the original size is 20ml, after adjustment Spout will continue to signal as 20ml to
Master Unit.
2. Spout does not require adjusting for each size. After adjustment, all 4 optional sizes will follow the
change.
3. After calibration the spout, the initial pour need to be ignored as spout was previously reset by the key
to execute the calibration, the second pour should be ok.
11 Skyflo™ Wireless Beerflo
Brief Instructions to use the Wireless Beerflo
For security reason during transportation, the Beerflo was
previously entered Cleaning Line mode to avoid sending signal.
After unpack it for install, the first thing is to exit Cleaning Line mode,
refer below steps.
Note: when RF module and Flow meter are separate, do always remember to enter RF module into
Cleaning Line mode to avoid Huge Power Consumption from the RF module with attempt looking for flow
meter pins connection.
Put Washing Key on the ring (for add device, exit and enter cleaning line mode and etc.)
LED1 LED 2 1. Press washing key OPEN, Flowmeter LED 1 blinks red & green alternatively, Wireless Beerflo stops
counting the pulses. This message can be treated as “Clean Line” or “Change Keg”. In order to
separate this two messages, application software need to accumulated the volume from the keg to tell.
2. Press washing key CLOSE, Beerflo LED 2 blinks red & green alternatively, Wireless Beerflo will send
signal as to “Add Device” in the master via SKYMAN or other application software.
This is also used to EXIT “Cleaning Line” or “Change Keg”.
3. When LEDs 1 & 2 flash green, it means no master in responding to this Wireless Beerflo.
4. When LED 1 blinks red weakly, it means battery low.
Battery can last 2 years as per calculation in theory. Battery is replaceable.
12 Mind how the RFModule is connected to the Flow Meter.
(RF Module “+V” hole to Flow Meter “+V” pin)
Attention: wrong connection is prohibited as it may lead beerflo over heated and battery flat!!
13 Skyflo™ Wireless Beerflo Monitor
Beerflo Monitor Box is able to connect to 8 kegs (beer lines).
With LCD display, touch keypad, and 8 beer line LEDs
1. Power is DC12 volts. **Do not connect this power supply to any other Skyflo product.
8 flowmeter connections, RS485 port (not in use) & DC power 12V (though silkscreen is 24V).
1) Screw here 9 to open the housing at 4 corners at the back
housing. (Inside the deep-hole screws)
Do not unscrew the covered PCB screws.
2) Open Beer Monitor housing. Mind not to break the FPC
connection to the touch Keypad. 14 3) Connect the flowmeter cable to the Beerflo PCB. • Printed Circuit Board:
“V” for Power
“S” for signal
“G” for Ground
• Titan Beverage Meter 300-010:
Red cable = “V” for Power
Blue cable = “S” for signal
Black cable = “G” for Ground
•
Note the Switch Direction:
Make sure below 8 Switches pointing to “ON” after connection to Titan Meter 300-010.
* Only when an infrared flowmeter such as SF800-Swiss Flow is connected, the 8
switches should point OFF (the opposite position of ON).
4) Once you have connected the flowmeter to the beer monitor, after power up the beerflo monitor box,
the relevant channel LED will turn ON.
2. Connecting the Beerflo Monitor to a Master Unit through RF
1) Note: before add device, make sure minimum one channel is wired to the connector.
Ex-work hardware may have one channel connected with resistance for easy add device.
Screw off the resistance after one channel is wired to the connector.
2) After you have installed SKYMAN on your PC go to Program – Configuration - Master and
Click Add Device.
15 3) Connect the Beerflo Monitor power line, enter Menu and find “Remove keg”, input your beer
line channel (numbered from 1 to 8). Touch button “Enter” on Beer Monitor Keypad, you will
be able to see the Beerflo device ID on the Skyman screen, input a name for this Beer
Monitor (maximum 5 digits).
4) Open the page Skyman ÆManagerÆDevice. Give each of the connected channels a
product name for each beer line. Products have previously been set inside Products page of
Skyman ÆManagerÆProduct.
5) You must also configure the pour rate of each connected channel/beer line in the R1,
R2, R3 etc. column.
For Titan Beverage Meter 300-010 you should enter 1420 (‘K’ Factor) as per its specification
1420 pulses = 1 liter.
For example if the Titan Beverage Meter 300-010 shows pulses 1164 Skyman will give
819ml. (819ml = 1164/1420*1000).
Skyman will now show measurements in ml. You can test this if you wish by blowing gently
into the flowmeter before connecting it to the beer line.
If you want the Master Unit to show pulses instead of ml, input 1000 for each channel rate
inside Skyman ÆManagerÆDevice page after you add the Beerflo device.
3. LED, LCD and keypad functions:
z
Front Panel LED display:
LED indicators 1 ~ 8 under the LCD:
Off: no flow meter.
Red: flow meter is connected.
Blue: flowing.
Blink Red-Blue: washing.
Blink Red: changing keg.
z
LED indicator left to the LCD:
On: “Fn” function key is activated.
Off: normal condition.
LED indicator right to the LCD:
Blink blue: attempt to transmit recorded pulses.
LCD default display
[ …….
]
[->3….235 _ ö X_ __ ]
Power up beerflo: “…….” no pulses recorded.
Recorded pulses: “3” is beer line/channel, “235” is pulses, maximum display 16 events.
touch keypad “arrow up”
or “arrow down” to turn page.
Channel Off: ‘ ‘ (blank) no flow meter is detected.
Channel On: ‘_’ (underline) the flow meter is connected;
Washing line: “ö” in washing mode, flow does not count.
Changing keg: “X” in changing keg mode, flow does not count.
Flowing: “ “ dynamic height to indicate the flow speed.
z
System information
16 In “LCD default display” mode, touch “Fn”+”#” to display system information
1. Version
2. Device ID
3. Time (auto synchronize with Master) Format: “Month-Day Hour:Minute:Second”
4. 6,7,8,9. Some debug data
5. Pour data in the buffer; “A-X-X”: A is saved events in the memory, X for debug.
A. Hardware flags.
z
Definitions of menu
In “LCD default display” mode, touch ‘Menu’ to enter the menu. Touch keypad “arrow up”
or “arrow down” to turn page:
Start clean (F1)
Stop clean (F2)
Remove keg (F3)
Restore keg (F4)
Memory
Admin
= clean beer line
= stop clean beer line
= take out empty keg
= Install a new full keg
= Manage the eeprom and ram memory, only for debug.
= Set Admin ID and password; set the waiter ID and password,
support max 8 waiters.
Clean time
= setup clean time
NOTE: Only the admin has the authorization to use the functions of ‘Memory’, ‘Admin’
and ‘Clean time’.
z
Start and Stop cleaning beer line
1)
In “Menu” mode, move the arrow to “Start clean (F1) ”, touch “Enter”; or In “LCD
default display” mode, touch “F1”.
[Start
[ Clean
9 _ _ öX _ _ 9]
2 3
*7
]
‘ö’ –the channel 4 is already in washing mode.
‘X’--the channel 5 is changing keg.
‘_’—the channel is in normal work mode, channel 2, 3, 6,7.
9
‘ ‘—no flow meter is connected. Channel 1 & 8.
‘2’, ‘3’,’7’ – channel 2,3,7 can go to washing mode.
“*”— channel 6 already been selected.
Only the displayed channel numbers are ok for further operation. Select the channel to
be cleaned by touch “0” to “8”, touch “0” for reverse the selection, then touch “Enter” ;
2) To exit clean Line mode, In “Menu” mode move arrow to “Stop clean (F2) ”, touch
“Enter”; or In “LCD default display” mode, touch “F2”. Select the channel then touch
“Enter”.
[Stop
[ Clean
9 _ _ öX _ _ 9 ]
4
]
17 Note:
If the beer line is left running with water without entering cleaning mode previously,
Beerflo will send every 10,000 pulses to Master Unit. Application software must treat
those big readings plus final small readings as cleaning events. Otherwise it will
influence the accuracy of dispense record.
z
Remove and Restore keg
Enter “Remove keg (F3)” and “Restore keg (F4)”, follow the same principle as above “Start and
Stop cleaning”.
z
Set Admin ID
In “Menu” mode, move the arrow to “Admin”, input the code “100000” and touch “Enter”; it
will show “Admin” “0” “pswd” “100000”; move arrow to “admin” input number to give a
different admin ID, not forget to touch “Enter” and save it; follow the same principle for a
different password setting. (Please remember your new password!)
The Admin ID is with the top level of authorization for change keg and clean line.
There are total 8 waiter IDs with password, it is not in use yet.
z
Setup Clean time
In “Menu” mode, move the arrow to “Clean time”, input the code “100000” and touch “Enter”;input
the number of minutes you wish to have the line exit cleaning mode automatically.
18 Wireless Optic Pearl
Economic Liquor Control Solution
Wireless pearl counter
The system comprises of:
Standard Measure Brackets, pearl, wireless pearl counter, bottle inserts.
Standard Measure Brackets
Pearl & bottle inserts. Available pearl: 25ml, 35ml, 50ml; bottle insert for 75cl & 1 liter bottle.
19 Using the Optic Pearl
Replace your old support with
the Skyflo Optic Pearl support
Insert the optic into the support
Skyflo Optic Pearl support
Bottle switch
Dispensing switch
Optic Pearl
Once the bottle is removed it automatically
signals a bottle change to the Master Unit
20 How to Replace Pearl Counter Battery
Button Cell Battery: CR2032, 3V 200mAH
1.
Screw off the Cover of Pearl Counter.
2.
Take Battery Holder PCB out of Counter Housing
4. Use a non-metallic tool to push battery completely out of the holder.
5. Replace with a full battery, insert LEDs to the plastic cover, push back the Battery Holder PCB and screw on
Cover of Counter Housing.
Important – when shipping this product always isolate the battery.
RF devices must always be switched off in transit!
21 Skytag
Attached to individual bottles, Skytag wirelessly transmits pour data by the millisecond when the bottle
is tilted.
22 Frequently Asked Questions
(in no particular order)
1. Will switching off the Master Unit save the battery in the Skyflo Spout?
Not really, once all pour data has been transmitted from the Skyflo Spout the
Master only contacts it once an hour.
2. What about pouring more viscous liquids?
The pour rate can be adjusted when configuring the Spout with our Skyman
program. We suggest that you may wish to keep the Spout reserved for this
product once it is configured to save modifying it every time.
3. Why is my Charging Key not working?
Ensure the Key is fully charged before placing it on the Spout. Then move it around
to ensure good contact.
4. The Spout refuses to pour?
It will not pour if it cannot sense liquid. For high alcohol drinks the Spout should be
configured to a higher sensitive setting.
5 After unpack Skyflo Spout, I insert it on a bottle with whisky, why it starts free
pours without stopping? When I want to change size by touch the button, I see
middle 2 LEDs turns on and turns off.
A:
Skyflo is in washing mode. Take a washing key to close the Spout while the
bottle presence sensor is not depressed.
6 When I pour a drink with pre-measured size, I see Skyflo 4 LEDs blink in blue
and flash off from bottom to top but no liquid comes out of the bottle while the
bottle is full of liquor, if I keep the bottle inclined they repeat 2 times then flash
off completely.
A:
Skyflo liquid sensor does not detect the liquid. Please configure Spout via a
Washing Key and change the Liquid Detect.
7 After I pour a drink and I see Skyflo Spout top and bottom LED blinks blue
twice. What does it stand for?
A:
Master does not respond to Spout, pour data was not sent successfully to
Master Unit. It will continue trying to send.
8 If the pour data was not sent successfully to Master, will we lose the data?
A:
The Skyflo Spout is currently designed to transmit pour data to the Master
immediately, and if it gets no response, to continue sending after
2/4/8/16/30/60/120/240/480 seconds, attempting to transmit until it succeeds. The
Spout synchronizes with the Master Unit once every hour to check connection,
whether the Spout is pouring or at rest.If the Spout is unable to transmit the data
23 immediately it is able to store more than 50 events (pour data/bottle on or off
info/washing on or off into).
9 How do I know if Master responds to Skyflo spout?
A:
Master LED 2 will blink red once after it receives data from spout.
10 How do I know if Master is connected well to PC?
A:
Master LED 3 will blink red once PC is communicating with Master via either
serial port or Ethernet port.
11 What API can help to a whole system?
A:
API (Application Program Interface) is designed to integrate Skyflo System
into your own existing software or POS interface. You will need to look through all
function lists and files and complete your own software before reading pour data or
configuring the spout.
12 Why does my PC can not detect USB port after I plug in the USB converter?
A:
You need to install the PL-2302 USB to serial driver.
13 Why I can not get Ethernet port working?
A:
You need a special Ethernet cable to fit the Master hardware.
14 What is the RF range?
A:
Current Master can respond to Skyflo spout /other RF devices in open air
maximum 50 meters, 2 walls and 1 floor. If the drink is poured beyond the RF range,
once the Spout comes closer to Master, all stored data will be registered into Master.
15 What should I do after I see Skyflo spout top LED blinks red?
A:
Please charge the spout as it shows low battery by blinking red.
16 How to do if I want to compare the POS report with Skyflo control report?
A:
Skyflo system is not connected to any POS system yet, keep the Skyflo spout
and Master within max RF range to make sure the pour data will be transmitted.