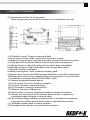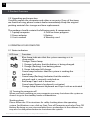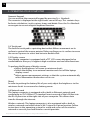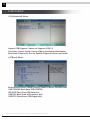
1
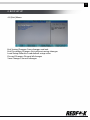
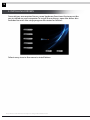
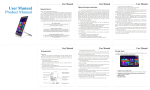
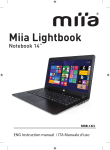
USERMANUAL w w w. r e d f o x t e c h n o l o g i e s . c o m 1 DISCLAIMER Dear REDFOX User: Thank you for purchasing and using our product. For future reference, please read the product specifications as well as all the materials attached before using the product. We shall not assume responsibility for damages or losses due to failure to use the device according to this operational manual or to what is implied by the product specifications. The proprietary right to alter or change any of the content in the specifications belongs to our company; no part of the specifications may be reproduced, stored in a retrieval system, or transmitted in any form or by any means without prior written permission of the company. Trademarks and trade names mentioned in the specifications belong to their respective owners. If the content of the specifications doesn't conform to that of the actual product, the actual product shall be binding. If you have inquiries or objections about any content, article or clause in the specifications, please forward a written objection within seven (7) days after purchasing the unit. Otherwise, it shall be deemed that you have agreed to, understood, and accepted all the content of the specifications. On Software and Peripherals This laptop computer can support several peripheral devices & hardware, such as mouse, keyboard, printer, and scanner. The company also guarantees functionality of software pre-installed in this unit before purchase. Customers who purchase these products from third parties are bound to the terms and equipment specifications attached with these items. The company recommends the use of high-quality equipment and genuine software that are compatible with the specifications of this laptop computer. The company does not guarantee the compatibility and reliability of any third-party peripheral equipment or software attached or installed onto the computer. For compatibility issues with any of third-party items, please contact the product’s manufacturer. REDFOX may also provide technical support when necessary. 2 TABLE OF CONTENTS Disclaimer ................................................................. Table of Contents ......................................................... 1. Quick Guide ............................................................. 1.1 Hints ................................................................. 1.2 Basic product care tips ................................................ 1.2 Safety Instructions .................................................... 1.3 Instructions before product use ....................................... 1.4 Battery ............................................................... 1.5 Power ................................................................ 1.6 Ergonomics .......................................................... 2. Product overview ....................................................... 2.1 Product specifications ................................................ 2.2 Introduction to parts & components .................................. 2.3 Unpacking and inspection ............................................ 3. Operating your computer ............................................... 3.1 Status indicators ...................................................... 3.2 Turning the computer off ............................................. 3.3 Function keys ......................................................... 3.4 Touch pad ............................................................ 3.5 Display screen ........................................................ 3.6 Network card ......................................................... 4. BIOS Setup .............................................................. 4.1 BIOS Setup ........................................................... 4.2 Main (main setup) .................................................... 4.3 [Advanced] Menu ..................................................... 4.3 [Boot] Menu .......................................................... 4.4 [Exit] Menu ........................................................... 5. Installing drivers ........................................................ 6. Basic Troubleshooting .................................................. 6.1 Sound Problems ...................................................... 6.2 Hard Drive Problems .................................................. 6.3 Display Problems ..................................................... 6.4 Display Problems ..................................................... 6.5 Problems on memory ................................................ All specifications and information are subject to changes without further notice I II 3 3 3 4 5 6 8 8 10 10 11 12 12 12 12 13 14 14 15 17 17 17 18 18 19 20 21 21 21 22 22 23 3 1. QUICK GUIDE 1.1 Hints Easy-to-read hints indicate that special attention should be paid to the information succeeding it. These hints are expressed as follows: [Danger]---indicates high risk; [Warning]---indicates medium risk; [Note]---indicates that attention should be paid to light risks; [Prohibition]---indicates that dangerous operation should be prohibited; [Reminder]---indicates that attention should be paid to safety or other contents; Besides the information expressed along with these hints, please read the content and safety information on product parts and usage included on the following chapters. 1.2 Basic Product Care Tips This laptop is a high-tech precision product that requires proper usage and maintenance. Please take note of the following basic care tips for using your REDFOX laptop: 1. Maintenance of the LCD screen Don't place heavy objects on top of the laptop computer. When placed in a suitcase or backpack, make sure that there aren't too much objects inside the bag that place additional pressure to the back part of LCD screen Don't scratch, twist, or strike the LCD screen. Don't place the LCD screen in an environment where the temperature exceeds 40ºC or the humidity exceeds 90%. Don't expose the LCD screen to direct sunlight or strong fluorescence. Don't place any object between the LCD screen and keyboard, such as a pencil, paper documents, and other items which may damage or scratch the screen. Don’t use corrosive detergent to wipe LCD screen. 2. In order to prevent the computer from overheating, please keep the ventilation vents unobstructed during computer operation. 3. Please make sure that external devices such as floppy drives, CD-ROM and other mobile storages are safely removed from the system before they are unplugged. Otherwise, failure to safely remove these devices may lead to system breakdown or data damage. 4 1. Quick Guide 4. Do not open the computer casing while the system is running. 5. Please back up your data in advance before formatting the hard drive, this process will delete all data stored previously in the system. 6. Power Supply The power supply should be stable and be free from interference. Please make sure that the power has been correctly grounded when plugging the computer to an external power supply. Please do not damage the grounding line of the power socket. Shut down the computer properly before unplugging. If you won't use the computer for a long period of time, please pull off the power plug in order to avoid transient voltage that may lead to possible damage to the computer. Please make sure to pull from the root of the socket so as to guarantee safety. When you are not clear about the local specifications on electric devices, please consult your local power supply company. 7. Unplug the computer from the power supply and remove the battery before cleaning the device. 8. Do not hand carry the laptop computer with one hand or place your laptop computer in an unstable platform. 9. This product can only be disassembled by an authorized service staff or agents assigned by the company. Please keep all labels, markings and seals intact since these are crucial for the warranty and service processes. 10. Do not forget your user password. Else, please contact the supplier or authorized service center. 11. Please don't use pencil and other breakable items to manually eject the Disk Drive. 1.2 Safety Instructions 1. The power socket hole should be installed in an accessible area near the equipment. When inserting or pulling out the power cord, always pull from the root of plug to avoid electric shock. Do not disassemble the power adaptor. 2. Do not use this device near water or spill liquid of any kind onto the product or its power adaptor. All specifications and information are subject to changes without further notice 5 1. QUICK GUIDE 3. Do not place the product in places where people frequently go by as to avoid trampling the electric wire. Please make sure that no articles are placed on the electric wire. 4. Follow all the warning information and indication on the actual unit or any of the devices and peripherals attached. 5. Remove connection from the external power supply when product is not in use to avoid excessive transient voltage, which can cause damage. 6. Seek technical service in case of the following: a. The power line or socket has been destroyed or torn off. b. The product is drenched, causing damage c. The product is unable to run normally despite following instructions in the operational manual. d. If the product is exposed to shock causing damage to internal parts or casing. e. For the usage and storage temperature of this product, please refer to the product specification in annex A. If the product is not used and stored within the defined temperature scope, it may lead to permanent damages on the product. 1.3 Instructions before product use Applicable group [Note] The computer is not suitable for independent operation by children seven years old and below. Adult supervision is advised. Working environment [Danger] For your safety, operate this device strictly in a working environment defined as follows: Conditions Temperature (for storage and transportation) Relative humidity (for storage and transportation) Atmospheric pressure Adaptation capability of power Working humidity Working temperature Value -20°C - 55°C 20% - 93%(40°C) 86 kPa - 106 kPa 100V-240V, 50Hz ±1Hz 35% - 80% 10°C - 35°C 6 1. Quick Guide [Note] In order to prevent damage due to dampness, dust, food, liquid, direct exposure to sunlight or such, the computer should be placed in a cool and dry place with good ventilation. Keep this device away from other household electrical appliances. [Warning] Booting or disassembling the computer in a room temperature below 10°C may lead to internal damages in the device. Leave the computer shut down in a 10°C to 35°C working environment before use to avoid the computer’s temperature from getting excessively low. 1.4 Battery For newly-purchased battery: Empty the new battery’s power completely before charging it for the first time. Lifespan of the battery: The duration of the battery may be influenced by the following factors: time of charging and consumption, operating system, brightness setting of the LCD, application or programs running , power management setup, network connections, etc. The battery’s full capacity will also gradually decrease over frequent use. In order to improve battery performance and increase its lifespan, the battery should thoroughly discharged every other month and be recharged fully. Battery gauge: The built-in gauge in the battery determines the total battery power and controls charging and discharging process. To maintain the accuracy if this gauge, thoroughly discharge the battery every other month and recharge the battery to its full capacity. To save on battery power: A. Main power management: To save on battery power, adjust processor speed and ambient parts of this device through the main power management function. B. The brightness of the LCD: Decrease the display brightness of this device to consumption. All specifications and information are subject to changes without further notice save on energy 7 1. QUICK GUIDE C. Software and peripheral: Executing programs and using peripherals on this device consume battery power. To save the energy consumption, we recommend the following: Limit the use of the modem, Wi-Fi or other communication functions. Take out the unused PC card from the computer slot. Unplug unnecessary peripherals from the computer socket. Instructions: Fully discharging the battery Let the computer run with the battery power until it is fully discharged and the computer automatically shuts off. Fully charging the battery While charging the battery, wait until that the battery indicator lamp in the computer indicates that the charging has been completed, i.e. reaching full power. For details, please refer to the power state indication subject in this manual. Battery Replacement and Disposal The battery can only be used in this laptop computer. Replace the battery properly to avoid danger of explosion. Only battery products of same or equivalent type recommended by manufacturers can be used for replacement. Do not disassemble the battery. It is advisable that the replacement and installation of the lithium-ion battery be done by technical professionals. Dispose used batteries properly to avoid serious environmental consequences. Do not dispose in fire or water. You may return the battery to the post-sales and maintenance department for proper disposal. Battery maintenance Thoroughly discharge battery power and recharge up to full capacity at least every other month or after every other 20 times of incomplete discharge. Warning In order to prevent the fire accident, combustion or damages on the battery, avoid touching the two poles of the battery with metals. Special care should be taken when handling damaged or leaked batteries. If accidentally exposed to the battery liquid, rinse thoroughly with soap and water. If it gets into your eyes or open wounds, flush with running water for at least 15 minutes and seek medical attention immediately. For your safety, do not charge the battery at temperatures below 0°C or above 104°F. 8 1. Quick Guide Do not expose the battery to extreme temperatures during transportation or storage 1.5 Power [Danger] Use only quality three-core grounding power plug and socket with grounding protection. The power socket should be inserted into an external source with a sound grounding. Power lines should conform to local safety regulations such as compliance to CCC Certification. Cable length should not exceed 4.5 meters. Should you replace standard power lines, seek aid from authorized professionals to avoid accidents. Before using an external power source, check first if it specifications of the device. conforms to the [Danger] Avoid using the computer during thunderstorms. Disconnect all cables that connect the computer outdoors such as the telephone line, network line and power line. Do not touch these lines or cables during a thunderstorm. [Warning] Do not insert a 110V power line into a 220V source. Do not change the voltage selector switch of the computer power to avoid physical harm or equipment damage. [Note] Carefully examine the AC power line attached after purchasing the unit. In case of problem, contact your product dealer. 1.6 Ergonomics [Reminder] Computer users may experience discomfort such as back pain, eye strain or headache after prolonged use of the unit. Bad posture, continuous usage, extreme heat or cold, stress and poor working habits increase risk of physical injury in using the computer. If you are experiencing recurring discomfort associated to the use of this device, seek medical advice as soon as possible. The following gives you information for more a comfortable use of this device: All specifications and information are subject to changes without further notice 9 1. QUICK GUIDE 1. Back support Select a chair which fully supports the lower part of your back. Adjust the height of your chair or your working surface to a comfortable level 2. Posture Remove all items in your working area which restricts leg movement Rest your legs comfortably on a surface such as the floor or a footstool. When using the keyboard, touchpad, or control devices such as a mouse or a game controller, lightly touch the keys or buttons and keep your hands and fingers relaxed Pause occasionally when typing. Avoid resting your palm or wrist on rough surfaces or table edges Sit comfortably, allowing the chair to fully support your weight 3. Preventing eye fatigue Put the screen in your arm's reach and comfortably sit before the screen. Place screen in a position slightly below eye level. If you refer to documents frequently, you may place these documents directly before you slightly move to the side of the display panel. For users diagnosed with astigmatism or similar eye problems, it may be necessary to put the screen lower, or wear glasses suitable to computer work as advised by qualified eye experts. The position of the display should be in a comfortable distance from the light source as to not generating glares. Use a window curtain or blinds to minimize glare. Clean the display screen regularly. Adjust font size, brightness and contrast of the display screen to a comfortable view. 10 2. Product Overview 2.1 Product Specifications Product Name CPU Chipset System memory Displaying memory Display Input devices Storage Hard Drive Sound I/O Interface LAN Wireless network Other connectivity Power Battery Dimension Weight REDFOX Wizbook Intel N450 1.6GHz Intel NM10 Express DDRII SO-DIMM socket; upgradeable up to 2GB max Intel GMA X3150; Dynamic shared memory; 10.1” LED B/L wide-screen with 1024×600 resolution 82-key keyboard; touchpad with 2 buttons 3-in-1 card reader (SD/MS/MMC) 2.5”, height 9.5mm, SATA interface, supporting 80GB/ 160GB/ 250GB/ 320GB/ 500GB HDD Stereo headphones; microphone Supports HD Audio, 1 mic socket; 1 earphone socket, 2 USB2.0 interfaces, 1 interface for external monitor, 1 socket for network line (RJ-45), 1 card reader (SD/MS/ MMC/Micro-SD with adaptor), 1 DC-IN socket 10/100M Base-TX 802.11 B/G/N Bluetooth Input: 100-240V ~ 50-60Hz 1.7A Output: 17V-19V 3.5A 3-cell smart lithium-ion /lithium polymer battery; up to 160 minutes battery life. Actual battery life will depend on battery condition and specifications Approx. 258mm (W) x184mm (D) x28.5mm (H) Approx. 1.0 kilograms (including battery) Note: Specifications of similar models of this product may be upgraded, modified, or changed without prior notice. The configuration of the unit purchased by the user shall be final and absolute. All specifications and information are subject to changes without further notice 11 2. PRODUCT OVERVIEW 2.2 Introduction to Parts & Components Note: Images may vary from the actual unit. For reference use only. 1. LED-backlit screen. Displays image and data 2. Power button. Starts, wakes up or shuts down the system 3. Keyboard. Used for data entry and execution of certain Windows function 4. Touch pad. Built-in pointer device used to move the mouse pointer. 5. Left key of mouse. Left-clicks data; used to select, drag or highlight 6. Right key of mouse. Right-clicks data; used to drop down menu 7. Fan grid. Used for ventilation. 8. Battery locking bolt. Locks or releases battery pack. 9. Bottom cover. Secures the DDR memory, hard drive, and other components. 10. Battery pack. Power the computer if the external power is not connected. 11. Socket for card reader. Reads SD/MS/MMC/ cards. 12. Camera. Integrated camera device 14. DC-IN socket. Connects the power adaptor 15. VGA port. Connects external monitor 16. RJ-45 interface. Connects network line 17. USB port. Connects USB devices 18. Stereo socket. Connects earphones, headset or external speakers 19. Security slot. Provision for security lock that locks the computer to a stationary object through a secured cable 20. LED indicator lamp. Indicates charging status or whether the computer is turned on or off (for details, please refer to the following section) 21. Left/Right speaker. Built-in stereo speakers. 22. Microphone slot. Serves as an external microphone 12 2. Product Overview 2.3 Unpacking and inspection Carefully unpack the computer and other accessories. If any of the items are found missing, please contact dealer immediately. Keep the original packing materials for storage and item replacement. The package should contain the following parts & components: 1. Laptop computer 4. Disk on driver program 2. Power adaptor 5. Battery 3. User's manual 6. Warranty card 3. OPERATING YOUR COMPUTER 3.1 Status indicators LED Icon Function Blue lamp: Indicates that the system running or is in sleep-mode. Orange/ Green lamp: 1. Orange: Indicates that the battery is being charged. 2. Orange (flashing): Low battery power 3. Green: Indicates full-charge. Green lamp: Indicates that the system is reading the hard drive. Green lamp (flashing): Indicates that the wireless network card is currently switched on. Red lamp: Caps Lock is turned on Green lamp: Numeric keyboard is activated. Orange lamp: Numeric keyboard and Caps Lock are activated 3.2 Turning the computer off When you finish working on your computer, you may shut down the system or choose to go to the standby mode or hibernation. Shutting down: Please follow the OS instructions for safely shutting down the operating system. For Windows users, click on Start, Turn off Computer, and select Turn Off button. By doing so, you can avoid data losses or damages in the software. You may also use the power button to shut down the system. All specifications and information are subject to changes without further notice 14 3. OPERATING YOUR COMPUTER Numeric Keypad You can activate the numerical keypad by pressing Fn + Numlock. The numeric is displayed at the right lower corner of keys. This contains keys for basic calculation, i.e. plus, minus, times and divide. Press the Fn+Numlock once again to resume original keyboard function. 3.4 Touch pad The built-in touch pad is a pointing device that follows movement on its surface to control the mouse pointer. Slide your finger on its surface to move the cursor. Tap once to select and twice to double-click 3.5 Display screen Your laptop computer is equipped with a TFT LCD screen designed to be comfortable to the eyes, It supports high resolution and real color functions. To prolong the lifespan of display screen Adjust the brightness of screen to minimum levels Switch the display to an external monitor and shut off the laptop display screen Adjust power management settings so that the system automatically enters hibernation mode when not in use [Note] In order to prolong the battery life of your unit, adjust the brightness to the minimum levels to consume less battery power. 3.6 Network card This laptop computer is equipped with a built-in Ethernet network card conforming to 10/100 Base-TX standard. Insert one end of the LAN line into the RJ-45 provision at the right side of your computer. This allows data transfer through the internet. Wireless network. This laptop computer is also equipped with a built-in wireless network card which detects Wi-Fi signal in a given location. Follow instructions in the operating system for setup and access of the wireless network or consult your local wireless service provider. All specifications and information are subject to changes without further notice 15 4. BIOS SETUP The BIOS (Basic Input and Output System) contains the pre-set value of a computer. You can modify these values to meet specific hardware requirements such as booting through another drive, upgrading, enabling disk recovery or setting up a BIOS password to prevent unauthorized access. 4.1 BIOS Setup Here are some cases that may require you to modify the BIOS setup: Hardware problem detected in the booting test Resetting to default values Adjusting setup values to achieve optimum system performance Adjusting boot sequence To enter the BIOS setup, press the F2 key during POST boot. How to select You can select items from two- or three-level options consisting of the menu title in the first level, drop-down menu in the second level, and the sub-menu in the third level. Move by using the arrow keys and select by pressing ENTER. All available keyboard controls are seen at the bottom of the screen. 4.2 Main (main setup) System Time: Setup of system time System Date: Setup of system date SATA AHCI Enable: This is enabled if HDD has AHCI function. SATA Port 1: SATA hard disk port0 SATA Port 2: SATA hard disk port1 System Memory: System basic memory size Extended Memory: System extended memory size 16 4. BIOS SETUP 4.3 [Advanced] Menu Legacy USB Support: Option to Support USB 1.0 Summary screen: Setup screen of basic hardware information Boot-time Diagnostic Screen: Enable Diagnostic Boot-up Details 4.4 [Boot] Menu Boot priority order: Setups priority order of drives to boot from USB CDROM: Boot from USB CDROM IDE HDD: Boot from IDE hard disk USB KEY: Boot from USB remove disk USB FDC: Boot from USB floppy disk All specifications and information are subject to changes without further notice 17 4. BIOS SETUP 4.5 [Exit] Menu Exit Saving Changes: Save changes and exit Exit Discarding Changes: Exit without saving changes Load Setup Defaults: Load default setup value Discard Changes: Discard all changes Save Changes: Save all changes 18 5. INSTALLING DRIVERS Some drivers are required to run some hardware functions that may not be pre-installed on your computer. To install these drivers, open the driver disc included to enter the setup program illustrated as follows: Select every icon in the menu to install driver All specifications and information are subject to changes without further notice 19 6. BASIC TROUBLESHOOTING Every REDFOX™ laptop computer goes through a complete system test and quality control before being available in the market. However, in some cases, you may encounter some problems on your computer hardware or software due to incorrect operation or negligence, which needs to be addressed immediately. This chapter provides instructions on addressing general problems on hardware and software you may encounter and work out on your own. If the problem continues to emerge, consult your distributors for service information. 6.1 Sound Problems No sound Double-click the loudspeaker icon at the lower right corner of the taskbar and check whether the volume of loudspeaker has been adjusted down or muted. Press Fn+F8 in order to increase the volume. Most of the problems on sound are due to software adjustments. Check on your program settings and adjust accordingly. Unable to record sound For Windows users, double-click the loudspeaker icon at the lower right corner of the taskbar. 1. Press the Option and select Property. 2. Select Recording and press the Enter button. 3. After the Enter button is pressed, the control console for recording volume will pop out. 6.2 Hard Drive Problems HD is unable to run normally or not recognized by the system If you upgraded the HD, check if the actual disk is firmly attached and if the installation of HD is properly completed. Pull off the joint, re-insert it firmly and restart the computer once again. The new HD needs re-formatting. The operating system and driver programs will also need to be re-installed. Examine if the HD indicator lamp flashes in response when accessing documents and processing programs Check if the HD is broken due to physical or electrostatic damage. In this case, you may need to replace the HD and re-install the OS, drivers and other programs. 20 6. BASIC TROUBLESHOOTING Slow processing If your HD has been used for a long time, excessive and unorganized files, programs, and disk fragmentation which in turn slows down processes. To defragment drive: Start > program > accessory > system tool> disk defragmentation This process may take some time. Check if the hard drive has been infected with virus. Install anti-virus software to remove malware. Damaged Document Execute the surface scan for disk examination. Double-click My Computer, right click C:, and select Property. Select Start Checkup under the Tool menu to execute the disc scan. 6.3 Display Problems Black screen Please make sure that the laptop computer is not in hibernation or standby mode. While in these modes, the display will be shut off. Press the function key to make sure that the laptop computer is not External Display mode. The screen is not easy to read. Please press the function key to increase the brightness of screen. The resolution of monitor should be set as 1024x 600 so as to acquire the optimum display result. 1. Please enter Start >Setup Control panel and double-click the icon of Display. 2. In the page of Setup, the resolution is set as 1024x600. Screen flashing When you start or shut the computer, the screen may normally flash for several times. Damaged points’ in the display Due to the restriction of LCD manufacturing process, some image points cannot display a certain colors in LCD (i.e. generally called ‘damaged points’). For details, please refer to GB/T9813-2000. All specifications and information are subject to changes without further notice 21 6. BASIC TROUBLESHOOTING The relevant contents on the national standards are as follows. Inspection shall be conducted under the following conditions: Ambient temperature: 20 ~25 Light: 300 lx~700 lx Distance for visual observation: 35cm Angle for visual observation: the visual line and the screen surface form 90 degrees. 6.4 Problems on internet connection The system cannot connect to the internet See if the LAN cable is attached if connecting through a Local Area Network Check if wireless network function is turned on (Fn+F11).Wireless connection can only work in areas with access to Wi-Fi service. Please check if your area has subscribed to this connection or has a good Wi-Fi reception. Ask your local internet service provider for details. Make sure that your computer or network is not protected by firewall or proxy server. Turn off firewall protection or contact your server maintenance personnel for details on disabling proxy limitations. When using Windows, try running network repair or configuring internet settings through the Internet Options menu on your browser 6.5 Problems on memory After installing a new memory card, the added memory capacity is not displayed during self-testing in the POST boot. See if: The installation of memory module may be incorrect. The memory module may be broken. Your system may be incompatible with some memory modules. Error information on insufficient memory is displayed. This problem usually results from installed programs or restrictions in the OS. Close unused application programs and re-start the computer. You may also install more memory modules to expand memory capacity. w w w. r e d f o x t e c h n o l o g i e s . c o m