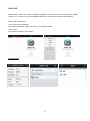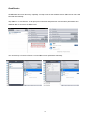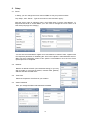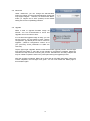
1
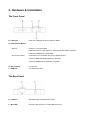
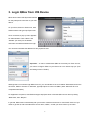
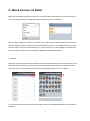
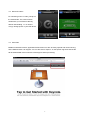
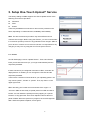
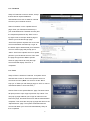
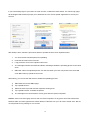
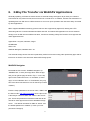
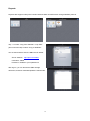
Quick Access Box for iOS User Manual V. 1.0 Copyright © 2012 Aron Technologies Limited. All rights reserved. Table of Contents Forward 1. Introduction ................................................................................................................... 2 2. Hardware & Installation ................................................................................................. 3 3. Login QBox from iOS Device ........................................................................................ 5 4. Quick Access via Safari................................................................................................. 6 5. Setup One-Touch Upload™ Service ............................................................................. 8 6. 2-Way File Transfer via WebDAV Applications ........................................................... 11 7. Administration of QBox................................................................................................ 17 8. Specifications .............................................................................................................. 20 9. Contact Us .................................................................................................................. 21 Copyright © 2012 Aron Technologies Limited. All rights reserved. Forward Copyright and Trademark Notice Aron and other names of Aron products are trademarks of Aron Technologies Limited. Apple, iPad, iPhone, iPod touch, iOS, Safari, App Store, iTunes, Mac and Apple OS X are registered trademarks of Apple, Inc. All other trademarks and brand names are the property of their respective owners. Specifications are subject to change without notice. Copyright © 2012 Aron Technologies Limited. All rights reserved. About This Manual All information in this manual has been carefully verified to ensure its correctness. In case of an error, please provide us with your feedback. Aron Technologies Limited reserves the right to modify the contents of this manual without notice. Limited Warranty Aron Technologies Limited guarantees all components of QBox are thoroughly tested before they leave the factory and should function normally under general usage. In case of any system malfunctions, Aron Technologies Limited and its local representatives and dealers are responsible for repair without cost to the customer if the product fails within the warranty period and under normal usage. Aron Technologies Limited is not responsible for any damage or loss of data deemed to be caused by its products. It is highly recommended that users conduct necessary back-up practices. Caution: Users must thoroughly check for the successful completion of any photo and/or file transmission between QBox and other apps/devices before deletion of the files from your SD card or thumb drive. We are not be responsible for any damage or loss of data. Copyright © 2012 Aron Technologies Limited. All rights reserved. 1. Introduction Thank you for purchasing Aron QBox – the Quick Access Box for iOS. This device enables quick access of SD card or USB thumb drive by iOS device through wireless LAN. It also has the simplest One-Touch Upload™ function to transfer photos from SD card to your pre-configured cloud storage or social network store. Simply insert your SD Card and/or USB thumb drive into QBox, connect the device to your network, configure some basic settings, and you are ready to share your files to your iDevice straightly. QBox has a simple and clear iOS-style web interface enabling easy setup and configuration. Main Features Allow iPad, iPhone & iPod touch to direct access files stored in SD card or USB thumb drive. One-Touch Upload™ sends photos from SD card to selective social network, such as Picasa, Flickr & Facebook, for sharing & storage. Stream music and movies to iOS device through wireless LAN. Enable 2-Way File Transfer between iOS device and SD card/USB thumb drive. Support third-party Apps with WebDAV protocol, such as WebDAV Navigator, iWork, GoodReader etc. Up to 64GB (32GB thumb drive & 32GB SD card) storage extension for iOS device. Package Contents QBox unit Quick User Guide Power Adaptor Ethernet Cable Quick Notes for Setup & Login Safari on iOS: http://qbox.local Chrome/Safari/Firefox on Windows : Safari on Mac PC: http://qbox http://qbox.local WebDAV Nav or Other Third-party applications: http://qbox.local:9880 Default Username: admin (cannot be altered) Default Password: 000000 (six zeros) 2 2. Hardware & Installation The Front Panel A - LED Light Dual color LED light shows the status of QBox. D - Dual-function Button Boot-up: Power-on - LED turns RED. RED LED Flashes - push button to reset system parameters to default. LED shows GREEN for normal state. One-Touch Upload Push button once to initiate One-Touch Upload function. LED turns RED indicating uploading in progress. LED turns GREEN when uploading completes. B - SD Card Slot For SD card. C - USB Slot For USB thumb drive. The Back Panel E - LAN Port Standard RJ45 10/100 Ethernet socket. F - Mini-USB Socket for DC Power 5V via mini-USB Connector. 3 Installation Steps to install QBox: Step 1. Connect the Ethernet cable to wireless LAN router and QBox. Step 2. Connect to power source with the power adaptor and the mini-USB cable. Step 3. The red LED lights on and flashes. It turns GREEN when QBox is ready. If you have SD card and/or USB thumb drive ready, you can insert it/them into the front slot(s) now. Step 4. On your iOS Device, start Safari to set up the connection with QBox as shown in the following chapter. Once connected, you can then tap “Browse File” to explore folders and files stored in SD card and/or USB thumb drive. Refer to Chapter 4 for more details. Step 5. For setting up of One-Touch Upload™ service, please refer to Chapter 5. Step 6. If you would like to use third-party apps for 2-Way File Transfer, go to App Store to download the free “WebDAV Navigator” app or other respective apps. Refer to Chapter 6 for more details. 4 3. Login QBox from iOS Device Qbox has a built-in iOS Style web interface for easy setup and connection to your iOS device. On your iPad, iPhone or iPod touch, start Safari browser and type http://qbox.local. Once connected, a pop-up menu appears for authentication. Enter “admin” and “000000” (six zeros) for the default Username and default Password to login. You can then bookmark this address for easy repeat access. Important: In order to authenticate QBox to work with your Flickr account, you need to configure Safari on your iDevice to not to “Block Pop-ups” (from the Settings menu of Safari). Although there is no need to login QBox from PC, you can still able to do so if needed. Start web browser such as Firefox, Safari or Chrome on Windows, type http://qbox to connect to QBox. (Note: Microsoft IE is not compatible with QBox.) For Apple Mac computers, start Safari and type http://qbox.local or find the QBox server name by hitting “Bookmark”, then “Bonjour”. In general, QBox works automatically with your home’s network environment. It uses DHCP service of your router to get the IP, and to broadcast the server name, “QBox”, so that you can access it by its name. 5 4. Quick Access via Safari QBox has the innovative quick access function for viewing files and documents as well as streaming music and videos directly from USB thumb drive and SD card to your iOS device. After you login to QBox from Safari, tap “Browse File” to start the quick access browsing mode for the inserted storage. Browse the folder and tap the selected file to open it. In the Safari browser, the quick access mode is just for read and streaming only. In later chapter, you will be guided to use third-party apps to perform read/write access to QBox via WebDAV supported applications. 4.1 Photos When you tap on a photo file from the Safari browser, it will list the photo files on a new a window. If the photo files have thumbnails, you can see the photo thumbnails by tapping on the “Thumbnail” button on the top right. Or you can switch back to list format by tapping again on the “List” button. If you want to save the photo to your iDevice, please refer to the “WebDAV Navigator” section shown in Chapter 6. 6 4.2 Musics & Videos For streaming music or video, just tap on the selected file. The content will be streamed to your iOS device directly without downloading, i.e. no need to occupy storage space in your iOS device. 4.3 Other files Besides multimedia content, application file/document can also be freely opened and viewed as long as the Safari browser can support. You can also select “Open in” on the specific app such that the file will be downloaded to the local store of the app for further processing. 7 5. Setup One-Touch Upload™ Service The factory settings of QBox support One-Touch Upload service to the following cloud service providers: Facebook Flickr Picasa There may be additional connection to other service providers in the future, depending on market demand, availability and feasibility. Note: The above-mentioned providers may have different service schemes and charges. Before using this function, you are recommended to consult the specific provider for any potential service charges. QBox is just a device to connect to such services. We are not responsible for any charges you may incur by using the One-Touch Upload service. 5.1. Picasa On iOS Safari page, choose “Upload Service”. Then select Picasa. Enter your Picasa username (i.e. your login email address) and the respective password. If there has been a pre-configured username in QBox, it will also be displayed here. If needed, you can change the username and the respective password. There is also a selection of share level for your uploading photos. You may choose “public”, “friends” or “private”. Then, tap “Save” on the upper right corner. QBox will verify your Picasa account and show if the “sign in” is “success”. QBox is then ready to upload photos from SD card slot to Picasa. You can initiate the upload process by tapping on “Upload Pictures” or long-press the “One-Touch Upload” button at the front panel of QBox. When the upload is in progress, the red LED light will flash. When the upload completes, it turns green. 8 5.2. Facebook Setup of Facebook account is similar, except that Facebook requires additional authentication from user to allow for external access to your Facebook account. Select “Facebook” on the “Upload Service” page. Enter your Facebook username (i.e. your email address for Facebook account) and the respective password. Tap “Save” on the top right corner. It will open another page to redirect you to Facebook login page. “One-Touch Upload” requests user to re-enter account information and then tap “Login” at the bottom right to authenticate your Facebook account. Another page will prompt you to “Allow” “One-Touch Upload” service to upload photos to your Facebook account. Then close the page and go back to QBox “Upload Services” page. Qbox will verify the login account and will display “Success” if completed. 5.3. Flickr Setup of Flickr is similar to Facebook. It requests user to authorize the access of “One-Touch Upload” service to access the account. (Note: You need to set the “Block Pop-ups” of Safari (on iOS Settings page) to “OFF” in order to authenticate QBox to work with Flickr.) Choose Flickr in the “Upload Service” page. The web control will prompt user to open a pop-up window. Tap “Allow”. The new pop-up page redirects you to login to Yahoo account. Follow the page, and allow the access until the authentication completes. Then close the new pop-up page and return to the “Upload Service” page. The system will authenticate the access and obtain your account ID automatically. Setup is then completed. 9 If you have already login to your Yahoo or Flickr account, cookies have been stored. The Yahoo login page will be skipped and will direct prompt you to authorize the “One-Touch Upload” application to access your account. After Setup is done, follow the procedures below to operate the One-Touch Upload function: 1. You have the SD card with photos for uploading. 2. Insert the SD card into the front slot. 3. Long-press the “One-Touch Upload” button once. 4. The LED light indicator turns RED and blinks, indicating that QBox is uploading photos to the cloud store. 5. QBox will “index” the uploaded photos. So next time when you have new photos in the same SD card, QBox will only upload the new ones. Alternatively, you can use the iOS device to initiate the uploading process: 1) Start Safari and access QBox page. 2) Tap “Upload Service”. 3) Select the service provider and the respective sharing level. 4) Tap “Upload Pictures” to initiate the upload. 5) The LED light turns red and blinks. It turns green after the upload completes. Caution: Users must thoroughly check for the successful completion of any photo and/or file transmission between QBox and other apps/devices before deletion of the files from your SD card or thumb drive. We are not responsible for any damage or loss of data. 10 6. 2-Way File Transfer via WebDAV Applications Generally speaking, iOS Devices restrict access to external storage through its 30-pin dock port. Camera Connection Kit only works for iPad, but not for iPhone nor iPod touch. In addition, iOS also has restrictions on uploading files from SD card or USB to the device. It is not an open operation and cannot be easily accessed by other applications. QBox supports WebDAV networking protocol which is also supported by Apple iOS, utilizing the HTTP networking stack to communicate between QBox and iOS. This allows iOS applications to access external storage, such as SD card and USB thumb drive, and hence enabling 2-Way File Transfer. Some popular and useful applications are: Apple iWork : Keynote, Numbers, Pages GoodReader Office² HD WebDAV Navigator, WebDAV Nav+ etc. This external storage access function is particularly useful for iPad users using other productivity apps and for iPod touch or iPhone users who have limited iOS storage space. WebDAV Navigator Download the free version “WebDAV Navigator” (or “WebDAV Nav” in short) from App Store. Start the app and you can get the page as shown. Tap “+” on the top right corner to add new server, i.e. the QBox. (In other apps, such as WebDAV Nav+ or GoodReader, they may have auto-detect mechanism to look for the Bonjour name of QBox.) Enter the setup parameters: the server name, “QBox” and the Server URL: http://qbox.local:9880 where “qbox.local” is the Bonjour name for QBox and “9880” is the access port. These two parameters should be noted and will be reused for other apps that access the WebDAV storage server. The default username for QBox is “admin” and the default password is “000000” (or enter your new password if changed). 11 When Setup completes, you should now see the server name: “QBox”. Tap it to access the files stored in SD card and/or USB thumb drive. Tap on the selected folder or file to open. If the file type association is recognized, the app will download the file and play accordingly. If you long tap (i.e. tap and hold for a second) on the selected file, there are options available. You can “Delete”, “Rename” or “Copy” the files. You can “Download” files, photos, music and videos to the Local Store of WebDAV Nav. For multi-media content such as music, photo or video, you tap “Play” directly. The content will then be streamed and played on your iOS device without downloading, so that you can reserve the limited storage space in your iOS device for other purpose. This is especially useful when you view movie or video. You can also select “Open with” so that the file will be downloaded and transferred to your specified application for further processing. (Note: “WebDAV Nav+” is a premium version of “WebDAV Nav”. You can visit App Store to find out more details.) 12 Different options to explore files in WebDAV Nav: 13 Keynote Keynote also supports 2-Way File Transfer between QBox and iOS Device through WebDAV protocol. Tap “+” to select “Copy from WebDAV” or tap “Edit” (and choose the file) to select “Copy to WebDAV”. You are then asked to enter the QBox server details: Server Address: http://qbox.local:9880 Username : admin Password : 000000 or your updated one. After sign in, you can browse the QBox storage directories, and then download/upload the selected file. 14 Office² HD Besides iWork, Office² HD is also a compatible application. It reads and writes directly with files in QBox storage, i.e. no need to work through WebDAV local store, enhancing convenience and efficiency. Select “Edit” at the top bar. Then choose “Other WebDAV”. Enter QBox parameters. Server: “qbox.local”; Port Number: 9880. Then “Save”. You should now able to access QBox. 15 GoodReader GoodReader has server discovery capability. Just tap to list out the available server. QBox server name will be listed automatically. Tap “QBox” in “Local Servers”. It will prompt for username and password. Use the same parameters as in WebDAV Nav to access to the QBox store. You can also tap “Connect to Server” to enter QBox server parameters manually. 16 7. Administration of QBox QBox is managed via iPhone, iPod touch or iPad. Open Safari and type the URL: http://qbox.local. Besides “Browse File”, you can also find “Status”, “Setup” and “Upload Service”. 1. Status Tapping on Status will find out more details regarding QBox Information, Network and the external storage device connected. . 17 2. Setup 2.1 Server In Setup, you can change the server name of QBox to suit your personal needs. Tap “Setup”, then “Server”. Type the new server name and then “Apply”. After the server name is changed, open a new Safari page. Type the new address, i.e. http://newname.local to access QBox. (You also need to change the server name in all other third-party apps accordingly.) You are also recommended to register an e-mail address in “Notice E-mail”, together with the respective password, for initializing the “One Touch Upload” e-mail notification service. QBox will send notification email to this specific e-mail address once the One-Touch Upload process is completed. 2.2 Network Network is default at DHCP (recommended setting) or you may wish to modify on your own for fixed IP, network mask, gateway address and also the DNS serer. 2.3 Time Zone Select the respective Time Zone of your location. 2.4 Admin Password Here you change the QBox Authentication Password. 18 2.5 Advanced Under “Advanced”, you can change the authentication method to “Digest” for some special application clients that only support “Digest”. However, we recommend “Basic” mode (i.e. “Digest” set at “OFF” position) as the default setting due to less compatibility problems. 2.6 Upgrade QBox is able to upgrade firmware image via internet. You are recommended to check this Upgrade service from time to time. If a new firmware upgrade image is ready, you can see this screen. You are asked to check “reserve configuration” (by default) and to check “confirm to upgrade”. (“Reserve configuration” means all of your previously saved parameters in QBox are reserved.) Tap the upper right “Upgrade” button to start the firmware upgrade process. The LED light turns RED and blinks. It may take a few minutes to complete the upgrade. Please be reminded to keep the Power on during the process. Otherwise the unit may collapse and may be unable to operate if there is any interruption during the upgrade process. After the Upgrade completes, QBox will re-boot and its LED RED light blinks. When the re-boot completes, the LED light turns green. You can now refresh the Safari page to access QBox again. 19 8. Specifications Hardware Power 100 – 240 AC input, Weight 4.4 oz / 125 gm Network 10 / 100M Fast Ethernet, RJ45 USB Port USB 2.0 host ports (type A connector) USB Storage Maximum capacity of 32GB thumb drive SD Card SDHC, maximum capacity of 32GB LED Indicator Power and operation Button Reset & One-Touch Upload 5V, 1A DC mini-USB Function File Storage WebDAV Storage Format FAT32 Ports Used Main Configuration 1010 TCP WebDAV 9880 TCP 20 9. Contact Us Aron Technologies Limited Room 1001, 10/F, No. 1, Hung To Road Kwun Tong, Kowloon Hong Kong Email: [email protected] 21 Copyright © 2012 Aron Technologies Limited. All rights reserved.