1
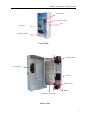
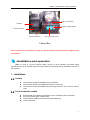
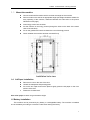
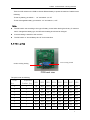
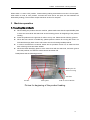
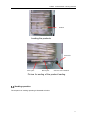
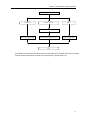
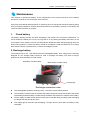
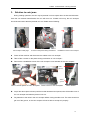
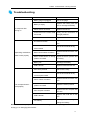
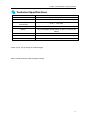
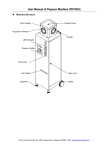
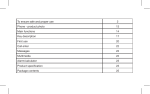
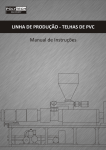
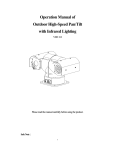
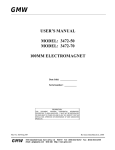
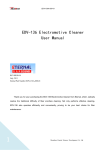
TR3501 Toothbrush/Pen Vending Machine MANUAL TR3501 Toothbrush/Pen Vending Machine Preface Welcome to use our vending machine! Before you install and operate this machine, please read the manual carefully. In order to make good use of superior performance of the machine, we strongly recommend you install and maintain it strictly following the instruction of the manual. Please keep this manual for your future reference. If you have any question about operation or service, feel free to contact us. Panda Vending Limited Add: 704A/1, No.1029 Kongjiang Road, Shanghai 200093, China Tel: 0086-21-55807515 Fax: 0086-21-55807516 E-mail: [email protected] Website: www.pandavending.com 1 TR3501 Toothbrush/Pen Vending Machine Contents Preface ________________________________________________________________________ 1 Contents _______________________________________________________________________ 2 Features _______________________________________________________________________ 2 Appearance and Components _____________________________________________________ 2 Installation and operation_________________________________________________________ 4 1 Installation _______________________________________________________________ 4 2 Operating the machine _____________________________________________________ 8 3 Machine operation ________________________________________________________ 10 Maintenance __________________________________________________________________ 13 1. Check battery ____________________________________________________________ 13 2. Recharge battery _________________________________________________________ 13 3. Solution to coin jam_______________________________________________________ 14 Troubleshooting _______________________________________________________________ 15 Technical Specifications_________________________________________________________ 16 Features z Compact size and easy to install z High quality surface spray to ensure rust prevention z Suitable for vending one-off cleanser, pen or other tube shape products z Creative pedrail dispensing mechanism by reversible revolving belt z Easy-to-use design with counter to checking sales z Precise comparative coin acceptor rejecting fake coin and tokens z Accept one denomination of coin each time, but can accept 1-6pcs by setting z High volume rechargeable battery or 8pcs Size D dry battery powered no need for electricity. z Low voltage consumption, vending over 3000packs of products or for 3months after fully recharged. Appearance and Components 2 TR3501 Toothbrush/Pen Vending Machine Coin acceptor Coin release handle Lock Ad panel Product collector Front View Control module Coin acceptor Coin box Sellout sensor Battery Dispensing mechanism Inner View 3 TR3501 Toothbrush/Pen Vending Machine Battery test button Counter Product loading button Power Switch Motor test button Pricing setting switch Control Box Note: the pictures in the manual are only for reference and all of them should be subject to the real machine. Installation and operation Note: In order to use this machine safely, ensure its good operation and better being maintained, be sure to carefully read and strictly follow the manual before the installation and use of this machine.。 1 Installation 1.1 Caution z The machine should be installed firmly on solid wall z The machine shouldn’t be installed in the wet or dusty area z The machine should be installed near the lamp-house so that it can be used at night 1.2 Tools & materials needed z z z z Electrical drill with a drilling bit (diameter 12mm, for drilling holes on the wall) Four bulgy screws (M8, or similar size) Sleeve wrench suitable for M8 nuts (or similar size nuts) Cross screwdriver 4 TR3501 Toothbrush/Pen Vending Machine 1.3 Mount the machine z Choose a wall with flat surface which can bear the weight of the machine z Drill four holes on the wall at an appropriate height (the height should be suitable for easy operating of the machine, distances between the holes refer to the picture followed on next page) z Insert bulgy screws into the holes z Put the machine on the bulgy screws (through the holes on the back of the metal z Put on the gaskets and nuts then fasten the nuts of the bulgy screws z Check whether the machine has been mounted firmly case of the machine) Installation hole view 1.4 Ad Paper Installation z Remove six nuts on the rear of the door z Unload the transparent Ad pressing plate z Put on the ad. Paper and use the plate to tightly press the Ad paper on the front surface of the door Fasten the six bolts back. Size of Ad. paper:3140mm long and 545mm height 1.5 Battery Installation This machine can be powered by dry battery or rechargeable battery. The machine is installed one of the battery according to customer’s order when leaving the factory. 5 TR3501 Toothbrush/Pen Vending Machine 1) Rechargeable battery powered Cathod Anode Battery Installation View Rechargeable Battery Connection View z The item No. of the rechargeable battery:GS12V1.3AH z Please pay attention to the Cathode and Anode of the battery. The red cable should be connected to the Anode of the battery. Incorrect connection is dangerous and harmful to the machine and human. 2) Dry battery powered Electrode Right way for placing battery box z Incorrect way for placing battery box Please pay attention to the Cathode and Anode of the battery. The red cable should be connected to the Anode of the battery. Incorrect connection is dangerous and harmful to the machine and human. z The machine should be equipped with 8 Size D dry batteries. z To protect the dry battery from leaking in damp environment, the electrode of the battery box should not touch the machine cabinet (please pay attention to the above pictures for the way of 6 TR3501 Toothbrush/Pen Vending Machine placing battery box). The electrode of the battery box sticks with insulating tape. Please check the tape not to break off before operating the machine. 1.6 Sample Coin Installation This machine uses a comparative coin detector, so a real coin that is the same as the coins you want the machine to accept must be installed on the coin detector before using. When installing sample coin, pull the sample coin holder upward and put the sample coin/token into the slot carefully. (Refer to the following illustration). Pull the sample coin holder upward The position of sample coin Installing Sample Coin Coin Validating Sensor Sample coin (Should be on the center of the validating coin) Sample Coin Installed 7 TR3501 Toothbrush/Pen Vending Machine After the installation of the sample coin finished, the coin acceptor should be tested with the true coins repetitiously. (Each time one piece of product will come out after inserting coins), If the motor can act after inserting the coin each time, it means that the sample coin has been installed properly and this machine is ready to use. During the test, if you find the coin acceptor always refuses the coins, pls change another coin as a sample one. Coin validating sensor Coin validating sensor Coin sample Sample of thick coin Front view Sample of thin coin Side view 2 Operating the machine 2.1 PCB Board and set the type of battery Power DIP switch for battery Motor test button Coin-in sensor Battery low indicator Battery test button Counter Motor sensor Coin acceptor Motor Sellout sensor Connector on PCB 8 TR3501 Toothbrush/Pen Vending Machine There is a DIP switch on the PCB to choose different battery to power the machine. Details are as following: To use dry battery, put switch 1 “on” and switch 2,3 “off”. To use rechargeable battery, put switch 2 “on” and switch 1,3 “off”. Note: z The DIP switch set according to the type of battery it used when leaving the factory. If customer hasn’t changed the battery type, the DIP switch setting should not be changed. z Incorrect setting is harmful to the machine. z The DIP switch “3” should always be “off” for this machine. 2.2 Set price Price setting switch Product adding loading PCB back view The price is set as following: Coin Qty Dispensed Product Qty DIP1 DIP2 DIP3 DIP4 DIP5 DIP6 DIP7 DIP8 1 1 ON OFF OFF OFF OFF OFF OFF OFF 2 1 OFF ON OFF OFF OFF OFF OFF OFF 3 1 OFF OFF ON OFF OFF OFF OFF OFF 4 1 OFF OFF OFF ON OFF OFF OFF OFF 5 1 OFF OFF OFF OFF ON OFF OFF OFF 6 1 OFF OFF OFF OFF OFF ON OFF ON 7 1 OFF OFF OFF OFF OFF OFF ON OFF 8 1 OFF OFF OFF OFF OFF OFF OFF ON 9 TR3501 Toothbrush/Pen Vending Machine When switch 1 is set to “ON” position, it means during making a transaction one coin is for one pack, when switch 2 is set to “ON” position, it means two coins are for one pack, the rest switches are deduced by analogy. The machine accepts maximum 8 coins for one pack. 3 Machine operation 3.1 Loading the products z When loading the products into the machine, please make sure that the special baffle plate to be at the same level with start hole as the following picture for beginning of the product loading. z Place the products on the grooves of column one by one. Please do not miss any grooves. z When the front column is loaded fully, please press the button for running the column on PCB and the empty back column will come to the front for being loaded products. z In order to avoid that the customer inserts and no products comes out, do make sue that each column groove have been loaded. z When the black identifying plate is at the same level with the start hole, and each groove have the products, it means the whole column have been full. Detail please see the following pictures: Baffle plate for sold out sensing Start hole Product Short plates Sold out sensor Module Picture for beginning of the product loading 10 TR3501 Toothbrush/Pen Vending Machine Product Loading the products Start Hole Short plate Black plate Sold out Sensor Module Picture for ending of the product loading 3.2 Vending operation The sequence of vending operating is illustrated as below. 11 TR3501 Toothbrush/Pen Vending Machine Insert a coin Invalid coin Product available Sellout Dispense tissue automatically Reject coin without beep Pick up tissue from the collector Reject coin with beep Over Note: When the coin whose size is more than the specified one is inserted into the coin acceptor, it will be jammed and please press the coin return button to get back the coin. 12 TR3501 Toothbrush/Pen Vending Machine Maintenance This machine is operated by battery. So the maintenance of the machine will focus on the battery because it is critical for the functionality of the machine. Every time when adding tissues/products or collecting coins, the machine should be checked by doing a few purchasing operations. Another task should be done is the battery checking. A low battery will cause the machine works un-properly. 1. Check battery The battery checking function has been integrated in the machine for convenient maintenance. To check whether the battery low occurs, the only task to do is pressing the battery test button on the control panel. If the voltage is too low, the LED indicator beside the button will keep lighting when the button being pressed, it means the battery should be recharged. If LED just flashes once or keeps dark when the button is pressed down, it means the voltage is normal. 2. Recharge battery The machine uses a 12V 1.3Ah VRLA lead-acid rechargeable battery. So a charger that is specially designed for 12V storage battery should be used to recharge the battery. This kind of charger products can be found easily from the market. Red safety crocodile clamp Black safety crocodile clamp Charger light Recharge connection view z The rechargeable should be recharged every 3 months to ensure battery lifetime. z The red safety crocodile clamp of the lead acid battery charger should be connected to the anode of the battery and black safety crocodile clamp should be connected to the cathode of the battery. z The two safety crocodile clamps should not be short connected during connecting and recharging. It is dangerous and harmful to human z The charge light is red when start recharging. The light will turn green after the battery is fully recharged. 13 TR3501 Toothbrush/Pen Vending Machine 3. Solution to coin jams During vending operation, the coin may be jammed in coin acceptor due to its size and thickness. Push the coin release button/handle, the coin will come out. If failed in this way, the coin acceptor should be removed to take the jammed coin out. Details are as following: Coin acceptor cable plugs Screws on the power-saving mechanism Installation screws of coin acceptor z Power off the machine and disconnect the cables to the coin acceptor z Take off the 3 screws on the power-saving mechanism of coin acceptor. z Remove the 4 installation screws of the coin acceptor cover and take off the coin acceptor. Valve groove Valve groove Take out side panel of coin acceptor z Inner view of coin acceptor Valve detail As per the above picture shows push the buckle downward and upward, take off the side cover of the coin acceptor and take the jammed coin out. z Pay attention to the valve in the coin acceptor before closing the side cover. The value should not get out of the groove, or the coin acceptor will not be able to accept coin properly. 14 TR3501 Toothbrush/Pen Vending Machine Troubleshooting Problems Causes Solution 1. Battery plugs un-plugged Put on the plugs Replace the battery with new 2. Battery is empty No response after turning on one or recharge the battery 3. Sellout sensor is broken Replace the sensor 4. Connectors on the control PCB Firmly put the connectors on are loosed the right positions 5. PCB is broken Replace PCB with new one Replace the motor with a new 1. The motor is broken one 2. The connector on the PCB for motor loosed Dispensing mechanism doesn’t work properly 3. Motor control sensor is broken 4. Motor control sensor on wrong position or loosed one Adjust the sensor position and 5. Battery low Recharge the battery 6. PCB is broken Replace PCB with new one 1. Coin slot is jammed Get rid of the rarity coin acceptor loosed 4. Coin-in sensor on position or loosed 5. Coin acceptor is broken 6. PCB is broken 7. Low battery Put on the connector firmly Replace the sensor with a new 3. Coin-in sensor is broken work properly Replace the sensor with a new fix it firmly 2. The connector on the PCB for Coin acceptor doesn’t Put on the connector firmly one wrong Adjust the sensor position Replace the coin acceptor with new one Replace the PCB with a new one Recharge the battery or change the battery. Note: Be sure don’t put your hands, tools or other things into the dispensing mechanism to avoid hurting you or damaging the machine. 15 TR3501 Toothbrush/Pen Vending Machine Technical Specifications Item TR3501 Dimension 626mm (H) x 424mm (W) x 136mm (D) Net Weight 14.5KG Ambient temperature 0~40℃、10%~85% and humidity Pack dispensing speed Less than 3 seconds Battery 12V rechargeable storage battery or 8pcs 1.5V Size D dry battery Coin acceptable Configurable Coin capacity Over 300pcs Toothbrush/Pen capacity 60 packs Toothbrush/Pen (Configured upon order) Thank you for your choosing our products again. ©2011 Panda Vending Limited, All rights reserved 16