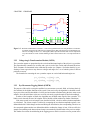
1
EyeRIS User’s Manual
Fabrizio Santini, Gabriel Redner, Michele Rucci
December 2004
Technical Report CAS/CNS-TR-2004-018
Permission to copy without fee all or part of this material is granted provided that: 1. The copies are
not made or distributed for direct commercial advantage; 2. the report title, author, document number,
and release date appear, and notice is given that copying is by permission of the BOSTON UNIVERSITY CENTER FOR ADAPTIVE SYSTEMS AND DEPARTMENT OF COGNITIVE AND NEURAL
SYSTEMS. To copy otherwise, or to republish, requires a fee and/or special permission.
Copyright 2004
Boston University Center for Adaptive Systems and
Department of Cognitive and Neural Systems
677 Beacon Street
Boston, MA 02215
E YE RIS U SER ’ S M ANUAL
Fabrizio Santini, Gabriel Redner, Michele Rucci
Department of Cognitive and Neural Systems
and Center for Adaptive Systems
Boston University
Submitted: December, 2004
Technical Report CAS/CNS-TR-2004-018
All correspondence should be addressed to:
Fabrizio Santini, Ph.D.
Active Perception Lab
Department of Cognitive and Neural Systems
Boston University
677 Beacon Street
Boston, MA 02215
Phone: (617) 358-1385
Fax: (617) 358-7755
E-mail: [email protected]
Contents
1 Introduction
1.1 Eye Movement Contingent Display control . . . . . . . . . . . . . . . . . . . . . . . .
1.2 Objective . . . . . . . . . . . . . . . . . . . . . . . . . . . . . . . . . . . . . . . . . .
1.3 System architecture . . . . . . . . . . . . . . . . . . . . . . . . . . . . . . . . . . . . .
2
2
4
5
2 Hardware
2.1 DSP board . . . . . . . . . . . .
2.2 Digital board . . . . . . . . . .
2.3 Analog/Digital conversion board
2.4 Video board . . . . . . . . . . .
.
.
.
.
7
7
8
8
9
3 Firmware
3.1 Firmware fundamentals and operation modes . . . . . . . . . . . . . . . . . . . . . . .
3.2 Processing pipeline . . . . . . . . . . . . . . . . . . . . . . . . . . . . . . . . . . . . .
3.3 Communication protocol . . . . . . . . . . . . . . . . . . . . . . . . . . . . . . . . . .
10
10
11
14
4 Low-level software
4.1 Hardware/firmware mapping class . . . . .
4.2 Experiment management and system classes
4.3 Graphic management classes . . . . . . . .
4.4 Input/Output management classes . . . . .
4.5 Additional classes . . . . . . . . . . . . . .
4.6 Examples of low-level software . . . . . . .
.
.
.
.
.
.
.
.
.
.
.
.
.
.
.
.
.
.
.
.
.
.
.
.
.
.
.
.
.
.
.
.
.
.
.
.
.
.
.
.
.
.
.
.
.
.
.
.
.
.
.
.
.
.
.
.
.
.
.
.
.
.
.
.
.
.
.
.
.
.
.
.
.
.
.
.
.
.
.
.
.
.
.
.
.
.
.
.
.
.
.
.
.
.
.
.
.
.
.
.
.
.
.
.
.
.
.
.
.
.
.
.
.
.
.
.
.
.
.
.
.
.
.
.
.
.
.
.
.
.
.
.
.
.
.
.
.
.
.
.
.
.
.
.
19
19
20
21
22
22
23
5 EDL language
5.1 A very simple EDL program
5.2 Basic elements of EDL . . .
5.3 Entity statements . . . . . .
5.4 Flow-control statements . . .
5.5 Reference . . . . . . . . . .
5.6 Complete EDL Example . .
.
.
.
.
.
.
.
.
.
.
.
.
.
.
.
.
.
.
.
.
.
.
.
.
.
.
.
.
.
.
.
.
.
.
.
.
.
.
.
.
.
.
.
.
.
.
.
.
.
.
.
.
.
.
.
.
.
.
.
.
.
.
.
.
.
.
.
.
.
.
.
.
.
.
.
.
.
.
.
.
.
.
.
.
.
.
.
.
.
.
.
.
.
.
.
.
.
.
.
.
.
.
.
.
.
.
.
.
.
.
.
.
.
.
.
.
.
.
.
.
.
.
.
.
.
.
.
.
.
.
.
.
.
.
.
.
.
.
.
.
.
.
.
.
33
33
34
39
40
41
45
.
.
.
.
.
.
.
.
.
.
.
.
.
.
.
.
.
.
.
.
.
.
.
.
.
.
.
.
.
.
.
.
.
.
.
.
.
.
.
.
.
.
.
.
.
.
.
.
.
.
.
.
.
.
.
.
.
.
.
.
.
.
1
.
.
.
.
.
.
.
.
.
.
.
.
.
.
.
.
.
.
.
.
.
.
.
.
.
.
.
.
.
.
.
.
.
.
.
.
.
.
.
.
.
.
.
.
.
.
.
.
.
.
.
.
.
.
.
.
.
.
.
.
.
.
.
.
.
.
.
.
.
.
.
.
.
.
.
.
.
.
.
.
.
.
.
.
.
.
.
.
.
.
.
.
.
.
.
.
.
.
.
.
.
.
Chapter 1
Introduction
Contents
1.1
1.2
Eye Movement Contingent Display control . . . . . . . . . . . . . . . . . . . . . .
Objective . . . . . . . . . . . . . . . . . . . . . . . . . . . . . . . . . . . . . . . . .
2
4
1.3
System architecture . . . . . . . . . . . . . . . . . . . . . . . . . . . . . . . . . . .
5
1.1 Eye Movement Contingent Display control
Our eyes are always in motion. During natural viewing, fast relocations of gaze (saccades) occur every few hundred milliseconds. Even in between saccades, when the eyes are fixating on a target, small
fixational eye movements, of which we are usually not aware, continuously move the projection of the
stimulus on the retina (see Figure 1.1). It is surprising that the visual system is able to construct a coherent percept from such fragmentary and continuously changing input. Although much progress has been
made in understanding how the brain processes sensory signals, the fundamental mechanisms by which
visual information is organized into a global representation of the scene are still elusive.
In experimental studies of visual functions, the need often emerges for modifying the stimulus according to the eye movements performed by the subject. The methodology of Eye Movement Contingent
Display (EMCD) enables accurate control of the position and motion of the stimulus on the retina. It has
been successfully used in several areas of vision science, including visual attention, fixational eye movements, and the physiological characterization of neuronal response properties. In addition to basic vision
research, EMCD control is also crucial in a variety of applications ranging from augmented information
displays to aids for subjects with visual impairments. Unfortunately, the difficulty of real-time programming and the unavailability of flexible and economical systems that can be easily adapted to the diversity
of experimental needs and laboratory setups have prevented a widespread use of EMCD control.
Despite the important benefits offered by EMCD control to many areas of vision research, several
factors have prevented widespread use of this technique. A first problem is that real-time control (i.e. ensuring an upper boundary on the delay between subject eye movements and the update of the stimulus on
the display) is a difficult operation that requires the development of complex hardware and/or advanced
programming expertise.
The development of real-time software is also challenged by the characteristics of the most popular
operating systems, such as Microsoft Windows and Apple MacOS, which do not allow precise control
2
CHAPTER 1. INTRODUCTION
3
Figure 1.1 – Example of fixational eye movements. A trace of eye movements recorded by a DPI eyetracker is
shown superimposed on the original image. The panel on the bottom right shows a zoomed portion
of the trace in which small fixational eye movements are present. The color of the trace represents
the velocity of eye movements (red: slow movements; yellow: fast movements). Blue segments
mark periods of blink. The image was examined for a period of 10 s.
of temporal events. Secondly, available systems lack the flexibility that is required to accommodate the
diverse needs of experimenters. They are usually designed for specific tasks and cannot be easily modified. Another important element has been the exorbitant cost of commercially available systems. These
systems are usually sold as components or accessories of specific eyetrackers and cannot be interfaced
with more affordable devices (see Table 1.1).
The tremendous improvements in computational power, video hardware, and eye tracking technologies of recent years have opened the way to a flexible and economical approach to EMCD experiments.
Personal computers now possess the computational resources and high-speed interfaces that are necessary for real-time data processing.
High-quality CRTs with refresh rates up to 200 Hz and graphic boards with built-in accelerators for
the fast generation of visual stimuli are now available. The short delays and quality of visualization
provided by these systems are adequate for many experiments of visual neuroscience. Improvements
in eye-tracking methods have widely enlarged the circle of potential users by miniaturizing the devices,
significantly simplifying their use and reducing their costs.
The system described here provides widespread access to the methodology of EMCD control. It
enables laboratories that conduct research in visual psychophysics and neurophysiology to design their
own EMCD experiments as well as to adopt the procedures already in use. Furthermore, by allowing
stimulus modifications on the basis of various parameters of oculomotor activity, this system opens the
way for a new generation of EMCD experiments in which changes in the visual input do not depend only
on the position of gaze. Experiments of this kind are needed in several areas of vision research.
CHAPTER 1. INTRODUCTION
4
Table 1.1 – This table summarizes the main systems and algorithms currently available to experimenters in the
field of visual neuroscience. Commercial products and open source software present complementary
strengths and disadvantages. Public domain systems come at no cost, but being based purely on
software, they cannot reach the high refresh rates required by many experiments. Software systems
also lack a check of real-time compliance because they do not guarantee that the system is running at
the expected frequency without missing frames. Commercial products can be faster as they usually
rely on dedicated hardware. However, they come at high cost and surprisingly little flexibility. Since
most of these systems were not specifically designed for EMCD control, they have serious structural
limitations. The range of possible applications remains limited, and no flexible system for EMCD
control is currently available.
1.2 Objective
This report focuses on the development of a general-purpose system to perform EMCD experiments on
a personal computer. We have recently developed a hardware and software prototype to study fixational
eye movements that combines flexibility, simplicity of use, and low cost of the components.
The Eye movement Real-time Integrated System (EyeRIS) (Active Perception Lab, Boston University) takes advantage of recent technological advancements to develop a general-purpose system for
EMCD experiments. The proposed system complies with the following specifications:
1. Flexibility of experimental design: The experimenter needs to be able to design an EMCD experiment by selecting the variables of oculomotor activity that are relevant to the study and linking
them to changes in the visual stimulus in the desired fashion. In addition to enabling changes in the
visual stimulus according to the position of gaze, the system also allows control of the stimulus on
the basis of higher-order parameters of oculomotor activity such as processed signals (e.g., speed,
acceleration) or the type of oculomotor activity (e.g., saccade vs. smooth pursuit).
2. Versatility: The system accommodates the diversity of experimental demands and setups of different laboratories as it works under Windows, the operating system most often used by laboratory
computers.
3. Simplicity of use: The nuances of real-time programming and the hardware characteristics of the
system are transparent to the user. The system possesses an intuitive high-level interface that
provides access to users with no programming experience.
4. High-level performance: The system operates at the highest refresh rates and resolutions allowed
CHAPTER 1. INTRODUCTION
5
by current commercial graphic cards and CRTs. This level of performance is often needed in
experiments of visual neurophysiology.
5. Real-time compliance: Real-time performance is guaranteed by external sensors which provide an
upper boundary to the delay of the stimulus update on the screen. Trials in which this upper bound
is accidentally exceeded are automatically flagged to the user.
6. Affordability: The system is designed using low-cost technologies.
1.3 System architecture
The proposed system intimately links the eyetracker and the computer as it is responsible for (a) sampling
and processing oculomotor signals and subject responses, and (b) communicating with the graphics card
on the host PC to allow the real-time generation, visualization, and gaze-contingent modification of
visual stimuli. Its structure consists of:
1. A dedicated DSP board with analog and digital interfaces which possesses dedicated firmware
specifically designed for the real-time processing of eye movement data. It will enable EMCD
experiments with real-time performance guaranteed by a maximum delay of two-frames (10 ms at
200 Hz).
2. An extensive software library, implemented in C++, for the control of the board and the real-time
manipulation and display of visual stimuli. The graphic component of this library is built on top of
OpenGL (Silicon Graphics, Inc.) and uses the hardware acceleration of OpenGL routines present
in current graphic cards. The C++ library will enable programmers to control all functionalities of
the system without dealing with the details of the hardware and real-time control.
3. A high-level programming language for the simple design and execution of EMCD experiments.
This language has been developed to make the system accessible to users with no programming
experience.
During the generation of each video frame, the real-time routines run on the DSP to sample input data,
label saccades and periods of fixation (see Figure 1.2), and convert input voltages into angles on the basis
of an initial calibration procedure. Processed data is transmitted to the host CPU, where C++ routines
convert it to pixel coordinates and update the stimulus on the display at the next video frame.
CHAPTER 1. INTRODUCTION
6
Figure 1.2 – Functional architecture of the system. It is designed to enable EMCD control with refresh rates up
to 200Hz at the highest resolution supported by the video board, and with maximum delay of 10 ms
(average delay 5 ms). Real-time performance is guaranteed by monitoring the signal of a photocell
located at the corner of the display.
Chapter 2
Hardware
Contents
2.1
2.2
DSP board . . . . . . . . . . . . . . . . . . . . . . . . . . . . . . . . . . . . . . . .
Digital board . . . . . . . . . . . . . . . . . . . . . . . . . . . . . . . . . . . . . . .
7
8
2.3
2.4
Analog/Digital conversion board . . . . . . . . . . . . . . . . . . . . . . . . . . . .
Video board . . . . . . . . . . . . . . . . . . . . . . . . . . . . . . . . . . . . . . .
8
9
The hardware component of EyeRIS includes four major modules: a C6713 DSP board, a generic digital
I/O board, A/D conversion module, and a video board to display stimuli.
2.1 DSP board
The C6713 DSK (Spectrum Digital Inc.) is a low-cost standalone development platform that enables
users to evaluate and develop applications for the TI C67xx DSP family. This card is based on the
TMS320C6713 (Texas Instruments Inc.), which operates at 300 MHz, delivering 2400 million instructions and 1800 million floating-point operations per second. The DSK comes with a full complement of
on-board devices that suit a wide variety of application environments. Key features include:
1. A Texas Instruments TMS320C6713 DSP operating at 225 MHz
2. An AIC23 stereo codec
3. 8 MBytes of synchronous DRAM
4. 512 KBytes of non-volatile Flash memory
5. 4 user accessible LEDs and DIP switches
6. Software board configuration through registers implemented in CPLD
7. Configurable boot options
8. Standard expansion connectors for daughter card use
9. JTAG emulation through on-board JTAG emulator with USB host interface or external emulator
7
CHAPTER 2. HARDWARE
8
Figure 2.1 – Prototype of the EyeRIS hardware component.
The DSP on the DSK interfaces with on-board peripherals, such as SDRAM, Flash memory, and CPLD,
through a 32-bit wide EMIF (External Memory Interface). This interface also connects daughter card
expansions (EDCI) which are used for third party add-in boards.
The DSP interfaces with analog audio signals through an on-board AIC23 codec and four 3.5 mm
audio jacks (microphone input, line input, line output, and headphone output). The codec can select the
microphone or the line input as the active input. The analog output is driven to both the line out (fixed
gain) and headphone (adjustable gain) connectors. McBSP0 is used to send commands to the codec
control interface while McBSP1 is used for digital audio data. McBSP0 and McBSP1 can be re-routed
to the expansion connectors in software.
A CPLD programmable logic device is used to configure some of the components of the DSK and
provide user input/output features. The CPLD has a register based user interface that lets the user configure some of the settings of the board by reading and writing to its registers.
The DSK includes 4 LEDs and a 4 position DIP switch as a simple way to provide the user with
interactive feedback. Both are accessed by reading and writing to the CPLD registers.
2.2 Digital board
The system includes a digital interface specifically designed and developed in-house to acquire 32 I/O
simultaneous binary events (TTL-levels), record subject’s responses, and drive visual and acoustic warnings. It acquires the general status of the eyetracker (some of the status signals, such as blink and track,
are TTL compatible), and the input devices (a Playstation2-type joypad from Sony Inc.). This board is
designed to connect directly to C5000 and C6000 DSK platforms through the EDCI interface.
2.3 Analog/Digital conversion board
The system acquires the oculomotor signals generated by the eyetracker by means of a ADS8364 Evaluation Module (EVM) board which is built around a high-speed, low power, dual 16-bit A/D converter
CHAPTER 2. HARDWARE
9
(Texas Instrument Inc.). The six fully differential channels allow simultaneous holding and sampling
on all six analog inputs at a maximum frequency of 250KHz. They can operate on mixed voltages (+/10V, +/- 5V, +/- 2.5V), which are normalized to the nominal A/D converter range by the analog front-end
circuitry. The EVM is designed to function with C5000 and C6000 DSK platforms through the EDCI
interface.
2.4 Video board
Stimuli and eye movements are visualized on a high refresh rate monitor by means of a commercial
video board. Modern graphic boards perform most processing in hardware, enabling fast visualization of
computationally intensive displays. On the host computer, the system currently uses a RADEON 9800
XT AGP which can be considered a video board with high-level performance. Major characteristics
include:
1. Eight parallel rendering pipelines
2. Four parallel geometry engines
3. 256-bit DDR memory interface
4. AGP 8X support
5. Dual integrated 10-bit per channel 400 MHz DACs
6. Pixel Fill-rate: 3.3Gpixel/sec; Geometry Rate: 412Mtriangles/s
7. Max Refresh rate: 200Hz at 1152x864
8. Native OpenGL acceleration
The RADEON 9800 XT AGP presents a very good stability of the output signal that allows its use in
experiments of visual psychophysics. Signal instability is less than 0.1% (calculated at the 100 % of red
component).
Chapter 3
Firmware
Contents
3.1
3.2
3.3
Firmware fundamentals and operation modes . . . . . . . . . . . . . . . . . . . . 10
Processing pipeline . . . . . . . . . . . . . . . . . . . . . . . . . . . . . . . . . . . . 11
3.2.1
3.2.2
Dropped Frames Detection Module (DFDM) . . . . . . . . . . . . . . . . . . 12
Voltage-Angle Transformation Module (VATM) . . . . . . . . . . . . . . . . . 13
3.2.3
3.2.4
Eye Movements Tagging Module (EMTM) . . . . . . . . . . . . . . . . . . . 13
EMCD Variables Calculation Module (EVCM) . . . . . . . . . . . . . . . . . 14
Communication protocol . . . . . . . . . . . . . . . . . . . . . . . . . . . . . . . . 14
3.3.1 Conduits and packets . . . . . . . . . . . . . . . . . . . . . . . . . . . . . . . 14
3.3.2
Commands . . . . . . . . . . . . . . . . . . . . . . . . . . . . . . . . . . . . 15
A number of processes run in parallel on the DSP by means of the Eyetracker Operative System 2
(ETOS2) (Active Perception Lab, Boston University), the proprietary firmware that acquires and processes in real-time oculomotor data and subject responses.
3.1 Firmware fundamentals and operation modes
As illustrated in Figure 3.1, ETOS2 is responsible for the acquisition, preprocessing, and communication
of the oculomotor data and subject responses to the PC host. The firmware is based on the DSP/BIOS
(Texas Instrument Inc.) version 2, which is a scalable real-time kernel designed for the TMS320C5000
and TMS320C6000 DSP platforms.
Because DSP/BIOS enables real-time applications to be cleanly partitioned, the firmware is easy
to maintain and new functions can be added without disrupting real-time response. DSP/BIOS provides standardized APIs across C5000 and C6000 DSP platforms to support rapid application migration.
DSP/BIOS has been proved in thousands of customer designs and requires no runtime license fees.
The firmware can function in three different modalities:
1. When in idle mode, the firmware continuously polls the communication channel for new commands. Data is not collected from the ADC, and no transfer to the PC is performed. The joypad is
active. Its status is acquired and transmitted (every 100ms) to the PC.
10
CHAPTER 3. FIRMWARE
11
Figure 3.1 – Real-time functioning of the system. The eyetracker signals and the subject responses are preprocessed by the processing pipeline inside the DSP, and transferred to the PC in the very first stage of
graphic rendering.
2. The raw mode disables all the data processing of the firmware, allowing the voltage values of the
six channels of the ADS8364 to be transmitted without analysis. The joypad is active, and its status
is transmitted (every 100ms) to the PC. This mode is activated and deactivated only by command
from the PC.
3. The firmware in trial mode performs the processing of all six channels’ data, including voltageangle transformation, real-time tagging, and dropped frame counting and recording. This mode is
activated and deactivated only by command from the PC, and its current status is indicated by the
large red LED on the board.
3.2 Processing pipeline
When the firmware is in trial mode, all the data collected from the six A/D channels are preprocessed
by a series of software tasks before being communicated to the PC host. This software component of
the DSP firmware is responsible for a variety of tasks related to data acquisition, digital filtering, data
transformation, and real-time verification. Samples pass through a pipeline formed by different tasks,
each of which can modify the received sample according to its particular function. For example, one
of these processes is responsible for transforming the data represented in voltages from the eyetracker
into angle units. Another task tags the data acquired in order to classify eye movements into saccades,
fixational eye movements, etc.
These are the stages (in order of execution) active in this version of the firmware:
1. Dropped Frames Detection Module (DFDM): This task detects if the PC is refreshing visual information within the time constraints set by the refresh rate of the monitor.
2. Voltage-Angle Transformation Module (VATM): This task is responsible for transforming the input
voltages from the eyetracker into arc minutes of visual angle.
3. Eye Movements Tagging Module (EMTM): This task classifies the eye movements, obtained from
task VATM, into two different classes: saccades and fixations.
CHAPTER 3. FIRMWARE
12
Figure 3.2 – Real-time compliance of the stimuli visualized on the monitor is ensured by monitoring the flickering
of a small square displayed at the corner of the screen (a and d). If the system requires more than
one frame to update the stimulus, the flickering frequency of the square will be altered. Video
signals are measured in real time by a fast photodiode (b and e), and missing or additional frames
will be detected by measuring the temporal displacements between successive white squares (c and
f ). Trials with missing frames are automatically labeled and signaled to the experimenter.
4. EMCD Variables Calculation Module (EVCM): This task calculates all the information regarding
the oculomotor data sampled from the eyetracker (included summary information produced by the
EMTM).
Each task produces information which is collected by the firmware and transfered to the PC. Once on the
host, the information is available to the user for further processing and recording.
3.2.1
Dropped Frames Detection Module (DFDM)
This task ensures real-time performance of the PC during the stimuli visualization. Contemporaneously
to the visual stimuli scheduled for the frames by the experiment, the low level software of the library (see
Chapter 4 for further details) places, every other frame, a small white square at the corner of the monitor.
The flickering of this square produces a specific signal (see Figure 3.2, lines b and e) which is sampled
by the system. If the calculation performed by the PC of the next frame requires more then the time set
by the monitor vertical refresh, the square will appear as delayed in the signal, disrupting its frequency.
Trials with missing frames are automatically marked by this task and signaled to the PC at the end
of the trial. The experimenter can request, through the low-level functions (see Chapter 4), a complete
report of the dropped frames and their temporal locations in the experiment.
CHAPTER 3. FIRMWARE
13
Horizontal EM
Vertical EM
HE
System
0
1000
2000
3000
Time [ms]
4000
5000
6000
Figure 3.3 – Real-time identification of saccades. A real-time algorithm based on several parameters of oculomotor signals compared well with respect to a human expert (HE). The mean error of classification over
400 s of recordings is about 3.0%. EM signals (EM) represent horizontal and vertical components
of eye movements in a trial. Saccade labeling is shown on the bottom. The x axis represents time in
ms.
3.2.2
Voltage-Angle Transformation Module (VATM)
The eyetracker outputs are proportional to the vertical and horizontal angles of the subject’s eye position.
The proportionality constants are an offset and a gain in each of the vertical and horizontal directions.
These constants are determined in the calibration procedure (see Chapter 4 for further details), by performing a linear regression to map between voltages and angles for a set of stimulus points in known
positions on-screen.
The formulas for converting the raw eyetracker outputs to vertical and horizontal angles are:
posx = (voltagex + of f setx ) ∗ gainx
posy = (voltagey + of f sety ) ∗ gainy
3.2.3
Eye Movements Tagging Module (EMTM)
The purpose of this task is to categorize and label eye-movements as saccade, blink, or fixation (relatively
slow motion) for the higher functions of the system. Data received by the algorithm is classified according to past values and two thresholds of velocity and acceleration calculated using the three most recent
samples. Once the initial three values are received, each newly acquired sample is labeled accordingly.
In order to label samples as blinks, the algorithm uses the blink status signal of the eyetracker. If a
blink event is detected, the next 100 samples will be labeled as blink without any further calculations.
If the most recently received sample is not classified as blink, velocities and acceleration amplitudes
are calculated. The current sample is labeled by comparing the acceleration amplitude against a user
defined threshold. If label changes are detected during the classification, the corresponding velocities are
also compared against another user defined threshold to confirm the change of state. If the test fails, the
sample corresponding to the detected state change is automatically labeled as that of the previous sample.
This further test reduces the mislabeling in the tagging process which is sensitive to noise present in the
CHAPTER 3. FIRMWARE
14
velocity and acceleration variables. An example comparison of the output of the algorithm vs. human
tagged data is presented in the Figure 3.3.
3.2.4
EMCD Variables Calculation Module (EVCM)
This task calculates the set of oculomotor-related flags and variables that the user can link to conditions
for stimulus manipulation. During an experiment, the user is able to specify which EMCD variable to
monitor and use them as events in EDL (see Chapter 5 for further details).
Using the transformed eyetracker signals and digital input data, this module produces single binary
events or analog output values that signal the occurrence of the specified condition. EMCD variables
can be used, for example, in experiments in which the position of gaze has exceeded a pre-specified
threshold, or a saccade has exceeded a user-specified amplitude.
These are the EMCD variables currently available in this version of the module:
1. Velocity x, Velocity y: These variables represent horizontal and vertical velocity (arcmin/s) of
the eye movements sampled by the eyetracker.
2. Acceleration x, Acceleration y: These variables represent horizontal and vertical acceleration
(arcmin/s2 ) of the eye movements sampled by the eyetracker.
3. Saccade duration, Saccace amplitude: This variable indicates the duration and the amplitude (respectively in ms and arcmin) of the saccade which has just ended. Their values are valid only at
the transition of the saccade/fixation signal generated by the EMTM module.
4. Fixation duration: This variable indicates the duration (in ms) of a fixation which has just ended.
Its value is valid only at the transition of the fixation/saccade signal generated by the eye movements tagging module.
3.3 Communication protocol
Commands and data between the DSP board and the host CPU are transferred in little-endian format
over the real-time communication protocol RTDX (Texas Instruments Inc.). Data transfer occurs on the
basis of a fault-tolerant master-slave communication protocol (the DSP assumes a slave role) accessible
through the low-level functions described in Chapter 4.
When the PC writes a command, the DSP executes it and signals either success or failure. The DSP
sends data to the PC both through synchronous replies to the commands and through periodical writing
data to the PC.
3.3.1
Conduits and packets
The communication protocol provides two conduits through which data and commands can flow. An
output conduit which carries commands and data from the PC to the DSP, and an input conduit that
carries data from the DSP to the PC. The underlying RTDX protocol guarantees that transmitted data
will arrive in-order, but not necessarily contiguously. Data on both conduits are organized in packets of
two different types: commands and data request sent by the PC (transported by the output conduit), and
DSP answers to the requests (transported by the input conduit). The general structure of a packet is the
following:
CHAPTER 3. FIRMWARE
15
ID
SIZE
COMMAND
uint
uint
uint
PAYLOAD
...
• Packet identification (ID): Packets carry, as an unsigned 32-bit integer, a unique ID number generated by the PC. This number is then copied into the corresponding ACK packet, so the PC can
verify that the correct request’s response has arrived.
• Packet size (SIZE): This field holds, as an unsigned 32-bit integer, the size of the payload in units
of 32-bit words. Applications that wish to transmit irregularly-sized data must pad the data to a
4-byte boundary before transmission.
• Packet command (COMMAND): This field holds, as an unsigned 32-bit integer, the description of
the information contained in the payload (see the following sections for a complete list of available
commands).
• Packet payload (PAYLOAD): This field holds the data that has to be transferred. The size of this
section is variable and depends on the command transmitted, but must be a multiple of four bytes.
3.3.2
Commands
COM DFDM GET COUNT
Request:
Response:
ID
0
ID
COM DFDM GET COUNT
3
COM ET ACK
COM DFDM GET COUNT
Count
uint
uint
This command requests from the DFDM the number of frames dropped during the last trial.
COM DFDM GET FRAMES
Request:
Response:
ID
0
ID
COM DFDM GET FRAMES
2 + n
COM ET ACK
COM DFDM GET FRAMES
Frame 0
Frame 1
...
uint
uint
uint
uint
This command requests from the DSP which frames have been dropped. The number of dropped frames
n is contained in the size of the message, while information about the dropped frames in contained in the
payload.
COM DFDM SET FRAMERATE
Request:
Response:
ID
1
COM DFDM SET FRAMERATE
Frame rate
float
ID
1
COM ET ACK
This command communicates to the Dropped Frames Detection Module the refresh rate of the monitor
(in Hz). Without the proper value, the module will not be able to detect dropped frames.
CHAPTER 3. FIRMWARE
16
COM DSP END RAW
Request:
Response:
ID
0
ID
COM DSP END RAW
1
COM ET ACK
This command communicates to the DSP to exit raw mode and enter idle mode. All modules of the
software pipeline are enabled by this command.
COM DSP END TRIAL
Request:
Response:
ID
0
ID
COM DSP END TRIAL
1
COM ET ACK
This command communicates to the DSP to exit trial mode and enter idle mode. All modules of the software pipeline remain enabled, and contain valid data which can be retrieved at the end of the experiment.
The DIO board LED is turned off when this command is executed.
COM DSP PING
Request:
Response:
ID
0
ID
COM DSP PING
1
COM ET ACK
This command can be sent to the firmware to verify correct functioning of the board and measure the
communication latency.
COM DSP START RAW
Request:
Response:
ID
0
ID
COM DSP START RAW
1
COM ET ACK
This command communicates to the DSP to enter raw mode. All modules of the software pipeline are
disabled by this command.
COM DSP START TRIAL
Request:
Response:
ID
0
ID
COM DSP START TRIAL
1
COM ET ACK
This command communicates to the DSP to enter trial mode. All modules of the software pipeline are
enabled and initialized, and the DIO board LED is turned on by this command.
COM EMTM SET THRESH
Request:
Response:
ID
ID
4
COM VATM SET VAPARAMS
1
Velocity
Acceleration
Amplitude
Blink skip
float
float
float
float
COM ET ACK
This command communicates to the DSP board the new thresholds which will be used by the EMTM
CHAPTER 3. FIRMWARE
17
module in the processing pipeline to classify eye movements in saccades and fixations. These parameters
include: velocity (arcmin/s), acceleration (arcmin/s2 ), amplitude (arcmin). It also possible to set the
number of samples ignored by the module after a blink of the subject.
COM ET DATA
ID
7
COM ET DATA
Triggers
Ch 1
Ch 2
Ch 3
Ch 4
Ch 5
Ch 6
uint
float
float
float
float
float
float
This command communicates to the PC the values collected by the ADC. These values are preprocessed
in the software pipeline if the firmware is in trial mode. Triggers are packed into an unsigned 32-bit
integer, while channel data are represented as 32-bit floats.
COM JP DATA
ID
3
COM JP DATA
Joypad data (9 bytes)
uint
Padding (3 bytes)
uint
uint
Joypad data is also transmitted as soon as it is read from the joypad. Due to the latency of the joypad,
this packet is transmitted every 100 ms.
The Playstation joypad (Sony Inc.) can function in two different modes: analog and digital. Data
structure changes according to the modality of the joypad, and takes the following form:
Analog Mode:
Byte
1
2
3
4
5
6
7
8
9
Bit 0
Bit 3
Bit 4
Bit 5
Bit 6
Reserved
Reserved
Reserved
JOYR
JOYL
STRT
UP
RGHT
DOWN
R2
L1
R1
4
°
×
Right Joypad: Left = 0x00, Right = 0xFF
Right Joypad: Up = 0x00, Down = 0xFF
Left Joypad: Left = 0x00, Right = 0xFF
Left Joypad: Up = 0x00, Down = 0xFF
LEFT
2
Bit 0
Bit 1
Bit 2
SLCT
L2
R2
L1
SLCT
L2
Bit 1
Bit 2
Bit 7
Digital Mode:
Byte
1
2
3
4
5
Bit 3
Bit 4
Reserved
Reserved
Reserved
STRT
UP
R1
4
Bit 5
Bit 6
Bit 7
RGHT
°
DOWN
×
LEFT
2
The correct interpretation of this information is left to the supplementary classes included in the lowlevel software (see Chapter 4).
COM VATM GET VAPARAMS
Request:
Response:
ID
ID
0
COM VATM GET VAPARAMS
6
COM ET ACK
COM VATM GET VAPARAMS
Offset x
Offset y
Gain x
Gain y
uint
float
float
float
float
This command requests the current V-A parameters (offset x and y, gain x and y) used by the VATM
module in the processing pipeline. The V-A parameters will be null if they have not been set since the
last DSP boot.
CHAPTER 3. FIRMWARE
18
COM VATM SET VAPARAMS
Request:
Response:
ID
ID
4
COM VATM SET VAPARAMS
1
Offset x
Offset y
Gain x
Gain y
float
float
float
float
COM ET ACK
This command communicates to the DSP board the new V-A parameters (offset x and y, gain x and y,
expressed in armin/V ) which will be used by the VATM module in the processing pipeline.
Chapter 4
Low-level software
Contents
4.1
4.2
Hardware/firmware mapping class . . . . . . . . . . . . . . . . . . . . . . . . . . . 19
Experiment management and system classes . . . . . . . . . . . . . . . . . . . . . 20
4.3
4.4
Graphic management classes . . . . . . . . . . . . . . . . . . . . . . . . . . . . . . 21
Input/Output management classes . . . . . . . . . . . . . . . . . . . . . . . . . . . 22
4.5
4.6
Additional classes . . . . . . . . . . . . . . . . . . . . . . . . . . . . . . . . . . . . 22
Examples of low-level software . . . . . . . . . . . . . . . . . . . . . . . . . . . . . 23
4.6.1
4.6.2
Create a basic experiment . . . . . . . . . . . . . . . . . . . . . . . . . . . . 23
Create an experiment that displays stationary planes . . . . . . . . . . . . . . 24
4.6.3
4.6.4
4.6.5
Create an experiment in which planes track the subject’s eye movements . . . . 25
Create an experiment that responds to the keyboard and joypad . . . . . . . . . 26
Save experiment data for offline analysis . . . . . . . . . . . . . . . . . . . . 28
4.6.6
4.6.7
Load recorded eyetracker data and play it back . . . . . . . . . . . . . . . . . 29
Do your own OpenGL rendering . . . . . . . . . . . . . . . . . . . . . . . . . 30
4.6.8
Display a scene that changes over time . . . . . . . . . . . . . . . . . . . . . 31
The Eye Movements Integrated Library (EMIL) (Active Perception Lab, Boston University) constitutes
the control center of the system and provides the foundation for the execution of real-time experiments.
Although accessible by users with programming expertise, this library remains hidden under the OOP
interface. Different classes of functions cover all the functionalities of the system.
4.1 Hardware/firmware mapping class
CDSP
The CDSP class provides a transparent interface to the physical DSP by completely hiding the communication protocol, giving the appearance of the programmer commanding the DSP board directly.
Among the high-level commands provided by this class are functions for fetching eyetracker data from
the DSP, querying the joypad status, and calibrating the DSP. As more features are added to the DSP
program, new functions can easily be added to the CDSP class to reflect them into the EMIL library. This
19
CHAPTER 4. LOW-LEVEL SOFTWARE
20
Figure 4.1 – Real-time functioning of the system. The eyetracker signals and the subject responses are preprocessed by the DSP during a frame, and transferred to the PC in the very first stage of graphic
rendering. While the DSP continues to sample and process input signals, the CPU and video board
use available data during to design and render the display at the next video frame.
class also implements a partial emulation mode, so that experiments can be tested without the physical
DSP connected, or recorded data can be replayed to recreate an old experiment.
4.2 Experiment management and system classes
These classes provide the framework within which experiments will be designed. They specify the way
in which input devices will be used, which oculomotor events to respond to, and how to modify the
stimulus accordingly. Some routines also control the proper functioning of the system by handling system initialization, opening and managing communication channels, assessing real-time compliance, and
executing the proper shutdown of the system.
CEnvironment
CEnvironment is the class that ties all lower-level functions together. It handles system initialization, where it commands the CDSP class to open a communication channel, and CScene to ready the
display for drawing. It manages a list of CExperiments, which it runs in sequence, passing keyboard, mouse, joypad, and render events into the running experiment. CEnvironment also fetches
eyetracker and joypad data from the CDSP object, and passes those data into the current experiment for
processing. Finally, CEnvironment handles system shutdown, in which experiment objects are destroyed, DSP communication terminated, and the display returned to default settings. This class allows
the main function in an EMIL program to be extremely short, using only a few commands to create the
CEnvironment, populate it with experiments, and activate it, with everything else handled by the class.
CHAPTER 4. LOW-LEVEL SOFTWARE
21
CExperiment
The CExperiment class provides a framework within which real experiments may be written. This
class handles the rendering of planes and the photocell marker, as well as movie recording. To write a
custom experiment, the programmer must inherit from CExperiment, and overload whichever event
methods he deems necessary - keyboard, mouse, joypad, and render. The render event is central, as it
receives eyetracker data, and also manipulates the CPlanes to be drawn in the next frame. The ability
to respond to input devices as well as changing eye movements makes this class extremely flexible. Additionally, experienced programmers may elect to forgo the use of CPlanes for drawing and implement
their own OpenGL rendering commands, meaning that anything that the computer is capable of drawing
can be used as a stimulus, without altering the basic experiment structure.
4.3 Graphic management classes
The graphic engine of the system is built on top of OpenGL. It consists of two levels, with the lower level
directly interacting with the video card to take advantage of its accelerated hardware features. While experienced programmers are be able to add their own OpenGL code to implement new features, system
graphic functions enable creation, manipulation and rendering of visual stimuli without explicitly calling
OpenGL routines. Access is given to all basic graphic parameters, including frame rate, display resolution, and units of measurement of visual space.
CScene
The CScene class exists to handle the setup and maintenance of EMIL’s OpenGL context. Its tasks
include resolution and frame rate switching, the printing of on-screen text, and the registration and routing of event callbacks (keyboard, mouse, frame).
COGLHal
CScene also utilizes the lower-level class COGLHal (OpenGL Hardware Abstraction Layer) that permits movement of the EMIL system across video cards with different capabilities. COGLHal handles
the checking of OpenGL extensions, and interfaces with some video-card specific features, such as the
toggling of the vertical sync.
CPlane
CPlane is the basic drawing primitive of EMIL. It permits a client program to manipulate basic stimuli
without any explicit OpenGL code. CPlanes can be translated and scaled with single commands, and
can use both pixels and arcmin units, making precise alignment to on-screen objects or eye positions
trivial. CPlane can natively display only solid colors.
CTexture
The CTexture class exists to allow a CPlane to display an image loaded from disk and generated
by other programs. Currently, CTexture supports the BMP and Targa image formats.
CHAPTER 4. LOW-LEVEL SOFTWARE
22
4.4 Input/Output management classes
These classes provide the basic tool for storing and exchanging data. They are responsible for: (a) Storing and retrieving experimental data in the EMIL format, which enables replaying experimental trials.
(b) Generating movies of the stimulus and the experiment. It is possible to display in the movie the
position of gaze as well as the values of the selected EMCD variables.
CDSPDataStreams
An auxiliary set of classes, collectively called CDSPDataStreams, exist to facilitate saving and loading of eyetracker data for this purpose. These classes are easily extensible to provide new data-handling
capabilities; for instance, the buffering of eyetracker data for later analysis, or the streaming of such data
over a network connection.
CTaggedFile
CTaggedFile is a general-purpose tagged file format written specifically to be used within the EMIL
framework. It records binary data in a set of records, each with a tag containing arbitrary user-defined
meta-data. A client program can efficiently search these tags for requested data. This format is used for
the saving of old eyetracker data for playback, and the recording of calibration parameters to disk, and is
extensible to many other uses.
CMovieSaver
CMovieSaver is an auxiliary class that uses the libavformat and libavcodec libraries (LGPL
license) to record an on-screen experiment to a movie file. Movie recording is fairly slow, and is bound
by the speed of the machine it runs on, so this class is most effectively used on pre-recorded data sets
that can be played back at leisure.
4.5 Additional classes
These classes provide additional functionality to EMIL. They can be used to provide: (a) automatic or
refined manual calibration of the eyetracker. (b) interpretation of the joypad events.
CCalibrator
This class, which derives from CExperiment, exists to provide an automatic calibration of the eyetracker. It determines the linear mapping parameters that the DSP pipeline will use to convert raw eyetracker outputs into arcminutes of vertical and horizontal visual angle.
It works by displaying nine points on-screen sequentially, with the subject instructed to fixate on
each one as it appears. The points are arranged in a square, with one point at screen center, two along
each coordinate axis, and one in the corner of each quadrant.
To make the calibration, the PC instructs the DSP to transmit raw voltage data, then displays the
points. At each point, the PC records data until it decides that the subject’s eyes are fixated, then averages a set of 3500 data points to interpolate the point location in voltage space. Once all nine points
are recorded, linear regressions are calculated in the X and Y directions, and the resulting calibration
parameters transmitted to the DSP.
CHAPTER 4. LOW-LEVEL SOFTWARE
23
CManualCalibrator
The automatic calibration implemented by CCalibrator is not perfect, and can suffer systematic
errors from optical aberrations in the experimental setup and computational errors in locating the point
centers. CManualCalibrator is an experiment that allows the subject to manually adjust the calibration parameters in real-time.
This experiment first places the DSP in raw mode, and activates functionality that allows the PC
library to emulate the DSP’s calibration. The subject is then presented with all nine points from the automatic calibration at once, along with a visual marker that indicates where the system believes the subject
to be looking. The subject can fixate on the center point, and if the visual marker does not coincide
with the point, use the system’s joypad to adjust the offset parameters until they line up. The subject
can then saccade to the other calibration points, and adjust the gain parameters until those points line up
with the visual marker as well. Once the subject deems the calibration complete, the new parameters are
transmitted to the DSP.
CPS2 JoypadParser
CPS2 JoypadParser is an auxiliary class that interprets the data coming from a PS2 joypad (Sony
Inc.). This class supplies the user with a high level interface to the events generated by this kind of joypad.
CDestroyer JoypadParser
CDestroyer JoypadParser is an auxiliary class that interprets the data coming from a basic joypad (4 buttons analog joypads). This class supplies the user with a high level interface to the events
generated by this kind of joypad.
4.6 Examples of low-level software
4.6.1
Create a basic experiment
Every EMIL experiment must conform to a template in order to function properly. The experiment shown
below can serve as such a template. When run, this experiment will simply do nothing, and can only be
exited by pressing ESC, which will exit EMIL altogether.
class ExperimentBody : public CExperiment {
public :
// Set up the experiment. pxWidth and pxHeight should be set to the desired pixel
// width and height of the screen, and RefreshRate should be passed the desired refresh
// rate (in Hz) of the monitor.
ExperimentBody (int pxWidth , int pxHeight , int RefreshRate );
// These functions handle EMIL events
void eventKeyboard (unsigned char key , int x , int y ) {}
void eventMouse (int x , int y ) {}
void eventRender (int FrameCount , int NumSamples , const float ∗ Samples ) {}
void eventJoypad () {}
};
CHAPTER 4. LOW-LEVEL SOFTWARE
24
ExperimentBody :: ExperimentBody (int pxWidth , int pxHeight , int RefreshRate ) :
CExperiment (pxWidth , pxHeight , RefreshRate )
{}
4.6.2
Create an experiment that displays stationary planes
The simplest object that EMIL can draw is a solid-color plane. EMIL provides the addPlane functions
to simplify the creation of planes, and a number of functions for their manipulation. This experiment
will render a single red plane in the center of the screen. EMIL can also display a plane that is painted
with an image loaded from a file on-disk. This experiment will also display a textured plane.
class ExperimentBody : public CExperiment {
public :
// Set up the experiment. pxWidth and pxHeight should be set to the desired pixel
// width and height of the screen, and RefreshRate should be passed the desired refresh
// rate (in Hz) of the monitor.
ExperimentBody (int pxWidth , int pxHeight , int RefreshRate );
// These functions handle EMIL events
void eventKeyboard (unsigned char key , int x , int y ) {}
void eventMouse (int x , int y ) {}
void eventRender (int FrameCount , int NumSamples , const float ∗ Samples ) {}
void eventJoypad () {}
// These functions are for general set-up and clean-up
void initialize ();
protected :
// Pointers to our planes
CPlane ∗ m solid plane ;
CPlane ∗ m textured plane ;
};
ExperimentBody :: ExperimentBody (int pxWidth , int pxHeight, int Ref reshRate) :
CExperiment (pxWidth , pxHeight , RefreshRate )
{}
void ExperimentBody :: initialize ()
{
CExperiment :: initialize ();
// Create the solid plane. The three arguments to the function are red, green, and blue components,
// and their range is 0-255.
m solid plane = addPlane (255, 0, 0);
// Set the position of the plane. (0, 0) is the center of the screen, and the ranges of the arguments
// are (-m pxWidth/2, m pxWidth/2), and (-m pxHeight/2, m pxHeight/2)
m solid plane → SetPositionPixels (0, 0);
// Set the size of the plane.
m solid plane → SetSizePixels (100, 100);
// Now, create the textured plane and set its size and location
CHAPTER 4. LOW-LEVEL SOFTWARE
25
m textured plane = addPlane (”M yImage.bmp”);
m textured plane → SetPositionPixels (0, 200);
m textured plane → SetSizePixels (100, 100);
}
4.6.3
Create an experiment in which planes track the subject’s eye movements
One of EMIL’s advantages is the ease with which one can cause a displayed image to track the subject’s
eyes. The code below accomplishes just this, causing a small red dot to follow the subject’s eyes around
the screen.
class ExperimentBody : public CExperiment {
public :
// Set up the experiment. pxWidth and pxHeight should be set to the desired pixel
// width and height of the screen, and RefreshRate should be passed the desired refresh
// rate (in Hz) of the monitor.
ExperimentBody (int pxWidth , int pxHeight , int RefreshRate );
// These functions handle EMIL events
void eventKeyboard (unsigned char key, int x, int y) {}
void eventMouse (int x, int y) {}
void eventRender (int F rameCount, int N umSamples, const float ∗ Samples);
void eventJoypad () {}
// These functions are for general set-up and clean-up
void initialize ();
void finalize ();
protected :
CPlane ∗ m plane ;
};
ExperimentBody :: ExperimentBody (int pxWidth , int pxHeight, int Ref reshRate) :
CExperiment (pxWidth , pxHeight, Ref reshRate)
{}
void ExperimentBody :: initialize ()
{
CExperiment :: initialize ();
// Create the dot - a red plane, 2 pixels on a side.
m plane = addPlane (255, 0, 0);
m plane → SetPositionPixels (0, 0);
m plane → SetSizePixels (2, 2);
// Here we place the DSP in trial, or data-collecting mode. If we did not do this, the
// DSP would not give us any data form the eyetracker
m DSPEngine → StartTrial ();
}
void ExperimentBody :: finalize ()
{
// Tell the DSP to stop collecting data now that we are finished
CHAPTER 4. LOW-LEVEL SOFTWARE
26
m DSPEngine → EndTrial ();
CExperiment :: finalize ();
}
// This event is called every time EMIL is preparing to render a frame. It can be used to
// move planes around, do on-line data processing, or even execute raw OpenGL commands.
void ExperimentBody :: eventRender (int F rameCount, int N umSamples, const float ∗ Samples)
{
// These variables will store the on-screen position of the dot.
float xPos , yPos ;
// Multiple eyetracker samples may be transmitted in a single frame, but we will ignore
// all but one in this experiment. The data we are receiving is stored in Samples, in the
// format [X, Y, triggers]. First, we must check that we received data at all.
if (NumSamples == 0) return ;
// Because we may receive multiple position data per frame, we will ignore all but the most recent
// here. The X- and Y-values we want are stored in Samples[3*(NumSamples-1)] and
// Samples[3*(NumSamples-1)+1], respectively
// However, because the eyetracker transmits X- and Y- positions in units of arcmin, we must convert
// to pixels for display.
// This function call fetches the current converter, which is an object designed to handle
// several types of necessary coordinate transformations. In this case, we use the ’a2p’
// function, which transforms angles as transmitted by the DSP into pixel positions on-screen.
m Environment → getConverter ().a2p (Samples [3 ∗ (NumSamples − 1)],
Samples [3 ∗ (NumSamples − 1) + 1], xPos , yPos );
// Now that we know which pixel position the subject is looking at, we can simply move the plane there.
m plane → SetPositionPixels (xPos , yPos );
}
4.6.4
Create an experiment that responds to the keyboard and joypad
Often experiments require to use input devices to affect what is being displayed, and what is being
processed. EMIL provides functions to receive input events from the keyboard, mouse, and joypad. This
experiment will demonstrate proper usage of this functionality.
For demonstration purposes, this example will have the following features:
• Pressing the P key will activate or deactivate the photocell
• Pressing the Q key will end the experiment
• Pressing the SPACE bar will ping the DSP
• Pressing the R1 button on the joypad will show or hide the joystick tracers
• Moving the right joystick will cause a small dot to move on-screen, unless deactivated
CHAPTER 4. LOW-LEVEL SOFTWARE
class ExperimentBody : public CExperiment {
public :
ExperimentBody (int pxWidth , int pxHeight , int RefreshRate );
void eventKeyboard (unsigned char key , int x , int y );
void eventMouse (int x , int y ) {}
void eventRender (int FrameCount , int NumSamples , const float ∗ Samples ) {}
void eventJoypad ();
void initialize ();
void finalize ();
protected :
// The plane that will trace the joystick’s movements
CPlane ∗ m plane ;
// Indicate whether the joystick tracer is to be shown or hidden
bool m show tracer ;
// Indicate whether the photocell is being displayed
bool m show photocell ;
};
ExperimentBody :: ExperimentBody (int pxWidth , int pxHeight, int Ref reshRate) :
CExperiment (pxWidth , pxHeight , RefreshRate )
{}
void ExperimentBody :: initialize ()
{
CExperiment :: initialize ();
// Create the tracer dot - a blue plane, 4 pixels on a side.
m plane = addPlane (0, 0, 255);
m plane → SetPositionPixels (0, 0);
m plane → SetSizePixels (4, 4);
// Start out by displaying the tracer and the photocell
m show tracer = true ;
m show photocell = true ;
}
void ExperimentBody :: eventKeyboard (unsigned char key, int x, int y)
{
switch (key ) {
case 0 p0 : // If the ’p’ key was pressed, turn on or off the photocell
m show photocell = !m show photocell ;
if (m show photocell )
activatePhotocell ();
else
deactivatePhotocell ();
return ;
case 0 0 : // If the space bar is pressed, ping the DSP
m DSPEngine → Ping ();
27
CHAPTER 4. LOW-LEVEL SOFTWARE
28
return ;
}
}
void ExperimentBody :: eventJoypad ()
{
// Next, grab the position of the right joystick
float jX = m joypad .getJoystickStatus (CPS2 JoypadParser :: JPAD JOYSTICK RIGHT H );
float jY = m joypad .getJoystickStatus (CPS2 JoypadParser :: JPAD JOYSTICK RIGHT V );
// Now, calculate where on-screen to display the tracer
float x = (float (jX ) − 128)/255.0f ∗ m pxWidth ;
float y = (float (jY ) − 128)/255.0f ∗ m pxHeight ;
// Move the tracer there
m plane → SetPositionPixels (x , y );
// Now, check whether the trigger button was pressed in the last frame
if (m joypad .getButtonPressed (CPS2 JoypadParser :: JPAD BUTTON R1 )){
// If the tracer is currently visible
if (m show tracer ){
// Make the tracer invisible
m plane → Hide ();
m show tracer = false ;
}
else{
// If the tracer is currently not visible
// Make the tracer visible again
m plane → Show ();
m show tracer = true ;
}
}
}
4.6.5
Save experiment data for offline analysis
EMIL has built-in the capability to record and save raw data from the DSP to a file for off-line analysis
with Matlab (Mathworks Inc.) or other analysis tool. This experiment simply runs until the user presses
Q, then writes out data it has recorded to a file.
class ExperimentBody : public CExperiment {
public :
ExperimentBody (int pxWidth , int pxHeight , int RefreshRate );
void eventKeyboard (unsigned char key , int x , int y ) {}
void eventMouse (int x , int y ) {}
void eventRender (int FrameCount , int NumSamples , const float ∗ Samples ) {}
void eventJoypad () {}
void initialize ();
void finalize ();
private :
CHAPTER 4. LOW-LEVEL SOFTWARE
29
// This object handles the file output
COutFileDSPDataStreamm outData ;
};
ExperimentBody :: ExperimentBody (int pxWidth , int pxHeight , int RefreshRate ) :
CExperiment (pxWidth , pxHeight , RefreshRate )
{}
void ExperimentBody :: initialize ()
{
CExperiment :: initialize ();
// Tell the DSP engine to direct its output to the stream
m DSPEngine → SetOutputStream (&m outData );
// Start fetching data from the DSP
m DSPEngine → StartTrial ();
}
void ExperimentBody :: finalize ()
{
// Tell the DSP to stop collecting data
m DSPEngine → EndTrial ();
// Write the stream data out to EMIL’s native file format
m outData .write (00 data.dat00 );
// Write the same data out to matlab format
m outData .writeMatlab (00 channel1.dat00 , 00 channel2.dat00 , 00 channel3.dat00 );
CExperiment :: finalize ();
}
4.6.6
Load recorded eyetracker data and play it back
Another basic capability of EMIL is to operate without the physical DSP. This is accomplished by loading
saved trial data into the DSP engine and placing it in emulation mode. In this mode, all commands given
to the DSP engine are intercepted before reaching the physical DSP, and some commands (fetch data, for
one) are emulated.
class ExperimentBody : public CExperiment {
public :
ExperimentBody (int pxWidth , int pxHeight , int RefreshRate );
void eventKeyboard (unsigned char key , int x , int y ) {}
void eventMouse (int x , int y ) {}
void eventRender (int FrameCount , int NumSamples , const float ∗ Samples ) {}
void eventJoypad () {}
void initialize ();
void finalize ();
private :
CHAPTER 4. LOW-LEVEL SOFTWARE
30
// This object handles the file input
CInFileDSPDataStreamm inData ;
};
ExperimentBody :: ExperimentBody (int pxWidth , int pxHeight , int RefreshRate ) :
CExperiment (pxWidth , pxHeight , RefreshRate )
{}
void ExperimentBody :: initialize ()
{
CExperiment :: initialize ();
// Load the file data into our stream object. This load command expects a file
// in EMILs native file format. For other suported formats, see the CDSPDataStream
// header file.
m inData .load (00 data.dat00 );
// Place the DSP in emulation mode, and tell it to receive data from the input stream.
m DSPEngine → enterEmulationMode ();
m DSPEngine → SetInputStream (&m inData );
}
4.6.7
Do your own OpenGL rendering
EMIL’s emphasis on ease of use has come at the price of flexibility in some areas. The built-in support
for plane rendering is adequate for many experiments, but some applications require finer control. EMIL
allows users to write their own OpenGL commands directly into their experiments. We will illustrate this
technique and point out a few pitfalls to be avoided. This experiment will run until the Q key is pressed,
and draw triangles in OpenGL on top of and below an EMIL-rendered plane.
class ExperimentBody : public CExperiment {
public :
ExperimentBody (int pxWidth , int pxHeight , int RefreshRate );
void eventKeyboard (unsigned char key , int x , int y ) {}
void eventMouse (int x , int y ) {}
void eventRender (int FrameCount , int NumSamples , const float ∗ Samples );
void eventJoypad () {}
void initialize ();
void finalize ();
private :
CPlane ∗ m plane ;
};
ExperimentBody :: ExperimentBody (int pxWidth , int pxHeight , int RefreshRate ) :
CExperiment (pxWidth , pxHeight , RefreshRate )
{}
void ExperimentBody :: initialize ()
{
CExperiment :: initialize ();
CHAPTER 4. LOW-LEVEL SOFTWARE
31
// Create the central red plane
m plane = addPlane (255, 0, 0);
m plane → SetPositionPixels (0, 0);
m plane → SetSizePixels (150, 150);
}
void ExperimentBody :: eventRender (int FrameCount , int NumSamples , const float ∗ Samples )
{
// The OpenGL setting in place when this function is called is:
// gluOrtho2D(-m pxWidth / 2, m pxWidth / 2, -m pxHeight / 2, m pxHeight / 2);
// Feel free to change it as you see fit, but CHANGE IT BACK BEFORE THE FUNCTION
// EXITS. Later system rendering will be corrupted if the view is changed.
// First, render the big blue triangle that will go on the bottom
glColor3f (0, 0, 1);
glBegin (GL P OLY GON );
glVertex2f (0, 300);
glVertex2f (300, − 300);
glVertex2f (−300, − 300);
glEnd ();
// Next tell EMIL to render its own planes. If this is not done, then the
// planes are rendered after this function exits, which is fine for most
// applications, but will overwrite any user rendering done in this function.
// Call renderPlanes() before any user rendering that should not be overwritten.
renderPlanes ();
// Now, draw the small green triangle on top
glColor3f (0, 1, 0);
glBegin (GL P OLY GON );
glVertex2f (0, 50);
glVertex2f (50, − 50);
glVertex2f (−50, − 50);
glEnd ();
}
4.6.8
Display a scene that changes over time
Experiments are often passive, collecting data for background analysis while preprogrammed stimuli
appear on-screen. EMIL’s built-in timer class can be used to easily update the display in real-time, or
after a delay. This example displays a square that shift position every 1 second.
class ExperimentBody : public CExperiment {
public :
ExperimentBody (int pxWidth , int pxHeight , int RefreshRate );
void eventKeyboard (unsigned char key , int x , int y ) {}
void eventMouse (int x , int y ) {}
void eventRender (int FrameCount , int NumSamples , const float ∗ Samples );
void eventJoypad () {}
CHAPTER 4. LOW-LEVEL SOFTWARE
void initialize ();
private :
CPlane ∗ m plane ;
// The timer we will use
CTimerm timer ;
// The current position of the plane
float m planePosition ;
};
ExperimentBody :: ExperimentBody (int pxWidth , int pxHeight , int RefreshRate ) :
CExperiment (pxWidth , pxHeight , RefreshRate )
{}
void ExperimentBody :: initialize ()
{
CExperiment :: initialize ();
// Start out with the plane on the left-hand side of the screen
m planePosition = −m pxWidth /4;
// Create the plane and position it
m plane = addPlane (255, 255, 255);
m plane → SetPositionPixels (m planePosition , 0);
m plane → SetSizePixels (150, 150);
// Set the timer to expire in 1 second ans start the timer
m timer .setDuration (1000);
m timer .restart ();
}
void ExperimentBody :: eventRender (int FrameCount , int NumSamples , const float ∗ Samples )
{
// Check whether the timer has expired
if (m timer .isExpired ()){
// Restart the timer
m timer .restart ();
// Move the plane around
m planePosition + = m pxWidth /4;
if (m planePosition > m pxWidth /4)
m planePosition = −m pxWidth /4;
// Move the plane to its new position
m plane → SetPositionPixels (m planePosition , 0);
}
}
32
Chapter 5
EDL language
Contents
5.1
5.2
A very simple EDL program . . . . . . . . . . . . . . . . . . . . . . . . . . . . . . 33
Basic elements of EDL . . . . . . . . . . . . . . . . . . . . . . . . . . . . . . . . . . 34
5.2.1
5.2.2
Names in EDL . . . . . . . . . . . . . . . . . . . . . . . . . . . . . . . . . . 34
Constant and variable types . . . . . . . . . . . . . . . . . . . . . . . . . . . 35
5.3
5.2.3 Expressions, operators, and built-in constants . . . . . . . . . . . . . . . . . . 36
Entity statements . . . . . . . . . . . . . . . . . . . . . . . . . . . . . . . . . . . . 39
5.4
5.3.1 States . . . . . . . . . . . . . . . . . . . . . . . . . . . . . . . . . . . . . . . 39
5.3.2 Event and Event handlers . . . . . . . . . . . . . . . . . . . . . . . . . . . . . 39
Flow-control statements . . . . . . . . . . . . . . . . . . . . . . . . . . . . . . . . . 40
5.5
5.6
Reference . . . . . . . . . . . . . . . . . . . . . . . . . . . . . . . . . . . . . . . . . 41
5.5.1 Events . . . . . . . . . . . . . . . . . . . . . . . . . . . . . . . . . . . . . . . 41
5.5.2 Commands . . . . . . . . . . . . . . . . . . . . . . . . . . . . . . . . . . . . 42
Complete EDL Example . . . . . . . . . . . . . . . . . . . . . . . . . . . . . . . . . 45
The Experiment Description Language (EDL) (Active Perception Lab, Boston University) is a programming language for describing psychophysical vision experiments in a compact, clear format. It makes
it possible for experimenters without deep programming experience to write complicated experiments
using the full power of EMIL’s display and real-time interaction.
EDL programs, which describe the experimental procedure to perform, are implemented as Finite
State Machines (FSMs), in which a set of states, each identifying a unique phase of the procedure, is
connected by a set of conditions that regulate the transitions among states.
5.1 A very simple EDL program
The simple program below shows a EDL program which will just print out a message. Although the
program is very simple, a few points are worthy of note:
• Most EDL programs are in lower case letters. As matter of fact, EDL is a case-sensitive language,
that is, it recognizes a lower case letter and its upper case equivalent as being different.
33
CHAPTER 5. EDL LANGUAGE
34
• Comments are often added to make a EDL program more readable. The slash/star (/* .. */)
combination is used in EDL for comment delimiters. The first slash star combination introduces
the first comment and the star slash at the end of the first line terminates this comment. EDL
supports also // as an inline comment, as it can be used on any line and is delimited by the newline
character (return).
• Every EDL program contains a state declaration called begin, and it represent the starting point
of the program. The two curly brackets after the declaration of the state begin represent the
beginning and end of the state. Curly brackets in EDL are used to group statements together. Such
a grouping is known as a compound statement or a block.
• Upon entering the state begin, the enter event is triggered, and its code executed. The first
command in this example prints the string “Hello, world!”.
• Unlike in other programming languages, the statement that ends the program has to be clearly
stated. In fact, the other command present in the program, the instruction jump, is an unconditional state transition to the final default state end. This state is a placeholder state that causes
program termination when jumped to.
state begin {
event enter {
// Print out a greeting
print (“Hello, world!”);
/* Quit the program. This type of comment can
be extended to more than one line */
jump (end );
}
}
5.2 Basic elements of EDL
5.2.1
Names in EDL
Before you can do anything in any language, one must know how to name an entity. An identifier is
applied to all variables, states, event handlers. In EDL, an identifier is a combination of alphanumeric
characters, the first being a letter of the alphabet or an underscore character, and the remainder consists
of letters of the alphabet, digits, and underscore. EDL recognizes upper and lower case characters as
being different. Finally, one is not allowed to use EDL’s keywords as variable names. Examples of legal,
unique variable names include:
x
x1
POWER
result
x2
Power
movement
out file
Gamma
amplitude
max amplitude
Power
CHAPTER 5. EDL LANGUAGE
5.2.2
35
Constant and variable types
Variables
In EDL, a variable must be declared before it can be used. Variables can be declared at the beginning of
a state, in which case they are local variables, or at the beginning of the EDL program, in which case
they are global variables.
A declaration begins with the type, followed by the name of the variable. It can also be initialized
when it is declared, which is done by adding an equals sign and the required value after the declaration.
EDL provides a useful range of types, such as integer, float, string, and boolean. Variables
may be left uninitialized, in which case integers and floats will default to 0, strings to the empty string
“”, and booleans to false. For example:
integer a;
float b = 0.5;
string c = “Hello”;
boolean d = true ;
// Integer variables can assume values −231 through +231 − 1
/* Float variables can assume values −1.79E + 308 through 1.79E + 308 */
// Boolean variables can assume only values true and false
If the definition of a variable is preceded by the keyword const, the assigned value to the variable
cannot be modified inside the program. For example:
const integer f ive = 5;
const string name = “J. Random Hacker”;
const float pi = 3.14159;
const boolean f oo = true ;
Images and vectors of images
A special type of constant identifier is image, and its vector form multiImage. A constant of type
image binds the name of the constant to a file which contains the image itself, and it is used to display
images during an experiment without referring directly to the physical position on the PC.
An constant of type multiImage, instead, is a container that may hold any number of images, only
one of which can be displayed at a time. The particular image to be displayed can be chosen by index or
randomly.
A noisy modifier can be applied to both image and multiImage. This form will apply random gray
noise selected uniformly between the highest and lowest gray values in each image. The argument of the
noisy modifier is an integer between 0 and 100 indicating the percentage of image pixels to replace with
noise.
image x (“picture.tga”);
noisy (50)image y (“picture.tga”); // 50% replaced by noise
multiImage z (“p1.tga”, “p2.tga”, 5, “p3.tga”);
/* multiImage holding one copy each of p1 and p3, and 5 copies of p2 */
noisy (20)multiImage w (“p6.tga”, 10); // multiImage with random noise applied
It is possible to select particular images within multiImage to be displayed (for further details see
reference in Section 5.5):
display (my imagevector (2));
display (my nimagevector (4));
where the index of the vector must be an integer less than the size of the vector (i.e. counting from zero).
CHAPTER 5. EDL LANGUAGE
5.2.3
36
Expressions, operators, and built-in constants
Assignment Statement
The easiest example of an expression is the assignment statement. An expression is evaluated, and the
result is saved in a variable:
y = (m ∗ x ) + c ;
This assignment will save the value of the expression in variable y.
Arithmetic operators
EDL introduces a number of common arithmetic operators for each type of variable:
Operator
Description
+
Addition
Subtraction
*
Multiplication
/
Division
%
Modulo reduction (remainder from integer division)
Multiplication, division, and modulo reduction will be performed before addition or subtraction in any
expression. Brackets can be used to force a different order of evaluation to this. Where division is
performed between two integers, the result will be an integer, with remainder discarded. Operations
between integers and floats will result in automatic casting of the integer to a float. Modulo reduction
is only meaningful between integers. If a program is ever required to divide a number by zero, this will
cause an error.
Comparison
EDL, like other programming languages, has operators to compare variables and constants:
Operator
Description
==
Equal to
>
Greater than
<
Less than
>=
Greater than or equal to
<=
Less than or equal to
!=
Not equal to
Note that == is used in comparisons and = is used in assignments. Comparison operators are used in
expressions like: x == y , i > 10, a + b != c . In the last example, all arithmetic is done before any
comparison is made.
CHAPTER 5. EDL LANGUAGE
37
Logical Connectors
EDL allows to combine conditions using relational operators:
Operator
Description
&&
And
||
Or
!
Not
In EDL these logical connectives employ a lazy evaluation technique. They evaluate their left hand
operand, and then only evaluate the right hand one if this is required. Clearly, false && <anything> is
always false, true || <anything> is always true. In such cases the second test is not evaluated.
Here is an example of the use of logical connectors:
boolean Result = (x < 20) && (x >= 10);
if (!Acceptable || y < 10)
print (“Not Acceptable”);
Built-in functions
Some common mathematical functions are accessible through EDL.
Floating-Point functions:
Function
floor(x)
ceil(x)
sqrt(x)
abs(x)
fabs(x)
rand(x, y)
round(x)
Description
Calculates the floor (greatest integer less than or equal to) value of a
number
Calculates the ceiling (smallest integer greater than or equal to) value of
a number This is the result of rounding up
Calculates the square root of a floating-point number
Takes the absolute value of an integer
Takes the absolute value of an floating-point
Generates a pseudo-random number within x and y from a uniform distribution
Calculates the closest integer in value to the argument
Logarithmic functions:
Function
exp(x)
log(x)
log10(x)
pow(x, y)
Description
Calculates the exponential function value of a floating-point number
Calculates the natural logarithm (base e) of a floating-point number
Calculates the common logarithm (base 10) of a floating-point number
Calculates the value of x raised to the power of y, xy
CHAPTER 5. EDL LANGUAGE
38
Trigonometric functions:
Function
cos(x)
sin(x)
tan(x)
acos(x)
asin(x)
atan(x)
Description
Calculates the cosine of a floating-point number, in arcmin
Calculates the sine of a floating-point number, in arcmin
Calculates the tangent of a floating-point number, in arcmin
Calculates the arccosine of a floating-point number, in arcmin
Calculates the arcsine of a floating-point number, in arcmin
Calculates the arctangent of a floating-point number, in arcmin
Strings
EDL supports also some basic operations on the strings:
Function
length(s)
empty(s)
clear(s)
getAt(s)
setAt(s)
compare(s1, s2)
compareNoCase(s1, s2)
extract(s, b, l)
makeUpper(s)
makeLower(s)
format(f, a1, a2, ...)
find(c, s)
reverseFind(c, s)
Description
Returns the number of characters in a string
Tests whether a string contains no characters
Forces a string to have 0 length
Returns the character at a specified position
Sets a character at a specified position
Compares (lexicographic order) two strings (case sensitive)
Compares (lexicographic order) two strings (case insensitive)
Extracts the l characters of a string beginning from position b
Converts all the characters in the string to uppercase characters
Converts all the characters in the string to lowercase characters
Format the string (refer to the command sprintf of C)
Finds a character or substring inside a larger string
Finds a character inside a larger string; starts from the end
Built-in EMCD variables
Some useful read-only integer and boolean variables are provided by EDL during the execution of an
experiment:
Variable
pos h
pos v
vel h
vel v
acc h
acc v
jpad LH
jpad LV
jpad RH
jpad RV
Description
Current horizontal eye position
Current vertical eye position
Current horizontal eye position velocity
Current vertical eye position velocity
Current horizontal eye position acceleration
Current vertical eye position acceleration
Horizontal position of the left joypad joysticks (PS2 joypads)
Vertical position of the left joypad joysticks (PS2 joypads)
Horizontal position of the right joypad joysticks (PS2 joypads)
Vertical position of the left joypad joysticks (PS2 joypads)
CHAPTER 5. EDL LANGUAGE
Variable
saccade amplitude
saccade duration
fixation duration
in blink
in saccade
39
Description
Amplitude of last saccade
Duration of last saccade
Duration of last fixation
true if the subject is in a blink
true if the subject is in a saccade
5.3 Entity statements
5.3.1
States
A EDL program may consist of many states, each corresponding to a single stage of the experiment.
At any point in time, a running program is in a single state, which defines all program behavior at that
instant. For example, one state may display a fixation dot, while the next displays a stimulus that is
stabilized to the subject’s eyes, while a third counts saccades.
Each state is characterized by its name, a set of local variables, and a set of event handlers:
state < name > {
< local variable declarations >
< event handler 1 >
< event handler 2 >
< event handler 3 >
...
}
In any EDL program, begin and end states represent the initial and final state of the experiment. The state
begin must be always defined, while it is illegal to define a state named end (it is a placeholder provided
by the EDL runtime).
5.3.2
Event and Event handlers
When certain system event occur or conditions are satisfied, EDL asserts that an event has occurred, and
searches the current state for a corresponding event handler to execute. An event handler consists of a
list of EDL commands, related to the event is executed sequentially. Each state possesses a certain set of
handlers which are active only when that state is active. Only one event handler at the time can be active.
The general EDL form for an event handlers is as following:
event < event name > (< arguments >) {
< command list >
...
}
CHAPTER 5. EDL LANGUAGE
40
5.4 Flow-control statements
if-else
The if-else statement is a two-way decision statement. Its general form is:
if (< condition >)
< EDL command 1 >
else
< EDL command 2 >
The else portion is optional. If the <condition> evaluates to true then <EDL command 1> is executed.
If there is an else statement and the <condition> evaluates to false <EDL command 2> is executed.
EDL commands are terminated by a semicolon “;”, and can grouped into blocks by enclosing them in
curly brackets. For example:
if (p == 1)
r = p ∗ 2 + q;
if (p == 1) {
r = p ∗ 2 + q;
p = p ∗ 2;
}
if (p == 1) {
r = p ∗ 2 + q;
p = p ∗ 2;
} else {
r = p ∗ 3 + q;
p = p ∗ 3;
}
Because the statement in the else part can also be an if statement, a construct such as shown below is
possible EDL to create a multiple choice construct.
if (< condition 1 >)
< EDL command 1 >
else if (< condition 2 >)
< EDL command 2 >
else if (< condition 3 >)
< EDL command 3 >
else if (< condition 4 >)
< EDL command 4 >
CHAPTER 5. EDL LANGUAGE
41
5.5 Reference
5.5.1
Events
Blink end
Handler
Arguments
: event blinkEnd {}
: none
The eyetracker asserts a blink signal when it loses track of the subject’s eye and detects an eyelid instead.
The DSP board reports the status of this signal, and EDL activates the event handler in the current state
when the signal falls (if the handler has been defined).
Blink start
Handler
Arguments
: event blinkStart {}
: none
The eyetracker asserts a blink signal when it loses track of the subject’s eye and detects an eyelid instead.
The DSP board reports the status of this signal, and EDL activates the event handler in the current state
when the signal rises (if the handler has been defined).
Enter into state
Handler
Arguments
: event enter {}
: none
Called before other state event handlers are activated.
Exit from state
Handler
Arguments
: event exit {}
: none
Called after current state event handlers are deactivated, but before the next state’s enter event is
triggered.
Joypad events
: event joypad(<button>, <status>) {}
:
<button> Identification of the joypad’s button
<status> on or off
Handler
Arguments
When joypad’s buttons are pressed or released, the event handler in the current state is triggered. The indicated button must belong to the set {L1, L2, R1, R2, UP, DOWN, LEFT, RIGHT, TRIANGLE, SQUARE,
CIRCLE, X, START, SELECT, JOYL, JOYR}. The second argument indicates whether the event should
be triggered when the button is pressed (on) or released (off).
CHAPTER 5. EDL LANGUAGE
42
Saccade end
: event saccadeEnd {}
: none
Handler
Arguments
When the board tags the end of a saccade, EDL triggers this type of event handler in the current state (if
previously defined).
Saccade start
: event saccadeStart {}
: none
Handler
Arguments
When the board tags the beginning of a saccade, EDL triggers this type of event handler in the current
state (if previously defined).
Timer events
: event timer(<timer ID>) {}
:
<timer ID> Identification number of the timer
Handler
Arguments
When the timer with the specified identification expires, the event handler in the current state is triggered.
Timer events are local to the current state, and are deleted when a state transition occurs.
5.5.2
Commands
break
Forms
Arguments
: break
: none
break;
This command stops the execution of the current event handler.
destabilize
: destabilize(<image>)
: destabilize(my image); destabilize(my multiImage);
:
<image> Image to stabilize
Forms
Example
Arguments
This command turns off stabilization for the indicated image. The image will be left at the last position
of the subject’s eyes, shifted by the offset if defined in the stabilize command. If the indicated image is
already destabilized, this command has no effect.
display
Forms
Example
: display(<h>, <v>, <image>)
: display(0 px, 0 px, my image);
CHAPTER 5. EDL LANGUAGE
Arguments
43
:
<h>
<v>
<image>
Horizontal coordinates
Vertical coordinates
Image variable to display
Displays the specified image or images at the specified location. Coordinates can be indicated in arcminutes (arcmin), degrees (deg), or pixels (px). If the image is already displayed, it is moved to the
specified location. If the indicated image object is a multiImage, an image is selected at random from
its set and displayed.
hide
: hide(<image>)
: hide(my image); hide(my multiImage);
:
<image> Image variable to hide
Forms
Example
Arguments
This command hides the indicated image, or multiImage. If it is already hidden, this command has
no effect. If an multiImage is displayed by index, one hides it by calling the command on the entire
variable.
jump
: jump(<state>);
: jump(end);
:
<state> Name of the state destination
Forms
Example
Arguments
This command causes the EDL to jump to the specified state. EDL will perform the following sequence
of operations:
1. Trigger the current state’s exit event
2. Deactivate the current state’s event handlers
3. Trigger the next state’s enter event
4. Activate the next state’s event handlers.
print
: print(<argument1>, <argument2>, ...)
: print(7, ‘‘ate’’, x != 5); print(<state>); print(<image>);
:
<argument> Any kind of EDL entity
Forms
Example
Arguments
This command prints on the console any EDL literal or variable in a human-readable form. Commaseparated arguments are printed with spaces separating them. Each print command prints a newline after
its arguments. An empty command print() simply prints a newline.
CHAPTER 5. EDL LANGUAGE
44
setTimer
: setTimer(<timer ID>, <time>)
: setTimer(0, 5 sec); setTimer(1, 100 ms); setTimer(2, 5 frs);
:
<timer ID> Identification number of the timer
<time>
Time to expire
Forms
Example
Arguments
This command activates timers that trigger state timer events when they expire. The <timer ID> passed
to this command must match the <timer ID> of a timer event handler in the current class. Time can
be indicated in seconds (sec), milliseconds (ms), or frames (frs). The event will trigger as soon as
possible after the indicated time has elapsed, but the system’s time granularity may be one frame if the
system is not busy, or several frames if it overloaded.
stabilize
: stabilize(<image>, <h offset>, <v offset>)
: stabilize(my image, 100 arcmin, -200 arcmin);
:
<image>
Image to stabilize
<h offeset> Horizontal offset
<v offeset> Vertical offset
Forms
Example
Arguments
Stabilizes the indicated image to the subject’s eyes with an optional offset. Offset can be indicated in
arcminutes (arcmin), degrees (deg), or pixels (px). If the indicated image is already stabilized, this
command will modify the offset if necessary. If the indicated image is currently displayed, this command takes effect immediately. When the image is hidden, stabilization is activated but the effect is not
shown until the image is displayed. If an images is stabilized and display is called again to change
the displayed image, the newly-displayed image will also be stabilized.
CHAPTER 5. EDL LANGUAGE
45
Figure 5.1 – FSM representation of the experiment that measures the difference in a subject’s perception when a
stabilized stimulus is presented as opposed to a stationary one.
5.6 Complete EDL Example
This section includes a complete EDL example program whose functionality is similar to that of a real
psychophysical experiment originally performed using a very complex C++ program.
The purpose of this experiment is to measure the difference in a subject’s perception when a stabilized
stimulus is presented as opposed to a stationary one. Two stimuli are used: a right-facing and left-facing
gray bar, and both are obscured by random noise. A single trial consists of several steps (see FSM
representation in Figure 5.1):
1. A fixation dot is displayed for 1.57 s.
2. A set of arcs is displayed at a random location a fixed distance from screen center, for 240 ms.
3. The system then hides the fixation dot and the arcs, and waits for the subject to make a saccade to
the region in which the arcs appeared and enter a visual fixation.
4. A stimulus is then displayed, tilted right or left, chosen randomly. The stimulus is displayed for
500 ms. Depending on a flag set by the programmer, the stimulus is either stationary at the arcs’
old location, or stabilized, following the subject’s gaze.
5. A mask is then displayed for 1.33 s, at the same location and in the same mode as the stimulus.
6. The system then waits for the subject to indicate whether they saw a left- or right-tilted bar, and
prints to the console if the response was correct or incorrect.
7. This process repeats for a certain number of trials.
CHAPTER 5. EDL LANGUAGE
// Constant definitions - Edit here to change the parameters of the experiment
const integer MaxTrials = 40; // How many trials to run
const integer NoisyImages = 25; // The number of noisy images to generate
const integer NoiseLevel = 80; // The percentage of image pixels to be replaced by noise
const boolean Stabilization = true ; // True for stabilized stimuli, false for unstabilized
const integer CueArcsRadius = 50; // Radius of the arcs
const integer CueArcsDistance = 400; // Distance from screen center to the arcs
// Image definitions
image FixationDot (“dot.tga”);
image CueingArcs (“arcs.tga”);
noisy (NoiseLevel ) multiImage LeftStimulus (“leftbar.tga”, N oisyImages);
noisy (NoiseLevel ) multiImage RightStimulus (“rightbar.tga”, N oisyImages);
image Mask (“mask.tga”);
// Global variables
integer CurrentTrial = 0; // The number of the current trial
integer CuePosX ; // Position of the cueing arcs
integer CuePosY ;
integer CurrentStimulus ; // 0 for left, 1 for right
// Begin - This state displays a fixation dot at screen center for 1.57 seconds
// It also checks whether we have completed our quota of trials
state begin {
event enter {
// Exit the program if we have run enough trials
CurrentTrial = CurrentTrial + 1;
if (CurrentTrial == MaxTrials ) jump (end );
display (0, 0, FixationDot ); // Display the fixation dot at screen center
setTimer (0, 1570 ms); // Set a timer to jump to the next state
}
// Jump to the cueing state
event timer (0) {
jump (CueState );
}
}
// This state displays cueing arcs for 240 ms.
state CueState {
float Angle ;
event enter {
// Choose a position for the arcs
Angle = rand (0, 360 ∗ 60);
CuePosX = round (CueArcsDistance ∗ cos (Angle ));
CuePosY = round (CueArcsDistance ∗ sin (Angle ));
display (CuePosX , CuePosY , CueingArcs ); // Display the arcs at that position
setTimer (0, 240 ms); // Set a timer to jump to the next state
}
46
CHAPTER 5. EDL LANGUAGE
// Jump to the saccade state
event timer (0) {
jump (SaccadeState );
}
// Clean up displayed images
event exit {
hide (FixationDot );
hide (CueingArcs );
}
}
// This state waits for the subject’s gaze to stabilize inside the spot where the arcs were
state SaccadeState {
boolean Check ;
// Set an initial timer event
event enter {
setTimer (0, 1 f rs);
}
// Every frame, check whether we are fixating inside the arcs, and jump to the next state if so
event timer (0) {
Check = sqrt (pow (PosX − CuePosX , 2) + pow (PosY − CuePosY , 2)) <= CueArcsRadius );
if (Check && !inSaccade ) jump (StimulusState );
setTimer (0, 1 f rs);
}
}
// This state displays the stimulus for 500 ms
state StimulusState {
event enter {
// Randomly decide which stimulus to display
CurrentStimulus = rand (0, 1);
print (LeftStimulus , PosX , PosY , CurrentStimulus == 0);
print (RightStimulus , PosX , PosY , CurrentStimulus == 1);
// Stabilize if that parameter is set
stabilize (LeftStimulus , Stabilization );
stabilize (RightStimulus , Stabilization );
setTimer (0, 500 ms); // Set the expiration timer
}
// Jump out when time expires
event timer (0) {
jump (MaskState );
}
// Clean up images
event exit {
hide (LeftStimulus );
hide (RightStimulus );
destabilize (LeftStimulus );
47
CHAPTER 5. EDL LANGUAGE
48
destabilize (RightStimulus );
}
}
// This state displays the mask for 1333 ms
state MaskState {
event enter {
// Display the mask and set the expiration timer
display (PosX , PosY , Mask );
stabilize (Mask , Stabilization );
setTimer (0, 1333ms);
}
// Jump out when time expires
event timer (0) {
jump (WaitState );
}
// Clean up images
event exit {
hide (Mask );
destabilize (Mask );
}
}
// This state waits for the subject to indicate whether they saw a right- or left-facing bar, and prints out the results
state WaitState {
// React to joypad button presses - left or right - and return to the beginning
event joypad (L1, on ) {
// Print out the actual orientation of the bar, followed by subject response and correct flag
print (CurrentStimulus , 0, CurrentStimulus == 0);
jump (begin );
}
event joypad (R1, off ) {
// Print out the actual orientation of the bar, followed by subject response and correct flag
print (CurrentStimulus , 1, CurrentStimulus == 1);
jump (begin );
}
}