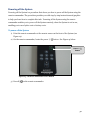
1
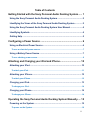
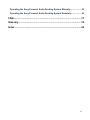
Sony Personal Audio Docking System
Model RDP-M5iP
User Manual
Prepared By: Lorraine McGee
Date: 2013/04/14
For: TWR2004
i
Table of Contents
Getting Started with the Sony Personal Audio Docking System ...... 1
Using the Sony Personal Audio Docking System ........................................... 2
Identifying the Views of the Sony Personal Audio Docking System .............. 2
Using the Sony Personal Audio Docking System User Manual ..................... 4
Identifying Symbols ........................................................................................... 4
Getting Help ....................................................................................................... 5
Configuring a Power Source ................................................................ 6
Using an Electrical Power Source .................................................................... 6
To use an electrical power source ....................................................................................... 7
Using a Battery Power Source .......................................................................... 7
To use a battery power source............................................................................................. 8
Attaching and Charging your iPod and iPhone ................................ 10
Attaching your iPod ......................................................................................... 10
To attach your iPod ............................................................................................................. 11
Attaching your iPhone ..................................................................................... 12
To attach your iPhone......................................................................................................... 12
Charging your iPod.......................................................................................... 13
To charge your iPod............................................................................................................ 14
Charging your iPhone...................................................................................... 14
To charge your iPhone ....................................................................................................... 14
Operating the Sony Personal Audio Docking System Manually ..... 15
Powering on the System ................................................................................. 15
To power on the System ..................................................................................................... 16
ii
Playing your Music .......................................................................................... 16
To play your music.............................................................................................................. 17
Pausing/Un-pausing your Music..................................................................... 18
To pause/un-pause your music.......................................................................................... 18
Adjusting the Volume for your Music ............................................................. 18
To adjust the volume for your music................................................................................. 19
Powering off the System ................................................................................. 20
To power off the System ..................................................................................................... 20
Operating the Sony Personal Audio Docking System Remotely .... 21
Powering on the System ................................................................................. 21
To power on the System ..................................................................................................... 22
Playing your Music .......................................................................................... 23
To play your music.............................................................................................................. 24
Selecting a Track to Play from your iPod or iPhone ..................................... 24
To select a track to play from your iPod or iPhone .......................................................... 25
Pausing/Un-Pausing your Music .................................................................... 27
To pause/un-pause your music.......................................................................................... 28
Adjusting the Volume for your Music ............................................................. 28
To adjust the volume for your music................................................................................. 29
Powering off the System ................................................................................. 30
To power off the System ..................................................................................................... 30
Troubleshooting .................................................................................. 32
Configuring a Power Source ........................................................................... 33
Attaching and Charging your iPod or iPhone ................................................ 34
iii
Operating the Sony Personal Audio Docking System Manually .................. 35
Operating the Sony Personal Audio Docking System Remotely.................. 36
FAQs ..................................................................................................... 37
Glossary ............................................................................................... 39
Index ..................................................................................................... 40
iv
Getting Started with the Sony Personal Audio Docking System
The Sony Personal Audio Docking System (hereinafter called “the System”), is an electronic
audio system used to attach your iPod or iPhone to in order to listen to music stored on your
iPod or iPhone. You can do the following with the System:
•
Listen to music stored on your iPod or iPhone (using the System’s built-in speakers)
•
Use an electrical power source or a battery power source
•
Charge your iPod or iPhone
•
Operate the System manually or remotely (using the remote commander)
You get the following accessories with the System:
•
Remote commander
•
AC power adapter
•
Universal dock adapter (12) for iPhone
•
Universal dock adapter (15) for iPhone 3G/iPhone 3GS
•
Universal dock adapter (19) for iPhone 4
You can use the following iPod and iPhone models with the System:
•
iPod touch 4th generation
•
iPod touch 3rd generation
•
iPod touch 2nd generation
•
iPod touch 1st generation
•
iPod nano 5th generation (video camera)
•
iPod nano 4th generation (video)
•
iPod nano 3rd generation (video)
•
iPod nano 2nd generation (aluminum)
•
iPod 5th generation (video)
•
iPod classic
•
iPhone 4
•
iPhone 3G and 3GS
•
iPhone
1
Using the Sony Personal Audio Docking System
You require either an iPod or an iPhone and either batteries or a 120 volt AC electrical outlet
to use the System.
Identifying the Views of the Sony Personal Audio Docking System
Figure 1 - Front View of the System
Figure 2 - Back View of the System
2
Figure 3 - Top View of the System
Figure 4 - Bottom View of the System
3
Using the Sony Personal Audio Docking System User Manual
This user manual is an introductory manual to instruct new owners on how to use the System
to listen to music stored on their iPod or iPhone. The user manual does not include
instructions on how to use an iPod or an iPhone.
The user manual is organized into the following main sections:
•
Getting Started with the Sony Personal Audio Docking System
•
Configuring a Power Source
•
Attaching and Charging your iPod or iPhone
•
Operating the Sony Personal Audio Docking System Manually
•
Operating the Sony Personal Audio Docking System Remotely
•
Troubleshooting
•
FAQs
•
Glossary
•
Index
The above-noted main sections all have sub-sections, which provide more information for the
procedures that follow. Under each sub-section are instructional steps to perform that
specific procedure.
Identifying Symbols
Throughout this user manual you will see the three symbols noted below. Please take note of
the meaning of each symbol before proceeding.
This icon is used to indicate a good tip (an alternative way to do the procedure).
This icon is used to indicate a note (additional information explaining an aspect of the
procedure).
This icon is used to indicate caution (a warning against damage to the System).
4
Getting Help
This manual contains a troubleshooting section and an FAQ section where you can get
additional help.
The troubleshooting section contains help on:
•
Configuring a Power Source
•
Attaching and Charging your iPod or iPhone
•
Operating the Sony Personal Audio Docking System Manually
•
Operating the Sony Personal Audio Docking System Remotely
The FAQ section answers the following questions:
•
How do I replace one of the universal dock adapters if one of them gets damaged?
•
How long do batteries usually last for the System?
•
How long does the battery for the remote commander last?
•
If I use rechargeable batteries in the System, does the System recharge these batteries?
If you encounter problems with the System not covered by either the Troubleshooting or FAQ
sections of this user manual, you can contact Sony’s technical support at:
Telephone Number: 1-888-862-9212
You can also search the FAQs on the following site, or send an email to Sony’s technical
support from the following site:
http://www.justanswer.com/sip/sony?r=ppc|ga|4|Computer+%2D+Top+Brands|Sony+%2D
+1&JPKW=sony%20help&JPDC=S&JPST=&JPAD=11041920300&JPMT=b&JPNW=g&JPA
F=txt&JPCD=20120207&JPRC=1&JPOP=Darren_Andrew9sec_Trans&gclid=CI_d9cR9bUCFcme4AodN30AxA
5
Configuring a Power Source
This section of the user manual tells you about the different power sources available for use
with the System, how to configure each power source, and how you can use each power source
to your benefit.
There are two power sources available for use with the System–an electrical power source and
a battery power source. Configuring an electrical power source allows you to use the System
anywhere there is an electrical outlet. Configuring a battery power source allows you to use
the System anywhere. Using an electrical power source enables you to use the System for a
longer period of time, as you are not limited by the life of the batteries. Using a battery power
source, however, allows you the freedom to go anywhere you want with the System (e.g., you
can listen to your music in the backyard or anywhere there is no electrical power outlet).
The purpose of this section is to show you how to configure each power source. You will learn
about:
•
Using an electrical power source
•
Using a battery power source
Using an Electrical Power Source
Using an electrical power source is a procedure that shows you how to configure an electrical
power source for the System. The procedure provides you with step-by-step instructions and
graphics to help you learn how to complete this task. Using an electrical power source enables
you to use the System from any room in your home that has a 120 volt electrical power outlet–
helping you save money on battery costs.
6
To use an electrical power source
1) Looking at the back of the System, plug the female end of the AC power adapter into
the DC IN 6V jack on the back of the System. See Figure 5 below.
DC IN 6V
Jack
Prong
End
Female
End
AC Power
Adapter
Figure 5 - AC Power Adapter
2) Plug the prong end of the AC power adapter into a 120 volt electrical power outlet. See
Figure 5 above.
The System is now configured to use an electrical power source.
If you are using an electrical power source with the System, ensure that the System is
unplugged from the electrical power outlet during a lightning storm to prevent damage to the
System.
Using a Battery Power Source
Using a battery power source is a procedure that shows you how to configure a battery power
source for the System. The procedure provides you with step-by-step instructions and
graphics to help you learn how to complete this task. Using a battery power source enables
you to configure the System to use it anywhere you want–providing portability for your music
system.
7
To use a battery power source
1) Looking at the back of the System, lay the System on its front so the bottom panel is
exposed.
You see a left battery cover and a right battery cover, which cover the two battery
enclosures. See Figure 6 below.
Left Battery
Right Battery
Cover
Cover
Outer Clip
Outer Clip
Figure 6 - Battery Covers and Outer Clips
2) Push in on the outer clips for each battery cover. See Figure 6 above.
3) Pull off the battery covers for each battery enclosure.
You see the inside of the battery enclosures.
8
4) Line up the batteries according to the + symbols inside the battery enclosure. See
Figure 7 below.
+ Symbol
+ Symbol
Figure 7 - Inside the Battery Enclosure
The System requires four Sony AAA/LR03 alkaline batteries or four Sony NH-AAA
rechargeable batteries. The batteries are not supplied with the System.
5) Insert the batteries into both battery enclosures.
6) Line up each battery cover over its battery enclosure.
7) Push in on each battery cover to snap it back into place.
The System is now configured to use a battery power source.
If you are using a battery power source with the System, do not expose the System to
excessive heat such as sunshine, fire, or the like for long periods of time–doing so could cause
the System to catch on fire or cause other damage to the System.
To be able to use a battery power source with the System, you have to ensure that the AC
power adapter is disconnected from the back of the System.
To preserve the life of the batteries, remove the batteries from the System when you are
using an electrical power source.
9
Attaching and Charging your iPod and iPhone
This section of the user manual tells you how to attach an iPod or iPhone to the System, how
to charge your iPod or iPhone using the System, and how you can use this to your benefit.
Attaching your iPod or iPhone to the System allows you to listen to music stored on your iPod
or iPhone through the System’s built-in speakers–eliminating the need to wear ear buds.
Charging your iPod or iPhone while it is attached to the System ensures that your iPod or
iPhone is always charged and ready for use without the System. For example, if you lose your
USB to AC adapter for your iPod or iPhone, you can just attach the iPod or iPhone to the
System to charge it–enabling you to continue using your iPod or iPhone independent of the
System.
The purpose of this section is to show you how to attach and charge both an iPod and iPhone.
You will learn about:
•
Attaching your iPod
•
Attaching your iPhone
•
Charging your iPod
•
Charging your iPhone
Attaching your iPod
Attaching your iPod is a procedure that shows you how to attach your iPod to the System
(without using a universal dock adapter). The procedure provides you with step-by-step
instructions and graphics to help you learn how to complete this task. Attaching your iPod to
the System enables you to access the music stored on your iPod, so you can listen to your
music using the System’s built-in speakers.
10
To attach your iPod
1) Looking at the front of the System, line up your iPod with the docking tray connector in
the middle of the docking tray–ensuring your iPod is at the same angle as the docking
tray connector. See Figure 8 below.
Docking Tray
Docking
Connector
Tray
Figure 8 - Docking Tray Connector
2) Push your iPod down onto the docking tray connector.
3) Ensure that your iPod is securely fastened (e.g., that your iPod is pushed down all the
way and doesn’t move around).
Your iPod is now attached to the System.
A universal dock adapter does not come with the System, but you can contact the
manufacturer of your iPod to obtain one. If your iPod does not come with a universal dock
adapter, you can still attach your iPod to the System without using one (as shown in the
procedure above).
If you have a universal dock adapter that came with your iPod, follow the procedure
under “To attach your iPhone” to attach your iPod to the System.
11
Attaching your iPhone
Attaching your iPhone is a procedure that shows you how to attach your iPhone to the System
(using a universal dock adapter). The procedure provides you with step-by-step instructions
and graphics to help you learn how to complete this task. Attaching your iPhone to the
System enables you to access the music stored on your iPhone, so you can listen to your music
using the System’s built-in speakers.
To attach your iPhone
1) Select one of the three universal dock adapters for the type of iPhone you have (see the
note below for details).
There are three universal dock adapters that come with the System–one for an iPhone,
one for an iPhone 3G/iPhone 3GS, and one for an iPhone 4. On the underside of each of the
universal dock adapters is a number to indicate which universal dock adapter goes with which
type of iPhone. The iPhone uses universal dock adapter number 12, the iPhone 3G/iPhone
3GS uses universal dock adapter number 15, and the iPhone 4 uses universal dock adapter
number 19.
2) Looking at the front of the System, line up the universal dock adapter with the docking
tray (the docking tray connector fits through the opening in the middle of the universal
dock adapter).
3) Push the universal dock adapter down into the docking tray until you hear it click into
place.
12
The universal dock adapter is now in place. See Figure 9 below.
Universal Dock
Adapter in
Docking Tray
Docking Tray
Connector
Universal
Dock Adapters
Figure 9 - Universal Dock Adapters and Docking Tray Connector
4) Line up your iPhone with the docking tray connector in the middle of the docking tray.
See Figure 9 above.
5) Push your iPhone down onto the docking tray connector.
6) Ensure that your iPhone is securely fastened (e.g., that your iPhone is pushed down all
the way and doesn’t move around).
Your iPhone is now attached to the System.
Charging your iPod
Charging your iPod is a procedure that shows you how to charge your iPod using the System.
The procedure provides you with step-by-step instructions to help you learn how to complete
this task. Charging your iPod using the System enables you to charge your iPod if you have
lost your USB to AC adapter for your iPod.
13
To charge your iPod
1) Attach your iPod to the System (see “To attach your iPod” for detailed instructions).
2) Power on your iPod (see the manufacturer’s instructions for your iPod).
3) Power on the System either manually or remotely (see “To power on the System” under
either “Operating the Sony Personal Audio Docking System Manually” or “Operating
the Sony Personal Audio Docking System Remotely”).
Your iPod begins charging.
If the battery in your iPod is low, charge the iPod using the System for a couple of hours
before playing your music through the System–this will prevent any interruptions.
Charging your iPhone
Charging your iPhone is a procedure that shows you how to charge your iPhone using the
System. The procedure provides you with step-by-step instructions to help you learn how to
complete this task. Charging your iPhone using the System enables you to charge your iPhone
if you have lost your USB to AC adapter for your iPhone.
To charge your iPhone
1) Attach your iPhone to the System (see “To attach your iPhone” for detailed
instructions).
2) Power on your iPhone (see the manufacturer’s instructions for your iPhone).
3) Power on the System either manually or remotely (see “To power on the System” under
either “Operating the Sony Personal Audio Docking System Manually” or “Operating
the Sony Personal Audio Docking System Remotely”).
Your iPhone begins charging.
If the battery in your iPhone is low, charge the iPhone using the System for a couple of
hours before playing your music through the System–this will prevent any interruptions.
14
Operating the Sony Personal Audio Docking System Manually
This section of the user manual tells you about the basic operations that are available
operating the System manually, how to perform each operation, and how each operation can
be used to your benefit.
Operating the System manually allows you to perform basic operations such as: powering on
the System, playing your music, pausing/un-pausing your music, adjusting the volume for
your music, and powering off the System. You can transfer music to your iPod or iPhone from
CDs that you have bought or you can download music from the Internet onto your iPod or
iPhone. Using the System to play music stored on your iPod or iPhone gives you a lot more
options than just playing music from a CD source. You can play your music using the System
without having to use ear buds–reducing the chances of hearing loss. You can pause your
music, if you are interrupted. You can adjust the volume according to your situation (e.g., if
you are in the same room with the System, you can keep the volume low–if you are in a
different room from where the System is located, you can increase the volume to meet your
needs).
The purpose of this section is to show you how to use the System manually to perform basic
operations. You will learn about:
•
Powering on the System
•
Playing your music
•
Pausing/un-pausing your music
•
Adjusting the volume for your music
•
Powering off the System
Powering on the System
Powering on the System is a procedure that shows you how to manually power on the System.
The procedure provides you with step-by-step instructions and graphics to help you learn how
to complete this task. Powering on the System enables you to start using the System to enjoy
your music.
15
To power on the System
1) Looking at the top of the System, locate the power I /
button. See Figure 10 below.
Power I /
Button
OPR/BATT
Light
Figure 10 - Power Button and OPR/BATT Light
2) Press I /
.
3) Looking at the top of the System, confirm that the OPR/BATT light is green. See
Figure 10 above.
The System powers on.
You can also power on the System using the remote commander. See “To power on the
System” under the “Operating the Sony Personal Audio Docking System Remotely” section.
Playing your Music
Playing your music is a procedure that shows you how to play music stored on your iPod or
iPhone using the System. The procedure provides you with step-by-step instructions and
graphics to help you learn how to complete this task. Playing your music allows you to start
listening to music stored on your iPod or iPhone, without having to use ear buds.
16
To play your music
1) Attach your iPod or iPhone to the System (see the procedure under “To attach your
iPod” or “To attach your iPhone”).
2) Power on your iPod or iPhone (see the manufacturer’s instructions for your iPod or
iPhone).
3) Power on the System (see the procedure “To power on the System” above).
4) Looking at the top of the System, locate the play/pause
button. See Figure 11
below.
Play/Pause
Button
Figure 11 - Play/Pause Button
5) Press
.
The System begins playing the music.
If you want to select another track to play, you have to use your iPod or iPhone to scroll
and select the track. See the manufacturer’s instructions for your iPod or iPhone for details.
You can also play your music and select a track using the remote commander. See “To
play your music” and “To select a track to play from your iPod or iPhone” under the
“Operating the Sony Personal Audio Docking System Remotely” section.
17
Pausing/Un-Pausing your Music
Pausing/un-pausing your music is a procedure that shows you how to pause and un-pause
music you are playing through the System. The procedure provides you with step-by-step
instructions to help you learn how to complete this task. Pausing your music allows you to
stop playing your music if you are interrupted with a phone call–un-pausing your music
allows you to continue listening to your music.
To pause/un-pause your music
1) Looking at the top of the System, locate the play/pause
button (ensure the music
is playing).
2) Press
.
The music stops playing.
3) To un-pause the music, press
again.
The music starts playing again.
You can also pause/un-pause your music using the remote commander. See “To
pause/un-pause your music” under the “Operating the Sony Personal Audio Docking System
Remotely” section.
Adjusting the Volume for your Music
Adjusting the volume for your music is a procedure that shows you how to decrease and
increase the volume using the System. The procedure provides you with step-by-step
instructions and graphics to help you learn how to complete this task. Adjusting the volume
for your music enables you to decrease the volume if you are talking to someone on the phone,
as well as increase the volume if you move to another room or location.
18
To adjust the volume for your music
1) Looking at the top of the System, locate the minus
volume button and the plus
volume button. See Figure 12 below.
Minus Volume
Button
Plus Volume
Button
Figure 12 – Minus and Plus Volume Buttons
2) Press
continuously to decrease the volume to the desired level.
The volume decreases to the selected level.
3) Press
continuously to increase the volume to the desired level.
The volume increases to the selected level.
The OPR/BATT indicator flashes three times when the sound is set to either maximum or
minimum volume.
You can also adjust the volume using the remote commander. See “To adjust the volume
for your music” under the “Operating the Sony Personal Audio Docking System Remotely”
section.
19
Powering off the System
Powering off the System is a procedure that shows you how to manually power off the System.
The procedure provides you with step-by-step instructions and graphics to help you learn how
to complete this task. Powering off the System, when the System is not in use, enables you to
save hydro costs or battery costs.
To power off the System
1) Looking at the top of the System, locate the power I /
button. See Figure 13 below.
Power I /
Button
OPR/BATT
Light
Figure 13 - Power Button and OPR/BATT Light
2) Press I /
.
3) Looking at the top of the System, confirm that the green OPR/BATT light is off. See
Figure 13 above.
The System powers off.
You can also power off the System using the remote commander. See “To power off the
System” under the “Operating the Sony Personal Audio Docking System Remotely” section.
20
Operating the Sony Personal Audio Docking System Remotely
This section of the user manual tells you about the basic operations that are available
operating the System remotely, how to perform each operation, and how each operation can
be used to your benefit. Operating the System remotely using the remote commander is more
challenging than using the System manually.
With the remote commander you can do the same basic operations remotely that you can do
manually such as: powering on the System, playing your music, pausing/un-pausing your
music, adjusting the volume for your music, and powering off the System. One additional task
you can do using the remote commander, however, is selecting a track to play from your iPod
or iPhone. Using the System remotely allows you greater convenience and flexibility. You can
adjust the volume, select a different song, or perform another operation using the remote
commander from across the room. This saves you time and energy–you don’t have to keep
getting up out of your comfy chair to perform an operation.
The purpose of this section is to show you how to use the System remotely using the remote
commander to perform basic operations. You will learn about:
•
Powering on the System
•
Playing your music
•
Selecting a track to play from your iPod or iPhone
•
Pausing/un-pausing your music
•
Adjusting the volume for your music
•
Powering off the System
Powering on the System
Powering on the System is a procedure that shows you how to power on the System using the
remote commander. The procedure provides you with step-by-step instructions and graphics
to help you learn how to complete this task. Powering on the System with the remote
commander alleviates the need for you to get up out of your comfy chair to turn the System
on.
21
To power on the System
1) Point the remote commander at the remote sensor on the front of the System. See
Figure 14 below.
Remote
Sensor
Figure 14 - Remote Sensor
2) On the remote commander, locate the power I /
button. See Figure 15 below.
Power I /
Button
Figure 15 - Remote Commander Power Button
3) Press I /
on the remote commander.
22
4) Confirm that the OPR/BATT light is green on the front of the System. See Figure 16
below.
OPR/BATT
Light
Figure 16 - OPR/BATT Light
The System powers on.
If you use the remote commander to operate the System, ensure that you replace the
battery for the remote commander with a Sony CR2025 lithium battery only–use of another
battery may present a risk of a fire or an explosion, causing damage to the System.
You cannot power on the System using the remote commander if you are using a battery
power source–you have to use an electric power (e.g., the AC power adapter) to do this.
To preserve the life of the battery in the remote commander, remove the battery if you
are not using the remote commander.
Playing your Music
Playing your music is a procedure that shows you how to play music stored on your iPod or
iPhone using the remote commander. The procedure provides you with step-by-step
instructions and graphics to help you learn how to complete this task. Playing your music
using the remote commander alleviates the need to have to exert yourself–getting up off the
couch to hit the play button.
23
To play your music
1) Attach your iPod or iPhone to the System (see the procedure under “To attach your
iPod” or “To attach your iPhone”).
2) Power on your iPod or iPhone (see the manufacturer’s instructions for your iPod or
iPhone).
3) Power on the System (see “To power on the System” above).
4) Point the remote commander at the remote sensor on the front of the System (see
Figure 14).
5) On the remote commander, locate the play/pause
button. See Figure 17 below.
Play/Pause
Button
Figure 17 - Remote Commander Play/Pause Button
6) Press
on the remote commander.
The System begins playing the music.
Selecting a Track to Play from your iPod or iPhone
Selecting a track to play from your iPod or iPhone is a procedure that shows you how to select
tracks from your iPod or iPhone using the remote commander. The procedure provides stepby-step instructions and graphics to help you learn how to complete this task. Selecting a
track to play from your iPod or iPhone using the remote commander allows you the flexibility
of selecting or changing your music from across the room.
24
To select a track to play from your iPod or iPhone
To move forward:
1) Point the remote commander at the remote sensor on the front of the System (see
Figure 14).
2) On the remote commander, locate the forward
button. See Figure 18 below.
Forward
Button
Figure 18 - Remote Commander Forward Button
3) Press
once to go to the next track.
4) Press
and hold until you reach the desired track on your iPod or iPhone–when
you hear the track you want to listen to, release
. You can also locate the
desired track from viewing your iPod or iPhone.
The System begins playing the music you selected.
25
To move backward:
1) Point the remote commander at the remote sensor on the front of the System (see
Figure 14).
2) On the remote commander located the backward
button. See Figure 19 below.
Backward
Button
Figure 19 - Remote Commander Backward Button
3) Press
once to go back one track.
4) Press
and hold until you reach the desired track on your iPod or iPhone–when
you hear the track you want to listen to, release
. You can also locate the
desired track from viewing your iPod or iPhone.
The System begins playing the music you selected.
To use the menu, move up and down, and enter:
1) Point the remote commander at the remote sensor on the front of the System (see
Figure 14).
26
2) On the remote commander locate the MENU button. See Figure 20 below.
Up
Down
Button
Button
Menu Button
Enter Button
Figure 20 - Remote Commander Menu, Up, Down, and Enter Buttons
3) Press MENU to display the menu on your iPod or iPhone.
4) Press
to go to the top of the menu on your iPod or iPhone.
5) Press
to go to the bottom of the menu on your iPod or iPhone.
6) Press ENTER to select the track you want to listen to.
The System begins playing the music you selected.
Pausing/Un-pausing your Music
Pausing/un-pausing your music is a procedure that shows you how to pause and un-pause
your music using the remote commander. The procedure provides you with step-by-step
instructions and graphics to help you learn how to complete this task. Pausing and unpausing your music using the remote commander allows you to stop playing your music and
resume playing your music from across the room.
27
To pause/un-pause your music
1) Point the remote commander at the remote sensor on the front of the System (see
Figure 14).
2) On the remote commander, locate the play/pause
button (ensure the music is
playing). See Figure 21 below.
Play/Pause
Button
Figure 21 - Remote Commander Play/Pause Button
3) Press
on the remote commander.
The music stops playing.
4) To un-pause the music, press
again on the remote commander.
The music starts playing again.
Adjusting the Volume for your Music
Adjusting the volume for your music is a procedure that shows you how to decrease and
increase the volume using the remote commander. The procedure provides you with step-bystep instructions and graphics to help you learn how to complete this task. Adjusting the
volume for your music using the remote commander enables you to decrease the volume if
you are talking to someone on the phone, as well as increase the volume if you move to
another room or location–all done from your comfy chair.
28
To adjust the volume for your music
1) Point the remote commander at the remote sensor on the front of the System (see
Figure 14).
2) On the remote commander locate the minus
volume button and the plus
volume
button. See Figure 22 below.
Plus Volume
Button
Minus Volume
Button
Figure 22 - Remote Commander Minus and Plus Volume Buttons
2) Press
continuously on the remote commander to decrease the volume to the desired
level.
The volume decreases to the selected level.
3) Press
continuously on the remote commander to increase the volume to the desired
level.
The volume increases to the selected level.
The OPR/BATT indicator flashes three times when the sound is set to either maximum or
minimum volume.
29
Powering off the System
Powering off the System is a procedure that shows you how to power off the System using the
remote commander. The procedure provides you with step-by-step instructions and graphics
to help you learn how to complete this task. Powering off the System using the remote
commander enables you to power off the System remotely, when the System is not in use,
enabling you to save hydro costs or battery costs.
To power off the System
1) Point the remote commander at the remote sensor on the front of the System (see
Figure 14).
2) On the remote commander, locate the power I /
button. See Figure 23 below.
Power I /
Button
Figure 23 - Remote Commander Power Button
3) Press I /
on the remote commander.
30
4) Confirm the OPR/BATT light is off on the front of the System. See Figure 24 below.
OPR/BATT
Light
Figure 24 - OPR/BATT Light
The System powers off.
31
Troubleshooting
This section of the user manual tells you how to troubleshoot common problems you may
encounter while setting up or operating the System. Use this section to help you resolve
problems quickly–eliminating the need to contact Sony’s technical support. Problems you can
troubleshoot using this section include:
•
Power problems relating to the AC power adapter, batteries for the System, or
batteries for the remote commander
•
Connectivity problems relating to the iPod or iPhone
•
Audio problems or an operation not being performed
•
Remote commander problems such as, the System not responding
This section of the user manual is designed for advanced users, who have experience
troubleshooting technical equipment and who are familiar with electrical and battery
requirements.
This section of the user manual is organized according to the menu in the Table of Contents–
according to main section headings. Troubleshooting tips for the following main section
headings are covered:
•
Configuring a Power Source
•
Attaching and Charging your iPod or iPhone
•
Operating the Sony Personal Audio Docking System Manually
•
Operating the Sony Personal Audio Docking System Remotely
Under each main section heading is a table listing the sub-section of the main section that the
problem relates to. The problems are listed in the column on the left side of the table, the
possible causes are listed in the column in the middle of the table, and the resolutions to the
problems are listed in the column on the right side of the table.
If this section does not contain a troubleshooting tip for the problem you are having with the
System, you can contact Sony’s technical support. For contact information for Sony’s
technical support, see the “Getting Help” section under “Getting Started with the Sony
Personal Audio Docking System.”
32
Configuring a Power Source
Problem Relates To: Using an Electrical Power Source
Problem
Possible Causes
(contains a description of the (lists the possible causes for
problem)
the problem)
The System won’t power on
• The prong end of the AC
(either manually or using the
power adapter is not
remote commander)
securely connected to the
electrical power outlet
•
The female end of the AC
power adapter is not
securely connected to the
DC IN 6V jack on the back
of the System
•
The AC power adapter
cord is damaged (e.g., a
cut in the cord or chew
marks from a pet)
Problem Relates To: Using a Battery Power Source
The System won’t power on
• The batteries in the
(either manually or using the
System need to be
remote commander)
replaced
•
The batteries are not
inserted correctly
Resolution
(recommends resolutions for
the problem)
• Push the prong end of the
AC power adapter
securely into the electrical
power outlet
•
Push the female end of the
AC power adapter into the
DC IN 6V jack on the back
of the System
•
Contact Sony to replace
the AC power adapter if
the cord is damaged
•
Replace the batteries in
the System with new
batteries
Check the batteries in the
System and make sure
they are inserted correctly
•
33
Attaching and Charging your iPod or iPhone
Problem Relates To: Attaching your iPod and Attaching your iPhone
Problem
Possible Cause
Resolution
(contains a description of the (lists the possible causes for
(recommends resolutions for
problem)
the problem)
the problem)
When you press the play
• The iPod or iPhone is not • Remove the iPod or
button or volume buttons on
securely connected to the
iPhone from the docking
the System, the iPod or
docking tray connector
tray connector, and reseat
iPhone does not respond
the iPod or iPhone on the
connector
•
The iPod or iPhone is not
powered on
•
•
The prong end of the AC
power adapter is not
securely connected to the
electrical power outlet, or
the female end of the AC
power adapter is not
securely connected to the
DC IN 6V jack on the back
of the System
•
Push the prong end of the
AC power adapter
securely into the electrical
power outlet
•
Push the female end of the
AC power adapter into the
DC IN 6V jack on the back
of the System
Check your iPod or iPhone
to make sure it is powered
on
Problem Relates To: Charging your iPod and Charging your iPhone
The iPod or iPhone is not
• The iPod or iPhone is not • Remove the iPod or
charging
securely connected to the
iPhone from the docking
docking tray connector
tray connector, and reseat
the iPod or iPhone on the
connector
34
Operating the Sony Personal Audio Docking System Manually
Problem Relates To: Adjusting the Volume for your Music
Problem
Possible Cause
(contains a description of the (lists the possible causes for
problem)
the problem)
There is no audio coming
• The iPod or iPhone is not
from the System
connected firmly to the
docking tray connector
•
The volume is turned
down on the System
Resolution
(recommends resolutions for
the problem)
• Remove the iPod or
iPhone from the docking
tray connector, and reseat
the iPod or iPhone on the
connector
•
Use the plus volume
button on the System, or
on the remote
commander, to increase
the volume
35
Operating the Sony Personal Audio Docking System Remotely
Problem Relates To: Adjusting the Volume for your Music
Problem
Possible Cause
(contains a description of the (lists the possible causes for
problem)
the problem)
There is no audio coming
• The iPod or iPhone is not
from the System
connected firmly to the
docking tray connector
Resolution
(recommends resolutions for
the problem)
• Remove the iPod or
iPhone from the docking
tray connector, and reseat
the iPod or iPhone on the
connector
•
The volume is turned
down on the System
•
•
The remote commander is
not pointed at the remote
sensor on the System
•
Point the remote
commander at the remote
sensor on the System
•
There are obstacles in the
way between the remote
commander and the
System
•
Remove the obstacles
between the remote
commander and the
System
•
You are not close enough
to the System
•
Move closer to the System
Use the plus volume
button on the remote
commander to increase
the volume
Problem Relates To: Powering on the System, Playing your Music, Selecting a Track to
Play from you iPod or iPhone, Adjusting the Volume of your Music, and Powering off
the System
The remote commander does • The battery in the remote • Replace the battery in the
not function
commander needs to be
remote commander with a
replaced
Sony CR2025 lithium
battery only
36
FAQs
This section of the user manual provides you with answers to frequently asked questions with
respect to the System and its accessories. This section provides you with answers to questions
such as: the battery life for the batteries used by the System and the remote commander,
charging batteries, and how to replace accessories. Using this section, you can quickly answer
these questions–eliminating the need to contact Sony’s technical support or spend hours
online searching the Internet.
This section of the user manual is designed for users of all types. The questions are organized
alphabetically under the Questions and Answers section below.
This section of the user manual provides you with information such as:
•
How do I replace one of the universal dock adapters if one of them gets damaged?
•
How long do batteries usually last for the System?
•
How long does the battery for the remote commander last?
•
If I use rechargeable batteries in the System, does the System recharge these batteries?
If you have a question that is not answered by this FAQ section, you can search through FAQs
on Sony’s website as well. For details on how to access FAQs on Sony’s website, see the
“Getting Help” section under “Getting Started with the Sony Personal Audio Docking System.”
37
Questions and Answers:
Q.
How do I replace one of the universal dock adapters if one of them gets
damaged?
A.
Contact Sony technical support to order a new universal dock adapter if one of them
gets damaged. See the “Getting Help” section under “Getting Started with the Sony
Personal Audio Docking System” for contact information.
Q.
How long do batteries usually last for the System?
A.
Sony AAA/LR03 alkaline batteries will last for approximately 10 hours. Sony NH-AAA
rechargeable batteries will last approximately 8 hours. All other battery types have not
been tested for use with the System–the battery life will vary depending on use.
Q.
How long does the battery for the remote commander last?
A.
With normal use, the battery in the remote commander should last six months.
Q.
If I use rechargeable batteries in the System, does the System recharge
these batteries?
A.
No, the System cannot recharge batteries installed in the battery enclosures. The
System can only recharge your iPod or iPhone.
38
Glossary
AC Power Adapter: An alternating current (AC) power adapter is a transformer that is
used to provide electrical power to the System.
Docking Tray: The docking tray is the half-moon shaped component that is attached to the
front of the System at the bottom. The docking tray is where you attach your iPod or iPhone
to the System.
Docking Tray Connector: The docking tray connector is an interface connector in the
middle of the docking tray that you attach your iPod or iPhone to in order to use your iPod or
iPhone with the System.
Remote Commander: The remote commander is a portable (3 ½ inch by 1 ½ inch),
remote control device that comes with the System. The remote control device can be used to
power on the System, play music, select a track to play from your iPod or iPhone, pause/unpause your music, adjust the volume, and power off the System.
Remote Sensor: The remote sensor is a small, round shaped component on the front of the
System that uses infrared in order to detect signals from the remote commander. The remote
sensor interprets the signals it receives from the remote commander, enabling a user to
remotely operate the System.
Universal Dock Adapter: A universal dock adapter is a 2 ½ inch by 1 inch plastic, molded
snap-in that fits into the docking tray on the front of the System. The snap-in inserts into the
docking tray to enable you to use various models of iPods or iPhones with the System.
USB to AC Adapter: Universal serial bus (USB) to alternating current (AC) Adapter
converts the signal from a USB interface to alternating current.
39
Index
A
C
AC Electrical Outlet, 2
Charging your iPod and iPhone, 10, 13, 14
AC Power Adapter, 7, 9, 33, 39
Configuring a Power Source, 6
Accessories
AC power adapter, 7
battery, 7
electrical, 6
remote commander, 22
Connector. See docking tray connector
universal dock adapter number 12 for iPhone, 12
Ctrl Button, 4
universal dock adapter number 15 for iPhone 3G/iPhone
3GS, 12
universal dock adapter number 19 for iPhone 4, 12
Adjusting the Volume for your Music (manually), 18
Adjusting the Volume for your Music (remotely), 28
Attaching and Charging your iPod and iPhone, 10
attaching your iPhone, 12
attaching your iPod, 10
charging your iPhone, 14
charging your iPod, 13
B
Backward Button, 26
Batteries, 9, 33, 36
D
Damage, 7, 9, 23
DC IN 6V Jack, 7, 33, 34
Docking Tray, 11, 12, 13, 39
Docking Tray Connector, 11, 12, 13, 39
Down Button, 27
E
Enter Button, 27
F
FAQs, 5, 37
Battery Cover, 8, 9
batteries, 37
Battery Enclosures, 8, 9
remote commander, 37
Buttons
universal dock adapter, 37
backward button, 26
Figures
ctrl button, 4
figure 1 - front view of the System, 2
down button, 27
figure 10 - power button and OPR/BATT light, 16
enter button, 27
figure 11 - play/pause button, 17
forward button, 25
figure 12 - minus and plus volume buttons, 19
menu button, 27
figure 13 - power button and OPR/BATT light, 20
minus volume button, 19, 29
figure 14 - remote sensor, 22
play/pause button, 17, 18, 24, 28
figure 15 - remote commander power button, 22
plus volume button, 19, 29
figure 16 - OPR/BATT light, 23
power button, 16, 20, 22, 30
figure 17 - remote commander play/pause button, 24
up button, 27
figure 18 - remote commander forward button, 25
figure 19 - remote commander backward button, 26
figure 2 - back view of the System, 2
40
figure 20 - remote commander menu, up, down, and enter
buttons, 27
figure 21 - remote commander play/pause button, 28
figure 22 - remote commander minus and plus volume
buttons, 29
O
Operating the Sony Personal Audio Docking System Manually,
15
adjusting the volume for your music, 18
figure 23 - remote commander power button, 30
pausing/un-pausing your music, 18
figure 24 - OPR/BATT light, 31
playing your music, 16
figure 3 - top view of the System, 3
powering off the System, 20
figure 4 - bottom view of the System, 3
powering on the System, 15
figure 5 - AC power adapter, 7
Operating the Sony Personal Audio Docking System Remotely,
figure 6 - battery covers and outer clips, 8
21
figure 7 - inside the battery enclosure, 9
adjusting the volume for your music, 28
figure 8 - docking tray connector, 11
pausing/un-pausing your music, 27
figure 9 - universal dock adapters and docking tray
playing your music, 23
connector, 13
Forward Button, 25
powering off the System, 30
powering on the System, 21
selecting a track to play from your iPod or iPhone, 24
G
OPR/BATT Light, 16, 20, 23, 31
Outer Clips, 8
Getting Started with the Sony Personal Audio Docking System,
1
getting help, 5
P
requirements for use, 2
Pausing/Un-pausing your Music (manually), 18
symbols in the user manual, 4
Pausing/Un-pausing your Music (remotely), 27
user manual, 4
Photos. See figures
views of the System, 2
Pictures. See figures
Glossary, 39
Play/Pause Button, 17, 18, 24, 28
Graphics. See figures
Playing your Music (manually), 16
Playing your Music (remotely), 23
H
Plus Volume Button, 19, 29
Power Adapter. See AC power adapter
Help. See getting help under getting started with the Sony
Personal Audio Docking System
I
Images. See figures
M
Menu Button, 27
Minus Volume Button, 19, 29
Power Button, 16, 20, 22, 30
Power Cord. See AC power adapter
Power Source. See configuring a power source
Powering off the System (manually), 20
Powering off the System (remotely), 30
Powering on the System (manually), 15
Powering on the System (remotely), 21
R
Remote Commander, 21–32, 36, 39
41
Remote Sensor, 22–30, 39
operating the Sony Personal Audio Docking System
remotely, 36
S
Sony’s Technical Support, 5, 32
Symbols, 4
U
Universal Dock Adapter, 11, 12, 13, 39
Up Button, 27
T
USB to AC Adapter, 10, 13, 14, 39
Table of Contents, 4
Troubleshooting, 5, 32
attaching and charging your iPod or iPhone, 34
V
Volume, 15, 18, 19, 28, 29
configuring a power source, 33
operating the Sony Personal Audio Docking System
manually, 35
42