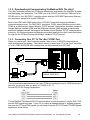
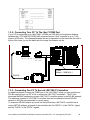
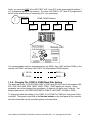
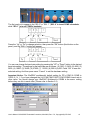
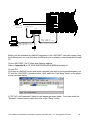
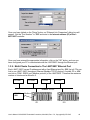
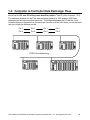
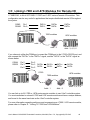
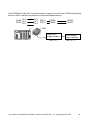
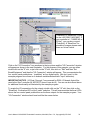
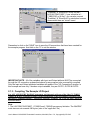
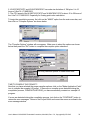
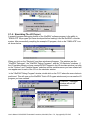
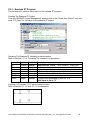
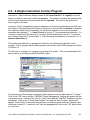
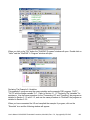
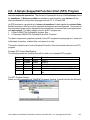
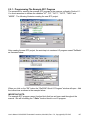
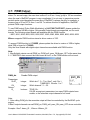
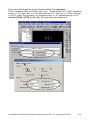
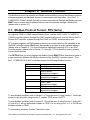
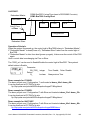
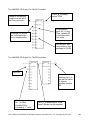
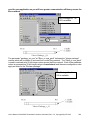
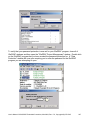
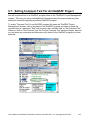
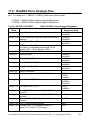
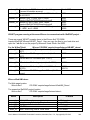
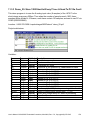
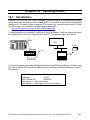
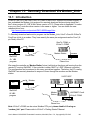
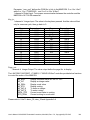
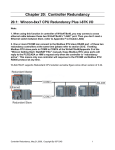
1
User’s Manual of ISaGRAF Embedded Controllers By ICP DAS CO. , LTD. & ICP DAS-USA , January 2002, All Rights Reserved The "User’s Manual of ISaGRAF Embedded Controllers" is intended for integrators, programmers, and maintenance personnel who will be installing and maintaining an I8417/8817/8437/8837, I-7188EG, I-7188XG , Wincon-8037/8337/8737 & Wincon8047/8347/8747 series controller system featuring the ISaGRAF Workbench software program. ICP DAS CO., LTD. would like to congratulate you own your purchase of our ISaGRAF controller. The ease to integration of the controller system and the power of the IEC 61131-3 ISaGRAF software program combine to make a powerful, yet inexpensive industrial process control system. Legal Liability ICP DAS CO., LTD. assumes no liability for any and all damages that may be incurred by the user as a consequence of this product. ICP DAS CO., LTD. reserves the right to change this manual at any time without notice. ICP DAS CO., LTD. constantly strives to provide our customers with the most reliable and accurate information possible regarding our products. However, ICP DAS CO., LTD. assumes no responsibility for its use, or for any infringements of patents or other rights of third parties resulting from its use. Trademark & Copyright Notice The names of products are used for identification purposes only, and are the registered trademarks of their respective owners or companies. Copyright January 2002, by ICP DAS CO., LTD. All Rights Reserved. User’s Manual Of ISaGRAF Embedded Controllers, Mar.2006, Rev. 5.0 , Copyright By ICP DAS 1 Table of Contents USER’S MANUAL OF ISAGRAF EMBEDDED CONTROLLERS ....................................... 1 Legal Liability .................................................................................................................... 1 Trademark & Copyright Notice ......................................................................................... 1 TABLE OF CONTENTS .......................................................................................................... 2 REFERENCE GUIDE .............................................................................................................. 7 HOW TO SELECT BETWEEN W-8X47 , W-8X37 , I-8XX7, I-7188EG & I-7188XG ............... 8 SPECIFICATIONS: W-8047 / 8347 / 8747 (DUAL ETHERNET)............................................. 9 SPECIFICATIONS: W-8037 / 8337 / 8737 ............................................................................ 11 SPECIFICATIONS: I-8437 / 8837 ......................................................................................... 13 SPECIFICATIONS: I-8417 / 8817 ......................................................................................... 15 SPECIFICATIONS: I-7188EG ............................................................................................... 17 SPECIFICATIONS: I-7188XG ............................................................................................... 19 SELECTION GUIDE .............................................................................................................. 21 CHAPTER 1: SOFTWARE & HARDWARE INSTALLATION.............................................. 30 1.1: INSTALLING THE ISAGRAF W ORKBENCH SOFTWARE PROGRAM ....................................... 30 1.1.1: When closing my ISaGRAF window on windows 2000, it holds. Why ? ............... 34 1.1.2: One Quick way to avoid the “hold” problem on windows 2000. ............................ 35 1.2: INSTALLING THE ICP DAS UTILITIES FOR ISAGRAF....................................................... 36 1.3: CONNECTING YOUR PC TO THE CONTROLLER................................................................ 37 1.3.1: Setting The NET-ID Addresses For The I-8xx7 Controller System ...................... 37 1.3.2: Downloading & Communicating Via Modbus With The I-8xx7 ............................. 38 1.3.3: Connecting Your PC To The I-8xx7 COM1 Port .................................................. 38 1.3.4: Connecting Your PC To The I-8xx7 COM2 Port .................................................. 39 1.3.5: Connecting One PC To Several I-8417/8817 Controllers .................................... 39 1.3.6: Changing The COM1 & COM2 Baud Rate Setting .............................................. 40 1.3.7: Deleting An ISaGRAF Project From The I-8xx7 Controller .................................. 42 1.3.8: Connecting Your PC To The I-8437/8837 Ethernet Port...................................... 42 1.3.9: Multi-Clients Connection to The I-8437/8837 Ethernet Port................................. 44 1.4: CONTROLLER TO CONTROLLER DATA EXCHANGE: FBUS .................................................. 45 1.5: LINKING I-7000 AND I-87K MODULES FOR REMOTE I/O .................................................. 46 1.6: CREATING A MODBUS LINK W ITH THE I-8XX7 CONTROLLER ............................................ 47 1.7: LINKING TO AN MMI INTERFACE DEVICE ........................................................................ 49 1.8: USING N-PORT COM.................................................................................................... 50 User’s Manual Of ISaGRAF Embedded Controllers, Mar.2006, Rev. 5.0 , Copyright By ICP DAS 2 CHAPTER 2: GETTING STARTED...................................................................................... 51 2.1: A SIMPLE LADDER LOGIC (LD) PROGRAM ...................................................................... 51 2.1.1: Programming LD.................................................................................................. 54 2.1.2: Connecting The I/O.............................................................................................. 75 2.1.3: Compiling The Example LD Project ..................................................................... 77 2.1.4: Simulating The LD Project ................................................................................... 79 2.1.5: Download & Debugging The Example LD Project ............................................... 81 2.2: A SIMPLE STRUCTURED TEXT (ST) PROGRAM ................................................................ 85 2.2.1: Example ST Program .......................................................................................... 89 2.3: A SIMPLE FUNCTION BLOCK DIAGRAM (FDB) PROGRAM ................................................. 93 2.3.1: Programming The Example FBD Program .......................................................... 93 2.3.2: Simulating The FBD Program .............................................................................. 99 2.4: A SIMPLE INSTRUCTION LIST (IL) PROGRAM ................................................................. 102 2.5: A SIMPLE SEQUENTIAL FUNCTION CHART (SFC) PROGRAM .......................................... 105 2.5.1: Programming The Example SFC Program ........................................................ 107 2.5.2: Editing The SFC Program.................................................................................. 110 2.5.3: Simulating The SFC Program ............................................................................ 116 CHAPTER 3: ESTABLISHING I/O CONNECTIONS ......................................................... 117 3.1: LINKING I/O BOARDS TO AN ISAGRAF PROJECT ......................................................... 117 3.1.1: Linking I/O Boards ............................................................................................. 118 3.1.2: Linking Input & Output Board Variables............................................................. 119 3.2: LINKING ANALOG TYPE I/O BOARDS ............................................................................. 121 3.2.1: Setting “range” parameter in analog IO board ................................................... 121 3.2.2: Setting special “range” parameter of temperature input board to get clear “Degree Celsius” or “Degree Fahrenheit” input value ................................................................. 122 3.3: LINKING "PUSH4KEY" & "SHOW 3LED" ......................................................................... 124 3.4: DIRECTLY REPRESENTED VARIABLES ........................................................................... 125 3.5: D/I COUNTERS BUILT IN THE I-87XXX D/I MODULES ...................................................... 128 3.6: AUTO-SCAN I/O.......................................................................................................... 130 3.7: PWM OUTPUT ........................................................................................................... 132 3.8: COUNTERS BUILT IN PARALLEL D/I BOARDS ................................................................. 136 CHAPTER 4: LINKING CONTROLLERS TO AN HMI PROGRAM ................................... 137 4.1: DECLARING VARIABLE ADDRESSES FOR NETWORK ACCESS .......................................... 137 4.2:READ/W RITE W ORD, LONG W ORD & FLOAT THROUGH MODBUS ...................................... 143 4.3: USING I-8XX7 AS A MODBUS I/O OR A MODBUS TCP/IP I/O......................................... 145 4.4: LINKING I-8XX7, I-7188EG/XG & W-8XX7 TO TOUCH 500 ........................................... 150 4.4.1: Program the I-8xx7, I-7188EG/XG & W-8xx7 .................................................... 151 4.4.2: Program the Touch 510T................................................................................... 152 4.5: ACCESS TO W ORD & INTEGER ARRAY VIA MODBUS ...................................................... 172 CHAPTER 5: MODBUS PROTOCOL ................................................................................ 173 5.1: MODBUS PROTOCOL FORMAT: RTU SERIAL ................................................................ 173 5.2: MODBUS PROTOCOL FORMAT: TCP/IP ....................................................................... 178 5.3: ALGORITHM FOR CRC-16 CHECK................................................................................ 179 CHAPTER 6: LINKING I-7000 & I-87XX MODULES ......................................................... 180 6.1: CONFIGURING THE I-7000 & I-87XX MODULES ............................................................. 180 User’s Manual Of ISaGRAF Embedded Controllers, Mar.2006, Rev. 5.0 , Copyright By ICP DAS 3 6.2: OPENING THE "BUS7000B" FUNCTION ......................................................................... 182 6.3: PROGRAMMING AN I-7000 MODULE ............................................................................. 184 6.3.1: Program I-7xxx or I-87xxx remote IO function blocks ........................................ 184 6.3.2: Setting a special “ADR_” parameter of remote temperature input module to get clear “Degree Celsius” or “Degree Fahrenheit” input value .......................................... 187 6.4: REDUNDANT BUS7000................................................................................................ 189 CHAPTER 7: CONTROLLER TO CONTROLLER DATA EXCHANGE.............................. 191 7.1: BASIC FBUS RULES..................................................................................................... 191 7.2: CONFIGURING AN I-8XX7 TO BE A FBUS "MASTER" OR "SLAVE" .................................... 192 7.2.1: Configuring The Fbus Master Boolean Packages.............................................. 194 7.3: PROGRAMMING FBUS PACKAGES ................................................................................. 196 7.4: AN FBUS DATA EXCHANGE EXAMPLE ........................................................................... 199 7.5: PROGRAMMING THE EBUS ........................................................................................... 204 7.5.1: Basic Ebus Rules............................................................................................... 204 7.5.2: Configuring the Controller To Be A Ebus "Master" Or "Slave" ............................ 206 7.5.3: Programming Ebus Packages ........................................................................... 209 CHAPTER 8: LINKING THE CONTROLLER TO MODBUS RTU & MODBUS ASCII DEVICES ............................................................................................................................. 210 8.1: 8.2: 8.3: 8.4: CONFIGURING THE CONTROLLER TO BE A MODBUS MASTER ........................................ 210 PROGRAMMING A MODBUS RTU MASTER .................................................................... 212 MODBUS ASCII MASTER............................................................................................. 216 MULTI-PORTS MODBUS RTU/ASCII MASTER ............................................................... 218 CHAPTER 9: COMMONLY USED ISAGRAF UTILITIES .................................................. 221 9.1: CREATING AN ISAGRAF PROJECT GROUPS................................................................. 222 9.2: UPLOADING AN ISAGRAF PROJECT ............................................................................ 223 9.3: SETTING AN ISAGRAF PASSWORD ............................................................................. 226 9.4: CREATING AN ISAGRAF PROGRAM DIARY ................................................................... 228 9.5: BACKING UP & RESTORING AN ISAGRAF PROJECT ..................................................... 229 9.6: COPYING & RENAMING AN ISAGRAF PROJECT ............................................................ 231 9.7: SETTING COMMENT TEXT FOR AN ISAGRAF PROJECT ................................................. 233 9.8: SETTING THE SLAVE ID FOR AN ISAGRAF CONTROLLER ............................................. 234 9.9: OPTIMIZING THE ISAGRAF CODE COMPILER ............................................................... 235 9.10: USING THE ISAGRAF CONVERSION TABLE ................................................................ 236 9.11: EXPORT / IMPORT VARIABLE DECLARATIONS VIA MICROSOFT EXCEL ............................. 239 9.12: SPY LIST .................................................................................................................. 242 9.13: HOW TO SEARCH A VARIABLE NAME IN AN ISAGRAF PROJECT ? ................................... 245 CHAPTER 10: THE RETAINED VARIABLE AND DATA BACKUP.................................. 246 10.1: THE RETAINED VARIABLE .......................................................................................... 246 10.2: DATA BACKUP TO THE EEPROM.............................................................................. 251 10.3: BATTERY BACKUP SRAM.......................................................................................... 253 10.3.1: Access to the SRAM........................................................................................ 254 10.3.2: Upload data stored in the SRAM ..................................................................... 254 10.3.3: Download data to the SRAM............................................................................ 256 10.3.4: Operation Functions for the battery backup SRAM.......................................... 258 10.4: USING I-8073 - MULTIMEDIACARD TO STORE DATA ...................................................... 258 User’s Manual Of ISaGRAF Embedded Controllers, Mar.2006, Rev. 5.0 , Copyright By ICP DAS 4 10.5: READING & W RITING FILE .......................................................................................... 259 10.6: CONTROLLER FAULT DETECTION ................................................................................ 260 CHAPTER 11: ISAGRAF PROGRAMMING EXAMPLES.................................................. 262 11.1: INSTALLING THE ISAGRAF PROGRAMMING EXAMPLES................................................ 262 11.2: ISAGRAF DEMO EXAMPLE FILES .............................................................................. 265 11.3: DESCRIPTION OF SOME DEMO EXAMPLES .................................................................. 271 11.3.0 Demo_01A & Demo_03: Do something at specific time .................................... 271 11.3.1 Demo_02 : Start, Stop And Reset Timer ........................................................... 275 11.3.2 Demo_17 : R/W Integer Value From/To The EEPROM..................................... 277 11.3.3 Demo_29: Store 1200 Short Int Every 75 sec & Send To PC Via Com3 .......... 279 11.3.4 Demo_33 : R/W User Defined protocol Via Com3:RS232/RS485 ..................... 284 11.3.5 Send string to COM2 or COM3 when alarm 1 to 8 happens. (Access to variables as array) ............................................................................................................................ 292 CHAPTER 12: SENDING EMAILS..................................................................................... 296 12.1: INTRODUCTION ......................................................................................................... 296 12.2: PROGRAMMING THE “EMAIL”...................................................................................... 297 CHAPTER 13: REMOTELY DOWNLOAD VIA MODEM_LINK ......................................... 301 13.1: INTRODUCTION ......................................................................................................... 301 13.2: DOWNLOAD PROGRAM VIA MODEM_LINK ................................................................... 302 CHAPTER 14: SPOTLIGHT : SIMPLE HMI....................................................................... 309 14.1 A Spotlight Example: ............................................................................................ 309 CHAPTER 15: CREATING USER-DEFINED FUNCTIONS ................................................ 325 15.1: CREATING FUNCTIONS INSIDE ONE PROJECT ................................................................ 325 15.2: CREATING FUNCTIONS IN THE LIBRARY ........................................................................ 330 CHAPTER 16: LINKING MMICON...................................................................................... 334 16.1: HARDWARE INSTALLATION ......................................................................................... 334 16.2: CREATE BACKGROUND PICTURE OF THE MMICON..................................................... 335 16.3: W RITING CONTROL PROGRAM .................................................................................... 335 CHAPTER 17: SMS: SHORT MESSAGE SERVICE ......................................................... 337 17.1: HARDWARE INSTALLATION ......................................................................................... 337 17.2: A SMS DEMO EXAMPLE ............................................................................................. 338 CHAPTER 18 : MOTION .................................................................................................... 342 18.1: INSTALL MOTION DRIVER ............................................................................................ 342 18.2: INTRODUCTION ......................................................................................................... 344 18.2.1: System Block Diagram ..................................................................................... 344 18.2.2: DDA Technology............................................................................................... 344 18.3: HARDWARE .............................................................................................................. 346 18.3.1: I-8000 hardware address.................................................................................. 346 18.3.2: LED Indicator .................................................................................................... 347 18.3.3: Hardware Configuration.................................................................................... 347 18.3.4: Pin assignment of connector CN2 .................................................................... 350 18.4: SOFTWARE............................................................................................................... 354 User’s Manual Of ISaGRAF Embedded Controllers, Mar.2006, Rev. 5.0 , Copyright By ICP DAS 5 I/O connection: ............................................................................................................. 354 Setting commands: ....................................................................................................... 355 M_regist Register one I-8091............................................................................ 355 M_r_sys Reset all setting .................................................................................... 356 M_s_var Set motion system parameters............................................................. 357 M_s_dir Define output direction of axes ............................................................. 358 M_s_mode Set output mode ................................................................................ 358 M_s_serv Set servo ON/OFF .............................................................................. 359 M_s_nc Set N.O. / N.C. ..................................................................................... 359 Stop commands:........................................................................................................... 360 M_stpx Stop X axis............................................................................................. 360 M_stpy Stop Y axis ............................................................................................. 360 M_stpall Stop X & Y axes ................................................................................... 360 Simple motion commands: ........................................................................................... 361 M_lsporg Low speed move to ORG .................................................................... 361 M_hsporg High speed move to ORG .................................................................. 361 M_lsppmv Low speed pulse move...................................................................... 362 M_hsppmv High speed pulse move ................................................................... 362 M_nsppmv Normal speed pulse move ............................................................... 363 M_lspmv Low speed move ................................................................................ 363 M_hspmv High speed move............................................................................... 364 M_cspmv Change speed move.......................................................................... 364 M_slwdn Slow down to low speed ...................................................................... 365 M_slwstp Slow down to stop............................................................................... 365 Interpolation commands: .............................................................................................. 366 M_intp Move a short distance on X-Y plane ...................................................... 366 M_intln Move a long distance on X-Y plane....................................................... 367 M_intln2 Move a long distance on X-Y plane ..................................................... 368 M_intcl2 Move a circle on X-Y plane .................................................................. 369 M_intar2 Move a arc on X-Y plane ..................................................................... 370 M_intstp Test X-Y plane moving command ........................................................ 371 I-8090 encorder commands:......................................................................................... 372 M_r_enco Reset I-8090’s encorder value to 0..................................................... 372 CHAPTER 19: ETHERNET COMMUNICATION AND SECURITY .................................... 373 19.1: ETHERNET SECURITY ................................................................................................ 373 19.2: DELIVERING MESSAGE VIA UDP ................................................................................ 375 19.3: DELIVERING MESSAGE VIA TCP/IP ............................................................................ 377 CHAPTER 20: REDUNDANT SOLUTIONS....................................................................... 378 20.1: W INCON-8XX7 CPU REDUNDANT PLUS I-87K I/O ...................................................... 378 20.2: W INCON-8XX7 CPU REDUNDANT PLUS I-87K I/O & MODBUS RTU DEVICES ............... 382 User’s Manual Of ISaGRAF Embedded Controllers, Mar.2006, Rev. 5.0 , Copyright By ICP DAS 6 Reference Guide English manual: I-8000 & I-7188 CD: \napdos\isagraf\8000\english_manu\ “user_manual_i_8xx7.pdf“ Wincon CD: \napdos\isagraf\wincon\english_manu\ “user_manual_i_8xx7.pdf” 中文使用手冊: 中文使用手冊 I-8000 & I-7188 CD: \napdos\isagraf\8000\chinese_manu\ “chinese_user_manual_i_8xx7.pdf” Wincon CD: \napdos\isagraf\wincon\chinese_manu\ “chinese_user_manual_i_8xx7.pdf” I-8000 Hardware Manual: Please refer to I-8000 CD\NAPDOS\8000\index.htm . Resource on the Internet: Newly updated ISaGRAF IO libraries, drivers and manuals can be found at http://www.icpdas.com/products/PAC/i-8000/isagraf.htm Technical Service: Please contact local agent or email problem-report to [email protected] New information can be found at www.icpdas.com Industrial Ethernet Switch : NS-205 / NS-208 Best choice for Industrial Ethernet Communication. http://www.icpdas.com/products/Switch/industrial/ethernet_switch.htm FAQ: Please visit www.icpdas.com - “FAQ” - “Software” - “ISaGRAF” for Frequently Asked Question, or visit http://www.icpdas.com/faq/isagraf.htm User’s Manual Of ISaGRAF Embedded Controllers, Mar.2006, Rev. 5.0 , Copyright By ICP DAS 7 How to select between W-8x47 , W-8x37 , I-8xx7, I7188EG & I-7188XG Memory considerations: 1. The I-8417/8817/8437/8837 , I-7188EG and I-7188XG has memory limitation. The ISaGRAF code size can not exceeds 64K bytes. (size of the “appli.x8m” file) 2. W-8037/8337/8737 and W-8047/8347/8747 has code size limitation of 1M bytes. It is 16 times of the size of I-8xx7 & I-7188EG/XG. CPU speed considerations: The CPU of I-8417/8817/8437/8837 , I-7188EG and I-7188XG is 80188 or compatible. It is a 16-bit cpu. It is not good at doing floating point value calculation. If your application will do lots of floating point value calculation, it is better to use W-8037/8337/8737 and W-8047/8347/8747 or future advanced ISaGRAF controllers. The CPU is 32-bit and its speed is about 10 to 20 times compared to the I-8xx7 & I-7188EG/XG, especially for floating point value calculation. Redundant considerations: Wincon-8047/8347/8747 supports redundant solution. Two controllers to be one redundant system. One is redundant Master, one is redndant slave. Master handles all inputs & outputs of the remote RS-485 I/O (I-7k & I-87K) at run time. If master is dead, Slave will take over the control of the remote I/O. All Outputs should be configured as RS-485 remote I/O. Inputs can locate at slot 1 through 7 or configured as RS-485 remote I/O. Redundant Change Over Time: <= 500 ms, Synchronization: <= 75ms Ethernet considerations: Up to now, only W-8047/8347/8747’s ethernet is 10/100 Mbyte type and dual ports. I-7188EG , W-8037/8337/8737 & I-8437/8837 is 10 Mbyte type. All of them support Modbus TCP/IP slave protocol. I-7188XG & I-8417/8817 no supports Ethernet. 2. W-8037/8337/8737 & W-8047/8347/8747 or future advanced ISaGRAF controllers support sending / receiving user’s defined message (string) via UDP/IP or TCP/IP to PC or other devices. However I-7188EG & I-8437/8837 no support them. Windows considerations: Only W-8037/8337/8737 & W-8047/8347/8747 or future advanced ISaGRAF controllers support Window CE. The W-8036/8336/8736 & W-8046/8346/8746 support both ISaGRAF driver & Indusoft driver. Size considerations: The controller size is W-8747/8737 > I-8817/8837 > W-8347/8337 > I-8417/8437 > W8037/8047 > I-7188EG/XG. Price considerations: Please consult with your local agent. User’s Manual Of ISaGRAF Embedded Controllers, Mar.2006, Rev. 5.0 , Copyright By ICP DAS 8 Specifications: W-8047 / 8347 / 8747 (Dual Ethernet) Development software ISaGRAF Version 3 Max. code size Non-ISaGRAF Web HMI Security Power supply Protection General environment Temperature Humidity System CPU Watchdog timer Real time clock SDRAM & FLASH Compact Flash Card EEPROM I/O slots VGA Port Two USB ports Reset Button & Led Unique Serial Number NET ID Serial ports COM1 COM2 COM3 Two Ethernet ports Motion PWM output Counters Parallel D/I counter Serial D/I counter IEC61131-3 standard. Languages: LD, ST, FBD, SFC, IL & FC accepts max. 1M bytes ISaGRAF code size (Appli.x8m must < 1M) Options: Microsoft EVC++4.0 or VS.NET 2003 (VB.NET, C#.NET) PC running Internet Explorer can access to the Wincon-8047/8347/8747 via Local Ethernet or Internet or dial Modem, monitoring and Control. Three Level username and password protection 10 to 30VDC (unregulated), 20W (when I/O slots are empty ) Built-in power protection & network protection circuit Operating: -25 to +75°C , Storage: -30 to +85°C, 5 to 95 % (non-condensed) Intel Strong ARM CPU, 206MHz, or compatible Yes Gives hour, minute, sec, date of week, date of month, month & year SDRAM:64M bytes , FLASH Memory: 32M bytes for OS image One Compact Flash slot: CF memory card is 128M bytes or more 16K bytes, retention > 100 years. 1,000,000 erase/write cycles I/O slots: W-8047: 0 , W-8347: 3 , W-8747: 7. accept I-8K & I-87K boards 1 VGA port: resolution: 320x240x16 to 1024x768x16 USB 1.1 Host ports for USB drive or USB mouse or USB Key-board 1 reset button & 1 power Led 64-bit hardware unique serial number From 1 to 255, set by software Internal use for I-87K IO boards of W-8347/8747. W-8047 has no COM1 RS232: full modem signals, Speed: 115200 bps max. RS-485, Speed: 115200 bps max. D+, D10/100M bps, NE2000 compatible, 10 BaseT, Program download port. Please use NS-205 / NS-208 Industrial Ethernet Switch. W-8347/8747 integrate with one I-8091(2-axes) or two I-8091(4-axes) can do motion control. 8 channels max. 250Hz max. for Off=2 & On=2 ms . Output square curve: Off: 2 to 32766 ms, On: 2 to 32766 ms. Optional D/O boards: i8037, 8041, 8042, 8054, 8055, 8056, 8057, 8060, 8063, 8064, 8065, 8066,8068, 8069 (Relay boards can not generate fast square curve) 8 ch. max. for 1 controller. Counter value: 32 bit. 250Hz max. Min. ON & OFF width must > 2ms. Optional D/I boards: i-8040, 8042, 8051, 8052, 8053, 8054, 8055, 8058, 8063, 8077 Counter input: 100Hz max. Counter value: 0 to 65535 (16 bit) Optional serial I-87K D/I boards: i-87040, 87051, 87052, 87053, 87054, 87055, 87058, 87063 User’s Manual Of ISaGRAF Embedded Controllers, Mar.2006, Rev. 5.0 , Copyright By ICP DAS 9 Remote D/I counter All remote I-7000 & I-87K D/I modules support counters. 100Hz max. value: 0 to 65535 i-87082: 100kHz max. 32 bit, i-8080: 450kHz max. 32 bit High speed counter Protocols Modbus serial protocol Up to 5 COM ports (COM2, 3, 5, 6,7 or 8) can support Modbus RTU slave protocol for connecting ISaGRAF, PC/HMI/OPC Server & HMI panels. Modbus TCP/IP Supports Modbus TCP/IP slave protocol for ISaGRAF & PC/HMI. Web HMI protocol Ethernet port for connecting PC running Internet Explorer I-7000 & I-87K Remote COM3 supports I-7000 I/O modules & (I-87K base + I-87K serial I/O I/O boards) as remote I/O. Max. 255 I-7000/87K remote I/O modules for one controller M-7000 series Modbus Max. 10 R-485 ports – COM3 & (COM5 to COM14 if I-8142/8142i/8144 I/O are found) can support M-7000 series Modbus I/O. Each port can connect up to 247 M-7000 Modules. Modbus master Supports multi-ports of Modbus RTU / ASCII master protocol to connect protocol (multi-port) to other Modbus slave devices. COM2,COM3,(or COM4 to COM14 if I8112/8114/8142/8142i/8144 are found) Ebus to exchange data between ICP DAS’s ISaGRAF Ethernet controllers via Ethernet port. SMS: Short Message One of COM2 (or COM5 if I-8112/8114 is found) can link to a GSM Service modem to support SMS. User can request data/control the controller by cellular phone. The controller can also send data & alarms to cellular phone. Optional GSM modems: M1206 or GM29 (GSM 900/1800 ) User defined protocol User can write his own protocol applied at COM2, COM3, (& COM5 to COM14 in multi-serial port boards) by serial comm. function blocks. Modem_Link COM2 supports PC remotely download & monitor the controller through a normal modem. MMICON / LCD COM2 (or COM5 if I-8112/8114 is found) supports ICP DAS’s MMICON. The MMICON is featured with a 240 x 64 dot LCD & a 4 x 4 Keyboard to display picture, string, integer, float, & input a char, string, integer & float. Delivering Message Ethernet port can setup to send/receive message via UDP/IP protocol to commnunicate with PC or other device. Redundant Solutions Two controllers to be one redundant system. One is redundant Master, one is redndant slave. Master handles all inputs & outputs of the remote RS-485 I/O (I-7k & I-87K) at run time. If master is dead, Slave will take over the control of remote I/O. All Outputs should be configured as RS485 remote I/O. Inputs can locate at slot 1 to 7 or configured as RS-485 remote I/O. Change Over Time: <= 500 ms, Synchronization: <= 75ms Battery Backup SRAM W-8347/8747 supports up to 4096 retain variables with a S256/S512 plug in the socket of the new back-plane( ver. 3-slot:2.6 , 7-slot:2.8 ). Optional: S256: 256kbytes, S512: 512kbytes Note: W-8047 doesn’t support S-256 / S-512 File Access The Compact Flash card can be used for storing run time data & any controller setting with file operation (by f_xxx function block). The CF card size default is 128Mbytes, can be more. Modbus TCP/IP IO ( Will be available) W-8047/8347/8747 ‘s second ethernet port will support connecting to Modbus TCP/IP IO modules User’s Manual Of ISaGRAF Embedded Controllers, Mar.2006, Rev. 5.0 , Copyright By ICP DAS 10 Specifications: W-8037 / 8337 / 8737 Development software ISaGRAF Version 3 Max. code size Non-ISaGRAF Web HMI Security Power supply Protection General environment temperature Humidity System CPU Watchdog timer Real time clock SDRAM FLASH Memory Compact Flash Card EEPROM I/O slots VGA Port PS/2 Port & USB port IEC61131-3 standard. Languages: LD, ST, FBD, SFC, IL & FC accepts max. 1M bytes ISaGRAF code size (Appli.x8m must < 1M) Options: Microsoft EVC++4.0 or VS.NET 2003 (VB.NET, C#.NET) PC running Internet Explorer can access to the Wincon-8037/8337/8737 via Local Ethernet or Internet or dial Modem, monitoring and Control. Three Level username and password protection 10 to 30VDC (unregulated), 20W (when I/O slots are empty ) Built-in power protection & network protection circuit Operating: -25°C to +75°C , Storage : -30°C to +85°C 5 to 95 % (non-condensed) Intel Strong ARM CPU, 206MHz, or compatible Yes Gives hour, minute, sec, date of week, date of month, month & year SDRAM:64M bytes , FLASH: 32M bytes for OS image One Compact Flash slot: CF memory card is 128M bytes or more 16K bytes, retention > 100 years. 1,000,000 erase/write cycles I/O slots: W-8037: 0 , W-8337: 3 , W-8737: 7, accept I-8K & I-87K boards 1 VGA port: resolution: 320x240x16 to 1024x768x16 2 PS/2 ports: keyboard and mouse. 1 USB 1.1 Host port for USB drive or USB mouse Reset Button & Led 1 reset button & 1 power Led Unique Serial Number 64-bit hardware unique serial number NET ID From 1 to 255, set by software Serial ports COM1 Internal use for I-87K boards of W-8337/8737. W-8037 has no COM1 COM2 RS232: full modem signals, Speed: 115200 bps max. COM3 RS-485, Speed: 115200 bps max. D+, DEthernet 10M bps, NE2000 compatible, 10 BaseT, Program download port. Motion W-8337/8737 integrate with one I-8091(2-axes) or two I-8091(4-axes) can do motion control. PWM output 8 channels max. 250Hz max. for Off=2 & On=2 ms. Output square curve: Off: 2 to 32766 ms, On: 2 to 32766 ms. Optional D/O boards: i-8037, 8041, 8042, 8054, 8055, 8056, 8057, 8060, 8063, 8064, 8065, 8066,8068, 8069 (Relay boards can not generate fast square curve) Counters Parallel D/I counter 8 ch. max. for 1 controller. Counter value: 32 bit. 250Hz max. Min. ON & OFF width must > 2ms. Optional D/I boards: i-8040, 8042, 8051, 8052, 8053, 8054, 8055, 8058, 8063, 8077 Serial D/I counter Counter input: 100Hz max. Counter value: 0 to 65535 (16 bit) Optional serial I-87K D/I boards: i- User’s Manual Of ISaGRAF Embedded Controllers, Mar.2006, Rev. 5.0 , Copyright By ICP DAS 11 Remote D/I counter 87040,87051,87052,87053,87054,87055,87058,87063 All remote I-7000 & I-87K D/I modules support counters. 100Hz max. value: 0 to 65535 i-87082: 100kHz max. 32 bit, i-8080: 450kHz max. 32 bit High speed counter Protocols Modbus serial protocol Up to 5 COM ports (COM2, 3, 5, 6,7 or 8) can support Modbus RTU slave protocol for connecting ISaGRAF, PC/HMI/OPC Server & HMI panels. Modbus TCP/IP Supports Modbus TCP/IP slave protocol for ISaGRAF & PC/HMI. Web HMI protocol Ethernet port for connecting PC running Internet Explorer I-7000 & I-87K Remote COM3 supports I-7000 I/O modules & (I-87K base + I-87K serial I/O I/O boards) as remote I/O. Max. 255 I-7000/87K remote I/O modules for one controller M-7000 series Modbus Max. 10 R-485 ports – COM3 & (COM5 to COM14 if I-8142/8142i/8144 I/O are found) can support M-7000 series Modbus I/O. Each port can connect up to 247 M-7000 Modules. Modbus master Supports multi-ports of Modbus RTU / ASCII master protocol to connect protocol to other Modbus slave devices. COM2,COM3,(or COM4 to COM14 if I(multi-port) 8112/8114/8142/8142i/8144 are found) Ebus to exchange data between ICP DAS’s ISaGRAF Ethernet controllers via Ethernet port. SMS: Short Message One of COM2 (or COM5 if I-8112/8114 is found) can link to a GSM Service modem to support SMS. User can request data/control the controller by cellular phone. The controller can also send data & alarms to cellular phone. Optional GSM modems: M1206 or GM29 (GSM 900/1800 ) User defined protocol User can write his own protocol applied at COM2, COM3, (& COM5 to COM14 if multi-serial port boards are plugged) by serial communication function blocks. Modem_Link COM2 supports PC remotely download & monitor the controller through a normal modem. MMICON / LCD COM2 (or COM5 if I-8112/8114 is found) supports ICP DAS’s MMICON. The MMICON is featured with a 240 x 64 dot LCD & a 4 x 4 Keyboard to display picture, string, integer, float, & input a char, string, integer & float. Delivering Message Ethernet port can setup to send/receive message via UDP/IP protocol to commnunicate with PC or other device. Redundant Solutions Two controllers to be one redundant system. One is redundant Master, one is redndant slave. Master handles all inputs & outputs of the remote RS-485 I/O (I-7k & I-87K) at run time. If master is dead, Slave will take over the control of remote I/O. All Outputs should be configured as RS485 remote I/O. Inputs can locate at slot 1 to 7 or configured as RS-485 remote I/O. Change Over Time: <= 500 ms, Synchronization: <= 75ms Battery Backup SRAM W-8337/8737 supports up to 4096 retain variables with a S256/S512 plug in the socket of the new back-plane( ver. 3-slot:2.6 , 7-slot:2.8 ). Optional: S256: 256kbytes, S512: 512kbytes Note: W-8037 doesn’t support S-256 / S-512 File Access The Compact Flash card can be used for storing run time data & any controller setting with file operation (by f_xxx function block). The CF card size default is 128Mbytes, can be more. User’s Manual Of ISaGRAF Embedded Controllers, Mar.2006, Rev. 5.0 , Copyright By ICP DAS 12 Specifications: I-8437 / 8837 Power supply Power requirements Protection General environment temperature Humidity System CPU Watchdog timer Real time clock SRAM FLASH Memory NVSRAM EEPROM SMMI I/O slots NET ID Serial ports COM1 Ethernet COM3 COM4 10 to 30VDC (unregulated), 20W (when I/O slots are empty ) Built-in power protection & network protection circuit Operating: -25°C to +75°C , Storage : -30°C to +85°C 5 to 95 % (non-condensed) 80188, or compatible, I-8437/8837: 40M Hz , I-8437-80 / 8837-80: 80M Hz Yes Gives hour, minute, sec, date of week, date of month, month & year (1980 to 2079) 512Kbytes 512Kbytes, Erase unit is 64K bytes, 100,000 erase/write cycles 31 bytes, battery backup, data valid up to 10 years 2048 bytes, retention > 100 years. 1,000,000 erase/write cycles Five 7-Seg. Led, four push buttons & three Led on the front panel. It can display message, value, input value, simulate input & output. 4 empty slots for I-8437, 8 empty slots for I-8837. Accept parallel & serial I/O boards 8 dip switch to set NET ID as 1 to 255 RS232: TXD,RXD,GND, Speed: 115200 bps max. Program download port. 10M bps, NE2000 compatible, 10 BaseT, Program download port. Can be configed as RS232 or S485, Speed: 115200 bps max. RS232: TXD,RXD,RTS,CTS,GND, RS485: Data+, DataRS232: Full modem signals, 115200 bps max. TXD,RXD,RTS,CTS,DSR,DTR,CD,RI,GND. Development software ISaGRAF Version 3 IEC61131-3 standard. Languages: LD, ST, FBD, SFC, IL & FC Max. code size I-8437/8837 accepts max. 64K byte ISaGRAF code size (Appli.x8m must < 64K) Motion control I-8437/8837 can integrate with one I-8091(2-axes) or two I-8091(4-axes) to do motion control. When doing motion control, I-8437 / 8837’s Ethernet communication is not available. PWM output Pulse Width 8 channels max. for one controller. 500Hz max. for Off=1 & On=1 ms Modulation output Output square curve: Off: 1 to 32767 ms, On: 1 to 32767 ms Optional D/O boards: i-8037, 8041, 8042, 8054, 8055, 8056, 8057, 8060, 8063, 8064, 8065, 8066,8068, 8069 (Relay Output boards can not generate fast square curve) Counters User’s Manual Of ISaGRAF Embedded Controllers, Mar.2006, Rev. 5.0 , Copyright By ICP DAS 13 Parallel D/I counter Serial D/I counter Remote D/I counter 8 ch. max. for 1 controller. Counter value: 32 bit. 500Hz max. Min. ON & OFF width must > 1ms. Optional D/I boards: i-8040, 8042, 8051, 8052, 8053, 8054, 8055, 8058, 8063, 8077 Counter input: 100Hz max. Counter value: 0 to 65535 (16 bit) Optional serial I-87K D/I boards: i-87051, 87052, 87053, 87054, 87055, 87058, 87063 All remote I-7000 & I-87K D/I modules support counters. 100Hz max. value: 0 to 65535 i-87082: 100kHz max. 32 bit, i-8080: 450kHz max. 32 bit High speed counter Protocols Modbus serial protocol COM1 default supports Modbus RTU slave protocol for connecting ISaGRAF, PC/HMI/OPC Server & MMI panels. Modbus TCP/IP Ethernet port support Modbus TCP/IP slave protocol for connecting protocol ISaGRAF & PC/HMI. Remote I/O One of COM3 or COM4 supports I-7000 I/O modules & (I-87K base + I87K serial I/O boards) as remote I/O. Max. 64 remote I/O module for one controller Modbus master One of COM1 or COM3 or COM4 ( or COM5 if multi-serial port boards protocol are plugged) supports Modbus RTU / ASCII master protocol to connect to other Modbus slave devices Fbus built in COM3 port to exchange data between ICP DAS’s ISaGRAF controllers. Ebus to exchange data between ICP DAS’s ISaGRAF Ethernet controllers via Ethernet port. SMS: Short Message One of COM4 or COM5 can link to a GSM modem to support SMS. User Service can request data/control the controller by cellular phone. The controller can also send data & alarms to user’s cellular phone. Optional GSM modems: M1206 or GM29 (GSM 900/1800 ) User defined protocol User can write his own protocol applied at COM1, COM3, COM4 (& COM5 to COM20 if multi-serial port boards are plugged) by serial communication function blocks. Modem_Link Supports PC remotely download & monitor the controller through a normal modem. MMICON / LCD One of COM3 or COM4 supports ICP DAS’s MMICON. The MMICON is featured with a 240 x 64 dot LCD and a 4 x 4 Keyboard. User can use it to display picture, string, integer, float, and input a character, string, integer and float. Battery backup SRAM I-8437/8837 can support up to 1024 retain variables with a S256/S512 plug in the socket of the back-plane. Data can also be stored in the S256/S512, and then PC can load these data via COM1 or ethernet. PC can also download pre-defined data to the S256/S512. Optional: S256: 256kbytes, S512: 512kbytes User’s Manual Of ISaGRAF Embedded Controllers, Mar.2006, Rev. 5.0 , Copyright By ICP DAS 14 Specifications: I-8417 / 8817 Power supply Power requirements Protection General environment temperature Humidity System CPU Watchdog timer Real time clock SRAM FLASH Memory NVSRAM EEPROM SMMI I/O slots NET ID Serial ports COM1 COM2 COM3 COM4 Development software ISaGRAF Version 3 Max. code size 10 to 30VDC (unregulated), 20W (when I/O slots are empty ) Built-in power protection & network protection circuit Operating: -25°C to +75°C , Storage : -30°C to +85°C 5 to 95 % (non-condensed) 80188,40MHz, or compatible Yes Gives hour, minute, sec, date of week, date of month, month & year (1980 to 2079) 512Kbytes 512Kbytes, Erase unit is 64K bytes, 100,000 erase/write cycles 31 bytes, battery backup, data valid up to 10 years 2048 bytes, retention > 100 years. 1,000,000 erase/write cycles Five 7-Seg. Led, four push buttons & three Led on the front panel. It can display message, value, input value, simulate input & output. 4 empty slots for I-8417, 8 empty slots for I-8817. Accept parallel & serial I/O boards 8 dip switch to set NET ID as 1 to 255 RS232: TXD,RXD,GND, Speed: 115200 bps max. Program download port. RS485: D+, D-, 115200 bps max. Self-tuner ASIC inside, Program download port. Can be configed as RS232 or S485, Speed: 115200 bps max. RS232: TXD,RXD,RTS,CTS,GND, RS485: Data+, DataRS232: Full modem signals, 115200 bps max. TXD,RXD,RTS,CTS,DSR,DTR,CD,RI,GND. IEC61131-3 standard. Languages: LD, ST, FBD, SFC, IL & FC I-8417/8817 accepts max. 64K byte ISaGRAF code size (Appli.x8m must < 64K) Motion control I-8417/8817/8437/8837 can integrate with one I-8091(2-axes) or two I8091(4-axes) to do motion control. When doing motion control, I-8437 / 8837’s Ethernet communication is not available. PWM output Pulse Width Modulation 8 channels max. for one controller. 500Hz max. for Off=1 & On=1 ms output Output square curve: Off: 1 to 32767 ms, On: 1 to 32767 ms Optional D/O boards: i-8037, 8041, 8042, 8054, 8055, 8056, 8057, 8060, 8063, 8064, 8065, 8066,8068, 8069 (Relay Output boards can not generate fast square curve) Counters User’s Manual Of ISaGRAF Embedded Controllers, Mar.2006, Rev. 5.0 , Copyright By ICP DAS 15 Parallel D/I counter Serial D/I counter Remote D/I counter High speed counter Protocols Modbus serial protocol 8 ch. max. for 1 controller. Counter value: 32 bit. 500Hz max. Min. ON & OFF width must > 1ms Optional D/I boards: i-8040, 8042, 8051, 8052, 8053, 8054, 8055, 8058, 8063, 8077 Counter input: 100Hz max. Counter value: 0 to 65535 (16 bit) Optional serial I-87K D/I boards: i-87051, 87052, 87053, 87054, 87055, 87058, 87063 All remote I-7000 & I-87K D/I modules support counters. 100Hz max. value: 0 to 65535 i-87082: 100kHz max. 32 bit, i-8080: 450kHz max. 32 bit COM1 & COM2 default supports Modbus RTU slave protocol for connecting ISaGRAF, PC/HMI/OPC Server & MMI panels. Remote I/O One of COM3 or COM4 supports I-7000 I/O modules & (I-87K base + I-87K serial I/O boards) as remote I/O. Max. 64 remote I/O module for one controller Modbus master protocol One of COM1 or COM3 or COM4 ( or COM5 if multi-serial port boards are plugged) supports Modbus RTU / ASCII master protocol to connect to other Modbus slave devices Fbus built in COM3 port to exchange data between ICP DAS’s ISaGRAF controllers. SMS: Short Message One of COM4 or COM5 can link to a GSM modem to support SMS. Service User can request data/control the controller by cellular phone. The controller can also send data & alarms to user’s cellular phone. Optional GSM modems: M1206 or GM29 (GSM 900/1800 ) User defined protocol User can write his own protocol applied at COM1, COM3, COM4 (& COM5 to COM20 if multi-serial port boards are plugged) by serial communication function blocks. Modem_Link Supports PC remotely download & monitor the controller through a normal modem. MMICON / LCD One of COM3 or COM4 supports ICP DAS’s MMICON. The MMICON is featured with a 240 x 64 dot LCD and a 4 x 4 Keyboard. User can use it to display picture, string, integer, float, and input a character, string, integer and float. Battery backup SRAM I-8417/8817 can support up to 1024 retain variables with a S256/S512 plug in the socket of the back-plane. Data can also be stored in the S256/S512, and then PC can load these data via COM1 or COM2. PC can also download pre-defined data to the S256/S512. Optional: S256: 256kbytes, S512: 512kbytes User’s Manual Of ISaGRAF Embedded Controllers, Mar.2006, Rev. 5.0 , Copyright By ICP DAS 16 Specifications: I-7188EG Power supply Power requirements Protection General environment temperature Humidity System CPU Watchdog timer Real time clock 10 to 30VDC (unregulated), I-7188EG:2W , I-7188EGD:3W Built-in power protection & network protection circuit Operating: -25°C to +75°C , Storage : -30°C to +85°C 5 to 95 % (non-condensed) 80188 40MHz, or compatible Yes Gives hour, minute, sec, date of week, date of month, month & year (1980 to 2079) SRAM 512Kbytes FLASH Memory 512Kbytes, Erase unit is 64K bytes, 100,000 erase/write cycles NVSRAM 31 bytes, battery backup, data valid up to 10 years EEPROM 2048 bytes, retention > 100 years. 1,000,000 erase/write cycles Display for I-7188EGD Five 7-Seg. Led on the front. It can display message & value. Expansion I/O bus One optional Xxxx series I/O board can be plugged inside the I-7188EG / 7188EGD. NET ID Set by software, 1 to 255 Serial ports COM1 RS232: TXD,RXD,GND, Speed: 115200 bps max. Program download port. COM2 RS485: D+, D-, 115200 bps max. Self-tuner ASIC inside, Program download port. Ethernet 10M bps, NE2000 compatible, 10 BaseT, Program download port. Development software ISaGRAF Version 3 IEC61131-3 standard. Languages: LD, ST, FBD, SFC, IL & FC Max. code size I-7188EG/7188EGD accepts max. 64K byte ISaGRAF code size (Appli.x8m must < 64K) PWM output Pulse Width All Xxxx series D/O boards support PWM output. 8 channels max. for Modulation output one controller. 500Hz max. for Off=1 & On=1 ms Output square curve: Off: 1 to 32767 ms, On: 1 to 32767 ms Counters Parallel D/I counter All Xxxx series D/I boards support D/I counter. 8 ch. max. for one controller. Counter value: 32 bit 500Hz max. Min. ON & OFF width must > 1ms Remote D/I counter All remote I-7000 & I-87K D/I modules support counters. 100Hz max. value: 0 to 65535 Remote high speed Optional i-87082:100kHz max. , 32 bit counter Protocols Modbus serial protocol COM1 default supports Modbus RTU slave protocol for connecting User’s Manual Of ISaGRAF Embedded Controllers, Mar.2006, Rev. 5.0 , Copyright By ICP DAS 17 ISaGRAF, PC/HMI/OPC Server & MMI panels. TCP/IP Ethernet port supports Modbus TCP/IP slave protocol for connecting ISaGRAF & PC/HMI. One of COM2 (or COM3:RS485 if found) supports I-7000 I/O modules & (I-87K base + I-87K serial I/O boards) as remote I/O. Max. 64 I/O modules for one controller Modbus master One of COM1 or COM2 (or COM3 if found) supports Modbus RTU / protocol ASCII master protocol to connect to other Modbus slave I/O devices Fbus built in COM2 port to exchange data between ICP DAS’s ISaGRAF controllers. Ebus to exchange data between ICP DAS’s ISaGRAF Ethernet controllers via Ethernet port. SMS: Short Message One of (COM3:RS232 or COM4:RS232 if found) can link to a GSM Service modem to support SMS. User can request data/control the controller by cellular phone. The controller can also send data & alarms to user’s cellular phone. Optional GSM modems: M1206 or GM29 (GSM 900/1800 ) User defined protocol User can write his own protocol applied at COM1, COM2 & (COM3 to COM8 if found) by serial communication function blocks. MMICON / LCD One of (COM3:RS232 if found) supports ICP DAS’s MMICON. The MMICON is featured with a 240 x 64 dot LCD and a 4 x 4 Keyboard. User can use it to display picture, string, integer, float, and input a character, string, integer and float. Battery backup SRAM I-7188EG / 7188EGD can support up to 1024 retain variables with a X607 / X608 plug in the only expansion I/O slot. Data can be stored in X607/X608, and then PC can load these data via COM1 or ethernet. PC can also download pre-defined data to the X607/X608 Optional: X607: 128kbytes, X608: 512kbytes Modbus protocol Remote I/O User’s Manual Of ISaGRAF Embedded Controllers, Mar.2006, Rev. 5.0 , Copyright By ICP DAS 18 Specifications: I-7188XG Power supply Power requirements Protection General environment temperature Humidity System CPU Watchdog timer Real time clock 10 to 30VDC (unregulated), I-7188XG:2W , I-7188XGD:3W Built-in power protection & network protection circuit Operating: -25°C to +75°C , Storage : -30°C to +85°C 5 to 95 % (non-condensed) 80188 40MHz, or compatible Yes Gives hour, minute, sec, date of week, date of month, month & year (1980 to 2079) SRAM 512Kbytes FLASH Memory 512Kbytes, Erase unit is 64K bytes, 100,000 erase/write cycles NVSRAM 31 bytes, battery backup, data valid up to 10 years EEPROM 2048 bytes, retention > 100 years. 1,000,000 erase/write cycles Display for I-7188XGD Five 7-Seg. Led on the front. It can display message & value. Expansion I/O bus One optional Xxxx series I/O board can be plugged inside the I-7188XG / 7188XGD. NET ID Set by software, 1 to 255 Serial ports COM1 Can be used as RS232 or RS485 , Speed: 115200 bps max. RS232 TXD,RXD,RTS,CTS,GND RS485: D+, D-, self-tuner inside Program download port. COM2 RS485: D+, D-, 115200 bps max. Self-tuner ASIC inside, Program download port. Development software ISaGRAF Version 3 IEC61131-3 standard. Languages: LD, ST, FBD, SFC, IL & FC Max. code size I-7188XG/7188XGD accepts max. 64K byte ISaGRAF code size (Appli.x8m must < 64K) PWM output Pulse Width All Xxxx series D/O boards support PWM output. 8 channels max. for Modulation output one controller. 500Hz max. for Off=1 & On=1 ms Output square curve: Off: 1 to 32767 ms, On: 1 to 32767 ms Counters Parallel D/I counter All Xxxx series D/I boards support D/I counter. 8 ch. max. for one controller. Counter value: 32 bit 500Hz max. Min. ON & OFF width must > 1ms Remote D/I counter All remote I-7000 & I-87K D/I modules support counters. 100Hz max. value: 0 to 65535 Remote high speed Optional i-87082:100kHz max. , 32 bit counter Protocols User’s Manual Of ISaGRAF Embedded Controllers, Mar.2006, Rev. 5.0 , Copyright By ICP DAS 19 Modbus serial protocol COM1 default supports Modbus RTU slave protocol for connecting ISaGRAF, PC/HMI/OPC Server & MMI panels. Remote I/O One of COM2 (or COM3:RS485 if found) supports I-7000 I/O modules & (I-87K base + I-87K serial I/O boards) as remote I/O. Max. 64 I/O modules for one controller Modbus master One of COM2 (or COM3 if found) supports Modbus RTU / ASCII master protocol protocol to connect to other Modbus slave I/O devices Fbus built in COM2 port to exchange data between ICP DAS’s ISaGRAF controllers. SMS: Short Message One of (COM3:RS232 or COM4:RS232 if found) can link to a GSM Service modem to support SMS. User can request data/control the controller by cellular phone. The controller can also send data & alarms to user’s cellular phone. Optional GSM modems: M1206 or GM29 (GSM 900/1800 ) User defined protocol User can write his own protocol applied at COM2 & (COM3 to COM8 if found) by serial communication function blocks. MMICON / LCD One of (COM3:RS232 if found) supports ICP DAS’s MMICON. The MMICON is featured with a 240 x 64 dot LCD and a 4 x 4 Keyboard. User can use it to display picture, string, integer, float, and input a character, string, integer and float. Battery backup SRAM I-7188XG / 7188XGD can support up to 1024 retain variables with a X607 / X608 plug in the only expansion I/O slot. Data can be stored in X607/X608, and then PC can load these data via COM1. PC can also download pre-defined data to the X607/X608 Optional: X607: 128kbytes, X608: 512kbytes User’s Manual Of ISaGRAF Embedded Controllers, Mar.2006, Rev. 5.0 , Copyright By ICP DAS 20 Selection Guide Power supply ACE-540A DIN-540A KA-52F DIN-KA52F KWM020-1824F DP-1200 DP-640 DP-660 DP-665 24V/1.7A power supply(panel Mount) 24V/1.7A power supply(DIN-Rail mount) 24V/1A power supply(no mounting) 24V/1A power supply(DIN-Rail mountong) 24V/0.75A power supply (No-mounting) 24V/5A power supply 24V/1.7A Power supply 24V/2.5A 5V/0.5A Power supply 24V/2.5A 5V/0.5A Power supply Development tools ISaGRAF-256-E ISaGRAF-256-C ISaGRAF Book-E ISaGRAF Book-C ISaGRAF Ver.3, up to 256 I/O tags + one English manual ISaGRAF Ver.3, up to 256 I/O tags + one Chinese manual User’s manual of ISaGRAF controllers (English) User’s manual of ISaGRAF controllers (Chinese, traditional) ISaGRAF controller I-8417 I-8817 I-8417-G I-8817-G I-8437 I-8837 I-8437-G I-8837-G I-8437-80 I-8837-80 I-8437-80-G I-8837-80-G I-7188XG I-7188XGD I-7188EG I-7188EGD W-8037 W-8337 W-8737 ISaGRAF I-8000 controller, 4 empty slots (Support battery-backup retain variables & memory if a S-256 / S-512 is plug in the back-plane) ISaGRAF I-8000 controller, 8 empty slots (Support battery-backup retain variables & memory if a S-256 / S-512 is plug in the back-plane) I-8417 gray color version I-8817 gray color version ISaGRAF I-8000 ethernet controller, 4 empty slots (Support batterybackup retain variables & memory if a S-256 / S-512 is plug in the backplane) ISaGRAF I-8000 ethernet controller, 8 empty slots (Support batterybackup retain variables & memory if a S-256 / S-512 is plug in the backplane) I-8437 gray color version I-8837 gray color version I-8437 with faster CPU (80M Hz) I-8837 with faster CPU (80M Hz) I-8437-80 gray color version I-8837-80 gray color version IsaGRAF I-7188 controller (Support battery-backup retain variables & memory if a X-607 / X-608 is plug in the only I/O expansion slot) 7188XG controller with display IsaGRAF I-7188 ethernet controller (Support battery-backup retain variables & memory if a X-607 / X-608 is plug in the only I/O expansion slot) I-7188EG with display IsaGRAF Wincon-8000 controller, No I/O slot (No support battery-backup retain variables & memory : S-256 / S-512) IsaGRAF Wincon-8000 controller, 3 empty slots (Support battery-backup retain variables & memory if a S-256 / S-512 is plug in the back-plane) ISaGRAF Wincon-8000 controller, 7 empty slots (Support battery-backup retain variables & memory if a S-256 / S-512 is plug in the back-plane) User’s Manual Of ISaGRAF Embedded Controllers, Mar.2006, Rev. 5.0 , Copyright By ICP DAS 21 W-8037-G W-8037 gray color version W-8337-G W-8337 gray color version W-8737-G W-8737 gray color version Recommand to use Indutrial Ethernet Switch: NS-205 / NS-208 for W-8047/8347/8747 and their gray color vesion. W-8047 IsaGRAF Wincon-8000 controller with Dual 10/100M Ethernet ports, No I/O slot (No support battery-backup retain variables : S-256 / S-512) W-8347 IsaGRAF Wincon-8000 controller with Dual 10/100M Ethernet ports, 3 empty slots (Support battery-backup retain variables if a S-256 / S-512 is plug in the back-plane) W-8747 ISaGRAF Wincon-8000 controller with Dual 10/100M Ethernet ports, 7 empty slots (Support battery-backup retain variables if a S-256 / S-512 is plug in the back-plane) W-8047-G W-8047 gray color version W-8347-G W-8347 gray color version W-8747-G W-8747 gray color version Battery backup SRAM S256 S512 X607 X608 256Kbytes battery backup SRAM for I-8417 /8817/8437/8837 and W8337/8737 (W-8037 doen’t support S-256/512) 512Kbytes battery backup SRAM for I-8417 /8817/8437/8837 and W8337/8737 (W-8037 doen’t support S-256/512) 128Kbytes battery backup SRAM for I-7188XG/7188EG & I7188XGD/7188EGD 512Kbytes battery backup SRAM for I-7188XG/7188EG & I7188XGD/7188EGD MMICON MMICON / LCD MMICON / Starter Kit Man-machine interface : 240x64 dots LCD Display Man-machine interface : 240x64 dots LCD Display + 4x4 Keyboard GSM modem M1206 GM29 900/1800 GSM/GPRS External Modem 900/1800 GSM/GPRS External Modem I-87K expansion base I-87K4 I-87K5 I-87K8 I-87K9 I-87K4-G I-87K5-G I-87K8-G I-87K9-G Accepts I-87K serial I/O boards Remote I-87K I/O base, 4 empty slots, RS-485 signal Remote I-87K I/O base, 5 empty slots, RS-485 signal Remote I-87K I/O base, 8 empty slots, RS-485 signal Remote I-87K I/O base, 9 empty slots, RS-485 signal I-87K4 gray color version I-87K5 gray color version I-87K8 gray color version I-87K9 gray color version Radio I/O expansion base RF-87K1 Accepts I-87K serial I/O boards Remote I-87K I/O base, 1 empty slot, Radio signal (Can work together with SST-2450) User’s Manual Of ISaGRAF Embedded Controllers, Mar.2006, Rev. 5.0 , Copyright By ICP DAS 22 RF-87K2 RF-87K5 RF-87K9 Remote I-87K I/O base, 2 empty slots, Radio signal (Can work together with SST-2450) Remote I-87K I/O base, 5 empty slots, Radio signal (Can work together with SST-2450) Remote I-87K I/O base, 9 empty slots, Radio signal (Can work together with SST-2450) Motion control board I-8091 I-8090 2-axes stepping/servo motor control card 3-axes encoder card Timer/Counter board I-8080 I-8080-G I-87082 I-87082-G 4-ch. counter/frequency, 32 bit , 450K Hz max. I-8080 gray color version 2 channel counter/Frequency, 32 bit, 100K Hz max. I-87082 gray color version RS-232/485/422 board I-8112 I-8114 I-8142 I-8142i I-8144 I-8112-G I-8114-G I-8142-G I-8142i-G I-8144-G 2-port RS232 4-port RS232 2-port RS485/422 2-port isolated RS485/422 4-port RS485/422 I-8112 gray color version I-8114 gray color version I-8142 gray color version I-8142i gray color version I-8144 gray color version Parallel analog I/O board I-8017H I-8024-G 8-ch. 14-bit analog input, each ch. can be different input type (V, mA) & range. Range of +/- 20 mA need external resistor of 125 ohms. Differential input. I-8017H gray color version 8-ch. 14-bit analog input, each ch. can be different input type (V, mA) & range. Range of +/- 20 mA need external resistor of 125 ohms. Differential or Single-ended input, module is taller than I-8017H I-8017HS gray color version 4-ch. 14-bit analog output, each ch. can be different output type (V,mA) & range I-8024 gray color version Parallel digital I/O board I-8037 I-8037-G I-8040 I-8040-G I-8041 I-8041-G I-8042 I-8042-G 16-ch. isolated open-source output I-8037 gray color version 32-ch. isolated digital input I-8040 gray color version 32-ch. isolated digital output I-8041 gray color version Isolated digital 16-ch. input & 16-ch. output I-8042 gray color version I-8017H-G I-8017HS I-8017HS-G I-8024 User’s Manual Of ISaGRAF Embedded Controllers, Mar.2006, Rev. 5.0 , Copyright By ICP DAS 23 I-8050 I-8050-G I-8051 I-8051-G I-8052 I-8052-G I-8053 I-8053-G I-8054 I-8054-G I-8055 I-8055-G I-8056 I-8056-G I-8057 I-8057-G I-8058 I-8058-G I-8060 I-8060-G I-8063 I-8063-G I-8064 I-8064-G I-8065 I-8065-G I-8066 I-8066-G I-8068 I-8068-G I-8069 I-8069-G I-8077 I-8077-G Serial analog I/O board I-87013 I-87013-G I-87015 I-87015-G I-87016 I-87016-G I-87017 I-87017-G I-87017R I-87017R-G I-87017RC 16-ch. universal Digital I/O, each channel can be config as input or output (isolated) I-8050 gray color version 16-ch. non-isolated digital input I-8051 gray color version 8-ch. isolated digital input (differential) I-8052 gray color version 16-ch. isolated digital input I-8053 gray color version Isolated digital 8-ch. input & 8-ch. output I-8054 gray color version Non-isolated digital 8-ch. input & 8-ch. output I-8055 gray color version 16-ch. non-isolated O.C. output I-8056 gray color version 16-ch. isolated O.C. output I-8057 gray color version 8-ch. isolated digital input, AC/DC input, max. 250V I-8058 gray color version 6-ch. relay output , AC: 125V @0.6A; 250V @0.3A, DC: 30V @2A; [email protected] I-8060 gray color version Isloated digital 4-ch. input & 4-ch. relay , AC: 125V @0.6A; 250V @0.3A I-8063 gray color version 8-ch. power relay output , AC: 250V @5A, DC: 30V @5A I-8064 gray color version 8-ch. SSR-AC output, AC: 24 to 265Vrms @1.0Arms, Max. load current: 1.0 Arms I-8065 gray color version 8-ch. SSR-DC output, DC: [email protected], Max. load current: 1.0A I-8066 gray color version 8-ch. relay output, AC: 120V @0.5A, DC:30V @ 1A I-8068 gray color version 8-ch. Photo Mos relay output I-8069 gray color version Simulation board: 8-ch. digital input (DIP switch) & 8-ch. output (Leds) I-8077 gray color version 4-ch. RTD input (temperature measurement with broken-line detection) I-87013 gray color version 7-ch. RTD input (temperature measurement with broken-line detection) I-87015 gray color version 2-ch. Isolated Strain Gauge Input (Will be available) I-87016 gray color version 8-ch. analog input (V, mA). Range of +/- 20 mA need external resistor of 125 ohms. I-87017 gray color version I-87017 with Over voltage protection: +/- 240 Vrms I-87017R gray color version 8-ch. analog input. Accept 4-20mA, 0-20mA or +/- 20mA. No external User’s Manual Of ISaGRAF Embedded Controllers, Mar.2006, Rev. 5.0 , Copyright By ICP DAS 24 I-87017RC-G I-87018 I-87018-G I-87018R I-87018R-G I-87019R I-87019R-G I-87022 I-87022-G I-87024 I-87024-G I-87026 I-87026-G Serial digital I/O board I-87040 I-87040-G I-87041 I-87041-G I-87051 I-87051-G I-87052 I-87052-G I-87053 I-87053-G I-87054 I-87054-G I-87055 I-87055-G I-87057 I-87057-G I-87058 I-87058-G I-87063 I-87063-G I-87064 I-87064-G I-87065 I-87065-G I-87066 resistor needed. I-87017RC gray color version. 8-ch. thermocouple input (No broken-line detection) I-87018 gray color version 87018 with Over voltage protection: +/- 240 Vrms (temperature measurement with broken-line detection) I-87018R gray color version 8-ch. universal Input with Over voltage protection: +/- 240 Vrms (V, mA, Thermocouple), each channel can be different input type and range (temperature measurement with broken-line detection) Range of +/- 20 mA need to set jumper on board. I-87019R gray color version 2-ch. 12-bit analog output, each ch. can be different output type (V,mA) & range, support channel to channel isolation I-87022 gray color version 4-ch. 14-bit analog output I-87024 gray color version 2-ch. 16-bit analog output, each ch. can be different output type (V,mA) & range, support channel to channel isolation I-87026 gray color version 32-ch. isolated digital input I-87040 gray color version 32-ch. isolated digital output I-87041 gray color version 16-ch. non-isolated digital input I-87051 gray color version 8-ch. isolated digital input (differential) I-87052 gray color version 16-ch. isolated digital input I-87053 gray color version Isolated digital 8-ch. input & 8-ch. output I-87054 gray color version Non-isolated digital 8ch. input & 8ch. output I-87055 gray color version 16-ch. isolated O.C. output I-87057 gray color version 8-ch. isolated digital input, AC/DC input, max. 250V I-87058 gray color version Isloated digital 4-ch. input & 4-ch. relay, AC: 125V @0.6A; 250V @0.3A DC: 30V @2A; [email protected] I-87063 gray color version 8-ch. power relay output, AC: 250V @5A, DC:30V @5A I-87064 gray color version 8-ch. SSR-AC output, AC: 24 to 265Vrms @1.0Arms, Max. load current: 1.0 Arms I-87065 gray color version 8-ch. SSR-DC output, DC: 3-30VDC @ 1A, Max. load current: 1.0A User’s Manual Of ISaGRAF Embedded Controllers, Mar.2006, Rev. 5.0 , Copyright By ICP DAS 25 I-87066-G I-87068 I-87068-G I-87069 I-87069-G I-87066 gray color version 8-ch. relay output, AC: 120V @0.5A, DC:30V @1A I-87068 gray color version 8-ch. photo Mos relay I-87069 gray color version Conveter & Repeater PCISA-7520R PCISA-7520AR I-7520 I-7520R I-7520A I-7520AR I-7560 I-7561 I-7563 I-7510 I-7510A I-7510AR PCI / ISA bus RS-232 to RS-485 card PCI / ISA bus RS-232 to RS-485/422 card RS-232 to RS-485 converter I-7520 with 3000V DC isolation at RS-485 side RS-232 to RS-422/RS-485 converter I-7520A with 3000V DC isolation at RS-422/485 side USB to RS-232 Converter USB to RS-232/422/485 Converter USB to 1-ch RS-485 conveter with a three way RS485 Hub (isolated) RS-485 isolated repeater RS485/RS422 isolated repeater Three way Isolated RS-422/485 Repeater RS-485 Hub I-7513 3-way isolated RS485 to 3 ports RS485 hub Man Machine Interface Touch506L Touch506S Touch510T 5.7" 4-Gray STN Panel display with touch 5.7" Color STN Panel display with touch 10.4" Color TFT Panel Display With Touch Wireless Modem SST-2450 Wireless Modem Module with RS-232/RS-485 Interface I-7000 analog I/O module I-7011P I-7011PD I-7012 I-7012D I-7012F I-7012FD I-7013 I-7013D I-7014D I-7015 I-7016 I-7016D I-7016P I-7016PD I-7017 1-ch. thermo-couple input (16-bit), 1-ch. D/I & 2-ch. D/O, enhanced version of I-7011 I-7011P with display 1-ch. analog input (16-bit), 1-ch. D/I & 2-ch. D/O I-7012D with display High speed version of I-7012 (12-bit), normal 16-bit I-7012F with display ch. RTD input (16-bit) temperature measurement with broken-line detection I-7013 with display 1-ch. analog/transmitter input (16-bit) with display, 1-ch. D/I & 2-ch. D/O 6-ch. 2-or-3 wire RTD input (16-bit) temperature measurement with broken-line detection 2-ch. strained gauge input (16-bit), 1-ch. D/I & 4-ch. D/O I-7016 with display 1-ch. strained gauge input for longer cable length (16-bit), 1-ch. D/I & 4-ch. D/O I-7016P with display 8-ch. analog input (16-bit), support voltage input and current input. Range of User’s Manual Of ISaGRAF Embedded Controllers, Mar.2006, Rev. 5.0 , Copyright By ICP DAS 26 I-7017C I-7017R I-7017RC I-7018 I-7018P I-7018R I-7019R I-7021 I-7021P I-7022 I-7024 I-7033 I-7033D I-7000 digital I/O module I-7041 I-7041D I-7042 I-7042D I-7043 I-7043D I-7044 I-7044D I-7045 I-7045D I-7050 I-7050D I-7050A I-7050AD I-7052 I-7052D I-7053 I-7053D I-7055 I-7055D I-7060 I-7060D I-7063 I-7063D +/- 20 mA need external resistor of 125 ohms I-7017 with current input only (+/- 20mA). No external resistor needed. 8-ch. analog input (16-bit), support voltage input and current input, Robust & high speed version of I-7017, higher Over voltage protection: (240Vrms). Range of +/- 20 mA need external resistor of 125 ohms I-7017R with current input only (+/- 20mA). No external resistor needed 8-ch. thermocouple input (16-bit) (No broken-line detection) 8-ch. thermocouple input (16-bit), add 2 thermo-input type: L, M (No broken-line detection) Enhanced version of I-7018P with temperature broken-line detection & higher Over voltage protection: (240Vrms) 8-ch. universal analog input, (voltage, current & Thermocouple), higher Over voltage protection: (240Vrms), each channel can be different input type and range (temperature measurement with broken-line detection) Range of +/- 20 mA need to set jumper on board 1-ch. analog output (12-bit) 1-ch. analog output (16-bit) 2-ch. analog output (12-bit), each ch. can be different output type (V,mA) & range 4-ch. analog output (14-bit) 3-ch. RTD input (16-bit) temperature measurement with broken-line detection I-7033 with display 14-ch. isolated digital input I-7041 with LED display 13-ch. isolated O.C. output I-7042 with LED display 16-ch. non-isolated O.C. output I-7043 with LED display Isolated digital 4-ch. input & 8-ch. output I-7044 with LED display 16-ch. Isolated digital output I-7045 with LED display Non-isolated 7-ch. digital input (sink) & 8-ch. output I-7050 with LED display 7 digital input & 8 output (current source) I-7050A with LED display 8-ch. isolated digital input (6 differential + 2 single end) I-7052 with LED display Non-isolated 16-ch. digital input I-7053 with LED display 8-ch. isolated input & 8-ch. isolated output I-7055 with LED display 4-ch. isolated input & 4-ch. relay output, AC: 125V @0.6A; 250V @0.3A, DC: 30V @2A; 110V @0.6A I-7060 with LED display 8-ch. isolated input & 3-ch. power relay, AC: 250V @5A, DC: 30V @5A I-7063D with LED display User’s Manual Of ISaGRAF Embedded Controllers, Mar.2006, Rev. 5.0 , Copyright By ICP DAS 27 I-7063A I-7065BD I-7066 I-7066D I-7067 I-7067D 8-ch. isolated input & 3-ch. AC-SSR output, AC:24~ 265Vrms @1.0Arms, Max. Load current 1.0Arms I-7063A with LED display 8-ch. isolated input & 3ch. DC-SSR output, DC:3~ 30Vdc @1.0Arms, Max. Load current 1.0Arms I-7063B with LED display 4-ch. isolated input & 5-ch. power relay, AC: 250VAC @5A, DC: 30V @5A I-7065 with LED display 4-ch. isolated input & 5ch. AC-SSR relay, AC:24~ 265Vrms @1.0Arms, Max. Load current 1.0Arms I-7065A with LED display 4-ch. isolated input & 5ch. DC-SSR relay, DC:3~ 30Vdc @1.0Arms, Max. Load current 1.0Arms I-7065B with LED display 7-ch. Photo Mos relay output I-7066 with LED display 7-ch. relay output, AC [email protected], DC 24V@1A I-7067 with LED display I-7000 counter module I-7080 I-7080D 2 high speed counter/frequency input (32-bit), 100K Hz max. I-7080 with display I-7063AD I-7063B I-7063BD I-7065 I-7065D I-7065A I-7065AD I-7065B X-board (parellel I/O) X107 X109 X110 X111 X116 X119 X202 X203 X303 X304 X305 X307 X308 X310 X-board (RS232/422/485) X503 X504 X505 X506 X507 For I-7188XG & I-7188EG Non-isolated 6-ch. D/I and 7-ch. D/O Isolated 7-ch. PhotoMos Relay Non-isolated 14-ch. D/I Non-isolated 13-ch. D/O Isolated 4-ch. D/I and 6-ch. Relay (without case) Non-isolated 7-ch. D/O and 7-ch. D/I (without case) Non-isolated 7-ch. A/D (0~20mA, 12-bit) Non-isolated 2-ch. A/D (0~20mA, 12-bit), 2-ch. D/I, 6-ch. D/O Non-isolated 1-ch. A/D (+/-5V, 12-bit), 1-ch. D/A (+/-5V, 12-bit), 4-ch. D/I, 6-ch. D/O Non-isolated 3-ch. A/D (+/-5V, 12-bit), 1-ch. D/A (+/-5V, 12-bit), 4-ch. D/I, 4-ch. D/O Non-isolated 7-ch. A/D (+/-5V, 12-bit), 1-ch. D/A (+/-5V, 12-bit), 2-ch. D/I, 2-ch. D/O Non-isolated 8-ch. A/D (+/-10V, 12-bit), 2-ch. D/I, 2-ch. D/O (will be available) Non-isolated 4-ch. A/D (+/-10V, 12-bit), 6-ch. D/O Non-isolated 2-ch. A/D, ch.0:(0~20mA, 12-bit), ch.1: A/D (0~10V, 12-bit) 2-ch. D/A (0~10V, 12-bit), 3-ch. D/I, 3-ch. D/O For I-7188XG & I-7188EG 1-Port RS-232 (5-Pin) 2-Port RS-232, one is 5-Pin , one is 9-Pin 3-Port RS-232 (5-Pin) 6-Port RS-232 (3-Pin) 1-Port RS-422/485, Non-isolated 4-ch. D/I, 4-ch. D/O User’s Manual Of ISaGRAF Embedded Controllers, Mar.2006, Rev. 5.0 , Copyright By ICP DAS 28 X508 X509 X510 X511 X518 X560 1-Port RS-232 (5-Pin), Non-isolated 4-ch. D/I, 4-ch. D/O 2-Port RS-232 (3-Pin), Non-isolated 4-ch. D/I, 4-ch. D/O 1-Port RS-232 (3-Pin ), Non-isolated 5-ch. D/I, 5-ch. D/O, EEPROM 128K x2 3-Port RS-485 1-Port RS-232 (5-Pin), Non-isolated 8-ch. D/O 3-Port RS-232 (3-Pin), 8M bytes Flash memory (without case) For I-7188XG & I-7188EG X-board (Battery backup SRAM) X607 X608 128Kbytes battery backup SRAM 512Kbytes battery backup SRAM Industrial Ethernet Switch NS-205 NS-208 Unmanaged 5-Port Industrial 10/100 Base-T Ethernet Switch Unmanaged 8-Port Industrial 10/100 Base-T Ethernet Switch User’s Manual Of ISaGRAF Embedded Controllers, Mar.2006, Rev. 5.0 , Copyright By ICP DAS 29 Chapter 1: Software & Hardware Installation NOTE: The I-8xx7 abbreviation is for the I-8417, I-8437, I-8817 and I-8837 controllers, while W-8xx7 is the abbreviation for the Wincon-8037/8337/8737 and Wincon-8047/8347/8747 controller. 1.1: Installing The ISaGRAF Workbench Software Program Chapter 1 of the "User’s Manual of ISaGRAF Embedded Controllers" manual details how to properly setup and run the I-8xx7, I-7188EG/XG & W-8xx7 controller system and the ISaGRAF Workbench software program. Numerous illustrations and pictures are provided in this chapter to assist the integrator and programmer with the basics of how to properly setup the hardware and software for their system. If you are not familiar with the setup of either the I-8xx7, I-7188EG/XG & W-8xx7 controller system or the ISaGRAF Workbench software program, please take the time to thoroughly read Chapter 1. The procedures detailed in this chapter are easy to understand, and will assist the user to quickly and easily setup and start running the controller and the ISaGRAF software program. For the I-8xx7, I-7188EG/XG & W-8xx7 controller system and the ISaGRAF Workbench software to operate properly, it is imperative that each is setup correctly. This chapter covers the details of how to setup the controller system and the ISaGRAF Workbench software in a minimum of time. Before you can start programming the I-8xx7, I-7188EG/XG & W-8xx7 embedded controller system with the ISaGRAF software program, you must first install the ISaGRAF Workbench software program on a target PC. Hardware Requirements • A Personal Computer With At Least A Pentium, 133 MHz Or Faster Processor • 32 Mbytes Memory (Preferably 64 Mbytes RAM) • A Hard Drive With At Least 128 Mbytes Of Storage Space (Preferably Larger) • At Least One RS-232 Serial Port Software Requirements One of the following computer operating systems must be installed on the target computer system before you can install the ISaGRAF Workbench software program. • Windows 95 • Windows 98 • Windows NT Version 3.51 or Windows NT Version 4.0 • Windows 2000 Or Windows XP Steps To Installing The ISaGRAF Workbench Program User’s Manual Of ISaGRAF Embedded Controllers, Mar.2006, Rev. 5.0 , Copyright By ICP DAS 30 Insert the ISaGRAF Workbench CD into your CD-ROM drive. Normally the auto-start program will activate the "install.bat" file automatically. If your computer does not have the auto-start feature active, use the Windows Explorer and go to the CD-ROM drive where the Workbench CD is installed, then double-click on the "install.bat" file listed on the ISaGRAF CD. If the "install.bat" file is not found on your ISaGRAF CD, then double-click on the "ISaGRAF.exe" file to start the installation process. Once you have started the "install.bat" file, a dialog box will appear as shown on the next page. Select the language version of the ISaGRAF software program you would like to use. The English version is used on all subjects and examples throughout this manual. Once you have selected to install the ISaGRAF Workbench program and selected the desired language, just press the "Install" button, and follow the step-by-step directions of each dialog box as they appear to complete the installation process. The first dialog box to appear allows the user to define what drive and subdirectory the ISaGRAF program will install into. The next dialog box asks the user how much of the ISaGRAF program to you wish to install. By default, it is best to allow all of the ISaGRAF programs to install. Once you have selected which programs and applications are to be installed, the installation process begins, and an installation progress dialog box will appear showing the installation progress. User’s Manual Of ISaGRAF Embedded Controllers, Mar.2006, Rev. 5.0 , Copyright By ICP DAS 31 Once the ISaGRAF Workbench software installation process has been completed, a Windows Explorer window will appear showing the installed programs. The installation process is now complete, and you can begin to use the ISaGRAF software program. To begin the ISaGRAF 3.x software program, click on the Windows "Start" button, then on "Programs", and you should see the ISaGRAF program group as illustrated below. You will see that six program icons are now associated with the ISaGRAF 3.x software group. You can select any of the icons to learn more about the ISaGRAF Workbench software program. If your ISaGRAF Key-Pro is USB type, please follow below steps to install the proper USB driver. 1. To make your PC recognize the ISaGRAF USB protection-key, please un-plug the USB protection-key from your USB port first, then run “\Sentinel\SSD5411-32bit.exe“ in the ISaGRAF 3.51 SP6 CD-ROM after you have installed the ISaGRAF. Then please reset your PC. 2. To run ISaGRAF Ver. 3.51,please always plug the USB protection-key in the PC’s USB port. User’s Manual Of ISaGRAF Embedded Controllers, Mar.2006, Rev. 5.0 , Copyright By ICP DAS 32 NOTE: You must install the hardware protection device (dongle) provided with the ISaGRAF software on your computers parallel port to for the ISaGRAF program to achieve fully authorized functionality. While using ISaGRAF and the dongle is plugged well, if the “Help” – “About” says “Maximum number of IO variables: 32”, it means ISaGRAF workbench cannot find the dongle well. Please reset your PC and then check the “Help” – “About” again. If it still displays “Maximum number of IO variables: 32”, the dongle driver may not be installed well. Please execute the ISaGRAF CD_ROM \Sentinel5382\setup.exe for ISaGRAF-80 or \Sentinel\setup.exe for other ISaGRAF version or follow the former section if your protection-key is USB type. and then reset the PC again. Important Notice For Window NT Users If your computer is using the Windows NT operating system, you will need to add one line to the "isa.ini" file in the ISaGRAF Workbench "EXE" subdirectory. If the ISaGRAF program is installed on your computers "C" hard drive, you will find the required file in the following path: C:\isawin\exe\isa.ini You can use any ASCII based text editor (such as Notepad or UltraEdit32) to open the "isa.ini" file. Locate the [WS001] header in the "isa.ini" initialization file (it should be at the top of the file). Anywhere within the [WS001] header portion of the "isa.ini" initialization file, add the entry shown below within the [WS001] header: [WS001] NT=1 Isa=C:\ISAWIN IsaExe=C:\ISAWIN\EXE Group=Samples IsaApl=c:\isawin\smp IsaTmp=C:\ISAWIN\TMP The [WS001] header should now look like the above example. The NT=1 entry addition is absolutely required for the RS-232 communications to operate properly in the Windows NT operating environment. User’s Manual Of ISaGRAF Embedded Controllers, Mar.2006, Rev. 5.0 , Copyright By ICP DAS 33 1.1.1: When closing my ISaGRAF window on windows 2000, it holds. Why ? This problem usually happens on the windows 2000. When you close some ISaGRAF windows by clicking on the “X” , it holds about 20 to 40 seconds (No response). This “hold” behavior is caused by the “CTFMON.EXE” process. We still don’t know the reason yet. You may stop this process by click on the “Ctrl” & “Alt” & “Del” at the same time to open the window Task Manager, and then stop it as next page. However you will find the “CTFMON.EXE” still load to run when you reboot your PC or run Microsoft Office. So you need to stop it every time when your windows 2000 is rebooted. If you want to know more about the “CTFMON.EXE”, please visit www.microsoft.com & search “CTFMON.EXE”. User’s Manual Of ISaGRAF Embedded Controllers, Mar.2006, Rev. 5.0 , Copyright By ICP DAS 34 1.1.2: One Quick way to avoid the “hold” problem on windows 2000. You may create a short cut for the “ISaGRAF project manager. And then check on "run in separate memory space" option in the shortcut property. User’s Manual Of ISaGRAF Embedded Controllers, Mar.2006, Rev. 5.0 , Copyright By ICP DAS 35 1.2: Installing The ICP DAS Utilities For ISaGRAF The “ICP DAS Utilities For ISaGRAF” consists of 3 major items. I/O library definition Modem_Link utility (Chapter 13) Auto-scan I/O utility (Section 3.6) The ISaGRAF Workbench software program must be installed before attempting to install the “ICP DAS Utilities for ISaGRAF”. If you have not already installed the ISaGRAF Workbench program, please refer to section 1.1 before continuing. When the ISaGRAF Workbench program is first installed, it contains only the basic I/O libraries from CJ International - the authors of the ISaGRAF software program. Users will have to install the appropriate I/O library files and some utilities before you can properly program the ISaGRAF controller. There is a CD-ROM supplied with each of the ISaGRAF controllers with the “ICP DAS Utilities for ISaGRAF”. Please insert the CD-ROM into your CD-ROM drive. Then run “setup.exe” in the folder of CD-ROM: \napdos\isagraf\ . Follow the steps to install it. Note: If “setup.exe” is not in your CD-ROM, please download “ICP DAS Utilities For ISaGRAF.zip” from http://www.icpdas.com/products/PAC/i-8000/isagraf.htm User’s Manual Of ISaGRAF Embedded Controllers, Mar.2006, Rev. 5.0 , Copyright By ICP DAS 36 1.3: Connecting Your PC To The Controller Note: Below sections are for the I-8417/8817/8437/8837 controller only, please refer to the respective “Getting Started” Manual which delivered with the controller for connecting PC to the I-7188EG/XG or W-8xx7 controller. 1.3.1: Setting The NET-ID Addresses For The I-8xx7 Controller System For the I-8xx7 controller to properly operate, it must first be addressed correctly. 1 2 3 4 5 6 7 8 NET-ID=00 NET-ID=01 ON NET-ID=02 ON NET-ID=03 ON ON NET-ID=04 ON NET-ID=FF ON ON ON ON ON ON ON ON Default setting NET-ID=01 For ISaGRAF workbench , it can only recognize NET-ID from 01 to FF (1~255). The NET-ID of every Main Control Unit in the same network must be unique (different from each other). Default setting NET-ID=1 NET-ID=0x02 NET-ID=0x04 User’s Manual Of ISaGRAF Embedded Controllers, Mar.2006, Rev. 5.0 , Copyright By ICP DAS 37 1.3.2: Downloading & Communicating Via Modbus With The I-8xx7 The I-8xx7 controller provides two COM ports standard for downloading the ISaGRAF program and debugging your application. The COM1 port is an RS-232 port and the COM2 port is an RS-485 port for the I-8417/8817 controller system, and the I-8437/8837 features an Ethernet port connection instead of a second COM port. Both of the COM1 and COM2 ports of the I-8417/8817 controllers support the Modbus communications protocol. For I-8437/8837 controllers, COM1 support Modbus protocol while COM2 is an ethernet port support Modbus TCP/IP protocol. There are an abundant number of Human Machine Interface (HMI) and Man Machine Interface (MMI) software programs and additional hardware devices that support the Modbus or/and Modbus TCP/IP communications protocols. All of these programs and devices can access data from the I-8xx7 controller system through the two COM ports using the Modbus / Modbus TCP/IP protocol. 1.3.3: Connecting Your PC To The I-8xx7 COM1 Port When you receive your I-8xx7 controller system, there is one (1) RS-232 communications cable provided with the system. The cable is used to connect your PC to the I-8xx7 controller or to an I-7520 RS-232/RS-485 converter that can be purchased from ICP DAS. 841X/881X POWER SUPPLY +10V~30VDC CA0915 COM1 of I-8xx7 Default 19200,8 N,1 HOST COMPUTER The communication parameters for the I-8xx7 COM1 port defaultly be set to 19200-baud rate, 8 data bits, no stop bits, and one parity bit ("19200, 8, N, 1"). Normal RS-232 Pin Wiring Assignments For the ISaGRAF Workbench RS-232 communications to operate properly, only the RXD, TXD, and the GND signals are used. If your PC is running a hardware device or software program that uses the CTS and DSR signals, you will need to wire the RTS-CTS and DTR-DSR signals together as shown below. User’s Manual Of ISaGRAF Embedded Controllers, Mar.2006, Rev. 5.0 , Copyright By ICP DAS 38 1.3.4: Connecting Your PC To The I-8xx7 COM2 Port If your PC is connecting to an I-8417/8817's COM2 port (RS-485), the maximum distance between the I-7520 (the RS-232/RS-485 converter) and an I-8xx7 controller is up to 1,200 meters (4,000 feet). The distance between the two is dependent on the baud rate; the rule to follow is the lower you set the baud rate, the longer the distance can be. 841X/881X V+ HOST COMPUTER GND POWER SUPPLY +10V~+30VDC COM2 Default 19200,8,N,1 GND CA0915 V+ DATADATA+ 7520 1.3.5: Connecting One PC To Several I-8417/8817 Controllers An additional feature of using the COM2 port of the I-8417/8817 is that you can configure an RS-485 network from one PC to link to numerous I-8417/8817 controllers. The PC can download ISaGRAF applications to each I-8417/8817 controller system on the RS-485 network. The maximum number of I-8417/8817 controllers that can be networked via the RS-485 network is 255 (Not recommended to use so many). To create an RS-485 network you must first insure that each I-8417/8817 controller has a unique NET-ID address, and each of the controllers link the "DATA+" to the "DATA+" signal, and the "DATA-" to the "DATA-" signals. User’s Manual Of ISaGRAF Embedded Controllers, Mar.2006, Rev. 5.0 , Copyright By ICP DAS 39 Lastly, you must plug ONE of the I-8417/8817's JP-1 and JP-2 on the power board to position 1 to 2, (resistance applied to the network). The other I-8417/8817's JP-1 and JP-2 plugs should be left at the default setting of connecting 2 to 3 (no resistance). P C RS232/485 i7520 COM2, RS485 Network I-8x17 NET-ID =1 I-8x17 NET-ID =7 I-8x17 NET-ID =3 I-8x17 NET-ID = n It is recommended to add two terminal resistors (try 220Ω, then 110Ω, and then 330Ω) on the nearest I-8417/8817 and farest I-8417/8817 for long distance RS485 network. DATA+ DATA+ DATA- DATA- 1.3.6: Changing The COM1 & COM2 Baud Rate Setting The baud rate for the I-8417/8817/8437/8837’s COM1 port (RS-232) can be set between 300, 600, 1200, 2400, 4800, 9600, 19200, 38400, 57600, 115200 bps(bit per second). Other parameter can not be changed, they are always - 8 data bits, No parity, and 1 stop bit . The default baud rate for I-8417/8817/8437/8837’s COM1 & I-8417/8817’s COM2 is 19200. To change the baud rate setting on the COM1 & I-8417/8817’s COM2 port, first power off the controller. Then press in and hold in the first two buttons on the front panel of the controller and then power back up the controller system as shown below. User’s Manual Of ISaGRAF Embedded Controllers, Mar.2006, Rev. 5.0 , Copyright By ICP DAS 40 The first read out to appear is the “SEL 0” or "SEL 1" (“SEL 0” is to set COM1’s baudrate, while “SEL 1” is to set COM2’s baudrate). Press the “Up” or “Dn” to change selection, then press the "OK" button (third button on the panel), and the "BAU x" setting will appear. You can now change the baud rate setting by pressing the "UP" or "Down" button to the desired baud rate setting. The settings for the baud rate are as follows: (0) 1200, (1) 2400, (2) 4800, (3) 9600, (4) 19200, (5) 38400, (6) 57600, (7) 115200, (8) 300 & (9) 600. Press “OK” to save the selected setting. And then press some “Cancel” to exit the hardware setting. Important Notice: The ISaGRAF workbench’s default setting for PC’s COM1 & COM2 is 19200, 8, N, 1. If you have changed the I-8417/8817/8437/8837 COM1/COM2’s baud rate to other value. You should change your ISaGRAF Workbench’s COMM to the same setting before they can link to each other. (Please refer to Section 2.5) User’s Manual Of ISaGRAF Embedded Controllers, Mar.2006, Rev. 5.0 , Copyright By ICP DAS 41 1.3.7: Deleting An ISaGRAF Project From The I-8xx7 Controller There may be occasions when you will need to delete the ISaGRAF project from the controller system. To begin this, you follow the same control start up routine as changing the baud rate. You first press in and hold in the first two buttons on the front panel of the controller and then power back up the I-8417/8817/8437/8837 controller to gain the ability to change the parameters. When the first display appear, press the "Up" or "Down" button until "SEL 2" (Select 2) appears in the LED readout. Press the "Up" or "Down" buttons until "dEL" appears in the LED read out. Press the "Up" or "Down" buttons until "y" appears in the LED readout then press the "OK" button. This will delete the currently installed ISaGRAF project from the controller system. After that press some “Cancel” to exit the hardware setting. 1.3.8: Connecting Your PC To The I-8437/8837 Ethernet Port Note: If the controller is W-8x47/8x46. There are two Ethernet ports built in the W-8x47/8x46 controllers. Please connect your PC to W-8x47/8x46’s “LAN1” port. And please using “NS-205” or “NS-208” Ethernet switch. The I-8437 and I-8847 controller systems feature a built in Ethernet port. The COM2 port is replaced from an RS-485 to Ethernet. User’s Manual Of ISaGRAF Embedded Controllers, Mar.2006, Rev. 5.0 , Copyright By ICP DAS 42 841X/881X POWER SUPPLY +10V~30VDC To Ethernet Router HUB 1 2 3 4 5 6 7 8 8X3X : Ethernet 10M 8X4X : Ethernet 10M / 100M 8X3X : Ethernet 10M 8X4X : Ethernet 10M / 100M HOST COMPUTER Before you can download an ISaGRAF application to the I-8437/8837 controller system using the Ethernet port, you must first setup the Ethernet port to properly communicate with the host PC. On the I-8437/8837, Set IP, Mask and Gateway address: Refer to Appendix B or CD_ROM:\NAPDOS\ISaGRAF\8000\driver\setip.txt On your PC: First open an ISaGRAF project and select a program you wish to communicate between your PC and the I-8437/8837 controller system. Next, select the "Link Setup" button on the project screen as shown below. A "PC-PLC Link Parameters" dialog box will appear as shown below. From here select the "Ethernet" communications option and click on the "Setup" button. User’s Manual Of ISaGRAF Embedded Controllers, Mar.2006, Rev. 5.0 , Copyright By ICP DAS 43 Once you have clicked on the "Setup" button, an "Ethernet Link Parameters" dialog box will appear. Set the "Port Number" to "502" and enter in the Internet address (IP) of the I8437/8837 controller. Once you have entered the appropriate information, click on the "OK" button, and now you have configured your PC to communicate with the I-8437/8837 through the Ethernet port. 1.3.9: Multi-Clients Connection to The I-8437/8837 Ethernet Port Each I-8437 / 8837 has an IP address and with a fixed Ethernet port No. 502. Up to 4 PCs can link to one I-8437 / 8837 throughout Ethernet (Modbus TCP/IP protocol). Another PC or MMI can link to COM1: RS232 port (Modbus protocol) of the I-8437/8837. Therefore the maximum number of clients can be linked is 5. PC/HMI PC/HMI PC/HMI PC/HMI Modbus TCP/IP PC/HMI MMI Modbus IP1 IP2 User’s Manual Of ISaGRAF Embedded Controllers, Mar.2006, Rev. 5.0 , Copyright By ICP DAS 44 1.4: Controller to Controller Data Exchange: Fbus Connect all COM3's Pin 1 together and Pin 9 together and then one of these I-8xx7 controllers should set its JP1 and JP2 of the power board to position "1 to 2" (refer to section 1.3.5). The maximum distance for the Fbus data exchange network is 1200 meters (4,000 feet) depending on the communication baud rate. The distance between the PC and the I-8xx7 controller system is dependent on the baud rate; the rule to follow is the lower you set the baud rate, the longer the distance can be. Pin 1 Pin 9 Pin 1 Pin 9 Pin 1 Pin 9 Pin 1 Pin 9 COM3: Fbus Networking User’s Manual Of ISaGRAF Embedded Controllers, Mar.2006, Rev. 5.0 , Copyright By ICP DAS 45 1.5: Linking I-7000 and I-87K Modules For Remote I/O The I-8xx7 controller system can use one of its COM3 or COM4 ports, wile COM2 or COM3 for I-7188EG/XG, to link to ICP DAS's "I-7000" and “I-87K” series of remote I/O modules. This configuration can be very useful in applications that require distributed remote I/O throughout the system. COM3 RS485 Pin 1 Pin 9 DATA+ DATA- DATA+ DATA- DATA+ DATA- 7000 modules I-87K modules Addr : 2 Addr : 3, 4, 5, 6 Addr : 1 If you choose to utilize the COM4 port, connect the COM4 port to the I-7520's RS-232 port, and also connect the "DATA+" to the "DATA+" signal, and the "DATA-" to the "DATA-" signal as shown below. COM4 RS232 Pin 2 Pin 3 Pin 5 Pin 2 Pin 3 Pin 5 DATA+ DATA- DATA+ DATA- DATA+ DATA- I-7520 7000 modules Addr : 1 Addr : 2 DATA+ DATA- I-87K modules Addr : 3, 4, 5, 6 You can link up to 64 I-7000 or I-87K series remote modules to one I-8xx7 controller system. You must remember to set each I-7000 and I-87K remote module must have a unique address, and be set to the same baud rate as the I-8xx7 controller system. For more information regarding setting up and programming an I-7000 / I-87K remote module, please refer to Chapter 6 - "Linking To I-7000 and I-87K Modules". User’s Manual Of ISaGRAF Embedded Controllers, Mar.2006, Rev. 5.0 , Copyright By ICP DAS 46 1.6: Creating A Modbus Link With The I-8xx7 Controller The I-8xx7 controller system can be a Modbus "Slave" and/or a Modbus "Master" controller depending on the application. Through this method you can use the COM1 and COM2 ports of the I-8xx7 controller system to link to a PC or other HMI products. In this type of configuration, the I-8xx7 controller system becomes a Modbus slave controller system. For more information about setting up and programming for Modbus slave, please refer to Chapter 4 – “Linking The I-8xx7 To An HMI Program”. If COM3 or COM4 is used to link to other devices that support the Modbus protocol, the I-8xx7 controller system will be the Modbus master controller. For more information about setting up and programming for Modbus master, please refer to Chapter 8 - "Linking To A Modbus RTU Or Other Devices". If the COM3:RS485 port is used for Modbus master, one I-8xx7 can connect to many other devices. Each device on the link must have a unique NET ID (1 ~ 255) address, and communicate at same baud rate settings. COM3 Pin 1 RS485 Pin 9 RS485+ RS485- RS485+ RS485- Other PLCs support Modbus Other devices support Modbus NET ID : 1 NET ID : 2 If COM4 is used, you can only link one I-8xx7 to one other Modbus device. RXD 2 TXD COM4 TXD 3 RXD RS232 GND 5 GND RTS CTS DTR DSR Other devices support Modbus NET ID : 1 User’s Manual Of ISaGRAF Embedded Controllers, Mar.2006, Rev. 5.0 , Copyright By ICP DAS 47 If the COM4 port of the I-8xx7 controller system is used to connect to one I-7520 remote device, then the I-8xx7 controller can network to numerous Modbus devices. Pin 2 COM4 Pin 3 RS232 Pin 5 Pin 2 Pin 3 Pin 5 DATA+ DATA- RS485+ RS485- RS485+ RS485- I-7520 Other PLCs support Modbus NET ID : 1 Other devices support Modbus NET ID : 2 User’s Manual Of ISaGRAF Embedded Controllers, Mar.2006, Rev. 5.0 , Copyright By ICP DAS 48 1.7: Linking To An MMI Interface Device The COM1 (RS-232) and COM2 (RS-485) ports of the I-8xx7 controller system can be used to interface with additional Man Machine Interface (MMI) devices such as touch screen displays. ICP DAS provides a full line of touch screen displays, such as the "Touch" series screens. The models in the product line include the Touch 506L/506S and Touch 510T MMI products. If you are using any of the “Touch” series of MMI devices to connect to an I-8xx7 controller, you can only interface the devices to the COM1 port on the I-8xx7 controller. Cable wiring COM1 TXD 2 RXD 3 GND 5 RS232 TXD 2 RXD 3 GND 5 CTS 7 RTS 8 Touch 506L/506S 510T RS232 COM1 For more information regarding interfacing the Touch series of MMI devices to the I-8xx7 controller system, please refer to Chapter 4- "Linking The I-8xx7 To HMI Devices". User’s Manual Of ISaGRAF Embedded Controllers, Mar.2006, Rev. 5.0 , Copyright By ICP DAS 49 1.8: Using N-Port COM There are some N-Port COM boards that can be used to extend communication ability of the I-8xx7 controller. The model No. available are as below. I-8112: I-8114: I-8142: I-8144: 2-channel RS232 Module 4-channel RS232 Module 2-channel RS422/485 Module 4-channel RS422/485 Module Note: These N-Port COM boards can only be plugged into slot 0 to slot 3. It doesn’t support slot 4 to slot 7. That means user can use only Com5 to Com20 of N-Port COM boards. Some functions can be used to read/write these COM ports. Please refer to Appendix A.4 for “COMOPEN” , “COMOPEN2”, “COMCLOSE” , “COMREADY” , “COMARY_R” , “COMARY_W” , “COMREAD” , “COMSTR_W” , “COMWRITE” and “COMCLEAR”. Pin assignment: User’s Manual Of ISaGRAF Embedded Controllers, Mar.2006, Rev. 5.0 , Copyright By ICP DAS 50 Chapter 2: Getting Started This chapter provides simple yet effective program examples of how you can use the different ISaGRAF programming languages available with the I-8417/8817/8437/8837, I-7188EG/XG , W-8037/8337/8737 & W-8047/8347/8747 controller system. The ISaGRAF programming environment provides a powerful and flexible way to create industrial control software. For more extensive information regarding all of the capabilities of the ISaGRAF programming system, please refer to Appendix E: “Language Reference” of this manual or the “ISaGRAF USER’S GUIDE” manual which can be found from the CD_ROM of the ISaGRAF workbench. Its file name is either “ISaGRAF.pdf” or “ISaGRAF.doc”. This manual provides some program examples and its description, please refer to Chapter 11. 2.1: A Simple Ladder Logic (LD) Program Ladder Logic Basics "Ladder Logic" programming (LD) is a graphical representation of Boolean equations, combining contacts (input arguments) and coils (output results). Ladder Logic most closely resembles the electrical schematics that an electrician or technician may use to diagnose and troubleshoot an industrial process controller system. The LD language enables the programmer to describe the conditions and modifications to Boolean data by placing "graphical symbols" to represent hardware devices used in a process control application. A Simple Ladder Example Program The following is a step-by-step example on how to create a ladder logic (hence forth referred as "LD") program using the ISaGRAF Workbench software program provided with the ISaGRAF controller system. We will create one another Structured Text (hence forth referred as “ST”) program to indicate the first PLC scan cycle. That means in this example ISaGRAF project, we have two programs inside it. One is written in LD and the other is written in ST. The example project name is “simpleLD”. The name of the LD program of this example project is “LD1” and “end_init” is the name of the ST program . Project name “simpleLD” User’s Manual Of ISaGRAF Embedded Controllers, Mar.2006, Rev. 5.0 , Copyright By ICP DAS 51 Variables Used In The Example LD Program: Name INIT M3 OUT01 OUT02 OUT03 T1 Pulse_No Type Boolean Boolean Boolean Boolean Boolean Timer Integer Attribute Internal Internal Output Output Output Internal Internal Description initial value at “TRUE”. TRUE means 1st scan cycle Indicate a pulse is generated or not. Output 1 Output 2 Output 3 Time Period of blinking, initial value is set at "T#1s" To puls one when M3 pulse is generated initial value is set at "0" Ladder Logic Program “LD1” Outline: VAL10LED is only for I-8xx7 & I-7188EGD/XGD. W-8xx7 doesn’t support this block. ST program “end_init” Outline: INIT := FALSE ; User’s Manual Of ISaGRAF Embedded Controllers, Mar.2006, Rev. 5.0 , Copyright By ICP DAS 52 Process Operation Actions: Ladder Logic Program “LD1” : Blink Outputs 1, 2, & 3 with a period of “T1” in the first 15 seconds, “T1” has initial value equal to 1 second. Atfer these 15 seconds, Outputs 1, 2, & 3 will be turned OFF. Generate a pulse output every 1 second to the internal boolean variable “M3”. Plus integer variable “pulse_No” by 1 every time when “M3” pulse is generated. Display the value of “pulse_No” to the 7-Seg leds of the I-8xx7 or I-7188EG/XG controller. ST Program “end_init” : Set boolean variable “INIT” to FALSE at the end of the PLC scan cycle. So that “INIT” will be TRUE only at the first scan cycle. Description of block and some basic LD item: TOF:To turn off a boolean however delay a time of “PT”. “IN” is a boolean parameter, if falling from TRUE to FALSE. The timer ticks from 0 to “PT” “PT” is a timer parameter, it defines the delay time of output. “Q” is the boolean output of this block. It will be turned OFF when “PT” is reached. “ET” is the timer output of this block. (We don’t use it in this example) BLINK: To blink a boolean with a period of “CYCLE”. “RUN” is a boolean parameter, if it is TRUE, the boolean output “Q” will be blinking at period of the timer parameter “CYCLE”. VAL10LED: Display a interger value to the 7-Seg leds of the controller. Only for I-8xx7, I-7188EGD & I-7188XGD. “RUN_” is a boolean parameter. TRUE to display. “FSH_” is a boolean parameter. TRUE to blink the display. “CLK_” is a timer parameter. It defines the blinking period. “VA_I_” is the integer to display. User’s Manual Of ISaGRAF Embedded Controllers, Mar.2006, Rev. 5.0 , Copyright By ICP DAS 53 “N” coil : Coil with N type means it will be set to a pulse TRUE when the left status is just falling from TRUE to FALSE. “Retrun” : To return from the excution if the left status is TRUE, that is, the reset LD rungs of the program below this “return” will not excute when the left status is TRUE. 2.1.1: Programming LD Starting & Running The ISaGRAF Workbench Program Click on the Windows "Start" button, then click on "Programs", then click on "ISaGRAF 3.4", then click on "Projects" as shown below. User’s Manual Of ISaGRAF Embedded Controllers, Mar.2006, Rev. 5.0 , Copyright By ICP DAS 54 2.1.1.1: Creating An ISaGRAF User's Group Click on the "Select Project Group", and then click on "New Group", then type in the name for the new user's group you wish to create, and last click on "OK". Note that the name that you give the "New Project Group" also creates a new sub-directory corresponding to the project group name in the "c:\isawin" sub-directory. To get into the new project group, either double click on the new group name, or click on the new group name (the name will be highlighted) to select the new project group and click on the "Select" button. User’s Manual Of ISaGRAF Embedded Controllers, Mar.2006, Rev. 5.0 , Copyright By ICP DAS 55 2.1.1.2: Creating A New ISaGRAF Project To start a new ISaGRAF project, click on the "Create New Project" icon and then enter in the name for the new project. You can then enter additional information for your project by clicking on the "Edit" and then "Set Comment Text" menu as illustrated below. You will now see the name of the new project in the "Project Management" window. Double click on the name of the new project to open the new project. User’s Manual Of ISaGRAF Embedded Controllers, Mar.2006, Rev. 5.0 , Copyright By ICP DAS 56 2.1.1.3: Declaring The ISaGRAF Project Variables Before you can start creating an ISaGRAF program, you must first declare the variables that will be used in the ISaGRAF program. To begin this process, first click on the "Dictionary" icon and then click on the "Boolean" tab to declare the Boolean variables that will be used in our example program. To declare the program variables for the ISaGRAF project, double click on the colored area below the "Boolean" tab, and a "Boolean Variable" window will open. Enter in the name of the variable to be used in the project. For the purpose of this example program the variable "Boolean Variable Name" is "INIT", and "Flag to indicate first scan cycle or not" is added to the "Comment Section". The next item that must be declared is what type of "Attribute" the variable will possess. In this example program, INIT’s attribute will be an "Internal". Lastly, check on the “set to true at init” since we need INIT has its initial value as TRUE when the project is just power up to run. Then press the "Store" button to save the Boolean variable that has been created. User’s Manual Of ISaGRAF Embedded Controllers, Mar.2006, Rev. 5.0 , Copyright By ICP DAS 57 The new Boolean variable has now been declared. Note the other information areas that are provided for the programmer to fully explain how the variable will be handled. NOTE: You MUST make sure that the variable you have declared has the desired Attribute assigned. If you decide that you want to change a project variable’s attribute, just double click on the variable name and you can reassign the attribute for the variable. Using the same method described above, declare the additional Boolean variables for this example program, "M3". When you have completed the Boolean variable assignments, the Global Boolean window should look like the example below. User’s Manual Of ISaGRAF Embedded Controllers, Mar.2006, Rev. 5.0 , Copyright By ICP DAS 58 There are three outputs used in this example program named "OUT01, OUT02, and OUT03". ISaGRAF provides a quick and easy way to declare like variables that are sequentially ordered. To begin this process, click on the "Quick Declaration" icon, and enter in the output number that you will start with in the "Numbering" from and "To" field (this example uses from 1 to 3). Enter the "Symbol" name for the output variables being declared, and lastly, set the attribute to "Output". User’s Manual Of ISaGRAF Embedded Controllers, Mar.2006, Rev. 5.0 , Copyright By ICP DAS 59 When you click on the "OK" button, all three outputs will be immediately added to the "Global Boolean" window. To declare the timer (T1) variable used in this example program, click on the "Timers" tab in the setup screen. Double click on the colored area and enter the Name as "T1", set the "Attributes" to "Internal", the "Initial Value" to "T#1s", then click on the "Store" button. User’s Manual Of ISaGRAF Embedded Controllers, Mar.2006, Rev. 5.0 , Copyright By ICP DAS 60 To declare the Integer (pulse_No) variable used in this example program, click on the "Integers/Reals" tab in the setup screen. Double click on the colored area and enter the Name as "pulse_No", set the "Attributes" to "Internal", the “Format” to “Integer”, and the "Initial Value" to "0", then click on the "Store" button. Once all of the variable characteristics have been properly setup, click on “save” and then click on "X" at the top right of the setup window to close the variable dictionary for this example project. User’s Manual Of ISaGRAF Embedded Controllers, Mar.2006, Rev. 5.0 , Copyright By ICP DAS 61 2.1.1.4: Creating The Example LD Program Once all of the variables have been properly declared, you are now ready to create the example LD program. To start this process, click on the "Create New Program" icon and the "New Program" window will appear. Enter the "Name" as "LD1" (the name of our example program), next, click on the "Language" scroll button and select "Quick LD: Ladder Diagram", and make sure the "Style" is set to "Begin: Main Program". You can add any desired text to the "Comment" section for the LD program, but it isn’t required. The "LD1" program has now been created. To open the "LD1" program, double click on the "LD1" name. 2.1.1.5: Editing The Example "LD1" Program When you double click on the "LD1" name the "Quick LD Program" window will appear. To start programming our LD program, click on "Edit" from the main menu bar, then click on "Insert Rung" as shown below. “Insert Rung” means to insert a basic LD rung just above the current position. User’s Manual Of ISaGRAF Embedded Controllers, Mar.2006, Rev. 5.0 , Copyright By ICP DAS 62 Or, you may just simply click on the "F2 (Contact On The Left)” icon, and the following will appear within the Quick LD Program window. Click on the "F7 (Block on the right)" icon and you will create a block on the right of the first input contact. User’s Manual Of ISaGRAF Embedded Controllers, Mar.2006, Rev. 5.0 , Copyright By ICP DAS 63 Click on "F7 (Block on the right)" icon again to create one another block on the right of the first block. Then you will get the window as below. Move the cursor to the Coil on the right. Then click on “F5 (Coil)” to add one coil just below the first coil. And then click on “F5 (Coil)” again to add the third coil. Then the window will look like below. User’s Manual Of ISaGRAF Embedded Controllers, Mar.2006, Rev. 5.0 , Copyright By ICP DAS 64 Double click anywhere inside of the second block and the "Function Block" assignment window appears. Select the "BLINK" type function block are using in our example program. To learn how the "BLINK" function operates you can click on the "Info" button for a detailed explanation of its functionality. Using the same procedure to assign the first block to “TOF” as below. User’s Manual Of ISaGRAF Embedded Controllers, Mar.2006, Rev. 5.0 , Copyright By ICP DAS 65 Now we are going to assign the associated variable & constant to each item. Double click on the first contact, a “Select variable” screen appeared. First select the “Scope” to “(Global)” and the proper type to “Boolean”. Then double click on “INIT” or you may use the keyboard to type “INIT”. Using the same procedure to assign OUT01 thru. OUT03 to the associated coil. User’s Manual Of ISaGRAF Embedded Controllers, Mar.2006, Rev. 5.0 , Copyright By ICP DAS 66 Now move your cursor to the left of the parameter “PT” of the “TOF” block. Double click on it, type “T#15s” (it means 15 second), then press “OK”. Do the same way to assign “T1” to the left of the parameter “CYCLE” of the “BLINK” block. User’s Manual Of ISaGRAF Embedded Controllers, Mar.2006, Rev. 5.0 , Copyright By ICP DAS 67 Now the window will look like below. To add a new LD rung, first move the cursor to the proper position below the first rung. Then click on “Edit – Insert rung” User’s Manual Of ISaGRAF Embedded Controllers, Mar.2006, Rev. 5.0 , Copyright By ICP DAS 68 We don’t need the contact in the new rung, move cursor to it, then click on “Cut”. Now click on “F6 (Block on the left)” , and then double click on inside the block to create an “BLINK” block. Assign “T#1s” to the parameter of “CYCLE”, then we got the below window. User’s Manual Of ISaGRAF Embedded Controllers, Mar.2006, Rev. 5.0 , Copyright By ICP DAS 69 Move the cursor to the right coil, then click on “Coil/contact type” some times to assign the type to “N”. User’s Manual Of ISaGRAF Embedded Controllers, Mar.2006, Rev. 5.0 , Copyright By ICP DAS 70 Double click on the N coil to assign “M3” to it. Now we are going to add another LD rung. Move the cursor to the below position of the second rung. And click on “F9 (Return)”. User’s Manual Of ISaGRAF Embedded Controllers, Mar.2006, Rev. 5.0 , Copyright By ICP DAS 71 Move the cursor to “return” and then click on “F2 (Contact on the left)” to add a contact on the left. Then double click on the contact to assign “M3” to it. And change its type to “\” (inverted contact). User’s Manual Of ISaGRAF Embedded Controllers, Mar.2006, Rev. 5.0 , Copyright By ICP DAS 72 The procedure to create the forth & the last LD rung is similar as former steps. Please do it by yourself. The final LD program should look like the below. VAL10LED is only for I-8xx7, 7188EGD & 7188XGD. Not available for Wincon-8xx7 Save this LD program and quit. User’s Manual Of ISaGRAF Embedded Controllers, Mar.2006, Rev. 5.0 , Copyright By ICP DAS 73 2.1.1.6: Create The ST "end_init" Program In this project we need an extra ST program to handle the “INIT” variable. Click on “Create new program” in the “ … - Programs” window to add a ST program. Given the Name as “end_init” , Comment as “Handle INIT variable” , Language as “ST: Structured Text” , & Style as “End: Main program”. Then click on “OK”. Now we have two programs inside this project. ISaGRAF will run these two programs one time in each PLC scan cycle. Programs in the “begin” area will run first, then the “Sequential” area, and last the “End” area. An ISaGRAF cycle run in the way as the below scheme. Scan all inputs Process ‘begin’ area ISaGRAF Cycle Process ‘Sequential’ area Process ‘End’ area Reflash all outputs User’s Manual Of ISaGRAF Embedded Controllers, Mar.2006, Rev. 5.0 , Copyright By ICP DAS 74 Double click on “end_init” program to edit it. Click on “save” and then exit when you finish it. (Any character inside between “(*” and “*)” is the comment.) (* An ST demo program *) INIT := FALSE ; Since “INIT” is declared with an initial value “TRUE”, this ST program will let “INIT” set to “FALSE” at the end of the first scan cycle. In other word, “INIT” will indicate this project is running in the first scan cycle or not (TRUE: first scan cycle, FALSE: other cycles). Now we have finished the programming, now we are going to the next step – “Connect the I/O”. 2.1.2: Connecting The I/O The ISaGRAF Workbench software program is an open programming system. This allows the user to create an ISaGRAF program that can operate a large number of different PLC controller systems. It is the responsibility of the PLC hardware manufacturer to embed the ISaGRAF "driver" in their respective controller for the ISaGRAF program to operate properly. The ICP DAS line of I-8417/8817/8437/8837, I-7188EG, I-7188XG , W-8037/8337/8737 & W8047/8347/8747 series of controllers have the ISaGRAF driver embedded, creating a powerful and flexible industrial controller system. Now that you have created the ISaGRAF example program, now you must connect the I/O to the controller system. A useful feature of the I-8xx7 controller system is that you can run program we have created WITHOUT having any I/O boards plugged into the I-8xx7 controller system. The four pushbuttons on the I-8xx7 controller system can be used as four digital inputs, and the three left LED’s above the control panel pushbuttons can be used as outputs. User’s Manual Of ISaGRAF Embedded Controllers, Mar.2006, Rev. 5.0 , Copyright By ICP DAS 75 “Push4key” & “Show3Led” is only for the I-8417/8817/8437/8837. If your controller is I-7188EG/XG or W-8xx7, you can also connect “Push4key” & “Show3Led” for simulation however please mark them as “virtual” board. Click on the "I/O Connection" icon as shown in the top picture and the "I/O Connection" window will appear as shown in the next illustration. For the purpose of this example, you can either double click on the "9" slot, or just click on the "9" slot, then click on "Edit" and then "Set Board/Equipment" and then the "I/O Connection" window will appear. This now associates the four control panel pushbuttons - “push4key” as four digital inputs. (We don’t use it in this example program since there is no boolean variable declared with “Input” attribution). IMPORTANT NOTICE: I/O Slots 0 through 7 are reserved for REAL I/O boards that will be used in the I-8xx7 controller (W-8337/8737 doesn’t have slot 0). You can use slots 8 and above for additional functionality as illustrated by the example program. To create the I/O connections for the outputs, double click on the "10" slot, then click on the "Show3led: 3 indication LED on 8xx7 panel" selection. This will now associate the three LED’s above the four control panel pushbuttons as the three outputs for the example program. Your "I/O Connection" window should now look like the screen below. User’s Manual Of ISaGRAF Embedded Controllers, Mar.2006, Rev. 5.0 , Copyright By ICP DAS 76 “Push4key” & “Show3Led” is only for the I8417/8817/8437/8837. If your controller is I7188EG/XG or W-8xx7, you can also connect “Push4key” & “Show3Led” for simulation however please mark them as “virtual” board. Remember to click on the "SAVE" icon to save the I/O connections that have been created for the example program. And click on the “X” to exit the window. IMPORTANT NOTE: All of the variables with Input and Output attribute MUST be connected through the I/O connection as described above for any program to be successfully compiled. Only the Input and Output attributed variables will appear in the "I/O Connections" window. In this example we have only 3 boolean output variables, they are OUT01, OUT02 & OUT03. 2.1.3: Compiling The Example LD Project For ANY AND EVERY ISaGRAF program to work properly with any of the I-8xx7, I-7188EG, 7188XG & W-8xx7 controller systems, it is the responsibility of the programmer to properly select the correct "Compiler Options". You MUST select the "ISA86M: TIC Code For Intel" option as described below. Note: 1. The I-8417/8817/8437/8837 , I-7188EG and I-7188XG has memory limitation. The ISaGRAF code size can not exceeds 64K bytes. (size of the “appli.x8m” file) User’s Manual Of ISaGRAF Embedded Controllers, Mar.2006, Rev. 5.0 , Copyright By ICP DAS 77 2. W-8037/8337/8737 and W-8047/8347/8747 has code size limitation of 1M bytes. It is 16 times of I-8xx7 & I-7188EG/XG. 3. The CPU speed of the W-8037/8337/8737 and W-8047/8347/8747 is about 10 to 20 times of the I-8xx7 & I-7188EG/XG. Especially for floating point value calculation. To begin the compilation process, first click on the "MAKE" option from the main menu bar, and then click on "Compiler Options" as shown below. The "Compiler Options" window will now appear. Make sure to select the options as shown below then press the "OK" button to complete the compiler option selections. You may check all options to make better code. TIME TO COMPILE THE PROJECT! Now that you have selected the proper compiler options, click on the "Make Application Code" icon to compile the example LD project. If there are no compiler errors detected during the compilation process, CONGRATULATIONS, you have successfully created our example LD program. If errors are detected during the compilation process, just click on the "CONTINUE" button to review the error messages. Return to the Project Editor and correct the errors as outlined in the error message window. User’s Manual Of ISaGRAF Embedded Controllers, Mar.2006, Rev. 5.0 , Copyright By ICP DAS 78 2.1.4: Simulating The LD Project A powerful program-debugging feature of the ISaGRAF software program is the ability to "SIMULATE" the program you have developed before loading it into the ISaGRAF controller system. After successfully compiling the example LD program, click on the "SIMULATE" icon as shown below. When you click on the "Simulate" icon three windows will appear. The windows are the "ISaGRAF Debugger", the "ISaGRAF Debug Programs", and the "I/O Simulator" windows. If the I/O variable names you have created DO NOT appear in the I/O simulator window, just click on the "Options" and "Variable Names" selection and the variable names you have created will now appear next to each of the I/O’s in the simulator window. In the "ISaGRAF Debug Program" window, double click on the "LD1" where the cursor below is positioned. This will open up the ISaGRAF Quick LD Program window and you can see the LD program you have created. Close the “..Debugger” window will exit the simulation. User’s Manual Of ISaGRAF Embedded Controllers, Mar.2006, Rev. 5.0 , Copyright By ICP DAS 79 Running The Simulation Program When you double click on "LD1" in the "ISaGRAF Debug Programs" window, the follow window should appear. You can see outputs “OUT01” thru. “OUT03” will blink in the first 15 seconds. And the “pulse_No” continuously plus one every second. You can adjust the "T1" variable while the program is running. To accomplish this, click on the "Dictionary" icon which will open the "ISaGRAF Global Variables" window as shown in the first two pictures below. Click on “Timer” tab and then double click on “T1” to change the timer value to “T#500ms” (this means 0.5 second). Then click on “Write”. User’s Manual Of ISaGRAF Embedded Controllers, Mar.2006, Rev. 5.0 , Copyright By ICP DAS 80 2.1.5: Download & Debugging The Example LD Project The last step required to running the example LD program on the ISaGRAF controller system is to download the project to the controller (frequently referred to as the "Target" platform"). Before this download can be accomplished you must first establish communications between your development PC and the controller. To begin this process, click on the "Link Setup" icon in the "ISaGRAF Programs" window. When you click on the "Link Setup" icon, the following window will appear. The "Target Slave Number" is the Node-ID address for the I-8xx7 controller as defined by the dipswitch settings outlined in Chapter 1, Section 1.3.1. The Node-ID dipswitch is located in the bottom right portion of the I-8xx7 controller. If your I-8xx7 controller is the first one, the Node-ID address should be set to "1". The "Communication Port" is the serial port connection on your development PC, and this is normally either COM1 or COM2. Default Net-ID of the I8xx7, I-7188EG/XG & W8xx7 controller is 1 when shipped out. It can be switched to be 1 to 255. The communication parameters for the target I-8xx7 controller MUST be set to the same serial communication parameters for the development PC. For I-8417 and I-8817 controllers (serial port communications), the default parameters for COM1 (RS232) and COM2 (RS485) ports are: Baudrate: Parity: Format: Flow control: 19200 none 8 bits, 1 stop none User’s Manual Of ISaGRAF Embedded Controllers, Mar.2006, Rev. 5.0 , Copyright By ICP DAS 81 IMPORTANT NOTE It may be necessary to change the COM port settings for the development PC. Depending on which computer operating system you are using, you will need to make sure that the COM port can properly communicate to the I-8xx7, I-7188EG/XG & W-8xx7 controller system. DOWNLOADING THE EXAMPLE PROJECT Before you can download the project to the controller, you must first verify that your development PC and the controller are communicating with each other. To verify proper communication, click on the "Debug" icon in the "ISaGRAF Programs" window as shown below. If the development PC and the I-8xx7, I-7188EG/XG & W-8xx7 controller system are communicating properly with each other, the following window displayed below will appear (or if a program is already loaded in the controller system, the name of the project will be displayed with the word "Active" following it. If the message in the "ISaGRAF Debugger" says "Disconnected", it means that the development PC and the controller system have not established communications with each other. The most common causes for this problem is either the serial port cable not being properly configured, or the development PC’s serial port communications DO NOT match that of the controller system. You may have to either change the serial port communication settings for the development PC (which may require changing a BIOS setting) or change the "Serial Link Parameters" in the ISaGRAF program. If there is a project already loaded in the controller system you will need to stop that project before you can download the example project. Click on the "STOP" icon as illustrated above to halt any applications that may be running. User’s Manual Of ISaGRAF Embedded Controllers, Mar.2006, Rev. 5.0 , Copyright By ICP DAS 82 STARTING THE DOWNLOADING PROCESS From the "ISaGRAF Debugger" window click on the "Download" icon, then click on "ISA86M: TIC Code For Intel" from the "Download" window as shown below. The example project will now start downloading to the I-8xx7, I-7188EG/XG & W-8xx7 controller system. A progress bar will appear in the "ISaGRAF Debugger" window showing the project downloading progress. When the example project has successfully completed the downloading process to the controller system the following two windows will appear. RUNNING THE EXAMPLE LD PROGRAM You can observe the real time I/O status from several ISaGRAF windows while you are running the example project. One of the windows is the "I/O Connections" window, which shows each of the inputs and outputs as assigned. Click on the "I/O Connections" icon in the ISaGRAF User’s Manual Of ISaGRAF Embedded Controllers, Mar.2006, Rev. 5.0 , Copyright By ICP DAS 83 Debugger window to open the "I/O Connections" screen. Another VERY helpful window you can open is the "Quick LD Program" window. From this window you can observe the LD program being executed in real time. In the window below, the OUT01 thru. OUT03 is blinking in the first 15 seconds. The "Quick LD Program" window shows the entire ladder logic program in REAL TIME and is an excellent diagnostic tool for development and troubleshooting. Though there are numerous steps involved in creating and downloading an ISaGRAF program, each step is quick and easy to accomplish, and the end result is a powerful and flexible control development environment for the ISaGRAF controller systems. PRACTICE, PRACTICE, PRACTICE! Now that you have successfully created and ran your first ISaGRAF program with the I-8xx7, I-7188EG/XG & Wincon-8xx7 controller system, you should practice creating more elaborate and powerful programs. Like any other computer development environment, practice and experimentation is the key to understanding and success, GOOD LUCK! User’s Manual Of ISaGRAF Embedded Controllers, Mar.2006, Rev. 5.0 , Copyright By ICP DAS 84 2.2: A Simple Structured Text (ST) Program A "Structured Text" program is a high-level program language that is designed for automation process control applications. The "Structured Text (henceforth referred to as "ST") is primarily used to implement complex procedures that cannot be easily expressed by a graphical language such as LD or FBD. An ST program is comprised by a list of "ST Statements", and each "ST Statement" MUST end with a semi-colon “;”. All characters inside between “(*” and “*)” is comment. Variables Used In The Example ST Project: Name INIT K1 K2 M1 M2 TEMP COUNT Type Boolean Boolean Boolean Boolean Boolean Boolean Integer Attribute Internal Input Input Internal Internal Internal Internal Description initial value at “TRUE”. TRUE means 1st scan cycle The first pushbutton on the front panel of the I-8xx7 The second pushbutton on the front panel of the I-8xx7 Indicate pushbutton K1 is just pushed. Indicate pushbutton K2 is just pushed. A boolean variable for temporary use A integer value generated by push K1 & K2 initial value is set at "0" Three programs are used in this example. One is LD program named “LD1”, The other two are ST programs named respectively as “ST1” & “end_init”. LD program “LD1” Outline: User’s Manual Of ISaGRAF Embedded Controllers, Mar.2006, Rev. 5.0 , Copyright By ICP DAS 85 ST program “ST1” Outline: (* Open Com3 with 9600 baud rate, 8 char. size, no parity, 1 stop bit at first scan cycle *) if INIT=TRUE then TEMP := comopen(3, 9600, 8, 0, 1) ; end_if ; (* Do something when K1 or K2 is pushed *) if (M1=TRUE) or (M2=TRUE) then (* COUNT plus 1 when K1 is pushed *) if M1=TRUE then COUNT := COUNT+1 ; end_if ; (* COUNT plus 10 when K2 is pushed *) if M2=TRUE then COUNT := COUNT+10 ; end_if ; (* save COUNT value to the 5th Pos. of No.2 integer arry *) TEMP := ARY_N_W(2, 5, COUNT) ; (* write one byte = 2 (hex.) to Com3 *) TEMP := COMWRITE(3, 16#2) ; (* write 1 integer (1 long integer contains 4 bytes) of Pos. 5 inside No.2 array to Com3 *) TEMP := COMAY_NW(3, 2, 1, 5) ; (* write one byte = 3 (hex.) to Com3 *) TEMP := COMWRITE(3, 16#3) ; end_if ; ST program “end_init” Outline: INIT := FALSE ; User’s Manual Of ISaGRAF Embedded Controllers, Mar.2006, Rev. 5.0 , Copyright By ICP DAS 86 Process Operation Actions: LD Program “LD1” : Catch the rising edge status when pushbutton K1 is just pushed and save it into a internal boolean variable “M1” Catch the rising edge status when pushbutton K2 is just pushed and save it into a internal boolean variable “M2” ST Program “ST1” : Open Com3 of the I-8xx7 controller with 9600 baud rate, 8 char. size, no parity, 1 stop bit at the first scan cycle. Plus “COUNT” value by 1 every time when pushbutton K1 is pushed. Plus “COUNT” value by 10 every time when pushbutton K2 is pushed. Send “Count” value to a PC via Com3 of the I-8xx7 controller in the below frame format. STX Value of COUNT ETX Lowest byte 2nd lower byte 3rd lower byte Highest byte STX : Start of frame, byte value = 2 ETX : End of frame, byte value = 3 ST Program “end_init” : Set boolean variable “INIT” to FALSE at the end of the PLC scan cycle. So that “INIT” will be TRUE only at the first scan cycle. Function description: “P” contact : Contact with P type means the right status will be set to a pulse TRUE when the contact is just rising from FALSE to TRUE. Comopen(PORT, BAUD, CHAR, PARI, STOP) : To open a Com port of the I-8xx7 controller Parameter PORT : BAUD : CHAR : PARI : STOP : Return : Integer Integer Integer Integer Integer boolean 3:COM3 ,4:COM4, ..., 20:COM20 baud rate, 2400, 4800, 9600, 19200, 38400, 57600, 115200 char. size, 7 or 8 parity, 0:none, 1:even, 2:odd stop bit, 1 or 2 ok.: TRUE , fail: FALSE User’s Manual Of ISaGRAF Embedded Controllers, Mar.2006, Rev. 5.0 , Copyright By ICP DAS 87 Ary_N_W(NUM, ADR, DATA) : Save one long integer into an integer array. Parameter NUM : ADR : DATA : Return : Integer Integer Integer boolean save to which array (1-6) save to which Pos. in this array (1-256) the integer value to save ok.: TRUE , fail: FALSE ComWrite(PORT, DATA) : Write one byte to a Com port Parameter PORT : Integer DATA : Integer 3:COM3 ,4:COM4, ..., 20:COM20 the byte value (0 - 255) to write Return : ok.: TRUE , fail: FALSE boolean ComAy_NW(PORT, ARY_NO, NUM, POS) : Write an integer array to a Com port Parameter PORT : Integer ARY_NO : Integer NUM : Integer POS : Integer 3:COM3 ,4:COM4, ..., 20:COM20 the array No. to write (1-6) number of integers to write (0-256) start position inside the array to write (1-256) Return : ok.: TRUE , fail: FALSE boolean User’s Manual Of ISaGRAF Embedded Controllers, Mar.2006, Rev. 5.0 , Copyright By ICP DAS 88 2.2.1: Example ST Program The first step is to create a new project for the example ST program. Creating The Example ST Project From the "ISaGRAF Project Management" window click on the "Create New Project" icon and enter "ST_Exam" for the name for the example ST project. Declaring The Example ST Variables as below content Refer to Section 2.1.1.3. "Declaring The Variables" for assistance. Name INIT K1 K2 M1 M2 TEMP COUNT Type Boolean Boolean Boolean Boolean Boolean Boolean Integer Attribute Internal Input Input Internal Internal Internal Internal Description initial value at “TRUE”. TRUE means 1st scan cycle The first pushbutton on the front panel of the I-8xx7 The second pushbutton on the front panel of the I-8xx7 Indicate pushbutton K1 is just pushed. Indicate pushbutton K2 is just pushed. A boolean variable for temporary use. A integer value generated by push K1 & K2 initial value is set at "0" Creating a LD program “LD1” with the below content. Refer to Section 2.1.1.4. and 2.1.1.5 for assistance. User’s Manual Of ISaGRAF Embedded Controllers, Mar.2006, Rev. 5.0 , Copyright By ICP DAS 89 Follow the same steps as 2.1.1.6. to create a ST program “end_init” with the below content. INIT := FALSE ; Creating a ST program “ST1” with the below content. Refer to Section 2.1.1.6. for assistance. (* Open Com3 with 9600 baud rate, 8 char. size, no parity, 1 stop bit at first scan cycle *) if INIT=TRUE then TEMP := comopen(3, 9600, 8, 0, 1) ; end_if ; (* Do something when K1 or K2 is pushed *) if (M1=TRUE) or (M2=TRUE) then (* COUNT plus 1 when K1 is pushed *) if M1=TRUE then COUNT := COUNT+1 ; end_if ; (* COUNT plus 10 when K2 is pushed *) if M2=TRUE then COUNT := COUNT+10 ; end_if ; (* save COUNT value to the 5th Pos. of No.2 integer arry *) TEMP := ARY_N_W(2, 5, COUNT) ; (* write one byte = 2 (hex.) to Com3 *) TEMP := COMWRITE(3, 16#2) ; (* write 1 integer (1 long integer contains 4 bytes) of Pos. 5 inside No.2 array to Com3 *) TEMP := COMAY_NW(3, 2, 1, 5) ; (* write one byte = 3 (hex.) to Com3 *) TEMP := COMWRITE(3, 16#3) ; end_if ; IMPORTANT NOTE Each ST statement line MUST end with a semi-colon ";" as shown above. After entering in the above example program remember to click on the "Save" icon to save the program, then click on "Exit". User’s Manual Of ISaGRAF Embedded Controllers, Mar.2006, Rev. 5.0 , Copyright By ICP DAS 90 Use the similar procedure for the "Connecting I/O" as detailed in Section 2.1.2 Use the similar procedure for the "Compilling the project" as detailed in Section 2.1.3 User’s Manual Of ISaGRAF Embedded Controllers, Mar.2006, Rev. 5.0 , Copyright By ICP DAS 91 After compiling the example ST project click on the "Simulate" icon to observe the ST program running. You may open the dictionary window to see the “COUNT” value. Click on “K1” or “K2”, you will see the “COUNT” value is changed. You can now download this example project to the I-8xx7 controller system. Please follow the same procedure as outlined in Section 2.1.5 . After downloading to the controller, the program will send 6 bytes via Com3 of the controller whenever K1 or K2 is pushed. If you have your RS232 monitoring program running on your PC, you can connect Com3 to your PC to see how it works. User’s Manual Of ISaGRAF Embedded Controllers, Mar.2006, Rev. 5.0 , Copyright By ICP DAS 92 2.3: A Simple Function Block Diagram (FDB) Program The "Function Block Diagram (FBD) is a graphical programming language that allows a programmer to build complex procedures by taking existing "Functions" from the ISaGRAF library and "Wiring" them together graphically to create powerful process control applications. The following section details how to build a "Function Block Diagram" program with ISaGRAF. Function Block Diagram programs are extremely useful for managing several control process programs from a single source. Example FBD Control Specification: The following details the variables that will be used in our example Function Block Diagram program. Name OUT1 OUT2 A1 Type Boolean Boolean Integer Attribute Output Output Internal Description High alarm Low alarm Simulate a temperature input, initial value is 0 FBD Program Outline: FBD Program Action: If “A1” > 5000, output “OUT1” is "TRUE". If “A1” < 2000, output “OUT2” is "TRUE". Other situation, output “OUT1” and “OUT2” are "FALSE" 2.3.1: Programming The Example FBD Program Creating a Function Block Diagram (henceforth referred to as "FBD") program is very similar to creating a LD program as outlined in Section 2.1. The following steps detail how easy it is to create a FBD program. Creating a New FBD Project From the "ISaGRAF Project Management" window click on the "Create New Project" icon and enter the name "FBD_Exam". User’s Manual Of ISaGRAF Embedded Controllers, Mar.2006, Rev. 5.0 , Copyright By ICP DAS 93 After you have created the new FBD project, double click on the "FBD_Exam" name in the "ISaGRAF Project Management" window to open the new FBD project. Click on the "Create New Program" icon in the "ISaGRAF Programs" window, which will open the "New Programs" window. In the "New Programs" window enter in the name field "Main", and for "Language" make sure the "FBD – Function Block Diagram" is selected. You can add a comment about your program also while in the "New Program" window, but it is not mandatory. Once you have entered in all the information in the "New Programs" window click on the "OK" button. User’s Manual Of ISaGRAF Embedded Controllers, Mar.2006, Rev. 5.0 , Copyright By ICP DAS 94 Declaring The Variables For our example FBD program we are going to declare three variables. The variables to be used are "OUT1", "OUT2", and an integer variable called "A1". Declaring variables for the FBD program is like declaring variables for the LD program. Refer to Section 2.1.1.3 – "Declaring The Variables" to review the variable declaration process. Editing The FBD Program To create and edit the example FBD program, double click on word "MAIN" in the "ISaGRAF Programs" window, and then click on the "Insert Function Block" icon as shown below. User’s Manual Of ISaGRAF Embedded Controllers, Mar.2006, Rev. 5.0 , Copyright By ICP DAS 95 Move the cursor to approximately the middle of the "ISaGRAF FBD/LD Program" window and click the mouse one time to add the first function block. Next, double click on the block to select "> Greater Than". For more information regarding any of the function blocks available in the ISaGRAF program just click on "Info" button. Using the same procedure as described above, add a "< Less Than" function block below the "Greater Than" function block. Now it is time to add the program variables to the FBD example program. Click on the "Insert Variable" icon as shown above, and then click on "Integer/Real" from the "ISaGRAF Select Variable" window. This will cause the variable "A1" to appear in the "ISaGRAF Select Variable" to appear. User’s Manual Of ISaGRAF Embedded Controllers, Mar.2006, Rev. 5.0 , Copyright By ICP DAS 96 Double click on the highlighted "A1 Simulate Temperature Input" which will then place the variable "A1" inside of the "ISaGRAF FBD/LD Program" window. Repeat the same process to add a second "A1" variable. Click on the "Insert Variable" icon to add the "OUT1" and "OUT2" variables to the right of the function blocks as shown below. Lastly, add two additional variables, the first is a constant of "5000" and place it below the first "A1" variable, then create a second constant of "2000", and place it below the second "A1" variable. User’s Manual Of ISaGRAF Embedded Controllers, Mar.2006, Rev. 5.0 , Copyright By ICP DAS 97 Your "ISaGRAF FBD/LD Program" window should now look like the above example. Remember, we have added a total of six variables to the program. We have added the "A1" variable twice, the "OUT1" variable, the "OUT2" variable, one constant called "5000" and another constant called "2000" to the FBD example program. The last task to accomplish is making the connection between each of the variables (and constants) and the function blocks. Click on the "Draw Connection Line" icon and draw a line between each of the variables and function blocks as shown below. The top "A1" variable should connect to the "IN1" of the "> Greater Than" function block, the "5000" constant to the "IN2" of the "> Greater Than" function block, the bottom "A1" variable to the "IN1" of the "< Less Than" function block, and the "2000" constant to the "IN2" of the "< Less Than" function block. Lastly, connect the "Q" of the "> Greater Than" function block to the "OUT1" variable, and the "Q" of the "< Less Than" function block to the "OUT2" variable. Connecting The I/O & Compiling The Project Follow the same procedure as outlined in Section 2.1.2 and 2.1.3 for connecting the I/O and compiling the FBD example program. The "ISaGRAF I/O Connection" window should look like the example below. User’s Manual Of ISaGRAF Embedded Controllers, Mar.2006, Rev. 5.0 , Copyright By ICP DAS 98 2.3.2: Simulating The FBD Program You can now run the "Simulate" on the example FBD program by clicking on the "Simulate" icon in the "ISaGRAF Programs" window. When you click on the "Simulate" icon the "ISaGRAF Debugger" window, the "ISaGRAF Debug Programs", and the "I/O Simulator" window will now open. If you double click on "MAIN" in the "ISaGRAF Debug Programs" window the "ISaGRAF FBD/LD Program" window will open showing the state of the program. Notice that because the "A1" variable is less than 2000 (currently set to 1000 in the example below) that the "OUT2" output is currently true and the "OUT1" output is false. User’s Manual Of ISaGRAF Embedded Controllers, Mar.2006, Rev. 5.0 , Copyright By ICP DAS 99 To further test the example FBD program, click on the "Dictionary" icon in the "ISaGRAF Debug Programs" window to open the "Global Dictionary" window, and click on the "Integer/Real" tab. Click on the highlighted "A1" and the "Write Integer/Real Variable" will open. Type in "6000" in the "Enter New Value" field and click on the "Write" button. Now the following changes will be observed. User’s Manual Of ISaGRAF Embedded Controllers, Mar.2006, Rev. 5.0 , Copyright By ICP DAS 100 You can now download the example FBD program to the I-8xx7 controller system. Follow the same procedure as outlined in Section 2.1.5 for downloading the program to the I-8xx7 controller system. User’s Manual Of ISaGRAF Embedded Controllers, Mar.2006, Rev. 5.0 , Copyright By ICP DAS 101 2.4: A Simple Instruction List (IL) Program Instruction List (IL) programming is a low level programming language consisting of a list of instructions. Each instruction always relates to the current result (or IL register) and must begin on a new line and must contain an operator. The operator indicates the operation that must be made between the current value and the operand. The result of the operation is stored again in the result. Instruction List (IL) programming requires adherence to a strict programming format that must be followed. Each instruction must begin on a new line, it must contain an operator, completed with optional modifiers and if necessary, for the specific operation, one or more operands, separated with commas (","). A label followed by a colon (":") may precede the instruction. If a comment is attached to an instruction, it must be the last component of the line. Comments must always begin with (* and end with *). The following is an example of a comment in IL; (* place comment here *). This section describes how to program an Instruction List (henceforth referred to as IL) program. This IL program has the same program specification as the FBD program as outlined in Section 2.3. The first step to creating an IL program is to create an IL project. This is accomplished in the same manner as creating any other ISaGRAF project. For the purpose of this example IL program I have created a new IL project name of "IL_Exam". Click on the "OK" button and the "ISaGRAF Project Management" window will appear with the new project name. Double click on the "IL_Exam" name and the "ISaGRAF Programs" window will appear. Click on the "Create New Program" icon and the "New Program" window will appear. Enter "Hello" in the name field (and you can add a program comment if desired) and make sure to select "IL: Instruction List" from the language field, click on the "OK" button when you are done. User’s Manual Of ISaGRAF Embedded Controllers, Mar.2006, Rev. 5.0 , Copyright By ICP DAS 102 When you click on the "OK" button the "ISaGRAF Programs" window will open. Double click on "Hello" and the "ISaGRAF IL Program" window will open. Declaring The Example IL Variables This example IL program uses the same variables as the example FBD program, "OUT1", "OUT2" and the integer variable "A1". Refer to Section 2.1.1.3 "Declaring The Variables" for assistance. Use the same procedure for the "Connecting I/O" and "Compiling" the program as detailed in Section 2.1.2 and 2.1.3, and use the same procedure to "Simulate" the program as detailed in Section 2.3.2. When you have connected the I/O and compiled the example IL program, click on the "Simulate" icon and the following window will appear. User’s Manual Of ISaGRAF Embedded Controllers, Mar.2006, Rev. 5.0 , Copyright By ICP DAS 103 Because the variable "A1" value is 0, "OUT1" is set to false and "OUT2" is set to true. Change the value of "A1" to a value greater than 5001 and you will see that "OUT1" is set to true and "OUT2" is set to false. User’s Manual Of ISaGRAF Embedded Controllers, Mar.2006, Rev. 5.0 , Copyright By ICP DAS 104 2.5: A Simple Sequential Function Chart (SFC) Program A Sequential Function Chart (SFC) program is a graphical programming language used to describe sequential operations. The process is represented as a set of defined steps, linked by transitions. A Boolean condition is attached to each transition, and actions with the steps are detailed by using other languages such as ST, IL, LD and FDB. An SFE program is a graphical set of steps and transitions, linked together by oriented links. Multiple connection links are used to represent divergences and convergences. Some parts of the complete program may be separated and represented in the main chart by a single symbol, call macro steps. The basic graphic rules for an SFC program are: 1. A Step CANNOT Be Followed By Another Step 2. A Transition CANNOT Be Followed By Another Transition The basic components (graphical symbols) of the SFC programming language are: steps and initial steps, transitions, oriented links, and jumps to a step. This section details how to build a Sequential Function Chart (henceforth referred to as SFC) program. Example SFC Control Specification: The following details the variables that will be used in our example SFC program. Name OUT1 OUT2 K1 K2 TMR1 Mode Type Boolean Boolean Boolean Boolean Timer Integer Attribute Output Output Input Input Internal Internal Description Output 1 Output 2 Mode 1 button input Mode 2 button input Switch time of output, initial value is "T#1s" 1 means mode1 , 2 means mode2, initial value is 1 The SFC Program Outline: When you have completed the "ISaGRAF Programs" window, it should look like the following: User’s Manual Of ISaGRAF Embedded Controllers, Mar.2006, Rev. 5.0 , Copyright By ICP DAS 105 LD Program "SelMode" SFC Program "Main" OUT1(R); OUT2(R); Mode=1; Mode1; Mode<>1; SFC Child Program "Mode1" OUT1; OUT2; GS1.T > TMR1; Mode=2; Mode2; Mode<>2; SFC Child Program "Mode2" OUT1; GS1.T > TMR1; OUT2; GS2.T > TMR1; GS2.T > TMR1; SFC Program Action: 1. When "K1" is pressed, run the "Mode1" program. 2. When "K2" is pressed, run the "Mode2" program. User’s Manual Of ISaGRAF Embedded Controllers, Mar.2006, Rev. 5.0 , Copyright By ICP DAS 106 2.5.1: Programming The Example SFC Program The procedure for creating the example SFC program is the same as outlined in Section 2.1. You must remember to declare the variables "K1", "K2", "OUT1", "OUT2", "TMR1" and "MODE". The following illustrates creating the new SFC project. After creating the new SFC project, the next step is to create an LD program named "SelMode" as illustrated below. When you click on the "OK" button the "ISaGRAF Quick LD Program" window will open. Add the instructions as shown in the example below. IMPORTANT NOTE: The example SFC program uses a function block that has not been used throughout the manual. We will be adding the "1 Gain" function block to our LD program. User’s Manual Of ISaGRAF Embedded Controllers, Mar.2006, Rev. 5.0 , Copyright By ICP DAS 107 Even though the "EN" (input) and "ENO" (output) arguments are not shown in the above example, they will be added when you place the "1 Gain" function block in the program. You will need to change the "K1" and "K2" contacts type to "P". The "P" contact (Positive) enables a Boolean operation between a connection line state and the rising edge of a Boolean variable. Place the cursor to the right of the "Q" and click once, then type in "Mode" for both lines of logic. Place the cursor to the left of the "IN" on the top "1 Gain" function block, click once and enter a "1". Do the same for the second LD line and enter a value of "2", then click once on the "Q" and enter in "Mode". When you are finished editing the "ISaGRAF Quick LD Program" window it should look like the below example. User’s Manual Of ISaGRAF Embedded Controllers, Mar.2006, Rev. 5.0 , Copyright By ICP DAS 108 The next step is to create a new SFC program called "Main". The next step is to create a "CHILD" program called "Mode1". User’s Manual Of ISaGRAF Embedded Controllers, Mar.2006, Rev. 5.0 , Copyright By ICP DAS 109 Follow the same procedure to create a second "CHILD" program named "Mode2". When you are completed the "ISaGRAF Programs" window should look as follows. 2.5.2: Editing The SFC Program To begin editing the example SFC program double click on "Main" in the sequential portion of the "ISaGRAF Programs" window and the "ISaGRAF SFC Program" window will appear. You will note an additional box to the right of the initial step box. This box will contain the code for each of the steps and transitions in the example SFC program. The "code box" is not required during the initial programming so you can to get rid of it temporarily by clicking on the black dot in the gray box area below the initial step and resize the window to approximately the size of the initial step box. User’s Manual Of ISaGRAF Embedded Controllers, Mar.2006, Rev. 5.0 , Copyright By ICP DAS 110 The gray box will move down automatically when you click on the "OR Divergence" icon. The next step is to click on the "Transition" icon to create "Transition 1" and then the "Step" icon to create "Step 2 as shown below. User’s Manual Of ISaGRAF Embedded Controllers, Mar.2006, Rev. 5.0 , Copyright By ICP DAS 111 With the gray box below "Step 2" click on the transition button to add a second transition (transition #2) to the example SFC program. After adding the second transition below "Step 2", click directly below the "OR Divergence" so that the gray box is now placed there. Click on the transition icon again with the gray box below the "OR Divergence" to add a third transition (transition #3). When you have completed these tasks your SFC program should now look like the third SFC picture below. From where the gray box is currently click on the "Step" icon to add Step #3, and then with the gray box below the newly created step #3 click on the transition icon to add a fourth transition (transition #4) to the example SFC program. Your SFC program should now look like the below example. User’s Manual Of ISaGRAF Embedded Controllers, Mar.2006, Rev. 5.0 , Copyright By ICP DAS 112 Now click the gray box below transition #2 and click on the "OR Convergence" (F7) icon. Now click on the "Jump To Step" (F5) icon, this will open the "Jump Destination" window. Double click on the "GS1" label in the "Jump Destination" window. User’s Manual Of ISaGRAF Embedded Controllers, Mar.2006, Rev. 5.0 , Copyright By ICP DAS 113 We have now finished programming the "Main" portion of the example SFC program. The next detail is to add the code for each of the steps and transitions. Double click on step #1 (initial step) and the "ISaGRAF SFC Program" window will open. Type the displayed text into the area shown below. This will associate the typed in code with the step #1. REMEMBER to type a semi-colon (":") at the end of each line of code. OUT1(R); OUT2(R); Using the same method as described above, double click on each transition and step and add the code for each item as shown below. User’s Manual Of ISaGRAF Embedded Controllers, Mar.2006, Rev. 5.0 , Copyright By ICP DAS 114 CONGRATULATIONS! You have now successfully programmed the "Main" section of the example SFC program (and the most time consuming). The last portion of creating the example SFC program requires the creation and editing of the two "CHILD" programs. You program the "CHILD" programs using the exact same method as required for creating the "MAIN" program. When you are finished creating and editing the "CHILD" programs your two windows should look like the examples below. SFC Child Program "Mode1" SFC Child Program "Mode2" Final Details Remember that you must follow the same procedure for "Connecting I/O’s" and "Compiling The Project" as detailed in Section 2.1.2 and Section 2.1.3. User’s Manual Of ISaGRAF Embedded Controllers, Mar.2006, Rev. 5.0 , Copyright By ICP DAS 115 2.5.3: Simulating The SFC Program After you have successfully compiled the SFC program, you can now run the example SFC program in "Simulate" mode to observe how the two "CHILD" programs work within the "MAIN" SFC program. When "K1" is on, "Mode1" is true and both "OUT1" and "OUT2 turn on and off together, and "Mode2" is false. When "K2" is on "Mode2" is true "OUT1" will turn on while "OUT2" is off and then they will alternate where "OUT2" will turn on and "OUT1" will be off, and "Mode1" is false. User’s Manual Of ISaGRAF Embedded Controllers, Mar.2006, Rev. 5.0 , Copyright By ICP DAS 116 Chapter 3: Establishing I/O Connections Before you can operate an ISaGRAF program with the I-8xx7, I-7188EG/XG & Wincon-8xx7 controller, you must make sure that the I/O Library has been installed. If you haven’t done so already, install it as outlined in Section 1.2 "Installing The ICP DAS Utilities For ISaGRAF". 3.1: Linking I/O Boards To An ISaGRAF Project To begin connecting I/O boards to an ISaGRAF project you must first link the I/O boards to the ISaGRAF program. The numbers on the left of the "I/O Connections" window indicate the slot number. Slots 0 through 7 are used ONLY for real I-8000 series I/O boards(Slot 1 through 7 for W-8xx7). Slots 8 and above can be used for "virtual" I/O boards such as the "Push4Key" and "Show3Led" functions fot I-8xx7. For I-7188EG/XG, slot 0 is for Xxxx serial I/O boards, slot 1 & above are for others. In this example I/O connection we are using the I-8417 controller system that has the following boards installed: Slot 0: I-8055 Board (8 digital inputs & 8 digital outputs) Slot 1: I-87055 Board (8 serial inputs & 8 serial outputs) Slot 2: I-87017 Board (8 channel analog input) Slot 3: I-87024 Board (4 channel analog output) Slot 8: "Push4Key" Slot 9: "Show3Led" A powerful feature of the I-8xx7 controller system is that you can intersperse "real" I/O boards with "virtual" I/O boards. User’s Manual Of ISaGRAF Embedded Controllers, Mar.2006, Rev. 5.0 , Copyright By ICP DAS 117 3.1.1: Linking I/O Boards With the "I/O Connection" window open double click on the slot that you want to connect an I/O board to. The "Select Board/Equipment" window will open, scroll to the name of the I/O board that you want to associate with the particular slot. The ISaGRAF controller library defines two basic types of real I/O boards, "Boards" and "Equipments". The "Boards" selection is for I/O boards that are "single type", meaning that all of the channels on that board are of a single type and attribute. The "Equipments" selection is for I/O boards that are "multi-type", which means boards that have multiple types (such as the I-8055 digital I/O board that has 8 digital inputs and 8 digital outputs all on the same board). To begin the linking I/O board process, double click on the slot that you want to associate an I/O board to. If you link an I/O board to an incorrect slot, first click on the slot number you wish to correct, then just click on the "Clear Slot" icon to delete the connection. The connection is now cleared, and now you can make a connection to the desired slot location. User’s Manual Of ISaGRAF Embedded Controllers, Mar.2006, Rev. 5.0 , Copyright By ICP DAS 118 3.1.2: Linking Input & Output Board Variables All of the input and output board "variables (or names)" must be linked (connected) in the "I/O Connection" window. Click on the slot you wish to link the attribute to, then double click on the channel (or I/O point name) number on the right hand portion of the "I/O Connection" window. Lastly, choose the variable name you wish to link to and then click on the "Connect" button. IMPORTANT NOTE Remember that before you can assign any input or output, you must FIRST declare the variable in the "ISaGRAF Global Variables" window as shown below. Click once on slot 8, then double click on "1" on the right hand side of the "ISaGRAF I/O Connection" window. With the "Connect I/O Channel #1" window now open, click on the "Connect" button to create the link between the variable "K1" and channel number 1 of the "Push4Key" input. User’s Manual Of ISaGRAF Embedded Controllers, Mar.2006, Rev. 5.0 , Copyright By ICP DAS 119 If you connect an input or an output variable to the wrong (or undesired) I/O location, double click on the I/O point you wish to remove. The "Connect I/O Channel #x" will open then click on the "Free" button to remove that variable from the I/O point. Click on here to see the on-line help. When you click on the "Free" button you will see that the variable is removed from the I/O point in the "ISaGRAF I/O Connection" window and the variable is placed in the "Free" portion of the "Connect I/O Channel #x" window. User’s Manual Of ISaGRAF Embedded Controllers, Mar.2006, Rev. 5.0 , Copyright By ICP DAS 120 3.2: Linking Analog Type I/O Boards 3.2.1: Setting “range” parameter in analog IO board The method to connect analog type I/O boards to the controller system is very similar to that of connecting digital I/O boards. First, variables which are connected to analog type I/O boards should be declared as “Interger” format. The ONE main difference is that you MUST define one parameter that defines the range for the analog board so it will operate as expected. Click on here to see the on-line help. User’s Manual Of ISaGRAF Embedded Controllers, Mar.2006, Rev. 5.0 , Copyright By ICP DAS 121 To modify the analog board "Range" parameter, click on the word "Range" in the "ISaGRAF I/O Connection" window and the "I/O Board Parameter" window will open. Enter in the correct "Range" parameter for your particular analog board application. The below table provides information on several of the possible options for the "Range" parameter. Note that the default value is set to "8", which means you can interface to a –10v to +10v signal with a range value of –32768 to 32767. Changing the value of "Range" parameter to "9" means you can interface to a –5v to +5v signal with a range value of –32768 to 32767. Note that if you set the "Range" parameter to "A" you will be interface to a –1v to +1v signal with a range value of –32768 to 32767. This range value can be very helpful in analog applications that require a great deal of resolution over a very small range (typically temperature) control. Please refer to Appendix D - “Table of The Analog IO Value” for more information for several different types of analog boards and their respective ranges. 3.2.2: Setting special “range” parameter of temperature input board to get clear “Degree Celsius” or “Degree Fahrenheit” input value ICPDAS provides many temperature input modules as below. With “broken-line detection” or called “wire opening detection” Thermocouple type: I-87018R, 87019R, 7018R, 7018BL, 7019, 7019R RTD type: I-87013, 87015, 7013, 7015, 7033 Thermister type: I-87005, 7005 Without “broken-line detection” Thermocouple type: I-87018, 7018, 7018P The “range” parameter of temperature IO board can be “standard setting” or “special setting”. User’s Manual Of ISaGRAF Embedded Controllers, Mar.2006, Rev. 5.0 , Copyright By ICP DAS 122 For example, I-87013: 4 channel RTD input module. Its range can be 20 : Platinum 100, a=0.00385, -100 ~ +100 degree Celsius … 2F : Platinum 100, a=0.003916, -200 ~ +200 degree Celsius Range=20 (TT=00, RR=20), standard setting. Input value is normally from –32768 to +32767 If range=1020 (TT=10, RR=20), the input value will be a clear “Degree Celsius” value. For ex, 2312 means temperature is “23.12” degree celsius. If seting range as 20 (or 21 to 2F), then it is “standard setting”. The temperature input value is 2’s compliment value from –32768 to +32767 depends on the “range” value. For example, setting range as 20, value of –32767 means temperature is about –100 Degree, +32766 is about +100 Degree. Value of 16383 means +50 Degree (Note:Normally value of –32768 or +32767 means wire “broken-line”) If user want to get a clear temperature input value, for example, value of 2312 means “23.12” Degree Celsius. Then please set “range” to a special value defined as below. Important: Special “range” is supported since driver version of I-8xx7:3.11 , W-8xx7:3.24 Format: TTRR (Hex. Value) TT=10 (Convert to "Degree Celsius") TT=20 (Convert to "Degree Fahrenheit") TT=00 (Default value, -32768 to +32767, this is “standard setting”) RR: original "range" setting For example, setting I-87013’s "range" as A. 1020 : (TT=10, RR=20) the input value will be "Degree Celsius", unit is 0.01 degree, range= "20 : Platinum 100, a=0.00385, degree Celsius". That results input value of "2356" = 23.56 Degree Celsius, "-489" = -4.89 Degree Celsius, "999990" = sensor broken line. B. 202A : (TT=20, RR=2A) the input value will be "Degree Fahrenheit", unit is 0.01 degree, range= "2A: Platinum 1000, a=0.00385, degree Celsius". That results input value of "4512" = 45.12 Degree Fahrenheit, "500" = 5.00 Degree Fahrenheit, "999990" = sensor broken line. C. 21 : (TT=00, RR=21) the input value will be Default value (standard “range” setting), -32768 to +32767, range = "21 : Platinum 100, a=0.00385, degree Celsius" User’s Manual Of ISaGRAF Embedded Controllers, Mar.2006, Rev. 5.0 , Copyright By ICP DAS 123 3.3: Linking "Push4Key" & "Show3Led" The I-8xx7 controllers have an additional feature that is useful for program testing and debugging. These features are the "Push4Key" and "Show3Led" on the front panel on the I8xx7 controller system. Note: I-7188EG/XG & Wincon-8037/8337/8737 doesn’t support “Pusg4Key” & “Show3Led” The "Push4Key" are the four pushbuttons on the I-8xx7 control front panel and they are handled as digital inputs. The "Show3Led" are three of the four LED’s on the I-8xx7 control front panel (the first three from left to right, the fourth LED is strictly to show if the power is turned on the I-8xx7 controller system) and they are handled as digital outputs. Both of these can be linked to an ISaGRAF program through the "I/O Connection" window and can be used to interface with Man Machine Interface (MMI) programs or for program debugging. It is recommended that you assign these functions to slot 8 or higher (remember, slots 0 through 7 are reserved for real I/O boards. IMPORTANT NOTE: As with any real digital input or real digital output, you MUST declare a variable name for each of the "Push4Button" inputs and "Show3Led" outputs in the "ISaGRAF Global Variables" window BEFORE they can be assigned to an ISaGRAF program. User’s Manual Of ISaGRAF Embedded Controllers, Mar.2006, Rev. 5.0 , Copyright By ICP DAS 124 3.4: Directly Represented Variables If you have an ISaGRAF-256 or ISaGRAF-L workbench (Version 3.4x or 3.5x ) with a dongle, you don’t need to use the skill described in this section. A very useful feature of the ISaGRAF Workbench program is the ability to create "directly represented (or internal)" variables. Internal variables are program variables that can be used in an ISaGRAF program, but they are not physically connected to any of the input or output variables. There are four versions of the ISaGRAF Workbench program available with the I8xx7 controller system: ISaGRAF-32, ISaGRAF-80, ISaGRAF-256, and ISaGRAF-L. The number after "ISaGRAF" represents the number of I/O variables that are allowed with that particular ISaGRAF Workbench program. The ISaGRAF Workbench program comes with a hardware protection device (dongle) that plugs directly into your development computers parallel port. Every time you compile a program in ISaGRAF the hardware protection device is read to make sure that you are not trying to connect to more program variables than are allowed with your particular copy of the ISaGRAF Workbench program that you purchased with your I-8xx7 controller system. These "directly represented (henceforth called "internal") variables can be used in lieu of your real world inputs and outputs so you can create additional program variables that do not count against the amount of ISaGRAF program variables. The only "caveat emptor" to these internal variables is that you must follow a strict programming scheme to program and access these internal variables, and they are more complicated to create than the regular input and output variables. For a professional programmer, recommend to purchase an ISaGRAF-256 workbench rather than an ISaGRAF-80 or ISaGRAF-32 workbench for programming on I-8xx7, I-7188EG/XG & Wincon-8xx7 controllers. Single Type Internal Variable Programming Scheme: For single-typed board: "s" is the slot No, "c" is the channel No. %IXs.c free channel of a boolean input board, ex. %QXs.c free channel of a boolean output board, ex. %IDs.c free channel of an integer input board, ex. %QDs.c free channel of an integer output board, ex. %ISs.c free channel of a message input board, ex. %QSs.c free channel of a message output board, ex. %IX2.3 %QX0.2 %ID3.1 %QD2.4 %IS3.1 %QS2.4 Complex Type Internal Variable Programming Scheme: For complex board: "s" is the slot No, "b" is the index of the single board within the complex equipment. "c" is the channel No. %IXs.b.c free channel of a boolean input board, ex. %IX2.3.2 %QXs.b.c free channel of a boolean output board, ex. %QX0.2.1 %IDs.b.c free channel of an integer input board, ex. %ID3.1.3 %QDs.b.c free channel of an integer output board, ex. %QD2.4.3 %ISs.b.c free channel of a message input board, ex. %IS3.3.1 %QSs.b.c free channel of a message output board, ex. %QS2.1.4 User’s Manual Of ISaGRAF Embedded Controllers, Mar.2006, Rev. 5.0 , Copyright By ICP DAS 125 An Internal Variable Program Example Create a new project for an ISaGRAF ST program, and then create a link to the I/O boards that are specified in the window below. Declare three input variables called "D1", "D2", & "D3" for the I-8051 board located at slot 0, and then create three output variables called "OUT1", "OUT2", & OUT3" for an I-8056 board located at slot 1. This time set each of their respective attributes to "internal" instead of input or output (this means they are not connected to any real physical I/O). Create A New "ST" Program Double click on the "ST_Inter" that is highlighted and the "ISaGRAF ST Program" window will open. Type in the program code displayed in the window below EXACTLY as shown. Remember, each line MUST end with a semi-colon (";"). User’s Manual Of ISaGRAF Embedded Controllers, Mar.2006, Rev. 5.0 , Copyright By ICP DAS 126 D1 := %IX0.1 ; D2 := %IX0.2 ; D3 := %IX0.3 ; %QX1.1 := OUT1 ; %QX1.2 := OUT2 ; %QX1.3 := OUT3 ; Now we can use the internal variables D1 through D3 and OUT1 through OUT3 that have been created in other programs in the same project. The newly created internal variables will generate input and output actions to the associated channels in this ST program. IMPORTANT NOTE: If once the input or output attributed variables have been connected to an connected IO board or complex equipment, and if they would like to be replaced by Directly represented variables, these input or output attributed variables have to be re-attributed to “internal” and the board or equipment must be re-connected to the slot. If you wish to replaced these variables by directly represented variables, re-attributed them to “internal” attribution in the “dictionary” window. Clear slot and re-connect again. IMPORTANT NOTE If you enable the compiler option of upload, option “Comments for not connected I/O channels” must be choosed if “Directly represented variables” is used in this project (refer to section 9.2). User’s Manual Of ISaGRAF Embedded Controllers, Mar.2006, Rev. 5.0 , Copyright By ICP DAS 127 3.5: D/I Counters Built in The I-87xxx D/I Modules 87051, 87052, 87053, 87054, 87055, 87058 & 87063 have built-in low speed D/I counters associated with each D/I channel. The max counter speed of these modules is 100Hz. The counter value is ranging from 0 to 65535 and can be reset to 0. To use these D/I counters, connect these I/O modules with a last character – “C”. For ex. “i_87052C” . Click on here to see the online help User’s Manual Of ISaGRAF Embedded Controllers, Mar.2006, Rev. 5.0 , Copyright By ICP DAS 128 If the I-87xxx D/I Module is plugged in the 87K4, 87K5, 87K8 & 87K9 extension base module, or the I-7000 D/I module is used, Please refer to Chapter 6 to use “7000 utility” to set the appropriate address, baud rate , then connect “Bus7000” on the ”I/O connection” window. Then using “I_DiCnt” block to get the “D/I Counter” value. Each “I_DiCnt” can get 4 counters. Address of the D/I module The Counter value (Integer) returned Starting from which channel If the boolean value rising from FALSE to TRUE, reset the associated counter value to 0 User’s Manual Of ISaGRAF Embedded Controllers, Mar.2006, Rev. 5.0 , Copyright By ICP DAS 129 3.6: Auto-Scan I/O Before you can use Auto-scan I/O utility, make sure the “ICP DAS Utilities For ISaGRAF” has been installed. (please refer to section 1.2) What is Auto-scan I/O : It’s a tool for ISaGRAF to easily configure your I/O connection and automatically declare variables for each I/O channel. How to use ? A. Open your ISaGRAF program. B. Click on “Tools/ICP DAS/Auto-scan I/O” to run Auto-scan. C. The Auto-scan I/O is divided into three area. Original I/O Connection shows the modules that already exist in your I/O connection at the first eight slots of your ISaGRAF project. Current Found I/O Modules shows the I/O modules that detected in your controller (By RS232 or TCP/IP). Auto-Declare Variables shows what modules that you want Auto-scan to automatically declare variables for you also. User’s Manual Of ISaGRAF Embedded Controllers, Mar.2006, Rev. 5.0 , Copyright By ICP DAS 130 D. In the “Current Found I/O Modules.” area: The check box will be enable only when an I/O module is detected in the controller and the slot is not used by original I/O connection. E. In the “Auto-Declare Variables”: The check box can be enable only when one I/O module is checked in the current found area. F. You can check the “Select All” to check all available boxes in the respective area. What is necessary for Auto-scan I/O ? A. Make sure the “Link setup” parameter is correct. B. Plug in I/O boards first before your ISaGRAF can detect them. Naming rules of automatically declared variables Name format : Type_Slot_Channel Type: Digital Input : DI Digital Output : DO Analog Input : AI Analog Output : AO Slot : one digital slot number. Channel : two digital channel number. For ex. : DI_0_02 , Digital Input channel at channel No.2 of slot 0. AI_5_06 , Analog Input channel at channel No.6 of slot 5. DO_2_12, Digital Output channel at channel No.12 of slot 2. AO_1_03, Analog Output channel No. 3 of slot 1. Note: I-8xx7 & Wincon-8xx7 supports “Auto-Scan”, however I-7188EG/XG doesn’t supoort it. User’s Manual Of ISaGRAF Embedded Controllers, Mar.2006, Rev. 5.0 , Copyright By ICP DAS 131 3.7: PWM Output The scan time of the ISaGRAF controller depends on the ISaGRAF program and the hardware driver. For normal usage, the scan time is about 5 to 40 ms. It may go up to 100 ms sometime when the user’s ISaGRAF program is very complicated. It is not easy to generate a precise periodic pulse output because the scan time of ISaGRAF is always varying, for example, a square curve of 2 ms OFF & then 1 ms ON. To achieve this kind of application, ISaGRAF provide PWM output functions. To use PWM output (Pulse Width Modulation) in I-8417/8817/8437/8837, please update the driver to version of 2.43 or higher. Only parallel Output boards are supported, not for serial boards. The following output boards are available with the PWM function. I-8037, 8041, 8042, 8054, 8055, 8056, 8057, 8060, 8063, 8064, 8065, 8066, 8068, 8069 Wincon supports PWM functions since its driver version of 3.23. To support PWM function in I-7188EG, please update the driver to version of 1.35 or higher, while 1.32 or higer for I-7188XG Only the Xxxx boards with digital output channels are available with PWM function. Note: 1. Max 8 digital outputs can call PWM_en, PWM_en2, pwm_ON & pwm_OFF at the same time. 2. I-7188EG/XG must connect the Xxxx board at slot 0, or the PWM function will not work. PWM_dis Disable PWM output Parameters: SLOT_ integer CH_ Return: Q_ integer boolean Which slot ? 0 ~ 7 for I-8xx7, only 0 for I7188EG/XG. Wincon: 1 to 7 Which channel ? 1 ~ 32. TRUE: Ok . FALSE: wrong input parameters, too many PWM outputs been enable, or the associate output channel is not found. Note: 1. After calling PWM_dis, the associate output will then be controlled by the ISaGRAF cycle engine. 2.Max 8 output channels can call PWM_en, PWM_en2, pwm_ON, pwm_OFF at one controller. Example: I-8xx7: demo_63 , Wincon: Wdemo_22 User’s Manual Of ISaGRAF Embedded Controllers, Mar.2006, Rev. 5.0 , Copyright By ICP DAS 132 PWM_en Enable PWM to output until PWM_dis is called Parameters: SLOT_ integer CH_ OFF_ integer integer ON_ integer Which slot ? 0 ~ 7 for I-8xx7, only 0 for I7188EG/XG. Wincon: 1 to 7 Which channel ? 1 ~ 32. Off time, I-8xx7 & I-7188EG/XG: 1 ~ 32,767, scale is 1 ms. Wincon: 2 ~ 32766 (Wincon’s scale is 2ms) On time, I-8xx7 & I-7188EG/XG: 1 ~ 32,767, scale is 1 ms. Wincon: 2 ~ 32766 (Wincon’s scale is 2ms) Return: Q_ boolean PWM_en2 Enable PWM to output a given number of pulse Parameters: SLOT_ integer TRUE: Ok . FALSE: wrong input parameters, too many PWM outputs been enable, or the associate output channel is not found. Example: I-8xx7: demo_63 , Wincon: Wdemo_22 CH_ OFF_ integer integer ON_ integer NUM_ integer Return: Q_ boolean Which slot ? 0 ~ 7 for I-8xx7, only 0 for I7188EG/XG. Wincon: 1 to 7 Which channel ? 1 ~ 32. Off time, I-8xx7 & I-7188EG/XG:1-32,767, scale is 1ms. Wincon: 2 ~ 32766 (Wincon’s scale is 2ms) On time, I-8xx7 & I-7188EG/XG:1-32,767, scale is 1 ms. Wincon: 2 ~ 32766 (Wincon’s scale is 2ms) number of pulse to output, 1 - 2,147,483,647. If gives a negative value to NUM_, for ex. –1, it will ouput indefinitely until pwm_dis been called. TRUE: Ok . FALSE: wrong parameters, too many PWM outputs been enable, or the associate output channel is not found. Example: I-8xx7:demo_63, Wincon: Wdemo_22 PWM output curve: Note: 1. Every time the PWM_en or PWM_en2 is called, it will reset its internal tick to 0, and re-start ticking to OFF, ON, OFF, ON, ... 2. If the given number of pulse of pwm_en2 is reached, it will stop & disable PWM auomatically (Calling PWM_dis for pwm_en2 is not necessary). 3. PWM_sts can be used to test if pwm_en2 reaches its given number of pulse or not. 4. Max 8 output channels can call PWM_en, PWM_en2, pwm_ON, pwm_OFF at one controller. 5. Do not enable the channel that is already enable. Please disable it first. User’s Manual Of ISaGRAF Embedded Controllers, Mar.2006, Rev. 5.0 , Copyright By ICP DAS 133 pwm_ON Set parallel D/O to TRUE immediately Parameters: SLOT_ integer CH_ integer Return: Q_ boolean Which slot ? 0 ~ 7 for I-8xx7, only 0 for I7188EG/XG. Wincon: 1 to 7 Which channel ? 1 ~ 32. TRUE: Ok . FALSE: wrong input parameters, too many PWM outputs been enable, or the associate output channel is not found. Example: demo_63 pwm_OFF Set parallel D/O to FALSE immediately Parameters: SLOT_ integer CH_ integer Return: Q_ boolean Which slot ? 0 ~ 7 for I-8xx7, only 0 for I7188EG/XG. Wincon: 1 to 7 Which channel ? 1 ~ 32. TRUE: Ok . FALSE: wrong input parameters, too many PWM outputs been enable, or the associate output channel is not found. Example: demo_63 Note: 1. Max 8 output channels can call PWM_en, PWM_en2, pwm_ON, pwm_OFF at one controller. 2. pwm_ON will set the associate parallel D/O to TRUE immediately. 3. pwm_OFF will set the associate parallel D/O to FALSE immediately. 4. If users wish to enable one D/O as PWM output by PWM_en or PWM_en2 after pwm_ON & pwm_OFF has been called, please disable it first by PWM_dis, then call PWM_en or PWM_en2. User’s Manual Of ISaGRAF Embedded Controllers, Mar.2006, Rev. 5.0 , Copyright By ICP DAS 134 PWM_set Parameters: SLOT_ Dynamically change the ON_, OFF_ & NUM_ setting integer CH_ OFF_ integer integer ON_ integer NUM_ integer Return: Q_ PWM_sts Parameters: SLOT_ CH_ Return: Q_ boolean Which slot ? 0 ~ 7 for I-8xx7, only 0 for I7188EG/XG. Wincon: 1 to 7 Which channel ? 1 ~ 32. Off time, I-8xx7 & I-7188EG/XG:1-32,767, scale is 1ms. Wincon: 2 ~ 32766 (Wincon’s scale is 2ms) On time, I-8xx7 & I-7188EG/XG:1-32,767, scale is 1 ms. Wincon: 2 ~ 32766 (Wincon’s scale is 2ms ) number of pulse to output, 1 - 2,147,483,647. If gives a negative value to NUM_, for ex. –1, it will ouput indefinitely until pwm_dis been called. TRUE: Ok . FALSE: wrong parameters, too many PWM outputs been enable, or the associate output channel is not found. Get PWM status integer integer boolean Which slot ? 0 ~ 7 for I-8xx7, only 0 for I-7188EG/XG. Wincon: 1 to 7 Which channel ? 1 ~ 32. TRUE: this channel has been enable FALSE: disable (for pwm_en2 been called, it means the given pulse number is reached). Note: 1. Max 8 output channels can call PWM_en, PWM_en2, pwm_ON, pwm_OFF at one controller. 2. This function can be used to test if "PWM_en2" reachs its given pulse number or not. PWM_sts2 Parameters: SLOT_ Get pulse number been output by pwm_en2 and pwm_en integer Which slot ? 0 ~ 7 for I-8xx7, only 0 for I-7188EG/XG. Wincon: 1 to 7 Which channel ? 1 ~ 32. CH_ integer Return: NUM_ integer the pulse number already been output by pwm_en2 Note: 1. This function only works when "pwm_sts" return True. 2. The returned pulse number may less than the given number in "pwm_en2" when it reach the destination. For example, gives 20000 pulse in "pwm_en2", however when reach the end, the "pwm_sts2" may return only 19998. 3. If the ouput number given in the "pwm_en2" is a negative value, the pulse output will never stop unless the "pwm_dis" command is given. Then the returned number of "pwm_sts2" will become 0 , 1, 2, ... to 2,147,483,647 and then go back to 0, 1, 2, ... Example: I-8xx7: demo_63 , Wincon: Wdemo_22 User’s Manual Of ISaGRAF Embedded Controllers, Mar.2006, Rev. 5.0 , Copyright By ICP DAS 135 3.8: Counters Built in Parallel D/I Boards I-8417/8817/8437/8837 supports D/I counters since its driver version of 2.43. Only parallel input boards plug at slot 0 are supported, not for serial boards. The following input boards are available with D/I counters. I-8040, 8042, 8051, 8052, 8053, 8054, 8055, 8058, 8063, 8077 Wincon supports Di_Cnt since its driver version of 3.23. Only its slot 1 can use Di_Cnt. I-7188EG supports D/I counters since its driver version of 1.35 while I-7188XG since 1.32. Only the X??? boards with digital input channels are available with D/I counters. The max channel of parallel D/I counter available in one controller is up to 8. And the max frequency of counter input for I-8xx7 & I-7188EG/XG is up to 500 Hz with minimum NO and OFF width > 1 ms. While Wincon is up to 250 Hz with minimum ON & OFF width > 2 ms. The below c function block is for getting/reset D/I counters at slot 0. Parameters: RS1_ ~ RS8_ boolean Return: Q_ boolean CN1_ ~ CN8_ integer Reset the associated D/I counter when rising from False to True work ok. : TRUE. If Q_ is FALSE , it means “No parallel D/I module found at slot 0 " DI Counter value of channel No. 1 to 8. Valid value is ranging from 0 to 2,147,483,647. If value is over 2,147,483,647, it restarts at 0. Note: I-8xx7 & I-7188EG/XG: Only Parallel D/I board plug in slot 0 support “Di_Cnt”, W-8xx7 is slot 1. Only the first 8 D/I channel support “Di_Cnt”. I-7188EG/XG must connect the X??? board at slot 0, or the “Di_Cnt” will not work. Demo: Please refer to I-8417/8817/8437/8837’s demo_63. Wincon: Wdemo_22 User’s Manual Of ISaGRAF Embedded Controllers, Mar.2006, Rev. 5.0 , Copyright By ICP DAS 136 Chapter 4: Linking Controllers To An HMI Program Note: For communicating to W-8x47/8x46 via Modbus TCP/IP protocol, there are two Ethernet ports built in the W-8x47/8x46 controller, please connect your PC/HMI to W-8x47/8x46’s “LAN1” port. And please using “NS-205” or “NS-208” Ethernet switch. This chapter details how to make data from the I-8xx7, I-7188EG/XG & W-8xx7 controller system available to Human Machine Interface (HMI) programs. This is a powerful feature that allows customers to create their own custom HMI programs and link them to the controller system. After you realize the material described in section 4.1, if you would like to use the I-8xx7, I7188EG/XG controller as a Modbus or Modbus TCP/IP I/O, you may refer to section 4.3. Additionally there are "touch screen" monitors provided by ICP DAS that support the "Modbus" protocol, and these touch screen monitors can also access data from an controller . Section 4.4 illustrates how to link a "Touch 510" monitor to an ISaGRAF controller system. 4.1: Declaring Variable Addresses For Network Access To make data from an I-8xx7, I-7188EG/XG & W-8xx7 controller system available to other software programs or HMI devices, you must first declare the variable with a "Network Address". The variable must be declared with a network address number that is in the "Modbus" format. Other software programs or HMI devices will access the controller information through these network addresses. There are two methods available to declare a variable for network address access. The first method is described below. Open an "ISaGRAF Programs" windows and click on the "Dictionary" icon, then double click on the variable to assign a network address number. Note: 1. The valid network addresses for an I-8417/8817/8437/8837 & I-7188EG/XG controller system is from 1 to FFF in hexadecimal (1 ~ 4095). Network address 5001 to 8072 is for word and integer arrays, please refer to Section 4.5. 2. The valid network addresses for an W-8037/8337/8737 & W-8047/8347/8747 controller system is from 1 to 1FFF in hexadecimal (1 ~ 8191). Network address 10,001 to 19,216 is for word and integer arrays, please refer to Section 4.5. User’s Manual Of ISaGRAF Embedded Controllers, Mar.2006, Rev. 5.0 , Copyright By ICP DAS 137 Note: The value displayed here is always in hexadecimal. When you click on the "Store" button you will see that "ISaGRAF Global Variables" window will now be updated with the new network address for the variable. The second method for assigning network addresses to variables requires that you declare the variables BEFORE you assign them. This method allows you to assign numerous network address variables before you link them to an ISaGRAF program. User’s Manual Of ISaGRAF Embedded Controllers, Mar.2006, Rev. 5.0 , Copyright By ICP DAS 138 When you click on "Modbus SCADA Addressing Map" (SCADA is an industrial process control acronym that stands for "Supervisory Control And Data Acquisition") the "Modbus SCADA Addressing Map" window will open. Note that one of the variables (D1) is already assigned from our previous network-addressing example. You will note that the other variables that are not yet mapped are displayed in the lower portion under the "Variables (Not Mapped)" portion of the "Modbus SCADA Addressing Map" window. User’s Manual Of ISaGRAF Embedded Controllers, Mar.2006, Rev. 5.0 , Copyright By ICP DAS 139 To assign the other variable address click on an unassigned "Map Segment" number, and then double click on the variable you want to assign to the address and the variable will automatically assign itself to the "Map Segment". To assign continuous Network address to similar variables, for example, assigning No. 1 to 5 for D001 to D005, please select those variable names and then click on “Edit” – “Map selected variable”. User’s Manual Of ISaGRAF Embedded Controllers, Mar.2006, Rev. 5.0 , Copyright By ICP DAS 140 For human’s thinking way, network address represented in hexadecimal format is inconvenient and it increases the chance to make mistake. Therefore, it’s better to change it to be represented in decimal format. To do that is as following. IMPORTANT NOTE REGARDING MODBUS NETWORK ADDRESSING The Modbus network address definition scheme is sometimes different between HMI devices and other software programs. The difference is typically that the other programs may assign a network address number that is one (1) less than that of the I-8xx7, I-7188EG/X & W-8xx7 controller system. HMI or devices such as Indusoft, Iconics, Citech, Wizcon, Kepware’s OPC server, Intellution’s "iFix", Wonderware’s "Intouch", National Instruments "Labview", and ICP DAS’s Touch 506L, Touch 506T and Touch 510T do have the exact same addressing scheme as the I-8xx7, I7188EG/X & W-8xx7 controller system. Known addressing disparities include "LabLink" and "Hitech" HMI software programs and devices. If you are assigning a network address of "B" (hexadecimal) of these products the I8xx7 network address should be set to "C". A network address of "2" should be associated with a network address of "3" in the ISaGRAF controller system. Another things mistaked very often is the first digit of the network address of many HMI softwares resprent the data type and Read/Write authority not one part of the network address. For example, the network address relation between “iFix” and ISaGRAF is as below. iFix(Decimal) I-8xx7 (Decimal) 00001 (R/W Boolean) 1 … … 10010 (Read Boolean) 10 … … 31000(Read Word) 1000 … … 42101(R/W Word) 2101 User’s Manual Of ISaGRAF Embedded Controllers, Mar.2006, Rev. 5.0 , Copyright By ICP DAS 141 ICP DAS has not been able to test every possible HMI software program or hardware device that has Modbus addressing capability. If you are trying to connect your HMI software program or hardware device with Modbus to an I-8xx7, I-7188EG/X & W-8xx7 controller system, REMEMBER that you may have to offset the Modus addressing by 1 between these products so they will properly communicate with each other. Developers who design and write their own software interface programs using Microsoft’s Visual Basic or Visual C++ programming language should refer to Chapter 5 of this manual for more information on how to interface the Modbus protocol to these programming languages. NOTE: While talking to the I-8xx7, I-7188EG/X & W-8xx7, ONE Modbus frame cannot request more than 255 bits, and also cannot request more than 120 words. It should be divided into 2 or more requests to achieve it. User’s Manual Of ISaGRAF Embedded Controllers, Mar.2006, Rev. 5.0 , Copyright By ICP DAS 142 4.2:Read/Write Word, Long Word & Float through Modbus Modbus protocol provides function 3 and 4 for reading multiple words while function 6 and 16 to write words. Please refer to Chapter 5 for more information about the protocol. The word defined in the Modbus protocol of I-8xx7, I-7188EG/X & W-8xx7 controllers is like a signed short integer, which occupies 2 bytes and range from –32,768 (8000 in hexa.) to +32,767 (7FFF in hexa.). It is normally used to describe the behavior of analog I/O channels. For examples, the I-87017 I/O board (please refer to section 3.2) I-87017 : Range ID (hexadecimal) 8 (default) 9 A B C D Electrical Range ± 10V ± 5V ± 1V ± 500mV ± 150mV ± 20mA Values on the channel (decimal) -32768 0 +32767 - 10V 0V + 10V - 5V 0V + 5V - 1V 0V + 1V - 500mV 0mV + 500mV - 150mV 0mV + 150mV - 20mA 0mA + 20mA The long word defined in the Modbus protocol of I-8xx7, I-7188EG/X & W-8xx7 controllers is like a signed long integer, which occupies 4 bytes and range from -2,147,483,648 (8000 0000 in hexa.) to +2,147,483,647 (7FFF FFFF in hexa.). It is normally used to describe the value of internal integer variables declared on ISaGRAF workbench. All integer variables declared on ISaGRAF are signed 32-bit format however the integer variable, which assigned with a network address will only, occupies 1 word (2 bytes) in the Mudbus transportation format. Since a long word occupies 2 words (4 bytes), to Read/Write long word through Modbus, the network address assigned to the integer variable has to be followed as below. V1 is assigned to a network address “1”. If the network address “2” is not assigned to any other variable, V1 will occupy a long word (4 bytes) in the Modbus transportation formate. However if “2” is assigned to one another variable, V1 will only occupy one word (2 bytes) in the Modbus transportation format. In this example, V1, V2, V3, V6, V7 and V8 will occupy 4 bytes however V4 and V5 only occupy 1 word (Lowest word) in the Modbus User’s Manual Of ISaGRAF Embedded Controllers, Mar.2006, Rev. 5.0 , Copyright By ICP DAS 143 To read long word value of V1 is to read 2 words by using modbus function 3 or 4 (please refer to section 5.1). Modbus address 0000 is associate with network address 1 of the variable Read 2 words Req: Slv 03 00 00 00 02 crcH crcL Ans: Slv 03 04 vH vL vH vL crcH crcL Highest word Lowest word To write long word to V1 is to write 2 words by using modbus function 16. Req: slv 10 00 00 00 02 04 vH vL vH vL crcH crcL Ans: slv 10 00 00 00 02 crcH crcL Lowest word Highest word To read / write float (4 bytes) is very similar to read / write long word. The difference is the variable should be declared as “Real” type, and the next network address No. should not be assigned to any other variable. There are much available HMI software on the market. You don’t need to care about the modbus protocol format. Just be careful to assign the correct network address on ISaGRAF. User’s Manual Of ISaGRAF Embedded Controllers, Mar.2006, Rev. 5.0 , Copyright By ICP DAS 144 4.3: Using I-8xx7 As A Modbus I/O Or A Modbus TCP/IP I/O There are some configurations that the HMI software gathers the I/O data from some called Modbus I/O modules. There I/O modules scan each input channels and refresh the output channels when need. Most of time there are no control logic inside these I/O modules, they are controlled by the HMI. To fit such kind of usage, the I-8417/8817/8437/8837 can be a Modbus I/O module, additionally the I-8437/8837 can be a Modbus TCP/IP I/O module. To do that, follow the following procedures (If you are not familiar with the ISaGRAF programming, recommended to review Chapter 2). Create a new project You may refer to section 2.1.1.2 Example: User’s Manual Of ISaGRAF Embedded Controllers, Mar.2006, Rev. 5.0 , Copyright By ICP DAS 145 Create an empty program No logic need. Example: Connect I/O modules You may refer to section 3.1 Example: User’s Manual Of ISaGRAF Embedded Controllers, Mar.2006, Rev. 5.0 , Copyright By ICP DAS 146 Declare Variables associated with the channels of connected I/O modules. You may refer to section 2.1.1.3 Example: User’s Manual Of ISaGRAF Embedded Controllers, Mar.2006, Rev. 5.0 , Copyright By ICP DAS 147 Link Variables to the associated channels of connected I/O modules. You may refer to section 3.1.2 Example: Assign the linked Variable a network address No. You may refer to section 4.1 Example: User’s Manual Of ISaGRAF Embedded Controllers, Mar.2006, Rev. 5.0 , Copyright By ICP DAS 148 Compile & download the project You may refer to section 2.1.3 & 2.1.5 Note: Make sure the Net ID is set to the proper No. (section 1.3.1) For I-8437/8837, make sure the IP and Mask address is well set (appendix B). The HMI can access to I/O channels through the associated network address now! User’s Manual Of ISaGRAF Embedded Controllers, Mar.2006, Rev. 5.0 , Copyright By ICP DAS 149 4.4: Linking I-8xx7, I-7188EG/XG & W-8xx7 To Touch 500 This section illustrates a demo program to link the I-8417 controller to a Touch 510T HMI. Software Installation: EasyBuilder 500 Please download its newly toolkit & Manual at http://www.icpdas.com/download/others/touch/touch.htm “setup.zip” or run CD-ROM:\napdos\others\touch\500series\setup \“setup.exe” (V2.52 or later) Note: Please always install it to “c:\EB500” (the default path) The cable to link PC to the Touch 506L/506T/510T has pin assignment as following. It can be used to download the designed MMI picture from the PC to the 506L/506T/510T. PC 9-Pin (RS232) TXD 2 RXD 3 GND 5 PC T510T (PC-232) 8 TXD 7 RXD 5 GND T510T T506L/506T After the Touch 510T has been programmed a MMI picture, another cable should be used to link the Touch 510T to the I-8xx7, I-7188EG/XG & W-8xx7 controller. Cable Pin Assignment: I-8000 COM1 & I-7188 COM1 (RS232) Touch 506T/506L/510T (PLC 232) 9-Pin Dsub Male 2 TXD 3 RXD 5 GND 9-Pin Dsub Male 2 TXD 3 RXD 5 GND 7 CTS 8 RTS Wincon COM2 (RS232) Touch 506T/506L/510T (PLC 232) 9-Pin Dsub Female 2 RXD 3 TXD 5 GND 9-Pin Dsub Male 2 TXD 3 RXD 5 GND 7 CTS 8 RTS User’s Manual Of ISaGRAF Embedded Controllers, Mar.2006, Rev. 5.0 , Copyright By ICP DAS 150 4.4.1: Program the I-8xx7, I-7188EG/XG & W-8xx7 To make data of the I-8xx7, I-7188EG/XG & W-8xx7 controller to be accessible to the Touch 510T, variables in the controller should be assigned a network address. Please refer to section 4.1, 4.2. If you are not familiar with the ISaGRAF programming, recommended to review Chapter 2. Variables used in this example. Name Type Attribute OUT01 Boolean Output OUT02 Boolean Output VAL1 Integer Internal Network address 0001 0002 000A (10) Others - IO connection: A simple LD program to show the “VAL1” to 7-segment LED: After you finish this project, compile and download it to the I-8xx7 controller. User’s Manual Of ISaGRAF Embedded Controllers, Mar.2006, Rev. 5.0 , Copyright By ICP DAS 151 4.4.2: Program the Touch 510T The “EasyBuilder 500” software can be used to designe many useful pictures for Touch 500 series. This section illustrates a simple example to program a Touch 510T. For more information about programming on the Touch series, please refer to the user manual which is provided with the “Touch” series hardware. Click on the Windows "Start" button, then click on the "Program" button, then click on the "EasyBuilder" – “EasyBuilder 500” button. The following window will be displayed. Select the proper model for your application. Click “File” – “New” to create a new project. User’s Manual Of ISaGRAF Embedded Controllers, Mar.2006, Rev. 5.0 , Copyright By ICP DAS 152 Click “Edit” – “System Parameters” to set the communication parameter between the Touch 510 and the ISaGRAF controller. PLC type should be set to “MODBUS RTU”, Serial port set to “RS232”, Data bits set to “8 Bits”, Stop bits set to “1 Bit”, Baud rate set to “19200”, Parity set to “None”, PLC station No. set to be equal to the Net-ID of the I-8xx7 (set to 1 in this example). User’s Manual Of ISaGRAF Embedded Controllers, Mar.2006, Rev. 5.0 , Copyright By ICP DAS 153 Click on “Text” to add a text. Select the prefered “Color”, “Font”, “Align” for the text and then enter the “Content”. And then place it to the proper position. User’s Manual Of ISaGRAF Embedded Controllers, Mar.2006, Rev. 5.0 , Copyright By ICP DAS 154 Click on “Function Key” to add a change-window button. Click on “General”, then select “Change Window” and set “Window No.” to 11. User’s Manual Of ISaGRAF Embedded Controllers, Mar.2006, Rev. 5.0 , Copyright By ICP DAS 155 Click on “Shape”, then select “Use shape” and the click on “Shape library …” Select the prefered “Shape library” and then select one item and click on “OK”. User’s Manual Of ISaGRAF Embedded Controllers, Mar.2006, Rev. 5.0 , Copyright By ICP DAS 156 Click on “Label”, then select the prefered “Color”, “Font”, “Align” and set “Content” to “GOTO S11”, and make sure “Use label” is selected. Click on “Bit Lamp” User’s Manual Of ISaGRAF Embedded Controllers, Mar.2006, Rev. 5.0 , Copyright By ICP DAS 157 Click on “General”, then select “Device type” to “0x” (0x is for boolean variables), then set “Device address” to 1 (this value is associated with the network address value of the variable in the I-8xx7). And then set “Function” to “Normal”. By the same way as former, select prefered “Shap library”. User’s Manual Of ISaGRAF Embedded Controllers, Mar.2006, Rev. 5.0 , Copyright By ICP DAS 158 And then select “Label”, given a “OFF” to “Content” for “State : 0”. Make sure “Use label” is choosed. And then change “State” to 1, and given a “ON” to “Content”. Make sure “Use label” is choosed. User’s Manual Of ISaGRAF Embedded Controllers, Mar.2006, Rev. 5.0 , Copyright By ICP DAS 159 By the same way as former, create one another Bit Lamp with a “Device address” = 2. User’s Manual Of ISaGRAF Embedded Controllers, Mar.2006, Rev. 5.0 , Copyright By ICP DAS 160 Click on “Toggle Switch”, then set all “Device Type” to “0x”, all “Device address” to 1 and select “Switch Type ” to “Toggle”. User’s Manual Of ISaGRAF Embedded Controllers, Mar.2006, Rev. 5.0 , Copyright By ICP DAS 161 By the same way as former to choose a prefered “shape” and “label”. User’s Manual Of ISaGRAF Embedded Controllers, Mar.2006, Rev. 5.0 , Copyright By ICP DAS 162 By the same way as former, create one another “Toggle Switch” however set all “Device address” to 2 and “Switch style” to “Momentary”. Click on “save” to save the project. User’s Manual Of ISaGRAF Embedded Controllers, Mar.2006, Rev. 5.0 , Copyright By ICP DAS 163 We are going to design another window. Click on “Windows” – “11”, then click and hold on the right button of the mouse and drag to “Create”. User’s Manual Of ISaGRAF Embedded Controllers, Mar.2006, Rev. 5.0 , Copyright By ICP DAS 164 Double click on “Window_011”. Create a change-window “Function Key” as former method to change to “Window No.” = 10, and Labeled as “BACK”. User’s Manual Of ISaGRAF Embedded Controllers, Mar.2006, Rev. 5.0 , Copyright By ICP DAS 165 Click on “Set Word”, then set “Device Type” as “4x” (4x is for short integer, 4L is for long integer), set “Device address” to 10, “BIN”, and “Set style” to “Set Constant”, and “Set value” = 100. And then select the prefered “shape”, and set “label” to “Set to 100”. User’s Manual Of ISaGRAF Embedded Controllers, Mar.2006, Rev. 5.0 , Copyright By ICP DAS 166 Click on “Numerical Data”, set “Device Type” to “4x” (4x is for short integer, 4L is for long integer), “Device address” to 10, “BIN”, “Number of words” to 1, “No. above Dec” to 7, “No. below Decimal” to 0, “Input low” to –32768, “Input high” to +32767. And then select the prefered shape. User’s Manual Of ISaGRAF Embedded Controllers, Mar.2006, Rev. 5.0 , Copyright By ICP DAS 167 Now we are going to add one another “Numerical Data” with conversion. Click on “Numerical Data”, set “Device Type” to “4x” , “Device address” to 10, “BIN”, “Number of words” to 1, “No. above Dec” to 5, “No. below Decimal” to 0, “Input low” to –32768, “Input high” to +32767, check “Do conversion”, set “engineering low” to –10, “engineering high” to +10 (Convert [-32768,+32767] to [-10,+10] ). And then select the prefered font. User’s Manual Of ISaGRAF Embedded Controllers, Mar.2006, Rev. 5.0 , Copyright By ICP DAS 168 Click on “Numerical Input”, set “Device Type” to “4x”, “Device address” to 10, “BIN”, “Number of words” to 1, “Trigger Device Type” to “LB”, “Trigger Device address” to “9000”, “No. above Dec” to 7, “No. below Decimal” to 0, “Input low” to –32768, “Input high” to +32767. And then select the prefered shape. User’s Manual Of ISaGRAF Embedded Controllers, Mar.2006, Rev. 5.0 , Copyright By ICP DAS 169 Click “Tools” – “Compile …” to compile this project. User’s Manual Of ISaGRAF Embedded Controllers, Mar.2006, Rev. 5.0 , Copyright By ICP DAS 170 To download the project to the Touch 510, click on the Windows "Start" button, then click on the "Program" button, then click on the "EasyBuilder" – “EasyManager” button. The following window will be displayed. Choose the correct COM No. on your PC (Normally is COM1), “115200 bps”. Connect the RS232 download cable (refer to section 4.4) between PC and Touch 510. Touch 510 PC Click on “Jump To RDS” first, if OK., you can see the screen of the Touch 510 will change and wait for project download. Click on “Download” to start to download the MMI picture to the Touch 510. If downloading is OK, You may choose to click on “Jump To Application” or reset the Touch 510T , and then connect another RS232 cable between Touch 510 and the I-8xx7 (refer to section 4.4). Now, you may touch each icon on the Touch 510 to test. Have a good luck ! Touch 506L/506T 510T RS232 COM1 User’s Manual Of ISaGRAF Embedded Controllers, Mar.2006, Rev. 5.0 , Copyright By ICP DAS 171 4.5: Access To Word & Integer Array Via Modbus User can use the below functions to read/write word & integer arrays inside the ISaGRAF project. For more information about these functions, please refer to Appendix A.4. ARY_N_R ARY_N_W ARY_W_R ARY_W_W Read one integer(4 byte, signed) from an integer array Write one integer(4 byte, signed) to an integer array Read one word(2 byte, signed) from an word array Write one word(2 byte, signed) to an word array Word and integer arrays built in the I-8xx7, I-7188EG, I-7188XG & Wincon-8xx7 controller occupy the same memory area, please use them carefully. Other softwares (HMI, OPC server, …) running on the PC can access to these word and integer arrays via Modbus protocol. The valid network address for these arrays is from 5001 to 8072 for I-8xx7, I7188EG & I-7188XG, while 10,001 to 19,216 for the W-8xx7 and their relation is listed in below table. For the I-8xx7, I-7188EG, I-7188XG: Network Address (Decimal) 5001 5002 5003 5004 … … 8071 8072 Word Array (1,1) (1,2) (1,3) (1,4) … … (12,255) (12,256) Integer Array (1,1) For the W-8xx7: Network Address (Decimal) 10001 10002 10003 10004 … … 19215 19216 Word Array (1,1) (1,2) (1,3) (1,4) … … (36,255) (36,256) Integer Array (1,1) (1,2) … (6,256) (1,2) … (18,256) Note: 1. Network address 1 to 4095 for I-8xx7 & I-7188EG/XG, while 1 to 8191 for W-8xx7, can be defined by users, please refer to Section 4.1. 2. Modbus address in the physical transmission format is equal to Network address minus one (please refer to Chapter 5). So the valid Modbus address for word & integer arrays is from 5000 to 8071 for I-8xx7, I-7188EG/XG, and 10000 to 19215 for W-8xx7. User’s Manual Of ISaGRAF Embedded Controllers, Mar.2006, Rev. 5.0 , Copyright By ICP DAS 172 Chapter 5: Modbus Protocol The Modbus protocol is a powerful and flexible communications protocol that allows numerous software programs and hardware devices to communicate with each other. Any I-8xx7, I7188EG/XG & W-8xx7 variable that will be used to communicate through the Modbus protocol MUST have a unique network address before it can communicate through a Modbus link (please refer to section 4.1). 5.1: Modbus Protocol Format: RTU Serial The Modbus "RTU Serial" format is supported by the I-8417 and I-8817 controller systems through both COM1 or COM2 communications ports, and the I-8437, I-8837, I-7188EG & I7188XG controller systems through the COM1 communications port, and the Wincon-8x37 & Wincon-8x47 controller systems through the COM2 (or COM3) communications port. PC software programs and HMI hardware devices can access data from the variables in the ISaGRAF controller system ONLY after that variable is assigned a unique network address (please refer to Chapter 4). For more information regarding connecting a PC to an I-8xx7 controller system, please refer to Section 1.3.3 through 1.3.5 for details on how to properly connect these devices. It is CRITICAL that you must program the Modbus format EXACTLY as described to make a proper connection between the Modbus device and the ISaGRAF controller system. The I8xx7, I-7188EG/XG & W-8xx7 controllers support the following Modbus functions. Modbus function 1 2 3 4 5 6 15 16 Action Read N bits (booleans) Read N bits (booleans) Read N words (signed short integers) Read N words (signed short integers) Write 1 bit (boolean) Write 1 word (signed short integer) Write N bits (booleans) Write N words (signed short integers) To read boolean variables, both of function 1 or 3 may be used. If using function 1, values are stored in a bit field while using function 3, variable TRUE means 0xFFFF. To write boolean variables, both of function 5, 15 could be used. If using function 5, writing bit 0 of byte-vH to 1 will set the Boolean variable to TRUE. For ex, writing vH=1 or 3, or 255 will set Boolean variable to TRUE. To read analog variables, function 3 should be used. User’s Manual Of ISaGRAF Embedded Controllers, Mar.2006, Rev. 5.0 , Copyright By ICP DAS 173 To write analog variables, both of function 6, 16 could be used. To read long words (signed long integers, float), function 3 should be used. To write long words, function 16 should be used. Please refer to section 4.2 for the definition of network address of long words. To assist you with the naming conventions used throughout the Modbus protocol-addressing chapter, the following table describes the notations used in this chapter. Slv Nbw Nbb Nbi AddH AddL VH VL V CrcH CrcL Slave number (Net ID address of the I-8xx7) Number of words Number of bytes Number of bits Modbus address, high byte , 0 ~ 0F Modbus address, low byte , 0 ~ FE Word value, high byte Word Value, low byte Byte value Checksum, high byte , CRC-16 Checksum, low byte , CRC-16 IMPORTANT NOTE All of the values used in the request and answer frames are hexadecimal values. Modbus address described in this chapter is equal to Network address of the variable minus one. For ex., Modbus address 0 is associate with Network address 1. Modbus address FFE (4094) is associate with Network address FFF (4095). Function 1: Read "N" Bits Function 1 reads "n" number of bits (nbi) in Boolean starting from Modbus address addH/addL. V0, V1 … are the bit fields of number of bytes (nbb) using the following format. User’s Manual Of ISaGRAF Embedded Controllers, Mar.2006, Rev. 5.0 , Copyright By ICP DAS 174 Bit 1 corresponds to the Boolean value of the variables with the Modbus address addH/addL. Bit nbi corresponds to the Boolean value of the variable with the Modbus address addH/addL + nbi – 1. If the value of the Boolean variable is "True", then the corresponding bit will be set to a "1". If the value is "False", the corresponding bit will be set to a "0". Function 2: Read N Bits Function 2 has the same exact same format as function 1. Function 3: Read N Words Function 3 reads the number of words (nbw), in signed 16-bit integer format, starting from the Modbus address addH/addL. The number of bytes (nbb) is the total number of bytes from word value high byte (vH) to word value low byte (vL) inclusive. IMPORTANT NOTE About Function 3 Integer values can be read by function 3. A word in the modbus protocol is a 16-bit value (signed short integer), and an integer variable is a 32-bit value, so only the lower 16 bits of the integer variable are returned. If users would like to read a 32-bit integer (signed long integer) of I-8xx7 controller, the proper network address of the variable should be set as described in section 4.2. Function 4: Read N Words Function 4 has the same exact format as function 3. Function 5: Write 1 Bit Function 5 writes one (1) bit to the Boolean variable with the Modbus address addH/addL. User’s Manual Of ISaGRAF Embedded Controllers, Mar.2006, Rev. 5.0 , Copyright By ICP DAS 175 Writing a 0xFF value to the byte value (V) will set the Boolean variable to "True". Writing a zero to the byte value (V) is set the Boolean variable to "False". Function 6: Write 1 Word Function 6 writes one (1) word (16 bits) to the integer variable with the Modbus address addH/addL. Function 15: Write N Bits Function 15 writes a number of bits (nbi) to the Boolean variables starting from the Modbus address addH/addL to addH/addL + nbi – 1. The total number of bytes (nbb) is the total amount of bytes occupied by nbi bits, that means nbb = (nbi+7)/8. For ex. nbi=1~8, nbb=1; nbi=9~16, nbb=2. V0, V1 … are the bit fields of number of bytes (nbb) using the following format. Bit 1 corresponds to the Boolean value of the variables with the Modbus address addH/addL. Bit nbi corresponds to the Boolean value of the variable with the Modbus address addH/addL + nbi – 1. Writing a 1 to a bit will set the value of the corresponding Boolean variable to "True", and writing a 0 to a bit will set the corresponding Boolean variable to "False". Function 16: Write N Words User’s Manual Of ISaGRAF Embedded Controllers, Mar.2006, Rev. 5.0 , Copyright By ICP DAS 176 Function 16 writes a number of words (nbw) to the integer variables starting from the Modbus address addH/AddL to addH/addL + nbw – 1. The number of bytes (nbb) is the total amount of bytes occupied by number of words (nbw), that is nbb = 2 * nbw. Examples Of Modbus Function Formats Function 1: Read 15 bits starting from Modbus address 0x1020. The NET ID address is 1. In this example function 1 returns 2 bytes, the value is 0x0012. This means variables with a network address of 0x102A and 0x102D are "True" (Modbus address is 0x1029 and 0x102C), the rest of the variables are set to "False". Function 5: Write 1 bit to the Boolean variable with the Modbus address 0x0006. The NET ID address is 1. The value to write to is 0xFF. In this example of function 5 the Boolean variable is set to "True". Function 16: Write 2 words (4 bytes) to the integer variables with the Modbus address starting from 0x2100. The first word value to write to is 0x1234. The second word value to write to is 0x5678. The NET ID address is 1. User’s Manual Of ISaGRAF Embedded Controllers, Mar.2006, Rev. 5.0 , Copyright By ICP DAS 177 5.2: Modbus Protocol Format: TCP/IP The I-8437 / I-8837 , I-7188EG, W-8x37 and W-8x47 controller systems support the Modbus "TCP/IP" communications protocol. ALL requests are sent via TCP on port number 502. The Modbus TCP/IP protocol adds 6 extra bytes before the Modbus RTU serial protocol, and these 6 extra bytes and the Modbus RTU serial protocol are all packed inside the TCP/IP protocol. The rest of the Modbus TCP/IP protocol is the same as the Modbus RTU Serial protocol after byte No. of 6 except that the CRC-16 is not need for the Modbus TCP/IP protocol. Example TCP/IP Transactions The first example of a TCP/IP transaction is reading one (1) word at Modbus address 4 from slave number 9 returning a value of 8; the transaction would be as follows: The second example of a TCP/IP transaction is reading 8 bits starting from Modbus address 2 from slave number 7, returning a value of 0x49 (bit field: 01001001) would be as follows: User’s Manual Of ISaGRAF Embedded Controllers, Mar.2006, Rev. 5.0 , Copyright By ICP DAS 178 5.3: Algorithm For CRC-16 Check The following C language algorithm is for Modbus RTU Serial ONLY!! This CRC (Cyclic Redundancy Check) program provides a checksum that can be used to validate information being passed through Modbus RTU Serial protocol. This CRC-16 check program first calls "crc_init()" one time at the beginning of the communication to initialize the checksum table. Then you can call "crc_make()" to calculate a checksum whenever you want to. #define POLY_CRC16 0xA001 static BYTE TABLE1[256]; static BYTE TABLE2[256]; void crc_init(void) /* set crc table */ { WORD mask,bit,crc,mem; for(mask=0;mask<0x100;mask++) { crc=mask; for(bit=0;bit<8;bit++) { mem=crc & 0x0001; crc/=2; if(mem!=0) crc ^= POLY_CRC16; } TABLE2[mask]=crc & 0xff; TABLE1[mask]=crc >> 8; } } void crc_make(WORD size, BYTE *buff, BYTE *hi, BYTE *lo) /* calculate crc */ { BYTE car,i; BYTE crc[2]; crc[0]=0xff; crc[1]=0xff; for(i=0;i<size;i++) { car = buff[i]; car ^= crc[0]; crc[0]=crc[1] ^ TABLE2[car]; crc[1]=TABLE1[car]; } *hi=crc[0]; *lo=crc[1]; } User’s Manual Of ISaGRAF Embedded Controllers, Mar.2006, Rev. 5.0 , Copyright By ICP DAS 179 Chapter 6: Linking I-7000 & I-87xx Modules The I-8xx7, I-7188EG/XG & W-8xx7 controller system provides the capability to integrate with ICP DAS’s I-7000 and I-87xx (87K4 / 87K5 / 87K8 / 87K9) series modules. This functionality to interface with these modules expands the capability of the I-8xx7, I-7188EG/XG & W-8xx7 controller series products. Please refer to Section 1.5 for connection instructions between the I-8xx7 controller system to the I-7000 and I-87xx series modules. 6.1: Configuring The I-7000 & I-87xx Modules To begin configuration of the I-7000 and I-87xx series modules to the controller system, use the "DCON Utility" program (or called “7000 utility”) to set up the I-7000 and I-87xx modules. Once you have selected the "DCON Utility" program, the "DCON Utility" window will open. User’s Manual Of ISaGRAF Embedded Controllers, Mar.2006, Rev. 5.0 , Copyright By ICP DAS 180 The "DCON Utility" program will go out and attempt to link to any I-7000 and I-87xx modules. IMPORTANT NOTES Regarding I-7000 & I-87xx Modules One I-8xx7, I-7188EG/XG controller system can link up to a maximum of 64 pcs. of I-7000 and I-87xx modules(However 255 pcs for W-8xx7). It is recommended though that you do not link more than 40 modules to a single I-8xx7, 7188EG/XG & W-8xx7 controller system. Each I7000 and I-87xx module MUST have it’s own unique address to properly link to an ISaGRAF controller system. Make sure to set the "Checksum" to disabled (If set as enabled, please connect “bus7000b” listed in section 6.2 and set “checksum” parameter to 1), and make sure that all of the I-7000 and I-87xx modules are set to the same baud rate as the controller system (9600 baud by default). When you receive any of the I-7000 series modules or I-87xxx modules you will receive documentation called "Getting Started With I-7000 Series Modules" that provides instructions on how to properly configure these modules. If you need assistance on changing the baud rate or checksum, please refer to the "Change Baud Rate & Checksum" section in the "Getting Started With I-7000 Series Modules". You can find all of the documentation on the CD provided with your I-7000 series module from ICP DAS in a file titled "getstart.pdf". The I-7000 and I-87xx "Analog Input" type modules MUST have their data format set to "2’s Complement". This includes the I-7013, I-7015, I-7016, I-7017, I-7018, I-7019, I-7033, I87013, I-87015, I-87017, and I-87018 & I-87019 analog input modules. The I-7000 and I-87xx "Analog Output" type modules MUST have their data format set to "Engineer Unit". This includes the I-7021, I-7022, I-7024, I-87022, I-87024 and I-87026 analog output modules. User’s Manual Of ISaGRAF Embedded Controllers, Mar.2006, Rev. 5.0 , Copyright By ICP DAS 181 6.2: Opening The "Bus7000b" Function To create a link between the I-8xx7, I-7188EG/XG & W-8xx7 controller system and an I-7000 and I-87xx module, you need to connect the "Bus7000" function through the "ISaGRAF I/O Connection" window. The "Bus7000b" function is considered a "virtual board", and must be selected from the "Equipments" section of the "Select Board/Equipment" window. The "Bus7000b" MUST be connected to slot number 8 or higher on the "ISaGRAF I/O Connection" window (since slot 0 through 7 are used to connect to real I-8000 boards). Only one "Bus7000b" can be linked to one I-8xx7, I-7188EG/XG & W-8xx7 controller system! If you attempt to connect more than one "Bus7000b" to an ISaGRAF controller, it will not work. In the example provided, set the slot below number 9 to "Bus7000: Remote". Com_port setting: I-8xx7: 3 or 4 (COM3 or COM4) I-7188EG/XG: 2 or 3 W-8xx7: 3 The "com_port" parameter can have a value of 3 (for COM3) or 4 (for COM4) for the I-8xx7 controller, while 2 (COM2) or 3(COM3) for the I-7188EG/XG, and 3 (COM3) for the W-8xx7. User’s Manual Of ISaGRAF Embedded Controllers, Mar.2006, Rev. 5.0 , Copyright By ICP DAS 182 This parameter defines which COM port ID the controller system will communicate with the I7000 / I-87xx module. The default value for the "com_port" parameter is 3. The "com_baud" parameter defines the baud rate that the I-8xx7, I-7188EG/XG & W-8xx7 will communicate with the I-7000 / I-87xx module. The possible values are 2400, 4800, 9600, 19200, 38400, 57600, and 115200. You must make sure that the controller system and the I7000 / I-87xx modules are all set to the same "com_baud" value. The "host_watchdog" parameter enables or disables the watchdog function for the I-7000 and I-87xx module. Setting the "host_watchdog" parameter to a non-zero value will enable the "host_watchdog" feature. The "watchdog_timer" parameter defines the amount of time before a "host_watchdog" will occur. The value for the "watchdog_timer" is defined in a hexadecimal value with the units defined in 0.1-second increments. For example, if the "watchdog_timer" is set to a value of 1E, the "watchdog_timer" is set for 3 seconds. If the "watchdog_timer" value is set to 2A, the "watchdog_timer" is set for 4.2 seconds. The “checksum” parameter defines the remote IO is using “0: No checksum” or “1:with checksum”. If the host watchdog feature is active and the watchdog timer is exceeded on the controller system (it means the connection is break between the controller and I-7000 / I-87xx modules), the I-7000 / I-87xx modules will go to a "safe" predetermined value. There is an analog input channel available on the "Bus7000: Remote" virtual board. This analog input channel will return a value equal to the currently set baud rate. User’s Manual Of ISaGRAF Embedded Controllers, Mar.2006, Rev. 5.0 , Copyright By ICP DAS 183 6.3: Programming an I-7000 Module 6.3.1: Program I-7xxx or I-87xxx remote IO function blocks To link any I-7000 and I-87xx module to the I-8xx7, I-7188EG/XG & W-8xx7 controller system, the "Bus7000b" module MUST be opened first. Once the "Bus7000b" is opened, the "I_7xxx" / “I-87xx” function block can now be programmed and you can access all of the I/O channels available from that function block, and that data can now be used in a LD program. NOTE: You can declare all variables which connect to the I-7xxx / I-87xx function block as “Internal“ attribution. Example 1: Programming An I-7050D Module Address of I-76050D 8 D/O channels of I7050D. Can declared as “Internal” attribute. Connect well will return TRUE. 7 D/I channels of I7050D. Can be declared as “Internal” attribute. Example 2: Programming An I-7041D Module Address of I-7041D Connect well will return TRUE. 14 D/I channels of I-7041D. Can be declared as “Internal” attribute. User’s Manual Of ISaGRAF Embedded Controllers, Mar.2006, Rev. 5.0 , Copyright By ICP DAS 184 Example 3: Programming An I-7017 Module The Data Format Used Is: 2’s Complement If connect well, return TRUE Address of that I-7017 The 8 A/I channels of I-7017. Can be declared as “Internal” attribute. The following table describes the scaling factor from an analog signal to an integer value. Range ID (set by using 7000 Utility) 8 9 A B C D Electrical range Value in I-7017 block (decimal) -32768 0 +32767 ± 10V ± 5V ± 1V ± 500mV ± 150mV ± 20mA - 10V - 5V - 1V - 500mV - 150mV - 20mA 0V 0V 0V 0mV 0mV 0mA + 10V + 5V + 1V + 500mV + 150mV + 20mA User’s Manual Of ISaGRAF Embedded Controllers, Mar.2006, Rev. 5.0 , Copyright By ICP DAS 185 For additional information regarding any I-7000 and I-87xx module, click on the function block and press the "F1" key for an on-line description with "Technical Notes" for the selected function block. User’s Manual Of ISaGRAF Embedded Controllers, Mar.2006, Rev. 5.0 , Copyright By ICP DAS 186 6.3.2: Setting a special “ADR_” parameter of remote temperature input module to get clear “Degree Celsius” or “Degree Fahrenheit” input value ICPDAS provides many temperature input modules as below. With “broken-line detection” or called “wire opening detection” Thermocouple type: I-87018R, 87019R, 7018R, 7018BL, 7019, 7019R RTD type: I-87013, 87015, 7013, 7015, 7033 Thermister type: I-87005, 7005 Without “broken-line detection” Thermocouple type: I-87018, 7018, 7018P The “ADR_” parameter of temperature IO function block can be “standard setting” or “special setting”. For example setting “ARD_” of the “I_7033” function block to 1 to 255 (Dec. value) means “standard setting”, the value of 1 to 255 indicates the address of the remote I-7033. The temperature input value is normally –32768 to + 32767 in the case. It depends on the IO module’s “Type code” setting (Set by DCON utility). (normally value of –32768 & +32767 means wire “broken-line” ) ADR_ = 10 (TT=00, RR=00, AA=0A, Hex.) means “standard setting”, address=10, the temperature input value is normally –32768 to + 32767 If ADR_= 16#10201A (TT=10, RR=20, AA=1A, Hex) means “special setting”, “Degree Celsius”, “type code=20 of this I-7033 module set by DCON utility”, address=26, the temperature input value is a clear “Degree Celsius” value, for example, value of 4556 mans “45.56” degree. “-500” means “-5.00” degree. If user want to get a clear temperature input value, for example, value of 2312 means “23.12” Degree Celsius. Then please set “ADR_” to a special value defined as below. Important: Special “ADR_” setting is supported since driver version of I-8xx7:3.11 , I-7188EG:2.09 , I-7188XG:2.07 , W-8xx7:3.24 Format: TTRRAA (Hex.) TT=10 (Convert to "Degree Celsius") TT=20 (Convert to "Degree Fahrenheit") User’s Manual Of ISaGRAF Embedded Controllers, Mar.2006, Rev. 5.0 , Copyright By ICP DAS 187 TT=00 (standard setting, -32768 to +32767. RR should be set as 00 if TT=00) RR: "type code" setting of the related temperature input module AA: address of the related temperature input module For example, setting "ADR_" as A. 16#102011 : (TT=10, RR=20, AA=11, Hex) the input value will be "Degree Celsius", unit is 0.01 degree, range= "20 : Platinum 100, a=0.00385, degree Celsius", address=17(Dec.). That results input value of "2356" = 23.56 Degree Celsius, "-489" = -4.89 Degree Celsius, "999990" = sensor broken-line. B. 16#202A03 : (TT=20, RR=2A, AA=03, Hex)) the input value will be "Degree Fahrenheit", unit is 0.01 degree, range= "2A : Platinum 1000, a=0.00385, degree Celsius", address=3(Dec.). That results input value of "4512" = 45.12 Degree Fahrenheit, "500" = 5.00 Degree Fahrenheit, "999990" = sensor broken line. C. 16#01 : (TT=00, RR=00, AA=1) standard setting, the input value will be , -32768 to +32767, address=1 User’s Manual Of ISaGRAF Embedded Controllers, Mar.2006, Rev. 5.0 , Copyright By ICP DAS 188 6.4: Redundant Bus7000 W-8x37 and W-8x47 support CPU redundant solutions. Please refer to Chapter 20. 7188EG(Rev.1.19 or above), 7188XG(Rev.1.17 or above) & I-8417/8817/8437/8837(Rev.2.27 or above) support Redundant Bus7000. These configurations are listed as the following. The Fbus/Ebus are for exchanging data between the “Redundant Master” & “Redundant Slave”, and the Fbus/Ebus cable must be always working(break is not allowed). I-7188XG: Redundant Master COM3:Bus7000 (need a RS485 Xxxx board) I-7188XG Com2:Fbus I-7000 I-7000 I-87K I-7188XG Configuration 1 Redundant Slave I-7188EG: Redundant Master COM3:Bus7000 if using Fbus (need a RS485 Xxxx board) COM2:Bus7000 if using Ebus I-7188EG Com2: Fbus or Ebus I-7000 I-7188EG I-87K Configuration 2 Redundant Slave I-8417/8817: Redundant Master I-7000 COM4:Bus7000 if using Fbus (need a RS232/485 Conveter) I-8417/8817 I-7000 I-7000 I-87K Com3: Fbus I-8417/8817 Configuration 3 Redundant Slave User’s Manual Of ISaGRAF Embedded Controllers, Mar.2006, Rev. 5.0 , Copyright By ICP DAS 189 I-8437/8837: Redundant Master COM4:Bus7000 if using Fbus (need a RS232/485 Convetor) COM3:Bus7000 if using Ebus I-8437/8837 I-7000 I-7000 I-87K Com3: Fbus or Ebus Configuration 4 I-8437/8837 Redundant Slave Operations Principle: When the system is powered up, the control right of Bus7000 belong to “Redundant Master”. If “Redundant Master” is dead(Power off), “Redundant Slave” takes over the control right of Bus7000. If “Redundant Master” is alive from dead (power up again), it takes over the control of Bus7000 again. User’s control data is exchanging via Fbus or Ebus. The “i7000_en” can be used to Enable/Disable the control right of Bus7000. The system’s default status is Enable. Parameter: EN_7000_ integer Return: Q_ boolean True: Enable, False: Disable Always return True. Demo example for I-7188XG: The demo project uses “Configuration 1” and located at demo_48a & demo_48b. It can be download at ICP DAS’s ftp site. ftp://ftp.icpdas.com/pub/cd/8000cd/napdos/isagraf/7188xg/demo/ Demo example for I-7188EG: The demo project uses “Configuration 2” with Ebus and located at demo_51a & demo_51b. It can be download at ICP DAS’s ftp site. ftp://ftp.icpdas.com/pub/cd/8000cd/napdos/isagraf/7188eg/demo/ Demo example for I-8437/8837: The demo project uses “Configuration 4” with Ebus and located at demo_49a & demo_49b. It can be download at ICP DAS’s ftp site. ftp://ftp.icpdas.com/pub/cd/8000cd/napdos/isagraf/8000/demo/ User’s Manual Of ISaGRAF Embedded Controllers, Mar.2006, Rev. 5.0 , Copyright By ICP DAS 190 Chapter 7: Controller To Controller Data Exchange The I-8xx7, I-7188EG/XG & W-8xx7 controller system provides the capability of exchanging data with other I-8xx7, I-7188EG/XG & W-8xx7 controller systems. Wincon-8x37 & Wincon-8x47 support “Deliver message via UDP”, please refer to section 19.2 Important Note: The max. boolean & integer package No. of Fbus & Ebus reduce from 256 to 128 since driver version of I-8417/8817/8437/8837:2.42 , I-7188EG:1.32 & I-7188XG:1.29 7.1: Basic Fbus Rules Any I-8xx7 & I-7188EG/XG controller system can access data from another I-8xx7 & I7188EG/XG through the Fbus data exchange system. While Wincon-8xx7 doesn’t support Fbus, it supports Ebus only. Please refer to section 7.5 for programming Ebus on I8437/8837, I-7188EG & W-8037/8337/8737. There are 2 types of data that can be exchanged through the Fbus protocol; they are "Boolean" and "integer". The Fbus driver first creates a packet of eight Boolean values to form a "Boolean package", and then creates a packet of eight 32-bit integers to form an "integer package". Both of the "Boolean packages" and "integer packages" can be distributed on the Fbus to allow the data to be exchanged from one I-8xx7 & I-7188EG/XG controller system to another I-8xx7 & I7188EG/XG controller system. The Following Fbus Rules MUST Be Observed: RULE #1: Each "Boolean package" must have an attached identification number ranging from 1 to 128. This means that there is a maximum of 128 "Boolean packages" that can be exchanged across an Fbus connection. Each "Boolean package" contains 8 Boolean values, and these Boolean values can only have the value of either "True" or "False". The Boolean values in the "Boolean package" can be assigned and exchanged with either "Internal", "Input", or "Output" Boolean variables or Boolean constants. RULE #2: Each "integer package" must have an attached identification number ranging from 1 to 128. This means that there is a maximum of 128 "integer packages" that can be exchanged across an Fbus connection. Each "integer package" contains eight 32-bit integer values. The integer values can range from –2147483648 to 2147483647. The integer values in the "integer package" can be assigned and exchanged with either "Internal", "Input", or "Output" integer variables or integer constants. Rule #3: Each number assigned to a "Boolean package" or an "integer package" can only be written to by one I-8xx7 & I-7188EG/XG controller system across the Fbus. User’s Manual Of ISaGRAF Embedded Controllers, Mar.2006, Rev. 5.0 , Copyright By ICP DAS 191 Each I-8xx7 & I-7188EG/XG controller system CANNOT write the same identification number for either a "Boolean package" or an "integer package" across the Fbus. WRITTING A PACKAGE IS NOT SHARED with the other I-8xx7 & I-7188EG/XG controller systems across the Fbus network. In this example, there are five I-8xx7 controller systems communicating through an Fbus network, and the controller systems are named S1, S2, S3, S4, and S5 respectively. If the S1 controller system attempts to write a "Boolean package" with an ID of "1" and an "integer package" with an ID of "1" across the Fbus, the other four controllers CANNOT write either a "Boolean package" or an "integer package" with the same number. However, the other controller systems could write a "Boolean package" with an ID of "3" and an "integer package with an ID of "2". There is no limitation on how many I-8xx7 & I-7188EG/XG controllers can read the same number package across the Fbus network. Any of the S2, S3, S4, S5 controller systems can read the "Boolean package" with an ID of "1" and the "integer package" with an ID of "1" if desired. Rule #4: ONLY ONE I-8xx7 or I-7188EG/XG controller system can be configured as a Fbus "Master", all the others I-8xx7 & I-7188EG/XG controller systems MUST be configured as a Fbus "Slave". The "master" controller sends commands for how data is to be exchanged across the Fbus network. If you configure more than one I-8xx7 or I-7188EG/XG controller system as a "master", or configure none of the I-8xx7 & I-7188EG/XG controller systems as a "master" on the Fbus, NO DATA CAN BE EXCHANGED across the Fbus network. Important Note: The max. boolean & integer package No. of Fbus & Ebus reduce from 256 to 128 since driver version of I-8417/8817/8437/8837:2.42 , I-7188EG:1.32 & I-7188XG:1.29 7.2: Configuring An I-8xx7 To Be A Fbus "Master" Or "Slave" To begin configuring an I-8xx7 & I-7188EG/XG controller system as either a Fbus master or slave, first open up the "ISaGRAF I/O Connections" window and double click on a slot number higher than 7. The "Select Board/Equipments" window will now open, click on "Equipments", and then double click on the "fbus_s" selection to configure an Fbus slave, or double click on "fbus_m" to configure an Fbus master. Remember, ONLY ONE controller can be the Fbus master, and you CANNOT configure an I-8xx7 & I-7188EG/XG controller system to be both a Fbus master and a Fbus slave. User’s Manual Of ISaGRAF Embedded Controllers, Mar.2006, Rev. 5.0 , Copyright By ICP DAS 192 If you configure an I-8xx7 & I-1788EG/XG controller system as an Fbus slave, only one parameter needs to be set, and that is the "baud_rate" parameter. The baud rate parameter can be set to 2400, 4800, 9600, 19200, 38400, 57600 or 115200 baud rate. The default baud rate value is 19200 for the I-8xx7 & I-7188EG/XG controller system. All controllers on the same Fbus network MUST be set to the same baud rate. There is a digital input channel associated with the "fbus_s: rate" equipment. This function will return the status when opening up an Fbus connection. If the Fbus connection has been established, the digital input channel will return a "TRUE" value. If the Fbus connection failed to establish, the digital input channel will return a "FALSE" value. User’s Manual Of ISaGRAF Embedded Controllers, Mar.2006, Rev. 5.0 , Copyright By ICP DAS 193 If you configure an controller as Fbus master, the parameter "baud_rate" and "fbus_m: rate" can be set to 2400, 4800, 9600, 19200, 38400, 57600 or 115200. The default value is 19200 for the controller. All controllers on the same Fbus MUST be set to the same baud rate. There is a digital input channel associated with the "fbus_m: rate" equipment. This function will return the status when opening up an Fbus connection. If the Fbus connection has been established, the digital input channel will return "TRUE" value, if the Fbus connection failed to establish, the digital input channel would return a value of "FALSE". 7.2.1: Configuring The Fbus Master Boolean Packages To begin configuring the Fbus Master Boolean Packages, click on the "boo_pack" selection from the "fbus_m" I/O connection. Only Package No. 1 to 128 is available. User’s Manual Of ISaGRAF Embedded Controllers, Mar.2006, Rev. 5.0 , Copyright By ICP DAS 194 The parameter "package_xxx_xxx" at "fbus_m: boo_pack" indicates the "Boolean package" number which is allowed to be written to or read from across the Fbus network. The parameter value is given as a 32-bit integer in hexadecimal. As an example, if the "package_1_32" is set to "FFFFFFFF" this will enable all the packages from number 1 to number 32 to be written to or read from across the Fbus network. If the "package _1_32" is set to a value of "A", this will only enable the number 2 and number 4 Boolean packages to be written to or read from across the Fbus network. The more packages that are enabled on a Fbus network the slower the communication efficiency will be. With this in mind, always remember to enable only the required number of packages that you need for your application so you will have greater communication efficiency across the Fbus network. Only Package No. 1 to 128 is available. The parameter "package_xxx_xxx" at "fbus_m: ana_pack" indicates the "integer package" number which will be written to and read from on the Fbus network. The "fbus_m: ana_pack" is used to read and write 32-bit integer values across the Fbus network. Each of the parameter values is expressed as 32-bit integer values in hexadecimal, and the same configuration rules apply as those for the "Boolean package". User’s Manual Of ISaGRAF Embedded Controllers, Mar.2006, Rev. 5.0 , Copyright By ICP DAS 195 Only Package No. 1 to 128 is available. 7.3: Programming Fbus Packages Before you can exchange any data across a Fbus network, you must make sure that each I8xx7 & I-7188EG/XG is either configured as either a Fbus master "fbus_m" (and remember, only ONE controller can be the master) or Fbus slave "fbus_s". Refer to Section 7.2 for details on how to implement these configurations. The following Fbus function blocks can be used in a LD program to exchange data across an Fbus network. Fbus_b_r Fbus_b_w Fbus_n_r Fbus_n_w read one boolean package. write one boolean package. read one integer package. write one integer package. The below two blocks can be used to exchange “real” value via Fbus. Block “Real_Int” can be used to Map a “real” value to a 32-bit integer. So that you can deliver this integer to the Fbus, and then on the receiver controller, use “Int_Real” to map this integer back to the original “real” value. Int_Real Real Int Map a long integer to a Real value. Map a Real value to a long integer. The below block is to get the communication ststus of each Boolean & Integer Package. Fbus_sts Get ststus of each Package. User’s Manual Of ISaGRAF Embedded Controllers, Mar.2006, Rev. 5.0 , Copyright By ICP DAS 196 Fbus Function #1: "Fbus_b_r" The "Fbus_b_r" function reads one Boolean package from the Fbus network. In the example below the "Fbus_b_r" function has a Boolean package ID address of "1". The "A1" output contains the value of the first Boolean of the package No. of 1, the "A2" output contains the value of the second Boolean of the package No. of 1, and the "A3" output contains the value of the third Boolean of the package No. of 1. The other outputs follow the same format to where the "A8" output contains the value of the eighth Boolean of the package No. of 1. Please do not add any condition on the left of the Fbus_xxx block. Package No. should be aconstant value not a variable value Fbus Function #2: "Fbus_b_w" The "Fbus_b_w" function writes one Boolean package on the Fbus network. In the example below the "Fbus_b_w" function has a Boolean package ID address of "255", the "C1" input writes a value to the first Boolean of the package No. of 255, the "C2" input writes a value of the second Boolean of the package No. of 255, and the "C3" input writes a value of the third Boolean of the package No. of 255. The other inputs follow the same format to where the "C8" input writes a value of the eighth Boolean of the package No. of 255. Please do not add any condition on the left of the Fbus_xxx block. Fbus_b_w always returns TRUE Package No. should be aconstant value not a variable value User’s Manual Of ISaGRAF Embedded Controllers, Mar.2006, Rev. 5.0 , Copyright By ICP DAS 197 Fbus Function #3: "Fbus_n_r" The "Fbus_n_r" function reads one integer package from the Fbus network. In the example below the "Fbus_n_r" function has an Integer package ID address of "5". The "D1" output contains the value of the first integer of the package No. of 5, the "D2" output contains the value of the second integer of the package No. of 5, and the "D3" output contains the value of the third integer of the package No. of 5. The other outputs follow the same format to where the "D6" output contains the value of the sixth integer of the package No. of 5. Please do not add any condition on the left of the Fbus_xxx block. Package No. should be aconstant value not a variable value Fbus Function #4: "Fbus_n_w" The "Fbus_n_w" function writes one integer package to the Fbus network. In the example below the "Fbus_n_w" function write variables “E1” to the first integer of the package of No. 1. “E2” to the second integer of the package of No. 1. “E3” to the third integer of the package of No. 1. Please do not add any condition on the left of the Fbus_xxx block. Fbus_n_w always returns TRUE Package No. should be aconstant value not a variable value User’s Manual Of ISaGRAF Embedded Controllers, Mar.2006, Rev. 5.0 , Copyright By ICP DAS 198 7.4: An Fbus Data Exchange Example Example Description: In this Fbus data exchange example there are three I-8xx7 controller systems linked together in an Fbus network. The I-8xx7 controller systems are named "SA (master I-8xx7 controller system #1)", "SB (slave I-8xx7 controller system #2), and "SC (slave I-8xx7 controller system #3). One of the digital input values from the SA controller (master I-8xx7 system) needs to be shared with the SB and SC (the slave I-8xx7 systems) controllers across the Fbus network, and the name for this digital input value will be called "ZZ". The first task of this example is to create an Input variable named ZZ on the SA controller system. Use the "ISaGRAF Project" window to declare ZZ as an "input" variable, and then link the ZZ input variable using the "ISaGRAF I/O Connections" window for the SA controller system. Next, you will need to declare a Boolean Internal variable named ZZ for both the SB and SC controllers (so they can exchange the ZZ value with the SA controller system). You must declare the ZZ variable as an internal variable for the SB and SC controllers because there is only one real input variable (from the SA controller) that is being exchanged, and neither the SB or SC has a real input variable named ZZ. An additional requirement for this example is that an internal integer value named "WW" that comes from the SB controller system needs to be shared with the SC controller system. To accomplish this declare an Internal integer variable named WW on both the SB and SC controller systems. Example Prerequisites: The SA controller system is the Fbus master controller and the SB and SC controllers are Fbus slave controllers. Each of the controllers has their baud rates set to 19200. User’s Manual Of ISaGRAF Embedded Controllers, Mar.2006, Rev. 5.0 , Copyright By ICP DAS 199 Setting The SB and SC Controllers As Fbus Slaves: You should use the "ISaGRAF I/O Connections" window to declare the SB and SC controller systems as Fbus slaves. Use the "ISaGRAF I/O Connections window to declare the SA controller system as the Fbus master controller. User’s Manual Of ISaGRAF Embedded Controllers, Mar.2006, Rev. 5.0 , Copyright By ICP DAS 200 Additionally, enable the Boolean package for the SA controller: Also enable the integer package for the SA controller system: User’s Manual Of ISaGRAF Embedded Controllers, Mar.2006, Rev. 5.0 , Copyright By ICP DAS 201 The ISaGRAF LD Project For The SA Controller: FBUS_B_W always return TRUE Please do not add any condition on the left of the Fbus_xxx block. Write boolean pack. No.1 to the Fbus, variable ZZ is included at the first value. Package No. should be aconstant value not a variable value. Set the other nonused values in this package to FALSE The ISaGRAF LD Project For The SB Controller: Pack. No. Read boolean package No. 1 to get the first value to internal boolean variable ZZ Write integer package No. 1 to Fbus. Variable WW is included .at 1st value. Fbus_n_w always return TRUE, these 2 blocks can link together. User’s Manual Of ISaGRAF Embedded Controllers, Mar.2006, Rev. 5.0 , Copyright By ICP DAS 202 The ISaGRAF LD Project For The SC Controller: Read boolean package No. 1 to get the first value to internal boolean variable ZZ Read Integer package No. 1 to get the first value to internal integer variable WW User’s Manual Of ISaGRAF Embedded Controllers, Mar.2006, Rev. 5.0 , Copyright By ICP DAS 203 7.5: Programming The Ebus Ebus is a software mechanism which allows I-8437/8837, I-7188EG & W-8x37 / W-8x47 controllers to access data to each other through the ethernet port. Ebus is only working on the local area. That means exchanging data through a gateway is no possible. Important Note: 1. If the controller is W-8x47/8x46, please conntect Ebus at their “LAN2” port, and please use “NS-205” or “NS-208” Ethernet switch. (refer to Appendix F to Enable LAN2) 2.The max. boolean & integer package No. of Fbus & Ebus reduce from 256 to 128 since driver version of I-8417/8817/8437/8837:2.42 , I-7188EG:1.32 & I-7188XG:1.29 8437/ 8837 Ethernet 8437/ 8837 7188EG The I-8437, I-8837 controllers support Ebus since its driver version of 2.15 and the I-7188EG support Ebus since its driver version of 1.08. And W-8x37 / W-8x47 support Ebus since its driver version of 3.10. Please refer to Appendix C to make sure your I-8xx7’s controller driver version is the same or higher. You can obtain the new released driver from: http://www.icpdas.com/products/PAC/i-8000/isagraf.htm 7.5.1: Basic Ebus Rules The I-8437/ 8837, I-7188EG & W-8x37 / W-8x47 Ebus driver first creates a packet of eight Boolean values to form a "Boolean package", and then creates a packet of eight 32-bit integers to form an "integer package". Both of the "Boolean packages" and "integer packages" can be distributed on the Ebus to allow the data to be exchanged from one controller to another controller. The basic Ebus rules are similiar as Fbus (refer to 7.1) as below. RULE #1: Each Ebus network is identified with a “Group_No” ranging from 1 to 10. Data is only exchangable with controllers that are assigned with the same “Group No”. For example, there are 5 controllers located at the same local ethernet area, named A1, A2, A3, A4, A5 respectively. A1, A2 & A3 are assigned with Ebus: Group_No = 1 while A4 & A5 are assigned with Ebus: Group_No = 2. Therefore, A1 can access data from A2 & A3 however can not access data from A4 & A5. RULE #2: Each "Boolean package" in the same Ebus:Group_No must have an attached identification number ranging from 1 to 128. This means that there is a maximum of 128 "Boolean packages" that can be exchanged across an Ebus:Group_No connection. User’s Manual Of ISaGRAF Embedded Controllers, Mar.2006, Rev. 5.0 , Copyright By ICP DAS 204 Each "Boolean package" contains 8 Boolean values, and these Boolean values can only have the value of either "True" or "False". The Boolean values in the "Boolean package" can be assigned and exchanged with either "Internal", "Input", or "Output" Boolean variables or Boolean constants. RULE #3: Each "integer package" in the same Ebus:Group_No must have an attached identification number ranging from 1 to 128. This means that there is a maximum of 128 "integer packages" that can be exchanged across an Ebus:Group_No connection. Each "integer package" contains eight 32-bit integer values. The integer values can range from –2147483648 to 2147483647. The integer values in the "integer package" can be assigned and exchanged with either "Internal", "Input", or "Output" integer variables or integer constants. Rule #4: Each number assigned to a "Boolean package" or an "integer package" can only be written to by one I-8437/ 8837 (or I-7188EG or W-8x37 / W-8x47) controller system across the same Ebus:Group_No network. Each I-8437/ 8837, I-7188EG or W-8x37 / W-8x47 controller CANNOT write the same identification number for either a "Boolean package" or an "integer package" across the same Ebus:Group_No. WRITTING A PACKAGE IS NOT SHARED with the other controller across the same Ebus:Group_No network. In this example, there are five controllers communicating through an Ebus:Group_No network, and the controllers are named S1, S2, S3, S4, and S5 respectively. If the S1 controller attempts to write a "Boolean package" with an ID of "1" and an "integer package" with an ID of "1" across the Ebus:Group_No, the other four controllers CANNOT write either a "Boolean package" or an "integer package" with the same number. However, the other controllers could write a "Boolean package" with an ID of "3" and an "integer package with an ID of "2". There is no limitation on how many controllers can read the same number package across the same Ebus:Group_No network. Any of the S2, S3, S4, S5 controllers can read the "Boolean package" with an ID of "1" and the "integer package" with an ID of "1" if desired. Rule #5: ONLY ONE I-8437/ 8837, I-7188EG or W-8x37 / W-8x47 controller in the same Group_No can be configured as a Ebus "Master", all the others controller in the same Group_No MUST be configured as a Ebus "Slave". The "master" controller sends commands for how data is to be exchanged across the same Ebus:Group_No network. If you configure more than one controller as a "master", or configure none of the controllers as a "master", NO DATA CAN BE EXCHANGED across the Ebus:Group_No network. Important Note: The max. boolean & integer package No. of Fbus & Ebus reduce from 256 to 128 since driver version of I-8417/8817/8437/8837:2.42 , I-7188EG:1.31 & I-7188XG:1.28 User’s Manual Of ISaGRAF Embedded Controllers, Mar.2006, Rev. 5.0 , Copyright By ICP DAS 205 7.5.2: Configuring the Controller To Be A Ebus "Master" Or "Slave" To begin configuring an I-8437/ 8837, I-7188EG or W-8x37 / W-8x47 controller system as either a Ebus master or a slave, first open up the "ISaGRAF I/O Connections" window and double click on a slot number higher than 7. The "Select Board/Equipments" window will now open, click on "Equipments", and then double click on the "Ebus_s" selection to configure an Ebus slave, or double click on "Ebus_m" to configure an Ebus master. Remember, ONLY ONE I-8437/ 8837, I-7188EG or W-8x37 / W-8x47 controller system can be the Ebus master, and you CANNOT configure an controller to be both a master and a slave. If you config a controller as an Ebus slave, only one parameter needs to be set, the “Group_No”. The valid value is ranging from 1 to 10. Set to other value will become a default value , 1. User’s Manual Of ISaGRAF Embedded Controllers, Mar.2006, Rev. 5.0 , Copyright By ICP DAS 206 If you config a controller as an Ebus master, the parameter “Group_No” should be set to the same as the salve. The valid value is ranging from 1 to 10. Set to other value will become a default value , 1. Configuring The Ebus Master Boolean Packages: To begin configuring the Ebus Master Boolean Packages, click on the "boo_pack" selection from the "Ebus_m" I/O connection. Only Package No. 1 to 128 is available. The parameter "package_xxx_xxx" at "Ebus_m: boo_pack" indicates the "Boolean package" number which is allowed to be written to or read from across the Ebus network. The parameter value is given as a 32-bit integer in hexadecimal. As an example, if the "package_1_32" is set to "FFFFFFFF" this will enable all the packages from number 1 to number 32 to be written to or read from across the Ebus network. If the "package _1_32" is set to a value of "A", this will only enable the number 2 and number 4 Boolean packages to be written to or read from across the Ebus network. The more packages that are enabled on a Ebus network the slower the communication efficiency will be. With this in mind, always remember to enable only the required number of packages that you User’s Manual Of ISaGRAF Embedded Controllers, Mar.2006, Rev. 5.0 , Copyright By ICP DAS 207 need for your application so you will have greater communication efficiency across the Ebus network. Only Package No. 1 to 128 is available. The parameter "package_xxx_xxx" at "Ebus_m: ana_pack" indicates the "integer package" number which will be written to and read from on the Ebus network. The "Ebus_m: ana_pack" is used to read and write 32-bit integer values across the Ebus network. Each of the parameter values is expressed as 32-bit integer values in hexadecimal, and the same configuration rules apply as those for the "Boolean package". Only Package No. 1 to 128 is available. User’s Manual Of ISaGRAF Embedded Controllers, Mar.2006, Rev. 5.0 , Copyright By ICP DAS 208 7.5.3: Programming Ebus Packages Before you can exchange any data across a Ebus network, you must make sure that each I8437/ 8837, I-7188EG & W-8x37 / W-8x47 is configured as either a Ebus master "ebus_m" (and remember, only ONE controller can be the master in the same Ebus “Group_No”) or Ebus slave "ebus_s". Refer to Section 7.5.2 for details on how to implement these configurations. The following Ebus function blocks can be used in a LD program to exchange data across an Ebus network. Ebus_b_r Ebus_b_w Ebus_n_r Ebus_n_w read one boolean package. write one boolean package. read one integer package. write one integer package. The below two blocks can be used to exchange “real” value via Ebus. Block “Real_Int” can be used to Map a “real” value to a 32-bit integer. So that you can deliver this integer to the Ebus, and then on the receiver controller, use “Int_Real” to map this integer back to the original “real” value. Int_Real Real_Int Map a long integer to a Real value. Map a Real value to a long integer. The below block is to get the communication ststus of each Boolean & Integer Package. Ebus_sts Get ststus of each Package. To program the Ebus_x_x blocks is similar to the Fbus, please refer to section 7.3 & 7.4 for detail. Note: Wrong using “Int_Real” may cause controller fault, please refer to section 10.6 User’s Manual Of ISaGRAF Embedded Controllers, Mar.2006, Rev. 5.0 , Copyright By ICP DAS 209 Chapter 8: Linking The Controller To Modbus RTU & Modbus ASCII Devices The I-8xx7, I-7188EG/XG & W-8xx7 can interface with the Modbus RTU Serial or Modbus ASCII devices. Please refer to Section 1.6 for the connection interface between the I-8xx7 controller system to Modbus RTU and other Modbus devices. 8.1: Configuring The Controller To Be A Modbus Master To begin configuring an I-8xx7, I-7188EG/XG & W-8xx7 controller system to interface with a Modbus device, you must first configure the ISaGRAF program by linking the "Mbus" function to the ISaGRAF project. Open the "ISaGRAF I/O Connections" window and double click on a slot number higher than 7 and the "Select Board/Equipments" window will open. From the "Library", click on the "Equipments" choice, and then click on the "Mbus: Modbus Master On …" selection, and then click on the "OK" to complete the installation. Wincon supports multi-ports of Modbus RTU & ASCII Master, please refer to section 8.4 Please refer to section 8.3 for Modbus ASCII Master function IMPORTANT NOTE: Only ONE "Mbus" (or “Mbus_asc”) complex equipment function can be linked to ONE I-8xx7, I-7188EG/XG controller system, however MANY for W-8xx7 controller system. "Mbus: com_port" Parameter The "Mbus: com_port" parameter sets the same baud rate that the I-8xx7, I-7188EG/XG & W-8xx7 controller system and all Modbus devices will communicate at. ALL devices MUST be set to the same baud rate setting. The default baud rate setting for the "Mbus: com_port" parameter is 19200. User’s Manual Of ISaGRAF Embedded Controllers, Mar.2006, Rev. 5.0 , Copyright By ICP DAS 210 "Mbus: port_no" Parameter The "Mbus: port_no" parameter defines which COM port the Modbus devices will communicate with the controller. The "Mbus: port_no" parameter can be set to either a value of “1” (COM1), "3" (COM3), "4" (COM4) or “5” (COM5 on the I-8112/8114/8142/8144 board) for the I-8417/8817/8437/8837, while “1” , "2" , "3" for the I-7188EG, and "2" , "3" for the I-7188XG & the W-8037/8337/8737. The default setting for the "Mbus: port_no" parameter is "4". Note: When setting COM1 of the I-8417/8817/8437/8837 & the I-7188EG to be a Modbus master port, please refer to Appendix C.1 – “Setting COM1 As None-Modbus Port” to disable COM1:Modbus RTU port. W-8xx7’s COM2 is Modbus RTU port by default, please disable it if using it as a Modbus master port. Please refer to W-8xx7’s “Getting Started” Manual. "Mbus: baud" Parameter The "Mbus: baud" parameter defines what the communications baud rate setting will be. The "Mbus: baud" can be set to 2400, 4800, 9600, 19200, 38400, 57600 or 115200 baud rate. The default baud rate value is 19200 for the I-8xx7, I-7188EG/XG & W-8xx7 controller system. All controllers on the same Modbus MUST be set to the same baud rate. "Mbus: parity" Parameter The "Mbus: parity" parameter defines what the communications parity setting will be. Setting the "Mbus: parity" parameter to a value of "0" sets the parity to "none", a value of "1" sets the parity to even, and a value of "2" sets the parity to odd. "Mbus: stop_bit" Parameter The "Mbus: stop_bit" parameter defines the number of stop bits will be used in the Modbus communications. If the "Mbus: stop_bit" parameter is set to "1", this equals 1 stop bit, and a value of "2" equals 2 stop bits. User’s Manual Of ISaGRAF Embedded Controllers, Mar.2006, Rev. 5.0 , Copyright By ICP DAS 211 "Mbus: timeout" Parameter Allowed time to wait for response from remote device, unit is ms, min value is 50, max value is 5000. seting out of range ( > 5000, < 50 ) will set to value of 250 ms. For ex, 200 is 200ms, 1000 is 1 sec, seting 30 will become 250 ms, seting 7000 will become 250ms. 8.2: Programming A Modbus RTU Master The following function blocks can be used to pass data through the Modbus protocol in an LD program. Mbus_R Read max. 12 word-value (-32768 ~ +32767) using Modbus function code 3 or 4 Read max.192 bit-value using Modbus function code 1 or 2 Mbus_R1 Same as Mbus_R but with one extra setting – Period. Read words or bits with a specified period time (unit is second) Mbus_N_R Read 8 word-value (-32768 ~ +32767) using Modbus function code 3 Mbus_NR1 Same as Mbus_N_R but with one extra setting – Period. Read 8 words with a specified period time (unit is second) MBUS_B_R Read 8 bit-value using Modbus function code 1 MBUS_BR1 Same as Mbus_B_R but with one extra setting – Period. Read 8 bits with a specified period time (unit is second) MBUS_N_W Write max. 4 word-value (-32768 ~ +32767) using Modbus function code 6 or 16 MBUS_B_W Write max. 4 bit-value using Modbus function code 5 or 15 MBUS_WB Write max. 16 bit-value using Modbus function code 15 NOTE: The maximum number of each "Mbus_x_x" function block that can be used with one I8xx7 & I-7188EG/XG controller system is 64, while 256 for W-8xx7. Modbus Example Function: "Mbus_b_r" The following example the "Mbus_b_r" function block is reading five (5) bits from a slave Modbus device with a NET ID address of 1, with the Modbus address starting from 1. In this example the results of "B1" contains the value of the Modbus address 1, "B2" equals the value of Modbus address 2, etc. "B5" equals the value of the Modbus address 5. Please do not add any condition on the left of the Mbus_xxx block. “Slave_” & “Addr_” should be a constant value not a variable value. User’s Manual Of ISaGRAF Embedded Controllers, Mar.2006, Rev. 5.0 , Copyright By ICP DAS 212 Modbus Example Function : "Mbus_b_w" The following example of the "Mbus_b_w" function block is writing one (1) bit to a slave Modbus device with a NET ID address of 1. The "Mbus_b_w" function will only write this one bit when the "ACTION_" line is true. In the example below the resulting value of "B1" is written to the Modbus address 16#1001 (or 4097) of that Modbus device when the "ACTION_" line is true. The value of "Stat1" is connected to the output coil and if the operation is successful "Stat1" will be true, otherwise the value of "Stat1" will be false. Please do not add any condition on the left of the Mbus_xxx block. “Slave_” , “Addr_” & “NUM_W_” should be a constant value not a variable value. If the “ACTION_” input keeps at the status of TRUE, it will continue to write this "B1" many times to that Modbus device until it is reset to FALSE. If you just want to write one time, you can write a LD program similar as the following. The M0 is declared as an internal Boolean Please do not add any condition on the left of the Mbus_xxx block. “Slave_” , “Addr_” & “NUM_W_” should be a constant value not a variable value. variable. User’s Manual Of ISaGRAF Embedded Controllers, Mar.2006, Rev. 5.0 , Copyright By ICP DAS 213 Modbus Example Function : "Mbus_n_r" The following example the "Mbus_n_r" function block is reading eight (8) words from a slave Modbus device with a NET ID address of 2 (the Modbus address starts from 1). In this example the results of "A1" contains the value of the Modbus address 1, "A2" equals the value of Modbus address 2, etc., through "A8" which equals the value of the Modbus address 8. The value of "Stat1" is connected to the output coil and if the operation is successful "Stat1" will be true, otherwise the value of "Stat1" will be false. Please do not add any condition on the left of the Mbus_xxx block. “Slave_” & “Addr_” should be a constant value not a variable value. Modbus Example Function : "Mbus_n_w" The following example of the "Mbus_n_w" function block is writing three (3) words to a slave Modbus device with a NET ID address of 1, and the Modbus address is starting from 16#201. The "Mbus_n_w" function will only write when the "ACTION_" line is true. In this example when the "ACT1" line is True, the value of A1 will be written to the value of Modbus address 16#201 of that Modbus device, the value of A2 will be written to the value of Modbus address 16#202, and A3 will be written to the value of Modbus address 16#203. The value of "Stat1" is connected to the output coil and if the operation is successful "Stat1" will be true, otherwise the value of "Stat1" will be false. Please do not add any condition on the left of the Mbus_xxx block. “Slave_” , “Addr_” & “NUM_W_” should be a constant value not a variable value. If the “ACTION_” input keeps at the status of TRUE, it will continue to write these "A1" through "A3" many times to that Modbus device until it is reset to FALSE. If you just want to write one User’s Manual Of ISaGRAF Embedded Controllers, Mar.2006, Rev. 5.0 , Copyright By ICP DAS 214 time, you can write a LD program similar as the following. The M0 is declared as an internal Boolean variable. Please do not add any condition on the left of the Mbus_xxx block. “Slave_” , “Addr_” & “NUM_W_” should be a constant value not a variable value. User’s Manual Of ISaGRAF Embedded Controllers, Mar.2006, Rev. 5.0 , Copyright By ICP DAS 215 8.3: Modbus ASCII Master I-7188EG : I-7188XG : I-8xx7 : W-8x37 / W-8x47 : driver ver. 2.07 or later driver ver. 2.05 or later driver ver. 3.08 or later driver ver. 3.20 or later I-7188EG/XG & I-8417/8817/8437/8837 support only one Modbus Master port. (can be Modbus RTU Master or Modbus ASCII Master) Wincon-8037/8337/8737/8036/8336/8736 support Multi-ports of Modbus Master. (can be Modbus RTU Master or Modbus ASCII Master), please refer to ISaGRAF section 8.4 To use Modbus ASCII Master, please connect “mbus_asc” in the IsaGRAF I/O connection windows as below. If you can not find “mbus_asc” in your ISaGRAF, please visit http://www.icpdas.com/products/PAC/i-8000/isagraf.htm to download “ICP DAS Utilities For ISaGRAF.zip”. For new driver please click “New Driver for I-8xx7, 7188EG/XG & W-8x37” The Character size setting can be 7 or 8 bit depended on your Modbus ASCII device. User’s Manual Of ISaGRAF Embedded Controllers, Mar.2006, Rev. 5.0 , Copyright By ICP DAS 216 Then using below function blocks in your ISaGRAF Ladder or Function block program. Mbus_R Mbus_R1 Mbus_N_R Mbus_NR1 MBUS_B_R Read max. 12 word-value (-32768 ~ +32767) using Modbus function code 3 or 4 Read max.192 bit-value using Modbus function code 1 or 2 Same as Mbus_R but with one extra setting – Period. Read words or bits with a specified period time (unit is second) Read 8 word-value (-32768 ~ +32767) using Modbus function code 3 Same as Mbus_N_R but with one extra setting – Period. Read 8 words with a specified period time (unit is second) Read 8 bit-value using Modbus function code 1 MBUS_BR1 Same as Mbus_B_R but with one extra setting – Period. Read 8 bits with a specified period time (unit is second) MBUS_N_W Write max. 4 word-value (-32768 ~ +32767) using Modbus function code 6 or 16 MBUS_B_W Write max. 4 bit-value using Modbus function code 5 or 15 MBUS_WB Write max. 16 bit-value using Modbus function code 15 For example: User’s Manual Of ISaGRAF Embedded Controllers, Mar.2006, Rev. 5.0 , Copyright By ICP DAS 217 8.4: Multi-Ports Modbus RTU/ASCII Master W-8x37 / W-8x47 : driver ver. 3.20 or later I-7188EG/XG & I-8417/8817/8437/8837 support only one Modbus Master port. (can be Modbus RTU Master or Modbus ASCII Master) Wincon-8x37/8x36 & Wincon-8x47/8x46 support Multi-ports of Modbus Master. (can be Modbus RTU Master or Modbus ASCII Master) To use multi-ports of Modbus RTU or ASCII Master in Wincon, please connect “mbus” or “mbus_asc” in the ISaGRAF I/O connection windows as below. If you can not find “mbus_asc” in your ISaGRAF, please visit http://www.icpdas.com/products/PAC/i-8000/isagraf.htm to download “ICP DAS Utilities For ISaGRAF.zip”. For new driver please click “New Driver for I-8xx7, 7188EG/XG & W-8x37” In this examole, there are two Modbus RTU Master (at COM2 & COM5) and one Modbus ASCII Master (at COM3) User’s Manual Of ISaGRAF Embedded Controllers, Mar.2006, Rev. 5.0 , Copyright By ICP DAS 218 Then using below function blocks in your ISaGRAF Ladder or Function block program. Note: 1. The “SLAVE_” setting in the below function blocks means Port No. & slave No. Port No. = SLAVE / 1000 slave No. = SLAVE mod 1000 For example, if SLAVE = 2001, Port No. = COM2 & slave No. = 1 if SLAVE = 9002, Port No. = COM9 & slave No. = 2 if SLAVE = 10002, Port No. = COM10 (MSP1:) & slave No. = 2; 2. If you are using I-8112/8114/8142/8144 in Wincon, please plug these boards in Wincon first and then run “Start” – “Programs” - "Wincon utility" - "Com" - "New Card Wizard" - "Slot Scan" , then click on "Save New Module" to properly set each extra COM port. Mbus_R Mbus_R1 Mbus_N_R Mbus_NR1 MBUS_B_R Read max. 12 word-value (-32768 ~ +32767) using Modbus function code 3 or 4 Read max.192 bit-value using Modbus function code 1 or 2 Same as Mbus_R but with one extra setting – Period. Read words or bits with a specified period time (unit is second) Read 8 word-value (-32768 ~ +32767) using Modbus function code 3 Same as Mbus_N_R but with one extra setting – Period. Read 8 words with a specified period time (unit is second) Read 8 bit-value using Modbus function code 1 MBUS_BR1 Same as Mbus_B_R but with one extra setting – Period. Read 8 bits with a specified period time (unit is second) MBUS_N_W Write max. 4 word-value (-32768 ~ +32767) using Modbus function code 6 or 16 MBUS_B_W Write max. 4 bit-value using Modbus function code 5 or 15 MBUS_WB Write max. 16 bit-value using Modbus function code 15 Then follow below Ladder or Function block program. User’s Manual Of ISaGRAF Embedded Controllers, Mar.2006, Rev. 5.0 , Copyright By ICP DAS 219 For example: SLAVE_ = 2001 means Port = COM2, slave No. = 1 SLAVE_ = 3001 means Port = COM3, slave No. = 1 User’s Manual Of ISaGRAF Embedded Controllers, Mar.2006, Rev. 5.0 , Copyright By ICP DAS 220 Chapter 9: Commonly Used ISaGRAF Utilities The following chapter describes many useful features and utilities of the ISaGRAF Workbench programming environment. These features and utilities make programming an ISaGRAF project quick and easy. This chapter in no way contains all of the features and utilities available with the ISaGRAF Workbench program. For more details and information about all the features the ISaGRAF Workbench program has to offer consult the "ISaGRAF USER’s GUIDE" manual which can be found from the CD ROM of the ISaGRAF workbench. Its file name is either “ISaGRAF.pdf” or “ISaGRAF.doc”. User’s Manual Of ISaGRAF Embedded Controllers, Mar.2006, Rev. 5.0 , Copyright By ICP DAS 221 9.1: Creating An ISaGRAF Project Groups A very useful feature of the ISaGRAF program is the ability to organize numerous programs into "projects". The "Creating Projects" feature assists an ISaGRAF programmer who must create and maintain many different ISaGRAF programs for different application projects. If you want to delete an existing project group, simply use the Windows Explorer to locate the ISaGRAF sub-directory you want to delete. An example of this is that if you wanted to delete the project just created, use the Windows Explorer and go to the C:\isawin\factory directory, and then just delete the "factory" sub-directory. User’s Manual Of ISaGRAF Embedded Controllers, Mar.2006, Rev. 5.0 , Copyright By ICP DAS 222 9.2: Uploading An ISaGRAF Project There may be occasions when you will want to "Upload" an ISaGRAF project from an I-8xx7, I-7188EG/XG & W-8xx7 controller system to your development PC. This is easily accomplished IF the "Upload" function from the "Compiler Option" is turned on. To turn the upload function on from the "Compiler Option", open the "ISaGRAF Programs" window, select "Make" from the menu bar, and then click on "Compiler Options". The "Compiler Options" window will open, make sure the "ISA86M: TIC Code For Intel" is selected, and then click on the "Upload" button. The "Prepare Project For Upload" window will open, click on the "Embed Source Code For Upload" checkbox and then click on the "OK" button. VERY IMPORTANT NOTE: Option “Comments for not connected I/O channels” must be choosed if “Directly represented variables” is used in this project (refer to section 3.4). After you have checked the "Embed Source Code For Upload" checkbox and clicked on the "OK" button, you will need to recompile the project and download the project to the I-8xx7, I7188EG/XG & W-8xx7 controller system. User’s Manual Of ISaGRAF Embedded Controllers, Mar.2006, Rev. 5.0 , Copyright By ICP DAS 223 IMPORTANT NOTE: Once you have enabled the "Upload" option, the code generated by the compiler will increase the size of the original program from ONE & A HALF TO THREE TIMES the original program size. If the uploaded code size is larger than 64K bytes, you will not be able to download the program to the I-8xx7 & I-7188EG/XG controller system. The code size limitation is 1M bytes for W-8xx7 controller system. Before trying to download the program it is advisable that you check the size of the uploaded program. To check the uploaded program size, use the Windows Explorer program and go to the appropriate sub-directory that the application program resides in. As an example, the "SIMPLELD" program that was create resides in the C:\ISAWIN\DEMOPGM\SIMPLELD program sub-directory. Remember, the "DEMOPGM" sub-directory is the Project group that the SIMPLELD program resides in, and the "SIMPLELD" sub-directory is where the actual application code files reside in. Look for the file named "APPLI.X8M" and check the size of this file. The "APPLIC.X8M" file is the file that contains the actual code that will be uploaded or downloaded to the I-8xx7 controller system. Make sure the sizes of this file DOES NOT exceed 64K for I-8xx7 & I7188EG/XG. And Do not exceed 1M for W-8xx7. UPLOADING AN ISaGRAF PROJECT To upload an ISaGRAF project from an I-8xx7, I-7188EG/XG & W-8xx7 controller system open the "ISaGRAF Project Management" window, select "File", and then click on "Upload Project". The "Upload Project" window will now open, and check that the communication settings between your development PC and the I-8xx7, I-7188EG/XG & W-8xx7 controller system match each other. If the communication settings DO NOT match between the development PC and the controller, click on the "Setup" button to configure the proper communication settings. User’s Manual Of ISaGRAF Embedded Controllers, Mar.2006, Rev. 5.0 , Copyright By ICP DAS 224 Once you have made sure that the communication settings are properly configured, click on the "RUN" button in the "Upload Project" windows. User’s Manual Of ISaGRAF Embedded Controllers, Mar.2006, Rev. 5.0 , Copyright By ICP DAS 225 9.3: Setting An ISaGRAF Password An ISaGRAF Workbench project can be password protected by configuring a user-defined password. To configure an ISaGRAF password, open the "ISaGRAF Project Window", select "Project" from the menu bar, and then click on "Set Password". The "Data Protection" window will open and then select on of the passwords from "00 to 15" to configure a password (this means that up to 16 passwords can be assigned with the ISaGRAF Workbench program). You will also need to select the type of data protection you are creating for your ISaGRAF project. In the example below we are defining the "Global Protection" for this ISaGRAF project. When you click on the "OK" button from the "Enter Password" window your new password will now be associated with the ISaGRAF project. The next item you need to define is the type of data protection "Permissions" that will define for your ISaGRAF project. Double click on new password you have created and the "Data Protection Permissions" window will open. To allow full access WITH password protection, click on the "Full Access" scroll bar and click on the new password name you have created. User’s Manual Of ISaGRAF Embedded Controllers, Mar.2006, Rev. 5.0 , Copyright By ICP DAS 226 To verify that your password protection is now set for your ISaGRAF program, close all of ISaGRAF windows and then open the "ISaGRAF Project Management" window. Double click on the ISaGRAF program that you have created the password protection for. A "Data Protection" window will now open requiring you to enter the password for the ISaGRAF program you are attempting to open. User’s Manual Of ISaGRAF Embedded Controllers, Mar.2006, Rev. 5.0 , Copyright By ICP DAS 227 9.4: Creating An ISaGRAF Program Diary When you modify an ISaGRAF program you can keep track of these revisions by entering a comment into the "Edit Diary" window. This affords the programmer the opportunity to add comments about program modifications and then save a record of these changes using the "Edit Diary" facility for enhanced program management capability. When you have completed entering information in the "ISaGRAF Diary" file, just click on the "Save" icon for your revision notes to be saved. User’s Manual Of ISaGRAF Embedded Controllers, Mar.2006, Rev. 5.0 , Copyright By ICP DAS 228 9.5: Backing Up & Restoring An ISaGRAF Project For archiving purposes you can "Back Up" and "Restore" an ISaGRAF project. For example, you may want someone to test your program or email to [email protected] for ICP DAS’s ISaGRAF technical service. Backing Up An ISaGRAF Project Open the "ISaGRAF Project Management" window, select "Tools" from the menu bar, click on "Archive", and then click on "Projects". An "Archive Projects" window will open which allows you to designate where you want to save the ISaGRAF project to. Click on the name of the ISaGRAF project you want to backup, and then click on the "Backup" button. You can compress the size of the file you have backed up by clicking on the "Compress" checkbox BEFORE you click on the "Backup" button. You will now find the backed up ISaGRAF project file in the "Archive" location you have designated. In the example above, the name of the backed up file is "simpleld.pia". Restoring An ISaGRAF Project To restore an ISaGRAF project from a backed up file, use the same method as above to access the "Archive Projects" window, click on the name of the project you want to restore from the User’s Manual Of ISaGRAF Embedded Controllers, Mar.2006, Rev. 5.0 , Copyright By ICP DAS 229 "Workbench" window, then click on the name of the backed up file from the "Archive" window, then click on the "Restore" button. The ISaGRAF project will now be restored to the subdirectory you designated. You can now open, edit and download the restored ISaGRAF project file. User’s Manual Of ISaGRAF Embedded Controllers, Mar.2006, Rev. 5.0 , Copyright By ICP DAS 230 9.6: Copying & Renaming An ISaGRAF Project The ISaGRAF Workbench program has the capability of copying and renaming an ISaGRAF project or program. This is useful if you want to maintain a copy of an ISaGRAF project or program in a secondary directory. Copying An ISaGRAF Program To copy an ISaGRAF program open the "ISaGRAF Project Management" window, first click on the name of the ISaGRAF program you want to copy, then select "File" from the menu bar, and then click on "Copy". When you click on "Copy" the "Copy Project" window will open, and now you can enter the name of the program you have selected to where you want to copy the program. If the new program name does not already exist, ISaGRAF will create the project name for you. Note in the bottom screen that ISaGRAF has created a new program named "Scott" and placed a copy of all the files from "simpleld" into the "Scott" program group. Renaming An ISaGRAF Program To rename an ISaGRAF program open the "ISaGRAF Project Management" window, click on the name of the ISaGRAF program you want to rename, then select "File" from the menu bar, and then click on "Rename". When you click on "Rename" the "Rename Project" window will open, and now you can enter the new name for the ISaGRAF program. User’s Manual Of ISaGRAF Embedded Controllers, Mar.2006, Rev. 5.0 , Copyright By ICP DAS 231 The former program named "scott" has now been changed to "gonzo", but it still has all the files from the "simpleld" program. User’s Manual Of ISaGRAF Embedded Controllers, Mar.2006, Rev. 5.0 , Copyright By ICP DAS 232 9.7: Setting Comment Text For An ISaGRAF Project A useful feature of the ISaGRAF Workbench program is the ability to create "Comment Text" that will be placed next to an ISaGRAF program name in the "ISaGRAF Project Management" window. This way you can provide additional information about the purpose and any other additional comments regarding a particular ISaGRAF program. To create "Comment Text" for an ISaGRAF program first open the "ISaGRAF Project Management" window, click on the name of the ISaGRAF program you want to create the comment text for, then select "Edit" from the menu bar, and then click on "Set Comment Text". When you click on "Set Comment Text" the "Project Comment Text" window will open, and now you can enter any comments and information you desire for the ISaGRAF program you have selected. User’s Manual Of ISaGRAF Embedded Controllers, Mar.2006, Rev. 5.0 , Copyright By ICP DAS 233 9.8: Setting The Slave ID For An ISaGRAF Controller Each I-8xx7, I-7188EG/XG & W-8xx7 controller system has a "NET ID" address that must be set to identify the controller to the ISaGRAF Workbench program. By default the NET ID address is "1" when it is shipped out. If you need to communicate with multiple I-8xx7, I-7188EG/XG & W-8xx7 controller systems via RS485 network, you must set the NET ID address in the ISaGRAF program for the specific I8xx7, I-7188EG/XG & W-8xx7 controller system you want to communicate with. To communicate with different controller systems from one development PC open the "ISaGRAF Programs" window and click on the "Link Setup" icon. When you click on the "Link Setup" icon, the "PC-PLC Link Parameters" window will open. Enter the "Target Slave Number" of the I-8xx7, I-7188EG/XG & W-8xx7 controller system you want to communicate with. IMPORTANT NOTE Remember that the NET ID address of the I-8xx7 controller system is determined by the DIP switch settings on the bottom right hand side of the controller. Refer to Section 1.3.1 for the DIP switch settings to determine the NET ID address for the I-8xx7 controller system you want to communicate with. To set Net-ID for the I-7188EG/XG & Wincon-8xx7, please refer to their own “Getting Started Manual” delivered with the product. User’s Manual Of ISaGRAF Embedded Controllers, Mar.2006, Rev. 5.0 , Copyright By ICP DAS 234 9.9: Optimizing The ISaGRAF Code Compiler The ISaGRAF Workbench program allows you to modify the settings for the "Compiler Options" to optimize the ISaGRAF program when you compile your project. To access the "Compiler Options" open the "ISaGRAF Programs" window and select "Make" on the menu bar, and then click on "Compiler Options". The "Compiler Options" window will open, and now you can select which optimization parameters you want for when you compile your ISaGRAF program. Selecting the "Run Two Optimizer Passes" will insure that the code is compiled into the smallest possible program code. User’s Manual Of ISaGRAF Embedded Controllers, Mar.2006, Rev. 5.0 , Copyright By ICP DAS 235 9.10: Using The ISaGRAF Conversion Table Note: The conversion table is only for Input & Output attribution variables, not for internal variables. You may refer to Appendix A.4 for “A4_20_to” , “To_A4_20” to convert Integer variable to 4 to 20 mA, or “V0_10_to” , “To_V0_10” for converting to 0 to 10 Volt. Conversion Table Example In this "Conversion Table" example the value from an I-87017 (an eight channel analog input module) board needs to be converted. The I-87017 is configured to receive a –10v to +10v signal, where –10v equals a value of "-32768", and a +10v signal equals a value of "+32767". You may refer to Appendix D to see the translation table of each analog board. In this example we will use the "Conversion Table" to reconfigure the I-87017 so that a –10v signal will equal a value of "-10000" and a +10v signal will equal a value of "10000". In this example a value of +2.573v signal will equal a value of "2573". Note: The I-8xx7, I-7188EG/XG & W-8xx7 controller only supports the value before conversion within –32768 to +32767, and the value after conversion within –10000 to +10000. Setting conversion table out of these range may cause errors. To configure a "Conversion Table" open the "ISaGRAF Programs" window and click on the "Dictionary" icon. This will open the "ISaGRAF Global Variables" window, select "Tools" from the menu bar, and then click on "Conversion Tables". When you click on the "Conversion Tables" selection the "Conversion Tables" window will open. Next, click on the "New" button and then the "Create Table" window will now open. In the "Create Table" window enter the name for the conversion table you are creating. User’s Manual Of ISaGRAF Embedded Controllers, Mar.2006, Rev. 5.0 , Copyright By ICP DAS 236 To properly create our example "Conversion Table" at least two values must be defined. The "Electrical" field means the original value BEFORE conversion and the "Physical" field is for the value AFTER conversion. The two points defined in this example are (-32768, -10000 "lower limit") and (+32767, 10000 "upper limit"). Click on the "STORE" button to save each entry. When you have completed entering in the two value points, click on the "OK" button to save the entered values. User’s Manual Of ISaGRAF Embedded Controllers, Mar.2006, Rev. 5.0 , Copyright By ICP DAS 237 The last step is to assign the conversion table "CN1" to a program variable that will be used in an ISaGRAF program. Note: Only integer variable declared as input or output attribution can be assigned a conversion table. User’s Manual Of ISaGRAF Embedded Controllers, Mar.2006, Rev. 5.0 , Copyright By ICP DAS 238 9.11: Export / Import Variable Declarations Via Microsoft Excel Variables can be defined in Microsoft Excel and then be imported to ISaGRAF workbench. And also they can be exported from ISaGRAF to Excel. To export to a text file, with an extension name “.txt”, run “Tools” - “Export text” from the “dictionary” window. Select “File” and given a name to it, “int_1.txt” in this sample. Then click on “Browse” to select the directory where this txt file will be saved. User’s Manual Of ISaGRAF Embedded Controllers, Mar.2006, Rev. 5.0 , Copyright By ICP DAS 239 You may open and edit the file from the Excel. Please make sure to save this file with an extension “.txt”. To import a text file to ISaGRAF, with an extension name “.txt”, run “Tools” - “Import text” from the dictionary window. Then click on “Browse” to select the associated text file. User’s Manual Of ISaGRAF Embedded Controllers, Mar.2006, Rev. 5.0 , Copyright By ICP DAS 240 And then it is done as below. User’s Manual Of ISaGRAF Embedded Controllers, Mar.2006, Rev. 5.0 , Copyright By ICP DAS 241 9.12: Spy list ISaGRAF supports “Spy list” to spy some specific variables when linking to the controller. Please follow below steps to create a “spy list”. First click on “Simulate”, then click on “Tools – Spy list”. Next click on “Insert variable” to insert the variable to be spied. User’s Manual Of ISaGRAF Embedded Controllers, Mar.2006, Rev. 5.0 , Copyright By ICP DAS 242 When all spied variables are inserted, remember to click on “Save list”. Then close the ”Debugger” window. Click on “Debug – Workspace” User’s Manual Of ISaGRAF Embedded Controllers, Mar.2006, Rev. 5.0 , Copyright By ICP DAS 243 Move all “List” to the right hand side. Then, you will see the “spy list” will automatically display when ISaGRAF linking to the controller. User’s Manual Of ISaGRAF Embedded Controllers, Mar.2006, Rev. 5.0 , Copyright By ICP DAS 244 9.13: How to search a variable name in an ISaGRAF project ? Please click on “Cross references” and then entering the name you would like to search. The location will appear on the right hand side. Just click on it to get into it. User’s Manual Of ISaGRAF Embedded Controllers, Mar.2006, Rev. 5.0 , Copyright By ICP DAS 245 Chapter 10: The Retained Variable And Data Backup 10.1: The Retained Variable Note: Read floating point value from S-256/512 & X607/608 may cause controller fault if there is no floating point value saved inside. Please refer to Section 10.6 – “Controller Fault Detection” New Retain Function: The I-8417/8817/8437/8837 & I-7188EG/XG , Wincon-8x37/8x36 & Wincon-8x47/8x46 supports new retain function since below driver version. I-7188EG + X607 or X608: driver ver. 2.05 or later I-7188XG + X607 or X608: driver ver. 2.04 or later I-8xx7+ S256 or S512 : driver ver. 3.07 or later W-83x7/83x6+ S256 or S512 : driver ver. 3.18 or later with below new back-plane WB-831 (For 3-slot ): Rev 2.6 W-87x7/87x6+ S256 or S512 : driver ver. 3.18 or later with below new back-plane WB-871 (For 7-slot ): Rev 2.8 If battery backup SRAM is found in the back-plane of the controller (I-8xx7: S256/S512, I7188EG/XG: X607/X608, Wincon-83x7/87x7/83x6/87x6: S256/S512 ), the maxinum number of retained variables for new retain function are listed as below. New retain variable is supported by below ISaGRAF “C-function” Target 1 : I-7188EG/XG+X607/608, I-8417/8817/8437/8837+S256/512 Target 2 : Wincon+S256/512 with new Wincon back-plane Retain_B : retain Boolean variable. Target 1: max. 256 variables, Target 2: max. 1024. Retain_N : retain Integer variable. Target 1: max. 1024 variables, Target 2: max. 4096. Retain_F : retain Real variable. Target 1: max. 1024 variables, Target 2: max. 4096. Retain_T : retain Timer variable. Target 1: max. 256 variables, Target 2: max. 1024. Retain_X : retain variable by using its Network address The retain value by new retain function will keep alive always whatever controller’s power is off, or modifying , re-compiling & download a new ISaGRAF project. Data will be lost when rnning out of the battery power. Please refer to below two ST examples to use new retain function. To use new retain function, please do not check “Retain” on the IsaGRAF dictionary window. And if your controller is I-7188EG/XG, please connect IO complex equipment “X607_608” in the IO connection windows. User’s Manual Of ISaGRAF Embedded Controllers, Mar.2006, Rev. 5.0 , Copyright By ICP DAS 246 To use new retain function, please do not check “Retain” on the IsaGRAF dictionary window If the controller is I-7188EG/XG, please connect “X607_608” and enter the correct value. 607: X607 608: X608 User’s Manual Of ISaGRAF Embedded Controllers, Mar.2006, Rev. 5.0 , Copyright By ICP DAS 247 Example1: (* Set by variable name *) (* To_Retain is declared as an internal boolean variable with initial value as TRUE *) (* Tmp is declared as an internal boolean variable *) (* B1 , B2 is declared as internal Boolean variable, Do not check "Retain" *) (* N1 , N2 is declared as internal Integer variable, Do not check "Retain" *) (* F1 , F2 is declared as internal Real variable, Do not check "Retain" *) (* T1 , T2 is declared as internal Timer variable, Do not check "Retain" *) (* is_fault & fault_type are declared as internal integer *) (* PC / HMI can request controller fault state & type by Modbus protocol at No.=9999 & 9998 *) is_fault := R_MB_ADR(1,9999) ; (*to get controller state, 0: Ok , 1: controller fault happens *) (* controller fault type 101 : Global fault : project stop running, only PC/HMI can request it by Modbus No. 9999 / 9998 --- other value is Local fault --102: S_R_R error, invalid REAL value 103: R_MB_REL error, invalid REAL value 104: INT_REAL error, invalid REAL value 105: RETAIN_F error, invalid REAL value 106: RETAIN_X error, invalid REAL value 107: Real value divided by 0 108: Integer value divided by 0 109: F_READ_F error, invalid REAL value (For Wincon-8x37/8x36 only) 110: I-87K IO board in slot 0 to 7 not found. *) fault_type := R_MB_ADR(1,9998) ; (* Do action here when "Local Fault" happens *) if is_fault=1 then (* Do action here when "Local Fault" happens *) (* … *) (* Only for Wincon: Stop program running & reset all output in slot 1 to 7 *) (* tmp := Stop_APL( ) ; *) (* To clear the value in Network address 9999 & 9998 when Local fault happens *) tmp := W_MB_ADR(1, 9999, 0) ; tmp := W_MB_ADR(1, 9998, 0) ; end_if; (* To set retained variables when controller is start running *) if To_Retain then To_Retain := False ; (* Only do it once *) Tmp := Retain_B( B1 , 1 ) ; Tmp := Retain_B( B2 , 2 ) ; Tmp := Retain_N( N1 , 1 ) ; Tmp := Retain_N( N2 , 2 ) ; Tmp := Retain_F( F1 , 1 ) ; Tmp := Retain_F( F2 , 2 ) ; Tmp := Retain_T( T1 , 1 ) ; Tmp := Retain_T( T2 , 2 ) ; end_if ; (* After then B1, B2, N1, N2, F1, F2, T1, T2 will be automatically retained in the program *) User’s Manual Of ISaGRAF Embedded Controllers, Mar.2006, Rev. 5.0 , Copyright By ICP DAS 248 Example2: (* Set by variable's network address No. *) (* To_Retain is declared as an internal boolean variable with initial value as TRUE *) (* Tmp is declared as internal boolean variable *) (* ii is declared as an internal integer *) (* N01 ~ N10 is declared as internal Integer variable with network address No. = 1, 3, 5, 7, 9, 11, 13, 15, 17, 19, Do not check "Retain" *) (* F01 ~ F10 is declared as internal Real variable with network address No. = 21, 23, 25, 27, 29, 31, 33, 35, 37, 39, Do not check "Retain" *) (* is_fault & fault_type are declared as internal integer *) (* PC / HMI can request controller fault state & type by Modbus protocol at No.=9999 & 9998 *) is_fault : R_MB_ADR(1,9999) ; (*to get controller state , 0: Ok , 1: controller fault happens *) (* controller fault type 101 : Global fault : project stop running, only PC/HMI can request it by Modbus No. 9999 / 9998 --- other value is Local fault --102: S_R_R error, invalid REAL value 103: R_MB_REL error, invalid REAL value 104: INT_REAL error, invalid REAL value 105: RETAIN_F error, invalid REAL value 106: RETAIN_X error, invalid REAL value 107: Real value divided by 0 108: Integer value divided by 0 109: F_READ_F error, invalid REAL value (For Wincon-8x37/8x36 only) 110: I-87K IO board in slot 0 to 7 not found. *) fault_type := R_MB_ADR(1,9998) ; (* Do action here when "Local Fault" happens *) if is_fault=1 then (* Do action here when "Local Fault" happens *) (* … *) (* Only for Wincon: Stop program running & reset all output in slot 0 to 7 *) (* tmp := Stop_APL( ) ; *) (* To clear the value in Network address 9999 & 9998 when Local fault happens *) (* tmp := W_MB_ADR(1, 9999, 0) ; tmp := W_MB_ADR(1, 9998, 0) ; *) end_if; (* To set retained variables when controller is start running *) if To_Retain then To_Retain := False ; (* Only do it once *) for ii := 1 to 10 do Tmp := Retain_X( 'N' , 2*ii-1 , ii ) ; (* retained N01 to N10 *) Tmp := Retain_X( 'F' , 2*ii+19 , ii ) ; (* retained F01 to F10 *) end_for ; end_if ; (* After then N01 to N10 & F01 to F10 will be automatically retained in the program *) User’s Manual Of ISaGRAF Embedded Controllers, Mar.2006, Rev. 5.0 , Copyright By ICP DAS 249 Old Retain Method: If the controller doesn’t find the battery backup SRAM in the back-plane of the controller (I-8xx7: S256/S512, I-7188EG/XG: X607/X608, Wincon: S256/S512 ). The I-8xx7 and I-7188EG/XG supports old retain variable, while Wincon supports no retain variable. There is a 31-byte “NVSRAM” in the I-8xx7 & I-7188EG/XG’s CPU board . A maxinum of six Integers/Reals (signed 32-bit) and sixteen Booleans can be retained with this 31-byte NVSRAM. To enable the old retained function, click on “Retain” for each associated variable. Note: If battery backup SRAM is found in the controller (I-8xx7: S256/S512, I-7188EG/XG: X607/X608, Wincon: S256/S512), Please use new retain function listed in the former section. The old retain method has two disadvantage: (1) The data will lost when download a modified ISaGRAF project. (2) Its retain variable amount is less than new method. User’s Manual Of ISaGRAF Embedded Controllers, Mar.2006, Rev. 5.0 , Copyright By ICP DAS 250 10.2: Data Backup To The EEPROM Data can be stored into the EEPROM. The value will be always hold even the power is dead unless the value is updated. The EEPROM of I-8xx7, I-7188EG/XG & W-8xx7 controller can be read freely however can be written only about to 100,000 times.To read a value from the EEPROM, the following functions can be used. EEP_B_R EEP_BY_R EEP_WD_R EEP_N_R Reads one boolean Reads one byte Reads one word (2 bytes, signed) Reads one integer (4 bytes, signed) To write a value to the EEPROM, should remove the protection of the EEPROM first and then write operation is possible. The following functions can be used. EEP_EN EEP_PR EEP_B_W EEP_BY_W EEP_WD_W EEP_N_W Removes the protection of EEPROM Set the protection of EEPROM Writes a boolean, up to 256 booleans can be stored. Writes one byte, up to 1,512 bytes can be stored. Writes one word (2 bytes, signed), up to 756 words can be stored. Writes one integer (4 bytes, signed), up to 378 integers can be stored. The below two blocks can be used to Read/Save “real” value . To save a Real value to the EEPROM, use Real_Int to map the real value to an integer, and then use EEP_N_W to save this mapped integer. To read a Real value from EEPROM, use EEP_N_R to read it, and then use Int_Real to map this integer to an real value. Int_Real Real_Int Map a long integer to a Real value. Map a Real value to a long integer. Note: Using “EEP_N_R” + “Int_Real” to read floating point value form EEPROM may cause controller fault if there is no floating point value saved inside. Please refer to Section 10.6 – “Controller Fault Detection” Bytes, words and integers will be stored to the same memory area in the EEPROM. Be careful to arrange their address before using the above write functions. There are total 1,512 bytes in the EEPROM memory area of the I-8xx7 & I-7188EG/XG, while much more in the W-8xx7. For I-8xx7 & I-7188EG, the addressing No. of bytes is range from 1 to 1,512, while words is 1 to 756, and integers is 1 to 378. The following No. will use the same memory address in the EEPROM. Byte Word Integer 4n-3, 4n-2, 4n-1, 4n 2n-1, 2n n (* n = 1, 2, …378 *) User’s Manual Of ISaGRAF Embedded Controllers, Mar.2006, Rev. 5.0 , Copyright By ICP DAS 251 For W-8xx7, the addressing No. of bytes is range from 1 to 14272, while words is 1 to 7136, and integers is 1 to 3568. The following No. will use the same memory address in the EEPROM. Byte Word Integer 4n-3, 4n-2, 4n-1, 4n 2n-1, 2n n (* n = 1, 2, …3568 *) When using the write functions, the EEPROM will be damaged if the write operation is more than 100,000 times. For example, the following program is dangerous since the EEPROM will be written once per cycle (normally, the cycle is about 2 to 60 ms depends on the application) . (* ST program, Val is declared as an integer, TEMP is declared as a boolean *) TEMP := eep_n_w(1, Val); (* dangerous *) However the following program is safe if Val is not changed frequently. (* ST program, Val, Old_Val declared as integers, TEMP declared as a boolean *) IF Val <> Old_Val THEN TEMP := eep_n_w(1, Val); Old_Val := Val; END_IF; Each read / write operation in the EEPROM will consume a lot of CPU time of I-8xx7, I7188EG/XG & W-8xx7 controller system. The following approximate time is for each function being called. EEP_EN EEP_B_R EEP_BY_R EEP_WD_R EEP_N_R ~ 0.08 ms ~ 0.8 ms ~ 0.8 ms ~ 1.5 ms ~ 2.9 ms EEP_PR EEP_B_W EEP_BY_W EEP_WD_W EEP_N_W ~ 0.08 ms ~ 6 ms ~ 6 ms ~ 12 ms ~ 23 ms Recommend to read values from the EEPROM at one time when the I-8xx7, I-7188EG/XG & W-8xx7 is powered up, and then updated the associated address in the EEPROM when the value is changed. Please refer to a sample program in Chapter 11 – “demo_17” & “Wdemo_10”. For those data which are frequently changed are not suitable to be stored in the EEPROM. User’s Manual Of ISaGRAF Embedded Controllers, Mar.2006, Rev. 5.0 , Copyright By ICP DAS 252 10.3: Battery Backup SRAM Note: Read floating point value from S-256/512 & X607/608 may cause controller fault if no floating point value saved inside. Please refer to Section 10.6 – “Controller Fault Detection” The I-8417/8817/8437/8837 and W-8337/8737/8336/8736 can integrate with a S256 or S512 battery backup SRAM to store data, alarm, and information, while X607 & X608 for the I7188EG/XG controller. The data stored in these SRAM is always retained unless their battery running out of energy. Their memory size is as below, however the upper 12K is reserved by I-8417/8817/8437/8837 and I-7188EG/XG, while 64K is reserved by W-8337/8737/8336/8736. I-8417/8817/8437/8837 S256 244K bytes (256-12=244) S512 500K bytes (512-12=500) W-8337/8737/8336/8736 S256 192K bytes (256-64=192) S512 448K bytes (512-64=448) X607 X608 I-7188EG/XG 116K bytes (128-12=116) 500K bytes (512-12=500) If battery backup SRAM is found in the controller, the maxinum number of retained variables for new retain function “Retain_X” , “Retain_B”, “Retain_N”, “Retain_F” & “Retain_T” can be extend to as below (please refer to Section 10.1). I-7188EG/XG+X607/608 and I-8417/8817/8437/8837+S256/512 New Retain function Boolean 256 Integer 1024 Real 1024 Timer 256 old retain method 256 256 (Integer + Real) 32 W-8337/8737/8336/8736+S256/512 with new Wincon back-plane (section 10.1) New Retain function old retain method Boolean 1024 1024 Integer 4096 4096 (Integer + Real) Real 4096 Timer 1024 1024 ICP DAS provides an utility “ICPDAS UDloader” that can be installed on the PC to upload and download data from/to the ISaGRAF controller. Please copy “UDloader.exe” from the ICP DAS’s CD-ROM:\napdos\isagraf\some_utility\ to your windows. The I-8417/8817/8437/8837 supports S256/S512 since its driver version of 2.25, while I7188EG supports X607/608 since its driver version of 1.18, and version 1.16 for I-7188XG. W-8337/8737/8336/8736 supports S256/S512 since its driver version 3.18 (Please refer to section 10.1). If your driver is older one, please upgrade the hardware driver to the associate version or a higher version. The driver can be found from the below ICP DAS’s web site: http://www.icpdas.com/products/PAC/i-8000/isagraf.htm User’s Manual Of ISaGRAF Embedded Controllers, Mar.2006, Rev. 5.0 , Copyright By ICP DAS 253 10.3.1: Access to the SRAM The SRAM can store boolean, byte, word, integer, real & message. Their format is as below. Boolean: True=1, False=0 1 byte Byte: 0 ~ 255 1 byte Word: -32768 ~ 32767 2 bytes Integer: signed 32-bit 4 bytes Real: float 4 bytes Message: string (len<=255) len bytes To access to the SRAM, the below functions can be used (Please refer to Appendix A). S_B_R, S_B_W, S_BY_R , S_BY_W, S_M_R, S_M_W S_WD_R, S_WD_W, S_N_R , S_N_W, S_R_R, S_R_W S_MV 10.3.2: Upload data stored in the SRAM For PC to upload data stored in the volatile SRAM of the ISaGRAF controllers, the SRAM should be divided into 1 or up to 8 files. Each file has a ID No. of 1 to 8 and a name of up to 12 characters. The below functions are for handling file format inside the SRAM. S_FL_INI, S_FL_AVL, S_FL_RST, S_FL_STS Please use functions of S_FL_INI & S_FL_AVL to arrange the file resident location & current available location (Please refer to Appendix A & demo_40, 41 or 42). The volatile SRAM is consisted of bytes. The total number of bytes available depends on which module is used as below. The upper 12K is reserved. Module name I-8xx7: S256 I-8xx7: S512 I-7188XG/EG: X607 I-7188XG/EG: X608 Byte No. 1 ~ 249,856 1 ~ 512,000 1 ~ 118,784 1 ~ 512,000 (244K), (500K), (116K), (500K), (256-244=12K is reserved) (512-500=12K is reserved) (128-116=12K is reserved) (512-500=12K is reserved) A file can be located at any place inside these bytes. Each file’s location can be described as (Begin, End). Begin is the lower limit byte No. of the associated file, while End is the upper limit byte No., and Begin is always less than End. A file inside the SRAM has a current available area (Head, Tail). Head is the starting position of the file, Tail is the ending position. Head can be larger, less than or equal to Tail. For ex, a file resides at (Begin, End) = (1, 20000) 1. If (Head, Tail) = (1001,5100), it means the available data of the file is starting from byte No. of 1001 to 5100. The available file contains 4100 bytes. 2. If (Head, Tail) = (10001,5000), it means the available data of the file is starting from byte No. of 10001 to 20000 and then continued with 1 to 5000. The available file contains 15000 bytes. 3. If (Head, Tail) = (5001,5000), it means the available data of the file is starting from byte No. of 5001 to 20000 and then continued with 1 to 5000. The available file contains 20000 bytes. 4. If (Head, Tail) = (5000,5000), it means the available data of the file is empty, 0 byte. User’s Manual Of ISaGRAF Embedded Controllers, Mar.2006, Rev. 5.0 , Copyright By ICP DAS 254 5. If (Head, Tail) = (-1,-1), it means the available data of the file is empty, 0 byte. To upload the data stored in the SRAM, please make sure you have installed the “ICPDAS UDloader” on your PC. To upload data stored in the SRAM of the ISaGRAF controller to PC, please run “UDloader.exe”, then click on “Link Setup” to set proper communication parameters, then click on “Upload 1” to upload it. Example: Please download demo_41 to one I-8417/8817/8437/8837. Then push button 1 or 2 or 3 or 4 several times. Then upload the file stored in the SRAM. file resident location. File name & location (PC). Current available file location. Click here to set communication parameters. User’s Manual Of ISaGRAF Embedded Controllers, Mar.2006, Rev. 5.0 , Copyright By ICP DAS 255 10.3.3: Download data to the SRAM For PC to download data to the volatile SRAM of the ISaGRAF controllers. The below functions can be used. Please refer to Appendix A & demo_44. S_DL_EN, S_DL_DIS, S_DL_RST, S_DL_STS Please call S_DL_EN to enable it. The Controller accepts only the binary format for String, Byte, Word, Int & Real. Byte: 0 ~ 255 1 byte Word: -32768 ~ +32767 2 byte [low bye] [high byte] Int: 32-bit, signed integer 4 byte [lowest] [2nd] [3rd] [highest] Real: 32-bit float 4 byte [lowest] [2nd] [3rd] [highest] String: up to 255 bytes If using the “UDloader.exe” to download data to the volatile SRAM, the data to be downloaded should be edited as a text file. Its format should follow the below rules. The first line should be a No. indicate that to download to which starting Byte No. of the SRAM. Valid starting byte No is as below. S256: 1 ~ 249,856 S512: 1 ~ 512000 X607: 1 ~ 118,784 X608: 1 ~ 512000 The other line is the data. A. String String should start and end with the character of ‘ , for ex. ‘Abcd123’ (7 byte). The $NN (NN in hexidecimal and should not equal to 0), could be used to indicate the ASCII character. For ex, ‘ABC$0D’ contains 4 bytes, the 4th byte is <CR>. B. Byte Byte should start with ( and end with ) , for ex. (0) , (123), (255). Valid byte range is from (0) to (255). C. Word Word should be start with [ and end with ] , for ex. [-100] , [20000], [32767]. Valid word range is from [-32768] to [32767]. D. Integer Integer should be start with { and end with } , for ex. {-1234567} , {200000}. Valid integer range is from {-2147483648} to {2147483647}. E. Real Real value should be start with < and end with > , for ex. <123> , <1.56E-2>, <-123.456>. 3. The character between each Byte, Word, Integer, Real, String at the same line should be at least one space character <SP> or , <Comma> or, <Tab> For ex. 201 to download to the SRAM which staring from byte No. 201 ‘Hello’ (10) (20) (30) (40) [-10000] {70000} ‘End’ data (total 18 bytes) User’s Manual Of ISaGRAF Embedded Controllers, Mar.2006, Rev. 5.0 , Copyright By ICP DAS 256 1 to download to the SRAM which staring from byte No. 1 (23) data (total 57 bytes) {-1},{2},{-3},{4},{-5},{6} {-7} {8} {-9} {10} comma, <SP> & <Tab> are all acceptable <0.123> <456.789> <100> , <2.3E3> Example: Please download demo_44 to one I-8417/8817/8437/8837. Then edit a text file as below. 1 {1000} {250} {100} ‘sTART’ The {1000} means the blinking period of L1 is 1000 ms. The {250} means the blinking period of L2 is 250 ms. The {100} means the blinking period of L3 is 100 ms. . Then run “UDloader.exe”. You will see something change on the led of the controller. Click “Link Setup” to set proper communication parameters. Click “Set Load File” to indicate which text file to operate. Click “Download” to start to download. User’s Manual Of ISaGRAF Embedded Controllers, Mar.2006, Rev. 5.0 , Copyright By ICP DAS 257 10.3.4: Operation Functions for the battery backup SRAM The below functions are for the ISaGRAF controller to access to the volatile SRAM. S_FL_INI S_FL_AVL S_FL_STS S_FL_RST Init one file’s name & location for the volatile SRAM Set one file's current available byte No. for the volatile SRAM Get file's Status, end byte No. that has been load by PC for the volatile SRAM Reset file's Status to "Not been load by PC yet" for the volatile SRAM S_B_R: S_BY_R: S_WD_R: S_N_R: S_R_R: S_M_R: Read one Boolean (TRUE, FALSE) Read one Byte (0 ~ 255) Read one Word (-32768 ~ +32767) Read one Integer (32 bit, signed) Read one Real (32 bit, float) Read one String S_B_W: S_BY_W: S_WD_W: S_N_W: S_R_W: S_M_W: Write one Boolean (TRUE, FALSE) Write one Byte (0 ~ 255) Write one Word (-32768 ~ +32767) Write one Integer (32 bit, signed) Write one Real value (32 bit, float) Write one String S_DL_EN S_DL_DIS S_DL_STS S_DL_RST Enable the download permission for PC to download data to the volatile SRAM Disable the download permission for PC to download data to the volatile SRAM Get PC’s Download Status for the volatile SRAM Reset the Download Status to “-1:No action” for the volatile SRAM 10.4: Using I-8073 - MultiMediaCard to store data The I-8073 is not support by I-8xx7, I-7188EG/XG & W-8xx7. User’s Manual Of ISaGRAF Embedded Controllers, Mar.2006, Rev. 5.0 , Copyright By ICP DAS 258 10.5: Reading & Writing File Note: Read floating point value from files may cause controller fault if there is no floating point value saved inside. Please refer to Section 10.6 – “Controller Fault Detection” The W-8037/8337/8737/8036/8336/8736 & W-8047/8347/8747/8046/8346/8746 controller system support file operation however I-8xx7 & I-7188EG/XG doesn’t. Wincon has a Compact Flah Disk with normal size of 128Mbytes (the size depends on the Compact Flash Disk been installed). The following ISaGRAF standard functions are support by W-8xx7/ 8xx6 F_ROPEN F_WOPEN F_CLOSE F_EOF FA_READ FA_WRITE FM_READ FM_WRITE Open an existing binary file in READ mode . Open an existing binary file in READ & WRITE mode . Close an open file Test if end-of-file has been reached Read one integer (4 bytes, signed) from a file. Write one integer (4 bytes, signed) to a file open with Write mode. Read one message (String) from a file. Write one message (String) to a file open with Write mode with <CR> <LF> at the end of the string. The following functions are support by W-8xx7 / 8xx6 F_APPEND F_COPY F_CREAT F_DELETE F_DIR F_END F_SEEK F_READ_B F_WRIT_B F_READ_W F_WRIT_W F_READ_F F_WRIT_F F_WRIT_S Append one file to the other file. Copy one file to another one. Creat an empty file for reading & writing . Delete a file. Create a directory. Move file position to End-Of-File. Move file position to … Read one byte (0 - 255) from a file . Write one byte (0 - 255) to a file open with Write mode. Read one Word (-32768 to +32767) from a file . Write one byte (-32768 to +32767) to a file open with Write mode. Read one float value(For ex. 123.45, -2.15E-03, …) from a file . Write one float value to a file open with Write mode. Write one string to current position of an open file without <CR> <LF> at the end of the string. The example programs for file operation reside at the Wincon CD-ROM: \napdos\isagraf\wincon\demo\ “wdemo_01.pia” & “wdemo_02.pia” & “wdemo_11.pia” & “wdemo_12.pia” or ftp://ftp.icpdas.com./pub/cd/winconcd/napdos/isagraf/wincon/demo/ User’s Manual Of ISaGRAF Embedded Controllers, Mar.2006, Rev. 5.0 , Copyright By ICP DAS 259 10.6: Controller Fault Detection There is some event may cause “controller fault” happens. For example, value divided by zero or reading a floating point value from EEPROM or S256 or file which has no floating point value saved inside. ICP DAS ISaGRAF controllers support Controller Fault detection since below driver version. I-7188EG I-8417/8817/8437/8837 ver. 2.05 ver. 3.07 I-7188XG W-8x37/8x47 ver. 2.04 ver. 3.18 There is two type of controller fault. One is called “Global” fault. The other is “Local” fault. When Global fault happens, the ISaGRAF project will stop running. Waiting the new modified project to be download. When Local fault happens, the ISaGRAF project still runs. PC/HMI/OPC Server can request the controller fault state by using Modbus protocol. Word address of 9999 is the controller fault state. 0: Ok , 1: Controller fault. Word address of 9998 is the controller fault type. 101 : Global fault (other value is Local fault) 102: S_R_R error, invalid REAL value 103: R_MB_REL error, invalid REAL value 104: INT_REAL error, invalid REAL value 105: RETAIN_F error, invalid REAL value 106: RETAIN_X error, invalid REAL value 107: Real value divided by 0 108: Integer value divided by 0 109: F_READ_F error, invalid REAL value (For Wincon-8xx7/8xx6 only) 110: I-87K IO board in slot 0 to 7 not found. When Local fault happens, the project is still running, the ISaGRAF project can use R_MB_ADR( 1, 9999) to get controller_state R_MB_ADR(1, 9998) to get fault_type. To clear the value in Network address 9999 & 9998, please use W_MB_ADR(1, 9999, 0) and W_MB_ADR(1, 9998, 0). Please refer to below example. User’s Manual Of ISaGRAF Embedded Controllers, Mar.2006, Rev. 5.0 , Copyright By ICP DAS 260 Example: (* When controller "Local Fault" happens, the ISaGRAF program can detect it and then program can do the right action *) (* is_fault & fault_type are declared as internal integer *) (* tmp is declared as internal boolean *) (* PC / HMI can request controller fault state & type by Modbus protocol at No.=9999 & 9998 *) (* to get controller state *) is_fault := R_MB_ADR(1,9999) ; (* 0: Ok , 1: controller fault happens *) (* To get controller fault type 101 : Global fault : stop running, only HMI/PC can request it by Modbus No. 9999 & 9998 --- other value is Local fault --102: S_R_R error, invalid REAL value 103: R_MB_REL error, invalid REAL value 104: INT_REAL error, invalid REAL value 105: RETAIN_F error, invalid REAL value 106: RETAIN_X error, invalid REAL value 107: Real divided by 0 108: Integer divided by 0 109: F_READ_F error, invalid REAL value (For Wincon-8x37/8x36 only) 110: I-87K IO board in slot 0 to 7 not found. *) fault_type := R_MB_ADR(1,9998) ; if is_fault=1 then (* Do action here when "Local Fault" happens *) (* ... *) (* Only for Wincon-8x37: Stop program running & reset all output in slot 1 to 7 *) (* tmp := Stop_APL( ); *) (* To clear the value in Network address 9999 & 9998 when Local fault happens *) tmp := W_MB_ADR(1, 9999, 0) ; tmp := W_MB_ADR(1, 9998, 0) ; end_if ; User’s Manual Of ISaGRAF Embedded Controllers, Mar.2006, Rev. 5.0 , Copyright By ICP DAS 261 Chapter 11: ISaGRAF Programming Examples When you receive the your I-8xx7, I-7188EG/XG & W-8xx7 controller system, ICP DAS has created a number of ISaGRAF programming examples for them. These example programs are useful for understanding how to program the controller system with the ISaGRAF Workbench software program. Users may refer to section 11.3 for the description of some demo examples. 11.1: Installing The ISaGRAF Programming Examples The ISaGRAF programming examples are installed on the same CD-ROM which the “ICP DAS Utilities For ISaGRAF” resides. The CD-ROM is delivered with the product. You will find the programming example files in the below sub-directory in the CD-ROM. I-8xx7: I-7188EG: I-7188XG: W-8xx7: I-8000 CD-ROM: \napdos\isagraf\8000\demo\ I-8000 CD-ROM: \napdos\isagraf\7188eg\demo\ I-8000 CD-ROM: \napdos\isagraf\7188xg\demo\ Wincon CD-ROM: \napdos\isagraf\wincon\demo\ Or you may download them from below web site: I-8xx7 & I-7188EG: ftp://ftp.icpdas.com./pub/cd/8000cd/napdos/isagraf/ W-8xx7: ftp://ftp.icpdas.com./pub/cd/winconcd/napdos/isagraf/ When you install the ISaGRAF example for the controller system it is recommended that you create an "ISaGRAF Project Group" to install the demo program files into. User’s Manual Of ISaGRAF Embedded Controllers, Mar.2006, Rev. 5.0 , Copyright By ICP DAS 262 To install the demo programs into the project you have created, open the "ISaGRAF Project Management" window to select "Tools" from the menu bar, then select the "Archive" option and then click on "Projects". When you click on the "Projects" selection the "Archive Projects" window will open. Click on the "Browse" button to select the drive and the sub-directory where the demo files are located (For example: Napdos\ISaGRAF\8000\Demo\ on the CD-ROM) . To install all of the Demo files, click on the "demo_01" file, then press and hold down the "Shift" key, continue to hold down the "Shift" key and use your mouse to scroll down to last file in the "Archive" window. Click on the last file name from the demo file location and that will select the entire group of demo files. Lastly, click on the "Restore" button in the "Archive Projects" window and all of the demo files will be installed into the sub-directory you have created. User’s Manual Of ISaGRAF Embedded Controllers, Mar.2006, Rev. 5.0 , Copyright By ICP DAS 263 User’s Manual Of ISaGRAF Embedded Controllers, Mar.2006, Rev. 5.0 , Copyright By ICP DAS 264 11.2: ISaGRAF Demo Example Files The following details the contents of the "ISaGRAF Demo" example files for the I-8xx7 & W8xx7. For example of I-7188EG & I-7188XG, please refer to below folder. I-7188EG: I-8000 CD-ROM: \napdos\isagraf\7188eg\demo\ I-7188XG: I-8000 CD-ROM: \napdos\isagraf\7188xg\demo\ For the I-8417/8817/8437/8837: I-8000 CD-ROM: \napdos\isagraf\8000\demo\ Project Description I/O Boards Or Complex Name Equipment Used Demo_01 Timer Control Push4Key, Show3Led Demo_01a To do something at some sec later when an event Push4Key, happens Show3Led Demo_02 Start, Stop, & Reset Timer Push4Key, Show3Led Demo_03 R/W System Date & Time To output at a scheduled time interval, For ex. Moday, 09:00 ~ 18:00, Sunday, 10:00 ~ … Demo_04 Calculate Empty Cycle Time Demo_05 Blinking Output Push4Key, Show3Led Demo_06 Change Output Mode Push4Key, Show3Led Demo_07 Show A Value To S-MMI Push4Key, Show3Led Demo_08 Input A Value To S-MMI Push4Key, Show3Led Demo_09 Integer Calculation Demo_10 Display Analog Input Value To S-MMI I-87017, I-87024, Push4Key Demo_11a Fbus Master, NET_ID = 1 Fbus_m, Push4Key, Show3Led Demo_11b Fbus Slave, NET_ID = 2 Fbus_s, Push4Key Demo_12 Use COM3 To Receive User-Defined Command Show3Led From PC Demo_13 Send User-Defined Data To PC Via COM3 Every 3 I-87017 Seconds Demo_14 Convert I-7000 & I-87xx Protocol To Modbus Bus7000 Protocol Demo_15a Link To Other Modbus Devices Mbus Demo_15b Simulate I-8417 As A Modbus Device For None Demo_15a To Link To This Project User’s Manual Of ISaGRAF Embedded Controllers, Mar.2006, Rev. 5.0 , Copyright By ICP DAS 265 Project Name Demo_16 Description Demo_17 Demo_18 Demo_19 Demo_20 Periodic Pulse Generation, And Send Modbus Commands To Another Controller Read/Write EEPROM PID control Use retained variable to retain Integer Use retained variable to retain Timer Demo_21 Write one string to Com5 & Com6 Demo_22 Demo_23 Demo_27 Demo_28 Demo_29 Demo_30 Demo_31 Demo_32 Demo_33 Demo_35a Demo_35b Demo_37 Demo_38 Demo_39 Demo_40 Demo_41 Demo_42 Demo_43 I/O Boards Or Complex Equipment Used Push4Key, Mbus Show3Led Show3Led Push4Key, Show3Led Receive message and echo back to Com5 or Com6 Show3Led Receive a user defined protocol from PC Show3Led Motion x, slot 0: i-8091, 8091 Slot 1:i-8090, I-8090 Napdos\ISaGRAF\8000\Driver\motion.pdf Show3Led Motion x-y, slot0: i-8091, slot1: i-8090, 8091 Napdos\ISaGRAF\8000\Driver\motion.pdf I-8090 Show3Led Store 1200 short-int values every 75 sec. and then I-87017 send to PC via Com3 Store 2880 short-int values every 18 sec. and then I-8017h send to PC via Com3 Press push button 1 to send an email from Com4 of Push4Key I-8xx7 controller Press Push button 1 or 2 or 3 to send emails to two Push4Key users with multi-buffers R/W user defined protocol via Com3 Show3Led Time Synchronization : SA Update Date & Time at this controller will sychronize Fbus_m date & time at SB Time Synchronization : SB Fbus_s Spotlight demo Push4Key Show3Led I-8xx7 talks to the MMICON : Demo 1 MMICON 8xx7 talks to the MMICON : Demo 2 MMICON store 8 A/I (binary) to S256 per min, then PC can load it by "ICPDAS UDloader" I-8017h S256_512 Show3Led Record Alarm (text) to S256/512 & PC can load it by S256_512 "ICPDAS UDloader" Show3Led store 8 A/I (text) to S256 per min, then PC can load I-8017h it by "ICPDAS UDloader" S256_512 Show3Led SMS demo, Please declare your own phone No. in SMS the dictionay, message type Show3Led Push4key User’s Manual Of ISaGRAF Embedded Controllers, Mar.2006, Rev. 5.0 , Copyright By ICP DAS 266 Project Name Demo_44 Demo_46 Demo_49a Demo_49b Demo_50 Demo_52 Demo_53 Demo_55 Demo_61 Demo_63 Demo_70 Description I/O Boards Or Complex Equipment Used Demo of PC to download data to the S256/512 Show3Led Motion control: I-8091 Pulse move at a specified speed I-8090 Push4Key Redundant: 8437/8837 redundant Master Bus7000 Ebus_m Redundant: 8437/8837 redundant slave Bus7000 Ebus_s PWM I/O demo. (Pulse Width Modulation) I-8055 Parallel D/I counter demo 1 at slot 0 (Counter Value I-8051 is retained in this demo) Push4Key Parallel D/I counter demo 2 at slot 0 (high speed I-8051 near 1K) (Not retained) I-8056 Push4key PWM I/O demo 2. (Pulse Width Modulation) I-8055 DI counters using DI_CNT, 8xx7 + 8051 I-8051 Do somethig when DI signal happens PWM & DI_CNT demo, ON & OFF time can be I-8055 dynamically changed Send string to COM3 when alarm 1 to 8 happens Slot 1: i8077 (Access to variables as array) NOTE: Demo_18 uses PID_AL which is provided by CJ International for evaluation. Please refer to “CD\Napdos\isagraf\8000\english_manu\ PID_AL.ComplexPIDalgorithm implementation.htm”. Visual Basic Demo program: I-8000 CD-ROM:\napdos\isagraf\vb_demo\ or ftp://ftp.icpdas.com/pub/cd/8000cd/napdos/isagraf/vb_demo Project Name Demo_1 Demo_2 Description PC access to I-8437/8837 by Modbus TCP/IP protocols PC access to the remote I-8417/8817/8437/8837 via a Modem with a phone line (Please refer to Chapter 13) I/O Boards Or Complex Equipment Used I-8437/8837 I-8054 I-84x7/88x7 I-87064 Modem Phone line User’s Manual Of ISaGRAF Embedded Controllers, Mar.2006, Rev. 5.0 , Copyright By ICP DAS 267 For the W-8xx7/8xx6: Wincon CD-ROM: \napdos\isagraf\wincon\demo\ Project Description I/O Boards Or Complex Name Equipment Used wdemo_01 R/W float value from file wdemo_02 R/W long integer value from file wdemo_03 To output something at a scheduled time interval: For ex. Moday, 09:00 ~ 18:00, Sunday, 10:00 ~ … User defined Modbus protocol (No using "Mbus") wdemo_04 wdemo_05 wdemo_06 wdemo_07 wdemo_08 wdemo_09 wdemo_10 wdemo_11 wdemo_12 wdemo_13 wdemo_14 wdemo_16 wdemo_17 wdmo_18 wdemo_19 wdemo_20 wdemo_21 wdemo_22 wdemo_23 To do something at some sec later when an event happens Using Message Array - MsgAry_r , MsgAry_w Convert float value to string, using real_str & rea_str2 PID control, refer to CD: \napdos\isgraf\wincon\english_manu\"PID...htm" Store & backup boolean & long integer value To/From files Store & backup boolean & long integer value To/From EEPROM Dir is \Compact Flash ,save 3val to 3 file per 10min,change file name per month Same as Wdemo_11,but Dir is \CompactFlash (no blank between Compact & Flash) record i-8081 ODM-2 's frequency into files for 5 seconds Retain variable by Retain_b, Retain_N, Retain_f, Retain_t Dir is \Compact Flash ,save 3val to 1 file per min,change file name per day Same as Wdemo_16,but Dir is \CompactFlash (no blank between Compact & Flash) Redundant Master & slave, Wincon + I-87K4/5/8/9 + I-87055, Master IP is 10.0.0.103, slave is 10.0.0.104 Send String to remote PC or controller via UDP/IP i-8055 i-081F2 i-8055 receive String coming from remote PC or controller via UDP/IP using "com_MRTU" to disable/enable Modbus RTU slave port, PWM I/O demo. (Pulse Width Modulation), i-8055 minimum scale is 2ms for Wincon Send time string to COM2:RS232 every second by COMOPEN & COMSTR_W User’s Manual Of ISaGRAF Embedded Controllers, Mar.2006, Rev. 5.0 , Copyright By ICP DAS 268 wdemo_24 wdemo_26 wdemo_27 wdemo_28 wdemo_29 Send string to COM2 when alarm 1 to 8 happens (Access to variables as array) To move some pulse at x-axis of i-8091 of slot 1 in W-8337/8737 Motion x, slot 1: i-8091, slot 2: i-8090, Napdos\ISaGRAF\8000\Driver\motion.pdf Motion x-y, slot1: i-8091, slot2: i-8090, Napdos\ISaGRAF\8000\Driver\motion.pdf Moving to he Abs. position when CMD is given, slot 1 : i-8091, slot 2: i-8090 Slot 1: i8077 i-8091 i-8091 i-8090 i-8091 i-8090 i-8091 i-8090 VB.NET program running at the same Wincon to communicate with ISaGRAF project : There are several VB.NET example demo in the Wincon-8xx7 CD-ROM: \napdos\ISaGRAF\Wincon\VB.NET_Demo”. User can copy the files to your hard drive and open the *.sln file to run the project by Microsoft Visual Studio .Net 2003 For the W-8xx7/8xx6: Wincon CD-ROM: \napdos\isagraf\wincon\VB.NET_demo\ vbdmo_01 VB.net demo 01: Digital output module (slot 1: i-8077 8077) vbdmo_02 VB.net demo 02: Change output mode (slot 1: i-8077 8077) vbdmo_03 VB.net demo 03: DIO demo (slot 1: 8077) i-8077 vbdmo_05 VB.net demo 05: Analog output (slot 2: 87024) i-87024 vbdmo_06 VB.net demo 06: Analog I/O (slot 2: 87024 , 3: 8017H) VB.net demo 07: R/W long , float & Timer (No IO board) i-87024 i-8017H vbdmo_07 Wincon Web HMI demo : The Web page location: Wincon-8xx7 CD-ROM: \napdos\isagraf\wincon\WebHMI_Demo\ The respective ISaGRAF project location: Wincon-8xx7 CD-ROM: \napdos\isagraf\wincon\demo\ Name sample example1 whmi_01 whmi_02 whmi_03 Description A Web HMI sample A simple example listed in Chapter 4 Display controller's date & time DI & DO demo Read / Write Long, float & Timer value IO board No I/O board slot 1: I-8077 No I/O board slot 1: I-8077 No I/O board User’s Manual Of ISaGRAF Embedded Controllers, Mar.2006, Rev. 5.0 , Copyright By ICP DAS 269 whmi_04 Read / Write controller's String No I/O board whmi_05 Multi-Pages demo (slot 1: I-8077) Page menu is on the Left slot 1: I-8077 whmi_05a Multi-Pages demo (slot 1: I-8077) Page menu is on the Top slot 1: I-8077 whmi_06 AIO demo, scaling is in ISaGRAF slot 2: I-87024 slot 3: I-8017H whmi_07 AIO demo, scaling is in PC slot 2: I-87024 slot 3: I-8017H whmi_08 download controller's file to PC slot 1: I-8077 whmi_09 pop up an alarm window on PC slot 1: I-8077 whmi_10 Entering data to the controller and then store them into file. slot 1: I-8077 User’s Manual Of ISaGRAF Embedded Controllers, Mar.2006, Rev. 5.0 , Copyright By ICP DAS 270 11.3: Description Of Some Demo Examples 11.3.0 Demo_01A & Demo_03: Do something at specific time Demo_01A: Do something at some seconds later when an event happens. Location: I-8000 CD-ROM: \napdos\isagraf\8000\demo\ “demo_01a.pia” Variables : Name Type Attribute Description K1 Boolean Input push K1 to start running motor (pushbutton 1 on the I-8xx7) Motor Boolean Output True means to run motor, False means to stop motor Gate Boolean Output True means to open gate, False means to close gate M1 Boolean Internal event generated at 5 sec later when K1 is pushed M2 Boolean Internal event generated at 15 sec later when K1 is pushed M3 Boolean Internal event generated at 18 sec later when K1 is pushed T1 Timer Internal Time past User’s Manual Of ISaGRAF Embedded Controllers, Mar.2006, Rev. 5.0 , Copyright By ICP DAS 271 Demo_03: Do something at specific weekday & some time interval Location: I-8000 CD-ROM: \napdos\isagraf\8000\demo\ “demo_03.pia” Variables : Name Year Month Day Wday Hour Minute Second YY MM DD HH Mn Sec Act Act1 OK1 OK2 L1 ~ L3 Time_val Type Integer Integer Integer Integer Integer Integer Integer Integer Integer Integer Integer Integer Integer Boolean Boolean Boolean Boolean Boolean Integer Attribute Internal Internal Internal Internal Internal Internal Internal Internal Internal Internal Internal Internal Internal Internal Internal Internal Internal Internal Internal Description System year, 2001 ~ System Month, 1 ~ 12 System date, 1 ~ 31 System Wday, 1:Monday ~ 6:Saturday, 7:Sunday System hour, 0 ~ 23 System minute, 0 ~ 59 System second, 0 ~ 59 New system year to set New system month to set New system date to set New system hour to set New system minute to set New system second to set Trigger to set new date Trigger to set new time Read back of “SYSDAT_W” Read back of “SYSTIM_W” Simulate Boolean Output 1 to 3 unit is sec, = 3600 x hour + 60 x minute + sec, every day = 0~86399 Operation action: 1. Monday ~ Saturday, L1 ~ L3, 09:00:00 ~ 18:00:00 ON 2. Sunday, L1, 13:00:00 ~ 20:00:00 ON 3. Other time, L1 ~ L3 are all OFF User’s Manual Of ISaGRAF Embedded Controllers, Mar.2006, Rev. 5.0 , Copyright By ICP DAS 272 Ladder program : get_time User’s Manual Of ISaGRAF Embedded Controllers, Mar.2006, Rev. 5.0 , Copyright By ICP DAS 273 ST program : control time_val := 3600*hour + 60*minute + second; (* calculate time in sec. *) (* set as False at the beginning of this ST program*) L1 := False; L2 := False; L3 := False; (* Monday ~ Saturday, L1 ~ L3, 09:00:00 ~ 18:00:00 ON *) IF (Wday >= 1) AND (Wday <= 6)THEN IF (time_val >= 32400) AND (time_val <= 64800) THEN L1 := True; L2 := True; L3 := True; END_IF; END_IF; (* Sunday, L1, 13:00:00 ~ 20:00:00 ON *) IF (Wday = 7) THEN IF (time_val >= 46800) AND (time_val <= 72000) THEN L1 := True; END_IF; END_IF; User’s Manual Of ISaGRAF Embedded Controllers, Mar.2006, Rev. 5.0 , Copyright By ICP DAS 274 11.3.1 Demo_02 : Start, Stop And Reset Timer Location: I-8000 CD-ROM: \napdos\isagraf\8000\demo\ “demo_02.pia” Project architecture: Variables : Name M1 M2 M3 K1 K2 K3 L1 L2 L3 T1 Type Boolean Boolean Boolean Boolean Boolean Boolean Boolean Boolean Boolean Timer Attribute Internal Internal Internal Input Input Input Output Output Output Internal Description Indicate a rising pulse of K1 Indicate a rising pulse of K2 Indicate a rising pulse of K3 Pushbutton 1 Pushbutton 2 Pushbutton 3 Output 1 Output 2 Output 3 Operation timer, initial value is set at "T#0s" LD program “prg1” : Get rising pulse of K1, K2, K3 and save to M1, M2, & M3 User’s Manual Of ISaGRAF Embedded Controllers, Mar.2006, Rev. 5.0 , Copyright By ICP DAS 275 ST program “demo” : (* Start timer *) IF M1 THEN TSTART(T1); END_IF; “TSTART” will start ticking the “T1” timer (* Stop timer *) IF M2 THEN TSTOP(T1); END_IF; “TSOP” will stop ticking “T1” timer (* Reset timer *) IF M3 THEN T1 := T#0s; END_IF; Reset “T1” timer to 0 sec. (* Output L1 ~ L3 *) L1 := ( T1 > T#2s ) AND ( T1 < T#15s ); L2 := L1; L3 := L1; “L1” will be TRUE between 2 and 15 sec of the value of “T1” User’s Manual Of ISaGRAF Embedded Controllers, Mar.2006, Rev. 5.0 , Copyright By ICP DAS 276 11.3.2 Demo_17 : R/W Integer Value From/To The EEPROM Location: I-8000 CD-ROM: \napdos\isagraf\8000\demo\ “demo_17.pia” Project architecture: Variables: Name V1 V2 V3 V4 V5 V6 V7 V8 Old_V1 Old_V2 Old_V3 Old_V4 Old_V5 Old_V6 Old_V7 Old_V8 TEMP INIT Type Integer Integer Integer Integer Integer Integer Integer Integer Integer Integer Integer Integer Integer Integer Integer Integer Boolean Boolean Attribute Internal Internal Internal Internal Internal Internal Internal Internal Internal Internal Internal Internal Internal Internal Internal Internal Internal Internal Description Change value of V1 to save new value to EEPROM Old value of V1 for temporal use If controller is just powered up, initial value is TRUE User’s Manual Of ISaGRAF Embedded Controllers, Mar.2006, Rev. 5.0 , Copyright By ICP DAS 277 ST program “st_init” : if INIT=TRUE then (* First scan cycle *) (* Read 8 integers from EEPROM *) (* save them to Old_V1 ~ 8 , V1 ~ V8 *) Old_V1 := eep_n_r(1); Read long integers stored at the Old_V2 := eep_n_r(2); position from 1 to 8 of the eeprom Old_V3 := eep_n_r(3); at the first scan cycle. Old_V4 := eep_n_r(4); Old_V5 := eep_n_r(5); Old_V6 := eep_n_r(6); Old_V7 := eep_n_r(7); Old_V8 := eep_n_r(8); V1 := Old_V1; V2 := Old_V2; Init V1 to V8 V3 := Old_V3; V4 := Old_V4; V5 := Old_V5; V6 := Old_V6; V7 := Old_V7; V8 := Old_V8; (* remove protection of EEPROM *) TEMP := eep_en(); Remove the protection of EEPROM, so that it can be written later. end if; ST program “save” : (* save V1 ~ V8 to EEPROM *) (* You will find write to EEPROM take lots of time, about 23ms for each eep_n_w *) IF V1 <> Old_V1 THEN TEMP := eep_n_w(1,V1); Old_V1 := V1; END_IF; IF V2 <> Old_V2 THEN TEMP := eep_n_w(2,V2); Old_V2 := V2; END_IF; IF V3 <> Old_V3 THEN TEMP := eep_n_w(3,V3); Old_V3 := V3; END_IF; IF V4 <> Old_V4 THEN TEMP := eep_n_w(4,V4); Old_V4 := V4; END_IF; IF V5 <> Old_V5 THEN TEMP := eep_n_w(5,V5); Old_V5 := V5; END_IF; IF V6 <> Old_V6 THEN TEMP := eep_n_w(6,V6); Old_V6 := V6; END_IF; IF V7 <> Old_V7 THEN TEMP := eep_n_w(7,V7); Old_V7 := V7; END_IF; IF V8 <> Old_V8 THEN TEMP := eep_n_w(8,V8); Old_V8 := V8; END_IF; The value will be saved to eeprom only when the current value is changed. ST program “end_init” : if INIT=TRUE then INIT := FALSE; (* end of first PLC scan *) end_if; Then update Old value to the new value. Set “INIT” to False, so that “INIT” is only TRUE at the first scan cycle since it is declared with the initial value - TRUE. User’s Manual Of ISaGRAF Embedded Controllers, Mar.2006, Rev. 5.0 , Copyright By ICP DAS 278 11.3.3 Demo_29: Store 1200 Short Int Every 75 sec & Send To PC Via Com3 This demo program is to save the 8 analog input value (8 samples) of the I-87017 to the short-integer array every 500ms. Then when the number of samples reach 1200, these samples will be divided in 10 frames, each frame contain 120 samples, and sent to one PC via COM3 (RS232/RS485). Location: I-8000 CD-ROM: \napdos\isagraf\8000\demo\ “demo_29.pia” Project architecture: Variables : Name M M1 M2 INIT TMP A1 A2 A3 A4 A5 A6 A7 A8 count position No Frame_No TMP_VAL Type Boolean Boolean Boolean Boolean Boolean Integer Integer Integer Integer Integer Integer Integer Integer Integer Integer Integer Integer Integer Attribute Internal Internal Internal Internal Internal Input Input Input Input Input Input Input Input Internal Internal Internal Internal Internal Description pulse to store a sample pulse to send frame To generate M1 pulse If controller is just powered up, initial value is TRUE For temporal use Connect to Ch. 1 of I-87017 Connect to Ch. 2 of I-87017 Connect to Ch. 3 of I-87017 Connect to Ch. 4 of I-87017 Connect to Ch. 5 of I-87017 Connect to Ch. 6 of I-87017 Connect to Ch. 7 of I-87017 Connect to Ch. 8 of I-87017 No. of sample(1~1200) that is processing, init value=1 position in current short integer array, 1 ~ 256 current short integer array No. which is processing only = 0 ~ 10 For temporal use User’s Manual Of ISaGRAF Embedded Controllers, Mar.2006, Rev. 5.0 , Copyright By ICP DAS 279 ST program “st_init” : if INIT=TRUE then (* First scan cycle *) COUNT:=1; (* init count to 1 *) FRAME_NO:=0; (* init to 0 *) M2 := False; (* init M2 to false *) TMP:=comopen(3,9600,8,0,1); end_if; Do some init at first scan cycle Open Com3 as baud=9600, char. size=8, no parity & stop bit=1 LD program “Pulse” : Generate M pulse every 500 ms, M pulse is used to record the A/I sample value Generate M1 pulse every 500 ms when “M2” is set to TRUE, M1 pulse is used to send one frame to PC User’s Manual Of ISaGRAF Embedded Controllers, Mar.2006, Rev. 5.0 , Copyright By ICP DAS 280 ST program “Sampling” : (* no M pulse, return *) if M=False then return; end_if; This will make the following statement only be processed when M pulse is generated Get current array No. and the start pos. of the array which the samples will save to. Each array No:=((COUNT-1)/240)+1; (* which array No *) can store up to 240 samples position:=COUNT-240*(No-1); (* which start position of the array *) (* Store I-87017 : 8 A/I value to short integer array *) (* Please keep in mind, the max No of short int arry can be used is 12 *) TMP:=ary_w_w(No,position,A01); TMP:=ary_w_w(No,position+1,A02); TMP:=ary_w_w(No,position+2,A03); TMP:=ary_w_w(No,position+3,A04); Store I-87017 : 8 A/I value TMP:=ary_w_w(No,position+4,A05); to short integer array TMP:=ary_w_w(No,position+5,A06); TMP:=ary_w_w(No,position+6,A07); If number of stored samples reach 1200, TMP:=ary_w_w(No,position+7,A08); send to PC via Com3 in 10 frames if (COUNT+7 >= 1200) then FRAME_NO := 1; (* set FRAME_NO=1 *) set M1=True to send first frame at next ST program - "SendCom" M1 := True; M2 := True; set M2=True to generate M1 pulse at COUNT := 1; (* reset COUNT to 1 *) previouse LD program - "Pulse" else COUNT := COUNT+8; (* next sampling *) end_if; If the number of stored samples hasn’t reached 1200 yet, pulse “COUNT” by 8 for next sampling. User’s Manual Of ISaGRAF Embedded Controllers, Mar.2006, Rev. 5.0 , Copyright By ICP DAS 281 ST program “SendCom” : If M1=False then return; end_if; This will make the following statement only be processed when M1 pulse is generated User defined frame format : Each contains 120 short integers STX DLE FRAME_NO DATA ETX number of bytes 1 1 1 120x2 1 value 0x2 0x10 1~10 ? 0x03 if( (FRAME_NO>=1) and (FRAME_NO<=10) ) then No:=(FRAME_NO-1)/2+1; When “FRAME_NO” is between 1 and 10 Get the short integer array No to process. Keep in mind, each array strore up to 240 samples. (in other word -- 2 frames) case (FRAME_NO-2*(No-1)) of 1: position := 1; 2: position := 121; Get starting position inside the array end_case; Send one frame via Com3 TMP := comwrite(3,16#2); (* write one byte = STX to Com3 *) TMP := comwrite(3,16#10); (* write one byte = DLE to Com3 *) TMP := comwrite(3,FRAME_NO); (* write frame No = 1 ~ 10 to Com3 *) (* write 120 short integers inside the array to Com3 *) TMP := comay_ww(3,No,120,position); TMP := comwrite(3,16#3); M1 := False; (* write one byte = ETX to Com3 *) 500 ms later, send next frame. “M1” will be turned ON after 500 ms later at LD program - "Pulse" if (FRAME_NO=10) then If all frames are sent, reset “FRAME_NO” to 0 FRAME_NO := 0; , and set “M2” to FALSE to stop to generate “M1” M2 := False; else FRAME_NO := FRAME_NO+1; (* for next cycle *) end_if; end_if; If some frames have not been sent yet, plus “FRAME_NO” by 1 to send next frame when next “M1” is generated User’s Manual Of ISaGRAF Embedded Controllers, Mar.2006, Rev. 5.0 , Copyright By ICP DAS 282 ST program “end_init” : if INIT=TRUE then INIT := FALSE; (* end of first PLC scan *) end_if; Set “INIT” to False, so that “INIT” is only TRUE at the first scan cycle since it is declared with the initial value - TRUE. How to test ? Plug one I-87017 in the slot 0 of the I-8xx7 controller. Download Demo_29 to the controller. Prepare a RS232 cable to connect Com3 of the controller to Com1 of your PC. There is one ultilty named “ComTest.exe” located in the ICP DAS’s CD-ROM. Copy it to your PC. “\Napdos\ISaGRAF\some_utility\Comtest.exe” or you may obtain it from below site. ftp://ftp.icpdas.com/pub/cd/8000cd/napdos/isagraf/some_utility/ Execute “ComTest” and select the parameter to “COM1” , “9600” , “No parity” , “1 stop bit” and then click on “Open Com”. You will receive 10 frames coming from the target controller every 75 seconds. User’s Manual Of ISaGRAF Embedded Controllers, Mar.2006, Rev. 5.0 , Copyright By ICP DAS 283 11.3.4 Demo_33 : R/W User Defined protocol Via Com3:RS232/RS485 This demo program can let I8417/ 8817/ 8437/ 8837 accept commands coming from PC via a RS232 cable. The command protocol format can be defined by the user. We use the below protocol format in this example. Command is case insensitive, that means M1 & m1 are same Protocol Format: PC req. M1<CR> : Change to Mode 1 M2<CR> : Change to Mode 2 M3<CR> : Change to Mode 3 Txxxx<CR> : Change Period time to xxxx ms for ex. T250<CR> will change period time to 250ms Controller Ans. OK<CR> PC req. M?<CR> : Request the current Mode Controller Ans. Mx<CR> : for ex. M1 means Mode 1 PC req. T?<CR> : Request the current Period time Controller Ans. Txxxx<CR> : for ex. T1500 means Period time is 1500ms Timeout: a valid command should be completely sent in 5 sec. Project architecture: User’s Manual Of ISaGRAF Embedded Controllers, Mar.2006, Rev. 5.0 , Copyright By ICP DAS 284 Variables : Name L1 L2 L3 INIT TMP Mode Step NUM Num_com3 byt index CMD TMP_val ii T1 tout Type Boolean Boolean Boolean Boolean Boolean Integer Integer Integer Integer Integer Integer Integer Integer Integer Timer Timer Attribute Output Output Output Internal Internal Internal Internal Internal Internal Internal Internal Internal Internal Internal Internal Internal Description Output 1 Output 2 Output 3 If controller is just powered up, initial value is TRUE For temporal use Operation Mode, range from 1 to 3 Processing step Received valid byte number return value of Comary_R Current operating byte Index of byte array command type, M, m, T, or t for temporal use for temporal use Period time, valid range is 50 ~ 9999 ms timer to measure timeout, tick when first valid byte recved ST program “st_init” : if INIT=TRUE then (* Init *) Mode := 1 ; STEP := 0 ; T1 := T#500ms ; NUM := 0 ; tout := T#0s ; Do some init at the first scan cycle (* Open Com3 as baud=9600, char. size=8, no parity & stop bit=1 *) TMP:=comopen(3,9600,8,0,1); end_if; User’s Manual Of ISaGRAF Embedded Controllers, Mar.2006, Rev. 5.0 , Copyright By ICP DAS 285 ST program “R_W_COM” : (* STEP: (* 0: no valid data coming (* 1: first valid byte received (* 2: receive '?' command (* 10: check if other byte is '0' ~ '9' (* 21: receive complete command num_com3 := 0 ; (* reset to 0 *) if ComReady(3) then num_com3 := Comary_R(3, 1) ; end_if; (* if data coming, process it *) index := 1 ; while num_com3 > 0 do num_com3 := num_com3-1; byt := array_r(1,index) ; index := index + 1 ; *) *) *) *) *) *) test if data coming from Com3 read all coming bytes to byte array 1 Process all coming bytes get current operating byte from array 1 case STEP of STEP 0 : check if 1st byte valid or not 0: case byt of (* check 1st byte *) 16#4D, 16#6D, 16#54, 16#74 : (* 1st byte is valid, M, m, T, or t *) STEP := 1 ; (* for next STEP *) NUM := 1 ; (* plus valid received byte number by 1 *) TSTART(tout); (* start ticking tout *) CMD := byt ; (* record command type *) TMP := Array_w(2, NUM, byt); (* save 1st valid byte to byte array 2*) end_case; 1: STEP 1 : check if 2nd byte valid or not case byt of (* check 2nd byte *) 16#3F : (* 2nd byte is '?' *) STEP := 2 ; (* for next STEP *) NUM := 2 ; (* plus valid received byte number by 1 *) TMP := Array_w(2, NUM, byt); (* save 2nd valid byte to byte array 2*) else if (CMD=16#4D or CMD=16#6D) (* cmd is M, m *) and (byt >= 16#31) and (byt <= 16#33) then (* '1' ~ '3' *) STEP := 10 ; (* for next step *) NUM := 2 ; (* plus valid received byte number by 1 *) TMP := Array_w(2, NUM, byt); (* save 2nd valid byte to byte array 2*) elsif (CMD=16#54 or CMD=16#74) (* cmd is T, t *) and (byt >= 16#30) and (byt <= 16#39) then (* '0' ~ '9' *) STEP := 10 ; (* for next step *) NUM := 2 ; (* plus valid received byte number by 1 *) User’s Manual Of ISaGRAF Embedded Controllers, Mar.2006, Rev. 5.0 , Copyright By ICP DAS 286 TMP := Array_w(2, NUM, byt); (* save 2nd valid byte to byte array 2*) else STEP := 0 ; (* not valid data, reset STEP to 0 *) TSTOP(tout) ; (* stop ticking "tout" *) tout := T#0s ; (* reset "tout" *) NUM := 0 ; (* reset NUM *) end_if; end_case; STEP 2 : after receive 2nd byte = ‘?’ , check if 3rd byte is <CR> 2: if byt=16#0D then (* check 3rd byte is <CR> or not *) STEP := 21 ; (* complete command is received *) (* send answer to Com3 *) case CMD of Receive valid “M?” command, 16#4D, 16#6D : (* M or m *) reply “Mx”, x = ‘1’ ~ ‘3’ TMP := ComWrite(3, 16#4D); (* M *) TMP := ComWrite(3, Mode+16#30 ); (* Mode *) TMP := ComWrite(3, 16#0D ); (* <CR> *) Receive valid “T?” command, 16#54, 16#74 : (* T or t *) reply “Txxxx”, x = ‘0’ ~ ‘9’ TMP := ComWrite(3, 16#54); (* T *) TMP := ComStr_w(3, MSG(ANA(T1))) ; (* Timer value *) TMP := ComWrite(3, 16#0D ); (* <CR> *) end_case ; else STEP := 0 ; (* not valid data, reset STEP to 0 *) TSTOP(tout) ; (* stop ticking "tout" *) tout := T#0s ; (* reset "tout" *) NUM := 0 ; (* reset NUM *) end_if; STEP 10 : check 3rd and other byte when command is “Mx” or “Txxxx” 10: if (byt=16#0D) then (* received <CR> *) STEP := 21 ; (* complete command is received *) case CMD of Receive valid “Mx” command, 16#4D, 16#6D : (* M or m *) chang Mode value and reply Mode := Array_r(2,2)-16#30; (* Change Mode *) “OK” to PC (* send answer to Com3 *) TMP := ComStr_w(3, 'OK'); TMP := ComWrite(3, 16#0D ); (* <CR> *) Receive valid “Txxx” command, 16#54, 16#74 : (* T or t *) change T1 value and reply “OK” (* get Period *) to PC TMP_val := 0 ; for ii := 1 to NUM-1 do TMP_val := 10*TMP_val + (Array_r(2,1+ii)-16#30) ; end_for ; if (TMP_val >= 50) and (TMP_val < 10000) then (* T1 must be in 50 ~ 9999 ms *) T1 := TMR(TMP_val) ; (* Change T1 *) (* send answer to Com3 *) User’s Manual Of ISaGRAF Embedded Controllers, Mar.2006, Rev. 5.0 , Copyright By ICP DAS 287 TMP := ComStr_w(3, 'OK'); TMP := ComWrite(3, 16#0D ); end_if; end_case ; (* <CR> *) Receive ‘0’ ~ ‘9’, command is not completely received yet, process next byte elsif (byt >= 16#30) and (byt <= 16#39) then (* '0' ~ '9' *) STEP := 10 ; (* for next step *) NUM := NUM+1 ; (* plus valid received byte number by 1 *) TMP := Array_w(2, NUM, byt); (* save other valid byte to byte array 2*) if NUM>5 then (* command is too long, drop it *) STEP := 0 ; (* reset STEP *) TSTOP(tout) ; (* stop ticking "tout" *) tout := T#0s ; (* reset "tout" *) NUM := 0 ; (* reset NUM *) EXIT; (* exit while loop *) end_if; else STEP := 0 ; (* not valid data, reset STEP to 0 *) TSTOP(tout) ; (* stop ticking "tout" *) tout := T#0s ; (* reset "tout" *) NUM := 0 ; (* reset NUM *) end_if; end_case ; end_while; (* Check timeout *) if tout > T#5s then (* if timeout *) STEP := 0 ; (* reset STEP *) TSTOP(tout) ; (* stop ticking "tout" *) tout := T#0s ; (* reset "tout" *) NUM := 0 ; (* reset NUM *) end_if; Check timeout, a valid complete command should be received in 5 seconds (* reset STEP to 0 *) if STEP=21 then TSTOP(tout) ; (* stop ticking "tout" *) tout := T#0s ; (* reset "tout" *) NUM := 0 ; (* reset NUM *) STEP := 0 ; end_if; Valid command has been processed, reset to STEP 0 User’s Manual Of ISaGRAF Embedded Controllers, Mar.2006, Rev. 5.0 , Copyright By ICP DAS 288 SFC program “Out” : Each statement should end with a colon “;” If Mode = 1, run child program “action1” If Mode = 2, run child program “action2” If Mode = 3, run child program “action3” SFC child program “action1” : Mode 1 L1, L2 & L3 set to the same value, True or False, as SFC step 1 GT1.T > T1 means if the time has been stay in SFC step 1 larger than Timer variable “T1” User’s Manual Of ISaGRAF Embedded Controllers, Mar.2006, Rev. 5.0 , Copyright By ICP DAS 289 SFC child program “action2” : Mode 2 SFC child program “action3” : Action(P) : L1 := TRUE; L2 := FALSE; L3 := FALSE; End_action ; Mode 3 Action(P) : L1 := TRUE; L2 := TRUE; L3 := FALSE; End_action ; Action(P) : L1 := TRUE; L3 := TRUE; End_action ; Action(P) : L1 := FALSE; L3 := FALSE; End_action ; L2 := TRUE; L2 := FALSE; User’s Manual Of ISaGRAF Embedded Controllers, Mar.2006, Rev. 5.0 , Copyright By ICP DAS 290 ST program “end_init” : if INIT=TRUE then INIT := FALSE; (* end of first PLC scan *) end_if; Set “INIT” to False, so that “INIT” is only TRUE at the first scan cycle since it is declared with the initial value - TRUE. How to test ? 1 . Download Demo_33 to the controller. 2. Prepare a RS232 cable to connect Com3 of the controller to Com1 of your PC. 3. There is one ultilty named “ComTest.exe” located in the ICP DAS’s CD-ROM. Copy it to your PC. “\Napdos\ISaGRAF\some_utility\Comtest.exe” or you may obtain it from below site. ftp://ftp.icpdas.com/pub/cd/8000cd/napdos/isagraf/some_utility/ 4. You may open a “Hyper Terminal” with Com1, 9600, N, 8, 1 and “No flow control” to type the following command to test M2<CR> : T?<CR> : T200<CR> : T1500<CR> : M?<CR> : change to mode 2 request current period time change to 200ms change to 1500ms request current mode <CR> is the return char. User’s Manual Of ISaGRAF Embedded Controllers, Mar.2006, Rev. 5.0 , Copyright By ICP DAS 291 11.3.5 Send string to COM2 or COM3 when alarm 1 to 8 happens. (Access to variables as array) This demo program can be running in Wincon-8xx7/8xx6 or in I-8xx7. Please init “PORT” as 2 if your target is Wincon, while 3 for I-8xx7. Variables : Name INIT TMP Tick1 IN1 to IN8 Old_1 to Old_8 ii Port CNT1 to CNT8 CNT Boo1 Old_Boo1 Msg1 Type Boolean Boolean Boolean Boolean Boolean Attribute Internl Internal Internal Input Internal Description Init as TRUE, True indicates first PLC scan cycle Temporary using pulse generated every 1 sec to counting time input of ch1 to 8 at slot 1: 8077,network addr 101 to 108 Old value of IN1 to IN8,network addr 111 to 118 Integer Integer Integer Internal Internal Internal Integer Integer Integer Message Internal Internal Internal Internal Index of “For” loops COM PORT Number to open, init as 2 for Wincon time of True state of IN1 to 8, addr=201 to 208, unit is sec Temporary using Temporary using Temporary using Message to send to COM2, init length as 128 Project architecture: Operations: 1. If IN1 to IN8 rising from False to True and hold in True for at least 3 seconds, send one message = ‘Alarm N’ + <LF> <CR> to COM2. N= 1,2, … 8 depends on which Input is triggered. For ex, if IN3 is rising and hold in True longer than 3 seconds, send ‘Alarm 3’ + <LF> <CR> to COM2 2. If after IN1 to IN8 ‘s first alarm is sent and then continusly hold in True for 30 seconds, then send one more messge after every 30 second past to COM2 until the state of IN1 to IN8 is falling to FALSE. The string is for ex, ‘Alarm 3 , 30 sec past !’ User’s Manual Of ISaGRAF Embedded Controllers, Mar.2006, Rev. 5.0 , Copyright By ICP DAS 292 This demo project is in W-8xx7’s CD-ROM:\napdos\isagraf\wincon\demo\ “wdemo_24” or i-8xx7’s CD-ROM:\napdos\isagraf\8000\demo\ “demo_70” How to test ? 1. Please download wdemo_24 to W-8xx7+ slot 1: I-8077 (or demo_70 for I-8xx7+slot 0: I8077) 2. Connect a RS232 cable between W-8xx7’s COM2 to your PC’s COM1 Wincon (COM2) 2 RXD 3 TXD 5 GND PC (COM1) 2 RXD 3 TXD 5 GND Or if you are using I-8xx7’s COM3 to your PC’s COM1 I-8xx7 (COM3) 2 TXD 3 RXD 5 GND PC (COM1) 2 RXD 3 TXD 5 GND 3. Open PC’s Hyper terminal at COM1 with 9600, 8 char. size, no parity, 1 stop bit and No flow control. And then please switch I-8077’s Input1 or 2 or … from FALSE to TRUE and wait about three seconds. If it works, there should be a message “Alarm …” displayed. And then please hold this input TRUE more than 30 seconds, there should be one another message “Alarm …, 30 sec past !” displayed. Does it display “Alarm …” ? User’s Manual Of ISaGRAF Embedded Controllers, Mar.2006, Rev. 5.0 , Copyright By ICP DAS 293 Program description: LD1 program: Generate a pulse True to “Tick1” every second. ST1 program: (* only do it in 1st PLC scan *) if INIT then INIT := FALSE ; (* No more 1st PLC scan cycle *) TMP := COMOPEN(PORT, 9600, 8, 0, 1) ; (* open COM2, 9600,8,N,1 *) (* init value of CNT1 to CNT8 to -7, CNT1 to CNT8's addr is 201 to 208 *) for ii := 1 to 8 do (* 1st para. 0:boolean, 1:Integer, 2nd para.: related Network address, 3rd para.: value *) TMP := W_MB_ADR(1, 200+ii, -7) ; (* at addr 201 to 208 (200+ii) *) end_for ; end_if ; (* test all IN 1 to 8 if rising from False to True *) for ii := 1 to 8 do (* return 0 = False , 1 = True *) (* 1st para. 0:boolean, 1:Integer, 2nd para.: related Network address *) (* get boolean value IN1 to IN8 at network address 101 to 108 (100+ii) *) Boo1 := R_MB_ADR(0, 100+ii) ; (* get boolean value OLD_IN1 to OLD_IN8 at network address 111 to 118 (110+ii) *) Old_Boo1 := R_MB_ADR(0, 110+ii) ; (* 1st para. 0:boolean, 1:Integer, 2nd para.: related Network address *) (* get CNT_1 to 8 integer value at addr 201 to 208 (200+ii) *) CNT := R_MB_ADR(1, 200+ii) ; (* test if INx signal rising *) if (Boo1=1) and (Old_Boo1=0) then (* set related CNTx value to -3 when Input event is trigered *) (* if CNTx value is not -7, it means "INPUT been trigered" *) (* the CNTx value will plus 1 per sec past later, except the related INPUT become FALSE, *) CNT := -3 ; User’s Manual Of ISaGRAF Embedded Controllers, Mar.2006, Rev. 5.0 , Copyright By ICP DAS 294 end_if ; (* if INPUT is cleared or "if related INPUT become FALSE", the related CNTx value will reset to -7: "No input event happens at that INPUT channel" *) if Boo1=0 then (* signal is becoming FALSE *) (* set related CNT value to -7: "No input event happens at that INPUT channel" *) CNT := -7 ; end_If ; if Tick1 then (* Tick1 is generated as pulse "True" every second in "LD1" program *) (* if CNT value is not -7, means the related input is trigered *) if CNT > -7 then CNT := CNT + 1 ; (* plus 1, Tick1 = True means 1 sec has passed *) (* INPUT event happens and 3 sec past, send 1st alarm message to COM3 *) if (CNT=0) then (* send 1st alarm when CNT is from -3, -2, -1 ---> 0 *) CNT := 0 ; (* re-start from 0 and then count to 30 second to send alarm *) (* send one message to COM2 *) msg1 := 'Alarm ' + MSG(ii) + ' $0A$0D' ; TMP := comstr_w(PORT, msg1) ; end_if ; (* INPUT event happens and every 30 second past, send one alarm message *) if (CNT=30) then (* send one alarm when CNT is from 0, 1, 2, ..., 30 *) CNT := 0 ; (* re-start from 0 and then count to 30 second to send alarm *) (* send one message to COM2 *) msg1 := 'Alarm ' + MSG(ii) + ', 30 sec past ! $0A$0D' ; TMP := comstr_w(PORT, msg1) ; end_if ; end_if ; (* "if CNT > -7 then" *) end_if ; (* "if Tick1 then" *) (* 1st para. 0:boolean, 1:Integer, 2nd para.: related Network address, 3rd para.: value *) TMP := W_MB_ADR(0, 110+ii, Boo1) ; (* Update Old_INx *) (* 1st para. 0:boolean, 1:Integer, 2nd para.: related Network address, 3rd para.: value *) TMP := W_MB_ADR(1, 200+ii, CNT) ; (* Update CNTx *) end_for ; User’s Manual Of ISaGRAF Embedded Controllers, Mar.2006, Rev. 5.0 , Copyright By ICP DAS 295 Chapter 12: Sending Emails 12.1: Introduction COM4 of The I-8417/8817/8437/8837 supports full modem signals. It has embedded an email protocol only with the driver version of “email_2.42”. It is a special driver version not the default released one. You have to refer to Appendix C to change your controller driver version if Email function is need. You can obtain the new released driver from: http://www.icpdas.com/products/PAC/i-8000/isagraf.htm To Send email from the controller, Com4 has to link to a modem. Com4 has exactly the same pin assignments as the Com1 (9-pin Dsub) of the PC. The operation figure is as below. COM4 ISP Email Modem Phone Line Mail Server You have to register a User-name/Password from the local ISP(Internet Service Provider). And you have to get the ISP’s phone No. and at least one mail-server’s address near the local ISP. For example. User Name : David Password : A1234 ISP’s Phone No. : 29020001 Mail server 1 : mail.seed.net.tw Mail server 2 : mail.icpdas.com (not necessary) User’s Manual Of ISaGRAF Embedded Controllers, Mar.2006, Rev. 5.0 , Copyright By ICP DAS 296 12.2: Programming The “Email” The “EMAIL” block is for sending email. This section provides an demo example to detail how to send an email to one receiver. Parameter description: (Name) (Type) : (Description) ACT_ <boolean> : if rising from false to true, start to send an email, and the return value - STEP_ will be changed. If no sending request occurs, the return value STEP_ will be 0 (0 means sleep) TIMEOUT_ <integer> : unit : seconds. The max time allowed to send an email after linking to mail server. Value should be between 50 ~ 120 (sec). PHONE_ <message> : ISP's phone No. For ex. '4123000' or '0,4123000' the ',' char. will delay 1 sec and then dial the rest No. USER_ <message> : Registerd user name from ISP. ex. 'Chun' PASSWD_ <message> : Password of USER_ ex. 'abcd127' SERVER1_ <message> : Mail server 1. ex. 'ms9.hinet.net' SERVER2_ <message> : Mail server 2. ex. 'mail.icpdas.com' . If only one mail server found, please set SERVER2 as same as SERVER1 FROM_ <message> : email address of sender. ex. '[email protected]' TO_ <message> : email address of receiver. ex. '[email protected]' SUBJECT_ <message> : subject of email. ex. 'Hi !' DATA_ <message> : email message. ex. 'Dear Chun, Hello !' return: STEP_ <Integer> : 0 : sleep 21 : mail successfully ! less than 0 , error happens -1 : Com4 not ready -2 : modem not ready -3 : ISP doesn't pick up the phone -4 : ISP request to terminate -5 : Timeout happen -6 : Mail server refuse to send mail -7 : Can not link to mail server 1 & 2 -8 : Can't get IP address of mail server 1 & 2 others : reserved User’s Manual Of ISaGRAF Embedded Controllers, Mar.2006, Rev. 5.0 , Copyright By ICP DAS 297 Note: 1. After an email is successfully sent, if no more sending request occurs in 8 seconds, the controller will disconnect the connection from the connected ISP and then hang off the phone . 2. If sending request occurs in 8 second After an email is successfully sent, and then again, the max number of emails can be sent in one phone connection is 10. The other more emails should be sent in another phone connection (In other words, re-dial). 3. If dial fail, for ex. the target phone No. is busy. The controller will dial again about one minute later. The max re-dial number is 3 for each sending request. An Email sample: Please refer to section 9.5 to install the demo project into your ISaGRAF. The project file “demo31.pia” & “demo32.pia” can be found at CD-ROM: \napdos\isagraf\8000\demo\ or ftp.icpdas.com/pub/cd/8000cd/napdos/isagraf/8000/demo Variables declared in the sample: Name K1 INIT STEP PHONE USER PASSWD SERVER1 SERVER2 MAIL_FROM MAIL_TO SUBJECT MAIL_DATA Type Boolean Boolean Integer Message Message Message Message Message Message Message Message Message Attribute Input Internal Internal Internal Internal Internal Internal Internal Internal Internal Internal Internal Description Pushbutton 1, Push it to triger the “Email" block initial value at “TRUE”. TRUE means 1st scan cycle Return value of the “Email” block Phone No. of ISP Registered User Name from ISP Registered Password from ISP Address of mail server 1 Address of mail server 2 Mail address of sender Mail address of receiver Subject of the email Content of the email Project architecture: st_init : a ST program to do some initial actions when the project is just beginning Mail : a LD program to send email End_init : a ST program to indicate the first scan cycle User’s Manual Of ISaGRAF Embedded Controllers, Mar.2006, Rev. 5.0 , Copyright By ICP DAS 298 ST program - “st_init” : (* first PLC scan, init the message variable *) Please give your correct data if INIT=TRUE then PHONE := '12345678' ; (* ISP's phone No. Please given your No. *) USER := 'David' ; (* Registerd user name from ISP. given yours *) PASSWD := 'abcdef' ; (* Password. Please given yours *) SERVER1 := 'seed.net.tw' ; (* Mail server 1. Please given yours *) SERVER2 := 'mail.seed.net.tw' ; (* Mail server 2. Please given yours *) MAIL_FROM := '[email protected]' ; (* Sender. Please given yours *) MAIL_TO := '[email protected]' ; (* Receiver. Please given yours *) SUBJECT := 'Hello !' ; (* Email subject *) MAIL_DATA := 'Dad, I am out !' ; (* Email data *) end_if; LD program – “mail” : ST program – “end_init” : (* NOTE: INIT should be declared with a initial value = TRUE in the "dictionary" window *) if INIT=TRUE then INIT := FALSE ; (* end of first PLC scan *) end_if; User’s Manual Of ISaGRAF Embedded Controllers, Mar.2006, Rev. 5.0 , Copyright By ICP DAS 299 I/O connection: Projection Operation Actions: After compiling the project and download it to one I-8417/ 8817/ 8437/ 8837 controller, push the first pushbutton of the front panel. You will see the modem dialling and if everything is Ok, the email will be sent. See the return value of the “Email” block. (0 means no triggering, 21 means Ok. Less than 0 means something wrong). User’s Manual Of ISaGRAF Embedded Controllers, Mar.2006, Rev. 5.0 , Copyright By ICP DAS 300 Chapter 13: Remotely Download Via Modem_Link 13.1: Introduction COM4 of The I-8417/8817/8437/8837 & COM2 of the W-8xx7 supports full modem signals. It has embedded the Modem_Link protocol for remotely download and monitoring since the I8xx7 driver version of 2.14 & W-8xx7 driver version of 3.10. Please refer to Appendix C to make sure your I-8xx7 controller driver version is the same or higher. You can obtain the new released driver from: http://www.icpdas.com/products/PAC/i-8000/isagraf.htm To Remotely download and monitor program via the Modem_Link, I-8xx7’s Com4 & W-8xx7’s Com2 has to link to a modem. They have exactly the same pin assignments as the Com1 (9pin Dsub) of the PC. I-8xx7’s COM4 or W-8xx7’s COM2 PC Modem Modem Station ISaGRAF Modem Phone Line Or VB6 program Phone Line We name the controller as “Modem Station” since it will pick up the phone call coming from the remote PC running ISaGRAF. If the controller is either I-8437 or I-8837 (Ethernet controller), The configuration can be extened to link many controllers together. Therefore, the PC running ISaGRAF can remotely download to anyone of them through the modem and the Modem station. I-8437/ 8837 PC Modem Ethernet ISaGRAF Or VB6 program Phone Line Modem Station i8437/8837 Com4 W-8xx7 COM2 Modem Phone Line Note: W-8xx7’s COM2 can be set as Modbus RTU port, please disable it if using as “modem_link” port. Please refer to W-8xx7’s “Getting Started” Manual. User’s Manual Of ISaGRAF Embedded Controllers, Mar.2006, Rev. 5.0 , Copyright By ICP DAS 301 13.2: Download Program Via Modem_Link Warnning: Do not download a project which uses I-8xx7’s Com4 & W-8xx7’s COM2 to do other things to the “Modem station” controller. For ex, do not connect “Bus7000” & “Mbus” with port_no = 4 (for I-8xx7) & port_no=2(for W-8xx7). And do not use “Comopen” to open Com4(for I-8xx7) & Com2(for W-8xx7). It will disable “Modem_Link” if you use them for other purpose. That means, you can not remotely connect to it. Note: W-8xx7’s COM2 can be set as Modbus RTU port, please disable it if using as “modem_link” port. Please refer to W-8xx7’s “Getting Started” Manual. The first thing is to add a “modem password” to your ISaGRAF program of the “Modem station” controller for security. To do it, click on one empty slot No. from the I/O connection window. Then connect “Modem_PS” on the slot. Then you got the window similar as below. Type in your prefered password for the “Modem station” controller. The password can contain up to 12 characters & can’t use character “ and ‘. Then re-compile it and download it to the “Modem station” controller. Note: User can write Visual Basic program to acess to the I-8417/8817/8437/8837 & W-8xx7 via Modem. Please download VB6 demo source code at http://www.icpdas.com/products/PAC/i-8000/I-8417.htm or ftp://ftp.icpdas.com/pub/cd/8000cd/napdos/isagraf/vb_demo/ or CD-ROM:\napdos\isagraf\vb_demo\ User’s Manual Of ISaGRAF Embedded Controllers, Mar.2006, Rev. 5.0 , Copyright By ICP DAS 302 Very Important: If you don’t assign the Modem password to the “Modem station” controller, anyone who has the phone No. of your “Modem station” controller can link to it to do anything. Be very careful. Now we are going to download and monitor the program of faraway controllers. Click on “Link setup”, select “Modem_Link”, and then click on “Setup” User’s Manual Of ISaGRAF Embedded Controllers, Mar.2006, Rev. 5.0 , Copyright By ICP DAS 303 For windows NT, 2000 & XP users: If you are going to connect the “Modem station” controller, check “Modem station”, otherwise check “Other IP”. “Other IP” means the target controller is not connect to a modem however connect to the “Modem station” controller via an ethernet cable, the IP address has to be assigned. Then click on “debug”. Select the correct Com port of your PC which will dial the modem. And then click on “Add Station” to add a station if you have none. Then you will see the below window. Given a name for this new station and the target phone No. If you add a “,” character inside the phone No. It will wait one second and then dial the rest No. User’s Manual Of ISaGRAF Embedded Controllers, Mar.2006, Rev. 5.0 , Copyright By ICP DAS 304 For ex. Given No. as “9,,22570001” will dial “9” first, then wait 2 seconds and then dial “22570001”. The password must set to the same password of the “modem station” controller. Click on the station you would like to connect first and then click on “Connect to Station” to command the modem dialing to the faraway controller. After the connection is Ok. You can download, monitor and change the variable value just like you did when the controller is near beside you. User’s Manual Of ISaGRAF Embedded Controllers, Mar.2006, Rev. 5.0 , Copyright By ICP DAS 305 To disconnect from the target controller, close the “ … Debugger” window. Then you can choose “No” to keep the phone connected, or “Yes “ to hang off phone. If you choose to keep the phone connected, you can open another ISaGRAF project to directly connect to another faraway target. The modem won’t dial again. However, keep in mind, remember to disconnect the modem_link when you finish your work, don’t waste the money to the telecom company. User’s Manual Of ISaGRAF Embedded Controllers, Mar.2006, Rev. 5.0 , Copyright By ICP DAS 306 For windows 95 & 98 users: Given the correct target phone No. and the correct Com port of your PC which will dial the modem. If you add a “,” character indise the phone No. It will wait one second and then dial the rest No. For ex. Given No. as “9,,22570001” will dial “9” first, then wait 2 seconds and then dial “22570001”. The password must set to the same password of the “modem station” controller. If you are going to connect the “Modem station” controller, check “Modem station”, otherwise check “Other IP”. “Other IP” means the target controller is not connect to a modem however connect to the “Modem station” controller via an ethernet cable, the IP address has to assign. Then click on “debug” to start dialing the modem to connect to the faraway controller. After the connection is Ok., you can download a new program, monitor the variable status just like you did when the controller is near beside you. When you close the “ … Debugger” window, the PC will command the modem to hang off the phone and disconnect with the faraway controller. User’s Manual Of ISaGRAF Embedded Controllers, Mar.2006, Rev. 5.0 , Copyright By ICP DAS 307 Note: The Modem_Link software installed on windows 95 & 98 doesn’t support “keep the phone connected” function. That means each time you close the “ … Debugger” window, the phone will be hanged off too. So next time when click on “debug”, you will see the modem dialing again to conect to the faraway controller. For Windows NT, 2000 and XP users, the modem will not dial if you keep the phone connected. User’s Manual Of ISaGRAF Embedded Controllers, Mar.2006, Rev. 5.0 , Copyright By ICP DAS 308 Chapter 14: Spotlight : Simple HMI Spotlight is a simple HMI coming with ISaGRAF which allows user to build Boolean Icon, Bar Graph, Trend Curve, Value Text, Bitmap Picture to make application more friendly. 14.1 A Spotlight Example: This Demo example can be restored from the ICP DAS’s I-8000 CD-ROM - “demo_37” (For I8xx7). Please refer to Chapter 11 to restore it. Variables used In the example: Name INIT L1 L2 L3 Button1 Button2 Button3 Button4 VAL_OUT OLD_VAL_OUT T1 MSG1 Type Boolean Boolean Boolean Boolean Boolean Boolean Boolean Boolean Integer Integer Timer Message Attribute Internal Output Output Output Inpput Inpput Inpput Inpput Internal Internal Internal Internal Description Only = TRUE at the 1st scan cycle, INIT value is TRUE Output 1, connect to Ch1 of “show3led” Output 2, connect to Ch2 of “show3led” Output 3, connect to Ch3 of “show3led” Input 1, connect to Ch1 of “push4key” Input 2, connect to Ch2 of “push4key” Input 3, connect to Ch3 of “push4key” Input 4, connect to Ch4 of “push4key” to set blinking period, initial value is set at 500 (unit:ms) Old value of VAL_OUT Time Period of blinking Status report, please set its Maxinum Length to 48 HMI screen outline: User’s Manual Of ISaGRAF Embedded Controllers, Mar.2006, Rev. 5.0 , Copyright By ICP DAS 309 Project architecture: Group name: Spotlight project name: demo_37 ST Program “st_init” in the “Begin” area : (* Do some init action *) if INIT=TRUE then T1 := TMR(VAL_OUT); (* Convert integer:VAL_OUT to Timer:T1 in ms *) MSG1:='OK.'; OLD_VAL_OUT := VAL_OUT; (* init OLD value *) end_if; (* if set a new value to VAL_OUT *) if VAL_OUT <> OLD_VAL_OUT then (* VAL_OUT is acceptable *) if (VAL_OUT>=200) & (VAL_OUT<=5000) then T1 := TMR(VAL_OUT); (* Convert integer:VAL_OUT to Timer:T1 in ms *) MSG1:='OK.'; else (* VAL_OUT out of range *) MSG1:='VAL_OUT should be between 200 and 5000 .'; end_if; OLD_VAL_OUT := VAL_OUT; (* update OLD value *) end_if; ST Program “end_init” in the “End” area : INIT := FALSE ; User’s Manual Of ISaGRAF Embedded Controllers, Mar.2006, Rev. 5.0 , Copyright By ICP DAS 310 LD Program “Demo” in the “Begin” area: Operations : The status of four push buttons will be displayed on the HMI screen The first output will be blinking with the period defined by “VAL_OUT” in ms Value of “VAL_OUT” can be modified from the HMI screen The second and third output “L2” & “L3” can be controlled by the HMI screen. The Value of “VAL_OUT” will also be displayed on the front panel of the controller. User’s Manual Of ISaGRAF Embedded Controllers, Mar.2006, Rev. 5.0 , Copyright By ICP DAS 311 Steps to build a Spotlight: HMI screen: Complete this Demo project as described above. After you finish it. Compile it to make sure there is no error. Copy all files inside “ICO” folder to the associate directory of your project. The “ICO” folder contains some boolean icon files already bulit by ICP DAS. They can be found from the ICP DAS’s CD-ROM : \napdos\isagraf\ICO\ For example, this demo project is inside group “spotligh” and the project name is “demo_37”, then copy CD-ROM: \napdos\isagraf\ICO\*.* to c:\isawin\spotligh\demo_37\ If the “ICO” folder is not found in your CD-ROM. Please download it from the below site. ftp://ftp.icpdas.com/pub/cd/8000cd/napdos/isagraf/ Get into the Spotlight editor. Click on “Simulate”, then click on “Spotlight” to open spotlight editor. A “SpotLight” window will appear as below. User’s Manual Of ISaGRAF Embedded Controllers, Mar.2006, Rev. 5.0 , Copyright By ICP DAS 312 Add “boolean Icons” Click on “Boolean icon”, then set the associated Name as “Button1”, Caption as “Name”, Align as “Top” and then set the prefered *.ico file to display with “FALSE” and “TRUE”, and un-check “Command variable”. Click to set the *.ico file to display. If ico files are not found, please refer to step 2. Then drag the boolean icon to appropriate place. User’s Manual Of ISaGRAF Embedded Controllers, Mar.2006, Rev. 5.0 , Copyright By ICP DAS 313 Check on the new created boolean icon, copy it(Ctrl+c) and then paste it (Ctrl+v) to reproduce one another boolean icon. Then drag it to the prefered place. Check on the new created boolean icon, then click the right button of the mouse, select “Set item style” to modify the name to “Button2”. click the right button of the mouse. User’s Manual Of ISaGRAF Embedded Controllers, Mar.2006, Rev. 5.0 , Copyright By ICP DAS 314 Then we have … Follow the same method to create 4 boolean icons as below. Recommand to save it anytime for safety. Given a name to this screen. User’s Manual Of ISaGRAF Embedded Controllers, Mar.2006, Rev. 5.0 , Copyright By ICP DAS 315 We need one another Boolean icon to display the status of “L1”. Create it with a different color (TRUE : “YEL_ON2.ico” , FALSE : “YEL_OFF2.ico” ). And then create L2 & L3 with TRUE:”CMD_ON2.ico” and FLASE: “CMD_OFF2.ico” as below. Save it anytime, L2 & L3 should not un-check “Command variable”. Keep it checked for L2 & L3 User’s Manual Of ISaGRAF Embedded Controllers, Mar.2006, Rev. 5.0 , Copyright By ICP DAS 316 Add “Unipolar bargraph” Click on “Unipolar bargraph”, set the associated Name as “VAL_OUT”, Scale as “5000”, Color as blue, Back as gray, Direction as “To the right”, Caption as “Name=Value”, Align as “Top”, and un-check “Command variable” Click and hold on the left button of the mouse to change to the prefered shape as below. Save it anytime. User’s Manual Of ISaGRAF Embedded Controllers, Mar.2006, Rev. 5.0 , Copyright By ICP DAS 317 Add “Single text” Click on “Single text”, set the associated Name as “VAL_OUT”, Caption as “Name”, Align as “Top” Keep it checked for VAL_OUT Move it to the prefered place and save it. User’s Manual Of ISaGRAF Embedded Controllers, Mar.2006, Rev. 5.0 , Copyright By ICP DAS 318 Click on “Single text” again, set the associated Name as “MSG1”, Caption as “None”, Align as “Left” and un-check “Command variable”. Move it to the prefered place and save it. User’s Manual Of ISaGRAF Embedded Controllers, Mar.2006, Rev. 5.0 , Copyright By ICP DAS 319 Add “Curve” Click on “Curve”, set the associated Name as “VAL_OUT”, Scale as “5000”, Color as red, Back as gray, Caption as “Name”, Align as “Top”, and un-check “Command variable” Click and hold on the left button of the mouse to change to the prefered shape as below. Save it anytime User’s Manual Of ISaGRAF Embedded Controllers, Mar.2006, Rev. 5.0 , Copyright By ICP DAS 320 Add “picture” Please build 2 bitmap pictures by MS painter as below. Then save them respectively with file names of “sp2.bmp” & “ms.bmp” to the associate project directory. (For this example “c:\isawin\spotligh\demo_37\”) Click on “Picture”, Select the associate bmp file name. User’s Manual Of ISaGRAF Embedded Controllers, Mar.2006, Rev. 5.0 , Copyright By ICP DAS 321 Add 2 pictures “sp2.bmp” and “ms.bmp” to the prefered place, then we got the below window. Click on “Lock” to protect it (No modification allowed). Save it anytime. Add the HMI screen to the “Workspace” Quit “simulation”, then run “Debug”-“Workspace”. User’s Manual Of ISaGRAF Embedded Controllers, Mar.2006, Rev. 5.0 , Copyright By ICP DAS 322 Move the HMI screen to the right (Workspace). J. Time to download to the controller and test Click on “Debug” to download the project to the controller and test it. You may double click on “L2”, “L3” or “VAL_OUT” to modify the value and see what it happens on the controller. And also you can press the 4 pushbuttons on the controller. OK. User’s Manual Of ISaGRAF Embedded Controllers, Mar.2006, Rev. 5.0 , Copyright By ICP DAS 323 You may double click on “VAL_OUT” and give a value large than 5000 to see what it happens. Note: For quick response, user may click on “Options” – “Parameters”, and then set the “Cyclic refresh duration to a smaller value. (Recommand not to set below 200 ms) User’s Manual Of ISaGRAF Embedded Controllers, Mar.2006, Rev. 5.0 , Copyright By ICP DAS 324 Chapter 15: Creating User-Defined Functions ISaGRAF supoorts functions written in ST, FBD, IL and QLD languages. User-defined functions are normally for some algorithm which been used again and again. A function always has an return value (output parameter) and its name should be the same name as the function, and may have up to 31 input parameters. The code written inside functions can not call any function block, however can call other ISaGRAF standard functions and c functions provided by ICP DAS. We are going to creating a function to save an integer value to the EEPROM. Its format is as the below. Function name : Description: Input parameters: ADDR_ (integer) : V1_ (integer) : V2_ (integer) : Return parameter: W_EEP (integer): W_EEP Save an integer to the EEPROM when its value changed the address of the EEPROM to write New value Old value return the new value Note: The parameter names been used will become reserved names. That’s why we use ADDR_ , V1_ , V2_ rather than ADDR , V1 & V2. 15.1: Creating functions inside one project Functions created inside one project can be only called by other programs written in the same project. A. Click on “Create new program” inside the project. Given Name as “W_EEP”, Language as “ST:…”, Style as “Function”. User’s Manual Of ISaGRAF Embedded Controllers, Mar.2006, Rev. 5.0 , Copyright By ICP DAS 325 B. Double click on the function to get into it. Then click on “Sub-program parameters” to define input and output parameters. User’s Manual Of ISaGRAF Embedded Controllers, Mar.2006, Rev. 5.0 , Copyright By ICP DAS 326 C. Declare local variables. We need a local boolean internal variable “TMP” in this example. D. Enter function codes. IF V1_ <> V2_ THEN (* if value changed *) TMP := EEP_N_W(ADDR_, V1_); (* save it to the EEPROM *) W_EEP := V1_ ; (* return the new value *) END_IF ; E. Verify the function. User’s Manual Of ISaGRAF Embedded Controllers, Mar.2006, Rev. 5.0 , Copyright By ICP DAS 327 F. Call it in other programs in the same project. Global variables used in the project: Name Type Attribute Description INIT Boolean Internal initial value at “TRUE”. TRUE means 1st scan cycle K1 Boolean Input Connect to 1st ch. Of “push4key”, press it to get “Val” New_Val Integer Internal New value wish to save to the EEPROM Old_Val Integer Internal Old value Val Integer Internal Read back value of the EEPROM Project architecture: ST program – “end_init” in the “End” area : IF INIT=TRUE THEN INIT := FALSE ; END_IF ; LD program – “demo” : User’s Manual Of ISaGRAF Embedded Controllers, Mar.2006, Rev. 5.0 , Copyright By ICP DAS 328 G. Set Compiler Options and compile the project. After download to the controller, you may change the “New_Val”, and then press “K1” to see what it happens. User’s Manual Of ISaGRAF Embedded Controllers, Mar.2006, Rev. 5.0 , Copyright By ICP DAS 329 15.2: Creating functions in the library Functions created in the library can be called by programs in any project. The steps is similar to the former section 15.1. Please refer to it in advance. A. Get into the library. Then click on “Functions” B. Create an new function and given Name as “W_EEP_N” , Language as “Structured Text”. User’s Manual Of ISaGRAF Embedded Controllers, Mar.2006, Rev. 5.0 , Copyright By ICP DAS 330 C. Define input and return parameters D. Add codes. IF V1_ <> V2_ THEN (* if value changed *) TMP := EEP_N_W(ADDR_, V1_); (* save it to the EEPROM *) W_EEP_N := V1_ ; (* return the new value *) END_IF ; User’s Manual Of ISaGRAF Embedded Controllers, Mar.2006, Rev. 5.0 , Copyright By ICP DAS 331 E. Declare local variables. We need a boolean internal variable – “TMP” E. Save the function and set compiler options. User’s Manual Of ISaGRAF Embedded Controllers, Mar.2006, Rev. 5.0 , Copyright By ICP DAS 332 E. Verify the function. Then you can call it in any project. User’s Manual Of ISaGRAF Embedded Controllers, Mar.2006, Rev. 5.0 , Copyright By ICP DAS 333 Chapter 16: Linking MMICON The I-8417/8817/8437/8837, I-7188EG, I-7188XG & W-8xx7 controller can integrate the ICP DAS’s MMICON to become their Man Machine Interface. The MMICON is featured with a 240 x 64 dot LCD and a 4 x 4 Keyboard. User can use it to display picture, string, integer, float, and input a character, string, integer and float. All control logic is written in ISaGRAF program. 16.1: Hardware Installation Please refer to the “MMICON Hardware Manual” which is delivered with the hardware for more hardware details. 1. The MMICON has a COM port. Please set as a RS232 port. (Please look at the jumper “J7” & “J8” setting on the hardware). Pin assignment : I-8417/8817/8437/8837: COM3 & COM4 can be used. W-8xx7: COM2 or COM5 to COM9 I-8xx7 (COM4) W-8xx7 (COM2) MMICON (CN3) RS232 I-8xx7 (COM3) RS232 MMICON (CN3) RS232 2 RXD 3 TXD 5 GND 2 TXD 3 RXD 5 GND 3 RXD 2 TXD 5 GND 2 TXD 3 RXD 5 GND I-7188EG/XG: COM3 can be used. (COM3 is added on X503 ~ X51x board) I-7188EG/XG RS232 MMICON (CN3) RS232 RXD TXD GND 2 TXD 3 RXD 5 GND 2. Please set Jumper “J2” of MMICON to position “INIT”. I-8417/8817/8437/8837, I7188EG/XG & W-8xx7 only support COM parameter “9600, 8, N, 1” and “address = 0” to talk to the MMICON. User’s Manual Of ISaGRAF Embedded Controllers, Mar.2006, Rev. 5.0 , Copyright By ICP DAS 334 16.2: Create Background Picture Of the MMICON Please refer to the “MMIDOS Software User Manual” which is delivered with the hardware for more software details. The number of the background pictures depends on the ROM memory on the MMICON. It can up to 256 pages for EPROM like “27040”, and 128 pages for “27020”, and 64 pages for “27010”. Note: ROM/ EPROM/ EEPROM/ FLASH are all validate. Please Install the “MMICON” folder from CD-ROM: \Napdos\others\mmicon\ to your hard disk. Note: Please change all these file’s attribute : removing “Read-only” Create all the background pages by Microsoft painter (Please refer to “P0.bmp”). Edit your “Autox.dat” file (Please refer to “Auto1.dat”). This file must remove its “Read-only” attribute. Run “MMIDOS.exe” to build the “romx.bin”, For ex. “rom1.bin” Using your ROM programmer to burn this “romx.bin” image to the ROM memory. Then plug it into the socket on the MMICON. Please refer to the “MMIDOS Software User Manual” which is delivered with the hardware for more software details. 16.3: Writing Control program The I/O complex equipment “mmicon” should be connected to the I/O connection window first. You can find 3 boards under “MMICON”. Status: User’s Manual Of ISaGRAF Embedded Controllers, Mar.2006, Rev. 5.0 , Copyright By ICP DAS 335 Parameter “com_port” defines the COM No. to link to the MMOCON. 3 or 4 for I-8xx7, while 2 or 3 for I-7188EG/XG , and 2 or 5 to 9 for W-8xx7 1 channel of Digital Input: True means communication between the controller and the MMICON is Ok. FALSE means fail. Key_in: 1 channel of Integer Input: The value is the key been pressed. And the value will last only for one scan cycle, then go back to 0. Key 0 1 2 3 4 5 6 7 8 9 A B C D E F Key code value 16#30 16#31 16#32 16#33 16#34 16#35 16#36 16#37 16#38 16#39 16#41 16#42 16#43 16#44 16#45 16#46 Key Enter . Left Right Up Down Back space F1 F2 F3 F4 Key code value 16#0D 16#2E 16#1B 16#1A 16#18 16#19 16#08 16#F1 16#F2 16#F3 16#F4 Page_out: 1 channel of Integer Output: The value output define the page No. to display. The I-8417/8817/8437/8837, I-7188EG, I-7188XG & W-8xx7 controller provide below functions to control the action of the MMICON. MI_BOO MI_INT MI_REAL MI_STR MI_INP_N MI_INP_S REAL_STR STR_REAL Display a boolean value as “ON” or “OFF” Display an integer value Display a real value Display a string To enter an integer To enter a string Convert a real value to a string Convert a string to a real value Please refer to I-8xx7’s demo_38, dem_39 and Appendix A.4 User’s Manual Of ISaGRAF Embedded Controllers, Mar.2006, Rev. 5.0 , Copyright By ICP DAS 336 Chapter 17: SMS: Short Message Service The I-8417/8817/8437/8837, I-7188EG, I-7188XG & Wincon-8xx7 controller can integrate with a GSM Modem to support SMS: Short Message Service. This allows user to request information or control something from his own cellular phone to the ISaGRAF controller. Beside, the controller can also send information and alarms to user’s cellular phone. 17.1: Hardware Installation The I-8417/8817/8437/8837 supports SMS since its driver version of 2.24, while version 1.14 for I-7188EG, and version 1.12 for I-7188XG, and version of 3.10 for W-8xx7. If your driver is older one, please upgrade the hardware driver to the associate version or a higher version. The driver can be found from the below ICP DAS’s web site: http://www.icpdas.com/products/PAC/i-8000/isagraf.htm The I/O library should be re-installed if yours is older one. Please refer to section 1.2. Or you can refer to Appendix A.2 to simply install “C functions” with the below items. SMS_test, SMS_get, SMS_gets, SMS_send, SMS_sts and “I/O complex equipment” : SMS. The GSM Modem M1206 (900/1800) is recommanded for the ISaGRAF controller since its driver version of I-8xx7:2.47, I-7188EG:1.38, I-7188XG:1.35 & Wincon-8xx7:3.10. You may purchase them from ICP DAS or from your local agent. ICP DAS is not sure for other GSM modems working or not. Note: Please REMOVE the password setting in SIM card , then plug it into GSM modem. I-8xx7(COM4/5) W-8xx7(COM2) 2 RXD 3 TXD 5 GND GSM cable of M1206 (or GM29) 2 TXD 3 RXD 5 GND 4 DTR ------------- 4 DSR 7 RTS ------------- 7 CTS 7188EG/XG:COM3/4 GSM cable of RS232 M1206 (or GM29) RXD 2 TXD TXD 3 RXD GND 5 GND DTR (or RTS) ------------- 4 DSR DTR (or RTS) ------------- 7 CTS User’s Manual Of ISaGRAF Embedded Controllers, Mar.2006, Rev. 5.0 , Copyright By ICP DAS 337 17.2: A SMS demo example The demo project is located at I-8xx7’s demo_43, please refer to section 11.1 to install it to your ISaGRAF workbench. Or It can be download at ICP DAS’s ftp site. ftp://ftp.icpdas.com/pub/cd/8000cd/napdos/isagraf/8000/demo/ Variables : Name M1 M2 K1 L1 L2 L3 Q1 TMP SMS_available T1 data phone Date_time To_who Msg_to_send Year1 Mon1 Day1 Wday1 Hour1 Min1 Sec1 Q1_cnt Msg_status TMP_v Type Boolean Boolean Boolean Boolean Boolean Boolean Boolean Boolean Boolean Timer Message Message Message Message Message Integer Integer Integer Integer Integer Integer Integer Integer Integer Integer Attribute Description Internal Trigger to send an alarm message when K1 is pushed Internal Trigger to send a report message when a message is coming Input Pushbutton 1, connect to push4key Output Output 1, connect to show3led Output Output 2, connect to show3led Output Output 3, connect to show3led Internal Test if message is coming Internal Temportary usage Input is SMS available ? connect to SMS - status Internal Blinking time of L1 to L3, init at T#500ms Internal The coming Message Internal phone No. of sender Internal Message coming date & time in string format Internal phone No of receiver, please use your own No. Internal Message to send out Internal Message coming year Internal Message coming month Internal Message coming date Internal Message coming week date Internal Message coming hour Internal Message coming minute Internal Message coming second Internal Message coming count, declared as retained variable Internal Message sending status Internal temportary usage Project architecture : Operation actions: 1. If K1 is pushed, an Alarm message will be sent. 2. If the user send a message in format, for ex. T0200 or T1500 to the controller, the blinking period will change to 200ms and 1500ms. And then the controller will response a report message back to the user. User’s Manual Of ISaGRAF Embedded Controllers, Mar.2006, Rev. 5.0 , Copyright By ICP DAS 338 I/O connection: LD program : work Trigger to send an alarm message when K1 is pushed Get message Sending status every scan cycle Blink outputs Message coming count, Q1_cnt is declared as retained variable User’s Manual Of ISaGRAF Embedded Controllers, Mar.2006, Rev. 5.0 , Copyright By ICP DAS 339 ST program : rcv_msg Test if a message is coming or not Q1 := SMS_test(); if Q1 then if a message coming Year1 := SMS_get(1); Mon1 := SMS_get(2); Day1 := SMS_get(3); Wday1 := SMS_get(4); Hour1 := SMS_get(5); Min1 := SMS_get(6); Sec1 := SMS_get(7); call SMS_get to get message coming date & Time in integer format get phone No. of sender get message coming date & time in string format phone := SMS_gets(2); date_time := SMS_gets(3); data := SMS_gets(1); get message data, SMS_gets(1) should be called in the last one, because it will reset SMS_test status to FALSE:No message coming Check the coming message. For ex. T1500 will result T1=1500 ms, while T0300 result T1=300ms, however TAB10 will result T1=0 ms (not valid) if mid(data,1,1) = 'T' then check 1st char is T or not TMP_v := ANA(mid(data,4,2)); extract 4 bytes starting from string position 2, and then convert to an integer (* valid format *) if TMP_v>=50 and TMP_v<=9999 then T1 := TMR(TMP_v); (* convert to timer *) Msg_to_send := 'Current T1 change to ' + Msg(TMP_v) + ' ms.'; M2 := TRUE; Trigger to send a report message to sender else (* invalid format*) Msg_to_send := '!!! Wrong command, Val should be between T0050 to T9999. Current T1 remains at ' + Msg(Ana(T1)) + ' ms.'; M2 := TRUE; Trigger to send a report message to sender end_if; end_if; end_if; (* if mid(data,1,1) = 'T' then *) (* if Q1 then *) ST program : snd_msg User’s Manual Of ISaGRAF Embedded Controllers, Mar.2006, Rev. 5.0 , Copyright By ICP DAS 340 if message sending status is not 1:busy if (Msg_status <> 1) and SMS_available then if M1 then (* alarm triggering *) TMP := SMS_send(to_who,'K1 is pushed!'); M1 := FALSE; Message sending status: 0: waiting for a new sending request 1: busy. (message is processing now) 21: The message is sent successfullly -1: SMS system is not available -2: Timeout, No response. elsif M2 then (* Report triggering *) TMP := SMS_send(phone,Msg_to_send); (* report message back *) M2 := FALSE; end_if; Must disable it (set to FALSE) after SMS_send is called end_if; More description of SMS_sts, SMS_send, SMS_test, SMS_get & SMS_gets, Please refer to ISaGRAF’s On-line Help. “Library” – “C functions” – “SMS_xxxx” User’s Manual Of ISaGRAF Embedded Controllers, Mar.2006, Rev. 5.0 , Copyright By ICP DAS 341 Chapter 18 : Motion 18.1: Install motion driver Limitation: 1. I-8437/8837 CAN NOT do ethernet communication when using I-8091 to do motion control, while W-8xx7 doesn’t have this limitation. 2. Only one I-8091 board in I-8417/8817/8437/8837 & W-8xx7 can do X-Y dependent motion, other I-8091s should be moving independent. Or all I-8091s are moving independent. The I-8417/8817/8437/8837 & Wincon-8xx7 can integrate with the I-8091 to do Motion control. The default ISaGRAF driver burned in the Flash memory of the I-8417/8817/8437/8837 controller is for general usage not for motion control. Please update it to the motion driver by yourself. While user don’t need to upgrade the driver of Wincon-8xx7 if its driver version is 3.08 or higher. The motion driver of I-8417/8817/8437/8837 can be found in the ICP DAS CD-ROM. napdos\isagraf\8000\driver\motion?.??\ or can be downloaded from ftp.icpdas.com/pub/cd/8000cd/napdos/isagraf/8000/driver/ motion?.?? Please refer to the “ReadMe.txt” in the folder of “motion?.??” (for ex. “Motion2.45”) Restriction of the motion driver of I-8417/8817/8437/8837: The motion driver for I-8417/8817/8437/8837 doesn’t support the Ethernet communication, however W-8xx7 desen’t have this limitation. The ISaGRAF demo projects of motion for I-8417/8817/8437/8837 are “demo_27” , “demo_28”, & “demo_46”. They are located in the 8000 CD-ROM: napdos\isagraf\8000\demo\” , or from ftp.icpdas.com/pub/cd/8000cd/napdos/isagraf/8000/demo/ The ISaGRAF demo projects of motion for W-8xx7 are “wdemo_26” , “wdemo_27”, “wdemo_28” & “wdemo_29”. They are located in the Wincon CD-ROM: napdos\isagraf\wincon\demo\” , or from ftp://ftp.icpdas.com./pub/cd/winconcd/napdos/isagraf/wincon/demo/ User’s Manual Of ISaGRAF Embedded Controllers, Mar.2006, Rev. 5.0 , Copyright By ICP DAS 342 All functions that trigger I-8091 & I-8090 are named as ”M_???” , Please refer to the On-line help from the ISaGRAF “Help” – “Library” - “C functions” for names starting with “M_???”. Beside, please refer to “I-8091 & I-8090 User’s Manual” .It can be found in the package box of the i-8091, or CD-ROM: napdos\8000\motion\i8091\manual\ ftp site: ftp://ftp.icpdas.com/pub/cd/8000cd/napdos/8000/motion/i8091/manual/ User’s Manual Of ISaGRAF Embedded Controllers, Mar.2006, Rev. 5.0 , Copyright By ICP DAS 343 18.2: Introduction 18.2.1: System Block Diagram The I-8091 stepping motor control card is a micro-computer controlled, 2-axis pulse generation card. It includes a 2Kbytes-FIFO to receive motion command from host, a micro-computer for profile generation and protection, 2-axis DDA chip to execute DDA function when interpolation command is used, 2500Vrms optical isolation inserted for industrial application. CPU 2K FIFO DDA Chip Profile Generation Interface Protection Bus X-axis DDA Chip Y-axis Optical Isolation Limit Switch Input Port Connector Limit Switch Signal Limit Switch Input Port Fig.(1) block diagram of I-8091 card 18.2.2: DDA Technology The DDA chip is the heart of I-8091 card, it will generate equal-space pulse train corresponding to specific pulse number during a DDA period. This mechanism is very useful to execute pulse generation and interpolation function. The DDA period can be determined by DDA cycle. Table(1) shows the relation among DDA cycle, DDA period and output pulse rate. When DDA cycle set to 1, the DDA period is equal to (1+1)x1.024ms = 2.048ms. The output pulse number can be set to 0~2047, therefore the maximum output pulse rate will be 1Mpps. The minimum output pulse rate is 3.83pps when set DDA cycle=254 (DDA period = (254+1)x1.024ms = 261.12ms). DDA period DDA cycle X pulse = Y pulse = 6 Z pulse = 4 Fig.(2) DDA mechanism User’s Manual Of ISaGRAF Embedded Controllers, Mar.2006, Rev. 5.0 , Copyright By ICP DAS 344 Table(1) The Relation among DDA cycle, DDA period and output pulse rate. DDA cycle DDA period Max. pulse Min. pulse rate (n=1) rate(n=2047) 1 2.048ms 999511pps 488pps 2 3.072ms 666341pps 325pps 3 4.096ms . . . . . . N (N+1)*1.024ms 2047/(DDA period) 1/(DDA period) . . . . 254 261.12ms 7839pps 3.83pps The DDA cycle can be set by i8091_SET_VAR() command which decribed in charpter 3. The selection criterion of DDA cycle was described as following. 1. The required max. output pulse rate. PRmax = Vmax*N/60 2047 PRmax = ( DDAcycle + 1) * 1. 024ms PRmax : max. output pulse rate. Vmax : max. speed (rpm). N : the pulse number of stepping motor per revolution (pulse/rev). 2. The required speed resolution. The maximum output pulse number is Np(0~2047), therefore the speed resolution is Vmax(max. speed)/Np. The DDA cycle can be obtained by following equation. Np PRmax = ( DDAcycle + 1) * 1. 024ms 3. When choose large DDA cycle (DDA period), it will occur vibration between different pulse input which generally can be observed during acceleration or deceleration. So, the small DDA cycle , the smooth acceleration/deceleration curve as long as the speed resolution is acceptable. Example: Stepping Motor The spec. of stepping motor is 500 pulse/rev, max. speed 500 rpm, speed resolution 2 rpm. The required max. pulse rate PRmax = 500 rpm*500/60 = 4166.67 pps The maximum output pulse Np = 500rpm/2rpm =250 pulse number User’s Manual Of ISaGRAF Embedded Controllers, Mar.2006, Rev. 5.0 , Copyright By ICP DAS 345 The DDA cycle can be calculated by follow equation Np PRmax = ( DDAcycle + 1) * 1. 024ms 250 4166.67 = ( DDAcycle + 1) * 1. 024ms DDA cycle = 58 High Speed = 247 pulse (4166.67*58*0.001024) The above results means that maximum speed is 500rpm when send command i8091_SET_VAR(0, 58, 2, 2, 247) to I-8091 card. Example: Pulse type input Servo Motor The spec. of servo motor is 8000 pulse/rev, max. speed 3000 rpm, speed resolution 2 rpm. The required max. pulse rate PRmax = 3000 rpm*8000/60 = 400,000 pps The maximum output pulse Np = 3000rpm/2rpm =1500 pulse number The DDA cycle can be calculated by follow equation Np PRmax = ( DDAcycle + 1) * 1. 024ms 1500 400,000 = ( DDAcycle + 1) * 1. 024ms DDA cycle = 3 High Speed = 1638 pulse (400,000*4*0.001024) The above results means that maximum speed is 3000rpm when send command i8091_SET_VAR(0, 3, 2, 2, 1638) to I-8091 card. 18.3: Hardware 18.3.1: I-8000 hardware address The hardware address of I-8000 main system is fixed as following table. There are 4 slots I8000 and 8 slots I-8000. I-8000, 4 slot address I-8000, 8 slot address Slot 0 Slot 1 Slot 2 Slot 3 Slot 4 Slot 5 Slot 6 Slot 7 0x080 0x0A0 0x0C0 0x0E0 --------0x080 0x0A0 0x0C0 0x0E0 0x140 0x160 0x180 0x1A0 Fig.(3) I-8000 hardware address User’s Manual Of ISaGRAF Embedded Controllers, Mar.2006, Rev. 5.0 , Copyright By ICP DAS 346 18.3.2: LED Indicator power /ORG1: X-axis’s original limit switch for machine home position. /LS11, /LS14 : X-axis’s negative and positive limit switches. /ORG2: Y-axis’s original limit switch for machine home position. /LS21, /LS24 : Y-axis’s negative and positive limit switches. /EMG : system’s emergency signal input. /ORG1 /LS11 /LS14 /ORG2 /LS21 /LS24 /EMG Fig.(4) I-8091 LED indicator 18.3.3: Hardware Configuration Limit switch configuration Because the profile generation and protection is executed by the CPU on I-8091 card, the limit switches must configure as following diagram. The motion command just can work properly. CCW/BW CW/FW Motor ccm LS11 ORG1 LS14 /LS11 /ORG1 /LS14 EXT GND X axis /EMG Emergency Fig.(5) Limit switch configuration of X axis User’s Manual Of ISaGRAF Embedded Controllers, Mar.2006, Rev. 5.0 , Copyright By ICP DAS 347 CCW/BW CW/FW Motor ccm LS21 ORG2 LS24 /LS21 /ORG2 /LS24 EXT GND Y axis Fig.(6) Limit switch configuration of Y axis Output pulse mode configuration I-8091 card provide two kind output method. (a) CW/CCW mode (b) Pulse/Direction mode The command M_s_mode(card_NO_, modeX_, modeY_) provide parameters 0: CW_CCW and 1: PULSE_DIR to define output pulse mode. CW Mode = 0 (CW_CCW) CCW Mode = 1 (PULSE_DIR) Pulse Direction Fig.(7) Output pulse mode Direction configuration Sometimes, the output direction of X-axis, Y-axis is not in the desired direction due to the motor’s connection or gear train. It is recommended to unify the output direction as shown in Figure(5)(6). The CW/FW direction is defined as toward outside from motor and the CCW/BW direction is defined as toward inside to motor. The M_s_dir(card_NO_, defdirX_, defdirY_) command provides parameters 0: NORMAL_DIR and 1:REVERSE_DIR to define the rotating direction of motor. User’s Manual Of ISaGRAF Embedded Controllers, Mar.2006, Rev. 5.0 , Copyright By ICP DAS 348 Turn Servo ON/OFF (Hold ON/OFF) To turn servo motor into servo ON(OFF) state, or turn stepping motor into hold ON(OFF) state, the command M_s_serv(card_NO_, sonX_, sonY_) provide parameters 1:ON and 0:OFF to turn ON or OFF. Automatic protection The I-8091 card has a automatic protected system. (a) If X-aixs command is executing and moving toward CW/FW direction, X-axis will immediately stop when LS14 is touched. To release this protection as long as X-axis move toward CCW/BW direction. (b) If X-aixs command is executing and moving toward CCW/BW direction, X-axis will immediately stop when LS11 is touched. To release this protection as long as X-axis move toward CW/FW direction. (c) If Y-aixs command is executing and moving toward CW/FW direction, Y-axis will immediately stop when LS24 is touched. To release this protection as long as Y-axis move toward CCW/BW direction. (d) If Y-aixs command is executing and moving toward CCW/BW direction, Y-axis will immediately stop when LS21 is touched. To release this protection, as long as Y-axis move toward CW/FW direction. (e) If the signal of the emergency limit switch /EMG was found in CPU firmware, all motion will be terminated and stop. Set limit switch as normal close condition The limit switches /EMG, /LS11, /LS14, /LS21, /LS24, /ORG1, /ORG2 is initially normal open condition, that is, these signal is active when connect it to ground. In industrial application, it might be recommended normal close condition, that is, these signal is active when open from ground. The M_s_nc(card_NO_, sw_) command can be set sw=0 (default), for normal open condition. When set sw=1, for normal close condition. User’s Manual Of ISaGRAF Embedded Controllers, Mar.2006, Rev. 5.0 , Copyright By ICP DAS 349 18.3.4: Pin assignment of connector CN2 CN2 DB25M-90 +5V CW_PULSE2 CCW_DIR2 HOLD2 CW_PULSE1 CCW_DIR1 HOLD1 GND EXT_VCC (12~24V) ORG1 ORG2 LS11 LS21 LS14 LS24 EMG EXT_GND 1 14 2 15 3 16 4 17 5 18 6 19 7 20 8 21 9 22 10 23 11 24 12 25 13 Fig.(8) CN2 connector of I-8091 Table of CN2 connector’s pin assignment pin name pin Description number +5V 1 Internal +5V power, Max. output current: 50mA CW_PULSE1 2 X-axis CW (Pulse) output pin CCW_DIR1 3 X-axis CCW (Direction) output pin HOLD1 4 X-axis HOLD (servo on) output pin GND 5 Signal ground of pin 2,3,4 EXT_VCC 6 External power(12~24V) for limit switches /ORG1 7 X-axis original (home) limit switch /LS11 8 X-axis limit switch 9,10 No used /LS14 11 X-axis limit switch /EMG 12 Emergency input EXT_GND 13 External ground for limit switch +5V 14 Internal +5V power, Max. output current: 50mA CW_PULSE2 15 Y-axis CW (Pulse) output pin CCW_DIR2 16 Y-axis CCW (Direction) output pin HOLD2 17 Y-axis HOLD (servo on) output pin GND 18 Signal ground of pin 15,16,17 EXT_VCC 19 External power(12~24V) for limit switches /ORG2 20 Y-axis original (home) limit switch /LS21 21 Y-axis limit switch 22,23 No used /LS24 24 Y-axis limit switch EXT_GND 25 External ground for limit switch User’s Manual Of ISaGRAF Embedded Controllers, Mar.2006, Rev. 5.0 , Copyright By ICP DAS 350 The internal circuit of CW_PULSE, CCW_DIR, HOLD When output these signal as 1, it can source 15mA(max.). When output these signal as 0, it can sink 50mA(max.) +5V 330 CW_PULSE1 CCW_DIR1 HOLD1 CW_PULSE2 CCW_DIR2 HOLD2 i8091 Fig.(9) internal circuit of pulse output pin The internal circuit of limit switch input Initially, the limit switch inputs of I-8091 board are normal open (N.O.), the I-8091 board will automatic protect when limit switch pin connect to EXT_GND. The user can use the command M_s_nc(card_NO_, 1) to let those limit switch input as normal close condition at the beginning of the user’s program. EXT_VCC (12V~24V) 4.7K /ORG1, /LS11, /LS14 /ORG2, /LS21, /LS24 i8091 /EMG Fig.(10) internal circuit of limit switch input pin User’s Manual Of ISaGRAF Embedded Controllers, Mar.2006, Rev. 5.0 , Copyright By ICP DAS 351 Example of connection +5V 1 3 6 5 4 CW_PULSE1 CW + 1 4 CW - 2 3 +5V 1 3 6 5 4 CCW_DIR1 CCW + 1 4 CCW - 2 3 HOLD + 1 4 HOLD - 2 3 +5V 1 3 6 5 4 HOLD1 GND FAN-OUT TYPE (VEXTA) DRIVER DGND Fig.(11) fan-out type driver (VEXTA's motor driver) +5V COM 1 3 6 5 4 CW_PULSE1 CW/PULSE 1 4 2 3 1 4 2 3 1 4 2 3 +5V 1 3 6 5 4 CCW_DIR1 CCW/DIR +5V 1 3 6 5 4 HOLD1 HOLD GND DGND SINK TYPE DRIVER Fig.(12) Sink type driver User’s Manual Of ISaGRAF Embedded Controllers, Mar.2006, Rev. 5.0 , Copyright By ICP DAS 352 CN2 DB25M-90 S5V CW_PULSE1 CW_PULSE2 CCW_DIR1 CCW_DIR2 HOLD1 HOLD2 SGND EXT_VCC EXT_VCC (12V~24V) PHOME2 PLS21 PLS24 PHOME1 PLS11 PLS14 PEMG EXT_GND 1 14 2 15 3 16 4 17 5 18 6 19 7 20 8 21 9 22 10 23 11 24 12 25 13 S8091 card CN2 DB25M-90 1A+ 1A1B+ 1B1C+ 1CE5V EGND 2A+ 2A2B+ 2B2C+ 2CE5V EGND 3A+ 3A3B+ 3B3C+ 3CE5V EGND EGND 1 14 2 15 3 16 4 17 5 18 6 19 7 20 8 21 9 22 10 23 11 24 12 25 13 S8090 card Fig.(13) The connection between I-8090 and I-8091 for function testing or pulse feedback by I-8090 encoder card. User’s Manual Of ISaGRAF Embedded Controllers, Mar.2006, Rev. 5.0 , Copyright By ICP DAS 353 18.4: Software I/O connection: The “I-8091A” connectted on the I/O connection window contains 11 digital input channels. Input Channel: CH1 : EMG, emergency stop CH2 : /FFEF, FIFO is empty or not, TRUE: empty CH3 : /FFFF, FIFO is full or not, TRUE: full The “NO_OR_NC” parameter can be set as 0: Normal Open 1: Normal close CH4 : LS11, Left limit swtch of X-axis CH5 : LS14, Right limit swtch of X-axis CH6 : ORG1, Original position swtch of X-axis CH7 : XSTOP, Stop or not of X-axis, TRUE: stop CH8 : LS21, Left limit swtch of Y-axis CH9 : LS24, Right limit swtch of Y-axis CH10 : ORG2, Original position swtch of Y-axis CH11 : YSTOP, Stop or not of Y-axis, TRUE: stop I-8090 contains 3 analog input channels. Parameter: x_mode : integer counting mode of X-axis y_mode : integer counting mode of Y-axis z_mode : integer counting mode of Z-axis 00: quadrant counting mode 10: CW/CCW counting mode 20: pulse/direction counting mode Input Channel: CH1 : encorder value of X-axis CH2 : encorder value of Y-axis CH3 : encorder value of Z-axis CH1 to CH3 are signed 32-bit integer format User’s Manual Of ISaGRAF Embedded Controllers, Mar.2006, Rev. 5.0 , Copyright By ICP DAS 354 Setting commands: M_regist Register one I-8091 In order to distinguish more than one I-8091 card in I-8417/8817/8437/8837 platform, the I-8091 cards should be registrated before using it. This command will assign a card number = “card_NO_” to I-8091 card at that “address_” . If there is no I-8091 at the given address, this command will return FALSE. Note: If using “I_8091A” rather than “I_8091” on the I/O connection window, user don’t need to call “m_regist” & “m_s_nc”, they are ignored. The card_NO of “I-8091A” is equal to its slot No. I-8xx7: 0 ~ 7. W-8xx7: 1 ~ 7. Parameters: card_NO_ integer address_ integer Return: Q_ boolean valid is 0 ~ 19. the plugged slot address of the i8091 card slot 0: 16#80 slot 1: 16#A0 slot 2: 16#C0 slot 3: 16#E0 slot 4: 16#140 slot 5: 16#160 slot 6: 16#180 slot 7: 16#1A0 TRUE: Ok , FALSE: Fail Example: I-8417/8817/8437/8837: demo_46, demo_27, demo_28 W-8337/8737: wdemo_26, wdemo_27, wdemo_28, wdemo_29 (* declaration: INIT as boolean <internal> and has initial value of TRUE *) (* TMP as boolean <internal> *) (* cardNO as integer <internal> and has intial value of 1 *) (* Do some init setting at 1st scan cycle *) if INIT then INIT := FALSE; TMP := M_regist(cardNO,16#80); (* plug i8091 in slot 0 *) TMP := M_r_sys(cardNO); (* reset i8091's setting *) TMP := M_s_var(cardNO,4,2,5,100); TMP := M_s_dir(cardNO,0,0); (* Normal direction *) TMP := M_s_mode(cardNO,1,1); (* pulse_dir mode *) TMP := M_s_serv(cardNO,1,1); (* X & Y server ON *) TMP := M_s_nc(cardNO,0); (* Normal open *) end_if; User’s Manual Of ISaGRAF Embedded Controllers, Mar.2006, Rev. 5.0 , Copyright By ICP DAS 355 M_r_sys Reset all setting To reset I-8091 card, this command will terminate the running command in I-8091 card. User can use this command as software emergency stop. This command also will clear all of setting, so, all I-8091 card’s parameter should be set again. Parameters: card_NO_ integer Return: Q_ boolean the card No. has been set by M_regist, valid is 0 ~ 19 always return TRUE. Example: I-8417/8817/8437/8837: demo_46, demo_27, demo_28 W-8xx7: wdemo_26, wdemo_27, wdemo_28, wdemo_29 User’s Manual Of ISaGRAF Embedded Controllers, Mar.2006, Rev. 5.0 , Copyright By ICP DAS 356 M_s_var Set motion system parameters To set DDA cycle, accelerating/decelerating speed, low speed and high speed value. Parameters: card_NO_ the card No. has been set by M_regist, valid is 0 ~ 19 DDA_cycle_ integer DDA cycle , valid is 1 ~ 254 Acc_Dec_ integer Acc/Dec speed , valid is 1 ~ 200 Low_Speed_ integer low speed , valid is 1 ~ 200 , Low_Speed_ >= Acc_Dec_ High_Speed_ integer high speed , Low_Speed_ <= High_Speed <= 2047 Return: Q_ integer boolean always return TRUE. Note: The lower “DDA_cycle_” is given, the smaller delay time between /ORG1 ON and /X_STOP ON (or /ORG2 ON and /Y_STOP ON) when using M_hsporg & M_lsporg command. For ex, DDA_cycle_ set to 4, the delay time is about 5 to 13 ms. High_Speed Acc_Dec Restriction: Acc_Dec Low_Speed 1 ≤ DDA _ cycle ≤ 254 1 ≤ Acc _ Dec ≤ 200 1 ≤ Low _ Speed ≤ 200 Low _ Speed ≤ High _ Speed ≤ 2047 Low_Speed >= Acc_Dec Default value DDA_cycle = 10 Acc_Dec = 1 Low_Speed = 10 High_Speed = 100 Example: I-8417/8817/8437/8837: demo_46, demo_27, demo_28 W-8xx7: wdemo_26, wdemo_27, wdemo_28, wdemo_29 TMP := M_s_var(1, 5, 2, 10, 150); (* DDA_cycle = 5 --> DDA period = (5+1)*1.024ms = 6.144ms Acc_Dec = 2 --> Acc/Dec speed = 2/(6.144ms)^2 = 52981 p/s^2 Low_Speed = 10 --> low speed = 10/6.144ms = 1628pps High_Speed = 150 --> high speed = 150/6.144ms = 24414pps *) User’s Manual Of ISaGRAF Embedded Controllers, Mar.2006, Rev. 5.0 , Copyright By ICP DAS 357 M_s_dir Define output direction of axes Sometimes, the output direction of X-axis, Y-axis is undesired direction due to the motor’s connection or gear train. In order to unify the output direction as shown in Fig.(5) and Fig.(6). Where CW/FW direction is defined as toward outside from motor, CCW/BW direction is defined as toward inside from motor. This command provide parameters to define the rotating direction of motor. Parameters: card_NO_ integer defdirX_ integer defdirY_ integer Return: Q_ boolean the card No. has been set by M_regist, valid is 0 ~ 19 X axis direction definition , valid is 0 ~ 1 Y axis direction definition , valid is 0 ~ 1 0: normal direction, 1: reverse direction always return TRUE. Example: I-8417/8817/8437/8837: demo_46, demo_27, demo_28 W-8xx7: wdemo_26, wdemo_27, wdemo_28, wdemo_29 M_s_mode Set output mode Parameters: card_NO_ integer modeX_ modeY_ Return: Q_ integer integer boolean Mode = 0 (CW_CCW) Mode = 1 (PULSE_DIR) the card No. has been set by M_regist, valid is 0 ~ 19 X axis mode, valid is 0 ~ 1 Y axis mode, valid is 0 ~ 1 0: CW_CCW, 1: PULSE_DIR always return TRUE. CW CCW Pulse Direction Example: I-8417/8817/8437/8837: demo_46, demo_27, demo_28 W-8xx7: wdemo_26, wdemo_27, wdemo_28, wdemo_29 User’s Manual Of ISaGRAF Embedded Controllers, Mar.2006, Rev. 5.0 , Copyright By ICP DAS 358 M_s_serv Set servo ON/OFF Parameters: card_NO_ integer sonX_ sonY_ Return: Q_ integer integer boolean the card No. has been set by M_regist, valid is 0 ~ 19 X axis servo/hold on switch , valid is 0 ~ 1 Y axis servo/hold on switch , valid is 0 ~ 1 0: OFF, 1: ON always return TRUE. Example: I-8417/8817/8437/8837: demo_46, demo_27, demo_28 W-8xx7: wdemo_26, wdemo_27, wdemo_28, wdemo_29 M_s_nc Set N.O. / N.C. To set all of the following limit switches as N.C.(normal close) or N.O.(normall open). If set as N.O., those limit switches are active low. If set as N.C., those limit switches are active high. The auto-protection will automatically change the judgement whatever it is N.O. or N.C.. Limit switches: ORG1, LS11, LS14, ORG2, LS21, LS24, EMG. Note: If using “I_8091A” rather than “I_8091” on the I/O connection window, user don’t need to call “m_regist” & “m_s_nc”, they are ignored. The card_NO of “I-8091A” is equal to its slot No. I-8xx7: 0 ~ 7. W-8xx7: 1 ~ 7. Parameters: card_NO_ integer sw_ integer the card No. has been set by M_regist, valid is 0 ~ 19 0: N.O. (default) , 1: N.C. Return: Q_ always return TRUE. boolean Example: I-8417/8817/8437/8837: demo_46, demo_27, demo_28 W-8xx7: wdemo_26, wdemo_27, wdemo_28, wdemo_29 User’s Manual Of ISaGRAF Embedded Controllers, Mar.2006, Rev. 5.0 , Copyright By ICP DAS 359 Stop commands: M_stpx Stop X axis Parameters: card_NO_ integer the card No. has been set by M_regist, valid is 0 ~ 19 Return: Q_ always return TRUE. boolean Example: I-8417/8817/8437/8837: demo_46, demo_27, demo_28 W-8xx7: wdemo_26, wdemo_27, wdemo_28, wdemo_29 M_stpy Stop Y axis Parameters: card_NO_ integer the card No. has been set by M_regist, valid is 0 ~ 19 Return: Q_ always return TRUE. boolean Example: I-8417/8817/8437/8837: demo_46, demo_27, demo_28 W-8xx7: wdemo_26, wdemo_27, wdemo_28, wdemo_29 M_stpall Stop X & Y axes This command will stop X & Y axes and clear all of commands pending in the FIFO. Parameters: card_NO_ integer the card No. has been set by M_regist, valid is 0 ~ 19 Return: Q_ always return TRUE. boolean Example: I-8417/8817/8437/8837: demo_46, demo_27, demo_28 W-8xx7: wdemo_26, wdemo_27, wdemo_28, wdemo_29 User’s Manual Of ISaGRAF Embedded Controllers, Mar.2006, Rev. 5.0 , Copyright By ICP DAS 360 Simple motion commands: M_lsporg Low speed move to ORG Low speed move , and stop when ORG1/ORG2 limit switch is touched. Parameters: card_NO_ integer DIR_ integer AXIS_ integer the card No. has been set by M_regist, valid is 0 ~ 19 0: CW , 1: CCW 1: X axis , 2: Y axis Return: Q_ always return TRUE. boolean ORG Low speed M_hsporg High speed move to ORG High speed move , and stop when ORG1/ORG2 limit switch is touched. Parameters: card_NO_ integer DIR_ integer AXIS_ integer the card No. has been set by M_regist, valid is 0 ~ 19 0: CW , 1: CCW 1: X axis , 2: Y axis Return: Q_ always return TRUE. boolean ORG high speed Example: I-8417/8817/8437/8837: demo_46, demo_27, demo_28 W-8xx7: wdemo_26, wdemo_27, wdemo_28, wdemo_29 Note: The lower “DDA_cycle_” is given, the smaller delay time between /ORG1 ON and /X_STOP ON (or /ORG2 ON and /Y_STOP ON) when using M_hsporg & M_lsporg command. For ex, DDA_cycle_ set to 4, the delay time is about 5 to 13 ms. User’s Manual Of ISaGRAF Embedded Controllers, Mar.2006, Rev. 5.0 , Copyright By ICP DAS 361 M_lsppmv Low speed pulse move Low speed move a specified “pulse” Parameters: card_NO_ integer AXIS_ integer Pulse_ integer Return: Q_ boolean the card No. has been set by M_regist, valid is 0 ~ 19 1: X axis , 2: Y axis number of pulse to move. if > 0, move toward CW/FW dir. if < 0, move toward CCW/BW dir. always return TRUE. #pulseN Example: I-8417/8817/8437/8837: demo_46, demo_27, demo_28 W-8xx7: wdemo_26, wdemo_27, wdemo_28, wdemo_29 M_hsppmv High speed pulse move High speed move a specified “pulse” Parameters: card_NO_ integer AXIS_ integer Pulse_ integer Return: Q_ the card No. has been set by M_regist, valid is 0 ~ 19 1: X axis , 2: Y axis number of pulse to move. if > 0, move toward CW/FW dir. if < 0, move toward CCW/BW dir. boolean always return TRUE. high speed #pulseN Example: I-8417/8817/8437/8837: demo_46, demo_27, demo_28 W-8xx7: wdemo_26, wdemo_27, wdemo_28, wdemo_29 User’s Manual Of ISaGRAF Embedded Controllers, Mar.2006, Rev. 5.0 , Copyright By ICP DAS 362 M_nsppmv Normal speed pulse move Normal speed move a specified “pulse” Parameters: card_NO_ integer AXIS_ Pulse_ integer integer SPEED_ integer the card No. has been set by M_regist, valid is 0 ~ 19 1: X axis , 2: Y axis number of pulse to move. if > 0, move toward CW/FW dir. if < 0, move toward CCW/BW dir. Speed, low speed <= SPEED_ <= high speed boolean always return TRUE. Return: Q_ Example: I-8417/8817/8437/8837: demo_46, demo_27, demo_28 W-8xx7: wdemo_26, wdemo_27, wdemo_28, wdemo_29 M_lspmv Low speed move Low speed move toward the direction specified. It can be stop by M_stpx or M_stpy or M_stpall command Parameters: card_NO_ integer DIR_ integer AXIS_ integer the card No. has been set by M_regist, valid is 0 ~ 19 direction. 0: CW , 1: CCW 1: X axis , 2: Y axis Return: Q_ always return TRUE. boolean Low speed Example: I-8417/8817/8437/8837: demo_46, demo_27, demo_28 W-8xx7: wdemo_26, wdemo_27, wdemo_28, wdemo_29 User’s Manual Of ISaGRAF Embedded Controllers, Mar.2006, Rev. 5.0 , Copyright By ICP DAS 363 M_hspmv High speed move High speed move toward the direction specified. It can be stop by M_stpx or M_stpy or M_stpall command Parameters: card_NO_ integer DIR_ integer AXIS_ integer the card No. has been set by M_regist, valid is 0 ~ 19 direction. 0: CW , 1: CCW 1: X axis , 2: Y axis Return: Q_ always return TRUE. boolean high speed Example: I-8417/8817/8437/8837: demo_46, demo_27, demo_28 W-8xx7: wdemo_26, wdemo_27, wdemo_28, wdemo_29 M_cspmv Change speed move This command will accelerate/decelerate the selected axis’s motor to the “move_speed”. This command can be continuously send to I-8091 to dynamicly change speed. The rotating motor can be stop by the command M_stpx, M_stpy, M_stpall, or M_slwstp Parameters: card_NO_ dir_ axis_ move_speed_ integer integer integer integer the card No. has been set by M_regist, valid is 0 ~ 19 direction. 0: CW , 1: CCW 1: X axis , 2: Y axis 0 < move_speed_ <= 2040 Return: Q_ boolean always return TRUE. Acc_Dec move speed Example: I-8417/8817/8437/8837: demo_46, demo_27, demo_28 W-8xx7: wdemo_26, wdemo_27, wdemo_28, wdemo_29 User’s Manual Of ISaGRAF Embedded Controllers, Mar.2006, Rev. 5.0 , Copyright By ICP DAS 364 M_slwdn Slow down to low speed To decelerate to slow speed until M_stpx or M_stpy or M_stpall is executed. Parameters: card_NO_ integer AXIS_ integer the card No. has been set by M_regist, valid is 0 ~ 19 1: X axis , 2: Y axis Return: Q_ always return TRUE. boolean SLOW_DOWN Example: I-8417/8817/8437/8837: demo_46, demo_27, demo_28 W-8xx7: wdemo_26, wdemo_27, wdemo_28, wdemo_29 M_slwstp Slow down to stop To decelerate to stop. Parameters: card_NO_ integer AXIS_ integer the card No. has been set by M_regist, valid is 0 ~ 19 1: X axis , 2: Y axis Return: Q_ always return TRUE. boolean SLOW_STOP Example: I-8417/8817/8437/8837: demo_46, demo_27, demo_28 W-8xx7: wdemo_26, wdemo_27, wdemo_28, wdemo_29 User’s Manual Of ISaGRAF Embedded Controllers, Mar.2006, Rev. 5.0 , Copyright By ICP DAS 365 Interpolation commands: M_intp Move a short distance on X-Y plane This command will move a short distance (interpolation short line) on X-Y plane. This command provided a method for user to generate an arbitrary curve on X-Y plane. Parameters: card_NO_ integer Xpulse_ integer Ypulse_ integer the card No. has been set by M_regist, valid is 0 ~ 19 -2047 <= Xpulse_ <= 2047 -2047 <= Ypulse_ <= 2047 Return: Q_ always return TRUE. boolean Y Y 10 (Xpulse,Ypulse) 9 3 2 X 8 4 5 6 7 1 X Example: I-8417/8817/8437/8837: demo_46, demo_27, demo_28 W-8xx7: wdemo_26, wdemo_27, wdemo_28, wdemo_29 NOTE: For a lot of M_intp call set at the same time, please check if the FIFO is not full. Call it if FIFO is not full. FIFO indicator is a Digital Input resides at CH3 of i-8091. i-8091 D/I channel on ISaGRAF I/O connection window: CH1 : EMG, emergency stop CH2 : /FFEF, FIFO is empty or not, TRUE: empty CH3 : /FFFF, FIFO is full or not, TRUE: full CH4 : LS11, Left limit swtch of X-axis CH5 : LS14, Right limit swtch of X-axis CH6 : ORG1, Original position swtch of X-axis CH7 : XSTOP, Stop or not of X-axis, TRUE: stop CH8 : LS21, Left limit swtch of Y-axis CH9 : LS24, Right limit swtch of Y-axis CH10 : ORG2, Original position swtch of Y-axis CH11 : YSTOP, Stop or not of Y-axis, TRUE: stop User’s Manual Of ISaGRAF Embedded Controllers, Mar.2006, Rev. 5.0 , Copyright By ICP DAS 366 M_intln Move a long distance on X-Y plane This command will move a long distance (interpolation line) on X-Y plane. The CPU on I-8091 card will generate a trapezoidal speed profile of X-axis and Y-axis, and execute interpolation by way of DDA chip. Parameters: card_NO_ integer Xpulse_ integer Ypulse_ integer the card No. has been set by M_regist, valid is 0 ~ 19 -524287 <= Xpulse_ <= 524287 -524287 <= Xpulse_ <= 524287 Return: Q_ always return TRUE. boolean Y (Xpulse,Ypulse) (0,0) X Example: I-8417/8817/8437/8837: demo_46, demo_27, demo_28 W-8xx7: wdemo_26, wdemo_27, wdemo_28, wdemo_29 User’s Manual Of ISaGRAF Embedded Controllers, Mar.2006, Rev. 5.0 , Copyright By ICP DAS 367 M_intln2 Move a long distance on X-Y plane This command will move a long interpolation line on X-Y plane. It will automatically generate a trapezoidal speed profile of X-axis and Y-axis by state-machine-type calculation method. Parameters: card_NO_ integer x_, y_ integer speed_ integer acc_mode_ integer Return: Q_ boolean the card No. has been set by M_regist, valid is 0 ~ 19 end point relate to present position 0 ~ 2040 0: enable acceleration/deceleration profile 1: disable acceleration/deceleration profile always return TRUE. Y (X,Y) (0,0) X NOTE: 1. Only one of M_intln2, M_intcl2 & M_intar2 command can be called at one time, the other motion moving commands related to the same I-8091 card should not be called unless it is completed. (Please use M_intstp to test command of M_intln2, M_intcl2 & M_intar2 completed or not). 2. One controller can only drive one I-8091 to move by M_intln2 , M_intcL2 , M_intar2 command. Two or more I-8091 cards in the same controller to use M_intln2 , M_intcL2 , M_intar2 at the same time is not possible. User’s Manual Of ISaGRAF Embedded Controllers, Mar.2006, Rev. 5.0 , Copyright By ICP DAS 368 M_intcl2 Move a circle on X-Y plane This command will generate an interpolation circle on X-Y plane. It will automatically generate a trapezoidal speed profile of X-axis and Y-axis by state-machine-type calculation method. Parameters: card_NO_ integer x_, y_ integer dir_ integer speed_ integer acc_mode_ integer Return: Q_ boolean the card No. has been set by M_regist, valid is 0 ~ 19 center point of circle relate to present position moving direction. 0: CW , 1: CCW 0 ~ 2040 0: enable acceleration/deceleration profile 1: disable acceleration/deceleration profile always return TRUE. Y (X,Y) CW X CCW where radius = sqrt(X^2 + Y^2) NOTE: 1. Only one of M_intln2, M_intcl2 & M_intar2 command can be called at one time, the other motion moving commands related to the same I-8091 card should not be called unless it is completed. (Please use M_intstp to test command of M_intln2, M_intcl2 & M_intar2 completed or not). 2. One controller can only drive one I-8091 to move by M_intln2 , M_intcL2 , M_intar2 command. Two or more I-8091 cards in the same controller to use M_intln2 , M_intcL2 , M_intar2 at the same time is not possible. User’s Manual Of ISaGRAF Embedded Controllers, Mar.2006, Rev. 5.0 , Copyright By ICP DAS 369 M_intar2 Move a arc on X-Y plane This command will generate an interpolation arc on X-Y plane. It will automatically generate a trapezoidal speed profile of X-axis and Y-axis by state-machine-type calculation method. Parameters: card_NO_ integer x_, y_ R_ integer integer dir_ integer speed_ integer acc_mode_ integer Return: Q_ boolean the card No. has been set by M_regist, valid is 0 ~ 19 end point of arc relate to present position radius of arc, if > 0, the arc < 180 degree, if < 0, the arc > 180 degree R_ must > ( square root of (X_*X_+Y_*Y_) ) / 2 moving direction. 0: CW , 1: CCW 0 ~ 2040 0: enable acceleration/deceleration profile 1: disable acceleration/deceleration profile always return TRUE. 'A' CW Y (X,Y) 'B' R R>0 R>0 R<0 R<0 dir CW CCW CW CCW path of curve 'B' 'C' 'A' 'D' 'C' CW CCW 'D' X CCW NOTE: 1. Only one of M_intln2, M_intcl2 & M_intar2 command can be called at one time, the other motion moving commands related to the same I-8091 card should not be called unless it is completed. (Please use M_intstp to test command of M_intln2, M_intcl2 & M_intar2 completed or not). 2. One controller can only drive one I-8091 to move by M_intln2 , M_intcL2 , M_intar2 command. Two or more I-8091 cards in the same controller to use M_intln2 , M_intcL2 , M_intar2 at the same time is not possible. User’s Manual Of ISaGRAF Embedded Controllers, Mar.2006, Rev. 5.0 , Copyright By ICP DAS 370 M_intstp Test X-Y plane moving command To test the below 3 commands completed or not. M_intln2 , M_intcL2 , M_intar2 It will return FALSE for interpolation command completed while return TRUE for busy - not completed yet. Return: Q_ boolean TRUE: busy , FALSE: completed NOTE: 1. Only one of M_intln2, M_intcl2 & M_intar2 command can be called at one time, the other motion moving commands related to the same I-8091 card should not be called unless it is completed. (Please use M_intstp to test command of M_intln2, M_intcl2 & M_intar2 completed or not). 2. One controller can only drive one I-8091 to move by M_intln2 , M_intcL2 , M_intar2 command. Two or more I-8091 cards in the same controller to use M_intln2 , M_intcL2 , M_intar2 at the same time is not possible. User’s Manual Of ISaGRAF Embedded Controllers, Mar.2006, Rev. 5.0 , Copyright By ICP DAS 371 I-8090 encorder commands: M_r_enco Reset I-8090’s encorder value to 0 Parameters: slot_ axis_ integer integer the slot No. where the i8090 is plugged, 0 ~ 7 1: x-axis, 2: y-axis, 3: z-axis Return: Q_ boolean always return TRUE. Example: demo_27, demo_28, demo_46 User’s Manual Of ISaGRAF Embedded Controllers, Mar.2006, Rev. 5.0 , Copyright By ICP DAS 372 Chapter 19: Ethernet Communication and Security 19.1: Ethernet Security There are some ways user can get access to the Wincon-8xx7 via its ethernet port. 1. Using Modbus TCP protocol at port No.= 502. (ISaGRAF and other HMI can do this) 2. Using ftp (for example, keyin “ftp://10.0.0.103” on the Internet Explorer) 3. Using telent (for example, keyin “telnet 10.0.0.103 in the “command” window) 4. Using the Web server (The Web HMI does) Note: 1. While for I-8xx7 & I-7188EG, only item 1 is possible. 2. If the controller is W-8x47/8x46, when using “ftp”, “telnet”, “Web HMI” & “Modbus TCP/IP”, please connect your PC/HMI to W-8x47/8x46’s “LAN1” port, and please use “NS-205” or “NS-208” Ethernet switch. For safety, recommand to disable item 2 and 3 at run time for Wincon. Check it to disable. And about item 4, please set proper username & password for the Wincon Web HMI. Setting user name & password here User’s Manual Of ISaGRAF Embedded Controllers, Mar.2006, Rev. 5.0 , Copyright By ICP DAS 373 About item 1, user may set up to 8 IP address for ISaGRAF or other HMI to get access to the I-8x37, I-7188EG & W-8xx7 via the Modbus TCP/IP protocol as below. On the IO connection window of ISaGRAF. Please connect “vip” and entering the IP which can get access to the controller via Modbus TCP/IP protocol. If “vip” is not connected, any remote IP can get access to your controller via Modbus TCP/IP protocol. If “vip” is connected and No IP is entered (all assigned as “N/A”), No HMI and ISaGRAF can get access to it anymore. User’s Manual Of ISaGRAF Embedded Controllers, Mar.2006, Rev. 5.0 , Copyright By ICP DAS 374 19.2: Delivering Message via UDP Note: When using this function in controller of W-8x47/8x46, you may choose connecting ethernet cable at “LAN1” or “LAN2” port. Please use “NS-205” or “NS-208” Ethernet switch for W-8x47/8x46. (refer to Appendix F to Enable LAN2) Wincon supports receiving and sending message via UDP protocol by Ethernet communication. While I-8x37 and I-7188EG supports only receiving message via UDP protocol. Please make sure your controller driver version. I-7188EG: driver 2.08 or later W-8xx7/8xx6 : driver ver. 3.24 or later I-8437/8337: driver 3.10 or later Note: 1. I-7188EG & I-8437/8837 support only “udp_ip” & “udp_recv” 2. Wincon-8xx6 and Wincon-8xx7 support all of “udp_ip” , “udp_recv” & “udp_send” UDP_IP: Please connect “udp_ip” in the ISaGRAF I/O connection window first before using “udp_recv” and “udp_send” functions. This_port: Port No. of UDP/IP used for receiving message from remote PC or controllers. It is better to use value larger than 1000. Default is 12001 This_ip: Not necessary for I-7188EG, I8x37 & W-8x37 since these controllers have only one Ethernet port (one IP) However, for Wincon-8x47, there is two Ethernet port (two IP) in the controller. Then you need to specify the correct IP of “LAN1” or “LAN2” port. Only necessary for sending message out. Please set IP as N/A if the controller only receiving message (no sending). Port1 to Port4: Port No. of UDP/IP of the remote PCs and controllers. Max. 4 connection to send message to remote PCs or controllers.. IP1 to IP4: IP address of the remote PC or controller. If the sending connection is not used, please set as N/A. User’s Manual Of ISaGRAF Embedded Controllers, Mar.2006, Rev. 5.0 , Copyright By ICP DAS 375 UDP_Recv: To receive message from remote PCs or controllers, please use “udp_recv” function. For example: (* test if message is coming from UDP *) (* Msg1 is declared as Message variable *) (* if return = '' (empty message), that means no message coming *) Msg1 := udp_recv( ) ; Note: The receiving buffer size for Wincon is 8192 bytes - include one extra message end: 1 byte in each message. While for I-7188EG & I-8437/8837 is 2048 bytes. If the receiving buffer is full, the oldest received message will be overwritten. UDP_Send: To send message to remote PCs or controllers, please use “udp_send” function. For example: (* TMP is declared as Internal / Boolean *) (* 1st parameter: To which connection - defined in IO connection "udp_ip", can be 1 to 4 *) (* 2nd parameter: the message to send out *) (* Return True:Ok, False: sending buffer is full or connection not defined well in “udp_ip” *) TMP := udp_send(1, ‘Alarm1’ ); Note: 1. The sending buffer size for Wincon is 2048 bytes - include extra message end: 1 byte. That means max. 2048 bytes in one PLC scan can be send to remote IP. 2. Please do not send lots of bytes in one PLC scan cycle too frequent. The controller driver will actually send only one message out each PLC scan when there is message in the sending buffer. For example, if there is 100 messages in the sending buffer, the controller will send over these 100 message in 100 PLC scan cycles. 3. I-7188EG & I-8437/8837 support only “udp_ip” & “udp_recv” Example: Please refer to Wincon CD-ROM:\napdos\isagraf\wincon\demo\wdemo_19 & Wdemo_20 or ftp://ftp.icpdas.com.tw/pub/cd/winconcd/napdos/isagraf/wincon/demo/ If you can not find “udp_ip” , “udp_recv” and “udp_send” in your ISaGRAF, please visit http://www.icpdas.com/products/PAC/i-8000/isagraf.htm to download “ICP DAS Utilities For ISaGRAF.zip”. For new driver please click “New Driver for I-8xx7, 7188EG/XG & W-8x37” Test Utility: there is a useful utility “udp.exe” can be used on PC to receive message coming from UDP IP. Please run it in command shell. W-8xx7 CD-ROM:\napdos\isagraf\some_utility\udp_test\udp.exe User’s Manual Of ISaGRAF Embedded Controllers, Mar.2006, Rev. 5.0 , Copyright By ICP DAS 376 19.3: Delivering Message via TCP/IP Wincon will support receiving and sending message via TCP/IP protocol by Ethernet communication. This topics will be available in the W-8xx7’s CD-ROM: \napdos\isagraf\wincon\english_manu\ “msg_tcp.pdf” or ftp.icpdas.com/pub/cd/winconcd/napdos/isagraf/wincon/english_manu/ “msg_tcp.pdf” User’s Manual Of ISaGRAF Embedded Controllers, Mar.2006, Rev. 5.0 , Copyright By ICP DAS 377 Chapter 20: Redundant Solutions 20.1: Wincon-8xx7 CPU Redundant Plus I-87K I/O Note: When using this function in controller of W-8x47/8x46, it is better to connect a cross ethernet cable between these two W-8x47/8x46’s “LAN2” port. Then you don’t need a Ethernet switch between them. (refer to Appendix F to Enable LAN2) W-8x47/8x37 supports Redundant CPU solution as below figure since driver version of 3.24. Redundant Master RS-485 Ethernet I-87K I/O Redundant Slave Operations principle: 1. Two Wincons can use its COM3:RS485 to connect to one group of RS-485 remote IOs. The IO can be the I-87K4/5/8/9 extension base plus many I-87K IO modules or the I-7000 series remote IO. (Please refer to Chapter 6 for description of remote I/O) 2. All outputs should be configured as RS-485 remote outputs, while inputs can locate at slot 1 through slot 7 (I-8K or I-87K IO modules) or configured as RS-485 remote inputs. 3. At least one I-7000 or I-87K Remote IO should be connected in COM3:RS485. 4. At run time, only the Redundant Msater controller handles the RS485 command of the remote I/O. The slave controller just standby. 5. When Master controller is dead, the slave controller will take over the control to remote IO. 6. If Master is alive again, it will take back the control of remote IO . 7. The synchronous data is exchanged via the ethernet cable between the Master & slave controller. If you are using Wincon-8x47 (Wincon that has two ethernet ports), it is better to use one cross cable to link from Master controller’s LAN2 port to Slave controller’s LAN2 port. 8. Redundant change over time <= 500ms , Data sychronization time <= 75ms. Example program: Wdemo_18 for both Master (IP=10.0.0.103) & Slave (IP=10.0.0.104) controller. The program in the Master and Slave controllers are identical (wdemo_18). Please DO NOT User’s Manual Of ISaGRAF Embedded Controllers, Mar.2006, Rev. 5.0 , Copyright By ICP DAS 378 re-compile this project if you just change the Link-Setup setting, or the project’s CRC value in Master and Slave may be different (Master & Slave ‘s project must be the same one) Please DO NOT re-compile this project if you just change the Link-Setup setting. If you re-compile the project, you need to re-download the same project to Master AND Slave. Please connect “rdn” in the IO connection window first as below. Please set the correct Master IP address and Slave IP address. For W-8x47, it is better to use IP address of the “LAN2” port. Please set “Remote_IO_type” to 1 if the remote IO is I-87K and I-7000 RS485 IO (At least one Remote IO should be connected in COM3:RS485 when type=1). (type 2 is reserved for future Modbus TCP/IP IO, not available before June.30,2006) Type 1 : I-87K and I-7000 RS485 I/O Type 2 : reserved for future usage. The boolean input channel return True if this controller take the control of remote IO. User’s Manual Of ISaGRAF Embedded Controllers, Mar.2006, Rev. 5.0 , Copyright By ICP DAS 379 The integer input channel in “M_or_S” indicate this controller is 1:Master or 2:Slave or 0:IP Error. In the project , please must place the I-87xxx function blocks and the I-7xxx function blocks on the top. The second program should be “RDN_Data” which call the RDN_xx functions at the first PLC scan cycle. All Remote IO function blocks should be placed on the top . The second program should be “RDN_Data” which call the RDN_xx functions at the first PLC scan cycle. All redundant synchronous data should be set in the first PLC scan cycle by using the following functions. RDN_B( Boolean_variable_name ) RDN_F( REAL_variable_name ) RDN_N( Integer_variable_name ) RDN_T( Timer_variable_name ) User’s Manual Of ISaGRAF Embedded Controllers, Mar.2006, Rev. 5.0 , Copyright By ICP DAS 380 For example, if RDN_init then (* RDN_init is decalred with a initial value of "True" *) RDN_init := False ; (* only do it once *) (* Please set Output channels of I-7000 & I-87K IO as synchronous data *) (* Not necessary for Input channels of I-7000 & I-87K IO ,they are automatically updated *) TMP := RDN_B(OUT_1) ; TMP := RDN_B(OUT_2) ; (* Boolean *) TMP := RDN_B(OUT_3) ; TMP := RDN_B(OUT_4) ; (* TMP & RND_init is declared as Boolean internal variable *) TMP := RDN_B(OUT_5) ; TMP := RDN_B(OUT_6) ; TMP := RDN_B(OUT_7) ; TMP := RDN_B(OUT_8) ; (* set other synchronous data by using rdn_b(bool), rdn_n(integer), rdn_f(real), rdn_t (timer) *) TMP := RDN_N(Mode) ; (* Integer *) TMP := RDN_F(Real1) ; (* Real *) TMP := RDN_T(Timer1) ; (* Timer *) end_if ; Please refer to “Wdemo_18” in W-8xx7 CD-ROM:\napdos\isagraf\wincon\demo\ or ftp://ftp.icpdas.com/pub/cd/winconcd/napdos/isagraf/wincon/demo/ “wdemo_18.pia” User’s Manual Of ISaGRAF Embedded Controllers, Mar.2006, Rev. 5.0 , Copyright By ICP DAS 381 20.2: Wincon-8xx7 CPU Redundant Plus I-87K I/O & Modbus RTU Devices Note: When using this function in controller of W-8x47/8x46, it is better to connect a cross ethernet cable between these two W-8x47/8x46’s “LAN2” port. Then you don’t need a Ethernet switch between them. (refer to Appendix F to Enable LAN2) The W-8x47/8x37 Redundant CPU solution can also support Modbus IO device as below. At least one I-7000 or I-87K Remote IO should be connected in COM3:RS485 Please place Mbus_xxx function blocks on the third position as below. Please refer to Chapter 8 for using Modbus RTU devices. Please place Mbus_xxx function blocks on the third position User’s Manual Of ISaGRAF Embedded Controllers, Mar.2006, Rev. 5.0 , Copyright By ICP DAS 382 And please connect “mbus” or “mbus_asc” in the IO connection windows. Specify which RS-485 port is for linking to Modbus RTU devices. COM5 to COM14 Note: 1. Redundant solution doesn’t support Modbus RTU device in RS-232 ports since RS-232 is one-to-one connection (Two Wincon can not link to one Modbus RTU device by RS-232) 2. The Modbus device can be RTU or ASCII format listed as section 8.3. 3. Multi-ports Modbus IO can also work in redundant solution. Please refer to section 8.4 Example: Please refer to “Wdemo_25” in W-8xx7 CD-ROM:\napdos\isagraf\wincon\demo\ or ftp://ftp.icpdas.com/pub/cd/winconcd/napdos/isagraf/wincon/demo/ “wdemo_25.pia” User’s Manual Of ISaGRAF Embedded Controllers, Mar.2006, Rev. 5.0 , Copyright By ICP DAS 383