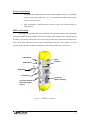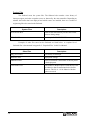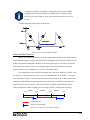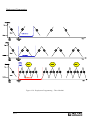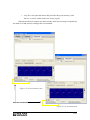
1
McLane Moored Profiler User Manual MMP Version 5.22 Appendix A Quick Reference to Sampling Parameters MMP Deployment Definition Parameters Quick Reference Mooring ID: Three position numeric identifier (001 to 999) sent with UIM metadata (stored with deployment data in the URAO). Differentiates data if more than one MMP is deployed. Countdown delay: The MMP wakes from ‘sleep’ when the countdown alarm reaches zero. If the transponder is installed, the countdown begins when the firmware pings the transponder and profile 0 begins when the countdown reaches zero (one to two minutes after confirming deployment). Range: 0 seconds to 24 hours in 1 second increments. OR Scheduled start: Scheduled start is an absolute date and time. Profile 0 begins when the RTC reaches the specified time. Range: Years 1970 to 2038 in 1 second increments and at least 10 minutes in the future as measured by the RTC. Profile start interval/Pair start interval: Interval between profiles or profile pairs measured between the start of profiling motion of sequential profiles or pairs of profiles. Continuous profiling results from a 0 setting. Range: 0 seconds to 366 days in 1 second increments. Reference date/time: Initial reference time for the deployment (start of Profile 1). Subsequent profiles reference this time. Range: Years 1970 to 2038 in 1 second increments. Burst interval: Interval between profile bursts or profile pairs. Continuous bursts are selected by setting the burst interval to 0. Range: 0 seconds to 366 days in 1 second increments. Profiles per burst/ Pairs per burst: The number of profiles or pairs of profiles in a burst. Setting this to 1 disables burst profiling. Range: 1 – 1000 profiles or pairs of profiles. Paired profiles: Enables or disables paired profiles. When paired profiles are enabled, the deployment is scheduled in up-down pairs. Range: Enabled/Disabled. Profiles/file set: Profiles stored on the flash card as a single data file. Example: ‘10’ places profiles 1 through 10 into a single data file on the flash card. (Unpacker produces 1 file per profile when the raw data is processed from the flash card). Appendix A-1 Appendix B Profile Exit Conditions The Profile Exit describes how each profile ends. Profile Exit is listed in the ENG file. Some exit condition thresholds are set in the firmware Advanced Interface menu. Profile Exit Conditions Condition Definition SMOOTH RUNNING Profile ended as programmed. OPERATOR [CTRL]-[C] Operator exit. LOGGER COM FAILURE Microcontroller error. CTD COMM FAILURE CTD Communications Error TIMER EXPIRED Time limit expired. MIN BATTERY Low battery voltage reached. MAX MOTOR CURRENT High Motor current was detected for the number of Backtrack iterations specified. TOP PRESSURE Programmed top (shallow) pressure was reached. BOTTOM PRESSURE Programmed bottom (deep) pressure was reached. PRESSURE RATE ZERO Pressure rate programmed detected for lower than threshold was the number of Backtrack iterations specified. STOP NULL Profile ended for an unknown reason. FLASH CARD FULL Disk capacity was reached. FILE SYSTEM FULL (For TT8 microcontrollers only) File capacity of 4095 was reached. B-1 Appendix C Unpacked Files The Profile Data Unpacker unpacks binary deployment data files to readable format. The list that follows provides information about files that the Profile Data Unpacker creates. For more information about the Profile Data Unpacker see Chapter 6 ‘Unpacking Deployment Data’ in this User Manual. File Contains Axxxxxxx.DAT ACM sensor files Cxxxxxxx.DAT CTD sensor files Nxxxxxxx.DAT SUNA nitrate sensor files Bxxxxxxx.DAT Biosuite sensor files Mxxxxxxx.DAT Motion Pack sensor files Sxxxxxxx.DAT Deployment Planner Schedule files (for Patterned Profiling) Exxxxxxx.DAT Engineering files contain date, mA, V and dbar data. Each sensor occupies a consistent order in the data file. For example, Fluorometer data first, followed by Turbidity data next, followed by Optode data. Oxxxxxxx.DAT CO2 sensor files Hxxxxxxx.DAT Methane sensor files Fxxxxxxx.DAT Fluoroprobe sensor files Profiles.DAT Unpacks to Profiles.TXT and contains the profile count, which is the number of the last profile of the deployment. LastSent.DAT Unpacks to Last Sent.TXT IRQ_XCPT.DAT Unpacks to IRQ_XCPT.LOG C-1 File Contains Deploy.TXT For the standard Profiler, this file contains deployment configuration, for the scheduled Profiler, this file also contains the deployment schedule. UnpackErrors.TXT Summarizes the total files that were unpacked and missing. UnpackLog.TXT. Provides a list of unpacked files and indicates file unpacking results. If a file does not unpack it will be missing from the list. A message at the bottom of the screen indicates total number of unpacked and missing files and whether or not errors existed (see Figure D-1). TimeTags.TXT Each line contains profile number, sensor power on date and time, motion start date and time, sensor turn off date and time, and profiler termination code defining how each profile ended (see Appendix C in this User Manual for more details about Profile Termination Codes). SNSRTIME.TXT Logs sensor power up and power down times. 2015 May C-2 Unpacking results Figure C-1: UnpackLog.TXT C-3 Notes C-4 Profile Exit Conditions Condition Definition TOO MANY OPEN FILES File system firmware not functioning properly. STATIONARY EXPIRED For Patterned indicates that Profiling a mode, stationary profile completed successfully. DOCK PROXIMITY For Adaptive and Patterned Profiling modes, indicates that docking with a charging station completed successfully. B-2 Shallow pressure: “Top” of the profiling range. The MMP stops profiling on an upward profile when the ambient pressure drops below this limit. Range: 0.0 dbar to Deep pressure. Deep pressure: “Bottom” of the profiling range. The MMP stops profiling on a downward profile when the ambient pressure exceeds this limit. Range: Shallow pressure to 6000.0 dbar. Shallow error: A relative pressure below (deeper than) the shallow pressure stop. If a zero pressure rate is detected while inside the shallow error window on an upward profile, profiling stops. This value is relative to the shallow pressure. Range: 0.0 dbar to 6000.0 dbar. Deep error: A relative pressure above (more shallow than) the deep pressure stop. If a zero pressure rate is detected while inside the deep error window on a downward profile, profiling stops. This value is relative to the deep pressure. Range: 0.0 dbar to 6000.0 dbar. Profile time limit: Maximum time for profiler motion. If the time limit expires while profiling, the MMP stops. Calculation: profile time limit = 1.25 × (deep pressure - shallow pressure) / nominal profiling speed. Range: 10 seconds to 8 hours in 1 second increments. Stop check interval: Frequency to check ambient pressure, pressure rate, elapsed time, battery voltage and motor current. Range: 1 second to 60 seconds in 1 second increments. Fluorometer: If the fluorometer is enabled, this option can be used to change the gain and the average number of samples to record. OBS Turbidity: If the turbidity is enabled, this option can be used to change the gain and the average number of samples to record. Power for a single profile: Single profile battery drain is one of the components of the battery endurance estimate. Total profiles/ (240 Ah): Total estimated profiles based on battery energy (the L24-1000 battery has 240Ah). Battery energy can be changed in the System Configuration menu). Est battery expiration: Estimated battery expiration. Estimate basis: battery energy, single profile drain, and total profile number (estimate adjusts as deployment parameters change). Appendix A-2 Verify and proceed: Selecting ‘V’ instructs the firmware to conduct parameter range and consistency checks and perform the endurance calculation but does not start the deployment. Appendix A-3 ©2015 McLane Research Laboratories, Inc., Rev. 15.G.08 Tel: +1 (508) 495-4000 Skype: mclane_research [email protected] www.mclanelabs.com MMP User Manual Table of Contents Chapter 1 MMP Introduction ...................................................................................... 1-1 User Key ...................................................................................................................... 1-1 MMP Components....................................................................................................... 1-1 Mechanical components .......................................................................................... 1-3 Electrical components.............................................................................................. 1-3 Sensors..................................................................................................................... 1-4 Profiling Modes ........................................................................................................... 1-5 Deployment Process .................................................................................................... 1-6 Starting a Deployment ............................................................................................. 1-6 Ending a Deployment .............................................................................................. 1-7 MMP Line Drawing................................................................................................. 1-7 Profiler Toolkit ............................................................................................................ 1-8 Customer Support Resources....................................................................................... 1-9 McLane and Firmware Information......................................................................... 1-9 Technical Support.................................................................................................... 1-9 MMP Training ......................................................................................................... 1-9 Chapter 2 Communicating with your McLane Instrument ...................................... 2-1 Cable and COM Connectors.................................................................................... 2-1 Motocross Terminal Emulator................................................................................. 2-2 Configuring Motocross................................................................................................ 2-3 Capturing instrument output to a text file................................................................ 2-5 Connecting COM Cable and Battery, Starting Firmware............................................ 2-7 Connecting COM Cable .......................................................................................... 2-7 Connecting Battery .................................................................................................. 2-7 Activating the Firmware .......................................................................................... 2-8 Troubleshooting Communication with your Instrument ............................................. 2-9 Troubleshooting: Confirm correct Port # defined ................................................... 2-9 Troubleshooting: Transmission Mode Toggle....................................................... 2-10 Troubleshooting: USB Adaptor............................................................................. 2-10 Chapter 3 MMP Firmware 5.x User Interface ........................................................... 3-1 Powering On the Profiler............................................................................................. 3-1 Powering Off the Profiler ............................................................................................ 3-3 Firmware Control Menus............................................................................................. 3-4 Prompts and Key Combinations .............................................................................. 3-4 Main Menu .................................................................................................................. 3-4 System Configuration Menu...................................................................................... 3-10 System Parameter Options..................................................................................... 3-11 Sensor Suite Options.............................................................................................. 3-11 Main Menu Detailed Option Descriptions................................................................. 3-12 Main Menu Set Time................................................................................................. 3-12 Main Menu Diagnostics............................................................................................. 3-13 TOC-1 Main Menu Flash Card Ops....................................................................................... 3-15 Option <1> Flash Card Size/Free .......................................................................... 3-15 Option <2> List Files............................................................................................. 3-16 Option <3> Show Profile Count ............................................................................ 3-17 Option <4> Delete All Files .................................................................................. 3-17 <5> Exchange Flash Cards .................................................................................... 3-18 <6> Format Flash Card......................................................................................... 3-18 <7> Command Interface ........................................................................................ 3-19 Sleep .......................................................................................................................... 3-20 Main Menu Bench Test ............................................................................................. 3-21 Bench Tests System Evaluation Options............................................................... 3-22 Option <7> Motor Operation................................................................................. 3-22 Option <8> Set Brake ............................................................................................ 3-23 Option <9> Independent Watchdog....................................................................... 3-24 Option <0> Estimated Endurance.......................................................................... 3-27 Option <D> Detailed Schedule (Patterned Profiling)............................................ 3-27 Option <S> Recover Schedule (Patterned Profiling)............................................. 3-27 System Sensor & Option Tests .............................................................................. 3-27 Main Menu Deploy Profiler ...................................................................................... 3-28 Main Menu Offload Deployment Data...................................................................... 3-32 Main Menu Contacting McLane....................................................................................32 Chapter 4 Mechanical Description............................................................................... 4-1 Frame ........................................................................................................................... 4-1 Front Plate.................................................................................................................... 4-1 Skin.............................................................................................................................. 4-2 Cable Retainers............................................................................................................ 4-3 Profiler Buoyancy........................................................................................................ 4-3 Removing the Glass Spheres ................................................................................... 4-4 Bottom End Cap .......................................................................................................... 4-5 Pressure Housings and Cables..................................................................................... 4-6 Controller Housing ...................................................................................................... 4-6 Pressure Relief Valve .............................................................................................. 4-8 Relieving Pressure in a Controller Housing Equipped with the PRV ..................... 4-9 Motor Housing and Drive Wheel .............................................................................. 4-10 Motor Movement ................................................................................................... 4-10 Mooring Wire ........................................................................................................ 4-11 Chapter 5 Electronics Description ............................................................................... 5-1 Rev D3/CF2 Electronics Controller Board.................................................................. 5-2 CF2 Microcontroller Board ..................................................................................... 5-5 System Files............................................................................................................. 5-6 MMPD3 Motherboard ............................................................................................. 5-8 MMPD3 Board Overlays......................................................................................... 5-9 MMPD3 Motherboard Peripheral Components..................................................... 5-10 MMP CF2 Interface Board .................................................................................... 5-12 MMP CF2 Interface Board Overlays..................................................................... 5-13 COM Cable Wiring ................................................................................................... 5-14 TOC-2 3 and 5-Pin COM Connector ................................................................................. 5-14 Suspend Mode ........................................................................................................... 5-16 Chapter 6 Operations .................................................................................................... 6-1 Section 6.1 Ballasting..................................................................................................... 6-1 Understanding the Ballast Sheet.................................................................................. 6-2 Detail of Calculations .............................................................................................. 6-4 Determining Air and Water Weights ....................................................................... 6-6 Section 6.2 Deployment Programming – Standard Mode ......................................... 6-8 Standard Profiling Deployment Programming ............................................................ 6-8 Start Parameters........................................................................................................... 6-9 Mooring ID ................................................................................................................ 6-10 Mooring ID <M> ................................................................................................... 6-10 Schedule and Stops Settings ...................................................................................... 6-10 Profile Start Interval/Pair Start Interval <I> .......................................................... 6-10 Reference Date/Time <R>..................................................................................... 6-11 Paired Profiles <P> ................................................................................................ 6-12 Profiles Per Burst/ Pairs Per Burst <N> ................................................................ 6-13 Burst Interval <B> ................................................................................................. 6-13 Deployment Programming..................................................................................... 6-14 Stops Parameters........................................................................................................ 6-15 Pressure Rate ......................................................................................................... 6-15 Ramming Action.................................................................................................... 6-16 Shallow and Deep Pressure Limits ........................................................................ 6-16 Shallow Pressure <S> ............................................................................................ 6-16 Deep Pressure <D> ................................................................................................ 6-17 Shallow Error <H> ................................................................................................ 6-17 Deep Error <E>...................................................................................................... 6-17 Profile Time Limit <T> ......................................................................................... 6-18 Stop Check Interval <K> ....................................................................................... 6-19 Enabled Sensors and Options .................................................................................... 6-20 Endurance Parameters ............................................................................................... 6-20 Single Profile Current ............................................................................................ 6-20 Total Profiles/(Ah)................................................................................................. 6-20 Est. Battery Expiration........................................................................................... 6-20 Deploy ....................................................................................................................... 6-21 <V> Verify and Proceed........................................................................................ 6-21 Parameter Range Check......................................................................................... 6-24 Schedule Check ..................................................................................................... 6-24 Committing to the Deployment ............................................................................. 6-27 Section 6.3 Patterned Profiling Deployment Programming .................................... 6-28 Patterned Profiling Deployment Programming ......................................................... 6-29 Patterns Tab ........................................................................................................... 6-31 Dive Zero/ Pattern Zero Relationship and Deployment Programming ................. 6-31 Profile Viewer........................................................................................................ 6-36 Quick Add Mode ................................................................................................... 6-37 TOC-3 Profile Editor ......................................................................................................... 6-38 Writing and Downloading the Deployment Schedule ........................................... 6-41 Changing User Preferences ....................................................................................... 6-45 Chapter 7 Deployment and Recovery .......................................................................... 7-1 Attaching to a Mooring................................................................................................ 7-1 Mooring Example .................................................................................................... 7-1 Launch Preparation .................................................................................................. 7-3 Post-Deployment Operations....................................................................................... 7-6 Deployment Termination......................................................................................... 7-6 Reviewing Deployment Data....................................................................................... 7-6 Recovery Procedure............................................................................................... 7-15 Unpacking Deployment Data .................................................................................... 7-17 Removing the Flash Card .......................................................................................... 7-17 Using the Profile Data Unpacker............................................................................... 7-19 Unpacked Files ...................................................................................................... 7-21 Profile Exit Conditions Defined ............................................................................ 7-22 Chapter 8 Maintenance and Storage ........................................................................... 8-1 Cleaning and Inspection Procedures............................................................................ 8-1 O-Rings.................................................................................................................... 8-1 Bulkhead and Cable Connectors.............................................................................. 8-2 Connector Alignment............................................................................................... 8-3 Nylon and Stainless Steel Hardware........................................................................ 8-3 Glass Spheres............................................................................................................... 8-4 Battery Maintenance.................................................................................................... 8-4 Lithium Battery Pack............................................................................................... 8-4 Sensor Maintenance..................................................................................................... 8-5 Packing and Storage .................................................................................................... 8-5 Packing the FSI ACM Sting in the Crate................................................................. 8-6 Stabilizing the Motor in the Crate ........................................................................... 8-7 Storing the Battery................................................................................................... 8-7 Appendix A MMP Deployment Definition Parameters Quick Reference............... A-1 Appendix B Profile Exit Conditions............................................................................ B-1 Appendix C Unpacked Files ........................................................................................ C-1 TOC-4 MMP User Manual List of Figures Figure 1-1: MMP Line Drawing.................................................................................. 1-7 Figure 1-2: Toolkit....................................................................................................... 1-8 Figure 1-3: McLane Contact Information ................................................................... 1-9 Figure 2-1: Cable Connector Styles............................................................................. 2-1 Figure 2-2: Computer COM Setup Styles ................................................................... 2-2 Figure 2-3: Change Default Settings for Sending Control Characters ........................ 2-3 Figure 2-4: Ctrl+C/Ctrl+V Transmits Control Characters .......................................... 2-4 Figure 2-5: Communication Settings Configuration ................................................... 2-4 Figure 2-6: Start and Stop Capture File....................................................................... 2-5 Figure 2-7: Overwrite or Append Capture File ........................................................... 2-6 Figure 2-8: Include Buffer Text?................................................................................. 2-6 Figure 2-9: Connecting the Battery ............................................................................ 2-7 Figure 2-10: Configured for Character Transmission Mode ..................................... 2-10 Figure 2-11: Configured for Windows Editing Mode – Do Not Use........................ 2-10 Figure 3-1: Profiler System Initialization Sequence.................................................... 3-1 Figure 3-2: Profiler Main Menu .................................................................................. 3-4 Figure 3-3: Profiler Advanced Interface Menu ........................................................... 3-5 Figure 3-4: Motor Speed.............................................................................................. 3-6 Figure 3-5: Pressure Rate Threshold ........................................................................... 3-6 Figure 3-6: Pressure Rate Time Threshold.................................................................. 3-7 Figure 3-7: Sensor Warm Up Interval ......................................................................... 3-7 Figure 3-8: Sensor Warm Down Interval .................................................................... 3-7 Figure 3-9: Display verbose messages ........................................................................ 3-8 Figure 3-10: History reset............................................................................................ 3-8 Figure 3-11: Profiling mode ........................................................................................ 3-8 Figure 3-12: Adjust profile counter ............................................................................. 3-9 Figure 3-13: Capture file enabled/disabled ................................................................. 3-9 Figure 3-14: Profiler System Configuration Menu.................................................... 3-10 Figure 3-15: Profiler Main Menu .............................................................................. 3-12 Figure 3-16: Set Time................................................................................................ 3-12 Figure 3-17: Diagnostics ........................................................................................... 3-13 Figure 3-18: Low Battery Voltage............................................................................. 3-14 Figure 3-19: Replace Battery..................................................................................... 3-14 Figure 3-20: Option <3> Flash Card Operations...................................................... 3-15 Figure 3-21: Flash Card Operations <1> Flash card size/file.................................... 3-15 Figure 3-22: Flash Card Operations <2> List files.................................................... 3-16 Figure 3-23: Flash Card Operations <3> Show profile count ................................... 3-17 Figure 3-24: Flash Card Operations <4> Delete all files .......................................... 3-17 Figure 3-25: Flash Card Operations <6> Format flash card...................................... 3-18 Figure 3-26: Flash Card Operations <7> Command Interface.................................. 3-19 Figure 3-27: Suspend Mode ...................................................................................... 3-20 Figure 3-28: Bench Tests........................................................................................... 3-21 Figure 3-29: Bench Tests <7> Motor Operation ....................................................... 3-22 LOF-1 Figure 3-30: Bench Tests <8> Brake Set .................................................................. 3-23 Figure 3-31: Bench Tests <8> Brake Released ......................................................... 3-23 Figure 3-32: Bench Tests <9> Independent Watchdog Tests ................................... 3-24 Figure 3-33: Option <1> Test Watchdog IRQ .......................................................... 3-24 Figure 3-34: Option <2> Test Watchdog Reset While Awake ................................. 3-25 Figure 3-35: Option <2> Test Watchdog Reset While Suspended ........................... 1-26 Figure 3-36:Option <6> Deploy Profiler Deployment Initialization ....................... 1-28 Figure 3-37: Standard Mode Deployment Menu (firmware version 5.00)................ 1-30 Figure 3-38: Pattern Mode Deployment Menu (firmware version 5.12) .................. 1-31 Figure 3-39: McLane Contact Information ............................................................... 1-32 Figure 4-1: MMP Front Plate (Sample View) ............................................................. 4-1 Figure 4-2: Removing the Skin from the MMP Port Side........................................... 4-2 Figure 4-3: Cable Retainer and Guide Wheel ............................................................. 4-3 Figure 4-4: Glass Spheres............................................................................................ 4-4 Figure 4-5: Unscrewing the Nylon Cap Screw and Removing End Cap .................... 4-5 Figure 4-6: Gathering Excess Cable Length................................................................ 4-6 Figure 4-7: Prying End Cap From Pressure Cylinder.................................................. 4-6 Figure 4-8: MMP Controller Housing End Cap w/Orientation Notch ........................ 4-7 Figure 4-9: Controller End Cap, with PRV ................................................................. 4-9 Figure 4-10: Releasing PRV........................................................................................ 4-9 Figure 4-11: Drive Wheel with Magnet .................................................................... 4-10 Figure 5-13: Rev D3, CF2 Profiler Electronics Stack ................................................. 5-3 Figure 5-14: Optional MotionPack Electronics........................................................... 5-4 Figure 5-16: CF2 Microcontroller Board .................................................................... 5-5 Figure 5-17: Profiler System Configuration Menu...................................................... 5-7 Figure 5-18: D3 Motherboard...................................................................................... 5-8 Figure 5-19: D3 Motherboard Overlay - Top.............................................................. 5-9 Figure 5-20: D3 Motherboard Overlay - Bottom ........................................................ 5-9 Figure 5-21: CF2 Interface Board ............................................................................. 5-12 Figure 5-22: CF2 Interface Board Overlay - Top...................................................... 5-13 Figure 5-23: CF2 Interface Board Overlay - Bottom ................................................ 5-13 Figure 5-24: COM Connector Diagram (5-Pin) ........................................................ 5-14 Figure 5-25: COM Connector Diagram (3-Pin) ........................................................ 5-15 Figure 5-26: 5-Pin and 3-Pin connectors................................................................... 5-15 Figure 5-27: ‘Suspend’ Mode Saves Power .............................................................. 5-16 Figure 6.1-1: Water Weight Changes Over Five Hours .............................................. 6-7 Figure 6.2-1: Deployment Menu Standard Profiling................................................... 6-8 Figure 6.2-2: <2> Start Parameters ............................................................................. 6-9 Figure 6.2-3: <I> Profile Start Interval...................................................................... 6-10 Figure 6.2-4: Single Profiles Example ...................................................................... 6-11 Figure 6.2-5: Reference Date/Time Example............................................................ 6-11 Figure 6.2-6: Paired Profile Example ........................................................................ 6-12 Figure 6.2-7: Burst Example ..................................................................................... 6-13 Figure 6.2-8: Deployment Programming – Three Methods ...................................... 6-14 Figure 6.2-9: Sample Deployment (Standard Profiling) screen 1 of 2..................... 6-22 Figure 6.2-10: Sample Deployment (Standard Profiling) screen 2 of 2................... 6-23 LOF-2 Figure 6.3-1: Deployment Menu Pattern Profiling.................................................... 6-28 Figure 6.3-2: Deployment Planner Project Tab......................................................... 6-29 Figure 6.3-3: Patterns Tab ......................................................................................... 6-31 Figure 6.3-4: Less than 30 Days Between Dive 0 and Pattern 0 ............................... 6-32 Figure 6.3-5: More than 30 Days Between Dive 0 and Pattern 0.............................. 6-33 Figure 6.3-6: Less than One Week Between Dive 0 and Pattern 0 ........................... 6-34 Figure 6.3-7: Pattern 0 is in the Year Following Dive Zero...................................... 6-35 Figure 6.3-8: Profile Viewer...................................................................................... 6-36 Figure 6.3-9: Quick Add Mode ................................................................................. 6-37 Figure 6.3-10: Profile Editor ..................................................................................... 6-38 Figure 6.3-11: Profile Editor - Edit Pattern Mode..................................................... 6-39 Figure 6.3-12: Deployment Planner Deployment Tab .............................................. 6-40 Figure 6.3-13: Write SCHEDULE.DPL.................................................................... 6-41 Figure 6.3-14: Rename PIN....................................................................................... 6-42 Figure 6.3-15: PIN Display on Deployment Menu ................................................... 6-42 Figure 6.3-16: Status Window Information............................................................... 6-44 Figure 6.3-17: Download Results Dialog Box .......................................................... 6-44 Figure 6.3-18: Download Succeeded......................................................................... 6-45 Figure 6.3-19: Download Failed................................................................................ 6-45 Figure 6.3-20: Reset User Preferences ...................................................................... 6-46 Figure 6.3-21: Change Battery Endurance Calc........................................................ 6-46 Figure 6.3-22: Deployment Menu Pattern Profiling Mode ....................................... 6-47 Figure 6.3-23: Sample Deployment –Patterned Profiling (1 of 2) ............................ 6-48 Figure 6.3-24: Sample Deployment –Patterned Profiling (2 of 2) ............................ 6-49 Figure 7-1: MMP Mooring Schematic ........................................................................ 7-2 Figure 7-2: Connecting the Battery ............................................................................. 7-3 Figure 7-3: Removing the Cable Retainers ................................................................. 7-4 Figure 7-4: Offload Files from FLASH Menu ............................................................ 7-7 Figure 7-5: Option <L> Offload Logging Files Menu ................................................ 7-8 Figure 7-6: Log Files Option <1> Profiles.dat ............................................................ 7-9 Figure 7-7: Log Files Option <2> Deploy.Dat (screen 1 of 2).................................. 7-10 Figure 7-8: Log Files Option <2> Deploy.Dat (screen 2 of 2).................................. 7-11 Figure 7-9: Log Files Option <3> IRQ/Xcpt Log ..................................................... 7-12 Figure 7-10:Log Files Option <4> Profile Termination Log .................................... 7-13 Figure 7-11: Log Files Option <5> Last Sent ........................................................... 7-14 Figure 7-12: Log Files Option <6> Deployment Termination Condition................. 7-14 Figure 7-13: Recovering an MMP ............................................................................ 7-16 Figure 7-14: Flash Card Removal ............................................................................. 7-18 Figure 7-15: Profiler Data Unpacker ......................................................................... 7-19 Figure 7-16: Data Unpacking Status ......................................................................... 7-20 Figure 7-17: Data Unpacking Complete.................................................................... 7-21 Figure 7-18: Unpacked Engineering File – Profile Exit Condition........................... 7-22 Figure 8-1: Connector Labels ...................................................................................... 8-3 Figure 8-2: Fitting the MMP in the Crate.................................................................... 8-6 Figure 8-3: Stabilizing the Motor in the Crate ............................................................ 8-7 Figure C-1: UnpackLog.TXT ......................................................................................C-3 LOF-3 LOF-4 Chapter 1 MMP Introduction This manual describes the operation and maintenance of the McLane Moored Profiler (MMP), an autonomous oceanographic instrument that collects time-series, in situ data including temperature, salinity, velocity. These and other sensor measurements are collected on a user programmed trajectory as the Profiler travels up and down a mooring cable. User Key This user manual contains the following symbols that call attention to information: Note This symbol indicates information and tips that are helpful for operating the instrument. Important This symbol indicates information that could affect key product operations. Warning This symbol indicates information that must be followed to prevent instrument damage or user injury. MMP Components The standard MMP is a subsurface instrument that runs from a 240Ah lithium battery. The Profiler travels along a fixed mooring cable at 25cm/sec (a 33cm/sec and 10cm/sec is optional) with a minimum 500lb of maintained cable tension. Sampling schedules and profile patterns can include the full depth of the water column down to 6,000 meters. Year long deployments are possible depending on profile frequency, depth, and power requirements of installed sensors. The MMP has many mechanical and firmware options: • Deployment Planner, a Windows program that provides a way to define reusable profiles and patterns. 1-1 • Unpacker, a Windows program that unpacks binary data files into readable format. • Integrated sensors are matched to the scientific needs of the project. • An extended battery provides a total 360Ah of power. • Inductive communications for near real-time data transfer (requires a customersupplied surface package). For best results, deploy the MMP at least 30-50m below the surface. Deployments at more shallow depths are possible but will affect Profiler performance. A minimum 500lbs (227kg) of mooring tension must also remain on the cable at all times for Profiler movement. Neutral buoyancy (achieved through careful ballasting) is also required for deployment. See Chapter 7 in this User Manual “Deployment and Recovery”, for more information about the Profiler mooring. 1-2 The MMP has Mechanical and Electrical components, and Sensors. These parts are summarized below and explained in more detail in separate Chapters of this User Manual. Mechanical components Mechanical components include the MMP covering (skins), controller housing, drive wheels, flotation spheres and sensors. Electrical components Electrical components include the microcontroller board, motherboard, flashcard, battery connection, and firmware. The controller contains the interface circuits that translate the signals and commands passing between the microcontroller, the peripheral components of the system, the system watchdog circuit and the independent power supply. The watchdog circuit is mounted on the motherboard to send periodic interrupt requests to the microcontroller, and a hardware counter, which can restart the microcontroller if acknowledgement is not received. Deployment instructions are created using the Deployment Planner or entered on a computer connected via RS/232 COM cable. The firmware controls system testing, deployment programming, and data recovery. Terminal emulation software (Motocross) captures deployment programming and bench test results. The MMP Unpacker application (for firmware versions 3.01 and higher) unpacks the binary deployment data files to ASCII text. 1-3 Sensors Sensors are either self-logging or non-self-logging. These modes are explained below. Sensors are also explained in detail in a separate User Manual, the “Profiler Integrated Sensors and Communications Interface User Manual”. Minimally, the Profiler must have a Conductivity, Temperature, Depth sensor (CTD) installed. Logging Mode Self-Logging Non-Self-Logging Where Data is recorded to sensor’s own internal memory. Data is recorded to the Profiler controller. When Data is recorded during the sensor warm-up and warm-down periods, and during the profile. Data is recorded only during the profile (not during sensor warm-up or warmdown periods). Rate Data is recorded at the native rate of the sensor. Data is recorded only at the Stop Check Interval rate. Stored Where Data is transferred to the Profiler at the end of each profile and stored by the Profilers as a separate file (Cxxxxxxx.DAT Axxxxxxx.DAT, and so on). Data is stored by the Profiler in the Engineering file (Exxxxxxx.DAT). The number of non-self-logging sensors installed on the Profiler can affect the sampling rate. Refer to the “Profiler Integrated Sensors and Communications Interface User Manual” for specific sensor sample rates. If the rate is adjustable, this parameter is set in the Configuration Menu. The Profiler polls the CTD at the Stop Check for depth to confirm the programmed pressure stops are reached. The minimum value for the Stop Check Period is 2 seconds, but this time can be longer depending on the sensor suite installed. The number and type of sensors the system must poll can increase the duration as much as 8 seconds. While a given sensor may have an internal rate of 1Hz, the Profiler will sample at a slower rate. 1-4 Profiling Modes The MMP has Standard, Patterned and Adaptive profiling modes. The Profiler is shipped with the mode already set in the Advanced Interface menu. A description of profiling modes and deployment suitability is provided below. Profiling Deployment Requirements Other Considerations For a deployment that only requires simple travel up and down the mooring wire, defined by upper and lower pressure limits, profile schedules, and operating parameters. All profiles have the same shallow and deep end points, and time between profiles is fixed throughout the deployment. Mode Standard Single profiles, paired profiles (up followed immediately by down) and burst profiles can be programmed. Programming is done in the Profiler firmware. Patterned For a deployment that requires a more flexible profiling plan. Shallow and deep pressure stops can be different per profile, intervals can be user defined, and profiling parameters can differ. Each individual profile can have different shallow and deep pressure stops. Intervals can be programmed to increase or decrease profiling frequency over the time of the deployment. When scientifically important conditions are expected (eg. seasonally), profiling can occur more frequently. Profiling can be programmed for less frequent data casts during less active conditions. Stationary profiles are also possible. Programming is done in the Deployment Planner Windows program and transferred to the Profiler firmware. Adaptive The deployment that does not require preprogrammed deployment parameters. Profiler movement is triggered instead by commands received via inductive modem through an external controller with real-time communications. The Profiler waits for commands from the external controller, reports the results, and waits for the next commands. There are no pre-programmed deployment parameters in this Profiling Mode. Adaptive profiling mode requires significant customer-supplied infrastructure on the mooring, extensive testing, and further integration. Contact [email protected] to discuss adaptive profiling deployments. 1-5 Deployment Process Starting a Deployment After the MMP is tested, ballasted and has a deployment schedule programmed, the following occurs: 1. The firmware places the microcontroller into Suspend mode for a user-specified interval, while the mooring is set and the Profiler deployed. 2. The microcontroller wakes from Suspend mode (based on an alarm signal set by the firmware), the time in the programmed schedule. 3. The system conducts Profile 0 to move the MMP to the bottom of the programmed range. Subsequent profiles are numbered 1, 2, 3, … and are conducted following the schedule (or pattern) programmed by the operator. 4. The sensors turn on and begin logging data two minutes before the scheduled start time of each profile. 5. Profiler motion starts at the scheduled start time. During the profile, certain sensors log data autonomously and the MMP records other engineering and status information. Some sensors are self-logging and other sensors transfer collected data to the Profiler via digital (RS232, RS485) or analog connectors. 6. The Profiler stops moving when the end of the programmed profiling range is detected. The sensors continue to log internally for two minutes. 7. The system stops the sensors and transfers sensor data to the flash card (a profile is complete when the sensor and engineering files have been closed). 8. The system enters Suspend mode again and waits for the next scheduled profile. The interval of sensor logging before motion start and after motion stop provides data for use during post-processing to correct for sensor drift. Other conditions, such as an obstacle blocking the mooring cable, can be detected during a profile and may trigger changes in profiling action. 9. The system continues to conduct profiles until the deployment is terminated. 1-6 Ending a Deployment 1. The system ends a deployment if the user sends multiple [CTRL]-[C] termination sequences, the battery falls below 7.5 V, or a termination condition such as motor current or pressure occurs. 2. After terminating a deployment the firmware places the microcontroller in Suspend mode. MMP Line Drawing The MMP Line Drawing shown next illustrates the mechanical design and construction of a standard MMP with an example CTD and an example ACM installed. Since installed options can differ, this example reflects only one of the many possible sensor options and configurations. Refer the Profiler Integrated Sensors and Communications Interface User Manual for more specific details about the mechanical integration of the sensors installed on your Profiler. Cable Guide Guide Wheel Glass Flotation ACM Sting Drive Motor CTD (with optional dissolved oxygen sensor) Controller / Battery Housing Figure 1-1: MMP Line Drawing 1-7 Profiler Toolkit Each new Profiler comes with a Toolkit that contains tools, software, and spare parts including: • Backup batteries (AAA). • Wrenches, screwdrivers, and hex drivers sized for the Profiler hardware. • Spare o-rings, nylon and stainless steel screws and bolts. • Communications cable for serial port connection to a computer. • Media with the Motocross software and firmware documentation. • USB to RS-232 connector. Figure 1-2: Toolkit The Profiler toolkit in Figure 1-2 is shown only as an example. Do not use the photo to compare with your actual toolkit contents. 1-8 Customer Support Resources McLane Research Laboratories is on the Web at http://www.mclanelabs.com or via email at [email protected]. The MMP pages http://www.mclanelabs.com/master_page/producttype/profilers/mclane-moored-profiler on the McLane website contain links to documentation including Technical Bulletins, and papers that describe the development and early use of the MMP. McLane and Firmware Information Option <8> from the Profiler Main Menu interface also displays McLane contact information and the firmware version. Selection [] ? 8 McLane Research Laboratories, USA Falmouth Technology Park 121 Bernard E. Saint Jean Drive East Falmouth, MA 02536-4444 USA Email: [email protected] Web: http://www.McLaneLabs.com Tel: 508-495-4000 Fax: 508-495-3333 Configuration: MPP_IM_CT Source file: CF2-5_01.c Electronics S/N: ML12345-67D Compiled: Jan 24 2013 12:17 Press any key to continue. Figure 1-3: McLane Contact Information Technical Support When contacting McLane for technical support, please provide the following: • Firmware version and MMP serial number. Serial number is printed on a silver label attached to the controller housing or on the Contact screen (Figure 1-3). • A description of the problem. • A text file created using the Motocross or Crosscut file capture utility. MMP Training McLane Research Laboratories also offers a 1-2 day MMP training course at our facility free of charge with the purchase of a new Profiler. Participants conduct trial deployments and work directly with members of the McLane engineering staff. Conducting trial deployments is a beneficial way to learn system operations before actual field investigations. For more information refer to http://www.mclanelabs.com. 1-9 Notes 1-10 Chapter 2 Communicating with your McLane Instrument The Profiler toolkit includes a COM cable for connecting the instrument to a host computer. You must also install the Motocross terminal emulation program (MotoCrossML.exe) on the computer. Once the COM cable is connected to the instrument and host computer, connecting the main instrument battery powers on the firmware. The following topics are part of instrument connection: • Cable and COM connectors • Configuring MotoCrossML.exe • Powering on the instrument (main battery connection) Cable and COM Connectors Locate the COM cable (in the instrument’s toolkit) that connects the instrument and a computer. Determine whether the computer has a built-in serial port. Built-in serial ports are preferred for connection with your instrument. However, a USB to RS-232 adaptor is included in the toolkit for connection to computers without built-in serial ports. The adaptor is a DS_US232R-10(R-100/500) adaptor cable (manufactured by FTDI Ltd). The COM bulkhead connector is a 5-pin MCBH style. Some instruments may have a 3pin XSG style bulkhead connector (Figure 2-1). Both style cables have a serial connector. The serial connector either plugs directly into the computer or into the USB to RS-232 adaptor and then into the computer (Figure 2-2). Figure 2-1: Cable Connector Styles 2-1 Figure 2-2: Computer COM Setup Styles Motocross Terminal Emulator Motocross is a terminal emulator for communicating with McLane instruments. McLane created a custom version of Motocross (MotoCrossML.exe), configured with the Motocross settings required by our instruments. Other Motocross considerations: • A built-in Motocross feature can log communications with your instrument to a capture file located on the connected host computer. McLane recommends using capture file logging when running any bench tests or setting up a deployment. McLane instruments require Motocross [CTRL]-C keystrokes to be configured as character transmissions for canceling operations, waking from Suspend mode, and navigating menus. The other Motocross Transmission mode, Standard Windows Editing mode, uses [CTRL]-C as a text copy function and is not recognized by McLane instrument operations. • MotoCrossML.exe is included on the media shipped with a new instrument and is available at www.mclanelabs.com under Support > Software Utilities. 2-2 Configuring Motocross 1. Install MotocrossML.exe (from the media included with your instrument) on a computer. 2. Open MotocrossML.exe. MotocrossML.exe is configured with the settings required by our instruments, however some setup is still needed. Running a Motocross executable other than the program provided by McLane (MotoCrossML.exe ) will not make the necessary configuration changes for using Motocross terminal emulation with McLane instruments. 3. Confirm that “Transmit Control Characters” (Figure 2-3) is enabled. From the top menu bar, select the Edit menu. Confirm Copy-Paste Options are set to transmit control characters (Figure 2-4), click OK. Figure 2-3: Change Default Settings for Sending Control Characters 2-3 Figure 2-4: Ctrl+C/Ctrl+V Transmits Control Characters 4. From the File menu, select “Communication Settings” (Figure 2-5). Set parameters as follows and click OK: • Port # (the connected port). • Baud Rate: 9600 baud • Parity: None • Data Bits: 8 • Flow Control: None Figure 2-5: Communication Settings Configuration 2-4 Capturing instrument output to a text file A built-in Motocross feature will log all communications to a capture file located on the connected host computer. This capture file is a very useful troubleshooting tool. McLane recommends setting up a capture file while running any bench tests or setting up a deployment. 1. Click the Transfer Menu. 2. Select “Capture Text”. 3. Enter a file name and location for the capture file. 4. Click “Start”. Figure 2-6: Start and Stop Capture File 2-5 5. Select whether to Append or Overwrite the file (Figure 2-7). Use caution when making this selection. Overwrite replaces any information in the log file. Append adds new information to the file. Figure 2-7: Overwrite or Append Capture File 6. Click “No” when prompted whether or not to include the Buffer text (Figure 2-8). Figure 2-8: Include Buffer Text? 7. To finish capturing to file, select “Capture Text” from the Transfer menu (Figure 2-6) and then click “Stop” in the Transfer menu. 2-6 Connecting COM Cable and Battery, Starting Firmware Connecting COM Cable 1. Place the Profiler in a dry area. 2. With Motocross running, remove the dummy plug from the COM connector on the controller housing end cap. 3. Connect the COM cable to the computer serial communication port (use the USB to RS232 Adaptor, if the computer does not have a built-in serial port). Make this connection before connecting to the COM connector on the controller end cap. 4. Connecting to the COM bulkhead connector on the controller end cap. Connecting Battery 1. Open the controller housing by unscrewing the six (6) bolts from the controller housing end cap (the cap that contains the connectors). The controller, computer, and batteries are mounted to this end cap. 2. Pull the end cap straight out from the cylinder. 3. Connect the main battery to the battery connector on the electronics stack (Figure 2-9). Figure 2-9: Connecting the Battery 2-7 There are two battery connectors (each on opposite sides of the motherboard). Either side can be used whether connecting two batteries for the Extended MMP or a single battery for the Standard MMP. 4. The system initialization will begin (see Chapter 3 “User Interface” for details on the system initialization and firmware menus). 5. Slide the end cap back into the cylinder and close the controller housing, ensuring that the o-rings are correctly seated to prevent water leakage. 6. Secure the end cap with the six (6) bolts and tighten with a hex driver (included in the Toolkit). Do not over-tighten the bolts. Always make and break the COM connection at the controller housing rather than the computer serial port to avoid crashing the controller. Activating the Firmware 1. After system initialization, press [CTRL]-[C] to control the firmware. If the Profiler firmware is in Suspend mode, pressing [CTRL]-[C] three times (with three second pauses between each press) is required to display the Main Menu. 2-8 Disconnect the main battery before shipping to prevent electrical system damage during transit. Before disconnecting power, press [CTRL]-[C] to return to the Main Menu and put the Profiler in Suspend mode. Troubleshooting Communication with your Instrument Troubleshooting: Confirm correct Port # defined If the instrument firmware does not respond when connected to Motocross, use these steps to troubleshoot: • Confirm the battery is connected to the instrument. • Verify the correct Port # is defined (Figure 2-5). • Ensure that character transmission mode is set (Figure 2-4). • Read below for information on the toggle that changes Transmission mode. 2-9 Troubleshooting: Transmission Mode Toggle It is possible to mistakenly switch between Control Character mode, and standard Windows Editing functions by holding down the [CTRL] key and pressing the Shift key. If Motocross does not respond as expected, press [CTRL]-Shift to toggle back to Character Transmission mode if needed. Figure 2-10: Configured for Character Transmission Mode Figure 2-11: Configured for Windows Editing Mode – Do Not Use Troubleshooting: USB Adaptor The USB adaptor has LED indicator lights for transmitting and receiving data. Typing any key in Motocross terminal emulation should be indicated by the LED. If no LED light flashes on keystrokes, you may have selected the incorrect COM Port. Refer to the section that follows for instructions on Motocross setup. 2-10 Chapter 3 MMP Firmware 5.x User Interface This chapter describes menu options and screens in MMP 5.x firmware versions. MMP 5.x firmware operates on the Rev D3 electronics board and the CF2 electronics board. Both standard and patterned profiling modes are available in a single firmware version with release 5.00 and higher. Powering On the Profiler Connecting the main lithium battery pack is the only way to power on the Profiler. When the battery is connected, the power-on sequence occurs as follows: D:PROFILER ________________________________________________________________ CF2-MPP-5.00 R9 L2.0 U304 5_00.c compiled Jan 3 2013 at 00:50 S/N ML12345-67D Pattern Profiler © 1999-2013 McLane Research Laboratories. All rights reserved. ________________________________________________________________ The "Pattern Profiler" MPP operator interface is now running. Type ^C within 30 seconds to assert control and initialize system. 28 seconds [^C] Clock reads 01/03/13 12:42:04. Change it [N] ? y Enter date as mm/dd/yy or mm/dd/yyyy, time as hh:mm:ss Enter correct time [01/03/2013 12:42:13] ? 01/03/2013 12:42:32 Clock reads 01/03/13 12:42:32. Change it [N] ? 01/03/13 01/03/13 01/03/13 01/03/13 12:42:35 12:42:35 12:42:36 12:42:36 SYSTEM SYSTEM SYSTEM SYSTEM Checking FlashCard ... done. 35 files found on disk. Capture is disabled. D:CAPTUR*.TXT size is ~0.00 MB of 8.1 MB max. 01/03/13 12:42:36 01/03/13 12:42:36 01/03/13 12:42:36 SYSTEM Reading D:ODOMETER.DAT ... done. SYSTEM History: 67.41 motor hours, 891 meters. SYSTEM Hardware: Rev-D. Motor OpAmp offset: 31mA. 01/03/13 12:42:37 01/03/13 12:42:37 01/03/13 12:42:37 SYSTEM Watchdog initialized. SYSTEM Watchdog alarm IRQ has been activated. SYSTEM Setting watchdog clock ... done. 01/03/13 01/03/13 01/03/13 01/03/13 01/03/13 01/03/13 01/03/13 01/03/13 01/03/13 01/03/13 01/03/13 01/03/13 SYSTEM SYSTEM SYSTEM SYSTEM SYSTEM SYSTEM SYSTEM SYSTEM SYSTEM SYSTEM SYSTEM SYSTEM 12:42:37 12:42:37 12:42:37 12:42:38 12:42:38 12:42:38 12:42:38 12:42:39 12:42:39 12:42:39 12:42:39 12:42:39 Loading URAO ... done. Initializing sensors ........................ done. Sizing CompactFlash ... done. CompactFlash: 0.6 MB used, 986.6 MB free, 987.2 MB size. Backup battery measures 3.2V. Main battery measures 12.0V. Loading schedule information ... Loading SCHEDULE.DPL. Scheduled dive zero time is 12/14/12 11:55:00. Filling in schedule years ... done. Loaded SCHEDULE.DPL. Generating SCHEDULE.TXT ... done. Figure 3-1: Profiler System Initialization Sequence 3-1 When the Profiler is powered on, using a file capture utility such as Motocross (www.Persistor.com) provides a complete record of deployment programming and is important during data analysis or troubleshooting. The section that follows describes each step in the initialization process. Profiler Initialization Sequence Step Process 1. Initialization • Initialization begins a 30 second countdown. • Typing [CTRL]-[C] gains control of the firmware. If the countdown is not interrupted, the Unattended Reset, Autonomous Operation (URAO) attempts to restart the deployment (for more details see “Watchdog Reset Test Example” in this chapter). 2. Setting the real time clock (RTC) • User sets the real time clock (RTC) by entering the date and time (MM:DD:YY:MM:SS) and pressing [Enter]. The watchdog clock (WDC) is automatically synchronized to the RTC. 3. Confirming the flash card 4. Displaying profiling history • Confirm compact flash is functioning. • Displays motor hours and estimated meters traveled (stored in EEPROM). 5. Activating the Watchdog circuit • Activates Watchdog circuit. A warning displays if a problem is detected. Typing ‘w’ or ‘W’ at the Main Menu manually triggers watchdog activation. 6. Loading deployment definition parameters • Loads deployment definition parameters from EEPROM. The deployment parameters are recorded in the EEPROM and on the flash card whenever a deployment begins. The stored parameters are also used by URAO to restart a deployment if unattended rest occurs. 7. Compact flash • Displays compact flash size and available storage. 8. Battery • Displays battery voltage. 9. Schedule • Loads deployment schedule, displays dive zero start and generates SCHEDULE.TXT (patterned profiling mode only). The power-on sequence does not repeat unless the firmware is re-booted. Perform a “cold” re-boot by disconnecting the power and then reconnecting after 5 to 10 seconds. The delay allows capacitors to fully discharge. Perform a “warm” re-boot, which will not reset the RTC, by exiting the firmware and then manually re-starting the program. 3-2 Powering Off the Profiler To power off the Profiler, complete the following steps: 1. Return to the Main Menu. 2. Select ‘Sleep’ from the menu. 3. Disconnect the main lithium battery pack. Never disconnect power to stop a deployment. Disconnecting power during deployment can corrupt open data files. 3-3 Firmware Control Menus Profiler Menus provide firmware settings for installed sensors and controls for the deployment. Three settings menus are: Main Menu, Advanced Interface Menu and System Configuration Menu. These menus are explained in the section that follows. Prompts and Key Combinations Within the firmware some prompts and key combinations are frequently used: • [CTRL]-[C] does the following: terminate the current operation and return to the Main Menu, terminate a deployment after Profiler recovery, wake from Suspend mode. • Pressing [ENTER] selects the default choice for many prompts. If a default is available, the value is displayed at the end of the prompt in square brackets. • Upper and lower case alphabetic characters display most prompts. • Prompts for numerical values accept only numbers that fall within the displayed range. • Prompts for alphanumeric input accept only characters from the displayed list. Main Menu The Main Menu automatically displays after firmware initialization. The enabled sensors, firmware version and compile date display at the top of each firmware screen. The profiling mode (patterned or standard) displays above the Profiler serial number and is also indicated in the header by MPP (patterned profiling) or MMP (standard profiling). The options on this menu are explained in more detail at the end of this chapter. Patterned Profiling Mode Sensors: CTD, Current Meter, Biosuite Scatter Detection ________________________________________________________________ Configuration: MPP_CT_CM_SC CF2 V5.00 of Jan 3 2013 McLane Research Laboratories, USA Pattern Profiler S/N: ML12345-67D ___________________________________ Main Menu ___________________________________ Thu Jan 3 12:42:42 2013 <1> Set Time <5> Bench Test <2> Diagnostics <6> Deploy Profiler <3> Flash Card Ops <7> Offload Deployment Data <4> Sleep <8> Contacting McLane <C> Configure Selection [] ? Figure 3-2: Profiler Main Menu 3-4 Advanced Interface Menu The Advanced Interface Menu options control profiling, sensor settings, and inductive communication functions. This menu requires a password. Type A from the Main menu or any firmware menu and then type the password adv. Selection [] ? a Advanced interface Password: *** ________________________________________________________________ Config: MPP_IM_CT CF2 V5.14 of Jun 2 2014 ___________________________________ Pattern Profiler Advanced Interface ___________________________________ Fri Jun 6 13:19:39 2014 <0> <1> <2> <3> <4> full Speed pressure Rate threshold pressure rate Time limit Sensor warmup Sensor warmdown <A> <B> <D> <F> <G> <H> <I> <J> <K> <L> <M> <N> <P> <S> <T> <U> <W> Annunciate comm traffic NO Backtrack iterations 3 Display verbose messages NO IMM use Force capture YES Get pressure during ramp NO History reset Infinite deployment ENABLED use Slower uart clock YES IM ACK/NAK reply timer 100 seconds IM Listening loop timer 40 seconds profiling Mode PATTERN adjust profile couNter -1 caPture file enabled NO IMM configure Surface NO Terminate profile in ramp NO Ramp duration 30 IMM send Wakeup tone YES <X> Save changes 0.250 dbar/sec 0.045 dbar/sec 60 seconds 120 seconds 120 seconds <^C> Cancel changes Selection [] ? x Figure 3-3: Profiler Advanced Interface Menu Menu commands with “IMM” refer specifically to the Seabird IMM (Inductive Modem Module) and are only available if the Seabird IMM is attached and enabled. Command descriptions with “IM” refer generically to all Profiler inductive modem hardware variations. 3-5 Advanced Interface settings include critical controls for Profiler, sensor and inductive communications performance. Only experienced users should change these settings. Contact McLane before making changes. Option <0> ‘FullSpeed’ defines which motor (standard or fast) is installed on the Profiler. This setting affects only calculations (not actual motor speed) such as deployment duration and battery life and should be changed only if a different speed motor is installed on the Profiler. Selection [] ? 0 dbar/sec speed of vehicle motor [2=.25, 3=.33] (2-3) [2] ? Figure 3-4: Motor Speed Option <1> ‘ PR Threshold’ is used as a deployment termination condition. This dBar/sec rate is used with the shallow/ deep pressure rate set in the deployment parameters and the PR TimeThreshold. The firmware ends the profile if speed of movement on the wire falls to this rate (plus or minus the shallow/deep pressure rates) for the duration specified in PR TimeThreshold, Selection [] ? 1 Pressure rate threshold [dbar/sec] (0.0 to 1.00) ? Figure 3-5: Pressure Rate Threshold 3-6 Option <2> ‘PR TimeThreshold’ is used as a deployment termination condition. This defines how long the Profiler travels at the PR Threshold dBar/sec rate before terminating the deployment. The firmware ends the profile if the speed of movement on the wire falls to the PR Threshold rate (plus or minus the shallow/deep rates set in the deployment parameters) for the duration specified here. Selection [] ? 2 Pressure rate time threshold [sec] (5-300) [180] ? Figure 3-6: Pressure Rate Time Threshold Option <3> ‘Sensor warmup’ changes the sensor warmup time from the default which is 120 seconds. Selection [] ? 3 Sensor warm-up interval [sec] (0 to 300) [120] ? Figure 3-7: Sensor Warm Up Interval Option <4> ‘Sensor warmdown’ changes the sensor warmdown time from the default which is 120 seconds. Selection [] ? 4 Sensor warm-down interval [sec] (0 to 300) [120] ? Figure 3-8: Sensor Warm Down Interval 3-7 Option <I> ‘Infinite deployment’, sets the Profiler to run until the battery drains, or another deployment termination condition such as operator [CTRL]-[C] is reached, or the deployment is completed as programmed. Release v5.13 and higher of Profiler firmware supports this option for both Standard and Pattern profiling modes. Infinite deployment is supported for Standard Profiling mode in Release versions below 5.13. Option <D> ‘Display verbose messages’ sets whether more detailed messages display during deployment. The default entry is ‘No’. Selection [] ? d Verbose display disabled Figure 3-9: Display verbose messages Option <H> ‘History reset’ reads the odometer and displays the reading. Typing ‘Y’ resets the odometer to zero. Selection [] ? h 01/04/13 11:08:45 SYSTEM Reading D:ODOMETER.DAT ... done. 01/04/13 11:08:45 SYSTEM History: 67.41 motor hours, 891 meters. Reset total Motor Hours [N] ? Reset total Meters Traveled [N] ? Figure 3-10: History reset Option <M> ‘Profiling mode’ sets the profiling mode to either patterned or standard. Selection [] ? m Switching modes forces a Profiler reboot. Are you sure [N] ? Figure 3-11: Profiling mode 3-8 Option <N> ‘adjust profile counter’ manually resets the profile counter to -1. The firmware automatically performs this reset at the start of a new deployment. Contact McLane before using this option. Selection [] ? n Adjust profiler counter (0-9999) [-1] ? Adjust profiler counter (0-9999) [-1] ? [^C] Figure 3-12: Adjust profile counter Option <P> ‘Capture file enabled’ writes a capture.txt file to the Profiler PicoDOS of all screens. Enabling this setting may be useful for bench testing, however this function takes some battery drain and affects processing speed. Selection [] ? p Capture file disabled Figure 3-13: Capture file enabled/disabled The Advanced Interface options <F>, <K>, <L>, <S>, and <W> control inductive communications settings. If using inductive communications, refer to the Profiler Integrated Sensors and Communications Interface User Manual for more information about these settings. 3-9 System Configuration Menu The System Configuration Menu specifies the active sensors and contains settings for those sensors where indicated. Sensor suites are grouped by the sensor connectors on the electronics with port headings that correspond to the actual connectors on the electronics board. See Chapter 3 ‘Electronics’ in this User Manual for more details. ________________________________________________________________ Config: MMP_CT_CM CF2 V5.15 of Jun 24 2014 ___________________________________ Standard Profiler System Configuration ___________________________________ Wed Jun 25 14:31:39 2014 System Parameters: <0> Battery capacity 240 Ah Sensor Suite: Port J9:CTD <1> Seabird 52MP CTD -------------- ENABLED Port J5:ACM <2> Nobska MAVS ACM --------------- ENABLED mavs41p1 Port J6:IMM <I> Telemetry <B> <N> <O> <U> <W> Port J4:SSP BioSuite Triplet/PAR Satlantic SUNA Nitrate Aanderaa Optode bbe FluoroProbe Wetlabs ECO BBFL2 Port J10:SPR <L> Wetlabs ECO FLBB(RT)/D <P> Biospherical PAR Port J7:TRB <T> Seapoint IR Turbidity Port J8:FLR <E> Seapoint CHL Fluorometer <F> Wetlabs CDOM Fluorometer Port J4i:SER <H> ProOceanus CH4 <M> OceanServer5000 MotionPack Port J5i:SER <K> ProOceanus CO2 Exit: <X> Save changes <^C> Cancel changes Figure 3-14: Profiler System Configuration Menu 3-10 System Parameter Options Option <0> ‘Battery capacity’ changes the battery energy number used to calculate estimated battery expiration. Estimated endurance displays on the Deployment Menu. The standard battery energy used in the calculation is 240 Ah. This entry can be changed to a number between 10 and 1000. The L24-1000 battery has 240 Ah of battery energy. Nominal endurance is used only to calculate an estimate based on other deployment factors and energy drain from installed sensors. Options <D> and <I> ‘File deletion’ and ‘Inductive telemetry’ enable inductive telemetry and changes the number of files (between 0 and 60) stored before deletion. More detailed information about Inductive Telemetry is explained in the Profiler Integrated Sensors and Communications Interface User Manual. Sensor Suite Options Each Sensor Suite option is explained with the applicable sensor in the Profiler Integrated Sensors and Communications Interface User Manual. 3-11 Main Menu Detailed Option Descriptions This section describes the Profiler Main Menu options in detail. ________________________________________________________________ Config: MMP_CT_CM CF2 V5.15 of Jun 24 2014 McLane Research Laboratories, USA Standard Profiler S/N: ML13248-02D ___________________________________ Standard Profiler Main Menu ___________________________________ Wed Jun 25 14:30:54 2014 <1> <2> <3> <4> Set Time Diagnostics Flash Card Ops Sleep <5> <6> <7> <8> Bench Test Deploy Profiler Offload Deployment Data Contacting McLane <C> Configure Selection [] ? Figure 3-15: Profiler Main Menu Main Menu Set Time Option <1> ‘Set Time’ sets the real time clock (RTC). The watchdog clock (WDC) automatically synchronizes to the RTC. A Colon (:), space, or slash (/) can be used as field separators. Selection [] ? 1 Enter date as mm/dd/yy or mm/dd/yyyy, time as hh:mm:ss Enter correct time [12/07/2012 13:31:39] ? Clock reads 12/07/12 13:31:39. Change it [N] ? 12/07/12 13:31:39 SYSTEM Setting watchdog clock ... done. Figure 3-16: Set Time 3-12 McLane recommends setting the RTC during the power-up sequence. At Profiler power-on, the clock setting is not current. Set the clock to any date and time in the allowed range and the count continues from the new value. Main Menu Diagnostics Option <2> ‘Diagnostics’ is a scrolling display of status information including the RTC, WDC, battery voltage and motor current (mA). A new battery generates approximately 11.6 V but drops to 10.8 V after some use and stabilizes for most of the usable battery life. A sample Diagnostics display is shown next. Typing ‘X’, ‘x’, or [CTRL]-[C] exits from Diagnostics and returns to the Main Menu. The display can be toggled on and off without leaving Diagnostics by pressing any key. Selection [] ? 2 Press ^C to exit, or any other key to pause|continue. RTC 13:17:39, WDC 13:17:39, 11.6Vb, 0mA RTC 13:17:40, WDC 13:17:40, 11.6Vb, 0mA RTC 13:17:41, WDC 13:17:41, 11.6Vb, 0mA RTC 13:17:42, WDC 13:17:42, 11.6Vb, 0mA RTC 13:17:43, WDC 13:17:43, 11.6Vb, 0mA [^C] Figure 3-17: Diagnostics 3-13 The battery voltage provides information about the battery. A new battery reads above 11 V. After the initial high readings, the battery voltage will remain near 10.8 V until ~90% of the available energy in the battery has been used. Replace the battery if the reading is below 10.0 V which indicates that at least 90% of the lithium battery capacity is used. A battery voltage below 7.5 V indicates a drained battery. The steady advance of both clocks indicates that they are working (a one second offset is typical). An accurate and advancing WDC also indicates proper functioning. Low battery output voltage triggers operator warning messages. If battery output of the lithium battery is below 10.0 V, a caution message displays during the exit from Diagnostics suggesting battery replacement before deployment. Battery voltage is abnormally low. Check/replace main battery pack before deploying system. Press any key to continue. Figure 3-18: Low Battery Voltage If the output of the lithium battery is below 7.5 V, a warning message and a single status line displays. Diagnostics automatically terminates and returns to the Main Menu. Main battery is extremely low and should be replaced before running diagnostics. RTC: 01/28/2006 16:35:46 WDC: 01/28/2006 16:35:46 Battery voltage is abnormally low. Check/replace main battery pack before deploying system. Press any key to continue. Figure 3-19: Replace Battery 3-14 6.8 Vb 0 mA Main Menu Flash Card Ops Option <3> Flash Card Ops accesses the files on the flash card through a DOS-like interface called PicoDOS. Use caution with the Flash Card Operations Menu. Files including the firmware can be deleted. ________________________________________________________________ Configuration: MPP_IM_CT_CM CF2 V5.00 of Jan 4 2013 ___________________________________ Pattern Profiler Flash Card Operations ___________________________________ Fri Jan <1> <2> <3> <4> <5> <6> <7> <M> 4 16:44:13 2013 Flash card size/free List files Show profile count Delete all files Exchange flash cards Format flash card Command interface Main Menu Selection [] ? Figure 3-20: Option <3> Flash Card Operations Option <1> Flash Card Size/Free Option <1> from the Flash Card Operations menu measures the total capacity and remaining free space on the flash card and calculates the number of files that can be stored. Selection [] ? 1 01/04/13 16:44:17 SYSTEM Sizing CompactFlash ... done. 01/04/13 16:44:17 size. SYSTEM CompactFlash: 1.2 MB used, 986.0 MB free, 987.2 MB Press any key to continue. Figure 3-21: Flash Card Operations <1> Flash card size/file 3-15 Option <2> List Files Option <2> from the Flash Card Operations menu lists the files on the flash card. These include AUTOEXEC.BAT, the batch file that calls the firmware when power is applied to the Profiler and SCHEDULE.DPL if patterned profiling is active. Additional files include the deployment definition parameters (DEPLOY.DAT), the current profile count (PROFILES.DAT), the interrupt request log (IRQ_XCPT.LOG), and the last profile number completely transmitted via inductive modem (LASTSENT.DAT). These binary files are processed by the on-board offload utility or the McLane Profile Data Unpacker program. Engineering, CTD, and ACM files and Deployment Planner .TXT files are also listed. Selection [] ? 2 Volume in drive C is PROFILER500 Volume Serial Number is 1C78-3422 Directory of C:\ SCHEDULE.DPL 10,852 01-02-13 11:20a AUTOEXEC.BAT 28 12-31-12 12:42p DEPLOY.DAT 304 12-31-12 12:42p PROFILES.DAT 4 12-31-12 12:43p IRQ_XCPT.LOG 6 12-31-12 12:42p LASTSENT.DAT 4 12-31-12 12:42p E0000000.DAT 216 12-31-12 12:45p C0000000.DAT 8 12-31-12 12:45p A0000000.DAT 131,084 01-04-13 4:39p PROFILEA.LOG 28 12-31-12 12:45p SCHEDULE.TXT 1,743 01-04-13 3:45p S0000000.DAT 10,852 01-02-13 11:20a A0000001.DAT 27,192 01-04-13 3:08p A0000002.DAT 54,372 01-04-13 3:14p A0000003.DAT 108,732 01-04-13 3:21p A0000004.DAT 216,732 01-04-13 3:29p A0000006.DAT 27,192 01-04-13 2:00p A0000007.DAT 54,372 01-04-13 2:06p A0000008.DAT 108,732 01-04-13 2:12p A0000009.DAT 24,492 01-04-13 2:18p A0000010.DAT 16,212 01-04-13 2:23p A0000011.DAT 27,192 01-04-13 2:29p A0000012.DAT 54,372 01-04-13 2:35p A0000013.DAT 108,732 01-04-13 2:42p A0000014.DAT 24,492 01-04-13 2:47p A0000016.DAT 21,972 01-02-13 2:50p A0000017.DAT 21,972 01-02-13 2:53p A0000018.DAT 21,972 01-02-13 2:55p A0000019.DAT 21,972 01-02-13 2:58p A0000020.DAT 21,972 01-02-13 3:00p A0000021.DAT 21,972 01-02-13 3:03p A0000022.DAT 21,972 01-02-13 3:06p 32 file(s) 1,161,749 bytes 0 dir(s) 1,033,867,264 bytes free Press any key to continue. Figure 3-22: Flash Card Operations <2> List files 3-16 Option <3> Show Profile Count Option <3> from the Flash Card Operations menu shows the profile count. Selection LOCATION CONTENTS 00000000 00 [] ? 3 Press any key to continue. Figure 3-23: Flash Card Operations <3> Show profile count Option <4> Delete All Files Option <4> from the Flash Card Operations menu deletes all files except for AUTOEXEC.BAT and SCHEDULE.DPL. Although deleting files is faster than formatting the flash card, formatting is recommended to ensure compatibility. Selection [] ? 4 This deletes all deployment files on the flash card except AUTOEXEC.BAT and SCHEDULE.DPL. The system control code will NOT be affected. Do you wish to continue [N] ? y 01/04/13 16:44:38 01/04/13 16:44:38 SYSTEM Saving AUTOEXEC.BAT ... done. SYSTEM Reading SCHEDULE.DPL ... done. 01/04/13 16:44:38 SYSTEM Erase C:\*.* ... All files in directory will be deleted! Are you sure (Y/N) ? Y 32 file(s) erased 01/04/13 16:44:44 01/04/13 16:44:44 SYSTEM Restoring SCHEDULE.DPL ... done. SYSTEM Restoring AUTOEXEC.BAT ... done. Press any key to continue. Figure 3-24: Flash Card Operations <4> Delete all files 3-17 <5> Exchange Flash Cards Use option <5> from the Flash Card Operations menu if there is a need to swap the flash card without disconnecting the battery. Alternatively, swap the flash card by disconnecting the battery, inserting a new flash card and reconnecting the battery to re-boot the system. <6> Format Flash Card Use option <6> from the Flash Card Operations menu to properly format the flash card. The operation saves a copy of AUTOEXEC.BAT and SCHEDULE.DPL, formats the flash card and then copies AUTOEXEC.BAT and SCHEDULE.DPL back to the flash card. This operation requires more time than deleting all files from the flash card. Selection [] ? 6 This utility ensures flash card compatibility. However, running format will delete all files except AUTOEXEC.BAT and SCHEDULE.DPL. The system control code will NOT be affected. Do you wish to continue [N] ? y 01/04/13 01/04/13 01/04/13 01/04/13 16:45:27 16:45:28 16:45:28 16:45:35 01/04/13 16:45:35 SYSTEM SYSTEM SYSTEM SYSTEM Saving AUTOEXEC.BAT ... done. Reading SCHEDULE.DPL ... done. Format C: /v:Profiler500 /q /p ... Restoring SCHEDULE.DPL ... done. SYSTEM Restoring AUTOEXEC.BAT ... done. Press any key to continue. Figure 3-25: Flash Card Operations <6> Format flash card 3-18 <7> Command Interface Option <7> from the Flash Card Operations menu accesses a command line. If an error is made while using these commands, data could be corrupted or deleted. As a precaution, backup the firmware and AUTOEXEC.BAT before using this option. Selection [] ? 7 CAUTION: Some of these commands can erase, halt, damage, or hide the system program. ? for command listing, ^C to exit. *** C:\>dir Volume in drive C is PROFILER500 Volume Serial Number is 1C78-04D7 Directory of C:\ SCHEDULE.DPL AUTOEXEC.BAT 10,852 28 2 file(s) 0 dir(s) *** C:\>? ========= APP BACKROM BOOT CCC CHKDSK DUMP DEL ERASE FORMAT LO MKDIR MM MR MON PBM PR PS PM TYPE RESET SAVE SET XR YR *** C:\> 01-04-13 01-04-13 4:45p 4:45p 10,880 bytes 1,035,091,968 bytes free PicoDOS built-in commands run flash app [args...] [d:][path] [/SAVPI] [PICO][PBM][APP] Card Change [delay secs] [d:][p][fn] [/F][/I] file[start[,end]] [drv:][pth][name] [/P] [drv:][pth][name] [/P] [drv:][/V[:label]][/Q/E] [ofs][;Bx[+]] [;G] [drive:][path] modify [address] Memory Read MR[.bwl] Reset to PBM Reset to PBM pin read <1..50> pin set <1..50> pin mirror <1..50> [drv:][pth][name] (hard reset) file[start][end] [var=[str]] [/SLFE?] [/X][/C][/Q][file] [/G][/Q] (plus .PXE and .BAT Files) ========= ATTRIB [+ - RASH] [d:][p][name] BAUD [newrate] [/Q/P/E/O/N/2] CAPTURE [d:][p]fn [/Dx/B/N/E] CHDIR [drive:][path] COPY source dest [/V] DATE [mdy[hms[a|p]]] /IEUMCP] DIR [d:][p][fn] [/PWBLV4A:a] FDISK [/Pnn/M/Sdev/@/F/Rnn/Q] GO args... | addr /A | /Fn MOUNT [V:][DEV[-n]][/D/P/N/V/Q] MD display [range] ML disassemble [range] MW Memory Write MW[.bwl] PATH [[d:]path[;...]] [/P] PROMPT [text] [/P] PC pin clear <1..50> PT pin toggle <1..50> TIME [hh:mm:ss [a|p]] [/M/C] REN [d:][p]oldname newname RMDIR [drive:][path] SD sect.dump[d:][range][/C] XS [/X][/C][/Q]file YS [/G][/Q]file[,file...] VER Firmware versions [/I] Figure 3-26: Flash Card Operations <7> Command Interface 3-19 Sleep Option <4> ‘Sleep’ places the electronics in Suspend mode to conserve battery power. The firmware enters Suspend mode whenever more than 20 minutes elapse without operator input. During Suspend mode, the firmware wakes every 20 minutes to check status, display the time, and returns to Suspend mode. To wake the firmware and return to the Main Menu press [CTRL]-[C] three times (with three second pauses between each keystroke). Selection [] ? 4 10/01/14 14:29:23 SYSTEM Suspended ... Figure 3-27: Suspend Mode 3-20 Main Menu Bench Test Bench Test selections display based on the mode of profiling (standard or patterned) that is active. Options are grouped into ‘Sensor Utilities’, ‘System Evaluation’ and ‘System Sensor & Option Tests’. Sensor Utilities that display are based on the active sensors. For detailed information about Sensor Utilities see the sections in the Profiler Integrated Sensors and Communications Interface User Manual. ________________________________________________________________ Configuration: MMP_IM_CT_CM_PA_SC CF2 V5_00 of Nov 27 2012 ___________________________________ Pattern Profiler Bench Tests ___________________________________ Wed Nov 28 14:49:11 2012 Sensor Utilities: <1> Seabird 52MP <2> Seabird 52MP <3> Seabird 52MP <4> Seabird 52MP CTD CTD CTD CTD communication pressure average pressure temperature record <5> Nortek AquaDopp DVS communication <6> Nortek AquaDopp DVS tilt & compass System Evaluation: <7> Motor operation <8> Set Brake <9> Independent Watchdog <0> Estimated endurance <D> Detailed schedule <S> Recover schedule System Sensor & Option Tests: <I> Seabird Inductive Modem <M> OceanServer5000 MotionPack <P> Biospherical PAR <W> Wetlabs ECO BBFL2 Exit: <X> Main Menu Selection ? X Figure 3-28: Bench Tests The options <D> ‘Detailed schedule’ and <S> ‘Recover schedule’ display only in Pattern Profiling mode. 3-21 Bench Tests System Evaluation Options System Evaluation from the Bench Tests menu checks the drive motor, brake, and watchdog circuit. Option <7> Motor Operation Option <7> from the Bench Tests menu tests the drive motor. The motor direction and duration of the velocity ramp can be controlled for visual verification that the motor is spinning in the proper direction during the test. A ramp duration of 30 seconds is recommended for a motor with load. A ramp duration of a few seconds is sufficient for an unloaded motor. A scrolling display of date and time, motor current, and battery voltage is provided once the motor reaches full speed. The motor is automatically disabled and the dynamic brake set once the motor is stopped. An example is shown next. Selection Selection [] ? 7 [] ? 7 Motor direction (Up/Down) [U] ? Enter ramp duration [sec] (2-60) [ 2] ? Press ^C to exit. 12/07/12 13:27:50 SYSTEM Starting ramp ..... done. Full speed reached. Setting run mode. Monitoring motor current and battery voltage. 12/07/12 12/07/12 12/07/12 12/07/12 12/07/12 12/07/12 12/07/12 13:27:53, 13:27:54, 13:27:55, 13:27:56, 13:27:57, 13:27:58, 13:27:59, 12.3Vb, 12.3Vb, 12.3Vb, 12.3Vb, 12.3Vb, 12.3Vb, 12.3Vb, 44mA 46mA 45mA 47mA 49mA 46mA 49mA 12/07/12 12/07/12 12/07/12 12/07/12 13:28:23, 13:28:24, 13:28:25, 13:28:26, 12.3Vb, 12.3Vb, 12.3Vb, 12.3Vb, 49mA 56mA 45mA 46mA [^C] . . . Motor disabled. Brake set. Press any key to continue. Figure 3-29: Bench Tests <7> Motor Operation 3-22 Motor currents of 35 to 40mA are typical for an unloaded motor. Currents of 120 to 130mA are expected during a profile where hydrodynamic drag becomes a factor. In the ocean, where horizontal forcing and ballasting contribute, motor currents of 140 to 250mA have been recorded. Option <8> Set Brake Option <8> from the Bench Tests menus toggles the motor between free-wheeling and brake set. The motor will spin freely if the brake is released and will resist external torques if the brake is set. The setting displays in the Main Menu at Set Brake or Release Brake depending on which setting is chosen. Selection [] ? 8 Set Brake [Y] ? y Figure 3-30: Bench Tests <8> Brake Set Select <8> and change Enable Free Wheel to ‘Yes’ to turn the brake off. Selection [] ? 8 Release Brake (FreeWheel) [Y] ? y Figure 3-31: Bench Tests <8> Brake Released 3-23 Option <9> Independent Watchdog Option <9> from the Bench Tests menus tests the watchdog circuit. The watchdog circuit sends periodic interrupt requests to the microcontroller, and a hardware counter, which can restart the microcontroller if the IRQ is not acknowledged. Three watchdog tests are available. Selection [] ? 9 ________________________________________________________________ Config: MPP_IM_CT CF2 V5.01 of Jan 24 2013 ___________________________________ Pattern Profiler Watchdog Tests ___________________________________ Tue Jan 29 04:35:38 2013 <1> Test Watchdog IRQ ( 2 seconds) <2> Test Watchdog reset while AWAKE (68+ minutes) <3> Test Watchdog reset while SUSPENDED (68+ minutes) <M> previous Menu Figure 3-32: Bench Tests <9> Independent Watchdog Tests Option <1> issues an interrupt request while the firmware is awake and confirms that the request was received. Selection [] ? 1 Initializing ... done. Waiting for IRQ (2 seconds) ... IRQ detected. Watchdog IRQ test completed normally. Figure 3-33: Option <1> Test Watchdog IRQ 3-24 Option <2> performs a Watchdog Reset, ignores the IRQ interrupt, resets the hardware counter to zero and remains awake and running. Without receiving the IRQ, the counter re-boots the microcontroller after 68 minutes (1 hour, 8 minutes). The test times out after 70 minutes if there is no reset and can be stopped manually at any time by typing [CTRL]-[C]. Selection [] ? 2 This test verifies operation of the watchdog reset while the system remains AWAKE. If successful, the system will reset, and operation will proceed as it does when system power is first applied. The reset will not occur until 68 minutes and 16 seconds (4096 seconds) have passed. If the reset hardware fails, the test will time out after 70 minutes. This test can be cancelled by pressing ^C. Proceed with test [Y] ? yy Current time is 01/29/13 04:35:50 Expect reset at 01/29/13 05:44:06 01:08:08 [^C] Watchdog reset test terminated by operator. Figure 3-34: Option <2> Test Watchdog Reset 3-25 Option <3> performs a Watchdog Reset while the firmware is suspended, ignores the IRQ interrupt, resets the hardware counter to zero and transitions to Suspend mode. Without receiving the IRQ, the counter re-boots the microcontroller after 68 minutes (1 hour, 8 minutes). The test times out after 70 minutes if there is no reset and can be stopped manually at any time by typing [CTRL]-[C]. Selection [] ? 3 This test verifies operation of the watchdog reset while the system remains SUSPENDED. If successful, the system will reset, and operation will proceed as it does when system power is first applied. The reset will not occur until 68 minutes and 16 seconds (4096 seconds) have passed. If the reset hardware fails, the test will time out after 70 minutes. This test can be cancelled by pressing ^C. Proceed with test [Y] ? yy Current time is 01/29/13 04:36:05 Expect reset at 01/29/13 05:44:21 01/29/13 04:36:06 SYSTEM Suspended until 01/29/13 05:46:05 ... . Enter ^C now to wake up ... [^C] Watchdog reset test terminated by operator. Figure 3-35: Option <2> Test Watchdog Reset While Suspended 3-26 Option <0> Estimated Endurance This option displays the battery capacity used to calculate endurance parameters in the Deployment options. The default battery capacity 240Ah can be changed here. The extended model MMP has an additional 120Ah battery. Option <D> Detailed Schedule (Patterned Profiling) This option displays the patterned profiling schedule that is stored in RAM. Option <D> displays only if Patterned Profiling is the mode. Option <S> Recover Schedule (Patterned Profiling) This option reads the patterned profiling schedule that is stored on the flash card and displays the details. Option <S> displays only if Patterned Profiling is the mode. System Sensor & Option Tests See each sensor specific section in the Profiler Integrated Sensors and Communications Interface User Manual. 3-27 Main Menu Deploy Profiler Option <6> provides the interface for programming a deployment. Deployment parameters are stored in EEPROM (and on the flash card in non-volatile storage) and loaded at firmware startup. The parameters also reside in RAM while the battery remains connected. If Patterned profiling is the mode, the deployment is programmed as part of a re-usable pattern schedule in the Deployment Planner Windows application. The firmware completes an initialization and displays settings that define the profiling behavior beginning with a prompt to change the RTC and select sensor verification mode. Selection [] ? 6 Clock reads 12/07/12 13:55:00. Change it [N] ? 12/07/12 13:55:02 SYSTEM Setting watchdog clock ... done. 12/07/12 13:55:03 SYSTEM Reading D:ODOMETER.DAT ... done. 12/07/12 13:55:03 SYSTEM History: 426.86 motor hours, 100224 meters. 12/07/12 13:55:03 SYSTEM Backup battery measures 3.3V. 12/07/12 13:55:03 SYSTEM Main battery measures 12.4V. Verification of sensor settings <A> Automated (standard settings only) <M> Manual (operator controlled) <S> Skip verification Selection [] ? a 12/07/12 12/07/12 12/07/12 12/07/12 12/07/12 12/07/12 12/07/12 12/07/12 12/07/12 12/07/12 12/07/12 12/07/12 12/07/12 12/07/12 12/07/12 12/07/12 12/07/12 12/07/12 . . . 13:55:05 13:55:05 13:55:06 13:55:06 13:55:06 13:55:07 13:55:08 13:55:09 13:55:09 13:55:10 13:55:10 13:55:11 13:55:11 13:55:12 13:55:12 13:55:17 13:55:18 13:55:18 SYSTEM SYSTEM SBE/52MP SBE/52MP SBE/52MP SBE/52MP SBE/52MP SBE/52MP SBE/52MP SBE/52MP SBE/52MP SBE/52MP SBE/52MP SBE/52MP SBE/52MP SBE/52MP SYSTEM SYSTEM Automated verification of sensor settings. Verifying CTD ... 9.6 kBaud communication channel opened. Powered on. Sending command [qs]. Sending command []. . . Sending command [ds]. ............... Identified as V2.4, S/N 106. Sending command [outputctdo=n]. . Sending command [outputctdoraw=n]. . Sending command [pcutoff= -100.0]. . Sending command [initprofile]. . Sending command [ds]. ............... Powered off. Power-down delay ..................... 9.6 kBaud communication channel closed. CTD settings verified. Verifying ACM ... 12/07/12 13:56:07 OST/5kMP Settings verified. 12/07/12 13:56:07 SYSTEM Sensor suite initialized and ready. Proceed with the deployment [Y] ? y Figure 3-36:Option <6> Deploy Profiler Deployment Initialization 3-28 During initialization the firmware does the following: Step 1 − Checks for successful firmware initialization. Step 2 − Prompts to set the RTC (real-time clock). Step 3 − Displays the profiling history for informational purposes. Step 4 − Verifies sensor settings (three modes: automatic, manual, or skip): Automatic sensor verification confirms that the standard settings are present in the sensor EEPROMs. If the verified sensor is not the configured sensor, the firmware changes the configuration to the verified sensor. If an alternate to the configured sensor is found, the firmware reconfigures the settings based on the detected sensor. If a configuration change is made, the firmware prompts the operator to re-run sensor verification. If no sensors are found or if the detected sensor matches the configuration, the system makes no configuration change. If a sensor problem is detected, a warning displays and the firmware terminates the deployment. Manual sensor verification establishes pass-through communications channels to the sensors, allowing direct communication with and changing of the sensor settings. Skipping sensor verification bypasses the process and displays the screen to proceed with the deployment. 3-29 The Deployment Menu displays when deployment initialization completes. Standard and Pattern profiling modes have different Deployment Menus. The menu for Standard profiling mode has settings including the type of deployment start, profile timing and limits that end a profile. See the ‘Programming a Deployment’ section in Chapter 5 of this User Manual for detailed descriptions of the options on this menu. Proceed with the deployment [Y] ? y ________________________________________________________________ Config: MMP_IM_CT_CM_PA_SC_MP Start: CF2 V5.00 of Jan 24 2013 ___________________________________ Standard Profiler Deployment Menu ___________________________________ Sat Feb 2 21:45:16 2013 <Z> Countdown delay <M> Mooring ID 00:02:30 [HH:MM:SS] 326 Schedule: <I> profile start Interval <R> Reference date/time <P> Paired profiles <N> profiles per burst <B> Burst interval 000 00:30:00 [DDD HH:MM:SS] 11/29/12 15:10:33 disabled disabled disabled Stops: <S> Shallow pressure <D> Deep pressure <H> sHallow error <E> dEep error <T> profile Time limit <K> stop checK interval 1.5 dbar 11.5 dbar 1.0 dbar 1.0 dbar 00:02:00 [HH:MM:SS] 10 seconds Enabled Sensors & Options: Seabird 52MP CTD -------------Nortek AquaDopp DVS ----------OceanServer5000 MotionPack ---Biospherical PAR -------------Wetlabs ECO BBFL2 ------------Seabird Inductive Modem ------- SBE/52MP AQUADOPP OST/5kMP BII/PAR @ 5 samp/avg WL/BBFL2 SBE/IMM @ 1200 baud Endurance Estimates: 12 mAh / profile 18914 total profiles / 240 Ah Battery expiration on 01/05/2014 Deploy: <V> Verify and Proceed <^C> Cancel deployment Figure 3-37: Standard Mode Deployment Menu (firmware version 5.00) 3-30 Proceed with the deployment [Y] ? _______________________________________________________________ Config: MPP_IM_CT_CM_PA_SC_MP CF2 V5.12 of Feb 11 2014 ___________________________________ Pattern Profiler Deployment Menu ___________________________________ Tue Mar 11 15:51:45 2014 Schedule V2.4 PID "New Proj6925CCC" 03/11/14 16:30:00 Dive Zero 03/11/14 17:00:00 Pattern 0 ID <M> Mooring ID = 001 Start <D> Dive 0 Scheduled Start = 03/11/14 16:30:00 Deploy <V> Verify and Proceed Selection [] ? v Accept and store schedule selections [Y] ? Figure 3-38: Pattern Mode Deployment Menu (firmware version 5.12) The Pattern profiling Deployment menu has fewer settings than the menu for Standard profiling. For example, only the scheduled start option is available when using Pattern profiling mode. Pattern profiling uses the Windows Deployment Planner application for building re-usable deployment schedules. Deployment parameters are defined as part of the patterns in a schedule so they are not necessary on the Deployment Menu. For more detailed information about deployment programming see Chapter 5 ‘Operations’ in this User Manual. As with deployment settings for Standard profiling, the Dive Zero time can be re-set for Patterned profiling in case a change occurs to the deployment plan. 3-31 Main Menu Offload Deployment Data Option <7> ‘Offload Deployment Data’ reads binary data from the flash card while the flash card is still in the Profiler. Use this option after Profiler recovery to connect the instrument to a computer, display the binary data that was collected and examine the profile count before removing the flash card from the Profiler. For detailed information about data offload options see Chapter 5 “Operations” in this User Manual. Main Menu Contacting McLane Option <8> Contacting McLane displays McLane contact information and includes the Profiler configuration, software version and serial number. Selection [] ? 8 McLane Research Laboratories, USA Falmouth Technology Park 121 Bernard E. Saint Jean Drive East Falmouth, MA 02536-4444 USA Email: [email protected] Web: http://www.McLaneLabs.com Tel: 508-495-4000 Fax: 508-495-3333 Configuration: MPP_IM_CT Source file: CF2-5_01.c Electronics S/N: ML12345-67D Compiled: Jan 24 2013 12:17 Press any key to continue. Figure 3-39: McLane Contact Information 3-32 Chapter 4 Mechanical Description Physical and mechanical MMP components include the frame, front plate, skin and controller housing. Some components vary based on installed options such as sensors. Sensorspecific components are described in the Profiler Integrated Sensors and Communications Interface User Manual. Frame The standard MMP frame (Figure 4-1) is made from white, ultra high molecular weight polyethylene (UHMW) and high density polyethylene (HDPE), designed for strength without a buoyancy penalty. The faired skin and end caps are shaped for low drag performance. The MMP skin is abrasion-resistant. However, use care during handling. The skin and frame can be damaged by dragging or drop speeds over two knots. Front Plate The front plate is the primary structural frame member. Oval ribs mounted on the inner side of the plate extend to the back of the Profiler. The structure is stiffened with four columns of frame spacer posts. Two braces maintain the right angle between the front plate and ribs. Upper Guide Wheel Motor Spring Lower Guide Wheel Upper Cable Retainer Lower Cable Retainer ACM Drive Motor CTD Figure 4-1: MMP Front Plate (Sample View) 4-1 Skin The faired skin and end caps are high-visibility yellow, medium density polyethylene. The shape of the MMP and attachment position on the mooring cable make the Profiler selfaligning. The leading edge of the skin is recessed in a groove machined in the edge of the front plate. Installing or removing the drive motor and sensors can require removing the skin or mounting brackets from the port side of the MMP. Sensor-specific mounting components are explained in the Profiler Integrated Sensors and Communications Interface User Manual. To access the interior of the MMP, remove the skin from the frame by loosening the screws and lifting the skin off the ribs. Figure 4-2: Removing the Skin from the MMP Port Side 4-2 Cable Retainers Cable retainers secure the MMP to the mooring cable. Each retainer is secured to the front plate with four socket head nylon cap screws. The retainers support the MMP weight during recovery when it is suspended in air and the free flooding skin is filled with water. The retainers are also designed to withstand the snap loads that can occur during launch and recovery. Figure 4-3: Cable Retainer and Guide Wheel Profiler Buoyancy The standard MMP has two glass spheres mounted in the frame which provide 20kg (44lbs) of buoyancy to balance the weight of the pressure housings and their contents. The MMP must be ballasted for neutral buoyancy for successful movement. See the, “Operations” chapter in this User Manual for more information about buoyancy and ballasting. After each deployment, inspect the glass spheres for signs of fatigue caused by repeated pressure cycling. Contact McLane (www.mclanelabs.com) for glass inspection guidelines. 4-3 Figure 4-4: Glass Spheres Removing the Glass Spheres The top faired end cap must be off to remove the upper glass sphere (once the end cap is released the sphere is free to move). Unscrew the flat-head nylon screws securing the edge of the end cap to the top rib. To remove the lower sphere, remove the port and starboard halves of the Profiler skin and disassemble the upper portion of the frame. Replace the spheres with the equator aligned to the ribs of the MMP. The original spheres can be reinstalled, however, installing new spheres requires re-ballasting to ensure a precise ballast calculation. McLane offers a reglass, re-ballast service. 4-4 Bottom End Cap Removing the bottom end cap provides access to the electronics housing, To remove the end cap, first lay the Profiler on its starboard side. Unscrew and remove the socket head nylon cap screw located in the opening from the seam where the skin halves meet (the screw is fingertight). Elevate the lower end of the MMP slightly when removing or replacing the end cap and place a support under a rib so that the load is not entirely on the skin. Figure 4-5: Unscrewing the Nylon Cap Screw and Removing End Cap With the cap screw removed, slide the assembly back and off its four 316 stainless steel mounting posts. (Reverse the procedure to reattach the end cap). The end cap has a short loop of rope to keep it attached to the frame. This rope can be used for a tending line during launch and recovery at sea. 4-5 Pressure Housings and Cables Pressure housing hardware is designed to resist corrosion. Replace this hardware as necessary (spare hardware is in the Toolkit). Once all cables are connected, excess cable length can be gathered in the open space above the bottom MMP rib. Figure 4-6: Gathering Excess Cable Length Controller Housing The controller housing contains the electronics and lithium battery. These components are mounted to the lower end cap as a single assembly. To access the assembly, unscrew the six stainless steel cap screws from the end cap and gently pry the end cap from the pressure cylinder. Figure 4-7: Prying End Cap From Pressure Cylinder 4-6 All connections between the controller and the other components of the system pass through the lower end cap. Cable for the serial communications port is provided in the Toolkit, and a dummy plug is in place for shipment. The end cap bulkhead connectors are labeled for the COMM port, Motor, Pressure Relief Value (PRV) and each installed sensor. Two clamps (the rear portions of the two lowermost ribs of the frame) secure the controller housing to the frame, held in place by two socket head nylon cap screws that are accessible only when the skins are removed. The housing has an orientation notch to ensure proper alignment of the controller housing. Orientation notch Figure 4-8: MMP Controller Housing End Cap w/Orientation Notch 4-7 Pressure Relief Valve Attention and care should be taken in maintaining, operating, and opening the pressure housing. Though unlikely, an unsafe internal controller housing pressure is possible, resulting from the chemical reaction between alkaline electrolyte and anodized aluminum due to battery failure with or without the intrusion of seawater. There can be enough pressure to cause the endcap bolts to fail, especially when one or more are loosened or removed. As with all pressure housings, special care should be taken with O-rings and associated surfaces. O-rings and surfaces should be cleaned with isopropyl alcohol. O-rings should be lubricated with provided Parker O-Lube and replaced when necessary. Spare O-rings are included in the toolkit, and more can be purchased from McLane. The sections that follow provide procedures for detecting and relieving pressure build-up in the controller housing, both with and without the PRV installed. Observe safety precautions including removing personnel and objects from the path of the end-cap when performing either of these procedures. 4-8 Relieving Pressure in a Controller Housing Equipped with the PRV The MMP controller housing includes a Pressure Relief valve. This valve will open automatically at a pressure differential greater than 10psi. As an additional measure, the valve should be manually released prior to opening the controller housing by following the steps below. PRV Figure 4-9: Controller End Cap, with PRV 1. Screw an 8-32 bolt into the threaded hole in the end of the pressure plug. 2. Slowly pull the valve out to equalize pressure. Figure 4-10: Releasing PRV 4-9 Motor Housing and Drive Wheel Motor Movement The motor is driven in clockwise and counterclockwise rotation for up and down profiling directions. During stationary profiles or between profiles, a dynamic brake is applied which supports several pounds of positive or negative buoyancy. In free wheel mode, the motor is not driven by the battery and offers no resistance (other than friction) to external torque. The motor is automatically in free wheel mode during launch to reduce slip related wear of the drive wheel. The motor is connected to and powered from the controller housing. The direct current (DC) brushed motor and gearbox operate in air within the titanium housing. The motor is magnetically coupled to the drive wheel. The magnetic coupling also serves as a clutch to prevent motor damage should the Profiler encounter an obstruction. The components of the drive wheel are machined from titanium and PBT (polybutylene terephthalate, a polyester). The drive shaft is supported by two all-ceramic bearings. The portion of the drive surface in contact with the mooring cable is coated with urethane. The urethane has favorable wear properties and increases the level of torque that can be applied by the motor without slip. Operators should inspect the urethane for visible wear after each deployment and have the drive wheel resurfaced or replaced by McLane when necessary. The drive wheel wet side assembly with magnet is shown in Figure 4-11. Figure 4-11: Drive Wheel with Magnet 4-10 The drive motor assembly is suspended from the frame in a bracket. The pivoting bracket has two rotational degrees of freedom and allows the drive wheel to pass over small obstructions on the mooring cable. The drive wheel is pulled against the cable by a spring, providing traction on the mooring cable. The actual load limit depends on local environmental conditions and can vary. Maintaining 500lbs (227kg) of tension on the mooring cable at all times is necessary for proper frictional coupling between the drive wheel and mooring cable, which produces the Profiler traction. Mooring Wire Guide wheels for the cable are located next to each of the cable retainers. NILSPIN 3x19 polyurethane jacketed oceanographic wire is recommended for MMP deployments. The user must determine the appropriate diameter for the mooring design. Larger diameter cables can be accommodated with a custom drive wheel design. Contact McLane (www.mclanelabs.com) for more information. 4-11 Notes 4-12 Chapter 5 Electronics Description Profiler electronics include the following components: Controller board MMP motherboard, CF2 based controller, and compact flash card. Cables COM cable connects the Profiler to an external computer. Electronics cables connect the controller to the motors. Sensor cables connect sensors to the electronics. Communications Serial and (optional) inductive communications provide transfer of data from the Profiler. Sensor sampling Sensor types are self logging (record data internally and transfer to the Profiler at the end of each profile) and non-self logging (MMP controller samples data at the “check-stop” and stores on the Profiler compact flash card in the Engineering file (0000000.ENG). Supported sensors include CTD, fluorometry, dissolved oxygen, PAR, optical backscatter, turbidity, CO2, methane, and nutrients See the Profiler Integrated Sensors and Communications Interface Manual for detailed information about supported sensors. Motion pack Optional sensor supported by Profiler firmware release v5.00 and higher. The Ostar OceanServer 5000 motion sensor records profile heading, pitch and roll position with acceleration X, Y, and Z axes. Watchdog circuit A real-time clock chip that sends periodic interrupt requests to the microcontroller. An unacknowledged request signals the microcontroller to restart. The watchdog is powered by the main battery and also has a short-term independent power source that can last in the event of an interrupted power supply. Batteries Main battery is a Lithium battery pack, DD type cells Lithium Sulfuryl Chloride chemistry, non-rechargeable (require hazardous good shipping). Backup batteries are two alkaline ‘AAA’ cells. 5-1 Rev D3/CF2 Electronics Controller Board Profiler firmware version 5.00 and higher supports the CF2 microcontroller and MMPD3 electronics. The system power-up shows the microcontroller that is installed (see Figure 5-11). CF2 Micro Controller Installed D:PROFILER ________________________________________________________________ CF2-MPP-5.00 R7 L2.0 U304 5_00.c compiled Dec 19 2012 at 00:42 S/N ML12997-01D Pattern Profiler © 1999-2012 McLane Research Laboratories. All rights reserved. ________________________________________________________________ The "Pattern Profiler" MPP operator interface is now running. Type ^C within 30 seconds to assert control and initialize system. 28 seconds [^C] Clock reads 09/11/12 01:57:12. Change it [N] ? Figure 5-12: Power-Up Status Shows Microcontroller The section that follows describes Rev D3/CF2 electronics. 5-2 The Profiler Rev D3/CF2 electronics components are summarized below. Follow standard electrostatic discharge (ESD) precautions when handling the electronics. Component Description Microcontroller Board Persistor CF2 low power microcontroller with compact flash. MMPD3 Motherboard The Motherboard interface circuits translate signals and commands between the microcontroller and peripheral components. These components include the system watchdog, watchdog clock (WDC), and the WDC independent power supply. MMP CF2 Interface Board The CF2 Interface Board is the main controller and contains serial communication ports, configurable UARTS or simple digital I/O and timing interfaces. CF2 Microcontroller Board CF2 Interface Board MMPD3 Motherboard Figure 5-13: Rev D3, CF2 Profiler Electronics Stack 5-3 Optional Component Description Motion Pack Board (optional) The optional MotionPack is an interface board connected to the Motherboard. For more information about the MotionPack see the Profiler Integrated Sensors and Communications Interface User Manual. Inductive Modem Module (IMM) (optional) The optional Inductive Modem is a separate sensor installed on the underside of the Motherboard. For more information about Inductive Communications see the Profiler Integrated Sensors and Communications Interface User Manual. Motion Pack Sensor Board Figure 5-14: Optional MotionPack Electronics Figure 5-15: Optional Inductive Communications Electronics 5-4 Electronics Details CF2 Microcontroller Board The CF2 board is a Freescale (Motorola) 68332 single board microcontroller with computational and I/O capabilities. A Texas Instruments MSP430 coprocessor manages and monitors power and provides a real time clock, non-volatile flash memory, and RAM storage. This board holds a compact flash card. The flash card should be installed or removed only when the Profiler is powered off. Figure 5-16: CF2 Microcontroller Board 5-5 System Files The flashcard stores the system files. The flashcard also contains a time history of interrupt requests and other exceptions sent to or detected by the microcontroller. Depending on whether the Profiler has been deployed and which sensors are installed, there are a number of engineering files also stored on the flashcard. System Files Description AUTOEXEC.BAT Batch file that automatically executes the Profiler firmware during startup. FIRMWARE For example: D:\PROFILER.PXE. Examples of other files stored on the flashcard are listed below. A complete list of flashcard files is documented in Appendix C ‘Unpacked Files’ in this User Manual. Other Files 5-6 Description IRQ_XCPT.LOG Time history of interrupts. DEPLOY.DAT Deployment settings. PROFILES.DAT Profile count which is the number of the last profile in the deployment. LASTSENT.DAT If the Inductive Modem option is used this file is the last inductive data file transmitted to the Profiler firmware. This file is -1 if the Inductive Modem option is not used. The System Configuration Menu groups sensor suites according to the sensor connector numbering on the electronics boards. ________________________________________________________________ Config: MPP_IM_CT_CM_PA_MP CF2 V5.16 of Aug 22 2014 ___________________________________ Pattern Profiler System Configuration ___________________________________ Tue Sep 2 09:51:03 2014 System Parameters: <0> Battery capacity 240 Ah Sensor Suite: Port J9:CTD <1> Seabird 52MP CTD -------------- ENABLED Electronics Board Connectors Port J5:ACM <2> Falmouth Scientific 2d ACM ---- ENABLED Port J6:IMM <I> Telemetry --------------------- ENABLED IMM @ 1200 Baud <B> <N> <O> <U> <W> Port J4:SSP BioSuite Triplet/PAR Satlantic SUNA Nitrate Aanderaa Optode bbe FluoroProbe Wetlabs ECO BBFL2 Port J10:SPR <L> Wetlabs ECO FLBB(RT)/D <P> Biospherical PAR -------------- ENABLED 2300 @ 2X, 10 samp/avg Port J7:TRB <T> Seapoint IR Turbidity Port J8:FLR <E> Seapoint CHL Fluorometer <F> Wetlabs CDOM Fluorometer Port J4i:SER <H> ProOceanus CH4 <M> OceanServer5000 MotionPack ---- ENABLED Port J5i:SER <K> ProOceanus CO2 Exit: <X> Save changes <^C> Cancel changes Selection [] ? Figure 5-17: Profiler System Configuration Menu 5-7 MMPD3 Motherboard The Rev D3 Motherboard has a single Complex Programmable Logic Device (CPLD). A temperature-compensated crystal oscillator (TCXO) provides accurate time-keeping in the system watchdog clock. Each sensor connector has a dedicated switched power connector. JTAG Figure 5-18: D3 Motherboard CF2 REVD3 BOARD 5-8 Board Connector Notes J1A (Battery 1) & J1B (Battery 2) Amp MTE 10-pin for the main and half batteries J2 (Motor) Amp MTE 3-pin for the drive motor J3 (COM) Amp MTE 4-pin for the communications J4 (SSP) RS-232 5-pin, dedicated switched power output. J5 (ACM) Amp MTE 6-pin for the optional trigger J6 (IMM) Amp MTE 7-pin for Inductive Modem J7 (TRB) Amp MTE 8-pin for the Turbidity sensors J8 (FLR) Amp MTE 9-pin for Fluorometer J9 (CTD) Amp MTE 11-pin for CTD J10 (SPR) RS-232 12-pin, dedicated switched power output, 3 analog inputs, 2 digital outputs, 1 user interrupt input MMPD3 Board Overlays The board overlays shown next illustrate the slot configurations in more detail. Figure 5-19: D3 Motherboard Overlay - Top Figure 5-20: D3 Motherboard Overlay - Bottom 5-9 MMPD3 Motherboard Peripheral Components Component Notes Zener Diodes Zener Diodes are used as part of the circuit protection. Three separate circuits are protected. The communications circuit and the sensor circuit are each protected by individual 15V and 5W zener diodes. The motor circuit is protected by a pair of 15V, 50W zener diodes to prevent back EMF from the drive motor. Drive Motor The drive motor control interface is composed of three DIO lines. One DIO line sets the motor direction for upward or downward profiling. The second line enables the motor or disables it and sets the brake. The third DIO line is programmable (free wheel or profile). During free wheel, the motor is not driven by the battery and offers no resistance (other than friction) to external torque. The motor is automatically set to free wheel during launch to reduce slip related wear of the drive wheel. Watchdog The system watchdog ensures that the firmware continues to operate during deployment. The DS1306 real-time clock chip is mounted on the motherboard and sends periodic requests to the microcontroller and a hardware counter. The microcontroller is restarted if the interrupt request (IRQ) from the DS1306 is not acknowledged. The watchdog circuit receives power from the main lithium battery. All components of the watchdog are mounted on the motherboard. 5-10 Component Notes URAO An Unattended Reset, Autonomous Operation (URAO) is triggered by the watchdog if the interrupt request does not receive a response. URAO will reset the system, load the correct time from the DS1306 real-time chip, recover the programmed deployment parameters and restart the deployment that was underway. URAO also functions in the event of a transient loss of the main power supply. All URAO elements are checked at system initialization to prevent uninitialized variables. If the system detects a problem, error messages display. 5-11 MMP CF2 Interface Board The CF2 Interface Board is the main controller and contains serial communication ports, configurable UARTS or simple digital I/O and timing interfaces. The Interface Board connectors share a common power switch. Figure 5-21: CF2 Interface Board CF2 INTERFACE BOARD 5-12 Board Connector Notes J4i OceanServer MotionPack Sensor J5i For future use MMP CF2 Interface Board Overlays Figure 5-22: CF2 Interface Board Overlay - Top Figure 5-23: CF2 Interface Board Overlay - Bottom 5-13 COM Cable Wiring The current model MMP uses an Impulse 5-pin MCBH-5-M for the communications connector. Older MMP models use the Impulse 3-pin RMG-3-FS connector. Wiring diagrams for both communications connector types are included below. 3 and 5-Pin COM Connector The wiring diagram for the Impulse RMG-3-FS to DB-9 and MCIL-5-MP to DB-9 is shown below. The pin numbering specified by Impulse is also shown for the mating bulkhead connector. There are no pin numbers printed on the connector itself. Impulse Bulkhead MCBH(WB)-5-FS Connector Female Pins Newark 44N8875 DB-9S Female Sockets Impulse MCIL-5-MP & MCDLS-F Connector Male Pins 1 1 2 2 3 4 5 1 2 PC - RxD N/C 3 PC - TxD N/C 4 White 3 5 Black 4 6 Red 5 (PC - DGND) 7 8 4 5 1 Face View 3 2 3 2 1 Face View 9 4 5 Cable Drawing M3351 Figure 5-24: COM Connector Diagram (5-Pin) 5-14 5 1 9 6 Face View Newark 44N8875 DB-9S Female Sockets 1 Impulse RMG-3-FS & G-FSL-P Connector Female Pins Impulse Bulkhead XSG-3-BCL-HP Connector Male Pins 2 PC - RxD 3 PC - TxD 4 1 2 3 White 1 5 Black 2 6 Red 3 (PC - DGND) 7 8 2 1 3 Face View 2 9 1 3 Face View Cable Drawing M3118 5 1 9 6 Face View Figure 5-25: COM Connector Diagram (3-Pin) Figure 5-26: 5-Pin and 3-Pin connectors 5-15 Suspend Mode Persistor has a power saving mode, ‘Suspend’, that uses the lowest power and is triggered whenever power savings are required (such as when ‘Sleep’ is selected from the Main Menu). ________________________________________________________________ Configuration: MMP_IM_CT_CM_FL_TU_OP CF2 V5.00 of Dec 14 2012 McLane Research Laboratories, USA Standard Profiler S/N: ML12936-02D ___________________________________ Main Menu ___________________________________ Mon Dec 17 11:11:08 2012 <1> <2> <3> <4> Set Time Diagnostics Flash Card Ops Sleep <5> <6> <7> <8> Bench Test Deploy Profiler Offload Deployment Data Contacting McLane Selection [] ? 4 12/17/12 11:11:10 SYSTEM Suspended ... Enter ^C now to wake up ... ^C] [ Figure 5-27: ‘Suspend’ Mode Saves Power 5-16 Chapter 6 Operations Profiler operations include pre-deployment processes such as ballasting, deployment programming and attaching the profiler to a mooring. Section 6.1 Ballasting Ballast sheet calculations must be performed for each new deployment. The Profiler lift capacity is dependent upon the strength of the coupling between the drive wheel and the mooring cable. Accurate ballasting is critical to Profiler operation. If the Profiler becomes trapped against one of the stops because it is too heavy, data will be collected from only a single depth. Accurate ballasting requires: • Precise measurements of the MMP air weight and MMP weight in water of some known density. • Knowledge of the effective compressibility of the profiler and the dependence of profiler density on temperature. With these numbers available, the required weight of lead ballast can be calculated for a particular deployment if the density, pressure, and temperature of the water at the neutral point of the planned profile are known. It is the in situ quantities that are required, not the potential density or temperature. McLane calculates and attaches an appropriate quantity of lead ballast for the initial deployment based on in situ density and deployment defined pressure information provided by the customer. This information is entered into a ballast sheet which is completed by McLane and included electronically with the instrument. In addition to a completed ballast sheet, the media delivered with a new profiler includes blank ballast sheets. 6-1 Any weight change must be considered in the ballast calculation. Variables that affect ballast include adding sensors, replacing glass spheres, changing the main battery pack or swapping existing sensors. Contact McLane for ballast recalculation assistance. Understanding the Ballast Sheet A detailed description of ballast calculations and a sample ballast sheet are included in the section that follows. The deployment parameters on the ballast sheet are in situ pressure, temperature, salinity, and density of water at the planned neutral depth for the deployment. That density may be available directly or it may be calculated, using an equation of state for seawater, from measurements of pressure, temperature, and salinity at the neutral depth. To avoid exceeding the lift capacity of the profiler at the deep and shallow limits of travel, the ballast calculation should make the MMP neutrally buoyant at the mid-point of the profile. Maintaining neutral buoyancy at the mid-point also reduces drive train losses, which increases endurance. The neutral depth is generally the mid-point of the planned profile. The MMP is less compressible than seawater, so buoyancy increases as it profiles down and decreases as it profiles up. 6-2 McLane Moored Profiler Ballast Sheet Project: Date Ballasted: MMP S/N: MMP Electronics S/N: CTD S/N: ACM S/N: Glass Sphere #1 S/N: Glass Sphere #2 S/N: MMP Software Version: Deployment Defined Values (Given By User) Deployment (Neutral) Pressure (in db): Deployment (Neutral) Temperature (in °C): Deployment (Neutral) Salinity (pss): Deployment (Neutral) Density (in g/cc): Deployment Site Latitude: Deployment Site Longitude: Deployment Date: Recovery Date: 29-Jul-11 12345-01 110917 110689 5.00 1000 4.2 34.97 1.03234 not given not given not given not given Customer to enter / confirm values Make necessary adjustments as required Measured Weights (note: water weights are to 1g accuracy and air weights are to 10g accuracy) MMP Air Weight w/o battery (in g): 69090 Tare Water Weight (includes test battery air weight) (in g): 7016 MMP+Tare Water Weight (in g): 572 Lithium Battery Air Weight (in g): 8019 Calculated Values and Ballasting Constants 1 - MMP Water Weight (in g): 1575 2 - Ballast Tank Water Temperature (in °C): 18.3 3 - Water Density (from table in g/cc): 0.998565 4 - MMP Volume (in cc) 75642.54 5 - MMP Compressibility Constant (in cc/db) 0.3 6 - MMP Volume Change @ Deployment Pres. (in cc): 300 7 - MMP Volume @ deployment Pres. (in cc): 75342.54 8 - MMP Volume Temp. Correction Const. (in cc/°C): 6 9 - Temperature Difference (in °C): 14.1 10 - MMP Volume Change @ Deployment Temp.(in cc): 84.6 11 - MMP Volume @ Deployment Temp. & Pres.(in cc): 75257.94 12 - Calculated Air Weight for Neutral MMP @ 77691.78 Deployment Pressure (in g): 13 - Weight Difference (in g): 582.78 14 - Ballast Weight (in g): 455 15 - Average Motor Current Difference from Previous 0 Deployment (in mA): 16 - Effective Motor Current Change for Neutrally Bouyant 0 MMP (in mA): 17 - Ballast Air Weight Correction based on 4 g/mA 0 Effective Motor Current (in g): 18 - Ballast Water Weight Correction based on density of 0 lead (in g): 19 - Corrected Ballast Weight (in g): 455 Notes: Item 15 is calculated as Average Down Profile Motor Current - Average Up Profile Motor Current If ballast is added to pressure housing item 19 is ballast air weight. If ballast is added outside the pressure housing item 19 is ballast water weight. Additional Sensors: 6-3 Detail of Calculations The Ballast Spreadsheet (Excel file) performs the necessary calculations automatically after data is entered. The calculations are described next in detail. Measured Weights (note: water weights are to 1g accuracy and air weights are to 10g accuracy) MMP air weight w/o battery (in g) ⎯⎯⎯⎯⎯⎯⎯⎯⎯⎯⎯⎯⎯⎯⎯⎯⎯⎯⎯⎯⎯⎯⎯ Tare water weight (includes test battery air weight) (in g) ⎯⎯⎯⎯⎯⎯⎯⎯⎯⎯⎯⎯⎯⎯⎯⎯⎯⎯⎯⎯⎯⎯⎯ The MMP is buoyant in fresh water (and seawater), so a tare weight is required to fully submerge it for the water weight measurement. The water weight of the lead tare weight is measured using a triple beam balance (+ 1g accuracy) MMP + Tare Water Weight (in g) ⎯⎯⎯⎯⎯⎯⎯⎯⎯⎯⎯⎯⎯⎯⎯⎯⎯⎯⎯⎯⎯⎯⎯ Lithium Battery Air Weight (in g) ⎯⎯⎯⎯⎯⎯⎯⎯⎯⎯⎯⎯⎯⎯⎯⎯⎯⎯⎯⎯⎯⎯⎯ 6-4 Check your battery weight (+ 10g) Calculated Values and Ballasting Constants 1 - MMP Water Weight (in g) ⎯⎯⎯⎯⎯⎯⎯⎯⎯⎯⎯⎯⎯⎯⎯⎯⎯⎯⎯⎯⎯⎯⎯ This is calculated as (Item C − Item B) + Item D and is a negative number because the profiler is positively buoyant. 2 – Ballast Tank Water Temperature (in °C) ⎯⎯⎯⎯⎯⎯⎯⎯⎯⎯⎯⎯⎯⎯⎯⎯⎯⎯⎯⎯⎯⎯⎯ 3 - Water Density (from table in g/cc) ⎯⎯⎯⎯⎯⎯⎯⎯⎯⎯⎯⎯⎯⎯⎯⎯⎯⎯⎯⎯⎯⎯⎯ In the McLane lab tank, fresh water is used, so the density depends only on temperature. 4 - MMP Volume (in cc) ⎯⎯⎯⎯⎯⎯⎯⎯⎯⎯⎯⎯⎯⎯⎯⎯⎯⎯⎯⎯⎯⎯⎯ Volume calculation is: (Item A + Item D) − 1 / or, MMP Air Weight − MMP Water Weight / Water Density. Physically, this is the mass of the water displaced by the profiler divided by fluid density. 5- This is experimentally a constant of 0.3. MMP Compressibility Constant (in cc/db) This is the density, from the table provided with the ballast sheet. If the ballasting is done in seawater, you would measure the pressure, temperature, and salinity of the water and calculate the in situ density using an equation of state. 6 - MMP volume change @ deployment pressure ⎯⎯⎯⎯⎯⎯⎯⎯⎯⎯⎯⎯⎯⎯⎯⎯⎯⎯⎯⎯⎯⎯⎯ Compressibility constant multiplied by the pressure at Deployment (Neutral) Depth (Item 5 × Deployment (Neutral) Pressure). 7 - MMP volume @ deployment pressure ⎯⎯⎯⎯⎯⎯⎯⎯⎯⎯⎯⎯⎯⎯⎯⎯⎯⎯⎯⎯⎯⎯⎯ This is the calculated volume change at the planned neutral depth. In this calculation, the volume change is subtracted from the reference volume (Item 4 − Item 6). 8 - MMP volume temperature correction constant ⎯⎯⎯⎯⎯⎯⎯⎯⎯⎯⎯⎯⎯⎯⎯⎯⎯⎯⎯⎯⎯⎯⎯ This is the constant characterizing the dependence of MMP volume (density) on temperature. 9 - Temperature difference ⎯⎯⎯⎯⎯⎯⎯⎯⎯⎯⎯⎯⎯⎯⎯⎯⎯⎯⎯⎯⎯⎯⎯ This calculation is the temperature difference between the reference water and the temperature at the planned neutral depth (Item 2 − Deployment (Neutral) Temperature). 10 - MMP volume change @ deployment temp ⎯⎯⎯⎯⎯⎯⎯⎯⎯⎯⎯⎯⎯⎯⎯⎯⎯⎯⎯⎯⎯⎯⎯ This calculation is the temperature constant × temperature difference (Item 8 × Item 9). 11 - MMP volume @ deployment temp & pressure ⎯⎯⎯⎯⎯⎯⎯⎯⎯⎯⎯⎯⎯⎯⎯⎯⎯⎯⎯⎯⎯⎯⎯ The temperature (and pressure) of the corrected profiler volume i.e., volume at neutral pressure and temperature (Item 7 − Item 10). 12 - Calculated Air Weight for Neutral MMP @ Deployment Pressure (in g) ⎯⎯⎯⎯⎯⎯⎯⎯⎯⎯⎯⎯⎯⎯⎯⎯⎯⎯⎯⎯⎯⎯⎯ 13 - Weight Difference (in g) ⎯⎯⎯⎯⎯⎯⎯⎯⎯⎯⎯⎯⎯⎯⎯⎯⎯⎯⎯⎯⎯⎯⎯ The air weight for which the MMP will be neutrally buoyant at the planned neutral depth, neutral volume × neutral density (Item 11 − × Deployment (Neutral) Density. 14 - Ballast Weight (in g) ⎯⎯⎯⎯⎯⎯⎯⎯⎯⎯⎯⎯⎯⎯⎯⎯⎯⎯⎯⎯⎯⎯⎯ Final calculation is the empirical correction for the remaining uncertainty in the compressibility constant (Item 13 − 128 g). This weight is the quantity of lead to be added as ballast (removed if the quantity is negative). McLane uses an external tare weight, so the value in Item 14, (positive), is the water weight of lead that must be added to the profiler. If the tare weight of lead used to sink the profiler for the water weight measurement were placed inside the pressure housing, Item 14 would be the air weight of lead to add to the lead inside the pressure housing. The lead is added externally. Note that Items 15 through 19 are used only if ballast weight adjustments are necessary after the initial deployment. The difference between the required air weight and the actual air weight is the weight of lead that must be attached as ballast for the profiler to be neutrally buoyant at the planned mid-point depth (Item 12 − (Item A + Item D). 15 - Average Motor Current Difference from Previous Deployment (in mA) ⎯⎯⎯⎯⎯⎯⎯⎯⎯⎯⎯⎯⎯⎯⎯⎯⎯⎯⎯⎯⎯⎯⎯ Average down motor current minus average up motor current. This difference can be used to calculate a ballast adjustment. Retain the sign (+ or − ) that results from this calculation for Items 16-19. A positive difference (+) indicates a light MMP (add ballast); a negative difference (− ) indicates a heavy MMP (remove ballast). 16 – Effective Motor Current Change for Neutrally Bouyant MMP (in mA) Item 16 = Item 15 / 2. 17 – Ballast Air Weight Correction based on 4 g/mA Effective Motor Current (in g) Item 16 × (4 g / mA) 18 – Ballast Water Weight Correction based on density of lead (in g) Item 17 × (.907) 19 – Corrected Ballast Weight (in g) Item 14 + Item 18 6-5 Determining Air and Water Weights Air and water weight measurements are provided for the Profiler by McLane. A complete description is also included here to provide an understanding of the process and the accuracy requirements. Contact McLane for a re-ballast if required. The air weight should be measured on a scale with an accuracy of ± 10 gram (10g). Accuracy of the water weight measurement may be affected by microscopic bubbles on the exposed surfaces of the MMP. A continuous sheet of bubbles can coat the MMP within a few minutes of immersion. Submerging the Profiler to a depth of two meters or more prevents bubble formation. The presence of bubbles adds a significant amount of buoyancy to the profiler and invalidates the weight measurement. In addition, the density of the MMP has a distinct temperature dependence. Changes occur in the MMP water weight during temperature equilibration. A plot of these changes over a five hour period is shown in Figure 6.1-1. In this case the water temperature was approximately 18°C and the initial temperature of the MMP was approximately 25°C. The ultimate change in weight was approximately 40 g (out of a total mass of ~70000 g) or 6 g/°C. 6-6 To allow for complete temperature equilibration McLane leaves MMPs suspended at the bottom of our test tank (15m deep) for a minimum of ten hours before recording their water weight. Figure 6.1-1: Water Weight Changes Over Five Hours 6-7 Section 6.2 Deployment Programming – Standard Mode Programming a deployment begins with the initial dive setting. Programming defines whether the deployment begins as a countdown delay or scheduled start and defines controls that affect how profiles operate and terminate. Deployment endurance estimates also display based on deployment settings. Two methods of programming the deployment are provided: • Define the controls on the Deployment Menu (if using standard profiling mode). • Create a re-usable schedule of deployment patterns in the Deployment Planner Standard Profiling Deployment Programming The Deployment Menu for Standard Profiling groups settings by general function ________________________________________________________________ Config: MMP_IM_CT_CM_PA_SC_MP CF2 V5.17 of Sep 16 2014 ___________________________________ Standard Profiler Deployment Menu ___________________________________ Wed Oct 1 14:29:00 2014 Start: <Z> Countdown delay 00:02:30 [HH:MM:SS] <M> Mooring ID 001 Schedule: <I> profile start Interval 000 00:15:00 [DDD HH:MM:SS] <R> Reference date/time 10/01/14 14:26:46 <P> Paired profiles disabled <N> profiles per burst disabled <B> Burst interval disabled Stops: <S> Shallow pressure 1.0 dbar <D> Deep pressure 11.5 dbar <H> sHallow error 1.0 dbar <E> dEep error 1.0 dbar <T> profile Time limit 00:00:42 [HH:MM:SS] <K> stop checK interval 2 seconds Enabled Sensors & Options: Seabird 52MP CTD -------------- SBE/52MP Falmouth Scientific 3d ACM+ --- FSI/ACM+ OceanServer5000 MotionPack ---- OST/5kMP Biospherical PAR -------------- BII/PAR 2200 @ 1X, 5 samp/avg Wetlabs ECO BBFL2 ------------- WL/BBFL2 Seabird Inductive Modem ------- SBE/IMM @ 1200 Baud Endurance Estimates: 14 mAh / profile 26073 total profiles / 360 Ah Battery expiration on 06/30/2015 Press any key to continue. Deploy: <V> Verify and Proceed <^C> Cancel deployment Figure 6.2-1: Deployment Menu Standard Profiling 6-8 Start Parameters Option <Z> defines the start of Profile 0 (Dive 0) which begins the deployment. The first dive can have a countdown delay or scheduled start. The Deployment Menu displays the start as the mode that is currently selected. Only the scheduled start option is available when using Pattern Profiling mode. Countdown delay - A countdown delay in hours, minutes, and seconds can be set between 00:00:00 and 24:00:00. When the operator commits to the deployment, the countdown timer begins decrementing. When the alarm is triggered the MMP wakes up and begins operations. If an optional transponder is installed, the firmware pings the transponder at the start of a deployment and the countdown begins 1 to 2 minutes after the operator commits to a deployment. Profile 0 begins when the countdown reaches zero. Scheduled start - A scheduled start is specified as an absolute date and time. Profile 0 begins when the RTC reaches the specified time. A scheduled start time must be at least 10 minutes in the future when ‘V’ Verify and Proceed is selected, indicating that deployment programming is complete. Allowed range is 1970 to 2038 in 1 second increments and at least 10 minutes in the future as measured by the RTC. Selection [] ? z (S)cheduled start or (C)ountdown delay [] ? c Enter deployment delay Hours ( 0-24) [ 0] ? 0 Minutes ( 0-59) [ 0] ? 6 Seconds ( 0-59) [ 0] ? 0 Figure 6.2-2: <2> Start Parameters 6-9 Mooring ID Mooring ID <M> Option <M> ‘Mooring ID’ is a user defined three digit mooring identifier (001 to 999) that is stored in the Unattended Reset, Autonomous Operation URAO to differentiate deployment data when multiple profilers are deployed. In the event of a transient loss of the main power supply, all URAO elements are checked at system initialization to prevent uninitialized variables. The firmware displays the entry with leading zeros. Mooring ID is also embedded in the metadata that precedes files transferred via inductive modem. For details about the inductive modem metadata structure, refer to Chapter 5, ‘Underwater Inductive Modem’ in this User Manual. Schedule and Stops Settings Schedule and Stops settings control profile timing. Profiles can be scheduled individually or in up-down pairs. The profiles or pairs of profiles can be scheduled at regular intervals or in bursts. Burst profiling is executed with regular intervals between bursts and (shorter) intervals within a burst. Profile Start Interval/Pair Start Interval <I> Option <I> ‘Profile start interval’ is the time between profiles (or pairs). If the interval is less than the time required to complete a profile (or pairs), the next profile (or pair) will be skipped to prevent asynchronous profiling. Schedule: <I> profile start Interval <R> Reference date/time <P> Paired profiles <N> profiles per burst <B> Burst interval Stops: <S> Shallow pressure <D> Deep pressure <H> sHallow error <E> dEep error <T> profile Time limit <K> stop checK interval 000 00:30:00 [DDD HH:MM:SS] 11/29/12 15:10:33 disabled disabled disabled 1.5 dbar 11.5 dbar 1.0 dbar 1.0 dbar 00:02:00 [HH:MM:SS] 10 seconds Figure 6.2-3: <I> Profile Start Interval Enter a Profile Start Interval greater than the Profile Time Limit (one of the Stops conditions). Continuous profiling is set by entering 0 for the Profile Start Interval. 6-10 Continuous profiling is asynchronous and provides the most dense MMP sampling possible. During continuous profiling there is no delay between profiles (each profile begins as soon as the data from the previous profile is saved). A deployment with single profiles is shown next. Figure 6.2-4: Single Profiles Example Reference Date/Time <R> Option <R> ‘Reference date/time’ keeps the deployment schedule in sync. In the event of an unexpectedly long profile time, the reference time algorithm synchronizes the profile start time with the programmed deployment schedule. If the actual profile time is less than or exceeds the Profile Start Interval, the reference time algorithm adjusts the profile start times as needed. Reference time is also used during recovery from a Watchdog reboot. The example below shows profiles intended to start at 0000 hrs, 0600 hrs, 1200 hrs, 1800 hrs, and so on. The initial reference time is set to the intended start time of Profile 1. The actual time required for Profile 1 is less than the start interval for the deployment, so the reference time calculation yields 0600 hrs as the expected start time for Profile 2. In Profile 2, the actual time required exceeds the start interval, so the reference time calculation yields 1800 hrs and the profile scheduled at 1200hrs is skipped. In this example, Profile 3 would begin at 1800 hrs. 00.00 Profile 1 0600 Profile 2 1200 Profile 3 1800 Actual Profile Time Reference Time Calculation Figure 6.2-5: Reference Date/Time Example 6-11 Paired Profiles <P> When Paired Profiles are enabled, the deployment is scheduled in up-down pairs. The down profile starts as soon as the up profile data storage is completed. The start interval is the time between the start of motion for sequential up profiles. Figure 6.2-6: Paired Profile Example 6-12 Profiles Per Burst/ Pairs Per Burst <N> If Burst Profiling is disabled (set to 1), the profiling schedule is determined by the profile start interval. A number greater than 1 enables Profiles per Burst (the firmware also displays a default Burst Interval which should be changed based on specific deployment needs). Profile 0 is not part of the number of Profiles per Burst, as shown in the next example. Burst Interval <B> The burst interval is the time between bursts of profiles or pairs. Sampling with profile bursts or profile pairs strikes a balance between the need for relatively high frequency profiling given the need for long time series and the finite battery endurance. When Profiles per Burst is enabled (set to a number greater than 1), the firmware displays a default Burst Interval. Change this default to the desired Burst Interval. Range is 0 seconds to 366 days in 1 second increments. The MMP continues a burst until it has completed all of the profiles or pairs in the burst. If this requires longer than the burst interval, the next burst (or bursts) will be skipped. Range is 1 − 1000 profiles or pairs of profiles. A deployment with bursts shows next. Figure 6.2-7: Burst Example The example shown next is a visual comparison of three deployment methods (straight profiles, pairs, and bursts). 6-13 Deployment Programming Figure 6.2-8: Deployment Programming – Three Methods 6-14 Stops Parameters Stops parameters define limits that end a profile. The MMP depends primarily on CTD pressure measurements to detect the end of a profile. The pressure measurements acquired through the CTD are time tagged and stored in the engineering data file. This time and pressure information is used to dynamically calculate the pressure rate, dP/dt. Status and elapsed profiling time are also monitored. Typically, a profile is terminated based on the pressure limits. The dP/dt calculation is not performed for the first 3 minutes and 30 seconds of a profile. The pressure measurements and time tags are kept in rolling, indexed buffers so that the mooring motion filtering requirement of the calculation can be verified. Failed pressure acquisitions are flagged and not used in the calculation. Pressure Rate The pressure rate is also used to detect obstacles on the mooring cable that hinder profiling motion. MMP nominal profiling speed is 25cm/s. When the pressure rate, averaged over at least 3 minutes, falls below a threshold of 0.045 dbar/s ~ (4.5 cm/s), the firmware detects a zero pressure rate. Wave induced mooring motions that modulate steady MMP progress could lead to false detection of a zero pressure rate. The action taken after a zero pressure rate detection depends on the MMP depth, the current profiling direction, and the shallow or deep error programmed by the operator. 6-15 Ramming Action In the mid-water region away from the shallow and deep error windows, a zero pressure rate is interpreted as an obstacle on the mooring cable. The mid-water obstacle ramming behavior is triggered in an effort to clear the cable and get past the obstruction. The MMP first backs away from the obstacle for 30 seconds, then moves forward again. If the ramming behavior is successful the MMP continues the profile. If the obstruction remains, another zero pressure rate will be detected after 3 minutes and the ramming behavior is repeated. Ramming is limited to a maximum of five occurrences during any one profile (battery energy and drive train wear required for 15 minutes of drive wheel slip on the cable is required to make five detections). A sixth zero pressure rate detection terminates the profile. The sensor data acquisition continues for the warm down period before the firmware stops logging and transfers the sensor data to the flash card. The detections do not have to be at or near the same depth. Each restart is logged in the engineering data file. Ramming can be disabled by extending the shallow and deep errors to cover the full extent of the profiling range. Shallow and Deep Pressure Limits The shallow and deep pressure limits or “stops” are ambient pressure levels (dbars) between which the MMP travels. When the ambient pressure is less than the shallow pressure stop on an upward profile or greater than the deep pressure stop on a downward profile, the MMP stops. The sensor data acquisition continues as above before the firmware stops logging and transfers the sensor data to the flash card. The pressure stops are pressures (dbar). Physical locations on the mooring are commonly referenced in meters. The MMP does not map between decibars and meters. Shallow Pressure <S> Option <S> ‘Shallow pressure’ is the intended “top” of the profiling range. The MMP stops profiling on an upward profile when the ambient CTD pressure becomes less than the shallow pressure limit. The shallow pressure limit is ignored during downward profiles. Range is deep pressure to 0.0 dbar. 6-16 Deep Pressure <D> Option <D> ‘Deep pressure’ is the intended “bottom” of the profiling range. The firmware stops profiling on a downward profile when the ambient CTD pressure becomes greater than the deep pressure limit. The deep pressure limit is ignored during upward profiles. Range is shallow pressure to 6000.0 dbar. Shallow Error <H> Option <H> ‘Shallow error’ defines a pressure below (deeper than) the shallow pressure stop. If a zero pressure rate is detected while inside the shallow error window on an upward profile, the MMP stops profiling. The mid-water obstacle ramming behavior is not triggered. The shallow error is ignored on downward profiles. The shallow error allows the operator to compensate for mooring dynamics and uncertainty in the actual depth of the shallow bumper. As the mooring leans over in a current or if the anchor is deeper than expected the shallow bumper may be pulled below the shallow pressure stop. In these cases the obstacle ramming behavior would be undesirable. The shallow error is chosen based on calculations of the dynamic mooring behavior and knowledge of the possible depth error. Inside that window a zero pressure rate is interpreted as the shallow bumper and the ramming behavior is not triggered. The profile terminates as if the shallow pressure stop had been detected. The mid-water obstacle ramming behavior can be disabled during upward profiles by setting the shallow error below (deeper than) the deep pressure. Range is 0.0 dbar to 6000.0 dbar. Deep Error <E> Option <E> ‘Deep error’ defines a pressure above (more shallow than) the deep pressure stop. If the firmware detects a zero pressure rate while inside the deep error window on a downward profile, the MMP stops profiling. The mid-water obstacle ramming behavior is not triggered. The deep error is ignored on upward profiles. The deep error allows the operator to compensate for mooring dynamics and uncertainty in the actual depth of the bottom. If the mooring dynamics are less than anticipated or if the bottom is shallower than expected, the deep bumper may rise above the deep pressure stop. In these cases the obstacle ramming behavior would be undesirable. The deep error is chosen based on calculations of the dynamic mooring behavior and knowledge of the possible depth error. Inside that window a zero pressure rate is interpreted as the deep bumper, and the ramming behavior is not triggered. The profile terminates as if the deep pressure stop had been detected. Range is 0.0 dbar to 6000.0 dbar. 6-17 Profile Time Limit <T> Option <T> ‘Profile time limit’ is the maximum time allowed for MMP motion. The firmware displays a default Profile Time Limit after the shallow and deep pressure stops are entered (this should be changed for the specific deployment). When the firmware cannot detect a pressure or pressure rate based stop (and the battery voltage and motor current are within their prescribed limits), the profile terminates based on elapsed travel time. If the time limit expires while the MMP is profiling, the firmware halts MMP motion. The sensor data acquisition continues before the firmware stops logging and transfers the sensor data to the flash card. The time limit applies only to the period of profiler motion during a single profile. It does not include the sensor logging intervals that occur before and after profile motion or the time required to move data from the sensors to the flash card. Changes to shallow or deep pressure settings trigger the firmware to calculate the time that will be required to cover that distance: profile time limit = 1.25 × (deep pressure - shallow pressure) / nominal profiling speed. The additional time (25%) is added to account for slower profiling near the battery life limit. The operator can accept or manually change the suggested time limit. Note that any subsequent changes to the shallow or deep pressures will automatically update the profile time limit, overwriting the manual change. The profile time limit has an absolute maximum value of 8 hours. The memory capacity and the data rate of the CTD and the ACM limit internal logging to approximately 8.5 hours. The time limit is dynamically incremented during a profile whenever the mid-water obstacle ramming behavior is triggered. The increment includes the duration of the two additional velocity ramps, the zero pressure rate interval, and the stop check interval. The time limit is reset to 8 hours whenever an increment raises the time limit above the absolute maximum. In general, the profile time limit will not be reached. Setting the time limit to 8 hours maximizes the amount of time to reach the stop on each profile and each profile will likely terminate on pressure or pressure rate. However, if there are problems acquiring pressure measurements, this approach will also result in the maximum amount of time pushing against the physical stop and wasting battery energy. Range is 10 seconds to 8 hours in 1 second increments. 6-18 Stop Check Interval <K> Option <K> ‘Stop check interval’ sets the frequency of checks during profile motion to determine if the MMP has reached a stop. Stop check interval is also the rate at which the Profiler records data for non-self-logging sensors (see Chapter 1 of this User Manual for more information about sensors). During a profile, the firmware periodically sends a data request to the CTD while the CTD is logging internally. The CTD responds with the most recent scan of data which is parsed to extract the pressure used in the stop check internal algorithm. The checks include examination of the ambient pressure, the pressure rate, the elapsed time, battery voltage and motor current. Sensors that are not self logging are also polled during stop checks. The electronics enters suspend mode between checks. Allowed range: 2 seconds to 60 seconds in 1 second increments. Infrequent checks (30 to 60 second intervals) save a small amount of power and are appropriate for relatively long profiles (>500m). Unfortunately, a 30-60 second stop check interval also permits the MMP to overshoot the pressure stop and push against the physical stop until the next stop check. More frequent checks (5 to 15 second intervals), use more power but also reduce overshoot. Frequent checks are appropriate for relatively short profiles (< 500m). High motor currents initiate the ramming behavior, similar to the repetitive attempts to pass an obstacle. High motor currents do not end the deployment. However, motor currents above 1500 mA indicate a catastrophic circuit failure and result in immediate termination of profiler motion. The MMP uses a threshold of 7.5 V to detect battery exhaustion and terminate the deployment. The output voltage of the main lithium battery is nominally 10.8 V until ~90% of the available energy in the battery has been used. The voltage then drops rapidly to ~7.8 V and remains at that level while most of the remaining available energy is used. As the battery nears complete exhaustion (99+% of the available energy extracted), the voltage falls rapidly to zero unless the current drain is drastically reduced. To avoid a premature or erroneous termination of the deployment, the battery voltage is averaged over five clean measurements obtained during sequential stop checks. 6-19 The stop check “algorithm” is: • • Firmware always checks: • Motor current below 1500 mA • Elapsed time less than profile time limit • Battery voltage above 7.5 V Firmware checks after velocity ramp: • Pressure • Pressure rate Enabled Sensors and Options These deployment settings display for the active sensors. For more detailed information see the Profiler Integrated Sensors and Communications Interface User Manual. Endurance Parameters Endurance estimates show the number of programmed profiles and an estimated battery expiration. The estimate adjusts each time a deployment parameter is changed. The single profile battery drain is also listed for information purposes. Single Profile Current An estimate in mAh of the battery drain for a single profile. Total Profiles/(Ah) The estimated total profiles per battery pack. The default standard battery energy is 240Ah (the energy of the L24-1000 battery). Change this default, if necessary in the ‘Nominal Endurance’ option on the System Configuration menu. The extended Profiler battery is an additional 120Ah battery which provides 50% more battery capacity and is 12.7cm longer than the standard MMP battery. Estimated Battery Expiration An estimate of battery expiration based on battery energy (the default is 240Ah), the single profile drain, and the total number of profiles. The estimate is updated each time a deployment parameter is changed. 6-20 Deploy <V> Verify and Proceed This option indicates that deployment programming is complete. The firmware conducts profiling range and consistency checks and estimates battery expiration. Range violations and parameter inconsistencies trigger user prompts for changes. If the consistency checks pass, a prompt displays to accept and store the selections in non-volatile EEPROM. A ‘No’ response returns to the Deployment Menu for further changes. A ‘Yes’ response stores the parameters. The Diagnostics routine is run and the initial dive time displays on the screen. The final prompt is ‘Proceed with the deployment (Yes/No) [N]?’ This option starts the deployment which puts the firmware into Suspend mode until the initial dive. The screens shown next illustrate examples of a sample deployment. 6-21 Deploy: <V> Verify and Proceed <^C> Cancel deployment Selection [] ? v 01/25/13 01/25/13 01/25/13 01/25/13 01/25/13 01/25/13 01/25/13 11:09:06 11:09:06 11:09:06 11:09:06 11:09:06 11:09:06 11:09:06 SYSTEM SYSTEM SYSTEM SYSTEM SYSTEM SYSTEM SYSTEM Checking entries ... done. All entries are within allowed ranges. Checking profile schedule ... done. Calculated minimum profile pair duration is 00:11:02. Profile schedule selections are consistent. Checking burst schedule ... done. Burst mode disabled. Accept and store schedule selections [Y] ? 01/25/13 11:09:12 SYSTEM Storing deployment parameters ... done. !!!!!!!! WARNING: If you have not already done so, Remove the CTD flow path caps NOW. Failure to remove the caps prevents proper CTD operation during the deployment & may cause permanent sensor damage.. Have you removed the CTD caps [Y] ? 01/25/13 11:09:27 SYSTEM Status. RTC 11:09:28, WDC 11:09:28, 11.3Vb, 0mA !!!!!!!! CAUTION: Deployment will ERASE ALL DATA stored on flash card. Proceed [N] ? y 01/25/13 11:09:35 SYSTEM Initializing autonomous operation. 01/25/13 11:09:35 SYSTEM Setting motor to Free Wheel during launch ... done. Figure 6.2-9: Sample Deployment (Standard Profiling) screen 1 of 2 6-22 !!!!!!!! NOTICE: DO NOT REMOVE communication cable until instructed. 01/25/13 11:09:36 SBE/IMM 9.6 kBaud communication channel opened. 01/25/13 11:09:36 SBE/IMM Powered on. 01/25/13 11:09:36 SBE/IMM Sending command [\n]. . 01/25/13 11:09:36 SBE/IMM Sending command [SETDEBUGLEVEL=2]. . 01/25/13 11:09:36 SBE/IMM Sending command [SETTERMFROMHOST=255]. . 01/25/13 11:09:37 SBE/IMM Sending command []. . 01/25/13 11:09:37 SBE/IMM Sending command []. . 01/25/13 11:09:37 SBE/IMM Sending command [GETCD]. ............................. . 01/25/13 01/25/13 01/25/13 01/25/13 01/25/13 11:09:41 11:09:42 11:09:46 11:09:47 11:09:48 SBE/IMM SBE/IMM SBE/IMM SBE/IMM SBE/IMM 01/25/13 01/25/13 01/25/13 01/25/13 01/25/13 01/25/13 01/25/13 01/25/13 01/25/13 01/25/13 01/25/13 01/25/13 01/25/13 01/25/13 01/25/13 01/25/13 01/25/13 11:09:49 11:09:49 11:09:49 11:09:50 11:09:50 11:09:50 11:10:04 11:10:04 11:10:04 11:10:04 11:10:05 11:10:05 11:10:05 11:10:06 11:10:07 11:10:08 11:10:08 SYSTEM SYSTEM SYSTEM SYSTEM SYSTEM SYSTEM SYSTEM SYSTEM SYSTEM SYSTEM SYSTEM SYSTEM SYSTEM SYSTEM SYSTEM SYSTEM SYSTEM !!!!!!!! Sending Sending Sending Sending Sending command command command command command [FORCECAPTURELINE]. . [SENDWAKEUPTONE]. ... [#G0:@@@MMP/ML12964-01/001/01]. . [RELEASELINE]. . [PWROFF]. . Initializing data pointers and status flags ... done. Initializing flash card. Deleting all previous data files. Please wait ... Saving AUTOEXEC.BAT ... done. Reading SCHEDULE.DPL ... done. Format C: /v:Profiler500 /q /p ... Restoring SCHEDULE.DPL ... done. Restoring AUTOEXEC.BAT ... done. Initializing disk pointers. Creating DEPLOY.DAT ... done. Creating PROFILES.DAT ... done. Creating IRQ_XCPT.LOG ... done. Creating LASTSENT.DAT ... done. Flash card initialization complete. Current time is 01/25/13 11:10:06. Sensor warmup at 01/25/13 14:28:00. Initial dive at 01/25/13 14:30:00. NOTICE: System is ready to deploy. Remove communication cable NOW. Install communications port dummy plug. Attach faired bottom cap to vehicle. 01/25/13 11:10:09 SYSTEM Waiting until 01/25/13 14:28:00. ... Figure 6.2-10: Sample Deployment (Standard Profiling) screen 2 of 2 6-23 Parameter Range Check The parameter range checks verify that each of the deployment parameters is within its allowed range. If a range violation is detected, the operator is prompted to change the parameter and then returns to the deployment menu. Schedule Check When all of the deployment parameters are within the specified ranges, the firmware performs a profile consistency check on the proposed schedule. The consistency checks begin with the calculation of the minimum profile duration (MPD) where: MPD = DPL - SPL + SLBP + SLAP 1+ NPS DGR x 1.10 DTR Time buffer Profile travel time Sensor logging Data transfer time DPL = Deep Pressure Limit [dbar] SPL = Shallow Pressure Limit [dbar] NPS = Nominal Profiling Speed [dbar/sec] SLBP = Sensor Logging Before Profiling [sec] SLAP = Sensor Logging After Profiling [sec] DGR = Data Generation Rate [byte/sec] DTR = Data Transfer Rate [byte/sec] If continuous profiling is selected, the profile consistency check is not performed. 6-24 The MPD is compared to the profile start interval. If the programmed start interval is shorter than the MPD the operator will be prompted to change the selections. The operator may choose to disregard the warning and proceed, thus accepting the risk of skipped profiles (or bursts) during the deployment. If burst mode is disabled (profiles/pairs per burst set to 1) or if continuous bursts are selected (burst interval set to 00 00:00:00), no burst consistency check is performed. When burst mode is enabled and the burst interval is not zero, the firmware compares the minimum burst duration with the burst interval which is one of: • MPD × profiles per burst if continuous profiling is enabled • start interval × profiles per burst if MPD < a non-zero start interval • [MPD / start interval] × profiles per burst if MPD ≥ a non-zero start interval An inconsistent (but operator approved) start interval can also be detected. If the programmed burst interval is shorter than the calculated time to conduct the burst the user is prompted to change the selections. Consistency checks are based on the calculated travel time for a profile, not on the profile time limit set by the operator. 6-25 When the deployment definition parameters are consistent (or have been approved by the operator) the operator is prompted to store the parameters in the EEPROM. A ‘No’ response returns to the deployment menu for further parameter entry. This feature can be used to quickly loop through the range and consistency checks and the endurance calculation while making iterative adjustments to the deployment parameters. This loop can be a useful tool when developing profiling schedules for a deployment. A ‘Yes’ response stores the deployment definition parameters in the EEPROM and then runs a single iteration of Diagnostics, the Main Menu utility that scrolls status information. Diagnostics includes the 10 V and 7.5 V battery warning checks (a warning message displays if more than ~90% of the energy in the battery has been used). 6-26 Committing to the Deployment The final deployment prompt is ‘Proceed with the deployment (Yes/No) [N]?’ Two separate keystrokes are required, making an accidental deployment unlikely. Before a deployment, archive a copy of the data files stored on the flash card. Once the firmware is initialized for use, the flash card is reformatted, erasing stored data files. Once ‘Proceed with Deployment’ is ‘Yes’ the firmware enters Suspend mode for the programmed interval so that the MMP can be deployed in the water. The firmware ‘wakes’ at the specified schedule start time and performs Profile 0 (Dive 0), taking the MMP to the bottom of the programmed range. Subsequent profiles are numbered sequentially, and follow the programmed schedule. The sensors power on for a warm up period (default is 2 minutes) before the scheduled start time of each profile, log data autonomously during the profile, and the MMP records engineering and status information. For the standard Profiling mode, where no profiles are skipped or missed, odd numbered profiles proceed from the bottom to the top of the programmed range. Even numbered profiles proceed from top to bottom. Profiling stops when the end of the programmed profiling range is detected. The sensors continue to log internally for a warm down period (default is 2 minutes), stop, and transfer data to the flash card. A profile is complete when the sensor and engineering files have been closed. The firmware enters Suspend mode and waits for the next scheduled profile. The MMP continues to profile until the deployment is terminated. 6-27 Section 6.3 Patterned Profiling Deployment Programming A separate Windows application called the Deployment Planner is the deployment programming method for Pattern profiling mode. Patterned profiling consists of a deployment schedule that can contain up to 12 reusable patterns. Each pattern can have up to 100 different profiles. Patterned profiling mode is set in the ‘Profiling mode’ option on the Advanced Interface Menu. The Deployment Menu for Patterned Profiling (Figure 6.3-1) has fewer options than the Standard profiling Deployment Menu. The Deployment Planner defines deployment settings and provides endurance estimates. The schedule is saved as a single file, SCHEDULE.DPL. This file is loaded into the Profiler via direct communication or flashcard. ___________________________________ Pattern Profiler Deployment Menu ___________________________________ Fri Jan 11 14:30:40 2013 Schedule V2.2 PIN "TANK TES2DEE1517" 07/21/15 15:15:00 Dive Zero 07/21/15 15:45:00 Pattern 0 ID <M> Mooring ID = 355 Start <D> Dive 0 Scheduled Start = 01/11/13 15:15:00 Deploy <V> Verify and Proceed Selection [] ? v Figure 6.3-1: Deployment Menu Pattern Profiling 6-28 Patterned Profiling Deployment Programming Clicking ‘Create’ from the initial screen defines a new project. ‘Browse’ locates existing project files (which have the file extension .MPR). Dive Zero Top and Bottom Stops Status Window Figure 6.3-2: Deployment Planner Project Tab The bottom stop is the depth that the Profiler will travel for Dive Zero. 6-29 1. Click ‘Create a New Project’. 2. Define the Top and Bottom stops, which are the allowed range (in dBars) for each profile in the pattern. The bottom stop cannot be below 6000 dBars. 3. Complete the checkboxes for the Instrument Configuration and select the specific sensors from the drop down lists. These selections are only used for an endurance estimate which is displayed on the Deployment tab. 4. Click the ‘Patterns’ tab to continue. 5. Add patterns in one of several ways as described in the section that follows: Telemetry must be selected in the Profiler firmware Configuration Menu to enable Telemetry sessions when defining profiles for the Deployment Planner. The start mode for a Patterned profiling deployment is always ‘Scheduled start’. 6-30 Patterns Tab On the ‘Patterns’ tab clicking the down arrow lists the patterns in the project (clicking ‘New’ creates a new pattern). When a pattern is selected, the Profiles are listed in the Pattern Contents window. Click arrow Click New to to see existing create a new patterns pattern Menu Bar Pattern Contents window shows profile settings Move Up/ Move Down Preview Pane Status Window Figure 6.3-3: Patterns Tab Dive Zero/ Pattern Zero Relationship and Deployment Programming When defining the first Pattern in a schedule (Pattern Zero), understanding how Dive Zero and the first Pattern function together is critical. Dive Zero start date/time is when the profiler travels to the bottom stop. First Pattern start date/time is when the profiler begins scheduled sampling and affects the rest of the deployment schedule. Pattern starts have only a date/time and not a year to allow the same patterns to repeat annually. Dive Zero date/time sets the year of the first Pattern. Understanding this relationship is critical to avoid programming an unintended long sleep. 6-31 If the first Pattern starts within 30 days of Dive Zero, the profiler treats the years of Dive Zero and the first Pattern as the same. If the first Pattern starts more than 30 days after Dive Zero, the Profiler treats the Pattern start as the next year and inserts a long sleep before the first Pattern. The screens that follow show examples of how the number of days between Dive 0 and Pattern 0 affects the start of Pattern 0. Figure 6.3-4 shows a Dive 0 of 04/09/2014 and a Pattern 0 of 05/08. Pattern 0 is within 30 days after Dive Zero therefore Pattern 0 starts in the same year (2014). Figure 6.3-4: Less than 30 Days Between Dive 0 and Pattern 0 6-32 Figure 6.3-5 shows a Dive 0 of 07/07/2014 and a Pattern 0 of 05/08. Pattern 0 is more than 30 days different from Dive Zero therefore Pattern 0 starts in the next year (2015). Figure 6.3-5: More than 30 Days Between Dive 0 and Pattern 0 Dive zero warning messages display on the Deployment Tab. Clicking the caution box provides error detail. 6-33 Figure 6.3-6 shows the warning when Dive Zero is 05/06/2014 and Pattern 0 is 05/08. Currently, Pattern 0 is scheduled for the same year as Dive 0 (2014). With only two days between, if the deployment is delayed for any reason and Dive Zero occurs later than 05/08, Pattern 0 would be moved to the following year (2015) Figure 6.3-6: Less than One Week Between Dive 0 and Pattern 0 6-34 Figure 6.3-7 shows the warning when Dive Zero is 06/09/2014 and Pattern 0 is 05/08. Pattern 0 is more than 30 days earlier than Dive Zero so is scheduled for the year following Dive 0 (2015). Figure 6.3-7: Pattern 0 is in the Year Following Dive Zero If Dive Zero needs to be changed, there is an opportunity to make adjustments in the Profiler firmware Deployment Menu (see Figure 6.3-1) just prior to beginning the deployment. 6-35 Profile Viewer Selecting View > Profile List from the menu displays the Profile Viewer, which contains profile details. Figure 6.3-8: Profile Viewer 6-36 Quick Add Mode Quick Add places more profiles into the pattern. As shown next, the defined pattern contains profiles ABABABBAB, therefore more ‘A’ and ‘B’ profiles can be added. Figure 6.3-9: Quick Add Mode 6-37 Profile Editor If not using the Quick Add mode, the profile editor is for adding new profiles or changing existing profiles within patterns. Add or Edit displays Profile Editor Quick Add Move Up, Move Down Figure 6.3-10: Profile Editor The Profile Editor table shown next describes the entries for a new profile. In general, navigation on this screen is as follows: • Zoom in [+], zoom out [-] and the scroll bars change the view (the selected profile is shaded light blue and highlighted in the Pattern Contents list). • ‘Move Up’ or ‘Move Down’ reorders profiles. • ‘Delete Profile’ removes the profile selected in the Pattern Contents window (deleted profiles are removed from the pattern but remain in the profile catalog). 6-38 Select from additional options to add or change profiles in the pattern. Figure 6.3- 11: Profile Editor – Edit Pattern Mode Profile Editor Add mode In add mode, click the Profile drop down arrow and select the next available letter for a new profile. The default direction for a new profile is Stationary and the default profile duration is ‘Same as Total Dive Time’. Edit mode In edit mode, Profile Name and Profile Description can be changed. The profile letter (A,B,C) cannot be changed. Shallow Range, Deep Range and Check Stop Controls For details about Shallow and Deep ranges and Check Stop Controls, see ‘standard profiling’ in this Chapter of the User Manual. Ignore Profile Errors checkbox If ‘Ignore Profile Errors’ is checked, the pop-up error box will not display when the Deployment Planner detects a profile with errors. Leaving ‘Ignore Profile Errors’ unchecked is recommended. Total Dive Time The Preview pane shows the Total Dive Time, which is automatically calculated based on profile settings. 6-39 • EditCopy, EditPaste (or CTRL C, CTRL V) adds another instance of a profile. All profile settings are copied. 6. After profiles are added, click the Deployment tab to verify patterns and profiles and make any changes (battery endurance estimate is in the lower right window). Status window Battery Endurance Figure 6.3-12: Deployment Planner Deployment Tab • On the Deployment Tab, use Move Up and Move Down to reorder patterns or click Add, Edit or Delete to change patterns in the deployment. Changing Dive 0 time on the Deployment tab changes the initial dive to the bottom. In patterned profiling, the Dive Zero date determines the start year of the first pattern in the list. See the section ‘Dive Zero/ Pattern Zero Relationship and Deployment Programming’ in this chapter for details. • 6-40 The Status window indicates the pattern and profile that are selected. Writing and Downloading the Deployment Schedule Select one of the following methods to load SCHEDULE.DPL into the Profiler firmware. The SCHEDULE.DPL file must be on the Profiler flashcard to run a Pattern Profiling deployment. • Clicking ‘Write SCHEDULE.DPL’ saves the deployment schedule in flashcard format to be manually copied to the Profiler’s flash card. • ‘Download SCHEDULE.DPL’ downloads the deployment schedule directly to the Profiler firmware via direct communication. ‘Write’ and ‘Download’ Schedule DPL automatically generate a PIN to uniquely identify the deployment schedule. PIN also displays in the firmware Deployment menu for Patterned Profiling Mode) to confirm the schedule that is loaded before committing to the deployment. The system-generated PIN (Figure 6.3-13) can be renamed to a more meaningful identifier (Figure 6.3-14). Figure 6.3-13: Write SCHEDULE.DPL 6-41 Figure 6.3-14: Rename PIN Proceed with the deployment [Y] ? _______________________________________________________________ Config: MPP_IM_CT_CM_PA_SC_MP CF2 V5.12 of Feb 11 2014 ___________________________________ Pattern Profiler Deployment Menu ___________________________________ Tue Mar 11 15:51:45 2014 Schedule V2.4 PID "Mooring_A_IndianOcean_2015" 03/11/14 16:30:00 Dive Zero 03/11/14 17:00:00 Pattern 0 ID <M> Mooring ID = 001 Start <D> Dive 0 Scheduled Start = 03/11/14 16:30:00 Deploy <V> Verify and Proceed Selection [] ? v Accept and store schedule selections [Y] ? Figure 6.3-15: PIN Display on Deployment Menu 6-42 To use direct communication complete the following steps: • Connect the COM cable to the computer and then to the Profiler • Click the ‘Download SCHEDULE.DPL button. During the scheduled download, the Status window shows the data packet that is transferred and reports progress as a percentage of total data bytes. The Download Results dialog box shows whether the download succeeds or fails. • Optionally, clicking ‘Export to ASCII’ creates a text file with project, pattern, and profile. 6-43 Write/Download/Export SCHEDULE.DPL Status window Figure 6.3-16: Status Window Information Figure 6.3-17: Download Results Dialog Box 6-44 • A log file is also generated and saved by default in the project directory (click ‘Browse’ to choose a different directory for the log file). When the download is complete, the Status window shows the percentage completed and the number of COM protocol exchanges that are transmitted. Figure 6.3-18: Download Succeeded Schedule Download Results Figure 6.3-19: Download Failed 6-45 Changing User Preferences Other Deployment Planner options include changing User Preferences from the Initial screen. User Preference options provide options that reset defaults including changing the battery endurance calculation. Clearing the Recent Projects list removes the projects that are listed on the initial Deployment Planner screen. Figure 6.3-20: Reset User Preferences Clicking ‘Battery Calculations’ displays the dialog box to change the default current draw (in mAh) for each sensor selected on the Project Tab. This affects the battery estimate only. Figure 6.3-21: Change Battery Endurance Calculation 6-46 Sample deployment screens for Patterned profiling is shown next. ___________________________________ Pattern Profiler Deployment Menu ___________________________________ Fri Jan 11 14:30:40 2013 Schedule V2.2 PID "TANK TES2DEE1517" 01/11/13 15:15:00 Dive Zero 01/11/13 15:45:00 Pattern 0 ID <M> Mooring ID = 355 Start <D> Dive 0 Scheduled Start = 01/11/13 15:15:00 Deploy <V> Verify and Proceed Selection [] ? v Figure 6.3-22: Deployment Menu Patterned Profiling Mode 6-47 Deploy <V> Verify and Proceed Selection [] ? v Accept and store schedule selections [Y] ? y 01/11/13 14:33:44 01/11/13 14:33:45 SYSTEM Updating SCHEDULE.DPL ... done. SYSTEM Storing deployment parameters ... done. !!!!!!!! WARNING: If you have not already done so, Remove the CTD flow path caps NOW. Failure to remove the caps prevents proper CTD operation during the deployment & may cause permanent sensor damage.. Have you removed the CTD caps [Y] ? y 01/11/13 14:33:46 SYSTEM Status. RTC 14:33:47, WDC 14:33:46, 11.0Vb, 0mA !!!!!!!! CAUTION: Deployment will ERASE ALL DATA stored on flash card. Proceed [N] ? y 01/11/13 14:33:49 01/11/13 14:33:49 SYSTEM Initializing autonomous operation. SYSTEM Setting motor to Free Wheel during launch ... done. !!!!!!!! NOTICE: DO NOT REMOVE communication cable until instructed. 01/11/13 14:33:50 SBE/IMM NOTICE! Communication channels already open. 01/11/13 14:33:50 SBE/IMM 9.6 kBaud communication channel closed. 01/11/13 14:33:51 SBE/IMM 9.6 kBaud communication channel opened. 01/11/13 14:33:51 SBE/IMM Powered on. 01/11/13 14:33:51 SBE/IMM Sending command [\n]. . 01/11/13 14:33:51 SBE/IMM Sending command [SETDEBUGLEVEL=2]. . 01/11/13 14:33:52 SBE/IMM Sending command [SETTERMFROMHOST=255]. . 01/11/13 14:33:53 SBE/IMM Sending command []. . 01/11/13 14:33:53 SBE/IMM Sending command []. . 01/11/13 14:33:53 SBE/IMM Sending command [GETCD]. ............................. . 01/11/13 14:33:57 SBE/IMM Sending command [FORCECAPTURELINE]. . 01/11/13 14:33:57 SBE/IMM Sending command [#G0:@@@MMP/ML12936-02/355/01]. . 01/11/13 14:33:58 SBE/IMM Sending command [RELEASELINE]. . 01/11/13 14:33:59 SBE/IMM Sending command [PWROFF]. . 01/11/13 14:34:00 SYSTEM Initializing data pointers and status flags ... done. 01/11/13 14:34:00 SYSTEM Initializing flash card. 01/11/13 14:34:00 SYSTEM Deleting all previous data files. Please wait ... 01/11/13 14:34:01 SYSTEM Saving AUTOEXEC.BAT ... done. 01/11/13 14:34:01 SYSTEM Reading SCHEDULE.DPL ... done. 01/11/13 14:34:01 SYSTEM Format C: /v:Profiler500 /q /p ... 01/11/13 14:34:15 SYSTEM Restoring SCHEDULE.DPL ... done. 01/11/13 14:34:15 SYSTEM Restoring AUTOEXEC.BAT ... done. 01/11/13 14:34:15 SYSTEM Initializing disk pointers. 01/11/13 14:34:15 SYSTEM Creating DEPLOY.DAT ... done. 01/11/13 14:34:15 SYSTEM Creating PROFILES.DAT ... done. 01/11/13 14:34:16 SYSTEM Creating IRQ_XCPT.LOG ... done. 01/11/13 14:34:16 SYSTEM Creating LASTSENT.DAT ... done. 01/11/13 14:34:17 SYSTEM Generating S0000000.DAT from SCHEDULE.DPL ... 01/11/13 14:34:17 SYSTEM Copying SCHEDULE.DPL to S0000000.DAT. SCHEDULE.DPL 1 file(s) copied Figure 6.3-23: Sample Deployment –Patterned Profiling (1 of 2) 6-48 01/11/13 14:34:19 SYSTEM Flash card initialization complete. 01/11/13 14:34:19 SYSTEM Saving emergency schedule ....... done. 01/11/13 14:34:20 SYSTEM Current time is 01/11/13 14:34:19. 01/11/13 14:34:21 SYSTEM Sensor warmup at 01/11/13 15:15:00. 01/11/13 14:34:21 SYSTEM Initial dive at 01/11/13 15:17:00. !!!!!!! NOTICE: System is ready to deploy. Remove communication cable NOW. Install communications port dummy plug. Attach faired bottom cap to vehicle. 01/11/13 14:34:22 SYSTEM Waiting until 01/11/13 15:15:00. ... Figure 6.3-24: Sample Deployment –Patterned Profiling (2 of 2) 6-49 Notes 6-50 Chapter 7 Deployment and Recovery Attaching to a Mooring Physical stoppers can be secured to the mooring cable above and below the range defined by the pressure stops. These stoppers are available from McLane and are manufactured specifically for use with the profiler. Stoppers are typically placed 5 meters to 50 meters outside the range defined by the pressure stops. The actual placement depends on the anticipated dynamics of the mooring and on the placement of other mooring components. Stoppers prevent the profiler from straying off the portion of the mooring reserved for it. This is important because flotation and other instrumentation may occupy other parts of the mooring. Mooring Example This deployment example assumes a simple mooring with a subsurface float, a single, continuous length of jacketed cable, an acoustic release, and an anchor. Two physical stops with padded stoppers are mounted on the mooring, some distance above and below the programmed depth limits of the profile. In more complex moorings there may be additional instruments above and/or below the physical stops. The ship has a rear A-frame, a crane, and a selection of winches, blocks, and capstans. You may need to modify the process that follows based on your specific equipment. The Profiler requires 500 lbs (227 kg) of tension be maintained on the wire at all times in order to move up and down. 7-1 Sub-surface flotation (typical 30-50m) Top stopper 1m below subsurface buoy Profiler Travels Up and Down the Wire Bottom stopper Reserve flotation (typical) Acoustic release (typical) Figure 7-1: MMP Mooring Schematic 7-2 Launch Preparation To deploy the profiler, program the deployment using one of the options described earlier in this Chapter and continue with the following steps: 1. Disconnect the communications cable and attach the dummy plug. Secure the bottom faired end cap. Figure 7-2: Connecting the Battery 2. Check the sensor-specific sections in Profiler Integrated Sensors and Communications Interface User Guide. Some sensors have mounting components such as hinged support brackets that must be removed to attach the mooring wire. 7-3 3. Remove the cable retainers to attach the MMP to the mooring cable. Figure 7-3: Removing the Cable Retainers 4. Launch a subsurface float using the crane and begin streaming the mooring cable behind the ship using the winch and a block suspended from the A-frame. 5. Pull cable that has passed through the block onto the deck and attach the top bumper at the intended depth. 6. Stream additional cable and again pull cable that has passed through the block onto the deck. 7. Lay the cable in place along the front plate of the MMP, ensuring the cable is oriented so that the top of the profiler is towards the subsurface float and the bottom of the profiler is towards the block. 8. Secure the MMP to the cable with the cable retainers. Tighten all eight of the socket head nylon cap screws firmly. 9. Pass the cable under the hinged bracket on which the ACM sting is mounted and secure the bracket. Make sure the drive wheel properly engages the cable. 10. Using the crane and appropriate tag lines, lift the MMP using the loop of rope that extends out of the bottom faired end cap. 11. Use a slip line or a release to attach the crane to the rope loop. Gradually allow cable that had been pulled onto the deck and attached to the MMP to return to the 7-4 position it occupied while streaming. The MMP is now supported, upside-down, from the crane and the cable. 12. Use the crane to slide the profiler down the cable and into the water. When the MMP is sufficiently immersed to avoid unnecessary snap loads, release it and recover the crane and tag lines. 13. Continue to stream cable, attaching the lower bumper at the planned location. Secure the end of the cable to the acoustic release and anchor. 14. Deploy the anchor when the station is reached. 7-5 Post-Deployment Operations After the deployment ends and the MMP is recovered, connecting the instrument to a computer and using Option <7> ‘Offload Deployment Data’ displays the binary data that was collected. The profile count can be examined and some binary data files reviewed before removing the flash card. Deployment Termination A deployment typically ends when it is manually terminated after MMP recovery, the battery drains or the last profile in the schedule is completed. The Deployment termination code is stored in EEPROM and can be viewed using option <7> ‘Offload Logging Files’ from the Offload Deployment Data menu. A complete list of Deployment Termination codes and definitions is provided in Appendix B of this User Manual for reference. Reviewing Deployment Data Use the option <3> ‘Flash Card Ops’ and option <7> ‘Offload Deployment Data’ to review deployment data before removing the flash card from the electronics: 1. Boot the computer and start Motocross or Crosscut (with capture ‘On’). 2. Connect the COM cable provided in the Toolkit to the computer. 3. Remove the dummy plug from the MMP connector and connect the COM cable to the MMP COM port (on the pressure housing end cap). 4. Press [CTRL]-[C]. This terminates the deployment or wakes the system from Suspend mode. If the deployment is terminated while a profile is in progress, a prompt after the first [CTRL]-[C] may ask to save or discard that portion of the data. 5. From the Main Menu select <3> ‘Flash Card Ops’ and then select <2> ‘List flash card files’. 6. Examine the profile count and view the list of data files. 7-6 7. From the Main Menu select <7> ‘Offload Deployment Data’ to display the Offload Menu options. Selection [] ? 7 ________________________________________________________________ Configuration: MMP_IM_CT_CM_PA_SC CF2 V5_00 of Dec 7 2012 ___________________________________ Offload Files From FLASH ___________________________________ Tue Dec 11 17:43:26 2012 Offload from: <D> Deployment <S> Single profile <G> Group of profiles <L> Logging files <M> Main Menu Figure 7-4: Offload Files from FLASH Menu Option <D> ‘Deployment’ selects only the specified file type, or all data files from the deployment. Option <S> ‘Single profile selects the only the specified file type, or all files from a specific profile. Option <R> ‘Range of Profiles selects only the specified file type, or all files from within a user-specified range of profiles. 7-7 Option <L> selects deployment log files. Select from the files to offload. Selection [] ? l ________________________________________________________________ Configuration: MMP_IM_CT_CM_PA_SC CF2 V5_00 of Dec 7 2012 ___________________________________ Offload Logging Files Menu ___________________________________ Tue Dec 11 17:43:28 2012 Select log to offload: <1> Profiles.dat <2> Deploy.dat <3> IRQ/Xcpt Log <4> Profile Termination Log <5> Last sent <6> Deployment Termination Condition <M> previous Menu Figure 7-5: Option <L> Offload Logging Files Menu 7-8 Option <1> ‘Profiles.DAT’ displays the number of the last profile of the deployment. Selection [] ? 1 Profile count: 208 Press any key to continue. Figure 7-6: Log Files Option <1> Profiles.dat 7-9 Option <2> ‘Deploy.DAT’ displays the conditions under which deployment data was collected. Selection [] ? 2 DEPLOYMENT PARAMETERS _____________________ Countdown delay Profile start interval Reference date/time Burst interval Profiles per burst 00:02:30 [HH:MM:SS] 000 00:30:00 [DDD HH:MM:SS] 11/29/2012 15:10:33 010 00:00:00 [DDD HH:MM:SS] disabled Paired profiles Profiles / file set Shallow pressure 1 1.5 [dbar] Deep pressure 11.5 [dbar] Shallow error 1.0 [dbar] Deep error 1.0 [dbar] Profile time limit 00:00:50 [HH:MM:SS] Stop check interval 5 [sec] Transmission duration 0 [min] SYSTEM CONFIGURATION ____________________ Nominal Endurance 240 Ah Inductive Telemetry ----------- ENABLED IMM @ 1200 baud File Deletion ----------------- ENABLED @ 60 profiles stored FSI EM CTD Seabird 41CP CTD Seabird 52MP CTD -------------- ENABLED Figure 7-7: Log Files Option <2> Deploy.Dat (screen 1 of 2) 7-10 RBR 620 CTD FSI 2D ACM Falmouth Scientific 3d ACM+ Nobska MAVS ACM Teledyne RDI DVS Nortek AquaDopp DVS ----------- ENABLED Seapoint CHL Fluorometer Wetlabs CDOM Fluorometer Seapoint IR Turbidity BioSuite Triplet/PAR Satlantic SUNA Nitrate Aanderaa Optode Wetlabs ECO BBFL2 ------------- ENABLED Wetlabs ECO FLBB(RT)/D OceanServer5000 MotionPack ---- ENABLED Biospherical PAR -------------- ENABLED @ 5 samp/avg INTERNAL PARAMETERS ___________________ FullSpeed 0.250 [dbar/sec] PR_Threshold 0.045 [dbar/sec] PR_TimeThreshold 180 [sec] sensor_warmup 120 [sec] sensor_warmdown 120 [sec] Press any key to continue. Figure 7-8: Log Files Option <2> Deploy.Dat (screen 2 of 2) 7-11 Option <3> IRQ/XCPT Log displays the time tagged log of interrupt requests and exceptions. The first entry is the creation time of the file. Subsequent entries include regular watchdog IRQ requests at one minute after each hour. Selection [] ? 3 12/11/12 17:43:37 SYSTEM Opening exception processing log. 12/07/2012 14:00:43 Log file creation time. 12/07/2012 15:01:08 Unattended system reset by watchdog. 12/07/2012 16:00:59 Watchdog IRQ acknowledged. 12/07/2012 17:00:59 Watchdog IRQ acknowledged. 12/07/2012 18:00:59 Watchdog IRQ acknowledged. 12/07/2012 19:00:59 Watchdog IRQ acknowledged. 12/07/2012 20:00:59 Watchdog IRQ acknowledged. 12/07/2012 21:00:59 Watchdog IRQ acknowledged. 12/07/2012 22:00:59 Watchdog IRQ acknowledged. 12/07/2012 23:00:59 Watchdog IRQ acknowledged. 12/08/2012 00:00:59 Watchdog IRQ acknowledged. . . . 12/11/2012 08:00:59 Watchdog IRQ acknowledged. 12/11/2012 09:00:59 Watchdog IRQ acknowledged. 12/11/2012 10:00:59 Watchdog IRQ acknowledged. 12/11/2012 11:00:59 Watchdog IRQ acknowledged. 12/11/2012 12:00:59 Watchdog IRQ acknowledged. 12/11/2012 13:00:59 Watchdog IRQ acknowledged. 12/11/2012 14:00:59 Watchdog IRQ acknowledged. 12/11/2012 15:00:59 Watchdog IRQ acknowledged. 12/11/2012 16:00:59 Watchdog IRQ acknowledged. Press any key to continue. Figure 7-9: Log Files Option <3> IRQ/Xcpt Log 7-12 Option <4> ‘Profile Termination Log’ displays data from the last ten profiles, including the profile exit condition. Selection [] ? 4 The profile termination log consists of data from the last 10 profiles stored in rolling file buffers The display below is not date sorted. 12/11/12 17:43:51 Profile: SYSTEM Reading ProfileA.log ... done. 200 Motion start: 12/11/12 14:02:03 Motion stop: 12/11/12 14:03:09 Start pressure: 12.8 [dbar] Stop pressure: 12.8 [dbar] Ramp exit: SMOOTH RUNNING Profile exit: STATIONARY TIMER Log time: 12/11/12 14:06:20 . . . 12/11/12 17:43:55 Profile: SYSTEM Reading ProfileJ.log ... done. 199 Motion start: 12/11/12 13:47:01 Motion stop: 12/11/12 13:48:06 Start pressure: Stop pressure: 0.7 [dbar] 12.8 [dbar] Ramp exit: SMOOTH RUNNING Profile exit: BOTTOM PRESSURE Log time: 12/11/12 13:51:14 Press any key to continue. Figure 7-10:Log Files Option <4> Profile Termination Log 7-13 Option <5> Last Sent displays the last inductive file transmitted. Selection [] ? 5 12/11/12 17:44:01 SYSTEM Reading LASTSENT.DAT ... done. Oldest profile transmitted is 116 Press any key to continue. Figure 7-11: Log Files Option <5> Last Sent Option <6> ‘Deployment Termination Condition’ displays the deployment termination code. Selection [] ? 6 12/11/12 17:44:04 SYSTEM Deployment terminated by operator on 12/07/12 11:24:24. Press any key to continue. Figure 7-12: Log Files Option <6> Deployment Termination Condition 8. Once all necessary data files are reviewed turn the Motocross capture feature ‘Off’. 9. Return to the Main Menu and select <4> ‘Sleep’. 7-14 Recovery Procedure To recover the MMP, complete the following steps: 1. Trigger the release and capture one end of the mooring. 2. Detach the float and run the cable through the A-frame block and onto the winch. When the upper bumper is reached, pull that section of cable onto the deck and remove the bumper. 3. Continue to wind cable onto the winch. The MMP will be on the tether somewhere between the stoppers. The exact location of the MMP depends on the profiling schedule, ballasting accuracy, and whether the tension in the cable after release can sustain some degree of coupling with the drive wheel. The presence of flotation modules below the lower stopper may have a strong effect on coupling. However, the MMP is not buoyant in air and the drive wheel, even with strong coupling, will only sustain a few pounds. 4. Continue to wind the mooring cable onto the winch and, in the absence of severe fouling or entanglement, the MMP must eventually fetch up against the bottom stopper. The stopper will sustain the full flooded weight of the MMP and can be used to lift the profiler clear of the water. If you recover the bottom of the mooring first, the top stopper can be used to lift the MMP. 7-15 Figure 7-13: Recovering an MMP 5. Once the MMP has been lifted clear, pull it onto the deck and release it from the tether. The drive motor may be running while you work and it can be safely ignored until you can connect a communications cable to the system and terminate the deployment. Always boot the computer and start the communications software before connecting the communications cable. Connect the COM cable first to the computer and then to the MMP. 6. Move the MMP to a dry, stable location and rinse with fresh water. Thoroughly rinse the end cap of the controller housing since you will be opening that first to recover the data. 7. See the ‘Unpacking Deployment Data’ section of this chapter to use Offload data options and check the binary data profile count before removing the flash card. Once the compact flash card has been recovered and the end cap has been reinstalled, rinse or immerse the MMP in fresh water more thoroughly. 7-16 Unpacking Deployment Data After the data files are checked (see the steps in the ‘Operations’ chapter in this User Manual), the flash card can be removed from the profiler and the data files can be unpacked. Removing the Flash Card After checking the data files, complete the following steps (in order) to remove the flash card: • Put the Profiler into Suspend mode. • Open the Profiler pressure housing and remove the compact flash card. • Insert the compact flash card in a compact flash card reader. • Run the Profile Unpacker Windows application to unpack binary data files into readable ASCII text (CSV or SPV format). • Perform further data analysis (for example, mapping velocity measurements and synchronizing sensor data streams). Do not expose the electronics or flash card to salt water. Move the Profiler to a stable, dry area before opening the pressure housing and if the electronics get wet, immediately disconnect power, immerse in fresh water (do not immerse the lithium battery) and dry. To remove the compact flash card from the electronics housing complete the following steps: 1. Open the pressure relief valve on the pressure housing to equalize the internal and external pressure. See Chapter 4, ‘Mechanical Description’ in this User Manual for details about the pressure relief valve and opening the controller housing. 2. Disconnect the cables from the electronics housing. 3. Unscrew the six socket-head stainless steel cap screws that secure the end cap, pry open the pressure housing, and slide out the electronics assembly. 7-17 4. Disconnect the battery. 5. Slide the compact flash card out of its socket and remove it. Figure 7-14: Flash Card Removal 6. Insert the compact flash card into the compact flash card reader on a computer. 7. Copy the flash card contents to the computer hard drive (this procedure does not remove the data from the flash card). 8. See the section that follows to run the Profiler Data Unpacker. This tool unpacks the binary data files to readable text files. 7-18 Using the Profile Data Unpacker The Profile Data Unpacker automatically unpacks binary deployment files. Unpacker.Exe is included with the media that ships with the Profiler. Unpacker supports profiler firmware releases back to v3.01. Copy Unpacker.exe into a computer directory or download the most current Unpacker.zip file from www.mclanelabs.com. Source Contents Files to Unpack Figure 7-15: Profiler Data Unpacker Before unpacking the binary data, create file backups in the computer directory where the binary data from the flash card is copied. 1. Start Unpacker.Exe. 2. Select the Source Folder that contains the binary files. The Contents window displays the firmware version that created the file and the number of profiles recorded. 7-19 3. Select a Destination folder for the unpacked data, either in the default folder that displays or in a new folder. If the destination directory does not exist, the Unpacker prompts to create the directory. 4. The firmware automatically fills in the appropriate check box in ‘Files to Unpack’ based on the sensor data that exists in the Source folder. 5. Additional selections display in ‘Files to Unpack’ if Inductive files are present. 6. The ‘Add prefix to output files’ checkbox optionally attaches a user-defined prefix to the unpacked data files to identify unpacked files from multiple deployments. 7. Files can be unpacked as Comma Separated Value (CSV) or Space Padded Value (SPV) formats. CSV format is the default. Unpacking progress displays in the status bar. Errors are reported in the Unpacker Activity Log (see Figure 7-16). Details of the unpacking process are saved in UNPACKER.LOG in the destination directory. The Unpacker skips missing data files and continues processing. A summary at the end of the UnpackLog.TXT and UnapckErrors.TXT files notes the total number of missing files. Figure 7-16: Data Unpacking Status 7-20 The Source Files, Unpacked Files and Activity Log can be viewed by clicking the appropriate link. View Activity Log Figure 7-17: Data Unpacking Complete Converted DEPLOY.DAT information is written to a DEPLOY.TXT file and also saved in the destination directory. Archive DEPLOY.DAT as a record of the conditions under which the data was collected. Unpacked Files Unpacked files include self-logging sensor data, auxiliary files, and informational files created by the Unpacker. Data for sensors other than the self-logging sensors log data in the Engineering file. The unpacked files are assigned names with the file type (for example, Engineering files are ENNNNNNN.DAT, CTD files are CNNNNNNN.DAT, ACM files are ANNNNNNN.DAT, and so on, identifying the files for example, engineering (E) and the profile number padded including leading zeros (0000000, 0000001). When DEPLOY.DAT is located in the source directory, the firmware version, sensor selections and data files to unpack default based on installed sensors. Data can be unpacked in Comma Separated Value (CSV) or Space Padded Values (SPV) which is a fixed format output. The default is CSV. 7-21 In addition to UNPACKER.LOG, and the unpacked sensor and Engineering files, other auxiliary text files are saved in the destination directory with DEPLOY.TXT. A complete list of unpacked files and file contents is listed in Appendix C of this User Manual for reference. Profile Exit Conditions Defined The ENG file records how each profile ends. This information, called ‘Profile exit’ is included for each profile with the unpacked ENG file. Profile 2 Sensors were turned on at 12/07/2012 16:30:02 Vehicle began profiling at 12/07/2012 16:32:02 Date, [mA], [V], [dbar], Par[mV], scatSig, chlSig, CDOMSig 12/07/2012 16:32:02 -30, 12.1, 0.800, 10.80, 70, 53, 99 12/07/2012 16:32:08 -29, 12.1, 0.800, 12.80, 70, 52, 101 12/07/2012 16:32:14 -30, 12.1, 0.800, 13.80, 71, 53, 100 12/07/2012 16:32:19 -30, 12.1, 0.790, 14.00, 69, 55, 100 12/07/2012 16:32:25 -30, 12.1, 0.800, 17.40, 71, 54, 99 12/07/2012 16:32:31 -30, 12.1, 0.800, 11.40, 70, 53, 101 Ramp exit: SMOOTH RUNNING Profile exit: STATIONARY EXPIRED Profile Exit Condition Vehicle motion stopped at 12/07/2012 16:33:07 Sensor logging stopped at 12/07/2012 16:35:15 Figure 7-18: Unpacked Engineering File – Profile Exit Condition A complete list of of the profile exit conditions is provided in Appendix B of this User Manual for reference. . 7-22 Data Processing after Unpacking Processing and interpreting unpacked Profiler data is the next step. A suite of Matlab shareware programs designed to process MMP data has been developed at the Woods Hole Oceanographic Institution. The programs are freely available to all members of the Moored Profiler community, however, Matlab is required to for these processing tools. Contact McLane Research Labs www.mclanelabs.com for more information. Mission Planner is a tool developed by McLane that works with the Unpacker to graphically display unpacked deployment data and provide battery endurance estimates. Contact McLane ([email protected]) for more information about the Mission Planner. 7-23 Notes 7-24 Chapter 8 Maintenance and Storage Cleaning and Inspection Procedures Several maintenance procedures are recommended for the MMP. Before deployment, after recovery, and before and after storage, inspect the following: • O-rings • Bulkhead and cable connectors • Nylon and stainless steel hardware • Glass spheres If you can immerse the MMP in fresh water, use warm water with soap or mild detergent added to remove salt and other substances. Common soaps and detergents will not damage the MMP. Do not use solvents. Thoroughly rinsing the MMP with fresh water immediately after recovery is a critical maintenance procedure to extend system life and prevent future problems. Salt crystals can form on o-rings or o-ring sealing surfaces as seawater evaporates, leaving grit that could cause future leaks. O-Rings Both ends of the controller housing are sealed with face and radial o-rings. Inspect o-rings for damage, wear, and foreign material before and after every deployment to prevent flooding of the housing. Look for small cracks and feel for bumps, grit, or hair. After inspection, ensure that the o-rings stay in position as the end cap is inserted into the cylinder. Spare o-rings are included in the Toolkit. Part numbers are given in the following table: Controller Face 2-256, BUNA-N, 70 durometer Radial 2-253, BUNA-N, 70 durometer Back-up 8-253, BUNA-N, 90 durometer 8-1 Apply a thin, even coating of lubricant to the o-rings when they are installed and inspected. McLane recommends Parker O-Lube, a barium-based grease made by Parker Seals, for use with pressure housing o-rings. O-Lube is environmentally safe and can be cleaned up with soap or mild detergent. The motor housing has two o-rings on the end cap. There are no user serviceable parts inside the motor housing. Motor Radial 2-146, BUNA-N, 70 durometer Back-up 8-146, BUNA-N, 90 durometer Bulkhead and Cable Connectors The bulkhead connectors, with the exception of the connector on the motor housing, are fabricated from glass reinforced epoxy. The motor connector is neoprene. All of the connectors are threaded into their end caps and sealed with o-rings. These are long-term seals and do not require regular inspection as long as the connectors and end caps are thoroughly rinsed/soaked in fresh water after recovery. The pins and bodies of the bulkhead connectors and the sockets and cowls of the cable connectors must be regularly inspected, cleaned, and greased to prevent leaks. Connectors that are regularly connected and disconnected, such as those on the end cap of the controller housing, require regular maintenance. This is particularly true of the communications cable, bulkhead connector, and dummy plug. Apply a thin coating of grease to all contact surfaces, including pins, sockets, cowls, and bodies. McLane recommends DowCorning 55, an o-ring lubricant, for this purpose. Silicon-based products such as Dow-Corning 4 or Dow-Corning 5 are also suitable. All of these lubricants are environmentally safe and can be cleaned up with soap or mild detergent. Properly maintained connectors will commonly trap a small quantity of air as they are mated. The air can cause problems and should be removed before tightening the plastic locking shell. To remove the air, place the fingers of one hand around the top of the cowl and slide them towards the bulkhead connector while squeezing. You should hear the air escape. 8-2 Connector Alignment Cables and connectors are labeled to indicate the correct match. Confirm that the cables are matched with the corresponding connectors. Figure 8-1: Connector Labels Do not force together cables and connectors until they are properly matched and aligned. Forcing a connection with the wrong cables or misaligned cables could damage the sockets, electronics, or peripheral components. Nylon and Stainless Steel Hardware Nylon hardware is used in the MMP because it is light, strong, and does not corrode. Maintenance requires fresh water rinsing after recovery. Do not over tighten the nylon hardware as the threads are easily stripped and the heads of screws and bolts can twist off the shaft when excessive torque is applied. The flat head bolts that secure the MMP skin can pull right through the skin if they are over-tightened. The MMP Toolkit contains spare screws and bolts. Do not force the nylon bolts. Nylon absorbs water and swells slightly when immersed, therefore, the screws and bolts will be tighter when the MMP is recovered. The swollen screws and bolts will respond to a slow, steady turn and should not be forced. 8-3 The socket head cap screws securing the controller and motor housing end caps are 316 stainless steel. They are more robust than the nylon hardware, but they should still not be overtightened. A thin coating of non-metal, anti-seize, thread compound should be applied to the screws before they are threaded into the titanium pressure housing. McLane recommends Lub-O-Seal’s NM-91 non-metal anti-seize thread compound for the MMP controller and motor housings. Replacement cap screws used with the titanium housings should be 316 stainless steel. Contact McLane for additional spares if necessary. Tighten the controller housing end cap screws evenly and carefully. The end cap should slide smoothly into the pressure housing. Visually check that wires are not caught between the end cap and the housing Glass Spheres After each deployment, visually inspect the glass spheres to check for signs of fatigue caused by repeated pressure cycling. Inspect the inside for: (1) excessive glass dust, (2) large shards of glass, (3) spawls on the equator, (4) water. If signs of glass fatigue are present the sphere should be replaced at McLane. The installation of new glass spheres requires re-ballasting. A re-glass, reballast service is available at McLane. Battery Maintenance Lithium Battery Pack The MMP is powered by a high-capacity lithium battery pack. Twenty-four double-D cells are assembled in two layers inside the pack. Electrically the pack is arranged in eight parallel stacks of three cells in series. The nominal delivered voltage is 10.8 V. The nominal energy capacity of the battery is 240 Ahr. 8-4 Wrap the alkaline batteries in non-conductive plastic, or tape the contacts to prevent discharge. The lithium in the battery pack qualifies as Class 9 hazardous goods. U.S. and international regulations require shipping the main lithium battery via an approved hazardous goods shipper. Sensor Maintenance Sensors should be fully calibrated at a properly equipped facility before and after deployments. The calibration results allow investigators to account for sensor drift during data post-processing. Calibration can be performed by the sensor manufacturer. If you can provide an environment of known characteristics for the sensor, you can also perform this test to provide a quick verification of function and accuracy. Packing and Storage The MMP shipping crate is a fitted, reusable, international freight container. The crate is intended for both shipping and storing the MMP and meets the requirements for international transport by ground, ocean, or air freight carriers. If storing the MMP for more than one month, ensure that any data stored on the flash card is properly archived and remove all batteries (main lithium battery pack, backup alkaline batteries) from the controller housing. Check the o-rings, reassemble the housing, and perform any necessary maintenance procedures, including a fresh water rinse. Keep the MMP assembled for shipping or storage. Storage facility temperatures between 0°C and 40°C are recommended. Temperatures above this range should not cause damage, however, temperatures below 0°C could cause damage if water is still present in crevices or seals. 8-5 Packing the FSI ACM Sting in the Crate If the Profiler has a Falmouth Scientific Inc. (FSI) ACM, the ACM sting fits in the crate next to the top section of the MMP. Slide a short length of the oil filled cable out from the interior of the MMP and surround the sting with ample padding to prevent movement. Ensure that the fingers are protected on all sides and are clear of the crate cover. Handle the oil filled tube with care. Do not pinch or pull the oil filled tube during packing. Figure 8-2: Fitting the MMP in the Crate 8-6 Stabilizing the Motor in the Crate To prevent the MMP motor from moving and becoming damaged during shipment, the crate contains additional inside supports. If shipping the MMP in a crate without this added motor stabilization, use foam or other padding to support the motor in a manner similar to Figure 8-3. Figure 8-3: Stabilizing the Motor in the Crate Storing the Battery If the main battery is not fully discharged, cover the connector with insulating tape and store the battery within the 0°C and 40°C temperature range. The battery should never be exposed to temperatures in excess of 93°C. If the main battery is fully discharged it should be disposed in accordance with safety and environmental regulations. 8-7 Notes 8-8 MMP Version 5.22 Appendix A Quick Reference to Sampling Parameters MMP Deployment Definition Parameters Quick Reference Mooring ID: Three position numeric identifier (001 to 999) sent with UIM metadata (stored with deployment data in the URAO). Differentiates data if more than one MMP is deployed. Countdown delay: The MMP wakes from ‘sleep’ when the countdown alarm reaches zero. If the transponder is installed, the countdown begins when the firmware pings the transponder and profile 0 begins when the countdown reaches zero (one to two minutes after confirming deployment). Range: 0 seconds to 24 hours in 1 second increments. OR Scheduled start: Scheduled start is an absolute date and time. Profile 0 begins when the RTC reaches the specified time. Range: Years 1970 to 2038 in 1 second increments and at least 10 minutes in the future as measured by the RTC. Profile start interval/Pair start interval: Interval between profiles or profile pairs measured between the start of profiling motion of sequential profiles or pairs of profiles. Continuous profiling results from a 0 setting. Range: 0 seconds to 366 days in 1 second increments. Reference date/time: Initial reference time for the deployment (start of Profile 1). Subsequent profiles reference this time. Range: Years 1970 to 2038 in 1 second increments. Burst interval: Interval between profile bursts or profile pairs. Continuous bursts are selected by setting the burst interval to 0. Range: 0 seconds to 366 days in 1 second increments. Profiles per burst/ Pairs per burst: The number of profiles or pairs of profiles in a burst. Setting this to 1 disables burst profiling. Range: 1 – 1000 profiles or pairs of profiles. Paired profiles: Enables or disables paired profiles. When paired profiles are enabled, the deployment is scheduled in up-down pairs. Range: Enabled/Disabled. Profiles/file set: Profiles stored on the flash card as a single data file. Example: ‘10’ places profiles 1 through 10 into a single data file on the flash card. (Unpacker produces 1 file per profile when the raw data is processed from the flash card). Shallow pressure: “Top” of the profiling range. The MMP stops profiling on an upward profile when the ambient pressure drops below this limit. Range: 0.0 dbar to Deep pressure. Appendix A-1 Deep pressure: “Bottom” of the profiling range. The MMP stops profiling on a downward profile when the ambient pressure exceeds this limit. Range: Shallow pressure to 6000.0 dbar. Shallow error: A relative pressure below (deeper than) the shallow pressure stop. If a zero pressure rate is detected while inside the shallow error window on an upward profile, profiling stops. This value is relative to the shallow pressure. Range: 0.0 dbar to 6000.0 dbar. Deep error: A relative pressure above (more shallow than) the deep pressure stop. If a zero pressure rate is detected while inside the deep error window on a downward profile, profiling stops. This value is relative to the deep pressure. Range: 0.0 dbar to 6000.0 dbar. Profile time limit: Maximum time for profiler motion. If the time limit expires while profiling, the MMP stops. Calculation: profile time limit = 1.25 × (deep pressure - shallow pressure) / nominal profiling speed. Range: 10 seconds to 8 hours in 1 second increments. Stop check interval: Frequency to check ambient pressure, pressure rate, elapsed time, battery voltage and motor current. Range: 1 second to 60 seconds in 1 second increments. Fluorometer: If the fluorometer is enabled, this option can be used to change the gain and the average number of samples to record. OBS Turbidity: If the turbidity is enabled, this option can be used to change the gain and the average number of samples to record. Power for a single profile: Single profile battery drain is one of the components of the battery endurance estimate. Total profiles/ (240 Ah): Total estimated profiles based on battery energy (the L24-1000 battery has 240Ah). Battery energy can be changed in the System Configuration menu). Est battery expiration: Estimated battery expiration. Estimate basis: battery energy, single profile drain, and total profile number (estimate adjusts as deployment parameters change). Verify and proceed: Selecting ‘V’ instructs the firmware to conduct parameter range and consistency checks and perform the endurance calculation but does not start the deployment. Appendix A-2 Appendix B Profile Exit Conditions The Profile Exit describes how each profile ends. Profile Exit is listed in the ENG file. Some exit condition thresholds are set in the firmware Advanced Interface menu. Profile Exit Conditions Condition Definition SMOOTH RUNNING Profile ended as programmed. OPERATOR [CTRL]-[C] Operator exit. LOGGER COM FAILURE Microcontroller error. CTD COMM FAILURE CTD Communications Error TIMER EXPIRED Time limit expired. MIN BATTERY Low battery voltage reached. MAX MOTOR CURRENT High Motor current was detected for the number of Backtrack iterations specified. TOP PRESSURE Programmed top (shallow) pressure was reached. BOTTOM PRESSURE Programmed bottom (deep) pressure was reached. PRESSURE RATE ZERO Pressure rate programmed detected for lower than threshold was the number of Backtrack iterations specified. STOP NULL Profile ended for an unknown reason. FLASH CARD FULL Disk capacity was reached. FILE SYSTEM FULL (For TT8 microcontrollers only) File capacity of 4095 was reached. B-1 Profile Exit Conditions Condition Definition TOO MANY OPEN FILES File system firmware not functioning properly. STATIONARY EXPIRED For Patterned indicates that Profiling a mode, stationary profile completed successfully. DOCK PROXIMITY For Adaptive and Patterned Profiling modes, indicates that docking with a charging station completed successfully. B-2 Appendix C Unpacked Files The Profile Data Unpacker unpacks binary deployment data files to readable format. The list that follows provides information about files that the Profile Data Unpacker creates. For more information about the Profile Data Unpacker see Chapter 6 ‘Unpacking Deployment Data’ in this User Manual. File Contains Axxxxxxx.DAT ACM sensor files Cxxxxxxx.DAT CTD sensor files Nxxxxxxx.DAT SUNA nitrate sensor files Bxxxxxxx.DAT Biosuite sensor files Mxxxxxxx.DAT Motion Pack sensor files Sxxxxxxx.DAT Deployment Planner Schedule files (for Patterned Profiling) Exxxxxxx.DAT Engineering files contain date, mA, V and dbar data. Each sensor occupies a consistent order in the data file. For example, Fluorometer data first, followed by Turbidity data next, followed by Optode data. Oxxxxxxx.DAT CO2 sensor files Hxxxxxxx.DAT Methane sensor files Fxxxxxxx.DAT Fluoroprobe sensor files Profiles.DAT Unpacks to Profiles.TXT and contains the profile count, which is the number of the last profile of the deployment. LastSent.DAT Unpacks to Last Sent.TXT IRQ_XCPT.DAT Unpacks to IRQ_XCPT.LOG C-1 File Contains Deploy.TXT For the standard Profiler, this file contains deployment configuration, for the scheduled Profiler, this file also contains the deployment schedule. UnpackErrors.TXT Summarizes the total files that were unpacked and missing. UnpackLog.TXT. Provides a list of unpacked files and indicates file unpacking results. If a file does not unpack it will be missing from the list. A message at the bottom of the screen indicates total number of unpacked and missing files and whether or not errors existed (see Figure D-1). TimeTags.TXT Each line contains profile number, sensor power on date and time, motion start date and time, sensor turn off date and time, and profiler termination code defining how each profile ended (see Appendix C in this User Manual for more details about Profile Termination Codes). SNSRTIME.TXT Logs sensor power up and power down times. 2015 May C-2 Unpacking results Figure C-1: UnpackLog.TXT C-3 Notes C-4