1
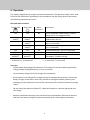
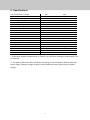
c-Go
12V/10A
12V/20A
Power supply and battery charger
GB
Instruction manual
1
Index
1.
2.
3.
4.
5.
6.
Product description ......................................................................................................................... 2
Safety advices .................................................................................................................................. 3
Mounting and installation ............................................................................................................... 4
Operation ........................................................................................................................................ 5
Problem solving ............................................................................................................................... 6
Specifications................................................................................................................................... 7
1. Product description
De c-Go 12V charger series is designed for full automatic supplying a caravan 12V board
system and charging Gel and AGM batteries. The charger contains the latest, state of the art
power converter and the charge process is controlled by a microcontroller.
If the safety precautions in this manual are observed and the charger is operated according
to this manual, optimal and save charging of the battery is guaranteed.
The charger consists of:
1. A high quality plastic enclosure.
2. A battery cable with a 3 pole connector for connecting to the caravan 12V board system,
a battery and the car 12V supply. (Supplied with two cables)
3. A mains cable for connecting to the public grid.
4. Two colored LED’s (Light Emitting Diodes) indicating the operation mode.
The charger operates full automatically and needs no adjusting.
2
Symbols:
Read the safety advices carefully.
Read the user manual before using the battery charger.
For indoor use only
Do not use the battery charger in a wet environment or in the rain.
The battery charger and batteries are not to be discarded with normal
household waste. Dispose properly according to the local regulations.
The battery charger is a class II appliance (double insulated)
The battery charger complies with the European CE requirements.
2. Safety advices
-
-
-
-
-
This appliance can be used by children aged from 8 years and above and persons with
reduced physical, sensory or mental capabilities or lack of experience and knowledge if
they have been given supervision or instruction concerning use of the appliance in a safe
way and understand the hazards involved. Children shall not play with the appliance.
Cleaning and user maintenance shall not be made by children without supervision.
Never use the charger in a wet environment (for example outside), spill fluids over the
enclosure or submerge in water.
Do not use the charger if the cables are damaged, the enclosure is open, or the charger is
damaged in such way that internal parts become accessible.
If the supply cord is damaged, it must be replaced by the manufacturer, its service agent
or similarly qualified persons in order to avoid a hazard. If the charger is defective, do not
try to repair it.
Make sure the charger is positioned stable.
Keep a free zone of 10cm around the charger to ensure that heat, generated during
operation, can be removed.
The battery charger is suited for the in Europe standard 220-240V/50Hz mains grid.
Operating the charger in places where different mains voltages are applicable will
damage the charger or render it unsafe. Please consult Your supplier in case of doubt.
Charge specified batteries only. Do not recharge non-rechargeable batteries.
Charge the batteries only if there is proper ventilation. Especially around the batteries.
While charging, a small amount of explosive gasses can be generated in the batteries.
inadequate ventilation in combination with open fire or sparks can lead to dangerous
situations.
Do not connect or disconnect the battery while the battery charger is connected to the
mains. E.g. to reduce risk of sparking. Always disconnect the mains, prior to connecting a
battery.
3
-
-
Batteries are capable of providing much energy in a very short time. Prevent short
circuits any way. For example walking over the cables or damaging the cables or
connector by improper use.
Do not shorten the length of the charge cable.
3. Mounting and installation
The power supply / battery charger is not suited for outdoor use.
Use the battery charger in a dry, well ventilated place.
Keep at least an area of 10cm around the enclosure for proper battery charger cooling.
During charging, the enclosure can become hand warm. This is normal.
The 20A version is equipped with a build in fan, operating automatically when the internal
battery charger temperature increases. For all versions the output power will be reduced in
case of insufficient cooling or too high ambient temperatures. When charging, the time
required for the total charge process may increase. In power supply mode the maximum
output current will be limited. For this reason, do not subject the battery charger to direct
sunlight.
Connections:
The battery charger is equipped with a EU plug for connection to the 220-240V/50Hz mains
grid. Connect the power supply/battery charger to the mains after the battery is connected.
The output cable has 3 connections:
Connect (A) to the battery or caravan board system with one of the two included
connection cables. Red is positive (+) and black is minus (-).
For fixed installations the connection cable with the Ring Tongues are recommended.
The crocodile clamp connection cable should only be used if a battery outside the caravan
should be charged. (e.g. at home).
Connect (B) to the permanent plus (+) 12V connection of the car.
Now the power supply/battery charger can be connected to the mains.
Important note: Always disconnect the power supply / battery charger from the mains if
the battery has to be installed or replaced.
4
4. Operation
The power supply/battery charger operates automatically. The operation mode can be read
from the LED indications. Depending on the installation and the charge level of the battery
the following indications can occur:
LED indication overview:
Orange LED
Green LED
Mains
available ?
Off
Off
No
Blinking
slowly*
Off
Blinking
slowly*
Blinking
slowly*
Blinking
slowly*
On
On
Blinking
quickly**
No
On
Off
On
Blinking
quickly**
* 2 seconds on / 2 seconds off
Yes
Yes
Yes
Yes
Yes
Description:
No car connected. Power supply / battery
charger off or car voltage too low.
Caravan battery and 12V board system are
supplied from the car.
Caravan battery is charged.
(No car connected)
Caravan battery is charged.
(Car is connected)
Caravan battery full. (No car connected)
Caravan battery full. (Car connected)
A problem occurred.
See chapter “Problem solving”.
** ½ second on / ½ second off
User tips:
- Prevent deep discharging of the batteries. The battery life will be reduced significantly.
Charge a deep discharged battery as soon as possible.
-
Let the battery charger finish the charge cycle completely.
-
If the battery is not charged for a longer period, for example during winter, connect the
battery charger to the mains once every month to recharge the battery. Battery selfdischarge and the quiescent current of the connected users will drain the battery charge
slowly.
-
Do not charge the batteries below 0°C. Move the battery to a warmer place and start
the charge.
-
Keep the ventilation openings clean and free of accumulated dust. Blow away the dust
and clean the battery charger enclosure eventually with a cloth slightly moistened.
5
5. Problem solving
In case there is a problem or there is a suspicion the charger is not operating as expected,
first check which of the indication LEDs are on. If both the orange and the green LED are
blinking quickly ( ½ second on, ½ second off followed by a 1 second pause), they are
indicating an error.
The number of flashes, between the pauses are indicating the error code.
Next, consult the next tables to diagnose the problem.
Table 1: Fault diagnostics
Problem
None of the LEDs
are on.
All LEDs are blinking
quickly.
Possible causes
No mains voltage.
Car battery voltage too low.
Battery charger or mains
cable broken.
Problem detected.
Solution
Check the mains voltage connection.
Check the car battery voltage.
Consult Your supplier.
Count the number of flashes between
the pauses and consult table 2.
Table 2: Error codes
Error code(s)
1, 2 , 3
4
Description
Internal battery charger
problem.
Temperature too low.
5
Temperature too high.
7
Current too high.
9
Battery reverse polarity.
Possible causes and solution(s)
Restart battery charger. If the error is repeated
Consult Your supplier.
Move to a warmer environment and restart the
charging.
Let the charger cool down for 15 minutes and
restart the charging. Prevent direct sunlight.
If the problem persists please consult Your
supplier.
Cabling problem or other problem. Check cabling
and connections and restart. If unsuccessful
consult Your supplier.
Disconnect the battery and check the polarity.
If the cause of the failure has been removed, the power supply / battery charger can be
restarted by disconnecting it shortly from the mains .
6
6. Specifications
c-Go specifications / model
Supported batteries
Battery capacity range
Mains voltage
Mains frequency
Output voltage range
Output current range
Maximum output power *
Efficiency
Protections
Dimensions
Charge status indication
Use
Operational temperature range *
Storage temperature
Cooling
Maximum humidity
Safety class
Regulations
Standards
10A
20A
Lead Acid (Gel / AGM) 12V
60-100Ah
90-240Ah
220-240Vac nominal, (single phase)
50/60 Hz
12V nominal
0 – 10A
0 – 20A
150W
240W
> 90% at full load and 230Vac
Polarity ** , Output voltage , Temperature
210 x 175 x 65mm
2 LEDs
Indoor use only
0 – 40°C
-15 - +50°C
Passive
Active (Fan)
95% (non condensing)
II
CE (LVD, EMC, RoHS)
EN60335-2-29, EN55014-1, EN55014-2
* At elevated ambient temperatures or if there is no sufficient cooling the output power can
be reduced.
** The polarity detection does not detect connecting a reversed polarity battery when the
power supply / battery charger already is connected to the mains (operating as a power
supply).
7