1
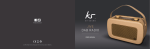
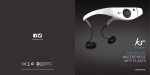
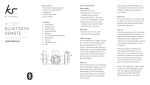
kitsound.co.uk
REVIVE
DAB/FM AL ARM
CLOCK RADIO
USER MANUAL
JB. 3208 / Made in China. © KitSound™ 2014. Christchurch, Dorset. BH23 4FL
We are cr af tspeople. We are musicians. We are KitSound ™
And we all commit ourselves to achieving one shared goal: Bringing
people closer to their music. By truly understanding music we stay true
to its craft. Pure, rich, incredible sound. We’ll settle for nothing less.
At KS we believe your music deserves to be showcased on great
quality products that don’t cost the earth. We might not all share
the same taste in music (the ferocious disputes on music forums
prove that), but whether it’s Irish folk, death metal or any number
of obscure genres which seem to be multiplying by the minute, the
artists responsible for connecting with you through their craft have
bared their souls to do so. And we think that’s worth celebrating.
Please read this manual carefully before use.
On the front:
14.Display
Box contents
KS Revive DAB/FM alarm clock radio
• DC power adaptor
• User manual
On the back:
15.OFF/ON
16.DC 5 V in
17. Headphone socket (output only)
Functions
On the bottom:
18.Battery cover
19. Antenna
•
On the top:
1. Previous station
2. Mode
3. Preset
4. Next station
5. Standby
6. Scan
7. Alarm 1
8. Alarm 2
9. Snooze/Sleep
10.Vol –
11. Enter
12.Vol +
13.Info
6
19
REVIVE
Model no.: KSREVIVE
DC output: 5 V
DC input: 5 V / 0.5 A
Made in China
14
1
12
2
13
3
4
5
6
7
9
8
10 11
15
16
17
18
7
Instructions for use
Using the Revive
Powering the Revive
Once the Revive has been switched ON, press the mode button to switch between DAB and FM modes.
The Revive can be powered by either of the methods below:
Mains power:
• Connect the DC jack to the back of the Revive
• Plug the mains plug into a mains socket and switch on
• Slide the OFF/ON switch on the back of the Revive to the ON position
Battery power (4 x AA):
Remove the battery cover on the Revive
• Insert the 4 x AA batteries observing the correct polarity
• Replace the battery cover
• Slide the OFF/ON switch on the back of the Revive to the ON position
•
DAB radio mode
When DAB radio mode is activated for the first time, a full scan will automatically commence. Please make
sure the antenna is fully extended and the radio is positioned in a strong signal location. If no stations are
found, try re-positioning the radio and doing another channel scan by pressing the ‘Scan’ button.
Select stations
To change stations, press the ‘Next station’ or ‘Previous station’ button then press the ‘Enter’ button.
Adjust volume
Press the Vol – or Vol + buttons to decrease or increase the volume respectively.
[continued...]
8
9
[...continued] DAB radio mode
Setting a preset
Up to 10 stations can be set under a preset. To store a radio station under a preset, press and hold the
‘Preset’ button. ‘Preset # Save’ will appear on the screen. Select the preset number by pressing the
‘Next station’ or ‘Previous station’ button and then press ‘Enter’ when done.
Recall a preset
Press (don’t hold) the ‘Preset’ button. Select the preset number by pressing the ‘Next station’ or
‘Previous station’ button and then press ‘Enter’ when done.
View more information
You can view further information by pressing the ‘Info’ button several times. This information includes:
– DLS (Dynamic Label Segment – short text information broadcast with DAB audio)
– Frequency
– PTY (Program Type)
– Time/date
10
FM radio mode
FM radio mode receives analogue radio from the FM band. While FM radio is playing, the screen shows
its frequency.
Scan FM station
The first time you select FM radio, it is set to the lowest frequency in the FM band.
In FM mode, press and hold the ‘Next station’ or ‘Previous station’ button to scan through the
FM frequencies. Alternatively, press the ‘Scan’ button. The scan stops when a station is found.
Setting presets
This is the same as in DAB mode (see DAB mode preset instructions).
View more information
You can view further information by pressing the ‘Info’ button several times. This information includes:
– PS (Programme Service)
– PTY (Programme Type)
– Audio mode (Auto is default, switch between Auto/Mono by pressing ‘Enter’)
– Time/date
11
Setting the time
The time will automatically be set once DAB mode has been activated and a signal has been found.
Note: It is not possible to set the time manually.
Sleep timer
In DAB or FM mode, press the ‘Snooze/Sleep’ button to bring up the Sleep Timer. Keep pressing (not holding)
the ‘Snooze/Sleep’ button to change the length of sleep time in 10 minute intervals. The maximum sleep
time is 90 minutes. Once the sleep time has elapsed, the Revive will go into standby mode.
Alarm
To set the alarm, first you will need to put the Revive into standby mode. To do this, press the ‘Standby’
button in either FM or DAB mode. Then:
To set Alarm 2, follow the Alarm 1 instructions but press the ‘Alarm 2’ button instead.
To turn ON/OFF the alarms you have just set:
1. In standby mode, press (don’t hold) the ‘Alarm 1’ or ‘Alarm 2’ button
2.Press the ‘Next station’ or ‘Previous station’ button to change between the Alarm being
ON or OFF, then press the ‘Alarm 1’ or ‘Alarm 2’ button
When the alarm is sounding, it will start quietly and slowly increase in volume (FM and DAB).
To stop the alarm, you can either:
– Press ‘Snooze/Sleep’ to delay the alarm for another 9 minutes
– Press ‘Standby’ to stop the alarm
Note: The Revive must be left turned ON for the alarm to work.
1. Press and hold the ‘Alarm 1’ button and the Alarm 1 settings menu will appear
2.Press the ‘Next station’ or ‘Previous station’ button to change the hours, then press the ‘Alarm 1’
button to confirm
3.Press the ‘Next station’ or ‘Previous station’ button to change the minutes, then press the
‘Alarm 1’ button to confirm
4.Press the ‘Next station’ or ‘Previous station’ button to change between FM, DAB or Buzzer,
then press the ‘Alarm 1’ button to confirm
12
13
Care for your Revive
Troubleshooting
Please DON’T
Factory reset
If for some reason the Revive is not working correctly or you want to reset all the settings, you can reset
the Revive back to factory defaults. To do this:
Get the Revive wet
Drop the Revive as this will invalidate your warranty
• Open up the Revive (except the battery cover). There are no user serviceable parts inside
• Use any other mains adaptor than the one supplied
• Expose the Revive to extreme temperatures or rapid changes of hot to cold or vice versa
•
•
We hope you’ve now got all the information you need to get started, but if you’re having problems
with anything, please feel free to contact us at: [email protected]
Please DO
•
1. In FM or DAB mode, press and hold the ‘Mode’ button
2. Press the ‘Enter’ button and the Revive will reset itself then restart
Clean the Revive with a soft dry cloth and no detergents
Specifications
14
Audio output
2W
Frequency response
125 Hz – 8 kHz
Frequency
87.5 – 108 MHz
Jack plug
3.5 mm
Media
FM & DAB
Clock
24 hour
Power supply
Batteries: 4 x 1.5 V AA
Mains: DC 5 V / 800 mA
We apologise for any inconvenience caused by minor inconsistencies in these instructions, which may occur as a result of
product improvement and development.
15