1
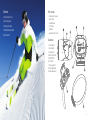
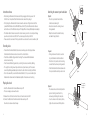
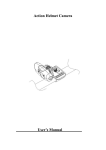
Action Camera
User Manual
kitvision.co.uk
JB. 3640 / Made in China. © Kitvision 2014. Christchurch, Dorset. BH23 4FL.
All trademarks are acknowledged as the property of their respective owners. Unless otherwise stated their use does not imply
that the Trademark owner is affiliated with Kondor or endorses the products herein.
Contents
Pack contains
4
4
4
5
6
•
•
•
•
•
•
Instructions for use
Recording video
Playing video back
Handlebars attachment
Specification
Kitvision Action Camera
Helmet Strap
Bike Attachment
TV Out Cable
USB Cable
Quick start and Driver CD
4
1
3
6
2
Description
1. Record Button
2. Delete Button
3. Display Screen
4. Micro SD Card Slot
5. Mini USB Port
6. TV Out Port
7. Frequency Switch
8. Bicycle Attachment
9. Helmet Attachment
5
7
8
9
2
3
Instructions for use
Attaching the camera to your handlebars
• A
fter taking the Kitvision Action Camera out of the packaging and before you use it for
the first time, it is important that the Kitvision action camera is fully charged
• To fully charge the Kitvision Action Camera remove the back cover. Plug the small end of the
provided Mini USB cable into the Mini USB Connection Port (5) on the Kitvision Action Camera
and the other end of the USB cable into your PC/Laptop/Mac or into any USB output mains adapter
• The Kitvision Action Camera has no built-in internal memory, so in order to record your footage
you will need to insert a micro SD Card. The camera supports cards up to 32 GB
• Please ensure the back cover is firmly replaced before use to ensure the device is weather proof
Figure 1:
• Place the bicycle attachment onto the
handle bars as shown right
• Ensure the arrow on the locking screw is
facing outwards
• Wrap the belt under the bar and thread up
and down through the slots
Playing video back
• Install the Kitvision Action Camera software on your PC
• There are 2 ways you can view the video:
1. Remove the micro SD card and insert into a card reader connected to a PC
2. Connect the USB cable to the Kitvision Action Camera and your PC.
You will be able to view videos this way.
Handlebars
Belt
Figure 1
Recording video
• P
ress and hold the Record Button (1). A camera icon will appear on the display to show
the Kitvision Action Camera is turned on and in the correct function
• Press the Record Button (1) again to start recording. The camera will flash to show the
camera is now recording
• Press the Record Button (1) again to stop recording. The camera icon will stop flashing
• The length of recording time will depend on the size of your memory card. The camera
icon will stop flashing automatically to indicate the card is full and recording has finished
• To turn the camera off press and hold the Record Button (1). The preserve the battery the
Kitvision Action Camera will turn of automatically after 1 minute when not recording
Locking screw
Figure 2:
• Firmly pull down on the belt to secure the
bicycle attachment onto the handlebars
• To lock the belt in position, turn the locking
screw so that the arrow is pointing inwards
• Push the Kitvision Action Camera down onto
the bicycle attachment until you hear a click
Figure 2
Turn screw to
fix position of
base plate
Figure 3:
• The camera can be set in the desired position
by either rotating the unit itself or by
unscrewing and rotating the base plate
• Once the camera is in the desired position,
tighten the screw below to fix the position
Figure 3
4
5
Technical specifications
Storage media
Supports up to a 32 GB micro SD
Video resolution
720 x 480, 30 frames per second
Audio recording
Built-in microphone with a 12 foot range
Focus
Built-in Lithium battery
Weatherproof
MOV
Safety instructions
Please DON’T:
• Modify, disassemble or open the Kitvsion Action Camera
• Expose the Kitvsion Action camera to extreme temperatures or pressures
• Place the Kitvsion Action camera in ant flames or exposure to direct sunlight
• Allow children to play with the Kitvsion Action camera
• Submerge the Kitvision Action Camera in water
Photo Resolution
Rated IP65
Please DO:
• Ensure the Kitvision Action Camera is fully charged before use
• Ensure the back cover is firmly in place to retain the weather proof rating
Software compatibility
Windows 2000 / XP / Vista / Windows 7®
Troubleshooting
We hope you’ve now got all the information you need to get started, but if you’re having problems
with anything, please feel free to contact us at: [email protected] or visit www.kitvision.co.uk
We apologise for any inconvenience caused by minor inconsistencies in these instructions, which may occur as a result of product improvement
and development.
6
7