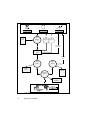
1
Repro Station
User Manual
Océ-Technologies B.V.
This manual covers Repro Station software version 3.2
Trademarks
HP-GL, HP-GL/2, HP-RTL are trademarks of Hewlett Packard Company
Microsoft and MS are registered trademarks of Microsoft Corporation
Windows is a trademark of Microsoft Corporation
CalComp is a trademark of California Computer Products Inc.
Intel and Pentium are registered trademarks of Intel Corporation.
Adaptec is a registered trademark of Adaptec, Inc.
Novell is a trademark of Novell Inc.
TIFF is a trademark of Aldus Corporation
CALS is a military standard
Copyright
Océ-Technologies B.V. Venlo, The Netherlands © 1998
All rights reserved. No part of this work may be reproduced, copied, adapted,
or transmitted in any form or by any means without written permission from
Océ.
Océ-Technologies B.V. makes no representation or warranties with respect to
the contents hereof and specifically disclaims any implied warranties of
merchantability or fitness for any particular purpose.
Further, Océ-Technologies B.V. reserves the right to revise this publication and
to make changes from time to time in the content hereof without obligation to
notify any person of such revision or changes.
Code number 7056127
Edition 5.0
GB
Contents
Chapter 1
Introduction
This manual has been written for ... 8
The concept 9
Océ scanning and printing applications 9
Job tickets, matrix tickets and check plots 13
Using this manual 15
Related documentation 15
Chapter 2
Getting started
Installation 18
Installing Océ Repro Station 18
Starting Repro Station 20
Preparations 22
Machine Monitor 22
Configuring network 22
Setting the interface language 23
Defining measurement unit 23
Creating printer queues 24
Limiting the size of the Ready queue 28
Viewing printer configuration and defining set processing 30
Viewing installed media and setting output delivery 31
Specifying file types in menus 34
Specifying available paper sizes in menus 35
Defining a list of users and accounts 37
Configuring stamps 40
Configuring check plots 44
Quitting Repro Station 46
Using Help 47
Chapter 3
Using the Queue window
Queue display 50
Using the Queue window 51
Managing jobs 53
Contents
3
Modifying a job 53
Modifying check plots 54
Moving a job 55
Deleting a job 55
Displaying notes 56
Using logfiles 57
Printing 60
Printing jobs in manual mode 60
Printing jobs in automatic mode 61
Stop printing 64
Retrieving jobs from the Ready queue 64
Chapter 4
Customizing Repro Station
Repro Station defaults 68
Specifying defaults, starting from the Defaults menu 68
Specifying defaults, starting from a matrix or job ticket window 69
Loading defaults 71
The banner page default 73
Using multiple Repro Station queues 74
Using tools 78
Using convertors 85
Using banner pages 91
Appendix A
Example of an extended logfile
Extended logfile 94
Appendix B
Convertors: technical details
About convertors 98
Print formats 98
Requirements 100
Appendix C
Miscellaneous
Notation conventions 104
Reader’s comment sheet 105
Addresses of local Océ organisations 107
4
Repro Station User Manual
Index 109
Contents
5
6
Repro Station User Manual
Repro Station
User Manual
Chapter 1
Introduction
The concept of Océ scanning and printing, and the
meaning of job tickets and matrix tickets. What application
should be used to define users and accounts.
7
This manual has been written for ...
This manual has been written for PC users of the Océ Repro Station
application for Microsoft Windows. Knowledge of Microsoft Windows basics
is presumed.
8
Repro Station User Manual
The concept
An Océ large format print system will primarily be used in central
reproduction environments. Remote control, speed and integrated finishing
capabilities make the Océ printer the ideal solution in these environments.
Files that are sent to the printer will be printed, sorted and folded on request.
This results in greatly improved productivity over traditional printing and
copying.
Combined with a special software application, the Océ print system allows you
to productively scan paper drawings and convert them to digital files.
Prints, hard copy drawings and print files are not the only form of information
entering repro departments. Equally important is information regarding:
■
■
■
how copies should be produced,
how sets should be printed ready for distribution,
how prints are to be distributed.
This type of additional information is traditionally communicated via
telephone, fax, or internal electronic mail. Rather than improving just part of
the reproduction process, the Océ scanning and printing applications include
all these information aspects.
Océ scanning and printing applications
The Océ scanning and printing applications support the digitalisation of
engineering drawings, and/or the high-volume reproduction of digital
engineering drawings. These applications are supplied by four software
modules:
■
■
■
■
■
Job Director
Repro Station (described in this manual)
Scan Station
View Station
Machine Monitor
Job Director Job Director is a Microsoft Windows application which runs on
PCs, ideally in a network. It allows users to create, edit and send reproduction
requests - jobtickets or matrix tickets - from any PC to Repro Station.
Introduction
9
For more information, see the Océ Job Director User Manual.
Repro Station Repro Station is a Microsoft Windows application which
controls printing on the Océ printer. All print jobs go through Repro Station
where they are queued, logged and managed. Repro Station supports the
following functions:
■ accept plain print files, print files with Océ header information and digital
reproduction requests (job tickets),
■ provide queuing and other system management functions to the operator of
the printer,
■ control the Océ printer to produce complete sets of documents: sorted, folded
and deposited in one of the output devices of the printer, ready for
distribution.
Apart from job requests initiated by Job Director, Repro Station also accepts
print jobs and check plots from other sources, like printer drivers or document
management systems. Job tickets must comply with the job ticket format
specification as described in the ‘Océ Job Ticket Interface Programmer's
Manual’.
This manual describes Repro Station in more detail.
Scan Station Scan Station is a Microsoft Windows application which allows
you to control the scanning (also called upload) process. You can specify
settings like resolution and file format. You also specify where the resulting
files must be stored, which can be a network disk. When a file has been
received by Scan Station you may view it on the PC's screen to check the
quality of the scan.
For more information, see the Océ Scan Station User Manual.
View Station View Station is a built-in viewer that allows you to view scans
made with Scan Station on the Scan Station screen.
For more information, see the Océ View Station User Manual.
Machine Monitor Machine Monitor is in fact part of the Repro Station and/or
Scan Station concept. Repro Station and Scan station can send scan jobs to the
printer via Machine Monitor. If both Repro Station and Scan Station want to
send a job, Machine Monitor decides which job comes first, and which job has
to wait.
10
Repro Station User Manual
If the printer supports back channel communication, Machine Monitor can
also collect information from the printer, and send this information to Repro
Station or Scan Station. In this way the following information can be collected:
■ Status information
■ Printer settings, e.g. engine configuration, printer stamps
■ Other printer information, e.g. printer in error
■ Rolls and media information
■ Job information (statistics)
For more information, see the Océ Machine Monitor User Manual.
The illustration on the next page gives you a complete overview of the Océ
scanning and printing concept.
Introduction
11
.
Floppy disk
Job
Director
A
Job
Ticket
Network
Hard disk
Job
Director
B
Job
Director
C
check plots
print files
jobs
Repro Station
queue
scanned
files
Repro
Station
Scan
Station
Ready
queue
Scan
Ticket
Machine
Monitor
Job
database
3151
[1] Océ scanning and printing concept
12
Repro Station User Manual
Scanner
Printer
Job tickets, matrix tickets and check plots
Three basic concepts used throughout this manual are:
■
■
■
check plot
job ticket
matrix ticket
Check plot A check plot is a print file that has been copied directly to the
Repro Station queue, without information on how this file should be processed
and printed. Check plots can thus be considered ‘naked’ or plain print jobs.
However, some check plots may contain a Remote Control Format (RCF)
header, e.g. print files generated using an Océ printer driver. This header
contains some information on how the file should be printed.
Job ticket A job ticket is basically a text document which contains all the
information required for processing the job:
■
■
■
the print files that are to be reproduced and the settings for each print:
scaling, rotation, media size and type
job information: number of sets, folding and sorting requirements,
distribution information and notes for the operator
information about the sender and the project.
In other words, job tickets can be seen as ‘labels’ which mention two types of
information:
■
■
the set of files which has to be processed and printed as one job
how these files have to be processed.
job
job ticket
3152
ies
op s
5 c file r
ir nt ese este d
P f th ly ad
o n po nd nt te
o m a urre da
fil e c and
th e
tim
plain print
files
[2] Job tickets label print files as one single job and tell the printer how to process these files.
Introduction
13
Matrix tickets Matrix tickets are in fact sets of job tickets. It may happen that
the same set of files has to be printed with different settings for different
recipients. Rather than creating a job ticket for each individual recipient, you
may want to use a matrix ticket, allowing the print settings for each recipient
to be defined in one ticket.
A matrix is a rectangular array of rows and columns. The rows represent the
print files in the job; the columns represent the recipients. A matrix program is
a set of print settings which is used for one particular recipient.
ies
op d C
5 c an r
int A ste
Pr f file olye add
o n p and ent ate
o lm urr d d
fi e c an
th me
ti
ies
op n
5c so
int file er
Pr f all pap and
o lain d
p tate red
ro irro
m
ies
op
5 c file ter
s
int
Pr f this olye
o np
o lm
fi
y
op
1c
ies
int A
Pr f file B on ranc
o nd pa
a ans
tr
A
3153
B
C
[3] Matrix ticket: sets of files to be printed using different settings for different recipients.
Repro Station seamlessly fits in with existing document management systems,
since it also accepts job tickets and check plots which are created by other,
non-Océ applications. Such job tickets must comply with the job ticket format
specification as described in the Océ Job Ticket Interface Programmer’s
Manual.
14
Repro Station User Manual
Using this manual
This manual is intended for the operator of Repro Station. The user of Repro
Station is often also the operator of the Océ printer/copier. It is assumed that
you have some understanding of the Océ printer. More information can be
found in the User Manual.
This manual explains:
■
■
■
how to install Repro Station and how to get things up and running (see
chapter 2, ‘Getting started’ on page 17)
how to use Repro Station to print and modify jobs (see chapter 3, ‘Using the
Queue window’ on page 49)
how to use more advanced features and customize the program (see
chapter 4, ‘Customizing Repro Station’ on page 67)
Read Chapter 2 for a brief introduction and learn how to install and get the
program running on your PC.
If you want to have a thorough understanding of the functions of Repro
Station, you should read Chapter 3.
If you want to customize Repro Station, everything you need to know is in
Chapter 4.
References to the functionality of the Job Director application are made
throughout this manual. You may need to refer to the Océ Job Director User
Manual’.
Related documentation
Océ 9800 Copier Printer User Manual
Océ 9800 Printer User Manual
Océ 9700 Copier Printer User Manual
Océ 9700 Printer User Manual
Océ Job Director User Manual
Océ Scan Station User Manual
Océ View Station User Manual
Océ Machine Monitor User Manual
Introduction
15
Océ Job Ticket Interface Programmer’s Manual
Océ Remote Control Format Reference Manual
16
Repro Station User Manual
Repro Station
User Manual
Chapter 2
Getting started
This chapter describes how to install the software on your
PC running Microsoft Windows, and describes what you
must do before using the application.
17
Installation
To get Repro Station up and running you need to:
■ a PC with Pentium 100 MHz Intel processor, running Windows 95 or
Windows NT 3.51/4.0 for the 32-bit application or Windows 3.1/3.11 for the
16-bit application,
■ internal memory of 32MByte,
■ have a dongle for Repro Station on one of your parallel PC ports (the dongle
is included in the Repro Station package),
■ a TCP-IP network (needed for remote connections),
■ install Repro Station as described in this section,
■ start the program as is described on page 20,
■ prepare Repro Station as is described on page 22.
Installing Océ Repro Station
During installation of Repro Station several files will be copied to the hard disk
of your PC. The installation program prompts you to create the destination
directory in which the files are copied.
When installing Repro Station, you can press the Help button for more
information about the steps. To return to a previous step, click Back.
Note: Install Océ View Station before installing Repro Station.
Machine Monitor Note that during the installation of Repro Station you are
asked whether also Machine Monitor must be installed on your PC. This
depends on your configuration:
■
■
18
It is possible to run Repro Station and Machine Monitor on different PC’s.
Machine Monitor must always run on the PC that is directly coupled to the
printer with a SCSI connection. Repro Station may run on a different PC, and
remotely couple to Machine Monitor via a network. In that case select not to
install Machine Monitor as well. Machine Monitor must be installed
separately on the other PC (see the ‘Océ Machine Monitor User Manual’ for
more information).
In the recommended configuration, Repro Station and Machine monitor run
on the same PC. This PC is directly coupled to the printer with a SCSI
connection. In that case select Machine Monitor to be installed as well. Make
sure to install the SCSI connection to the printer first:
Repro Station User Manual
▼
Installing the SCSI connection
1 Install the Adaptec SCSI board on the PC.
2 Install the EZ-SCSI software.
3 Connect the Océ 9700/9800 and make sure that it is recognized as ‘Tandberg
TDC 3600’.
▼
Installing Repro Station software
1 Insert the CD ROM into the CD ROM drive.
2 Now follow the instructions in the CD ROM’s booklet.
Getting started
19
Starting Repro Station
You can start Repro Station in several ways just like any other Windows
program. Follow the procedure below. Quitting Océ Repro Station is explained
in ‘Quitting Repro Station’ on page 46.
▼
Starting Océ Repro Station
1 Start MS-Windows.
2 Double-click the Repro Station icon in the program group you have just
created.
The Repro Station application window will be displayed as shown in the
illustration below:
3154-144
t
[4] Repro Station Application Window
20
Repro Station User Manual
3 You are asked to specify whether Repro Station has to connect to a remote
Machine Monitor application or to a local Machine Monitor.
When a local Machine Monitor has been selected (see ‘Configuring network’
on page 22), also the Machine Monitor is started automatically. Machine
Monitor will appear in the state that you have specified: either as an icon or a
window on your desktop.
If you have selected a remote connection, Repro Station will try to connect to
Machine Monitor across the network.
If you did not connect the dongle to a parallel output port of your PC, the
following error message will appear:
3155-144
[5] Repro Station did not detect a dongle.
Quit all applications and power off your PC, connect the dongle, switch on the
PC and start Repro Station again.
Note: Repro Station creates an initialization file named ‘ocers.ini’ in the
Windows directory when the application is started for the first time. This file
contains your default settings.
Getting started
21
Preparations
Before you can work with Repro Station, you need to define several settings
and default values. The following sections explain how to modify these
settings to match your configuration or personal wishes.
Machine Monitor
Machine Monitor is the application that provides the connection to the printer.
You need to make some settings in Machine Monitor first, like printer type,
language, and network settings. Refer to the Machine Monitor User Manual
for details.
Configuring network
To send data to the printer, Repro Station must connect to Machine Monitor.
Machine Monitor can run on the same PC (local), or on a network PC (remote).
You have to specify if Machine Monitor runs local or remote.
Note: If Machine Monitor runs remote, the PC’s must be running Windows NT
and beconnected via a TCP/IP network. Repro Station will use a socket
connection to send data to Machine Monitor. Repro Station can only make a
connection when Machine Monitor is already running on the remote PC.
▼
Configuring Network
1 From the Configure menu, choose Network.
The Network dialog box appears.
3156-144
[6] Network dialog box
22
Repro Station User Manual
2 Select Local or Remote.
If you select Remote, also define the IP adress of the remote PC (Host) and the
Port number (Port).
Note: The port number must match the Scan port number in Machine
Monitor.
3 Click the Connect button.
Note: Machine Monitor must already be running. If Machine Monitor starts
later, you must repeat this procedure.
Setting the interface language
You can set the language of Repro Station menus, dialog boxes and online help
as follows:
▼
Setting the interface language
1 From the Configure menu, choose Language.
The following dialog box appears:
3157-144
[7] Language window
2 Open the drop-down list box and select the appropriate language.
3 Click the ‘OK’ button.
The working language of Repro Station will be changed.
Defining measurement unit
You have to specify whether Repro Station uses mm or inches. This
measurement unit is used when the paper size is defined.
▼
Specifying measurement unit
1 From the Configure menu, choose Units.
The Measurement units dialog box appears.
3158-144
[8] Measurement units dialog box
Getting started
23
2 Choose the required measurement.
3 Click the OK button.
Creating printer queues
Repro Station makes use of two queues:
■
■
the Repro Station queue
the Ready queue.
Repro Station queue The Repro Station queue is a directory where jobs and
check plots arrive that have to be printed on the Océ printer.
Ready queue The Ready queue is a directory which contains all the jobs and
check plots that have been printed on the printer. When printing a job or check
plot, Repro Station will automatically take the corresponding files from the
Repro Station queue and move them to the Ready queue.
Repro Station must have read and write permission for these directories since
it must be able to move the job from one queue to the other when it is finished.
When you start Repro Station and you have not created any queues, the system
asks you to do so.
Repro Station creates two subdirectories in both queues: \prfiles and \status.
The \prfiles subdirectory contains the genuine printfiles to which a job ticket
can refer to. For example, when you create and send a job ticket with Job
Director, the ticket is placed in the Repro Station queue and the files that have
to be printed are copied to the \prfiles subdirectory.
The \status subdirectory contains status files that are mainly meant for internal
use of Repro Station. The directory can include, among others, the following
files:
■
■
■
images.jt: this is a job ticket that defines the image stamps. Refer to
‘Configuring Image stamps’ on page 41 to change its contents.
stamps.txt: in this file, the printer stamps are defined. Refer to ‘Viewing
Printer stamps’ on page 40 to view its contents.
iqstatus.txt: this file contains the actual status of the queue. Job Director
reads this file and shows the contents in the Repro Station Queue window.
The arrival of jobs in the Repro Station queue is determined by two timers:
24
Repro Station User Manual
■
■
Queue refresh time
Job show-up time.
Queue refresh time This parameter determines how often the queue list is
updated. The default value is 10 seconds, so the list is updated 6 times every
minute. The minimum value you can specify is 5 seconds, so the list is
refreshed 12 times per minute.
Job show-up time This is a timer that determines how ‘old’ a job must be
before it shows up in the queue. If the Job show-up time has been set to
30 seconds, e.g., Repro Station will wait 30 seconds to allow the other
application to place the whole job on disk.
This function is particularly important when applications write check plots to
the Repro Station queue that can be large files. It may take the application a
while before the check plot file is complete, while the file is already visible in
the Repro Station queue directory. To prevent Repro Station from starting to
print the job when it is not complete yet, you should set the Job show-up time
to a value that guarantees that each application can write a job within this
time-frame. If the Job show-up time is chosen too small, Repro Station may
start printing incomplete check plots. The default setting is 30 seconds.
▼
Creating the Repro Station queue
Attention: Do not change the queue when jobs are being printed or being
modified.
1 From the Configure menu, choose Queues > Repro Station queue.
The Repro Station queue dialog box appears:
3159-144
[9] Configure Repro Station queue dialog box
2 In the text box, type the full path name of the directory which is to be used as
Repro Station queue.
This can also be a directory which does not exist yet.
Getting started
25
If you wish to use an existing directory but you don’t know its full path name,
choose the Browse button to display a list of directories. Select the appropriate
directory from the list, and then choose the OK button.
3 Specify the Queue refresh time.
The Queue refresh time determines how often the queue list is updated. The
default value is 10 seconds, so the list is updated 6 times every minute. The
minimum value you can specify is 5 seconds, so the list is refreshed 12 times
per minute.
4 Specify the Job show-up time.
The Job show-up time determines how ‘old’ a job must be before it shows up
in the queue. If the Job show-up time has been set to 30 seconds, e.g., Repro
Station will wait for 30 seconds to allow the other application to place the
whole job on disk.
5 If necessary, select the Full queue public option:
3160-108
[10] Full queue public option.
■
If you select this option, users of Job Director can see full details of the Repro
Station queue, e.g.
3091-144
[11] Repro Station queue displayed in Job Director with ‘Full queue public’ option enabled.
26
Repro Station User Manual
■
If you clear this option, e.g. if user names are confidential, users of Job
Director will only see the messages ‘active’ if Repro Station is running or
‘stopped’ if you quit Repro Station.
3161-144
[12] Repro Station queue displayed in Job Director with ‘Full queue public’ option disabled.
6 Click the OK button.
If you have specified a directory which does not exist yet, the following
message will appear asking you whether you want to create this directory.
3162-144
[13] Creating a new Repro Station queue.
7 Click the OK button to create a new directory or Cancel and specify an existing
directory.
▼
Creating the Ready queue
1 From the Configure menu, choose Queues > Ready queue.
The Ready queue dialog box appears.
3163-144
[14] Ready queue dialog box.
2 Select one of the following options:
Getting started
27
■
■
No maximum size, if you have enough disk space to keep a copy of all the
printed jobs.
Maximum size, and specify the allowed size of the ready queue in kilobytes.
Note: If you specify a maximum size of 0, no jobs will be saved in the ready
queue.
3 In the text box, type the full path name of the directory which is to be used as
Repro Station queue.
This can also be a directory which does not exist yet.
If you wish to use an existing directory but you don’t know its full path name,
choose the Browse button to display a list of directories. Select the appropriate
directory from the list, and then choose the OK button.
4 Click the OK button in the Ready queue dialog box.
If you have specified a directory which does not exist yet, the following
message will appear asking you whether you want to create this directory.
3164-144
[15] Creating a new Ready queue
5 Click the OK button to create a new directory or Cancel and specify an existing
directory.
Limiting the size of the Ready queue
Normally, printing or deleting a job in the Repro Station queue means that the
corresponding file is moved from the Repro Station queue to the Ready queue.
Thus, your file system may become full, which might lead to several problems
when you want to work with Repro Station or other applications.
Attention: To prevent your file system from getting full, you should specify
a maximum size for the ready queue, or specify 0 kB. In this case, no jobs
will be saved in the Ready queue at all.
▼
Limiting the size of the Ready queue
1 From the Configure menu, select Queues > Ready queue.
28
Repro Station User Manual
The Ready queue dialog box appears.
3163-144
[16] Ready queue dialog box.
2 Type the maximum size of the Ready queue directory in the text box.
This value must be given in kilobytes.
The minimum value is 0 kB (no files saved at all). Default is 1024 kB = 1 MB.
When a new job is copied to the ready queue and the queue is full, the oldest
job in the ready queue is removed until there is sufficient disk space for the new
job. In other words, only the latest jobs are stored.
Once a job has been removed from the ready queue, it can not be recovered
and reprinted. Note that job tickets and print files are stored in the ready queue.
So make sure that the maximum size is large enough. When a job does not fit
in the Ready queue, all jobs in the queue will be deleted.
Getting started
29
Viewing printer configuration and defining set processing
Repro Station must have some information about the features supported by
your printer. This information is provided by Machine Monitor. You can view
whether your printer uses mm or inches and which output and finishing devices
are present:
■
■
■
■
■
■
a folder
a first fold output
a puncher
a reinforcement unit
a lower container unit
a high-capacity stacker.
Set processing You can specify if set processing is done by Repro Station or
by the printer. Set processing by the printer provides a better performance.
Only if the printer has not enough set memory, you must select Repro Station
for set processing.
Note: If the printer does not support set processing, Repro Station is
automatically selected to do this. In that case, you can not change this setting.
▼
Viewing printer configuration and defining set processing
1 From the Configure menu, choose Printer.
The Printer dialog box appears, showing the printer configuration:
3165-144
[17] Printer dialog box.
30
Repro Station User Manual
2 If set processing should not be done by the printer, select ‘Repro Station
creates sets’.
3 Click the OK button.
Viewing installed media and setting output delivery
Machine Monitor provides all information about the printer, including
information about the loaded rolls of copy material. This information can be
viewed in Repro Station.
Output delivery You have to determine where the printer has to deposit folded
and unfolded output of regular print jobs and check plots. Of course, the
available options depend on the output devices attached to your printer, e.g.
whether your printer is equipped with:
■
■
■
a Folder (optionally equipped with belts and puncher)
a Lower Output
a High Capacity Stacker.
The following options are available:
Output device
Delivery when folded
None
Folder
(& belts & puncher)
Delivery when not folded
Copy Delivery Tray
Stacker
Copy Delivery Tray
Belt 1
Belt 2
Belts
Lower Output
Copy Delivery Tray
Lower Output
High Capacity Stacker
Selected bin >>
Next bin per set
Next bin per job
Continuous
Bin per account
Of course, if your printer is equipped with several output devices, a
combination of options will be available.
Getting started
31
▼
Specifying output delivery
1 From the Configure menu, choose Rolls and delivery.
The Rolls and delivery dialog box appears:
3166-144
[18] Rolls and delivery dialog box.
2 Specify where the printer has to deposit your folded and unfolded output of
both check plots and regular print jobs.
You have some of the following options, depending on the available output
devices (see above).
■ Stacker
■ Belt 1 or 2
Select either one of these two belts. If the selected belt is full, the printer will
stop
■ Belts
You use both belts and thus combine their output capacity. If one belt is full,
the printer will deposit all subsequent prints on the other belt.
■ Copy Delivery Tray
This is the default output device of the printer. If no other output devices are
available, the printer will deposit the prints on the Copy Delivery Tray by
default.
■ Lower Output
for long, unfolded prints.
■ Selected bin
which is one of the available bins of the High Capacity Stacker.
■ Next bin per set
to sort unfolded output by set. The printer will then deposit each set in a new
bin. If there are more sets than bins, e.g. 8 sets and 6 bins, the printer will
32
Repro Station User Manual
■
■
■
deliver the prints cyclically: place set 1 to 6 in the respective bins and then
place set 7 on top of set 1 in bin 1 and set 8 on top of set 2 in bin 2.
Next bin per job
to sort unfolded output by job. The printer will deposit each job in a new bin.
If all bins contain prints and new jobs are sent to the printer, they will be
placed on top of the prints still present in the bins.
Continuous
to combine the output capacity of all the bins of the high-capacity stacker.
All the physical bins are thus turned into 1 logical bin: If the first bin is full,
the printer will automatically deposit the subsequent prints in the second bin.
This option may be handy if one job contains a large number of prints which
would not fit into one single bin.
Bin per account
which you can use if there are incoming jobs from different accounts or
users. Each job will be delivered in the bin that has been assigned to this user
or account. See also ‘Defining a list of users and accounts’ on page 37.
3 If necessary, click the check box ‘Offset stack’.
3167-108
[19] Offset stack option.
This means that the sets of printed pages are deposited on top of each other
with a slight offset.
4 If necessary, click the check box ‘Long plots to container’.
3168-108
[20] Long plots to container option.
If this option is selected, the printer will deposit all long plots (longer than
1230 mm or 48.5”) via the Lower Output, even if output devices other than the
Lower Output have been selected for unfolded output of check plots or regular
jobs.
5 Click the Apply button.
6 All subsequent prints will be delivered as specified.
Getting started
33
Specifying file types in menus
Only the file types you select here, will appear in the list of file types you can
choose from in the appropriate dialog boxes and menus. In this way you can
modify the user interface, to show only those file types that are actually used.
If you are sure that you will never get HP-GL/2 files, for example, you can use
this function to remove HP-GL/2 format from the list of available file types.
Note: This setting is used for Repro Station dialog boxes and menus. For Job
Director dialog boxes and menus, you must specify the same settings in Job
Director.
▼
Specifying file types
1 From the Configure menu, choose File types.
The following dialog box appears:
3169-144
[21] File types dialog box
2 Select the File types which you do not need in the selected list and
click
to remove them.
and
buttons to specify the order in which you want to see the
file types displayed in menus and drop-down list boxes.
3 Use the
34
Repro Station User Manual
For example, if you place TIFF on top of the list in this menu, it will also
appear as the first option in the File type drop-down list box of a job ticket
window:
3175-144
3174-144
[22] The file type placed on top of the Selected list in the File types dialog box appears as the first
option in drop-down list boxes.
4 Click the OK button.
Specifying available paper sizes in menus
Only the paper sizes you select here, will appear in the list of paper sizes you
can choose from in the appropriate dialog boxes and menus. In this way you
can modify the user interface, to show only those paper sizes that are actually
used.
Note: This setting is used for Repro Station dialog boxes and menus. For Job
Director dialog boxes and menus, you must specify the same settings in Job
Director.
Getting started
35
▼
Specifying paper sizes
1 From the Configure menu, choose Paper sizes.
The following dialog box appears:
3174-144
[23] Paper sizes dialog box
2 Select the Paper sizes you do not need in the Selected list and click
3170
to remove them.
and
buttons to specify the order in which you want to see the
paper sizes displayed in menus and drop-down list boxes.
For example, if you place A1 on top of the list in this menu, it will also appear
as the first option in the Paper size drop-down list box of a job ticket window:
3 Use the
3176-144
3177-144
[24] The paper size placed on top of the Selected list in the Paper sizes dialog box appears as
the first option in drop-down list boxes.
4 Click the OK button.
36
Repro Station User Manual
Defining a list of users and accounts
You can define a list of users and accounts, e.g. departments, to allow print job
management. This list is used for the following purposes:
■
■
■
■
Statistics
In the list a number is assigned to each user and account. This number is used
for statistical purposes (job logging) by Machine Monitor.
Print permission
In Repro Station you can restrict printing. If this option is selected, only users
and/or accounts that are defined in the list are allowed to send jobs to the
printer (see ‘Specifying print criteria’ on page 62).
Bin selection High Capacity Stacker
If your printer is equipped with a High Capacity Stacker, you can use the list
to define which output bin should be used for a specified user and/or account.
In Repro Station you can define if this specified bin is to be used (see
‘Specifying output delivery’ on page 32).
Assigning user and account names to Scan Station jobs.
In Scan Station you can select user and account names from the list to assign
to scan jobs and check plots.
You can define a list of users and accounts in Repro Station, Machine Monitor
and Scan Station. If the applications are installed correctly, only one list of
users and accounts is used. You can use any of the named applications to add
users and accounts to this list, or to remove them.
Attention: Only if Repro Station, Machine Monitor and Scan Station are
installed on the same PC and in the same directory, the named applications
will use the same list. Otherwise special arrangements are necessary.
Getting started
37
▼
Adding Users and accounts to the list
1 From the Configure menu, choose Accounts.
The Users and Accounts dialog box appears.
3178-144
[25] The Users and accounts dialog box
2 In the Name box of the Users and/or Accounts, type the respective name of the
3
4
5
6
7
38
user or account user you wish to define.
For example, an account name could be the name of a department: ‘Sales’.
In the Number box, type the number you wish to assign to the user or account
(you can enter up to 9 digits). If you click the button that is located at the right
side of the number field, the first free number (following the currently
displayed number) will appear. This number is not in use for other users or
accounts.
If your printer is equipped with a High Capacity Stacker, specify a bin number
where the printer has to deposit the prints of this particular user or account.
Note: Bin numbers assigned to users overrule bin numbers assigned to
accounts.
Choose the Add button.
Repeat steps 2 to 5 to add all the users and accounts of your choice.
Click the OK button.
Repro Station User Manual
▼
Removing Users and accounts from the list
1 From the Configure menu, choose Accounts.
The Users and Accounts dialog box appears ((see figure 25)).
2 Click the button behind the Name box of the Users and/or Accounts to select
a user or account you want to remove from the list.
3 Click the appropriate ‘Delete’ button to remove the selected user or account
from the list.
4 If you want to remove all users or all accounts from the list, click the
appropriate ‘Delete all’ button.
5 Click the OK button.
Getting started
39
Configuring stamps
By using stamps you can print extra information on your output. Stamps can
be divided into three categories:
■
■
■
Printer stamps
Up to 50 printer stamps can be defined on the printer.
Free text stamps
Using Job Director, you can define (job specific) text.
Image stamps
You, as Repro Station operator, can define which images can be used as
stamps, and specify their settings.
Note: Repro Station checks for available printer stamps in the file ‘stamps.txt’
which is located in the status directory of the Repro Station queue.
Note: If Free text stamps or Image stamps are selected for a print job, but these
stamps are not supported by your printer, the job will be printed without a
stamp. If also the printer stamp option is not installed on your printer, no
stamps can be used.
▼
Viewing Printer stamps
1 From the Configure menu, choose Stamps --> Printer stamps.
The Stamps dialog box appears.
3179-144
[26] Printer stamps dialog box
2 Specify a number, ranging from 1 to 50, to identify the stamp.
3 The Contents text box shows the stamp as it is currently defined in the printer,
e.g. -time and date-.
4 Click the OK button.
You can define which overlay files can be used as image stamps. You also have
to define several settings for these files. Users of Job Director can define
position and rotation of these images themselves.
40
Repro Station User Manual
▼
Configuring Image stamps
1 From the Configure menu, choose Stamps --> Image stamps.
The Images.jt box appears.
3180-144
[27] Image stamps dialog box
2 Use the ‘Add’ button to open a separate window, in which you can select image
files that you want to use as a stamp. These images appear in the Files list box.
3 Make all other required settings for each file.
4 To assign a name to the image stamps, click the ‘Extra settings: Open’ button.
Select the Stamps window by selecting ‘Stamp’ from the drop-down list box
Getting started
41
in the job ticket window or by clicking the stamp button on the QuickAccess
bar..
3181-144
[28] Stamps window
5 Specify the stamp name in the edit field, for each image file.
When defining an image stamp, the free text stamp field is not used to actually
define a free text stamp to put on the image stamp file. However, the first line
of the free text stamp field is used to assign a descriptive name to the selected
image stamp file. In figure 28, stamp name ‘aircraft stamp’ is specified in the
edit field.
Note: If no stamp name is specified, the file name will be used.
42
Repro Station User Manual
6 You can change the font settings by pressing the ‘Modify’ button. The standard
Windows font selection dialog is shown.
3184-144
[29] Windows font selection dialog
In this dialog, all available fonts with their style and size are shown. The Script
combo box is disabled.
The size of the font must be between 1 and 250 points. When this is not the
case, an error message box will be shown the moment you press the OK button.
When you press the OK button and all font settings are correct, they are
applied to the selected file(s). The font selection dialog is removed and the
settings are shown below the edit field (see figure 28).
7 Click the OK button.
Note: It is possible that files with different font settings are selected
simultanuously. In this case, it is not possible to show the text in all selected
fonts in the edit field. The possible situations are listed below.
Font name When it is the same for all selected files, it is used for displaying
the text in the edit box. When it is not the same for all files, the standard font
is used. In the latter case, the ‘Name:’ field below the edit box is empty.
The default setting is ‘Courier New’.
Font style The style is only used for displaying the text when both the font
name and style are the same for all selected files, otherwise the regular style is
used. In the latter case, the ‘Style:’ field below the edit box is empty.
The default setting is ‘regular’.
Getting started
43
Font size As explained earlier, the font size of the shown text is fixed and does
not represent the chosen font size. When the size is not the same for all selected
files, the ‘Size:’ field below the edit text box is empty.
The default setting is ‘7 pt’.
When a font name, style or size is not the same for all selected files, its
corresponding field in the font selection dialog (see figure 29) is also empty.
Configuring check plots
A check plot is a print file that has been copied directly to the Repro Station
queue, without Océ job ticket information. Some check plots may contain a
Remote Control Format (RCF) header, e.g. print files which were generated
using an Océ printer driver.
You, as Repro Station operator, can treat incoming check plots in two ways:
■
■
You can modify the check plot before printing, i.e. create a job ticket for this
check plot.
You can print the check plot without modifications, but this is not possible if
the check plot contains a RCF header.
For both ‘modifying’ and ‘printing’ separately, you can specify that the
settings of the check plot header or the Repro Station default settings ((see
‘Repro Station defaults’ on page 68)) should be used.
▼
Configuring check plots
1 From the Configure menu, choose Check plots.
The Check plot settings dialog box appears.
3182-144
[30] Check plot settings dialog box
44
Repro Station User Manual
2 Make the appropriate selection in the Modify area:
■
■
If you select ‘Use check plot header’, the settings as specified in the RCF
header will be adopted in the job ticket if the check plot is modified.
If you select ‘Use Repro Station default settings’ and you modify the check
plot later on, a job ticket will be created based on the Repro Station default
settings.
3 Make the appropriate selection in the Print area:
■
■
If you select ‘Use check plot header’, the settings as specified in the RCF
header will be used when the check plot is printed.
If you select ‘Use Repro Station default settings’, the RCF header of the
check plot will not be used. Instead, Repro Station generates and uses a RCF
header containing the default settings of Repro Station.
In both cases, the check plot file itself remains unchanged.
4 Click the OK button.
Getting started
45
Quitting Repro Station
When you do not want to print any more jobs, you can quit Repro Station. Note
that applications are still able to send jobs to the Repro Station queue when
Repro Station is not active; these jobs will be waiting in the Repro Station
queue.
Attention: Do not quit Repro Station while jobs are still being printed. Some
jobs may not be ready and must be completely reprinted later. For this
reason, it is good practice to make sure that the submitting of jobs to the
printer is completed before quitting Repro Station.
▼
Quitting Repro Station
1 If Repro Station is running, click the Stop button.
The submitting of new jobs to the printer will be stopped.
2 Wait until the active job has been sent to the printer completely.
3 In the Repro Station window, choose Exit from the File menu.
Note: When Repro Station stops, Machine Monitor on the same PC will remain
active. You have to explicitly quit this application. The reason for not stopping
Machine Monitor is that it may be needed for other printing, scanning, or
copying processes that are still active. Another reason is that maybe you want
to keep logging information about jobs in progress.
46
Repro Station User Manual
Using Help
Online help for Repro Station Repro Station is a quick and convenient way to
look up information about a task you are performing, a feature you would like
to know more about, or a command you want to use.
Help is available whenever you see a Help command button, or help as an item
on the menu bar.
When you select help from the menu, the first page of Océ Repro Station Help
appears.
▼
Using the Help menu
1 From the Help menu, choose Contents.
The Repro Station Help screen appears.
You can also press F1 at any time for help information. For menus, the Status
bar at the bottom of the window also displays a one-line text to explain the
purpose of the currently selected menu item.
Getting started
47
48
Repro Station User Manual
Repro Station
User Manual
Chapter 3
Using the Queue window
This chapter deals with the main function of Repro Station:
to control all print jobs for the printer. It also describes
how to use all functions of the Repro Station Queue
window.
49
Queue display
In this section the items in the Repro Station Queue window will be explained.
Furthermore, all actions that you can perform on the jobs are described.
The main part of the Repro Station Queue window shows the jobs in the queue.
3273-144
[31] Repro Station Queue window
Each job is displayed on one line in the list box. It contains:
■ the status of the job; more detailed information about these fields will be
described below,
■ the job name,
■ the user name (submitter of the job),
■ the number of print files in the job,
■ the total number of copies,
■ information whether it’s a normal job, or a matrix job,
■ the paper sizes,
■ the media types,
■ the finishing mode,
■ whether operator notes and/or distribution info are present.
50
Repro Station User Manual
New jobs and check plots are automatically displayed at the end of the queue,
some time (see ‘Job show-up time’ on page 25), after they arrive in the Repro
Station queue.
Using the Queue window
The Queue window shows all jobs that are waiting to be printed. You can see
several job features in the Queue window at a glance. The row of icons on top
of the menu indicates the field's contents.
Repro Station can run in one of two modes: Manual or Automatic printing. In
both modes printing can be started or stopped by clicking the Start or the Stop
button. You can switch between Manual and Automatic when printing is not
active.
When printing is active a green arrow pointing upward is shown just below the
printer icon. A red circle indicates that printing is inactive.
The job that is currently being printed is shown in the field next to the printer
icon.
You can select one or more jobs in the queue list box. If you select one job, the
Analysis field shows the date and time when the job arrived. The format is
month/day/year. The field also shows which print criteria are not met.
If the job contains operator notes or distribution information, the Notes and/or
Distribution buttons are available. Click the button to view the information.
When you have selected one or more jobs, you can delete them from the queue
by selecting the Delete button. Jobs that are removed are copied to the Ready
queue.
To view or modify jobs, select the Modify button. All selected jobs will get the
status ‘w’. The first one to be modified gets status ‘M’ and a window is
displayed where you can view/modify its settings. Make any required changes
and select OK when you want to save them. Choose Cancel when you do not
want to change the job settings.
To change the order of jobs, press the Up arrow button to move all selected
jobs one place up. Select the Down button to move the jobs one place down.
Using the Queue window
51
:
Explanation of codes in the queue
Job status
““
+
w
M
P
E
-
h
C
F
T
Criteria status
““
X
ID
default [switch to Automatic mode -> "+"]
scheduled for printing
waiting to be modified
being modified
printed correctly, but not removed from the queue
error occurred during printing, job still in queue
job still arriving, not complete yet
(this occurs when it takes very long to complete
writing the job to the queue - will only occur occasionally)
job needs conversion and is put on hold. If a suitable convertor is installed, the job will be converted automatically. If you have defined to
suspend all conversion jobs, the job stays on hold until you select the
job, and press Start.
busy converting
failure during conversion
time out during conversion
job meets all active criteria
job does not meet at least one of the criteria
job name, or "checkplot"
user name for a job, or file name for a check plot
number of files in the job
number of copies specified in the job
#
job is a matrix job
used paper sizes in the job (?= automatic)
used media in the job (pl = plain paper,
tr = transparent, po = polyester film, ma = manual feed)
finishing options (fo = fold on, pu = punch on,
- = no finishing selected)
job includes information for the operator
(+ = yes, - = no)
52
Repro Station User Manual
Managing jobs
Jobs and check plots arrive in the Repro Station queue. This section explains
how to handle jobs, i.e. how to modify a job using the job ticket editor, how to
remove a job from the queue and how to give the job another place in the
queue.
Note: Detailed information about modifying a job can be found in the ‘Océ Job
Director User Manual’.
Modifying a job
It is possible that you need to modify the settings of a job. As Repro Station
operator you can modify all job tickets. You can modify the ‘contents’ of the
job, you can change which files are included in the job, their order and their
settings.
▼
Modifying jobs
1 Select one or more jobs from the Repro Station queue window.
2 Choose the Modify button.
All selected jobs will get the status "w" in the Queue window. The first one to
be modified gets the status "M" and a job ticket window is displayed where you
can view or modify its settings (see figure 32 on page 54).
Using the Queue window
53
3274-144
[32] Modifying a job.
Note: The matrix ticket window will be displayed if you selected a matrix
job.
3 Make the required changes.
4 Click the OK button.
Modifying check plots
Check plots are print files that have been copied directly to the Repro Station
queue, without Océ job ticket information. They are indicated as such by their
string “checkplot” in the Repro Station queue. Check plots in the Repro Station
queue can still be modified, which will imply that they are turned into a job
ticket.
▼
Modifying check plots
1 Select a check plot in the Queue window and choose the modify button.
The following message will appear:
3277-144
[33] Modifying a check plot: creating a job ticket.
54
Repro Station User Manual
2 Click the Yes button.
A job ticket window appears which has the same name as the check plot.
3 Make the necessary modifications.
For detailed information on how to create a job ticket and specify its settings,
refer to the Océ Job Director User Manual.
4 Click the OK button in the job ticket window.
Moving a job
Moving one or more jobs in the Repro Station queue is done by selecting the
job(s) and clicking the Up or Down button.
▼
Moving jobs
1 Select one or more jobs from the Repro Station queue window.
2 Click the Up or Down button:
■
■
Click the Up button to move all selected jobs closer to the top of the print
queue, making them print earlier.
Click the Down button to move the jobs closer to the bottom of the print
queue, making them print later.
Deleting a job
Deleting a job from the Repro Station queue is done by selecting the job and
clicking the Delete button. The job ticket and the plot files of this job will be
moved to the Ready queue, so it is possible to find them again and print them
later.
▼
Deleting jobs
1 Select one or more jobs from the Repro Station queue window.
2 Click the Delete button.
You are asked to confirm the action:
3275-144
[34] Deleting jobs from the queue.
3 Click OK to delete the selected jobs from the Repro Station queue.
Using the Queue window
55
Deleted jobs are copied to the Ready queue.
Displaying notes
Jobs that contain distribution information or notes for the operator, are marked
with a ‘+’-sign in the Notes field of the queue. By selecting one job, these notes
can be displayed.
▼
Displaying distribution notes
1 Select one job from the queue.
If distribution notes are present, the Distribution button will be enabled.
2 Click the Distribution button.
A window containing the information appears, e.g.:
3278-144
[35] Show distribution notes dialog box.
3 Click OK when you have read the notes.
▼
Displaying operator notes
1 Select one job from the queue.
If operator notes are present, the Notes button will be enabled.
2 Click the Notes button.
A window containing the notes appears, e.g.:
3279-144
[36] Show operator notes dialog box.
3 Click OK when you have read the notes.
56
Repro Station User Manual
Using logfiles
Standard logfile Océ Repro Station keeps a record of all the jobs it has
submitted to the printer. Every time a job leaves the Repro Station queue, the
information about this job is added to a standard logfile. This logfile is called
ocers.log and is saved in the subdirectory ‘...\accounts’. You can read this
logfile using any standard text editor, e.g. Microsoft Notepad. The information
appears in this logfile as it is listed in the Queue window and is preceded by
the time and date at which the job was printed.
Extended logfile Next to this standard logfile, Repro Station can also keep
track of the jobs in an extended logfile. This extended logging can be used for
statistical purposes. The extended logfile lists more detailed information about
every job that is submitted from Repro Station to the Océ printer. This
information is presented in tabular form. Each line consists of 70 tab-separated
fields. The very first line is the header row of the ‘table’ and is written when
the file is created. Examples of the type of information listed in the extended
logfile are:
■
■
■
■
■
■
■
■
■
■
the current date
the current time
the status of the job
the filename of the job or check plot
the user name
the account name
the total number of copies
the paper size
the media type
the type of finishing.
Furthermore the extended log file reports the status of the printed files.
Possible messages are: “Printed”, “Not printed”, “Unknown error”, etc.
An example of an extended logfile and a table explaining all the fields is
included in Appendix A ‘Example of an extended logfile’, page 93.
Note: You may want to clear the extended logfile regularly or copy the logging
data to another file. A large logfile slows down Repro Station.
Using the Queue window
57
▼
Creating an extended logfile
1 From the Configure menu, choose Logfile.
The Extended logfile dialog box appears.
3276-144
[37] Extended logfile dialog box
2 Select Logging on.
3 Click the Browse button to specify a logfile.
Specify the directory and filename where new logging information should be
saved. You can either:
■ merge new logging information with an existing logfile
or
■ type a new name for the logfile in the File Name text box, in which case a
message will appear saying that the file does not exist and asking whether
you want to create this file.
The extended logfile which is currently in use is displayed in the File name
field.
3283-144
[38] Currently used logfile.
4 In the Extended logfile dialog box, click the OK button.
58
Repro Station User Manual
▼
Clearing the extended logfile
1 From the Configure menu, choose Logfile.
The Extended logfile dialog box appears.
3276-144
[39] Extended logfile dialog box
2 Choose the Clear logfile button.
A warning appears asking for your confirmation to remove all the data from
the logfile.
3280-144
[40] Clearing the extended logfile.
3 Choose Yes to clear the extended logfile or No to cancel.
4 In the Extended logfile dialog box, click the OK button.
Using the Queue window
59
Printing
Repro Station can run in one of the following modes: Manual or Automatic. In
both modes printing can be started or stopped. You can switch between Manual
and Automatic when printing is not active.
Printing jobs in manual mode
In Manual mode, jobs that arrive in the queue are added at the bottom of the
list. To print one or more jobs, you must select the job(s) and click the Start
button.
The selected jobs get a ‘+’ status and the first one will be printed. It will be
moved from the queue to the printer field. Now printing is active which is
indicated by a green arrow in the top left corner.
If the first selected job has been printed, the next ‘+’ job will be selected and
printed.
When all selected jobs have been printed, printing will be stopped and the
printing status will be marked by a red circle in the top left corner.
You can stop printing at any time by pressing the Stop button. The current job
will be finished.
▼
Starting Manual Printing
1 When printing is not active, select Manual Print Mode in the Queue window.
2 Select the print job(s).
3 Click the Start button.
The red circle in the top left corner of the Queue window will change to a green
arrow and the job to be submitted to the printer, will move to the printer field
above the queue icons. When all selected jobs have been printed, the green
arrow changes to a red circle again.
You can still select jobs, modify or delete them when Repro Station is sending
jobs to the printer.
A job will be printed using the settings that have been specified in its job ticket.
60
Repro Station User Manual
A check plot will be printed as specified by the check plot settings on Repro
Station ((see ‘Configuring check plots’ on page 44)).
Printing jobs in automatic mode
Automatic printing means that all incoming jobs and check plots are
automatically sent to the printer. With Repro Station you can specify some
categories of jobs that may not be printed; these jobs remain in the Repro
Station queue. You do this by specifying print criteria against which each job
is checked. If the job does not match the criteria, it stays in the Repro Station
queue. Other jobs that do match the criteria will be printed, although they may
arrive later than jobs that are suspended.
During Automatic printing, you can perform the same actions as for Manual
printing. However, the functions of the Stop and Start button are slightly
different: when Automatic mode is selected, you can click the Start button to
start printing in automatic mode. When all jobs that match the criteria have
been printed, the queue stays in printing mode. New jobs that arrive in the
queue (and match the criteria) will be printed without intervention. Pressing
the Stop button stops automatic printing.
▼
Starting Automatic Printing
1 In the Queue window, select the Automatic Print mode option.
2 Click the Start button.
Using the Queue window
61
The red stop sign in the top left corner of the Queue window will change to a
green arrow and the “+” jobs will be printed. The job that is currently being
printed appears in the Status area.
3285-144
currently
printed job
green
arrow:
printing in
[41] Printing in progress.
There is always only one print job at a time being printed. But it is possible that
already several jobs have been sent to the printer.
Specifying print criteria You can use print criteria to suspend or allow the
printing of specific jobs. You can suspend jobs for all kind of reasons. For
example, because the sender is not on the list of authorized users, or because
its number of requested prints exceeds the specified maximum number.
Print jobs that do not match your criteria will be suspended. They are marked
with an "X" in the queue. The Analysis box of the Repro Station Queue
window displays the specific criteria which the selected job does not meet.
3284-144
[42] Analysis box of the Repro Station Queue window.
Note: A print job that is suspended in automatic mode, can be printed on
request in manual mode.
62
Repro Station User Manual
▼
Specifying print criteria
1 From the Configure menu, choose Print criteria.
The Print criteria dialog box appears.
3281-144
[43] Print criteria dialog box
2 Click the items you want to use as condition.
If you select ‘Conversion needed’, automatic conversion will never take place.
Indeed, the window in figure 43 deals with print criteria, whereas conversion
is a process that proceeds printing.
If you select ‘Allow only specific users/accounts’, only the users and/or
accounts that are specified in the ‘Users and accounts’ list are allowed to send
jobs to the printer. This list is used for multiple purposes. See ‘Defining a list
of users and accounts’ on page 37 for more information. You can also get
direct access to this list by clicking the ‘Edit’ button.
3 In the Print criteria dialog box, click the Apply button.
4 The jobs in the queue will be evaluated according to your new set of criteria.
Using the Queue window
63
Stop printing
When Repro Station is sending jobs to the printer, you can stop this process.
You can define if the job that is currently being printed, will be finished.
▼
Stopping the print process
1 Press the Stop button. The following window may appear:
3286-144
[44] Stopping the print process
2 Select one of the following options in the pop up menu:
■
■
Abort: The current job will be aborted.
Finish: The current job will be finished before stopping.
Retrieving jobs from the Ready queue
If an error occurs, an ‘E’ will be shown before the job line in the Queue
window. This job is still in the queue. You can select it in Manual mode and
choose Start to print it again.
Finished and removed jobs are saved in the Ready queue. You can reprint a job
from the Ready queue.
The following steps describe the procedure.
64
Repro Station User Manual
▼
Reprinting from the Ready queue
1 From the Configure menu, choose Queues > Repro Station queue.
The Repro Station queue dialog box appears:
3282-144
[45] Configure Repro Station queue dialog box
2 In the text box, type the full path name of the directory which is currently used
for the Ready queue. You can also use the ‘Browse’ button to locate this queue.
3 Click the OK button.
Both the Repro Station queue and Ready queue are now the same directory.
The Queue window lists all jobs that are present in the Ready queue.
4 Select the job(s) you want to reprint in Manual mode.
5 Click the Start button.
Note that when a job is printed, it is not removed from the Repro Station queue:
The Ready queue is the same as the Repro Station queue. The status after
printing is ‘P’, which indicates that it is printed but not removed from the
queue.
Jobs that cannot be printed stay in the queue and receive the ‘E’ status. You
may want to move these jobs to a special directory, the ‘error queue’. The next
procedure shows how you can save jobs in the error queue.
Attention: If the Repro Station queue and the Ready queue are different
directories and you delete a job, you actually move this job from the Repro
Station queue to the Ready queue. If the Repro Station queue and the Ready
queue point to the same directories, however, deleting a job implies that the
job is really removed from the disk.
6 When you are finished with reprinting your jobs, reset the Repro Station queue
to its original directory.
Repeat steps 1 to 3 but type the full name and path of the former Repro Station
queue in the text box.
Using the Queue window
65
You can save jobs that produced errors in a special queue. You can create such
an error queue yourself:
▼
Saving E-jobs in a separate queue
1 From the Configure menu, choose Queues > Ready queue.
2 Rename the Ready queue into e.g. ‘error_q’.
3 Select No maximum size. Otherwise these jobs may be lost.
4 Click the OK button.
5 Click Manual print mode in the Queue window.
Select the job(s) you want to save.
6 Press the Delete button.
Now the job is removed from the Repro Station queue and copied to the error
queue.
7 Set the Ready queue to the original Ready queue again (set to original value).
66
Repro Station User Manual
Repro Station
User Manual
Chapter 4
Customizing Repro Station
This chapter describes the usage of default settings,
multiple queues, tools, format conversion and banner
pages.
67
Repro Station defaults
Repro Station can save defaults for file types, e.g. HP-GL, CALS, CalComp,
and for print parameters, e.g users and accounts, operator notes. These default
settings can be used for check plots (see ‘Configuring check plots’ on page 44),
or they can be ‘loaded’ when you are modifying a job ticket (see ‘Loading
defaults’ on page 71).
You can specify defaults in two ways:
■
■
starting from the Defaults menu
starting from a matrix or job ticket window
Each way gives access to the same default settings.
the banner page default, which takes a special place among the Repro Station
defaults, is discussed in ‘The banner page default’ on page 73.
Specifying defaults, starting from the Defaults menu
After opening the Defaults menu, you can select a file type or print parameter
and specify the settings of your choice.
▼
Specifying defaults, starting from the Defaults menu
1 From the Defaults menu, choose a print parameter, e.g. Stamping.
The corresponding dialog box appears:
3255-144
[46] Default Stamp dialog box.
2 Specify the settings as you want them to be used by Repro Station as defaults.
3 Click the OK button.
4 Repeat the above steps to specify the print parameters of your choice.
For more information on defaults, refer to the chapter 5 of the Océ Job Director
User Manual.
68
Repro Station User Manual
Specifying defaults, starting from a matrix or job ticket window
Starting from a (matrix) job ticket window, you can save specified settings as
default settings.
▼
Specifying defaults, starting from a (matrix) job ticket window
1 Select a job from the Repro Station queue list.
2 Click the Modify button
The job ticket window appears.
3250-144
[47] Modifying a job.
Note: The matrix ticket window will be displayed if you have selected a
matrix job.
3 Choose the
button.
Customizing Repro Station
69
The job ticket window unfolds and displays the extra settings.
3251-144
[48] Job ticket window unfolded.
4 Select a file in the Files list box for which you wish to specify extra settings.
5 Select one of the settings from the drop-down list box ➊ or click the
corresponding button on the QuickAccess bar ➋.
➋
3253-144
➊
3252-144
[49] Selecting a print parameter setting.
70
Repro Station User Manual
6 Specify the settings as you want them to be used by Repro Station as defaults.
7 Repeat steps 5 and 6 to specify all the settings of your choice.
8 Leave the job ticket window open and choose Save active settings from the
Defaults menu.
The Save as defaults dialog box appears:
3254-144
[50] Save as defaults dialog box.
9 Click the check boxes of the settings which you wish to save as defaults.
10 Choose the OK button.
The selected settings are now saved as defaults. Later on, you can load these
defaults and apply them to print jobs.
11 Choose Save from the File menu.
Loading defaults
Loading defaults means that you:
■
■
▼
retrieve default settings which have previously been saved
apply these default settings to files in new job tickets.
Loading defaults
1 Select one or more jobs from the Repro Station queue.
2 Click the Modify button.
Customizing Repro Station
71
The job ticket window of the first selected job appears.
3256-144
[51] Modifying a job.
Note: The matrix ticket window will be displayed if you have selected a
matrix job.
3 Select one or more files or programs in the job ticket for which you wish to
load the default settings.
4 Leave the job ticket window open and select Load default settings from the
Defaults menu.
72
Repro Station User Manual
The Load defaults dialog box appears.
3257-144
[52] Load defaults dialog box.
5 Click the check boxes of the settings for which you wish to load defaults.
6 Choose the OK button in the Load defaults dialog box.
The selected settings will return to their defaults in the job ticket window.
7 Choose Save from the File menu.
8 Repeat steps 3 to 7 for all selected jobs.
The banner page default
The banner page default is a mechanism that enables the operator to force a
banner page.
When the default is ‘OFF’, a banner page will only be produced if the user has
specified this in the job ticket.
When the default is ‘ON’, a banner page is always produced, even when the
user switches it off.
Customizing Repro Station
73
Using multiple Repro Station queues
For statistical purposes it may come in handy to have more than one Repro
Station queue. You can make a Repro Station queue for each department, or
have an ‘urgent’ queue and a ‘batch’ queue, or maybe even a queue for each
individual user.
Thus, you can use Repro Station to determine the priority of the queues. You
can make a Repro Station queue active and only one queue can be active at a
time.
Attention: Only create a new queue when printing is stopped and nothing is
being modified.
Example Creating two Repro Station queues, ‘urgent’ and ‘batch’, and
making either one of these queues active.
1 From the Configure menu, choose Queues > Repro Station queue.
The Repro Station queue dialog box appears:
3258-144
[53] Configure Repro Station queue dialog box.
74
Repro Station User Manual
2 In the text box, type the full path name of the directory which is to be used as
the Repro Station ‘batch’ queue, e.g.:
3259-144
[54] Creating a Repro Station ‘batch’ queue.
This directory does not necessarily have to exist yet.
If you wish to use an existing directory but you don’t know its full path name,
choose the Browse button to display a list of directories. Select the appropriate
directory from the list, and then choose the OK button.
Attention: Make sure that Job Director and other applications that send
jobs to these queues know where these directories are. They have to be
configured to write to the appropriate queue.
3 Choose the OK button in the Repro Station queue dialog box.
If you have specified a directory which does not exist yet, the following
message will appear asking you whether you want to create this directory.
3260-144
[55] Creating a Repro Station ‘batch’ queue.
4 Click the OK button to create this directory.
5 From the Configure menu, choose Queues > Repro Station queue again.
Customizing Repro Station
75
The Repro Station queue dialog box appears and displays the currently active
queue, i.e. the ‘batch’ queue you have just created, e.g.:
3261-144
[56] Currently active queue.
6 In the text box, type the full path name of the directory which is to be used as
the Repro Station ‘urgent’ queue, e.g.:
3262-144
[57] Creating a Repro Station ‘urgent’ queue.
7 Choose the OK button in the Repro Station queue dialog box.
If you have specified a directory which does not exist yet, the following
message will appear asking you whether you want to create this directory.
3263-144
[58] Creating a Repro Station ‘batch’ queue.
8 Click the OK button to create this directory.
The queue which was last created or selected using the command
Configure > Queues > Repro Station queue is the active queue. This is the
queue ‘c:\ocers_q\urgent’ in the current example.
9 In the Queue window, select Automatic in the print mode field and press Start,
or use the manual print mode.
76
Repro Station User Manual
In the ‘Automatic’ mode, all jobs and check plots that arrive in the ‘urgent’
queue and match the criteria are automatically printed. Jobs that appear in the
‘batch’ queue are put on hold until you switch the Repro Station queue to
directory ‘c:\ocers_q\batch’.
10 To switch to the Repro Station ‘batch’ queue, choose
Configure > Queues > Repro Station queue and enter the full path name of the
‘batch’ queue in the text box.
Customizing Repro Station
77
Using tools
You can start other applications without leaving Repro Station. This allows
you to for instance view, or convert images before they are printed. These
applications are called Tools in Repro Station and they are listed in the Tools
menu.
The Tools menu lists either applications, or groups of applications. For
instance: Viewers, Convert, Access. Where Viewers is a group of viewers, and
Convert and Access are applications.
Applications can be associated with certain types of files through their
extension, for instance Viewer1 for all .TIF files, Viewer2 for all .CAL files
and Viewer3 for all other files.
The table below illustrates how the applications in the above example can be
grouped into Tools and how they can be linked to file extensions.
Tool
Extension
Application
Viewers
CAL
TIF
*
@@@
@@@
VIEWER1.EXE
VIEWER2.EXE
VIEWER3.EXE
CONVERT.EXE
MSACCESS.EXE
Convert
Access
There are two ways to start a Tool:
■ Select it from the Tools menu.
When a file in the ‘Files' area was selected, the application will start and open
that file.
■ Double click on a file in the 'Files' area.
This feature must be enabled in the 'Configure tools' window.
The application will start and open the selected file.
If a group of applications is selected, e.g. Viewers, which application will be
started, depends on the extension with which it is associated.
Three types of extensions can be used.
'@@@', for an application which must be started without a file,
■ the exact extension (e.g. TIF, CAL), for only files with that extension,
■ an asterisk (*), for any file.
■
78
Repro Station User Manual
Applications associated with '@@@' have the highest priority, then the
programs coupled to the exact extension and finally applications associated
with an asterisk.
▼
Defining a tool
1 From the Configure menu, choose Tools.
The Configure Tools dialog box appears.
3264-144
[59] Configure Tools dialog box
2 In the New Menu Entry dialog box, type a descriptive name for a tool you wish
to define, e.g. ‘View file’.
3265-144
[60] Defining a new tool.
3 Choose the Add button.
Customizing Repro Station
79
The Associations dialog box appears.
3266-144
[61] Tool association.
4 In the Extension box, type the extension of the print files, e.g. ‘txt’, ‘hgl’, ‘tif’
5
6
7
8
9
10
80
etc.
You can use the wildcard character * for all the extensions which you do not
want to specify explicitly.
Note: You can also enter the extension @@@. You can use this option to
start an application of your choice from within Repro Station, but not open
the selected file. This may be handy for applications which are not directly
related to a print file, but which you frequently use in combination with
Repro Station, e.g. Microsoft Calculator.
In the Command Line box, type the name of the program file, including the
path and extension.
For example, to add Microsoft Notepad, located in the directory named
C:\WINDOWS, type c:\windows\notepad.exe.
If you don’t know the name of the program file, choose the Browse button to
display a list of files and directories. Select the appropriate filename from the
list, and then choose the OK button.
In the Arguments box, define the necessary arguments. Arguments are fixed
parameters that are used when the application starts. If you need to specify
arguments, this information is supplied with the tool.
Click Add in the Associations dialog box.
Repeat steps 4 to 7 to make all the necessary associations.
You can make as many associations as you want. For example, you may have
a number of viewing applications at your disposal, each of which can be used
to view specific file types. You may then want to use the tool Viewers in
different ways, depending on the extension of the selected file, e.g. start an
application to view TIFF files (*.tif) and start another application to view
HP-GL (*.hpg) files.
Click the OK button in the Associations dialog box.
Repeat step 2 to 9 to define all the tools of your choice.
You can define up to 10 tools.
Repro Station User Manual
11 Arrange the defined tools in the order of your choice by selecting a tool in the
Menu Contents box and then clicking the Up or Down button.
The first, i.e. the tool which appears on top of the list, is the default tool. This
tool will also be displayed as such in the Tools menu.
3141-144
3144-108
[62] The first tool in the Menu Contents text box is the default tool and appears as the first menu
item of the Tools menu.
12 If necessary, select the option ‘Double click on filename = start first tool’.
This option means that, if you modify a job in the Queue window and
double-click on a print filename in this job, the first (default) tool will start and
open the selected file automatically.
13 Click the OK button in the Configure Tools dialog box.
▼
Starting a tool
1 Select a job in the Queue window and choose the Modify button.
The Job Ticket window appears.
2 Select a file in the Files area.
Customizing Repro Station
81
3 From the Tools menu, choose a tool.
➌
➊
➋
3267-144
[63] Starting a tool: ➊ modify a job, ➋ select a file in the Job Ticket and ➌ choose a tool.
If you want to start the default tool, you can also double-click the filename.
The associated application then starts from within Océ Repro Station.
If you quit the application, you will return to Océ Repro Station.
82
Repro Station User Manual
▼
Changing or deleting a file association
1 From the Configure menu, choose Tools.
The Configure Tools dialog box appears.
3268-144
[64] Configured tools.
2 Select the tool in the Menu Contents box of which you want to change the file
association.
3 Choose the Associate button.
The Associations dialog box appears.
3269-144
[65] Tool association.
4 In the Extension box, type the extension which you want to associate with a
different application.
You can use the wildcard character * for all the extensions which you do not
want to specify explicitly.
The name, path and extension of the existing associated application, if any,
appears in the Command Line box.
5 In the Command Line box, delete the name, path and extension of the program
file.
You now have the following option:
■ If you just want to delete the file association, proceed with step 8.
■ If you want to create a new association, proceed with step 6.
Customizing Repro Station
83
6 In the Command Line box, type the name, path and extension of the new
program file.
If you don’t know the name of the program file, choose the Browse button to
display a list of files and directories. Select the appropriate filename from the
list, and then choose the OK button.
7 In the Arguments box, specify the necessary arguments.
8 Click the OK button in the Associations dialog box.
9 Click the OK button in the Configure Tools dialog box.
84
Repro Station User Manual
Using convertors
You (or the Océ system consultant) can install convertors on the PC and hook
them up to the Repro Station application.
Suppose that you need to print files that have a format that is not supported by
the Océ printer, e.g. PostScript. You can use Repro Station to automatically
convert such files to a printable format. This means that jobs that contain
PostScript files or checkplots in PostScript format are converted to a format
that the printer supports, e.g. TIFF. This is done by an external (Windows)
conversion program or convertor. See appendix B on page 97 for a technical
description of the requirements for convertors.
First find a convertor program(s) that does the required conversion for you. In
our example this is ps2tiff.exe.
Install the (external) convertors that are required.
Customizing Repro Station
85
▼
To add convertors to Repro Station
1 From the Configure menu, choose Convertors. The Configure Convertors
dialog box appears.
3270-144
[66] The Configure Convertors dialog box
In the ‘Conversion based on’ field, you select whether the convertor must be
selected based on the filename extension, or the format detected by the built-in
ALS (automatic language sensing).
If both filename extension and ALS are selected, first the language is checked.
If a match is found the corresponding convertor will be used. If the language
is not recognized, the extension is checked. If the extension is not in the list,
nothing is converted. If both extension and ALS are de-selected (default), no
conversion is done.
By selecting ALS it is possible to automatically convert checkplots that
contain a Remote Control Format (RCF) header into jobtickets. A convertor
must not be configured. For checkplots without RCF the former will not work.
In the ‘Install convertor’ field, you specify all information to launch a
convertor.
An example of the following procedure can be found on page 88.
86
Repro Station User Manual
▼
Installing convertors
1 Specify the extension in the edit field. You can also scroll here through the
2
3
4
5
6
already defined extensions to view the information specified earlier. Or, select
one of the file formats recognized by ALS, which is presented in a list box.
Note: Only the options (extension edit or ALS list selection) are available
that are currently active. When you select one of these, the other is
‘disabled’. So you can only specify settings for one of these options at a
time.
In the ‘Command Line’ box, type the name of the convertor's program file,
including the path and extension. If you don't know the name of the program
file, choose the Browse button to display a list of files and directories. Select
the appropriate filename from the list, and then choose the OK button.
In the ‘Arguments’ box, specify the necessary arguments. Here you can use the
following keywords:
■ %F% inputfilename (file-to-be-converted)
■ %O% outputfilename
■ %P% parameter file. This keyword will generate a pop up dialog, that allows
you to type in a filename, or to browse for the required parameter file.
This information will be filled in by Repro Station when starting the convertor.
Specify additional convertor information that Repro Station needs in the
‘Output Directory’ and ‘Info file’ boxes. Some convertors have predefined
settings; Repro Station needs to know this information to be able to use the
results of the conversion. If you have already specified these settings in the
command line arguments (in other words, Repro Station tells the convertor
where to write its output), this information is still required in these fields.
Note: The output directory must exist. It must be reserved for Repro Station,
because it is used to detect if the conversion process created multiple
output files from one input file. So the contents of this directory has a
temporary character and will be emptied by Repro Station before the
convertor is started!
Some convertors generate a separate info file for each input file. The info file
will get the same name as the input file, but with a different extension. This
extension must be specified in the ‘Info file’ box, using the keyword %S% .ext,
where ‘ext’ is the required extension.
Specify the time-out value for this convertor. If the convertor does not
terminate before this time-out expires, it is assumed to have failed and Repro
Station will try to kill it.
Set the time-out to a value large enough for a complex file to be converted. You
may need to experiment!
Note: If you do not specify a time-out value, Repro Station will wait until
the convertor terminates. If the convertor does not terminate, Repro
Station will keep on waiting.
Customizing Repro Station
87
7 Click the Add button to store the settings.
8 Go back to step 1 to install more convertors.
9 Choose the Test button if you want to verify if the convertor is installed
correctly. This procedure is described below.
10 Select the OK button to leave the dialog and save all settings. Select Cancel if
you do not want to save the settings.
▼
Example: Installing a PostScript convertor
1 Choose ALS in the Configure-Convertors dialog box.
2 The convertor is installed (for example) in the directory c:\convertor. Use
Browse to select the convertor ‘ps2tiff.exe’ in this directory.
3 The first argument on the command line is the file to be converted, so specify
%F% as first argument in the argument box. The second parameter on the
command line is the parameter file, so specify %P% as second argument in the
argument box. The dialog box ‘Advanced settings’ will pop up. The parameter
file is installed (for example) in the directory c:\convertor. Use Browse to
select ‘ps2tiff.par’. Press ‘OK’.
4 Use Browse to select the output directory ‘c:\convertor\out’ (for example). For
each input file, the convertor will generate an info file with the same name, but
with a different extension. You must specify this extension, in this example:
‘.rep’. This is done by typing in the info file box: ‘%S%.rep’.
The selected convertor in this example generates an info file. If you want to use
the info file of the convertor, you must specify the exact string, as generated by
the converter, to indicate that the process has succeeded (see the convertor
manual). In this example the string ‘Processing completed successfully’ is
used.
5 Specify the time out, in this example 5 minutes. This is done by defining 300
seconds.
6 Press OK.
▼
Removing a convertor
1 From the Configure menu, choose Convertors.
2 Select the appropriate file extension or ALS format. Clear the Command line
edit field.
3 Select the Delete button. Now the convertor is removed from the list.
4 Select the OK button to save the new settings.
Sometimes you may want to test if a convertor is working properly. This can
be done when you are configuring the convertors, but also when a new type of
file is used or when problems occur. The procedure described below enables
you to determine where the problem is, and may give information about how
to fix it.
88
Repro Station User Manual
▼
To determine a problem
1 From the Configure menu, choose Convertors
2 Select one of the available convertors, by selecting one of the available
languages or an extension from the list box.
3 Click the Test button. A dialog appears that enables you to select an input file.
This is the file that will be converted.
4 Select the file and click OK. A dialog appears which shows the preconditions
of the conversion process.
3271-144
[67] Selecting an input file
It shows the name of the input file, the name of the output file, and which
filename extension or file format was recognized by Repro Station. If the
detected format is not correct for the selected convertor, the command line will
show the following message: ‘Wrong format for this convertor’. Otherwise it
shows the command line that will be used to start up the convertor.
5 Select Convert when this information is correct. Select Cancel when this is not
correct and change the Install convertor settings again.
6 Wait until the conversion is finished. A dialog box is shown with the following
information: name of the output file, format of the output file as recognized by
ALS, an indication if this format is supported by the printer, the name of the
info file (if the convertor generated one), and the time it took to convert the file.
It also indicates whether the convertor generated multiple output files from one
input file. You can use this information to determine if the conversion process
is okay. The following errors may occur:
Time out No output file is shown, and ‘Conversion time’ is followed by the
message ‘Conversion timed out’. You can try to solve this problem as follows:
■ Specify more time for ‘Time out’ in the Configure-Convertors menu, and try
again.
■ If this does not work, try using the convertor as a stand-alone program.
■ If this does not work either, try to convert another input file with the same
format, using the same convertor. If the conversion fails again, contact your
convertor vendor.
Customizing Repro Station
89
Conversion failed If the conversion failed, but the convertor terminates
normally, the message ‘Conversion failed’ is shown. You can try to solve this
problem as follows:
■ Try using the convertor as a stand-alone program.
■ If this does not work, try to convert another input file with the same format,
using the same convertor. If the conversion fails again, contact the supplier
of the convertor.
7 Select OK to return to the Convertors dialog.
8 Click OK to save all settings.
Note: You may need to do the test for several files.
90
Repro Station User Manual
Using banner pages
An example of an ASCII banner page is installed together with Repro Station.
This example consists of two files, flagbody.asc and flaghead.asc, which you
can find the ‘system’ subdirectory of the Repro Station directory. They can be
used by renaming them to flagbody.txt and flaghead.txt respectively. This
ASCII banner page lists all possible parameters:
■
■
■
■
■
■
■
%A% for the account name of the job,
%D% for the current date,
%J% for the jobname,
%N% for the distribution notes,
%O% for the operator notes,
%T% for the current time,
%U% for the user name of the job.
Of course, you can also create a banner page yourself in ASCII or HP-GL and
use these parameters, as long as the data file is called "flagbody.txt" and the
header file "flaghead.txt".
The banner page is printed with the same settings as the first file in the job. The
settings (APPLDATA commands) taken from this first file are the following:
■
■
■
■
■
APPLDATA 002 (job parameters)
APPLDATA 003 (transformation)
APPLDATA 021 (media selection, fit method, paper media)
APPLDATA 022 (finishing)
APPLDATA 023 (delivery, cut method).
Other settings (e.g. pen sizes, data format) can be defined by using the
appropriate APPLDATA commands and storing them in the file "flaghead.txt"
in the subdirectory ‘system’ of the Repro Station directory.
For more information on banner pages, refer to the ‘Océ Job Ticket Interface
Programmer’s Manual’ and the ‘Océ Remote Control Format (RCF)
Programmer’s Manual’.
Customizing Repro Station
91
92
Repro Station User Manual
Repro Station
User Manual
Appendix A
Example of an extended logfile
This chapter includes an example of an extended logfile
and an explanation of each of this logfile’s fields.
93
Extended logfile
The extended logfile is a text file, which you can open using a standard text
editor, such as Microsoft Notepad. A partial view of a logfile is shown below.
header
row
3272-144
[68] Example of a logfile in Microsoft Notepad.
The information in the extended logfile is presented in tabular form. The very
first line of the logfile is the header row of the ‘table’ and consists of 70
tab-separated fields. The table below lists these fields, together with their full
meaning.
Field name
Date
Time
Status
FileNm
JobNm
UserNm
Accnt
Matrix
Copies
Files
AutoPl
AutoTr
AutoPo
A0Pl
A0Tr
A0Po
A1Pl
A1Tr
A1Po
A2Pl
A2Tr
A2Po
94
Meaning
The current date
The current time
The status, e.g. "Printed_not_removed"
The filename of the job or of the check plot
The job name or "checkpl" for a check plot
The user name
The account number
Is it a matrix job?
Total number of copies*
Number of files
Nr of copies to print on plain paper and auto papersize
Nr of copies to print on transparent and auto papersize
Nr of copies to print on polyester and auto papersize
Nr of copies to print on plain paper and A0 papersize
Nr of copies to print on transparent and A0 papersize
Nr of copies to print on polyester and A0 papersize
Nr of copies to print on plain paper and A1 papersize
Nr of copies to print on transparent and A1 papersize
Nr of copies to print on polyester and A1 papersize
Nr of copies to print on plain paper and A2 papersize
Nr of copies to print on transparent and A2 papersize
Nr of copies to print on polyester and A2 papersize
Repro Station User Manual
Field name
Date
A3Pl
A3Tr
A3Po
A4Pl
A4Tr
A4Po
36Pl
36Tr
36Po
24Pl
24Tr
24Po
18Pl
18Tr
18Po
12Pl
12Tr
12Po
9Pl
9Tr
9Po
34Pl
34Tr
34Po
22Pl
22Tr
22Po
17Pl
17Tr
17Po
11Pl
11Tr
11Po
8hPl
8hTr
8hPo
30Pl
30Tr
30Po
500Pl
500Tr
Meaning
The current date
Nr of copies to print on plain paper and A3 papersize
Nr of copies to print on transparent and A3 papersize
Nr of copies to print on polyester and A23papersize
Nr of copies to print on plain paper and A4 papersize
Nr of copies to print on transparent and A4 papersize
Nr of copies to print on polyester and A4 papersize
Nr of copies to print on plain paper and 36" papersize
Nr of copies to print on transparent and 36" papersize
Nr of copies to print on polyester and 36" papersize
Nr of copies to print on plain paper and 24" papersize
Nr of copies to print on transparent and 24" papersize
Nr of copies to print on polyester and 24" papersize
Nr of copies to print on plain paper and 18" papersize
Nr of copies to print on transparent and 18" papersize
Nr of copies to print on polyester and 18" papersize
Nr of copies to print on plain paper and 12" papersize
Nr of copies to print on transparent and 12" papersize
Nr of copies to print on polyester and 12" papersize
Nr of copies to print on plain paper and 9" papersize
Nr of copies to print on transparent and 9" papersize
Nr of copies to print on polyester and 9" papersize
Nr of copies to print on plain paper and 34" papersize
Nr of copies to print on transparent and 34" papersize
Nr of copies to print on polyester and 34" papersize
Nr of copies to print on plain paper and 22" papersize
Nr of copies to print on transparent and 22" papersize
Nr of copies to print on polyester and 22" papersize
Nr of copies to print on plain paper and 17" papersize
Nr of copies to print on transparent and 17" papersize
Nr of copies to print on polyester and 17" papersize
Nr of copies to print on plain paper and 11" papersize
Nr of copies to print on transparent and 11" papersize
Nr of copies to print on polyester and 11" papersize
Nr of copies to print on plain paper and 8.5" papersize
Nr of copies to print on transparent and 8.5" papersize
Nr of copies to print on polyester and 8.5" papersize
Nr of copies to print on plain paper and 30" papersize
Nr of copies to print on transparent and 30" papersize
Nr of copies to print on polyester and 30" papersize
Nr of copies to print on plain paper and 500 mm papersize
Nr of copies to print on transparent and 500 mm papersize
Example of an extended logfile
95
Field name
Date
500Po
700Pl
700Tr
700Po
Fold
Punch
Stamp
Reinforce
Meaning
The current date
Nr of copies to print on polyester and 500 mm papersize
Nr of copies to print on plain paper and 700 mm papersize
Nr of copies to print on transparent and 700 mm papersize
Nr of copies to print on polyester and 700 mm papersize
Nr of copies to be folded
Nr of copies to be punched
Nr of copies to be stamped
Nr of copies to be reinforced
Note: *Banner pages are not counted.
96
Repro Station User Manual
Repro Station
User Manual
Appendix B
Convertors: technical details
Technical information about convertors, including
requirements for usage.
97
About convertors
External programs can be used in Repro Station to convert ‘unknown’ print
formats to a format that the printer supports. This appendix provides some
technical information about the requirements these convertors have to fulfil.
Normally, when a convertor supports these functions and behaves in this way,
it can be used in Repro Station. You can also check if it works as intended by
using the Test option in the Configure Convertors dialog (see ‘To determine a
problem’ on page 89).
However, occasionally you may experience problems that cannot be solved
easily. In that case contact Océ Service for support.
Print formats
Repro Station can automatically detect several print formats (using its built-in
Automatic Language Sensing, or ALS, module). The following table shows
which formats are recognized by Repro Station, and which formats are
supported by the printer. A convertor always has to convert to a format that is
supported by the printer. So for example, from PostScript to HPGL/2.
When you are using a print format that is not recognized by ALS, you can rely
on the file name extension. However, make sure that this format is
‘recognized’ by ALS as Unknown, or, when this format is incorrectly seen as
e.g. ASCII, make sure that no convertor is installed for this recognized format.
Install a convertor for the file extension, and then use this extension for all files
of this format.
98
Repro Station User Manual
Format recognized
in Repro Station
(ALS)
Format
supported
by the printer
Remarks
ASCII
ASCII
The ASCII character set supported by
the printer is limited to the character
values < 128.
Note that ASCII is not automatically
recognized by the priner.
Autocad BINDXF
Autocad SHX
Autocad DXB
Autocad SLD
Autocad SLDLIB
Autocad RND
Autocad DWG
BGL
C4
Calcomp
Calcomp
The printer needs to know the correct
parameters, like EOM character, synchronization character, ....
CALS
CCR
DXF
GIF
GKSM
HPGL
HPGL/2
HPRTL
IGES
JPEG
MI
NIRS
PCX
PostScript
PROSHAPE
SunRaster
TARGA
TIFF
Unknown
CALS
HPGL
HPGL/2
HP RTL
TIFF
Color not supported by the printer.
Will not be used to start a convertor.
Use file name extension to select convertor.
[69] Print formats
Convertors: technical details
99
Format recognized
in Repro Station
(ALS)
Format
supported
by the printer
Remarks
VDF
Windows Bitmap
[69] Print formats
Requirements
A convertor has to satisfy the following requirements:
1 It must run under the same operating system as Repro Station, i.e. Windows
3.x, Windows NT 3.51, Windows 95 or Windows NT 4.0.
2 It must be a ‘well-behaved’ Windows application, i.e. it must not monopolize
system resources (processor, memory, disk access). This means that it must
give the operating system and other applications a chance to proceed
(voluntary yield control), even when it is performing lengthy calculations.
This allows the convertor to run ‘in the background’. Note that this is not a
problem under Windows NT, since this is a pre-emptive multitasking
environment.
3 It must be an input/output convertor which reads an input file and produces one
or more output files. The output file(s) must be in a format supported by the
printer (see table above). The output files must be written to a temporary
directory that may be emptied, so not the directory where the convertor's
executable or auxiliary files are located. Repro Station treats all files that
appear in this directory as output of the convertor.
4 It must be a stand-alone program without user interaction. The program may
optionally display an icon to indicate that it is busy converting.
5 It must have a command line interface so that it can be launched from Océ
Repro Station (uses WinExec internally). The command line specifies the
following parameters:
■ input file name (mandatory)
■ output directory, or output file name (recommended)
■ output, or error, log file (recommended)
■ output format (optional)
■ resolution (optional)
■ other convertor settings (optional)
When recommended parameters are not specified on the command line, they
are assumed to be fixed for this convertor (or in a parameter file) and must be
filled in Repro Station.
100
Repro Station User Manual
6 It must terminate when one input file has been converted. Repro Station will
7
8
9
10
11
12
13
be informed that the conversion process has ended when the convertor
application terminates. So the convertor cannot stay active after processing a
file, and wait for the next file to be offered.
It must produce output file(s) with the same size as the original. So when a user
selected Automatic Paper size, a drawing of the same size (100% zoom)
should be printed. It may scale images or use a higher resolution to improve
the quality of bitmap images. However, Repro Station has no knowledge of the
size of the resulting print files. So this option can only be used when the user
has specified the output paper format explicitly (e.g. A1 and Automatic Zoom).
It should use a modest amount of memory (all software including the
convertor(s) should run in a minimum 16 Mb RAM configuration). Large
bitmap images should be produced by using banding.
It should do the conversion in a reasonable amount of time. The performance
of the convertor has direct consequences for the productivity of the printing
process.
It may produce multiple output files from one input file. These must all be
written to the output directory. These files must be generated in the correct
order. The first file that is written to the directory will be the first file that is
printed by Repro Station.
It may handle files that describe plots of maximal 12 meters by 914 mm at 200
dpi, or 6 meters by 914 mm at 400 dpi. This is no hard requirement, but is
determined by the size of the files that need to be printed. At least the ‘normal’
Engineering drawing sizes (up to A0) should be supported.
It may inform Repro Station about the results of the conversion process by
writing information in a so-called Info file. Unique (sub)strings should be used
to indicate failures or correct results. Repro Station will look for these strings
when defined, and react accordingly.
It may be located on a (common) network drive. However, this will affect the
performance of the conversion process.
Note: Repro Station performs one conversion step for each incoming print file.
So it is not possible to combine several convertors to produce a printable
format file. So for example, DWG to DXF to TIFF is not possible. In that case,
the convertors have to be combined into one application.
Some convertors are recommended by Océ. They have been tested against the
criteria outlined above. Ask your Service engineer for a list of available
conversion programs that can be used with Repro Station.
Convertors: technical details
101
102
Repro Station User Manual
Repro Station
User Manual
Appendix C
Miscellaneous
103
Notation conventions
There are a number of notation conventions used in this manual. This
consistent style enables you to quickly become conversant with the use of this
manual and consequently the Repro Station.
Description Each section or subsection contains a description of the feature or
operation identified in the title. It might also include possible applications, as
well as any guidelines that you should bear in mind.
Procedures A description is followed by a procedure. A procedure always
begins with a phrase which briefly describes the procedure (for example,
Loading paper:) followed by a series of numbered steps that take you, step by
step, through all phases of performing the operation.
Figures and tables Figures and tables are titled and numbered sequentially
throughout this manual. Figures include pictures of product components,
examples, and diagrams of concepts discussed in the description.
Attention getters There are several types of information to which we draw
your attention. This information is classified as follows:
Note: In a ‘Note’, information is given about matters which ensure the proper
functioning of the copier, but useful advice concerning its operation may also
be given.
Attention: The information that follows ‘Attention’ is given to prevent
something (your copy or original, the copier, etc.) being damaged.
Caution: The information that follows ‘Caution’ is given to prevent you
suffering personal injury.
104
Repro Station User Manual
Reader’s comment sheet
Have you found this manual to be accurate?
❏ Yes
❏ No
Could you operate the product after reading this manual?
❏ Yes
❏ No
Does this manual provide enough background information?
❏ Yes
❏ No
Is the format of this manual convenient in size, readability and arrangement
(page layout, chapter order, etc.)?
❏ Yes
❏ No
Could you find the information you were looking for?
❏ Always
❏ Most of the times
❏ Sometimes
❏ Not at all
What did you use to find the required information?
❏ Table of contents
❏ Index
Are you satisfied with this manual?
❏ Yes
❏ No
Thank you for evaluating this manual.
If you have other comments or concerns, please explain or suggest
improvements overleaf or on a separate sheet.
7056127
Miscellaneous
105
Comments:
------------------------------------------------------------------------------------------------------------------------------------------------------------------------------------------------------------------------------------------------------------------------------------------------------------------------------------------------------------------------------------------------------------------------------------------------------------------------------------------------------------------------------------------------------------------Date:
This reader’s comment sheet is completed by:
(If you prefer to remain unknown, please do fill in your occupation)
Name:
Occupation:
Company:
Phone:
Address:
City:
Country:
Please return this sheet to:
Océ-Technologies B.V.
For the attention of ITC user documentation.
P.O. Box 101,
5900 MA Venlo
The Netherlands
106
Repro Station User Manual
Addresses of local Océ organisations
Océ-Australia Ltd.
P.O.Box 196
Cheltenham VIC 3192
Australia
Océ-Österreich GesmbH
Postfach 95
1233 Vienna
Austria
Océ-Belgium N.V./S.A.
Avenue J.Bordet 32
1140 Brussels
Belgium
Océ-Brasil Comércio e Industria Ltda.
Caixa Postal 3187
01060-970 Sao Paulo, SP
Brazil
Océ-Canada Inc.
525, Logan Avenue,
Toronto, Ontario M4K 3B3
Canada
Océ Office Equipment (Beijing) Co Ltd.
Xu Mu Cheng
Chaoyang District
Beijing 100028
China
Océ-âeská republika s.r.o.
K Ry‰ánce 16
14754 Praha 4
Czech Republic
Océ-Danmark A.S.
Kornmarksvej 6
2605 Brondby
Denmark
Miscellaneous
Océ-France S.A.
32, Avenue du Pavé Neuf,
93882 Noisy-le-grand
Cedex
France
Océ-Deutschland GmbH
Postfach 101454
45481 Mülheim an der Ruhr
Deutschland
Océ (Hong Kong China) ltd.
Post Box 30971
Causeway Bay Post Office
Hong Kong
Océ-Hungária Kft.
P.O.B. 237
1244 Budapest
Hungary
Océ-Italia S.p.A.
Casella Postale
10.230 Milano
Italia
Océ Systems (Malaysia Sdn. Bhd.
#3.01, Level 3, Wisma Academy
Lot 4A, Jalan 19/1
46300 Petalig Jaya
Selangor Darul Ehsan
Malaysia
Océ-Nederland B.V.
P.O.Box 800
5201 AV Den Bosch
The Netherlands
107
Océ Norge A/S
Postboks 53, Grefsen
0409 Oslo
Norway
Océ-Poland Ltd.
Lopuszanska 53
02-232 Warszawa
Poland
Océ-Lima Mayer S.A.
Avenue Infante D.Henrique
Lote 309 - Cabo Ruivo
1900 Lisboa
Portugal
Océ (Far East) Pte. Ltd./
Océ (Singapore) Pte. Ltd.,
1 Clementi Loop
#02-10 Margateo Districentre
Clementi West Distripark
Singapore 129808
Océ España SA
Business Park MAS BLAU
Osona 2
08820 El Prat del Llobregat (Barcelona)
Spain
Océ-Schweiz AG
Postfach 114
CH-8152 Glattbrugg
Switzerland
Océ-Svenska AB
P.O.box 1231
164 28 Kista
Sweden
Océ (Taiwan) Ltd.
No. 99-24 Nan-Kang Road
Sec 2
Taipei
Taiwan, ROC
108
Repro Station User Manual
Océ (Thailand) Ltd.
16th Floor, B.B. Building
54 Asoke Road, Sukhumvit 21
Bangkok 10110
Thailand
Océ-U.K.Ltd.
Langston Road
Loughton Essex IG10 3SL
United Kingdom
Océ-USA Inc.
5450 North Cumberland Av.
Chicago, Ill. 60656
U.S.A.
Index
A
accounts
defining 38, 39
sorting output per account 33
accounts
defining a list of users and - 37
associating tools 83
automatic printing 61
B
banner pages 91
belts, delivery when folded 32
bin
assigning to specific accounts 38
combining bin 1 and bin 2 33
per account 33
specifying delivery option for unfolded output
32
start 87
test 88
convertors 85
copy delivery tray, explained 32
D
defaults
assign - to check plots 44
defining ~ for print parameters 68
loading 71
specifying from a (matrix) job ticket window
69
specifying using the defaults menu 68
defining
list of users and accounts 37
delivery options
overview 31
specifying 32
distribution notes, displaying 56
dongle
not found 21
system requirements 18
E
C
check plot
configuring 44
converting into job ticket 54
defined 13, 44
modifying 54
using header settings when modified 45
using header settings when printed 45
using repro station default settings when
modified 45
using repro station default settings when
printed 45
versus job ticket 13
codes in the queue, explained 52
continuous, delivery when not folded 33
convertor
add 86
remove 88
Index
e code in queue window 52
e-jobs, saving 66
extended logfile
clearing 59
creating 58
explained 57
F
f code in queue window 52
file association of tools, changing 83
file types
displaying in menus 34
hiding in menus 34
rearranging their order in menus 34
finishing options in job 52
folded output, specifying delivery 32
full queue public
109
option cleared 27
option selected 26
specifying 26
M
code in queue window 52
image stamps 41
m code in queue window 52
machine monitor 22
explained 10
manual printing, starting 60
matrix ticket
defined 14
maximum size of the ready queue, specifying 28
measurement. 24
media
code in queue window 52
modifying
check plot 54
job 53
moving job(s) in queue 55
multiple queues 74
J
N
job director, defined 9
job ticket
defined 13
jobs
changing the order in the queue window 55
deleting 55
modifying 53
removing from the queue 55
show-up time 25, 26
network 22
next bin
per job 33
per set 32
notes, displaying 56
H
h code in queue window 52
help, using online - 47
high-capacity stacker, sorting output 32
I
id
L
list of users and accounts
defining a - 37
logfile
clearing the extended ~ 59
creating an extended ~ 58
standard v. extended 57
long plots to container, delivery when not folded
33
lower output, delivery when not folded 32
110
Repro Station User Manual
O
offset stack, sorting output 33
online help, using 47
operator notes, displaying 56
order of jobs, changing 55
output delivery
overview of available options 31
specifying 32
P
p code in queue window 52
paper sizes
displaying in menus 36
hiding in menus 36
rearranging their order in menus 36
print criteria
defined 62
specifying 63
print jobs
allowing to be printed using print criteria 62
reprinting 65
suspending printing using print criteria 62
print parameter
defining defaults 68
example 68
printed jobs
discarding 28
saving 27
printer stamps 40
printing
in automatic mode 61
in manual mode 60
jobs of specific accounts or users only 63
starting 61
stopping 64
suspending using print criteria 62
Q
queue refresh time
defined 25
specifying 26
queues
creating the ready queue 27
creating the repro station queue 25
limiting the size of the ready queue 28
ready queue, defined 24
repro station queue, defined 24
specifying maximum size of the ready queue
28
using multiple queues 74
quitting repro station 46
R
ready queue
creating 27
defined 24
limiting the size 28
reprinting jobs 65
specifying maximum size 28
Index
rearranging the order of jobs in the queue 55
related documentation 15, 91
reprinting jobs 65
repro station
explained 10
interaction with job director 10
interaction with machine monitor 10
repro station queue
creating 25
defined 24
retrieving defaults 71
rolls
specifying widths and media 32
S
sorting
unfolded output by account 33
unfolded output by job 33
unfolded output by set 32, 33
stacker
combining output capacity of all bins 33
sorting output 32
standard logfile, explained 57
starting
manual printing 60
repro station 20
stopping
printing 64
T
t code in queue window 52
tool
changing file association 83
default 81
defining 79
first 81
starting 81
tools 78
U
unfolded output, specifying delivery 32
111
units 23
user name 52
users
defining 38, 39
users and accounts
defining a list of - 37
W
w code in queue window 52
width of rolls, specifying 32
X
x code in queue window 52
112
Repro Station User Manual