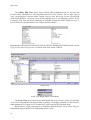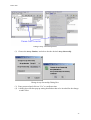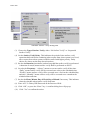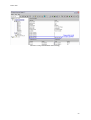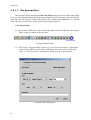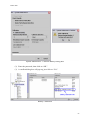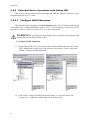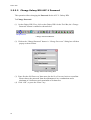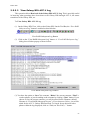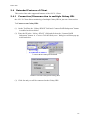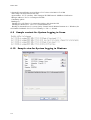
1
Rorke Data Array Virtual Console
for
Galaxy HDi Series
(Fibre Channel / SCSI Model)
AVC-L
Linux, Windows, Solaris, MacOS
Version 4.6
User’s Manual
Rorke Data
Foreword
Thank you for purchasing Rorke Data’s Galaxy HDi (also referred to as RAID
Subsystem). This Rorke Data RAID Subsystem Monitoring Program is provided for
our valued clients for use with Galaxy HDi, SCSI models. This User’s Manual
describes the following aspects of the Rorke Data RAID Subsystem monitoring
package AVC-L Version 4.6: (1) How To Get Started, (2) Functionalities, (3) Things
to Note, and (4) Specification. Before using the Galaxy HDi product, please take a
few moments to get to know how to remotely configure and monitor your RAID
Subsystem by reading through this User’s Manual.
Please keep this manual in an accessible place to be able to refer to any time.
Before performing any operation, make sure to clearly understand the steps specified.
Read carefully also the ‘Warning’ statements to avoid improper operation with the
RAID Subsystem.
For hardware problems that you might encounter, please refer to the User’s Manual of
the Rorke Data Galaxy HDi also included in the distribution package when you
purchase your Galaxy HDi.
Note:
The version displayed on the captured GUI’s in the proceeding pages might differ
with the actual version of the programs provided to you. However, this does not affect
the functionality of the application unless explicitly specified.
i
Rorke Data
ii
Rorke Data
Safety Warnings
Throughout this manual, the following symbols are used to highlight important
things.
•
•
•
WARNING!
Indicates a situation that must be thought over
thrice before committing the action. And this
might result to permanent data lost.
IMPORTANT!
Indicates important information for proper
operation of the software. Must be noted before
taking further actions.
Windows and Microsoft are trademarks of Microsoft Corporation
RedHat is a trademark of Red Hat Corporation
Intel is a trademark of Intel Corporation
* THIS DOCUMENT MAY NOT BE REPRODUCED OR COPIED IN
WHOLE OR IN PART, WITHOUT THE EXPRESS WRITTEN PERMISSION
OF RORKE DATA.
* THE CONTENTS OF THIS DOCUMENT ARE SUBJECT TO CHANGE
WITHOUT PRIOR NOTICE.
* WE HAVE MADE EVERY EFFORT TO ENSURE THE ACCURACY
AND COMPLETENESS OF THIS DOCUMENT. IF YOU FIND INACCURACIES
OR OMISSIONS, PLEASE CONTACT YOUR DISTRIBUTOR.
Copyright © 2004 Rorke Data
iii
Rorke Data
Revision History
v4.0 - Initial release of AVC-L User’s Manual English version for AVC-L v4.0.
(Apr. 01, 2003)
v4.1 - Release of AVC-L User’s Manual English version for AVC-L v4.1
(Jul. 04, 2003)
v4.2 - Release of AVC-L User’s Manual English version for AVC-L v4.2
(Jul. 07, 2003)
v4.3 - Release of AVC-L User’s Manual English version for AVC-L v4.3
(Jul. 31, 2003)
v4.4 - Release of AVC-L-SCSI User’s Manual English version for AVC-L v4.4
(Sep. 29, 2003)
v4.5 - Release of AVC-L User’s Manual English version for AVC-L v4.5
(Oct. 27, 2003)
v4.5.1 - Release of AVC-L User’s Manual English version for AVC-L v4.5.1
(Dec. 15, 2003)
v4.5.2 - Release of AVC-L User’s Manual English version for AVC-L v4.5.2
(Jan. 15, 2004)
v4.5.3 - Release of AVC-L User’s Manual English version for AVC-L v4.5.3
(Jan. 30, 2004)
v4.6 - Release of AVC-L v4.6
(Apr 05, 2004)
iv
Rorke Data
Foreword . . . . . . . . . . . . . . . . . . . . . . . . . . . . . . . . . . . . . . . . . . . . . . . . . . . . . . . . . . . . . . . . . i
Safety Warnings . . . . . . . . . . . . . . . . . . . . . . . . . . . . . . . . . . . . . . . . . . . . . . . . . . . . . . . . . . . ii
Revision History . . . . . . . . . . . . . . . . . . . . . . . . . . . . . . . . . . . . . . . . . . . . . . . . . . . . . . . . . . . ii
NOTES
..1
CHAPTER 1 - General Introduction . . . . . . . . . . . . . . . . . . . . . . . . . . 3
Introduction . . . . . . . . . . . . . . . . . . . . . . . . . . . . . . . . . . . . . . . . . . . . . . . 3
AVC-L Client . . . . . . . . . . . . . . . . . . . . . . . . . . . . . . . . . . . . . . . . . . . . . . 5
AVC Monitor Daemon. . . . . . . . . . . . . . . . . . . . . . . . . . . . . . . . . . . . . . . . 6
AVC-L Server . . . . . . . . . . . . . . . . . . . . . . . . . . . . . . . . . . . . . . . . . . . . . . 7
CHAPTER 2 - Getting Started . . . . . . . . . . . . . . . . . . . . . . . . . . . . . . 9
Machine/Platform Requirements and Supported OS’s . . . . . . . . . . . . . . . 9
AVC Monitor Daemon for Linux . . . . . . . . . . . . . . . . . . . . . . . . . . . . . . . . 9
AVC Monitor Daemon for Windows . . . . . . . . . . . . . . . . . . . . . . . . . . . . . . 9
AVC Monitor Daemon for Solaris . . . . . . . . . . . . . . . . . . . . . . . . . . . . . . . 9
AVC Monitor Daemon for MacOS . . . . . . . . . . . . . . . . . . . . . . . . . . . . . . . 9
AVC-L Client . . . . . . . . . . . . . . . . . . . . . . . . . . . . . . . . . . . . . . . . . . . . . . 9
CD-ROM Contents (AVC-L_CDROM_46) . . . . . . . . . . . . . . . . . . . . . . . . . 11
Installation/Uninstallation . . . . . . . . . . . . . . . . . . . . . . . . . . . . . . . . . . . 11
Using installers with GUI . . . . . . . . . . . . . . . . . . . . . . . . . . . . . . . . . . . . 11
Using non-GUI installers . . . . . . . . . . . . . . . . . . . . . . . . . . . . . . . . . . . . 25
Java Runtime (JRE) 1.4 and the Client . . . . . . . . . . . . . . . . . . . . . . . . . . 29
Starting/Stopping the modules . . . . . . . . . . . . . . . . . . . . . . . . . . . . . . . 29
Starting/Stopping the AVC Monitor Daemon for Linux . . . . . . . . . . . . . . 29
Starting/Stopping the AVC Monitor Daemon for Windows . . . . . . . . . . . 30
Starting/Stopping the AVC Monitor Daemon for Solaris . . . . . . . . . . . . . 31
Starting/Stopping the AVC Monitor Daemon for MacOS . . . . . . . . . . . . . 31
Starting the Client on Windows . . . . . . . . . . . . . . . . . . . . . . . . . . . . . . . 32
Starting the Client on Linux and Solaris . . . . . . . . . . . . . . . . . . . . . . . . . 32
Starting the Client on MacOS . . . . . . . . . . . . . . . . . . . . . . . . . . . . . . . . . 33
Stopping the Client. . . . . . . . . . . . . . . . . . . . . . . . . . . . . . . . . . . . . . . . . 33
CHAPTER 3 - AVC-L Client . . . . . . . . . . . . . . . . . . . . . . . . . . . . . . . 35
AVC-L Client Environment . . . . . . . . . . . . . . . . . . . . . . . . . . . . . . . . . . . 35
Operations with Galaxy HDi . . . . . . . . . . . . . . . . . . . . . . . . . . . . . . . . . . 45
Basic Device Operations with Galaxy HDi . . . . . . . . . . . . . . . . . . . . . . . . 45
Extended Device Operations with Galaxy HDi . . . . . . . . . . . . . . . . . . . . . 84
Operations related to Payable Functions. . . . . . . . . . . . . . . . . . . . . . . . . 95
Operations with the Monitor Daemon . . . . . . . . . . . . . . . . . . . . . . . . . . 119
Connection/Disconnection to the Monitor Daemon. . . . . . . . . . . . . . . . 119
Changing the Monitor Daemon Configuration . . . . . . . . . . . . . . . . . . . . 123
Changing the Monitor Daemon Password . . . . . . . . . . . . . . . . . . . . . . . 132
Viewing the Monitor Daemon Log . . . . . . . . . . . . . . . . . . . . . . . . . . . . . 133
Extended Features of Client . . . . . . . . . . . . . . . . . . . . . . . . . . . . . . . . . 135
Connection/Disconnection to multiple Galaxy HDi . . . . . . . . . . . . . . . . 135
Client Logging . . . . . . . . . . . . . . . . . . . . . . . . . . . . . . . . . . . . . . . . . . . 137
Changing the AVC-L Client’s Update Interval . . . . . . . . . . . . . . . . . . . . 138
Enable/Disable Pop Up of Error Messages . . . . . . . . . . . . . . . . . . . . . . 139
CHAPTER 4 - AVC Monitor Daemon . . . . . . . . . . . . . . . . . . . . . . . . 141
CHAPTER 5 - AxrlUtil - Instant Copy Command Line Utility . . . . 143
AxrlUtil Program Description and Specification. . . . . . . . . . . . . . . . . . . 143
v
Rorke Data
Syntax and Return Status . . . . . . . . . . . . . . . . . . . . . . . . . . . . . . . . . . 144
Sample command call on performing external instant copy (Solaris) . . . 146
CHAPTER 6 - Log files, Passwords, Related-Files and Others . . 147
Log files . . . . . . . . . . . . . . . . . . . . . . . . . . . . . . . . . . . . . . . . . . . . . . . . 147
Monitor Daemon Log on Monitor Daemon. . . . . . . . . . . 147
Client Log. . . . . . . . . . . . . . . . . . . . . . . . 148
Galaxy HDi Log. . . . . . . . . . . . . . . . . . . . . . 148
Default Password. . . . . . . . . . . . . . . . . . . . . . . . . . . . . . . . . . . . . . . . . 148
Files created by each module.. . . . . . . . . . . . . . . . . . . . . . . . . . . . . . . . 149
Monitor Daemon. . . . . . . . . . . . . . . . . . . . . . 149
Client . . . . . . . . . . . . . . . . . . . . . . . . . . . . . . . . . . . . . . . . . . . . . . . . . . . . . . . . . . . . . . . 151
Temporary files created by each module. . . . . . . . . . . . . . . . . . . . . . . . 152
Monitor Daemon. . . . . . . . . . . . . . . . . . . . . . 152
Sample Email send from Monitor Daemon in Linux . . . . . . . . . . . . . . . 152
Sample output when enabling “Email Contents Passed to External Program”
with the “notepad.exe” command in Windwos. . . . . . . . . . . . . . . . . . . . 153
Sample SNMP Trap Messsage in Linux using “snmptrapd” . . . . . . . . . . 153
Sample SNMP Trap Messages in Windows received using a free SNMP Manager
software . . . . . . . . . . . . . . . . . . . . . . . . . . . . . . . . . . . . . . . . . . . . . . . . 153
Sample content for System Logging in Linux. . . . . . . . . . . . . . . . . . . . . 154
Sample view for System Logging in Windows . . . . . . . . . . . . . . . . . . . . 154
CHAPTER 7 - Troubleshooting and Tips . . . . . . . . . . . . . . . . . . . . 155
Loss of AVC-L RAID Subsystem Password . . . . . . . . . . . . . . . . . . . . . . 155
Loss of AVC Monitor Daemon Password . . . . . . . . . . . . . . . . . . . . . . . . 155
Errors Displayed on Client . . . . . . . . . . . . . . . . . . . . . . . . . . . . . . . . . . 156
Galaxy HDi Status Change . . . . . . . . . . . . . . . . . . . . . . . . . . . . . . . . . . 157
States of Components/Features . . . . . . . . . . . . . . . . . . . . . . . . . . . . . . 158
Tips (What to do when a problem/warning occurs) . . . . . . . . . . . . . . . . 160
Appendix . . . . . . . . . . . . . . . . . . . . . . . . . . . . . . . . . . . . . . . . . . . . 163
vi
Rorke Data
NOTES
IMPORTANT!
AVC-L v4.1 through v4.4 used JRE 1.3. AVC-L v4.6 and above
uses JRE 1.4.
IMPORTANT!
Each version of AVC-L is made to work correctly with specific
firmware. To verify for the correct AVC version for your microcode, please refer to the
Rorke Data home page ( http://www.rorke.com ). If the Galaxy HDi doesn’t have the
correct firmware to work with this version of AVC, the following warning is displayed.
IMPORTANT!
When the Client is run on SMP machines on Windows and
Solaris, it may produce Java Language Exception. When this happens, please stop and
restart the AVC-L Client, to check if this can solve the problem. Or please avoid using
SMP machines.
IMPORTANT!
AVC-L Client might not work correctly with Linux releases
aside from RedHat 7.1, 7.2 and 7.3. For installation into the platforms not supporting
AVC-L Client, please use the NO GUI installer -- RPM package included in the cdrom.
IMPORTANT!
For Update Microcode(Firmware) operation, the network
connection of the Client program to the Galaxy HDi is critical or significant.
Performing the operation from slow network may result to occurence of network
errors. Also, if the CPU speed is slow, errors may occur. Update Firmware is a critical operation.
Thus, please wait for this operation to finish before performing other operations.
IMPORTANT!
On MacOS, the AVC-L Client must be run on at least the
Panther 10.3. When run in earlier versions, this produces some problems (like a
window can’t be close after). You can use the NOGUI installer to run the AVC Monitor
Daemon on earlier versions.
IMPORTANT! On Linux and Windows platform, after installing 4.6, you must
reconfigure the AVC Monitor Daemon (Galaxy HDi to monitor, Notification Settings,
Periodic Instant Copy configuration). Previous configuration is not carried over.
IMPORTANT!
On MacOS, when running AVC-L Client program, be sure you
have root permissions. Otherwise, the AVC-L Client program would not be able to
write to configuration files, log files.
1
Rorke Data
IMPORTANT!
Sometimes, the AVC Monitor Daemon program may not be run
properly when using the GUI Installer for Solaris platform - Log files is not created.
Make sure to verify that AVC Monitor Daemon is run properly by checking from
AVC-L Client that AVC Monitor Daemon log is not empty. If the log files is empty, just
manually restart the AVC Monitor Daemon.
2
Rorke Data
CHAPTER 1 - General Introduction
This chapter would give you an overview of what Rorke Data Array Virtual Console for
Galaxy HDi (AVC-L) is all about. It gives you a little background of each module included, and
contains valuable information that would let you know better about the AVC-L RAID
Subsystem monitoring program.
1.1
Introduction
The Rorke Data Array Virtual Console for Galaxy HDi (AVC-L) is a package of programs
that provides the functionality of monitoring Rorke Data Galaxy HDi, SCSI, and P Series (also
refered to as RAID Subsystems). All these series supports 3 ways of communication. The FC
or SCSI communication that provides the main functionality of receiving and sending data to
different hosts PC, the RS232C (Serial Port), and the Ethernet (TCP/IP) that provides the tool
for monitoring and configuring of the Galaxy HDi. This AVC-L’s functionality closely rely on
the third one - TCP/IP.
AVC-L is an application package providing administrators with remote monitoring and
configuring capabilities, allowing them to gain access and maintain control over their primary
storage assets anywhere through TCP/IP technology.
AVC-L package is divided into 2 main components: the AVC-L Client Module, and the
AVC Monitor Daemon Module. The AVC-L Client module component communicates with
the Galaxy HDi and the AVC Monitor Daemon module through TCP/IP, while the AVC
Monitor Daemon communicates with the Galaxy HDi and the AVC-L Client module through
TCP/IP and/or either FC or SCSI interface using SCSI command protocol. Each component can
be installed on the same or on a different host PC. An illustration of general environment setup is shown below:
3
Rorke Data
MacOS
General Environment Set-up
Short descriptions of the package follows:
(a.) Galaxy HDi configuration can be managed with the AVC-L Client module. The
Client comes with GUI (Graphical User Interface) interface and is easy-to-use. It can be run on
any platform provided the necessary Java files are installed. The Client connects to the Galaxy
HDi’s AVC-L Server and to the AVC Monitor Daemon module through TCP/IP.
(b.) The AVC-L Client can be run in multiple sessions within one system. Each client
program can connect to multiple Galaxy HDi devices at a time. Each client can also connect to
multiple AVC Monitor Daemon at a time.
(c.) The AVC-L Client need not run all the time because the AVC Monitor Daemon
(avcdaemon) component can be given the task of monitoring any status change of the Galaxy
HDi for 24 hours a day, 7 days a week. The AVC Monitor Daemon comes without GUI, but
with amazing capabilities such as email notification, SNMP traps, system logging, and local
logging/notification capabilities. All these are valuable for knowing the status changes that
have occurred in the Galaxy HDi. While the AVC-L Client’s main function is to provide an
easy-way of managing and configuring the Galaxy HDi, the purpose of AVC Monitor Daemon
4
Rorke Data
is to monitor any status change in the Galaxy HDi and be able to send out notification informing
administrators of the occurrence of status change.
(d.) Status monitoring thru SNMP browsers is also supported on Windows and Solaris.
(Not implemented yet for Linux and MacOS). This is achieved through the implementation of
SNMP Subagents. On Windows platform, the SNMPv1 and SNMPv2 are supported, one
prerequisite is that Windows SNMP Service must be installed. For Solaris platform, the
SNMPv1 is supported; one prerequisite is that the SNMP-related packages must be already
installed: Solstice Enterprise Agent and/or SUNWsacom, SUNWsasnm, SUNWsadmi,
SUNWmibii. For Solaris, please use the SNMPv1 MIB files used also in Windows. (For Linux
and MacOS only sending of SNMP Traps is supported.)
1.2
AVC-L Client
The AVC-L Client runs on top of Java technology and this provides Graphical User
Interface (GUI) for monitoring the current status of Galaxy HDi and it also provides interface
for reconfiguring the Galaxy HDi. Aside from communication with Galaxy HDi, this also
provides the communication window to multiple AVC Monitor Daemon. Before the AVC
Monitor Daemon would be able to send out notifications, you have to set first the notification
parameters such as recipient’s email address through the client program.
This module also provides functionality for viewing status of the Galaxy HDi in a treelike graphical view. You can just click on the Arrays, Spares, Logical Units, Disks, and
Components to see more information about each item. It also provides capability to retrieve the
log files of the Galaxy HDi device itself and the AVC Monitor Daemon. The log file is specially
useful in analyzing problems that may occur with the Galaxy HDi or the AVC Monitor Daemon.
This module by default connects to TCP/IP port 2001 for communication with the Galaxy
HDi and to port 2002 for communication with the AVC Monitor Daemon module. You can
change the default ports through the client.
The AVC-L Client also provides a way to invoke the special feature “Instant Copy”
operation. Instant Copy is a feature that provides Background Data Backup to another logical
unit (LU) on the device or on an external device without Host intervention. Another special
feature supported by the Client is the “External Mirroring”. External Mirroring is a feature
that provides Background Mirroring of data to an external storage device without host
intervention. The difference between Instant Copy and Remote Mirroring willl be stated in more
detail in the later chapters. For both of these special features, you need to purchase a license.
In times when there is no activity performed with the client for a one-hour period, the
program will automatically terminate. So, if your purpose is to monitor the status of the Galaxy
HDi, please use the AVC Monitor Daemon module.
AVC-L Client is discussed more in Chapter 3 - AVC-L Client.
1.3
AVC Monitor Daemon
5
Rorke Data
The AVC Monitor Daemon’s main task is to monitor status changes in the Galaxy HDi
registered for it to monitor. If any changes occur, it will log such events and send out
notifications that status change have occured so that administrators may then perform
neccessary actions. Notifications made by the AVC Monitor Daemon includes Email, SNMP,
and System Logging. These notification parameters can be enabled/disabled via the Client
module. The AVC Monitor Daemon detects status changes in Galaxy HDi by comparing current
status with the previous status of the Galaxy HDi. If a difference is detected, it is logged and a
notification is send out.
This module also maintains a log file that records all the status changes detected, and
additionally, it also records results of commands received from Client, results of notification
sending, when possible, reasons for failure of the notification sending (especially with email),
and other activities. Contents of this log can be viewed by using the AVC-L Client program or
by using any text editor program.
Additional important feature supported by the AVC Monitor Daemon is “Periodic
Instant Copy” for Galaxy HDi devices. Instant Copy is a function that provides administrators
the functionality of doing back-up without “down-time”. Data from one lun can be copied
instantly to another lun in the same Galaxy HDi unit or by specifying the WWPN of the instant
copy target device in your SAN. This is a payable feature though, thus if you want to be able to
use this feature, you have to pay for the instant copy license. However, you can also have a 30day free trial of this feature thereby enabling you to experience this feature before taking the
step to purchase the official license. Through the Periodic Instant Copy function, administrators
can schedule when they want the back-up process to be done. Result of periodic instant copy is
also logged in the Monitor Daemon’s log and can be viewed later for verification.
This module by default listens to port 2002 for connections from the AVC-L Client
module. And it also by default connects to port 2001 of the Galaxy HDi for monitoring
purposes. You can change the port to listen to through the Client as described in the succeding
chapters.
On Windows platform, SNMP status monitoring is also supported. This is achieved by
running the Windows SNMP Service together with the AVC SNMP Agent program. MIB file
is also provided for use with your SNMP Manager program.
On Solaris platforms, SNMP status monitoring is also supported. This is achieved by
running the Solaris “snmpd” (master agent), together with the AVC SNMP Agent program avcdaemon_snmpd. However, only SNMPv1 is supported. For the MIB files, please use the
SNMPv1 MIB files provided for Windows.
(For Linux and MacOS platforms, only SNMP trap is supported.)
AVC Monitor Daemon is discussed more in CHAPTER 4 - AVC Monitor Daemon.
1.4
AVC-L Server
The Galaxy HDi device itself includes the AVC-L Server Component. Thus, by
connecting the Galaxy HDi’s ethernet port to the network, and configuring its TCP/IP settings,
6
Rorke Data
AVC-L Client and the AVC Monitor Daemon module can be used to monitor and configure the
Galaxy HDi.
The Galaxy HDi also maintains a log file related to AVC-L communication. This records
the result of the commands received from different AVC-L Clients that would result to any
configuration change to the Galaxy HDi and is saved in the Galaxy HDi. This can be useful for
tracking down misuse of the AVC-L functionality.
For Galaxy HDi with Dual Controller support, two ethernet ports are available, thus each
ethernet port will have its own TCP/IP settings. You can have the Client monitor through both
TCP/IP ports eventhough the result will be almost exactly the same. The default settings for the
ethernet port are: IP address - “0.0.0.0”, Subnet mask address - “255.255.255.0”, Default
Gateway - “0.0.0.0”, Primary DNS - “0.0.0.0”, Secondary DNS - “0.0.0.0”. To start using the
AVC-L Client with the Galaxy HDi, please set first the IP of the Galaxy HDi through the
Operating Panel (OP), with reference to the User’s Manual of the Galaxy HDi hardware
manual.
7
Rorke Data
8
Rorke Data
CHAPTER 2 - Getting Started
This chapter concentrates on the things to do before you can start using the AVC-L
Monitoring Program. It discusses things like: What are the basic requirements? How to install?
How to start the different modules? Please read the following information carefully before
proceeding with the installation of the AVC-L Monitoring Program.
The AVC-L Monitoring Program is composed of the AVC-L Client module and the AVC
Monitor Daemon module. Both can either be installed in one system or in separate systems.
2.1
Machine/Platform Requirements and Supported OS’s
For the AVC-L modules to run and perform its function, the PC where it is installed must
be connected to a network and that TCP/IP is supported. For more information on how to setup TCP/IP, please ask for your network administrator’s assistance.
2.1.1
AVC Monitor Daemon for Linux
H/W : CPU Intel Architecture, 200Mhz or better, 128MB of memory, LAN card
O/S : Linux Kernel 2.2 and above, TCP/IP support
2.1.2
AVC Monitor Daemon for Windows
H/W : CPU Intel Architecture, 200Mhz or better, 128MB of memory, LAN card
O/S : Windows XP, Windows NT 4.0 Workstation & SP5, Windows NT 4.0 & SP5,
WIndows 2000 Professional, Windows 2000 Server, TCP/IP support
2.1.3
AVC Monitor Daemon for Solaris
H/W : CPU Sparc Architecture, 200Mhz or better, 128MB of memory, LAN card
O/S : Solaris 7, 8, 9
2.1.4
AVC Monitor Daemon for MacOS
H/W : CPU PowerPC G3, G4, G5, 128MB of memory, LAN card
O/S : MacOS X 10.2.6 and above.
2.1.5
AVC-L Client
AVC-L Client runs on top of Java technology. The Java Runtime Environment Version
1.4 (JRE1.4.1_02) is also included in the installer. When JRE 1.4 is used, the maximum needed
amount of memory is 20MB.
The Client needs to run on XGA(1024x768) resolution for better performance.
For Update Firmware operation, the AVC-L Client needs to be run on at least 500 Mhz
CPU speed to prevent firmware update failure.
2.1.5.1
AVC-L Client for Linux
H/W : CPU Intel Architecture, 200Mhz or better, 128MB of memory, LAN card
O/S : GUI (Gnome or KDE), TCP/IP support
9
Rorke Data
2.1.5.2
AVC-L Client for Windows
H/W : CPU Intel Architecture, 200Mhz or better, 128MB of memory, LAN card
O/S : Windows 95, Windows 98, Windows 98 SE, Windows ME, Windows XP,
Windows NT 4.0 Workstation & SP5, Windows NT 4.0 Server & SP5, WIndows
2000 Professional, Windows 2000 Server, Windows 2000 server, TCP/IP support
2.1.5.3
AVC-L Client for Solaris
H/W : CPU Sparc Architecture, 200Mhz or better, 128MB of memory, LAN card
O/S : GUI (CDE), Solaris 7, 8, 9, TCP/IP support
Note: AVC-L Client does not use the JRE 1.4 installed with Solaris 9.0. It uses the JRE
1.4 installed in the AVCL Client directory.
2.1.5.4
AVC-L Client for MacOS
H/W : CPU PowerPC G3, G4, G5, 128MB of memory, LAN card
O/S : MacOS X Panther 10.3
2.2
CD-ROM Contents (AVC-L_CDROM_46)
(In case the file names below does not much that in the content of the installer CD, please take
the content of the CD as the correct one.)
AVC-L_CDROM_46
|--- Readme.txt .............................................................. Readme (Japanese) version
|--- AVC-L_Man-J-V46.pdf ......................User’s Manual (Japanese) version
|--- AVC-L_Man-E-V46.pdf ........................ User’s Manual (English) version
|--- rorke data-smi.mib ................................ SNMPV1 MIB File (Windows NT4.0)
|--- rorke data-raid-avcl.mib ........................ SNMPV1 MIB File (Windows NT4.0)
|--- rorke data-smi-s2.mib ......................... SNMPV2 MIB File(Windows 2000/XP)
|--- rorke data-raid-avcl-s2.mib ................. SNMPV2 MIB File(Windows 2000/XP)
|--- avcl_trial_license.lic ......... Trial license for Instant Copy & Mirroring functions
|
|--- Linux
|
|--- avlxsv4604 ....................... Linux AVC Monitor Daemon Runtime module
|
|--- avlxg4604.................................................................... Linux GUI Installer
|
|--- avlxn4604.rpm ...................................................... Linux NOGUI Installer
|
|--- Windows
|
|--- avwdg4600.exe ............................................................ Windows Installer
|
|--- aspi_v471a2.exe ...................... ASPI for Windows(needs to be unzipped)
|
|--- Solaris
|
|--- avsosv4608 ..................... Solaris AVC Monitor Daemon Runtime module
|
|--- avsog4601 ............................................................... Solaris GUI Installer
|
|--- avson4608.pkg ................................................... Solaris NOGUI Installer
|
|--- MacOS
10
Rorke Data
|--- avmcg4600 ....................................................................... MacOS Installer
|--- avmcsv4608 .................... MacOS AVC Monitor Daemon Runtime module
|--- avmcn4608.pkg.tar ............................................ MacOS NOGUI Installer
2.3
Installation/Uninstallation
Installation and Uninstallation of the AVC Monitoring Package can be achieved by using
GUI installers or non-GUI installers. If you choose to use the non-GUI installers, only AVC
Monitor Daemon would be installed. However, if you choose to use the GUI installers, you
would also be able to install the AVC-L Client program.
For Linux and Solaris platforms, both GUI and non-GUI installers are provided. However,
for Windows and MacOS, only GUI installer is provided.
2.3.1
Using installers with GUI
2.3.1.1
Installation for Windows
IMPORTANT! For smooth installation, it is advisable to have at least 35MB of
available space and at least 40MB of temporary space in the directory specified by the
TEMP environmental variable. Otherwise, errors mights happen during installation.
WARNING! On Windows system, to install AVC Monitor Daemon with SNMP
support, you must install first Windows SNMP Service. However, if you don’t need
the SNMP Monitoring functions, this would not be a requirement.
WARNING! On Windows system, if you will be using the Periodic Instant Copy
functionality through FC protocol, you must first install ASPI. And please make sure
ASPI is properly installed before installing the AVC Monitoring Package.
WARNING! On Windows system, if you are using a USERID wherein the first
character is a “#” ‘pound sign’, InstallShield is unabled to use the TEMP environment
correctly, thus installation may fail. So, during installation, please use the USERID
Administrator.
To install the AVC-L Client and AVC Monitor Daemon for Windows:
(1) If you have a previous version of the AVC-L installed, please uninstall it first before
proceeding.
(2) The filename avwdg4600.exe in the installer CD-ROM is the installer file.
(3) You have to have Administrator access to continue the installation process.
(4) AVC-L will be installed under “\Program Files\AVCL\4.6” folder.
(5) From the Windows Explorer, double click on the avwdg4600.exe file. The following
will be shown:
11
Rorke Data
(6) This is the first window for installation.
(7) Click on “Next”, and the following window will be shown. “Typical” installs both
AVC-L Client and AVC Monitor Daemon. “Custom” installs either the AVC-L
Client only, AVC Monitor Daemon only, or both, and is advised only for use by
advanced users.
12
Rorke Data
(8) Below is the window shown when you choose “Custom”. If you have chosen
“Typical”, then the window below would be skipped.
IMPORTANT! The AVC Monitor Daemon for Windows uses ASPI (Advanced
SCSI Programming Interface) to communicate with the Galaxy HDi devices for in-
13
Rorke Data
band or direct FC/SCSI connection. In the installation, the installer detects if the system have
ASPI or not. If there is ASPI, it installs the module with FC/SCSI direct connection functions.
(9) You can install the AVC-L Client only, or AVC Monitor Daemon only, or both.
Please make sure you have enough disk space for each module as indicated in the
window below.
(10) When you click on “Next” again, copying of the files to your system and installation
will then start.
14
Rorke Data
(11) After the installation, the AVC Monitor Daemon service will then be registered as
a service and started automatically even after a reboot.
(12) After the installation process, the following files will be available:
15
Rorke Data
\Program Files\AVCL\4.6\Daemon\avcdaemon44NA.exe .................... AVC-L Daemon Runtime
\Program Files\AVCL\4.6\Daemon\agent\avclagent.dll .................................... AVC-L SNMP dll
\Program Files\AVCL\4.6\Client\AVCClient.exe ..................................... AVC-L Client Runtime
\Program Files\AVCL\4.6\Client\AVCClient.jar ...................................... AVC-L Client JAR File
\Program Files\AVCL\4.6\Client\AVCClient.ico ................................... AVC-L Client ICON File
\Program Files\AVCL\4.6\_uninst\UninstallAVCL44.exe .............................................. Uninstall
\Program Files\AVCL\4.6\_uninst\uninstall.jar ..................................................... Uninstall JAVA
\Program Files\AVCL\4.6\_uninst\Uninstall.dat .................................................... Uninstall DAT
\Program Files\AVCL\4.6\_jvm ....................................................... JVM-Related Files (multiple)
\Winnt\avcdaemon.ini .................................................. AVC Monitor Daemon Configuration File
\Winnt\system32\avcdaemon.pw ....................................... AVC Monitor Daemon Password File
\Winnt\system32\avcdaemon.log ............................................... AVC Monitor Daemon Log File
\Winnt\system32\avcdaemon.logYYY.MM.DD-XXhXXmXXs ... Old AVC Monitor Daemon Log File
\Winnt\system32\avcdaemon.tmp.MMDDXXX .................................. External Email Temporary
\Winnt\system32\avccflush.exe .................................................. AVC-L Cache Flush Executable
\Winnt\system32\axrlutil.exe ................................................. Instant Copy Command Line Utility
\Winnt\system32\lsvdlib.dll .................................................................. AVC-L Cache Flush DLL
\Winnt\system32\avwdslogs.dll .............................................................. AVC-L Event Log DLL
\Winnt\system32\msvcp60.dll ............................................................................. Windows DLL
\Documents and Settings\(log-in name)\AVCClient.log ............................................. Client Log
\Documents and Settings\(log-in name)\AVCClient.property ...................... Client Configuration
\Documents and Settings\(log-in name)\AVCClient.history .... Galaxy HDi IP Address History
\Documents and Settings\(log-in name)\AVCClient.port .... Galaxy HDi IP Address & Port No.
\Documents and Settings\(log-in name)\AVCClient.server ................................ Galaxy HDi IP
Address & Port (Connected)
\Documents and Settings\(log-in name)\AVCClient.daemon .................... AVC Monitor Daemon
IP Address & Port (Connected)
\Documents and Settings\(log-in name)\AVCClient.daemonhistory .......... AVC Monitor Daemon
IP Address & Port No.
2.3.1.2 Recommended Setting for AVC Monitor Daemon as a
Windows Service after Installation.
There might be a time, though very rare, that the Daemon on Windows will have an
application error due to some circumstance regarding system resources. To avoid this situation,
it is recommended that Daemon service’s Recovery option be manually set. In the near future,
this might be automatically set during installation. Follow the directions below for setting the
Recovery option of Daemon service.
(1) Click on Start, then Control Panel.
(2) Go to Administrative Tools and then invoke (double-click) on the Services icon.
(3) Locate and select the “Array Virtual Console Monitor Daemon v4.6” service.
(4) Invoke the service’s Properties. The properties window will pop up as shown below.
16
Rorke Data
(5) Select the Recovery tab. The default setting on the failure options is “Take No
Action.” Change this on all the failure options by selecting “Restart the Service” as shown
below.
17
Rorke Data
(6) Click on the Apply button and then on OK to finish the setting.
2.3.1.3
Uninstall for Windows
(1) You have to have Administrator’s access to perform the following.
(2) The Client and/or the AVC Monitor Daemon can be uninstalled via any of the
following:
(a) “Start” -> “Settings” -> “Control Panel” -> “Add/Remove Programs” and then
select the “Array Virtual Console v4.6 for Windows”, then click on “Change/
Remove” button. InstallShield Wizard will then be started.
(b) Or, from “Windows Explorer”, choose the folder where AVC modules are
installed “\Program Files\AVCL\4.6\_uninst” and double click on the file
“UninstallAVCL46.exe”. InstallShield Wizard will then be started.
18
Rorke Data
(3) The following window is displayed and you can choose which module to delete. You
can choose to delete either the AVC-L Client, or the AVC Monitor Daemon, or
both.
19
Rorke Data
(4) Next, the confirmation of deletion window will be displayed. If you want to proceed
with the Uninstallation, click on the “Next”. You can always reinstall again later if
you want to have the AVC modules back again.
(5) Next, the window that will be displayed is that of the completion of uninstallation as
shown below. Click on the Finish button to finish the uninstallation.
20
Rorke Data
WARNING!
On Windows, when using the “Add/Remove Programs” to uninstall
AVC-L, after the icon “Finish” is clicked, the “Add/Remove Programs” window may
sometimes seem to freeze. When this happen, please terminate the “Add/Remove
Programs” window through the task manager. This problem occurs especially when the
operating system is Japanese.
2.3.1.4
Installation for Linux
WARNING!
Only RedHat 7.1, 7.2, and 7.3 is tested and supported if you want
to install the AVC-L Client.
(1) Mount the CDROM and copy the Linux GUI Installer file avlxg4600 to a temporary
directory.
(2) You have to have Root access for this.
(3) AVC will be installed under /usr/local/AVCL/4.6 directory.
(4) Installation is the same as that in Windows, so please view the subsection
“Installation of the AVC-L Client and the AVC Monitor Daemon for
Windows”.
(5) In the last window, there is NO NEED for a system reboot and after the installation,
the AVC Monitor Daemon will automatically be started.
(6) There are cases wherein the AVC Monitor Daemon can’t be successfully started
depending on the version, so please make sure that it was indeed successfully
started, and if not, please manually start the AVC Monitor Daemon.
# ps -ef | grep avcdaemon
./avcdaemon -start <== this shows that it was successfully started
To manually start the AVC Monitor Daemon,
# cd /usr/local/AVCL/4.6/daemon
# ./avcdaemon -start &
(7) After the installation process, the following files will be available:
• /usr/local/AVCL/4.6/daemon/avcdaemon ............................... AVC Monitor Daemon Runtime
• /usr/local/AVCL/4.6/daemon/avcdaemon.conf ............. AVC Monitor Daemon Configuration file
• /usr/local/AVCL/4.6/daemon/avcdaemon.log .................. Newest AVC Monitor Daemon Log file
• /usr/local/AVCL/4.6/daemon/avcdaemon.logXX .... Old AVC Monitor Daemon Configuration file
• /usr/local/AVCL/4.6/daemon/.avcdaemon.pw .......... AVC Monitor Daemon password file (hidden)
• /usr/local/AVCL/4.6/daemon/axrlutil ............................... Instant Copy Command Line Utility
• /usr/local/AVCL/4.6/daemon/avcdaemon_snmpd ................................................. SNMP Agent
• /usr/local/AVCL/4.6/daemon/snmpd.conf .................................. Sample SNMP Configuration file
• /avcdaemon_snmp.port ........................... avcdaemon & avcdaemon_snmpd communication port
• /avcdaemon.pid .................................................................... AVC Monitor Daemon Process ID
• /etc/rc2.d/S99avcdaemon ....................................................................................... Start script
• /etc/rc3.d/S99avcdaemon ....................................................................................... Start script
• /etc/rc5.d/S99avcdaemon ....................................................................................... Start script
• /etc/rc0.d/K99avcdaemon ....................................................................................... Stop script
• /etc/rc1.d/K99avcdaemon ....................................................................................... Stop script
21
Rorke Data
• /etc/rc6.d/K99avcdaemon ....................................................................................... Stop script
• /etc/rc.d/init.d/avcdaemon .............................................................................. Start/Stop script
• /usr/local/AVCL/4.6/_uninst ..................................................................... Uninstall-related Files
• /usr/local/AVCL/4.6/_jvm ............................................................................. JVM-related Files
• /usr/local/AVCL/4.6/client/AVCLClient ...................................................... AVC-L Client Runtime
• /usr/local/AVCL/4.6/client/AVCLClient.jar ................................................ AVC-L Client JAR File
• /etc/.AVCLclient.history ........................................................... Galaxy HDi IP Address History
• /etc/.AVCClient.property .......................................................................... Client Configuration
2.3.1.5
Uninstall in Linux
(1) To uninstall the AVC-L Client and/or AVC Monitor Daemon for Linux, you have to
have root access.
(2) Using the “File Manager”, go to the folder where AVC is installed. “/usr/local/AVC/
4.6/_uninst” and double click on the uninstall file “UninstallAVCL46”. Follow on
the instruction for uninstallation, this is the same as that in Windows.
(3) Some files under “/usr/local/AVCL” may not be deleted, e.g. AVC log files. You
may delete them manually if you think you won’t need them anymore.
2.3.1.6
Installation for Solaris
(1) Mount the CDROM and copy the Solaris GUI Installer file avsog4600 to a temporary
directory.
(2) You have to have Root access for this.
(3) AVC will be installed under /usr/local/AVCL/4.6 directory.
(4) Installation is the same as that in Windows, so please view the subsection
“Installation of the AVC-L Client and the AVC Monitor Daemon for
Windows”.
(5) In the last window, there is NO NEED for a system reboot and after the installation,
the AVC Monitor Daemon will automatically be started.
(6) There are cases wherein the AVC Monitor Daemon can’t be successfully started
depending on the version, so please make sure that it was indeed successfully
started, and if not, please manually start the AVC Monitor Daemon.
# ps -ef | grep avcdaemon
./avcdaemon -start <== this shows that it was successfully started
To manually start the AVC Monitor Daemon,
# cd /usr/local/AVCL/4.6/daemon
# ./avcdaemon -start &
(7) After the installation process, the following files will be available:
•
•
•
•
•
•
22
/usr/local/AVCL/4.6/daemon/avcdaemon ..................................... AVC Monitor Daemon Runtime
/usr/local/AVCL/4.6/daemon/avcdaemon.conf ............. AVC Monitor Daemon Configuration file
/usr/local/AVCL/4.6/daemon/avcdaemon.log ................... Newest AVC Monitor Daemon Log file
/usr/local/AVCL/4.6/daemon/avcdaemon.logXX .... Old AVC Monitor Daemon Configuration file
/usr/local/AVCL/4.6/daemon/.avcdaemon.pw ........ AVC Monitor Daemon password file (hidden)
/usr/local/AVCL/4.6/daemon/axrlutil ............................... Instant Copy Command Line Utility
Rorke Data
• /usr/local/AVCL/4.6/daemon/avcdaemon_snmpd ................................................. SNMP Agent
• /usr/local/AVCL/4.6/daemon/libstdc++.so.5 ............................................................. Library file
• /usr/local/AVCL/4.6/daemon/libgcc_s.so.1 ............................................................... Library file
• /avcdaemon_snmp.port ........................... avcdaemon & avcdaemon_snmpd communication port
• /avcdaemon.pid .......................................................................... AVC Monitor Daemon Process ID
• /etc/rc2.d/S99avcdaemon ....................................................................................... Start script
• /etc/rc0.d/K99avcdaemon ....................................................................................... Stop script
• /usr/local/AVCL/4.6/_uninst ..................................................................... Uninstall-related Files
• /usr/local/AVCL/4.6/_jvm ............................................................................. JVM-related Files
• /usr/local/AVCL/4.6/client/AVCLClient ...................................................... AVC-L Client Runtime
• /usr/local/AVCL/4.6/client/AVCLClient.jar ................................................ AVC-L Client JAR File
• /etc/.AVCLclient.history ........................................................... Galaxy HDi IP Address History
• /etc/.AVCClient.property .......................................................................... Client Configuration
2.3.1.7
Uninstall in Solaris
(1) To uninstall the AVC-L Client and/or the AVC Monitor Daemon for Solaris, you
must have root access.
(2) Using the “File Manager”, go to the folder where AVC is installed. “/usr/local/AVC/
4.6/_uninst” and double click on the uninstall file “UninstallAVCL46”. Follow on
the instruction for uninstallation, this is the same as that in Windows.
(3) Some files under “/usr/local/AVCL” may not be deleted, e.g. AVC log files. You
may delete them manually if you think you won’t need them anymore.
2.3.1.8
Installation for MacOS
(1) On your desktop, click the icon where the AVC-L_CDROM_46 installer is and locate
the installer file avmcg4600.
(2) Double-click on the installer file and then just follow the instruction under
“Installation of the AVC-L Client and the AVC Monitor Daemon for
Windows”.
(3) Or alternatively, open up a terminal, copy the installer file to some temporary
directory and add execution permission to the installer file. Then execute the
installer file. You have to have Root access for this.
# chmod +x avmcg4600
# ./avmcg4600
(4) AVC will be installed under /usr/local/AVCL/4.6 directory.
(5) In the last window, there is NO NEED for a system reboot and after the installation,
the AVC Monitor Daemon will automatically be started.
(6) There are cases wherein the AVC Monitor Daemon can’t be successfully started
depending on the version, so please make sure that it was indeed successfully
started, and if not, please manually start the AVC Monitor Daemon.
Check first the process id (pid) of the ‘avcdaemon’
23
Rorke Data
# cat /avcdaemon.pid <-- if this file is present, it will show you a process id.
# ps -p <pid>
./avcdaemon -start <== this shows that it was successfully started
To manually start the AVC Monitor Daemon,
# cd /usr/local/AVCL/4.6/daemon
# ./avcdaemon -start &
(7) After the installation process, the following files will be available:
•
•
•
•
•
•
•
•
•
•
•
•
•
•
•
/usr/local/AVCL/4.6/daemon/avcdaemon ..................................... AVC Monitor Daemon Runtime
/usr/local/AVCL/4.6/daemon/avcdaemon.conf ............. AVC Monitor Daemon Configuration file
/usr/local/AVCL/4.6/daemon/avcdaemon.log ................... Newest AVC Monitor Daemon Log file
/usr/local/AVCL/4.6/daemon/avcdaemon.logXX .... Old AVC Monitor Daemon Configuration file
/usr/local/AVCL/4.6/daemon/.avcdaemon.pw ........ AVC Monitor Daemon password file (hidden)
/avcdaemon.pid .......................................................................... AVC Monitor Daemon Process ID
/Library/StartupItems/avcdaemon .................................................................... Daemon Directory
/Library/StartupItems/avcdaemon/avcdaemon ........................................................ Daemon script
/Library/StartupItems/avcdaemon/StartupParameters.plist.......................................... Plist File
/usr/local/AVCL/4.6/_uninst ..................................................................... Uninstall-related Files
/usr/local/AVCL/4.6/_jvm ............................................................................. JVM-related Files
/usr/local/AVCL/4.6/client/AVCLClient ...................................................... AVC-L Client Runtime
/usr/local/AVCL/4.6/client/AVCLClient.jar ................................................ AVC-L Client JAR File
/etc/.AVCLclient.history ........................................................... Galaxy HDi IP Address History
/etc/.AVCClient.property .......................................................................... Client Configuration
2.3.1.9
Uninstall in MacOS
(1) To uninstall the AVC-L Client and/or the AVC Monitor Daemon for MacOS, you
must have root access.
(2) Using the “Finder” application, go to the directory where AVC is installed. “Go” > “Go To Folder”, in the folder name, enter “/usr/local/AVCL/4.6/_uninst” and
double click on the uninstall file “UninstallAVCL”. Follow on the instruction for
uninstallation, this is the same as that in Windows.
(3) Some files under “/usr/local/AVCL” may not be deleted, e.g. AVC log files. You
may delete them manually if you think you won’t need them anymore.
2.3.2
Using non-GUI installers
2.3.2.1
Installation of AVC Monitor Daemon for Linux
(1) Mount the CDROM and copy the Linux NOGUI Installer to a temporary directory.
The avlxn4600.rpm file under the Linux directory is the Linux NOGUI Installer.
(2) You need to have root access to do the following.
(3) Install the AVC Monitor Daemon using the “rpm” command:
# rpm -iv avlxn4600.rpm
Preparing packages for installation ...
24
Rorke Data
avcdaemon-4.6-0
AVC Monitor Daemon Program v4.603 at 192.168.10.20 started
(4) After the above process, the AVC Monitor Daemon will be started and the Client
can now be used to connect to the AVC Monitor Daemon.
(5) The default directory where AVC Monitor Daemon is installed is “/usr/local/AVCL”
(6) After the installation process, the following files will be available:
•
•
•
•
•
•
•
•
•
•
•
•
•
•
•
•
•
/usr/local/AVCL/4.6/daemon/avcdaemon ..................................... AVC Monitor Daemon Runtime
/usr/local/AVCL/4.6/daemon/avcdaemon.conf ............... AVC Monitor Daemon Configuration file
/usr/local/AVCL/4.6/daemon/avcdaemon.log .................... Newest AVC Monitor Daemon Log file
/usr/local/AVCL/4.6/daemon/avcdaemon.logXX .... Old AVC Monitor Daemon Configuration file
/usr/local/AVCL/4.6/daemon/.avcdaemon.pw .......... AVC Monitor Daemon password file (hidden)
/usr/local/AVCL/4.6/daemon/axrlutil ............................... Instant Copy Command Line Utility
/usr/local/AVCL/4.6/daemon/avcdaemon_snmpd ................................................. SNMP Agent
/usr/local/AVCL/4.6/daemon/snmpd.conf .................................. Sample SNMP Configuration file
/avcdaemon_snmp.port ........................... avcdaemon & avcdaemon_snmpd communication port
/avcdaemon.pid .......................................................................... AVC Monitor Daemon Process ID
/etc/rc2.d/S99avcdaemon ....................................................................................... Start script
/etc/rc3.d/S99avcdaemon ....................................................................................... Start script
/etc/rc5.d/S99avcdaemon ....................................................................................... Start script
/etc/rc0.d/K99avcdaemon ....................................................................................... Stop script
/etc/rc1.d/K99avcdaemon ....................................................................................... Stop script
/etc/rc6.d/K99avcdaemon ....................................................................................... Stop script
/etc/rc.d/init.d/avcdaemon .............................................................................. Start/Stop script
2.3.2.2
Uninstallation of AVC Monitor Daemon for Linux
(1) You need to have root access to do the following.
(2) Uninstall the AVC Monitor Daemon using the “rpm” command:
# rpm -e avcdaemon
(3) The AVC Monitor Daemon will first be stopped and then uninstalled.
(4) Some files created by AVC Monitor Daemon have to be manually deleted:
avcdaemon.log, avcdaemon.conf, .avcdaemon.pw, PeriodicIC.conf
2.3.2.3
Installation of AVC Monitor Daemon for Solaris
(1) Mount the CDROM and copy the Solaris NOGUI Installer to a temporary directory.
The avson4600.pkg file under the Solaris directory is the Solaris NOGUI Installer.
(2) You need to have root access to do the following.
(3) Install the AVC Monitor Daemon using the “pkgadd” command:
# pkgadd -d ./avson4600.pkg
The following packages are available:
25
Rorke Data
1 avcdaemon
avcdaemon
(sparc) 4.6-0
Select package(s) you wish to process (or 'all' to process
all packages). (default: all) [?,??,q]:
Processing package instance <avcdaemon> from </testsolaris/avson4603.pkg>
avcdaemon
(sparc) 4.6
This appears to be an attempt to install the same architecture and
version of a package which is already installed. This installation
will attempt to overwrite this package.
RORKE DATA
Using </usr/local> as the package base directory.
## Processing package information.
## Processing system information.
1 package pathname is already properly installed.
## Verifying disk space requirements.
## Checking for conflicts with packages already installed.
## Checking for setuid/setgid programs.
This package contains scripts which will be executed with super-user
permission during the process of installing this package.
Do you want to continue with the installation of <avcdaemon> [y,n,?] y
Installing avcdaemon as <avcdaemon>
## Installing part 1 of 1.
/etc/rc0.d/K99avcdaemon
/etc/rc2.d/S99avcdaemon
/usr/local/AVCL/4.6/daemon/avcdaemon
[ verifying class <none> ]
## Executing postinstall script.
Installation of <avcdaemon> was successful.
# AVC Monitor Daemon Program v4.603 at rorke dataavc1 started
(4) After the above process, the AVC Monitor Daemon will be started and the Client
can now be used to connect to the AVC Monitor Daemon.
(5) The default directory where AVC Monitor Daemon is installed is “/usr/local/AVCL”
(6) After the installation process, the following files will be available:
• /usr/local/AVCL/4.6/daemon/avcdaemon ..................................... AVC Monitor Daemon Runtime
• /usr/local/AVCL/4.6/daemon/avcdaemon.conf ............... AVC Monitor Daemon Configuration file
• /usr/local/AVCL/4.6/daemon/avcdaemon.log .................... Newest AVC Monitor Daemon Log file
26
Rorke Data
• /usr/local/AVCL/4.6/daemon/avcdaemon.logXX ...................... Old Daemon Configuration file
• /usr/local/AVCL/4.6/daemon/.avcdaemon.pw .......... AVC Monitor Daemon password file (hidden)
• /usr/local/AVCL/4.6/daemon/axrlutil ............................... Instant Copy Command Line Utility
• /usr/local/AVCL/4.6/daemon/avcdaemon_snmpd ................................................. SNMP Agent
• /usr/local/AVCL/4.6/daemon/libstdc++.so.5 ............................................................. Library file
• /usr/local/AVCL/4.6/daemon/libgcc_s.so.1 ............................................................... Library file
• /avcdaemon_snmp.port ........................... avcdaemon & avcdaemon_snmpd communication port
• /avcdaemon.pid .......................................................................... AVC Monitor Daemon Process ID
• /etc/rc2.d/S99avcdaemon ....................................................................................... Start script
• /etc/rc0.d/K99avcdaemon ....................................................................................... Stop script
2.3.2.4
Uninstallation of AVC Monitor Daemon for Solaris
(1) You need to have root access to do the following.
(2) Uninstall the AVC Monitor Daemon using the “pkgrm” command:
# pkgrm avcdaemon
(3) The AVC Monitor Daemon will first be stopped and then uninstalled.
(4) Some files created by the AVC Monitor Daemon have to be manually deleted:
avcdaemon.log, avcdaemon.conf, .avcdaemon.pw, PeriodicIC.conf
2.3.2.5
Installation of AVC Monitor Daemon for MacOS
(1) Mount the CDROM and copy the MacOS NOGUI Installer to a temporary directory.
The avmcn4600.pkg.tar file under the MacOS directory is the MacOS NOGUI
Installer.
(2) You need to have root access to do the following. In the following instruction, we
will assume you copied the MacOS NOGUI Installer file to the directory “/temp”
for demonstration.
(3) If you have previously installed avcdaemon, check that avcdaemon is not running.
# cat /avcdaemon.pid <- you will get the process ID of the avcdaemon if its running.
# ps -p <pid>
If it is running, stop it first.
# cd /usr/local/AVCL/*/daemon
# ./avcdaemon -stop
(4) Uncompress the MacOS NOGUI Installer file to get the real installer file.
# cd /temp
# tar -xvf avmcn4600.pkg.tar
The installer file would be extracted as a directory with the name - avmcn46201.pkg.
(5) Start the program “Finder” and locate where the installer file is. You can use the
option in the Finder program to go directly to a directory -- “Go” -> “Go To Folder”,
then type “/temp” in the directory specified under “Go To Folder:”.
27
Rorke Data
In the “Finder” program, the installer file will be shown as a single file in package
format ( though when you browse the package file through terminal, you will see a
directory).
(6) Double click on the installer file and just follow the instructions. You need to have root
access for this. After installation, avcdaemon will be automatically started.
(7) The default directory where AVC Monitor Daemon is installed is “/usr/local/AVCL”
(8) After the installation process, the following files will be available:
•
•
•
•
•
•
•
•
•
/usr/local/AVCL/4.6/daemon/avcdaemon ..................................... AVC Monitor Daemon Runtime
/usr/local/AVCL/4.6/daemon/avcdaemon.conf ............... AVC Monitor Daemon Configuration file
/usr/local/AVCL/4.6/daemon/avcdaemon.log .................... Newest AVC Monitor Daemon Log file
/usr/local/AVCL/4.6/daemon/avcdaemon.logXX ...................... Old Daemon Configuration file
/usr/local/AVCL/4.6/daemon/.avcdaemon.pw .......... AVC Monitor Daemon password file (hidden)
/avcdaemon.pid .......................................................................... AVC Monitor Daemon Process ID
/Library/StartupItems/avcdaemon .................................................................... Daemon Directory
/Library/StartupItems/avcdaemon/avcdaemon ........................................................ Daemon script
/Library/StartupItems/avcdaemon/StartupParameters.plist.......................................... Plist File
2.3.2.6
Uninstallation of AVC Monitor Daemon for MacOS
(1) You need to have root access to do the following.
(2) Stop the avcdaemon.
# cd /usr/local/AVCL/4.6/daemon
# ./avcdaemon -stop
(3) Remove the directory /usr/local/AVCL related files. Save first any data you might
need in future.
# cd /
# rm -r /usr/local/AVCL
# rm -r /Library/Receipts/avmcn46201.pkg
# rm -r /Library/StartupItems/avcdaemon
2.4
Java Runtime (JRE) 1.4 and the Client
The Client works with java runtime 1.4 (JRE 1.4.1_02). When installing the Client using
the InstallShield, this JRE version will also be installed automatically.
2.5
Starting/Stopping the modules
2.5.1
Starting/Stopping the AVC Monitor Daemon for Linux
To Start the AVC Monitor Daemon:
(1) On a new console or terminal, go to the subdirectory where the AVC Monitor
Daemon executable file resides:
28
Rorke Data
# cd /usr/local/AVCL/4.6/daemon
(2) Execute the following command which will run the AVC Monitor Daemon as a
background process:
# ./avcdaemon -start &
(3) Please do not forget to configure the sending of notifications via the Client.
To Stop the AVC Monitor Daemon:
(1) On a console, go to the subdirectory where the AVC Monitor Daemon executable file
resides:
# cd /usr/local/AVCL/4.6/daemon
(2) Execute the following command :
# ./avcdaemon -stop
2.5.2
dows
Starting/Stopping the AVC Monitor Daemon for Win-
The AVC Monitor Daemon is automatically registered as a service and this is automatically
started upon installation. To manually start the service, please use the “Services” Tab of the
“Computer Management Tool.”
To Start the AVC Monitor Daemon:
(1) Click on “Start” -> “Settings” -> “Control Panel”.
(2) Double-click on the “Services” icon.
(3) In the list, select the line with “Array Virtual Console Monitor Daemon v4.6”.
(4) If its status is empty or no “Started” is shown, click the “Start” button.
(5) The “Start” button becomes disabled while the “Stop” button becomes enabled. The
server will then be started.
(6) Please do not forget to configure the sending of notifications via the Client.
To Stop the AVC Monitor Daemon:
(1) Click on “Start” -> “Settings” -> “Control Panel”.
(2) Double-click on the “Services” icon.
(3) In the list, select the line with “Array Virtual Console Monitor Daemon v4.6”.
(4) If its status shows “Started”, click the “Stop” button.
(5) The “Stop” button becomes disabled while the “Start” button becomes enabled. The
server will then be stopped.
29
Rorke Data
2.5.3
Starting/Stopping the AVC Monitor Daemon for Solaris
To Start the AVC Monitor Daemon:
(1) On a new console or terminal, go to the subdirectory where the AVC Monitor
Daemon executable file resides:
# cd /usr/local/AVCL/4.6/daemon
(2) Execute the following command which will run the AVC Monitor Daemon as a
background process:
# ./avcdaemon -start &
(3) Please do not forget to configure the sending of notifications via the Client.
To Stop the AVC Monitor Daemon:
(1) On a console, go to the subdirectory where the AVC Monitor Daemon executable file
resides:
# cd /usr/local/AVCL/4.6/daemon
(2) Execute the following command :
# ./avcdaemon -stop
2.5.4 Starting/Stopping the AVC Monitor Daemon for MacOS
You have to have root access for this, so you have to login to SuperUser account.
To login to SuperUser account:
(1) On a new console or terminal:
# sudo su
(2) Enter the password for superuser / root.
To Start the AVC Monitor Daemon:
(1) On a new console or terminal, go to the subdirectory where the AVC Monitor
Daemon executable file resides:
# cd /usr/local/AVCL/4.6/daemon
(2) Execute the following command which will run the AVC Monitor Daemon as a
background process:
# ./avcdaemon -start &
(3) Please do not forget to configure the sending of notifications via the Client.
To Stop the AVC Monitor Daemon:
(1) On a console, go to the subdirectory where the AVC Monitor Daemon executable file
resides:
# cd /usr/local/AVCL/4.6/daemon
(2) Execute the following command :
30
Rorke Data
# ./avcdaemon -stop
2.5.5
Starting the Client on Windows
To Start the Client:
(1) Click on “Start” -> “Programs” -> “Array Virtual Console”-> “Array Virtual
Console Client 4.6”.
(2) The following picture will appear to show that the Client is now in the startup process.
Client Starting up View
(3) After, when the Client is already ready, the following window is displayed.
Client Window
(4) Please proceed to the next chapter for more discussion about the Client.
2.5.6
Starting the Client on Linux and Solaris
To Start the Client:
(1) Start a “File Manager” window or in MacOS, start the ‘Finder’ application, Go->Go
To Folder
(2) Go to the Client directory - “/usr/local/AVCL/4.6/client”
(3) Click on the executable file: “AVCLClient”, then everything would be the same as
that in “Starting the Client on Windows”.
31
Rorke Data
2.5.7
Starting the Client on MacOS
To Start the Client:
(1) Start the “Finder” application. “Go” -> “Go To Folder”, enter “/usr/local/AVCL/
4.6/client”
(2) Click on the executable file: “AVCLClient”, then everything would be the same as
that in “Starting the Client on Windows”.
2.5.8
Stopping the Client
Before the Client exits upon stopping, it would first save the current connection
configuration. Thus, all the device being monitored now will be re-connected upon next startup of the Client. The connected AVC Monitor Daemon information will also be saved. Thus,
upon next start-up of the Client, it will automatically reconnect to the AVC Monitor Daemon
programs.
To Stop the Client:
(1) Click on the “Options” menu, and then choose “Exit”. Or,
(2) Just simply click on the “Close Window Button” icon on the upper-right of the Client
window.
Confirmation Window when Closing the Client
(3) Just simply click on the “Yes” button to confirm exit.
32
Rorke Data
CHAPTER 3 - AVC-L Client
This chapter discusses the important features and functions of the Rorke Data Array
Virtual Console for Galaxy HDi -- AVC-L Client. It is also a must-read section of this manual,
since almost everything you can do to your Galaxy HDi starts with the client module.
AVC-L Client is the interface of the user to the Galaxy HDi and to the AVC Monitor
Daemon. This is a user-friendly GUI-based application that you’ll come to appreciate more
when you start using it.
When no activity, mouse-click and/or keyboard entry, is performed in a period of onehour, the AVC-L Client would automatically terminate. This event would be logged in the
AVC-L Client log.
3.1
AVC-L Client Environment
The AVC-L Client Environment is composed of several major functional areas: (1)
Server Address Field, (2) Tool Bar, (3) Device Navigation, (4) Device Information, and (5)
AVC Monitor Daemon, as shown in the image that follows.
Client General View
35
Rorke Data
The Server Address Field is an editable combo box where you type the Galaxy HDi’s
hostname or IP address. Or you can also click on the little arrow to show hostnames of the
Galaxy HDis’ previously connected.
The Toolbar area is composed of functional command buttons that you can invoke by
clicking. Most of these invocations result to the appearance of dialog boxes wherein you can
change or input desired parameters and it will send the operation to the Galaxy HDi and
allowing you to modify your Galaxy HDi in just a series of clicking with your mouse.
The Device Navigation area is a tree-like view of the Galaxy HDis’ currently connected
to by the AVC-L Client. Here, the devices can be branched out to show Arrays, Spares, Logical
Units, configured for the Galaxy HDi in focus. An HDD list and a Component List shows the
available HDD’s and Components for the Galaxy HDi in focus. The Array can then be branched
out to show its Logical Units and HDD’s included for that Array. A mouse left-button click to
any of these objects will result to a display of its information on the right-side panel, while a
right-button click on the Galaxy HDi, Array, Spare, or Logical Unit will show a menu of the
commands you can invoke for that item. These commands may also be invoked from the
Toolbar area.
The Device Information area will show more information of the object in focus in the
Device Navigation area.
The Monitor Daemon area shows the status of connection to the AVC Monitor Daemon.
If it is NOT connected, it would be shown with an X mark. And if connected to a Monitor
Daemon, placing the mouse near the icon shows the hostname of the current connected host. A
click on the icon shown would show menus available for the AVC Monitor Daemon module.
Other items on the lowest part of the AVC-L Client GUI are the Status Bar, and the AVCL Client Update Interval. The Status Bar will show the status of the AVC-L Client when
sending a request through network. Example of this situations are: (1) Client refreshes
information on connected Galaxy HDi, (2) a command is being executed, etc. During these
operations, you will see that the status bar goes through “opening connection” -> “getting reply”
-> “ready”. When the status bar shows “ready”, then, the AVC-L Client is ready to accept new
command. the AVC-L Client Update Interval, when double-clicked, will show a dialog box
wherein you can change the time interval setting of the client refresh time, measured in minutes.
Set System Date
Unassign Spare HDD
Assign Spare HDD
Remove LU
Add LU
Remove Array
Add Array
Set System Parameters
Get Error Log
Update Firmware
Invoke Rebuild
Start/Stop Instant Copy
Change Password
View RAID Subsystem Log
View Client Log
Disconnect
Connect
Refresh
ArrayMasStor IP Field
Tool Bar View
36
Set Mirroring
Set LU Masking
Set Ethernet Configuration
Schedule Surface Verify
Reboot Device
Rorke Data
To be familiar with the AVC-L Client GUI when initially started, navigation views are
shown below:
Galaxy HDi View
Galaxy HDi View Right-Mouse Click Menu
37
Rorke Data
The Galaxy HDi View above shows Galaxy HDi information (for FC device) like
Product Name, Manufacturer, Revision(firmware level), Serial Number, Device Date, Device
Time, Assigned Spare, Initiator Mode, Instant Copy License, Mirroring License, World Wide
Node Name (WWNN), Controller (as to which controller AVC-L is connecting), Surface Verify
Frequency. The view also shows summary of available Components and Configured Array’s.
For SCSI device, the information view will be similar as below:
Information for SCSI device will have 4 SCSI ID Channels instead of the Initiator Mode, Instant
Copy License, Mirroring License, & World Wide Node Name (WWNN).
Array View
Array View Right-Mouse Click Menu
The Array View above shows Array information like Array Number, Status, Size(in KB),
Array Ownership(whether this array belong to primary / secondary controller). It also shows a
status summary of Configured LU for that array, and Assigned HDD for that Array.
When Surface Verify is in progress, it would also show the Surface Verify Check Progress
information along with the LUN undergoing surface verify.
38
Rorke Data
Logical Unit View
Logical Unit View Right-Mouse Click Menu
The Logical Unit View above shows Logical Unit(LU) information like LU Number,
RAID Level, Size (in KB), Status, and Member Array Number.
Array HDD View
The Array HDD View above shows HDD information like the HDD Number,
Configuration, Status. Array Number, Logical Drive Number, Capacity, Retry Count, Recon
Count, Error Count, SMART (SMART Error), Recon Skip, Recon Error, WarningFlag.
If the HDD is assigned to an Array, the configuration is “Assigned” and the Array
Number to which this HDD is assigned to is displayed.
39
Rorke Data
Spare View
Spare View Right Mouse Click Menu
The Spare View above shows Spare information like Spare Number, Status, HDD
Number, Type of Spare(Global or Local), and the Array Number if it’s a local spare.
A Global Spare type is a spare to any Array, while a Local Spare is a spare to a specific
Array.
HDD List View
The HDD List View above shows a summary listing of HDD slots of the Galaxy HDi. It
shows the HDD #, Configuration of each HDD, the Array / Spare Number of the HDD to which
it is assigned to, Status and Size(KB) of each HDD.
40
Rorke Data
Component List View
Component List View - shows a summary listing of the components available. The
available types of components are:
Power Supply
Fan
Controllers
Thermometer
Battery Backup Unit
41
Rorke Data
IMPORTANT!
When an Array, Spare, or LU fails, its object would be
presented with a background colored in RED as shown in the picture below.
Failed Array, HDD in RED View
In the above picture, it shows that HDD 2 and Array 0 are in red, which implies that HDD
2 has failed and Array 0 is now in degraded mode. Normally, the Galaxy HDi would start the
Recon process automatically to a spare HDD if there is any. But when the AutoRecon system
parameter is turned off, you must manually invoke the Rebuild icon to start the reconstruction
process.
42
Rorke Data
IMPORTANT! When an Array, Spare, or LU is not in normal mode, such as
initialization, reconstruction, its object would be presented with a background
colored in YELLOW(Yellow) as shown in the picture below.
Device not normal, LU in YELLOW((Yellow) View
In the above picture, it shows that the Galaxy HDi is not in normal mode, but not in failure
mode either. It means that the Galaxy HDi is performing some operation and when this
operation is finished, it will be back in normal mode. In the above picture, it shows that LUN 0
is undergoing “Initialization” process.
The Galaxy HDi will also be shown in yellow when one of the components is not in
normal mode.
43
Rorke Data
While AVC Monitor Daemon has the feature to notify user of critical status through
Email/SNMP Traps, etc., AVC-L Client has the feature to notify user of critical status by
displaying “Pop-up Dialog” windows.
Sample Warning Dialog from an Galaxy HDi
Sample Warning Dialog from a Monitor Daemon
44
Rorke Data
3.2
Operations with Galaxy HDi
3.2.1
Basic Device Operations with Galaxy HDi
This section focuses on the basic operations with the Galaxy HDi. Some of these functions
can also be invoked from the operating panel (OP) of the Galaxy HDi.
3.2.1.1
Add/Delete Array
An Array is a group of HDD comprised to form a RAID. And in each Array, you may
create a number of Logical Units.
The minimum Array number that can be created is Array 0, while the maximum Array
number that can be created is Array 14. The minimum number of HDD for an Array is One(1),
while the maximum is set to the limit of the number of HDD’s available. Although drives with
different capacities may be combined into an array, available disk space is restricted to the
smallest drive capacity present in the array. Thus, it is recommended to combine drives of
identical capacity, wherever possible, to build an array.
Once an array is configured, a new drive cannot be added to an existing array. To add a
new drive to an existing array, backup first the data in the Array, then delete and reconfigure the
array.
For dual controllers, there is the concept of Array Ownership. It indicates which controller
can have direct access to that specific array. If Array 0 belongs to Primary Controller (Controller
1), then Secondary Controller (Controller 2) will have access to Array 0 thru the Primary
controller.
To Add an Array:
(1) On the Galaxy HDi View, click on the Galaxy HDi where you will add an Array. On
the Tool Bar, the “Add Array” button is enabled as shown below.
Add Array
Add Array Button
(2) Click on the “Add Array” button. Or, you can click the mouse’s right-button on the
Galaxy HDi to see the Galaxy HDi menu items, then select “Add Array”. A “Add
Array” dialog box will then pop up as shown below.
Add Array Dialog Box
(3) Choose the Array Number to be created from the “Array Number” drop down list
and determine also which controller shall be set as owner of the Array.
(4) Click on the check boxes of the HDD/s that will be included in the new Array.
45
Rorke Data
(5) Enter AVC-L Galaxy HDi Password on the Password field.
(6) Click “OK”, or press the “Enter” key. An “Add Array Confirm” dialog box pops up.
(7) Click “Yes” to confirm the action.
Result for Add Array
IMPORTANT!
If only 1 HDD is configured for that Array, then only LU of
RAID level 0 is configurable on that Array. To configure a LU with RAID level 5, a
minimum of 3 HDD’s is required.
To Change Ownership for an existing Array:
WARNING! Changing of Array Ownership would require a reboot of the Galaxy
HDi. The new setting would only take effect after the Galaxy HDi is rebooted.
(1) Click on the Array which you want the Ownership changed. And then right-click to
see other operations supported. Alternately, you can also click on “Tools” then
choose “Change Array Ownership”.
46
Rorke Data
Change Array Ownership Menu
(2) Choose the Array Number, and select also the desired Array Ownership.
Change Array Ownership Dialog Box
(3) Enter password and click on “Yes” to confirm action.
(4) A dialog box will then pop-up stating that Reboot has to be invoked for the change
to take effect.
47
Rorke Data
Change Array Ownership: Reboot Dialog Box
(5) After sending the Reboot operation, you can then reconnect to the device after a few
minutes.
Result of Change Array Ownership
To Delete an existing Array:
WARNING! Removing an Array would require removing of all the LU
configured under that Array. Removing an LU would mean destroying all the data
stored in that LU.
(1) Please remove first all Logical Unit’s configured in the Array you wish to remove
(Please refer to the section “Add/Delete Logical Unit” in this chapter).
(2) On the Galaxy HDi View, click on the Galaxy HDi where you will delete an Array.
On the Tool Bar, the “Remove Array” button is enabled as shown below.
48
Rorke Data
Remove Array
Remove Array Button
(3) Click on the “Remove Array” button. Or, you can click the mouse’s right-button on
the Galaxy HDi to see the Galaxy HDi menu items, then select “Remove Array”. A
“Remove Array” dialog box will then pop up as shown below.
Remove Array Dialog Box
(4) Choose the Array Number you wish to remove from the “Array Number” drop down
list.
(5) Enter AVC-L Galaxy HDi Password on the Password field.
(6) Click “OK”, a “Remove Array Confirm” dialog box pops up.
(7) Click “Yes” to confirm the action.
Result for Remove Array
49
Rorke Data
3.2.1.2
Add/Delete Logical Unit(LU)
A Logical Unit (LU), sometimes refered to as Logical Volume is a logically partitioned
area of an array. You can create multiple Logical Unit (LU) in one array. And each logical unit
may assume different RAID Levels. Currently supported RAID levels are : (1) RAID level 0 data is distributed to all configured drivers, (2) RAID level 1 - same data is written to two drives
in duplicate(mirroring) for protection, (3) RAID level 5 - one drive is used for parity data. Each
logical unit is recognized as a single drive by a host system.
The minimum Logical Unit number that can be created is LU 0, while the maximum is
LU 63, giving you a total of 64 luns. The maximum size of a logical unit you can create is about
2.2TB(2,199GB).
NOTE: “KB” is equivalent to 1000 bytes, “MB” is the square of 1000 bytes, “GB” is the third
power of 100 bytes and “TB” is the fourth power of 1000 bytes.
IMPORTANT! In some operating systems, it is required that LU 0 exist for the
Galaxy HDi to be detected by the operating system.
To Add a Logical Unit:
(1) On the Galaxy HDi View, click on the Galaxy HDi or click on an Array where you
will add an LU. On the Tool Bar, the “Add LU” button is enabled as shown below.
Add LU
Add LU Button
(2) Click on the “Add LU” button. Or, you can click the mouse’s right-button on the
Galaxy HDi to see the Galaxy HDi menu items, then select “Add LU”. A “Add LU”
dialog box will then pop up as shown below.
50
Rorke Data
Logical LU Mapping
Current LU Mapping Information
Add LU Dialog Box
(3) Choose the Array Number to which you wish to create the new LU from the “Choose
Array Number” drop-down list.
(4) Choose the RAID Level for the new LU from the “RAID Level” drop-down list.
(5) Choose the free space where the LU will be created.
(6) Choose the LU number from the “LU Number” drop down list.
(7) From here, you can also change the “Lun Masking” of the LU you will create by
clicking on the “Lun Mask” field. The current Lun Mapping information is
displayed in the LU Table Mapping Information for your convenience. If you want
the LU to be hidden by default, chose “-” as the value for Lun Mask.
Lun Masking is a mapping of physical LU number (as seen from Galaxy HDi) to a
logical LU number (as seen from an operating system through HBA). (To
understand more about the concept of Lun Masking, please refer to the section: Set
Lun Masking in this chapter)
51
Rorke Data
Logical LU Mapping
with respect to specific
HBA
Add LU Dialog Box
(8) Enter the desired LU size in KB and AVC-L Galaxy HDi password. In the event
wherein the size you input does not fall within the boundary of perfect size, a dialog
“Boundary LU Size” will pop-up giving you lower and upper limit for the size you
have chosen. Select the desired size to be created.
Add LU Dialog Box
(9) Click “OK”, or press the “Enter” key. A confirm dialog will pop up.
52
Rorke Data
(10) Click “Yes” to confirm the action.
Result of Add LU
IMPORTANT! After adding a new LU, it would undergo initialization. You
can see the progress of initiailization in the LU information. Within an Array, only 1
LU can undergo initialization. Thus a second LU created while another LU is still
undergoing initialization would have a status of “Initialization Required”.
To Removing an existing LU:
WARNING! Removing an LU would mean destroying all the data stored in that
LU.
(1) On the Galaxy HDi View, click on the Galaxy HDi where you will delete an LU. On
the Tool Bar, the “Remove LU” button is enabled as shown below.
Remove LU
Remove LU Button
(2) Click on the “Remove LU” button. Or, you can click the mouse’s right-button on the
Galaxy HDi to see the Galaxy HDi menu items, then select “Remove LU”. A
“Remove LU” dialog box will then pop up as shown below.
53
Rorke Data
Remove LU Dialog Box
(3) Choose the Array Number and LU Number you wish to remove from the “Array
Number” drop down list and the “LU Number” drop down list, respectively.
(4) Enter AVC-L Galaxy HDi Password on the Password field.
(5) Click “OK”, or press the “Enter” key. A confirm dialog box will pop up.
(6) Click “Yes” to confirm the action.
Result of Remove LU
54
Rorke Data
3.2.1.3
Assign/Unassign Spare HDD
Spare HDD are HDD pre-assigned as spare drives. When a spare drive is set, data in a
failed drive is immediately reconstructed in the spare drive upon drive failure (with Automatic
Reconstruction Mode ON). The total available space of the Galaxy HDi is less as much as the
number of spare drives, but the reliability is improved.
Spare drive may be configured as a common spare drive across all arrays - GLOBAL, or
as a spare to a specific array.
To Assign Spare HDD:
(1) On the Galaxy HDi View, click on the Galaxy HDi where you will “Assign New
Spare”. On the Tool Bar, the “Assign Spare HDD” button is enabled as shown
below.
Assign Spare HDD
Assign Spare HDD Button
(2) Click on the “Assign Spare HDD” button. Or, you can click the mouse’s right-button
on the Galaxy HDi to see the Galaxy HDi menu items, then select “Assign Spare
HDD”. A “Assign Spare HDD” dialog box will then pop up as shown below.
Assign Spare HDD Dialog Box
(3) Choose the HDD number to be assigned as spare from the “HDD” drop down list.
(4) Choose the Array number to which this Spare will be assigned, or choose “Global”
for Array Number to set this spare as “Global Spare”.
(5) Enter AVC-L Galaxy HDi Password on the Password field.
(6) Click “OK”, or press the “Enter” key. A confirm dialog box will pop up.
(7) Click “Yes” to confirm the action.
Result of Assign Spare HDD
55
Rorke Data
IMPORTANT!
Spares are very useful when an Array goes into degraded
mode. This data of the failed drive would be recreated to this spare drive if the RAID
level is 1 or 5.
To Unassign an existing Spare:
(1) On the Galaxy HDi View, click on the Galaxy HDi where you will delete the Spare.
On the Tool Bar, the “Unassign Spare HDD” button is enabled as shown below.
UnAssign Spare HDD
Unassign Spare HDD Button
(2) Click on the “Unassign Spare HDD” button. Or, you can click the mouse’s rightbutton on the Galaxy HDi to see the Galaxy HDi menu items, then select “Unassign
Spare HDD”. A “Unassign Spare HDD” dialog box will then pop up as shown
below.
Unassign Spare HDD Dialog Box
(3) Choose the Spare Number you wish to remove from the “Spare Number” drop down
list.
(4) Enter AVC-L Galaxy HDi Password on the Password field.
(5) Click “OK”, or press the “Enter” key. A confirm dialog box will pop up.
(6) Click “Yes” to confirm the action.
56
Rorke Data
Result of Unassign Spare HDD
57
Rorke Data
3.2.1.4
Set System Parameters
With Set System Parameters, you can set here the RECON Settings, Cache Settings,
Fibre Channel Settings, and Others.
IMPORTANT!
For the default values of these parameters, please consult your
hardware manual - User’s Manual of the Rorke Data Galaxy HDi Series also
included in the distribution package.
WARNING!
Changing some parameters here would require reboot of the
Galaxy HDi for the change to take effect. These parameters are: Look Ahead Table
(Cache Settings), FC Speed and Loop ID (Fibre Channel Settings), SCSI ID (SCSI
Channel Settings).
To Set System Parameters:
(1) On the Galaxy HDi View, click on the Galaxy HDi. On the Tool Bar, the “Set System
Parameters” button is enabled as shown below.
Set System Parameters
Set System Parameters Button
(2) Click on the “Set System Parameters” button. Or, you can click the mouse’s rightbutton on the Galaxy HDi to see the Galaxy HDi menu items, then select “Set
System Parameters”. The picture below shows the parameters that can be set in each
tab: RECON Settings, Cache Setting, Fibre Channel, and Others.
Set System Parameters Dialog Boxes (top: FC device; above: SCSI device)
(3) Set the necessary parameters:
RECON Settings
Auto RECON - If this is set, then when an Array enters degraded mode and a Spare drive is
available or the failed hard disk is replaced, automatic reconstruction would be started
immediately. Otherwise, if this is not set, user have to manually start the “reconstruction”
process by either “Invoke Rebuild” from the client.
RECON on Fail - When a drive encounters an error, its status changes from Normal to Fail.
If this parameter is set, then the Galaxy HDi will attempt to perform reconstruction on the
failed drive and the Array status will be in “Recon Mode”. Otherwise, the Array status
would be immediately set to “Fail”.
58
Rorke Data
RECON Unit(blocks) - This is the unit of block (sectors) that the Galaxy HDi performs the
data reconstruction at a time. Valid values are: 128, 256, 512, 1024, 2048, 4096, 8192,
and 16384.
RECON Verify Unit(blocks) - This is the unit of block (sectors) that the Galaxy HDi verifies
the data is properly written to the media of target drive during data reconstruction. Valid
values are: Disabled, or the range from 16384 ~ 268435466 depending on the value of
Recon Unit.
RECON Delay - This specifies the period of delay that Galaxy HDi pauses the reconstruction
operation when the host system tries to access other data. Valid values are: Disabled, 10
msec, 50 msec, 100 msec, 500 msec, 1 sec, 2.5 sec.
RECON Limit - This is the limit on number of times Reconstruction can be performed on a
failed disk when Recon On Fail is enabled. (A recon count is displayed in the HDD
information when the HDD is assigned in Array or Spare.) Valid values are 0..255.
Cache Setting
Cache Setting
Cache Mirroring - if this is set, then the Galaxy HDi synchronizes the write cache between
the RAID controllers for the dual controller configuration.
When Cache Mirroring is ON and the host system sends WRITE command to RAID
controller 1,
(1) RAID controller 1 copies the data to its cache.
(2) RAID controller 2 then copies the data to the other controller, RAID controller 2.
(3) When the copy is completed, RAID controller 1 informs the host system about the
completion of the command.
(4) RAID controller 1 then writes the data to drive 1.
(5) If the RAID controller fails some time between steps 3 and 4, RAID controller 2 takes
over and writes the data to drive 1.
When Cache Mirroring parameter is set to OFF, then steps 2 and 5 above are not performed.
You should set this to ON if you are using clustering software or path-multiplexing
software with the dual controller configuration.
59
Rorke Data
Write Cache - With RAID level 5, writes of small-sized data involve recalculation of parity
by reading old data and parity data, thus resulting in degradation of performance. When
this is ON, the Galaxy HDi write data into the cache memory, and sends a complete
message to the host and the data is collectively written from the cache into the drives later.
This contributes in the write performance of the device but if power is lost before the data
is really written to the hard disk, then the data may be lost. When the cache is off, then
data is stored in the cache and written to the hard disks first before a command complete
message is sent to the host.
In addition to the controller cache, the drive cache of the hard disk drive also acts as a write
cache similarly. Valid values are: Disabled, CTL:ON/DRV:OFF, CTL:OFF/DRV:ON,
Enabled.
Look Ahead Table - The Look Ahead is the funcitonthat improves the performance by
predicting the next location that the host system may read and by reading the data at that
location from the media of drive before requested. The Galaxy HDi keeps tracking of the
latest access from the host system, and it reads the data ahead if the host system reads the
data from the sequential locations previously. Look Ahead Table is the depth of the list
that the Galaxy HDi holds the latest accesses to determine linear accesses. Valid values
are: Disable, 1, 2, 4, 8, 16, 32, 64, 128, and 256.
Fibre Channel Settings
Fibre Channel Setting
FC Speed - The Fibre Channel interface of the Galaxy HDi supports Auto Negotiation mode
that automatically switches between 2Gbps and 1 Gbps according to the device
connected. If you use the Auto Negotiation mode in FC-AL topology, all the Fibre
Channel devices connected in a loop need to be set in Auto Negotiation mode. For
combination with a device that is not capable of Auto Negotiation, you need to set it in
fixed mode of 2 Gbps or 1 Gbps. Supported values are: Auto(auto negotiation), 1 Gbps
(Gigabytes per sec.), 2 Gbps.
LOOP ID - In FC-AL topology, a total of 127 devices (including HBA), i.e., 126 devices of
NL port and one device of FL port, may be connected concurrently. In that case, you have
to use different, unique addresses (AL-PA) for all the devices in a loop. You may set the
60
Rorke Data
FC address to be address from 0-125 or as Soft Address. With Soft Address scheme,
Galaxy HDi automatically determines address by acquiring it during loop initialization.
You can set the FC setting for each port (total of 4 ports).
SCSI Channel Settings
SCSI Channel Settings
SCSI ID - This dialog is used for setting the SCSI ID for the 4 SCSI channels
available especially those that have connections.
61
Rorke Data
Settings Dialog for Others
Others
UNIX C/H/S - Some operating system requires the drive geometry for accessing the drive
and it reads the geometry of logical unit by sending MODE SENSE command to the
Galaxy HDi. The drive geometry is specified by number of cylinders(C), number of
heads(H), and the number of sectors per track(S).
Some earlier version of operating system has problem in handling the drive
geometryinformation, and it recognizes the capacity of drive less than actual.
The UNIX C/H/S parameter selects the factors in the following formula by which the Galaxy
HDi calculates the number of cylinders.
(# of cylinders) = (# of sectors in a logical unit) / (# of heads) * (# of sectors per track)
When this is ON, the Galaxy HDi determines the number of cylinders given that the number of heads
is 64 and number of sectors per tract is 256. Otherwise, the Galaxy HDi determines the number of
cylinders given that the number of heads is 16 and number of sectors per tract is 63.
DPO/FUA Bit - The Galaxy HDi writes back the data in its Write Cache when the host
system sends the Synchronize Cache command. Some operating system issues the
Synchronize cache command to the Galaxy HDi only when the DPO(Disable Page Out)/
FUA(Force Unit Access) bit is ON.
Blink On Error - This parameter defines the behavior of the ArryMasStor when a power
supply module or fan module fails. The Galaxy HDi blinks the status LED of all drives
all together when a failure is detected to be visible from the front.
Ignore Stop Unit - This parameter is significant only when the host system connected to
Galaxy HDi is a Mac (Macintosh) OS of Apple computers. For a Mac OS host, this should
be marked to ignore the Stop Unit (RAID subsystem) command processing on the device.
S.M.A.R.T. Monitor - S.M.A.R.T (Self Monitoring Analysis and Reporting Technology) is
a self diagnostics function of Hard Disk Drives. Galaxy HDi can execute S.M.A.R.T. to
each hard disk drive to detect if the drive exceeded the S.M.A.R.T. criteria and the drive
would be killed or warning would be set to be able to make actions before further damage
would be made. “Disabled” means SMART checking is not enabled. “Every Minute”
62
Rorke Data
means SMART check will be performed every minute. Otherwise, you can set the
SMART check by Hour.
Serial Interface Speed - This parameter specifies the baud rate for serial communication.
Valid values are: 9600, 19200, 38400, 57600, 115200 bps (bits per second).
LU Qualifier Mode - This parameter defines the behavior of how the Galaxy HDi responds
to the Inquiry command to the logical unit not being configured. Valid values are:
Standard, Hide Unused LUs. Standards - The Galaxy HDi sets the peripheral qualifier
field in the Inquiry data to 001b to indicate that the logical unit is valid but is not available
as specified in SCSI standard. Hide Unused LUs - The Galaxy HDi sets the peripheral
qualifier field in the Inquiry data to 011b to hide the logical unit. Some operating systems
detects 64 logical units despite your RAID configuration. Use “Hide Unused LUs” to
prevent this symptom.
RETRY Limit - This is the limit of number of times the disk can undergo Retry status. (A
retry count information is displayed in the HDD information when the HDD is assigned
in Array or Spare). Valid values are 0..255.
Device Password - This is the operating panel (OP) password for the Galaxy HDi and is
different from that of the AVC-L Galaxy HDi password.
A “Restore Default” button is also included to restore all parameters to its default value.
Please consult your hardware manual - User’s Manual of the Galaxy HDi Series also included
in the distribution package for the corresponding default values of each item.
(4) Enter AVC-L Galaxy HDi Password on the Password field.
(5) Click “OK”, or press the “Enter” key. A confirm dialog box will pop up.
(6) Click “Yes” to confirm the action.
63
Rorke Data
3.2.1.5
Set Ethernet Configuration
This function enables changing of the TCP/IP configuration of the Galaxy HDi. You can
change the IP address, Subnet Mask, Gateway, DNS Settings, and Port Number to where
AVC-L listens for AVC-related connections. The default IP set in the Galaxy HDi when
shipped is “0.0.0.0”, default subnet mask is “255.255.255.0”, default gateway is “0.0.0.0”,
default Primary and Seconday DNS server is “0.0.0.0”.
IMPORTANT! In case the Galaxy HDi can’t be seen from the network or can’t
be ping-ed in the network, please set first the IP from the OP panel.
WARNING! Changing the Port to where AVC-L Server listen to, would require a
reboot of the Galaxy HDi. The new setting would only take effect after the Galaxy HDi
is rebooted.
To Set Ethernet Configuration:
(1) On the Galaxy HDi View, click on the Galaxy HDi. On the Tool Bar, the “Set
Ethernet Configuration” button is enabled as shown below.
Set Ethernet Configuration
Set Ethernet Configuration Button
(2) Click on the “Set Ethernet Configuration” button. Or, you can click the mouse’s rightbutton on the Galaxy HDi to see the Galaxy HDi menu items, then select “Set
Ethernet Configuration”. A “Set Ethernet Configuration” dialog box will then pop
up as shown below.
64
Rorke Data
Set Ethernet Configuration Dialog Box
(3) Change the entry by clicking on the “Edit” beside each parameter as shown in the
picture above.
(5) After making the necessary changes, click on the “Apply” button.
(6) After making all the necessary changes, enter AVC-L Galaxy HDi Password on the
Password field
(7) Click “OK”, or press the “Enter” key. A confirm dialog box will pop up.
Set Ethernet Configuration Dialog Box
65
Rorke Data
(8) Click “Yes” to confirm the action.
(9) If you have attempted to change the Port Number where AVC-L Server will listen, a
confirmation to reboot the Galaxy HDi will appear since changing the port number
would require that the Galaxy HDi be rebooted.
Set Ethernet Configuration: Reboot Dialog Box
(10) After sending the Reboot operation, you can then re-connect to the device with the
new ethernet settings.
66
Rorke Data
3.2.1.6
Schedule Surface Verify
Surface Verify is a function provided to resolve integrity problem. The Galaxy HDi will
read all the data and reconstruct unreadable sectors by using the data in other array members.
The check is performed on a logical unit-basis and the check runs simultaneously on multiple
logical units, one logical unit per array. The check is not performed on logical units with RAID
level 0.
This feature would prevent sudden failure of hard disk by performing verification at some
scheduled intervals. If a drive failed while at verification, an Error Recovery Procedure will be
performed. If the the error is not recovered, the drive would then be killed.
This operation is performed only when the Galaxy HDi’s Array Group status is “Normal”.
If the status is “Degraded Mode” or “Reconstruction Mode”, this operation will be skipped even
if it is scheduled. If the Array Group enters “Retry Mode”, this operation will be “suspended”
until the Array Group’s status is changed.
Surface Verify can also be invoked manually. Please check on the “System Maintenance”
section for this feature and other related information.
To Schedule Surface Verify:
(1) On the Galaxy HDi View, click on the Galaxy HDi. On the Tool Bar, the “Schedule
Surface Verify” button is enabled as shown below.
Schedule Surface Verify
Schedule Surface Verify Button
(2) Click on the “Schedule Surface Verify” button. Or, you can click the mouse’s rightbutton on the Galaxy HDi to see the Galaxy HDi menu items, then select “Schedule
Surface Verify”. A “Schedule Surface Verify” dialog box will then pop up as shown
below.
67
Rorke Data
Schedule Surface Verify Dialog Box
(3) Choose the Type of Surface Verify, either “No Surface Verify” or “Sequential
Surface Verify.”
(4) Set the Surface Verify Delay. This indicates the period of time surface verify
operation shall wait before continuing when request from a host system is received,
since request from a host system would be treated with higher priority. Delay
choices are shown on the drop-down lost above.
(5) Set also the Duration (in minutes) on how long shall the surface verify be performed.
A duration of zero(0) means surface verify shall be performed on all LU.
(6) Set also the Frequency. “Always” means to execute surface verify all the time.
“Daily” means surface verify will be executed once a day at the scheduled time.
“Weekly” means surface verify will be executed once a week at the scheduled day
and time. “Monthly” means surface verify will be executed once a month at the
scheduled date and time.
(7) Set also the Hour, Minute, Day of Week, Day of Month if necessary. This indicates
when the schedule when surface verify shall start.
(8) Enter AVC-L Galaxy HDi Password on the Password field.
(9) Click “OK”, or press the “Enter” key. A confirm dialog box will pop up.
(10) Click “Yes” to confirm the action.
68
Rorke Data
Surface Verify Information after Setting
69
Rorke Data
3.2.1.7
Set System Date
This operation allows changing the Date and Time setting in the clock of the Galaxy HDi
Device. It is recommended that you set the date and time only at initial usage of the Galaxy HDi.
After that, the date and time of the Galaxy HDi will be automatically updated by it’s internal
clock, thus there would be no need to set the date and time anymore.
To Set System Date:
(1) On the Galaxy HDi View, click on the Galaxy HDi. On the Tool Bar, the “Set System
Date” button is enabled as shown below.
Set System Date
Set System Date Button
(2) Click on the “Set System Date” button. Or, you can click the mouse’s right-button
on the Galaxy HDi to see the Galaxy HDi menu items, then select “Set System
Date”. A “Set System Date” dialog box will then pop up as shown below.
Set System Date Dialog Box
70
Rorke Data
(3) AVC-L Client provides 3 ways to set the Galaxy HDi’s clock:
(a) Computer’s Date and Time Setting - sets the time of the Galaxy HDi to same as that
of the running host.
(b) NTP Setting - configures Galaxy HDi to synchronize time with an “NTP(Network
Time Protocol) Server” at every “Update Interval”. This feature is not supported by
all microcode.
(c) Manual Setting - sets the time of the Galaxy HDi according to the set values in Day,
Month, Year, Hour, and Minute.
(4) Set the necessary parameters. The hour is specified as military time.
(5) Enter AVC-L Galaxy HDi Password on the Password field
(6) Click “OK”, or press the “Enter” key. A confirm dialog box will pop up.
(7) Click “Yes” to confirm the action.
71
Rorke Data
3.2.1.8
Set LUN Masking
This operation will allow making modifications to the LU Masking of the Galaxy HDi.
LU Masking is a feature that provides to Administrators the functionality of hiding
one or more LU of the Galaxy HDi from Host PC (through WWPN or SCSI ID of HBA)
connected to the FC switch in a network of storage devices (for FC) or connected in the SCSI
chain (for SCSI). You can also map Physical LU Numbers to Logical LU Numbers for
viewing from a Host PC.
To hide / map LUs’ with all Host PC, you modify the Default LU Masking.
To hide / map LUs’ with a specific Host PC, you register the WWPN or SCSI ID of that
Host PC in the Galaxy HDi’s Registered LU Masking.
The operations included in this command are: (1) Register LU Masking, and (2) Modify
Default LU Masking.
Register LU Masking means you add LU Masking for a specific WWPN (FC) or SCSI
ID (SCSI). All access to the Galaxy HDi from this WWPN or SCSI ID would be according to
the setting for the LU Masking of this registered WWPN or SCSI ID.
Modify Default LU Masking means modifying the Default LU Mapping for all WWPNs
or SCSI IDs accessing the Galaxy HDi.
Modify Registered LU Masking allows changing of the currently registered LU
Mapping for a specific WWPN or SCSI ID that is accessing through a specific port.
Delete Registered LU Masking means to delete an already registered LU Masking
information for a specific WWPN or SCSI ID. Once deleted, access from this WWPN or SCSI
ID will now confront to the Default LU Masking.
To Set LU Masking
(1) On the Galaxy HDi View, click on the Galaxy HDi. On the Tool Bar, the “Set LU
Masking” button is enabled as shown below.
Set LU Masking
Set LU Masking Button
(2) Click on the “Set LU Masking” button. Or, you can click the mouse’s right-button
on the Galaxy HDi to see the Galaxy HDi menu items, then select “Set LU
Masking”. A “Set LU Masking” dialog box will then pop up as shown below.
72
Rorke Data
Set LU Masking Dialog Box (left: FC device; right: SCSI device)
(3) Set the necessary parameters:
Port - This indicates the FC port number to be used. Can be either 1, or 2 for single
controllers and additionally 3, 4 for dual controllers.
World Wide Port Name (for FC devie) - the WWPN of the HBA from Host PC’s or
the WWPN’s of devices that can act as Initiator in the SAN where the Galaxy HDi
is connected.
SCSI ID (for SCSI device) - the SCSI ID of the HBA from HOst PC where the Galaxy
HDi is connected.
Hostname - hostname of the registered WWPN or SCSI ID. This will be used as
identification purpose only so that we won’t have to remember each WWPN when
making modifications. You can change this during Register and Modify operation.
LU Table Mapping - this table shows the current LU Mapping to be modified. The
upper part refers to the “Physical LU Number”, while the lower part refers to the
“Logical LU Mapping”.
73
Rorke Data
Sample LU Table Mapping
The sample LU Table Mapping above shows that:
(a) Physical LU 3 is hidden (mapped to “---”)
(b) LU 4 is mapped as LU 5
(c) LU 5 is mapped as LU 4
(d) LU 6 is not mapped and would be acccessed from a Host as LU 6.
(4) The current LU Masking is always shown for reference in the LU Table Mapping
Information. You can save this information to a file by clicking on the “Save”
button.
(5) Click “OK”, or press the “Enter” key. A confirm dialog box will pop up.
(6) Click “Yes” to confirm the action.
(7) To verify the result, click on “Set LU Masking” icon again, and the newly added LU
masking would be displayed in the LU Table Mapping Information section.
74
Rorke Data
Newly added LU Mapping
Set LU Masking : Result of Registering World Wide Port Name
WARNING! Changing of LU Mapping may lead to inaccessibility of Galaxy HDi
from Host PC in the SAN.
75
Rorke Data
3.2.1.9
Invoke Rebuild
Invoke Rebuild is useful only when AutoRecon is not enabled and an Array Group is in
Degraded Mode. This will start the Reconstruction of data from a failed drive to an available
Spare HDD. The RAID level wherein data reconstruction is possible is only RAID 1, RAID 5,
or combination of both.
IMPORTANT! Invoke Rebuild shall only be performed when an Array is in
degraded mode. When all Arrays are functioning normally, this operation shall not be
invoked.
To Invoke Rebuild
(1) An Array Group must be in Degraded Mode. During degraded mode, the Array
Group would be highlightened in RED.
Sample Degraded Mode View
(2) On the Galaxy HDi View, click on the Galaxy HDi. On the Tool Bar, the “Invoke
Rebuild” button is enabled as shown above.
(3) Click on the “Invoke Rebuild” button. Or, you can click the mouse’s right-button on
the Galaxy HDi to see the Galaxy HDi menu items, then select “Invoke Rebuild”.
An “Invoke Rebuild” dialog box will then pop up as shown below.
76
Rorke Data
Invoke Rebuild Dialog Box
(4) Set the necessary parameters. Select the Array Number in Degraded Mode and Spare
Number to be used for the Reconstruction process.
(5) Enter AVC-L Galaxy HDi Password on the Password field
(6) Click “OK”, or press the “Enter” key. A confirm dialog box will pop up.
(7) Click “Yes” to confirm the action.
Result of Invoke Rebuild - Array goes into Reconstruction Mode
77
Rorke Data
3.2.1.10
Reboot Device
Rebooting would cause the Galaxy HDi to be rebooted and would cut-off all current
connections not only ethernet (AVC Monitor Daemon, AVC-L Client), but also the fibre
connection of the Galaxy HDi.
WARNING! Rebooting the device would result to inaccessibility to the Galaxy
HDi from all other host.
IMPORTANT!
Reboot of the Galaxy HDi may fail when Initialization/
Reconstruction is in progress. Please perform the reboot after the Initialization/
Reconstruction process is finished.
To Reboot Device
(1) On the Galaxy HDi View, click on the Galaxy HDi. On the Tool Bar, the “Reboot
Device” button is enabled as shown below.
Reboot Device
Reboot Device Button
(2) Click on the “Reboot Device” button. Or, you can click the mouse’s right-button on
the Galaxy HDi to see the Galaxy HDi menu items, then select “Reboot Device”.
A “Reboot Device” dialog box will then pop up as shown below.
Reboot Device Dialog Boxes
(3) You should first enter the password, then a confirm dialog box will pop up.
Rebooting the Galaxy HDi will cut off all current connections to the device.
78
Rorke Data
(4) A warning message will then pop-up informing you the result of the Reboot
operation.
(5) Click “OK”, or press the “Enter” key.
(6) You can then reconnect to the device after a few minutes.
79
Rorke Data
3.2.1.11
System Maintenance
System Maintenance is where you can have the Galaxy HDi perform Surface Verify Now,
and Calibrate Battery.
To invoke System Maintenance:
On the Galaxy HDi view, right-click on the Galaxy HDi, or click on the Tools Menu and
then select System Maintenance menu item. A dialog box will pop-up.
System Maintenance Menuitem
80
Rorke Data
System Maintenance Dialog Box
Surface Verify is a function provided to resolve integrity problem. The Galaxy HDi will
read all the data and reconstruct unreadable sectors by using the data in other array
members. The check is performed on a logical unit-basis and the check runs
simultaneously on multiple logical units, one logical unit per array. The check is not
performed on logical units with RAID level 0.
Surface Verify can also be started periodically without user intervention. Please check on
the “Schedule Surface Verify” section for this feature and other related information.
To invoke Surface Verify Now:
(1) Click on the “Invoke Surface Verify Now” radio-button, and just enter the password
and click “OK”.
(2) A confirm dialog box will pop-up, just click on “Yes”.
System Maintenance - Invoke Surface Verify Now Confirmation
81
Rorke Data
Surface Verify in Progress
IMPORTANT!
Surface verify takes a lower priority than Reconstruction, LU
Initialization, and Instant Copy, thus will not be started if any of these is already in
progress.
Calibrate Battery is a function that allows you to calibrate the gauge circuit in the battery
module. The gauge is adjusted at the manufacturing so that it automatically charges
appropriately, but you may need the readjustment after the long use of the battery
module or repeated charge/discharge cycle.
To invoke Calibrate Battery,
(1) Click on the “Calibrate Battery” radio-button, choose the Battery Backup Number to
calibrate and the operation whether to “Start” or “Cancel” the calibration.
82
Rorke Data
System Maintenance - Calibrate Battery Dialog Box
(2) Enter the password, then click on “OK”.
(3) A confirm dialog box will pop-up, just click on “Yes”.
Battery Calibration
83
Rorke Data
3.2.2
Extended Device Operations with Galaxy HDi
This section lists operations that are not supported from the Operator Panel but is only
supported from the AVC-L Client.
3.2.2.1
Configure RAID Subsystem
This operation allows changing of the Port Number where AVC-L listens to and viewing
of the other AVC-L related information such as: AVC-L Version Number, Update Interval, IP,
and the Current Port Number to where AVC-L accepts connections.
WARNING! If you change the Port Number, there would be a need to Reboot the
Galaxy HDi for the change to take effect.
To Configure RAID Subsystem:
(1) On the Galaxy HDi View, click on the Galaxy HDi’s IP/Hostname (not the Galaxy
HDi). And then do a right-click of the mouse or click on the “Tools” menu, then
choose “Configure RAID Subsystem”.
Configure RAID Subsystem
(2) Click on the “Configure RAID Subsystem” button. A “Set RAID Subsystem
Cofiguration” dialog box will then pop up as shown below.
84
Rorke Data
Change RAID Subsystem Dialog Box
(3) Here, the AVC-L Galaxy HDi information is displayed. This information include
AVC-L Galaxy HDi version, RAID Subsystem IP, and Port Number.
(4) You can make changes to the port number where AVC-L Galaxy HDi listens for
connections by clicking the “Change Port Number” button.
(5) Enter AVC-L Galaxy HDi Password on the Password field
(6) Click “OK”, or press the “Enter” key. A confirm dialog box will pop up.
(7) Click “Yes” to confirm the action. Another dialog will pop up to confirm rebooting
of the device as shown below.
(8) A dialog saying that a device reboot has been invoked. You can then reconnect to the
device after a few minutes.
85
Rorke Data
3.2.2.2
Change Galaxy HDi AVC-L Password
This operation allows changing the Password for the AVC-L Galaxy HDi.
To Change Password:
(1) On the Galaxy HDi View, click on the Galaxy HDi. On the Tool Bar, the “Change
Password” button is enabled as shown below.
Change Password
Change Password Button
(2) Click on the “Change Password” button. A “Change Password” dialog box will then
pop up as shown below.
Change Password Dialog Box
(3) Enter first the Old Password, then enter also the New Password twice to reconfirm.
Please choose the password from the alphanumeric key combinations and a
minimum of 4 characters and a maximum of 8 characters.
(4) Click “OK”, or press the “Enter” key.
86
Rorke Data
3.2.2.3
View Galaxy HDi AVC-L Log
This operation allows Retrieval of the Galaxy HDi AVC-L Log. This is specially useful
in knowing what operations have been done to the Galaxy HDi through AVC-L, the status
transitions of the Galaxy HDi, etc.
To View Galaxy HDi AVC-L Log:
(1) On the Galaxy HDi View, click on the Galaxy HDi. On the Tool Bar, the “View RAID
Subsystem Log” button is enabled as shown below.
View RAID Subsystem Log
View RAID Subsystem Log Button
(2) Click on the “View RAID Subsystem Log” button. A “View RAID Subsystem Log”
dialog box will then pop up as shown below.
View RAID Subsystem Log Window
(3) You have the option to “Save” the contents, “Delete” the current contents, “Find” a
word or phrase, or just do nothing to the contents by clicking “Close” button. If you
choose to Save the current contents, you will be asked for the filename (default
filename is “View RAID Subsystem Log.txt”). If you choose to Delete, you will be
asked for the AVC-L Galaxy HDi Password. To search for an desired word or
phrase within the log displayed, click on “Find (on This LOG)...” button.
87
Rorke Data
3.2.2.4
Get/Clear Error Log
The Error Log is different from the View Galaxy HDi AVC-L log. This is the log of the
firmware microcode and is specially useful in analyzing microcode-related issues.
This operation allows Saving and Clearing the Error Log of the Galaxy HDi.
(1) On the Galaxy HDi View, click on the Galaxy HDi. On the Tool Bar, the “Get Error
Log” button is enabled as shown below.
Get Error Log
Get Error Log Button
(2) Click on the “Get Error Log” button. An “Get Error Log” dialog box will then pop
up as shown below.
Get Error Log Dialog Box
(3) Here, you can either Get the Error Log, or Clear the Error Log. If you choose the Get
Error Log, you will be asked for the filename. If you choose the Clear Error Log,
you must enter password. If you choose the latter, a confirm dialog box will pop-up.
88
Rorke Data
3.2.2.5
Update Firmware
This operation is essential only when there is a new microcode released from Rorke Data.
Upgrading to newer microcode means bug fix implemented or enhancements implemented, this
would enhance the quality of the Galaxy HDi.
WARNING!. When performing Update Firmware, please make sure no OS is
accessing any LU. After doing an Update Firmware, a Reboot of the Galaxy HDi is also
needed.
IMPORTANT!. For
Update Firmware operation, the AVC-L Client needs to be
run on at least 500 Mhz CPU speed to prevent firmware update failure.
(1) First verify the current microcode level of the Galaxy HDi.
Device Informration Window showing Current Microcode Level
(2) On the Galaxy HDi View, click on the Galaxy HDi. On the Tool Bar, the “Update
Firmware” button is enabled as shown below.
Update Firmware
Update Firmware Button
89
Rorke Data
(3) Click on the “Update Firmware” button. An “Update Firmware” dialog box will then
pop up as shown below.
Update Firmware Dialog Box
(4) Then, click on the “find” icon and locate where your RAM file is available. This
RAM file must be released from Rorke Data. This file usually have a filename
extention of “.ram”.
(5) If “Auto Reboot” is not enabled, the Galaxy HDi will not be rebooted.
IMPORTANT!.
Newly downloaded microcode does not take effect until the
Galaxy HDi is rebooted.
(6) Enter AVC-L Galaxy HDi Password on the Password field.
(7) Click “OK”, or press the “Enter” key. A confirm dialog box will pop up.
Update Firmware Dialog Box
(7) Click “Yes” to confirm the action. Then the AVC-L Client will start transfering the
microcode data to the Galaxy HDi.
90
Rorke Data
Update Firmware: Sending Firmware Data to Galaxy HDi
(8) When all the Firmware data is send, it will now start to write the microcode data to
the flashable ram. This may take a while. If there are two controllers connected, it
will update the microcode of both controllers.
Update Firmware: Firmware Data being written to Flash RAM of Galaxy HDi
Update Firmware: Firmware Data successfully written to Flash RAM of Galaxy HDi
(9) After the firmware data is successfully written to flash ram, the Galaxy HDi will be
automatically rebooted.
(10) You can reconnect to your Galaxy HDi after your Galaxy HDi becomes ready after
the reboot. Please reconfirm that the microcode is updated successfully.
91
Rorke Data
Current Microcode Level
Result of Update Firmware
92
Rorke Data
3.2.2.6
Reset Config & System Halt
When the Galaxy HDi detects unrecoverable error or mismatch of drive configuration
during the startup, its state becomes SYSTEM HALT. You will recognize this because when
you connect to the Galaxy HDi from the AVC-L Client, it will pop-up a window:
Galaxy HDi in System Halt Warning
The SYSTEM HALT state could be due to the replacement of drives in the Array, when
the Galaxy HDi is off. For example, you remove the drives units from the Galaxy HDi because
you want to remove the Galaxy HDi from the cabinet, and have forgotten to install the drive
units back to the Galaxy HDi. In this case, there might be no need to perform Reset Config. Just
insert back the drive units and reboot your Galaxy HDi. Otherwise, you might have to perform
a Reset Config(Reset Configuration).
If you do not know of any cause for the SYSTEM HALT state, consult your distributor
for the repair before taking any further action.
WARNING!. The Galaxy HDi returns to the normal mode after performing Reset
Config. However, be informed that this operation will ERASE ALL USER DATA.
To perform Reset Config:
(1) Click on “OK” in the above warning for System Halt. Then the System Maintenance
window will appear with the option to “Reset Config”.
93
Rorke Data
System Maintenance - Reset Config Window
(2) Enter password for the Galaxy HDi in the Password field. Then click “OK”.
(3) A confirm dialog will pop-up, click YES to continue. Then the configuration of the
Galaxy HDi will be erased.
System Maintenance - Reset Config Confirm Window
(4) You can now then reconnect to the Galaxy HDi.
94
Rorke Data
3.2.3
Operations related to Payable Functions
Galaxy HDi supports two special features: Instant Copy and External Mirroring.
Instant Copy (IC) provides Background Data Backup without Host intervention.
External Mirroring provides Background Mirroring to an external storage device without
Host Intervention. All data written to specified Logical Units will be copied to an external
storage as long as mirroring is set.
Instant Copy can be started thru ethernet(TCP) or thru fibre channel(FC). If you use
AVC-L Client or use AVC Monitor Daemon for MacOS, Instant Copy is started through TCP.
On the other hand, AVC Monitor Daemon for Linux, Windows, Solaris, supports starting of
Periodic(Scheduled) Instant Copy thru TCP and FC.
With the AVC-L Client, you have to manually do the flushing of the data to the LUN
before starting instant copy. With the AVC Monitor Daemon, you can provide the mount point
and the AVC Monitor Daemon will do the unmount-ing and mount-ing of the LUNS to do the
flushing of the data before starting the instant copy operation. After starting the instant copy
operation, the data copying itself is performed by the Galaxy HDi thru FC protocol.
Mirroring on the other hand, can be started only through AVC-L Client. You register
the mirroring information such as source lun, target lun, target WWPN, etc. through the AVCL Client. And the actually data copying would be performed by the Galaxy HDi itself through
FC protocol.
To be able to use these features, you have to obtain a license from your distributor. A 30days free trial of these features is also available in the file included in the installation CD avcl_trial_license.lic. After the trial period, these features would be disabled.
To request for a permanent license, you need to inform your distributor the Serial Number
of your Galaxy HDi. The serial number can be found in your Client:
95
Rorke Data
Serial Number Information
Please make the request for a permanent license a number of days before your trial license
expires.
In case your Galaxy HDi’s controller is replaced and you have purchased a permanent
license, please install the temporary license, and quickly request for another copy of the
permanent license.
96
Rorke Data
3.2.3.1
License Installation (for FC Galaxy HDi)
To Install License:
(1) You must have already requested for a license file from your distributor using the
serial number of your Galaxy HDi.
(2) On the Menu Bar, click on “Tools” -> “Install License”.
Install License in Menu Bar
(3) Click on “find” and look for the location of your license file then click “Open”. Then
click “OK”.
Install License Dialog Boxes
(4) If you installed the “avcl_trial_license1.lic”, the serial number of the devices, which
the AVC-L Client is currently connected to, will appear (only the devices with NO
Instant Copy &/or NO Mirroring license):
97
Rorke Data
Install License Dialog Box
(5) On the “Instant Copy License” field and the “Mirror License” field, you can click on
the entry “Temporary” and change it to “Disabled” if you don’t want to install that
license as of this time.
(6) You can also click on the “Add” button to add more serial numbers or click on the
“Delete” button to remove some devices listed.
(7) If you installed a permanent license, it will display immediately the contents of the
license file for you. And you only have to click on the “Password” field, then enter
the password for the Galaxy HDi with the corresponding serial number.
98
Rorke Data
Install License Dialog Box
(8) Then click on “OK” to proceed with the operation. A confirm dialog box will appear,
just click on “Yes” to continue.
(9) For external instant copy and mirroring, you need to enable the “Initiator Mode” for
the Galaxy HDi to be able to locate other devices connected to the SAN. If initiator
mode is not currently enabled. A summary of the license installation will then popup. Just click on “OK”.
Summary of License Installation
(10) The following shows the result of installing the Temporary Instant Copy and
Temporary Mirroring licenses using the “avcl_trial_license1_o.lic”.
99
Rorke Data
Result of Install License Operation with avcl_trial_license1_o.lic
IMPORTANT!.
If you want to perform External Instant Copy or External
Mirroring,, you must enable the Initiator Mode. Please check on the next section on
how to enable Initiator Mode.
100
Rorke Data
3.2.3.2
Initiator Flag (for FC Galaxy HDi)
Initiator Flag is a flag that indicates whether Initiator Mode for the Galaxy HDi (FC
interface) is enabled or not. The current status can be verified in the Device Information window
as follows:
Status of Initiator Mode
When Initiator Flag is enabled, it enables the Galaxy HDi to act as Initiator and thereby
being able to get the WWPN of target storage device attached to the SAN. When you want to
perform External Instant Copy, or External Mirroring, you must enable this flag. A REBOOT
is needed after changing initiator flag for the change to take effect.
To Enable Initiator Mode:
(1)
On the Menu Bar, click on “Tools” -> “Enable/Disable Initiator Mode”. A dialog
box will appear as shown below.
101
Rorke Data
Enable/Disable Initiator Mode Dialog Box
(2)
A check-mark present in the box indicates Initiator Mode-Enabled, while an empty
box indicates Initiator Mode-Disabled. Put a check-mark in the box to enable
Initiator Mode and enter the password in Password field.
(3)
A confirmation dialog box will pop-up, click “Yes” to continue.
Enable/Disable Initiator Mode Confirmation
(4)
Then a dialog will pop-up asking whether “Reboot” shall also be send to the Galaxy
HDi. For the Initiator Mode change to take effect, the ArrayMaStor must be
rebooted. You can click “Yes” to send the Reboot command now, or you can click
“No” and reboot the Galaxy HDi later. You can then reconnect to the device when
it’s ready.
Enable/Disable Initiator Mode - Reboot Dialog Box
102
Rorke Data
Initiator Mode Change Operation and Result
WARNING!. Some Host PC might not be able to recognize/detect the Galaxy HDi
when Initiator Mode is turned ON/Enabled.
103
Rorke Data
3.2.3.3
Start/Stop Instant Copy (for FC Galaxy HDi)
Instant Copy (IC) provides Background Data Backup without Host interventions. It
copies the data stored in one logical unit to another logical unit. Access to the copy source is
controlled during copying; thus, even if the data in the copy source is rewritten during copying,
the data available in the copy source at the time when IC is started is copied reliably.
Furthermore, when the copy target of IC is a logical unit within the Galaxy HDi, data may be
read from the copy target during copying as if all the data has already been copied. (If you
selected a logical unit of an external disk device as the copy target, you should not use the copy
target until copying is completed.)
Host is responsible to flush unwritten data to the Source LU before starting the Instant
Copy. In UNIX systems, this can be performed by unmounting the LU before Instant Copy
operation. In Windows, we have provided a utility to do the flushing of data of source LU.
Generally speaking, these are the steps user must do to perform IC :
* Close of all applications that would access the logical units involved in IC process.
* “Flash” all the data to the source lun.
* Start the instant copy operation.
* Verify that data IC operataion is ication when instant copy is finished.
There are two types of Instant Copy: Copy within Device, and Copy to External Device.
Copy within Device means the copying is within one LU of the Galaxy HDi to another
LU of the Galaxy HDi.
Copy to External Device means the copying is from the Galaxy HDi to another device
connected to the Storage Area Network (SAN). The external device can be detected via the
WWPN using Fibre Channel protocol.
IMPORTANT! You can only perform Instant Copy when you have installed the
Instant Copy license. You can only perform Instant Copy to an external device when
you have Initiator Mode of the Galaxy HDi enabled.
To Start/Stop Instant Copy:
WARNING!
Instant Copy will destroy the data in target by making the data in
the source LU copied to the target LU.
(1) On the Galaxy HDi View, click on the Galaxy HDi. On the Tool Bar, the “Start/Stop
Instant Copy” button is enabled as shown below.
(2) Click on the “Start/Stop Instant Copy” button. Or, you can click the mouse’s rightbutton on the Galaxy HDi to see the Galaxy HDi menu items, then select “Start/Stop
Instant Copy”. A “Start/Stop Instant Copy” dialog box will then pop up as shown
below.
104
Rorke Data
Start/Stop Instant Copy
Start/Stop Instant Copy Button
Start/Stop Instant Copy Dialog Boxes
(3) Set the necessary parameters. If you are performing “Copy Within Device” operation,
you need to supply the (a) Source LU Number, (b) Destination LU Number. If you
are performing “Copy to External Device”, you need to (1) Enable Initiator Mode,
(2) Supply the External Instant Copy parameters: (a) Source LU Number, (b) Port,
(c) World Wide Port Name, (d) Destination LU Number. The Source LU must
always be smaller or of the same size with the Destination LU.
(4) Below is a sample operation performing “Copy to External Device”. It will detect
target WWPN connected in the SAN to the Galaxy HDi through fibre channel.
105
Rorke Data
Copy to External Device Dialog Box
(5)
Enter AVC-L Galaxy HDi Password on the Password field. Click “OK”, or press
the “Enter” key. A confirm dialog box will pop up.
Instant Copy going on Button View
106
Rorke Data
Result of Start Instant Copy
107
Rorke Data
3.2.3.4
Periodic Instant Copy (for FC Galaxy HDi)
Periodic Instant Copy provides administrators the convenience of scheduling backups daily, weekly, or monthly. Administrators can just set the time, and the AVC Monitor Daemon
would invoke the Instant Copy operation according to the schedule set. For this function to
work, you must install also the AVC Monitor Daemon module in a Host PC connected to the
Galaxy HDi through fibre channel/ethernet connection.
In UNIX systems, before performing instant copy, it unmounts the source and target lun
to ensure that all data are written to the LUN(cache flush) before the operation is invoked. The
LUNs are then mounted back immediately after the Instant Copy is stareted. In Windows
systems, the cache flushing is done by executing first the utility that flushes all data of a
specified volume.
IMPORTANT!
Mount points cannot be two separate words. Two separate
words would be considered as two different mount points. Example: “/my mount”
would be considered as “/my” and “mount” mount points. (MacOS does allow
directories having a ‘ ’ (space) character.)
IMPORTANT! You can only perform Periodic Instant Copy when you have
installed the Instant Copy license. You can only perform Periodic Instant Copy for an
Galaxy HDi when you have the Galaxy HDi monitored. You can only perform Periodic
Instant Copy to an external device when you have Initiator Mode of the Galaxy HDi enabled.
IMPORTANT!
AVC Monitor Daemon for MacOS starts the instant copy
operation through TCP only. While AVC Monitor Daemon for Linux, Windows,
Solaris supports starting instant copy through either TCP or FC protocol.
IMPORTANT! Galaxy HDi’s must first be included for monitoring before it can
be scheduled for Periodic Instant Copy.
To set Periodic Instant Copy Configuration:
(1) On the Monitor Daemon Status Area, click the icon of Monitor Daemon.
(2) Click on the “Configure Periodic Instant Copy” option.
Left mouse-click menu on monitor daemon
108
Rorke Data
Configure Monitor Daemon Option
(3)
A “ Periodic Instant Copy” dialog box will then pop up as shown below.
Periodic Instant Copy Dialog Box
(3) Click on the “Add” button to add an Galaxy HDi to be scheduled for Periodic Instant
Copy. Choose the corresponding Serial Number and IP of the Galaxy HDi you want
to schedule for instant copy.
Periodic Instant Copy - Add Entry Dialog Box
(4)
After clicking on the “Apply” button above, you will have the following window.
109
Rorke Data
Periodic Instant Copy Dialog Box
(5) Next, you must set the schedule for the Periodic Instant Copy Schedule and set also
the Periodic Instant Copy Details. This is done by clicking on one of the fields
above, then clicking “Events”.
(6) The protocol to be used for starting the instant copy operation is shown: for Linux,
Windows, Solaris, both FC and TCP protocols are supported, while for MacOS,
only TCP protocol is supported. The default protocol to be used is TCP.
110
Rorke Data
Periodic Instant Copy schedule
Available protocol to start instant copy
Periodic Instant Copy details
Periodic Instant Copy Parameters Dialog Box
(7) For Periodic Instant Copy Schedule, there are three types of frequency available: (a)
Daily, (b) Weekly, (c) Monthly. If you have chosen Daily, you have to set the Hour,
and Minute as to when the Instant Copy shall be performed. If you have chosen
Weekly, you have to set also the Day of Week. If you have chosen Monthly, you
have to set also the Day of Month.
IMPORTANT!
Size of the Target LU must be bigger or equal to the size of the
Source LU.
(8)
To add details in the Periodic Instant Copy Details, click on an empty cell in the
“Copy Type” column. There are two available options for this: (a) Copy Within
Device, (b) Copy to External Device. If you have chosen Copy Within Device, you
have to set also the Source Lun and the Target Lun. If you have chosen Copy to
External Device, you have to set also the Port #, and Target WWPN. If the Source
Lun or Target Lun is mounted, you have to enter the mount points so that it can be
“unmount” or “cache flush” operation can be performed before Periodic Instant
Copy is started. You can enter multiple mount points by separating each with a
comma (,). The sample below is scheduled to start Daily at 9:01 AM of the Host PC
where Monitor Daemon is running. It has two Instant Copy operation to be
performed. (A) Copy Within Device, from Source LU 0, which is mounted at
directories: /smnt1, and /smnt2 to Target LU 1, which is mounted at directories: /
dmnt1, and /dmnt2. (B) Copy to External Device, from Source LU 0, which is
mounted at directories: /smnt1, and /smnt2 to Target LU 0 of the device with
WWPN 50:03:07:A8:0B:40:01:04.
111
Rorke Data
For Windows system, sample of entering mount points is: c:, d:, e:. It is adviced to
leave the Target LUN’s Mount Point blank as this have no significance and is
ignored
Sample Periodic Instant Copy Parameters Dialog Box
(9) You can also start the instant copy now by enabling the “Invoke Instant Copy Now”
check box. This would automatically start the instant copy process in addition to the
scheduled one.
(10) After setting the parameters, click on “OK”. Enter AVC-L Galaxy HDi Password
on the Password field.
(11) Click “OK”, or press the “Enter” key. A confirm dialog box will pop up.
(12) Click “Yes” to confirm the action.
IMPORTANT! Periodic Instant Copy will be invoked when time now is already
same as the scheduled one. You must verify the result of the Periodic Instant Copy
operation in the Monitor Daemon log file to ensure that it did work without error.
Otherwise, if error have occurred, please take necessary action to resolve the error.
112
Rorke Data
3.2.3.5
Set Mirroring (for FC Galaxy HDi)
This function provides Background Mirroring to an external storage device without Host
interventions. Same data written to specified LU will be copied to an external storage connected
in the SAN!
Host is responsible to flush unwritten data to the Source LU before starting the mirroring.
Unlike Instant Copy, the mirroring of the source lun and target lun is performed as long as the
luns are mirrored.
Possible value for “Mirroring Status” are:
Disabled - mirroring functionality disabled. Source lun is not mirrored to target lun.
Mirrored - mirroring functionality enabled. Source lun is mirrored to target lun.
Synchronization was not performed before.
Synchronizing (Sync) - source lun is now being synchronized/copied to target lun.
Synchronized and Mirrored (Sync & Mirror) - mirroring functionality enabled.
Source lun is mirrored to target lun. Synchronization was performed before.
Mirror Target Fail (M Tgt Fail) - mirroring failed. The Galaxy HDi fails to
perform WRITE operation to the target device - target device size might be
smaller than source.
Mirror Target Not Found (M Tgt NF) - mirroring failed. The Galaxy HDi fails to
communicate with the target device.
Mirror Source Read Fail (M Src RE) - mirroring failed. The Galaxy HDi fails to
READ from the source lun.
Controller Fail (CTLer Fail) - mirroring failed. The Galaxy HDi’s controller have
failed.
Cancelled - mirroring functionality is disabled. This data will be remove soon.
IMPORTANT! The terms enclosed in the parenthesis above are the terms logged
by Monitor Daemon when mirroring status change is detected.
IMPORTANT!
You can only perform Mirroring when you have Mirroring
license installed. You can only perform external mirroring when you have Initiator
Mode of the Galaxy HDi enabled.
IMPORTANT! Before setting the mirroring, make sure you have the same data
between the two luns involved in mirroring. Otherwise, eventhough the luns are
mirrored, content between the luns would still be different.
IMPORTANT! When the mirroring status fail, remember to perform a Re-Sync
to Re-Activate mirroring.
WARNING! This operation overwrites the target lun’s data with that of the source
lun.
To Set Mirroring:
113
Rorke Data
(1)
On the Galaxy HDi View, click on the Galaxy HDi. On the Tool Bar, the “Set
Mirroring” button is enabled as shown below.
(2)
Click on the “Set Mirroring” button. Or, you can click the mouse’s right-button on
the Galaxy HDi to see the Galaxy HDi menu items, then select “Set Mirroring”. A
“Set Mirroring” dialog box will then pop up as shown below.
Set Mirroring
Set Mirroring Button
Set Mirroring Dialog Box
114
Rorke Data
(3) In this dialog box, you can Register Mirroring Information(Add a new one), Delete
Registered Mirroring Information(Delete existing one), Re-start Registered
Mirroring (Re-start or re-activate registered mirroring).
(4)
If you choose to Register Mirroring Information, make sure first you have
Initiator Mode Enabled. Then you have to enter the Mirroring Detail: Source Lun
Number (Mirror Source Lun), Port, WWPN, and Destination Lun Number(Mirror
Target Lun).
IMPORTANT!
(1) Destination means unique combination of WWPN + Target LU.
(2) Each Source LU can be mirrored to one or more Destination.
(3) Each destination cannot be configured as destination for multiple Source LU.
Sample Register Mirroring Information Dialog Box
(5)
You also have the option to “Synchronize First” or not. Synchronizing would
perform first copy of all data in source lun to target lun at the same time performing
115
Rorke Data
mirroring. Without synchronization, only new data would be mirrored to the target
lun.
(6)
The newly Registered Mirroring Information would be available under the LUN
View.
Registered Mirroring Information of an LU
(7)
116
If you choose to Delete Registered Mirroring Information, select the Registered
Mirroring information you want to delete by selecting “first” the Source Lun
Number(Mirror Source), and then its corresponding Port, WWPN, and Destination
Lun Number(Mirror Target). If these information does not match any of the
registered mirroring information, you would be prompted with error:
Rorke Data
Sample Delete Registered Mirroring Information Dialog Box
(8)
Another operation supported is Re-start Registered Mirroring. In the table shown
in the Registered Mirroring Information, you can choose to re-start failed mirroring
operations. You can choose only “Re-start” to re-start mirroring without
synchronization, or choose “Sync First” + “Re-start” to re-start mirroring with
synchronization. In the sample below, the second entry is re-started with
synchronization first.
117
Rorke Data
Sample Resynchronize Registered Mirroring Information Dialog Box
118
(9)
For your convenience, the table “Registered Mirroring Information” can be used as
a reference for knowing what are mirroring entries already registered. If you click
on the “Save” button, the current Registered Mirroring Information can be saved to
a file for your further reference later.
(10)
After entering the Set Mirroring Parameters, please enter AVC-L Galaxy HDi
Password on the Password field.
(11)
Click “OK”, or press the “Enter” key. A confirm dialog box will pop up.
(12)
Click “Yes” to confirm the action.
Rorke Data
3.3
Operations with the Monitor Daemon
AVC-L Client can connect to multiple Monitor Daemon at a time.
N O T Connected to a M onitor Daem on
Connected to a M onitor Daem on
Monitor Daemon Status View
The icon
shows that no Monitor Daemon is currently connected. While the icon
shows that the AVC-L Client is connected to at least 1 Monitor Daemon.
When you place your mouse near the Monitor Daemon icon, a Hint on the connected
Monitor Daemon will appear like the picture below.
Hint on Connected Monitor Damon
There are 5 options supported for operation of the AVC-L Client with each Monitor
Daemon:
(1) Disconnection from a Monitor Daemon - disconnection of the current connected
Monitor Daemon.
(2) Change Monitor Daemon Configuration - allows setting of notification parameters,
such as e-mail, snmp trap, and also setting of Monitor Daemon parameters, such as ports to
listen to, refresh interval, etc.
(3) Change of Monitor Daemon Password - allows changing of the password of AVC
Monitor Daemon. This password would be requested whenever an operation to change the
settings of Monitor Daemon is made.
(4) View Monitor Daemon Log - allows viewing of the Monitor Daemon’s log file. This
log file includes status changes detected in the monitored Galaxy HDi, results of commands
received from client, results of notifications, etc.
3.3.1
Connection/Disconnection to the Monitor Daemon
Each Client can be connected to multiple Monitor Daemon. The icon for Monitor
Daemon-related operations is shown at the lower-right portion of the AVC-L Client. By default,
Monitor Daemon and AVC-L Client communicates through port 2002.
119
Rorke Data
To Connect to Monitor Daemon - A:
(1) Under the “Options” menu, there is “Set AVC Monitor Daemon IP Address” as
shown below.
(2) Click on the “Set AVC Monitor Daemon IP Address” button. A “Connect to
Daemon” dialog box will then pop up as shown below.
Set AVC Monitor Daemon IP Address Menu
Connect to Daemon Dialog Box
(3) Enter IP Address and Port Number for Monitor Daemon to connect to.
(4) Click “OK”.
To Connect to Monitor Daemon - B:
(1) If the Monitor Daemon Status shows an “X” mark, you can double-click on that and
a dialog box similar to below will appear.
120
Rorke Data
Connect to Daemon Dialog Box
(2) Enter the IP Address and Port Number of the Monitor Daemon that you want to
connect to.
(3) Click “Set”.
(4) It will now show a status that it is connected to a Monitor Daemon. If you place your
mouse near the icon, it will show you the IP addresss of the Monitor Daemon you
are connected to.
To Connect to Monitor Daemon - C:
(1) If you have already connected to at least one Monitor Daemon, you can connect to
another Monitor Daemon by performing steps in “To Connect to Monitor Daemon
- A”, or thru the “Connect to Daemon” option given in the Monitor Daemon icon.
Option for connecting to another
Monitor daemon
Connected Monitor Daemon
Menu for Monitor Daemon Icon
(2) Either way would give you the “Connect to Daemon” dialog box.
To Disconnect a Monitor Daemon
(1) On the optios given in the Monitor Daemon Icon, choose the Monitor Daemon you
want to disconnect from.
Menu to disconnect from a Monitor Daemon
121
Rorke Data
(2) Click on the “Disconnect Monitor” option.
(3)
122
The Monitor Daemon would then be disconnected.
Rorke Data
3.3.2
Changing the Monitor Daemon Configuration
This operation allows changing of the parameters set for the Monitor Daemon.
Parameters include: (1)Monitored Host (the IP and port number of Galaxy HDi to be
monitored), (2) Update Interval, (3)Port Number where Monitor Daemon listens for
connection, (4)SMTP(E-mail) Notification Settings, (5) SNMP Notification Settings, (6)
System Logging.
To Change Monitor Daemon Configuration:
(1) On the options provided by the Monitor Daemon Icon, choose the Monitor Daemon
you want to configure.
(2) Click on the “Configure Monitor ” option. A “ Set Monitor Configuration” dialog
box will then pop up as shown below.
Configure Monitor Daemon Option
123
Rorke Data
Set Monitor Configuration - General Information Dialog Box
(3) Under the General Information Sub-menu tab, the following can be changed:
Monitored Host Information, System Logging, Update Interval, and Port number.
Information on Monitored Devices, when one is selected, can be changed with the
3 operations: Add, Delete, & Edit.
Add enables you to add a new entry by supplying IP address and port number
of Galaxy HDi for monitoring.
Delete enables you to remove a monitored Galaxy HDi entry,
Edit enables you to modify the current IP address and port number.
124
Rorke Data
Add/Edit Monitored Host Entry Dialog Box.
System Logging notification can be enabled/disabled. To enable, click on the
“Enable System Logging” checkbox. A check mark will be present in the box
beside it. This will enable logging of most commands made by the Daemon and
of events that may occur as the Galaxy HDi is being monitored
Update Interval can be changed by clicking on the “Change Update Interval”
icon. The unit is in minutes. Update interval is the rate upon which the Daemon
updates its monitoring and refreshes the collected data.
Change Update Interval of Monitor Daemon Dialog Box
Port Number is the TCP/IP port where the Daemon communicates with the AVCL Client. You can change this by clicking on the “Change Port Number” button.
The default port number is 2002.
Change Port Number of Monitor Daemon Dialog Box
IMPORTANT!
The change in port number would take effect only after the
Monitor Daemon is restarted. While it is not restarted, it would continue to accept
connections from the old port number.
125
Rorke Data
(4) Under the E-mail Notification Sub-menu tab, the following can be changed: Status
of E-mail Notification (Enabled or Disabled), Type of E-mail Notification Enabled
(E-mail Transmission or External Program),
Set Monitor Configuration - E-mail Notification Dialog Box
Enable E-mail Notification shows whether e-mail notification is enabled, or
disabled. Can be set by enabling or disabling the “check mark”. When enabled,
the default notification type that will be enabled is the Type 1, E-mail
Transmission.
Type of E-mail Notification can be set to either E-mail Transmission or External
Program (cannot be selected/enabled together. You can set this by clicking and
having a “check mark” on the box behind the Type of E-mail Notification. If type
is E-mail Transmission, it also allows you to set the following: E-mail Server
Address, Mail Origin Address, Mail Recipient names (including the setting of
Events per recipient).
If the type of E-mail Notification is Passing to External Program, it allows you
to set the External Program name, on your system, to be invoked that will
include/show the message contents. If your system don’t have the capability to
126
Rorke Data
send out e-mail directly, you might want to use the Passing to External Program.
It copies the main contents of the e-mail to a temporary file. The external
program can then be called to process the file and the external program is also
responsible for the deletion of the temporary file, although the temporary file
would also be deleted automatically after 24 hours.
For e-mail transmission, Mail Server Address and Mail Origin Address can be
set by clicking the “Edit” button beside each. “Mail Origin Address” by default
is set to “avcdaemon@yyyy,” where yyyy is the IP address of host system or its
hostname plus “.com”. But if some mail servers won’t accept such address, it is
given as an Edit option for the user to make modifications. Mail Recipient names
supports 4 other operations:
Add enables you to add a new e-mail recipient (maximum of 5 e-mail
recipients only)
Edit enables you to modify the current set e-mail recipient address.
Add/Edit Mail Recipient Dialog Box
Delete enables you to remove a mail recipient entry.
Events enables you to modify the Selectable Event Notification. Events are
classified into 3 categories: Category 1 is for events that need the highest
attention, Category 2 is for events that need medium attention, Category 3
is for events that need minimal attention.
Send Test E-mail - you can set here an e-mail address to test connection of the
Monitor Daemon program to mail server. If the mail is not successfully sent, you
can then make modifications to current e-mail settings. Below is a sample of test
e-mail:
Sample Test E-mail
127
Rorke Data
E-mail Recipient - Selectable Event Notification (Category 1) Dialog Box
For each event, having a “check mark” in the box beside the event means a
notification would be performed when that event occur. To unselect an
event, just unmark the corresponding check box for that event. To select an
event, just mark the corresponding check box for that event. To return to
default settings (all events enabled), just click on the “Default” icon. Click
“Apply” when finished.
128
Rorke Data
(5) Under the SNMP Notification Sub-menu tab, the following can be changed: Status
of SNMP Notification (Enabled or Disabled), SNMP-related Parameters (SNMP
Community Address, SNMP Host IP address)
Set Monitor Configuration - SNMP Notification Dialog Box
Status of SNMP Notification whether enabled, or disabled, can be set by enabling
or disabling the “check mark” behind “SNMP Sending Enabled”.
For SNMP-related Parameters, SNMP Community Address can be set by clicking
the “Edit” button besides it. “SNMP Community Address” by default is set to
“public”. SNMP Host IP Address supports 4 other operations:
Add enables you to add a new SNMP Host IP Address (maximum of 5 only)
Edit enables you to modify current set SNMP Host IP Address.
Add/Edit SNMP Host IP Address Dialog Box
129
Rorke Data
Delete enables you to remove an SNMP Host IP Address entry.
Events enables you to modify the Selectable Event Notification. Events are
classified into 3 categories: Category 1 is for events that need the highest
attention , Category 2 is for events that need high attention, Category 3 is
for events that need minimal attention.
SNMP Host IP Address - Selectable Event Notification (Category 2) Dialog Box
For each event, having a “check mark” in the box beside the event means
sending the notification when that event occur. To unselect an event, just
unmark the corresponding check box for that event. To select an event, just
mark the corresponding check box for that event. To return to default
settings (all events enabled), just click on the “Default” icon. Click
“Apply” when finished.
130
Rorke Data
Selectable Event Notification (Category 3) Dialog Box
IMPORTANT!
If you have any difficulties setting E-mail-related parameters or
SNMP-related parameters, please ask assistance from your network administrator.
(6) Enter AVC-L Galaxy HDi Password on the Password field
(7) Click “OK”, or press the “Enter” key. A confirm dialog box will pop up.
(8) Click “Yes” to confirm the action.
131
Rorke Data
3.3.3
Changing the Monitor Daemon Password
This operation allows changing of the Password of the Monitor Daemon. You need to
input this password whenever you make modifications to the Monitor Daemon settings.
To Change Password:
(1) On the options provided by the Monitor Daemon Icon, choose the Monitor Daemon
you want the password changed.
(2) Click on the “Change Password” option. A “Change Password” dialog box will then
pop up as shown below.
Change Password Option
Change Password Dialog Box
(3) Enter first the Old Password, then enter also the New Password twice to reconfirm.
Please choose the password from the alphanumeric key combinations and a
minimum of 4 characters and a maximum of 8 characters.
(4) Click “OK”, or press the “Enter” key.
132
Rorke Data
3.3.4
Viewing the Monitor Daemon Log
To View the Monitor Daemon Log:
(1) On the options provided by the Monitor Daemon Icon, choose the Monitor Daemon
you want to view the log file.
(2) Click on the “View Daemon Log” option. A “View Log File” dialog box will then
pop up as shown below.
View Daemon Log Option
View Monitor Log Dialog Window
(3) A feature to copy specific line contents to the clipboard is supported by highlightening the text portion and a right-mouse click. There is also a vertical scrollbar
used to view logs above and below current window.
(4) Five other operations are available:
(a) View All logs - this toggles between “View All Logs” and “View Recent
Log”. “View All logs” includes displaying old logs if any is applicable. “View
Recent Log” displays only the current log file.
(b) OK - closes the View LOG file dialog box.
133
Rorke Data
(c) Save - saves the content of the current window to a file. You will be asked
for the filename to where the file will be saved.
(d) Delete All Logs - deletes all previous logs.
(e) Find (on This Log)... - capability to find a specified word or phrase
within the displayed log. When this button is clicked, a dialog will pop up as
shown below.
“Find ...” Dialog Box
Sample search on the word “battery”
134
Rorke Data
3.4
Extended Features of Client
This section lists other supported features of the AVC-L Client.
3.4.1
Connection/Disconnection to multiple Galaxy HDi
the AVC-L Client allows monitoring of multiple Galaxy HDi in just one client session.
To Connect to an Galaxy HDi:
(1) On the Tool Bar, the “Galaxy HDi IP” field and “Connect RAID Subsystem” button
is enabled as shown below.
(2) Enter the IP in the “Galaxy HDi IP” field and click on the “Connect RAID
Subsystem” button. A “Connect To RAID Subsystem” dialog box will then pop up
as shown below.
Connect RAID Subsystem Button
Connect to RAID Subsystem Dialog Box
(3) Click Set and you will be connected to the Galaxy HDi.
135
Rorke Data
Result of Connecting to an Galaxy HDi
To DisConnect to an Galaxy HDi:
(1) Click on the IP of the Galaxy HDi and do a right-mouse click. Click on “Disconnect
RAID Subsystem” . On the Tool Bar, the “Disconnect RAID Subsystem” button is
enabled as shown below.
(2) Click the “Disconnect RAID Subsystem ” A “Disconnect RAID Subsystem” dialog
box will then pop up as shown below.
DisConnect RAID Subsystem Button
Disconnect RAID Subsystem Dialog Box
(3) Click OK and you will be disconnected from the Galaxy HDi.
136
Rorke Data
Result of Disconnect from Galaxy HDi
3.4.2
Client Logging
Activities for the AVC-L Client is log in the AVC-L Client’s log. Included information
is: (1) Operations that would invoke reconfiguration of the Galaxy HDi connected, or Monitor
Daemon connected. (2) Connections/Disconnections to Galaxy HDi and the Monitor Daemon,
including explicit request to disconnect and disconnections due to error. (3) Other
miscellaneous information.
To View the AVC-L Client Log:
(1) Click on “View Client Log” icon in the Tool Bar.
(2) A “View Log File” dialog box will then pop up as shown below.
View Client Log Button
View Client Log File Dialog Box
(3) A feature to copy specific line contents to the clipboard is supported by highlightening the text portion and a right-mouse click. There is also a veritical scrollbar
used to view logs above and below current window.
(4) Five other operations are available:
137
Rorke Data
View All logs - this toggles between “View All Logs” and “View Recent
Logs”. “View All logs” includes displaying old logs if any is applicable.
OK - closes the View LOG file dialog box.
Save - saves the content of the current window to a file. You will be asked for
the filename to where the file will be saved.
Delete All Logs - deletes all previous logs.
Find (on This Log)... - capability to find a specified word or phrase within
the displayed log. When this button is clicked, a dialog will pop up as shown
below.
3.4.3
Changing the AVC-L Client’s Update Interval
Client Update Interval shows the interval wherein connection to the Galaxy HDi or the
Monitor Daemon is made to refresh the current data. Default for this is 1 min. You may change
this to some bigger value, like 10 min. to minimize network traffic.
To Change the AVC-L Client Update Interval:
(1) Click on “Change Update Interval” area.
(2) A “Set Update Interval” dialog box will then pop up as shown below.
Change Client Update Interval Area
Change Client Update Interval Dialog Box
(3) Enter the desired update interval in minutes and click “Set”. A confirm dialog with
then pop up, then click “yes”.
Result of Changing Client Update Interval
138
Rorke Data
3.4.4
Enable/Disable Pop Up of Error Messages
Error Messages Popup enables the pop-up of error messages such as network error
messages during refresh operation. When network traffic is heavy, this would pop-up quite
often. To eliminate this, you can disable this option. Network errors will still be logged in the
AVC-L Client’s log file.
To Enable/Disable Error Messages Popup:
(1) Click on “Options” menu.
(2) A check mark (/) mark present to the left of “Enable Error Messages Popup” enables
the showing of the error messages. Without a check mark, network errors during
refresh would be suspressed.
(3) Change the setting by clicking on the box.
Enable Error Message Popup Option
139
Rorke Data
140
Rorke Data
CHAPTER 4 - AVC Monitor Daemon
This chapter gives you a background on the main functions of the AVC Monitor Daemon
module. If you are in a hurry to start using AVC-L, you can skip this chapter but you must not
forget to configure the sending of notification via the Client so as not to defeit the purpose of
this module.
The AVC Monitor Daemon’s primary purpose is to monitor Galaxy HDi and send
notifications to Administrator so that proper action can be performed immediately. The Galaxy
HDi’s status is monitored through TCP/IP, which can be set in the AVC Monitor Daemon’s
Configuration through the Client. The AVC Monitor Daemon communicates to the Galaxy HDi
by connecting to TCP port 2001 of the Galaxy HDi by default while the Client communicates
with the AVC Monitor Daemon by connecting to TCP port 2002 of the AVC Monitor Daemon
by default.
Before any notification can be send, all necessary settings must be made first in the AVC
Monitor Daemon’s configuration. Things like: What is the hostname or IP of the Galaxy HDi
to be monitored? Should all events send out notifications?
When is a notification sent to a specified email address? What are the incidents that
triggers sending of the notifications? The answer to these questions is a simple sentence: When
a status change is detected.
The AVC Monitor Daemon keeps a record of the current status of the Galaxy HDi then
after some short interval (default is 1 minute), it gets again the current status of the Galaxy HDi
and compares it with the previous one. For example if the previous status of an HDD is
“Normal”, and then the current status of that HDD is “Fail”, thus, there is status change, so
notifications are sent.
There are several kinds of notifications available and they can all be set or disabled as you
prefer. These include: (1) Email, (2) SNMP-Trap sending, (3) System Logging, (4) AVC
Monitor Daemon Logging.
With the proper information set in the AVC Monitor Daemon’s configuration, email can
be send out. And if your computer has no email-sending capability, alternately, you can enable
the Passing to External Program. By enabling the Passing to External Program (disabling the
email), content of the email will be written to a temporary file and then an external program
specified in the configuration can be invoked with the temporary file as the parameter. The
external program would also be responsible for the deletion of this temporary file (this
temporary file would also be automatically deleted after 24 hours).
You can also enable the support on system logging. When status change is detected on
any of the monitored device, the information about that event would be log in the system log.
On Windows systems, you can view the system log through Computer Management, and then
viewing the Event Log for Applications. On Linux systems, you can view the system log on the
file /var/log/messages. On Solaris systems, you can view the system log on the file /var/adm/
messages. On MacOS systems, this is available in /var/log/system.log.
141
Rorke Data
142
Rorke Data
CHAPTER 5 - AxrlUtil - Instant Copy Command Line
Utility
This chapter is about the “axrlutil” program included for Galaxy HDi FC devices
purchased. If you’d like to perform your own scheduling of instant copy, and you don’t want to
use the avcdaemon monitor program, you can use this utility.
IMPORTANT!
This utility is only provided for Linux, Windows and Solaris
platforms. And not available for the MacOS platform. For MacOS platform, please use
the AVC-L Client program or the AVC Monitor Daemon program.
5.1
AxrlUtil Program Description and Specification
AxrlUtil is a command line utility program for invoking instant copy. Administrators can
execute this file in consoles or make script files or batch files and just call this program from it
As instant copy is a payable feature, your Galaxy HDi must have instant copy license already
installed.
On Unix, this program is located in “/usr/local/AVCL/4.6/daemon” and on Windows, this
program is located in “%Systemboot%system32”.
Instant Copy operation is achieved through fibre channel connection, so your Galaxy HDi
must be connected to your host PC through fibre channel protocol. On Windows, you would
need to install ASPI.
Before performing the instant copy, user is responsible to perform unmount / mount /
flush operations on the LUNs involved. On Unix, you need to unmount first the luns involved.
Aftter when the instant copy process is already started, you can then just mount the luns back.
On windows, you need to perform first cache flush on the source lun.
For Windows, a program for performing cache flush is included and installed in
“%Systemboot%system32” - avccflush.exe. To execute at command line:
c:\> avccflush <-q> <drive to flush>
-q - omits the program’s confirmation of the cache flushing. Without this option,
the program will prompt for confirmation of the cache flushing.
Possible return codes:
0 - Successful
2 - Flushing failed. No such file or directory.
4 - Flushing failed. Interrupted system call.
5 - Flushing failed. I/O error.
6 - Flushing failed. No device or address.
11 - Flushing failed. No more processes or no LWPs.
12 - Flushing failed. Not enough space.
13 - Flushing failed. Permission denied.
22 - Flushing failed. Invalid argument.
23 - Flushing failed. File table overflow.
24 - Flushing failed. Too many open files.
143
Rorke Data
5.2
Syntax and Return Status
You can just supply the parameter “-H” to check for syntax and return status:
On a Unix-based supported platform, one can run the utility on a console as shown below.
(For Windows, just type on a command prompt as follows: “> axrlutil -H)
# ./axrlutil -H
axrlutil v1.00
axrlutil parameters:
-H --> display help info
-D --> display debug message or verbose
-C --> check and evaluate parameters only
-Q <d | i device> --> query on current status
d - displays the serial number and device file of all attached AXRR-L devices
i - instant copy status
device - <s serial_number | d device_file>
-I <device> <flag> <IC_detail> --> invoke instant copy
device - <s serial_number | d device_file>
flag : 1 - copy within the device
2 - copy to external device
IC_detail:
source_lun target_lun [ port WWPN ]
port: <1 | 2 | 3 | 4>
Target WWPN shall only be supplied if external IC is performed
Format of WWPN is: aa:aa:aa:aa:aa:aa:aa:aa
Meaning of Exit Status Values:
0 - Success
1 - Unknown Error
2 - All Parameters Valid
30 - Instant Copy in Progress
31 - Instant Copy not in Progress
32 - Instant Copy Stopped
33 - Instant Copy Started
34 - Instant Copy to External Device
36 - Instant Copy Failed Due to Error
37 - Instant Copy Cancelled
40 - Invalid Parameters
41 - SCSI Command Failed
49 - Unable to get device file
50 - Error: Instant Copy in Progress
51 - Error: Instant Copy not in Progress
52 - Error: No Instant Copy License
54 - Set Instant Copy Command Failed
56 - Failed to get Instant Copy Status
57 - Failed to Start Instant Copy
58 - No Instant Copy License
144
Rorke Data
axrlutil
-D
-I
s
B3600096
2
0
0
1
50:03:07:A8:0A:40:01:27
Target WWPN
Port Number
Target LU Number
Source LU Number
External Instant Copy Switch
Source Serial Number
Source specification is serial number
Instant Copy Switch
Debug Mode Switch
WARNING!
When performing Instant Copy operation you must supply the
WWPN (World Wide Port Name). What is displayed during output of “axrlutil -Q d”
is WWNN (World Wide Node Name). When you use the AVC-L Client to perform
external instant copy, what is displayed is the WWPN.
WWPN
Start Instant Copy Dialog Box
IMPORTANT!
For Galaxy HDi AXRR-L device, you can compute for the
WWPN thru its WWNN. The formula is as follows:
WWNN : xx : xx : xx : xx : xx : YY : xx : xx eg. 50:03:07:A8:0B:01:01:04
Add Z to YY:
Port 1: Z=0x40, WWPN = 50:03:07:A8:0B:41:01:04
145
Rorke Data
Port 2: Z=0x80, WWPN = 50:03:07:A8:0B:81:01:04
Port 3: Z=0x60, WWPN = 50:03:07:A8:0B:61:01:04
Port 4: Z=0xA0, WWPN = 50:03:07:A8:0B:A1:01:04
5.3 Sample command call on performing external instant
copy (Solaris)
Query on attached devices :
# ./axrlutil -Q d
axrlutil v1.00
GetAttachedDevices: start search of attached AXRR-L device...
AXRR-L detected: Host2 Target0 Serial- S000133 L545 50:03:07:A8:0A:00:01:33
Device File-/dev/rdsk/c2t0d0s2
AXRR-L detected: Host2 Target2 Serial- S000103 L448 50:03:07:A8:0A:00:01:03
Device File-/dev/rdsk/c2t2d0s2
AXRR-L detected: Host2 Target3 Serial-B3500054 L44x 50:03:07:A8:0B:00:00:71
Device File-/dev/rdsk/c2t3d0s2
AXRR-L detected: Host2 Target4 Serial- S000023 L25X 50:03:07:A8:0A:09:00:23
Device File-/dev/rdsk/c2t4d0s2
AXRR-L detected: Host2 Target5 Serial- S000133 L545 50:03:07:A8:0A:00:01:33
Device File-/dev/rdsk/c2t5d0s2
AXRR-L detected: Host2 Target6 Serial- S000113 L44X 50:03:07:A8:0A:00:01:13
Device File-/dev/rdsk/c2t6d0s2
GetAttachedDevices: end of search for attached AXRR-L devices...
GetAttachedDevices: found 6 AXRR-L devices.
Executing external instant copy:
# ./axrlutil -D -I s S000103 2 0 0 1 50:03:07:A8:0A:60:01:13
axrlutil v1.00
CheckParam: to evaluate parameter -I ...
CheckParam: Evaluating Instant Copy parameters.. <device> <IC_flag> <IC_Details>
CheckParam: Device ok..
CheckParam: IC_flag ok ..
CheckParam: IC_Details ok..
CheckParam: ’-I Instant Copy’ parameter okay..
axrlutil: Device file of S000103 = /dev/rdsk/c2t2d0s2
SetInstantCopy: instant copy license valid.
SetInstantCopy: instant copy not going on.
SetInstantCopy: Start Instant Copy, SCSI command successful.
QueryInstantCopyStatus: Instant Copy in progress.
QueryInstantCopyStatus: Source Lun 0
QueryInstantCopyStatus: Target Lun 0
QueryInstantCopyStatus: Port 1
QueryInstantCopyStatus: WWPN 50:03:07:A8:0A:60:01:13
SetInstantCopy: success!
Query on Instant Copy Status:
# ./axrlutil -Q i s S000103
axrlutil v1.00
axrlutil: Instant Copy In Progress
146
Rorke Data
CHAPTER 6 - Log files, Passwords, Related-Files
and Others
This chapter shows examples of log files, information on the default password, file names
and purposes of files created by AVC, and other miscellaneous information. If you are in-ahurry, you can safely skip this chapter and take a look at it later when you needed to. But don’t
forget to take a glance first at section 5.2, so that you would know what password to enter before
changing the password to a more secured one.
6.1
Log files
For every event, a log is created. These log files are also rotated when the size exceed
10KB to avoid filling up disk space. Rotation of log files is: avcdaemon.log renamed to
avcdaemon.log01, ... , until avcdaemon.log99, with the oldest log file automatically removed.
6.1.1
Monitor Daemon Log on Monitor Daemon
-------------------------------------------------------------------------------------------------# AVC Monitor Daemon Version 4.07
# Log File
# AVC Monitor Daemon at MonitorDaemon.rorke data.com
Fri Dec 13 2002 08:43:25
started.
Fri Dec 13 2002 08:43:25
Fri Dec 13 2002 08:44:29
Fri Dec 13 2002 08:44:29
Fri Dec 13 2002 08:45:32
Fri Dec 13 2002 09:57:00
Fri Dec 13 2002 09:57:00
Fri Dec 13 2002 09:57:00
Fri Dec 13 2002 09:58:07
Fri Dec 13 2002 09:58:07
Fri Dec 13 2002 09:58:07
Fri Dec 13 2002 10:00:16
connected changed: 1 ==> 0
Fri Dec 13 2002 10:00:16
Fri Dec 13 2002 10:01:23
connected changed: 0 ==> 1
Fri Dec 13 2002 10:01:23
Fri Dec 13 2002 10:05:37
connected changed: 1 ==> 2
Fri Dec 13 2002 10:05:37
Fri Dec 13 2002 10:05:40
Fri Dec 13 2002 10:05:40
Fri Dec 13 2002 10:06:48
connected changed: 2 ==> 1
Fri Dec 13 2002 10:08:09
connected changed: 1 ==> 2
Fri Dec 13 2002 10:11:11
Rorke Data Array Virtual Console - Monitor Daemon v4.07 at MonitorDaemon.Rorke Data.com
(Rorke Data Galaxy HDi) Number of Rorke Data L Model RAID Subsystem monitored: 2
Rorke Data Galaxy HDi IP 192.168.10.199 device connected.
(Rorke Data Galaxy HDi) Number of Rorke Data L Model RAID Subsystem connected: 1
Rorke Data Galaxy HDi IP 192.168.10.189 device not accessible.
0000250 IP 192.168.10.199 (Number of ARRAY Changed): 1 ==> 0
0000250 IP 192.168.10.199 Number of Spare Changed: 1 ==> 0
0000250 IP 192.168.10.199 Disk 1 : Normal ==> Offline
0000250 IP 192.168.10.199 (Number of ARRAY Changed): 0 ==> 1
0000250 IP 192.168.10.199 Number of Volume Changed: 0 ==> 1
0000250 IP 192.168.10.199 Disk 1 : Offline ==> Normal
(Rorke Data Galaxy HDi) Number of Rorke Data L Model RAID Subsystem
Rorke Data Galaxy HDi IP 192.168.10.199 device not accessible.
(Rorke Data Galaxy HDi) Number of Rorke Data L Model RAID Subsystem
Rorke Data Galaxy HDi IP 192.168.10.189 device already accessible.
(Rorke Data Galaxy HDi) Number of Rorke Data L Model RAID Subsystem
Rorke Data Galaxy HDi IP 192.168.10.199 device already accessible.
0000240 IP 192.168.10.189 Array 0 : Degraded Mode ==> Reconstruction Mode
0000240 IP 192.168.10.189 Disk 3 : Replaced ==> Recon
(Rorke Data Galaxy HDi) Number of Rorke Data L Model RAID Subsystem
(Rorke Data Galaxy HDi) Number of Rorke Data L Model RAID Subsystem
0000250 IP 192.168.10.199 Number of Volume Changed: 1 ==> 2
# AVC Monitor Daemon Version 1.14
# Log File
# AVC Monitor Daemon at MonitorDaemon.rorke data.com
Fri Dec 13 2002 10:12:14
Fri Dec 13 2002 10:18:03
Fri Dec 13 2002 10:18:27
New log file created.
"SET SERVER CONFIG" from 127.0.0.1 returned SUCCESS
"SET SERVER CONFIG" from 127.0.0.1 returned SUCCESS
147
Rorke Data
Fri Dec 13 2002 10:35:27
Fri Dec 13 2002 10:35:27
Fri Dec 13 2002 10:41:33
Fri Dec 13 2002 10:43:37
Fri Dec 13 2002 12:54:00
Fri Dec 13 2002 13:08:50
Fri Dec 13 2002 13:09:53
connected changed: 1 ==> 2
Fri Dec 13 2002 13:09:53
Fri Dec 13 2002 13:11:57
0000240 IP 192.168.10.189 Array 0 : Reconstruction Mode ==> Normal Mode
0000240 IP 192.168.10.189 Disk 3 : Recon ==> Normal
0000250 IP 192.168.10.199 Number of Volume Changed: 2 ==> 1
0000250 IP 192.168.10.199 Number of Volume Changed: 1 ==> 2
File avcdaemon.tmp1212000 has been deleted.
Rorke Data Galaxy HDi IP 192.168.10.189 device not accessible.
(Rorke Data Galaxy HDi) Number of Rorke Data L Model RAID Subsystem
Rorke Data Galaxy HDi IP 192.168.10.189 device already accessible.
File avcdaemon.tmp1212001 has been deleted.
-------------------------------------------------------------------------------------------------
6.1.2
Client Log
-------------------------------------------------------------------------------------------------# Array Virtual Console v4.08
# Client Log File
Sat Dec 07 13:08:16 JST 2002
Sat Dec 07 13:08:21 JST 2002
Sat Dec 07 13:08:24 JST 2002
Sat Dec 07 13:09:18 JST 2002
Sat Dec 07 13:09:41 JST 2002
Sat Dec 07 13:09:48 JST 2002
Sat Dec 07 13:10:13 JST 2002
Sat Dec 07 13:10:47 JST 2002
Sat Dec 07 13:11:46 JST 2002
Sat Dec 07 13:12:26 JST 2002
Sat Dec 07 13:12:58 JST 2002
New log file created.
Client disconnects from [192.168.10.41].
Client connects to [192.168.10.40].
SET SERVER PASSWORD for 192.168.10.40 returned SUCCESS
Client disconnects from [192.168.10.40].
Client connects to [192.168.10.40].
ADD ARRAY(Array 6) for 192.168.10.40 returned SUCCESS
Client connects to Monitor Daemon [192.168.10.50].
ADD LUN(Lun 7 of Array 6) for 172.168.10.40 returned SUCCESS
Rorke Data AVC-L Client v4.08 stopped at Machine1/192.168.10.200.
Rorke Data AVC-L Client v4.08 started at Machine1/192.168.10.200.
--------------------------------------------------------------------------------------------------
6.1.3
Galaxy HDi Log
-------------------------------------------------------------------------------------------------AVC SERVER LOG
3/01/14 19:18:03 AVC Server 6.9 started
3/01/14 19:21:14 Drive 1 Completes Recon, Array 0 Enter Normal Mode
3/01/14 19:22:51 Drive 0 Retry, Array 0 Enter Retry Mode
3/01/14 19:25:47 Drive 12 Completes Recon, Array 0 Enter Normal Mode
3/01/14 19:29:42 Array 0 Added
3/01/14 19:29:47 LUN 0 Added in Array 0
3/01/14 19:32:20 Drive 0 Completes Recon, Array 0 Enter Normal Mode
3/01/15 10:03:20 LUN 3 Added in Array 0
3/01/15 10:03:40 LUN 3 Removed from Array 0
3/01/15 13:29:28 LUN 1 Added in Array 0
--------------------------------------------------------------------------------------------------
6.2
Default Password.
The default password for AVC-L Galaxy HDi is “password”.
The default password for the Monitor Daemon is “password”.
148
Rorke Data
6.3
Files created by each module.
6.3.1
Monitor Daemon
6.3.1.1 Monitor Daemon for Linux and Solaris and MacOS.
File:
avcdaemon.pid
Location:
Root directory ( / )
Purpose:
Contains process ID of the avcdaemon program
File:
avcdaemon.conf
Location:
Directory where avcdaemon is installed and run.
e.g. /usr/local/AVC_Daemon/4.6
Purpose:
Holds all information of the configuration of the Monitor
Daemon program, like: notification settings, monitored hosts,
etc.
File:
avcdaemon.log
Location:
Directory where avcdaemon is installed and run.
e.g. /usr/local/AVC_Daemon/4.6
Purpose:
Contains all information such as status change that happens
on the AVC-L Galaxy HDi being monitored by avcdaemon.
Errors that have occured, and if possible, the reason for the
error, interaction with the Client that suggests changes to the
avcdaemon’s operation, etc.
File:
avcdaemon.logXX
Location:
Directory where avcdaemon is installed and run.
e.g. /usr/local/AVC_Daemon/4.6
Purpose:
Contains rotated log files from previous avcdaemon.log.
File:
PeriodicIC.conf
Location:
Directory where avcdaemon is installed and run.
e.g. /usr/local/AVC_Daemon/4.6
Purpose:
Contains Periodic Instant Copy configuration (deprecated)
File:
.avcdaemon.pw (hidden)
149
Rorke Data
Location:
Directory where avcdaemon is installed and run.
e.g. /usr/local/AVC_Daemon/4.6
Purpose:
Contains the encrypted password used to process passwordprotected commands from the Client
6.3.1.2 Monitor Daemon for Windows
150
File:
avcdaemon.ini
Location:
..\winnt
Purpose:
Holds all information of the configuration of the Monitor
Daemon program, like: notification settings, monitored hosts,
etc.
File:
avcdaemon.log
Location:
..\winnt\system32
Purpose:
Contains all information such as status change that happens
on the AVC-L Galaxy HDi being monitored by avcdaemon.
Errors that have occured, and if possible, the reason for the
error, interaction with the Client that suggests changes to the
avcdaemon’s operation, etc.
File:
avcdaemon.logYYYY.MM.DD-HHhMMmSSs.txt
Location:
..\winnt\system32
Purpose:
Contains previous logs when avcdaemon.log reaches 20Kb
size.
File:
avcdaemon.pw
Location:
..\winnt\system32
Purpose:
Contains the encrypted password used to process passwordprotected commands from the Client
Rorke Data
6.3.2
Client
File:
avcclient.history
Location:
in Windows, user’s home directory
e.g. c:\Documents and Settings\User1
in Unix, /etc
Purpose:
Contains the Client-Server Address History File
File:
avcclient.properties
Location:
in Windows, user’s home directory
e.g. c:\Documents and Settings\User1
in Unix, /etc
Purpose:
Contains the Client Property information.
e.g. Client version, Client refresh interval
File:
avcclient.port
Location:
in Windows, user’s home directory
e.g. c:\Documents and Settings\User1
in Unix, /etc
Purpose:
Contains the server address and port history information
File:
avcclient.server
Location:
in Windows, user’s home directory
e.g. c:\Documents and Settings\User1
in Unix, /etc
Purpose:
Contains the client connected server address history file.
File:
avcclient.log
Location:
in Windows, user’s home directory
e.g. c:\Documents and Settings\User1
in Unix, /etc
Purpose:
Contains client log. This file automatically rotates and the old
log file would be named avcclient.log01 and so on.
File:
avcclient.daemon
151
Rorke Data
Location:
in Windows, user’s Home Directory.
e.g. c:\Documents and Settings\User1
in Unix, /etc
Purpose
Contains the connected Monitor Daemon’s IP and their
respective ports for reconnection.
File:
avcclient.daemonhistory
Location:
in Windows, user’s Home Directory
e.g. c:\Documents and Settings\User1
in Unix, /etc
Purpose:
Contains the connected AVC Monitor Daemon History List
with their respective ports
6.4
Temporary files created by each module.
6.4.1
Monitor Daemon
6.4.1.1 Monitor Daemon for Linux, Solaris, and MacOS
File:
avcdaemon.tmpMMDDXXX
Location:
Directory where avcdaemon is installed and run.
e.g. /usr/local/AVC_Daemon/4.0
Purpose:
Created whenever email contents passing to external program
option of event notification is set. This file will be
automatically deleted by avcdaemon after 24 hours.
6.4.1.2 Monitor Daemon for Windows
File:
avcdaemon.tmpMMDDXXX
Location:
..\winnt\system32
Purpose:
Created whenever email contents passing to external program
option of event notification is set. This file will be
automatically deleted by avcdaemon after 24 hours.
6.5
152
Sample Email send from Monitor Daemon in Linux
Rorke Data
6.6 Sample output when enabling “Email Contents Passed to
External Program” with the “notepad.exe” command in Windwos.
6.7 Sample SNMP Trap Messsage in Linux using “snmptrapd”
6.8 Sample SNMP Trap Messages in Windows received using a
free SNMP Manager software
1: daemonEvent notification received from: 172.17.1.64 at 1/24/2003 3:56:42 PM
Time stamp: 120 days 18h:19m:10s.02th
Agent address: 172.17.1.64 Port: 1701 Transport: IP/UDP Protocol: SNMPv2c Notification
Manager address: 172.17.1.64 Transport: IP/UDP
Community: public
Bindings (3)
Binding #1: sysUpTime.0 *** (timeticks) 120 days 18h:19m:10s.02th
Binding #2: internet.6.3.1.1.4.1.0 *** (oid) daemonEvent
Binding #3: daemonEvent *** (octets) (Array Virtual Console Monitor Daemon v4.4 - Windows) Serial Number: B3500053 IP 172.17.1.172 Battery 0 : Normal ==> Fail
153
Rorke Data
2: daemonEvent notification received from: 172.17.1.64 at 1/24/2003 3:57:45 PM
Time stamp: 120 days 18h:19m:10s.65th
Agent address: 172.17.1.64 Port: 1709 Transport: IP/UDP Protocol: SNMPv2c Notification
Manager address: 172.17.1.64 Transport: IP/UDP
Community: public
Bindings (3)
Binding #1: sysUpTime.0 *** (timeticks) 120 days 18h:19m:10s.65th
Binding #2: internet.6.3.1.1.4.1.0 *** (oid) daemonEvent
Binding #3: daemonEvent *** (octets) (Array Virtual Console Monitor Daemon v4.4 - Windows) Serial Number: B3500053 IP 172.17.1.172 Battery 0 : Fail ==> Normal
6.9
6.10
154
Sample content for System Logging in Linux
Sample view for System Logging in Windows
Rorke Data
CHAPTER 7 - Troubleshooting and Tips
This chapter discusses on some troubleshooting procedures and tips - the chapter to
consult when problem happens. Hopefully, you have reached this chapter only because you
want to read the entire user’s manual.
7.1
Loss of AVC-L RAID Subsystem Password
When this event happen, please apply for Customer’s Support written in Appendix A.
7.2
Loss of AVC Monitor Daemon Password
Steps to do for restoring AVC Monitor Daemon password to the default:
(1)
Stop the Monitor Daemon, if it’s running.
(2)
Delete the Monitor Daemon password file corresponding to your platform (please
refer to chapter 5 for the location of the password file - avcdaemon.pw).
(3)
Restart the Monitor Daemon, and you will now have the default password.
155
Rorke Data
7.3
Errors Displayed on Client
The following are common errors that may be encountered when running the Client:
Error Message
Reason/s For The Error
Things You Can Do
Invalid Command From
Client
• AVC-L Galaxy HDi or the Monitor
Daemon did not understand the command
given by the client.
• This usually happens if there was an
error in the transfer of the command from
client to the receiving module.
• This error may also be due to the use of
different versions of client with the
receiving module.
• This is a rare error. If this happens,
please retry the command. If the error
continues to occur, please check if you have
the valid version of the Client with the
receiving module.
Invalid Command
Parameters
• This usually happens if there was error
during transfer of the command or when an
invalid parameter is send along with the
operation.
• Repeat the operation and verify that you
have the parameters set correctly.
RAID Subsystem not
Running
• The Client was not able to successfully
connect to the Galaxy HDi
• This might happen also during regular
scan interval
• Check if the Galaxy HDi IP and port
number is set correctly.
• Make sure that the Galaxy HDi is up and
running normally.
Daemon not Running
• The Client was not able to successfully
connect to the Monitor Daemon
• This might happen also during regular
scan interval
• Check if the Monitor Daemon IP and
port number is set correctly.
• Make sure that the Monitor Daemon is
up and running normally.
No response from
[hostname] or No response
from [IP Address]
• Request for connection to the given
hostname or IP address failed.
• This is caused if hostname does not
exist, or IP address can’t be ping’ed in the
network.
• Make sure the IP you set is valid and can
be ping’ed in the network.
Invalid password
•
The password entered is incorrect.
• Verify that you have the correct
password and repeat the command.
• In case you forgot the password, please
view the sections above on password
recovery method.
Process Timed Out
• Processing of the operation requested
was not finished in the alotted interval.
• This is not a serious error. Just click on
the “Refresh” button to see if the command
was carried out and if not, please repeat the
operation.
Connection to RAID
Subsystem was lost
• Communication between the Client and
the Galaxy HDi did not finish or did not
follow the correct protocol. This may occur
for example if the Galaxy HDi is suddenly
turned OFF in the middle of
communication.
• This is a network-related error. You can
retry the command later. If this error
continues to happen, please restart the
Galaxy HDi and/or the Client.
• If in case the Galaxy HDi was turned off,
the new error message will now be “No
response from [hostname].”
Connection to Monitor
Daemon was lost
• Communication between the Client and
the Monitor Daemon did not finish or did
not follow the correct protocol. This may
occur when the Monitor Daemon is
suddenly turned OFF in the middle of
communication.
• This is a network-related error. You can
retry the command later. If this error
continues to happen, please restart the
Monitor Daemon and/or the Client.
• If in case the Monitor Daemon was
stopped, the new error message will now be
“No response from [hostname].”
156
Rorke Data
The following are common errors that may be encountered when running the Client:
Error Message
Reason/s For The Error
Things You Can Do
Input Read Stream Error
• Communication between the Client and
the other module is suddenly broken.
• This is a network-related error. Just try
to refresh and see if the operation is carried
out. Just repeat again the command.
[hostname] is a Daemon
Server not a RAID
Subsystem
• An attempt to connect to an Galaxy HDi
is made when hostname and port number
specified is not an Galaxy HDi AVC-L
• Verify that you are connecting to the
correct hostname and port number.
Connections to the Monitor Daemon and
Galaxy HDi’s are different.
[hostname] is not a Monitor
Daemon
• An attempt to connect to a Monitor
Daemon is made when hostname and port
number specified is that of a Monitor
Daemon.
• Verify that you are connecting to the
correct hostname and port number.
Connections to the Monitor Daemon and
Galaxy HDi’s are different.
•
•
7.4
Galaxy HDi Status Change
The following are possible status changes of Galaxy HDi. These information maybe logged in
a log file or maybe send out as notifications in email, snmp trap, etc.
Error Message
Reason/s For The Error
Things You Can Do
Instant Copy Status Changed: Failed
• Instant Copy operation
wasn’t successful
Confirm if instant copy source
and target logical units exist and
running.
Array #: [old status] => Degraded Mode
• Array became degraded
maybe because a drive has
failed.
• Replace failed drive.
Array #: [old status] => Reconstruction Mode
• A drive belonging to this
array is undergoing
reconstruction mode.
• No action required.
Array #: [old status] => Retry Mode
• A drive belonging to this
array is undergoing retry mode.
• No action required.
Array #: [old status] => System Halt
• When 2 or more drives
belonging to the array have
failed.
• Confirm if wrong drives
were replaced. If so, power off
and replace drives then power
on.
Spare #: [old status] => Failed
• Specified Spare drive has
failed.
• Replace failed drives.
Spare #: [old status] => Offline
• Spare drive was assigned as
Offline.
• No action required
Spare #: [old status] => Missing
• Spare drive was removed.
• No action required.
Spare #: [old status] => Reconstruction Mode.
• Data reconstruction started
on spare drive.
• No action required.
Spare #: [old status] => Retry Mode
• The specified spare drive is
undergoing retry mode.
• No action required.
Spare #: [old status] => Blank
• Spare drive was assigned as
offfline.
• No action required.
157
Rorke Data
Error Message
Reason/s For The Error
Things You Can Do
Array # LUN #: [old status] => Initialization
Required
• The specified LUN is newly
created and waiting to be
initialized as there is still a
pending LU under initialization.
• No action required.
Array # LUN #: [old status] => LUN Failed
• The specified LU had not
been configured successfully.
• Delete and Initialize the LU
once again.
Disk #: [old status] => Failed
• The specified disk drive has
failed.
• Replace the disk drive with a
new disk drive for it to start
reconstruction.
Disk #: [old status] => Offline
• Specified disk drive was
assigned as offline, or the array
the drive belongs to was
removed.
• No action required.
Disk #: [old status] => Missing
• The disk drive was removed.
• Insert the disk into the drive
to start reconstruction.
Disk #: [old status] => Reconstruction Mode
• Specified disk drive is under
reconstruction.
• No action required.
Disk #: [old status] => Retry Mode
• Specific disk drive under
retry mode.
• No action required.
Disk [disk #]: [old status] => Blank
• Offline disk was removed.
• No action required.
Power Supply #: [old status] => Failed
• Power supply has failed.
• Replace power supply.
Power Supply #: [old status] => Missing
• Power supply is not found.
• Insert power supply.
Fan #: [old status] => Failed
• Fan module has failed.
• Replace fan module.
Fan #: [old status] => Missing
• Fan module is not found.
• Insert fan module.
Primary Controller: [old status] => Failed
• Primary controller has
failed.
• Replace primary controller
card.
Primary Controller: [old status] => Missing
• Primary controller is not
found.
• Insert primary controller
card.
Secondary Controller: [old status] => Failed
• Secondary controller has
failed.
• Replace secondary
controller card.
Secondary Controller: [old status] => Missing
• Secondary controller is not
found.
• Insert secondary controller
card.
Battery Backup Unit #: [old status] => Failed
• Battery module has failed.
• Replace battery module.
Battery Backup Unit #: [old status] => Missing
• Battery module is not found.
• Insert battery module.
Battery Backup Unit #: [old status] => Insufficient
• Battery module is running
low.
• Replace/Calibrate battery
module.
7.5
States of Components/Features
The following are tables for the possible states that the Galaxy HDi components/features may
have. When these states occur, they are included on the messages for E-mail notification and/or
SNMP traps.
158
Rorke Data
Table 1: States of Array, LU, & Spare
Array States Included in
E-mail/SNMP Message
LU States Included in Email/SNMP Message
Spare States Included in Email/SNMP Message
Normal Mode
Initialization Complete
Normal
Degraded Mode
Initialization Required
Fail
Reconstruction Mode
Initialization In Progress
Unknown Status
Retry Mode
LUN Failed
System is Starting Up
LUN Not Configured
System Shutdown
Format Required
System is Not Configured
Format In Progress
System Halt
Preparing to Initialize
Unknown Status
Unknown Status
Table 2: States of HDD, Component, & Instant Copy
HDD States Included in Email/SNMP Message
Component States
Included in E-mail/SNMP
Message
Normal
Normal
Started
Failed
Fail
Copy to External Device Started
Offline
Missing
In Progress
Spare
Low (Battery Insufficient)
Failed Due to Error
Missing
Unknown Status
Cancelled
Recon
Instant Copy Included in
E-mail/SNMP Message
Successfully Completed
Replaced
Retry
Blank
Starting Up
Unknown Status
159
Rorke Data
Table 3: States of LU Mirroring & Battery Calibration
LU Mirroring States
Included in E-mail/SNMP
Message
Battery Calibration States
Included in E-mail/SNMP
Message
No Mirroring
In Progress
Mirrored
Finished
Synchronizing
Failed
Synchronized and Mirrored
Cancelled
Mirror Target Failed
Mirror Target Not Found
Mirror Source Read Fail
Controller Fail
Unknown Status
7.6
Tips (What to do when a problem/warning occurs)
7.6.1 You want to change the default behavior of the Client program upon starting up
Upon starting the Client, it would connect to devices it is previously connected to. To
avoid this behavior, delete all the permanent client files (Please view chapter 5 for the location
of the permanent client files.)
7.6.2 You have lost or destroyed your license.
A quick and efficient way you can do is to contact your distributor.
7.6.3 You are prompted with the following message: (Galaxy HDi connection lost from the
Monitor Daemon)
This message would pop up when the Monitor Daemon fails to connect to one of the
Galaxy HDi. Check the log file of the Monitor Daemon. And check which Galaxy HDi is the
one in problem. Then try to correct the problem.
160
Rorke Data
7.6.4 You are prompted with the following message: (HDD Warning)
This message would pop up when the connected Galaxy HDi’s HDD warning is set. This
warning dialog box would be displayed every refresh. To disable displaying of the warning
dialog, SET the “Do not show this dialog next time”.
The HDD Warning Flag can be verified when the HDD is configured as part of an Array
or as Spare.
161
Rorke Data
HDD Warning means you have to replace your HDD soon to prevent resulting to real
damage. Make sure also you have set the RETRY Limit and RECON Limit to appropriate
values.
7.6.5 You are prompted with the following message: (Client Warning)
This message will pop up when the Client connects to a Server (Galaxy HDi device) with
an old microcode level or to old device models.
162
Rorke Data
Appendix
Appendix A - Customer’s Support
If you have any questions or would like to request for technical support, please contact your
reseller or our support office. Don’t forget to include the following information:
1. Your name, address, contact information, fax, and/or mailing address.
2. The Galaxy HDi’s product name, microcode revision
level, AVC package version.
3. System Configuration (OS Name, OS version, CPU, Memory, HBA, physical
connection setup)
4. The current status or configuration (what time, what happens, current status, a snap
of current status, error message content/details, log files).
5. Filled up Problem Report Form attached in the next page. If possible, attach and
send the AVC log files thru email.
Rorke Data
9700 W. 76th Street
Eden Prairie, MN 55344
952-829-0300
Fax: 952-829-0988
Web Site:
http://www.rorke.com
Support Office:
TEL:
952-829-0300 FAX: 952-829-0988
E-mail:
[email protected]
Office Hour: Mon-Fri 8:00-5:30 (except Saturdays, Sundays, and Holidays)
MEMO
Your reseller’s information:
Company Name
Telephone No.
: ____________________________
: ____________________________
163
Rorke Data
Problem Report Form
1. Date Filed: _________________________________
2. Company and Department Name : ___________________________________
3. In-charge : ___________________________________
4. Postal Code : _________________________________
5. Address : _______________________________________________________
6. Telephone No. : _______________________________
7. FAX No. : ___________________________________
8. E-Mail Address : ______________________________
9. Product Name and Type : _______________________
10. Firmware Revision Level : _____________________
11. AVC Monitor Daemon Version : _________________
12. AVC Monitor Daemon Platform (OS, OS Version, Service Pack level) : ____
_________________________________________________________________
13. AVC Client Version : __________________________
14. AVC Client Platform (OS, OS Version, Service Pack level) : _____________
_________________________________________________________________
15. Platform(s) that the Galaxy HDi is connected to : ____________________
_________________________________________________________________
_________________________________________________________________
16. HBA Name and HBA Connection Configuration with the Galaxy HDi :
_________________________________________________________________
_________________________________________________________________
17. BIOS Level of the HBA(s) Used : __________________________________
18. Device Driver used by the HBA(s) : _________________________________
19. Fibre Channel Switch Model Name(if any) : ___________________________
20. Fibre Channel Switch’s Firmware Revision Level : ______________________
21. AVC Client Log File Attached:
YES:_____ NO: _____
22. AVC Monitor Daemon Log File Attached: YES:_____ NO: _____
23. AVC Server Log File Attached:
YES:_____ NO: _____
21. Problem Symptom : ______________________________________________
_________________________________________________________________
_________________________________________________________________
22. Actions performed before problem occur :
1. ____________________________________________________________
2. ____________________________________________________________
3. ____________________________________________________________
4. ____________________________________________________________
5. ____________________________________________________________
23. Other useful information
_________________________________________________________________
_________________________________________________________________
_________________________________________________________________
_________________________________________________________________
164