1
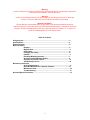
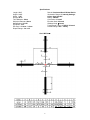
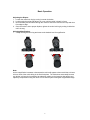
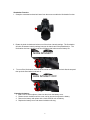
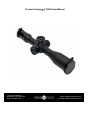
Premier Heritage™ 3-15X50 User Manual
175 Commonwealth Ct.
Winchester, VA 22602 USA
Phone: 540-868-2044
Email: [email protected]
Website: www.premierreticles.com
Warning:
Failure to follow the instructions outlined in this manual could result in the damage or destruction
of the optic, its accessories, and/or bodily injury.
Warning:
Under no circumstances should you look through the optic directly at the sun or laser light
devices. Doing so could result in severe and/or permanent eye damage.
Mounting Hardware:
Premier Reticles recommends that only high quality rings and bases made from steel or
aluminum be used to mount the scope to a rifle and that all manufacturers’ instructions should be
followed. With the articulating lens covers ring height should be no less than .97” to ensure no
contact is made between the cover and the barrel.
Table of Contents:
Design/Layout………………………………………………………………………..………...3
Specifications……………………………………………………………………………...…..4
Reticle Diagram…………………………………………………………………………..….…4
Basic Operation:
Dioption……………………………………………………………….…..….5
Magnification……………………………………………………….……..…5
Illumination………………………………………………………………..…6
Changing the battery………………………………………………….…...6
Parallax…………………………………………………………………..……7
Elevation/Windage Operation………………………………………….…7
Zeroing Elevation/Windage Knobs……………………………………...8
Objective and Ocular Covers…………………………………………..….9
Anti-Reflection Device……………………………………………………..10
Maintaining the Scope:
General Maintenance………………………………………………….……11
Operation/Maintenance in Special Climates…………………………..11
Maintenance Plan………………………………………………………..…..12
Troubleshooting………………………………………………………....….13
Warranty/Repair Information…………………………………………………………….……13
2
Design And Layout:
3
Specifications:
Length: 13.6”
Height: 3.09”
Width: 3.98”
Weight: 38 oz.
Tube Diameter: 34mm
Objective Diameter: 50mm
Magnification: 3X-15X
Eye Relief: 3.54”
Exit Pupil: 11.5mm – 3.5mm
Diopter Range: -3 to +2.5
Reticle: Illuminated Gen 2 Mil-dot Reticle
Illumination Range: 11 Intensity Settings;
6-Hour Auto Shut Off
Battery: CR2032
Click Value: 0.1 mrad
Elevation Knob: 22 mrad
Windage Knob: ±8 mrad
Total Internal Travel: 117 MOA / 34 mrad
Parallax Range: 50m – Infinity
Gen II Mil Dot™
4
Basic Operation:
Adjusting the Diopter:
1. Loosen the ocular lock ring by turning it counter clockwise.
2. Look through the ocular and adjust it in or out until the reticle is clearly in focus.
3. Now look away and look back through the ocular to ensure the reticle is still crisp and clear
from edge to edge.
4. Once the ocular is set to proper dioption, tighten the ocular lock ring by turning it clockwise
until it is snug.
Adjusting Magnification:
1. Grasp the magnification ring and rotate to the desired level of magnification.
LESS MAGNIFICATION
MORE MAGNIFICATION
Note:
As the magnification increases or decreases the reticle will appear to become thicker or thinner,
this is a result of the reticle being in the first focal plane. The reticle does not actually become
any thicker or thinner but it maintains its subtension relative to the image so that ranging and
trajectory compensation using the reticle can be done anywhere along the magnification range.
5
Illumination Function:
1. Grasp the outermost knob and pull away from the scope to enable the illumination function.
2. Rotate the knob clockwise and select one of the eleven intensity settings. The illumination
will shut off between intensity settings however the barrel cannot be pushed back in. The
illumination also has a six-hour auto shut off feature that helps preserve battery life.
MORE INTENSITY
3.
To turn off the illumination rotate the knob counter clockwise until the knob hits the stop and
then push the illumination knob back in.
LESS INTENSITY/OFF
Changing the battery:
1. Use a coin or similar object to insert into the slot on the battery cover.
2. Rotate counter clockwise until the cover can be removed to expose the battery.
3. Remove the battery and replace with a fresh CR2032 coin cell battery.
4. Replace the battery cover and rotate clockwise until snug.
6
Adjusting Parallax:
Parallax is the apparent movement of the reticle against the target caused by the reticle and
target image not being on the same focal plane. When there is no parallax, the user can move
their head slightly while looking through the scope and see no apparent movement of the reticle
against the target. The Heritage™ has a large parallax knob on the left side that will allow the
user to get parallax free from 50 meters to infinity.
To remove parallax, look through the scope towards the target and move the head down slightly,
looking for any movement of the reticle against the target. Follow the instructions below to get
parallax free.
IF THE RETICLE APPEARS
TO GO DOWN, TURN THE
KNOB CLOCKWISE.
IF THE RETICLE APPEARS TO
GO UP, TURN THE KNOB
COUNTER-CLOCKWISE
Operating The Elevation/Windage Knobs:
The elevation and windage knobs are single turn knobs with 0.1 milliradian clicks and a more
tactile “clunk” every ten clicks, there is also a zero stop .5 milliradian below zero. This is done so
that the user can quickly make adjustments with confidence without having to look at the knobs,
even in complete darkness if necessary. When zeroing the knobs the reticle can easily be used
to calculate the correct necessary since both the adjustments and reticle are in milliradian. The
Heritage™ is shipped optically and mechanically centered meaning that the user has equal
elevation and windage travel to aid in zeroing the optic.
UP
DOWN
LEFT
RIGHT
Note: The elevation and windage knobs may feel stiff when first received however the feeling of
the clicks and clunks should improve with use.
7
Zeroing out the knobs:
1. Use a cartridge case or other object to lift the Lever-Lock™ toggle on top of the elevation and
windage knobs.
2. Flip the toggle 180° until the toggle is upside down.
3. Grasp the knob and reset it to zero. While turning the knob it will still have audible clicks and
clunks however there will be no change in zero.
4. Once the knob is reset to zero, flip the toggle back to the upright position.
8
5. Now, attempt to close the toggle. Firm steady pressure should be used to close the toggle
correctly. If the toggle is not in the optimal position then the toggle will not close or it will
require excessive pressure to close. If excessive pressure is necessary to close the toggle,
lift it and turn counter clockwise 1/16th of a turn, then retry. Too little pressure on the toggle
can result in the toggle becoming loose while turning the knob, which can result in no
correction being made despite audible clicks and clunks.
The Articulating Objective and Ocular Covers:
The Heritage™ is available with articulating lens covers that fold completely back and can be
easily configured to open according to the user’s preferences.
9
Removal of the Objective and Ocular Lens Covers:
1. Place the heel of the hand on the face of the cover and use the fingers to pry the edges of the
cover over the ridge on the finish ring.
2. Once the edge of the cover is over the ridge in several places, it should easily come off
exposing the ridge that goes around the finish ring.
Installation of the Objective and Ocular Lens Covers:
1. Place the cover over the ridge on the finish ring.
2. Use the heel of the hand to press firmly against the cover until it snaps into place.
3. Position the cover as necessary.
Installation of the Anti-Reflection Device:
1. Remove the objective cover per the instructions above.
2. Thread the ARD into the threads on the finish ring.
3. Turn the ARD clockwise until snug. Do not tighten beyond hand tight as too much force can
cause the ARD to lock up and potentially damage the ARD when attempting to remove it.
4. While the ARD is in place the objective cover cannot be used, take measures to prevent its
loss or damage.
10
Maintaining The Scope:
The Heritage™ is designed to be a very durable optic built to withstand harsh use, however this
does not mean it is completely maintenance free, follow the steps below to ensure your scope will
stay in good working order.
General Maintenance:
Main Tube:
1. Inspect the main tube for dents, scrapes, and/or gouges that could affect the function of
the scope.
2. Wipe the main tube down with a soft, lint-free cloth.
Moving Parts:
1. Ensure the fit, form, and function of all moving parts by working them several times to
look for any rough movement or lock up.
2. Inspect for broken or missing parts.
3. Use a soft bristle brush to remove dust and other debris from moving parts.
Lenses:
1. Inspect lenses for scratches or nicks to the lens surface.
2. Use a soft bristle, optics-quality lens brush to remove dirt and large particles from the
lens surface.
3. Use a lens pen or optics-quality lens cleaning solution in addition to quality lens paper to
clean the lens surface by using a spiral motion beginning at the center of the lens and
moving out towards the edge of the glass.
4. Remove any residue or streaks from the lens surface using the lens pen or a piece of
lens paper.
Flip Caps:
1. Inspect the objective and ocular covers for damaged or missing parts.
2. Remove the objective and ocular covers and clean with warm, soapy water.
3. Rinse with clean water and allow to air dry.
Anti-Reflection Device:
1. Remove the ARD from the optic and inspect the honeycomb structure for grit, dirt, or
other foreign matter.
2. Blow through the honeycomb to remove any grit, dirt, or other foreign matter present.
3. If necessary run plain water through the honeycomb to clear any debris.
4. Tap the housing lightly on a solid object to clear any excess water and blow through the
honeycomb to dry.
Operation and Maintenance in Special Climates:
Cold Weather:
1. Protect the optic from extreme temperature changes when at all possible. If bringing the
optic into warm room from a cold environment, place a scope cover over the optic and do
not remove the cover until it has reached room temperature.
2. Condensation should be removed using a soft cloth and the optics should be dried using
a cleaning cloth or lens pen.
3. At low temperatures the moving parts and knobs can become stiff and difficult to move.
Rotate them repeatedly to loosen them up and turn more freely. If moving them
repeatedly does not correct the problem use a piece of cloth to rub the parts to build
friction and slowly warm the parts. Avoid warming the optical components quickly and
with too much heat, doing so can cause damage. Do not breathe on the glass
components to warm them up.
11
Arid Weather:
1. Protect the optic from dust and sand, this means all moving parts and glass
components. Failure to do so can cause permanent damage to lens coatings and
the possible failure of moving parts from the build up of sand and grit.
2. Keep rubber parts flexible by rubbing them with talcum powder.
Humid Weather:
1. High humidity and salty environments will enhance corrosion.
2. Inspect the optic often for corrosion damage and service accordingly.
Maintenance Plan:
Item
Component
Inspection
1.
Main Tube
2.
Lenses
3.
Lens Covers
4.
Battery
5.
Battery Cap
6.
Diopter,
Elevation/Windage
Adjustment, Parallax, and
Illumination Control
Damage,
Cleanliness
Damage,
Cleanliness
Damage,
Cleanliness
Performance,
Leakage
Damage,
Function
Damage, Fit, Form, and
Function
12
When?
Before/After
B/A
B/A
B/A
B/A
B/A
B/A
Troubleshooting Chart:
Problem
Reticle will not illuminate.
Cause
Weak/Dead Battery.
Corrective Action
Change CR2032 battery.
Reticle will not focus.
Damaged illumination band.
Diopter not adjusted properly.
Spots on the reticle or in the
field of view.
Target will not focus.
Dirt or other material on the
reticle and/or internal lenses.
Parallax not adjusted properly.
Return for repair.
Adjust diopter per instructions
and secure lock ring.
Return for repair
Magnification will not change.
Lever-Lock™ toggle will not
open.
Loose internal lens.
Power adjustment ring locked.
Too much pressure on the
toggle when closed.
Return for repair.
Return for repair.
Lift the toggle carefully if
possible to prevent damage
and reset per the instructions.
Toggle damaged.
Lever-Lock™ toggle not
tightened properly and has
become loose during knob
operation.
Return for repair.
Tighten the Cam Lock toggle
to the proper tension per the
instructions.
Elevation and/or windage will
not track properly.
Lenses fog internally and/or
moisture on internal lenses.
Lens covers will not open or
close properly.
Scope tube bent and/or
otherwise damaged.
Adjust parallax per
instructions.
Damaged elevation or
windage knob or damaged
internal components.
Failed o-ring seal.
Return for repair.
Return for repair.
Covers are not seated
properly.
Seat the covers over the ridge
per the instructions.
Damaged covers.
Improper mounting.
Replace lens cover.
Return for repair.
Dropped.
Other hard impact.
Warranty/Repair:
The Premier Heritage™ is backed by a lifetime warranty. If there is a problem with your scope that
requires repair or replacement of a component that goes beyond what is outlined in this manual
contact us. DO NOT attempt to repair anything outside of what is outlined in this manual.
Premier Reticles Ltd.
175 Commonwealth Court
Winchester, VA 22602
Phone: 540-868-2044
Fax: 540-868-2045
Email: [email protected]
Website: www.premierreticles.com
13
14