1
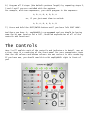
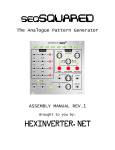
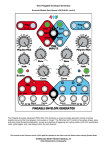
seqSQUARED
The Analogue Pattern Generator
USER MANUAL REV.1
Brought to you by:
hexinverter.net
Introduction
ABOUT THIS MANUAL: Anywhere you see text coloured like this indicates a
hyperlink! Click it to go to the corresponding page/website!
Greetings! Thank you for your interest in/purchase of seqSQUARED. It is my
hope that you find whatever creative tool it is you are looking for in this
design of mine.
Check out the QUICK START GUIDE for getting up and running fast!
This project was made possible through the excellent online synth DIY community and their trustworthy attitudes. As project funding was acquired
through pre-orders, it would not have been possible without the support of
everyone that committed to pre-ordering. Thank you for making this happen!
This is the user manual for this project, and will walk you through how to
use seqSQUARED. It will also detail its technical ability. You can find the
ASSEMBLY manual at the hexinverter.net project site if you are building
your own module.
If I have not explained everything you wanted to know about the module
here, and you have read the entire manual, my apologies for wasting your
time. Please email me at: hex[at]hexinverter.net or visit the Muffwiggler
forum and we will resolve your issue!
Frequently Asked Questions
Here I will answer some of the most commonly asked questions. Please read
through all of these before contacting me with questions!
Will it sync with my other modules?
Do your sequencers synchronize to your other modules? Then, yes. seqSQUARED will sync to your sequencer/s, so if your sequencers are synced,
seqSQUARED will work with them as well!
seqSQUARED takes a positive clock pulse (0->5V) as clock input, and is
intended to be clocked from the same signal driving your sequencers. Each
time your sequencer steps, seqSQUARED’s clock indicator LED flashes, showing you that it is counting the steps until it switches to the next sequencer.
What makes it different from any other
sequential switch on the market?
Imagine four 8 step sequencers plugged in. Let us call them Sequencer A,
B, C and D.
Most other sequential switches can only switch incrementally. ie: A, B, C,
D, A, B, C, D...and so on. They usually only have as many steps as they
have inputs (ie: 4), and just rotate between the inputs. They also only
process one type of input at a time (thus, you need TWO switches to switch
CV and Gate)
The really fancy ones let you select which input is active via CV (ie:
1.00V = A, 2.00V = B, etc.)
seqSQUARED can be any pattern you want. You can very quickly program it to
go (for example):
A, A, A, B, A, B, C, D, A, C, B, D,...and so on. Up to 32 STEPS LONG!
If you have ever used Fruity Loops or another pattern-based editor you can
probably see the potential usefulness of this module already!
It also sports a feature called “Chaos” which allows you to introduce a
percentage change of adding some musical variation when a note sounds.
Can I use the CV/Gate inputs for switching other
things?
Yes, you most certainly can! While labelled “CV” and “Gate”, the two inputs are actually just independent analogue switches. You could switch two
separate channels of gate signals, and no CV, for instance.
You could technically switch between different signals of any type. LFOs,
random voltage generators, etc. You could also use audio, although, that
isn’t particularly recommended as the multiplexer chip used isn’t really
designed to handle audio. It might not sound that great, but, feel free to
experiment. One thing to note is that the input cannot process negative
voltages. Because it is designed to multiplex sequencers, which typically
only produce positive-going control voltages, it will simply clip any negative voltages and they will not come out the other end.
Is it easy to build?
Assembling your own seqSQUARED is not terribly hard, but it is definitely
not a beginner’s project. Read through the ASSEMBLY MANUAL and see if it
seems doable, yourself.
When I plug in two or more sequencers and turn
up the CHAOS control, it doesn’t randomize them
like it should. It just stays on Input A. What’s
wrong?
Have you programmed in a pattern yet? seqSQUARED does not know what number
of sequencers to randomize between until you have used them in creating a
pattern, so, when it first starts up it only sees Input A!
If you want to use seqSQUARED to simply randomize between 2 or more inputs
non-stop, you can do that! No problem -- make a pattern only one step in
length, and set that single step to the last input you have filled with a
sequencer. For example, if I had 3 sequencers plugged in only, I would set
that one step to Input Source C. If I had 4 sequencers, I would set it to
Input Source D. Get it? :)
Features
Technical Attributes
- Runs at +/-12 or +/-15V DC without modifications
- 50mA @ +12V, 30mA @ -12V. 15V is expected to be a little more.
- Internal 5V regulator means no 5V supply needed
- Eurorack compatible design
- Analogue user interface (potentiometers and LEDs instead of encoders and
LCDs)
- Switch inputs respond to 0 to 5V
- CV and Gate inputs respond to 0 to 5V
- Clock input responds to 0 to 5V
Switch Features
- Two programmable 4-to-1 channel analogue switches (CV and Gate)
- User defined switching pattern via a simple user interface
- User definable pattern up to 32 steps in length
- Internal clock divider with sequencer length user programmable
- Easily select between common sequencer lengths with Divide control (1,
4, 8, 16, 32)
Other Features
- Chaos feature introduces a percentage chance on each clock-pulse that
the switch will grab a random sequencer’s CV and Gate instead of the one
that is programmed
- Both Divider and Chaos controls are voltage-controllable
Quick Start
The Main Idea
The intended use of seqSQUARED is to generate complex sequences from basic
sequential voltage sources. At a basic level, you can use it to simply expand multiple, shorter length sequencers into sequencers of longer length.
You could, for example, take four 16-step sequencers (let’s call them A,
B, C and D) and make them into a 64-step sequencer by programming in a 4
length pattern of: A, B, C, D.
This is the most basic use of seqSQUARED.
What really makes seqSQUARED unique is the ability to go beyond that, and
generate more musically interesting structures of sequence combinations.
With those four sequencers, you can now program something interesting,
like:
A, B, C, D, A, A, B, B, etc...
With up to 32 steps in length, you can program quite a few bars of patterns, depending on your sequencer length and song timing.
If you have ever used pattern bank based editing software, you may be familiar with this concept. ReBirth, Reason, Fruity Loops and many other
popular programs have used this concept for ages.
This served as my main inspiration for creating this module.
Your First Patch
The front panel of seqSQUARED is designed to (hopefully) be intuitive
while patching your system with it.
I recommend starting with a simple patch to begin to understand the module. You will need:
seqSQUARED
Two to four sequencers of any length
A clock source for/from those sequencers
Some sort of voltage controlled voice
Let’s get started!
1.) Set your sequencers and seqSQUARED up so they are both clocking off
of the same clock source. You should see the “CLOCK IN” indicator on
seqSQUARED blinking with each clock pulse. If this light is not blinking,
your clock source is not working.
2.) Plug one sequencer’s Gate and CV outputs into one of seqSQUARED’s input channels (ie: channel A)
3.) Repeat with a new channel for your other sequencer/s
4.) Turn the DIVIDE control to set to your shortest sequencer’s length (or
the closest value to it)
5.) If your sequencer/s have a reset output, plug it into seqSQUARED’s RESET IN jack.
6.) Reset your sequencers and seqSQUARED. They should now be in sync.
7.) Plug the outputs of seqSQUARED into something that makes sound.
Your first patch is complete. Now, go to the next section and program it!
Programming Your First Pattern
1.) Enter EDIT MODE by pressing and holding the EDIT/ENTER button until
the EDIT MODE indicator lights up solid, showing you are in EDIT MODE.
2.) Move the PAGE control fully to the left. Neither of the PAGE indicators should be lit, indicating (based on the legend) that you are on the
first page of editing.
3.) Move the STEP control, noting that the cursor moves around on the
step display. Note also that INPUT A’s indicator is solidly lit for all 8
steps. This is the default when seqSQUARED is powered up. Select a step
that you wish to program to something other than INPUT A, using the STEP
control.
4.) Move the SOURCE control. The cursor for the SOURCE control is a blinking indicator. The currently assigned input for that step is shown with a
solidly lit indicator. Select a desired input source for the step you are
on.
5.) Press the EDIT/ENTER button quickly to write the step to the pattern.
A step write animation plays on the step display, and the input indicator
switches to the input source you have programmed by solidly lighting that
indicator.
6.) Program all 8 steps (the default pattern length) by repeating steps 2,
3 and 4 until you are satisfied with the pattern.
For example, with two sequencers, you could program in the sequence:
A, B, A, B, A, B, B, A
or, if you just want them to switch:
A, B, A, B, A, B, A, B
7.) Press and hold the EDIT/ENTER button until you have left EDIT MODE.
And there you have it. seqSQUARED is programmed and you should be having
some fun by now. Read on for a full, detailed explanation of all of the
controls and functions!
The Controls
Here I will explain each of the controls and indicators in detail, one at
a time. Here is a rendering of the front panel for your convenience. Note
that the LED colours and button colours are not correct in this rendering.
If you have one, you should read this with seqSQUARED right in front of
you!
Step Display (LEDs 1-8)
This displays the currently playing step in the pattern, as well as plays
animations for when writing steps and performing other tasks.
Input Display (LEDs A-B)
This displays what input source is currently being routed to the output.
CLOCK IN
This is the heart of seqSQUARED. Without it, it will not count the steps
as they happen and will not advance steps (well, unless you press the STEP
button yourself of course). This input accepts 0 to 5V clock signals.
RESET IN
Plug a positive logic signal into this input (5V), and seqSQUARED will reset to the beginning of the pattern. This is used to keep sync with your
sequencers and other modules.
EDIT/ENTER Button
Pressing and holding this button will toggle EDIT MODE.
Pressing this button quickly while in EDIT MODE will write the step to
pattern memory.
RESET Button
Pressing this button will reset seqSQUARED to the beginning of the
pattern.
STEP/MULT Button
Pressing and holding this button will toggle MULTIPLIER MODE.
Pressing this button quickly while in EDIT MODE will set the presently
selected step’s position as the total PATTERN LENGTH.
Pressing this button quickly while in SEQUENCE MODE will advance the
pattern by one step.
STEP Control
Turning this knob moves the cursor on the Step Display in various modes
SOURCE Control
Turning this knob moves the cursor on the Input Display in various modes
PAGE Control + Indicators
While in EDIT MODE, turning this knob will change the PAGE of steps you
are editing. The indicators represent the page you are on. Refer to the
legend to determine which page is presently displayed.
There are 4 pages at 8 steps each, for a total of 32 possible steps.
DIVIDE Control + CV Input
Turning this knob allows you to quickly set the amount of steps seqSQUARED
is to count before advancing to the next step in the pattern. Effectively,
it allows you to program in the length of your sequencers being used. If
you wish to use an external clock divider, set this to 1.
Note that when you have programmed in a custom multiplier for the clock
division (by entering MULTIPLIER MODE) the DIVIDE control is part of the
multiplier calculation. ie: it will multiply by either x1, x4, x6, x16 or
x32. For more information, see the section on MULTIPLIER MODE.
The CV input provides a way to control this parameter with a 0 to 5V signal.
CHAOS Control, Indicator + CV Input
As you rotate the CHAOS control further to the right, it increases the
percentage chance that when a clock signal is received (ie: when your sequencers sound a note/gate), seqSQUARED selects a RANDOM sequencer’s data
instead of the one you have programmed. It could be the one you have programmed, depending on the random selection.
When the CHAOS event happens, the CHAOS indicator lights up.
When you program your pattern into seqSQUARED, it automatically determines
(based on what inputs are present in the pattern, ie: A, B and C, but not
D) what sequencer inputs you are using. This means that it will only randomize between 3 of them, if you have only used three in your pattern.
This prevents it from occasionally selecting sequencers without any inputs.
Still not clear? Here’s an example. Let us say you only have two sequencers plugged in, but you want to introduce some chaos function into them.
When the random sequencer is picked, if seqSQUARED had no way of knowing
how many sequencers you have plugged in, it would select from sequencer A,
B, C, or D, regardless of whether there is anything plugged in, or not.
This would cause some “blank” notes/gates when an input that isn’t A or B
is selected.
However, seqSQUARED scans the pattern you have programmed and looks at
what the last input you have programmed into your sequence is. This is the
logical breakdown. As you can see, if you were to, say, populate Input
Source A and C, but NOT Input Source B, seqSQUARED would think you have
something plugged into B and would select it sometimes when generating a
random input source. In this way, you can trick it into injecting blank
notes sometimes, which could be very interesting :)
Here is how seqSQUARED thinks on this matter when scanning the pattern,
for your reference, and creative abuse:
Is Input D Present in the pattern? If yes
If not...
Is input C present in the pattern? If yes
If not...
Is input B present in the pattern? If yes
If not...
There is only one sequencer
= 4 sequencers to choose from.
= 3 sequencers to choose from.
= 2 sequencers to choose from.
to choose from.
CV OUT + GATE OUT
It probably comes as no surprise to you that these outputs pass their
respective active input’s signal out. While labelled “CV” and “Gate”, they
are actually interchangeable. Feel free to use both for Gate, or both for
CV...as you please!
Programming Modes
SEQUENCE MODE
This is the mode seqSQUARED is in on a fresh power-up. In SEQUENCE MODE,
seqSQUARED shows the indicator advancing from left to right through the
steps, and their corresponding Inputs as they are selected. This mode is
ALWAYS running in the background, no matter what you are editing at the
time. In this way, the module continues to run even when you are editing a
pattern.
EDIT MODE
EDIT MODE is where you program your pattern of sequences into seqSQUARED.
EDIT MODE is also where you set the length of your pattern.
EDIT MODE is accessed by pressing and holding the EDIT/ENTER button until
the EDIT MODE indicator is lit. To leave EDIT MODE, you press and hold the
EDIT/ENTER button until the indicator is no longer lit. You are then back
in SEQUENCE MODE.
MULTIPLIER MODE
MULTIPLIER MODE is where you program the clock divider for odd, or longer
than 32-step sequencers. It is somewhat cryptic but is easy to understand
once you’ve used it.
To enter MULTIPLIER MODE, from SEQUENCE MODE, you press and hold the STEP/
MULT button until the EDIT MODE indicator begins to blink.
Your cursor for the Step and Input displays become inverted when in
MULTIPLIER MODE. That is, your cursor is now the LED that is NOT lit. To
program the division, you have to do some basic math:
Division = Step Display x Input Display x DIVIDE Control
For example, if you were using 64 step sequencers, you could choose:
8 x 1 x 8 (because 8 x 8 = 64)
...you would then (while in MULTIPLIER MODE), set the STEP control to 8,
the SOURCE control to 1, and the DIVIDE control to 8.
Note that for the SOURCE control, the corresponding Input Display integer
is relative to the character’s position in the Alphabet. That is:
A
B
C
D
=
=
=
=
1
2
3
4
...so, in the example, you would set the SOURCE control to A.
The result is written as soon as you enter MULTIPLIER MODE. There is no
need to push a button to write it to memory.
Programming a Pattern
Programming Steps in EDIT MODE
All step programming is done in EDIT MODE. The SOURCE and STEP controls
are rotated to select the Input Source and step you wish to edit. A step
is written to the presently selected Input Source by pressing the
EDIT/ENTER button quickly.
The user selects through the pattern, editing the steps they wish to edit,
until the desired pattern is programmed. The pattern changes take
effect the moment the step is written by pressing the EDIT/ENTER button.
For a step-by-step example, read the QUICK START section of this manual.
Programming patterns longer than 8 steps
seqSQUARED can handle a pattern of up to 32 steps in length. These 32
steps are divided into 4 pages of 8 steps each. When seqSQUARED is first
turned on, the pattern length is set to 8 steps.
To change the pattern length, the step length is selected by navigating to
the PAGE and STEP on that page that is the desired final step in the
pattern. the STEP/MULT button is pressed quickly and a write animation is
played. The new pattern length is written to memory and effective
immediately. As it plays back your pattern, you will notice that the page
now “turns” as you step past the 8th step into the other pages of the pattern, if the pattern length is longer than 8 steps.
Some Patch Ideas
Now that we have examined how to use seqSQUARED, I thought it would be fun
to give you same patch ideas that may hopefully help to inspire you to be
creative!
A Touch of Random
Probably the most practical use of the CHAOS control is to load some inputs with sequences of similar composition and introduce some random
probability into the mix. For example, program a duplicate bassline on two
sequencers, but then change one of the sequencers from that base pattern
and put some “fill” notes and variation in it. Now, program seqSQUARED
to have a pattern containing the base sequence, with the variated sequence
occuring only every 4 steps or so (ie: A, A, A, B) but turn up the CHAOS
control a bit. Now, every once in awhile, instead of playing that basic
sequence you’ve programmed in during the A parts, it will throw in a
different note from the other sequencer, or miss a note (if you’ve turned
some steps off).
A Touch of...Nothing
This is a variation on the above setup, but, in this case, you set up your
inputs as follows:
Input A: Nothing plugged in
Input B (and above): Your inputs
Now, you program a sequence something like: B, B, B, C, B, B, B, C - or,
whatever inputs you have setup. The idea is to not include input A in your
pattern.
Now, you have a bank of “OFF” notes in A.
Turn up the chaos control just a bit, and every once and awhile,
seqSQUARED will now drop gates/CVs instead of playing them!
LFO Crosstalk
Have some sequencers plugged into one or more of your inputs, but then
plug an LFO into another input. Now, you can switch between LFO modulation
and a sequential pattern. This could be really interesting for pitches.
These are just some ideas. Experiment!