1
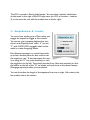
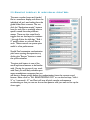
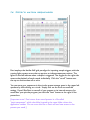
petri
Generative Sample Player & Sequencer
www.sineqube.com © 2011
Petri is a sample player that generates its own sequences and selects up to eight
random samples from a folder of your choosing. But more than simply creating
randomized patterns, Petri uses a series of probability algorithms that respond to
however sparse or dense you would like the sequences to be, simply by dragging a
slider. If you prefer, all randomization can be turned off, and Petri can instead be
used as a traditional sample player with sequences input by hand using a familiar
8x8 matrix editor. Petri is very simple to use and includes mouse-over hints
throughout the interface. This guide will walk you through the
main parts of the program and get you up and running quickly.
(If you want to dive into Petri as fast as possible, click the question mark
icon in the lower right hand corner of Petri and follow the Quick Start
Guide. For more detail, read on ...)
I. Setup
To begin, first click on “Audio setup” and make sure your audio driver has been
selected. If you’re just using the built-in audio in Mac OS X, select “Core Audio
Built-in Output”. Next, locate a folder on your hard drive filled with samples in aif
or wav format that you would like Petri to use as its source material to generate
new sequences. (A set of samples, “Petri electro samples” is provided in the Petri
application folder for testing purposes).
You can load samples in three ways:
• Drag and drop a folder directly
onto the folder icon
• Click on the “Load sample folder”
button and a dialog will be presented
asking you to navigate to the desired
folder
•Choose “Load sample folder” from
the Samples menu in the menu bar.
Petri will then populate its menu system with the files inside the folder. Insure
that the “power” button is toggled on, or you won’t hear any sound once you
engage the sequencer. Stereo is the default setting, but you can toggle the “stereo/
mono” button on to work with mono
files as well.
Individual volume and pitch control for
each of the eight loaded samples are
accessible underneath the
oscilloscopes and level meters. You
can reset the pitch of the samples with
the aptly-named “Reset” button above
the pitches multislider. Finally, master
volume control is located to the right.
Underneath the volume, pitch, and
master controls is Petri’s filter
system. Lowpass, highpass,
bandpass, bandstop, and resonant
selections are available, and the
resonance level is adjustable via
the number box in the upper right.
You can sweep the filter manually
with your mouse, or let Petri
automate the filter using a triangle
LFO or two random LFOs, coupled
with the range slider beneath the filter graph. Random 1 selects new values from
anywhere within the selected range, and Random 2 utilizes a “drunken walk”
randomization, where new values are selected near each previous value.
The LFO is synced to Petri’s global tempo. You can select rhythmic subdivisions
via the menu to the right of the LFO type menu (no LFO, tri, random 1, random
2), or fine tune the rate with the number box at the far right.
II. Sequencer & tempo
You won’t hear anything out of Petri unless you
engage the sequencer toggle in this console.
You can use your computer keyboard to turn
this on and off quickly with “shift + S” (or just
“S” with CAPS LOCK engaged) which can be
useful to create live gating effects.
Petri features tap tempo or manual input with
up to four decimal places for fine control over
the sequencer rate. To use tap tempo, first turn
it on using the “U” key (case-sensitive), or click
the toggle box to the left. Then simply tap the H key (also case-sensitive) or click
the button to the left of the “H” on screen until you arrive at the desired tempo.
Disengage tap tempo when you are finished.
You can also adjust the length of the sequence from one to eight 16th notes in the
last number box in this section.
III.Sample display & individual control
The next console shows each loaded
file in a waveform display, and allows for
individual .aif and .wav loading from the
global folder Petri accesses. You can
click the “Randomize sample” buttons
here for each file, or manually select a
specific sound from the pulldown
menus. There are also mute & solo
toggles that are hot-keyed to numbers
1 through 8 plus the shift key. “Shift +
0” quickly mutes or solos all files at
once. These controls can prove quite
useful in a live performance.
Should Petri’s extensive randomization
yield some syncing discrepancies, try
clicking the “Resync” button to reset
the synchronization.
The giant pink button is one of the
more important features to be familiar
with. During the course of your work
with Petri, you will likely stumble upon
many serendipitous moments that you
will want to freeze quickly before any randomization loses the current sound
forever. Either click on “ALL RANDOMIZING OFF” or use the hot-keys, “shift +
X” or “command + X,” and Petri will stop all pitch, sample, and sequence
randomizing so that you can use the current pattern until you want to fire up the
chaos again.
IV. Petri’s matrix sequencer
Petri employs the familiar 8x8 grid paradigm for inputting sample triggers, with the
running lights system across the top portion to indicate sequence position. The
lights on the left indicate when a sample is triggered. The toggles on the right side
reverse the playback of each sample individually. Click the “rev all” button near
the top to reverse them all at once.
You can store your sequences in the circular preset storage space in the upper left
quadrant by shift-clicking on a circle. Simply click on the circle to recall the
setting. If you’d like Petri to save all of your presets to its internal memory for
recall after you quit the program, just click the “Save” button to the right of the
preset box.
[Important note! Petri stores these saved presets in a file called
“petri.maxpresets” which should be located in the same folder where the
application resides. Do not move this file or Petri will not have access to the
presets you saved.]
V. Randomization -- the heart of Petri
This is likely where you will expend most of your mouse clicks. Petri’s primary
function is in providing new sequences of randomly chosen samples played back at
random pitches. You can decide how much control you want to retain over the
sequences created and how much you want Petri to take over. If you want full
control and would like to use Petri like a standard sampler, insure that all of the
sample, sequence, and pitch toggle boxes are unselected, and use the 8x8 grid to
decide where in the sequence you want each individually chosen sample to be
played. But to witness Petri’s full power, engage the bluish toggles and decide
when each new randomization should occur with the number boxes to the right.
Time is measured in quarter notes. Rather than simply filling up the matrix with
random sequences, you can select how sparse or dense you want those sequences
to be using Petri’s probability slider at the top right of the console.
For added insanity, try turning on the “rolls” for a couple of samples, and sounds
will be looped at random times throughout the sequence. A word of caution,
engaging all 8 rolls for every loaded sample at full volume will likely result in
granular madness, depending on the length of the samples you are loading. If
you’ve had enough of the snare rushes and glitchy buzzing, click the “All rolls off”
button to eliminate the looping.
You can tell Petri to choose random lengths from within each loaded sound file as
well, and set a percentage of the file that should be played via the “sample time %”
number box. This is especially useful if you load samples with long reverb tails or
dead space and want Petri to just use a portion of the file. Select a rate for Petri’s
internal sine LFO that modulates the start time of each file playback with the
number box to the right.
VI.Samples menu
Several functions are also available via the menu bar under the Samples heading.
They are as follows:
• Load a new sample folder (command + F)
• Randomize samples (command + J)
• Randomize sequence (command + K)
• Randomize pitch (command + L)
• All randomizing off (command + X; shift + X)
VII.Recording to disk
Petri provides simple and straightforward recording to hard disk. First set the
audio record path by clicking on the appropriate button at the top left. Click the
toggle to start recording and the elapsed time will be displayed in the number box
at the bottom left. Recording will continue until you click the toggle box again to
uncheck it or you run out of hard disk space.
VIII. Registering to disable demo mode
Petri is fully functional in demo
mode so that you can try it without
feature restrictions, time limits, or
nag screens. Until you register
however, a two-second sine wave
burst will occur every 30 seconds.
This will be eliminated after
purchasing the program and
inputting your serial code, mailed to
you after receipt of your purchase.
Make sure that you use a
valid email address when you
pay for the program or there
will be no way to send you a
serial code!
Upon receiving the email with your
code, click on the “Register”
button underneath the title box. A
new window will open allowing
you to input the code.
Once this is done, click “Register”
and “Demo mode” should change
to “Authorized” indicating that the
program is fully unlocked, and you
should no longer hear the sine
wave bursts interrupting all of your
amazing creations.
Additionally, you can smile proudly knowing that thanks to you, independent,
quirky development is still alive and well and you have done your part to keep it
going.
Happy creating, and if you culture some spectacular new music with Petri, drop a
line and share your sounds!
IX.Additional notes
• Petri features an extensive hint system on almost every control displayed on the
interface. Hover your mouse over a control to get an idea of what each
parameter does.
• The menu bar is only utilized for the “Samples” selection. Most features are
directly controllable from the main interface window.
• Petri was made with the amazing, all-powerful Max/MSP modular programming
environment. For more information, please visit http://www.cycling74.com
• Sineqube bears no responsibility in regards to the well-being of your computer.
Use the software at your own risk, and leisure.
• I lack the resources to test the program on all possible hardware configurations,
but Petri has run for days on end without crashing on a couple of MacBooks, 2
Ghz and 2.2 Ghz, as well as a Macbook Pro Intel Core 2 Duo 2.26 Ghz.
• Visit www.sineqube.com for more information about Sineqube music, software,
and DIY projects.
• special thanks to j