1
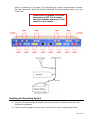
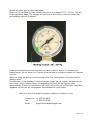
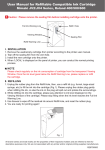
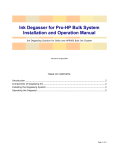
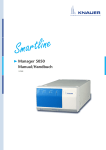
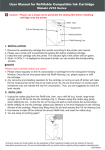
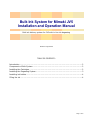
Bulk Ink System for Mimaki JV5
Installation and Operation Manual
Bulk ink delivery system for JV5 with in-line ink degassing
Revised 01 August 2009
TABLE OF CONTENTS:
Introduction ........................................................................................................... 2
Components of Bulk System..................................................................................... 2
Installing the Cartridges .......................................................................................... 2
Installing the Degassing System ............................................................................... 3
Installing ink bottles................................................................................................ 4
Filling the ink ......................................................................................................... 4
Page 1 of 6
Introduction
Bulk system for JV5 is non-invasive solution that allows you to use bottled ink on your
printer. The ink is delivered from the 4 ink bottles with CMYK ink to 16 cartridges. Ink
passes through the degassing unit before it enters the cartridges. A cartridge connects
the ink line to the printer and it provides connection for the Lite-S chip. One chip lasts
approximately 500ml of ink and then needs to be replaced. Each liter of ink requires two
Lite-S chips.
Ink degasser removes dissolved air from the printing ink as it passes from the supply
bottle into the printer. Air-free ink works more stable, will less nozzle outages and
therefore allows higher print speeds, higher print yield with better quality. Principle of
operation: as the ink passes through the degassing unit, it flows along the porous
membrane, the pores of which are sized so that only the gas molecules can pass through
them. A deep vacuum is applied on the other side of a membrane, pulling the gasses out
of the ink.
Components of Bulk System
1. Ink bottles – 4 pcs.
2. Tray for ink bottles.
3. 16 cartridges.
4. Degassing unit.
5. Vacuum pump, AC120V or AC220V.
6. Air tank.
7. Vacuum gauge.
8. Tubing with a check valve on it.
9. 4 hose clamps.
10. Syringe and a needle.
11. Sticky pads and nylon ties.
12.Test chip (optional).
13. Lite-S chips (optional).
Installing the Cartridges
1. Turn your Mimaki off. Remove all cartridges from it.
2. Insert 16 cartridges of the bulk system.
3. Insert the Lite-S chips in the blue connectors at the back of each cartridge. The
black chip must be facing right. The chips must be programmed for HS ink type.
Remember to use correct colors for each cartridge.
4. Turn the printer on. When it boots up, it should recognize all chips. If a chip is not
recognized, remove it (with the printer on) and insert a test chip in its place. The
LED on a test chip should light up. No light means there is no connection to the
Page 2 of 6
printer. Contact us in this case. If you get the light, remove the cartridge. Connect
the chip instead of a test chip. Insert a cartridge. If printer doesn’t read it, you got
a bad chip.
Chips must be replaced only when
the printer is OFF. If you replace
the chips with the power on, it will
result in a chip failure.
Installing the Degassing System
5. Connect the components as shown on the picture above. Make sure all the Luer
fittings are tightened.
6. Using the sticky pads and nylon ties, mount the air tank to the Mimaki frame.
Page 3 of 6
7. Mount the vacuum gauge using the sticky Velcro pad supplied with it. You can
mount it on the side of a Mimaki frame. It must be visible when you activate the
pump.
8. Remove the black cap from the vacuum pump and fill it with pump oil to the fill
line, which is in the center of the round glass window. Close the black cap.
9. Connect the Pump to the tubing and place it on the floor under the air tank. You
will need access to the on/off switch of the pump intermittently to replenish the
vacuum.
10. Connect the Luer fitting of the air tubing to the “Vacuum” port of the degassing
unit. Make sure the other vacuum port is capped.
11. Connect the tubing that goes to the bulk system’s cartridges, to the “ink out” ports
of the degasser.
12. Double-check all Luer connections, making sure they are tight.
Installing ink bottles
Put the tray with 4 ink bottles on top of the degassing unit. Do not expose the sticky tape
on the tray risers.
Connect all bottles to the “ink in” ports of the degasser, making sure the luers are tight.
Peel the liner off the sticky pads on the tray risers and set the tray closer to the back
edge of the degassing unit.
Filling the ink
Before charging the ink into the printer, check if the vacuum will be stable and there are
no leaks in any connections. Turn on the vacuum pump and watch the vacuum gauge. As
the vacuum reaches the level of -27” Hg, turn off the pump. Now the vacuum should
remain fairly stable. Watch for any vacuum changes in the next minute. It should remain
at the same level. If it drops, re-tighten all Luer fittings. Slow leaks will take place
because the degassers are not filled with ink yet.
Release the vacuum by opening one of the caps on the 2nd vacuum port of a degassing
module.
Fill one of the bottles with ink. Do not fill it up completely; otherwise ink will leak from the
place where the tubing enters the bottle.
Remove one of the cartridges from the printer and draw the air out of the ink line with a
syringe. Insert the needle in a rubber seal of the cartridge and draw the air out. When the
ink has filled the ink line completely, remove the syringe. Repeat the same with the other
3 cartridges of the same color. By then, all the ink lines of this color should be filled with
ink. Insert cartridges in the printer.
If you spot any ink leak, you can close
off the ink lines using hose clamps
supplied with the bulk system.
Page 4 of 6
Repeat the same with all other cartridges.
When the ink has filled all lines, create a vacuum in the range of -28”…-30” Hg. This will
be the operating range. The vacuum will slowly drop with time, so check it twice a day
and replenish vacuum if needed.
Please note that the vacuum pump does not have a vacuum sensor. It operates in a
manual mode. Do not leave it on. Usually a few seconds is enough to restore the required
vacuum.
When not using the printer, let the vacuum drop. You need vacuum only when the ink
starts to move.
The efficiency of the degasser is lower when you charge the ink system, because the ink
flow is high. As you keep printing, the degassing efficiency will be high and after
approximately 500ml of consumed ink (per color) the printer will be filled with completely
degassed ink and you will see dramatic improvements in print quality.
With your technical questions please contact your dealer or us at:
Telephone: +1 905 820 8833
Fax:
+1 905 820 8768
Email:
[email protected]
Page 5 of 6