1
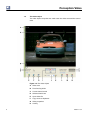
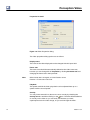
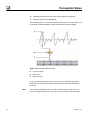
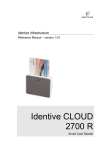
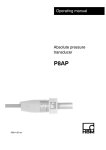
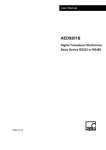
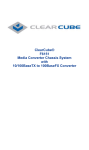
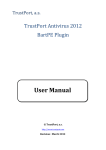
User Manual
English
Video Playback Option
I2694-1.1 en
Perception
Perception Video
Document version 1.1 - July 2009
For Perception 6.04 or higher
For HBM's Terms and Conditions visit www.hbm.com/terms
HBM GmbH
Im Tiefen See 45
64293 Darmstadt
Germany
Tel: +49 6151 80 30
Fax: +49 6151 8039100
Email: [email protected]
www.hbm.com/highspeed
Copyright © 2009
All rights reserved. No part of the contents of this book may be reproduced or
transmitted in any form or by any means without the written permission of the publisher.
2
I2694-1.1 en
Perception Video
LICENSE AGREEMENT AND WARRANTY
For information about LICENSE AGREEMENT AND WARRANTY refer to
www.hbm.com/terms.
I2694-1.1 en
3
4
I2694-1.1 en
Perception Video
Table of Contents
Page
1
Video Playback Option
6
1.1
Introduction
6
1.1.1
How to install the Video Playback option
6
1.2
Adding and deleting video objects
7
1.3
The video object
8
1.4
Setting up video for playback
14
1.5
Synchronized video playback
17
I2694-1.1 en
5
Perception Video
1 Video Playback Option
1.1
Introduction
The Perception video playback option enables synchronized playback of
recorded waveforms and video/audio data streams. This option combines
video with data and synchronizes the video frame rate to the data
acquisition rate. Once synchronized you can scroll back and forth in the
video as well as the data and watch the video and data together as one.
1.1.1
How to install the Video Playback option
The Perception software requires a HASP key. HASP (Hardware Against
Software Piracy) is a hardware-based (hardware key) software copy
protection system that prevents unauthorized use of software applications.
Each HASP key contains a unique ID number used for personalization of the
application according to the features and options purchased. The key is also
used for storing licensing parameters, applications and customer-specific
data.
If you have purchased the Video Playback option as a separate item, you will
receive a personalized "key file". Use this file to unlock the additional features.
You can find the serial number of your key in Help
About Perception
To update the key information:
1
2
3
Choose Help Update Key...
In the Open dialog locate the Key File (*.pKey) and click Open.
If everything is OK you will see the following message:
Figure 1.1: Software copy protection dialog
4 Click OK.
After the installation you can go to Help
see all installed options.
About Perception
More... to
You will need to restart the program before the changes take effect. The
Video Playback option is now available.
6
I2694-1.1 en
Perception Video
1.2
Adding and deleting video objects
A video object can be easily added to a sheet. Once a sheet is ‘full’ you
cannot add a new object. Nor can you replace an object. In such a case you
must delete an object first before you can add a new video object.
Objects are placed in the area that you last clicked or in the last available area.
Figure 1.2: Add object menu (empty sheet context)
To add a video object:
To add an object to a sheet do one of the following:
l
l
l
In the menu bar choose [dynamic menu] ► Add ► Video.
When visible, in the toolbar click the video object button
With a right mouse click in the sheet area call the context menu. In the
context menu select Add ► Video.
To delete a video object:
1
2
3
4
I2694-1.1 en
Select the video object that you want to delete.
Right-click the video object to access the context menu.
In the context menu click Delete Video [name].
In the confirmation dialog that comes up click OK.
7
Perception Video
1.3
The video object
The video object comprises two main areas: the video area and the control
area.
Figure 1.3: The video object
8
A
Video area
B
Time line/Jog slider
C
Current frame/control
D
Selected frame rate
E
Open video file
F
Copy frame to clipboard
G
Video properties
H
Overlay
I2694-1.1 en
Perception Video
I
Playback controls
J
Select link source
K
Activate link
L
Set synchronization point
M Clear synchronization point
N
Go to synchronization point
O
Video time position
P
Display time position
A
Video area This is the area where the video is displayed. When you
resize the video object, or hide the control panel, the video will be
resized accordingly.
B
Position indicator/slider This indicator shows the current position in
time of the video. You can also use this indicator as a handle and drag it
to jog through the data.
C
Current frame
There is a number of inbuilt commands which will be active on mouse
hover or click within the Current Frame field which is underlined with dots.
Figure 1.4: Current frame
The dots - as in other areas of Perception - indicate the presence of
more hidden shortcut functions such as “drag” or “scroll” to navigate
through frames easily.
I2694-1.1 en
D
Frame Rate
Is the number of frames per second which has been set in Properties.
E
Open
Open a video file.
F
Frame
Click this button to save the current frame to the Windows clipboard
ready to paste into a graphics or Office program.
9
Perception Video
G
Properties
Within the Properties dialog you can:
l
Change the Display name of the video
l
Adjust the Frame rate of the video accurately or use the given frame
rate from the chosen file
l
Set the Playback speed of the video up to 8x
l
Add Overlay text of your choice to the video module
H
Overlay
You may insert text and/or a data source as an overlay by checking the
icon. The data will be
Overlay text box and then clicking on the
added as an overlay on the video so you can easily see the data you
need, superimposed over the video image, as you scroll through the video.
I
Playback controls A set of controls, many of which resemble the
playback controls of a VCR or DVD player.
1
2
3
4
5
6
J
10
Go to beginning Click the left arrow to go to the beginning of the
video.
Step frame Use this button to step one frame backward.
Loop Click the Loop button to make the video loop continuously
until stopped.
Step frame Use this button to Step one frame forward.
Go to end Click the right arrow to go to the end of the video.
Play
Select Link source
I2694-1.1 en
Perception Video
K
Link to selected display
After you have selected the desired display from the link box you can
click the Link button which will then Link and synchronize to the
selected display.
Button is up: Not linked
l
Button is down: linked
l
The following is an overview of the Set and Link combination of options.
L
Set
Click this button at the data and video position you want to refer to as
the synchronization point.
M Clear
If you need to choose a new synchronization point or redo a set link
point in the data, make sure you are not linked and then click Clear first.
I2694-1.1 en
N
Go to
When linked, click this button to go to the synchronization point.
O
Video Time position
This displays the time in relation to the current video.
P
Display Time position
This displays the time in relation to the waveform data.
11
Perception Video
Properties in detail
Figure 1.5: Video Properties dialog
The video properties dialog options are as follows:
Display name
The name of the video displayed can be changed with this input field.
Frame rate
The frame rate should be automatically defined to the video frame rate,
however you can change this in Properties by clicking Set frame rate and
changing the frame rate in the input field.
Note
When frame rate is changed, so is the Duration since:
Duration = Frame rate x seconds.
Playback
The speed at which the video plays back can be adjusted here up to a
speed of 8X the normal speed.
Overlay
You may insert text and/or a data source as an overlay by checking the
icon. The data will be added as
Overlay text box and then clicking on the
an overlay on the video so you can easily see the data you need,
superimposed over the video image, as you scroll through the video.
12
I2694-1.1 en
Perception Video
Note
I2694-1.1 en
1.If the overlay needs to be changed, make sure to completely clear the
entry field before choosing a different overlay.
2. Checking the check box Non-transparent background will make the
overlay solid which may cover some of your video image.
13
Perception Video
1.4
Setting up video for playback
To set up the video, you need to set up your sources for data and video, and
define the Set point and video frame rate.
To Open a video
1
Click the Open icon in the Video area and an Open video file dialog will
appear from which you can select a video. You can also go to the
Dynamic sheet menu menu and then go to File and click Open Video
File, the Open video file dialog will appear from which you can select
your video.
Synchronize a Video with Data
Figure 1.6: Synchronization Settings
When a set of data and a video is open you can synchronize them.
Synchronizing allows you to set a synchronization point and match a
different data rate and video rate so you can scroll through data and video
as one
Navigate to a recognizable/trigger point in your video and data and then
click Set under Synchronization. This sets a single synchronization point in
your video and data that you can return to when linked by clicking Go to.
14
I2694-1.1 en
Perception Video
Figure 1.7: A video snapshot of a trigger point
Step by step calibration
Note
1
Make sure you have data available in the display.
2
Click Open to load a video.
3
Select a link source from the drop down box.
4
In the data, go to the point of interest.
5
In the video go to the point of interest.
6
Click Set to store points of interest to memory.
At this point your data and video are still not linked, enabling you to
navigate the data with the cursor and the video with the slider independently.
7
I2694-1.1 en
Click Link to actualize the synchronization.
15
Perception Video
8
Optionally set the frame rate and/or replay speed in properties.
9
Verify link points by clicking Go to.
The following Figure 1.8 shows two different set points, one in the video, one
in the data, and the link button which will link the two points together.
Figure 1.8: Data and video file linking
A
Cursor set point
B
Link button
C
Video set point
In you can see a data stream and a video stream in which the link points
have been set and will be linked and synchronized when the link button is
pressed.
Note
16
Once linked, the Go to button will work for both data and video, also you
cannot change the set point in any way until you unlink the data and video.
I2694-1.1 en
Perception Video
1.5
Synchronized video playback
Once you have a set point and frame rate which have been linked you can
start with synchronized playback.
Playing, rewinding or stepping through the video results in corresponding
cursor movements in the data, tracking the video frames. In addition:
dragging the cursor in the data display results in a corresponding movement
of the video.
Video playback controls:
To play the video do any of the following:
l
l
To play the video click the Play/Pause button.
To pause the video click the Play/Pause button: the video will
stop at the current position.
l
To go to the beginning of the video, click the Go to Start button.
l
To go to the end of the video, click the Go to End button.
l
To go forward one frame, click the Frame forward button.
l
To go backward one frame, click the Frame backward button.
Alternate Video control
Figure 1.9: Current frame
You can navigate in the normal way using the cursor for data navigation or
the video jog slider for video navigation. With the exception that, when
linked, these controls are also linked. Within the current frame field you can
click and drag:
Left to go backwards and right to go forwards in the video.
You can also click once to activate the mouse scroll wheel:
Scroll through the frames quickly and accurately.
I2694-1.1 en
17
Perception Video
Index
A
Add video object .................................................... 7
D
Delete video object ................................................. 7
J
Jog Slider ............................................................... 8
L
License ................................................................... 3
P
Playback controls ................................................... 9
V
Video ...................................................................... 7
Video object ........................................................... 8
W
Warranty ................................................................. 3
18
I2694-1.1 en
Head Office
HBM
Im Tiefen See 45
64293 Darmstadt
Germany
Tel: +49 6151 8030
Email: [email protected]
France
HBM France SAS
46 rue du Champoreux
BP76
91542 Mennecy Cedex
Tél:+33 (0)1 69 90 63 70
Fax: +33 (0) 1 69 90 63 80
Email: [email protected]
Germany
HBM Sales Office
Carl-Zeiss-Ring 11-13
85737 Ismaning
Tel: +49 89 92 33 33 0
Email: [email protected]
UK
HBM United Kingdom
1 Churchill Court, 58 Station Road
North Harrow, Middlesex, HA2 7SA
Tel: +44 (0) 208 515 6100
Email: [email protected]
USA
HBM, Inc.
19 Bartlett Street
Marlborough, MA 01752, USA
Tel : +1 (800) 578-4260
Email: [email protected]
PR China
HBM Sales Office
Room 2912, Jing Guang Centre
Beijing, China 100020
Tel: +86 10 6597 4006
Email: [email protected]
measure and predict with confidence
I2694-1.1 en
© Hottinger Baldwin Messtechnik GmbH. All rights reserved.
All details describe our products in general form only.
They are not to be understood as express warranty and do
not constitute any liability whatsoever.