1
●This guide is intended for users of DOCOMO mobile phones with a DOCOMO UIM Card (or otherwise a FOMA Card or DOCOMO
mini UIM Card. Hereinafter the same applies).
Regarding ●If the SIM lock system of a DOCOMO mobile phone is disabled and a non-DOCOMO SIM card is inserted, the services described in
this guide will not be available. If a DOCOMO UIM Card is used for a non-DOCOMO mobile phone, some of the services described
Use of
in this guide may not be available.
In
guide, the term "FOMA or Xi" refers to a FOMA or Xi handset in which your DOCOMO UIM Card is inserted. *The operational procedures cited
This Guide *in thisthisguide
cannot be used when the phone is out of service range. Android is a trademark or registered trademark of Google Inc. The names and
*
logos of services and products included in this publication are the trademarks or registered trademarks of their respective owners.
*
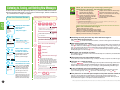
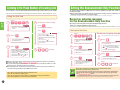
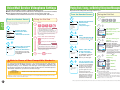
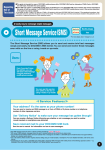
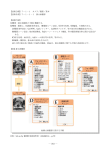
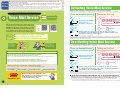
Activating Voice Mail Service
When you first subscribe to Voice Mail Service, this service is activated.
*Except when the Call Forwarding Service is initiated. *You can make calls even while the Voice Mail Service is activated.
DOCOMO holds messages for you when you are not available
Voice Mail Service
Monthly Charge
Required
300 yen (excluding tax)
Using the Dial Pad
1
1
*For more details, refer to "Charges" on p. 26.
Voice mail
Play messages
Activate
Deactivate
Apply
Here
Display the Voice Mail
Service menu,
and select "Activate."
From i-modehandsets
●When your Mobile phone handset is turned off
●When you do not answer the call within the set ring duration*
*You can set the ringing duration from 0 to 120 seconds.
4
1
1
Announcement
Press
to finish.
Select "YES" to activate the service, or "NO" to cancel it.
Voice mail
Activate?
YES
1
"The Voice Mail Service is activated."
2
From smartphones
Press
*The Announcement may differ depending on the setting.
2
(in Japanese
only)
●When radio signals are too weak to connect the call
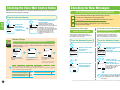
Uses:
From the Handset Screen
Voice Mail
Service
When you are unable to take a call, for instance when you are
out of the service area or when your handset is turned off, the
DOCOMO Voice Mail Service Center will take a voice mail
message for you. Alternatively, an Announcement Only function
is also available, which answers calls with an outgoing
message from you, but does not accept voice mail messages.
Application
NO
A confirmation screen will appear. Select "YES" to activate Voice Mail Service.
After this, the results of your setting appear.
*It is then possible to set the ring duration.
phone is turned on and you are inside the service area, you can still answer your phone after activating the Voice Mail Service at any time until
*theIf your
message is forwarded to the Voice Mail Service Center. *For instructions to use the service with Videophones, refer to p. 21. *For instructions to
"Activate" or "Deactivate" the Voice Mail Service for an additional number under the Multi number service, refer to the Usage and Setting Procedures for
the Multi number on the DOCOMO website (in Japanese only).
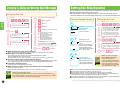
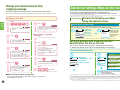
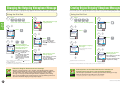
Deactivating Voice Mail Service
Turn off the
power in the
movie theaterno problem.
Inform callers you
are on a long
business trip with
a creative message.
Service Features
Up to 20 voice mail messages can be recorded.
Each message can be up to 3minutes long.
*Up to 20 voice phone and 20 Videophone messages can be saved. Voice mail messages are stored for 72 hours.
If you are using a Videophone-compatible handset,
you can record video messages as well as voice messages.
Please be aware that deactivating Voice Mail is not the same as cancelling the Voice Mail Service subscription.
*The monthly charge applies even when the service is deactivated.
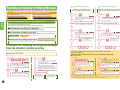
From the Handset Screen
Using the Dial Pad
1
1
Voice mail
Play messages
Activate
Deactivate
Set ring time
*This service is not available with smartphones or some other handset models (refer to p. 21).
Display the Voice Mail
Service menu, and
select "Deactivate."
1
4
1
0
Announcement
"The service is deactivated."
*The announcement may differ depending on the setting.
2
2
Press
Press
to finish.
[With smartphones (only models running AndroidOS)]
Use the following procedure to make the settings.
*Procedures may differ depending on handset.
●From the Handset Screen
Select "Settings."
Select "Call settings."
Now even
more convenient!
Works with
Videophones, too!
1
Select "Network service."
Select "Voice mail service."
Now leave messages with video, too!
With Videophones, you can now leave messages that
include not only voice, but video as well.
For more details, refer to p. 21-25.
Voice mail
Deactivate?
YES
NO
Select "YES" to deactivate the service, or "NO" to cancel it.
A confirmation screen will appear. Select "YES" to deactivate Voice Mail Service.
After this the results of your setting appear.
if Voice Mail Service has been deactivated, you can automatically or manually transfer incoming calls to the Voce Mail Service Center when you are already on the line. See p. 14 and p. 18 for details.
*Even
Various functions such as replaying incoming messages and changing the outgoing message can be performed in the usual manner even when the Voice Mail
*Service
is deactivated. Furthermore, an announcement will notify you if there are new messages waiting when you deactivate the service.
● When Simultaneously Subscribed to the "Call Forwarding Service"
Although the two services cannot be active at the same time, you can have incoming messages recorded at the Voice
Mail Service Center if the Call Forwarding Service is activated and the phone at the forwarding number is busy.
further settings instructions, refer to the Usage and Setting Procedures for the Call Forwarding Service on the DOCOMO website.
*For
*You can record a voice mail message even if the Voice Mail Service is deactivated.
●
The set up procedure may differ depending on the handset. See the user's manual of your handset for details. ● Actual screen may be different.
2
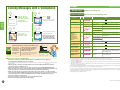
Listening to, Saving, and Deleting New Messages
Listen to new voice mail messages being held for you at the Voice Mail Service Center.
●An announcement will inform you if you have no new messages, and the call will end
(no communications charges are applied).
Using the Dial Pad
1
1
Voice mail
Play messages
Activate
Deactivate
Set ring time
Check setting
Setting
Display the Voice Mail
Service menu,
and select
"Play messages."
One-Point
Advice
Press
1
4
1
7
Play messages
"To listen to this message again,..."
*If only voice messages have been
Play (voice call)
X
Play (videophone) X
received, the screen in Step 3 appears.
2
Press one of the following:
Select "YES" to listen
to new messages,
or "NO" to cancel it.
3
Play messages of
voice call?
A confirmation screen will
appear. Select "YES" to
listen to your messages.
1
(Hear again)
2
(Save)
3
(Delete)
Skip to the next message
Stop the message and return to
the main menu
6 4 will not work if you are listening to the first message. If you perform this operation by accident, press the
twice to return to the previous operation.
This will not work unless the Caller ID Announcement function is activated.
See p. 11, listening to the number of the incoming call.
key
a new message is stored
the number of unread messages changes
●When you contact the Voice Mail Service Center
●When you make a Short Message Service (SMS) inquiry
●When you have an incoming or outgoing call
●When
Announcement
Announcement
9 Jump 5 seconds forward in the message ●When
"This is the 1st (2nd...) message
received at..."
* One of your messages is played.
8 Pause the message (for 20 seconds)
When am I notified of messages?
Announcement
Select
"Play (voice call)× ."
7 Jump 5 seconds back into the message
2
*1
*2
【When there is a new message】
"There are X new messages..."
2
Listen to the message again
Save the message playing
Delete the message playing
3
6 4 Listen to the previous message *1
6 5 Announce the time and date the
message was received
6 6 Announce the number of the caller
who left the message *2
1
Voice Mail
Service
Voice Mail
Service
From the Handset Screen
While you are listening to a message, pressing the
following keys performs the following operations:
● Checking to see if you have any voice mail messages in
the Voice Mail Service Center
1 4 1 7 to call the Voice Mail Service Center, or check for messages from the menu, etc.
Press ● After playing back messages
Press 2 to save the message, or 3 to delete it. If you do not perform either of these operations, the
message is treated as a new message. For example, if while listening to a message you hang up or
press # to play back the next message, it will remain in the Voice Mail Service Center as a new
message. The next time you press 1 4 1 7 to connect to the message center, the same message
will be played again as a new message.
● Messages are saved for 72 hours.
(Hear the next message)
Voice mail messages are saved for 72 hours from the time they are recorded. They are deleted after
72 hours have elapsed.
● The center can save up to 20 messages.
YES
NO
1
2
You are connected to the
Voice Mail Service Center.
4
[ Calling ]
Play messages
1417
3
You are connected to the DOCOMO
Voice Mail Service Center, and new
messages are ready to be played.
During this time, "Play messages"
and "1417" appear on the screen.
↓
Follow the instructions in the
announcement to listen to your voice
mail (See "Using the Dial Pad" in the
following section for instructions on
what to do after the announcement).
3
→Listen to the message again
→Save the message. An announcement
will state: "Message has been saved."
→Delete the message. An announcement
will state: "Message has been deleted."
→Listen to the next message
After all messages have been heard, the following
*announcement
is played:
We recommend you delete unneeded messages so that you can always accept new voice mail messages.
● To listen to a saved message
1 4 1 7
If you press to
listen to your messages, even if you have saved messages, if there are no
new messages for you, the call will be terminated without connecting you to the Voice Mail Service
Center. To listen to saved messages, see p. 7, "Listening to, Saving and Deleting Saved Messages."
Announcement
"There are no more messages,..."
● If you mistakenly erase an incoming message
By carrying out the following procedure before hanging up, you can hear the message again.
(1) For one message only → Press 1 (2) For two or more messages → Press then 1
3
Press
to finish.
*When using the dial pad for these procedures (except for entering
phone numbers and Network PINs with remote operation), you can still
use it while announcements are playing as long as you know how to
carry out the procedure you want to perform.
● If the phone is in an area with poor reception or the phone has been turned off.
There are cases in which the icon that indicates a message has been received may not be
displayed in real time. We recommend contacting the Voice Mail Service Center when you are in
an area with better reception or the phone has been turned back on.
●
The set up procedure may differ depending on the handset. See the user's manual of your handset for details. ● Actual screen may be different.
4
Checking the Voice Mail Service Status
Checking for New
したい Messages
Check to see if Voice Mail Service is activated or deactivated, check your ring duration,
Videophone and change these settings.
Voice mail
Play messages
Activate
Deactivate
Set ring time
Check setting
Setting
Voice mail setting
Voice mail
XX
Ring time XXXsec
Videophone
XX
The Setting Confirmation
screen appears.
2
If the displayed settings for activating or
deactivating the Voice Mail Service, the ring
duration, and activating or deactivating Videophone
compatibility are correct, then end the call.
To change these settings, select the function menu,
then select the item to change. This will take you to
the respective setup screen; perform the
configuration directly from there (see the
respective pages for instructions for each
operation).
3
Before Setup
Dial 1 4 1 7
to call the Voice Mail Service Center and confirm.
See p. 3 for details. (Listening to, Saving, and Deleting New Messages)
The icon in the stand-by display allows you to check whether
or not you have messages.
To Check for Messages
Check new messages
Contact the Voice Mail Service Center to
check whether you have new messages and
the number of new messages.
To Learn When You Have More Messages
Voice Mail
Service
Voice Mail
Service
2
Display the
Voice Mail
Service menu,
and select
"Check setting."
You can confirm this with the "Check new messages" function.
You will also be notified when more messages arrive.
1
From the Handset Screen
1
You can use the following procedures to check whether or not
any new messages have been left with the Voice Mail Service.
Set Ring/Vibration when
number of messages increases
Configure your phone to Ring / Vibrate
when the number of messages increases
(may not be available on some models).
From the Handset Screen
From the Handset Screen
1
1
You can use the handset screen to automatically dial "1416."
One-Point
Advice
You can also use the procedures on the following screens to set the features made
available by dialing " 1 4 1 6 ."* After the announcement, continue by referring to
the respective pages.
Voice mail
Play messages
Activate
Deactivate
Set ring time
Check setting
Setting
Display the Voice Mail
Service menu, and select
"Setting."
Setting
Voice mail
Play messages
Activate
Check setting
Setting
Check new messages
Message notification
Erase icon
Set voice mail for
voice call?
Setting (voice call)
Setting (videophone)
YES
Select "Setting (voice call)."
* To make Videophone settings, select
"Setting (videophone)."
NO
Select "YES" to configure
Voice Mail Service, or "NO"
to cancel it.
A confirmation screen will appear. Select "YES"
to begin configuring your Voice Mail Service.
Follow the instructions in the announcement to configure Voice Mail Service*.
(See "Using the Dial Pad" on each setting* pages for instructions on what to do after the announcement.)
Voice mail
Play messages
Activate
Check setting
Setting
Check new messages
Message notification
Erase icon
2
2
Completed
Check on
stand-by display
* "1416" used for making the following settings.
5
Display the Voice Mail
Service menu,
and select
"Check new messages."
The results of your
inquiry appear on
stand-by display.
Notify tone message
Set?
YES
NO
Display the Voice Mail
Service menu,
and select
"Message notification."
Select "YES" to
activate the "Message
notification," or
"NO" to deactivate it.
A confirmation screen will
appear. Select "YES" to
activate "Message
notification ."
OK
"Listening to, Saving and Deleting Saved Messages" p. 7
"Changing the Outgoing Videophone Message"
p. 23
"Recording and Changing the Outgoing Message"
p. 9,10
"Creating Original Outgoing Videophone Messages"
p. 24
"Listening to the Phone Numbers of Incoming Calls"
p. 11
"Setting the Announcement Only Function"
p. 12,13
3
●
The results of your setting appear.
If the setting is successful, "Notify tone
msg. set" will appear. This completes
the setting.
The set up procedure may differ depending on the handset. See the user's manual of your handset for details. ● Actual screen may be different.
6
Listening to,Saving and Deleting Saved Messages
You can also use these features by following the procedures shown in "One-Point Advice" on p. 5.
Using the Dial Pad
1
Press
1
4
1
6
3
1 (Hear again)
From the Handset Screen
2 (Save)
1
Press
3 (Delete)
(Hear the next message)
1
1
Announcement
2
"This is the 1st (2nd...) saved
message..."
3
* One of your messages is played.
Announcement
→Listen to the message again.
→Save the message.
An announcement will state:
"Message has been saved."
→Delete the message.
An announcement will state:
"Message has been deleted."
→Listen to the next message
1
Voice mail
Play messages
Activate
Deactivate
Set ring time
Check setting
Setting
Setting the ring
duration, and select
"Set."
Announcement
"There are no more messages,..."
4
Press
Display the Voice Mail
Service menu,
and select
"Set ring time."
1
4
1
9
Announcement
"You can change the period of time
your phone rings before forwarding
the call to the Voice Mail Service
Center. Range is between 0 and
120 seconds. Please enter the time
in seconds, followed by the key."
Press
2
all messages have been heard, the following
*After
announcement is played:
"To listen to this message again,..."
Using the Dial Pad
Voice Mail
Service
Voice Mail
Service
"There are X saved messages..."
Press
You can set the amount of time the phone rings before connecting a caller to the Voice
Mail Service Center when inside the service area.
●The ring duration can be set to between 0 and 120 seconds; you can answer the call
before this time has run out. These settings apply both to voice phones and Videophones.
Press one of the following:
Announcement
2
Setting the Ring Duration
Ring time(seconds)
000∼120? 000
to finish.
Set
You can set the ring time
before a caller is connected
to the Voice Mail Service
Center. Enter a ring duration
of 0 to 120 seconds.
● While listening to voice mail messages
2
Announcement
"The ringing time has been set to
XXX second(s). To accept, press the
key; to change, press the
key."
3
Press
to finish.
Various operations are available by pressing the keys on your handset (see p. 4 for details).
● Messages are saved for 72 hours.
Voice mail messages are saved for 72 hours from the time they are recorded.
They are deleted after 72 hours have elapsed.
The storage time does not change if you play a saved message, and select 2 (save) again.
● To listen to messages using a different phone
You can carry out various operations from different phones, including DOCOMO mobile phones, landline
phones, and NTT public phones. For details, see p. 19, "Remote Operation from Another Phone."
3
Ring time
set
● If you have new messages
Saved messages are playing after new message.
● When there are no messages, you will hear this announcement.
" There are no new messages."
Please follow the main menu if you want to carry out any further procedures.
When Leaving Messages
One-Point
Advice
7
An outgoing message that instructs the caller to "When you are finished, press 1 ..."
the incoming message is recorded even if 1 is not pressed. Messages are recorded
for up to three minutes, or up until the caller hangs up.
What if I am using the
Voice Memo function
at the same time?
The results of
your setting appear.
If the setting is successful,
"Ring time set" will appear.
This completes the setting.
One-Point
Advice
To give Voice Mail precedence when
the Voice Memo function of the mobile
phone and Voice Mail are activated,
set the ringing duration for Voice Mail
shorter than that for Voice Memo.
●When you subscribe to Voice Mail Service, the ring duration is set to 15 seconds.
●The ring duration can be set to between 0 and 120 seconds.
●The ring duration setting is saved even after the Voice Mail Service is deactivated.
●If the ring duration is set to 0 seconds, the caller is connected directly to the Voice Mail Service
Center without the call being registered in the mobile phone's call history.
●If your phone is turned off or out of range, the caller is connected directly to the Voice Mail Service.
●The actual ring duration may vary depending on radio reception.
●
The set up procedure may differ depending on the handset. See the user's manual of your handset for details. ● Actual screen may be different.
8
Recording and Changing the Outgoing Message
Voice Mail Service allows you to choose the outgoing message you want callers to hear.
Continued from Step
3
on p. 9
Change your outgoing message
to one recorded in your own voice
Continued from Step
3
on p. 9
Change your outgoing message to one with
only your name spoken in your own voice
The Voice Mail Service includes the following two functions.
Voice Mail Function
Announcement Only Function
This stores messages left by callers.
Messages from callers are not stored.
See p. 9 and p. 10 for the Voice Mail outgoing messages.
4
2
Press
4
Press
Announcement
Announcement
"Please record your announcement
after the tone. When you are finished,
press the
key."
See p. 12 and p. 13 for the outgoing messages used in Announcement Only.
4
"Please record your name after the
tone. When you finish recording,
press the
key."
Record your outgoing message.
Record your name only.
* Your outgoing message can be up to 10 seconds long.
*Your outgoing message can be up to 3 minutes long.
■ Entire message recorded in your own voice
You can record any message you like up to three minutes in length.
5
* The outgoing message uses the system message.
■ Standard system greeting (female voice)
Outgoing message set at the time of subscription
Please leave your message after the tone. When you are finished, press 1 to exit. To check
your message or to record it again, press the
key.
Procedure for changing the outgoing message
from the standard system greeting
You can also use these features by following the procedures shown in "One-Point Advice" on p. 5.
Using the Dial Pad
Announcement
【The outgoing message you recorded plays】
"To select this announcement,
press 1 ..."
You can set the outgoing message to a standard system greeting, in which you give your name in your own voice.
Yamamoto
Your voice
Press
Announcement
■ Only your name is spoken in your voice
This is
(Prerecorded voice)
5
Press
6
Press
7
Press
1
This portion also includes
*announcements;
carry out the
procedure after the
announcement has begun.
to finish.
Voice Mail
Service
Voice Mail
Service
Types of outgoing messages for Voice Mail Service
Select from the following three patterns.
The standard system greeting is set at the time of subscription.
"Your callers will hear the following name..."
【Your have reached...】
"To select this announcement, press 1 ..."
6
Press
7
Press
1
This portion also includes
*announcements;
carry out the
procedure after the
announcement has begun.
to finish.
You can restore the outgoing message to the standard
system greeting.
[ Example ] Switching a greeting entirely in your own voice to the standard system greeting
● Using the Dial Pad
1
Press
1
4
1
6
Announcement
"There are X new messages. You are in the
main menu.To listen to your messages...
To change mail box options, press 9 …"
2
Press
9
Press
2
1
If you have already recorded an Announcement Only
*outgoing
message, press 2 , then press 1 . After that,
follow the instructions below.
1
4
1
3
6
Press
9
"Your current setting is the Voice
Mail Service...To check or to modify
your announcement, press 2 …"
Continued in Step
Change your outgoing
message to one recorded
in your own voice
4
on p. 10
Change your outgoing
message to one with only your name
spoken in your own voice
"Your current setting is the Voice Mail
Service...To check or to modify your
announcement, press 2 …"
2
*
follow the instructions below.
"There are X new messages. You are in the
main menu.To listen to your messages...
To change mail box options, press 9 …"
2
Press
If you have already recorded an Announcement Only
*outgoing
message, press 2 , then press 1 . After that,
Announcement
Announcement
"To listen to the current Voice Mail Service
Announcement, press 1. . To record the
announcement in your own voice, press 2 .
To include your name in the announcement,
press 4 . To exit this menu, press the key."
Press
Announcement
Announcement
9
3
*
Announcement
"To listen to the current Voice Mail Service Announcement,
press 1 . To record the announcement in your own voice,
press 2 . To switch to the default prerecorded
announcement, press 3 …"
4
Press
3
Announcement
"Switched to the default prerecorded announcement.
To include your name in the announcement, press
2 . To exit this menu, press the
key."
*The procedure for changing the setting of only your name spoken in your own voice to the standard system greeting differs from 3 above.
Please carry out the procedure according to the instructions in the announcement.
*The outgoing message is erased when you change from a message entirely in your own voice or a message where only your name is spoken
in your own voice back to the standard system greeting. To reregister, first record the message in advance.
10
Listening to the Phone Numbers of Incoming Calls
Setting the Announcement Only Function
You can listen to an announcement with both the message and the caller's phone number.
An announcement informs callers that you are not available, and the service will not
receive messages.
●Please use it when you will be gone for a long period of time, such as on business or
vacation, and cannot listen to your messages.
*The Announcement Only function does not accept Voice Mail messages. Additionally, this is not compatible with Videophones.
You can also use these features by following the procedures shown in "One-Point Advice" on p. 5.
Using the Dial Pad
Press
1
4
1
6
4
To keep the current setting,
press
Announcement
"There are... . You are in the main
menu..."
Record your own message for the Announcement Only function.
There is no standard greeting for this function.
1
To change the setting,
press
You can also use these features by following the procedures shown in "One-Point Advice" on p. 5.
Using the Dial Pad
2
Announcement
2
Press
【If you pressed 1 】
"Your current setting is the Voice
Mail Service (Announcement Only
Service)..."
9
Announcement
"Your current setting is the
Voice Mail Service ..."
3
Press
Press
1
1
"Caller ID Announcement is currently
off (on). To maintain the current
settings, press 1 . To turn on (off) the
caller ID announcement, press 2 . To
exit this menu, press the
key."
5
4
1
6
"There are... . You are in the main
menu..."
2
Press
Announcement
Record your outgoing message.
Announcement
【If you pressed 2 】
"The Caller ID Announcement is
now on (off)..."
3
Voice Mail
Service
Voice Mail
Service
1
Record an outgoing message
for the Announcement Only function
Press
*Your outgoing message can be up to 3 minutes long.
4
Announcement
【The outgoing message you
recorded plays.】
"To select this Announcement, press
1 . To modify your announcement,
press 2 . To cancel the modification
procedure, press the
key."
9
Announcement
to finish.
Press
"Your current setting is the Voice
Mail Service..."
5
Press
1
Announcement
3
Press
"Your current setting is the
Announcement Only Service..."
1
Announcement
●When you first register for Voice Mail Service, the Caller ID Notification function is deactivated.
1 4 1 6
1 4 1 7
●To listen to messages, press or .
●If you activate the Caller ID Notification function, you can also hear the phone numbers of callers
who left messages while the function was deactivated.
●In the following cases, only the time and date received and the message itself are available for
voice mail messages held by the Voice Mail Service Center:
caller has intentionally blocked the Caller ID function.
●The call was made from a public phone.
●The call was made from a line incapable of transmitting the caller's phone number.
●The Caller ID Notification function has been deactivated.
"Switching to Announcement Only
Service. Please record your
announcement..."
6
to finish.
How do I switch to and from the Voice Mail and
Announcement Only Services?
●The
11
Press
One-Point
Advice
If you have registered separate outgoing messages for both the Voice Mail function
and the Announcement Only function, you can switch the messages by following
Step 1
2
3
6 above.
You can activate/deactivate the Announcement Only function just as you do the Voice Mail Service. However if you deactivate
*the
Voice Mail Service while the Announcement Only function is set, the function will still be in effect upon reactivation of the
Voice Mail Service. After using the announcement, be sure to remember to switch back to Voice Mail Service.
12
Change your Announcement Only
outgoing message
Call Arrival Settings When on the Line
Change the outgoing message recorded for the Announcement Only function.
You can select how incoming calls are connected while you are on the line with another call.
subscribed to the Voice Mail Service and Call Forwarding Service,
you can also use other network services you are subscribed to at the same time.
this function separately from the normal setting (Activate/Deactivate).
*Set
You can only use this function when an incoming call is received while you are on the line. For other situations (when you are outside the service area,
*unable
to answer your phone, or your phone is off, etc.), the operation follows the normal settings.
●If
You can also use these features by following the procedures shown in "One-Point Advice" on p. 5.
Using the Dial Pad
Prior Settings
Press
1
4
1
6
5
Press
2
Activate Set In-Call Arrival Act
Announcement
Announcement
"Please record your announcement
after the tone. When you are finished,
press the key."
"There are... . You are in the main
menu..."
2
Press
Announcement
"Your current setting is the
Announcement Only Service..."
6
Press
Announcement
Press
【The outgoing message you
recorded plays.】
2
"To select this announcement,
press 1 . To modify your
announcement, press 2 . To cancel
the modification procedure, press
the
key."
Announcement
"To check or to modify your Voice Mail
Announcement, press 1 . To check or
to modify your announcement for the
Announcement Only Service, press 2 .
To exit this menu, press the
key."
7
Press
1
Announcement
4
Press
1
Record your outgoing
message.
9
*Your outgoing message can be up to 3 minutes long.
3
When you subscribe to Voice Mail Service or Call Forwarding Service, Set in-call arrival act is
set to Activated (informs you of incoming calls when you are already on the line).
"Your current setting is the
Announcement Only Service ..."
2
Announcement
"To listen to the current announcement
for the Announcement Only Service,
press 1 . To modify your
announcement, press 2 ..."
Display the
"NW services"
menu, and
select "Set incall arrival act."
2
Set in-call arrival act
Setting in Advance How Incoming Calls Are
Handled While You Are on the Line
You can set "Voice Mail," "Call Forwarding," "Call Blocking" (Call rejection),
or "Normal Call" (Answer) for incoming calls received while you are on the line.
From the Handset Screen
1
2
NW services
Caller ID notification
Voice mail
Nuis. call blocking
Caller ID request
Display the
"NW services" menu,
and select
"Arrival call act."
Select the
desired settings.
2 Call forwarding*2
Forward calls received while the line
is busy to another phone number.
3 Call rejection
Have the new caller hear a busy
signal while the line is busy.
4 Answer*3
Hear a notification informing you
another call is coming in.
to finish.
3
*
If you have recorded an Announcement Only message, you can use it with
the Voice Mail Service as well.
1 Voice mail*1
Connect calls received while the line is
busy to the Voice Mail Service Center.
Arrival call act
Voice mail
Call forwarding
Call rejection
Answer
Press
●When setting the voice mail function
Display "Set in-call
arrival act Activate?"
and select "YES."
After this, the results
of your setting
appear.
*
Arrival call act
8
Select "Activate."
Set arrival act
Activate
Deactivate
Check setting
However, setting the "Set in-call arrival act" mode to "Activate" is not necessary when Call Waiting Service is already set to "Activate."
The announcement may differ depending on the setting.
13
NW services
Caller ID notification
Voice mail
Nuis. call blocking
Caller ID request
Voice Mail
Service
Voice Mail
Service
1
Perform the following procedure
using the handset screen.
The results of your setting appear.
If the setting is successful, the selected
category will appear.
This completes the setting.
*On those models that do not have an "Arrival call act" menu (i.e., smartphones and certain other models), only the "Normal Call" (Answer) can be set.
1 Subscription to Voice Mail Service is required. *2 Subscription to Call Forwarding Service is required. *3 If you are subscribed to Call Waiting
*Service
and Call Waiting is activated, the call is taken with Call Waiting as normal. However, if you are simultaneously subscribed to the Voice Mail
Service or Call Forwarding Service and the respective service is activated, then after the set ring duration has passed, the call is transfered to the Voice
Mail Service Center or the forwarding number (the call is not received with Call Waiting after the set ring duration has passed). Voice Memo does not
work with calls received while the phone is in use.
●
The set up procedure may differ depending on the handset. See the user's manual of your handset for details. ● Actual screen may be different.
14
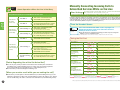
Connections Made in the Event of
an Incoming Call with Each of the Settings
When setting any of the incoming call handling options, the specific way the call is
handled depends on the subscription and the setup as follows.
1
Connect to Voice Mail
When you receive a call while you are on the line,
the "Transfer Calls to the Voice Mail Service Center"
setting has precedence.
When you receive a call while you are on the line
Regardless of whether
Voice Mail is on or off
Subscribed to
Call Forwarding Service
Only
You will hear the announcement "Operation unsuccessful.
Please try again." and will be unable to make the setting.
Subscribed to Voice Mail,
and Call Forwarding
and/or Call Waiting
Services
Regardless of whether
Voice Mail is on or off
Subscribed to
Call Forwarding and
Call Waiting Services
You will hear the announcement "Operation unsuccessful.
Please try again." and will be unable to make the setting.
2
The call is automatically
transferred to the Voice
Mail Service Center.
(Call Forwarding and Call Waiting are not operational.)
Call Forwarding
When you receive a call while you are on the line,
the "Transfer Calls to the Forwarding Number"
setting has precedence.
When you receive a call while you are on the line
Subscribed to
Voice Mail Service only
You will hear the announcement "Operation unsuccessful.
Please try again." and will be unable to make the setting.
Subscribed to
Call Forwarding Service
Only
Regardless of whether
Call Forwarding is
on or off
Subscribed to Voice Mail
and Call Waiting Services
You will hear the announcement "Operation unsuccessful.
Please try again." and will be unable to make the setting.
(Call Waiting does not operate.)
Subscribed to
Call Forwarding and
Call Waiting Services
Regardless of whether
Call Forwarding is
on or off
The call is transferred to
the forwarding number.
Voice Mail on
The call is transferred to
the forwarding number.
Subscribed to
Voice Mail and
Call Forwarding Services
or Voice Mail,
Call Forwarding and
Call Waiting Services
15
Call Blocking
(Call rejection)
Incoming calls received while you are on the line are not
transferred to the Voice Mail Service Center or the
forwarding number, and the caller hears the busy signal.
When you receive a call while you are on the line
Subscribed to
Voice Mail Service only
Regardless of whether
Voice Mail is on or off
The caller hears the
busy signal.
Subscribed to
Call Forwarding Service
Only
Regardless of whether
Call Forwarding is
on or off
The caller hears the
busy signal.*
Subscribed to
Voice Mail and
Call Forwarding Services
Regardless of whether
Voice Mail and Call
Forwarding are on or off
The caller hears the
busy signal.*
Subscribed to
Voice Mail and
Call Waiting Services
Regardless of whether
Voice Mail is on or off
Subscribed to
Call Forwarding and
Call Waiting Services
Regardless of whether
Call Forwarding is
on or off
The caller hears the
busy signal.*
Subscribed to Voice Mail,
Call Forwarding
and Call Waiting Services
Regardless of whether
Voice Mail and Call
Forwarding are on or off
The caller hears the
busy signal.*
Voice Mail
Service
Voice Mail
Service
The call is automatically
transferred to the Voice
Mail Service Center.
Subscribed to
Voice Mail Service only
3
The caller hears the
busy signal.
(Call Waiting is not operational.)
(Call Waiting is not operational.)
(Call Waiting is not operational.)
* When the Call Forwarding Service is activated in locations with poor reception, the ringback tone will be heard before the busy signal.
4
Normal Call
(Answer)
When you receive a call while you are on the line,
you are notified by a series of short beeps.
● If you are subscribed to Call Waiting Service
The call is transferred to
the forwarding number.
(Voice Mail Service cannot be used simultaneously in this case.)
Call Forwarding on
The call is transferred to
the forwarding number.
When Voice Mail and
Call Forwarding both off
The call is transferred to
the forwarding number.
If Call Waiting is activated, the ordinary call waiting function is used.
● If you are subscribed to Voice Mail Service
If Voice Mail is activated, the call is transferred to the Voice Mail Service Center after the set ring
duration for Voice Mail Service has passed.
● If you are subscribed to Call Forwarding Service
If Call Forwarding is activated, the call is forwarded to the forwarding number after the set ring
duration for Call Forwarding Service has passed.
You can connect the new incoming call to the subscribed service manually as well. See p. 18 for details.
16
One-Point
Advice
About Operations When the Line is Not Busy
Manually Connecting Incoming Calls to
Subscribed Services While on the Line
Prior Settings
When an incoming call is received but you do not answer your phone,
your phone is off, or you are outside the service area
The call is transferred to the
Voice Mail Service Center.
Voice Mail off
The caller hears the ringback tone or
an announcement that phone is turned
off, or that the phone is out of range.
Call Forwarding on
Subscribed to
Call Forwarding
Service Only
Operations for handling of incoming calls while you are on the line
If another call arrives while you are already on the line, a tone will inform you of the incoming call.
You then handle the incoming call using the keys on your handset. You can also handle incoming
calls manually when you are not on line. These operations, and their effects, are valid even if each
service is deactivated. (With the exception of Call Waiting Service.)
From the Handset Screen
The call is transferred to the
forwarding number.
Function
Call rejection
Call forwarding
Voice mail
(The call is transferred to the set list number.)
Call Forwarding off
Voice Mail on
The caller hears the ringback tone or
an announcement that phone is turned
off, or that the phone is out of range.
Call Forwarding on
Waiting or a non-compatible models.
The call is transferred to the
Voice Mail Service Center.
Using the Dial Pad
The call is transferred to the
forwarding number.
Subscribed to
Voice Mail Service only
Press
+
Connects to Voice Mail Service Center
Subscribed to Call
Forwarding Service only
Press
+
Forwards call to forwarding number
Subscribed to Call
Waiting Service*1 only
Press
When Call Forwarding is set to transfer
calls to the Voice Mail Service Center when
the forwarding number is busy:
The call is transferred to the
Voice Mail Service Center.
When Voice Mail
and Call Forwarding
both off
The caller hears the ringback tone or
an announcement that phone is turned
off, or that the phone is out of range.
【Points Regarding Use of the Set Arrival Act】
●You can only carry out the procedures for this function from a mobile phone subscribed to
Voice Mail Service or Call Forwarding Service. You cannot carry out procedures by Remote
Access from landline phones, NTT public phones, or other mobile phones, etc.
●You must make your desired setting before initiating a call.
【When you receive a call while you are making the call】
●At the start of your subscription to the Voice Mail Service (or Call Forwarding Service), if you are
making the call when an incoming call is received while the incoming call setting is set to "Normal
Call" or "Call Blocking," the caller is connected to Voice Mail Service (or Call Forwarding Service).
17
● Use the dial pad to complete the following procedure if you are using Call
*This service is not available on the models that do not have a "Function" menu (i.e., smartphones and certain other models).
(The call is transferred to the set list number.)
Subscribed to
Voice Mail and
Call Forwarding
Services
Press the function button while a call is in progress to
display the function screen, then select the service to
which you want to connect.
Voice Mail
Service
Voice Mail
Service
Subscribed to
Voice Mail
Service only
Voice Mail on
If you want to make a selection while on the line, you must set the Arrival Call
Act to "Normal Call." For more details, refer to p. 14.
Use Call Waiting function
or
Subscribed to
Voice Mail and
Call Forwarding
Services
Press
+
Connects to Voice Mail Service Center
Press
+
Forwards call to forwarding number
Subscribed to
Voice Mail and
Call Waiting*1 Services
Press
+
Connects to Voice Mail Service Center
Subscribed to
Call Forwarding and
Call Waiting*1 Services
Press
Subscribed to
Voice Mail,
Call Forwarding and
Call Waiting*1 Services
Press
Press
Uses Call Waiting function
or
+
Forwards call to forwarding number
Uses Call Waiting function
or
Press
+
Connects to Voice Mail Service Center
Press
+
Forwards call to forwarding number
Press
or
Uses Call Waiting function
1 When Call Waiting Service is set to "Activated."
*
* Procedures differ slightly on some models. For details, refer to your user's manual.
1 0
* When using manual operation, this function is not available when on the line to 4 (directory assistance), 1 1 0 (police), 1 1 8 (marine emergencies), 1 1 9 (fire/ambulance), likewise 3-digit numbers and 1 4 × × (Voice Mail Service operations, etc.).
When WORLD WING is being used, incoming calls cannot be manually switched to the Voice Mail Service or Call Forwarding Service.
*
●
The set up procedure may differ depending on the handset. See the user's manual of your handset for details. ● Actual screen may be different.
18
Remote Operations from Another Phone
You can perform Remote Operations from landline and other phones. You need your 4digit Network Password to carry out these procedures.
Activate / Deactivate Remote Access
Making Various Settings from
Another Phone Using Remote Access
*Be sure to set the Remote Operation function to "Activate" before using these operations. (See p. 19)
1
1 Operating from a DOCOMO mobile phone, landline phone, NTT public phone, or other such phone
●
Perform this operation from your mobile phone. When you subscribed, your phone is set to block Remote
Access, so you will first need to activate Remote Access with the handset you are currently using.
From the Handset Screen
International
access number*
Press
1
5
Remote access
Activate?
NO
2
Press
1
or
0
【If you pressed 1 】
"Remote Access is activated."
【If you pressed 0 】
"Remote Access is deactivated."
3
1
0
1
4
3
1
0
1
4
0
stands for the code
for the procedure you desire.)
" Enter the full 11-digit number of
your mobile phone."
2
0
Voice Mail
1
4
1
1 Activate Voice Mail Service
1
4
1
0 Deactivate Voice Mail Service
1
4
1
7 Listen to new messages
1
4
1
6 Listen to saved messages, and configure Voice Mail Service
1
4
1
9 Set the ring duration for Voice Mail Service
Call Forwarding
1
4
2
9 Configure Call Forwarding Service
1
4
2
1
4
2
1 (Set the forwarding number)
0 Deactivate Call Forwarding Service
Activate Call Forwarding Service
0
After you hear a series of tones, enter the phone number
for the mobile phone currently subscribed.
Announcement
Nettowaku anshou bangou wo oshite kudasai.
3
Press
" Please enter your Network Password."
to finish.
Operations can be performed from DOCOMO Mobile Phones, landline phones, NTT public phones,
etc.*1*2 However, such phones must be able to send touch-tone signals. If you use a touch-tone
phone with a pulse line, you may need to press
(tone) to transmit touch-tone signals when
dialing your phone number after dialing 0 9 0 - 3 1 0 - 1 4 1
(for the Voice Mail Service)
or 0 9 0 - 3 1 0 - 1 4 2
(for the Call Forwarding Service). (Procedures for transmitting
touch-tone signals vary depending on the type of phone.)
*1 Non-DOCOMO mobile and PHS phones, non-NTT public phones, and NTT train public phones cannot be used for this service. *2 IP phones may not be operable in certain cases.
Prevent Unauthorized Use with Remote Access Lock
This function automatically deactivates Remote Access when the Network Password
is entered from another handset more than a predetermined number of times so as to
prevent unauthorized control of your phone.
● If the Network Password is entered incorrectly three consecutive times→
the phone is disconnected from the Center. * Remote Access is not set to "Deactivated" at this stage.
● If the Network Password is entered incorrectly four consecutive times→
the phone is disconnected from the Center, and the Remote Access function is disabled.
How to Cancel the
Remote Access Lock
0
(Deactivate)
● Telephones capable of using Remote Access
One-Point
Advice
9
Okyaku sama no denwa bangou
wo oshite kudasai.
When you hear a series of
tones, press either one of
these buttons.
Announcement
A confirmation screen
will appear. To activate/
deactivate the Remote Access,
select "YES." If the setting is
successful, a message to this
effect will be displayed.
*Shown here is the Remote Access activation screen.
1
Announcement
Select "YES" to activate
the Remote Access,
or "NO" to deactivate it.
2
8
"To deactivate Remote Access,
press 0 . To activate Remote
Access, press 1 ."
(Activate)
YES
(
Announcement
Display the "Remote
access" menu,
and select "Activate"
("Deactivate").
0
*For country you are calling from
9
1
Remote access
Activate
Deactivate
Check setting
9
2 Operating from a landline phone or other phone overseas
●
Using the Dial Pad
1
0
Voice Mail
Service
Voice Mail
Service
With smartphones and certain other models without a "Remote
*access"
menu, operations are carried out with the dial pad.
Press
Either activate Remote Access from the mobile phone currently being
used,or carry out the procedure to change your Network Password.
*You can make corrections by pressing
3
if you have entered the wrong phone number.
(your Network Password)
When you hear a series of tones, enter your (4-digit) Network Password.
You can now perform operations just as you would from mobile phones. Follow the
announcements to conduct each operation.
●Notes Regarding Remote Operations
【Operating from a DOCOMO mobile phone, landline phone, NTT public phone, or other such phone】
●You cannot use Remote Access to make settings for Multi number additional numbers.
●No dialing charges apply for activating, deactivating, or setting the ring duration for the Voice Mail Service or for
activating, deactivating, and making other settings for the Call Forwarding Service. However, if you use Remote
Access from a hotel room phone, you may be billed by the hotel for dialing charges.
【Operating from a landline phone or other phone overseas】
●The caller is directly charged the international dialing charges in the country where the call is made. (The charges
are not included in the bill.) And also, if you use Remote Access from a hotel room phone, you may be billed by the
hotel for dialing charges.
●This service may not be available from certain countries and with certain phones.
●For forwarding calls overseas, a prior application with DOCOMO (for the International Call Forwarding Service) is
required.
* Remote Access is set to "Activated" when the password is resubmitted.
19
●
The set up procedure may differ depending on the handset. See the user's manual of your handset for details. ● Actual screen may be different.
20
Voice Mail Service Videophone Settings
This sets the Voice Mail to activate or deactivate the Videophone.
● When you first subscribe to Voice mail Service, the Videophone voice mail is activated.
● Even with the Videophone enabled, you cannot use the service unless the
Voice Mail Service is activated. For instructions on using the feature, refer to p. 2.
From the Handset Screen
●
1
Press
1
4
1
2
1
Announcement
Voice mail
Play messages
Activate
Deactivate
"The Voice Mail Service is currently
deactivated (activated) for videophones. To
set it to...To keep the current setting, press..."
Display the Voice
Mail Service menu,
and select
"Voice mail set for VP."
Notice call
Voice mail set for VP
*The announcement may differ depending
on the setting.
2
2
From the Handset Screen
Using the Dial Pad
1
1
Voice mail
Play messages
Activate
Deactivate
Set ring time
Check setting
Setting
(Videophone Activated)
2
(Videophone Deactivated)
Select
"Play (videophone)
Play messages
"The Voice Mail Service is now activated
(deactivated) for videophones. Thank you."*
Select "ON" to activate
the Videophone, or
"OFF" to deactivate it.
If the setting is successful,
a message to this effect will
be displayed.
*When new video messages are being held,
a message to this effect is given before the
announcement is played.
3
Press
to finish.
! Note to Users of Non-Compatible Handsets
received, the screen in Step 3 appears.
You cannot play back Videophone messages or use outgoing message and other functions
with handsets that are not DTMF (touch-tone signal) or non-Videophone compatible. If the
Videophone setting is set to "Activated," video messages cannot be played back, but instead
are held and accumulate. Use the dial pad procedure described above to set the Videophone to
"Deactivated." Furthermore, you cannot record video messages.
Handsets Not
Compatible with DTMF
[ Video calling ]
Play messages
1417
SIMPURE N, P2101V, P2402, P2403, D2101V, T2101V, SH2101V, F2402, M2501, N2502
(As of December 2013)
Smartphones, tablets, and other data communications products are not compatible with the Videophone service. For other
incompatible terminals, check the DOCOMO website.
●
The number of new
messages and
presence of any saved
messages is
indicated.
The first message is
played.*
3
Select "YES" to listen
to new messages,
or "NO" to cancel it.
A confirmation screen will
appear. Select "YES" to
listen to your messages.
You are connected to the
Voice Mail Service Center.
4
7
2
1st message
Next message
NO
1
to transmit with the Videophone.
1m30s
14:20
3
Play messages of
videophone?
4
."
*If only Videophone messages have been
Play (voice call) X
Play (videophone) X
YES
21
1
New message 1
Stored message No
Message playback
2
Press one of the following:
1
Display the Voice Mail
Service menu,
and select
"Play messages."
Press
Announcement
Set voice mail active
for videophone?
ON
OFF
Play back the incoming video messages held for you.
Voice Mail
Service
Voice Mail
Service
These settings cannot be made from the handset screen on models
prior to the 906i and 706i series or on smartphones. Please refer to
the sections on Using the Dial Pad.
Using the Dial Pad
Playing Back, Saving, and Deleting Videophone Messages
You are connected to the DOCOMO
Voice Mail Service Center, and new
messages are ready to be played.
During this time, "Play messages"
and "1417" appear on the screen.
↓
Follow the instructions in the
announcement to listen to your voice
mail (for instructions on what to do
afterwards, refer to the instructions
beginning from Step 2 in "Using
the Dial Pad" shown at the right).
1m30s
14:20
If there are only saved
messages, the saved
messages are played back.
If there are no new or saved
messages, the connection
is terminated.
*Pressing the
key during playback
of messages skips the message
currently being played back and plays
the next message. You can also skip
certain other guidance announcements
by pressing the key.
Press one of the
following:
4
1 (Replay)
Replay
1
Save
2
Delete
3
1m30s
14:20
2 (Save)
3 (Delete)
1 →The message is played back once more.
2 →The message is saved.
If there are any remaining messages, they are then played
back. If there are no messages, the connection is terminated.
3 →The message is deleted.
If there are any remaining messages, they are then played
back. If there are no messages, the connection is terminated.
*All guidance includes voice announcements.
The set up procedure may differ depending on the handset. See the user's manual of your handset for details. ● Actual screen may be different.
22
Changing the Outgoing Videophone Message
Creating Original Outgoing Videophone Messages
You can select the video "outgoing message" played to those who make calls to your Videophone.
You can create your own "outgoing Videophone message" videos to play for those making Videophone calls.
Using the Dial Pad
Using the Dial Pad
1
Press
1
4
1
6
4
1
2
1
1
6
to transmit with the Videophone.
2
4
Finish recording: #
Press
1m30s
14:20
3
Press
5
Press
1
Preset message
Own recording
Quit
1
2
∼
2
Enter the number
corresponding to the
outgoing message
you want to set.
If there are no messages
you have recorded, you can
press 2 to display an
announcement saying that
no message has been
recorded; create messages
starting from the screen in
Step 2 on p. 24.
1m3 0 s
1 4 :2 0
* You can confirm the current settings by pressing
1 while the screen
Set
1
Select another
2
1m 30s
14:20
To set other messages,
press 2 . The display
switches to the screen in
Step 3 .
Set
Record again
Review
Cancel
3
1
1
2
3
1m30s
14:20
Start recording
video message
The results of your
setting appear.
1m 30s
14:20
Press
Record the outgoing
message.
6
Set as answering
message
5
1m30s
14:20
1
*Your outgoing message can be up to
3 minutes long.
in Step 2 is displayed.
The results of your
setting appear.
Set as answering
message
1m30s
14:20
If the setting is successful,
"Set as answering
message" will appear. This
completes the setting.
*All guidance includes voice announcements.
*For instructions on using the handset screen for this procedure, refer to the "One-Point Advice" on p. 5.
About the English Announcements Settings
When the outgoing language is set to "English" in the English guidance settings,
guidance announcements for each procedure are played in English. In addition, you
can select either of two settings for the outgoing message, your own original
message or a message recorded in English. However, depending on the settings
status for the transmitting and receiving handsets, a message differing from the one
selected as the default outgoing message may be played.
6
1m30s
14:20
If the setting is successful,
"Set as answering
message" will appear. This
completes the setting.
*All guidance includes voice announcements.
*For instructions on using the handset screen for this procedure, refer to the "One-Point Advice" on p. 5.
One-Point
Advice
2
Check current setting 1
Create message
2
3
Change message
Exit
1 m3 0 s
1 4 :2 0
3
Press
Recording
1m 30s
14:20
Check current setting 1
Create message
2
3
Change message
Exit
23
4
Voice Mail
Service
Voice Mail
Service
The selected message
is played back.
to transmit with the Videophone.
Press
Subscriptions to the Voice Mail Service includes an
outgoing message that is set to change monthly.
One-Point
Advice
This message is replaced with a new message each month, allowing you to enjoy
having an outgoing message with a bit of seasonal flair.
*Outgoing messages may differ according to the English announcements settings.
●
Actual screen may be different.
24
Charges
Leaving Messages with a Videophone
1
Video calling
Press
1
1
Operation
*
The message is saved, even if the
transmission is ended at this point.
2
3
After the outgoing
message is
played, record
your message.
1 m3 0 s
1 4 :2 0
With some handsets, notification
uses the Short Message Service
(SMS) and indicates only the
number of messages.
*No communications charges apply for notification.
*Notification is made even when you have the
Fm
Sub
2008/7/20 11:13
docomo MSG
SMS
《留守電 テレビ電話》
新規メッセージ:○件
メッセージを確認するには
1417 へテレビ電話
でおかけください。
The service cannot be used with handsets that are not DTMF (touch-tone signals) or
non-Videophone compatible. See p. 21 for details.
Video messages will accumulate if the Videophone setting on the above handsets is set to "Enable"; transmit 1 4 1 2
setting to "Disable."
to set the Videophone
Remote operation, the Announcement Only function, and the Caller ID Notification function
cannot be used from a different phone.
●You may be unable to record or process video messages using non-DOCOMO Videophones.
●Video messages cannot be recorded to mobile phones during International Roaming. Neither can
video messages be recorded from mobile phones during International Roaming.
●When using the "Chara-den" function and/or when using certain models, you will not be able
erase messages with the DTMF transmission mode switched off. In such cases, after connecting
to the Voice Mail Service, switch the DTMF transmission mode to ON in the function menu
before proceeding to use the service.
●The service cannot be used with calls made from 32K Videophones.
●Content of the outgoing message may be changed.
25
1
1
Deactivate service
Free
1
4
1
0
1
4
1
7
*
Remote Access from FOMA or Xi 4
Yes
* *
1 2
Depending on the plan to which you are subscribed,
dialing charges may apply to calls made to landline phones.
Access from Subscribed
Mobile Phone
0 9 0
3 1 0
1 4 1 7
Dialing charges apply for calls made under Plan 150 to
landline phones. 5
*
*
Remote Access from Landline Phones 4
Dialing charges apply for calls made to mobile phones.
1
4
1
6
Access from Subscribed
Mobile Phone
Depending on the plan to which you are subscribed,
dialing charges may apply to calls made to landline phones.
*
Remote Access from FOMA or Xi 4
Yes
* *
1 3
0 9 0
3 1 0
1 4 1 6
Dialing charges apply for calls made under Plan 150 to
landline phones. 5
*
*
Remote Access from Landline Phones 4
Dialing charges apply for calls made to mobile phones.
*
Remote Access from NTT Public Phones 4
Set ring duration
Free
Configure Remote Access
Free
Activate/ Deactivate
Videophone settings
Free
Play back new video
messages, and play back
saved video messages
Yes
Create and change
outgoing Videophone
messages
Yes
1
4
1
1
5
9
9
受信メール
●
●
4
Listen to saved
messages,
change outgoing
message,
and set Caller ID
Notification and
Announcement Only
Function
If the message is saved
successfully, "Message
saved" will appear. This
completes the procedure.
Message saved
Thank you
●Notes on Use of Videophones
*
1
*
The results of your
setting appear.
1m 30s
14:20
Reject SMS setting enabled.
Free
Charges
Remote Access from NTT Public Phones 4
About Notification of New Video Messages
The icon in the
stand-by display
allows you to
check whether
or not you have
messages.
Dial Pad Operation
Activate service
Listen to new messages
4
Dialing
Charges
Charges
]
Voice Mail[
Service
Voice Mail
Service
1m 30s
14:20
2
300 yen (excluding tax)
Charges for Operatings Please refer to the following table.
Save and exit
Record again
Review
Cancel and exit
0X0XXXXXXXX
One-Point
Advice
Monthly Charge
3
Dial the phone
number of your
intended recipient
to make the
Videophone call.
Application Required
*6
1
4
1
2
1
4
1
7
(Videophone transmissions)
1
4
1
6
(Videophone transmissions)
Access from Subscribed
Mobile Phone
Depending on the plan to which you are subscribed,
digital communications charges may apply to calls
made to landline phones.
Access from Subscribed
Mobile Phone
Depending on the plan to which you are subscribed,
digital communications charges may apply to calls
made to landline phones.
*1 Dialing charges apply starting the moment the announcement begins playing (same when operating from handset screen).
*2 If you use the 1 4 1 7 operation, you are not charged if you don't have any messages waiting in the Voice Mail Service Center (same when
operating from handset screen).
1 4 1 6 operation, you are charged even if you don't have any messages waiting in the Voice Mail Service Center (same when
operating from handset screen).
4 Even if these remote access operations are performed from a phone other than the mobile phone you are subscribed, the charges are still billed to
the number for the subscribed mobile phone.
5 Plan 150 (FOMA and Xi) applies, regardless of the subscription plan. For more details on various billing plans, please refer to the DOCOMO website.
6 No communications charges apply if there are no new (or saved) video messages being held.
*3 If you use the
*
*
*
*The caller is charged for dialing and communications charges for recording voice and video messages. (Dialing and communications charges apply
starting the moment the Voice Mail Service outgoing message begins playing.) When recording a message, the caller can press "
outgoing message (limited to touch-tone capable phones only).
Certain charges may vary at different locations.
" to skip the
*
●
Actual screen may be different.
26
Notes on Use
●Changes in Mobile Phone Subscriptions
Voice Mail
[
Service
●All stored messages will be deleted when the use of your mobile phone number is suspended,
the phone number is changed, or your contract is terminated. Stored messages are not deleted
in the case of name changes or inheritance.
●When mobile phone use is temporarily suspended, the monthly charge still applies even though
the various Voice Mail Service operations (including remote operation) cannot be used.
Accumulated voice mail messages are deleted 72 hours from the time they are recorded,starting
with the earliest recorded message.
●When changing the name, all stored messages should first be deleted. The new user may listen
to stored messages. The service must also be deactivated before changing the name in order to
keep messages from being recorded while the change of name is being processed.
●After the change of name, the new user must change the Network Password at a service counter.
If the Network Password is not changed, the previous user may listen to stored messages. The
outgoing messages should also be checked and changed if necessary.
]
Notes on Use
●Using in conjunction with other services
●If you are using the Voice Mail Service in conjunction with the Call Forwarding Service, activating
one service automatically deactivates the other. However, deactivating the service currently in use
does not automatically activate the other service.
●Other Notes
●The Voice Mail and Announcement Only functions cannot be set simultaneously.
●While the caller is using the Tsuuwa-Rokuon Service, part or all of the outgoing message for the
Voice Mail function or the Announcement Only function may not play. For further information
about the Tsuuwa-Rokuon Service, refer to DOCOMO’s corporate sales website, docomo
Business Online (in Japanese only).
●If it is temporarily difficult to obtain a connection to the Voice Mail Service Center, a message
will play informing you of this. In this case, please wait a short while and try again.
●This service is not available if you are subscribed to the FOMA・Xi Data Plan.
●Some smartphones provide notification of the number of remaining messages using the SMS
message "VM:○○", in which "○○" is a two-digit number indicating the number of messages
that have not yet been deleted or saved.
Transmission of this SMS message cannot be cancelled, and reception cannot be rejected using
the SMS rejection setting. There is no charge to receive the SMS.
●This service, or parts of this service, may not be available on some handsets.
* For notes on use related to the Remote Access, refer to p. 20; for notes on use related to the Videophones, refer to p. 25.
27