1
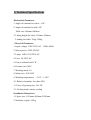
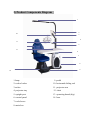
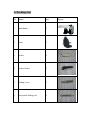
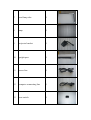
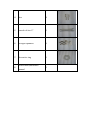
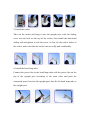
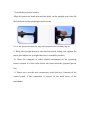
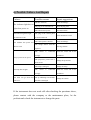
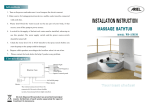
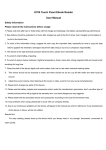
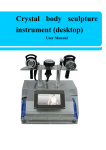
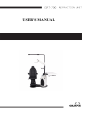
USER'S MANUAL
Product
Profile
Thanks to purchase and use the combined table made by our
company. The combined table is a new type of product that brings in
advanced design and manufacturing technology of abroads, taking the
simple, fashional, practical as starting point. It has stable performance,
comprehensive function and the appearance is refinement and novelty, the
structure is firm, light and handy.
The combined table uses quality hardness materials and the whole
device’s structure is solid. The special surface spray coating technology
protects the instrument’s surface not to be scratched easily and it has the
characteristics of waterproof, dampproof, durable and never distort.
1. The operating board which can horizontally rotate 90° uses quality
environmental protection materials that is high-temperature endurable,
abrasion proof, corrosion resistance, solid and bearable. It can provide
power input.
2. The design of the hand-operated rocker is more human because the
rocker can randomly swing up and down, left and right to the best
position, making the optometrist’s operation more convenient and the
subject’s eyes more comfortable, improving the satisfaction of the
optometrist and the subject.
3. The comfortable and beautiful electric chair has large lifting range, low
noise and automatic inhibiting function, it runs safely and steadily,
making the subject and the operator feel quick and easy when use this
instrument.
Matters
Needing
Attention
Caution!
1. Before assembling and using the instrument, you must read this manual
carefully.
2. Before using the instrument, you should install the ground of the city
power outlet reliably.
3. When assemble, move or disassemble the instrument, don’t thump,
strike or take the board. When install the fasteners, the force should be
well-distributed and gentle.
4. The instrument must be placed smooth and steady, avoid bearing or
shaking. Choose a place that is well-ventilated, dry and clear as far as
possible to assemble the instrument, it’s inadvisable to work in the
condition of open air, high temperature, exposed to sunshine and so on.
5. When there is something wrong with the instrument, maintain it under
the professional’s instruction referring to this manual, if the circuit needs
to be adjusted, you must shut off the power and let the professional do it.
6. You must change the fuse or lamp according to the original accessories’
specifications and models in the state of shutting off the power when you
need to change them.
7. Make sure to use the required supply voltage because the instrument
will be easily damaged if the voltage is too high or too low.
8. Shut off the power after the examination, please unplug the power plug
if the instrument will not be used for a long time.
9. Don’t wash the surface of the instrument using organic solvent,
otherwise it will damage the instrument’s appearance.
CONTENTS
1) Technical Specification…………………………………1
2) Product Components Diagram………………………….2
3) Package List…………………………………………….3
4) Assembly Process……………………………………….6
5) Operating Manual……………………………………….8
6) Possible Failure And Repair…………………………….9
7) Electric Principle Map…………………………………10
8) Electric System Map…………………………………...11
This document is supplied according to the exist products. We reserve the
right to make changes or take back this document anytime without prior
notice.
1) Technical Specifications
Mechanical Parameters
1. Angle of rotation for rocker: ±30°
2. Angle of rotation for table: 90°
Table size: 840mm×405mm
3. Lifting height for chair: 150mm~200mm
Loading for chair: 70kg~150kg
Electrical Parameters
1. Input voltage: 110V/220V AC 50Hz~60Hz
2. Motor power: 55W 24V DC
3. Lamp: 16W 110V/220V AC
4. Fuse: 5A 250V AC
5. Power without load: 1W
6. Pressure test: 2KV
7. Working mode: S1
8. Main wire: 10A 250V
9. Working temperature: -30℃~+50℃
10. Relative humidity: less than 90%
11. Force of pressing key: 1N~5N
12. Cooling mode: nature cooling
Installation Dimensions
1. Figure size: 1150mm×865mm×2030mm
2. Machine weight: 150kg
2) Product Components Diagram
1
2
3
10
4
11
5
12
13
6
7
8
9
14
1.lamp
9. pedal
2. rocker locker
10. horizontal sliding rod
3.rocker
11. projector arm
4. projector tray
12. chair
5. upright post
13. operating board (big)
6. control panel
14. base
7. tools boxes
8. main box
3) Packing List
ID
Name
Qty
1
mainframe
1
2
chair
1
3
rocker
1
4
rocker locker
1
5
sliding cover
1
6
horizontal sliding rod
1
Figure
7
bend lamp tube
1
8
lamp
1
9
projector bracket
1
10
upright post
1
11
power line
1
12
computer connecting line
1
13
reset switch
1
14
fuse
4
15
wrench of size 17
1
16
hexagon spanners
6
17
decorative ring
1
18
certification,instruction
manual
1
4) Assembly Process
1. First of all, open the box and read the instruction manual carefully, then
check the parts and tools.
2. Put the mainframe on a suitable place, adjust the 4 screws on the base
to make sure that the mainframe is stable.
Notice particularly: When assemble or move the instrument, don’t take
the operating board.
3. Install the chair
Take out the chair, unscrew the 4 screws on it, align the holes on the chair
and their corresponding holes on the chair connecting plate, then fix them
with the screws.
4. Install the upright post
Put the decorative ring around the upright post shaft, make the power
lines of the projector and lamp go through the holes on the chassis, then
put the upright post around the shaft, in this step, you should keep the
upright post vertical to the ground. Then open the back cover of the
chassis through loosing the screws on it, find the power lines of the
projector and lamp, connect them to the corresponding positions of the
circuit board, the last step is fix the upright post to the chassis through
tightening the screws.
5. Install the rocker
Take out the rocker and hang it onto the upright post, stick the sliding
cover into the hole on the top of the rocker, then install the horizontal
sliding rod and tighten it with the screw. At last, fix the rocker locker to
the rocker, make sure that the rocker can run softly and comfortably.
6. Install the bend lamp tube
Connect the power line in the bend lamp tube with the power line on the
top of the upright post according to the same color and push the
connected power line into the upright post, then fix the bend lamp tube to
the upright post.
7. Install the projector bracket
Align the projector bend arm and the holes on the upright post, then fix
the bend arm to the upright post with screws.
8. Fix the projector onto the tray with prepared screws and plug in.
9. Hang the eyesight detector onto the horizontal sliding rod, tighten the
knob, then adjust the eyesight detector to a suitable position.
10. Place the computer or other related instruments on the operating
board, connect it to the outlet below the board with the prepared power
line.
11. Power on to test the wire connection, check the keys’ function of the
control panel, if the connection is correct, fit the back cover of the
mainframe.
5) Operating Manual
1. Let the subject sit on the chair, power on the instrument and press the
[power] key on the panel, the instrument will stand by
2. Loose the locker of the rocker, adjust the eyesight detector to a suitable
position, then lock the rocker
3. Adjust the height of the chair using the [up/down] keys on the panel
according to the subject’s height to make sure that the subject’s eyes and
the eyesight detector’s sight holes are on a level. You can also use the
[up/down] switch on the front of the operating board to do the same
operation. In addition, there is chair up inhibiting device below the
operating board to protect the subject’s legs.
4. When you need it, you can rotate the [lamp] knob on the panel.
5. Press the [projector] key on the control panel and refer to a manual of
the projector.
6. You should refer to a manual of the eyesight detector if you do not
know how to operate it.
7. After the eyesight examinations, you have to loose the rocker locker,
move the rocker to its original position and lock it. At last, let the subject
come down from the chair, shut off the power.
6) Possible Failure And Repair
Failures
Possible reasons
Repair suggestions
The fuse is blown
Check and change
The plug is not inserted well
Insert the plug well
The outlet has no power
Test and confirm
The indicator light has no
light when power on
The indicator light has light
The plug of the control panel
but it dosen’t work
is not inserted well
Check and insert it well
The control panel is broken
Check and change
The machine has power but
The voltage dosen’t meet the
dosen’t work
Test ang confirm
required
The
circuit
is
connected
wrongly
Check the circuit and fix the
breakdown
The projector has no power
The projector’s power line is
Change the power line
short-circuit
The lamp has no light
The lamp is damaged
Change the lamp
The
Check the circuit and fix the
circuit
is
connected
wrongly
The chair can go down but
The up inhibiting switch under
cann’t rise
the table is damaged
breakdown
Change the switch
If the instrument dose not work still after checking the questions above,
please contact with the company or the maintenance place, let the
professionals check the instrument or change the parts.