1
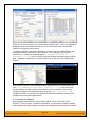
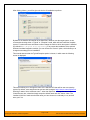
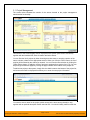
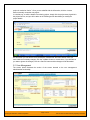
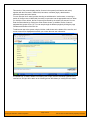
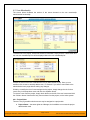
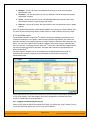
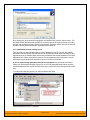
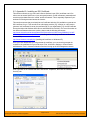
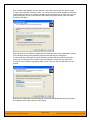
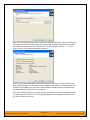
SpiraTest Administration Guide
Version 1.0.4
Inflectra Corporation
Date: April 15, 2007
Contents
1. Introduction
1. Introduction
1
2. Installing SpiraTestTM
2
2.1. System Prerequisites
2
2.2. Installing the Software
2
2.3. Security Considerations
2
3. System Administration
2
3.1. Project Management
2
3.2. User Management
2
3.3. License Management
2
4. Project Administration
2
4.1. Project Details
2
4.2. User Membership
2
4.3. Excel Data Import
2
5. Appendices
SpiraTestTM provides an integrated, holistic
Quality Assurance (QA) management solution
that manages requirements, tests and incidents
in one environment, with complete traceability
from inception to completion.
This administration guide outlines how to setup
a working installation of the SpiraTestTM system,
and how to perform routine administrative tasks.
It assumes a basic understanding of how to
setup and administer either a Windows 2003
Server or Windows XP workstation, and also
assumes that you have access to a valid
Administrator level account.
For information on how to use SpiraTestTM to
manage the quality assurance lifecycle of your
project, please refer to the SpiraTestTM User
Manual instead.
2
5.1. Appendix A – Troubleshooting IIS
2
5.2. Appendix B – Installing an SSL
Certificate
2
5.3. Appendix C – Disabling Features
of SpiraTest
2
© Copyright 2006-2007, Inflectra Corporation
Page 1 of 36
This document contains Inflectra proprietary information
2. Installing SpiraTestTM
This section outlines how to prepare your system for installation of SpiraTestTM, how to actually
install the software using the provided installation package, and finally how to ensure that your
web-server is correctly configured to ensure secure operation.
The first sub-section will outline what hardware and software configurations are supported and
the exact installation sequence for both Windows NT and Windows 2000. The second subsection will explain how to load the SpiraTestTM software onto the server, and discuss common
problems and solutions.
The minimum hardware and software requirements for running the SpiraTestTM system are:
Requirement
Minimum Specification
Processor:
PC-compatible with Intel® Pentium P4® processor or
equivalent
Memory:
512 MB, 1 GB recommended
Operating System:
Windows XP Professional (recommended)*
Windows 2000 Professional Edition*
Windows Server 2003 (recommended)
Windows 2000 Server Edition
Service Packs:
Windows XP Professional SP2*
Windows 2000 Professional Edition SP4*
Windows Server 2003 SP2
Windows 2000 Server Edition SP4
Database:
Microsoft SQL Server 2000
Microsoft SQL Server 2005 (recommended)
Microsoft SQL Server 2005 Express Edition
Microsoft SQL Server Desktop Engine (MSDE) 2000
Web Server:
Internet Information Services (IIS) 5.0+
Web Browser:
Internet Explorer 6.0+ (recommended)
Mozilla Firefox 2.0+
Opera 9.0+
Other Components:
Microsoft .NET Framework 1.1+
Microsoft Data Access Components (MDAC) 2.7
Microsoft Excel 2003 (needed for Excel importer)
*Note that SpiraTestTM can be loaded onto either Windows Server or Professional editions,
provided that the IIS web-server is installed and that either SQL Server or MSDE is available as a
database engine. However Windows 2000 Professional and Windows XP Professional can only
support a maximum of 15 concurrent user web sessions. In general unless there are only going to
be a couple of client machines hitting the server, we recommend using Windows Server
(preferably Windows Server 2003).
© Copyright 2006-2007, Inflectra Corporation
Page 2 of 36
This document contains Inflectra proprietary information
2.1. System Prerequisites
Assuming that you have already installed the appropriate version of Microsoft Windows onto your
computer (or that has been pre-installed for you), you need to then make sure that the various
prerequisites have been correctly added to your installation before trying to install SpiraTestTM.
The SpiraTestTM installer will check to ensure that the various prerequisites are in place, and will
abort the install if any are missing, indicating to the user what action needs to be taken.
We recommend that you install / configure the prerequisites in the following order:
h
Install SQL Server / MSDE 2000 or later
h
Install Internet Explorer 6.0 or later
h
Ensure that IIS is installed
h
Install the .NET Framework v1.1 or later
h
Ensure that ASP.NET is installed
2.1.1. Install SQL Server / MSDE 2000 or later
Install the appropriate version of the database software, following the instructions provided with
the installation. Note that during the installation, make sure that you choose “Mixed Mode”
authentication. This will allow you to log-in to the database either using Windows NT Integrated
Authentication or using SQL Server login/password authentication. This is important as
SpiraTestTM uses a SQL Server login/password to access the database.
2.1.2. Install Internet Explorer 6.0 or later
Install the appropriate version of the browser, following the instructions provided with the
installation. You are free to use Internet Explorer, Mozilla, Firefox or Opera with SpiraTestTM.
Other browsers (Netscape, Safari, etc.) may work with SpiraTestTM, but they have not been
exhaustively tested for compatibility by Inflectra.
2.1.3. Ensure that IIS is installed
On Windows Server installations, IIS is usually installed as part of the factory configuration,
whereas on Windows XP and 2000 Professional installations, you typically need to manually add
the components to the factory configuration.
To check if you have IIS installed, click Start > Settings > Control Panel > Administrative Tools.
Under the “Administrative Tools folder”, you should see an icon for “Internet Information
Services”. If you don’t see this icon, then it means that you need to add IIS to your computer:
© Copyright 2006-2007, Inflectra Corporation
Page 3 of 36
This document contains Inflectra proprietary information
To install IIS, you need to click Start > Settings > Control Panel > Add or Remove Programs, then
choose the option to “Add / Remove Windows Components” as illustrated below:
Check the box marked “Internet Information Services (IIS)”, and click the <Next> button to install
the missing Windows components. Once the installation has completed, IIS will now be installed
on your system. To verify that this is the case, type http://localhost into the address bar of Internet
Explorer on your computer. You should see a screen either displaying a webpage, or the initial IIS
startup page:
If you don’t see this page, but instead see an IIS error page (e.g. Internal Server Error 500),
please refer to Appendix A – Troubleshooting IIS to fix your IIS installation before following the
rest of this installation guide.
2.1.4. Install the .NET Framework v1.1 or later
On Windows XP SP2 and 2003 Server SP2 installations, Microsoft .NET Framework v1.1 is
usually installed as part of the factory configuration, whereas on Windows 2000 and pre-SP2
installations, you typically need to manually add the components to the factory configuration.
© Copyright 2006-2007, Inflectra Corporation
Page 4 of 36
This document contains Inflectra proprietary information
To check if you have Microsoft .NET installed, click Start > Settings > Control Panel >
Administrative Tools. Under the “Administrative Tools folder”, you should see an icon for
“Microsoft .NET Framework 1.1 Configuration”. If you don’t see this icon, then it means that you
need to add the .NET Framework to your computer:
To install the .NET Framework, launch Internet Explorer and enter the URL:
http://www.microsoft.com/netframework. From this page there will be links to download and install
the latest version of the .NET Framework (version 2.0 at time of writing). Click on the option to
download and install the .NET Framework, and follow the instructions provided. Once you have
completed the install, verify that the installation was successful by looking in the “Administrative
Tools” folder as illustrated above.
2.1.5. Ensure that ASP.NET is installed
Now that you have both IIS and .NET installed, you need to make sure that the Active Server
Pages (ASP.NET) components that allow IIS to access the .NET framework have been correctly
configured. If you installed .NET after IIS then ASP.NET is typically configured for you, but if you
installed IIS afterwards, then further manual steps may be necessary.
To verify that ASP.NET has been correctly configured, click on Start > Settings > Control Panel >
Administrative Tools > Internet Information Services to launch the IIS administrative console:
Expand the name of the web-server (marked as local computer), expand the “Web Sites” folder,
right-click on “Default Web Site” and choose the “Properties” link. This will bring up the IIS
configuration dialog-box. Then click on the <Configuration> button to bring up the “Application
Configuration” window:
© Copyright 2006-2007, Inflectra Corporation
Page 5 of 36
This document contains Inflectra proprietary information
If ASP.NET is correctly configured, you will see entries marked “.aspx”, “.asax” in the “Application
Mappings” portion of the window (see above). If you don’t see those entries, then ASP.NET
needs to be configured for this web site.
To configure ASP.NET on an existing IIS website, you need to open up Windows Explorer and
navigate to the folder containing the .NET Framework. So, for example, if you have .NET
Framework v1.1 installed, you would navigate to C:\ WINDOWS\ Microsoft.NET\
Framework\ v1.1.4322. Now, you need to open up a Windows command prompt by clicking
Start > Programs > Accessories > Command Prompt. This will open up the command prompt
window:
Now change the directory in the command window to the folder name in windows explorer (i.e.
type CD C:\ WINDOWS\ Microsoft.NET\ Framework\ v1.1.4322 where the version
number matches the version number of the framework you have installed). Once you have
changed the directory to the appropriate folder, simply type aspnet_regiis.exe – i to
configure ASP.NET. You can now verify that ASP.NET has been installed by checking the IIS
management console (as described above).
2.2. Installing the Software
Now that all the prerequisites have been correctly installed, you are now ready to install
SpiraTestTM onto your system. To perform the installation, you will need the installation package
downloaded from the Inflectra website, the name of the organization that the software is licensed
© Copyright 2006-2007, Inflectra Corporation
Page 6 of 36
This document contains Inflectra proprietary information
to, and the actual license key code which will be available in the customer area of the Inflectra
website.
To start the installation, double-click on the SpiraTestTM installation package (it will have a
filename of the form SpiraTest-v1.x.x.x.msi), and the Windows Installer will display the
following dialog box:
If you are upgrading from an earlier version of SpiraTest, the dialog box will be similar except that
it will instead let you know that you are upgrading from an existing version to version 1.0.2:
In this instance the installer will update the program files on your computer and migrate your data
into the new version seamlessly. If for any reason you don’t see the upgrade message and you
have an existing installation, don’t continue, but instead contact Inflectra customer support first.
This will ensure that your existing data is not overwritten by a clean install.
In either case, click the <Next> button to start the installation wizard, which will gather information
from you regarding how you want to setup the system, before actually installing the web-server
files and database components. If any of the prerequisites were not correctly installed, the
installer will display an error window that lists the missing component(s) instead of this screen. If
this happens, please refer to section 2.1 for installation of any prerequisites.
© Copyright 2006-2007, Inflectra Corporation
Page 7 of 36
This document contains Inflectra proprietary information
The next screen in the installation wizard outlines the SpiraTestTM End User License Agreement
(EULA). Please read this carefully as it describes the legal contract between you – the user of the
software – and Inflectra Corporation, the developer and publisher. Once you have read the
agreement and understood your rights and obligations, select the radio button marked “I accept
the terms in the License Agreement” and click the <Next> button.
The following screen will be displayed:
You need to enter your full name, the organization that was issued the software license, and
finally the full hexadecimal license key that was provided with the software. Once you click
<Next>, the installer will verify that all three were entered, and that the license key matches the
product being installed and that it matches the organization name. The installer will warn you of
any discrepancies, but will allow you to proceed; however after installation, the system will not
operate until a correct license key is entered.
If for any reason you are unable to get the provided license key to work, please contact Inflectra
customer support immediately and they will resolve the issue.
© Copyright 2006-2007, Inflectra Corporation
Page 8 of 36
This document contains Inflectra proprietary information
After clicking <Next>, you will be given the choice of installation to perform:
By default, the installer will install all of the SpiraTestTM features onto the target system, so we
recommend choosing either a “Typical” or “Complete” install, which will both install the complete
system. For advanced users who want to either change the folder to which the system is installed
(by default it is C:\Program Files\SpiraTest), or to prevent the installation of the optional
web-services data integration modules, you can choose the “Custom” option, which allows you to
change those settings prior to installation.
This manual assumes that the Typical/Complete option is chosen, in which case the following
screen is displayed:
This screen allows you to change the name of the web-site URL that will be user to access the
system. By default, users would need to type into their browsers: http://<server name>/SpiraTest.
Should you want to have a different name – other than SpiraTest – change the name in the
Virtual Directory box, otherwise simply accept the default name and click <Next>. Note: The
installer will check to make sure that the name you have chosen is not already in use, and will
warn you if it is.
© Copyright 2006-2007, Inflectra Corporation
Page 9 of 36
This document contains Inflectra proprietary information
Upon clicking <Next>, you will be taken the database connection screen:
The “Database” box is the name of the database schema that the installer will create inside SQL
Server. The default value is “SpiraTest”, and we recommend that you use this.
For the “Server” box, you need to enter the name of the Microsoft SQL Server instance that is
running on your system; the installer will default it to the hostname of the server (which in many
cases will be correct). The easiest way to find out the database server name is to open up the
SQL Server Administrative console (typically by clicking Start > Programs > Microsoft SQL Server
> Enterprise Manager) and look for the name of the server.
For the “User” and “Password” fields you need to enter a SQL Server login that has Database
Administrative (DBA) permissions. Typically the login is called “sa”, and the password will have
been chosen by you during the installation of SQL Server. (Note: The current version of
SpiraTestTM requires the use of a SQL Server administration login for this process; future versions
will be able to support use of integrated Windows NT authentication)
Once you have entered the various pieces of information, click <Next>. The installer will attempt
to connect to the database using the provided information, and it will display an error message if
any of the information is incorrect. Assuming the information is correct, the following screen will
be displayed:
© Copyright 2006-2007, Inflectra Corporation
Page 10 of 36
This document contains Inflectra proprietary information
Click the <Install> button to actually begin the process of installing SpiraTestTM onto your system.
The installer will display a progress bar that gradually fills as the installation proceeds:
Once the installation is complete, the following message will be displayed:
Congratulations! You have successfully installed SpiraTestTM onto your system. If you type
http://localhost/SpiraTest into your browser you should see the SpiraTestTM login page, as
illustrated in the SpiraTestTM User Manual. If for any reason you don’t see the login page, please
refer to Appendix A – Troubleshooting IIS.
2.3. Security Considerations
The Microsoft Internet Information Services (IIS) web-server and SQL Server database are
powerful tools to managing web-based applications. However it is important to make sure that
they are correctly secured to prevent unauthorized access to applications being hosted on them.
This is a fast changing field and beyond the scope of this guide to address, however we
recommend reading the following article for details on how to secure IIS:
http://www.windowsecurity.com/articles/Installing_Securing_IIS_Servers_Part1.html
In addition to the steps outlined in this article, it is important to note that by default, all web pages
served by IIS using the HTTP protocol are unencrypted, and as such, the usernames and
passwords used by SpiraTestTM to log into the application can be read by network sniffing tools. If
you are using SpiraTestTM purely within an intranet environment, this may not be an issue.
However if you are externally hosting SpiraTestTM onto a publicly accessible website, we
© Copyright 2006-2007, Inflectra Corporation
Page 11 of 36
This document contains Inflectra proprietary information
recommend installing a Secure Sockets Layer (SSL) encryption certificate, and restricting all webtraffic to the secure HTTPS protocol instead. For details on how to perform this task, please refer
to Appendix B - Installing an SSL Certificate.
© Copyright 2006-2007, Inflectra Corporation
Page 12 of 36
This document contains Inflectra proprietary information
3. System Administration
Now that you have successfully installed SpiraTestTM, this section of the guide outlines how to
perform the typical system-wide administrative tasks necessary for setting up projects in the
system, managing users and verifying the license information. To perform these tasks, you need
to login to the system with a username that has “System Administration” permissions. The special
“Administrator” username is created by the installer for this very purpose. You should initially login
to SpiraTestTM with the username Administrator, and the password PleaseChange. It is
recommend that this password be changed as soon as possible to something that is secure yet
memorable by clicking on the “User Profile” link – see the SpiraTestTM User Manual for more
details.
Once you have logged in as the Administrator, you need to click the “Administration” link above
the main navigation bar. This will display the Administration home page:
The Administration home page is divided into two main areas – the project administration panel
on the left hand side, and the system administration panel on the right hand side. If you are a
“project owner” and are currently logged into that project, then you will see the project
administration panel, and if you have been given the system administrator permission, then you
will see the system administration panel. You may have both of these permissions or just one.
This section describes the functionality available to the system administrator only. The two main
tasks performed by the system administrator are creating/editing projects and creating/editing
users. These tasks typically need to be performed before any other users can use the system,
since there will be no logins or projects available other than the sample ones provided during the
installation.
© Copyright 2006-2007, Inflectra Corporation
Page 13 of 36
This document contains Inflectra proprietary information
3.1. Project Management
The screen below illustrates the section of the screen devoted to the project management
administrative functionality:
This section of the screen displays the list of projects in the system (both inactive and active)
together with their website URL, date of creation and active status.
You can filter the list of projects by either choosing an active status, or entering a portion of the
name, web-site or date into the appropriate text box. When you click the <Filter> button, the list of
projects will be filtered by the criteria you entered. You can clear the filter selection by clicking the
<Clear Filters> button. In addition, the list of projects is paginated into groups of ten (10). You can
step through the different pages by clicking the page numbers at the bottom of the project list.
To add a new project to the system, simply click the <Add> button at the bottom of the project list,
and a new screen will be displayed that allows you to enter the new project information:
You need to enter a name for the project (which cannot be the same as any already in use),
together with an optional description and/or web-site URL. You should initially make sure that the
© Copyright 2006-2007, Inflectra Corporation
Page 14 of 36
This document contains Inflectra proprietary information
project is marked as “Active”. Once you are satisfied with the information, click the <Insert>
button to actually create the new project.
In a similar way, to edit the details of an existing project, simply click the project name hyperlink in
the project list box, and you will be taken to the following screen that allows you modify the
project details:
On this screen you can edit the name, description, website URL and active status. Once you
have made the necessary changes, click the <Update> button to commit them. If you decide that
you want to ignore the changes, click the <Cancel> button and the changes will be discarded.
3.2. User Management
The screen below illustrates the section of the screen devoted to the user management
administrative functionality:
© Copyright 2006-2007, Inflectra Corporation
Page 15 of 36
This document contains Inflectra proprietary information
This section of the screen displays the list of users in the system (both inactive and active)
together with their first name, middle initial, last name, username (login), administrative
permission status and active status.
You can filter the list of users by either choosing an administrative / active status, or entering a
portion of the first name, middle initial, last name or username into the appropriate text box. When
you click the <Filter> button, the list of users will be filtered by the criteria you entered. You can
clear the filter selection by clicking the <Clear Filters> button. In addition, the list of users is
paginated into groups of ten (10). You can step through the different pages by clicking the page
numbers at the bottom of the user list.
To add a new user to the system, simply click the <Add> button at the bottom of the user list, and
a new screen will be displayed that allows you to enter the new user information:
In a similar way, to edit the details of an existing user, simply click the username hyperlink in the
user list box, and you will be taken to the following screen that allows you modify the user details:
© Copyright 2006-2007, Inflectra Corporation
Page 16 of 36
This document contains Inflectra proprietary information
On this screen you can edit the first name, middle initial, last name, username, email address,
system administration status and active status. Once you have made the necessary changes,
click the <Update> button to commit them. If you decide that you want to ignore the changes,
click the <Cancel> button and the changes will be discarded.
3.3. License Management
At the bottom of the system management pane, there is a small section of the screen that
displays the current software license information. It displays the currently licensed product (e.g.
SpiraTest), the license version (e.g. v1.0.0.0), the type of license in effect (x-user fixed, x-user
concurrent, demonstration, enterprise, etc.), the organization that the license belongs to, and
finally the number of users concurrently logged-in.
This last piece of information is useful as it helps administrators track down how many licenses
are currently in use.
© Copyright 2006-2007, Inflectra Corporation
Page 17 of 36
This document contains Inflectra proprietary information
4. Project Administration
This section describes the functionality available to a project administrator only. The two main
tasks performed by the project administrator are modifying the details of the project and changing
the project user membership. These tasks would be performed after the system administrator has
created the project, created the users, and designated a user as a project administrator. This
allows the system administrator to delegate responsibility for managing project-level permissions.
4.1. Project Details
The screen below illustrates the section of the screen devoted to the project details administrative
functionality:
On this screen you can edit the name, description, and website URL. Once you have made the
necessary changes, click the <Update> button to commit them. If you decide that you want to
ignore the changes, click the <Cancel> button and the changes will be discarded.
© Copyright 2006-2007, Inflectra Corporation
Page 18 of 36
This document contains Inflectra proprietary information
4.2. User Membership
The screen below illustrates the section of the screen devoted to the user membership
administrative functionality:
To add a user to the project, so that can access its information, simply click the <Add> button and
the new user membership form will be displayed below the user membership list:
Choose the name of the user to add and the role you want him/her to play. Once you are
satisfied, click <Insert> to actually add the user, or <Cancel> if you want to return back to the
administration home page without making any changes.
Similarly, to modify the role of a user assigned to the project, simply change the role for that
user’s entry in the drop-down menu and click the <Update> button.
To remove a user from the project, simply check the box to the left of the user’s name and click
the <Delete> button. Note that this only removes them from the project, not the entire system.
4.2.1. Project Roles
There are five (5) possible roles that a user may be assigned to a project with:
h
Project Owner – the same rights as a Manager, but in addition can access the project
administration tools
© Copyright 2006-2007, Inflectra Corporation
Page 19 of 36
This document contains Inflectra proprietary information
h
Manager – can see all screens and add/edit all artifacts, but cannot access project
administration tools
h
Developer – can see all screens, but can only add/edit incidents and tests and change
requirement coverage
h
Tester – can see all screens, but can only add/edit incidents and execute tests. Note:
cannot delete incidents, only a Manager can do that.
h
Observer – can see all screens, but cannot perform any write operations (insert / update
/ delete)
Note: The System Administrator is automatically added to every project as a Project Owner, and
can never be removed as Project Owner, made inactive or made a different role on the project.
4.3. Excel Data Import
The web-based interface of SpiraTestTM is ideal for creating and managing requirements, test
cases and incidents for a new project. However when migrating requirements, test cases, test
steps and incidents for an existing project from another system or Microsoft Office document (e.g.
Excel), it is useful to be able to load in a batch of artifacts, rather than having to manually enter
them one at a time. To simplify this task, SpiraTestTM comes with a Microsoft Excel data importer
that can bulk-load requirements, test cases, test steps and incidents from a populated Excel
sheet into SpiraTestTM.
The Excel Importer template can be downloaded from the Administration home page. As
illustrated below, there is a hyperlink to the spreadsheet on the bottom of the project
administration pane:
Simply right-click on the “SpiraTest Excel Importer” link and choose to download the spreadsheet
to your local machine. Once downloaded, open up the spreadsheet in Microsoft Excel and
choose to “Enable Macros” when prompted.
4.3.1. Logging-in and Selecting the Project
When you first open the SpiraTest Importer Excel sheet, you will see the “Login” window. If this is
not the first sheet that opens, click on the “LogIn” tab to display it.
© Copyright 2006-2007, Inflectra Corporation
Page 20 of 36
This document contains Inflectra proprietary information
This page allows you to login to SpiraTestTM via Excel and choose the project that you want to
import data into. Enter into the Application URL cell the web address that you use to access
SpiraTestTM in your browser. This is usually of the form http://<hostname>/SpiraTest.
Make sure that you remove any suffixes from the address (e.g. Default.aspx).
Then, in the user-name and password cells, enter the user-name and password that you normally
log into SpiraTestTM with on the web. Once you have entered this, click the <Load Projects>
button to load the list of projects that you are authorized to access.
Now, select the project you’re interested in from the drop-down menu. You are now ready to
begin importing requirements, test cases, test steps and/or incidents into the project.
4.3.2. Importing Requirements
To import requirements, first you need to click on the “Requirements” tab in the Excel sheet:
Next, you need to either enter the requirements into the Excel sheet or cut and paste them in
from another existing Excel sheet that you’ve been using to manage requirements. The sheet
expects the requirements to be indented according to the hierarchical arrangement of the
requirements. In addition, each requirement should be designated an importance and completion
© Copyright 2006-2007, Inflectra Corporation
Page 21 of 36
This document contains Inflectra proprietary information
status from the relevant drop-down lists. If you’re not sure, you can leave the importance blank,
but you must enter a status, so we recommend initially using “Requested”
Once you have entered all the requirements, click the <Start Import> button. The Excel importer
will now access the SpiraTestTM import web-service and begin loading the data. Once the import
has finished, a message box will be displayed indicating if there were any errors in the import. If
there were any errors, then an error message will be displayed to the right of each entry that
failed. This will enable you to correct the specific entry that failed, and re-run the import for that
line.
4.3.3. Importing Test Cases
To import test cases, first you need to click on the “Test Cases” tab in the Excel sheet:
Next, you need to either enter the test cases and test folders into the Excel sheet or cut and paste
them in from another existing Excel sheet that you’ve been using to manage test cases. The
sheet expects the test folders to be indented according to their hierarchical arrangement, with the
test cases arranged inside these folders. Each entry needs to be designated as either a test case
or a test folder, by choosing either Y or N from the drop-down list.
Once you have entered all the test folders and test cases, click the <Start Import> button. The
Excel importer will now access the SpiraTestTM import web-service and begin loading the data.
Once the import has finished, a message box will be displayed indicating if there were any errors
in the import. If there were any errors, then an error message will be displayed to the right of each
entry that failed. This will enable you to correct the specific entry that failed, and re-run the import
for that line.
© Copyright 2006-2007, Inflectra Corporation
Page 22 of 36
This document contains Inflectra proprietary information
4.3.4. Importing Test Steps
To import test steps, you first need to click on the “Test Steps” tab in the Excel sheet:
Next, you need to either enter the test steps into the Excel sheet or cut and paste them in from
another existing Excel sheet that you’ve been using to manage test steps. They should be
entered in list form, with the step number, description, expected result and sample data fields
filled out. The step number and description fields are required, and the other two are optional. In
addition, you need to enter the ID of the test case you want to load the steps into at the top of the
sheet in the cell provided. This ID can be found on the Test Cases page inside SpiraTestTM.
Once you have entered all the test steps, click the <Start Import> button. The Excel importer will
now access the SpiraTestTM import web-service and begin loading the data. Once the import has
finished, a message box will be displayed indicating if there were any errors in the import. If there
were any errors, then an error message will be displayed to the right of each entry that failed.
This will enable you to correct the specific entry that failed, and re-run the import for that line.
4.3.5. Importing Incidents
To import incidents, first you need to click on the “Incidents” tab in the Excel sheet:
© Copyright 2006-2007, Inflectra Corporation
Page 23 of 36
This document contains Inflectra proprietary information
Next, you need to either enter the incidents into the Excel sheet or cut and paste them in from
another existing Excel sheet that you’ve been using to manage bugs / issues / defects. The sheet
expects the incidents to be arranged in a list with a name, description and optional resolution. In
addition to these three text fields, you need to choose the type (incident, bug, issue, etc.), status
(new, open, assigned, etc.), and priority (critical, high, etc.) from the appropriate drop-down lists.
Once you have entered all the incidents, click the <Start Import> button. The Excel importer will
now access the SpiraTestTM import web-service and begin loading the data. Once the import has
finished, a message box will be displayed indicating if there were any errors in the import. If there
were any errors, then an error message will be displayed to the right of each entry that failed.
This will enable you to correct the specific entry that failed, and re-run the import for that line.
4.4. Migration Tool for HP Mercury QualityCenter®
This application is a data migration tool that allows you to migrate an existing testing project from
HP/Mercury TestDirector or QualityCenter into SpiraTest. To use the application, you need to
right-click on the Windows Installer package (.msi) link illustrated above and download the
package to your workstation. Once downloaded, please refer to the separate Migration Tool for
QualityCenter User Guide that outlines the process for installing and using the tool.
4.5. Integration Adapter for IBM Rational RequisitePro®
This application is an integration adapter that allows you to periodically load and update
Requirements and Use Cases from Rational RequisitePro into SpiraTest. To use the application,
you need to right-click on the Windows Installer package (.msi) link illustrated above and
download the package to your workstation. Once downloaded, please refer to the separate
Integration Adapter for RequisitePro User Guide that outlines the process for installing and
using the tool.
© Copyright 2006-2007, Inflectra Corporation
Page 24 of 36
This document contains Inflectra proprietary information
5. Appendices
5.1. Appendix A – Troubleshooting IIS
If you receive the dreaded “IIS 500 Internal Error” webpage when you try and access an ASP or
ASP.NET application on the server, there can be a myriad of causes. However a good first place
to look for the cause is inside the Windows Event Viewer, which stores all errors raised in the
system.
To open the Event Viewer, click Start > Settings > Control Panel > Administrative Tools > Event
Viewer. This will open up the event viewer:
Click on the Application and System folders in turn and look for errors raised by
“MSSQLSERVER”, “SpiraTest”, “DCOM”, “Component Service” or “IISCTLS”. Click on the error
message, and copy the text of the message into a text editor (e.g. Notepad).
We recommend using either the Microsoft support website (http://support.microsoft.com) or a
simple web search (www.google.com, www.yahoo.com, etc.) to search for the specific error
message you cut and paste into notepad. This will typically find the cause of most common IIS
errors.
5.1.1. Missing MSDTC Issue
There is one common error that has been found with installations where Microsoft SQL Server
was installed after IIS was installed. This typically affects only Windows XP Professional, but
could occur in other situations. What happens is that the SQL Server installation inadvertently
removes the Microsoft Distributed Transaction Coordinator (MSDTC) service from the system
during the installation.
To determine if this is indeed the cause of the observed error, you need to click on Start >
Settings > Control Panel > Administrative Tools > Component Services:
© Copyright 2006-2007, Inflectra Corporation
Page 25 of 36
This document contains Inflectra proprietary information
Once the window has opened, expand the folders marked “Component Services”, “Computers”,
“My Computer” and “COM+ Applications” in turn. If the window opens correctly and displays the
information illustrated above, then your IIS 500 error is being caused by something else.
However if you receive an error message that indicates an inability to connect with the
“Distributed Transaction Coordinator”, then you have to fix the MSDTC service to enable IIS and
ASP.NET to operate properly.
To fix the issue, you need to make changes to the Windows System Registry (hereafter referred
to as “the registry”). This is a process that should not be attempted by novice users, since any
incorrect changes can complete wreck the Windows installation, requiring a complete
reinstallation of the operating system.
To open the registry, click Start > Run, and type “Regedit.exe” into the dialog box, and the
registry will open:
Expand the folders marked “My Computer”, “HKEY_LOCAL_MACHINE”, “SOFTWARE” and
“Microsoft” in turn and navigate to the folder marked “MSDTC”. Click the <Delete> button on your
keyboard, and click <OK> on the confirmation box. Now close the registry editor.
Now you need to click on Start >Settings > Control Panel > Add or Remove Programs and click
on the tab marked “Add/Remove Windows Components”:
© Copyright 2006-2007, Inflectra Corporation
Page 26 of 36
This document contains Inflectra proprietary information
Don’t change any of the selected components, but instead simply click the <Next> button. The
Windows installer will detect that the MSDTC is missing (due to the registry change you made)
and will now reinstall it correctly. Once this has finished, reboot the system and you should now
be able to access ASP and ASP.NET applications from within IIS.
5.1.2. Application Session Pooling Issues
This issue will only affect Windows Server 2003 installations using IIS 6.0. With this release,
Microsoft introduced several new features into the IIS web server that affect how sessions and
application pools are handled. Most web hosting companies host multiple websites in the same
application pool. When resources are maxed out for an application pool IIS 6 starts to recycle
these sites causing application variables to be lost for those recycled sites.
If you are experiencing application/session loss symptoms then we would recommend
asking your web hosting company to place you in your own application pool with all recycling
options disabled and the recycle worker process set to recycle only once during the day at a set
time.
To make these changes yourself, you need to follow these steps:
Add new application pool for “SpiraTest”.
© Copyright 2006-2007, Inflectra Corporation
Page 27 of 36
This document contains Inflectra proprietary information
Next, choose your own application pool in the web site properties:
Click <OK> and you should now find that the issues with sessions disappearing has been
corrected.
© Copyright 2006-2007, Inflectra Corporation
Page 28 of 36
This document contains Inflectra proprietary information
5.2. Appendix B – Installing an SSL Certificate
This section outlines how you can install a Secure Sockets Layer (SSL) certificate onto IIS to
allow users to access SpiraTestTM via an encrypted protocol, so that usernames, passwords and
sensitive project data cannot be “sniffed” across the network. This is especially important if your
web-server is being accessed across the Internet.
This section assumes that you already have a Certificate Authority (CA) available to generate an
SSL certificate for you. This can either be a third-party provider (e.g. Verisign) or a tool used to
generate “self certificates” that can be used internally to your organization (e.g. the IIS Certificate
Server that ships with Windows 2000 Server and Windows Server 2003). For more information on
the differences between these two options, please read the following documents:
http://www.microsoft.com/technet/prodtechnol/WindowsServer2003/Library/IIS/8d3bb71a-0a7f443f-8084-908d0dab9caa.mspx?mfr=true (installing self or third-party certificate on Windows
Server 2003)
http://www.somacon.com/p42.php (installing self-certificate on Windows XP)
Once you have decided how you will generate the certificate, you next need to generate the
request for the certificate from your web server. First, click Start > Settings > Control Panel >
Administrative Tools > Internet Information Services to bring up the IIS management console:
Now, right-click on the “Default Web Site” and choose “Properties”, then click the “Directory
Security” tab:
© Copyright 2006-2007, Inflectra Corporation
Page 29 of 36
This document contains Inflectra proprietary information
Now, click the button marked “Server Certificate”, click <Next> and choose the option marked
“Create a new certificate”, and click <Next>. You can then choose to either prepare the certificate
request and sent it later, or to send the certificate request immediately to an online CA. If you are
using a third-party CA and are connected to the Internet choose the second option, otherwise
choose the first option.
Enter the name for the certificate, typically this will contain the name of the organization, purpose
of the certificate and any other pertinent information that will help you distinguish it.
You should choose a bit-length of at least 2048 bits, and leave the other options unchecked
unless you are using the server outside of the United States, in which case you will need to
choose the “Server Gated Cryptography (SGA)” option. Click the <Next> button when you are
finished.
Now enter the organization and organizational unit name that best describes who is requesting
the certificate. Click <Next> when you are finished.
© Copyright 2006-2007, Inflectra Corporation
Page 30 of 36
This document contains Inflectra proprietary information
Next enter the “common name” for the web site that will be using the certificate. For a website
that will be accessed across the Internet, this should the fully qualified domain name (e.g.
www.mysite.com), whereas for a website that is limited to a local intranet, the computer name will
suffice (e.g. myhost). Click <Next> when you are finished.
Next enter the country / region, state / province and city / locality that best describe where the
web-server will operate or where the organizational entity resides. Once you are finished, click
<Next>.
© Copyright 2006-2007, Inflectra Corporation
Page 31 of 36
This document contains Inflectra proprietary information
Next, enter the filename that you want to use for the certificate request file. This is the file that you
will send to the Certificate Authority (CA) to request an SSL certificate. This filename should be
memorable and describe what the certificate is for. The file extension should be .txt. Click
<Next> once you have finished entering the filename.
Finally, you will get a confirmation screen that verifies the information you have entered. If you
want to make changes, click the <Back> button, otherwise click <Next> to actually generate the
certificate. Once finished, you will now have the certificate request file that you can send to the
Certificate Authority (CA) to process your request.
Once the CA has processed your request, they will send back the actual SSL certificate that you
can install onto your web-sever. The next steps will describe how to install the certificate once
you receive it back from the CA.
© Copyright 2006-2007, Inflectra Corporation
Page 32 of 36
This document contains Inflectra proprietary information
Once you have received the SSL certificate back from the CA, save the file onto your hard-disk
with the file-extension .cer. Now open up the IIS management console (as described above),
right-click on the “Default Web Site” icon and choose “Properties”. Now select the “Directory
Security” tab, and click the button marked <Server Certificate> under the heading “Secure
Communications”. When the dialog box appears, choose the second option – to process an
existing request. This will bring up the following dialog box:
Now, browse to the place on your hard disk where you saved the SSL certificate (with extension
.cer) and select the file you saved. Click <Next> to load the certificate. Once the certificate has
been loaded, all that remains is to tell IIS to require a secure HTTPS connection, so that users
don’t attempt to access the website over the unencrypted HTTP protocol.
From the IIS properties dialog box, click the button marked <Edit> under the “Secure
Communications” heading:
Check the box marked “Require secure channel (SSL)”, and click the <OK> button. You have
now successfully configured IIS for secure HTTPS data transmission.
© Copyright 2006-2007, Inflectra Corporation
Page 33 of 36
This document contains Inflectra proprietary information
5.3. Appendix C – Disabling Features of SpiraTest
SpiraTestTM provides a complete test management solution that manages requirements, tests
and defects in an integrated environment. However recognizing that you may already have made
investments in other tools that provide bug-tracking, requirements management and test
management, there is an option to disable any of the three main application modules
(requirements, tests and incidents). This will remove them both from the main navigation tabs and
from the project and users’ home pages.
To disable any of the tabs, you need to simply open up the web.config file in a text editor and
add the following lines to the configuration file in between the <appSettings> tags:
<add key="SpiraTest.HiddenTabs"
value="Requirements;Test Cases;Incidents" />
You need to enter the list of modules to disable separated by semicolons (with no spaces in
between). Note that the example above will disable all the modules. Once you have saved the
configuration file, the changes will take place immediately.
Legal Notices
This publication is provided as is without warranty of any kind, either express or implied,
including, but not limited to, the implied warranties of merchantability, fitness for a particular
purpose, or non-infringement.
This publication could include technical inaccuracies or typographical errors. Changes are
periodically added to the information contained herein; these changes will be incorporated in new
editions of the publication. Inflectra Corporation may make improvements and/or changes in the
product(s) and/or program(s) and/or service(s) described in this publication at any time.
The sections in this guide that discuss internet web security are provided as suggestions and
guidelines. Internet security is constantly evolving field, and our suggestions are no substitute for
an up-to-date understanding of the vulnerabilities inherent in deploying internet or web
applications, and Inflectra cannot be held liable for any losses due to breaches of security,
compromise of data or other cyber-attacks that may result from following our recommendations.
The section of the manual that describes modifying the Windows System Registry (“Registry”)
should only be attempted by experienced Windows administrators who are familiar with its
organization and contents. Inflectra cannot be held liable for any losses due to damage to the
system registry made by inexperienced personnel.
SpiraTestTM and InflectraTM are trademarks of Inflectra Corporation in the United States of
America and other countries. Microsoft®, Windows®, Explorer® and Microsoft Project® are
registered trademarks of Microsoft Corporation. All other trademarks and product names are
property of their respective holders.
Please send comments and questions to:
Technical Publications
Inflectra Corporation
10301 Julep Avenue
Silver Spring, MD 20902
U.S.A.
[email protected]
© Copyright 2006-2007, Inflectra Corporation
Page 34 of 36
This document contains Inflectra proprietary information
© Copyright 2006-2007, Inflectra Corporation
Page 35 of 36
This document contains Inflectra proprietary information