1
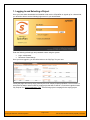
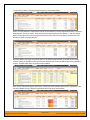
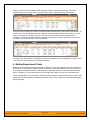
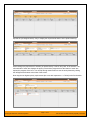
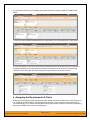
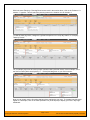
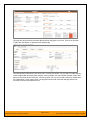
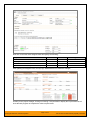
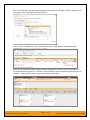
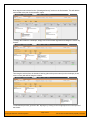
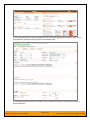
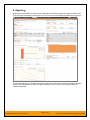
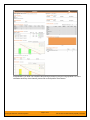
SpiraPlan® | Quick Start Guide
Inflectra Corporation
Date: October 6th, 2014
Contents
Introduction
Introduction
1
1. Logging In and Selecting a Project
2
2. Enter the Requirements and User Stories3
3. Create the Release Plan
6
4. Adding Requirement Tasks
7
5. Planning the Iteration
10
6. Assigning the Requirements & Tasks 12
7. Logging Issues and Defects
16
8. Reporting
20
Legal Notices
22
SpiraPlan® is a complete agile project
planning and management system
designed specifically for agile
methodologies such as Scrum, Kanban,
and Extreme Programming.
SpiraPlan manages your project's
requirements, user stories, release
plans, iteration/sprint plans, tasks, bugs
and issues in one environment. Since its
web based, teams can collaborate in
real time and have up to the minute
visibility of the project’s status.
This guide provides a quick step-by-step
tutorial for creating a sample SpiraPlan
project, adding some user stories and
associated tasks, building the release
plan, assigning the backlog items to the
various sprints, and then demonstrating
how the developers manage their
workload, update their assigned items
and log bugs/issues as needed.
For further information on using
SpiraPlan, please refer to the more
comprehensive SpiraPlan User Manual.
For information on setting up a new
SpiraPlan instance, creating projects
and users and other administration
tasks, please refer to the SpiraPlan
Administration Guide.
© Copyright 2006-2014, Inflectra Corporation
Page 1 of 23
This document contains Inflectra proprietary information
1. Logging In and Selecting a Project
Once you have either downloaded and installed a trial version of SpiraPlan or signed up for a hosted trial,
you should be able to see the following login screen in your web browser:
Enter the following default login and password to start using the system:
•
•
Login: administrator
Password: PleaseChange
Once you have logged-in, you should be taken to the “My Page” for your user:
Initially this page will be fairly empty, with only the list of sample projects populated. This is normal. For
this tutorial we want to start out with an empty project that has no data in it, so click the hyperlink under
“My Projects” for “Sample Application Two”. That will bring up the homepage for the empty project:
© Copyright 2006-2014, Inflectra Corporation
Page 2 of 23
This document contains Inflectra proprietary information
The project home page will display various widgets containing key project metrics; however they will be
initially empty. The next step will be to start entering your project’s data.
2. Enter the Requirements and User Stories
Click on the Planning > Requirements menu option to display the project’s requirements list page:
The terminology in SpiraPlan is designed to be methodology agnostic, however the following table
illustrates the nomenclature used in SpiraPlan and how it relates to some common agile methodologies:
SpiraPlan
Summary Requirement
Requirement
Task
Release
Iteration
Extreme Programming
Epic
User Story
Task
Release
Iteration
Scrum
Epic
Backlog Item
Task
Release
Sprint
AgileUP / DSDM
Feature Group
Requirement
Task
Release
Iteration
Initially the requirements list will be empty. Click on the “Insert” button in the main toolbar to enter the
following requirements in turn:
•
•
•
•
•
•
•
Functional Requirements
Module 1
System must allow entry of users
System must allow the modification of users
System must allow the deletion of users
Module 2
System should allow administrators to setup notifications
© Copyright 2006-2014, Inflectra Corporation
Page 3 of 23
This document contains Inflectra proprietary information
You should now have a simple flat requirements list, as illustrated below:
Now to correctly indent the requirements, select the checkboxes of all the requirements under “Functional
Requirements” and click ‘Indent’. Then select the three requirements under “Module 1” and click ‘Indent’
again. Finally right-click on the last requirement and choose ‘Indent’ from the popup context menu. You
should now have a list that looks like:
We finally want to set a type and priority value for the different requirements, to do that we can simply
click the “select all” checkbox at the top of the list and then click on the top ‘Edit’ button in the right-hand
column. That will make all the requirement rows editable:
Now, set the requirement type to ‘User Story’ and choose some different values for the ‘Importance’ field
and click Update. Now you will have a prioritized list of user story requirements:
© Copyright 2006-2014, Inflectra Corporation
Page 4 of 23
This document contains Inflectra proprietary information
Now that we have prioritized the requirements, the developers or business analysts would be responsible
for estimating the complexity of each requirement and entering that estimate for each item. To do that we
first need to display the estimate column in the grid. To do that, click on the “Show/Hide Columns”
dropdown list and show the Estimate column. This will display the requirements’ estimates in the grid:
By default, all the requirements will have been assigned a default estimate of 1.0 points. The points are
not a defined number of hours, but are instead an indication of the size of the requirement. The estimates
should reflect how big each of the requirements are relative to each other.
Now, we can simply click the “select all” checkbox at the top of the list and then click on the top ‘Edit’
button in the right-hand column. The requirements will be displayed in editable mode again. Enter the
following initial estimates for the requirements:
Requirement
System must allow entry of users
System must allow the modification of users
System must allow the deletion of users
System should allow administrators to setup notifications
Estimate
1.5 points
2.0 points
1.0 points
2.0 points
You should now have the requirements’ estimates displayed in the system:
You can also view this same information in a graphic form by going to Planning > Planning Board to
display the SpiraPlan agile planning board:
© Copyright 2006-2014, Inflectra Corporation
Page 5 of 23
This document contains Inflectra proprietary information
In the screenshot above, the planning board is displaying the product backlog by Priority/Importance. You
can easily change the priority of requirements by dragging the items from one priority grouping to another.
Also you can rearrange the items that have the same priority using drag and drop to specify a more exact
prioritization.
Now that we have a list of prioritized, estimated requirements, the next task is to enter in our planned list
of releases and iterations for the project.
3. Create the Release Plan
Click on the Planning > Releases menu option to display the project’s release list page:
Initially the release list will be empty. Click on the “Insert” button in the main toolbar to enter the following
releases in turn:
•
•
Release 1.0 – version number 1.0.0.0
o Start Date: Today’s Date
o End Date: Today’s Date + 2 months
Release 1.1 – version number 1.1.0.0
o Start Date: Today’s Date + 2 months
o End Date: Today’s Date + 4 months
You should now have a list of releases that looks like the following:
Now that we have the releases defined, we need to add one additional level of detail to each release –
the list of iterations or sprints that will take place in each release. We shall enter in some sample iterations
for the first release only.
Select the checkbox for the second release (Release 1.1) and choose the menu option Insert > New
Iteration. A new iteration will be inserted between Release 1.0 and Release 1.1. Choose a name for the
iteration, specify the date-range for the iteration, and click ‘Update’. Now repeat this process twice and
you should now have three iterations added to the list. We recommend making each iteration last 2weeks and have each one scheduled in series:
© Copyright 2006-2014, Inflectra Corporation
Page 6 of 23
This document contains Inflectra proprietary information
Finally, to indent the three iterations under the parent release, select the checkboxes of the three
iterations and click the ‘Indent’ button. You should now have a release hierarchy that looks like:
Finally we need to specify the number of resources that will be assigned to each iteration and release. To
do that, click on the “Show/Hide Columns” dropdown list and Show the “# Resources” column. To make
room you can hide the “Iteration?” column. Once the column is visible, select the checkboxes for
“Release 1.0” and click the Bulk Edit button again. Now you should be able to adjust the # resources for
the release and its iterations to 2. Then click Update:
The screen now shows that the Plan Effort for each of the iterations has been doubled to 160 hours. This
is the amount of time that you have available to allocate.
4. Adding Requirement Tasks
Now that we have defined the macro-schedule for Release 1.0, the next stage is to have the developers
take each of the requirements defined so far and define the various tasks that will need to be carried out
to develop the functionality outlined in the requirement. Each task will have its own estimate associated
with it. In addition, you can optionally specify date-ranges and priorities to each of the individual tasks.
To start adding tasks, click on Planning > Requirements to display the requirements list. Now, click on the
hyperlink for the first requirement (“System must allow entry of users”) and the requirements details page
will be displayed:
© Copyright 2006-2014, Inflectra Corporation
Page 7 of 23
This document contains Inflectra proprietary information
Notice that the system displays an initial resource estimate of 12.00 hours for this requirement. This is
simply based on an initial project setting of 8 hours per story point. Once you start adding tasks and
getting metrics based on the actual team velocity (how many story points they can accomplish in a given
time frame), the system can update that conversion metric.
Now click on the “Tasks” tab to display the list of tasks defined for this requirement:
Initially the list of tasks will be empty. Before entering the tasks, first click on the “Show/Hide Columns”
dropdown list and show the “Show Est. Effort” column. This will display the estimated effort for each Task.
Now, click on the “New Task” hyperlink to add a new task associated with this requirement:
Enter the name of the task “Create user data tables” and the estimated effort 10.0h and click Update. The
new task should now have been added:
© Copyright 2006-2014, Inflectra Corporation
Page 8 of 23
This document contains Inflectra proprietary information
Now we need to add the remaining tasks; the following table outlines all the tasks that need to be added
under each of the requirements (we have included the one already created for completeness):
Requirement / Task
Est. Estimate
System must allow entry of users
Create user data tables
10.0h
Develop user business object
10.0h
Build user creation screens
20.0h
System must allow the modification of users
Extend user business object to handle updates
5.0h
Add user list page
15.0h
Add user details page
20.0h
Add user permissions page
15.0h
System must allow the deletion of users
Extend user business object to handle deletes
5.0h
Update user list page to add delete functionality
10.0h
System should allow administrators to setup notifications
Create user administration home page
15.0h
Add user settings for notifications to database
10.0h
Create user notifications administration page
20.0h
You should now have the following requirements list page:
Where we’ve hidden the “Author” field and shown the “Task Effort” field to illustrate that the detailed task
estimates may be different from the original estimates for the requirements.
Now when we add new requirements, it would be nice if the system would use this updated information
when determining the estimated number of hours to deliver requirements with a specified number of story
points. To update the metric the system uses, go to Administration > Planning Options:
© Copyright 2006-2014, Inflectra Corporation
Page 9 of 23
This document contains Inflectra proprietary information
As you can see, the system lists 8.0 hours as the current number of hours required to deliver a single
story point of functionality. Now that we have some actual tasks in the project, click on the “Suggest”
button to have the system provide its suggestion of the new metric:
Click the ‘Apply’ button to update the planning metric, and then click the main ‘Update’ button to confirm
the change.
5. Planning the Iteration
Now that the developers have elaborated each of the requirements to include the necessary tasks, the
next step is to scope out the plan for each iteration / sprint. Click on the Planning > Planning Board option
on the main menu to display the product backlog planning board:
Now to view the iteration plan for a specific release, select ‘Release 1.0’ from the drop-down menu at the
top-left of the screen. That will display the iteration plan for the selected release:
© Copyright 2006-2014, Inflectra Corporation
Page 10 of 23
This document contains Inflectra proprietary information
Expand the ‘(Unassigned Items)’ entry to display the requirements that are in the product backlog:
Each backlog item (requirement or incident) is represented by a virtual “story card” in the iteration. The
left-hand side of each item displays the priority color and the progress bar at the bottom of each item
depicts the progress of the item. You can flip through each iteration to see the work planned by clicking
the left/right arrow buttons at the sides of the screen.
Now drag the two highest priority requirements (the ones with Importance = 1-Critical) to the first iteration:
© Copyright 2006-2014, Inflectra Corporation
Page 11 of 23
This document contains Inflectra proprietary information
If you would like to see more information about each requirement, simply enable the ‘Detailed View’
option:
To see the individual tasks associated with each requirement, you can also select the ‘Tasks’ option:
You can now determine how much time has been scheduled in the first iteration and how much time is
remaining. Although we do have spare time available in Iteration 1 we will leave room left for fixing
incidents, so next, drag and drop the remaining two requirements to the second iteration:
6. Assigning the Requirements & Tasks
Now that we have planned which requirements (user stories) and tasks are planned for each iteration, we
can assign the individual tasks to the appropriate developer(s). The process you follow will depend on
your methodology (e.g. in Scrum the developers simply pick the tasks, whereas in Extreme Programming
the project manager will usually do the assignment).
© Copyright 2006-2014, Inflectra Corporation
Page 12 of 23
This document contains Inflectra proprietary information
Within the same Planning > Planning Board screen used in the section above, click on the ‘Release 1.0 Iteration 1’ hyperlink. This will switch the planning board to the iteration view for iteration 1:
To view the tasks by person, change the right-hand dropdown from “Group By: Status” to “Group By:
Tasks by Person”:
For our sample project we have three project members listed (included ourself). As an example, select
the first four tasks (which are all priority = 1 – Critical) and drag them to your user’s section:
Now you can clearly see the four tasks that have been assigned to your user. To simulate how this would
appear to a developer, click on the main SpiraPlan icon (in the top-left) to display your user’s “My Page”
dashboard:
© Copyright 2006-2014, Inflectra Corporation
Page 13 of 23
This document contains Inflectra proprietary information
This page lists all the development tasks that have been assigned to your user. Click on the first task
“Create user data tables” to display the task details page:
This task has been estimated at 10.0 hours and is currently not started. The next step is to start working
on the assigned task and report back progress. As an example, click the workflow operation “Start Task”,
then enter an actual effort of 3.0 hours, a remaining effort of 5.0 hours and add a comment “Added initial
set of data tables”. Upon clicking ‘Save’, the progress indicator will reflect the changes and the new
comment will have been added to the list:
© Copyright 2006-2014, Inflectra Corporation
Page 14 of 23
This document contains Inflectra proprietary information
Now click on the other three assigned tasks and specify the following:
Requirement / Task
Create user data tables
Develop user business object
Build user creation screens
Extend user business object to handle updates
Est. Estimate
10.0h
10.0h
20.0h
5.0h
Actual Effort
3.0h
2.0h
3.0h
0.5h
Remaining Effort
5.0h
7.5h
18.0h
4.0h
After updating the assigned tasks, the ‘My Page’ dashboard will now reflect the changes:
Similarly for the project manager, clicking on Planning > Requirements to display the requirements list will
show the task progress as it impacts the various requirements:
© Copyright 2006-2014, Inflectra Corporation
Page 15 of 23
This document contains Inflectra proprietary information
7. Logging Issues and Defects
During the development of the various features, the developers may run into unexpected issues/defects
with other parts of the system. To record these incidents and have them reflected in the plan, we shall
pretend that a bug was found during the development of the user entry screen. Click on the Tracking >
Incidents page to display the list of incidents and then click on the “New Incident” icon:
Enter in the following information for this new incident and click “Save”:
•
•
•
•
•
Name: Error when logging in to application to add users
Type: Bug
Description: When logging in to the application to build the new users administration section, I
received a 500 system error.
Detected Release: 1.0.0.0.0000 - Release 1.0 - Iteration 1
Priority: 2 - High
Once the incident has been saved, click on the “Associations” tab to add a link from the new incident to
the requirement that it’s related to:
© Copyright 2006-2014, Inflectra Corporation
Page 16 of 23
This document contains Inflectra proprietary information
Click on the “Add” hyperlink and choose the Requirement radio button and then select the “System must
allow entry of users” requirement from the hierarchy:
Leave the Type as ‘Related-to’, enter a comment and click the “Add” button to add the association:
Now that a new incident has been logged, the project manager will review the incident and assign it to
one of the iterations to be fixed in. To do this, click on Planning > Planning Board and change the view to
‘Release 1.0’ grouped ‘By Iteration’ (make sure ‘Incidents are included):
© Copyright 2006-2014, Inflectra Corporation
Page 17 of 23
This document contains Inflectra proprietary information
Now drag the new incident from the “(Unassigned Items)” section to the first iteration. This will add the
new incident to the plan for this iteration / sprint:
To assign the incident to a developer, simply click on the Iteration hyperlink and change the view to ‘By
Person’:
Then drag the incident from the Iteration1 backlog (above the person names) to the developer (in this
case our user) who will be fixing the incident:
To simulate this process, go back to the “My Page” by clicking on the orange Spira icon in the top-left of
the screen:
© Copyright 2006-2014, Inflectra Corporation
Page 18 of 23
This document contains Inflectra proprietary information
You can now see that you’ve been assigned an incident under the “My Assigned Incidents”. Now click on
the hyperlink for the incident to bring up the incident details page:
The developer would now resolve the incident, add a comment describing the solution and change the
status to Resolved.
© Copyright 2006-2014, Inflectra Corporation
Page 19 of 23
This document contains Inflectra proprietary information
8. Reporting
Now that we have created our requirements, added tasks, reporting progress and logged incidents, if we
go to the project homepage for this project, we’ll now see the various widgets populated with key metrics:
Some of the graphs (e.g. burndown and burnup) make more sense when you have a Release or Iteration
selected in the dropdown list on the top-right of the page. Once you do that you’ll get the Release or
Iteration dashboard:
© Copyright 2006-2014, Inflectra Corporation
Page 20 of 23
This document contains Inflectra proprietary information
Congratulations, you have now completed the planning and tracking lifecycle using SpiraPlan. For more
information about any of the features, please refer to the SpiraPlan User Manual.
© Copyright 2006-2014, Inflectra Corporation
Page 21 of 23
This document contains Inflectra proprietary information
Legal Notices
This publication is provided as is without warranty of any kind, either express or implied, including, but not
limited to, the implied warranties of merchantability, fitness for a particular purpose, or non-infringement.
This publication could include technical inaccuracies or typographical errors. Changes are periodically
added to the information contained herein; these changes will be incorporated in new editions of the
®
publication. Inflectra Corporation may make improvements and/or changes in the product(s) and/or
program(s) and/or service(s) described in this publication at any time.
The sections in this guide that discuss internet web security are provided as suggestions and guidelines.
Internet security is constantly evolving field, and our suggestions are no substitute for an up-to-date
®
understanding of the vulnerabilities inherent in deploying internet or web applications, and Inflectra
cannot be held liable for any losses due to breaches of security, compromise of data or other cyberattacks that may result from following our recommendations.
The section of the manual that describes modifying the Windows System Registry (“Registry”) should only
be attempted by experienced Windows administrators who are familiar with its organization and contents.
®
Inflectra cannot be held liable for any losses due to damage to the system registry made by
inexperienced personnel.
SpiraTest®, SpiraPlan®, SpiraTeam® and Inflectra® are registered trademarks of Inflectra Corporation in
®
®
®
®
the United States of America and other countries. Microsoft , Windows , Explorer and Microsoft Project
are registered trademarks of Microsoft Corporation. All other trademarks and product names are property
of their respective holders.
Please send comments and questions to:
Technical Publications
Inflectra Corporation
8121 Georgia Ave
Suite 504
Silver Spring, MD 20910
U.S.A.
[email protected]
© Copyright 2006-2014, Inflectra Corporation
Page 22 of 23
This document contains Inflectra proprietary information