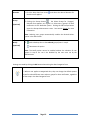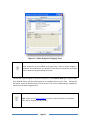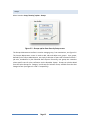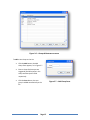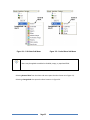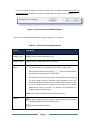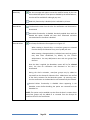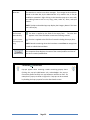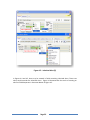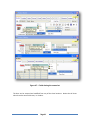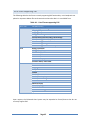
1
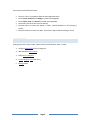
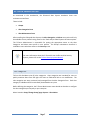
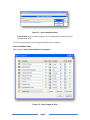
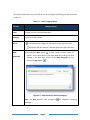
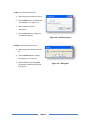
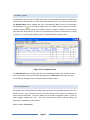
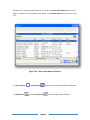
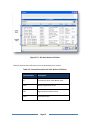
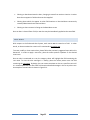
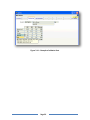
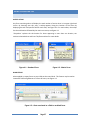
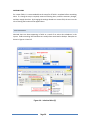
Enhanced Alerts System Version 1 12/15/2006 TSI SYSTEMGROUP INC TriForce Team Email: [email protected] www.systemgroup.com © Copyright 2006 TSI Systemgroup Inc. Enhanced Alerts System Version 1 12/15/2006 TSI SYSTEMGROUP INC TriForce Team The information, opinions, directions, suggestions, or instructions howsoever provided are provided ‘as is’ by TSI Systemgroup Inc. without any warranty of any kind, either express or implied or condition of merchantability. TSI Systemgroup Inc. is in no way responsible or liable for any damage whether direct, indirect, consequential, incidental, special, punitive, exemplary, or general, contribution or indemnity, of any kind whatsoever, howsoever caused, (including but not limited to breach of contract, loss of profit, business interruption, loss of business data or information, negligence or other tortuous behaviour, deletion, error, defect, omission, or any other cause of action regardless of whether it arises at law or in equity) arising directly or indirectly out of or in connection with the access to, use of, reliance on, influence of, accuracy of, or performance of information provided by TSI Systemgroup Inc. either printed or electronic. © Copyright 2006 TSI Systemgroup Inc. Page 2 TABLE OF CONTENTS Introduction ...................................................................................................................................... 4 Overview ......................................................................................................................... 5 How to Guide .................................................................................................................. 6 EAS SYSTEM ADMINISTRATION .................................................................................................. 7 Alert Categories .............................................................................................................. 7 Groups ........................................................................................................................... 12 Reminder System .......................................................................................................... 17 Alerts Maintenance....................................................................................................... 17 CREATING / MODIFYING / CLEARING ALERTS ........................................................................ 24 Creating Alerts .............................................................................................................. 24 Modifying Alerts............................................................................................................ 33 Clearing Alerts ............................................................................................................... 34 Matrix Alerts ................................................................................................................. 35 FORMS SUPPORTING EAS ......................................................................................................... 37 Forms and Record Alerts............................................................................................... 37 Inherited Alerts ............................................................................................................. 38 Cross Tab / Screen Alerts .............................................................................................. 40 List of Forms Supporting EAS ........................................................................................ 43 Page 3 INTRODUCTION The Enhanced Alerts System (EAS) has been developed in order to facilitate communication between departments within your organization. The subsystem provides an easy-to-use interface with which any user can quickly apply a colour-coded alert to any field within TriForce. The system also integrates these alerts into the existing Reminders System so that you can remind users of important alerts. It is important to note that the EAS system is also a selfmaintaining system; alerts with a specified expiry date will automatically be removed from the system on the defined date. For enhanced usability and flexibility, two alert types exist; General Alerts; Categorized Alerts, which inherit Administrator-defined category properties. Key Features Fields are colour-coded for easy identification Tooltips are used as an informative tool displaying the alert message Pop-up Alerts: visible for high level, important alerts Alert Categories: Administrator-defined and colour-coded for quick application Listing of all Active/Inactive alerts via menu path Tools/ Alerts Alerts Details Screen for quickly managing all company alerts across an enterprise Self-Maintaining System: Alerts with limited duration automatically clear on their expiry date Displays the total number of Alerts per form (in form’s upper right hand corner) Integrated Reminder System: generates a reminder of the applied Alert Extensibility: upon request, EAS may be included in forms that currently do not support EAS Page 4 OVERVIEW An alert can be quickly applied to any field by selecting an alert type from the right click Alerts sub menu. Fields containing an alert are highlighted with a specific color, thereby visually catching a user's attention. Alert messages are easily viewed in a tooltip when the mouse pointer is placed over the corresponding field. Depending on alert settings, the alert message may be a Pop-up and/or be made Read Only. Alerts can be created, modified and cleared by any TriForce XP user. A form holding a record containing more than one alert displays the number of active alerts in its upper right hand corner. Hovering over this area invokes a tooltip, displaying each record’s alerts with their tab and field location. The Reminder, Enhanced Alerts system, and user groups work in collaboration to notify selected users of an existing alert. The Enhanced Alert System introduces three new maintenance interfaces. These include: Alert Categories Form The Alert Categories form distributes nine (9) alert categories per company or system. These pre-defined categories are intended for users to quickly associate alerts to fields with little or no modification. Groups The Groups interface handles the definition of user groups which can be assigned to TriForce XP users. User groups are currently intended for use by the Enhanced Alerts System. Alert Maintenance Form The Alert Maintenance form lists all system-wide alerts along with their location and expiry date. The Alerts Details Screen provides useful and time-efficient tools for quick alert navigation, modification and deactivation. Page 5 Some important clarifications follow: The term “Alert” encompasses General and Categorized Alerts. Terms Create, Associate, and Apply are used interchangeably. Terms Expire, Clear, and Inactive are used interchangeably. Active alerts are alerts that have not expired. Inherited alerts are alerts that appear in fields, created elsewhere in the company’s system. Empty forms do not contain any data. These forms appear before selecting a record. HOW TO GUIDE Setting up the EAS is fairly simple. Please ensure you follow these steps, in order: 1. Configure Setup 0554 for Alert Categories; 2. Add and Define User Groups; 3. Define Alert Categories; 4. Create/ Modify/ Clear field Alerts; 5. Manage Alerts. Page 6 EAS SYSTEM ADMINISTRATION As mentioned in the introduction, the Enhanced Alert System introduces three new maintenance interfaces. These include: Groups Alert Categories Form Alert Maintenance Form After installing the Enhanced Alert System, the Alert Categories and Alerts menu points will only be available to user profiles having access to the Tools and/or Global System sub menu options. The TriForce Administrator is responsible for setting the appropriate status to the Alert Categories and Alerts menu points in user profiles. The Groups maintenance interface is available to users who have access to the Security menu. For more information about the TriForce XP User Profiles and the Security System, please refer to the TriForce Security System Manual. Alert Categories TriForce XP distributes nine (9) alert categories. Alert categories are intended for users to quickly associate alerts from the right click menu to fields with little or no modification. The alert categories are setup, activated, and managed from the Alert Categories form. Each alert category is editable and can be activated / deactivated at any time. Before defining the categories, the TriForce Administrator must decide on whether to configure the alert categories per company or per enterprise. Menu Location: Setup/ Change Setup/ page: System – Alert Notice Page 7 Figure 2.1 – Alert Categories Setup SETUP ID 0554 allows the Alert Categories to be configured per company (C) or per system/enterprise (S). The TriForce Administrator may now begin defining the Alert Categories. ALERT CATEGORIES FORM Menu Location: Setup/ System Global/ Alert Categories. Figure 2.2 – Alert Categories form Page 8 The TriForce Administrator can easily define each alert category by following the steps described in Table 2.1 Table 2.1 – Alert Category Setup Column Category Setup Color 1. Select one of the nine available colors. Category 2. Enter a Category Name Active 3. activates the alert category for selection from the right-click menu deactivates the alert category: removes option from right-click menu Note (Optional) 4. By clicking the Note button , a screen similar to that in Figure 2.3 appears. Set the alert options* (Pop-up & Read Only) and type an alert message in the Note box. Return to the Alert Categories form by clicking the Page button . Figure 2.3 – Alert Screen for an Alert Category Note: The Note button’s color changes to messages. Page 9 for categories containing Duration 5. Click the drop down box arrow the Alert once applied. Group 6. Clicking the Groups button and select the desired duration for , the Select Groups for ‘Category’ Selection form appears, as in Figure 2.4. Select users / groups* for alert notification via the Reminder system. Clicking the Edit Groups button opens the Groups Maintenance screen. See section Groups for more information. (Optional) Note: Selecting user groups automatically enables the Remind Others option in the Alert Screen. Notify (Optional) 7. sends a desktop alert to the selected groups/users in step 6. Deactivates the option. Note: The Notify option cannot be enabled without the selection of user groups in step 6 nor can it be disabled by the user once set by the Administrator Settings are saved by clicking the OK button when exiting the Alert Categories form. * When a user applies a categorized alert, they can change the default options as well as select different users and user groups for alert notification, regardless of the setup in the Alert Categories form. Page 10 Figure 2.4 – Select Groups for ‘Category’ form Alert categories can be modified at any given time. Once an active category is modified, the modification only applies to new alerts; all previously associated alerts retain their original settings and notes. The last alert type to appear in the form of Figure 2.2 is the General Alert type. Pop-up, Read Only, Remind Others and Remind Me options are establish directly on the form. The Remind Me option cannot be disabled from the Alert Screen if the TriForce Administrator enabled the option from the Alert Categories form. Note: Please see the Creating Alerts section for more information on the Read Only, Pop-up and Reminde Me options. Page 11 Groups Menu Location: Setup/ Security/ option - Groups Figure 2.5 – Groups option from Security Setup screen The Groups Maintenance interface is used to manage group / user associations, see Figure 2.6. The Groups Maintenance screen is used to add, edit and delete user groups. User groups, defined by the TriForce Administrator, are simply a collection of users with common functions – job roles, intended for by the Enhanced Alerts System. Essentially, user groups are created to select specific users for alert notification via the Reminder System. Groups can also be edited from the Select Groups for ‘Category’ and Groups for Selection forms, available from the Alert Categories form (see Figures 2.4 and 3.7 respectively). Page 12 Figure 2.6 – Groups Maintenance screen To add a User Group to the List: Click the Add button; the Add Group form appears, as in Figure 2.7 Enter a Group ID (acronyms are suggested) and description in the Group and Description fields respectively Click the Save button; the user group is added automatically to the list. Page 13 Figure 2.7 – Add Group form To edit a User Group from the List: Select the group to edit from the list Click the Edit button; the Edit Group form appears, as in Figure 2.8 Edit the Group ID and/or description Click the Save button; changes are immediately applied. Figure 2.8 – Edit Group form To delete a User Group from the List: Select the group to delete from the list Click the Delete button; a dialog box appears, as in Figure 2.9 Confirm deletion by clicking YES; the group is immediately removed from the list. Page 14 Figure 2.9 – Dialog Box Define / Update a User Group from the List: Select the group to define/update from the list Click the Users button; the Select Users for Group form appears containing the list of all TriForce XP users, as in Figure 2.10 Select the users you wish to add to add/remove from the user group Click the OK button. NOTE: Users selected from the form in Figure 2.10 are the users defined in the user group and displayed once the group is selected from the Select Group for ‘Category’ and the Groups for Selection forms in Figures 2.4 and 3.7. Figure 2.10 – Select Users form USER MASTER A new Tab, Member Of, has been added to the User Master, see Figure 2.11. When selected, a list of associated user groups is displayed. Alternatively, clicking the Add button opens the Select Groups for User form, as in Figure 2.12, listing all user groups defined in the Groups Maintenance screen. The user may be added to or removed from any of the user groups. The user can quickly be removed from a user group by selected the group from the list and clicking the Remove button. Page 15 Figure 2.11– User Master Tab ‘Member Of’ Figure 2.12 – Select Groups for User form Page 16 Reminder System The Reminder system works in collaboration with the Enhanced Alert System to deliver alert notifications to selected users from the Groups for Selection form. Once an alert is saved with the Remind Others option enabled, the alert is automatically added to the list of Reminders. The Reminders icon on the options toolbar blinks as it notifies users associated to the alert. Clicking the Reminder icon opens the reminder screen as in Figure 2.13 below. Alerts are listed until dismissed, deactivated, or if users are removed from the Groups for Selection form, shown in Figure 3.7, or until the Remind Others option is disabled within the Alert Screen. Figure 2.13 – Reminder screen The View Record button is used to open the record containing the alert, this provides the user with a quick way to access records with important alerts. Open Item button opens the Alert Screen thereby allowing the user to view the alert message in detail. Alerts Maintenance All company alerts, along with their location and expiry date, are grouped and listed in the Alert Notices screens. Upon selection of an alert, the Alerts Details Screen appears and displays the alert’s related information. The Alerts Details screen provides navigation buttons in order to easily navigate though each alert. The screen also includes buttons offering editing and deactivation capabilities for active alerts. Menu Location: Tools/ Alerts Page 17 All active alerts, excluding inherited alerts, are listed in the Active Alert Notices Grid View, as in Figure 2.14. Both active and inactive alerts appear in the All Alert Notices Grid View as in Figure 2.15. Figure 2.14 – Active Alert Notices Grid View The Show Inactive The Range Filter / Hide Inactive button is used to alternate between Grid Views. and the Go to Record Page 18 buttons are described in Table 2.3. Figure 2.15 – All Alert Notices Grid View Table 2.2 partitions alert information from the Grid Views into 7 columns. Table 2.2– Column Description for Alert Notices Grid Views Column Name Description S* I for Inactive alerts / A for Active alerts Form Relevant application screen Tab Page Location on above screen Field Field specification Page 19 Ending Alert Expiry Date Note: Empty fields imply unlimited duration. Key 1 Used to identify specific record key Key 2 Used to identify specific record sub-key *Column S is only available on the All Alert Notices Grid View. ALERT DETAILS SCREEN Upon selection of an alert from the Grid View listing, the Alert Details Screen, as in Figure 2.16, appears and displays the alert’s details. This screen provides useful and time-efficient tools for quick alert navigation, modification, and deactivation. The description for each button in the Alerts Details Screen is presented in Table 2.3. Figure 2.16 – Alerts Details Screen Page 20 Table 2.3 Screen button descriptions of Figure 4.5 Button Name Description Alert Status Screen Setup Used for flexible screens. Edit Allows the user to edit the alert message and options. Active Deactivate Alert Notice Deactivates active alerts; alert becomes Inactive. Active Range Filter Directs user to Range Filter Screen. Active /Inactive Previous Display the previous record in the Grid View listing. Active /Inactive List Re-directs the user to the Grid View. Active/Inactive Next Displays the next record in the Grid View listing. Active/Inactive Groups For Selection Opens Groups For Selection form as in Figure 3.7, displaying all groups / users associated to the presented alert. Active/ Inactive Go To Record Opens the form containing the alert. Active/ Inactive Quit Closes the form. Active/Inactive Page 21 Active/Inactive Icon ALERT DEACTIVATION The Range Filter quickly groups alerts for deactivation. By clicking the Range Filter button, the Range Filter Screen is displayed as illustrated in Figure 2.17. Leave all fields blank in order to select all active alerts; narrow your selection by entering data into the fields, then Confirm. The Deactivate Selected Alert Notices Grid View appears, as in Figure 2.18, displaying all filtered alerts. To exclude alerts from the list, use the Exclude and Exc.all buttons (this concurrently removes the ‘*’ from the I/E column). Click the Proceed button to confirm your selection and deactivate the alerts. Figure 2.17 – Range Filter Page 22 Figure 2.18 – Deactivate Selected Alert Notices Grid View The inactive alerts will appear in the All Alert Notices Grid View. Page 23 CREATING / MODIFYING / CLEARING ALERTS Creating Alerts Users can associate an alert to any field and matrix row on forms supporting EAS. To create a field alert: 1. Place the mouse pointer over the field that is to contain the alert 2. Right click the mouse on that field 3. Place the mouse pointer over the Alerts menu point from the pop-up menu 4. The Alerts sub menu appears 5. From the Alerts sub menu, select one of the alert types 6. The Alert Screen is now displayed 7. Setup the alert (see Table 3.1) 8. Click the Save button. The Alerts sub menu, as shown in Figures 3.1 and 3.2, offers two types of alerts for selection: General alert type: Always available for selection; Categorized alert type: Administrator defined, available upon activation. Figure 3.1 demonstrates the Alerts sub menu containing all active Alert Categories whereas Figure 3.2 demonstrates the Alerts sub menu containing only four active Alert Categories of the available nine. Page 24 Figure 3.1 – Full Alerts Sub Menu Figure 3.2 – Partial Alerts Sub Menu * Alerts may be applied to enabled or disabled, empty, or populated fields. Selecting General Alert from the Alerts sub menu opens the Alert Screen as in Figure 3.3; Selecting a Categorized alert opens the Alert Screen as in Figure 3.4. Page 25 Figure 3.3 – General Alert Screen Figure 3.4 – Categorized Alert Screen Page 26 If you are associating an alert to a field in an empty form, an additional option Set this alert for New Records Only will appear in the lower left hand side of the Alert screen, see Figure 3.5. Figure 3.5 –Alert Screen with Additional Option Table 3.1 lists and describes the available settings in Figures 2.3, 2.4, and 2.5. Table 3.1 – Alert Screen Setting Descriptions Setting Description Category Color Highlight colour used for that specific alert. Category Name Category Name; non-editable from this interface. Expires For General Alerts, use the date picker to choose an expiry date. Alerts saved without an expiry date ( ) have unlimited duration. An expiry date may be chosen at a later time. For Categorized Alerts, the expiry date is automatically calculated (using the alert category duration definition) and is displayed to the user. Although the expiration date cannot be modified from the Alert Screen, it can be modified from the Alerts Details Screen by the TriForce Administrator. Keep in mind that it is possible for the duration of a categorized alert to be unlimited. NOTE: Alerts expire at midnight on the date of their expiry. Pop-up* The alert message pops-up on screen. This occurs when a form/record containing pop-up alerts is accessed by a user. Pop-up functionality is disabled. Page 27 Read Only The alert message and options cannot be modified except by the user who enabled the option. If the option is disabled by the authorized user, the alert will be available for editing by any user. Read Only functionality is disabled, alert is editable by all users. Remind Me The Reminder screen lists the alert for notification until dismissed or deactivated. Remind Me functionality is disabled. Previously applied alerts with the Remind Me option enabled will have their associated reminders removed when this checkbox is disabled. Remind Others The Groups for Selection form appears as in Figure 3.7. When creating a General Alert, no user/user groups are selected from the Groups for Selection form; you may add your own. When creating a Categorized Alert, individual users and user groups may have been established, by default, by the TriForce Administrator. You may add/remove users and user groups from the form. Once the alert is applied, the Reminders screen will list, for selected users, the alert for notification until dismissed or the alert is deactivated. During the alert’s activation, users/user groups may by added or removed from the Groups for Selection form. Added users are notified of the alert’s existence via the Reminder system. By removing users, the alert notification in the Reminder list will automatically be removed. Remind Others functionality is disabled. Alerts appearing in the Reminder screen before disabling the option are removed from the Reminder list. NOTE: The option may be enabled any time after the alert’s creation where users/user groups may be added to or removed from the Groups for Selection form for alert notification. Page 28 Note Box The Note box is used to insert alert messages. If a message has already been placed in the Note box, by the Administrator or by another user, it may be modified or extended. Right clicking in the Note box pops-up a menu with text editing features such as cut, copy, paste, select all, zoom, and spell checker. NOTE: Tooltips and enabled pop-ups display the Category Name if the Note box is left empty. Set for New Records Only The alert is applied to the field of the empty form. The alert also appears in the same field when a new record is being created. (Option available from Empty Forms Only) The alert is applied to the field for all records including the empty form. NOTE: Records containing alerts that have been created from an empty base record are called Inherited Alerts. The Properties Sheet displays the name of the creator/modifier and time of the alert’s creation/modification. *SELECTING FOR POP-UPS Pop-ups appear when accessing records containing pop-up alerts. Clicking the pop-up’s OK button only acknowledges the pop-up. Choose the option carefully as it may become a nuisance to users. An example of a pop-up is shown in Figure 3.6. Pop-ups can be removed by disabling the Pop-Up option from the Alert Details screen. Page 29 Figure 3.6 – Example of a Pop-up on the Customer Master Screen Page 30 GROUPS FOR SELECTION FORM The Groups for Selection form is used to add a group of users and/or individual users to an alert in order to create an associated reminder for that alert. Alerts created by using the Administrator defined Categorized Alerts may already contain a list of groups/users for notification. The user is always presented with the option to modify the list of included groups/users by selecting the Remind Others option from the Alert Detail screen. Figure 3.7 – Groups for Selection Form Note: The Included Users listing displays a list of users who will be notified of the Alert via the Reminder system. If a user is present in more than one group, the list will only display unique instances of the UserID and the user will only receive the Reminder once. Page 31 After completing the six (6) steps for creating an alert, the alert’s colour will fill the corresponding field and the alert message will be displayed in the field’s tooltip. An example is shown in Figure 3.8. Figure 3.8 – Example of an associated Alert Once a field contains an alert (excluding inherited alerts), the options available in the field’s Alerts sub menu change (see sub sections on Modifying and Clearing Alerts). Note: You cannot apply more than one alert to a field. To apply another alert type, the current type must be cleared. See sub section Clearing Alerts. Page 32 Modifying Alerts To modify an active alert: 1. Place the mouse pointer over the field containing the alert to be modified; 2. Right click the mouse on that field; 3. Place the mouse pointer over the Alerts menu point from the pop-up menu; The Alerts sub menu as shown in Figure 3.9 appears: Figure 3.9 – Case 1. Alerts Sub Menu 4. Select the alert type from the Alerts sub menu; This opens the alert’s detail screen, containing its current settings; 5. Modify the alert; 6. Click the Save button. Note: If the Alerts sub menu as in Figure 3.10 appears and the Read Only option for that alert is enabled; you cannot modify the alert. Page 33 Figure 3.10 – Case 2. Alerts Sub Menu Note: When selecting a field with an applied alert, if the full Alerts menu is shown, then the field inherited the alert from another location. From the Alerts menu, your only option is to create a new alert overriding the inherited alert. This is not a recommended practice as the inherited alert may be used as guidance for the user base. Active alerts can be re-visited and modified as many times as needed until they are cleared, deactivated, or if they expire. Clearing Alerts To clear an active alert: 1. Place the mouse pointer over the field containing the alert to be cleared 2. Right click the mouse on that field 3. Place the mouse pointer over the Alerts menu point. The Alerts sub menu in either Figures 3.9 or 3.10 appears* 4. Select Clear Alert for Figure 3.9 or select Clear Alert – Read Only for Figure 3.10 depending on the presented situation. * When selecting a field with an applied alert, if the full Alert menu is shown, then the field inherited the alert from another location. The alert cannot be cleared from the current field location; the alert may be accessed from the blank form (i.e. no selected record). Page 34 Clearing an alert deactivates the alert, changing its status from active to inactive. Inactive alerts do not appear in fields and cannot be reapplied. Clearing alerts which also appear in other field locations as inherited alerts concurrently removes/deactivates these inherited alerts. Clearing an alert removes its listing on the Reminders screen. Once an alert is cleared from a field, a new alert may be immediately applied to the same field. Matrix Alerts With respect to the Enhanced Alert System, each matrix row is treated as a field. In other words, an alert associated to a matrix cell is associated to its entire row. To create, modify or clear matrix alerts, please follow the previously suggested steps within this document. In order to apply a new alert, place the mouse pointer anywhere on the desired matrix row. Once an alert is associated to a row, the category colour will highlight the field containing the row name. To view the alert message in a tooltip, place the mouse pointer over the field containing the row name. By design, the user cannot associate an alert to a specific matrix cell. It is recommended that the alert note field contain a detailed message in this or any other case. An example of a matrix alert is shown in Figure 3.11. Page 35 Figure 3.11 – Example of a Matrix Alert Page 36 FORMS SUPPORTING EAS Forms and Record Alerts ALERTS LISTING Any form containing alerts will display the total number of active alerts in its upper right hand corner. By hovering over this area, a tooltip appears listing the location of the alerts by displaying the tab* and specific field for each alert, see Figure 4.1. For matrix alerts, the tooltip lists the tab location followed by the matrix row name, see Figure 4.2. *‘Anywhere’ replaces the tab location for alerts appearing in more than one location, see sections Inherited Alerts and Cross Tab/Screen Alerts for more details. Figure 4.1 - Standard Form Figure 4.2 - Matrix Form BLANK FIELDS Alerts applied on empty forms are not visible at the record level. This feature may be used as interactive field level guidance to TriForce XP users, see Figure 4.3. Figure 4.3 – Alert associated to a field on an blank form Page 37 CUSTOM FIELDS For custom fields, it is recommended that the setup for all fields is complete before associating alerts. If a change in setup is required, remove all existing alerts, make the necessary changes, and then reapply the alerts. By changing the settings related to a custom field, the user runs the risk of altering the location of the applied alerts. Inherited Alerts Inherited alerts are alerts appearing in fields as a result of an active alert elsewhere in the system. Fields containing inherited alerts are usually those associated to lookups. Examples are shown in Figures 4.4 and 4.5. Figure 4.4 – Inherited Alert (1) Page 38 Figure 4.5 – Inherited Alert (2) In Figures 4.4 and 4.5, alerts may be created in fields containing inherited alerts. These new alerts would override the inherited alerts. Figure 4.6 demonstrates the result of creating an alert for field Salesperson in Customer Master of Figure 4.5. Page 39 Figure 4.6 – Applying an alert to a field containing an inherited alert CROSS TAB / SCREEN ALERTS Fields having the same field names and sharing the same data across different tabs and different screens also share alerts, see Figure 4.7. Page 40 Figure 4.7 – Fields sharing the same alert The alert can be accessed and modified from any of the three locations. Notice that all three alerts share the same field name, i.e. Product. Page 41 Fields in tabs containing Grid Views do not share alerts. Page 42 List of Forms Supporting EAS The following table lists the forms currently supporting EAS functionality. Initial emphasis was placed on important Master files and transactions where the data is in a recallable form. Table 4.1 - List of Forms supporting EAS Menu Title Actions View Master Sub Menu Points Sales Order/ New-Change Shipping/ Ship Shipping/ Ship Maintenance Billing/ New-Change Procurement (Purchase Order)/ New-Change Manufacturing/ Materials Allocation Manufacturing/ Scanned Allocation Manufacturing/ Change Manufacturing/ Materials Consumption Billing/ QuickView Billing/ PowerView Sales Order/ QuickView Sales Order/ PowerView Sales Order/ Order Fulfillment Purchase Order/ QuickView Purchase Order/ PowerView Customer Parent Shipping Address Salesperson Vendor Product/Item Product/Item Inquiry Product/Item Catalog Material Material Inquiry Material Catalog Matrix Definitions General Accounting/ GL Accounts System Remarks Upon request, the Enhanced Alert System may be expanded to Forms/Screens that do not currently support EAS. Page 43