1
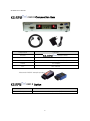
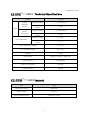
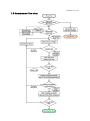
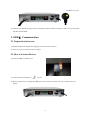
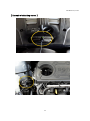
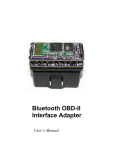
OBDⅡ
User Manual
KS RnD CO., LTD.
OBDⅡ
User Manual
V0.4
2.
Table of contents
User Precaution……………… 3
Component……………… 4
Option……………… 4
Technical Specifications……………… 5
Material……………… 5
Product Name……………… 6
1. Phono Magnetic Sensor……………… 6
1.1 Preparation before Use……………… 6
1.2 How to Connect Devices……………… 6
1.3 Measurement flow chart……………… 7
1.4 Measurement engine speed……………… 8
OBDⅡ Communication measurement ……………… 9
2.1 Preparation before Use……………… 9
2.2 How to Connect Devices……………… 9
2.3 Measurement engine speed……………… 10
Measurement Oil Temperature……………… 10
Example of Attaching Sensor……………… 11
KS RnD CO., LTD.
User Precautions
Please use this product after you have read the manual carefully to use the
device more safely and efficiently.
<General Safety Compliance>
1. Don’t use this product except for those who know how to use.
2. Do execute text of manual before measurement.
3. Do not disassemble the device.
<Dangerous>
1. This product’s 12V adapter is dedicated to AC220V. Please check the power before use.
2. Avoid content with rotor near the engine during measuring engine speed.
3. When you measure engine speed, be cautious for burn.
4. For your safety, hold the hand brake and put the bridging in front and in back of the tire.
3
KS-RPM User Manual
OBDⅡComposition Item
composition
contents
Product
machine body
Bluetooth Module
Bluetooth ELM327
Sensor
Sensor of measuring RPM (5 m)
Power
12V adapter
Etc.
User manual
※ Bluetooth ELM327 example product
OBDⅡOption
option
contents
Oil temp.
Oil temp. cable (5m)
4
KS RnD CO., LTD.
OBDⅡ Technical Specifications
details
Phono
magnetic
Sensor
contents
Analysis Range
0 ~ 8,000 rpm
Resolving
Power
1 rpm
Analysis Range
0 ~ 8,000 rpm
Resolving
Power
1 rpm
Analysis Range
0 ~ 200 ℃
Resolving
Power
0.1 ℃
RPM
OBDⅡ
(Bluetooth)
Oil Temperature
Use Temperature Range
0 ~ 50 ℃
Use Humidity Range
30 ~ 90 %
Weight
0.3kg
Dimensions
220(W) * 150(H) * 45(D) mm
Power Supply
12V adapter
Power Consumption
350 mA
Communication
RS232
OBDⅡMaterial
명칭
재질
The product body
Aluminum
Sensor Cable
Soft PVC
Sensor Measurement
Aluminum, Steel
5
KS-RPM User Manual
Product Name
1. Phono Magnetic Sensor
1.1 Preparation before use
1) Hold the hand breake and put the bridging in front and in back of the tire.
2) Set the car’s gear in neutral and start an engine.
3) Open the bonnet of a car.
1.2 How to Connect Devices
1) Connect the measurement sensor(15 pin connector) to
vibration.
2) Connect the DC 12V adapter to
of device.
6
of device, and place where there is no
KS RnD CO., LTD.
1.3 Measurement flow chart
7
KS-RPM User Manual
1.4 Engine speed measurement
1) When the power is turned on, version is displayed. Execute an initial check, alternately twinkling [CHK] and
[GOOD] on the left of LCD.
2) When an initial check is completed, [CHK]of the left of LCD is turned on and “rdy” is marked on LCD
display. At this time, red lamp of sensor is turned on.
3) Attach magnet of sensor on flat surface around the engine.
※ Sensor do not touch the rotor around the engine.
※ Attach sensor on flat surface avoiding the edge of the engine.
( refer to page 11 )
4) After a few seconds, [CHK] and [GOOD] on the left of LCD are turned on at the same time. And then current
engine speed is marked on display. At this time, Yellow lamp of sensor is turned on.
※ If the difference between measurement and RPM gauge value is lage, disconnect the sesor and connect
the sensor again when “rdy” is maked or LCD display.
※ IF “rdy” is maked more than 10 seconds, disconnect and connect again the sensor.
5) When normal engine speed is displayed, maintain 2000~2500 of the engine speed for a few seconds by
treadling the accelerator.
6) When only [GOOD] on the left of LCD is turned on, stop treadling the accelerator and check RPM. At this
time, Green lamp of sensor is turned on.
8
KS RnD CO., LTD.
7) Preparation for measuring engine speed is completed. Please tread the accelerator to make level you expected,
and then measure RPM.
2. OBDⅡ Communication
2.1 Preparation before use
1) Hold the hand breake and put the bridging in front and in back of the tire.
2) Set the car’s gear in neutral and start an engine.
2.2 How to Connect Devices
1) Attach the OBDⅡ module in car.
2) Connect the DC12V adapter to
of device.
3) When an initial check is completed, [CHK] on the left of LCD is turned on and “rdy” is marked on LCD
display.
9
KS-RPM User Manual
2.3 Engine speed measurement
1) When the device automatically recognize OBDИ
communication and properly connected, [GOOD] lamp
flashs and current RPM value is marked.
※ Detach the OBD2 module unless you can’t measure by phono magnetic methood
Oil Temperature measurement(Option)
1) Connect the sensor to
of the machine.
2) TEMP lamp of the right of LCD is turned on, and display a current temperature.
3) Input your sensor to place that measure the car’s engine oil.
※ Watch out burn since engine oil is hot.
Error of oil temp.
Display
Explanation
Hi
Temperature is higher than the measurement range (over 200.0℃)
Low
Temperature is lower than the measurement range (below 200.0℃)
oPEn
Oil sensor has a problem
10
KS RnD CO., LTD.
[ Example of attaching sensor ]
11
KS RnD CO., LTD.
Techno-park 201-906-1, 388, Songnae-daero, Wonmi-gu,
Bucheon-si, Gyeonggi-do 420-733 Korea
Tel : 82-32-325-6920
Fax : 82-32-325-6921
www.ksrnd.com