1
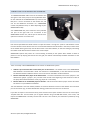
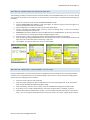
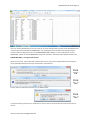
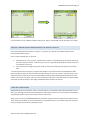
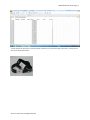
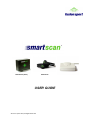
 RFID Reader (Gate)
RFID Bands
USER GUIDE
© Fusion Sport 2012, All Rights Reserved PC‐RFID reader SMARTSCAN User Guide Page | 2 CONNECTING YOUR SMARTSCAN HARDWARE The SMARTSCAN RFID reader must be connected to the start gate in each track (lane) via the supplied PS2 cable. On the underside of the SMARTSCAN unit, there are two PS2 ports – one for connection to the remote unit, and one for the additional connection of a SMARTJUMP contact mat (labeled “Jump” or “Mat” depending on your SMARTSCAN model). Your SMARTSCAN PS2 ports should be clearly labeled. The port on the right side is for connection to the SMARTSPEED remote unit, and the port on the left is for optional connection of a contact mat. HOW DOES SMARTSCAN WORK? Each Fusion Sport RFID wrist band contains a unique ID number. The tags are “passive” and therefore cannot have the athlete’s names written to them. The association between the ID number in the band, and the name of the athlete wearing the band, must be done either in the PDA software, or after the testing by associating the athlete name with the band number in the results output. SMARTSCAN replaces the process of a coach needing to identify to the system which athlete is about to perform a test. By swiping the band at the start gate, the athlete automatically identifies themselves to the PDA software. USING SMARTSCAN There are 3 ways in which SMARTSCAN can be used as an identification system. 1.
2.
3.
Athlete is pre‐associated with a wrist band prior to the session – the athlete name in the SMARTSPEED PDA database is associated with a band. The association is TEAM SPECIFIC, so one wrist band can be used for different athletes in different teams. This can be done on the PDA or in Microsoft Excel Band is associated with a player in the default team – a band is associated for each of the “players” in the default team (player 1, player 2, etc.) and the coach records at the beginning of the session the name of the player with each default team name (e.g. player 01 = John Smith) Band is added as an unidentified player in the field ‐ and the association with a player name is done after the session in a spreadsheet or Database. The most effective is the first method, however in situations where the names of the athletes are not known prior to the session (e.g. in talent identification testing), methods 2 and 3 are more convenient. If you wish to import a team list from Excel, please visit the Fusion Sport member’s area for the Team Import Template Excel file. This file allows you to register athletes using a PC‐USB RFID reader, save as CSV, and import into SMARTSYNC or directly into the PDA. This file is also used for post association (method 3) using SMARTSYNC. © Fusion Sport 2012, All Rights Reserved SMARTSCAN User Guide Page | 3 METHOD 1A: ASSOCIATING ATHLETES ON THE PDA The following procedure should be used to associate athlete names with RFID bands prior to a session. Please note that the association is team specific, so ensure that the correct team is selected when performing this procedure. 1.
2.
3.
4.
5.
6.
7.
8.
Set up one remote unit and connect the SMARTSCAN RFID reader
Start the SMARTSPEED PDA software. Press “Flash lights” on the front screen to ensure the gate is on and that the PDA and sleeve are connected Select “Edit/Player” from the main menu to enter the player editor Create a new player by tapping “New”, entering a name, and hitting “Save”, or edit a current player record by selecting them from the list REMEMBER: associations between names and RFID bands are TEAM SPECIFIC, so be sure to select the correct team prior to associating the band or adding the player name Press the “Scan” button, and you will see the message “Waiting for RFID” on the screen Scan the RFID tag using the SMARTSCAN unit. If successful the remote unit will beep and flash a blue light, and an ID number will appear next to the “ Tag# ” box Tap “Update” to finish and then move on to the next athlete. METHOD 1B: CREATING A TEAM IMPORT LIST IN EXCEL Using a PC‐RFID reader, open the Team Import List Template Excel file available on the Fusion Sport website members’ area. Complete the file for your team by adding a team name in cell A2, and by then adding player details as per the following Excel screenshot. 1.
2.
3.
4.
5.
Insert first name and last name (required) Insert the player weight if you wish to add these for use in the jumping protocol. If not, leave these blank and the PDA will add a default weight of 70kg. Click in the RFID_0 column next to a player, and scan the RFID band using your PC‐RFID reader If you wish, you can assign multiple bands to one player using the RFID_1 and RFID_2 columns Label the band with the “Band Label” number, so you know who each band belongs to in the session. Note – you can change the band label column to suit your needs, this column is ignored upon import. © Fusion Sport 2012, All Rights Reserved SMARTSCAN User Guide Page | 4 Once you have completed the file, choose “Save As” and save the worksheet in CSV (comma delimited) format. This file can then be imported into SMARTSYNC, or by copying the file to the PDA, and using the “Import” function under the New/Team menu on the SMARTSPEED PDA software. For more information on using SMARTSYNC, please consult the SMARTSYNC user guide, available in the Fusion Sport website member area. IMPORTANT NOTE – Saving CSV files in Excel When you save your Team Import List to CSV format in Excel, you will be prompted with three messages as Excel repeatedly attempts to have you save the file in native format – Click “OK” Click “Yes” Finally, when you attempt to close the file, you will be asked ‐ Click “Yes” If you wish to keep your team list in Excel format, choose “Save as” from the file menu and resave in Excel format. © Fusion Sport 2012, All Rights Reserved SMARTSCAN User Guide Page | 5 IMPORTANT NOTE ‐ once you have exported a team to CSV, you cannot reopen that CSV file and edit it ‐ you must export a fresh copy from Excel. Alternatively, when you open the CSV file in excel, you must change the RFID columns to NUMBER format before exporting again. METHOD 2: ASSOCIATING PLAYERS USING THE DEFAULT TEAM PLAYER LIST Using the above procedure, perform the association of the bands with players in the default team (Player 01, Player 02, etc.). Then at the testing/training session, simply record on a piece of paper which player is using which number player form the default team list. METHOD 3: POST SESSION ASSOCIATION OF PLAYER NAMES If an RFID wrist band is scanned during a session and is not already pre‐associated with a player in the team being used, the unique ID number of the band will automatically be added as a player in that team. During results analysis, this unique ID number can then be replaced by the athlete’s name in SMARTSYNC when exporting, using the Team Import List Template file. Please note that it a PC‐USB reader is highly recommended for this approach to allow registration of athletes on a PC. For more information on using SMARTSYNC for post‐association of RFID bands, please consult the SMARTSYNC user guide, available in the Fusion Sport website member area. USING RFID DURING A SESSION Using RFID during a session is simple. Ensure that one SMARTSCAN reader is connected to the start gate in each track. Please note each track must have its own SMARTSCAN unit connected to the first gate in that track, or a SMARTSTART unit in each track for a wireless option. 1.
2.
3.
4.
5.
6.
Set up the SMARTSPEED system as usual Choose the appropriate team from the team list and progress to the running page Choose “RFID” from the mode list Press “ready” and “GO” in the usual way The start gate will then display a green rotating LED to indicate that the system is awaiting an athlete to identify themselves to the track When the athlete touches their RFID band to the SMARTSCAN unit, the remote unit will beep and the start gate will turn green as per the usual starting procedure. The athlete’s name will appear on the green scroll bar © Fusion Sport 2012, All Rights Reserved SMARTSCAN User Guide Page | 6 If you would like to scan a different athlete simply press “Reset” and the RFID unit will be ready to scan again. HOW DO I KNOW WHICH BAND BELONGS TO WHICH ATHLETE? As the Fusion Sport RFID wrist bands are generic, many users ask “how do I know which band has been associated with which player?” There are two methods that can be used‐ 1.
2.
Label the bands – using names or squad numbers. Labels are provided with your bands at the time of purchase. When you create a new team list, print out a copy that shows the band number for each of your athletes in the team. Scan each band at the beginning of the session to see which athlete the band has been associated with To further explain the second option, imagine each athlete in your team has been associated with an RFID band, and after training each day you collect the bands. When you next run a session, simply set up your first drill for the session, take a band, scan it and the PDA will show you which athlete the band belongs to. Press “Reset” and scan the next band, and so on until all athletes at the session have their bands. This process takes around 10 seconds per athlete. The images immediately above illustrate this process. LABELING YOUR BANDS SMARTSCAN bands are made from a Silicon compound which is long lasting and durable but difficult to mark with a pen. Labeling your bands corresponding to the “Band Label” column in the Team Import List template is a good way to make it easy to hand out your bands in the session. When you first receive your SMARTSCAN bands, label them using the labels provided and scan them into the Team Import List template file. Save this Excel file as a template for future use, and then each time you add a team you simply need to add only the player names. © Fusion Sport 2012, All Rights Reserved SMARTSCAN User Guide Page | 7 To label the bands, wrap them around the band and adhere one end of the label to the other, as they will not stick to the bands themselves. © Fusion Sport 2012, All Rights Reserved