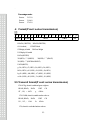
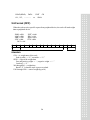
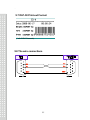
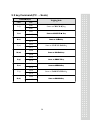
1
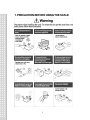
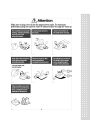
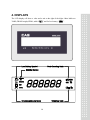
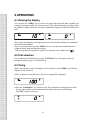
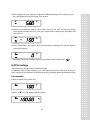
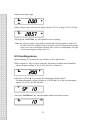
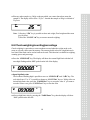
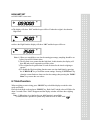
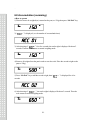
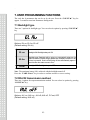
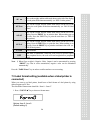
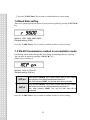
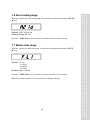
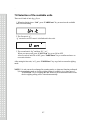
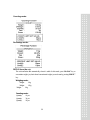
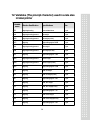
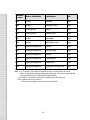
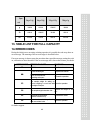
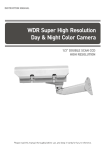
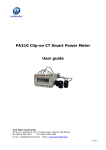
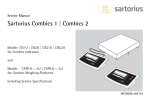
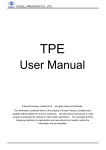
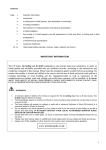
` CONTENTS 1. PRECAUTION BEFORE USING THE SCALE 4 2. INTRODUCTION 6 3. COMMON SPECIFICATIONS 7 4. DISPLAYS 8 .. 5. KEY DESCRIPTIONS 6. OPERATIONS 9 11 6.1 Zeroing the display 6.2 Unit selection 6.3 Taring 6.4 Percentage 6.5 Counting pieces 6.6 Check-weighing/counting/percentage 6.7 Hold function 6.8 Accumulation (summing) 6.9 Subtraction function 7. USER PROGRAMMING FUNCTIONS 7.1 Backlight type 7.2 RS-232 transmission method 7.3 Label format setting 7.4 Baud Rate setting 7.5 RS-232 transmission method in accumulation mode 7.6 Zero tracking range 7.7 Stable class range 7.8 Selection of the available units 11 11 11 12 13 14 16 17 18 19 19 19 20 21 21 22 22 23 8. BATTERY OPERATION 24 9. RS-232 OUTPUT 25 10. AUTO CALIBRATION 33 11. RECOVERY OF THE DEFAULT CALIBRATION VALUE FROM MEMORY 33 12. VARIABLES 34 13. TABLE LIST FOR FULL CAPACITY 36 14. ERROR CODES 36 15. TECHNICAL DATA 37 3 4 ` 1. PRECAUTION BEFORE USING THE SCALE 5 6 ` Environment The scale should always be used in an environment, which is free from excessive air currents, corrosives, vibration, and temperature or humidity extremes. These factors will affect displayed weight reading. DO NOT install the scale: *Next to open windows or doors causing drafts or rapid temperature changes *Near air conditioning or heating vents *Near vibrating, rotating or reciprocating equipment *Near magnetic fields or equipment that generates magnetic fields *On an unstable work surface *In a dusty environment *In direct sunlight Leveling the scale The scale is equipped with a level indicator on the left bottom side of the front panel and four adjustable leveling feet. Adjust the leveling feet until the bubble appears in the center circle of the indicator. Turn on the scale Do not turn on scale with anything on the platform. The switch is located at the bottom of the right side of the scale. The scale will start to count down from nine to zero. Then the scale is ready for use. Give a warm-up for 15~30 minutes before use. 2. INTRODUCTION The precision electronic weighing scale offers a range of capacities from 3 kg to 30kg. The scales are very simple to use and applicable for general weighing. The user can also use the parts counting and percent weighing functions for special applications. Special functions are available for weighing in up to 4 different units of weight. And the scale use grams as the default unit. The standard RS-232 interface allows the data to be sent to a computer or printer. (Only for the scale with RS-232 interface) The scale is with large easy to read LCD display with backlight, and all the keypads are sealed membrane switches. The scale includes audible alarm for pre-set weights, tare and an accumulation facility that allows the count to be stored and recalled as an accumulated total. 7 8 ` 3. COMMON SPECIFICATIONS Interface RS-232 Output Optional Operation Temperature 0℃ ~ 40℃ / 32℉ ~ 104 ℉ Power supply AC Adaptor 12V/800mA Display 6 digits LCD digital display Pan Size (mm/inch) 306(W) x 222(D) / 12.0 (W) x 8.7 (D) Functions -Weighing -Counting pieces -Percentage -Check-weighing -Check-counting, -Check-percentage, -Accumulation(summing) Other Features and Specs Internal rechargeable battery 9 4. DISPLAYS The LCD display will show a value and a unit to the right of the digits. Other labels are TARE, GROSS weight, ZERO, stable“ ” and for Low battery “ ”. 10 ` 5. KEY DESCRIPTIONS KEYS FUNCTIONS Set the zero point for all subsequent weighing. The display shows zero. Tare the scale. Stores the current weight in memory as a tare value, subtracts the tare value from the weight and shows results. This is the net weight. A secondary function “ ”, or “ Enter ” key when setting parameters or other functions. Set the limits for check weighing. Allow setting of either the low limit or the high limit or both. Secondary function “◄ ”, is to move the active digit to the left when setting values for parameters or other functions. Enter the percent weighing function. Allows the weight to be seen when parts counting. Secondary function “ ► ”, is to move the active digit to the right when setting values for parameters or other functions. Be used to select the functions of the scale. If the scale is in weighing mode, it will select parts counting. Of it is not in weighing mode it will return the user to weighing. A secondary function “▲”, increment the active digit when setting values for parameters or other functions. Print the results to a PC or a printer by using the optional RS-232 interface. It also adds the value to the accumulation memory if the accumulation function is not automatic. Press this key to enter into accumulation function. The display will show Accumulation times and total weight. Secondary function (Exit), is to return to normal operation when the scale is in parameter setting mode. Press this key to hold the display when an active thing is weighted. Select weigh units (kg, g, oz, and lb) A secondary function (Clear), is used to clear values when setting values for parameters or other functions. 11 12 ` 6. OPERATIONS 6.1 Zeroing the display You can press the “ZERO” key to set the zero point from which all other weighing and counting is measured, within 4% of power up zero. This will usually only be necessary when the platform is empty. When the zero point is obtained the display will show the indicator for zero. The scale has an automatic re-zeroing function to account for minor drifting or accumulation of material on the platform. However you may need to press the “ZERO” key to re-zero the scale if small amounts of weight are shown when the platform is empty. Note: Zeroing function is possible to operate only when the scale is stable with “ ” 6.2 Unit selection You can choose the desired unit by pressing “UNIT/Clear” key. The display will cycle through the options: g, kg, lb, oz and back to g. 6.3 Taring Before Tare function is used, if zeroing the scale is needed, press the “ZERO” key. Then the indicator of zero will be on. ● Place a container on the platform, a value for its weight will be displayed. ● Press the “TARE/Enter” key to tare the scale. The weight that was displayed is stored as the tare value and that value is subtracted from display, leaving zero on the display. The“NET” indicator will be on. 13 ● Put a weight on the pan. Only the weight that is added after taring will be displayed. And the value displayed is the net weight of the product ● Remove the container a negative value will be shown. If the scale was tared just before removing the container this value is the gross weight of the container plus all products that was removed. ● Press “TARE/Enter” key again to enter into the normal weighing mode, and the negative value will disappear. Note: Taring function is possible to operate only when the scale is stable with “ ” 6.4 Percentage This mode shows the proportion of standard weight. A standard weight is selected whatever you want within max capacity of the scale. When you place a sample on the container, the display shows the percentage against the standard weight. For example: ● Place a sample(700g) on the Pan. ● Press “ %/▶” key. The display will show 100%. 14 ` ● Remove the 700g weight ● Place a 200g weight on the pan, the display will show 28.57% as 200g is 28.57% of 700g. ● Pressing the “COUNT/▲” key will return the scale to weighing. Note : the scale may jump by large numbers unexpectedly if small weights are used to set the 100% level. For example if only 23.5g is on a scale with 0.5g increments and the scale is set to 100%, the display will show 100%, however a small change of weight will cause the display to jump to 100.13%. 6.5 Counting pieces Before beginning, if you want to use any container, use Tare function first. ● Place samples (ex. 200g as 10pcs) on the pan. The number of samples should match the options for parts counting: 10, 20, 50, 100, 200,500, or 1000 pieces ● Press the “COUNT/▲” key to begin. Then the display will show“SP 10”. To change the number of parts is possible as “COUNT/▲” key. It will cycle through the options : 10, 20, 50, 100, 200, 500,1000 ● Press the “TARE/Enter” key when the number matches the number of parts. 15 ● Place any other sample (ex. 500g) on the pan which you want to know how many the sample is. The display will be show “25 pcs”. It means the sample as 500g is consisted of 25 pieces. Note : 1) Pressing “%/▶” key is possible to show unit weight, Total weight and the count (pcs) by turns. 2) Press the “COUNT /▲” key to return to normal weighing. 6.6 Check-weighing/counting/percentage Check-weighing is a procedure to cause an alarm to sound when the weight on the scale meets or exceeds values stored in memory. The memory holds values for a high limit and a low limit. Either limit can be used or both can be used. This function is available in weighing, counting pieces and percentage. ● Press the “CHECK/◀” key. The display will show the current High Limit with the left most digit flashing and the “HI” symbol on the left of the display. ● Input high limit value The location of flashing digit is possible to move as “CHECK/◀” and “%/▶” key. The real value from “0” to “9” is possible to change as “COUNT/▲” key(ex. 3000g). After set desired high limit value, press the “TARE/Enter” key to accept the value. if you want to reset the value to zero, press “UNIT/Clear” key to clear the value ● After set high limit value by pressing the “TARE/Enter” key, then the display will show “LO” symbol on the left side. 16 ` 17 ● Input low limit value (ex. 100g), the way is as same as high limit was set. ● After inputting low limit value, press “TARE/Enter” key to confirm it. Then the scale will return to weighing mode with the Check-weighing function enabled When a weight is placed on the scale the arrows will show if the weight is above or below the limits and the beeper will sound as described below. BOTH LIMITS SET The display will show “OK” and the beeper will sound when the weight is between the limits. LOW LIMIT SET ● HIGH LIMIT is set to zero ● The display will show “OK” and the beeper will sound when the weight is less than the Low Limit. ● Above the Low Limit the display will show “HI” and the beeper will be off. 18 ` 19 HIGH LIMIT SET ● LOW LIMIT is set to zero ● The display will show “LO” and the beeper will be off when the weight is less than the High Limit. ● Above the High Limit the display will show “OK” and the beeper will be on. Note :1) When you would like to use check-counting/percentage, sampling should be set before you set HI/LO limit values 2) The low limit is set greater than the high limit. In this situation, the display will show E5 and you are supposed to reset the values. 3) The weight must be greater than 20 scale divisions for the check-weighing to operate. 4) To disable the Check-weighing function enter zero into both limits by pressing the “CHECK/◀” key to recall the current settings. Pressing “UNIT/Clear” key when the current limits are shown to clear the settings, then pressing the “TARE/ Enter” key to store the zero values. 6.7 Hold function When weighing an active thing, press “HOLD” key to hold the display to read the value easily and clearly. Place the load on the scale and press “HOLD” key. Both “hold” and the value will flicker for about 2 seconds. Then “Hold” disappears and the display window will show the weighing value. Note : 1) When there is no load on the pan, hold function is unavailable. 2) Hold function is possible to operate only when the scale is stable with “ ” 20 ` 6.8 Accumulation (summing) ● How to operate 1) Place the item to be weighed (or) counted on the pan (ex. 150g) then press “M+/Exit” key. 2) “ ×× ” is displayed. (xx: the number of accumulated times) 3) After showing of “ ×× ” for a few seconds, the total weight is displayed for about 2 seconds. Then the scale returns to normal weighing mode. 4) Remove all weights from the pan in order to zero the scale. Place the second weight on the pan(ex. 500g) 5) Press “M+/Exit” key to add the second weight, then “ seconds. ×× ” is displayed for a few 6) After showing of “ ×× ”, the total weight is displayed for about 2 seconds. Then the scale returns to normal weighing mode. 21 7) As soon as the total weight is disappeared, the display will show the new weight. ● To view the total weight from memory Press the “M+/Exit” key with nothing on the pan when the scale is at zero. The display will show the total number of times as “ ×× ” and total weight/count value momentarily. ● To delete Accumulated memory 1) Press the “UNIT/Clear” key while “ ×× ” is displaying. 2) Accumulated memory will be deleted as soon as press “PRINT” key to print out “Total” value after accumulating all items. Note : 1) Any of the accumulated items can be cleared by pressing “UNIT/Clear” key. Please refer to section “ 6.10 SUBTRACTION FUNCTION”. 2) Accumulation memory can be added up to 99 times, or up to the total value exceeds in maximum capacity. 3) The display weight must be stable( ) for M+ register. 4) Display must return to zero in order to add next item. 5) Accumulation memory is not retained when the scale is turned off. 6) There are two options of RS-232 transmission method in accumulation mode (Please refer to section 7.5). 7) When the present weight is less than 10d, and press “M+/Exit” key. The scale can’t store this value in memory but only display total accumulated values and times. 6.9 Subtraction function Use “UNIT/Clear” key to subtract accumulation values. This function is available only in accumulation mode. ● Nothing on the pan. If you make a mistake or want to cancel the last value, press, “UNIT/Clear” key with nothing on the pan. Then the last value will be subtracted from total. ● A weight on the pan. If you want to subtract any weight from total, just place any weight on the pan and press “UNIT/Clear” key. Note : 1) When you press “UNIT/Clear” key to subtract a weight from total, the accumulation count will be reduced one by one. 2) No matter what way you choose, you can’t continuously do the subtraction. It is possible only when new value has been accumulated. Namely, User must use this function once at a time. 3) When subtraction value is larger than total accumulated value, the display window will show ”E6”, and the current operation is ineffective. 22 ` 7. USER PROGRAMMING FUNCTIONS The scale has 8 parameters that can be set by the user. Press the “COUNT/▲” key for approx. 2 seconds to enter into Parameters Setting mode. 7.1 Backlight type There are 3 options for backlight type. You can select its options by pressing “COUNT/▲” key. Options: EL on, EL Au, EL off (Default setting: EL Au) EL on Backlight ON: Backlight always is ON EL Au Backlight auto: Backlight will be going on automatically whenever the scale is loaded by objects weigh greater than 9 display resolution or any of keys is pressed. And it will be going off also automatically approx. 5 seconds after the scale returns to zero. EL off Backlight OFF: Backlight always is OFF Note : The maximum battery life is achieved with the backlight turned off. Press the “TARE /Enter” key in order to confirm and move to next setting. 7.2 RS-232 transmission method There are 6 options for output transmission method. You can select its options by pressing “COUNT/▲” key. Options: AU on, AUL on , AU off, AUL off, P Cont, OFF (Default setting: AUL off) 23 AU on Place on the weight, and the stable mark shows on the left of the display, the scale prints all the data automatically. (ex. DEP-50 ticket printer) AUL on Place on the weight, and the stable mark shows on the left of the display, the scale prints all the data automatically. (ex. DLP-50 label printer) AU off Place on the weight, and the stable mark shows on the left of the display, Press the PRINT key to print the data. When nothing put on the scale, Press the PRINT key to print the total data. (ex. DEP-50 ticket printer) AUL of Place on the weight, and the stable mark shows on the left of the display, Press the PRINT key to print the data. When nothing is on the scale, Press the PRINT key to print the total data in bar code. (ex. DLP-50 label printer) P Cont Series transmit. OFF None data is transmitted. When the scale receives specific request from peripheral device, the scale will send weight data to peripheral device. Note : 1) When Gross weight is Negative Value, Output is not be transmitted by pressing “PRINT” key. But in series transmission, negative value can be transmitted automatically. Press the “TARE /Enter” key in order to confirm and move to next setting. 7.3 Label format setting (available when a label printer is connected) When you want to use label printer, should store a label format to Label printer by using editor program on PC first. The stored label format name should be “form 0 ~ form 9”. 1. Press “COUNT/▲” key to choose a format name. Options: from 0 - form 9 (Default setting: 0) 24 ` 2. Press the “TARE /Enter” key in order to confirm and move to next setting. 7.4 Baud Rate setting There are 4 options for baud rate option. You can select its options by pressing “COUNT/▲” key. Options: 1200, 2400, 4800, 9600 (Default setting: 9600) Press the “TARE /Enter” key in order to confirm and move to next setting. 7. 5 RS-232 transmission method in accumulation mode For selecting output method through RS-232C during accumulating, there are 2 options. You can select its options by pressing “COUNT/▲” key. (Please refer to section 9.4) Options : ACp on, ACp off (Default setting: ACp on) ACP on When pressing “M+/Exit” key in order to add a data, an each of added data (weight or count) will be transmitted and printed out. Also, when pressing “PRINT” key, the total value will be transmitted. ACP of When pressing “M+/Exit” key in order to add a data, an each of added data (weight or count) will not be transmitted and printed out. Also, when pressing “PRINT” key, only the total value will be transmitted. Press the “TARE /Enter” key in order to confirm and move to next setting. 25 7. 6 Zero tracking range There are 4 options for zero tracking range. You can select its options by pressing “COUNT/ ▲” key. Options: 0.5d, 1d, 2d, 4d (Default setting: A2 1d) Press the “TARE /Enter” key in order to confirm and move to next setting. 7. 7 Stable class range There are 3 options for stable class range. You can select its options by pressing “COUNT/ ▲” key. Options: 0 = 0 1 = 0.3d 2 = 0.6d 3 = 0.9d (Default value: 1=0.3d) Press the “TARE /Enter” key in order to confirm and move to next setting. Note: The smaller number is the shorter time for display stability. 26 ` 7.8 Selection of the available units There are 4 kinds of unit: kg, g, lb, oz 1. When the display show “Unit”, press “TARE/Enter” key to enter into the available units selection setting. 2. The first unit is “g”. “g” can not be set OFF cause it is default unit in the scale. 3. The second unit is “kg” and then “lb”, “oz”. When you meet a unit, press “COUNT/▲” key to set ON or OFF. After set each of unit ON or OFF, press “TARE/Enter” key to confirm and move to next unit selection. After setting the last unit (“oz”), press “TARE/Enter” key to go back to normal weighing mode. NOTE: 1) A unit can not be exchanged in counting mode, or when tare function performed. 2) In accumulation mode or check-weighing setting is available, give a long press of “UNIT/Clear” key to exchange the unit. However the accumulation value or the check-weighing setting will be cleared automatically. 27 8. BATTERY OPERATION The scale can be operated from the battery if desired. The battery life is approximately 80 hours. When the battery needs charging a symbol “ ” on the weight display will turn on. The battery should be charged when the symbol is on. The scale will still operate for about 10 hours after which it will automatically switch off to protect the battery. To charge the battery, simply attach the power supply module to the scale and plug in. The scale does not need to be turned on. The battery should be charged for 12 hours for full capacity. There is an LED to indicate the status of battery charging on the right of display. When the scale is plugged into the mains power the internal battery will be charged. Green: The battery has been charged. Red: The battery is nearly discharged Yellow: The battery is increasing the charge level. As the battery is used it may fail to hold a full charge. If the battery life becomes unacceptable then contact your distributor. Note: The battery should be recharged every 3 months if the scale is not used for long time. 28 ` 9. RS-232 OUTPUT The scale can be ordered with an optional RS-232 output. 9.1 Mode EIA-RS 232 C’s UART signal 9. 2 Format(Au on/off) Baud rate: 9600 BPS Data bits: 8 BITS Parity bit: No Stop bit: 1 BIT Data format: Code ASCII Connector: 9 pin socket Pin2 Input Pin3 Output Pin5 Signal Ground 9. 3 Transmit format (Au on/off) DEP-50 form(Au off): ● ACP is set to be on, then press M+/Exit key to output each accumulated value. Press PRINT key to transmit total accumulated values and accumulated times. (Please refer to the section 7.5). Weighing mode: ========WEIGHT======== Weight: 100.0 g Weight: 100.0 g Weight: 100.0 g Weight: -99.9 g Weight: 100.0 g Weight: - 13.8 g Weight: 100.0 g Weight: 100.0 g ………………………………. Total: 386.3 g Count: 4 times . Counting mode ========COUNT======== Quantity: 20 pcs Quantity: 23 pcs Quantity: -23 pcs Quantity: 23 pcs Quantity: - 3 pcs ………………………………….. 29 Total: Count: 40 pcs 1 times Note: In accumulation mode, when the total weight/pcs is”0” and the count is not “0”, the count of results will be “0”. Take weighing mode for instance. Weighing mode: ========WEIGHT======== Weight: 150 g Weight: 400 g Weight: -550g …………………………………. Total: 0g Count: 0 times When total weight/pcs is more than “0” and real count times is “0”, the results of count times won’t be “0”. For example: Counting mode: ========WEIGHT======== Quantity: 90 pcs Quantity: -56 pcs Quantity: 90 pcs Quantity: -56 pcs ………………………………… Total: Count: 68 pcs 1 times ● ACP is set off, the scale is in accumulation mode, and limit values are not set. Press PRINT key to output the total accumulated value and times. Weighing mode: ……………………………….. Total: 386.3g Count: 4 times Counting mode: ………………………………….. Total: 40 pcs Count: 1 times 30 ` ● When the accumulation is not used and limit values are not set, press PRINT key to transmit the value showing in display window. Weighing mode: -Weighing Function========WEIGHT======== Weight: 90 g Tare: 20 g Gross: 110 g Counting mode: -Counting Function- ========COUNT======== Weight: 174 g U/Weight: 9.04 g Quantity: 19 pcs Tare: 29 g Gross: 205 g Percentage mode: -Percentage Function========PERCENT======== Weight: 176 g Percent: 95.02 % Tare: 28 g Gross: 204 g ● When the Accumulation function is not used and the limit values are set. And transmit by pressing PRINT key: Weighing mode: 31 Counting mode: Percentage mode: DEP-50 form (Au on): The scale transmits data automatically when it is stable. In this mode, press “M+/Exit” key to accumulate weight / pcs, but it doesn’t transmit total weight / pcs and count by pressing “PRINT” key. Weighing mode: Weight: 90 g Weight: 120 g Weight: 90 g Counting mode: Quantity: 10 pcs Quantity: 34 pcs Quantity: 50 pcs 32 ` Percentage mode: Percent: 21.33 % Percent: 51.04 % Percent: 27.62 % .4 Format (P cont : series transmission) 1 2 3 4 5 6 7 8 9 10 11 12 13 14 15 16 17 18 19 20 HEAD1 , HEAD2 , HEAD1 (2 BYTES) OL-Overload, DATA UNITS HEAD2 (2BYTES) NT-NET Mode ST-Display is Stable GS-Gross Weight US-Display is Unstable DATA (8BYTES) 2D (HEX) =”-” (MINUS) 20(HEX) =” ” (SPACE) 2E (HEX) =”.”(DECIMALPOINT) UNIT (4BYTE): g- 20 ( HEX ) ; 67 ( HEX ) ; 20 ( HEX ) ; 20 ( HEX ) Ib-20 ( HEX ) ; 6C ( HEX ) ; 62 ( HEX ) ; 20 ( HEX ) kg-20 ( HEX ) ; 6B ( HEX ) ; 67 ( HEX ) ; 20 ( HEX ) oz-20 ( HEX ) ; 6F ( HEX ) ; 7A ( HEX ) ; 20 ( HEX ) 9.5 Transmit format(P cont: series transmission) EX+0.876g, when it is stable and gross weight as: HEAD, HEAD, DATA ST , GS , + 0.876 UNIT g CR 0D 0A EX-1.568lb, when it is unstable and net value as: HEAD, HEAD, DATA US , NT , - 1.568 UNIT lb CR 0D 0A EX, when it is overloaded and net value as: 33 CR HEAD, HEAD, DATA OL , NT , - - - - - - - - UNIT oz CR 0D 0A 9.6 Format (OFF) When the scale receives specific request from peripheral device, the scale will send weight data to peripheral device. “ENQ” -> 05H “ACK” -> 06H “NAK” -> 15H “STX” -> 02H “DC1” ->11H SOH STX COMMANDS STA “EOT” -> 04H “DC1” -> 11H “SOH” -> 01H “ETX” -> 03H SIGN W6 W5 W4 W3 W2 W1 W0 DATA BLOCKS REMARKS: STA → A weigh status of the scale Scale is stable → “ S ”, not stable → “ U ” SIGN → Sign of the weight data Zero and positive weight → “ “, negative weight → “ - ” Overload → “ F ” W6 through W0 → weight data But all “ F ”s when the scale is put on overload. UN1 through UN0 → unit of weight (kg or Ib) 34 UN1 UN0 BCC ETX EOT COMMANDS ` 9.7 DLP-50 Print-out Format (* with EAN13 barcode) 9.8 The wire connections 35 9. 9 key Command (PC → Scale) Command(1byte) Char. L (l) C (c) R (r) U (u) M (m) P (p) Z (z) T (t) H (h) Weighing Mode Hex 0x4C Same as CHECK/◀ key 0x6C 0x43 Same as COUNT/▲ Key 0x63 0x52 Same as %/▶ Key 0x72 0x55 Same as UNIT/CLEAR Key 0x75 0x4D Same as M+/Exit key 0x6D 0x50 Same as PRINT Key 0x70 0x5A Same as ZERO Key 0x7A 0x54 Same as TARE/ENTER Key 0x74 0x48 Same as HOLD Key 0x68 36 ` 10. AUTO CALIBRATION (can be done in kg/g, Ib) Give a long press of TARE/Enter key in normal weighing mode without performing Tare function. When the display is flashing and showing the weight value, put on the mass. While the scale is stable, the display will be back to zero automatically. Please take away the mass while scale is counting backward. The auto calibration is finished. By pressing the “COUNT/▲” key the weight value can be selected (1/3 Full weight, 2/3 Full weight and 3/3 Full weight). ★ This calibration instruction is NOT for US market. 11. RECOVERY OF THE DEFAULT CALIBRATION VALUE FROM MEMORY When a mistake is happened during calibration or parameter is set incorrectly, this function should be useful. Operation: Turning on the scale, press the “TARE+TARE+COUNT+COUNT+COUNT” keys orderly during self-check. Then, the scale will begin the self-check again. It means that the scale will come back with a default calibration value. 37 12. Variables (The prompt character) used in scale also in label printer Variable Effective Qualification name Specifications Size SER Weighing/counting Accumulated times 2 byte NWA Weighing/counting/percent Net weight 7 byte NWB Weighing/counting/percent Net weight(no dot) 6 byte NWP Weighing Right shifting digit of NWB 1 byte TWA Weighing/counting/percent Tare weight 7 byte TWB Weighing/counting/percent Tare weight (no dot) 6 byte TWP Weighing Right shifting digit of TWB 1 byte GWA Weighing/counting/percent Gross weight 7 byte GWB Weighing/counting/percent Gross weight (no dot) 6 byte GWP Weighing Right shifting digit of GWB 1 byte TNA Weighing Total net weight 7 byte TNB Weighing Total net weight(no dot) 6 byte TNP Weighing Right shifting digit of TNB 1 byte TTA Weighing Total Tare weight 7 byte TTB Weighing Total Tare weight(no dot) 6 byte TTP Weighing Right shifting digit of TTB 1 byte TGA Weighing Total Gross weight 7 byte TGB Weighing Total Gross weight(no dot) 6 byte TGP Weighing Right shifting digit of TGB 1 byte 38 ` Variable Effective Qualification name Specifications Size UWA Counting Unit weight 7 byte UWB Counting Unit weight (no dot) 6 byte QUA Counting /percent Quantity 7 byte QUB Counting /percent Quantity (no dot) 6 byte TQA Counting Total Quantity 7 byte TQB Counting Total Quantity (no dot) 6 byte CHA Weighing/counting/percent High Limit 7 byte CHB Weighing/counting/percent High Limit(no dot) 6 byte CLA Weighing/counting/percent Low Limit 7 byte CLB Weighing/counting/percent Low Limit(no dot) 6 byte UNT Weighing/counting/percent Weighing Unit 2 byte UWU Weighing/counting/percent Weighing unit in counting mode 2 byte Note: 1) ** P variable: The weight accumulation value exceeds 6 digits, but it can achieve 6-digit display through righting decimal point. (One or two digits behinds the decimal point won’t display after being rounded) ** B variable: It would be wrong if not considering the decimal point. 2) The variable can’t be less than 0. Moreover, the negative value will not be transmitted 39 Spec 3kg x 0.1g 6kg x 0.2g 15kg x 0.5g 30kg x 1g g 3.0009 6.0018 15.0045 30.009 Ib 6.0018 15.0045 30.009 60.018 oz 105.045 210.09 520.18 1050.45 unit 13. TABLE LIST FOR FULL CAPACITY 14. ERROR CODES During the initial power-on testing or during operation it is possible the scale may show an error message. The meaning of the error messages is described below. If an error message is shown repeat the procedure that caused the message, turning the scale on, calibration or other functions. If the error message still is shown then contact your dealer ERROR CODE E1 E2 POSSIBLE CAUSES HANDLING EPROM data lose. Re-calibrate the scale 1.Load cell damaged. 1.Replace the load cell. 2.Turn on the scale with something on the pan. 2.Correct the operation. E3 The sample weight for setting up Percent weighing is much less than Correct the operation. the weight on the pan. E4 The sample weight is less than 10d. Increase the weight on the pan. E5 Wrong values are inputted. (when Hi is less then LO) Reset the limit values. E6 The subtraction value is larger than the Correct the operation. total accumulated value for further support. 40 ` g Version Ib Version Capacity 3000g 6000g 15000g 30000g Readability(e=d) 0.1g 0.2g 0.5g 1g Capacity 6Ib 15Ib 30Ib 60Ib 0.0002Ib 0.0005Ib 0.001Ib 0.002Ib Readability(e=d) External Resolution 1/30,000 Internal Resolution 1/600,000 Display Type Display Indicators LCD Stability, Center of Zero, Gross, Net, Battery status, Hi-Ok-Lo, Units Hi-Lo Check Indicators Display with Alert beeper Weight Units Kg, g ,lb, oz Zero Range ±2% Tare Range Full Capacity by Subtraction Stabilization Time ≤2 seconds 0℃ ~ 40℃ / 32℉ ~ 104 ℉ Operation Temperature Humidity Range ≤90% relative humidity, non-condensing Power AC Adaptor 12V/800mA Internal rechargeable sealed acid battery Battery Life 80 hours continuous use with 12 hour recharge time Calibration Automatic external with g/Ib mass, factory calibration recovery Safe Overload Capacity 120% of capacity Product weight Dimension(mm / inch) 4.5kg / 9.92lb 330(W) x 346(D) x 107(H) / 12.9(W) x 13.6(D) x 4.2(H) Pan Size(mm / inch) 306(W) x 222(D) / 12.0 (W) x 8.7 (D) 15. TECHNICAL DATA 41 MEMO 42 ` MEMO 43 44