1
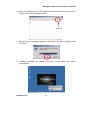
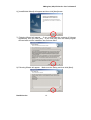
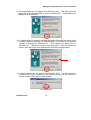
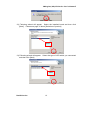
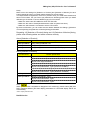
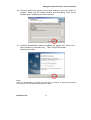
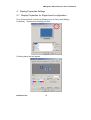
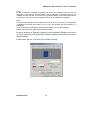
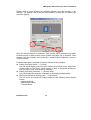
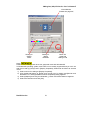
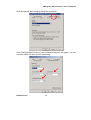
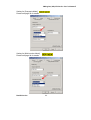
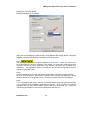
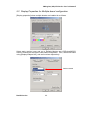
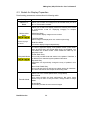
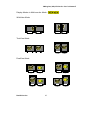
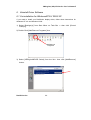
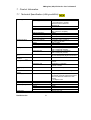
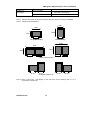
Document Number : 20021106MDCD-001E
VREngine /MD/CD Series
TM
High Resolution Display Controllers
User’s Manual (for Windows)
Ver. 2.0
RealVision Inc.
Distributed by RVU, INC.
50 Airport parkway #125
San Jose, CA 95110 USA
Tel : 408-437-7771
Fax : 408-437-4971
URL http://www.rvu-inc.com/
Copyright© 2001-2002 by RealVision Inc., all rights reserved.
VREngine/MD/CD Series User’s Manual
Welcome
Thank you for choosing the VREngine/MD/CD Series product, RealVision’s high
resolution display controllers that target the demands of imaging applications
and support high-resolution LCD monitors.
These boards are exclusively designed to deliver the highest quality visual
image on 2-Megapixel or 3-Megapixel LCD displays.
These boards are PCI bus graphics boards.
VREngine/MD/CD Series has following three products lineup.
Product Name
Product Outline
VREngine/MD2W
Color & Grayscale Display Card for 2-Megapixel LCD Monitor
VREngine/CD3W
Color Display Card for 3-Megapixel LCD Monitor
VREngine/MD3W
Grayscale Display Card for 3-Megapixel LCD Monitor
Regarding LCD monitor or related matters, please contact your local supplier or
display manufacturer.
About This Manual
Read this manual thoroughly before you use the “VREngine” board.
This manual provides detailed information on how to install and configure
your VREngine/MD/CD Series high-resolution display controllers. For
information regarding your computer monitor, or other attached devices not
associated with RealVision Inc., please consult the user’s manuals or your
supplier for those devices.
In this manual, following product specific marks are prepared and indicate
that the instructions with these marks have product specific contents. These
contents are distinguished from products common matters. Please refer this
manual with this notice.
VREngine/MD2W board specific contents :
VREngine/CD3W board specific contents :
VREngine/MD3W board specific contents :
Keep this manual as close to your computer as possible so that you can
review to it in need. In case of missing the manual, contact your local
supplier.
Attach this manual to the board when you transfer it to a third person.
The contents of this manual may be changed without notification.
RealVision Inc.
2
VREngine/MD/CD Series User’s Manual
About Trade Marks
■ VGA is a trademark of IBM.
■ VREngine™ is a trademark of RealVision.
■ All brand names are the property of their respective owners.
For Safety Use
This product is designed and manufactured by taking your maximum safety into
account. There are, however, possibilities of causing severe accidents by your
miss handling. In order to avoid such accidents, it is to be desired that you
should read this manual thoroughly before using this product.
RealVision Inc.
3
VREngine/MD/CD Series User’s Manual
Contents
Welcome .......................................................................................................... 2
About this Manual ............................................................................................ 2
About Trade Marks .......................................................................................... 2
For Safety Use ................................................................................................. 3
1. Check and Save Packaging Materials ....................................................... 5
2. Installation Procedure ................................................................................ 5
3. Board Installation ....................................................................................... 5
3.1 Notices for board installation ............................................................... 6
3.2 Configuring DIP switch settings ........................................................... 7
3.3 Board installation procedure ................................................................ 9
3.4 Connection with LCD Monitor(s) ....................................................... 10
4. Software Installation ................................................................................. 11
4.1 Installation for WindowsNT4.0/ 2000/ XP .......................................... 11
5. Display Properties .................................................................................... 18
5.1 Display Properties for Single board configuration ............................. 18
5.2 Display Properties for Multiple board configuration ........................... 24
5.3 Detail Setting for Display Properties .................................................. 25
6. Uninstall Driver Software .......................................................................... 28
6.1 Un-installation for WindowsNT4.0/ 2000/ XP .................................... 28
7. Product Information .................................................................................. 31
7.1 Technical Specification(VREngine/MD2W)..................................... 31
7.2 Technical Specification(VREngine/MD3W, VREngine/CD3W) ....... 33
7.3 Monitor Interface ............................................................................... 35
8. Limited Warranty ...................................................................................... 36
9. About Disposal a Product ......................................................................... 36
RealVision Inc.
4
VREngine/MD/CD Series User’s Manual
1. Check and Save Packing Materials
Make sure that your VREngine package contains the following :
Display controller board
Driver & Installer CD-ROM
User’s manual
Contact your local supplier if any of these items are missing.
Save the box and packing materials in case you need to return the board to
the supplier for any reason. Shipping damage is not covered under the
warranty.
2. Installation Procedure
Make sure the installation should be done in following steps :
1) Configuring DIP switch settings
2) Install the board into host system
3) Connection with LCD monitor(s)
(Connect interface cable(s) )
4) Power on the host system
5) Install driver software
6) Setting for [Display Properties] in Control Panel
7) Reboot the host system
RealVision Inc.
5
VREngine/MD/CD Series User’s Manual
3. Board Installation
In this section, how to install VREngine/MD/CD Series into your computer is
described. Refer to User’s Manual of your computer if needed.
3.1 Notices for Board Installation
■ It is recommended to ask your vendor to install the VREngine/MD/CD Series
into your computer.
■ Do not touch connectors, pins of IC/LSI, and patterns on the board directly
as the electronics devices used may be damaged by electro-static
discharge.
■ Clean your hands before installing the board in order to avoid dangers of
possible slippage caused by stains or oil stuck to your hands.
■ Keep the remaining parts not used at your installation as they may be to use
next installation later on.
■ Make sure if there are no any damages, deformations, rubbish, or stains on
connectors, connector pins, and contacts before doing connection. These
defects might be the root cause of short circuits that also might result a fire.
■ Be careful in handling the connectors to prevent them from dropping down
onto or dragging on the floor, so that the connectors are kept clean and no
damages.
■ Secure the bolts and nuts fastened enough so that dropouts, looseness of
bolts can be prevented. Otherwise, short & open circuits may occur.
■ Do not step on or put a heavy body on, or add intense heat to the cables. To
remove the cables, unfasten the locks and then pull out straightly by
grabbing the connectors. Putting mechanical stresses, adding intense heat
to the cables, or prying the connectors may cause damages to the cables
and connectors and then result in a fire by a short circuit.
RealVision Inc.
6
VREngine/MD/CD Series User’s Manual
3.2 Configuring DIP Switch Settings
The VREngine/MD2/MD3 board supports both grayscale and color modes, and
the VREngine/CD3 board supports only color mode. Multi-head support is
available through the use of multiple VREngine/MD/CD Series controllers using
Windows 2000 Operating system or greater.
In order to configure for specific display settings, you may need to change the
dipswitch settings on your board or boards. The dipswitches is located on the
corner of the board, opposite to the connectors, as described below :
Dip Switch (SW1)
The photo of backside of board
■ Settings for grayscale display
To display in grayscale mode using the product, you will need to set the
dipswitch to the following before you install the board. The default factory,
out-of-box setting for the VREngine/MD2W and VREngine/MD3W boards
are as follows respectively.
Grayscale display settings
RealVision Inc.
7
VREngine/MD/CD Series User’s Manual
■ Settings for color display
To display in color mode using the product, you will need to set the dipswitch
to the following before you install the board. The default factory, out-of-box
setting for the VREngine/CD3W board is as follows.
Color display settings
Note)
To change the board from color display mode to grayscale mode or from grayscale
mode to color mode, you will require to install software driver again. (please see page
12, Software Installation)
■ Setting for multiple board configuration
You can install more than one VREngine/MC/CD Series board into a same
system. Dipswitch(s) setting for secondary or later board(s) is as follows.
Multiple board settings
Note)
Above settings are applied to secondary or later board.
first board is set as grayscale mode or color mod.
Please make sure the
The maximum number of board to be installed into a same system depends on the
specification of host system.
You need to set the VREngineMD/CD Series board(s) as Multiple-board setting when
you use or need to use graphics adaptors on mother board, on AGP bus or on PCI
bus.
If you need other settings except for described above, please contact your local
supplier to confirm the right dipswitch setting(s).
RealVision Inc.
8
VREngine/MD/CD Series User’s Manual
3.3
Board Installation Procedure
1) Make sure the power is turned off when you get started. Turn off your
computer and peripheral devices hooked to it.
Note)
The internal parts of your computer are still very hot just after the turn off.
until everything gets enough cool and then start with the installation.
Wait
2) Follow User’s Manual of your computer to remove the cover.
3) Follow User’s Manual of your computer and install the board into open PCI
slot.
(1) If the target slot has a dust cap, remove it.
(2) Remove the bolts, which fix the rear cover of the PCI slot. The bolts
removed will be used to fix the graphics board.
(3) Make sure and change the setting for the Dipswitch (SW1) on the corner
of the board, opposite to the connectors. (Please see page 7 on
Configuring DIP witch Settings)
(4) Insert the edge connector of the board into the PCI slot slowly with care.
(5) Make sure if the board is inserted solidly, and then fix the rear panel using
the bolts removed at step (2). Make sure the board is installed properly.
Note)
If the board is not properly installed, you need to remove it from the slot and
install it again. Do not put excessive force to install or to remove the board so
that you can prevent it from causing damages to the cables, connectors, and the
board itself.
RealVision Inc.
9
VREngine/MD/CD Series User’s Manual
AGP Bus Slot
PCI Bus Slot-1
PCI Bus Slot-2
PCI Bus Slot-3
PCI Bus Slot-4
PCI Bus Slot-5
ISA Bus Slots
Above photo is an example of bus slots situation in PC as host system. You
must install VREngine/MD/CD Series board(s) into PCI bus slot(s). In above
example, five PCI bus slots are available between AGP bus slot and ISA bus
slots. The order of bus slot depends on a PC which you will use and some PC
doesn’t have AGP or ISA bus slot(s).
When you install only one board, you can use any unused PCI bus slot.
When you install multiple boards, you can use any unused PCI bus slot too.
However, you may need a bus order or slot number during software driver
installation, and please make sure these information before a installation.
3.4 Connection with LCD Monitor(s)
Regarding the connection with LCD monitor(s), please follow the instructions
of manuals which is attached to LCD monitor(s).
RealVision Inc.
10
VREngine/MD/CD Series User’s Manual
4. Software Installation
Once you have completed installing the hardware and rebooted your PC, you
will be ready to install the software or driver. The following are the procedures
for installing the VREngine board driver into either Windows NT 4.0, Windows
2000, Windows XP.
4.1 WindowsNT4.0/ 2000/ XP Driver Installation Procedure
1) Start Windows NT4.0, 2000 or XP and login as administrator. You need
administrator privileges to install drivers.
2) Following the message [Found New Hardware], [Found New Hardware
Wizard] is displayed. Then, please click [Cancel] button.
RealVision Inc.
11
VREngine/MD/CD Series User’s Manual
3) Insert the [Software Driver CD-ROM] into the host system and refer files.
Please double click [Setup.exe] icon.
Setup.exe
4) [Choose Setup Language] dialog box will appear and select [English], then
click [OK].
5 ) Following message will appear and then a next wizard will appear
automatically.
RealVision Inc.
12
VREngine/MD/CD Series User’s Manual
6) [InstallShield Wizard] will appear and then click [Next] button.
7) Following Wizard will appear . If you could accept the contents of [License
Agreement], then you click [Yes]. If you click [No], then the install program
will terminate and the installation has not been done.
8) Following Wizard will appear.
RealVision Inc.
Make sure the setting and then click [Next].
13
VREngine/MD/CD Series User’s Manual
9) Following dialog box will appear and then click [Yes]. This dialog box will
appear twice for Windows 2000 or once for Windows XP. There appears no
dialog box for Windows NT.
10) If multiple board is installed, following dialog box will appear two times of the
installed number of board(s) for Windows 2000 or one time of the installed
number of board(s) for Windows XP. There appears no dialog box for
Windows NT. Please click [Yes] for each dialog box. After the secondary
board, each dialog box show what number of board is corresponded.
11) Following dialog box will appear and then click [OK]. If multiple board is
installed, same type of dialog box will appear as same as the number of
boards and then click [OK] for each of them.
One board case
RealVision Inc.
14
VREngine/MD/CD Series User’s Manual
Multi-board case
12) Following wizard will appear. Select the installed board and then click
[Next]. Please see page 16 about [Selection of product].
Select
13) Following wizard will appear.
and then click [Next].
Select the type of LCD which you connected
Select
RealVision Inc.
15
VREngine/MD/CD Series User’s Manual
Note)
Make sure to do settings for [Selection of Product] and [Selection of Monitor] for each
board respectively when you install multiple boards into a host system.
In multiple board configurations, there is no problem when you install same boards and
same LCD monitors, but you have to pay attentions to following points when you install
different type of boards or connect different type of LCD monitors.
・ Make sure each board is installed to which PCI bus slot.
・ Make sure the order of board (Board detection order at system boot time).
・ Make sure which board is connected to which LCD monitor.
By these confirmation, you can make sure the relation between the dialogs ( [Selection
of Product] dialog and [Selection of Monitor] dialog) and boards.
Regarding 12)[Selection of Product] dialog and 13)[Selection of Monitor] dialog,
please refer following tables and select contents correctly.
About [Selection of Product]
Product Name
Setting
VREngine/MD2W
Using VREngine/MD2W card
VREngine/CD3W
Using VREngine/CD3W card for Color display
VREngine/MD3W
Using VREngine/MD3W card for Grayscale display
About [Selection of Monitor]
Product Name
VREngine/MD2W
Monitor Specification
2M pixel, Color Monitor (DotClock 162MHz)
2M pixel, Color Monitor (DotClock 133.6MHz)
2M pixel, DDC Supported Monitor
2M pixel, Grayscale Monitor, Type-I (DotClock 162MHz)
2M pixel, Grayscale Monitor, Type-I (DotClock 133.6MHz)
2M pixel, Grayscale Monitor, Type-II (DotClock 162MHz)
2M pixel, Grayscale Monitor, Type-II (DotClock 133.6MHz)
VREngine/CD3W
3M pixel, Color Monitor, Type-I
VREngine/MD3W
3M pixel, Color Monitor, Type-I
3M pixel, Grayscale Monitor, Type-I
3M pixel, Grayscale Monitor, Type-II
Note)
When you use DDC compatible 2 Megapixel LCD monitor(s), please select [2M pixel
DDC Supported Monitor] and then display parameters for connected display will be set
automatically.
(DDC : Display Data Channel)
RealVision Inc.
16
VREngine/MD/CD Series User’s Manual
14) Following wizard will appear and [Current settings:] show the results of
settings. Make sure the setting contents and click [Next]. Then, actual
software driver installation procedure will start.
15) Following [InstallShield Wizard Complete] will appear and select [Yes, I
want to restart my computer now]. Then, click [Finish] button.
Windows will restart.
Note)
When you add board(s) or change a PCI bus slot, you need to un-install (see page 28)
once and you need to install a software driver again.
RealVision Inc.
17
VREngine/MD/CD Series User’s Manual
5. Display Properties Settings
5.1 Display Properties for Single board configuration
From [Control Panel], double click [Display] icon, and then start [Display
Properties]. Please select [Setting] and click.
Following dialog box will appear.
RealVision Inc.
18
VREngine/MD/CD Series User’s Manual
Note)
At above example for [Display Properties], second and third display icons are for the
VREngine. The board for the first display icon [1] indicates a graphics board that is
installed into AGP bus slot or PCI bus slot, or graphics adaptor on a mother board of the
host system. This first icon doesn’t appear when only the VREngine is installed.
Note)
To support the DualView mode in Multi-monitor mode, virtual monitor(s) icon is displayed
in [Display Properties]. But usually, the icon can’t be selected and surrounded by a
dotted line.
At above example for [Display Properties], third display icon is a virtual display.
Please see page 28 for details about DualView mode.
At above example for [Display Properties], newly installed VREngine can control
up to two monitors but the board has not been displayed yet because of without
display settings.
Please select the icon of monitor [2] for display settings.
RealVision Inc.
19
VREngine/MD/CD Series User’s Manual
Please click to check [Extend my windows desktop onto this monitor] to do
settings. The display icon [2] will be surrounded by a solid line as follows and
then click [Apply].
Here, the second monitor is available. Third monitor will be available only when
DualView mode in Multi-monitor mode (please see page 23) is selected. Third
monitor can’t be selected (surrounded by a dotted line) at WideView mode or
TwinView mode.
Following settings are possible for second monitor at this situation.
Setting for display colors → [Colors]
You can select display colors for color monitor(s) from 256 colors, High Color
(16-bit colors) or True Color (32-bit colors). In case of Grayscale monitor(s),
only 256 colors (256 scales) can be selected.
Setting for display resolution → [Screen Area]
You can change the resolution of display or landscape/portrait setting.
Moving into advanced setting mode → [Advanced]
You can move into advanced setting mode and set following three display
modes.
- Grayscale Mode
- Multi-monitor Mode
- Transfer Mode
RealVision Inc.
20
VREngine/MD/CD Series User’s Manual
Virtual Monitor
(Please see page 28)
Setting for
display
colors
Setting for
display
resolution
Move into
Advanced
setting mode
Note)
Please note following points when use grayscale mode with WindowsXP.
In WindowsXP operating system, 256 colors is not normally supported and you can’t set
256 color mode by [Color]’s tab in [Display Properties]. Please set as follows to set 256
colors.
1) Select monitor for setting at [Display Properties].
2) Click [Advanced] button or double click monitor icon for setting and [Monitor and
RealVision Inc. VREngine/MD/CD Series Properties] dialog appears.
3) Select [Adaptor] and click [List All Modes,,,] button and mode reference appears.
4) Select the resolution and click [OK]
RealVision Inc.
21
VREngine/MD/CD Series User’s Manual
Click [Advanced], then following dialog box will appear.
Click [VREngine/MD/CD Series], then following dialog box will appear. You can
set three modes for each monitor respectively.
RealVision Inc.
22
VREngine/MD/CD Series User’s Manual
Setting for [Grayscale Mode]
Please see page 26 for details.
Setting for [Multi-monitor Mode]
Please see page 24 for details.
RealVision Inc.
23
VREngine/MD/CD Series User’s Manual
Setting for [Transfer Mode]
Please see page 26 for details.
After the new settings for each mode, click [Monitor Re-setup] button, then the
installer executes the Re-Setup procedure for the product.
Note)
The 10-bit grayscale output mode is available on the product. When you want to use
the lookup table for Gamma correction in the board, you must make valid the Gamma
correction function by using application with Gamma correction API provided from
RealVision. This application makes it possible to use the Gamma correction function
and 10-bit grayscale output.
Note)
After the setting for each mode, the setting will be valid to click [OK] or [Apply] button.
In case of the setting for [Grayscale] or [Multi-monitor Mode], the dialog box asking
whether reboot or not will appear. Then, only reboot will make valid the new settings.
Note)
If you click [Monitor Re-Setup], the step 4) [Choose Setup Language] (please see page
12) of software driver installation procedure will appear. Then you follow the normal
procedure and you may change display colors or dot clock at the step 13). Finally the
new setting will be valid by the reboot of Windows at the Step 15).
RealVision Inc.
24
VREngine/MD/CD Series User’s Manual
5.2 Display Properties for Multiple board configuration
[Display properties] when multiple boards are installed is as follows.
Select each monitor icons and go to [Default Monitor and VREngine/MD/CD
Series Products] as the case of one board configuration. Then, select one board
using [Display Adaptor NO.] and set functions respectively.
Select a board
RealVision Inc.
25
VREngine/MD/CD Series User’s Manual
5.3 Details for Display Properties
Detail setting parameters are described in following table.
Settings
Description
Selection of
Board
Allows you to select and configure for each board when you have
two or more boards installed.
Allows you to select one display mode from following three mode
in multi-monitor mode for displaying image(s) on multiple
monitors.
Multi-monitor
Mode
WideView Mode
Two monitors display images as one monitor.
TwinView Mode
Same images are displayed on two monitors (mirroring).
Please see page
27-28 too.
DualView Mode
2 monitors display images independently.
To control grayscale display, three palette modes (Linear Static
Gray, Dynamic Gray, Non-Linear Static Gray) are available. You
can select one of three modes. These modes are valid only for
grayscale mode.
Grayscale Mode
Linear Static Gray
This mode provides fixed 256 entries in the palette. Therefore, it
is different from standard system palette of Windows.
Dynamic Gray
Application can dynamically change the entry of palette in this
mode.
Non-Linear Static Gray
This mode sets the first and last ten palette entries for Windows.
The other 236 entries are ramped in ascending order.
Select one of two modes (Block Mode, Image Mode)
Transfer Mode
Block Mode
This mode provides the best performance. But some visual
artifact may be seen. If they are seen, change mode to Image
Mode.
Image Mode
This mode provides the most smooth images
RealVision Inc.
26
VREngine/MD/CD Series User’s Manual
Display Modes in Multi-monitor Mode :
WideView Mode
TwinView Mode
DualView Mode
RealVision Inc.
27
VREngine/MD/CD Series User’s Manual
About Dual Mode :
In DualView Mode, one VREngine board is recognized as 2 devices for
operating system (Windows). To support the DualView Mode, virtual monitor(s)
are displayed in [Display Properties]. Normally the icon of virtual monitor(s) is
surrounded by a dotted line and this indicates that you can’t use virtual
monitor(s) (please see page 20).
When you use DualView mode, you need to enable the virtual monitor(s)
(Windows desktop can move to the monitor). You can enable the virtual
monitor(s) by selecting [DualView] at [Multi-monitor Mode] during you are
selecting the corresponding monitor to the virtual monitor.
(In case of this manual, in the example window display at page 20, Select
[DualView] at [Multi-monitor Mode] with selecting the monitor icon of [2])
Please note following points for DualView Mode setting and usage.
1) [Colors] setting of two monitors must be the same by manual operation.
2) You can’t enable the virtual monitor(s) except for DualView Mode.
3) Two monitors that are used in DualView Mode must be connected to one
VREngine board. Make sure the correspondence of monitor numbers and
actual monitors by using [Identify] button which displays the monitor
numbers on actually connected monitors
4) You can’t use DualView Mode on Windows NT system.
5) Do not select 640x480 or 800x600 resolution at [Screen Area] on Windows
2000 system
6) You can’t use DualView Mode on Windows 2000 system if the host system
(PC) isn’t compatible with ACPI.
(You can confirm whether your PC is ACPI compatible or not. If you can find the
item “ACTP Uni-processor PC” at [Computer] ( ← [Device Manager] ← [Control
Panel] ), then your PC is compatible with ACPI.)
RealVision Inc.
28
VREngine/MD/CD Series User’s Manual
6. Uninstall Driver Software
6.1 Un-installation for WindowsNT4.0/ 2000/ XP
If you need to install your RealVision display driver, follow these instructions for
Windows NT 4.0 and Windows 2000.
1) Select [Settings(s)] from Start Menu on Task Bar -> then click [Control
Panel(c)].
2) Double Click [Add/Remove Programs] icon.
Add/Remove
Programs
3) Select [VREngine/MD/CD Series] from the list-> then click [Add/Remove]
button.
RealVision Inc.
29
VREngine/MD/CD Series User’s Manual
4) Click [Yes] button.
5) Restart Windows after all of applications are terminated. Un-installation have
not completed without restart.
RealVision Inc.
30
VREngine/MD/CD Series User’s Manual
7. Product Information
7.1 Technical Specification (VREngine/MD2W)
Operating Conditions
Host system
Operating systems
DOS/V compatibles
Windows NT 4.0 Workstation
(ServicePack 6 or greater)
Windows 2000 Professional
Windows XP
intel IA32, AMD, etc.
>500MHz
PCI 32-bit / 5V, 3.3V
(PCI Version2.2 compliant)
33MHz
>256Mbytes
5V ±0.25V
15W (max)
174.5 (W) x 106.7 (H) mm or
7.1 (W) x 4.2 (H) inch
158g / 0.34lbs
PCI bus slot x1
PCI board x1
1600 x 1200 pixel (Landscape)
1200 x 1600 pixel (Portrait)
3200 x 1200 pixel (Landscape)
2400 x 1600 pixel (Portrait)
2M-VESA compliant digital LCD monitor
2M-133.6MHz(Dotclk) digital LCD monitor
Max 2 monitors
Host processor
Operating frequency
Host bus spec.
Mechanical Spec.
Host bus frequency
Size of main memory
Operating voltage
Power consumption
Board size (Outline)
Display Resolution
Weight
# of occupied slot
# of board
Single-head case
Dual-head case
Connectable Monitor
Note 1)
# of connectable
monitors
Display Mode Note 2)
Single Head case
Landscape
Portrait
Landscape + Landscape
Portrait + Portrait
Dual Head case
VGA display function
Available
VGA standard compliant
Rotate-direction of
Screen
# of display bits
Counter clockwise
At Landscape – Portrait switching
Note 3)
Display memory size
Video Output Std.
Video Output Spec.
DVI (Digital Visual Interface)
Dot Clock
H-Sync
V-Sync.
Refresh Rate
Certification
RealVision Inc.
31
8-bit/pixel grayscale
10-bit/pixel grayscale (Integrated Gamma
table can select 256 scales from 1024
scales)
8, 24-bit/pixel color
64Mbytes SDRAM
DVI-D
162MHz or 133.6MHz
75KHz
60Hz
60Hz
UL/cUL, FCC, CE
VREngine/MD/CD Series User’s Manual
Operating Temperature
Condition for
preservation
0 - 45℃ / 32 – 113F
-40 – 75℃ / -40 – 167F
5 – 100% (None condensing)
Lower than 11,000m / 36,000ft
Temp. & Humidity
Altitude
Note 1) With the use except for 2M-VESA compliant monitors, EDID can provide compatibility.
Note 2) Display mode specifications
1200
1600
1600
1200
Landscape display
Portrait display
2400
3200
1600
1200
(Multi-monitor mode)
(DualView mode only)
Note 3) With a VGA mode, VGA display of 640×480 dots can be displayed with 2 x of in
horizontal & Vertical sizes.
RealVision Inc.
32
VREngine/MD/CD Series User’s Manual
7.2 Technical Specification (VREngine/MD3W/CD3W)
Operating Conditions
Host system
Operating systems
DOS/V compatibles
Windows NT 4.0 Workstation
(ServicePack 6 or greater)
Windows 2000 Professional
Windows XP
intel IA32, AMD, etc.
>500MHz
PCI 32-bit / 5V, 3.3V
(PCI Version2.2 compliant)
33MHz
>256Mbytes
5V ±0.25V
15W (max)
174.5 (W) x 106.7 (H) mm or
7.1 (W) x 4.2 (H) inch
158g / 0.34lbs
PCI bus slot x1
PCI board x1
2048 x 1536 pixel (Landscape)
1536 x 2048 pixel (Portrait)
4096 x 1536 pixel (Landscape)
3072 x 2048 pixel (Portrait)
3M-65MHz(Dotclk) digital LCD monitor
Host processor
Operating frequency
Host bus spec.
Mechanical Spec.
Host bus frequency
Size of main memory
Operating voltage
Power consumption
Board size (Outline)
Display Resolution
Weight
# of occupied slot
# of board
Single-head case
Dual-head case
(only MD3W)
Connectable Monitor
Note 1)
# of connectable
monitors
Display Mode Note 2)
Single Head case
VGA display function
Dual Head case
(MD3W only)
Available
Landscape
Portrait
Landscape + Landscape
Portrait + Portrait
VGA standard compliant
Counter clockwise
At Landscape – Portrait switching
Note 3)
Rotate-direction of
Screen
# of display bits
Display memory size
Video Output Std.
Video Output Spec.
Max 2 monitors (MD3W only)
DVI (Digital Visual Interface)
Dot Clock
H-Sync
V-Sync.
Refresh Rate
Certification
Operating
Temperature
RealVision Inc.
33
8-bit/pixel grayscale
10-bit/pixel grayscale (Integrated Gamma
table can select 256 scales from 1024
scales)
8, 24-bit/pixel color
64Mbytes SDRAM
DVI-D
65MHz
96.72KHz
60Hz
60Hz
UL/cUL, FCC , CE
0 – 45℃ / 32 – 113F
VREngine/MD/CD Series User’s Manual
Condition for
preservation
Temp. & Humidity
-40 – 75℃ / -40 – 167F
5 - 100% (None condensing)
Lower than 11,000m / 36,000ft
Altitude
Note 1) Display mode specifications
1536
2048
2048
1536
Landscape display
Portrait display
3072
4096
2048
1536
(MD3W Multi-monitor Mode)
(MD3W DualView Mode only)
RealVision Inc.
34
VREngine/MD/CD Series User’s Manual
7.3
Monitor Interface
DVI connector 2
DVI connector 1
Pin Location
1
8
C1
C2
C5
17
C3 C4
24
Digital
Interface
PIN
1
2
3
4
5
6
Signal
T.M.D.S. Data 2T.M.D.S. Data 2+
T.M.D.S. Data 2/4
Shield
T.M.D.S. Data 4T.M.D.S. Data 4+
DDCClock
7
DDC Data
15
Back Light ON
N.C.
N.C.
16
C2
C5
8
C1
C4
RealVision Inc.
PIN
9
10
11
Analog
Interface
Signal
T.M.D.S. Data 1T.M.D.S. Data 1+
T.M.D.S. Data 1/3 Shield
PIN
17
18
19
12
13
14
T.M.D.S. Data 3T.M.D.S. Data 3+
+5V Power
20
21
22
Ground
(return for +5V, HSync and
Vsync)
Monitor Sense
N.C.
N.C.
23
Signal
T.M.D.S. Data 0T.M.D.S. Data 0+
T.M.D.S. Data 0/5
Shield
T.M.D.S. Data 5T.M.D.S. Data 5+
T.M.D.S. Clock
Shield
T.M.D.S. Clock+
24
C3
T.M.D.S. ClockN.C.
35
VREngine/MD/CD Series User’s Manual
8. Limited Warranty
RealVision’s Standard high-resolution display controller Warranty and
Customer’s sole and exclusive remedies for such warranties are specified below.
REALVISION’S WARRANTIES STATED IN THIS SECTION ARE IN LIEU OF
ALL OTHER WARRANTIES EXPRESSED, IMPLIED, OR STATUTORY,
INCLUDING
WITHOUT
LIMITATION,
ANY
WARRANTY
OF
MERCHANTABILITY OR FITNESS FOR A PARTICULAR PURPOSE.
No statement, including without limitation, representations regarding capacity,
suitability for use or performance of Product(s), whether made by RealVision
employees or otherwise, shall be deemed to be a warranty by RealVision for
any purpose or give rise to any liability of RealVision unless expressly contained
in this Warranty.
The warranties in this section do not apply to any Product(s) which has been (i)
altered, except by RealVision or by another party adhering to RealVision’s
instructions, (ii) used in conjunction with another vendor’s product resulting in a
defect, or (iii) damaged by improper electrical power or environment, abuse,
misuse, accident or negligence.
RealVision warrants to Customer that the High resolution display controller
covered by the Standard High resolution display controller Warranty will be free
from defects in workmanship and materials for a period of thirty-six (36) months
from the date of purchase . For repairs after warranty period, please contact
your local supplier.
9. About Disposing the Product
To dispose the product, follow your regional regulations. For the detail, contact
your local government office.
RealVision Inc.
36