1
SAS 9.1
Companion for OpenVMS Alpha
®
The correct bibliographic citation for this manual is as follows: SAS Institute Inc. 2004.
SAS ® 9.1 Companion for OpenVMS Alpha. Cary, NC: SAS Institute Inc.
SAS® 9.1 Companion for OpenVMS Alpha
Copyright © 2004, SAS Institute Inc., Cary, NC, USA
ISBN 1–59047–211–X
All rights reserved. Produced in the United States of America. No part of this publication
may be reproduced, stored in a retrieval system, or transmitted, in any form or by any
means, electronic, mechanical, photocopying, or otherwise, without the prior written
permission of the publisher, SAS Institute Inc.
U.S. Government Restricted Rights Notice. Use, duplication, or disclosure of this
software and related documentation by the U.S. government is subject to the Agreement
with SAS Institute and the restrictions set forth in FAR 52.227–19 Commercial Computer
Software-Restricted Rights (June 1987).
SAS Institute Inc., SAS Campus Drive, Cary, North Carolina 27513.
1st printing, January 2004
SAS Publishing provides a complete selection of books and electronic products to help
customers use SAS software to its fullest potential. For more information about our
e-books, e-learning products, CDs, and hard-copy books, visit the SAS Publishing Web site
at support.sas.com/pubs or call 1-800-727-3228.
SAS® and all other SAS Institute Inc. product or service names are registered trademarks
or trademarks of SAS Institute Inc. in the USA and other countries. ® indicates USA
registration.
Other brand and product names are registered trademarks or trademarks of their
respective companies.
Contents
What’s New
ix
Overview
ix
Migrating Your Existing SAS Files to SAS 9.1
Restricted System Options
x
ix
Support for Extended (ODS-5) Syntax on ODS-5 Enabled Volumes
Support for Cluster-Level Logicals x
Specifying an Additional Configuration File
xi
Functionalities That Are Unavailable from a Captive Account
xi
Changes to SAS E-mail xi
Accessing External Shareable Images
Engines xii
SAS Resources xii
SAS Language Elements xii
PART
1
Running SAS under OpenVMS
Chapter 1
x
xi
1
4 Introduction to the OpenVMS Operating Environment
What Is the OpenVMS Operating Environment?
Access to OpenVMS
4
3
4
Basics of the OpenVMS File System
6
OpenVMS Filenames 8
OpenVMS File Types 12
OpenVMS File Types Used by SAS
12
OpenVMS Logical Names and Logical-Name Tables
The OpenVMS Digital Command Language 14
Data Security
17
Chapter 2
4 Getting Started with SAS under OpenVMS
Starting a SAS Session under OpenVMS 21
Selecting a Mode of Operation under OpenVMS
SAS Windowing Environment under OpenVMS
Batch Mode under OpenVMS
24
Interactive Line Mode under OpenVMS
26
Noninteractive Mode under OpenVMS
27
Running SAS in a SPAWN/NOWAIT Subprocess
Running SAS in a Detached Process 29
X Window Command Line Options
30
13
19
21
22
29
Techniques for Customizing Your SAS Session under OpenVMS
Customizing Your SAS Session Using System Options 32
Configuration Files 36
Autoexec Files
39
31
iv
Customizing Your SAS Session Using OpenVMS Logical Names 41
Issuing DCL Commands during a SAS Session
43
Determining the Completion Status of a SAS Job under OpenVMS
50
Interrupting a SAS Session under OpenVMS
51
Ending Your SAS Session
53
Identifying and Resolving Problems under OpenVMS
54
Chapter 3
4 Working in the SAS Windowing Environment
55
Introduction to Working in the SAS Windowing Environment
56
Description of SAS in the X Environment 56
The SAS Session Manager under OpenVMS
59
Displaying Function Key Definitions under OpenVMS
60
The SAS ToolBox under OpenVMS
61
Opening Files under OpenVMS
65
Changing Your Current Working Directory under OpenVMS
67
Searching for Character Strings under OpenVMS 68
Replacing Character Strings under OpenVMS 69
Setting Up Printers under OpenVMS
70
Sending Mail from within Your SAS Session under OpenVMS
71
Creating Icons for Windows under OpenVMS
73
Using the Menus under OpenVMS
73
Using the Mouse under OpenVMS
74
SAS Interface to the TPU Editor 74
Using Special Character Attributes under OpenVMS
74
Getting Help under OpenVMS
75
Chapter 4
4 Customizing the SAS Windowing Environment
77
Overview of Customizing SAS in X Environments
78
Overview of X Resources 79
Methods for Customizing X Resources 79
Editing the X Resource File 80
Modifying X Resource Settings by Using the Preferences Dialog Box 80
Customizing the SAS ToolBox under OpenVMS
88
Customizing Key Definitions under OpenVMS
94
Customizing Fonts under OpenVMS
101
Customizing Colors under OpenVMS
106
Controlling Menus under OpenVMS
112
Customizing Cut-and-Paste Operations under OpenVMS
113
Customizing Session Workspace, Session Gravity, and Window Sizes under
OpenVMS
117
Specifying User-Defined Icons under OpenVMS 119
Miscellaneous Resources under OpenVMS
120
Summary of X Resources for SAS under OpenVMS
122
Chapter 5
4 Using SAS Files
125
Introduction to SAS Files, Data Libraries, and Engines under OpenVMS
127
v
Common Types of SAS Files in OpenVMS 128
The WORK Data Library under OpenVMS
129
The SASUSER Data Library
134
Compatibility of Existing SAS Files with SAS 9.1
135
Accessing SAS Files under OpenVMS
136
Assigning Librefs under OpenVMS
136
Assigning OpenVMS Logical Names
140
Accessing Files in Concatenated SAS Data Libraries under OpenVMS
Accessing SAS Files on Tape under OpenVMS 144
How SAS Assigns an Engine When No Engine Is Specified 147
Sharing Data between OpenVMS Platforms 147
Multiuser Access to SAS Files under OpenVMS 148
Estimating the Size of a SAS Data Set under OpenVMS 149
Generation Data Sets under OpenVMS
152
Chapter 6
4 Using SAS Engines
143
153
Overview of the SAS Engine 154
Overview of the TAPE Engine under OpenVMS
154
Engines Available under OpenVMS
155
How to Select an Engine under OpenVMS
156
Member Types Supported for V9, V8, and V7 Engines 157
Engine/Host Options for the V9, V8, and V7 Engines
158
The V6 Engine under OpenVMS
159
The CONCUR Engine under OpenVMS
160
The DBMS Interface Engine 167
The OSIRIS and SPSS Engines under OpenVMS 167
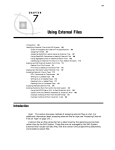
Chapter 7
4 Using External Files and Devices
171
Introduction to Using External Files and Devices under OpenVMS
172
Identifying External Files to SAS
173
Reading and Writing SAS Print Files under OpenVMS
178
Displaying Information about External Files under OpenVMS
179
Accessing External Files on Tape under OpenVMS
179
Accessing Remote External Files under OpenVMS
185
Reading from and Writing to OpenVMS Commands (Pipes) 186
Sending Electronic Mail Using the FILENAME Statement (E-MAIL)
189
Chapter 8
4 Routing the SAS Log and SAS Procedure Output
195
Overview to Routing Log and Procedure Output 195
Attributes of the SAS Log and Procedure Output Files 196
Overriding the Default Log and Output Destinations under OpenVMS
Routing Output in the SAS Windowing Environment
197
Routing Output in Interactive Line Mode
199
Routing Output in Noninteractive Mode 201
Routing Output in Batch Mode
204
Using the PRTFILE Command under OpenVMS 205
196
vi
Chapter 9
4 Accessing External Shareable Images from SAS
207
Overview of Shareable Images in SAS 208
The SASCBTBL Attribute Table
208
Special Considerations When Using External Shareable Images 213
Examples of Accessing External Shareable Images from SAS 226
PART
2
Application Considerations
Chapter 10
4 Data Representation
231
233
Numeric Variables in the Alpha Environment
Missing Values under OpenVMS 234
Chapter 11
PART
3
233
4 Optimizing System Performance
235
Overview of Optimizing OpenVMS System Performance
Data Set I/O under OpenVMS
236
External I/O under OpenVMS
241
System Start-up under OpenVMS
244
Optimizing Memory Usage under OpenVMS
244
235
Features of the SAS Language for OpenVMS
247
Chapter 12
4 Commands under OpenVMS
249
SAS Commands under OpenVMS
250
Dictionary
250
Function-Key Commands 271
Host-Specific Frames of the Form Window
Chapter 13
272
4 Data Set Options under OpenVMS
277
SAS Data Set Options under OpenVMS
277
Specifying Data Set Options
277
Summary Table of SAS Data Set Options under OpenVMS
Dictionary
282
Chapter 14
4 Formats under OpenVMS
SAS Formats under OpenVMS
297
Writing Binary Data under OpenVMS
Dictionary
298
Chapter 15
Chapter 16
297
297
4 Functions and CALL Routines under OpenVMS
SAS Functions under OpenVMS
310
SAS CALL Routines under OpenVMS
Dictionary
311
4 Informats under OpenVMS
SAS Informats under OpenVMS
361
Reading Binary Data under OpenVMS
Dictionary
362
278
311
361
361
309
vii
Chapter 17
4 Procedures under OpenVMS
SAS Procedures under OpenVMS
Dictionary
Chapter 18
373
373
4 Statements under OpenVMS
SAS Statements under OpenVMS
Dictionary
Chapter 19
373
393
393
393
4 System Options under OpenVMS
SAS System Options under OpenVMS
429
431
Determining How an Option Was Set under OpenVMS
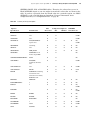
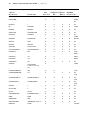
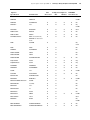
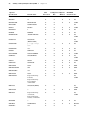
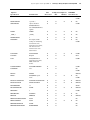
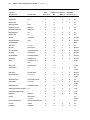
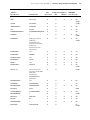
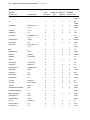
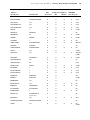
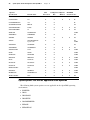
Summary of SAS System Options under OpenVMS
Dictionary
Chapter 20
431
432
443
4 Macro Facility under OpenVMS
517
About the SAS Macro Facility under OpenVMS
Automatic Macro Variables under OpenVMS
Macro Statements under OpenVMS
Macro Functions under OpenVMS
517
517
519
519
Autocall Libraries under OpenVMS
520
Stored Compiled Macro Facility under OpenVMS
521
Other Host-Specific Aspects of the Macro Facility under OpenVMS
PART
4
Appendices
Appendix 1
525
4 Error Messages
527
Overview of Error Messages under OpenVMS
527
OpenVMS Operating Environment Messages
Host Subsystem Messages under OpenVMS
TPU Interface Errors under OpenVMS
527
528
537
Concurrency Engine Errors under OpenVMS
Appendix 2
4 The SAS$ROOT Directory
539
Introduction to the SAS$ROOT Directory
Contents of the SAS$ROOT Directory
Appendix 3
4 Recommended Reading
Recommended Reading
Glossary
Index
543
555
541
539
539
541
538
523
viii
ix
What’s New
Overview
New and enhanced features in Base SAS improve ease of use and SAS performance
under the OpenVMS Alpha operating environment:
3 SAS is built to take advantage of the OpenVMS Alpha 64-bit architecture.
3 Your site administrator can restrict system options for your site.
3 You can create filenames similar to those on UNIX and Windows by using
Extended (ODS-5) Syntax on ODS-5 enabled volumes.
3 Support for cluster-level logicals has been incorporated into SAS in all areas where
multi-level logical definitions were previously supported.
3 SMTP (Simple Mail Transfer Protocol) is now the default for sending mail from
within SAS.
Note:
3 This section describes the features of SAS software under the OpenVMS Alpha
operating environment that are new or enhanced since SAS 8.2.
3 z/OS is the successor to the OS/390 operating system. Throughout this document,
any reference to z/OS also applies to OS/390, unless otherwise stated.
4
Migrating Your Existing SAS Files to SAS 9.1
Starting in SAS 9, SAS is built to take advantage of the OpenVMS Alpha 64–bit
architecture. The following list explains the compatibility of your existing SAS files
with SAS 9.1:
3 All of your Version 7 and Version 8 SAS files (except SAS catalogs) are compatible
with SAS 9.1. To take advantage of the new SAS 9 features and access your
existing SAS catalogs, convert your Version 7 and Version 8 files by using the
MIGRATE procedure.
x
What’s New
3 SAS 9.1 only supports input processing for Version 6 data files using the V6
read-only engine. To access all of your Version 6 files in SAS 9.1, you need to
migrate your Version 6 data libraries.
For more information about the compatibility of existing SAS files with SAS 9.1, see
“Compatibility of Existing SAS Files with SAS 9.1” on page 135.
You can use the MIGRATE procedure to convert all of your SAS files to the SAS 9.1
format. For more information about the MIGRATE procedure, see the Migration
Community at support.sas.com/rnd/migration.
If you use Remote Library Services (RLS) to access SAS files on a server, see the
SAS/CONNECT User’s Guide for information about accessing Version 6 SAS files.
Restricted System Options
Your site administrator can restrict SAS system options at three levels: for your site,
for a specific group, or for an individual user. Because these options are restricted, you
cannot change a value that is specified in the restricted configuration files. Use the new
RESTRICT option for the OPTIONS procedure to see all of the system options that have
been restricted. For more information about how SAS processes restricted configuration
files, see “Six Types of Configuration Files” on page 36. For information about creating
a restricted configuration file, see SAS System Configuration Guide for OpenVMS.
Support for Extended (ODS-5) Syntax on ODS-5 Enabled Volumes
SAS supports the Extended (ODS-5) Syntax on ODS-5 enabled volumes. The ODS-5
syntax allows longer filenames, supports more characters within filenames, preserves
case within filenames, and supports deeper directory structures. These extended file
specifications enable users to create filenames similar to those in UNIX and Windows.
The ODS-5 and Windows file-naming conventions are similar. For example, if a
filename exists in all uppercase, then any lowercase or uppercase reference to that file
will resolve to uppercase. See “ODS-5 File Naming Conventions” on page 10.
When using the ODS-5 syntax, you must issue an X statement before using a DCL
command in SAS. See “X Statement” on page 427.
Support for Cluster-Level Logicals
OpenVMS 7.2 introduced the new concept of clusterwide logical definitions. Support
for cluster-level logicals has been incorporated into SAS in all areas where multi-level
logical definitions were previously supported. See the OpenVMS documentation for
more information about cluster-level logical definitions.
SAS will use a clusterwide logical when you:
3 specify a cluster-level configuration file
3 specify a cluster-level autoexec file
3 use the GETLOG function .
For more information about creating these files, see “Configuration Files” on page 36
and “Autoexec Files” on page 39.
What’s New xi
Specifying an Additional Configuration File
You can specify the CONFIG= system option inside a configuration file to point to an
additional configuration file. Because the options specified in this additional file are
processed at the point of the CONFIG= specification, their precedence will be lower
than the next option listed in the original configuration file. See “Steps for Creating a
Configuration File” on page 37.
Functionalities That Are Unavailable from a Captive Account
Functionalities that require either a detached process or a subprocess are
unavailable from a captive account . These functionalities are:
3 host-specific commands that are executed asynchronously from the SYSTASK
statement
3 the PIPE device in the FILENAME statement
3 remote sign-ons using SAS/CONNECT
3 the SAS Help and Documentation in the SAS windowing environment
3 the SAS Session Manager (xsassm)
3 X commands that cannot be executed in the current process.
For more information, see “Limitations of Using a Captive Account” on page 47.
Changes to SAS E-mail
3 The default mail handler is SMTP (Simple Mail Transfer Protocol), which supports
attachments. For more information, see “Initializing Electronic Mail” on page 189.
3 The BCC option in the FILENAME statement enables you to send blind copy
e-mails during a SAS session. For more information, see “Syntax of the
FILENAME Statement for E-Mail” on page 189.
3 Using the Send Mail dialog box, you can now do the following:
3 include the contents of an active SAS text window (such as the Program
Editor or Log) in the body of your e-mail. For more information, see “Sending
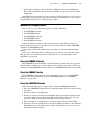
the Contents of a Text Window” on page 72.
3 attach the contents of a non-text window to your e-mail. Examples of
non-text windows include a graph generated by SAS/GRAPH and an image in
your PROC REPORT output. For more information, see “Sending the
Contents of a Non-Text Window” on page 73.
Note:
The VMS e-mail facility does not support attachments.
4
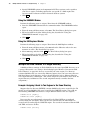
Accessing External Shareable Images
Shareable images are executable files that contain one or more routines written in
various programming languages. Shareable images store useful routines that might be
needed by many applications. Using the MODULE family of SAS CALL routines and
functions, you can invoke a routine that resides in an external shareable image from
within SAS. You can access the shareable images by using a DATA step, the IML
xii What’s New
procedure, and SCL code. For more information, see Chapter 9, “Accessing External
Shareable Images from SAS,” on page 207.
Engines
The following features are new or enhanced:
3 The new V6 read-only engine enables you to read your Release 6.12 data sets. For
more information about the V6 read-only engine, see SAS Language Reference:
Concepts.
3 The V5 and V6TAPE engines are no longer supported. Because of this, neither V5
nor V6TAPE options are valid in the LIBNAME statement or the ENGINE=
system option. See “LIBNAME Statement” on page 420 and “ENGINE= System
Option” on page 460.
SAS Resources
3 The following resources are new:
3 SAS.startSessionManager specifies whether SAS automatically starts the
session manager when a new SAS session is started.
3 SAS.suppressTutorialDialog specifies whether SAS displays the Getting
Started Tutorial dialog box at the start of your SAS session.
3 SAS.useNativeXmTextTranslations specifies whether any XmText widget
translations are inherited by all instances of the Text, Combo Box, and Spin
Box widgets used by the SAS X Motif user interface.
3 SAS.VMSdisplay controls how often SAS yields processing to the X
windowing environment.
For more information, see “Miscellaneous Resources under OpenVMS” on
page 120.
3 The SAS.webBrowser resource is no longer supported. The SAS.helpBrowser now
specifies the pathname of the World Wide Web browser for use when viewing the
online help or when the WBROWSE command is issued. For more information,
see “Miscellaneous Resources under OpenVMS” on page 120.
SAS Language Elements
Commands
3 The X command now breaks DCL commands that are longer than 256 characters
into smaller chunks before sending them to the operating environment for
processing. For more information, see “X Command” on page 270.
Functions
3 To call a specific routine or module that resides in a shareable image, you can use
the MODULE function. For more information, see “MODULE Function” on page
341.
What’s New xiii
3 You can store the contents of a memory address in a numeric variable on 32–bit
and 64–bit platforms by using the PEEKLONG function. This function replaces
the PEEK function, which was valid only on 32–bit platforms.For more
information, see “PEEKLONG Function” on page 345.
Procedures
3 To see all the system options that have been set by your site administrator, use the
RESTRICT option in the OPTIONS procedure. For more information,
see“OPTIONS Procedure” on page 383.
Statements
3 The following options are new in the %INCLUDE statement:
3 BLKSIZE= specifies the number of bytes that are physically read or written
in an I/O operation.
3 ENCODING= specifies the encoding to use when reading from the specified
source.
3 LRECL= specifies the record length (in bytes).
3 RECFM= controls the record format.
3 The V5 and V6TAPE options are not accepted by the LIBNAME statement. For
more information, see “LIBNAME Statement” on page 420.
System Options
3 The following system options are new:
3 You can specify the location of the Program Editor autosave file by using the
AUTOSAVELOC= system option. For more information, see
“AUTOSAVELOC= System Option” on page 447.
3 To specify that the asynchronous host command use a detached process, use
the DETACH system option. The default is DETACH. For more information,
see “DETACH System Option” on page 455.
3 If you create a customized table of contents and index for the SAS Help and
Documentation, use theHELPTOC= and HELPINDEX= system options to
specify the file location.For more information, see “HELPTOC= System
Option” on page 467 and “HELPINDEX= System Option” on page 465.
3 SSLCALISTLOC, SSLCRLLOC, SSLCERTLOC, SSLPVTKEYLOC, and
SSLPVTKEYPASS are authentication security options that are under the
OpenVMS Alpha operating environment. For details, see the
SAS/CONNECT User’s Guide.
3 The following system options have been changed or enhanced:
3 SMTP (Simple Mail Transfer Protocol) is the new default for the EMAILSYS=
system option. SMTP supports sending attachments.For more information,
see “EMAILSYS= System Option” on page 458.
3 V9 is a new value for the ENGINE= system option. V5 and V6TAPE are
obsolete and not accepted as valid values. For more information, see
“ENGINE= System Option” on page 460.
3 The SAS$USER logical, the default for the SASUSER= system option, now
defaults to the SASUSER91 subdirectory of the SYS$LOGIN directory. For
more information, see “SASUSER= System Option” on page 492.
xiv
What’s New
3 MAX is the new default value for the SORTSIZE= system option.For more
information, see “SORTSIZE= System Option” on page 494.
3 The value of stack-size for the STACK= system option must be an integer
between 65,535 and 5,242,880. The default value for most procedures is now
1,048,576 bytes.
3 The
3
3
3
3
3
3
following system options are obsolete or are no longer supported:
DBCS
DBCSLANG
DBCSTYPE
PROCLEAVE
SYSLEAVE
UNLOAD.
1
1
P A R T
Running SAS under OpenVMS
Chapter
1. . . . . . . . . . Introduction to the OpenVMS Operating Environment
Chapter
2 . . . . . . . . . . Getting Started with SAS under OpenVMS
Chapter
3 . . . . . . . . . . Working in the SAS Windowing Environment
Chapter
4 . . . . . . . . . . Customizing the SAS Windowing Environment
Chapter
5 . . . . . . . . . . Using SAS Files
Chapter
6 . . . . . . . . . . Using SAS Engines
Chapter
7 . . . . . . . . . . Using External Files and Devices
Chapter
8 . . . . . . . . . . Routing the SAS Log and SAS Procedure Output
195
Chapter
9 . . . . . . . . . . Accessing External Shareable Images from SAS
207
19
55
77
125
153
171
3
2
3
CHAPTER
1
Introduction to the OpenVMS
Operating Environment
What Is the OpenVMS Operating Environment? 4
OpenVMS VAX and Alpha Platforms 4
Access to OpenVMS 4
Requirements for Accessing an OpenVMS System 4
Login Procedure 5
Files That Affect the Login Procedure 5
User Authorization File 5
LOGIN.COM File 5
Logout Procedure 6
Basics of the OpenVMS File System 6
Directories 6
Introduction to the OpenVMS Directory File Structure 6
Creating Directories 7
Changing Your Default Directory 7
Files 8
OpenVMS Filenames 8
Syntax for File Specifications 8
What Is a Fully Qualified Name? 8
Rules for File Specifications 8
Description of File Specification Fields 8
ODS-5 File Naming Conventions 10
Difference between the ODS-2 and ODS-5 File Naming Conventions
Benefits to Using the ODS-5 Volume Structure 10
Issuing a DCL Command Using ODS-5 Syntax 11
Wildcards in OpenVMS Filenames 11
The Asterisk 11
The Percent Sign 11
OpenVMS File Types 12
OpenVMS File Types Used by SAS 12
Warning about Changing File Types 12
File Types for SAS Files 12
File Types for External Files 13
OpenVMS Logical Names and Logical-Name Tables 13
The OpenVMS Digital Command Language 14
Introduction to the OpenVMS Digital Command Language 14
The Command Line 14
How to Continue a Long Command on the Next Line 15
Interrupting Command-Line Processing 15
Command Procedures 15
Creating a Command Procedure 15
Invoking a Command Procedure 15
10
4
What Is the OpenVMS Operating Environment?
4
Chapter 1
Commonly Used DCL Commands 15
Commands for Controlling a Terminal Session 16
Commands for Managing Files 16
Data Security 17
Introduction to Data Security 17
File Protection 17
Specifying File Protection for a Process 18
Specifying File Protection for Individual Files 18
Access Control Lists 18
What Is the OpenVMS Operating Environment?
OpenVMS is an interactive virtual-memory operating environment that runs on
computers with CPUs developed by Compaq Computer Corporation. To communicate
with OpenVMS, you most commonly use the Digital Command Language (DCL).
Like any operating environment, OpenVMS is designed to manage information. It
accepts, stores, retrieves, and processes many types of information, such as data, text,
programs (such as SAS programs), and output from programs. The OpenVMS system
performs all data processing functions in response to DCL commands that you issue.
These functions include
3 managing a terminal session
3 submitting jobs for execution
3 storing and retrieving data files
3 allocating resources (for example, disk space, time, and internal memory) to
individual jobs
3 controlling peripheral equipment such as printers, plotters, disk drives, and tape
drives.
For detailed information about OpenVMS, see the documentation provided by
Compaq Computer Corporation such as OpenVMS User’s Manual. Also, the operating
environment provides an online help facility that you can access by using the Digital
Command Language (DCL) HELP command.
OpenVMS VAX and Alpha Platforms
Compaq Computer Corporation offers the OpenVMS operating environment on VAX
and Alpha platforms. SAS supports the OpenVMS Alpha platform.
Access to OpenVMS
Requirements for Accessing an OpenVMS System
In order to access an OpenVMS system, you must have an OpenVMS user name and
a password. In SAS documentation, the user name is usually called the user ID. Ask
your supervisor or system manager for a user ID, a password, and any other
information that you might need in order to access OpenVMS at your site. For example,
if your system is part of a DECnet for OpenVMS network, then you also need to know
how to access the appropriate computer system before you begin the login procedure.
Introduction to the OpenVMS Operating Environment
4
Files That Affect the Login Procedure
5
Login Procedure
The login procedure differs from site to site, depending on how your system is
configured.
When OpenVMS prompts you for your user ID, type the user ID and press the
Return key (or the Enter key, depending on your keyboard). Next, the system prompts
you for your password. Type the password and press Return. OpenVMS accepts and
validates the user ID and password, even though you cannot see the password on the
display. Next you might see messages welcoming you to the OpenVMS system. If you
enter an incorrect user ID or password, you must start the login procedure again.
The following sequence illustrates the login procedure:
Username: user-ID
<RETURN>
Password:
<RETURN>
. . . system messages . .
.
$
When you log in, OpenVMS defines the environment in which it responds to your
DCL commands. This environment is called your OpenVMS process.
Certain default characteristics are associated with your process, such as a default
disk, a directory name, and resource quotas. This information is taken from the user
authorization file. A command interpreter (usually the DCL interpreter) is also
associated with your process.
After you have logged in successfully, the system typically displays a dollar sign ($)
to indicate that it is ready to accept a command. However, a different symbol might be
used at your site, or you might use a menu interface. In this document, all examples
assume that your OpenVMS system uses the $ symbol as the system prompt and that it
uses the DCL command-line interpreter.
Files That Affect the Login Procedure
User Authorization File
During the login procedure, OpenVMS accesses a file called the user authorization file
(UAF) to validate your user ID and password. The UAF is maintained by your system
manager, and it contains a record for every person who is authorized to use the system.
Besides the user ID and password, the UAF record for each user specifies the user’s
default disk and default directory. Thus, each time you log in, your session is attached
to the default disk at a location called your default (or home) directory. The UAF also
specifies the access privileges and quota limits that are associated with your user ID.
LOGIN.COM File
At some sites, the system manager creates a login file, LOGIN.COM, in your home
directory when you are authorized to use the system. This file contains DCL commands
and utilities that are commonly used at your site.
When you log in, the OpenVMS system automatically searches for the LOGIN.COM
file in your home directory. If one exists, the system executes the commands in the file
before you receive the first DCL prompt (often the $ symbol).
If you find that you regularly use certain DCL commands and utilities to customize
your process, you can avoid entering these commands every time you log in by storing
them in the LOGIN.COM file in your home directory.
6
Logout Procedure
4
Chapter 1
Check with your system manager first before deleting or moving your LOGIN.COM
file. You can create or modify the LOGIN.COM file using an OpenVMS editor.
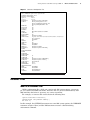
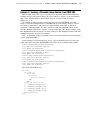
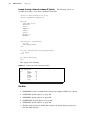
For example, suppose that user John Smith has the following LOGIN.COM file
stored in his home directory [SMITH]:
$ ! Login command file for John Smith
$ SHOW TIME
Each time Mr. Smith logs in, the command file executes automatically and displays
the current date and time. Note that the $ prompt is generally in column 1 of each line
that contains a DCL command. (A file containing just ‘‘SHOW TIME’’ will also work.)
To improve readability, you can insert one or more blanks after the $.
Note: If you use assignment statements in your LOGIN.COM file to create symbols,
be sure that they are global assignments by using a double equal sign (==); otherwise,
the symbols will be local to the LOGIN.COM file. In other words, an assignment
statement that uses a single equal sign (=) creates a symbol that exists only while the
LOGIN.COM file is executing. 4
The following is an example of a global symbol assignment statement. Mr. Smith
modifies the LOGIN.COM file by deleting the SHOW TIME command line and adding
the following assignment statement:
$ DT == "SHOW TIME"
With this modification, Mr. Smith can request the current date and time during his
terminal session by entering the following line:
$ DT
For more information about global and local assignments and about the LOGIN.COM
file in general, refer to OpenVMS User’s Manual.
Logout Procedure
When you are finished using the system, enter LOGOUT at the DCL prompt. The
system displays a message to confirm that you have logged out.
Basics of the OpenVMS File System
Directories
Introduction to the OpenVMS Directory File Structure
In the OpenVMS environment, files are organized into directories. A directory
contains a list of all the files that are organized within that directory. When you log in,
OpenVMS attaches your session to a directory on a default disk that is associated with
your user ID. This directory is called your home directory. For each user ID, there is
only one home directory. Often the home directory name is the same as the user ID.
The home directory can contain both files and other directories called subdirectories.
Subdirectories can also contain files and subdirectories. The terms directory and
subdirectory refer to the same type of file unit. The term subdirectory conveys the
Introduction to the OpenVMS Operating Environment
4
Directories
7
relationship of one directory to another in the hierarchical structure that begins with
the home directory.
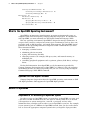
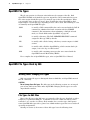
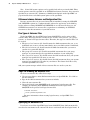
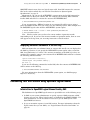
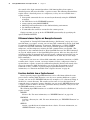
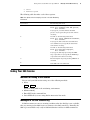
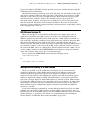
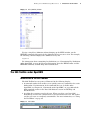
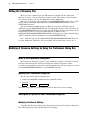
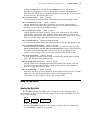
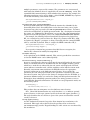
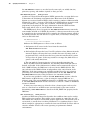
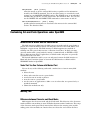
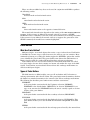
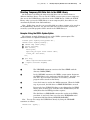
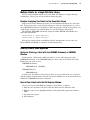
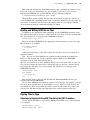
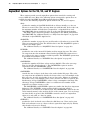
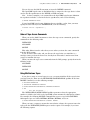
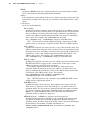
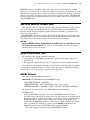
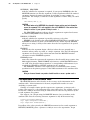
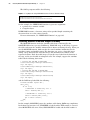
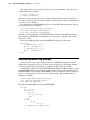
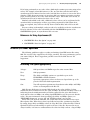
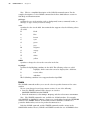
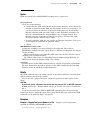
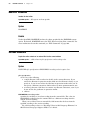
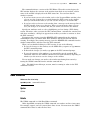
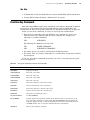
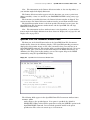
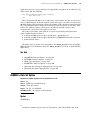
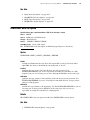
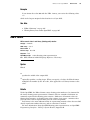
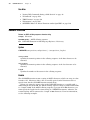
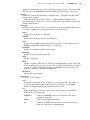
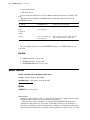
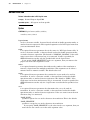
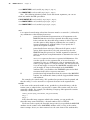
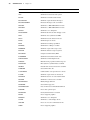
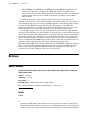
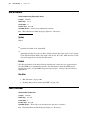
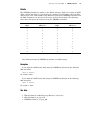
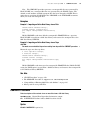
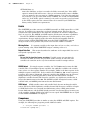
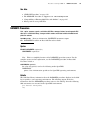
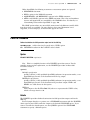
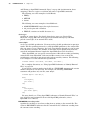
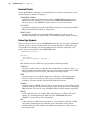
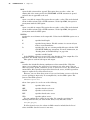
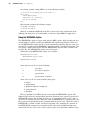
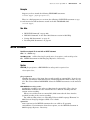
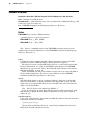
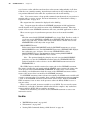
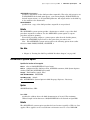
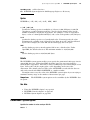
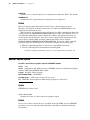
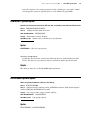
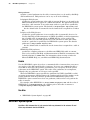
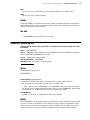
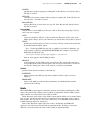
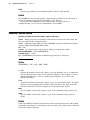
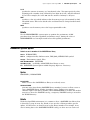
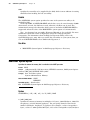
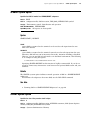
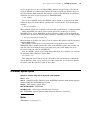
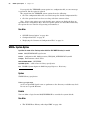
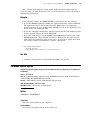
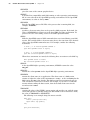
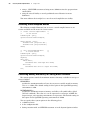
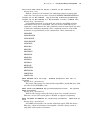
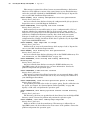
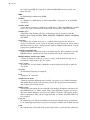
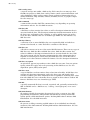
This method of structuring files enables you to group sets of related files within
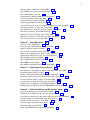
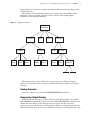
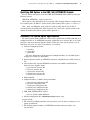
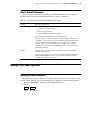
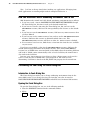
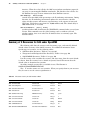
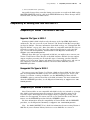
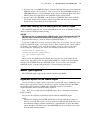
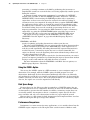
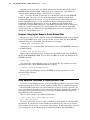
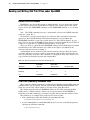
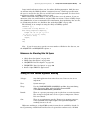
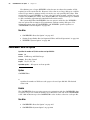
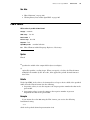
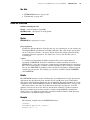
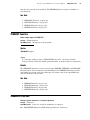
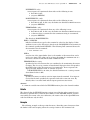
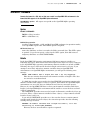
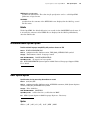
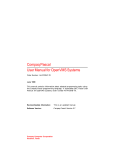
directories. You can organize your files however you like. The following figure
illustrates the directory file structure.
Figure 1.1 Directory File Structure
HOMEDIR
SUBDIR1
FILE1
SUBDIRA
FILE1
FILE2
SUBDIRB
FILE3
FILE1
FILE2
FILE2
SUBDIR2
FILEA
SUBDIRC
FILE1
FILE2
SUBDIRD
The directory that you are working in at any given time is called your default
directory. For example, when you log in, your home directory is usually your default
directory.
Creating Directories
To create a directory, use the DCL CREATE/DIRECTORY command.
Changing Your Default Directory
To move from one directory to another directory in the file structure, use the DCL
SET DEFAULT command. Each time you use the DCL SET DEFAULT command, your
default directory changes to the directory that you specify. Be sure to specify a
pathname to the target directory. (A full pathname follows an unbroken path from the
first-level directory down to the target subdirectory. However, a partial pathname, such
8
Files
4
Chapter 1
as [.SUBDIR], can also be specified.) Using Figure 1.1 on page 7 as an example, the
following command specifies the full pathname to the subdirectory SUBDIRC:
$ SET DEFAULT [HOMEDIR.SUBDIR2.SUBDIRC]
When this command executes, SUBDIRC becomes the default directory.
If you have any doubt about your current location in the file structure, use the DCL
SHOW DEFAULT command to show your default directory. Keeping track of your
default directory helps you keep track of files. For example, some programs write
output files to the default directory.
Files
Files contain various types of data, programming statements, or program output.
Under OpenVMS, you can create files with several editors, including the EVE and EDT
editors, the Text Processing Utility (TPU) Editor, and the SAS Text Editor. Regardless
of which editor you use, each file must have a unique name within that directory.
OpenVMS Filenames
Syntax for File Specifications
What Is a Fully Qualified Name?
A fully qualified name indicates how a file fits into a structure (a system of
directories and subdirectories) that contains all the files stored under the OpenVMS
system. The following type of file specification is a fully qualified name:
node::device:[directory]filename.file-type;version
Rules for File Specifications
A file specification cannot exceed 255 bytes. The directory and file-specification can
each consist of up to 39 characters. The file-type can consist of up to 38 characters,
although most of the default file types have only 3 characters. Permissible characters
are the letters A through Z, the numbers 0 through 9, an underscore (_), a hyphen (-),
or a dollar sign ($). You can enter OpenVMS filenames and file types in uppercase,
lowercase, or mixed case, but all characters are stored in uppercase format. For more
information about file specifications, refer to OpenVMS Guide to Extended File
Specifications.
Note: The default for OpenVMS filenames is the Traditional ODS-2 Syntax.
However, SAS supports the Extended (ODS-5) Syntax on ODS-5 enabled volumes. For
more information, see “ODS-5 File Naming Conventions” on page 10. 4
Description of File Specification Fields
In many cases you can uniquely identify a file even without specifying all of the fields
in a fully qualified name. The following definitions give default values for fields that
can be omitted from a file specification:
Introduction to the OpenVMS Operating Environment
4
Syntax for File Specifications
9
node
specifies a node name in an OpenVMS network. The node specification is always
followed by a double colon (::). The default value for node is your OpenVMS system
node; therefore, include node in the fully qualified name only when you require
access to a file that is located on a different node in your OpenVMS network.
device
specifies the name of the physical or logical disk or the physical tape that contains
the file. The device specification is always followed by a single colon (:). The
default value for device is your current disk. When you log in, the default disk is
the disk that is associated with your user ID. Include device in the fully qualified
name only when you need to access a tape file or a file on another disk.
directory
specifies the name of a directory or a sequence of directories. The directory
specification must be enclosed in brackets; for example, [DIR1.DIR2.DIR3]. The
directories that follow the first directory in the sequence are called subdirectories.
In the previous example, DIR2 is a subdirectory of DIR1 and DIR3 is a
subdirectory of DIR2.
The default value for directory is the default directory. Include directory in the
fully qualified name only when you need to access a file that is not in your default
directory. (For more information about the default directory, see “Directories” on
page 6.)
Note: You can substitute angle brackets (< >) for square brackets ([ ]) in
directory specifications. 4
file-specification
specifies the name of a particular file within the directory. If the file is a SAS file,
the filename must also comply with SAS naming conventions. (For details about
SAS naming conventions, see SAS Language Reference: Dictionary.) The
file-specification field has no default value unless you use a wildcard character.
file-type
usually describes the contents of the file. The file-type must be preceded by a
period (.).
The default value for file-type depends on how the file is created or used. For
example, some DCL commands assume default file types. You can assign a file
type when you create a file.
version
specifies the version number of the file. Each time you modify or create and save a
file, OpenVMS increments the highest existing version number for that file and
adds the new version to the directory. Version numbers can range from 1 to
32,767. If you request a file without specifying the version number, then you
access the latest version of the file by default. (The latest version of the file is the
one that has the highest version number.) If you specify a version number, you
must precede it with either a semicolon (;) or a period (.).
Your system manager sets the maximum number of versions of a file that are
saved at any given time. For example, if you have edited a file named [DIR1]
PROG.DAT 1,000 times and your system is set to keep four backup versions, then
the directory [DIR1] contains the following versions:
PROG.DAT;1000
PROG.DAT;999
PROG.DAT;998
PROG.DAT;997
10
ODS-5 File Naming Conventions
4
Chapter 1
When you edit PROG.DAT the next time (version 1001), PROG.DAT;1001 is
created and PROG.DAT;997 is deleted.
ODS-5 File Naming Conventions
Difference between the ODS-2 and ODS-5 File Naming Conventions
Although the default file naming convention is ODS-2, SAS accepts the Extended
(ODS-5) Syntax on ODS-5 enabled volumes. These extended file specifications enable
users to create filenames similar to those in the UNIX and Windows environments. The
ODS-5 file naming convention behaves like the Windows convention. For example, if a
filename exists in all uppercase, then any lowercase or uppercase reference to that file
will resolve to uppercase.
Benefits to Using the ODS-5 Volume Structure
Some benefits to using the ODS-5 volume structure include the following:
3 ODS-5 allows longer file names. Filenames can be up to 236 8-bit or 118 16-bit
characters in length. File specifications longer than 255 bytes will be abbreviated
by unmodified applications.
3 ODS-5 supports more characters from the 8-bit ISO Latin-1 and the 16-bit
Unicode (UCS-2) character sets. However, a few special characters in the ISO
Latin-1 character set are not allowed in OpenVMS file specifications.
The following characters are invalid:
3
3
3
3
3
3
3
3
3
C0 control codes (0x00 to 0x1F)
Double quotation marks (“)
Asterisk (*)
Backslash (\)
Colon (:)
Left and right angle brackets (<>)
Slash (/)
Question mark (?)
Vertical bar (|)
The remaining special characters in the ISO Latin-1 character set are valid
when preceded by the circumflex (^), which acts as an escape character.
Note: If you use the apostrophe (’) in a file specification, you must enclose it in
double quotation marks (“ ^’ “). If you enclose it in single quotation marks (’ ^’ ’),
SAS will state that there is an error in the filename due to an uneven quote.
4
3 ODS-5 file specifications are no longer converted and stored all uppercase. ODS-5
syntax supports mixed-case and lowercase file specifications.
3 ODS-5 supports deeper directory structures. Directories can be up to 255 levels.
The naming conventions for directories follows that for filenames. A directory
name can be up to 236 8-bit or 118 16-bit characters in length.
For more information about the Extended (ODS-5) Syntax, see the OpenVMS Guide
to Extended File Systems.
Introduction to the OpenVMS Operating Environment
4
Wildcards in OpenVMS Filenames
11
Issuing a DCL Command Using ODS-5 Syntax
When using the ODS-5 syntax, you must submit an X statement before issuing a
DCL command. For more information, see “Issuing DCL Commands during a SAS
Session” on page 43.
Wildcards in OpenVMS Filenames
OpenVMS supports two general-purpose wildcard characters: the asterisk (*) and the
percent sign (%). In DCL commands, you can use these wildcard characters in file
specifications to operate on a group of files instead of on a specific file.
Note: Using wildcard characters in file specifications can degrade the performance
of your operating environment. 4
For additional rules for using wildcard specifications in operations across nodes in a
network, refer to OpenVMS Networking Manual.
For information about using wildcards in file and directory specifications, see “Using
Wildcard Characters in External File Specifications” on page 175.
The Asterisk
The asterisk (*) replaces zero or more characters in one or more of the directory,
file-specification, file-type, and version fields in a file specification. It causes the DCL
command to act on all files whose names match the fields that you include in the
specification. For example, all of the following file specifications match CAT.SAS:
3 *.SAS
3 CA*.SAS
3 CAT*.SAS
3 *A*.SAS
3 CAT.*
The asterisk (*) often references sets of files in DCL commands such as PRINT,
TYPE, and COPY. For example, the following command prints all versions of all files in
directory [DIR1] that have the file type .SAS:
$ PRINT [DIR1]*.SAS;*
The Percent Sign
The percent sign (%) replaces a single character in directory, file-specification, and
file-type fields in the file specification. For example, the following command prints all
versions of every file whose name has five characters beginning with the letters PROG
and whose file type is .SAS:
$ PRINT PROG%.SAS;*
In other words, you can use the previous example to print files PROG1.SAS through
PROG9.SAS, but not file PROG10.SAS. To print all versions of every file whose name
begins with the letters PROG and whose file type is .SAS, enter the following command:
$ PRINT PROG*.SAS;*
12
OpenVMS File Types
4
Chapter 1
OpenVMS File Types
The file-type portion of a filename often indicates the contents of the file. Both
OpenVMS and SAS use default file types for output files. DCL commands that create
files often assign default file types if you omit file-type in the file specification. When
you assign file types to files you create, keep in mind that either OpenVMS or SAS
might require a certain file type, depending on how a file is used. The following is a list
of commonly used OpenVMS file types:
.COM
is usually a DCL command file that can be executed with the DCL @
command or submitted for batch execution with the SUBMIT
command. (For information about submitting a SAS job in batch
mode, see “Batch Mode under OpenVMS” on page 24.)
.DIR
is usually a directory. The DCL CREATE/DIRECTORY command
assigns the file type .DIR by default.
.LIS
is usually a file called a listing, which may contain output of a SAS
session.
.LOG
is usually a file called the OpenVMS log, which contains batch job
output, or it is the log of a SAS session.
.MAI
is usually a file containing messages that were entered with the
OpenVMS Personal Mail Utility (MAIL).
For a complete list of OpenVMS file types, refer to OpenVMS User’s Manual.
OpenVMS File Types Used by SAS
Warning about Changing File Types
SAS uses unique file types to distinguish between SAS files and OpenVMS external
files in a directory.
CAUTION:
Do not change these file types. The file types in the following sections are an integral
part of how SAS accesses files under OpenVMS. Changing the file types can cause
unpredictable results. 4
File Types for SAS Files
Most of the file types that SAS uses are assigned to files that are described as either
temporary or permanent SAS files. A SAS file is stored in a SAS data library and is
referred to as a member of a library. Each member has a member type. SAS equates
some OpenVMS file types with a general set of SAS member types that it uses under all
operating environments.
Starting in Version 8, the names of these file types have the following form:
Introduction to the OpenVMS Operating Environment
4
OpenVMS Logical Names and Logical-Name Tables
13
engine-name-filetype
engine-name
is the name of the SAS engine, such as SAS7B for the Base engine and SAS7S for
the sequential engine
filetype
is the type of file. For example, the SASV7BDAT file type is a data file that is
accessed by the SASV7 engine.
For information about SAS engines, see Chapter 6, “Using SAS Engines,” on page
153.
In addition, two types of SAS temporary files exist, with OpenVMS file types of
.SAS7BUTL and .SAS7BPUT. These files appear only in the SASWORK data library.
File Types for External Files
External files can be processed by other programs and by the FILENAME function
and the %INCLUDE, FILE, and INFILE statements in the SAS DATA step. (For more
information about external files, see Chapter 7, “Using External Files and Devices,” on
page 171.) SAS uses the following OpenVMS file types for external files:
.DAT
is an external file that contains data lines. This is the default file type that SAS
uses when it is reading and writing lines with the INFILE and FILE statements.
(For more information, see “Default File Types” on page 177.)
.LIS
is an external file that contains SAS procedure output. By default, the filename of
the .LIS file matches the filename of the .SAS program file that generated the
output.
.LOG
is the external file that contains the SAS log. By default, the filename of the .LOG
file matches the name of the SAS program file that generated it.
.SAS
is a SAS program file—that is, an external file that contains SAS statements. Use
this file type when you create a file that contains a SAS program. This is the
default file type for the FILE command and for the %INCLUDE statement.
.TLB
is an OpenVMS text library. SAS can access text libraries as external file
aggregates. Text library files typically store data or SAS programs that are related.
For example, you might want to store all SAS programs that are associated with a
particular application in one text library. (For more information about OpenVMS
text libraries, refer to OpenVMS Librarian Utility Manual.) OpenVMS text
libraries are also often used to store SAS macros. (For more information about
SAS macros, see Chapter 20, “Macro Facility under OpenVMS,” on page 517.)
OpenVMS Logical Names and Logical-Name Tables
Under OpenVMS, logical names are used extensively in place of part or all of a file
specification or to refer to devices or queues. For details about logical names and about
14
The OpenVMS Digital Command Language
4
Chapter 1
logical-name tables, refer to OpenVMS User’s Manual. You might also want to refer to
the following sections for information about how OpenVMS logical names are used by
SAS or about how you use them in SAS programs:
3
3
3
3
“Customizing Your SAS Session Using OpenVMS Logical Names” on page 41
“Assigning OpenVMS Logical Names” on page 140
“Assigning OpenVMS Logical Names to External Files” on page 173
“Commonly Used DCL Commands” on page 15
The OpenVMS Digital Command Language
Introduction to the OpenVMS Digital Command Language
When you communicate with the OpenVMS operating environment, you can use the
OpenVMS Digital Command Language (DCL). Like other languages, DCL has grammar
rules and a vocabulary. The vocabulary is a set of commands, and the grammar rules
determine how you specify the commands.
The Command Line
A completely specified DCL command is called a command line. The general form of
a command line is
$ command/qualifier parameter/qualifier
dollar sign ($)
prompt
is required in all DCL command lines. When you execute DCL
commands interactively, the OpenVMS system supplies the system
prompt, which by default is the $ prompt. When you enter DCL
commands in a command file, such as LOGIN.COM, you must enter
the $ prompt in column 1.
command
is a DCL command that identifies the action to be performed. Use
OpenVMS DCL Dictionary as a general reference to DCL commands
and rules of grammar. Some commonly used DCL commands are
described in “Commonly Used DCL Commands” on page 15.
Some DCL commands are called verbs. These are commands
whose names indicate the command’s function.
qualifier
is an optional keyword that modifies or expands the action of the
command. It is always preceded by a forward slash (/). If a qualifier
requires a value, it is given in the following form:
qualifier=value
parameter
is either a keyword or a file specification (depending on the
command) that is acted on by the command. For details about how
to enter an OpenVMS file specification, see “OpenVMS Filenames”
on page 8.
If the command requires one or more parameters, then OpenVMS
prompts you for them, unless you include the parameter in the
command line. Notice in the command line syntax that both
commands and parameters can be qualified.
Introduction to the OpenVMS Operating Environment
4
Commonly Used DCL Commands
15
How to Continue a Long Command on the Next Line
If a command line does not fit on one line, enter a space and a hyphen (-) as the last
element in the command line. Then press the RETURN key and continue the command
on the next line. Here is an example:
$ command _$ parameter/qualifier
When you end a command line with a hyphen, the next prompt is preceded by an
underscore (_).
Interrupting Command-Line Processing
You can interrupt command-line processing by simultaneously pressing the CTRL
key and the Y key (CTRL+Y).
Command Procedures
A command procedure is an OpenVMS file that contains sequences of DCL
commands. The OpenVMS file type for command procedures is .COM. The
LOGIN.COM file is an example of a command procedure. (For more information, see
“LOGIN.COM File” on page 5.) To save yourself time when you perform complicated or
repetitive tasks, you can create command procedures.
Creating a Command Procedure
Use your favorite editor to create the file of commands. For example, the following
series of commands might be included in a command procedure named RENAME.COM:
$ PURGE *.*
$ RENAME *.*; *.*;1
The first line deletes all but the latest version of all files in your default directory.
The second line renames all files in your current directory to version 1.
Invoking a Command Procedure
To invoke the RENAME.COM command procedure, you would enter the following
command at the $, or system, prompt:
$ @RENAME
The at sign (@) indicates that you want to execute a command procedure. For more
information about creating and using command procedures, refer to OpenVMS User’s
Manual.
Commonly Used DCL Commands
Some of the most commonly used commands in an interactive command language are
those that control your terminal session and those that manage files. The following
subset of commands is divided into these two categories: controlling a terminal session
and managing files. Many of these commands are used in examples throughout this
documentation. The common abbreviation for a command is shown in parentheses
beside the fully specified command. These abbreviations are the defaults; if these
commands or symbols have been redefined, they might have a different action. See your
system manager if the abbreviation does not work as you expected.
16
Commonly Used DCL Commands
4
Chapter 1
Note: You can issue any DCL command from within a SAS program by specifying
the command in the SAS X statement or X command. For more information, see
“Issuing DCL Commands during a SAS Session” on page 43. 4
Commands for Controlling a Terminal Session
Use the following DCL commands to control your terminal session:
DIRECTORY (DIR)
displays a list of files and subdirectories in the specified directory, or in the current
directory if no directory or file specification is given. For example, the following
command produces a list of files in your default directory:
$ DIR
HELP
activates the OpenVMS HELP facility.
LOGOUT (LO)
terminates a terminal session and deletes your process.
SET DEFAULT (SET DEF)
changes the default directory. If you move to another disk, this command also
changes the default disk device. For more information about the default directory,
see “Directories” on page 6.
SET DISPLAY (SET DISP)
indicates where to send the interactive display of an OpenVMS DECwindows
application. You need to use this command when you are running interactive SAS
on a non-local device such as a PC display running emulation software.
SHOW DEFAULT (SHO DEF)
displays the default directory and the default disk device.
SHOW QUEUE (SHO QUE)
displays all queues including the batch queue.
SUBMIT (SUBM)
places one or more jobs (command procedures) in a batch queue for processing.
Commands for Managing Files
Use the following DCL commands to manage your files:
COPY (COP)
copies one or more files to one or more specified files.
CREATE/DIRECTORY (CRE/DIR)
creates a directory.
DEFINE
associates a logical name with a file specification or equivalence name.
DELETE (DEL)
removes access to a file. The file specification must reference the version(s).
EDIT</editor> (ED</editor>)
invokes the specified OpenVMS editor to create or modify a file.
PRINT (PR)
prints a file on the default system printer or on a specified device.
Introduction to the OpenVMS Operating Environment
4
File Protection
17
PURGE (PUR)
deletes all versions of a specified file or files except the latest version.
TYPE (TY)
displays the contents of a file.
Data Security
Introduction to Data Security
SAS protects data sets, catalogs, and external files by using the normal OpenVMS
access-control measures: file protection and access control lists. These access-control
measures apply equally to SAS data sets, catalogs, and external files. SAS data set
security measures, such as data set “read” and “write” passwords, are also available.
File Protection
File protection is a generalized way of controlling access to files, based on the
relationship of the user that is accessing the file to the file owner. A typical file
protection is specified as a list of user classes and their permitted operations.
File protection consists of four classes of users who can access a file:
SYSTEM
refers to a user who has a system user identification code (UIC) or SYSPRV
privilege. This class is typically reserved for the system manager and operations
staff.
OWNER
refers to a user who has the same UIC as the user who created the file. At most
sites, each user has a unique UIC, so the OWNER is always the person who
created the file.
GROUP
refers to a user who has the same group number in his or her UIC as the creator
of the file.
WORLD
refers to any other user on the system.
Permitted operations are
READ access
is required in order to read a file. For example, you must have READ access to a
file if you intend to browse, copy, or move it.
WRITE access
is required in order to change the attributes of a file, including its file protection,
as well as to modify data in the file.
EXECUTE access
is required in order to execute files such as command procedures. It does not apply
to OpenVMS data files such as SAS data sets, catalogs, or external files.
DELETE access
is required in order to delete or move a file.
18
Access Control Lists
4
Chapter 1
A typical file-protection specification might be
(S:RWE, O:RWED, G:RE, W)
This example permits a SYSTEM user to READ, WRITE, or EXECUTE the file. The
OWNER is permitted any operation on the file. Members of the same GROUP as the
user are permitted to READ or EXECUTE the file. All other users are denied access to
the file.
Specifying File Protection for a Process
To specify file protection for the duration of your process (or until you change the
specification), use the SET PROTECTION/DEFAULT DCL command. The /DEFAULT
parameter tells OpenVMS to apply the specification to every file that you create during
your OpenVMS process except those for which you explicitly specify file protection. For
example, the following command specifies new protection values for files that you
subsequently create:
$ SET PROTECTION=(S:RWE,O:RWED,G:RE,W)/DEFAULT
Specifying File Protection for Individual Files
To specify file protection for a particular file or set of files, use the SET PROTECTION
command without the /DEFAULT parameter. For example, the following SET
PROTECTION command sets new protection values for the file MYDATA.SAS7BDAT:
$ SET PROTECTION=(S:RWE,O:RWED,G:RWED,W:RE) _$ MYDATA.SAS7BDAT
For more information about file protection, refer to OpenVMS User’s Guide and
OpenVMS Security Manual.
Access Control Lists
Access control lists (ACLs) provide more specific control over who can perform
operations on a file. ACLs allow each file to have a list of identifiers, which can be
either UICs or keyword names that are assigned by the system manager. Only users
with matching UICs or resource identifiers can perform operations on the file.
The description of ACLs is beyond the scope of this document. For more information,
refer to OpenVMS Security Guide.
19
CHAPTER
2
Getting Started with SAS under
OpenVMS
Starting a SAS Session under OpenVMS 21
Invoking SAS 21
What If SAS Does Not Start? 21
Selecting a Mode of Operation under OpenVMS 21
SAS Windowing Environment under OpenVMS 22
Introduction to the SAS Windowing Environment 22
Methods for Invoking a SAS Process 23
Invoking SAS with the SAS Command 23
Invoking SAS from Your Motif Session Manager 23
Invoking SAS from a Command Procedure File 24
Batch Mode under OpenVMS 24
What Is Batch Mode? 24
Files Required for Running in Batch Mode 24
Examples of Batch Job Files 25
Example 1: Separate Command Procedure and Program Files 25
Example 2: Passing the Name of the Program File as a Parameter 25
Example 3: Including the Program File in the Command Procedure File 26
Interactive Line Mode under OpenVMS 26
What Is Interactive Line Mode? 26
Invoking SAS in Interactive Line Mode 26
Recalling SAS Statements with CTRL+B and the Arrow Keys 26
Saving SAS Statements 27
Ending Your SAS Session 27
Noninteractive Mode under OpenVMS 27
What Is Noninteractive Mode? 27
Invoking SAS in Noninteractive Mode 28
Recalling SAS Statements 28
Running SAS in a SPAWN/NOWAIT Subprocess 29
Running SAS in a Detached Process 29
Advantage to Using a Detached Process 29
Example: Invoking the SAS Windowing Environment in a Detached Process 29
X Window Command Line Options 30
Specifying X Window Command Line Options 30
X Window Command Line Options Available at Invocation 30
Techniques for Customizing Your SAS Session under OpenVMS 31
Customizing Your SAS Session Using System Options 32
Displaying and Setting System Option Settings 32
OPTIONS Procedure 32
System Options Window 32
GETOPTION Function 33
Specifying System Options in the SAS Command 33
20
Contents
4
Chapter 2
General Form of the SAS Command 33
Example 1: Setting the LINESIZE= and PRINT= System Options 34
Example 2: Specifying System Options in Noninteractive Mode 34
Example 3: Disabling System Options 34
Specifying System Options in the OPTIONS Statement 34
Specifying SAS Options in the VMS_SAS_OPTIONS DCL Symbol 35
Precedence for System Option Specifications 35
Precedence for Similar Types of Options 36
Configuration Files 36
What Is a SAS Configuration File? 36
Six Types of Configuration Files 36
Determining the Configuration Files That SAS Processed 37
Steps for Creating a Configuration File 37
Specifying a User Configuration File 38
Displaying the Contents of Configuration Files 38
Example: Displaying the Contents of Your Configuration Files 38
Autoexec Files 39
What Is an Autoexec File? 39
Difference between Autoexec and Configuration Files 40
Five Types of Autoexec Files 40
Steps for Creating an Autoexec File 40
Specifying an Autoexec File 40
Displaying Autoexec Statements in the SAS Log 41
Customizing Your SAS Session Using OpenVMS Logical Names 41
Introduction to OpenVMS Logical Names Used by SAS 41
Logical Names That You Can Define 42
Issuing DCL Commands during a SAS Session 43
Introduction to Issuing DCL Commands within SAS 43
Issuing DCL Commands with ODS-5 Files 43
Executing DCL Commands Asynchronously 43
Preventing the Use of DCL Commands 43
Issuing a Single DCL Command Using the X Statement 44
How OpenVMS Processes the DCL Command 44
Executing a DCL Command Using Procedure Syntax 45
Issuing Several DCL Commands Using the X Statement 46
SAS System Options That Affect Subprocesses 47
Issuing OpenVMS Functions from Captive Accounts 47
Limitations of Using a Captive Account 47
Difference between Captive and Noncaptive Accounts 48
Functions Available from a Captive Account 48
Determining the Completion Status of a SAS Job under OpenVMS 50
Introduction to Three Termination Symbols 50
SAS$STATUS Symbol 50
$SEVERITY Symbol 50
$STATUS Symbol 51
Interrupting a SAS Session under OpenVMS 51
How to Interrupt a SAS Session 51
How SAS Processes Temporary Work Files 52
Interactive Line Mode Options 52
Windowing Environment Options 52
Ending Your SAS Session 53
Methods for Ending a SAS Session 53
Messages in the SAS Console Log 53
Identifying and Resolving Problems under OpenVMS 54
Getting Started with SAS under OpenVMS
4
Selecting a Mode of Operation under OpenVMS
21
Starting a SAS Session under OpenVMS
Invoking SAS
Regardless of which mode of operation you use for running SAS, you will need to ask
your system manager what the SAS command (the command that invokes SAS) is at
your site. At many sites, the SAS command is simply SAS, but a different command
could have been defined during the SAS installation process at your site.
Note:
The examples in this section use SAS91 as the SAS command.
4
Also ask your system manager which interface or mode of operation is the default
when you enter the SAS command.
When you invoke SAS, you can specify system options either when you issue the SAS
command or in a configuration file:
$ SAS91/FULLSTIMER/PRINT=SYS$LOGIN:TEST.OUT
For details, see “Specifying System Options in the SAS Command” on page 33 and
“Configuration Files” on page 36.
For more information about SAS system options, see Chapter 19, “System Options
under OpenVMS,” on page 429.
If no system options are specified in the SAS command, a configuration file, an
autoexec file, or the VMS_SAS_OPTIONS DCL symbol, then the default system options
that are shipped with SAS are in effect. However, your system manager might have
overridden the default options; ask your system manager for details about the default
options at your site.
What If SAS Does Not Start?
If SAS does not start, the SAS log might contain error messages that explain the
failure. Error messages that SAS issues before the SAS log is initialized, however, are
written to the SAS console log.
Under OpenVMS, the SYS$OUTPUT logical name specifies the location of the console
log. This location depends on the user mode. If you are invoking SAS in interactive
mode or using a command procedure, SAS displays the error messages at your terminal.
If you are invoking SAS in batch mode, SAS writes the error messages to a batch log file.
Selecting a Mode of Operation under OpenVMS
Under OpenVMS, you can use any of the following methods to run SAS:
3 SAS Explorer (see “SAS Windowing Environment under OpenVMS” on page 22)
3 batch mode (see “Batch Mode under OpenVMS” on page 24)
3 interactive line mode (see “Interactive Line Mode under OpenVMS” on page 26)
3 noninteractive mode (see “Noninteractive Mode under OpenVMS” on page 27).
For additional information about these modes, see SAS Language Reference: Concepts
and the Base SAS software section in SAS Help and Documentation.
Note: You can also run SAS in a SPAWN/NOWAIT subprocess or in a detached
process. SPAWN allows you to use the SAS windowing environment. However, the
22
SAS Windowing Environment under OpenVMS
4
Chapter 2
detached process method is similar to batch mode for queues. For details about these
methods, see “Running SAS in a SPAWN/NOWAIT Subprocess” on page 29 and
“Running SAS in a Detached Process” on page 29. 4
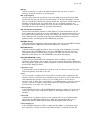
SAS Windowing Environment under OpenVMS
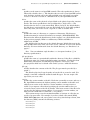
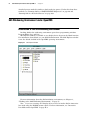
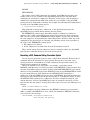
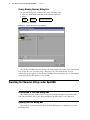
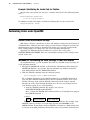
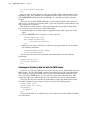
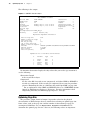
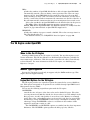
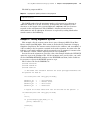
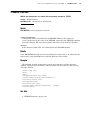
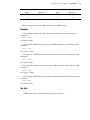
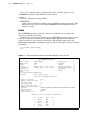
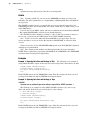
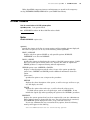
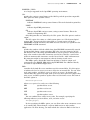
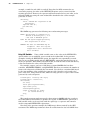
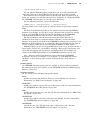
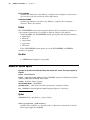
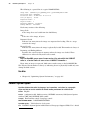
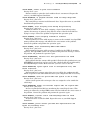
Introduction to the SAS Windowing Environment
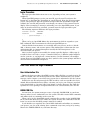
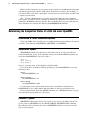
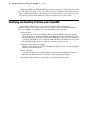
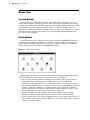
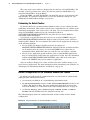
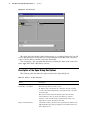
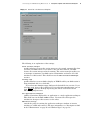
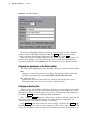
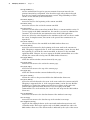
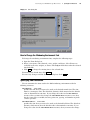
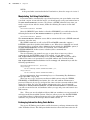
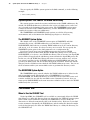
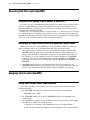
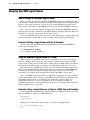
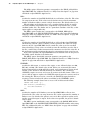
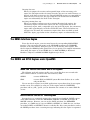
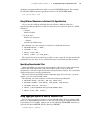
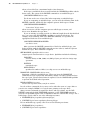
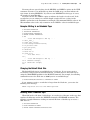
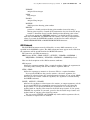
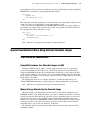
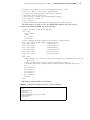
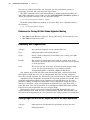
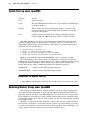
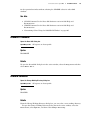
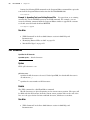
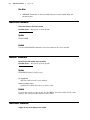
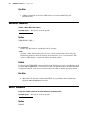
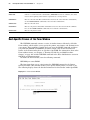
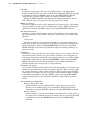
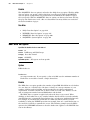
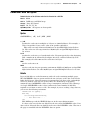
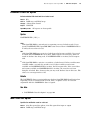
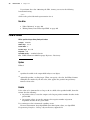
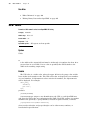
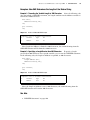
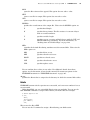
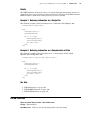
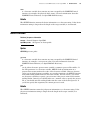
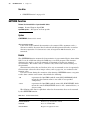
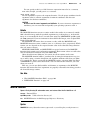
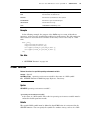
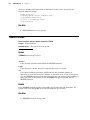
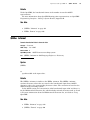
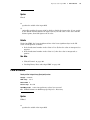
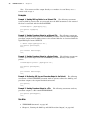
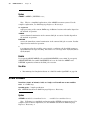
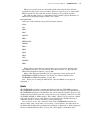
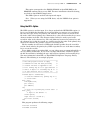
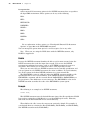
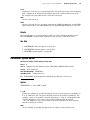
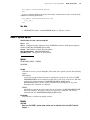
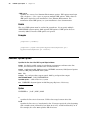
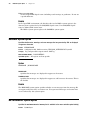
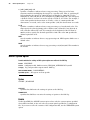
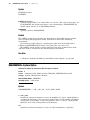
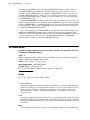
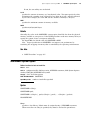
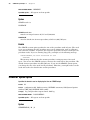
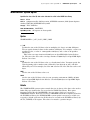
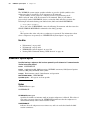
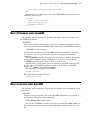
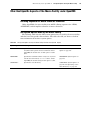
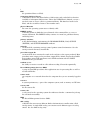
Invoking SAS in the windowing environment opens three programming windows:
Program Editor, Log, and List.
The Explorer window is available on any display device that uses the Motif interface.
For information about Motif, see your Motif documentation. The SAS Explorer window
is not the default for SAS in the OpenVMS operating environment.
Display 2.1 SAS Explorer Window
For more information about the SAS windowing environment, see Chapter 3,
“Working in the SAS Windowing Environment,” on page 55.
Note: If you are not using an X display, then you need to invoke SAS in interactive
line mode using the NODMS system option. For more information, see “Interactive
Line Mode under OpenVMS” on page 26. 4
Getting Started with SAS under OpenVMS
4
Methods for Invoking a SAS Process
23
Methods for Invoking a SAS Process
If you have the hardware and software to run the Motif interface, you can use any of
the following methods to invoke a SAS process:
3 the SAS command plus any appropriate system options
3 the Applications menu of the Motif Session Manager
3 a command procedure (COM) file.
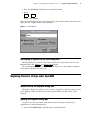
Invoking SAS with the SAS Command
If the SAS windowing environment is not the default, then use the SAS windowing
environment system option to specify the SAS windowing environment interface:
$ SAS91/DMS
If the SAS Explorer window is not the default, then use the EXPLORER system
option to specify the Explorer window:
$ SAS91/EXPLORER
To invoke both the SAS windowing environment and the SAS Explorer window, use
the DMSEXP system option:
$ SAS91/DMSEXP
As explained in “Starting a SAS Session under OpenVMS” on page 21, you can also
specify other system options when you invoke SAS in this manner.
To specify a display node, use the SET DISPLAY DCL command. For example, if you
want to invoke SAS with the Explorer window and to display the windows on node
MYNODE running TCP/IP transport protocol, type the following:
$ SET DISPLAY/CREATE/NODE=MYNODE/TRANS=TCPIP
$ SAS91/EXPLORER
For more information about the SET DISPLAY DCL command, see the OpenVMS
online help. For more information about logical names, refer to OpenVMS User’s
Manual.
Invoking SAS from Your Motif Session Manager
You can also invoke SAS from the Applications menu of your Motif Session
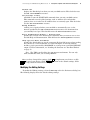
Manager. To add SAS to the Applications menu, follow these steps:
1 From the Options menu, select Menus.
2 Select Applications from the Menu Names list.
3 Enter a menu item name, such as MySAS, and define SAS91/system-option along
with the appropriate command-line qualifiers, as the DCL command.
4 Add the menu definition to the Item Names list by clicking the up arrow.
5 Add the new item name to the existing list of applications by clicking the left arrow.
6 Click Apply and then click Cancel in the Menus dialog box.
7 Select your menu command from the Applications menu to invoke SAS.
For more information about Session Manager, see the documentation for your Motif
interface.
24
Batch Mode under OpenVMS
4
Chapter 2
Invoking SAS from a Command Procedure File
To invoke SAS with the Explorer window from a command procedure (COM) file,
place the following commands in the COM file:
$ DEASSIGN SYS$INPUT
$ SAS91/EXPLORER
To invoke SAS with the SAS windowing environment interface from a command
procedure (COM) file, place the following commands in the COM file:
$ DEASSIGN SYS$INPUT
$ SAS91/DMS
To invoke SAS in the DMSEXP mode from a command procedure (COM) file, place
the following commands in the COM file:
$ DEASSIGN SYS$INPUT
$ SAS91/DMSEXP
The DEASSIGN command prevents OpenVMS from looking for program input in the
location defined by the SYS$INPUT logical name, and it enables SAS to be initialized
with the Explorer window.
If the COM file is named MYSAS.COM, then you would execute the file as follows:
$ @MYSAS
For more information about command procedure files, see “Command Procedures” on
page 15 and OpenVMS User’s Manual.
Batch Mode under OpenVMS
What Is Batch Mode?
SAS batch mode is equivalent to OpenVMS batch mode. It is useful for SAS programs
that require large amounts of time and memory. In batch mode, you submit a job to an
OpenVMS batch queue, and the job awaits execution along with batch jobs that have
been submitted by other OpenVMS users. The amount of time before your job executes
depends on how many other jobs are in the input queue, on what priority the operating
environment has assigned to your job, and how your batch queue(s) is configured.
You can use your terminal for other tasks while the job awaits execution, but you
cannot change the submitted job in any way until after it executes.
Files Required for Running in Batch Mode
Usually, the first step in executing a program in batch mode is to prepare two types
of files:
command procedure file
contains the DCL commands that are used to set up the SAS environment. For
example, it might include commands that do the following:
3 define OpenVMS logical names
3 set your default directory to access your data
3 invoke SAS with the appropriate SAS system options.
Getting Started with SAS under OpenVMS
4
Examples of Batch Job Files
25
program file
contains the SAS program that you want to execute. The name of this file can be
included in the text of the command procedure file, or it can be passed as a
parameter to the command procedure file. See the examples in “Examples of Batch
Job Files” on page 25.
Examples of Batch Job Files
Example 1: Separate Command Procedure and Program Files
In this example, a file called MYPROG.SAS that contains the following simple SAS
program is created first:
libname in ’disk:[directory]’;
proc print data=in.mydata;
title ’A Simple SAS Program’;
run;
Next, a command procedure file called CONTROL.COM that contains the following
DCL command is created:
$ SAS91/LINESIZE=76/NODATE [HOME.SUBDIR]MYPROG.SAS
CAUTION:
Do not give your SAS program and the command procedure the same name. Giving them
the same name causes confusion when both the OpenVMS log and the SAS log are
created. The OpenVMS log is created first (for example, MYPROG.LOG;1) and the
SAS log is created second (MYPROG.LOG;2). If your OpenVMS system has been set
up to keep only one version of a file, then the OpenVMS batch log will be overwritten
by the SAS log. 4
To submit the SAS job, the following command is entered at the DCL prompt:
$ SUBMIT/NOTIFY CONTROL.COM
The job is placed in the default batch queue, and the terminal session is available for
other work. You will be notified by the operating environment when your batch job has
completed.
Example 2: Passing the Name of the Program File as a Parameter
You can make your command procedure file more generic and pass the name of the
SAS program as a parameter. This is helpful if you want to execute several programs in
the same environment. To do this, you would modify the command procedure file from
Example 1 as follows:
$ SAS91/LINESIZE=76/NODATE
’P1’
The ’P1’ at the end of the SAS command line is the placeholder for the parameter
that you are going to pass to the command.
You could then submit a program called MYPROG.SAS by executing the following
command:
$ SUBMIT/NOTIFY/PARAMETER=("MYPROG.SAS") CONTROL.COM
26
Interactive Line Mode under OpenVMS
4
Chapter 2
Example 3: Including the Program File in the Command Procedure File
A third alternative is to include the SAS program in the same file as the control
commands. In a batch environment, the OpenVMS system assumes that the input
source is the command procedure file that is executing. This input source is named by
the OpenVMS logical name SYS$INPUT. To combine the control commands and the
SAS program in the same file, create a command file that contains the following lines:
$ SAS91/LINESIZE=76/NODATE/PRINT=DISK:[DIRECTORY]MYPROG.LIS/LOG=DISK:[DIRECTORY]MYPROG.LOG SYS$INPUT
libname in ’disk:[directory]’;
proc print data=in.mydata;
title ’A Simple SAS Program’;
run;
endsas;
The hyphen at the end of the first line of the SAS command indicates that the
command continues on the next line. Designating SYS$INPUT as your input file tells
SAS that your input will be included in the text of the command procedure file. Submit
this job as you would any other batch job at your site.
Interactive Line Mode under OpenVMS
What Is Interactive Line Mode?
In SAS interactive line mode, you enter SAS statements line by line in response to
line prompts that are issued by SAS. The SAS session retains exclusive use of the
terminal or terminal window.
Invoking SAS in Interactive Line Mode
To invoke SAS in interactive line mode, enter the following command at the DCL
prompt:
$ SAS91/NODMS
(If your system manager has set up the SAS environment so that the NODMS system
option is the default, you can omit the NODMS option.)
As explained in “Starting a SAS Session under OpenVMS” on page 21, you can also
specify other system options when you invoke SAS in this manner.
When SAS prompts you with the 1? prompt, enter your SAS statements. By default,
both the SAS log and the procedure output files (if any) appear on your display as each
step executes.
Recalling SAS Statements with CTRL+B and the Arrow Keys
Under OpenVMS you can recall SAS statements by using the CTRL+B key
combination and your up arrow and down arrow keys.
If you specify /termio=block when you invoke SAS, both CTRL+B and the up arrow
key move you backward through SAS statements that you entered previously. However,
Getting Started with SAS under OpenVMS
4
What Is Noninteractive Mode?
27
the default is /termio=noblock, which means that you can recall only the previous
command.
If you have specified /termio=block when you invoke SAS, and you enter four lines
of code and want to recall the first line, press CTRL+B or the up arrow key four times.
Each time you press CTRL+B or the up arrow key, the previous line appears after the
SAS prompt. When the correct line appears, press RETURN to submit the code.
If you accidentally miss the line that you wanted, then use the down arrow key to
move forward through the list of previously entered commands. Each time you press
the down arrow key, the next statement appears after the SAS prompt.
Saving SAS Statements
Interactive line mode is most effective when you use the %INCLUDE statement to
bring in most of your SAS statements. Using this method, the programs that you enter
are not long, and you do not need to save your SAS statements. However, if you want to
save your program, the best method is to write your SAS log to an OpenVMS file.
One easy way to save your SAS statements is to use the PRINTTO procedure followed
by the %LIST statement after you have entered your program statements. For example:
. .
14?
15?
16?
17?
. program statements . . .
filename mylog ’[sasdemo]program.log’;
proc printto log=mylog;
run;
%list;
This program gives you a listing of every line you have entered during your current
SAS session. The lines are saved in an OpenVMS file that is referred to by the fileref
MYLOG, which was assigned in the FILENAME statement in line 14.
Note: To redirect the log to your display, enter the following PROC PRINTTO
statement with no options:
proc printto;
run;
4
Ending Your SAS Session
The ENDSAS statement terminates SAS interactive line mode:
endsas;
Then OpenVMS prompts you for a DCL command.
Note: Like all SAS statements, the ENDSAS statement must be followed by a
semicolon (;). 4
Noninteractive Mode under OpenVMS
What Is Noninteractive Mode?
In SAS noninteractive mode, OpenVMS retains exclusive use of the terminal as the
noninteractive SAS job executes. However, if your SAS program invokes windowing
28
Invoking SAS in Noninteractive Mode
4
Chapter 2
procedures, you can interact with the program during program execution. Your SAS
program is read from a file that you specify by including the filename in the SAS
command.
Note: Noninteractive mode is similar to batch mode: statements are usually not
expected to come from the terminal, and the SAS log and procedure output are routed
to files with .LOG and .LIS file extensions by default. 4
Invoking SAS in Noninteractive Mode
To invoke SAS in noninteractive mode, enter the SAS command followed by the name
of the SAS program file that you want to execute. For example, suppose you have
stored SAS statements and data lines in a program file named
[HOME.SUBDIR]MYPROG.SAS. At the DCL prompt, enter the SAS command and the
name of the file as follows:
$ SAS91 [HOME.SUBDIR]MYPROG
You do not need to include the file type in the filename because the SAS command
uses the .SAS file extension by default. If [HOME.SUBDIR] is your current default
directory, then you can omit the directory name from the file specification as follows:
$ SAS91 MYPROG
In either case, SAS executes the statements in MYPROG.SAS and creates two files in
the default directory: MYPROG.LOG contains the SAS log output and MYPROG.LIS
contains the output from any SAS procedure that produces output.
To print one or both of these files, use the PRINT DCL command. To view these files
at your terminal, use the EDIT or TYPE command. Note that if you use the TYPE
command to list a SAS log that contains errors, overprinting obscures the line
containing the error unless the OVP system option was set to NOOVP during your SAS
session. (For a description of the OVP system option, see SAS Language Reference:
Dictionary.)
Recalling SAS Statements
In noninteractive mode, the %INCLUDE statement serves two purposes. You can use
it to include SAS statements that are stored in an external file, or you can issue the
following form of the statement to allow input from your current terminal:
%include *;
Program execution pauses as you are prompted for input from the terminal. The
prompt is a line number and an asterisk (*). Although this input method simulates SAS
interactive line mode (because you are prompted for statements line by line), the
statements are not interpreted line by line. This means that syntax errors are not
detected until you terminate input and return to noninteractive processing.
To terminate input and resume noninteractive processing, enter a %RUN statement:
%run;
Note: Like all SAS statements, the %RUN statement must be followed by a
semicolon (;). 4
Getting Started with SAS under OpenVMS
4
Example: Invoking the SAS Windowing Environment in a Detached Process
29
Running SAS in a SPAWN/NOWAIT Subprocess
The SPAWN= system option enables you to run SAS in a SPAWN/NOWAIT
subprocess. This method of running SAS is similar to batch mode if you do not specify
/DMS or /EXPLORER. The only difference is that in batch mode, SAS runs in its own
process rather than in a spawned subprocess.
When you specify SPAWN=NOWAIT in the SAS command and do not specify /DMS
or /EXPLORER, SAS assumes the terminal cannot be used to take input from the user.
Therefore, SAS will not run in interactive line mode if you do not specify /DMS or
/EXPLORER. You can, however, run SAS in noninteractive mode, or invoke SAS under
the Motif interface, as shown in the following SAS commands:
$ SPAWN/NOWAIT SAS91/SPAWN=NOWAIT MYFILE.SAS
$ SPAWN/NOWAIT SAS91/SPAWN=NOWAIT/EXPLORER
$ SPAWN/NOWAIT SAS91/SPAWN=NOWAIT/DMS
Attention-handling is disabled if you are running SAS with SPAWN=NOWAIT in effect.
Thus, to terminate the subprocess running SAS, use the STOP DCL command.
For details about invoking the SPAWN= system option, see “SPAWN= System
Option” on page 497.
Running SAS in a Detached Process
Advantage to Using a Detached Process
Unlike a spawned process, a detached process is independent of other processes; it is
not linked to an OpenVMS parent process. A batch job is one type of detached process.
To avoid the restrictions of batch processes, or to free up your DECterm window and
still invoke SAS interactively or noninteractively, you can submit a SAS job to run in a
detached process.
Example: Invoking the SAS Windowing Environment in a Detached
Process
The following DCL command procedure file, DETACH.COM, invokes SAS with the
SAS windowing environment interface in a detached process. (The numbered lines are
explained following the code.)
$! DETACH.COM
$ SET NOON
u$ DEFINE SYS$LOGIN DISK:[HOMEDIR]
$ SET DEFAULT SYS$LOGIN
$ @SYS$LOGIN:LOGIN.COM
$ DEFINE SAS$NET_TYPE XCLIENT
v$ @DUA1:[SAS91.TOOLS]SAS91.COM
$ SAS91:==$SAS$ROOT:[IMAGE]SAS91.EXE
$ SAS91/DMS
$ EXIT
30
X Window Command Line Options
4
Chapter 2
u
Replace DISK:[HOMEDIR] with your own disk.
v
Replace DUA1:[SAS91.TOOLS] with your own location for SAS.
Leave SAS91.COM as it is. (The SAS91.COM file defines OpenVMS
logical names that SAS uses. For more information about the
SAS91.COM file, see “Customizing Your SAS Session Using
OpenVMS Logical Names” on page 41.)
To execute the DETACH.COM file, you would use a command like the following:
$ RUN/DETACHED/INPUT=DETACH.COM_$ /OUTPUT=DETACH.LOG_$ SYS$SYSTEM:LOGINOUT.EXE
Note: If your LOGIN.COM does not include a SET DISPLAY command, you must
include one in your DCL command procedure. 4
X Window Command Line Options
Specifying X Window Command Line Options
When you invoke some X clients, such as SAS, you can use command line options
that are passed to the X Window System. In general, you should specify X Window
System options after SAS options on the command line with the /XRESOURCES option.
For example,
SAS91/xres="-display wizard:0.0"
The X Window command line options and their values must be enclosed in double
quotation marks. If the first blank-separated element of a /XRES argument list does not
begin with a hyphen (-), it is assumed to be the name to use for the application instance.
X Window Command Line Options Available at Invocation
The following list describes the X Window command line options that are available
when you invoke a SAS session from the command prompt:
-display host:server.screen
specifies the name or IP address of the terminal on which you want to display the
SAS session. For example, if your display node is “wizard,” you might enter
-display wizard:0.0
or
-display 10.22.1.1:0
You can set the display with the OpenVMS $SET DISPLAY/CREATE DCL command.
A -display option on the command line takes precedence over the default display
setting that is set with the $SET DISPLAY/CREATE command.
Note: Because SAS supports only the TCP/IP transport protocol, the
double-colon DECnet naming style (host::server.screen) is not valid. 4
Getting Started with SAS under OpenVMS
4
Techniques for Customizing Your SAS Session under OpenVMS
31
-name instance-name
reads the resources in your SAS resource file that begin with the value specified
for instance-name. For example, -name MYSAS reads the resources that begin with
MYSAS such as
MYSAS.dmsfont: Cour14
MYSAS.defaultToolbox: True
You can also specify the value for instance-name without putting -name in the
/XRES option if
-name
is the first item in the quotation marks. For example,
SAS91/xres="SAS"
is the same as
SAS91/xres="-name SAS"
-xrm string
specifies a resource to override any defaults. For example, the following resource
turns off the Confirm dialog box when you exit SAS:
SAS91/XRESOURCE="-xrm "SAS.confirmSASExit: False"
As an alternative to the -xrm option to /XRESOURCE, you can use multiple
instances of the /XRM command line option to specify individual X resources, for
example:
SAS91/XRM="SAS.confirmSASExit: False"/XRM="SAS.pmenu.On: False"
Techniques for Customizing Your SAS Session under OpenVMS
No matter which mode of operation you use for running SAS, you might want to
customize certain aspects of SAS. For example, you might want to change the line size
or page size for your output, or you might want to see performance statistics for your
SAS programs.
Under OpenVMS, you can customize SAS for your session in the following ways:
3 Specify SAS system options when you invoke SAS with the SAS command. This
method is usually used for one-time overrides of the system option settings that
would otherwise be in effect for your SAS session. See “Specifying System Options
in the SAS Command” on page 33.
3 Specify SAS system options in a configuration file. This method is useful if you, as
an individual user, always want to override the values of system options that are
specified in your site’s system configuration file, or if you always want particular
system options to be in effect for a particular job. See “Configuration Files” on
page 36.
3 Execute SAS statements (such as OPTIONS, LIBNAME, and FILENAME
statements) in an autoexec file. This method is most useful for specifying options
and files that pertain to a particular SAS application. See “Autoexec Files” on
page 39.
3 Execute an OPTIONS statement in a SAS program. See “Specifying System
Options in the OPTIONS Statement” on page 34.
32
Customizing Your SAS Session Using System Options
4
Chapter 2
3 If you are using the SAS windowing environment, change SAS system option
settings from within the System Options window. See “System Options Window”
on page 32.
3 If you are using the SAS windowing environment, specify a SASUSER library that
contains a user profile catalog. See “The SASUSER Data Library” on page 134.
3 Define or redefine OpenVMS logical names that SAS uses. See “Customizing Your
SAS Session Using OpenVMS Logical Names” on page 41.
3 Specify SAS system options using the VMS_SAS_OPTIONS DCL symbol. See
“Specifying SAS Options in the VMS_SAS_OPTIONS DCL Symbol” on page 35.
Note: For information about customizing your SAS windowing environment, see
Chapter 4, “Customizing the SAS Windowing Environment,” on page 77. 4
If no system options are specified in the SAS command, a configuration file, or an
autoexec file, then the default system options that are shipped with SAS are in effect.
However, your system manager might have overridden those default options. Ask your
system manager for details about the default system options at your site.
For more information about SAS system options, see Chapter 19, “System Options
under OpenVMS,” on page 429 and SAS Language Reference: Dictionary.
Customizing Your SAS Session Using System Options
Displaying and Setting System Option Settings
Most SAS system options are set to default values. To display the current settings of
SAS system options, use either the OPTIONS procedure, the System Options window,
or the GETOPTION function.
OPTIONS Procedure
The OPTIONS procedure writes to the SAS log all system options that are available
under OpenVMS. Chapter 19, “System Options under OpenVMS,” on page 429
describes the system options listed by the OPTIONS procedure that are host-specific
and that have host-specific behavior. SAS Language Reference: Dictionary describes all
system options that have no host-specific behavior but might be specified differently in
various operating environments.
By default, the procedure lists one option per line with a brief explanation of what
the option does. To list the options with no explanation, use the SHORT option:
proc options short;
run;
For more information about the OPTIONS procedure, see “OPTIONS Procedure” on
page 383 and Base SAS Procedures Guide.
System Options Window
The SAS System Options window displays the settings of the SAS system options.
The system options are grouped by their function within SAS. Each group has at least
one subgroup.
To display the System Options window, do one of the following:
Getting Started with SAS under OpenVMS
4
Specifying System Options in the SAS Command
33
3 Type options on the command line of any SAS windowing environment window or
windowing procedure window and press RETURN.
3 From the Tools menu, select Options, and then select System.
You can select a group of system options by clicking on the icon to the left of the group
name in the left side of the System Options window. To open a subgroup either click the
icon to the left of the subgroup name in left side of the window or double-click the
subgroup name in the right side of the window. You will see a list of the system options
in that subgroup, along with their values and a brief description.
You can also use the System Options window to change the settings of system options
for the duration of your SAS session. To change the setting of a system option either
double-click the name of the system option, or with cursor on the name of the system
option press the right mouse button and select Modify Value. The Modify Value dialog
box opens. You can then modify the setting of the system option as desired. Click OK
to save your changes. Click Cancel to ignore any changes and close the Modify Value
dialog box.
You can close the System Options window by doing one of the following:
3 Double-click the window menu button in the upper-left corner.
3 Click the window menu button in upper-left corner and select Close from the
menu.
For help and additional information about the System Options window, click Help in
the window.
For additional information about system options settings, see “Summary of SAS
System Options under OpenVMS” on page 432 and SAS Language Reference:
Dictionary.
GETOPTION Function
The GETOPTION function returns the value of a SAS system option or graphics
option. It can be used within the DATA step or in conjunction with %SYSFUNC in open
code. For more information about the GETOPTION function, see SAS Language
Reference: Dictionary.
Specifying System Options in the SAS Command
General Form of the SAS Command
The way you specify the SAS command determines the mode of operation that you
use for running SAS as well as the default SAS system options. The general form of the
SAS command is
$ SAS91/system-option-list file-specification
Both system-option-list and file-specification are optional. You can include
system-option-list for any mode of operation. If you include file-specification, then SAS
is invoked in noninteractive mode. If you do not include file-specification, then the mode
of operation will be the SAS windowing environment. For details about invoking SAS in
the different modes of operation, see “Selecting a Mode of Operation under OpenVMS”
on page 21.
All SAS system options can be specified in the SAS command. Under OpenVMS,
each option is preceded by a forward slash (/).
As “Example 1: Setting the LINESIZE= and PRINT= System Options” on page 34
and “Example 2: Specifying System Options in Noninteractive Mode” on page 34 show,
34
Specifying System Options in the OPTIONS Statement
4
Chapter 2
system options that take a value (such as LINESIZE= and PRINT=) are specified in the
following form:
/option-name=value
Note: Any option value that is entered on the OpenVMS command line within
single quotation marks (’) is resolved to its symbol value before it is processed by SAS.
Any quoted value that should not be resolved as a symbol must be enclosed in double
quotation marks (”). For example, the values for the system options FMTSEARCH=,
INITSTMT=, and SYSPARM= must be enclosed in double quotation marks. 4
Other system options can be thought of as on (enabled) or off (disabled). Specifying
just the keyword enables the option; specifying the keyword with the prefix NO disables
the option. For more information, see “Example 3: Disabling System Options” on page
34.
Example 1: Setting the LINESIZE= and PRINT= System Options
In the following example, the LINESIZE= system option tells SAS to use a line
length of 80 characters for the log file, the procedure output file, and the print file:
$ SAS91/LINESIZE=80/PRINT=SYS$LOGIN:TEST.OUT
The PRINT= system option tells SAS to route the procedure output to the file
SYS$LOGIN:TEST.OUT.
Example 2: Specifying System Options in Noninteractive Mode
The next example invokes SAS in noninteractive mode, specifying the program file
MYPROG and the LINESIZE= and PAGESIZE= system options:
$ SAS91/LINESIZE=60/PAGESIZE=80 MYPROG
Example 3: Disabling System Options
In the following example, the CENTER and STIMER system options are disabled:
$ SAS91/NOCENTER/NOSTIMER
Specifying System Options in the OPTIONS Statement
You can use the OPTIONS statement to specify system option settings at any time
during a SAS session, except within data lines or parmcard lines. Settings remain in
effect for the duration of the session or until you reset them with another OPTIONS
statement.
Not all system options can be specified in an OPTIONS statement. The summary
table of system options, Table 19.1 on page 433, tells where each system option can be
specified.
The following is an example of an OPTIONS statement:
options nodate linesize=72;
For more information about the OPTIONS statement, see SAS Language Reference:
Dictionary.
Getting Started with SAS under OpenVMS
4
Precedence for System Option Specifications
35
Specifying SAS Options in the VMS_SAS_OPTIONS DCL Symbol
You can define SAS options with the VMS_SAS_OPTIONS DCL symbol by using the
following syntax:
VMS_SAS_OPTIONS = “/option 1/option 2/...”
where option is the SAS option that you specify. This example defines a symbol in the
local symbol table. To define a symbol in the global symbol table, replace "=" with "==".
Note: Only one definition of the symbol is used by SAS, and the local table is
searched before the global table. This means that if a local and a global version of the
symbol are defined, the global version will be ignored. 4
Precedence for System Option Specifications
For many system options, different values can be specified in the SAS command, in a
configuration file, in an OPTIONS statement (submitted in an autoexec file or in a SAS
program), and in the System Options window. When the same system option is set in
more than one place, the order of precedence is as follows:
1 restricted configuration files
a user files
b group files
c global file.
(For more information about restricted configuration files, see the SAS System
Configuration Guide for OpenVMS.)
2 System Options window or OPTIONS statement (submitted from a SAS session or
job).
3 autoexec files that contain OPTIONS statements (after SAS is initialized but
before the user supplies input):
process-level autoexec file
job-level autoexec file
group-level autoexec file
system-level autoexec file
cluster-level autoexec file.
4 SAS command.
5 configuration files (as SAS is being initialized):
a
b
c
d
e
process-level configuration file
job-level configuration file
group-level configuration file
system-level configuration file
cluster-level configuration file.
6 VMS_SAS_OPTIONS DCL symbol:
a
b
c
d
e
a local or global symbol definition
7 default configuration file: SAS$ROOT[000000]sasv91.cfg
In other words:
3 The restricted configuration files take precedence over all other occurrences of an
option specification.
3 The System Options window or OPTIONS statement takes precedence over
autoexec files.
36
Precedence for Similar Types of Options
4
Chapter 2
3 Autoexec files take precedence over the SAS command.
3 The SAS command takes precedence over any created configuration files.
3 User-created configuration files take precedence over the VMS_SAS_OPTIONS
DCL symbol.
3 The VMS_SAS_OPTIONS DCL symbol takes precedence over any default
configuration file.
Precedence for Similar Types of Options
Some SAS system options have the same effect (and usually the same name) as other
types of options. For example, the BUFSIZE= system option is analogous to the
BUFSIZE= data set option. Also, under OpenVMS, the CC= system option is analogous
to the CC= external I/O statement option that is described in
“Host-Specific External I/O Statement Options” on page 402 in the FILENAME
statement.
In the case of overlapping options, SAS uses the following rules of precedence:
3 A value that is specified in a statement option (for example, an engine/host option
in the LIBNAME statement or an external I/O statement option in the
FILENAME, INFILE, or FILE statement) takes precedence over a value that is
specified in a system option.
3 A value that is specified in a data set option takes precedence over a value that is
specified in a statement option.
Configuration Files
What Is a SAS Configuration File?
A SAS configuration file contains SAS system options that are set automatically
when you invoke SAS. Configuration files can contain only SAS system option settings
and are processed before SAS initializes.
SAS ships with a default configuration file, sasv91.cfg, which is located in
SAS$ROOT:[000000]. This file contains the master settings for SAS and should not be
altered or deleted. If you need to override the settings in the default configuration file,
you can create one of the following configuration files.
Six Types of Configuration Files
Under OpenVMS, the OpenVMS logical name SAS$CONFIG is used to refer to SAS
configuration files. This logical name can exist in one or more of the process-, job-,
group-, system-, or cluster-level logical name tables.
Six types of configuration files can be created:
3 The process-level configuration file should contain the system option settings that
you, as an individual user, want to have in effect each time you invoke SAS.
3 The job-level configuration file should contain the system option settings that you
want to have in effect for a particular SAS job. (You can have multiple job-level
configuration files, one for each job or for a group of jobs.)
3 The group-level configuration file should contain the system option settings that
your group manager or system manager has defined for members of your
workgroup.
Getting Started with SAS under OpenVMS
4
Steps for Creating a Configuration File
37
3 The system-level configuration file should contain the system option settings that
your system manager has defined for all users at your site.
3 The cluster-level configuration file should contain the system option settings that
your system manager wants shared across e-mail nodes in your cluster. The
cluster-level file is only valid for OpenVMS 7.2 or later.
3 The restricted configuration files contain system options that are set by the site
administrator and cannot be changed by the user. Options can be restricted
globally, by group, or by user. For more information about restricted configuration
files, see the SAS System Configuration Guide for OpenVMS.
Ask your system manager which of these configuration files are used at your site.
Determining the Configuration Files That SAS Processed
To see which configuration files were processed for your SAS session, submit the
following code:
proc options option=config value; run;
All of the configuration files that SAS processed are listed as the value of the CONFIG=
system option.
Steps for Creating a Configuration File
To create a configuration file, follow these steps:
1 Use any text editor to write SAS system options into an OpenVMS file. Use .CFG
as the file extension.
2 Specify one or more system options in each line. A configuration file can contain
any system option except the VERBOSE system option. (If this option appears in
a configuration file, it is ignored; no error or warning message appears.)
Note: You can specify the CONFIG= system option inside a configuration file to
point to an additional configuration file. Since the options specified in this
additional file are processed at the point of the CONFIG= specification, their
precedence will be lower than the next option listed in the original configuration
file.
4
When specifying a system option, use the same syntax that you would use for
specifying system options with the SAS command (see “Specifying System Options
in the SAS Command” on page 33) — except don’t include the SAS command itself.
For example, a configuration file might contain the following lines:
/SASUSER=DISK:[JQK.SASUSER]/WORK=[JQK.SASWORK]
/DMS/LINESIZE=80/PAGESIZE=60
/FULLSTIMER
Note: You cannot include comment lines in a configuration file.
4
3 Close the new configuration file.
4 Create the logical name SAS$CONFIG in the appropriate logical name table. For
example, the following DEFINE DCL command creates the logical name
SAS$CONFIG in the process-level logical name table.
$ DEFINE SAS$CONFIG_$ DISK:[DIRECTORY]MYCONFIG.CFG
38
Specifying a User Configuration File
4
Chapter 2
For more information about creating logical names, see OpenVMS User’s
Manual.
Specifying a User Configuration File
If you have created the OpenVMS logical name SAS$CONFIG, then SAS
automatically executes the configuration file that is associated with that logical name.
If SAS$CONFIG exists in more than one logical name table, then SAS executes the
configuration files in the order in which they are listed in “Precedence for System
Option Specifications” on page 35.
Alternatively, you can use the CONFIG= system option in the SAS command to tell
SAS where to find your configuration file. For example, the following SAS command
invokes SAS and tells it to use the process-level configuration file MYCONFIG.CFG:
$ SAS91/CONFIG=DISK:[DIRECTORY]MYCONFIG.CFG
Displaying the Contents of Configuration Files
When you invoke SAS, you can use the VERBOSE system option to write the
contents of all configuration files to your OpenVMS display as SAS initializes.
The output from the VERBOSE system option displays the following:
3 all of the configuration files that are found (except for the default configuration file)
3 all of the options that have been set along with their values.
Note: Since some options are set by default, more options will be displayed than
were specified in the configuration files. In the output, the host options will be listed
first, followed by the options that are valid in all operating environments. 4
Example: Displaying the Contents of Your Configuration Files
Suppose your site has a system-level configuration file,
DISK:[SYSTEM]SYSCONFIG.CFG (defined by the logical name SAS$CONFIG in your
system-level logical name table) that contains the following system options:
/LINESIZE=80/PAGESIZE=60
Suppose that you have also created your own configuration file, MYCONFIG.CFG,
and that it contains the following options:
/FULLSTIMER
Now suppose you use the following command to invoke SAS:
$ SAS91/CONFIG=MYCONFIG.CFG/VERBOSE
The output should be similar to the following:
Getting Started with SAS under OpenVMS
4
What Is an Autoexec File?
39
Output 2.1 Contents of Configuration Files
The /VERBOSE option was specified.
SYSTEM SAS$CONFIG file
PROCESS SAS$CONFIG
Option
Value
======
======
APPLETLOC
SAS$ROOT:[MISC.APPLETS]
CONFIG
DISK:[SAS91]SASV9.CFG
DISK:[SYSTEM]SYSCONFIG.CFG
DISK:[USER]MYCONFIG.CFG
XKEYPAD
ON
XLOGICAL
ON
XOUTPUT
ON
XSYMBOL
ON
ABORT
RECOVER NOSYSLOG NODUMP
CODEGEN
ON
FULLSTIMER
ON
HELPLOC
SAS$ROOT:[HELP]
JREOPTIONS
-Djava.ext.dirs=/sas$root/misc/base:/sas$root/
misc/applets
MSG
SAS$MSG:
SETJMP
ON
VERBOSE
ON
MAPS
SAS$MAPS:
SASHELP
SAS$HELP
HELPLOC
SAS$ROOT:[HELP]
APPLETLOC
SAS$ROOT:[MISC.APPLETS]
NODMS
NOOBJECTSERVER
NODMR
NODMSEXP
NOEXPLORER
PAGESIZE
60
LINESIZE
80
TEXTURELOC
SAS$ROOT:[MISC.TEXTURES]
FONTSLOC
SAS$ROOT:[MISC.FONTS]
CONSOLELOG
SYS$OUTPUT
MVARSIZE
8192
MSYMTABMAX
51200
UNIVERSALPRINT
NEWS
SAS$NEWS:
SASUSER
SAS$USER:
WORK
SAS$WORKROOT:
GISMAPS
SAS$GISMAPS:
Autoexec Files
What Is an Autoexec File?
Unlike configuration files, which can contain only SAS system options, an autoexec
file can contain valid SAS statements. Autoexec files are processed immediately after
SAS initializes but before it processes any source statements.
For example, an autoexec file could contain the following lines:
options fullstimer linesize=75;
libname mylib ’dev:[homedir.subdir]’;
dm ’wait 0’;
In this example, the OPTIONS statement sets some SAS system options, the LIBNAME
statement assigns a libref, and the DM statement executes a SAS windowing
environment command.
40
Steps for Creating an Autoexec File
4
Chapter 2
Note: Some SAS system options can be specified only when you invoke SAS. These
system options cannot be specified in an OPTIONS statement; therefore, they cannot be
specified in an autoexec file. “Summary of SAS System Options under OpenVMS” on
page 432 tells where each SAS system option can be specified. 4
Difference between Autoexec and Configuration Files
Because autoexec files are processed after SAS is initialized, setting the NODATE
and LINESIZE= options in a configuration file affects the appearance of the SAS log
header, whereas setting NODATE and LINESIZE= in an autoexec file does not. An
OPTIONS statement in an autoexec file is equivalent to submitting an OPTIONS
statement as the first statement of your SAS session.
Five Types of Autoexec Files
Under OpenVMS, the OpenVMS logical name SAS$INIT is used to refer to SAS
autoexec files. This logical name can exist in one or more of the process-, job-, group-,
system-, or cluster-level logical name tables. Therefore, five types of autoexec files can
be created:
3 The process-level autoexec file should contain the SAS statements that you, as an
individual user, want to execute immediately after your SAS session is initialized.
3 The job-level autoexec file should contain the SAS statements that you want to
execute for a particular SAS job.
3 The group-level autoexec file should contain SAS statements that your group
manager or system manager has specified for members of your workgroup.
3 The system-level autoexec file should contain the SAS statements that your system
manager has specified for all users at your site.
3 The cluster-level autoexec file should contain the SAS statements that your system
manager has specified for all nodes in your cluster. The cluster-level file is only
valid for OpenVMS 7.2 or later.
Ask your system manager which of these autoexec files are used at your site.
Steps for Creating an Autoexec File
To create an autoexec file, follow these steps:
1 Use any text editor to write SAS statements into an OpenVMS file. Use .SAS as
the file extension.
2 Type in the SAS statements that you want to include.
3 Close the new autoexec file.
4 Create the logical name SAS$INIT in the appropriate logical name table. For
example, the following DCL DEFINE command creates the logical name
SAS$INIT in the process-level logical name table.
$ DEFINE SAS$INIT_$ DISK:[DIRECTORY]MYEXEC.SAS
For more information about creating logical names, see OpenVMS User’s
Manual.
Specifying an Autoexec File
If you have created the OpenVMS logical name SAS$INIT, then SAS automatically
executes the statements in the autoexec file that is associated with that logical name. If
Getting Started with SAS under OpenVMS
4
Introduction to OpenVMS Logical Names Used by SAS
41
SAS$INIT exists in more than one logical name table, then SAS executes the autoexec
files in the order in which they are listed in “Precedence for System Option
Specifications” on page 35.
Alternatively, you can use the AUTOEXEC= system option in the SAS command to
tell SAS where to find your autoexec file. For example, the following SAS command
invokes SAS and tells it to execute the autoexec file MYEXEC.SAS:
$ SAS91/AUTOEXEC=DISK:[DIRECTORY]MYEXEC.SAS
If you are specifying a DECnet location for an autoexec file while you are using a
proxy OpenVMS account, then you need to use the following syntax. This example uses
the SAS$INIT logical name with the AUTOEXEC= system option:
$ DEFINE MYAUTO node """useid""::DISK:[DIRECTORY]AUTOEXEC.SAS
$ SAS91/AUTOEXEC=MYAUTO
Note: Check to make sure you have the correct number of quotation marks
surrounding useid. If you have the incorrect number of quotation marks, then an error
will appear in the log when you are using interactive or batch modes. 4
Displaying Autoexec Statements in the SAS Log
SAS statements that are submitted from an autoexec file usually are not displayed in
the SAS log. However, if you specify the ECHOAUTO system option when you invoke
SAS, then SAS writes (or “echoes”) the autoexec statements to the SAS log as they are
executed. For example, suppose your autoexec file is MYEXEC.SAS and that it contains
the following SAS statements:
options fullstimer linesize=75;
libname mylib ’dev:[homedir.subdir]’;
dm ’wait 0’;
If you use the following command to invoke SAS, then the contents of MYEXEC.SAS
will be written to the SAS log.
$ SAS91/AUTOEXEC=MYEXEC.SAS/ECHOAUTO
For more information about the ECHOAUTO system option, see SAS Language
Reference: Dictionary.
Customizing Your SAS Session Using OpenVMS Logical Names
Introduction to OpenVMS Logical Names Used by SAS
The definitions for OpenVMS logical names are provided in one of the following ways:
3 by SAS or your system administrator to specify aspects of SAS programs or SAS
sessions for your site. These logical names are defined by the SAS91.COM file. For
more information, see the Installation Instructions for the SAS System under
OpenVMS Environments.
3 by you to customize aspects of your SAS session. For more information about the
logical names that you can define, see “Logical Names That You Can Define” on
page 42.
42
Logical Names That You Can Define
4
Chapter 2
Logical Names That You Can Define
You can use the following logical names to customize aspects of your SAS session.
SAS$ALTLOG
contains the name of the current alternate SAS log file, if one is created.
SAS$ALTLOG corresponds to the ALTLOG= system option. For more information,
see “ALTLOG= System Option” on page 443.
SAS$ALTPRINT
contains the name of the current alternate SAS list file, if one is created.
SAS$ALTPRINT corresponds to the ALTPRINT= system option. For more
information, see “ALTPRINT= System Option” on page 444.
SAS$CONFIG
defines to SAS the location of a configuration file. For more information, see
“Configuration Files” on page 36 and “Precedence for System Option
Specifications” on page 35.
SAS$INIT
defines to SAS the location of an autoexec file. The AUTOEXEC= system option
takes its value from SAS$INIT, if SAS$INIT is defined. For more information, see
“AUTOEXEC= System Option” on page 446.
SAS$LOG
contains the name of the SAS log. SAS$LOG corresponds to the LOG= system
option. For more information, see “LOG= System Option” on page 473.
SAS$PRINT
contains the name of the SAS list file. SAS$PRINT corresponds to the PRINT=
system option. For more information, see “PRINT= System Option” on page 485.
SAS$TRANTAB
specifies the names of translation tables that are used by various parts of SAS.
SAS$WORKLIB
points to your Work subdirectory. For more information about the Work
subdirectory, see “The WORK Data Library under OpenVMS” on page 129.
SAS$X_STATUS
contains the OpenVMS status code that indicates whether an X command or X
statement executed properly. The logical name is stored in the JOB logical name
table and can be checked after the execution of any X command or statement. If
the X command or statement was successful, the value is 1. Any other value
indicates that the X command or statement was not successful.
The following program uses the GETLOG function to determine whether the X
statement executed properly. If the X statement did execute properly, then the
program continues; if it did not, then the program stops.
x ’create/dir [sasxyz.newdir]’;
data _null_;
x=getlog(’sas$x_status’);
if x^="1" then do;
put ’The directory was not created.’;
put ’The OpenVMS return code was: ’ x;
put ’Program stopping.’;
abort return;
end;
else
Getting Started with SAS under OpenVMS
4
Introduction to Issuing DCL Commands within SAS
43
put ’Directory was created successfully.’;
run;
libname mylib ’[sasxyz.newdir]’;
data mylib.test;
input revenue expenses;
profit=revenue-expenses;
datalines;
39800.73 35678.93
28900.38 28456.99
40933.22 5683.33
;
Note: The ABORT RETURN statement not only stops the program, but also
ends your SAS session. 4
Issuing DCL Commands during a SAS Session
Introduction to Issuing DCL Commands within SAS
You can issue DCL commands from within a SAS program by using either the SAS X
statement (in any mode of SAS operation) or the SAS X command in interactive and
non-interactive mode. Depending on which form of the X statement (or X command)
that you use, you can either issue a single DCL command or you can spawn an
OpenVMS subprocess from which you can issue multiple DCL commands.
Note: In general, the X statement and the X command are equivalent. The following
sections illustrate the X statement but point out any differences that would apply to the
X command. 4
Issuing DCL Commands with ODS-5 Files
If you want to use DCL commands with ODS-5 files that exceed ODS-2 specifications,
then an X command needs to be executed for the parse_style procedure before issuing
any DCL commands. The following code allows DCL commands to be used with ODS-5
files:
X ‘‘set proc/parse_style=extended’’
To return to the default for ODS-2 files, enter the following code:
X ‘‘set proc/parse_style=traditional’’
Executing DCL Commands Asynchronously
You can use the SYSTASK statement to execute DCL commands asynchronously. For
more information, see “SYSTASK Statement” on page 422 and “WAITFOR Statement”
on page 425.
Preventing the Use of DCL Commands
System administrators can specify the NOXCMD option to prevent users from
issuing any DCL commands.
44
Issuing a Single DCL Command Using the X Statement
4
Chapter 2
Issuing a Single DCL Command Using the X Statement
Use the following form of the X statement to issue one DCL command:
X <’>DCL-command <’>;
The DCL-command is passed to the operating environment and executed. If errors
occur, the appropriate error messages are displayed.
In interactive line mode, after the command executes you are prompted for another
SAS statement. For example, in the following display the X statement is submitted
from an interactive line mode session and executes the DIRECTORY DCL command.
The contents of the current directory appear on the display, and then SAS prompts the
user for another SAS statement.
Display 2.2 Issuing DCL Commands with the X Statement
The XLOG option specifies to write the output from the X command to the SAS log.
However, XLOG is not the default. When XLOG is not turned on, the output from the X
command is displayed in the invocation window. The XCMDWIN option determines
whether X command output is displayed in a DECTERM window or in the invocation
window. XCMDWIN is on by default. For more details on the XCMDWIN option, see
“XCMDWIN System Option” on page 508.
Note: You can also use the VMS function, the CALL SYSTEM routine, or the
%SYSEXEC macro statement to issue single DCL commands. For details, see the
function “VMS Function” on page 359 and the routine “CALL SYSTEM Routine” on
page 313. 4
How OpenVMS Processes the DCL Command
It is important to understand how OpenVMS processes the DCL command that you
issue with the X statement. A DCL command can be executed in either the OpenVMS
parent process (the OpenVMS process in which your SAS session is running) or in an
OpenVMS subprocess. For some DCL commands, such as DIR or COPY, it makes little
difference whether it executes in the parent process or a subprocess. However, for DCL
commands such as DEFINE and MOUNT, the process in which they are executed is
significant. The following DCL commands are executed in the parent process:
ALLOCATE
ASSIGN
ATTACH
DEALLOCATE
DEASSIGN
DEFINE
Getting Started with SAS under OpenVMS
4
Issuing a Single DCL Command Using the X Statement
45
MOUNT
SET DEFAULT.
The results of these DCL commands (for example, OpenVMS logical names, tape
mounts, and so on) are available to the OpenVMS parent process. All other DCL
commands are executed in a subprocess. Therefore, when you use an X statement to
submit these commands from SAS, their results are not available to the OpenVMS
parent process in which SAS is running. For example, the following DCL command has
no effect in the OpenVMS parent process:
x ’set protection=o:d/default’;
This command is executed in a subprocess, so the default protection for the
OpenVMS process in which SAS is running does not change.
The XTIMEOUT= system option determines whether a subprocess remains in
existence after a DCL command has been executed and control has been returned to
SAS. (See the system option “XTIMEOUT= System Option” on page 514.) By default,
the same subprocess is used during the entire SAS session. However, when any of the
commands in the previous list are executed, the following actions occur regardless of
the value of the XTIMEOUT= system option:
3 The subprocess is deleted.
3 A new subprocess is started when the next X statement is issued.
These actions ensure that the subprocess always accurately reflects any OpenVMS
logical names or defaults that were set in the parent process.
Executing a DCL Command Using Procedure Syntax
You can also use procedure syntax to issue a single DCL command. However, the X
command and the X statement are more versatile because they each allow you to
specify parameters and qualifiers for a DCL command; with procedure syntax, you
cannot specify parameters or qualifiers.
When you ask SAS to run a procedure—for example, a procedure named
MYPROC—SAS first tries to load the procedure named MYPROC. If the procedure does
not exist, then SAS searches for either an image named MYPROC.EXE in your current
directory or the OpenVMS logical name MYPROC. If the image MYPROC.EXE is found
in your current directory, then SAS issues the MYPROC DCL command via a
subprocess. If the OpenVMS logical name exists for MYPROC, then SAS translates the
logical name and searches for the image that it points to. If it finds the image, it issues
the MYPROC DCL command via a subprocess. If it does not find the image in your
current directory, and if no OpenVMS logical name is assigned to the image or if the
logical name does not point to an image that exists, then you receive the following error
message:
ERROR: Procedure MYPROC not found.
In this example, note that if SAS issues the MYPROC command, you must either
define a symbol called MYPROC or have a DCL verb defined for MYPROC. Otherwise,
you receive the error message
%DCL-W-IVVERB, unrecognized command verb check validity and spelling.
46
Issuing Several DCL Commands Using the X Statement
4
Chapter 2
The most useful application of using procedure syntax to issue a DCL command is
executing a stand-alone image. Suppose you have a program called CALC.EXE in your
current directory that performs arithmetic calculations, and you want to run it from
within your SAS session. First, define a symbol with the same name as the image you
want to invoke. In this case, you define CALC as the following:
$ CALC := RUN MYDISK$:[MYDIR]CALC.EXE
Then, from your SAS session, run your program using a procedure statement. The
following is an example:
$ SAS91
. . . Log notes . . .
1? proc calc;
2? run;
Input the calculation: 2+2=
4.000000
3? endsas;
Now suppose that the CALC.EXE image is located in a different directory. The
symbol for CALC must still be defined, as in the previous example, but you also need an
OpenVMS logical name that points to the actual file. The following is an example:
$ DEFINE CALC MYDISK$:[MYPLAYPEN.SUBDIR]CALC.EXE
Now SAS can find the image that is defined by the OpenVMS logical name CALC
and can issue the CALC DCL command.
Note:
You can accomplish the same thing by issuing the following X command:
$ SAS91
. . . Log notes . . .
1? x ’run calc.exe’;
Input the calculation: 2+2=
4.000000
2? endsas;
4
Issuing Several DCL Commands Using the X Statement
You can use the X statement to spawn an OpenVMS subprocess from which you can
enter multiple DCL commands. In interactive line mode or noninteractive mode, use
either of the following forms of the X statement:
3 x ’’;
3 x;
(For more information, see “X Statement” on page 427.)
These statements make it easy for you to manage files and devices from within your
SAS session. When you use these forms of the X statement, you receive the following
message:
Type LOGOFF to return to SAS.
During the subprocess, you enter DCL commands in response to the following prompt:
SAS_$
The SAS_$ prompt appears in the terminal window from where you invoked SAS.
The XCMDWIN option specifies whether to create a DECTERM window from which
the spawned subprocess reads its input and writes it output. This option applies only in
Getting Started with SAS under OpenVMS
4
Issuing OpenVMS Functions from Captive Accounts
47
windowing mode. For more information about the XCMDWIN option, see “XCMDWIN
System Option” on page 508. If you use /NOXCMDWIN, the window from which SAS
was invoked will be used for both input and output for the subprocess.
Note: If you issue DCL commands that affect or describe process attributes, be
aware that these commands pertain to the subprocess, not to the process in which SAS
is running. For example, if you define OpenVMS logical names within the subprocess,
these logical names are not available to the OpenVMS parent process in which SAS is
running. Therefore, it is usually best to define logical names with the form of the X
statement described in “Issuing a Single DCL Command Using the X Statement” on
page 44. 4
To return to the SAS session, enter LOGOFF in response to the SAS_$ prompt.
SAS System Options That Affect Subprocesses
The following SAS system options affect the subprocess environment that is created
by an X statement or X command:
XCMDWIN
in windowing mode, determines whether a separate DECTERM window is created.
For more information, see “XCMDWIN System Option” on page 508.
XKEYPAD
affects which keypad settings the subprocess uses. For more information, see
“XKEYPAD System Option” on page 509.
XLOG
affects whether the output from the X command is displayed in the SAS log file.
For more information, see “XLOG System Option” on page 510.
XLOGICAL
affects which process-level logical names the subprocess uses. For more
information, see “XLOGICAL System Option” on page 510.
XOUTPUT
affects the display of output from the X command. For more information, see
“XOUTPUT System Option” on page 511.
XSYMBOL
affects the Command Line Interpreter (CLI) symbols that are used in the
subprocess. For more information, see “XSYMBOL System Option” on page 513.
XTIMEOUT=
affects the amount of time a subprocess exists or remains inactive before control is
returned to SAS. For more information, see “XTIMEOUT= System Option” on page
514.
Note:
These options take effect only after a subprocess is spawned.
4
Issuing OpenVMS Functions from Captive Accounts
Limitations of Using a Captive Account
If you run SAS from a captive OpenVMS account, then you cannot access the DCL
command level, nor can you spawn subprocesses. A captive OpenVMS account is under
48
Issuing OpenVMS Functions from Captive Accounts
4
Chapter 2
the control of the login command procedure. SAS functionalities that require a
detached process will not work under a captive account. The following functionalities
require either a detached process or a subprocess, so they are not available from a
captive account:
3 host-specific commands that are executed asynchronously using the SYSTASK
statement
3 the PIPE device in the FILENAME statement
3 remote signons using SAS/CONNECT
3 SAS Help and Documentation in the SAS windowing environment
3 the SAS Session Manager
3 X commands that cannot be executed in the current process.
Captive accounts are set up in the AUTHORIZE system utility by specifying the
option /FLAGS=CAPTIVE.
Difference between Captive and Noncaptive Accounts
As explained in “Issuing DCL Commands during a SAS Session” on page 43, if you
run SAS from a noncaptive account, you can issue DCL commands by means of the SAS
X command, SYSTASK statement, X statement, VMS function, or CALL SYSTEM
routine. For most DCL commands, each of these methods spawns an OpenVMS
subprocess, and the subprocess executes the DCL command that you specified. (The
exceptions are the commands listed in “How OpenVMS Processes the DCL Command”
on page 44, which execute in the OpenVMS parent process. Also note that only the X
statement and the X command can be used to spawn a subprocess from which you can
issue multiple DCL commands. The other methods can be used only to issue single
DCL commands.)
In general, if you issue one of these SAS commands, statements, functions, or CALL
routines from a captive account, a message informs you that a subprocess cannot be
spawned from a captive account; the command requested is denied, and control of the
process is returned to SAS. Nevertheless, you can use the X statement or the X
command to issue a number of general-purpose OpenVMS functions. For more
information, see “Functions Available from a Captive Account” on page 48.
Functions Available from a Captive Account
Several general-purpose OpenVMS functions can be called from within the same
process that is running SAS. Therefore, even if you are running SAS from a captive
account, you can use the FINDFILE function (for example) to see a directory listing of
the files in a certain directory. The results are the same as if you had issued an X
command from a noncaptive account. Similarly, you can use the DELETE function from
a captive account to delete a file from a particular directory structure, and you can use
the RENAME function to rename a file.
The following OpenVMS functions are available in SAS and can be called from a
captive account:
DELETE
deletes a file. For more information, see “DELETE Function” on page 316.
FINDFILE
searches a directory for a file. For more information, see “FINDFILE Function” on
page 327.
GETDVI
returns a specified item of information from a device. For more information, see
“GETDVI Function” on page 332.
Getting Started with SAS under OpenVMS
4
Issuing OpenVMS Functions from Captive Accounts
49
GETJPI
retrieves job-process information. For more information, see “GETJPI Function”
on page 333.
GETLOG
returns the value of a DCL logical name. For more information, see “GETLOG
Function” on page 334.
GETMSG
translates an OpenVMS error code into text. For more information, see “GETMSG
Function” on page 335.
GETQUOTA
retrieves disk quota information. For more information, see “GETQUOTA
Function” on page 336.
GETSYM
returns the value of a DCL symbol. For more information, see “GETSYM
Function” on page 337.
GETTERM
returns the characteristics of your terminal device. For more information, see
“GETTERM Function” on page 338.
PUTSYM
creates a DCL symbol in your process. For more information, see “PUTSYM
Function” on page 346.
RENAME
renames a file. For more information, see “RENAME Function” on page 348.
SETTERM
modifies a characteristic of your terminal device. For more information, see
“SETTERM Function” on page 349.
TERMIN
allows simple input from SYS$INPUT. For more information, see “TERMIN
Function” on page 352.
TERMOUT
allows simple output to SYS$OUTPUT. For more information, see “TERMOUT
Function” on page 353.
TTCLOSE
closes a channel that was previously assigned by TTOPEN. For more information,
see “TTCLOSE Function” on page 354.
TTCONTRL
modifies characteristics of a channel that was previously assigned by TTOPEN.
For more information, see “TTCONTRL Function” on page 355.
TTOPEN
assigns an I/O channel to a terminal. For more information, see “TTOPEN
Function” on page 356.
TTREAD
reads characters from the channel that was assigned by TTOPEN. For more
information, see “TTREAD Function” on page 358
TTWRITE
writes characters to the channel that was assigned by TTOPEN. For more
information, see “TTWRITE Function” on page 359.
50
Determining the Completion Status of a SAS Job under OpenVMS
4
Chapter 2
Misuse of these functions can occur only if your system has insufficient file-protection
and directory-protection schemes. SAS honors all protection schemes. For example, if
you cannot delete a file from a noncaptive account, then you cannot delete that file from
a captive account either.
Note: System administrators can restrict users from calling the above functions
from captive accounts by either renaming or deleting the appropriate executables or by
making the NOXCMD option the default. The executables that are associated with the
above functions are stored in the directory SAS$EXTENSION:[LOAD]. 4
Determining the Completion Status of a SAS Job under OpenVMS
Introduction to Three Termination Symbols
Under OpenVMS, three symbols are set at SAS termination that indicate the success
or failure of the SAS job: SAS$STATUS, $SEVERITY, and $STATUS.
SAS$STATUS Symbol
SAS$STATUS indicates the final state of the SAS session. A value of 0 indicates
normal termination. If any of the following versions of the SAS ABORT statement are
used, then SAS$STATUS is set to the value n:
abort n;
abort return n;
abort abend n;
where n can range from −2,147,483,648 to 2,147,483,647.
If you issue these statements without specifying n, then SAS$STATUS is set to the
following values:
abort;
sets SAS$STATUS to 12.
abort return;
sets SAS$STATUS to 12.
abort abend;
sets SAS$STATUS to 999.
If a fatal error occurs and the SAS session does not terminate normally, then
SAS$STATUS is set to either 999 or 998, depending on the type of internal error.
For more information about the ABORT statement, see “ABORT Statement” on page
393 and SAS Language Reference: Dictionary.
$SEVERITY Symbol
$SEVERITY indicates the most severe status of any step in your SAS program. To
see the value of $SEVERITY, use the SHOW SYMBOL $SEVERITY DCL command.
The following table correlates the value of $SEVERITY with the severity level of the
step in your program.
Getting Started with SAS under OpenVMS
4
How to Interrupt a SAS Session
51
Table 2.1 Severity Levels for $SEVERITY
Value of $SEVERITY
Severity Level
0
WARNING
1
SUCCESS
2
ERROR
3
INFORMATIONAL
4
FATAL
$STATUS Symbol
$STATUS indicates the most severe status of any step in your SAS program. An
OpenVMS severity level is associated with each value. You can check the severity level
of $STATUS with the SHOW SYMBOL $STATUS DCL command to determine the final
status of your SAS job. The following table shows the severity levels that are associated
with $STATUS under the given conditions.
Table 2.2 Severity Levels for $STATUS
Condition
Severity Level
Return Code Value
All steps terminated normally
SUCCESS
"%X1801A261"
SAS issued warning(s)
WARNING
"%X1801A3E0"
SAS issued error(s)
ERROR
"%X1801A44A"
User issued the ABORT statement
INFORMATIONAL
"%X1801A303"
User issued the ABORT RETURN statement
INFORMATIONAL
"%X1801A30B"
User issued the ABORT ABEND statement
FATAL
"%X1801A4F4"
SAS terminated abnormally
FATAL
"%X1801A4FC"
Core internal error
FATAL
"%X1801A4E4"
Host internal error
FATAL
"%X1801A4EC"
Interrupting a SAS Session under OpenVMS
How to Interrupt a SAS Session
If you are running SAS with the SAS Explorer window in the SAS windowing
environment, in interactive line mode, or in noninteractive mode, then you can
interrupt your SAS session by pressing CTRL+Y. This is called an attention sequence.
Note: CTRL+Y and CTRL+C function identically. You can follow this same
procedure to interrupt a SAS task. 4
After you press CTRL+Y, SAS will issue you a message. The content of the message
depends on the interface you are using and on what task SAS is performing at the time
of the interruption. Usually these messages appear immediately after you press
CTRL+Y.
52
Interactive Line Mode Options
4
Chapter 2
Note: If you have to wait a few seconds for these messages, do not repeatedly press
CTRL+Y. If you press CTRL+Y more than once, or if you press CTRL+Y while SAS is in
the process of initializing or shutting down, the WORK files might not be deleted. In
this case, you must use the CLEANUP tool to delete them. For more information, see
“The CLEANUP Tool” on page 132. 4
How SAS Processes Temporary Work Files
When you end your SAS session with a CTRL+Y, usually all temporary Work files
are properly deleted. In noninteractive mode, if you interrupt a SAS session, the .LOG
and .LIS files are retained, up to the point where you pressed CTRL+Y.
Interactive Line Mode Options
In interactive line mode after pressing CTRL+Y, you will receive the following
message:
Select:
1. Line Mode Process
2. DATASTEP
C. Cancel
T. Terminate System
The following table describes each of these options.
Table 2.3 Options when Interrupting an Interactive SAS Session
If you select . . .
The following will result . . .
1
You will see the following instructions:
Press Y to cancel submitted statements,
N to continue.
If you type Y, SAS cancels the statements that
were submitted. If you type N, the statements
will continue executing.
2
You will see the following instructions:
Press Y to halt data step/proc,
N to continue.
If you type Y, SAS stops processing the DATA
step or procedure. If you type N, the DATA step
or procedure will continue executing.
C
The interruption (begun by pressing CTRL+Y) is
cancelled.
T
Your SAS session is terminated.
Windowing Environment Options
In the SAS windowing environment after pressing CTRL+Y, you will receive the
following message:
Select:
1. DMS Process
2. Language Processor
3. DATASTEP
Getting Started with SAS under OpenVMS
4
Messages in the SAS Console Log
C. Cancel
T. Terminate System
The following table describes each of these options.
Table 2.4 Options when Interrupting a Session in the SAS Windowing
Environment
If you select . . .
The following will result . . .
1
You will see the following instructions:
Press Y to terminate this SAS process,
N to continue.
If you type Y, you will terminate the SAS
process. If you type N, the process will continue
executing.
2
You will see the following instructions:
Press Y to cancel submitted statements,
N to continue.
If you type Y, SAS cancels the statements that
were submitted. If you type N, the statements
will continue executing.
3
You will see the following instructions:
Press Y to halt data step/proc,
N to continue.
If you type Y, SAS stops processing the DATA
step or procedure. If you type N, the DATA step
or procedure will continue executing.
C
The interruption (begun by pressing CTRL+Y) is
cancelled.
T
Your SAS session is terminated.
Ending Your SAS Session
Methods for Ending a SAS Session
You can end your SAS session using one of the following methods:
3 Select
File
I
Exit
if you are using SAS in the windowing environment
3 Submit endsas;
3 Enter BYE in the command line
3 Press CTRL+Z if you are using SAS in interactive line mode.
Messages in the SAS Console Log
If SAS encounters an error or warning condition when the SAS log is not available,
then any messages that SAS issues are written to the SAS console log. Normally, the
SAS log is unavailable only early in SAS initialization and late in SAS termination.
53
54
Identifying and Resolving Problems under OpenVMS
4
Chapter 2
Under OpenVMS, the SYS$OUTPUT logical name specifies the location of the console
log. This location depends on the user mode. If you are working in interactive mode or
using a command procedure, SAS displays the error messages at your terminal. If you
are working in batch mode, SAS writes the error messages to a batch log file.
Identifying and Resolving Problems under OpenVMS
The SAS Web site contains a great deal of information that is useful for
problem-solving and for other purposes. For example, on the SAS Technical Support
page (see support.sas.com/ts), you will find the following resources:
Technical Notes
information about reported problems, fixes, and undocumented features of SAS.
This information is updated regularly on the SAS Web pages. The SAS Notes are
also distributed on all product installation CD-ROMs or tapes and are available on
a separate CD-ROM or tape by request. SAS Installation Coordinators can contact
the SAS Distribution Center to request a current copy of the notes.
Frequently Asked Questions (FAQs)
answers to the questions that the SAS Technical Support staff are most frequently
asked by SAS software users.
Sample Programs
a collection of thousands of SAS programs that demonstrate different features of
SAS and that illustrate how to use SAS to solve application problems.
You will also find information about how to report problems via e-mail.
55
CHAPTER
3
Working in the SAS Windowing
Environment
Introduction to Working in the SAS Windowing Environment 56
Description of SAS in the X Environment 56
Definition of X Window System 56
X Window Managers 56
SAS Window Session ID 57
Workspace and Gravity in a SAS Session 57
Window Types 58
Top-Level Windows 58
Interior Windows 58
The SAS Session Manager under OpenVMS 59
What Is the SAS Session Manager? 59
Features of the SAS Session Manager 59
Disabling the SAS Session Manager 60
Displaying Function Key Definitions under OpenVMS 60
Benefits of Assigning Function Key Definitions 60
Techniques for Displaying Function Key Definitions 60
The SAS ToolBox under OpenVMS 61
Introduction to the SAS ToolBox 61
Customizing the Default Toolbox 62
Default Configuration for the Command Window and Toolbar 62
Opening and Closing the Command Window and Toolbar 63
How to Execute Commands 65
Opening Files under OpenVMS 65
Opening the Open Dialog Box 65
Description of the Open Dialog Box Options 66
Specifying the Initial Filter and Directory Using SAS Resources 67
Changing Your Current Working Directory under OpenVMS 67
What Is Your Working Directory? 67
Changing Your Working Directory 67
Change Working Directory Dialog Box 68
Searching for Character Strings under OpenVMS 68
Introduction to the Find Dialog Box 68
Opening the Find Dialog Box 68
Description of Options in the Find Dialog Box 69
Replacing Character Strings under OpenVMS 69
Introduction to the Replace Dialog Box 69
Opening the Replace Dialog Box 69
Description of Options in the Replace Dialog Box 70
Setting Up Printers under OpenVMS 70
Sending Mail from within Your SAS Session under OpenVMS 71
Default E-mail Protocol in SAS 71
56
Introduction to Working in the SAS Windowing Environment
4
Chapter 3
What Is the Send Mail Dialog Box? 71
Sending E-Mail Using the Send Mail Dialog Box 71
Sending the Contents of a Text Window 72
Sending the Contents of a Non-Text Window 73
Changing the Default File Type 73
Creating Icons for Windows under OpenVMS 73
Using the Menus under OpenVMS 73
Using the Mouse under OpenVMS 74
SAS Mouse Pointer Shapes 74
SAS Interface to the TPU Editor 74
Using Special Character Attributes under OpenVMS 74
List of Character Attributes 74
Selecting an Attribute 75
Getting Help under OpenVMS 75
Setting Your System for Help and Online Documentation 75
Introduction to Working in the SAS Windowing Environment
SAS for OpenVMS operating environments features an X Window System interface
that is based on Motif. This interface uses the window manager on your system to
manage the windows on your display. The appearance of the SAS interface depends
partially on which window manager you use.
Many features of the SAS windowing environment are controlled by X resources. For
example, colors, window sizes, the appearance of the ToolBox, and key definitions are
all controlled through X resources. Chapter 4, “Customizing the SAS Windowing
Environment,” on page 77 provides general information about resources, such as how to
specify resources, and describes all of the resources that you can use to customize the
interface.
Note: The About SAS System dialog box displays version information about SAS,
your operating environment, and Motif. You can display the About SAS System dialog
box by selecting
Help
I
About SAS System
4
Description of SAS in the X Environment
Definition of X Window System
The X Window System is a networked windowing system. If several machines are on
a network, you can run an X server that in turn serves X applications (as clients) to all
the other machines in the network.
X Window Managers
Window managers are X clients that enable you to manage the windows on a display
by moving, resizing, and iconifying the windows. The Motif interface to SAS can be
used with any window manager that is compliant with the Inter-Client Communication
Working in the SAS Windowing Environment
4
Workspace and Gravity in a SAS Session
57
Conventions Manual (ICCCM). Vendors provide at least one window manager with the
X Window System environment.
All window managers perform the same basic functions, but they differ in their style
and in their advanced functions. The appearance and function of the interface to SAS
depends to some extent on your X window manager. Most window managers provide
some kind of frame around a window. The window manager also governs the
placement, sizing, stacking, and appearance of windows, as well as their interaction
with the keyboard. The basics of interacting with SAS are the same for all window
managers: opening pull-down and pop-up menus, moving windows, responding to dialog
boxes, dragging text, and so on.
SAS Window Session ID
When you run SAS on an X workstation, SAS shares the display with other X
applications, including other SAS sessions. To enable you to distinguish between
different applications and SAS sessions, SAS generates a SAS window session ID for
each session by appending a number to the application name, which by default is SAS.
This session ID appears in the window title bar for each SAS window and in the
window icon title. The SAS sessions are assigned sequentially. Your first SAS session is
not assigned a number, so the session ID is SAS; your second SAS session is assigned
the session ID SAS2; and so on. Although the default application name is SAS, you can
use the -name parameter to the XRESOURCES system option to change the instance
name. The instance name can be up to six characters long.
You can specify the XRESOURCE option with the following syntax:
sas91/name=sessionname
or
sas91/XRES="-name sessionname"
Workspace and Gravity in a SAS Session
When you use SAS on an X workstation, the display may be shared by many
concurrent applications. When SAS windows from several different sessions and
windows from other applications appear on the display, the display can become
cluttered. To help alleviate this problem, the windows for a SAS session first appear
within an application workspace (AWS). The AWS defines a rectangular region that
represents a virtual display in which SAS window are initially created. SAS attempts
to position the AWS in relation to the upper-left corner of your display. In other words,
the workspace gravitates toward a certain direction (session gravity) on the display.
Some window manager configurations might override the placement that SAS has
chosen for a window.
If you issue windowing commands or execute SAS procedures that create new SAS
windows, the same rules of initial position and size apply to these windows: they are
initially placed in the SAS AWS. You can use the WSAVE command to save the current
window positions (or geometry). For details, see “Customizing Session Workspace,
Session Gravity, and Window Sizes under OpenVMS” on page 117.
58
Window Types
4
Chapter 3
Window Types
Top-Level Windows
SAS uses primary and interior windows. Some SAS applications consist of one or
more primary windows controlled by the X window manager in addition to the interior
windows controlled by SAS. The SAS windowing environment primary windows, as well
as most SAS application windows, initially appear as top-level windows. Top-level
windows interact directly with the X window manager. They have a full title bar along
with other window manager decorations. You can manipulate them individually once
they appear on the display.
Interior Windows
Interior windows behave differently than primary windows. SAS/ASSIST software is
an example of an application with interior windows. Interior windows are contained
within container windows, which may or may not be primary windows. The following
display shows an interior window in SAS/ASSIST software.
Display 3.1 Sample Interior Window
SAS provides some degree of window management for interior windows. Specifically,
interior windows have the following sizing and movement capabilities:
3 You can move interior windows by clicking the left mouse button on the interior
window title bar and dragging the window to the desired location. If the
destination of the interior window is outside the bounds of the container window,
the container window changes according to the value of the SAS.awsResizePolicy
resource. (The space within the container window is the application workspace,
which is described in “Workspace and Gravity in a SAS Session” on page 57.) For
more information, see “Overview of X Resources” on page 79.
3 Interior windows cannot be iconified individually. Clicking on the container
window icon button iconifies the container window and its interior windows.
3 A push-to-back button (the small overlapping squares in the upper-right corner) is
also available with interior windows. However, you cannot push an active window
behind an inactive window.
Working in the SAS Windowing Environment
4
Features of the SAS Session Manager
59
The SAS Session Manager under OpenVMS
What Is the SAS Session Manager?
The SAS Session Manager (xsassm) is an X client that is run by SAS when you use
the SAS windowing environment. The session manager window is automatically
minimized (iconified). You can restore it by using the window menu.
The session manager window describes which SAS session it controls, the originating
host machine from which the SAS session was invoked, and the hexadecimal VMS
process identifier of the SAS session.
Note: The SAS Session Manager is not available from a captive account. If you need
to run SAS in the windowing environment and want to disable the SAS Session
Manager, see “Disabling the SAS Session Manager” on page 60. For more information
about captive accounts, see “Limitations of Using a Captive Account” on page 47. 4
Features of the SAS Session Manager
The SAS session manager enables you to
3 map and make icons of all windows of the SAS session. The Restore and Minimize
buttons restore and minimize all of the windows that are open in the SAS session
that is controlled by that session manager. These functions are performed with
standard X library calls and will work with most X window managers.
3 interrupt the SAS session. The Interrupt button sends a signal to SAS. When
SAS receives the signal, it displays a dialog box that asks for confirmation before
it cancels the submitted statements.
3 terminate the SAS session. Terminate displays a dialog box that asks you to
confirm that you want to terminate the SAS session. If you select OK , the session
manager sends a signal to the SAS session that forces the session to terminate.
CAUTION:
Terminating your SAS session might result in data loss or data corruption. Before
terminating your session, you should attempt to end SAS using one of the
methods described in “Ending Your SAS Session” on page 53.
4
3 use your host editor from within your SAS session. When you issue the
HOSTEDIT command, SAS passes the request to the session manager, which then
invokes your host editor; the session manager must be running in order for the
HOSTEDIT command to take effect. When you issue the HOSTEDIT command,
SAS creates a temporary file that contains the data from the active SAS window
60
Disabling the SAS Session Manager
4
Chapter 3
and passes this file to your host editor. (These temporary files are stored in the
directory specified by the SASWORK option.) When you save your file in the host
editor, the file is copied back into the SAS window if the window is writable, and
the temporary files are deleted when the SAS session ends. See “HOSTEDIT
Command” on page 262 for more information.
Disabling the SAS Session Manager
In some instances (for example, if you are running SAS from a captive account), you
might want to disable the SAS Session Manager. You can disable the SAS Session
Manager by performing one of the following steps:
3 Select
Tools
I
Options
I
Preferences
On the General tab, deselect the Start Session manager check box.
3 Specify the following X resource on the SAS command line at invocation:
$ SAS/XRES=’’-XRM=(SAS.startSessionManager: False)’’
Specifying the SAS.startSessionManager X resource will deselect the Start
Session manager check box in the Preferences dialog box. Specifying this resource
in your SAS$XDEFAULTS.DAT file will not disable the SAS Session Manager
because the options specified in the Preferences dialog box take precedence.
Note: SAS saves the settings in the Preferences dialog box when it exits. If you
have disabled the SAS Session Manager during your session, then the next time you
invoke SAS, the SAS Session Manager will not run. To start the SAS Session Manager,
select the Start Session manager check box in the Preferences dialog box or specify
the following on the SAS command line at invocation:
$ SAS/XRES=’’-XRM=(SAS.startSessionManager: True)’’
4
Displaying Function Key Definitions under OpenVMS
Benefits of Assigning Function Key Definitions
Function keys provide quick access to commands. They enable you to issue
commands, insert text strings, and insert commands in programs. Function key
definitions can be different on different terminals. These definitions are fully
customizable.
Techniques for Displaying Function Key Definitions
You can open the KEYS (DMKEYS) window to display all of your function key
definitions. To open this window, select
Tools
I
Options
I
Keys
Working in the SAS Windowing Environment
4
Introduction to the SAS ToolBox
61
Display 3.2 KEYS (DMKEYS) Window
To view a single key definition without bringing up the KEYS window, use the
KEYDEF command and specify the key definition that you want to view. For example,
the following command displays the definition for key F4:
keydef f4
For information about customizing key definitions, see “Customizing Key Definitions
under OpenVMS” on page 94. For more information about the KEYS window and the
KEYDEF command, see SAS Help and Documentation.
The SAS ToolBox under OpenVMS
Introduction to the SAS ToolBox
The SAS ToolBox has two parts as illustrated in the following display:
3 A command window that enables you to quickly enter any command in the active
SAS window. For information about commands that are available under
OpenVMS, see Chapter 12, “Commands under OpenVMS,” on page 249 and the
SAS commands section in the Base SAS Software section in SAS Help and
Documentation.
3 A toolbar that contains several tool icons. When you select a tool icon, SAS
immediately executes the command that is associated with that icon. The toolbar
and the tool icons are completely customizable. For more information, see “Using
the Tool Editor” on page 89.
Display 3.3 SAS ToolBox
62
Default Configuration for the Command Window and Toolbar
4
Chapter 3
The name of the active window is displayed in the title bar of the SAS ToolBox. For
example, if the Log window were active, the title bar would say SAS ToolBox: Log
instead of SAS ToolBox: Program Editor.
Under OpenVMS, a default SAS ToolBox automatically appears at the bottom of the
SAS windows. To control its configuration, you use the Preferences dialog box. (See
“Modifying the SAS ToolBox Settings” on page 86.)
Customizing the Default Toolbox
By default, SAS loads a standard toolbox definition when you are running the SAS
windowing environment. This toolbox contains some commands that are common to the
windowing environment, such as New, Save, and Print. You can customize this toolbox
using the TOOLEDIT command. Save the customized toolbox in
SASUSER.PROFILE.DMS.TOOLBOX. The next time that you invoke SAS this
customized toolbox will display.
If you invoke an application that does not have an associated PMENU entry, the
SASUSER.PROFILE.DMS.TOOLBOX is displayed. Any tools that are not valid for a
window will be dimmed. You can customize the toolbox for the application by using one
of the following methods:
3 You can modify the displayed toolbox and save the changes in
SASUSER.PROFILE.DEFAULT.TOOLBOX. SAS will load this customized toolbox
for all windows that do not have an associated PMENU entry. Since this is a
customized toolbox, SAS will not dim any tools that are not valid for a window.
3 You can create application-specific toolboxes (such as with SAS/AF applications)
that are automatically loaded when the application is loaded. Save the customized
toolbox in SASUSER.PROFILE.APP.TOOLBOX, where APP is the same entry
name as the PMENU entry for the window or application.
Only one toolbox is displayed at a time, and the tools in the toolbox change as you
move between applications. For more information about customizing your toolboxes, see
“Techniques for Customizing Toolboxes and Toolsets” on page 88.
Default Configuration for the Command Window and Toolbar
By default, the toolbar and the command window are joined and are automatically
displayed when SAS initializes unless
3 you executed your SAS job in a nonwindowing environment mode.
3 the SAS.defaultToolBox resource or SAS.defaultCommandWindow resource is set
to False. The default is True. For more information about the X resources that
control the ToolBox, see “X Resources that Control Toolbox Behavior” on page 88.
3 you deselect Display tools window, Display command window, or Combine
windows from the ToolBox tab in the Preferences dialog box.
The following display shows the command window and the toolbar in their default
configuration.
Display 3.4 Default Configuration for Command Window and Toolbar
Working in the SAS Windowing Environment
4
Opening and Closing the Command Window and Toolbar
Opening and Closing the Command Window and Toolbar
The following table lists the steps you can use to open and close the command
window and toolbar.
Table 3.1 Steps for Opening and Closing the Command Window and Toolbar
Window
How to Open
How to Close
Command Window
and Toolbar
To open both of the windows,
complete any of the following steps:
To close both windows, use one of the
following steps:
3
3
Issue the COMMAND
WINDOW command.
Double-click the window menu
button for the combined
command window and toolbar.
3
Select Close from the ToolBox
window menu.
3
Enter the TOOLCLOSE
command, as described in
“TOOLCLOSE Command” on
page 264.
3
Select
Select
Tools
I
3
3
I
Options
Toolbox
Issue the TOOLLOAD
command. For more
information, see “TOOLLOAD
Command” on page 265.
Tools
I
I
Options
ToolBox
so that ToolBox is deselected.
Command Window
To open only the command window:
To close only the command window:
1 Deselect Combine windows
1 Deselect Display command
from the ToolBox tab in the
Preferences dialog box.
window in the Preferences
dialog box.
2 Complete one of the following
2 Complete one of the following
steps:
steps:
3
Select Display
3
Select Close from the
window menu.
3
Double-click the window
menu button.
command window in
the Preferences dialog
box.
3
Issue the COMMAND
WINDOW command.
63
64
Opening and Closing the Command Window and Toolbar
4
Chapter 3
Window
How to Open
How to Close
Toolbar
To open only the toolbar:
To close the toolbar:
1 Deselect Combine windows
1 Deselect Combine windows
from the ToolBox tab in the
Preferences dialog box.
from the ToolBox tab in the
Preferences dialog box.
2 Complete one of the following
2 Complete one of the following
steps:
3
3
steps:
Select Display tools
window in the
Preferences dialog box.
3
Select
3
Issue the TOOLCLOSE
command, as described in
“TOOLCLOSE
Command” on page 264.
3
Select
Tools
I
3
I
Preferences dialog box.
Options
ToolBox
Issue the TOOLLOAD
command, as described in
“TOOLLOAD Command”
on page 265.
Deselect Display
tools window in the
Tools
I
I
Options
ToolBox
so that ToolBox is
deselected.
Working in the SAS Windowing Environment
4
Opening the Open Dialog Box
How to Execute Commands
You can execute commands from either the command window or the toolbar. The
following table provides more details about how to execute commands.
Table 3.2 Executing Commands in the Command Window and the Toolbar
Window
Executing a Command
Command Window
To issue a command,
1 Click in the command window.
2 Type in the command.
3 Press ENTER or click the check mark.
The command is submitted in the active SAS window.
You can use the up and down arrows to scroll through previously entered
commands, or you can select a previous command from the drop-down list.
Use the middle mouse button (MB2) to select and execute a command
from the list. If you use the left mouse button (MB1), the command is
selected, but you must then press ENTER or click on the check mark to
submit the command.
Toolbar
Clicking a tool icon in the toolbar executes the command or commands
associated with that icon.
If you place the cursor over an icon for the amount of time specified by the
SAS.toolBoxTipDelay resource, a pop-up window displays text that
describes the command for that icon.
Opening Files under OpenVMS
Opening the Open Dialog Box
The Open dialog box (see Display 3.5 on page 66) enables you to select a file to read
into the active window. To access this dialog box, complete one of the following steps:
3 Issue the DLGOPEN command in the command window.
3 Select
File
I
Open
in the active window.
65
66
Description of the Open Dialog Box Options
4
Chapter 3
Display 3.5 Open Dialog Box
The Open dialog box displays files and directories as a graphical hierarchy. You will
not see directories that you do not have read permission for. Double-click a directory
name to list the files it contains. Select the desired file.
You can display a list of possible file filters by selecting the down arrow next to the
File Type field. Click a file filter to select it.
Description of the Open Dialog Box Options
The following table describes the options found on the Open dialog box.
Table 3.3 Options in the Open Dialog Box
Option
Description
Enter directory,
filename, or filter
is where you can type in the name of the directory, file, or file
filter (file type) that you want to open.
To display a list of all the files in a directory, enter the asterisk
(*) wild card in the Filter field or select All Files;* from the
list of file types.
The directory listed under the Filter field is the currently
selected directory. You can change this directory either by
selecting a name from the Page of Directories list or by
typing the new name directly into the field.
Page of Directories
contains the names of the directories specified in the Filter and
Page fields.The Open dialog box displays nonreadable directories
with a different icon.
Working in the SAS Windowing Environment
4
Changing Your Working Directory
Option
Description
Page
enables you to change the directories that are displayed in the
Page of Directories list. (A new page is defined when the
number of entries in the Page of Directories list exceeds
twice the screen height.) You can change the page by using the
right or left arrows next to the field or by entering a page number
directly within the field.
Files
contains the files in the selected directory that match the file
filter specified.
File type
enables you to select the type or types of files to be shown in the
Files list box. You can display a list of possible file filters by
selecting the down arrow next to the field. Click a file filter to
select it.
67
Note: Because of the use of concealed logicals, you will not be able to access the
SAS$ROOT:[000000] directory from the Open dialog box. 4
Click OK when you have finished making your selection. Click Cancel to close the
Open dialog box without selecting a new file.
Specifying the Initial Filter and Directory Using SAS Resources
You can specify the initial file filter in the File type field by assigning a value to
the SAS.pattern resource. However, the Open dialog box retains its file filter between
invocations, so the SAS.pattern resource applies only to the first invocation of the
Open dialog box. You can also use the SAS.directory resource to specify the directory
that you want when you first invoked the Open dialog box.
For more information about specifying SAS resources, see “Overview of X Resources”
on page 79.
Changing Your Current Working Directory under OpenVMS
What Is Your Working Directory?
The working directory is the operating system directory where you invoke SAS. By
default, SAS uses the current directory as the working directory when you begin your
SAS session.
Changing Your Working Directory
You can change the current working directory during your SAS session. You can use
the Change Working Directory dialog box to select a new directory, or you can use the X
command, the X statement, the CALL SYSTEM routine, or the %SYSEXEC macro
statement to issue the change directory (set default) command.
68
Searching for Character Strings under OpenVMS
4
Chapter 3
Change Working Directory Dialog Box
To open this dialog box, complete one of the following steps:
3 Issue the DLGCDIR command in the command window
3 Select
Tools
I
Options
I
Change Directory
in the active window.
Display 3.6 Change Working Directory Dialog Box
The Change Working Directory dialog box works exactly the same as the Open dialog
box, except that you can select only a directory (not a file) from the list. For an
explanation of the options on the Change Working Directory dialog box, see “Description
of the Open Dialog Box Options” on page 66.
Searching for Character Strings under OpenVMS
Introduction to the Find Dialog Box
The Find dialog box enables you to search for character strings in any active SAS
text editor windows such as the Program Editor, the SCL editor, or the Notepad.
Opening the Find Dialog Box
To search for a character string, open the Find dialog box, by completing one of the
following steps:
Working in the SAS Windowing Environment
4
Opening the Replace Dialog Box
69
3 Issue the DLGFIND command in the command window.
3 Select
Edit
I
Find
in the active window.
When the Find dialog box opens, the name of the active window follows the name of the
dialog box (for example, Find...:Program Editor).
Display 3.7 Find Dialog Box
Description of Options in the Find Dialog Box
The Find dialog box works like the Replace dialog box, except it does not have the
Replace field or the Replace and Replace All buttons.
For a description of the options on the Find Dialog Box, see “Description of Options
in the Replace Dialog Box” on page 70.
Replacing Character Strings under OpenVMS
Introduction to the Replace Dialog Box
The Replace dialog box enables you to search for and replace character strings in any
active SAS text editor windows such at the Program Editor, the SCL editor, or the
Notepad.
Opening the Replace Dialog Box
To replace one character string with another, open the Replace dialog box, by
completing one of the following steps:
3 Issue the DLGREPLACE command in the command window.
70
Description of Options in the Replace Dialog Box
3 Select
Edit
I
4
Chapter 3
Replace
in the active window.
When the Replace dialog box opens, the name of the active window follows the name of
the dialog box (for example, Replace...:Program Editor).
Display 3.8 Replace Dialog Box
Description of Options in the Replace Dialog Box
To find a character string, type the string in the Find field, and select Find . To
change a character string, type the string in the Find field, type its replacement in the
Replace field, and select Replace . To change every occurrence of the string to its
replacement string, select Replace All .
You can tailor your find or replace operation by using the following buttons:
Match Case
tells the search to match the uppercase and lowercase characters exactly as you
typed them.
Match Word
searches for the specified string delimited by spaces, end-of-line characters, or
end-of-file characters.
Previous
searches for the specified string from the current cursor position toward the
beginning of the file.
Next
searches for the specified string from the current cursor position toward the end of
the file.
Setting Up Printers under OpenVMS
You can define different printers to use within your interactive SAS session. To
define a printer, complete the following steps:
Working in the SAS Windowing Environment
4
What Is the Send Mail Dialog Box?
71
1 Select
File
I
Print Setup
2 Click New to create a new printer entry.
3 Specify a name and a description for the printer. Click Next .
4 Select the model of the printer. Click Next .
5 Select PRINTER as the Device Type. Leave Destination blank. In the Host
Options field, specify PASSALL=YES and QUEUE=vmsprinterqueuename, where
vmsprinterqueuename refers to the printer queue defined on your OpenVMS
system. For more information about the PASSALL and QUEUE options, see
“FILENAME Statement” on page 397.
Click Next .
6 Leave None as the Previewer. Click Next .
Note: Print Preview is unavailable in OpenVMS.
4
7 Click Finish to complete the printer setup.
The new printer will appear in the Print Setup window.
For more information about printing in SAS, see Universal Printing in SAS
Language Reference: Concepts.
Sending Mail from within Your SAS Session under OpenVMS
Default E-mail Protocol in SAS
By default, SAS uses SMTP (Simple Mail Transfer Protocol) to send e-mail from
within your SAS session. For information about how to change to the VMS e-mail
facility, see “EMAILSYS= System Option” on page 458.
For more information about the SMTP e-mail interface, see SAS Language Reference:
Concepts.
What Is the Send Mail Dialog Box?
The Send Mail dialog box enables you to send e-mail without leaving your current
SAS session.
Sending E-Mail Using the Send Mail Dialog Box
To open the Send Mail dialog box, select
File
I
Send Mail
72
Sending the Contents of a Text Window
4
Chapter 3
Display 3.9 Send Mail Dialog Box
To send e-mail, complete the following steps as needed:
3 Enter the addresses of the e-mail recipients in the To, CC, and BCC fields. Separate
multiple addresses with either blanks or commas.
3 Edit the entry in the Subject field as needed.
3 Enter the name of the file that you want to send in the Attach field. Separate
multiple filenames with blanks. You can also use Browse to select a file.
3 Type your message in the message area or edit the contents grabbed from the
active SAS text window.
3 Click Send .
To cancel a message, click Cancel .
Note: The BCC and Attach fields are only valid with SMTP. The VMS e-mail facility
does not support them. If you use the VMS e-mail facility, then you cannot attach
images to your e-mails. For more information about attaching images, see “Sending the
Contents of a Non-Text Window” on page 73. 4
Sending the Contents of a Text Window
You can e-mail the contents of an active SAS text window (such as the Program Editor
or the Log) by using the Send Mail dialog box. To open the Send Mail dialog box, select
File
I
Send Mail
SAS automatically copies the contents in the active SAS window and includes the text
in the body of your e-mail. You can change or add to the e-mail message in the Send
Mail dialog box.
If you do not want to include the contents of the active SAS window in your message,
select
Working in the SAS Windowing Environment
Edit
I
4
Using the Menus under OpenVMS
73
Clear All
before opening the Send Mail dialog box.
Sending the Contents of a Non-Text Window
To send the contents of a non-text window (such as a graph generated by SAS/
GRAPH or an image from your PROC REPORT output), select
File
I
Send Mail
from the active SAS window.
SAS automatically copies the image data to a temporary file and enters that filename
in the Attach field of the Send Mail dialog box. To change the default file type for this
temporary file, see “Changing the Default File Type” on page 73.
SAS only copies the portion of the image that is visible in the active window, along
with the window frame and title. This behavior is similar to using the DLGSCRDUMP
command. For more information, see “DLGSCRDUMP Command” on page 258.
If you do not want to attach this image to your e-mail, clear the contents of the
Attach field.
Note: The VMS e-mail facility does not support attachments. You can only send
attachments when using SMTP. 4
Changing the Default File Type
You can change the default file type for the temporary file that SAS creates by using
the Preferences dialog box. To open the Preferences dialog box, select
Tools
I
Options
I
Preferences
On the DMS tab in the Image type for Email attachments box, select one of the
following image file types:
3 Portable Network Graphics (.png)
3 Graphics Interchange Format (.gif)
3 Tagged Image File Format (.tif).
Creating Icons for Windows under OpenVMS
Under OpenVMS, you can make icons only of top-level SAS windows and windowing
environment containers. You cannot create icons for groups of windows.
Using the Menus under OpenVMS
Under OpenVMS, the pull-down menu (PMENU) facility is turned on by default.
Also, some of the menus are customized, omitting items that are not applicable.
You can use the PMENU procedure under OpenVMS to create customized menus.
Some aspects of this procedure are specific to OpenVMS. For more information about
the PMENU procedure, see “PMENU Procedure” on page 384 and Base SAS Procedures
Guide.
74
Using the Mouse under OpenVMS
4
Chapter 3
Using the Mouse under OpenVMS
You can use the left mouse button (MB1) to make a mark, and the middle mouse
button (MB2) to paste the mark into a SAS window. Although the right mouse button
(MB3) is not used in cut-and-paste operations, various procedures use MB3 to display a
pop-up menu.
Note: These instructions are based on the default setting with MB1 being the
left-most mouse button. Your mouse buttons might have been reconfigured to meet
specific needs. 4
SAS Mouse Pointer Shapes
When you use the SAS windowing interface under OpenVMS, you see several mouse
pointer shapes. If the mouse pointer has its standard shape (usually an arrow), SAS is
ready to receive your input.
Besides the standard shape, two other mouse pointer shapes are common:
watch (or clock) cursor
indicates that you must wait. SAS is performing other tasks and is not ready to
accept your input.
dash inside a circle
indicates that the pointer is in an inactive window. User interaction with this
window is temporarily disabled.
SAS Interface to the TPU Editor
The TPU command (or its aliases, HOSTEDIT or HED) enables you to use the
OpenVMS Text Processing Utility (TPU) editor for editing instead of the default SAS
Text Editor. For additional details about the TPU command, see “TPU Command” on
page 266.
Using Special Character Attributes under OpenVMS
List of Character Attributes
SAS enables you to set the color and highlight attributes of text in some windows.
For example, in the Notepad window or in your SAS/AF or SAS/FSP applications, you
can turn on character underlining or reverse video to highlight a title. Character
attributes are listed in the following table.
Table 3.4 Selector Characters for Character Attributes
Selector Character
Function
0
Turns off all attributes.
1
Turns on bold.
2
Turns on underlining.
Working in the SAS Windowing Environment
Selector Character
4
Setting Your System for Help and Online Documentation
75
Function
3
Turns on reverse video.
4
Turns on blinking.
A
Sets color to gray.
B
Sets color to blue.
C
Sets color to cyan.
G
Sets color to green.
K
Sets color to black.
M
Sets color to magenta.
N
Sets color to brown.
O
Sets color to orange.
P
Sets color to pink.
R
Sets color to red.
W
Sets color to white.
Y
Sets color to yellow.
Selecting an Attribute
To select an attribute, complete the following steps:
1 Press and hold the Modifier 1 key on your keyboard (usually labeled “Meta,” “Alt,”
“Hyphen,” or “Extend char”).
2 Press the selector character (for example, 1).
Alternatively, you can use the COLOR command to combine several of these steps in
one command. For more information about the COLOR command, see “COLOR
Command” on page 251.
Getting Help under OpenVMS
In the SAS windowing environment, extensive online help is available. To open the
help, select
Help
I
SAS Help and Documentation
in the active window. Various topics, including an online version of this documentation,
are available from this point.
Note: The online help is unavailable if you are running SAS under a captive
account. SAS cannot start a Web browser in a detached process under a captive account.
For more information, see “Limitations of Using a Captive Account” on page 47. 4
Setting Your System for Help and Online Documentation
SAS Help and Documentation can be displayed only by using a Web browser. You
have to specify the browser and its location before you can use it.
76
Setting Your System for Help and Online Documentation
4
Chapter 3
To specify a Web browser and its location, complete the following steps:
1 Select
Tools
I
Options
I
Preferences
The Preferences dialog box opens.
2 Select the DMS tab.
3 In the Help and Documentation Browser field, specify the Netscape browser and
point to the location of its executable file.
77
CHAPTER
4
Customizing the SAS Windowing
Environment
Overview of Customizing SAS in X Environments 78
Overview of X Resources 79
Introduction to X Resources 79
Specifying X Resources 79
Methods for Customizing X Resources 79
Editing the X Resource File 80
Modifying X Resource Settings by Using the Preferences Dialog Box 80
What Is the Preferences Dialog Box? 80
Opening the Preferences Dialog Box 80
Description of Options on the Preferences Dialog Box 80
Modifying the General Settings 80
Modifying the DMS Settings 82
Modifying the Editing Settings 83
Modifying the Results Settings 85
Modifying the SAS ToolBox Settings 86
Customizing the SAS ToolBox under OpenVMS 88
Techniques for Customizing Toolboxes and Toolsets 88
What Is a Toolset? 88
X Resources that Control Toolbox Behavior 88
Using the Tool Editor 89
Opening the Tool Editor 89
Changing the Appearance of the Entire ToolBox 90
Changing an Existing Tool 90
Adding Tool Icons to the Toolbox 91
Changing the Order of the Icons in the Toolbox 92
Deleting Tool Icons from the Toolbox 92
Returning to the Default Settings 92
Saving Changes to the Toolbox or Toolset 92
Creating a New Toolbox 93
How to Load a Different Toolbox 93
Creating or Customizing an Application- or Window-Specific Toolbox 93
Creating or Customizing an Application- or Window-Specific Toolset 94
Customizing Key Definitions under OpenVMS 94
Introduction to Defining Keys 94
Methods for Customizing Key Definitions 94
Defining Key Translations 95
What Is a Key Translation? 95
What Is the SAS.keyboardTranslations Resource? 95
Steps for Creating a Key Definition 95
SAS Keyboard Action Names 96
Default Keyboard Actions 100
78
Overview of Customizing SAS in X Environments
4
Chapter 4
Extended-Attribute Key Resources 100
Customizing Fonts under OpenVMS 101
Difference between the System Font and Windowing Environment Fonts 101
How SAS Determines Which Windowing Environment Font to Use 102
Customizing the Font Using the Fonts Dialog Box 102
Introduction to Fonts Dialog Box 102
Opening the Fonts Dialog Box 102
How to Change the Windowing Environment Font 103
Specifying Font Resources 103
Specifying Font Aliases 105
Syntax for Specifying Font Aliases 105
Example: Substituting the Lucida Font for Palatino 106
Customizing Colors under OpenVMS 106
Default Color and Attribute Settings 106
Methods for Customizing the Color Settings in Your SAS Session 106
Customizing Colors Using the SASCOLOR Window 107
How to Open the SASCOLOR Window 107
Changing the Color of a Window Element 107
Defining Color Resources 107
What Are CPARMS Resources? 107
Categories of Color Resources 108
Specifying RGB Values or Color Names for Foreground and Background Resources
Defining Colors and Attributes for Window Elements (CPARMS) 109
Example: Defining CPARMS 112
Controlling Color Contrast 112
Controlling Menus under OpenVMS 112
Customizing Cut-and-Paste Operations under OpenVMS 113
Introduction to Marks and the Paste Buffer 113
Tasks That You Can Perform with Marked Text 113
Marking Text 113
Difference between Character and Block Marks 113
Marking Text Using the MARK Command 114
Marking Text Using the Mouse 114
Paste Buffers 115
What Are Paste Buffers? 115
Types of Paste Buffers 115
Manipulating Text Using Paste Buffers 116
Exchanging Information Using Paste Buffers 116
Customizing Session Workspace, Session Gravity, and Window Sizes under OpenVMS 117
Specifying User-Defined Icons under OpenVMS 119
Why Specify User-Defined Icons? 119
How SAS Locates a User-Defined Icon 119
X Resources for Specifying User-Defined Icons 119
Miscellaneous Resources under OpenVMS 120
Summary of X Resources for SAS under OpenVMS 122
108
Overview of Customizing SAS in X Environments
The SAS windowing environment supports the use of X-based graphical user
interfaces (GUIs). In OpenVMS Alpha, SAS provides an X Window System interface
that is based on the Motif style. For more information about SAS in the X environment,
see “Description of SAS in the X Environment” on page 56.
You can customize your working environment by using X resources.
Customizing the SAS Windowing Environment
4
Methods for Customizing X Resources
79
Overview of X Resources
Introduction to X Resources
X clients usually have characteristics that can be customized by the system
administrator or by the user; these properties are known as X resources. Since SAS
functions as an X windows client, many aspects of the appearance and behavior of the
SAS windowing environment are controlled by X resources. For example, X resources
can be used to define a font, a background color, or a window size. The resources for an
application, such as SAS, are placed in a resource database.
Specifying X Resources
A resource specification has the following format:
resource-string: value
The resource-string usually contains two identifiers and a separator. The first identifier
is the client or application name (SAS), the separator is a period (.) or asterisk (*)
character, and the second identifier is the name of the specific resource. The value given
might be a Boolean value (True or False), a number, or a character string, depending
on the resource type.
The application name and resource name can both specify an instance value or a
class value. A specification for a class applies to a larger scope than a single instance.
The following are sample resource specifications:
SAS.maxWindowHeight: 100
SAS.awsResizePolicy: grow
For more information about resource specifications, refer to your X Window System
documentation.
Methods for Customizing X Resources
SAS functions correctly without any modifications to the resource database.
However, you might want to change the default behavior or appearance of the interface.
There are several ways to specify your customizations. Some methods modify all SAS
sessions displayed on a particular X server. Some methods affect all SAS sessions run
on a particular host. Other methods affect only a single SAS session. You can use one
of the following methods to specify your customizations:
3 Edit the X resource file. (See “Editing the X Resource File” on page 80.)
3 Use the Preferences dialog box to modify X resource settings. (See “Modifying X
Resource Settings by Using the Preferences Dialog Box” on page 80.)
3 Submit the /XRES command line option. (See the system option “XRESOURCES=
System Option” on page 512.)
3 Submit one or more instances of the /XRM command line option.
If you need more information about X Window System clients and X resources, refer to
the documentation provided by your vendor.
80
Editing the X Resource File
4
Chapter 4
Editing the X Resource File
When you start a SAS session, the SAS interface to Motif calls the X Resource
Manager to create a resource database for that session. The interface then examines
the resource database for any user-defined X resource definitions.
SAS uses the X resource file specified by the SAS$XDEFAULTS logical name. If this
logical name is undefined, then SAS uses the SAS$XDEFAULTS.DAT file in your
SYS$LOGIN directory.
You can customize the SAS interface to Motif by creating or adding X resource
definitions to your SAS$XDEFAULTS file. (Changing the settings of the X resources in
your SAS$XDEFAULTS file will not affect other X Window System applications.) To see
the default X resource values for the SAS interface to Motif, see the
SAS$ROOT:[TOOLS]SAS$XDEFAULTS.DAT file. To change one of these default values,
add the changed X resource definition to your SAS$XDEFAULTS file.
Note: SAS does not use the SAS$ROOT:[TOOLS]SAS$XDEFAULTS.DAT file for X
resource definitions. This file is only an example of X resources that you can use. 4
Modifying X Resource Settings by Using the Preferences Dialog Box
What Is the Preferences Dialog Box?
The Preferences dialog box enables you to control the settings of certain X resources.
Changes made through the Preferences dialog box (with the exception of those
resources on the General tab) become effective immediately, and the settings are saved
in the SASUSERPREFS.DAT file in your SASUSER directory.
Opening the Preferences Dialog Box
You can open the Preferences dialog box by
3 issuing the DLGPREF command in the command window
3 selecting
Tools
I
Options
I
Preferences
Select the tabs at the top of the window to move between the various settings.
Description of Options on the Preferences Dialog Box
Modifying the General Settings
To modify the General settings, select the General tab in the Preferences dialog box.
The following display shows the default general settings.
Customizing the SAS Windowing Environment
4
Description of Options on the Preferences Dialog Box
81
Display 4.1 General Tab in the Preferences Dialog Box
The following is an explanation of the settings:
Start Session manager
specifies whether you want the session manager to be started automatically when
you start your SAS session. If you want to use your host editor in your SAS
session, the session manager must be running. The session manager enables you
to interrupt or terminate your SAS session and minimize and restore all of the
windows in a SAS session. This check box sets the SAS.startSessionManager
resource.
Startup Logo
specifies whether you want SAS to display an XPM file while your SAS session is
being initialized and, if so, which file.
If you select Use Default Logo, SAS uses the default file for your site. If you
select No Logo, then no file is displayed. If you select Use Custom Logo, you can
click Select to open the Startup Logo dialog box. These check boxes set the
SAS.startupLogo resource.
Use application workspace
confines all windows displayed by an application to a single application workspace.
This check box sets the SAS.noAWS resource. You must exit and reopen the
windows for changes to this resource to take effect.
AWS Resize Policy
controls the policy for resizing the application workspace windows as interior
windows are added and removed. (For more information, see “Description of SAS
in the X Environment” on page 56 and “Window Types” on page 58.)
82
Description of Options on the Preferences Dialog Box
4
Chapter 4
Grow
The application workspace window will attempt to grow any time an interior
window is grown or moved (to make all of its interior windows visible), but it
will not shrink to remove unused areas.
Fixed
The application workspace window will attempt to size itself to the size of the
first interior window and will not attempt any further size changes.
This area sets the SAS.awsResizePolicy resource.
After you have changed the settings, click OK to implement your choices or click
Cancel to cancel your choices. Click Defaults to return to the default settings. Click
Help for help about the Preferences dialog box.
Modifying the DMS Settings
To modify these settings, select the DMS tab in the Preferences dialog box. The
following display shows the default settings.
Display 4.2 DMS Tab in the Preferences Dialog Box
The following is an explanation of the settings:
Use menu access keys
activates menu mnemonics. When mnemonics are turned on, you can select menu
items by typing the single, underlined letter in the item. This check box sets the
SAS.usePmenuMnemonics resource.
Customizing the SAS Windowing Environment
4
Description of Options on the Preferences Dialog Box
83
Confirm exit
displays the Exit dialog box when you exit your SAS session. This check box sets
the SAS.confirmSASExit resource.
Save Settings on Exit
tells SAS to issue the WSAVE ALL command when you exit your SAS session.
This command saves the global settings, such as window color and window
position, that are in effect for all windows that are currently open. This check box
sets the SAS.wsaveAllExit resource.
Backup Documents
enables you to specify whether you want SAS to automatically save (at the
interval specified by the SAS.autoSaveInterval resource) the documents that
you currently have open. This check box sets the SAS.autoSaveOn resource.
Help & Documentation Browser -- Netscape Path
specifies the location of the Web browser executable that you want to use to view
the SAS Help and Documentation. This field sets the SAS.helpBrowser resource.
Image type for Email attachments
specifies the default file type for the temporary file that SAS creates when sending
the contents of a non-text window via e-mail. Examples of non-text windows
include a graph generated by SAS/GRAPH or an image from your PROC REPORT
output. For more information, see “Sending the Contents of a Non-Text Window”
on page 73.
Note: The VMS e-mail facility does not support attachments. You can only
send attachments when you are using SMTP. 4
After you have changed the settings, click OK to implement your choices or click
Cancel to cancel your choices. Click Defaults to return to the default settings. Click
Help for help about the Preferences dialog box.
Modifying the Editing Settings
To modify the Editing settings, select the Editing tab in the Preferences dialog box.
The following display shows the default editing settings.
84
Description of Options on the Preferences Dialog Box
4
Chapter 4
Display 4.3 Editing Tab in the Preferences Dialog Box
The following is an explanation of the settings:
Default paste buffer
defines an alias for the default SAS buffer. The following list describes the paste
buffer alias names and the X buffer with which each name is associated:
XPRIMARY
is the X primary selection (PRIMARY). This is the default.
XTERM
is the exchange protocol used by the xterm client.
XSCNDARY
is the X secondary selection (SECONDARY).
XCLIPBRD
is the X clipboard (CLIPBOARD).
XCUTn
is the X cut buffer where n is between 0 and 7, inclusive.
This field sets the SAS.defaultPasteBuffer resource. For more information
about paste buffers, see “Customizing Cut-and-Paste Operations under OpenVMS”
on page 113.
Automatically store selection
generates a STORE command every time that you mark a region of text with the
mouse. This check box sets the SAS.markPasteBuffer resource.
Customizing the SAS Windowing Environment
4
Description of Options on the Preferences Dialog Box
85
Cursor
controls the editing mode in SAS text editor windows. The Insert and Overtype
check boxes set the SAS.insertModeOn resource to True and False, respectively.
After you have changed the settings, click OK to implement your choices or click
Cancel to cancel your choices. Click Defaults to return to the default settings. Click
Help for help about the Preferences dialog box.
Modifying the Results Settings
The items on the Results tab control the format of the results that you produce. To
modify these settings, select the Results tab in the Preferences dialog box.
Display 4.4 Results Tab in the Preferences Dialog Box
The following is an explanation of the settings:
Create Listing
specifies that your output is in text format. You can select both Listing and HTML
format.
Create HTML
specifies that your output is in HTML format. You can select both Listing and
HTML format.
Style
specifies the HTML style to use when generating output in HTML format.
86
Description of Options on the Preferences Dialog Box
4
Chapter 4
Folder
specifies the folder in which to store your HTML results. Click Select to choose a
folder. Select Use WORK Folder to designate your SASWORK folder as the
repository for your HTML results.
View results as they are generated
specifies that HTML output is automatically displayed when it is generated. This
value cannot be selected if you have selected Password protect HTML file
browsing.
Password protect HTML file browsing
requires a password when sending HTML files to a browser. This value cannot be
selected if you have selected View results as they are generated.
After you have changed the settings, click OK to implement your choices or click
Cancel to cancel your choices. Click Defaults to return to the default settings. Click
Help for help about the Preferences dialog box.
Modifying the SAS ToolBox Settings
The items on the ToolBox tab affect both the toolbox and the command window. To
modify these settings, select the ToolBox tab in the Preferences dialog box. The
following display shows the default SAS ToolBox settings.
Display 4.5 ToolBox Tab in the Preferences Dialog Box
Customizing the SAS Windowing Environment
4
Description of Options on the Preferences Dialog Box
87
The following is an explanation of the settings:
Display tools window
determines whether to display the default toolbox. This check box sets the
SAS.defaultToolBox resource.
Display command window
determines whether to display the command window. This check box sets the
SAS.defaultCommandWindow resource.
Auto Complete Commands
specifies that commands will be automatically completed as you type the first
letters of the command. This check box sets the SAS.autoComplete resource.
Save Commands
specifies the number of commands to be saved. You can change the number by
clicking on the up or down arrow next to the number of commands. The default is
25. This field sets the SAS.commandsSaved resource.
Combine windows
combines the toolbar and command window into one window. The toolbar and
command window are combined by default. This check box sets the
SAS.useCommandToolBoxCombo resource.
Use arrow decorations
adds left and right arrows to either end of the combined toolbox/command window.
This check box sets the SAS.useShowHideDecorations resource.
Always on top
keeps the toolbox or the combined toolbar/command window on top of the window
stack. This check box is selected by default, which could cause problems with
window managers that are not Motif window managers or other applications that
want to be on top of the window stack. If you have such a situation, turn off this
feature. This check box sets the SAS.toolBoxAlwaysOnTop resource.
Toolbox Persistent
specifies whether the toolbox that is associated with the Program Editor window
stays open when you close the window. By default, the Program Editor toolbox
stays open whenever you close the Program Editor window. If you deselect this
check box, then the toolbox will close if you close the Program Editor window. This
check box sets the SAS.isToolBoxPersistent resource.
Tools
The items in the Tools area affect the individual tools in the toolbox:
Use large tools
controls whether tool icons are displayed as 24x24 or 48x48 pixels. The
default is 24x24. This check box sets the SAS.useLargeToolBox resource.
Use tip text
specifies whether tool tip text is displayed when you position your cursor over
a tool in the toolbox. Some window managers may place the toolbox tip
behind the toolbox. If this happens in your environment, deselect this check
box. This check box sets the SAS.useToolBoxTips resource.
delay
controls the delay in milliseconds before popping up the toolbox tip. This field
sets the SAS.toolBoxTipDelay resource. You can enter a value directly into
the field or use the arrows to the right of the field to change the value.
After you have changed the settings, click OK to implement your choices or click
Cancel to cancel your choices. Click Defaults to return to the default settings. Click
Help for help about the Preferences dialog box.
88
Customizing the SAS ToolBox under OpenVMS
4
Chapter 4
Customizing the SAS ToolBox under OpenVMS
Techniques for Customizing Toolboxes and Toolsets
You can customize toolboxes in the following ways:
3 through the Preferences dialog box. The Preferences dialog box enables you to
customize the appearance and behavior of toolboxes. For information about using
the Preferences dialog box, see “Modifying X Resource Settings by Using the
Preferences Dialog Box” on page 80 and “X Resources that Control Toolbox
Behavior” on page 88.
3 by specifying X resources in your resource file. For more information about X
resources that affect toolboxes, see “X Resources that Control Toolbox Behavior” on
page 88.
3 through the Tool Editor dialog box. The Tool Editor enables you to customize the
individual tools in a toolbox. For more information, see “Using the Tool Editor” on
page 89.
What Is a Toolset?
The Tool Editor also enables you to create custom toolsets for your SAS applications.
A toolset is a set of predefined tools that is associated with an application. Toolsets
make it easier for individual users to customize their application toolboxes. If you
create a toolset for an application, users can simply choose the tools they want to
appear in their toolboxes and do not have to define the icons, commands, tip text, and
IDs for those tools.
For example, you can define a default toolbox for your application that includes tools
for opening files, cutting, copying, and pasting text, and saving files. You can define a
toolset that includes those tools and tools for opening the Preferences dialog box,
opening the Replace dialog box, and entering the RECALL command. These additional
tools will not appear in the users’ toolbox unless a user adds them to their toolbox with
the Tool Editor.
You can view the TOOLSET contents by opening the Tool Editor dialog box and
clicking on Actions , provided that the TOOLSET name has the same name as the
TOOLBOX you are editing. For more information, see “Changing an Existing Tool” on
page 90 and “Creating or Customizing an Application- or Window-Specific Toolset” on
page 94.
X Resources that Control Toolbox Behavior
You can control the behavior of toolboxes with the following resources:
SAS.autoComplete:
[True | False]
specifies whether SAS automatically fills in the remaining letters of a command
that begins with the same letter as a command that you have entered previously
as you type it in the command window. The default value is True.
SAS.commandsSaved :
close up | n
specifies whether SAS saves the commands that you enter in the command
window and how many commands are saved. You can specify a number from 0 to
50. If you specify 0, no commands will be saved. If you specify 1 or more, that
Customizing the SAS Windowing Environment
4
Using the Tool Editor
89
number of commands is saved in the file commands.hist in your Sasuser
directory. If you specify 1 or more for this resource and SAS.autoComplete is
True, then SAS will be able to automatically fill in commands that were entered in
previous sessions. The default value is 25.
SAS.defaultToolBox:
[True | False]
controls opening the default toolbox when SAS is invoked. The default is True.
SAS.isToolBoxPersistent:
[True | False]
controls whether the toolbox stays open when you close the Program Editor
window. The default value is True, which means that the toolbox remains open
whenever you close the Program Editor window.
SAS.toolBoxAlwaysOnTop:
[True | False]
controls whether the toolbox is always on top of the window stack. The default
value is True, which might cause problems with window managers that are not
Motif window managers or other applications that want to be on top of the window
stack. If you have such a situation, set this resource to False.
SAS.toolBoxTipDelay:
delay-in-milliseconds
sets the delay in milliseconds before displaying the toolbox tip. The default is 750.
SAS.useCommandToolBoxCombo:
[True | False]
controls whether the command window and toolbox are joined or separated. The
SAS.defaultToolBox and SAS.defaultCommandWindow resources control whether
the toolbox and command window are displayed. If both are displayed, this
resource controls whether they are joined or separated. The default is True.
SAS.useLargeToolBox:
[True | False]
controls whether tool icons in the toolbox are displayed as 48x48 pixels or 24x24
pixels. The default is False (24x24 pixels).
SAS.useShowHideDecorations:
[True | False]
controls whether the combined command/toolbox window has arrows at the left
and right. You can use these arrows to hide or show portions of the window as
they are needed. The default is False.
SAS.useToolBoxTips:
[True | False]
determines if toolbox tip text is displayed. Some window managers, such as tvtwm,
might place the toolbox tip behind the toolbox. If this happens in your
environment, set this resource to False. The default is True.
Using the Tool Editor
Opening the Tool Editor
The Tool Editor dialog box enables you to modify the contents and appearance of
your toolboxes, as shown in the following display. To invoke the Tool Editor dialog box,
do one of the following:
3 Select
Tools
I
Options
I
Edit Toolbox
in the active window.
3 Issue the TOOLEDIT command in the command window. For more information,
see “TOOLEDIT Command” on page 264.
90
Using the Tool Editor
4
Chapter 4
Display 4.6 Tool Editor Dialog Box
By default, the Tool Editor dialog box edits the current toolbox. To edit a different
toolbox, invoke the Tool Editor dialog box and click Open . Then specify the libref,
catalog, and entry name for the toolbox that you want to edit. Click OK .
After you invoke the Tool Editor dialog box, the toolbox goes into “preview mode.” In
preview mode, clicking a tool icon makes that icon the current icon and displays its
associated commands in the Command field. The current icon always appears selected.
Changing the Appearance of the Entire ToolBox
The items in the ToolBox area of the Tool Editor dialog box affect the entire toolbox:
Name
displays the catalog entry that you are editing. The default toolbox for the SAS
windowing environment is named SASUSER.PROFILE.DMS.TOOLBOX.
Max tools per row
specifies how the icons in the toolbox are arranged. The default size creates a
horizontal toolbox. One tool per row creates a vertical toolbox.
Changing an Existing Tool
When you open the Tool Editor dialog box, the first icon in the toolbox is the current
icon (the icon appears selected), and its information appears in the Button area of the
dialog box. To change an existing tool, you can select a tool from the toolset displayed
by clicking Actions or you can modify the fields individually.
Note: Clicking Actions displays a toolset only if a toolset is associated with (has the
same entry name as) the toolbox that you are editing. For more information, see
“Saving Changes to the Toolbox or Toolset” on page 92. 4
To use Actions , select the tool that you want to change, and then select Actions . The
Tool Editor displays the toolset associated with the toolbox. If you select a tool from this
toolset, the Tool Editor enters the appropriate information into the button fields for you.
Customizing the SAS Windowing Environment
4
Using the Tool Editor
91
To modify the fields individually, perform the following steps:
1 Select the icon you want to change.
2 Click and change the Button area fields as appropriate:
Command
specifies the SAS windowing environment command or commands that you
want executed when you select the icon. You can use any SAS command that
is available under OpenVMS. For information about commands, see Chapter
12, “Commands under OpenVMS,” on page 249 and the SAS commands
section in the Base SAS section in SAS Help and Documentation. For
example, you could create an icon to open the Change Directory dialog box by
using the DLGCDIR command, which is described in “DLGCDIR Command”
on page 253.
Separate commands with a semicolon (;).
Help Text
is used for applications that are designed to be run under Microsoft Windows.
The help text is displayed in the SAS windowing environment status line on
Windows when a toolbox is ported to and loaded on those operating
environments.
Tip Text
specifies the text that is displayed when you position the cursor over the icon.
Id
is useful if you are creating toolboxes for SAS/AF applications. The ID is the
identifier of the corresponding menu item in the application. This number is
the value assigned to the item in the ID option of the ITEM statement in
PROC PMENU. If you specify an ID, then the application can set the state of
the PMENU item to match the state of the tool in the toolbox, and it can
make the PMENU item active or inactive to match whether the PMENU item
is active or inactive. If you do not specify an ID, the ID defaults to 0.
3 Change the icon if necessary:
a Click Icon or double-click an icon in the preview toolbox. The Select a
Pixmap dialog box opens, which displays the icons provided with SAS. These
icons are divided into several categories such as SAS windows; data; analysis;
numbers and symbols; files, folders, and reports; and so on. To change
categories, click the arrow to the right of the Icon Category field and select
a new category.
b Select the icon you want to use and then click OK .
c Save your changes as described in “Saving Changes to the Toolbox or Toolset”
on page 92.
Adding Tool Icons to the Toolbox
To add an icon to the toolbox, perform the following steps:
1 Select the icon that is adjacent to where you want to add the new tool icon.
2 Click Add before or Add after , whichever is appropriate. The Toolbox Editor adds
a new icon (labeled SAS) to the toolbox and clears the Button area fields.
3 Enter the appropriate information in the Button area fields. These fields are
described in “Changing an Existing Tool” on page 90.
4 Change the icon, if desired, as described in “Changing an Existing Tool” on page 90.
5 Save your changes as described in “Saving Changes to the Toolbox or Toolset” on
page 92.
92
Using the Tool Editor
4
Chapter 4
Changing the Order of the Icons in the Toolbox
To change the position of a tool in the toolbox, select the icon, and then click the left
or right arrows in the Button area to move the icon.
Deleting Tool Icons from the Toolbox
To delete a tool icon from the toolbox:
1 Select the icon that you want to delete.
2 Click Delete in the Button area.
3 Save your changes, as described in “Saving Changes to the Toolbox or Toolset” on
page 92.
Returning to the Default Settings
To return all tools in the current toolbox to their default settings, click Defaults at
the bottom of the Tool Editor dialog box. When you make this selection, any
customizations that you have made are lost. It also deletes any icons that you have
added to the toolbox. The Tool Editor dialog box asks you to verify your request. Click
Yes to restore the default settings, No to keep your customizations, or Cancel to do
neither.
Saving Changes to the Toolbox or Toolset
You can save the changes to the catalog entry that is displayed in the Name field of
the Tool Editor dialog box, or you can create a new toolbox with a different name.
Note: If you are customizing a window-specific or application-specific toolbox for
your personal use, save the customized toolbox in your SASUSER.PROFILE catalog by
using the same entry name as the PMENU entry for the window or application. SAS
searches for toolboxes first in the SASUSER.PROFILE catalog and then in the
application catalog. 4
Click Save or Save as to perform the following tasks:
Save
saves the toolbox information to the catalog entry shown in the Name field.
Save as
causes the Tool Editor dialog box to prompt you to enter a different libref, catalog,
and entry name. The entry type for a toolbox is always TOOLBOX.
You can also choose to save the toolbox as a toolset. If you save the toolbox as a
toolset, the entry type will be TOOLSET; otherwise, the entry type is always
TOOLBOX. Saving a set of tools as a TOOLSET does not change your TOOLBOX
entry. For more information about toolsets, see “Techniques for Customizing
Toolboxes and Toolsets” on page 88 and “Creating or Customizing an Applicationor Window-Specific Toolset” on page 94.
If you click Close or Open without first saving your changes, the Tool Editor dialog
box prompts you to save the changes to the current toolbox before continuing. Click Yes
to save your changes; click No to ignore any changes you made; or click Cancel to do
neither.
After you save the toolbox or toolset, the Tool Editor remains open for additional
editing, and the Name field changes to the name of the new entry (if you entered a new
name).
Note: To SAS/AF application developers or site administrators: If you are editing a
window-specific or application-specific toolbox that you want to be accessible to all users,
Customizing the SAS Windowing Environment
4
Creating or Customizing an Application- or Window-Specific Toolbox
93
you must save the TOOLBOX entry with the same library, catalog, and entry name as
the PMENU entry for the window or application. You need WRITE access to the
appropriate location. For example, to store a customized toolbox for the graphics editor,
the site administrator would store the toolbox in SASHELP.GI.GEDIT.TOOLBOX. 4
Creating a New Toolbox
To create a new toolbox, complete the following steps:
1 Perform one of the following:
3 Edit an existing toolbox by invoking the Tool Editor dialog box (select
I
Tools
Options
I
Edit Toolbox
in the active window) and making your changes. Then save the edited
toolbox, as described in “Saving Changes to the Toolbox or Toolset” on page 92.
3 Copy an existing TOOLBOX entry. You can copy a toolbox by opening the
CATALOG window, specifying the appropriate catalog, and then entering the
COPYITEM command. For example, to copy the default toolbox, enter the
following commands in the command window:
catalog sasuser.profile
copyitem sasuser.profile.dms.toolbox
sasuser.profile.newtools.toolbox
2 Edit the new toolbox by using the Tool Editor dialog box (select
Tools
I
Options
I
Edit Toolbox
in the active window).
3 Click Open .
4 Specify the libref, catalog, and entry name of the new toolbox.
5 Click OK to create the new toolbox.
How to Load a Different Toolbox
To load a toolbox, issue the TOOLLOAD command in the command window:
TOOLLOAD <libref.catalog.entry>
Creating or Customizing an Application- or Window-Specific Toolbox
If you are an application developer and want to create or edit an application
TOOLBOX, follow these steps:
1 Delete any existing TOOLBOX entry in your SASUSER.PROFILE catalog for the
window or application that you want to customize. When you delete the copy of the
toolbox in your SASUSER.PROFILE catalog, you automatically receive a copy of
the toolbox that is supplied with SAS when you invoke the Tool Editor dialog box.
2 Create or edit the application toolbox, as described in “Creating a New Toolbox” on
page 93 or “Using the Tool Editor” on page 89.
3 Save the edited toolbox, as described in “Saving Changes to the Toolbox or Toolset”
on page 92.
94
Creating or Customizing an Application- or Window-Specific Toolset
4
Chapter 4
4 Inform your users that you have changed the window or application toolbox. If
they want to use the new toolbox, they must delete the corresponding TOOLBOX
entry from their SASUSER.PROFILE catalog. The new toolbox will then be
automatically loaded when the window or application is invoked. If users do not
delete the corresponding TOOLBOX entry from their SASUSER.PROFILE catalog,
that copy of the toolbox will be loaded instead of the new toolbox.
Creating or Customizing an Application- or Window-Specific Toolset
You define application- or window-specific toolsets in the same way that you create
an application- or window-specific toolbox. There are only two differences:
3 To create a new toolset, start by defining a toolbox as described in “Creating a New
Toolbox” on page 93.
3 After you have defined the toolbox, save it as a TOOLSET entry, not as a
TOOLBOX entry.
Note: If you are an application developer, make sure that you delete an existing
TOOLSET entry for your application as described in “Creating or Customizing an
Application- or Window-Specific Toolbox” on page 93 before you modify your
application’s toolset. 4
Customizing Key Definitions under OpenVMS
Introduction to Defining Keys
You can define most of the keys on your keyboard. However, a few keys have
dedicated functions that are associated with them. For example, the mouse buttons are
dedicated to the cursor and cut-and-paste operations and are not available for user
customization. For more information, see “Default Keyboard Actions” on page 100.
Methods for Customizing Key Definitions
You can customize your key definitions by using one of the following methods:
3 Through the KEYS window. To open the KEYS window, do one of the following:
3 Issue the KEYS command.
3 Select
Tools
I
Options
I
Keys
If you change any key definitions through the KEYS window for the SAS
windowing environment windows, the definitions are stored in the
SASUSER.PROFILE catalog in the entry DMKEYS.KEYS. Key definitions for
other SAS windows are stored in catalog entries named BUILD.KEYS,
FSEDIT.KEYS, and so on.
For more information about the KEYS command and the KEYS window, refer to
the Base SAS section in SAS Help and Documentation.
3 With the KEYDEF command. The KEYDEF command enables you to redefine
individual function keys:
Customizing the SAS Windowing Environment
4
Defining Key Translations
95
keydef keyname <command | ~text-string>
For example, if you specify keydef F8 dlgpref, then the F8 key will issue the
DLGPREF command that opens the Preferences dialog box.
For more information about the KEYDEF command, refer to the Base SAS
section in SAS Help and Documentation.
3 By defining the SAS.keyboardTranslations and SAS.keysWindowLabels
resources in your resources file as described in “Defining Key Translations” on
page 95.
Defining Key Translations
What Is a Key Translation?
To customize a key for the X Window System, you define a key sequence and specify
an action to be executed when that key sequence is typed on the keyboard. This is
known as binding keys to actions; together they are referred to as a translation.
What Is the SAS.keyboardTranslations Resource?
The SAS.keyboardTranslations resource specifies the set of key bindings that SAS
uses in all SAS windows. The default value for the SAS.keyboardTranslations
resource is determined at run time based on the vendor identification string reported by
the X server that you are using as the display. These default settings are listed in the
SAS$ROOT:SAS$XDEFAULTS.DAT file. To modify the default bindings supplied by SAS,
you must modify the SAS.keyboardTranslations resource.
Note: The X Toolkit Intrinsics translations specified in this resource apply to both
the user area and the command line of all SAS windows that are affected by this
resource. This resource does not affect windows that are controlled by Motif interface
resources, such as the Command window, the Open or Import dialog boxes, and some
other pull-down menu dialog boxes. 4
Steps for Creating a Key Definition
To create a key definition, follow these steps:
1 Determine the keysyms for the keys that you want to define. Keysyms are the
symbols recognized by the X Window System for each key on a keyboard.
2 Modify/add the keyboardTranslations resource in your resource file to include
the definitions of the keys that you want to define. Use a keyboard action routine
to define which action you want the key to perform. The definition in the right
column in the KEYS window will no longer control the function of any keys that
are defined with a keyboard action routine other than sas-function-key().
3 Modify/add the SAS.keysWindowLabels resource in your resource file. The
SAS.keysWindowLabels resource specifies the set of valid labels that will appear
in the KEYS window. Modify this resource only if you want to add new labels or
modify existing labels in the left column in the KEYS window.
The SAS.keysWindowLabels resource defines only the mnemonics used in the
KEYS window. For a specific key to perform an action, you must specify a
SAS.keyboardTranslations definition for the key.
4 Start a SAS session and open the KEYS window.
5 Type a command name or other description of each key that you have defined in
the right-hand column in the KEYS window.
96
Defining Key Translations
4
Chapter 4
SAS Keyboard Action Names
SAS declares a set of keyboard actions during X initialization. You can think of these
keyboard actions as simple functions. When the actions are executed, they act on the
window that currently has keyboard input focus.
Keyboard action names represent X Toolkit action routines that are registered by the
SAS interface to Motif for use with X Toolkit keyboard-event translations. A set of
default keyboard actions is supplied as part of the interface. You can override and
augment these actions by supplying a suitably formatted X Toolkit translation string in
the SAS.keyboardTranslations resource.
Note: Most SAS documentation uses angle brackets (<>) to indicate optional syntax.
However, in this topic optional syntax is shown with square brackets ([ ]). The angle
brackets that are shown are part of the syntax and should be entered exactly as
shown. 4
The following list of keyboard actions represents action routines registered by the
Motif interface for use with X Toolkit keyboard event translations:
sas-cursor-down()
moves the cursor down one line in a SAS window. The cursor does not wrap when
it reaches the bottom of the SAS window interior.
sas-cursor-left()
moves the cursor left one character in a SAS window. The cursor does not wrap
when it reaches the left side of the SAS window interior.
sas-cursor-right()
moves the cursor right one character in a SAS window. The cursor does not wrap
when it reaches the right side of the SAS window interior.
sas-cursor-up()
moves the cursor up one line in a SAS window. The cursor does not wrap when it
reaches the top of the SAS window interior.
sas-delete()
deletes all text in the current field.
sas-delete-begin()
deletes all text from the current cursor position to the beginning of the current
text field.
sas-delete-char()
deletes the character under the text cursor and leaves the cursor in place.
sas-delete-end()
deletes text from the current cursor position to the end of the current text field.
sas-delete-prev-char()
deletes the character to the left of the text cursor and moves the cursor back one
space.
sas-delete-prev-word()
deletes text from the current cursor position to the start of the previous word. If
the cursor is in the interior of a word when the action is invoked, the text from the
cursor position to the beginning of the word is deleted.
sas-delete-word()
deletes text from the current cursor position to the end of the current or next word.
sas-do-command()
accepts one or more text-string parameters that are interpreted as SAS commands
to be executed when the action is invoked. The action can be invoked with
Customizing the SAS Windowing Environment
4
Defining Key Translations
97
multiple parameters, separated by commas. The parameters are concatenated,
with semicolon delimiters that are supplied by the sas-do-command() action. The
assembled SAS command string is then submitted for execution. For example, the
following translation can be used to define a global HOME, SUBMIT key sequence
for all SAS windowing environment windows:
SAS.keyboardTranslations: <Key>KP_F3:
_sas-do-command(HOME,SUBMIT)
sas-function-key("InternalKeyName")
invokes the SAS commands associated with the function key identified by the
InternalKeyName label. InternalKeyName is the character string (one to eight
characters long) that is passed to the SAS.keysWindowLabel resource. You must
enclose InternalKeyName in double quotation marks. For a description of internal
key names, see “Defining Key Translations” on page 95. For a list of function-key
parameters that SAS recognizes, refer to the sample SAS$XDEFAULTS.DAT file.
For example, the following keyboard translation designates the physical key
KP_1 as a function key and associates the “Keypd 1” parameter with KP_1. SAS
recognizes the “Keypd 1” parameter as being associated with the command LEFT
(that is, scroll left) by default. Thus, it assigns the LEFT command to KP_1.
SAS.keyboardTranslations: ~Ctrl<Key>KP_1:
_sas-function-key("Keypd 1")
If you specify a function-key parameter that SAS does not recognize, the
function-key command is initially left unspecified.
sas-home-cursor()
is the equivalent of the HOME command. This action is provided for convenience
so that the HOME action can be defined globally.
sas-insert-char(["InsertionString"])
inserts or overwrites the character typed into the input field under the text cursor.
Insert or overstrike behavior is determined by the sas-toggle-insert()action,
which has a mode that is reflected by the text cursor style displayed: the block
cursor indicates overstrike mode, and the underline cursor indicates insert mode.
Normally, sas-insert-char translates the XKeyEvent into the appropriate
character and inserts it at the SAS text cursor location. If you specify the
parameter, the text string represented by this parameter is inserted at the SAS
text cursor location. Any spaces in the string are interpreted by the X Toolkit as a
parameter delimiter unless you enclose the string in double quotation marks. For
information about embedding quotation marks in the string parameter, refer to
your X Window System documentation. To include an escaped quotation mark, use
the following syntax:
Shift<Key>KP_1:\
sas-insert-char("One\\"1\\" ")
This produces the text string One"1"at the SAS text cursor location.
Note: Most SAS documentation uses angle brackets (< >) to indicate optional
syntax. However, in this topic optional syntax is shown with square brackets ([ ]).
The angle brackets that are shown are part of the syntax and should be entered
exactly as shown. 4
sas-kp-application()
sets the workstation’s numeric keypad to allow function key translations to be
reinstated. This toggle only works for those keypad keys that are bound to
sas-function-key()actions. Keypad bindings to other actions are not affected by
this translation.
98
Defining Key Translations
4
Chapter 4
sas-kp-numeric()
sets the workstation’s keypad to generate numeric characters instead of its
previous function key assignment. Note that this toggle only works for keypad
keys that are bound to sas-function-key()actions. Keypad bindings to other
actions are not affected by this translation.
sas-move-begin()
moves the cursor to the beginning of the current text field.
sas-move-end()
moves the cursor to the end of the current text field.
sas-new-line()
generates an end-of-line event when invoked. This is a context-sensitive action. If
you are typing in the SAS command line, the text that you enter is submitted for
execution. If you invoke the sas-new-line action in the SAS application
client-area, then the action depends on the attributes of the text area that is under
the cursor. In simplest terms, this action is the general line terminator for an
input field.
sas-next-field()
advances the cursor to the next field in the SAS window client-area.
sas-next-word()
moves the cursor forward to the beginning of the next word in the current text
field. Wrapping is supported; that is, if the sas-next-word() action does not find
the beginning of a word in the current text field, it advances to the next SAS
application field. However, if you are typing in the SAS command-line area of the
window, the cursor will not wrap into the SAS window client-area.
sas-page-down()
scrolls the current window contents forward by one page.
sas-page-end()
moves the text cursor to the end of the current page.
sas-page-top()
moves the text cursor to the top of the current page.
sas-page-up()
scrolls the current window contents backward by one page.
sas-prev-field()
returns the cursor to the previous field in the SAS window client-area.
sas-prev-word()
moves the cursor backward to the start of the next word in the current text field.
Wrapping is supported; that is, if the sas-prev-word() action does not find the
beginning of a word in the current text field, then it returns to the end of the
previous SAS application field. However, if you are typing in the SAS
command-line area of the window, the cursor does not wrap into the SAS window
client-area.
sas-to-bottom()
moves the text cursor to the absolute bottom of the window’s text range.
sas-to-top()
moves the text cursor to the absolute top of the window’s text range.
sas-toggle-insert()
toggles the line-editing behavior of the associated window between insert and
overstrike modes. This action applies only to the SAS command line and to the
SAS window client-area. The current mode is indicated by the style of the cursor:
Customizing the SAS Windowing Environment
4
Defining Key Translations
99
block cursor
indicates overstrike mode.
underline cursor
indicates insert mode.
sas-xattr-key(<KeyType>[,<KeyParam>])
defines the extended attributes that are associated with extended-attribute keys.
This action accepts two text-string parameters.
Note: Most SAS documentation uses angle brackets (< >) to indicate optional
syntax. However, in this topic optional syntax is shown with square brackets ([ ]).
The angle brackets that are shown are part of the syntax and should be entered
exactly as shown. 4
The <KeyType> parameter must be one of the following:
XAATTR
sets a display attribute. If XAATTR is specified, then the second parameter
must be one of the following:
HIGHLIGHT
turns on bold.
UNDERLINE
turns on underlining.
REVERSE
turns on reverse video.
BLINK
turns on blinking.
Note: The BLINK attribute is not supported in the Motif interface.
However, if you specify the BLINK attribute, it will be displayed when
the catalog is ported to other operating environments. 4
XACLEAR
clears all attributes. If XACLEAR is specified, then you must specify NULL
as the second parameter.
XACOLOR
sets a color attribute. If XACOLOR is specified, then the second parameter
must be one of the following:
BLACK
sets the text color to black.
BLUE
sets the text color to blue.
BROWN
sets the text color to brown.
CYAN
sets the text color to cyan.
GRAY
sets the text color to gray.
GREEN
sets the text color to green.
MAGENTA
sets the text color to magenta.
100
4
Defining Key Translations
Chapter 4
ORANGE
sets the text color to orange.
PINK
sets the text color to pink.
RED
sets the text color to red.
WHITE
sets the text color to white.
YELLOW
sets the text color to yellow.
For example, the following resource definition defines the CTRL+B key
sequence to set the extended attribute for the color BLACK:
sas.keyboardTranslations:#override \
Ctrl<Key>b:sas-xattr-key(XACOLOR,BLACK)
Default Keyboard Actions
Some keyboard-action routines are assigned to certain keys by default. The following
table shows the default keyboard actions, which are defined by the
SAS.keyboardTranslations resource. For more information about this resource, see
“Defining Key Translations” on page 95 and your Motif documentation.
Note: Most SAS documentation uses angle brackets (< >) to indicate optional
syntax. However, in this topic the angle brackets that are shown are part of the syntax
and should be entered exactly as shown. 4
Table 4.1 Default Key Actions
Key Name
Keyboard Action Routine
<Key>Home
sas-home-cursor()
<Key>osfUp
sas-cursor-up()
<Key>osfDown
sas-cursor-down()
<Key>osfRight
sas-cursor-right()
<Key>osfLeft
sas-cursor-left()
<Key>Return
sas-new-line()
Shift<Key>Tab
sas-prev-field()
<Key>Tab
sas-next-field()
<Key>osfBackSpace
sas-delete-prev-char()
<Key>osfDelete
sas-delete-prev-char()
<Key>
sas-insert-char()
Shift<Key>
sas-insert-char()
Extended-Attribute Key Resources
The SAS interface to Motif supports the use of attributes such as bold, reverse video,
and underline. You can use the SAS.keyboardTranslations resource to control this
feature.
Customizing the SAS Windowing Environment
4
Difference between the System Font and Windowing Environment Fonts
101
The following table summarizes the functions that are provided through SAS
extended-attribute keys.
Note: Most SAS documentation uses angle brackets (< >) to indicate optional
syntax. However, in this topic the angle brackets that are shown are part of the syntax
and should be entered exactly as shown. 4
Table 4.2 Functions Provided through the SAS Software Extended-Attribute Keys
Keyboard Chord
Character Attribute Selected
Mod1<Key>b
Blue
Mod1<Key>r
Red
Mod1<Key>p
Pink
Mod1<Key>g
Green
Mod1<Key>c
Cyan
Mod1 <Key>y
Yellow
Mod1<Key>w
White
Mod1<Key>m
Magenta
Mod1<Key>o
Orange
Mod1<Key>k
Black
Mod1<Key>n
Brown
Mod1<Key>a
Gray
Mod1<Key>0
Clear extended attributes
Mod1<Key>1
Set highlight (bolding) attribute
Mod1<Key>2
Set underline attribute
Mod1<Key>3
Set reverse-video attribute
Customizing Fonts under OpenVMS
Difference between the System Font and Windowing Environment
Fonts
SAS uses two main types of fonts:
3 The system font is used in most dialog boxes and pull-down menus. SAS inherits
the system font defined by the *.systemFont resource. If this resource is not
defined, SAS uses a Helvetica font.
3 Windowing environment fonts are used in SAS windows. You can change the SAS
windowing environment font either through the Fonts dialog box or by specifying
the resources in your resources file. The windowing environment font must be a
fixed font.
102
How SAS Determines Which Windowing Environment Font to Use
4
Chapter 4
Note: It is best to change fonts before invoking any applications. Changing fonts
while applications are running might result in unexpected behavior. 4
How SAS Determines Which Windowing Environment Font to Use
SAS determines the normal (not bold) default windowing environment font as follows:
1 If you have saved a font in SASUSER.PROFILE.DMSFONT.VMSPREFS through
the Fonts dialog box, this font is used as the default normal font.
2 If you have not saved a font using the Fonts dialog box, but you have set the
SAS.DMSFont resource, SAS uses the font specified by this resource as the default
font.
3 If you have not set the SAS.DMSFont resource, SAS uses any *Font resources that
you have defined.
4 If you have not set the *Font resources, but you have set the SAS.DMSfontPattern
resource, SAS uses this resource to determine which font to use. The
SAS.DMSfontPattern resource will have no effect if a *Font resource is defined.
5 If no resources have been set, SAS chooses a font from the fonts that are available
on your server.
If you have not specified a value for the SAS.DMSboldFont resource, SAS uses the
default normal font to determine the default bold font. If the normal SAS.DMSFont
resource has an XLFD name associated with it, then SAS selects the matching bold font
and loads it. If SAS cannot automatically select or load a bold font, the normal font is
also used for the bold font.
In many cases, font names are given aliases so that a shorter name can be used to
refer to a font that has an XLFD name associated with it. The name used in
determining a bold font is based on the XA_FONT font property for the normal font.
Customizing the Font Using the Fonts Dialog Box
Introduction to Fonts Dialog Box
The Fonts dialog box enables you to change windowing environment fonts for the
entire SAS session. If you change the font, the font that you select is stored in
SASUSER.PROFILE.DMSFONT.VMSPREFS and will be used in future SAS sessions.
Opening the Fonts Dialog Box
To open the Fonts dialog box, use one of the following methods:
3 Issue the DLGFONT command in the command window.
3 Select
Tools
I
Options
I
Fonts
Customizing the SAS Windowing Environment
4
Specifying Font Resources
103
Display 4.7 Fonts Dialog Box
How to Change the Windowing Environment Font
To change the windowing environment font, complete the following steps:
1 Open the Fonts dialog box.
2 Select a font name, and if desired, a size, weight, and slant. (Not all fonts are
available in all sizes, weights, or slants.) The Sample field shows what the selected
font looks like.
3 Click OK to change the existing font to the selected font.
To return to the default font, click Default .
To cancel any changes and exit the Fonts dialog box, click Cancel .
Specifying Font Resources
You can customize the fonts used in the SAS windowing environment with the
following resources:
SAS.DMSFont:
font-name
specifies the font that you want to be used as the default normal font. The font
must be a monospace font. The default is dynamic, which means that the default
value is determined at run time. If you change the value for the SAS.DMSFont
resource, then you must also change the SAS.DMSboldFont resource to one that
has the same style, set width, font size, point size, spacing, and number of pixels
(or dots) per inch.
SAS.DMSboldFont:
font-name
specifies the font that you want to be used as the default bold font. The default is
dynamic, which means that the default value is determined at run time. If you
change the value for the SAS.DMSboldFont resource, then you must also change
104
Specifying Font Resources
4
Chapter 4
the SAS.DMSFont resource to one that has the same style, set width, font size,
point size, spacing, and number of pixels (or dots) per inch.
SAS.DMSfontPattern:
XLFD-pattern
specifies an X Logical Font Description (XLFD) pattern that you want SAS to use
to determine the windowing environment font. Most fonts in the X Window
System are associated with an XLFD, which contains a number of different fields
delimited by a dash (-) character. The fields in the XLFD indicate properties such
as the font family name, weight, size, resolution, and whether the font is
proportional or monospaced. For more information about the XLFD and font
names used with X, refer to your X Window documentation.
The XLFD-pattern that you specify for SAS.DMSfontPattern must contain the
same number of fields as an XLFD. An asterisk (*) character means that any value
is acceptable for that particular field. For example, the following pattern (which is
the default) matches any font that has a regular slant, is not bold, is monospaced,
and is an ISO 8859 font:
SAS.DMSfontPattern: \
-*-*-*-r-*--*-*-*-*-m-*-iso8859-1
SAS uses the XLFD-pattern to choose a font as follows:
1 SAS queries the X server for the list of fonts that match the
SAS.DMSfontPattern resource.
2 SAS excludes all fonts that have X and Y resolution values different from the
current X display, all fonts that have variable character cell sizing (such as
proportional fonts), and all fonts that have point sizes smaller than 8 points
or larger than 15 points. If this step results in an empty list, SAS chooses a
generic (and usually fixed) font.
3 The font with the largest point size is chosen from the remaining list.
Given an XLFD font for the DMS font, the matching XLFD bold font name is
derived and loaded. If the SAS interface to Motif cannot automatically select or
load a DMS bold font, the DMS font is also used for the DMS bold font. The
auto-selection of the DMS bold font is independent of the auto-selection of the
DMS font. If the font resources are explicitly specified, then the auto-selection
processing is not invoked. Explicitly specified values for the SAS.DMSFont and
SAS.DMSboldFont resources take precedence over automatic selection.
If you have not specified a value for the SAS.DMSboldFont resource, then the
SAS interface to Motif chooses a value by using the current DMS font as a
reference point. The current DMSFont must have an XLFD name associated with
it. The SAS.DMSfontPattern resource will have no effect if a *Font or *FontList
resource is defined.
In many cases font names are aliased so that a shorter name can be used to
refer to a font that has an XLFD name associated with it. The name used in
determining a SAS.DMSboldFont is based on the XA_FONT font property for the
DMS font.
SAS.fontPattern:
XLFD-pattern
specifies an XLFD font pattern that describes the candidate fonts used to resolve
SAS graphics font requests. This enables you to optimize or control the use of X
fonts within the context of various SAS graphics applications. The default value of
an asterisk (*) usually does not affect performance to a significant degree. Cases
where it might be appropriate to restrict the font search include X servers with an
excessive number of fonts or X servers operating on performance-limited
environments.
Customizing the SAS Windowing Environment
4
Specifying Font Aliases
105
SAS.systemFont
specifies the system font. The SAS windowing environment font is used in SAS
windows. The system font is used in most dialog boxes and menus. SAS typically
inherits the system font from the font resources set by the X window environment.
If the *.systemFont resource, SAS uses a 12-point Helvetica font.
Specifying Font Aliases
Syntax for Specifying Font Aliases
If your server does not provide fonts to match all of those that SAS supplies, you can
use font-alias resources to substitute the fonts that are available on your system. (Ask
your system administrator about the fonts that are available.) Use the following syntax
to specify font aliases in your resource file:
SAS.supplied-fontAlias: substitute-fontfamily
where supplied-font is the name of the font that SAS supplies and substitute-fontfamily
is the family name of the font that you want to substitute.
CAUTION:
Do not specify a SAS font as a font alias. A conflict can occur if you specify a font that
is supplied by SAS as a font alias, as in the following example:
SAS.timesRomanAlias: symbol
Assigning this value to a font alias prevents the selection of any symbol fonts
through the font selection dialog box, because they are specified as the Times Roman
alias. 4
The following table lists the SAS font-alias resource names. All of the resources
listed are of the type String and have a default of NULL.
Table 4.3 SAS Font-Alias Resources
Resource Name
Class Name
SAS.timesRomanAlias
TimesRomanAlias
SAS.helveticaAlias
HelveticaAlias
SAS.courierAlias
CourierAlias
SAS.symbolAlias
SymbolAlias
SAS.avantGardeAlias
AvantGardeAlias
SAS.bookmanAlias
BookmanAlias
SAS.NewCenturySchoolbookAlias
newCenturySchoolbookAlias
SAS.palatinoAlias
PalatinoAlias
SAS.zapfChanceryAlias
ZapfChanceryAlias
SAS.zapfDingbatsAlias
ZapfDingbatsAlias
106
Customizing Colors under OpenVMS
4
Chapter 4
Example: Substituting the Lucida Font for Palatino
Suppose that your system does not have a Palatino font, but has the following Lucida
font:
b&h-lucida-bold-r-normal-sans10-100-75-75-p-66-iso8859-1
To substitute Lucida for Palatino, include the following line in your resource file:
SAS.palatinoAlias: lucida
Customizing Colors under OpenVMS
Default Color and Attribute Settings
SAS ships to all sites a default set of colors and attribute settings for the elements of
all SAS windows. Although the same setting for each element is shipped to all sites, the
implementation of that setting is determined by device type, logically and physically.
Thus, settings might vary among sites and across operating environments.
Optionally, the SAS Installation Coordinator can create the catalog entry
SASHELP.BASE.SAS.CPARMS. The color and attribute settings in this catalog become
default for the site.
Methods for Customizing the Color Settings in Your SAS Session
As an individual user, you can customize the colors in your SAS session by using one
of the following methods:
3 Through the SASCOLOR window, as described in “Customizing Colors Using the
SASCOLOR Window” on page 107. You can customize any window element for
most SAS windows with the SASCOLOR window.
3 With the COLOR command using the following syntax:
color field-type <color | NEXT <highlight>>
For a complete description of the COLOR command, see “COLOR Command” on
page 251. The COLOR command affects only the specified element of the active
window. Changes made with the COLOR command override changes entered
through any of the other methods described here. To save your changes beyond
your current session, do one of the following:
3 Issue the WSAVE command. The changes are saved to
SASUSER.PROFILE.window.WSAVE.
Note: Issuing the WSAVE ALL command will save all windows that support
the WSAVE command.
4
3 Select
View
I
Change display
I
Save attributes
The WSAVE command is not available for all SAS windows. For example, with
SAS/FSP software, changes are saved either through the EDPARMS or the
PARMS window. To determine whether WSAVE is available for a SAS window that
is not part of the SAS windowing environment, refer to the product documentation.
Customizing the SAS Windowing Environment
4
Defining Color Resources
107
Both the COLOR command and the WSAVE command override actions in the
SASCOLOR window. That is, COLOR and WSAVE override the use of CPARMS
colors for that particular window without affecting the CPARMS values for other
SAS windows.
3 By entering the color resource specifications yourself. You can enter specific RGB
values or color names for any of the X resources that control color. For more
information, see “Defining Color Resources” on page 107.
Customizing Colors Using the SASCOLOR Window
How to Open the SASCOLOR Window
You can use the SASCOLOR window to change the color and highlighting of specific
elements of SAS windows. To open the SASCOLOR window, do one of the following:
3 Select
Tools
I
Options
I
Colors
in the active window.
3 Issue the SASCOLOR command in the command window.
Changing the Color of a Window Element
To change a color for a window element, complete the following steps:
1 Select the element name.
2 Select the color and attribute that you want assigned to the element.
3 Click OK to make the desired color change.
Click Cancel to ignore any changes you made and close the SASCOLOR window. To
return all tools in the current toolbox to their default settings, click Defaults . When
you click Save , your changes are saved to the catalog entry
SASUSER.PROFILE.SAS.CPARMS.
Note:
Close and reopen any active windows for new color settings to take effect.
4
For more information about the SASCOLOR window, see the Base SAS section in
SAS Help and Documentation.
Defining Color Resources
What Are CPARMS Resources?
You can define window colors and attributes by assigning values to SAS resources
known as CPARMS. The CPARMS resources are divided into classes, each of which
defines the color and attribute of a specific window element, such as the background in
a secondary window or the border of a primary window.
108
Defining Color Resources
4
Chapter 4
Categories of Color Resources
Color resources fall into two categories:
foreground and background definitions
These resources enable you to customize the RGB values that are used to define
the 12 DMS colors. Since each color could be used as either a background or a
foreground color, you can specify different RGB values or color names for each
color for each usage. For example, you can specify that when blue is used as a
foreground color that color #0046ED is used, and when blue is used as a
background that CornflowerBlue is used. For more information, see “Specifying
RGB Values or Color Names for Foreground and Background Resources” on page
108.
window element definitions
These resources, which are referred to as CPARMS resources, enable you to specify
which of the 12 DMS colors you want to use for each window element. For example,
you can specify that message text is displayed in magenta. For more information,
see “Defining Colors and Attributes for Window Elements (CPARMS)” on page 109.
The two types of resources work together. The CPARMS color values use the current
foreground and background definitions. For example, the following resources specify
that the background of your primary windows will be CornflowerBlue:
SAS.blueBackgroundColor: CornflowerBlue
SAS.cparmBackground: DmBlue
Specifying RGB Values or Color Names for Foreground and Background
Resources
SAS uses SAS.systemBackground, SAS.systemForeground, and the resources listed
in the following table to determine the colors to be used in the SAS windows:
SAS.systemForeground
specifies the color for the foreground system color in the SASCOLOR window.
SAS.systemBackground
specifies the color for the background system color the SASCOLOR window.
SAS.systemSecondaryBackground
sets the system secondary background color and specifies the color for the
secondary background system color in the SASCOLOR window.
You can specify color names such as MediumVioletRed or RGB values such as #0000FF
for all of the foreground and background resources. For more information about RGB
color values, refer to your X Window System documentation.
The following table lists all of the foreground and background color resources and
their class names. All of these resources are of the type String.
Table 4.4 Foreground and Background Color Resources
Resource Name
Class Name
SAS.systemForeground
SystemForeground
SAS.systemBAckground
SystemBackground
SAS.systemSecondaryBackground
Background
SAS.blackForegroundColor
BlackForegroundColor
SAS.blueForegroundColor
BlueForegroundColor
Customizing the SAS Windowing Environment
4
Defining Color Resources
Resource Name
Class Name
SAS.brownForegroundColor
BrownForegroundColor
SAS.cyanForegroundColor
CyanForegroundColor
SAS.grayForegroundColor
GrayForegroundColor
SAS.greenForegroundColor
GreenForegroundColor
SAS.magentaForegroundColor
MagentaForegroundColor
SAS.orangeForegroundColor
OrangeForegroundColor
SAS.pinkForegroundColor
PinkForegroundColor
SAS.redForegroundColor
RedForegroundColor
SAS.whiteForegroundColor
WhiteForegroundColor
SAS.yellowForegroundColor
YellowForegroundColor
SAS.blackBackgroundColor
BlackBackgroundColor
SAS.blueBackgroundColor
BlueBackgroundColor
SAS.brownBackgroundColor
BrownBackgroundColor
SAS.cyanBackgroundColor
CyanBackgroundColor
SAS.grayBackgroundColor
GrayBackgroundColor
SAS.greenBackgroundColor
GreenBackgroundColor
SAS.magentaBackgroundColor
MagentaBackgroundColor
SAS.orangeBackgroundColor
OrangeBackgroundColor
SAS.pinkBackgroundColor
PinkBackgroundColor
SAS.redBackgroundColor
RedBackgroundColor
SAS.whiteBackgroundColor
WhiteBackgroundColor
SAS.yellowBackgroundColor
YellowBackgroundColor
109
Defining Colors and Attributes for Window Elements (CPARMS)
You specify CPARMS resources just as you would specify any other SAS X resource
in an X resource file. You specify CPARMS values either in your resource file or with
the -xrm option, which can be used as a system option or on the SAS command line.
(The -xrm option is also described in “XRESOURCES= System Option” on page 512.)
Use the following syntax to specify CPARMS values:
SAS.cparmResource: DmColorName|DmAttrName\
[+ DmColorName|DmAttrName]
Resource can be any of the CPARMS resources listed in the following table. All of
these resources are of the type DmColor, and their default values are dynamic—that is,
the default values are determined at run time.
110
Defining Color Resources
4
Chapter 4
Table 4.5 SAS CPARMS Resources
Specifies the color and
attribute settings
Resource Name
for . . .
Class Name
Default Color
SAS.cparmBackground
backgrounds within all
primary windows displayed
in a SAS session
CparmBackground
DmWhite
SAS.cparmBanner
a banner within a window
CparmForeground
DmBlack
SAS.cparmBorder
the border of a primary
window
CparmBackground
DmBlack
SAS.cparmByline
BY lines written to the
Output window
CparmForeground
DmBlue
SAS.cparmColumn
text labels for column
information. You can use
this resource within the SAS
editor to identify editing
lines and in spreadsheet
windows to label
spreadsheets.
CparmForeground
DmBlue/
Underline
SAS.cparmCommand
the command data entry field
when menus are disabled.
CparmForeground
DmBlack
SAS.cparmData
general lines written to the
Log window or the Output
window
CparmForeground
DmBlack
SAS.cparmError
ERROR: lines that are
written to the Log window or
Output window
CparmForeground
DmRed
SAS.cparmFootnote
FOOTNOTE lines written to
the Output window
CparmForeground
DmBlue
SAS.cparmForeground
all text fields within a SAS
windowing environment
window that can be edited
CparmBackground
DmBlack
SAS.cparmHeader
HEADER lines written to
the Output window
CparmForeground
DmBlue
SAS.cparmHelpLink
links to additional levels of
information in the HELP
system
CparmForeground
DmGreen/
Underline
SAS.cparmHelpMainTopic
topic words or phrases in the
HELP system
CparmForeground
DmBlack
SAS.cparmHelpSubTopic
topic words or phrases in the
HELP system
CparmForeground
DmBlack
SAS.cparmInfo
text that is displayed in a
window as an aid to the user,
for example:
Press Enter to continue
CparmForeground
DmBlack
Customizing the SAS Windowing Environment
4
Defining Color Resources
Specifies the color and
attribute settings
Resource Name
for . . .
Class Name
Default Color
SAS.cparmLabel
text that precedes a widget.
For example, the text Name:
in the following example is a
label:
Name: _______________
CparmForeground
DmBlack
SAS.cparmMark
areas that have been
selected for operations such
as FIND, CUT, and COPY
CparmForeground
DmBlack/
DmReverse
SAS.cparmMessage
the message field
CparmForeground
DmRed
SAS.cparmNote
NOTE: lines that are written
to the Log window or the
Output window
CparmForeground
DmBlue
SAS.cparmSecondaryBackground
backgrounds in secondary
windows
CparmForeground
DmGray
SAS.cparmSecondaryBorder
the border of a secondary
window
CparmForeground
DmBlack
SAS.cparmSource
SAS source lines that are
written to the Log window
CparmForeground
DmBlack
SAS.cparmText
text labels for row
information. You can use
this resource within the SAS
editor to identify editing
lines and in spreadsheet
windows to label spreadsheet
rows.
CparmForeground
DmBlue
SAS.cparmTitle
TITLE lines written to the
Output window
CparmForeground
DmBlue
SAS.cparmWarning
WARNING lines written to
the Log window or the
Output window
CparmForeground
DmGreen
DmColorName can be any one of the following colors:
DmBLACK
DmBLUE
DmBROWN
DmCYAN
DmGRAY
DmGREEN
DmMAGENTA
DmORANGE
DmPINK
DmRED
111
112
Controlling Menus under OpenVMS
4
Chapter 4
DmWHITE
DmYELLOW
DmAttrName can be any one of the following attributes:
DmHIGHLIGHT
DmUNDERLINE
DmREVERSE
You can specify attribute names and color names in any order. If you specify more than
one color name for a single class, then SAS uses the last color that you specified.
Example: Defining CPARMS
The following example specifies that all background colors are gray and all
foreground colors are black:
SAS.cparmBackground: DmGRAY
SAS.cparmForeground: DmBLACK
You can add to these settings to make errors red with reverse video and warnings
yellow with bolding and reverse video:
SAS.cparmError: DmRED + DmREVERSE
SAS.cparmWarning:
DmHIGHLIGHT + DmYELLOW + DmREVERSE
You can further add to these settings by making the background of secondary
windows white:
SAS.cparmSecondaryBackground: DmWHITE
Controlling Color Contrast
During interactive move/stretch operations, such as rubberbanding and dragging
rectangles in SAS/INSIGHT software, you might find it hard to see the outline of the
graphics primitive because of the lack of contrast between the primitive and the
background. The XCONTRAST command makes the primitive visible against the
background. The rendering performance and the aesthetic appearance of the primitive
is compromised for the sake of visibility. You can enter XCONTRAST to act as a toggle,
or you can specify XCONTRAST ON or XCONTRAST OFF.
With some color combinations, text fields, push buttons, and check boxes and other
foreground categories might not be visible. The following resource makes these
categories legible:
SAS.dmsContrastCheck:
[True | False]
controls whether contrast mapping is applied to non-graphic foreground colors in a
SAS window. The value True specifies that DMS foreground colors will be
remapped if necessary to produce a contrast. The default value is False, which
disables contrast checking. Some color usage based on graphic operations is not
affected by this resource.
Controlling Menus under OpenVMS
Pull-down menus are controlled by the following resources:
Customizing the SAS Windowing Environment
SAS.pmenuOn:
4
Marking Text
113
[True | False]
turns the menus on for the current SAS session, regardless of the information
stored by the WSAVE command. You can use this resource to override the saved
settings in your SASUSER.PROFILE catalog. The WSAVE state of an individual
window takes precedence over the global state. The default is True. You can also
use the PMENU ON and PMENU OFF commands to turn menus on and off.
SAS.usePmenuMnemonics:
[True | False]
specifies whether mnemonics are attached to the menus for the current SAS
session. The default is True.
Customizing Cut-and-Paste Operations under OpenVMS
Introduction to Marks and the Paste Buffer
The SAS interface to Motif uses the SAS concepts of marks and the paste buffer to
provide the normal X Window System cut-and-paste behavior. The mark defines and
highlights a region of text. The SAS interface to Motif supports two methods of
marking text. The paste buffer retains a collection of text lines. In SAS, you must
associate marks with a paste buffer by issuing a command such as STORE or CUT.
This is different from other X applications, in which marks and paste are generally
synonymous with each other.
The default definitions enable you to cut and paste between the SAS interface to
Motif and other X window clients or between the SAS interface to Motif and the
XPRIMARY buffer in OpenVMS.
Tasks That You Can Perform with Marked Text
You can do any of the following tasks with a marked area of text in many SAS
windows:
3
3
3
3
3
delete the text.
delete and retain the text in a paste buffer.
search the text for words or phrases.
store the text in a paste buffer.
use the text in an application to define a set of values that are operated on by a
specified command.
3 submit the marked text only.
Marking Text
Difference between Character and Block Marks
SAS supports the character mark and the block mark. The behavior of the character
mark resembles text marking in most X Window System terminal emulators. The range
of the character mark spans whole interior lines between the starting point and the
ending point of the marked text. Interior lines are those that are between the lines
114
Marking Text
4
Chapter 4
containing the starting point and the ending point. By contrast, a block mark is a
rectangular region that includes one corner at the starting point and one corner at the
ending point of the mark.
Marking Text Using the MARK Command
The MARK command establishes a mode in the SAS window that lasts until you
issue another MARK command.
To mark an area of text, complete the following steps:
1 Position the cursor by clicking at the beginning of the text that you want to mark.
2 Issue the MARK command.
3 Move the cursor to the end of the text that you want to mark and click.
4 Issue the MARK command a second time. Before you issue the second MARK
command, the end point changes as you move the window’s text cursor by using
the keyboard arrow keys, tabbing, clicking the mouse, or scrolling through the
window’s contents. Mark highlighting also changes as you change the cursor
position.
You can issue the MARK command from the command line, or you can assign it to a
function key. If you want to select a rectangular block of text instead of a string of text,
add the BLOCK argument to the MARK command. With the MARK command, you can
select more than one area of text in the same window at the same time. To unmark the
selected text, issue the UNMARK command.
Marking Text Using the Mouse
You can also use the mouse to select text by clicking and dragging the left mouse
button (MB1) inside the SAS window. (The marks that are generated by this method
are called drag marks.) You can use keyboard modifiers to change the behavior of the
marking. When you end a drag mark by releasing MB1, SAS performs an end-of-mark
action that might generate a STORE command to save the contents of the mark into a
SAS paste buffer. This feature is controlled by the SAS.markPasteBuffer resource.
You can clear marks in a SAS window by clicking MB1 inside the SAS window or by
starting a new drag mark in the SAS window.
The SAS interface to Motif supports the following mouse button behavior:
MB1 press and move
makes a SAS character mark starting at the point where the mouse button is
depressed and marks an area with the mouse. The area that you mark is
highlighted. Release MB1 to complete the mark.
Note: Any existing marks in the same window are deleted when you press
MB1. 4
MB1 press and release
frees existing drag marks in the window except those that were created by the
MARK command. You can use MB1 to position the text cursor inside a SAS mark.
MB2 press
generates a PASTE command at the location of the click, using the
SAS.markPasteBuffer value as the name of the paste buffer if the resource is
defined. If SAS.markPasteBuffer is not defined, press MB2 to generate a PASTE
command with BUFFER=DEFAULT.
Customizing the SAS Windowing Environment
4
Paste Buffers
115
There are three modifier keys that can be used in conjunction with MB1 to produce
the following results:
Unmodified
character mark and end-of-mark action.
Shift
extend mark and end-of-mark action.
CTRL
block mark and end-of-mark action.
Mod1
alters end-of-mark action to the opposite of normal behavior.
The normal end-of-mark action depends on the setting of the SAS.markPasteBuffer
resource. If this resource is defined, the normal action is to generate a STORE
BUFFER=<name> command to store the newly created mark to the named paste buffer.
If this resource is not defined, the normal action is to suppress the generation of the
STORE command; the marked area remains highlighted.
Paste Buffers
What Are Paste Buffers?
SAS paste buffers are named objects that retain a copy of selected text. Each buffer
is identified by a name of up to eight characters; the name is not case sensitive. Most
commands operating on a SAS paste buffer support the BUFFER= option that enables
you to identify the paste buffer. This paste buffer name directs the SAS interface to
Motif to interact with the standard X interclient data exchange mechanisms.
Paste buffers that are not associated with an X interclient mechanism are called
local paste buffers because their contents are known only within the scope of the SAS
session. Paste buffers associated with X inter-client data exchange mechanisms are
called extended paste buffers.
Types of Paste Buffers
The SAS interface to Motif enables you to use X cut buffers and X selections to
exchange information with other X clients. The paste buffer name determines whether
the buffer has extended semantics in the context of the X data exchange mechanisms.
The following list describes paste buffer names and their associations:
XPRIMARY
is the paste buffer associated with the X primary selection (PRIMARY).
XPRIMARY is the default buffer. DEFAULT is an alias for XPRIMARY. If you
copy or cut text into the XPRIMARY buffer, the text is actually copied or cut into
all four of the paste buffers.
XSCNDARY
is the paste buffer associated with the secondary selection (SECONDARY).
XCLIPBRD
is the paste buffer associated with the clipboard selection (CLIPBOARD). This
paste buffer enables you to use the MIT X Consortium xclipboard client with
SAS.
XTERM
is the paste buffer associated with the exchange protocol used by the xterm client.
116
Paste Buffers
4
Chapter 4
XCUTn
is the paste buffer associated with the X cut buffer n, where the range of n is 0 to 7.
Manipulating Text Using Paste Buffers
If you want SAS to automatically copy selected text into your paste buffer every time
you mark a region of text with the mouse, you should specify your paste buffer name in
the SAS.markPasteBuffer resource. To generate a STORE command every time you
mark a region of text with the mouse, define the following X resource for the SAS
application:
SAS.markPasteBuffer: XPRIMARY
Since the DEFAULT paste buffer is aliased to XPRIMARY, you could also make the
following declaration for SAS.markPasteBuffer to produce the same result:
SAS.markPasteBuffer: DEFAULT
The markPasteBuffer definition causes SAS to automatically issue a STORE command
whenever you select text.
The STORE command, as well as the CUT and PASTE commands, support a
BUFFER= option that specifies which buffer to use. When these commands are issued
from function keys or menus whose definitions do not include the BUFFER= option, if
the SAS.markPasteBuffer resource is not defined, these commands use
BUFFER=DEFAULT. If this resource is defined, these commands use
BUFFER=buffer-name.
You can customize your normal cut, copy, or paste keys to issue any of these
commands with the BUFFER= option. For example, you can define a SAS
SAS.keyboardTranslations binding for the sas-do-command() action that will be
valid for the same set of operations in every SAS window and override the SAS
SAS.keyboardTranslations definition for the osfCopy and osfPaste keys with the
following specifications:
SAS.keyboardTranslations: #override\
<Key>osfCopy:
sas-do-command("STORE BUFFER=XCLIPBRD") \n\
<Key>osfPaste:
sas-do-command("PASTE BUFFER=XCLIPBRD")
For more information about customizing keys, see “Customizing Key Definitions
under OpenVMS” on page 94.
When you cut or copy and paste text between SAS sessions using the XTERM,
XPRIMARY, or XSCNDARY paste buffers, the color and attribute information is
preserved. However, if you copy and paste the same text into an xterm window while
using the vi editor, the color and attribute information is lost. If you change the
definition for SAS.defaultPasteBuffer and SAS.markPasteBuffer to XCUT0, then
you will not retain the text and attributes when you copy and paste text between two
SAS sessions.
Note: When you use the xclipboard client, SAS text attributes are not preserved in
exchanges made between SAS sessions. However, when you use the SAS XCLIPBRD
paste buffer without a clipboard manager such as the xclipboard client, SAS text
attributes are preserved in exchanges between SAS sessions. 4
Exchanging Information Using Paste Buffers
You can use X Window paste buffers and X selections to exchange information with
other X Window clients. The SAS paste-buffer interface allows this interaction for all
Customizing the SAS Windowing Environment
4
Customizing Session Workspace, Session Gravity, and Window Sizes under
OpenVMS
117
paste-buffer interaction commands and operations. With the SAS interface to Motif, you
can use the following paste buffers:
3 XPRIMARY
3 XSCNDARY
3 XCLIPBRD
3 XTERM
3 XCUTn
For more information about these paste buffers, see “Paste Buffers” on page 115.
If you are not sure which X data exchange protocols your other X clients are using,
you should use the XTERM paste buffer. You can specify your default paste buffer with
the SAS.defaultPasteBuffer resource:
SAS.defaultPasteBuffer: XTERM
If you know that the X clients in your workstation environment all use the X
PRIMARY selections to exchange data, you should use the XPRIMARY paste buffer:
SAS.defaultPasteBuffer: XPRIMARY
This specification uses both SAS and X resources more efficiently and provides for the
on-demand transfer of data between clients.
You can also use the SAS XCLIPBRD paste buffer to interact with Motif clients that
use the Motif clipboard mechanism for text exchanges. This clipboard mechanism
makes it unnecessary to have a dedicated client such as xclipboard. For example, you
can use XCLIPBRD to exchange text directly with the Motif xmeditor application when
you select the Cut, Copy, or Paste items from the xmeditor Edit menu.
Customizing Session Workspace, Session Gravity, and Window Sizes
under OpenVMS
SAS uses the following resources to determine the size of the session workspace, the
gravity of the workspace, and the size of the windows.
Note: SAS requires at least 20 rows and 78 columns of internal window space. If
you specify smaller dimensions for the SAS.maxWindowHeight, SAS.maxWindowWidth,
SAS.windowHeight, or SAS.windowWidth resource, then SAS defaults to these
minimum values. 4
SAS.awsResizePolicy
controls the policy for resizing the application workspace (AWS) windows as
interior window are added and removed. Possible values include the following:
grow
the AWS window will attempt to grow any time an interior window is grown
or moved, in order to show all interior windows, but it will not shrink to
removed dead areas.
fixed
the AWS window will attempt to size itself to the size of the first interior
window and will not attempt any further size changes.
118
Customizing Session Workspace, Session Gravity, and Window Sizes under OpenVMS
4
Chapter 4
The default is grow.
SAS.maxWindowHeight
specifies the maximum height of a window. The unit of measure is specified by the
SAS.windowUnitType resource. The default is 95.
SAS.maxWindowWidth
specifies the maximum width of a window. The unit of measure is specified by the
SAS.windowUnitType resource. The default is 95.
SAS.noAWS: [True | False]
controls whether each of your application’s windows appears in its own native
window rather than in an application workspace (AWS). The default is False,
which confines all windows displayed by an application to a single AWS window.
SAS.scrollBarSize
specifies the size of the scroll bars in pixels. The default is 17.
SAS.sessionGravity
specifies in which region of the screen that SAS attempts to place its windows.
Possible values include the following:
NorthWestGravity
NorthGravity
NorthEastGravity
WestGravity
CenterGravity
EastGravity
SouthWestGravity
SouthGravity
SouthEastGravity
The default is dynamic, which means that the default value is determined at run
time. For example, for the first SAS session that you invoke the default is
NorthWestGravity. However, if you invoke a second SAS session while the first
session is still running, the default for the second session is NorthEastGravity.
SAS.sessionGravityXOffset
specifies an X (horizontal) offset to be added when SAS attempts to place a window
in the gravity region. The default is 0.
SAS.sessionGravityYOffset
specifies a Y (vertical) offset to be added when SAS attempts to place a window in
the gravity region. The default is 0.
SAS.windowHeight
specifies the default height of a window. The unit of measure is specified by the
SAS.windowUnitType resource. The default is 50.
SAS.windowUnitType
specifies the unit of measure for the SAS.windowWidth, SAS.windowHeight,
SAS.maxWindowWidth, and SAS.maxWindowHeight resources. Possible values
include the following:
character
specifies the number of rows and columns.
Customizing the SAS Windowing Environment
4
X Resources for Specifying User-Defined Icons
119
pixel
specifies the number of pixels.
percentage
specifies the percentage of the display.
The default is percentage.
SAS.windowWidth
specifies the default width of a window. The unit of measure is specified by the
SAS.windowUnitType resource. The default is 67.
Specifying User-Defined Icons under OpenVMS
Why Specify User-Defined Icons?
You can add your own icons to the icons that are supplied with SAS. For example, if
you want to use your own color icons in the toolbox, define the SAS.colorUiconPath,
SAS.colorUiconCount, and SAS.sasUiconx resources. Then, when you are defining
tools in the tool editor, your icons appear in the display of icons that you can choose for
each tool.
How SAS Locates a User-Defined Icon
The resource name that is used to locate the icon bitmap filename for a user icon
number x is SAS.sasUiconx. For example, to define the filename MYICON for the user
icon 1, you should define the resource:
SAS.sasUicon1: myicon
If the resource name is not defined, SAS generates a filename of the form
sasuinnn.xbm or sasuinnn.xpm. The path elements from the SAS.uiconPath resource
are searched in sequence until the icon file is found or until the search path is
exhausted.
For example, the following set of X resources defines a collection of color icons:
SAS.colorUiconPath: MYDISK:[MYDIR1.PIXMAPS]
SAS.colorUiconCount: 7
SAS.sasUicon1: adsetup
SAS.sasUicon2: adverse
SAS.sasUicon3: altmenu
SAS.sasUicon4: batch
SAS.sasUicon5: is
SAS.sasUicon6: patgrps
SAS.sasUicon7: pctchg
The Motif interface will search for icon sasUicon1 in a file named
MYDISK:[MYDIR1.PIXMAPS]ADSETUP.XPM.
X Resources for Specifying User-Defined Icons
SAS uses the following resources to determine the number of user-defined icons that
are available and their location.
120
Miscellaneous Resources under OpenVMS
4
Chapter 4
SAS.colorUiconCount
specifies the number of user-defined color icons that are available for SAS to use.
The default is 0.
SAS.colorUiconPath
specifies the file search path for locating user-defined color icon files. The default
is NULL. This string resource can contain multiple directory paths to be searched
for a SAS icon file stored in X PixMap (.XPM) format. Use a comma to separate
individual directory path elements in the icon path string. For example, the
following string first searches for icon files in the MYDISK:[MYDIR1.PIXMAPS]
directory, then searches in the MYDISK:[MYDIR2.PIXMAPS] directory:
SAS.colorUiconPath : MYDISK:[MYDIR1.PIXMAPS],
MYDISK:[MYDIR2.PIXMAPS]
SAS.uiconCount
specifies the maximum number of user-defined icons that are available for use in
SAS. The default is 0.
SAS.uiconPath
specifies the search path for locating bitmap files for user-defined icons. The
default is NULL. This string resource can contain multiple directory paths to be
searched for the existence of a particular icon file. These files are assumed to be in
the X11 X Bitmap (.xbm) format. A comma delimits individual directory-path
elements in the icon-path string.
For example, the following string first searches for bitmap files in the
MYDISK:[MYDIR1.BITMAPS] directory, then in the
MYDISK:[MYDIR2.BITMAPS] directory:
SAS.uiconPath: MYDISK:[MYDIR1.BITMAPS],
MYDISK:[MYDIR2.BITMAPS]
The directory-path elements must contain the complete path syntax.
SAS.sasUiconx
associates a value with the filename of an X bitmap or pixmap file. The value of x
is a number assigned to the file. The default is NULL. A file extension of .XBM or
.XPM is automatically supplied.
Miscellaneous Resources under OpenVMS
You can also customize the following resources:
SAS.altVisualId:
ID
specifies a visual type ID. The default is NULL.
SAS.autoSaveInterval:
minutes
specifies how often (in minutes) the data from the Program Editor window should
be saved. The default is 10.
SAS.autoSaveOn:
[True | False]
specifies that data from the Program Editor window should be saved to a file at
intervals specified by the SAS.autoSaveInterval resource. The default is True.
Customizing the SAS Windowing Environment
SAS.confirmSASExit:
4
Miscellaneous Resources under OpenVMS
121
[True | False]
controls whether SAS displays the Exit dialog box when you issue the DLGENDR
command or when you select
File
I
Exit
The default is True.
SAS.defaultCommandWindow:
[True | False]
specifies whether the command window is opened when you start your SAS
session. The default is True.
SAS.directory:
directory-pathname
specifies the directory that you want when you first open a file selection dialog box.
By default, the Open dialog box uses the current directory.
SAS.helpBrowser:
pathname
specifies the pathname of the World Wide Web browser to use for viewing the
online help or when the WBROWSE command is issued. The default browser is
SAS$BROWSER.
SAS.insertModeOn:
[True | False]
controls the editing mode in SAS editor windows, either insert or overtype. The
default is False (overtype).
SAS.noDoCommandRecall:
[True | False]
specifies whether SAS commands submitted through the sas-do-command() Xt
action routine should be recorded in the command recall buffer. The default value,
True, causes these commands to be recorded.
SAS.pattern:
default-pattern
specifies the default pattern that you want to be used as the file filter when you
first invoke the Open dialog box. This pattern is displayed in the text field at the
top of the dialog box. By default, the Open dialog box uses the first filter in the
File type list. The SAS.pattern resource has no effect on the File type field.
SAS.selectTimeout:
seconds
specifies how long (in seconds) SAS waits for the completion of a request to convert
an X Toolkit selection. The default value, 60, is adequate in most cases.
SAS.startSessionManager:
[True | False]
specifies whether SAS automatically starts the session manager when a new SAS
session is started. Using your own host editor with SAS requires that the session
manager be running. The default is True.
SAS.startupLogo:
[xpm-filename | None | ""]
specifies the XPM file that you want SAS to display when it is initialized. If the
string is empty (“ ”, which is the default), SAS uses the default logo.
SAS.suppressMenuIcons:
[True | False]
specifies whether SAS will display any menu icons other than the check box and
toggle button icons in cascade or pop-up menus. True suppresses the icons and
improves how quickly the menus display on slower X servers. The default is False.
SAS.suppressTutorialDialog:
[True | False]
specifies whether SAS displays the Getting Started Tutorial dialog box at the start
of your SAS session. True suppresses the dialog box. You might want to suppress
this dialog box if you have previously used SAS. The default is False.
SAS.useNativeXmTextTranslations:
[True | False]
specifies whether any XmText widget translations are inherited by all instances of
the Text, Combo Box, and Spin Box widgets used by the SAS X Motif user
122
Summary of X Resources for SAS under OpenVMS
4
Chapter 4
interface. When the value is False, the SAS keys windows translations supercede
any user or system-supplied XmText translations. The default value is False. See
the XmText man page for more information about XmText resources.
SAS.VMSdelay:
milliseconds
controls how often SAS yields processing to the X windowing environment. During
this time, the X windowing environment updates the user interface. Smaller
values for this resource will increase responsiveness at the expense of increased
CPU time. Valid values range from 50 - 10,000 milliseconds. The default delay is
1000 milliseconds, or 1 second.
SAS.wsaveAllExit:
[True | False]
specifies whether SAS should issue the WSAVE ALL command when you end your
session. This command saves the global settings, such as window color and
window position, that are in effect for all windows that are currently open. The
default is False.
Summary of X Resources for SAS under OpenVMS
The following table lists the resource and class names, type, and statically defined
default values for many of the SAS X resources. For additional information about
specific types of resources, see the following tables:
3 “SAS Font-Alias Resources,” Table 4.3 on page 105
3 “Foreground and Background Color Resources,” Table 4.4 on page 108
3 “SAS CPARMS Resources,” Table 4.5 on page 110
If no X resource value overrides the resource and class name, then the static default
is chosen. Some X resources have a default of dynamic listed. This means that the
default value is determined at run time.
An online example resource file is available for use. The filename is
SAS$ROOT:SAS$XDEFAULTS.DAT.
Note: X resource names are case-sensitive. When you specify them in your resource
files, be sure to use the correct capitalization. 4
Table 4.6 X Resources Used by the SAS Interface to Motif
Resource Name
Class Name
Type
Default
SAS.altVisualId
AltVisualId
Integer
NULL
SAS.autoComplete
AutoComplete
Boolean
True
SAS.autoSaveInterval
AutoSaveInterval
Integer
10
SAS.autoSaveOn
AutoSaveOn
Boolean
True
SAS.awsResizePolicy
AWSResizePolicy
String
“grow”
SAS.colorUiconCount
UiconCount
Integer
0
SAS.colorUiconPath
UiconPath
String
NULL
SAS.colorUiconPath
UiconPath
String
NULL
SAS.commandsSaved
CommandsSaved
Integer
25
SAS.defaultCommandWindow
DefaultCommandWindow
Boolean
True
Customizing the SAS Windowing Environment
4
Summary of X Resources for SAS under OpenVMS
Resource Name
Class Name
Type
Default
SAS.defaultPasteBuffer
DefaultPasteBuffer
String
XPRIMARY
SAS.defaultToolBox
DefaultToolBox
Boolean
True
SAS.directory
Directory
String
NULL
SAS.DMSboldFont
Font
String
dynamic
SAS.dmsContrastCheck
DmsContrastCheck
Boolean
False
SAS.DMSFont
Font
String
dynamic
SAS.DMSfontPattern
DMSFontPattern
String
“-*-*-*-r-*–*-*-*-*-m-*-iso8859-1”
SAS.fontPattern
FontPattern
String
“*”
SAS.helpBrowser
helpBrowser
String
SAS$BROWSER
SAS.insertModeOn
InsertModeOn
Boolean
False
SAS.isToolBoxPersistent
IsToolBoxPersistent
Boolean
True
SAS.keyboardTranslations
KeyboardTranslations
Translation dynamic
SAS.keysWindowLabels
KeysWindowLabels
String
dynamic
SAS.markPasteBuffer
MarkPasteBuffer
String
NULL
SAS.maxWindowHeight
WindowHeight
Dimension
95
SAS.maxWindowWidth
WindowWidth
Dimension
95
SAS.noAWS
NoAWS
Boolean
False
SAS.noDoCommandRecall
NoDoCommandRecall
Boolean
True
SAS.pattern
Pattern
String
NULL
SAS.pmenuOn
PmenuOn
Boolean
True
SAS.scrollBarSize
ScrollBarSize
Dimension
17
SAS.selectTimeout
SelectTimeout
Integer
60
SAS.sessionGravity
SASGravity
String
dynamic
SAS.sessionGravityXOffset
SASGravityOffset
Integer
0
SAS.sessionGravityYOffset
SASGravityOffset
Integer
0
SAS.startSessionManager
StartSessionManager
Boolean
True
SAS.startupLogo
StartUpLogo
String
""
SAS.suppressMenuIcons
SuppressMenuIcons
Boolean
False
SAS.suppressTutorialDialog
SuppressTutorialDialog
Boolean
False
SAS.SystemFont
SystemFont
String
“-adobe-helvetica-medium-rnormal–12−*−*−*−*−*−*−*”
SAS.toolBoxAlwaysOnTop
ToolBoxAlwaysOnTop
Boolean
True
SAS.toolBoxTipDelay
ToolBoxTipDelay
Integer
750
SAS.uiconCount
UiconCount
Integer
0
SAS.uiconPath
UiconPath
String
NULL
SAS.useCommandToolBoxCombo
UseCommandToolBoxCombo
Boolean
True
SAS.useLargeToolBox
UseLargeToolBox
Boolean
False
123
124
Summary of X Resources for SAS under OpenVMS
4
Chapter 4
Resource Name
Class Name
Type
Default
SAS.useLargeToolBox
UseLargeToolBox
Boolean
False
SAS.useNativeXmTextTranslations UseNativeXmTextTranslations Boolean
False
SAS.useShowHideDecorations
UseShowHideDecorations
Boolean
False
SAS.useToolBoxTips
UseToolBoxTips
Boolean
True
SAS.VMSdisplay
VMSdisplay
Integer
1000
SAS.windowHeight
WindowHeight
Dimension
50
SAS.windowUnitType
WindowUnitType
String
percentage
SAS.windowWidth
WindowWidth
Dimension
67
SAS.wsaveAllExit
wsaveAllExit
Boolean
False
125
CHAPTER
5
Using SAS Files
Introduction to SAS Files, Data Libraries, and Engines under OpenVMS 127
What Is a SAS File? 127
What Is a Data Library? 127
What Is a Libref? 127
What Is an Engine? 127
Additional Resources 127
Common Types of SAS Files in OpenVMS 128
What Are Data Sets? 128
SAS Data Files (Member Type DATA) 128
SAS Data Views (Member Type VIEW) 128
What Are Catalogs? 129
What Are Stored Program Files? 129
What Are Access Descriptor Files? 129
The WORK Data Library under OpenVMS 129
The Importance of Disk Space in the WORK Library 129
Methods of Increasing Disk Space 130
Changing the Location of the WORK Library 130
Deleting Temporary SAS Data Sets 130
Directing Temporary SAS Data Sets to the USER Library 131
Example: Using the USER= System Option 131
System Options That Control the WORK Data Library 132
The WORKINIT System Option 132
The WORKTERM System Option 132
The CLEANUP Tool 132
When to Use the CLEANUP Tool 132
How to Delete Files with the CLEANUP Tool 133
Syntax Variations of the CLEANUP Command 133
The SASUSER Data Library 134
What Is the SASUSER Library? 134
Creating Your Own SASUSER Libraries 134
Compatibility of Existing SAS Files with SAS 9.1 135
Compatibility of Version 7 and Version 8 SAS Files 135
Supported File Types in SAS 9.1 135
Unsupported File Types in SAS 9.1 135
Compatibility of Version 6 SAS Files 135
Accessing SAS Files under OpenVMS 136
Difference in Accessing Files in Version 6 and SAS 9.1 136
Advantages of Using Librefs Rather than OpenVMS Logical Names 136
Assigning Librefs under OpenVMS 136
Listing Your Current Librefs under OpenVMS 136
Methods for Assigning Librefs 137
126
Contents
4
Chapter 5
Using the LIBNAME Statement 137
Using the LIBNAME Function 137
Using the LIBASSIGN Command 137
Using the LIBNAME Window 138
Using the SAS Explorer Window 138
Multiple SAS Data Libraries in a Single Directory 138
Example: Assigning Librefs to Two Engines in the Same Directory 138
Multiple Librefs for a Single SAS Data Library 139
Example: Assigning Two Librefs to the Same Data Library 139
Clearing Librefs under OpenVMS 139
Syntax for Clearing a Libref with the LIBNAME Statement or LIBNAME Function
How to Clear Librefs with the SAS Explorer Window 139
Assigning OpenVMS Logical Names 140
How to Assign an OpenVMS Logical Name 140
Example: Defining a Logical Name with the X Statement 140
Using an OpenVMS Logical Name as a Libref 140
Examples: Using a Logical Name as a Libref in a DATA Step and Procedure 140
Using an OpenVMS Logical Name in the LIBNAME Statement 141
Associating an Engine with an OpenVMS Logical Name 141
Associating a Libref and Engine with a Logical Name 141
Specifying Library or Engine/Host Options with a Logical Name 141
Using a Search-String Logical Name to Concatenate SAS Data Libraries 141
Order in Which SAS Opens Files 141
Example 1: Assigning a Search-String Logical Name with the X Statement 141
Example 2: Using a LIBNAME Statement 142
Example 3: Specifying a Search-String Logical Name in SAS Explorer 142
Additional Documentation 142
Concealed Logical Names 142
Accessing Files in Concatenated SAS Data Libraries under OpenVMS 143
Order in Which Concatenated Directories Are Accessed 143
Accessing Data Sets That Have the Same Name 143
Accessing SAS Files on Tape under OpenVMS 144
DCL Commands for Tape Access 144
Accessing Multivolume Tapes 144
Reading and Writing SAS Files on Tape 145
Copying Files to Tape 145
Advantage to Copying Existing SAS Files Using the COPY Procedure 145
Advantage to Creating a Data Set with the TAPE Engine 146
How SAS Assigns an Engine When No Engine Is Specified 147
Advantage to Assigning an Engine 147
Rules SAS Uses to Determine Engine When No Engine Is Specified 147
Sharing Data between OpenVMS Platforms 147
What Are Nonnative Files? 147
How to Convert Nonnative Data 148
Limitations of One-Time-Only Conversions 148
Example: How to Convert a File Using SAS Code 148
Multiuser Access to SAS Files under OpenVMS 148
Estimating the Size of a SAS Data Set under OpenVMS 149
Estimating the Amount of Disk Space for a Data Set 149
Determining Observation Length with PROC CONTENTS 149
Optimizing Page Size 150
Experimenting with Buffer Size to Set an Optimal Page Size 151
Generation Data Sets under OpenVMS 152
139
Using SAS Files
4
Additional Resources
127
Introduction to SAS Files, Data Libraries, and Engines under OpenVMS
What Is a SAS File?
Your data can reside in different types of files, including SAS files and files that are
formatted by other software products, such as database management systems. Under
OpenVMS, a SAS file is a specially structured OpenVMS file. Although the OpenVMS
operating environment manages the file for SAS by storing it, the operating system
cannot process it because of the structure built into the file by SAS. For example, you
can list the filename with the dir command, but you cannot use a system editor to edit
the file. A SAS file can be permanent or temporary.
What Is a Data Library?
An OpenVMS directory can contain many different types of files, including SAS files.
All SAS files in a directory that are accessed by the same engine belong to a SAS data
library. Thus, under OpenVMS, a SAS data library is a logical concept rather than a
physical one.
Any OpenVMS directory can become a SAS data library when SAS files are stored in
that directory; a single OpenVMS directory can contain several SAS data libraries. (See
“Multiple SAS Data Libraries in a Single Directory” on page 138.) Also, under
OpenVMS, several directories can constitute a single SAS data library if a search-string
logical name is assigned to the series of directories. You can have concatenated libraries
using a LIBNAME statement or LIBNAME function. (See “Using a Search-String
Logical Name to Concatenate SAS Data Libraries” on page 141.)
What Is a Libref?
SAS data libraries can be identified with librefs. A libref is a name by which you
reference the directory in your application. For more information about how to assign a
libref, see “Assigning Librefs under OpenVMS” on page 136.
What Is an Engine?
SAS files and SAS data libraries are accessed through engines. An engine is a set of
routines that SAS must use to access the files in the data library. SAS can read from
and, in some cases, write to the file by using the engine that is appropriate for that file
type. For some file types, you need to tell SAS which engine to use. For others, SAS
automatically chooses the appropriate engine. The engine that is used to create a SAS
data set determines the format of the file.
For more information about engines, see Chapter 6, “Using SAS Engines,” on page
153.
Additional Resources
For more information about SAS files, data libraries, and engines, see SAS Language
Reference: Concepts.
128
Common Types of SAS Files in OpenVMS
4
Chapter 5
Common Types of SAS Files in OpenVMS
What Are Data Sets?
Data sets consist of descriptor information and data values organized as a table of
rows and columns that can be processed by one of the engines. The descriptor
information includes data set type, data set label, the names and labels of the columns
in the data set, and so on. A SAS data set can also include indexes for one or more
columns.
SAS data sets are implemented in two forms:
3 If the data values and the data set’s descriptor information are stored in one file,
the SAS data set is called a SAS data file.
3 If the file simply contains information about where to obtain a data set’s data
values and descriptor information, the SAS data set is called a SAS data view.
The default engine processes the data set as if the data file (or data view) and the
indexes were a single entity.
For more information, see “SAS Data Files (Member Type DATA)” on page 128 and
“SAS Data Views (Member Type VIEW)” on page 128.
SAS Data Files (Member Type DATA)
The SAS data file is probably the most frequently used type of SAS file. These files
have the extension .sas7bdat. SAS data files are created in the DATA step and by
some SAS procedures. There are two types of data files:
3 Native data files store data values and their descriptor information in files
formatted by SAS. These are the traditional SAS data sets familiar from previous
versions of SAS.
Native SAS data files created by the default engine can be indexed. An index is
an auxiliary file created in addition to the data file it indexes. The index provides
fast access to observations within a SAS data file by a variable or key. Under
OpenVMS, indexes are stored as separate files but are treated as integral parts of
the SAS data file by SAS.
CAUTION:
Do not remove index files using OpenVMS commands. Removing the index file can
damage your SAS data set. Also, do not change its name or move it to a
different directory. Use the DATASETS procedure to manage indexes. 4
3 Interface data files store data in files that have been formatted by other software
and that SAS can only read. See “The OSIRIS and SPSS Engines under
OpenVMS” on page 167 for more information.
SAS Data Views (Member Type VIEW)
A SAS data view contains only the information needed to derive the data values and
the descriptor information. Depending on how the SAS data view is created, the actual
data can be in other SAS data sets or in other vendors’ files.
Views can be of two kinds:
3 Native SAS data views contain information about data in one or more SAS data
files or SAS data views. This type of view is created with the SQL procedure or
DATA step.
Using SAS Files
4
The Importance of Disk Space in the WORK Library
129
3 Interface SAS data views contain information about data formatted by other
software products, for example, a database management system. The ACCESS
procedure in SAS/ACCESS software, for example, creates such a view.
What Are Catalogs?
Catalogs are a special type of SAS file that can contain multiple entries. Many
different types of entries can be kept in the same SAS catalog. For example, catalogs
can contain entries created by SAS/AF and SAS/FSP software, windowing applications,
key definitions, SAS/GRAPH graphs, and so on.
Catalogs have the SAS member type of CATALOG.
What Are Stored Program Files?
Stored program files are compiled DATA steps generated by the Stored Program
Facility. For details on the Stored Program Facility, see SAS Language Reference:
Dictionary.
Stored program files have the SAS member type of PROGRAM.
What Are Access Descriptor Files?
Access descriptor files describe the data formatted by other software products such as
the Oracle database management system. Descriptor files created by the ACCESS
procedure in SAS/ACCESS software have the SAS member type of ACCESS.
The WORK Data Library under OpenVMS
The Importance of Disk Space in the WORK Library
Disk space is the aspect of the WORK library that is most likely to require your
consideration. If you have many large temporary SAS data sets, or if you use a
procedure that has many large utility files (for example, a PROC FREQ step with a
complex TABLES statement that you run against a large SAS data set), you might run
out of disk space in the WORK library. If you run out of disk space in batch mode, your
PROC or DATA step terminates prematurely and issues a message similar to the one
shown in the following output. In an interactive session, a dialog window asks you to
specify what action to take.
Output 5.1 Insufficient WORK Space Message
ERROR: Insufficient space in file WORK.DATASET.DATA.
NOTE: The SAS System stopped processing this step because of errors.
NOTE: SAS set option OBS=0 and will continue to check statements.
This may cause NOTE: No observations in data set.
WARNING: The data set WORK.DATASET may be incomplete. When this step
was stopped there were 22360 observations and 4 variables.
ERROR: Errors printed on page 1.
130
Changing the Location of the WORK Library
4
Chapter 5
Methods of Increasing Disk Space
To resolve the problem of insufficient WORK space, ask your system administrator to
increase the disk quota that has been assigned to you, or ask for the disk to be cleaned
up. Following are several methods of increasing your WORK space:
3 Designate a disk with more space as your WORK library. (See “Changing the
Location of the WORK Library” on page 130.)
3 Delete each temporary SAS data set as soon as you no longer need it. (See
“Deleting Temporary SAS Data Sets” on page 130.)
3 Direct the temporary SAS data sets to a different SAS data library so that disk
space in the WORK library is conserved for items that must be stored there. (See
“Directing Temporary SAS Data Sets to the USER Library” on page 131.)
3 Reduce the version limit on the directory in which the WORK library is created.
You can also combine these methods.
Changing the Location of the WORK Library
By default, a subdirectory of the current directory contains the WORK data library.
The name of the subdirectory that SAS creates for your WORK data library is
SAS$WORKcurrent-pid, where current-pid is the unique 8-byte process-identification
value that is assigned by OpenVMS. By default, this directory is created as a
subdirectory of the directory that is referenced by the OpenVMS logical name
SAS$WORKROOT. SAS$WORKROOT refers to SYS$DISK:[ ] by default, but your
system manager might have redefined it. The default may be changed when SAS is
installed by your system manager.
You can change the location of the WORK data library either by redefining the
OpenVMS logical name SAS$WORKROOT or by specifying the WORK= system option.
For example, the following SAS command tells SAS to create the WORK subdirectory in
the directory DISK:[XDIR]:
$ SAS91/WORK=DISK:[XDIR]
When SAS creates the WORK subdirectory, it also creates an OpenVMS process-level
logical name, SAS$WORKLIB, that references the WORK data library. You can use this
logical name within the SAS session to reference files in the WORK subdirectory. It
remains defined after the SAS session terminates.
Deleting Temporary SAS Data Sets
Under OpenVMS, temporary SAS data set means a data set that is stored in a
temporary SAS work library. That is, you cannot designate the data set itself as
temporary, but the data set takes on the attribute of the library in which it is stored.
One simple way to conserve space in the WORK library is to delete each temporary
SAS data set with a PROC DATASETS step after you no longer need it. However, there
are two problems with this method.
3 You can cause errors in a job by deleting a SAS data set before the job is finished
with it.
3 If you need several very large temporary SAS data sets in your job at the same
time, you might run out of space before you reach a point at which you can delete
any SAS data sets.
Using SAS Files
4
Directing Temporary SAS Data Sets to the USER Library
131
Directing Temporary SAS Data Sets to the USER Library
An alternative to deleting the temporary SAS data sets is to direct them to a
different SAS data library. You can use the USER= system option to store temporary
data sets in the USER library rather than in the WORK library. Unlike the WORK
library, when you use the USER library to store temporary files, these files are not
automatically deleted when SAS terminates.
Note: Utility data sets that are created by SAS procedures continue to be stored in
the WORK library. However, any data sets that have one-level names and that are
created by your SAS programs will be stored in the USER library. 4
Example: Using the USER= System Option
The following example illustrates the use of the USER= system option. The
numbered lines are explained following the code.
filename giant ’mydisk:[survey]tvdata.dat’;
libname result ’mydisk:[sasdata]’;
u libname temp ’disk2:[temp]’;
v options user=temp;
w data totalusa;
infile giant;
input home_id region income viewers cable;
if home_id=. then delete;
run;
x
proc freq;
tables region*income*viewers*cable
y / noprint out=result.freqdata;
run;
u
The LIBNAME statement associates the libref TEMP with the
directory DISK2:[TEMP].
v
In the OPTIONS statement, the USER= system option designates
the TEMP libref as the temporary SAS data library. Any data sets
that have one-level names and that are created by your SAS
program will be stored in this library.
w
A one-level name is used in the DATA statement. When the DATA
step is processed, the SAS data set TEMP.TOTALUSA is created.
x
Because the large TOTALUSA data set was directed to the TEMP
library, there is more space available in the WORK library for the
utility files that the FREQ procedure requires.
y
The SAS data set FREQDATA contains the results of the FREQ
procedure. A two-level name is used to store FREQDATA in the
permanent SAS data library MYDISK:[SASDATA].
Note: You can also assign the USER libref directly by using the LIBNAME
statement as follows:
libname user ’[mydir]’;
4
132
System Options That Control the WORK Data Library
4
Chapter 5
You can specify the USER= system option in the SAS command, as in the following
example:
$ SAS91/USER=[MYDIR]
System Options That Control the WORK Data Library
Two system options control the creation and deletion of the WORK subdirectory. By
default, the WORK subdirectory is deleted at the end of each SAS session, and a new
one is created at the beginning of the next session. The WORKTERM system option
controls the deletion of the WORK subdirectory, and the WORKINIT system option
controls the creation of the new subdirectory.
The WORKTERM and WORKINIT system options are valid in all operating
environments and are documented in SAS Language Reference: Dictionary.
The WORKINIT System Option
The default value of the WORKINIT system option is WORKINIT, and SAS
automatically creates a WORK subdirectory as it initializes. If you specify
NOWORKINIT, SAS looks for an existing WORK subdirectory in the current directory
and uses it, as is, if it exists. If it does not exist, one is created. You can specify the
WORKINIT system option in the SAS command or in a configuration file.
If you have logged out of your OpenVMS process since the previous WORK
subdirectory was saved, SAS cannot find the WORK data library even if you specify
NOWORKINIT, so it creates a new WORK data library. This is because your OpenVMS
process ID has changed and the subdirectory name includes the OpenVMS process ID.
In this case, the old WORK data library still exists (it was not written over), and you
can assign a new libref to the old WORK subdirectory (SAS$WORKold-pid) after you
get into your SAS session and use the files through the new libref. Search the default
directory for the old SAS session to find the old WORK subdirectory name. You can use
the X statement within your current SAS session to perform this directory search.
The WORKTERM System Option
The WORKTERM option controls whether the WORK subdirectory is deleted at the
end of your SAS session. The default value is WORKTERM. If you specify
NOWORKTERM, the WORK subdirectory is not deleted at the end of the session and
remains available for use with the next SAS session. Remember, however, that you
must specify NOWORKINIT in the next invocation of SAS in order to reuse the WORK
subdirectory that you saved.
The CLEANUP Tool
When to Use the CLEANUP Tool
Under OpenVMS, the CLEANUP tool is available to conveniently delete the WORK
data library or a utility file directory that was assigned by the UTILLOC system option.
When a SAS session terminates normally, the WORK library and any utility file
directories are deleted automatically (this is the default action). However, if your SAS
session terminates abnormally, the WORK library and the utility file directories might
not be deleted properly. To delete the WORK data library or a utility file directory, use
the CLEANUP tool.
Using SAS Files
4
The CLEANUP Tool
133
CAUTION:
Do not use the CLEANUP tool if your default directory is also the default directory for a
SAS batch job, and a SAS batch job is currently running. If you inadvertently delete the
WORK subdirectory that was created for a batch job, the job abends. Also, never
issue the CLEANUP command from an OpenVMS subprocess. 4
If the CLEANUP tool is not available at your site, contact your SAS Support
Consultant.
How to Delete Files with the CLEANUP Tool
To access the CLEANUP tool
1 Create a DCL symbol that points to the executable image. This symbol or foreign
command can be added to the SAS91.COM file. The symbol CLEANUP is used in
the following example:
$ CLEANUP == "$SAS$ROOT:[SASEXE]CLEANUP.EXE"
2 Issue the CLEANUP command from your DCL prompt to delete WORK data
libraries from one or more directories. For syntax information, see “Syntax
Variations of the CLEANUP Command” on page 133.
For each WORK data library that exists in the specified directory, the CLEANUP tool
issues the question
OK to delete
device:[dir]SAS$WORKnnnnnnnn.DIR;1
[YES]?
where device:[dir] is the name of the disk and directory to which you were attached
when you invoked SAS, and SAS$WORKnnnnnnnn.DIR;1 is the subdirectory that contains
the WORK library. YES is the default response, so to execute the CLEANUP command,
press the Return key. When the CLEANUP tool executes, it lists the names of the files
being deleted. If the specified directory contains more than one WORK subdirectory, the
CLEANUP tool then issues the previous question for the next WORK data library.
Note:
This behavior is the same if you are deleting a utility file directory.
4
Syntax Variations of the CLEANUP Command
The following are some syntax variations to be aware of:
To clean the current directory of work files, type
$ CLEANUP
To clean work files from [.TEMP], type
$ CLEANUP [.TEMP]
To clean work files from an entire directory tree, type
$ CLEANUP [...]
The CLEANUP command accepts the following qualifiers:
/LOG | /NOLOG
/LOG is the default. This causes the CLEANUP tool to issue a message showing
each file as it is deleted, and it shows how many directories were deleted. If you
specify /NOLOG, no messages are issued unless the CLEANUP tool encounters an
error while trying to delete one or more files.
134
The SASUSER Data Library
4
Chapter 5
/CONFIRM | /NOCONFIRM
/CONFIRM is the default. This causes the CLEANUP tool to prompt you for each
directory to be deleted. The default is Y for yes if you press RETURN. If you do
not want to be prompted, or if you are submitting the command from a batch job,
then use /NOCONFIRM.
/DATE=dd-mm-yy
This qualifier deletes all SAS work directories created on or before the specified
date.
Note: The /V5 | /NOV5 and /V6 | /NOV6 options for the CLEANUP command are
no longer supported. 4
The SASUSER Data Library
What Is the SASUSER Library?
SAS assigns a data library that has the libref SASUSER. The SASUSER library
contains a SAS catalog that enables you to customize certain features of SAS while your
SAS session is running and to save these changes. For example, in Base SAS software,
any saved changes that you make to function key settings or to window attributes are
stored in a catalog named SASUSER.PROFILE.
Note: If SASUSER.PROFILE does not exist and SASHELP.PROFILE (in the
SASHELP data library) does exist, SAS copies SASHELP.PROFILE to
SASUSER.PROFILE before invoking a SAS session. 4
The SASUSER library can also contain personal catalogs for other SAS software
products. You can also store SAS data files, SAS data views, SAS programs, and
additional SAS catalogs in your SASUSER library.
In addition to storing function key settings and window attributes, the
SASUSER.PROFILE catalog is used to store your DEFAULT.FORM. The
DEFAULT.FORM is created by the FORM subsystem. It is used to control the default
destination of all output that is generated by the PRINT command during a SAS
windowing environment session. For information about the FORM subsystem, see
“Host-Specific Frames of the Form Window” on page 272 and SAS Language Reference:
Concepts.
Under OpenVMS, the SASUSER= system option specifies the location of the
SASUSER data library. The default value of the SASUSER= system option is the value
of the SAS$USER logical name. This logical name is defined by the SAS91.COM file.
By default, the SAS$USER logical name points to the SASUSER91 subdirectory of the
SYS$LOGIN directory. (SYS$LOGIN is your default login directory.) For more
information about how to change the location of this library, see “SASUSER= System
Option” on page 492.
Creating Your Own SASUSER Libraries
By creating your own SASUSER libraries, you can customize SAS to meet the
requirements of a number of different types of jobs. For example, suppose you want to
create a user profile for a particular type of task that requires a unique set of key
definitions.
To tell SAS which library to use as your SASUSER library, use the SASUSER=
system option when you invoke SAS. For example, if you want to designate a directory
named MYSUSER as your SASUSER library, you would use the following command:
Using SAS Files
4
Compatibility of Version 6 SAS Files
135
$ SAS91/SASUSER=DISK:[MYSUSER]
Any profile changes that you make during your session are saved in the SAS catalog
SASUSER.PROFILE, which is a file in the MYSUSER directory. These changes will be
retained when you end your SAS session.
Compatibility of Existing SAS Files with SAS 9.1
Compatibility of Version 7 and Version 8 SAS Files
Supported File Types in SAS 9.1
Starting in SAS 9, SAS is built to take advantage of the OpenVMS Alpha 64–bit
architecture. You can access all of your Version 7 and Version 8 SAS files (except SAS
catalogs) in SAS 9.1. (For more information about SAS catalogs, see “Unsupported File
Types in SAS 9.1” on page 135.) Since these files are compatible with SAS 9.1, they are
referred to as native files. For a list of the supported processing for each native file
type, see the SAS 9 compatibility documentation in the Migration Community at
support.sas.com/rnd/migration.
Although these file types are supported in SAS 9.1, you might want to convert your
Version 7 and Version 8 data libraries to the SAS 9 format. SAS 9.1 does not support
output or update processing for all native file types. Converting your data libraries
enables you to have input, output, and update processing on all file types, and you can
take advantage of the new SAS 9 features. To convert these SAS files, use the
MIGRATE procedure.
Unsupported File Types in SAS 9.1
You cannot access your Version 7 or Version 8 SAS catalogs in SAS 9.1. Since these
files are incompatible with SAS 9.1, they are referred to as foreign files. To use your
Version 7 or Version 8 catalogs in SAS 9.1, use the MIGRATE procedure with the
SLIBREF= option to convert these files to the SAS 9.1 format. For more information
about the MIGRATE procedure, see the Migration Community at support.sas.com/
rnd/migration.
Compatibility of Version 6 SAS Files
Since Version 6 files are not compatible with SAS 9.1, they are referred to as foreign
files. SAS 9.1 only supports input processing for Version 6 data files using the V6
read-only engine. This engine does not support output or update processing, and
indexes are not supported. To convert your all of your Version 6 files to the SAS 9.1
format, use the MIGRATE procedure with the SLIBREF= option.
For more information about the compatibility of Version 6 files and the MIGRATE
procedure, see the Migration Community at support.sas.com/rnd/migration.
Note: See SAS/CONNECT User’s Guide for information about accessing Version 6
SAS files if you use Remote Library Services to access SAS files on a server. 4
136
Accessing SAS Files under OpenVMS
4
Chapter 5
Accessing SAS Files under OpenVMS
Difference in Accessing Files in Version 6 and SAS 9.1
In order to access an individual SAS file in Version 6 of SAS, you had to first assign a
libref or an OpenVMS logical name to the SAS data library. You could then refer to
individual SAS files as libref.member (or logical-name.member), where member is the
filename of the individual SAS file.
In SAS 9.1, you can still use librefs or logical names as a convenient way of referring
to a SAS data library in SAS programs. However, you can also fully specify individual
SAS files in most SAS statements and procedures that access SAS files. If portable SAS
code is an issue, then using librefs is the recommended method.
Advantages of Using Librefs Rather than OpenVMS Logical Names
Although you can use an OpenVMS logical name to identify a SAS data library to
SAS, you might want to use a SAS libref instead for the following reasons:
3 You cannot assign an engine nor specify any engine/host options with the DCL
DEFINE command. SAS uses the procedure described in “How SAS Assigns an
Engine When No Engine Is Specified” on page 147 to determine which engine to
use. However, it is more efficient to specify an engine explicitly in a LIBNAME
statement. Also, the following SAS engines must be specified in a LIBNAME
statement because they are not assigned by default: XPORT, SPSS, OSIRIS, and
REMOTE.
3 OpenVMS logical names are not included in the list that is produced by the
LIBNAME LIST statement until after they have been used as librefs in your SAS
session. (See “Listing Your Current Librefs under OpenVMS” on page 136.)
Assigning Librefs under OpenVMS
Listing Your Current Librefs under OpenVMS
As in other operating environments, you can view your current librefs using the
following methods:
3 the LIBNAME statement. The syntax for this statement is the following:
LIBNAME _ALL_ LIST;
3 the LIBNAME window. To open the LIBNAME window, enter libname in the
command line.
3 the SAS Explorer window. To see information about your currently assigned SAS
data libraries, complete the following steps:
1 From the tree structure, select Libraries to list all assigned librefs.
2 Select View and then select Details to list attributes of the assigned librefs.
Using SAS Files
4
Methods for Assigning Librefs
137
3 the Properties dialog box. Select the libref. With the cursor on the highlighted
libref, click and hold the right mouse button (MB3). A pop-up menu opens. Select
Properties.
OpenVMS logical names that you have assigned to SAS data libraries are also listed,
but only after you have used them as librefs in your current SAS process. (See “Using
an OpenVMS Logical Name as a Libref” on page 140.)
Methods for Assigning Librefs
You can use any of the following methods to assign a SAS libref:
3
3
3
3
3
the LIBNAME statement
the LIBNAME function
the LIBASSIGN command
the LIBNAME window
the SAS Explorer window .
A libref assignment remains in effect for the duration of the SAS job, session, or
process unless you either clear the libref or use the same libref in another LIBNAME
statement or LIBNAME function.
If you assign a libref from a SAS process, that libref is valid only within that SAS
process.
If you clear a libref from within a SAS process, that libref is not cleared from other
SAS processes. For information about clearing librefs, see “Clearing Librefs under
OpenVMS” on page 139.
Using the LIBNAME Statement
The LIBNAME statement identifies a SAS data library to SAS, associates an engine
with the library, enables you to specify options for the library, and assigns a libref to it.
For details about LIBNAME statement syntax, see “LIBNAME Statement” on page 420.
Using the LIBNAME Function
The LIBNAME function takes the same arguments and options as the LIBNAME
statement. For more information about the LIBNAME function, see “LIBNAME
Function” on page 340.
Using the LIBASSIGN Command
Perform the following steps to assign a libref using the LIBASSIGN command:
1 Issue the LIBASSIGN command in the command window. The New Library dialog
box opens.
2 Specify the libref in the Name field.
3 Specify an engine for the libref in the Engine field by selecting the default engine
or another engine from the drop-down menu. Depending on the engine that you
specify, the fields in the Library Information area might change.
4 Click the Enable at startup box to assign this libref when you invoke SAS.
5 Specify the necessary information for the desired SAS data library in the Library
Information area. Depending on the engine selected, there may or may not be a
Path field available for input.
138
Multiple SAS Data Libraries in a Single Directory
4
Chapter 5
6 Specify LIBNAME options in the Options field. These options can be specific to
your host or engine, including options that are specific to a SAS engine that
accesses another software vendor’s relational database system.
7 Click OK .
Using the LIBNAME Window
Perform the following steps to assign a libref from the LIBNAME window:
1 Issue the LIBNAME command in the command window. The LIBNAME window
opens.
2 From the File pull-down menu, select New. The New Library dialog box opens.
3 Fill in the fields in the New Library dialog box, described in “Using the
LIBASSIGN Command” on page 137.
4 Click OK .
Using the SAS Explorer Window
Perform the following steps to assign a libref from the SAS Explorer window:
1 From the File pull-down menu, select New when the Libraries node in the tree
structure is active. The New dialog box opens.
2 Select Library, and then click OK . The New Library dialog box opens.
3 Fill in the fields in the New Library dialog box, described in “Using the
LIBASSIGN Command” on page 137.
4 Click OK .
Multiple SAS Data Libraries in a Single Directory
A SAS data library consists of all the SAS files in the same OpenVMS directory (or in
a group of directories—see “Using a Search-String Logical Name to Concatenate SAS
Data Libraries” on page 141) that are accessed by the same engine. If a directory
contains SAS files that are accessed by different engines, then you have more than one
SAS data library in the directory, and you should therefore have a different libref for
each engine-directory combination. (You cannot assign the same libref to more than one
engine-directory combination. The second assignment merely overrides the first
assignment.)
Example: Assigning Librefs to Two Engines in the Same Directory
Suppose that the directory [MYDIR] contains SAS files that were created by the V9
engine as well as SAS files that were created by the CONCUR engine. You could use
the following LIBNAME statements to assign different librefs to the two engines:
libname one v9 ’[mydir]’;
libname two concur ’[mydir]’;
Data sets that are subsequently referenced by the libref ONE are created and
accessed using the V9 engine. Data sets that are referenced by the libref TWO are
created and accessed using the CONCUR engine. You can then concatenate librefs ONE
and TWO and access all files:
libname concat (one two);
Using SAS Files
4
Clearing Librefs under OpenVMS
139
Multiple Librefs for a Single SAS Data Library
You can assign multiple librefs to the same SAS data library (or engine-directory
combination), and you can use those librefs interchangeably.
Example: Assigning Two Librefs to the Same Data Library
Suppose that in two different programs you used different librefs for the same data
sets. Later you develop a new program from parts of the two old programs, or you use
the %INCLUDE statement to include two different programs. In the new program, you
could simply assign the two original librefs to each data library and proceed.
The following LIBNAME statements assign the librefs MYLIB and INLIB to the
same SAS data library:
libname mylib v9 ’[mydir.datasets]’;
libname inlib v9 ’[mydir.datasets]’;
Because the engine names and SAS data library specifications are the same, the
librefs MYLIB and INLIB are identical and interchangeable.
Clearing Librefs under OpenVMS
Syntax for Clearing a Libref with the LIBNAME Statement or LIBNAME
Function
To disassociate a libref from a SAS data library, use the following forms of the
LIBNAME statement or the LIBNAME function, where libref is the libref of the data
library that you want to clear:
LIBNAME statement:
LIBNAME libref < CLEAR>;
LIBNAME function:
LIBNAME(libref)
In both cases, the libref is cleared only if there are no open files that are associated
with that libref, and the libref is cleared only for the SAS process or job from which you
submit the LIBNAME statement or function.
How to Clear Librefs with the SAS Explorer Window
You can also use the SAS Explorer window to clear librefs, as follows:
1 With the tree structure activated, select the libref from the Libraries node.
2 With the cursor on the highlighted libref, click and hold the right mouse button
(MB3).
3 A pop-up menu opens.
4 Select Delete.
140
Assigning OpenVMS Logical Names
4
Chapter 5
Assigning OpenVMS Logical Names
How to Assign an OpenVMS Logical Name
There are some advantages to using the LIBNAME statement to identify your SAS
data libraries to SAS. (See “Advantages of Using Librefs Rather than OpenVMS Logical
Names” on page 136.) However, you can also use an OpenVMS logical name for the
same purpose. To assign an OpenVMS logical name, use the DCL DEFINE command.
Note: Because you cannot specify an engine name in the DCL DEFINE command,
SAS uses the procedure described in “How SAS Assigns an Engine When No Engine Is
Specified” on page 147 to determine which engine to use. 4
To use an OpenVMS logical name to refer to a SAS data library, you must define the
logical name either outside SAS or from your SAS session using the X statement.
Example: Defining a Logical Name with the X Statement
You can assign the OpenVMS logical name MYLIB to the directory [MYDIR] in
either of the following ways:
3 $ DEFINE MYLIB [MYDIR]
3 $ x ’define mylib [mydir]’;
Using an OpenVMS Logical Name as a Libref
After assigning an OpenVMS logical name to a directory, you can use the logical
name in a SAS job in the same way you would use a libref. Because the OpenVMS
logical name is being used as a SAS name, it must follow the SAS naming conventions.
For details about SAS naming conventions, see SAS Language Reference: Concepts.
The first time an OpenVMS logical name is used in this manner, SAS assigns it as a
libref for the SAS data library. The logical name is not listed by the LIBNAME LIST
statement or listed in the Explorer window until after you have used it in a SAS
statement. (See “Listing Your Current Librefs under OpenVMS” on page 136.)
Note: OpenVMS logical names that are defined in a subprocess are not recognized
by the current SAS session. However, OpenVMS logical names that are defined in the
OpenVMS parent process are available for use during the current session. For
information about how to use the X statement or the X command to define an
OpenVMS logical name in the OpenVMS parent process, see “Issuing DCL Commands
during a SAS Session” on page 43. 4
Examples: Using a Logical Name as a Libref in a DATA Step and Procedure
If you assigned the OpenVMS logical name MYLIB to a SAS data library, you could
then use MYLIB as a libref in a SAS DATA step:
data mylib.a;
set mylib.b;
run;
Similarly, you could use the logical name as a libref in a SAS procedure:
proc contents data=mylib._all_;
run;
Using SAS Files
4
Using a Search-String Logical Name to Concatenate SAS Data Libraries
141
Using an OpenVMS Logical Name in the LIBNAME Statement
Associating an Engine with an OpenVMS Logical Name
Because you cannot specify an engine in the DCL DEFINE command, you might
want to use the LIBNAME statement to specify an engine for a SAS data library to
which you previously assigned an OpenVMS logical name. You can use the logical name
in place of the libref in a LIBNAME statement, as in this example, which associates the
BASE engine with the logical name MAIL:
libname mail base;
Associating a Libref and Engine with a Logical Name
If you specify the logical name in place of the SAS-data-library argument of the
LIBNAME statement, then you can associate both a libref and an engine with the
logical name. The following example associates the libref IN and the BASE engine with
the data library that is referred to by the logical name MAIL:
libname in base ’mail’;
Specifying Library or Engine/Host Options with a Logical Name
You can also use the LIBNAME statement to specify library options that are valid in
all operating environments, or engine/host options for a SAS data library to which you
previously assigned an OpenVMS logical name. The following LIBNAME statement
associates the libref MAIL and the V8TAPE engine with a path that includes the logical
name MYDISK. It also specifies the portable library option ACCESS=:
libname mail v8tape ’mydisk:[mylib]’
access=readonly;
Using a Search-String Logical Name to Concatenate SAS Data Libraries
If you have several directories that you want to use as a single SAS data library, you
can define an OpenVMS search-string logical name to the list of libraries, and then use
that logical name in your SAS programs. The list of libraries can include both
directories and other logicals.
Order in Which SAS Opens Files
Files that are opened for input or update are opened from the first directory in which
they are found. Files that are created or opened for output are always created in the
first directory in the search list. For example, if a filename that you specify exists in
both [DIR1] and [DIR3], SAS opens the file that is in [DIR1].
Example 1: Assigning a Search-String Logical Name with the X Statement
The following X statement assigns the search-string logical name MYSEARCH to the
directories [DIR1], [DIR2], [DIR3], and MYLIB2:
x ’define mysearch [dir1],[dir2],[dir3],mylib2’;
142
Concealed Logical Names
4
Chapter 5
When you reference the data set MYSEARCH.TEST1, SAS searches [DIR1], [DIR2],
[DIR3], and then the directory pointed to by MYLIB2 for the TEST1 data set:
data new;
set mysearch.test1;
if total>10;
run;
Example 2: Using a LIBNAME Statement
You could also use a LIBNAME statement to assign the libref INLIBS to this series of
directories. You use the search-string logical name as the SAS-data-library specification:
libname inlibs ’mysearch’;
Example 3: Specifying a Search-String Logical Name in SAS Explorer
From the SAS Explorer’s New Library dialog box, you can also specify a search-string
logical name to assign a libref. To do this, type the search-string logical name in the
Path field.
Additional Documentation
For additional examples of how SAS files in concatenated SAS data libraries are
accessed, see “Accessing Files in Concatenated SAS Data Libraries under OpenVMS” on
page 143.
For more information about search-string logical names, refer to OpenVMS User’s
Manual.
Concealed Logical Names
By default, SAS translates concealed logical names to their full physical
specifications when they are used in LIBNAME statements. For example, consider the
following definition for the logical name MYDISK:
$ DEFINE/TRANSLATION=CONCEALED _$ MYDISK $1$DUA100:[MYDISK.]
SAS translates the MYDISK concealed logical name to its full physical specification,
resulting in the following libref definition:
1? LIBNAME MYLIB ’MYDISK:[MYDIRECTORY]’;
Note: Libref MYLIB was successfully assigned
as follows:
Engine: V9
Physical Name: $1$DUA100:[MYDISK.MYDIRECTORY]
Note: The EXPANDLNM system option controls whether concealed logical names
are expanded and displayed. Use the NOEXPANDLNM form of this option if you do not
want your concealed logical names to be expanded and displayed. For more
information, see “EXPANDLNM System Option” on page 461. 4
Using SAS Files
4
Accessing Data Sets That Have the Same Name
143
Accessing Files in Concatenated SAS Data Libraries under OpenVMS
Order in Which Concatenated Directories Are Accessed
SAS uses a set of rules to determine the order in which concatenated directories are
accessed. The rules differ depending on whether you are opening a SAS file for input,
update, or output:
3 When a SAS file is accessed for input or update, the first file found by that name is
the one that is accessed. In the following example, if the data set SPECIES exists
in both the [MYDIR] and [MYDIR.DATASETS] directories, the one in the [MYDIR]
directory is printed:
x ’define mysearch [mydir],[mydir.datasets]’;
libname mylib ’mysearch’;
proc print data=mylib.species;
run;
The same would be true if you used the FSEDIT procedure to open the
SPECIES data set for update.
3 When a SAS file is accessed for output, it is always written to the first directory, if
that directory exists. If the first directory does not exist, then an error message is
displayed and SAS stops processing this step, even if a second directory exists. In
the following example, SAS writes the SPECIES data set to the first directory,
[MYDIR]:
x ’define mysearch [mydir], sas$samp:[sasdata]’;
libname mylib ’mysearch’;
data mylib.species;
x=1;
y=2;
run;
If a copy of the SPECIES data set exists in the second directory, it is not
replaced.
Accessing Data Sets That Have the Same Name
If you create a new SAS data set from a data set that has the same name, the DATA
statement uses the output rules and the SET statement uses the input rules. In this
example, the SPECIES data set originally exists only in the second directory,
MYDISK:[MYDIR].
x ’define mysearch sys$disk:[sas],mydisk:[mydir]’;
libname test ’mysearch’;
data test.species;
set test.species;
if value1=’y’ then
value2=3;
run;
The DATA statement opens SPECIES for output according to the output rules, which
indicate that SAS opens a data set in the first of the concatenated directories
(SYS$DISK:[SAS]).
The SET statement opens the existing SPECIES data set in the second
directory(MYDISK:[MYDIR]), according to the input rules. Therefore, the original
144
Accessing SAS Files on Tape under OpenVMS
4
Chapter 5
SPECIES data set is not updated. After the DATA step is processed, two SPECIES data
sets exist, one in each directory.
Accessing SAS Files on Tape under OpenVMS
DCL Commands for Tape Access
In order to write to a tape in a SAS job, you can issue the following DCL commands
to allocate the tape drive and mount the appropriate tape volume. You must issue these
commands in the order shown:
$ ALLOCATE tape-device:
$ INITIALIZE tape-device: volume-label
$ MOUNT tape-device: volume-label
Note: If you are writing SAS files to tape with the TAPE engine, you must mount
the tape as a labeled Files-11 tape. A labeled Files-11 tape has header information
preceding each file. An unlabeled, or foreign, tape does not have this header
information. The TAPE engine can process only labeled Files-11 tapes. For more
information about Files-11 tapes, refer to Guide to OpenVMS Files and Devices. 4
CAUTION:
Issue the INITIALIZE command only if you are writing to a tape for the first time. When a
tape is initialized, any files that were previously stored on the tape are no longer
accessible. Therefore, use the ALLOCATE and MOUNT commands when you want to
read from a tape or write additional files to a tape; do not reinitialize the tape. 4
The volume label that you specify in the INITIALIZE command must be used
subsequently in the MOUNT command in order to access the tape. After you have
issued the appropriate commands to access the tape, you must then use the LIBNAME
statement to associate a libref with the tape.
When your SAS job finishes, issue the following commands to release the tape drive
from your terminal session:
$ DISMOUNT tape-device:
$ DEALLOCATE tape-device:
Any of these commands can also be issued in the X statement. However, if you use
the X statement, you must issue the INITIALIZE command before the ALLOCATE
command. The reverse order is not supported when you use the X statement.
Accessing Multivolume Tapes
When creating SAS files on multivolume tapes, you must initialize the tapes before
you write the files to the tapes. If you do not initialize the tapes first, the operating
environment will not recognize them as part of the same volume set. When you mount
the first volume of the set, use the following MOUNT command:
$ MOUNT/INITIALIZE=CONTINUATION _$ tape-device: label
Using SAS Files
4
Copying Files to Tape
145
This command instructs the OpenVMS system to add a continuation number to each
label as it creates the multivolume set. For example, if you have a series of tapes
initialized to MYTAPE and use drive MUA0:, use the following command:
$ MOUNT/INITIALIZE=CONTINUATION MUA0: MYTAPE
When the first volume is filled, the operating environment prompts the operator to
mount MYTA02. The OpenVMS system adds a sequencing number to the tape label. As
tape labels are limited to six characters, the original label, if it exceeds this number,
can be truncated when the continuation number is added.
Reading and Writing SAS Files on Tape
In addition to the appropriate DCL commands, use the LIBNAME statement or the
New Library dialog box to associate a libref with the tape when reading or writing SAS
files. The following is an example of the LIBNAME statement:
libname sample tape ’mua0:’;
Then use the libref SAMPLE in the appropriate SAS statements to refer to the tape.
The following is an example:
data sample.oldstat;
set status;
run;
A libref associated with a tape drive signals that the file to be read or written is in
sequential format.
Note: You can also write SAS files in sequential format on disk if you define the
libref to a disk location, but use the sequential engine (TAPE) in the LIBNAME
statement or in the New Library dialog box. 4
The tape can contain one or more SAS files. When you read or write a file on tape, you
use a two-level name; the first level is a libref that refers to the tape, and the second
level names the SAS file to be read or written. The following is an example of the
LIBNAME statement:
libname mytape ’mua0:’;
data diskds1;
set mytape.ds1;
run;
This program reads a data set with the filename DS1.SAS7SDAT from the tape
referenced by the libref MYTAPE.
You can write SAS files with duplicate names to the same tape. For example, you can
have more than one SAS data set named DS1 on a tape. When you read the data set
named DS1, the first (and possibly the oldest) version of DS1 found on the tape is the
version read. The first version found depends on the current position of the tape.
Copying Files to Tape
Advantage to Copying Existing SAS Files Using the COPY Procedure
Use the COPY procedure to copy existing SAS files from disk to tape. The following
is an example:
libname mydisk ’[dir1]’;
libname mytape tape ’mua0:’;
146
Copying Files to Tape
4
Chapter 5
proc copy in=mydisk out=mytape;
run;
This procedure is often simpler to use than the DCL COPY command when moving
SAS files to tape. Also, SAS log notes document the files copied. You can also use the
DCL DIRECTORY command to list the SAS files on a labeled tape after it has been
created.
When you use the DCL COPY command to move sequential format files created on
disk to tape, you must create the files with a page size of 512 bytes and mount the tape
with a block size of 512 bytes.
The following example creates a sequential format data set on disk. It then shows
how to copy it to tape and access it from within SAS.
1 Create the data set on disk using the sequential engine, with a page size of 512
bytes.
2 Use the BUFSIZE= data set option to set the page size:
libname seqdisk tape ’[dir]’;
data seqdisk.a(bufsize=512);
... more DATA step statements ...
run;
3 Mount the tape with a block size of 512 bytes and copy the file to tape by issuing
the following commands:
$ MOUNT/BLOCKSIZE=512 MUA0: MYTAPE
$ COPY A.SAS7SDAT MYTAPE:
You can now access this data set directly from within SAS, as in the following
statements:
libname seq tape ’mua0:’;
proc contents data=seq.a;
run;
Advantage to Creating a Data Set with the TAPE Engine
If you can, it is far more efficient to create the data set on tape within SAS, using the
TAPE engine. Use the DCL COPY command only when you have no other alternative.
The advantage of using the TAPE engine instead of the DCL COPY command is that
when you use the TAPE engine, you can use larger page sizes and block sizes. This
means that I/O is more efficient because you can process the data in larger chunks.
To convert the data sets currently in disk format to sequential format before using
the COPY command to move them to tape, you can use the following steps:
libname mydisk ’[dir1]’;
libname mytape tape ’[dir2]’;
data mytape.a;
set mydisk.a;
run;
If you store the files on an unlabeled tape, they must be restored to disk before SAS
can access them.
Using SAS Files
4
What Are Nonnative Files?
147
How SAS Assigns an Engine When No Engine Is Specified
Advantage to Assigning an Engine
It is always more efficient to explicitly specify the engine name than to ask SAS to
determine which engine to use. To assign an engine name, you can use any of the
following:
3 LIBNAME statement
3 LIBNAME function
3 LIBASSIGN command in the command window. If you use the LIBASSIGN
command the Default engine—that is, BASE—is listed in the Engine field of the
New Library dialog box; when you select OK , you automatically select this
default engine.
Rules SAS Uses to Determine Engine When No Engine Is Specified
If you do not assign an engine name, SAS looks at the OpenVMS file types of the files
that exist in the specified directory and uses the following rules to determine which
engine to assign:
3 If the directory contains SAS data sets from only one of the native library engines
that are supported, then that engine is assigned to the libref.
3 If the directory contains no SAS data sets, then the default engine is assigned to
the libref. The default engine is determined as follows:
3 For SAS data libraries on disk, the default engine is determined by the value
of the ENGINE= system option. By default, the ENGINE= system option is
set to V9. However, you can change the value of this system option if you
prefer to use a different engine as the default engine for disk libraries. Other
valid values are V8, V6, and CONCUR. For more information about the
ENGINE= system option, see “ENGINE= System Option” on page 460 and
SAS Language Reference: Dictionary.
3 For sequential-format SAS data libraries (either on tape or disk), the default
engine is determined by the value of the SEQENGINE= system option. By
default, SEQENGINE= is set to TAPE. The other valid values are V9TAPE
and V8TAPE.
3 A directory that contains SAS data sets from more than one engine is called a
mixed-mode library. SAS assigns the default engine to mixed-mode libraries.
Sharing Data between OpenVMS Platforms
What Are Nonnative Files?
SAS files that were created in an OpenVMS operating environment other than the
one on which the user is currently running are described as nonnative. For example,
data sets that were created on the VAX platform are defined as nonnative when they
are moved to an Alpha platform.
148
How to Convert Nonnative Data
4
Chapter 5
How to Convert Nonnative Data
Nonnative data must be converted before it can be accessed. There are two ways to
convert nonnative data:
3 convert the data “transparently” between the OpenVMS VAX format and the
OpenVMS Alpha format each time you access the file. This method causes
performance degradation.
3 convert the data to the local format one time only. This method is more efficient,
eliminating the need to convert the data each time you access it.
Limitations of One-Time-Only Conversions
A limitation of the one-time-only conversion is that the OpenVMS VAX platform
supports a minimum numeric variable length of 2 bytes. The OpenVMS Alpha platform
supports a minimum numeric variable length of 3 bytes. Therefore, using this method
to move data from the VAX platform, which supports 2-byte numeric storage, to the
Alpha platform, which supports 3-byte numeric storage, is not permitted. Instead, to
move data from the VAX platform to an Alpha platform, you must use the VAXTOAXP
procedure. Consequently, there is a potential loss of numeric precision when you move
data from a VAX platform to an Alpha platform. For more information, see Chapter 10,
“Data Representation,” on page 233. For more information about the VAXTOAXP
procedure, see “VAXTOAXP Procedure” on page 391.
Note: Starting in Version 8, the VAXTOAXP procedure increased, by one character,
VAX numeric variables that are two to seven characters in length to minimize loss of
precision. 4
Example: How to Convert a File Using SAS Code
The following is an example of how you can convert a file:
data a;
set b;
run;
This code reads file B, which is in nonnative format, and creates a native version A.
Multiuser Access to SAS Files under OpenVMS
Under certain circumstances, a SAS file can be accessed by more than one user
concurrently. This feature enables different users, or the same user from different
processes, to access the same SAS file at the same time without conflict. However, to
prevent problems of integrity or data conflict, multiple accesses of data are sometimes
blocked. The following rules summarize the conditions for allowing or disallowing
multiple access to the same SAS file with any engine except the CONCUR engine:
3 If a file is open for input, another user can also open that file for input. The same
process can also open the file for output, but all other access is denied.
3 If a file is opened for update, all other access is denied.
3 If a file is opened for output, the same process can also open the file for input if
the file previously existed, but all other access is denied.
The one exception to these rules is when an OpenVMS search-string logical name is
used as the physical path of a LIBNAME statement. In this case, when a SAS file is
Using SAS Files
4
Estimating the Amount of Disk Space for a Data Set
149
opened for input, another user can open that file for input. If the file is opened for
update or output, all other access is denied, including access by the same process.
Under OpenVMS, the concurrency engine (CONCUR) allows concurrent read and
write access to native data sets. For details, see “The CONCUR Engine under
OpenVMS” on page 160.
Estimating the Size of a SAS Data Set under OpenVMS
Estimating the Amount of Disk Space for a Data Set
To obtain a rough estimate of how much space you need for a disk-format SAS data
set that was created by the V9 engine, follow these steps:
Note: This procedure is valid only for uncompressed native SAS data files that were
created with the V9 engine. 4
1 Use the CONTENTS procedure to determine the size of each observation. (See
“Determining Observation Length with PROC CONTENTS” on page 149.)
2 Multiply the size of each observation by the number of observations.
3 Add 10 percent for overhead.
Determining Observation Length with PROC CONTENTS
To determine the length of each observation in a SAS data set, you can create a SAS
data set that contains one observation. Then run the CONTENTS procedure to
determine the observation length. The following program produces a SAS data set plus
PROC CONTENTS output:
data oranges;
input variety $ flavor texture looks;
total=flavor+texture+looks;
datalines;
navel 9 8 6
;
proc contents data=oranges;
run;
150
Optimizing Page Size
4
Chapter 5
The following is the output:
Output 5.2
CONTENTS Procedure Output
The CONTENTS Procedure
Data Set Name
WORK.ORANGES
Member Type
DATA
Engine
V9
Created
Monday, May 12, 2003 01:46:21
Last Modified
Monday, May 12, 2003 01:46:21
Protection
Data Set Type
Label
Data Representation ALPHA_VMS_64
Encoding
latin1 Western (ISO)
Observations
Variables
Indexes
Observation Length
Deleted Observations
Compressed
Sorted
1
5
0
40
0
NO
NO
Engine/Host Dependent Information
Data Set Page Size
Number of Data Set Pages
First Data Page
Max Obs per Page
Obs in First Data Page
Number of Data Set Repairs
Filename
Release Created
Host Created
File Size (blocks)
8192
1
1
203
1
0
SASDISK:[SASDEMO.SAS$WORK2040F93A]ORANGES.SAS7BDAT
9.0101B0
OpenVMS
17
Alphabetic List of Variables and Attributes
#
Variable
Type
Len
2
4
3
5
1
flavor
looks
texture
total
variety
Num
Num
Num
Num
Char
8
8
8
8
8
To determine observation length, the only values that you need to pay attention to
are the following
Observation Length
is the record size in bytes.
Compressed
has the value NO if records are not compressed, and either CHAR or BINARY if
records are compressed. If the records are compressed, do not use the procedure
given in “Estimating the Size of a SAS Data Set under OpenVMS” on page 149.
For an explanation of the CHAR and BINARY values, see “COMPRESS System
Option” in SAS Language Reference: Dictionary. For more information about
compressing data files, see SAS Language Reference: Concepts.
Optimizing Page Size
The procedure output shown in Output 5.2 provides values for the physical
characteristics of Work.Oranges that are useful when selecting an optimal page size.
Some values, such as the page size and the number of observations per page for
uncompressed SAS data sets, are Engine/Host Dependent Information. To
determine the optimal page size for a data set, the following values are important:
Using SAS Files
4
Optimizing Page Size
151
Observations
is the number of observations in the data set that have not been deleted or flagged
for deletion.
Observation Length
is the record size in bytes.
Compressed
has the value NO if records are not compressed, and either CHAR or BINARY if
records are compressed.
For an explanation of the CHAR and BINARY values, see “COMPRESS System
Option” in SAS Language Reference: Dictionary. For more information about
compressing data files, see SAS Language Reference: Concepts.
Data Set Page Size
is the page size, expressed in bytes.
Number of Data Set Pages
is the number of pages for the data set.
First Data Page
is the page number of the page containing the first observation for noncompressed
files. Descriptor information is stored before the observations in the file.
Max Obs per Page
is the maximum number of observations a page can hold for noncompressed files.
Obs in First Data Page
is the number of observations in the first page for noncompressed files.
Note: First Data Page, Max Obs per Page, and Obs in First Data Page are only
provided by the CONTENTS procedure for a noncompressed data set. These values
have little meaning for a compressed data set because each observation could be a
different size. 4
The following values change based on the number of observations in the data set:
3 Observations
3 Number of Data Set Pages
3 Obs in First Data Page. This value changes until there are enough observations to
fill the first data page.
For a single page size, the other values do not change.
Experimenting with Buffer Size to Set an Optimal Page Size
Using the CONTENTS procedure information, you can experiment with default page
size and various BUFSIZE= values to select an optimal page size—one that optimizes
your most valuable resource. For example, if you want to maximize the number of I/Os
performed on a data set, increase the BUFSIZE= value. This increases the Max Obs per
Page value given by the CONTENTS procedure. However, increasing the buffer size
does not maximize use of disk space and is probably only useful for large data sets,
where performance is an important issue.
For smaller data sets, you might want to optimize your use of disk space rather than
the number of I/Os performed. For example, if you run the DATA step used earlier with
a BUFSIZE= value of 512, the data set takes up only 6 disk blocks instead of 18. For a
small data set, this is more efficient because the number of I/Os is not a significant
factor.
When varying the BUFSIZE= value, decide which computer resources you want to
optimize first, then experiment until you get the result you want.
152
Generation Data Sets under OpenVMS
4
Chapter 5
Generation Data Sets under OpenVMS
Generation data sets are not supported in the OpenVMS operating environment. The
GENMAX= and GENNUM= data set options described in SAS Language Reference:
Dictionary are not supported under OpenVMS.
153
CHAPTER
6
Using SAS Engines
Overview of the SAS Engine 154
Overview of the TAPE Engine under OpenVMS 154
Differences between the SAS Engine and the TAPE Engine 154
When to Use the TAPE Engine 154
Limitations of the TAPE Engine 155
Engines Available under OpenVMS 155
File Types Created by Each Engine 156
How to Select an Engine under OpenVMS 156
Introduction to Selecting an Engine 156
The LIBNAME Statement or LIBASSIGN Command 156
SAS Selects the Engine for an Existing Data Library 156
The ENGINE= System Option 157
The SEQENGINE= System Option 157
Member Types Supported for V9, V8, and V7 Engines 157
Difference between SAS 9 and Previous Releases 157
Engine/Host Options for the V9, V8, and V7 Engines 158
The V6 Engine under OpenVMS 159
When to Use the V6 Engine 159
Member Types Supported 159
Engine/Host Options for the V6 Engine 159
Data Set Options Supported by the V6 Engine under OpenVMS 160
The CONCUR Engine under OpenVMS 160
What Is the CONCUR Engine? 160
Differences between the CONCUR Engine and the V9 Engine 160
How to Select the CONCUR Engine 160
Record-Level Locking and File-Sharing with the CONCUR Engine 161
Member Types Supported 161
Engine/Host Options for the CONCUR Engine 161
Data Set Options Supported by the CONCUR Engine 163
System Option Values Used by the CONCUR Engine 163
DECnet Access 163
Passwords 163
Internals of a Concurrency Engine Data Set 163
Contents and Organization of a Concurrency Engine Data Set 163
Notes on File-Sharing Capabilities 164
Optimizing the Performance of the CONCUR Engine 164
Introduction to Optimizing Engine Performance 164
Controlling the Size and Number of Buffers 164
Using Portable Data Set Options 165
Using the POINT= Option 166
Disk Space Usage 166
154
Overview of the SAS Engine
4
Chapter 6
Performance Comparisons 166
The DBMS Interface Engine 167
The OSIRIS and SPSS Engines under OpenVMS 167
When Can You Use the OSIRIS and SPSS Engines?
Restrictions on the Use of These Engines 167
Accessing OSIRIS Files 168
Assigning a Libref to an OSIRIS File 168
Referencing OSIRIS Files 168
Example: Accessing OSIRIS Files 169
Accessing SPSS Files 169
Assigning a Libref to an SPSS File 169
Referencing SPSS Files 169
Example: Accessing SPSS Files 170
167
Overview of the SAS Engine
The SAS engine is used to create SAS data libraries on disk and to read from, write
to, or update those libraries. These engines support indexing and compression of
observations.
Valid SAS engines in SAS 9.1 are: V9, V8, V7, and V6. The V9 engine is the default
engine for new SAS data libraries, unless the default engine has been changed with the
ENGINE= system option. For more information, see “ENGINE= System Option” on
page 460.
The V6 engine is a read-only engine. For more information about this engine, see
“The V6 Engine under OpenVMS” on page 159.
Note: Starting in SAS System 9, SAS is a 64-bit application. Previous releases of
SAS have been 32-bit. Consequently, the V9 engine cannot read the 32-bit SAS files
created in previous versions of SAS. For more information, see “Compatibility of
Existing SAS Files with SAS 9.1” on page 135. 4
Overview of the TAPE Engine under OpenVMS
Differences between the SAS Engine and the TAPE Engine
In contrast to the SAS engine, the TAPE engine does not support indexing and
compression of observations. Also, you cannot have a mixed mode, sequential-format
SAS data library; you can store only SAS System 9 or Version 8 sequential SAS data
sets on one tape, not some of each.
Note: For information about accessing SAS files on tape, see “Accessing SAS Files
on Tape under OpenVMS” on page 144. 4
When to Use the TAPE Engine
Use the TAPE engine to create sequential-format SAS data libraries either on disk or
on tape and to access files in sequential data libraries. The primary purpose of this
engine is to enable you to back up your SAS data sets, catalogs, or whole data libraries.
Using SAS Engines
4
Engines Available under OpenVMS
155
With this engine, it is possible to back up applications that contain both SAS data sets
and SAS catalogs.
Limitations of the TAPE Engine
The TAPE engine has the following limitations:
3 Because the TAPE engine is a sequential engine, it cannot be used with the
POINT= option of the SET statement nor with the FSBROWSE, FSEDIT, and
FSVIEW procedures. If you want to use these features of the SAS language with
sequential SAS data sets, then use the COPY procedure to copy them to a
disk-format SAS data library. (See “Copying Files to Tape” on page 145)
3 In a single DATA step or PROC step, you can use only one SAS data set from a
particular sequential SAS data library.
Engines Available under OpenVMS
The following table lists the engines that are available under OpenVMS in SAS 9.1
and tells you where to look for more information about each engine. The preferred
name of each engine is listed first, followed by acceptable nicknames, if any.
Table 6.1 SAS Engines under OpenVMS
Engine Name
(Alias)
Description
See...
V9 (BASE)
accesses SAS System 9 and SAS 9.1 files on disk
SAS Language Reference: Concepts
V9TAPE (TAPE)
accesses SAS System 9 and SAS 9.1
sequential-format SAS files
SAS Language Reference: Concepts
V8
accesses Version 8 SAS files on disk
SAS Language Reference: Concepts
V8TAPE
accesses Version 8 sequential- format SAS files
SAS Language Reference: Concepts
V7
accesses Version 7 SAS files on disk
SAS Language Reference: Concepts
V7TAPE
accesses Version 7 sequential-format SAS files
SAS Language Reference: Concepts
V6
reads Version 6 SAS data files on disk
“The V6 Engine under OpenVMS” on
page 159
CONCUR
provides concurrent update access to SAS data sets
“The CONCUR Engine under
OpenVMS” on page 160
ORACLE
accesses ORACLE database files
“The DBMS Interface Engine” on page
167
SQLVIEW
accesses data views that are described by the SQL
procedure
SAS Guide to the SQL Procedure:
Usage and Reference
XPORT
accesses transport files
Moving and Accessing SAS Files
156
File Types Created by Each Engine
4
Chapter 6
Engine Name
(Alias)
Description
See...
OSIRIS
provides read-only access to OSIRIS files
“The OSIRIS and SPSS Engines under
OpenVMS” on page 167
SPSS
provides read-only access to SPSS files
“The OSIRIS and SPSS Engines under
OpenVMS” on page 167
File Types Created by Each Engine
For information about the OpenVMS file types that SAS uses for SAS files, see
“OpenVMS File Types Used by SAS” on page 12.
How to Select an Engine under OpenVMS
Introduction to Selecting an Engine
Generally, SAS automatically determines the appropriate engine to use for accessing
the files in the library. If you want to create a new library with an engine other than
the default engine, you can override the automatic selection.
The LIBNAME Statement or LIBASSIGN Command
To change the current engine, you can complete either of the following tasks:
3 specify the SAS engine as the value of the engine argument in the LIBNAME
statement or LIBNAME function. Valid values include V9, V8, V7, and V6.
Note: Use BASE as the engine name if you write programs that create new
SAS data libraries and you want to create the data libraries in the latest available
format. BASE is an alias for the V9 engine, and it will be an alias for newer
engines in subsequent releases. 4
3 specify a TAPE engine in the Engine field of the New Library dialog box. You can
open the New Library dialog box by issuing the LIBASSIGN command in the
command window. Values include V9TAPE, V8TAPE, and V7TAPE.
Note: Use TAPE as the engine name if you write programs that create new
SAS data libraries and you want to create the data libraries in the latest available
format. TAPE is an alias for the V9TAPE engine, and it will be an alias for newer
sequential engines in subsequent releases. 4
SAS Selects the Engine for an Existing Data Library
For an existing SAS data library on disk that contains only SAS 9.1 data sets, do not
specify a value for engine in the LIBNAME statement or LIBNAME function, or select
Default as the type in the Engine field of the New Library dialog box. SAS
automatically selects the V9 engine. SAS also selects the V9 engine automatically if you
use the DCL DEFINE command to assign an OpenVMS logical name to an existing
Using SAS Engines
4
Difference between SAS 9 and Previous Releases
157
SAS 9.1 data library on disk and then use that logical name as a libref in a SAS file
specification.
The ENGINE= System Option
Set the value of the ENGINE= system option to the value of the engine that you
want to use. This option tells SAS which engine to use as the default when no engine is
specified and there are no existing data sets, or when the directory is in mixed mode.
For more information, see “ENGINE= System Option” on page 460.
The SEQENGINE= System Option
Set the value of the SEQENGINE= system option to the TAPE engine that you want
to use. This option tells SAS which sequential engine to use as the default when no
engine is specified and there are no existing SAS data sets.
Member Types Supported for V9, V8, and V7 Engines
The V9, V8, and V7 engines support files with the following member types:
ACCESS
ITEMSTOR
AUDIT
MDDB
BACKUP
PROGRAM
CATALOG
PUTILITY
DATA
SASODS
DMDB
UTILITY
FDB
VIEW
INDEX
These member types are also supported by the V9TAPE, V8TAPE, and V7TAPE engines.
Difference between SAS 9 and Previous Releases
The V9 and V9TAPE engines differ slightly from previous SAS engines. These
engines support long format and informat names. For more information about
compatibility between releases, see SAS Language Reference: Concepts.
Note: Starting in SAS 9, SAS is a 64-bit application. Previous releases of SAS have
been 32-bit. Consequently, the V9 engine cannot read the 32-bit SAS files (excluding
files of member type DATA) that were created in previous versions of SAS. For more
information, see “Compatibility of Existing SAS Files with SAS 9.1” on page 135. 4
158
Engine/Host Options for the V9, V8, and V7 Engines
4
Chapter 6
Engine/Host Options for the V9, V8, and V7 Engines
These engines provide several engine/host options that control the creating and
access of SAS data sets. Most of the following options correspond to options that are
available through OpenVMS Record Management Services (RMS).
You can use the following engine/host options with the V9, V8, and V7 engines:
ALQ=
specifies the number of OpenVMS disk blocks to allocate initially to a data set
when it is created. The value can range from 0 to 2,147,483,647. If the value is 0,
the minimum number of blocks that is required for a sequential file is used.
OpenVMS RMS always rounds the value up to the next disk cluster boundary.
The ALQ= option (allocation quantity) corresponds to the FAB$L_ALQ field in
OpenVMS RMS. For additional details, see “ALQ= Data Set Option” on page 282
and Guide to OpenVMS File Applications.
ALQMULT=
specifies the number of pages that are preallocated to a file when it is created. The
value can range from 1 to 128. The default value is 10. The ALQMULT= option is
related to the ALQ= option.
For additional details, see “ALQMULT= Data Set Option” on page 283.
BUFSIZE=
specifies the size of the internal I/O buffer used for output data sets. The value
can range from 0 to the maximum allowed under OpenVMS. The engine tries to
use a value in the range of 8,192 to 32,768 if possible. The BUFSIZE= option must
be specified in increments of 512.
For additional details, see “BUFSIZE= Data Set Option” on page 285.
CACHENUM=
specifies the number of I/O data caches used per SAS file. The value can range
from 1 to 16. The default value is 5. The CACHENUM= option is used in
conjunction with the CACHESIZE= option.
For additional details, see “CACHENUM= Data Set Option” on page 286.
CACHESIZE=
controls the size (in bytes) of the data cache used to buffer I/O pages. The value
can range from 0 to 65,024. By default, the chosen value is an even multiple of the
file’s page size. A value of 0 specifies to use no data cache. Memory is consumed
for the data cache, and multiple caches can be used for each data set opened. The
disadvantage of large CACHESIZE= values is large consumption of memory. The
advantage of large CACHESIZE= values is a reduction in the number of I/Os
required to read from or write to a file.
The CACHESIZE= and BUFSIZE= options are similar, but they have important
differences. The BUFSIZE= option specifies the file’s page size, which is
permanent. It can only be set on file creation. The CACHESIZE= option is the size
of the internal memory cache used for the life of the current open, so it can change
any time the file is opened. Also, BUFSIZE= cannot be used as an engine/host
option; it is only valid as a data set option.
For additional details, see “CACHESIZE= Data Set Option” on page 287.
CNTLLEV=
specifies the level of shared access allowed to SAS data sets. Users can be given
both read and write access to a data set that is opened for input only. By default,
only shared read access is allowed.
For additional details, see “CNTLLEV= Data Set Option” on page 288.
Using SAS Engines
4
Engine/Host Options for the V6 Engine
159
DEQ=
specifies the number of OpenVMS disk blocks to add each time OpenVMS RMS
automatically extends a data set during a write operation. The value can range
from 0 to 65,535. OpenVMS RMS always rounds the value up to the next disk
cluster boundary. A large value can result in fewer file extensions over the life of
the file; a small value results in numerous file extensions over the life of the file. A
file with numerous file extensions that may be noncontiguous slows record access.
If the value specified is 0, OpenVMS RMS uses the default value for the process.
The DEQ= option (default file extension quantity) corresponds to the
FAB$W_DEQ field in OpenVMS RMS. For additional details, see “DEQ= Data Set
Option” on page 289 and Guide to OpenVMS File Applications.
DEQMULT=
specifies the number of pages to extend a SAS file. The value can range from 1 to
128. The default value is 5.
For additional details, see “DEQMULT= Data Set Option” on page 290.
The V6 Engine under OpenVMS
When to Use the V6 Engine
Starting in SAS System 9, the V6 engine is read-only. You use this engine to read
Version 6 libraries. The V6 data libraries are disk-format data libraries, probably the
most common type of libraries. With this engine, you will not be able to write directly
to these libraries. For more information about the V6 engine, see SAS Language
Reference: Concepts.
Member Types Supported
Because the V6 engine is read-only, it supports only the DATA member type. This
engine does not support indexing.
Engine/Host Options for the V6 Engine
The V6 engine provides one engine/host option that controls the access of SAS data
sets. This option corresponds to an option that is available through OpenVMS Record
Management Services (RMS).
You can use the following engine/host option with the V6 engine:
CACHESIZE=
controls the size (in bytes) of the data cache used to buffer I/O pages. The value
can range from 0 to 65,024. By default, the chosen value is an even multiple of the
file’s page size. A value of 0 specifies to use no data cache. Memory is consumed
for the data cache, and multiple caches can be used for each data set opened. The
disadvantage of large CACHESIZE= values is large consumption of memory. The
advantage of large CACHESIZE= values is a reduction in the number of I/Os
required to read from or write to a file.
The CACHESIZE= and BUFSIZE= options are similar, but they have important
differences. The BUFSIZE= option specifies the file’s page size, which is
160
Data Set Options Supported by the V6 Engine under OpenVMS
4
Chapter 6
permanent. It can only be set on file creation. The CACHESIZE= option is the size
of the internal memory cache that is used for the life of the current open, so it can
change any time the file is opened. Also, BUFSIZE= cannot be used as an engine/
host option; it is only valid as a data set option.
For additional details, see “CACHESIZE= Data Set Option” on page 287.
Data Set Options Supported by the V6 Engine under OpenVMS
For a list of the data set options that the V6 engine recognizes, see “Summary Table
of SAS Data Set Options under OpenVMS” on page 278. The engine/host options
discussed in “Engine/Host Options for the V6 Engine” on page 159 can also be used as
data set options when you use the V6 engine.
The CONCUR Engine under OpenVMS
What Is the CONCUR Engine?
The concurrency (CONCUR) engine allows concurrent read and write access to data
sets. Note that the concurrency engine supports only SAS data sets. It does not support
SAS files of member types other than DATA, such as INDEX or CATALOG.
Differences between the CONCUR Engine and the V9 Engine
In contrast to the V9 engine, the CONCUR engine does not support indexing and
compression of observations. The CONCUR engine can only access files within a single
machine or OpenVMS cluster; access to SAS data sets on other operating environments
and concurrent read/write access to SAS data sets across DECnet are features that are
provided by SAS/SHARE software. For more information about using SAS/SHARE
software, refer to SAS/SHARE User’s Guide. The CONCUR engine is optimized for
random concurrent access, while the V9 engine is better suited to sequential access. So,
for example, if you intend to use the FSEDIT procedure or the POINT= option in the
SET statement to access your data randomly, the CONCUR engine might be the best
choice for you, even if you do not need any of the concurrent access capabilities.
Version 8 SAS introduced support for several new features related to data sets. The
CONCUR engine supports many of these features: member names with lengths up to
32 characters; variable names with lengths up to 32 characters; and member or variable
labels with lengths up to 256 characters. Note that while the CONCUR engine supports
the creation and access of Version 6 format files, the long character strings are not
allowed when accessing or creating a Version 6 concurrency engine file. For more
information about support for these longer character strings, see SAS Language
Reference: Concepts.
How to Select the CONCUR Engine
There are three ways to select the CONCUR engine:
3 Specify CONCUR as the value of the engine argument in the LIBNAME statement
or LIBNAME function, or specify CONCUR in the Engine field of the New Library
dialog box.
Using SAS Engines
4
Engine/Host Options for the CONCUR Engine
161
3 If you are sure your SAS data library contains only SAS data sets created with the
CONCUR engine, do not specify a value for engine in the LIBNAME statement or
LIBNAME function, or select Default as the type in the Engine field of the New
Library dialog box. SAS selects the CONCUR engine automatically.
3 Set the value of the ENGINE= system option to CONCUR. This option indicates
the default engine when either no engine is specified and there are no existing
SAS data sets or the directory is in mixed mode.
Record-Level Locking and File-Sharing with the CONCUR Engine
The CONCUR engine creates and accesses SAS data sets in an acceptable format to
allow record-level locking and file-sharing.
CAUTION:
SAS data sets that are created with the CONCUR engine are not interchangeable with SAS
data sets that are accessed and created with any other engine. If you plan to share a
particular SAS data set, create it using the CONCUR engine. 4
If you have a SAS data set that you want to share after it is created, you can copy it,
using the CONCUR engine as the output engine. Then it will be in the correct format
for sharing. For example, if you want shared update access to a data set that was
created using the V9 engine, you can use the following statements to convert it:
libname inlib v9 ’[mydir.base]’;
libname outlib concur ’[mydir.share]’;
proc copy in=inlib out=outlib;
run;
After you run this SAS program, all SAS data sets that are created with the V9
engine in the data library that is referenced by INLIB are copied to the data library
referenced by OUTLIB using the CONCUR engine. To create data sets using the
CONCUR engine, your directory must have a version limit greater than 1.
Member Types Supported
The CONCUR engine supports the SAS 9.1 member type DATA.
Engine/Host Options for the CONCUR Engine
Several concurrency engine options control the creation and access of SAS data sets.
Most of these options have direct correlation to options available through OpenVMS
Record Management Services (RMS). The CONCUR engine creates relative
organization files with record-level locking enabled.
Note: Data sets created with the CONCUR engine have a maximum observation
length of 32K. 4
You can use the following engine/host options with the CONCUR engine:
ALQ=
specifies the number of OpenVMS disk blocks to allocate initially to a data set
when it is created. The value can range from 0 to 2,147,483,647. If the value is 0,
the minimum number of blocks required for a sequential file is used. The ALQ=
option defaults to the bucket size. OpenVMS RMS always rounds the value up to
the next disk cluster boundary.
162
Engine/Host Options for the CONCUR Engine
4
Chapter 6
The ALQ= option (allocation quantity) corresponds to the FAB$L_ALQ field in
OpenVMS RMS. For additional details, see “ALQ= Data Set Option” on page 282
and Guide to OpenVMS File Applications.
BKS=
specifies the number of OpenVMS disk blocks in each bucket of the file. The value
can range from 0 to 63. If the value is 0, the bucket size used is the minimum
number of blocks needed to contain a single observation. The default value is 32.
When deciding on the bucket size to use, consider whether the file is usually
accessed randomly (small bucket size), sequentially (large bucket size), or both
(medium bucket size). The bucket size is a permanent attribute of the file, so this
option applies to output files only.
The BKS= option (bucket size) corresponds to the FAB$B_BKS field in
OpenVMS RMS or the FILE BUCKET_SIZE attribute when using File Definition
Language (FDL). For additional details, see “BKS= Data Set Option” on page 284
and Guide to OpenVMS File Applications.
DEQ=
specifies the number of OpenVMS disk blocks to add each time OpenVMS RMS
automatically extends a data set during a write operation. The value can range
from 0 to 65,535. OpenVMS RMS always rounds the value up to the next disk
cluster boundary. A large value can result in fewer file extensions over the life of
the file; a small value results in numerous file extensions over the life of the file. A
file with numerous file extensions that may be noncontiguous slows record access.
If the value specified is 0, OpenVMS RMS uses the default value for the process.
The DEQ= option defaults to the bucket size.
The DEQ= option (default file extension quantity) corresponds to the
FAB$W_DEQ field in OpenVMS RMS. For additional details, see “DEQ= Data Set
Option” on page 289 and Guide to OpenVMS File Applications.
FILEFMT=
specifies the file format, or version of the engine, to use. Allowed values are 606,
607, 801, and 901. The default value is 801. There was an internal file format
change between Release 6.06 and Release 6.07, and again between Version 6 and
Version 8. The Version 8 and SAS 9 formats are identical. The concurrency
(CONCUR) engine can create and access all versions of the file format. When you
access a file for input or update, the CONCUR engine detects the correct version of
the existing file. When you create a new file, the CONCUR engine defaults to
creating a Version 8 format file unless overridden by the FILEFMT= option.
The following example shows how to create a file in Release 6.07 format:
libname clib concur ’[]’;
data clib.v607 (filefmt=607);
... more SAS statements ...
run;
MBF=
specifies the number of I/O buffers you want OpenVMS RMS to allocate for a
particular file. The value can range from 0 to 127, and it represents the number of
buffers to use. By default, this option is set to 2 for files opened for update and 1
for files opened for input or output. If the value 0 is specified, the process’ default
value is used.
The MBF= option (multibuffer count) corresponds to the RAB$B_MBF field in
OpenVMS RMS or the CONNECT MULTIBUFFER_COUNT attribute when using
FDL. For additional details, see “MBF= Data Set Option” on page 293 and Guide
to OpenVMS File Applications.
Using SAS Engines
4
Internals of a Concurrency Engine Data Set
163
Data Set Options Supported by the CONCUR Engine
The CONCUR engine recognizes all data set options that are documented in SAS
Language Reference: Dictionary except the FILECLOSE=, COMPRESS=, and REUSE
options. Of special importance to the CONCUR engine is the portable data set option
CNTLLEV=. (For details, see “CNTLLEV= Data Set Option” on page 288.) Other data
set options that are likely to be useful include LOCKREAD= and LOCKWAIT=. (For
details, see “LOCKREAD= Data Set Option” on page 292 and “LOCKWAIT= Data Set
Option” on page 293.) For more information, refer to SAS Language Reference:
Dictionary.
The engine/host options that are discussed in “Engine/Host Options for the CONCUR
Engine” on page 161 can also be used as data set options when you use the CONCUR
engine. For details, see “Specifying Data Set Options” on page 277.
System Option Values Used by the CONCUR Engine
The CONCUR engine does not use the values of any SAS system options.
DECnet Access
The CONCUR engine supports both creation and reading of files across DECnet, but
not the updating of files across DECnet. You are allowed to create and read files
because the engine uses multistreaming only when the file is opened for update.
Support of DECnet access means you can now specify a node name in the physical
pathname of your SAS data library, as long as you do not plan to update the data sets
stored in the data library. The following is an example:
libname mylib concur ’mynode::bldgc:[testdata]’;
Passwords
The CONCUR engine supports SAS passwords. The syntax and behavior is the same
as passwords used with the V9 engine.
Internals of a Concurrency Engine Data Set
Contents and Organization of a Concurrency Engine Data Set
If you are familiar with OpenVMS RMS, it might be helpful to know the internal file
format of a concurrency engine data set. A concurrency engine data set is a relative
format file. The record length is determined by the length of one observation, with a
minimum length of 8 bytes. Because the data set is a relative format file, the maximum
observation length of a concurrency engine data set is 32,767 bytes. The first portion of
the file contains header records that provide information to the engine concerning the
number of observations in the file, the number of variables, some positioning
information to optimize access, the date and time, SAS software release, operating
environment the data set was created on, and so forth.
Following the header information is information pertaining to each individual
variable in the file. A NAMESTR is stored for each variable on the data set. The
NAMESTR includes the variable name, type, label, and size. Multiple NAMESTRs are
164
Optimizing the Performance of the CONCUR Engine
4
Chapter 6
stored in a single record, up to the maximum number of NAMESTRs that the record
length accommodates.
After the NAMESTRs, the observations begin. There is always one observation per
record. With one exception, the record length is the observation length. If the
observation length is less than 8 bytes, the record length defaults to 8. If you delete a
record in a relative format file, the record still exists in the file, but it is marked as
deleted.
Note: In a concurrency engine data set, a data set of deleted observations takes the
same amount of disk space as a data set of valid observations. To remove the deleted
observations, you must use the COPY procedure and copy the data set to a new data set
type, such as a data set created with the V9 or V9TAPE engine. 4
Notes on File-Sharing Capabilities
Although all record-level locking capabilities are provided through the use of
OpenVMS RMS features, some file-sharing capabilities are provided by OpenVMS RMS
and some are provided by the engine itself. The engine can correctly set the share
options of a file when the file is opened for input or update, because SAS uses the name
of the existing data set directly. However, output data sets are created with a
temporary name and then renamed to the actual data set name after the data set is
closed. This ensures the integrity of existing data sets of the same name in case an
error occurs during creation of the new data set. Therefore, the engine must handle all
file-sharing issues that disallow sharing of output files. This is done through the
locking of specific filenames, which is why your directory must have a version limit of at
least 2 to create concurrency engine data sets.
Optimizing the Performance of the CONCUR Engine
Introduction to Optimizing Engine Performance
Engine performance is often a trade-off between various factors. You can optimize the
performance of the CONCUR engine in your operating environment. By controlling the
size and number of buffers, you can specify how SAS accesses your data. By specifying
the data set options, you can control the level and amount of data that is accessed. The
amount of disk space available for these operations also effects engine performance.
Controlling the Size and Number of Buffers
Depending on the type of record access your SAS application performs, you need to
consider both the size of buffers (bucket size) and the number of buffers (multibuffer
count). For complete details about specifying the size and number of buffers, see “BKS=
Data Set Option” on page 284 and “MBF= Data Set Option” on page 293.
The two extremes of record access are records that are accessed completely
sequentially or completely randomly. For example, many SAS procedures typically
access data sets sequentially, processing the records from first to last. On the other
hand, you might access observations in a completely random order when using the
FSEDIT procedure to edit or browse observations in a data set.
There are also cases in which records are accessed randomly but might be reaccessed
frequently. One example is an application that uses a data set in which particular
observations contain information that is referred to frequently. Again, using the
FSEDIT procedure as an example, the data set can be designed in such a way that you
must access the first observation followed by observation 200, then the first observation
again followed by observation 300, and so on.
Using SAS Engines
4
Optimizing the Performance of the CONCUR Engine
165
Finally, there are cases in which records are accessed randomly, but then adjacent
records are likely to be accessed. An application can use the POINT= option in a SET
statement to selectively input the first 10 observations out of every 100 observations.
Most often, an application accesses a data set by a combination of several of these
methods. The following list gives suggestions for the number of buffers and bucket size
you should use for each method:
completely sequential or random access
is most efficient with a single buffer. However, the bucket size differs:
random access
is more efficient with a smaller bucket size.
sequential access
is more efficient with a larger bucket size.
random access with reaccessed records
is most efficient with multiple buffers to keep the reaccessed records in the buffer
cache. You should use a small bucket size in this instance.
random access with subsequent adjacent access
is most efficient with a single buffer. However, use a larger bucket size so that
more records are stored in the buffer cache. This increases the probability that the
required records have been read into memory with a single I/O.
If your program accesses the data set by several methods, you must find a
compromise between the number of buffers and bucket sizes. This is what SAS
attempts to do with the defaults, because the intended use of the file is unknown.
Because you know the intended use of your CONCUR engine data sets, you can
improve the CONCUR engine’s performance by optimizing the buffer settings.
Using Portable Data Set Options
Several data set options are portable options that are available for all engines, but
they are particularly useful in conjunction with the concurrency engine.
CNTLLEV=
specifies the level of access (control level) to the data set, whether concurrent or
exclusive. If you decide to create a concurrency engine data set to take advantage
of its random access optimizations, but you do not need to provide for concurrent
access at this time, you can use the CNTLLEV= data set option to further improve
performance. By default, when using the concurrency engine, data sets that are
opened for input allow shared read access, data sets that are opened for output
allow no sharing, and data sets that are opened for update allow shared update
access. When sharing is allowed, record-level locking is enabled. When you do not
need this feature, you can reduce the overhead of record locking by using
CNTLLEV=MEM to disable the sharing.
The CNTLLEV= data set option takes one of two values:
MEM
specifies that the application requires exclusive access to the
data set. Member-level control restricts any other application
from accessing the data set until the step has completed.
REC
specifies that concurrent access is allowed and OpenVMS RMS
record-level locking is enabled. This option entails more
processing overhead and should be used only when necessary.
Each SAS procedure specifies a required control level to the engine, depending on
the intended access of the observations. If you use CNTLLEV=REC and the SAS
procedure requires member-level control to ensure the integrity of the data during
166
Optimizing the Performance of the CONCUR Engine
4
Chapter 6
processing, a warning is written to the SAS log indicating that inaccurate or
unpredictable results can occur if the data set is being updated by another process
during the analysis.
A common example of improving performance by overruling the CNTLLEV
default of the procedure is with the FSEDIT procedure, which uses a default of
CNTLLEV=REC. A session using the FSEDIT procedure with a concurrency
engine data set does not need to incur the overhead of record-level locking if
concurrent access is not required. By using the data set option CNTLLEV=MEM,
the application tells the engine to override the control level specification of the
procedure because exclusive access at the member level is desired. This disables
record-level locking, decreases the overhead for processing the data set, and
improves performance. In tests using the SET statement to input a concurrency
engine data set, using the CNTLLEV=MEM option caused the step to run in
one-third the CPU time as the same step using the CNTLLEV=REC option.
For syntax and usage examples for the CNTLLEV= data set option, see
“CNTLLEV= Data Set Option” on page 288 and SAS Language Reference:
Dictionary.
FIRSTOBS= and OBS=
specify a beginning and ending observation to subset your data set.
The value of the FIRSTOBS= data set option specifies the first observation that
should be included for processing in the SAS DATA step. Some engines have to
read the records sequentially, discarding them until the requested observation is
reached. Because a concurrency engine data set is a relative format file, the
engine can directly access the beginning observation without having to first read
any other observations in the file.
Using the OBS= data set option to specify the last observation that you want to
process can improve performance by terminating the input of observations without
having to read records until the end-of-file character is reached.
For more information about the FIRSTOBS= and OBS= data set options, see
SAS Language Reference: Dictionary.
Using the POINT= Option
You can use the POINT= option in a SET statement to access contiguous ranges of
observation. For example, with the POINT= option, the SAS program can read
observations 10 through 50, then observations 90 through 150, and so on. Obviously,
only reading the records that you actually need improves performance by decreasing the
number of records you must access. Due to the physical format of a concurrency engine
data set, the engine can access the required records directly.
Disk Space Usage
For most data sets, the disk space that is required for a CONCUR engine data set
and a V9 engine data set are comparable. However, for data sets in which the number
of observations is greater than the number of variables, concurrency engine data sets
are usually smaller. An exception to this is a concurrency engine data set that has
many variables and only a few observations; in this case, space might be wasted.
However, there is a file format for both uncompressed and compressed data sets that
makes the V9 engine disk space usage more efficient.
Performance Comparisons
Performance is a main concern for many applications, so it is useful to know how the
CONCUR engine compares to the V9 engine when various features of SAS are used:
Using SAS Engines
4
Restrictions on the Use of These Engines
167
Creating data sets
When you compare the creation and sequential input of data sets using each
engine, the V9 engine tends to be faster when the data sets are small. However, as
the size of the data set increases, the V9 and CONCUR engines are comparable in
CPU time used. In all cases, the page faults that are incurred for the CONCUR
engine are substantially less than for the V9 engine.
Accessing existing data sets
When you compare random access of an existing file using both engines, the
concurrency engine is much faster. When you use a large bucket size in the
concurrency engine, with a comparable page size in the V9 engine, the concurrency
engine takes approximately one-half as much CPU time. When the bucket size
and page size are small, the concurrency engine takes about one-third as much
CPU time. Again, page faults for the concurrency engine are substantially less.
The DBMS Interface Engine
To use the Oracle engine, your site must license the corresponding SAS/ACCESS
interface. You can specify this engine in the LIBNAME statement, the LIBNAME
function, or the New Library dialog box, just as you do with the other engines. The
Oracle engine has DBMS-specific options that you can specify. For complete information
about using this engine to access DBMS data, see SAS/ACCESS for Relational
Databases: Reference and SAS/ACCESS Supplement for Oracle.
The OSIRIS and SPSS Engines under OpenVMS
When Can You Use the OSIRIS and SPSS Engines?
The following read-only engines enable you to access files that were created with
other vendors’ software as if those files were written by SAS:
OSIRIS
accesses OSIRIS files.
SPSS
accesses SPSS and SPSS-X system files from (Release 9) or earlier
and portable files.
You can use these engines in any SAS applications or procedures that do not require
random access. For example, by using one of the engines with the CONTENTS
procedure and its _ALL_ option, you can determine the contents of an entire SPSS file
at once.
Restrictions on the Use of These Engines
Because these are sequential engines, they cannot be used with the POINT= option
of the SET statement or with the FSBROWSE, FSEDIT, or FSVIEW procedures in
SAS/FSP software. However, you can use the COPY procedure, the DATASETS
procedure, or a DATA step to copy an OSIRIS or SPSS file to a SAS data set, and then
use either POINT= or SAS/FSP to browse or edit the file. Also, some procedures (such as
the PRINT procedure) issue a warning message indicating that the engine is sequential.
168
Accessing OSIRIS Files
4
Chapter 6
Accessing OSIRIS Files
Although OSIRIS runs only under z/OS and CMS, the SAS OSIRIS engine accepts an
z/OS data dictionary from any other operating environment that is running SAS. The
layout of an OSIRIS data dictionary is the same on all operating environments. The
data dictionary and data files should not be converted between EBCDIC and ASCII,
however, because the OSIRIS engine expects EBCDIC data.
Assigning a Libref to an OSIRIS File
In order to access an OSIRIS file, you must use the LIBNAME statement or
LIBNAME function to assign a libref to the file. (Alternately, you can select Default as
the type in the Engine field of the New Library dialog box.) Specify the OSIRIS engine
in the LIBNAME statement as follows:
LIBNAME libref OSIRIS ’data-filename’
DICT= ’dictionary-filename’;
where
libref
is a SAS libref.
OSIRIS
is the OSIRIS engine.
data-filename
is the physical name of the data file.
dictionary-filename
is the physical filename of the dictionary file. The dictionary filename can also be
a fileref or an OpenVMS logical name. However, if you use a fileref or an
OpenVMS logical name for the dictionary-filename, do not use quotation marks.
You do not need to use a LIBNAME statement before running the CONVERT
procedure if you are using PROC CONVERT to convert an OSIRIS file to a SAS data
file. (For more information, see “CONVERT Procedure” on page 377.)
Note that the LIBNAME statement has no engine/host options for the SPSS engine.
If you previously assigned a fileref or an OpenVMS logical name to the OSIRIS file,
then you can omit the data-filename in the LIBNAME statement. However, you must
still use the DICT= option, because the engine requires both files. (For details, see
“Example: Accessing OSIRIS Files” on page 169.)
You can use the same dictionary file with different data files. Enter a separate
LIBNAME statement for each data file.
Referencing OSIRIS Files
OSIRIS data files do not have individual names. Therefore, for these files you can
use a member name of your choice in SAS programs. You can also use the member
name _FIRST_ for an OSIRIS file.
Under OSIRIS, the contents of the dictionary file determine the file layout of the
data file. A data file has no other specific layout.
You can use a dictionary file with an OSIRIS data file only if the data file conforms to
the format that the dictionary file describes. Generally, each data file should have its
own DICT file.
Using SAS Engines
4
Accessing SPSS Files
169
Example: Accessing OSIRIS Files
Suppose you want to read the OSIRIS data file TEST1.DAT, and the dictionary file is
TEST1.DIC. The following statements assign a libref to the data file and then run
PROC CONTENTS and PROC PRINT on the file:
libname mylib osiris ’test1.dat’ dict=’test1.dic’;
proc contents data=mylib._first_;
run;
proc print data=mylib._first_;
run;
Accessing SPSS Files
The SPSS engine supports portable file (export) formats for both SPSS and SPSS-X
files. The engine automatically determines which type of SPSS file it is reading and
reads the file accordingly.
This engine can read only SPSS export files from any operating environment that
were created by using the SPSS EXPORT command.
Assigning a Libref to an SPSS File
In order to access an SPSS file, you must use the LIBNAME statement or LIBNAME
function to assign a libref to the file. (Alternately, you can select Default as the type in
the Engine field of the New Library dialog box.) Specify the SPSS engine in the
LIBNAME statement as follows:
LIBNAME libref SPSS ’filename’;
where
libref
is a SAS libref.
SPSS
is the SPSS engine.
file-specification
is the physical filename.
You do not need to use a LIBNAME statement before running the CONVERT
procedure if you are using PROC CONVERT to convert an SPSS file to a SAS data file.
(For more information, see the procedure “CONVERT Procedure” on page 377.)
Note that the LIBNAME statement has no engine/host options for the SPSS engine.
If you previously assigned a fileref or an OpenVMS logical name to the SPSS file,
then you can omit the file-specification in the LIBNAME statement. SAS uses the
physical filename that is associated with the fileref or logical name. (For details, see
“Example: Accessing SPSS Files” on page 170.)
Referencing SPSS Files
SPSS data files do not have names. For these files, use a member name of your
choice in SAS programs.
SPSS data files have only one logical member per file. Therefore, you can use
_FIRST_ in your SAS programs to refer to the first data file.
170
Accessing SPSS Files
4
Chapter 6
Example: Accessing SPSS Files
Suppose you want to read the SPSS file MYSPSSX.POR. The following statements
assign a libref to the file and then run PROC CONTENTS and PROC PRINT on the file:
libname mylib spss ’myspssx.por’;
proc contents data=mylib._first_;
run;
proc print data=mylib._first_;
run;
171
CHAPTER
7
Using External Files and Devices
Introduction to Using External Files and Devices under OpenVMS 172
What Are External Files? 172
Techniques for Accessing External Files 172
Identifying External Files to SAS 173
How to Identify an External File to SAS 173
Order of Precedence for External File Specifications 173
Assigning Filerefs 173
Assigning OpenVMS Logical Names to External Files 173
Examples: Using Logical Names to Access External Files 174
Using OpenVMS Pathnames to Identify External Files 174
Using Wildcard Characters in External File Specifications 175
Specifying Concatenated Files 175
Using Aggregate Syntax to Identify External Files 175
Identifying OpenVMS Text Libraries 176
Identifying an External File That Is in Your Default Directory 176
Default File Types 177
Reading and Writing SAS Print Files under OpenVMS 178
Default Print File Format 178
Print Files Created by Command Files 178
Displaying Information about External Files under OpenVMS 179
Accessing External Files on Tape under OpenVMS 179
Note on Tape Specifications 179
DCL Commands for Tape Access 179
Order of Tape Access Commands 181
Using Multivolume Tapes 181
Writing to a Labeled Tape 182
Writing to an Unlabeled Tape 182
Example: Writing to an Unlabeled Tape 183
Changing the Default Block Size 183
Reading from a Labeled Tape 183
Reading from an Unlabeled Tape 184
Required Options to Read from an Unlabeled Tape from the DATA Step 184
Example 1: Using a Null DATA Step to Position the Tape 184
Example 2: Using the SET MAGTAPE Command to Position the Tape 185
Accessing Remote External Files under OpenVMS 185
How to Access a Remote File across DECnet 185
Example 1: Accessing a Remote File 186
Example 2: Including the User Name and Password in the File Specification 186
Additional Documentation on DECnet Access 186
Reading from and Writing to OpenVMS Commands (Pipes) 186
What Are Pipes? 186
172
Introduction to Using External Files and Devices under OpenVMS
4
Chapter 7
Syntax for Assigning Filerefs to a Pipe 186
Using the Fileref for Reading 187
Example 1: Sending the Output of the DIRECTORY Command to a SAS DATA Step
Example 2: Using the SYS$INPUT Fileref to Read Input through a Pipe 187
Using the Fileref for Writing 188
Example: Sending Data to an External File via a Pipe 188
Sending Electronic Mail Using the FILENAME Statement (E-MAIL) 189
Advantages to Sending E-Mail from within SAS 189
Initializing Electronic Mail 189
Components of the DATA Step or SCL Code Used to Send E-Mail 189
Syntax of the FILENAME Statement for E-Mail 189
Specifying E-Mail Options in the FILE Statement 191
Defining the Body of the Message 191
Specifying E-Mail Directives in the PUT Statement 191
Example: Sending E-Mail from the DATA Step 192
Example: Sending E-Mail Using SCL Code 193
187
Introduction to Using External Files and Devices under OpenVMS
What Are External Files?
External files are files whose format is determined by the operating environment
rather than by SAS. These files are not managed by SAS. External files include raw
data files, files that contain SAS programming statements, and procedure output files.
Techniques for Accessing External Files
The following SAS statements and functions are used to access external files on disk
or tape:
FILENAME statement and FILENAME function
associate a fileref with an external file that you want to use for input or output.
(For more information, see “FILENAME Statement” on page 397 and “FILENAME
Function” on page 322.)
INFILE statement
opens an external file for reading data lines. (For more information, see “INFILE
Statement” on page 417.)
FILE statement
opens an external file for writing data lines. (For more information, see “FILE
Statement” on page 395.)
%INCLUDE statement
opens an external file for reading SAS statements. (For more information, see
“%INCLUDE Statement” on page 415.)
You also specify external files in various windowing environment fields (for example,
as a file destination in the Results window or as a source input in an INCLUDE
command).
Using External Files and Devices
4
Assigning OpenVMS Logical Names to External Files
173
Identifying External Files to SAS
How to Identify an External File to SAS
To access an external file, you must tell SAS how to find the file. Depending on the
context, you can use any of the following specifications to identify an external file to
SAS:
3 a fileref that was assigned with the FILENAME statement, the FILENAME
function, or with the SAS Explorer window
3 an OpenVMS logical name that was assigned with the DCL DEFINE (or ASSIGN)
command
3 an OpenVMS pathname enclosed in single or double quotation marks
3 aggregate syntax
3 a single filename without quotation marks (a file in the default directory).
Order of Precedence for External File Specifications
It is possible (though generally not advisable) to use the same text string as a
filename, a fileref, and an OpenVMS logical name. If an external file specification is a
valid SAS name and is not enclosed in quotation marks, then SAS uses the following
order of precedence to interpret the text string and locate the external file:
1 If you have defined the text string as a SAS fileref, then SAS uses the file that the
fileref refers to.
2 If the text string is not a fileref, then SAS looks to see whether you have defined it
as an OpenVMS logical name. If so, it uses the file that the logical name refers to.
3 If the text string is neither a fileref nor an OpenVMS logical name, then SAS looks
for a file by that name in your default directory.
Assigning Filerefs
Use the FILENAME statement, the FILENAME function, or the SAS Explorer
window to assign a fileref to an external file. For more information, see the following:
3 “FILENAME Statement” on page 397
3 “FILENAME Function” on page 322
3 “SAS Windowing Environment under OpenVMS” on page 22.
Assigning OpenVMS Logical Names to External Files
You can use an OpenVMS logical name as a file specification. Use the DCL DEFINE
command to associate a logical name with an external file.
When you assign an OpenVMS logical name to an external file, you cannot use the
pound sign (#) or the at sign (@) because these characters are not valid in OpenVMS
logical names. (By contrast, if you use the FILENAME statement to assign a fileref,
you can use these characters because filerefs follow SAS naming conventions.) Also,
using the DCL DEFINE command to define an OpenVMS logical name does not enable
you to specify the keywords or options that are available with the FILENAME
statement and the FILENAME function.
174
Using OpenVMS Pathnames to Identify External Files
4
Chapter 7
Remember that you can use the SAS X statement or X command to issue a DCL
DEFINE command from within a SAS program or a SAS process. (For details, see
“Issuing DCL Commands during a SAS Session” on page 43.)
Note: If you use the SAS X statement or X command to issue the DCL DEFINE
command, then you want to use the method described in “Issuing a Single DCL
Command Using the X Statement” on page 44 (which executes the command in the
parent OpenVMS process), not the method described in “Issuing Several DCL
Commands Using the X Statement” on page 46 (which executes multiple DCL
commands in an OpenVMS subprocess). OpenVMS logical names that are defined in a
subprocess are not recognized by the current SAS process. By contrast, OpenVMS
logical names that are defined in the OpenVMS parent process are available for use
during the current SAS process. 4
Examples: Using Logical Names to Access External Files
Suppose you want to read a data file named [YOURDIR]EDUC.DAT, and you decide
to use an OpenVMS logical name to access the file. You can issue the DCL DEFINE
command before you invoke SAS. The following is an example:
$ DEFINE INED [YOURDIR]EDUC.DAT
Alternatively, you can use the SAS X statement to issue a DCL DEFINE command in
your SAS program:
x ’define ined [yourdir]educ.dat’;
Either of these methods properly associates the OpenVMS logical name INED with
the file [YOURDIR]EDUC.DAT. You can then use INED as the file specification in the
INFILE statement:
infile ined;
You can use the same methods to write to an external file. For example, use an X
statement to issue a DCL DEFINE command as follows:
x ’define outfile [yourdir]scores.dat’;
Then use the OpenVMS logical name OUTFILE as the file specification in the
following FILE statement:
file outfile;
Using OpenVMS Pathnames to Identify External Files
If you use an OpenVMS pathname as an external file specification, you must enclose
the file specification in single or double quotation marks. The file specification must be
a valid OpenVMS pathname to the external file that you want to access; therefore, the
level of specification depends on your location in the directory structure. The number of
characters in the quoted string must not exceed the maximum filename length that
OpenVMS allows (255 characters).
Here are some examples of valid file specifications:
infile ’node2::device:[dir1.subdir1]food.dat’;
file ’[mydir]prices.dat’;
To access a particular version of a file, include the version number in the quoted file
specification. If you omit the version number, then SAS uses the most recent version
when reading, and it creates a new version when writing. To append records to the end
of an existing file, use the MOD option in the FILE statement, type APPEND in
Using External Files and Devices
4
Using Aggregate Syntax to Identify External Files
175
windowing environment filename fields, or use the FAPPEND function. For example,
the following FILE statement appends data lines to the file PRICES.DAT;1:
file ’prices.dat;1’ mod;
Using Wildcard Characters in External File Specifications
You can use the following wildcard characters inside a SAS job wherever a
quoted-string file specification is allowed, except that you cannot use them in a FILE
statement.
* (asterisk)
matches all files.
% (percent sign)
matches any character.
. . . (ellipsis)
searches all subdirectories.
The following are some examples of valid uses of wildcard characters:
3
3
3
3
filename myfile ’*.data’;
%include ’*.sas’;
infile ’test%.dat’;
infile ’[data...]*.test_data’;
The special characters # (pound sign) and @ (at sign) cannot be used in external file
specification because they are not valid in filenames created with the ODS-2 syntax.
Specifying Concatenated Files
Under OpenVMS, you can specify concatenations of files when reading and writing
external files from within SAS. Concatenated files consist of two or more file
specifications, enclosed in quotation marks and separated by commas. You can include
wildcard characters in the file specifications.
The usual rules for OpenVMS version-numbering apply. You cannot use a percent
symbol (%) in the version number field.
The following are some examples of valid concatenation specifications:
3
3
3
3
3
filename allsas ’one.sas, two.sas, three.sas’;
filename alldata ’test.data1, test.data2, test.data3’;
%include ’one.sas, two.sas’;
infile ’[area1]alldata.dat,[area2]alldata.dat’;
infile ’test*.dat, in.dat’;
Using Aggregate Syntax to Identify External Files
You can also use aggregate syntax to access individual files. To do so, assign a SAS
fileref or an OpenVMS logical name to a directory, and specify the individual filename
in parentheses. For example, suppose you use the following FILENAME statement to
associate the fileref MYFILE with the directory [MYDIR]:
filename myfile ’[mydir]’;
176
Identifying an External File That Is in Your Default Directory
4
Chapter 7
To access a file named SCORES02.DAT in that directory, you could use the following
INFILE statement:
infile myfile(scores02);
By default, the INFILE statement appends a file type of .DAT to the SCORES02
filename if a filetype is not specified. (For more information about default file types, see
“Default File Types” on page 177.)
If you want to specify a different file type, then enclose the file specification in
quotation marks, as in the following example:
infile myfile(’scores02.new’);
Identifying OpenVMS Text Libraries
Aggregate syntax is also used to identify OpenVMS text libraries. An OpenVMS text
library has a default file type of .TLB and can store frequently used text files. For
example, if you have several related files of data, you might want to store them in one
OpenVMS text library. OpenVMS text libraries are also commonly used as SAS autocall
libraries, which store SAS macros. For more information, see “Autocall Libraries under
OpenVMS” on page 520.
To access a file in an OpenVMS text library, complete the following steps:
3 Assign a fileref or OpenVMS logical name to the text library.
3 Specify the fileref or logical name in an INFILE or FILE statement, followed by
the filename in parentheses.
For example, you can use the following FILENAME statement to assign a fileref to
an OpenVMS text library:
filename mytxtlib ’[mydir]mydata.tlb’;
Then, assuming that you want to use a library member named SCORES01, you can
use the following INFILE statement:
infile mytxtlib(scores01);
Note: The file-type rules for OpenVMS text library syntax differ from the rules for
directory-based aggregate syntax. When referring to a member of an OpenVMS text
library, do not specify a file type. If you do, the file type is ignored. For example, in the
following statements the fileref TEST refers to an OpenVMS text library:
filename test ’mylib.tlb’;
data _null_;
file test(one.dat);
put ’first’;
run;
The file type .DAT is ignored, and the FILE statement writes member ONE to the
text library, not to ONE.DAT. Wildcard characters are not allowed in filenames when
you are using OpenVMS text-library syntax. 4
Identifying an External File That Is in Your Default Directory
As explained in “Order of Precedence for External File Specifications” on page 173, if
an external file specification is a valid SAS name and is neither quoted nor a previously
defined fileref or OpenVMS logical name, then SAS opens a file by that name in your
default directory. Therefore, you cannot use the special characters # or @ in the external
file specification, because these characters are not valid in OpenVMS filenames.
Using External Files and Devices
4
Identifying an External File That Is in Your Default Directory
177
The specification must be a filename only; do not include the file type. SAS uses a
default file type depending on whether you are reading or writing data lines or reading
SAS statements, as indicated in “Default File Types” on page 177.
The following INFILE statement reads the data file FOOD.DAT from the default
directory (FOOD has not been defined as a SAS fileref nor as an OpenVMS logical
name):
infile food;
When SAS encounters this statement, it searches the default directory for a file named
FOOD.DAT. Records are read from FOOD.DAT according to subsequent INPUT
statement specifications.
The following FILE statement writes data lines to the file PRICES.DAT in the
default directory (PRICES has not been defined as a SAS fileref nor as an OpenVMS
logical name):
file prices;
When SAS encounters this statement, it writes to a file named PRICES.DAT in the
default directory. Data lines are written to PRICES.DAT according to subsequent PUT
statement specifications.
Default File Types
By default, SAS uses the OpenVMS file type .DAT with both the INFILE and FILE
statements. Therefore, if you want to read from or write to an existing file in the
default directory when specifying only the filename, the file type must be .DAT;
otherwise, SAS cannot locate the file, and it issues an error message.
The default file types are different if you are using windowing environment
commands. The following table lists the default file types for SAS statements and
commands. Be sure to include the file type in a quoted file specification unless you are
sure that the SAS default is correct.
Table 7.1 Default File Types for Commands and Statements
Reference
File Type
Window
FILE command
.SAS
Program Editor
FILE command
.LOG
Log
FILE command
.LIS
Output
INCLUDE command
.SAS
Program Editor
FILE statement
.DAT
Program Editor
%INCLUDE statement
.SAS
Program Editor
INFILE statement
.DAT
Program Editor
178
Reading and Writing SAS Print Files under OpenVMS
4
Chapter 7
Reading and Writing SAS Print Files under OpenVMS
Default Print File Format
FORTRAN is the default file format for SAS print files. You can change the default
for the entire session or for specific files by using the CC= system option. This option
can be used in the FILENAME statement, in the FILENAME function, or as a system
option.
Note: The FILE command generates a nonprint file, whereas the PRINT command
generates a print file. 4
To specify the carriage-control format, use either the CC= external I/O statement
option (see “Host-Specific External I/O Statement Options” on page 402 in the
FILENAME statement) or the CC= system option (see “CC= System Option” on page
452). You can also use the FILECC system option to control how SAS treats the data in
column 1 of a print file (see “FILECC System Option” on page 461).
When you write to a print file with FORTRAN carriage control, SAS shifts all column
specifications in the PUT statement one column to the right to accommodate the
carriage-control characters in column 1.
A nonprint file that is written by SAS contains neither carriage-control characters
nor titles. Whether you create a print or nonprint file, SAS provides default values for
some characteristics of the file; these defaults are adequate in most cases. Table 7.2 on
page 178 lists the defaults for print and nonprint files.
Table 7.2 Default File Attributes for SAS Print and Nonprint Files
Print File
Print File
Attribute
(Batch)
(Interactive)
Nonprint File
Maximum record size
132
80
32,767
RECFM=
V
V
V
CC=
FORTRAN
FORTRAN
CR
Print Files Created by Command Files
When you run a SAS program from a command-procedure file with the DCL command
qualifier OUT= and also specify the SAS system option ALTLOG=SYS$OUTPUT, you
must also use the CC= system option to correctly set the print-file format.
The default print-file format is FORTRAN. However, the DCL command qualifier
OUT= creates a VFC format file. Unless you also specify either CC=FORTRAN or
CC=CR in your SAS command, your output or listing will lack the first column of data.
The following is an example that generates the correct results:
3 Your command-procedure file should look something like this:
$ SAS/ALTLOG=SYS$OUTPUT/CC=CR MYPROG.SAS
3 If your command file is named MY.COM, then you can run your SAS program by
entering the following command:
$ @MY.COM/OUT=OUT.LOG
Using External Files and Devices
4
DCL Commands for Tape Access
179
These commands send the log to the SYS$OUTPUT destination, and a copy of the log
(including the first column of data) is stored in the file OUT.LOG.
For more information about command-procedure files, see “Invoking SAS from a
Command Procedure File” on page 24, “Command Procedures” on page 15, and
OpenVMS User’s Manual.
Displaying Information about External Files under OpenVMS
As in other operating environments, you can use the following form of the
FILENAME statement under OpenVMS to list the attributes of all the external files
that are assigned for your current SAS process:
FILENAME _ALL_ LIST;
You can use the FINFO function, the FILENAME window, or the SAS Explorer
window to see information about your currently assigned external files. For details, see
“FINFO Function” on page 328.
OpenVMS logical names that you have assigned to external files are also listed, but
only after you have used them as filerefs in your current SAS process.
Accessing External Files on Tape under OpenVMS
Note on Tape Specifications
You cannot use wildcards in tape specifications, nor can you use concatenated tape
specifications.
DCL Commands for Tape Access
Use the following DCL commands to request and then release the tape drive and
volume for your SAS job or session. You can issue these commands either before you
invoke SAS or in the X statement after you invoke SAS.
ALLOCATE device-name<logical-name>
requests exclusive use of the tape drive on which the tape volume is physically
mounted, and it optionally establishes logical-name. This command is not
required; however, you do not have exclusive use of your device until you issue the
ALLOCATE command.
INITIALIZE </qualifier> device-name volume-label
initializes the tape and specifies a label to assign to the tape. Use the INITIALIZE
command only when you are writing to a tape for the first time. For more
information about initializing tapes, refer to Guide to VMS Files and Devices.
MOUNT </qualifier> device-name <volume-label>
requests that the tape be mounted on the tape drive identified by device-name. If
the tape is treated as ANSI-labeled, then you must include the volume label of the
mounted tape. The syntax of the MOUNT command for a labeled tape is
$ MOUNT device-name volume-label
180
DCL Commands for Tape Access
4
Chapter 7
where volume-label has a maximum length of six characters.
If the tape is unlabeled, then you must include the /FOREIGN qualifier and the
device name. The syntax of the MOUNT command for an unlabeled tape is
$ MOUNT/FOREIGN device-name
You do not need to use volume-label when requesting an unlabeled tape.
If you are requesting an unlabeled tape, you can issue the following form of the
MOUNT command, which tells the computer operator which tape to mount:
$ MOUNT/ASSIST/COMMENT=
“instructions” device-name
where instructions tell the computer operator which tape to mount, and
device-name identifies the tape drive.
If you are writing or reading records of a different length than the default block
size, you can use the /BLOCKSIZE= qualifier to specify the block size. For
example, in the following form of the MOUNT command, xxxx specifies the
appropriate block size for an unlabeled tape:
$ MOUNT/FOREIGN/BLOCKSIZE=
xxxx device-name
After you issue the MOUNT command for a labeled or unlabeled tape, your
keyboard locks until the MOUNT command executes (that is, until the operator
mounts the tape). This command is required.
SET MAGTAPE </qualifier> device-name
assigns special characteristics to a tape device. Qualifiers include the following:
/DENSITY=
sets the density of 800, 1,600, or 6,250 bpi (bytes per inch) for foreign tape
operations.
/REWIND
rewinds the tape.
/SKIP=FILES: n
specifies the number of files (n) to skip over on an unlabeled tape.
DISMOUNT </NOUNLOAD> device-name
dismounts a labeled or unlabeled tape. When you issue the DISMOUNT
command, the tape is physically unloaded by default. In order to mount and use
the tape again, operator intervention is required. Use the /NOUNLOAD qualifier
to prevent the default unload operation.
DEALLOCATE device-name
releases the tape drive from your job or session.
In each of these commands, device-name can be either the name of a tape drive at
your site (for example, MUA0:) or a logical name pointing to the tape drive.
After you issue commands to request the device and tape volume, use the DCL
DEFINE command, the SAS FILENAME statement, or the FILENAME function to
associate an OpenVMS logical name or SAS fileref with the external file on tape. For a
labeled tape, specify a file in one of the following two forms:
3 FILENAME fileref ’tapedevice:filename.filetype’;
3 $ DEFINE logical-name tapedevice:filename.filetype
For an unlabeled tape, specify a file in one of the following two forms:
3 FILENAME fileref ’tapedevice’;
3 $ DEFINE logical-name tapedevice
Using External Files and Devices
4
DCL Commands for Tape Access
181
You can also use the SAS X statement to issue the DEFINE command.
The OpenVMS logical name or SAS fileref that is assigned to the tape device is then
used as the file specification in the INFILE or FILE statement.
Note: In these examples, it is assumed that the OpenVMS logical name definition
for tapedevice includes a colon in the device specification, such as the following:
$ DEFINE TAPEDEVICE MUA0:
If your OpenVMS logical name definition does not include a colon, then you must
specify the colon when you use TAPEDEVICE, as in the following:
filename fileref ’tapedevice:’;
4
Order of Tape Access Commands
When you use the SAS X statement to issue the tape-access commands, specify the
commands in the following order:
INITIALIZE
ALLOCATE
MOUNT
This order differs from the order that you use when you issue the same commands
from the DCL prompt.
If you do not use this order, and you allocate the tape before you initialize it, a
message warns you that the device has already been allocated to another user when
you try to initialize the tape.
When you issue the tape-access commands from the DCL prompt, specify them in the
following order:
ALLOCATE
INITIALIZE
MOUNT
Using Multivolume Tapes
If you plan to write to several tapes in a set, you must initialize all the tapes before
you start your job. Then use the /INITIALIZE=CONTINUATION qualifier in the first
MOUNT command, as in the following example:
$
$
$
$
ALLOCATE TAPEDEVICE
INITIALIZE TAPEDEVICE TAPELIB
MOUNT/INITIALIZE=CONTINUATION TAPEDEVICE TAPELIB
SAS
. . . more SAS statements . . .
The /INITIALIZE=CONTINUATION qualifier guarantees that the appropriate
number is added to the label as the OpenVMS system mounts the subsequent volumes.
For example, the following MOUNT command first creates a tape labeled MYTAPE.
Subsequent tapes are labeled MYTA02, MYTA03, MYTA04, and so on:
$ MOUNT/INITIALIZE=CONTINUATION $2$MUA2: MYTAPE
When you issue a request to mount the next relative volume, the operator issues the
reply with the /INITIALIZE_TAPE=request-number option. For example, if you issue
the following request:
182
Writing to a Labeled Tape
4
Chapter 7
Request 69 from user SMITH. Mount relative volume
MYTA02 on $2$MUA2:
the operator performs the following steps:
1 Mounts an initialized tape on the drive.
2 Issues the following command:
$ REPLY/INITIALIZE_TAPE=69
which sends the following message to user SMITH:
Mount request 69 satisfied by operator
As this example illustrates, some coordination is required between the user and the
operator when multivolume tapes are used. Contact your system manager for more
information about this topic.
Writing to a Labeled Tape
The following example illustrates a SAS program (submitted in an interactive line
mode session) that writes to a labeled tape for the first time:
$
$
$
$
$
ALLOCATE TAPEDEVICE
INITIALIZE TAPEDEVICE LABEL1
MOUNT TAPEDEVICE LABEL1
DEFINE OUTTAPE TAPEDEVICE:EXPGIFTS.DAT
SAS
. . . notes and messages to SAS log . . .
1? data _null_;
2? input gift $ price;
3? file outtape;
4? if price>100 then
5? put gift price;
6? datalines;
7> watch 250.00
8> clown 35.31
. . . more data lines . . .
15> ;
. . . notes and messages to SAS log . . .
16? x ’dismount tapedevice’;
17? x ’deallocate tapedevice’;
18?
This program writes the file EXPGIFTS.DAT to the tape that is identified by the
label LABEL1. (The tape is referenced by the fileref OUTTAPE in the FILE statement.)
After the write operation, the tape remains positioned at the end of the first file, ready
to write another file. When you issue the DISMOUNT and DEALLOCATE commands,
the tape is rewound and physically unloaded, and the drive and tape are released from
your SAS session.
The default block size for an ANSI-labeled tape is 2,048 bytes.
Writing to an Unlabeled Tape
When you are writing to an unlabeled tape, you must use the /FOREIGN qualifier in
the MOUNT command:
$ MOUNT/FOREIGN TAPEDEVICE
Using External Files and Devices
4
Reading from a Labeled Tape
183
You must also use special values for the RECFM= and LRECL= options in the FILE
statement. To write to an unlabeled tape from the DATA step, you must indicate the
tape format by using RECFM=D. If you do not use RECFM=D for this type of access,
the results are unpredictable.
You must also use the LRECL= option to indicate the length of each record. If the
records that you are writing are variable-length records, then use a value for the
LRECL= option that is the maximum record length. The minimum LRECL= value is 14.
This minimum value is the only restriction on the LRECL= value for unlabeled tapes.
Example: Writing to an Unlabeled Tape
$
$
$
$
$
ALLOCATE TAPEDEVICE
INITIALIZE TAPEDEVICE
MOUNT/FOREIGN TAPEDEVICE
DEFINE OUTTAPE TAPEDEVICE
SAS
. . . notes and messages to SAS log . . .
1? data _null_;
2? input gift $ price;
3? file outtape recfm=d lrecl=80;
4? if price>100 then
5? put gift price;
6? datalines;
7> watch 250.00
8> clown 35.31
. . . more data lines . . .
15> ;
. . . notes and messages to SAS log . . .
16? x ’dismount outtape’;
17? x ’deallocate outtape’;
18?
Changing the Default Block Size
The default block size for an unlabeled tape is 512 bytes. If you want to write a
record that is longer than the default block size, you must increase the block size by
using the /BLOCKSIZE qualifier in the MOUNT command. For example, the following
command increases the block size to 8000 bytes for an unlabeled tape:
$ MOUNT/FOREIGN/BLOCKSIZE=8000 TAPEDEVICE LABEL1
If you attempt to write a record that is longer than the block size, you receive the
following error message:
ERROR: Tape block size less than LRECL specified.
Reading from a Labeled Tape
When SAS reads a file from a labeled tape, it searches for a filename on the tape that
matches the filename used in the DEFINE command or FILENAME statement. The
following example illustrates reading an external file from a labeled tape to create a
SAS data set:
$ ALLOCATE TAPEDEVICE
$ MOUNT TAPEDEVICE LABEL1
$ DEFINE INTAPE TAPEDEVICE:EXPGIFTS.DAT
184
Reading from an Unlabeled Tape
4
Chapter 7
$ SAS
. . . notes and messages to SAS log . . .
1? data expenses;
2?
infile intape;
3?
input gift $ price;
4? run;
. . . notes and messages to SAS log . . .
5? x ’dismount tapedevice’;
6? x ’deallocate tapedevice’;
7?
The DATA step in this example reads a file named EXPGIFTS.DAT, which is located
on the tape identified by the label LABEL1. (The file is referenced by the fileref
INTAPE in the INFILE statement.) After the read operation, the tape is positioned at
the start of the next file.
Reading from an Unlabeled Tape
When you read from an unlabeled tape, you must position the tape to the appropriate
file because there is no filename for which to search. Remember that the DEFINE
command or FILENAME statement for an unlabeled tape includes only the OpenVMS
logical name or fileref, plus the name of the tape device. If you specify a filename, it is
ignored.
Here are two ways of positioning a tape to the correct file:
3 Use null DATA steps to position the tape to the file you want.
3 Use the /SKIP=FILES: n qualifier in the SET MAGTAPE command, where n is the
number of files to skip.
Required Options to Read from an Unlabeled Tape from the DATA Step
To read from an unlabeled tape from the DATA step, you must indicate the tape
format by using RECFM=D. If you do not use RECFM=D for this type of access, the
results are unpredictable.
You must also use the LRECL= option to indicate the length of each record. If the
records that you are accessing are variable-length records, then use a value for the
LRECL= option that is the maximum record length. The minimum LRECL= value is 14.
This minimum value is the only restriction on the LRECL= value for unlabeled tapes.
Example 1: Using a Null DATA Step to Position the Tape
The following example illustrates using a null DATA step to skip the first file on an
unlabeled tape so that the second DATA step can read the next file:
$
$
$
$
ALLOCATE TAPEDEVICE
MOUNT/FOREIGN TAPEDEVICE
DEFINE MYTAPE TAPEDEVICE
SAS
. . . notes and messages to SAS log . . .
1? data _null_;
2?
infile mytape recfm=d lrecl=80;
3?
input;
4? run;
. . . notes and messages to SAS log . . .
5? data prices;
Using External Files and Devices
4
How to Access a Remote File across DECnet
185
6?
infile mytape recfm=d lrecl=80;
7?
input name $ x y z;
8?
prod=x*y;
9?
if prod<z then output;
0? run;
. . . notes and messages to SAS log . . .
5? x ’dismount mytape’;
6? x ’deallocate mytape’;
7?
Example 2: Using the SET MAGTAPE Command to Position the Tape
This example illustrates how to read the second file from the tape that is referenced
by the OpenVMS logical name MYTAPE by using the SET MAGTAPE command with
the /SKIP=FILES: n qualifier:
$
$
$
$
ALLOCATE TAPEDEVICE
MOUNT/FOREIGN TAPEDEVICE
DEFINE MYTAPE TAPEDEVICE
SAS
. . . notes and messages to SAS log . . .
1? x ’set magtape mytape/skip=files:1’;
2? data prices;
3?
infile mytape recfm=d lrecl=80;
4?
input name $ x y z;
5?
prod=x*y;
6?
if prod<z then output;
7? run;
. . . notes and messages to SAS log . . .
8? x ’dismount mytape’;
9? x ’deallocate mytape’;
10?
Accessing Remote External Files under OpenVMS
How to Access a Remote File across DECnet
SAS supports access to external files across DECnet. You can create or read external
files on any OpenVMS machine to which you have access in your DECnet network.
An external file that resides on another OpenVMS node can be specified in any
statement that contains a quoted file specification. You can also define an OpenVMS
logical name to point to a file on another node and then use the OpenVMS logical name
in your SAS session as described in “Assigning OpenVMS Logical Names to External
Files” on page 173. You can also use the FILENAME statement to assign a fileref to a
remote external file. Within the quoted string, DEFINE command, or FILENAME
statement, use the same syntax that you would use in any OpenVMS file specification
to access a target node.
Note: The MBC= and MBF= external I/O statement options are not supported
across DECnet. 4
186
Example 1: Accessing a Remote File
4
Chapter 7
Example 1: Accessing a Remote File
To access the file TEST.DAT on node VMSNODE, specify the following FILENAME
statement:
filename mine ’vmsnode::mydisk:[mydir]test.dat’;
Example 2: Including the User Name and Password in the File
Specification
To include a user name and password of an account on the target node as part of the
file specification, use the following FILENAME statement:
filename mine ’vmsnode "user-id
password"::mydisk:[mydir]test.dat’;
Additional Documentation on DECnet Access
For more information about DECnet access and file specification syntax, refer to
DECnet for OpenVMS Guide to Networking and DECnet for OpenVMS Networking
Manual.
Reading from and Writing to OpenVMS Commands (Pipes)
What Are Pipes?
Under OpenVMS, you can use the FILENAME statement to assign filerefs to a pipe.
Pipes enable your SAS application to receive input from any OpenVMS command that
writes to SYS$OUTPUT and to write input to any OpenVMS command that reads from
SYS$INPUT.
Note: The PIPE device cannot be used from a captive account. For more
information, see “Limitations of Using a Captive Account” on page 47. 4
Syntax for Assigning Filerefs to a Pipe
Use the following FILENAME statement syntax to assign filerefs to a pipe:
FILENAME fileref PIPE ’OpenVMS-command’ < options>
fileref
is the name by which you reference the pipe from SAS.
PIPE
identifies the device type as an OpenVMS pipe.
Using External Files and Devices
4
Using the Fileref for Reading
187
’OpenVMS-command’
is the name of one or more OpenVMS commands to which you want to route
output or from which you want to read input. The command must be enclosed in
single or double quotation marks.
options
control how the external file is processed. See “FILENAME Statement” on page
397 for more information.
Note: Only the LRECL= host external I/O option is supported with the PIPE
device. 4
Whether you are using the OpenVMS command as input or output depends on
whether you are using the fileref for reading or writing. For example, if the fileref is
used in an INFILE statement, SAS assumes that the input is coming from an
OpenVMS command. If the fileref is used in a FILE statement, SAS assumes that the
output is going to an OpenVMS command.
Using the Fileref for Reading
When the fileref is used for reading, the specified OpenVMS command executes, and
any output that is sent to SYS$OUTPUT or SYS$ERROR is read through the fileref.
SYS$INPUT is connected to the null device.
Example 1: Sending the Output of the DIRECTORY Command to a SAS DATA
Step
The following SAS program uses the PIPE device-type keyword to send the output of
the DIRECTORY command to a SAS DATA step. The resulting SAS data set contains
the filename, file type, version, and date and time information about each file in the
default directory.
filename dir_list pipe ’directory/date’;
data sasjobs;
infile dir_list pad;
length fname $ 80;
input fname $ char80.;
run;
proc print data=sasjobs;
run;
The DIRECTORY/DATE command retrieves information about the files in the
current directory. The FILENAME statement connects the output of the DIRECTORY
command to the fileref DIR_LIST. The DATA step creates a data set named SASJOBS
from the INFILE statement; SASJOBS points to the input source. The INPUT
statement reads the first 80 characters in each input line.
Example 2: Using the SYS$INPUT Fileref to Read Input through a Pipe
In the following example, the SYS$INPUT fileref is used to read input through a pipe
into the SAS command. The SAS command executes the SAS program. The program in
the previous example has been changed and stored in the file DIR.SAS. By placing the
188
Using the Fileref for Writing
4
Chapter 7
piping operation outside the SAS program, you can change the information that is
passed to the program through the command without having to modify the program
itself.
data sasjobs
infile SYS$INPUT;
length fname $ 80;
input fname $ char80.;
run;
proc print data=sasjobs;
run;
To run the program, use the OpenVMS PIPE command to send the output of the
DIR/DATE command to the SAS command:
$pipe dir/date | sas dir
The output is stored in DIR.LIS and the log is stored in DIR.LOG. See “Overriding
the Default Log and Output Destinations under OpenVMS” on page 196 for more
details about routing SAS log and procedure output.
Using the Fileref for Writing
When the fileref is used for writing, the output from SAS is read in by the specified
OpenVMS command, which then executes.
Example: Sending Data to an External File via a Pipe
In the following example, the OpenVMS CREATE command takes its input from the
CXTFILE fileref and the file LIST.TXT is created in the default directory. The file
LIST.TXT contains one record:
Mary 39 jacks
The code creates the data in a SAS program and sends the data to an external file
via PIPE:
filename extfile pipe ’create list.txt’;
data a;
input name $ num toy$;
file extfile;
put _infile_;
cards;
Mary
39
jacks
;
Using External Files and Devices
4
Syntax of the FILENAME Statement for E-Mail
189
Sending Electronic Mail Using the FILENAME Statement (E-MAIL)
Advantages to Sending E-Mail from within SAS
SAS lets you send electronic mail using SAS functions in a DATA step or in SCL.
Sending e-mail from within SAS enables you to
3 use the logic of the DATA step or SCL to subset e-mail distribution based on a
large data set of e-mail addresses.
3 send e-mail automatically upon completion of a SAS program that you submitted
for batch processing.
3 direct output through e-mail based on the results of processing.
Initializing Electronic Mail
By default, SAS uses SMTP (Simple Mail Transfer Protocol) to send e-mail. SMTP,
unlike the VMS e-mail facility, supports attachments. This default is specified by the
EMAILSYS system option. For information on how to change the e-mail protocol, see
“EMAILSYS= System Option” on page 458.
Before you can send e-mail from within SAS, your system administrator might need
to set the EMAILHOST system option to point to the SMTP server. For more
information about the EMAILHOST system option, see SAS Language Reference:
Dictionary.
Components of the DATA Step or SCL Code Used to Send E-Mail
In general, a DATA step or SCL code that sends electronic mail has the following
components:
3 a FILENAME statement with the EMAIL device-type keyword.
3 options specified on the FILENAME or FILE statements indicating the e-mail
recipients and subject.
3 PUT statements that contain the body of the message.
3 PUT statements that contain special e-mail directives (of the form !EM_directive!)
that can override the e-mail attributes (TO, CC, SUBJECT) or perform actions
(such as SEND, ABORT, and start a NEWMSG).
Syntax of the FILENAME Statement for E-Mail
To send electronic mail from a DATA step or SCL, issue a FILENAME statement
using the following syntax:
FILENAME fileref EMAIL ’address’ <e-mail-options>
where
fileref
is a valid fileref.
190
Syntax of the FILENAME Statement for E-Mail
4
Chapter 7
EMAIL
specifies the EMAIL device type, which provides the access method that enables
you to send electronic mail programmatically from SAS.
’address’
is the destination e-mail address of the user to whom you want to send e-mail. You
must specify an address here, but you can override its value with the TO= e-mail
option.
e-mail-options
can be any of the following:
TO=to-address
specifies the primary recipients of the electronic mail. If an address contains
more than one word, you must enclose it in quotation marks. To specify more
than one address, you must enclose the group of addresses in parentheses,
enclose each address in double quotation marks, and separate each address
with a space. For example, to=’[email protected]’and
to=("[email protected]" "[email protected]")are valid TO values.
Note: You can send an e-mail without specifying a recipient in the TO=
option as long as you specify a recipient in either the CC= or BCC= option.
4
CC=cc-address
specifies the recipients you want to receive a copy of the electronic mail. If an
address contains more than one word, you must enclose it in quotation marks.
To specify more than one address, you must enclose the group of addresses in
parentheses, enclose each address in quotation marks, and separate each
address with a space. For example, cc=’[email protected]’and
cc=("[email protected]" "[email protected]")are valid CC values.
BCC=bcc-address
specifies the recipients you want to receive a blind copy of the electronic mail.
The BCC field does not appear in the e-mail header, so that these e-mail
addresses cannot be viewed by other recipients.
If an address contains more than one word, you must enclose it in
quotation marks. To specify more than one address, you must enclose the
group of addresses in parentheses, enclose each address in quotation marks,
and separate each address with a space. For example,
bcc=’[email protected]’and bcc=("[email protected]"
"[email protected]")are valid BCC values.
Note: The BCC option is only valid when using SMTP. The VMS e-mail
facility does not support this option. 4
SUBJECT=’subject’
specifies the subject of the message. If the subject text is longer than one
word (that is, it contains at least one blank space), you must enclose it in
quotation marks. You also must use quotation marks if the subject contains
any special characters. For example, subject=Sales and subject="June
Report" are valid SUBJECT values. Any subject text not enclosed in
quotation marks is converted to uppercase.
ATTACH=’filename’ | ATTACH = (’filename’ attachment-options)
specifies the physical name of the file(s) to be attached to the message and
any options to modify the attachment specifications. Enclose filename in
quotation marks. To attach more than one file, enclose the group of filenames
in parentheses. For example, valid file attachments are
attach=’DISK1:[MYDIR]OPINION.TXT’ and attach=("june2003.txt"
"july2003.txt").
Using External Files and Devices
4
Syntax of the FILENAME Statement for E-Mail
191
By default, SMTP e-mail attachments are truncated at 256 characters. To
send longer attachments, you can specify the LRECL= and RECFM= options
from the FILENAME statement as attachment-options. For more information
about the LRECL= and RECFM= options, see “Host-Specific External I/O
Statement Options” on page 402.
For more information about the options that are valid when you are using SMTP, see
“FILENAME Statement, EMAIL (SMTP) Access Method” in SAS Language Reference:
Dictionary.
Specifying E-Mail Options in the FILE Statement
You can also specify the e-mail-options in the FILE statement inside the DATA step.
Options that you specify in the FILE statement override any corresponding options that
you specified in the FILENAME statement.
Defining the Body of the Message
In your DATA step, after using the FILE statement to define your e-mail fileref as
the output destination, use PUT statements to define the body of the message.
Specifying E-Mail Directives in the PUT Statement
You can also use PUT statements to specify e-mail directives that changes the
attributes of your electronic message or perform actions with it. Specify only one
directive in each PUT statement; each PUT statement can contain only the text
associated with the directive it specifies.
The directives that change the attributes of your message are the following:
!EM_TO! addresses
replaces the current primary recipient addresses with addresses. In the PUT
statement, specify addresses without single quotation marks.
!EM_CC! addresses
replaces the current copied recipient addresses with addresses. In the PUT
statement, specify addresses without single quotation marks.
!EM_BCC! addresses
Replace the current blind copied recipient addresses with addresses. In the PUT
statement, specify addresses without single quotation marks.
!EM_SUBJECT! subject
replaces the current subject of the message with subject.
The directives that perform actions are the following:
!EM_SEND!
sends the message with the current attributes. By default, SAS sends a message
when the fileref is closed. The fileref closes when the next FILE statement is
encountered or the DATA step ends. If you use this directive, SAS sends the
message when it encounters the directive, and again at the end of the DATA step.
!EM_ABORT!
aborts the current message. You can use this directive to stop SAS from
automatically sending the message at the end of the DATA step.
!EM_NEWMSG!
clears all attributes of the current message, including TO, CC, SUBJECT, and the
message body.
192
Example: Sending E-Mail from the DATA Step
4
Chapter 7
Example: Sending E-Mail from the DATA Step
Suppose that you want to tell your coworker Jim, whose user ID is JBrown, about
some changes you made to your Config.sas file. If your e-mail program handles alias
names, you could send it by submitting the following DATA step:
filename mymail email ’JBrown’
subject=’My CONFIG.SAS file’;
data _null_;
file mymail;
put ’Jim,’;
put ’This is my CONFIG.SAS file.’;
put ’I think you might like the
new options I added.’;
run;
The following example sends a message to multiple recipients. It specifies the
e-mail-options in the FILE statement instead of the FILENAME statement:
filename outbox email ’[email protected]’;
data _null_;
file outbox
/* Overrides the value in */
/* the filename statement. */
to=("[email protected]" "[email protected]")
cc=("[email protected]"
"[email protected]")
subject=’My SAS output’;
put ’Folks,’;
put ’Take a look at my output from the
SAS program I ran last night.’;
put ’It worked great!’;
run;
You can use conditional logic in the DATA step to send multiple messages and control
which recipients get which messages. For example, suppose you want to notify members
of two different departments that their customized reports are available. If your e-mail
program handles alias names, your DATA step might look like the following:
filename reports email ’Jim’;
data _null_;
file reports;
infile cards eof=lastobs;
length name dept $ 21;
input name dept;
/* Assign the TO attribute
put ’!EM_TO!’ name;
*/
/* Assign the SUBJECT attribute
*/
put ’!EM_SUBJECT! Report for ’ dept;
Using External Files and Devices
4
Example: Sending E-Mail Using SCL Code
193
put name ’,’;
put ’Here is the latest report for ’ dept ’.’;
if dept=’marketing’ then
put ’ATTN: Sales Representatives’;
else
put ’For Your Information’;
/* Send the message
put ’!EM_SEND!’;
*/
/* Clear the message attributes */
put ’!EM_NEWMSG!’;
return;
/* Abort the message before the */
/* Run statement causes it to
*/
/* be sent again.
*/
lastobs: put ’!EM_ABORT!’;
datalines;
Susan
Jim
Rita
Herb
;
run;
marketing
marketing
development
development
The resulting e-mail message and its attachments are dependent on the department
to which the recipient belongs.
Note: You must use the !EM_NEWMSG! directive to clear the message attributes
between recipients. The !EM_ABORT! directive prevents the message from being
automatically sent at the end of the DATA step. 4
Example: Sending E-Mail Using SCL Code
The following example is the SCL code behind a frame entry design for e-mail. The
frame entry includes several text entry fields that let the user enter information:
mailto
the user ID to send mail to
copyto
the user ID to copy (CC) the mail to
subject
the subject of the mail message
line1
the text of the mail message
The frame entry also contains a pushbutton called SEND that causes this SCL code
(marked by the send: label) to execute.
send:
/* set up a fileref */
rc = filename(’mailit’,’userid’,’email’);
/* if the fileref was successfully set up */
194
Example: Sending E-Mail Using SCL Code
4
Chapter 7
/* open the file to write to
if rc = 0 then do;
fid = fopen(’mailit’,’o’);
if fid >0 then do;
/* fput statements are used to
/* implement writing the mail
/* and the components such as
/* subject, who to mail to, etc.
fputrc1 = fput(fid,line1);
rc = fwrite(fid);
*/
*/
*/
*/
*/
fputrc2 = fput(fid,’!EM_TO! ’||mailto);
rc = fwrite(fid);
fputrc3 = fput(fid,’!EM_CC! ’||copyto);
rc = fwrite(fid);
fputrc4 = fput(fid,’!EM_SUBJECT! ’||subject);
rc = fwrite(fid);
closerc = fclose(fid);
end;
end;
return;
cancel:
call execcmd(’end’);
return;
195
CHAPTER
8
Routing the SAS Log and SAS
Procedure Output
Overview to Routing Log and Procedure Output 195
Attributes of the SAS Log and Procedure Output Files 196
Overriding the Default Log and Output Destinations under OpenVMS 196
Controlling Output Destinations Using SAS System Options 196
Controlling Output Destinations Using the PRINTTO Procedure 196
Routing Output in the SAS Windowing Environment 197
Default Output Destination in the Windowing Environment 197
Notes on Routing Output in the Windowing Environment 197
Routing the Log to a Printer 197
Routing the Log to a Disk File 198
Routing Procedure Output to a Printer 198
Routing Procedure Output to a Disk File 199
Routing Output in Interactive Line Mode 199
Default Output Destination in Interactive Line Mode 199
Routing the Log to a Printer 199
Routing the Log to a Disk File 200
Routing Procedure Output to a Printer 200
Routing Procedure Output to a Disk File 201
Routing Output in Noninteractive Mode 201
Default Output Destination in Noninteractive Mode 201
Routing the Log to a Display 201
Routing the Log to a Printer 202
Routing the Log to a Disk File 202
Routing Procedure Output to a Display 203
Routing Procedure Output to a Printer 203
Routing Procedure Output to a Disk File 204
Routing Output in Batch Mode 204
Default Output Destination in Batch Mode 204
Routing Log and Procedure Output to a Printer 205
Using the PRTFILE Command under OpenVMS 205
Overview to Routing Log and Procedure Output
For each SAS job, process, or session, SAS automatically creates the SAS log file and
the WORK data library. (For a discussion of the WORK data library, see “The WORK
Data Library under OpenVMS” on page 129.) If procedures in the SAS program
produce printed output, then SAS also creates the procedure output file. If they are
stored as disk files, the SAS log and procedure output files usually have file types of
.LOG and .LIS, respectively.
196
Attributes of the SAS Log and Procedure Output Files
4
Chapter 8
The SAS log and procedure output files have default destinations, but you can set the
output destinations (terminal, printer, or disk file) from the various modes of running
SAS.
Attributes of the SAS Log and Procedure Output Files
The physical line size (number of columns per line) and the page size (number of
lines per page) of the SAS log and procedure output files depend on the destination of
the file. If these files appear on your display, then the default line size and page size
are derived from the size of your display. For example, on a display device, the default
line size is dependent on the window size determined by X resources.
If these files are sent to the system printer or written to a disk file (.LOG or .LIS),
then the default line size is 132 characters, and the default page size is 60 lines. You
can change these defaults with the LINESIZE= and PAGESIZE= system options. The
value of LINESIZE= can range from 64 to 256; the value of PAGESIZE= can range from
15 to 32,767.
Note: You can change the line size or page size either when you invoke SAS or
during your session with the OPTIONS statement. 4
The .LOG and .LIS files have the following OpenVMS file attributes:
3 file organization: sequential
3 record format: variable length
3 record attributes: FORTRAN carriage control.
Overriding the Default Log and Output Destinations under OpenVMS
Each method of running SAS has a default destination for the SAS log and procedure
output files, but you can override these defaults with either SAS system options (when
you invoke SAS) or the PRINTTO procedure (while you are running SAS).
Controlling Output Destinations Using SAS System Options
Two system options control the destination of the SAS log: LOG= and ALTLOG=.
Two similar options control the destination of procedure output: PRINT= and
ALTPRINT=. The LOG= and PRINT= system options change the default destination of
the SAS log and procedure output; the output does not appear at the original default
destination. The ALTLOG= and ALTPRINT= system options send a copy of the output
to the new destination; the output also appears at the original default destination.
These options can only be specified when you invoke SAS or a new SAS process.
Controlling Output Destinations Using the PRINTTO Procedure
If you want to reroute the SAS log or the procedure output after you enter your SAS
session, you can use the PRINTTO procedure with the LOG= and PRINT= statement
options. Unlike the ALTLOG= and ALTPRINT= system options, the PRINTTO
procedure does not send the output to both the new and default destinations; only the
specified destination receives output. You must use the PROC PRINTTO statement
before the SAS log entries or procedure output you want to route are generated. When
you want the output to revert to the default destination, use a PROC PRINTTO
statement with no statement options.
Routing the SAS Log and SAS Procedure Output
4
Routing the Log to a Printer
197
Routing Output in the SAS Windowing Environment
Default Output Destination in the Windowing Environment
In the windowing environment, the SAS log is automatically routed to the Log
window, and the procedure output is automatically routed to the Output window.
Notes on Routing Output in the Windowing Environment
The LOG= and PRINT= system options are ignored in the windowing environment.
When you send your log or procedure output to a printer from the SAS windowing
environment, you can use the FSFORM command to invoke the FORM window to set
your default printer destination, page format, and so on. For more information about
the OpenVMS specifics of the FSFORM command, see “Host-Specific Frames of the
Form Window” on page 272. For general information about the FSFORM command,
refer to SAS Help and Documentation.
Routing the Log to a Printer
To send the SAS log to a printer from the windowing environment, choose from the
following methods:
PRINT
This command, issued from the command line of the Log window, sends the
contents of the Log window to the queue of the default system printer
(SYS$PRINT).
You can also use the PRTFILE command, which is described in “Using the
PRTFILE Command under OpenVMS” on page 205.
$ SAS/ALTLOG=SYS$PRINT
This SAS command sends a copy of the SAS log to the SYS$PRINT printer queue
and to the default destination (Log window). If you want to send the copy to a
different printer, you must redefine the SYS$PRINT logical name.
PROC PRINTTO LOG=fileref;
This procedure statement sends any following SAS log entries to the default
system printer during a SAS session. You must have defined fileref in a
FILENAME statement or function with the PRINTER device-type keyword. For
more information, see “PRINTTO Procedure” on page 385 and “Device-Type
Keywords” on page 400 in the FILENAME statement.
198
Routing the Log to a Disk File
4
Chapter 8
Routing the Log to a Disk File
To send the SAS log to a disk file from the windowing environment, choose from the
following methods:
FILE file-specification
This command, issued from the command line of the Log window, sends a copy of
the window’s contents to the file associated with file-specification.
For more information about the FILE command, see “FILE Command” on page
258.
$ SAS/ALTLOG=file-specification
This SAS command sends a copy of the SAS log to the disk file file-specification, as
well as to the default destination (Log window). The following is an example of
this command:
$ SAS/ALTLOG=MYLOG.LOG
PROC PRINTTO LOG=file-specification;
This procedure statement sends any following SAS log entries to the disk file
associated with file-specification during a SAS session. The value for
file-specification can be any valid external file specification discussed in
“Identifying External Files to SAS” on page 173.
Routing Procedure Output to a Printer
To send the procedure output to a printer from the windowing environment, choose
from the following methods:
PRINT
This command, issued from the command line of the Output window, sends the
contents of the Output window to the queue of the default system printer
(SYS$PRINT). See your system manager for the location of your default printer.
You can also use the PRTFILE command. For more information, see “Using the
PRTFILE Command under OpenVMS” on page 205.
P selection-field command
When issued from the Results window, this selection-field command sends the
procedure output to the default system printer. Also, you can edit your output from
the Results window and then send the modified output to the printer. For more
information about the Results window, refer to SAS Help and Documentation.
$ SAS/ALTPRINT=SYS$PRINT
This SAS command sends a copy of the procedure output to the SYS$PRINT
printer queue and to the default destination (Output window). If you want to send
the procedure output to a different printer, you must redefine the SYS$PRINT
logical name.
PROC PRINTTO PRINT=fileref;
This procedure statement sends any following procedure output to the default
system printer during a SAS session. You must have defined fileref in a
FILENAME statement or function with the PRINTER device-type keyword. For
more information, see “PRINTTO Procedure” on page 385 and “Device-Type
Keywords” on page 400 in the FILENAME statement.
Routing the SAS Log and SAS Procedure Output
4
Routing the Log to a Printer
199
Routing Procedure Output to a Disk File
To send the procedure output to a disk file from the windowing environment, choose
from the following methods:
FILE file-specification
When issued from the command line of the Output window, this command sends a
copy of the window’s contents to the file associated with file-specification. For more
information about the FILE command, see “FILE Command” on page 258.
F selection-field command
When issued from the Results window, this selection-field command brings up a
requestor window that asks for the filename and enables you to specify attributes
such as REPLACE or APPEND. Also, you can edit your procedure output from the
Results window and then send the modified output to a file. For more information
about the Results window, see SAS Help and Documentation.
$ SAS/ALTPRINT=file-specification
This SAS command sends a copy of the procedure output to the disk file
file-specification and to the default destination (Output window). The following is
an example of this command:
$ SAS/ALTPRINT=MYPROG.LIS
PROC PRINTTO PRINT=file-specification;
This procedure statement sends any following procedure output to the disk file
associated with file-specification during a SAS session. The value for
file-specification can be any valid external file specification discussed in
“Identifying External Files to SAS” on page 173.
Routing Output in Interactive Line Mode
Default Output Destination in Interactive Line Mode
If you run your SAS program in interactive line mode, the SAS log and procedure
output appear on the display by default. SAS statements from your program, the SAS
log, and procedure output (if the program produces any) are interleaved on the display
according to the order of DATA and PROC steps in your program.
Routing the Log to a Printer
To send the SAS log to a printer in interactive line mode, choose from the following
methods:
$ SAS/NODMS/LOG=SYS$PRINT
This SAS command sends the SAS log to the SYS$PRINT printer queue instead of
the default destination (the display). If you want to send the log to a different
printer, you must redefine the SYS$PRINT logical name.
$ SAS/NODMS/ALTLOG=SYS$PRINT
This SAS command sends a copy of the SAS log to the SYS$PRINT printer queue
and to the default destination (the display). If you want to send the log to a
different printer, you must redefine the SYS$PRINT logical name.
200
Routing the Log to a Disk File
4
Chapter 8
PROC PRINTTO LOG=fileref;
This procedure statement sends any following SAS log entries to the default
system printer during a SAS session. You must have defined fileref in a
FILENAME statement or function with the PRINTER device-type keyword. For
more information, see “PRINTTO Procedure” on page 385 and “Device-Type
Keywords” on page 400 in the FILENAME statement.
Routing the Log to a Disk File
To send the SAS log to a disk file in interactive line mode, choose one of the following
methods:
$ SAS/NODMS/LOG=file-specification
This SAS command sends the SAS log to the disk file file-specification instead of
the default destination (the display). The following is an example of this command:
$ SAS/NODMS/LOG=MYLOG.LOG
$ SAS/NODMS/ALTLOG=file-specification
This SAS command sends a copy of the SAS log to the disk file file-specification
and to the default destination (the display). The following is an example of this
command:
$ SAS/NODMS/ALTLOG=MYLOG.LOG
PROC PRINTTO LOG=file-specification;
This procedure statement sends any following SAS log entries to the disk file
associated with file-specification during a SAS session. The value for
file-specification can be any valid external file specification discussed in
“Identifying External Files to SAS” on page 173.
Routing Procedure Output to a Printer
To send the procedure output to a printer in interactive line mode, choose from the
following methods:
$ SAS/NODMS/PRINT=SYS$PRINT
This SAS command sends the procedure output to the SYS$PRINT printer queue
instead of to the default destination (the display). If you want to send the
procedure output to a different printer, you must redefine the SYS$PRINT logical
name.
$ SAS/NODMS/ALTPRINT=SYS$PRINT
This SAS command sends a copy of the procedure output to the SYS$PRINT
printer queue and to the default destination (the display). If you want to send the
procedure output to a different printer, you must redefine the SYS$PRINT logical
name.
PROC PRINTTO PRINT=fileref;
This procedure statement sends any following procedure output to the default
system printer during a SAS session. You must have defined fileref in a
FILENAME statement or function with the PRINTER device-type keyword. For
more information, see “PRINTTO Procedure” on page 385 and “Device-Type
Keywords” on page 400 in the FILENAME statement.
Routing the SAS Log and SAS Procedure Output
4
Routing the Log to a Display
201
Routing Procedure Output to a Disk File
To send the procedure output to a disk file in interactive line mode, choose from the
following methods:
$ SAS/NODMS/PRINT=file-specification
This SAS command sends the procedure output to the disk file file-specification
instead of to the default destination (the display). The following is an example of
this command:
$ SAS/NODMS/PRINT=MYPROG.LIS
$ SAS/NODMS/ALTPRINT=file-specification
This SAS command sends a copy of the procedure output to the disk file
file-specification and to the default destination (the display). The following is an
example:
$ SAS/NODMS/ALTPRINT=MYPROG.LIS
PROC PRINTTO PRINT=file-specification;
This procedure statement sends any following procedure output to the disk file
associated with file-specification during a SAS session. The value for
file-specification can be any valid external file specification discussed in
“Identifying External Files to SAS” on page 173.
Routing Output in Noninteractive Mode
Default Output Destination in Noninteractive Mode
In noninteractive mode, the default destination for the log is the disk file
program-name.LOG, where program-name is the name of the file that contains the
submitted SAS statements. The default destination for the procedure output is a disk
file named program-name.LIS. For example, if you run your SAS program in
noninteractive mode using the following command, the SAS log is automatically
directed to a file named PROGNAME.LOG and the procedure output is written to a file
named PROGNAME.LIS:
$ SAS PROGNAME
Both files are written in the default directory.
Routing the Log to a Display
To send the SAS log to a display in noninteractive mode, choose from the following
methods:
$ SAS/LOG=SYS$OUTPUT program-name
This SAS command sends the SAS log to your display instead of the default
destination (program-name.LOG file).
$ SAS/ALTLOG=SYS$OUTPUT program-name
This SAS command sends a copy of the SAS log to your display and to the default
destination (program-name.LOG file).
202
Routing the Log to a Printer
4
Chapter 8
PROC PRINTTO LOG=fileref;
This procedure statement sends the SAS log to your display during a
noninteractive job. You must have defined fileref in a FILENAME statement or
function with the TERMINAL device-type keyword. For more information, see
“PRINTTO Procedure” on page 385 and “Device-Type Keywords” on page 400 in
the FILENAME statement.
Routing the Log to a Printer
To send the SAS log to a printer in noninteractive mode, choose from the following
methods:
$ SAS/LOG=SYS$PRINT program-name
This SAS command sends the SAS log to the SYS$PRINT printer queue instead of
the default destination (program-name.LOG file). If you want to send the log to a
different printer, you must redefine the SYS$PRINT logical name.
$ SAS/ALTLOG=SYS$PRINT program-name
This SAS command sends a copy of the SAS log to the SYS$PRINT printer queue
and to the default destination (program-name.LOG file). If you want to send the
log to a different printer, you must redefine the SYS$PRINT logical name.
PROC PRINTTO LOG=fileref;
This procedure statement sends the SAS log to a printer during a noninteractive
job. You must have defined fileref in a FILENAME statement or function with the
PRINTER device-type keyword. For more information, see “PRINTTO Procedure”
on page 385 and “Device-Type Keywords” on page 400 in the FILENAME
statement.
You can also use the DCL PRINT command to send the program-name.LOG file to
the printer after a noninteractive job finishes.
Routing the Log to a Disk File
To send the SAS log to a disk file in noninteractive mode, choose one of the following
methods:
$ SAS/LOG=file-specification program-name
This SAS command sends the SAS log to the file file-specification instead of the
default destination (program-name.LOG file). The following is an example of this
command:
$ SAS/LOG=MYLOG.LOG PROG1
$ SAS/ALTLOG=file-specification program-name
This SAS command sends a copy of the SAS log to the disk file file-specification
and to the default destination (program-name.LOG file). The following is an
example of this command:
$ SAS/ALTLOG=MYLOG.LOG PROG1
PROC PRINTTO LOG=file-specification;
This procedure statement sends any following SAS log entries to the disk file
associated with file-specification during a noninteractive job. The value for
file-specification can be any valid external file specification, as discussed in
“Identifying External Files to SAS” on page 173.
Routing the SAS Log and SAS Procedure Output
4
Routing Procedure Output to a Printer
203
Routing Procedure Output to a Display
To send the procedure output to a display in noninteractive mode, choose from the
following methods:
$ SAS/PRINT=SYS$OUTPUT program-name
This SAS command sends the procedure output to your display instead of the
default destination (program-name.LIS file).
$ SAS/ALTPRINT=SYS$OUTPUT program-name
This SAS command sends a copy of the procedure output to your display and to
the default destination (program-name.LIS file).
PROC PRINTTO PRINT=fileref;
This procedure statement sends the procedure output to your display during a
noninteractive job. You must have defined fileref in a FILENAME statement or
function with the TERMINAL device-type keyword. For more information, see
“PRINTTO Procedure” on page 385 and “Device-Type Keywords” on page 400 in
the FILENAME statement.
Routing Procedure Output to a Printer
To send the procedure output to a printer in noninteractive mode, choose from the
following methods:
$ SAS/PRINT=SYS$PRINT program-name
This SAS command sends the procedure output to the SYS$PRINT printer queue
instead of the default destination (program-name.LIS file). If you want to send the
procedure output to a different printer, you must redefine the SYS$PRINT logical
name.
$ SAS/ALTPRINT=SYS$PRINT program-name
This SAS command sends a copy of the procedure output to the SYS$PRINT
printer queue and to the default destination (program-name.LIS file). If you want
to send the procedure output to a different printer, you must redefine the
SYS$PRINT logical name.
PROC PRINTTO PRINT=fileref;
This procedure statement sends the procedure output to a printer during a
noninteractive job. You must have defined fileref in a FILENAME statement or
function with the PRINTER device-type keyword. For more information, see
“PRINTTO Procedure” on page 385 and “Device-Type Keywords” on page 400 in
the FILENAME statement.
You can also use the DCL PRINT command to send the program-name.LIS file to the
printer after a noninteractive job finishes.
204
Routing Procedure Output to a Disk File
4
Chapter 8
Routing Procedure Output to a Disk File
To send the procedure output to a disk file in noninteractive mode, choose one of the
following methods:
$ SAS/PRINT=file-specification program-name
This SAS command sends the procedure output to the disk file file-specification
instead of the default destination (program-name.LIS file). The following is an
example of this command:
$ SAS/PRINT=MYPROG.LIS PROG1
$ SAS/ALTPRINT=file-specification program-name
This SAS command sends a copy of the procedure output to the file
file-specification and to the default destination (program-name.LIS file). The
following is an example of this command:
$ SAS/ALTPRINT=MYPROG.LIS PROG1
PROC PRINTTO PRINT=file-specification;
This procedure statement sends any following procedure output to the disk file
associated with file-specification during a noninteractive job. The value for
file-specification can be any valid external file specification discussed in
“Identifying External Files to SAS” on page 173.
Routing Output in Batch Mode
Default Output Destination in Batch Mode
The default for handling output in batch mode is similar to noninteractive mode.
When you invoke SAS in batch mode, the SAS log is written to a file with OpenVMS file
type .LOG, and the procedure output is written to a file with OpenVMS file type .LIS in
the default directory of the command procedure within which SAS was invoked.
Typically, the default directory for a batch job is the SYS$LOGIN directory. You can
change the default by using a SET DEFAULT command in the BATCH command file.
The filename for the .LOG and .LIS files is the name of the SAS program file that you
specified in the SAS command.
In addition to the .LOG and .LIS files that are created for SAS output, the OpenVMS
system also creates an OpenVMS log file in batch mode. The OpenVMS batch log is
named command-file.LOG, where command-file is the command procedure that you
submitted for execution. Do not confuse the OpenVMS log with the SAS log. Both have
the OpenVMS file type .LOG, but the OpenVMS log contains commands and messages
that are generated by OpenVMS when it processes any batch job, including a SAS batch
job. The SAS log contains statements and messages that are generated by SAS.
CAUTION:
Do not give your SAS program and the command procedure the same name. This causes
confusion when the OpenVMS and SAS logs are created. If this does occur, the
OpenVMS log is created first (for example MYPROG.LOG;1) and the SAS log is
created second (MYPROG.LOG;2). If you cannot keep more than one version of a file
(perhaps because file version limits are in effect), the OpenVMS batch log is
overwritten with the SAS log. 4
Routing the SAS Log and SAS Procedure Output
4
Using the PRTFILE Command under OpenVMS
205
Routing Log and Procedure Output to a Printer
You can send the SAS log and procedure output to a printer instead of to the default
.LOG and .LIS files. To redirect the SAS log and procedure output to the queue of the
system printer, use SYS$PRINT as the value for the LOG=, ALTLOG=, PRINT=, and
ALTPRINT= system options, where appropriate. You can also use the DCL PRINT
command to send the .LOG and .LIS files to the printer after a batch job has finished.
Using the PRTFILE Command under OpenVMS
The PRTFILE command enables you to change the control information for a file that
you are routing to a printer. For example, if you want to send a file to a printer queue
other than the default, submit the following FILENAME statement:
filename woutput printer queue=myqueue;
Then you can issue the following series of commands from the command line of a
window to send the contents of the window to the MYQUEUE printer queue:
prtfile woutput
print
free
After you issue the PRTFILE command, a note in the SAS log indicates that the
output was sent to a file named SAS nnnn.DAT. This is a temporary file that is deleted
when you issue the PRINT command.
As another example, the following FILENAME statement associates the fileref
MYFILE with the external file [MYDIR]SPECIAL.SAS and specifies that the
carriage-control format is FORTRAN:
filename myfile ’[mydir]special.sas’ cc=fortran;
Then the following series of commands from the command line of a window sends the
contents of the window to the external file SPECIAL.SAS:
prtfile woutput
print myfile
free
Note: Do not use the PRTFILE command with the FSFORM command. For
information about the FSFORM command, see “Host-Specific Frames of the Form
Window” on page 272. 4
206
207
CHAPTER
9
Accessing External Shareable
Images from SAS
Overview of Shareable Images in SAS 208
What is a Shareable Image? 208
Invoking Shareable Images from within SAS 208
Steps for Accessing an External Shareable Image 208
The SASCBTBL Attribute Table 208
How the MODULE Function Works 208
What Is the SASCBTBL Attribute Table? 209
Syntax of the Attribute Table 209
ROUTINE Statement 209
ARG Statement 211
The Importance of the Attribute Table 212
Special Considerations When Using External Shareable Images 213
32-Bit and 64-Bit Considerations 213
Compatibility between Your Shareable Images and SAS 213
Memory Storage Allocated by the Shareable Image 213
Naming Considerations When Using Shareable Images 214
Using PEEKLONG Functions to Access Character String Arguments 214
Accessing External Shareable Images Efficiently 216
Grouping SAS Variables as Structure Arguments 217
Example of Grouping SAS Variables as Structure Arguments 217
Using Constants and Expressions as Arguments to MODULE 220
Specifying Formats and Informats to Use with MODULE Arguments 220
C Language Formats 220
FORTRAN Language Formats 221
PL/I Language Formats 221
COBOL Language Formats 222
$CSTRw. Format 222
$BYVALw. Format 223
Understanding MODULE Log Messages 224
Examples of Accessing External Shareable Images from SAS 226
Example 1: Updating a Character String Argument 226
Example 2: Passing Arguments by Value 227
Example 3: Invoking a Shareable Image Routine from PROC IML 229
208
Overview of Shareable Images in SAS
4
Chapter 9
Overview of Shareable Images in SAS
What is a Shareable Image?
Shareable images are executable files that contain one or more routines written in
any of several programming languages. A shareable image is created when you use the
/SHAREABLE qualifier with the LINK command. Shareable images are a mechanism
for storing useful routines that might be needed by many applications. When an
application needs a routine that resides in a shareable image, it loads the shareable
image and invokes the routine.
Invoking Shareable Images from within SAS
SAS provides routines and functions that let you invoke these external routines from
within SAS. You can access the shareable image routines from the DATA step, the IML
procedure, and SCL code. You use the MODULE family of SAS call routines and
functions (including MODULE, MODULEN, MODULEC, MODULEI, MODULEIN, and
MODULEIC) to invoke a routine that resides in an external shareable image. This
documentation refers to the MODULE family of call routines and functions generically
as the MODULE function.
Steps for Accessing an External Shareable Image
The following are the steps for accessing an external shareable image routine:
1 Create a text file that describes the shareable image routine you want to access,
including the arguments it expects and the values it returns (if any). This
attribute file must be in a special format, as described in “The SASCBTBL
Attribute Table” on page 208.
2 Use the FILENAME statement to assign the SASCBTBL fileref to the attribute
file you created.
3 In a DATA step or SCL code, use a call routine or function (MODULE, MODULEN,
or MODULEC) to invoke the shareable image routine. The specific function you
use depends on the type of expected return value (none, numeric, or character).
(You can also use MODULEI, MODULEIN, or MODULEIC within a PROC IML
step.) The MODULE function is described in “MODULE Function” on page 341.
CAUTION:
Only experienced programmers should access external routines in shareable images. By
accessing a function in an external shareable image, you transfer processing control
to the external function. If done improperly, or if the external function is not reliable,
you might lose data or have to reset your computer (or both). 4
The SASCBTBL Attribute Table
How the MODULE Function Works
Because the MODULE function invokes an external function that SAS knows
nothing about, you must supply information about the function’s arguments so that the
Accessing External Shareable Images from SAS
4
Syntax of the Attribute Table
209
MODULE function can validate them and convert them, if necessary. For example,
suppose you want to invoke a routine that requires an integer as an argument. Because
SAS uses floating point values for all of its numeric arguments, the floating point value
must be converted to an integer before you invoke the external routine. The MODULE
function looks for this attribute information in an attribute table that is referred to by
the SASCBTBL fileref.
What Is the SASCBTBL Attribute Table?
The attribute table is a sequential text file that contains descriptions of the routines
you can invoke with the MODULE function. The table defines how the MODULE
function should interpret supplied arguments when it is building a parameter list to
pass to the called routine.
The MODULE function locates the table by opening the file that is referenced by the
SASCBTBL fileref. If you do not define this fileref, the MODULE routines simply call
the requested shareable image routine without altering the arguments.
CAUTION:
Using the MODULE functions without defining an attribute table can cause SAS to crash or
force you to reset your computer. You need to use an attribute table for all external
functions that you want to invoke. 4
Syntax of the Attribute Table
The attribute table should contain the following:
3 a description in a ROUTINE statement for each shareable image routine you
intend to call
3 descriptions in ARG statements for each argument associated with that routine.
At any point in the attribute table file, you can create a comment using an asterisk
(*) as the first nonblank character of a line or after the end of a statement (following
the semicolon). You must end the comment with a semicolon.
ROUTINE Statement
The syntax of the ROUTINE statement is
ROUTINE name MINARG=minarg MAXARG=maxarg
<CALLSEQ=BYVALUE | BYADDR>
<TRANSPOSE=YES | NO> <MODULE=shareable-image-name>
<RETURNS=SHORT | USHORT | LONG | ULONG | DOUBLE | DBLPTR >;
The following are descriptions of the ROUTINE statement attributes:
ROUTINE name
starts the ROUTINE statement. You need a ROUTINE statement for every
shareable image function that you intend to call. The value for name must match
the routine name or ordinal you specified as part of the ’module’ argument in the
MODULE function, where module is the name of the shareable image (if not
specified by the MODULE attribute), followed by a comma, and then the routine
name or ordinal. For example, in order to specify KERNEL32,GetPath in the
MODULE function call, the ROUTINE name should be GetPath.
The name argument is required for the ROUTINE statement.
210
Syntax of the Attribute Table
4
Chapter 9
MINARG=minarg
specifies the minimum number of arguments to expect for the shareable image
routine. In most cases, this value will be the same as MAXARG; but some routines
do allow a varying number of arguments. This is a required attribute.
MAXARG=maxarg
specifies the maximum number of arguments to expect for the shareable image
routine. This is a required attribute.
CALLSEQ=BYVALUE | BYADDR
indicates the calling sequence method used by the shareable image routine.
Specify BYVALUE for call-by-value and BYADDR for call-by-address. The default
value is BYADDR.
FORTRAN and COBOL are call-by-address languages. C is usually
call-by-value, although a specific routine might be implemented as call-by-address.
The MODULE function does not require that all arguments use the same
calling method. You can identify any exceptions by using the BYVALUE and
BYADDR options in the ARG statement.
TRANSPOSE=YES | NO
specifies whether SAS transposes matrices that have both more than one row and
more than one column before it calls the shareable image routine. This attribute
applies only to routines called from within PROC IML with MODULEI,
MODULEIC, and MODULEIN.
TRANSPOSE=YES is necessary when you are calling a routine that is written
in a language that does not use row-major order to store matrices. (For example,
FORTRAN uses column-major order.)
For example, consider this matrix with three columns and two rows:
rows
columns
1
2
3
-------------1 | 10 11 12
2 | 13 14 15
PROC IML stores this matrix in memory sequentially as 10, 11, 12, 13, 14, 15.
However, FORTRAN routines will expect this matrix as 10, 13, 11, 14, 12, 15.
The default value is NO.
MODULE=shareable-image-name
names the executable module (the shareable image) in which the routine resides.
The MODULE function searches the directories named by the SAS$LIBRARY
environment variable. If you specify the MODULE attribute here in the
ROUTINE statement, then you do not need to include the module name in the
module argument of the MODULE function (unless the shareable image routine
name you are calling is not unique in the attribute table). The MODULE function
is described in “MODULE Function” on page 341.
You can have multiple ROUTINE statements that use the same MODULE
name. You can also have duplicate routine names that reside in different
shareable images.
RETURNS=SHORT | USHORT | LONG | ULONG | DOUBLE | DBLPTR
specifies the type of value that the shareable image routine returns. This value
will be converted as appropriate, depending on whether you use MODULEC
(which returns a character) or MODULEN (which returns a number). The
following are the possible return value types:
SHORT
short integer.
Accessing External Shareable Images from SAS
4
Syntax of the Attribute Table
211
USHORT
unsigned short integer.
LONG
long integer.
ULONG
unsigned long integer.
DOUBLE
double-precision floating point number.
DBLPTR
pointer to a double-precision floating point number (instead of using a
floating point register). Consult the documentation for your shareable image
routine to determine how it handles double-precision floating point values.
If you do not specify the RETURNS attribute, you should invoke the routine
with only the MODULE and MODULEI call routines. You will get unpredictable
values if you omit the RETURNS attribute and invoke the routine using the
MODULEN/MODULEIN or MODULEC/MODULEIC functions.
ARG Statement
The ROUTINE statement must be followed by as many ARG statements as you
specified in the MAXARG= option. The ARG statements must appear in the order that
the arguments will be specified within the MODULE routines.
The syntax for each ARG statement is
ARG argnum NUM | CHAR <INPUT | OUTPUT | UPDATE> <NOTREQD |
REQUIRED> <BYADDR | BYVALUE> <FDSTART> <FORMAT=format>;
Here are the descriptions of the ARG statement attributes:
ARG argnum
defines the argument number. This a required attribute. Define the arguments in
ascending order, starting with the first routine argument (ARG 1).
NUM | CHAR
defines the argument as numeric or character. This is a required attribute.
If you specify NUM here but pass the routine a character argument, the
argument is converted using the standard numeric informat. If you specify CHAR
here but pass the routine a numeric argument, the argument is converted using
the BEST12 informat.
INPUT | OUTPUT | UPDATE
indicates the argument is either input to the routine, an output argument, or both.
If you specify INPUT, the argument is converted and passed to the shareable
image routine. If you specify OUTPUT, the argument is not converted, but is
updated with an outgoing value from the shareable image routine. If you specify
UPDATE, the argument is converted, passed to the shareable image routine and
updated with an outgoing value from the routine.
You can specify OUTPUT and UPDATE only with variable arguments (that is,
no constants or expressions are allowed).
212
The Importance of the Attribute Table
4
Chapter 9
NOTREQD | REQUIRED
indicates whether the argument is required. If you specify NOTREQD, then the
MODULE function can omit the argument. If other arguments follow the omitted
argument, identify the omitted argument by including an extra comma as a
placeholder. For example, to omit the second argument to routine XYZ, you would
specify:
call module(’XYZ’,1,,3);
CAUTION:
Be careful when using NOTREQD; the shareable image routine must not attempt to
access the argument if it is not supplied in the call to MODULE. If the routine does
attempt to access it, your system is likely to crash. 4
The REQUIRED attribute indicates that the argument is required and cannot
be omitted. REQUIRED is the default value.
BYADDR | BYVALUE
indicates whether the argument is passed by reference or by value.
BYADDR is the default value unless CALLSEQ=BYVALUE was specified in the
ROUTINE statement, in which case BYVALUE is the default. Specify BYADDR
when you are using a call-by-value routine that also has arguments to be passed
by address.
FDSTART
indicates that the argument begins a block of values that are grouped into a
structure whose pointer is passed as a single argument. Note that all subsequent
arguments are treated as part of that structure until the MODULE function
encounters another FDSTART argument.
FORMAT=format
names the format that presents the argument to the shareable image routine. Any
SAS supplied formats, PROC FORMAT style formats, or SAS/TOOLKIT formats
are valid. Note that this format must have a corresponding valid informat if you
specified the UPDATE or OUTPUT attribute for the argument.
The FORMAT= attribute is not required, but is recommended, since format
specification is the primary purpose of the ARG statements in the attribute table.
CAUTION:
Using an incorrect format can produce invalid results or cause a system crash.
4
The Importance of the Attribute Table
The MODULE function relies heavily on the accuracy of the information in the
attribute table. If this information is incorrect, unpredictable results can occur
(including a system crash).
Consider an example routine xyz that expects two arguments: an integer and a
pointer. The integer is a code indicating what action takes place. For example, action 1
means that a 20-byte character string is written into the area that is pointed to by the
second argument, the pointer.
Now suppose you call xyz using the MODULE function, but you indicate in the
attribute table that the receiving character argument is only 10 characters long:
routine xyz minarg=2 maxarg=2;
arg 1 input num byvalue format=ib4.;
arg 2 output char format=$char10.;
Regardless of the value given by the LENGTH statement for the second argument to
MODULE, MODULE passes a pointer to a 10-byte area to the xyz routine. If xyz
Accessing External Shareable Images from SAS
4
32-Bit and 64-Bit Considerations
213
writes 20 bytes at that location, the 10 bytes of memory following the string provided by
MODULE are overwritten, causing unpredictable results:
data _null_;
length x $20;
call module(’xyz’,1,x);
run;
The call might work fine, depending on which 10 bytes were overwritten. However, this
might also cause you to lose data or cause your system to crash.
Also, note that the PEEKLONG and PEEKCLONG functions rely on the validity of
the pointers you supply. If the pointers are invalid, it is possible that SAS could crash.
For example, this code would cause a crash:
data _null_;
length c $10;
/* trying to copy from address 0!!!*/
c = peekclong(0,10);
run;
Note:
SAS does not support return types for 64-bit pointers.
4
Special Considerations When Using External Shareable Images
32-Bit and 64-Bit Considerations
Compatibility between Your Shareable Images and SAS
Starting in SAS System 9, SAS is a 64-bit application that runs on an operating
system that is 64-bit enabled. When you call external routines in shareable images
using the MODULE functions, the shareable image needs to be of the same bit family
as the version of SAS you are running. If you are running SAS 9.1, then the shareable
image needs to be 64-bit. If you are using a previous release of SAS, then the shareable
image needs to be 32-bit.
For information about how to compile and link to a 64-bit shareable image, see
“Using PEEKLONG Functions to Access Character String Arguments” on page 214.
Note:
SAS does not support return types for 64-bit pointers.
4
Memory Storage Allocated by the Shareable Image
When specifying your SAS format and informat for each routine argument in the
FORMAT attribute of the ARG statement, you need to consider the amount of memory
storage the external shareable image allocates for the parameters that it receives and
returns. The data types of the external routine will determine the SAS format and
informat to be used in the SASCBTBL attribute table. To determine how much storage
is being reserved for the input and return parameters of the routine in the external
shareable image, you can use the sizeof() C function.
The following table lists the typical memory allocations for C data types for 32-bit
and 64-bit systems.
214
Naming Considerations When Using Shareable Images
4
Chapter 9
Table 9.1 Memory Allocations for C Data Types
32-Bit System Size
64-Bit System Size
Type
Bytes
Bits
Bytes
Bits
char
1
8
1
8
short
2
16
2
16
int
4
32
4
32
long
4
32
4
32
long long
8
64
8
64
float
4
32
4
32
double
8
64
8
64
pointer
4
32
8
64
For information about the SAS formats to use for your data types, see “Specifying
Formats and Informats to Use with MODULE Arguments” on page 220.
Naming Considerations When Using Shareable Images
SAS automatically loads external shareable images that conform to the following
naming conventions:
3 the name is eight characters or less
3 the name does not contain a period.
If the name of your external shareable image is greater than eight characters or
contains a period, then you can create a logical name to point to the destination of the
shareable image. The following code shows how to define the logical name LIBCLNK:
$ define libclnk $1$disk:[tmp]libraryclink.exe
After the new logical name is created, you can update the MODULE= statement in the
attribute table. In the following example, MODULE= is set to the name of the new
logical name, LIBCLNK.
routine name minarg=2 maxarg=2 returns=short module=libclink;
arg 1 char output byaddr fdstart format=$cstr9.;
arg 2 char output
format=$cstr9.;
Using PEEKLONG Functions to Access Character String Arguments
Since the SAS language does not provide pointers as data types, you can use the SAS
PEEKLONG functions to access the data stored at these address values.
For example, the following C program demonstrates how the address of a pointer is
supplied, and how it can set the pointer to the address of a static table containing the
contiguous integers 1, 2, and 3. It also calls the useptr routine in the vmslib
shareable image on a 64-bit operating system.
#include <stdarg.h>
#include <stdio.h>
static struct MYTABLE
{
Accessing External Shareable Images from SAS
4
Using PEEKLONG Functions to Access Character String Arguments
215
int value1;
int value2;
int value3;
}
mytable = {1,2,3};
useptr(toset)
char **toset;
{
*toset = (char *)&mytable;
}
The following code shows how the C source code is then compiled and linked using a
DCL command file, such as VMSLIB.COM.
$!Compiles are required to use /float=IEEE because SAS treats
$!floats as IEEE S or D-Floats on OpenVMS Alpha.
$ cc/decc/float=ieee/obj=vmslib.o/pointer=64 vmslib.c
$ open/write optfile vmslib.opt
$ write optfile ‘‘symbol_vector=(useptr=procedure)’’
$ write optfile ‘‘vmslib.o’’
$ close optfile
$ link/exe=vmslib.exe/share/bpage=13/map/cross/full vmslib.opt/opt
The SAS source code needed to create the SASCBTBL attribute table and call the
routine from within the DATA step is the following:
filename sascbtbl ’sas$worklib:temp.dat’;
data _null_;
file sascbtbl;
input;
put _infile_;
datalines4;
routine useptr minarg=1 maxarg=1 module=vmslib;
arg 1 char update format=$char20.;
;;;;
data _null_;
length ptrval $20 thedata $12;
call module(’*i’,’useptr’,ptrval);
thedata=peekclong(ptrval,12);
/* Converts hexadecimal data to character data */
put thedata=$hex24.;
/* Converts hexadecimal positive binary values to fixed
or floating point values */
put ptrval=hex40.;
run;
Note:
PEEKCLONG is used in this example because SAS 9.1 is 64-bit enabled.
4
216
Accessing External Shareable Images Efficiently
4
Chapter 9
The SAS log output would be the following:
Output 9.1 Log Output for Using PEEKLONG Functions To Access Character Strings
thedata=010000000200000003000000
ptrval=00202F0100000000202020202020202020202020
In this example, the PEEKCLONG function is given two arguments:
3 a pointer via a numeric variable
3 a length in bytes.
PEEKCLONG returns a character string of the specified length containing the
characters that are at the pointer location.
For more information, see “PEEKLONG Function” on page 345.
Accessing External Shareable Images Efficiently
The MODULE function reads the attribute table that is referenced by the
SASCBTBL fileref once per step (DATA step, PROC IML step, or SCL step). It parses
the table and stores the attribute information for future use during the step. When you
use the MODULE function, SAS searches the stored attribute information for the
matching routine and module names. The first time you access a shareable image
during a step, SAS loads the shareable image and determines the address of the
requested routine. Each shareable image you invoke stays loaded for the duration of
the step, and is not reloaded in subsequent calls. For example, suppose the attribute
table had the following basic form:
* routines XYZ and BBB in FIRST.EXE;
routine XYZ minarg=1 maxarg=1 module=first;
arg 1 num input;
routine BBB minarg=1 maxarg=1 module=first;
arg 1 num input;
* routines ABC and DDD in SECOND.EXE;
routine ABC minarg=1 maxarg=1 module=second;
arg 1 num input;
routine DDD minarg=1 maxarg=1 module=second;
arg 1 num input;
and the DATA step looked like the following:
filename sascbtbl ’myattr.tbl’;
data _null_;
do i=1 to 50;
/* FIRST.EXE is loaded only once */
value = modulen(’XYZ’,i);
/* SECOND.EXE is loaded only once */
value2 = modulen(’ABC’,value);
put i= value= value2=;
end;
run;
In this example, MODULEN parses the attribute table during DATA step compilation.
In the first loop iteration (i=1), FIRST.EXE is loaded and the XYZ routine is accessed
when MODULEN calls for it. Next, SECOND.EXE is loaded and the ABC routine is
Accessing External Shareable Images from SAS
4
Grouping SAS Variables as Structure Arguments
217
accessed. For subsequent loop iterations (starting when i=2), FIRST.EXE and
SECOND.EXE remain loaded, so the MODULEN function simply accesses the XYZ and
ABC routines.
Note that the attribute table can contain any number of descriptions for routines
that are not accessed for a given step. This does not cause any additional overhead
(apart from a few bytes of internal memory to hold the attribute descriptions). In the
above example, BBB and DDD are in the attribute table but are not accessed by the
DATA step.
Grouping SAS Variables as Structure Arguments
A common need when calling external routines is to pass a pointer to a structure.
Some parts of the structure might be used as input to the routine, while other parts
might be replaced or filled in by the routine. Even though SAS does not have structures
in its language, you can indicate to the MODULE function that you want a particular
set of arguments grouped into a single structure. You indicate this by using the
FDSTART option of the ARG statement to flag the argument that begins the structure
in the attribute table. SAS gathers that argument and all that follow (until
encountering another FDSTART option) into a single contiguous block, and passes a
pointer to the block as an argument to the shareable image routine.
Example of Grouping SAS Variables as Structure Arguments
This example uses the uname routine that is part of Compaq’s DEC C Run-Time
Library on the OpenVMS Alpha environment. It is used with permission of Compaq
Computer Corporation. This routine returns information about your computer system.
This information includes the following:
3 the nodename on which you are executing SAS
3 the version of the operating system
3 the vendor of the operating system
3 the machine identification number
3 the model type of your machine.
Since a shareable image name is required when using the MODULE functions, you
first need to create your own shareable image that contains a routine that will include
the uname routine for your use.
The C source code for VMSLIB.C is the following:
#include
#include
#include
#include
<stdarg.h>
<stdio.h>
<string.h>
<utsname.h>
/* The header file <utsname.h> declares the uname prototype and
defines the utsname struct as:
int uname(struct utsname *name);
struct utsname
{
char sysname [31+1];
char release [31+1];
char version [31+1];
char machine [31+1];
char nodename[1024+1];
218
Grouping SAS Variables as Structure Arguments
4
Chapter 9
#ifndef _POSIX_C_SOURCE
char arch
[15+1];
char __spare [256+1];
#else
char __spare [15+1+256+1];
#endif
};
*/
int vmsuname(struct utsname *name)
{
int rc;
struct utsname vmsname;
/* The Compaq DEC C Run-Time Library function ‘‘uname()’’ is one of the few
functions that does not accept 64-bit pointers; so you need to declares a
32-bit pointer &vmsname to pass into uname() in order to access
the necessary information */
if ((rc=uname(&vmsname))!=0)
perror(‘‘vmslib’’);
else
{
/* printf’s used for debugging:
printf(‘‘vmsname(%d) = %d\n’’,sizeof(vmsname),&vmsname);
printf(‘‘sysname(%d) = %s\n’’,sizeof(vmsname.sysname),vmsname.sysname);
printf(‘‘release(%d) = %s\n’’,sizeof(vmsname.release),vmsname.release);
printf(‘‘version(%d) = %s\n’’,sizeof(vmsname.version),vmsname.version);
printf(‘‘machine(%d) = %s\n’’,sizeof(vmsname.machine),vmsname.machine);
printf(‘‘nodename(%d)= %s\n’’,sizeof(vmsname.nodename),vmsname.nodename);
printf(‘‘arch(%d)
= %s\n’’,sizeof(vmsname.arch), vmsname.arch);
printf(‘‘spare(%d)
= %s\n’’,sizeof(vmsname.__spare),’’Filler’’);
printf(‘‘\n’’);
*/
*/ Since a 32-bit address &vmsname was used to get the information it is
necessary to copy that information over to the 64-bit location (name)
sent in as an argument to vmsuname */
strcpy(name->sysname,vmsname.sysname);
strcpy(name->release,vmsname.release);
strcpy(name->version,vmsname.version);
strcpy(name->machine,vmsname.machine);
strcpy(name->nodename,vmsname.nodename);
strcpy(name->arch,vmsname.arch);
strcpy(name->__spare,vmsname.__spare);
}
return(rc);
}
The following example shows how the C source code could be compiled and linked
using a DCL Command file, such as VMSLIB.COM:
Accessing External Shareable Images from SAS
4
Grouping SAS Variables as Structure Arguments
219
$!Compiles are required to use /float=IEEE because SAS treats
$!floats as IEEE S or D-Floats on OpenVMS Alpha.
$ cc/decc/float=ieee/obj=vmslib.o/pointer=64 vmslib.c
$ open/write optfile vmslib.opt
$ write optfile ‘‘symbol_vector=(vmsuname=procedure)’’
$ write optfile ‘‘vmslib.o’’
$ close optfile
$ link/exe=vmslib.exe/share/bpage=13/map/cross/full vmslib.opt/opt
The SAS source code used to create the SASCBTBL attribute table and call the
routine from within the DATA step is the following:
filename sascbtbl ’sas$worklib:temp.dat’;
data _null_;
file sascbtbl;
input;
put _infile_;
datalines4;
routine vmsuname minarg=7 maxarg=7 returns=short module=vmslib;
arg 1 char output byaddr fdstart format=$cstr32.;
arg 2 char output
format=$cstr32.;
arg 3 char output
format=$cstr32.;
arg 4 char output
format=$cstr32.;
arg 5 char output
format=$cstr1025;
arg 6 char output
format=$cstr16.;
arg 7 char output
format=$cstr257;
;;;;
data _null_;
length sysname $32 release $32 version $32 machine $32 nodename $1025 arch $16
spare $257.;
retain sysname release version machine nodename arch spare ‘‘ ‘‘;
rc=modulen(’vmsuname’,sysname,release,version,machine,nodename,arch,spare);
put rc
=;
put sysname =;
put release =;
put version =;
put machine =;
put nodename=;
put arch
=;
run;
The SAS log output would be the following:
Output 9.2 Log Output for Grouping SAS Variables as Structure Arguments
rc=0
sysname=OpenVMS
release=0
version=V7.2--2
machine=AlphaServer_4100_5/533_4MB
nodename=AX4000
arch=Alpha
220
Using Constants and Expressions as Arguments to MODULE
4
Chapter 9
Using Constants and Expressions as Arguments to MODULE
You can pass any kind of expression as an argument to the MODULE function. The
attribute table indicates whether the argument is for input, output, or update.
You can specify input arguments as constants and arithmetic expressions. However,
because output and update arguments must be able to be modified and returned, you
can pass only a variable for them. If you specify a constant or expression where a value
that can be updated is expected, SAS issues a warning message pointing out the error.
Processing continues, but the MODULE function cannot perform the update (meaning
that the value of the argument you wanted to update will be lost).
Consider these examples. Here is the attribute table:
* attribute table entry for ABC;
routine abc minarg=2 maxarg=2;
arg 1 input format=ib4.;
arg 2 output format=ib4.;
Here is the DATA step with the MODULE calls:
data _null_;
x=5;
/* passing a variable as the second argument - OK */
call module(’abc’,1,x);
/* passing a constant as the second argument - INVALID */
call module(’abc’,1,2);
/* passing an expression as the second argument - INVALID */
call module(’abc’,1,x+1);
run;
In the above example, the first call to MODULE is correct because x is updated by
the value that the abc routine returns for the second argument. The second call to
MODULE is not correct because a constant is passed. MODULE issues a warning
indicating you have passed a constant, and passes a temporary area instead. The third
call to MODULE is not correct because an arithmetic expression is passed, which causes
a temporary location from the DATA step to be used, and the returned value to be lost.
Specifying Formats and Informats to Use with MODULE Arguments
You specify the SAS format and informat for each shareable image routine argument
by specifying the FORMAT attribute in the ARG statement. The format indicates how
numeric and character values should be passed to the shareable image routine and how
they should be read back upon completion of the routine.
Usually, the format you use corresponds to a variable type for a given programming
language. The following sections describe the proper formats that correspond to
different variable types in various programming languages.
C Language Formats
C Type
SAS Format/Informat
double
RB8.
float
FLOAT4.
signed int
IB4.
Accessing External Shareable Images from SAS
4
Specifying Formats and Informats to Use with MODULE Arguments
C Type
SAS Format/Informat
signed short
IB2.
signed long
IB4.
char *
IB8.
unsigned int
PIB4.
unsigned short
PIB2.
unsigned long
PIB4.
char[w]
$CHARw. or $CSTRw. (see “$CSTRw. Format”
on page 222)
221
Note: For information about passing character data other than as pointers to
character strings, see “$BYVALw. Format” on page 223. 4
FORTRAN Language Formats
FORTRAN Type
SAS Format/Informat
integer*2
IB2.
integer*4
IB4.
real*4
RB4.
real*8
RB8.
character*w
$CHARw.
The MODULE function can support FORTRAN character arguments only if they are
not expected to be passed by a descriptor.
PL/I Language Formats
PL/I Type
SAS Format/Informat
FIXED BIN(15)
IB2.
FIXED BIN(31)
IB4.
FLOAT BIN(21)
RB4.
FLOAT BIN(31)
RB8.
CHARACTER(w)
$CHARw.
The PL/I descriptions are added here for completeness. This does not guarantee that
you will be able to invoke PL/I routines.
222
Specifying Formats and Informats to Use with MODULE Arguments
4
Chapter 9
COBOL Language Formats
SAS
COBOL Format
Format/Informat
Description
PIC Sxxxx BINARY
IBw.
integer binary
COMP-2
RB8.
double-precision
floating point
COMP-1
RB4.
single-precision
floating point
PIC xxxx or Sxxxx
Fw.
printable numeric
PIC yyyy
$CHARw.
character
The following COBOL specifications might not match properly with the SAS supplied
formats because zoned and packed decimal are not truly defined for systems based on
Intel architecture.
SAS
COBOL Format
Format/Informat
Description
PIC Sxxxx DISPLAY
ZDw.
zoned decimal
PIC Sxxxx PACKED-DECIMAL
PDw.
packed decimal
The following COBOL specifications do not have true native equivalents and are only
usable in conjunction with the corresponding S370Fxxx informat and format, which
enables IBM mainframe-style representations to be read and written in the PC
environment.
COBOL Format
SAS Format/Informat
Description
PIC xxxx DISPLAY
S370FZDUw.
zoned decimal unsigned
PIC Sxxxx DISPLAY SIGN LEADING
S370FZDLw.
zoned decimal leading
sign
PIC Sxxxx DISPLAY SIGN LEADING
SEPARATE
S370FZDSw.
zoned decimal leading
sign separate
PIC Sxxxx DISPLAY SIGN TRAILING
SEPARATE
S370FZDTw.
zoned decimal trailing
sign separate
PIC xxxx BINARY
S370FIBUw.
integer binary unsigned
PIC xxxx PACKED-DECIMAL
S370FPDUw.
packed decimal unsigned
$CSTRw. Format
If you pass a character argument as a null-terminated string, use the $CSTRw.
format. This format looks for the last nonblank character of your character argument
Accessing External Shareable Images from SAS
4
Specifying Formats and Informats to Use with MODULE Arguments
223
and passes a copy of the string with a null terminator after the last nonblank character.
For example, given the following attribute table entry:
* attribute table entry;
routine abc minarg=1 maxarg=1;
arg 1 input char format=$cstr10.;
you can use the following DATA step:
data _null_;
rc = module(’abc’,’my string’);
run;
The $CSTR format adds a null terminator to the character string my string before
passing it to the abc routine. This is equivalent to the following attribute entry:
* attribute table entry;
routine abc minarg=1 maxarg=1;
arg 1 input char format=$char10.;
with the following DATA step:
data _null_;
rc = module(’abc’,’my string’||’00’x);
run;
The first example is easier to understand and easier to use when using variable or
expression arguments.
The $CSTR informat converts a null-terminated string into a blank-padded string of
the specified length. If the shareable image routine is supposed to update a character
argument, use the $CSTR informat in the argument attribute.
$BYVALw. Format
When you use the MODULE function to pass a single character by value, the
argument is automatically promoted to an integer. If you want to use a character
expression in the MODULE call, you must use the special format/informat called
$BYVALw. The $BYVALw. format/informat expects a single character and will produce
a numeric value, the size of which depends on w, the value of width. $BYVAL2.
produces a short, $BYVAL4. produces a long, and $BYVAL8. produces a double.
Consider this example using the C language:
long xyz(a,b)
long a; double b;
{
static char c = ’Y’;
if (a == ’X’)
return(1);
else if (b == c)
return(2);
else return(3);
}
In this example, the xyz routine expects two arguments, a long and a double. If the
long is an X, the actual value of the long is 88 in decimal. This is because an ASCII X is
stored as hex 58, and this is promoted to a long, represented as 0x00000058 (or 88
decimal). If the value of a is X, or 88, then a 1 is returned. If the second argument, a
double, is Y (which is interpreted as 89), then 2 is returned.
224
Understanding MODULE Log Messages
4
Chapter 9
Now suppose that you want to pass characters as the arguments to xyz. In C, you
would invoke them as follows:
x = xyz(’X’,(double)’Z’);
y = xyz(’Q’,(double)’Y’);
This is because the X and Q values are automatically promoted to integers (which are
the same as longs for the sake of this example), and the integer values corresponding to
Z and Y are cast to doubles.
To call xyz using the MODULEN function, your attribute table must reflect the fact
that you want to pass characters:
routine xyz minarg=2 maxarg=2 returns=long;
arg 1 input char byvalue format=$byval4.;
arg 2 input char byvalue format=$byval8.;
Note that it is important that the BYVALUE option appears in the ARG statement as
well. Otherwise, MODULEN assumes that you want to pass a pointer to the routine,
instead of a value.
Here is the DATA step that invokes MODULEN and passes it characters:
data _null_;
x = modulen(’xyz’,’X’,’Z’);
put x= ’ (should be 1)’;
y = modulen(’xyz’,’Q’,’Y’);
put y= ’ (should be 2)’;
run;
Understanding MODULE Log Messages
If you specify i in the control string parameter to MODULE, SAS prints several
informational messages to the log. You can use these messages to determine whether
you have passed incorrect arguments or coded the attribute table incorrectly.
Consider this example that uses MODULEIN from within the IML procedure. It uses
the MODULEIN function to invoke the changi routine (which is stored in theoretical
TRYMOD.EXE). In the example, MODULEIN passes the constant 6 and the matrix x2,
which is a 4x5 matrix to be converted to an integer matrix. The attribute table for
changi is as follows:
routine changi module=trymod returns=long;
arg 1 input num format=ib4. byvalue;
arg 2 update num format=ib4.;
The following PROC IML step invokes MODULEIN:
proc iml;
x1 = J(4,5,0);
do i=1 to 4;
do j=1 to 5;
x1[i,j] = i*10+j+3;
end;
end;
y1= x1;
x2 = x1;
y2 = y1;
rc = modulein(’*i’,’changi’,6,x2);
....
Accessing External Shareable Images from SAS
4
Understanding MODULE Log Messages
225
The ’*i’ control string causes the lines shown in the following output to be printed in
the log.
Output 9.3 MODULEIN Log Output
---PARM LIST FOR MODULEIN ROUTINE--- CHR PARM 1 885E0AA8 2A69 (*i)
CHR PARM 2 885E0AD0 6368616E6769 (changi)
NUM PARM 3 885E0AE0 0000000000001840
NUM PARM 4 885E07F0
0000000000002C400000000000002E40000000000000304000000000000031400000000000003240
000000000000384000000000000039400000000000003A400000000000003B400000000000003C40
0000000000004140000000000080414000000000
---ROUTINE changi LOADED AT ADDRESS 886119B8 (PARMLIST AT 886033A0)--- PARM 1 06000000
PARM 2 88604720
0E0000000F00000010000000110000001200000018000000190000001A0000001B0000001C000000
<CALL-BY-VALUE>
22000000230000002400000025000000260000002C0000002D0000002E0000002F00000030000000
---VALUES UPON RETURN FROM changi ROUTINE--PARM 1 06000000
<CALL-BY-VALUE>
PARM 2 88604720
140000001F0000002A0000003500000040000000820000008D00000098000000A3000000AE000000
F0000000FB00000006010000110100001C0100005E01000069010000740100007F0100008A010000
---VALUES UPON RETURN FROM MODULEIN ROUTINE--- NUM PARM 3 885E0AE0 0000000000001840
NUM PARM 4 885E07F0
00000000000034400000000000003F4000000000000045400000000000804A400000000000005040
00000000004060400000000000A06140000000000000634000000000006064400000000000C06540
0000000000006E400000000000606F4000000000
The output is divided into four sections.
3 The first section describes the arguments passed to MODULEIN.
The ’CHR PARM n’ portion indicates that character parameter n was passed. In
the example, 885E0AA8 is the actual address of the first character parameter to
MODULEIN. The value at the address is hex 2A69, and the ASCII representation
of that value (’*i’) is in parentheses after the hex value. The second parameter is
likewise printed similarly. Only these first two arguments have their ASCII
equivalents printed; this is because other arguments might contain unreadable
binary data.
The remaining parameters appear with only hex representations of their values
(NUM PARM 3 and NUM PARM 4 in the example).
The third parameter to MODULEIN is numeric, and it is at address 885E0AE0.
The hex representation of the floating point number 6 is shown. The fourth
parameter is at address 885E07F0, which points to an area containing all the
values for the 4x5 matrix. The *i option prints the entire argument. Be careful if
you use this option with large matrices, because the log might become quite large.
3 The second section of the log lists the arguments that are to be passed to the
requested routine and, in this case, changed. This section is important for
determining whether the arguments are being passed to the routine correctly. The
first line of this section contains the name of the routine and its address in
memory. It also contains the address of the location of the parameter block that
MODULEIN created.
The log contains the status of each argument as it is passed. For example, the
first parameter in the example is call-by-value (as indicated in the log). The
second parameter is the address of the matrix. The log shows the address, along
with the data to which it points.
Note that all the values in the first parameter and in the matrix are long
integers because the attribute table states that the format is IB4.
3 In the third section, the log contains the argument values upon return from
changi. The call-by-value argument is unchanged, but the other argument (the
matrix) contains different values.
226
Examples of Accessing External Shareable Images from SAS
4
Chapter 9
3 The last section of the log output contains the values of the arguments as they are
returned to the MODULEIN calling routine.
Examples of Accessing External Shareable Images from SAS
Example 1: Updating a Character String Argument
This example uses the tmpnam routine that is part of Compaq’s DEC C Run-Time
Library under the OpenVMS Alpha environment. The tmpnam routine generates a
unique filename that can safely be used as a temporary filename.
The C source code for VMSLIB.C is the following:
#include <stdio.h>
#include <string.h>
/* Declares prototype:
char * tmpnam(char *s); */
vmstmpnam(char *s)
{
tmpnam(s);
printf(‘‘tmpnam(%d) = %s\n’’,sizeof(s),s);
return(0);
}
The following code shows how the C source code could be compiled and linked using a
DCL Command file, such as VMSLIB.COM.
$!Compiles are required to use /float=IEEE because SAS treats
$!floats as IEEE S or D-Floats on OpenVMS Alpha.
$ cc/decc/float=ieee/obj=vmslib.o/pointer=64 vmslib.c
$ open/write optfile vmslib.opt
$ write optfile ‘‘symbol_vector=(vmstmpnam=procedure)’’
$ write optfile ‘‘vmslib.o’’
$ close optfile
$ link/exe=vmslib.exe/share/bpage=13/map/cross/full vmslib.opt/opt
The following SAS source code can be used to create the SASCBTBL attribute table
and call the routine from within the DATA step.
filename sascbtbl ’sas$worklib:temp.dat’;
data _null_;
input;
put _infile_;
datalines4;
routine vmstmpnam minarg=1 maxarg=1 module=vmslib;
arg 1 char update byaddr format=$cstr255.;
;;;;
data _null_;
length tempname $255;
retain tempname ‘‘ ‘‘;
tret = modulec(’vmstmpnam’,tempname);
put tempname = ;
run;
Accessing External Shareable Images from SAS
4
Example 2: Passing Arguments by Value
227
The SAS log output would be:
Output 9.4 Log Output for Updating a Character String Argument
tempname=aaa383073
The POSIX standard for the maximum number of characters in a pathname is
defined in <limits.h> to be 255 characters. Consequently, this example uses 254
characters as the length of the generated filename, tempname, with one character
reserved for the null-terminator. The $CSTR255. informat ensures that the
null-terminator and all subsequent characters are replaced by trailing blanks when
control returns to the DATA step.
Example 2: Passing Arguments by Value
This example calls the access routine that is part of Compaq’s DEC C Run-Time
Library under OpenVMS Alpha. This routine is used with the permission of Compaq
Computer Corporation. The access routine checks for the existence and accessibility of
a file according to the bit pattern contained in the mode argument. A return value of 0
indicates a successful completion and the requested access is permitted. A return value
of -1 indicates a failure, and the requested access is not permitted.
Because the mode argument is passed by value, this example includes the BYVALUE
option for arg 2 in the attribute table. If both arguments were pass by value, you could
use the CALLSEQ=BYVALUE attribute in the ROUTINE statement, and it would not
be necessary to specify the BYVALUE option in arg 2.
The C source code for the VMSLIB.C is:
#include <unistd.h>
#include <stdlib.h>
#include <stdio.h>
/* The header file <unistd.h> declares the access prototype and defines the
bit patterns for mode as:
int access(const char *file_spec,int mode);
#define
#define
#define
#define
F_OK
X_OK
W_OK
R_OK
0
1
2
4
...
...
...
...
File existence
Execute access
Write access
Read access
A logical OR of these values will test for more than one bit pattern. */
int vmsaccess(const char *file_spec,int mode)
{
int rc;
if ((rc=access(file_spec,mode)) == -1)
perror(‘‘vmsaccess’’);
return(rc);
}
228
Example 2: Passing Arguments by Value
4
Chapter 9
The following example shows how the C source code is compiled and linked using a
DCL Command file, such as VMSLIB.COM:
$!Compiles are required to use /float=IEEE because SAS treats
$!floats as IEEE S or D-Floats on OpenVMS Alpha.
$ cc/decc/float=ieee/obj=vmslib.o/pointer=64 vmslib.c
$ open/write optfile vmslib.opt
$ write optfile ‘‘symbol_vector=(vmsaccess=procedure)’’
$ write optfile ‘‘vmslib.o’’
$ close optfile
$ link/exe=vmslib.exe/share/bpage=13/map/cross/full vmslib.opt/opt
The following SAS source code can be used to create the SASCBTBL attribute table
and call the routine from within the DATA step.
filename sascbtbl ’sas$worklib:temp.dat’;
data _null_;
file sascbtbl;
input;
put _infile_;
datalines4;
routine vmsaccess minarg=2 maxarg=2 returns=short module=vmslib;
arg 1 char input byaddr format=$cstr200.;
arg 2 num input byvalue format=ib4.;
;;;;
data _null_;
length path $200.;
/* A test file’s permissions have been modified to the following:
set protection vmstest.com/prot=(system:r,owner:r,group:r,world:r) */
path=’sys$login:vmstest.com’;
/* User is testing for Write and Execute permissions (W_OK | E_OK) */
rc = modulen( ‘‘*ie’’, ’vmsaccess’, path, 3 );
put rc = ;
run;
The SAS log output would be the following:
Output 9.5
Log Output for Failure
rc=-1
This return code means that one of the following conditions was true:
3 the file did not have the bit pattern you were searching for
3 the file could not be located in the specified path.
This return code means that requested access is not permitted.
The SAS source code is changed to check for read permissions,
rc = modulen( ‘‘*ie’’, ’vmsaccess’, path, 4);
then the SAS log output is the following:
Output 9.6
rc=0
Log Output for Successful Completion
Accessing External Shareable Images from SAS
4
Example 3: Invoking a Shareable Image Routine from PROC IML
229
Example 3: Invoking a Shareable Image Routine from PROC IML
This example shows how to pass a matrix as an argument within PROC IML. The
example creates a 4x5 matrix. Each cell is set to 10x+y+3, where x is the row number
and y is the column number. For example, the cell at row 1 column 2 is set to
(10*1)+2+3, or 15.
The example invokes several routines from the theoretical TRYMOD shareable
image. It uses the changd routine to add 100x+10y to each element, where x is the C
row number (0 through 3) and y is the C column number (0 through 4). The first
argument to changd specifies the extra amount to sum. The changdx routine works
just like changd, except that it expects a transposed matrix. The changi routine works
like changd except that it expects a matrix of integers. The changix routine works like
changdx except that integers are expected.
Note: A maximum of three arguments can be sent when invoking a shareable image
routine from PROC IML. 4
In this example, all four matrices x1, x2, y1, and y2 should become set to the same
values after their respective MODULEIN calls. Here are the attribute table entries:
routine changd module=trymod returns=long;
arg 1 input num format=rb8. byvalue;
arg 2 update num format=rb8.;
routine changdx module=trymod returns=long transpose=yes;
arg 1 input num format=rb8. byvalue;
arg 2 update num format=rb8.;
routine changi module=trymod returns=long;
arg 1 input num format=ib4. byvalue;
arg 2 update num format=ib4.;
routine changix module=trymod returns=long transpose=yes;
arg 1 input num format=ib4. byvalue;
arg 2 update num format=ib4.;
Here is the PROC IML step:
proc iml;
x1 = J(4,5,0);
do i=1 to 4;
do j=1 to 5;
x1[i,j] = i*10+j+3;
end;
end;
y1= x1; x2 = x1; y2 = y1;
rc = modulein(’changd’,6,x1);
rc = modulein(’changdx’,6,x2);
rc = modulein(’changi’,6,y1);
rc = modulein(’changix’,6,y2);
print x1 x2 y1 y2;
run;
230
Example 3: Invoking a Shareable Image Routine from PROC IML
4
Chapter 9
The following are the results of the PRINT statement:
Output 9.7
X1
20
130
240
350
X2
20
130
240
350
Y1
20
130
240
350
Y2
20
130
240
350
Invoking a Shareable Image Routine from PROC IML
31
141
251
361
42
152
262
372
53
163
273
383
64
174
284
394
31
141
251
361
42
152
262
372
53
163
273
383
64
174
284
394
31
141
251
361
42
152
262
372
53
163
273
383
64
174
284
394
31
141
251
361
42
152
262
372
53
163
273
383
64
174
284
394
231
2
P A R T
Application Considerations
Chapter
10. . . . . . . . .Data Representation
Chapter
11. . . . . . . . .Optimizing System Performance
233
235
232
233
CHAPTER
10
Data Representation
Numeric Variables in the Alpha Environment
Missing Values under OpenVMS 234
233
Numeric Variables in the Alpha Environment
The default length of numeric variables in SAS data sets is 8 bytes. (You can change
the length of SAS numeric variables with the LENGTH statement in the DATA step.)
In SAS under OpenVMS Alpha, the data type of numeric variables is IEEE double
precision or T_FLOATING. The precision of an OpenVMS Alpha T_FLOATING value is
expressed as 15 decimal digits, with a range for T_FLOATING numeric variables of
1.7E+308 to 2.3E−308.
In addition, with Alpha T_FLOATING numbers, you must specify a minimum length
of 3 bytes using the LENGTH statement in the DATA step.
The issue of numeric precision affects the return values of almost all SAS math
functions and many numeric values returned from SAS procedures. The following table
shows the number of nontruncated significant digits and the largest integers that can
be represented exactly with no loss of precision for each of the specified lengths.
Table 10.1 Significant Digits and Largest Integer for SAS Variables in the Alpha
Environment
Length
Significant
Largest Integer
in Bytes
Digits
Represented
Retained
Exactly
3
3
8,191
4
6
2,097,151
5
8
536,870,911
6
11
137,438,953,471
7
13
35,184,372,088,831
8
15
9,007,199,254,740,991
234
Missing Values under OpenVMS
4
Chapter 10
Missing Values under OpenVMS
In SAS under OpenVMS Alpha, missing values are represented by IEEE
Not-a-Number values. An IEEE Not-a-Number is an IEEE floating-point bit pattern
that represents something other than a valid numeric value. These numbers are not
computationally derivable, meaning that the numeric representation for a
Not-a-Number is artificially set. The bit pattern will never be generated by an
arithmetic operation.
235
CHAPTER
11
Optimizing System Performance
Overview of Optimizing OpenVMS System Performance 235
Data Set I/O under OpenVMS 236
Allocating Data Set Space Appropriately 236
References for Allocating Data Set Space 237
Turning Off Disk Volume Highwater Marking 237
References for Turning Off Disk Volume Highwater Marking 238
Eliminating Disk Fragmentation 238
Setting Larger Buffer Size for Sequential Write and Read Operations 238
Using the BUFSIZE= Option 239
Using the CACHENUM= Option 239
Using the CACHESIZE= Option 240
Using Asynchronous I/O When Processing SAS Data Sets 240
References for Using Asynchronous I/O 241
External I/O under OpenVMS 241
Allocating File Space Appropriately 241
References for Allocating File Space 242
Turning Off Disk Volume Highwater Marking 242
References for Turning Off Disk Volume Highwater Marking 242
Eliminating Disk Fragmentation 243
Specifying Default Multiblock Count 243
System Start-up under OpenVMS 244
References for System Start-up 244
Optimizing Memory Usage under OpenVMS 244
Using the LOADLIST= System Option 245
Overview of Optimizing OpenVMS System Performance
All software users are concerned about system speed and resource consumption. This
section provides suggestions that might increase performance and reduce resource
consumption in the OpenVMS operating environment. Suggestions are grouped by SAS
function: data set I/O, external file I/O, and system start-up.
SAS performance partially depends on the performance of the underlying OpenVMS
environment. This document does not discuss how to improve the performance of your
OpenVMS environment, but it does offer some suggestions, such as installing SAS
images, that can aid OpenVMS system-wide performance.
Note: This section does not discuss OpenVMS hardware solutions to problems that
are related to I/O. 4
The suggestions described here are based on testing on an OpenVMS Alpha
workstation with 64MB of memory and an attached SCSI disk drive. Both SAS
236
Data Set I/O under OpenVMS
4
Chapter 11
performance data that is generated by the STIMER system option and information from
the DCL SHOW STATUS command were used to collect data points.
Each suggestion includes the following information in a tabular summary at the
beginning of each section:
Job type
is the type of SAS application affected.
User
is the person(s) who can implement the suggestion.
Usage
is a usage example.
Benefit
describes the potential benefits.
Cost
is the cost in system performance.
Use this information to help you decide which suggestions are suitable for your SAS
applications.
Most of these suggestions have an associated cost, which can often involve a tradeoff
between resources. For example, reduced I/O might require more memory consumption
or greater CPU time. Pay careful attention to the possible costs of each suggestion.
Some suggestions can cause performance degradation if they are misapplied.
Data Set I/O under OpenVMS
The information that is presented in this section applies to reading and writing SAS
data sets. In general, the larger your data sets, the greater the potential performance
gain for your entire SAS job. The performance gains that are described here were
observed on data sets of approximately 100,000 blocks.
Allocating Data Set Space Appropriately
Job type
Jobs that write data sets.
User
SAS programmer.
Usage
Use ALQ=x and DEQ=y (or ALQMULT=x and DEQMULT=y) as
LIBNAME statement options or as data set options, where x and y
are values representing the number of blocks.
Benefit
There is up to a 50 percent decrease in elapsed time on write
operations as reflected in fewer direct I/Os. File fragmentation is also
reduced, thereby enhancing performance when you read the data set.
Cost
You will experience performance degradation when ALQ= or DEQ=
values are incompatible with the data set size.
SAS initially allocates enough space for 10 pages of data for a data set. Each time
the data set is extended, another 5 pages of space is allocated on the disk. OpenVMS
maintains a bit map on each disk that identifies the blocks that are available for use.
When a data set is written and then extended, OpenVMS alternates between scanning
the bit map to locate free blocks and actually writing the data set. However, if the data
sets were written with larger initial and extent allocations, then write operations to the
data set would proceed uninterrupted for longer periods of time. At the hardware level,
this means that disk activity is concentrated on the data set, and disk head seek
operations that alternate between the bit map and the data set are minimized. The
user sees fewer I/Os and faster elapsed time.
Optimizing System Performance
4
Turning Off Disk Volume Highwater Marking
237
Large initial and extent values can also reduce disk fragmentation. SAS data sets
are written using the RMS algorithm “contiguous best try.” With large preallocation,
the space is reserved to the data set and does not become fragmented as it does when
inappropriate ALQ= and DEQ= values are used.
SAS recommends setting ALQ= to the size of the data set to be written. If you are
uncertain of the size, underestimate and use DEQ= for extents. Values of DEQ= larger
than 5000 blocks are not recommended. For information about predicting data set size,
see “Estimating the Size of a SAS Data Set under OpenVMS” on page 149.
The following is an example of using the ALQ= and DEQ= options:
libname x ’[]’;
/* Know this is a big data set. */
data x.big (alq=100000 deq=5000);
length a b c d e f g h i j k l m
_n o p q r s t u v w x y z $200;
do ii=1 to 13000;
output;
end;
run;
Note: If you do not want to specify an exact number of blocks for the data set, use
the ALQMULT= and DEQMULT= options. 4
References for Allocating Data Set Space
3
3
3
3
3
“ALQ= Data Set Option” on page 282
“DEQ= Data Set Option” on page 289
“ALQMULT= Data Set Option” on page 283
“DEQMULT= Data Set Option” on page 290
Guide to OpenVMS File Applications
Turning Off Disk Volume Highwater Marking
Job type
Any SAS application that writes data sets. Data set size is not
important.
User
System manager.
Usage
Use the /NOHIGHWATER_MARKING qualifier when initializing
disks. For active disks, issue the DCL command SET
VOLUME/NOHIGHWATER_MARKING.
Benefit
There is a greater percentage gain for jobs that are write intensive.
The savings in elapsed time can be as great as 40 percent. Direct
I/Os are reduced.
Cost
There is no performance penalty. However, for security purposes,
some OpenVMS sites might require this OpenVMS highwater
marking feature to be set.
Highwater marking is an OpenVMS security feature that is enabled by default. It
forces prezeroing of disk blocks for files that are opened for random access. All SAS
238
Eliminating Disk Fragmentation
4
Chapter 11
data sets are random-access files and, therefore, pay the performance penalty of
prezeroing, increased I/Os, and increased elapsed time.
Two DCL commands can be used independently to disable highwater marking on a
disk. When initializing a new volume, use the NOHIGHWATER_MARKING qualifier to
disable the highwater function as in the following example:
$ initialize/nohighwater $DKA470 mydisk
To disable volume highwater marking on an active disk, use a command similar to
the following:
$ set volume/nohighwater $DKA200
References for Turning Off Disk Volume Highwater Marking
3 OpenVMS System Manager’s Manual: Tuning, Monitoring, and Complex Systems
3 OpenVMS DCL Dictionary A-M
Eliminating Disk Fragmentation
Job type
Any jobs that frequently access common data sets.
User
SAS programmer and system manager.
Usage
Devote a disk to frequently accessed data sets, or keep your disks
defragmented.
Benefit
The savings in elapsed time varies with the current state of the
disk, but it can exceed 50 percent on write operations and 25 percent
on read operations.
Cost
The cost to the user is the time and effort to better manage disk
access. For the system manager, it can involve regularly
defragmenting disks or obtaining additional disk drives.
Any software that reads and writes from disk benefits from a well-managed disk.
This applies to SAS data sets. On an unfragmented disk, files are kept contiguous;
thus, after one I/O operation, the disk head is well positioned for the next I/O operation.
A disk drive that is frequently defragmented can provide performance benefits. Use a
frequently defragmented disk to store commonly accessed SAS data sets. In some
situations, adding an inexpensive SCSI drive to the configuration allows the system
manager to maintain a clean, unfragmented environment more easily than using a
large disk farm. Data sets maintained on an unfragmented SCSI disk might perform
better than heavily fragmented data sets on larger disks.
Defragmenting means a process that runs the OpenVMS Backup Facility after
regular business hours. SAS does not recommend using dynamic defragmenting tools
that run in the background of an active system because such programs can corrupt files.
Setting Larger Buffer Size for Sequential Write and Read Operations
Job type
SAS steps that do sequential I/O operations on large data sets.
User
SAS programmer.
Optimizing System Performance
4
Setting Larger Buffer Size for Sequential Write and Read Operations
239
Usage
The CACHESIZE= data set option controls the buffering of data set
pages during I/O operations. CACHESIZE= can be used either as a
data set option or in a LIBNAME statement that uses the BASE
engine. The BUFSIZE= data set option sets the data set page size
when the data set is created. BUFSIZE= can be used as a data set
option, in a LIBNAME statement, or as a SAS system option.
Benefit
There is as much as a 30 percent decrease in elapsed time in some
steps when an appropriate value is chosen for a particular data set.
Cost
If the data set observation size is large, substantial space in the
data set might be wasted if you do not choose an appropriate value
for BUFSIZE=. Also, memory is consumed for the data cache, and
multiple caches might be used for each data set opened.
Using the BUFSIZE= Option
The BUFSIZE= data set option sets the SAS internal page size for the data set. Once
set, this becomes a permanent attribute of the file that cannot be changed. This option
is meaningful only when you are creating a data set. If you do not specify a BUFSIZE=
option, SAS selects a value that contains as many observations as possible with the
least amount of wasted space.
An observation cannot span page boundaries. Therefore, unused space at the end of
a page can occur unless the observations pack evenly into the page. By default, SAS
tries to choose a page size between 8192 and 32768 if an explicit BUFSIZE= option has
not been specified. If you increase the BUFSIZE= value, more observations can be
stored on a page, and the same amount of data can be accessed with fewer I/Os. When
explicitly choosing a BUFSIZE, be sure to choose a value that does not waste space in a
data set page, resulting in wasted disk space. The highest recommended value for
BUFSIZE= is 65024.
The following is an example of an efficiently written large data set, using the
BUFSIZE= data set option. Note that in the following example, BUFSIZE=63488
becomes a permanent attribute of the data set:
libname buf ’[]’;
data buf.big (bufsize=63488);
length a b c d e f g h i j k l m
n o p q r s t u v w x y z $200;
do ii=1 to 13000;
output;
end;
run;
Using the CACHENUM= Option
For each SAS file that you open, SAS maintains a set of caches to buffer the data set
pages. The size of each of these caches is controlled by the CACHESIZE= option. The
number of caches used for each open file is controlled by the CACHENUM= option. The
ability to maintain more data pages in memory potentially reduces the number of I/Os
that are required to access the data. The number of caches that are used to access a file
is a temporary attribute. It might be changed each time you access the file.
By default, up to 10 caches are used for each SAS file that is opened; each of the
caches is the value (in bytes) of CACHESIZE= in size. On a memory-constrained system
you might wish to reduce the number of caches used in order to conserve memory.
The following example shows using the CACHENUM= option to specify that 8 caches
of 65024 bytes each are used to buffer data pages in memory.
240
Using Asynchronous I/O When Processing SAS Data Sets
4
Chapter 11
proc sort data=cache.big (cachesize=65024 cachenum=8);
by serial;
run;
Using the CACHESIZE= Option
SAS maintains a cache that is used to buffer multiple data set pages in memory.
This reduces I/O operation by enabling SAS to read or write multiple pages in a single
operation. SAS maintains multiple caches for each data set that is opened. The
CACHESIZE= data set option specifies the size of each cache.
The CACHESIZE= value is a temporary attribute that applies only to the data set
that is currently open. You can use different CACHESIZE= values at different times
when accessing the same file. To conserve memory, a maximum of 65024 bytes is
allocated for the cache by default. The default allows as many pages as can be
completely contained in the 65024-byte cache to be buffered and accessed with a single
I/O.
Here is an example that uses the CACHESIZE= data set option to write a large data
set efficiently. Note that in the following example, CACHESIZE= value is not a
permanent attribute of the data set:
libname cache ’[]’;
data cache.big (cachesize=65024);
length a b c d e f g h i j k l m
n o p q r s t u v w x y z $200;
do ii=1 to 13000;
output;
end;
run;
Using Asynchronous I/O When Processing SAS Data Sets
Job type
Jobs that read or write SAS files.
User
SAS programmer.
Usage
The BASE engine now performs asynchronous reading and writing
by default. This allows overlap between SAS data set I/O and
computation time.
Note: Asynchronous reading and writing is enabled only if
caching is turned on. 4
Benefit
Asynchronous I/O allows other processing to continue while SAS is
waiting for I/O completion. If there is a large gap between the CPU
time used and the elapsed time reported in the FULLSTIMER
statistics, asynchronous I/O can help reduce that gap.
Cost
Because data page caching must be in effect, the memory usage of
the I/O cache must be incurred. For more information about
controlling the size and number of caches used for a particular SAS
file, see “CACHENUM= Data Set Option” on page 286 and
“CACHESIZE= Data Set Option” on page 287.
Asynchronous I/O is enabled by default. There are no additional options that need to
be specified to use this feature. For all SAS files that use a data cache, SAS performs
asynchronous I/O. Since multiple caches are now available for each SAS file, while an
Optimizing System Performance
4
Allocating File Space Appropriately
241
I/O is being performed on one cache of data, SAS might continue processing using other
caches. For example, when SAS writes to a file, once the first cache becomes full an
asynchronous I/O is initiated on that cache, but SAS does not have to wait on the I/O to
complete. While that transaction is in progress, SAS can continue processing new data
pages and store them in one of the other available caches. When that cache is full, an
asynchronous I/O can be initiated on that cache as well.
Similarly, when SAS reads a file, additional caches of data can be read from the file
asynchronously in anticipation of those pages being requested by SAS. When those
pages are required, they will have already been read from disk, and no I/O wait will
occur.
Because caching (with multiple caches) needs to be enabled in order for asynchronous
I/O to be effective, if the cache is disabled with the CACHESIZE=0 option or the
CACHENUM=0 option, no asynchronous I/O can occur.
References for Using Asynchronous I/O
3 “CACHENUM= Data Set Option” on page 286
3 “CACHESIZE= Data Set Option” on page 287
External I/O under OpenVMS
The following guidelines apply to reading and writing OpenVMS native files using
SAS. For several of the suggestions, the larger your files, the more performance gain for
your entire SAS job. These suggestions parallel several of the SAS data set I/O
suggestions.
Allocating File Space Appropriately
Job type
SAS procedures and DATA steps that write external files.
User
SAS programmer.
Usage
The ALQ= and DEQ= options are specified as part of the
FILENAME or FILE statement.
Benefit
Specifying appropriate values can decrease elapsed time up to 50
percent and reduce disk fragmentation.
Cost
You will experience performance degradation when ALQ= and DEQ=
values are incompatible with file size.
SAS allocates disk space for external files based on the value of ALQ=. It then
extends the file if needed, based on the value of DEQ=. By default, the ALQ= value is 0
(indicating that the minimum number of blocks required for the given file format is
used) and the value for DEQ= is 0 (telling OpenVMS RMS to use the process’s default
value). For more information about specifying the ALQ= and DEQ= options, see
“FILENAME Statement” on page 397 and “FILE Statement” on page 395.
Every time a file must be extended, the system must search the disk for free space.
This requires I/Os. When this is done repeatedly for large files, performance degrades.
By setting larger ALQ= and DEQ= values for large files, this overhead will be reduced.
Optimal I/O will occur when ALQ= is equal to the size of the file. Because this is not
always feasible, it is better to underestimate the value for ALQ= and set a larger DEQ=
242
Turning Off Disk Volume Highwater Marking
4
Chapter 11
value. This allocates enough space for a smaller file, while extending it occasionally to
meet the demands of a larger file. Allocating too much space can be costly if
/HIGHWATER_MARKING is set on the disk. (For more information, see “Turning Off
Disk Volume Highwater Marking” on page 242.)
References for Allocating File Space
3 Guide to OpenVMS File Applications
3 “FILE Statement” on page 395
3 “FILENAME Statement” on page 397
Turning Off Disk Volume Highwater Marking
Job type
Jobs that write external files.
User
System manager.
Usage
Use the /NOHIGHWATER_MARKING qualifier when initializing
disks. For active disks, issue the DCL command SET
VOLUME/NOHIGHWATER_MARKING.
Benefit
Elapsed time can be improved by up to 40 percent. Direct I/Os are
reduced.
Cost
There is no performance penalty. However, for security purposes,
some OpenVMS sites might require this OpenVMS highwater
marking feature to be set.
SAS uses the random access method when opening external files. This means that
allocated disk space does not have to be processed in a sequential method.
/HIGHWATER_MARKING is a safeguard that clears disk space before it is allocated to
remove residue of former files. To do this, the entire space that is allocated has to be
overwritten. Overwriting the space costs some elapsed time and I/Os. If the data that is
stored on the disk is not of a truly confidential nature, then a performance gain can be
achieved by disabling highwater marking on this disk.
Two DCL commands can be used independently to disable highwater marking on a
disk. When initializing a new volume, use the following to disable the highwater
function:
$ initialize/nohighwater $DKA470 mydisk
To disable volume highwater marking on an active disk, use a command similar to
the following:
$ set volume/nohighwater $DKA200
References for Turning Off Disk Volume Highwater Marking
3 OpenVMS System Manager’s Manual: Tuning, Monitoring, and Complex Systems
Optimizing System Performance
4
Specifying Default Multiblock Count
243
Eliminating Disk Fragmentation
Job type
Any jobs that access common external files frequently.
User
System manager.
Usage
You will need to devote a disk to frequently accessed files or keep
your disks defragmented.
Benefit
The savings on elapsed time depend on the current state of the disk,
but the time can be reduced by up to 40 percent.
Cost
The cost to the user is the time and effort to better manage disk
access rather than letting the OpenVMS environment do all of the
work. For the system manager, this might involve regularly
defragmenting disks or obtaining additional disk drives.
On an defragmented disk, files are contiguous, so after one I/O operation the disk
head is well positioned for the next I/O operation. Split I/Os are rare on an
defragmented disk, which decreases elapsed time to perform I/O.
Where possible, dedicating a disk drive to frequent defragmentation can provide
performance benefits. Use this disk to store commonly accessed SAS external files. In
some situations, adding an inexpensive SCSI drive to the configuration might allow the
system manager to maintain a clean, defragmented environment more easily than
maintaining a large disk farm. Files that are maintained on this defragmented SCSI
disk might perform better than heavily fragmented files on larger disks.
Specifying Default Multiblock Count
Job type
Jobs that write large external files.
User
SAS programmer.
Usage
The MBC= option (multiblock count) is specified as part of the
FILENAME or FILE statement.
Benefit
Elapsed time can be improved by 25 to 35 percent on jobs that
output large external files.
Cost
Increasing multiblock count can slightly increase the requirements
for memory.
By default, SAS uses the default value for your process for the multiblock count,
which is specified by the RAB$B MBC field in OpenVMS RMS. You can use the MBC=
external I/O option to specify the size of the I/O buffers that OpenVMS RMS allocates
for writing or reading an external file. The MBC= option controls how many 512-byte
pages of memory are reserved to perform file access. When you increase the buffer size,
you use more memory.
We recommend a value of approximately 32 blocks for the MBC= option when you
are writing a very large external file (over 100,000 blocks). You might see improvement
in elapsed time up to 35 percent. Only minimal gains in performance will occur when
you specify the MBC= option for reading an external file.
Note: You can use the MBC= option to affect a particular file. If you want to specify
a default multiblock count for your process that will affect all external files in your SAS
program, use the DCL SET RMS_DEFAULT command. 4
244
System Start-up under OpenVMS
4
Chapter 11
System Start-up under OpenVMS
Job type
All jobs.
User
System manager.
Usage
The OpenVMS Install facility can be used to make core SAS images
resident in memory.
Benefit
Elapsed time of system start-up might decrease as much as 30
percent when you are running SAS under X windows and by 40
percent in other modes.
Cost
Installing all images listed in the sample commands consumes
between 7500 and 1200 global pages and 6 to 8 global sections.
Installing SAS images can decrease the elapsed time of SAS start-up by up to 40
percent. Installing images is most effective on systems where two or more users are
using SAS simultaneously. Use the following commands in the system start-up file to
install the core set of SAS images:
$
$
$
$
@SASdisk:[SAS91.TOOLS]SAS91.COM
INSTALL :== $SYS$SYSTEM:INSTALL/COMMAND"
INSTALL ADD SAS$ROOT:[SASEXE]SAS91.EXE/OPEN/SHARE
INSTALL ADD SAS$ROOT:[SASEXE]SASMOTIF.EXE/OPEN/SHARED
SASdisk is the disk containing SAS; SAS$ROOT is the root directory of SAS.
The Install facility can be used to make core SAS images resident in the memory.
Elapsed time of system start-up might decrease by as much as 30 percent when you are
running SAS under X windows, and by 40 percent in other modes. Installing the
images listed in the sample commands consumes the following resources:
SAS91.EXE
2 global sections and 2352 global pagelets
SASMOTIF.EXE
2 global sections and 10144 global pagelets
References for System Start-up
3 OpenVMS System Manager’s Manual: Tuning, Monitoring, and Complex Systems
Optimizing Memory Usage under OpenVMS
You can make tradeoffs between memory and other resources. This is explained in
“Data Set I/O under OpenVMS” on page 236 and “External I/O under OpenVMS” on
page 241. To make the most of the I/O subsystem, you need to use more, larger buffers.
These buffers are allocated out of your available virtual address space and must share
your physical address space (that is, your working set) with the other memory demands
of your SAS session.
Therefore, optimization of other resources is often at the expense of using more and
more memory. If memory is your critical resource, there are several things you can do
to reduce the dependence on increased memory. However, most of these techniques are
at the expense of increased I/O processing or increased CPU usage.
Optimizing System Performance
4
Using the LOADLIST= System Option
245
Increasing the values of the MBC= and MBF= external I/O statement options, the
CACHESIZE= option, and the BKS= option enables you to optimize the I/O subsystem
by reducing the number of accesses necessary to reference the data. But reducing the
number of accesses uses more memory. If you are operating in a memory-constrained
environment, you need to reduce these values to minimize memory usage.
The size of your I/O buffers depends on your working set size. It is important not to
increase I/O buffers up to the point that you exhaust your available working set. If you
do this, you will notice an increase in the page fault rate for your job.
Using the LOADLIST= System Option
Job type
Any job that accesses a SAS image.
User
SAS programmer.
Usage
The LOADLIST= system option reports the SAS images that were
used the most often.
Benefit
You can optimize memory usage by installing the most heavily used
images as known images.
Cost
There is no performance penalty.
To optimize memory usage, ensure that images that are used most often are installed as
known images to the OpenVMS operating environment. If you use the LOADLIST=
system option, SAS reports which images were used most often. If you install the most
heavily used images as known images, they do not require additional physical memory
if used by multiple users. These images should be installed with the /SHARED option.
For information about using the INSTALL utility, refer to “System Start-up under
OpenVMS” on page 244. For more information, see “LOADLIST= System Option” on
page 471.
246
247
3
P A R T
Features of the SAS Language for OpenVMS
Chapter
12. . . . . . . . .Commands under OpenVMS
Chapter
13. . . . . . . . .Data Set Options under OpenVMS
Chapter
14. . . . . . . . .Formats under OpenVMS
Chapter
15. . . . . . . . .Functions and CALL Routines under OpenVMS
Chapter
16. . . . . . . . .Informats under OpenVMS
Chapter
17. . . . . . . . .Procedures under OpenVMS
373
Chapter
18. . . . . . . . .Statements under OpenVMS
393
Chapter
19. . . . . . . . .System Options under OpenVMS
Chapter
20. . . . . . . . .Macro Facility under OpenVMS
249
277
297
361
429
517
309
248
249
CHAPTER
12
Commands under OpenVMS
SAS Commands under OpenVMS 250
Dictionary 250
AUTOSCROLL Command 250
CAPS Command 251
COLOR Command 251
DLGABOUT Command 253
DLGCDIR Command 253
DLGENDR Command 254
DLGFIND Command 254
DLGFONT Command 255
DLGOPEN Command 255
DLGPREF Command 256
DLGREPLACE Command 257
DLGSAVE Command 257
DLGSCRDUMP Command 258
FILE Command 258
FILL Command 260
FONTLIST Command 261
HOME Command 261
HOSTEDIT Command 262
INCLUDE Command 262
RESHOW Command 263
TOOLCLOSE Command 264
TOOLEDIT Command 264
TOOLLARGE Command 264
TOOLLOAD Command 265
TOOLTIPS Command 266
TPU Command 266
UNDO Command 267
WBROWSE Command 268
WCOPY Command 268
WCUT Command 269
WPASTE Command 269
WUNDO Command 269
X Command 270
Function-Key Commands 271
Host-Specific Frames of the Form Window 272
OpenVMS Print File Parameters Window Frame 273
OpenVMS Job and Page Definitions Window Frame 275
250
SAS Commands under OpenVMS
4
Chapter 12
SAS Commands under OpenVMS
During an interactive SAS session, you can issue commands from the SAS command
line or from the SAS command window. SAS supports many commands that help you
navigate through your session and accomplish certain tasks. In many cases, the
command is another way to invoke an action that you can also accomplish by using the
SAS menus and windows. However, advanced users might find that the supported
commands are a more efficient way to work. Sometimes commands offer a more flexible
way to accomplish a task when the parameters of your task are different from those
that the SAS interface supports.
There are two main types of commands available under OpenVMS: SAS windowing
environment commands and SAS Text-Editor commands. The SAS windowing
environment commands control window management, file management, toolboxes,
dialog boxes, color, and output. The SAS Text-Editor commands control how text is
manipulated, such as upper- and lowercase, cutting, copying and pasting.
Most SAS commands are described in the Base SAS Software section in SAS Help
and Documentation. The commands that are described here have syntax or behavior
that is specific to the OpenVMS operating environment.
Dictionary
AUTOSCROLL Command
Controls the display of lines in the Log and Output windows
OpenVMS specifics:
default values
Syntax
AUTOSCROLL <n | PAGE | MAX >
no argument
displays the current setting of the AUTOSCROLL command.
n
specifies the number of lines that the window should scroll when it receives a line of
data that cannot fit. The default in the Output window is 1.
PAGE
specifies in the Output window only that no lines are displayed until a complete page
of output is written to the window.
MAX
specifies in the Output window only that no lines are written until the end of each
procedure.
Commands under OpenVMS
4
COLOR Command
251
Details
Under OpenVMS, the default value for the AUTOSCROLL command in the Output
window is 1 (meaning that no output is written to that window while statements are
executing, which provides the best performance).
Scrolling can increase the length of time that SAS takes to run your program. The
less scrolling that the Log and Output windows do, the faster your program will run.
Setting the value of n equal to 0 might also speed up interactive jobs.
See Also
3 “AUTOSCROLL Command” in the Base SAS Software section in SAS Help and
Documentation
CAPS Command
Changes the default case of text
OpenVMS specifics:
All aspects are host-specific
Syntax
CAPS <ON | OFF>
ON
causes characters to be translated to uppercase.
OFF
turns off CAPS command; characters retain their case.
Details
The CAPS command is a SAS Text-Editor command.
Under OpenVMS, characters are translated when you move the cursor off the line or
when you press RETURN.
See Also
3 “CAPS Command” in the Base SAS Software section in SAS Help and
Documentation
COLOR Command
Changes the color and highlighting of selected portions of a window
OpenVMS specifics:
valid field types and attributes
Syntax
COLOR field-type <color | NEXT <highlight>>
252
COLOR Command
4
Chapter 12
Note: This is a simplified description of the COLOR command syntax. For the
complete description, see the COLOR command in the Base SAS Software section in
SAS Help and Documentation 4
field-type
specifies the area of the window (such as background, banner, command, border, or
message) or type of text you want to change.
color
specifies the color for the field. On terminals that support color, the following values
are valid:
K
black
B
blue
n
brown
C
cyan
G
green
?
grey
M
magenta
O
orange
R
red
W
white
Y
yellow
NEXT
specifies to change the color to the next color in the list.
highlight
specifies the highlighting attribute for the field. The following values are valid:
H
highlight, which causes the text to be displayed in a bold font.
R
reverse video.
U
underline.
The B (blinking) attribute is not supported under OpenVMS.
Details
The COLOR command enables you to set the color for specific elements of the active
window.
To save your changes beyond your current session, do one of the following:
3 Issue the WSAVE command. The changes are saved to
SASUSER.PROFILE.window.WSAVE.
3 From the View menu, select Change display, and then select Save attributes.
Note: The WSAVE command is not available for all SAS windows. For example,
with SAS/FSP or SAS/CALC software, changes are saved either through the EDPARMS
window or the PARMS window. To determine whether WSAVE is available for a
particular SAS window, refer to the product documentation. 4
Both the COLOR command and the WSAVE command override actions in the
SASCOLOR window. That is, COLOR and WSAVE override the use of CPARMS colors
Commands under OpenVMS
4
DLGCDIR Command
253
for that particular window without affecting the CPARMS values for other SAS
windows.
See Also
3 “COLOR Command” in the Base SAS Software section in SAS Help and
Documentation
3 “WSAVE Command” in the Base SAS Software section in SAS Help and
Documentation
3 “Customizing Colors Using the SASCOLOR Window” on page 107
DLGABOUT Command
Opens the About SAS dialog box
OpenVMS specifics:
All aspects are host-specific
Syntax
DLGABOUT
Details
To open the About SAS dialog box in the active window, select the Help menu and then
select About SAS 9.
DLGCDIR Command
Opens the Change Working Directory dialog box
OpenVMS specifics:
All aspects are host-specific
Syntax
DLGCDIR
Details
From the Change Working Directory dialog box, you can select a new working directory.
To open the Change Working Directory dialog box in the active window, select the
Tools menu, select Options, and then select Change Directory.
254
DLGENDR Command
4
Chapter 12
See Also
3 “Changing Your Current Working Directory under OpenVMS” on page 67
3 “Opening Files under OpenVMS” on page 65
DLGENDR Command
Opens the Exit dialog box
OpenVMS specifics:
All aspects are host-specific
Syntax
DLGENDR
Details
The Exit dialog box prompts you to confirm that you want to exit SAS. If you click OK
in the dialog box, the SAS session ends. If you have set the SAS.confirmSASExit
resource to False, then this command is equivalent to the BYE command.
To open the Exit dialog box in the active window, select the File menu and then
select Exit.
See Also
3 “Miscellaneous Resources under OpenVMS” on page 120 for more information
about the SAS.confirmSASExit resource
DLGFIND Command
Opens the Find dialog box
OpenVMS specifics:
All aspects are host-specific
Syntax
DLGFIND
Details
The Find dialog box enables you to search for text strings. To open the Find dialog box
in the active window, select the Edit menu and then select Find.
Commands under OpenVMS
4
DLGOPEN Command
255
See Also
3 “Searching for Character Strings under OpenVMS” on page 68
3 “DLGREPLACE Command” on page 257
3 “Replacing Character Strings under OpenVMS” on page 69
DLGFONT Command
Opens the Fonts dialog box
OpenVMS specifics:
All aspects are host-specific
Syntax
DLGFONT
Details
The Fonts dialog box enables you to dynamically change the font when you are in the
SAS windowing environment. To open the Fonts dialog box in the active window, select
the Tools menu, then select Options, and then select Fonts.
See Also
3 “Customizing Fonts under OpenVMS” on page 101
DLGOPEN Command
Opens the Open or Import dialog box
OpenVMS specifics:
All aspects are host-specific
Syntax
DLGOPEN <FILTERS=’filters’ <IMPORT> <SUBMIT | NOSUBMIT> < VERIFY>>
no arguments
opens the Open dialog box with the default settings.
FILTERS=’filters’
specifies one or more file filters to use as search criteria when SAS is displaying files.
For example, the following command displays all files in the current directory that
have a .SAS extension and adds *.TXT to the File type combo box in the dialog box:
DLGOPEN FILTERS="*.sas *.txt"
256
DLGPREF Command
4
Chapter 12
You can specify multiple filters; they all appear in the File type box. If you do
not specify any filters, the dialog box displays a default list.
IMPORT
opens the Import dialog box, which enables you to import graphics files to your
SAS/GRAPH applications.
SUBMIT | NOSUBMIT
specifies whether the SUBMIT command is pushed after the file is opened.
VERIFY
checks whether the DLGOPEN command is appropriate for the active window.
Details
The Open and Import dialog boxes enable you to select a file to read into the active
window. To open the Open dialog box in the active window, select the File menu and
then select Open. To open the Import dialog box in the active window, select the File
menu and then select Import.
See Also
3 “Opening Files under OpenVMS” on page 65
3 “Image Extensions” section in SAS/GRAPH Reference, Volumes 1 and 2
DLGPREF Command
Opens the Preferences dialog box
OpenVMS specifics:
All aspects are host-specific
Syntax
DLGPREF
Details
The Preferences dialog box enables you to dynamically change certain X resource
settings. To open the Preferences dialog box in the active window, select the Tools
menu, select Options, and then select Preferences.
See Also
3 “Modifying X Resource Settings by Using the Preferences Dialog Box” on page 80
Commands under OpenVMS
4
DLGSAVE Command
257
DLGREPLACE Command
Opens the Replace dialog box
OpenVMS specifics:
All aspects are host-specific
Syntax
DLGREPLACE
Details
The Replace dialog box enables you to search for and replace text strings. To open the
Replace dialog box in the active window, select the Edit menu and then select Replace.
See Also
3 “Replacing Character Strings under OpenVMS” on page 69
3 Command: “DLGFIND Command” on page 254
DLGSAVE Command
Opens the Save As or Export dialog box
OpenVMS specifics:
All aspects are host-specific
Syntax
DLGSAVE <FILTERS=’filters’ <EXPORT> < VERIFY>>
no arguments
opens the Save As dialog box with the default settings.
FILTERS=’filters’
specifies one or more file filters to use as search criteria when you are displaying files.
For example, the following command displays all files in the current directory that
have a .SAS extension and adds *.TXT to the File type combo box in the dialog box:
DLGSAVE FILTERS="*.sas *.txt"
You can specify multiple filters; they all appear in the file type box. If you omit the
filters, the dialog box displays a default list.
EXPORT
opens the Export dialog box, enabling you to export graphics files in your SAS session.
VERIFY
verifies whether the DLGSAVE command is appropriate for the active window.
258
DLGSCRDUMP Command
4
Chapter 12
Details
To open the Save As dialog box in the active window, select the File menu and then
select Save as.
To open the Export dialog box in the active window, select the File menu and then
select Export as Image.
See Also
3 “Image Extensions” section in SAS/GRAPH Reference, Volumes 1 and 2.
DLGSCRDUMP Command
Saves the active SAS/GRAPH window as an image file using the file specification and file type that
you specify
OpenVMS specifics:
All aspects are host-specific
Syntax
DLGSCRDUMP <’file-specification.ext’ FORMAT=’file-type’>
no argument
opens the Export dialog box and enables you to choose a filename and file type.
’file-specification.ext’
specifies the name of the file you want to save.
FORMAT=’file-type’
specifies the file type of the file you want to save.
Details
The DLGSCRDUMP command saves screen captures in any image format that is
supported by SAS/GRAPH software with Image extensions. If your site has not licensed
SAS/GRAPH with Image extensions, then screen captures can be saved only as .XPM
files.
See Also
3 “Opening Files under OpenVMS” on page 65
3 “Image Extensions” section in SAS/GRAPH Reference, Volumes 1 and 2.
FILE Command
Writes the contents of the current window to an external file
OpenVMS specifics:
valid values for file-specification and encoding-value
Commands under OpenVMS
4
FILE Command
259
Syntax
FILE < file-specification><ENCODING=’encoding-value’>< option-list>
file-specification
can be any of the following:
3 a single filename. SAS writes the file in the current directory. If you enclose the
filename in quotation marks, SAS uses the filename exactly as you specify it. If
you do not enclose the filename in quotation marks and if you do not specify a
filename extension, SAS uses .SAS, .LOG, or .LIS, depending on whether you
issue the command from the Program Editor, Log, or Output window. If no
filename extension is specified and the file-specification is longer than eight
characters, then the default value is .DAT.
3 an entire pathname. SAS does not assume any filename extensions, even if you
do not enclose the pathname in quotation marks.
3 a fileref.
ENCODING=’encoding-value’
specifies the encoding to use when writing to the output file. The value for
ENCODING= indicates that the output file has a different encoding from the current
session encoding.
When you write data to the output file, SAS transcodes the data from the session
encoding to the specified encoding.
For valid encoding values, see “Encoding Values in SAS Language Elements” in
SAS National Language Support (NLS): User’s Guide.
option-list
specifies options for the FILE command that are valid in all operating environments.
For more information about these options, see the FILE command in the Base SAS
Software section in SAS Help and Documentation.
Details
The FILE command writes the entire contents of the current window to an external file
without removing text from the window.
You can also use a physical filename (enclosed in quotation marks) in place of the
fileref.
CAUTION:
If you do not specify a filename, then the file from the previous FILE or INCLUDE command
is used. In this case, a dialog box first asks if you are sure you want to overwrite the
file. 4
If you have not issued any FILE or INCLUDE commands, then an error message
informs you that no default file exists. For a list of default file types used for the FILE
command, see “Default File Types” on page 177
Examples
Example 1: Copying Text from a Window to a File
specified the following FILENAME statement:
filename sasfile ’[mydir]program1.sas’;
Suppose you have previously
260
FILL Command
4
Chapter 12
Issuing the following FILE command on the Program Editor command line copies the
text from the Program Editor window into the file PROGRAM1.SAS:
file sasfile
Example 2: Appending Text to an Existing External File
To append text to an existing
external file, use the APPEND option in the FILE command. For example, you can
issue the following command from the Program Editor window to append the contents
to the file associated with the fileref MYFILE:
file myfile append
See Also
3 “FILE Command” in the Base SAS Software section in SAS Help and
Documentation
3 “Identifying External Files to SAS” on page 173
3 “Default File Types” on page 177
FILL Command
Specifies the fill character
OpenVMS specifics:
default character
Syntax
FILL <fill-character> <n>
fill-character
specifies the fill character to be used. Under OpenVMS, the default fill character is
an underscore (_).
n
specifies the exact number of fill characters.
Details
The FILL command is a SAS Text-Editor command.
The fill characters are placed beginning at the current cursor position. The space will
be filled with the fill character from the current cursor position either to the end of the
line or to the space before the first nonblank character, whichever occurs first.
See Also
3 “FILL Command” in the Base SAS Software section in SAS Help and
Documentation
Commands under OpenVMS
4
HOME Command
261
FONTLIST Command
Lists available software fonts
OpenVMS specifics:
all
Syntax
FONTLIST
Details
The FONTLIST command opens windows that list all of the software fonts that are
available in your operating environment. This might be useful if you want to choose a
font to use in a SAS program, typically with a FONT= or FTEXT= option. Issuing the
FONTLIST command from the SAS command line opens the Select Font window,
which contains two buttons, Copy and System . Clicking the System button opens the
Fonts window, from which you select and preview all available system fonts. Once you
select the desired font and font attributes, click OK . The Select Font window reopens
with your selected font name displayed. Clicking the copy button places the font name
in the copy buffer so that you can paste the selected font name into your SAS program.
HOME Command
Toggles the cursor position between current position and home position
OpenVMS specifics:
keyboard equivalent
Syntax
HOME
Details
Under OpenVMS, you can define a function key to execute the HOME command, which
toggles between the last cursor position and the home position (usually the command
line). This behavior is the same in all windows. You can also define a function key to
execute the CURSOR command, which positions the cursor on the command line but
has no toggle effect.
See Also
3 “HOME Command” in the Base SAS Software section in SAS Help and
Documentation
262
HOSTEDIT Command
4
Chapter 12
HOSTEDIT Command
Invokes the host editor
OpenVMS specifics:
All aspects are host-specific
Syntax
HOSTEDIT
Details
Under OpenVMS, HOSTEDIT invokes the editor specified by the EDITCMD system
option. By default, HOSTEDIT issues the TPU (Text Processing Unit) command. For
more information about this command, see “TPU Command” on page 266.
INCLUDE Command
Copies the entire contents of an external file into the current window
OpenVMS specifics:
valid values for file-specification and encoding-value
Syntax
INCLUDE <file-specification><ENCODING=’encoding-value’><option-list >
file-specification
can be any of the following:
3 a single filename. SAS searches for the file in the current directory. If you
enclose the filename in quotation marks, SAS uses the filename exactly as you
specify it. If you do not enclose the filename in quotation marks and if you do
not specify a filename extension, SAS searches for file-specification.sas.
3 an entire pathname. SAS does not assume any filename extensions, even if you
do not enclose the pathname in quotation marks.
3 a fileref.
ENCODING=’encoding-value’
specifies the encoding to use when reading from the external file. The value for
ENCODING= indicates that the external file has a different encoding from the
current session encoding.
When you read data from an external file, SAS transcodes the data from the
specified encoding to the session encoding.
For valid encoding values, see “Encoding Values in SAS Language Elements” in
SAS National Language Support (NLS): User’s Guide.
Commands under OpenVMS
4
RESHOW Command
263
option-list
names options for the INCLUDE command that are valid in all operating
environments. For more information about these options, see the INCLUDE
command in the Base SAS Software section in SAS Help and Documentation.
Details
The INCLUDE command copies the entire contents of an external file into the current
window.
If you do not specify a file-specification, then SAS uses the filename from the previous
FILE or INCLUDE command. In this case, SAS first asks you if you want to overwrite
the file. If you have not issued any FILE or INCLUDE commands, you receive an error
message indicating no default file exists. For a list of default file types used for the
INCLUDE command, see “Default File Types” on page 177.
Example
Suppose you have previously specified the following FILENAME statement:
filename myfile ’[mydir]oranges.dat’;
The following INCLUDE command includes the file ORANGES.DAT in the Program
Editor window:
include myfile
See Also
3 “INCLUDE Command” in the Base SAS Software section in SAS Help and
Documentation
3 “Identifying External Files to SAS” on page 173
3 “Default File Types” on page 177
RESHOW Command
Redisplays the windows that are currently displayed
OpenVMS specifics:
keyboard equivalent
Syntax
RESHOW
Details
If your session is interrupted, by a message from the operating environment for
example, the RESHOW command redisplays the windows that were displayed before
the interruption.
264
TOOLCLOSE Command
4
Chapter 12
See Also
3 “RESHOW Command” in the Base SAS Software section in SAS Help and
Documentation
TOOLCLOSE Command
Closes the toolbox in the active window
OpenVMS specifics:
All aspects are host-specific
Syntax
TOOLCLOSE
Details
Use the TOOLCLOSE command to close the toolbox in the active window.
TOOLEDIT Command
Opens the specified toolbox entry for editing
OpenVMS specifics:
All aspects are host-specific
Syntax
TOOLEDIT <library.catalog.entry>
no argument
edits the toolbox for the active window.
library.catalog.entry
specifies the toolbox entry that you want to edit.
Details
If you do not specify an entry name, the Tool Editor opens the toolbox for the active
window. You can then make changes to the toolbox.
TOOLLARGE Command
Toggles the size of the buttons in the toolbox
Commands under OpenVMS
OpenVMS specifics:
4
TOOLLOAD Command
265
All aspects are host-specific
Syntax
TOOLLARGE <ON | OFF>
no argument
toggles the size of the toolbox.
ON
sets the size of the buttons in the toolbox to 48x48 pixels.
OFF
sets the size of the buttons in the toolbox to 24x24 pixels.
Details
If you do not specify ON or OFF, the TOOLLARGE command toggles the size of the
toolbox. The size of the toolbox changes for your current session only; the new size is
not saved.
To change the size of the toolbox in the active window, select the Tools menu, select
Options, and then select Preferences. This opens the Preferences dialog box. Select
the ToolBox tab, and select Use large tools. If you change the size of the toolbox
through the Preferences dialog box, the new size is saved, and SAS will display the
large toolbox in subsequent sessions.
TOOLLOAD Command
Loads the specified toolbox
OpenVMS specifics:
All aspects are host-specific
Syntax
TOOLLOAD < library.catalog.entry>
no argument
loads the toolbox for the active window.
library.catalog.entry
specifies the catalog entry to load.
Details
If you do not specify a catalog entry, the TOOLLOAD command loads the toolbox for the
active window. After this command is processed, the specified toolbox is the active
toolbox.
266
TOOLTIPS Command
4
Chapter 12
TOOLTIPS Command
Toggles the tool-tip text for an icon on and off
OpenVMS specifics:
All aspects are host-specific
Syntax
TOOLTIPS <ON | OFF>
no argument
toggles the tool-tip text on and off.
ON
specifies that the tool-tip text is displayed when you move the cursor over an icon in
the toolbox.
OFF
specifies that the tool-tip text is not displayed.
Details
The TOOLTIPS command specifies whether the tool-tip text is displayed when you
move the cursor over an icon in the toolbox. If you do not specify either ON or OFF, the
TOOLTIPS command toggles the text on and off, depending on the current setting.
See Also
3 “Changing an Existing Tool” on page 90
TPU Command
Starts a session of the TPU Editor
OpenVMS specifics:
all aspects are host-specific
Syntax
TPU
TPU
opens a session of the TPU Editor.
Details
The TPU command enables you to use the OpenVMS Text Processing Utility (TPU)
Editor for editing instead of the default SAS Text Editor.
Commands under OpenVMS
4
UNDO Command
267
The command initiates a session of the TPU Editor. When this session begins, the
TPU window displays the contents of the window from which it was invoked, and the
name of the window is displayed on the TPU status line. You can then edit the
window’s contents.
3 If you have write access to the window (such as the Program Editor window), then
you can save the changes that you make during the TPU session to the window
when you exit from the editor, or you can save the changes to an external file.
3 If you have only read access to the window, then a message on the message line of
the TPU window alerts you to this fact. When you exit from the editor, you can
save your changes to an external file, but you cannot save them to the window.
Special text attributes such as color or highlighting are lost during a TPU editing
session. Therefore, when you issue the TPU command from a window that contains text
with these attributes, a dialog box appears that enables you either to continue or abort
the TPU command.
To suppress this warning, issue the HEATTR OFF command from the window’s
command line before you invoke TPU. Text attributes will then be deleted without
warning. To redisplay the warning message, issue the HEATTR ON command from the
window command line, and then issue the TPU command.
When you have finished editing in a TPU session, do one of the following:
3 To save the changes to the window, use the CTRL+Z key sequence or type EXIT at
the TPU command prompt.
3 To discard the changes you made, type QUIT at the TPU command prompt.
3 To save the contents of the window to an external file, use the standard TPU
commands. Then use the CTRL+Z command or the QUIT command, depending on
whether you also want to save the changes to the window.
You can undo any changes you made to the window text during that session by
issuing the UNDO command from the window command line.
Note: The SAS Session Manager, xsassm, must be running in order for the TPU
command to work. 4
UNDO Command
Undoes one line of text entry
OpenVMS specifics:
command behavior
Syntax
UNDO
Details
The UNDO command is a SAS Text-Editor command.
Under OpenVMS, executing the UNDO command once undoes one line of text entry.
For example, suppose you have entered three lines of text. You must issue the UNDO
command three times to undo all three lines.
268
WBROWSE Command
4
Chapter 12
See Also
3 “UNDO Command” in the Base SAS Software section in SAS Help and
Documentation
WBROWSE Command
Invokes a World Wide Web browser
OpenVMS specifics:
All aspects are host-specific
Syntax
WBROWSE <“URL”>
no argument
invokes the Web browser specified by the X resource.
“URL”
specifies a URL (Uniform Resource Locator), which contains the server and path
information needed to find a document on the Internet or on a local intranet. The
value for URL must be enclosed in double quotation marks.
Details
By default, the WBROWSE command invokes the Web browser that is specified by the X
resource SAS.helpBrowser. If you specify a URL, the document that the URL identifies
is displayed instead. Note that you must enclose the URL in double quotation marks.
See Also
3 “Miscellaneous Resources under OpenVMS” on page 120 for more information
about the SAS.helpBrowser resource
WCOPY Command
Copies the marked contents of the active window to the default buffer
OpenVMS specifics:
Syntax
WCOPY
All aspects are host-specific
Commands under OpenVMS
4
WUNDO Command
Details
The WCOPY command is a SAS Text-Editor command.
If the active window is a Base SAS window, SAS issues the STORE command.
WCUT Command
Moves the marked contents of the active window to the default buffer
OpenVMS specifics:
All aspects are host-specific
Syntax
WCUT
Details
The WCUT command is a SAS Text-Editor command.
If the active window is a Base SAS window, SAS issues the CUT command.
WPASTE Command
Pastes the contents of the default buffer into the active window
OpenVMS specifics:
All aspects are host-specific
Syntax
WPASTE
Details
The WPASTE command is a SAS Text-Editor command.
If the active window is a Base SAS window, SAS issues the PASTE command.
WUNDO Command
Undoes one line of text entry
OpenVMS specifics:
All aspects are host-specific
269
270
X Command
4
Chapter 12
Syntax
WUNDO
Details
The WUNDO command is a SAS Text-Editor command.
If the active window is a Base SAS window, SAS issues the UNDO command. If the
active window is a SAS/GRAPH window, WUNDO is not a valid command.
Under OpenVMS, executing the WUNDO command once undoes one line of text
entry. For example, suppose you have entered three lines of text. You must issue the
WUNDO command three times to undo all three lines.
X Command
Enters host-system mode or enables you to submit a DCL command without ending your SAS
session
OpenVMS specifics:
valid values for DCL-command; syntax
Syntax
X < ’>DCL-command<’>
DCL-command
specifies the DCL command that you want to execute. If SAS recognizes the value for
DCL-command as a valid DCL command, then no quotation marks are needed.
However, code is easier to read if quotation marks appear around the DCL commands.
Details
This form of the X command issues one DCL command. The DCL command is passed to
the operating environment and executed. If errors occur, the appropriate error
messages are displayed.
The VMS command element limit is 256 characters. Any DCL command that is
greater than 256 characters will be broken up and sent to the operating system in
chunks less than or equal to 256 characters. Breaks will occur on the following
characters:
3 forward slash (/)
3 hyphen (-)
3 space
3 quotation marks (“).
Note: If the DCL command is longer than 256 characters, then SAS will be unable
to verify whether the DCL command should be executed in the parent process. All DCL
commands greater than 256 characters will always be executed in a subprocess. 4
Commands under OpenVMS
4
Function-Key Commands
271
See Also
3 “X Command” in the Base SAS Software section in SAS Help and Documentation
3 “Issuing DCL Commands during a SAS Session” on page 43
Function-Key Commands
SAS under OpenVMS provides many windowing environment commands in addition
to those that are documented in the Base SAS Software section in SAS Help and
Documentation. These host-specific commands are described in Table 12.1 on page 271.
Before you use these commands, be aware of several special considerations:
3 Each of these commands is the only definition for a function key; that is, the
command cannot be combined with any other command. For example, the
following is a valid key definition:
PF1
CURSORUP
The following key definitions are not valid:
PF1
HOME; CURSORUP
PF2
CURSORUP; CURSORUP
3 You cannot specify any of these commands in the DM statement.
3 You cannot enter any of these commands on a command line except where noted in
the description.
If you use one of these commands incorrectly, you receive a message that the given
use is not supported.
Table 12.1
Host-Specific Windowing Commands Under OpenVMS
Command
Description
CHINSERT
Toggles insert mode.
CURSORDOWN
Moves the cursor down.
CURSORLEFT
Moves the cursor left.
CURSORRIGHT
Moves the cursor right.
CURSORUP
Moves the cursor up.
DELCHAR
Deletes the character at the cursor location.
DELLINE
Deletes all characters on the current line.
DELPCHAR
Deletes the character to the left of the cursor.
DELTOEOL
Deletes all characters to the end of the line.
DELWORD
Deletes the word under the cursor.
KP_APPLICATION
See KP_NUMERIC.
KP_NUMERIC
Puts the application keypad into numeric mode. Numeric mode is convenient to use in
data entry where numbers are involved. The KP_APPLICATION command returns the
keypad to application mode, so that the keypad keys resume their functionality listed in
the KEYS window. You can issue this command from the command line.
MOVEBOL
Moves to the beginning of the line.
272
Host-Specific Frames of the Form Window
4
Chapter 12
Command
Description
MOVEEOL
Moves to the end of the line.
NEWLINE
If there is a command on the command line, NEWLINE executes it; otherwise, the cursor
moves to the beginning of the next line (equivalent to a carriage return).
NEXTFIELD
Moves to the next field. This command does not move the cursor from the command line;
use the HOME (CTRL-F) command to move from the command line.
NEXTWORD
Moves to the next word.
PREVFIELD
Moves to the previous field. This command does not move the cursor from the command
line; use the HOME (CTRL-F) command to move from the command line.
PREVWORD
Moves to the previous word.
Host-Specific Frames of the Form Window
The FSFORM command activates a series of window frames collectively called the
Form window, which enables you to specify the printer, text format, and destination for
your output. This capability is useful when you issue the PRINT command and when
you print from SAS/AF and SAS/FSP procedure output. This section describes the
frames of the Form window that are specific to OpenVMS. For information about other
Form window frames, see Chapter 8, “Routing the SAS Log and SAS Procedure
Output,” on page 195 and the FSFORM command in the Base SAS Software section in
SAS Help and Documentation.)
To invoke the Form window, issue the following command:
FSFORM form-name.FORM
The first frame that you see after issuing the FSFORM command is the Printer
Selection window. This window enables you to specify which printer you want to use.
The following display shows the default information for this window under OpenVMS.
Display 12.1
Printer Selection Window
Commands under OpenVMS
4
OpenVMS Print File Parameters Window Frame
273
Note: The information in the Printer Selection window is also site-dependent, so
your window might look slightly different. 4
The Printer Selection window appears only the first time you create a print form.
After you modify a form, it is stored in your SASUSER.PROFILE catalog (entry type
FORM).
The next time you modify this form, the Printer Selection window is skipped. You
cannot return to the Printer Selection window from the second Form window frame.
The third Form window frame is also host-specific. This frame has two parts: the
OpenVMS Print File Parameters window frame and the OpenVMS Job and Page
Definitions window frame.
Note: The information in these window frames is site-dependent, so your window
frames might look slightly different from those shown in Display 12.2 on page 273 and
Display 12.3 on page 275. 4
OpenVMS Print File Parameters Window Frame
The first part of the third Form window is the OpenVMS Print File Parameters
window frame (shown in the following display). The OpenVMS print file parameters
displayed in this window frame are the same parameters that you would use in an
OpenVMS PRINT command. This window frame provides field-specific help. To receive
help on a field, place your cursor on that field and press the HELP function key. In
addition to the help given in this window, you can also request help on the PRINT
command by using the OpenVMS Help Facility.
Display 12.2
OpenVMS Print File Parameters Window Frame
The following fields appear in the OpenVMS Print File Parameters window frame:
Printer queue
sends output to the specified queue. If no queue is specified, the default is
SYS$PRINT. Filling in this field is equivalent to using the QUEUE= option in the
OpenVMS PRINT command. Do not include quotation marks in the queue
specification. The value can contain up to 31 characters.
274
OpenVMS Print File Parameters Window Frame
4
Chapter 12
Job name
specifies the output name. The name is specified using 1 to 39 alphanumeric
characters. The default is the name of the file being submitted. Filling in this field
is equivalent to using the NAME= option in the OpenVMS PRINT command,
except that the job name cannot contain any spaces or quotation marks.
Issuing the SHOW QUEUE command from the DCL prompt displays the job
name. The job name is also printed on the flag page for the output.
Number of copies
specifies the number of copies of the output that you want to receive. The number
of copies defaults to 1, but it can be specified from 1 to 255. Filling in this field is
equivalent to using the COPIES= option in the OpenVMS PRINT command.
Job characteristics
specifies one or more characteristics, separated by commas, for your output. The
list of characteristics cannot contain any spaces. For example, you can specify the
following:
LOWER,DOUBLE
Job characteristics are site- and printer-specific; see your system manager for
information on what characteristics are available for your printers. Filling in this
field is equivalent to using the CHARACTERISTICS= option in the OpenVMS
PRINT command, except that the specification might not include parentheses or
quotation marks.
Parameters
specifies one or more parameters, separated by commas, for your output. The list
of parameters cannot contain any spaces. These parameters are site-specific; see
your system manager for information about what parameters are available. Filling
in this field is equivalent to using the PARAMETERS= option in the OpenVMS
PRINT command, except that the specification cannot include parentheses or
quotation marks. You can specify up to eight parameters.
Date/time for print
can be used to hold the output until the date and time specified. Use absolute date
and time to specify the day and time the output is printed. (That is, specify 12:00,
not “3 hours from now.”) Enter values from left to right. You do not need to fill in
each field, but each field to the left of one that is entered must be filled in. Filling
in this field is equivalent to using the AFTER= option in the OpenVMS PRINT
command, except that the date and time specification cannot include quotation
marks.
Job termination parameters:
Do not notify when done
specifies whether you are notified when the output has been printed. By
default, you are notified when your job is finished. Filling in this field is
equivalent to using the NOTIFY= option in the OpenVMS PRINT command.
Do not restart
specifies whether to restart the printing of the output when a crash occurs or
if a stop/requeue command is issued. By default, jobs are restarted. This field
is equivalent to using the RESTART= option in the OpenVMS PRINT
command.
Commands under OpenVMS
4
OpenVMS Job and Page Definitions Window Frame
275
OpenVMS Job and Page Definitions Window Frame
The second part of the third Form window frame is the OpenVMS Job and Page
Definitions window frame. This window frame is shown in the following display. You
display this window frame by placing the cursor on the SELECT field at the bottom of
the OpenVMS Print File Parameters window frame (described in “OpenVMS Print File
Parameters Window Frame” on page 273) and pressing RETURN.
Display 12.3
OpenVMS Job and Page Definitions Window
The following fields appear in the OpenVMS Job and Page Definitions window frame:
Print form name:
specifies the name of the form that is used for the print queue. Filling in this field
is equivalent to using the FORM= option in the OpenVMS PRINT command.
These forms are site-dependent. See your system manager for information about
which forms are available.
Flag page message:
specifies the message to be printed on the flag page. Filling in this field is
equivalent to using the NOTE= option in the OpenVMS PRINT command, except
that the message cannot contain any spaces or quotation marks.
Job definition parameters
Print flag page
controls whether a flag page is printed before the output. The flag page
displays the name of the user submitting the output and other information
about the output being printed. By default, no flag page is printed. Filling in
this field is equivalent to using the FLAG= option in the OpenVMS PRINT
command.
276
OpenVMS Job and Page Definitions Window Frame
4
Chapter 12
Print burst page
specifies whether a flag page is printed over the perforation in the paper so
that the output is easily identified. By default, no burst page is printed.
Filling in this field is equivalent to using the BURST= option in the
OpenVMS PRINT command.
Print trailer page
specifies whether to print a trailer page at the end of the output. The trailer
page has the name of the user submitting the output and other information
about the output being printed. By default, no trailer page is printed. Filling
in this field is equivalent to using the TRAILER= option in the OpenVMS
PRINT command.
Passall
specifies whether all formatting is bypassed and sent to the printer with
formatting suppressed. By default, formatting is used. Filling in this field is
equivalent to using the PASSALL= option in the OpenVMS PRINT command.
Page definition parameters
Form feed
specifies whether form feeds occur within the last four lines of the page when
printing is taking place. By default, no form feeds are performed. Filling in
this field is equivalent to using the FEED= option in the OpenVMS PRINT
command.
Double space
specifies whether to double-space the output. By default, the output is
single-spaced. Filling in this field is equivalent to using the SPACE= option
in the OpenVMS PRINT command.
Title each page
specifies whether to print a title on each page of output. By default, no titles
are printed. Filling in this field is equivalent to using the HEADER= option
in the OpenVMS PRINT command.
277
CHAPTER
13
Data Set Options under
OpenVMS
SAS Data Set Options under OpenVMS 277
Specifying Data Set Options 277
Option Syntax 278
Summary Table of SAS Data Set Options under OpenVMS 278
Data Set Options That Are Not Applicable Under OpenVMS
Dictionary 282
ALQ= Data Set Option 282
ALQMULT= Data Set Option 283
BKS= Data Set Option 284
BUFSIZE= Data Set Option 285
CACHENUM= Data Set Option 286
CACHESIZE= Data Set Option 287
CNTLLEV= Data Set Option 288
DEQ= Data Set Option 289
DEQMULT= Data Set Option 290
FILECLOSE= Data Set Option 291
LOCKREAD= Data Set Option 292
LOCKWAIT= Data Set Option 293
MBF= Data Set Option 293
OUTREP= Data Set Option 294
WORKCACHE= Data Set Option 295
282
SAS Data Set Options under OpenVMS
SAS data set options control certain aspects of your SAS session, including the
attributes of SAS files and data libraries.
Most SAS data set options are completely described in SAS Language Reference:
Dictionary. Only the data set options that are specific to the OpenVMS operating
environment are documented here. However, all the SAS data set options that are
available under OpenVMS are listed in “Summary Table of SAS Data Set Options
under OpenVMS” on page 278.
Specifying Data Set Options
Data set options can be specified in parentheses following a data set name. Each
option applies only to the SAS data set whose name it follows. RENAME= and KEEP=
are examples of SAS data set options.
278
4
Option Syntax
Chapter 13
Some data set options can also be specified as engine or host options in the
LIBNAME statement or function.
When one such option appears in a LIBNAME statement or function, it affects all
data sets in that SAS data library. If the same option is specified both in the LIBNAME
statement or function and after a data set name, SAS uses the value given after the
data set name. For more information about the LIBNAME statement and about engine
or host options, see “LIBNAME Statement” on page 420.
Some SAS data set options have the same effect (and usually the same name) as
system or statement options. For example, the BUFSIZE= data set option is analogous
to the BUFSIZE= system option. In the case of overlapping options, SAS uses the
following rules of precedence:
3 data set option values (highest precedence)
3 statement option values (precedence over system options)
3 system option values (precedence over default values)
3 default values (lowest precedence).
For more information about SAS system options under OpenVMS, see Chapter 19,
“System Options under OpenVMS,” on page 429.
Option Syntax
When you specify a data set option, use the following syntax:
data-set-name (option-1 = value-1 option-2 = value-2)
For those options that are valid as engine or host options in the LIBNAME
statement or function, use the following syntax:
LIBNAME libref <engine> ’SAS-data-library’ option-1=value-1 option-2=value-2 ...;
Remember that not all data set options are valid as engine or host options. Also keep
in mind that it is usually better to specify an engine in the LIBNAME statement than
to let SAS determine which engine to use. This is important when you specify an
engine or host option that is supported by two engines (for example, the ALQ= data set
option) but which behaves differently in each context.
Summary Table of SAS Data Set Options under OpenVMS
The following table lists both the data set options that are valid in all operating
environments and the data set options that are specific to OpenVMS. It describes each
option and tells whether the option can be used for a data set that has been opened for
input, output, or update. The See column tells you where to look for more detailed
information about an option. Use the following legend to see where to find more
information about an option.
COMP
See the description of the data set option in this section.
LR
See SAS Language Reference: Dictionary.
NLS
See SAS National Language Support (NLS): User’s Guide.
The table also lists the engines with which the option is valid.
Data Set Options under OpenVMS
Table 13.1
4
Summary Table of SAS Data Set Options under OpenVMS
Summary of SAS Data Set Options
Data Set Option
Description
Where Used
Engines
See
ALQ=
specifies the allocation quantity for a data set
output
V9, V8,
V7,
CONCUR
COMP
ALQMULT=
specifies the multiple of pages allocated for a
data set
output
V9, V8,
V7,
CONCUR
COMP
ALTER=
assigns an alter password to a SAS file and
enables access to a password-protected SAS file
input, output,
update
V9, V8,
V7, V6,
V9TAPE,
V8TAPE,
V7TAPE,
CONCUR
LR
BKS=
specifies the bucket size for a data set
output
CONCUR
COMP
BUFNO=
specifies the number of buffers for processing a
SAS data set
input, output,
update
V9, V8,
V7, V6,
V9TAPE,
V8TAPE,
V7TAPE
LR
BUFSIZE=
specifies permanent buffer page size for output
SAS data sets
output
V9, V8,
V7,
V9TAPE,
V8TAPE,
V7TAPE
LR,
COMP
CACHENUM=
specifies the number of I/O data caches
input, output,
update
V9, V8,
V7, V6
COMP
CACHESIZE=
specifies the size of each I/O data cache
allocated for a file
input, output,
update
V9, V8,
V7, V6
COMP
CNTLLEV=
specifies the level of shared access to SAS data
sets
input, update
V9, V8,
V7,
CONCUR
LR,
COMP
COMPRESS=
compresses observations in an output SAS data
set
output
V9, V8,
V7, V6,
V9TAPE,
V8TAPE,
V7TAPE
LR
DEQ=
specifies the default file-extension quantity for
a data set
output, update
V9, V8,
V7,
CONCUR
COMP
DEQMULT=
specifies the number of pages to extend
output, update
V9, V8,
V7,
CONCUR
COMP
DLDMGACTION=
specifies what type of action to take when a
SAS catalog in a SAS data library is detected
as damaged
input, output,
update
V9, V8,
V7,
LR
279
280
Summary Table of SAS Data Set Options under OpenVMS
4
Chapter 13
Data Set Option
Description
Where Used
Engines
See
DROP=
excludes variables from processing or from
output SAS data sets
input, output,
update
all
LR
ENCODING=
specifies the character-set encoding to use for
processing a particular input or output SAS
data set
input, output
V9, V8,
V7,
V9TAPE,
V8TAPE,
V7TAPE
NLS
ENCRYPT=
encrypts SAS data files
output
V9, V8, V7
LR
FILECLOSE=
specifies how a tape is positioned when a SAS
file on the tape is closed
input, output
V9TAPE,
V8TAPE,
V7TAPE
LR,
COMP
FIRSTOBS=
begins processing at a specified observation
input, update
all
LR
IDXNAME=
directs SAS to use a specific index to satisfy the
conditions of a WHERE expression
input, update
V9, V8,
V7, V6
LR
IDXWHERE=
overrides the SAS decision about whether to
use an index to satisfy the conditions of a
WHERE expression
input, update
V9, V8,
V7, V6
LR
IN=
creates a variable that indicates whether a data
set contributed data to the current observation
input
all
LR
INDEX=
defines indexes when creating a SAS data set
input, output,
update
V9, V8,
V7, V6,
V9TAPE,
V8TAPE,
V7TAPE
LR
KEEP=
specifies variables for processing or writing to
output SAS data sets
input, output,
update
all
LR
LABEL=
specifies a label for a data set
input, output,
update
all
LR
LOCKREAD=
specifies whether to read a record if a lock
cannot be obtained for the record
input
CONCUR
COMP
LOCKWAIT=
indicates whether SAS should wait for a locked
record
input
CONCUR
COMP
MBF=
specifies the multibuffer count for a data set
input, output,
update
CONCUR
COMP
OBS=
specifies the last observation of a data set to
process
input, update
all
LR
OBSBUF=
determines the size of the view buffer for
processing a DATA step view
input
V9, V8, V7
LR
OUTREP=
specifies the data representation for the output
SAS data set
output
V9, V8,
V7,
V9TAPE,
V8TAPE,
V7TAPE
COMP
Data Set Options under OpenVMS
4
Summary Table of SAS Data Set Options under OpenVMS
Data Set Option
Description
Where Used
Engines
See
POINTOBS=
controls whether or not a compressed data set
is processed by random access rather than by
sequential access only
input
V9, V8, V7
LR
PW=
assigns a read, write, or alter password to a
SAS file and enables access to a
password-protected SAS file
input, output,
update
V9, V8,
V7, V6,
V9TAPE,
V8TAPE,
V7TAPE,
CONCUR
LR
PWREQ=
controls the pop-up menu of a requestor
window for a data set password
input, output,
update
V9, V8,
V7, V6,
V9TAPE,
V8TAPE,
V7TAPE
LR
READ=
assigns a read password to a SAS file and
enables access to a read-protected SAS file
input, output,
update
V9, V8,
V7, V6,
V9TAPE,
V8TAPE,
V7TAPE,
CONCUR
LR
RENAME=
changes the name of a variable
input, output,
update
all
LR
REPEMPTY=
replaces an existing data set with a new data
set of the same name
output
V9, V8, V7
LR
REPLACE=
controls replacement of like-named temporary
or permanent SAS data sets
output
all
LR
REUSE=
specifies reuse of space when observations are
added to a compressed data set
output
V9, V8, V7
LR
SORTEDBY=
specifies how the data set is currently sorted
input, output,
update
V9, V8,
V7, V6,
V9TAPE,
V8TAPE,
V7TAPE
LR
SORTSEQ=
specifies the collating sequence to be used by
the SORT procedure
input, output,
update
V9, V8, V7
NLS
SPILL=
specifies whether to create a spill for
non-sequential processing of a DATA step view
output
V9, V8, V7
LR
TOBSNO=
specifies the number of observations to be
transmitted in each multi-observation exchange
with a SAS server
input, output,
update
V9, V8, V7
LR
TYPE=
specifies the data set type for input, update,
and output data
input, output,
update
all
LR
WHERE=
selects observations that meet the specified
condition
input, output,
update
all
LR
WHEREUP=
specifies whether to evaluate added
observations and modified observations against
a WHERE clause
output, update
V9, V8,
V7, V6
LR
281
282
Data Set Options That Are Not Applicable Under OpenVMS
4
Chapter 13
Data Set Option
Description
Where Used
Engines
See
WORKCACHE=
specifies the size of the I/O data cache allocated
for a file in the WORK data library
input, output,
update
V9, V8, V7
COMP
WRITE=
assigns a write password to a SAS file and
enables access to a write-protected SAS file
input, output,
update
V9, V8,
V7, V6,
V9TAPE,
V8TAPE,
V7TAPE,
CONCUR
LR
Data Set Options That Are Not Applicable Under OpenVMS
The following SAS data set options are not applicable under OpenVMS:
3 RDBLOCK=
3 RDBCONST=
Dictionary
ALQ= Data Set Option
Specifies how many disk blocks to initially allocate to a new SAS data set
Default:
enough blocks for 10 data set pages
Valid in:
DATA step and PROC steps
Category:
Data Set Control
Engines: V9, V8, V7, CONCUR
OpenVMS specifics:
All aspects are host-specific
Syntax
ALQ=allocation-quantity
allocation-quantity
can range from 0 to 2,147,483,647 blocks. (A block is 512 bytes.) The default value is
enough space for 10 pages. If you specify ALQ=0 with the V6 or V8 engine,
OpenVMS uses the minimum number of blocks that are required for a sequential file.
If you specify ALQ=0 with the CONCUR engine, OpenVMS uses the minimum
number of blocks that are required for a relative file. OpenVMS RMS always rounds
the ALQ= value up to the next disk cluster boundary.
Details
The ALQ= data set option is often used with the BUFSIZE= and DEQ= data set options
to control buffer size and disk allocation for more efficient I/O. For example, if an
Data Set Options under OpenVMS
4
ALQMULT= Data Set Option
283
application processes a large SAS data set sequentially, it might be more efficient to use
option values like the following:
data mylib.a(bufsize=16384 alq=300 deq=96);
. . . more data lines . . .
run;
These statements tell SAS to use a buffer size of 16,384 bytes for data set I/O and to
allocate 300 disk blocks to the file initially; when more space is needed, it is allocated in
96-block chunks. This potentially reduces the number of file extensions required for the
file. Unused disk blocks are deallocated and freed to the file system at close time. This
reduces the number of times a file must be extended, potentially creates a more
contiguous file, and reduces subsequent access time.
The order of precedence (from highest to lowest) for specifying initial-allocation
values and file-extension values is
1 an ALQ= or DEQ= data set option specified for a specific data set
2 an ALQ= or DEQ= data set option specified in a LIBNAME statement or function
3 system default values.
The ALQ= data set option also corresponds to the FAB$L_ALQ field in the OpenVMS
RMS structure. For information about the FAB$L_ALQ field, see Guide to OpenVMS File
Applications.
See Also
3
3
3
3
3
3
“ALQMULT= Data Set Option” on page 283
“BUFSIZE= Data Set Option” on page 285
“DEQ= Data Set Option” on page 289
“DEQMULT= Data Set Option” on page 290
“Allocating Data Set Space Appropriately” on page 236
“Allocating File Space Appropriately” on page 241
ALQMULT= Data Set Option
Specifies the number of pages that are preallocated to a file
10
Valid in: DATA step and PROC steps
Category: Data Set Control
Engines: V9, V8, V7, CONCUR
OpenVMS specifics: All aspects are host-specific
Default:
Syntax
ALQMULT=n
n
specifies the number of pages that are allocated for a file. The default value is 10.
284
BKS= Data Set Option
4
Chapter 13
Details
The ALQMULT= data set option is related to the ALQ= data set option. With the ALQ=
data set option, you specify a block value that is preallocated. With the ALQMULT=
data set option, enough blocks are preallocated to accommodate the number of pages
that you specify. With the ALQMULT= data set option you don’t need to know how big
the page size (buffer size) is for a file or to determine how many blocks are needed for
the desired number of pages.
See Also
3
3
3
3
“ALQ= Data Set Option” on page 282
“BUFSIZE= Data Set Option” on page 285
“DEQMULT= Data Set Option” on page 290
“ALQMULT= System Option” on page 443
BKS= Data Set Option
Specifies the bucket size for a new data set
32
Valid in: DATA step and PROC steps
Category: Data Set Control
Engines: CONCUR
OpenVMS specifics: All aspects are host-specific
Default:
Syntax
BKS=bucket-size
bucket-size
can range from 0 to 63. If you specify a value of 0, SAS uses the minimum number of
blocks that are needed to contain a single observation.
Details
The BKS= data set option specifies the number of OpenVMS disk blocks in each bucket
of a new data set. A disk block is 512 bytes. A bucket is a storage structure of a set
number of blocks used for building and processing files of relative and indexed
organization. A bucket contains one or more records or record cells. Buckets are the
unit of contiguous transfer between RMS buffers and the disk.
The BKS= data set option is applied only when the data set is created. When
deciding on the bucket size to use, consider whether the file will be accessed randomly
(small bucket size), sequentially (large bucket size), or both ways (medium bucket size).
For example, if you know that all the files in a SAS data library will be accessed
randomly, by using the FSEDIT procedure for example, then use a small bucket size at
the creation of each file to optimize the access. The following example uses the BKS=
option in the LIBNAME statement so that the bucket size applies to all CONCUR data
sets in that library:
Data Set Options under OpenVMS
4
BUFSIZE= Data Set Option
285
libname test concur ’[randomdir]’ bks=30;
The BKS= data set option corresponds to the FAB$B_BKS field in OpenVMS RMS or
to the FILE BUCKET_SIZE attribute when you use File Definition Language (FDL).
For additional details, see Guide to OpenVMS File Applications.
See Also
3 “The CONCUR Engine under OpenVMS” on page 160
BUFSIZE= Data Set Option
Specifies the permanent buffer page size for an output SAS data set
Default:
none
Valid in:
DATA step and PROC steps
Category: Data Set Control
Engines: V9, V8, V7, V9TAPE, V8TAPE, V7TAPE
OpenVMS specifics:
See:
the value of n
BUFSIZE= Data Set Option in SAS Language Reference: Dictionary
Syntax
BUFSIZE=n | nK | nM | nG | hexX | MAX
n | nK | nM | nG
specifies the page size in multiples of 1 (bytes); 1,024 (kilobytes); 1,048,576
(megabytes); or 1,073,741,824 (gigabytes). For example a value of 4k specifies a page
size of 4096 bytes.
Note: When you specify n, the value should be in increments of 512. However,
the n in nK, nM, and nG does not need to be in increments of 512. 4
hexX
specifies the page size as a hexadecimal value. You must specify the value beginning
with a number (0–9), followed by hex digits (0–9, A-F), and then followed by an X.
For example, 2dx sets the page size to 45 bytes.
MAX
sets the buffer page size to the maximum possible number in your operating
31
environment, up to the largest four-byte, signed integer, which is 2 -1, or
approximately 2 billion bytes.
Details
The BUFSIZE= data set option specifies the page size (in bytes) for SAS files. A page of
a data set is a logical unit that is used by the engine. The page size is a permanent
attribute of the data set. The page size is set when the file is created and cannot be
changed thereafter. There is no default value; the value that the engine uses depends
on the size of the observation.
286
CACHENUM= Data Set Option
4
Chapter 13
For efficiency, use a larger BUFSIZE= value because it reduces the number of I/Os
required to read or write the file. However, if the value is too large, disk space could be
wasted. Pages must be written in full, even if they are only partially full of data. This
means that if you set BUFSIZE= to a large value, 65,536 for example, and the last page
contains only 4,000 bytes of data, more than 61,000 bytes of unused storage are written
to disk, consuming approximately 120 disk blocks unnecessarily.
The system-dependent CACHESIZE= data set option is related to the BUFSIZE=
data set option and can improve I/O performance without wasting disk space. For
information about using the CACHESIZE= and BUFSIZE= options together, see
“CACHESIZE= Data Set Option” on page 287.
See Also
3 “CACHESIZE= Data Set Option” on page 287
3 “Setting Larger Buffer Size for Sequential Write and Read Operations” on page 238
3 “BUFSIZE= System Option” on page 448
CACHENUM= Data Set Option
Specifies the number of I/O data caches used per SAS file
Default:
10
Valid in:
DATA step and PROC steps
Category:
Data Set Control
Engines: V9, V8, V7, V6
OpenVMS specifics:
All aspects are host-specific
Syntax
CACHENUM=n
n
specifies the number of I/O data-cache pages to be used per SAS file. The default
value is 10.
Details
The CACHENUM= data set option operates in conjunction with the CACHESIZE= data
set option. Pages are cached in memory in a buffer that is the size of the CACHESIZE=
value. SAS maintains up to the CACHENUM= value of these caches for each open file.
See Also
3 “CACHESIZE= Data Set Option” on page 287
3 “CACHENUM= System Option” on page 449
Data Set Options under OpenVMS
4
CACHESIZE= Data Set Option
287
CACHESIZE= Data Set Option
Controls the size of the I/O data cache that is allocated for a SAS file
65024
Valid in: DATA step and PROC steps
Category: Data Set Control
Engines: V9, V8, V7, V6
OpenVMS specifics: All aspects are host-specific
Default:
Syntax
CACHESIZE=n | nK | hexX | MIN | MAX
n | nK
specifies the cache size in multiples of 1 (bytes) or 1,024 (kilobytes). For example, a
value of 8 specifies 8 bytes, and a value of 3k specifies 3,072 bytes.
This value can range from 0 to 65,024 bytes on OpenVMS Alpha before Release
7.2. The cache size can range from 0 to 130,048 bytes on OpenVMS Alpha Release
7.2 or later.
hexX
specifies the cache size as a hexadecimal value. You must specify the value beginning
with a number (0–9), followed by hex digits (0–9, A-F), and then followed by an X.
For example, the value 2dx sets the cache size to 45 bytes.
MIN
sets the cache size to 0.
MAX
sets the cache size for your operating environment. MAX is 65,024 bytes on OpenVMS
Alpha before Release 7.2 and 130,048 bytes on OpenVMS Alpha Release 7.2 or later.
Details
Pages of SAS files are cached in memory with each cache containing multiple pages.
The CACHESIZE= data set option controls the size (in bytes) of the data cache used to
buffer the I/O pages. Note that memory is consumed for each data cache, and multiple
caches are used for each data set opened. Thus, the disadvantage of specifying
extremely large CACHESIZE= values is large consumption of memory. The advantage
of a larger CACHESIZE= value is that it reduces the actual number of disk I/Os
required to read from or write to a file. For example, if you are reading a large data set,
you can use the following statements:
libname test v8 ’[mydir]’;
data new;
set test.big(cachesize=65024);
. . . more data lines . . .
run;
This DATA step reads the TEST.BIG data set in the most efficient manner.
If a data cache is used, then one disk I/O is the size of the CACHESIZE= value. If no
data cache is allocated, then one disk I/O is the size of the BUFSIZE= value. The size of
the page is controlled with the BUFSIZE= data set option.
288
CNTLLEV= Data Set Option
4
Chapter 13
Comparisons
The CACHESIZE= and BUFSIZE= data set options are similar, but they have important
differences. BUFSIZE= specifies the file’s page size, which is a permanent attribute of
the file. It can be set only when the file is created. CACHESIZE= is the size of the
internal memory cache that is used for the life of the current file open. It can change
any time the file is opened. Specifying a large BUFSIZE= value and CACHESIZE=0
improves I/O the same way that specifying a large CACHESIZE= value does. However,
because only complete pages can be written to the file, if the actual data requires less
space than the specified BUFSIZE= value, the file uses more disk space than necessary.
For example, if you specify BUFSIZE=65024 and CACHESIZE=0, I/O is performed in
increments of the page size. If the data actually require only 32,000 bytes of storage,
then more than half the space allocated for the file is unused. If you specify
BUFSIZE=32768 and CACHESIZE=65024, I/O is still performed in increments of
65,024 bytes. However, if the data requires only 32,000 bytes, little space is wasted.
See Also
3
3
3
3
“BUFSIZE= Data Set Option” on page 285
“CACHENUM= Data Set Option” on page 286
“Setting Larger Buffer Size for Sequential Write and Read Operations” on page 238
“CACHESIZE= System Option” on page 450
CNTLLEV= Data Set Option
Specifies the level of shared access to SAS data sets
Default:
varies
Valid in:
DATA step and PROC steps
Category:
Data Set Control
Engines: V9, V8, V7, CONCUR
OpenVMS specifics:
See:
syntax
CNTLLEV= Data Set Option in SAS Language Reference: Dictionary
Syntax
CNTLLEV=MEM | REC
MEM
specifies that concurrent access is controlled at the SAS data set (or member) level.
Member-level control restricts concurrent access to only one update or output process
but allows read access to many sessions, procedures, or statements.
REC
specifies that concurrent access is controlled at the observation (or record) level.
Record-level control allows more than one update access to the same SAS data set,
but it denies concurrent update of the same observation.
Data Set Options under OpenVMS
4
DEQ= Data Set Option
289
Details
The CNTLLEV= option specifies the level at which shared update access to a SAS data
set is denied.
With the CONCUR engine, you can request exclusive access to the file, or you can
share access with record-level locking.
By default with the concurrency engine, data sets that are opened for input allow
shared read access; data sets that are opened for output demand exclusive access; and
data sets that are opened for update either allow shared read and shared write access
or they retain exclusive access to the file, depending on the method that is used.
For example, you can allow other users both read and write access to a data set that
you are opening for input only. By default, only shared read access is allowed. To
enable record-level locking for the data set TEST.TWO, use the following statements:
libname test concur ’[mydir]’;
data test.one;
set test.two(cntllev=rec);
run;
As another example, suppose you want to both plot and update your file
simultaneously by using the FSEDIT procedure. By default, the PLOT procedure opens
a data set for exclusive access, even though it only reads the file. To allow concurrent
access, use the following statements:
libname test concur ’[mydir]’;
proc plot data=test.a(cntllev=rec);
run;
Note: The CNTLLEV= data set option is ignored for output files; output files always
retain exclusive access. 4
DEQ= Data Set Option
Tells OpenVMS how many disk blocks to add when it automatically extends a SAS data set during
a write operation
Default:
enough blocks for 5 data set pages
Valid in:
DATA step and PROC steps
Category: Data Set Control
Engines: V9, V8, V7, CONCUR
OpenVMS specifics:
All aspects are host-specific
Syntax
DEQ=default-file-extension-quantity
default-file-extension-quantity
can range from 0 to 65,535 blocks. (A block is 512 bytes.) If you specify a value of 0,
OpenVMS uses the process’s default value. The default value is enough space for 5
pages.
290
DEQMULT= Data Set Option
4
Chapter 13
Details
You should set the value to at least 10 percent of the normal data set size. A large
value results in fewer file extensions during the life of the file; a small value results in
many file extensions over the life of the file. Note that record access is slowed when a
file has many noncontiguous file extensions.
Example
Suppose you specify the DEQ= data set option as follows:
libname test ’[mydir]’;
data test.a(alq=1000 deq=1000);
. . . more data lines . . .
run;
Specifying DEQ=1000 indicates that if more space is needed for the file, that space is
allocated in 1,000-block chunks. Note that OpenVMS always rounds the DEQ= value
up to the next disk-cluster boundary.
See Also
3
3
3
3
“ALQ= Data Set Option” on page 282
“DEQMULT= Data Set Option” on page 290
“Allocating Data Set Space Appropriately” on page 236
“Allocating File Space Appropriately” on page 241
DEQMULT= Data Set Option
Specifies the number of pages to extend a SAS file
5
Valid in: DATA step and PROC steps
Category: Data Set Control
Engines: V9, V8, V7, CONCUR
Default:
OpenVMS specifics:
All aspects are host-specific
Syntax
DEQMULT=n
n
specifies the number of pages to extend a SAS file. The default value is 5.
Details
The DEQMULT= data set option controls how many pages worth of disk blocks are
added to a file each time it has to be extended. By default, enough space for 5 pages is
added.
Data Set Options under OpenVMS
4
FILECLOSE= Data Set Option
291
See Also
3
3
3
3
“ALQ= Data Set Option” on page 282
“ALQMULT= Data Set Option” on page 283
“DEQ= Data Set Option” on page 289
“DEQMULT= System Option” on page 455
FILECLOSE= Data Set Option
Specifies how a tape is positioned when a SAS file on the tape is closed
Default:
LEAVE
Valid in:
DATA step and PROC steps
Category: Miscellaneous
Engines:
V9TAPE, V8TAPE, V7TAPE
OpenVMS specifics:
See:
list of valid values
FILECLOSE= Data Set Option in SAS Language Reference: Dictionary
Syntax
FILECLOSE= FREE | LEAVE | REREAD | REWIND
FREE
rewinds and dismounts the tape when the current file is closed. Note that under
OpenVMS, the device is dismounted, not deallocated or “freed.”
LEAVE
positions the tape at the end of the file that was just processed. Use
FILECLOSE=LEAVE if you are not repeatedly accessing the same files in a SAS
program, but you are accessing one or more subsequent SAS files on the same tape.
REREAD
positions the tape volume at the beginning of the file that was just processed. Use
FILECLOSE=REREAD if you are accessing the same SAS data set on tape several
times in a SAS program.
REWIND
rewinds the tape volume to the beginning. Use the FILECLOSE=REWIND if you are
accessing one or more previous SAS files on the same tape, but you are not
repeatedly accessing the same files in a SAS program.
Details
The FILECLOSE= data set option overrides the TAPECLOSE= system option.
See Also
3 “TAPECLOSE= System Option” on page 503
292
LOCKREAD= Data Set Option
4
Chapter 13
LOCKREAD= Data Set Option
Specifies whether to read a record if a lock cannot be obtained for the record
Default:
NO
Valid in:
DATA step and PROC steps
Category:
Observation Control
Engines: CONCUR
OpenVMS specifics:
All aspects are host-specific
Syntax
LOCKREAD=YES | NO
YES
indicates that the record must be locked when read. If another process already has
the record locked, the read operation fails, and you receive a message that the record
is locked by another process.
NO
indicates that records do not have to be locked when they are read. If another
process already has the record locked, the data is read but is not locked by the
reading process.
Details
The LOCKREAD= data set option controls whether SAS reads a record when the record
is locked by another process. This option applies only to data sets that are accessed for
input. Examples of accessing a data set for input include using the SET statement and
the PRINT and FSBROWSE procedures. This data set option does not apply when you
are using, for example, the FSEDIT procedure, which accesses a data set for update.
If you specify LOCKREAD=YES and your job tries to access a locked record, the read
operation fails. The severity of the failure depends on your job. If you are using
FSBROWSE, and you try to move to a locked observation, a message displays saying
the observation is unavailable. However, you can still move to other observations that
are not locked. A more severe failure occurs if you are using a SET statement in the
DATA step. If the DATA step encounters a locked record, the DATA step fails, and your
data set will probably be incomplete.
CAUTION:
Use LOCKREAD=NO with care. When you specify LOCKREAD=NO, SAS reads locked
records. This can result in obsolete data being read. If you know that the data that
you are reading is changing often, do not use LOCKREAD=NO. 4
LOCKREAD= is closely related to the LOCKWAIT= data set option, which controls
whether SAS waits for a locked record to become available.
See Also
3 “LOCKWAIT= Data Set Option” on page 293
Data Set Options under OpenVMS
4
MBF= Data Set Option
293
LOCKWAIT= Data Set Option
Indicates whether SAS should wait for a locked record
NO
Valid in: DATA step and PROC steps
Category: Observation Control
Engines: CONCUR
OpenVMS specifics: All aspects are host-specific
Default:
Syntax
LOCKWAIT=YES | NO | n
YES
tells OpenVMS RMS to wait when it is requesting access to locked records. If you
specify LOCKWAIT=YES, OpenVMS RMS waits forever. Even if LOCKREAD=NO is
in effect, the record is not read.
NO
tells OpenVMS RMS not to wait for a locked record to become available. If a record
is locked and LOCKREAD=NO is in effect, SAS reads the record anyway. This can
result in obsolete data being read. If LOCKREAD=YES is in effect, the I/O request
fails.
n
tells OpenVMS RMS to wait for n seconds for a locked record. If the record becomes
available within n seconds, the record is read. If the record does not become
available and LOCKREAD=YES is in effect, the I/O request fails. If the record does
not become available and LOCKREAD=NO is in effect, the record is read even
though it is locked. Note, however, that you may read obsolete data in this case. The
value of n can range from 1 to 255.
Details
The LOCKWAIT= data set option indicates whether OpenVMS RMS should wait when
requesting access to locked records for read, write, or update access. It is used in
conjunction with the LOCKREAD= data set option.
See Also
3 “LOCKREAD= Data Set Option” on page 292
MBF= Data Set Option
Specifies the multibuffer count for a data set
2 for files opened for update; 1 for files opened for input or output
Valid in: DATA step and PROC steps
Default:
294
OUTREP= Data Set Option
4
Chapter 13
Data Set Control
Engines: CONCUR
OpenVMS specifics: All aspects are host-specific
Category:
Syntax
MBF=multibuffer-count
multibuffer-count
is the number of I/O buffers that you want OpenVMS RMS to allocate for a
particular file. The value can range from 0 to 127, and it must be an integer. If you
specify MBF=0, the process’s default value is used.
Details
A multibuffer count of 1 is adequate to process your data set sequentially. However, for
random access, it is more efficient to use more than one buffer to store various parts of
your file in memory. For example, to tell OpenVMS RMS to allocate five buffers for
every file in a data library, use the following statement:
libname test concur ’[mydir]’ mbf=5;
The MBF= data set option corresponds to the FAB$B_MBF field in OpenVMS RMS or
to the CONNECT MULTIBUFFER_COUNT attribute when you are using FDL. For
additional details about the FAB$B_MBF field, see Guide to OpenVMS File Applications.
See Also
3 “The CONCUR Engine under OpenVMS” on page 160
OUTREP= Data Set Option
Specifies the data representation for the output SAS data set
DATA step, PROC steps, LIBNAME statement
Engines: V9, V8, V7, V9TAPE, V8TAPE, V7TAPE
Category: Data Set Control
OpenVMS specifics: enables you to access files between OpenVMS VAX and ALPHA
operating environments
See: OUTREP= Data Set Option in SAS Language Reference: Dictionary
Valid in:
Syntax
OUTREP=format
format
specifies the data representation for the output SAS data set. For a complete list of
valid values, see “OUTREP= Data Set Option” in SAS Language Reference:
Dictionary.
Data Set Options under OpenVMS
4
WORKCACHE= Data Set Option
295
Details
CEDA enables you to access files between ALPHA_VMS and VAX_VMS hosts in SAS
Version 8. They are considered one platform even though they have different
representations.
For more information about CEDA, see SAS Language Reference: Concepts.
See Also
3 “WORKCACHE= System Option” on page 507
3 “CACHESIZE= Data Set Option” on page 287
WORKCACHE= Data Set Option
Specifies the size of the I/O data cache allocated for a file in the WORK data library
65024
Valid in: DATA step and PROC steps
Category: Data Set Control
Engines: V9, V8, V7
OpenVMS specifics: valid values for n
Default:
Syntax
WORKCACHE=n | nK | hexX | MIN | MAX
n | nK
specifies the size of the I/O data cache in multiples of 1 (bytes) or 1,024 (kilobytes).
For example, a value of 8 specifies 8 bytes, and a value of 3k specifies 3,072 bytes.
This value can range from 0 to 65,024 bytes on OpenVMS Alpha before Release
7.2. The size of the data cache can range from 0 to 130,048 bytes on OpenVMS Alpha
Release 7.2 or later.
hexX
specifies the size of the I/O data cache as a hexadecimal value. You must specify the
value beginning with a number (0–9), followed by hex digits (0–9, A-F), and then
followed by an X. For example, the value 2dx sets the size of the I/O data cache to 45
bytes.
MIN
sets the size of the I/O data cache to 0.
MAX
sets the size of the I/O data cache for your operating environment. MAX is 65,024
bytes on OpenVMS Alpha before Release 7.2 and 130,048 bytes on OpenVMS Alpha
Release 7.2 or later.
Details
The WORKCACHE= data set option controls the size (in bytes) of each I/O data cache
used for all files in the WORK data library. The value of n must be a positive integer.
296
WORKCACHE= Data Set Option
4
Chapter 13
See Also
3 “WORKCACHE= System Option” on page 507
3 “CACHESIZE= Data Set Option” on page 287
297
CHAPTER
14
Formats under OpenVMS
SAS Formats under OpenVMS 297
Writing Binary Data under OpenVMS
Dictionary 298
HEXw. Format 298
$HEXw. Format 299
IBw.d Format 300
PDw.d Format 301
PIBw.d Format 302
RBw.d Format 303
UICw. Format 304
VMSMSGw. Format 305
VMSTIMEF. Format 305
VMSZNw.d Format 306
297
SAS Formats under OpenVMS
A SAS format is an instruction or template that SAS uses to write data values. Most
SAS formats are described completely in SAS Language Reference: Dictionary. The
formats that are described here have behavior that is specific to SAS under OpenVMS.
Many of the SAS formats that have details that are specific to the OpenVMS
operating environment are used to write binary data. For more information, see
“Writing Binary Data under OpenVMS” on page 297.
Writing Binary Data under OpenVMS
Different computers store numeric binary data in different forms. IBM 370 and
Hewlett-Packard 9000 computers store bytes in one order. Microcomputers that are
IBM compatible and some computers manufactured by Compaq store bytes in a
different order called byte-reversed.
Binary data that is stored in one order cannot be read by a computer that stores
binary data in the other order. When you are designing SAS applications, try to
anticipate how your data will be read and choose your formats and informats
accordingly.
SAS provides two sets of informats for reading binary data and corresponding
formats for writing binary data.
3 The IBw.d, PDw.d, PIBw.d, and RBw.d informats and formats read and write in
native mode, that is, using the byte-ordering system that is standard for the
machine.
298
Dictionary
4
Chapter 14
3 The S370FIBw.d, S370FPDw.d, S370FRBw.d, and S370FPIBw.d informats and
formats read and write according to the IBM 370 standard, regardless of the
native mode of the machine. These informats and formats enable you to write SAS
programs that can be run in any SAS environment, regardless of how numeric
data is stored.
If a SAS program that reads and writes binary data runs on only one type of
machine, you can use the native mode informats and formats. However, if you want to
write SAS programs that can be run on multiple machines using different byte-storage
systems, use the IBM 370 formats and informats. The purpose of the IBM 370
informats and formats is to enable you to write SAS programs that can be run in any
SAS environment, no matter what standard you use for storing numeric data.
For example, suppose you have a program that writes data with the PIBw.d format.
You execute the program on a microcomputer so that the data is stored in byte-reversed
mode. Then you run another SAS program on the microcomputer that uses the PIBw.d
informat to read the data. The data is read correctly because both of the programs are
run on the microcomputer using byte-reversed mode. However, you cannot upload the
data to a Hewlett-Packard 9000-series machine and read the data correctly because it is
stored in a format that is native to the microcomputer but foreign to the
Hewlett-Packard 9000. To avoid this problem, use the S370FPIBw.d format to write the
data; even on the microcomputer, this causes the data to be stored in IBM 370 mode.
Then read the data using the S370FPIBw.d informat. Regardless of what type of
machine you use when reading the data, it is read correctly.
Dictionary
HEXw. Format
Converts real-binary (floating-point) values to hexadecimal values
Category:
numeric
1 to 16
Width range:
Default width:
Alignment:
8
left
OpenVMS specifics:
See:
ASCII character-encoding system
HEXw. Format in SAS Language Reference: Dictionary
Syntax
HEXw.
w
specifies the width of the output field. When you specify a w value of 1 through 15,
the real binary number is truncated to a fixed-point integer before being converted to
hexadecimal notation. When you specify 16 for the w value, the floating-point value
of the number is used; in other words, the number is not truncated.
Formats under OpenVMS
4
$HEXw. Format
299
Details
Each byte requires two columns to represent the corresponding hexadecimal digits.
Under OpenVMS, the hexadecimal format of the number is stored in ASCII
representation. For example, the decimal integer 17 has a hexadecimal value of 11, so
the HEX2. format of 17 is 11.
If HEX16. is specified, the floating-point number is not converted to an integer, and
you receive the hexadecimal representation of the native floating-point representation.
The bytes of the number are printed so that the left-most byte is of the lowest
significance. For more information about OpenVMS floating-point representation, see
OpenVMS Programming Interfaces: Calling a System Routine, Appendix B.
See Also
3 “$HEXw. Format” on page 299
3 “HEXw. Informat” on page 362
$HEXw. Format
Converts character values to hexadecimal values
Category: character
Width range:
1 to 32767
Default width: 4
Alignment:
left
OpenVMS specifics:
See:
ASCII character-encoding system
$HEXw. Format in SAS Language Reference: Dictionary
Syntax
$HEXw.
w
specifies the width of the output field.
Details
The $HEXw. format is like the HEXw. format in that it converts a character value to
hexadecimal notation, with each byte requiring two columns. Under OpenVMS, the
$HEXw. format produces hexadecimal representations of ASCII codes for characters.
See Also
3 “HEXw. Format” on page 298
3 “$HEXw. Informat” on page 363
300
IBw.d Format
4
Chapter 14
IBw.d Format
Writes numbers in integer binary (fixed-point) format
Category:
numeric
1 to 8
Width range:
Default width:
4
Decimal range:
Alignment:
0 to 10
left
OpenVMS specifics:
See:
twos-complement notation; overflow behavior
IBw.d Format in SAS Language Reference: Dictionary
Syntax
IBw.d
w
specifies the width of the output field in bytes (not digits).
d
optionally specifies a scaling factor. When you specify a d value, the IBw.d format
d
multiplies the number by the 10 value, then applies the integer binary format to
that value.
Details
Negative values are stored in twos-complement notation. If a noninteger value is
formatted, rounding occurs. If the value to be formatted is too large to fit in a field of
the specified width, then the IBw.d format does the following:
3 for positive values, it sets the output to the largest positive number that fits in the
given width.
3 for negative values, it sets the output to the negative number of greatest
magnitude that fits in the given width.
For more information about OpenVMS native fixed-point values, see OpenVMS
Programming Interfaces: Calling a System Routine, Appendix B.
Example
If you format the value 300 using the IB1. format, you receive the following value:
127
which is the largest positive value that fits in a byte.
If you format the value -300 using the IB1. format, you receive the following value:
-128
Formats under OpenVMS
4
PDw.d Format
301
See Also
3 “IBw.d Informat” on page 364
3 “Writing Binary Data under OpenVMS” on page 297
PDw.d Format
Writes values in packed decimal format
Category: numeric
1 to 16
Width range:
Default width: 1
Decimal range:
Alignment:
0 to 10
left
OpenVMS specifics:
See:
overflow behavior
PDw.d Format in SAS Language Reference: Dictionary
Syntax
PDw.d
w
specifies the width of the output field in bytes (not digits).
d
optionally specifies a scaling factor. When you specify a d value, the PDw.d format
d
multiplies the number by the 10 value, then applies the packed decimal format to
that value.
Details
Under OpenVMS, if the value to be formatted is too large to fit in a field of the specified
width, then the PDw.d format does the following:
3 for positive values, it sets the output to the largest positive number that fits in the
given width.
3 for negative values, it sets the output to the negative number of greatest
magnitude that fits in the given width.
Example
If you format the value 300 using the PD1. format, you receive the following
hexadecimal string:
’9C’x
which is the packed decimal representation for 9.
302
4
PIBw.d Format
Chapter 14
If you format the value -300 using the PD1. format, you receive the following
hexadecimal string:
’9D’x
which is the packed decimal representation for -9.
See Also
3 “PDw.d Informat” on page 364
3 “Writing Binary Data under OpenVMS” on page 297
PIBw.d Format
Writes positive integer-binary fixed-point values
Category:
numeric
1 to 8
Width range:
Default width:
1
Decimal range:
Alignment:
0 to 10
left
OpenVMS specifics:
See:
overflow behavior
PIBw.d Format in SAS Language Reference: Dictionary
Syntax
PIBw.d
w
specifies the width of the output field in bytes (not digits).
d
optionally specifies a scaling factor. When you specify a d value, the PIBw.d format
d
multiplies the number by the 10 value, then applies the positive integer binary
format to that value.
Details
If the value to be formatted is too large to fit in a field of the specified width, then this
format does the following:
3 for positive values, it sets the output to the largest positive number that fits in the
given width.
3 for negative values, it sets the output to the negative number of greatest
magnitude that fits in the given width.
If a noninteger value is formatted, rounding occurs.
For more information about OpenVMS native fixed-point values, see OpenVMS
Programming Interfaces: Calling a System Routine, Appendix B.
Formats under OpenVMS
4
RBw.d Format
303
Example
If you format the value 300 with the PIB1. format, you receive the following value:
255
which is the largest unsigned value that fits in a 1-byte field.
See Also
3 “PIBw.d Informat” on page 365
3 “Writing Binary Data under OpenVMS” on page 297
RBw.d Format
Writes numeric data in real-binary (floating-point) notation
Category: numeric
2 to 8
Width range:
Default width: 4
Decimal range:
Alignment:
0 to 10
left
OpenVMS specifics:
See:
native floating-point representation
RBw.d Format in SAS Language Reference: Dictionary
Syntax
RBw.d
w
specifies the width of the output field.
d
optionally specifies a scaling factor. When you specify a d value, the RBw.d format
d
multiplies the number by the 10 value, then applies the real binary format to that
value.
Details
Under OpenVMS, the RBw.d format causes floating-point numbers to be formatted in
the native floating-point representation. Numeric data for scientific calculations are
commonly represented in floating-point notation. (SAS stores all numeric values in
floating-point notation.) A floating-point value consists of two parts: a mantissa that
gives the value and an exponent that gives the value’s magnitude.
Real binary is the most efficient format for representing numeric values because SAS
already represents numbers this way and no conversion is needed.
For more information about OpenVMS floating-point representation, see OpenVMS
Programming Interfaces: Calling a System Routine, Appendix B.
304
UICw. Format
4
Chapter 14
See Also
3 “RBw.d Informat” on page 366
3 “Writing Binary Data under OpenVMS” on page 297
UICw. Format
Converts a SAS numeric value to an OpenVMS UIC string
Category:
numeric
16 to 31
Width range:
Default width:
Alignment:
31
left
OpenVMS specifics:
All aspects are host-specific
Syntax
UICw.
w
is the width of the output field and must be 16 through 31 (numbers less than 16 or
greater than 31 are invalid). If no w value is specified, then UIC defaults to the
width of the resulting output string.
Details
The UIC value is a 32-bit value, where the upper 16 bits is the group value and the
lower 16 bits is the member value. The UIC values that are displayed as two numbers
are octal numbers. If alphanumeric values exist for the numbers, the alphanumerics
will be displayed. For example:
data _null_;
x=4194377;
put x uic.;
run;
produces
[HOSTVMS,MYIDENT]
A system manager assigns a user identification code (UIC) to each OpenVMS user
and stores the UIC in the user authorization file (UAF). Each UIC consists of a member
identifier and (optionally) a group identifier, enclosed in square brackets, as follows:
[<group-identifier>,member-identifier]
where member-identifier and group-identifier can be either names, numbers, or
hexadecimal representations.
Formats under OpenVMS
4
VMSTIMEF. Format
305
See Also
3 “GETQUOTA Function” on page 336
VMSMSGw. Format
Writes numeric values as character strings that contain the equivalent OpenVMS message
Category: numeric
16 to 32767
Alignment: left
OpenVMS specifics: All aspects are host-specific
Width range:
Syntax
VMSMSGw.
w
specifies the width of the output field.
Details
Data formatted using the VMSMSGw. format are ASCII strings.
Symbolic FAO (Formatted ASCII Output) substitution is not performed.
Example
If you format the value 1 using the VMSMSG. format in the following SAS statement:
put rc vmsmsg.;
the result is %SYSTEM-S-NORMAL, which is an ASCII string indicating normal
successful completion.
VMSTIMEF. Format
Converts a SAS date-time value to an 8-byte binary value in OpenVMS date and time format
Category: date and time
Width range:
8
Default width: 8
Alignment:
left
OpenVMS specifics:
Syntax
VMSTIMEF.
All aspects are host-specific
306
VMSZNw.d Format
4
Chapter 14
Details
The VMSTIMEF. format is specific to OpenVMS. You cannot specify a width with this
format; the width is always 8 bytes.
OpenVMS date and time values that are read in with the VMSTIME. informat retain
precision up to 1/100 of a second, even though SAS cannot display anything less than
whole seconds. If you later use the VMSTIMEF. format to write out the date-time
value, the precision is retained.
See Also
3 “VMSTIME. Informat” on page 368
VMSZNw.d Format
Generates VMS zoned numeric data
numeric
Width range: 1 to 32
Default width: 1
Alignment: left
OpenVMS specifics: All aspects are host-specific
Category:
Syntax
VMSZNw.d
w
specifies the width of the output field
d
optionally specifies the number of digits to the right of the decimal point in the
numeric value.
Details
The VMSZNw.d format is similar to the ZDw.d format. Both generate a string of ASCII
digits, and the last digit is a special character that denotes the magnitude of the last
digit and the sign of the entire number. The difference between these formats is in the
special character that is used for the last digit. The following table shows the special
characters that are used by the VMSZNw.d format.
Desired
Special
Desired
Special
Digit
Character
Digit
Character
0
0
-0
p
1
1
-1
q
2
2
-2
r
Formats under OpenVMS
4
VMSZNw.d Format
Desired
Special
Desired
Special
Digit
Character
Digit
Character
3
3
-3
s
4
4
-4
t
5
5
-5
u
6
6
-6
v
7
7
-7
w
8
8
-8
x
9
9
-9
y
307
Data formatted using the VMSZNw.d format are ASCII strings.
If the value to be formatted is too large to fit in a field of the specified width, then
the VMSZNw.d format does the following:
3 for positive values, it sets the output to the largest positive number that fits in the
given width.
3 for negative values, it sets the output to the negative number of greatest
magnitude that fits in the given width.
Example
Example 1: Using the VMSZNw.d Format in a SAS Statement
If you format the value
1234 using the VMSZNw.d format in the following SAS statement:
put i vmszn4.;
the result is 1234, which is an ASCII string.
If you format the value 1234 using the VMSZNw.d format in the following SAS
statement:
put i vmszn5.1;
the result is 12340, which is an ASCII string.
If you format the value 1234 using the VMSZNw.d format in the following SAS
statement:
put i vmszn6.2;
the result is 123400, which is an ASCII string.
If you format the value -1234 using the VMSZNw.d format in the following SAS
statement:
put i vmszn5.;
the result is 123t, which is an ASCII string.
See Also
3 “ZDw.d Format” in SAS Language Reference: Dictionary
3 “VMSZNw.d Informat” on page 368
3 “ZDw.d Informat” on page 370
308
309
CHAPTER
15
Functions and CALL Routines
under OpenVMS
SAS Functions under OpenVMS 310
Using Terminal-Access Functions 310
SAS CALL Routines under OpenVMS 311
Dictionary 311
ASCEBC Function 311
BYTE Function 311
CALL FINDEND Routine 312
CALL SYSTEM Routine 313
COLLATE Function 314
DELETE Function 316
DINFO Function 316
DOPEN Function 317
DOPTNAME Function 318
DOPTNUM Function 318
EBCASC Function 319
FDELETE Function 319
FEXIST Function 320
FILEATTR Function 321
FILEEXIST Function 322
FILENAME Function 322
FILEREF Function 326
FINDFILE Function 327
FINFO Function 328
FOPEN Function 329
FOPTNAME Function 330
FOPTNUM Function 331
GETDVI Function 332
GETJPI Function 333
GETLOG Function 334
GETMSG Function 335
GETQUOTA Function 336
GETSYM Function 337
GETTERM Function 338
LIBNAME Function 340
LIBREF Function 341
MODULE Function 341
MOPEN Function 343
NODENAME Function 344
PATHNAME Function 344
PEEKLONG Function 345
PUTLOG Function 346
310
SAS Functions under OpenVMS
4
Chapter 15
PUTSYM Function 346
RANK Function 347
RENAME Function 348
SETTERM Function 349
SYSGET Function 351
TERMIN Function 352
TERMOUT Function 353
TRANSLATE Function 353
TTCLOSE Function 354
TTCONTRL Function 355
TTOPEN Function 356
TTREAD Function 358
TTWRITE Function 359
VMS Function 359
SAS Functions under OpenVMS
A SAS function returns a value from a computation or system operation. Most
functions use arguments that are supplied by the user as input.
Most SAS functions are completely described in SAS Language Reference: Dictionary.
The functions that are described here have syntax or behavior that is specific to the
OpenVMS operating environment.
Using Terminal-Access Functions
In the following sections, a category is listed immediately following the name and
short description of each function. Most of these categories are self-explanatory. For
terminal-access functions, which enable you to get information from and write
information to the terminal, please observe the following caution:
CAUTION:
Do not use the terminal-access functions in the windowing environment. Terminal-access
functions work in the windowing environment, but they can either overwrite the
display or be overwritten by the display. (The REFRESH (CTRL-R) command can be
used to restore your display.) For details about the REFRESH command, see the
Base SAS Software section in SAS Help and Documentation. 4
Under OpenVMS, the following SAS functions are terminal-access functions:
SETTERM
TERMIN
TERMOUT
TTCLOSE
TTCONTRL
TTOPEN
TTREAD
TTWRITE
Functions and CALL Routines under OpenVMS
4
BYTE Function
311
SAS CALL Routines under OpenVMS
SAS CALL routines are used to alter variable values or perform other system
functions. Most CALL routines are completely described in SAS Language Reference:
Dictionary. The CALL routines that are described here have syntax or behavior that is
specific to the OpenVMS operating environment.
Dictionary
ASCEBC Function
Converts an input character string from ASCII to EBCDIC
Category: Character-String Translation
OpenVMS specifics:
All aspects are host-specific
Syntax
ASCEBC (in-string)
in-string
is any ASCII string, and can be a character variable, a character literal enclosed in
double quotation marks, or another character expression. The value of in-string is
limited to 200 characters.
Details
The return value is the EBCDIC translation of in-string.
BYTE Function
Returns one character in the ASCII collating sequence
Category: Character
ASCII collating sequence
BYTE Function in SAS Language Reference: Dictionary
OpenVMS specifics:
See:
Syntax
BYTE(n)
312
4
CALL FINDEND Routine
Chapter 15
n
specifies an integer that represents a specific ASCII character. The value of n can
range from 0 to 255.
Details
If the BYTE function returns a value to a variable that has not yet been assigned a
length, by default the variable is assigned a length of 1.
CALL FINDEND Routine
Releases resources that are associated with a directory search
Category:
General-Purpose OpenVMS
OpenVMS specifics:
All aspects are host-specific
Syntax
CALL FINDEND(context);
context
is the same as the context variable that is used by the FINDFILE function to
maintain the search context between executions of FINDFILE. The context argument
must be initialized before FINDFILE is called. Also, the value of context must not be
manipulated before it is used in the CALL FINDEND routine; if it is, channels and
resources cannot be freed to the process until the process terminates.
Details
Like the LIB$FIND_FILE_END Run Time Library Call, the CALL FINDEND routine
releases resources that were associated with a directory search. Use the CALL
FINDEND routine with the FINDFILE function.
Example
In the following example, FINDFILE is used to search the user’s directories for a
filename that matches MYPROG*.SAS. If it finds a file named MYPROG12.SAS, for
example, then FN is set to myprog12.sas. The CALL FINDEND routine is then called
to terminate the directory search and to release the associated resources.
context=0;
fn=findfile("myprog*.sas",context);
do while (fn ^= ’ ’);
put fn;
fn=findfile("myprog*.sas",context);
end;
call findend(context);
Functions and CALL Routines under OpenVMS
4
CALL SYSTEM Routine
313
See Also
3 “FINDFILE Function” on page 327
CALL SYSTEM Routine
Submits an operating system command for execution
Category: Special
Issues DCL commands; some commands execute in a subprocess,
others in the parent process
OpenVMS specifics:
See:
CALL SYSTEM Routine in SAS Language Reference: Dictionary
Syntax
CALL SYSTEM(DCL-command);
DCL-command
can be any of the following under OpenVMS:
3 a DCL command enclosed in single or double quotation marks
3 an expression whose value is a DCL command
3 the name of a character variable whose value is a DCL command.
Details
In the windowing environment, a new window is displayed when the command
executes. Any output from the command is displayed (for example, a directory listing).
Select the File menu and click on Exit to remove this window.
Note that some DCL commands execute in the parent OpenVMS process and some
execute in a subprocess. For more information, see “Issuing DCL Commands during a
SAS Session” on page 43.
Comparisons
The CALL SYSTEM routine is similar to the X statement, the X command, the
%SYSEXEC macro, and the VMS function; however it can be called conditionally. In
most cases, the X statement, the X command, or the %SYSEXEC macro are preferable
because they require less overhead. However, the CALL SYSTEM routine can be useful
in certain situations because it is executable, and because it accepts expressions as
arguments. The benefit of the CALL SYSTEM routine being callable is that it is not
executed unconditionally at DATA step compile time, whereas other methods are.
Example
The following is an example of the CALL SYSTEM routine:
data _null_;
call system(’define mylib [mydir.datasets]’);
run;
314
COLLATE Function
4
Chapter 15
See Also
3
3
3
3
3
“Issuing DCL Commands during a SAS Session” on page 43
“X Command” on page 270
“VMS Function” on page 359
“X Statement” on page 427
%SYSEXEC Macro in “Macro Functions under OpenVMS” on page 519
COLLATE Function
Returns an ASCII collating sequence character string
Character
OpenVMS specifics: ASCII collating sequence
Category:
See:
COLLATE Function in SAS Language Reference: Dictionary
Syntax
COLLATE(start-position< ,end-position>) | (start-position<,,length>)
start-position
specifies the numeric position in the collating sequence of the first character to be
returned.
end-position
specifies the numeric position in the collating sequence of the last character to be
returned.
length
specifies the number of characters in the collating sequence.
Details
The COLLATE function returns a string of ASCII characters, which can range in value
from 0 to 255. Characters 128 to 255 are usually special control characters such as
special fonts, but the COLLATE function returns them.
Unless you assign the return value of the COLLATE function to a variable with a
defined length less than 200, the ASCII collating sequence string is padded with blanks
to a length of 200. If the ASCII collating sequence is greater than 200 characters, you
must specify the length for the return string in a LENGTH statement; otherwise, the
returned string will be truncated to a length of 200 characters. For more information,
see the following examples.
Functions and CALL Routines under OpenVMS
4
COLLATE Function
315
Examples: How SAS Determines the Length of the Return String
Example 1: Truncating the Variable Length to 200 Characters
Since the following code
does not include a LENGTH statement, the length attribute for the Address variable is
truncated to 200 characters.
data sales;
Address=collate(1,241);
run;
proc contents;
run;
Output 15.1
Portion of PROC CONTENTS Output
Alphabetic List of Variables and Attributes
#
Variable
Type
Len
1
Address
Char
200
Since length for Address is limited to 200 characters, the returned string from the
COLLATE function will be limited to 200 characters.
Example 2: Specifying a Length Greater than 200 Characters
To specify a length
greater than 200 characters for a specific variable, you can use the LENGTH statement.
In the following code, the length of Address is specified as 240 characters.
data sales;
length Address $240;
Address=collate(1,241);
run;
proc contents;
run;
Output 15.2
Portion of PROC CONTENTS Output
Alphabetic List of Variables and Attributes
#
Variable
Type
Len
1
Address
Char
240
Since the length of Address is set to 240 characters, the returned string from the
COLLATE function will contain 240 characters.
See Also
3 “LENGTH Statement” on page 419
316
DELETE Function
4
Chapter 15
DELETE Function
Deletes a file
General-Purpose OpenVMS
OpenVMS specifics: All aspects are host-specific
Category:
Syntax
DELETE(’file-specification’)
’file-specification’
is the name of the file to be deleted. It can be a character variable, a character literal
enclosed in double quotation marks, or another character expression. The value for
file-specification must be enclosed in single or double quotation marks.
Details
If the DELETE function executes successfully, the return value is 0. Otherwise, the
return value is any of the OpenVMS error codes that indicate why it failed.
The following are two common error codes:
98962
File not found.
98970
Insufficient privilege or file protection violation.
The text of the error codes is retrieved using the GETMSG function.
See Also
3 “GETMSG Function” on page 335
DINFO Function
Returns information about a directory
External Files
OpenVMS specifics: Valid values for info-item; returned values
See: DINFO Function in SAS Language Reference: Dictionary
Category:
Syntax
DINFO(directory-id,info-item)
directory-id
specifies the identifier that was assigned when the directory was opened, generally
by the DOPEN function.
Functions and CALL Routines under OpenVMS
4
DOPEN Function
317
info-item
specifies the information item to be retrieved.
Details
Directories that are opened with the DOPEN function are identified by a directory-id
and have a number of associated information items. Use DOPTNAME to determine the
names of the available system-dependent directory information items. Use DOPTNUM
to determine the number of directory information items available.
See Also
3 “DOPEN Function” on page 317
3 “DOPTNAME Function” on page 318
3 “DOPTNUM Function” on page 318
DOPEN Function
Opens a directory and returns a directory identifier value
Category: External Files
OpenVMS specifics:
See:
Valid values for fileref
DOPEN Function in SAS Language Reference: Dictionary
Syntax
DOPEN(’fileref’)
’fileref’
specifies the fileref assigned to the directory. The value for fileref must be enclosed in
single or double quotation marks.
Details
The DOPEN function opens a directory and returns a directory identifier value (a
number greater than 0) that is used to identify the open directory in other SAS external
file access functions. If the directory cannot be opened, DOPEN returns a value of 0.
The directory to be opened must be identified by a fileref.
See Also
3 “DINFO Function” on page 316
3 “DOPTNAME Function” on page 318
3 “DOPTNUM Function” on page 318
318
DOPTNAME Function
4
Chapter 15
DOPTNAME Function
Returns the name of a directory information item
Category:
External Files
OpenVMS specifics:
See:
Valid values for nval; number of options available
DOPTNAME Function in SAS Language Reference: Dictionary
Syntax
DOPTNAME(directory-id,nval)
directory-id
specifies the identifier that was assigned when the directory was opened, generally
by the DOPEN function.
To use DOPTNAME on a directory, the directory must have been previously
opened by using the DOPEN function.
nval
specifies the sequence number of the information item.
Details
The number, names, and nature of the directory information varies between operating
environments. The number of options available for a directory varies depending on the
operating environment. Under OpenVMS, the filename is returned.
See Also
3 “DINFO Function” on page 316
3 “DOPEN Function” on page 317
3 “DOPTNUM Function” on page 318
DOPTNUM Function
Returns the number of information items that are available for a directory
Category:
External Files
OpenVMS specifics:
See:
Valid values for directory-id; number of options available
DOPTNUM Function in SAS Language Reference: Dictionary
Syntax
DOPTNUM(directory-id)
Functions and CALL Routines under OpenVMS
4
FDELETE Function
319
directory-id
specifies the identifier that was assigned when the directory was opened, generally
by the DOPEN function.
Details
The directory specified by directory-id must have been previously opened by using
the DOPEN function.
See Also
3 “DINFO Function” on page 316
3 “DOPEN Function” on page 317
3 “DOPTNAME Function” on page 318
EBCASC Function
Converts an input character string from EBCDIC to ASCII
Category: Character-String Translation
OpenVMS specifics:
All aspects are host-specific
Syntax
EBCASC(in-string)
in-string
is any EBCDIC string, and can be a character variable, a character literal enclosed
in double quotation marks, or another character expression. The value of in-string is
limited to 200 characters.
Details
The return value is the ASCII translation of in-string.
FDELETE Function
Deletes an external file or an empty directory
Category: External Files
OpenVMS specifics:
See:
Valid values for directory
FDELETE Function in SAS Language Reference: Dictionary
320
FEXIST Function
4
Chapter 15
Syntax
FDELETE(’fileref’)
fileref
specifies the fileref that you assign to the external file or directory you want to
delete. The fileref cannot be associated with a list of concatenated filenames or
directories. If the fileref is associated with a directory, the directory must be empty.
You must have permission to delete the file.
Under OpenVMS, filerefs can be assigned by environment variables and by system
commands. The fileref must be enclosed in single or double quotation marks.
Details
FDELETE returns 0 if the operation was successful, or a non-zero number if it was not
successful.
FEXIST Function
Verifies the existence of an external file associated with a fileref
Category:
External Files
OpenVMS specifics:
See:
Valid values for fileref
FEXIST Function in SAS Language Reference: Dictionary
Syntax
FEXIST(“fileref”)
“fileref”
specifies the fileref assigned to an external file. The fileref must have been previously
assigned. The fileref must be enclosed in single or double quotation marks.
Details
The FEXIST function returns a value of 1 if the external file that is associated with
fileref exists, and a value of 0 if the file does not exist.
See Also
3 “FILENAME Statement” on page 397
3 “FILENAME Function” on page 322
Functions and CALL Routines under OpenVMS
4
FILEATTR Function
321
FILEATTR Function
Returns the attribute information for a specified file
Category: General-Purpose OpenVMS
OpenVMS specifics:
All aspects are host-specific
Syntax
FILEATTR(file-specification,item)
file-specification
is the file for which you are requesting information. It can be a character variable, a
character literal enclosed in double quotation marks, or another character
expression. You must have access to the file that you are referencing.
item
specifies which attribute of the file you are requesting. It can be a character variable,
a character literal enclosed in double quotation marks, or another character
expression. If the item is more than 16 characters long, it is truncated. The items
that can be requested are the same as the items that can be requested using the
DCL lexical function F$FILE_ATTRIBUTE.
Details
The FILEATTR function returns information about a file based on the type of
information that is requested with the item parameter. Numeric values are returned as
character values.
The FILEATTR function closely resembles the F$FILE_ATTRIBUTE lexical function
of DCL. For more information about DCL lexical functions, refer to OpenVMS DCL
Dictionary.
You cannot request the following attribute information:
3 after-image journaling (AI)
3 before-image journaling (BI)
3 recovery-unit journaling (RU).
Example
The following example uses the FILEATTR function:
data a;
fattr=fileattr(‘‘test.sas’’, ‘‘rdt’’);
put fattr=;
run;
This example displays the revision date of the file. The revision date (rdt) should be
the same as the date displayed outside of SAS when you use the DIR/FULL or DIR/
DATE=MODIFIED command on the TEST.SAS file.
322
FILEEXIST Function
4
Chapter 15
FILEEXIST Function
Verifies the existence of an external file by its physical name
External Files
Valid values for filename
See: FILEEXIST Function in SAS Language Reference: Dictionary
Category:
OpenVMS specifics:
Syntax
FILEEXIST(“filename”)
“filename”
specifies a fully qualified physical filename of the external file. In a DATA step,
filename can be a character expression, a string in quotation marks, or a DATA step
variable. In a macro, filename can be any expression.
Under OpenVMS, the filename that you specify must be enclosed in single or
double quotation marks.
Details
The FILEEXIST function returns a value of 1 if the external file exists and a value of 0
if the external file does not exist.
You must always use fully qualified physical filenames with the FILEEXIST function.
An example of a fully qualified physical filename is the TEST.SAS file in your default
directory. For more information, see “Basics of the OpenVMS File System” on page 6.
See Also
3 “FILENAME Function” on page 322
FILENAME Function
Assigns or deassigns a SAS fileref for an external file, directory, or an output device
External Files
OpenVMS specifics: Valid values for filename, device-type, host-options and dir-ref
See: FILENAME Function in SAS Language Reference: Dictionary
Category:
Syntax
FILENAME(fileref, filename<, device-type< ,host-options< ,dir-ref>>>)
fileref
in a DATA step, specifies the fileref to assign to an external file. In a macro (for
example, in the %SYSFUNC function), fileref is the name of a macro variable
Functions and CALL Routines under OpenVMS
4
FILENAME Function
323
(without an ampersand) whose value contains the fileref to assign to the external file.
(For details, see the FILENAME function in SAS Language Reference: Dictionary.)
filename
specifies the external file. Specifying a blank filename (’ ’)deassigns the fileref that
was previously assigned.
Under OpenVMS, the filename must be a valid OpenVMS pathname to the
external file that you want to use. You can specify the version number of the file, for
example, myfile.dat;1.
device-type
specifies the type of device or the access method that is used if the SAS fileref points
to an input or output device or location that is not a physical file:
DISK
specifies that the device is a disk drive.
DUMMY
specifies that the output to the file is discarded.
PIPE
specifies an OpenVMS command. For more information, see “Reading from and
Writing to OpenVMS Commands (Pipes)” on page 186.
PLOTTER
specifies an unbuffered graphics output device.
PRINTER
specifies a printer or printer spool file.
TAPE
specifies a tape drive.
TEMP
specifies a temporary file that can only be accessed through the logical name and
is only available while the logical name exists. If a physical pathname is specified,
an error is returned. Files manipulated by the TEMP device can have the same
attributes and behave identically to DISK files.
TERMINAL
specifies the user’s terminal.
host-options
can be any of the following:
ALQ=
specifies how many disk blocks to allocate to a new external file. The value can
range from 0 to 2,147,483,647. If the value is 0 (the default), the minimum
number of blocks required for the given file format is used.
CC=
tells SAS what type of carriage control to use when it writes to external files.
Values for the CC= option are
FORTRAN
indicates FORTRAN carriage-control format. This is the
default for print files.
PRINT
indicates OpenVMS print format.
CR
indicates OpenVMS carriage-return carriage-control format.
This is the default for nonprinting files.
324
FILENAME Function
4
Chapter 15
DEQ=
tells OpenVMS how many disk blocks to add when it automatically extends an
external file during a write operation. The value can range from 0 to 65,535. The
default value is 0, telling OpenVMS RMS to use the process’s default value.
FAC=
overrides the default file access attributes used for external files. Values for the
FAC= option are
DEL
specifies delete access.
GET
specifies read access.
PUT
specifies write access.
UPD
specifies update access.
GSFCC=
specifies the file format of graphic stream files (GSF files). The accepted values are
PRINT
creates a GSF file. It is a VFC format file with carriage control
set to null. These files can be used with most utilities with the
exception of some file transfer protocols, such as Kermit. This
is the default value for this option.
CR
creates a carriage return carriage control file.
NONE
creates a file with no carriage control. This format is useful if
you plan to download the file to a personal computer.
KEY=
specifies which key SAS uses to read the records in an RMS file with indexed
organization. The KEY= option is always used with the KEYVALUE= option.
KEYVALUE=
specifies the key value with which to begin reading an indexed file.
LRECL=
specifies the record length of the output file. If you do not specify a record length,
the default is varying length records. For input, the existing record length is used
by default. If the LRECL= option is used, the input records are padded or
truncated to the specified length.
The maximum record size for OpenVMS is 32,767. LRECL values greater than
32,767 are valid only when reading and writing to tape. If an LRECL value
greater than 32,767 is specified when writing to a non-tape device, the LRECL
value is set 32,767. You should use the maximum LRECL values for the various
file types provided in Table 18.1 on page 404.
MBC=
specifies the size of the I/O buffers that OpenVMS RMS allocates for a particular
file. The value can range from 0 to 127 and represents the number of blocks used
for each buffer. By default, this option is set to 0 and the default values for the
process are used.
MBF=
specifies the number of I/O buffers you want OpenVMS RMS to allocate for a
particular file. The value can range from 0 to 255 and represents the number of
buffers used. By default, this option is set to 2 buffers. If a value of 0 is specified,
the default value for the process is used.
Functions and CALL Routines under OpenVMS
4
FILENAME Function
325
MOD
opens the file referenced for append. This option does not take a value.
NEW
opens a new file for output. This option does not take a value.
OLD
opens a new file for output. This option does not take a value.
RECFM=
specifies the record format of the output file. Values for the RECFM= option are
F
specifies fixed length.
N
specifies binary format. The file consists of a stream of bytes
with no record boundaries.
V
specifies variable length.
D
specifies you are accessing unlabeled tapes with the PUT and
INPUT DATA step statements. For more information, see
“Reading from an Unlabeled Tape” on page 184.
SHR=
overrides the default file-sharing attributes used for external files. Values for the
SHR= option are
DEL
specifies delete access.
GET
specifies shared read access.
NONE
specifies no shared access.
PUT
specifies shared write access.
UPD
specifies update access.
You can combine these values in any order. For additional details about these
options, see the discussion of host-specific external I/O statement options for the
FILENAME statement in “FILENAME Statement” on page 397.
dir-ref
specifies the fileref that is assigned to the directory in which the external file resides.
Details
FILENAME returns 0 if the operation was successful, and a non-zero number if it was
not successful.
Under OpenVMS, you can assign SAS filerefs using two methods. You can use the
DCL DEFINE command to assign a fileref before you invoke SAS. For example:
$ define myfile a.txt
$ sas;
data;
file myfile;
put "HELLO";
run;
This creates the file A.TXT.
You can use the X command to assign a fileref during your SAS session.
326
FILEREF Function
4
Chapter 15
See Also
3
3
3
3
3
3
“FILEREF Function” on page 326
“FILENAME Statement” on page 397
“ALQ= Data Set Option” on page 282
“DEQ= Data Set Option” on page 289
“CC= System Option” on page 452
“X Command” on page 270
FILEREF Function
Verifies that a fileref has been assigned for the current SAS session
External Files
OpenVMS specifics: Valid values for fileref
See: FILEREF Function in SAS Language Reference: Dictionary
Category:
Syntax
FILEREF(fileref)
fileref
specifies the fileref to be validated. Under OpenVMS, fileref can also be an OpenVMS
logical name that was assigned using the DCL DEFINE command.
Details
A negative return code indicates that the fileref exists but the physical file associated
with the filref does not exist. A positive value indicates that the fileref is not assigned.
A value of zero indicates that the fileref and external file both exist.
Under OpenVMS, you can assign SAS filerefs using either of the following commands:
1 the DCL DEFINE command
2 X command
You can use the DCL DEFINE command to assign a fileref before you invoke SAS.
For example:
$ define myfile a.txt
$ sas;
data;
file myfile;
put "HELLO";
run;
This creates the file A.TXT.
You can use the X command to assign an OpenVMS logical name during your SAS
session.
Then you can use the FILEREF function to verify that the fileref was correctly
assigned. For examples of using this function, see SAS Language Reference: Dictionary.
Functions and CALL Routines under OpenVMS
4
FINDFILE Function
327
See Also
3 “FILENAME Function” on page 322
3 “X Command” on page 270
FINDFILE Function
Searches a directory for a file
Category: General-Purpose OpenVMS
OpenVMS specifics:
All aspects are host-specific
Syntax
FINDFILE(file-specification,context)
file-specification
specifies the file specification of the file that you are searching for. It can contain any
valid OpenVMS file specification, including wildcards. The value for file-specification
can be a character variable, a character literal enclosed in double quotation marks,
or another character expression. You must have access to the file that you are
searching for.
context
is a variable used internally by SAS to maintain the search context between
executions of FINDFILE. It must be initialized to 0 before the first execution of
FINDFILE for a given file-specification and must not be modified between executions.
The context value must be a numeric variable initialized to 0; it cannot be a literal 0.
You can use FINDFILE for multiple search streams by specifying a different context
variable for each stream. For example, you can have variables named CONTEXT1
and CONTEXT2.
Details
The FINDFILE function searches all directories and subdirectories for file-specification
and returns the first filename that matches the file specification given. Subsequent
calls return other filenames that match the specification. For more information, see the
description of the CALL FINDEND routine in “CALL FINDEND Routine” on page 312.
The return value is the name of the file that matches file-specification. If no file
matches or if the last one in the list has already been returned, a blank is returned.
The target variable must be long enough to contain an OpenVMS file specification,
which can be up to 4095 characters long (for ODS-5 enabled volumes). SAS character
variables have a maximum length of 32,767.
Example
The following example uses the FINDFILE function:
context=0;
fn=findfile(’myprog*.sas’,context);
do while (fn ^= ’ ’);
328
4
FINFO Function
Chapter 15
put fn;
fn=findfile(’myprog*.sas’,context);
end;
This example searches the user’s directories for a filename that matches
MYPROG*.SAS; for example, if it finds a file named MYPROG12.SAS, then FN is set to
myprog12.sas.
Note: If you use a file specification that is greater than 200 characters (such as a
filename allowed by ODS-5), then you must specify a LENGTH statement for the
variable to receive the filename. The following code shows the LENGTH statement for
the previous example:
length fn $ 4096;
4
See Also
3 “CALL FINDEND Routine” on page 312
FINFO Function
Returns the value of an information item for an external file
External Files
Category:
OpenVMS specifics:
See:
Types of information items
FINFO Function in SAS Language Reference: Dictionary
Syntax
FINFO(file-id,info-item)
file-id
specifies the identifier that was assigned when the file was opened, generally by the
FOPEN function.
info-item
specifies the name of the file information item to be retrieved. This is a character
value.
Under OpenVMS, info-item can have the following values:
3
3
3
3
3
File Name
Owner Name
Group Name
Access Permission
File Size (bytes).
If you concatenate filenames, then an additional info-item is available: File List.
Functions and CALL Routines under OpenVMS
4
FOPEN Function
329
Details
The FINFO function returns the value of a system-dependent information item for an
external file that was previously opened and assigned a file-id by the FOPEN function.
FINFO returns a blank if the value given for info-item is invalid.
Example 1: Returning Information on a Single File
The following example returns information on a single file named myfile.dat:
filename myfile "myfile.dat";
data;
fid=fopen(’myfile’);
fnum=foptnum(fid);
do i = 1 to fnum;
name=foptname(fid,i);
info=finfo(fid,name);
put name= info= ;
end;
run;
Example 2: Returning Information on a Concatenation of Files
The following example returns information on a concatenation of files named
myfile1.dat and myfile2.dat:
filename myfile ("myfile1.dat" "myfile2.dat");
data;
fid=fopen(’myfile’);
fnum=foptnum(fid);
do i = 1 to fnum;
name=foptname(fid,i);
info=finfo(fid,name);
put name = info= ;
end;
run;
See Also
3 “FOPEN Function” on page 329
3 “FOPTNAME Function” on page 330
3 “FOPTNUM Function” on page 331
FOPEN Function
Opens an external file and returns a file identifier value
Category: External Files
OpenVMS specifics:
Files are not closed automatically after processing
330
FOPTNAME Function
See:
4
Chapter 15
FOPEN Function in SAS Language Reference: Dictionary
Syntax
FOPEN(’fileref’< ,open-mode<,record-length <,record-format>>>)
Note: This is a simplified version of the FOPEN function syntax. For the complete
syntax and its explanation, see the FOPEN function in SAS Language Reference:
Dictionary. 4
’fileref’
specifies the fileref assigned to an external file. The value for fileref must be enclosed
in single or double quotation marks.
Details
FOPEN returns a 0 if the file could not be opened.
Under OpenVMS, you must close files with the FCLOSE function at the end of a
DATA step; files are not closed automatically after processing.
See Also
3 “FILENAME Function” on page 322
3 “FILEREF Function” on page 326
3 “FCLOSE Function” in SAS Language Reference: Dictionary
FOPTNAME Function
Returns the name of an information item for an external file
Category:
External Files
OpenVMS specifics:
See:
Available information items
FOPTNAME Function in SAS Language Reference: Dictionary
Syntax
FOPTNAME(file-id,nval)
file-id
specifies the identifier that was assigned when the file was opened, generally by the
FOPEN function.
nval
specifies the number of the information item. The following table shows the values
that nval can have in OpenVMS operating environments for single and concatenated
files.
Functions and CALL Routines under OpenVMS
4
FOPTNUM Function
331
Information Items Available For...
nval
Single File
Concatenated Files
1
File Name
File Name
2
Owner Name
File List
3
Group Name
Owner Name
4
Access Permission
Group Name
5
File Size (bytes)
Access Permission
6
File Size (bytes)
Details
FOPTNAME returns a blank if an error occurred.
See Also
3 “FILENAME Function” on page 322
3 “FOPEN Function” on page 329
3 “FOPTNUM Function” on page 331
FOPTNUM Function
Returns the number of information items available for an external file
Category: External Files
OpenVMS specifics:
See:
Available information items
FOPTNUM Function in SAS Language Reference: Dictionary
Syntax
FOPTNUM(file-id)
file-id
specifies the identifier that was assigned when the file was opened, generally by the
FOPEN function.
Details
Under OpenVMS, five information items are available for all types of files:
3 File Name
3 Owner Name
3 Group Name
332
GETDVI Function
4
Chapter 15
3 Access Permission
3 File Size (bytes).
If you concatenate filenames, then an additional information item is available: File
List.
The open-mode specified in the FOPEN function will determine the value that
FOPTNUM returns.
Open Mode
FOPTNUM Value
Information Items Available
Append
6 for concatenated files
All information items available.
Input
5 for single files
Sequential
Update
Output
5 for concatenated files
4 for single files
Since the file is open for output, the File
Size information type is unavailable.
For an example of how to use the FOPTNUM function, see “FINFO Function” on
page 328.
See Also
3 “FINFO Function” on page 328
3 “FOPEN Function” on page 329
3 “FOPTNAME Function” on page 330
GETDVI Function
Returns a specified item of information from a device
Category:
General-Purpose OpenVMS
OpenVMS specifics:
All aspects are host-specific
Syntax
GETDVI(device-name,item)
device-name
specifies a physical device name or a logical name equated to a physical device name.
Specify the device name as a character-string expression.
After the device-name argument is evaluated, the F$GETDVI lexical function
examines the first character of the name. If the first character is an underscore (_),
the name is considered a physical device name. Otherwise, a maximum of 10 levels of
logical name translations are performed, and the equivalence names, if any, are used.
Functions and CALL Routines under OpenVMS
4
GETJPI Function
333
item
is a character variable that contains any item accepted by the F$GETDVI lexical
function (for example, the physical device name). For more information about the
F$GETDVI lexical function, see OpenVMS DCL Dictionary.
Details
The GETDVI function returns the device information as a character string. If the device
information string is longer than the length of the target variable, it is truncated.
GETJPI Function
Retrieves job-process information
Category: General-Purpose OpenVMS
OpenVMS specifics:
All aspects are host-specific
Syntax
GETJPI(jpi-item<,pid>)
jpi-item
is a character variable that contains any item accepted by the F$GETJPI lexical
function, for example, a user process name. For more information about the
F$GETJPI lexical function, see OpenVMS DCL Dictionary.
pid
can be either character (process-name variable) or numeric (process-ID variable). If
the PID parameter is a character variable, GETJPI looks up information for a
process whose name matches the value of the character variable. However, because
of the way in which character variables are passed to functions, the GETJPI function
must trim trailing blanks from the character variable. For this reason, you cannot
use character variables to specify a process name if the process name itself contains
trailing blanks. Instead, you should either use a numeric value to specify the process
ID, or you should omit the trailing blanks from the name of the desired process. If
you do not specify this argument, the current process is used.
Details
The GETJPI function returns the job-process information as a character string. If the
job-process information string is longer than the length of the target variable, it is
truncated.
334
GETLOG Function
4
Chapter 15
GETLOG Function
Returns information about a DCL logical name
Category:
General-Purpose OpenVMS
OpenVMS specifics:
All aspects are host-specific
Syntax
GETLOG(logical-name<,table>,< index>,
<mode>,< case>,< item>)
logical-name
can be a character variable, character literal enclosed in double quotation marks, or
another character expression. This required argument is the DCL logical name that
you want information about.
table
is an optional character parameter that is the name of a DCL logical name table. It
can be a character variable, a character literal enclosed in double quotation marks,
or another character expression. The default is “LNM$DCL_LOGICAL”. If the table
name is more than 31 characters long, it is truncated. If table is specified, the
GETLOG function searches only the specified table for the logical name.
If you specify “CASE_SENSITIVE” in the case argument, then you must use the
proper case in the table argument as well.
index
is an optional numeric parameter that indicates the number of the translation to
return if a logical name has multiple translations. This argument can be either a
numeric literal or numeric variable. The default value is 0.
mode
is an optional character parameter that contains the access mode to be used for
translation. It can be a character variable, a character literal enclosed in double
quotation marks, or another character expression. The default is “USER”. If the
mode name is more than 10 characters long, it is truncated. If mode is specified, the
GETLOG function searches only for a logical name created with the specified access
mode.
case
is an optional character parameter that determines the case to be used for
translation. It can be a character variable, a character literal enclosed in double
quotation marks, or another character expression. If the case name is more than 14
characters long, it is truncated.
“CASE_BLIND”
specifies to ignore the case of the characters for translation. This is the default.
“CASE_SENSITIVE”
specifies to accept the case of the characters for translation.
If you specify “CASE_SENSITIVE” as the value for the case argument, then you
must also use the correct case in the table argument value.
Functions and CALL Routines under OpenVMS
4
GETMSG Function
335
item
is an optional character parameter that specifies what type of information is to be
returned about a logical name. It can be a character variable, a character literal
enclosed in double quotation marks, or another character expression. The default
value is “VALUE”. If item is more than 11 characters long, it is truncated.
Details
The GETLOG function returns information about a DCL logical name. The return
string is always a character value. Numeric values are returned as character values.
The default return value is the equivalence name of a logical name.
The GETLOG function closely resembles the F$TRNLNM lexical function of DCL.
For more information about the syntax and arguments of the GETLOG function, such
as all valid values for a particular argument, refer to the F$TRNLNM lexical function
in OpenVMS DCL Dictionary or in the Base SAS Software section in SAS Help and
Documentation.
Note: You cannot skip any arguments when using the GETLOG function. For
example, in order to specify a value for item, you must also specify values for table,
index, mode, and case. If you do not want to change the values for these arguments,
then simply specify the default value. 4
GETMSG Function
Translates an OpenVMS error code into text
Category: General-Purpose OpenVMS
OpenVMS specifics:
All aspects are host-specific
Syntax
GETMSG(status)
status
is an OpenVMS status code. It is usually returned from one of the other functions
that return an OpenVMS status code on failure.
Details
The return value is a character variable that receives the message text corresponding to
the status code. If the message string is longer than the length of the target variable, it
is truncated.
See Also
3 “DELETE Function” on page 316
336
GETQUOTA Function
4
Chapter 15
GETQUOTA Function
Retrieves disk quota information
Category:
General-Purpose OpenVMS
OpenVMS specifics:
All aspects are host-specific
Syntax
GETQUOTA(dev,user,usage,perm,over,context,chan)
dev
is the device that you want to gather disk quota information for.
user
receives your numeric user identification code (UIC) on the disk. The UICw. format
can be used to format the numeric value. This variable must be initialized to 0 before
the first execution.
usage
receives your current disk usage in blocks. This variable must be initialized to 0
before the first execution.
perm
receives your permanent quota. This variable must be initialized to 0 before the first
execution.
over
receives your allowed overdraft. This variable must be initialized to 0 before the first
execution.
context
is a numeric variable that must be initialized to 0 before the first execution and must
not be modified between calls.
chan
is a numeric variable that must be initialized to 0 before the first execution and must
not be modified between calls.
Details
Besides storing the quota information in the USER, USAGE, PERM, and OVER
variables, the GETQUOTA function also returns the OpenVMS status code that is
returned by SYS$QIO. The OpenVMS status code can have the following return codes:
1
indicates the GETQUOTA function was successful and more disk
quota remains.
996
indicates that no more quota information is available.
980
indicates that quotas are not enabled on the volume.
Any other value indicates an OpenVMS error.
Note: In order to use the GETQUOTA function, you must have either SYSPRV
privileges or read access to Quota.sys on the volume. 4
Functions and CALL Routines under OpenVMS
4
GETSYM Function
337
Example
The following example uses the GETQUOTA function:
data gquota;
dev="$1$DUA0:";
user=0;
usage=0;
perm=0;
over=0;
context=0;
chan=0
do until (rc ^= 1);
rc=getquota(dev,user,usage,perm,over,context,chan);
output;
end;
run;
proc print data=gquota;
run;
See Also
3 “UICw. Format” on page 304
GETSYM Function
Returns the value of a DCL symbol
Category: General-Purpose OpenVMS
OpenVMS specifics:
All aspects are host-specific
Syntax
GETSYM(symbol-name)
symbol-name
is the name of a DCL symbol defined in your process. It can be a character variable,
character literal enclosed in double quotation marks, or another character
expression. If symbol-name is more than 200 characters long, it is truncated.
Details
The return value is the character string equivalent of the DCL symbol. If the symbol is
defined as both a local and global symbol, then the local value is returned. If the
symbol value string is longer than the length of the target variable, it is truncated.
338
GETTERM Function
4
Chapter 15
See Also
3 “SYSGET Function” on page 351
GETTERM Function
Returns the characteristics of your terminal device
Category:
General-Purpose OpenVMS
All aspects are host-specific
OpenVMS specifics:
Syntax
GETTERM(characteristic-name)
characteristic-name
is the name of the terminal characteristic to be returned. The argument can be a
character variable, character literal enclosed in double quotation marks, or another
character expression. If characteristic-name is longer than 200 characters, it is
truncated.
Details
The GETTERM function returns the characteristics of your terminal device from within
SAS. It can be called from either the DATA step or an SCL program. This function
eliminates the need to use the X command or statement to return your terminal
characteristics. The return value is a numeric code, which is the current setting of a
characteristic.
Characteristic values that are Boolean (off or on) are returned as 0 or 1, respectively.
Characteristic values that have integer values, such as page size, are returned as the
function value.
If an error occurs during the execution of the function, GETTERM returns a negative
result. Some common error return codes include the following:
−20
represents the OpenVMS symbolic name SS$_BADPARAM, which
means the characteristic name is not valid or was specified
ambiguously.
−2313
represents the OpenVMS symbolic name, SS$_NOSUCHDEV, which
means the current SYS$OUTPUT device is not a terminal device, or
does not exist.
The following table lists in alphabetic order the characteristics that can be returned
by the GETTERM function.
Table 15.1
Terminal Characteristics
Characteristic
Explanation
ALTTYPEAHEAD
Alternate type ahead buffer enabled
ANSICRT
Device is an ANSI CRT
APPLICATION
Keypad is in application mode
Functions and CALL Routines under OpenVMS
4
GETTERM Function
Characteristic
Explanation
AUTOBAUD
Automatic baud rate detection is enabled
AVO
Terminal has advanced video option
BLOCK
Terminal is in block transfer mode
BROADCAST
Terminal accepts broadcast messages
BROADCASTMBX
Broadcast messages sent via mailbox
DECCRT
Terminal is a DEC CRT (VT100 or later)
DECCRT2
Terminal is a DEC CRT (VT200 or later)
DIALUP
Terminal is on a dialup line
DISCONNECT
Terminal disconnects when hangup occurs
DMA
Terminal uses asynchronous DMA
DRCS
Terminal has soft character font set
ECHO
Terminal input is echoed
EDIT
Terminal has editing capabilities
EDITING
Terminal line editing is enabled
EIGHTBIT
Terminal accepts 8-bit escape codes
ESCAPE
Terminal validates escape sequences
FALLBACK
Output is transformed by TFF
FORMFEED
Terminal has mechanical form feed
HALFDUPLEX
Terminal is in half-duplex mode
HANGUP
Modem is hung up when terminal logs out
HOSTSYNC
Host system is synchronized to terminal
INSERT
Default mode is insert instead of overstrike
LINESIZE
Sets terminal line size
LOCALECHO
Command line read operations are echoed
LOWER
Terminal accepts lowercase characters
MAILBOX
Terminal does not use associated mailbox
MODEM
Terminal is connected via a modem
MODHANGUP
Modify hangup behavior
PAGESIZE
Sets terminal page size
PASSTHROUGH
Pass all characters unmodified/examined
PRINTER
Device has a printer port
READSYNC
Read synchronization is enabled
REGIS
Device supports graphics
REMOTE
Terminal is on a dialup line
SCOPE
Terminal is a video display device
SECURE
Device is on secure communication line
SIXEL
Device supports graphics
339
340
LIBNAME Function
4
Chapter 15
Characteristic
Explanation
SYSPASSWORD
System password required at login
TAB
Terminal has mechanical tab
TTSYNC
Terminal is synchronized to host system
TYPEAHEAD
Terminal accepts unsolicited input
WRAPCR/LF
Inserted for line wrap
XON
XON/XOFF handshaking used
See Also
3 “SETTERM Function” on page 349
LIBNAME Function
Assigns or deassigns a libref for a SAS data library
SAS File I/O
OpenVMS specifics: Valid values for SAS-data-library
See: LIBNAME Function in SAS Language Reference: Dictionary
Category:
Syntax
LIBNAME(’libref’< ,’SAS-data-library’<,engine< ,options>>>)
libref
specifies the libref that is assigned to a SAS data library. The value for libref must be
enclosed in single or double quotation marks.
SAS-data-library
specifies the physical name of the SAS data library that is associated with the libref.
The value of SAS-data-library must be enclosed in single or double quotation marks.
You can omit this argument if you are merely specifying the engine for a libref or an
OpenVMS logical name that you previously assigned.
If the directory that you specify does not already exist, then you must create it
before you attempt to use the libref that you have assigned to it.
Details
If the LIBNAME function returns a 0, then the function was successful. However, you
could receive a non-zero value, even if the function was successful. A non-zero value is
returned if an error, warning, or note is produced. To determine if the function was
successful, look through the SAS log and use the following guidelines:
3 If a warning or note was generated, then the function was successful.
3 If an error was generated, then the function was not successful.
Under OpenVMS, if you specify a SAS-data-library of ’[]’ (with or without a space
between the brackets), SAS assigns a libref to the current directory. If you do not
Functions and CALL Routines under OpenVMS
4
MODULE Function
341
specify a SAS-data-library or if you specify a SAS-data-library of ’’ (with no space
between the quotation marks), then the LIBNAME function dissociates the libref from
the data library.
OpenVMS logical names (created by using the DCL DEFINE command) can also be
used to refer to SAS data libraries. For more information, see “Assigning OpenVMS
Logical Names” on page 140.
See Also
3 “Assigning Librefs under OpenVMS” on page 136
3 “LIBNAME Statement” on page 420
LIBREF Function
Verifies that a libref has been assigned
Category: SAS File I/O
Syntax
See: LIBREF Function in SAS Language Reference: Dictionary
OpenVMS specifics:
Syntax
LIBREF(’libref’)
libref
specifies the libref to be verified. The value for libref must be enclosed in single or
double quotation marks.
Details
LIBREF returns a value of 0 if the operation was successful, and a non-zero value if it
was not successful.
See Also
3 “LIBNAME Function” on page 340
MODULE Function
Calls a specific routine or module that resides in a shareable image
Category: External Files
OpenVMS specifics:
All
Syntax
CALL MODULE(<cntl>,module,arg-1,arg-2...,arg-n);
342
MODULE Function
4
Chapter 15
num=MODULEN(<cntl>,module,arg-1,arg-2...,arg-n);
char=MODULEC(<cntl>,module,arg-1,arg-2...,arg-n);
Note: The following functions permit vector and matrix arguments; you can use
them only within the IML procedure. 4
CALL MODULEI <cntl>,module, arg-1,arg-2...,arg-n);
num=MODULEIN(< cntl>,module,arg-1,arg-2...,arg-n)
char=MODULEIC(<cntl>,module,arg-1,arg-2...,arg-n);
cntl
is an optional control string whose first character must be an asterisk (*), followed by
any combination of the following characters:
I
prints the hexadecimal representations of all arguments to the
MODULE function and to the requested shareable image routine
before and after the shareable image routine is called. You can
use this option to help diagnose problems that are caused by
incorrect arguments or attribute tables. If you specify the I
option, the E option is implied.
E
prints detailed error messages. Without the E option (or the I
option, which supersedes it), the only error message that the
MODULE function generates is "Invalid argument to function,"
which is usually not enough information to determine the cause of
the error.
Sx
uses x as a separator character to separate field definitions. You
can then specify x in the argument list as its own character
argument to serve as a delimiter for a list of arguments that you
want to group together as a single structure. Use this option only
if you do not supply an entry in the SASCBTBL attribute table. If
you do supply an entry for this module in the SASCBTBL
attribute table, you should use the FDSTART option in the ARG
statement in the table to separate structures.
H
provides brief help information about the syntax of the MODULE
routines, the attribute file format, and the suggested SAS formats
and informats.
For example, the control string ’*IS/’ specifies that parameter lists be printed and
that the string ’/’ is to be treated as a separator character in the argument list.
module
is the name of the external module to use, specified as a shareable image, and the
routine name or ordinal value, separated by a comma. The routine name has to be
externally callable. For example, the following C language link options file contains
externally callable routines:
SYMBOL_VECTOR=(RTN_a=PROCEDURE, RTN_b=PROCEDURE)
RTN_a.0
RTN_b.0
If the shareable image supports ordinal-value naming, you can provide the
shareable image name followed by a decimal number, such as ’XYZ,30’.
You do not need to specify the shareable image name if you specified the MODULE
attribute for the routine in the SASCBTBL attribute table, as long as the routine
name is unique (that is, no other routines have the same name in the attribute file).
Functions and CALL Routines under OpenVMS
4
MOPEN Function
343
You can specify module as a SAS character expression instead of as a constant;
most often, though, you will pass it as a constant.
arg-1, arg-2, ...arg-n
are the arguments to pass to the requested routine. Use the proper attributes for the
arguments (that is, numeric arguments for numeric attributes and character
arguments for character attributes).
CAUTION:
Be sure to use the correct arguments and attributes. If you use incorrect arguments or
attributes, you can cause SAS and possibly your operating system to crash. 4
Details
The MODULE functions execute a routine module that resides in an external (outside
SAS) shareable image with the specified arguments arg-1 through arg-n. A shareable
image is an executable file that is created when using the /SHAREABLE qualifier with
the LINK command. For more information about Shareable Images, refer to OpenVMS
Linker Utility Manual.
The MODULE call routine does not return a value, while the MODULEN and
MODULEC functions return a number (num) or a character (char), respectively. Which
routine you use depends on the expected return value of the shareable image function
that you want to execute.
MODULEI, MODULEIC, and MODULEIN are special versions of the MODULE
functions that permit vector and matrix arguments. Their return values are still scalar.
You can invoke these functions only from PROC IML.
Other than this name difference, the syntax for all six routines is the same.
The MODULE function builds a parameter list by using the information in arg-1 to
arg-n and by using a routine description and argument attribute table that you define
in a separate file. Before you invoke the MODULE routine, you must define the fileref
of SASCBTBL to point to this external file. You can name the file whatever you want
when you create it.
This way, you can use SAS variables and formats as arguments to the MODULE
function and ensure that these arguments are properly converted before being passed to
the shareable image routine.
See Also
3 “The SASCBTBL Attribute Table” on page 208
3 “PEEKLONG Function” on page 345
MOPEN Function
Opens a file by directory ID and member name, and returns either the file identifier or a 0
Category: External Files
Valid values for directory-id
See: MOPEN Function in SAS Language Reference: Dictionary
OpenVMS specifics:
Syntax
MOPEN(directory-id,member-name<,open-mode <,record-length< ,record-format>>>)
344
NODENAME Function
4
Chapter 15
Note: This is a simplified version of the MOPEN function syntax. For the complete
syntax and its explanation, see the MOPEN function in SAS Language Reference:
Dictionary. 4
directory-id
specifies the identifier that was assigned when the directory was opened, generally
by the DOPEN function.
Details
The MOPEN function returns the identifier for the file, or 0 if the file could not be
opened.
See Also
3 “DOPEN Function” on page 317
NODENAME Function
Returns the name of the current node
Category:
General-Purpose OpenVMS
OpenVMS specifics:
All aspects are host-specific
Syntax
NODENAME()
Details
This function takes no arguments. The returned value can be up to 16 bytes long. In
the following example, executing the statement on a node with the node name of
MYALPHA assigns the value MYALPHA to the variable THISNODE:
data _null_;
thisnode=nodename();
run;
PATHNAME Function
Returns the physical name of a SAS data library or of an external file, or returns a blank
Category:
SAS File I/O
OpenVMS specifics:
See:
fileref or libref can be an OpenVMS logical name
PATHNAME Function in SAS Language Reference: Dictionary
Functions and CALL Routines under OpenVMS
4
PEEKLONG Function
345
Syntax
PATHNAME(’fileref’|’libref’< search-ref>)
’fileref’
specifies the fileref assigned to an external file. Under OpenVMS, fileref can also be
an OpenVMS logical name that was assigned with a DCL DEFINE command. The
value of fileref must be enclosed in single or double quotation marks.
’libref’
specifies the libref assigned to a SAS library. Under OpenVMS, OpenVMS logical
names that are created with the DCL DEFINE command can also be used to refer to
SAS libraries.
search-ref
specifies whether to search for a fileref or libref.
F
specifies a search for a fileref.
L
specifies a search for a libref.
Details
PATHNAME returns the physical name of an external file or SAS library, or blank if
fileref or libref is invalid.
PEEKLONG Function
Stores the contents of a memory address in a numeric variable on 32-bit and 64-bit platforms
Category: Special
All
PEEKLONG Function in SAS Language Reference: Dictionary
OpenVMS specifics:
See:
Syntax
PEEKCLONG(address,length);
PEEKLONG(address,length);
address
specifies the string that is the memory address.
length
specifies the length of the data.
Details
CAUTION:
Use the PEEKLONG functions only to access information returned by one of the MODULE
functions. 4
346
PUTLOG Function
4
Chapter 15
The PEEKLONG function returns a value of length length that contains the data
that starts at memory address address.
The variations of the PEEKLONG functions are:
PEEKCLONG
accesses character strings.
PEEKLONG
accesses numeric values.
Usually, when you need to use one of the PEEKLONG functions, you will use
PEEKCLONG to access a character string. The PEEKLONG function is mentioned
here for completeness.
PUTLOG Function
Creates an OpenVMS logical-name in your process-level logical name table
General-Purpose OpenVMS
OpenVMS specifics: All aspects are host-specific
Category:
Syntax
PUTLOG(logical-name,value)
logical-name
the name of the OpenVMS logical name that you want to create. It can be a
character variable, a character literal enclosed in double quotation marks, or another
character expression.
value
is the string to be assigned to the symbol. It can be a character variable, a character
literal enclosed in double quotation marks, or another character expression.
Details
The PUTLOG function creates an OpenVMS logical name in your process-level logical
name table. If the PUTLOG function executes successfully, the return value is 0.
Otherwise, the return value is the OpenVMS error code indicating why it failed.
PUTSYM Function
Creates a DCL symbol in the parent SAS process
Category:
General-Purpose OpenVMS
All aspects are host-specific
OpenVMS specifics:
Syntax
PUTSYM(symbol-name,value,scope)
Functions and CALL Routines under OpenVMS
4
RANK Function
347
symbol-name
is the name of the DCL symbol that you want to create. It can be a character
variable value, a character literal enclosed in double quotation marks, or another
character expression.
value
is the string to be assigned to the symbol. It can be a character variable, a character
literal enclosed in double quotation marks, or another character expression.
scope
defines whether the symbol is a local or global symbol. If the value of scope is 1, the
symbol is defined as a local symbol. If the value of scope is 2, the symbol is defined as
a global symbol. The scope argument can be either a numeric literal or a numeric
variable.
Details
The PUTSYM function creates a DCL symbol in the parent SAS process. If the
PUTSYM function executes successfully, then the return value is 0. Otherwise, the
return value is the OpenVMS error code that indicates why it failed.
Symbols created by the PUTSYM function do not affect an existing subprocess. Any
symbol that is created with the PUTSYM function is unavailable to future X commands,
SYSTEM calls, or VMS functions for the existing subprocesses. If the current
subprocess is destroyed and a new subprocess created, then the new subprocess will
inherit all existing symbols and logical names from the parent SAS process.
For further information, see “XTIMEOUT= System Option” on page 514. If you need
the symbol for use in future X commands, then use an X command to create the symbol
using normal DCL syntax instead of using the PUTSYM function.
See Also
3 “Issuing DCL Commands during a SAS Session” on page 43
3 “XSYMBOL System Option” on page 513
3 “XTIMEOUT= System Option” on page 514
RANK Function
Returns the position of a character in the ASCII collating sequence
Category: Character
OpenVMS specifics:
See:
ASCII collating sequence
RANK Function in SAS Language Reference: Dictionary
Syntax
RANK(x)
348
RENAME Function
4
Chapter 15
x
is a character expression (or character string) that contains a character in the ASCII
collating sequence. If the length of x is greater than 1, you receive the rank of the
first character in the string.
Details
Because OpenVMS uses the ASCII character set, the RANK function returns an integer
that represents the position of a character in the ASCII collating sequence.
RENAME Function
Renames a file
Category:
General-Purpose OpenVMS
OpenVMS specifics:
All aspects are host-specific
Syntax
RENAME(old-name,new-name)
old-name
is the current name of the file. It can be a character variable, a character literal
enclosed in double quotation marks, or another character expression.
new-name
is the new name of the file. It can be a character variable, character literal enclosed
in double quotation marks, or another character expression.
Details
You must have proper access to both the directory that contains the file and the file that
you want to rename. If the RENAME function executes successfully, the return value is
0. Otherwise, the return value is the OpenVMS error code that indicates why it failed.
The following are two common error codes:
98962
File not found.
98970
Insufficient privilege or file protection violation.
The text of the error codes is retrieved using the GETMSG function.
See Also
3 “GETMSG Function” on page 335
Functions and CALL Routines under OpenVMS
4
SETTERM Function
349
SETTERM Function
Modifies a characteristic of your terminal device
Category: Terminal-Access
OpenVMS specifics:
All aspects are host-specific
Syntax
SETTERM(characteristic-name,new-value)
characteristic-name
is the name of the terminal characteristic to be modified. The argument can be a
character variable, a character literal enclosed in double quotation marks, or another
character expression.
new-value
is the new setting for the characteristic.
Details
The SETTERM function modifies a terminal characteristic from within SAS. The
SETTERM function can be called from either the DATA step or an SCL program. This
function eliminates the need to use an X command or statement to modify your
terminal characteristics.
The return value is a numeric status code, which is the previous setting of the
characteristic, before the characteristic is changed by the function call.
Characteristic values that are Boolean (on or off) are returned as 1 or 0.
Characteristic values that have integer values, such as page size, are returned as the
function value.
If an error occurs during the execution of the SETTERM function, the result
returned is negative. Some common error return codes include the following:
−20
represents the OpenVMS symbolic name SS$_BADPARAM, which
means that the characteristic name is not valid or was specified
ambiguously.
−2313
represents the OpenVMS symbolic name, SS$_NOSUCHDEV, which
means the current SYS$OUTPUT device is not a terminal device, or
does not exist.
The characteristics that can be set with the SETTERM function are the same as
those that can be returned by the GETTERM function, and they are listed in Table 15.2
on page 349.
Table 15.2
Terminal Characteristics
Characteristic
Explanation
ALTTYPEAHEAD
Alternate type ahead buffer enabled
ANSICRT
Device is an ANSI CRT
APPLICATION
Keypad is in application mode
350
SETTERM Function
4
Chapter 15
Characteristic
Explanation
AUTOBAUD
Automatic baud rate detection is enabled
AVO
Terminal has advanced video option
BLOCK
Terminal is in block transfer mode
BROADCAST
Terminal accepts broadcast messages
BROADCASTMBX
Broadcast messages sent via mailbox
DECCRT
Terminal is a DEC CRT (VT100 or later)
DECCRT2
Terminal is a DEC CRT (VT200 or later)
DIALUP
Terminal is on a dialup line
DISCONNECT
Terminal disconnects when hangup occurs
DMA
Terminal uses asynchronous DMA
DRCS
Terminal has soft character font set
ECHO
Terminal input is echoed
EDIT
Terminal has editing capabilities
EDITING
Terminal line editing is enabled
EIGHTBIT
Terminal accepts 8-bit escape codes
ESCAPE
Terminal validates escape sequences
FALLBACK
Output is transformed by TFF
FORMFEED
Terminal has mechanical form feed
HALFDUPLEX
Terminal is in half-duplex mode
HANGUP
Modem is hung up when terminal logs out
HOSTSYNC
Host system is synchronized to terminal
INSERT
Default mode is insert instead of overstrike
LINESIZE
Sets terminal line size
LOCALECHO
Command line read operations are echoed
LOWER
Terminal accepts lowercase characters
MAILBOX
Terminal does not use associated mailbox
MODEM
Terminal is connected via a modem
MODHANGUP
Modify hangup behavior
PAGESIZE
Sets terminal page size
PASSTHROUGH
Pass all characters unmodified/examined
PRINTER
Device has a printer port
READSYNC
Read synchronization is enabled
REGIS
Device supports graphics
REMOTE
Terminal is on a dialup line
SCOPE
Terminal is a video display device
SECURE
Device is on secure communication line
SIXEL
Device supports graphics
Functions and CALL Routines under OpenVMS
Characteristic
Explanation
SYSPASSWORD
System password required at login
TAB
Terminal has mechanical tab
TTSYNC
Terminal is synchronized to host system
TYPEAHEAD
Terminal accepts unsolicited input
WRAPCR/LF
Inserted for line wrap
XON
XON/XOFF handshaking used
4
SYSGET Function
351
Example
In the following example, the purpose of the DATA step is to turn off broadcast
messages, and to force the terminal line width to be 80 characters. The old settings for
these values are stored in macro variables so that they can be reset easily at a later
time:
data _null_;
old_bc=setterm("broadcast",0);
old_ls=setterm("linesize",80);
call symput("saved_bc",put(old_bc,best.));
call symput("saved_ls",put(old_ls,best.));
run;
See Also
3 “GETTERM Function” on page 338
SYSGET Function
Returns the value of a specified operating-environment variable
Category: Special
OpenVMS specifics:
See:
operating-environment-variable is the name of a DCL symbol
SYSGET Function in SAS Language Reference: Dictionary
Syntax
SYSGET(“operating-environment-variable”)
“operating-environment-variable”
is the name of a DCL symbol. The value for operating-environment-variable must be
enclosed in double quotation marks.
Details
The specified DCL symbol must be defined in OpenVMS before it is referenced in the
SYSGET function. You can specify the symbol in a number of ways, such as in a DCL
352
TERMIN Function
4
Chapter 15
.COM file or at the DCL prompt before you invoke a SAS session. You cannot define a
symbol either by using the SAS X command while you are in a SAS session or by using
a logical name in OpenVMS.
If the value of the symbol is truncated, or if the symbol is not defined under
OpenVMS, then SYSGET displays a warning message in the SAS log.
Example
This example defines two symbols in the OpenVMS environment:
$ PATH="QC:[GOMEZ.TESTING]"
$ USER="[GOMEZ.MYTESTS]"
data _null_;
length result2 result3 $ 40;
SYMBOL2="PATH";
SYMBOL3="USER";
result2=sysget(trim(symbol2));
result3=sysget(trim(symbol3));
put result2= result3=;
run;
and then returns their values:
RESULT2=QC:[GOMEZ.TESTING]
RESULT3=[GOMEZ.MYTESTS]
See Also
3 “GETSYM Function” on page 337
3 “X Command” on page 270
TERMIN Function
Allows simple input from SYS$INPUT
Category:
Terminal-Access
All aspects are host-specific
OpenVMS specifics:
Syntax
TERMIN(prompt)
prompt
is the prompt printed on the display. It can be a character variable, a character
literal enclosed in double quotation marks, or another character expression.
Details
The TERMIN function is easier to use than the TTOPEN, TTREAD, and TTCLOSE
functions, but it does not offer the same flexibility. The return value is the characters
Functions and CALL Routines under OpenVMS
4
TRANSLATE Function
353
that the user entered at the terminal. The TERMIN function accepts a maximum of
132 characters.
See Also
3
3
3
3
“TERMOUT Function” on page 353
“TTCLOSE Function” on page 354
“TTOPEN Function” on page 356
“TTREAD Function” on page 358
TERMOUT Function
Allows simple output to SYS$OUTPUT
Category: Terminal-Access
OpenVMS specifics:
All aspects are host-specific
Syntax
TERMOUT(output)
output
is a character string to write to SYS$OUTPUT. It can be a character variable,
character literal enclosed in double quotation marks, or another character expression.
Details
The TERMOUT function is easier to use than the TTOPEN, TTWRITE, and TTCLOSE
functions, but it does not offer the same flexibility. If the TERMOUT function executes
successfully, the return value is 0. Otherwise, the return value is the OpenVMS error
code that indicates why it failed.
See Also
3
3
3
3
“TERMIN Function” on page 352
“TTCLOSE Function” on page 354
“TTOPEN Function” on page 356
“TTWRITE Function” on page 359
TRANSLATE Function
Replaces specific characters in a character expression
Category: Character
Pairs of to and from arguments are optional
See: TRANSLATE Function in SAS Language Reference: Dictionary
OpenVMS specifics:
354
TTCLOSE Function
4
Chapter 15
Syntax
TRANSLATE(source,to-1,from-1<,…to-n,from-n>)
source
specifies the SAS expression that contains the original character value.
to
specifies the characters that you want TRANSLATE to use as substitutes.
from
specifies the characters that you want TRANSLATE to replace.
Details
Under OpenVMS, you do not have to provide pairs of to and from arguments. However,
if you do not use pairs, you must supply a comma as a place holder.
TTCLOSE Function
Closes a channel that was previously assigned by TTOPEN
Category:
Terminal-Access
OpenVMS specifics:
All aspects are host-specific
Syntax
TTCLOSE(channel)
channel
is the channel variable returned from the TTOPEN function.
Details
If the TTCLOSE function executes successfully, the return value is 0. Otherwise, the
return value is the OpenVMS error code that indicates why it failed.
See Also
3 “TTOPEN Function” on page 356
Functions and CALL Routines under OpenVMS
4
TTCONTRL Function
355
TTCONTRL Function
Modifies the characteristics of a channel that was previously assigned by TTOPEN
Category: Terminal-Access
OpenVMS specifics:
All aspects are host-specific
Syntax
TTCONTRL(control-specification,channel)
control-specification
is the control string as described for the TTOPEN function. The syntax for
control-specification is the same as for TTOPEN, except that the DEVICE= attribute
cannot be changed. The new characteristics take effect on the next I/O operation.
channel
is the channel variable that was returned from the TTOPEN function.
Details
If the TTCONTRL function executes successfully, the return value is 0. Otherwise, the
return value is the OpenVMS error code that indicates why it failed.
Example
The following example prompts the user for the password, reads the password
(without echoing it to the terminal), and then writes out the password. The last step
closes the channel:
length string $ 80;
input=’
’;
chan=0;
rc=ttopen("device=tt echo",chan);
rc=ttwrite(chan,"0D0A"X||"Enter password: ");
rc=ttcontrl("noecho",chan);
rc=ttread(chan,input);
rc=ttcontrl("echo",chan);
rc=ttwrite(chan,"0D0A"X||"Password was: "||input);
rc=ttclose(chan);
See Also
3 “TTOPEN Function” on page 356
356
TTOPEN Function
4
Chapter 15
TTOPEN Function
Assigns an I/O channel to a terminal
Category:
Terminal-Access
OpenVMS specifics:
All aspects are host-specific
Syntax
TTOPEN(control-specification,channel)
control-specification
is the control string that specifies the terminal and processing options, separated
from each other by blanks. It can be a character variable, a character literal enclosed
in double quotation marks, or another character expression. The value for
control-specification gives the device name and processing options and has the
following form:
DEVICE=name <processing-option-list>
Each argument can be abbreviated to the shortest unique spelling. There is no
default.
name
specifies the terminal name for subsequent I/O operations. DEVICE=name is
required.
processing-option-list
can be one or more of the following, separated by blanks:
BUFFERFULL | NOBUFFERFULL
If you specify BUFFERFULL as one of the processing options when you
enumerate the control string for the TTOPEN function, input terminates when
the buffer is full or when a terminating character (either the default character
or the character set with the TERMINATOR processing option) is read.
The following list enumerates the effects on input termination when you turn
on combinations of processing options:
BUFFERFULL and TERMINATOR=
causes input to be terminated when any of the following is true:
3 the buffer is full. The size of the buffer is specified by the SIZE= option.
If SIZE= is not specified, then the buffer size defaults to 200 characters.
3 a character that is contained in the terminator string is encountered.
3 you press RETURN.
NOBUFFERFULL and TERMINATOR=
causes input to be terminated when any of the following is true:
3 the buffer is full. In this case, the buffer size defaults to 1024
characters. The SIZE= option is ignored.
3 a character that is contained in the terminator string is encountered.
3 you press RETURN.
Functions and CALL Routines under OpenVMS
4
TTOPEN Function
357
BUFFERFULL (only)
causes input to be terminated when either of the following is true:
3 the buffer is full
3 you press RETURN.
NOBUFFERFULL (only)
causes input to be terminated when either of the following is true:
3 the buffer is full. In this case, the buffer size defaults to 1024 characters.
3 you press RETURN.
TERMINATOR= (only)
causes input to be terminated when any of the following is true:
3 the buffer is full. In this case, the buffer size defaults to 1024 characters.
3 a character that is contained in the terminator string is encountered.
3 you press RETURN.
The default is NOBUFFERFULL.
ECHO | NOECHO
indicates whether data typed at the terminal is echoed on the display. If this
attribute is not set, the behavior is based on the LOCALECHO characteristic for
the terminal specified with DEVICE=. The following DCL command shows the
characteristics for the terminal:
$ SHOW TERMINAL name
SIZE=n
sets the size of the input buffer (that is, the number of characters that can be
read at one time). The value can be no more than 200, the maximum size of a
character variable in SAS. The default is 200 characters.
TERMINATOR=hex-string
specifies the list of characters that are considered to be terminating characters
for input. The hex-string consists of hexadecimal digit pairs that correspond to
the ASCII value of the characters used as terminators. Do not separate the
digit pairs with delimiters such as commas or spaces.
If NOBUFFERFULL is in effect, the default terminator is a carriage return
(hexadecimal value is 0D).
TIMEOUT=n
specifies how many seconds to wait for input from the terminal. If no input is
received in the time specified, the operation fails with a time-out error. By
default, there is no time limit and the input operation waits forever.
channel
is a numeric variable into which the TTOPEN function places the channel number.
Details
The channel that the TTOPEN function assigns is used by the other terminal-access
functions to perform I/O to and from the terminal. If the TTOPEN function executes
successfully, the return value is 0. Otherwise, the return value is the OpenVMS error
code that indicates why it failed.
Example
The following example reads up to 20 characters, discarding extra characters when
the buffer is full and accepting either the carriage return or the horizontal tab
358
TTREAD Function
4
Chapter 15
character (hexadecimal value is 09) as terminators. If the read is successful, the
program prints the string:
length string $ 20;
rc=ttopen("dev=TT: size=20 term=0D09",chan);
rc=ttread(chan,string,size);
if size>0 & rc=0 then put string;
rc=ttclose(chan);
See Also
3 “TTCLOSE Function” on page 354
TTREAD Function
Reads characters from the channel assigned by TTOPEN
Category:
Terminal-Access
OpenVMS specifics:
All aspects are host-specific
Syntax
TTREAD(channel,buffer,<size>)
channel
is the channel variable returned from the TTOPEN function.
buffer
is the character variable where the returned characters are stored.
size
is an optional numeric parameter which indicates the maximum number of
characters to read and receives the number of characters read. If you do not specify
size, the TTREAD function reads characters up to the size of buffer. The handling of
extra characters is determined by the BUFFERFULL option specified with the
TTOPEN function.
Details
If the TTREAD function executes successfully, the return value is 0. Otherwise, the
return value is the OpenVMS error code that indicates why it failed.
See Also
3 “TTOPEN Function” on page 356
Functions and CALL Routines under OpenVMS
4
VMS Function
359
TTWRITE Function
Writes characters to the channel assigned by TTOPEN
Category: Terminal-Access
OpenVMS specifics:
All aspects are host-specific
Syntax
TTWRITE(channel,buffer,< size>)
channel
is the channel variable returned from the TTOPEN function.
buffer
is the character string variable that contains the data to be written.
size
is an optional numeric parameter that specifies how many characters to write from
buffer. If you do not specify size, the entire buffer is sent, including any trailing
blanks.
Details
If the TTWRITE function executes successfully, the return value is 0. Otherwise, the
return value is the OpenVMS error code that indicates why it failed.
The TTWRITE function does not supply any carriage control. You must insert into
the buffer any carriage-control characters that you want.
See Also
3 “TTOPEN Function” on page 356
VMS Function
Spawns a subprocess and executes a DCL command
Category: General-Purpose OpenVMS
OpenVMS specifics:
All aspects are host-specific
Syntax
VMS(DCL-command)
DCL-command
is the DCL command that is passed to the subprocess. It can be a character variable,
a character literal enclosed in double quotation marks, or another character
expression.
360
VMS Function
4
Chapter 15
Details
The VMS function spawns a subprocess and executes the command that is passed to it.
Any output that is produced is sent to SYS$OUTPUT. If you are using the SAS
windowing environment, the results appear in a new window. To close the new window,
select the File menu and then select Exit. This is consistent with the behavior of the
X statement and the X command.
If the VMS function executes successfully, the return value is 0. Otherwise, the
return value is an OpenVMS error code that indicates why the function failed. If you
supply an invalid command, you will receive a return error code such as the following:
229520
%CLI-W-IVVERB, unrecognized command verb – check validity and
spelling.
Comparisons
The VMS function is similar to the X statement, the X command, the %SYSEXEC
macro, and the CALL SYSTEM routine. In most cases, the X statement, the X
command, or the %SYSEXEC macro are preferable because they require less overhead.
However, the VMS function is useful for conditional processing because it returns a
return code. The CALL SYSTEM routine can be useful in certain situations because it
is executable, and because it accepts expressions as arguments.
See Also
3
3
3
3
3
“Issuing DCL Commands during a SAS Session” on page 43
“X Statement” on page 427
“X Command” on page 270
“CALL SYSTEM Routine” on page 313
%SYSEXEC Macro in “Macro Statements under OpenVMS” on page 519
361
CHAPTER
16
Informats under OpenVMS
SAS Informats under OpenVMS 361
Reading Binary Data under OpenVMS
Dictionary 362
HEXw. Informat 362
$HEXw. Informat 363
IBw.d Informat 364
PDw.d Informat 364
PIBw.d Informat 365
RBw.d Informat 366
VMSTIME. Informat 368
VMSZNw.d Informat 368
ZDw.d Informat 370
361
SAS Informats under OpenVMS
A SAS informat is an instruction or template that SAS uses to read data values into
a variable. Most SAS informats are described completely in SAS Language Reference:
Dictionary. The informats that are described here have behavior that is specific to SAS
under OpenVMS.
Many of the SAS informats that have details that are specific to the OpenVMS
operating environment are used to read binary data. For more information, see
“Reading Binary Data under OpenVMS” on page 361.
Reading Binary Data under OpenVMS
Different computers store numeric binary data in different forms. IBM 370 and
Hewlett-Packard 9000 computers store bytes in one order. Microcomputers that are
IBM compatible and some computers manufactured by Compaq store bytes in a
different order called “byte-reversed.”
Binary data that is stored in one order cannot be read by a computer that stores
binary data in the other order. When you are designing SAS applications, try to
anticipate how your data will be read and choose your formats and informats
accordingly.
SAS provides two sets of informats for reading binary data and corresponding
formats for writing binary data.
3 The IBw.d, PDw.d, PIBw.d, and RBw.d informats and formats read and write in
native mode, that is, using the byte-ordering system that is standard for the
machine.
362
Dictionary
4
Chapter 16
3 The S370FIBw.d, S370FPDw.d, S370FRBw.d, and S370FPIBw.d informats and
formats read and write according to the IBM 370 standard, regardless of the
native mode of the machine. These informats and formats enable you to write SAS
programs that can be run in any SAS environment, regardless of how numeric
data is stored.
If a SAS program that reads and writes binary data runs on only one type of
machine, you can use the native mode informats and formats. However, if you want to
write SAS programs that can be run on multiple machines using different byte-storage
systems, use the IBM 370 formats and informats. The purpose of the IBM 370
informats and formats is to enable you to write SAS programs that can be run in any
SAS environment, no matter what standard you use for storing numeric data.
For example, suppose you have a program that writes data with the PIBw.d format.
You execute the program on a microcomputer so that the data is stored in byte-reversed
mode. Then you run another SAS program on the microcomputer that uses the PIBw.d
informat to read the data. The data is read correctly because both of the programs are
run on the microcomputer using byte-reversed mode. However, you cannot upload the
data to a Hewlett-Packard 9000-series machine and read the data correctly because it is
stored in a format that is native to the microcomputer but foreign to the
Hewlett-Packard 9000. To avoid this problem, use the S370FPIBw.d format to write the
data; even on the microcomputer, this causes the data to be stored in IBM 370 mode.
Then read the data using the S370FPIBw.d informat. Regardless of what type of
machine you use when reading the data, it is read correctly.
Dictionary
HEXw. Informat
Converts hexadecimal positive binary values to either integer-binary (fixed-point) or real-binary
(floating-point) values
Category:
numeric
Width range:
Default width:
1 to 16
8
OpenVMS specifics:
See:
ASCII character-encoding system
HEXw. Informat in SAS Language Reference: Dictionary
Syntax
HEXw.
w
specifies the field width of the input value. If you specify a w value of 1 through 15,
the input hexadecimal value is converted to an fixed-point number. If you specify 16
for the w value, the input hexadecimal value is converted to a floating-point number.
Informats under OpenVMS
4
$HEXw. Informat
363
Details
Under OpenVMS, the hexadecimal format of the number is stored in ASCII
representation.
For more information about OpenVMS floating-point representation, see OpenVMS
Programming Interfaces: Calling a System Routine, Appendix B.
See Also
3 “$HEXw. Informat” on page 363
3 “HEXw. Format” on page 298
$HEXw. Informat
Converts hexadecimal data to character data
Category: character
Width range:
1 to 32767
Default width: 2
OpenVMS specifics:
See:
ASCII character-encoding system
$HEXw. Informat in SAS Language Reference: Dictionary
Syntax
$HEXw.
w
specifies width of the input value.
Details
The $HEXw. informat is similar to the HEXw. informat. The $HEXw. informat
converts character values that are stored as the hexadecimal equivalent of ASCII
character codes to the corresponding character values. The conversion is based on the
ASCII character-encoding system.
In the ASCII system, the conversion for 8-bit hexadecimal input (x’80’ and above) is
for the Multinational Character Set, which includes national characters such as Ä and
ß. For more information about the Multinational Character Set, see Guide to Using
OpenVMS.
See Also
3 “HEXw. Informat” on page 362
3 “$HEXw. Format” on page 299
364
4
IBw.d Informat
Chapter 16
IBw.d Informat
Reads integer-binary (fixed-point) values
Category:
numeric
Width range:
Default width:
Decimal range:
1 to 8
4
0 to 10
OpenVMS specifics:
See:
native twos-complement notation
IBw.d Informat in SAS Language Reference: Dictionary
Syntax
IBw.d
w
specifies the width of the input field.
d
optionally specifies the power of 10 by which to divide the input value. If you specify
d
d, the IBw.d informat divides the input value by the 10 value. SAS uses the d value,
even if the input data contains decimal points.
Details
The IBw.d informat reads integer-binary (fixed-point) values that are represented in
the OpenVMS twos-complement notation. For information about OpenVMS native
fixed-point values, see OpenVMS Programming Interfaces: Calling a System Routine,
Appendix B.
See Also
3 “IBw.d Format” on page 300
3 “Reading Binary Data under OpenVMS” on page 361
PDw.d Informat
Reads packed decimal data
Category:
numeric
Width range:
Default width:
Decimal range:
1 to 16
1
0 to 10
OpenVMS specifics:
See:
How values are interpreted as negative or positive
PDw.d Informat in SAS Language Reference: Dictionary
Informats under OpenVMS
4
PIBw.d Informat
365
Syntax
PDw.d
w
specifies the width of the input field.
d
optionally specifies the power of 10 by which to divide the input value. If you specify
d
d, the PDw.d informat divides the input value by the 10 value. If the data contains
decimal points, then SAS ignores the d value.
Details
Under OpenVMS, the least significant 4 bits of the least significant byte in the PD
value are interpreted as follows:
3 If the hexadecimal number in the 4 bits is D or F, then the value is interpreted as
negative.
3 If the hexadecimal number in the 4 bits is C, then the value is interpreted as
positive.
See Also
3 “PDw.d Format” on page 301
3 “Reading Binary Data under OpenVMS” on page 361
PIBw.d Informat
Reads positive integer-binary (fixed-point) values
Category: numeric
Width range:
1 to 8
Default width: 1
Decimal range:
0 to 10
OpenVMS specifics:
See:
native integer-binary values; byte reversal
PIBw.d Informat in SAS Language Reference: Dictionary
Syntax
PIBw.d
w
specifies the width of the input field.
366
RBw.d Informat
4
Chapter 16
d
optionally specifies the power of 10 by which to divide the input value. If you specify
d
d, the PIBw.d informat divides the input value by the 10 value. SAS uses the d
value even if the input data contains decimal points.
Details
Under OpenVMS, the PIB informat reads native integer-binary values. However, this
informat ignores the negativity of data in twos-complement notation and reads it as
positive. For more information about OpenVMS native fixed-point values, see
OpenVMS Programming Interfaces: Calling a System Routine, Appendix B.
See Also
3 “PIBw.d Format” on page 302
3 “Reading Binary Data under OpenVMS” on page 361
RBw.d Informat
Reads real-binary (floating-point) data
Category:
numeric
2 to 8
Width range:
4
Decimal range: 0 to 10
OpenVMS specifics: native floating-point representation
See: RBw.d Informat in SAS Language Reference: Dictionary
Default width:
Syntax
RBw.d
w
specifies the width of the input field.
d
optionally specifies the power of 10 by which to divide the input value. If you specify
d
d, the RBw.d informat divides the input value by the 10 value. SAS uses the d value
even if the input data contains decimal points.
Details
The RBw.d informat reads numeric data that is stored in native real-binary
(floating-point) notation. Numeric data for scientific calculations is often stored in
floating-point notation. (SAS stores all numeric values in floating-point notation.) A
floating-point value consists of two parts: a mantissa that gives the value and an
exponent that gives the value’s magnitude.
Informats under OpenVMS
4
RBw.d Informat
367
It is usually impossible to key in floating-point binary data directly from a terminal,
but many programs write floating-point binary data. Use caution if you are using the
RBw.d informat to read floating-point data created by programs other than SAS
because the RBw.d informat is designed to read only double-precision data.
Since the RBw.d informat is designed to read only double-precision data, it supports
widths of less than 8 bytes only for those applications that truncate numeric data for
space-saving purposes. RB4., for example, does not expect a single-precision number
that is truncated to 4 bytes.
External programs such as those written in C and FORTRAN can produce only
single- or double-precision floating-point numbers. No length other than 4 or 8 bytes is
allowed. The RBw.d informat allows a length of 3 through 8 bytes, depending on the
storage you need to save.
The FLOAT4. informat has been created to read a single-precision, floating-point
number. If you read the hexadecimal notation 3F800000with FLOAT4., the result is a
value of 1.
To read data created by a C or FORTRAN program, you need to decide on the proper
informat to use. If the floating-point numbers require an 8-byte width, you should use
the RB8. informat. If the floating-point numbers require a 4-byte width, you should use
FLOAT4.
For more information about OpenVMS floating-point representation, see OpenVMS
Programming Interfaces: Calling a System Routine, Appendix B.
Examples
Example 1: Single- vs. Double-Precision Representation
Consider how the value of 1
is represented in single-precision and double-precision notation. For single-precision,
the hexadecimal representation of the 4 bytes of data is 3F800000. For
double-precision, the hexadecimal representation is 3FF0000000000000. The digits at
the beginning of the data are different, indicating a different method of storing the data.
Example 2: Writing External Data
Consider this C example:
#include <stdio.h>
main() {
FILE *fp;
float x[3];
fp = fopen(‘‘test.dat’’,’’wb’’);
x[0] = 1; x[1] = 2; x[2] = 3;
fwrite((char *)x,sizeof(float),3,fp);
fclose(fp);
}
The file TEST.DAT will contain, in hexadecimal notation, 3f8000004000000040400000.
See Also
3 “RBw.d Format” on page 303
3 “Reading Binary Data under OpenVMS” on page 361
368
VMSTIME. Informat
4
Chapter 16
VMSTIME. Informat
Converts an 8-byte binary value that is in OpenVMS date and time format to a SAS date-time value
date and time
Width range: 8
Category:
Default width:
8
OpenVMS specifics:
All aspects are host-specific
Syntax
VMSTIME.
Details
The VMSTIME. informat is specific to the OpenVMS operating environment. You
cannot specify a width with this informat; the width is always 8 bytes.
OpenVMS date and time values that are read in with the VMSTIME. informat retain
precision up to 1/100 of a second, even though SAS cannot display anything less than
whole seconds. If you later use the VMSTIMEF. format to write out the date-time
value, the precision is retained.
See Also
3 “VMSTIMEF. Format” on page 305
VMSZNw.d Informat
Reads VMS zoned numeric data
numeric
Width range: 1 to 32
Category:
Default width:
1
OpenVMS specifics:
All aspects are host-specific
Syntax
VMSZNw.d
w
specifies the width of the output field.
d
optionally specifies the number of digits to the right of the decimal point in the
numeric value.
Informats under OpenVMS
4
VMSZNw.d Informat
369
Details
The VMSZNw.d informat is similar to the ZDw.d informat. Both read a string of ASCII
digits, and the last digit is a special character denoting the magnitude of the last digit
and the sign of the entire number. The difference between the VMSZNw.d informat and
the ZDw.d informat is in the special character used for the last digit. The following
table shows the special characters used by the VMSZNw.d informat.
Desired
Special
Desired
Special
Digit
Character
Digit
Character
0
0
-0
p
1
1
-1
q
2
2
-2
r
3
3
-3
s
4
4
-4
t
5
5
-5
u
6
6
-6
v
7
7
-7
w
8
8
-8
x
9
9
-9
y
Data formatted using the VMSZNw.d informat are ASCII strings.
Examples
If you input the ASCII string 1234 using the VMSZNw.d informat in the following
SAS statement:
input @1 vmszn4.;
the result is 1234.
If you input the ASCII string 123t using the VMSZNw.d informat in the following
SAS statement:
input @1 vmszn4.;
the result is -1234.
See Also
3 “ZDw.d Informat” in SAS Language Reference: Dictionary
3 “ZDw.d Informat” on page 370
3 “VMSZNw.d Format” on page 306
370
4
ZDw.d Informat
Chapter 16
ZDw.d Informat
Reads zoned decimal data
Category:
numeric
Width range:
Default width:
1 to 32
1
OpenVMS specifics:
See:
the last byte includes the sign
ZDw.d Informat in SAS Language Reference: Dictionary
Syntax
ZDw.d
w
specifies the width of the input field.
d
optionally specifies the power of 10 by which to divide the input value. If you specify
d
d, the ZDw.d informat divides the input value by the 10 value. If the data contains
decimal points, then SAS ignores the d value.
Details
The ZDw.d informat accepts true zoned decimal, trailing numeric strings with the
overpunch format; numeric strings of the form that is read by the standard numeric
informat; and hybrid strings. A hybrid string is a zoned decimal string that has an
explicit sign.
To achieve the same results as the SAS Release 6.06 implementation of the ZDw.d
informat, use the ZDVw.d informat.
A zoned decimal, or trailing numeric string with overpunch format, is a character
string consisting of digits. The last character of the string is a special character that
specifies both the value of the last digit and the sign of the entire number. The special
characters are listed in the following table.
ASCII
ASCII
Digit
Character
Digit
Character
0
{
-0
}
1
A
-1
J
2
B
-2
K
3
C
-3
L
4
D
-4
M
5
E
-5
N
6
F
-6
O
7
G
-7
P
Informats under OpenVMS
ASCII
4
ZDw.d Informat
371
ASCII
Digit
Character
Digit
Character
8
H
-8
Q
9
I
-9
R
The data formatted using the ZDw.d informat are ASCII strings.
Examples
If you input the ASCII string 123{ using ZDw.d informat in the following SAS
statement:
input i zd4.;
the result is 1230.
If you input the ASCII string 123} using the ZDw.d informat in the following SAS
statement:
input i zd4.;
the result is -1230.
If you input the ASCII string 1230 using the ZDw.d informat in the following SAS
statement:
input i zd4.;
the result is 1230.
If you input the ASCII string -1230 using the ZDw.d informat in the following SAS
statement:
input i zd5.;
the result is -1230.
If you input the ASCII string +123{ using the ZDw.d informat in the following SAS
statement:
input i zd5.;
the result is 1230.
See Also
3 “ZDVw.d Informat” in SAS Language Reference: Dictionary
372
373
CHAPTER
17
Procedures under OpenVMS
SAS Procedures under OpenVMS 373
Dictionary 373
CATALOG Procedure 373
CIMPORT Procedure 374
CONTENTS Procedure 375
CONVERT Procedure 377
CPORT Procedure 379
DATASETS Procedure 381
FORMAT Procedure 382
OPTIONS Procedure 383
PMENU Procedure 384
PRINTTO Procedure 385
SORT Procedure 387
VAXTOAXP Procedure 391
SAS Procedures under OpenVMS
Base SAS procedures enable you to perform statistical computations, create reports,
and manage your data. Most of the Base SAS procedures are completely described in
Base SAS Procedures Guide. The procedures described here have syntax or behavior
that is specific to the OpenVMS operating environment.
Dictionary
CATALOG Procedure
Manages entries in SAS catalogs
FILE= option in the CONTENTS statement
CATALOG Procedure in Base SAS Procedures Guide
OpenVMS specifics:
See:
Syntax
PROC CATALOG CATALOG=<libref.>catalog <ENTRYTYPE=etype> <KILL>;
374
CIMPORT Procedure
4
Chapter 17
CONTENTS <OUT=SAS-data-set> <FILE=fileref>;
Note: This is a simplified version of the CATALOG procedure syntax. For the
complete syntax and its explanation, see the CATALOG procedure in Base SAS
Procedures Guide. 4
fileref
names a file specification that is specific to the OpenVMS operating environment.
Details
The CATALOG procedure manages entries in SAS catalogs.
The FILE= option in the CONTENTS statement of the CATALOG procedure accepts
a file specification that is specific to OpenVMS. If an unquoted file specification is given
in the FILE= option, but no FILENAME statement or DCL DEFINE command has
been issued to define the file specification, then the file is named according to the rules
for naming OpenVMS files. Consider the following example. If MYFILE is neither a
SAS fileref nor an OpenVMS logical name, then the file MYFILE.LIS, containing the
list of contents for SASUSER.PROFILE, is created in your default directory:
proc catalog catalog=sasuser.profile;
contents file=myfile;
run;
CIMPORT Procedure
Restores a transport file created by the CPORT procedure
OpenVMS specifics:
See:
name and location of transport file; using a transport file on tape
CIMPORT Procedure in Base SAS Procedures Guide
Syntax
PROC CIMPORT destination=libref.member-name<option(s) >;
destination
identifies the file(s) in the transport file as a single SAS data set, single SAS catalog,
or multiple members of a SAS data library.
Details
Note: Starting in SAS 9.1, you can use the MIGRATE procedure to convert your
SAS files. For more information, see “Compatibility of Existing SAS Files with SAS 9.1”
on page 135. 4
The CIMPORT procedure imports a transfer file that was created (exported) by the
CPORT procedure.
If you have used the CPORT procedure, the CIMPORT procedure enables you to move
catalogs, data sets, and SAS data libraries from one operating environment to another.
Procedures under OpenVMS
4
CONTENTS Procedure
375
Note: The CIMPORT procedure processes a transport file that was generated by
PROC CPORT, not a transport file that was generated by the XPORT engine. The
default record attribute for SAS transport files has been changed to NONE. This is
equivalent to specifying CC=NONE in the LIBNAME or the FILENAME statement
when you create the transport file. 4
Examples
Example 1: Importing an Entire Data Library from a Disk
libname newlib ’SAS-data-library’;
filename tranfile ’transport-file’;
proc cimport library=newlib infile=tranfile;
run;
PROC CIMPORT reads from disk the transport file TRANFILE that a previous
PROC CPORT created from a SAS data library and restores the transport file to the
SAS data library NEWLIB.
Example 2: Importing an Entire Data Library from a Tape
CAUTION:
You must use an unlabeled tape when reading from tape with the CIMPORT procedure.
4
Mount the tape onto the tape drive.
x ’alloc tape-drive sastape’;
x ’mount/for sastape’;
libname newlib ’SAS-data-library’;
filename tranfile ’sastape’;
proc cimport library=newlib infile=tranfile tape;
run;
PROC CIMPORT reads from tape the transport file TRANFILE that PROC CPORT
(using the TAPE option) created from a SAS data library and restores the transport file
to the SAS data library NEWLIB.
See Also
3
3
3
3
“CPORT Procedure” on page 379
The MIGRATE Procedure at support.sas.com/rnd/migration
“Compatibility of Existing SAS Files with SAS 9.1” on page 135
Moving and Accessing SAS Files
CONTENTS Procedure
Prints descriptions of the contents of one or more files from a SAS data library
OpenVMS specifics: Engine/Host Dependent Information output
See: CONTENTS Procedure in Base SAS Procedures Guide
Syntax
PROC CONTENTS <option(s)>;
376
CONTENTS Procedure
4
Chapter 17
Note: For a complete listing and explanation of the available options, see the
CONTENTS procedure in Base SAS Procedures Guide. 4
option(s)
can be the following under OpenVMS:
DIRECTORY
prints a list of information specific to the OpenVMS operating environment. This
information is the same as the PROC DATASETS directory information that is
written to the log.
Details
The CONTENTS procedure shows the contents of a SAS data set and prints the
directory of the SAS data library.
Although most of the printed output that the CONTENTS procedure generates is the
same on all operating environments, the Engine/Host Dependent Information
output is specific to your operating environment. The following output shows the
Engine/Host Dependent Information generated for the V9 engine from the following
statements:
proc contents data=oranges;
run;
Output 17.1
Engine/Host Dependent Information from PROC CONTENTS Using the V9 Engine
The CONTENTS Procedure
Data Set Name
WORK.ORANGES
Member Type
DATA
Engine
V9
Created
Monday, May 12, 2003 01:46:21
Last Modified
Monday, May 12, 2003 01:46:21
Protection
Data Set Type
Label
Data Representation ALPHA_VMS_64
Encoding
latin1 Western (ISO)
Observations
Variables
Indexes
Observation Length
Deleted Observations
Compressed
Sorted
1
5
0
40
0
NO
NO
Engine/Host Dependent Information
Data Set Page Size
Number of Data Set Pages
First Data Page
Max Obs per Page
Obs in First Data Page
Number of Data Set Repairs
Filename
Release Created
Host Created
File Size (blocks)
8192
1
1
203
1
0
SASDISK:[SASDEMO.SAS$WORK2040F93A]ORANGES.SAS7BDAT
9.0101B0
OpenVMS
17
Alphabetic List of Variables and Attributes
#
Variable
Type
Len
2
4
3
5
1
flavor
looks
texture
total
variety
Num
Num
Num
Num
Char
8
8
8
8
8
Procedures under OpenVMS
4
CONVERT Procedure
377
The engine name is listed in the header information. The Engine/Host Dependent
Information describes the size of the data set, as well as the physical name of the data
set.
Note: In SAS 9.1, the PROC CONTENTS output shows a value of Default in the
Data Representation and Encoding fields for a data set that was created using the
V6 engine in an OpenVMS VAX environment.
4
See Also
3 “Starting with SAS Data Sets” in Step-by-Step Programming with Base SAS
Software
CONVERT Procedure
Converts OSIRIS system files and SPSS export files to SAS data sets
OpenVMS specifics:
All aspects are host-specific
Syntax
PROC CONVERT product-specification <option(s)>;
product-specification
is required and can be one of the following:
OSIRIS=fileref-1 DICT=fileref-2
specifies a fileref or libref for the OSIRIS file to be converted into a SAS data set.
If you use this product specification, you must also use the DICT= option, which
specifies the OSIRIS dictionary to use.
SPSS=fileref
specifies a fileref or libref for the SPSS file to be converted into a SAS data set.
The SPSS file can have the following formats:
3 SPSS-X format (whose originating operating environment is OpenVMS)
3 portable file format created by using the SPSS EXPORT command (from any
operating environment).
option(s)
can be one or more of the following:
FIRSTOBS=n
specifies the number of the observation where the conversion is to begin. This
option enables you to skip over observations at the beginning of the OSIRIS or
SPSS file.
OBS=n
specifies the number of the last observation to convert. This option enables you to
exclude observations at the end of the file.
378
CONVERT Procedure
4
Chapter 17
OUT=SAS-data-set
names the SAS data set that is created to hold the converted data. If the OUT=
option is omitted, SAS still creates a data set and automatically names it DATAn,
as if you omitted a data set name in a DATA statement. If it is the first such data
set created in a job or session, SAS names it DATA1; the second is named DATA2,
and so on. If the OUT= option is omitted, or if you do not specify a two-level name
in the OUT= option, then the converted data set is stored in your WORK data
library and by default is not permanent.
Details
The CONVERT procedure converts an OSIRIS system file or SPSS export file to a SAS
data set. It produces one output data set but no printed output. The new data set
contains the same information as the input file; exceptions are noted in “Output Data
Sets” on page 378. The OSIRIS and SPSS engines provide more extensive capabilities.
Because the OSIRIS and SPSS products are maintained by other companies or
organizations, changes might be made that make the files incompatible with the
current version of PROC CONVERT. SAS upgrades PROC CONVERT to support
changes made to these products only when a new version of SAS is available.
Missing Values
If a numeric variable in the input data set has no value, or if it has a
system missing value, PROC CONVERT assigns a missing value to it.
Output Data Sets
This section describes the attributes of the output SAS data set for
each product-specification value.
CAUTION:
Be sure that the translated names are unique. Variable names can sometimes be
translated by SAS. To ensure the procedure works correctly, be sure that your
variables are named in such a way that translation results in unique names. 4
OSIRIS Output
For single-response variables, the V1–V9999 name becomes the SAS
variable name. For multiple-response variables, the suffix Rn is added to the variable
name, where n is the response number. For example, V25R1 is the first response of the
multiple-response variable V25. If the variable after V1000 has 100 or more responses,
responses above 99 are eliminated. Numeric variables that OSIRIS stores in character,
fixed-point binary, or floating-point binary mode become SAS numeric variables.
Alphabetic variables become SAS character variables; any alphabetic variable that is
longer than 200 is truncated to 200. The OSIRIS variable description becomes a SAS
variable label, and OSIRIS print formats become SAS formats.
SPSS Output
SPSS variable names and variable labels become unchanged variable
names and labels. SPSS alphabetic variables become SAS character variables of length
4. SPSS blank values are converted into SAS missing values. SPSS print formats
become SAS formats, and the SPSS default precision of no decimal places becomes part
of the variables’ formats. SPSS value labels are not copied. DOCUMENT data is copied
so that PROC CONTENTS can display it.
Comparisons
Using the CONVERT procedure is similar to using the OSIRIS and SPSS engines. For
example, the following two programs provide identical results:
/* using the CONVERT procedure
filename xxx ’mybmdp.dat’;
*/
Procedures under OpenVMS
4
CPORT Procedure
379
proc convert osiris=xxx out=temp;
run;
/* using the OSIRIS engine */
libname xxx osiris ’myosiris.dat’;
data temp;
set xxx._first_;
run;
However, the OSIRIS and SPSS engines provide more extensive capability than
PROC CONVERT.
Example
The following is an example of converting an OSIRIS file to a SAS data set, using a
fileref named save:
filename save ’[mydir]osiris.dat’;
proc convert osiris=save;
run;
If you have more than one save file in the OSIRIS file referenced by fileref, then you
can use two additional options in parentheses after the fileref. The CODE= option lets
you specify the code of the save file that you want, and the CONTENT= option lets you
specify the save file’s content. For example, if a save file had CODE=JUDGES and
CONTENT=DATA, you could use the following statements to convert the save file to a
SAS data set:
filename save ’[mydir]osiris1.dat’;
proc convert osiris=save(code=judges content=data);
run;
See Also
3 “The OSIRIS and SPSS Engines under OpenVMS” on page 167
CPORT Procedure
Writes SAS data sets and catalogs into a special format in a transport file
name and location of transport file; creating a transport file on tape
See: CPORT Procedure in Base SAS Procedures Guide
OpenVMS specifics:
Syntax
PROC CPORT source-type=libref<.member-name> <option-list>;
Note: This is a simplified version of the CPORT procedure syntax. For the complete
syntax and its explanation, see the CPORT procedure in Base SAS Procedures Guide. 4
380
CPORT Procedure
4
Chapter 17
libref
specifies the name and location of the file to be transported.
Details
Note: Starting in SAS 9.1, you can use the MIGRATE procedure to convert your
SAS files. For more information, see “Compatibility of Existing SAS Files with SAS 9.1”
on page 135. 4
The CPORT procedure creates a transport file to be later restored (imported) by the
CIMPORT procedure. The transport file can contain a SAS data set, SAS catalog, or an
entire SAS library.
If you do not use the FILE= option and have not defined the reserved fileref SASCAT,
a file named SASCAT.DAT is created in your default directory.
The CPORT procedure defaults to writing to a file on disk. If you want to write to a
file on tape, you must use the TAPE option in the PROC CPORT statement.
Note: You do not need to define the fileref SASCAT to your tape drive. You can
choose any fileref, or you can let the file default to SASCAT.DAT, as it does for disk
access. 4
You do not need to use the /BLOCKSIZE=8000 option in the DCL MOUNT command,
although it is recommended.
Note: The default record attribute for SAS transport files has been changed to
NONE. This is equivalent to specifying CC=NONE in the LIBNAME or the FILENAME
statement when creating the transport file. 4
Examples
Example 1: Exporting Data Sets and Catalogs to Disk
The following is an example of
using PROC CPORT to export all the data sets and catalogs from a data library on disk:
libname newlib ’SAS-data-library’;
filename tranfile ’transport-file’;
proc cport library=newlib file=tranfile;
run;
PROC CPORT writes the file TRANFILE to disk. This file contains the data sets and
catalogs in the SAS data library NEWLIB in transport format.
Example 2: Exporting Data Sets and Catalogs to Tape
CAUTION:
You must use an unlabeled tape when writing to tape with the CPORT procedure.
4
The following is an example of using PROC CPORT to mount a tape onto a tape
drive and export all the data sets and catalogs in a data library:
x ’alloc tape-drive sastape’;
x ’mount/for sastape’;
libname newlib ’SAS-data-library’;
filename tranfile ’sastape’;
proc cport library=newlib file=tranfile tape;
run;
PROC CPORT writes the file TRANFILE to tape. This file contains the data sets and
catalogs in the SAS data library NEWLIB in transport format.
Procedures under OpenVMS
4
DATASETS Procedure
See Also
3
3
3
3
“CIMPORT Procedure” on page 374
The MIGRATE Procedure at support.sas.com/rnd/migration
“Compatibility of Existing SAS Files with SAS 9.1” on page 135
Moving and Accessing SAS Files
DATASETS Procedure
Lists, copies, renames, repairs, and deletes SAS files; manages indexes for and appends SAS
data sets in a SAS data library; changes variable names and related variable information and
prints the contents
directory information; CONTENTS statement output
See: DATASETS Procedure in Base SAS Procedures Guide
OpenVMS specifics:
Syntax
PROC DATASETS <option(s)>;
CONTENTS <option(s)>
Note: This is a simplified version of the DATASETS procedure syntax. For the
complete syntax and its explanation, see the DATASETS procedure in Base SAS
Procedures Guide. 4
CONTENTS option(s)
the value for option(s) can be the following under OpenVMS:
DIRECTORY
prints a list of information specific to the OpenVMS operating environment.
Details
The SAS data library information that the DATASETS procedure displays in the SAS
log is specific to your operating environment. The following output shows the
information that the DATASETS procedure writes to the SAS log when the following
SAS statements are executed in the OpenVMS environment:
proc datasets library=work;
run;
381
382
FORMAT Procedure
4
Chapter 17
Output 17.2
1
SAS Data Library Information from PROC DATASETS with the V9 Engine
proc datasets library=work;
Directory
Libref
Engine
Physical Name
2
$
WORK
V9
SASDISK:[SASDEMO.SAS$WORK2542293E]
#
Name
Member
Type
1
ORANGES
DATA
File Size
(blocks)
17
Last Modified
12MAY2003:13:46:22
quit;
The output shows you the libref, engine, and physical name associated with the
library, as well as the names of the data sets that the library contains. It also shows
the names of any catalogs and valid memtype stored in the library.
The CONTENTS statement of the DATASETS procedure generates the same
Engine/Host Dependent Information as the CONTENTS procedure.
See Also
3 “CONTENTS Procedure” on page 375
3 “Modifying Data Set Names and Attributes” in Step-by-Step Programming with
Base SAS Software
FORMAT Procedure
Creates user-defined formats and informats
OpenVMS specifics: location of temporary formats and informats
See: FORMAT Procedure in Base SAS Procedures Guide
Syntax
PROC FORMAT <options(s)>;
Note: This is a simplified version of the FORMAT procedure syntax. For the
complete syntax and its explanation, see the FORMAT procedure in Base SAS
Procedures Guide. 4
option(s)
specifies the options that control the behavior of and information about formats and
informats.
Details
The FORMAT procedure enables you to define your own informats and formats for
variables.
Procedures under OpenVMS
4
OPTIONS Procedure
383
Under OpenVMS, temporary formats and informats are stored in the temporary
catalog FORMATS.SASEB$CATALOG in your WORK data library.
OPTIONS Procedure
Lists the current values of all SAS system options
OpenVMS specifics:
See:
host options listed
OPTIONS Procedure in Base SAS Procedures Guide
Syntax
PROC OPTIONS < options(s)>;
option(s)
controls the format of the list of system options and the number of items displayed.
The value for option(s) can be any of the following under OpenVMS:
HOST | NOHOST
displays only host options (HOST) or only portable options (NOHOST).
PORTABLE is an alias for NOHOST.
LONG | SHORT
specifies the format for displaying the settings of the SAS system options. LONG
lists each system option and its value on a separate line with an explanation.
SHORT produces a compressed listing without explanations.
OPTION=option-name <DEFINE> <VALUE>
displays a short description and the value (if any) of the option specified by
option-name. DEFINE and VALUE provide additional information about the
option.
option-name
specifies the option to use as input to the procedure.
DEFINE
displays the short description of the option, as well as its type and how to get,
set, and display its value.
VALUE
displays the option value and scope, as well as how the value was set.
If a SAS system option uses an equals sign, such as PAGESIZE=, do not
include the equals sign when specifying the option to the OPTION= procedure.
RESTRICT
displays the system options that have been restricted by your site administrator.
These options cannot be changed by the user. For each option that is restricted,
the RESTRICT option displays the value, scope, and how it was set.
If your site administrator has not restricted any options, then the following
message will appear in the SAS log:
Your Site Administrator has not restricted any options.
384
PMENU Procedure
4
Chapter 17
Details
The OPTIONS procedure lists the current settings of the SAS system options.
The portable options (session and configuration) displayed by the OPTIONS
procedure are the same for every operating environment, although the default values
might differ slightly. However, the host options that PROC OPTIONS displays are
different for each operating environment.
Also, some option values depend on which mode of operation you use to run SAS. For
example, the default for the LOG= option is blank under a windowing environment, but
in interactive line mode the default is SYS$OUTPUT. Finally, the way you set up your
process affects the default values of system options. For example, the default value of
the CONFIG= option depends on whether you have defined the OpenVMS logical name
SAS$CONFIG in your process.
By using PROC OPTIONS, you can check the values of all system options. For more
information about a particular host option, see the entry for the option in Chapter 19,
“System Options under OpenVMS,” on page 429.
See Also
3 For more information about restricted options, see “Six Types of Configuration
Files” on page 36.
PMENU Procedure
Defines pull-down menu facilities for windows that were created with SAS software
OpenVMS specifics:
Some options and statements are ignored in the OpenVMS
environment
See:
PMENU Procedure in Base SAS Procedures Guide
Syntax
PROC PMENU <CATALOG=< libref.>catalog>
<DESC ’entry-description’>;
Note: This is a simplified version of the PMENU procedure syntax. For the complete
syntax and its explanation, see the PMENU procedure in Base SAS Procedures Guide. 4
CATALOG=<libref.>catalog
specifies the catalog in which you want to store PMENU entries. If you omit libref,
the PMENU entries are stored in a catalog in the SASUSER data library. If you omit
CATALOG=, the entries are stored in the SASUSER.PROFILE catalog.
DESC ’entry-description’
provides a description of the PMENU catalog entries created in the step.
Details
The PMENU procedure defines pull-down menus that can be used in DATA step
windows, macro windows, SAS/AF and SAS/FSP windows, or in any SAS application
that enables you to specify menus.
Procedures under OpenVMS
4
PRINTTO Procedure
385
Under OpenVMS, the following statements or statement options are ignored:
3
3
3
3
SEPARATOR statement
HELP= option in the DIALOG statement
ACCELERATE= and MNEMONIC= options in the ITEM statement
ATTR= and COLOR= options in the TEXT statement. The colors and attributes
for text and input fields are controlled by the CPARMS colors. For details, see
“Customizing Colors under OpenVMS” on page 106.
The GRAY option makes any unavailable menu items look different (usually bold)
from those that are available. On some displays, this visual distinction is not
supported; on these displays, all menu items appear the same.
PRINTTO Procedure
Defines destinations for SAS procedure output and for the SAS log
OpenVMS specifics:
See:
valid values for file-specification; UNIT= option
PRINTTO Procedure in Base SAS Procedures Guide
Syntax
PROC PRINTTO <option(s)>
Note: This is a simplified version of the PRINTTO procedure syntax. For the
complete syntax and its explanation, see the PRINTTO procedure in Base SAS
Procedures Guide. 4
option(s)
LOG=file-specification
specifies a fileref, a fully qualified OpenVMS pathname (in quotation marks), or an
OpenVMS logical name as the destination for the log output.
PRINT=file-specification
specifies a fileref, a fully qualified OpenVMS pathname (in quotation marks), or an
OpenVMS logical name as the destination for procedure output. FILE= and
NAME= are valid aliases for this option.
UNIT=nn
sends output to the file FTnnF001.LIS, where nn represents the UNIT= value,
which can range from 1 to 99.
Details
The PRINTTO procedure defines destinations for SAS procedure output and for the
SAS log.
To send output directly to a printer, use a FILENAME statement with the PRINTER
device-type keyword. This sends the output to the default SYS$PRINT queue. If you
want to override the default queue, use the QUEUE= option in the FILENAME
statement to specify a different queue.
386
PRINTTO Procedure
4
Chapter 17
Note: You cannot send the output directly to a member of a text library or to a
remote node or tape. 4
Examples
Example 1: Sending SAS Log Entries to an External File
The following statements
send any SAS log entries that are generated after the RUN statement to the external
file that is associated with the fileref MYFILE:
filename myfile ’[mydir]mylog.log’;
proc printto log=myfile;
run;
Example 2: Sending Procedure Output to an External File
The following statements
send the procedure output from the CONTENTS procedure (and any other subsequent
procedure output from the SAS session) to the external file that is associated with the
OpenVMS logical name OUTPUT:
x ’define output [mydir]proc1.lis’;
proc printto print=output;
run;
proc contents data=oranges;
run;
Example 3: Sending Procedure Output to a System Printer
The following statements
send the procedure output from the CONTENTS procedure directly to the system
printer:
filename myfile printer ’[mydir]proc2.lis’;
proc printto print=myfile;
run;
proc contents data=oranges;
run;
Example 4: Redirecting SAS Log and Procedure Output to the Default
The following
statements (a PROC PRINTTO statement with no options) redirect the SAS log and
procedure output to the original default destinations:
proc printto;
run;
Example 5: Sending Procedure Output to a File
The following statements send any
procedure output to a file named MYPRINT.DAT:
proc printto print=myprint;
run;
See Also
3 “FILENAME Statement” on page 397
3 Chapter 8, “Routing the SAS Log and SAS Procedure Output,” on page 195.
Procedures under OpenVMS
4
SORT Procedure
387
SORT Procedure
Sorts observations in a SAS data set by one or more variables, then stores the resulting sorted
observations in a new SAS data set or replaces the original data set
OpenVMS specifics:
See:
available sort routines
SORT Procedure in Base SAS Procedures Guide
Syntax
PROC SORT <option(s)> <collating-sequence-option>;
Note: This is a simplified version of the SORT procedure syntax. For the complete
syntax and its explanation, see the SORT procedure in Base SAS Procedures Guide. 4
option(s)
NODUPKEY
under OpenVMS, the observation that is returned is unpredictable; that is, the
observation returned is not guaranteed to be the first observation that was
encountered for that BY variable. For further explanation of the NODUPKEY
option, see “NODUPKEY Option” on page 387.
SORTWKNO=n
specifies the number of sort work files to be used by the OpenVMS sort utility. The
value for n can be 0 through 6. For further explanation of the SORTWKNO=
option, see “SORTWKNO= Option” on page 388.
Details
The SORT procedure sorts observations in a SAS data set by one or more character or
numeric variables, either replacing the original data set or creating a new, sorted data
set. By default under OpenVMS, the SORT procedure uses the ASCII collating
sequence.
The SORT procedure uses the sort utility specified by the SORTPGM system option.
By default, when SORTPGM is set to HOST, the SORT procedure uses the OpenVMS
sort utility. (An alternate host sort utility, Hypersort V04–003, is also available. For
information about how the sort utility is chosen, see “SORTPGM= System Option” on
page 493.)
You can use all of the options available to the SAS sort utility with your host sort. If
you specify an option that is not supported by the host sort, then the SAS sort will be
used instead. For a complete list of options, see the SORT procedure in the Base SAS
Procedures Guide.
NODUPKEY Option
The SAS sort utility and the OpenVMS sort utility differ slightly in their
implementation of the NODUPKEY option. If you need to use both the NODUPKEY
and EQUALS options (that is, if you need to guarantee that the first observation
returned is the first observation that was input), then use the SAS sort utility.
When you use the SAS sort utility, the NODUPKEY option implies the EQUALS
option by default. As a result, the observation that is returned for like BY values is the
388
SORT Procedure
4
Chapter 17
first observation that was encountered for the key BY variable. That is, the
observations are returned in the order in which they were input.
By contrast, the OpenVMS sort utility does not support the EQUALS option in
conjunction with the NODUPKEY option. When NODUPKEY is used with the
OpenVMS sort utility, the EQUALS option is set to NOEQUALS unconditionally. As a
result, when NODUPKEY is specified with the OpenVMS sort utility, the observation
that is returned for observations with like BY values is not guaranteed to be the first
observation that was encountered for that BY variable. The observation that the
OpenVMS sort utility returns when NODUPKEY is in effect is unpredictable.
SORTWKNO= Option
The SORTWKNO= option specifies the number of sort work files to be used by the
OpenVMS sort utility.
The OpenVMS sort utility can support up to 10 work files. If you set SORTWKNO=
to 0 and define the ten sort work files, SAS uses the ten files. To use the sort work files,
you must define a SORTWORK# logical name for each sort work area. For example:
$DEFINE SORTWORK0
$DEFINE SORTWORK1
$DEFINE SORTWORK2
DISK1:[TEMP]
DISK2:[TEMP]
DISK3:[TEMP]
The SORTWORK= system option can also be used to assign up to ten work files.
The following example uses the SORTWKNO= option to specify that four work files
should be used:
libname mylib ’[mydata]’;
proc sort data=mylib.june sortwkno=4;
by revenue;
run;
Customizing Collating Sequences
The options EBCDIC, ASCII, NATIONAL, DANISH, SWEDISH, and REVERSE specify
collating sequences that are stored in the HOST catalog.
If you want to provide your own collating sequences or change a collating sequence
provided for you, use the TRANTAB procedure to create or modify translation tables.
For more information about the TRANTAB procedure, see SAS National Language
Support (NLS): User’s Guide. When you create your own translation tables, they are
stored in your PROFILE catalog, and they override any translation tables that have the
same names in the HOST catalog.
Note: System managers can modify the HOST catalog by copying newly created
tables from the PROFILE catalog to the HOST catalog. Then all users can access the
new or modified translation table. 4
If you are using the SAS windowing environment and want to see the names of the
collating sequences that are stored in the HOST catalog, issue the following command
from any window:
CATALOG SASHELP.HOST
If you are not using the SAS windowing environment, then issue the following
statements to generate a list of the contents of the HOST catalog:
proc catalog catalog=sashelp.host;
contents;
run;
Procedures under OpenVMS
4
SORT Procedure
389
Entries of type TRANTAB are the collating sequences.
To see the contents of a particular translation table, use the following statements:
proc trantab table=table-name;
list;
run;
The contents of collating sequences are displayed in the SAS log.
Setting the Host Sort Utility as the Sort Algorithm
To specify a host sort utility as the sort algorithm:
1 Set the SORTPGM system option to tell SAS when to use the host sort utility.
3 If SORTPGM=HOST, then SAS will use the OpenVMS sort utility. If you have
enabled the Hypersort utility, then SAS will use it as the host sort utility.
3 If SORTPGM=BEST, then SAS chooses the best sorting method (either the
SAS sort or the host sort) for the situation.
For more information, see “SORTPGM= System Option” on page 493.
Specifying the SORTSEQ= Option with a Host Sort Utility
The SORTSEQ= option enables you to specify the collating sequence for your sort. For
a list of valid values, see Base SAS Procedures Guide.
CAUTION:
If you are using a host sort utility to sort your data, then specifying the SORTSEQ= option
might corrupt the character BY variables if the sort sequence translation table and its
inverse are not one-to-one mappings. In other words for the sort to work, the
translation table must map each character to a unique weight, and the inverse table
must map each weight to a unique character variable. 4
If your translation tables do not map one-to-one, then you can use one of the
following methods to perform your sort:
3 create a translation table that maps one-to-one. Once you create a translation table
that maps one-to-one, you can easily create a corresponding inverse table using
the TRANTAB procedure. If your table is not mapped one-to-one, then you will
receive the following note in the SAS log when you try to create an inverse table:
NOTE:
This table cannot be mapped one to one.
For more information about the TRANTAB procedure, see SAS National Language
Support (NLS): User’s Guide.
3 use the SAS sort. You can specify the SAS sort using the SORTPGM system
option. For more information, see “SORTPGM= System Option” on page 493.
3 specify the collation order options of your host sort utility. See the documentation
for your host sort utility for more information.
3 create a view with a dummy BY variable. For an example, see “Example: Creating
a View with a Dummy BY Variable” on page 390.
Note: After using one of these methods, you might need to perform subsequent BY
processing using either the NOTSORTED option or the NOBYSORTED system option.
For more information about the NOTSORTED option, see “BY Statement” in SAS
Language Reference: Dictionary. For more information about the NOBYSORTED
system option, see “BYSORTED System Option” in SAS Language Reference:
Dictionary. 4
390
SORT Procedure
4
Chapter 17
Example: Creating a View with a Dummy BY Variable
The following code is an
example of creating a view using a dummy BY variable:
options no date nostimer ls-78 ps-60;
options sortpgm=host msglevel=i;
data one;
input name $ age;
datalines;
anne 35
ALBERT 10
JUAN 90
janet 5
bridget 23
BRIAN 45
;
data oneview / view=oneview;
set one;
name1=upcase(name);
run;
proc sort data=oneview out=final(drop=name1);
by name1;
run;
proc print data=final;
run;
The output is the following:
Output 17.3
Creating a View with a Dummy BY Variable
The SAS System
Obs
name
1
ALBERT
2
anne
3
BRIAN
4
bridget
5
janet
6
JUAN
age
10
35
45
23
5
90
See Also
3 “TRANTAB Procedure” in SAS National Language Support (NLS): User’s Guide
3 “SORTPGM= System Option” on page 493
3 “SORTSIZE= System Option” on page 494
3 “SORTWORK= System Option” on page 495
3 “SORTPGM= System Option” on page 493
3 “Working with Grouped or Sorted Observations” in Step-by-Step Programming
with Base SAS Software
Procedures under OpenVMS
4
VAXTOAXP Procedure
391
VAXTOAXP Procedure
Converts the format of a SAS data set that was created in an OpenVMS VAX environment to the
format that SAS supports in the OpenVMS Alpha environment
OpenVMS Alpha specifics: All aspects are specific to the OpenVMS Alpha operating
environment
Syntax
PROC VAXTOAXP
DATA = <libref.>member
OUT = <SAS-data-set>;
DATA=libref.member
specifies a libref member, a fully qualified OpenVMS pathname (in quotation marks),
or an OpenVMS logical name. The DATA= option is required.
OUT=SAS-data-set
names the SAS data set that is created to hold the converted data. The OUT= option
is optional. If you do not specify a value for the OUT= option, then SAS creates a
temporary SAS data set called WORK.DATAn.
Details
In the OpenVMS VAX operating environment, SAS stores numeric variables as
D-floating data types, which means that their length varies from 2 to 8 bytes. However,
in the OpenVMS Alpha operating environment, numeric variables are stored as IEEE
T-floating data types, which means that their length varies from 3 to 8 bytes. If you
attempt to move data with 2-byte numeric variables from an OpenVMS VAX
environment to an OpenVMS Alpha environment, you will get the following error
message:
ERROR: IEEE numbers with a length less than 3 are not supported.
This data set contains observations with numeric variables of length 2. The data
set cannot be created/translated.
If a SAS data set that was created in the OpenVMS VAX environment contains only
numeric variables with lengths of 3 bytes or greater, then SAS in the OpenVMS Alpha
environment can access the data set without the need for any conversion process.
However, if your OpenVMS VAX data set does contain numeric variables with 2-byte
lengths, your OpenVMS Alpha environment will be unable to access the data set until
you have converted it.
The VAXTOAXP procedure increases the length of all numeric variables by 1 byte up
to 8 bytes. Thus, a 2-byte numeric variable becomes 3 bytes, a 3-byte numeric variable
becomes 4 bytes, and so on.
If you run the VAXTOAXP procedure on a data set that does not contain numeric
variables with lengths less than 8 bytes, the conversion proceeds after the following
warning message is issued:
WARNING: No numeric variables had a length less than 8, so it was
unnecessary to invoke PROC VAXTOAXP.
However, the data set will still be copied as requested.
392
VAXTOAXP Procedure
4
Chapter 17
Note: You cannot use this procedure to convert SAS catalogs. On OpenVMS VAX
and Alpha, catalogs must be converted with PROC CIMPORT. 4
Example
Suppose you have a permanent SAS data set named CHARLIE that you created in
an OpenVMS VAX environment. You know that this data set contains numeric
variables with 2-byte lengths. To read that data set into SAS running in an OpenVMS
Alpha environment, use the following statements:
libname vlib v6 ’user$disk:[dir]’;
libname alib v8 ’[nwdir]’;
proc vaxtoaxp data=vlib.charlie out=alib.charlie;
run;
You can verify that all 2-byte numeric variables have been converted to 3 bytes by
running the CONTENTS procedure on the ALIB.CHARLIE data set. All numeric
variables that have lengths less than 8 bytes will have their lengths increased by 1 byte.
Note: If you attempt to use the VAXTOAXP procedure while running in an
OpenVMS VAX operating environment, you will receive the following error message:
ERROR: Procedure VAXTOAXP is not supported on the VAX.
4
393
CHAPTER
18
Statements under OpenVMS
SAS Statements under OpenVMS 393
Dictionary 393
ABORT Statement 393
ATTRIB Statement 394
FILE Statement 395
FILENAME Statement 397
FOOTNOTE Statement 414
%INCLUDE Statement 415
INFILE Statement 417
LENGTH Statement 419
LIBNAME Statement 420
SYSTASK Statement 422
TITLE Statement 425
WAITFOR Statement 425
X Statement 427
SAS Statements under OpenVMS
A SAS statement is a directive to SAS that either requests that SAS perform a
certain operation or provides information to the system that might be necessary for
later operations.
All SAS statements are completely described in SAS Language Reference: Dictionary.
Those that are described here have syntax and usage that is specific to the OpenVMS
operating environment.
Dictionary
ABORT Statement
Stops executing the current DATA step, SAS job, or SAS session
Valid:
in a DATA step
OpenVMS specifics:
See:
action of ABEND and RETURN; maximum value of n
ABORT Statement in SAS Language Reference: Dictionary
394
ATTRIB Statement
4
Chapter 18
Syntax
ABORT < ABEND | RETURN> <n>;
Note: This is a simplified explanation of the ABORT statement syntax. For the
complete explanation, see SAS Language Reference: Dictionary. 4
no argument
stops processing of the current DATA step. Additional actions and results depend on
the method of operation.
ABEND
causes abnormal termination of the current SAS job or session. Results depend on
the method of operation.
RETURN
causes the immediate normal termination of the current SAS job or session. Results
depend on the method of operation.
n
is an integer value that enables you to specify a condition code that SAS returns to
OpenVMS when it stops executing. The value of n can range from −2,147,483,648 to
2,147,483,647.
Details
If you specify ABORT ABEND, the symbol SAS$STATUS is set to 999. If you specify
ABORT RETURN, the symbol SAS$STATUS is set to 12. Both the ABEND and
RETURN arguments terminate the SAS job or session.
See Also
3 “Determining the Completion Status of a SAS Job under OpenVMS” on page 50
ATTRIB Statement
Associates a format, an informat, a label, or a length, or all four with one or more variables
in a DATA step
OpenVMS specifics: length specification
See: ATTRIB Statement in SAS Language Reference: Dictionary
Valid:
Syntax
ATTRIB variable-list-1 attribute-list-1< . . . variable-list-n attribute-list-n>;
Note: Following is a simplified explanation of the ATTRIB statement syntax. For
complete syntax and its explanation, see the ATTRIB statement in SAS Language
Reference: Dictionary. 4
Statements under OpenVMS
4
FILE Statement
395
attribute-list
LENGTH=<$>length
specifies the length of variables in variable-list. A dollar sign ($) is required in
front of the length of character variables. For character variables, the value of
length can be 1 to 32,767.
Details
Under OpenVMS Alpha, the minimum length that you can specify for a numeric
variable is 3 bytes.
FILE Statement
Specifies the current output file for PUT statements
Valid:
in a DATA step
OpenVMS specifics:
See:
valid values for file-specification, host-option-list, and encoding-value
FILE Statement in SAS Language Reference: Dictionary
Syntax
FILE file-specification <ENCODING=’encoding-value’>< option-list>
<host-option-list>;
file-specification
can be any type of file specification discussed in “Identifying External Files to SAS”
on page 173.
ENCODING=’encoding-value’
specifies the encoding to use when writing to the output file. The value for
ENCODING= indicates that the output file has a different encoding from the current
session encoding.
When you write data to the output file, SAS transcodes the data from the session
encoding to the specified encoding.
For valid encoding values, see “Encoding Values in SAS Language Elements” in
SAS National Language Support (NLS): User’s Guide.
option-list
specifies options for the FILE statement that are valid in all operating environments.
For information about these options, see the FILE statement in SAS Language
Reference: Dictionary.
host-option-list
specifies external I/O statement options that are specific to the OpenVMS
environment. These options can be any of the following:
ALQ=
CC=
DEQ=
396
FILE Statement
4
Chapter 18
FAC=
GSFCC=
LINESIZE=
LRECL=
MBC=
MBF=
MOD
NEW
OLD
PAGESIZE=
RECFM=
SHR=
For information about these options, see “Host-Specific External I/O Statement
Options” on page 402 in the FILENAME statement.
Many of the DCL print qualifiers are also supported as host options in the FILE
and FILENAME statements. For details, see “Printer Options in the FILENAME
and FILE Statements” on page 412 in the FILENAME statement.
You can intersperse options from option-list and host-option-list in any order.
Note: When using the PIPE device with the FILE statement, only the LRECL host
option is supported. 4
Details
By default, PUT statement output is written to the SAS log. Use the FILE statement to
route this output to either the same external file to which procedure output is written
or to a different external file. You can indicate whether or not carriage control
characters should be added to the file.
You can use the FILE statement in conditional (IF-THEN) processing because it is
executable. You can also use multiple FILE statements to write to more than one
external file in a single DATA step.
The ENCODING= option is valid only when the FILE statement includes a file
specification that is not a reserved fileref. If the FILE statement includes the
ENCODING= option and the reserved filerefs LOG or PRINT as the file-specification,
then SAS issues an error message. The ENCODING= value in the FILE statement
overrides the value of the ENCODING= system option.
Example
The following is an example of a FILE statement:
file prices;
This FILE statement uses the default filename form of the file specification (PRICES
has not been assigned as a SAS fileref or OpenVMS logical name). Therefore, SAS looks
for the file PRICES.DAT in the current directory.
Statements under OpenVMS
4
FILENAME Statement
397
When SAS writes a file, it creates a new version by default. For example, if your
default directory contains versions 1 and 2 of the file PRICES.DAT, then this FILE
statement writes PRICES.DAT;3 in your default directory.
If you want to append output lines to the most recent version of an external file, use
the MOD option in the FILE statement. For instance, from the previous example your
default directory contains three versions of PRICES.DAT. The following statement
appends data lines to PRICES.DAT;3:
file prices mod;
To reference an explicit version of a file, use the version number as part of the file
specification within a quoted string. For example, the following FILE statement writes
to version 1 of the file:
file ’prices.dat;1’;
See Also
3 “FILENAME Statement” on page 397
3 “Identifying External Files to SAS” on page 173
3 “FILE Command” on page 258
FILENAME Statement
Associates a SAS fileref with an external file or output device
anywhere in a SAS program
Valid:
OpenVMS specifics:
valid values for device-type, encoding-value, external-file, and
host-option-list
See:
FILENAME Statement in SAS Language Reference: Dictionary
Syntax
FILENAME fileref <device-type>
’external-file’ <ENCODING=’encoding-value’>< host-option-list>;
FILENAME fileref device-type <’external-file’>< ENCODING=’encoding-value’>
<host-option-list>;
Note: This is a simplified version of the FILENAME statement syntax. For the
complete syntax and its explanation, see the FILENAME statement in SAS Language
Reference: Dictionary. 4
fileref
is any valid fileref and can be up to eight characters long. The first character must
be a letter (A to Z), an underscore (_), a dollar sign ($), a pound sign (#), or an at sign
(@). Subsequent characters can be any of these characters, or they can be numbers.
Neither OpenVMS nor SAS distinguishes between uppercase and lowercase letters in
filerefs or in filename specifications. This is a required argument. See “Reading from
398
FILENAME Statement
4
Chapter 18
and Writing to OpenVMS Commands (Pipes)” on page 186 for information about
assigning a fileref to a pipe to read from and write to OpenVMS commands.
The following are some examples of valid filerefs:
3 TEST_1
3 MYFILE
3 abc123
The following are some examples of invalid filerefs:
3 ALONGFILENAME (longer than eight characters)
3 123_test (begins with a number)
3 TEST%X (contains an invalid character (%)).
device-type
specifies an output device. For details about device types, see “Device-Type
Keywords” on page 400. The device-type keyword must follow fileref and must
precede external-file (if an external file is used).
’external-file’
can be any valid file specification. You must enclose the file specification in quotation
marks. The file specification must be a valid OpenVMS pathname to the external file
that you want to access. Therefore, the level of specification depends on your location
in the directory structure. The number of characters in the quoted string must not
exceed the maximum filename length that OpenVMS allows (255 characters).
Under OpenVMS, you can specify concatenations of files when reading and writing
external files from within SAS. Concatenated files consist of two or more file
specifications, enclosed in quotation marks and separated by commas. The following
is an example of a valid concatenation specification:
filename alldata ’test.data1, test.data2, test.data3’;
For a complete discussion, see “Using OpenVMS Pathnames to Identify External
Files” on page 174
If you specify a version number for the file in a FILENAME statement, the version
number of the file is not increased. For example, the following FILENAME
statement will produce only one file, test.dat;1:
filename myfile ’test.dat;1’;
data;
file myfile;
put ’hello’;
run;
data;
file myfile;
put ’hello again’;
run;
For more details, see “Using OpenVMS Pathnames to Identify External Files” on
page 174. For more information about valid OpenVMS pathnames, refer to
OpenVMS User’s Manual.
ENCODING=’encoding-value’
specifies the encoding to use when reading from or writing to the external file. The
value for ENCODING= indicates that the external file has a different encoding from
the current session encoding.
Statements under OpenVMS
4
FILENAME Statement
399
When you read data from an external file, SAS transcodes the data from the
specified encoding to the session encoding. When you write data to an external file,
SAS transcodes the data from the session encoding to the specified encoding.
For valid encoding values, see “Encoding Values in SAS Language Elements” in
SAS National Language Support (NLS): User’s Guide.
host-option-list
names any of the following external I/O statement options:
ALQ=
CC=
DEQ=
FAC=
GSFCC=
KEY=
KEYVALUE=
LRECL=
MBC=
MBF=
MOD
NEW
OLD
RECFM=
SHR=
These options control how the external file is processed and are specific to the
OpenVMS environment. For information about these options, see “Host-Specific
External I/O Statement Options” on page 402.
Many of the DCL print qualifiers are also supported as host options in the
FILENAME and FILE statements. For details, see “Printer Options in the
FILENAME and FILE Statements” on page 412.
Note: When you are using the PIPE device, only the LRECL= host option is
supported. 4
Details
The FILENAME statement is significantly different from the LIBNAME statement.
The FILENAME statement is for external files only and references a specific filename.
The LIBNAME statement is for SAS files only, and it generally specifies directory- and
subdirectory-level information only (except when you are assigning a libref for use with
the XPORT, OSIRIS, or SPSS engines). Also, unlike a libref, you can associate a fileref
with a file that does not yet exist; when you use the fileref in a FILE statement or
command, the file is created according to your specifications.
You can choose to use only a directory name in the FILENAME statement (the
directory must exist, except when you are doing a concatenation). You must then use
the fileref and the filename in subsequent statements as discussed in “Using Aggregate
Syntax to Identify External Files” on page 175. SAS supplies a default file type.
400
FILENAME Statement
4
Chapter 18
Reserved Filerefs
Under OpenVMS, the following are reserved filerefs (the items in parentheses are the
SAS statements to which each applies):
DATALINES (INFILE)
specifies that input data immediately follows a DATALINES statement in your
SAS stream. The only time you need to use the INFILE DATALINES fileref is
when you want to use INFILE statement options to read in stream data.
LOG (FILE)
specifies that output lines produced by PUT statements are written to the SAS log.
LOG is the default destination for output lines.
PRINT (FILE)
specifies that output lines produced by PUT statements are written to the
procedure output file, the external file to which SAS procedure output is written.
Device-Type Keywords
When you specify a device-type in a FILENAME statement, the external-file argument is
optional. If you do specify an external file, its meaning depends on which device type
you specified. For example, the following SAS program sends the output file to the
printer that is associated with the SYS$PRINT queue:
filename myfile printer;
data test;
file myfile;
put ’This is spooled to a printer.’;
run;
The following are the valid device-type keywords and their meanings:
CATALOG
references a SAS catalog as a flat file. The external file is a valid two-, three-, or
four-part SAS catalog name followed by any catalog options needed. Refer to SAS
Language Reference: Dictionary for a description of catalog options.
DISK
sends the output to or reads the input from a disk device. This is the default
behavior if you do not specify any device-type keywords in the FILENAME
statement. You must specify an external file with this keyword.
DUMMY
sends the output to NLA0: (the null device). If you specify an external file, the file
specification is ignored. This device-type keyword is useful when you are debugging
SAS programs. You can test your algorithms without actually writing output files.
EMAIL
sends electronic mail to an address. The external file is an address and email
options. See “Sending Electronic Mail Using the FILENAME Statement
(E-MAIL)” on page 189 for more information.
FTP
reads or writes to a file from any machine on a network that is running an FTP
server. The external file is the pathname of the external file on the remote
machine followed by FTP options. See SAS Language Reference: Dictionary for
more information.
Statements under OpenVMS
4
FILENAME Statement
401
PIPE
sends the output to or reads the input from an OpenVMS command. For more
information, see “Reading from and Writing to OpenVMS Commands (Pipes)” on
page 186.
Note: The PIPE device cannot be used from a captive account. For more
information, see “Limitations of Using a Captive Account” on page 47. 4
PLOTTER
spools the output to a printer queue that has been assigned to a plotter. This
keyword works the same as the PRINTER keyword except that the file format is
valid for a plotter device. The file that is created is an OpenVMS print file; it has
a variable record format, with a 2-byte, fixed-length control field.
For every record, the 2-byte control field is set to NULL, indicating no carriage
control.
PRINTER
spools the output to a printer queue. If you do not specify an external file, the
output is sent first to a temporary file on disk and then to the SYS$PRINT queue.
Then the disk file is deleted. If you do specify a file, the output is sent to that file
and then sent to the SYS$PRINT queue. In this case, the disk file is not deleted.
To send the output to a printer queue other than SYS$PRINT, use the QUEUE=
option in the FILENAME or FILE statement. For information about printer
options, see “Printer Options in the FILENAME and FILE Statements” on page
412.
SOCKET
reads and writes information over a TCP/IP socket. The external file depends on
whether the SAS application is a server application or a client application. In a
client application, the external file is the name or IP address of the host and the
TCP/IP port number to connect to followed by any TCP/IP options. In server
applications, it is the port number to create for listening, followed by the SERVER
keyword, and then any TCP/IP options. See SAS Language Reference: Dictionary
for more information.
TAPE
sends the output to or reads the input from a tape device. You are responsible for
allocating the tape drive and mounting the tape before output is sent to the device.
If you do not specify an external file, the output is sent to the tape device that is
associated with the logical name SASTAPE. If you do specify a file, the device
portion of the filename must be a valid tape device.
TEMP
is a temporary file that can only be accessed through the logical name and is only
available while the logical name exists. If a physical pathname is specified, an
error is returned. Files manipulated by the TEMP device can have the same
attributes and behave identically to DISK files.
TERMINAL
sends the output to or reads the input from a terminal device. If you do not specify
an external file, the output goes to the SYS$OUTPUT output stream. If you do
specify an external file, the file specification is ignored and SYS$OUTPUT is still
used.
If you want to display and enter data in the same step, then issue two
FILENAME statements and use one fileref for input and one for output.
UPRINTER
sends output to the default printer that was set up through the Print dialog box.
402
FILENAME Statement
4
Chapter 18
URL
enables you to access remote files using the URL of the file. The external file is the
name of the file that you want to read from or write to on a URL server. The URL
must be in one of the following forms:
http://hostname/file
http://hostname:portno/file
Refer to SAS Language Reference: Dictionary for more information.
These keywords are valid only in the FILENAME statement. However, a fileref for
which you specified a device-type keyword can be used in the SAS windowing
environment commands and in the FILE, INFILE, and %INCLUDE statements. In
order to use these devices correctly, you must specify the device-type keyword in the
FILENAME statement. (If you use a device specification only in the quoted file
specification of a FILE or INFILE statement, the results are unpredictable.) For
example, to correctly send output to the display, use the following statements:
filename myfile terminal;
data test;
file myfile;
put ’This is my test’;
run;
By contrast, the following lines are incorrect and might yield unpredictable results:
data test2;
file ’sys$output’;
put ’This may not work in all cases.’;
run;
When you use the TERMINAL device type with the INFILE statement, you
terminate input by pressing CTRL+Z.
Host-Specific External I/O Statement Options
The following external I/O statement options can be used in the FILE, INFILE, and
FILENAME statements. Note that some of these options, such as ALQ=, have the same
names as SAS data set options. Do not confuse the two types of options. You cannot use
data set options with external files.
This list includes only options that are specific to the OpenVMS environment. For a
complete list of external I/O statement options, see “Summary of External I/O
Statement Options” on page 411 and the SAS statements documentation in SAS
Language Reference: Dictionary.
The following descriptions include an explanation of the option, its valid and default
values, and whether it is used for input, output, or both.
If the same option is used in both the FILENAME and FILE statements or in both
the FILENAME and INFILE statements, the FILE or INFILE value takes precedence
over the value used in the FILENAME statement.
ALQ=
specifies the number of blocks initially allocated to an external file when it is
created. The value can range from 0 to 2,147,483,647. If the value is 0 (the
default), the minimum number of blocks required for the given file format is used.
The ALQ= option (allocation quantity) is used for output and corresponds to the
FAB$L_ALQ field in OpenVMS Record Management Services (RMS). For
additional details, refer to Guide to OpenVMS File Applications.
Statements under OpenVMS
4
FILENAME Statement
403
BLKSIZE= | BLK=
is no longer supported in the OpenVMS operating environment.
CC=
specifies the carriage-control format of the SAS log and the procedure output file.
This option has three possible values:
FORTRAN
indicates FORTRAN carriage-control format. This is the default for print files.
PRINT
indicates OpenVMS print format.
CR
indicates OpenVMS carriage-return, carriage-control format. This is the
default for nonprinting files.
Only SAS print files are affected by the CC= option. The CC= option is used for
output.
The CC= option also exists as a SAS system option (see “CC= System Option”
on page 452). If you specify this option both as a system option and in the
FILENAME or FILE statement, then SAS uses the value that you specified in the
FILENAME or FILE statement.
DEQ=
specifies the number of blocks added when OpenVMS RMS automatically extends
an external file during a write operation. The value can range from 0 to 65,535.
The default value is 0, telling OpenVMS RMS to use the process’s default value. A
large value results in fewer file extensions over the life of the file; a small value
results in numerous file extensions over the life of the file. A file with numerous
file extensions might be noncontiguous, thereby slowing record access.
The DEQ= option (default file extension quantity) is used for output and
corresponds to the FAB$W_DEQ field in OpenVMS RMS. For additional details,
see Guide to OpenVMS File Applications.
FAC=
overrides the default file access attributes used for external files. Use this option
to indicate the level of access you want to allow for an external file. You can allow
read, write, update, and delete access (as well as no access). By default with
external files, files opened for input allow read access, files opened for output allow
write access, and files opened for update allow read and write access. The form of
the FAC= option is
FAC=access-option-list
where access-option-list can be one of the following:
DEL
specifies delete access.
GET
specifies read access.
PUT
specifies write access.
UPD
specifies update access.
You can combine these values in any order. For example, specifying the
following indicates you want delete, read, and write access:
fac=(del,get,put)
By also specifying the SHR= option, you can allow other users concurrent access
to an external file, either through a separate SAS session or with another
application. To allow sharing, you must include the values for FAC= in the list of
404
FILENAME Statement
4
Chapter 18
values for SHR= (but the reverse is not true). For more information, see the
description of the SHR= option later in this section.
The FAC= option (file access) can be used for both input and output and
corresponds to the FAB$B_FAC field in OpenVMS RMS or the ACCESS attribute
when using File Definition Language (FDL). For additional details about file
sharing, see Guide to OpenVMS File Applications.
GSFCC=
specifies the file format of graphic stream files (GSF files). When specified on the
FILENAME statement, it affects only the GSF files that are created using that
fileref. The accepted values are
PRINT
creates a GSF file. It is a VFC format file with carriage control
set to null. These files can be used with most utilities with the
exception of some file transfer protocols, such as Kermit. This
is the default value for this option.
CR
creates a carriage return carriage control file.
NONE
creates a file with no carriage control. This format is useful if
you plan to download the file to a personal computer.
KEY=
specifies which key SAS uses to read the records in an RMS file with indexed
organization. The KEY= option is always used with the KEYVALUE= option. For
details, see “Using the KEY= Option” on page 407 and “Using the KEYVALUE=
Option” on page 408.
KEYVALUE=
specifies the key value with which to begin reading an indexed file. For details, see
“Using the KEYVALUE= Option” on page 408.
LRECL=
specifies the record length of the output file. If you do not specify a record length,
the default is varying length records. For input, the existing record length is used
by default. If the LRECL= option is used, the input records are padded or
truncated to the specified length.
The maximum record size for OpenVMS is 32,767. However, your LRECL=
value might differ depending on the record format you use. LRECL values greater
than 32,767 are valid only when reading and writing to tape. If an LRECL= value
greater than 32,767 is specified when you are writing to a non-tape device, the
value is set 32,767. You should use the maximum LRECL values for the various
file types provided in the following table.
Because the FLOWOVER option on the FILE statement is the default, lines
that are longer than the length specified by the LRECL= option are split.
When accessing unlabeled tapes, you must use LRECL=. The minimum value
in this case is 14. For more information, see “Reading from an Unlabeled Tape” on
page 184.
The LRECL= option is used for both input and output.
Table 18.1
Maximum LRECL Values for File Types
File Organization
Record Format
Maximum LRECL
Value
Sequential
Fixed length
32,767
Sequential (disk)
Variable length
32,765
Sequential (disk)
VFC
32,767-FSZ
Statements under OpenVMS
4
FILENAME Statement
File Organization
Record Format
Maximum LRECL
Value
Sequential (disk)
Stream
32,767
Sequential (disk)
Stream-CR
32,767
Sequential (disk)
Stream-LF
32,767
Sequential (ANSI Tape)
Variable length
9,995
Sequential (ANSI Tape)
VFC
9,995-FSZ
Relative
Fixed length
32,255
Relative
Variable length
32,253
Relative
VFC
32,253-FSZ
Indexed, Prolog 1 or 2
Fixed length
32,234
Indexed, Prolog 1 or 2
Variable length
32,232
Indexed, Prolog 3
Fixed length
32,224
Indexed, Prolog 3
Variable length
32,224
405
FSZ represents the size, in bytes, of the fixed control area in a record with VFC
record format.
MBC=
specifies the size of the I/O buffers that OpenVMS RMS allocates for a particular
file. The value can range from 0 to 127 and represents the number of blocks used
for each buffer. By default, this option is set to 0 and the default values for the
process are used.
The MBC= option (multiblock count) is used for both input and output to control
the allocation for a particular file. If you want to control the allocation size for all
the external files used during the current SAS session, you can use the MBC=
option in every FILE, FILENAME, or INFILE statement. You can also use the
DCL SET RMS_DEFAULT command to specify a process default, and let the SAS
values default to the process’s default values.
The MBC= option corresponds to the RAB$B_MBC field in OpenVMS RMS or
the CONNECT MULTIBLOCK_COUNT attribute when using FDL. This option is
not supported for DECnet operations. For additional details, see Guide to
OpenVMS File Applications.
MBF=
specifies the number of I/O buffers you want OpenVMS RMS to allocate for a
particular file. The value can range from 0 to 127 and represents the number of
buffers used. By default, this option is set to 2 buffers. If a value of 0 is specified,
the default value for the process is used.
The MBF= option (multibuffer count) is used for both input and output to control
the number of buffers allocated for a particular file. If you want to control the
number of buffers allocated for all the external files used during the SAS session,
you can use the MBF= option in every FILE, FILENAME, or INFILE statement.
The DCL SET RMS_DEFAULT command can be used to specify a process default.
Then, you can let the SAS values default to the process’s default values.
The MBF= option corresponds to the RAB$B_MBF field in OpenVMS RMS or
the CONNECT MULTIBUFFER_COUNT attribute when using FDL. This option
is not supported for DECnet operations. For additional details, see Guide to
OpenVMS File Applications.
406
FILENAME Statement
4
Chapter 18
MOD
opens the file referenced for append. This option does not take a value. An
existing file of the name given in the FILENAME or FILE statement is opened
and new data is appended to the end.
NEW
opens a new file for output. This option does not take a value. This is the default
action for files referenced by a FILE statement. Under OpenVMS, this option is
synonymous with the OLD option.
OLD
opens a new file for output. This option does not take a value. This is the default
action for files referenced by a FILE statement. Under OpenVMS, this option is
synonymous with the NEW option.
RECFM=
specifies the record format of the output file. Values for the RECFM= option are as
follows:
F
specifies fixed length.
N
specifies binary format. The file consists of a stream of bytes
with no record boundaries.
D
specifies that you are accessing unlabeled tapes with the PUT
and INPUT DATA step statements. For more information, see
“Reading from an Unlabeled Tape” on page 184.
V
specifies variable length.
If the RECFM= option is not used, the value defaults to V for output files. For
input files, the default value is the record format of the file.
This option is used for both input and output.
SHR=
overrides the default file-sharing attributes used for external files. With this
option, you can indicate the access level you want to give other users. You can
allow read, write, update, and delete access (as well as no access). By default with
external files, files opened for input allow shared read access, and files opened for
output or update do not allow shared access.
However, you can allow other users to have read and write access to a file that
you are opening for input only. To accomplish this, use the SHR= option. The
syntax of the SHR= option is
SHR=share-option-list
where share-option-list can be one of the following:
DEL
specifies delete access.
GET
specifies shared read access.
NONE
specifies no shared access.
PUT
specifies shared write access.
UPD
specifies update access.
You can combine these values in any order. For example, specifying the
following indicates that you want shared delete, read, and write access:
shr=(del,get,put)
To allow shared access, the values for FAC= must be included in the list of
values for SHR= (but the reverse is not true).
Statements under OpenVMS
4
FILENAME Statement
407
This option corresponds to the FAB$B_SHR field in OpenVMS RMS or the
SHARING attribute when you use FDL. For more information about file sharing,
see Guide to OpenVMS File Applications.
The SHR= option is used for both input and output.
Note: When you are using the PIPE device, only the LRECL= host option is
supported. 4
Using the KEY= Option
The KEY= option is used for input. It is always used with the KEYVALUE= option. A
key is a record field that identifies the record and helps you retrieve it in an indexed
file. The two types of keys are primary and alternate. Data records are stored in the
file in the order of their primary key. Alternate keys (also called secondary keys) create
alternate indexes in the file. The alternate index can then be used to process the
records in order of the alternate key. The only difference between the primary key and
the alternate key is that the records are actually stored in the order of the primary key,
whereas the alternate key provides a means of accessing them.
The key number is zero-based, so KEY=0 (the default) specifies that the records be
read in sorted order by the primary key. KEY=1 specifies the use of the first secondary
key to access the records.
To use SAS to write to an indexed file, you can either create an empty indexed file or
use any existing indexed file. If you create an empty indexed file, use FDL to specify
the file characteristics, including the type and location of primary and secondary keys.
(For more information about FDL, see OpenVMS File Definition Language Facility
Manual.) The following is an example program:
/*-------------------------------------------*/
/* This SAS program accesses an empty
*/
/* indexed file that has been previously
*/
/* created. The data is appended to the
*/
/* file. Primary key #0 is of type character */
/* and is in bytes 0-2. Secondary key #1 is */
/* of type character and is in bytes 3-5.
*/
/*-------------------------------------------*/
filename myfile ’indexed.dat’;
/* Load the indexed file, primary key in */
/* sorted order.
*/
data _null_;
file myfile mod;
put ’aaaccc’;
put ’bbbaaa’;
run;
/* Print out in primary key sorted order. */
data _null_;
/* Key=0 is the default. */
infile myfile;
input first $3. second $3.;
put first= second=;
run;
This program produces the following output:
first=aaa second=ccc
first=bbb second=aaa
408
4
FILENAME Statement
Chapter 18
In contrast, consider setting KEY=1 as in the following example:
/* Print out in secondary key sorted order. */
data _null_;
infile myfile key=1;
input first $3. second $3.;
put first= second=;
run;
This program produces the following output:
first=bbb second=aaa
first=aaa second=ccc
All keys are defined in RMS when the file is created. For more information about
defining and using keys in an indexed file, see Guide to OpenVMS File Applications.
Using the KEYVALUE= Option
The KEYVALUE= option is always used with the KEY= option, which specifies the key
used by SAS to read the records in an RMS file with indexed organization. When you
use the KEYVALUE= option, the file is read sequentially, beginning with the value you
specified. It is similar to the FIRSTOBS= option used with a sequential-format file. You
can specify a SAS variable name with the KEYVALUE= option to drive random reads
from the file. The KEYVALUE= option is used for input.
Valid forms of the KEYVALUE= option are as follows:
KEYVALUE operator value
AND KEYVALUE operator value
KEYVALUE=SAS-variable
where operator can be one of the following:
<
less than
<=
less than or equal to
>
greater than
>=
greater than or equal to.
where value can be one of the following data types:
3
3
3
3
3
integer
quoted string
quadword (signed or unsigned)
packed decimal
date/time.
The key specified in the KEY= option is used with the KEYVALUE= option. The
defined order of the key specified must match the direction of the operator given in the
KEYVALUE= option. For example, if the key is an ascending order key, the < and <=
operators are invalid operators. When the value of KEYVALUE= is a constant value, the
file is processed sequentially by key, beginning with the given value. When the value of
KEYVALUE= is a SAS variable, the first record with a key satisfying the criterion of
the KEYVALUE= expression is read from the file. Note that the SAS variable value
must match the key value of one of the records exactly or an end-of-file condition occurs.
Statements under OpenVMS
4
FILENAME Statement
409
The data type of the key specified in the KEY= option must also correspond to the
type given as the value for the KEYVALUE= option. The following RMS data types are
supported by the KEYVALUE= option:
3 unsigned 2-byte binary
3 unsigned 4-byte binary
3 unsigned 8-byte binary
3 signed 2-byte binary
3 signed 4-byte binary
3 signed 8-byte binary
3 left-justified string of characters
3 packed decimal string of characters.
SAS converts an integer value to the correct format of the supported numeric types.
Character string values are not changed when used for the character type.
When you use date-time values, the data is stored in signed 8-byte binary RMS key
fields. Use the VMSTIMEF. format to convert SAS date-time values to signed 8-byte
binary values. When you access records through a date-time value key using the
KEYVALUE=SAS-variable option, the SAS variable must have one of the following SAS
formats or informats associated with it:
DATEw.
DATETIMEw.
DDMMYYw.
JULIANw.
MMDDYYw.
MONYYw.
YYMMDDw.
YYQw.
A format or informat must be associated with the SAS variable because neither the
variable value nor the field value within the record indicates that the data represents
date-time values. For more information about these formats and informats, refer to
SAS Language Reference: Dictionary.
Suppose you want to input an indexed file that has an alternate key defined as a
signed 4-byte integer in descending sort order. You can process only the records with
the values less than 5,000 with the following DATA step:
filename in ’indexed.dat’ key=2 keyvalue<5000;
data _null_;
infile in;
input name $9. num;
put name num;
run;
Using Compound Expressions
You may further restrict the number of records read by
using a compound KEYVALUE expression. For example, suppose you want to input an
indexed file that has a primary key defined as a signed 2-byte integer in ascending sort
order. You can retrieve records with key values between −10 and 10 inclusive with the
following FILENAME statement:
filename in ’indexed.dat’ keyvalue>=-10 and
keyvalue<=10;
When given a compound KEYVALUE expression, SAS reads records from the input
file until a record is read with a key exceeding the upper boundary, which is 10 in this
410
FILENAME Statement
4
Chapter 18
example, or until the end of file is reached. Note that the AND construct has an
associative property; the order of the KEYVALUE options can be reversed and the
meaning preserved. However, the operators still must match the key sort order, so the
following DATA step using the same indexed file described in the earlier example
generates an error:
data wrong;
infile ’indexed.dat’ keyvalue<=-10 and
keyvalue>=10;
input num name $9.;
put name num;
run;
This DATA step generates the following error and warning messages:
ERROR: Specified key on indexed file is
defined as ascending but <, <= or
= was used in KEYVALUE option.
NOTE: The SAS System stopped processing
this step because of errors.
WARNING: The data set WORK.WRONG may be
incomplete. When this step was
stopped there were O observations
and 1 variables.
Using SAS Variables
Using a SAS variable name as the value of the KEYVALUE=
option enables you to randomly access records in the indexed file. In the previous
examples of using the KEYVALUE= option, the input file was sequentially accessed.
You can use any SAS variable with the KEYVALUE= option that matches the type of
the key in question. When SAS reads from the file, it reads the first record with the key
value that matches the value of the SAS variable.
For example, suppose you have a SAS data set named SALES that has three
variables: SALESREP, ITEMNO, and QUANTITY. This data set contains the number of
items each salesperson sold during the last month. You also have an indexed file keyed
by the item numbers of the products the company sells. Stored in each record is the
price of the item. Using these two files, SAS can easily generate a report of the revenue
generated by each salesperson:
filename parts ’inventory.idx’ key=0;
filename report ’revenue.lis’;
data revenue;
set sales;
infile parts keyvalue=itemno;
input itemno price;
revenue=quantity*price;
output @5 salesrep @30 itemno
@50 revenue dollar3.2;
stop;
run;
This sample program match-merges the observations in SALES with the records in
the indexed file by item number to produce the reports. A KEYVALUE= option with a
SAS variable name can be used only with the equal sign (=) operator and cannot be
used in compound KEYVALUE= expressions.
Note that in the previous example, the DATA step is driven entirely by the SET
statement. The DATA step terminates when all records from the data set SALES have
Statements under OpenVMS
4
FILENAME Statement
411
been processed. It is possible to use the SAS variable form of the KEYVALUE= option
with other types of control mechanisms. In the following example, an iterative DO loop
determines the set of records read from an indexed file:
data example2;
do i=1 to 20 by 2;
infile myfile key=0 keyvalue=i;
input var1 var2 var3 ...;
/* .... variable processing ... */
output var1 var2 var3 ...;
end;
stop;
run;
In this example, the DO loop is used to read every other record from MYFILE. Note
that the STOP statement terminates the DATA step and closes the input file. Because
the KEYVALUE=I option reads only those records specified in the DO statement, SAS
cannot read an end-of-file indicator as it would if it were reading the file sequentially.
Without the STOP statement to end the DATA step, SAS can get into an infinite loop by
accessing the same index file repeatedly.
For more information about indexed files and keys, refer to Guide to OpenVMS File
Applications.
Summary of External I/O Statement Options
The following table alphabetically lists all available external I/O statement options,
including both options that are valid in all operating environments and options that are
specific to the OpenVMS environment. The Use column indicates whether the option is
used for input, output, or both. The support of the options in the FILENAME statement
is host-specific. Options that are used with the FILENAME statement are not
documented in SAS Language Reference: Dictionary.
Table 18.2
Summary of External I/O Statement Options
Option
Use
Option
Use
ALQ= **
output
LINESIZE= *
input, output
CC= **
output
LRECL= *
input, output
COLUMN= ***
input, output
MBC= **
input, output
DELIMITER= ***
input
MBF= **
input, output
DEQ= **
output
MISSOVER ***
input
DROPOVER ***
output
MOD *
output
END= ***
input
N= ***
input, output
EOF= ***
input
NEW **
output
EXPANDTABS ***
input
NOTITLES ***
output
FAC= **
input, output
OBS= ***
input
FILENAME= ***
input, output
OLD *
output
FILEVAR ***
input, output
PAD ***
input, output
FIRSTOBS= ***
input
PAGESIZE= *
output
FLOWOVER ***
input, output
PRINT ***
input, output
412
FILENAME Statement
4
Chapter 18
Option
Use
Option
Use
GSFCC **
output
RECFM= *
input, output
HEADER= ***
output
SHR= **
input, output
KEY= **
input
SHAREBUFFERS ***
input
KEYVALUE= **
input
START= ***
input
LENGTH= ***
input
STOPOVER ***
input, output
LINE= ***
output
UNBUFFERED ***
input
* This option is also documented in SAS Language Reference: Dictionary.
** All the information for this option is contained in this document.
***This option is completely documented in SAS Language Reference: Dictionary.
Printer Options in the FILENAME and FILE Statements
Many of the DCL print qualifiers are supported as host options in the FILE and
FILENAME statements. If the same option is used in both the FILE and FILENAME
statements, the FILE statement value overrides the FILENAME statement value. You
send a file to a printer by using the PRINTER or PLOTTER device-type keyword in the
FILENAME statement.
A complete list of supported options follows. For more information about the
meanings of specific options, refer to OpenVMS DCL Dictionary.
AFTER=“quoted-string”
specifies a time after which the file can be printed. The time can be specified as
absolute time or a combination of absolute and delta times and must be enclosed
in double quotation marks.
BURST=ALL | NO
specifies a burst page or not. The default value is NO.
CHAR=(,,,)
lists characteristics for the printer. The list can be one item or a group of items
enclosed by parentheses. No spaces are allowed in the list.
COPIES=n
specifies the number of copies to print. The default value is 1.
FEED=YES | NO
specifies whether to perform a form feed at the end of the page. The default value
is YES.
FLAG=ALL | NO
specifies whether to print a flag page preceding each file. The default value is NO.
FORM=type
defines the form name or number used.
HDR=YES | NO
controls whether a header line is printed at the top of each page. The default
value is NO.
NAME=quoted-string
specifies the name of the submitted job shown when you issue a SHOW QUEUE
command. The default is the filename. The quoted-string argument can contain
spaces.
Statements under OpenVMS
4
FILENAME Statement
413
NOTE=quoted-string
specifies a message to appear on the flag page. The quoted-string argument can
contain spaces.
NOTIFY=YES | NO
controls whether to notify the user when the job is finished. The default value is
NO.
PARAM=<“>(,,,)<”>
sends a list of up to eight parameters to the printer device. The PARAM= value
can be one item without parentheses, or a group of items enclosed by parentheses.
If the value contains blanks or nonalphanumeric characters, enclose the entire
value argument in single or double quotation marks.
PASSALL=YES | NO
specifies whether all formatting is bypassed and sent to the device driver with
formatting suppressed. The default value is NO.
QUEUE=<“>queue-name<”>
specifies the name of the printer queue to send the job to. If this option is not
used, the job is submitted to the SYS$PRINT queue. If the queue name contains
characters not recognized by SAS, it must be enclosed in single quotation marks;
for example, SYS$PRINT must be enclosed in quotation marks, but CLXYJ31 does
not need to be. The queue-name argument cannot contain any spaces.
RESTART=YES | NO
restarts the job after a crash. The default value is YES.
SETUP=(,,,)
sets up module names to extract from the device control library. The list can be a
single item or a group of items enclosed by parentheses.
SPACE=1 | 2
specifies double- or single-spacing. The default value is single.
TRAILER=ALL | NO
prints a trailer page at the end of the file. The default value is NO.
Examples
Example 1: Associating a Fileref with an External File
In this example, the
FILENAME statement associates the fileref PGMSAS with an external file that
contains a SAS program. PGMSAS is then used as the fileref in the %INCLUDE
statement to read a file that contains SAS statements.
filename pgmsas ’[yourdir]prog1.sas’;
%include pgmsas;
Example 2: Using a File as Input to an INFILE Statement
Consider the following
FILENAME statement:
filename myfile ’[mydir]’;
If you want to use a file in [MYDIR] named SCORES02.DAT as input to an INFILE
statement, issue the following statement:
infile myfile(scores02);
SAS assumes a file type of .DAT in the INFILE statement.
414
FOOTNOTE Statement
4
Chapter 18
If you do not specify a file type in the external file specification, the default file type
is .DAT. For example, the following FILENAME statement associates the fileref
MYFILE with a file named SURVEY.DAT:
filename myfile ’survey’;
Example 3: Using Printer Options
The following statement sends a copy of the file
A.LIS to the CLXYJ31 queue, holds it until 2:00 p.m., and then prints two copies:
filename x printer ’a.lis’ queue=clxyj31
after="14:00:00" copies=2;
The following statement creates the file A.LIS but does not send it to the printer
because the PRINTER device-type keyword is not used. The AFTER= option is ignored.
filename x ’a.lis’ after="14:00:00";
The following statement sends the file A.LIS to the SYS$PRINT queue, holding it
until 2:30 p.m.:
filename x printer ’a.lis’ after="14:30:00";
The following statement creates a temporary file called SAS0000n and sends it to the
SYS$PRINT queue. The file is deleted after printing.
filename x printer;
The following statement creates the file CLXYJ31.DAT and sends it to the
SYS$PRINT queue. The file is not deleted after printing.
filename x printer ’clxyj31’;
As a final example, the following lines create a file A.LIS and send it to the
SYS$PRINT queue. The job name submitted is MYFILE.
filename x printer ’a.lis’;
data a;
file x name="myfile";
. . . more SAS statements . . .
run;
See Also
3 Chapter 7, “Using External Files and Devices,” on page 171
FOOTNOTE Statement
Prints up to ten lines of text at the bottom of the procedure output
anywhere in a SAS program
maximum length of footnote
See: FOOTNOTE Statement in SAS Language Reference: Dictionary
Valid:
OpenVMS specifics:
Syntax
FOOTNOTE <n> <’text’ | “text”>;
Statements under OpenVMS
4
%INCLUDE Statement
415
no arguments
cancels all existing footnotes.
n
specifies the relative line to be occupied by the footnote.
’text’ | “text”
specifies the text of the footnote that is enclosed in single or double quotation marks.
For compatibility with previous releases, SAS accepts some text without quotation
marks. When writing new programs or updating existing programs, always surround
text with quotation marks.
Details
If the footnote length is greater than the value of the LINESIZE= system option, the
footnote is truncated to the line size.
See Also
3 “LINESIZE= System Option” on page 470
%INCLUDE Statement
Includes SAS statements and data lines
Valid:
anywhere in a SAS program
OpenVMS specifics: valid values for encoding-value and source, if a file specification is used
See:
%INCLUDE Statement in SAS Language Reference: Dictionary
Syntax
%INCLUDE source-1 < . . . source-n></
<ENCODING=’encoding-value’>< host-options>>;
source-1 < . . . source-n>
describes the location of the information that you want to access with the
%INCLUDE statement. The three possible sources are an external file specification,
previously entered SAS statements from your SAS session, or a keyboard entry. The
file specification can be any of the file specification forms discussed in “Identifying
External Files to SAS” on page 173.
Note: When you use aggregate syntax and the member name contains a leading
digit, enclose the member name in quotation marks. If the member name contains a
macro variable reference, use double quotation marks. 4
This section discusses only external file specifications. For information about
including lines from your terminal or from your SAS session, see “Recalling SAS
Statements” on page 28 and the SAS statements portion of SAS Language Reference:
Dictionary.
416
%INCLUDE Statement
4
Chapter 18
ENCODING=’encoding-value’
specifies the encoding to use when reading from the specified source. The value for
ENCODING= indicates that the specified source has a different encoding from the
current session encoding.
When you read data from the specified source, SAS transcodes the data from the
specified encoding to the session encoding.
For valid encoding values, see “Encoding Values in SAS Language Elements” in
SAS National Language Support (NLS): User’s Guide.
host-options
consists of statement options that are valid under OpenVMS. The following options
are available:
BLKSIZE=block-size
BLK=block-size
specifies the number of bytes that are physically read or written in an I/O
operation. The default is 8K. The maximum is 1M.
LRECL=record-length
specifies the record length (in bytes). Under OpenVMS, the default is 256. The
value of record-length can range from 1 to 1,048,576 (1 megabyte).
RECFM=record-format
controls the record format. The following values are valid under OpenVMS:
D
default format (same as variable).
F
fixed format. That is, each record is the same length.
N
binary format. The file consists of a stream of bytes with no
record boundaries.
P
print format.
V
variable format. Each record ends with a newline character.
S370V
variable S370 record format (V).
S370VB
variable block S370 record format (VB).
S370VBS
variable block with spanned records S370 record format (VBS).
The S370 values are valid with files laid out as z/OS files only. That is, files that
are binary, have variable-length records, and are in EBCDIC format. If you want to
use a fixed-format z/OS file, first copy it to a variable-length, binary z/OS file.
Details
When you execute a program that contains the %INCLUDE statement, SAS executes
your code, including any statements or data lines that you bring into the program with
%INCLUDE.
The %INCLUDE statement is most often used when you are running SAS in
interactive line mode, noninteractive mode, or batch mode. Although you can use the
%INCLUDE statement when you are running SAS using windows, it might be more
practical to use the INCLUDE and RECALL commands to access data lines and
program statements, and submit these lines again.
The %INCLUDE statement executes statements immediately.
Note: If you specify any options on the %INCLUDE statement, remember to precede
the options list with a forward slash (/). 4
Statements under OpenVMS
4
INFILE Statement
417
Example
Suppose you have issued the following FILENAME statement:
filename mypgm ’[mydir]program1.sas’;
Then, in a SAS program you can issue the following %INCLUDE statement to copy
in and execute the SAS statements stored in the file PROGRAM1.SAS:
%include mypgm;
See Also
3
3
3
3
“INCLUDE Command” on page 262
“RECALL Command” in the Base SAS Software section in SAS Help
“Saving SAS Statements” on page 27
“Recalling SAS Statements” on page 28
INFILE Statement
Specifies an external file to read with an INPUT statement
Valid:
in a DATA step
OpenVMS specifics:
See:
valid values for file-specification, host-options, and encoding-value
INFILE Statement in SAS Language Reference: Dictionary
Syntax
INFILE file-specification <ENCODING=’encoding-value’>< option-list>
<host-option-list>;
file-specification
identifies the source of the input data records (usually an external file). It can be any
of the file specification forms discussed in “Identifying External Files to SAS” on page
173. The reserved fileref DATALINES allows the INFILE statement to read instream
data.
ENCODING=’encoding-value’
specifies the encoding to use when reading from the external file. The value for
ENCODING= indicates that the external file has a different encoding from the
current session encoding.
When you read data from an external file, SAS transcodes the data from the
specified encoding to the session encoding.
For valid encoding values, see “Encoding Values in SAS Language Elements” in
SAS National Language Support (NLS): User’s Guide.
option-list
names options for the INFILE statement that are valid in all operating
environments. For information about these options, see the INFILE statement in
SAS Language Reference: Dictionary.
418
INFILE Statement
4
Chapter 18
host-option-list
names external I/O statement options for the INFILE statement that are specific to
the OpenVMS environment. These options can be any of the following:
FAC=
KEY=
KEYVALUE=
LINESIZE=
LRECL=
MBC=
MBF=
RECFM=
SHR=
For an explanation of these options, see “Host-Specific External I/O Statement
Options” on page 402 in the FILENAME statement.
You can intersperse options from option-list and host-option-list in any order.
Note: When you are using the PIPE device with the INFILE statement, only
LRECL is supported. 4
Details
Because the INFILE statement identifies the file to read, it must execute before the
INPUT statement that reads the input data records. You can use the INFILE
statement in conditional processing, such as an IF-THEN statement, because it is
executable. This enables you to control the source of the input data records.
When you use more than one INFILE statement for the same file specification and
you use options in each INFILE statement, the effect is additive. To avoid confusion,
use all the options in the first INFILE statement for a given external file.
The ENCODING= option is valid only when the INFILE statement includes a file
specification that is not a reserved fileref. If the INFILE statement includes the
ENCODING= argument and the reserved filerefs DATALINES or DATALINES4 as a
file-specification, then SAS issues an error message. The ENCODING= value in the
INFILE statement overrides the value of the ENCODING= system option.
Example
The following is an example of an INFILE statement:
infile food;
This INFILE statement uses the default filename form of the file specification (FOOD
has not been assigned as a SAS fileref or as an OpenVMS logical name). Therefore,
SAS looks for the file FOOD.DAT in the current directory.
When SAS reads a file, it uses the most recent version by default. For example, if
your default directory contains the files FOOD.DAT;1, FOOD.DAT;2, and FOOD.DAT;3,
this INFILE statement reads FOOD.DAT;3.
Statements under OpenVMS
4
LENGTH Statement
See Also
3 Chapter 7, “Using External Files and Devices,” on page 171
3 “FILENAME Statement” on page 397
LENGTH Statement
Specifies how many bytes SAS uses to store a variable’s value
Valid:
in a DATA step
valid numeric variable lengths
See: LENGTH Statement in SAS Language Reference: Dictionary
OpenVMS specifics:
Syntax
LENGTH <variable-specification-1>
<. . .variable-specification-n>< DEFAULT=n>;
length
can range from 3 to 8 bytes for numeric variables in the OpenVMS Alpha
environment.
DEFAULT=n
changes the default number of bytes used for storing the values of newly created
numeric variables from 8 to the value of n.
In the OpenVMS Alpha environment, n can range from 3 to 8 bytes.
Details
The LENGTH statement specifies the number of bytes used for storing variables.
In general, the length of a variable depends on
3 whether the variable is numeric or character
3 how the variable was created
3 whether a LENGTH or ATTRIB statement is present.
Subject to the rules for assigning lengths, lengths that are assigned with the
LENGTH statement can be changed in the ATTRIB statement and vice versa.
See Also
3 “Numeric Variables in the Alpha Environment” on page 233
3 “ATTRIB Statement” on page 394
419
420
LIBNAME Statement
4
Chapter 18
LIBNAME Statement
Associates a libref with a SAS data library and lists file attributes for a SAS data library
anywhere in a SAS program
OpenVMS specifics: valid values for engine-name; specifications for SAS-data-library; valid
values for engine/host-option-list
See: LIBNAME Statement in SAS Language Reference: Dictionary
Valid:
Syntax
LIBNAME libref <engine> ’SAS-data-library’
<portable-options> <engine/host-options>;
LIBNAME libref | _ALL_ CLEAR;
LIBNAME libref | _ALL_ LIST;
Note: This is a simplified version of the LIBNAME statement syntax. For the
complete syntax and its explanation, see the LIBNAME statement in SAS Language
Reference: Dictionary. 4
libref
is a SAS name that complies with SAS naming conventions and is used in SAS
statements to point to SAS-data-library. This argument is required.
The libref can also be an OpenVMS logical name or a search-string logical name.
For more information, see “Using an OpenVMS Logical Name in the LIBNAME
Statement” on page 141 and “Using a Search-String Logical Name to Concatenate
SAS Data Libraries” on page 141.
Under OpenVMS, the only reserved librefs are those that are reserved by SAS on
all operating environments. For a list of reserved librefs, see the LIBNAME
statement in SAS Language Reference: Dictionary.
engine
tells SAS which engine to use for accessing the library. For a list of valid engine
names for OpenVMS, see “Engines Available under OpenVMS” on page 155. The
engine that is associated with a libref accesses only files that were created by that
engine, not other SAS files.
Note: The V5 engine is not supported in SAS 9.1. 4
If you do not specify an engine, then SAS uses the procedures described in “How
SAS Assigns an Engine When No Engine Is Specified” on page 147 to assign an
engine for you.
SAS-data-library
is the name of the directory that contains the SAS data library. You must enclosed it
in quotation marks. For example:
’mydisk:[mydirectory]’
You can refer to SAS data libraries on a network by specifying the node name,
followed by the disk and directory names:
Statements under OpenVMS
4
LIBNAME Statement
421
’mynode::mydisk:[mydirectory]’
You can omit the SAS-data-library argument if you are merely specifying the
engine for a libref or an OpenVMS logical name that you previously assigned.
If the directory that you specify does not already exist, then you must create it
before you attempt to use the libref that you have assigned to it. (Under OpenVMS,
the LIBNAME statement does not actually create directories.)
Use the following syntax for concatenated libraries:
LIBNAME libref
(’SAS-data-library’ ’...SAS-data-library)’
Note that librefs can be used as part of a physical name or a previously assigned
libref.
The level of specification depends on your current location in the OpenVMS file
structure. For example, if you want to access a directory that is located on another
node in your OpenVMS network, then the file specification in the LIBNAME
statement must include the node, the device, and the directory levels.
The file specification generally must not extend beyond the directory or
subdirectory level (that is, it must not include a filename), because the libref/
directory association that is made in the LIBNAME statement gives you access to all
SAS files in the data library, not to a single file. However, this rule does not apply if
you are assigning a libref for use with the XPORT, OSIRIS, or SPSS engines.
SAS-data-library can also be an OpenVMS logical name (or a path that contains a
logical name). In this case, you would be assigning a libref to the logical name, and
you would subsequently use the libref in your SAS program. For examples, see
“Using an OpenVMS Logical Name in the LIBNAME Statement” on page 141.
Note: Directory wildcard specifications are not supported in LIBNAME
statements. If you use an asterisk (*) or an ellipsis (...) in the SAS-data-library
argument, an error message tells you that the physical name of the library is
invalid. 4
portable-options
are LIBNAME statement options that are available in all operating environments.
For information about these options, see the LIBNAME statement in SAS Language
Reference: Dictionary.
engine/host-options
are one or more of the following host-specific options:
ALQ=
specifies how many disk blocks to allocate to a new SAS data set. For more
information, see “ALQ= Data Set Option” on page 282.
ALQMULT=
specifies the number of pages that are preallocated to a file. For more information,
see “ALQMULT= Data Set Option” on page 283.
BKS=
specifies the bucket size for a new data set. For more information, see “BKS= Data
Set Option” on page 284.
CACHENUM=
specifies the number of I/O data caches used per SAS file. For more information,
see “CACHENUM= Data Set Option” on page 286.
CACHESIZE=
controls the size of the I/O data cache that is allocated for a file. For more
information, see “CACHESIZE= Data Set Option” on page 287.
422
SYSTASK Statement
4
Chapter 18
DEQ=
tells OpenVMS how many disk blocks to add when it automatically extends a SAS
data set during a ’write’ operation. For more information, see “DEQ= Data Set
Option” on page 289.
DEQMULT=
specifies the number of pages to extend a SAS file. For more information, see
“DEQMULT= Data Set Option” on page 290.
MBF=
specifies the multibuffer count for a data set. For more information, see “MBF=
Data Set Option” on page 293.
Not every option is available with every engine. For information about which
engine or host options are available with each engine, see Chapter 6, “Using SAS
Engines,” on page 153.
All of these options correspond to a data set option of the same name and have the
same effect as the data set option. However, engine or host options apply to all SAS
data sets that are stored in the SAS data library.
Specify as many options as you need. Separate them with a blank space.
Details
The LIBNAME statement associates a libref with a permanent SAS data library and
lists the file attributes of a SAS data library.
Note: The LIBNAME statement is also used to clear a libref. For complete
documentation about this use, see the LIBNAME statement in SAS Language
Reference: Dictionary. 4
Listing Data Library Attributes
You can use the LIBNAME statement to list attributes
of SAS data libraries by using the LIST option.
See Also
3
3
3
3
“Using the LIBNAME Statement” on page 137
“Using an OpenVMS Logical Name in the LIBNAME Statement” on page 141
“FILE Statement” on page 395
“FILENAME Statement” on page 397
SYSTASK Statement
Executes, lists, or kills asynchronous tasks
Valid:
SAS Program Editor
OpenVMS specifics:
all
Syntax
SYSTASK COMMAND “host-command”
<WAIT|NOWAIT>
Statements under OpenVMS
4
SYSTASK Statement
423
<TASKNAME=taskname>
<MNAME=name-variable>
<STATUS=status-variable>
SYSTASK LIST <_ALL_ | taskname> <STATE> <STATVAR>;
SYSTASK KILL taskname <taskname...>;
COMMAND
executes the host-command.
LIST
lists either a specific active task or all of the active tasks in the system.
KILL
forces the termination of the specified task(s).
host-command
specifies the name of an OpenVMS command (including any command-specific
options).
WAIT | NOWAIT
determines whether SYSTASK COMMAND suspends execution of the current SAS
session until the task has completed. NOWAIT is the default. For tasks that start
with the NOWAIT option, you can use the WAITFOR statement when necessary to
suspend execution of the SAS session until the task has finished.
TASKNAME=taskname
specifies a name that identifies the task. Task names must be unique among all
active tasks. A task is active if it is running, or if it has completed and has not been
waited for using the WAITFOR statement. Duplicate task names generate an error
in the SAS log. If you do not specify a task name, SYSTASK will automatically
generate a name. If the task name contains a blank character, enclose the task name
in quotation marks.
MNAME=name-variable
specifies a macro variable in which you want SYSTASK to store the task name that
it automatically generated for the task. If you specify both the TASKNAME option
and the MNAME option, SYSTASK copies the name that you specified with
TASKNAME into the variable that you specified with MNAME.
STATUS=status-variable
specifies a macro variable in which you want SYSTASK to store the status of the
task. Status variable names must be unique among all active tasks.
_ALL_
specifies all active tasks in the system.
STATE
displays the status of the task, which can be Start, Failed, Running, or Complete.
STATVAR
displays the status variable associated with the task. The status variable is the
variable that you assigned with the STATUS option in the SYSTASK COMMAND
statement.
Details
SYSTASK enables you to execute host-specific commands from within your SAS session
or application. Unlike the X statement, SYSTASK runs these commands as
424
SYSTASK Statement
4
Chapter 18
asynchronous tasks, which means that these tasks execute independently of all other
tasks that are currently running. Asynchronous tasks run in the background, so you
can perform additional tasks while the asynchronous task is still running.
Note: You cannot execute a host-specific command asynchronously if your session is
running under a captive account. For more information, see “Limitations of Using a
Captive Account” on page 47. 4
The output from the command is displayed in the SAS log.
Note: Program steps that follow the SYSTASK statements in SAS applications
usually depend on the successful execution of the SYSTASK statements. Therefore,
syntax errors in some SYSTASK statements will cause your SAS application to abort.
4
There are two types of asynchronous processes that can be started from SAS:
Task
All tasks started with SYSTASK COMMAND are of type Task. For these tasks, if
you do not specify STATVAR or STATE, then SYSTASK LIST displays the task
name, type, and state, and the name of the status macro variable. You can use
SYSTASK KILL to kill only tasks of type Task.
SAS/CONNECT Process
Tasks started from SAS/CONNECT with the RSUBMIT statement are of type
SAS/CONNECT Process. For SAS/CONNECT processes, SYSTASK LIST displays
the task name, type, and state. You can use SYSTASK KILL to kill a
SAS/CONNECT process. For information about starting SAS/CONNECT
processes, refer to SAS/CONNECT User’s Guide.
Note: The preferred method to display any task (not just SAS/CONNECT
processes) is to use the LISTTASK statement instead of SYSTASK LIST. The
preferred method to end a task is to use the KILLTASK statement instead of
SYSTASK KILL. 4
The SYSRC macro variable contains the return code for the SYSTASK statement.
The status variable that you specify with the STATUS option contains the return code
of the process started with SYSTASK COMMAND. To ensure that a task executes
successfully, you should monitor both the status of the SYSTASK statement and the
status of the process that is started by the SYSTASK statement.
If a SYSTASK statement cannot execute successfully, the SYSRC macro variable will
contain a non-zero value. For example, there could be insufficient resources to complete
a task, or the SYSTASK statement could contain syntax errors. With the SYSTASK
KILL statement, if one or more of the processes cannot be killed, SYSRC is set to a
non-zero value.
When a task is started, its status variable is set to NULL. You can use the status
variables for each task to determine which tasks failed to complete. Any task whose
status variable is NULL did not complete execution.
Unlike the X statement, you cannot use the SYSTASK statement to start a new
interactive session.
See Also
3 “WAITFOR Statement” on page 425
3 “X Statement” on page 427
3 “Issuing DCL Commands during a SAS Session” on page 43
Statements under OpenVMS
4
WAITFOR Statement
425
TITLE Statement
Specifies title lines for SAS output
Valid:
anywhere in a SAS program
OpenVMS specifics:
See:
maximum length of title
TITLE Statement in SAS Language Reference: Dictionary
Syntax
TITLE <n> <’text’ | “text”>;
no arguments
cancels all existing titles.
n
specifies the relative line that contains the title line.
’text’ | “text”
specifies the text of the title that is enclosed in single or double quotation marks. For
compatibility with previous releases, SAS accepts some text without quotation
marks. When writing new programs or updating existing programs, always surround
text with quotation marks.
Details
If the title length is greater than the value of the LINESIZE= system option, then the
title is truncated to the line size.
See Also
3 “LINESIZE= System Option” on page 470
WAITFOR Statement
Suspends execution of the current SAS session until the specified tasks finish executing
Valid:
anywhere in a SAS program
OpenVMS specifics:
all
Syntax
WAITFOR <_ANY | _ALL_> taskname < taskname...> < TIMEOUT=seconds>;
426
WAITFOR Statement
4
Chapter 18
taskname
specifies the name of the task(s) that you want to wait for. The task name(s) that you
specify must match exactly the task names assigned through the SYSTASK
COMMAND statement. You cannot use wildcards to specify task names.
_ANY_ | _ALL_
suspends execution of the current SAS session until either one or all of the specified
tasks finishes executing. The default setting is _ANY_, which means that as soon as
one of the specified task(s) completes executing, the WAITFOR statement will finish
executing.
TIMEOUT=seconds
specifies the maximum number of seconds that WAITFOR should suspend the
current SAS session. If you do not specify the TIMEOUT= option, WAITFOR will
suspend execution of the SAS session indefinitely.
Details
The WAITFOR statement suspends execution of the current SAS session until the
specified task(s) finish executing or until the TIMEOUT= interval (if specified) has
elapsed. If the specified task was started with the WAIT option, then the WAITFOR
statement ignores that task.
For example, the following statements start three different SAS jobs and suspend the
execution of the current SAS session until those three jobs have finished executing:
systask
systask
systask
waitfor
command "sas myprog1.sas" taskname=sas1;
command "sas myprog2.sas" taskname=sas2;
command "sas myprog3.sas" taskname=sas3;
_all_ sas1 sas2 sas3;
The SYSRC macro variable contains the return code for the WAITFOR statement. If
a WAITFOR statement cannot execute successfully, the SYSRC macro variable will
contain a non-zero value. For example, the WAITFOR statement might contain syntax
errors. If the number of seconds specified with the TIMEOUT= option elapses, then the
WAITFOR statement finishes executing, and SYSRC is set to a non-zero value if one of
the following is true:
3 you specified a single task that did not finish executing
3 you specified more than one task and the _ANY_ option (which is the default
setting), but none of the tasks finish executing
3 you specified more than one task and the _ALL_ option and any one of the tasks
did not finish executing.
Any task whose status variable is still NULL after the WAITFOR statement has
executed did not complete execution.
See Also
3 “SYSTASK Statement” on page 422
3 “X Statement” on page 427
3 “Issuing DCL Commands during a SAS Session” on page 43
Statements under OpenVMS
4
X Statement
427
X Statement
Issues an operating environment command from within a SAS session
Valid:
anywhere in a SAS program
OpenVMS specifics:
See:
operating environment command; OpenVMS subprocesses
X Statement in SAS Language Reference: Dictionary
Syntax
X <’DCL-command’>;
no argument
spawns an OpenVMS subprocess, where you can issue DCL commands on OpenVMS
Alpha.
’DCL-command’
specifies a single DCL command. The value for DCL-command must be enclosed in
quotation marks.
Details
The X statement issues a DCL command from within a SAS session. SAS executes the
X statement immediately.
For complete information about the X statement, see “Issuing DCL Commands
during a SAS Session” on page 43.
428
429
CHAPTER
19
System Options under OpenVMS
SAS System Options under OpenVMS 431
Determining How an Option Was Set under OpenVMS 431
Summary of SAS System Options under OpenVMS 432
System Options That Are Not Applicable under OpenVMS
Dictionary 443
ALQMULT= System Option 443
ALTLOG= System Option 443
ALTPRINT= System Option 444
APPLETLOC= System Option 445
AUTOEXEC= System Option 446
AUTOSAVELOC= System Option 447
BUFNO= System Option 447
BUFSIZE= System Option 448
CACHENUM= System Option 449
CACHESIZE= System Option 450
CATCACHE= System Option 451
CC= System Option 452
CLEANUP System Option 453
CONFIG= System Option 454
DEQMULT= System Option 455
DETACH System Option 455
DEVICE= System Option 456
DUMP= System Option 457
EDITCMD System Option 458
EMAILSYS= System Option 458
ENCODING= System Option 459
ENGINE= System Option 460
EXPANDLNM System Option 461
FILECC System Option 461
FMTSEARCH= System Option 462
FONTSLOC= System Option 463
FULLSTIMER System Option 463
GISMAPS= System Option 464
GSFCC= System Option 465
HELPINDEX= System Option 465
HELPLOC= System Option 467
HELPTOC= System Option 467
INITSTMT= System Option 468
JREOPTIONS System Option 469
LINESIZE= System Option 470
LOADLIST= System Option 471
442
430
Contents
4
Chapter 19
LOCALE= System Option 472
LOG= System Option 473
LOGMULTREAD System Option 473
LOGPARM= System Option 474
MAPS= System Option 476
MEMSIZE= System Option 476
MSG= System Option 477
MSGCASE System Option 478
MSYMTABMAX= System Option 478
MVARSIZE= System Option 479
NEWS= System Option 480
NLSCOMPATMODE System Option 481
OBS= System Option 481
OPLIST System Option 482
PAGENO= System Option 483
PAGESIZE= System Option 484
PARMCARDS= System Option 485
PRINT= System Option 485
REALMEMSIZE= System Option 486
RSASUSER System Option 487
S= System Option 488
S2= System Option 489
SASAUTOS= System Option 490
SASHELP= System Option 491
SASUSER= System Option 492
SEQENGINE= System Option 492
SORTPGM= System Option 493
SORTSIZE= System Option 494
SORTWORK= System Option 495
SPAWN= System Option 497
STACK= System Option 497
STIMEFMT System Option 498
STIMER System Option 499
SYSIN= System Option 500
SYSPARM= System Option 501
SYSPRINT System Option 502
TAPECLOSE= System Option 503
TERMIO= System Option 504
USER= System Option 504
VERBOSE System Option 505
WORK= System Option 506
WORKCACHE= System Option 507
XCMD System Option 508
XCMDWIN System Option 508
XKEYPAD System Option 509
XLOG System Option 510
XLOGICAL System Option 510
XOUTPUT System Option 511
XRESOURCES= System Option 512
XSYMBOL System Option 513
XTIMEOUT= System Option 514
System Options under OpenVMS
4
Determining How an Option Was Set under OpenVMS
431
SAS System Options under OpenVMS
SAS system options control many aspects of your SAS session, including output
destinations, the efficiency of program execution, and the attributes of SAS files and
data libraries. System options can be specified in various ways: at SAS invocation, in a
SAS configuration file, in an OPTIONS statement (either in a SAS program or in a SAS
autoexec file), in the System Options window, in SCL programs, or in the
VMS_SAS_OPTIONS DCL symbol.
Most SAS system options are completely described in SAS Language Reference:
Dictionary. Only the system options that have syntax or behavior that is specific to the
OpenVMS operating environment are documented here. “Summary of SAS System
Options under OpenVMS” on page 432 is a summary of all SAS system options and
gives specific information about where each system option can be specified.
Once a system option is set, it affects all subsequent DATA and PROC steps in a
program or SAS process until it is respecified.
Some SAS system options have the same effect (and usually the same name) as data
set or statement options. For example, the BUFSIZE= system option is analogous to
the BUFSIZE= data set option. In the case of overlapping options, SAS uses the
following rules of precedence:
3 data set option values (highest precedence)
3 statement option values (precedence over system options)
3 system option values (lowest precedence).
Determining How an Option Was Set under OpenVMS
Because of the relationship between some SAS system options, SAS can modify an
option’s value. This modification might change your results.
To determine how an option was set, enter the following code in the SAS Program
Editor:
proc options option=option value;
run;
After you submit this code, the SAS Log window will display this information. The
following output is displayed when you enter
proc options option=CATCACHE value;
run;
Output 19.1
Log Output for the CATCACHE System Option
Option Value Information for SAS Option CATCACHE
Option Value: 0
Option Scope: Default
How option value was set: Shipped Default
Options that are set by SAS will often say “Internal” in the How option value was
set field.
432
Summary of SAS System Options under OpenVMS
4
Chapter 19
Summary of SAS System Options under OpenVMS
The following table lists all the SAS system options that are available to SAS users
under the OpenVMS operating environment. Many of these options have no
system-dependent behavior and are described completely in SAS Language Reference:
Dictionary. Others are available only under OpenVMS and are completely described
here. Other options are described both in this document and in SAS Language
Reference: Dictionary. Use the following abbreviations to determine where to find more
information about an option:
ACCESS
indicates that the option is described in the SAS/ACCESS section of
SAS Help and Documentation.
COMP
indicates that the option is completely described here. Some options
are not applicable to the OpenVMS operating environment; these
options are listed in “System Options That Are Not Applicable under
OpenVMS” on page 442.
CON
indicates that the option is described in SAS/CONNECT User’s
Guide.
DQ
indicates that the option is described in SAS Data Quality Server:
Reference.
IT
indicates that the option is described in the documentation for SAS
Integration Technologies, either with the SAS Integration
Technologies software or on the SAS Web site.
LR
indicates that the option is described in SAS Language Reference:
Dictionary.
MACRO
indicates that the option is described in SAS Macro Language:
Reference.
NLS
indicates that the option is described in SAS National Language
Support (NLS): User’s Guide.
SHAR
indicates that the option is described in SAS/SHARE User’s Guide.
SPDE
indicates that the option is described in SAS Scalable Performance
Data Engine: Reference.
WEB
indicates that the option is described in documentation posted on
the SAS Web site (support.sas.com).
The table provides you with the following information about each SAS system option:
3 the option name
3 the default value that is in effect if you do not specify the option and if the option
does not appear in
3 a configuration file
3 your site’s default options table
3 your site’s restricted options table
3 where you can specify the option.
Remember that the default values listed in the following table are the default values
that are hardcoded into SAS. When SAS is installed, the default values of SAS system
options can be changed by specifying the options in a configuration file (when
referenced by the SAS$CONFIG logical name in one or more of the CLUSTER,
System Options under OpenVMS
4
Summary of SAS System Options under OpenVMS
433
SYSTEM, GROUP, JOB, or PROCESS tables). Therefore, the values that you see in
PROC OPTIONS output at your site might not match the values that are shown in the
table. If you have a question about the default value for a particular option, use PROC
OPTIONS, or ask your SAS Support Consultant. For more information about
configuration files, see “Configuration Files” on page 36.
Table 19.1
Summary of SAS System Options
System
Options
SAS
Specification
Default Value
ALQMULT=
10
ALTLOG=
Invocation
Configuration Options
OPTIONS
File
Window
Statement See
X
X
X
none
X
X
COMP
ALTPRINT=
none
X
X
COMP
APPLETLOC
SAS$APPLETLOC
logical value
X
X
X
X
LR,
COMP
ARMAGENT
sasarmmg
X
X
X
X
LR
ARMLOC
none
X
X
X
X
LR
ARMSUBSYS
ARM_NONE
X
X
X
X
LR
ASYNCHIO
ASYNCHIO in all
modes except DMS
X
X
LR
AUTHPROVIDERDOMAIN=
NULL
X
X
LR
AUTOEXEC=
SAS$INIT,
if defined; otherwise
none
X
X
COMP
AUTOSAVELOC=
none
X
X
X
X
COMP
AUTOSIGNON
FALSE
X
X
X
X
CON
BATCH
NOBATCH (windowing
environment and
interactive line modes);
BATCH (batch)
X
X
BINDING=
DEFAULT
X
X
X
X
LR
BOTTOMMARGIN=
0
X
X
X
X
LR
BUFNO=
1
X
X
X
X
LR,
COMP
BUFSIZE=
0
X
X
X
X
LR,
COMP
BYERR
BYERR
X
X
X
X
LR
BYLINE
BYLINE
X
X
X
X
LR
BYSORTED
BYSORTED
X
X
CACHENUM=
5
X
X
X
X
COMP
CACHESIZE=
65024
X
X
X
X
COMP
CAPS
NOCAPS
X
X
X
X
LR
X
COMP
LR
LR
434
Summary of SAS System Options under OpenVMS
4
Chapter 19
System
Options
SAS
Specification
Default Value
CARDIMAGE
NOCARDIMAGE
CATCACHE=
0
Invocation
Configuration Options
File
Window
X
X
X
X
X
OPTIONS
Statement See
X
LR
COMP,
LR
CBUFNO=
0
X
X
X
X
LR
CC=
FORTRAN
X
X
X
X
COMP
CENTER
CENTER
X
X
X
X
LR
CHARCODE
NOCHARCODE
X
X
X
X
LR
CLEANUP
CLEANUP
X
X
X
X
LR,
COMP
CMDMAC
NOCMDMAC
X
X
X
X
MACRO
CMPLIB
NULL
X
X
X
X
LR
CMPOPT
CMPOPT
X
X
X
X
LR
COLLATE
NOCOLLATE
X
X
X
X
LR
COLORPRINTING
COLORPRINTING
X
X
X
X
LR
COMAMID=
TCP
X
X
X
X
CON,
SHAR
COMAUX1=
none
X
X
SHAR
COMAUX2=
none
X
X
SHAR
COMPRESS=
NO
X
X
CONFIG=
SAS$CONFIG
if defined; otherwise
none
X
CONNECTPERSIST
YES
X
X
CONNECTREMOTE=
none
X
X
X
X
LR,
CON
CONNECTSTATUS
CONNECTSTATUS
X
X
X
X
LR,
CON
CONNECTWAIT
CONNECTWAIT
X
X
X
X
LR,
CON
COPIES=
1
X
X
X
X
LR
CPUCOUNT
8
X
X
X
X
LR
CPUID
CPUID
X
X
DATASTMTCHK=
COREKEYWORDS
X
X
X
X
LR
DATE
DATE
X
X
X
X
LR
DATESTYLE
MDY
X
X
X
X
LR
DBSLICEPARM=
(THREADED_APPS, 2)
X
X
X
X
LR
DBSRVTP
NONE
X
X
X
X
LR
COMP
CON
LR
ACCESS
System Options under OpenVMS
4
Summary of SAS System Options under OpenVMS
435
System
Options
SAS
Configuration Options
OPTIONS
Specification
Default Value
DEQMULT=
5
DETACH
DETACH
DETAILS
NODETAILS
X
X
X
X
LR
DEVICE=
none
X
X
X
X
LR,
COMP
DFLANG=
ENGLISH
X
X
X
X
NLS
DKRICOND=
ERROR
X
X
X
X
LR
DKROCOND=
WARN
X
X
X
X
LR
DLDMGACTION=
FAIL for batch mode;
REPAIR for interactive
mode
X
X
X
X
LR
DMR
NODMR
X
X
LR,
CON
DMS
DMS
X
X
LR
DMSEXP
NODMSEXP
X
X
LR
DMSLOGSIZE
99999
X
X
LR
DMSOUTSIZE
99999
X
X
LR
DMSSYNCHK
NODMSSYNCHK
X
X
X
X
LR
DQLOCALE
NULL
X
X
X
X
DQ
DQSETUPLOC
NULL
X
X
X
X
DQ
DSNFERR
DSNFERR
X
X
X
X
LR
DTRESET
NODTRESET
X
X
X
X
LR
DUMP
none
X
X
X
X
COMP
DUPLEX
NODUPLEX
X
X
X
X
LR
ECHOAUTO
NOECHOAUTO
X
X
EDITCMD
EDIT/TPU
X
X
EMAILAUTHPROTOCOL=
NONE
X
X
LR
EMAILHOST=
localhost
X
X
LR
EMAILID=
none
X
X
LR
EMAILPORT=
25
X
X
LR
EMAILPW=
NULL
X
X
LR
EMAILSYS=
SMTP
X
X
ENCODING=
latin1
X
X
NLS
ENGINE=
BASE
X
X
LR,
COMP
ERRORABEND
NOERRORABEND
X
X
X
X
LR
ERRORBYABEND
NOERRORBYABEND
X
X
X
X
LR
Invocation
X
File
Window
X
X
Statement See
X
COMP
COMP
LR
X
X
X
X
COMP
COMP
436
Summary of SAS System Options under OpenVMS
4
Chapter 19
System
Options
SAS
Specification
Default Value
ERRORCHECK=
NORMAL
ERRORS=
Invocation
Configuration Options
OPTIONS
File
Window
Statement See
X
X
X
X
LR
20
X
X
X
X
LR
EXPANDLNM
EXPANDLNM
X
X
X
X
COMP
EXPLORER
NOEXPLORER
X
X
FILECC
FILECC
X
X
X
X
COMP
FIRSTOBS=
1
X
X
X
X
LR
FMTERR
FMTERR
X
X
X
X
LR
FMTSEARCH=
(WORK LIBRARY)
X
X
X
X
LR,
COMP
FONTSLOC
SAS$ROOT:
[MISC.FONTS]
X
X
FORMCHAR=
|−−−−|+|−−−+=|−/
\<>*
X
X
X
X
LR
FORMDLIM=
none
X
X
X
X
LR
FORMS=
DEFAULT
X
X
X
X
LR
FULLSTIMER
NOFULLSTIMER
X
X
X
X
COMP
GISMAPS=
SAS$GISMAPS
X
X
X
X
LR,
COMP
GSFCC=
PRINT
X
X
X
X
COMP
GWINDOW
GWINDOW
X
X
X
X
LR
HELPADDR
NULL
X
X
X
X
WEB
HELPBROWSER
SAS
X
X
X
X
WEB
HELPENCMD
none
X
X
HELPHOST
NULL
X
X
HELPINDEX
/help/common.hlp/
index.txt,
/help/common.hlp/
keywords.htm,
common.hhk
X
X
LR,
COMP
HELPLOC
SAS$ROOT:[HELP]
X
X
LR,
COMP
HELPPORT
0
X
X
HELPTOC
/help/common.hlp/
contents.txt,
/help/common.hlp/
toc.htm, common.hhc
X
X
IBUFSIZE
0
X
X
X
X
LR
IMPLMAC
NOIMPLMAC
X
X
X
X
MACRO
INITCMD=
none
X
X
LR
LR,
COMP
LR
X
X
X
X
WEB
WEB
LR,
COMP
LR
System Options under OpenVMS
4
Summary of SAS System Options under OpenVMS
437
System
Options
SAS
Configuration Options
OPTIONS
Specification
Default Value
INITSTMT=
none
X
X
INVALIDDATA=
a period (.)
X
X
JREOPTIONS
-Djava.ext.dirs=/
SAS$ROOT/misc/
base:/SAS$ROOT/misc/
applets
X
X
LABEL
LABEL
X
X
X
X
LR
_LAST_=
_NULL_
X
X
X
X
LR
LEFTMARGIN=
0
X
X
X
X
LR
LINESIZE=
the display width
setting for windowing
environment and
interactive line modes;
132 characters for
noninteractive and
batch modes
X
X
X
X
LR,
COMP
LOADLIST=
NOLOADLIST
X
X
X
X
COMP
LOCALE=
English
X
X
X
LOG=
SYS$OUTPUT for
interactive line mode,
DMS, and batch
modes.
X
X
COMP
LOGMULTREAD
NOLOGMULTREAD
X
X
COMP
LOGPARM=
none
X
X
LR,
COMP
MACRO
MACRO
X
X
MACRO
MAPS=
SAS$MAPS logical
name
X
X
X
X
LR,
COMP
MAUTOLOCDISPLAY
NOMAUTOLOCDISPLAY
X
X
X
X
MACRO
MAUTOSOURCE
MAUTOSOURCE
X
X
X
X
MACRO
MAXSEGRATIO
75
X
X
MCOMPILENOTE
NONE
X
X
MEMSIZE=
0
X
X
MERGENOBY
NOWARN
X
X
X
X
LR
MERROR
MERROR
X
X
X
X
MACRO
METAAUTORESOURCES
NULL
X
X
METACONNECT
NULL
X
X
METAENCRYPTALG
NONE
X
X
LR
METAENCRYPTLEVEL
EVERYTHING
X
X
LR
Invocation
File
Window
Statement See
LR,
COMP
X
X
LR
COMP
NLS
SPDE
X
X
MACRO
COMP
LR
X
X
LR
438
Summary of SAS System Options under OpenVMS
4
Chapter 19
System
Options
SAS
Configuration Options
OPTIONS
Specification
Default Value
METAID
none
X
X
METAPASS
none
X
X
X
X
LR
METAPORT
0
X
X
X
X
LR
METAPROFILE
NULL
X
X
METAPROTOCOL
BRIDGE
X
X
METAREPOSITORY
DEFAULT
X
X
METASERVER
none
X
X
X
X
LR
METAUSER
none
X
X
X
X
LR
MFILE
NOMFILE
X
X
X
X
MACRO
MINDELIMITER
NULL
X
X
X
X
MACRO
MINPARTSIZE
0
X
X
MISSING=
a period (.)
X
X
X
X
LR
MLOGIC
NOMLOGIC
X
X
X
X
MACRO
MLOGICNEST
NOMLOGICNEST
X
X
X
X
MACRO
MPRINT
NOMPRINT
X
X
X
X
MACRO
MPRINTNEST
NOMPRINTNEST
X
X
X
X
MACRO
MRECALL
NOMRECALL
X
X
X
X
MACRO
MSG=
SAS$MSG logical
name
X
X
COMP
MSGCASE
NOMSGCASE
X
X
COMP
MSGLEVEL=
N
X
X
X
X
LR,
COMP
MSTORED
NOMSTORED
X
X
X
X
MACRO
MSYMTABMAX=
51,200 bytes
X
X
X
X
MACRO,
COMP
MULTENVAPPL
NOMULTENVAPPL
X
X
X
X
LR
MVARSIZE=
8,192 bytes
X
X
X
X
MACRO,
COMP
NETENCRYPT
NONETENCRYPT
X
X
X
X
CON
NETENCRYPTALGORITHM= none
X
X
X
X
CON
NETENCRYPTKEYLEN=
0
X
X
X
X
CON
NETMAC
NETMAC
X
X
X
X
CON
NEWS=
SAS$NEWS,
if defined
X
X
LR,
COMP
NLSCOMPATMODE
NONLSCOMPATMODE
X
X
NLS
NOTES
NOTES
X
X
X
X
LR
NUMBER
NUMBER
X
X
X
X
LR
Invocation
File
Window
Statement See
LR
LR
X
X
LR
LR
WEB
System Options under OpenVMS
4
Summary of SAS System Options under OpenVMS
439
System
Options
SAS
Configuration Options
OPTIONS
Specification
Default Value
OBJECTSERVER
NOOBJECTSERVER
X
X
OBS=
2147483647
X
X
OPLIST
NOOPLIST
X
X
ORIENTATION=
PORTRAIT
X
X
X
X
LR
OVP
NOOVP
X
X
X
X
LR
PAGEBREAKINITIAL
NOPAGEBREAKINITIAL
X
X
PAGENO=
1
X
X
X
X
LR,
COMP
PAGESIZE=
display page size for
windowing
environment and
interactive line modes;
60 lines for
noninteractive and
batch modes
X
X
X
X
LR,
COMP
PAPERDEST=
none
X
X
X
X
LR
PAPERSIZE=
LETTER
X
X
X
X
LR
PAPERSOURCE=
none
X
X
X
X
LR
PAPERTYPE=
PLAIN
X
X
X
X
LR
PARM=
none
X
X
X
X
LR
PARMCARDS=
FT15F001
X
X
X
X
LR,
COMP
PRINT= arg
none for interactive
line mode and the SAS
windowing
environment;
SYS$OUTPUT for
batch mode.
X
X
PRINTERPATH=
none
X
X
PRINTINIT
NOPRINTINIT
X
X
PRINTMSGLIST
PRINTMSGLIST
X
X
PRODTOC
NULL
X
X
QUOTELENMAX
QUOTELENMAX
X
X
REALMEMSIZE
0
X
X
REPLACE
REPLACE
X
X
X
X
LR
REUSE=
NO
X
X
X
X
LR
RIGHTMARGIN=
0
X
X
X
X
LR
RSASUSER
NORSASUSER
X
X
Invocation
File
Window
Statement See
LR
X
X
LR,
COMP
COMP
LR
COMP
X
X
LR
LR
X
X
LR
WEB
X
X
LR
COMP
LR,
COMP
440
Summary of SAS System Options under OpenVMS
4
Chapter 19
System
Options
SAS
Specification
Default Value
S=
0
S2=
Invocation
Configuration Options
OPTIONS
File
Window
Statement See
X
X
X
X
LR,
COMP
0
X
X
X
X
LR,
COMP
SASAUTOS=
SASAUTOS logical
name
X
X
X
X
MACRO,
COMP
SASCMD
none
X
X
X
X
LR
SASFRSCR
none
X
X
X
X
CON
SASHELP=
SAS$HELP logical
name
X
X
SASMSTORE=
NONE
X
X
X
X
MACRO
SASSCRIPT=
none
X
X
X
X
CON
SASUSER=
SAS$USER logical
name
X
X
SEQ=
8
X
X
X
X
LR
SEQENGINE=
TAPE
X
X
X
X
COMP
SERROR
SERROR
X
X
X
X
MACRO
SETINIT
NOSETINIT
X
X
SKIP=
0
X
X
SOLUTIONS
SOLUTIONS
X
X
SORTDUP=
PHYSICAL
X
X
X
X
LR
SORTEQUALS
SORTEQUALS
X
X
X
X
LR
SORTPGM=
BEST
X
X
X
X
COMP
SORTSEQ=
none
X
X
X
X
NLS
SORTSIZE=
MAX
X
X
X
X
COMP
SORTWORK=
none
X
X
X
X
COMP
SOURCE
SOURCE
X
X
X
X
LR
SOURCE2
NOSOURCE2
X
X
X
X
LR
SPAWN=
WAIT
X
X
SPDEINDEXSORTSIZE
32M
X
X
SPDEMAXTHREADS
0
X
X
SPDESORTSIZE
32M
X
X
SPDEUTILLOC
NULL
X
X
SPDE
SPDEWHEVAL
COST
X
X
SPDE
SPOOL
NOSPOOL
X
X
X
X
LR
SSLCALISTLOC
none
X
X
X
X
CON
SSLCERTLOC
none
X
X
X
X
CON
LR,
COMP
LR,
COMP
LR
X
X
LR
LR
COMP
X
X
SPDE
SPDE
X
X
SPDE
System Options under OpenVMS
4
Summary of SAS System Options under OpenVMS
441
System
Options
SAS
Specification
Default Value
SSLCLIENTAUTH
NOSSLCLIENTAUTH
SSLCRLCHECK
Invocation
Configuration Options
OPTIONS
File
Window
Statement See
X
X
X
X
CON
NOSSLCRLCHECK
X
X
X
X
CON
SSLCRLLOC
none
X
X
X
X
CON
SSLPVTKEYLOC
none
X
X
X
X
CON
SSLPVTKEYPASS
none
X
X
X
X
CON
STACK=
0
X
X
X
X
COMP
STARTLIB
STARTLIB
X
X
STIMEFMT
M
X
X
X
X
COMP
STIMER
STIMER
X
X
X
X
COMP
SUMSIZE=
0
X
X
X
X
LR
SYMBOLGEN
NOSYMBOLGEN
X
X
X
X
MACRO
SYNCHIO
SYNCHIO
X
X
SYNTAXCHECK
SYNTAXCHECK
X
X
SYSIN=
none
X
X
SYSPARM=
none
X
X
X
X
MACRO,
COMP
SYSPRINT
SYS$PRINT
X
X
X
X
COMP
SYSPRINTFONT
none
X
X
LR
SYSRPUTSYNC
NO
X
X
CON
TAPECLOSE=
LEAVE
X
X
X
X
COMP
TBUFSIZE=
0
X
X
X
X
CON
TCPPORTFIRST=
0
X
X
X
X
CON
TCPPORTLAST=
0
X
X
X
X
CON
TERMINAL
TERMINAL
X
X
LR
TERMIO=
NOBLOCK
X
X
COMP
TERMSTMT=
none
X
X
LR
TEXTURELOC
none
X
X
X
X
LR
THREADS
NOTHREADS
X
X
X
X
LR
TOOLSMENU
TOOLSMENU
X
X
TOPMARGIN=
0
X
X
TRAINLOC=
SAS$TRAINLOC
logical value
X
X
TRANTAB=
none
X
X
UNIVERSALPRINT
UNIVERSALPRINT
X
X
USER=
none
X
X
LR
LR
X
X
LR
COMP
LR
X
X
LR
LR
X
X
NLS
LR
X
X
LR,
COMP
442
System Options That Are Not Applicable under OpenVMS
4
Chapter 19
System
Options
SAS
Configuration Options
OPTIONS
Specification
Default Value
UTILLOC
none
X
X
UUIDCOUNT=
100
X
X
UUIDGENDHOST=
none
X
X
IT
V6CREATEUPDATE
ERROR
X
X
LR
VALIDFMTNAME=
LONG
X
X
X
X
LR
VALIDVARNAME=
V7
X
X
X
X
LR
VERBOSE
NOVERBOSE
X
VIEWMENU
VIEWMENU
X
X
VNFERR
VNFERR
X
X
WORK=
SAS$WORKROOT
logical name
X
X
LR,
COMP
WORKINIT
WORKINIT
X
X
LR
WORKTERM
WORKTERM
X
X
X
X
LR
WORKCACHE=
65024
X
X
X
X
COMP
XCMD
XCMD
X
X
COMP
XCMDWIN
XCMDWIN
X
X
COMP
XKEYPAD
XKEYPAD
X
X
X
X
COMP
XLOG
NOXLOG
X
X
X
X
COMP
XLOGICAL
XLOGICAL
X
X
X
X
COMP
XOUTPUT
XOUTPUT
X
X
X
X
COMP
XRESOURCES=
none
X
X
XSYMBOL
XSYMBOL
X
X
X
X
COMP
XTIMEOUT=
NOXTIMEOUT
X
X
X
X
COMP
YEARCUTOFF=
1920
X
X
X
X
LR
Invocation
File
Window
Statement See
LR
X
X
IT
COMP
LR
X
X
LR
COMP
System Options That Are Not Applicable under OpenVMS
The following SAS system options are not applicable in the OpenVMS operating
environment:
3 BLKSIZE=
3 DBCS
3 DBCSLANG
3 DBCSTYPE
3 LOADMEMSIZE=
3 RTRACE
3 RTRACELOC
System Options under OpenVMS
4
ALTLOG= System Option
443
Dictionary
ALQMULT= System Option
Specifies the number of pages that are preallocated to a file
Default:
10
configuration file, SAS invocation, OPTIONS statement, SAS System Options
window, VMS_SAS_OPTIONS DCL symbol
Valid in:
Category: Files: SAS files
PROC OPTIONS GROUP= SASFILES
OpenVMS specifics:
All aspects are host-specific
Syntax
ALQMULT=n
n
specifies the number of pages that are allocated for a SAS file. The default value is 10.
Details
The ALQMULT= system option controls how many pages of disk blocks are allocated to
a file when it is created. By default, enough space for 10 pages is allocated. This option
applies to internal SAS files, such as data sets, catalogs, index files, and utility files. It
does not apply to external files, such as data files, log files, and listings.
See Also
3 “ALQMULT= Data Set Option” on page 283
3 “DEQMULT= System Option” on page 455
ALTLOG= System Option
Specifies the destination for a copy of the SAS log
Default:
none
Valid in:
configuration file, SAS invocation,VMS_SAS_OPTIONS DCL symbol
Category: Environment control: Files
PROC OPTIONS GROUP= ENVFILES
OpenVMS specifics:
valid values for destination; syntax
444
ALTPRINT= System Option
4
Chapter 19
Syntax
ALTLOG=destination
NOALTLOG
ALTLOG=destination
can be SYS$PRINT (the default print queue); your current display, SYS$OUTPUT
(the default output stream); or an OpenVMS pathname. All messages written to the
SAS log are written to the destination.
NOALTLOG
specifies that the SAS log is not to be printed.
Details
The ALTLOG= system option specifies a destination to which a copy of the SAS log is
written. Use the ALTLOG= system option to capture log output for printing.
To send the SAS log to a printer other than the default printer, redefine the
SYS$PRINT logical name to the queue that you want to use.
Note: ALTLOG= replaces the following options from earlier releases of SAS: LDISK,
LPRINT, and LTYPE. 4
See Also
3 “Overriding the Default Log and Output Destinations under OpenVMS” on page
196
ALTPRINT= System Option
Specifies the destination for a copy of the SAS procedure output file
Default:
none
Valid in:
configuration file, SAS invocation, VMS_SAS_OPTIONS DCL symbol
Category:
Environment control: Files
PROC OPTIONS GROUP= ENVFILES
OpenVMS specifics:
valid values for destination; syntax
Syntax
ALTPRINT=destination
NOALTPRINT
System Options under OpenVMS
4
APPLETLOC= System Option
445
ALTPRINT=destination
specifies a destination for the SAS procedure output file. The value of destination can
be SYS$PRINT (the default print queue); your current display, SYS$OUTPUT (the
default output stream); or an OpenVMS pathname. All output written to the SAS log
is also written to the destination.
NOALTPRINT
specifies that a copy of the SAS procedure output file is not produced.
Details
The ALTPRINT= system option specifies a destination to which a copy of the SAS
procedure output file is written. Use the ALTPRINT= system option to capture
procedure output for printing.
To send the procedure output to a printer queue other than the default printer,
redefine the SYS$PRINT logical name to the queue that you want to use.
Note: The ALTPRINT= system option replaces the following options from earlier
releases of SAS: PDISK, PPRINT, and PTYPE. 4
See Also
3 Chapter 8, “Routing the SAS Log and SAS Procedure Output,” on page 195
APPLETLOC= System Option
Specifies the location of Java applets
value of SAS$APPLETLOC logical name
configuration file, SAS invocation, OPTIONS statement, SAS System Options
window, VMS_SAS_OPTIONS DCL symbol
Category: Environment control: Files
PROC OPTIONS GROUP= ENVFILES
OpenVMS specifics: default
See: APPLETLOC= System Option in SAS Language Reference: Dictionary
Default:
Valid in:
Syntax
APPLETLOC=base-URL
base-URL
specifies the address where the SAS documentation is located. The maximum
address length is 256 characters. SAS$APPLETLOC is the default on OpenVMS.
Details
The APPLETLOC= system option specifies the base location (typically a URL) for Java
applets. These applets can be accessed from an intranet server or a local CD-ROM.
446
AUTOEXEC= System Option
4
Chapter 19
AUTOEXEC= System Option
Specifies the autoexec file that is used when SAS is initialized
Default:
SAS$INIT, if SAS$INIT is defined, otherwise no default
Valid in:
configuration file, SAS invocation, VMS_SAS_OPTIONS DCL symbol
Category:
Environment control: Files
PROC OPTIONS GROUP= ENVFILES
OpenVMS specifics:
valid values for file-specification; syntax
Syntax
AUTOEXEC=file-specification
NOAUTOEXEC
AUTOEXEC=file-specification
specifies an autoexec file to use instead of any existing process-level SAS$INIT file.
Even if SAS$INIT is defined in your process-level logical name table, it is ignored.
However, cluster-, system-, group-, and job-level autoexec files are still processed if
they exist.
The file specification can be an OpenVMS pathname or logical name. If you do not
supply a file type, the type SAS is assumed.
NOAUTOEXEC
indicates that no process-level autoexec file is processed even if one exists. If no
process-level logical name SAS$INIT exists, NOAUTOEXEC is the default. The
cluster-, system-, group-, and job-level autoexec files are still processed if they exist.
Note: In PROC OPTIONS, this system option is listed as AUTOEXEC= rather than
NOAUTOEXEC as it was in Version 6. 4
Details
The AUTOEXEC= system option specifies the autoexec file. The autoexec file contains
SAS statements that are executed automatically when you invoke SAS or when you
start another SAS process. The autoexec file can contain any valid SAS statements. For
example, you can include LIBNAME statements for SAS data libraries you access
routinely in SAS sessions.
System-, group-, cluster-, and job-level SAS$INIT files are processed regardless of the
value of the AUTOEXEC= system option and regardless of whether the process-level
SAS$INIT logical name exists.
In SAS 9.1, whenever any level of SAS$INIT is processed as an AUTOEXEC file, the
value of AUTOEXEC= from PROC OPTIONS is AUTOEXEC=SAS$AUTO. To see which
files are actually processed as autoexecs, issue the following SAS statement:
x ’show logical SAS$AUTO’;
Note: Although SAS$INIT is the OpenVMS logical name that is used to specify one
or more autoexec files, SAS$AUTO is returned from PROC OPTIONS when SAS$INIT
is processed at any level. 4
System Options under OpenVMS
4
BUFNO= System Option
447
See Also
3 “Autoexec Files” on page 39
AUTOSAVELOC= System Option
Specifies the location of the Program Editor autosave file
none
Valid in: configuration file, SAS invocation, OPTIONS statement, SAS System Options
window
Category: Environment control: Display
PROC OPTIONS GROUP= ENVDISPLAY
OpenVMS specifics: valid values of pathname
Default:
Syntax
AUTOSAVELOC= fileref | “pathname”
fileref
specifies a fileref to the location where the autosave file is saved.
pathname
specifies the pathname of the autosave file. The pathname must be a valid OpenVMS
pathname specified in double quotation marks.
Details
By default, SAS saves the Program Editor autosave file, PGM.ASV, in the current
folder. You can use the AUTOSAVELOC= system option to specify a different location
for the autosave file.
See Also
3 “SETAUTOSAVE Command” in the Base SAS Software section in SAS Help and
Documentation
BUFNO= System Option
Specifies the number of buffers to be allocated for processing SAS data sets
1
Valid in: configuration file, SAS invocation, OPTIONS statement, SAS System Options
window, VMS_SAS_OPTIONS DCL symbol
Category: Files: SAS Files
PROC OPTIONS GROUP= SASFILES, PERFORMANCE
OpenVMS specifics: Default value; valid values of n
Default:
448
BUFSIZE= System Option
See:
4
Chapter 19
BUFNO= System Option in SAS Language Reference: Dictionary
Syntax
BUFNO= n | nK | nM | nG | hexX | MIN | MAX
n | nK | nM | nG
specifies the number of buffers to be allocated in multiples of 1 (bytes); 1,024
(kilobytes ); 1,048,576 (megabytes); or 1,073,741,824 (gigabytes). You can specify
decimal values for the number of kilobytes, megabytes, or gigabytes. For example, a
value of 8 specifies 8 buffers, a value of .782k specifies 801 buffers, and a value of 3m
specifies 3,145,728 buffers.
hexX
specifies the number of buffers as a hexadecimal value. You must specify the value
beginning with a number (0–9), followed by hex digits (0–9, A-F), and then followed
by an X. For example, 2dx specifies 45 buffers.
MIN
sets the number of buffers to 0, and requires SAS to use the default value of 1.
MAX
sets the number of buffers to 2,147,483,647.
Details
The number of buffers is not a permanent attribute of the data set; it is valid only for
the current SAS session or job.
BUFNO= applies to SAS data sets that are opened for input, output, or update.
Using BUFNO= can improve execution time by limiting the number of input/output
operations that are required for a particular SAS data set. The improvement in
execution time, however, comes at the expense of increased memory consumption.
Under OpenVMS, the maximum number of buffers that you can allocate is
determined by the amount of memory available. However, it is unusual to specify more
than 10.
You might want to vary the value of the BUFNO= system option if you are trying to
maximize memory usage or the number of observations per page.
See Also
3 “BUFSIZE= System Option” on page 448
BUFSIZE= System Option
Specifies the permanent buffer page size for processing output SAS data sets
0
Valid in: configuration file, SAS invocation, OPTIONS statement, SAS System Options
window, VMS_SAS_OPTIONS DCL symbol
Category: Files: SAS Files
PROC OPTIONS GROUP= SASFILES, PERFORMANCE
Default:
System Options under OpenVMS
OpenVMS specifics:
See:
4
CACHENUM= System Option
449
valid values for n
BUFSIZE= System Option in SAS Language Reference: Dictionary
Syntax
BUFSIZE=n | nK | nM | nG | hexX | MIN | MAX
n | nK | nM | nG
specifies the buffer page size in multiples of 1 (bytes); 1,024 (kilobytes); 1,048,576
(megabytes); or 1,073,741,824 (gigabytes). You can specify decimal values for the
number of kilobytes, megabytes, or gigabytes. For example, a value of 8 specifies 8
bytes, a value of .782k specifies 801 bytes, and a value of 3m specifies 3,145,728 bytes.
hexX
specifies the buffer page size as a hexadecimal value. You must specify the value
beginning with a number (0–9), followed by hex digits (0–9, A-F), and then followed
by an X. For example, the value 2dx sets the buffer page size to 45 bytes.
MIN
sets the buffer page size to 0 and requires SAS to use a default value. Under
OpenVMS, the default value is 0. The minimum number is −2,147,483,648.
MAX
sets the buffer page size to 2,147,483,647 bytes.
Details
The BUFSIZE= system option enables you to specify the permanent buffer page size for
output SAS data sets. Under OpenVMS, the buffer page size can range from 0 to
2,147,483,647 (2 gigabytes). The value is always rounded up to the next multiple of 512
bytes. If the value is 0, the engine picks a value depending on the size of the
observation. The default value is 0. The value of BUFSIZE is saved with the data set
and can be viewed with PROC CONTENTS or a similar window.
You might want to vary the value of the BUFSIZE= system option if you are trying to
maximize memory usage or the number of observations per page.
Comparisons
The BUFSIZE= system option can be overridden by the BUFSIZE= data
set option.
See Also
3 “Using the BUFSIZE= Option” on page 239
3 “BUFSIZE= Data Set Option” on page 285
3 “BUFNO= System Option” on page 447
CACHENUM= System Option
Specifies the number of caches used per SAS file
Default:
5
450
CACHESIZE= System Option
4
Chapter 19
configuration file, SAS invocation, OPTIONS statement, SAS System Options
window, VMS_SAS_OPTIONS DCL symbol
Category: Files: SAS Files
PROC OPTIONS GROUP= SASFILES
OpenVMS specifics: All aspects are host-specific
Valid in:
Syntax
CACHENUM=n
n
specifies the number of I/O data-cache pages to be used per SAS file. The default
value is 5.
Details
Pages of SAS files are cached in memory with each cache containing multiple pages. By
default, the CACHENUM= system option maintains up to 5 caches for each open file.
See Also
3 “CACHENUM= Data Set Option” on page 286
3 “CACHESIZE= System Option” on page 450
CACHESIZE= System Option
Specifies the size of cache that is used for each open SAS file
65024
Valid in: configuration file, SAS invocation, OPTIONS statement, SAS System Options
window, VMS_SAS_OPTIONS DCL symbol
Category: Files: SAS Files
PROC OPTIONS GROUP= SASFILES
OpenVMS specifics: All aspects are host-specific
Default:
Syntax
CACHESIZE=n | nK | hexX | MIN | MAX
n | nK
specifies the cache size in multiples of 1 (bytes) or 1,024 (kilobytes). You can specify
decimal values for the number of kilobytes. For example, a value of 8 specifies 8
bytes, a value of .782k specifies 801 bytes, and a value of 3k specifies 3,072 bytes.
This value can range from 0 to 65,024 bytes on OpenVMS Alpha before Release
7.2. The cache size can range from 0 to 130,048 bytes on OpenVMS Alpha Release
7.2 or later.
System Options under OpenVMS
4
CATCACHE= System Option
451
hexX
specifies the cache size as a hexadecimal value. You must specify the value beginning
with a number (0–9), followed by hex digits (0–9, A-F), and then followed by an X.
For example, the value 2dx sets the cache size to 45 bytes.
MIN
sets the cache size to 0.
MAX
sets the cache size for your operating environment. MAX is 65,024 bytes on OpenVMS
Alpha before Release 7.2 and 130,048 bytes on OpenVMS Alpha Release 7.2 or later.
Details
Pages of SAS files are cached in memory with each cache containing multiple pages.
The CACHESIZE= system option controls the size (in bytes) of this data cache.
See Also
3 “CACHESIZE= Data Set Option” on page 287
3 “CACHENUM= System Option” on page 449
3 “BUFSIZE= System Option” on page 448
CATCACHE= System Option
Specifies the number of SAS catalogs to keep open
Default:
0
Valid in:
configuration file, SAS invocation, VMS_SAS_OPTIONS DCL symbol
Category: Files: SAS Files
PROC OPTIONS GROUP= SASFILES
OpenVMS specifics:
See:
Valid values for n
CATCACHE= System Option in SAS Language Reference: Dictionary
Syntax
CATCACHE = n | nK | MIN | MAX
n | nK
specifies the number of open-file descriptors to keep in cache memory in multiples of
1 (n) or 1,024 (nK). You can specify decimal values for the number of kilobytes. For
example, a value of 8 specifies 8 open-file descriptors, a value of .782k specifies 801
open-file descriptors, and a value of 3k specifies 3,072 open-file descriptors.
If n > 0, SAS places up to that number of open-file descriptors in cache memory
instead of closing the catalogs.
MIN
sets the number of open-file descriptors that are kept in cache memory to 0.
452
4
CC= System Option
Chapter 19
MAX
sets the number of open-file descriptors that are kept in cache memory to 32,767.
Details
By using the CATCACHE= system option to specify the number of SAS catalogs to keep
open, you can avoid the repeated opening and closing of the same catalogs.
If SAS is running on an z/OS server and the MINSTG system option is in effect, SAS
sets the value of CATCACHE to 0.
See Also
3 The section about optimizing system performance in SAS Language Reference:
Concepts
CC= System Option
Tells SAS what type of carriage control to use when it writes to external files
FORTRAN
Valid in: configuration file, SAS invocation, OPTIONS statement, SAS System Options
window, VMS_SAS_OPTIONS DCL symbol
Category: Files: External Files
PROC OPTIONS GROUP= EXTFILES
OpenVMS specifics: carriage-control format
Default:
Syntax
CC=CR | FORTRAN | PRINT
CR
specifies OpenVMS carriage-return carriage-control format. The use of overprinting
with CC=CR is not supported.
FORTRAN
specifies FORTRAN carriage-control format. This is the default.
PRINT
specifies OpenVMS print carriage-control format.
Details
The CC= system option specifies what type of carriage control to use when SAS writes
to external files. All SAS procedure output files are affected by this option. If the CC=
system option is specified when SAS is invoked, then it also affects the SAS log.
See Also
3 “Reading and Writing SAS Print Files under OpenVMS” on page 178
System Options under OpenVMS
4
CLEANUP System Option
453
CLEANUP System Option
Specifies how to handle an out-of-resource condition
CLEANUP
configuration file, SAS invocation, OPTIONS statement, SAS System Options
window, VMS_SAS_OPTIONS DCL symbol
Category: Environment control: Error handling
PROC OPTIONS GROUP= ERRORHANDLING
OpenVMS specifics: operation in various modes
See: CLEANUP System Option in SAS Language Reference: Dictionary
Default:
Valid in:
Syntax
CLEANUP | NOCLEANUP
CLEANUP
specifies that during the entire session, SAS attempts to perform automatic,
continuous clean up of resources that are not essential for execution. Nonessential
resources include those that are not visible to the user (for example, cache memory)
and those that are visible to the user (for example, the KEYS windows).
CLEANUP does not prompt you before SAS attempts to clean up your disk.
However, when an out-of-disk-space condition occurs and your display is attached to
the process, you are prompted with a menu selection even if the CLEANUP option is
on.
When the CLEANUP option is on, SAS performs automatic continuous cleanup. If
not enough resources are recovered, the request for the resource fails, and an
appropriate error message is written to the SAS log.
CLEANUP is the default in batch mode because there is no display attached to the
process to accommodate prompting.
NOCLEANUP
specifies that SAS allows the user to choose how to handle an out-of-resource
condition. When NOCLEANUP is in effect and SAS cannot execute because of a lack
of resources, SAS automatically attempts to clean up resources that are not visible to
the user (for example, cache memory). However, resources that are visible to the user
(for example, the KEYS windows) are not automatically cleaned up. Instead, SAS
prompts you before attempting to clean up your disk.
Details
The CLEANUP system option indicates whether you are prompted with a menu of
items to clean up when SAS encounters an out-of-resource condition.
When CLEANUP is on, you are not prompted for any out-of-resource condition except
for out-of-disk-space conditions. If you do not want to be prompted for out-of-disk-space
conditions, use the CLEANUP option in conjunction with the NOTERMINAL option.
If you specify NOCLEANUP, a dialog box prompts you for input when SAS runs out
of a resource. On every menu except the out-of-disk-space menu, you can select
Continuous. If you choose Continuous, the CLEANUP system option is turned on, and
you are not prompted again in out-of-resource conditions, unless SAS runs out of disk
space.
454
4
CONFIG= System Option
Chapter 19
CONFIG= System Option
Specifies the configuration file that is used when initializing or overriding the values of SAS
system options
Default:
sasv91.cfg in SAS$ROOT:[000000]
Valid in:
configuration file, SAS invocation
Category:
Environment control: Files
PROC OPTIONS GROUP= ENVFILES
OpenVMS specifics:
All aspects are host-specific; valid values for file-specification; syntax
Syntax
CONFIG=file-specification
NOCONFIG
CONFIG=file-specification
indicates that the specified file is used as the configuration file, and SAS$CONFIG in
your process-level logical name table is ignored. However, cluster-, system-, group-,
and job-level configuration files are still processed if they exist.
The value for file-specification must be a valid OpenVMS pathname or logical
name. If you do not supply a file type, the type CFG is assumed.
NOCONFIG
indicates that no process-level configuration file is processed, even if one exists. The
cluster-, system-, group-, and job-level configuration files are still processed if they
exist.
Details
The CONFIG= system option specifies the complete filename of your configuration files.
These files contain SAS options that are executed automatically whenever SAS is
invoked. You can create your own configuration file and store it in a location you choose.
To see which configuration files were processed for your SAS session, submit the
following code:
proc options option=config value;
run;
All of the configuration files that SAS processed are listed as the value of the CONFIG=
system option.
Cluster-, system-, group-, and job-level SAS$CONFIG files are processed regardless
of the value of the CONFIG= option and regardless of whether the process-level
SAS$CONFIG logical name exists.
See Also
3 “Configuration Files” on page 36
System Options under OpenVMS
4
DETACH System Option
455
DEQMULT= System Option
Specifies the number of pages to extend a file
Default:
5
configuration file, SAS invocation, OPTIONS statement, SAS System Options
window, VMS_SAS_OPTIONS DCL symbol
Valid in:
Category: Files: SAS files
PROC OPTIONS GROUP= SASFILES
OpenVMS specifics:
All aspects are host-specific
Syntax
DEQMULT=n
n
specifies the number of pages desired to extend a SAS file. The default value is 5.
Details
The DEQMULT= system option controls how many pages of disk blocks are added to a
file each time it has to be extended. By default, enough space for 5 pages is added.
See Also
3 “DEQMULT= Data Set Option” on page 290
3 “ALQMULT= System Option” on page 443
DETACH System Option
Specifies that the asynchronous host command uses a detached process
Default:
DETACH
Valid in:
configuration file, SAS invocation, VMS_SAS_OPTIONS DCL symbol
Category: Environment control: Initialization and operation
PROC OPTIONS GROUP= EXECMODES
OpenVMS specifics:
All aspects are host-specific
Syntax
DETACH | NODETACH
456
DEVICE= System Option
4
Chapter 19
DETACH
specifies to use a detached process for asynchronous commands. This is the default.
NODETACH
specifies that the asynchronous host command uses a subprocess.
Details
The user’s login.com automatically executes when a detached process starts.
Therefore, the symbols and logical names that are defined in LOGIN.COM are also
defined for the detached process.
When launched, the detached process will execute the DCL command procedure that
is pointed to by the SAS$DETACH_TEMPLATE logical name, if it is defined. You can
use this DCL command procedure to define the symbols and logical names that are
needed by the detached process, since they are not automatically inherited from the
process that is running SAS. A sample command procedure can be found in
SAS$ROOT:[MISC.BASE]DETACH_TEMPLATE.COM. To execute a DCL command
procedure when the detached process is launched, complete the following steps:
1 Edit the command procedure to contain any needed DCL commands.
2 Issue the following DCL command before invoking SAS:
$ DEFINE SAS$DETACH_TEMPLATE SAS$ROOT:[MISC.BASE]DETACH_TEMPLATE.COM
DEVICE= System Option
Specifies a device driver for graphics output for SAS/GRAPH software
none
Valid in: configuration file, SAS invocation, OPTIONS statement, SAS System Options
window, VMS_SAS_OPTIONS DCL symbol
Category: Graphics: Driver settings
PROC OPTIONS GROUP= GRAPHICS
OpenVMS specifics: valid values for device-driver-name
See: DEVICE= System Option in SAS Language Reference: Dictionary
Default:
Syntax
DEVICE=device-driver-name
device-driver-name
specifies the name of a device driver for graphics output.
Details
To see a list of device drivers that are available under OpenVMS, use the GDEVICE
procedure. If you are using the SAS windowing environment, submit the following
statements:
System Options under OpenVMS
4
DUMP= System Option
457
proc gdevice catalog=sashelp.devices;
run;
If you are running SAS in interactive line mode, noninteractive mode, or batch mode,
submit the following statements:
proc gdevice catalog=sashelp.devices nofs;
list _all_;
run;
See Also
3 “GDEVICE Procedure” in SAS/GRAPH Reference, Volumes 1 and 2
DUMP= System Option
Specifies when to create a process dump file
Default: none
Valid in: configuration file, SAS invocation, OPTIONS statement, SAS System Options
window, VMS_SAS_OPTIONS DCL symbol
Category: Environment control: Error handling
PROC OPTIONS GROUP= ERRORHANDLING
OpenVMS specifics: All aspects are host-specific
Syntax
DUMP=END_PROC | FATAL
NODUMP
DUMP
tells SAS to create a process dump file. This form of the option can take the following
values:
END_PROC
causes the next procedure that runs to completion to signal a fatal error. If SET
PROCESS/DUMP has been turned on, this forces a file to be created on a disk that
can later be analyzed with the ANALYZE/PROCESS_DUMP utility.
DUMP=END_PROC is used to gather information for debugging at any point
throughout the execution of a SAS job.
FATAL
tells SAS to resignal any fatal errors that it encounters. If SET PROCESS/DUMP
has been turned on, this forces a file to be created on a disk that can later be
analyzed with the ANALYZE/PROCESS_DUMP utility.
NODUMP
tells SAS not to perform any dump activity.
Details
CAUTION:
Never use the DUMP= system option unless you are advised to do so by SAS Technical
Support. 4
458
EDITCMD System Option
4
Chapter 19
The DUMP= system option is used for debugging purposes only. You use it in
conjunction with the DCL command SET PROCESS/DUMP to write the contents of the
address space to a file on disk when SAS terminates due to a fatal error. To create a
dump file, type the following DCL command at the DCL prompt before you run your
SAS job:
$ SET PROCESS/DUMP
EDITCMD System Option
Specifies the host editor to be used with the HOSTEDIT command
Default:
EDIT/TPU
configuration file, SAS invocation, OPTIONS statement, VMS_SAS_OPTIONS
DCL symbol
Valid in:
Category:
Environment control: Display
PROC OPTIONS GROUP= ENVDISPLAY
OpenVMS specifics:
all aspects are host-specific
Syntax
EDITCMD=host-editor-pathname editor-options
host-editor-pathname
is the location of the host editor.
editor-options
are the options supplied to the host editor.
Details
The host editor that you specify is used when you issue the HOSTEDIT command. The
HOSTEDIT command is valid only when you are running in a SAS windowing
environment.
EMAILSYS= System Option
Specifies the e-mail protocol to use for sending electronic mail
Default:
SMTP (Simple Mail Transfer Protocol)
configuration file, SAS invocation, OPTIONS statement, SAS System Options
window, VMS_SAS_OPTIONS DCL symbol
Valid in:
Category:
Communications: Email
PROC OPTIONS GROUP= EMAIL
OpenVMS specifics:
all aspects are host-specific
System Options under OpenVMS
4
ENCODING= System Option
459
Syntax
EMAILSYS=SMTP | VMS
SMTP
specifies the SMTP protocol. This value is the default. This value supports sending
e-mail attachments on OpenVMS.
VMS
specifies the native OpenVMS e-mail facility. This value does not support sending
blind carbon copies (the BCC field) or sending e-mail attachments.
Details
The EMAILSYS= system option specifies which type of e-mail system to use for sending
electronic mail from within SAS. Specifying SMTP supports sending e-mail attachments
on OpenVMS, but might require changing the values of EMAILHOST= and
EMAILPORT=, depending on your site configuration.
See Also
3
3
3
3
3
“Sending Mail from within Your SAS Session under OpenVMS” on page 71
“Sending Electronic Mail Using the FILENAME Statement (E-MAIL)” on page 189
“EMAILHOST= System Option” in SAS Language Reference: Dictionary
“EMAILPORT= System Option” in SAS Language Reference: Dictionary
“SMTP E-mail Interface” in SAS Language Reference: Concepts
ENCODING= System Option
Specifies the default character-set encoding for processing external data
Default:
latin1
Valid in:
configuration file, SAS invocation, VMS_SAS_OPTIONS DCL symbol
Category: Environment control: Language control
PROC OPTIONS GROUP= LANGUAGECONTROL
OpenVMS specifics:
valid values for character-string
ENCODING= System Option in SAS National Language Support (NLS): User’s
Guide
See:
460
4
ENGINE= System Option
Chapter 19
ENGINE= System Option
Specifies the default access method to use for SAS libraries
BASE
Valid in: configuration file, SAS invocation, VMS_SAS_OPTIONS DCL symbol
Category: Files: SAS files
PROC OPTIONS GROUP= SASFILES
OpenVMS specifics: valid values for engine-name
See: ENGINE= System Option in SAS Language Reference: Dictionary
Default:
Syntax
ENGINE=engine-name
engine-name
can be one of the following under OpenVMS:
BASE | V9
specifies the default SAS engine for SAS 9 and SAS 9.1 files. This engine is 64-bit.
Previous SAS engines were 32-bit.
V8
specifies the SAS engine for all SAS Version 8 files.
V7
specifies the SAS engine for all Version 7 files.
V6
specifies the read-only Version 6 SAS engine. This engine enables you to read your
Version 6 data sets in SAS 9.1.
TAPE | V9TAPE
specifies the default sequential engine for SAS 9 and SAS 9.1 files.
V8TAPE | V7TAPE
specifies the SAS sequential engine for all Version 8 and Version 7 files. These
engines are identical to the V9TAPE engine.
CONCUR
specifies the concurrency engine.
XPORT
specifies the transport engine. The XPORT engine reads or writes one or more
SAS data sets in transport format.
Note:
V5 and V6TAPE are no longer valid engine names.
4
See Also
3 Chapter 6, “Using SAS Engines,” on page 153
3 “Compatibility of Existing SAS Files with SAS 9.1” on page 135
3 SAS Language Reference: Concepts
System Options under OpenVMS
4
FILECC System Option
461
EXPANDLNM System Option
Specifies whether concealed logical names are expanded when libref paths are displayed to the
user
EXPANDLNM
Valid in: configuration file, SAS invocation, OPTIONS statement, SAS System Options
window, VMS_SAS_OPTIONS DCL symbol
Category: Environment control: Display
PROC OPTIONS GROUP= ENVDISPLAY
OpenVMS specifics: All aspects are host-specific
Default:
Syntax
EXPANDLNM | NOEXPANDLNM
EXPANDLNM
specifies that concealed logical names are to be expanded. This is the default.
NOEXPANDLNM
specifies that concealed logical names are not to be expanded when paths are
displayed.
Details
The EXPANDLNM system option controls whether concealed logical names are
expanded when libref paths are displayed to the user.
In SAS 9.1, the EXPANDLNM system option can be used with all engines.
Example
For example,
MYDISK$:[DIRECTORY]
is displayed as
$1$DUA1:[MYDISK.DIRECTORY]
FILECC System Option
Specifies how to treat data in column 1 of a print file
FILECC
configuration file, SAS invocation, OPTIONS statement, SAS System Options
window, VMS_SAS_OPTIONS DCL symbol
Default:
Valid in:
462
FMTSEARCH= System Option
4
Chapter 19
Log and procedure output control: Procedure output
PROC OPTIONS GROUP= LISTCONTROL
OpenVMS specifics: All aspects are host-specific
Category:
Syntax
FILECC | NOFILECC
FILECC
specifies that data in column 1 of a print file should be treated as carriage control.
This is the default.
NOFILECC
specifies that data in column 1 of a print file should be treated as data.
Details
The FILECC system option specifies whether to treat data in column 1 of a print file as
carriage control or as data.
See Also
3 “Reading and Writing SAS Print Files under OpenVMS” on page 178
FMTSEARCH= System Option
Controls the order in which format catalogs are searched
(WORK LIBRARY)
Valid in: configuration file, SAS invocation, OPTIONS statement, SAS System Options
window, VMS_SAS_OPTIONS DCL symbol
Category: Environment control: Files
PROC OPTIONS GROUP= ENVFILES
OpenVMS specifics: valid values for catalog-specification
See: FMTSEARCH= System Option in SAS Language Reference: Dictionary
Default:
Syntax
FMTSEARCH=(catalog-specification–1 catalog-specification–2 . . .
catalog-specification-n)
catalog-specification
specifies a valid OpenVMS libref. The value of libref can be either libref or
libref.catalog. If only the libref is given, SAS assumes that FORMATS is the catalog
name.
When you specify this system option in a configuration file or on the SAS
command line, you must enclose catalog-specification in double quotation marks. You
System Options under OpenVMS
4
FULLSTIMER System Option
463
must also separate each catalog-specification with a blank space, not with a comma,
even though the comma is typically used as a list delimiter by OpenVMS.
FONTSLOC= System Option
Specifies the directory that contains the SAS fonts that are loaded by some Universal Printer drivers
Default:
Valid in:
SAS$ROOT:[MISC.FONTS]
configuration file, SAS invocation
PROC OPTIONS GROUP= ENVDISPLAY
Category: Environment control: Display
OpenVMS specifics:
default value; valid directory specifications
Syntax
FONTSLOC = "directory-specification"
"directory-specification"
specifies the directory that contains the SAS fonts that are loaded during the SAS
session. The directory-specification must be enclosed in double quotation marks.
Details
The directory must be a valid OpenVMS Alpha pathname.
FULLSTIMER System Option
Writes all system performance statistics to the SAS log
Default:
NOFULLSTIMER
configuration file, SAS invocation, OPTIONS statement, SAS System Options
window, VMS_SAS_OPTIONS DCL symbol
Valid in:
Category: Log and procedure output control: SAS log
PROC OPTIONS GROUP= LOGCONTROL
OpenVMS specifics:
host-specific options
Syntax
FULLSTIMER | NOFULLSTIMER
464
GISMAPS= System Option
4
Chapter 19
FULLSTIMER
specifies that SAS write to the SAS log a complete list of computer resources that
were used for each step and for the entire SAS session.
NOFULLSTIMER
specifies that SAS does not write to the SAS log a complete list of computer
resources. This is the default.
Details
The FULLSTIMER system option specifies whether all the performance statistics of
your computer system that are available to SAS are written to the SAS log.
Under OpenVMS, the FULLSTIMER system option prints the following statistics:
3
3
3
3
3
buffered I/O
direct I/O
elapsed time
page faults
CPU time.
If the FULLSTIMER system options is set, the FULLSTIMER and STIMER
statistics are printed.
See Also
3 “STIMER System Option” on page 499
GISMAPS= System Option
Specifies the location of the SAS data library that contains U.S. Census Tract maps supplied by
SAS/GIS
Default:
SAS$GISMAPS
configuration file, SAS invocation, OPTIONS statement, SAS System Options
window, VMS_SAS_OPTIONS DCL symbol
Valid in:
Category:
Graphics: Driver settings
PROC OPTIONS GROUP= GRAPHICS
OpenVMS specifics:
See:
valid values for library-specification and path-to-library
GISMAPS= System Option in SAS Language Reference: Dictionary
Syntax
GISMAPS=library-specification | path-to-library
library-specification | path-to-library
specifies either a library or a physical path to a library that contains U.S. Census
Tract maps supplied by SAS/GIS.
System Options under OpenVMS
4
HELPINDEX= System Option
465
GSFCC= System Option
Tells SAS what type of carriage control to use for writing to graphics stream files
PRINT
Valid in: configuration file, SAS invocation, OPTIONS statement, SAS System Options
window, VMS_SAS_OPTIONS DCL symbol
Category: Input control: Driver settings
PROC OPTIONS GROUP= GRAPHICS
OpenVMS specifics: All aspects are host-specific
Default:
Syntax
GSFCC=CR | PRINT | NONE
CR
creates a carriage return carriage control file.
PRINT
is a VFC format file with all carriage controls set to null. These files can be used
with most utilities except for some file transfer protocols, such as Kermit.
NONE
creates a file with no carriage control. This format is useful if you plan to download
the file to a personal computer.
Details
The GSFCC= option determines the file format of graphics stream files. When used as a
system option, GSFCC= controls all graphics files that are created in a single SAS
session. To specify a different format for a single file, use the GSFCC= statement option
in the FILENAME statement.
See Also
3 FILENAME statement: “Host-Specific External I/O Statement Options” on page
402
HELPINDEX= System Option
Specifies one or more index files to be used by SAS Help and Documentation
/help/common.hlp/index.txt, /help/common.hlp/keywords.htm,
common.hhk
Default:
configuration file, SAS invocation
Category: Environment control: Help
PROC OPTIONS GROUP= HELP
OpenVMS specifics: HTML files must reside in the path specified by the HELPLOC= option
Valid in:
466
HELPINDEX= System Option
4
Chapter 19
Syntax
HELPINDEX = index-pathname-1 < index-pathname-2 < index-pathname-3>>
index-pathname
specifies the partial pathname for the index that is to be used by SAS Help and
Documentation. The index-pathname can be any or all of the following:
/help/applet-index-filename
specifies the partial pathname of the index file that is to be used by the SAS
Documentation Java applet in a UNIX environment. applet-index-filename must
have a file extension of .txt and it must reside in a path that is specified by the
HELPLOC= system option. The default is /help/common.hlp/index.txt.
See the default index file for the format that is required for an index file.
/help/accessible-index-filename
specifies the partial pathname of an accessible index file that is to be used by the
online SAS Documentation in UNIX, OpenVMS, or z/OS environments. An
accessible index file is an HTML file that can be used by Web browsers.
accessible-index-filename must have a file extension of .htm and it must reside in a
path that is specified by the HELPLOC= system option. The default pathname is
/help/common.hlp/keywords.htm.
See the default index file for the format that is required for an index file.
HTML-Help-index-pathname
specifies the pathname of the Microsoft HTML Help index that is to be used by the
online SAS Documentation in Windows environments. The default pathname is
common.hhk. For information about creating an index for Microsoft HTML Help,
see your Microsoft HTML Help documentation.
Details
Use the HELPINDEX= option if you have a customized index that you want to use in
place of the SAS-supplied index. If you use one configuration file to start SAS in more
than one operating environment, you can specify all of the partial pathnames in the
HELPINDEX= option. The order of the pathnames is not important, although only one
pathname of each type can be specified.
When the HELPINDEX= option specifies a pathname for UNIX, OpenVMS, or z/OS
operating environments, SAS determines the complete path by replacing /help/ in the
partial pathname with the pathname specified in the HELPLOC= option. If the
HELPLOC= option contains more than one pathname, SAS searches each path for the
specified index.
For example, when the value of HELPINDEX= is /help/common.hlp/myindex.htm
and the value of HELPLOC= is /u/myhome/myhelp, the complete path to the index is
/u/myhome/myhelp/common.hlp/myindex.htm.
See Also
3 “HELPLOC= System Option” on page 467
System Options under OpenVMS
4
HELPTOC= System Option
467
HELPLOC= System Option
Specifies the location of the text and index files for the facility that is used to view SAS Help and
Documentation
Default:
SAS$ROOT:[HELP]
Valid in:
configuration file, SAS invocation
Category: Environment control: Help
PROC OPTIONS GROUP= HELP
OpenVMS specifics:
default value; valid values for pathname
Syntax
HELPLOC=pathname<,pathname-2,...,pathname-n>
pathname
specifies one or more directory pathnames in which SAS Help and Documentation
files are located. The Pathname must be a fully qualified OpenVMS filename.
Details
Specifying a value for the HELPLOC= system option causes SAS to insert that value at
the start of a list of concatenated values, the last of which is the default value. This
enables you to access the help for your site without losing access to SAS Help and
Documentation.
For example, after two values are supplied for HELPLOC=, the specification list has
the following form:
helploc-specification-2, helploc-specification-1, SAS$ROOT:[HELP]
HELPTOC= System Option
Specifies the table of contents files to be used by SAS Help and Documentation
Default:
Valid in:
/help/helpnav.hlp/config.txt, /help/common.hlp/toc.htm, common.hhc
configuration file, SAS invocation
Category: Environment control: Help
PROC OPTIONS GROUP= HELP
OpenVMS specifics:
HTML files must reside in the path specified by the HELPLOC= option
Syntax
HELPTOC = TOC-pathname-1 < TOC-pathname-2 < TOC-pathname-3>>
468
INITSTMT= System Option
4
Chapter 19
TOC-pathname
specifies a partial pathname for the table of contents that is to be used by SAS Help
and Documentation. TOC-pathname can be any or all of the following:
/help/applet-TOC-filename
specifies the partial pathname of the table of contents file that is to be used by the
SAS Documentation Java applet in a UNIX environment. The applet-TOC-filename
must have a file extension of .txt and it must reside in a path that is specified by
the HELPLOC= system option. The default is /help/helpnav.hlp/config.txt.
See the default table of contents file for the format that is required for an index
file.
/help/accessible-TOC-filename
specifies the partial pathname of an accessible table of contents file that is to be
used by SAS Help and Documentation in UNIX, OpenVMS, or z/OS environments.
An accessible table of contents file is an HTML file that can be used by Web
browsers. The accessible-TOC-filename has a file extension of .htm and it must
reside in a path that is specified by the HELPLOC= system option. The default
pathname is /help/common.hlp/toc.htm.
See the default table of contents file for the format that is required for a table of
contents.
HTML-Help-TOC-pathname
specifies the complete pathname to the Microsoft HTML Help table of contents
that is to be used by SAS Help and Documentation in Windows environments. The
default pathname is common.hhc. For information about creating an index for
Microsoft HTML Help, see your Microsoft HTML Help documentation.
Details
Use the HELPTOC= option if you have a customized table of contents that you want to
use in place of the SAS supplied table of contents. If you use one configuration file to
start SAS in more than one operating environment, you can specify all of the partial
pathnames in the HELPTOC= option. The order of the pathnames is not important,
although only one pathname of each type can be specified.
When the HELPTOC= option specifies the pathname for UNIX, OpenVMS, or z/OS
operating environments, SAS determines the complete path by replacing /help/ in the
partial pathname with the pathname specified in the HELPLOC= option. If the
HELPLOC= option contains more than one pathname, SAS searches each path for the
table of contents.
For example, when HELPTOC= is /help/common.hlp/mytoc.htm and the value of
HELPLOC= is /u/myhome/myhelp, the complete path to the table of contents is
/u/myhome/myhelp/common.hlp/mytoc.htm.
See Also
3 “HELPLOC= System Option” on page 467
INITSTMT= System Option
Specifies a SAS statement that is to be executed after any statements in the autoexec file and
before any statements from the SYSIN file
System Options under OpenVMS
4
JREOPTIONS System Option
469
none
Default:
Valid in:
configuration file, SAS invocation, VMS_SAS_OPTIONS DCL symbol
IS=
Alias:
Category: Environment control: Initialization and operation
PROC OPTIONS GROUP= EXECMODES
OpenVMS specifics:
See:
valid values for statement(s)
INITSTMT= System Option in SAS Language Reference: Dictionary
Syntax
INITSTMT=“statement(s)”
IS=“statement(s)”
“statement(s)”
specifies any SAS statement or statements. The value for statement(s) must be
enclosed in double quotation marks.
Details
In order to conform to the OpenVMS command-line syntax, the value for this option
must be enclosed in double quotation marks. The quotation marks enable you to
preserve case, as well as to specify a compound statement. Any value that is enclosed
in single quotation marks is resolved as a symbol by OpenVMS before it is processed by
SAS. If no symbol exists for the specified value, unexpected results might occur.
Note: Placing single quotation marks inside double quotation marks might not
create the effect that you want. To preserve the case of the characters, enclose strings
in double quotation marks. 4
JREOPTIONS System Option
Identifies Java Runtime Environment (JRE) options for SAS
Default:
-Djava.ext.dirs=/SAS$ROOT/misc/base:/SAS$ROOT/misc/applets
Valid in:
configuration file, SAS invocation
Category: Environment control: Initialization and operation
PROC OPTIONS GROUP= EXECMODES
OpenVMS specifics:
all
Syntax
JREOPTIONS= “(-JRE-option-1 <-JRE-option-n>)”
470
LINESIZE= System Option
4
Chapter 19
-JRE-option
specifies one or more Java Runtime Environment options. JRE options must begin
with a hyphen (-). Use a space to separate multiple JRE options. Valid values for
JRE-option depend on your installation’s Java Runtime Environment. For
information about JRE options, see your installation’s Java documentation.
Details
The set of JRE options must be enclosed in parentheses. If you specify multiple
JREOPTIONS system options, SAS appends JRE options to JRE options that are
currently defined. Incorrect JRE options are ignored.
Examples
jreoptions=’’(-verbose)’’
jreoptions=’’(-Djava.class.path=/myjava/classes/myclasses.jar:/
myjava2/classes/myclasses.jar -oss600k)’’
LINESIZE= System Option
Specifies the line size of the SAS Log and Output windows
the display width setting for windowing environment and interactive line
modes; 132 characters for noninteractive and batch modes
Valid in: configuration file, SAS invocation, OPTIONS statement, SAS System Options
window, VMS_SAS_OPTIONS DCL symbol
Alias: LS=
Category: Log and procedure output control: SAS log and procedure output
PROC OPTIONS GROUP= LOG_LISTCONTROL
OpenVMS specifics: valid values for n; syntax
See: LINESIZE= System Option in SAS Language Reference: Dictionary
Default:
Syntax
LINESIZE= n | hexX | MIN | MAX
n
specifies the line size in characters. Valid values range between 64 to 256.
hexX
specifies the line size as a hexadecimal value. You must specify the value beginning
with a number (0–9), followed by hex digits (0–9, A–F), and then followed by an X.
For example, the value 0fax specifies 250 characters.
System Options under OpenVMS
4
LOADLIST= System Option
471
MIN
sets the line size to 64 characters, and requires SAS to use a default value.
MAX
sets the line size to 256 characters.
Details
Under OpenVMS, the default for interactive modes (the SAS windowing environment
and interactive line mode) is the display width setting. For noninteractive and batch
modes, the default is 132 characters.
See Also
3 “PAGESIZE= System Option” on page 484
LOADLIST= System Option
Specifies whether to print to the specified file the information about images that SAS has loaded
into memory
Default:
NOLOADLIST
configuration file, SAS invocation, OPTIONS statement, SAS System Options
window, VMS_SAS_OPTIONS DCL symbol
Valid in:
Category: Environment control: Files
PROC OPTIONS GROUP= ENVFILES
OpenVMS specifics:
All aspects are host-specific
Syntax
LOADLIST=file-specification
NOLOADLIST
LOADLIST=file-specification
identifies an external file where the information is printed. The value for
file-specification can be either a pathname or a logical name.
Note: When you use LOADLIST= in an OPTIONS statement, you must enclose
file-specification in double quotation marks. When you use LOADLIST= during SAS
invocation or in a configuration file, do not use quotation marks. 4
NOLOADLIST
specifies to not print any information. This is the default.
Details
The LOADLIST= system option helps you identify images that should be either moved
to your local node or installed on your system in order to improve performance. Each
time an image is loaded into memory, its name is added to the list. The images that
appear most often in the list are likely candidates for performance enhancements.
472
4
LOCALE= System Option
Chapter 19
The following is a partial list of a typical LOADLIST file:
Image Path: $1$DUA304:[901_MASTER_SUPIO.][COM.ALPND]SAS7IO.EXE
Associated Task: DATASTEP
Activation Time: 25-APR-2003 14:35:14.79
Size (in bytes): 327680
Requested Loads: 1
Physical Loads: 1
Beginning Address: X013F8000
Ending Address: x01446DFF
Each entry consists of the following:
Image Path
is the image that was loaded from the SAS library.
Size
is the size of the image, in bytes.
Requested Loads
indicates how many times the image was requested for loading. This is a usage
count for the image.
Physical Loads
indicates how many times the image is physically loaded. This number is always 1.
Beginning and Ending Address
describes the actual location in memory where the image was loaded. These
addresses are where the Physical Load occurred.
CAUTION:
Each new OpenVMS process opens its own version of the external file that LOADLIST
writes to, so version limits can cause a loss of LOADLIST information. 4
Every time an image is requested, SAS writes another entry to the LOADLIST file.
The Physical Loads number is always 1, indicating that it is physically loaded only once
during the SAS session.
See Also
3 Chapter 11, “Optimizing System Performance,” on page 235
LOCALE= System Option
Specifies attributes that reflect the language, local conventions, and culture for a geographic
region and that are used to establish the default working environment for a SAS session
Default:
English
configuration file, SAS invocation, OPTIONS statement, SAS System Options
window, VMS_SAS_OPTIONS DCL symbol
Valid in:
Category:
Environment control: Language control
PROC OPTIONS GROUP= LANGUAGECONTROL
OpenVMS specifics:
See:
Valid values for locale-name
LOCALE= System Option in SAS National Language Support (NLS): User’s Guide
System Options under OpenVMS
4
LOGMULTREAD System Option
473
LOG= System Option
Specifies where the SAS log is written when running SAS programs in any mode other than the
windowing environment
SYS$OUTPUT for interactive line mode, noninteractive, batch, and SAS
windowing environment mode
Default:
Valid in:
configuration file, SAS invocation, VMS_SAS_OPTIONS DCL symbol
Category: Environment control: Files
PROC OPTIONS GROUP= ENVFILES
OpenVMS specifics:
valid values for destination; syntax
Syntax
LOG=destination
NOLOG
LOG=destination
specifies either an external file or a device where the SAS log is written. The value of
destination can be SYS$PRINT (the default printer queue); your current display;
SYS$OUTPUT (the default output stream); or an OpenVMS pathname.
NOLOG
specifies that the SAS log is not written to a file. NOLOG is valid only in
noninteractive mode and batch mode.
Details
The LOG= system option specifies a destination to which the SAS log is written when
executing SAS programs in modes other than the windowing environment.
To send the log to a printer other than the default printer, redefine the SYS$PRINT
logical name to the queue that you want to use.
The LOG= option is valid in interactive line mode, noninteractive mode, and batch
mode. It is ignored in the SAS windowing environment. NOLOG is valid in
noninteractive mode and batch mode; it is ignored in interactive line mode and the SAS
windowing environment.
See Also
3 Chapter 8, “Routing the SAS Log and SAS Procedure Output,” on page 195
LOGMULTREAD System Option
Specifies the session log file to be opened for shared read access
Default:
NOLOGMULTREAD
Valid in:
configuration file, SAS invocation, VMS_SAS_OPTIONS DCL symbol
474
LOGPARM= System Option
Category:
4
Chapter 19
Log and procedure output control: SAS log
PROC OPTIONS GROUP= LOGCONTROL
OpenVMS specifics:
All aspects are host-specific
Syntax
LOGMULTREAD | NOLOGMULTREAD
LOGMULTREAD
opens the session log file for shared read access.
NOLOGMULTREAD
closes the session log file. This is the default.
Details
The LOGMULTREAD system option enables you to open the session log file for shared
read access. The default is NOLOGMULTREAD. Specifying LOGMULTREAD degrades
performance, because data is written to the log more frequently.
LOGPARM= System Option
Controls when SAS log files are opened, closed, and, in conjunction with the LOG= system option,
how they are named
Default:
none
Valid in:
configuration file, SAS invocation
Category:
Log and procedure output control: SAS log
PROC OPTIONS GROUP= LOGCONTROL
behavior of ROLLOVER=NONE; must enclose log name in quotation
marks if the directive is lowercase
OpenVMS specifics:
See:
LOGPARM= System Option in SAS Language Reference: Dictionary
Syntax
LOGPARM=
“<OPEN= APPEND | REPLACE | REPLACEOLD>
<ROLLOVER= AUTO | NONE | SESSION>
<WRITE= BUFFERED | IMMEDIATE>”
OPEN=
when a log file already exists, controls how the contents of the existing file are
treated.
System Options under OpenVMS
4
LOGPARM= System Option
475
APPEND
appends the log when opening an existing file. If the file does not already exist, a
new file is created.
REPLACE
overwrites the current contents when opening an existing file. If the file does not
already exist, a new file is created.
REPLACEOLD
replaces files that are more than one day old. If the file does not already exist, a
new file is created.
ROLLOVER=
controls when or if the SAS log “rolls over,” that is, when the current log is closed
and a new one is opened.
AUTO
causes an automatic “rollover” of the log when the directives in the value of the
LOG= option change, that is, the current log is closed and a new log file is opened.
NONE
specifies that rollover does not occur, even when a change occurs in the name that
is specified with the LOG= option.
Note: Under OpenVMS, because the % symbol is not valid in a filename, you
cannot specify a directive with ROLLOVER=NONE. For example, if you invoke
SAS using the following code:
sas91/sysin=oranges/log=mylog%m/logparm=’’rollover=none’’
then an error appears and the SAS job fails.
4
SESSION
at the beginning of each SAS session, opens the log file, resolves directives that
are specified in the LOG= system option, and uses its resolved value to name the
new log file. During the course of the session, no rollover is performed.
WRITE=
specifies when content is written to the SAS log.
BUFFERED
writes content to the SAS log only when a buffer is full in order to increase
efficiency.
IMMEDIATE
writes to the SAS log each time that statements are submitted that produce
content for the SAS log.
Details
The LOGPARM= system option controls the opening and closing of SAS log files. This
option also controls the naming of new log files, in conjunction with the LOG= system
option and the use of directives in the value of LOG=.
Using directives in the value of the LOG= system option enables you to control when
logs are open and closed and how they are named, based on real time events, such as
time, month, day of week, etc. For a list of directives, see LOGPARM= System Option
in SAS Language Reference: Dictionary.
Some of the directives require lowercase values. By default, OpenVMS will
uppercase any text that is not enclosed in quotation marks. To specify a lowercase
directive, you must enclose the name of the log file in quotation marks.
476
MAPS= System Option
4
Chapter 19
For example, if you want to include the value of the current month in the name of
the log file (specified by the %m directive), then you must include quotation marks
around the value of LOG=:
sas91/sysin=oranges/log=’’mylog%m’’/logparm=’’rollover=auto’’
If you omit the quotation marks, then OpenVMS will resolve %m to %M, and the name
of the log file will contain the value of the minute that the log was created rather than
the month.
Note:
Under OpenVMS, you cannot specify directives using the # symbol.
4
See Also
3 “LOG= System Option” on page 473
MAPS= System Option
Specifies the name of the SAS library that holds the SAS/GRAPH map data sets
Default:
SAS$MAPS logical name
configuration file, SAS invocation, OPTIONS statement, SAS System Options
window, VMS_SAS_OPTIONS DCL symbol
Valid in:
Category:
Graphics: Driver settings
PROC OPTIONS GROUP= GRAPHICS
OpenVMS specifics:
See:
default; valid values for location-of-maps
MAPS= System Option in SAS Language Reference: Dictionary
Syntax
MAPS=location-of-maps
location-of-maps
specifies a libref, an OpenVMS logical name, or a pathname to the directory or
subdirectory level. Do not use a specific filename.
MEMSIZE= System Option
Specifies the limit on the total amount of memory to be used by SAS
Default:
0 (unlimited memory)
Valid in:
configuration file, SAS invocation, VMS_SAS_OPTIONS DCL symbol
Category:
System administration: Memory
PROC OPTIONS GROUP= MEMORY
OpenVMS specifics:
All aspects are host-specific
System Options under OpenVMS
4
MSG= System Option
477
Syntax
MEMSIZE=n | nK | nM | nG | hexX | MIN | MAX
n | nK | nM | nG
specifies the amount of memory in multiples of 1 (bytes); 1,024 (kilobytes); 1,048,576
(megabytes); or 1,073,741,824 (gigabytes). You can specify decimal values for the
number of kilobytes, megabytes, or gigabytes. For example, a value of 8 specifies 8
bytes, a value of .782k specifies 801 bytes, and a value of 3m specifies 3,145,728 bytes.
The default is 0, or unlimited memory.
hexX
specifies the amount of memory as a hexadecimal value. You must specify the value
beginning with a number (0–9), followed by hex digits (0–9, A-F), and then followed
by an X. For example, the value 2dx sets the memory to 45 bytes.
MIN
specifies 0, which specifies that there is no limit.
MAX
specifies to set the total memory size to the largest possible setting.
Details
The MEMSIZE= system option specifies a limit on the total amount of memory SAS
uses at any one time. The operating system may use additional amounts of memory. A
value of 0 or MIN indicates that there is no limit. Too low a value will result in
out-of-memory conditions.
On OpenVMS, the default value for the MEMSIZE system option is 0. However, the
amount of memory available to a SAS process depends on your process quotas and
maximum working set.
MSG= System Option
Specifies the library that contains SAS error messages
Default:
SAS$MSG logical name
Valid in:
configuration file, SAS invocation, VMS_SAS_OPTIONS DCL symbol
Category: Environment control: Files
PROC OPTIONS GROUP= ENVFILES
OpenVMS specifics:
All aspects are host-specific
Syntax
MSG=library-specification
478
MSGCASE System Option
4
Chapter 19
library-specification
can be an OpenVMS logical name (including search strings) or pathname. Do not use
a specific filename.
Details
In the OpenVMS environment, the default value for the MSG= system option is the
directory that is pointed to by the SAS$MSG logical name. If no SAS$MSG logical
name is defined, SAS cannot start.
The MSG= system option replaces the SASMSG= system option.
MSGCASE System Option
Specifies whether notes, warnings, and error messages that are generated by SAS are displayed
in uppercase characters
Default:
NOMSGCASE
Valid in:
configuration file, SAS invocation, VMS_SAS_OPTIONS DCL symbol
Category:
Log and procedure output control: SAS log
PROC OPTIONS GROUP= LOGCONTROL
OpenVMS specifics:
All aspects are host-specific
Syntax
MSGCASE | NOMSGCASE
MSGCASE
specifies that messages are displayed in uppercase characters.
NOMSGCASE
specifies that messages are displayed in uppercase and lowercase characters. This is
the default.
Details
The MSGCASE system option specifies whether or not messages from the message file
are uppercased before they are written out. User-generated messages and source lines
are not affected by this system option.
MSYMTABMAX= System Option
Specifies the maximum amount of memory that is available to the macro variable symbol table(s)
Default:
51,200 bytes
System Options under OpenVMS
4
MVARSIZE= System Option
479
configuration file, SAS invocation, OPTIONS statement, SAS System Options
window, VMS_SAS_OPTIONS DCL symbol
Valid in:
Category: Macro: SAS macro
PROC OPTIONS GROUP= MACRO
OpenVMS specifics:
See:
default; valid values for n
MSYMTABMAX= System Option in SAS Macro Language: Reference
Syntax
MSYMTABMAX=n | nK | nM | nG | hexX | MIN | MAX
n | nK | nM | nG
specifies the maximum amount of memory that is available in multiples of 1 (bytes);
1,024 (kilobytes); 1,048,576 (megabytes); or 1,073,741,824 (gigabytes). You can
specify decimal values for the number of kilobytes, megabytes, or gigabytes. For
example, a value of 8 specifies 8 bytes, a value of .782k specifies 801 bytes, and a
value of 3m specifies 3,145,728 bytes.
hexX
specifies the maximum amount of memory that is available as a hexadecimal value.
You must specify the value beginning with a number (0–9), followed by hex digits
(0–9, A-F), and then followed by an X. For example, the value 2dx sets the amount of
memory that is available to 45 bytes.
MIN
sets the amount of memory that is available to the minimum setting, which is 0 bytes.
MAX
sets the amount of memory that is available to the maximum setting, which is
2,147,483,647 bytes.
Details
Under OpenVMS, the range for the MSYMTABMAX= system option is 0 to
2,147,483,647 bytes. After the MSYMTABMAX value is reached, SAS writes any
additional macro variables to disk.
MVARSIZE= System Option
Specifies the maximum size for in-memory macro variable values
Default:
8,192 bytes
configuration file, SAS invocation, OPTIONS statement, SAS System Options
window, VMS_SAS_OPTIONS DCL symbol
Valid in:
Category: Macro: SAS macro
PROC OPTIONS GROUP= MACRO
OpenVMS specifics:
See:
default; valid values for n
MVARSIZE= System Option in SAS Macro Language: Reference
480
NEWS= System Option
4
Chapter 19
Syntax
MVARSIZE=n | nK | nM | nG | hexX | MIN | MAX
n | nK | nM | nG
specifies the maximum macro variable size in multiples of 1 (bytes); 1,024 (kilobytes);
1,048,576 (megabytes); or 1,073,741,824 (gigabytes). You can specify decimal values
for the number of kilobytes, megabytes, or gigabytes. For example, a value of 8
specifies 8 bytes, a value of .782k specifies 801 bytes, and a value of 3m specifies
3,145,728 bytes.
hexX
specifies the maximum macro variable size as a hexadecimal value. You must specify
the value beginning with a number (0–9), followed by hex digits (0–9, A-F), and then
followed by an X. For example, the value 2dx sets the maximum macro variable size
to 45 bytes.
MIN
sets macro variable size to the minimum setting, which is 0. This value causes all
macro variables to be written to disk.
MAX
sets the macro variable size to the maximum setting, which is 65,534.
Details
The MVARSIZE= system option specifies the maximum size for macro variables that
are stored in memory. If the size of the macro variable is larger than the maximum
value that is specified, variables are written out to disk.
The value of the MVARSIZE= system option can affect system performance. Before
you specify the value for production jobs, run tests to determine the optimum value.
NEWS= System Option
Specifies a file that contains messages to be written to the SAS log
SAS$NEWS, if defined. If no SAS$NEWS logical name exists, no news is
written to the SAS log.
Valid in: configuration file, SAS invocation, VMS_SAS_OPTIONS DCL symbol
Category: Environment control: Files
PROC OPTIONS GROUP= ENVFILES
OpenVMS specifics: valid values for file-specification
See: NEWS= System Option in SAS Language Reference: Dictionary
Default:
Syntax
NEWS=file-specification
NONEWS
System Options under OpenVMS
4
OBS= System Option
481
NEWS=file-specification
specifies an external file. The value for file-specification can be a valid OpenVMS
pathname or logical name.
NONEWS
specifies that the contents of the NEWS file is not displayed in the SAS log, even if
the file exists.
Details
Under OpenVMS, the default behavior is to search for the SAS$NEWS logical name. If
it is found, the contents of the NEWS file are displayed in the SAS log immediately
after the SAS header.
NLSCOMPATMODE System Option
Provides national language compatibility with previous releases of SAS
Default:
NONLSCOMPATMODE
Valid in:
configuration file, SAS invocation, VMS_SAS_OPTIONS DCL symbol
Category: Environment control: Language control
PROC OPTIONS GROUP= LANGUAGECONTROL
OpenVMS specifics:
all aspects are host specific
NLSCOMPATMODE System Option in SAS National Language Support (NLS):
User’s Guide
See:
OBS= System Option
Specifies when to stop processing observations or records
Default:
2,147,483,647
configuration file, SAS invocation, OPTIONS statement, SAS System Options
window, VMS_SAS_OPTIONS DCL symbol
Valid in:
Category: Files: SAS files
PROC OPTIONS GROUP= SASFILES
OpenVMS specifics:
See:
valid values for n; valid value for MAX
OBS= System Option in SAS Language Reference: Dictionary
Syntax
OBS=n | nK | nM | nG | nT | hexX | MIN | MAX
482
4
OPLIST System Option
Chapter 19
n | nK | nM | nG| nT
specifies a number to indicate when to stop processing. Using one of the letter
notations results in multiplying the integer by a specific value. That is, specifying K
(kilo) multiplies the integer by 1,024, M (mega) multiplies by 1,048,576, G (giga)
multiplies by 1,073,741,824, T (tera) multiplies by 1,099,511,627,776. You can specify
a decimal value for n when it is used to specify a K, M, G, or T value. For example, a
value of 20 specifies 20 observations or records, a value of .782k specifies 801
observations or records, and a value of 3m specifies 3,145,728 observations or records.
hexX
specifies a number to indicate when to stop processing as a hexadecimal value. You
must specify the value beginning with a number (0–9), followed by hex digits (0–9,
A-F), and then followed by an X. For example, the hexadecimal value F8 must be
0F8x in order to specify the decimal equivalent of 248. The value 2dx specifies the
decimal equivalent of 45.
MIN
sets the number to indicate when to stop processing to 0. MIN requires SAS to use a
default value.
MAX
sets the number to indicate when to stop processing to 2,147,483,647. This number is
the default.
OPLIST System Option
Controls whether the settings of SAS system options are written to the SAS log
Default:
NOOPLIST
Valid in:
configuration file, SAS invocation, VMS_SAS_OPTIONS DCL symbol
Category:
Log and procedure output control: SAS log
PROC OPTIONS GROUP= LOGCONTROL
OpenVMS specifics:
All aspects are host-specific
Syntax
OPLIST | NOOPLIST
OPLIST
specifies that SAS write the settings of options to the SAS log.
NOOPLIST
specifies that SAS does not write the settings of options to the SAS log.
Details
Under OpenVMS, the OPLIST system option echoes only the system options specified
when SAS is invoked; it does not echo any system options specified in a configuration
file. If you want to echo the contents of the configuration file, use the VERBOSE system
option.
System Options under OpenVMS
4
PAGENO= System Option
483
You cannot change the settings of SAS system options with the OPLIST system
option.
Example
Suppose you invoke SAS with the following command:
$ SAS/NODMS/FULLSTIMER/OPLIST
The following line is then written to the SAS log:
/NODMS/FULLSTIMER/OPLIST
See Also
3 “VERBOSE System Option” on page 505
PAGENO= System Option
Resets the page number
Default:
1
configuration file, SAS invocation, OPTIONS statement, SAS System Options
window, VMS_SAS_OPTIONS DCL symbol
Valid in:
Category: Log and procedure output control: Procedure output
PROC OPTIONS GROUP= LISTCONTROL
OpenVMS specifics:
See:
valid values for n; syntax
PAGENO= System Option in SAS Language Reference: Dictionary
Syntax
PAGENO=n | nK | nM | nG | hexX | MIN | MAX
n | nK | nM | nG
specifies the page number in multiples of 1 (n); 1,024 (nK); 1,048,576 (nM); or
1,073,741,824 (nG). You can specify a decimal value for n when it is used to specify a
K, M, or G value. For example, a value of 8 sets the page number to 8, a value of
.782k sets the page number to 801, and a value of 3m sets the page number to
3,145,728.
hexX
specifies the page number as a hexadecimal value. You must specify the value
beginning with a number (0–9), followed by hex digits (0–9, A-F), and then followed
by an X. For example, the value 2dx sets the page number to 45.
MIN
sets the page number to the minimum number, which is 1.
484
PAGESIZE= System Option
4
Chapter 19
MAX
sets the page number to the maximum number, which is 2,147,483,647.
Details
The PAGENO= system option specifies a beginning page number for the next page of
output that SAS produces. Under OpenVMS, 1 is the default.
If you specify the PAGENO= system option when you invoke SAS or in a
configuration file, you can use the command-line alias, PAGNO.
PAGESIZE= System Option
Specifies the number of lines that compose a page of SAS output
Default: display page-size for windowing environment and interactive line modes; 60
lines for noninteractive and batch modes
Valid in: configuration file, SAS invocation, OPTIONS statement, SAS System Options
window, VMS_SAS_OPTIONS DCL symbol
Alias: PS=
Category: Log and procedure output control: SAS log and procedure output
PROC OPTIONS GROUP= LOG_LISTCONTROL
OpenVMS specifics: syntax
See: PAGESIZE= System Option in SAS Language Reference: Dictionary
Syntax
PAGESIZE=n | nK | hexX | MIN | MAX
n | nK
specifies the number of lines that compose a page in multiples of 1 (n) or 1,024 (nK).
You can specify decimal values for the number of kilobytes. For example, a value of
800 specifies 800 lines, a value of .782k specifies 801 lines, and a value of 3k
specifies 3,072 lines.
hexX
specifies the number of lines that compose a page as a hexadecimal value. You must
specify the value beginning with a number (0–9), followed by hex digits (0–9, A-F),
and then followed by an X. For example, the value 2dx specifies 45 lines.
MIN
sets the number of lines that compose a page to the minimum setting, which is 15.
MAX
sets the number of lines that compose a page to the maximum setting, which is
32,767.
Details
Under OpenVMS, the default for interactive modes (interactive line mode and the SAS
windowing environment) is your display page-size setting. For noninteractive and batch
modes, the default is 60 lines.
System Options under OpenVMS
4
PRINT= System Option
485
See Also
3 “LINESIZE= System Option” on page 470
PARMCARDS= System Option
Specifies the file reference to use as the PARMCARDS file
Default:
FT15F001
configuration file, SAS invocation, OPTIONS statement, SAS System Options
window, VMS_SAS_OPTIONS DCL symbol
Valid in:
Category: Environment control: Files
PROC OPTIONS GROUP= ENVFILES
OpenVMS specifics:
See:
valid values for fileref
PARMCARDS= System Option in SAS Language Reference: Dictionary
Syntax
PARMCARDS=fileref
fileref
specifies the file reference of the file to be opened.
Details
The PARMCARDS= system option specifies the file reference of a file that SAS opens
when it encounters a PARMCARDS= statement in a procedure.
If you specify the PARMCARDS= system option when you invoke SAS or in a
configuration file, you can use the command-line alias, PRMCARDS.
PRINT= System Option
Specifies the destination of the procedure output
Default:
none for line mode or windowing environment; SYS$OUTPUT for batch.
Valid in:
configuration file, SAS invocation, VMS_SAS_OPTIONS DCL symbol
Category: Environment control: Files
PROC OPTIONS GROUP= ENVFILES
OpenVMS specifics:
All aspects are host-specific
486
REALMEMSIZE= System Option
4
Chapter 19
Syntax
PRINT=destination
NOPRINT
PRINT=destination
specifies to print either to an external file or to a device. The value of destination can
be SYS$PRINT (the default print queue); your current display, SYS$OUTPUT (the
default output stream); or an OpenVMS pathname.
NOPRINT
specifies to print to SYS$OUTPUT.
Details
The PRINT= system option specifies the destination to which SAS output is written
when executing SAS programs in modes other than the interactive windowing
environment.
To send the procedure output to a printer queue other than the default printer,
redefine the SYS$PRINT logical name to the queue that you want to use.
The PRINT= system option is valid in interactive line mode, noninteractive mode,
and batch mode; it is ignored in the SAS windowing environment.
See Also
3 Chapter 8, “Routing the SAS Log and SAS Procedure Output,” on page 195
REALMEMSIZE= System Option
Indicates the amount of real memory SAS can expect to allocate
0
Valid in: configuration file, SAS invocation, VMS_SAS_OPTIONS DCL symbol
Category: System administration: Memory
PROC OPTIONS GROUP= MEMORY
OpenVMS specifics: valid values
Default:
Syntax
REALMEMSIZE= n | nK | nM | 1G | hexX | MIN | MAX
n | nK | nM
specifies the amount of memory to reserve in multiples of 1 (bytes); 1,024 (kilobytes);
or 1,048,576 (megabytes). You can specify decimal values for the number of kilobytes
or megabytes. For example, a value of 8 specifies 8 bytes, a value of .782k specifies
801 bytes, and a value of 3m specifies 3,145,728 bytes.
1G
specifies the amount of memory to reserve is 1,073,741,824 bytes (1 gigabyte).
System Options under OpenVMS
4
RSASUSER System Option
487
hexX
specifies the amount of memory as a hexadecimal value. You must specify the value
beginning with a number (0–9), followed by hex digits (0–9, A-F), and then followed
by an X. For example, the value 2dx sets the amount of memory to 45 bytes.
MIN
specifies a value of 0, which indicates that the memory usage is determined by SAS
when SAS starts. This is the default value and should not be changed under normal
conditions.
MAX
specifies to set the memory size to the largest permissible value.
Details
Use the REALMEMSIZE= system option to optimize the performance of SAS
procedures that alter their algorithms and memory usage. Setting the value of
REALMEMSIZE= too low might result in less than optimal performance.
RSASUSER System Option
Controls access to members in the SASUSER data library
NORSASUSER
Valid in: configuration file, SAS invocation, VMS_SAS_OPTIONS DCL symbol
Category: Environment control: Files
PROC OPTIONS GROUP= ENVFILES
OpenVMS specifics: availability of SASUSER data library to users
See: RSASUSER System Option in SAS Language Reference: Dictionary
Default:
Syntax
RSASUSER | NORSASUSER
RSASUSER
limits access to the SASUSER data library to read-only access.
NORSASUSER
prevents users from sharing SASUSER library members, because it allows a user to
open a SASUSER library member for update access. Update access requires
exclusive rights to the library member. When NORSASUSER is in effect and another
user tries to share the PROFILE catalog, a temporary PROFILE catalog is created in
the WORK directory.
Details
Under the OpenVMS environment, it is common to have a SASUSER data library that
is shared by a group of users. By default, if one user has a library member open for
update, all other users are denied access to that library member. For example, if one
user is writing data to the SASUSER.PROFILE catalog, no other user can even read
488
S= System Option
4
Chapter 19
data from the PROFILE catalog. Specifying RSASUSER enables a group of users to
share SASUSER library members by allowing all the users only read-only access to
members. In this PROFILE catalog example, if RSASUSER is in effect, each user can
open the PROFILE catalog for read-only access, allowing other users to concurrently
read from the PROFILE catalog. However, no user would be able to write information
to the PROFILE catalog.
Specifying RSASUSER in a SAS session affects only that session’s access to files. To
enable a group of users to share members in the SASUSER library, the system manager
should set RSASUSER in a configuration file that is shared by all the users who will be
accessing the files. For example, RSASUSER can be contained in a file referenced by a
group-level SAS$CONFIG logical name.
Note: The usefulness of the RSASUSER option depends on how SAS is being used.
Although the RSASUSER system option is extremely useful when users must share
information (such as the PROFILE catalog) that is stored in the SASUSER data library,
it is not useful if these same users are using SAS/ASSIST software. SAS/ASSIST
software requires update access to the SASUSER library. 4
S= System Option
Specifies the length of statements in each line of source statements and the length of data in the
line following a DATALINES statement
0
configuration file, SAS invocation, OPTIONS statement, SAS System Options
window, VMS_SAS_OPTIONS DCL symbol
Category: Input control: Data processing
PROC OPTIONS GROUP= INPUTCONTROL
OpenVMS specifics: valid values for n
See: S= System Option in SAS Language Reference: Dictionary
Default:
Valid in:
Syntax
S=n | nK | nM | nG | hexX | MIN | MAX
n | nK | nM | nG
specifies the length of statements and data in multiples of 1 (bytes); 1,024 (kilobytes);
1,048,576 (megabytes); or 1,073,741,824 (gigabytes). You can specify decimal values
for the number of kilobytes, megabytes, or gigabytes. For example, a value of 8
specifies 8 bytes, a value of .782k specifies 801 bytes, and a value of 3m specifies
3,145,728 bytes.
hexX
specifies the length of statements and data as a hexadecimal value. You must specify
the value beginning with a number (0–9), followed by hex digits (0–9, A-F), and then
followed by an X. For example, the value 2dx sets the length of statements and data
to 45 bytes.
MIN
sets the length of statements and data to 0, and requires SAS to use a default value.
System Options under OpenVMS
4
S2= System Option
489
MAX
sets the length of statements and data to the maximum, which under OpenVMS is
2,147,483,647.
Details
Input can be from either fixed- or variable-length records. Both fixed-length and
variable-length records can be either unsequenced or sequenced. Unsequenced records
do not contain sequence fields.
SAS determines whether the input contains sequence numbers that are based on the
value of S. The S= system option specifies the length of statements, exclusive of
sequence numbers, on each line of SAS source statements and the length of data,
exclusive of sequence numbers, on lines following a DATALINES statement.
Under OpenVMS, the value of the S= system option can range from 0 to
2,147,483,647.
S2= System Option
Specifies the length of secondary source statements
0
configuration file, SAS invocation, OPTIONS statement, SAS System Options
window, VMS_SAS_OPTIONS DCL symbol
Category: Input control: Data processing
PROC OPTIONS GROUP= INPUTCONTROL
OpenVMS specifics: valid values for n
See: S2= System Option in SAS Language Reference: Dictionary
Default:
Valid in:
Syntax
S2= S | n | nK | nM | nG | hexX | MIN | MAX
S
uses the current value of the S= system option to compute the record length of text
that comes from the %INCLUDE statement, an autoexec file, or an autocall macro
file.
n | nK | nM | nG
specifies the value by which to compute the record length of text that comes from an
%INCLUDE statement, an autoexec file, or an autocall macro file. It specifies this
value in multiples of 1 (bytes); 1,024 (kilobytes); 1,048,576 (megabytes); or
1,073,741,824 (gigabytes). You can specify decimal values for the number of
kilobytes, megabytes, or gigabytes. For example, a value of 8 specifies 8 bytes, a
value of .782k specifies 801 bytes, and a value of 3m specifies 3,145,728 bytes.
hexX
specifies the length of statements and data as a hexadecimal value. You must specify
the value beginning with a number (0–9), followed by hex digits (0–9, A-F), and then
490
SASAUTOS= System Option
4
Chapter 19
followed by an X. For example, the value 2dx sets the length of statements and data
to 45 bytes.
MIN
sets the length of statements and data to 0, and requires SAS to use a default value.
MAX
sets the length of statements and data to the maximum, which under OpenVMS is
2,147,483,647.
Details
The S2= system option operates exactly like the S= system option except that the S2=
system option controls input from only an %INCLUDE statement, an autoexec file, or
an autocall macro file.
SASAUTOS= System Option
Specifies the autocall macro library
Default:
SASAUTOS logical name
configuration file, SAS invocation, OPTIONS statement, SAS System Options
window, VMS_SAS_OPTIONS DCL symbol
Valid in:
Category:
Environment control: Files
Macro: SAS macro
PROC OPTIONS GROUP= ENVFILES
MACRO
OpenVMS specifics:
See:
valid values for library-specification
SASAUTOS System Option in SAS Macro Language: Reference
Syntax
SASAUTOS=library-specification | (library-specification-1, . . . , library-specification-n)
library-specification
can be any valid reference to an aggregate storage location under OpenVMS
(directories or OpenVMS text libraries). The specification can be a fileref or an
OpenVMS logical name (including search strings) or pathname. OpenVMS
pathnames must be enclosed in quotation marks. (Remember that quotation marks
used in the SAS command must be double quotation marks unless a symbol is
implied, as discussed in “INITSTMT= System Option” on page 468.) Any aggregate
storage location specifications that are not enclosed in quotation marks are
considered logical names.
Details
Under OpenVMS, the default is the SASAUTOS logical name. If no SASAUTOS logical
name is defined and an autocall library is referenced, the following message appears:
System Options under OpenVMS
4
SASHELP= System Option
491
ERROR: No file referenced by SASAUTOS OPTION can
be opened.
WARNING: Source level autocall is not found or
cannot be opened.
Autocall has been suspended and OPTION
NOMAUTOSOURCE has been set.
To use the autocall facility again, set OPTION
MAUTOSOURCE.
CAUTION:
Do not override the definition of the SASAUTOS logical name. Several parts of SAS
require the macros that are defined in the supplied SASAUTOS files. These parts
include SAS/ASSIST software and the PMENU facility under the SAS windowing
environment autocall libraries. 4
When you specify two or more autocall libraries in the SAS command, you must
enclose the specifications in parentheses and use commas to separate multiple
specifications. Blanks are not acceptable delimiters in the SAS command, but they are
accepted if you specify the SASAUTOS option in the OPTIONS statement.
See Also
3 “INITSTMT= System Option” on page 468
3 “Autocall Libraries under OpenVMS” on page 520
3 SAS Macro Language: Reference
SASHELP= System Option
Specifies the directory or directories to be searched for SAS help files, default forms, device lists,
dictionaries, and other entries in the SASHELP catalog
SAS$HELP logical name
Valid in: configuration file, SAS invocation, VMS_SAS_OPTIONS DCL symbol
Category: Environment control: Files
PROC OPTIONS GROUP= ENVFILES
OpenVMS specifics: valid values for library-specification
See: SASHELP= System Option in SAS Language Reference: Dictionary
Default:
Syntax
SASHELP=library-specification
library-specification
can be an OpenVMS logical name (including search strings) or pathname. Do not use
a specific filename.
Details
The SASHELP= system option is set during the installation process and normally is not
changed after installation.
492
SASUSER= System Option
4
Chapter 19
Under OpenVMS, the default value for the SASHELP= system option is the directory
that the SAS$HELP logical name points to. If no SAS$HELP logical name is defined,
SAS cannot start.
SASUSER= System Option
Specifies the name of the SASUSER library
SAS$USER logical name
configuration file, SAS invocation, VMS_SAS_OPTIONS DCL symbol
Category: Environment control: Files
PROC OPTIONS GROUP= ENVFILES
OpenVMS specifics: valid values for library-specification; syntax
See: SASUSER= System Option in SAS Language Reference: Dictionary
Default:
Valid in:
Syntax
SASUSER=library-specification
library-specification
specifies an OpenVMS logical name or pathname to the directory or subdirectory
level for a SAS data library. Do not use a specific filename.
Details
The SASUSER= system option specifies the SAS data library that contains a user’s
profile catalog.
Under OpenVMS, the default value for the SASUSER= system option is the value of
the SAS$USER logical. By default, the SAS$USER logical points to the SASUSER91
subdirectory of the SYS$LOGIN directory. If this directory does not exist and it cannot
be created, then SAS cannot start.
See Also
3 “The SASUSER Data Library” on page 134
SEQENGINE= System Option
Specifies the default access method for SAS sequential data libraries
V9TAPE
Valid in: configuration file, SAS invocation, OPTIONS statement, SAS System Options
window, VMS_SAS_OPTIONS DCL symbol
Category: Files: SAS files
PROC OPTIONS GROUP= SASFILES
OpenVMS specifics: All aspects are host-specific
Default:
System Options under OpenVMS
4
SORTPGM= System Option
493
Syntax
SEQENGINE=engine-name
engine-name
can be one of the following under OpenVMS:
V9TAPE
specifies the sequential engine for SAS 9 and SAS 9.1. This is the default.
V8TAPE
specifies the sequential engine for SAS Version 8.
V7TAPE
specifies the sequential engine for Version 7.
Details
The SEQENGINE= option specifies the default access method, or engine, that is used
when you are creating new sequential-format SAS data libraries. The engine that is
used with an existing sequential library is determined by the first data set in that
library and is not affected by this option.
See Also
3 Chapter 6, “Using SAS Engines,” on page 153
SORTPGM= System Option
Specifies the name of the sort utility
BEST
Valid in: configuration file, SAS invocation, OPTIONS statement, SAS System Options
window, VMS_SAS_OPTIONS DCL symbol
Category: Sort: Procedure options
PROC OPTIONS GROUP= SORT
OpenVMS specifics: valid values for sort utility; syntax
Default:
Syntax
SORTPGM=BEST | HOST | SAS
BEST
specifies the sort utility that is best suited for the data. This is the default.
HOST
specifies the host sort utility that is available under OpenVMS. The host sort utility
might be more suitable than the sort utility supplied by SAS for data sets that
contain many observations.
494
SORTSIZE= System Option
4
Chapter 19
SAS
specifies the sort utility to be supplied by the SAS, which is more efficient for sorting
small files than invoking the host sort utility.
Details
The SORTPGM= system option specifies the name of the system sort utility to be
invoked by SAS.
Under OpenVMS, if SORTPGM=BEST and the data set to be sorted contains 50,000
observations or fewer, the SAS sort is used; otherwise, the Host sort is used. The
informational message that describes which sort was used when SORTPGM=BEST is
suppressed unless the value of the MSGLEVEL= system option is I (informational).
Note: An alternate host sort utility, Hypersort V04–003, is also available. For more
information about this version of Hypersort, contact the Compaq Computer
Corporation. For information about enabling the Hypersort utility, refer to the
OpenVMS help topic, sort. After you enable this sort utility on your system, then you
can use SORTPGM=HOST to have SAS invoke Hypersort. 4
See Also
3 “MSGLEVEL System Option” in SAS Language Reference: Dictionary
SORTSIZE= System Option
Specifies the amount of memory that is available to the SORT procedure
MAX
Valid in: configuration file, SAS invocation, OPTIONS statement, SAS System Options
window, VMS_SAS_OPTIONS DCL symbol
Category: Sort: Procedure options
System administration: Memory
PROC OPTIONS GROUP= SORT
MEMORY
OpenVMS specifics: default value
See: SORTSIZE= System Option in SAS Language Reference: Dictionary
Default:
Syntax
SORTSIZE=n | nK | nM | nG | hex X | MIN | MAX
n | nK | nM | nG
specifies the amount of memory in multiples of 1 (bytes); 1,024 (kilobytes); 1,048,576
(megabytes); or 1,073,741,824 (gigabytes). You can specify decimal values for the
number of kilobytes, megabytes, or gigabytes. For example, a value of 8 specifies 8
bytes, a value of .782k specifies 801 bytes, and a value of 3m specifies 3,145,728 bytes.
System Options under OpenVMS
4
SORTWORK= System Option
495
If n=0, the sort utility uses its default.
hexX
specifies the amount of memory as a hexadecimal value. You must specify the value
beginning with a number (0–9), followed by hex digits (0–9, A-F), and then followed
by an X. For example, the value 2dx sets the amount of memory to 45 bytes.
MIN
specifies the minimum amount of memory available.
MAX
specifies 2,147,483,647 bytes.
Details
Generally, the value of the SORTSIZE= system option should be less than the physical
memory available to your process. If the SORT procedure needs more memory than you
specify, the system creates a temporary utility file.
For OpenVMS, the default value for SORTSIZE is MAX.
Note: Proper specification of SORTSIZE= can improve sort performance by
restricting the swapping of memory that is controlled by the operating environment.
4
See Also
3 “SORT Procedure” on page 387
SORTWORK= System Option
Defines locations for host sort work files
Default:
none
configuration file, SAS invocation, OPTIONS statement, SAS System Options
window, VMS_SAS_OPTIONS DCL symbol
Valid in:
Category: Sort: Procedure options
PROC OPTIONS GROUP= SASFILES
OpenVMS specifics:
number of work files specified
Syntax
SORTWORK=< libref>;
SORTWORK=path;
SORTWORK=(< libref1> | path1,< libref2> | path2, ... <libref10> | path10)
NOSORTWORK
libref
specifies a data library. Librefs must be assigned using a LIBNAME statement.
When more than one libref is specified, they must be enclosed in parentheses.
496
SORTWORK= System Option
4
Chapter 19
path
specifies an OpenVMS pathname. The value for path must be enclosed in single or
double quotation marks.
NOSORTWORK
deassigns the librefs or paths assigned using SORTWORK=.
Details
The SORTWORK= system option enables you to specify up to ten work files for the
OpenVMS host sort. The paths and librefs defined in the SORTWORK= system option
are assigned to the OpenVMS logical names SORTWORK0 through SORTWORK9. The
OpenVMS host sort uses these logical names to determine where to create the host sort
work files.
You can specify the NOSORTWORK option to deassign the logical names that are set
using SORTWORK=. Otherwise, they stay assigned until the SAS session is terminated.
The SORTWORKn logical names are not assigned during options processing. They
are assigned during processing of the SORT procedure. The same applies to deassigning
the logical names. If you specify OPTIONS NOSORTWORK, the deassigning of the
logical names will not take place until another SORT procedure is submitted.
The SORT procedure option, SORTWKNO=, overrides SORTWORK=. SORTWKNO=
enables the user to specify how many work files the host sort should use. Valid values
range from 0 through 6. No matter how many sort work file locations have been
assigned through SORTWORK=, the number that is specified with SORTWKNO=
determines how many of the locations are used.
Since the SORTWKNO= option is limited, you can use the OpenVMS maximum of 10
sort work files by defining SORTWORK0 through SORTWORK9. If you specify
locations with SORTWORK=, SAS tells the sort utility how many work files to create
(one per location). If you specify some number of SORTWORK= locations, but do not
want to use them all for a particular PROC SORT command, use SORTWKNO= in the
SORT procedure to specify exactly how many to use.
If you specify fewer SORTWORK= locations than the number that was specified with
SORTWKNO=, the extra work files will be created in SYS$SCRATCH.
Not specifying SORTWKNO= and specifying SORTWKNO=0 have the same effect: if
SORTWORK= locations have been defined, the OpenVMS host sorting algorithm will
determine which of these locations to use. To insure that all of the defined
SORTWORK= locations are used simultaneously, use the Hypersort V04–003 utility.
For more information about this version of Hypersort, contact the Compaq Computer
Corporation. For information about enabling the Hypersort utility, refer to the
OpenVMS help topic, sort.
If the SORTWORK= locations have not been defined, then 0 will be sent to the sort
utility as the number of work files; this is the OpenVMS default. The default action is
to create a work file if needed in SYS$SCRATCH.
See Also
3 “SORT Procedure” on page 387
3 “LIBNAME Statement” on page 420
System Options under OpenVMS
4
STACK= System Option
497
SPAWN= System Option
Specifies that SAS is invoked in a SPAWN/NOWAIT subprocess
Default:
WAIT
Valid in:
configuration file, SAS invocation, VMS_SAS_OPTIONS DCL symbol
Category: Environment control: Initialization and operation
PROC OPTIONS GROUP= EXECMODES
OpenVMS specifics:
All aspects are host-specific
Syntax
SPAWN=WAIT | NOWAIT
WAIT
causes SAS to assume that the terminal can be used to take input from the user.
This is the default.
NOWAIT
causes SAS to assume that the terminal cannot be used to take input from the user.
Therefore, SAS will not run in interactive line mode. Attention handling is disabled.
However, you can run SAS in batch mode or in the Motif environment. The following
is an example of using this option:
$ SPAWN/NOWAIT SAS/SPAWN=NOWAIT MYFILE.SAS
Specifying SPAWN=NOWAIT in this situation is highly recommended. If you do not
specify it, unnecessary interactions occur between the spawned SAS session and your
terminal.
Details
The SPAWN= system option facilitates smooth operation of SAS in a SPAWN/NOWAIT
subprocess.
To terminate the subprocess that runs SAS, use the DCL STOP command.
See Also
3 “Running SAS in a SPAWN/NOWAIT Subprocess” on page 29
STACK= System Option
Specifies the size of the procedure stack in bytes
Default:
0
configuration file, SAS invocation, OPTIONS statement, SAS System Options
window, VMS_SAS_OPTIONS DCL symbol
Valid in:
Category: System administration: Memory
498
STIMEFMT System Option
4
Chapter 19
PROC OPTIONS GROUP= MEMORY
OpenVMS specifics:
All aspects are host-specific
Syntax
STACK=stack-size
NOSTACK
STACK=stack-size
must be an integer between 65,535 and 5,242,880.
NOSTACK
uses the default size for most procedures, which is 1,048,576 bytes.
Details
The STACK= system option specifies the size of the procedure stack in bytes. The stack
is an area of memory that the procedure uses to store information, such as call-frame
data and local variables. In general, the larger the procedure, the more stack space the
procedure needs. If you are running large jobs, you might see the following message:
%SAS-W-LOWSTACK, low stack encountered for task
task-name
This message indicates that the current procedure is using up most of its stack
space. You can use the STACK= option to increase the stack size for the procedure. The
default for most procedures is 1,048,576 bytes. If you use the STACK= system option,
you change the size of the stack for all procedures. Therefore, you might need to set the
stack size back to the default after certain procedures.
STIMEFMT System Option
Specifies the format to use for displaying the time on STIMER output
Default:
M
configuration file, SAS invocation, OPTIONS statement, SAS System Options
window, VMS_SAS_OPTIONS DCL symbol
Valid in:
Category:
Log and procedure output control: SAS log
PROC OPTIONS GROUP= LOGCONTROL
OpenVMS specifics:
All aspects are host-specific
Syntax
STIMEFMT=H | M | S
System Options under OpenVMS
4
STIMER System Option
499
H
specifies that SAS display the STIMER output time in hours, minutes, and seconds
in the following format: hours:minutes:seconds.
M
specifies that SAS display the STIMER output time in minutes and seconds in the
following format: minutes:seconds. This is the default.
S
specifies that SAS display the STIMER output time in seconds.
Details
The STIMEFMT system option specifies the format to use for displaying the time on
STIMER output as either seconds, minutes:seconds, or hours:minutes:seconds.
See Also
3 “STIMER System Option” on page 499
STIMER System Option
Writes a subset of system performance statistics to the SAS log
Default:
STIMER
configuration file, SAS invocation, OPTIONS statement, SAS System Options
window, VMS_SAS_OPTIONS DCL symbol
Valid in:
Category: Log and procedure output control: SAS log
PROC OPTIONS GROUP= LOGCONTROL
OpenVMS specifics:
All aspects are host-specific
Syntax
STIMER | NOSTIMER
STIMER
specifies that SAS write the statistics. When STIMER is in effect, SAS writes to the
SAS log a list of computer resources used for each step and the entire SAS session.
NOSTIMER
specifies that SAS not write performance statistics to the SAS log.
Details
The STIMER system option specifies whether performance statistics of your operating
environment are written to the SAS log.
500
SYSIN= System Option
4
Chapter 19
Under OpenVMS, the STIMER option writes the following statistics:
3 elapsed time
3 CPU time.
If both STIMER and FULLSTIMER are set, the FULLSTIMER statistics are printed.
Comparisons
The STIMER system option specifies whether a subset of all the performance statistics
of your operating environment that are available to SAS are written to the SAS log.
The FULLSTIMER system option specifies whether all of the available performance
statistics are written to the SAS log.
See Also
3 “FULLSTIMER System Option” on page 463
3 “STIMEFMT System Option” on page 498
SYSIN= System Option
Specifies the default location of SAS source programs
none
Valid in: configuration file, SAS invocation, VMS_SAS_OPTIONS DCL symbol
Category: Environment control: Files
PROC OPTIONS GROUP= ENVFILES
OpenVMS specifics: All aspects are host-specific
Default:
Syntax
SYSIN=file-specification
NOSYSIN
SYSIN=file-specification
identifies an external file. The value for file-specification can be an OpenVMS logical
name or pathname.
NOSYSIN
invokes SAS, processes the autoexec file, and then terminates SAS, returning you to
the DCL prompt.
Details
The SYSIN= system option specifies a file containing a SAS program. This option
indicates to SAS that you are executing in noninteractive mode and can be specified
only in the SAS invocation.
The default value for the SYSIN= system option under interactive line mode and the
SAS windowing environment is the SYS$INPUT logical name. Any value other than
SYS$INPUT for file-specification prevents SAS from running interactively. The value
System Options under OpenVMS
4
SYSPARM= System Option
501
for file-specification can be a valid OpenVMS pathname or logical name. The default
value for SYSIN= in noninteractive and batch modes is the file specification that you
provided with the SAS command. For example, if you invoke SAS with the following
command, the value for file-specification is ORANGES.SAS:
$ SAS ORANGES
You can also explicitly specify the SYSIN= system option as an option in the SAS
command when you invoke SAS in noninteractive or batch mode, as in the following
example:
$ SAS/SYSIN=ORANGES
This technique allows you to include your source file specification in a configuration file.
Under OpenVMS, the syntax of this system option also enables you to specify
NOSYSIN. If you specify NOSYSIN, as in the following example, SAS is invoked, the
autoexec file is processed, and then SAS terminates, returning you to the DCL prompt:
$ SAS/NOSYSIN/AUTOEXEC=MYEXEC.SAS
This technique is useful if you want to test an autoexec file without actually running a
complete SAS session.
The SYSIN= system option is associated with an automatic macro variable,
VMSSASIN. This variable contains the value of the SYSIN= option, and provides you
with the name of the SAS job that is currently being run. When SAS is run in an
interactive mode the value is SYS$INPUT.
Also, the SYSIN= option accepts wildcard specifications. For example, you could use
the following SAS command to invoke SAS:
SAS/SYSIN=*.SAS
This command causes SAS to execute all the files with an extension of .SAS in the
current directory. Only one log and one procedure output file are created. By default,
the name of the first job run is used for these files.
SYSPARM= System Option
Specifies a character string that can be passed to SAS programs
Default:
none
configuration file, SAS invocation, OPTIONS statement, SAS System Options
window, VMS_SAS_OPTIONS DCL symbol
Valid in:
Category: Environment control: Files
PROC OPTIONS GROUP= ENVFILES
valid values and syntax for characters
See: SYSPARM= System Option in SAS Language Reference: Dictionary
OpenVMS specifics:
Syntax
SYSPARM=< “>characters<”>
502
SYSPRINT System Option
4
Chapter 19
characters
writes the character string in all uppercase.
“characters”
preserves the case of the character string.
Details
The SYSPARM= system option specifies a character string that can be passed to SAS
programs.
By default, the value of the SYSPARM= system option is uppercased under
OpenVMS. To preserve the case of the string, enclose it in double quotation marks.
Example
If you specify the following command,
$ SAS/SYSPARM=mytext
the string MYTEXT is passed to your SAS session.
However, if you specify the following command,
$ SAS/SYSPARM="mytext"
the string mytext is passed to your SAS session.
SYSPRINT System Option
Specifies the destination for printed output
Default:
SYS$PRINT
configuration file, SAS invocation, OPTIONS statement, VMS_SAS_OPTIONS
DCL symbol
Valid in:
Category:
Files: SAS files
PROC OPTIONS GROUP= SASFILES
OpenVMS specifics:
All aspects are host-specific
Syntax
SYSPRINT=“print-queue-name”<“destination”>
“print-queue-name”
specifies the name of the printer as it is installed under OpenVMS. The value for
printer-name must be enclosed in double quotation marks.
“destination”
optionally specifies a filename to write the print file to disk. If specified, then all
printer output that is generated by SAS is routed to this file. Even though the output
System Options under OpenVMS
4
TAPECLOSE= System Option
503
is not sent directly to a printer, it is still formatted using the printer driver
associated with printer-name. The value for destination must be enclosed in double
quotation marks.
Details
The SYSPRINT system option specifies the destination of a printer where you want to
print your SAS output.
If you do not specify the SYSPRINT system option, the printer-name and destination
arguments use the default system printer values.
See Also
3 Chapter 8, “Routing the SAS Log and SAS Procedure Output,” on page 195
TAPECLOSE= System Option
Specifies the default CLOSE disposition for a SAS data library on tape
Default:
LEAVE
configuration file, SAS invocation, OPTIONS statement, SAS System Options
window, VMS_SAS_OPTIONS DCL symbol
Valid in:
Category: Files: SAS files
PROC OPTIONS GROUP= SASFILES
OpenVMS specifics:
All aspects are host-specific
Syntax
TAPECLOSE=disposition
disposition
can be one of the following under OpenVMS:
REWIND
rewinds to the beginning of the tape after closing each member.
LEAVE
performs no tape positioning when you close a member.
FREE
rewinds and dismounts the tape when the next member is closed.
Details
The only valid value for tape libraries that are accessed by the COPY procedure is
LEAVE; it cannot be overridden.
504
4
TERMIO= System Option
Chapter 19
See Also
3 “COPY Procedure” in Base SAS Procedures Guide
TERMIO= System Option
Specifies whether terminal I/O is blocking or non-blocking
Default:
NOBLOCK
only at session startup in configuration file, SAS invocation,
VMS_SAS_OPTIONS DCL symbol
Valid in:
Category:
System administration: Performance
PROC OPTIONS GROUP= PERFORMANCE
OpenVMS specifics:
All aspects are host-specific
Syntax
TERMIO=BLOCK | NOBLOCK
BLOCK
specifies that terminal I/O is blocking.
NOBLOCK
specifies that terminal I/O is non-blocking.
Details
TERMIO controls whether terminal I/O in line mode SAS is blocking or non-blocking.
NOBLOCK, the default, allows other processes, such as ODS, to execute while the line
mode process waits for terminal input. While NOBLOCK is set, command line recall is
limited to one previous command. Specify TERMIO=BLOCK to enable full command
line recall functionality.
USER= System Option
Specifies the default permanent SAS data library
Default:
none
configuration file, SAS invocation, OPTIONS statement, SAS System Options
window, VMS_SAS_OPTIONS DCL symbol
Valid in:
Category:
Environment control: Files
PROC OPTIONS GROUP= ENVFILES
OpenVMS specifics:
See:
valid values for library-specification
USER= System Option in SAS Language Reference: Dictionary
System Options under OpenVMS
4
VERBOSE System Option
505
Syntax
USER=library-specification
library-specification
can be a libref, an OpenVMS logical name, or a pathname to the directory or
subdirectory level. Do not use a specific filename.
Details
If the USER= system option is specified, you can use one-level names to reference
permanent SAS files in SAS statements. However, if USER=WORK is specified, SAS
assumes that files referenced with one-level names refer to temporary work files.
See Also
3 “Directing Temporary SAS Data Sets to the USER Library” on page 131
VERBOSE System Option
Controls whether SAS writes the settings of all the system options specified in the configuration
file, either to the terminal or the batch log
NOVERBOSE
SAS invocation, VMS_SAS_OPTIONS DCL symbol
Category: Log and procedure output control: SAS log
PROC OPTIONS GROUP= LOGCONTROL
OpenVMS specifics: All aspects are host-specific
Default:
Valid in:
Syntax
VERBOSE | NOVERBOSE
VERBOSE
specifies that SAS writes the settings of the system options.
NOVERBOSE
specifies that SAS does not write the settings of the system options.
Details
The VERBOSE system option is valid only on the command line at SAS invocation or in
the VMS_SAS_OPTIONS DCL symbol.
Under OpenVMS, the settings are written to your display in any method of running
SAS except batch mode. If you invoke SAS as a part of a batch job, the settings are
written to the OpenVMS batch log.
506
WORK= System Option
4
Chapter 19
If you specify the VERBOSE system option in a configuration file, no error message
is generated, but the option is ignored.
The output from the VERBOSE system option shows the following:
3 all of the configuration files that are found (except the default configuration file)
3 all of the options that have been set along with their current values.
Note: Since some options are set by default, more options are displayed than are
specified in the configuration files. The host specific options are listed first followed by
the options that are found in all operating environments. 4
See Also
3 “OPLIST System Option” on page 482
3 “Configuration Files” on page 36
3 “Displaying the Contents of Configuration Files” on page 38
WORK= System Option
Specifies the name of the directory under which the SAS WORK directory is created
Default:
SAS$WORKROOT logical name
Valid in:
configuration file, SAS invocation, VMS_SAS_OPTIONS DCL symbol
Category:
Environment control: Files
PROC OPTIONS GROUP= ENVFILES
OpenVMS specifics:
See:
valid values for library-specification
WORK= System Option in SAS Language Reference: Dictionary
Syntax
WORK=library-specification
library-specification
can be an OpenVMS logical name or pathname to the directory or subdirectory level.
Do not use a specific filename.
Details
You can define a logical name SAS$WORKROOT to override the system default.
See Also
3 “The WORK Data Library under OpenVMS” on page 129
System Options under OpenVMS
4
WORKCACHE= System Option
507
WORKCACHE= System Option
Specifies the size of the I/O data cache allocated for a file in the WORK data library
Default:
65024
configuration file, SAS invocation, OPTIONS statement, SAS System Options
window, VMS_SAS_OPTIONS DCL symbol
Valid in:
Category: Files: SAS files
PROC OPTIONS GROUP= SASFILES
OpenVMS specifics:
All aspects are host-specific
Syntax
WORKCACHE=n | nK | hexX | MIN | MAX
n | nK
specifies the size of the I/O data cache in multiples of 1 (bytes) or 1,024 (kilobytes).
You can specify decimal values for the number of kilobytes. For example, a value of 8
specifies 8 bytes, a value of .782k specifies 801 bytes, and a value of 3k specifies
3,072 bytes.
This value can range from 0 to 65,024 bytes on OpenVMS Alpha before Release
7.2. The size of the data cache can range from 0 to 130,048 bytes on OpenVMS Alpha
Release 7.2 or later.
hexX
specifies the size of the I/O data cache as a hexadecimal value. You must specify the
value beginning with a number (0–9), followed by hex digits (0–9, A-F), and then
followed by an X. For example, the value 2dx sets the size of the I/O data cache to 45
bytes.
MIN
sets the size of the I/O data cache to 0.
MAX
sets the size of the I/O data cache for your operating environment. MAX is 65,024
bytes on OpenVMS Alpha before Release 7.2 and 130,048 bytes on OpenVMS Alpha
Release 7.2 or later.
Details
The WORKCACHE= system option controls the size (in bytes) of the data cache used to
buffer I/O pages for files that are created in the WORK data library. This option
functions exactly like the CACHESIZE= data set option, which you can use in a
LIBNAME statement. However, because no LIBNAME statement is explicitly issued for
the WORK data library, the WORKCACHE= system option is necessary to enable you
to specify a default cache size for all files that are created in the WORK data library by
the V8, V8TAPE, or V6 engines. The value of n must be a positive integer.
508
XCMD System Option
4
Chapter 19
See Also
3
3
3
3
“WORKCACHE= Data Set Option” on page 295
“CACHESIZE= Data Set Option” on page 287
“CACHESIZE= System Option” on page 450
“LIBNAME Statement” on page 420
XCMD System Option
Specifies whether the X command is valid in the current SAS session
XCMD
configuration file, SAS invocation, VMS_SAS_OPTIONS DCL symbol
Category: Environment control: Display
PROC OPTIONS GROUP= ENVDISPLAY
OpenVMS specifics: All aspects are host-specific
Default:
Valid in:
Syntax
XCMD | NOXCMD
XCMD
specifies that the X command is valid in the current SAS session.
NOXCMD
specifies that the X command is not valid in the current SAS session.
Details
The XCMD system option specifies whether the X command is valid in the current SAS
session.
See Also
3 “X Command” on page 270
3 “XCMDWIN System Option” on page 508
XCMDWIN System Option
Specifies whether to create a DECTERM window for X command output when in the SAS
windowing environment
XCMDWIN
Valid in: configuration file, SAS invocation, VMS_SAS_OPTIONS DCL symbol
Category: Environment control: Display
PROC OPTIONS GROUP= ENVDISPLAY
Default:
System Options under OpenVMS
OpenVMS specifics:
4
XKEYPAD System Option
509
All aspects are host-specific; valid only on OpenVMS Alpha
Syntax
XCMDWIN | NOXCMDWIN
XCMDWIN
specifies that a DECTERM window should be created for X command output when in
the SAS windowing environment.
NOXCMDWIN
specifies that no DECTERM window should be created.
Details
The XCMDWIN option specifies whether to create a DECTERM window for X command
output when in the SAS windowing environment. This option is ignored when running
line mode, non-interactive mode, or batch mode.
See Also
3 “Issuing DCL Commands during a SAS Session” on page 43
3 “X Statement” on page 427
3 “X Command” on page 270
XKEYPAD System Option
Specifies that subprocesses use the keypad settings that were in effect before you invoked SAS
Default:
XKEYPAD
configuration file, SAS invocation, OPTIONS statement, SAS System Options
window, VMS_SAS_OPTIONS DCL symbol
Valid in:
Category: Environment control: Initialization and operation
PROC OPTIONS GROUP= EXECMODES
OpenVMS specifics:
All aspects are host-specific
Syntax
XKEYPAD | NOXKEYPAD
XKEYPAD
specifies that SAS uses the previous settings in the subprocess.
NOXKEYPAD
specifies that SAS uses the SAS keypad settings currently in the subprocess.
510
XLOG System Option
4
Chapter 19
Details
The XKEYPAD system option specifies whether a subprocess that was spawned by an X
statement or X command uses the keypad settings in effect before you invoked SAS.
The XKEYPAD system option is valid in interactive line mode and in the SAS
windowing environment.
See Also
3 “X Statement” on page 427
3 “X Command” on page 270
XLOG System Option
Specifies whether to display the output from the X command in the SAS log file
NOXLOG
configuration file, SAS invocation, OPTIONS statement, SAS System Options
window, VMS_SAS_OPTIONS DCL symbol
Category: Log and procedure output control: SAS log
PROC OPTIONS GROUP= LOGCONTROL
OpenVMS specifics: All aspects are host-specific
Default:
Valid in:
Syntax
XLOG | NOXLOG
XLOG
specifies that SAS displays the X command output in the SAS log file.
NOXLOG
specifies that SAS does not display the X command output in the SAS log file.
Details
The XLOG system option specifies whether to display the X command output in the
SAS log file.
See Also
3 “XOUTPUT System Option” on page 511
3 “XCMD System Option” on page 508
3 “X Command” on page 270
XLOGICAL System Option
Specifies that process-level logical names are passed to the subprocess that is spawned by an X
statement or X command
System Options under OpenVMS
Default:
4
XOUTPUT System Option
511
XLOGICAL
configuration file, SAS invocation, OPTIONS statement, SAS System Options
window, VMS_SAS_OPTIONS DCL symbol
Valid in:
Category: Environment control: Initialization and operation
PROC OPTIONS GROUP= EXECMODES
OpenVMS specifics:
All aspects are host-specific
Syntax
XLOGICAL | NOXLOGICAL
XLOGICAL
passes the logical names to the subprocess.
NOXLOGICAL
does not pass the logical names to the subprocess.
Details
The XLOGICAL system option specifies whether to pass the process-level logical names
to the subprocess that is spawned by an X statement or X command.
The XLOGICAL system option takes effect only after a subprocess is spawned. For
information about when a subprocess is spawned, see “XTIMEOUT= System Option” on
page 514.
See Also
3 “X Statement” on page 427
3 “X Command” on page 270
3 “XTIMEOUT= System Option” on page 514
XOUTPUT System Option
Specifies whether to display the output from the X command
Default:
XOUTPUT
configuration file, SAS invocation, OPTIONS statement, SAS System Options
window, VMS_SAS_OPTIONS DCL symbol
Valid in:
Category: Log and procedure output control: SAS log and procedure output
PROC OPTIONS GROUP= LOG_LISTCONTROL
OpenVMS specifics:
All aspects are host-specific
Syntax
XOUTPUT | NOXOUTPUT
512
XRESOURCES= System Option
4
Chapter 19
XOUTPUT
specifies that SAS displays the output from the X command.
NOXOUTPUT
specifies that SAS does not display the output from the X command.
Details
The XOUTPUT system option enables you to suppress output that is created by the X
command. The XOUTPUT system option is intended for SAS/AF applications that issue
operating environment commands behind the scenes.
See Also
3 “X Command” on page 270
XRESOURCES= System Option
Specifies a character string of X resource options or the application instance name for the SAS
interface to Motif
Default:
none
Valid in:
configuration file, SAS invocation, VMS_SAS_OPTIONS DCL symbol
Category:
Environment control: Display
PROC OPTIONS GROUP= ENVDISPLAY
OpenVMS specifics:
All aspects are host-specific
Syntax
XRESOURCES=“resource-list”
“resource-list”
specifies the resource setting to be passed to SAS. The value for resource-list must be
enclosed in double quotation marks.
Details
For the SAS interface to Motif, the XRESOURCES= system option enables you to pass
any valid X window system command-line options as well as -xrm options to the
interface. The xrm option enables you to set any resource used by SAS. For a complete
list of resource and class names used by SAS, see “Summary of X Resources for SAS
under OpenVMS” on page 122. The first argument in the resource list can also be used
to specify the application instance name.
In order to conform to the OpenVMS command-line syntax, this option must be
enclosed in double quotation marks. This enables you to preserve case, as well as to
specify a compound statement. Any value that is enclosed in single quotation marks is
resolved as a symbol by OpenVMS before it is processed by SAS. If no symbol exists for
the specified value, unexpected results might occur.
System Options under OpenVMS
4
XSYMBOL System Option
513
Note: Placing single quotation marks inside double quotation marks might not
create the effect you want. To preserve the case of the characters, enclose the string in
double quotation marks. 4
Example
In the following example, the XRESOURCES= system option does three things:
3 It uses the AXPSAS argument to define this application instance name as AXPSAS.
The application class is always SAS. Therefore, SAS will use any application
instance resources that are prefixed with AXPSAS, as well as any application class
resources that are prefixed by SAS.
3 It uses the -display command-line option to specify that the SAS windows for the
session should be displayed on node MYNODE.
3 It uses the -xrm option to set the AXPSAS.sessionGravity resource to the value
SouthWestGravity. When the SAS windows are displayed on the node, they are
positioned in the southwest region of the screen. If you want to specify more than
one resource setting, you must issue a separate -xrm option.
$ SAS /XRESOURCES="AXPSAS
-display mynode:0
-xrm=(AXPSAS.sessionGravity: SouthWestGravity)"
See Also
3 “Summary of X Resources for SAS under OpenVMS” on page 122
XSYMBOL System Option
Specifies that global symbols are passed to the subprocess that is spawned by an X statement or
X command
Default:
XSYMBOL
configuration file, SAS invocation, OPTIONS statement, SAS System Options
window, VMS_SAS_OPTIONS DCL symbol
Valid in:
Category: Environment control: Initialization and operation
PROC OPTIONS GROUP= EXECMODES
OpenVMS specifics:
All aspects are host-specific
Syntax
XSYMBOL | NOXSYMBOL
XSYMBOL
passes the global symbols to the subprocess.
NOXSYMBOL
does not pass the global symbols to the subprocess.
514
XTIMEOUT= System Option
4
Chapter 19
Details
The XSYMBOL system option specifies whether to pass the global symbols to the
subprocess that is spawned by an X statement or X command.
Local symbols are not passed to a subprocess that is created using the X
’DCL-command’ form of the X statement or X command. Thus, if you define a
process-level symbol, MYSYMBOL, before you invoke SAS, and then you issue the
following X statement during your SAS session, SAS cannot find MYSYMBOL:
x ’show symbol mysymbol’;
To see the value of MYSYMBOL, issue the following X statement and then issue the
SHOW SYMBOL MYSYMBOL command at the SAS_$ prompt:
x ’’;
This option takes effect only after a subprocess is spawned. For information about
when a subprocess is spawned, see “XTIMEOUT= System Option” on page 514.
See Also
3
3
3
3
“X Statement” on page 427
“X Command” on page 270
“XTIMEOUT= System Option” on page 514
“Issuing DCL Commands during a SAS Session” on page 43
XTIMEOUT= System Option
Specifies how long a subprocess that has been spawned by an X statement or X command remains
inactive before being deleted
NOXTIMEOUT
Valid in: configuration file, SAS invocation, OPTIONS statement, SAS System Options
window, VMS_SAS_OPTIONS DCL symbol
Category: Environment control: Initialization and operation
PROC OPTIONS GROUP= EXECMODES
OpenVMS specifics: All aspects are host-specific
Default:
Syntax
XTIMEOUT=time-span
NOXTIMEOUT
XTIMEOUT=time-span
specifies the number of minutes until an inactive subprocess is deleted. The value of
time-span can range from 0 to 59. XTIMEOUT=0 indicates that the subprocess is
deleted immediately when control returns to SAS.
NOXTIMEOUT
indicates that the subprocess never times out, and it is not deleted until the SAS
session terminates.
System Options under OpenVMS
4
XTIMEOUT= System Option
515
Details
This option affects only the following form of the X command or X statement:
X ’DCL-command’
When an X statement or X command spawns a subprocess to issue one specific DCL
command, the subprocess is not automatically deleted when control returns to SAS; it
remains active based on the value of the XTIMEOUT= system option.
Each time an X statement or X command is issued, the timer is reset to the value
specified in the XTIMEOUT= system option. When the subprocess remains inactive for
the time period specified by XTIMEOUT=, the subprocess is deleted.
Note: When certain DCL commands are submitted by an X statement or X
command, any existing subprocess is deleted regardless of the value of the
XTIMEOUT= system option. 4
See Also
3 “X Statement” on page 427
3 “X Command” on page 270
3 “Issuing DCL Commands during a SAS Session” on page 43
516
517
CHAPTER
20
Macro Facility under OpenVMS
About the SAS Macro Facility under OpenVMS 517
Automatic Macro Variables under OpenVMS 517
Macro Statements under OpenVMS 519
Macro Functions under OpenVMS 519
Example: Using the %SYSGET Function 520
Autocall Libraries under OpenVMS 520
What Is an Autocall Library? 520
Available Autocall Macros 520
Creating an Autocall Macro 520
Specifying a User Autocall Library 520
Stored Compiled Macro Facility under OpenVMS 521
Introduction to the Stored Compiled Macro Facility 521
Advantages of Using the Stored Compiled Macros 521
Making Your Stored Compiled Macros Accessible to Your SAS Session
Accessing Stored Compiled Macros 522
Controlling Memory Availability for Storing Macro Variables 522
Other Host-Specific Aspects of the Macro Facility under OpenVMS 523
Collating Sequence for Macro Character Evaluation 523
SAS System Options Used by the Macro Facility 523
521
About the SAS Macro Facility under OpenVMS
In general, the SAS macro language is portable across operating environments.
However, some components of the macro facility have details that are specific to
OpenVMS. For more information, see
3 SAS Macro Language: Reference
3 SAS Macro Facility Tips and Techniques
3 the online help for the macro facility.
Automatic Macro Variables under OpenVMS
The following automatic macro variables have aspects that are specific to the
OpenVMS operating environment:
SYSCC
contains the current SAS condition code that SAS will return to the OpenVMS
Alpha operating environment when SAS exits. Upon exit, SAS translates this
condition code to a return code that has a meaningful value for the operating
system. For OpenVMS, a successful completion returns a code of $STATUS=1.
518
Automatic Macro Variables under OpenVMS
4
Chapter 20
SYSDEVIC
gives the name of the current graphics device.
SYSENV
is provided for compatibility with SAS running on other operating environments,
but it is not relevant in the OpenVMS operating environment. In the OpenVMS
environment, its value is always FORE.
SYSJOBID
lists the OpenVMS process ID (PID) of the process that is running SAS, (for
example, 27A0D1D2).
SYSPARM
specifies a character string that can be passed to SAS programs. By default, the
value of SYSPARM is in uppercase in the OpenVMS operating environment. To
preserve the case of the string, enclose it in double quotation marks.
SYSRC
holds the OpenVMS status of DCL commands that were issued during your SAS
session. The variable holds a character string that is the text form of the decimal
value of the OpenVMS command status. For example, consider the following
statements:
x ’dirf’; /* an invalid OpenVMS command */
%put This OpenVMS status is &sysrc;
x ’dir’; /* a valid OpenVMS command */
%put The corrected OpenVMS status is &sysrc;
When these statements are issued, the following lines are written to the SAS log:
This OpenVMS status is 229520
The corrected OpenVMS status is 0
SYSSCP
in the OpenVMS Alpha operating environment, SYSSCP returns the value
VMS_AXP.
SYSSCPL
returns the value OpenVMS for the OpenVMS Alpha operating environment.
SYSSESID
returns the client name of an application. The client name of a SAS session
consists of either the value of the xresources=’’name’’ or the word SAS plus the
SAS session ID. SAS is the default. The SAS session ID is incremented once for
each concurrent session that is started. For example, if you start a second SAS
session without ending the first session, then the default client name for the
second session is SAS2.
VMSSASIN
contains the value of the SYSIN= system option and provides you with the name
of the SAS job that is currently being run. When SAS is run in interactive mode,
the value of VMSSASIN is SYS$INPUT.
The following is an example using this macro variable:
data test;
infile ’[school]roster.dat’;
input name $ age grade $;
run;
proc print data=test;
Macro Facility under OpenVMS
4
Macro Functions under OpenVMS
519
title "Output generated by &vmssasin program.";
run;
Alternatively, you could put the value of the VMSSASIN macro variable into a
variable in your data set:
data test;
infile ’[school]roster.dat’;
input name $ age grade $;
job=symget("vmssasin");
run;
Macro Statements under OpenVMS
The following macro statement has operating dependencies that are specific to the
OpenVMS environment:
%SYSEXEC
issues DCL commands immediately and places the operating environment return
code in the automatic variable SYSRC. The syntax of the %SYSEXEC statement is
%SYSEXEC <DCL-command>;
where DCL-command can be any OpenVMS operating environment command or
any sequence of macro operations that generates an operating environment
command.
The %SYSEXEC statement is similar to the X statement, which is described in
“Issuing DCL Commands during a SAS Session” on page 43. You can use the
%SYSEXEC statement either inside a macro or in open code.
Omitting DCL-command puts you in an interactive OpenVMS subprocess and
sets the value of the SYSRC automatic variable to 0. To return to your SAS
session, type LOGOFF at the subprocess prompt.
The following is an example of %SYSEXEC:
%sysexec show time;
The output looks something like this:
12-JAN-1998 16:02:52
Macro Functions under OpenVMS
The following macro function has details that are specific to the OpenVMS operating
environment:
%SYSGET
returns the character-string value of the OpenVMS symbol that you specified as
the argument. The syntax of this function is
%SYSGET(OpenVMS-symbol-name);
You can use %SYSGET to translate either local or global OpenVMS symbols. If
the symbol that you specify does not exist, SAS prints a warning message in the
log.
520
Example: Using the %SYSGET Function
4
Chapter 20
Example: Using the %SYSGET Function
The following example writes square brackets ([]) to the SAS log.
1 Issue the following command to define a global symbol, HERE, to be []:
$ HERE == "[]"
2 Invoke SAS, using the invocation command that is used at your site (usually $
SAS).
3 In your SAS session, assign the value of the %SYSGET function to the macro
variable VAR1, using the symbol HERE as the argument.
%let var1=%sysget(here);
%put &var1;
Autocall Libraries under OpenVMS
What Is an Autocall Library?
An autocall library contains files or members that define SAS macros. The autocall
facility enables you to invoke a macro without having previously defined that macro in
the same SAS program. In order to use the autocall facility, the SAS system option
MAUTOSOURCE must be in effect. (For information about the MAUTOSOURCE
system option, see SAS Language Reference: Dictionary.)
Available Autocall Macros
SAS supplies some autocall macros. When SAS is installed, a SASAUTOS logical
name is defined. This OpenVMS logical name refers to the location of the default macros
that are supplied by SAS. Whether this logical name is placed in the system-level
logical name table or in the process-level logical name table is site-dependent.
You can also define your own autocall macros in a user autocall library.
Creating an Autocall Macro
To create an autocall macro, perform the following tasks:
1 Create either an OpenVMS directory or an OpenVMS text library to function as an
autocall library, or use an existing autocall library.
2 In the autocall library, create a file (filetype .SAS) or member (filetype .TLB) that
contains the source statements for the macro. The filename or member name must
be the same as the name of the macro. For example, if a file named
PRTDATA.SAS is stored in an OpenVMS directory, then the file must define a
macro named PRTDATA. Similarly, if the text library MYLIB.TLB contains the
member DATACONT, then that member must define a macro named DATACONT.
Specifying a User Autocall Library
Use the SAS system option SASAUTOS to specify the location of one or more user
autocall libraries. (For more information about this option, see “SASAUTOS= System
Macro Facility under OpenVMS
4
Introduction to the Stored Compiled Macro Facility
521
Option” on page 490.) You can specify autocall libraries either when you invoke SAS or
during a SAS session, as follows:
3 When you invoke SAS:
single autocall library:
SAS/MAUTOSOURCE/SASAUTOS=’’[mydir]’’
[dir]program
concatenated autocall library:
SAS/MAUTOSOURCE/SASAUTOS=(‘‘[mydir1]’’,
‘‘[mydir2]’’,sasautos) [dir]program
Note: Invocation options are separated by slashes following the SAS command.
4
3 During a SAS session (using an OPTIONS statement in your program):
single autocall library:
options mautosource sasautos=’[mydir]’;
concatenated autocall library:
options mautosource sasautos=(’[mydir1]’,
’[mydir2]’,sasautos);
Stored Compiled Macro Facility under OpenVMS
Introduction to the Stored Compiled Macro Facility
The stored compiled macro facility gives you access to permanent SAS catalogs that
contain compiled macros. In order for SAS to use stored compiled macros, the SAS
system option MSTORED must be in effect. In addition, you use the SAS system option
SASMSTORE= to specify the libref of a SAS data library that contains a catalog of
stored compiled SAS macros. For more information about these options, see SAS
Language Reference: Concepts.
Advantages of Using the Stored Compiled Macros
Using stored compiled macros offers the following advantages over other methods of
making macros available to your session:
3 SAS does not have to compile a macro definition when a macro call is made.
3 Session-compiled macros and the autocall facility are also available in the same
session.
Because you cannot re-create the source statements from a compiled macro, you must
save the original macro source statements.
Note:
Catalogs of stored compiled macros cannot be concatenated.
4
Making Your Stored Compiled Macros Accessible to Your SAS Session
If you do not want to use the stored compiled macro facility, you can make macros
accessible to your SAS session or job by doing the following:
3 placing all macro definitions in the program before calling them
522
Accessing Stored Compiled Macros
4
Chapter 20
3 using a %INCLUDE statement to bring macro definitions into the program from
external files
3 using the autocall facility to search predefined source libraries for macro
definitions.
Your most efficient choice might be to use the stored compiled macro facility.
Accessing Stored Compiled Macros
The following example illustrates how to create a stored compiled macro in one
session and then use the macro in a later session:
/* Create a Stored Compiled Macro
/*
in One Session
libname mylib ’[dir]’;
options mstored sasmstore=mylib;
*/
*/
%macro myfiles / store;
filename file1 ’[dir]first.dat’;
filename file2 ’[dir]second.dat’;
%mend;
/* Use a Stored Compiled Macro
*/
/*
in a Later Session
*/
libname mylib ’[dir]’;
options mstored sasmstore=mylib;
%myfiles;
data _null_;
infile file1;
*statements that read input file FILE1;
file file2;
*statements that write to output file FILE2;
run;
Controlling Memory Availability for Storing Macro Variables
Two system options control the maximum amount of memory available for storage of
macro variables:
MVARSIZE=n
specifies the maximum number of bytes for any macro variable stored in memory
(0 <= n <= 32768). The default setting for this option in the OpenVMS operating
environment is 8192.
MSYMTABMAX=n
specifies the maximum amount of memory available to all symbol tables (global
and local combined). The value of n can be expressed as an integer or MAX (the
largest integer your operating environment can represent). The default setting for
this option in the OpenVMS operating environment is 51200.
You can specify these system options in the following places:
3 at SAS invocation
3 in the configuration file
3 during execution with an OPTIONS statement or in the System Options window
Macro Facility under OpenVMS
4
SAS System Options Used by the Macro Facility
523
Other Host-Specific Aspects of the Macro Facility under OpenVMS
Collating Sequence for Macro Character Evaluation
Under OpenVMS, the macro facility uses ASCII collating sequences for %EVAL,
%SYSEVALF, and for implicit evaluation of macro characters.
SAS System Options Used by the Macro Facility
The following table lists the SAS system options that are used by the macro facility
and that have host-specific characteristics. The table also tells you where to look for
more information about these system options.
Table 20.1
SAS System Options Used by the Macro Facility That Have Host-Specific Aspects
System Option
Description
See
MSYMTABMAX=
Specifies the maximum amount of memory available to
all symbol tables (global and local combined). Under
OpenVMS, the default value for this option is 51,200
bytes.
“MSYMTABMAX= System
Option” on page 478
MVARSIZE=
Specifies the maximum number of bytes for any macro
variable stored in memory (0 <= n <= 32767). Under
OpenVMS, the default setting for this option is 8,192.
“MVARSIZE= System Option” on
page 479
SASAUTOS=
Specifies the autocall library.
“SASAUTOS= System Option” on
page 490 and “Specifying a User
Autocall Library” on page 520
524
525
4
P A R T
Appendices
Appendix
1. . . . . . . . . Error Messages
Appendix
2. . . . . . . . . The SAS$ROOT Directory
Appendix
3. . . . . . . . . Recommended Reading
527
539
541
526
527
APPENDIX
1
Error Messages
Overview of Error Messages under OpenVMS 527
OpenVMS Operating Environment Messages 527
Host Subsystem Messages under OpenVMS 528
TPU Interface Errors under OpenVMS 537
Concurrency Engine Errors under OpenVMS 538
Overview of Error Messages under OpenVMS
Error messages can be of several different types:
informational
is usually not serious. It simply provides helpful information.
warning
is more serious than informational messages but does not stop processing. Usually,
warnings indicate that something works but not the way that you intended.
error
is usually serious and can be caused by either a user mistake or an internal SAS
error. Report internal errors to your SAS Support Consultant.
fatal error
is serious. It stops SAS. Fatal errors can be caused by either a user mistake or an
internal SAS error. Report internal errors to your SAS Support Consultant.
Note: If the SAS log cannot be used, any error messages that SAS issues are
written to the SAS console log. Under OpenVMS, the SYS$OUTPUT logical name
specifies the location of the Console Log. For more information, see “Messages in the
SAS Console Log” on page 53. 4
OpenVMS Operating Environment Messages
%SHOW-S-NOTRAN, no translation for logical name SAS*
Severity Level: informational
You can use the following command to see if the SAS logical names are defined
for SAS 9.1:
$ SHOW LOGICAL SAS*
If you receive this error message, SAS logical names are not defined on your
system. Notify your SAS Installation Representative immediately. Refer your SAS
528
Host Subsystem Messages under OpenVMS
4
Appendix 1
Installation Representative to the Installation Instructions and System Manager’s
Guide for the SAS System for OpenVMS Alpha for information about how to set up
the SAS logical names on your system.
Host Subsystem Messages under OpenVMS
ERROR: Bad parameter value
ERROR: Insufficient space in file xxx.xxxxx.DATA
Severity Level: error
SAS data sets are limited in size to 4,294,967,294 (or 4 gigabyte) blocks. When
this value is exceeded, you receive these errors.
ERROR: Broadcast trapping disabled due to internal errors
Severity Level: error
This message indicates that a non-fatal error occurred while SAS was trying to
establish broadcast message trapping. Although your SAS session will initialize,
broadcast messages will not be trapped properly if you are running SAS in the
windowing environment.
ERROR: Cannot create mailbox for subprocess.
privileges
Check quotas and
Severity Level: error
SAS encountered an error while trying to create the mailbox used by the
X ’DCL-command’ form of the X statement or command. This message might be
preceded by an OpenVMS message indicating the exact nature of the problem.
Check your process privileges and quotas.
ERROR: Cannot spawn subprocess.
privileges
Check process limit quotas and
Severity Level: error
SAS encountered an error while trying to spawn a subprocess from the X
command or statement. This message might be preceded by an OpenVMS message
indicating the exact nature of the problem. Check your process quotas and
privileges.
ERROR: Data overrun.
used to write data
Tape device mounted with blocksize smaller than
Severity Level: error
The block size specified in the DCL MOUNT command is smaller than the
actual block size of the tape. Remount the tape with the correct block size.
ERROR: Error attempting terminal input with /SPAWN=NOWAIT in effect
Severity Level: error
You cannot invoke SAS interactively in a SPAWN/NOWAIT subprocess. For
additional details, see “Running SAS in a SPAWN/NOWAIT Subprocess” on page
29.
ERROR: Error while loading image image-name
Severity Level: error
SAS was unable to load the named image, but processing continues if possible.
Ensure that you have spelled all procedures, functions, and formats correctly. If
you are unable to determine the cause of this error, contact your SAS Installation
Representative.
Error Messages
4
Host Subsystem Messages under OpenVMS
529
ERROR: Error while opening loadlist file file-specification
Severity Level: error
An error occurred when SAS was opening the LOADLIST file. Check the
filename for valid OpenVMS filename specifications. For more information about
specifying OpenVMS filenames, see “OpenVMS Filenames” on page 8.
ERROR: Error while writing to loadlist file file-specification
Severity Level: error
An error occurred when SAS was writing to the LOADLIST file. Ensure that
you have write access to the LOADLIST file.
ERROR: IEEE numbers with a length less than 3 are not supported
Severity Level: error
This data set contains observations with numeric variables of length 2. The
data set cannot be created or translated. For information about converting 2-byte
variables to 3-byte variables, see “VAXTOAXP Procedure” on page 391.
ERROR: Insufficient memory to initialize the SAS System
Severity Level: error
There is not enough memory for SAS to initialize.
ERROR: Interactive SAS invocation unsupported with /SPAWN=NOWAIT in
effect
Severity Level: error
You cannot invoke SAS interactively in a SPAWN/NOWAIT subprocess. For
additional details, see “Running SAS in a SPAWN/NOWAIT Subprocess” on page
29.
ERROR: Insufficient virtual memory to load image image-name
Severity Level: error
Insufficient memory was obtained to load the image.
ERROR: Invalid conversion of KEYVALUE to data type of specified key
on indexed file
Severity Level: error
A conversion error, such as overflow, underflow, or value is not an integer, has
occurred. Check the defined key data type on the indexed file and modify the
KEYVALUE= value accordingly.
ERROR: LRECL must be specified when RECFM equals FIXED
Severity Level: error
If you are writing records to a file that uses fixed-length records, you must use
the LRECL= external I/O statement option to specify the record length.
ERROR: LRECL must be specified with RECFM=D
Severity Level: error
A record format of D (DATA step unlabeled tape) was specified but the LRECL=
option was not specified. Correct your program and resubmit it.
ERROR: Maximum of 8 parameters exceeded for PARAMETERS= option
Severity Level: error
Due to DCL restrictions, a maximum of eight parameters can be specified for a
job that was submitted to a printer queue. Correct your program and resubmit it.
ERROR: Module module-name signalled fatal error condition
Severity Level: fatal error
SAS encountered a fatal internal error. Report this error to your SAS Support
Consultant.
530
Host Subsystem Messages under OpenVMS
4
Appendix 1
ERROR: Output open of a text library requires exclusive access.
is already open
File
Severity Level: error
The OpenVMS system enables you to write to only one member of a text library
at a time. Modify your SAS job accordingly.
ERROR: Specified key on indexed file is defined as key-data-type-1,
but key-data-type-2 was used in KEYVALUE option
Severity Level: error
The specified KEYVALUE= value has a data type that conflicts with the defined
key data type on the indexed file. Check the defined key data type on the indexed
file and modify the KEYVALUE= value accordingly.
ERROR: Specified key on indexed file is of unsupported type for
KEYVALUE option
Severity Level: error
SAS does not support the following key data types: unsigned 8-byte binary,
signed 8-byte integer, collating key, and packed decimal string.
ERROR: Subordinate image image-name not found
Severity Level: error
SAS could not find the named subordinate image while trying to load a
higher-level image. This message is preceded by a message that indicates which
high-level image was being loaded. Report this error to your SAS Installation
Representative.
ERROR: This option can be used on command line only
Severity Level: error
A host system option that can be used only in the SAS command or
configuration file was specified in the OPTIONS statement.
ERROR: Trying to write block shorter than 14 bytes.
complete
File will not be
Severity Level: error
While writing to tape, SAS attempted to write a block that is less than 14 bytes
long. This error typically indicates that the entire file is less than 14 bytes. Use
the LRECL= option to extend the length of each record.
ERROR: Unable to print fatal condition
Severity Level: error
SAS encountered a fatal internal error. Report this error to your SAS Support
Consultant.
ERROR: Update access to indexed files is not supported
Severity Level: error
You have specified both a FILE and an INFILE statement that access the same
indexed file. Update access is currently not supported. Correct your program and
resubmit it.
ERROR: Update or random access to members of text libraries is not
supported
Severity Level: error
You have tried to update a member of an OpenVMS text library (perhaps with a
FILE statement), or used the FSLIST procedure with an OpenVMS text library.
This access is currently not supported. Correct your program and resubmit it.
ERROR: Wildcard or concatenated filespec not allowed for output
Severity Level: error
While wildcards and concatenated file specifications are allowed for input, they
are not allowed for output. Correct your program and resubmit it.
Error Messages
4
Host Subsystem Messages under OpenVMS
531
Full screen SAS could not obtain a channel to the terminal
Severity Level: error
Without a channel to the terminal, the windowing method of running SAS
cannot run. Your process may have reached the SYSGEN CHANNELCNT limit.
Illegal use of dms-command. Key processing terminated prematurely.
Illegal use of dms-command in a DM statement or from a command line
Severity Level: informational
Certain SAS commands are supported only under the OpenVMS operating
environment. Their use is constrained. Only one of these commands can be
assigned to a single function key. The commands cannot be mixed with each other
or with other windowing commands. These commands cannot be used in DM
statements or typed manually on the command line. These commands are
CHINSERT
CURSORDOWN
CURSORLEFT
CURSORRIGHT
CURSORUP
DELCHAR
DELLINE
DELPCHAR
DELTOEOL
DELWORD
MOVEBOL
MOVEEOL
NEWLINE
NEXTFIELD
NEXTWORD
PREVFIELD
PREVWORD
NOTE: BUFSIZE value too large.
16776704.
Maximum allowed for this file is
Severity Level: informational
The largest I/O transfer size allowed under OpenVMS is 16,776,704 bytes. SAS
uses this for the BUFSIZE= value.
NOTE: CC=CR and OVERPRINT may yield unexpected results.
NOOVP with CC=CR
Use options
Severity Level: informational
With the CR (carriage return) file format, there is no overprint character.
Therefore, set the OVP system option to NOOVP to suppress overprinting.
NOTE: CC=PRINT and RECFM=F are conflicting attributes.
used
CC=CR will be
Severity Level: informational
CC=PRINT corresponds to the variable with fixed control (VFC) file format.
Therefore, a fixed record format is incompatible. CC=CR (carriage return) is
compatible with a fixed record format.
532
Host Subsystem Messages under OpenVMS
4
Appendix 1
NOTE: Could not load image SASMSG
Severity Level: informational
The SASMSG image, which contains the text of all host messages, could not be
loaded. Although SAS is able to run without this image, report this error to your
SAS Installation Representative.
NOTE: LRECL option ignored for PRINT files when RECFM equals VARIABLE
Severity Level: informational
The LRECL= external I/O statement option specifies record lengths when
RECFM=FIXED; it is not valid when RECFM=VARIABLE. Modify your SAS job
accordingly.
NOTE: OVERPRINT ignored when specified with option CC=CR
Severity Level: warning
Overprinting is not allowed when you write to files with carriage-return
carriage control.
NOTE: Previous value of logical-name has been superseded
Severity Level: informational
The OpenVMS logical name has been superseded by a new value.
NOTE: Some records have been truncated to existing length of variable
length record
Severity Level: informational
During an update to an external file, the length of the new record exceeded the
length of the existing record. The new record was truncated to the length of the
existing record.
NOTE: Some records have been truncated to length specified by LRECL
option
Severity Level: informational
This message is printed if you are writing records that are larger than those
specified by the LRECL= external I/O statement option. You may want to modify
the LRECL= value accordingly.
NOTE: Text library members cannot be spooled.
or PLOTTER ignored
Device type of PRINTER
Severity Level: informational
You have specified the PRINTER or PLOTTER device type keyword in a
FILENAME statement with an OpenVMS text library. OpenVMS does not allow
spooling of text library members.
NOTE: Unable to queue job to printer due to the following error:
Severity Level: informational
This message is followed by an OpenVMS message describing the error. Correct
the problem and perform the operation again.
%SAS-E-BADCHECK, bad image header for image image-name
Severity Level: fatal error
While loading the named image, SAS encountered invalid data in the image and
could not proceed. Ask your SAS Installation Representative to check the
installation of the product. Ensure that your site is licensed for the product that
you are trying to use.
%SAS-E-NOIMAGE, image image-name not found
Severity Level: fatal error
SAS was unable to load the named image because it could not find the image.
Ask your SAS Installation Representative to check the installation of the product.
Ensure that your site is licensed for the product that you are trying to use.
Error Messages
4
Host Subsystem Messages under OpenVMS
533
%SAS-E-NOMSG, unable to print fatal condition
Severity Level: error
SAS was unable to print the fatal condition that it encountered. Report this
error to your SAS Support Consultant.
%SAS-E-NOPGMCON, no program constants found for image image-name
Severity Level: fatal error
The named image contains invalid internal data. Report this error to your SAS
Installation Representative.
%SAS-F-ASNERR, error assigning files during CLI processing
Severity Level: fatal error
If SAS encounters an error while assigning a logical name when parsing
options, this message is printed, along with the name of the file that SAS was
trying to assign. Correct the problem and perform the operation again.
%SAS-F-ASNTERM, error assigning filename to terminal
Severity Level: fatal error
SAS encountered an error while trying to connect to the terminal. An OpenVMS
message follows this message and indicates the exact nature of the problem.
Correct the problem and perform the operation again.
%SAS-F-ASTERR, error establishing CTRL-C AST handler
Severity Level: fatal error
SAS encountered an error while creating a handler for the CTRL-C attention
sequence. The OpenVMS return code is printed along with this message. Correct
the problem and perform the operation again.
%SAS-F-AUTOEXECFNF, autoexec file file-specification not found
Severity Level: fatal error
SAS could not find the autoexec file specified. Check the file specification in any
AUTOEXEC= options that you have used. Also, check the file that is indicated by
the SAS$INIT logical name. Make sure that you have access to the file.
%SAS-F-BADOPTION, option syntax error in configuration file, SAS
cannot initialize
Severity Level: fatal error
SAS encountered a system option that was not valid in the configuration file.
Check all options in the SAS command and in your configuration file for accuracy.
%SAS-F-BADRANGE, value for option-name host option is out of range
Severity Level: fatal error
A host system option with an integer value was assigned a value outside the
valid range.
%SAS-F-BADTRNLNM, Unable to translate logical name for logical-name
Severity Level: fatal error
An error occurred when SAS was translating the named logical name. This
message is followed by an OpenVMS return code that indicates the exact nature of
the problem. Correct the problem and perform the operation again.
%SAS-F-BRGLOOP, transfer vector stub-name/image-name not fixed
Severity Level: fatal error
An internal error occurred in SAS. Report this error to your SAS Support
Consultant.
%SAS-F-CALLREP, please contact your SAS Site Representative and
report the following error:
Severity Level: fatal error
534
Host Subsystem Messages under OpenVMS
4
Appendix 1
This message is printed for all fatal errors encountered during a SAS session.
Check for old or duplicate versions of the named image in your default directory
and in the path that is defined by SAS$LIBRARY search list logical. Report this
error to your SAS Installation Representative.
%SAS-F-CLSERR, error closing configuration file file-specification
Severity Level: fatal error
An error occurred when SAS was closing the configuration file file-specification.
Report this error to your SAS Support Consultant.
%SAS-F-CONFIGOPEN, error opening file-level filename
Severity Level: fatal error
SAS encountered an error while trying to open a configuration file. File-level
indicates whether the configuration file was at the process, group, system, or
cluster level. file-specification is the full pathname for the file. Ensure that you
spelled any configuration filenames correctly. Also, check with your system
manager to ensure that you have privileges for the group- and system-level
configuration files. Finally, check that the file that is pointed to by the OpenVMS
logical name SAS$CONFIG exists.
%SAS-F-CORRUPT, image image-name is corrupt
Severity Level: fatal error
SAS detected an error in the named image while trying to load it. Report this
error to your SAS Installation Representative.
%SAS-F-DELETE, error deleting file file-specification
Severity Level: fatal error
An error occurred when SAS was deleting a file in the WORK subdirectory. For
more information, see “The CLEANUP Tool” on page 132.
%SAS-F-ERRCREWRK, error creating work library subdirectory
directory-name
Severity Level: fatal error
An error occurred when SAS was creating the WORK subdirectory. An
OpenVMS return code is printed to give you more information. Correct the
problem and perform the operation again.
%SAS-F-INTSASERR, A SAS error has occurred
Severity Level: fatal error
This message is printed for all fatal errors that are encountered during a SAS
session. Report this error and the full text of any error message that follows it to
your SAS Support Consultant.
%SAS-F-INVOPTVALUE, value for host-option host option is invalid
Severity Level: fatal error
You specified an invalid value for the host-option option. For the valid values for
the option, see Chapter 19, “System Options under OpenVMS,” on page 429.
Specify a valid value and perform the operation again.
%SAS-F-INVWRKLIB, work library specified contains invalid directory
path
Severity Level: fatal error
The directory path that was specified for the data library has invalid OpenVMS
directory syntax. Correct the problem and perform the operation again.
%SAS-F-LOADERR, error while loading image image-name
Severity Level: fatal error
SAS was unable to load the named image. This message is followed by an
OpenVMS return code that indicates the exact nature of the problem. Correct the
problem and perform the operation again.
Error Messages
4
Host Subsystem Messages under OpenVMS
535
%SAS-F-NOMEM, insufficient virtual memory
Severity Level: fatal error
Memory that is needed for the internal use of the SAS memory manager could
not be allocated. This message is equivalent to the message %SAS-F-CLIMEM.
%SAS-F-NOMEM, SAS memory manager ran out of memory for internal use
Severity Level: fatal error
Memory that is needed for the internal use of the SAS memory manager could
not be allocated. This message is equivalent to the message %SAS-F-CLIMEM.
%SAS-F-NOTPRNTQ, value for option-name specifies a queue that is not
an output queue
Severity Level: fatal error
An invalid queue name was specified for the given option. Correct your program
and resubmit it.
%SAS-F-NOWRKFILCRE, unable to create files in the work library
subdirectory directory-name
Severity Level: fatal error
SAS was unable to create files in the WORK data library subdirectory. An
OpenVMS message follows this message and indicates the exact nature of the
problem. Correct the problem and perform the operation again.
%SAS-F-NOWRKFILDEL, unable to delete files in the work library
subdirectory directory-name
Severity Level: fatal error
SAS was unable to delete files in the WORK data library subdirectory. An
OpenVMS message follows this message and indicates the exact nature of the
problem. Correct the problem and perform the operation again.
%SAS-F-OPENERR, unable to open image image-name
Severity Level: fatal error
SAS received an error while opening the named image to load it. This message
is followed by an OpenVMS return code that indicates the exact nature of the
problem. Correct the problem and perform the operation again.
%SAS-F-OPENIN, error opening file-specification as input
Severity Level: fatal error
An error occurred when SAS was opening one of several files: the configuration
file, the input SAS file, or a device. An OpenVMS return code is printed after this
message that indicates the exact nature of the problem. Correct the problem and
perform the operation again.
%SAS-F-OPENTERM, error opening terminal device
Severity Level: fatal error
SAS encountered an error while trying to connect to the terminal. An OpenVMS
message follows this message that indicates the exact nature of the problem.
Correct the problem and perform the operation again.
%SAS-F-REAERR, Error reading configuration file file-specification
Severity Level: fatal error
An error occurred when SAS was reading the configuration file file-specification.
Correct the problem and perform the operation again.
%SAS-I-ALTOPT, option old-option has been converted to new-option
Severity Level: informational
The option that was specified was converted to its new name under the current
release of SAS.
536
Host Subsystem Messages under OpenVMS
4
Appendix 1
%SAS-I-NOMSG, unable to retrieve resource thief messages
Severity Level: informational
SAS encountered an error while trying to read a message file. This error does
not keep SAS from running, but if you encounter resource-critical situations (such
as out-of-disk conditions), title messages will not appear. Report this error to your
SAS Support Consultant.
%SAS-I-OBSOPT, ignoring obsolete option option-name
Severity Level: informational
The option that was specified was a valid option in an earlier version of SAS,
but it is no longer valid and is ignored.
%SAS-W-ALTNOTPRNTQ, value for option-name specifies a queue that is
not an output queue
Severity Level: warning
You specified an invalid queue name for the given option. Correct your program
and resubmit it.
%SAS-W-INVNOLOG, interactive mode prohibits use of /NOLOG, qualifier
ignored
Severity Level: warning
If you are entering SAS in interactive line mode, the NOLOG option is
prohibited. This option is valid only in noninteractive and batch modes.
%SAS-W-NOLOGNAM, no logical name match
Severity Level: warning
You attempted to use an X command to deassign a logical name that does not
exist.
%SAS-W-NOLOGTAB, no logical name table match
Severity Level: warning
You issued an ASSIGN or DEFINE command from the X command and
specified a logical name table that does not exist.
%SAS-W-NOPRIV, no privilege for attempted operation
Severity Level: warning
You issued an ASSIGN or DEFINE command from the X command and
attempted an operation for which your process does not have privilege.
%SAS-W-UNSUPPORTED, the qualifier qualifier-name is unsupported and
will be ignored
Severity Level: warning
You specified a MOUNT command from the X command and specified a
MOUNT qualifier that is not supported by the X command.
%SAS-W-X_NORC, unable to retrieve status from X command
Severity Level: warning
The X command status could not be retrieved from the subprocess.
The GOLD key is not supported in numeric mode
Severity Level: informational
In the SAS windowing environment, you cannot use the Gold key while in
numeric mode. Turn numeric mode off with the APPLICATION command before
you press the Gold key.
Error Messages
4
TPU Interface Errors under OpenVMS
537
Type LOGOFF to return to SAS
Severity Level: informational
You entered one of the following forms of the X statement and spawned a
subprocess:
3 X ’’;
3 X;
Warning:
ignored
CC option may be specified for print files only.
Option
Severity Level: warning
You specified the CC= option for a nonprint file. This option is valid only for
print files. Modify your SAS job accordingly.
WARNING: low stack encountered for task task-name
Severity Level: warning
The task named has a stack size that is too small for the attempted job. You can
use the STACK system option to modify the amount of stack space allocated for
the job. Report this message to your SAS Support Consultant.
X command submode not supported in batch
Severity Level: informational
You used one of the following forms of the X statement in a SAS job that is
running in batch mode:
3 X ’’;
3 X;
The X statement is not supported in batch mode.
TPU Interface Errors under OpenVMS
Error creating Host Editor task
Severity Level: error
An internal error occurred in SAS. Report this error to your SAS Support
Consultant.
Error executing Host Editor
Severity Level: error
An internal error occurred in SAS. Report this error to your SAS Support
Consultant.
Error executing Host Editor initialization and/or command file
Severity Level: error
Check the initialization and command file that you have defined for errors.
Error initializing Host Editor section file
Severity Level: error
The logical name SAS$SECTION points to the section file that is provided by
SAS. If the logical name has been misassigned, you can reassign it. If the TPU file
is bad, locate the problem and correct it.
If you redefined this logical name to point to your own file, then check that file
for errors.
538
Concurrency Engine Errors under OpenVMS
4
Appendix 1
The Host Editor is not available from this window
Severity Level: informational
The TPU Editor can be invoked only from the Log, Output, and Program Editor
windows.
Concurrency Engine Errors under OpenVMS
ERROR: Creating files with concurrency engine requires version limit
greater than one
Severity Level: error
When a concurrency engine data set is created, there is a brief span of time
when two versions of the file exist. If you can keep only one version of a file, you
cannot use the concurrency engine. See your system manager for information
about increasing your version limit.
ERROR: Observation length greater than maximum length of 32,255 for
concurrency engine
Severity Level: error
Observations in a concurrency engine data set cannot be greater than 32,255
bytes (32K) because of the restrictions of the RMS relative file format. Correct
your program and resubmit it.
ERROR: Node specification not allowed with concurrency engine for
update access
Severity Level: error
The concurrency engine does not support update access on a remote node. Note
that the concurrency engine allows a node specification in the LIBNAME
statement (that is, it allows DECnet access) when the data set is opened for input
or output, but not for update.
ERROR: Requested function not performed because there is no current
record on (libref-datasetname). Probably the last read failed.
Severity Level: error
This is a limitation of the CONCUR engine. An attempt to update an
observation in a CONCUR data set with the MODIFY statement fails when an
earlier observation in the same data set is locked by another process.
539
APPENDIX
2
The SAS$ROOT Directory
Introduction to the SAS$ROOT Directory 539
Contents of the SAS$ROOT Directory 539
Introduction to the SAS$ROOT Directory
When SAS is installed, its entire directory structure is placed on a in a subdirectory
in your file system. This subdirectory, which forms the root of SAS, is called the
SAS$ROOT directory.
Contents of the SAS$ROOT Directory
The SAS$ROOT directory contains the files required to use SAS. This directory
includes invocation points, configuration files, sample programs, catalogs, data sets, and
executable files. You do not need to know the organization of these directories to use
SAS.
The following tables list the files and directories that are found in the SAS$ROOT
directory:
Table A2.1
SAS Files in the SAS$ROOT Directory
SAS File
Description of Contents
SASSETUP.COM
is the invocation point for SAS Setup, the
installation program for SAS.
SASV9.CFG
is the system configuration file for SAS.
SETINIT.SAS
is the SAS program used for updating licensing
information.
Table A2.2
SAS Directories in the SAS$ROOT Directory
SAS Directory
Description of Contents
GISMAPS
contains Census Tract maps for SAS/GIS
software.
HELP
contains the SAS help files, data sets, and
catalogs.
540
Contents of the SAS$ROOT Directory
4
Appendix 2
SAS Directory
Description of Contents
INSTALL
contains configuration information about the
current SAS installation. Do not remove or
change the contents of this directory. Removing
this directory will result in incorrect behavior
for future sessions of the SAS Setup program
and inhibit SAS Technical Support’s ability to
diagnose any problems that might arise.
MAPS
contains the map data sets if you have SAS/
GRAPH or SAS/GIS software. You receive some
maps with SAS/GRAPH software. Additional
maps are available in the SAS Map Data
Library Series.
MESSAGE
contains the SAS message files.
MISC
contains subdirectories with miscellaneous
product files, such as applets, fonts, and scripts.
NLS
contains subdirectories for national language
support. For example, the EN directory contains
English versions of SAS files.
SAMPLES
contains subdirectories for different SAS
products. Each subdirectory contains sample
SAS programs, but subdirectories are not
created unless the samples are installed. Since
the installation procedure lets the system
administrator decide whether to copy the sample
programs, this directory might be empty.
SASAUTOS
contains predefined SAS macros. See “Autocall
Libraries under OpenVMS” on page 520.
SASCFG
contains miscellaneous configuration files.
SASEXE
contains SAS executable images.
SASTEST
contains files that are used by the Feature
Testing Tool.
TOOLS
contains startup command procedures,
configuration programs, and support files.
USER
contains user-written functions and procedures.
X11
contains the subdirectories with the files needed
for the X Window system.
541
APPENDIX
3
Recommended Reading
Recommended Reading
541
Recommended Reading
Here is the recommended reading list for this title:
3 SAS Language Reference: Concepts
3 SAS Language Reference: Dictionary
3 Base SAS Procedures Guide
3 SAS Macro Language: Reference
3 SAS National Language Support (NLS): User’s Guide
For a complete list of SAS publications, see the current SAS Publishing Catalog. To
order the most current publications or to receive a free copy of the catalog, contact a
SAS representative at
SAS Publishing Sales
SAS Campus Drive
Cary, NC 27513
Telephone: (800) 727-3228*
Fax: (919) 677-8166
E-mail: [email protected]
Web address: support.sas.com/publishing
* For other SAS Institute business, call (919) 677-8000.
Customers outside the United States should contact their local SAS office.
542
543
Glossary
ACL
See access control list.
active window
a window that is open and displayed, and to which keyboard input is directed. Only
one window can be active at a time.
aggregate syntax
a convenient way of referring to individual files in a single directory or folder.
Instead of assigning a unique fileref to each file, you assign a fileref to the directory
or folder. Then, to refer to a specific file in that folder, you enclose the filename in
parentheses following the fileref. In the OpenVMS operating environment, aggregate
syntax is used in the FILE, INFILE, and %INCLUDE statements.
American Standard Code for Information Interchange
See ASCII.
application workspace (AWS)
(1) a window that contains other windows (child windows) or from which other
windows can be invoked, but which is not contained within any parent window that is
part of the same software application. (2) under OpenVMS, an application from which
you can interact with the DECwindows window manager. See also child window.
ASCII (American Standard Code for Information Interchange)
a 7-bit character coding scheme (8 bits when a parity check bit is included) that
includes both graphic (printable) codes and control (nonprintable) codes.
ASCII collating sequence
an ordering of characters that follows the order of the characters in the American
Standard Code for Information Interchange (ASCII) character coding scheme. SAS
uses the same collating sequence as its host operating environment. See also
EBCDIC collating sequence.
autoexec file
a file that contains SAS statements that are executed automatically when SAS is
invoked. The autoexec file can be used to specify some of the SAS system options, as
well as to assign librefs and filerefs to data sources that are used frequently. See also
libref, fileref.
544 Glossary
batch file
a file that contains operating-system commands, which are processed sequentially
when the file is executed.
batch mode
a method of executing SAS programs in which a file that contains SAS statements
plus any necessary operating environment commands is submitted to the computer’s
batch queue. After you submit the program, control returns to your terminal or
workstation, where you can perform other tasks. Batch mode is sometimes referred
to as running in the background. The program output can be written to files or
printed on an output device. Under OpenVMS, a Status window that is associated
with the SAS job indicates which SAS job is running and tells you which device or
files the log file and the procedure output file will be routed to.
buffer
an area of computer memory that is reserved for use in performing input/output (I/O)
operations.
button
a component of a graphical user interface. A button is usually in the form of a
rectangle or square that contains a label. The button is programmed to execute a
command, to open a window, or to perform some other function when a user selects
it. For example, many graphical user interfaces include buttons that have labels
such as OK, Cancel, and Help.
captive account
a type of OpenVMS account that limits the user to the commands that are listed in
the LOGIN.COM file.
carriage-control character
a specific symbol that tells the printer how many lines to advance the paper, when to
begin a new page, when to skip a line, and when to hold the current line for
overprinting.
catalog
See SAS catalog.
catalog entry
See SAS catalog entry.
child window
a window that is invoked from or contained in another window (the parent window).
client
(1) a computer or application that requests services, data, or other resources from a
server. (2) in DECwindows, a requestor of visual services. For example, SAS is a
client because it requests windows to be created, results to be displayed, and so on.
See also server.
command file
Under OpenVMS, command files usually have a .COM file extension.
command procedure
an OpenVMS file that contains DCL commands, which are processed sequentially
when the file is executed. The file extension for command procedures is .com.
command prompt
Under OpenVMS, the default command prompt is $.
Glossary 545
converting SAS files
the process of changing the format of a SAS file from the format that is appropriate
for one version of SAS to the format that is appropriate for another version in the
same operating environment.
CPU
See central processing unit (CPU).
current directory
the directory that you are working in at any given time. When you log on, your
current directory is the starting point for relative pathnames. See also working
directory.
DCL (Digital Command Language)
the command language that is used in the OpenVMS operating environment.
DECwindows
a windowing interface that is based on the X Window System.
DECwindows Session Manager
a facility that provides desktop administrative services and utility services in the
workstation environment, such as default color settings, default window
characteristics, foreign language support, and display capture and printing.
DECwindows window manager
a facility that oversees the placement, sizing, and stacking of windows, their
appearance (title bar and so on), and the keyboard input in the DECwindows
interface to SAS.
default directory
the directory that you are working in at any given time. When you log in, your
default directory is usually your home directory.
descriptor information
information about the contents and attributes of a SAS data set. For example, the
descriptor information includes the data types and lengths of the variables, as well
as which engine was used to create the data. SAS creates and maintains descriptor
information within every SAS data set.
dialog box
a type of window that opens to prompt you for additional information or to ask you to
confirm a request.
directory
a named subdivision on a disk or diskette, used in organizing files. A directory also
contains information about the file, such as size and date of last change.
download
to copy a file from a remote host to a local host.
drag
to press and hold a mouse button while moving the mouse.
dummy variable
in some statistical applications, a numeric variable whose value is limited to 1 or 0.
engine
a component of SAS software that reads from or writes to a file. Each engine enables
SAS to access files that are in a particular format. There are several types of
engines. See also interface engine, library engine, native engine, view engine.
546 Glossary
engine/host option
an option that is specified in a LIBNAME statement. Engine/host options specify
attributes that apply to all SAS data sets in a SAS data library. See also data set
option.
entry type
a characteristic of a SAS catalog entry that identifies the catalog entry’s structure
and attributes to SAS. When you create an entry, SAS automatically assigns the
entry type as part of the name.
external file
a file that is created and maintained by a host operating system or by another
vendor’s software application. SAS can read data from and route output to external
files. External files can contain raw data, SAS programming statements, procedure
output, or output that was created by the PUT statement. An external file is not a
SAS data set. See also fileref.
file extension
the classification of a file in a directory that identifies what type of information is
stored in the file. For example, .SCAT is the file extension for SAS catalogs. See also
member type.
file type
the classification of a file in an OpenVMS directory that identifies what type of
information is stored in the file. For example, SASEB$CATALOG is the file type for
SAS catalogs. See also member type.
filename
under DOS, the identifier used for a file (including the file extension), such as
PROFILE.SC2. See also fully qualified filename, pathname.
fileref
a name that is temporarily assigned to an external file or to an aggregate storage
location such as a directory or folder. The fileref identifies the file or the storage
location to SAS. Under OpenVMS, you can assign a fileref with a FILENAME
statement, with the SET system option, or from the New File Shortcut dialog box in
the SAS Explorer window. See also OpenVMS logical name.
font
a complete set of all the characters of the same design and style. The characters in a
font can be figures or symbols as well as alphanumeric characters. See also type style.
fully qualified name
an OpenVMS filename that specifies how the file fits into the file structure. A fully
qualified name contains specifications for node, device, directory, filename, file type,
and version. VMSMB::MUAO:[MYDIR] MYFILE.SAS;3 is an example of a fully
qualified name.
function key
a keyboard key that can be defined to have a specific action in a specific software
environment. For example, Keypad 3 is defined as PASTE in the PROGRAM
EDITOR window, but in the context of the FSEDIT procedure, Keypad 3 is defined as
DUP. See also hard key.
gravity
See session gravity.
hard key
a keyboard key that performs a specific action, regardless of the software
environment. For example, the RETURN and BACKSPACE keys are hard keys. See
also function key.
Glossary 547
home directory
under OpenVMS and UNIX operating systems, the directory in which a user is
placed after logging in. The home directory is also called the login directory.
icon
in windowing environments, a pictorial representation of an object. An icon usually
represents a window or an object associated with an action such as printing or filing.
index
in SAS software, a component of a SAS data set that enables SAS to access
observations in the SAS data set quickly and efficiently. The purpose of SAS indexes
is to optimize WHERE-clause processing and to facilitate BY-group processing.
interactive line mode
a method of running SAS programs in which you enter one line of a SAS program at
a time at the SAS session prompt. SAS processes each line immediately after you
press the ENTER or RETURN key. Procedure output and informative messages are
returned directly to your display device.
interface engine
a SAS engine that reads and writes file formats supported by other vendors’
software. See also engine, native engine.
library engine
an engine that accesses groups of files and puts them into the correct form for
processing by SAS utility windows and procedures. A library engine also determines
the fundamental processing characteristics of the library, presents lists of files for the
library directory, and supports view engines. See also engine, view engine.
libref
a name that is temporarily associated with a SAS data library. The complete name of
a SAS file consists of two words, separated by a period. The libref, which is the first
word, indicates the library. The second word is the name of the specific SAS file. For
example, in VLIB.NEWBDAY, the libref VLIB tells SAS which library contains the
file NEWBDAY. You assign a libref with a LIBNAME statement or with an operating
system command. See also first-level name.
listing file
an obsolete term that refers to the procedure output file. Do not use this term. See
SAS procedure output file, print file.
local node
the computer that you are currently logged in to.
logical name
under OpenVMS, an equivalence string that is created with the DEFINE command
or with the ASSIGN command. Logical names are associated with file specifications,
device names, or other logical names. Logical names can be used on the command
line, in command files, or in programs. Logical names are stored in the logical name
table.
logical name table
a table that contains each logical name and the equivalence string that is associated
with each logical name. See also logical name.
login directory
See home directory.
login file
the file that contains the DCL commands and utilities that are commonly used at
your site. When you log in, OpenVMS automatically executes the commands in this
548 Glossary
file. Under OpenVMS, the login file is called LOGIN.COM and is located in your
home directory.
MEA
See Multi-Engine Architecture (MEA).
member
(1) a SAS file in a SAS library. (2) under OpenVMS, a component of an OpenVMS
text library.
member name
a name that is assigned to a SAS file in a SAS library. Under OpenVMS, the member
name is the same as the filename for files that are stored in a SAS data library.
member type
a SAS name that identifies the type of information that is stored in a SAS file.
Member types include ACCESS, DATA, CATALOG, ITEMSTOR, MDDB, PROGRAM,
and VIEW.
menu bar
the primary list of items at the top of a window which represent the actions or
classes of actions that can be executed. Selecting an item executes an action, opens a
pull-down menu, or opens a dialog box that requests additional information. See also
pop-up menu, pull-down menu.
methods of running SAS
standard methods of operation used to run SAS programs. These methods are SAS/
ASSIST software, interactive line mode, noninteractive mode, and batch mode.
Multiple Engine Architecture (MEA)
a feature of SAS that enables it to access a variety of file formats through sets of
instructions called engines. See also engine.
native engine
an engine that accesses forms of SAS files created and processed only by SAS. See
also engine.
network
an interconnected group of computers.
node
a computer on a network.
noninteractive mode
a method of running SAS programs in which you prepare a file of SAS statements
and submit the program to the operating system. The program runs immediately
and occupies your current session.
ODS-5 syntax
a file-naming convention that was introduced by Compaq Computer Corporation for
OpenVMS Release 7.2. ODS-5 syntax allows longer filenames, supports more legal
characters within filenames, preserves case within a filename, and supports deeper
directory structures. This syntax is supported only on volumes for which ODS-5 has
been enabled.
page size
the number of bytes of data that SAS moves between external storage and memory
in one input/output operation. Page size is analogous to buffer size for SAS data sets.
path
the route through a hierarchical file system that leads to a particular file or directory.
Glossary 549
/
PDS
See partitioned data set (PDS).
permanent SAS data library
a SAS library that is not deleted when a SAS session ends, and which is therefore
available to subsequent SAS sessions. Unless the USER libref is defined, you use a
two-level name to access a file in a permanent library. The first-level name is the
libref, and the second-level name is the member name.
physical filename
the name the operating system uses to identify a file.
PMENU facility
a menuing system in SAS that is used instead of the command line as a way to
execute commands. The PMENU facility consists of a menu bar, pull-down menus,
and dialog boxes.
primary windows
in the SAS windowing environment, the PROGRAM EDITOR, LOG, OUTPUT
(LISTING), and OUTPUT MANAGER windows.
print file
an external file containing carriage-control (printer-control) information. See also
carriage-control character, external file.
procedure output file
an external file that contains the result of the analysis or the report produced. Most
procedures write output to the procedure output file by default. Reports that DATA
steps produce using PUT statements and a FILE statement with the PRINT
destination also go to this file.
random access
the ability to retrieve records in a file without reading all records sequentially.
Record Management Services (RMS)
a group of OpenVMS procedures that applications use for processing files as well as
records within files.
remote node
any computer on a network other than the computer that you are currently logged in
to.
resource
in system performance, a part of the computer system, such as memory or CPU time.
resource file
See X resource file.
return code
a code passed to the operating system that indicates whether a command or job step
has executed successfully.
RMS
See Record Management Services (RMS).
SAS catalog
a SAS file that stores many different kinds of information in smaller units called
catalog entries. A single SAS catalog can contain several different types of catalog
entries. See also SAS catalog entry.
550 Glossary
SAS catalog entry
a separate storage unit within a SAS catalog. Each entry has an entry type that
identifies its purpose to SAS. Some catalog entries contain system information such
as key definitions. Other catalog entries contain application information such as
window definitions, Help windows, formats, informats, macros, or graphics output.
See also entry type.
SAS command
a command that invokes SAS. This command may vary depending on operating
environment and site. See also SAS invocation.
SAS data file
a SAS data set that contains data values as well as descriptor information that is
associated with the data. The descriptor information includes information such as
the data types and lengths of the variables, as well as which engine was used to
create the data. SAS data files are of member type DATA. See also SAS data set,
SAS data view.
SAS data library
a collection of one or more SAS files that are recognized by SAS and which are
referenced and stored as a unit. Each file is a member of the library.
SAS data set
a file whose contents are in one of the native SAS file formats. There are two types of
SAS data sets: SAS data files and SAS data views. SAS data files contain data
values in addition to descriptor information that is associated with the data. SAS
data views contain only the descriptor information plus other information that is
required for retrieving data values from other SAS data sets or from files whose
contents are in other software vendors’ file formats. See also descriptor information.
SAS data set option
an option that appears in parentheses after a SAS data set name. Data set options
specify actions that apply only to the processing of that SAS data set. See also
engine/host option, SAS system option.
SAS data view
a type of SAS data set that retrieves data values from other files. A SAS data view
contains only descriptor information such as the data types and lengths of the
variables (columns), plus other information that is required for retrieving data values
from other SAS data sets or from files that are stored in other software vendors’ file
formats. SAS data views are of member type VIEW.
SAS file
a specially structured file that is created, organized, and, optionally, maintained by
SAS. A SAS file can be a SAS data set, a catalog, a stored program, or an access
descriptor.
SAS initialization
the setting of global characteristics that must be in place at start-up for a SAS
programming environment. SAS performs initialization by setting certain SAS
system options called initialization options. Invoking SAS software initiates SAS
initialization. See also SAS invocation.
SAS invocation
the process of calling or starting up SAS software by an individual user through
execution of the SAS command. Invoking SAS initiates SAS initialization. See also
SAS initialization.
Glossary 551
SAS log
a file that contains a record of the SAS statements that you enter as well as
messages about the execution of your program.
SAS system option
an option that affects the processing of an entire SAS program or interactive SAS
session from the time the option is specified until it is changed. Examples of items
that are controlled by SAS system options include the appearance of SAS output, the
handling of some files that are used by SAS, the use of system variables, the
processing of observations in SAS data sets, features of SAS initialization, and the
way SAS interacts with your host operating environment.
SAS windowing environment
an interactive windowing interface to SAS software. In this environment you can
issue commands by typing them on the command line, by pressing function keys, or
by selecting items from menus or menu bars. Within one session, you can perform
many different tasks, including preparing and submitting programs, viewing and
printing results, and debugging and resubmitting programs.
SASHELP library
a SAS data library supplied by SAS software that stores the text for HELP windows,
default function-key definitions and window definitions, and menus.
SASUSER library
a default, permanent SAS data library that is created at the beginning of your first
SAS session. The SASUSER library contains a PROFILE catalog that stores the
customized features or settings that you specify for SAS. You can also store other
SAS files in this library. See also PROFILE catalog, SAS data library.
SASUSER.PROFILE catalog
a SAS catalog in which SAS stores information about attributes of your SAS
windowing environment. For example, this catalog contains function-key definitions,
fonts for graphics applications, window attributes, and other information that is used
by interactive SAS procedures.
sequential access
a method of file access in which the records are read or written one after the other
from the beginning of the file to the end.
server
(1) in a network, a computer that is reserved for servicing other computers in the
network. Servers can provide several different types of services, such as file services
and communication services. Servers can also enable users to access shared
resources such as disks, data, and modems. (2) in DECwindows, a