1
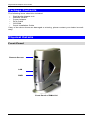
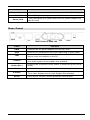
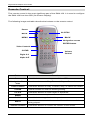
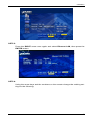
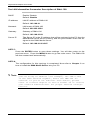
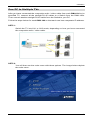
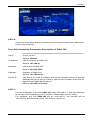
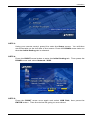
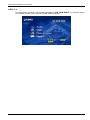
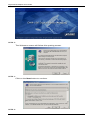
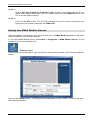
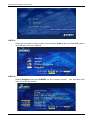
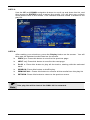
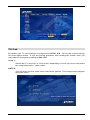
Digital Media Adapter
DMA-100
User’s Manual
Copyright
Copyright (C) 2004 PLANET Technology Corp. All rights reserved.
The products and programs described in this User ’s Manual are licensed products of PLANET
Technology, This User’s Manual contains proprietary information protected by copyright, and
this User’s Manual and all accompanying hardware, software, and documentation are copyrighted.
No part of this User’s Manual may be copied, photocopied, reproduced, translated, or reduced
to any electronic medium or machine-readable form by any means by electronic or mechanical.
Including photocopying, recording, or information storage and retrieval systems, for any purpose other than the purchaser's personal use, and without the prior express written permission
of PLANET Technology.
Disclaimer
PLANET Technology does not warrant that the hardware will work properly in all environments
and applications, and makes no warranty and representation, either implied or expressed, with
respect to the quality, performance, merchantability, or fitness for a particular purpose.
PLANET has made every effort to ensure that this User ’s Manual is accurate; PLANET disclaims liability for any inaccuracies or omissions that may have occurred.
Information in this User’s Manual is subject to change without notice and does not represent a
commitment on the part of PLANET. PLANET assumes no responsibility for any inaccuracies
that may be contained in this User ’s Manual. PLANET makes no commitment to update or keep
current the information in this User ’s Manual, and reserves the right to make improvements to
this User’s Manual and/or to the products described in this User ’s Manual, at any time without
notice.
If you find information in this manual that is incorrect, misleading, or incomplete, we would
appreciate your comments and suggestions.
CE mark Warning
This equipment has been tested and found to comply with the limits for a Class B digital device,
pursuant to Part 15 to the FCC rules. These limits are designed to provide reasonable protection against harmful interference when the equipment is operated in a residential environment.
This equipment generates, used, and can radiate radio frequency energy, and, if not installed
and used in accordance with the instruction manual, may cause harmful interference to radio
communications. Operation of this equipment in a residential area is unlikely to cause harmful
interference. But if it does, the user will be required to correct the interference at his or her own
expense. The authority to operate this equipment is conditioned by the requirement that no
modifications will be made to the equipment unless PLANET expressly approves the changes
or modifications.
Trademarks
The PLANET logo is a trademark of PLANET Technology. This documentation may refer to
numerous hardware and software products by their trade names. In most, if not all cases, these
designations are claimed as trademarks or registered trademarks by their respective companies.
Revision
User’s Manual for PLANET Digital Media Adapter:
Model: DMA-100
Rev: 1.0 (Oct. 2004)
Part No. EM-DMA100V1
ii
TABLE OF CONTENTS
CHAPTER 1 INTRODUCTION .......................................................................... 1
DMA-100 Features................................................................................................. 1
Package Contents ................................................................................................. 2
Physical Details..................................................................................................... 2
CHAPTER 2 INSTALLATION ........................................................................... 5
Connecting the DMA-100...................................................................................... 5
CHAPTER 3 MEDIA SERVER INSTALLATION ............................................. 17
Preparation .......................................................................................................... 25
CHAPTER 4 VIEWING THE MEDIA ............................................................... 25
CHAPTER 5 ADVANCED SETTINGS............................................................. 34
APPENDIX A TROUBLE SHOOTING............................................................ 41
APPENDIX B SPECIFICATION..................................................................... 42
i
Chapter 1
Introduction
1
Enjoy Media Content Sharing and Playback in Digital Home – Digital Media Adapter
from PLANET.
PLANET DMA-100 is an innovative, easy-to-use entertainment center designed for
your digital media playback. Via wired network connection or USB media storage, this
device can playback your favorite digital music, picture, and video onto television or
stereo system in your home at your convenience. With its on-screen, ease-of-use user
interface and handy remote control, you can start sharing the media content on the TV
or stereo system in your digital home in real-time.
The DMA-100 is a multimedia player that can play the popular MPEG 1, MPEG 2,
MPEG 4, DivX video format files from your computer to TV. Using this device, you can
also enjoy the playback of your favorite MP3, AC3 audio files on your TV in the living
room or your stereo system in the kitchen. As digital photo is gaining its popularity,
the DMA-100 is capable of displaying slide show of your favorite pictures on TV (supported formats in JPEG, PNG, BMP), giving you the convenience of viewing and
sharing these pictures on TV in your living space with friends and family members.
DMA-100 Features
·
Popular media file format supports
PLANET DMA-100 support popular audio formats (MP3, WAV, AAC, AC3), image
formats (JPG, PNG, and BMP), and video formats (MPEG-1/2/4, DivX).
·
Smart Install wizard
The DMA-100 has built-in easy TV setup for machine configuration to bring the
most convenience. Via intuitive design remote controller, users may enjoy the
media content just in minutes.
·
Analog/Digital audio output
DMA-100 has built-in left / right analog stereo audio and coaxial digital audio
connectors for the audio system connection.
·
USB medial storage support
DMA-100 is able to view the stored images in slide show or digital album mode for
more convenience and pleasure.
·
Image viewing
DMA-100 is able to view the stored images in slide show or digital album mode for
more convenience and pleasure.
1
Digital Media Adapter User Guide
Package Contents
The following items should be included:
• Digit Media Adapter unit
• Remote Control
• Power Adapter
• RCA Cable
• CD-ROM
• Quick Installation Guide
If any of the above items are damaged or missing, please contact your dealer immediately.
Physical Details
Front Panel
Remote Sensor
LAN
PWR
Front Panel of DMA-100
2
Indicator
Indication
Remote Sensor
Point the remote control at this sensor to use it effectively.
LAN LED
This LED lights up in green when LAN interface is enabled.
Power LED
This LED lights up in green when the AC power adapter into
the DC-inlet.
Rear Panel
Rear Panel of DMA-100
Label
Function
PWR
Connect the AC power adapter into the DC-inlet.
USB
Connect to a USB device such as a flash disk to play media.
LAN
Connect the RJ-45 cable to a PC or Switch. The DMA Media
Server must be installed on the PC.
Coaxial
Connect a Coax cable to this port for better quality. However,
your audio system must support this interface.
Audio (R+L)
Connect the composite audio cables to these two ports (red &
white).
Video
S-Video
Reset
Connect the composite video cable to this port (yellow)
Connect the S-Video cable for high quality video. However, the
TV or other display device must support this interface.
If the device crashes, please press this reset button.
3
Digital Media Adapter User Guide
Remote Control
This remote control is the most significant part of the DMA-100. It is used to configure
the DMA-100 from the OSD (On Screen Display).
The following image and table describe the buttons on the remote control.
Power
AL/NTSC
MUTE
MENU
BACK
Navigation arrows
ENTER button
Video Controls
CLEAR
Volume
Control
Digits 0-9
Alpha A-Z
Button
Power
Function
Use this button to turn the power ON or OFF
Navigation Buttons
Use these buttons to Play, Forward, Skip, or Pause the media.
Video Control
Use these buttons to Play, Forward, Skip, or Pause the media.
CLEAR
Use this button to clear an existing setting.
0-9 A-Z
Use these buttons to enter digits or alphabets.
MENU
Use this button at any time to return to the main menu.
BACK
Use this button to go back to the previous menu.
MUTE
Use this button to mute the sound while a video or audio is
being played.
Volume Control
Use these buttons to control the volume of the media.
4
Chapter 2
Installation
2
Connecting the DMA-100
This chapter describes the different topologies of the DMA-100 and how to connect
and setting the topology with your PC and TV.
Under every situation the DMA-100/DMA100W must be wired to the TV or other display device. The following image shows the rear panel of the DMA-100 and the TV.
As you can see in the above diagram the composite Audio / Video cable is connected
from the DMA-100 to the same ports of the TV.
One PC to One TV
After you have connected the composite audio / video cable to your TV, connect the
cross-over RJ-45 cable to your PC.
Follow the steps below to assign an IP address to the DMA-100.
SETP 1:
Switch the TV into AV1 or AV2 mode, depending on how you have connected
the composite audio / video cable.
SETP 2:
You will then see the main menu with three options. The image below depicts
the main menu.
5
Digital Media Adapter User Guide
SETP 3:
Using your remote control, press 2 to enter the Setup screen. You will then
see three tabs on the left side of the screen. Press the DOWN arrow twice so
that that Initial Setting tab is selected.
SETP 4:
Press the RIGHT arrow button to enter the Initial Setting tab. Then press the
DOWN arrow and select Network / USB.
6
Installation
SETP 5:
Press the RIGHT arrow once again and select Ethernet LAN, then press the
ENTER button.
SETP 6:
Using the arrow keys and the numbers on the remote change the existing settings to the following:
7
Digital Media Adapter User Guide
The LAN information Parameter Description of DMA-100
DHCP
Enable/ Disable
Default: Disable
IP address
LAN IP address of DMA-100
Default: 192.168.0.1
Netmask
LAN mask of DMA-100
Default: 255.255.255.0
Gateway
Gateway of DMA-100
Default: 192.168.0.254
Server IP
The Server IP is the IP address that will be assigned to the PC that the
DMA Media Server will be running, and the port number is the one assigned to the DMA Media Server.
Default: 192.168.0.100 4567
SETP 7:
Press the ENTER button to save these settings. You will then return to the
previous menu. Press the MENU button to go the main menu. The DMA-100
will then restart itself automatically.
SETP 8:
The configuration for this topology is completed. Now refer to Chapter 3 on
how to install the DMA Media Server into your PC.
ëNote
In the first installation, it is suggested to locate
your PC using IP address (for example, 192.168.0.100)
in the same network segment, where the DMA-100 installed. If you’re not familiar with TCP/IP, please
refer to related chapter on user’s manual CD or consult
your network administrator for proper network configurations.
8
Installation
One PC to Multiple TVs
After you have connected the composite audio / video cable from each DMA-100 to its
specified TV, connect all the straight RJ-45 cables to a Switch from the DMA-100s.
Then connect another straight RJ-45 cable from the Switch to your PC.
Follow the steps below for each DMA-100 so that each one has a separate IP address.
SETP 1:
Switch the TV into AV1 or AV2 mode, depending on how you have connected
the composite audio / video cable.
SETP 2:
You will then see the main menu with three options. The image below depicts
the main menu.
9
Digital Media Adapter User Guide
SETP 3:
Using your remote control, press 2 to enter the Setup screen. You will then
see three tabs on the left side of the screen. Press the DOWN arrow twice so
that that Initial Setting tab is selected.
SETP 4:
Press the RIGHT arrow button to enter the Initial Setting tab. Then press the
DOWN arrow and select Network / USB.
SETP 5:
Press the RIGHT arrow once again and select Ethernet LAN, then press the
ENTER button.
10
Installation
SETP 6:
Using the arrow keys and the numbers on the remote change the existing settings to the following:
The LAN information Parameter Description of DMA-100
DHCP
Enable/ Disable
Default: Disable
IP address
LAN IP address of DMA-100
Default: 192.168.0.1
Netmask
LAN mask of DMA-100
Default: 255.255.255.0
Gateway
Gateway of DMA-100
Default: 192.168.0.254
Server IP
The Server IP is the IP address that will be assigned to the PC that the
DMA Media Server will be running, and the port number is the one assigned to the DMA Media Server.
Default: 192.168.0.100 4567
SETP 7:
For the IP address of the first DMA-100, enter 192.168.0.1, and then add one
to the last octet depending on the number of DMA-100s you are using.
For example, the first DMA-100 will be 192.168.0.1, the second will be
192.168.0.2, and the third will be 192.168.0.3, and so on.
11
Digital Media Adapter User Guide
SETP 8:
Press the ENTER button to save these settings. You will then return to the
previous menu. Press the Main Menu button to go the main menu. The DMA100 will then restart itself automatically.
SETP 9:
The configuration for this topology is completed. Now refer to Chapter 3 on
how to install the DMA Media Server into your PC.
ëNote
In the first installation, it is suggested to locate
your PC in the same network segment (192.168.0.100) of
DMA-100/DMA-100W. If you’re not familiar with TCP/IP,
please refer to related chapter on user’s manual CD or
consult your network administrator for proper network
configurations.
Connect with USB Disk
After you have connected the composite audio / video cable to your TV, connect the
USB Disk to your DMA-100.
Follow the steps below to assign an IP address to the DMA-100.
SETP 1:
Switch the TV into AV1 or AV2 mode, depending on how you have connected
the composite audio / video cable.
SETP 2:
You will then see the main menu with three options. The image below depicts
the main menu.
12
Installation
SETP 3:
Using your remote control, press 2 to enter the Setup screen. You will then
see three tabs on the left side of the screen. Press the DOWN arrow twice so
that that Initial Setting tab is selected.
SETP 4:
Press the RIGHT arrow button to enter the Initial Setting tab. Then press the
DOWN arrow and select Network / USB.
SETP 5:
Press the RIGHT arrow once again and select USB Disk, then press the
ENTER button. Then the device will going to auto reboot.
13
Digital Media Adapter User Guide
SETP 6:
Then you can see the main menu updated as the following images.
SETP 7:
Using your remote control, press 1 to select USB Disk. The screen will show
“Wait to get USB disk” to sense if USB Disk plug ready.
14
Installation
SETP 7.1:
If connection is properly, the screen will show “Get USB DISK”, then you can
choose to surf Audio/ Photo or view Playlist.
M
Note
Due to bandwidth limitation on the USB interface, the Video function can’t be
selected in the USB disk media playback.
15
Digital Media Adapter User Guide
SETP 7.2:
If connection is failed, the screen will show “NO USB DISK” on the top, then
you better check if you plug the USB Disk properly.
16
Chapter 3
Media Server Installation
Install Procedure
3
This chapter describes how to install the DMA Media Server on to your PC and then
configure the TCP/IP and DMA Media Server settings.
Install Requirements
DMA Media Server installation requirement
System Hardware
Support OS
•
CPU: Pentium III, 800 MHz or above
•
Memory Size: 128 MB (256 MB recommended)
•
VGA card resolution: 1024 x 768 or above
•
128MB or above free HDD space
•
CD ROM drive
•
10/100 Mbps Ethernet Adapter
Win 98 SE, Win 2000, Win Me, Win XP
DMA Installation requirement
·
•
TV with vacant RCA or S-video input connector
•
Stereo amplifier with vacant RCA input connectors
Your PC can establish a physical connection to the Digital Media Adapter. The PC
and the Digital Media Adapter must be directly connected (using the LAN port on
the Digital Media Adapter) or on the same LAN segment. That is, the PC must be
configured to an IP address and subnet mask in 192.168.0.x segment. For example: IP: 192.168.0.100, subnet mask: 255.255.255.0.
· The Digital Media Adapter must be installed and powered ON.
If the Digital Media Adapter's default IP Address (192.168.0.1) is already used by
another device, the other device must be turned OFF until the Digital Media Adapter is
allocated a new IP Address during configuration.
Install the DMA Media Server
SETP 1:
Insert the CD-ROM that is provided in this package into the CD-ROM drive of
you PC. The software should run automatically, if it does not, then you need to
run the setup.exe file manually by clicking on the CD-ROM drive from the My
Computer icon on the desktop. You will then see the Opening screen.
17
Digital Media Adapter User Guide
SETP 2:
The Welcome screen will follow this opening screen.
SETP 3:
Click on the Next button to continue.
SETP 4:
18
After reading the License Agreement, click on the Yes button to continue.
SETP 5:
Click on the Browse button if you would like to change the destination location,
if not click on the Next button to continue.
SETP 6:
On this screen you may change the name of the program folder. If you do not
want to change this name, click on the Next button to begin copying the files.
SETP 7:
After the files have been copied the following message will appear. Click on
the Finish button to complete the installation.
19
Digital Media Adapter User Guide
SETP 8:
The DMA Media Server installation process is complete. You will then see the
DMA Media Server icon on the desktop.
Desktop Icon
TCP/IP settings of DMA Media Server
Follow the steps below in order to configure the TCP/IP settings of Media server.
SETP 1:
In the Control Panel double click Network Connections, then double click on
the connection of your Network Interface Card (NIC) and then click on the
Properties button. You will then see the following window appear.
20
SETP 2:
Select Internet Protocol (TCP/IP) and then click on the Properties button.
This will allow you to configure the IP address of your PC. You will then see
the following window.
21
Digital Media Adapter User Guide
SETP 3:
Select Use the following IP address radio button, and then enter an IP address and subnet mask for your PC. Make sure that the DMA-100 and your
PC is on the same subnet.
SETP 4:
Click on the OK button. The TCP/IP settings of your PC have now been configured on the same subnet as the DMA-100.
Setup the DMA Media Server
After installation completed, you will see the icon of DMA Media Server in the Windows Programs and on the desktop.
To run the DMA Media Server click Start > Programs > DMA Media Server, or just
double click on the desktop icon.
Desktop Icon
After launching the program, you will see the main setup screen, as the image depicts
below.
Click on the Setup button, to configure the destination of the media. You will then see
the following screen.
22
†
Port: This is the default port of the DMA Media Server. Do not change this
unless you have changed the default port number on the DMA-100.
†
Maximum Connections: Set this value depending on the number of DMA100’s you have. If you have only one, then change this number to one.
However, leaving this at 10 will not make a difference.
†
Video Directory: This is the folder where the video content is located. Click
on the Browse button to select the appropriate folder, and then click on the
OK button.
†
Audio Directory: This is the folder where the audio (MP3) content is located. Click on the Browse button to select the appropriate folder, and then
click on the OK button.
23
Digital Media Adapter User Guide
†
Photo Directory: This is the folder where the JPEG images are located.
Click on the Browse button to select the appropriate folder, and then click
on the OK button.
†
Upgrade BIN File: This is the folder where the new firmware is located.
Click on the Browse button to select the appropriate folder, and then click
on the OK button.
†
Message: This value is the number of lines that will be displayed on the
system message. You may leave this at its default setting, as this will not affect the viewing experience.
Click on the Save button, you will then return main screen, and then click on the
Start button to start the DMA Media Server.
24
Chapter 4
Viewing the Media
DMA-100 Service Preparation
4
After reading the previous chapters and successfully complete the DMA-100 installations. Now, we’ll show you how to bring the media content on the media server into
your living space.
When powering on the DMA-100, the DMA-100 home page will be displayed approximately 2 seconds on your television, then boot into the OSD menu for easy navigation.
Listen to your favorite music
SETP 1:
Switch the TV into AV1 or AV2 mode, depending on how you have connected
the composite audio / video cable.
SETP 2:
You will then see the main menu with three options. The image below depicts
the main menu.
25
Digital Media Adapter User Guide
SETP 3:
Using the remote control, press 1 to enter the VOD (Video on Demand) menu.
You will then see four options.
And the screen will show “Waiting for DMA Media server” to sense.
If the media connection is failed, there will be message: “Can’t Link to DMA
Media Server. Please Check Your Network.” on the television, please check
network connection between the DMA-100 and the media server.
26
If media server is properly connected, the screen will show “CONNECTION”,
then you can choose to surf Audio/ Photo or view Playlist.
SETP 4:
Select Audio and press ENTER on the remote control. The available music
files will be listed on the TV screen.
27
Digital Media Adapter User Guide
SETP 5:
Use the UP and DOWN navigation buttons to scroll up and down the list, and
then press the Enter button to play the selected track. The other buttons are
as follows:
†
PREV |<<: Press this button to scroll to the previous page
†
NEXT >>|: Press this button to scroll to the next page.
†
PLAY >: Press this button to play all the tracks, starting with the selected
track.
†
RETURN: Press this button to return to the previous menu.
Watch your favorite Videos
SETP 1:
Switch the TV into AV1 or AV2 mode, depending on how you have connected
the composite audio / video cable.
SETP 2:
You will then see the main menu with three options. The image below depicts
the main menu.
SETP 3:
Using the remote control, press 1 to enter the VOD (Video on Demand) menu.
You will then see four options.
28
SETP 4:
Select Video and press ENTER on the remote control. You will then see your
list of videos.
SETP 5:
Use the UP and DOWN navigation buttons to scroll up and down the list, and
then press the ENTER button to play the selected video. The other buttons are
as follows:
†
PREV |<<: Press this button to scroll to the previous page
†
NEXT >>|: Press this button to scroll to the next page.
†
PLAY >: Press this button to play all the tracks, starting with the selected
track.
†
RETURN: Press this button to return to the previous menu.
29
Digital Media Adapter User Guide
View your favorite JPEG images
SETP 1:
Switch the TV into AV1 or AV2 mode, depending on how you have connected
the composite audio / video cable.
SETP 2:
You will then see the main menu with three options. The image below depicts
the main menu.
SETP 3:
Using your remote control, press 1 to enter the VOD (Video on Demand) menu.
You will then see four options.
30
SETP 4:
Select Photo Pictures and press ENTER on the remote control. You will then
see your list of pictures.
SETP 5:
Use the UP and DOWN navigation buttons to scroll up and down the list, and
then press the ENTER button to display the selected image. The other buttons
are as follows:
†
PREV |<<: Press this button to scroll to the previous page
†
NEXT >>|: Press this button to scroll to the next page.
†
PLAY >: Press this button to play all the tracks, starting with the selected
track.
†
RETURN: Press this button to return to the previous menu.
Build a Playlist of your favorite media
SETP 1:
Switch the TV into AV1 or AV2 mode, depending on how you have connected
the composite audio / video cable.
SETP 2:
You will then see the main menu with three options. The image below depicts
the main menu.
31
Digital Media Adapter User Guide
SETP 3:
Using your remote control, press 1 to enter the VOD (Video on Demand) menu.
You will then see four options.
SETP 4:
Select Playlist and press ENTER on the remote control. You will then see
your list of all the media.
32
SETP 5:
Use the UP and DOWN navigation buttons to scroll up and down the list, and
then press the ENTER button to select the media. You will then see a check
mark placed next to the media. This indicates that the media is added to the
play list.
SETP 6:
After making your selections, press the Display button on the screen. You will
then see the selected media listed on the screen.
†
PREV |<<: Press this button to scroll to the previous page
†
NEXT >>|: Press this button to scroll to the next page.
†
PLAY >: Press this button to play all the tracks, starting with the selected
track.
†
SEARCH: Press this button to shuffle play.
†
REMOVE ALL: Press this button to remove all the media from the play list
†
RETURN: Press this button to return to the previous menu.
M
Note
This play list will be lost of the DMA-100 is restarted.
33
Digital Media Adapter User Guide
Chapter 5
Advanced Configurations
5
DMA-100 Advanced Functions
This chapter describes how to configure the more advanced settings of the DMA-100,
such as: Audio, Video, Firmware Version, and Upgrade Firmware.
Audio Out
By default, the Audio Out settings is configured to Analog DPCM. This is the correct
setting if you are using the composite audio cable that is supplied in this package. If
you are using the coax cable for your audio devices, then you may want to change this
setting to Encoded Digital.
SETP 1:
Switch the TV into AV1 or AV2 mode, depending on how you have connected
the composite audio / video cable.
SETP 2:
You will then see the main menu with three options. The image below depicts
the main menu.
SETP 3:
Using your remote control, press 2 to enter the Setup screen. You will then
see three tabs on the left side of the screen. Press the RIGHT arrow twice to
change the audio out setting to Encoded Digital, and then press the Enter
button.
34
TV Out
By default, the TV Out settings is configured to NTSC C/S. This is the correct setting
for most digital media. If you are having problems with viewing the media, then you
may want to change this setting to PAL C/S.
SETP 1:
Switch the TV into AV1 or AV2 mode, depending on how you have connected
the composite audio / video cable.
SETP 2:
You will then see the main menu with three options. The image below depicts
the main menu.
35
Digital Media Adapter User Guide
SETP 3:
Using your remote control, press 2 to enter the Setup screen. You will then
see three tabs on the left side of the screen. Press the DOWN arrow once to
change the TV out setting to PAL C/S Video, and then press the Enter button. .
Firmware Version
SETP 1:
Switch the TV into AV1 or AV2 mode, depending on how you have connected
the composite audio / video cable.
SETP 2:
You will then see the main menu with three options. The image below depicts
the main menu.
36
SETP 3:
Using your remote control, press 2 to enter the Setup screen. You will then
see three tabs on the left side of the screen. Press the DOWN arrow twice to
move to Initial Setting.
SETP 4:
Press the RIGHT button once, and then DOWN button to select Firmware
Version, and then press the ENTER button.
After entering the Firmware version menu, you may now verify the current
installed firmware version in DMA-100.
Firmware Upgrade
In most circumstances, it is not required to perform firmware upgrade. In some spectacular scenario, you might need to upgrade the firmware of the DMA-100 when there
is a patch firmware available from your local distributor.
SETP 1:
Before upgrading the firmware, the firmware file should be placed in the proper
folder in the DMA Media Server “Upgrade Bin file” menu.
37
Digital Media Adapter User Guide
Upgrade BIN File: This is the folder where the new firmware is located. Click
on the Browse button to select the appropriate folder, and then click on the
OK button.
SETP 2:
Switch the TV into AV1 or AV2 mode, depending on how you have connected
the composite audio / video cable.
SETP 3:
You will then see the main menu with three options. The image below depicts
the main menu.
SETP 4:
Using your remote control, press 2 to enter the Setup screen. You will then
see three tabs on the left side of the screen. Press the DOWN arrow twice to
move to Initial Setting.
38
SETP 5:
Press the RIGHT button once, and then the DOWN button four times to select
Upgrade Firmware, and then press the ENTER button.
SETP 6:
If you are sure that you would like to upgrade the firmware, click on the Yes
button.
39
Digital Media Adapter User Guide
SETP 7:
Wait a few moments while the firmware is upgraded. Do not power off the device during this process. The DMA-100 will reboot automatically after the
firmware upgrade.
M
Note
Please be sure to have a stable power supply before upgrading the DMA100, and DO NOT interrupt the upgrading procedure, or the unit will be
permanently damaged.
40
Appendix A
Trouble Shooting
A
Q: I have plugged the DMA-100 in my TV correctly, but I don’t see anything on the
screen.
A: Please make sure that the DMA-100 is plugged in and notice the LEDs. Change
your TVs setting to AV1 or AV2.
Q: I press the right buttons on my remote control, but noting happens.
A: (1) Point the remote control closer to the DMA-100’s sensor
(2) Change the batteries.
Q: I would like to list my media on the OSD, but I do not see my media listed.
A: (1) Please make sure that you have setup the media folders (audio, video, and
images) correctly.
(2) Start the DMA Media Server. Refer to Chapter 3 for details.
Q: The media plays fine for a while, and then all of a sudden it freezes on the
screen.
A: (1) If you are using Ethernet, please make sure that the cable is secure, if using
wireless, this could be due to 2.4GHz interference from other 802.11b devices such as: WLAN, cordless phone, or microwave ovens.
(2) You may need to start the server again.
(3) Press the reset button on the rear panel of the DMA-100
Q: My media list formats are *. MPEG and *. JPEG, how can I display those files?
A: Change the file name to *.MPG and *.JPG then you can display any media you
want.
41
Digital Media Adapter User Guide
Appendix B
Specification
Model
B
DMA-100
Hardware
Ethernet Interface
10/100Base-TX, RJ-45
Output
RCA video
S-Video
RCA audio
Coaxial Digital Audio
Software
Supported image format
JPG, PNG, BMP
Supported audio format
Audio Sampling rates of 32, 44.1, 44, 48, 88.2, 96KHz
MPEG-1 Layers I, II and III (MP3), AAC, AC-3
Supported video format
MPEG-1 (MPG/DAT) decoding
MPEG-2 (MPG/VOB) decoding
MPEG-4 (DivX/AVI) decoding
Media server requirement
Network connection
Ethernet
OS
Microsoft Windows 2000 or XP Home/Profession Edition
Processor
Intel PIII 500MHz or above
RAM
128MB
Disk storage (for Media
server installation)
20MB
Environment
Operating Temperature
0~45 degree C, 5~95% humidity
Power Requirement
5V DC
EMC/EMI
CE, FCC Class B
Network and Configuration
Management
On-screen remote control, Media server for media content
management
42