1
USER'S
MANUAL
Click Here to Begin
CameraMate
Digital Film Reader
Version 2.0
CONTENTS
?
HELP
CONTACT
BACK
NEXT
USER'S
MANUAL
USB CameraMate
CONTENTS
Home
How to use this Online Guide
Getting Started
Connecting to a Macintosh
Connecting to a PC Compatible
Using the USB CameraMate
Obtaining Technical Support
Contacting Microtech
CONTENTS
2
?
HELP
CONTACT
BACK
NEXT
?
USER'S
MANUAL
USB CameraMate
HOW TO USE
This Online Guide
Controls in this online guide
Controls within Adobe®
Acrobat® Reader?
CONTENTS
3
?
HELP
CONTACT
BACK
NEXT
USER'S
MANUAL
USB CameraMate
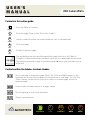
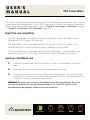
Controls in this online guide
Go to the Table of Contents.
CONTENTS
?
Go to this page ("How to Use This Online Guide").
HELP
How to contact Microtech via e-mail, telephone, fax, or standard mail.
CONTACT
Go to next page.
NEXT
Go back to previous page.
BACK
Text and buttons are also used throughout this guide (such as in the Table of
Contents). Underlined text links (similar to a text link on a web page) are also used.
The mouse pointer will change to a pointing hand ( ) when ever you pass over an
active link.
Controls within the Adobe® Acrobat® Reader.
Go to next page or to previous page. (Note: The "Left" and "Right" arrows on the
keyboard can also be used to advance to the previous or next page. The "Up" and
"Down" arrows can be used to scroll up or down on a current page, as well as
advance pages).
Undo or redo of certain actions or of pages visited.
Go to beginning or end of this document.
Zoom in and zoom out.
CONTENTS
4
?
HELP
CONTACT
BACK
NEXT
1
USER'S
MANUAL
USB CameraMate
GETTING
STARTED
Introduction
What's included with the
USB CameraMate
System Requirements
Parts of the USB CameraMate
Registering the USB CameraMate
CONTENTS
5
?
HELP
CONTACT
BACK
NEXT
USER'S
MANUAL
USB CameraMate
Introduction:
Thank you for purchasing the USB CameraMate from Microtech International, Inc.
The USB CameraMate is a card reader for new Apple Macintosh (iMac, iBook, G3/G4, Cube, etc.)
and PC Compatible owners who wish to use SmartMedia or CompactFlash cards. The USB
CameraMate is easy to use and provides transfer rates of up to 12Mb/sec (1.5MB/sec).
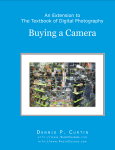
What's included with the USB CameraMate:
The USB CameraMate includes the following package contents:
USB CameraMate Digital Film Reader
■ Microtech Installer CD (includes this User's Guide, drivers, and free software)
■ Quick-Start Guide
■ Warranty Registration Card
■
System Requirements:
PC Compatible:
Desktop or laptop PC Compatible with an available USB port
■ Windows 98, 98 SE, ME, 2000
■
Macintosh:
Macintosh computer with an available USB port
■ Mac OS 8.5 or higher
■
CONTENTS
6
?
HELP
CONTACT
BACK
NEXT
USER'S
MANUAL
USB CameraMate
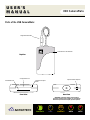
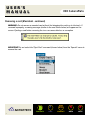
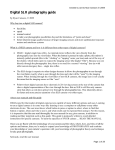
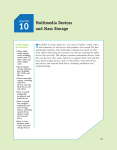
Parts of the USB CameraMate:
Integrated USB Cable
Power/Access LED indicator
Top View
CompactFlash slot
SmartMedia slot
Optional Power Adapter*
CompactFlash eject
button
+
DC 5V
Rear View
Front View
*WARNING: Permanent damage will result when
used with a standard power adapter. Use only with the
Microtech Optional Power Adapter (if power required).
CONTENTS
7
?
HELP
CONTACT
BACK
NEXT
USER'S
MANUAL
USB CameraMate
Registering the USB CameraMate
Thank you again for purchasing the Microtech USB CameraMate. In order for us to better serve
you, we encourage you to register your USB CameraMate as soon as possible. There are several benefits to registering the USB CameraMate:
1.
Registering your USB CameraMate entitles you to free periodic driver software
updates when available.
2.
Registering your USB CameraMate entitles you to toll free technical assistance
from Microtech.
There are three options for you to register the USB CameraMate:
1.
Register online at http://www.microtechint.com/usbregister for instant
registration.
2.
Complete and mail the included Warranty Registration Card to Microtech.
3.
Complete and fax the included Warranty Registration Card to Microtech.
Click here to
register online
CONTENTS
8
?
HELP
CONTACT
BACK
NEXT
2
USER'S
MANUAL
USB CameraMate
CONNECTING
to a Macintosh
Installing the Driver Software
Connecting to the USB Port
Connecting to a USB Hub
CONTENTS
9
?
HELP
CONTACT
BACK
NEXT
USER'S
MANUAL
USB CameraMate
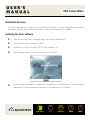
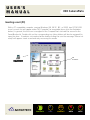
Installation Overview
The USB CameraMate is relatively easy to install and operate. To avoid complications during the
installation process, please follow the steps in order as described in this chapter.
Installing the driver software
1.
Start up your Macintosh computer and close all other applications.
2.
Insert the Microtech Installer CD-ROM
3.
Double-click on the "Microtech DPCM-USB Installer" Icon
4.
The following splash screen will arrear. Click "Continue."
5.
Another screen will appear containing the Software License Agreement. Please read the
agreement. To acknowledge to the terms of the agreement, click "Agree".
CONTENTS
10
?
HELP
CONTACT
BACK
NEXT
USER'S
MANUAL
USB CameraMate
6.
A dialog box will appear advising that you may have to restart your computer after
installing the software, click "Yes" to continue. Your Macintosh will then begin performing
the installation and a status bar will appear displaying the progress of the installation.
Note the actual driver installation should take only a few seconds.
7.
A final dialog box will appear advising that the software was successfully installed. Click
"Restart" to complete the installation.
Congratulations! Driver installation is now complete. You may now connect the Microtech USB
CameraMate to your computer after restarting. Proceed to the next page for instructions on
connecting the Microtech USB CameraMate.
Installation note: If you attempt to attach the USB connector of the USB CameraMate to the
computer prior to installing the drivers, you will receive the following (or a similar) message:
If this occurs, click "Cancel", install the driver software, and then attach the USB connector. For
more information on attaching USB devices proceed to the section "Connecting to the USB Port"
(page 12) or "Connecting to a USB Hub" (page 13).
CONTENTS
11
?
HELP
CONTACT
BACK
NEXT
USER'S
MANUAL
USB CameraMate
Connecting to the USB port:
1.
Connect the USB connector of the USB CameraMate to the USB port located at
the back of the computer. In the case of the Apple iMac or iBook, use the USB ports
located on the side of the computer. Do not use the USB port on the keyboard. Refer to
the illustrations below.
2.
Make sure the cable ends are firmly connected. Be careful not to confuse the upper
and lower parts of the connector. Do not force connections, as this may damage the
computer or the USB CameraMate.
The USB cable may be plugged into the computer while the computer is running.
Enlarged view
Enlarged view
Attach the USB connector from
the USB CameraMate to the
USB port on your Macintosh.
CONTENTS
12
?
HELP
CONTACT
BACK
NEXT
USER'S
MANUAL
USB CameraMate
Connecting to a USB hub (using with other USB devices):
1.
Connect the USB hub (purchased separately) to the USB port on your Macintosh.
NOTE: Use only with a powered USB hub or the optional Microtech Power Adapter may
be required.
2.
Then connect the USB connector of the USB CameraMate to a port on the USB
hub. The USB cable may be plugged into the computer or hub while the computer is
running.
IMPORTANT: Make sure the cable ends are firmly connected. Be careful not to
confuse the upper and lower parts of the connector. Do not force connections, as this
may damage the computer or the USB CameraMate.
Enlarged view
Enlarged view
Attach the USB connector from the USB hub
to the USB port on your computer
Attach the USB connector from
the USB CameraMate to the USB
port on the USB hub
CONTENTS
13
?
HELP
CONTACT
BACK
NEXT
3
USER'S
MANUAL
USB CameraMate
CONNECTING
to a PC Compatible
Installing the Driver Software
Connecting to the USB Port
Connecting to a USB Hub
CONTENTS
14
?
HELP
CONTACT
BACK
NEXT
USER'S
MANUAL
USB CameraMate
Installation Overview
The USB CameraMate is relatively easy to install and operate. To avoid complications during the
installation process, please follow the steps in order as described in this chapter.
Installing the driver software
Before connecting and using the USB CameraMate, you must first install the device drivers
located on the accompanying Microtech Driver CD. Note: the screenshots below may vary
slightly from those on your computer.
1.
Start your computer running Windows 98, 2000, or ME. Close any open applications.
Insert the Microtech Installer CD. The auto-run program will then launch the setup
application.
2.
If the installer does not begin automatically, double click on "My Computer." The window
for "My Computer" will open. Double click on the drive corresponding to your CD-ROM.
3.
The window for the CD-ROM will open. Double click "Setup.exe". After a few moments
Setup displays a dialog box similar to the one as shown below. Click Next.
Click Next.
CONTENTS
15
?
HELP
CONTACT
BACK
NEXT
USER'S
MANUAL
USB CameraMate
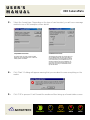
4.
Read the license agreement and click
Yes as shown on left.
Click Yes.
5.
Select the location on your computer
where you wish to install the drivers.
Click Next.
Click Next.
6.
Click Next.
Click Next.
CONTENTS
16
?
HELP
CONTACT
BACK
NEXT
USER'S
MANUAL
USB CameraMate
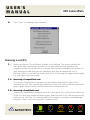
7.
Click Next.You will see a status
window advising the progress of the
current installation .
Click Next.
8.
Click Finish and restart your computer
once the installation is complete.
Click Finish
Congratulations! Driver installation is now complete. You may now connect the USB
CameraMate to your computer. Proceed to the next page for instructions on connecting
the USB CameraMate.
CONTENTS
17
?
HELP
CONTACT
BACK
NEXT
USER'S
MANUAL
USB
USB CameraMate
CameraMate
Connecting to the USB port:
1.
Connect the USB connector of the USB CameraMate to the USB port on your
computer. The USB cable may be plugged into the computer while the computer is
running.
Enlarged view
Attach the USB connector from the USB
CameraMate to the USB port on your computer
2.
Make sure the cable ends are firmly connected. Be careful not to confuse the upper
and lower parts of the connector. Do not force connections, as this may damage the
computer or the USB CameraMate.
CONTENTS
18
?
HELP
CONTACT
BACK
NEXT
USER'S
MANUAL
USB CameraMate
Connecting to a USB hub (using with other USB devices):
1. Connect the USB hub (purchased separately) to your computer's USB port.
NOTE: Use only with a powered USB hub or the optional Microtech Power Adapter may
be required.
2. Then connect the USB connector of the USB CameraMate to a port on the USB
hub. Make sure the connectors are secured firmly. The USB cable may be plugged
into the computer or hub while the computer is running.
IMPORTANT: Make sure the cable ends are firmly connected. Be careful not to
confuse the upper and lower parts of the connector. Do not force connections, as this
may damage the computer or the USB CameraMate.
Enlarged view
Enlarged view
Attach the USB connector from the USB hub
to the USB port on your computer
Attach the USB connector from
the USB CameraMate to the USB
port on the USB hub
CONTENTS
19
?
HELP
CONTACT
BACK
NEXT
4
USER'S
MANUAL
USB CameraMate
HOW TO USE
the USB CameraMate
Digital film card compatibility
Inserting a SmartMedia card
Inserting a CompactFlash card
Inserting a card (Macintosh)
Formatting cards (Macintosh)
Removing a card (Macintosh)
Inserting a card (PC)
Formatting cards (PC)
Removing a card (PC)
Using the USB CameraMate
with digital cameras
CONTENTS
20
?
HELP
CONTACT
BACK
NEXT
USER'S
MANUAL
USB CameraMate
This section describes the operation relating to the USB CameraMate and digital film cards. To avoid
complications while attempting to use your USB CameraMate, Microtech recommends reading this
entire chapter. For installation information, refer to “Chapter 2: Connecting to a Macintosh” (page 9)
or “Chapter 3: Connecting to a PC Compatible” (page 14).
Digital film card compatibility
The USB CameraMate was designed to accept CompactFlash cards in the upper slot and
SmartMedia (SSFDC) cards in the lower slot.
The SmartMedia™ slot is compatible with both 3.3 Volt and 5 Volt SSFDC formats. The
SmartMedia slot can accept SmartMedia cards in capacities of up to 128MB.
The CompactFlash slot is compatible with all current CompactFlash™ cards available on the
market, as well as CFII and CF+ Type II formats, such as the IBM family of microdrives.
Inserting a SmartMedia card
1.
Position the SmartMedia card in the direction as shown in the illustration on the next
page.
2.
Insert the card into the lower slot with the gold contacts facing up.
3.
Gently push the card in all the way until the card is locked in place. You will feel a slight
resistance as you insert the card into the spring-loaded slot. Note: The spring-loaded slot
is similar in concept to a retractable ball point pen.
WARNING: Be careful not to insert the SmartMedia card in the wrong direction. Be sure to
insert the SmartMedia with the gold contacts facing up. If it is forced in, the slot or the
SmartMedia may be damaged, or data on the card may be lost.
CONTENTS
21
?
HELP
CONTACT
BACK
NEXT
USER'S
MANUAL
USB CameraMate
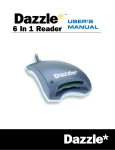
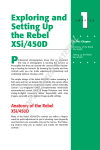
Inserting a SmartMedia card (continued)
Insert the SmartMedia card as shown below. The CameraMate can accept both 3.3V and 5V
Smartmedia cards. Notice the notched corner of the SmartMedia card. The location of notch will
appear at different locations indicating whether the card is a 5V or 3.3V SmartMedia card - refer
to the illustration at the bottom of the page.
NOTE: For both 3.3V and 5V type Smartmedia cards, be sure to insert the card with the gold
contacts facing up.
I
I
N
T
E
R
N
A
T
I
O
N
A
N
C.
L,
Left notch
indicates 5V card
Right notch
indicates 3.3V card
Gold contacts
Gold contacts
Write protect area
Write protect area
I N T E R N A T I O N A L,
I N C.
CONTENTS
22
I N T E R N A T I O N A L,
I N C.
?
HELP
CONTACT
BACK
NEXT
USER'S
MANUAL
USB CameraMate
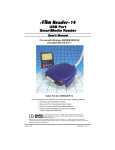
Inserting a CompactFlash card
1.
Position the CompactFlash card in the direction as shown in the illustration below.
2.
Insert the card into the upper slot. Be certain of the orientation - all leading
manufacturers of CompactFlash cards adhere to a specification requiring a positive keying
of the card. Gently push the card in all the way until the card is locked in place. The card
will slide in on the molded rails and a slight amount of resistance will be felt as the
connectors make contact. This is normal.
IMPORTANT: If excessive force is required, or the card just doesn’t seem to fit, do not attempt
to force the card in the reader, instead, call Microtech’s toll free tech support number for assistance.
WARNING: Be careful not to insert the CompactFlash card in the wrong direction - be sure the
connectors are facing inward and the card is not inserted upside down. If it is forced in, the slot
or CompactFlash card may be damaged or data on the card may be lost.
CompactFlash connectors
MB
2
3
ilm
shF
Fla
act
p
Com
CONTENTS
23
?
HELP
CONTACT
BACK
NEXT
USER'S
MANUAL
USB CameraMate
Inserting a card (Macintosh)
After a card is inserted on a Macintosh computer, a distinct icon will appear on the Mac OS
desktop. This is the “mounted” state, which enables read and write operations for the digital
film card. If both a CompactFlash as well as a SmartMedia card are inserted, icons will appear
for each (see below right). The time required between card insertion and mounting depends on
the type and brand of card. Usually, a card can be mounted and accessed within a few seconds.
When a card is mounted, it can be used in the same fashion as a floppy or other type of removable disk. Double-click the icon to open it's respective file window. Notice the screen shot
below, the SmartMedia 8MB card contains two JPEG images taken on a digital camera.
Likewise, the IBM 340 MB microdrive contains 10 high resolution TIF images taken on a professional digital camera. The images stored on these cards can be dragged, copied, opened, edited,
deleted, and so forth.
IMPORTANT: Be sure you have installed the USB CameraMate drivers prior to attempting to
operate the USB CameraMate. Also be sure the Apple File Exchange control panel is set to load
in your system folder - you can activate it using the Apple Extensions Manager control panel.
SmartMedia icon
CompactFlash icon
(example shown: IBM
340 MB microdrive)
Files contained within a card can be accessed by
double-clicking on its respective icon.
CONTENTS
24
?
HELP
CONTACT
BACK
NEXT
USER'S
MANUAL
USB CameraMate
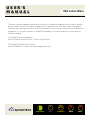
Formatting cards (Macintosh)
There may be instances where you may wish to format a card in the USB CameraMate rather
than in a digital camera. There may also be times when you may be required or prompted to
format your card. As such please read the information in this section for information on formatting either CompactFlash or SmartMedia cards.
WARNING: Formatting a CompactFlash or SmartMedia card will completely erase all data currently stored on the card. If there are important images or files you wish to safeguard for later
use, make a backup copy on your hard drive, CDR drive, or other type of removable media.
Formatting CompactFlash cards:
1.
Highlight/select the CompactFlash card icon. Select the "Erase Disk" command in the
"Special" menu (as shown below).
2.
As formatting a card will completely erase any data currently stored on the card, a dialog
box will appear asking if you wish to completely erase the card. Click "Erase" to begin
formatting the card. Or, click "Cancel" if you do not wish to format the card.
CONTENTS
25
?
HELP
CONTACT
BACK
NEXT
USER'S
MANUAL
USB CameraMate
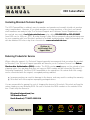
Formatting cards (Macintosh - continued)
Formatting SmartMedia cards:
SmartMedia cards cannot be formatted on a Macintosh using the CameraMate. SmartMedia
cards should be formatted on a digital camera (or a PC Compatible or handheld PC equipped
with a SmartMedia slot). If you attempt to format a SmartMedia card using the "Erase Disk"
command in the "Special" menu (shown below - left) you will first see a dialog box asking if you
wish to completely erase the card (below - right). Click "Cancel."
If you click "Erase," a message will
appear advising that SmartMedia formatting is not supported.
You will then receive a message
advising that the formatting (erase)
attempt failed. Click "OK" and format
the card in your digital camera.
CONTENTS
26
?
HELP
CONTACT
BACK
NEXT
USER'S
MANUAL
USB CameraMate
Removing a card (Macintosh)
1.
Make sure that the "Access/Power" indicator is not flashing. The access indicator will
flash when data is being read or written on the card. Wait until the operations are complete and the access indicator is no longer flashing before attempting to remove the card.
Removing a card during access operations will cause the data to be lost or corrupted.
Drag the card icon to the trash.
The card icon will disappear and
a dialog box similar to the one
below will appear.
2.
Drag the card icon and drop it onto the trash icon as shown above. The card icon will
disappear from the desktop. A dialog box similar to the one below will appear. It is now
safe to remove the card.
3a. Removing a CompactFlash card:
To remove a CompactFlash card, press the eject button located to the right of the
CompactFlash slot - the card will eject slightly out of the slot. With your thumb and index
fingers, grasp the end of the card and remove the card from the slot.
3b. Removing a SmartMedia card:
To remove a SmartMedia card gently push the card inward - the card will then extend out
of the slot. With your thumb and index fingers, grasp the end of the card and remove the
card from the slot. Note: The spring-loaded slot is similar in concept to a retractable ball
point pen - push in once to insert, push in again to eject.
CONTENTS
27
?
HELP
CONTACT
BACK
NEXT
USER'S
MANUAL
USB CameraMate
Removing a card (Macintosh - continued)
WARNING: Do not remove a mounted card without first dragging the card icon to the trash. If
removed improperly, a warning message (similar to the one shown below) will appear on the
screen. Ejecting a card before removing the icon can cause data loss or corruption.
IMPORTANT: Do not select the "Eject Disk" command (shown below) from the "Special" menu to
remove the card.
CONTENTS
28
?
HELP
CONTACT
BACK
NEXT
USER'S
MANUAL
USB CameraMate
Inserting a card (PC)
With a PC compatible computer, running Windows (98, 98 SE, ME, or 2000), two DPCM-USB
icons for each slot will appear under "My Computer" as removable drives (see the illustration
below). In general, the first icon is assigned to the CompactFlash slot and the second to the
SmartMedia slot. Double-click on the corresponding icon (drive letters will also be assigned) to
open the drive. If media is not inserted while double-clicking the icon the message "Device not
ready" will appear. Insert a card and retry accessing the media.
USB
CameraMate
CONTENTS
29
?
HELP
CONTACT
BACK
NEXT
USER'S
MANUAL
USB CameraMate
Formatting cards (PC)
There may be instances where you may wish to format a card in the USB CameraMate rather
than in a digital camera. There may also be times when you may be required or prompted to
format your card. As such please read the information in this section for information on formatting either CompactFlash or SmartMedia cards.
WARNING: Formatting a CompactFlash or SmartMedia card will completely erase all data currently stored on the card. If there are important images or files you wish to safeguard for later
use, make a backup copy on your hard drive, CDR drive, or other type of removable media.
Formatting CompactFlash or SmartMedia cards:
1.
Double click "My Computer." You will see two DPCM-USB (CameraMate) icons, these are
removable drives.
2.
If you are using a CompactFlash or a Microdrive, you should right click on the first DPCM
icon (F: in the picture provided), or the second DPCM icon (G: in the picture) if you are
using SmartMedia. A pop-up menu will appear. Select "Format."
USB
CameraMate
CONTENTS
30
?
HELP
CONTACT
BACK
NEXT
USER'S
MANUAL
3.
USB CameraMate
Select the format type. Depending on the type of card inserted, you will see a message
similar to one of the examples shown below.
CompactFlash format screen:
SmartMedia format screen:
The CFPrep Utility will create a single formatted
partition on your CompactFlash card - no other formatting options are available.
The SMPrep Utility provides two format options for
your SmartMedia card. The Quick format option is
selected by default, and recommended for general
use to erase data on your SmartMedia card. If you
experience problems with your SmartMedia, you
may wish to select the Full format option to completely erase and scan your SmartMedia card for
any bad data blocks.
4.
Click "Start." A dialog will appear warning that you are about to erase everything on the
media.
5.
Click "OK" to proceed. It will format the media and then bring up a format status screen.
CONTENTS
31
?
HELP
CONTACT
BACK
NEXT
USER'S
MANUAL
6.
USB CameraMate
Click "Close." Formatting is now complete.
Removing a card (PC)
1.
Make sure that the "Access/Power" indicator is not flashing. The access indicator will
flash when data is being read or written on the card. Wait until the operations are
complete and the access indicator is no longer flashing before attempting to remove the
card. Removing a card during access operations will cause the data to be lost. In
Windows 2000, you can right click and select "Eject." A message will appear advising that
it is now safe to eject the media.
2a. Removing a CompactFlash card:
To remove a CompactFlash card, press the eject button located to the right of the
CompactFlash slot - the card will eject slightly out of the slot. With your thumb and index
fingers, grasp the end of the card and remove the card from the slot.
2b. Removing a SmartMedia card:
To remove a SmartMedia card gently push the card inward - the card will then extend out
of the slot. With your thumb and index fingers, grasp the end of the card and remove the
card from the slot. Note: The spring-loaded slot is similar in concept to a retractable ball
point pen - push in once to insert, push in again to eject.
CONTENTS
32
?
HELP
CONTACT
BACK
NEXT
USER'S
MANUAL
USB CameraMate
Using the USB CameraMate with digital cameras
The USB CameraMate was designed to simplify life for the digital photographer and not to
detract from the creative process. Most digital cameras include the necessary software/drivers
to access images on your computer— make sure that the required software for your camera is
installed. Using the USB CameraMate for digital photography applications provides two major
advantages:
1.
Using the USB CameraMate you no longer have to connect a camera directly to your
computer. Simply take pictures to one or more cards and use the USB CameraMate to
quickly transfer the new images.
2.
The USB CameraMate uses a USB interface which provides a performance increase in
data transfer rates when compared to the traditional serial connection of a tethered
camera. This translates to less time waiting for image transfers and more free time for
you to spend taking pictures.
Additional Resources for the Digital Photographer
The internet is a great place to find tips, techniques, and suggestions for the digital photographer. Visit our web site (www.microtechint.com) for helpful hints on using your USB CameraMate.
In addition to the Microtech web site, here is a list of informative sites:
www.dcresource.com
www.dpcorner.com
www.dpreview.com
www.imaging-resource.com
www.megapixel.net
www.pcphotoreview.com
www.photohighway.com
www.robgalbraith.com
www.steves-digicams.com
www.shortcourses.com
www.zonezero.com
http://photo.net/photo/
CONTENTS
33
?
HELP
CONTACT
BACK
NEXT
USER'S
MANUAL
USB CameraMate
There are several magazines dedicated exclusively to digital photography which can be tremendously helpful. Most of the these magazines also maintain web sites with useful information.
There are also a growing number of books marketed to both novice and professional digital photographers. For a good overview of Digital Photography or Photojournalism you may want to
consider reading:
The Digital Camera Companion:
by Ben Sawyer and Ron Pronk, Coriolis Group Books
The Digital Photojournalists Guide:
by Rob Galbraith, to order visit www.robgalbraith.com
CONTENTS
34
?
HELP
CONTACT
BACK
NEXT
5
USER'S
MANUAL
USB CameraMate
OBTAINING
Technical Support
Contacting Microtech Technical Support
Returning Products For Service
Microtech Limited Warranty
CONTENTS
35
?
HELP
CONTACT
BACK
NEXT
USER'S
MANUAL
USB CameraMate
Contacting Microtech Technical Support
The USB CameraMate is relatively easy to maintain and operate and normally should not produce
many complications. However, if you need assistance or have questions of any kind, our trained
staff members are ready to help. Our Technical Support and Customer Service Departments can
be reached via e-mail at [email protected] or by calling 800-666-9689 or 203-483-9402
from 8:00 a.m. to 6:00 p.m. (EST), Monday through Friday. We recommend calling while being near
to your computer with your Microtech product to facilitate troubleshooting. Helpful information can
also be obtained 24 hours a day from our web site: www.microtechint.com.
Click here to
visit Microtech Tech
Support Online
Returning Products for Service
When calling for support, if a Technical Support specialist recommends that you return the product
to Microtech, the Technical Support specialist will transfer you to Customer Service for a Return
Merchandise Authorization (RMA) number. The RMA number must appear on the outside of your
shipping carton. Any package that does not carry an RMA number will be refused by Microtech’s
Receiving Department. Pack the USB CameraMate in its original box. Be certain that it fits snugly
and is surrounded with the original, corrugated packing material.
Improper packing can result in damage to the device, and may result in voiding the warranty.
■ Microtech will not accept an improperly packaged device.
■
You are responsible for paying the cost of shipping the device to Microtech; Microtech will pay the
return shipping on any Warranty RMA. Be sure to include the RMA number on the outside of the
box. Please ship the device to:
Microtech International, Inc.
242 Branford Road
North Branford, CT 06471-1303 USA
CONTENTS
36
?
HELP
CONTACT
BACK
NEXT
USER'S
MANUAL
USB CameraMate
MICROTECH LIMITED WARRANTY
Microtech’s warranty obligations are limited to the terms set forth below:
Microtech International, Inc., (“Microtech”) warrants this product against defects in material and workmanship for the period of time
indicated on the warranty certificate included with this product. The warranty period begins with the date of original retail purchase.
This limited warranty is made only to the original end user purchaser ("you") of the product and does not extend to any subsequent
purchasers or owners of the product. The "original end user" is the first user to put the product into service in any fashion, but the
term "original end user" shall exclude dealers. Dealers shall not be entitled to the benefits of the limited warranty.
It is your responsibility to establish the warranty period by verifying the original purchase date. Accordingly, to avoid dispute, you
should return the warranty card to Microtech within ninety (90) days after the date of purchase.
If you discover a defect, Microtech will, at its option, repair or replace this product with a new or reconditioned product at no charge
to you, provided you return it during the warranty period, with transportation charges prepaid, to Microtech. (You can obtain additional information by contacting Microtech at the address printed on the certificate.) To each product returned for warranty service,
please attach your name, address, telephone number, and a copy of the bill of sale bearing the appropriate Microtech serial numbers
as proof of date of original retail purchase, as well as a detailed description of the problem for which service is requested. Prior to
returning the product, you must obtain from Microtech a Return Merchandise Authorization Number (RMA#). You are responsible for
packaging the product to be returned, and should take care that the product is packed in its original packaging. If the repairs are covered by the Limited Warranty and if the product was properly shipped to Microtech, Microtech will pay the return shipping charges.
This warranty applies only to hardware products manufactured by Microtech that can be identified by the “Microtech” trademark,
trade name, or logo affixed to them. This warranty does not cover: damage resulting from accident, misuse, abuse, or neglect and/or
damage during any type of transportation resulting from improper packaging; damage to any product which has been altered in any
fashion, including the alteration or removal of any Microtech serial number; damage resulting from causes other than product
defects, including and not by way of limitation, lack of technical skill, competence, or experience of the user, and/or failure to use the
product in accordance with the instructions provided in the User’s Manual; and service performed by an unauthorized person or entity.
All computer software either sold and/or licensed to a purchaser or user is done so on an “as is” basis, without warranty of any kind
by Microtech. The only warranties relating to such software, if any, are provided by the Master Licensor of such software and are
set forth in the User’s Manual. The entire risk as to the quality and performance of such software is with the purchaser or user.
Should such software prove defective following its purchase the purchaser or user, as the case may be (and not Microtech) assumes
the entire cost of all necessary servicing or repair.
Any implied warranties including fitness for use and merchantability are limited in duration to the period of the expressed warranty
set forth above. The remedies provided under this warranty are exclusive and in lieu of all others.
Microtech hereby expressly disclaims liability and shall not be responsible for incidental, consequential and contingent damages of
any kind or nature, including, without limitation: damages to persons or property, whether a claim for such damages is based upon
warranty, contract, tort or otherwise; damages due to or arising out of the loss of data; or lost profits.
Microtech shall not be responsible for any damages caused by the presence of error or omission in any so-called “foreign language
version” of its manuals, instructions or related materials.
Microtech International, Inc. — 242 Branford Road — North Branford, CT 06471 USA — 203-483-9402
CONTENTS
37
?
HELP
CONTACT
BACK
NEXT
USER'S
MANUAL
USB CameraMate
CONTACTING
Microtech International
Microtech International, Inc. is an industry leader in digital
connectivity solutions and personal computer memory
upgrades. Our digital connectivity solutions include an extensive line of PC Card and flash memory readers and media,
which improve the performance, capacity, and flexibility of
any digital appliance. Microtech is well known throughout the
world for its innovative products and exceptional customer
service.
Click to visit Microtech online
Based in North Branford, Connecticut (USA) Microtech has
been manufacturing quality memory and computer peripheral
products since 1985. Microtech is a wholly owned subsidiary
of SCM Microsystems, Inc. (Nasdaq: SCMM; Neuer Markt:
SMY)
Microtech is open Monday through Friday from 8:00a.m. to
6:00p.m. (US. Eastern Standard Time).
Microtech International, Inc.
Corporate Headquarters
242 Branford Road
North Branford, CT 06471-1303 USA
Tel: 800-626-4276 (Toll free USA only)
Tel: +203-483-9402
Fax: +203-483-0129
Web site: http://www.microtechint.com
E-mail: [email protected]
CONTENTS
38
?
HELP
CONTACT
BACK
NEXT
USER'S
MANUAL
USB CameraMate
Copyright Information
The contents of this manual are copyrighted by Microtech International, Inc. and may not be reproduced in whole or in part without
written permission of Microtech International, Inc. The same proprietary and copyright notices must be affixed to any permitted
copies as were affixed to the original. This exception does not allow copies to be made for others, whether or not sold, but all of the
material purchased (with all backup copies) may be sold, given or loaned to another person. Under the law, copying includes translating into another language or format. You may use the software on a single computer owned by you and extra copies cannot be
made.
Third-party products mentioned are in most cases for informational purposes only and constitute neither an endorsement nor a recommendation. Microtech assumes no responsibility with regard to the performance or use of the products.
Product specifications and information contained herein are subject to change without notice.
© Copyright 2001 Microtech International, Inc. All rights reserved. Manual version 2.0 — 01.25.01 VRM
Trademarks
Microtech and the Microtech insignia are registered trademarks of Microtech International, Inc.
USB CameraMate, Digital FlashFilm, Compact FlashFilm, DPA Drives, and the DPA logo are trademarks of Microtech International,
Inc.
Microsoft, Windows, the Windows Logo, and MS-DOS are registered trademarks of Microsoft Corporation.
Apple, Macintosh, and Mac OS are registered trademarks of Apple Computer, Inc.
Mac and iMac are trademarks of Apple Computer, Inc.
IBM PC/AT is the trademark of International Business Machines Corporation.
CompactFlash is a trademark of SanDisk Corp. and is licensed royalty-free to the CFA
(CompactFlash Association) which in turn will license it royalty-free to CFA members.
SSFDC and SmartMedia are trademarks of Toshiba Corp.
All other company names and product names are trademarks or registered trademarks of their respective owners.
For more information contact:
Microtech International, Inc.
242 Branford Road
North Branford, CT 06471 USA
Tel: 203-483-9402
CONTENTS
39
?
HELP
CONTACT
BACK
NEXT