1
OPEN SYSTEMS® Accounting Software
Resource Manager
User’s Manual
PN/2210.RM605
© 1999 Open Systems Holdings Corp. All rights reserved.
Document Number 2210.RM605
No part of this manual may be reproduced by any means without the written permission of Open Systems
Holdings Corp.
OPEN SYSTEMS is a registered trademark and OSAS, Resource Manager, Resource Manager for Windows,
and Report Writer are trademarks of Open Systems Holdings Corp. BBx is a trademark and PRO/5 and Visual
PRO/5 are registered tradmarks of BASIS International Ltd. Novell and NetWare are registered trademarks of
Novell, Inc. Microsoft, Windows, Windows 95, Windows 98, Windows NT, and MS-DOS are either
trademarks or registered trademarks of Microsoft Corporation. Adobe and Acrobat are registered trademarks
of Adobe Systems, Inc. TrueType is a registered trademark of Apple Computer, Inc.
Open Systems Accounting Software for UNIX uses PKUNZIP utilities from Ascent Solutions, Inc.,
9009 Springboro Pike, Miamisburg, OH 45342. Phone: (937) 847-2374 Internet: www.asizip.com
Printed in U.S.A. This manual is recyclable.
August 1999, Release 6.05
This document has been prepared to conform to the current release version of OPEN SYSTEMS Accounting
Software. Because of our extensive development efforts and our desire to further improve and enhance the
software, inconsistencies may exist between the software and the documentation in some instances. Call your
customer support representative if you encounter an inconsistency.
Open Systems Holding Corp.
1157 Valley Park Drive
Suite 105
Shakopee, Minnesota 55379
General Telephone
(612) 403-5700
General Fax
(612) 496-2495
Support Telephone
(800) 582-5000
Support Fax
(612) 403-5870
Internet Address
www.osas.com
Resource Manager User’s Manual
6.05
Contents
Introduction
Welcome to Resource Manager
Resource Manager Overview
Conventions
Text Menu
Graphical-Style Menus
Favorites Menu
Function Commands
Reports
1-3
1-5
1-9
1-13
1-17
1-27
1-31
1-39
Workstation Configuration
Colors
Keyboard
Devices
Defaults
2-3
2-7
2-11
2-23
Company Setup
Company Information
Data File Creation
Data File Conversion
Options and Interfaces
Access Codes
Country Codes
3-3
3-7
3-9
3-13
3-17
3-21
Application Setup
Tax Classes
Tax Locations
Tax Groups
Sales Tax Report
Clear Sales Tax
Resource Manager User’s Manual 6.05
4-3
4-7
4-13
4-17
4-21
iii
Period Setup
Forms Reorder
Forms Reorder Codes
4-25
4-29
4-37
Data File Maintenance
Backup
Restore
Application Tables
Change File Size
View File Contents
File Rebuild/Verify
Purge Data Records
5-3
5-7
5-11
5-15
5-19
5-23
5-27
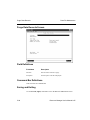
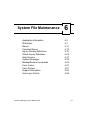
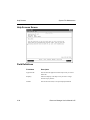
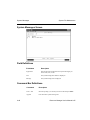
System File Maintenance
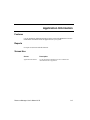
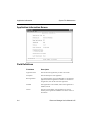
Application Information
Directories
Menus
Favorites Menus
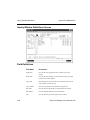
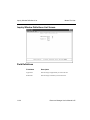
Inquiry Window Definitions
Global Inquiry Definitions
Help Screens
System Messages
Backup/Restore Commands
Form Codes
Form Printers
Support Information
User Login Activity
6-3
6-7
6-11
6-15
6-19
6-23
6-37
6-39
6-43
6-47
6-51
6-55
6-59
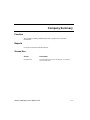
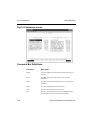
EIS Dashboards
Company Summary
Cash Requirements Forecast
Daily Statistics
Accounts Receivable Analysis
Accounts Payable Analysis
Top 10 Customers
iv
7-3
7-7
7-11
7-15
7-19
7-23
Resource Manager User’s Manual 6.05
Top 10 Items
Top 10 Sales Reps
Top 10 Vendors
7-27
7-31
7-35
Executive Information Summary
EIS Dashboard
Dashboard
Dashboard History
Field History
Global Dashboard Update
Purge Dashboard History
Field Definitions
Setup
Functions
Access Codes
Dashboard Editor
Tables
Screen Definitions List
Field Definitions List
Functions List
Setup Definitions List
8-3
8-7
8-11
8-15
8-19
8-23
8-27
8-31
8-35
8-39
8-43
8-47
8-51
8-55
8-59
8-63
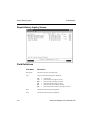
Print Manager
Report History Inquiry
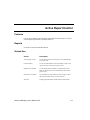
Active Report Control
Archive Report Control
Report Class Maintenance
Parameter Maintenance
Purge Report History
9-3
9-7
9-15
9-23
9-27
9-31
Reports
Data File Allocation Report
Product Suggestions Report
Error Log
Global Inquiry Window Audit Report
Resource Manager User’s Manual 6.05
10-3
10-7
10-11
10-15
v
Master File Lists
Menu List
Backup/Restore Commands List
Application Information List
Company Information List
Help Screens List
Inquiry Window Definitions List
Global Inquiry Window List
Tables List
Country Codes List
Tax Locations List
Tax Groups List
Options and Interfaces List
11-3
11-7
11-11
11-15
11-19
11-23
11-27
11-31
11-35
11-39
11-43
11-47
References
System Messages
File Descriptions
Common Questions
Laser Alignment Notes
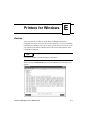
Printers for Windows
Other Commands
Common Ratios
Predefined Functions
Building Functions
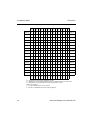
Compatibility Matrix
A-1
B-1
C-1
D-1
E-1
F-1
G-1
H-1
I-1
J-1
Index
vi
Resource Manager User’s Manual 6.05
Resource Manager User’s Manual Introduction
6.05
Introduction
Welcome to Resource Manager
Resource Manager Overview
Conventions
Text Menu
Graphical-Style Menus
Favorites Menu
Function Commands
Reports
Resource Manager User’s Manual 6.05
1
1-3
1-5
1-9
1-13
1-17
1-27
1-31
1-39
1-1
Welcome to Resource Manager
The OPEN SYSTEMS Accounting Software (OSAS™) product line consists of
several accounting applications. Each application addresses a different phase of
your financial operations; together, they form a powerful accounting solution to
your daily and periodic accounting needs.
Customer Support
Open Systems has a strong commitment to customer service and product quality. If
you have difficulty in using Open Systems products, consult the user’s manual and
other OSAS reference materials. If you need more information, consult a customer
support representative.
OSAS Overview
Resource Manager
The Resource Manager application is the foundation or shell of OSAS; it provides
the operating environment that holds the other applications. Resource Manager is
also bundled with two formerly separate applications: Executive Information
Summary (EIS) and Print Manager. With EIS, company information can be
accessed quickly and reports compiled and printed out, summarizing all aspects of
a company or a group of companies. With Print Manager, when you print reports to
file, your reports can be stored, sorted, printed, and searched for specific text.
Base Applications
Base applications are designed and produced with the largest possible number of
industries in mind. They are most effective when you interface them with each
other. Base applications are usually named after common accounting operations.
Examples are: General Ledger, Accounts Payable, Purchase Order, Accounts
Receivable, Sales Order, Payroll, and Inventory.
Resource Manager User’s Manual 6.05
1-3
Resource Manager Overview
To use OSAS, you must run Resource Manager through an operating system based
on Microsoft® Windows 95™, Windows 98®, Windows NT®, UNIX®, or Novell®
NetWare®. OSAS operates on LAN systems, across a web server using the OSAS
Web program, and within a single computer. After you install Resource Manager,
you can use it to install other applications, modify how each application works, and
specify how the overall system operates.
You can install the other applications in any order unless their user’s manuals
specify otherwise.
Workstation Configuration
Use the Configure Workstation functions to assign colors on a workstation; define
the keys that will execute particular functions and editing commands; define
multiple terminals, printers, and graphics devices; and specify default system
information.
Installation
After you set up your workstations, you can begin installing other applications on
your system. However, some applications will not appear on the Main menu until
you create or convert data files.
Company Setup
Use the Company Setup functions to set up company information, create or convert
the data files for each application, select options for each application and the
interfaces between applications, set up access codes to protect your data from
unauthorized access, and set up country codes.
Resource Manager User’s Manual 6.05
1-5
Resource Manager Overview
Introduction
Application Setup
After you have installed applications on your system and created or converted your
data files, use the Application Setup functions to create the Period Setup tables.
You can also assign tax classes, tax locations, and tax groups; print the Sales Tax
Report; clear accumulated sales tax from tax location records; and set up codes for
reordering Open Systems forms, enter a reorder, and print it.
Data File Maintenance
Use the Data File Maintenance functions to backup or restore your data files, build
application tables, change file size, view file contents, rebuild and verify files, and
purge data records.
System File Maintenance
Use the System File Maintenance functions to set up and maintain application
installation information, directories, application and favorites menus, inquiry
window definitions, global inquiry definitions, help screens, system messages,
backup and restore commands, form codes, forms printer definitions, and support
information. You can also view the locations of other OSAS users through the User
Login Activity function.
EIS Dashboards
The EIS Dashboards menu allows you to view summarized accounting information
on convenient screens called dashboards. The dashboards show data from many
different applications for one or more companies.
Executive Information Summary
The EIS functions allow you to set up various dashboards and fields, recalculate
results for various dashboards, maintain files, and print file lists.
Print Manager
Use Print Manager to search reports printed to file for specific information or
general inquiries. Print Manager allows you to control printing queues and
maintain saved and archived files.
1-6
Resource Manager User’s Manual 6.05
Introduction
Resource Manager Overview
Reports
Use the Reports functions to audit the amount of disk space your data files occupy
and to print product suggestions, error logs, and global inquiry window definitions.
Master File Lists
Use the Master File Lists functions to print lists of information that you set up in
other Resource Manager functions. These lists are useful if you are planning to
make changes, want to add information, or keep a record of information that is on
your system.
Resource Manager User’s Manual 6.05
1-7
Conventions
Your manual will help you to install OSAS on any standard machine within many
popular operating systems and help you with your accounting software questions.
In the manual, we use the term “Conventions”, or standards, to help describe
complicated processes, new terms, and to help you use your OSAS applications.
Manual Conventions
The Resource Manager user manuals are divided into two volumes, the Resource
Manager Installation Manual and the Resource Manager User’s Manual. The
Installation Manual is divided into these sections:
•
“Introduction” provides an overview of Resource Manager and the OSAS
system, including installation procedures, graphical and text-based application
features, and function key references.
•
“Installation” explains the steps necessary to begin using Resource Manager
in your company, including how to install OSAS on your system. For
conversion information, see Appendix E in the Installation Manual.
The Resouce Manager User’s Manual is made up of several chapters covering:
•
Function Instructions, in which each chapter describes a function group or
menu within Resource Manager.
•
Examples of day-to-day functions.
•
Report examples.
Mouse Conventions
The standard mouse has two buttons, left and right, each performing certain
functions. In this manual, we use these terms for using the mouse: click, right-click,
double-click, and deselect.
Resource Manager User’s Manual 6.05
1-9
Conventions
Introduction
The click is a single press on the left mouse button. Place the cursor over the
desired function, and press the left button to enable, or “select”, that function.
A right-click is a single press of the right mouse button.
To double-click, move the cursor over the desired function, and quickly press the
left mouse button twice. If there is too long a pause between clicks, the computer
may interpret your action as two separate clicks and may not perform the desired
function.
To deselect an object, move the cursor off the icon or folder onto a blank space
within the window and press the left mouse button.
Note
Some mouse manufacturers allow you to change the function of the mouse
buttons for those who prefer (for example) to use the mouse with their left hand.
In this case, reverse the commands when you use them. For example, a click
refers to a single press of the right mouse button, while the term right-click refers
to a single press of the left button, and so on.
OSAS Conventions
Operations in OSAS follow conventions, or patterns. The conventions used in
OSAS applications are presented below.
Running OSAS
OSAS runs in an operating system supported by 100 megabytes permanent storage
and 1 MB RAM. You may need additional disk space or memory depending on the
size of your data files, and the operating system you use. Consult your reseller for
more information.
“Setting Up” explains how to install this version of Resource Manager. To update
from a version whose files you need to convert, see Appendix E in the Installation
Manuals.
1-10
Resource Manager User’s Manual 6.05
Introduction
Conventions
Starting OSAS
To start OSAS on a Windows machine, double-click the OSAS icon on the desktop
or in the appropriate folder.
To start OPEN SYSTEMS Accounting Software on a non-Windows machine,
enter osas at the operating system prompt.
The command can recognize three parameters: -t, -c, and -a.
The terminal ID (-t) is the identification code assigned to the terminal you are using
to work with OSAS. On multiuser systems each terminal usually has a default ID
that was assigned when the terminals were added to the system. Use the -t
parameter only when you want to log on with an ID other than the default ID. The
terminal parameter is valid only if you are using Resource Manager for LANs.
The company ID (-c) is the identification code assigned to a company. If your
system carries two or more companies and you do not enter a company ID, the
menu of the company entered by the last person who used the terminal appears.
The access code (-a) is your personal password. Refer to the chapter 3 for
information about assigning access codes.
The most general expression for getting into OSAS takes all the parameters into
account. For example, if you are on terminal 2, you want to work with company B,
and the password is pratt, specify that information to enter the system:
osas -t T2 -c B -a pratt
For UNIX, you can enter the parameters in any order, and you can use any
combination. You must leave a space between the parameter mark (-t, -c, or -a) and
the parameter itself.
An example for Windows only: click on the icon’s properties and, in the Target
field, enter your access code and your company ID. Example, using pratt as your
access code and H for your company ID:
C:\osas\progrm\osastm.exe -m4096 -tT00 -nT00 - -apratt -cH
Resource Manager User’s Manual 6.05
1-11
Conventions
Introduction
For Window icon properties, the parameter marks (-m, -t, or -n) can be entered in
any combination but must be before the separation dash. The access code and
company ID commands (-a and -c) must be entered after the separation dash.
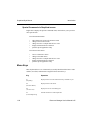
Menu Conventions
When you start OSAS, the Main menu, which presents the applications you can
use, appears. If you are using the Resource Manager for UNIX, the Text menu
appears. If you are using the Resource Manager for Windows, you can choose
between the Text Menu, Graphical Menu, or Start Menu. In Windows, use the
Workstation Configuration Defaults function (page 2-23) to select the style of
menu you want displayed. The following pages describe how you use each of these
types of menus.
Favorites Menu
The Favorites menu operates in the text-based format as well as in the graphical
formats. The Favorites menu allows quick and easy access to the OSAS functions
you use most, allowing you to add selections for entire menus or particular
functions.
With the Favorites menu, you save time in no longer switching to and from
commonly accessed applications. For example, if you have application entries in
Transactions (Accounts Payable), Transfer Journals (Inventory), and Edit
Transactions (General Ledger), rather than moving through each application menu
by menu, you could set up a Favorites Menu where, with one press of the enter key
or a click of a button, your function would be open for work.
Favorites Menu: Graphical Style
For Favorites Menu setup information, see page 1-27.
1-12
Resource Manager User’s Manual 6.05
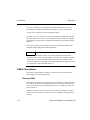
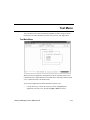
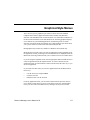
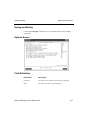
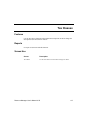
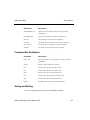
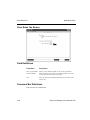
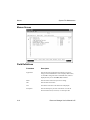
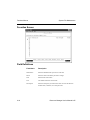
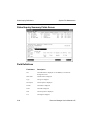
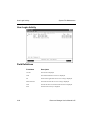
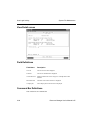
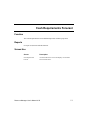
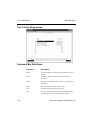
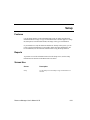
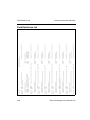
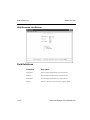
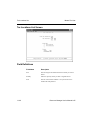
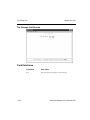
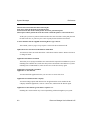
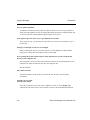
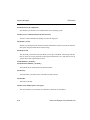
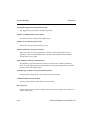
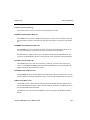
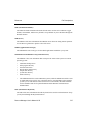
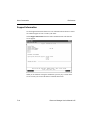
Text Menu
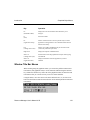
The Text menu can be used on all OSAS compatible systems. Using text-based
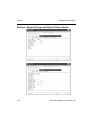
menus, the Text menu (shown below) offers easy access to your applications.
Text Main Menu
When you select an application, the application’s menu, which presents several
related functions, is superimposed over the Main menu. Selecting a function leads
you to a function screen or to another menu.
You can select applications from the Main menu in these ways:
•
Use the arrow keys to move the cursor up or down, highlighting the
application you want to use. Then press PgDn or Enter to select it.
Resource Manager User’s Manual 6.05
1-13
Text Menu
Introduction
•
Press the first letter of the application you want to use. The cursor jumps to the
first application beginning with the letter, press the letter key or the down
arrow until the application you want is highlighted. When your choice is
highlighted, press PgDn or Enter to select it.
•
Position the mouse cursor over the application and click. The application will
briefly highlight and switch to the application screen.
•
To jump to the first application on the menu, press Home. To jump to the last
application on the menu, press End.
To select a function from an application menu, highlight and select your choices
the same way you do on the Main menu—with one exception: you can press PgDn
only when an option leads to another menu, and you must press Enter to select a
function.
On an application menu you can press PgUp to move to the menu immediately
above it. If you are several menu levels away from the Main menu, you can return
to the Main menu by pressing PgUp repeatedly or by pressing the Tab key.
You can exit from a menu in these ways:
•
•
•
Press the PgUp key to go to the previous menu (one menu up)
Press the Tab key to go to the Main menu
Use the Exit (F7) command to go to the operating system.
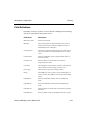
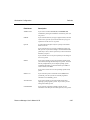
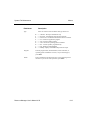
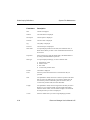
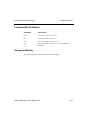
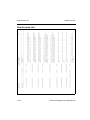
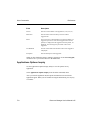
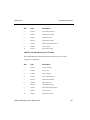
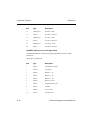
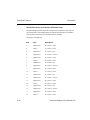
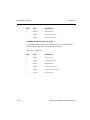
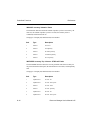
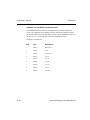
Function Keys Used in the Text menu
Most keyboards have a set of function keys (usually labeled with the letter F and a
number). Within the menu, commands are assigned to these function keys. You can
use the commands to work with data entry screens.
1-14
Resource Manager User’s Manual 6.05
Introduction
Text Menu
Except for the Command Help (Esc), the Jump (Tab) commands, and the Enter
key, you can use the Keyboard function on the Workstation Configuration menu to
reassign any function key to any command (see the Keyboard function on page 2-7).
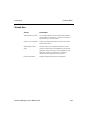
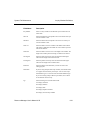
Key
Operation
Esc
(Command help)
Views the list of commands for the menu. (To close the
commands window, press any key.)
F1
(Function Help)
Displays help information for this function.
F2
(Favorites Menu)
Displays the Favorites menu or changes to the regular menu
from the Favorites menu.
F3
(Change Company)
Allows you to switch between companies.
F4
(Access Code)
Displays the Access Code prompt.
F4 (twice)
(Other Menu)
Opens a menu of utilities. A calculator and Global Inquiry
(which consolidates and presents information from other
applications) are some of the utilities on the Other Commands
menu. See Appendix F for information about the utilities on
the Other Commands menu.
F5
(Live/Sample swap)
Switches between live and sample data.
F6
(Workstation Date)
Displays the current workstation date and allows you to
change it.
F7
(Exit)
Exits from OSAS.
F9
(Application Setup)
Allows certain functions to be set up. Works only in certain
applications. The application’s user’s manual will describe the
function if necessary.
F10
(Add to Favorites)
Allows you to add to and delete from your Favorites menu.
Resource Manager User’s Manual 6.05
1-15
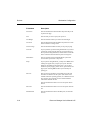
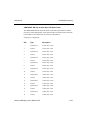
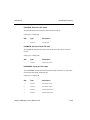
Text Menu
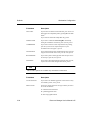
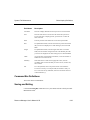
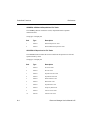
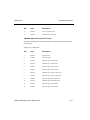
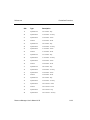
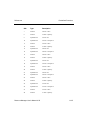
1-16
Introduction
Key
Operation
Shift + F5
(Change menu style)
Switch between text and graphical menu styles without going
into Defaults.
Shift + F2
(Application Info)
Displays information about the applications you have
installed.
PgUp
(Start over)
Move back one menu level.
Tab
(Jump)
Move back to the Main menu.
Enter
Select a menu or function from a menu.
Up Arrow
Down Arrow
Move the cursor up or down through the menu selections.
Ctrl + G
(Bell on/off)
If the bell is turned on, it sounds at an error or when you must
verify a command. To turn off the bell, use this command or
the Defaults function on page 2-23. To turn the bell back on,
use this command again.
Resource Manager User’s Manual 6.05
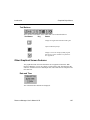
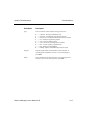
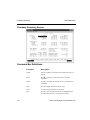
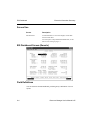
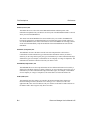
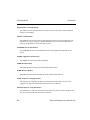
Graphical-Style Menus
There are two types of graphical-style menus to choose from. The standard
Graphical menu features application buttons that resemble many Windows
functions. The Start Main menu is named because of its functional resemblance to
the Start menu in Windows 95/98 and Windows NT. Featuring graphical displays,
access buttons for your installed applications, and allowing access to OSAS
functions via both the mouse and function keys, both graphical-style menus allow
you a greater selection of interaction with OSAS and your data.
Both graphical-style menus are available in a Windows environment only.
Much like the Text menu, when you select an application in either graphical menu,
the application’s menu, presenting several related functions, is displayed beside the
Main menu. Selecting a function leads you to a function screen or to another menu.
If you are using the Graphical menu, click the appropriate button with the mouse to
select an application from the Graphical menu. To select a function from an
application menu, click the function’s button with the mouse the same way as you
do for an application.
If you choose the Start menu you can select applications from the Main menu in
these ways:
•
•
•
Use the arrow keys and press Enter
Click the selection
Hold the mouse over the selection
From any application menu, you can select a button from the previous menu to
move directly to that menu. If you are several menu levels away from the Main
menu, you can return to the Main menu by clicking items on previous menus.
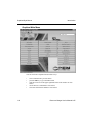
Resource Manager User’s Manual 6.05
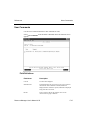
1-17
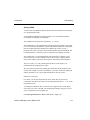
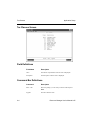
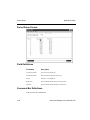
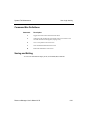
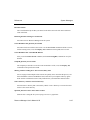
Graphical-Style Menus
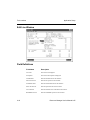
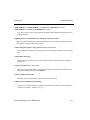
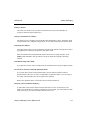
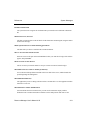
Introduction
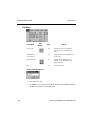
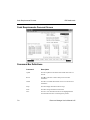
Graphical Main Menu
You can exit from a Graphical menu in these ways:
•
•
•
•
•
1-18
select a button from a previous menu
press the Tab key to go to the Main menu
click the Close box in the upper right hand corner of the window to close
OSAS
use the Exit (F7) command to close OSAS
select Exit from the File Menu to close OSAS
Resource Manager User’s Manual 6.05
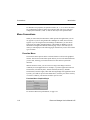
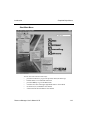
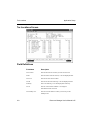
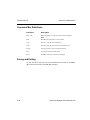
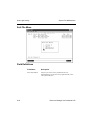
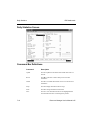
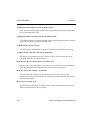
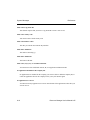
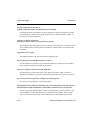
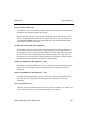
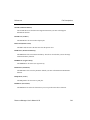
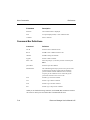
Introduction
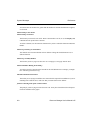
Graphical-Style Menus
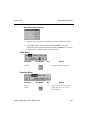
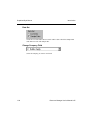
Start Main Menu
You can exit from a menu in these ways:
•
•
•
•
•
•
press the left arrow key to go to the previous menu (one menu up)
hold the mouse over a different menu item
press the Tab key to go to the Main menu
click the Close box in the upper right hand corner to close OSAS
use the Exit (F7) command to close OSAS
select Exit from the File Menu to close OSAS
Resource Manager User’s Manual 6.05
1-19
Graphical-Style Menus
Introduction
Special Commands in Graphical menus
Right-click to display the Special Commands menu, which allows you to perform
these special tasks:
From the standard menus:
•
•
•
•
•
add a function or menu to the Favorites menu
change to the Favorites menu
change from live to sample data and vice versa
display information about a function
perform special application setup
From the Favorites menu:
•
•
•
•
•
remove a function or menu
change to the Main menu
change from live to sample data and vice versa
display information about a function
perform special application setup
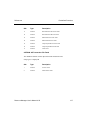
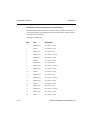
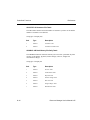
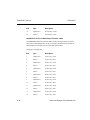
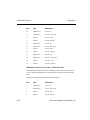
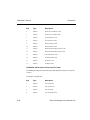
Menu Keys
Most keyboards have a set of function keys (usually labeled with the letter F and a
number). In OSAS, commands are assigned to these function keys.
1-20
Key
Operation
F1
(Key Help)
Displays the list of Icons and Functions keys available to you.
F2
(Favorites Menu)
Displays the Favorites menu.
F4
(Access Code)
Displays the Access Code dialog box.
F5
(Live/Sample swap)
Switches between live and sample data.
Resource Manager User’s Manual 6.05
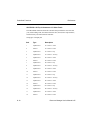
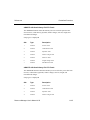
Introduction
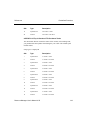
Graphical-Style Menus
Key
Operation
F6
(Workstation Date)
Displays the current workstation date and allows you to
change it.
F7
(Exit)
Exits from OSAS.
F9
(Application Setup)
Allows certain functions to be set up. Works only in certain
applications. The application’s user’s manual will describe the
function if necessary.
F10
(Change to Favorites)
Allows you to add to and delete from your Favorites menu.
(works only with Start-style menu).
Right-click
Displays the Special Commands menu.
Shift + F5
(Change menu style)
Switch between text and graphical menu styles without going
into Defaults.
Shift + F2
(Application Info)
Displays information about the applications you have
installed.
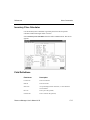
Window Title Bar Menus
When working using the graphical menus, you can use the pull-down menus and
tool buttons (with graphical icons) to access functions without using the function
keys. While the function keys still work in the graphical menus, the menu bar and
tool buttons offer you a choice in how you access certain functions.
Using the mouse, move the cursor to the menu and click once, or, click on a tool
button for the function desired. Pictured below are the OSAS pull-down menu and
tool buttons.
Resource Manager User’s Manual 6.05
1-21
Graphical-Style Menus
Introduction
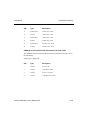
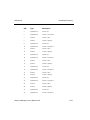
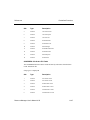
File Menu
Command
Tool
Button
Key
Result
Access code
F4
Displays the Access Code dialog
box. See Access Code dialog box
below.
Sample data set
or Live data set
F5
Toggles between the sample data and
the live data.
Workstation date
F6
Displays the Workstation Date
dialog box. See Workstation Date
dialog box below.
Exit
F7
Exits from OSAS.
Access Code dialog box
1. Enter the access code.
2. Click OK to save your entry and return to the Main menu or Exit to abandon
the dialog box and return to the Main menu.
1-22
Resource Manager User’s Manual 6.05
Introduction
Graphical-Style Menus
Workstation Date dialog box
1. Enter the date, or use the up/down buttons to increase or decrease the date.
2. Select OK to change the workstation date, System Date to change the
workstation date to match the operating system date, Abandon to exit without
changing the date, or Exit to return to the Main menu.
Tools Menu
Command
Tool Button
Key
Calculator
Result
Displays the Windows calculator.
Favorites Menu
Command
Tool Button
Change to
Favorites
Resource Manager User’s Manual 6.05
Key
Result
F2
Toggles between the Favorites menu
and the Main menu. See Favorites
Menu on page 1-27.
1-23
Graphical-Style Menus
Introduction
Other Menu
The Other menu contains a set of utilities. A calculator and Global Inquiry (which
consolidates and presents data from other applications) are some of the utilities on
the Other menu. See Appendix F for information about the utilities on the Other
menu.
Help Menu
Command
Help
About OSAS
1-24
Tool Button
Key
F1
Result
Displays the online help.
Displays the About OSAS dialog
box.
Resource Manager User’s Manual 6.05
Introduction
Graphical-Style Menus
Tool Buttons
There are three tool buttons on the toolbar that were not described above.
Tool Button
Key
Result
Displays the Application Information dialog box.
Opens an MS-DOS prompt.
Displays a screen for calling any BBx program
that does not require variables to be passed to it.
See Appendix F.
Other Graphical Screen Features
The graphical menus offer more than short cuts to application functions. With
Resource Manager, you can, at a glance or with a mouse click, determine the date
and time, switch between live and sample data, and switch between companies and
their data sets.
Date and Time
The workstation date and time are displayed.
Resource Manager User’s Manual 6.05
1-25
Graphical-Style Menus
Introduction
Data Set
Check the Live Data radio button to work with live data. Check the Sample Data
radio button to work with sample data.
Change Company Field
Select the company you want to work with.
1-26
Resource Manager User’s Manual 6.05
Favorites Menu
Your Favorites menu saves time in moving between applications, opening and
closing submenus and application menus, and allows easy access to your common
applications. By setting up your Favorites menu, you can access your most-used
functions or submenus by pressing the F2 button (or selecting the mouse pull-down
menu).
Favorites Menu: Text Style
There are two ways you can set up your Favorites menu, depending on if you use
the text-style menu or the graphical-style menus.
To set up the text-style Favorites menu, follow these steps:
1. Move your cursor to the submenu or application that you want placed in the
Favorites menu.
2. Press F10.
You can press F2 to verify your selection was added to your Favorites menu.
To remove an application:
1. Press F2 to display the Favorites menu.
2. Move your cursor to the submenu or application you want removed.
3. Press F10.
Resource Manager User’s Manual 6.05
1-27
Favorites Menu
Introduction
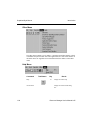
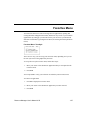
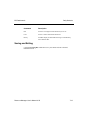
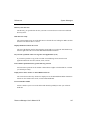
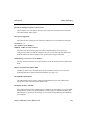
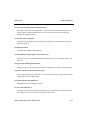
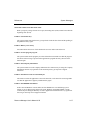
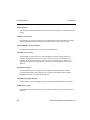
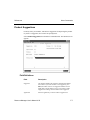
Favorites Menu: Start-Style
To set up the graphical-style display, follow these steps:
1. Position the cursor over the submenu or function you want placed into your
Favorites menu.
2. Right-click on the function or submenu. The Favorites menu set up box
(shown below) appears.
3. Click on Add to Favorites.
1-28
Resource Manager User’s Manual 6.05
Introduction
Favorites Menu
Screen Use
Screen
Description
Add to/Remove Favorites
Use the Add to/Remove Favorites menu button to add the
desired submenu or function to, or remove the submenu or
function from, your Favorites menu.
Change to Favorites/Main
Toggles your display menu between your Favorites menu
and your Main menu.
Sample data/Live data
Switches between your sample data and your live data.
Setup
Clicking on this button or pressing F9 sets up the selected
application. Setup works only in certain applications. If an
application requires a setup function, you will find
instructions in that application’s user’s manual.
Function Information
Displays information about the selected function.
Resource Manager User’s Manual 6.05
1-29
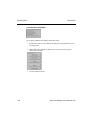
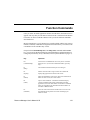
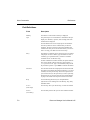
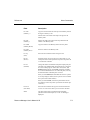
Function Commands
Once you select an OSAS application function from the menu, the function screen
appears. The way that you enter data on OSAS screens is consistent from function
to function. To move around the OSAS screens you use the function commands
described below.
Most keyboards have a set of function keys (usually labeled with the letter F and a
number). In OSAS, commands are assigned to these function keys. You can use the
commands to work with data entry screens.
Except for the Command Help (Esc) and Jump (Tab) commands and the Enter
key, you can use the Keyboard function on the Workstation Configuration menu to
reassign any function key to any command (see the Keyboard function on page 2-7).
Key
Operation
Esc
(Command help)
View the list of commands for the screen you are on and the
field you are in. (To close the commands window, press any
key.)
F1
(Help)
Get information about the field you are working on.
F2
(Inquiry)
Make a selection from a range of entries for a field if the
Inquiry flag appears at the bottom of the screen.
F3
(Delete)
Delete the information on the screen. Since this command can
delete an entire record, use it with caution.
F4
(Other)
Open a menu of utilities. A calculator and Global Inquiry
(which consolidates and presents information from other
applications) are some of the utilities on the Other Commands
menu. See Appendix F for information about the utilities on
the Other Commands menu.
F5
(Abandon)
Move the cursor back to the first field on the screen or to the
first field after the key field. The entries and changes you
made are erased.
Resource Manager User’s Manual 6.05
1-31
Function Commands
1-32
Introduction
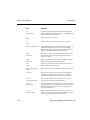
Key
Operation
F6
(Maintenance)
Go directly to the appropriate File Maintenance function to
update information about the field you are in if the Maint flag
appears at the bottom of the screen.
F7
(Exit)
Exit from a screen or a window.
F8
(List)
Send the contents of the screen to a printer or a text file.
Shift + F2 (Information)
Open an Information menu. Each selection on the menu is an
information window that you can access if the Info flag
appears at the bottom of the screen. Each window contains a
category of information about the field you are in.
PgUp
(Start over)
Move the cursor back to the first field on the screen or to the
first field after the key field without erasing the entries or
changes you made.
PgDn
(Proceed)
Approve the data on the screen, change the file accordingly,
and proceed to the next spot (field or screen).
Tab
(Jump)
Move the cursor to the next block of data on the screen or to
the next field that requires an entry.
Enter or Down Arrow
(Enter)
Move the cursor to the next field and accept the data entered.
Up Arrow
Move the cursor up (or back) one field. If you changed the
information in the field you were in before you used this
command, the change is lost when you move the cursor up.
Ctrl + V
(Verification on/off)
If verification is turned on, you must press a key twice to
verify that you want to perform that operation.
Ctrl + G
(Bell on/off)
If the bell is turned on, it sounds at an error or when you must
verify a command. To turn off the bell, use this command or
the Defaults function in chapter 3. To turn the bell back on,
use this command again.
Ctrl + F
(Quick on/off)
If this option is turned off, the cursor stops at every field
possible. To make the cursor skip the fields that do not require
an entry, use this command to turn the option on.
Resource Manager User’s Manual 6.05
Introduction
Function Commands
Key
Operation
Ctrl + O
(Show/hide function
keys)
If this option is turned on, the applicable function keys are
displayed on the screen. If this option is turned off, no keys are
displayed.
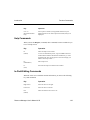
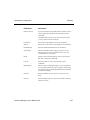
Help Commands
When you use the Help (F1) command, three commands become available for you
to use on help screens.
Key
Operation
F3
(Delete)
Delete the help screen contents.
F6
(Maintenance)
Edit a help screen.
F7
(Exit)
Exit from the help screen and close the window.
To recover a deleted help screen, copy the xxHELP file from
the distribution media to the /PROGxx subdirectory (xx is the
application ID). The copying process overwrites changes you
made to other help screens.
In-Field Editing Commands
When the cursor is in a field that contains information, you can use the following
keys and commands:
Key
Operation
Right Arrow
Move the cursor to the right.
Left Arrow
Move the cursor to the left.
Del
(Delete)
Delete the character the cursor is on.
Resource Manager User’s Manual 6.05
1-33
Function Commands
Introduction
Key
Operation
Ins
(Insert on/off)
Switch insert mode on and off. When the Insert flag appears at
the bottom of the screen, characters you type push characters
after the cursor off to the side. When insert mode is turned off,
characters you type write over existing ones.
Home
Move the cursor directly to the beginning of the field.
End
Move the cursor directly to the end of the field.
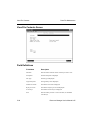
F9
(Undo)
Restore a field to the way it was before you changed it. You
can use this command only while you are in the field; once
you move past it, you must use the Abandon (F5) command
to clear the field.
F10
(Delete to end of line)
Delete the characters in the field to the right of the cursor. If
insert mode is turned off and you enter a character in the
field’s first position, everything in the field is deleted.
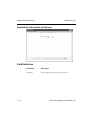
Inquiry Commands
When you use the Inquiry (F2) command, several other commands become
available for you to use in the inquiry window.
Note
To shorten your data search, use a partial-key inquiry to cut down the size of the inquiry list.
For example, if you know that the ID starts with J, enter J in the ID field before you use the
Inquiry command. The inquiry list will start with J and run through the end of the list.
1-34
Key
Operation
PgUp
Display the previous page of the window.
PgDn
Display the next page of the window.
End
Move directly to the last item on file.
Resource Manager User’s Manual 6.05
Introduction
Function Commands
Key
Operation
Home
Move directly to the first item on file.
Down Arrow
Move down one item.
Up Arrow
Move up one item.
Ins
(Look up)
Enter a string of information.
F7
(Exit)
Leave the Inquiry window without selecting anything.
Enter
Select the item the cursor is pointing to.
Esc
(View commands)
Open a window that shows Inquiry window commands and
the window ID.
If you have an idea of what you are looking for and the ID is
longer than one character, you can make a partial-key inquiry
to cut down the size of the inquiry list. For example, if you
know that the ID starts with J, enter J in the ID field.
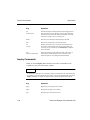
Inventory Search Commands
If you use the Inventory application and the cursor is in an Item ID field, you can
use any of the Inventory Search commands to search for information about items
and select an item for entry in the field you are in.
Key
Operation
Shift + F3
(Alias Lookup)
Search for items with a specified alias listed as an alternate
item. When you enter the alias, you can use the “*” and “?”
wildcard characters to restrict or widen the search.
Shift + F4
(Customer/Vendor
Lookup)
Search for an item based on customer ID or vendor ID.
When you enter the customer or vendor ID, you can use the
“*” and “?” wildcard characters to restrict or widen the
search.
Resource Manager User’s Manual 6.05
1-35
Function Commands
Introduction
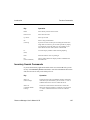
Key
Operation
Shift + F5
(Detail Lookup)
Search for detailed information about an item. You can
enter search information in any of the fields that appear,
using any of the following wildcard characters to restrict or
widen the search: * ? < > =.
Shift + F6
(Lot–Item Lookup)
Search for an item based on lot number. When you enter the
lot number, you can use the “*” and “?” wildcard characters
to restrict or widen the search.
Shift + F7
(Serial Number–Item
Lookup)
Search for an item based on serial number. When you enter
the serial number, you can use the “*” and “?” wildcard
characters to restrict or widen the search.
Shift + F8
(Item Description Lookup)
Search for an item based on item description. When you
enter the description, you can use the “*” and “?” wildcard
characters to restrict or widen the search.
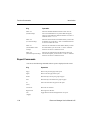
Report Commands
You can use the following commands when a report is displayed on the screen:
1-36
Key
Operation
PgUp
Move to the previous page of the report.
PgDn
Move to the next page of the report.
Home
Move directly to the top of a group of pages.
End
Move directly to the bottom of a group of pages.
F7
(Exit)
Exit to the menu from any point in the report.
Left Arrow
Move left one character.
Right Arrow
Move right one character.
Tab
(Toggle)
Toggle between the left and right halves of a report.
Resource Manager User’s Manual 6.05
Introduction
Function Commands
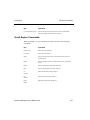
Key
Operation
Up Arrow/Down Arrow
Move a line up and down the screen to line up information
when you toggle between halves of a report.
Scroll Region Commands
When the prompt (>) is in a line-item scroll region, you can use the following
commands:
Key
Operation
Down Arrow
Move down one line item.
Up Arrow
Move up one line item.
PgUp
Move to the previous screen or to the first line if you are on
the first screen.
PgDn
Move to the next screen or to the last line if you are on the last
screen.
Home
Move to the first line item in the entire list.
End
Move to the last line item in the entire list.
F3
(Delete)
Delete the line item at the prompt (>).
Ins
(Insert)
Insert a line item at the prompt (>).
Enter
(Edit)
Edit the line item at the prompt (>).
Resource Manager User’s Manual 6.05
1-37
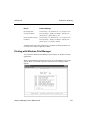
Reports
Selecting a Range of Information
To produce a report, you must specify the amount of information you want in the
report.
•
To produce a report that includes all the available information, leave the
From-Thru fields on the report function screen blank. For example, if you
want information about all the vendors to be in a report, leave the Vendor ID
From and Thru fields blank.
•
To limit the amount of information in the report, enter the range of
information in the From-Thru fields. For example, if you want a report to
include information only about vendor ACE001, enter ACE001 at both From
and Thru. If you want the report to include information only about vendors
that start with CO, enter CO at From and COZZZZ at Thru.
Each field where you enter information on a report function screen usually restricts
the overall output of the report. For example, if you leave the Vendor ID From and
Thru fields blank, the report will contain information about all the vendors. But if
you enter invoice 100 in the Invoice Number From and Thru fields, and invoice
100 is assigned only to vendor ACE001, the report includes information only about
vendor ACE001.
Sorting
Information for reports is sorted first by a space (_), then by characters, then by
digits, then by uppercase letters, and finally by lowercase letters. No matter what
you enter in the From and Thru fields, however, your entries are sorted in
alphabetical order (unless the function provides an option to sort the information
differently).
Sorting by alphabetical codes or IDs is easy. For example, the ID ACL comes
before the ID BB because A comes before B.
Resource Manager User’s Manual 6.05
1-39
Reports
Introduction
But take notice when you enter codes or IDs that consist of something other than
letters; the order might not be what you expect. For example, if 20 items are labeled
1 through 20 and you want all of them to be in a report, you might enter 1 at From
and 20 at Thru, expecting them to be listed 1, 2, 3 . . . 19, 20. However, since OSAS
sorts in alphabetical order, they are listed in a different order: 1, 10–19, 2, 20, 3–9.
To prevent that situation, pad extra spaces in codes and IDs with zeros so that
numbers in alphabetical order are also in numerical order. In the example above the
items would be labeled 00000000000000000001 through 00000000000000000020.
Output Device
Report functions screens offer four output options: printer, file, screen, and end.
•
When you need a hard copy of a report, select P, and either accept the printer
that appears or enter the code for the printer you want to use.
If applicable, select S if you want the report to be in standard-size print or C if
you want it to be in compressed print.
If you want to stop printing after it has begun, press Ctrl + Break.
•
If you want to save the report as a data file—for example, to include it in a
word-processed report (in CR-LF format)—select F. The data path for the
workstation, including the default drive, appears if it is specified in the
Defaults function. Enter the filename and file extension, using no more than
35 characters overall.
•
To preview the report—you must be using the Visual PRO/5 Interpreter and
have a sysprint printer in your CONFIG.BBX file—select R.
If applicable, select S if you want the report to be in standard-size print or C if
you want it to be in compressed print.
In the Printer dialog box that appears, select a sysprint printer and press
Enter. The report is displayed on the screen. See Appendix F for toolbar and
menu options.
1-40
Resource Manager User’s Manual 6.05
Introduction
Reports
•
To view the report on the screen, select S. If the workstation default for
compressed characters is inactive, the report is displayed in standard character
mode. If the default is active, you can select standard mode or compressed
mode. See your terminal documentation and the section on the termcap file in
the PRO/5 and Visual PRO/5 User’s Manual.
If the message End of Page appears at the bottom of the report screen, you
can press Enter to generate the next page of the report. If the message End of
Report appears at the bottom of the report screen, you can press Enter to exit
to the menu you selected the report from.
•
If you need to change some selections before you produce the report, select E
and then press Enter. To end the function and return to the menu without
producing the report, select E and then use the Exit (F7) command.
Resource Manager User’s Manual 6.05
1-41
Resource Manager User’s Manual
6.05
Workstation Configuration
Colors
Keyboard
Devices
Defaults
Resource Manager User’s Manual 6.05
2
2-3
2-7
2-11
2-23
2-1
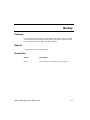
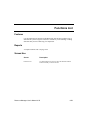
Colors
Features
Use the Colors function on the Workstation Configuration menu to customize the
colors at your workstation for each type of screen and window in OPEN
SYSTEMS Accounting Software.
The type of monitor you are using determines the color combinations that are
available.
The colors you choose affect only the character-based OSAS screens. The colors
used on graphical screens are based on the default Windows color scheme you use.
Use the Colors function on the Windows Control Panel to change your Windows
color scheme.
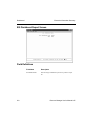
Reports
No report is associated with this function.
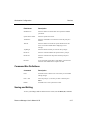
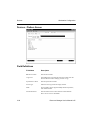
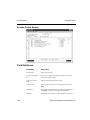
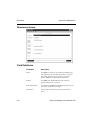
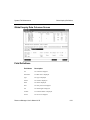
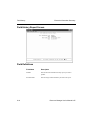
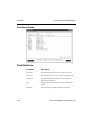
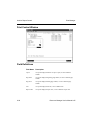
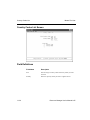
Screen Use
Screen
Description
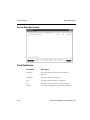
Colors
Use the Colors screen to customize colors for 14 types of
windows and screens.
Resource Manager User’s Manual 6.05
2-3
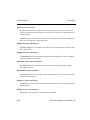
Colors
Workstation Configuration
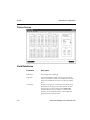
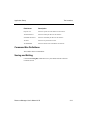
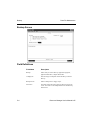
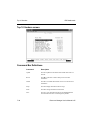
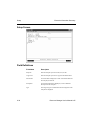
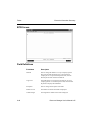
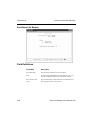
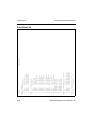
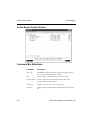
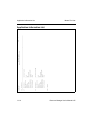
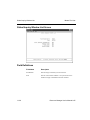
Colors Screen
Field Definitions
2-4
Field Name
Description
Workstation
The workstation ID is displayed.
Copy From
If you have a multiuser system, you can copy color settings
from one workstation to another with a similar monitor. Enter
the ID of the workstation you want to copy the color settings
from.
Color Group
For each screen type, you can select the colors for the screen
background (a color group), text, border, and title. To select
the screen type you want to change, use the Jump (Tab)
command until you get to the window or screen you want.
Then enter a color combination from one of the eight color
groups on the left side of the screen.
Resource Manager User’s Manual 6.05
Workstation Configuration
Colors
Field Name
Description
Text
Enter the number of the color (within the color group you
selected) you want for text.
Border
Enter the number of the color (within the color group you
selected) you want for borders.
Title
Enter the number of the color group you want for the title.
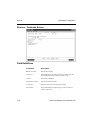
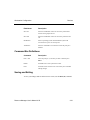
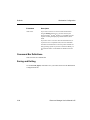
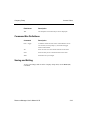
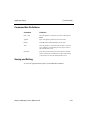
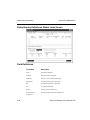
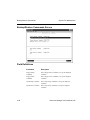
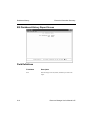
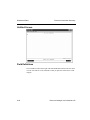
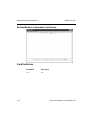
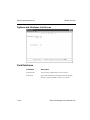
Command Bar Definitions
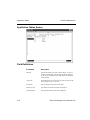
This screen has no command bar.
Saving and Exiting
Use the Proceed (PgDn) command to save your entries and exit to the Workstation
Configuration menu.
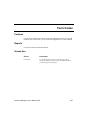
Resource Manager User’s Manual 6.05
2-5
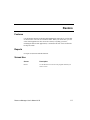
Keyboard
Features
Use the Keyboard function on the Workstation Configuration menu to customize
the function and editing keys for your workstation and to copy a keyboard layout to
another workstation or set of workstations.
Reports
No report is associated with this function.
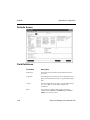
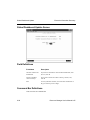
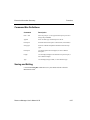
Screen Use
Screen
Description
Keyboard
Use the Keyboard screen to customize the function and
editing keys for your workstation.
Resource Manager User’s Manual 6.05
2-7
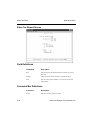
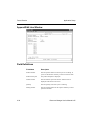
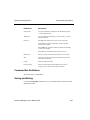
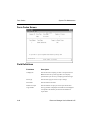
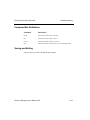
Keyboard
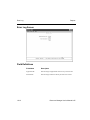
Workstation Configuration
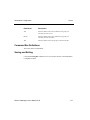
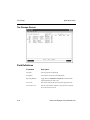
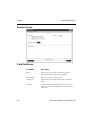
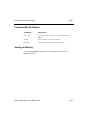
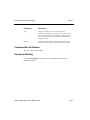
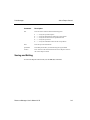
Keyboard Screen
Field Definitions
2-8
Field Name
Description
Workstation
Enter the ID of the workstation whose keyboard you want to
edit.
Copy From
This field appears if you entered a new workstation ID. Enter
the ID of the workstation you want to copy the keyboard
functions from.
Resource Manager User’s Manual 6.05
Workstation Configuration
Keyboard
Field Name
Description
Copy To
If you have a multiuser system, you can save time when you
set up workstations with similar keyboards by copying the
keyboard definition to other workstations.
Enter the workstation ID you want to copy the keyboard
functions to, or enter *ALL to copy to all the workstations. If
you are changing the keyboard functions on your terminal
only, skip this field.
Description
The keyboard command keys are displayed.
Type
The type of command—screen or edit—is displayed.
Default
The control character or escape sequence for each base
command is displayed.
Key Label
The key label assigned to each command is displayed.
To edit the command, press Enter. Then press the function or
editing key you want to use. (An asterisk next to the key label
indicates which command you are working with.)
User Label
The user label is a description of the key label. Accept the
displayed description, or enter the user label that you want to
be displayed when you are prompted for a command response.
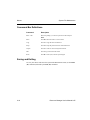
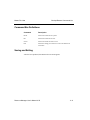
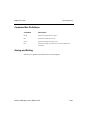
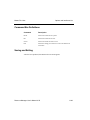
Command Bar Definitions
Command
Description
Enter = edit
Move the prompt (>) to the line you want to edit and press
Enter.
Write
Press W to write changes to the file and exit from the function.
Saving and Exiting
To write changes to the file and exit to the Workstation Configuration menu, use
the Write (W) command.
Resource Manager User’s Manual 6.05
2-9
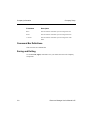
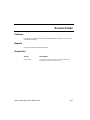
Devices
Features
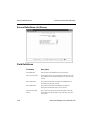
Use the Devices function on the Workstation Configuration menu to set up
terminals, printers, Windows graphics devices, and other graphics devices (such as
plotters) you use on your system. If you have a multiuser system, you can also
specify whether a device will be local (used by one workstation) or shared by all
workstations.
You can save your last device setting in a file that you specify by using the
Configuration Backup screen. The screen appears when you enter the devices
function and will prompt you for a backup file name. You can preserve your old
backup files by choosing a unique file name. Overwriting the old file will erase
your previous Device setting and replace it with your current settings.
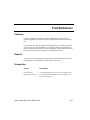
Reports
No report is associated with this function.
Resource Manager User’s Manual 6.05
2-11
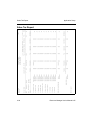
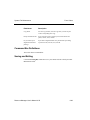
Devices
Workstation Configuration
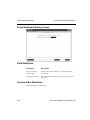
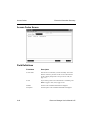
Screen Use
Screen
Description
Devices
Use the Devices screen to set up the configuration for each
workstation in your system.
Devices - Printers
Use the Printers screen to set up the printer configuration
for the system.
Devices - Terminals
Use the Terminals screen to set up the terminal
configuration for the system.
Devices - Plotters
Use the Plotters screen to set up the plotter configuration for
the system.
Devices - Configuration
Backup window
Use the Configuration Backup window to establish a
configuration backup file for the system.
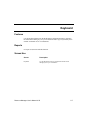
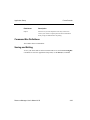
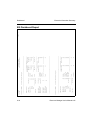
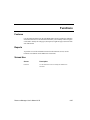
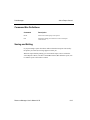
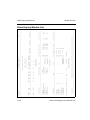
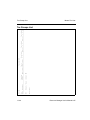
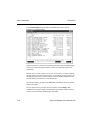
Devices Screen
2-12
Resource Manager User’s Manual 6.05
Workstation Configuration
Devices
Field Definitions
Field Name
Description
none
The devices and assigned values are displayed.
Command Bar Definitions
Command
Description
Enter = edit
Move the prompt (>) to the line you want to edit and press
Enter.
Append
Press A to add a device. A second command bar appears.
Write
Press W to save your entries to a file.
Terminal
Press T to add a terminal.
Printer
Press P to add a printer.
Graphics Plotter
Press G to add a graphics plotter.
Other
Press O to create a blank line so that you can add other
configuration options.
Saving and Exiting
To save your entries and exit to the Workstation Configuration menu, use the
Write (W) command and then enter Y.
Resource Manager User’s Manual 6.05
2-13
Devices
Workstation Configuration
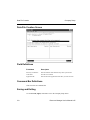
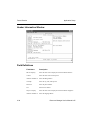
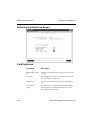
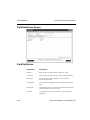
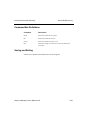
Devices - Sysprint Screen and Direct Printers Screen
2-14
Resource Manager User’s Manual 6.05
Workstation Configuration
Devices
Field Definitions
Depending on the type of printer you select, Resource Manager has the following
options for regular printers and sysprint devices.
Field Name
Description
BBx Device Name
Enter the device name.
Backspace
If the printer supports an ASCII backspace code, enter Y. If
the printer does not have backspace capability, enter N or a
hexadecimal code for a backspace.
Carriage Return
If the printer supports the ASCII carriage return code, enter Y;
if it does not, enter N or the hexadecimal code for a carriage
return.
Compress Print
Enter the hexadecimal code for compressed print (about 17.6
characters an inch).
Compress Cols
Enter the number of columns that can be printed in
compressed printer mode.
Copy From
This field appears if you entered a new device name. Enter the
name of the device whose settings you want to copy.
Device Type
Select the device type from the inquiry window.
Dialog
Enter YES if you want to call up a screen that will allow you
to select a printer. Enter NO if you want to print to the default
printer.
Expanded On
Enter the hexadecimal code that turns on expanded print
mode.
Expanded Off
Enter the hexadecimal code that turns off expanded print
mode.
Expanded Cols
Enter the number of columns that can be printed in expanded
print mode.
Expanded Lines
Enter the number of lines of expanded print that fit on a page.
Resource Manager User’s Manual 6.05
2-15
Devices
Workstation Configuration
Field Name
Description
Form Feed
Enter the hexadecimal code that makes the printer skip to the
top of the next page.
Font
Enter the font you wish to print your reports in.
Left Margin
Enter the amount of offset you want for the left margin.
Line Feed
Enter the hexadecimal code that makes the printer move to the
next line without a carriage return.
Lines Per Page
Enter the maximum number of lines you can print per page
Lock File
If your system has a printer locking mechanism or if you have
a single-user system, skip this field. If your system does not
have a printer locking mechanism, enter the name of a file that
will be created on the disk when the printer is being used.
Initialization
Enter an operating system command that the system will
execute before a job is sent to the printer.
Setup
If your system is using Windows, you may select YES to have
a dialog box appear when you print your reports. With the
dialog box, depending on the printer driver, you can select
amount of copies per page, printer choices, print formats, and
page layout. Selecting NO will allow you to default your
printing job.
Slave On
Slave printers are attached to one terminal and can be used
from other workstations on the system. (This feature is not
available with some operating systems.) To communicate with
slave printers, the system may need to send hexadecimal
codes before and after the text.
Enter the hexadecimal codes to be sent to the printer before
the text.
2-16
Slave Off
Enter the hexadecimal codes to be sent to the printer after the
text.
Standard Print
Enter the hexadecimal code for standard print (10 characters
an inch).
Resource Manager User’s Manual 6.05
Workstation Configuration
Devices
Field Name
Description
Standard Cols
Enter the number of columns that can be printed in standard
print mode.
System Device Name
Enter the system device name.
Termination
Enter the commands to reset the device when the print job is
finished.
Timeout
Enter the number of seconds the system should wait for the
device to become available before displaying an error
message.
Top Margin
Enter the amount of offset you want for the top margin.
Printer On
Enter the codes that initialize the printer before a print job.
Printer Off
Enter the codes that reset the printer when the print job is
finished.
Print File
If you entered the system device name $FILE, you must enter
the name of the default file for output to the disk.
Command Bar Definitions
Command
Description
Done
Press D to return to the Devices screen when you are finished
making changes.
Enter = edit
Move the prompt (>) to the line you want to edit and press
Enter.
Header
Press H to enter a new system device name.
Saving and Exiting
To save your changes and exit to the Devices screen, use the Done (D) command.
Resource Manager User’s Manual 6.05
2-17
Devices
Workstation Configuration
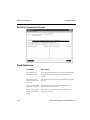
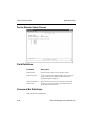
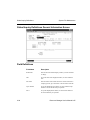
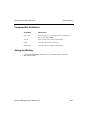
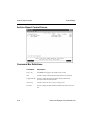
Devices - Terminals Screen
Field Definitions
2-18
Field Name
Description
BBx Device Name
Enter the device name.
Copy From
This field appears if you entered a new device name. Enter the
name of the device whose settings you want to copy.
User ID
The user ID is displayed.
System Device Name
Enter the system device name.
Device Type
Select the device type from the inquiry window.
Driver Name
If you selected doscon as the device type, enter the name of
the device driver file.
Resource Manager User’s Manual 6.05
Workstation Configuration
Devices
Field Name
Description
DMA
If you selected doscon as the device type, enter Y for a
terminal that supports direct memory access, or enter N for a
terminal that does not support direct memory access.
Mode
If you selected doscon as the device type, refer to the terminal
manual to find out which modes it supports. If you want to
change the mode of your terminal when you start OSAS, enter
the mode number.
Keystart
If your terminal has function keys that are described such that
the termcap ‘k0’ entry is really function key 10, enter Y: if
not, enter N.
Keywait
Enter the number of seconds the terminal should wait before
processing a group of characters.
Initialization
Enter an operating system command that the system will
execute before using the terminal.
Termination
Enter an operating system command to reset the terminal
when the job is finished.
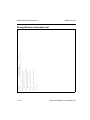
Command Bar Definitions
Command
Description
Enter = edit
Move the prompt (>) to the line you want to edit and press
Enter.
Header
Press H to enter a new system device name.
Done
Press D to return to the Devices screen when you are finished
making changes.
Saving and Exiting
To save your changes and exit to the Devices screen, use the Done (D) command.
Resource Manager User’s Manual 6.05
2-19
Devices
Workstation Configuration
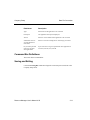
Devices - Plotters Screen
Field Definitions
2-20
Field Name
Description
BBx Device Name
Enter the device name.
Copy From
This field appears if you entered a new device name. Enter the
name of the device whose settings you want to copy.
System Device Name
Enter the system device name.
Device Type
Select the device type from the inquiry window.
Mode
If your graphics device supports multiple modes of operation,
enter a mode number.
Font1/Font2/Font3
Enter the names of one to three files that contain fonts the
device can use. Font1 is the default.
Resource Manager User’s Manual 6.05
Workstation Configuration
Devices
Field Name
Description
Slave On
Enter the hexadecimal codes to be sent to the printer before
the text for the graphics device.
Slave Off
Enter the hexadecimal codes to be sent to the printer after the
text.
Initialization
Enter an operating system command that the system will
execute before a job is sent to the printer.
Termination
Enter the commands to reset the device when the print job is
finished.
Command Bar Definitions
Command
Description
Enter = edit
Move the prompt (>) to the line you want to edit and press
Enter.
Header
Press H to enter a new system device name.
Done
Press D to return to the Devices screen when you are finished
making changes.
Saving and Exiting
To save your changes and exit to the Devices screen, use the Done (D) command.
Resource Manager User’s Manual 6.05
2-21
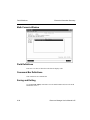
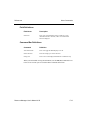
Defaults
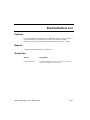
Features
Use the Defaults function on the Workstation Configuration menu to set defaults
for functions, fields, and directories for a workstation.
Note
The defaults you set in this function will override defaults specified in Company
Setup (page 3-3)
Reports
No report is associated with this function.
Screen Use
Screen
Description
Defaults
Use the Defaults screen to set the defaults for each
workstation.
Resource Manager User’s Manual 6.05
2-23
Defaults
Workstation Configuration
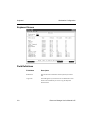
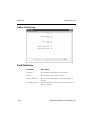
Defaults Screen
Field Definitions
2-24
Field Name
Description
Workstation
Enter the ID of the workstation whose defaults you want to
work with.
Copy From
This field appears if you entered a new workstation ID. Enter
the ID of the workstation you want to copy the default settings
from.
Copy To
Enter the workstation ID you want to copy the default settings
to, or enter *ALL to copy the default settings to all
workstations.
BELL
If you want the computer to beep during verification of
commands such as Exit (F7), Abandon (F5), and Proceed
(PgDn), press A; if not, press I.
Resource Manager User’s Manual 6.05
Workstation Configuration
Defaults
Field Name
Description
VERIFY EXIT
If you want to confirm the Exit (F7) and Abandon (F5)
commands by issuing the command a second time, press A; if
not, press I.
INSERT
If you want the character you type to appear before (to the left
of) the cursor, press A. If you want the character you type to
replace the one the cursor is on, press I.
QUICK
In some applications quick entry lets you skip nonessential
fields on a screen.
If you want the cursor to stop only at fields that require new
data, press A. If you need to change a nonessential field when
quick entry is active, use the up-arrow key to move back to the
field after you pass it.
If you want the cursor to stop at every field you can change on
the screen, press I.
SHELL
If you want to be able to exit to the operating system’s shell
(environment) through the BBx interpreter, press A. The shell
has only enough memory to run simple operating system
commands and utilities. To exit from OSAS, press Alt 1. To
return to OSAS, enter Exit.
If you want to restrict access to the operating system’s shell,
press I.
SHELL ‘CS’
If you want the system to refresh the screen (Alt 2) after a
system call, press A. If you do not want the programs to
refresh the screen manually, press I.
ALLOW EXIT
If you want to be able to exit from OSAS and run other
operating system programs, press A. If you want to prevent
exiting from OSAS, press I.
COPYRIGHTS
If you want the copyrights of OSAS to appear on your
workstation each time you start OSAS, press A; if not, press I.
Resource Manager User’s Manual 6.05
2-25
Defaults
Workstation Configuration
Field Name
Description
LIVE DATA
If you want to use OSAS with live data files, press A. You can
still toggle to the sample data path by pressing F5 at the Main
menus.
If you want use OSAS with sample data only, press I.
VERIFY PGDN
If you want to confirm the Proceed (PgDn) command by
issuing the command a second time, press A; if not, press I.
COMPRESSED
If you want to be able to select compressed screen printing,
press A. If you never use compressed print or if your
workstation does not support it, press I.
ONLINE HELP
If you want the function keys and the functions they represent
to appear at the bottom of the screen, press A; if not, press I.
BANNER PAGE
If you want to print a banner page that shows the pick screen
of each report, press A; if not, press I.
FAVORITES
If you want to start OSAS using the Favorites menu, press A;
if you want to start OSAS using the main menu, press I.
Note
The next three options are available only on Windows workstations.
Field Name
Description
GUI FUNCTIONS
If you want to use Windows graphical screens whenever they
are available, press A; if not, press I.
MENU STYLE
Choose one of these options for the type of menu you want to
use on this workstation:
T = traditional text-based menu
G = panelled graphical menu
S = Start-style graphical menu
2-26
Resource Manager User’s Manual 6.05
Workstation Configuration
Defaults
Field Name
Description
DELAY VALUE
If you chose the Start-style graphical menu, the delay value is
used to regulate how quickly the menu responds to mouse
movements.
The default delay value is 1, but you can increase this value
(1-9) if your menu behaves erratically.
Location ID
Enter the ID of the default location for the workstation.
Bank ID
Enter the ID of the bank that is the default for the workstation.
EIS Dashboard
Enter the default EIS Dashboard for the workstation.
Screen Pages
Enter the maximum number of pages you want to store in
memory from a report that is displayed on the screen. The
system default is 5 screen pages.
Printer
Enter the name of the default printer. You can also enter the
BBx device name such as LP or P0.
User ID
Enter the ID that you want to be associated with the
workstation.
Bitmap Image
Enter the name of a bitmapped image to use as a background
for your graphical menu. If you do not specify a bitmap name,
the system will use the default OSAS.BMP which is installed
with Resource Manager.
Print File
Enter the subdirectory where you want your reports to be
filed.
Sort File
Enter the subdirectory where you want sorted files created by
OSAS to be stored.
Resource Manager User’s Manual 6.05
2-27
Defaults
Workstation Configuration
Field Name
Description
.PDF Viewer
If you want to be able to access the online documentation
using the Shift-F1 function key, you must enter the path
where the Adobe® Acrobat® Reader (or a compatible program
capable of reading and displaying .PDF documents) can be
found.
If you don’t want to access the online documentation files, or
if you don’t have a compatible reader, leave this field blank.
The Adobe Acrobat Reader is a freeware product available for
many operating systems. If you have an OSAS CD-ROM, you
can install the Adobe Acrobat Reader for Windows from the
CD.
Command Bar Definitions
This screen has no command bar.
Saving and Exiting
Use the Proceed (PgDn) command to save your entries and exit to the Workstation
Configuration menu.
2-28
Resource Manager User’s Manual 6.05
Resource Manager User’s Manual
6.05
Company Setup
Company Information
Data File Creation
Data File Conversion
Options and Interfaces
Access Codes
Country Codes
Resource Manager User’s Manual 6.05
3
3-3
3-7
3-9
3-13
3-17
3-21
3-1
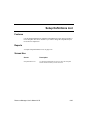
Company Information
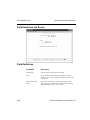
Features
Use the Company Information function on the Company Setup menu for the
following tasks:
•
•
•
•
•
•
add companies
change the name, address, and phone and fax numbers for a company
set a company’s location and bank ID defaults
set the user-defined masks for numeric values
remove company records from the system
select the date and time format for a company’s reports and screens
The numeric masks you set up in this function are used in most of the OSAS
applications. By entering the number of decimals you want for each mask type, you
define the way they appear in other applications.
Some applications may have fields that override the numeric masks you assign in
this function. Refer to the user’s manual for the application if you suspect that a
field is not using the masks you set up here.
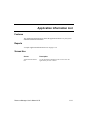
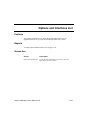
Reports
No report is associated with this function.
Screen Use
Screen
Description
Company Information
Use the Company Information screen to enter or change
information for a company.
Resource Manager User’s Manual 6.05
3-3
Company Information
Company Setup
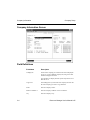
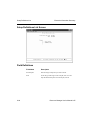
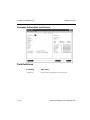
Company Information Screen
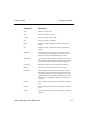
Field Definitions
Field Name
Description
Company ID
The ID of the company you selected at the menu is displayed.
Accept it, or enter a different company ID, using one to three
numbers and uppercase letters.
You can delete a company from the system only if there are no
data files for it.
3-4
Copy From
This field appears if you entered a new company ID. Enter the
ID of the company you want to copy data from.
Name
Enter the company’s name.
Address 1/Address 2
Enter the company’s address on one or both lines.
City
Enter the company’s city.
Resource Manager User’s Manual 6.05
Company Setup
Company Information
Field Name
Description
State
Enter the company’s state.
Zip
Enter the company’s zip code.
Country
Enter the company’s country code.
Site
Enter the company’s site number.
Phone
Enter the area code, a hyphen (if necessary), and the phone
number.
Fax
Enter the area code, a hyphen (if necessary), and the phone
number.
Date Mask
If you want dates in the company’s reports and on screens to
be in American format (mm/dd/yyyy), enter 0. If you want
them to be in European format (dd/mm/yyyy), enter 1.
Time Mask
If you want times in the company’s reports and on screens to
be in standard 12-hour format (hh:mm am/pm), enter 0. If you
want them to be in military 24-hour format (hh:mm), enter 1.
Location ID
Enter the ID of the location associated with the company.
Bank ID
Enter the ID of the bank associated with the company.
Reg Dollars
Enter the number of decimals you want assigned to regular
dollar amounts. The location of the company might determine
the number of decimals you enter. For example, if you set up
regular dollars for a U.S. company, you might enter 2 for the
dollar; if you set up a Japanese company, you might enter 0
for the yen.
IN Costs
Enter the number of decimals you want assigned to inventory
costs.
IN Prices
Enter the number of decimals you want assigned to inventory
prices.
IN Qtys
Enter the number of decimals you want assigned to inventory
quantities.
Resource Manager User’s Manual 6.05
3-5
Company Information
Company Setup
Field Name
Description
Rates
Enter the number of decimals you want assigned to rates.
Hours
Enter the number of decimals you want assigned to hours.
Cr Limits
Enter the number of decimals you want assigned to credit
limits.
Command Bar Definitions
This screen has no command bar.
Saving and Exiting
Use the Proceed (PgDn) command to save your entries and exit to the Company
Setup menu.
3-6
Resource Manager User’s Manual 6.05
Data File Creation
Features
Use the Data File Creation function on the Company Setup menu to create the data
files that you need to process information for a company.
Reports
No report is associated with this function.
Screen Use
Screen
Description
Data File Creation
Use the Data File Creation screen to select the directory for
the files you create.
Resource Manager User’s Manual 6.05
3-7
Data File Creation
Company Setup
Data File Creation Screen
Field Definitions
Field Name
Description
Directory on Which to
Create Files
Enter the number of the data directory where you want the
new files to be created.
Application ID
Enter the ID of the application whose files you want to create.
Command Bar Definitions
This screen has no command bar.
Saving and Exiting
Use the Proceed (PgDn) command to exit to the Company Setup menu.
3-8
Resource Manager User’s Manual 6.05
Data File Conversion
Features
Use the Data File Conversion function on the Company Setup menu to convert data
files from OPEN SYSTEMS Accounting Software version 3.2 or higher to the
latest version.
Reports
No report is associated with this function.
Screen Use
Screen
Description
Data File Conversion
Use the Data File Conversion screen to select the directory
for the converted files.
Resource Manager User’s Manual 6.05
3-9
Data File Conversion
Company Setup
Data File Conversion Screen
Field Definitions
3-10
Field Name
Description
Select directory on
which to create files.
Accept the displayed data directory, or enter the number of the
data directory where you want the converted files to be
created.
Enter directory that
contains the files to be
converted.
Enter the name of the directory that contains the files you want
to convert.
Do you want source files
erased after conversion?
If you want the source files to be erased after they are
converted, enter Y; if not, enter N.
Do you want conversion
to pause if a problem is
found?
If you want the conversion to pause when problems arise,
enter Y; if not, enter N.
Resource Manager User’s Manual 6.05
Company Setup
Data File Conversion
Field Name
Description
Appl
Enter the ID of the application to be converted.
Description
The application description is displayed.
Version
Enter the version number of the application to be converted.
xxData files exist. Do
you want this task to
erase them?
Enter Y to erase the existing files or N to change your entries.
Do you want a printout
of the error log after
each application?
If you want an error log to be printed after each application is
converted, enter Y; if not, enter N.
Command Bar Definitions
This screen has no command bar.
Saving and Exiting
Use the Proceed (PgDn) command to begin the conversion process and exit to the
Company Setup menu.
Resource Manager User’s Manual 6.05
3-11
Options and Interfaces
Features
Use the Options and Interfaces function on the Company Setup menu to determine
the way the system functions and to set up interfaces between some applications
installed on your system.
Reports
To produce a list of the information entered in the Options and Interfaces function,
use the Options and Interfaces List function.
Screen Use
Screen
Description
Options and Interfaces
Use the Options and Interfaces screen to select the application
you want to set up options and interfaces for.
Options
Use the Options screen to view and edit the settings for the
application you selected.
Resource Manager User’s Manual 6.05
3-13
Options and Interfaces
Company Setup
Options and Interfaces Screen
Field Definitions
Field Name
Description
Company ID
The company you selected on the menu is displayed.
Option Table Type
Enter Own to keep each company’s options separate, or enter
Share if you want companies to use the same options and
interfaces.
Application ID
Enter the ID of the application you want to set the options for.
Command Bar Definitions
This screen has no command bar.
3-14
Resource Manager User’s Manual 6.05
Company Setup
Options and Interfaces
Saving and Exiting
Use the Proceed (PgDn) command to save your entries and exit to the Company
Setup menu.
Options Screen
Field Definitions
Field Name
Description
Description
The options for the application you selected are displayed.
Value
The current value of the option is displayed.
Resource Manager User’s Manual 6.05
3-15
Options and Interfaces
Company Setup
Command Bar Definitions
Command
Description
Enter = toggle
Press Enter to toggle between options.
Write
Press W to save the values you selected and exit to the
Company Setup menu.
Saving and Exiting
To save your entries and exit to the Company Setup menu, use the Write (W)
command.
3-16
Resource Manager User’s Manual 6.05
Access Codes
Features
Use the Access codes function on the Company Setup menu to protect your data
files from unauthorized access.
Reports
No report is associated with this function.
Screen Use
Screen
Description
Access Codes
Use the Access Codes screen to select the menus and
functions to protect from unauthorized access.
Resource Manager User’s Manual 6.05
3-17
Access Codes
Company Setup
Access Codes Screen
Field Definitions
3-18
Field Name
Description
Access Name
Enter an access name.
Copy From Company
ID
To copy access rights from another company’s access code,
enter the ID of that company.
Copy From Access
Name
Enter the access name you want to copy.
Access Code
Enter an access code. To create a blank access code, press
Enter.
Application
Enter the ID of the application you want to assign rights to, or
press Enter to assign access rights to the Main menu.
Menu ID
Enter the ID of the menu you want to assign access rights to.
Resource Manager User’s Manual 6.05
Company Setup
Access Codes
Field Name
Description
Title
The description of the menu ID you chose is displayed.
Command Bar Definitions
Command
Description
Enter = toggle
To indicate whether the users of the code should have access
to a function, move the prompt (>) to the line and toggle
between YES and NO.
All
Press A to turn on access to all the functions on the menu.
None
Press N to deny access to all the functions on the menu.
Write
Press W to save your changes.
Saving and Exiting
To save your changes and exit to the Company Setup menu, use the Write (W)
command.
Resource Manager User’s Manual 6.05
3-19
Country Codes
Features
Use the Country Codes function on the Company Setup menu to assign a twocharacter code to a country.
Reports
To produce a list of the information entered on the Country Codes screen, use the
Country Codes List function.
Screen Use
Screen
Description
Country Codes
Use the Country Codes screen to assign a code to a country.
Resource Manager User’s Manual 6.05
3-21
Country Codes
Company Setup
Country Codes Screen
Field Definitions
Field Name
Description
Country Code
Enter the code for the country.
Name of Country
Enter the full name of the country.
Command Bar Definitions
This screen has no command bar.
Saving and Exiting
Use the Proceed (PgDn) command to save your entries and exit to the Company
Setup menu.
3-22
Resource Manager User’s Manual 6.05
Resource Manager User’s Manual
6.05
Application Setup
Tax Classes
Tax Locations
Tax Groups
Sales Tax Report
Clear Sales Tax
Period Setup
Forms Reorder
Forms Reorder Codes
Resource Manager User’s Manual 6.05
4
4-3
4-7
4-13
4-17
4-21
4-25
4-29
4-37
4-1
Tax Classes
Features
Use the Tax Classes function on the Application Setup menu to add or change the
descriptions associated with tax classes.
Reports
No report is associated with this function.
Screen Use
Screen
Description
Tax Classes
Use the Tax Classes screen to add or change tax classes.
Resource Manager User’s Manual 6.05
4-3
Tax Classes
Application Setup
Tax Classes Screen
Field Definitions
Field Name
Description
Class
The numeric representation of the tax class is displayed.
Description
The description of the tax class is displayed.
Command Bar Definitions
4-4
Command
Description
Enter = edit
Move the prompt (>) to the class you want to edit and press
Enter.
Append
Press A to add a tax class.
Resource Manager User’s Manual 6.05
Application Setup
Tax Classes
Saving and Exiting
To save your entries, press Enter. To exit to the Application Setup menu, use the
Exit (F7) command.
Resource Manager User’s Manual 6.05
4-5
Tax Locations
Features
Use the Tax Locations function on the Application Setup menu to set up and
maintain the authorities you accumulate sales taxes for. Set up tax classes before
setting up tax locations.
Reports
No report is associated with this function.
Screen Use
Screen
Description
Tax Locations
Use the Tax Locations screen to add or change tax location
records.
Edit Line window
Use the Edit Line window to change tax location
information.
View Line window
Use the View Line window to look at tax class detail
information.
Resource Manager User’s Manual 6.05
4-7
Tax Locations
Application Setup
Tax Locations Screen
Field Definitions
4-8
Field Name
Description
Tax Location
Enter the ID of the tax location you want to work with.
Name
Enter the name of the tax location, or use the displayed name.
Tax Level
Enter the tax level of the location.
Tax ID
Enter the tax ID of the authority, or use the displayed tax ID.
Authority
Enter a tax authority, or use the displayed tax authority.
Tax on
Enter Y or N to indicate whether or not freight or
miscellaneous items are taxed.
Tax Liability Acct
Enter the account number to which you want to post the
liability for tax.
Resource Manager User’s Manual 6.05
Application Setup
Tax Locations
Field Name
Description
Tax Refundable Acct
Enter the account number to which you want to post the
refundable tax.
Class/Description
The tax classes and their descriptions are displayed.
Sales Tax
The percentage of tax for the class is displayed.
Purch Tax
The amount of tax for purchases for the class is displayed.
Tax Collected
The amount of tax collected for the class is displayed.
Tax Paid
The amount of tax paid for the class is displayed.
Command Bar Definitions
Command
Description
Enter = edit
Move the prompt (>) to the tax location you want to edit and
press Enter.
Tax Loc
Press T to select a different tax location.
First
Press F to go to the first tax location record.
Last
Press L to go to the last tax location record.
Next
Press N to go to the next tax location record.
Prev
Press P to go to the previous tax location record.
View
Press V to view tax class detail information.
Header
Press H to return to the screen header information.
Saving and Exiting
To exit to the Application Setup menu, use the Exit (F7) command.
Resource Manager User’s Manual 6.05
4-9
Tax Locations
Application Setup
Edit Line Window
Field Definitions
4-10
Field Name
Description
Tax Class
The tax class is displayed.
Description
The tax class description is displayed.
Taxable Sales
Enter the taxable sales for the location.
Sales Tax Percent
Enter the tax percent for the location.
Nontaxable Sales
Enter the nontaxable sales for the location.
Purch Tax Percent
Enter the purchases tax for the location.
Tax Collected
Enter the amount of tax collected for the location.
Refundable Percent
Enter the refundable percent for the location.
Resource Manager User’s Manual 6.05
Application Setup
Tax Locations
Field Name
Description
Expense Acct
Enter the expense account number for the location.
Taxable Purchases
Enter the taxable purchases for the location.
Nontaxable Purchases
Enter the nontaxable purchases for the location.
Tax Paid
Enter the tax paid for the location.
Tax Refundable
Enter the amount of tax refunded for the location.
Command Bar Definitions
This window has no command bar.
Saving and Exiting
Use the Proceed (PgDn) command to save your entries and exit to the Tax
Locations screen.
Resource Manager User’s Manual 6.05
4-11
Tax Locations
Application Setup
View Line Window
Field Definitions
You cannot enter or change information in this window.
Command Bar Definitions
This window has no command bar.
Saving and Exiting
To exit to the Tax Locations screen, press any key.
4-12
Resource Manager User’s Manual 6.05
Tax Groups
Features
Use the Tax Groups function on the Application Setup menu to set up and maintain
the tax groups and tax levels.
Reports
No report is associated with this function.
Screen Use
Screen
Description
Tax Groups
Use the Tax Groups screen to add or change tax groups and
levels.
Resource Manager User’s Manual 6.05
4-13
Tax Groups
Application Setup
Tax Groups Screen
Field Definitions
4-14
Field Name
Description
Group ID
The tax group IDs are displayed.
Description
A description of each tax group is displayed.
Reporting Method
Toggle between Combined and Separate to indicate which
reporting method you want to use.
Tax Levels
Enter the tax location that you want at the appropriate level.
Tax on Tax Level
Enter Y or N to indicate whether or not you want to compute
tax on the previous tax level.
Resource Manager User’s Manual 6.05
Application Setup
Tax Groups
Command Bar Definitions
Command
Description
Enter = edit
Move the prompt (>) to the tax group you want to edit and
press Enter.
Append
Press A to add a tax group.
Saving and Exiting
To save your entries, press Enter. To exit to the Application Setup menu, use the
Exit (F7) command.
Resource Manager User’s Manual 6.05
4-15
Sales Tax Report
Features
Print the Sales Tax Report at the end of each period for information about how
taxes have been allocated for the tax locations you set up.
Reports
A sample Sales Tax Report is on page 4-20.
Screen Use
Screen
Description
Sales Tax Report
Use the Sales Tax Report screen to select the tax authorities
and locations you want in the report.
Resource Manager User’s Manual 6.05
4-17
Sales Tax Report
Application Setup
Sales Tax Report Screen
Field Definitions
Field Name
Description
Pick
Enter the range of tax authorities and tax locations you want in
the report.
Print By
Select the item by which you want to organize the report.
Print
Enter Y or N to indicate whether or not you want to list sales
and purchases.
Command Bar Definitions
4-18
Command
Description
Printer
Select P to send the report to a printer.
Resource Manager User’s Manual 6.05
Application Setup
Sales Tax Report
Command
Description
File
Select F to send the report to a file.
Screen
Select S to send the report to the screen.
End
Select E to change your selections or exit to the Application
Setup menu.
Saving and Exiting
After the report is produced, the Application Setup menu appears.
Resource Manager User’s Manual 6.05
4-19
Builders Supply
Sales Tax Report
By Tax Location
Page
1
Sales Tax Report
4-20
6.500
.000
.000
.000
.000
.000
.000
.000
.000
.000
.000
.000
.000
.000
.000
.000
.000
.000
.000
.000
End of report
.00
2290957.44
.00
.00
.00
.00
.00
.00
.00
.00
.00
.00
.00
.00
.00
.00
.00
.00
.00
.00
.00
.00
.00
.00
.00
.00
.00
.00
.00
.00
.00
.00
.00
.00
.00
.00
.00
.00
.00
.00
.00
.00
.00
.00
.00
.00
.00
.00
.00
.00
.00
.00
.00
.00
.00
.00
.00
.00
.00
.00
.00
.00
.00
.00
.00
.00
.00
.00
.00
.00
.00
.00
.00
.00
.00
.00
.00
.00
.00
.00
.00
.00
.00
.00
.00
.00
.00
.00
.00
.00
.00
.00
.00
.00
.00
.00
.00
.00
.00
.00
.00
.00
.00
.00
.00
.00
.00
.00
.00
.00
----------------------------------------------------------------------------------------Sales
.00
2290957.44
.00
.00
.00
Purchases
.00
.00
.00
.00
.00
.00
Sales
Purchases
Sales
Purchases
Sales
Purchases
Sales
Purchases
Sales
Purchases
Sales
Purchases
Sales
Purchases
Sales
Purchases
Sales
Purchases
Sales
Purchases
Taxable
Nontaxable
Tax
Calculated
Over/Short
Refundable
=========================================================================================
GRAND TOTAL Sales
.00
2290957.44
.00
.00
.00
Purchases
.00
.00
.00
.00
.00
.00
TOTAL FOR LOCATION MNR
09 Services
08 Gasoline
07 Clothing
06 Food Products
05 Motor Vehicles
04 Interstate Comm
03 Ind/Agr Prod.
02 Exempt Sales
01 Resale Sales
00 Consumer Goods
Tax Description Tax Per.
Class
Ref. Per.
Taxable
Nontaxable
Tax
Calculated
Over/Short
Refundable
------------------------------------------------------------------------------------------------------------------------------------
------ General Ledger Accounts ------- --- Tax on --Tax Loc Name
Level Tax Auth. Tax ID
Tax Liabilty Tax Expense Refundable Frt.
Misc.
-----------------------------------------------------------------------------------------------------------------------------------MNR
Minnesota - Resale
1
MN
23-876182734
2038
NO
NO
06/09/1999
9:02 AM
Sales Tax Report
Application Setup
Resource Manager User’s Manual 6.05
Clear Sales Tax
Features
Use the Clear Sales Tax function on the Application Setup menu to clear the
accumulated sales and tax amounts from the tax location records at the end of the
tax reporting period. This function prepares the records to accumulate new figures
for the next reporting period. You can clear tax locations for a range of taxing
authorities and tax locations.
Reports
No report is associated with this function.
Screen Use
Screen
Description
Clear Sales Tax
Use the Clear Sales Tax screen to select the tax authorities
and locations you want to clear accumulated sales tax for.
Resource Manager User’s Manual 6.05
4-21
Clear Sales Tax
Application Setup
Clear Sales Tax Screen
Field Definitions
Field Name
Description
Have you printed the
Sales Tax Report?
Enter Y or N to indicate whether or not you have printed the
Sales Tax Report. If you enter N, the system prompts you to exit
to the menu so that you can print the report.
Pick
Enter the range of tax authorities and locations you want to clear
sales tax for.
Command Bar Definitions
This screen has no command bar.
4-22
Resource Manager User’s Manual 6.05
Application Setup
Clear Sales Tax
Saving and Exiting
After you clear the sales tax, the Application Setup menu appears.
Resource Manager User’s Manual 6.05
4-23
Period Setup
Features
Use the Period Setup function on the Application Setup menu to set up the
CNVTxxx (Period Conversion) table, the current fiscal year, and the number of
periods per year.
Reports
No report is associated with this function.
Screen Use
Screen
Description
Period Setup
Use the Period Setup screen to establish the current fiscal
year and number of periods.
Resource Manager User’s Manual 6.05
4-25
Period Setup
Application Setup
Period Setup Screen
Field Definitions
Field Name
Description
Current Fiscal Year
Enter the current fiscal year.
No of Periods/Year
Enter the number of periods in the year.
Period
Periods 1-13 are displayed.
Begin Date
Enter the month and the first day of each period.
End Date
Enter the month and the last day of each period.
Command Bar Definitions
This screen has no command bar.
4-26
Resource Manager User’s Manual 6.05
Application Setup
Period Setup
Saving and Exiting
Use the Proceed (PgDn) command to save your entries and exit to the Application
Setup menu.
Resource Manager User’s Manual 6.05
4-27
Forms Reorder
Features
Use the Forms Reorder function on the Application Setup menu to enter order
information for Open Systems forms and to print the reorder form.
Reports
A sample reorder form is on page 4-36.
Screen Use
Screen
Description
Forms Reorder
Use the Forms Reorder screen to view line items you have
entered and to select a command from the command bar.
Append/Edit Line window
Use the Append/Edit Line window to add or edit a line
item.
Header Information
window
Use the Header Information window to enter header
information for shipping and billing purposes.
Resource Manager User’s Manual 6.05
4-29
Forms Reorder
Application Setup
Forms Reorder Screen
Field Definitions
4-30
Field Name
Description
Product No
The product number for the form you are ordering is
displayed.
Description
The product description is displayed.
Parts
The number of parts the form has is displayed.
Qty
The quantity of the form you are ordering is displayed.
Start No
The starting number printed on the first form is displayed.
Resource Manager User’s Manual 6.05
Application Setup
Forms Reorder
Command Bar Definitions
Command
Definition
Enter = edit
Move the prompt (>) to the line you want to edit and press
Enter.
Append
Press A to append a product line item to the order.
Header
Press H to enter header information for the order.
View
Move the prompt (>) to the line item you want to view and
press V. When you are finished, press any key to return to
the Forms Reorder screen.
Print form
Press P to print the reorder form. Then enter P to send the
form to a printer, F to send the form to a file, or E to change
your selections or exit to the Forms Reorder screen.
Saving and Exiting
To exit to the Application Setup menu, use the Exit (F7) command.
Resource Manager User’s Manual 6.05
4-31
Forms Reorder
Application Setup
Append/Edit Line Window
Field Definitions
4-32
Field Name
Description
Product Number
Enter the product number for the form you are reordering. If
you are in the Edit Line window, you cannot access this field.
Product Description
The product description is displayed.
Number of Parts
Enter the number of parts the form has. Valid choices are
displayed at the bottom of the screen.
Quantity
Enter the quantity of the form you are reordering.
Starting Number
Enter the starting number for the sequence numbers you want
printed on the forms.
Resource Manager User’s Manual 6.05
Application Setup
Forms Reorder
Field Name
Description
Imprint
Enter the text you want imprinted on as many as nine lines.
Contact your reseller or Open Systems Forms for information
about pricing for additional lines of printing.
Command Bar Definitions
This window has no command bar.
Saving and Exiting
To save your entries and exit to the Forms Reorder screen, use the Proceed (PgDn)
command. To exit to the Application Setup menu, use the Exit (F7) command.
Resource Manager User’s Manual 6.05
4-33
Forms Reorder
Application Setup
Header Information Window
Field Definitions
4-34
Field Name
Description
Bill to Company
Enter the name of the company the reorder should be billed to.
Contact
Enter the name of the contact person.
Address 1/Address 2
Enter the billing address.
Ct/St/Zip
Enter the city, state, and zip code.
Phone No
Enter the phone number.
Fax
Enter the fax number.
Ship to Company
Enter the name of the company the reorder should be shipped to.
Address 1/Address 2
Enter the shipping address.
Resource Manager User’s Manual 6.05
Application Setup
Forms Reorder
Field Name
Description
Ct/St/Zip
Enter the city, state, and zip code.
Attention
Enter the name of the person who should receive the reorder.
Phone No
Enter the phone number.
Previous Invoice
Number
Enter the number of the previous invoice you used to order
forms.
Your PO Number
Enter your company’s purchase order number for the reorder.
Customer Number
Enter your customer number.
Special Shipping
Instructions
Enter special shipping instructions.
Command Bar Definitions
This window has no command bar.
Saving and Exiting
Use the Proceed (PgDn) command to save your entries and exit to the Forms
Reorder screen. Use the Exit (F7) command to exit to the Application Setup menu.
Resource Manager User’s Manual 6.05
4-35
4-36
================================================================================
Other
CA,CO,GA,IL,MN,MS
Subtotal
Artwork
Charges
NJ,TX-add sales tax
TOTAL
________
_______
_______
___________________
____________________
================================================================================
Method of Payment:
OPEN SYSTEMS FORMS
Page
1
P.O. BOX 103, Route 77
Deerfield Street, NJ 08313-0103
800-994 OPEN (800-994-6736) Fax:(800-225-3933)
================================================================================
Bill To:
Ship To:
Builders Supply
Builders Supply
7626 Golden Triangle Dr.
7626 Golden Triangle Dr.
Eden Prairie
MN 55344-3732
Eden Prairie
MN 55344-3732
612-829-0011
612-829-0011 Fax612-829-1493
circle:
Special Shipping Instructions:
Have you ordered from us before? YES / NO
Exact repeat?
YES / NO
New order?
YES / NO
Previous Invoice Number
Revised repeat?
YES / NO
Your Purchase Order No.
Confirming order?
YES / NO
Customer Number
================================================================================
Products:
Item Product
Parts
Quantity
Starting Stock
Signature Price
Description
Number
LOGO No. Lines
-------------------------------------------------------------------------------001 101
1
500
33654
________ __
$________
Payroll Check
Forms Reorder
Application Setup
Sample Order Form
Resource Manager User’s Manual 6.05
Forms Reorder Codes
Features
Use the Forms Reorder Codes function on the Application Setup menu to add or
change a form that you want to reorder.
Reports
No report is associated with this function.
Screen Use
Screen
Description
Forms Reorder Codes
Use the Forms Reorder Codes screen to enter the product
number and the information you want to add or change.
Resource Manager User’s Manual 6.05
4-37
Forms Reorder Codes
Application Setup
Forms Reorder Codes Screen
Field Definitions
Field Name
Description
Product Number
Enter the product number you want to add or change.
Product Description
If you are entering a new product number, enter a description
for the product. If you are editing a product number, the
product description is displayed.
Choices for Number of
Parts for Form
Enter each of the choices for parts of the form. The system
prompts you to select one of these parts numbers when you
use the Forms Reorder function.
Command Bar Definitions
This screen has no command bar.
4-38
Resource Manager User’s Manual 6.05
Application Setup
Forms Reorder Codes
Saving and Exiting
Use the Proceed (PgDn) command to save your entries and exit to the Application
Setup menu.
Resource Manager User’s Manual 6.05
4-39
Resource Manager User’s Manual
6.05
Data File Maintenance
5
Backup
Restore
Application Tables
Change File Size
View File Contents
File Rebuild/Verify
Purge Data Records
5-3
5-7
5-11
5-15
5-19
5-23
5-27
Resource Manager User’s Manual 6.05
5-1
Backup
Features
Use the Backup function on the Data File Maintenance menu to back up your data
files before using critical functions and to make regular backup or archived copies
of your data files, programs, and Report Writer data files.
Reports
No report is associated with this function.
Screen Use
Screen
Description
Backup
Use the Backup screen to make your backup selections.
Resource Manager User’s Manual 6.05
5-3
Backup
Data File Maintenance
Backup Screen
Field Definitions
5-4
Field Name
Description
Backup
Select what you want to back up: application programs,
application data files, or Report Writer files.
Company ID
Enter the range of companies whose data files you want to
back up.
Backup Device
Select a backup device: floppy or tape.
Directories
The names of the directories appear in the lower part of the
screen. You need a set of backup diskettes for each directory
that is listed.
Resource Manager User’s Manual 6.05
Data File Maintenance
Backup
Command Bar Definitions
This screen has no command bar.
Saving and Exiting
Use the Proceed (PgDn) command to exit to the Data File Maintenance menu.
Resource Manager User’s Manual 6.05
5-5
Restore
Features
Use the Restore function on the Data File Maintenance menu only if you lose data
or files because of an error or a hardware failure. When you restore files, you can
select which application’s files need to be restored; everything you select,
including the data in other applications, is returned to the state it was in when the
backup was made.
Reports
No report is associated with this function.
Screen Use
Screen
Description
Restore
Use the Restore screen to select the programs and files you
want to restore.
Resource Manager User’s Manual 6.05
5-7
Restore
Data File Maintenance
Restore Screen
Field Definitions
5-8
Field Name
Description
Restore
Select what you want to restore: application programs,
application data files, or Report Writer data files.
Restore Device
Select the restore device: floppy or tape.
Company ID
Enter the range of companies whose data files you want to
restore.
Directories
The names of the directories appear in the lower part of the
screen. You need a set of backup diskettes for each directory
that is listed.
Resource Manager User’s Manual 6.05
Data File Maintenance
Restore
Command Bar Definitions
This screen has no command bar.
Saving and Exiting
Use the Proceed (PgDn) command to exit to the Data File Maintenance menu.
Resource Manager User’s Manual 6.05
5-9
Application Tables
Features
Use the Application Tables function on the Data File Maintenance menu to edit and
view the tables used by any application.
Reports
To produce a list of the information entered on the Tables screen, use the Tables
List function.
Screen Use
Screen
Description
RMTB
Use the RMTB screen to add or change an application table.
Resource Manager User’s Manual 6.05
5-11
Application Tables
Data File Maintenance
Application Tables Screen
Field Definitions
5-12
Field Name
Description
Table ID
Enter the ID of table you want to add or change. To set up a
company-specific table, enter the table ID plus the company
ID. To set up a terminal-specific table, enter the table ID plus
the terminal ID.
Copy From
This field appears if you entered a new table ID. Enter the ID
of the table you want to copy from.
Description
Enter or change the description of the table.
Number of Cols
The number of columns in the table is displayed.
Column Length
The length of columns in the table is displayed.
Resource Manager User’s Manual 6.05
Data File Maintenance
Application Tables
Field Name
Description
Type
The type of character you can enter in the table is displayed:
alphanumeric or numeric.
Parameter
Accept the displayed parameter, or enter a different parameter.
Application
Accept each displayed application ID, or enter a different ID
on the appropriate line.
Window
Accept each displayed window ID, or enter a different ID on
the appropriate line.
Command Bar Definitions
This screen has no command bar.
Saving and Exiting
Use the Proceed (PgDn) command to save your entries and exit to the Data File
Maintenance menu.
Resource Manager User’s Manual 6.05
5-13
Change File Size
Features
Use the Change File Size function on the Data File Maintenance menu to create a
new file and copy the data from the old file into it. During this process, you can
determine the type of file to create, the number of records it contains, and the size
of the records in the file.
Reports
No report is associated with this function.
Screen Use
Screen
Description
Change File Size
Use the Change File Size screen to create or change a file.
Resource Manager User’s Manual 6.05
5-15
Change File Size
Data File Maintenance
Change File Size Screen
Field Definitions
5-16
Field Name
Description
Filename
Enter the name of the file you want to resize.
Description
The description of the file is displayed.
File Type
Enter 2 to create a keyed (direct) file or 6 to create an Mkeyed
(multikeyed) file.
Number of Records
Enter the number of records you want in the new file. For a
dynamically allocated Mkeyed file, enter 0.
Bytes per Record
Enter the number of bytes to set aside for each record in the
new file.
Key Chain
Enter the key chain number you want to copy the data by.
Resource Manager User’s Manual 6.05
Data File Maintenance
Change File Size
Command Bar Definitions
This screen has no command bar.
Saving and Exiting
Use the Proceed (PgDn) command to save your entries and exit to the Data File
Maintenance menu.
Resource Manager User’s Manual 6.05
5-17
View File Contents
Features
Use the View File Contents function on the Data File Maintenance menu to display
information from a data file for a specified range of records.
Reports
No report is associated with this function.
Screen Use
Screen
Description
View File Contents
Use the View File Contents screen to select the file you
want to view.
Resource Manager User’s Manual 6.05
5-19
View File Contents
Data File Maintenance
View File Contents Screen
Field Definitions
5-20
Field Name
Description
Filename
Enter the name of the file whose contents you want to view.
Description
The file description is displayed.
File Type
The file type is displayed.
Logical Key Size
The logical key size is displayed.
Number of records
The number of records is displayed.
Bytes per record
The number of bytes per record is displayed.
Active keys
The number of active keys is displayed.
Pick
Enter the index you want to view in the data, or enter 99 to
view all keys.
Resource Manager User’s Manual 6.05
Data File Maintenance
View File Contents
Command Bar Definitions
This screen has no command bar.
Saving and Exiting
Use the Proceed (PgDn) command to exit to the Data File Maintenance menu.
Resource Manager User’s Manual 6.05
5-21
File Rebuild/Verify
Features
Use the File Rebuild/Verify function on the Data File Maintenance menu to rebuild
your data files or to verify that they are still usable.
Reports
No report is associated with this function.
Screen Use
Screen
Description
File Rebuild/Verify
Use the File Rebuild/Verify screen to specify the file you
want to rebuild or verify.
Resource Manager User’s Manual 6.05
5-23
File Rebuild/Verify
Data File Maintenance
File Rebuild/Verify Screen
Field Definitions
Field Name
Description
File to Rebuild/Verify
Enter the name of the file you want to rebuild or verify.
Key to Rebuild
Accept the displayed key, or enter the key with the highest
number of active records.
Replace original file
with rebuilt file?
Enter Y to save the rebuilt file, or enter N to use the original
file.
Command Bar Definitions
This screen has no command bar.
5-24
Resource Manager User’s Manual 6.05
Data File Maintenance
File Rebuild/Verify
Saving and Exiting
Use the Proceed (PgDn) command to exit to the Data File Maintenance menu.
Resource Manager User’s Manual 6.05
5-25
Purge Data Records
Features
Use the Purge Data Records function on the Data File Maintenance menu to
remove specific data records.
Contact your Open Systems client support representative for advice on the correct
course of action for this function.
Reports
No report is associated with this function.
Screen Use
Screen
Description
Purge Data Records
Use the Purge Data Records screen to select the file you
want to remove.
Resource Manager User’s Manual 6.05
5-27
Purge Data Records
Data File Maintenance
Purge Data Records Screen
Field Definitions
Field Name
Description
Filename
Enter the name of the file to purge.
Description
The description of the file is displayed.
Command Bar Definitions
This screen has no command bar.
Saving and Exiting
Use the Proceed (PgDn) command to exit to the Data File Maintenance menu.
5-28
Resource Manager User’s Manual 6.05
Resource Manager User’s Manual
6.05
System File Maintenance
Application Information
Directories
Menus
Favorites Menus
Inquiry Window Definitions
Global Inquiry Definitions
Help Screens
System Messages
Backup/Restore Commands
Form Codes
Form Printers
Support Information
User Login Activity
Resource Manager User’s Manual 6.05
6
6-3
6-7
6-11
6-15
6-19
6-23
6-37
6-39
6-43
6-47
6-51
6-55
6-59
6-1
Application Information
Features
Use the Application Information function on the System File Maintenance menu to
maintain the information about the applications on your system.
Reports
No report is associated with this function.
Screen Use
Screen
Description
Application Information
Use the Application Information screen to maintain the
information about an application.
Resource Manager User’s Manual 6.05
6-3
Application Information
System File Maintenance
Application Information Screen
Field Definitions
6-4
Field Name
Description
Application Code
Enter the ID of the application you want to work with.
Description
Enter the description of the application.
Base Application
For a base application, leave this field blank. For an enhanced
application, enter the application’s identifier. For an add-on to
an application, enter the ID of the base application.
Installed
If the application is not installed, enter N. If the application is
installed, enter Y.
Version
Enter the version number of the application. The version
number protects against the installation of an earlier version of
the software.
Resource Manager User’s Manual 6.05
System File Maintenance
Application Information
Field Name
Description
Date Installed
Enter the date the application was installed on the system.
Program Directory
Enter the directory that contains the programs for the
application.
Verification File
Enter the name of the file used to verify that the application is
installed for a company. If the file name changes, depending
on the company involved, add a lowercase x in place of the
company ID.
Last Maintenance
Displays the date of the last maintenance operation performed
for the application.
Command Bar Definitions
This screen has no command bar.
Saving and Exiting
Use the Proceed (PgDn) command to save your entries and exit to the System File
Maintenance menu.
Resource Manager User’s Manual 6.05
6-5
Directories
Features
Use the Directories function on the System File Maintenance menu to add data
directories to those that were established when Resource Manager was installed,
and to change the directories used by OSAS programs, data files, Report Writer
files, sample data, and utilities.
Reports
No report is associated with this function.
Screen Use
Screen
Description
Directories
Use the Directories screen to add data directories.
Resource Manager User’s Manual 6.05
6-7
Directories
System File Maintenance
Directories Screen
Field Definitions
6-8
Field Name
Description
Install
Press Enter if you want to copy the Resource Manager and
other application files from the displayed drive, or enter the
letter for the diskette or tape drive you are copying the
Resource Manager and other application files from.
Program
Press Enter if the displayed directory will contain the
program subdirectories, or change it.
Data 1/Data 2/Data 3
For each line, press Enter if the displayed directory is the one
you will use for data files, or change it.
System Files
Enter the path to the directory where the system files are
stored.
Resource Manager User’s Manual 6.05
System File Maintenance
Directories
Field Name
Description
Report Writer
Press Enter if the displayed directory is for the Report Writer
data files, or change it.
Sample Data
Press Enter if the displayed directory will contain the sample
data, or change it.
Utils
Enter the name of the directory where your utility files will be
stored. This directory is available in both live and sample data.
Command Bar Definitions
This screen has no command bar.
Saving and Exiting
Use the Proceed (PgDn) command to save your entries and exit to the System File
Maintenance menu.
Resource Manager User’s Manual 6.05
6-9
Menus
Features
Use the Menus function on the System File Maintenance menu to change the
menus for any application that is installed for the company you selected at the Main
menu. You can change the order of the selections on the menu, add descriptive
information to a menu, or add other BBx-compatible programs to a menu.
Reports
To produce a list of the information entered on the Menus screen, use the Menu
List function.
Screen Use
Screen
Description
Menus
Use the Menus screen to add or change an application’s
menu.
Resource Manager User’s Manual 6.05
6-11
Menus
System File Maintenance
Menus Screen
Field Definitions
6-12
Field Name
Description
Application
Enter the ID of the application whose menus you want to
change; leave the field blank to edit a company’s Main menu;
or enter OS to change the Other Commands menu, which is
displayed when you use the Other (F4) command.
Menu
Enter the name of the menu you want to change.
Title
Enter the title for the menu.
Line
The number of the line on the menu item is displayed.
Description
Enter the description you want on the menu. It can be the
name of another menu, a function, or a descriptive line.
Resource Manager User’s Manual 6.05
System File Maintenance
Menus
Field Name
Description
Type
Enter one of these codes to indicate what type of line it is:
0
1
2
3
4
5
6
7
8
=
=
=
=
=
=
=
=
=
comment - descriptive information only
menu file - uses different menu file when selected
menu record - uses different menu file from the current file
run - executes an application program
call - executes a public program
scall - executes an operating system command
info - executes a public program directly
EIS - displays an EIS dashboard
RW Rpt - displays a GENERAL Report Writer report
Program
Enter the program name, menu filename, menu record name, or
operating system command to execute; or if you selected type 0,
press Enter.
Param
Enter a parameter for the menu selection. If you selected type 0 for
the line or if you do not need a parameter, press Enter.
Resource Manager User’s Manual 6.05
6-13
Menus
System File Maintenance
Command Bar Definitions
Command
Description
Enter = edit
Move the prompt (>) to the line you want to edit and press
Enter.
Move
Press M to move the line to a new location.
Copy
Press C to copy the line to another line.
Swap
Press S to swap the position of a line with another line.
Unique
Press U to create or remove unique menu items.
Title
Press T to go back to the Title field.
Write
Press W to write (save) the line you changed.
Saving and Exiting
To save your entries and exit to the System File Maintenance menu, use the Write
(W) command, followed by the Exit (F7) command.
6-14
Resource Manager User’s Manual 6.05
Favorites Menus
Features
The Favorites menu allows you to build your own menu of the functions and
submenus you use most. You create the Favorites menu automatically by using the
Add to Favorites (F10) command on the menu.
Use this function to modify the Favorites menu that is created automatically. For
example, you might group some Favorites together into a submenu.
Reports
No report is associated with this function.
Screen Use
Screen
Description
Favorites
The Favorites screen allows you to modify your Favorites menu.
Resource Manager User’s Manual 6.05
6-15
Favorites Menus
System File Maintenance
Favorites Screen
Field Definitions
6-16
Field Name
Description
Workstation
Enter the Workstation ID you want to work with.
Menu
Enter the name of the menu you want to change.
Title
Enter the title of the menu.
Line
The number of the line on the menu.
Description
Enter the description you want on the menu. It can be the name of
another menu, a function, or a descriptive line.
Resource Manager User’s Manual 6.05
System File Maintenance
Favorites Menus
Field Name
Description
Type
Enter one of these codes to indicate what type of line it is:
0
1
2
3
4
5
6
7
8
=
=
=
=
=
=
=
=
=
comment - descriptive information only
menu file - uses different menu file when selected
menu record - uses different menu file from the current file
run - executes an application program
call - executes a public program
scall - executes an operating system command
info - executes a public program directly
EIS - displays an EIS dashboard
RW Rpt - displays a GENERAL Report Writer report
Program
Enter the program name, menu filename, menu record name, or
operating system command to execute; or if you selected type 0,
press Enter.
Param
Enter a parameter for the menu selection. If you selected type 0 for
the line or if you do not need a parameter, press Enter.
Resource Manager User’s Manual 6.05
6-17
Favorites Menus
System File Maintenance
Command Bar Definitions
Command
Description
Enter = edit
Move the prompt (>) to the line you want to edit and press
Enter.
Move
Press M to move the line to a new location.
Copy
Press C to copy the line to another line.
Swap
Press S to swap the position of a line with another line.
Unique
Press U to create or remove unique menu items.
Title
Press T to go back to the Title field.
Write
Press W to write (save) the line you changed.
Saving and Exiting
To save your entries and exit to the System File Maintenance menu, use the Write
(W) command, followed by the Exit (F7) command.
6-18
Resource Manager User’s Manual 6.05
Inquiry Window Definitions
Features
Use the Inquiry Window Definitions function on the System File Maintenance
menu to maintain the windows that appear when you use the Inquiry (F2)
command. Although the inquiry windows are already set up for you, you can
change the size of the window, modify data and headings, or add a window.
Reports
No report is associated with this function.
Screen Use
Screen
Description
Inquiry Window
Definitions
Use the Inquiry Window Definitions screen to maintain
inquiry windows.
Resource Manager User’s Manual 6.05
6-19
Inquiry Window Definitions
System File Maintenance
Inquiry Window Definitions Screen
Field Definitions
6-20
Field Name
Description
Application
Enter the ID of the application whose windows you want to
change.
Window ID
Enter the ID of the window you want to add or change. The data
on file for the window appears.
Copy From
This field appears if you entered a new window ID. Enter the ID
of the window you want to copy.
Topic Number
Enter the topic number of the data file to be displayed.
File Name
Enter the name of the data file to be displayed in the window.
File Number
Enter the channel number to use for the data file.
Title
Enter the title that you want to appear in the window.
Resource Manager User’s Manual 6.05
System File Maintenance
Inquiry Window Definitions
Field Name
Description
Key Number
Enter a sort key number for the filename you entered in the File
Name field.
Start Col
Enter the number that corresponds to the screen column where you
want the window to start.
Start Row
Enter the number that corresponds to the screen row where you
want the window to start.
Total Col
Enter the number of screen columns in the width of the window.
The starting column plus the number of screen columns you enter
must be less than 80.
Total Row
Enter the number of screen rows in the length of the window. The
length of the window plus the starting row must be less than 25.
Inc Beg/Len
Enter the position of the key where the inclusion mask begins.
Then enter the length of the inclusion mask.
Exc Beg/Len
Enter the position of the key where the exclusion mask begins.
Then enter the length of the exclusion mask.
Return No
Enter the number of the data name you want to return to the
calling program.
Data Name
If you are using a Report Writer topic number, enter the data name
as it appears in the dictionary for the topic. You can enter only a
file definition type or a noncross-referenced math definition type.
If you are not using a Report Writer topic number, enter a name
for the field for reference only.
Typ
Enter the data type for the Data Name field:
1 to display characters
2 to display numbers
3 to display dates
4 to display telephone numbers
5 to display social security numbers
Resource Manager User’s Manual 6.05
6-21
Inquiry Window Definitions
System File Maintenance
Field Name
Description
User Mask
Enter the company-defined user mask you want to use for the
field.
Fmt
Enter a code that identifies the way the data should be formatted.
Use any combination of these characters:
$
format as a dollar amount (defaults to two decimal
places), format with commas inserted where necessary
1-7 format with the specified number of decimal places
Z
format to display totals of zero when applicable
Fld
Enter the number of the data name’s field in the record.
Beg/Len
Enter the character in the field to begin at and the length of the
data.
Col
Enter the number of the first column to display the data.
Headings/Output
Enter the column headings as you want them to appear. (Do not
press Enter until you have entered all the column headings.) The
number of characters you can enter is determined by the width of
the window.
Command Bar Definitions
This screen has no command bar.
Saving and Exiting
Use the Proceed (PgDn) command to save your entries and exit to the System File
Maintenance menu.
6-22
Resource Manager User’s Manual 6.05
Global Inquiry Definitions
Features
A Global Inquiry window consolidates and displays information from other
applications. These windows are valuable if you are in the middle of an application
and need information from a different application but do not want to back out from
entering a transaction.
Use the Global Inquiry Definitions function on the System File Maintenance menu
to design, edit, or delete windows.
Reports
To produce a list of the information entered on the Global Inquiry Definitions
screen, use the Global Inquiry Window List function.
Screen Use
Screen
Description
Global Inquiry Definitions
Use the Global Inquiry Definitions screen to select the
window you want to define or change.
Global Inquiry Definitions
General Information
Use the General Information screen to view, add, or edit
information about the source of the window data.
Global Inquiry Summary
Fields
Use the Summary Fields screen to establish and update
information displayed in the window’s header fields.
Global Inquiry Data
Columns
Use the Data Columns screen to establish and update
information about which data is displayed in the window.
Global Inquiry Definitions
Global Links
Use the Global Links screen to establish and update
information about which window IDs you want to link to
the window ID.
Resource Manager User’s Manual 6.05
6-23
Global Inquiry Definitions
System File Maintenance
Global Inquiry Definitions Screen
Field Definitions
6-24
Field Name
Description
Global Inquiry Window
ID
Enter the ID of the Global Inquiry window you want to define
or change.
Copy From
This field appears if you entered a new window ID. Enter the
ID of the window you want to copy.
Window Title
Accept the title of the displayed window, or enter a different
title.
Do You Want To
Change
If you want to enter or change general information, summary
fields, data columns, or global inquiry links, enter Y in the
appropriate fields; if not, enter N.
Resource Manager User’s Manual 6.05
System File Maintenance
Global Inquiry Definitions
Command Bar Definitions
This screen has no command bar.
Saving and Exiting
Use the Proceed (PgDn) command to save your entries and exit to the System File
Maintenance menu.
Resource Manager User’s Manual 6.05
6-25
Global Inquiry Definitions
System File Maintenance
Global Inquiry Definitions General Information Screen
Field Definitions
6-26
Field Name
Description
Window ID
Enter the ID of the Global Inquiry window you want to define
or change.
Title
Accept the title of the displayed window, or enter a different
title.
File Name
Enter the name of the central file for the window. If the file is
company-specific, put a lowercase x after the name of the file.
Topic Number
Accept the displayed topic number, or enter a different topic
number to use for the data file you specified.
File #
Accept the displayed file number, or enter the file number to
use for the data file you specified.
Resource Manager User’s Manual 6.05
System File Maintenance
Global Inquiry Definitions
Field Name
Description
# Flds
Accept the displayed number of fields, or enter the number of
fields that the file you specified holds.
Key #
Enter the key number that you want to use for the data files
you selected.
Key Len
Accept the displayed number, or enter the length of the key
number associated with the selected data file.
Inclusion Mask Begin/
Length
Enter the position of the key where the segment of the
inclusion mask begins. Then enter the length of the inclusion
mask.
Exclusion Mask Begin/
Length
Enter the position of the key where the exclusion mask begins.
Then enter the length of the exclusion mask.
Label
Enter the label that identifies the key segment to be entered
when you use the Search (Insert) command, or leave the field
blank to disable the Search command.
Position
Enter the position in the key number where the search label is
found.
Length
Enter the length in the Search command where the Search
definition begins.
Command Bar Definitions
This screen has no command bar.
Saving and Exiting
Use the Proceed (PgDn) command to save your entries and exit to the System File
Maintenance menu.
Resource Manager User’s Manual 6.05
6-27
Global Inquiry Definitions
System File Maintenance
Global Inquiry Summary Fields Screen
Field Definitions
6-28
Field Name
Description
Fld
The field number is displayed. Use the Tab key to scroll down
through the screens.
Data Name
The data name is displayed.
Type
The type is displayed.
Description
The description is displayed.
Format
The format is displayed.
Field
The field is displayed.
Start
The start position is displayed.
Len
The length is displayed.
Resource Manager User’s Manual 6.05
System File Maintenance
Global Inquiry Definitions
Field Name
Description
Row/Col
The row/column position is displayed.
Customer ID
The customer ID is displayed.
Address
The customer address is displayed.
Cust Name
The customer name is displayed.
Data Name
Accept the displayed name for the field, enter a different name, or
blank out the field if you want to enter a mathematical statement on
the next line.
Expression
Enter a statement by using the Global Inquiry shorthand method or
by stating valid mathematical expressions.
Label
Accept the displayed label for the field, enter a different label, or
blank out the field.
Data Type
Accept the displayed data type, or enter a different value:
1 alphanumeric values
2 numeric values
3 date values
4 social security number values
Format
The format is displayed.
Field
The field is displayed.
Start
The start position is displayed.
Length
The field length is displayed.
Row/Col
Enter the row/column where you want the field to begin.
User Mask
Enter the company-defined user mask you want to use for the field.
Xref
Enter the name of the cross-reference file whose data you want to
access. If the file is company-specific, put lowercase xxx after the
name of the file.
Field
Enter the position of the field in the record of the specified file.
Resource Manager User’s Manual 6.05
6-29
Global Inquiry Definitions
System File Maintenance
Field Name
Description
Start
For alphanumeric fields, enter the first character position in the field
that you want to be displayed. For other field types, leave this field
blank.
Length
For alphanumeric fields, enter the length of the data. For numeric
fields, enter the number of digits to the left of the decimal place that
you want to be displayed. For other field types, leave this field blank.
# Flds
Accept the displayed value, or enter the number of fields in the crossreference file.
Table Key
If the field refers to a table for the appropriate value, enter the
coordinate of the record in the table you want to access; if it does not,
leave it blank.
Test
For a self-join field, enter an expression for the value needed to
access the correct key. For self-join fields, the number is always 1.
For a cross-reference-by-table field, enter the row/column reference
in the format RxxCyy.
Command Bar Definitions
This screen has no command bar.
Saving and Exiting
Use the Proceed (PgDn) command to save your entries and exit to the System File
Maintenance menu.
6-30
Resource Manager User’s Manual 6.05
System File Maintenance
Global Inquiry Definitions
Global Inquiry Data Columns Screen
Field Definitions
Field Name
Description
Col
The column is displayed.
Data Name
The data name is displayed.
Type
The type is displayed.
Format
The format is displayed.
Field
The field is displayed.
Start
The start position is displayed.
Len
The field length is displayed.
Column
The column number is displayed.
Invoice
The invoice is displayed.
Resource Manager User’s Manual 6.05
6-31
Global Inquiry Definitions
System File Maintenance
Field Name
Description
Date
The date is displayed.
Item No.
The item number is displayed.
Description
The description is displayed.
Salesord
The sales order is displayed.
Qty
The quality is displayed.
Ext Price
The external price is displayed.
Data Name
Accept the displayed name for the field, enter a different name, or
blank out the field if you want to enter a mathematical statement on
the next line.
Expression
Enter a statement by using the Global Inquiry shorthand method or
by stating valid mathematical expressions.
Data Type
Accept the displayed data type, or enter a different value:
1
2
3
4
6-32
alphanumeric values
numeric values
date values
social security number values
Format
The format is displayed.
Field
Enter the position of the field in the record of the file that you
specified.
Start
For alphanumeric fields, enter the first character position in the field
that you want to be displayed. For cross-reference fields, enter the
first character position of the linking field. For numeric, data, or
social security number fields, leave this field blank.
Length
For alphanumeric fields, enter the length of the data that you want to
display. For cross-reference fields, enter the length of the linking
field. For numeric fields, enter the number of digits to the left of the
decimal place that you want to be displayed.
Col No
Enter the column where you want to begin displaying the field.
Resource Manager User’s Manual 6.05
System File Maintenance
Global Inquiry Definitions
Field Name
Description
User Mask
Enter the company-defined user mask you want to use for the field.
Xref
Enter the name of the cross-reference file whose data you want to
access. If the file is company-specific, put lowercase xxx after the
name of the file.
Field
Enter the position of the field in the record of the specified file.
Start
For alphanumeric fields, enter the first character position in the field
that you want to be displayed. For other field types, leave this field
blank.
Length
For alphanumeric fields, enter the length of the data. For numeric
fields, enter the number of digits to the left of the decimal place that
you want to be displayed. For other field types, leave this field blank.
# Flds
Accept the value specified in the xxTOP file, or enter the number of
fields in the cross-reference file.
Table Key
If the field refers to a table for the appropriate value, enter the
coordinate of the record in the table you want to access; if it does not,
leave it blank.
Test
For a self-join field, enter an expression for the value needed to
access the correct key. For self-join fields, the number is always 1.
For a cross-reference-by-table field, enter the row/column reference
in the format RxxCyy.
Command Bar Definitions
This screen has no command bar.
Saving and Exiting
Use the Proceed (PgDn) command to save your entries and exit to the System File
Maintenance menu.
Resource Manager User’s Manual 6.05
6-33
Global Inquiry Definitions
System File Maintenance
Global Inquiry Definitions Global Links Screen
Field Definitions
6-34
Field Name
Description
Label
The label is displayed.
Wind ID
The window ID is displayed.
Define By
How the screen is defined is displayed.
Fld/Pos/Val
The field/position/value is displayed.
Beg
The beginning position is displayed.
Len
The length is displayed.
KeyPos
The key position is displayed.
Switch/Output
Appearance
The switch/output appearance is displayed.
Resource Manager User’s Manual 6.05
System File Maintenance
Global Inquiry Definitions
Field Name
Description
Switch Label
Accept the label that is displayed for the Global Inquiry link,
or enter a different label.
Window ID
Accept the displayed window ID, or enter the ID you want to
link the window to.
Define by
Enter FIL if the segment to be sent is in the central file.
Enter LIN if the segment is defined as a field in the data
section of the window.
Enter SUM if the segment is defined as a field in the summary
section of the window.
Enter VAL if a user-defined literal value is to be sent.
Fld/Pos/Val
Enter the position of the field in the file list to be accessed.
Start
Enter the first character position in the field that you want to
send to the next window.
Length
Enter the length of the field.
Position in Key
Enter the position that the data segment being sent is to
occupy in the key used in the connecting window.
Command Bar Definitions
This screen has no command bar.
Saving and Exiting
Use the Proceed (PgDn) command to save your entries and exit to the System File
Maintenance menu.
Resource Manager User’s Manual 6.05
6-35
Help Screens
Features
Use the Help Screens function on the System File Maintenance menu to customize
an application’s help screens.
Reports
No report is associated with this function.
Screen Use
Screen
Description
Help Screens
Use the Help Screens screen to add or change help for a
field.
Resource Manager User’s Manual 6.05
6-37
Help Screens
System File Maintenance
Help Screens Screen
Field Definitions
6-38
Field Name
Description
Application ID
Enter the ID of the application whose help screens you want to
add or edit.
Help Key
Select the Help key of the help screen you want to change
from the inquiry window.
Field ID
Enter the ID of the field, or accept the displayed field ID.
Resource Manager User’s Manual 6.05
System Messages
Features
Use the System Messages function on the System File Maintenance menu to
change or add system messages in any application.
Reports
No report is associated with this function.
Screen Use
Screen
Description
System Messages
Use the System Messages screen to add, change or view
system messages for an application.
Resource Manager User’s Manual 6.05
6-39
System Messages
System File Maintenance
System Messages Screen
Field Definitions
Field Name
Description
Application
Enter the ID of the application whose system messages you
want to add, view, or edit.
Line
The system message line number is displayed.
Message
The system message text is displayed.
Command Bar Definitions
6-40
Command
Description
Enter = edit
Move the prompt (>) to the line you want to edit and press Enter
Append
Press A to add a system message line.
Resource Manager User’s Manual 6.05
System File Maintenance
System Messages
Saving and Exiting
Uuse the Proceed (PgDn) command to save your entries and exit to the System File
Maintenance menu.
Resource Manager User’s Manual 6.05
6-41
Backup/Restore Commands
Features
Use the Backup/Restore Commands function on the System File Maintenance
menu to customize your backup and restore commands.
Reports
To produce a list of the information entered on the Backup/Restore Commands
screen, use the Backup/Restore Commands List function.
Screen Use
Screen
Description
Backup/Restore
Commands
Use the Backup/Restore Commands screen to customize the
backup and restore commands for your system.
Resource Manager User’s Manual 6.05
6-43
Backup/Restore Commands
System File Maintenance
Backup/Restore Commands Screen
Field Definitions
6-44
Field Name
Description
Floppy Backup
Command
Enter a floppy backup command, or accept the displayed
command.
Floppy Restore
Command
Enter a floppy restore command, or accept the displayed
command.
Tape Backup Command
Enter a tape backup command, or accept the displayed
command.
Tape Restore Command
Enter a tape restore command, or accept the displayed
command.
Resource Manager User’s Manual 6.05
System File Maintenance
Backup/Restore Commands
Command Bar Definitions
This screen has no command bar.
Saving and Exiting
Use the Proceed (PgDn) command to save your entries and exit to the System File
Maintenance menu.
Resource Manager User’s Manual 6.05
6-45
Form Codes
Features
Use the Form Codes function on the System File Maintenance menu to set up and
maintain codes for the forms you use in the OSAS applications you have installed.
Reports
No report is associated with this function.
Screen Use
Screen
Description
Form Codes
Use the Form Codes screen to set up form types and to
specify the number of copies to print, along with the names
you want to appear on the copies.
Resource Manager User’s Manual 6.05
6-47
Form Codes
System File Maintenance
Form Codes Screen
Field Definitions
Field Name
Company ID
Description
Enter the ID of the company you want to set up the form for.
Note: You must set up a form type that is not companyspecific before you can set up a company-specific form type.
6-48
Form Type
Enter the form type you want to set up or change.
Form Name
Enter the name for the form.
Number of Copies
Enter the number of copies you want to print for the form.
Copy Number
The copy number is displayed. The number of lines displayed
corresponds to the number you entered in the Number of
Copies field.
Resource Manager User’s Manual 6.05
System File Maintenance
Form Codes
Field Name
Description
Copy Name
For each copy number, enter the copy name you want to print
on the corresponding form copy.
Prompt to Mount Forms
If you want the system to prompt you to load forms into the
printer, enter Y; if not, enter N.
Do you want to print
alignment mark before
printing?
If you want an alignment mark to be printed before proceeding
to print the forms, enter Y; if not, enter N.
Command Bar Definitions
This screen has no command bar.
Saving and Exiting
Use the Proceed (PgDn) command to save your entries and exit to the System File
Maintenance menu.
Resource Manager User’s Manual 6.05
6-49
Form Printers
Features
Use the Form Printers function on the System File Maintenance menu to set up
default printers for form types.
Reports
No report is associated with this function.
Screen Use
Screen
Description
Form Printers
Use the Form Printers screen to add or change the printer
information for form types.
Resource Manager User’s Manual 6.05
6-51
Form Printers
System File Maintenance
Form Printers Screen
Field Definitions
6-52
Field Name
Description
Form Type
Enter the form type you want to set up default printers for.
Company ID
If the form type is company-specific, enter the company ID
for the form type.
Workstation ID
If the form type is for a specific workstation, enter the
workstation ID for the form type.
Printer ID
Enter the printer ID for the form type. You can select only
from the printers that are set up in the Resource Manager
Devices function.
Printer Name
The printer name is displayed.
Resource Manager User’s Manual 6.05
System File Maintenance
Form Printers
Command Bar Definitions
Command
Description
Enter = edit
Move the prompt (>) to the line you want to edit and press
Enter.
Append
Press A to add a form type.
Saving and Exiting
To exit to the System File Maintenance menu, use the Exit (F7) command.
Resource Manager User’s Manual 6.05
6-53
Support Information
Features
Use the Support Information function on the System File Maintenance menu to
enter the information that appears on the Other Commands Support Information
screen.
You can also access this function by pressing Shift + F3 when a Basic Error
window appears.
Reports
No report is associated with this function.
Screen Use
Screen
Description
Support Information
Use the Support Information screen to enter information
about your dealer, site number, and phone numbers for
technical support.
Resource Manager User’s Manual 6.05
6-55
Support Information
System File Maintenance
Support Information Screen
Field Definitions
6-56
Field Name
Description
Dealer Name
Enter your dealer’s company name.
Dealer Contact
Enter the name of your contact person at the dealer.
Dealer Phone Number
Enter your dealer’s phone number.
Fax No
Enter your dealer’s fax number.
Dealer Site Number
Enter the dealer’s site number.
Note 1/Note 2
You can enter two notes.
Customer Site Number
Enter your site number.
Open Systems Technical
Support
Enter the United States or Canadian phone number you call
for technical support.
Resource Manager User’s Manual 6.05
System File Maintenance
Support Information
Field Name
Description
Online
If you have online help available and you want to display the
command for the service vendor, enter the information.
Command Bar Definitions
This screen has no command bar.
Saving and Exiting
Use the Proceed (PgDn) command to save your entries and exit to the System File
Maintenance menu.
Resource Manager User’s Manual 6.05
6-57
User Login Activity
Features
Use the User Login Activity function on the Information Inquiry menu to view
which OSAS functions are in use and the last menu option accessed by users.
Reports
No report is associated with this function.
Screen Use
Screen
Description
User Login Activity
Use the User Login Activity screen to view OSAS user
activity and select how you want the information to be
displayed.
Resource Manager User’s Manual 6.05
6-59
User Login Activity
System File Maintenance
User Login Activity
Field Definitions
6-60
Field Name
Description
User ID
The user ID is displayed.
Term
The terminal number for the user is displayed.
AP
The ID of the application the user is accessing is displayed.
Menu Selection
The menu selection the user is accessing is displayed.
Time
The time the user accessed the menu selection is displayed.
Date
The date of the activity is displayed.
Resource Manager User’s Manual 6.05
System File Maintenance
User Login Activity
Command Bar Definitions
Command
Description
T
Toggle between the menu name and the file name
S
Change the order in which the users appear on the screen. Select a new
sort order from the list that appears (see page 6-62)
G
Go to a new position in the list of users
V
View the detailed information for this user
R
Refresh the information on the screen
Saving and Exiting
To exit to the Information Inquiry menu, use the Exit (F7) command.
Resource Manager User’s Manual 6.05
6-61
User Login Activity
System File Maintenance
Sort File Menu
Field Definitions
6-62
Field Name
Description
Select Sort Method
Enter 1 if you want to sort by terminal ID; 2 to sort
alphabetically by user ID; 3 to sort by application ID; or 4 to
sort by menu selection.
Resource Manager User’s Manual 6.05
System File Maintenance
User Login Activity
Command Bar Definitions
This window has no command bar.
Saving and Exiting
To exit to the User Login Activity screen, use the Exit (F7) command.
Resource Manager User’s Manual 6.05
6-63
User Login Activity
System File Maintenance
View Detail screen
Field Definitions
Field Name
Description
User ID
The current User ID is displayed.
Terminal
The current Terminal ID is displayed.
Current/Previous
Displays whether the user is using Live or Sample data in this
function.
Menu Selection
The name of the menu selection is displayed.
Company ID
The Company ID for the selection is displayed.
Command Bar Definitions
This window has no command bar.
6-64
Resource Manager User’s Manual 6.05
System File Maintenance
User Login Activity
Saving and Exiting
To exit to the User Login Activity screen, press any key.
Resource Manager User’s Manual 6.05
6-65
Resource Manager User’s Manual
6.05
EIS Dashboards
Company Summary
Cash Requirements Forecast
Daily Statistics
Accounts Receivable Analysis
Accounts Payable Analysis
Top 10 Customers
Top 10 Items
Top 10 Sales Reps
Top 10 Vendors
Resource Manager User’s Manual 6.05
7
7-3
7-7
7-11
7-15
7-19
7-23
7-27
7-31
7-35
7-1
EIS Dashboards
Introduction
This chapter explains the features and uses of predefined EIS Dashboards to
analyze information about various accounts and functions within your OPEN
SYSTEMS’ Accounting Software. The predefined Dashboards are designed to
display quickly the exact information you need without entering multiple
applications.
An EIS Dashboard is a screen that displays several fields and associated values.
Normally the EIS Dashboard shows related fields.
Use the EIS Dashboard function to do several tasks:
7-2
•
Redisplay the value of the fields on a screen in case another user on a network
recalculates the fields while you are viewing it.
•
Recalculate the value of a field or all fields on a screen.
•
Set up initial parameters that determine which values will be displayed on the
screen.
•
Change a fields’s definition.
•
View detailed information about a field (the field ID, description, and mask;
the last updated time, date, and user; and the status of the field).
•
Configure or edit the screen’s definition.
•
Load a new EIS Dashboard.
•
Load an EIS Dashboard that was saved in history.
Resource Manager User’s Manual 6.05
Company Summary
Function
The Company Summary dashboard provides a snapshot of key financial
information.
Reports
No report is associated with this function.
Screen Use
Screen
Description
EIS Dashboard
An EIS Dashboard is a screen that displays several fields
and associated values.
Resource Manager User’s Manual 6.05
7-3
Company Summary
EIS Dashboards
Company Summary Screen
Command Bar Definitions
7-4
Command
Description
Update
Press U to update the information in the fields when used on a
network.
Recalc
Press R to recalculate a field so that you have the latest
information.
Global
Press G to recalculate all the fields on the screen for the latest
information.
Setup
Press S to display information within a range.
Field
Press F to change the definition of the field.
View
Press V to view information about how the highlighted field
was built and what values it was designed to produce.
Resource Manager User’s Manual 6.05
EIS Dashboards
Company Summary
Command
Description
Edit
Press E to reconfigure the EIS Dashboard you are on.
Load
Press L to load a different EIS Dashboard.
History
Press H to display the EIS Dashboard using saved field history
from a different date.
Saving and Exiting
Use the Proceed (PgDn) command to save your entries and exit to the EIS
Dashboard menu.
Resource Manager User’s Manual 6.05
7-5
Cash Requirements Forecast
Function
The Cash Requirements Forecast dashboard provides cashflow projections.
Reports
No report is associated with this function.
Screen Use
Screen
Description
Cash Requirements
Forecast
An EIS Dashboard is a screen that displays several fields
and associated values.
Resource Manager User’s Manual 6.05
7-7
Cash Requirements Forecast
EIS Dashboards
Cash Requirements Forecast Screen
Command Bar Definitions
7-8
Command
Description
Update
Press U to update the information in the fields when used on a
network.
Recalc
Press R to recalculate a field so that you have the latest
information.
Global
Press G to recalculate all the fields on the screen for the latest
information.
Setup
Press S to display information within a range.
Field
Press F to change the definition of the field.
View
Press V to view information about how the highlighted field
was built and what values it was designed to produce.
Resource Manager User’s Manual 6.05
EIS Dashboards
Cash Requirements Forecast
Command
Description
Edit
Press E to reconfigure the EIS Dashboard you are on.
Load
Press L to load a different EIS Dashboard.
History
Press H to display the EIS Dashboard using saved field history
from a different date.
Saving and Exiting
Use the Proceed (PgDn) command to save your entries and exit to the EIS
Dashboard menu.
Resource Manager User’s Manual 6.05
7-9
Daily Statistics
Function
The Daily Statistics dashboard provides current data on Sales Order and Purchase
Order statuses.
Reports
No report is associated with this function.
Screen Use
Screen
Description
Daily Statistics
An EIS Dashboard is a screen that displays several fields
and associated values.
Resource Manager User’s Manual 6.05
7-11
Daily Statistics
EIS Dashboards
Daily Statistics Screen
Command Bar Definitions
7-12
Command
Description
Update
Press U to update the information in the fields when used on a
network.
Recalc
Press R to recalculate a field so that you have the latest
information.
Global
Press G to recalculate all the fields on the screen for the latest
information.
Setup
Press S to display information within a range.
Field
Press F to change the definition of the field.
View
Press V to view information about how the highlighted field
was built and what values it was designed to produce.
Resource Manager User’s Manual 6.05
EIS Dashboards
Daily Statistics
Command
Description
Edit
Press E to reconfigure the EIS Dashboard you are on.
Load
Press L to load a different EIS Dashboard.
History
Press H to display the EIS Dashboard using saved field history
from a different date.
Saving and Exiting
Use the Proceed (PgDn) command to save your entries and exit to the EIS
Dashboard menu.
Resource Manager User’s Manual 6.05
7-13
Accounts Receivable Analysis
Function
The Accounts Receivable Analysis dashboard provides information from key items
in Accounts Receivable and Sales Order.
Reports
No report is associated with this function.
Screen Use
Screen
Description
Accounts Receivable
Analysis
An EIS Dashboard is a screen that displays several fields
and associated values.
Resource Manager User’s Manual 6.05
7-15
Accounts Receivable Analysis
EIS Dashboards
Accounts Receivable Analysis Screen
Command Bar Definitions
7-16
Command
Description
Update
Press U to update the information in the fields when used on a
network.
Recalc
Press R to recalculate a field so that you have the latest
information.
Global
Press G to recalculate all the fields on the screen for the latest
information.
Setup
Press S to display information within a range.
Field
Press F to change the definition of the field.
View
Press V to view information about how the highlighted field
was built and what values it was designed to produce.
Resource Manager User’s Manual 6.05
EIS Dashboards
Accounts Receivable Analysis
Command
Description
Edit
Press E to reconfigure the EIS Dashboard you are on.
Load
Press L to load a different EIS Dashboard.
History
Press H to display the EIS Dashboard using saved field history
from a different date.
Saving and Exiting
Use the Proceed (PgDn) command to save your entries and exit to the EIS
Dashboard menu.
Resource Manager User’s Manual 6.05
7-17
Accounts Payable Analysis
Function
The Accounts Payable Analysis dashboard provides information from key items in
Accounts Payable and Purchase Order.
Reports
No report is associated with this function.
Screen Use
Screen
Description
Accounts Payable Analysis
Screen
An EIS Dashboard is a screen that displays several fields
and associated values.
Resource Manager User’s Manual 6.05
7-19
Accounts Payable Analysis
EIS Dashboards
Accounts Payable Analysis Screen
Command Bar Definitions
7-20
Command
Description
Update
Press U to update the information in the fields when used on a
network.
Recalc
Press R to recalculate a field so that you have the latest
information.
Global
Press G to recalculate all the fields on the screen for the latest
information.
Setup
Press S to display information within a range.
Field
Press F to change the definition of the field.
View
Press V to view information about how the highlighted field
was built and what values it was designed to produce.
Resource Manager User’s Manual 6.05
EIS Dashboards
Accounts Payable Analysis
Command
Description
Edit
Press E to reconfigure the EIS Dashboard you are on.
Load
Press L to load a different EIS Dashboard.
History
Press H to display the EIS Dashboard using saved field history
from a different date.
Saving and Exiting
Use the Proceed (PgDn) command to save your entries and exit to the EIS
Dashboard menu.
Resource Manager User’s Manual 6.05
7-21
Top 10 Customers
Function
The Top 10 Customers dashboard provides a list of the 10 customers with the
highest sales amount.
Reports
No report is associated with this function.
Screen Use
Screen
Description
Top 10 customers
An EIS Dashboard is a screen that displays several fields
and associated values.
Resource Manager User’s Manual 6.05
7-23
Top 10 Customers
EIS Dashboards
Top 10 Customers screen
Command Bar Definitions
7-24
Command
Description
Update
Press U to update the information in the fields when used on a
network.
Recalc
Press R to recalculate a field so that you have the latest
information.
Global
Press G to recalculate all the fields on the screen for the latest
information.
Setup
Press S to display information within a range.
Field
Press F to change the definition of the field.
View
Press V to view information about how the highlighted field
was built and what values it was designed to produce.
Resource Manager User’s Manual 6.05
EIS Dashboards
Top 10 Customers
Command
Description
Edit
Press E to reconfigure the EIS Dashboard you are on.
Load
Press L to load a different EIS Dashboard.
History
Press H to display the EIS Dashboard using saved field history
from a different date.
Saving and Exiting
Use the Proceed (PgDn) command to save your entries and exit to the EIS
Dashboard menu.
Resource Manager User’s Manual 6.05
7-25
Top 10 Items
Function
The Top 10 Items dashboard provides a list of the top 10 items.
Reports
No report is associated with this function.
Screen Use
Screen
Description
Top 10 Items
An EIS Dashboard is a screen that displays several fields
and associated values.
Resource Manager User’s Manual 6.05
7-27
Top 10 Items
EIS Dashboards
Top 10 Items screen
Command Bar Definitions
7-28
Command
Description
Update
Press U to update the information in the fields when used on a
network.
Recalc
Press R to recalculate a field so that you have the latest
information.
Global
Press G to recalculate all the fields on the screen for the latest
information.
Setup
Press S to display information within a range.
Field
Press F to change the definition of the field.
View
Press V to view information about how the highlighted field
was built and what values it was designed to produce.
Resource Manager User’s Manual 6.05
EIS Dashboards
Top 10 Items
Command
Description
Edit
Press E to reconfigure the EIS Dashboard you are on.
Load
Press L to load a different EIS Dashboard.
History
Press H to display the EIS Dashboard using saved field history
from a different date.
Saving and Exiting
Use the Proceed (PgDn) command to save your entries and exit to the EIS
Dashboard menu.
Resource Manager User’s Manual 6.05
7-29
Top 10 Sales Reps
Function
The Top 10 Sales Reps dashboard provides a list of the top 10 sales representatives.
Reports
No report is associated with this function.
Screen Use
Screen
Description
Top 10 Sales Reps
An EIS Dashboard is a screen that displays several fields
and associated values.
Resource Manager User’s Manual 6.05
7-31
Top 10 Sales Reps
EIS Dashboards
Top 10 Sales Reps screen
Command Bar Definitions
7-32
Command
Description
Update
Press U to update the information in the fields when used on a
network.
Recalc
Press R to recalculate a field so that you have the latest
information.
Global
Press G to recalculate all the fields on the screen for the latest
information.
Setup
Press S to display information within a range.
Field
Press F to change the definition of the field.
View
Press V to view information about how the highlighted field
was built and what values it was designed to produce.
Resource Manager User’s Manual 6.05
EIS Dashboards
Top 10 Sales Reps
Command
Description
Edit
Press E to reconfigure the EIS Dashboard you are on.
Load
Press L to load a different EIS Dashboard.
History
Press H to display the EIS Dashboard using saved field history
from a different date.
Saving and Exiting
Use the Proceed (PgDn) command to save your entries and exit to the EIS
Dashboard menu.
Resource Manager User’s Manual 6.05
7-33
Top 10 Vendors
Function
The Top 10 Vendors dashboard provided a list of the top 10 vendors.
Reports
No report is associated with this function.
Screen Use
Screen
Description
Top 10 Vendors
An EIS Dashboard is a screen that displays several fields
and associated values.
Resource Manager User’s Manual 6.05
7-35
Top 10 Vendors
EIS Dashboards
Top 10 Vendors screen
Command Bar Definitions
7-36
Command
Description
Update
Press U to update the information in the fields when used on a
network.
Recalc
Press R to recalculate a field so that you have the latest
information.
Global
Press G to recalculate all the fields on the screen for the latest
information.
Setup
Press S to display information within a range.
Field
Press F to change the definition of the field.
View
Press V to view information about how the highlighted field
was built and what values it was designed to produce.
Resource Manager User’s Manual 6.05
EIS Dashboards
Top 10 Vendors
Command
Description
Edit
Press E to reconfigure the EIS Dashboard you are on.
Load
Press L to load a different EIS Dashboard.
History
Press H to display the EIS Dashboard using saved field history
from a different date.
Saving and Exiting
Use the Proceed (PgDn) command to save your entries and exit to the EIS
Dashboard menu.
Resource Manager User’s Manual 6.05
7-37
Resource Manager User’s Manual
6.05
Executive Inform ation Sum m ary
8
EIS Dashboard
EIS Dashboard
8-3
EIS Reports
Dashboard
Dashboard History
Field History
8-7
8-11
8-15
EIS Periodic Maintenance
Global Dashboard Update
Purge Dashboard History
8-19
8-23
EIS File Maintenance
Field Definitions
Setup
Functions
Access Codes
Dashboard Editor
Tables
8-27
8-31
8-35
8-39
8-43
8-47
EIS Master File List
Screen Definitions List
Field Definitions List
Functions List
Setup Definitions List
8-51
8-55
8-59
8-63
Resource Manager User’s Manual 6.05
8-1
EIS Dashboard
Features
An EIS Dashboard is a screen that displays several fields and associated values.
Normally the EIS Dashboard shows related fields.
Use the EIS Dashboard function to do several tasks:
•
Redisplay the value of the fields on a screen in case another user on a network
recalculates the fields while you are viewing it.
•
Recalculate the value of a field or all fields on a screen.
•
Set up initial parameters that determine which values will be displayed on the
screen.
•
Change a fields’s definition.
•
View detailed information about a field (the field ID, description, and mask;
the last updated time, date, and user; and the status of the field).
•
Configure or edit the screen’s definition.
•
Load a new EIS Dashboard.
•
Load an EIS Dashboard that was saved in history.
Reports
No report is associated with this function.
Resource Manager User’s Manual 6.05
8-3
EIS Dashboard
Executive Information Summary
Screen Use
Screen
Description
EIS Dashboard
An EIS Dashboard is a screen that displays several fields
and associated values.
For a description of the predefined EIS Dashboards, see the
EIS overview starting on page 1-5.
EIS Dashboard Screen (Generic)
Field Definitions
You can customize the EIS Dashboard, producing many combination of screen
layouts.
8-4
Resource Manager User’s Manual 6.05
Executive Information Summary
EIS Dashboard
Command Bar Definitions
Command
Description
Update
Press U to update the information in the fields when used on a
network.
Recalc
Press R to recalculate a field so that you have the latest
information.
Global
Press G to recalculate all the fields on the screen for the latest
information.
Setup
Press S to display information within a range.
Field
Press F to change the definition of the field.
View
Press V to view information about how the highlighted field
was built and what values it was designed to produce.
Edit
Press E to reconfigure the EIS Dashboard you are on.
Load
Press L to load a different EIS Dashboard.
History
Press H to display the EIS Dashboard using saved field history
from a different date.
Saving and Exiting
Use the Proceed (PgDn) command to save your entries and exit to the EIS
Dashboard menu.
Resource Manager User’s Manual 6.05
8-5
Dashboard
Features
The EIS Dashboard Report contains information about an EIS Dashboard or a
group of EIS Dashboards.
Reports
A sample EIS Dashboard Report is on page 8-10.
Screen Use
Screen
Description
EIS Dashboard Report
Use the EIS Dashboard Report screen to select the screens
you want to produce the report for.
Resource Manager User’s Manual 6.05
8-7
Dashboard
Executive Information Summary
EIS Dashboard Report Screen
Field Definitions
8-8
Field Name
Description
Pick Dashboard ID
Enter the range of dashboards you want to produce a report
for.
Resource Manager User’s Manual 6.05
Executive Information Summary
Dashboard
Command Bar Definitions
Command
Description
Printer
Select P to send the report to a printer.
File
Select F to send the report to a file.
Screen
Select S to send the report to the screen.
End
Select E to change your selections or exit to the Reports menu.
Saving and Exiting
After the report is produced, the Reports menu appears.
Resource Manager User’s Manual 6.05
8-9
8-10
Accounts Payable Analysis
Builders Supply
EIS Dashboard Report
179,054.08
.00
453,032.20
16
7
0
14
Amt on Hold
Amt on Tmp Hold
Amt Released
Total Vendors
Inv on Hold
Inv on Tmp Hold
Inv Released
------- Payment History -------Period-to-Date
Year-to-Date
Prepaids
.00
.00
Discount
.00
.00
Checks
.00
.00
Discount
.00
.00
--------------- --------------Total
.00
.00
------- Purchase History ------Period-to-Date
Year-to-Date
Invoices
241,484.21
241,484.21
Freight
47,747.12
47,747.12
Tax
3,556.00
3,556.00
Misc
.00
.00
--------------- --------------Total
292,787.33
292,787.33
Accounts Receivable Analysis
-------- Sales History -------Period-to-Date
Year-to-Date
Unpd Fin Chg
.00 Sales
.00
.00
Current Due
.00 Returns
.00
.00
Balance 31-60
.00 Sales Tax
.00
.00
61-90
.00 Freight
.00
.00
91-120
.00 Misc Chgs
.00
.00
121+
157,620.48 Fin Chgs
.00
.00
Unapplied Cr
.00
--------------- ----------------------------- Total
.00
.00
Total Due
157,620.48
Payments
.00
.00
Aging Analysis
-----------------------------------------------------------------------------
Screen ID ARANAL
-----------------------------------------------------------------------------
Total Due
632,086.28
.00
.00
.00
.00
--------------632,086.28
Current Due
Balance 31-60
61-90
91-120
121+
Aging Analysis
-----------------------------------------------------------------------------
Screen ID APANAL
07/13/1999
1:35 PM
Page
1
Dashboard
Executive Information Summary
EIS Dashboard Report
Resource Manager User’s Manual 6.05
Dashboard History
Features
The EIS Dashboard History Report contains the values in the EIS Dashboards that
you have saved using the Global Dashboard Update function (see page 8-19). Use
this report to discover important trends in your business.
Reports
A sample EIS Dashboard History Report is on page 8-14.
Screen Use
Screen
Description
EIS Dashboard History
Report
Use the EIS Dashboard History Report screen to select the
screens, dates, and times you want to produce the report for.
Resource Manager User’s Manual 6.05
8-11
Dashboard History
Executive Information Summary
EIS Dashboard History Report Screen
Field Definitions
8-12
Field Name
Description
Pick
Enter the range of screens, dates, and times you want in the
report.
Resource Manager User’s Manual 6.05
Executive Information Summary
Dashboard History
Command Bar Definitions
Command
Description
Printer
Select P to send the report to a printer.
File
Select F to send the report to a file.
Screen
Select S to send the report to the screen.
End
Select E to change your selections or exit to the Reports menu.
Saving and Exiting
After the report is produced, the Reports menu appears.
Resource Manager User’s Manual 6.05
8-13
8-14
Accounts Payable Analysis
Builders Supply
EIS Dashboard History Report
.00
.00
.00
0
0
0
0
Amt on Hold
Amt on Tmp Hold
Amt Released
Total Vendors
Inv on Hold
Inv on Tmp Hold
Inv Released
------- Payment History -------Period-to-Date
Year-to-Date
Prepaids
.00
.00
Discount
.00
.00
Checks
.00
.00
Discount
.00
.00
--------------- --------------Total
.00
.00
------- Purchase History ------Period-to-Date
Year-to-Date
Invoices
.00
.00
Freight
.00
.00
Tax
.00
.00
Misc
.00
.00
--------------- --------------Total
.00
.00
Accounts Receivable Analysis
-------- Sales History -------Period-to-Date
Year-to-Date
Unpd Fin Chg
18.00 Sales
.00
.00
Current Due
1,060,955.04 Returns
.00
.00
Balance 31-60
206,287.24 Sales Tax
.00
.00
61-90
15,300.00 Freight
.00
.00
91-120
.00 Misc Chgs
.00
.00
121+
19,462.78 Fin Chgs
.00
.00
Unapplied Cr
29,566.49--------------- ----------------------------- Total
.00
.00
Total Due
1,272,456.57
Payments
.00
.00
Aging Analysis
-----------------------------------------------------------------------------
Dashboard ARANAL
--- 08/31/1999 13:57 --------------------------------------------------------
Total Due
.00
.00
.00
.00
.00
--------------.00
Current Due
Balance 31-60
61-90
91-120
121+
Aging Analysis
-----------------------------------------------------------------------------
Dashboard APANAL
07/13/1999
1:36 PM
Page
1
Dashboard History
Executive Information Summary
EIS Dashboard History Report
Resource Manager User’s Manual 6.05
Field History
Features
The Field History Report contains historical information about a field that you
specify. You can specify that the report contain all the available history
information about the field or only the information within a range of dates. It
eliminates the need to produce several EIS Dashboard History Reports.
Reports
A sample Field History Report is on page 8-18.
Screen Use
Screen
Description
Field History Report
Use the Field History Report screen to select the fields,
dates, and times you want in the report.
Resource Manager User’s Manual 6.05
8-15
Field History
Executive Information Summary
Field History Report Screen
Field Definitions
8-16
Field Name
Description
Field ID
Enter the ID of the field whose history report you want to
produce.
Pick Date/Time
Enter the range of dates and times you want in the report.
Resource Manager User’s Manual 6.05
Executive Information Summary
Field History
Command Bar Definitions
Command
Description
Printer
Select P to send the report to a printer.
File
Select F to send the report to a file.
Screen
Select S to send the report to the screen.
End
Select E to change your selections or exit to the Reports menu.
Saving and Exiting
After the report is produced, the Reports menu appears.
Resource Manager User’s Manual 6.05
8-17
8-18
Builders Supply
Field History Report
*** End of Report ***
Time
18:47:14
17:43:11
18:30:10
Value
499,326.93
499,326.93
499,326.93
Accounts Payable Balance
Date
09/30/1999
10/31/1999
11/30/1999
APBAL
08/07/1999
10:40 AM
Page
1
Field History
Executive Information Summary
Field History Report
Resource Manager User’s Manual 6.05
Global Dashboard Update
Features
Use the Global Dashboard Update function on the Periodic Maintenance menu to
recalculate all the fields on all the EIS Dashboards, to save the values of the screens
in history, or both.
Reports
No report is associated with this function.
Screen Use
Screen
Description
Global Dashboard Update
Use the Global Dashboard Update screen to specify when
you want all the fields on all the EIS Dashboards to be
recalculated.
Resource Manager User’s Manual 6.05
8-19
Global Dashboard Update
Executive Information Summary
Global Dashboard Update Screen
Field Definitions
Field Name
Description
Calculate values for all
Dashboards?
If you want to calculate the values for all the dashboards, enter
Y; if not, enter N.
Transfer calculated
values to history?
If you want to transfer the values to history, enter Y; if not,
enter N.
Start
Use the system date and time, or enter the date and the time of
day you want the process to begin.
Command Bar Definitions
This screen has no command bar.
8-20
Resource Manager User’s Manual 6.05
Executive Information Summary
Global Dashboard Update
Saving and Exiting
Use the Proceed (PgDn) command to start the update process and exit to the
Periodic Maintenance menu.
Resource Manager User’s Manual 6.05
8-21
Purge Dashboard History
Features
Use the Purge Dashboard History function on the Periodic Maintenance menu to
remove EIS Dashboard records from the Field History file. This function is
valuable if you want to eliminate historical data you no longer need.
Reports
No report is associated with this function.
Screen Use
Screen
Description
Purge Dashboard History
Use the Purge Dashboard History screen to specify the
history you want to delete.
Resource Manager User’s Manual 6.05
8-23
Purge Dashboard History
Executive Information Summary
Purge Dashboard History Screen
Field Definitions
Field Name
Description
Have you backed up
your data files?
Enter Y or N to indicate whether or not you have backed up
your data files.
Purge History Through
Enter the date and time before which you want to remove the
history data.
Command Bar Definitions
This screen has no command bar.
8-24
Resource Manager User’s Manual 6.05
Executive Information Summary
Purge Dashboard History
Saving and Exiting
Use the Proceed (PgDn) command to purge the history and exit to the Periodic
Maintenance menu.
Resource Manager User’s Manual 6.05
8-25
Field Definitions
Features
Use the Field Definitions function on the File Maintenance menu to create or
modify the attributes of a field: description, display mask, function ID, and setup
ID.
If you intend to use only the functions and setup IDs that are already in the system,
you are ready to use this information. If you intend to define the field in terms of
functions and setup IDs that have not been established, use the Setup function and
the Functions function before using the Field definitions function.
Reports
To produce a list of the information entered on the Field Definitions screen, use the
Field Definitions List function on the Master File Lists menu.
Screen Use
Screen
Description
Field Definitions
Use the Field Definitions screen to create or modify a field.
Math Formula window
Use the Math Formula window to enter a formula for the
field on the dashboard.
Resource Manager User’s Manual 6.05
8-27
Field Definitions
Executive Information Summary
Field Definitions Screen
Field Definitions
8-28
Field Name
Description
Field ID
Enter the ID of the field you want to add, view, or edit.
Copy From
Enter the ID of the field you want to copy the information from.
Description
Use the description that is displayed, or enter a different
description for the field.
Display Mask
Use the mask that is displayed, or enter a different mask for the
field.
Function ID
The function ID refers to the operation you want done to the data
and the information you want in return.
Setup ID
The setup ID refers to a range of data you want to confine the
operation to.
Resource Manager User’s Manual 6.05
Executive Information Summary
Field Definitions
Command Bar Definitions
Command
Description
Enter = edit
Move the prompt (>) to the line of function and setup IDs you
want to edit and press Enter.
Append
Press A to add a line of function and setup IDs.
Header
Press H to edit the header information.
Math formula
Press M to activate the Math Formula window.
Saving and Exiting
Use the Proceed (PgDn) command to save your entries and exit to the File
Maintenance menu.
Resource Manager User’s Manual 6.05
8-29
Field Definitions
Executive Information Summary
Math Formula Window
Field Definitions
Enter one to 10 lines of formula to calculate the display value.
Command Bar Definitions
This window has no command bar.
Saving and Exiting
Use the Proceed (PgDn) command to save the math formula and exit to the Field
Definitions screen.
8-30
Resource Manager User’s Manual 6.05
Setup
Features
Use the Setup function on the File Maintenance menu to modify the following
information about a range of a type of information that a function applies to: setup
ID, description, associated function ID, and range of the type of information.
If you intend to use only the functions IDs that are already in the system, you are
ready to use this information. If you intend to define the setup IDs that have not
been established, use the Functions function before using the Setup function.
Reports
To produce a list of the information entered on the Setup screen, use the Setup
Definitions List function on the Master File Lists menu.
Screen Use
Screen
Description
Setup
Use the Setup screen to modify a range of information in a
function.
Resource Manager User’s Manual 6.05
8-31
Setup
Executive Information Summary
Setup Screen
Field Definitions
8-32
Field Name
Description
Setup ID
Enter the setup ID you want to add, view, or edit.
Copy From
Enter the setup ID you want to copy the information from.
Function ID
Use the ID that is displayed, or enter a function ID that uses
the setup ID you entered.
Description
Use the description that is displayed, or enter a different
description for the setup ID.
Type
The ranges of types of information that are assigned to each
setup ID are displayed.
Resource Manager User’s Manual 6.05
Executive Information Summary
Setup
Command Bar Definitions
Command
Description
Enter = edit
Move the prompt (>) to the type you want to edit and press
Enter.
Append
Press A to add a type and range to the list.
Description
Press D to change the description of the setup ID.
Saving and Exiting
Use the Proceed (PgDn) command to save your entries and exit to the File
Maintenance menu.
Resource Manager User’s Manual 6.05
8-33
Functions
Features
Use the Functions function on the File Maintenance menu to modify the definition
of functions that retrieve and calculate information you eventually want to assign to
a field and to modify the setup types (description, length and type) associated with
each function ID.
Reports
To produce a list of the information entered on the Functions screen, use the
Functions List function on the Master File Lists menu.
Screen Use
Screen
Description
Functions
Use the Functions screen to modify the definition of
functions.
Resource Manager User’s Manual 6.05
8-35
Functions
Executive Information Summary
Functions Screen
Field Definitions
8-36
Field Name
Description
Function ID
Enter the ID of the function you want to add, view or edit.
Copy From
Enter the function ID you want to copy the information from.
Description
Use the description that is displayed, or enter a different
description for the function.
Type
The type of data returned can be of two types: alphanumeric or
numeric.
Description
Enter a description of the data returned by the function.
Resource Manager User’s Manual 6.05
Executive Information Summary
Functions
Command Bar Definitions
Command
Description
Enter = edit
Move the prompt (>) to the type and description you want to
change and press Enter.
Append
Press A to add a type and description to the list.
Description
Press D to edit the description of the function (in the header).
Setup types
Press S to establish and update information about the setup
types.
Description
Use the description that is displayed, or enter a different
description.
Length
Use the displayed length of the field that accepts the input, or
enter a different length.
Type
Use the displayed type of data, or enter a different type.
Saving and Exiting
Use the Proceed (PgDn) command to save your entries and exit to the File
Maintenance menu.
Resource Manager User’s Manual 6.05
8-37
Access Codes
Features
Use the Access Codes function on the File Maintenance menu to restrict access to
commands and fields.
Reports
No report is associated with this function.
Screen Use
Screen
Description
Access Codes
Use the Access Codes screen to specify which fields and
commands you want to restrict access to.
Resource Manager User’s Manual 6.05
8-39
Access Codes
Executive Information Summary
Access Codes Screen
Field Definitions
8-40
Field Name
Description
Access Name
Enter the access code name you want to modify. You cannot
define a code here; you must use the Access Codes function
on the Company Setup menu to set up an access code (see
page 3-17).
Access
If you want to grant access to this function or command, press
Enter to toggle to YES; if not, toggle to NO.
Field ID
The IDs of the commands and fields are displayed.
Description
The description of the commands and fields are displayed.
Resource Manager User’s Manual 6.05
Executive Information Summary
Access Codes
Command Bar Definitions
Command
Description
Enter = toggle
Move the prompt (>) to the command or field ID you want to
restrict access to and press Enter to toggle from YES to NO or
back again.
All
Press A to change the status of all the commands and field IDs
in EIS to free access.
None
Press N to change the status of all the commands and field IDs
in EIS to restricted access.
Saving and Exiting
Use the Proceed (PgDn) command to save your entries and exit to the File
Maintenance menu.
Resource Manager User’s Manual 6.05
8-41
Dashboard Editor
Features
Use the EIS Dashboard Editor on the File Maintenance menu to create or modify a
new dashboard.
Use this function only after you have established the fields you need through the
Field Definitions function.
Reports
No report is associated with this function.
Screen Use
Screen
Description
Untitled Screen
Use the blank Untitled Screen to create your dashboard.
Resource Manager User’s Manual 6.05
8-43
Dashboard Editor
Executive Information Summary
Untitled Screen
Field Definitions
The coordinates at the bottom right of the EIS Dashboard indicate where the cursor
is on the screen. Refer to the coordinates when you place the fields and set visual
margins.
8-44
Resource Manager User’s Manual 6.05
Executive Information Summary
Dashboard Editor
Command Bar Definitions
Command
Description
File
Press F to create or retrieve a dashboard file.
Load Dashboard
Press L in File mode to load an existing dashboard.
Save Dashboard
Press S in File mode to save the dashboard you are on. If the
screen does not have a name, enter a descriptive name to make
future access easy; the screen is saved under the name. If the
screen already has a name accept it, or enter a different name.
New Dashboard
Press N in File mode to work with a new dashboard.
Delete Dashboard
Press D in File mode to delete a dashboard.
Edit
Press E to edit the fields on a dashboard.
Add field
Press A in Edit mode to add a field to the dashboard.
Change field
Press C in Edit mode to replace the field where the cursor is
with a different field.
Delete field
Press D in Edit mode to remove the field where the cursor is
from the screen.
Move field
Press M in Edit mode to move the field where the cursor is to
a different part of the screen.
Options
Press O to change the look of the screen.
Set tab size
Press S in Options mode to set the number of spaces between
tabs. The setting is saved.
Change title
Press C in Options mode to change the title of the screen.
Saving and Exiting
Use the Proceed (PgDn) command to save your entries and exit to the File
Maintenance menu.
Resource Manager User’s Manual 6.05
8-45
Tables
Features
Use the Tables function on the File Maintenance menu to view the settings for EIS.
The tables are for information only; use the Options and Interfaces function in
Resource Manager to change the settings.
Reports
No report is associated with this function.
Screen Use
Screen
Description
EITB
Use the EITB screen to view the settings for EIS.
Resource Manager User’s Manual 6.05
8-47
Tables
Executive Information Summary
EITB Screen
Field Definitions
8-48
Field Name
Description
Table ID
Enter or change the table ID. To set up a company-specific
table, enter the table ID plus the one- to three-character
company ID. To set up a terminal-specific table, enter the
table ID plus the four-character terminal ID.
Copy From
This field appears if you entered a new table ID. To copy a
company-specific or a terminal-specific table, enter the table
ID plus the company and terminal ID.
Description
Enter or change the description of the table.
Number of Cols
The number of columns in the table is displayed.
Column Length
The length of the columns in the table is displayed
Resource Manager User’s Manual 6.05
Executive Information Summary
Tables
Field Name
Description
Type
The type of characters you can enter in the table is
displayed—alphanumeric (A), numeric (N), or numeric with
one to four decimal places. Although you can change the type,
you cannot enter any other type of character than the table
originally specifies.
Settings
Switch setting 1 means YES and a space means NO. Do not
change the settings; doing so may produce undesired results.
Command Bar Definitions
This screen has no command bar.
Saving and Exiting
Use the Proceed (PgDn) command to save your entries and exit to the File
Maintenance menu.
Resource Manager User’s Manual 6.05
8-49
Screen Definitions List
Features
Use the Screen Definitions List function on the Master File Lists menu to produce a
list of EIS Dashboards.
Reports
A sample Screen Definitions List is on page 8-54.
Screen Use
Screen
Description
Screen Definitions List
Use the Screen Definitions List screen to select the
information you want in the list.
Resource Manager User’s Manual 6.05
8-51
Screen Definitions List
Executive Information Summary
Screen Definitions List Screen
Field Definitions
8-52
Field Name
Description
Pick Dashboard
Enter the IDs of the dashboards you want in the list.
Show screen layouts?
If you want the list to show the appearance of the screen with
the coordinates at the top and left of the screen, enter Y; if not,
enter N.
Show fields used?
If you want to list the ID, description, and display mask of
each field, enter Y; if not, enter N.
Show field detail?
If you want to break down each field into its setup ID,
description, and formula, enter Y; if not, enter N.
Show function/setup
detail?
If you want to list each function and setup ID for each field
broken down into ID, description, type, and range, enter Y; if
not, enter N.
Resource Manager User’s Manual 6.05
Executive Information Summary
Screen Definitions List
Command Bar Definitions
Command
Description
Printer
Select P to send the list to a printer.
File
Select F to send the list to a file.
Screen
Select S to send the list to the screen.
End
Select E to change your selections or exit to the Master File
Lists menu.
Saving and Exiting
After the list is produced, the Master File Lists menu appears.
Resource Manager User’s Manual 6.05
8-53
8-54
999,999,999.00999,999,999.00999,999,999.00999,999,999.00999,999,999.00--------------999,999,999.00-
Field ID
APAGE_CU
APHINPST
APHINYST
APAGE_30
APHINPFR
APHINYFR
APAGE_60
APHINPTX
APHINYTX
APAGE_90
APHINPMI
APHINYMI
APAGE_12
APHINPTO
999,999
99,999
99,999
99,999
History -------Year-to-Date
999,999,999.00999,999,999.00999,999,999.00999,999,999.00--------------999,999,999.00-
History ------Year-to-Date
999,999,999.00999,999,999.00999,999,999.00999,999,999.00--------------999,999,999.00-
Display Mask
999,999,999.00999,999,999.00999,999,999.00999,999,999.00999,999,999.00999,999,999.00999,999,999.00999,999,999.00999,999,999.00999,999,999.00999,999,999.00999,999,999.00999,999,999.00999,999,999.00-
------- Payment
Period-to-Date
Prepaids 999,999,999.00Discount 999,999,999.00Checks 999,999,999.00Discount 999,999,999.00--------------Total
999,999,999.00-
------- Purchase
Period-to-Date
Invoices 999,999,999.00Freight 999,999,999.00Tax
999,999,999.00Misc
999,999,999.00--------------Total
999,999,999.00-
Description
AP Aged Open Invoices - Current Due
AP Detail History Invoice Subtotal - PTD
AP Detail History Invoice Subtotal - YTD
AP Aged Open Invoices - 31-60
AP Detail History Invoice Freight - PTD
AP Detail History Invoice Freight - YTD
AP Aged Open Invoices - 61-90
AP Detail History Invoice Tax - PTD
AP Detail History Invoice Tax - YTD
AP Aged Open Invoices - 91-120
AP Detail History Invoice Misc - PTD
AP Detail History Invoice Misc - YTD
AP Aged Open Invoices - 121+
AP Detail History Invoice Total - PTD
Total Vendors
Inv on Hold
Inv on Tmp Hold
Inv Released
Amt on Hold
999,999,999.00Amt on Tmp Hold 999,999,999.00Amt Released
999,999,999.00-
Total Due
Current Due
Balance 31-60
61-90
91-120
121+
Aging Analysis
Fields Used
1
2
3
4
5
6
7
8
9
10
11
12
13
14
15
16
17
18
19
20
Accounts Payable Analysis
Builders Supply
Screen Definitions List
1
2
3
4
5
6
7
12345678901234567890123456789012345678901234567890123456789012345678901234567
Screen Layout
Dashboard APANAL
07/13/1999
11:39 AM
Row
04
04
04
05
05
05
06
06
06
07
07
07
08
09
Col
18
45
62
18
45
62
18
45
62
18
45
62
18
45
Page
1
Screen Definitions List
Executive Information Summary
Screen Definition List
Resource Manager User’s Manual 6.05
Field Definitions List
Features
Use the Field Definitions List function on the Master File Lists menu to produce a
list of fields that have been defined. You can list each function’s ID and
description, or you can list each function broken down with its types of output.
Reports
A sample Field Definitions List is on page 8-58.
Screen Use
Screen
Description
Field Definitions List
Use the Field Definitions List screen to select the fields and
the amount of detail you want in the list.
Resource Manager User’s Manual 6.05
8-55
Field Definitions List
Executive Information Summary
Field Definitions List Screen
Field Definitions
8-56
Field Name
Description
Pick Field ID
Enter the range of fields you want in the list.
Print
To list the functions and setup IDs assigned to each field
definition, enter 1. To list only the ID and description for each
field, enter 2.
Show function/setup
detail?
If you want to list the types of output, descriptions, setup
types, and ranges of each function and setup ID that make up
the field definition, enter Y; if not, enter N.
Resource Manager User’s Manual 6.05
Executive Information Summary
Field Definitions List
Command Bar Definitions
Command
Description
Printer
Select P to send the list to a printer.
File
Select F to send the list to a file.
Screen
Select S to send the list to the screen.
End
Select E to change your selections or exit to the Master File
Lists menu.
Saving and Exiting
After the list is produced, the Master File Lists menu appears.
Resource Manager User’s Manual 6.05
8-57
8-58
Function
APTRAN
APOPEN
APCHECK
Description
AP Transactions File Totals
AP Open Invoice File Totals
AP Checks File Totals
Field ID APHDBYFR AP Detail History Debit Memo Freight - YTD
# Function Description
1 APHIPTD AP Detail History File PTD Totals
Field ID APHDBPTX AP Detail History Debit Memo Tax - PTD
Formula F1[6]
# Function Description
1 APHIPTD AP Detail History File PTD Totals
Field ID APHDBPTO AP Detail History Debit Memos Total - PTD
Formula F1[5]+F1[6]+F1[7]+F1[8]
# Function Description
1 APHIPTD AP Detail History File PTD Totals
Display Mask 999,999,999.00-
Setup ID Description
COMP
Company Ranges
Display Mask 999,999,999.00-
Setup ID Description
COMP
Company Ranges
Display Mask 999,999,999.00-
Setup ID Description
COMP
Company Ranges
Display Mask 999,999,999.00-
Setup ID Description
COMP
Company Ranges
Display Mask 999,999,999.00-
Setup ID Description
COMP
Company Ranges
Display Mask 999,999,999.00-
Setup ID Description
COMP
Company Ranges
Field ID APHDBPST AP Detail History Debit Memo Subtotal - PTD
Formula F1[5]
# Function Description
1 APHIPTD AP Detail History File PTD Totals
Field ID APHDBPMI AP Detail History Debit Memo Misc - PTD
Formula F1[8]
# Function Description
1 APHIPTD AP Detail History File PTD Totals
Field ID APHDBPFR AP Detail History Debit Memo Freight - PTD
Formula F1[7]
# Function Description
1 APHIDAY AP Detail History File Daily Totals
Display Mask 999,999,999.00-
Setup ID Description
COMP
Company Ranges
COMP
Company Ranges
COMP
Company Ranges
Display Mask 999,999,999.99-
Builders Supply
Field Definition List
Field ID APHDBMFR AP Detail History Debit Memo Freight - Daily
Formula F1[7]
#
1
2
3
Field ID APBAL
Accounts Payable Balance
Formula (F1[1]-F1[2])+F2-F3
07/13/1999
11:41 AM
Page
1
Field Definitions List
Executive Information Summary
Field Definitions List
Resource Manager User’s Manual 6.05
Functions List
Features
Use the Functions List function on the Master File Lists menu to produce a list of
functions the system recognizes. This list is valuable if you are defining or editing
functions and you need a hard copy for comparison.
Reports
A sample Functions List is on page 8-62.
Screen Use
Screen
Description
Functions List
Use the Functions List screen to select the functions and the
amount of detail you want in the list.
Resource Manager User’s Manual 6.05
8-59
Functions List
Executive Information Summary
Functions List Screen
Field Definitions
8-60
Field Name
Description
Pick Function ID
Enter the range of functions you want in the list.
Print
To list the output and definitions for each function, enter 1. To
list only the ID and description for each function, enter 2.
Show function setup
types?
If you want the listing of each function to be broken down into
the setup types, enter Y; if not, enter N.
Resource Manager User’s Manual 6.05
Executive Information Summary
Functions List
Command Bar Definitions
Command
Description
Printer
Select P to send the list to a printer.
File
Select F to send the list to a file.
Screen
Select S to send the list to the screen.
End
Select E to change your selections or exit to the Master File
Lists menu.
Saving and Exiting
After the list is produced, the Master File Lists menu appears.
Resource Manager User’s Manual 6.05
8-61
8-62
APHCPTD AP Checks History File PTD Totals
Sub Type
Description
History File Daily Totals
Description
Regular Checks Gross Due
Regular Checks Discounts
Prepaid Checks Gross Due
Prepaid Checks Discounts
AP Cash Forecast Totals
Type
Description
Numeric
Net Due Total
Numeric
Discount Total
Numeric
Today Net Due
Numeric
Today Discount Amt
Numeric
Week 1 Net Due
Numeric
Week 1 Discount Amt
Numeric
Week 2 Net Due
Numeric
Week 2 Discount Amt
Numeric
Week 3 Net Due
Numeric
Week 3 Discount Amt
Numeric
Week 4 Net Due
Numeric
Week 4 Discount Amt
Numeric
Week 5 Net Due
Numeric
Week 5 Discount Amt
Numeric
Week 6 Net Due
Numeric
Week 6 Discount Amt
Numeric
Beyond Net Due
Numeric
Beyond Discount Amt
Alphanumeric Today’s Date
Alphanumeric Week 1 Date
Alphanumeric Week 2 Date
Alphanumeric Week 3 Date
Alphanumeric Week 4 Date
Alphanumeric Week 5 Date
Alphanumeric Week 6 Date
APHCDAY AP Checks
Sub Type
1 Numeric
2 Numeric
3 Numeric
4 Numeric
APFCST
Sub
1
2
3
4
5
6
7
8
9
10
11
12
13
14
15
16
17
18
19
20
21
22
23
24
25
Function Description
APCHECK AP Checks File Totals
Sub Type
Description
1 Numeric
Regular Check Amount
2 Numeric
Discounts Taken Amount
3 Numeric
Discounts Lost Amount
4 Numeric
Prepaid Check Amount
07/13/1999
11:43 AM
Builders Supply
Functions List
Page
1
Functions List
Executive Information Summary
Functions List
Resource Manager User’s Manual 6.05
Setup Definitions List
Features
Use the Setup Definitions List function on the Master File Lists menu to produce a
list of setup IDs. This list is valuable if you want to change the setup IDs and you
need a list for comparison.
Reports
A sample Setup Definitions List is on page 8-66.
Screen Use
Screen
Description
Setup Definitions List
Use the Setup Definitions List screen to select the setup IDs
and the amount of detail you want in the list.
Resource Manager User’s Manual 6.05
8-63
Setup Definitions List
Executive Information Summary
Setup Definitions List Screen
Field Definitions
8-64
Field Name
Description
Pick Setup ID
Enter the range of setup IDs you want in the list.
Print
To list the type and range of each setup ID, enter 1. To list
only the ID and description of each setup ID, enter 2.
Resource Manager User’s Manual 6.05
Executive Information Summary
Setup Definitions List
Command Bar Definitions
Command
Description
Printer
Select P to send the list to a printer.
File
Select F to send the list to a file.
Screen
Select S to send the list to the screen.
End
Select E to change your selections or exit to the Master File
Lists menu.
Saving and Exiting
After the list is produced, the Master File Lists menu appears.
Resource Manager User’s Manual 6.05
8-65
8-66
100999
1000
5020
5000
Cash on Hand GL Account Types
From
005
GLCSHOH
Type
02
01
GLCULIAB Current Liabilities Accounts
Type
From
01
02
2000
GLCUASST Current Assets Accounts
Type
From
01
02
1000
Cash on Deposit GL Account Types
From
010
GLCSHOD
Type
02
01
2499
Thru
1499
Thru
Thru
005
Thru
010
600
Thru
Thru
099
Thru
GL Cost of Goods Sold Accounts
From
GLCOGSAT Cost of Goods Sold (Account Types)
Type
From
01
02
600
GLCOGS
Type
01
02
GLCASSAT Current Assets (Account Types)
Type
From
01
02
005
010
Thru
Thru
Builders Supply
Setup Definitions List
Description
Cash Accounts
From
GLCASHAT Cash Accounts (Account Types)
Type
From
01
02
005
Setup ID
GLCASH
Type
01
02
07/13/1999
11:43 AM
Page
1
Setup Definitions List
Executive Information Summary
Setup Definitions List
Resource Manager User’s Manual 6.05
Resource Manager User’s Manual
6.05
Print Manager
9
Report History Inquiry
Report History Inquiry
9-3
Report Control
Active Report Control
Archive Report Control
9-7
9-15
File Maintenance
Report Class Maintenance
Parameter Maintenance
Purge Report History
9-23
9-27
9-31
Resource Manager User’s Manual 6.05
9-1
Report History Inquiry
Features
The Report History Inquiry function displays every report you have printed to file,
moved or printed from the Active Report Control function, and moved to, or
printed from, the Archive Report Control.
Reports
No report is associated with this function.
Screen Use
Screen
Description
Report History Inquiry
Use the Report History Inquiry screen to display reports
printed to file, and reports moved from and to the Active
and Archive Report Control functions.
Resource Manager User’s Manual 6.05
9-3
Report History Inquiry
Print Manager
Report History Inquiry Screen
Field Definitions
Field Name
Description
Description
The name of the print job is displayed.
Type
The action performed on the file is displayed:
PF
PQ
RQ
PA
RA
AR
9-4
=
=
=
=
=
=
printed to file
printed from Active Report Control
removed from Active Report Control
pinted from Archive Report Control
removed from Archive Report Control
archived and removed from Active Report Control
Date
The date the file was printed is displayed.
Time
The time the file was printed is displayed.
Resource Manager User’s Manual 6.05
Print Manager
Report History Inquiry
Cls
The classification, or status, of the printed file is displayed.
User
The User ID of the user who printed the report to file is displayed.
Term
The Terminal ID of the user who printed the report to file is
displayed.
Command Bar Definitions
Command
Description
V
View the complete path name for the selected file.
T
Toggle between the menu name and the file name.
S
Choose a new report sort method from the numbered list that appears:
1
2
3
4
5
6
7
=
=
=
=
=
=
=
sort by date of execution, from most recent to oldest
sort alphabetically
sort by date, from most recent to oldest
sort by User ID
sort by the activity type
sort by terminal ID
sort by date of execution, from oldest to most recent.
Saving and Exiting
Use the Exit (F7) command to exit to the Print Manager menu.
Resource Manager User’s Manual 6.05
9-5
Active Report Control
Features
Use the Active Report Control function on the Report Control menu to view and
work with print jobs that have not been archived.
Reports
No report is associated with this function.
Screen Use
Screen
Description
Active Report Control
Use the Active Report Control screen to view and maintain
active print jobs.
Control window
Use the Control window to enter the number of copies and
type of form you want to use to print a report.
Output Device window
Use the Output Device window to verify that the correct
forms are in place and to enter the last report class used to
print a report.
Search for Text window
Use the Search for Text window to enter a string you want
the system to find in the job you have selected.
View File
Displays path information and file name for selected file.
Resource Manager User’s Manual 6.05
9-7
Active Report Control
Print Manager
Active Report Control Screen
Command Bar Definitions
9-8
Command
Description
Enter = tag
Press Enter to toggle a selected file as tagged or untagged. Tagged
files can be printed using the Batch command.
Edit
Press E to edit the selected file description and the Cls field.
Toggle menu/file
Press T to toggle the description field to display either the file
description or the file path and name.
teXt search
Press X to search for text in a report. See page 9-10.
View File
Press V to display the path information and file name for the selected
file.
Resource Manager User’s Manual 6.05
Print Manager
Active Report Control
Command
Description
Sort
Press S to select from the numbered list that appears:
1
2
3
4
5
=
=
=
=
=
sort by the report description
sort by the date and time, from most recent to oldest
sort by the ID of the user who produced the file
sort by the report class
sort by the terminal ID where the file was produced
Print
Press P to print the selected file.
print Batch
Press B to print the files you selected using the tag command.
Archive
Press A to move the selected file from the Active Report Control to
the Archive Report Control.
Saving and Exiting
To exit to the Report Control menu, use the Exit (F7) command.
Resource Manager User’s Manual 6.05
9-9
Active Report Control
Print Manager
Search for Text Window
Field Definitions
9-10
Field Name
Description
Search For
Enter the string you want the system to search for, and use the Proceed
(PgDn) command. You must enter the text you are searching for
exactly as it appears in the print job. For example, if you are searching
for the employee ID BOU001, you can enter all six characters, just the
first few characters, or just the last few characters.
Pick
If the system locates the string you entered, the page number on which
the string appears is displayed. Press P to print the displayed page
number, A to print all pages where the string occurs, or C to continue
searching for more occurrences of the text string you entered.
Resource Manager User’s Manual 6.05
Print Manager
Active Report Control
Command Bar Definitions
This window has no command bar.
Saving and Exiting
When all occurances of the text you entered have been found, press Enter to return
to the Active Report Control screen.
Resource Manager User’s Manual 6.05
9-11
Active Report Control
Print Manager
Print Control Window
Field Definitions
9-12
Field Name
Description
Copies
Accept the displayed number of copies to print, or enter a different
number.
Page From
Accept the displayed beginning page number, or enter a different page
number.
Page Thru
Accept the displayed ending page number, or enter a different page
number.
User
Accept the displayed user ID, or enter a different ID.
Report Class
Accept the displayed report class, or enter a different report class.
Resource Manager User’s Manual 6.05
Print Manager
Active Report Control
Command Bar Definitions
Command
Description
Printer
Select P to send the print job to a printer.
End
Select E to change your selections or exit to the Report
Control menu.
Saving and Exiting
If you print using a report class that is different from the last report class used by
the printer you selected, a message appears to warn you.
When the report finishes printing, you can retain the report, remove it from the
Active Report Control, or archive it. Enter R to retain it, D to delete the report, or A
to send the report to the Archive Control.
Resource Manager User’s Manual 6.05
9-13
Archive Report Control
Features
Use the Archive Report Control function to view print jobs that have been archived
and to access information from those print jobs.
Reports
No report is associated with this function.
Screen Use
Screen
Description
Active Report Control
Use the Active Report Control screen to view and maintain
active print jobs.
Control window
Use the Control window to enter the number of copies and
type of form you want to use to print a report.
Output Device window
Use the Output Device window to verify that the correct
forms are in place and to enter the last report class used to
print a report.
Search for Text window
Use the Search for Text window to enter a string you want
the system to find in the job you have selected.
View File
Displays path information and file name for selected file.
Resource Manager User’s Manual 6.05
9-15
Archive Report Control
Print Manager
Archive Report Control Screen
Command Bar Definitions
9-16
Command
Description
Enter = tag
Press Enter to be toggle a selected file to tag or untag.
Edit
Press E to edit the selected file description and the Cls entry field.
Toggle menu/file
Press T to toggle the description field to display either the file
description or the file path and name.
teXt search
Press X to search for text in a report. See page 9-10.
View File
Press V to display the path information and file name for the selected
file.
Resource Manager User’s Manual 6.05
Print Manager
Archive Report Control
Command
Description
Sort
Press S to select from the numbered list that appears:
1
2
3
4
5
=
=
=
=
=
sort by the report description
sort by the date and time, from most recent to oldest
sort by the ID of the user who produced the file
sort by the report class
sort by the terminal ID where the file was produced
Print
Press P to print the selected file.
print Batch
Press B to print the files you selected using the tag command.
Saving and Exiting
To exit to the Report Control menu, use the Exit (F7) command.
Resource Manager User’s Manual 6.05
9-17
Archive Report Control
Print Manager
Search for Text Window
Field Definitions
9-18
Field Name
Description
Search For
Enter the string you want the system to search for, and use the Proceed
(PgDn) command. You must enter the text you are searching for
exactly as it appears in the print job. For example, if you are searching
for the employee ID BOU001, you can enter all six characters, just the
first few characters, or just the last few characters.
Pick
If the system locates the string you entered, the page number on which
the string appears is displayed. Press P to print the displayed page
number, A to print all pages where the string occurs, or C to continue
searching for more occurrences of the text string you entered.
Resource Manager User’s Manual 6.05
Print Manager
Archive Report Control
Command Bar Definitions
This window has no command bar.
Saving and Exiting
When all occurances of the text you entered have been found, press Enter to return
to the Archive Report Control screen.
Resource Manager User’s Manual 6.05
9-19
Archive Report Control
Print Manager
Print Control Window
Field Definitions
9-20
Field Name
Description
Copies
Accept the displayed number of copies to print, or enter a different
number.
Page From
Accept the displayed beginning page number, or enter a different page
number.
Page Thru
Accept the displayed ending page number, or enter a different page
number.
User
Accept the displayed user ID, or enter a different ID.
Report Class
Accept the displayed report class, or enter a different report class.
Resource Manager User’s Manual 6.05
Print Manager
Archive Report Control
Command Bar Definitions
Command
Description
Printer
Select P to send the print job to a printer.
End
Select E to change your selections or exit to the Report
Control menu.
Saving and Exiting
If you print using a report class that is different from the last report class used by
the printer you selected, a message appears to warn you.
When the report is printed, you can either retain the report or remove it from the
Archive Report Control. Enter R to retain the report or D to delete it.
Resource Manager User’s Manual 6.05
9-21
Report Class Maintenance
Features
Use the Report Maintenance function on the File Maintenance menu to set up and
maintain report classes.
Reports
No report is associated with this function.
Screen Use
Screen
Description
Report Maintenance
Use the Report Maintenance screen to enter the report
classes you want to use for print jobs.
Resource Manager User’s Manual 6.05
9-23
Report Class Maintenance
Print Manager
Report Maintenance Screen
Field Definitions
9-24
Field Name
Description
Report
Enter the alphanumeric ID for the report class.
Description
Enter the description of the report class. The system uses the
report class to remind you to load the proper forms before you
print a report.
Resource Manager User’s Manual 6.05
Print Manager
Report Class Maintenance
Command Bar Definitions
This screen has no command bar.
Saving and Exiting
Use the Proceed (PgDn) command to save your entries and exit to the File
Maintenance menu.
Resource Manager User’s Manual 6.05
9-25
Parameter Maintenance
Features
Use the Parameter Maintenance function to set up and maintain the defaults for the
archive directory and filenames.
Reports
No report is associated with this function.
Screen Use
Screen
Description
Parameter Maintenance
Use the Parameter Maintenance screen to enter the defaults
for the archive directory and filenames.
Resource Manager User’s Manual 6.05
9-27
Parameter Maintenance
Print Manager
Parameter Maintenance Screen
Field Definitions
9-28
Field Name
Description
Archive Directory
Enter the path for the default directory for archived print jobs.
Next automatic filename
Accept the displayed numbers, or enter different numbers.
Next archive filename
Accept the displayed numbers, or enter different numbers.
Resource Manager User’s Manual 6.05
Print Manager
Parameter Maintenance
Command Bar Definitions
This screen has no command bar.
Saving and Exiting
Use the Proceed (PgDn) command to save your entries. Use the Exit (F7)
command to exit to the File Maintenance menu.
Resource Manager User’s Manual 6.05
9-29
Purge Report History
Features
Use the Purge Transaction History function on the File Maintenance menu to delete
history transaction entries by date and transaction type.
Reports
No report is associated with this function.
Screen Use
Screen
Description
Purge Transaction History
Use the Purge Transaction History screen to enter the type
of transaction history you want to delete and the date before
which you want it deleted.
Resource Manager User’s Manual 6.05
9-31
Purge Report History
Print Manager
Purge Transaction History
Field Definitions
Field Name
Description
Purge Transaction Type
From the displayed list, enter the code for the transaction type
you want to delete.
Purge Transactions
Dated Prior To
Enter the date before which you want transaction history
purged.
Command Bar Definitions
This screen has no command bar.
Saving and Exiting
After the transactions have been purged, the File Maintenance menu appears.
9-32
Resource Manager User’s Manual 6.05
Resource Manager User’s Manual
6.05
Reports
Data File Allocation Report
Product Suggestions Report
Error Log
Global Inquiry Window Audit Report
Resource Manager User’s Manual 6.05
10
10-3
10-7
10-11
10-15
10-1
Data File Allocation Report
Features
The Data File Allocation Report provides a list of the data files on your system and
their sizes. Use it to audit the use of disk space.
Reports
A sample Data File Allocation Report is on page 10-6.
Screen Use
Screen
Description
Data File Allocation
Report
Use the Data File Allocation Report screen to select the
application, companies, and files you want in the report.
Resource Manager User’s Manual 6.05
10-3
Data File Allocation Report
Reports
Data File Allocation Report Screen
Field Definitions
10-4
Field Name
Description
Application
Enter the range of applications you want in the report.
Company
Enter the range of companies you want in the report.
Include
Enter Y or N to indicate whether or not you want to include
the files in the report.
Resource Manager User’s Manual 6.05
Reports
Data File Allocation Report
Command Bar Definitions
Command
Description
Printer
Select P to send the report to a printer.
File
Select F to send the report to a file.
Screen
Select S to send the report to the screen.
End
Select E to change your selections or exit to the Reports menu.
Saving and Exiting
After the report is produced, the Reports menu appears.
Resource Manager User’s Manual 6.05
10-5
10-6
Description
Shared Files for AP on /OSAS/RWdata/
APTOP
AP Topic File
RW200D
AP Vendor Dictionary
RW200I
AP Vendor RW Instructions
RW200M
AP Vendor Key Information
RW200N
AP Vendor Names File
RW200R
AP Vendor Report File
RW201D
AP Transaction Dictionary
RW201I
AP Transaction RW Instruction
RW201M
AP Transaction Key Info
RW201N
AP Transaction Names File
RW201R
AP Transaction RW Reports
RW202D
AP History Dictionary
RW202I
AP History RW Instructions
RW202M
AP History Key Information
RW202N
AP History Names File
RW202R
AP History RW Reports
RW203D
AP Checks Dictionary
RW203I
AP Checks RW Instructions
RW203M
AP Checks Key Information
RW203N
AP Checks RW Names
RW203R
AP Checks RW Reports
RW204D
AP Open Invoice Dictionary
RW204I
AP Open Invoice RW Instruct
RW204M
AP Open Invoice Key Info
RW204N
AP Open Invoice RW Names
RW204R
AP Open Invoice RW Reports
RW205D
AP Recurring Entries Dict
RW205I
AP Recurring Entries Instruct
RW205M
AP Recurring Entries Key Info
RW205N
AP Recurring Entries RW Names
Shared Files for AP on /OSAS/PROGAP/
APAPPL.TXT
AP Application File
APDATA.510
APFILES.TXT
AP Files List
APHELP
AP Help File
APLABEL.TXT
AP Label File
APMN
AP Menu File
APSWCH
AP Option Linkage Switches
APWIND
AP Window Definitions File
Filename
06/09/1999
9:21 AM
3,072
12,800
4,096
2,048
3,584
2,048
89,600
9,216
2,048
13,824
2,048
88,576
4,096
3,072
16,384
2,048
19,456
4,096
2,048
6,144
2,048
14,336
7,168
2,048
6,144
2,048
55,296
5,120
2,048
11,264
51
60,416
193
1,461,248
129
12,288
2,560
52,736
Filesize Used
11
4
29
(Dynamic)
(Dynamic)
(Dynamic)
15
70
10
5
4
2
494
15
6
14
2
486
12
10
18
2
103
12
3
7
2
79
21
2
5
2
216
13
4
11
4,182
(Dynamic)
(Dynamic)
(Dynamic)
(Dynamic)
(Dynamic)
(Dynamic)
(Dynamic)
(Dynamic)
(Dynamic)
(Dynamic)
(Dynamic)
(Dynamic)
(Dynamic)
(Dynamic)
(Dynamic)
(Dynamic)
(Dynamic)
(Dynamic)
(Dynamic)
(Dynamic)
(Dynamic)
(Dynamic)
(Dynamic)
(Dynamic)
(Dynamic)
(Dynamic)
(Dynamic)
(Dynamic)
(Dynamic)
(Dynamic)
(Dynamic)
60
Active Keys
(Dynamic)
Action
Builders Supply
Data File Allocation Report
Page
1
Data File Allocation Report
Reports
Data File Allocation Report
Resource Manager User’s Manual 6.05
Product Suggestions Report
Features
Produce the Product Suggestions Report when you are ready to fax or mail the
suggestions you created through the Product Suggestions utility to Open Systems.
Reports
A sample Product Suggestion Report is on page 10-10.
Screen Use
Screen
Description
Product Suggestions
Report
Use the Product Suggestions Report screen to select the
suggestions you want in the report.
Resource Manager User’s Manual 6.05
10-7
Product Suggestions Report
Reports
Product Suggestions Report Screen
Field Definitions
10-8
Field Name
Description
Suggestion #
Enter the range of suggestions you want in the report.
Date Entered
Enter the range of dates of the product suggestions that you
want in the report.
Resource Manager User’s Manual 6.05
Reports
Product Suggestions Report
Command Bar Definitions
Command
Description
Printer
Select P to send the report to a printer.
File
Select F to send the report to a file.
Screen
Select S to send the report to the screen.
End
Select E to change your selections or exit to the Reports menu.
Saving and Exiting
After the report is produced, the Reports menu appears.
Resource Manager User’s Manual 6.05
10-9
10-10
RM
6.0
All applications
Show network user ID on reports.
Version #:
Menu Item:
Description:
612-829-1493
Phone #: 612-829-0011
Fax #:
612-829-1493
Site #:
Suggestion #: 0005
Date Submitted: 09/02/1999
FAX #:
Builders Supply
Product Suggestion Report
Application:
Builders Supply
6477 City West Parkway
Eden Prairie, MN 55344
ATTN: Product Suggestions
OPEN SYSTEMS, INC.
7626 Golden triangle Drive
Eden Prairie, MN 55344-3773
Submitted by:
SEND TO:
06/09/1999
9:21 AM
Page
1
Product Suggestions Report
Reports
Product Suggestions Report
Resource Manager User’s Manual 6.05
Error Log
Features
The Error Log provides a list of the errors you encountered while using the
software.
Reports
A sample Error Log is on page 10-14.
Screen Use
Screen
Description
Error Log
Use the Error Log screen to select the applications and
errors you want in the log.
Resource Manager User’s Manual 6.05
10-11
Error Log
Reports
Error Log Screen
Field Definitions
10-12
Field Name
Description
Application ID
Enter the range of applications whose errors you want to list.
Date Entered
Enter the range of dates for which you want a list of errors.
Resource Manager User’s Manual 6.05
Reports
Error Log
Command Bar Definitions
Command
Description
Printer
Select P to send the log to a printer.
File
Select F to send the log to a file.
Screen
Select S to send the log to the screen.
End
Select E to change your selections or exit to the Reports menu.
Saving and Exiting
After the log is produced, the Reports menu appears.
Resource Manager User’s Manual 6.05
10-13
10-14
T000
Workstation:
Program = RMPRFILE
Time: 5:52 PM
Builders Supply
Error Log
End of Report
Line Listing: 7060 PRINT (F)@(LM),STBL(“DATE”)+” “,@(INT((OUTCOLS-LEN(STBL
(“CNAME”)))/2)),STBL(“CNAME”),@(OUTCOLS-14),” PAGE “,STR(PO:...
Error Message: BASIC ERROR = 41
Program Name: RMPRFILE
Line = 7060
Date: 05/06/1999
Error Number: 41 Invalid Integer
RM
Application:
06/09/1999
9:23 AM
Page
1
Error Log
Reports
Error Log
Resource Manager User’s Manual 6.05
Global Inquiry Window Audit Report
Features
The Global Inquiry Window Audit Report is a list of window link inconsistencies
associated with the Global Inquiry windows.
Reports
A sample Global Inquiry Window Audit Report is on page 10-18.
Screen Use
Screen
Description
Global Inquiry Window
Audit Report
Use the Global Inquiry Window Audit Report screen to
select the destination for the report.
Resource Manager User’s Manual 6.05
10-15
Global Inquiry Window Audit Report
Reports
Global Inquiry Window Audit Report Screen
Field Definitions
No fields are associated with this function.
10-16
Resource Manager User’s Manual 6.05
Reports
Global Inquiry Window Audit Report
Command Bar Definitions
Command
Description
Printer
Select P to send the report to a printer.
File
Select F to send the report to a file.
Screen
Select S to send the report to the screen.
End
Select E to change your selections or exit to the Reports menu.
Saving and Exiting
After the report is produced, the Reports menu appears.
Resource Manager User’s Manual 6.05
10-17
10-18
Link No.
2
1
1
1
1
1
APHI1
APHI8ID
APTR0D
APVE0
APVE1
APVE2PN
APHI1
APHI2
APHI5
End of Report
POOR1T
INVE1
INVE1
POOR1T
POOR1T
POOR1T
Link ID
Referenced Window not
Referenced Window not
Referenced Window not
Referenced Window not
Referenced Window not
Referenced Window not
Unreferenced Window
Unreferenced Window
Unreferenced Window
Anomaly
Builders Supply
Global Inquiry Window Audit Report
Window ID
9:24 AM
06/09/1999
defined
defined
defined
defined
defined
defined
Page
1
Global Inquiry Window Audit Report
Reports
Global Inquiry Window Audit Report
Resource Manager User’s Manual 6.05
Resource Manager User’s Manual
6.05
Master File Lists
Menu List
Backup/Restore Commands List
Application Information List
Company Information List
Help Screens List
Inquiry Window Definitions List
Global Inquiry Window List
Tables List
Country Codes List
Tax Locations List
Tax Groups List
Options and Interfaces List
Resource Manager User’s Manual 6.05
11
11-3
11-7
11-11
11-15
11-19
11-23
11-27
11-31
11-35
11-39
11-43
11-47
11-1
Menu List
Features
The Menu List shows the menus that are on your system for the companies,
applications, or menu IDs you select.
Reports
A sample Menu List is on page 11-6.
Screen Use
Screen
Description
Menu List
Use the Menu List screen to select the menus you want to list.
Resource Manager User’s Manual 6.05
11-3
Menu List
Master File Lists
Menu List Screen
Field Definitions
11-4
Field Name
Description
Company ID
Enter the range of companies you want in the list.
Application
Enter the range of applications you want in the list.
Menu ID
Enter the range of menus you want in the list.
Resource Manager User’s Manual 6.05
Master File Lists
Menu List
Command Bar Definitions
Command
Description
Printer
Select P to send the list to a printer.
File
Select F to send the list to a file.
Screen
Select S to send the list to the screen.
End
Select E to change your selections or exit to the Master File
Lists menu.
Saving and Exiting
After the list is produced, the Master File Lists menu appears.
Resource Manager User’s Manual 6.05
11-5
11-6
Builders Supply
Menu List
Page
1
Main Menu
1
2
Builders Supply
Menu List
Accounts Payable Rd 23
Resource Manager
1
1
APMN
RMMN
Page
2
1
2
3
4
1
2
3
4
5
6
1
2
3
4
5
6
Builders Supply
Menu List
Vendors and Invoices
Invoices
Detail History
Summary History
Transactions
Copy Recurring Entries
Purchases Journal
Miscellaneous Debits Journal
Daily Sales Tax Report
Post Transactions
Open Invoice Report
Cash Flow Report
Aged Trial Balance
Vendor Analysis Report
1099 Forms
Sales Tax Report
3
3
3
3
3
3
3
3
3
3
3
3
3
3
3
3
APQUIRY
APSOICON
APSDHCON
APVHS
APENTINI
APPSR
APPRJ
APPRJ
APTAX
APPST
APPRO
APCFL
APAGE
APPRA
APP99
RMTAX
Page
A
B
A
3
AP04
Pay Invoices
1
2
3
4
5
6
Change Open Invoice Status
Hold/Release Invoices
Prepare Checks
Select Payables
Edit Register
Print Checks
3
3
3
3
3
3
APCOIS
APHOLINI
APPCK
APSELINI
APPRR
APPRC
A
----------------------------------------------------- Accounts Payable Rd 23 ------------------------------------------------------ID
Title
#
Description
Type Program/Menu Parameter
------------------------------------------------------------------------------------------------------------------------------------
06/09/1999
9:26 AM
Management Reports
Daily Work
AP02
AP03
Information Inquiry
AP01
----------------------------------------------------- Accounts Payable Rd 23 ------------------------------------------------------ID
Title
#
Description
Type Program/Menu Parameter
------------------------------------------------------------------------------------------------------------------------------------
06/09/1999
9:26 AM
MAIN
------------------------------------------------- Company H - Builders Supply ---------------------------------------------------ID
Title
#
Description
Type Program/Menu Parameter
------------------------------------------------------------------------------------------------------------------------------------
06/09/1999
9:26 AM
Menu List
Master File Lists
Menu List
Resource Manager User’s Manual 6.05
Backup/Restore Commands List
Features
The Backup/Restore Commands List shows the commands that are used to back up
and restore the data and program files on your system.
Reports
A sample Backup/Restore Commands List is on page 11-10.
Screen Use
Screen
Description
Backup/Restore
Commands List
Use the Backup/Restore Commands List screen to select the
destination of the list.
Resource Manager User’s Manual 6.05
11-7
Backup/Restore Commands List
Master File Lists
Backup/Restore Commands List Screen
Field Definitions
11-8
Field Name
Description
none
none
Resource Manager User’s Manual 6.05
Master File Lists
Backup/Restore Commands List
Command Bar Definitions
Command
Description
Printer
Select P to send the list to a printer.
File
Select F to send the list to a file.
Screen
Select S to send the list to the screen.
End
Select E to change your selections or exit to the Master File
Lists menu.
Saving and Exiting
After the list is produced, the Master File Lists menu appears.
Resource Manager User’s Manual 6.05
11-9
11-10
End of Report
Restore from Tape Command Line (OSRET.TXT):
N/A
Backup to Tape Command Line (OSBUT.TXT):
N/A
Restore from Floppy Command Line (OSREF.TXT):
RESTORE (flop) (dir)\(select) /S
Backup to Floppy Command Line (OSBUF.TXT):
BACKUP (dir)\(select) (flop) /S
06/09/1999
Builders Supply
Page
1
9:27 AM
Backup/Restore Commands List
--------------------------------------------------------------------------------
Backup/Restore Commands List
Master File Lists
Backup/Restore Commands List
Resource Manager User’s Manual 6.05
Application Information List
Features
The Application Information List shows the applications that are on your system
and their installation information.
Reports
A sample Application Information List is on page 11-14.
Screen Use
Screen
Description
Application Information
List
Use the Application Information List screen to select the
applications you want in the list.
Resource Manager User’s Manual 6.05
11-11
Application Information List
Master File Lists
Application Information List Screen
Field Definitions
11-12
Field Name
Description
Application
Enter the range of applications you want in the list.
Resource Manager User’s Manual 6.05
Master File Lists
Application Information List
Command Bar Definitions
Command
Description
Printer
Select P to send the list to a printer.
File
Select F to send the list to a file.
Screen
Select S to send the list to the screen.
End
Select E to change your selections or exit to the Master File
Lists menu.
Saving and Exiting
After the list is produced, the Master File Lists menu appears.
Resource Manager User’s Manual 6.05
11-13
11-14
Builders Supply
Application Information List
Page
1
Description
Base Application
Version
Installed
Install Date
Program Directory
Verification File
Last Maintenance
End of Report
AR
:
:
:
:
:
:
:
:
6.05
NO
08/26/1999
C:/OSAS/progAR/
ARCUx
None
Accounts Receivable
ID Information
---------------------------------------------------------------------------------------------------------------AP Description
: Accounts Payable
Base Application
:
Version
: 6.05
Installed
: NO
Install Date
: 08/26/1999
Program Directory : C:/OSAS/progAP/
Verification File : APVEx
Last Maintenance
: None
08/26/1999
10:13 AM
Application Information List
Master File Lists
Application Information List
Resource Manager User’s Manual 6.05
Company Information List
Features
The Company Information List shows the names and addresses of companies that
are set up on your system.
Reports
A sample Company Information List is on page 11-18.
Screen Use
Screen
Description
Company Information List
Use the Company Information List screen to select the
companies you want in the list.
Resource Manager User’s Manual 6.05
11-15
Company Information List
Master File Lists
Company Information List Screen
Field Definitions
11-16
Field Name
Description
Company ID
Enter the range of companies you want in the list.
Resource Manager User’s Manual 6.05
Master File Lists
Company Information List
Command Bar Definitions
Command
Description
Printer
Select P to send the list to a printer.
File
Select F to send the list to a file.
Screen
Select S to send the list to the screen.
End
Select E to change your selections or exit to the Master File
Lists menu.
Saving and Exiting
After the list is produced, the Master File Lists menu appears.
Resource Manager User’s Manual 6.05
11-17
11-18
Name
Address 1
Address 2
City, State Zip
Country
Phone
Fax
Site
Date Format
Time Format
H
End of Report
Information
ID
06/09/1999
9:29 AM
:
:
:
:
:
:
:
:
:
:
Reg. Dollars
IN Costs
IN Prices
IN Quantities
Rates
Hours
Credit Limits
Eden Prairie, MN 55344-3732
US U.S.A.
612-829-0011
612-829-1493
0 (MM/DD/YYYY)
0 12-Hour (hh:mm AM/PM)
Location ID
Bank ID
Builders Supply
7626 Golden Triangle Dr.
Defaults
Builders Supply
Company Information List
9999999999.9999999999.999999999999.999999999999.9999999999999.999999999999.9999999999999999-
MN0001
FNB001
Page
1
Company Information List
Master File Lists
Company Information List
Resource Manager User’s Manual 6.05
Help Screens List
Features
The Help Screens List shows the contents of the help file for an application. Use
this function to plan changes to the help content or as a record of changes you
made.
Reports
A sample Help Screens List is on page 11-22.
Screen Use
Screen
Description
Help Screens List
Use the Help Screens List screen to select the help screens
you want to list.
Resource Manager User’s Manual 6.05
11-19
Help Screens List
Master File Lists
Help Screens List Screen
Field Definitions
11-20
Field Name
Description
Application
Enter the range of applications you want in the list.
Help ID
Enter the range of help screens you want in the list.
Field Name
Enter the range of field names you want in the list.
Print by
Select the option by which you want to organize the list.
Resource Manager User’s Manual 6.05
Master File Lists
Help Screens List
Command Bar Definitions
Command
Description
Printer
Select P to send the list to a printer.
File
Select F to send the list to a file.
Screen
Select S to send the list to the screen.
End
Select E to change your selections or exit to the Master File
Lists menu.
Saving and Exiting
After the list is produced, the Master File Lists menu appears.
Resource Manager User’s Manual 6.05
11-21
11-22
Builders Supply
Help Screens List
Page
1
APACVFM.PUB 001561
APACV1
APACVFM.PUB 001661
APACVFM.PUB 001861 If the vendor has a foreign address, enter {YES}; if not, enter
{NO}.
{1099 Field Indicator}
{1099 Foreign Address?}
{1099 Foreign Address?}
{1099 Foreign Address?}
{1099 Form Code} (1 character) APACV1
APACV1
{1099 Field Indicator}
001361
001661
001561
APACVFM.PUB 001961 If the Internal Revenue Service has notified your company twice
in the past three years that the vendor’s tax identification
number is incorrect, enter {YES}; if not, enter {NO}.
{1099 2nd TIN Notice?}
Enter {N} if the vendor will not receive a 1099 form, {I} if
the vendor files as an individual, or {B} if the vendor files
as a business.
If the vendor has a foreign address, enter {YES}; if not, enter
{NO}.
If the vendor has a foreign address, enter {YES}; if not, enter
{NO}.
The field indicator corresponds to the box number on the
1099-MISC form where the year-to-date purchases amount will be
printed. See the federal tax circular for more information.
Use {1-3}, {5-9}, {A} to toggle through the choices.
The field indicator corresponds to the box number on the
1099-MISC form where the year-to-date purchases amount will be
printed. See the federal tax circular for more information.
Enter {1-3}, {5-9}, {A} to toggle between the selections.
If the Internal Revenue Service has notified your company twice
in the past three years that the vendor’s tax identification
number is incorrect, enter {YES}; if not, enter {NO}.
APACVFM.PUB 001761
If the Internal Revenue Service has notified your company twice
in the past three years that the vendor’s tax identification
number is incorrect, enter {YES}; if not, enter {NO}.
{1099 2nd TIN Notice?}
001761
APACV1
{1099 2nd TIN Notice?}
------------------------------------------------- Accounts Payable Rd 23 ------------------------------------------------Field Name
Help ID
Help Text
--------------------------------------------------------------------------------------------------------------------------
06/09/1999
9:30 AM
Help Screens List
Master File Lists
Help Screens List
Resource Manager User’s Manual 6.05
Inquiry Window Definitions List
Features
The Inquiry Window Definitions List shows the inquiry windows on your system
and the information they contain.
Reports
A sample Inquiry Window Definitions List is on page 11-26.
Screen Use
Screen
Description
Inquiry Window
Definitions List
Use the Inquiry Window Definitions List screen to select
the windows you want to list.
Resource Manager User’s Manual 6.05
11-23
Inquiry Window Definitions List
Master File Lists
Inquiry Window Definitions List Screen
Field Definitions
11-24
Field Name
Description
Application
Enter the range of applications you want in the list.
Window ID
Enter the range of windows you want in the list.
Resource Manager User’s Manual 6.05
Master File Lists
Inquiry Window Definitions List
Command Bar Definitions
Command
Description
Printer
Select P to send the list to a printer.
File
Select F to send the list to a file.
Screen
Select S to send the list to the screen.
End
Select E to change your selections or exit to the Master File
Lists menu.
Saving and Exiting
After the list is produced, the Master File Lists menu appears.
Resource Manager User’s Manual 6.05
11-25
11-26
Builders Supply
Inquiry Window Definitions List
Page
1
0
0
APCDx
0
0
0
APCDx
0
0
23
GLMAx
0
5
5
20 10
10
15
0
17
BRBAx
0
17 14
0
0
OSCNVT
0
3
0
20
APTHx
0
20
3
3
APENRAW1
0
17
APRHx
0
7
5
Window Title: Transaction Inquiry
Column Headings: Tran No Vendor Invoice Date
APEDT1W1
Window Title: Conversion verify file
Column Headings: Appl Version File Name
APCNVT
Window Title: Bank Account Inquiry
Column Headings: Bank ID Bank Description
APBANKW1
Window Title: General Ledger Inquiry
Column Headings: GL Account Description
APACSCW2
Window Title: Distribution Codes
Column Headings: Code Description
APACDCW1
Window Title: Distribution Codes
Column Headings: Code Description
APACACW1
9
58 10
45 10
30 15
44
48 12
38 10
38 10
0
0
0
0
1
1
1
0
0
0
0
3
10
10
0
0
0
0
0
0
0
0
0
0
0
0
0
0
*
*
*
*
*
*
*
PURCHASE NO
NOTE: *=Returned Field
TRAN NO
VEND ID
INVOICE NO
INVOICE DATE
NOTE: *=Returned Field
Application
Version
File Name
NOTE: *=Returned Field
BANK ID
BANK DESCRIPTION
NOTE: *=Returned Field
GL ACCT NO
GL ACCT DESC
NOTE: *=Returned Field
Distribution Code
Description
NOTE: *=Returned Field
Code
Description
2
2
9
16
25
2
7
15
2
11
2
15
2
6
2
6
Topic File File
Key Starting Size
Inclusion Exclusion Add
Print
Window ID
No. No. Name
No. Col Row Col Row Begin Len Begin Len Routine
Data Names
@ Col
-----------------------------------------------------------------------------------------------------------------------------------
Accounts Payable Rd 23
06/09/1999
9:34 AM
Inquiry Window Definitions List
Master File Lists
Inquiry Window Definitions List
Resource Manager User’s Manual 6.05
Global Inquiry Window List
Features
The Global Inquiry Window List provides information about each Global Inquiry
window. This information is valuable if you are setting up windows and want a list
of windows that have already been established.
Reports
A sample Global Inquiry Window List is on page 11-30.
Screen Use
Screen
Description
Global Inquiry Window
List
Use the Global Inquiry Window List screen to select the
windows you want to list.
Resource Manager User’s Manual 6.05
11-27
Global Inquiry Window List
Master File Lists
Global Inquiry Window List Screen
Field Definitions
11-28
Field Name
Description
Pick Window
Enter the range of windows you want in the list.
Print
Enter Y or N to indicate whether or not you want the list to
include each type of information about the windows.
Resource Manager User’s Manual 6.05
Master File Lists
Global Inquiry Window List
Command Bar Definitions
Command
Description
Printer
Select P to send the list to a printer.
File
Select F to send the list to a file.
Screen
Select S to send the list to the screen.
End
Select E to change your selections or exit to the Master File
Lists menu.
Saving and Exiting
After the list is produced, the Master File Lists menu appears.
Resource Manager User’s Manual 6.05
11-29
11-30
APTHx
020
212
030
001
010
06
Summary Fields
--------------
01
VEND ID
0
TEMP;LAST PURCH DATE
TEMP;AMT DUE
NAME
0
TEMP;PURCH YTD
1
3
2
1
2
Vendor
Last Purch Dt
Amount Due
Name
Purch YTD
Data Fields
-----------
008
008
-##########.00 008
008
-##########.00 008
01/01
01/28
01/52
02/03
02/53
APVEx
APVEx
APVEx
APVEx
027
006
002
012
007
008
007
TRAN NO
TRAN TYPE
INVOICE NO
P O NO
INVOICE DATE
=[11]:[14]
PREPAID AMT
0
0
0
0
0
0
PO No
1
2
1
1
3
2
2
Inv Amount
Global Inquiry Links
--------------------
Date
Prepaid Amt
001 001 004
002
003 009 008
003 001 008
004
-##########.00
007
-##########.00 015
0-
01
08
12
22
33
43
59
Description
Window ID Exclusion Ap. Define by Fld/Pos/Val Start Length Position Record Test
------------------------------------------------------------------------------------------------------------------------------------
Column Headings: Tran Type Inv No
1.
2.
3.
4.
5.
6.
7.
Name/Formula
Type
Mask
Fld Strt Len Col Xref
Fld Strt Len
------------------------------------------------------------------------------------------------------------------------------------
1.
2.
3.
4.
5.
Name/Formula
Type Description
Mask
Fld Strt Len Row/Col Xref
Fld Strt Len
------------------------------------------------------------------------------------------------------------------------------------
APTR0
Window
File
File Topic No of Key
Key Inclusion Exclusion
ID
Name
No
No Flds
No
Len Begin Len Begin Len
Search Label
Search Pos
Search Len
------------------------------------------------------------------------------------------------------------------------------------
General Information
-------------------
Accounts Payable Transactions
9:36 AM
Builders Supply
Page
1
06/09/1999
Global Inquiry Window List
------------------------------------------------------------------------------------------------------------------------------------
Global Inquiry Window List
Master File Lists
Global Inquiry Window List
Resource Manager User’s Manual 6.05
Tables List
Features
The Tables List shows the tables that are in any application and the information
they contain.
Reports
A sample Tables List is on page 11-34.
Screen Use
Screen
Description
Tables List
Use the Tables List screen to select the tables you want to
list.
Resource Manager User’s Manual 6.05
11-31
Tables List
Master File Lists
Tables List Screen
Field Definitions
11-32
Field Name
Description
Application
Enter the range of applications you want in the list.
Table ID
Enter the range of tables you want in the list.
Suppress blank lines?
Enter Y or N to indicate whether or not you want blank lines
in the list.
Page break per table?
Enter Y or N to indicate whether or not you want each table to
begin on a new page.
Resource Manager User’s Manual 6.05
Master File Lists
Tables List
Command Bar Definitions
Command
Description
Printer
Select P to send the list to a printer.
File
Select F to send the list to a file.
Screen
Select S to send the list to the screen.
End
Select E to change your selections or exit to the Master File
Lists menu.
Saving and Exiting
After the list is produced, the Master File Lists menu appears.
Resource Manager User’s Manual 6.05
11-33
11-34
End of Report
Builders Supply
Tables List
Accounts Payable Rd 23
Description Transaction Default Accounts
2 Column Length 12
Type A
FIELD
DEFAULT VALUE
------------ -----------WIP Account 1042
INV Account 1044
Table ID DF
No. of Columns
06/09/1999
10:17 AM
Page
1
Tables List
Master File Lists
Tables List
Resource Manager User’s Manual 6.05
Country Codes List
Features
The Country Codes List shows the country codes and the names associated with the
codes that are on your system.
Reports
A sample Country Codes List is on page 11-38.
Screen Use
Screen
Description
Country Codes List
Use the Country Codes List screen to select the codes you
want in the list.
Resource Manager User’s Manual 6.05
11-35
Country Codes List
Master File Lists
Country Codes List Screen
Field Definitions
11-36
Field Name
Description
Pick
Enter the range of country codes and country names you want
in the list.
Print By
Select the option by which you want to organize the list.
Resource Manager User’s Manual 6.05
Master File Lists
Country Codes List
Command Bar Definitions
Command
Description
Printer
Select P to send the list to a printer.
File
Select F to send the list to a file.
Screen
Select S to send the list to the screen.
End
Select E to change your selections or exit to the Master File
Lists menu.
Saving and Exiting
After the list is produced, the Master File Lists menu appears.
Resource Manager User’s Manual 6.05
11-37
Builders Supply
Country Codes List
By Country Code
Page
1
Country Codes List
11-38
End of report
AE
AG
AI
AN
AO
AR
AT
AU
AW
U.A.E.
ANTIGUA
ANGUILLA
NL. ANTILLES
ANGOLA
ARGENTINA
AUSTRIA
AUSTRALIA
ARUBA
Code
Country Name
------------------------------------------------------------------------------------------------------------------------------------
08/26/1999
10:45 AM
Country Codes List
Master File Lists
Resource Manager User’s Manual 6.05
Tax Locations List
Features
The Tax Locations List shows the tax locations and tax authorities that are on your
system. The list also identifies the sales and tax collected for each tax class in each
tax location.
Reports
A sample Tax Locations List is on page 11-42.
Screen Use
Screen
Description
Tax Locations List
Use the Tax Locations List screen to select the tax
authorities and locations you want in the list.
Resource Manager User’s Manual 6.05
11-39
Tax Locations List
Master File Lists
Tax Locations List Screen
Field Definitions
11-40
Field Name
Description
Pick
Enter the range of tax authorities and tax locations you want in
the list.
Print By
Select the option by which you want to organize the list.
Print
Enter Y or N to indicate whether or not you want the list to
include sales and purchases.
Resource Manager User’s Manual 6.05
Master File Lists
Tax Locations List
Command Bar Definitions
Command
Description
Printer
Select P to send the list to a printer.
File
Select F to send the list to a file.
Screen
Select S to send the list to the screen.
End
Select E to change your selections or exit to the Master File
Lists menu.
Saving and Exiting
After the list is produced, the Master File Lists menu appears.
Resource Manager User’s Manual 6.05
11-41
11-42
Builders Supply
Tax Locations List
By Tax Location
Page
1
6.500
.000
.000
.000
.000
.000
.000
.000
.000
.000
.000
.000
.000
.000
.000
.000
.000
.000
.000
.000
End of report
.00
2290957.44
.00
.00
.00
.00
.00
.00
.00
.00
.00
.00
.00
.00
.00
.00
.00
.00
.00
.00
.00
.00
.00
.00
.00
.00
.00
.00
.00
.00
.00
.00
.00
.00
.00
.00
.00
.00
.00
.00
.00
.00
.00
.00
.00
.00
.00
.00
.00
.00
.00
.00
.00
.00
.00
.00
.00
.00
.00
.00
.00
.00
.00
.00
.00
.00
.00
.00
.00
.00
.00
.00
.00
.00
.00
.00
.00
.00
.00
.00
.00
.00
.00
.00
.00
.00
.00
.00
.00
.00
.00
.00
.00
.00
.00
.00
.00
.00
.00
.00
.00
.00
.00
.00
.00
.00
.00
.00
.00
.00
----------------------------------------------------------------------------------------Sales
.00
2290957.44
.00
.00
.00
Purchases
.00
.00
.00
.00
.00
.00
Sales
Purchases
Sales
Purchases
Sales
Purchases
Sales
Purchases
Sales
Purchases
Sales
Purchases
Sales
Purchases
Sales
Purchases
Sales
Purchases
Sales
Purchases
Taxable
Nontaxable
Tax
Calculated
Over/Short
Refundable
=========================================================================================
GRAND TOTAL Sales
.00
2290957.44
.00
.00
.00
Purchases
.00
.00
.00
.00
.00
.00
TOTAL FOR LOCATION MNR
09 Services
08 Gasoline
07 Clothing
06 Food Products
05 Motor Vehicles
04 Interstate Comm
03 Ind/Agr Prod.
02 Exempt Sales
01 Resale Sales
00 Consumer Goods
Tax Description Tax Per.
Class
Ref. Per.
Taxable
Nontaxable
Tax
Calculated
Over/Short
Refundable
------------------------------------------------------------------------------------------------------------------------------------
------ General Ledger Accounts ------- --- Tax on --Tax Loc Name
Level Tax Auth. Tax ID
Tax Liabilty Tax Expense Refundable Frt.
Misc.
-----------------------------------------------------------------------------------------------------------------------------------MNR
Minnesota - Resale
1
MN
23-876182734
2038
NO
NO
06/09/1999
10:21 AM
Tax Locations List
Master File Lists
Tax Locations List
Resource Manager User’s Manual 6.05
Tax Groups List
Features
The Tax Groups List shows the tax groups that are on your system.
Reports
A sample Tax Groups List is on page 11-46.
Screen Use
Screen
Description
Tax Groups List
Use the Tax Groups List screen to select the groups you
want in the list.
Resource Manager User’s Manual 6.05
11-43
Tax Groups List
Master File Lists
Tax Groups List Screen
Field Definitions
11-44
Field Name
Description
Pick
Enter the range of tax groups you want in the list.
Resource Manager User’s Manual 6.05
Master File Lists
Tax Groups List
Command Bar Definitions
Command
Description
Printer
Select P to send the list to a printer.
File
Select F to send the list to a file.
Screen
Select S to send the list to the screen.
End
Select E to change your selections or exit to the Master File
Lists menu.
Saving and Exiting
After the list is produced, the Master File Lists menu appears.
Resource Manager User’s Manual 6.05
11-45
11-46
Builders Supply
Tax Groups List
Page
1
Minnesota - Resale
End of report
MNR
Combined
MNR
Tax
Reporting
Tax on
Tax on Levels
Tax on Levels
Tax on Levels
Group Description
Method
Level 1 Level 2 Level 1 Level 3 1 2
Level 4 1 2 3
Level 5 1 2 3 4
------------------------------------------------------------------------------------------------------------------------------------
06/09/1999
10:22 AM
Tax Groups List
Master File Lists
Tax Groups List
Resource Manager User’s Manual 6.05
Options and Interfaces List
Features
The Options and Interfaces List shows the options and interfaces for the
applications that are on your systems and the information they contain.
Reports
A sample Options and Interfaces List is on page 11-50.
Screen Use
Screen
Description
Options and Interfaces List
Use the Options and Interfaces List screen to select the
applications you want in the list.
Resource Manager User’s Manual 6.05
11-47
Options and Interfaces List
Master File Lists
Options and Interfaces List Screen
Field Definitions
11-48
Field Name
Description
Application ID
Enter the range of applications you want in the list.
Print Detail?
If you want a detailed list of information about the program
and types of options available, enter Y; if not, enter N.
Resource Manager User’s Manual 6.05
Master File Lists
Options and Interfaces List
Command Bar Definitions
Command
Description
Printer
Select P to send the list to a printer.
File
Select F to send the list to a file.
Screen
Select S to send the list to the screen.
End
Select E to change your selections or exit to the Master File
Lists menu.
Saving and Exiting
After the list is produced, the Master File Lists menu appears.
Resource Manager User’s Manual 6.05
11-49
11-50
Builders Supply
Options and Interfaces List
For Accounts Payable Rd 23
Page
1
End of Report
Option Number
Description
Value
-----------------------------------------------------------------------------------------------------------------------------------001
Interface to General Ledger?
NO
002
Interface to Inventory?
NO
005
Interface to Job Cost?
NO
015
Interface to Bank Reconciliation?
NO
007
Post transactions in detail or summary?
DETAIL
009
Keep detail purchase history?
YES
011
Use additional descriptions?
YES
012
Copy additional descriptions from Inventory?
NO
013
Keep additional description in history?
NO
014
Allow printing of online checks?
YES
017
Keep summary purchase history?
NO
018
Use plain paper check stubs?
YES
020
Do you want to show a warning if duplicate invoice number?
YES
021
Do you want to force totals on exit of transaction entry?
YES
06/09/1999
10:22 AM
Options and Interfaces List
Master File Lists
Options and Interfaces List
Resource Manager User’s Manual 6.05
References
System Messages
Resource Manager User’s Manual 6.05
System Messages
A
xxCNVT.LOG - Error Log exists. Press ANY KEY to continue.
The files you are trying to convert for an application have already been converted. If you must
convert the files again, use the operating system commands to erase the specified file first.
Access code xxxxxx already exists.
You cannot have two access codes that are the same. Enter a different access code.
Access for file maintenance denied.
You are not authorized to use the File Maintenance function you are trying to work with.
Access Name {access code} Not On File
The name you entered is not on file. Enter a name that is on file, or use the Inquiry (F2)
command to look up and select a name.
You must use the Access Codes function in Resource Manager to define an access code (see
page 3-17).
Access to {item} Denied
Your access to the field, function, or command you are trying to use is restricted. If you have
clearance to use it, enter your access code and password first.
Resource Manager User’s Manual 6.05
A-1
System Messages
References
All form classes must match on batch selected jobs.
Form class cannot be changed on a batch selection.
If selected form class doesn’t match printer form class, job will not print.
Selected jobs will not print if the form class doesn’t match the printer’s current form class.
All the jobs you select to print in a batch must have the same form class. Select print jobs with
the same form class, or print one job at a time if print jobs have different form classes.
A driver filename must be supplied when using Device Type ‘doscon'.
The terminal you are trying to set up requires a value in the driver filename field.
Alpha Characters Not Allowed with Numeric Field Mask
You cannot use letters in a math formula for a field whose mask is numeric. Remove the letters
or change the mask.
Application information not found.
The media you are trying to install does not contain the files required for installation. If you are
installing from a diskette drive, make sure that you have inserted the correct diskette. If you are
installing from a CD-ROM drive, make sure the CD is in the drive and try again.
Application is not flagged as installed.
Application xx does not exist.
You must install the application before you can create or convert files for it.
Application not installed for this company.
You cannot change options and interfaces for an application that is not installed for the
company. Install the application, create or convert files, and then run the function again.
Application version must be greater than or equal to x.xx.
Installing this version number may cause compatibility problems throughout your system.
A-2
Resource Manager User’s Manual 6.05
References
System Messages
BASIC ERROR = nn HOST ERROR = xxx LINE = nnnn PROGRAM = xxxxxx
BASIC ERROR = nn LINE = nnnn PROGRAM = xxxxxx
A serious error has occurred. Write down the information that is displayed and get help from a
support technician.
Beginning date is not immediately after ending date of previous period.
Dates must not be missing between the ending date of one period and the beginning date of the
next period. Change the dates of the periods.
Cannot change this option. Change option xxxxxxxx to xxxxxxxxx.
You must change the option in the message before you can change the option you are working
with.
Cannot find terminal type.
The terminal type or termcap entry you specified is not in the termcap file. Enter a different
terminal type.
Cannot open print device - device name.
The printer you specified cannot be accessed now. Make sure that the printer is online. If you
want to quit without printing, press Ctrl-Break.
Cannot rebuild this type of file.
You cannot use the Rebuild/Verify function for the file you selected.
Cannot Perform Calculations With Strings
A string is a set of literal characters within quotation marks. You cannot use string variables in
a formula (for example, “SALES” + F1[1]).
Resource Manager User’s Manual 6.05
A-3
System Messages
References
Changing the column length may alter the display of data.
If you change the column length, the data will be reorganized to fit that column length, which
may produce undesirable results.
Changing the number of columns may alter the display of data.
If you change the number of columns, that data will be reorganized into the number of columns
you specified, which may produce undesirable results.
Column must be between 1 and 78.
The position of the column must be in the range 1 through 78. Enter a number in this range.
Could not find any valid source files for this application.
The directory you specified for the files you want to convert does not contain files for the
application. Enter the correct directory name.
Data files exist. Do you want this task to erase them? (Y/N)
Data files exist for the application you are trying to convert. Enter Y if you want the data files
for the application to be erased. Enter N if you want to abandon the operation.
Data files exist for this company - cannot delete.
You cannot delete the company from the system because it has data on file. Use the
appropriate operating system command to back up and delete the files from the data directory.
Then delete the company.
Device ID ‘xxxx' already exists.
You cannot use the same ID for more than one device. Enter a different ID, or exit from the
function and edit the device ID you specified.
A-4
Resource Manager User’s Manual 6.05
References
System Messages
Directory does not exist.
The directory you specified for the files you want to convert does not exist. Enter a different
directory name.
Disk drive not ready.
The system cannot access one of the disk drives to find the file it is looking for. Make sure that
the door to the diskette drive is closed.
Display Mask Does Not Fit on Screen
The size of the display mask is larger than the screen holds. Try to place the field farther away
from the right side of the screen in the EIS Dashboard Editor function.
Do you want a printout of the error log after each application? (Y/N)
If you want to produce a copy of the error that occurred during conversion after each
application has been converted, enter Y; if not, enter N.
Each column's position must be greater than any previous.
You must enter a position for the window column that is a higher value than that for a column
you entered previously.
Empty Screen. Press <Enter> to load a Different Screen
The screen does not have any fields to be displayed. Use the EIS Dashboard Editor function to
add one or more fields to the screen, or load an EIS Dashboard.
Error Found in Formula
You have made a syntax error in the field's math formula, probably because you violated a
math rule.
Resource Manager User’s Manual 6.05
A-5
System Messages
References
Error in window definition.
You defined a window incorrectly. Make sure that the fields are the correct type (numeric or
string), the field lengths are correct, the starting and column positions are within the limits, and
so on. Then enter the window definition again with the correct values.
Error log messages exist. Press a key to get output device selections.
After you press a key, you can select the output device you want to use to produce a copy of
the error log.
Existing record length exceeds new record length.
When you change the file size, you cannot specify a record length that is smaller than the
length of the existing data record. Enter a larger record length.
Error opening the SYSGUI channel, please check and make sure you have setup the X0
Device in your config.bbx file.
You will get this error if you select a GUI menu and you have not setup X0 SYSGUI in your
config.bbx file. Enter the following line into your config.bbx file:
alias X0 SYSGUI
File cannot be locked.
You cannot rebuild or verify the file you selected because the file is open at another
workstation.
Field ID {} Is Not on File
Field ID {} Not Found
The field you entered is not on file. Enter a field that is on file, or use the Inquiry (F2)
command to look up and select a field. To define a field, use the Field Definitions function.
A-6
Resource Manager User’s Manual 6.05
References
System Messages
Field {} is Invalid
The field is not valid because you entered a function incorrectly in the math editor. It
recognizes functions in the format Fn[m].
Field {} Is Not Defined As Numeric
The function you are assigning to the field ID returns alphanumeric values. The display mask
accepts numbers only. Change the display mask, or use a function that returns numeric values.
Field Setup Not Defined
You cannot assign setup types to a field whose setup ID is not defined. You might have made a
typographical error when you assigned the setup ID to a field.
Enter the field ID in the Field Definitions function and enter an existing setup ID, use the
Inquiry (F2) command to look up and select an ID, or define this setup ID in the Setup
function.
Field Will Overlap Other Fields
If you place the field too close to another field, its information will overlap the adjacent fields.
First and Last Characters Must Be Quotation Marks
If you return literal values (with quotation marks), the first and last characters must be
quotation marks. Otherwise, you have an odd number of quotation marks or you are trying to
use strings. The math editor does not recognize either situation.
Remove the quotation marks or use them as the first and last characters.
Function {} Does Not Return Element {}
A math editor cannot return a function element that does not exist. (An element is a line
number for a setup ID.) For example, if APBAL has two setup IDs, you cannot make the math
editor return F1[3], since element number three does not exist.
Resource Manager User’s Manual 6.05
A-7
System Messages
References
You cannot enter an element of 0, greater than the number of elements the function recognizes,
or a decimal.
Function ID {} Is Not on File
Function ID {} Not Found
The function you entered is not on file. Enter a function that is on file, or use the Inquiry (F2)
command to look up and select a function.
To define a function, use the Functions function after you have coded the function in Business
BASIC.
Function {} In Field {} Is Not Defined
The formula uses a function that has not been defined. Change the field definition to use a
different function.
Function {} Not Fully Defined
The function you are trying to use does not use a setup type; a setup type must be used.
Function Number Missing From Field {}
You did not specify a function in the formula for the field definition. For example, you might
have written F[3] instead of F1[3].
Filename information not found.
The media you are trying to install does not contain the files required for installation. If you are
installing from a diskette drive, make sure that you inserted the correct diskette.
filename is missing from queue. Cannot archive.
The print job you are trying to archive does not exist. It may have been deleted from the queue.
Check the filename and try again.
A-8
Resource Manager User’s Manual 6.05
References
System Messages
filename is missing from queue. Cannot search.
The print job you are searching for does not exist. It may have been deleted from the queue.
Check the filename and try again.
File type not supported.
You cannot use the Change File Size function to change the size of an indexed or string file.
fs load error = n
bbx: unable to open channel n
ERROR - A BBx error has occurred
You cannot start the accounting software with a terminal ID that is not set up in your
config.bbx file. Make sure that the config.bbx file is on your system, and start OSAS with a
different terminal ID. If the problem persists, get help from a support technician.
Global string ‘xxxxxxxxxxxx' is not defined.
The user mask you entered is not set up in memory. Check the name and enter a different user
mask.
History Not Selected in Options Table
The History option is not valid if the Keep Values File History switch is set to NO in the
Options and Interfaces function in Resource Manager (see page 3-13).
Incompatible enhancement.
The enhancement you are trying to install is incompatible with a previous enhancement.
Contact the reseller who sold you the enhancement.
Insufficient memory available.
Your computer does not have enough memory available to use the function. If you have RAMresident utilities (such as a keyboard enhancer or a desk organizer), unload them and try the
function again. If you still get the message, see your dealer about purchasing more RAM for
your computer.
Resource Manager User’s Manual 6.05
A-9
System Messages
References
Invalid characters in company ID.
The character you entered is not a valid filename in the operating system.
Invalid xxxxxxx command found in the OSxxx.txt file.
You have a bad command in the backup or restore file displayed.
Invalid date - format.
The date you entered does not conform to the date format that is used on your system. Enter the
date again, using the format shown in the message.
Invalid device ID.
The device ID you entered is not valid. When you set up a terminal ID, it must begin with the
letter T; when you set up a printer ID, it must begin with the letter P or L; and when you set up
a plotter ID, it must begin with the letter D.
Invalid Element {} In Field {}
Invalid Function Number {} In Field {}
The formula has an invalid element or function number.
Invalid entry.
The information you entered is not valid. Enter the data correctly.
Invalid Time
The format is hh:mm.
Invalid version number please enter again.
The version number you entered is not valid. Enter a different version number.
A-10
Resource Manager User’s Manual 6.05
References
System Messages
Invalid workstation ID.
The system does not recognize the workstation ID you entered. Enter a different workstation
ID.
Mask format error, use mask.
The data you entered does not fit the format for the field. Enter the data again, using the format
shown in the message.
Math expression does not contain matching parentheses.
The data name you chose is invalid in this window definition.
Move to New Location and Press Enter
Move the cursor to the spot on the EIS Dashboard where you want the left edge of the field to
appear, and press Enter.
Memo accounts are not allowed.
The GL account you entered cannot be set up as a memo account in General Ledger.
Must build ‘CNVTxxx' table to validate period entry.
Access the Period Setup function and fill in the lower half of the screen, which includes the
period beginning and ending dates.
Must build OPT table first.
The application you are working with does not have an OPT table. Use the Application Tables
function to create one.
Must define base window definition first.
You must define the base window before you can create an alternate inquiry window
definition. Enter a window ID without a character in the ninth position and create it first.
Resource Manager User’s Manual 6.05
A-11
System Messages
References
Must enter Copy From ID.
This function requires that you enter a Copy From ID to create a new record.
Must enter country code.
You cannot create a blank country code.
Must enter numeric value.
The data you entered must contain only numbers.
Must Enter Valid Date
The format is mm/dd/yyyy.
Must Enter Valid Time
The format is hh:mm.
Must enter (Y)es, (N)o, or an enhancement ID.
You cannot leave this field blank. Enter Y, N, or an application enhancement ID.
No application installed for this company ID.
No applications are installed for the company you selected. Select a different company ID, or
create the application files for the company before you try the function again.
No applications to convert.
You did not enter any applications to convert. Enter the IDs of the applications whose files you
want to convert.
A-12
Resource Manager User’s Manual 6.05
References
System Messages
No conversion program found for this application.
You cannot convert files for the application, or the conversion program is missing from your
system. Choose a different application to convert, or copy the conversion program to the
application’s program directory.
No data directories are defined.
You did not specify the directory that contains your data files. Use the Directories function to
specify the directory.
No Fields in Formula
A formula must contain at least one field.
No OSCODE File. Setup Company Access Codes First
You must set up access codes through Resource Manager before you set them up in EIS. (See
page 3-17.
No help records matching this field name.
The help record you specified does not contain any descriptive text. Enter a different help ID.
No jobs have been selected for batch processing.
Before printing jobs that are in the queue, you must select at least one print job to be included
in the batch by using the B command.
No options found for this application.
The application you selected has no options.
No source files found for xx.
The source files were not found for the application you are working with. Check the directory
that contains the files to be converted for the proper source files.
Resource Manager User’s Manual 6.05
A-13
System Messages
References
No unprinted suggestions match print selections.
The suggestions you entered have already been printed.
Number of columns must be greater than 4.
The window must be more than four columns wide.
Number of rows must be greater than 4.
The window must be more than four rows long.
Options and Interfaces program not found.
The system cannot access the program that is used to set options and interfaces for the
application. Choose a different application, or make sure that the application is installed
properly before you try again.
Path: pathname cannot be created/accessed.
The pathname you specified cannot be created or accessed. Enter a different pathname to
create, or use the Application Information function to ensure that the application is installed
properly. Then try the function again.
Print Manager is unable to locate the print file filename.
Check the name of the print job you are trying to print and try again.
Possible Invalid Characters in Mask
You have entered characters other than X or 9 in the mask.
Record is in use.
Another terminal on your system is using the data record you are trying to access. Wait a few
minutes and try again.
A-14
Resource Manager User’s Manual 6.05
References
System Messages
Record not in file.
The record identified by the data you entered in the field is not in the file. Enter a different
value in the field.
Removing Resource Manager is not allowed.
You cannot remove Resource Manager from the system.
Screen Definition File {filename} Not Found
You cannot load a screen that is not on file. Use the New Screen command to define a screen,
load an existing screen, or use the Inquiry (F2) command to look up and select a screen.
Screen Definition File *.SCR Will Be Deleted
After you use the Delete Screen command, use the Proceed (PgDn) command to verify the
deletion.
Setup ID {filename} Is Not on File
The setup ID you entered is not on file. Enter an ID that is on file, or use the Inquiry (F2)
command to look up and select an ID.
Sharing violation reading drive <drive>Abort, Retry, Fail.
You are trying to load multiple OSAS sessions too quickly. Press A to abort the process, exit
from all Windows sessions and Windows itself, and reboot your computer. Then try again—
make sure that each OSAS session is fully loaded before you load another OSAS session.
Source directory cannot be an OSAS directory.
You must enter a directory that is not used by OSAS. Create a directory to convert from and
enter it as the source directory.
Spool file filename is in use. Press Enter to abort.
Someone else is using the file you are trying to access. Try again later.
Resource Manager User’s Manual 6.05
A-15
System Messages
References
Starting column must be less than 75.
Starting column plus number of columns must be less than 80.
The starting position of the window you create cannot be beyond screen column 74, and the
last column in the window cannot extend beyond column 79. Make the window smaller, or
position the first column farther left.
Starting row must be less than 20.
Starting row plus the number of rows must be less than 25.
The starting position of the window you create cannot be below screen line 19, and the last row
of the window cannot extend beyond line 24. Make the window smaller, or position the first
row higher.
Suggestion xxxx not on file.
The suggestion number you entered is not in the Suggestions file.
The current period is invalid. Must be between 1 and x.
The current period you entered is not valid with the number of periods/year. Enter a number
that is less than or equal to the number of periods/year.
There are no options or interfaces for this application.
The application you entered does not have any options or interfaces. Make sure that the
application is installed on your system and that the data files have been created or converted.
The version entered is less than any available conversion programs.
The version you specified has no conversion program.
This application has violated system integrity due to an invalid general protection fault and
will be terminated. Quit all applications, quit Windows, and then restart your computer.
You are trying to load multiple OSAS sessions too quickly. Press A to abort the process, exit
from all Windows sessions and Windows itself, and reboot your computer. Then try again—
make sure that each OSAS session is fully loaded before you load another OSAS session.
A-16
Resource Manager User’s Manual 6.05
References
System Messages
Thru value cannot be less than From value.
When you specify a range of items for a report, the ending value (Thru) cannot be less than the
beginning value (From).
Unable to Create Directory.
The system cannot create the directory you specified. Check the drive letter and the spelling of
the pathname and try again.
Unable to Delete {screen name}
You cannot delete the screen. Check whether the screen is under restricted access.
Unable to execute program program.
The system cannot run the program you selected from the menu. Make sure that the program
file shown in the message is present in the application’s program directory; then select the
function again.
Unable to load company information.
The system cannot access the company information file. Someone may be using the Company
Information function. Try again later. If the situation persists, get help from a support
technician.
Unable to load menu record record from file file.
The menu record for the application is not in the menu file, or the menu file is missing. Make
sure that the application is properly installed and try again.
Unable to load PREFIX information.
In the LAN and Windows versions make sure that SHARE was executed during system
startup. If you get this message again in the LAN, Windows, and UNIX/XENIX versions,
someone may be editing the directory records or application information files. Try again later.
You can get more help from a support technician.
Resource Manager User’s Manual 6.05
A-17
System Messages
References
Unable to load workstation information.
In the LAN, Windows, UNIX/XENIX versions the system cannot access the workstation
records. Someone may be editing these records. Try again later. If you get this message again
in the UNIX/XENIX version, make sure that SHARE was executed during system startup. You
can get more help from a support technician.
Unable to lock - file in use.
You cannot run a function that must lock a file that is being used by another workstation on
your system. Try the function again when no one else is using the file.
Unable to open file.
Unable to open - file in use.
The file you are trying to use is locked at another terminal on your system, or the file is
corrupted. Wait a few minutes and try again. If the condition persists, get help from a support
technician.
Unable to print to device.
The system cannot access the device you are trying to print to. Make sure that the device is
online; then try again.
Unmatched Parenthesis Found in Formula
Every left parenthesis must have a right parenthesis, and vice versa.
Unmatched Quotation Marks Found in Formula
You must have an even number of quotation marks in a formula.
Version number must be equal to or greater than installed application.
You cannot install an earlier version of an application over a more recent version.
A-18
Resource Manager User’s Manual 6.05
References
System Messages
Version number too large.
The version number you entered is too large. Check the version number and try again.
Warning: invalid date entered.
The date you entered is not valid. The month you entered does not end with the day specified.
Warning! Setup Type {} Not Used!
When you establish a setup ID, you usually want to use all the available setup types. If you do
not, this message appears.
You can bypass the message, but be careful if you do. Some functions do not work properly or
produce the correct information if setup types are missing. In general, assign all the possible
setup types to a setup ID.
Warning: ‘RMPDxxx’ table does not exist. Entry here will add table.
The RMPDxxx table has not been set up. Press Enter to create a new table.
Width of window data is greater than window size.
Because the data you selected to appear in the window is wider than the window size you
defined, the window data will be truncated.
Window xxxxxxxxx not on file.
The window ID you selected is not in the Definitions file for the application.
You must enter a version number.
You cannot proceed with the conversion until you enter a valid version number.
Resource Manager User’s Manual 6.05
A-19
Resource Manager User’s Manual
6.05
References
File Descriptions
Resource Manager User’s Manual 6.05
File Descriptions
B
xxAPPL.TXT (Application Information)
The xxAPPL.TXT file stores information about the applications to be installed on the system.
xxDATA (Data Information)
The xxDATA file stores the data file information for applications. This information is used to
create files during installation, rebuilding/resizing files, and printing the Data File Allocation
Report.
xxFILES.TXT (Installation Copy Program)
The xxFILES.TXT file determines which files to copy and when to prompt for another
application volume during installation.
xxFRST.TXT (First Program Instructions)
The xxFRST.TXT file stores BB x statements that perform special functions before the
installation of an application.
xxHELP (Help)
The xxHELP file stores all the help screens for fields in all the applications. When you use the
Help (F1) command in a different application, the information is accessed from this file.
xxLABEL.TXT (Label)
The xxLABEL.TXT file stores the application name and copyright information. The label
information is used to verify that the appropriate installation media is installed, and the
copyright information is merged into the system copyright file.
Resource Manager User’s Manual 6.05
B-1
File Descriptions
References
xxLAST.TXT (Last Program Instructions)
The xxLAST.TXT file stores BBx statements that perform special functions after the normal
installation of an application.
xxMN (General Menu)
The xxMN file stores the menu records to be displayed on the screen for a company or an
application.
xxMSG (Message)
The xxMSG file stores the system messages for all applications. To view or change system
messages for an application, use the System Messages function.
xxOI (Options and Interfaces Definition)
The xxOI file stores records with Option definitions and application links for a single
application.
xxSWCH (Options Linkage Instructions)
The xxSWCH file stores the instructions that apply to a particular application and sets the
option switch of another application to the same value.
xxTB (General Table)
The xxTB file stores information that is relevant to each application. For example, the general
table records contain information such as the table ID, number of columns, table type, and
table data.
xxWIND (Window Definition)
The xxWIND file stores information needed to display an inquiry window. The information
from this file is then used by GENWIND.PUB to create an inquiry window.
B-2
Resource Manager User’s Manual 6.05
References
File Descriptions
CNVTLOG (Conversion Log)
The CNVTLOG file stores the errors that occurred during conversion.
EIFDDTA (Field Definition Data) file
The EIFDDTA file stores the field IDs and descriptions. It also stores the functions and setup
records needed to generate each field. Each field ID corresponds to a field value in the EIVAL
file.
EIFDHDR (Field Definition Header) file
The EIFDHDR file stores each field’s ID, mask, description, and math formula. It also stores
the value, date and time, terminal, and error type of the field’s last calculation.
This information is displayed when you use the View command on the EIS Dashboard. You
can use the Field Definitions function to change the ID, mask, description, and math formula.
EIFUDTA (Function Data) file
The EIFUDTA file stores each value returned by a function. A function can return several
values. Use the Recalc or Global command on the EIS Dashboard or the Global Dashboard
Update function to make a field return a value.
EIFUHDR (Function Header) file
The EIFUHDR file stores such information as the ID and description of each function. Use the
Functions function on the File Maintenance menu to enter the ID and description of a function.
EIHIST (Field History) file
The EIHIST file stores field values and the dates and times that the field was updated. If you
save an EIS Dashboard to history, values from the fields are saved here. The EISCR file saves
only the EIS Dashboard’s ID and title.
The information is retrieved from the EIHIST file when you produce the Dashboard History
Report.
Resource Manager User’s Manual 6.05
B-3
File Descriptions
References
EISCR (Screens) file
The EISCR file stores a list of the stored EIS Dashboard IDs and descriptions. This
information is updated when you build or save the layout of an EIS Dashboard and is retrieved
when you load an EIS Dashboard.
The values from an EIS Dashboard are not stored here; they are stored in the EIHIST file
because the system does not distinguish between one field and a group of fields. When you
save an EIS Dashboard, the values of the fields are sent to the EIHIST file as though you had
saved each field individually. Only the ID and title of the EIS Dashboard are stored in the
EISCR file.
EISTDTA (Setup Data) file
The EISTDTA file stores the data retrieved from each setup ID when a field value is
recalculated. The data includes the type and From/Thru information. When you define a
function, you use setup IDs to specify the type of information you want returned and the range
within those types (for example, a cash balance for one company or a range of companies). The
information is stored here and retrieved when you define a field.
EISTHDR (Setup Header) file
The EISTHDR file stores the setup ID headers and user-defined information to be used by a
function for calculation. When you define a function, you use setup IDs to specify the type of
information you want returned and the range within those types (for example, a cash balance
for one company or a range of companies). The actual data is stored in the EIVAL file.
EITB (Tables) file
The EITB file stores the settings you entered in the Options and Interfaces function in
Resource Manager for EIS. (See the Resource Manager User’s Manual; use EI as the
application ID.) This version of EIS uses only two switches in the OPTxxx table and none in
the OP2xxx table. EIS recognizes only these two tables.
B-4
Resource Manager User’s Manual 6.05
References
File Descriptions
EIVAL (Calculated Values) file
The EIVAL file stores each value that is displayed on an EIS Dashboard, the terminal that last
updated the value, and the last update date and time.
When the functions calculate a value, the data (including the system date and time) is sent to
this file. The EIS Dashboard function retrieves the data and sends it to the screen. When you
use the Recalc or Global command on an EIS Dashboard or the Global Dashboard Update
function, the information is stored here.
OSAPPL.DOS and OSAPPL.UNX (Application)
The OSAPPL.* files store information about individual applications. Resource Manager uses
the files during installation and to control the Applications menu. The OSAPPL.DOS file is
used on Windows systems, while the OSAPPL.UNX file is used on UNIX and Linux systems.
One or both files may be used depending on the operating systems you use with OSAS. In
mixed client/server environments, the UNIX terminals use the OSAPPL.UNX file for program
path information and the Windows workstations use OSAPPL.DOS.
OSBUF.TXT/OSREF.TXT (Backup/Restore—disk)
The OSBUF.TXT and the OSREF.TXT files are text files that contain the command to back up
or restore files from a diskette. Refer to the Backup/Restore Commands screen for more
information.
OSBUT.TXT/OSRET.TXT (Backup/Restore—tape)
The OSBUT.TXT and OSRET.TXT files are text files that contain the command to back up
and restore files from a tape. Refer to the Backup/Restore Commands screen for more
information.
OSCL (Workstation Colors)
The OSCL file stores information about the color sets used for a workstation’s 14 windows and
screens. Set up the colors of your workstation through the Colors function.
Resource Manager User’s Manual 6.05
B-5
File Descriptions
References
OSCN (Country)
The OSCN file stores such information about countries as the country code and the name of the
country.
OSCNVT (Conversion)
The OSCNVT file is used to compare the new application conversion and data files with the
current application files. This file is used to determine what version is on the system.
OSCNVT.HDR (Conversion Header)
The OSCNVT.HDR files stores general conversion information.
OSCODE (Access Codes)
The OSCODE file stores such access code information as the access name, menu type,
program, menu parameter, and access code for each user. If no access code exists for a
company, all the menu selections are valid. If an access code exists for a company, the
information is stored in the OSCODE file. Set up access codes through the Access Codes
function.
OSCOMP (Company)
The OSCOMP file stores the company names, addresses, and numeric mask defaults
associated with company IDs. Each time a new company ID is defined in the Company
Information function, a record is added to this file.
OSCOPR (Copyrights Messages)
The OSCOPR file stores copyright messages for applications, enhancements, and add-ons.
OSDE (Device Setup)
The OSDE file stores information needed to construct a maintenance screen for the Devices
function.
B-6
Resource Manager User’s Manual 6.05
References
File Descriptions
OSDF (Workstation Defaults)
The OSDF file holds information about the default values used for each workstation: toggle
defaults, field defaults, and directory defaults. Set up defaults on your workstation through the
Defaults function.
OSER (Error)
The OSERxxx file stores information about BASIC errors that occur during normal operation.
Use the Error Log function to produce a list of the errors.
OSFRM (Application Form Type)
The OSFRM file stores form types for the OSAS applications installed on your system.
OSINFO.DOS and OSINFO.UNX (System Directories)
The OSINFO.* files store information that is unique to the entire OSAS system on a certain
operating system:
•
•
•
•
•
•
•
installation/backup device
main program directory
three data directories
Report Writer data directory
sample data directory
system files directory
utilities directory
•
The OSINFO.DOS file is used on Windows systems, while the OSINFO.UNX file is used
on UNIX and Linux systems. One or both files may be used depending on the operating
systems you use with OSAS. In mixed client/server environments, the UNIX terminals
use the OSINFO.UNX file for path information and the Windows workstations use
OSINFO.DOS.
OSKY (Workstation Keyboard)
The OSKY file stores information about the keyboard values used for each workstation. Set up
your keyboard through the Keyboard function.
Resource Manager User’s Manual 6.05
B-7
File Descriptions
References
OSMN (Other Commands Menu)
The OSMN file stores the Other (F4 twice from a menu, F4 once from a field) Commands
menu for each company.
OSMNxxx (Main Menu)
The OSMNxxx file stores the menu records displayed on the screen for an application. The
main menu for a single company is updated when data files are created, the main menu is
edited, or an application is removed from the system.
OSORDER (Forms Information)
The OSORDER file stores form information for the OSAS applications installed on your
system.
OSPRN (Application Form Printer)
The OSPRN file stores form printer information.
OSRD (Reorder Detail)
The OSRD file stores line items for the Forms Reorder function.
OSRH (Reorder Header)
The OSRH file stores header information for the Forms Reorder function.
OSTD (Temporary config.bbx Detail)
The OSTD file is a temporary file that stores detailed information about a device in the
config.bbx file. This file is built and removed in the Devices function.
OSTM (Temporary config.bbx Master)
The OSTM file is a temporary file that stores the master list of devices in the config.bbx file.
This file is built and removed in the Devices function.
B-8
Resource Manager User’s Manual 6.05
References
File Descriptions
OSVAR (VAR Information)
The OSVAR file stores the dealer and support information you enter in the Support
Information function.
PMARCxxx (Archive)
The PMARCxxx file stores archived print jobs.
PMCLASS (Printer Class)
The PMCLASS file stores the last form class the printer used.
PMHSTxxx (Transaction History)
The PMHSTxxx file stores transaction history. This file is cleared when you use the Purge
Transaction History function.
PMMENxxx (Login Activity)
The PMMENxxx file stores user login activity.
PMOPTxxx (Parameter)
The PMOPTxxx file stores the parameter defaults you enter in the Parameter Maintenance
function.
PMQUExxx (Active)
The PMQUExxx file stores active print jobs.
PMSIZxxx (Form Class)
The PMSIZxxx file stores the form classes you set up in the Form Classes function.
Resource Manager User’s Manual 6.05
B-9
File Descriptions
References
RMCDxxx (Tax Class Code)
The RMCDxxx file stores tax classes and descriptions. When you set up tax locations, you
assign a percentage and other information to each tax class. The file is set up through the Tax
Classes function.
The RMCDxxx file is used only by Accounts Receivable but is stored in Resource Manager so
that it can be of future use to other applications.
RMDEVDEF (Device Definitions)
The RMDEVDEF file stores sample device names that are used as an inquiry window during
device maintenance.
RMDRVDEF (Driver Definitions)
The RMDRVDEF file stores terminal and plotter driver filenames that are used as an inquiry
window during device maintenance.
RMGIDEF (Global Inquiry Definitions)
The RMGIDEF file stores information and filenames that are used as an inquiry window
during global inquiries.
RMPRNDEF (Printer Definitions)
The RMPRNDEF file stores the default printer definitions that are used as an inquiry window
during device maintenance.
RMTDxxx (Tax Location Detail)
The RMTDxxx file stores such tax location detail information as the percentage rates and tax
expense account.
RMTHxxx (Tax Location Header)
The RMTHxxx file stores the tax location header information.
B-10
Resource Manager User’s Manual 6.05
References
File Descriptions
RMTXxxx (Tax Locations)
The RMTXxxx file stores such tax location information as the tax authority, tax ID, amount of
taxable and nontaxable sales, tax collected for each location, and GL account that sales taxes
are posted to from other applications.
RMUCxxx (User Comments)
The RMUCxxx file stores the comments you enter in the User Comments function.
RMUIxxx (User ID)
The RMUIxxx file stores descriptions of user IDs for the User Comments function.
SUGGEST (Suggestions)
The SUGGEST file stores the suggestions entered through the Other Commands menu.
Suggestions might include enhancements to the software that you would like to see.
Resource Manager User’s Manual 6.05
B-11
References
Common Questions
Resource Manager User’s Manual 6.05
Resource Manager User’s Manual
6.05
Common Questions
C
Note
For the latest answers to OSAS-related questions, see our website at
www.OSAS.com/support/osas/faq
Which interpreters work with Windows?
XW - Microsoft Windows 95, 98, and NT
XY - Microsoft Windows Netware Client
My customer is running multiple servers (Windows 95/98, Windows NT,
Novell, etc.) on the same network. Will there be any problems installing OSAS
for Windows?
As long as OSAS is installed on a supported server—Windows 95/98, Windows
NT 3.51 with service pack 5 or 4.0 with service pack 5, or Novell 3.2, 4.11, or
5.0—there should be no problems.
My customer is using Windows 95/98 as workstations, what network does
OSAS for Windows run on?
Windows 95/98, Windows NT 3.51 with service pack 5 or 4.0 with service pack 5
with the XW interpreter, and Novell 3.2, 4.11, and 5.0 with the XY interpreter.
What workstations are supported for OSAS for Windows?
OSAS for Windows supports workstations running under Windows 95/98 and NT,
3.51 Workstation with service pack 5, NT 4.0 Workstation with service pack 5.
Resource Manager User’s Manual 6.05
C-1
Common Questions
References
When I use continuous forms with a sysprint device, why is there an extra
form feed after the alignment mark?
When you print to a spooled printer, Windows automatically generates a form feed.
Printing an alignment mark requires opening and closing the printer, which triggers
a form feed through Windows. Turn the alignment mark off through Form Codes in
Resource Manager. If you wish to print direct with out the form feed, you need to
set up a device in OSAS that will print to the local port (for example, /dev/ltp1 for
Windows 95/98 and lpt for Windows NT) and the windows print driver needs to
print directly to the port.
What’s the best way to make changes to my CONFIG.BBX file?
The Resource Manager Devices function is designed so that the ALIAS parameters
and STBLEN values are automatically adjusted for you.
Why do my laser forms not align?
Printers have different drivers that cause forms to align differently. See Appendix
D on aligning laser forms.
When I close Print Preview window, an Error 2 screen appears and printing
stops.
Let the print job finish before you close the print preview screen. OSAS needs the
preview screen to remain open while the program completes the operation.
When I choose my SYSPRINT printer, non-legible characters are output.
What can I do?
Try changing the FONT setting for hte printer in the CONFIG.bbx file. Under the
Devices menu (see page 2-11) and select YES to overwrite. Select the appropriate
printer and enter “Courier New” (including the quote marks). Save you changes
and test your printer. If Courier New does not fix the output problem, try several
other fonts.
C-2
Resource Manager User’s Manual 6.05
References
Common Questions
The graphics on the console are not displayed correctly on SCO Open Server
5. What is wrong?
SCO Open Server 5 sets the console device to be IBM terminals instead of ANSI
terminals. Enter mapchan -n into the .profile file.
Print Manager
How can I access the Print Manager command letters and their functions?
The commands are displayed when you use the Help (F1) command. When you
know which command you want to use, use the Exit (F7) command on the Help
screen. Then enter the command.
Do the same access codes in OSAS apply to Print Manager?
Yes. If you do not have access to an OSAS function, you will not be able to access
a print job that was produced using that function.
How can I make Print Manager print reports without supervision?
You can use the B (Batch) command to mark the reports you want to print. The
reports you want to print in the batch must have the same form class. Then use the
P (Print) command to print the jobs you selected.
Does the form class configure the printer for the form I selected?
No. The form class assigned to the print job reminds you to verify that the proper
paper or forms are loaded in the printer, but it does not configure that printer.
Can I print more than one copy of a selected print job?
Yes. After you have selected the batch and used the P (Print) command, enter the
number of copies you want to print in the Control window that appears.
Resource Manager User’s Manual 6.05
C-3
Common Questions
References
EIS
What is a function?
A function is a small program that calculates data from a file and returns one or
more values. Use the Functions function on the File Maintenance menu to define
the values in the function. You can display the data straight from the function, or
you can use the Math formula command to manipulate the data the function
provides from one or more functions to calculate an original value. You must
supply a setup ID for the function to summarize the information correctly.
What does the word Global mean?
On an EIS Dashboard the Global command recalculates the fields on only the
current EIS Dashboard. The Global Dashboard Update function recalculates all the
fields in the system.
What is the difference between the Recalc and Global commands?
Use the Recalc command to recalculate the value only in the highlighted field. Use
the Global command to recalculate all the values on the EIS Dashboard.
How do I select two noncontiguous accounts from a file?
Enter two ranges in the setup ID: one for only the first account and another for only
the second account.
How often is the Field History file updated?
History data is stored when you run the Global Dashboard Update function with the
Save History flag set to YES.
How can I rename an EIS Dashboard?
You can load the EIS Dashboard in the EIS Dashboard Editor function and save it
as a different screen ID. If you do not want the screen to be labeled under the
original screen ID, use the Delete Screen command in the EIS Dashboard Editor
function to remove it.
C-4
Resource Manager User’s Manual 6.05
References
Common Questions
How can I find out the last time a field was recalculated?
Move the cursor to the field on the EIS Dashboard and use the View command.
The date and time the field was last calculated is displayed on the View screen. The
terminal ID of the workstation where it was recalculated is also displayed.
How can I change the default screen that appears when I select the EIS
Dashboard?
Use the Workstation Defaults function in Resource Manager to enter the screen ID
in the Dashboard field. That ID becomes the default screen.
How can I keep other users from seeing particular fields here and there?
Use the Access Codes function on the File Maintenance menu to assign access to
users for each field defined in the Field Definitions function. A string of Xs appears
if a user does not enter the right code. (Before you can use the Access Codes
function, you must set up access codes using the Access Codes function on the
Company Setup menu. See page 3-17 for information.)
Resource Manager User’s Manual 6.05
C-5
References
Laser Alignment Notes
Resource Manager User’s Manual 6.05
Resource Manager User’s Manual
6.05
Laser Alignment Notes
D
Printing Forms
Ordering
Forms are loaded into printers face up or face down. When you order forms for a
printer that loads face down, the order must be reverse collated. Request this when
ordering.
Laser Printer Alignment Tips for Forms
To make sure lines and characters are aligned properly when printing any form to a
laser printer, you must set the default lines per page to 60. This will ensure the lines
will not creep up the form. Follow these steps:
1. Select the printing menu from your printer control panel.
2. Press the item button until the FORM=## LINES choice is displayed.
The ## must be 60.
There are many discrepancies in the way different laser printers print. Some print
higher or lower than others as well as left to right. Open Systems has two HP4si
LaserJets, and we have found discrepancies in the way they print. This difference
left and right is usually slightly less than one character, and can only be resolved by
programming code to shift one full character at a time. Similarly, the difference up
and down is usually slightly less than one line, and can only be resolved by
programming code to shift one full line at a time. However, you may be able to
send printer commands through the config.bbx file to properly align characters and
lines.
Always print one form at a time until you get the alignment you like.
Resource Manager User’s Manual 6.05
D-1
Laser Alignment Notes
References
Note
Making these changes will affect all OSAS forms to that particular alias. Make a
copy of the config.bbx file (in progRM) before making any changes.
Left to Right Issues
Using sysprint in OSAS for Windows
If you are printing to a sysprint device, you can place a decimal in the printer’s Left
Margin field on the alias line to shift print to the left or right. For example, your
Left Margin setting is .260. To move to the right, increase the number (.285). To
move to the left, decrease the number (.235). A 1/4 character shift would be
approximately .025 added to or subtracted from .260.
Direct printing in OSAS for Windows or UNIX:
Moving text to the left:
You cannot move text to the left.
Moving text to the right:
If your forms are aligned too far to the left, you must add the following
configuration values in the config.bbx file for the printer alias you are using. These
values let you shift to the right in 1/720 inch increments. Follow these steps:
1. Select DEVICES from the Workstation Configuration menu in Resource
Manager.
2. Edit the appropriate alias line and add 1B266C323255 at the end of the
Standard or Compressed Print field.
D-2
Resource Manager User’s Manual 6.05
References
Laser Alignment Notes
The number “3232” is the hex code for 22, which moves everything to the right
22/720 of an inch. If you need to move to the right more, change the second and
last numbers in 3232 because the three’s are always constant. For example, if you
want to move text farther to the right, you could try 25. The hex code would change
to 3235. In hex, each number is represented by 3 and then the number, so 2=32 and
5=35.
Up and Down Issues
Using sysprint in OSAS for Windows
If you are printing to a sysprint device, you can place a decimal in the printer’s Top
Margin field on the alias line to shift print. For example, your Top Margin setting is
.5. To move down, increase the number (.54). To move up, decrease the number
(.46). A 1/4 character shift would be approximately .04 added to or subtracted from
.5.
Direct printing in OSAS for Windows or UNIX:
Moving text to the left:
You cannot move text up.
Moving text down:
To move lines down, you must add the following configuration values in the
config.bbx file for the printer alias you are using. These values let you move down
in 1/720 inch fragments. Follow these steps below:
1. Select DEVICES from the Workstation Configuration menu in Resource
Manager.
2. Edit the appropriate alias line and add 1B266C343555 at the end of the
Standard or Compressed Print field.
Resource Manager User’s Manual 6.05
D-3
Laser Alignment Notes
References
The number “3435” is the hex code for 45, which moves everything to the down
45/720 of an inch. If you need to move down more, change the second and last
numbers in 3435 because the three’s are always constant. For example, if you want
to move text farther to the right, you could try 56. The hex code would change to
3536. In hex, each number is represented by 3 and then the number, so 5=35 and
6=36.
Left to Right and Up and Down Issues
Direct printing in OSAS for Windows or UNIX:
If you must add hex codes to modify print left to right and up and down, you must
edit the config.bbx file with a text editor and add the codes to the end of the SP=
section of the alias line for standard forms or CP= for compressed forms. You must
enter the text editor because the command is too long to enter through Resource
Manager’s Devices function.
Printing Laser Forms on Ink Jets, Bubble Jets, or Desk Jets
These printers cannot interpret laser definitions. There is no way to control how the
forms print. Either they print correctly or they do not. Models labeled “for
Windows” have better success, but there is no way to control how forms print. Test
your situation before ordering laser forms. Call Open Systems Forms Division at
1-800-994-OPEN for sample forms.
Continuous Forms
When you print forms less than 11 inches in length (such as checks or invoices)
through sysprint, we recommend you turn off alignment mark printing. Printing the
alignment mark requires opening and closing the printer, which triggers a form
feed through Windows, causing forms to misalign. To turn the alignment mark off,
use Resource Manager’s Form Codes function.
D-4
Resource Manager User’s Manual 6.05
Resource Manager User’s Manual 6.05
References
Resource Manager User’s Manual
6.05
Printers for Windows
Printers for Windows
E
Devices
You can use the Devices function on the Resource Manager Workstation
Configuration menu to set up other devices that OSAS uses. If you are reinstalling
OSAS Resource Manager, you must set up the sysprint devices you want to use. If
you reinstall OSAS Resource Manager and use the Custom Install option, do not
reinstall the system files.
Note
The system defaults work with all Open Systems forms.
When you select the Full Install option and select Devices, the following screen
appears:
Resource Manager User’s Manual 6.05
E-1
Printers for Windows
References
Sysprint devices are available for laser, dot-matrix, and wide-carriage printers. To
change a sysprint device, move the cursor (>) to the device and press E. The
Devices Printers screen appears. (The Append screen is identical to the Edit
screen.)
Field Definitions
E-2
Field Names
Description
BBX Device Name
Enter the device name you want to edit or append.
Copy From
This field appears if you entered a new device name. Enter
the name of the device whose settings you want to copy
from.
System Device Name
Enter the system device name sysprint in lowercase letters.
A list of default device names is available if you use the
Inquiry (F2) command.
Device Type
Enter the device type. A list of default device types is
available if you use the Inquiry (F2) command.
Resource Manager User’s Manual 6.05
References
Printers for Windows
Field Names
Description
Lines Per Page
Accept the displayed number of lines per page, or enter a
different number
Standard Cols
Accept the displayed number of columns for standard mode
printing, or enter a different number.
Compress Cols
Accept the displayed number of columns for compressed
mode printing, or enter a different number.
Top Margin
Accept the displayed top margin size, or enter a different
margin size. The size is displayed in decimals. If you
change the default setting, the new setting overrides the
Windows default.
Left Margin
Accept the displayed left margin size, or enter a different
margin size. The default is blank. If you change the default
setting, the new setting overrides the Windows default.
Font
Enter the name of the TrueType® font you want to use—for
example, Courier. You can leave this field blank to use the
default font.
Setup
Toggle to YES or NO to select the Windows Print Setup
dialog box. If you select YES, the Windows Print Setup
dialog box appears when you print in OSAS with the
sysprint device you are editing. If you select YES, you
cannot select YES in the Dialog field. If you select NO for
both the Setup and Dialog fields, the system uses the
Windows default printer.
Dialog
Toggle to YES or NO to select the Windows Print dialog
box. If you select YES, the Windows Print dialog box
appears when you print in OSAS with the sysprint device
you are editing. If you select YES, you cannot select YES in
the Setup field. If you select NO for both the Setup and
Dialog fields, the system uses the Windows default printer.
Resource Manager User’s Manual 6.05
E-3
Printers for Windows
References
Defaults for the sysprint device are as follows:
Device
Default Settings
Windows Default Printer
Laser
Lines Per Page = 63, Standard Cols = 80, Compress Cols =
132, Top Margin = .5, Left Margin = [blank], Font =
[blank], Setup = [blank], Dialog = [blank].
Print Dialog Laser
Lines Per Page = 63, Standard Cols = 80, Compress Cols =
132, Top Margin = .5, Left Margin = [blank], Font =
[blank], Setup = [blank], Dialog = Yes.
Print Setup Laser
Lines Per Page = 63, Standard Cols = 80, Compress Cols =
132, Top Margin = .5, Left Margin = [blank], Font =
[blank], Setup = Yes, Dialog = [blank].
Windows Default Printer
Dot Matrix
Lines Per Page = 66, Standard Cols = 80, Compress Cols =
132, Top Margin = [blank], Left Margin = [blank], Font =
[blank], Setup = [blank], Dialog = [blank].
Print Dialog Dot Matrix
Lines Per Page = 66, Standard Cols = 80, Compress Cols =
132, Top Margin = .5, Left Margin = [blank], Font =
[blank], Setup = [blank], Dialog = Yes.
Print Setup Dot Matrix
Lines Per Page = 66, Standard Cols = 80, Compress Cols =
132, Top Margin = .5, Left Margin = [blank], Font =
[blank], Setup = [blank], Dialog = [blank].
If you are using a wide-carriage printer, use the Print Setup function in Windows to
set up the paper size. Select a paper size of 14-7/8 inches x 11 inches. Open
Systems recommends using the US SF (US standard fanfold) information in the
Windows Print Manager.
E-4
Device
Default Settings
Windows Default Printer
Wide Carriage
Lines Per Page = 66, Standard Cols = 136, Compress Cols =
240, Top Margin = [blank], Left Margin = [blank], Font =
[blank], Setup = [blank], Dialog = [blank].
Resource Manager User’s Manual 6.05
References
Printers for Windows
Device
Default Settings
Print Dialog Wide
Carriage Dot Matrix
Lines Per Page = 66, Standard Cols = 136, Compress Cols =
240, Top Margin = [blank], Left Margin = [blank], Font =
[blank], Setup = [blank], Dialog = Yes.
Print Setup Wide Carriage
Dot Matrix
Lines Per Page = 66, Standard Cols = 136, Compress Cols =
240, Top Margin = [blank], Left Margin = [blank], Font =
[blank], Setup = Yes, Dialog = [blank].
Terminal aliases specify that the alias is a syswindow. No other parameters are
necessary, nor are they recognized by OSAS.
Printing with Windows Print Manager
You can use the Windows Print Manager to print reports you produce in OSAS
applications.
When you finish making selections for a report or list, the output device prompt
appears. When you select P to print the report or list, the following window
appears:
Resource Manager User’s Manual 6.05
E-5
Printers for Windows
References
In the Printer field, enter LPL to print to the Windows default laser printer set up
for the terminal, PDL to access the Windows Print Dialog box for laser printers,
PSL to access the Windows Print Setup Dialog box for laser printers, PDD to
access the Windows Print Setup dialog box for dot-matrix printers, LPW to print to
the Windows default wide-carriage printer, PDW to access the Print Dialog box for
wide-carriage printers, or PSW to access the Printer Setup box for wide-carriage
printers. See the Windows manual for information about the Windows Print
Manager.
E-6
Resource Manager User’s Manual 6.05
References
Other Commands
Resource Manager User’s Manual 6.05
Resource Manager User’s Manual
6.05
Other Commands
F
Calculator
Use the Calculator function to do basic math calculations. You can store and
retrieve totals and tapes, add comments to tapes, and print tapes. A common use is
to calculate a total, exit from the Calculator, and enter the total into the field you
started from.
Select Calculator from the Other Commands menu. The function screen appears.
Resource Manager User’s Manual 6.05
F-1
Other Commands
References
Field Definitions
Field
Description
Memory
The number or total stored in memory is displayed.
Tape
The printout tape of a real calculator is simulated in the Tape
display area. Numbers, operators, and a running total of the
calculations are displayed.
Each workstation has its own unique tape for the calculator.
The last tape that was used is recalled when you start the
calculator. The tape is stored as a file on the hard disk and
reloaded each time you use the calculator. When you want to
start a new tape, press F1 to erase the current tape.
Entry
The number or comment you are entering or have just entered
is displayed. To enter a number, type the number. To enter a
comment, type a quotation mark (“) and then a comment.
Comments can be 16 characters long.
To make calculations with the Calculator, use postfix notation.
First, type a number. Then press the key of the operator (+, -,
x, or /) you want to use. Type a second number, and press the
key of another operator or press Enter to total the calculation.
F-2
Functions
The Calculator functions are displayed in the Functions field.
Press S to see the subtotal, the quotation mark key (“) to start a
comment, and T to print the tape. In the View Tape function
you can use three keys: the up-arrow key to move up the tape,
the down-arrow key to move down the tape, and the Esc key
to jump to the bottom of the tape and exit from View mode.
Keys
Use the following function keys or the alphanumeric
equivalents to work with figures in the Memory, Tape, Entry
and Status fields.
F1 or C
(Erase Tape)
Clear the tape. Once you clear the tape, it cannot be recalled.
F2 or E
(Clear Entry)
Clear the Entry field so that you can enter a different number.
Resource Manager User’s Manual 6.05
References
Other Commands
Field
Description
F3 or M+
(Memory +)
Copy the total at the bottom of the tape to the Memory field if
the figure in memory is .00.
Add the total at the bottom of the tape to the figure in the
Memory field.
F4 or M(Memory -)
Subtract the total at the bottom of the Tape field from the
number in the Memory field.
F5 or MR
(Memory Recall)
Copy the number in the Memory field to the Entry field.
F6 or MC
(Memory Clear)
Erase the number in the Memory field.
F7 or Q
(Exit)
Exit from the Calculator without saving the total.
F8 or P
(Printer)
Switch the printer on and off. If you turn the printer on, your
subsequent entries will be printed until you turn the printer off
or exit from the calculator.
F9 or O
(Decimal)
Change the number of default decimal places displayed by the
Calculator. The default number of decimal places is read from
the current OSAS program. Valid values are 0, 1, 2, 3, 4, 5,
FLOAT (Floating Point), and AUTO (Automatic). Numbers
are saved and calculated with 1 to 14 decimal places, but only
the default number of decimal places is shown.
When you select FLOAT, the decimal floats from 0 to 5 places
to correctly display a number (unless 5 places are not available
after you enter the whole number).
When you select AUTO, a decimal is placed before the last
two numbers of each entry unless you include a decimal as part
of the entry.
F10 or W
(Exit Total)
Exit from the Calculator and copy the total into the field the
cursor is in on the screen where you accessed the calculator.
Status
The status of the printer (on/off) and of the automatic
placement of the decimal point (0–5 or FL for floating) is
displayed.
Resource Manager User’s Manual 6.05
F-3
Other Commands
References
Making a Calculation
Follow the same procedure for each of the Calculator’s four math functions (+, -, x,
and /). For example, to add 32 and 99, follow these steps:
1. Enter the first number, 32 to load the new subtotal into the Calculator. The
number appears in the Entry field as you type and is transferred to the tape
when you press Enter.
2. Press one of these keys to enter the operator:
+ add
- subtract
* multiply
/ divide
For example, if you press +, the number you entered (32) followed by the plus
sign moves to the bottom of the Tape field. The Calculator inserts the decimal
point (and the following zeros if you are working with round numbers).
The subtraction operator works the same as those on adding machines. Press
+, a number, and -.
3. Enter the second number, 99. It appears in the Entry field as you type and
moves to the bottom of the tape when you press Enter. The calculation is then
made and the total (131.00) followed by two asterisks (**) is shown at the
bottom of the tape.
4. If you want to start a new tape, press F1 or C to clear the tape before you start
another calculation.
Making a String of Calculations
You can make consecutive calculations, using the running total from each previous
operation.
1. Enter the first number of the calculation to reset the current total. The new
total appears on the tape.
F-4
Resource Manager User’s Manual 6.05
References
Other Commands
2. Type the operator you want to use (do not press Enter). The number you
typed in step 1 and the operator appear in the Tape field.
3. Enter the second number. The calculation is made and the total is displayed at
the bottom of the tape. This total is used to start the next calculation.
4. Type the second operator (do not press Enter). The last total is recalled from
memory. The operator is then displayed in the Tape field behind the last total.
5. Enter the next number. The calculation is made and the new total is displayed
at the bottom of the tape.
Repeat steps 2–5 until the calculation is complete.
As new calculations are displayed at the bottom of the Tape field, the previous
numbers and operators scroll up the display area to make room. When the Tape
field is full, the numbers scroll off the top of the display area.
To repeat the last calculation, using the same operator and number, press the same
operator key again. You can repeat this operation indefinitely.
Execute an Operating System Command
You can execute an operating system command from any field in OPEN
SYSTEMS Accounting Software.
Follow these steps to execute an operating system command:
1. From the Other pull-down menu, select Execute an Operating System
Command.
2. Enter the command you want to execute.
3. Use the Proceed (PgDn) command to execute the operating system
command. If the operating system command works properly, the message
Press F7 to exit appears.
Resource Manager User’s Manual 6.05
F-5
Other Commands
References
If the system issues a return value (an error message), see the operating
system manual for information. If an error message appears, you must exit
from OSAS before you can execute any more operating system commands.
4. Press F7 to go to the field where you accessed Other commands.
CALL a BBx Program
From any field, you can call any BBx program that does not require variables to be
passed to it.
Follow these steps to call a BBx program:
1. Use the Other (F4 twice from a menu, F4 once from a field) command.
2. Select Call a BBx Program from the menu.
3. Enter the program you want to call.
4. Enter the parameter (if any) for the program.
5. Use the Proceed (PgDn) command to start the program.
6. Press Enter to return to the field where you accessed Other commands.
F-6
Resource Manager User’s Manual 6.05
References
Other Commands
Product Suggestions
From any field, you can make, edit and save suggestions for improving the product.
If you have a suggestion, fax or mail it to Open Systems.
Select Product Suggestions from the Other Commands menu. The function screen
appears.
Field Definitions
Field
Description
Suggestion
This number identifies the suggestion. Identification numbers
start at 0001. If you want to create a new suggestion, press
Enter; the editor creates a new suggestion number one unit
higher than your last number (if any). If you want to recall a
suggestion for editing, enter the number of the suggestion.
Application
Enter the application you want to make a suggestion for.
Resource Manager User’s Manual 6.05
F-7
Other Commands
References
Field
Description
Version
Enter the version number of the application (5.21, 6.05, etc.).
Menu Item
Enter the name of the menu item you want to make a
suggestion for.
Status
The cursor moves to this field when you enter the number of a
suggestion you want to recall. If the suggestion has not been
printed, N is displayed. If the suggestion has been printed, Y is
displayed. You can change the print status of the current
suggestion.
Last Modified
The last creation and/or last edit date of the current suggestion
is displayed.
Description
Enter the description of the suggestion.
When you have finished creating or editing a suggestion, use the Proceed (PgDn)
command to save your entries and exit to the Main menu.
Applications Options Inquiry
Use the Applications Options Inquiry utility to view the options for any
application.
Select Applications Options Inquiry from the Other Commands menu.
After you enter the application ID, the options and interfaces selected for the
application appear. When you are finished viewing the information, press any key
to continue.
F-8
Resource Manager User’s Manual 6.05
References
Other Commands
Global Inquiry
Use the Global Inquiry command from the Other Commands menu to gather
information from all the OSAS files (and applications) with a common field.
To produce a list of the windows, use the Global Inquiry Window List function. To
produce a report of occurrences where links between windows are not continuous,
use the Global Inquiry Window Audit Report function.
The options on the Global Inquiry menu are set up in the PARAM table in the
Application Tables function. Each option is assigned a window ID, whose
characteristics were either installed with Resource Manager or set up in the Global
Inquiry Definitions function. You need the File Descriptions Manual when you use
this function.
Setting up a Global Inquiry window is similar to setting up a report in Report
Writer. If you are not familiar with Report Writer or the operations associated with
Business BASIC, consult your value-added reseller when you add or change a
Global Inquiry window.
You can use the Global Inquiry Definitions and Application Tables functions to
establish and update information about Global Inquiry window IDs. A simple
installation accomplishes the same tasks. As a result, when you use the Global
Inquiry command, the windows should be set up and logically connected to each
other, with convenient categories (usually named after applications) as options. At
that point you are ready to choose an option.
Resource Manager User’s Manual 6.05
F-9
Other Commands
References
Select Global Inquiry from the Other Commands menu. Then select an
application. A window appears.
In the window above, the user selected Accounts Payable from the Global Inquiry
menu. The window that appears lists the vendors, by vendor ID, and the total
amount due.
Because of the way the window is set up, the user can access five other windows:
one that displays accounts payable invoices, one that displays invoice history, one
that displays paid invoices, one that displays accounts payable transactions, and
one that displays miscellaneous vendor information.
From Global Inquiry, you can use the Other (F4) command to access the Global
Inquiry menu again.
To look up and select a previously accessed window, use the Inquiry (F2)
command. The sequence number and description represent the window IDs that
you have accessed with the Global Inquiry command.
F-10
Resource Manager User’s Manual 6.05
References
Other Commands
For example, when you use the Other (F4) command, the Global Inquiry
command, and then the Inventory option, window A appears. When you use a
command at the bottom of the screen, window B appears. When you use a
command at the bottom of the screen, window C appears. You continue to use
commands until you reach window G. (Windows are not lettered like this; they are
lettered in the example to simplify the model.)
If you wanted to return to one of the previous six windows that were displayed, you
could use the Global Inquiry command again, but a simpler route would be to use
the Inquiry (F2) command, where you would find six sequence numbers: 001001,
001002, 001003, 001004, 001005, 001006. Each number would appear with a
description of a window: 001001 would be paired with the description of window
A; 001002 would be paired with the description of window B, and so forth. In the
window you could move the prompt (>) to the number that corresponds to the
description of the window you want.
The sequence number’s notation carries two pieces of information: the number of
times you used the Global Inquiry command and the number of windows you
accessed.
As explained above, the number 001002 provides two details: you have used the
Global Inquiry command only once (001), and this window was the second
window you accessed during the usage of the Global Inquiry command. Therefore,
001002 indicates the second window you accessed during your first usage of the
Global Inquiry command.
Had you used the Global Inquiry command to select the Payroll option in window
7, the sequence number of the window that appeared would be 002001. Every time
you enter Global Inquiry, the numbering starts at 001001, regardless of the
sequence numbers the window had before.
If you access more than 999 windows under the same use of Global Inquiry (for
example, the first use), the counter turns back to 001000. If you use the Global
Inquiry command more than 999 times before exiting (for example, at the first
window), the sequence number becomes 000001.
To exit from Global Inquiry at any point, use the Exit (F7) command.
Resource Manager User’s Manual 6.05
F-11
Other Commands
References
General Information Inquiry
Use the General Information Inquiry function to view information from the
Accounts Receivable, Accounts Payable, Sales Order, Purchase Order, and Payroll
applications. Depending on which applications are installed, you can view
information about vendors, customers, and employees.
Select General Information Inquiry from the Other Commands menu. The
function screen appears.
F-12
Resource Manager User’s Manual 6.05
References
Other Commands
Field Definitions
Field Name
Description
Search For
Press V to view information about a vendor, C to view
information about a customer, or E to view information
about an employee.
Command Bar Definitions
Command
Definition
View detail on/off
Press V to toggle the detail display on or off.
Search selection
Press S to change your search selection.
Change sort
Press C to sort the displayed information in a different way.
When you are finished viewing the information, use the Exit (F7) command to exit
to the screen or menu you accessed the Other Commands menu from.
Resource Manager User’s Manual 6.05
F-13
Other Commands
References
Support Information
Use the Support Information function to view information about whom to contact
for technical support or how to contact your dealer.
Select Support Information from the Other Commands menu. The function
screen appears.
When you are finished viewing the information, press any key to return to the
screen or menu you accessed the Other Commands menu from.
F-14
Resource Manager User’s Manual 6.05
References
Other Commands
User Comments
Use the User Comments function to enter comments or notes.
Select User Comments from the Other Commands menu. The function screen
appears.
Field Definitions
Field Name
Description
User ID
The user ID is displayed.
Shared/Private
This field appears only if you have set up access codes for
this function. If the comment is shared, SHARED is
displayed. If the comment is private, PRIVATE is displayed
along with the access name.
Ref ID
Enter a reference ID for the comment. You can use
reference IDs to group comments.
Resource Manager User’s Manual 6.05
F-15
Other Commands
References
Field Name
Description
End Date
The workstation date is displayed.
Date
Accept the displayed date, or enter a different date.
Comment
Enter a comment.
Command Bar Definitions
Command
Definition
new Id
Press I to enter a different user ID.
Ref id
Press R to enter a different reference ID.
end Date
Press D to change the end date.
Append
Press A to add a comment.
Enter = edit
Move the prompt (>) to the line you want to edit and press
Enter.
print Online
Press O to print the comment.
Shared/Private
This command appears only if you have set up access codes
for this function. Press E to toggle between shared and
private comments. Shared comments can be viewed by
everyone; private comments can be viewed only by the
person who enters the correct access code.
First
Press F to go to the first comment.
Last
Press L to go to the last comment.
Next
Press N to go to the next comment.
Prev
Press P to go to the previous comment.
When you are finished entering comments, use the Exit (F7) command to return to
the screen or menu you accessed the Other Commands menu from.
F-16
Resource Manager User’s Manual 6.05
References
Other Commands
Inventory Price Calculator
Use the Inventory Price Calculator to generate prices for items for specific
customers without entering an order or invoice.
Select Inventory Price Calculator from the Other Command menu. This screen
appears:.
Field Definitions
Field Name
Description
Location ID
Enter a location ID.
Item ID
Enter an item ID.
Sale Units
Accept the displayed unit of measure, or enter a different
unit of measure.
Price ID
Enter a price ID (optional).
Customer ID
Enter a customer ID (optional).
Resource Manager User’s Manual 6.05
F-17
Other Commands
References
Field Name
Description
Cust Level
Enter a customer level (optional).
Sale Date
Accept the displayed sale date, or enter a different date.
Sale Quantity
Accept the displayed sale quantity, or enter a different
quantity.
On Hand Qty
The quantity on hand is displayed.
Committed Qty
The committed quantity is displayed.
In Use Qty
The in-use quantity is displayed.
Available Qty
The available quantity is displayed.
On Order Qty
The on-order quantity is displayed.
LIFO/FIFO Cost
This field appears if you elected in the Resource Manager
Options and Interfaces function to show costs in the price
and availability lookup.
The LIFO/FIFO unit cost is displayed.
Average Cost
This field appears if you elected in the Resource Manager
Options and Interfaces function to show costs in the price
and availability lookup.
The average unit cost is displayed.
Standard Cost
This field appears if you elected in the Resource Manager
Options and Interfaces function to show costs in the price
and availability lookup.
The standard unit cost is displayed.
Base Cost
This field appears if you elected in the Resource Manager
Options and Interfaces function to show costs in the price
and availability lookup.
The base unit cost is displayed.
F-18
Calc Unit Price
The calculated unit price is displayed.
Calc Ext Price
The calculated extended unit price is displayed.
Resource Manager User’s Manual 6.05
References
Other Commands
Field Name
Description
Base
The base level is displayed.
Quantity
The sale quantity levels are displayed.
Unit Price
The calculated unit price for each quantity break is
displayed.
Command Bar
This window has no command bar.
Saving and Exiting
To return to the Price and Availability screen, use the Exit (F7) command.
Resource Manager User’s Manual 6.05
F-19
References
Common Ratios
Resource Manager User’s Manual 6.05
Resource Manager User’s Manual
6.05
Common Ratios
G
EIS can consolidate and display data directly from applications. You can also use
EIS to build ratios, or relationships, between individual figures or sets of figures.
Financial ratios are indications of the business's performance. They demonstrate
liquidity, solvency, and profitability.
Liquidity indicates the ability to pay bills as they fall due.
Solvency indicates the ability to pay off all obligations if you would sell out.
Profitability is a simple term, but it can be misleading. You can make a profit from
earnings generated in your normal course of business or from actions that you
cannot expect to repeat (such as the sale of irreplaceable assets).
The goal is to establish ratios that show whether the profits you receive are being
maximized or whether other investments could yield a better return with less risk.
With good ratios, you can identify adjustments that you need to make to survive
financially in difficult times and to succeed when your business is in good
economic times.
You can produce the following ratios in EIS:
Working capital is a measure of the liquid assets you have at your disposal. It is
expressed as the difference between your current assets and current liabilities. For
example, a working capital of $50,000 is negligible if your current asset base is
$10,000,000. A 0.5 percent drop in your current assets wipes out your working
capital. If your current asset base is only $100,000 and your working assets
$50,000, your working capital is high.
Resource Manager User’s Manual 6.05
G-1
Common Ratios
References
Current ratio is a measure of your ability to meet current liabilities as they fall due.
It is expressed as the amount of working capital divided by the amount of liability.
If your ratio is too low, you lack liquidity. If it is too high, you are probably not
getting the best return available.
Quick ratio is a measure of your ability to pay bills without relying on reducing
inventories through sales. It is expressed as financial assets that can be readily
turned to cash divided by current liabilities.
Days’ receivables is the average number of days it takes you to collect your
receipts once you have issued the bill.
Number of inventory turns is the number of times in a year your inventory turns
over. For example, if you have $100,000 of product in inventory, the number 6
means that you sold $600,000 of product during the year.
Debt to equity ratio is a measure of your business’s basic financial strength. It is
expressed as the amount of liabilities divided by the amount of equity.
Debt to asset ratio is expressed as the amount you owe divided by the amount of
assets your business employs.
Return on equity is expressed as net income divided by net worth.
Return on assets (ROA) is the return on assets employed. It is expressed as the
profit minus the amount invested in assets.
Return on investment (ROI) is the return on the investment you have in your
company. It is expressed as the profit minus the amount invested in assets and
equity.
G-2
Resource Manager User’s Manual 6.05
References
Predefined Functions
Resource Manager Functions Manual 6.05
Resource Manager User’s Manual
6.05
Predefined Functions
H
Executive Information Summary has many functions built into the system for your
use. This appendix documents the predefined functions. To generate your own
function list, use the Functions List function on the Master File Lists menu.
Conventions
The following convention is used to list a function:
FUNCNAME: Function Name
The FUNCNAME function returns particular values
Setup types: Description A (length n, type m), Description B (length n, type m)
Sub
Type
Description
1
Numeric
Description of the returned value
2
Alphanumeric
Description of the returned value
A Sub numbers an item that a function returns; some functions return 20 items of
information. The sub number is useful when you use the Math formula command;
you can manipulate individual data items.
A Type is the sort of information that is returned. A function returns one of two
types: numeric or alphanumeric.
A Description describes a data item that the function returns. Most are selfexplanatory; use the information as a guide for what the item returns and what the
entire function returns.
Resource Manager Functions Manual 6.05
H-1
Predefined Functions
References
Functions
APCHECK: Accounts Payable Checks File Totals
The APCHECK function returns the total amount of money paid through checks,
the money saved through discounts, the money lost by not taking advantage of
discounts, and the amount paid in advance by checks.
Setup types: Company ID
Sub
Type
Description
1
Numeric
Checks Total
2
Numeric
Discounts Taken Total
3
Numeric
Discounts Lost Total
4
Numeric
Prepaid Checks Total
APHCDAY: AP Checks History File Daily Totals
The APHCDAY function returns the total amount paid with checks for a particular
day.
Setup types: Company ID
H-2
Sub
Type
Description
1
Numeric
Checks Total
Resource Manager User’s Manual 6.05
References
Predefined Functions
APHCPTD: AP Checks History File PTD Totals
The APHCPTD function returns the total amount paid with checks in the period,
the amount saved through discounts by paying on time in the period, the amount
paid with checks in advance in the period, and the amount saved through discounts
by paying in advance in the period.
Setup types: Company ID
Sub
Type
Description
1
Numeric
Regular Checks Gross Due
2
Numeric
Regular Checks Discounts
3
Numeric
Prepaid Checks Gross Due
4
Numeric
Prepaid Checks Discounts
APHCYTD: AP Checks History File YTD Totals
The APHCYTD function returns the total amount paid with checks for the year to
date.
Setup types: Company ID
Sub
Type
Description
1
Numeric
Checks Total
Resource Manager User’s Manual 6.05
H-3
Predefined Functions
References
APHIDAY: AP Detail History File Daily Totals
The APHIDAY function returns the transaction totals for a particular day.
Setup types: Company ID
Sub
Type
Description
1
Numeric
Invoices Subtotal
2
Numeric
Invoices Tax
3
Numeric
Invoices Freight
4
Numeric
Invoices Miscellaneous
5
Numeric
Debit Memos Subtotal
6
Numeric
Debit Memos Tax
7
Numeric
Debit Memos Freight
8
Numeric
Debit Memos Miscellaneous
9
Numeric
Invoice Totals
10
Numeric
Debit Memos Totals
APHIPTD: AP Detail History File PTD Totals
The APHIPTD function returns the transaction totals for the period to date.
Setup types: Company ID
H-4
Sub
Type
Description
1
Numeric
Invoices Subtotal
2
Numeric
Invoices Tax
3
Numeric
Invoices Freight
Resource Manager User’s Manual 6.05
References
Predefined Functions
Sub
Type
Description
4
Numeric
Invoices Miscellaneous
5
Numeric
Debit Memos Subtotal
6
Numeric
Debit Memos Tax
7
Numeric
Debit Memos Freight
8
Numeric
Debit Memos Miscellaneous
9
Numeric
Invoices Totals
10
Numeric
Debit Memos Totals
APHIYTD: AP Detail History File YTD Totals
The APHIYTD function returns the transaction totals for the year to date.
Setup types: Company ID
Sub
Type
Description
1
Numeric
Invoices Subtotal
2
Numeric
Invoices Tax
3
Numeric
Invoices Freight
4
Numeric
Invoices Miscellaneous
5
Numeric
Debit Memos Subtotal
6
Numeric
Debit Memos Tax
7
Numeric
Debit Memos Freight
8
Numeric
Debit Memos Miscellaneous
9
Numeric
Invoices Totals
10
Numeric
Debit Memos Totals
Resource Manager User’s Manual 6.05
H-5
Predefined Functions
References
APMREQ: AP Material Requisitions File Totals
The APMREQ function returns the current, unposted material requisition
transaction totals.
Setup types: Company ID
Sub
Type
Description
1
Numeric
Material Requisitions Total
2
Numeric
Returned Material Requisitions Total
APOPEN: AP Open Invoice File Totals
The APOPEN function returns the invoice totals from the Open Invoice file and
separates them by status.
Setup types: Company ID
H-6
Sub
Type
Description
1
Numeric
Gross Due Total
2
Numeric
Discount Total
3
Numeric
Prepaid Gross Due Total
4
Numeric
Prepaid Discount Total
5
Numeric
Released Status Count
6
Numeric
Hold Status Count
7
Numeric
Prepaid Status Count
8
Numeric
Temporary Hold Count
9
Numeric
1099 Gross Due Total
10
Numeric
1099 Discount Total
Resource Manager User’s Manual 6.05
References
Predefined Functions
Sub
Type
Description
11
Numeric
Released Status Gross Due Total
12
Numeric
Released Status Discount Total
13
Numeric
Hold Status Gross Due Total
14
Numeric
Hold Status Discount Total
15
Numeric
Temporary Hold Gross Due Total
16
Numeric
Temporary Hold Discount Total
17
Numeric
Total Count
APTRAN: AP Transaction File Totals
The APTRAN function returns unposted current transaction totals.
Setup types: Company ID
Sub
Type
Description
1
Numeric
Invoices Total
2
Numeric
Debit Memos Total
Resource Manager User’s Manual 6.05
H-7
Predefined Functions
References
APVTOPP: AP Top 10 Vendors PTD Purchases Totals
The APVTOPP function returns the names of the vendors, in descending order, you
purchased the most product from during the period to date. The amounts paid
include returns.
Setup types: Company ID
H-8
Sub
Type
Description
1
Alphanumeric
#1 Vendor - Name
2
Numeric
#1 Vendor - Purchases
3
Alphanumeric
#2 Vendor - Name
4
Numeric
#2 Vendor - Purchases
5
Alphanumeric
#3 Vendor - Name
6
Numeric
#3 Vendor - Purchases
7
Alphanumeric
#4 Vendor - Name
8
Numeric
#4 Vendor - Purchases
9
Alphanumeric
#5 Vendor - Name
10
Numeric
#5 Vendor - Purchases
11
Alphanumeric
#6 Vendor - Name
12
Numeric
#6 Vendor - Purchases
13
Alphanumeric
#7 Vendor - Name
14
Numeric
#7 Vendor - Purchases
15
Alphanumeric
#8 Vendor - Name
16
Numeric
#8 Vendor - Purchases
17
Alphanumeric
#9 Vendor - Name
18
Numeric
#9 Vendor - Purchases
Resource Manager User’s Manual 6.05
References
Predefined Functions
Sub
Type
Description
19
Alphanumeric
#10 Vendor - Name
20
Numeric
#10 Vendor - Purchases
APVTOPY: AP Top 10 Vendors YTD Purchases Totals
The APVTOPY function returns the names of the vendors, in descending order,
you purchased the most product from during the year to date. The amounts paid
include returns.
Setup types: Company ID
Sub
Type
Description
1
Alphanumeric
#1 Vendor - Name
2
Numeric
#1 Vendor - Purchases
3
Alphanumeric
#2 Vendor - Name
4
Numeric
#2 Vendor - Purchases
5
Alphanumeric
#3 Vendor - Name
6
Numeric
#3 Vendor - Purchases
7
Alphanumeric
#4 Vendor - Name
8
Numeric
#4 Vendor - Purchases
9
Alphanumeric
#5 Vendor - Name
10
Numeric
#5 Vendor - Purchases
11
Alphanumeric
#6 Vendor - Name
12
Numeric
#6 Vendor - Purchases
13
Alphanumeric
#7 Vendor - Name
14
Numeric
#7 Vendor - Purchases
Resource Manager User’s Manual 6.05
H-9
Predefined Functions
References
Sub
Type
Description
15
Alphanumeric
#8 Vendor - Name
16
Numeric
#8 Vendor - Purchases
17
Alphanumeric
#9 Vendor - Name
18
Numeric
#9 Vendor - Purchases
19
Alphanumeric
#10 Vendor - Name
20
Numeric
#10 Vendor - Purchases
ARAGED: AR Open Invoice File Aged Totals
The ARAGED function returns current aging totals from the customer Open
Invoice file.
Setup types: Company ID
H-10
Sub
Type
Description
1
Numeric
Unpaid Finance Charges
2
Numeric
Current Due
3
Numeric
Balance 31 - 60
4
Numeric
Balance 61 - 90
5
Numeric
Balance 91 - 120
6
Numeric
Balance Over 120
7
Numeric
Unapplied Credits Total
8
Numeric
Total Due
9
Numeric
Invoice Count
10
Numeric
Customer Count
Resource Manager User’s Manual 6.05
References
Predefined Functions
Sub
Type
Description
11
Numeric
Active Customer Count
12
Numeric
Past Due Customer Count
ARCASH: AR Cash Receipts File Totals
The ARCASH function returns totals from the Cash Receipts file, broken down by
payment type.
Setup types: Company ID
Sub
Type
Description
1
Numeric
Receipts Total
2
Numeric
Discounts Total
3
Numeric
Payment Type 1 Total (Cash)
4
Numeric
Payment Type 1 Total (Cash)
5
Numeric
Payment Type 2 Total (Check)
6
Numeric
Payment Type 2 Total (Check)
7
Numeric
Payment Type 3 Total (Credit Card)
8
Numeric
Payment Type 3 Total (Credit Card)
9
Numeric
Payment Type 4 Total (Write-off)
10
Numeric
Payment Type 4 Total (Write-off)
11
Numeric
Payment Type 5 Total (Other)
12
Numeric
Payment Type 5 Total (Other)
Resource Manager User’s Manual 6.05
H-11
Predefined Functions
References
ARCTOPPL: AR Top 10 Customers L/Y Profit Totals
The ARCTOPPL function returns the customers that provided the most profit last
year, in descending order; the profit; the customer representative; and the territory
associated with the customer.
Setup types: Company ID
H-12
Sub
Type
Description
1
Alphanumeric
#1 Customer - Name
2
Numeric
#1 Customer - Profit
3
Alphanumeric
#1 Customer - Rep
4
Alphanumeric
#1 Customer - Territory
5
Alphanumeric
#2 Customer - Name
6
Numeric
#2 Customer - Profit
7
Alphanumeric
#2 Customer - Rep
8
Alphanumeric
#2 Customer - Territory
9
Alphanumeric
#3 Customer - Name
10
Numeric
#3 Customer - Profit
11
Alphanumeric
#3 Customer - Rep
12
Alphanumeric
#3 Customer - Territory
13
Alphanumeric
#4 Customer - Name
14
Numeric
#4 Customer - Profit
15
Alphanumeric
#4 Customer - Rep
16
Alphanumeric
#4 Customer - Territory
17
Alphanumeric
#5 Customer - Name
18
Numeric
#5 Customer - Profit
Resource Manager User’s Manual 6.05
References
Predefined Functions
Sub
Type
Description
19
Alphanumeric
#5 Customer - Rep
20
Alphanumeric
#5 Customer - Territory
21
Alphanumeric
#6 Customer - Name
22
Numeric
#6 Customer - Profit
23
Alphanumeric
#6 Customer - Rep
24
Alphanumeric
#6 Customer - Territory
25
Alphanumeric
#7 Customer - Name
26
Numeric
#7 Customer - Profit
27
Alphanumeric
#7 Customer - Rep
28
Alphanumeric
#7 Customer - Territory
29
Alphanumeric
#8 Customer - Name
30
Numeric
#8 Customer - Profit
31
Alphanumeric
#8 Customer - Rep
32
Alphanumeric
#8 Customer - Territory
33
Alphanumeric
#9 Customer - Name
34
Numeric
#9 Customer - Profit
35
Alphanumeric
#9 Customer - Rep
36
Alphanumeric
#9 Customer - Territory
37
Alphanumeric
#10 Customer - Name
38
Numeric
#10 Customer - Profit
39
Alphanumeric
#10 Customer - Rep
40
Alphanumeric
#10 Customer - Territory
Resource Manager User’s Manual 6.05
H-13
Predefined Functions
References
ARCTOPPP: AR Top 10 Customers PTD Profit Totals
The ARCTOPPP function returns the customers that provided the most profit for
the period to date, in descending order; the profit; the customer representative; and
the territory associated with the customer.
Setup types: Company ID
H-14
Sub
Type
Description
1
Alphanumeric
#1 Customer - Name
2
Numeric
#1 Customer - Profit
3
Alphanumeric
#1 Customer - Rep
4
Alphanumeric
#1 Customer - Territory
5
Alphanumeric
#2 Customer - Name
6
Numeric
#2 Customer - Profit
7
Alphanumeric
#2 Customer - Rep
8
Alphanumeric
#2 Customer - Territory
9
Alphanumeric
#3 Customer - Name
10
Numeric
#3 Customer - Profit
11
Alphanumeric
#3 Customer - Rep
12
Alphanumeric
#3 Customer - Territory
13
Alphanumeric
#4 Customer - Name
14
Numeric
#4 Customer - Profit
15
Alphanumeric
#4 Customer - Rep
16
Alphanumeric
#4 Customer - Territory
17
Alphanumeric
#5 Customer - Name
18
Numeric
#5 Customer - Profit
Resource Manager User’s Manual 6.05
References
Predefined Functions
Sub
Type
Description
19
Alphanumeric
#5 Customer - Rep
20
Alphanumeric
#5 Customer - Territory
21
Alphanumeric
#6 Customer - Name
22
Numeric
#6 Customer - Profit
23
Alphanumeric
#6 Customer - Rep
24
Alphanumeric
#6 Customer - Territory
25
Alphanumeric
#7 Customer - Name
26
Numeric
#7 Customer - Profit
27
Alphanumeric
#7 Customer - Rep
28
Alphanumeric
#7 Customer - Territory
29
Alphanumeric
#8 Customer - Name
30
Numeric
#8 Customer - Profit
31
Alphanumeric
#8 Customer - Rep
32
Alphanumeric
#8 Customer - Territory
33
Alphanumeric
#9 Customer - Name
34
Numeric
#9 Customer - Profit
35
Alphanumeric
#9 Customer - Rep
36
Alphanumeric
#9 Customer - Territory
37
Alphanumeric
#10 Customer - Name
38
Numeric
#10 Customer - Profit
39
Alphanumeric
#10 Customer - Rep
40
Alphanumeric
#10 Customer - Territory
Resource Manager User’s Manual 6.05
H-15
Predefined Functions
References
ARCTOPPY: AR Top 10 Customers YTD Profit Totals
The ARCTOPPY function returns the customers that provided the most profit for
the year to date, in descending order; the profit; the customer representative; and
the territory associated with the customer.
Setup types: Company ID
H-16
Sub
Type
Description
1
Alphanumeric
#1 Customer - Name
2
Numeric
#1 Customer - Profit
3
Alphanumeric
#1 Customer - Rep
4
Alphanumeric
#1 Customer - Territory
5
Alphanumeric
#2 Customer - Name
6
Numeric
#2 Customer - Profit
7
Alphanumeric
#2 Customer - Rep
8
Alphanumeric
#2 Customer - Territory
9
Alphanumeric
#3 Customer - Name
10
Numeric
#3 Customer - Profit
11
Alphanumeric
#3 Customer - Rep
12
Alphanumeric
#3 Customer - Territory
13
Alphanumeric
#4 Customer - Name
14
Numeric
#4 Customer - Profit
15
Alphanumeric
#4 Customer - Rep
16
Alphanumeric
#4 Customer - Territory
17
Alphanumeric
#5 Customer - Name
18
Numeric
#5 Customer - Profit
Resource Manager User’s Manual 6.05
References
Predefined Functions
Sub
Type
Description
19
Alphanumeric
#5 Customer - Rep
20
Alphanumeric
#5 Customer - Territory
21
Alphanumeric
#6 Customer - Name
22
Numeric
#6 Customer - Profit
23
Alphanumeric
#6 Customer - Rep
24
Alphanumeric
#6 Customer - Territory
25
Alphanumeric
#7 Customer - Name
26
Numeric
#7 Customer - Profit
27
Alphanumeric
#7 Customer - Rep
28
Alphanumeric
#7 Customer - Territory
29
Alphanumeric
#8 Customer - Name
30
Numeric
#8 Customer - Profit
31
Alphanumeric
#8 Customer - Rep
32
Alphanumeric
#8 Customer - Territory
33
Alphanumeric
#9 Customer - Name
34
Numeric
#9 Customer - Profit
35
Alphanumeric
#9 Customer - Rep
36
Alphanumeric
#9 Customer - Territory
37
Alphanumeric
#10 Customer - Name
38
Numeric
#10 Customer - Profit
39
Alphanumeric
#10 Customer - Rep
40
Alphanumeric
#10 Customer - Territory
Resource Manager User’s Manual 6.05
H-17
Predefined Functions
References
ARCTOPSL: AR Top 10 Customers L/Y Sales Totals
The ARCTOPSL function returns the customers that provided the most sales last
year, in descending order; the amount from the sales; the customer representative;
and the territory associated with the customer.
Setup types: Company ID
H-18
Sub
Type
Description
1
Alphanumeric
#1 Customer - Name
2
Numeric
#1 Customer - Profit
3
Alphanumeric
#1 Customer - Rep
4
Alphanumeric
#1 Customer - Territory
5
Alphanumeric
#2 Customer - Name
6
Numeric
#2 Customer - Profit
7
Alphanumeric
#2 Customer - Rep
8
Alphanumeric
#2 Customer - Territory
9
Alphanumeric
#3 Customer - Name
10
Numeric
#3 Customer - Profit
11
Alphanumeric
#3 Customer - Rep
12
Alphanumeric
#3 Customer - Territory
13
Alphanumeric
#4 Customer - Name
14
Numeric
#4 Customer - Profit
15
Alphanumeric
#4 Customer - Rep
16
Alphanumeric
#4 Customer - Territory
17
Alphanumeric
#5 Customer - Name
18
Numeric
#5 Customer - Profit
Resource Manager User’s Manual 6.05
References
Predefined Functions
Sub
Type
Description
19
Alphanumeric
#5 Customer - Rep
20
Alphanumeric
#5 Customer - Territory
21
Alphanumeric
#6 Customer - Name
22
Numeric
#6 Customer - Profit
23
Alphanumeric
#6 Customer - Rep
24
Alphanumeric
#6 Customer - Territory
25
Alphanumeric
#7 Customer - Name
26
Numeric
#7 Customer - Profit
27
Alphanumeric
#7 Customer - Rep
28
Alphanumeric
#7 Customer - Territory
29
Alphanumeric
#8 Customer - Name
30
Numeric
#8 Customer - Profit
31
Alphanumeric
#8 Customer - Rep
32
Alphanumeric
#8 Customer - Territory
33
Alphanumeric
#9 Customer - Name
34
Numeric
#9 Customer - Profit
35
Alphanumeric
#9 Customer - Rep
36
Alphanumeric
#9 Customer - Territory
37
Alphanumeric
#10 Customer - Name
38
Numeric
#10 Customer - Profit
39
Alphanumeric
#10 Customer - Rep
40
Alphanumeric
#10 Customer - Territory
Resource Manager User’s Manual 6.05
H-19
Predefined Functions
References
ARCTOPSP: AR top 10 Customers PTD Sales Totals
The ARCTOPSP function returns the customers that provided the most sales for
the period to date, in descending order; the amount from the sales; the customer
representative; and the territory associated with the customer.
Setup types: Company ID
H-20
Sub
Type
Description
1
Alphanumeric
#1 Customer - Name
2
Numeric
#1 Customer - Profit
3
Alphanumeric
#1 Customer - Rep
4
Alphanumeric
#1 Customer - Territory
5
Alphanumeric
#2 Customer - Name
6
Numeric
#2 Customer - Profit
7
Alphanumeric
#2 Customer - Rep
8
Alphanumeric
#2 Customer - Territory
9
Alphanumeric
#3 Customer - Name
10
Numeric
#3 Customer - Profit
11
Alphanumeric
#3 Customer - Rep
12
Alphanumeric
#3 Customer - Territory
13
Alphanumeric
#4 Customer - Name
14
Numeric
#4 Customer - Profit
15
Alphanumeric
#4 Customer - Rep
16
Alphanumeric
#4 Customer - Territory
17
Alphanumeric
#5 Customer - Name
18
Numeric
#5 Customer - Profit
Resource Manager User’s Manual 6.05
References
Predefined Functions
Sub
Type
Description
19
Alphanumeric
#5 Customer - Rep
20
Alphanumeric
#5 Customer - Territory
21
Alphanumeric
#6 Customer - Name
22
Numeric
#6 Customer - Profit
23
Alphanumeric
#6 Customer - Rep
24
Alphanumeric
#6 Customer - Territory
25
Alphanumeric
#7 Customer - Name
26
Numeric
#7 Customer - Profit
27
Alphanumeric
#7 Customer - Rep
28
Alphanumeric
#7 Customer - Territory
29
Alphanumeric
#8 Customer - Name
30
Numeric
#8 Customer - Profit
31
Alphanumeric
#8 Customer - Rep
32
Alphanumeric
#8 Customer - Territory
33
Alphanumeric
#9 Customer - Name
34
Numeric
#9 Customer - Profit
35
Alphanumeric
#9 Customer - Rep
36
Alphanumeric
#9 Customer - Territory
37
Alphanumeric
#10 Customer - Name
38
Numeric
#10 Customer - Profit
39
Alphanumeric
#10 Customer - Rep
40
Alphanumeric
#10 Customer - Territory
Resource Manager User’s Manual 6.05
H-21
Predefined Functions
References
ARCTOPSY: AR Top 10 Customers YTD Sales Totals
The ARCTOPSY function returns the customers that provided the most sales for
the year to date, in descending order; the amount from the sales; the customer
representative; and the territory associated with the customer.
Setup types: Company ID
H-22
Sub
Type
Description
1
Alphanumeric
#1 Customer - Name
2
Numeric
#1 Customer - Profit
3
Alphanumeric
#1 Customer - Rep
4
Alphanumeric
#1 Customer - Territory
5
Alphanumeric
#2 Customer - Name
6
Numeric
#2 Customer - Profit
7
Alphanumeric
#2 Customer - Rep
8
Alphanumeric
#2 Customer - Territory
9
Alphanumeric
#3 Customer - Name
10
Numeric
#3 Customer - Profit
11
Alphanumeric
#3 Customer - Rep
12
Alphanumeric
#3 Customer - Territory
13
Alphanumeric
#4 Customer - Name
14
Numeric
#4 Customer - Profit
15
Alphanumeric
#4 Customer - Rep
16
Alphanumeric
#4 Customer - Territory
17
Alphanumeric
#5 Customer - Name
18
Numeric
#5 Customer - Profit
Resource Manager User’s Manual 6.05
References
Predefined Functions
Sub
Type
Description
19
Alphanumeric
#5 Customer - Rep
20
Alphanumeric
#5 Customer - Territory
21
Alphanumeric
#6 Customer - Name
22
Numeric
#6 Customer - Profit
23
Alphanumeric
#6 Customer - Rep
24
Alphanumeric
#6 Customer - Territory
25
Alphanumeric
#7 Customer - Name
26
Numeric
#7 Customer - Profit
27
Alphanumeric
#7 Customer - Rep
28
Alphanumeric
#7 Customer - Territory
29
Alphanumeric
#8 Customer - Name
30
Numeric
#8 Customer - Profit
31
Alphanumeric
#8 Customer - Rep
32
Alphanumeric
#8 Customer - Territory
33
Alphanumeric
#9 Customer - Name
34
Numeric
#9 Customer - Profit
35
Alphanumeric
#9 Customer - Rep
36
Alphanumeric
#9 Customer - Territory
37
Alphanumeric
#10 Customer - Name
38
Numeric
#10 Customer - Profit
39
Alphanumeric
#10 Customer - Rep
40
Alphanumeric
#10 Customer - Territory
Resource Manager User’s Manual 6.05
H-23
Predefined Functions
References
ARCUTOT: AR Customer File Totals
The ARCUTOT function returns the number of customers you have on file and the
number of customers on credit hold.
Setup types: Company ID)
Sub
Type
Description
1
Numeric
Customer Count
2
Numeric
Customers on Hold Count
ARHIDAY: AR Detail History File Daily Totals
The ARHIDAY function returns the amount you received for a particular day from
invoices, credit memos, payments, finance charges, sales tax, freight, and
miscellaneous charges.
Setup types: Company ID
H-24
Sub
Type
Description
1
Numeric
Invoices Total
2
Numeric
Credit Memos Total
3
Numeric
Payments Total
4
Numeric
Finance Charges Total
5
Numeric
Sales Tax Total
6
Numeric
Freight Charges Total
7
Numeric
Miscellaneous Total
Resource Manager User’s Manual 6.05
References
Predefined Functions
ARHIPTD: AR Detail History File PTD Totals
The ARHIPTD function returns the amount you received for the period to date
from invoices, credit memos, payments, finance charges, sales tax, freight, and
miscellaneous charges.
Setup types: Company ID
Sub
Type
Description
1
Numeric
Invoices Total
2
Numeric
Credit Memos Total
3
Numeric
Payments Total
4
Numeric
Finance Charges Total
5
Numeric
Sales Tax Total
6
Numeric
Freight Charges Total
7
Numeric
Miscellaneous Total
ARHIYTD: AR Detail History File YTD Totals
The ARHIYTD function returns the amount you received for the year to date from
invoices, credit memos, payments, finance charges, sales tax, freight, and
miscellaneous charges.
Setup types: Company ID
Sub
Type
Description
1
Numeric
Invoices Total
2
Numeric
Credit Memos Total
3
Numeric
Payments Total
4
Numeric
Finance Charges Total
Resource Manager User’s Manual 6.05
H-25
Predefined Functions
References
Sub
Type
Description
5
Numeric
Sales Tax Total
6
Numeric
Freight Charges Total
7
Numeric
Miscellaneous Total
AROPEN: AR Open Invoice File Totals
The AROPEN function returns totals from the Open Invoice file, including the
total from invoices and finance charges and the net due total.
Setup types: Company ID
H-26
Sub
Type
Description
1
Numeric
Invoices Total
2
Numeric
Credit Memos Total
3
Numeric
Payments Total
4
Numeric
Finance Charges Total
5
Numeric
Open Invoice Grand Total
6
Numeric
Discounts Total
Resource Manager User’s Manual 6.05
References
Predefined Functions
ARRTOPSP: AR Top 10 Sales Reps PTD Sales Totals
The ARRTOPSP function returns the names of the sales representatives with the
most sales, in descending order, for the period to date. The function also returns the
total amount received from sales for each sales representative.
Setup types: Company ID
Sub
Type
Description
1
Alphanumeric
#1 Sales Rep - Name
2
Numeric
#1 Sales Rep - Sales
3
Alphanumeric
#2 Sales Rep - Name
4
Numeric
#2 Sales Rep - Sales
5
Alphanumeric
#3 Sales Rep - Name
6
Numeric
#3 Sales Rep - Sales
7
Alphanumeric
#4 Sales Rep - Name
8
Numeric
#4 Sales Rep - Sales
9
Alphanumeric
#5 Sales Rep - Name
10
Numeric
#5 Sales Rep - Sales
11
Alphanumeric
#6 Sales Rep - Name
12
Numeric
#6 Sales Rep - Sales
13
Alphanumeric
#7 Sales Rep - Name
14
Numeric
#7 Sales Rep - Sales
15
Alphanumeric
#8 Sales Rep - Name
16
Numeric
#8 Sales Rep - Sales
17
Alphanumeric
#9 Sales Rep - Name
18
Numeric
#9 Sales Rep - Sales
Resource Manager User’s Manual 6.05
H-27
Predefined Functions
References
Sub
Type
Description
19
Alphanumeric
#10 Sales Rep - Name
20
Numeric
#10 Sales Rep - Sales
ARRTOPSY: AR Top 10 Sales Reps YTD Sales Totals
The ARRTOPSY function returns the names of the sales representatives with the
most sales, in descending order, for the year to date. The function also returns the
total amount received from sales for each sales representative.
Setup types: Company ID
H-28
Sub
Type
Description
1
Alphanumeric
#1 Sales Rep - Name
2
Numeric
#1 Sales Rep - Sales
3
Alphanumeric
#2 Sales Rep - Name
4
Numeric
#2 Sales Rep - Sales
5
Alphanumeric
#3 Sales Rep - Name
6
Numeric
#3 Sales Rep - Sales
7
Alphanumeric
#4 Sales Rep - Name
8
Numeric
#4 Sales Rep - Sales
9
Alphanumeric
#5 Sales Rep - Name
10
Numeric
#5 Sales Rep - Sales
11
Alphanumeric
#6 Sales Rep - Name
12
Numeric
#6 Sales Rep - Sales
13
Alphanumeric
#7 Sales Rep - Name
14
Numeric
#7 Sales Rep - Sales
Resource Manager User’s Manual 6.05
References
Predefined Functions
Sub
Type
Description
15
Alphanumeric
#8 Sales Rep - Name
16
Numeric
#8 Sales Rep - Sales
17
Alphanumeric
#9 Sales Rep - Name
18
Numeric
#9 Sales Rep - Sales
19
Alphanumeric
#10 Sales Rep - Name
20
Numeric
#10 Sales Rep - Sales
ARSALE: Accounts Receivable Transaction File Sales Totals
The ARSALE function returns the amount from sales transactions and the costs of
the transactions.
Setup types: Company ID
Sub
Type
Description
1
Numeric
Invoice Totals
2
Numeric
Credit Memo Totals
3
Numeric
Invoice Cost Totals
4
Numeric
Credit Memo Cost Totals
Resource Manager User’s Manual 6.05
H-29
Predefined Functions
References
ARTRAN: AR Transaction File Invoice Totals
The ARTRAN function returns the totals from unposted invoices and
miscellaneous credits in the Transaction file.
Setup types: Company ID
Sub
Type
Description
1
Numeric
Invoice Totals
2
Numeric
Credit Memo Totals
3
Numeric
Invoice Cost Totals
4
Numeric
Credit Memo Cost Totals
BRBANK: BR Bank Accounts File Totals
The BRBANK function returns the bank balance.
Setup types: Company ID, Bank Accts
H-30
Sub
Type
Description
1
Numeric
Bank Balance
Resource Manager User’s Manual 6.05
References
Predefined Functions
BRJDAY: BR Journal File Daily Totals
The BRJDAY function returns for a particular day the amount of money you
deposited in the bank accounts, the amount you withdrew, adjustments made to the
accounts, and the amount you transferred from one account to another.
Setup types: Company ID, Bank Accts
Sub
Type
Description
1
Numeric
Deposit Total
2
Numeric
Disbursement Total
3
Numeric
Adjustment Total
4
Numeric
Transfer Total
BRJMTD: BR Journal File MTD Totals
The BRJMTD function returns for the month to date the amount of money you
deposited in the bank accounts, the amount you withdrew, adjustments made to the
accounts, and the amount you transferred from one account to another.
Setup types: Company ID, Bank Accts
Sub
Type
Description
1
Numeric
Deposit Total
2
Numeric
Disbursement Total
3
Numeric
Adjustment Total
4
Numeric
Transfer Total
Resource Manager User’s Manual 6.05
H-31
Predefined Functions
References
GLJDAY: GL Journal File Daily Totals
The GLJDAY function returns the amount of money from unposted journal entries
for today.
Setup types: Company ID, GL Account
Sub
Type
Description
1
Numeric
Unposted Journal Entries
GLJPTD: GL Journal File PTD Totals
The GLJPTD function returns the amount of money from unposted journal entries
for the period to date.
Setup types: Company ID, GL Account
Sub
Type
Description
1
Numeric
Unposted Journal Entries
GLJYTD: GL Journal File YTD Totals
The GLJPTD function returns the amount of money from unposted journal entries
for the year to date.
Setup types: Company ID, GL Account
H-32
Sub
Type
Description
1
Numeric
Unposted Journal Entries
Resource Manager User’s Manual 6.05
References
Predefined Functions
GLMPTD: GL Master File PTD Totals
The GLMPTD function returns the general ledger balances for the period: actual,
budgeted, last year’s, and forecast.
Setup types: Company ID, GL Account
Sub
Type
Description
1
Numeric
Actual Balance
2
Numeric
Budget Balance
3
Numeric
Last-Year Balance
4
Numeric
Forecast Balance
GLMYTD: GL Master File YTD Totals
The GLMYTD function returns the general ledger balances for the period: actual,
budgeted, last year’s, and forecast.
Setup types: Company ID, GL Accounts
Sub
Type
Description
1
Numeric
Actual Balance
2
Numeric
Budget Balance
3
Numeric
Last-Year Balance
4
Numeric
Forecast Balance
Resource Manager User’s Manual 6.05
H-33
Predefined Functions
References
INVALUE: Inventory Valuation Totals
The INVALUE function returns the amount of product you have in inventory, the
total cost, the amount of product you have on order, the amount you have
committed, and the amount in use.
Setup types: Company ID, Warehouse ID, Item Number
Sub
Type
Description
1
Numeric
Total Cost
2
Numeric
Total Quantity
3
Numeric
On-Order Quantity
4
Numeric
Committed Quantity
5
Numeric
In-Use Quantity
INVTOPPP: Inventory Top 10 Items - PTD Profit Totals
The INVTOPPP function returns the 10 most profitable items from inventory for
the period: the ID and description, the amount taken in from sales, and the quantity
sold.
Setup types: Company ID, Warehouse ID, Item Number
H-34
Sub
Type
Description
1
Alphanumeric
#1 Item - ID
2
Alphanumeric
#1 Item - Description
3
Numeric
#1 Item - Sales
4
Numeric
#1 Item - Quantity
5
Alphanumeric
#2 Item - ID
6
Alphanumeric
#2 Item - Description
Resource Manager User’s Manual 6.05
References
Predefined Functions
Sub
Type
Description
7
Numeric
#2 Item - Sales
8
Numeric
#2 Item - Quantity
9
Alphanumeric
#3 Item - ID
10
Alphanumeric
#3 Item - Description
11
Numeric
#3 Item - Sales
12
Numeric
#3 Item - Quantity
13
Alphanumeric
#4 Item - ID
14
Alphanumeric
#4 Item - Description
15
Numeric
#4 Item - Sales
16
Numeric
#4 Item - Quantity
17
Alphanumeric
#5 Item - ID
18
Alphanumeric
#5 Item - Description
19
Numeric
#5 Item - Sales
20
Numeric
#5 Item - Quantity
21
Alphanumeric
#6 Item - ID
22
Alphanumeric
#6 Item - Description
23
Numeric
#6 Item - Sales
24
Numeric
#6 Item - Quantity
25
Alphanumeric
#7 Item - ID
26
Alphanumeric
#7 Item - Description
27
Numeric
#7 Item - Sales
28
Numeric
#7 Item - Quantity
Resource Manager User’s Manual 6.05
H-35
Predefined Functions
References
Sub
Type
Description
29
Alphanumeric
#8 Item - ID
30
Alphanumeric
#8 Item - Description
31
Numeric
#8 Item - Sales
32
Numeric
#8 Item - Quantity
33
Alphanumeric
#9 Item - ID
34
Alphanumeric
#9 Item - Description
35
Numeric
#9 Item - Sales
36
Numeric
#9 Item - Quantity
37
Alphanumeric
#10 Item - ID
38
Alphanumeric
#10 Item - Description
39
Numeric
#10 Item - Sales
40
Numeric
#10 Item - Quantity
INVTOPPY: Inventory Top 10 Items - YTD Profit Totals
The INVTOPPY function returns the 10 most profitable items from inventory for
the year: the ID and description, the amount taken in from sales, and the quantity
sold.
Setup types: Company ID, Warehouse ID, Item Number
H-36
Sub
Type
Description
1
Alphanumeric
#1 Item - ID
2
Alphanumeric
#1 Item - Description
3
Numeric
#1 Item - Sales
4
Numeric
#1 Item - Quantity
Resource Manager User’s Manual 6.05
References
Predefined Functions
Sub
Type
Description
5
Alphanumeric
#2 Item - ID
6
Alphanumeric
#2 Item - Description
7
Numeric
#2 Item - Sales
8
Numeric
#2 Item - Quantity
9
Alphanumeric
#3 Item - ID
10
Alphanumeric
#3 Item - Description
11
Numeric
#3 Item - Sales
12
Numeric
#3 Item - Quantity
13
Alphanumeric
#4 Item - ID
14
Alphanumeric
#4 Item - Description
15
Numeric
#4 Item - Sales
16
Numeric
#4 Item - Quantity
17
Alphanumeric
#5 Item - ID
18
Alphanumeric
#5 Item - Description
19
Numeric
#5 Item - Sales
20
Numeric
#5 Item - Quantity
21
Alphanumeric
#6 Item - ID
22
Alphanumeric
#6 Item - Description
23
Numeric
#6 Item - Sales
24
Numeric
#6 Item - Quantity
25
Alphanumeric
#7 Item - ID
26
Alphanumeric
#7 Item - Description
Resource Manager User’s Manual 6.05
H-37
Predefined Functions
H-38
References
Sub
Type
Description
27
Numeric
#7 Item - Sales
28
Numeric
#7 Item - Quantity
29
Alphanumeric
#8 Item - ID
30
Alphanumeric
#8 Item - Description
31
Numeric
#8 Item - Sales
32
Numeric
#8 Item - Quantity
33
Alphanumeric
#9 Item - ID
34
Alphanumeric
#9 Item - Description
35
Numeric
#9 Item - Sales
36
Numeric
#9 Item - Quantity
37
Alphanumeric
#10 Item - ID
38
Alphanumeric
#10 Item - Description
39
Numeric
#10 Item - Sales
40
Numeric
#10 Item - Quantity
Resource Manager User’s Manual 6.05
References
Predefined Functions
INVTOPSP: Inventory Top 10 Items - PTD Sales Totals
The INVTOPSP function returns the 10 highest selling items from inventory for
the period: the ID and description, the amount taken in from sales, and the quantity
sold.
Setup types: Company ID, Warehouse ID, Item Number
Sub
Type
Description
1
Alphanumeric
#1 Item - ID
2
Alphanumeric
#1 Item - Description
3
Numeric
#1 Item - Sales
4
Numeric
#1 Item - Quantity
5
Alphanumeric
#2 Item - ID
6
Alphanumeric
#2 Item - Description
7
Numeric
#2 Item - Sales
8
Numeric
#2 Item - Quantity
9
Alphanumeric
#3 Item - ID
10
Alphanumeric
#3 Item - Description
11
Numeric
#3 Item - Sales
12
Numeric
#3 Item - Quantity
13
Alphanumeric
#4 Item - ID
14
Alphanumeric
#4 Item - Description
15
Numeric
#4 Item - Sales
16
Numeric
#4 Item - Quantity
17
Alphanumeric
#5 Item - ID
18
Alphanumeric
#5 Item - Description
Resource Manager User’s Manual 6.05
H-39
Predefined Functions
H-40
References
Sub
Type
Description
19
Numeric
#5 Item - Sales
20
Numeric
#5 Item - Quantity
21
Alphanumeric
#6 Item - ID
22
Alphanumeric
#6 Item - Description
23
Numeric
#6 Item - Sales
24
Numeric
#6 Item - Quantity
25
Alphanumeric
#7 Item - ID
26
Alphanumeric
#7 Item - Description
27
Numeric
#7 Item - Sales
28
Numeric
#7 Item - Quantity
29
Alphanumeric
#8 Item - ID
30
Alphanumeric
#8 Item - Description
31
Numeric
#8 Item - Sales
32
Numeric
#8 Item - Quantity
33
Alphanumeric
#9 Item - ID
34
Alphanumeric
#9 Item - Description
35
Numeric
#9 Item - Sales
36
Numeric
#9 Item - Quantity
37
Alphanumeric
#10 Item - ID
38
Alphanumeric
#10 Item - Description
39
Numeric
#10 Item - Sales
40
Numeric
#10 Item - Quantity
Resource Manager User’s Manual 6.05
References
Predefined Functions
INVTOPSY: Inventory Top 10 Items - YTD Sales Totals
The INVTOPSY function returns the 10 highest selling items from inventory for
the year: the ID and description, the amount taken in from sales, and the quantity
sold.
Setup types: Company ID, Warehouse ID, Item Number
Sub
Type
Description
1
Alphanumeric
#1 Item - ID
2
Alphanumeric
#1 Item - Description
3
Numeric
#1 Item - Sales
4
Numeric
#1 Item - Quantity
5
Alphanumeric
#2 Item - ID
6
Alphanumeric
#2 Item - Description
7
Numeric
#2 Item - Sales
8
Numeric
#2 Item - Quantity
9
Alphanumeric
#3 Item - ID
10
Alphanumeric
#3 Item - Description
11
Numeric
#3 Item - Sales
12
Numeric
#3 Item - Quantity
13
Alphanumeric
#4 Item - ID
14
Alphanumeric
#4 Item - Description
15
Numeric
#4 Item - Sales
16
Numeric
#4 Item - Quantity
17
Alphanumeric
#5 Item - ID
18
Alphanumeric
#5 Item - Description
Resource Manager User’s Manual 6.05
H-41
Predefined Functions
H-42
References
Sub
Type
Description
19
Numeric
#5 Item - Sales
20
Numeric
#5 Item - Quantity
21
Alphanumeric
#6 Item - ID
22
Alphanumeric
#6 Item - Description
23
Numeric
#6 Item - Sales
24
Numeric
#6 Item - Quantity
25
Alphanumeric
#7 Item - ID
26
Alphanumeric
#7 Item - Description
27
Numeric
#7 Item - Sales
28
Numeric
#7 Item - Quantity
29
Alphanumeric
#8 Item - ID
30
Alphanumeric
#8 Item - Description
31
Numeric
#8 Item - Sales
32
Numeric
#8 Item - Quantity
33
Alphanumeric
#9 Item - ID
34
Alphanumeric
#9 Item - Description
35
Numeric
#9 Item - Sales
36
Numeric
#9 Item - Quantity
37
Alphanumeric
#10 Item - ID
38
Alphanumeric
#10 Item - Description
39
Numeric
#10 Item - Sales
40
Numeric
#10 Item - Quantity
Resource Manager User’s Manual 6.05
References
Predefined Functions
JOBSACT: JO Jobs/Phases Actual Totals
The JOBSACT function returns the actual amount you billed the customer, the
pieces that have been completed (for an indication of how much of the job has been
done), the amount of labor hours, the miscellaneous costs from the NAMESxxx
table (see the Job Cost User’s Guide), and the sum of the miscellaneous costs.
Setup types: Company ID
Sub
Type
Description
1
Numeric
Bill Amount
2
Numeric
Pieces
3
Numeric
Labor Hours
4
Numeric
Cost #1
5
Numeric
Cost #2
6
Numeric
Cost #3
7
Numeric
Cost #4
8
Numeric
Cost #5
9
Numeric
Total Cost
Resource Manager User’s Manual 6.05
H-43
Predefined Functions
References
JOBSEST: JO Jobs/Phases Estimated Totals
The JOBSEST function returns the estimated amount to bill the customer, the
pieces to be completed (for an indication of how much of the job has been done),
the amount of labor hours, the miscellaneous costs from the NAMESxxx table (see
the Job Cost User’s Guide), and the sum of the miscellaneous costs.
Setup types: Company ID
H-44
Sub
Type
Description
1
Numeric
Bill Amount
2
Numeric
Pieces
3
Numeric
Labor Hours
4
Numeric
Cost #1
5
Numeric
Cost #2
6
Numeric
Cost #3
7
Numeric
Cost #4
8
Numeric
Cost #5
9
Numeric
Total Cost
Resource Manager User’s Manual 6.05
References
Predefined Functions
PACHECK: PA Checks File Totals
The PACHECK function returns the total from the Checks file.
Setup types: Company ID
Sub
Type
Description
1
Numeric
Checks Total
PATIMETK: PA Time Tickets File Total
The PATIMETK function returns the total amount in the time tickets entered in
Payroll.
Setup types: Company ID)
Sub
Type
Description
1
Numeric
Total Time Tickets
POORDERS: PO Orders File Totals
The POORDERS function returns the transaction counts and totals, by order status,
from the Purchase Order Transaction file.
Setup types: Company ID
Sub
Type
Description
1
Numeric
New Orders Count
2
Numeric
New Orders Total
3
Numeric
Printed Orders Count
4
Numeric
Printed Orders Total
Resource Manager User’s Manual 6.05
H-45
Predefined Functions
References
Sub
Type
Description
5
Numeric
Goods Received Orders Count
6
Numeric
Goods Received Orders Total
7
Numeric
Invoiced Orders Count
8
Numeric
Invoiced Orders Total
9
Numeric
Returned Orders Count
10
Numeric
Returned Orders Total
11
Numeric
Returned w/Debit Memo Orders Count
12
Numeric
Returned w/Debit Memo Orders Total
13
Numeric
Cancelled Orders Count
14
Numeric
Cancelled Orders Total
15
Numeric
All Orders Count
16
Numeric
All Orders Total
PORECINV: PO Receipts and Invoices File Totals
The PORECINV function returns the posted and unposted total from receipts and
invoices.
Setup types: Company ID
H-46
Sub
Type
Description
1
Numeric
Current Subtotal
2
Numeric
Current Sales Tax
3
Numeric
Current Freight
4
Numeric
Current Miscellaneous
Resource Manager User’s Manual 6.05
References
Predefined Functions
Sub
Type
Description
5
Numeric
Current Discount
6
Numeric
Current Prepaid
7
Numeric
Current Total
8
Numeric
Posted Subtotal
9
Numeric
Posted Sales Tax
10
Numeric
Posted Freight
11
Numeric
Posted Miscellaneous
12
Numeric
Posted Discount
13
Numeric
Posted Prepaid
14
Numeric
Posted Total
SOORDERS: SO Orders File Totals
The SOORDERS function returns counts and total by order status from the Sales
Order Transaction file.
Setup types: Company ID
Sub
Type
Description
1
Numeric
New Orders Total
2
Numeric
New Orders Count
3
Numeric
Picked Orders Total
4
Numeric
Picked Orders Count
5
Numeric
Verified Orders Total
6
Numeric
Verified Orders Count
Resource Manager User’s Manual 6.05
H-47
Predefined Functions
H-48
References
Sub
Type
Description
7
Numeric
Invoiced Orders Total
8
Numeric
Invoiced Orders Count
9
Numeric
Backordered Orders Total
10
Numeric
Backordered Orders Count
11
Numeric
Quoted Orders Total
12
Numeric
Quoted Orders Count
13
Numeric
Returned Orders Total
14
Numeric
Returned Orders Count
15
Numeric
All Orders Total
16
Numeric
All Orders Count
17
Numeric
Unshipped (New and Picked) Cost Total
18
Numeric
Shipped (Verified and Invoiced) Cost Total
19
Numeric
Backordered Cost Total
20
Numeric
Quoted Cost Total
21
Numeric
Returned Cost Total
22
Numeric
Total Cost
Resource Manager User’s Manual 6.05
References
Predefined Functions
TDAYS-PD: Total Days in Current Period
The TDAYS-PD function returns the number of calendar days and working days in
the current period.
Setup types: Company ID
Sub
Type
Description
1
Numeric
Total Days in Current Period
2
Numeric
Working Days in Current Period
Resource Manager User’s Manual 6.05
H-49
References
Building Functions
Resource Manager Functions Manual 6.05
Resource Manager User’s Manual
6.05
Building Functions
I
When you define a field in EIS, you must use functions that have already been built
or coded. Although the list of functions that EIS provides is extensive, you might
want to build your own functions. For example, you might want a field that returns
the number of employees from the Payroll application.
To build a function, you must program it in Business BASIC code. You should
know how to read code, use Business BASIC verbs, and make Business BASIC
manipulate data and handle files. (If you do not know how to program in Business
BASIC but want to create a function, contact your OPEN SYSTEMS Accounting
Software reseller.) You also need a copy of the OPEN SYSTEMS Developer Kit
for file descriptions and dimension lengths for arrays.
A sample function, GENERIC.FNC, is included with the software. The functions
that EIS provides follow the format of GENERIC.FNC; use it as a base for creating
new functions. If you are familiar with word processors or spreadsheets, this
function is like a template: the format is set, but you must fill in the blanks.
By looking at other functions already coded for specific tasks (for example,
ARTRAN.FNC and GLJYTD.FNC), you should be able to create your own
functions. You might notice that the line numbers are not necessarily continuous.
For example, line 899 is listed after line 699. Do not change line numbers that are
not listed; they either are not used or should not need to be modified when you
build a function.
Resource Manager Functions Manual 6.05
I-1
Building Functions
References
Planning the function
Before you use the GENERIC.FNC function to customize a function, plan the
attributes that you want the function to have:
•
•
•
What do you want the function to do?
Which values (and how many) do you want the function to return?
Which files (and applications) does the function need to access?
Consult the file descriptions of the applications involved to answer these questions.
Make a backup copy of GENERIC.FNC–or any function–before you modify it.
Modifying GENERIC.FNC
Precoded EIS functions use the following standard:
Lines 200–299
Set the following variables:
VALUES = The total number of values returned by the function. A value is
anything that the function returns: number, date, code, literal value.
RTN$ = The ID of the function. It must be 8 characters long. (If it has fewer than 8
characters, pad with spaces.)
Lines 300–399
This area is used to dimension application-specific variables used in the function
(with the DIM verb). Check the IOLists used in the function (in lines 899–989) for
arrays.
I-2
Resource Manager User’s Manual 6.05
References
Building Functions
Lines 400–499
Set the following variables:
FILES = The total number of application files opened for each company.
FILENAME$[1 - FILES] = Each filename excluding the company ID.
Lines 600–699
This area is used to check that each application you need for the function is
installed. Otherwise, the function returns an error in the EIVAL file.
Lines 899–989
This area holds the EIS IOLists. Do not change the code unless you really want to
modify how EIS works.
Lines 990–999
This area is used to place the IOLists the function needs from applications other
than EIS.
Lines 1000–1399
This area is used to read through the company ranges in the setup record and place
a list of valid companies in the variable CO$. This variable calls lines 5000–5199
to cycle through each company, open its files, and run a particular routine. When
the routine is done, the company IDs are cycled through until all the company IDs
have been used. The function (lines 4000–4199) then writes its results to the
EIVAL file and exits. Do not modify this area.
Lines 2000–3999
This area holds the code that uses a From/Thru range from the setup file and
calculates data from records in that range. For example, if the function is designed
to total a range of GL accounts, this section of code would read the GLMAxxx or
GLJRxxx file for each From/Thru range given. It would then keep a running total
in the array TOT$[VALUES].
Resource Manager User’s Manual 6.05
I-3
Building Functions
References
Each element in the array can contain different types of totals, BUDGETED,
ACTUAL, and so forth. When the From/Thru range has been completed, this
section ends and returns to the area of code that gets another From/Thru range.
Lines 4000–4199
This area is used to write each calculated value received from lines 2000–3999 to
the EIVAL file. Each value is placed in the array TOT$[VALUES] during
calculation. Do not modify this area.
Lines 4200–4599
This area is used to return error codes to the EIVAL file when a problem occurs in
the function. Do not modify this area.
Line 5000–5199
This area is called by lines 1000–1399 to read a setup record of type 1 (company
IDs) and add the ID to the variable CO$. It continues adding IDs to CO$ as long as
it finds a valid type 1 setup record. Do not modify this area.
Line 5200–5399
This area reads a setup record for a particular type. The type is specified by the
variable TYPE. The last valid record found for this type is stored in the variable
SEQ$[TYPE]. This variable is needed to allow the next setup record read to point
to the correct starting location for this type. After a setup record is read, the From
and Thru values are placed in the variables FR$[TYPE] and TH$[TYPE],
respectively. If no more setup records for this type are found, the Boolean variable
DONE is set to 1. Do not modify this area.
Line 9300–9399
GENLOCK (General Record Lock Routine). See the Development Standards
manual for an explanation of this routine.
I-4
Resource Manager User’s Manual 6.05
Resource Manager User’s Manual 6.05
References
Compatibility Matrix
Resource Manager User’s Manual
6.05
Compatibility Matrix
J
Compatibility helps keep OPEN SYSTEMS Accounting Software files fully
compatible across platforms and cooperative on a network.
On the following page is a compatibility matrix of OSAS 6.05 applications. Use the
matrix to set up your system with the right version of each application
Resource Manager User’s Manual 6.05
J-1
Compatibility Matrix
References
.
RM 6.0
R
M
A
P
A
R
B
K
B
R
D
D
F
A
G
L
G
N
I
N
J
C
O
D
O
W
P
A
P
O
S
O
X
R
R
S
R
R
R
R
S
R
R
S
S
R
R
R
AP 6.0
X
O
AR 6.0
X
1
BK 6.0
1
X
BR 6.0
O
O
R
R
X
DD 6.0
O
X
FA 6.0
O
AP 6.0
R
AR 6.0
O
BK 6.0
O
BR 6.0
O
DD 6.0
X
GL 6.0
O
O
O
O
O
O
FA 6.0
X
GN 6.0
O
O
O
O
O
X
IN 6.0
O
O
JC 6.0
O
O
R
X
OD 6.0
O
O
O
IN 6.0
O
O
JC 6.0
X
OW 6.0
OD 6.0
X
O
R
OW 6.0
X
PO 6.0
O
SO 6.0
A
P
A
R
B
K
PA 6.0
X
1
R
M
O
B
R
D
D
F
A
G
L
G
N
GL 6.0
GN 6.0
X
PA 6.0
RM 6.0
I
N
J
C
O
D
O
W
P
A
P
O
O
PO 6.0
X
SO 6.0
S
O
R = Application on top requires application on side.
S = Application requires side application and has no predefined functions within EIS
O = Application on top optionally writes data to application on side.
Blank = No interface.
1 = To utilize kitting feature, SO is required.
2 = EIS has no predefined functions for this application.
J-2
Resource Manager User’s Manual 6.05
IX
Resource Manager User’s Manual
6.05
Index
A
Access Codes
function, 3-17, 8-39
screen, 3-18
access codes
using in Print Manager, C-3
Active Print Queue Control
function, 9-7
Append Line window, 4-32
Application Information
function, 6-3
screen, 6-4
Application Information List
function, 11-11
screen, 11-12
Application Tables
function, 5-11
screen, 5-12
Applications Options Inquiry, F-8
Archive Print Queue Control
function, 9-19
B
Backup
function, 5-3
screen, 5-4
Backup/Restore Commands
function, 6-43
screen, 6-44
Backup/Restore Commands List
function, 11-7
sample, 11-10
screen, 11-8
building functions
custom solutions, I-1
Resource Manager User’s Manual 6.05
modifying generic code, I-2
planning, I-1
C
Calculator
consecutive calculations, F-4
description of, F-1
making calculations, F-4
Call a BBx Program, F-6
Change File Size
function, 5-15
screen, 5-16
Clear Sales Tax
function, 4-21
screen, 4-22
CNVTLOG file, B-3
Colors
function, 2-3
screen, 2-4
commands
accessing, C-2
common ratios
current ratio, G-2
days’ receivables, G-2
debt to asset ratio, G-2
debt to equity ratio, G-2
number of inventory turns, G-2
quick ratio, G-2
return of equity, G-2
return on assets (ROA), G-2
return on investment (ROI), G-2
working capital, G-1
Company Information
function, 3-3
screen, 3-4
IX-1
Company Information List
function, 11-15
sample, 11-18
compatible applications, J-1
Country Codes
function, 3-21
screen, 3-22
Country Codes List
function, 11-35
sample, 11-38
screen, 11-36
sample, 8-14
EIS Dashboard Report
function, 8-7
sample, 8-10
Error Log
function, 10-11
sample, 10-14
screen, 10-12
error messages, A-1
Execute an Operating System Command, F-5
F
D
Data File Allocation Report
function, 10-3
sample, 10-6
screen, 10-4
Data File Conversion
function, 3-9
screen, 3-10
Data File Creation
function, 3-7
screen, 3-8
Defaults
function, 2-23
screen, 2-24
Devices
function, 2-11
Plotters screen, 2-20
Printers screen, 2-14
screen, 2-12
Terminals screen, 2-18
Directories
function, 6-7
E
Edit Line window
Forms Reorder, 4-32
Tax Locations, 4-10
EIS Dashboard
function, 8-3
EIS Dashboard Editor
function, 8-43
EIS Dashboard History Report
function, 8-11
IX-2
Field Definitions
function, 8-27
Field Definitions List
function, 8-55
sample, 8-58
Field History Report
function, 8-15
sample, 8-18
file descriptions, B-1
File Rebuild/Verify
function, 5-23
screen, 5-24
files
CNVTLOG, B-3
OSAPPL, B-5
OSBUF.TXT, B-5
OSBUT.TXT, B-5
OSCL, B-5
OSCN, B-6
OSCNVT, B-6
OSCODE, B-6
OSCOMP, B-6
OSCOPR, B-6
OSDE, B-6
OSDF, B-7
OSER, B-7
OSINFO, B-7
OSKY, B-7
OSMN, B-8
OSMNxxx, B-8
OSREF.TXT, B-5
OSRET.TXT, B-5
OSTD, B-8
Resource Manager User’s Manual 6.05
OSTM, B-8
printing selected, C-3
RMCDxxx, B-10
RMDEVDEF, B-10
RMDRVDEF, B-10
RMGIDEF, B-10
RMPRNDEF, B-10
RMTDxxx, B-10
RMTHxxx, B-10
RMTXxxx, B-11
SUGGEST, B-11
xxAPPL.TXT, B-1
xxDATA, B-1
xxFILES.TXT, B-1
xxFRST.TXT, B-1
xxHELP, B-1
xxLABEL.TXT, B-1
xxLAST.TXT, B-2
xxMN, B-2
xxMSG, B-2
xxOI, B-2
xxSWCH, B-2
xxTB, B-2
xxWIND, B-2
Form Class Maintenance
function, 9-31
Form Codes
function, 6-47
screen, 6-48
Form Printers
function, 6-51
screen, 6-52
Forms Reorder
Append/Edit Line window, 4-32
function, 4-29
Header Information window, 4-34
sample, 4-36
screen, 4-30
Forms Reorder Codes
function, 4-37
screen, 4-38
Functions
building, I-1
function, 8-35
predefined, H-1
Functions List
Resource Manager User’s Manual 6.05
function, 8-59
sample, 8-62
G
General Information Inquiry function, F-12
screen, F-12
Global Dashboard Update
function, 8-19
Global Inquiry command, F-9
window, F-10
Global Inquiry Definitions
Data Columns screen, 6-31
function, 6-23
General Information screen, 6-26
Global Links screen, 6-34
screen, 6-24
Summary Fields screen, 6-28
Global Inquiry Window Audit Report
function, 10-15
sample, 10-18
screen, 10-16
Global Inquiry Window List
function, 11-27
sample, 11-30
screen, 11-28
H
Header Information window, 4-34
Help Screens
function, 6-37
screen, 6-38
Help Screens List
function, 11-19
sample, 11-22
screen, 11-20
I
Inquiry Window Definitions
function, 6-15, 6-19
screen, 6-20
Inquiry Window Definitions List
function, 11-23
sample, 11-26
screen, 11-24
IX-3
K
Keyboard
function, 2-7
screen, 2-8
M
Menu List
function, 11-3
sample, 11-6
screen, 11-4
Menus
function, 6-11
screen, 6-12
messages, A-1
N
N command, C-2
O
Options and Interfaces
function, 3-13
Options screen, 3-15
screen, 3-14
Options and Interfaces List
function, 11-47
sample, 11-50
screen, 11-48
Options screen, 3-15
OSAPPL file, B-5
OSBUF.TXT file, B-5
OSBUT.TXT file, B-5
OSCL file, B-5
OSCN file, B-6
OSCNVT file, B-6
OSCODE file, B-6
OSCOMP file, B-6
OSCOPR file, B-6
OSDE file, B-6
OSDF file, B-7
OSER file, B-7
OSINFO file, B-7
OSKY file, B-7
OSMN file, B-8
OSMNxxx file, B-8
IX-4
OSREF.TXT file, B-5
OSRET.TXT file, B-5
OSTD file, B-8
OSTM file, B-8
Other Commands
Applications Options Inquiry, F-8
Calculator, F-1
Call a BBx Program, F-6
Execute an Operating System Command, F-5
General Information Inquiry, F-12
Global Inquiry, F-9
Product Suggestions, F-7
Support Information, F-14
User Comments, F-15
P
Parameter Maintenance
function, 9-35
Period Setup
function, 4-25
screen, 4-26
Plotters screen, 2-20
PMARCxxx file, B-9
PMCLASS file, B-9
PMHSTxxx file, B-9
PMMENxxx file, B-9
PMOPTxxx file, B-9
PMQUExxx file, B-9
PMSIZxxx file, B-9
predefined functions, H-1
Printers screen, 2-14
printing multiple copies, C-3
printing print jobs, C-3
printing selected files, C-3
Product Suggestions, F-7
Product Suggestions Report
function, 10-7
sample, 10-10
screen, 10-8
Purge Dashboard History
function, 8-23
Purge Data Records
function, 5-27
screen, 5-28
Purge Transaction History
Resource Manager User’s Manual 6.05
function, 9-39
R
Reports
EIS Dashboard History Report, 8-11
EIS Dashboard Report, 8-7
Field Definitions List, 8-55
Field History Report, 8-15
Functions List, 8-59
Screen Definitions List, 8-51
Setup Definitions List, 8-63
Restore
function, 5-7
screen, 5-8
RMCDxxx file, B-10
RMDEVDEF file, B-10
RMDRVDEF file, B-10
RMGIDEF file, B-10
RMPRNDEF file, B-10
RMTDxxx file, B-10
RMTHxxx file, B-10
RMTXxxx file, B-11
S
Sales Tax Report
function, 4-17
sample, 4-20
screen, 4-18
Screen Definitions List
function, 8-51
sample, 8-54
Setup
function, 8-31
Setup Definitions List
function, 8-63
sample, 8-10, 8-14, 8-18, 8-66
SUGGEST file, B-11
Support Information
function, 6-55
screen, 6-56
Support Information command, F-14
screen, F-14
System Messages, A-1
function, 6-39
screen, 6-40
Resource Manager User’s Manual 6.05
T
Tables
function, 8-47
Tables List
function, 11-31
sample, 11-34
screen, 11-32
Tax Classes
function, 4-3
screen, 4-4
Tax Groups
function, 4-13
screen, 4-14
Tax Groups List
function, 11-43
sample, 11-46
screen, 11-44
Tax Locations
Edit Line window, 4-10
function, 4-7
screen, 4-8
View Line window, 4-12
Tax Locations List
function, 11-39
sample, 11-42
screen, 11-40
Terminals screen, 2-18
U
User Comments function, F-15
screen, F-15
User Login Activity
function, 6-59
utilities
Applications Options Inquiry, F-8
Calculator, F-1
Call a BBx Program, F-6
Execute an Operating System Command, F-5
General Information Inquiry, F-12
Global Inquiry, F-9
Product Suggestions, F-7
Support Information, F-14
User Comments, F-15
IX-5
V
version compatibility matrix, J-1
View File Contents
function, 5-19
screen, 5-20
View Line window, 4-12
X
xxAPPL.TXT file, B-1
xxDATA file, B-1
xxFILES.TXT file, B-1
xxFRST.TXT file, B-1
xxHELP file, B-1
xxLABEL.TXT file, B-1
xxLAST.TXT file, B-2
xxMN file, B-2
xxMSG file, B-2
xxOI file, B-2
xxSWCH file, B-2
xxTB file, B-2
xxWIND file, B-2
IX-6
Resource Manager User’s Manual 6.05