1
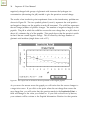
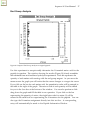
Sequence It! Version 1.38 User’s Manual Allen R. Place Thomas Schmidt University of Maryland Biotechnology Institute University of Maryland Biotechnology Institute A BioQUEST Library VII Online module published by the BioQUEST Curriculum Consortium The BioQUEST Curriculum Consortium (1986) actively supports educators interested in the reform of undergraduate biology and engages in the collaborative development of curricula. We encourage the use of simulations, databases, and tools to construct learning environments where students are able to engage in activities like those of practicing scientists. Email: [email protected] Website: http://bioquest.org Editorial Staff Editor: Managing Editor: Associate Editors: John R. Jungck Ethel D. Stanley Sam Donovan Stephen Everse Marion Fass Margaret Waterman Ethel D. Stanley Online Editor: Amanda Everse Editorial Assistant: Sue Risseeuw Beloit College Beloit College, BioQUEST Curriculum Consortium University of Pittsburgh University of Vermont Beloit College Southeast Missouri State University Beloit College, BioQUEST Curriculum Consortium Beloit College, BioQUEST Curriculum Consortium Beloit College, BioQUEST Curriculum Consortium Editorial Board Ken Brown University of Technology, Sydney, AU Joyce Cadwallader St Mary of the Woods College Eloise Carter Oxford College Angelo Collins Knowles Science Teaching Foundation Terry L. Derting Murray State University Roscoe Giles Boston University Louis Gross University of Tennessee-Knoxville Yaffa Grossman Beloit College Raquel Holmes Boston University Stacey Kiser Lane Community College Peter Lockhart Massey University, NZ Ed Louis The University of Nottingham, UK Claudia Neuhauser University of Minnesota Patti Soderberg Conserve School Rama Viswanathan Beloit College Linda Weinland Edison College Anton Weisstein Truman University Richard Wilson (Emeritus) Rockhurst College William Wimsatt University of Chicago Copyright © 1993 -2006 by Allen R. Place and Thomas Schmidt Copyright, Trademark, and License Acknowledgments Portions of the BioQUEST Library are copyrighted by Annenberg/CPB, Apple Computer Inc., Beloit College, Claris Corporation, Microsoft Corporation, and the authors of individually titled modules. All rights reserved. System 6, System 7, System 8, Mac OS 8, Finder, and SimpleText are trademarks of Apple Computer, Incorporated. HyperCard and HyperTalk, MultiFinder, QuickTime, Apple, Mac, Macintosh, Power Macintosh, LaserWriter, ImageWriter, and the Apple logo are registered trademarks of Apple Computer, Incorporated. Claris and HyperCard Player 2.1 are registered trademarks of Claris Corporation. Extend is a trademark of Imagine That, Incorporated. Adobe, Acrobat, and PageMaker are trademarks of Adobe Systems Incorporated. Microsoft, Windows, MS-DOS, and Windows NT are either registered trademarks or trademarks of Microsoft Corporation. Helvetica, Times, and Palatino are registered trademarks of Linotype-Hell. The BioQUEST Library and BioQUEST Curriculum Consortium are trademarks of Beloit College. Each BioQUEST module is a trademark of its respective institutions/authors. All other company and product names are trademarks or registered trademarks of their respective owners. Portions of some modules' software were created using Extender GrafPak™ by Invention Software Corporation. Some modules' software use the BioQUEST Toolkit licensed from Project BioQUEST. Table of Contents What Is SequenceIt!?...................................................................................................1 What You Need To Know.........................................................................................1 A Tour of SequenceIt!.................................................................................................4 Starting the Program.......................................................................................4 A Common Strategy for Protein Sequencing ............................................6 Selecting a Polypeptide ...................................................................................7 Performing an Experiment............................................................................8 Opening the Peptide Information Window ..............................................10 Redisplaying an Experiment .........................................................................11 Entering the Estimated Length .....................................................................11 Getting Some Help ..........................................................................................12 Removing Disulfide Bonds...........................................................................13 Initial Sequence Determination ...................................................................15 Performing a Cleavage....................................................................................18 Performing an Edman Degradation Experiment......................................21 Taking Notes.....................................................................................................23 Saving the Problem.........................................................................................23 Performing a Second Cleavage .....................................................................24 Reconstructing a Protein................................................................................25 Reconstructing the Original Protein............................................................27 Moving and Collapsing Branches of the Summary Tree .......................28 Determining the Location of Disulfide Bonds .........................................29 Entering Disulfide Bonds...............................................................................30 Designing Your Own Problems ................................................................................32 Computer Generated.......................................................................................32 User Entered......................................................................................................33 Analysis Experiments .................................................................................................35 Base Hydrolysis.................................................................................................35 Isoelectric Point Determination....................................................................35 End Group Analysis ........................................................................................37 File Menu ......................................................................................................................38 Setting Aside a Problem .................................................................................38 Printing from SequenceIt!..............................................................................39 View Menu ...................................................................................................................39 Windows Menu...........................................................................................................40 Shortcuts........................................................................................................................41 Summary Window Shortcuts.......................................................................41 Reference .......................................................................................................................42 Communicating with Other Programs.......................................................42 Unknown Cleavages.......................................................................................43 Appendices....................................................................................................................44 What Is the Educational Philosophy Embodied in SequenceIt!?..........44 Glossary of Biochemistry Terms...................................................................46 Glossary of Computer Terms ........................................................................48 Hardware and Software Requirements.......................................................50 Cursors and Icons.............................................................................................50 Index ...............................................................................................................................53 Sequence It! User Manual 1 What Is SequenceIt!? SequenceIt! is a training tool that allows you to experience the art and logic of protein sequencing through experimentation. You are given a polypeptide or protein whose sequence (the linear arrangement of amino acids) and length are unknown. Your objective is to deduce the sequence of this polypeptide using many of the tools available to a practicing protein chemist. You specify the operations and the order of their application. Success in determining the protein sequence depends on your understanding of the experimental procedures and on the logic you use in executing those procedures. Operations available range from simple cleavage reactions (enzymatic and chemical) which break a polypeptide into smaller fragments to complex sequential analyses (e.g., Edman degradation) that provide sequence information. SequenceIt! replicates laboratory situations (with errors and ambiguities) and places limits on the amount of material available for study. You can set up SequenceIt! so as to use only a simple short polypeptide initially, and add new complexity as your grasp of protein chemistry grows. We have incorporated many organizational tools to help in your hypothesis generation and data retrieval. Overall, we want you to experience what science is about by doing it! What You Need To Know We assume in this manual that you are already familiar with the basic set of standard Macintosh terms and operations. If you are not comfortable with these, you should work with the Macintosh Owner's Guide or another introduction to the Macintosh before you begin. The terms you need to be familiar with are: window, menu, mouse, point, click, shift click, drag, and double click. If you understand these you are ready to get started. Before long, however, you will also need to know several more Macintosh vocabulary words: close box, zoom box, grow box, title bar, 2 Sequence It! User Manual scroll bar, and clipboard. These terms are all defined in the glossary at the end of the manual. It also helps to understand some basic biology and chemistry. For example, the largest molecules in living things -- polysaccharides, nucleic acids and proteins -- are polymers built from simpler units of the appropriate type. Amino acids are the building blocks of all proteins (Figure 1). The amino acids possess both an acidic group (carboxyl group) and a basic group (amino group). Both of these chemical groups are attached to the same carbon atom which is call the α-carbon. The side chains, or R groups, are what distinguish each amino acid from another. It is the properties of the R groups that control the function of polypeptides or proteins. Amino Group Carboxyl Group R Group Figure 1. The structure of the amino acid glycine. Through a process called condensation or dehydration, amino acids are linked together into a polymer with the production of a water molecule (Figure 2). A linear polymer of amino acids is referred to as a polypeptide. A protein is simply a large polypeptide. Amino Acid 2 R1 + NH C COO 3 H N-Terminus C-Terminus { { Amino Acid 1 + H + NH C COO 3 R2 HO R1 H + NH C CO NH C COO 3 H R2 2 Peptide Bond Figure 2. The polymerization of two amino acids to form a dipeptide. Sequence It! User Manual 3 Twenty different amino acids are found in proteins; their precise order in a given protein (the primary structure or sequence) is determined by the order of a different class of building blocks in the corresponding DNA. At one end of the polypeptide there is a free amino group, the N-terminus, and at the other end there is a carboxyl group, the C-terminus. All the other amino and carboxyl groups of the amino acids are involved in peptide bonds. Thus there is a directionality or polarity to the polypeptide as well as a sequence or linear arrangement of each amino acid. The order of amino acids determines what a protein will do, how it will look, and where it will reside in an organism. Proteins occasionally can be crosslinked by a linkage called a disulfide bond, which forms between two cysteine amino acids. This crosslink helps lock a polypeptide into a particular structure or arrangement. The number of different proteins or polypeptides is enormous. Since there are 20 different amino acids there are 20 X 20 = 400 distinct dipeptides and 20 X 20 X 20 = 8000 different tripeptides. Considering that the average protein is approximately 150 - 250 amino acids in length the number of distinct structures is extremely large. Each of the different possible proteins would have its own distinct primary structure. It is your job to determine what this arrangement of amino acids is by using the techniques afforded a practicing protein chemist. The best way to get started with SequenceIt! is by taking the Introductory Tour of SequenceIt!. Feel free to experiment as you go along on your journey. 4 Sequence It! User Manual A Tour of SequenceIt! Starting The Program Figure 3. The SequenceIt! program icon. To start your tour of SequenceIt!, double click on the SequenceIt! program icon (Figure 3). Figure 4. SequenceIt! startup screen dialog. The next thing you will see is the SequenceIt! startup screen dialog (Figure 4). This window gives you the option of beginning the program with an unknown protein Sequence It! User Manual 5 (the SequenceIt! button) or with a protein you design (the Setup... button). You can also obtain additional help on using the program (the Help button), or begin your SequenceIt! apprenticeship with the introductory problem (the Introduction button). Click on the Introduction button now so you can follow along with the tutorial. Icon representing original protein Figure 5. Summary Window. A SequenceIt! problem always starts with the Summary Window (Figure 5). With this window you are able to choose a variety of ways to view what you have done and what type of data or information is available on a specified object. The icon currently displayed in this window represents a plastic tube containing the polypeptide to be sequenced. As we continue, the numbers of icons will increase in number and be displayed in an upside down tree format. Each of these icons represents a tube containing a protein or a fragment of a protein, termed a polypeptide. This is a general term we will use throughout the manual. 6 Sequence It! User Manual A Common Strategy for Protein Sequencing Protein chemists follow a basic strategy when they attempt to determine the sequence of most proteins and polypeptides. This strategy is outlined below and described in greater detail as we go through the steps of the tutorial. Keep in mind that this strategy is only a guide, and should not inhibit your own ingenuity on solving the sequence of a protein. (1) Determine the Amino Acid Composition In order to know which amino acids and how many of each amino acid there are in a polypeptide we must break the peptide bonds. This can be accomplished with strong acids (i.e., 6N HCl) or strong bases or by exhaustive enzymatic digestion. By performing an acid hydrolysis or base hydrolysis experiment you obtain a minimum length for the polypeptide. This information is useful for determining what cleavages to use in Step 4. However, there is a caveat. These procedures destroy several amino acids, so you must be cautious with your estimates. (2) Break All Disulfide Bonds Disulfide cross-links complicate the determination of amino acid sequences and usually are cleaved by reduction or oxidation before sequence analysis. (3) Perform an Initial N-Terminal and C-Terminal Sequence Determination Remember that a polypeptide has polarity and therefore a beginning and end. However, there are proteins that are made up of two or more polypeptides, e.g., insulin. Hence you have two beginnings and two ends. Also there are polypeptides where the beginning and ends are joined to form a closed structure. In this case, there are no N-terminal and Cterminal amino acids. Use End group, Aminopeptidase, and Edman degradation experiments to determine as much of the N-terminal sequence as possible, and use Carboxypeptidase to determine the C-terminal amino acids. Sequence It! User Manual 7 (4) Divide and Conquer Break the polypeptide into fragments by cleaving at specific amino acids. Several cleavage methods are available, each of which has different specificity (i.e., cleave at different amino acids). (5) Repeat Steps 3 and 4 To Determine Subsequences and Create "Overlappings" The initial cleavage is generally made as specific as possible in order to generate large peptide fragments. It is easy to arrange fewer fragments. These fragments can be positioned relative to one another after treatment of the original polypeptide by a second cleavage procedure that generates fragments whose sequences extend across the initial cleavage points (referred to as overlapping peptides). The amino acid sequence of each overlapped peptide orders two or more of the original fragments. (6) Reconstruct the Original Protein From the overlapping peptides and information gained from the original protein, you should be able to construct a unique sequence for the protein or polypeptide of interest. Your overlaps should be at least two amino acids in length. (7) Locate the Disulfide Bonds No primary structure analysis of a cyst(e)ine-containing protein can be regarded as complete before the presence and location of disulfide bonds have been established. Using a multistep process described in the tutorial, the location of these bonds can be assigned. Selecting a Polypeptide Use the mouse to position the cursor over the icon in the Summary Window. Press once on the mouse button. You'll notice the outline of the icon is now white on a black background, indicating that it is selected. You should also notice that once the polypeptide has been selected, many of the menu items become active. 8 Sequence It! User Manual Performing an Experiment Once you have selected the polypeptide, select the Acid Hydrolysis menu item under the Analysis menu. This is a good experiment to start with because it gives you a rough estimate of the total number of amino acids in the polypeptide, as well as which of the 20 amino acids are present. Remember, though, some amino acids are destroyed by the conditions used to hydrolyze the polypeptide. Figure 6. Hydrolysis Options Window. The first window displayed is the Hydrolysis Options Window (Figure 6). The default values are displayed here and can be changed if needed. All experiments in SequenceIt! allow default values to be changed in this manner; as you grow more comfortable with the program there will arise many instances where the defaults are unsatisfactory. For now, just click on the OK button to continue. The experiment is performed automatically, with the program graphically displaying the steps undergone to perform the acid hydrolysis experiment in a laboratory. Sequence It! User Manual 9 Figure 7 The output of an Acid Hydrolysis experiment. After all the steps in the hydrolysis process are completed, a window similar to that in Figure 7 will appear. This bar graph represents the molar quantities of each amino acid released. The quantity of sample used is displayed in the top right corner of the window. The three letter code designating each of the standard amino acids is displayed on the left axis of the bar graph. The corresponding single letter code is displayed on the far right of the empty table. If you need help in remembering this amino acid alphabet, you can display a list of them by selecting the Amino Acid Data menu item under the View menu. As you move the mouse across the graph you will notice the cursor changes to a target site cursor ( ). If you click on the bar for each amino acid, the numeric value represented by the bar will be entered in the table to the right of the graph. The sum 10 Sequence It! User Manual of all quantities will be tallied for you in the box at the bottom right corner of the window. You can also perform a click-drag -- dragging while holding down the mouse button -- over the graph and fill the table in one operation. You may be confused by the fact that the quantities of some amino acids are not whole numbers. The value graphed represents only a minimum estimate for the true number of each amino acid. Welcome to the thorny side of science! You will learn with experience that some procedures partially or completely destroy a particular amino acid. For example, the quantity of the amino acid serine (with the single letter code of S) is given as 1.47 residues. Our experience tells us that there are probably 2 residues of serine in the unknown protein. You can edit the value in the table by clicking on the numerical value (1.47) and typing in a new estimate (e.g. 2.00), hitting the return key to enter the value. The sum will change for your automatically. Close the window displaying the experiment's results now. You will be able to redisplay this information at a later time. Opening the Peptide Information Window A summary of information for each peptide is displayed in the Peptide Information Window (Figure 8). Open this window by selecting the icon in the Summary Window, then selecting the Peptide Information... menu item found under the View menu. Sequence It! User Manual 11 Figure 8. Peptide Information Window. Redisplaying an Experiment Displayed in a scrollable list in the right portion of the window are all experiments performed on the peptide. To open a window with the results of the experiment, select the name (position the mouse over the text Acid Hydrolysis and click once), then click on the button labeled Display Experiment Data. The Acid Hydrolysis Window (Figure 7) will now open in the same position it was in when the window was closed. Note the value in the sum box in the lower right hand corner and close the window again. Entering the Estimated Length The sum found in the Acid Hydrolysis Window is a good, conservative estimate of the length of the protein being sequenced. Enter this value (rounded up to 13) in the edit box labeled Length(?) found in the Peptide Information Window (just the 12 Sequence It! User Manual whole number portion -- the program will beep if you try to enter the decimal point) and press <RETURN>. Now the Sequence Determined is displayed. Since we haven't determined any of the actual sequence, only question marks are shown. As we continue and begin to enter the sequence, this portion of the window will display the single letter codes of all amino acids entered. Usually the letters displayed will be upper case. If a letter is shown in lower case then there is some conflict in the amino acids assigned for this position in the polypeptide. For example, you may have assigned one amino acid for the N-terminus from the Aminopeptidase experiment, and a different one from the Edman degradation experiment. The letter displayed is from the first experiment in which an assignment was made. Close the Peptide Information Window now by clicking in the Close box. Getting Some Help We are now ready for Step 2 of the strategy explained above, namely removing disulfide bonds. These bonds are a different type of link between amino acids than the standard ones (i.e., peptide bonds) which connect them together to form the polypeptide. Disulfide bonds are links between two cysteine amino acids; while we will have to determine their position later to consider the protein fully sequenced, for now their presence complicates the sequencing process by keeping cleaved fragments together. We remove disulfide bonds by modifying the R group of cysteine to a less reactive form. To determine which modification to use, we will use the Help system. To enter into the Help mode type -?. The cursor will change to a question mark. Now, go to the Modification menu and select the Performic Acid Oxidation menu item. A window will appear and the screen will change to appear like that in Figure 9. Sequence It! User Manual 13 Figure 9. Help for Performic Acid Oxidation menu item. This is a detailed description of the Performic Acid Oxidation process, and the important part is stated in the first sentence "Performic Acid Oxidation removes disulfide bonds...". Close the Help Window for now, but remember that you can get help on any menu item and many window elements by the same process: enter help mode and click on the item in question. Removing Disulfide Bonds Select the icon for the original protein in the Summary Window, and select the Performic Acid Oxidation menu item. A new options dialog comes up looking like the one in Figure 10. 14 Sequence It! User Manual Figure 10. Options for Performic Acid Oxidation experiment. This is your opportunity to change the default values the program has set up. For the tutorial these values are fine. Click on the OK button. The program now performs a performic acid oxidation on the original protein, displaying in a schematic form the process taken in the laboratory. After the process is finished, the summary window is displayed, looking like that in Figure 11. Figure 11. Summary Window after Performic Acid Oxidation experiment. Sequence It! User Manual 15 A new icon is displayed connected to the original protein's icon. We term this a descendant. It represents the results of the performic oxidation process, and the name of the experiment is shown to help you keep track of which icons represent polypeptide derived from which experiments. The arrow points to this label which we refer to as the descendant label. Open the peptide information window for this newly created polypeptide and enter the length (13) in the same way it was done for the original protein. Initial Sequence Determination We are now ready to perform experiments to determine the sequence of the polypeptide. For now we will use the descendant created by the performic oxidation modification since we know this polypeptide does not contain disulfides. Select the small Descendant icon to activate the menu items. Now, click on the Analysis menu and scroll down to the popup menu item Exopeptidase Degradation. Keeping the mouse button depressed move to the right and select the Aminopeptidase M menu item. Click on the OK button for the experiment's option dialog. The laboratory steps are displayed, followed by the experiment's results displayed in a window like Figure 12. 16 Sequence It! User Manual Figure 12. Results from Aminopeptidase M experiment. The exopeptidase procedures (both Aminopeptidase and all the Carboxypeptidase experiments) are "time based," meaning that the sequence is inferred by the rate of release of each amino acid, with the rate measured at specific time intervals. In this experiment, for example, more than 3 nMoles of the amino acid serine (single letter code S) were measured at 10 minutes, almost 6 nMoles at 20 minutes, and so on. Unfortunately, this was the only amino acid released, implying that the next amino acid in the sequence somehow blocks further cleavage by aminopeptidase. The sequence can be entered in two ways in this window: you can click on the legend item matching the amino acid (try it!), or you can simply type in the single letter code. With the Aminopeptidase experiment we have determined the amino terminal (Nterminal) amino acid. Using the Carboxypeptidase experiment, we can determine the carboxy terminal (C-terminal) amino acids. Close the window with the Aminopeptidase results and click on the Analysis menu again, this time choosing the Carboxypeptidase Y menu item. After following the same process as with Aminopeptidase digestion, a window like Figure 13 will appear. Sequence It! User Manual 17 Figure 13. Results from Carboxypeptidase Y experiment. This experiment produces considerably more interesting, and less easily interpretable, results. As you can see, at 10 minutes about 1.8 nMoles of threonine is released, and only slightly smaller amounts of alanine and glutamic acid. After these three amino acids, the amounts of each amino acid released at each time point are almost identical, making sequence determination beyond the first three amino acids released impossible. We now can assign the last three amino acids of the polypeptide. Move the cursor over the legend item representing threonine (three letter code Thr) and click once, then move over the item for alanine (Ala) and select it, and do the same for glutamic acid (Glu). Note that the sequence is being entered from right to left (i.e., from the C-terminus toward the N-terminus). This is normal for carboxypeptidase experiments because the enzyme starts cleavage at the C-terminal end of the protein and progresses toward the N-terminal end (right to left). Close the Carboxypeptidase Results Window and open the Peptide Information Window for the descendant icon on which these experiments have been performed. It will look like Figure 14. Note that all the experiments are listed, that the amount available is reduced by the amount used by the two experiments, and, most importantly, the sequence entered in the exopeptidase experiment windows is reflected in the Sequence Determined box. 18 Sequence It! User Manual Figure 14. Information after initial sequence determination. Performing a Cleavage Now it's time for Step 4 of the common strategy, "Divide and Conquer." Cleavage experiments are used for this step, in that they divide a protein into fragments by cleaving at specific sites -- before or after single amino acids or a group of amino acids. Here is where the help system comes in very handy, as each menu item under the cleavage menu has a corresponding help which describes the location at which the enzyme or chemical cleaves. This time, enter the help system by selecting the menu item Help with SequenceIt!... from under the Apple menu (with the icon title ). This opens a larger window with all help topics available in a list (Figure 15). Figure 15. General Help window. Scroll down the list until the enzymatic cleavages are displayed, and open the help message for Staphylococcal Protease. Note first that this new window, with the text for the cleavage help displayed (Figure 15a), allows you to move quickly to the previous and next help messages, as well as back to the topic list. Use this to scan through help messages more generally -- entering the help mode and selecting Sequence It! User Manual 19 individual items can get tedious after a while, especially if you're just looking around. Figure 15a. Help for Staphylococcal Protease. The message states that this enzyme cleaves on the carboxyl side of glutamyl (also called glutamic acid) residues. We know that there is at least one of these amino acids present (remember the results of the Carboxypeptidase experiment), so we'll use this protease (i.e., an enzyme which cleaves proteins) for our first cleavage. Determining which cleavage experiment to perform is one of the more difficult phases of protein sequencing -- not only do you have to know where each cleavage item works, but also you need some idea of the sequence of the protein. Close the Help Window for now and select the Descendant icon from the Performic Oxidation experiment. Click on the Cleavage menu, select the menu item Staphylococcal Protease , and use the defaults that the program has setup. After the computer has shown the steps done during an actual cleavage experiment, the Summary Window is shown with a new addition to the tree. The program automatically scrolls the tree so the newly created branch is visible; your screen should now look like that in Figure 16. 20 Sequence It! User Manual Figure 16. Summary Window after Staphylococcal Protease. There are four descendants from the Staphylococcal Protease experiment. This means that there are at least three glutamic acid amino acids in the sequence. This deserves a bit of explanation. If there are no amino acids that the cleavage mechanism recognizes there will be one descendant -- the untouched subject of the experiment. If there is one such amino acid, there will be two descendants -- one representing the fragment to the "left" of the cleavage, the other representing the fragment to the "right." You can picture this as a piece of string, as shown in Figure 17. The cleavage enzyme is like a pair of scissors, cutting the string at specific sights and creating fragments of string. Also, remember that the help message stated that glutamic acid residues followed by proline amino acids are resistant to cleavage. Therefore, it is possible that there are even more glutamic acid amino acids present than the three at which the protein was cleaved. Fragment 1 Fragment 2 Figure 17. Symbolic representation of protein cleavage. Fragment 3 Sequence It! User Manual 21 Performing an Edman Degradation Experiment You now need to determine, as a repeat of Step 3 of the common strategy, the sequence of each of the fragments produced from the cleavage. One of the most frequently used, and most useful, procedures is Edman Degradation. To perform this experiment, choose a peptide from the cleavage (the leftmost one below the label 'Staphylococcal Protease'), and choose the menu item Edman Degradation from the Analysis menu. After the default conditions are presented and are used, and the program displays the steps used in this experiment, you will be presented with a window like that in Figure 18. Figure 18. Results of Edman Degradation experiment. The output for this experiment is presented as a series of cycles, each of which displays the amino acid released at that cycle or step. To enter the amino acid either click on the graph at the location of the single letter code (i.e., on the bar in the graph for the cycle) or activate the text box labeled Amino Acid by clicking once inside the 22 Sequence It! User Manual box, and type in the single letter code. Do the same for cycle 2 and scroll down to cycle 3. Note that there is nothing shown in the bar graph for this cycle. There are a couple of possible reasons for this -- either the peptide has only two amino acids, or the amino acid for that cycle is destroyed by the experimental process, which happens to the amino acid cysteine only. (Refer to the Help message for this experiment to get a detailed explanation of its effects). For now, assume that there are only two amino acids in this fragment and close the window. Open the Peptide Information Window for the fragment on which the Edman Degradation experiment was performed, enter into the Length text box the number of amino acids believed to be in the fragment (2), and press <RETURN>. The Sequence Determined should now show the same two amino acids entered into the Edman Degradation Window (Figure 19). Figure 19. Peptide Information Window after Edman Degradation. Continue by performing the same sequence of actions on each of the remaining three fragments created from the Staphylococcal Protease cleavage, being sure to enter all amino acids which are displayed in the bar graphs, and to enter the number of amino acids into each Peptide Information Window. You will come across unknown amino acids, labeled 'X'. These are created by modifications on the protein (remember the Performic Acid Oxidation modification). For now, enter them as they appear on the graph; later on we will determine the actual amino acid. Sequence It! User Manual 23 Taking Notes Each peptide created by the program has associated with it a notepad. These are standard text windows in which you can store pictures, pasted in from the clipboard, and text, typing information in directly or pasting in previously copied text. Each experiment window, as well as the peptide information window, has present a small, standard notepad icon ( ). This icon represents the notepad for the subject peptide (that one on which the experiment was performed, or the one displayed by the peptide information window). To open a notepad click on the icon. Another way to open the notepad for a peptide is from the Summary Window. Select the icon representing the protein and, from the Edit menu, choose the Open Notepad menu item (or take the shortcut and press -K). We strongly encourage you to make extensive use of the notepads. You can make notes to yourself about the importance of a particular experiment or leave hints for others to follow. This is your only written record of why or how you did something. Also, this is the only vehicle currently available for you to get printed output from SequenceIt!. Saving the Problem It's wise to save the problem now, if you haven't done so already. No program is perfect, and it's possible that unexpected things could occur (power outages, random acts of God) that would cause you to lose all work done to this point. To save, go under the File menu and select the Save menu item. A standard Macintosh dialog will now come up, asking you for a name and location for the file which will be created. Use any name you like -- for the manual, the name "Intro Problem" was used, so this is what is displayed on all the following screen images. Performing a Second Cleavage 24 Sequence It! User Manual Go back to the fragment created by the Performic Acid Oxidation, select it, and choose the Cleavage menu item Clostripain. This protease cleaves after arginine amino acids, of which we know there is at least one (from the Edman experiment performed on peptide 4 from Staphylococcal Protease). Sure enough, we get a single cleavage, and hence two fragments are created. After some resizing of the window and scrolling to make everything visible, you should be able to get the Summary Window to appear as shown in Figure 20. Figure 20. Summary Window after Clostripain cleavage. Now you need to sequence the two fragments created. Use the Edman Degradation experiment recently described, and don't forget to enter the length into the Peptide Information Window to ensure that the program knows how many amino acids to display as the Sequence Determined. This is the fifth step of the common strategy -- repeating Steps 3 and 4 in order to get "overlapping peptides." Another symbolic figure is supplied here, in Figure 21, to help explain this concept. The sequence of the fragments from the first cleavage can be determined easily enough, and from the Aminopeptidase and Carboxypeptidase experiments we can determine which of the fragments are from the N-terminal and C-terminal ends of the peptide, but how to order the other fragments -- which goes Sequence It! User Manual 25 to the left, which to the right? By performing another cleavage and sequencing the fragments created, it becomes easy to make this determination -- now the only problem is entering this information into the computer. Positions from first cleavage Second cleavage Overlapping area Overlapping area Figure 21. Symbolic representation of overlapping fragments. Reconstructing a Protein The tool we provide for the reconstruction of a protein is called the Assemble Window. Select the same fragment we've been using, the one from the Performic Acid Oxidation, and choose the menu item Assemble Sequence from under the Analysis menu. If you've sequenced all the descendants of this peptide as was explained above, each individual subsequence should appear, as well as the sequence selected. See Figure 22. 26 Sequence It! User Manual Figure 22. Initial Assemble Window. Reorganize the fragments by clicking on the fragment itself and moving it around inside the window. As soon as you click on a fragment it becomes selected -- the sequence is highlighted, its origin is displayed in the bottom portion of the window, and the sequence is copied to the scrap. You can then paste the sequence into the Assembled Sequence text box at the top of the window at the current insertion point. This is a complex window, and another perfect opportunity to make the most of the program's on-line help. Enter the Help mode by typing -?, and click on the item in the window that is unclear. A small help window will then come up describing the item selected. Sequence It! User Manual 27 Figure 23. Fully assembled sequence. After aligning all fragments, the window should appear like that in Figure 23. Click on the Save button in the lower right hand corner of the window to register the assembled sequence with the Peptide Information Window, and close the Assemble Window. Go back to the Summary Window, select the peptide just assembled, and open the Peptide Information Window. Now displayed is the entire Sequence Determined. Reconstructing the Original Protein Still, only a descendant of the original protein has been sequenced. To enter the sequence for the original protein, select its icon in the Summary Window and then choose the menu item Assemble Sequence to open the Assemble Window for this protein -- the only fragment displayed will be that just sequenced -- the descendant created from the Performic Acid Oxidation. Select this fragment's sequence by 28 Sequence It! User Manual clicking on it and then Paste (from the Edit menu) the sequence into the Assemble Sequence region. Then save this window's configuration by clicking on the Save button. Go back to the Summary Window and open the Peptide Information Window for the original protein. Displayed is the entire sequence determined, but now we must deal with the unknown amino acids -- those labeled with the single letter code 'X'. One way to figure out which are the actual amino acids in the sequence is by a process of elimination. Reopen the window displaying the results of the Acid Hydrolysis experiment and notice that there were two cysteine amino acids counted. Since there are none displayed in the Sequence Determined, and there are only two unknowns, they must be the cystines. This one is easy! For future proteins it could be much more difficult -- amino acids could be modified and at the same time destroyed by the Acid Hydrolysis experiment, there could be several unknowns of different types, etc. Go back to the Assemble Window for the original protein and change the unknowns to the single letter code for Cystine (C). Save these changes, and close the Assemble Window. Moving and Collapsing Branches of the Summary Tree The number of branches of the tree represented in the Summary Window can quickly become overwhelming. Often they represent dead ends in the sequencing process, or, if one is sequencing a very complex protein, the branches could be going all over the place, distracting one from the current fragment being sequenced. For this reason, the program allows you to reorganize the placement of branches and also collapse and then expand branches of the tree. To move a branch of the tree, click on a label (e.g., the text box labeling the Performic Acid Oxidation experiment); while holding down the mouse button (an outline of the label will move with the cursor), move the cursor to the position where you want the label to be displayed, then release the mouse button. To collapse a branch of the tree, select a label by clicking once on the text, then move to the View menu and choose the menu item Contract. This reduces the branch of the tree so that only the label is displayed. Reverse the process by selecting the label again and choosing the menu item Expand from under the View menu. Sequence It! User Manual 29 Determining the Location of Disulfide Bonds There remains only one step in the full determination of the sequence: to find out if disulfide bonds exist and what their locations are. Remember that we modified the original protein as one of the first steps, and this modification was performed to get rid of the disulfide bonds. We then performed several cleavages to divide the modified protein -- in particular, the cleavage using the enzyme Staphylococcal Protease. This enzyme cleaves at glutamic acid amino acids (single letter code 'E') and now we know that there are three of these in the sequence. Since disulfide bonds connect two cysteine amino acids with a particular kind of bridge distinctly different from the standard peptide bond, and there is a glutamic acid residue in between the two cystines, it should be easy to determine if a disulfide bond exists. Select the original protein's icon and choose the Staphylococcal Protease cleavage again, using the defaults the program offers. Note the results of this cleavage -- only three descendants were created! To confirm the existence of a disulfide bond, you can now perform the modification done on the original on each of the peptides created from the cleavage. Here our hypothesis is confirmed -- the Perform Acid Oxidation of peptide three creates two fragments, meaning that the two were joined by a disulfide bond that was destroyed by the modification (Figure 24). 30 Sequence It! User Manual Moved and collapsed descendant label Figure 24. Summary Window after initial experiments for disulfide determination. Entering Disulfide Bonds To enter the disulfide bonds so they become part of the overall sequence determined, open the Assemble Window again for the original protein. Now, with two cystines present in the assigned sequence, the Setup Disulfides button should be enabled. Click on this button to open a window which shows an abstract representation of the protein, with the cystine amino acids explicitly shown. Your screen should now look like that in Figure 25. Sequence It! User Manual 31 Figure 25. Screen appearance for disulfide bond setup. To input the disulfide bond, click on one of the buttons representing a cystine amino acid, drag the mouse to the other, then release the mouse button. A graphical representation of the bond will then be displayed. Click on the OK button to close this window, and be sure to save the newly assembled protein using the Save button in the lower right corner of the window. The tutorial is now complete -- you have sequenced the protein SCIENCEISGREAT as the introductory problem. This small peptide has been found circulating in the blood stream of every research scientist in the world. Hopefully this has given you insight into how the program works, as well as made you excited enough to continue, allowing the program to generate proteins of increasing difficulty. Check out the section of this manual on Designing Your Own Problems to find out how to set the level of difficulty or enter your own protein. 32 Sequence It! User Manual Designing Your Own Problems Though SequenceIt! can be used to study preexisting problems, its true power lies in allowing you to conceive, define, and control all aspects of new problem sets. Therefore, understanding how to set up a problem from scratch is important in utilizing the program's full potential. Computer Generated Start SequenceIt!, and choose Setup from the Startup Screen dialog. You can also setup a problem by holding down the option key when choosing New under the File menu. After this you will be presented with the Problem Setup dialog (Figure 26). Initially the window displays the options for the Computer Generated setup. Here the options are simple -- just a set of controls called radio buttons. As you click in the radio button for each apprentice level you will be provided with a short description describing the general nature of the problem which will be automatically generated after clicking in the SequenceIt! button. Figure 26. Problem Setup dialog showing the Computer Generated options. Sequence It! User Manual 33 User Entered If you would like to know the sequence before you start or would like to import a sequence of a known protein, click on the User Entered radio button at the top of the window. The window will change to look like Figure 27. You can now enter a sequence in several ways. First, if you click on any of the buttons representing the three letter code for each amino acid, the single letter code for that amino acid will be entered in the sequence edit box at the current insertion point (where the cursor is blinking). You can also type directly into the sequence edit box using standard text editing commands. Lastly, you can import a sequence from the clipboard using the Paste command. All sequences entered must be in single letter code designations. Also, you can read in the sequence from another SequenceIt! file by using the Read From File button. Click there and a standard Macintosh Open File dialog is shown, allowing you to choose any file available. The sequence from the file is then put straight into the sequence editing box of the window, allowing you to change it at will. Figure 27. Problem Setup dialog showing the User Entered options. 34 Sequence It! User Manual Several Features of this window need some explanation : Save To File Button -- Common to both the User Entered and Computer Generated screens, this button allows you to save the protein being generated to a standard SequenceIt! file. It is useful for instructors setting up a series of problems for students. Circular Check Box -- Selecting this control causes a circular peptide to be generated, ignoring all other end group information. End Groups Button -- Opens a window allowing you to set the end groups of the protein to be generated. The window looks like that in Figure 26 -- select the radio button corresponding to the blocking you're interested in. Figure 28. End Groups dialog. Setup Disulfides Button -- Enabled when at least two cystine amino acids are entered into the sequence box, the button will open a window identical to that used to enter disulfide bonds in the introductory problem. Amount Entry -- The default value of 200 nMoles is placed here -- change it to whatever amount you'd like to use to solve the problem. Setup Menus Button -- Use this to filter the menus for different apprentice levels. Instructors setting up problems for their students may want to have only the least complex menu items displayed to lessen the chance for confusion and frustration. Sequence It! User Manual 35 Read From File Button -- Use this to read in a sequence from another file. Click on the button to open a standard Macintosh dialog for opening a file -the sequence will be entered into the editing area and can then be modified. Analysis Experiments There are several experiments available which were not needed for the determination of the sequence for the tutorial problem. These are shown under the Analysis menu and are chosen like any other experiment. Base Hydrolysis Base hydrolysis involves treating a polypeptide with a strong base to hydrolyze all peptide bonds and return the quantity in nanomoles of each amino acid released from a known quantity of polypeptide. The output is displayed in a window identical to that found with acid hydrolysis. The major use for this procedure is to obtain accurate estimates for tryptophan which is unstable to acid hydrolysis. Many other residues are affected by base hydrolysis, among them Cys, Arg, Thr, Ser, and Lys. Where stable derivatives are produced, XAA will appear in the output. As with acid hydrolysis, Asn and Gln are converted to Asp and Glu, respectively. Isoelectric Point Determination The isoelectric point of a protein is the pH at which the net charge of the protein is zero, i.e., the point at which the positive and negative charges are equal. This experiment is useful in distinguishing peptides with acidic residues from those with their neutral counterparts. For example, an acid hydrolysis experiment converts all asparagine and glutamine amino acids (neutral) to aspartic acid and glutamic acid, respectively. Hence, there's no way, with this experiment, to tell if the subject actually contains the neutral amino acids. By determining the isoelectric point, or pI, of the protein, one can make the distinction. In the absence of any positively charged side groups, a protein with glutamic acid residues will have a lower pI than a protein with glutamine amino acids. This is because the presence of the 36 Sequence It! User Manual negatively charged side groups of glutamic acid increases the hydrogen ion concentration (decreasing the pH) needed to give the protein a neutral charge. The results of an isoelectric point experiment done on the introductory problem are shown in Figure 29. The two symbols plotted (+ and -) represent the total positive and negative charges on the peptide at each pH increment. The solid line represents the net charge (number of positive charges - the number of negative charges) on the peptide. The pH at which the solid line crosses the zero charge line, at a pH value of about 4.0, estimates the pI of the peptide. This graph shows that the protein is acidic in that it has an overall negative charge This is caused by the large number of glutamic acid residues (single letter code of 'E'). Figure 29. The output from an Isoelectric Point experiment on the original peptide. As you move the mouse across the graph you will notice that the cursor changes to a target site cursor. If you click on the point where the net charge line crosses the zero charge line, you will notice that the question marks in the Isoelectric Point = field will change to the value you clicked on. If you click on the Record pI button, your estimate will be written to the Peptide Information Window for that protein. Sequence It! User Manual 37 End Group Analysis Figure 30. Output of End Group Analysis on original peptide. Use this experiment to unequivocably determine the N-terminal amino acid for the peptide in question. The window showing the results (Figure 30) closely resembles that obtained from acid and base hydrolysis experiments. Each bar represents the quantity of each amino acid reacting with the end group reagent. As you move the mouse across the graph you will notice that the cursor changes to a target site cursor. If you click on the bar for each amino acid, the quantitative value will be entered in the table to the right of the graph. The sum or total of each quantity will be tallied for you in the Sum box at the bottom of the window. You can also perform a clickdrag down the graph and fill the table in one operation. If you click on the bar representing the quantity of serine, the single letter code for serine (S) will be entered in the small text box representing the N-terminus for this peptide. You can also type the N-terminus assignment directly into this text box. A corresponding entry will automatically be made to the Peptide Information Window. 38 Sequence It! User Manual File Menu Setting Aside a Problem You can only have one problem open at a time in SequenceIt! However, you can Set Aside... a problem to the LabBench (Figure 31) for later re-examination. All the work you have currently performed will be saved to a disk when you set aside a problem. We implemented this tool to allow you to step away from your current research problem and try other approaches or techniques on other peptides without costing you any of your starting material. This strategy of putting aside a complex problem and attempting simpler, well behaved problems (i.e., problems in which you know the answer before hand ) is a useful tactic in science. Figure 31. The LabBench Window containing a previously Set Aside problem. Double-clicking on the file icon in the LabBench will close the current problem and restore the selected problem to your screen. You can have as many problems sitting on the LabBench as you desire but only one open at a time. Also, choosing the menu item Restore will re-open the currently selected problem in the LabBench. Sequence It! User Manual 39 Printing from SequenceIt! The only method of getting printed output from the program is through the notepads. To print a notepad, make sure that it is the frontmost window, then select the Print Notepad menu item under the File menu. A standard Macintosh printer dialog will appear allowing you to select the number of copies and the quality of the print. View Menu The View menu of the program has several items not described during the tutorial portion of this manual. These functions enable you to alter the display of the Summary Window to show or hide elements of particular concern. • The first six items in the menu alter the display of the individual peptide icons according to what experiment has been performed on them. For example, choosing the menu item By Composition changes the icons so the ones on which an Acid or Base Hydrolysis experiment has been performed will contain a small bar graph representative of the display of the experiment's results. Check out the Icons section of the manual for a description of the appearance of the icons for each menu item. • The Show Fragment Amount item, when chosen (a check mark will appear next to the item when activated), will cause the amount remaining of each selected fragment to be displayed right next to that fragment's icon. Also, a more immediate, visual clue is offered regarding the amount available. As the amount of a peptide decreases beyond a certain level the meniscus descends until, when there is no sample remaining, the icon appears empty. • The Full Menus item will display all available experiments at whatever Apprentice level has been setup. The menu will then change to Short Menus which reverses the display. • The Amino Acid Data item opens a window displaying the name of all amino acids, along with their corresponding three and single letter codes, like that in Figure 32. 40 Sequence It! User Manual Figure 32. Display of Amino Acid Data. • The Remove Info Page item, active only when the Peptide Information Window is frontmost, deletes the displayed page of the information window. Windows Menu The Stack Windows command reorders all the open windows by overlapping them. The windows are restacked in the standard overlapping pattern that is created when you open several windows in a row. This arrangement makes visible as many titles as possible while keeping all windows large. To make a stacked window active, click its title bar to bring the window to the front. The remainder of the menu lists all currently open windows by their titles. Select one of these items and that window is brought to the front. Sequence It! User Manual 41 Shortcuts This section describes ways to speed up use of the program. It's useful after you've become familiar with the more basic functions. Summary Window Shortcuts • After selecting an icon, use the command key equivalent of -I, or simply double-click on an icon to open the Peptide Information Window for that peptide. • Double-click on a descendant label to collapse or expand that portion of the summary tree. 42 Sequence It! User Manual Reference Communicating with Other Programs All communication between SequenceIt! and other programs takes place via the Macintosh Clipboard. Think of the clipboard as a place you can temporarily store something from one program and then retrieve from another program. You proceed by copying material from one program into the clipboard, switching to the other program, and then pasting the clipboard into the second program. This can be quite clumsy if you need to move several different things between the same two programs, since the clipboard can only hold one thing at a time. In this situation you may want to look into using the Macintosh Scrapbook, which can hold more than one thing at a time. Copy Window The Copy Window option on the Edit menu is always active as long as there is at least one window open. It will put a picture of the current frontmost window on the clipboard. Once it is on the clipboard, it can be pasted into a notepad or into another Macintosh program. The picture of the window looks exactly like the window. This is potentially confusing because it is not a window anymore but just a picture of one. This means that the Close box and other controls will not work. Copy Window Data Several SequenceIt! windows are able to put a copy of the data they contain on the clipboard in a form that is usable (not only displayable) by other programs. The data are in tab-delimited text format that is useable by many word processors, spreadsheets, data base managers, and graphing programs. Sequence It! User Manual 43 Tab-delimited text is text arranged in columns with each column separated by a tab. If you paste this into a word processor you will need to set the tab stops to line up the columns nicely. Unknown Cleavages To add some variety to the type of problems you can experience in SequenceIt!, we added three cleavage reactions (Protease #1 & #2; Reaction #1) to the Cleavage menu whose specificities are undefined. It is your job to determine what peptide bonds are cleaved by these reactions and the specificity of the cleavages. Hint: Perform cleavage reactions on short polypeptides of known sequence. We have included some test peptides for you to examine. They are included in the Test Peptides Folder. The file name is the sequence of each test peptide. 44 Sequence It! User Manual Appendices What Is the Educational Philosophy Embodied in SequenceIt!? To work under and learn from a master craftsman has been the concept of an apprenticeship since the origin of the word in the Middle Ages. A student learns from the experience and method of the teacher and is afforded access to the tools the master originated and developed in perfecting his craft. Determining the linear sequence of amino acids composing a protein (i.e., the primary structure) is what we view as a biological craft best learned from such masters as Nobel Laureate Fred Sanger. This clearly is not possible for most students. Moreover, protein sequencing has evolved into a highly technical field, requiring expensive instrumentation and hazardous chemicals. However, the tools and logic involved in this craft can be taught to all students, whether or not they are science majors. Our philosophy requires that you construct meaning as you work, by which we mean that beyond discovering a "fact or finding," you are continuously challenged to evaluate three structures of your knowledge: problem-statement (defense of the real problem to be solved), methodology (your solution strategy), and justification (defense of your current knowledge). We place peer group learning as an important adjunct to this approach and have accordingly made peer review and criticism of your "electronic notebook" an integral part of our approach. Using this approach, the role of your instructor is redefined from one of authority to one of a colleague who earns credibility through demonstrated skill. SequenceIt! is one of several programs composing The Biotechnologist's Workshop. Other programs include protein purification (PurifyIt!), enzyme kinetics (RateIt!™), and DNA cloning (CloneIt!™). Each program can be used alone or in concert with the others. For example, you can purify a protein, determine its amino acid sequence, and then clone the gene for it. If the protein purified is an enzyme, then the kinetic properties can be determined. The central idea inherent in all these programs is embodied in the master-apprentice relationship. Complex biological concepts that are either too costly or too time consuming to duplicate in a teaching laboratory can be experienced through the use of a microcomputer. In this Sequence It! User Manual 45 simulated research laboratory, however, one finds an environment that is infinitely patient, is inexhaustible in material, and is incomparably safe. Our philosophy o n teaching is best summarized with the ancient Chinese proverb: I hear, and I forget, I see, and I remember, I do, and I understand. 46 Sequence It! User Manual Glossary of Biochemistry Terms Amino Acid These are the building blocks of proteins. There are 20 different naturally occurring types of amino acids. One amino acid differs from another only by its side chain, or R group. Amino Acid Residues (Latin, residuus - left over) are the linked amino acids in a polypeptide. During polymerization, water is removed to form the peptide bond. C-Terminus or carboxyl terminus of a polypeptide is the last amino acid in a chain. By convention, residues are numbered from the Nterminus and written left to right in the order they occur in the chain. Disulfide Bonds play an important role in the structure of some proteins by tying parts of a single polypeptide chain together or by linking two different polypeptide chains within a protein. Disulfide bonds link two cystine amino acids together with a special type of bond distinct from the standard peptide bond. Hydrolysate is a mixture of amino acids resulting from hydrolysis of a polypeptide chain with 6N HCl at 100°C in vacuo for 24 to 72 hours. Meniscus The visible level of liquid in a tube. N-Terminus or amino terminus of a polypeptide is the first amino acid residue in a chain. By convention, residues are numbered from the N-terminus and written left to right in the order they occur in the chain. Sequence It! User Manual 47 Peptide Bond is the link between amino acids. An α-carboxylate group of one amino acid condenses with the α-amino group of another with the loss of a molecule of water. This is how polypeptides, or proteins, are formed, with potentially thousands of amino acids linking together. The resulting bond is also called an amide bond. Polypeptide is generally considered to be a chain of amino acids greater than 50 residues in length. Proteins Derived from the Greek word proteios, meaning primary, proteins are linear chains or polymers of amino acids. Primary Structure of a protein is the linear sequence of amino acid residues. When writing primary structures, one uses either three-letter or one-letter abbreviations of amino acids. R Group The side group of amino acids which distinguishes one from another. They range in complexity from a single hydrogen atom to multiple carbon ring structures. Repetitive Yield is the recovery or yield characterizing a sequential reaction or degradation. Sequence is the linear arrangement of amino acids making up a polypeptide or protein. Side Group See R Group. 48 Sequence It! User Manual Glossary of Computer Terms Clipboard The clipboard is an invisible place where something (usually a picture or a few words) can be stored for a moment. When you Copy text you put it on the clipboard. When you Paste you are pulling something off the clipboard to insert it into a document. The clipboard is part of the computer, not part of the particular program you are using, so you can use it to transfer information from one program to another. Customize is the ability to change parts of the program to better fit your needs and instructional objectives. In SequenceIt! you can change the sequence and quantity of the polypeptide, the default conditions for a particular procedure available on the menu bar (using the option-click), and difficulty of a problem. Desktop is analogous to the picture of what lays on your desk surface. It is the overall arrangement of menu bars, windows, icons, documents, etc. that you see on the screen. You can move things around, open, resize, and close windows, and throw things away, thus controlling the way your working area looks. Dialog Box is a window that contains requests for instructions or information. For instructions on using dialog boxes see your Macintosh Owner's Guide. Icon is the pictorial representation of a task or object. Sequence It! User Manual Menu At the very top of your Macintosh computer screen there is a white bar with a number of symbols and words. This is called the menu bar; each of the symbols and words is the title of a menu. For more information about menus and how to use them, see your Macintosh Owner's Guide. Mouse Please see your Macintosh Owner's Guide for information about what a mouse is and how you use it. Notepad is a window that you can type into, or insert pictures or data into using the Copy and Paste procedure. It is a place to write notes to yourself, or to collect your thoughts for a lab report. Each fragment has an associated notepad. To open a notepad, click on the symbol in the upper left of the window. Empty notepads are denoted by an empty symbol . Scrapbook The scrapbook is a desk accessory that will store more than one thing for you. This is an advantage over the clipboard, which can only store one thing at a time. See your Macintosh Owner's Guide for more information on desk accessories and the scrapbook. Window A window is an area of the computer screen, usually rectangular, that displays information. Most windows have a title displayed at the top. For more information see your Macintosh Owner's Guide. 49 50 Sequence It! User Manual Hardware and Software Requirements SequenceIt! requires a Mac Plus or later Macintosh computer running System 6.0.5 or later, with at least 1 megabyte of memory. To tell what system you are running, choose the About the Finder item from the menu of the Finder program. The Finder program is where you start out before you run a program like SequenceIt!. Cursors and Icons Cursors The arrow is the standard cursor in SequenceIt!. Use it to click in the title bar and drag a window, to move the scroll box, to pull down a menu and choose command, and to select a peptide item in a window. The wristwatch cursor indicates that SequenceIt! is performing a lengthy experiment or operation. The I-bar cursor appears at the insertion point in the editable text area of a window. Click to position the insertion point in the window or text. The question mark cursor appears when you enter the Help mode. Do this by typing a question mark while holding down the command key (-?). Use it to select a command or part of screen that you want to learn about. The target site cursor appears on some graphs. Click in the graph or legend to assign a residue or to obtain a numerical value. Sequence It! User Manual 51 These are disulfide editing cursors. When entering disulfides, either via the Customize window or the Assemble window, these cursors appear when dragging the link from one cystine amino acid to another. Icons Each fragment has associated with it a notepad. The "empty" notepad icon appears when the notepad is empty; the "full" icon when information has been entered. Click on either one to open the notepad it represents. The microcentrifuge tube (or Eppendorf) icon represents a peptide. The larger icon is used only for the original protein, the one to be sequenced. Click on one of these to select a peptide for an operation (when selected, the icon is inverted) and double click to open its Peptide Information Window. The level of the meniscus gives a rough indication of the amount of sample remaining. The amino acid composition tube icon indicates that an acid or base hydrolysis experiment has been performed on that peptide. Alter the tree to display these icons by selecting the By Composition item under the View menu. The N-terminal tube icon indicates that the amino terminus of the represented peptide has been determined. Alter the tree to display these icons by selecting the By Amino Terminus item under the View menu. 52 Sequence It! User Manual The C-terminal tube icon indicates that the carboxyl terminus of the represented protein has been determined. Alter the tree to display these icons by selecting the By Carboxy Terminus item under the View menu. The Sequence Tube icon indicates that sequence information exists for that peptide. The pI Tube icon indicates that isoelectric point determination has been performed on that peptide. These two icons are found in the End Group and Exopeptidase Windows. The first represents the N-terminal residues of a peptide and the second represents the C-terminal residues of a peptide. These two icons are found in the Assemble Window and indicate peptides that are neither circular nor have terminal blocking groups. These two icons are found in the Assemble Window and indicate that the peptide is circular. This icon is found in the Assemble Window and indicates that the C-terminus of the peptide is blocked. These icons are found in the Assemble Window and indicate that the N-terminus of the peptide is blocked. represents a formyl blocking group, an acetyl blocking group, and pyroglutamyl blocking group. a Sequence It! User Manual Index Acid Hydrolysis 12, 14 Amino Acid Composition 12 Amino Acid Data 15, 45 Amino Acids 8 Amino Group 8 Aminopeptidase M 21 Amount Entry 40 Analysis Menu 14, 21, 31 Arrow Cursor 56 Assemble Sequence 31, 33 Assemble Window 31, 33, 58 Assembled Sequence 32 Base Hydrolysis 12, 41 By Amino Terminus 57 By Carboxy Terminus 58 By Composition 45 C-Terminus 9 Carboxyl Group 8 Carboxypeptidase Y 22 Circular Check Box 40 Cleavage 24 Cleavage Menu 30 Click-Drag 16 Clostripain 30 Common Strategy 12 Computer Generated 38 Cursors 56 Descendant 21 Descendant Label 21, 47 Disulfide Bonds 12, 13, 18, 19, 35, 36 53 54 Sequence It! User Manual Disulfide Editing Cursors 57 Divide and Conquer 13, 24 Edit Menu 29 Edman Degradation 27 End Group 58 End Group Analysis 43 End Groups Button 40 Eppendorf 57 Exopeptidase 58 Exopeptidase Degradation 21 File 29 File Menu 38, 44, 45 Full Menus 45 Glossary of Biochemistry Terms 52 Glossary of Computer Terms 54 Hardware and Software Requirements 56 Help Mode 18 Icons 57 Isoelectric Point 41, 58 LabBench 44 Length 17 Length(?) 17 Lower Case 18 Meniscus 45, 57 Microcentrifuge Tube 57 Modification 28 Modification Menu 18 N-Terminal 43 N-Terminus, 9 New Protein 38 Notepad 29 Notepad Icon 29, 57 Open 29 Open Notepad Menu Item 29 Overlappings 13 Sequence It! User Manual Peptide Information Window 47 Peptide Information... 16 Performic Acid Oxidation 18, 19 Polypeptide 8, 11 Polypeptide or .I.Protein 7 Primary Structure 9 Print Notepad 45 Printed 29 Printing 45 Protein 8 Question Mark Cursor 56 R Groups 8 Read From File Button 41 Reconstruct 13 Reconstructing 31, 33 Redisplaying an Experiment 17 Reference 48 Remove Info Page 46 Restore 44 Save 29 Save To File Button 40 Saving 29 Selecting a Polypeptide 13 Sequence 7 Sequence Determination 21 Sequence Determined 18, 33 Set Aside... 44 Setting Aside a Problem 44 Setup Disulfides Button 40 Setup Menus Button 40 Short Menus 45 Show Fragment Amount 45 Single Letter Code 15, 45 Staphylococcal Protease 24 Summary Tree 11, 25, 34, 47 Summary Window 11 55 56 Sequence It! User Manual Tab-Delimited Text 48 Taking Notes 29 Target Site Cursor 15, 56 Three Letter Code 15, 45 Time Based 22 Unknown Amino Acids 28 User Entered 39 View Menu 15, 16, 45, 57 Windows Menu 46 Wristwatch Cursor 56