1
-
lntelligent Vacuum Cleaner
Model:T
User Manual
w
L
-ilrSafety lnstructions
Table of Gontents
normal
Features-PrOduCt Componenta
Main body and accsssoriss
PrOduCt
------------------------2-3
-------------------------4{
--_.--------------4
sabv
precautions.
and caBtully b. oE Ging t'ls poduc[
K6p tis @r manurl in yollr llght,
Anyopa€ion nctiollor/ingtlr.lrctuciions inihis @rmanudmyle€db ham
R€€d
hls Lrs$ manud tuluChly
human
_____
i
6
1
2'
d
ilvjurhqt
bdnusu
.an db€Es.ntr' ,E
p.d.i' u*.
pmr tda@.
ont ue tE ditid baotv
of
tE
aE not
d*d
pEduct lor
'tEl!hs'
'nd
' adapbrmyca..€Lctlcrio€kfiBdp.Dd'El&r'agE.
----DiSplaypangl..--.....-_.....--_83'DonolbiJch$6po!valc.d,DIqgoradapbrwlhv6than&.
4. BetoesbnnEth.pltdal,n.k BUEtE(fusltinflLrispEFdyiEblled.
------------------7
Rsmote controll€r
Eattery
charghg-
Starting up/psus€/St66p
modes--------product Maintaining.
Clsaning dust bin and
filtsr-
ro dbssssnbrs or
usins other
Ilparr
unfr"Ed
laun(rv'
---"--------------------4
mode-----------------------------------10
Cleaning
b
orhb pmdud
Safety lnstructions
Main body anatomy ------
charging hom6 bas€
a
a
a
6.
t16
mr*ing
cas.
7.
------------12
----------------------.13-14
8'
L
11.
12.
13
ioor.ntlltlllndn ( l€n'o/€ 6lr t16 {j€gil6 6bj€dr 6r'd @ElE, clotrhs, p6pdE, rGe
Erob lrl drrE1l and dEp€a ofitE ltdb id aiy posibb did.nb. ln
B6h6 G6, colocl
€HB,
ai€lla
t'3l.16€. dl€
E
rd€d
wjt| t16 Eodud, f'€ cabb mighl mow allund
wt'
lho pldud s3 it
Do not sit on top of this product or attach an object on the top of it. Beware of children or pets while the
product is in operation.
Onlvus.t.prcdLxtlncloo,. do notu€€ [outs6''
Do rEt leit'h pEdEl lEtcld€ t (&al€(6, hhbr, madl or*1yiammbl€s.
denhs, do
not@+endttE F€.@rd
r h6 p6ducl n6€&
not d€sn it whil6
Do
or
6aqing.
prBeethe poE dd eih hery dsh6lp oqEls.
c,€aninsssnsorsanddarsinsconn€ctonpo,*--_--.-_l4
ll il*trIllffiffil,lffi,Iil"*lf;tX*,f1,*,d.*d,Ec*Ee,6,b,
ctotl----TroubleShooting---
15.
16.
Mopping
cp6inns
i4
-------------------------n5
drh€ port/6r$lici tudng
t
17.
tErEporiauon trvfi€n yuJ dont n6€d
tippins, h6.m alrtho Fopl6 in tE hou6wtEn thb plodd is
B€b€ use,.h€d( rffilor.d.ftr and q:tel ars popcly srrcred.
a).
oo notU3.f'ls
Tum
To
m*j
us6
hb pmdlJcltra kr's lire.
rc*its
Frdudh hlgh.bltp€rB&r€ olMlll)nEnr trundsr bakfu €tldg ftra lon€tmo.
Productspecncation.-----.--.-.----.---.-.-.--.-"-.-r7 1l *ffiffitr#"ffff##.ff.X,1**
I
rh.
appll.nc. b iol lnLnd.d br u!. by p.opL (lr|cludlng .hll4!n) wnn tlduc.d piy.lc!|, !.n!ory or
msnt l c.pablllU.r, or 1h... wtlo l..i ol .)p.dlll. .nd kiorvl.dF .bo( .hcli..l .ppllanc6., unl6.g
lh.y h.\6 b.€n ghan lup.wllhn or lndrucuon.
ifl;
, tll
i;i
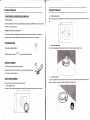
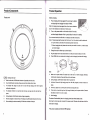
Product Features
ffi
Product Features
tu
Powerful Suction. lntelliqent Suction Adiustment
'!t
:i*
Powerful Suction
tr
With strong suction power, the product possesses superb cleaning capabilities-even tiny dust on the
,i;
r
2.
Spot cleaning mode
When the robot detects a dirtier area, it will activate the spot cleaning mode, which will clean in a spiral
way.
floor will be thoroughly cleaned.
lntelligent Suction power Adjustment
This product is able to automatically adjust its suction power when different floor environments are
detected. Not only it makes cleaning more efficiently, but also it helps to save more power.
Gonsiderate Desiqn
3.
By pressing only one button
"
ffi
\:/
Edge cleaning model
When the robot detects that it is along the wall, it will activate the edge cleaning mode.
Easy step-by-step operation
', you could easily direct the robot!
Dust bin is washable
Dust bin could be washed directly by tap water.
Simply wash dust bin under tap water per use to avoid dust blowing to the
air and cause a second pollution!
4.
Various Cleaninq Modes
Four cleaning modes are provided to meet your needs.
1.
Scheduling mode
User can schedule the robot cleaning time as they want. When a certain time is scheduled, the robot will
Auto cleaning mode
The robot will clean a room automaticallv and adiust its cleaninq mode according to the environment.
{;-1
+il#
leave the charging home base and start working at the scheduled time.
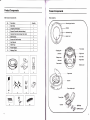
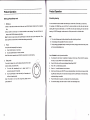
Product Components
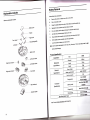
Product Components
Main body and accessories
Robot anatomy
No.
Description
Quantity
1
Main Body
1
3
Charqinq Home Base
Remote Controller (without battery)
4
Cleaning Tool (help to clean the robot)
1
5
Side Brushes
4
6
Screws for Side Brushes
4
7
User Manual
1
8
HEPA Filter
2
9
Power Adaoter
1
10
Moooino Cloth
1
2
1
1
Front wheel
Right brush
H
l.l
I
hA
5
tr
W
o
'.--'
tgt
L;]
10
Right wheel
Bottom cover
I
[,*]
@ry
Dust intake
Upper cover
Dust bin
Power adapter jack
E
,{
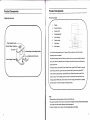
Product Components
Charging home base
lli
ii,
Product Gomponents
Remote Controller
1.
2.
3.
4.
5.
6.
7.
L
Display
Directional buttons
Powneron/off
Scheduling button
Auto charging
--1:/\
().'(_)
Cleaning mode
Clock set up
Spot cleaning
EE
SPOT
MOOE
You could use the remote like your TV remote. Firstly, to switch on robot, then point it
towards the robot to operate it.
Remote time setting: press CLK button for seconds, then you can press direction buttons to
set up time. After time selected, press CLK again to save the time and then it will show the
right synched time.
Cleaning function: press ON/OFF button; Sleep function: press ON/OFF bufton for seconds
(robot will stop work and, it goes into sleep mode 30s
late|; Spot cleaning: press SPOT
button; Cleaning mode selection: press MODE button; Scheduling function: press PLAN
button to set up it and for details operation please see Scheduling Cleaning section; Auto
charging: press HOME button, robot will stop work and charging automatically; By pressing
direction button, the robot will change its cleaning direction.
Note:
* Please install h/vo AJfuq type bafteries into the remote before use.
* lf the remote controller of the robot is used around the charging home base, tholc commtndt glv€n
above might not work properly because of signal interference.
* lf remote controller is not in use for a long time, pleaoe takc out lte batlcry'
,q
Product Gomponents
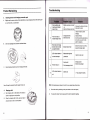
Product Operation
Display panel
Battery Charging
1.
Place charging home base against the wall, plug in adapter,
and signal light on charging home base will flash.
Note: Put charging home base against the wall and remove obstacles
about 1 meter distance at two sides and 2 meters ahead.
2.
Turn on the power switch on the bottom side of the robot,
W
and then display indicator will be in gradual blue, the robot is in standby.
(lf no command received, the robbt witt turn to sleeping mode after 20 seconds.)
Note: A. Please always keep the power switch turning on. lf not, it is unable to make the robot work.
B. lf power switch is turned off, all the scheduled operation will be lost.
C. Before charging the robot, please make sure the power swilch is turned on, or else the robot
can not be charged.
3.
Charge the robot in either way as shown below:
A.
Plug the adapter into tho robot and the other end to the power socket as below on the left;
B.
Press HOME button on remote control to direct the robot to charging home base for charging.
ry@
Note:
A.
@
A.
CLEAN button indicator will have red flash and the robot beeps.
cteaning button part
Switch on the robot, CLEAN button indicator will gradually show blue color
B.
C.
;
B.
Touch CLEAN button, the robot will beep once and the indicator will turn blue;
c.
The indicator will change its color and the robot will keep beeping when there happens
malfunction during work;
D.
Make sure the power switch at the bottom side of the robot is on before charging. OtheMise,
The indicator will flash in red and the robot will have one beep when the robot with low
During charging, CLEAN button indicator will be in gradual red.
lt will take 3-4hours for fully charging every time. After fully charged, the robot will have
3-5
beeps.
D.
E.
For first use, please run out of the power and then fully charge the robot.
lf the robot is not used for long time, fully charge the battery turn the power switch off, remove
the battery and store it in a cool, dry place.
power;
E.
During charging, CLEAN button indictor will get red gradually;
F.
After fully charged, the robot will have
G.
After scheduling the robot succossfully, CLEAN button indicator will be pink.
3-5 beeps and CLEAN button indicator will turn
4.
blue;
Auto charging
The robot will automatically return to charging home base when baftery is low,
Note: Keep the home base well connected to the power socket. Othenrvlse, the robot can not flnd tho
home base for charging.
.This product complies with the EU
ERP Btandard.
Product Operation
Product Operation
Starting up/Pause/SleeP mode
Scheduling cleaning
1.
You can schedule the robot to mako it start cleaning at a certain time. (Time delay up to 23 hours.)
Starting up
gradual
A. power on the switch at bottom side of the robot, and CLEAN button indicator will be in
For example, it's 9:00AM now, you set 6:30 on the remote controller, and then the robot will start
cleaning after 6 hours and 30 minutes, i.e. 15:30 PM. Since it's daily scheduling, the robot will start
blue.
have one
B. Touch CLEAN on main body or on remote controller to start cleaning. The robot will
get
blue.
beep, and the CLEAN indicator will
cleaning at 15:30 PM everyday-unless users turn off the power switch on its bottom side.
Note: lf robot is in sleep mode, press CLEAN button to wake the robot up from sleep mode' Then
Note:
press CLEAN for a second time, the robot starts cleaning automatically'
2.
A.
Pause
Touch CLEAN button on main body;
Or press CLEAN button on remote controller.
Note: when robot is paused, press GLEAN to make robot to re-start cleaning.
How to Schedule the robot by remote controller:
A.
3.
Turn robot into sleep mode, and its display indicator will be in dark
(robot in standby, not Powered off):
The robot will automatically turn
to
sleep mode
if
no
command received in 30 seconds.
B.
B.
C.
D.
E.
Touch CLEAN button on the main body for 3 seconds and it
l0
Press PLAN button until the remote displays flashed figure"00:00".
Press
'|' to set the flashing numbers.
r' to switch between hour and minute.
Press *r
After time confirmed, press ON/OFF to save scheduled setting, robot will have one beep, and the
CLEAN button will be pink. lf the robot has two beeps and the CLEAN button on the robot is blue,
will turn to sleeping mode.
Note: lf the robot is not in use for a long time' please turn the
power switch off.
To schedule the robot when it is standby or charging on home base. (Press CLEAN to wake up
the robot, or press ON/OFF on the remote to wake up it.)
Sleep mode
A.
home base), robot
will not accept scheduling set up.
To stop the robot temporarily from cleaning:
A.
B.
The robot will always work at the scheduled time after scheduling confirmed.
B. All scheduling will be cancelled if the robot is turned off.
C. During charging by adapter directly connecting to the robot (charging without
scheduled setting is cancelled.
F.
G.
Press PLAN button for seconds, it will get back from scheduling setting.
To cancel the setting, make the number to "00:00" under scheduling mode.
ll
Product Maintaining
Product Operation
1.
A.
Cleaning modes
1. Auto cleaning
The robot will clean a room automatically and adjust its cleaning
mode according to the environment.
on the brushes.
(( ))
IJ,
Note:
.
Press CLEAN button on remote control or touch CLEAN on robot
to start auto cleaning.
2.
Spot cleaning
Under two situations, the robot will activate spot cleaning:
1)
2)
When it detects a dirtier area;
Pressing SPOT on the remote to start spot cleaning.
A
I
"ul
\p/
B.
C.
lt is suggested that users should select spot cleaning mode only
around the areas with much dusUdirt. When the robot finished
cleaning for the dirtier area,
it will automatically
stop spot
cleaning mode and turn to selected mode'
3.
Edge cleaning
Switch on the robot, press MODE on the remote and select edge cleaning'
Under edge cleaning mode, the robot will clean along the obstacle by its side brushes.
Clean the side brushes by tool or cloth.
Replace side brushes if it's damaged. (Take out the side brush by a screw drivel then put a new
brush in the same position and fix it by a screw.)
2.
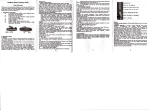
Gleaning dust bln and fllter
Empty dust bin after each use, thg procedures are shown in figures below.
A.
B.
C.
D.
E.
F.
G.
Note:
.
Cleaning side brushes
Check sidei brushes to see whother they're damaged or whether there are foreign matter stuck
Press "PUSH" mark to open the dust bin cover
Take out the dust bin.
Separate HEPAfiltor first from dust bin.
Pull out dust bin top cover and take out primary filter.
Empty dust bin and wipe the dust.
Wash dust bin and primary filter, clean HEPA with a brush.
lnstall primary filter and HEPA filter into dust bin, close dust bin cover, and then install it into main
body.
Note:
a
After taking out dust bin, check whether there are foreign matters stuck in dust passage and
clean
it.
a
Wash HEPA filter after 15-30 days use. Life span for HEPA is 24 months.
a
After wash HEPA and primary filter, dry them in ventilated & cool place and install them after
they are fully dry. Do not dry them under baking sunshine.
Dust bin and filters (including HEPA and primary filter) could be replaced if needed.
Note:
After switch on the robot, by pressing MODE on the remote to
select edge cleaning, and user can press ON/OFF button to
A
stop it.
.@ w
tu
F*'1
C
tr
@"d,1 *6o.l
l3
t2
Troubleshooting
Product Maintaining
3.
A.
Cleaning sensors and charging connection pole
Slighily wipe the sensor window at the robot boftom and auto charging sensors with cleaning tool
or a soft dry cloth, as circled below:
Robot suddenly stop
cleaning and indicator
keeps in blue
1. Re-place the robot on the floor
2. Re-start the robot
1. Check if robot is under
Power on robot, its
indicator keeps in blue
B.
Clean suck passage and dust sensor as shown below
1. Charging finished
2. Cliff sensor fault
Robot does not chango
direction when it comes
up against obstacle
charging
2. Clean cliff senor
3. lf all the solutions given above
don't work out, send it to the
'l.Check the sensor to see if it is
covered by foreign object
LED indicator flashes in
1. Switch on the robot
/1..-.*,:\
_Ri
'\-\[_a
_\_
red and robot beeps
1. Dust bin full
C.
2. Dust passage get stuck
1. Empty dust bin
2. Clean dust passage
Clean charging connection pole on charging home base'
1.
Note: Do keep the sensors free from water, thinner, etc.
4.
A.
Mopping cloth
Stick mopping cloth on the bottom of the robot as
shown in right figure to mop the floor.
B.
NOte: f
Fully charge the battery
att solutions given above don't work for you, please take actions below:
1)
Re-set the robot by switching on the power bufton on the control panel;
2)
lf re-set action doesn't work, please send the robot to seller for repairing.
When the mopping cloth is dirty, users can take it
away and stick a new one on the bottom.
t4
l5
Battery Removal
Replaceable modules
Please follow below Procedures:
Below are rePlaceable modules:
HBattery
O
Battery
"'22
rsr'/
Front
Left
cover
-\
wheer----€ Y
t*--/ ?
Rightbrush
Dust Passage baffle
brush-------{
A.
B.
C.
D.
E.
F.
G.
H.
l.
cover with a screw driver'
Remove the screws on battery
Pull out the battery cover'
and pick the battery up'
at two sides of the battery
Grasp the isolated strips
that links battery and robot'
Separate the wire connector
side facing up'
cabinet and keep the character
Put a new battery into its
battery and robot'
Joint the wire connector between
been placed well'
and isolated strips have
Check whether wire conndctor
battery slot with right direction'
Put the battery cover onto
cover with a driver'
Lock the screws on battery
used' lt mlght
othe*ise, if other type battery
battery for the robot only;
model
same
the
use
Note:
cause Product damage'
-. Bottom cover
@--r"ft
brush module
Rightbrushmooute----@
Right wheel
moa'te
&
-@
Mechanical
@-Leftwheelmodute
@-Fan
Specifications
modure
Main enclosure
Dust bin module
Note: Product storage temperature:
'20'C to 50'C'
l?
16