1
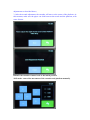
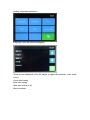
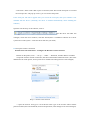
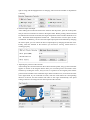
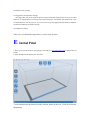
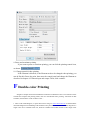
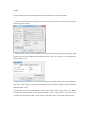
Dreamer Series User Manual
Welcome to the world of the Dreamer. To ensure that you have the best possible user
experience, it’s important that you follow this user manual. Let’s get started!
In Parts I through III, you will learn how to properly unpack the printer, and you will get
familiar with the accessories and the printing operation interface. In Parts IV through
VI, you will learn how to install software and make a first print, and you will learn the
double-color printing process.
CAUTION: Please do NOT:
1. Do not remove the yellow tape on the platform; the yellow tape is heat-resistant, and
will enhance the adhesion of the material and prevent slipping during printing.
2. Do not remove the packaging from the nozzle. The packaging consists of
fire-resistant ceramic fiber fabric and heat-resistant tape, which keeps the nozzle
temperature constant and improves the consistency of filament output.
Product Parameters
Printer:
Printing technology: hot melt stack forming technology
Operating interface: 3.5 inch full color IPS touch screen
Build size: 230×150×150mm
Printing precision: +-0.2
Filament diameter: 1.75mm
Extruder diameter: 0.4mm
Software:
Name of software: Flashprint
Support files: stl、obj
Operating systems: Windows
Linux
Mac OS
Appearance dimension:
Machine dimension: 485×400×335mm
Package dimension:
Net weight:
Package weight:
Input voltage: 100-240V,50-60Hz
Output voltage: 24V
Data transmission: USB, SD card, Wifi
A Unpacking Guide
Please read this section before opening the box. We pack the Dreamer with special care and
ask that you unpack it with similar care.
Warning
-The Dreamer is sensitive to static electricity; please make sure that you have released
static electricity from your body before operating the Dreamer.
-Before attempting to maintain or repair the Dreamer, make sure that the power supply is
off, and the power cord is unplugged.
-Danger! There is a heated build platform in the printer that can reach high temperatures
—let it cool down before repairing.
-Danger! The printer’s moveable parts may cause injury. Please do not risk entanglement
by wearing gloves when operating the printer.
Packing List
Dreamer printer: equipped with filament *2, tools box*1, dual-extruder*1, power cord*1,
blue tape*1.
——Filament: one is blue PLA filament, the other is white ABS filament.
——Tools box: tweezers*1, graver*1, SD card*1, washed glue*1, small shovel*1, storage
box*1, USB cable*1.
——Blue tape: this is heat-resistance tape that you will apply to the platform before
printing.
Unpacking
B Firmware Installation
Installing the extruders: place the extruder on the guide rail horizontally and align the
screw hole of the extruder to the screw hole at the bottom of guide rail. In the storage
box, find the screw for the extruder and the appropriate socket hex wrench, and install
the extruder on the guide rail.
Installing the spool: place the spool straight into the spool groove. Thread the filament
from the filament hole of the printer and then insert it into the extruder. The filament
hole is located at the top of the Z-axis.
It is important to adjust the platform: if the platform is too far away from the extruder,
the model fails to stick on the platform due to lack of adequate cohesion. If the platform
is too close to the extruder, the extruder will touch the platform, and fail to shape a
model. Caution: when the extruder is touching the platform there is a risk of damage to
the both the extruder and the platform.
C Operation Instruction
Turn on the Dreamer’s power supply. The screen will display the welcome
interface.
After a moment, the main operation interface is displayed.
Print: choose to print from the printer’s memory or from an SD card.
Preheat: heats the right and left extruders, and the platform.
Tools: More function settings
Change filament: loading and unloading the right and left extruders
Leveling: platform adjustment interface
The three knobs under the platform are used to raise or lower the platform.
♦
Tightening the knobs (turning them counterclockwise) moves the platform away
from the extruder nozzle;
♦
Loosening the knobs (turning them clockwise) moves the platform closer to the
extruder nozzle;
♦
Keep approximately 0.3mm between the platform and the nozzle.
Note: you may also visit our official website to watch the video of leveling the platform
Website: www.sz3dp.com
1. When the screen guides you to adjust the front left knob under the platform, measure
the distance between the platform and the nozzle with your eyes; then, adjust the knobs
one by one until the two nozzles are equal distance from the platform; you may use a
thin paper (A4 paper for example) to test the distance—making sure that the paper can
slide between the nozzle and the platform with slight friction;
2. When the extruder moves to the front right of the platform, perform the same
adjustments as described above;
3. After the second adjustment, the extruder will move to the center of the platform. At
this moment, make sure the paper can slide between the nozzle and the platform, with
some friction.
Default: the extruder returns back to the initial position
JOG mode: control the movement of the extruder and platform manually
Setting: set printer parameters
Language: select the preferred language
Touch screen calibration: select TP Adjust to adjust the sensitivity of the touch
screen
Clock: time setting
Date: date setting
Wifi: turn wifi on or off
Reset to default
D Software Installation
FlashPrint is the parameter setting software for the FlashForge Dreamer desktop 3D printer.
Software supporting notices:
Process of downloading and installing software:
D1 Software download:
Method 1: Insert the included SD card into a computer. We have already prepared the latest
driver installation package.
Method 2: Open a browser and input http://www.sz3dp.com/driver download/dreamer series/ to
download the installation package.
D2 Start software installation
1. Uncompress the downloaded RAR, and install according to the instructions.
2. Connect your Dreamer to your computer with a USB cable. Start the software with the
shortcut on the desk or in the Start Menu.
The software is compatible with Windows XP/Windows 7/Mac 32-bit operating systems. win8 and
64-bit systems are not recommended, as unpredictable errors may occur during the installation.
Please make sure to switch to Windows XP/Windows 7/Mac 32-bit operating systems before
installing this software.
D3 Introduction to software operation:
Application of SD card: 1. Upload STL model: (set up a STL model in advance, upload via
software)
2. Angle of view: observe the model from different angles. Operation method: click left button to
select the model, press the right button to change the angle by turning; viewing the model from
different distances. Operation method: turn the mouse wheel to adjust the distance.
3. Movement: when the model is selected, you can adjust its position. Generally, we suggest you
click “Centering” and “Placing on the bottom panel” to make sure that the model is within the
printing scope. Operation method: press the left button of the mouse to move the model; press the
right button of the mouse and turn to view the model.
4. Rotate: turning the model. Operation method: press the left button of the mouse and move to
adjust the position of the model; press the right button of the mouse and rotate to view the model.
5. Scaling: adjust the size of the model. Operation method: click scaling; press the left button of the
mouse and move to enlarge or shrink the model; press the right button of the mouse and rotate to
view the model.
6. Extruder: Click once again after selecting the extruder, choose to print with left or right extruder.
7. Slice: after the adjustment, choose suitable parameter according to the features of the filament,
click OK, transform the current model document into G document (“Slice only”, SD card
application) or transmit to Dreamer directly and start to print (connect line to print, the printing shall
be finished after the slicing is done).
8. Printing: select the generated G document and connect the computer to print.
Use the USB cable: connect the computer and 3D printer
1. Connect your computer with the USB cable to the USB port at the back of the printer. Turn on
the printer and start Flashprint software.
2. Click the “printer” menu at the top of the software interface, then select the “serial port” in
“connection.” If the result is that no port is connected, click “Re-scan the serial port” to scan and
the serial port No. will pop up. Click it, you can connect the printer.
If the serial port still fails to appear after you re-scan the serial port, then your software is not
installed with the driver. (Generally, the driver is installed automatically when installing the
software)
Open the root directory of the software, such as:
open the driver file under this
catalogue, search the driver software, and click install (there is installation software for a 64 bit
system and a 32 bit system—select the driver that suits your need).
D4 Set up the wireless connection
Wireless network connection: 1. Configure the Dreamer wireless network
a.Switch on the printer, tools——set up——WIFI——WIFI ON, and then WIFI is available.
b.Open the wireless network connection, and choose the Dreamer-LPB connection. (This is the
default network of the printer, and no password is needed if the settings haven’t been changed)
Step 1: Connect to the network
c. Open the browser and type in 10.10.100.254. Then type in the account admin and the
password admin (this is the default IP, account and password, if the settings haven’t been changed).
Step 2: Login interface
d. Click the mode setting, choose AP+STA mode and save it. Please do not reboot. (Note: if only
STA mode is chosen, the printer may be not able to connect to WIFI with the wrong STA setting)
Step 3: Change network mode
e. Open STA setting, click search, choose an appropriate network, type in password and save it.
Then reboot the printer.
Step 4: Change STA setting
f. Wait for five seconds after the reboot, then choose disconnect and try to connect the WIFI
again. After this, you do not need to connect WIFI in the future if no WIFI setting is changed. If you
want to change the WIFI setting, please try the same way.
Step 5: The screen after reboot
2. Use Flashprint to connect the printer
STA mode:
1)
Switch on the printer, tools——settings——WIFI——WIFI ON
2) Write down the IP address and the port number of the printer after WIFI opened
3) Open Flashprint, menu——print——connect, and choose WIFI as the connection method.
4) Type in the IP address and the port number noted just now, and click connect
Connection of Flashprint to the printer
AP mode:
1)
2)
3)
4)
Switch on printer, tools——settings——WIFI——WIFI ON
Open the wireless network connection, and choose Dreamer-LPB
Open Flashprint, menu-print-connect, and choose WIFI as the connection
Type in IP address and port number (it defaults to 10.10.100.254:8899), and click connect
Note: A printer can only have one connection. If printer is operating by another process, connections should be switched off first and try to
connect again. If AP mode is chosen, WIFI cannot be used by computer.
3. Firmware upgrade
When the software is upgraded, the firmware in the printer needs to be upgraded, as well. You
can do like this:
1) Connect the printer to the computer via USB, and confirm that it is connected successfully. Please
refer to D 3.8.2
2) Click the tools in the menu and choose upgrade firmware. See the picture below, please. Click
OK in the popup window, then the firmware in the computer is upgraded.
D5 Setting of control panel
1. Heating extruder and platform
After the connection between the software and the 3D printer is complete, click tools.
Choose control panel and then you will see the temperature
control interface of extruder. Fill in your target temperature in the blank (in general, the
respective temperature of extruder and platform is 220 and 115 , and the respective
maximum temperature is 230 and 120 ). Then you will see the actual temperature on the
right is rising, and the diagraph below is changing. This means the extruder or the platform
is heating.
2. Filament input and output
After making the connection between the software and the printer, open the control panel
and you will see an interface as shown in the figure below. Before printing, filament should
be melted in the extruder. To do that, the target temperature of the extruder should be set as
220 . When the actual temperature reaches 220 , click forward or reverse to put in or take
out filament. In addition, you can control the input/output speed of the filament by changing
the motor speed; you can control the time of input/output by changing the duration time.
Finally, touch the filament at the entrance--you will feel it moving, which means it’s
working properly.
3. Adjusting the position of the extruder
After making the connection between the software and the printer, the jog control interface
appears as shown in the diagram below. Here you can make precise movements of the
extruder by clicking the arrows, and you can set a position as the original point and the
position of the extruder as the coordinate origin. If the extruder moves, it will show the route
in the right blank. If you would like to return, click the center button for corresponding
direction of X/Y/Z, and the extruder will return to the origin automatically. The speed
setting of the axis can change the movement speed of the extruder.
D6 Double-color printing
D7 Suggestions for parameter settings
We suggest that you set the speed of space running as 80 and the feed speed as 60 if you use ABS
filament; we suggest that you set the speed of space running as 100 and the feed speed as 80 if you
use PLA filament. You may have to try several times to get the appropriate parameter as different
models have different parameter settings.
D8 Update of software
After you’ve finished the steps above, you are ready to print.
E Initial Print
1. Draw your own 3D model or open your browser and go to www.ishare3D.com to download a 3D
model.
2. Open Flashprint and upload your 3D model.
3.You can adjust the position of model with the menu on the left. Click slice after the
adjustment;
4. After the parameters are set, click OK to form the slice;
5. Click more options to define more settings;
6. Choose a location to save the file.
7. Save the Gcode to the SD card, and insert the SD card into the Dreamer. Then, the
printer is ready to print;
8. If the printer is connected to the computer through USB or WIFI, you can choose to
print immediately after slicing.
9. Pause and terminate printing
If you want to pause or terminate printing, you can click the printing control icon,
as shown.
10. Change material when printing
If the filament is blocked, or the filament needs to be changed when printing, you
can do like this: Pause the print, then enter the control panel and change the filament as
described in chapter 4: Filament input and output. Then, click continue.
F Double-color Printing
Imagine a complex and colorful model that combines two different colors. If we want this more
colorful and complex 3D printing effect, then we need double-color printing. And with its dual
extruders, the Dreamer can do it! Here’s how…
1. Draw a 3D model diagram, or open the browser and go to www.ishare3D.com to download the
3D model diagram from Flashforge 3D model base. Pay attention to whether the model diagram is a
single color one or a double-color one, because a double-color model consists of two single color
models.
2. Open Flashprint software and upload the 3D model file that you just downloaded.
3. Use the function button to adjust the position of the model, click slice and then you’ll see the
following popup window;
①Double-color printing (without support): choose different printing filaments according to actual
requirements and set the appropriate printing parameters: click “more options”, set the parameters,
then click OK to save.
②Support printing: sometimes we need to print a top-heavy model, and for this we need support to
print well. Click “support” and choose left extruder or right extruder to support, then set parameter
and click OK to save it.
4. Prepare the printer, and install filament in the left and right extruders. Copy the G file to the SD
card, then insert the SD card into the printer and start to print. If the printer is connected to your
computer through USB or WIFI, you can choose “print after cutting” to print the model directly.