1
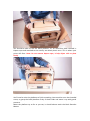
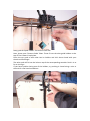
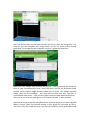
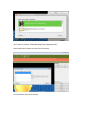
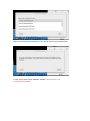
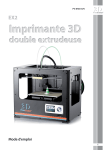
FlashForge Creator Quick Start Manual
Safety Information ............................................................................... 1
Please always check power setting before plug in ................................ 1
Unboxing.............................................................................................. 3
Package Contents...................................................................................................................... 3
Unboxing ................................................................................................................................... 3
Initial Hardware Setup ............................................................................................................. 5
The First Run Experience ...................................................................... 8
All set? ....................................................................................................................................... 8
Loading Filament .................................................................................................................... 10
Your First Print ........................................................................................................................ 12
ReplicatorG ........................................................................................ 13
Installing and Using ReplicatorG ............................................................................................ 13
Request on Python version .................................................................................................... 13
Using ReplicatorG ................................................................................................................... 13
The Control Panel ................................................................................................................... 13
Move, Scale, Rotate ................................................................................................................ 14
Slicing ...................................................................................................................................... 15
Dualstrusion....................................................................................... 17
Upgrading Firmware for The Creator .................................................. 19
Safety Information
Caution: The Creator generates high temperatures and includes moving parts that
can cause injury. Never reach inside The Creator while it is in operation, and allow
time for The Creator to cool down after operation.
The Creator is sensitive to electrostatic discharge. Make sure you don't have a static
charge on you by touching a grounded object before operating The Creator or
attempting any adjustments. If opening The Creator for service, ensure that the
power supply is turned off and the cord is disconnected.
Please always check power setting before plug in
FlashForge sets the power supply to default 230V before leaving factory. If voltage in
your location is between 90V to 132V, please switch the power setting from 230V to
115V before you plug in. You will find the power source at the bottom of The Creator.
The red box is where the power setting is located
Switch to correct voltage setting.
Unboxing
We packaged your Creator very carefully -- we hope you’ll read this guide and be just
as careful unpacking it. In fact, you should always be really careful with The Creator.
Here are a few things to keep in mind.
Package Contents
Here are the items that should be found in the Creator package:
-The Creator
-Dual Extruder
-Feet, Bolts and Hex Wrench Kit
-2x spool holders
-Power supply cable
-USB A to B cables
-2x filament guide tubes
Unboxing
First, place The Creator's box on the ground next to a clean, flat workspace. Discard
the top cardboard insert, if you haven’t already. Now remove the inner cardboard
box -- the one that fits around the outside of The Creator.
You’ll be able to see the top of The Creator now, as well as some cardboard boxes
and packaging. Note: the black cable is not a handle! Never lift The Creator by the
black cable.
Lift it up from the outside. Grasp the upper frame carefully and avoid touching the
internal belts and rods. Gently pull The Creator out of its packaging and place it on
your work surface.
You should be able to see the build platform: it’s an aluminum plate covered in
Kapton tape and attached to the rods by two black plastic arms. This is where your
prints will form. Note: Do not remove Kapton tape, it help object stick to plate
firmly.
You’ll need to raise the platform to finish unpacking. You can either turn the threaded
screw, or grasp the build platform firmly on both sides and move it up with gentle
pressure.
Move the platform up as far as you can; it should almost reach the black Extruder
Mount.
Underneath the build platform you’ll see some boxes,remove these, as well as the
remaining packing material. It’s easiest if you remove the packing material first.
You have now finished unpacking your Creator!
Initial Hardware Setup
With the build platform raised, you have a clear view of the black cable that leads
from the electronics cavity to the build platform.
Now we’re going to bolt the DualExtruder into place. Lower the build platform all the
way by turning the threaded screw behind the platform or by grasping the black
plastic arms at the sides of the platform and pushing down with gentle but steady
pressure. Now locate your Feet, Bolts and Hex Wrench Kit. Remove the two black
bolts from the kit and find the hex wrench that fits the bolts.
Grasp your DualExtruder by the sides and take it out of its protective bag. Place it on
the DualExtruder Mount so the bolt holes line up and the fans face forward. Secure it
with the bolts and wrench.
Now, grab the Spool holders. Put one on each side.
Next, locate your Filament Guide Tubes. These fit into the tube guide holders at the
top of The Creator’s back plate.
Place the very end of each tube into its holders and click them closed with your
thumb and forefinger.
The other end will fit into the hole on top of the corresponding extruder. Push it in as
far as it will go.
If you have trouble closing one of the holders, try pushing it closed using a coin or
the end of a flat-head screwdriver.
Almost finished! Locate your Power Supply and cable.
Next, plug the cable into the Power Supply, and the Power Supply into the power
input port, next to the power switch. Before connecting anything, make sure that the
Creator power switch is in the OFF position.
Now locate the USB A to B cable and plug it into the USB B port on The Creator. Don’t
plug the other end into anything yet.
Last, mount filaments on the Spool holders. Mount each spool so that the filament
feeds up from the center.
You’re done with initial hardware setup!
The First Run Experience
All set?
First, make sure that you’ve completed all the steps in the Unboxing and Hardware
Setup section: your DualExtruder should be bolted in place, your filament guide
tubes connected, and your spools of filament mounted on the spool holders. You can
plug in your power supply now, too.
If everything is ready, then flip on the power button on the back of your Creator.
The Creator will now guide you through initial setup and your first print. You should
see a welcome message on the LCD screen.
If you don’t see something like that, don’t worry -- just go to Utilities->Run Startup
Script. Use the up and down keys to move the cursor and push the M to select.
First the startup script will teach you a few basic things about how The Creator works.
Then it will help you level the platform, load filament, and start a test print.
Because the Creator has been tested and calibrated in the factory before being sent
out, so the following setting-up instructions may not appear, but you can also use
all these functions directly by select them on the menu.
Follow the on-screen instructions to set up your Creator for the first time! Leveling
Your Platform
Pay close attention: leveling your platform is very important to print quality!
Here’s the first screen
Those three dots mean the message isn’t over, so click the M when you’ve read the
screen and want to continue. Then you'll see this
After you finish reading this message, The Creator will tell you to tighten the knobs
on the bottom of the platform
These four knobs are the ones on the bottom of the platform, just inside the plastic
arms that hold it up. It's actually easier to level the platform if you don't tighten
these all the way. Instead, tighten each knob four complete turns. Then press the M
button.
It’s very important that you always move two knobs during each step -- if you try to
move only one knob at a time, the script can have unexpected results. Also, make
sure that you’re moving the specific knobs the script is telling you to use.
At each stage of the script, your Creator will ask you to test the platform height by
sliding a piece of paper between the platform and nozzle.
When you're done, The Creator will ask you if the nozzle height is OK.
Use the sticky note to test the platform height one last time. If the note can move up
and down underneath the nozzle, your platform is too low; select “Let’s try again.” If
it can slide around a little bit, you’re good to go.
If your platform is too low, your prints might not stick to the surface, and if it's too
high, the nozzles could tear the Kapton tape on the platform surface. If you're having
trouble, or if you just need to level your platform again, you can always get back to
the leveling script in the menu by going to Utilities->Level Build Plate
Loading Filament
The first step of filament loading is to remove the filament guide tube(s).
Once the tubes are disconnected, you can go ahead and feed the filament into the
guide tubes from the back until you see it come out at the front.
Make sure that the filament loads up from the center on both spools, so you don't
get jams during printing. One of the spools will have to go on backwards. You want it
to look like
After you’ve fed the filament through, press the M. The machine will start to heat
both extruders
You’ll have to wait for a few minutes for them to heat up. Be careful not to touch the
bottom of the Extruder while it’s heating -- it gets up to about 220° C, which is hot
and can burn you!
Once the nozzle is at temperature, The Creator will tell you to load filament in the
right-hand Extruder.
Click through the message until your Creator asks you to press the M when you see
plastic extruding. Then take the end of the filament itself and push it right into the
center of the hole. Make sure it goes into the center, and doesn’t get caught at the
edge.
You'll have to use some force, but as long as you’re holding only the filament, you
can’t hurt your Creator.
Maintain pressure on the filament, and after a few moments you should feel the
motor pulling it in. Then you’ll see some plastic start to come out the nozzle. When
that happens, you can press the M and push the guide tubes back into the blue rings.
Don't be surprised if you don't see the color you expected -- there's probably still a
bit of plastic inside the extruder left over from the testing process.
If you have a dual-extruder machine, The Creator will now ask you to load filament
into the left-hand extruder. Follow the same process you did for the right.
After The Creator is done extruding, wait a moment for the extruded plastic to cool
down before you pull it away. You can discard the plastic in your normal garbage, or
recycle it, if your recycling system can handle ABS. Don't leave plastic clinging to the
extruder nozzle -- if you do, newly extruded plastic might stick to the nozzle instead
of the build platform.
The Creator will give you a couple of chances at this before continuing. If you don’t
get it quite right the first time, you can load filament from the menu at any time by
going to Utilities->Filament Options in the menu.
Your First Print
Now your Creator will ask you if you’re ready to print.
Make sure your SD card is in the SD card slot at the right side of The Creator. Then, if
you’ve successfully leveled your platform and loaded filament into your extruder,
answer yes! The Creator will drop you into the “Print from SD” menu. Select one of
the prints and watch The Creator go to work!
Ready to find more things to print? Install ReplicatorG and learn how to print designs
from Thingiverse and all over the internet.
ReplicatorG
Installing and Using ReplicatorG
To take your experience to the next level, you’ll need to download and install
software ReplicatorG.
ReplicatorG translates designs from Thingiverse, 3D design software, and all around
the internet into the kinds of instructions that Creator understand.
Download and Install ReplicatorG
Go to http://replicat.org/download for the
version 0040
of the
ReplicatorG software.(Important: other versions may not compatible to
the default firmware 7.2 that Creator uses) Both the Mac and Windows
versions come with installers that will walk you through the installation process.
Request on Python version
The replicatorG installer will check for Python, which ReplicatorG needs to run
Skeinforge, its slicing engine. Please select Version2.6.8 or 2.7.4. Other versions may
not compatible.
Using ReplicatorG
Setup
Make sure your computer is connected to your Creator with the supplied USB cable.
Open ReplicatorG by double-clicking the application. The ReplicatorG software will
try to connect to your bot.
If your machine doesn’t connect properly, go to the Machine->Machine Type (Driver)
menu in ReplicatorG and choose your configuration. A dual extrusion Creator would
be "The Replicator Dual."
Next go to the Machine->Connection (Serial Port) menu. On Windows, try selecting
the highest-numbered port. Then click the "Connect" button.
The Control Panel
ReplicatorG’s control panel is a handy utility that allows you to test all of
functionality. You can access it by clicking on the button with four arrows at the
upper center of ReplicatorG's main screen. From there, you can move the X,Y, and Z
axes, control the heat of your extruders and platform, and move your extruder
motors backward and forward. You can change or load filament by heating up your
extruders and then using the extruder motors.
On the left side of the control panel window, you can use the axis buttons
superimposed on the image of your Creator to move each axis. The labels are
arranged to match the direction of movement that you’ll see on the bot, and the plus
or minus matches the direction you’ll see in the GCode. We highly recommend the
“Continuous Jog” setting here, but you can also move the axes by predetermined
increments.
In the lower right, you’ll see the temperature settings. There’s a color-coded
realtime readout of the temperatures for your extruder or extruders, as well as the
heated platform. To set a target for any of these, just type the target temperature
(in Celsius) into any of the boxes on the left and then hit enter.
To load or unload filament, set the target temperature for the extruder in question to
about 225° C. Once it hits the target temperature, you can load or unload
filament. To load or unload, you’ll need to release the filament guide tubes. Press
the blue ring on top of the extruder and pull the tube.
To unload, just tell the extruder in question to reverse at 3 rpm for 30 seconds to a
minute until you can remove the filament. To load, have the extruder move forward
at 3 rpm and push the filament until it catches.
Now that you’ve got RepG set up, you need a 3D model to replicate. It's time to
explore Thingiverse. Take some time to explore the popular and featured Things of
Thingiverse or use the search bar to find exactly what you’re looking for. And
remember, all the designs on Thingiverse are free!
Once you’ve found that special print, you will need to download the STL file that goes
with it. The downloadable STL file should be located on the left hand side of your
browser window, directly below the image of the object.
Next, you’ll need to get the file into ReplicatorG. Select "Open" from the drop-down
"File” menu in ReplicatorG and then select the file using the dialog box -- or you
could just open up ReplicatorG, find your STL file, and drag it into the ReplicatorG
window.
Now that your file is loaded, you should see an image of the model in
ReplicatorG. This is the model view, and you can always return here by clicking on
the tab labeled “model.”
Move, Scale, Rotate
While ReplicatorG’s main purpose is to convert your model into a form your Creator
understands, you can also use it to make basic changes to your models so they print
better.
First, make sure that your model is oriented correctly. Go into Rotate mode by
pressing the ‘rotate’ button at the lower right hand side of ReplicatorG. You can make
adjustments in any mode by clicking and holding the model and then moving the
mouse, but it can be easier to just use the buttons. Rotate mode's buttons will rotate
your model by 90 degrees in x, y, or z. Use them to make sure that the model’s
flattest side is on the bottom and also to avoid overhangs.
Next, make sure the model is resting on the surface of the platform, not suspended
in air or below the platform. Go ahead and click the “move” button, followed by “put
on platform.” You can also use this opportunity to center your object, by pressing
the button labeled “center.”
Once your model is in the right position, you might want to make it larger or
smaller. To do that, click the ‘scale’ button. If you know exactly how you want to
change the size, put the multiplier in the box and click “scale.” 0.5 will halve the size
of the model, and 2.0 will double it.
Slicing
Once your model is in position and ready to go, you’ll need to slice it.
Slicing is the process of breaking down your design into a set of movements for your
Creator to make. These instructions are called GCode, and they tell the Creator
exactly where to move the extruder in order to build your item up layer by
layer. ReplicatorG’s main job is to take your 3D models and turn them into this set of
step-by-step instructions. To get started, click the “Generate GCode” button.
Before you generate GCode, make sure your GCode generator -- found in the GCode
menu -- is set to the most recent version.
The first thing you’ll want to do here is select the proper Base Profile for your bot.
Start off with the default profile that best matches your Creator.
You can also choose to “Use Raft/Support” which prints a thick base underneath your
print, which can later be broken off. Rafts can help with tall, thin prints that may have
trouble sticking to the build platform. Support material is a thin webbing of plastic
to help prints with extreme overhangs. We won’t use these for now, but don’t
forget about them.
For now you’ll want to “use machine-specific start/end GCode” and “use
Print-O-Matic” so that your Creator will run at its default settings. You may notice
that the menu that appears when you choose to use Print-O-Matic shows a number
of interesting options. Print-O-Matic is a great way to change the infill, layer height,
and speed of your prints.
Once you’re happy with your settings, simply hit the Generate GCode button, and let
your computer do the heavy lifting.
Now that you’ve got your gcode, there are two ways to get it to your Creator. If your
computer is connected to the Creator, you can simply click the Build button. That's
the one at the upper left that looks like an arrow pointing to a bean. Your other
option is to click on the build to file button (the third button, with the arrow pointing
to a sheet of paper) and export the gcode to your SD card as an s3g file. Now just put
the SD card into your Creator’s SD slot and use the LCD interface to start your
print! There's a 26-character limit on filenames for use with The Creator, so if you're
having trouble, just make that filename a bit shorter.
And remember, if you change your mind and want to print something else, you can
always press the center button and use the arrows to navigate to a cancellation.
Dualstrusion
Dual Extrusion with ReplicatorG
First, you'll need to find a dual extrusion model to print. Go into ReplicatorG's
"Thingiverse" menu and select "Dual Extrusion models!" It will bring you to every
Thing tagged "Dualstrusion" on Thingiverse.
Any dual extrusion model you find is going to be composed of two .stl files, one for
each color or material. Make sure you download both. Then go to ReplicatorG's
"Gcode" menu and select "Merge .stl for DualExtrusion."
You'll see three fields: one for each extruder and one to name the merged file. The
fields for the two extruders will accept either .stl files or Gcode you've already
generated. The merged file will be Gcode, so give it a .gcode file extension.
When you click "Merge" two windows will pop up -- one to generate the Gcode for
each of your two component parts. These will look a lot like the Generate Gcode
window you've used for single extrusion. Make sure to check "Use default start/end
Gcode" and "Use Print-O-Matic". You'll also want to make sure that "Use Raft" is
unchecked for both items -- rafts currently don't work well with DualStrusion prints.
After you're sure that this looks good, click "Generate Gcode" in both windows.
ReplicatorG will generate the two different sets of Gcode and then put them together.
When it's done, you'll find yourself looking at that .gcode file you came up with a
name for earlier. Go ahead and print it just like you would any other generated Gcode!
It's as easy as that.
Upgrading Firmware for The Creator
Disconnect from ReplicatorG
To upgrade the firmware on your Creator, you're going to need to disconnect from
ReplicatorG.
Once you've clicked 'disconnect' in RepG, go into ReplicatorG's Machine menu, check
Connection (Serial Port) and make a note of which port The Creator was connected
to --- you'll need it later.
Select your new firmware
Now go back to RepG. Go into the Machine menu and choose "Upload new
firmware…"
The next step is to select the machine you’re upgrading.
you’ll want to choose ”MakerBot Replicator (Mightyboard).”
Now choose the newest version of the firmware.
This should be the one at the top.
Next, choose the correct serial port. This will be the one you noted earlier.
Finally, you'll see a button labelled "Upload." Do not press it yet.
Locate the Reset switch
The reset switch is on the back of your Creator, just to the right of the USB port. You'll
probably also need something to press the button with -- most fingers won't fit.
Hit the upload button, press the reset button, and wait
Hit upload, wait a fraction of a second, and then press the reset button.
It will take a little while, but soon you should see a message telling you that your
firmware has been updated successfully.
Once you see the "Firmware update succeeded!" message, you're set! Go back to
printing with your exciting new firmware.