1
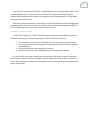
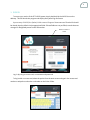
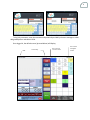
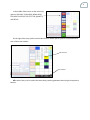
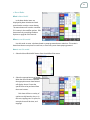
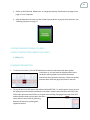
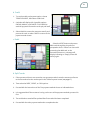
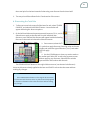
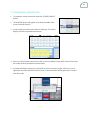
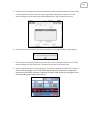
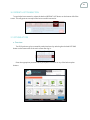
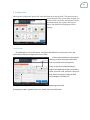
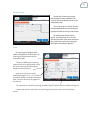
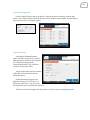
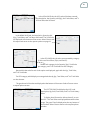
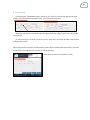
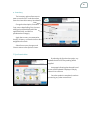
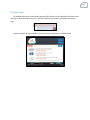
V2POS
USER MANUAL
1-855-340-7292
1
TABLE OF CONTENTS
Topic
1. OVERVIEW
2. SIGN IN
3. SALE TRANSACTIONS
a. ECR mode
b. SCAN mode
c. Menu Mode
4.PRE AUTHORIZATION SALE (US ONLY)
5. PRE AUTHORIZATION COMPLETE (US ONLY)
6. REFUND TRANSACTIONS
7. VOID SALE
8. TENDERING PAYMENT
a. Cash
b. Credit
c. Debit
d. Split Tender
e. Voucher/Gift/Loyalty Card
f. Other
9. REWARDS
10. DISCOUNTING A SALE
a. Specific Item Discount
b. Discounting the Total Sale
11. SUSPENDING A TRANSACTION
12. RECALLING A SUSPENDED TRANSACTION
13. SCALE INTERFACE
14. CASH OUT
15. ORDERS
16. REPRINT LAST TRANSACTION
17. OPTIONS AT POS
a. Overview
b. Configuration
c. Reports
d. Transactions
e. Inventory
f. Synchronization
g. Clock In/Out
h. Cash out History
i. Payout
j. Voucher/Card Balance
k. Employee Access Cards
18. CLOSINGTHE POINT OF SALE
Page #
2
5
9
12
14
15
15
15
16
17
18
18
18
19
20
20
22
24
25
26
27
29
31
33
33
34
43
49
50
50
51
52
52
53
53
54
2
OVERVIEW
Point of Sale is our Passion.
In the spring of 1983, RT7 Incorporated’s founder Tony Comparelli designed, developed,
programmed, and installed one of the world’s first PC based Point of Sale Systems. It was a simple
program that allowed the retailer to enter their daily cash receipts and generate simple inventory sold
reports in a batch at the end of day. It ran on a Radio Shack TRS-80 Model II Computer utilizing the
CP/M Operating System. After installing the system in about 60 stores
in the Toronto area, Tony decided to take the business from his
parent’s basement into a small office and incorporated his first
company. By the fall of 1984, his POS application had evolved into
an actual counter top transaction processing system
complete with perpetual inventory. It operated on the DOS
based IBM PC Model 5150 and included a cash drawer.
Between 1984 and 1990 the company sold more than 20,000 of its PC based POS units in 7 countries.
In 1990 the product continued to evolve into a complete retail management solution with full
inventory control, back office reporting, accounting, and payment processing. In 1991 The Retail
Council of Canada selected the system as the platform for its retail automation strategy and American
Express licensed the platform for its ‘At Your Service’ Retail Benefits Program. These relationships
furthered the expansion of the user base to over 50,000 Counter Tops. In 1996 the company had
grown to more than 200 employees and was eventually purchased by a leading hardware and
software manufacturer.
In 2002, Tony Comparelli decided it was time to realize his vision of the connected retail
enterprise and started RT7 Incorporated and the development of V1-POS. The connected retail
enterprise is a retail management system that could be
accessed and utilized by retailers of all sizes from any
device connected to the Internet. In other words POS in
the ‘CLOUD’. 11 years ago this was an almost
inconceivable vision. Retailing is referred to as a Mission
Critical application; it must work all of the time and it
must work even if the Internet is not available! It took
several years of development before a commercial test
of V1-POS could occur and in August 2004, the first V1POS hosted Point of Sale Systems in the ‘CLOUD’ were
installed in a chain of 70 locations. Several more years of
development and refinement had to occur in order to
perfect the hosted POS application. Not until 2007 was V1-POS ready for commercial use and between
2007 and 2010 over 2,000 stores processed millions of transactions on the V1-POS Platform.
3
Over 25 years of experience, knowledge, feedback, input, countless hours of actual use, and
hundreds of millions of transactions processed in the field has provided the foundation for our new
product V2-POS-The next generation of the hosted POS System. A well thought out, tested and proven
application for your retail business.
Key Features:
• Sell in three modes, Menu, Scan and ECR Mode
• Full QSR Menu Support with Modifiers
• Access to over 3 million SKU’s for Scan Mode (no need to build your own inventory database)
• Special Order Management with Customer Database
• Real Time Reporting at POS
• Real Time Reporting and Stats from Back Office
• Full Remote Access 24/7 from any Internet Connection
• Franchise Management and Reporting
• Transaction Set Management (Sale, Refund, Payout, Void, Discount, etc.)
• Online Video Tutorials
• Deal Voucher and Gift Card Management
• Works in Offline mode with Auto-Sync Technology
• Automated Program Updates
• Scale Interface*
• Multiple Kitchen or Station Printing*
* Additional Equipment Required. Additional Fees May Apply.
V2POS is the second generation of RT7′s Cloud Based Point of Sale System. Version 1.0 was
released in May 2004 and was one of the world’s first complete Point of Sale Systems available in the
Cloud.
Hundreds of retailers managed their day to day retail operations, generated reports, controlled
inventory, and processed millions of transactions on the V1 Platform. V2POS is RT7′s next generation
of Point of Sale in the Cloud.
4
Over the years retail users of V1 were key to the development of our next generation V2POS. They
provided feedback, ideas, retail use scenarios, data and other important information that we
combined with emerging technical ideas and concepts to create something special. A Cloud based
POS system that actually works!
What every retailer should know is that nothing can replace the experience and knowledge that is
created by actual users over many years and when it comes to mission critical applications like POS
you can’t afford down time. Don’t let your store become a test site!
Knowledge + Experience = V2POS
The RT7 V2POS System is a ‘CLOUD’ based POS system, which means all of the data is securely
stored on remote servers. The main advantages of ‘CLOUD’ based POS system are:
1. You can access your entire retail information 24/7 from any Internet connected device.
2. You can generate reports and manage your retail business in real time from any Internet
connected device
3. You don’t have to worry about backing up your data
4. You don’t have to worry about installing and maintaining program updates
It is important that you have a working Internet connection at all times. However, in the event
your Internet connection is down or not stable, V2POS will operate for up to 10 days in the Off Line
mode. When the Internet connection is re-established, all of your data will be synchronized with the
servers automatically.
5
1. SIGN IN
To access your version of the RT7 V2POS system, simply double click the V2POS icon on the
desktop. This will launch the program and display the System Sign On Screen.
Upon startup of V2POS, the (below) initial screen will appear. Store name and Terminal ID should
be already input by default in the appropriate fields. If these fields are not pre-filled, consult the store
manager or designated person for this information.
Make sure status is
online
Log in by using an access card, or username and password.
To log in with an access card, select the option from the start screen and type in the access card
number or swipe the card on the card reader on the Point of Sale.
6
To log in by username, enter the username and password provided by the store manager or other
designated person and select LOGIN.
Once logged in, the default screen (pictured below) will display.
Date
Time of day
Store name and
connection status
Store number
and Register
number
7
On the top left side of the screen is the
Transaction Summary where all of the transaction
entries will be displayed.
Below the transaction summary is the total
section where the quantity, discounts, subtotals,
applicable taxes, and total of transactions and
cash change to the customer are displayed.
On the bottom left of the screen there are 7
buttons: CLOSE, CASH OUT, SALE, REFUND,
ORDERS, REPRINT LAST, and OPTIONS. Each will
be described in detail later in this manual.
The system information is displayed here
including the software version.
8
In the middle of the screen are the main entry
options: VOID SALE, SCAN MODE, MENU MODE,
ECR MODE, DISCOUNT, DELETE ITEM, QUANTITY,
and RECALL.
On the right of the entry options are the Menu buttons where specific options can be selected for
each of the menu headers:
Menu Buttons
Menu Headers
All modes of entry can be used in the same sale by switching between them using their respective
buttons.
9
2. SALE TRANSACTIONS
a. ECR Mode
What is ECR Mode?
When signed in to the default screen after log in, the ECR MODE is located in the middle of the
screen below MENU MODE as a blue button.
After selecting ECR MODE a number pad will display on the right side as well as the option to
apply tax rates or to use the NO TAX option.
When to use this mode:
Select ECR MODE to manually enter sales
prices and taxes.
How to use this mode:
1. Select the ECR MODE button by touching it on the screen. It will become a darker shade than
the other modes, indicating this mode is now active.
2. Enter the price to charge for the item on the number pad to the right. Note there is no need to
enter a decimal between the dollars and cents.
3. Select the button on the far right (green buttons located below
the Load Card button) to classify the purchase under the
applicable category if necessary.
This step is NOT mandatory. If purchases are categorized,
they will appear named as such in the Transaction Summary
menu.
10
There are up to four options for categories. If items are not
categorized, they will appear in the Transaction Summary labeled as
ECR.
See page 27 for Tarepack use.
4. Apply the tax rate necessary by selecting the appropriate tax rate
using the navy coloured buttons on the right side of the screen.
There are 3 preselected tax rates available, including no tax.
5. After applying the tax rates, the transaction will then appear on the top left screen in the
Transaction Summary area with the type of purchase, quantity, price per item, and the total.
Below this are the subtotal and the tax amounts applied. On the
bottom below this is the grand total owed by the customer. If
discounts were applied, they will be located there above the
subtotal amount.
Deleting Entered Items:
To delete an item already in the Transaction Summary, select the item and the red DELETE
ITEM button in the middle of the screen. Once the item is selected it will appear
highlighted in blue. If an item is not selected, but the Delete button is pressed, the
last item entered on the Transaction Summary will be deleted.
Changing Quantity of Entered Items:
Change the quantity of an item by selecting it until it becomes
highlighted blue. Select the yellow QUANTITY button located below
the DELETE ITEM button. Windows pops up prompting entry of the
quantity amount, and then select ENTER to apply the change, or
CLOSE to return to the original screen.
11
Discounts in ECR Mode:
To enter a discount in this menu, select the item in the transaction summary by tapping it
until it is highlighted blue and select the yellow DISCOUNT button below the ECR MODE in the
middle of the screen. See Discounts on page 22.
Repeating Items:
To add the exact same items as the
last entry, simply select the REPEAT
button located on the right side of the
screen. This will duplicate the last entry.
Voiding and Clearing Entries:
To clear any entries made by the number pad, select CLEAR. This will zero out the numbers,
but keep all entries already made in the transaction summary.
To restart the sale or to remove all previously entered items, select
the red VOID SALE button located on the top middle of the screen. This
will redisplay the main
screen seen directly
after log in.
Accepting Payments:
Once all items are entered, select TENDER PAYMENT. Once this option is chosen the sale can
still be voided, discounted, or suspended. See more on payment options on page 17.
To load a prepaid card in this mode, enter the amount
the customer wishes to load on the number pad, then
select the LOAD CARD button on the top right of the
screen. Then select the payment option applicable and
process payment as normal.
Select BACK if to cancel the load.
12
b. Scan Mode
To use the scan menu select it from the middle of the screen using the
SCAN MODE button. Use the scanner to scan the item or manually input by
using the number pad to enter the SKU and pressing enter. Otherwise use the
scanning feature and scan the item automatically.
Manual Entry:
For manual SKU entry in Scan mode, choose the field below the SCAN YOUR ITEM field. A
window will display to enter the SKU. Select Enter after entry.
Use search in the number pad window when entering
manually and a new window will display to enter the
description of the item (generally the name). For this option,
select enter and another window will display with the search
results. Choose the result applicable and the system will
return to the sales window.
If the item selected does not require weight, it will
automatically display in the transaction summary field.
Otherwise, enter the weight or to place the item on the
scale to be weighed by the scale itself when prompted.
13
Adding new SKU:
If an SKU was entered that does not exist a new window will open to try again by choosing
Retry or Add to add the SKU. Retry will re direct back to the original sales screen.
If add is selected, a new window will display allowing entry of the applicable information for
the item.
Type in applicable name in the description field, select enter. Then input all applicable price,
tax parameters, and other fields and choose OK. The Transaction summary will be updated with
the new item.
Change quantity, apply discounts, and tender payments as normal (see applicable items in
Table of Contents). See page 27 for Tarepack use.
14
c. Menu Mode
What is Menu Mode?
In the Menu Mode, Items are
displayed by Menu Headers and each
menu header contains a menu button.
The menu button will contain a modifier
if it is set up in the modifier options. Edit
these menus by consulting the Menu
Options on page 38 of this manual.
When to use this mode:
Use this mode to enter sale items based on preprogrammed menu selections. This mode is
best when there are set prices for each item, or have many menu items preprogrammed.
How to use this mode:
1. Select the blue MENU MODE button from the middle of the screen.
2. Select the appropriate menu header.
When the menu header is selected,
the appropriate menu item buttons
will display above. Choose the
specific item to be purchased from
the menu buttons.
Each item will have a variety of
options usually based on size, or in
this case, toppings etc. For pizza, for
example, there will be sizes, and
toppings.
15
3. Similar to the ECR mode, delete items, or change the quantity. See directions on page 9. See
page 27 to use Tarepacks.
4. After the selections are made, use the Tender Payment button to pay for the transaction. See
Tendering Payments on page 17.
4. PREAUTHORIZATION SALE (US) ONLY
5. PRE AUTHORIZATION COMPLETE (US ONLY)
a. Adding Tip
6. REFUND TRANSACTION
1. To refund a transaction, pick the REFUND button located on the bottom left above system
information. A new sale must be displayed to do this as
the button will be greyed out once items have been
entered into the transaction summary. If items are already
entered, select VOID (see page 16) to enter a new sale.
2. The top of the screen will show a dark red box labeled REFUND. To use this option, simply choose
the appropriate menu headers and buttons in the Menu mode or enter the items manually in the
ECR mode in the exact same fashion as a regular sale including changing the quantity. Both ECR
mode and MENU mode can be used in the same
sale to refund a transaction by switching
between the menus by selecting their
respective buttons.
16
3. Select the Tender Payment button. Refund the
transaction using debit, credit, or cash refund
(see payment tender instructions on page 17).
To refund a sale with cash, simply choose the
yellow REFUND button on the bottom right,
this will open the cash drawer. Otherwise, use
the green CREDIT CARD, or DEBIT buttons on
the top right and swipe or insert the
customer’s card into the pin pad to complete
the refund.
4. Void the refund in the same way as voiding a
sale. See directions below.
7. VOID SALE
When a transaction has already been entered
and needs to be voided use the following method.
Select the red VOID SALE button on the top middle
of the screen.
Once it is clicked, a message window will pop up
to confirm the void of the sale. Select yes to
continue with void or no to return to the original
transaction. If Yes is selected, the screen will be
returned to the previous screen and all transactions
will be cleared from the Transaction Summary.
17
8. TENDERING PAYMENT
a. Cash
1. Once all applicable transactions for a sale have been entered, select the TENDER PAYMENT
button.
2. Choose either $5, $10, or $20 preset
amounts on the right hand side. If a specific
cash amount is required, enter it on the
number pad and select cash. Tender the
payment partially in cash, and partially in
other forms of payment, see Split Tender
instructions below.
3. To return without processing the
payment, simply select the BACK button
located in the bottom of the middle of the
screen.
4. The tender amount can exceed the total of the
transaction in this mode only.
18
b. Credit
1. To use the credit card payment option, choose
TENDER PAYMENT, then select Credit card.
2. A window will display with 3 possible options:
PINPAD, MANUAL, and CANCEL. Pick PINPAD to
send the payment information to the pin pad itself.
3. Select MANUAL to enter the amount manually and
process the card, or select CANCEL to return to the
payment tender screen.
c. Debit
Select the DEBIT button and process
debit card through the pin pad once
prompted to do so. If there is an issue with
processing the debit card, or the
transaction times out, a message will
display indicating so. Simply choose OK
and try again.
d. Split Tender
1. If the customer wishes to use more than one payment method, enter the amount to allocate
to the first method on the number pad in the Tender Payment screen (see page 17).
2. Then select the DEBIT, CREDIT, or CASH options.
3. Proceed with the instructions of the first payment method chosen as indicated above.
4. It is suggested that if the customer is using cash as one of the payment methods, process this
first.
5. The total balance owed will be updated after first method has been completed.
6. Proceed with the other payment methods to complete the sale.
19
Notes:
Once first payment method is completed, the Cash card will
appear in the area beneath AMOUNT DUE on the right hand side.
Proceed to pay the balance with any other form of payment
listed above.
If using a card that does not coincide with the payment
method selected, an error message will appear indicating the
card is invalid.
e. Voucher/Gift/Loyalty Card
1. To use a voucher, select the green VOUCHER button on the top right hand side of the screen.
This will open a window to enter the voucher id.
2. Do so, then select Enter and proceed with the rest of the transaction as per usual. The balance
of the voucher will be taken from the total of the sale and a new balance will appear.
3. If the voucher number provided is not valid, a message
will display indicating that the system cannot locate the
voucher. Choose OK to return back to the Tender
Payment screen.
20
f. Other
To use the other method of payment, simply select this button and accept the payment from
the customer. The sale will be completed. The display will be redirected to a new sale screen to
continue processing new transactions.
9. REWARDS
Use this feature when a customer has or wishes to
acquire a Rewards card.
1. Complete the transaction as normal then select
Tender Payment.
2. Select the teal Rewards button and enter the card
number or swipe the card. The rewards will automatically
apply to the card based on the parameters set up for the
particular sale item in the menu options (as discussed later
in this manual on page 38).
3. Once the card is swiped or entered manually, the name and balance on the card can be seen. If
the card is not programmed, a message will display indicating the card is not valid.
21
To add new customer:
1. Select orders from the main screen after log in (red button on bottom left of screen).
2. Select card number from top of screen and click the radio
button.
3. Enter card number to assign to a new
customer. This number should be unused.
4. A message will display that the card
number cannot be found, select yes to
create the new customer profile.
5. Enter the appropriate information in the
new screen which will appear titled
Customer Profile. The customer name and
phone number are mandatory fields.
6. Select save.
Check balance of the card:
To check the balance of the card, there are several methods available:
1. In the customer order screen, select the radio
button to search by the card number. Enter
the card number, select enter and if it is valid,
it will appear in the List of Customers section.
2. Tap the customer, and select the view
button. All of the entered information and the
card balance can be seen on right hand side
of the screen, as well as, the Total Sales, # of
Sales Transactions, Average sales, Last
transaction date, and Reward Balance
22
Notes:
Another method of checking the card balance can be seen
when selecting the rewards option upon tendering payment.
Once the card is swiped or entered, the customer name and card
balance will be displayed.
10. DISCOUNTING A SALE
Enter the items that the customer wishes to purchase. Then follow the below procedures based
on the type of discount to offer:
a. Specific Item Discount
1. In any menu mode, select the specific item to discount on the
left hand side from the transaction summary. The item will
highlight in blue.
2. Select the yellow DISCOUNT button located in the middle of
the screen. A window will
appear to select one of five
options: Percentage
discount, Dollar discount, Set Actual Price, Clear Discount,
and Cancel.
Percentage discount:
1. By selecting Percentage discount, choose a preselected percent of 5, 10, or 20 or enter a
specific percentage on the number pad manually and select ENTER.
23
2. Select CLEAR to remove the entered discount, or EXIT to exit the
percent discount screen. Once the selection is made, the display will return
to the sale screen and the discounted dollar amount appears in the Totals
area on the bottom left of the screen above the Subtotal amount.
Dollar discount:
1. By selecting the Dollar discount, choose from a preset
dollar discount values of 5, 10, or 20, or enter them
manually on the number pad and select ENTER.
2. Similar to the percentage discount, select CLEAR to clear number pad entries and EXIT to exit
discount screen. The discount appears under the discount section of the totals area on the
bottom left of the screen above the Subtotal amount.
Set Actual Price discount:
1. By selecting the Set Actual Price option, enter the
preset values of 5, 10 or 20, or enter a specific
amount using the number pad.
2. Select the CLEAR button to clear any entries made
on the number pad or EXIT to return to the sale
without applying any discounts. This option sets
24
the actual price for the item instead of subtracting a set discount from the item itself.
3. The new price will be reflected in the Totals section of the screen.
b. Discounting the Total Sale
1. To discount a total sale, enter all of the items for sale, select TENDER
PAYMENT, and select the DISCOUNT button. A new window will
appear indicating the discount options.
2. On the left hand side are the preset percent discounts of 5, 10, and 20.
Select them to apply to the sale total. As with individual item
discounts, once selected, the discount will appear beside the heading
Discount in the totals area above the Subtotal amount.
3. Enter amount, select the %
or $ symbols to apply discounts. Enter the value on the new
number pad, select the type of discount (% or $) and select
ENTER to apply.
4. Use the CLEAR button to clear any entries made on
the number pad. Select ESC to exit to the payment screen
without applying any discounts. Select BACK to exit the
payment menu and continue with the sale.
The CLEAR DISCOUNT button on the original discount menu (not the total sale discount)
clears any discounts already applied to the item and CANCEL exits to the sale screen without
making any changes.
Notes:
The CLEAR DISCOUNT button on the original discount menu
(not the total sale discount) clears any discounts already applied
to the item and CANCEL exits to the sale screen without making
any changes.
25
11. SUSPENDING A TRANSACTION
1. To suspend a current transaction select the TENDER PAYMENT
button.
2. The SUSPEND button will appear in the bottom middle of the
screen. Select this button.
3. A screen with each table and its status is displayed. This screen
displays all other suspended transactions.
4. Enter a re-call ID for the transaction so that it can be recalled at a later time. Choose Enter. Enter
the cashier ID when prompted and select Enter.
5. A window will display asking if you would like to print a customer receipt, select Yes or No as
applicable. Once the selection has been made, a new sale window will be generated . Proceed
with other sales.
26
12. RECALLING A SUSPENDED TRANSACTION
1. To recall a transaction first select the big green Recall button on a new sales screen. It can be used
in any of the sales modes. This will display the Suspend screen.
2. Select the transaction from the list. The transaction is displayed with date, time, transaction #,
recall ID, cashier number and total.
3. Select the table by number if applicable. Once a selection is made, the display will return back to
the sale that was suspended.
4. If this section was entered by accident, simply select close on the top right of the screen.
Otherwise, proceed with the recalled sale.
27
13. SCALE INTERFACE/TAREPACK
The scale menu buttons can be seen on the main screen after log-in. This is the default mode to
display. Change the scale options in the appropriate sections of the options menu (see Scale
Configuration on page 35).
Using the Scale Interface (ECR Mode):
1. When in ECR Mode, place the item on the scale and select SCALE READ.
Then input the price per lb (kg) price on the number pad and select Enter.
2. To use the Tarepack option, tap the button
located on the right side of the screen. A
new window will display with up to 10
Tarepack
options as set
up in the options of the POS. Select appropriate Tarepack size by
tapping the icon. Select Close to return without applying the
Tarepack. Otherwise, place the item on the scale for weighing.
The Transaction Summary will update with the new item
weight based on the programmed Tarepack weight.
3. Apply the tax rate on the right hand side of the screen or use the no tax option.
4. The total item cost will be shown on the transaction summary on the left top
side of the screen. Note the item weight displayed in the very top right of the
screen above the Tarepack section.
5. Continue with the transaction as per usual.
28
Using the Scale Interface (Menu Mode):
1. Place item on scale. Select appropriate menu item from the right side of the screen.
2. Note that the price per weight of the item should already be programmed through the Scale
Configuration (see page 35).
3. The item weight will be updated in the same manner as ECR Mode (weight will be displayed
above Tarepack information).
4. The item weight will be updated based on the weight on the scale reading. Again, continue
with regular transaction processing.
6. If the menu item is programmed to use the Tarepack option, a new window will display with
up to 10 Tarepack options as set up in the options of the POS. Select
appropriate Tarepack size by tapping the icon. Select Close to return
without applying the Tarepack. Otherwise, place the item on the
scale for weighing. The Transaction Summary will update with the
new item weight based on
the programmed Tarepack
weight.
7.
5. If the weight on the scale exceeds the weight preprogrammed a message will display
indicating so. The weight of the item will be updated based on the scale reading . Proceed
with the rest of the sale.
29
Using the Scale Interface (Scan Mode):
1. In Scan Mode, place the item on the scale, select SCALE READ and scan the item.
2. The transaction summary area will be updated with the new item and the user can continue
with finalizing the transaction as per usual.
Notes:
Up to 3 scale options labeled as SCALE 1, SCALE 2, and SCALE 3
can be set up above the Tarepack area of the screen. This allows
for different pricing for the scale per weight for the Menu and
Scan Modes. This can also be done in the Scale Configuration
section of the POS Options menu on page 35.
14. CASH OUT
1. To cash out, select the dark red CASH OUT button located on the
bottom left of the main screen. A window will then pop up with
pre-filled cash out date and username.
2. Select CANCEL to return to the sale screen or select CONTINUE to
proceed with the cash out.
3. Once CASH OUT has been selected, the cash drawer will open upon which time manually count
the cash in the till. After doing so, enter the total dollar
value in the Actual Cash Count field.
4. Select CASH OUT. A new window will appear prompting
user to shut down the POS. Select POS to proceed, or
30
select CANCEL to return to the cash out window. Select Windows to shut down the POS and the
system (for example at the end of a work day).
Notes:
You can perform more than one Cash Out per day. Simply
follow the steps as above. Follow below instructions for
Consolidated Cash Out Reports.
5.
Allowing the POS to shut down completes the cash out process during which a receipt will print
with details of the transactions and the total cash in the drawer.
6. If there were no transactions to report, an error screen will be generated, simply select OK to
proceed.
Consolidated Cash outs:
Select Consolidated Cash Out option in the Store Settings (see page 42). This will allow the
user to print a consolidated cash out report if there are multiple cash outs performed every day.
If this option is not selected and if there were transactions performed in a previous day after a
cash out, a message will display after log in the following day. It will indicate that there were
transactions found and whether the user would like to cash out separately or combine and cash
out with the current day’s transactions. Choose either option per preference.
Separate will print 2 cash out reports. Combined will generate a new message asking whether
to post the cash out time to previous day. The cash out
time in this case will be 11:59 pm. Select yes to post to
previous day, or no to apply to current day’s report.
If Consolidated Cashout is selected this message
will not appear as the previous day’s transactions will
automatically appear on the current day’s cash out
report.
31
15. ORDERS
To take an order, select the dark red ORDERS button on bottom left of the screen. The Customer
Order page will display.
Ordering with Existing Customer:
1. To use an existing customer, search for the customer by selecting which radio button apply
i.e. Phone, Name, Card Number, All.
2. Once the radio button has been selected, enter the information applicable and select Search.
3. If the customer exists, the name, number, card number (if the customer has a rewards card
see page 20 for more info on rewards cards) and phone number will display in the List of
Customers fields.
4. Select the applicable customer and choose View to
confirm it is the correct customer. This will display
the full information for that customer as seen below
with name, address, date of birth, and sales statistics
etc.
32
5. View the Last Transaction the customer selected has made to duplicate their last order. Select
Last Transaction from the Customer orders screen after selecting the customer. This will
return the display to the sales screen with prefilled items in the transaction summary.
6. If the customer has not had any previous transactions, a message will display indicating so.
7. If the customer has been located, select it from the List of Customers and select OK. This will
return the display to the sales screen. Or select Cancel order to cancel the order.
8. Notice the Orders button is now glowing blue. Proceed to complete the order in ECR, SCAN or
MENU modes (see pages 9 to 14). Then tender the payment (see payments) or suspend the
transaction for when the customer is able to pick up their order and/or pay (see pages 25 and
26on suspending and recalling transactions).
33
16. REPRINT LAST TRANSACTION
To reprint the last transaction, select the dark red REPRINT LAST button on the bottom left of the
screen. This will generate a receipt of the last successful transaction.
17. OPTIONS AT POS
a. Overview
The POS options may be accessed by authorized users by selecting the dark red OPTIONS
button on the bottom left of the main screen after log-in.
Enter the appropriate password when prompted to continue to any of the below option
buttons.
34
b. Configuration
Selecting the Configuration option will show the following screen (see left). This option window
allows changes to the Local Printer Settings, the
Kitchen Printer, the Scale, the Payment Process,
the Departments, the Payment Service, the
Menus, the Modifiers and the general Store
Settings.
Local Printer
By selecting the Local Printer option, the display will redirect to a new screen. This is the
printer which will print receipts at the Point of Sale.
In this screen enable the local printer by
selecting on/off in the printer status field.
Then choose the name of the printer.
There are options to enable printing of
original and duplicate receipts, activate the
cutter, print UPC code, and print a zero price
item. Do this by simply clicking the field
until it displays a check mark.
Add special messages to be printed for customers in the Message Line fields.
If changes have been applied, select save. Select Close to exit this menu.
35
Kitchen Printer
The Kitchen Printer is the printer
which will print items ordered on the
Point of Sale to the kitchen printer to be
collected by staff.
There can be up to 3 Kitchen Printers.
Navigate between them by selecting the
appropriate tabs on the top of the screen.
By selecting the Kitchen Printer
option, turn the printer on or off, and
activate the cutter in the same manner as
the Local Printer option by clicking the
field until the checkmark appears.
Scale
By selecting the Configure Scale
option, change the scale description by
entering the desired name into the
Description fields.
There are 3 different scale pricing
options that can be applied when using
the scale. Enter the price desired per
weight into the Price field.
Apply one of the 3 tax rates by
selecting the Apply Tax 1, 2, or 3 so that a
checkmark appears in the box beside the
field. These can be set up on page 42 of
the manual.
Turn the scale on and off by selecting the Status ON/OFF option so that a checkmark appears.
As with other options, select Save to save changes and Close to exit to the main Options
screen.
36
Tarepack Management
In this Configure Scale screen, manage the Tarepack options by selecting Tarepack Mgt.
button. The Tarepack option will allow change s to the Tarepack name, Weight, and Description
up to a maximum of 10 Tarepack options.
Payment Process
Selecting the Payment Process
option will allow acceptance of credit or
debit payments, Prompt to add Tip when
the customer is paying, Enable
Contactless payment (Tap), and allow
customer to Pay at the Table.
Simply select which option to enable
until there is a checkmark in the box
beside the option.
Enable the Reward program (see
page 42), choose a Pin Pad Type, and
specify the COMP Port. To do so, tap on
the drop down menu, and make the selection.
Select Save after the changes have been made, or Close to return to the Options menu.
37
Departments
By selecting the Departments button, the name of the department buttons can be edited.
These are the buttons located in ECR mode that allows the user to classify transactions under 4
different departments.
Type in any changes. Select SAVE to save entered changes, and EXIT to return to the option
screen.
Payment Service
Selecting Payment Service will allow
the set up of details for the payment
processor used to process debit and
credit transactions.
Enter the appropriate Payment
Terminal ID, Payment merchant ID,
Payment Client No, and Payment
Username and Password as applicable.
Select Fetch Info when connected to
locate the details automatically.
Select Save to save changes or Close
to return to the previous Options menu.
38
Menus
By selecting the Menus option, the below screen can be seen. Modify the names and options
of all of the menu headers and menu buttons used in Menu mode in this screen.
Change the menu button options, by selecting
the item from the screen that to edit.
An additional window will appear on the right of the menu items allowing changes to the
options associated with the item selected:
Change the 3 Description fields of the item here: color
(1), Price, Modifier ID, and various other options.
Make the item active or inactive by selecting or deselecting the appropriate box.
Add a menu modifier attached to the item. (2)
The other options can be selected by clicking in the box
beside the item until a check mark appears. These
options include: Apply Tax rates, set item to specific
Kitchen Printer, make the item require a Scale Read, set
No Discount, Apply Exemption (tax etc.), require Age
Verification, make the item EBT Applicable, set Variable
Price, make Tax Included in price, allow No Reward,
create a Bonus Rwd, create an SKU number associated
with the item, and set a default Quantity for the item.
(3)
39
(1) Change the colour that the item will display in by selecting the button named Color and select
from the various colour options via swatches, HSB, and RGB. A preview of the colour and text
will display below. Select OK to save and return, Cancel or Reset to return to previously saved
colour.
(2) Two menu modifiers can be added to a menu button item in this screen. Select Modifier 1
from the drop box and make sure the box is selected with a check mark to ensure it is active.
Uncheck this box if to make the modifier inactive.
Select Add to create the modifier. Enter a
modifier ID when prompted and choose Enter.
If the modifier ID already exists, an error
message will appear. Choose a brand new
modifier ID and select enter.
A new screen will appear confirming the modifier
has been created. Add additional modifiers in this screen by selecting Add. Delete existing
modifiers by selecting which one to delete and select Delete. Select Back to return to the Menu
screen.
See how to edit modifiers on page 41.
(3) Apply Tax rates – item will be apply taxes automatically when selected. Modify each tax rate
(1, 2, or 3) on pages 42.
40
PrintinKitchen – item will be generated on the kitchen receipt and sent to kitchen printer 1, 2,
3 or all of the above. The kitchen printer settings can be changed on page 35 .
Scale Read - item will require a scale reading. Scale settings can be modified on page 35.
No Discount – item will not allow discounts to be applied to its price.
Apply Exemption – item will be automatically tax exempt.
Age Verification – item will require age verification when it is selected.
EBT Applicable – item will be available for deduction on EBT cards.
Variable Price – item can have variable prices. When item is scanned, user will be prompted
to input a price.
Tax included in price – item price will display with calculated tax already included in the net
price.
No Reward – item will not be eligible for customer rewards. See rewards on page 20.
Bonus Rwd – when using customer rewards, an additional bonus amount will be applied to
this item. Indicate the amount of the bonus reward in the box beside the option.
Add on: SKU – item will have an SKU number associated with it to allow for use in ECR Mode.
Add number in box beside the option and select enter.
Quantity – item will have a preset quantity associated with it. Add quantity amount in the box
beside the option and select enter.
41
Modifiers
When Modifiers option is selected a screen will appear
listing all of the modifiers currently present under the menu
headers. This is the same screen that is shown in the Menu
options when modifiers are added (see above).
Add additional modifiers in this screen by selecting Add.
Delete existing modifiers by selecting which one to delete
and select Delete. Select Back to return to the Menu screen.
Creating/Editing Modifiers
1. Select a green square in order to launch the menu to
create the modifier.
2. The
Editing Modifiers
menu will appear on the right of the green box screen.
3. Add the description names, choose a colour
and a price. See more on colours above.
4. Select the radio button beside Active to use
the modifier or deselect it to remove it from the menu
screens.
5. Select the options in black text on the
bottom of the screen to apply to the menu modifier.
Apply tax options (Tax 1, Tax 2, Tax 3, and no Tax
option), apply a tax exemption, apply a Reward, a
Bonus reward, or allow item to be Duplicated. For
more information on these options see page 40.
6. Select Save to save changes, Close to return
to the modifier screen, or clear to clear all fields and
options entered.
7. * Only the items in red text can be applied to a menu header. See editing menu screen on
page 38.
42
Store Settings
If Store Settings option is selected, the information attached to the POS, as well as, the
information that will be printed on the receipts can be changed.
In this section, change
the Store Number, Name,
Phone Numbers, Address,
Contact Information, Preset
Tax Rates, and Tax
Numbers. Note the tax
numbers are those that will
display in the main sales
screen, as well as, the rates
that can be applied in the
menu item options.
Change or add the
information printed on the
receipts by changing the
fields in appropriate receipt
headers.
Select the appropriate box to Update Menu From Backoffice (allowing updates to be applied
to the menu), and Apply Rounding (as pennies are no longer being accepted by most retailers, this
will allow the totals of transactions to be rounded to the appropriate amount to avoid the use of
pennies).
In addition to this, the following options can also now be added:
Lock Screen - show lock screen after each screen to ensure user has access card
Customer Orders – allows terminal to accept customer orders.
Consolidated Cashout – previous day’s transactions after cash out will be combined with
current day’s report (see page 29).
One Screen Display- for stores with single displays.
Order Terminal - allows terminal to be used for orders only.
If Order Terminal is checked and Local Master Server IP is set, it will work as an Order
terminal. When a transaction is suspended, a bar code in printed.
If Order Terminal is unchecked and Local Master Server IP is set, it will work as a POS
terminal. When a transaction is recalled, select Barcode or Current POS as applicable.
43
If Order Terminal is unchecked and Local Master Server IP is empty, the terminal will work like
a regular POS terminal.
In this screen select a Default mode for the menu to start with: ECR, Menu, or Scan. The time
for the screen to shut down automatically can also be selected here.
Any changes made to the fields must be saved by selecting the Save button. Once completed,
select Close to return to the Options screen.
For more information on Customer orders and Cash outs please see related items in manual.
c. Reports
The reports option screen will generate various reports as seen below:
Notes:
In all reports, if there are no transactions to display a message will appear
that the report cannot be generated. Try expanding the date range to
generate the report.
44
How are we doing today?
By selecting the How are we doing today? Report, see the daily summary of transactions
performed on the POS. The date will be preselected under the Today field. Select Go to display the
information.
The report will show Total Net Sales for
the day, the Total Tax charged separated by
tax type, the total terminal Sales, the total
Terminal refunds, Sale Activity, Number of
Sale Transactions, number of Refund
Transactions, Number of Cancelled
transaction, and the average sale amount.
Sales Summary
By selecting the Sales Summary report, choose the date range to report by selecting the date
in the From and To fields. And selecting Go.
This will generate a report which will
display the Total sales activity and number
of sale transactions for that time period.
Below that, the dollar value of Scan sales,
Menu sales, ECR sales, Lottery sales, and
the Total can be seen.
For each of these groups, the totals are
broken out by No tax sales, Tax1, Tax3,
Total for each group, and each group as a
percent of the total amount.
Below this information is the Tender
Summary. This section displays the total sales amount separated by Cash, Credit, Credit Gratuity
(tips made through credit payment), Debit, Debit gratuity (tips made through debit payment),
Other payments, Voucher payments, and the grand Total of all sales.
45
Hourly Report
By selecting the Hourly Report, the Sales, # of
transactions, and % of total sales will be displayed
by each hour.
Select the time period by choosing the
appropriate date range in the From and To fields,
and selecting Go.
Cancelled Transactions
By selecting the Cancelled Transactions report,
transactions based on time period are displayed.
Select the time period by choosing the
appropriate dates in the From and To fields, and
select Go.
The report will display the date the transaction
was cancelled, the time, the transaction number
and the amount that was voided.
Inventory Sold
By selecting the Inventory Sold report, four tabs
displaying the total sales based on method of entry:
SCAN SALES, MENU SALES, ECR SALES, and LOTTERY
SALES (if applicable) are shown.
As with other reports, choose the date range by
selecting the appropriate dates in the From and To
fields and select Go to generate the report.
46
In the SCAN SALES tab, the UPC code of the item scanned,
the description, the Quantity sold (Qty), the Totals Sales, and %
Of Scan Sales total is shown.
In the MENU SALES tab, the Description, Quantity sold
(Qty), Total Sales, and % of Menu Sales total. The Total Sales
are displayed at the bottom of the screen. Select Close to exit
this report and return to the reports options on page 43.
In the ECR SALES tab, the sales are separated by category
(in this case Pizza Slices, Chips, and Panini).
Beside each category is the Quantity (Qty), Total Sales
per category, and % of Total Sales for each category.
Beneath this the sales for each Scale option are displayed, again with the Qty, Total Sales,
and % of Total Sales.
The ECR category which displays uncategorized sales by Qty, Total Sales, and % of Total Sales
can also be seen.
The grand total of the sales are displayed at the bottom of the screen. Select Close to return
to report options screen.
The LOTTERY SALES tab displays the UPC code,
Description, Qty Sold, Total Sales, and % of Total Lottery
Sales.
To display item information either show all, or scan
the UPC. The Total Sales are displayed beneath the date
range. The grand Total is displayed at the very bottom of
the window. Select Close to return to the report options
window.
47
Transaction History
By selecting the Transaction History report,
and choosing the date range, the Date, Time,
Transaction Number, Transaction Type, Pay
Type, And Total Value of Sale for each
transaction processed in the selected date range
will be displayed.
Select Close to return to reports screen.
Discount Report
Selecting the Discount Report, displays the transaction
(TRANS #) number, DATE transaction occurred, TOTAL SALE
BY TAX, the DISCOUNT AMOUNT, or DISCOUNT % based on
the selected date range.
Choose the dates applicable to view and select Go to
display the report.
Select Close to return to the options screen.
Payout Report
By selecting the Payout report, the Date, Time,
Transaction Number, and Total of the payout are
displayed.
Select the appropriate date range and select Go to view
the report.
Select each individual payout and select VIEW to see
the details of the Payout. If there
have not been any Payouts
completed, an error message will display indicating “No Transaction
found.
48
Tip Report
By selecting the Tip report, the Total Gratuities are
displayed, beneath that the gratuity amounts are split
by credit and debit transactions.
Name, Sale, and Gratuity amounts are displayed in
detail if any were created.
Clock In/Out Report
By selecting the Clock In/Out report the card #, Card
or Alias, Name, Clock in, Clock out times, and Total
Hours worked can be seen.
View this report either by date range, or by entering
the card number or alias and selecting Go.
If there are no clock in/out for the time period
chosen, an error message will appear. Try expanding
the date range and selecting Go again.
Select Close to return to Reports menu.
49
d. Transactions
By selecting the Transactions option, search by any date (by selecting the appropriate date
range), view transactions completed Today, or by Transaction Number.
When the Date option is selected, enter the appropriate date range in the From and To fields
and select Go.
Or select search by transaction, enter the Date or enter the Transaction Number. Select search
to display the results.
Select the specific transaction and then select Screen Recall to display the transaction in the sales
screen. Select Re-Print to print a receipt for that transaction.
Select Close to return to the Options screen.
50
e. Inventory
The inventory option allows user to
enter or scan the UPC code then select
Search to view the inventory item details.
Change the Description, Standard
Cost, enter a New Selling Price (current
selling price will be displayed in the
applicable field), and select a
predetermined category.
Apply the tax rate, a tax exemption,
classify as lottery, or allow the item to be
weighed on the scale.
Select Save to save changes, and
Close to return to the Options screen.
f. Synchronization
By selecting the Synchronize option, any
updates that the POS has pending will be
applied.
A message indicating that the media and
menu will be updated is displayed. Simply
select OK to continue.
Once the update is completed, continue
processing any other transactions.
51
g. Clock In/Out
The clock in/out option allows employees to use their
employee access cards to clock in/out when their shift
ends or begins or when they are taking breaks.
When clock in is selected, enter alias or access card number and select enter. A message will
display indicating employee has clocked in successfully with the time that the clock in was
completed.
To clock out return to the same options page and select
Clock Out, again enter alias or access card number, and
select enter.
Another message will display indicating employee has
clocked out successfully.
If the employee has not clocked in previously a message will
pop up indicating “Clock out failed. You have not clocked in
recently”.
Select Close to return to the Options screen.
52
h. Cash Out History
Select the Cash Out History store setting
to view the cash outs that have been
completed successfully by selecting the
appropriate date in the Select specific date
field and then select Go.
The Terminal, Date, Time and who the
transaction was Processed By is shown.
Select which cash out transaction needed
to be viewed and click Reprint to view the
details.
Select Close to return to the Options screen.
i. Payout
By selecting the payout option money from
the till can be used to pay someone for a specific
reason.
Enter the Amount, Tax, Paid to, Reason and
Name Of User and complete the payout by
selecting the Payout button.
This will open the cash drawer to allow
access to the cash in the till.
Select Close to return to the Options screen.
53
j. Voucher Balance
By selecting the Voucher Balance option,
look up a specific voucher by entering the
number in the Voucher ID field and select
Search.
The information on the Balance, Name On
Voucher, and Voucher Type will be displayed if
the voucher id coincides with an existing
voucher.
Otherwise, a message will display that will state that the
POS “Can’t find the voucher.”
Select Close to return to the Options screen.
k. Manage Employee Access
Use this option to authorize each employee access card to a particular employee.
Enter the Access Card number to assign to a new user in the Access Card field.
Then enter the first name, last
name, Alias, E-mail and Phone of the
employee.
Select which rules apply to this
employee, e.g. are they able to carry
out transactions as a manager, can
they void, refund, discount, or use
the POS only.
NEW: The delete item option is not
selected by default. If this button is
selected, the employee can delete
items normal transactions only and
suspended transactions will require a manager card to process.
If the button is selected, the employee can delete both suspended and normal transactions.
Select save after all options have been chosen.
54
Reassigning Card Numbers
To reassign an existing card to another employee, select the card number from the list in the
same screen and make any changes necessary like name and access parameters. Then select
Reassign.
When prompted to do so,
complete the change. |Choose Yes
to proceed, or no to return back to
the original screen.
NEW: Assign an alias user to an access card id. Select the alias user from the list. Select Reassign
and swipe the new access card when prompted. The alias user will not have any permissions by
default. Permissions will need to be enabled in the same manner as above.
18. CLOSING POINT OF SALE
To close the POS, simply select the dark red CLOSE button on the bottom left of the screen.
User must be in the main sales screen to complete this action.
Otherwise, select Close from the current screen until it has
returned to the main sales screen.
Once Close is chosen,
either Log out (return to log-in screen), or Exit to shut down the
POS completely.
To return to the sales screen without exiting select the red X to return.
55
Still Need Help?
For additional resources, and tutorials select the HELP button on the lower left of the main screen
after log-in. Serial Numbers of the unit, Tutorials and Resources buttons are displayed on the top
right.
Contact numbers are also available in this section for any hardware or software issues.