1
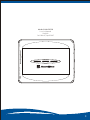
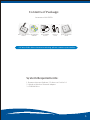
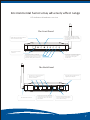
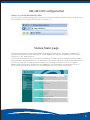
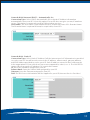
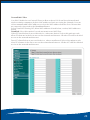
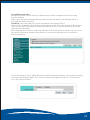
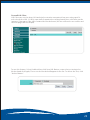
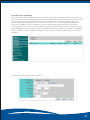
AzureWave Technologies, Inc.
IEEE 802.11 b/g Wireless Router
with 4 Port Switch
AW-GR520
User's Manual
1
COPYRIGHT
AzureWave Technologies, Inc. All rights reserved. No part of this document may be
reproduced, transmitted, transcribed, stored in a retrieval system, or translated into any
language in any form or by any means without the written permission of AzureWave
Technologies, Inc.
DISCLAIMER
AzureWave provides this document “as is”, without warranty of any kind, neither
expressed nor implied, including, but not limited to, the particular purpose. AzureWave
may make improvements and/or changes in this document or in the product described in
this document at any time. This document could include technical inaccuracies or
typographical errors.
TRADEMARKS
AzureWave is a trademark of AzureWave Technologies, Inc. Other names mentioned in
this document are trademarks/registered trademarks of their respective owners.
USING THIS DOCUMENT
This document provides detailed user guidelines to provide AzureWave 802.11 g/b
Wireless Router with 4 Port Switch operation and setting-up. Though every effort has
been made to assure that this document is current and accurate, more information may
have become available subsequent to the production of this guide. In that event, please
contact your AzureWave representative for additional information that may help in the
development process.
2
Model: AW-GR520
User’s Manual
English
1st Edition, April 2007
LINE OUT
4
3
LAN
2
1
INTERNET
RESET
DC
3
Table of Contents
Contents of Package
System Requirements
Introduction
Product overview
Key Features
LED Indicator & Hardware overview
LED Indicator
Antenna Location
The Hardware Installation
System Requirements
Hardware Installation
Range of Operation
How to Access the Web-based Utility
Status-Main Page
Log
DHCP Client List
Wireless Station List
Network
Connection type
DHCP-Automatically Set
Static IP
PPPOE
PPTP
LAN
Mac Clone
Dynamic DNS
UPnP
Wireless
Basic
Encryption type
64bit/128bit
WPA-PSK
WPA2-PSK
WPA-PSK/WPA2-PSK Mixed
WPA Enterprise
WPA2 Enterprise
WPA/WPA2 Mixed
5
5
6
6
6
7
8
8
8
8
8
8
10
10
11
11
11
12
12
12
12
12
13
14
14
14
15
15
15
16
16
16
17
17
17
18
19
Advanced
Broadcast SSID
Channel With
Beacon Period
RTS Threshold
Fragmentation Threshold
DTIM Interval
WMM
Short GI
Firewall
Internet Access
MAC Filter
Domain Filter
URL Filter
Port Forwarding
Triggering
DMZ
Security
Ping Access on WAN
IDENT Pass Through
Stateful Protect
SYN FLOOD Protect
PING FLOOD Protect
VPN Pass Through
IPSec Pass Through
PPTP Pass Through
L2TP Pass Through
System
Admin
Time
Config
Firmware
Regulatory Information
19
19
19
19
19
19
19
19
20
20
20
21
22
23
23
24
25
26
26
26
26
26
26
26
26
26
26
27
27
28
28
29
30
4
Contents of Package:
Azurewave AW-GR520
1
2
3
802.11 b/g Wireless User Manual on
Router
CD-ROM
Power Adapter
5V/2.0A
Ethernet
Cable
Quick Ins tallation
Gui de
※ If any of the above items are missing, please contact your retailer.
System Requirements:
1. Browser-Internet Explorer 5.5 above or Firefox 1.0
2. Wired or Wireless Network Adapter
3. CD-ROM Drive
5
Introduction
Product overview
Compliant with the IEEE 802.11b/g standard and the AW-GR520 use Direct Sequence
Spread Spectrum (DSSS), Orthogonal Frequency Division Multiplexing (OFDM), DBPSK,
DQPSK, CCK and QAM baseband modulation.
AW-GR520 is a Wireless Access Point and Broadband Router which allow user access
Internet via LAN/WLAN. AW-GR520 supports advanced security features including WEP,
WPA,WPA2, and Firewall, DoS (Denial of Service) protection, and internet access control.
Key Features
Standard
Wireless: IEEE 802.11b, IEEE 802.11g standard
Ethernet: IEEE802.3, IEEE802.3u
Data Rate: Up to 54Mbps data rate.
Security: Wi-Fi Protected Access (WPA), WPA2, 128-bit WEP encryption and MAC filtering
UPnP IGD enabled.
Web-based browser configuration for simplified management.
DHCP Client and Server allow true plug-and play installations.
Network Address /Port Translation (NAT/PAT) and Virtual Server Mapping allow LANs to be
served with one of few IP addresses
Firewall support for access-list control, DoS Attack prevention, stateful inspection (SPI).
Supporting Internet protocols include Cable modem (DHCP Client), ADSL modem (PPPoE),
PPTP, and Static IP.
Support VPN Pass Through for IPSec, PPTP, and L2TP.
All LAN ports support Auto-Crossover(MDI/MDI-X)
6
Environmental factors may adversely affect range
LED Indicator & Hardware overview
The Front Panel
WLAN LED: A solid light indicates
that the wireless segment is ready.
This LED blinks during wireless data
transmission.
Ready LED: A blinking light indicates
that the AW-GR520 is ready.
READ Y
WLAN
LAN1
LAN2
LAN3
LAN4 INTERNET
Reserving for advance
functions
Local Network LEDs: A solid light
indicates a connection to an Ethernetenabled computer on ports 1-4. This
LED blinks during data transmission.
Internet LED: A solid light indicates
connection on the Internet port.
This LED blinks during data
transmission.
The Back Panel
LAN Ports (1-4): Connect Ethernet
devices such as computers,
switches, and hubs.
Non-Detachable Antenna
Internet Port: The auto MDI/MDIX
Internet port is the connection for
the Ethernet cable to the cable or
DSL modem.
Power Receptor: Receptor for the
supplied power adapter.
Reset: Pressing the Reset button
restores the router to its original
factory default settings
7
The Hardware Installation
System Requirements
Before installing the AW-GR520, make sure your system satisfies the following requirements.
Desktop or Laptop with an Ethernet port
Browser-Internet Explorer 5.5 or Firefox 1.0 above
Wired or Wireless Network Adapter
CD-ROM Drive
Hardware Installation
The AW-GR520 package comes together with a Non-detachable type-antenna to maximize
its network operating range.
1. Make sure that all of your hardware is powered off, including the broadband modem and
PCs.
2. Connect your broadband modem’s Ethernet cable to the Router’s Internet port.
3. Connect one end of an Ethernet network cable to one of the numbered ports on the back
of the Router. Connect the other end to an Ethernet port on a network device, e.g., a PC,
print server, or switch. Repeat this step to connect more PCs or other network devices to the
Router.
4. Power on the broadband modem.
5. Connect the included power adapter to the Router’s Power port, and then plug the power
adapter into an electrical outlet. 6. Power on your PC(s).
7. Locate an optimum location for the Router. The best place for the Router is usually at the
center of your wireless network, with line of sight to all of your wireless devices.
Operating Range
The signal range of AW-GR520 varies from the operating environment. Obstacles such as
walls and metal barriers could reflex and absorb radio signals. Devices like microwave
ovens can create problems to the wireless network greatly. 802.11b/g: Indoor 130ft (40m),
outdoor (LOS, Light-of-Sight) 1000ft (310m) Set by default, the AW-GR520 should
automatically adjust the data rate. The closer the wireless stations are the better the signal
and transmission speed they will receive. To improve your wireless transmission, try moving
your wireless stations closer to the AW-GR520
8
AW-GR520 Configuration
How to Access the Web-based Utility
To access the configuration utility, open a web-browser such as Internet Explorer and enter
the IP address of the AW-GR520 router (192.168.0.1).
Status-Main page
The Router Status menu provides status and usage information. This page displays the
current information for the AW-GR520. It will display the System (Firmware version) WAN
(Internet), LAN, and Wireless.
If your Internet connection is set up for a Dynamic IP address then a Release button and a
Renew button will be displayed. Use Release to disconnect from your ISP and use Renew to
connect to your ISP. If your Internet connection is set up for PPPoE or PPTP, a Connect
button and a Disconnect button will be displayed. Use Disconnect to drop the PPPoE or
PPTP connection and use Connect to establish the PPPoE or PPTP connection.
9
System: This field displays the AW-GR520 firmware was built time, firmware version, Host
Name and Domain Name assigned to the router.
WAN (Internet): Displays the MAC address and IP address assigned by ISP.
LAN: Displays the MAC address and the private (local) IP settings and DHCP IP address
range from the AW-GR520 router.
Wireless: Displays the wireless MAC address and wireless settings such as SSID, Channel,
Wireless mode and Encryption mode.
Status-Log
The AW-GR520 router automatically logs (records) events of possible interest in its internal
memory. If there isn’t enough internal memory for all events, logs of older events are
deleted but logs of the latest events are retained.
Refresh: Click this button to refresh the log screen.
Clear: Click this button to clear the log entries.
Status-DHCP Client List
Displays computers and devices that are connected to the AW-GR520 router via Ethernet or
Wireless and that are receiving an IP address assigned by the AW-GR520 router
Status-Wireless Station List
The wireless Station List displays a list of current connected wireless Station. This List also
displays the MAC address and Wireless Mode of the connected wireless Stations.
10
Network-WAN (Internet) DHCP -- Automatically Set
Connection Type: Select DHCP-Automatically Set to obtain IP Address information
automatically from your ISP. Select this option if your ISP does not give you any IP numbers
to use. This option is commonly used for Cable modem services.
Host Name: The Host Name is optional but may be required by some ISPs. Domain Name:
The Domain Name is optional but may be required by some ISPs
Network-WAN - Static IP
Connection Type: Select Static IP Address if all the Internet port’s IP information is provided
to you by your ISP. You will need to enter in the IP address, subnet mask, gateway address,
and DNS address provided to you by your ISP. Each IP address entered in the fields must be
in the appropriate IP form, which are four octets separated by a dot (x.x.x.x). The AW-GR520
router will not accept the IP address if it is not in this format
IP: Enter the IP address assigned by your ISP.
Subnet Mask: Enter the Subnet Mask assigned by your ISP.
Gateway: Enter the Gateway assigned by your ISP.
DNS: The DNS server information will be supplied by your ISP (Internet Service Provider.)
11
Network-WAN -- PPPoE
Connection Type: Choose PPPoE (Point to Point Protocol over Ethernet) if your ISP uses a
PPPoE connection. Your ISP will provide you with a username and password. This option is
typically used for DSL services. Make sure to remove your PPPoE software from your
computer. The software is no longer needed and will not work through a router. Select
PPPoE (Username/Password) from the drop-down menu.
User Name: Enter your PPPoE user name.
Password: Enter your PPPoE password and then retype the password in the next box.
Select either “Always connect” or “Auto connect.”
Enter a maximum idle time during which the Internet connection is maintained during
inactivity. To disable this feature, enable "Always connect."
Network-WAN - PPTP
Connection Type: Choose PPTP (Point-to-Point-Tunneling Protocol) if your ISP uses a PPTP
connection. Your ISP will provide you with a username and password. This option is typically
used for DSL services.
IP: Enter the IP address assigned by your ISP.
Subnet Mask: Enter the Subnet Mask assigned by your ISP
Server IP: Enter the Server IP provided by your ISP (optional).
User Name: Enter your PPTP username assigned by your ISP.
Password: Enter your PPTP password assigned by your ISP.
Select either “Always connect” or "Auto connect."
Enter a maximum idle time during which the Internet connection is maintained during
inactivity. To disable this feature, enable “Always connect.”
12
Network-LAN
This section will allow you to change the local network settings of the router and to
configure the DHCP settings.
IP: Enter the IP address of the AW-GR520 router. The default IP address is 192.168.0.1.
If you change the IP address, once you click Apply, you will need to enter the new IP address
in your browser to get back into the configuration utility.
Subnet mask: The default subnet mask is 255.255.255.0.
DHCP Server: DHCP stands for Dynamic Host Control Protocol. The AW-GR520 Router has a
built-in DHCP server. The DHCP Server will automatically assign an IP address to the
computers on the LAN/private network. Be sure to set your computers to be DHCP clients by
setting their TCP/IP settings to “Obtain an IP Address Automatically.” When you turn your
computers on, they will automatically load the proper TCP/IP settings provided by the
Router. The DHCP Server will automatically allocate an unused IP address from the IP
address pool to the requesting computer. You must specify the starting and ending address
of the IP address pool.
DHCP Server: Choose the “Enable” button to enable the DHCP server or choose the
“Disabled” button to disable DHCP server function on your router
Address Range: Enter the starting and ending IP addresses for the IP assignment from
DHCP server.
WINS: Enter the Domain name (Optional).
Network-MAC Clone
The default MAC Address is set to the Internet port’s physical interface MAC address on the
Broadband Router. It is not recommended that you change the default MAC address unless
required by your ISP. You can use the Clone MAC of this PC button to replace the Internet
port’s MAC address with the MAC address of your Ethernet card.
13
Network-Dynamic DNS
The DDNS feature allows you to host a server (Web, FTP, Game Server, etc…) using a domain
name that you have purchased (www.dyndns.com) with your dynamically assigned IP
address. Most broadband Internet Service Providers assign dynamic (changing) IP
addresses. Using a DDNS service provider, your friends can enter in your domain name to
connect to your server no matter what your IP address is.
Dynamic DNS: Enabled/Disabled DDNS function.
User Name: Enter the Username for your DDNS account.
Password: Enter the Password for your DDNS account.
Host Name: Enter the Host Name that you registered with your DDNS service provider.
Network-UPnP
To use the Universal Plug and Play (UPnP™) feature click on Enabled. UPNP provides
compatibility with networking equipment, software and peripherals.
UPnP: Enabled/Disabled UPnP function.
Wireless-Basic
SSID: Service Set Identifier (SSID) is the name of your wireless network. Create a name
using up to 32 characters. The SSID is case-sensitive.
Channel: Indicates the channel setting for the AW-GR520. By default the channel is set to 6.
The Channel can be changed to fit the channel setting for an existing wireless network or to
customize the wireless network.
Mode: Mixed 802.11b/g- using a mix of 802.11b/g wireless clients.
14
Wireless-Basic Encryption Type – WEP 64/128bit
It is recommended to enable encryption on your wireless router before your wireless
network adapters. Please establish wireless connectivity before enabling encryption.
1. Select Encryption Type to WEP 64/128bit.
2. Next to WEP Key Length, select the level of encryption (64 or 128-bit) and either Hex or
ASCII. Hex - (recommended) Letters A-F and numbers 0-9 are valid. ASCII - All numbers and
letters are valid. 3. Next to WEP Key 1, enter a WEP key that you create. Make sure you enter
this key exactly on all your wireless devices. You may enter up to 4 different keys.
4. Click Apply to save your settings. If you are configuring the router with a wireless adapter,
you will lose connectivity until you enable WEP on your adapter and enter the same WEP key
as you did on the router.
Wireless-Basic Encryption Type – WPA-PSK
It is recommended to enable encryption on your wireless router before your wireless
network adapters. Please establish wireless connectivity before enabling encryption.
1. Select WPA-PSK mode.
2. Next to Cipher Suite, select TKIP or CCMP (AES).
3. Next to WPA Pass Phrase (Pre-Shared Key), enter a key (pass phrase). The key is entered as
a pass-phrase in ASCII format at both ends of the wireless connection. The pass-phrase
must be between 8-63 characters. 4. Click Apply to save your settings. If you are configuring
the router with a wireless adapter, you will lose connectivity until you enable WPA-PSK on
your adapter and enter the same pass phrase as you did on the router.
15
Wireless-Basic Encryption Type – WPA2-PSK
It is recommended to enable encryption on your wireless router before your wireless
network adapters. Please establish wireless connectivity before enabling encryption.
1. Select WPA2-PSK mode.
2. Next to Cipher Suite, select TKIP or CCMP (AES).
3. Next to WPA Pass Phrase (Pre-Shared Key), enter a key (pass phrase). The key is entered as
a pass-phrase in ASCII format at both ends of the wireless connection. The pass-phrase
must be between 8-63 characters.
4. Click Apply to save your settings. If you are configuring the router with a wireless adapter,
you will lose connectivity until you enable WPA2-PSK on your adapter and enter the same
pass phrase as you did on the router.
Wireless-Basic Encryption Type – WPA-PSK/WPA2-PSK Mixed
It is recommended to enable encryption on your wireless router before your wireless
network adapters. Please establish wireless connectivity before enabling encryption.
1. Select WPA-PSK/WPA2-PSK Mixed mode.
2. Next to Cipher Suite, select TKIP or CCMP (AES).
3. Next to WPA Pass Phrase (Pre-Shared Key), enter a key (pass phrase). The key is entered as
a pass-phrase in ASCII format at both ends of the wireless connection. The pass-phrase
must be between 8-63 characters.
4. Click Apply to save your settings. If you are configuring the router with a wireless adapter,
you will lose connectivity until you enable WPA-PSK/WPA2-PSK Mixed on your adapter and
enter the same pass phrase as you did on the router.
16
Wireless-Basic Encryption Type – WPA Enterprise
It is recommended to enable encryption on your wireless router before your wireless
network adapters. Please establish wireless connectivity before enabling encryption.
1. Select WPA Enterprise mode.
2. Next to Cipher Suite, select TKIP or CCMP (AES).
3. Next to RADIUS Server IP Address enter the IP Address of your RADIUS server.
4. Next to RADIUS Server Port, enter the port you are using with your RADIUS server. 1812 is
the default port.
5. Next to RADIUS Server Shared Secret, enter the security key.
6. Click Apply to save your settings. If you are configuring the router with a wireless adapter,
you will lose connectivity until you enable WPA Enterprise on your adapter.
Wireless-Basic Encryption Type – WPA2 Enterprise
It is recommended to enable encryption on your wireless router before your wireless
network adapters. Please establish wireless connectivity before enabling encryption.
1. Select WPA2 Enterprise mode.
2. Next to Cipher Suite, select TKIP or CCMP (AES).
3. Next to RADIUS Server IP Address enter the IP Address of your RADIUS server.
4. Next to RADIUS Server Port, enter the port you are using with your RADIUS server. 1812 is
the default port.
5. Next to RADIUS Server Shared Secret, enter the security key.
6. Click Apply to save your settings. If you are configuring the router with a wireless adapter,
you will lose connectivity until you enable WPA2 Enterprise on your adapter.
17
Wireless-Basic Encryption Type – WPA/WPA2 Mixed
It is recommended to enable encryption on your wireless router before your wireless
network adapters. Please establish wireless connectivity before enabling encryption.
1. Select WPA/WPA2 Mixed mode.
2. Next to Cipher Suite, select TKIP or AES.
3. Next to RADIUS Server IP Address enter the IP Address of your RADIUS server.
4. Next to RADIUS Server Port, enter the port you are using with your RADIUS server. 1812 is
the default port.
5. Next to RADIUS Server Shared Secret, enter the security key.
6. Click Apply to save your settings. If you are configuring the router with a wireless adapter,
you will lose connectivity until you enable WPA/WPA2 Mixed on your adapter.
Wireless-Advanced
Broadcast SSID: Select disabled if you do not want the SSID of your wireless network to be
broadcasted by the AW-GR520. If Disabled is selected, the SSID of the AW-GR520 will not be
seen by Site Survey utilities so your wireless clients will have to know the SSID of your AWGR520 in order to connect to it. Beacon Period: Beacons are packets sent by an Access Point
to synchronize a wireless network. Specify a value. 100 is the default setting and is
recommended. RTS Threshold: This value should remain at its default setting of 2346. If
inconsistent data flow is a problem, only a minor modification should be made.
Fragmentation Threshold: The fragmentation threshold, which is specified in bytes,
determines whether packets will be fragmented. Packets exceeding the 2346 byte setting
will be fragmented before transmission. 2346 is the default setting. DTIM Interval: (Delivery
Traffic Indication Message) is the default setting. A DTIM is a countdown informing clients
of the next window for listening to broadcast and multicast messages.
18
Firewall-Internet Access
The AW-GR520 router allows you to block the use of certain Internet services by computers
on
your network. This is called Internet Access blocking or port filtering. Enter a name for the
rule and select a Service (HTTP, FTP….) from the drop-down menu. Select the Protocol TCP or
UDP port that you want to block. You can enter a single port or a range of ports. When you
have finished making changes to this screen, click the Apply button to save the changes.
Disabled: Select this option if you do not want to block Internet services.
Allow to access services listed below, others are blocked: Select this option to allow
using Internet services listed below. Users will be block to all other Internet services.
Block services listed below, others are allowed: Select this option to block Internet
services listed below. Users will be allowed access to all other Internet services.
To delete the rules, click "delete Button."
19
Firewall-MAC Filter
Use MAC (Media Access Control) Filters to allow or deny LAN (Local Area Network) and
wireless station computers by their MAC addresses from accessing the Network. You can
either manually add a MAC address or select the MAC address from the list of clients that
are currently connected to the Broadband Router.
Select Turn MAC Filtering Off, allow MAC addresses listed below, or deny MAC addresses
listed.
Disabled: Select this option if you do not want to use MAC Filter.
Allow PC listed below to access this device, others are denied: Select this option to only
allow PCs that are in the list to access the network and Internet. All other PCs will be denied
access to the network and Internet.
Deny PCs listed below to access this device, others are allowed: Select this option to only
deny PCs that are in the list to access the network and Internet. All other PCs will be allowed
access to the network and Internet.
20
Firewall-Domain Filter
Domain Filters are used to deny LAN and wireless station computers from accessing
specific domain.
Enter the keywords of Domain that you want to block (or allow). Any Domain with the
keyword in it will be blocked.
Disabled: Select this option if you do not want to use Domain filters.
Allow to access domains listed below, others are blocked: Select this option to allow users
to access the specified Internet domains listed below. Users will be denied access to all
other Internet domains.
Block domains listed below, others are allowed: Select this option to block users access to
the specified Internet domains listed below. Users will be allowed access to all other
Internet domains.
To use this feature, Select Allow/Block then click New Domain Button, enters the text string
to be blocked and click Apply. The text to be blocked will appear in the list. To delete the
text, click “delete Button.”
21
Firewall-URL Filter
URL Filters are used to deny LAN and wireless station computers from accessing specific
web sites by the URL. A URL is a specially formatted text string that defines a location on the
Internet. If any part of the URL contains the blocked word, the site will not be accessible and
the web page will not display.
To use this feature, Select Enabled then click New URL Button, enters the text string to be
blocked and click Apply. The text to be blocked will appear in the list. To delete the text, click
"delete Button."
22
Firewall-Port Forwarding
The AW-G520 can be configured as a virtual server so that remote users accessing Web or
FTP services via the public IP address can be automatically redirected to local servers in the
LAN (Local Area Network). This will allow you to open a single port or a range of ports.
Enter a name for the rule and select an Service (HTTP, FTP….) from the drop-down menu.
Enter the IP address of the computer on your local network that you want to allow the
incoming service to. Enter the TCP and/or UDP port or ports that you want to open. You can
enter a single port or a range of ports. Separate ports with a common. Example: 3000-4000.
When you have finished making changes to this screen, click the Apply button to save the
changes.
To delete the rules, click "delete Button."
23
Firewall-Triggering
This screen instructs the Router to watch outgoing data for specific port numbers. The IP
address of the computer that sends the matching data is remembered by the Router, so that
when the requested data returns through the Router, the data is sent to the proper
computer by way of IP address and port mapping rules.
Name. Enter the name of the application.
Triggering Port. Enter the starting and ending port numbers of the triggered port range.
Check with the Internet application documentation for the port number(s) and Protocol
needed.
Open Port. Enter the starting and ending port numbers of opened port range and Protocol
needed.
When you have finished making changes to this screen, click the Apply button to save the
changes.
To delete the rules, click "delete Button."
24
Firewall-DMZ
The DMZ screen allows one local user to be exposed to the Internet for use of a specialpurpose service such as Internet gaming and videoconferencing. DMZ hosting forwards all
the ports at the same time to one PC. The Port Range Forwarding is more secure because it
only opens the ports you want to have opened, while DMZ hosting
opens all the ports of one computer, exposing the computer to the Internet.
Note: Placing a computer in the DMZ may expose that computer to a variety of security
risks. Use of this option is only recommended as a last resort.
To use this feature, select Enabled. To disable DMZ hosting, select Disabled. And enter the
IP address(es) in the fields provided.
Firewall-Security
Ping Access on WAN: Set to Disabled to prevent your router's WAN port from being detected
by ping.
IDENT Pass Through: This feature keeps port 113 from being scanned by devices outside of
your local network. Select Enabled to open port 113, or Disabled to filter port 113.
Stateful Protect: A firewall enhances network security and uses Stateful Packet Inspection
(SPI) for more detailed review of data packets entering your network. Select Enabled to use
a firewall, or Disabled to disable it.
SYN FLOOD Protect: Set to Enabled will protect your router from SYN FLOOD attack.
PING FLOOD Protect: Set to Enabled will protect your router from PING FLOOD attack.
25
Firewall-VPN Pass Through
IPSec Pass Through: IPSec (Internet Protocol Security) is a suite of protocols used to
implement secure exchange of packets at the IP layer. To allow IPSec Pass through, click the
Enabled button. To disable IPSec Pass through, click the Disabled button.
PPTP Pass Through: PPTP (Point-to-Point Tunneling Protocol) Pass through allows the Pointto-Point (PPP) to be tunneled through an IP network. To allow PPTP Pass through, click the
Enabled button. To disable PPTP Pass through, click the Disabled button.
L2TP Pass Through: Layer 2 Tunneling Protocol is the method used to enable Point-to-Point
sessions via the Internet on the Layer 2 level. To allow L2TP tunnels to pass through the
Router, click the Enabled button. To disable L2TP Pass through, click the Disabled button.
System-Admin
This page will allow you to change the Administrator passwords. You can also enable
Remote Management.
Device Name: Enter a name for the AW-GR520 router.
New Password: Enter a new password for the Administrator Login Name. The administrator
can make changes to the settings.
Retype Password: Retype the new password again.
Remote management: Remote management allows the AW-GR520 to be configured from
the Internet by a web browser. A username and password is optional to require to access
the Web-Management interface. In general, only a member of your network can browse
the built-in web pages to perform Administrator tasks. This feature enables you to perform
Administrator tasks from the remote (Internet) host.
The port number used to access the AW-GR520.
Example: http://x.x.x.x:8080 whereas x.x.x.x is the Internet IP address of the AW-GR520 and
8080 is the port used for the Web Management interface.
26
System-Time
The Time Configuration option allows you to configure, update, and maintain the correct
time on the internal system clock. From this section you can set the time zone that you are
in and set the Time Server.
Time Zone: Select the Time Zone from the drop-down menu.
NTP server: Enter the NTP server. NTP is short for Network Time Protocol. NTP synchronizes
computer clock times in a network of computers. This will only connect to a server on the
Internet, not a local server.
System-Config
Save Configuration File: Use this option to save the current router configuration settings to
a file on the hard disk of the computer you are using. First, click the Save button. You will
then see a file dialog, where you can select a location and file name for the settings.
Restore Configuration File: Use this option to load previously saved router configuration
settings. First, use the Browse control to find a previously save file of configuration settings.
Then, click the Load button to transfer those settings to the router.
Restore to Factory Default: This option will restore all configuration settings back to the
settings that were in effect at the time the router was shipped from the factory. Any settings
that have not been saved will be lost, including any rules that you have created. If you want
to save the current router configuration settings, use the Save button above.
27
System-Firmware
You can upgrade the firmware of the Router here. Make sure the firmware you want to use is
on the local hard drive of the computer. Click on Browse button to locate the firmware file to
be used then Click Update button.
28
Regulatory Information
Europe – EU Declaration of Conformity
This device complies with the essential requirements of the R&TTE Directive 1999/5/EC.
The following test methods have been applied in order to prove presumption of
conformity with the essential requirements of the R&TTE Directive 1999/5/EC:
EN 60 950-1: 2001 +A11: 2004
Safety of Information Technology Equipment
EN50371 : (2002-03)
Generic standard to demonstrate the compliance of low power electronic and electrical
apparatus with the basic restrictions related to human exposure to electromagnetic
fields (10 MHz - 300 GHz) -- General public
EN 300 328 V1.6.1 (2004-11)
Electromagnetic compatibility and Radio spectrum Matters (ERM); Wideband
transmission systems; Data transmission equipment operating in the 2,4 GHz ISM band
and using wide band modulation techniques; Harmonized EN covering essential
requirements under article 3.2 of the R&TTE Directive
EN 301 489-1 V1.6.1: (2005-09)
Electromagnetic compatibility and Radio Spectrum Matters (ERM); ElectroMagnetic
Compatibility (EMC) standard for radio equipment and services; Part 1: Common
technical requirements
EN 301 489-17 V1.2.1 (2002-08) Electromagnetic compatibility and Radio spectrum
Matters (ERM); ElectroMagnetic Compatibility (EMC) standard for radio equipment and
services; Part 17: Specific conditions for 2,4 GHz wideband transmission systems and 5
GHz high performance RLAN equipment
This device is a 2.4 GHz wideband transmission system (transceiver), intended for use in
all EU member states and EFTA countries, except in France and Italy where restrictive use
applies.
In Italy the end-user should apply for a license at the national spectrum authorities in
order to obtain authorization to use the device for setting up outdoor radio links and/or
for supplying public access to telecommunications and/or network services.
This device may not be used for setting up outdoor radio links in France and in some
areas the RF output power may be limited to 10 mW EIRP in the frequency range of 2454
– 2483.5 MHz. For detailed information the end-user should contact the national
spectrum authority in France.
29
0560
[Jméno výrobce] tímto prohlašuje, že tento [typ zařízení] je ve
Česky [Czech]
shodě se základními požadavky a dalšími příslušnými
ustanoveními směrnice 1999/5/ES.
Undertegnede [fabrikantens navn] erklærer herved, at følgende
Dansk [Danish]
udstyr [udstyrets typebetegnelse] overholder de væsentlige
krav og øvrige relevante krav i direktiv 1999/5/EF.
Hiermit erklärt [Name des Herstellers], dass sich das Gerät
Deutsch
[Gerätetyp] in Übereinstimmung mit den grundlegenden
[German]
Anforderungen und den übrigen einschlägigen Bestimmungen
der Richtlinie 1999/5/EG befindet.
Käesolevaga kinnitab [tootja nimi = name of manufacturer]
seadme [seadme tüüp = type of equipment] vastavust direktiivi
Eesti [Estonian]
1999/5/EÜ põhinõuetele ja nimetatud direktiivist tulenevatele
teistele asjakohastele sätetele.
Hereby, [name of manufacturer], declares that this [type of
English
equipment] is in compliance with the essential requirements
and other relevant provisions of Directive 1999/5/EC.
Por medio de la presente [nombre del fabricante] declara que el
[clase de equipo] cumple con los requisitos esenciales y
Español [Spanish]
cualesquiera otras disposiciones aplicables o exigibles de la
Directiva 1999/5/CE.
ΜΕ ΤΗΝ ΠΑΡΟΥΣΑ [name of manufacturer] ΔΗΛΩΝΕΙ ΟΤΙ
Ελληνική [Greek]
[type of equipment] ΣΥΜΜΟΡΦΩΝΕΤΑΙ ΠΡΟΣ ΤΙΣ
ΟΥΣΙΩΔΕΙΣ ΑΠΑΙΤΗΣΕΙΣ ΚΑΙ ΤΙΣ ΛΟΙΠΕΣ ΣΧΕΤΙΚΕΣ
ΔΙΑΤΑΞΕΙΣ ΤΗΣ ΟΔΗΓΙΑΣ 1999/5/ΕΚ.
Par la présente [nom du fabricant] déclare que l'appareil [type
Français [French]
d'appareil] est conforme aux exigences essentielles et aux
autres dispositions pertinentes de la directive 1999/5/CE.
30
Con la presente [nome del costruttore] dichiara che questo
Italiano [Italian]
[tipo di apparecchio] è conforme ai requisiti essenziali ed alle
altre disposizioni pertinenti stabilite dalla direttiva 1999/5/CE.
A r šo [name of manufacturer / izgatavotāja nosaukums]
Latviski [Latvian]
deklarē, ka [type of equipment / iekārtas tips] atbilst Direktīvas
1999/5/EK būtiskajām prasībām un citiem ar to saistītajiem
noteikumiem.
L ietuvių
[Lithuanian]
Šiuo [manufacturer name] deklaruoja, kad šis [equipment type]
atitinka esminius reikalavimus ir kitas 1999/5/EB Direktyvos
nuostatas.
Hierbij verklaart [naam van de fabrikant] dat het toestel [type
Nederlands
van toestel] in overeenstemming is met de essentiële eisen en
[Dutch]
de andere relevante bepalingen van richtlijn 1999/5/EG.
Hawnhekk, [isem tal-manifattur], jiddikjara li dan [il-mudel
Malti [Maltese]
tal-prodott] jikkonforma mal-ħtiġijiet essenzjali u ma
provvedimenti oħrajn relevanti li hemm fid-Dirrettiva
1999/5/EC.
Alulírott, [gyártó neve] nyilatkozom, hogy a [... típus] megfelel
Magyar
a vonatkozó alapvetõ követelményeknek és az 1999/5/EC
[Hungarian]
irányelv egyéb elõírásainak.
N iniejszym [nazwa producenta] oświadcza, że [nazwa wyrobu]
Polski [Polish]
jest zgodny z zasadniczymi wymogami oraz pozostałymi
stosownymi postanowieniami Dyrektywy 1999/5/EC.
[Nome do fabricante] declara que este [tipo de equipamento]
Português
está conforme com os requisitos essenciais e outras
[Portuguese]
disposições da Directiva 1999/5/CE.
31
Slovensko
[Slovenian]
Slovensky
[Slovak]
L ietuvių
[Lithuanian]
[ Ime proizvajalca] izjavlja, da je ta [tip opreme] v skladu z
bistvenimi zahtevami in ostalimi relevantnimi določili
direktive 1999/5/ES.
[ Meno výrobcu] týmto vyhlasuje, že [typ zariadenia] spĺňa
základné požiadavky a všetky príslušné ustanovenia Smernice
1999/5/ES.
Šiuo [manufacturer name] deklaruoja, kad šis [equipment type]
atitinka esminius reikalavimus ir kitas 1999/5/EB Direktyvos
nuostatas.
[Valmistaja = manufacturer] vakuuttaa täten että [type of
equipment = laitteen tyyppimerkintä] tyyppinen laite on
Suomi [Finnish]
direktiivin 1999/5/EY oleellisten vaatimusten ja sitä koskevien
direktiivin muiden ehtojen mukainen.
Härmed intygar [företag] att denna [utrustningstyp] står I
Svenska [Swedish]
överensstämmelse med de väsentliga egenskapskrav och övriga
relevanta bestämmelser som framgår av direktiv 1999/5/EG.
Version: 1.00
32