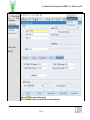
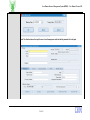
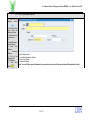
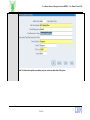
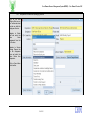
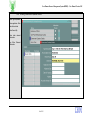
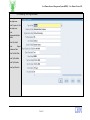
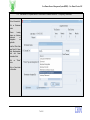
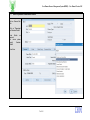
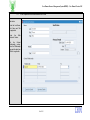
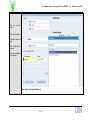
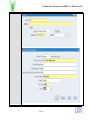
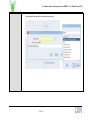
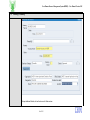
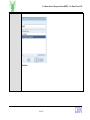
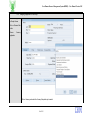
1
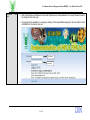
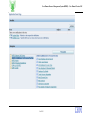
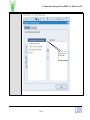
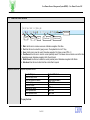
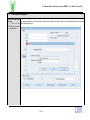
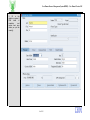
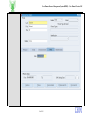
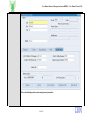
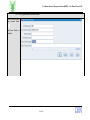
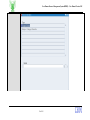
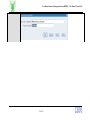
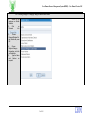
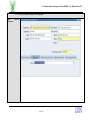
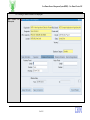
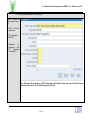
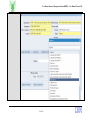
User Manual Version 20.0 Core Human Resource Management System (HRMS) – User Manual Implementation of Management Information System (MIS) Including Financial Management System (FMS) ICAR Version No.: 20.0 INDIAN AGRICULTURAL STATISTICS RESEARCH INSTITUTE (INDIAN COUNCIL OF AGRICULTURAL RESEARCH) LIBRARY AVENUE, PUSA, NEW DELHI – 110 012 www.iasri.res.in 2013 User Manual Version 1.0 Projects MIS – User Manual Version 1.0 Project Team List of Resource Personnel Mission Leader Dr. N.S. Rathor, DDG (Engg.) IASRI, New Delhi (Lead Institute) Dr. A.K. Choubey, HoD, CA Dr. Alka Arora, Sr. Scientist Dr. Sudeep Marwaha, Sr. Scientist Smt. Shashi Dahiya, Scientist Sh. S. N. Islam, Scientist Smt. Angshu Bhardwaj, Scientist Sh. Soumen Pal, Scientist (till 30th September, 2012) Sh. A.P. Sharma, F&AO Sh. K.P.S. Gautam, SAO IBM Team Sh. Amit Bothra Sh. Madhur Keswani Sh. Sameer Sachdeva Sh. Anil Sharma Sh. Ravi Kant Singh Sh. Navroz Singh Dhillon Sh. Alok Saraogi Sh. Pushpendu Roy Sh. Sapthagiri Srirangam Smt. Sneha Yadav Sh. Sourabh Kumar Sh. Nitin Batta Smt. Lakshmi Sowmya ICAR Sh. Devendra Kumar, Dir (F) Sh. Sanjay Gupta, Dir (A) (till July, 2012) Sh. J. Ravi, Dir (P) Dr AK Vasisht, ADG(PIM/ESM) Ms. Namrta Sharma, DS (P) Sh. Rupesh Sharma, SO (GA) Sh. Harpal, SO (Cash-I) Sh. Dilip Roy, CASH DISBURSEMENT Sh. SK Behera, DS (GAC) Sh. Rajiv Mangotra, DS (P) Smt. Rashmi Rao, Deputy Director Finance Sh. GP Sharma, DDF Sh. S K Pathak, SF&AO Sh. S K Sharma, F&AO Smt. Sunita Arya, SF&AO Smt. Rajashree Sunil, US (Tech & WS) Sh. Naresh Kumar Arora, F&AO (Edn) Sh. Kanhaiya Lal Chowdhary, DS (Edn) NDRI, Karnal Sh. J.K. Kewalramani, JD (Admn) & Registrar Sh. Vishal Acharya, AF&AO Sh. Brahm Parkash, AAO Sh. S George, CF&AO 2 of 103 Projects MIS – User Manual Version 1.0 NBPGR Sh. B K Bansal, F&AO Sh. S K Sinha, SAO CIFE, MUMBAI Sh. Suresh Chandra, CF&AO Sh. Suresh Kumar, CAO Dr. S. Jahageerdar, Officer In-Charge, IT IARI Sh. Radhey Shyam, CF&AO Sh. P.K. Jain, CAO NAARM, Hyderabad Sh. Sanjay Kant, JD (Admn) & Registrar Sh. Jakir Hussain Khilji, F &AO DKMA Sh. Himanshu, Scientist, DIPA, ICAR Sh. Naresh Kumar Arora, F&AO(Edn) CMFRI Sh. Rakesh Kumar, CAO Sh. AV Joseph, SF&AO CRIJAF Sh. K.P. Nath, F&AO Sh. M.K. Pachauri, SAO Dr. D. Barman, Scientist NAIP Sh. S Bilgrami, CF&AO Sh. Kumar Rajesh, US IVRI Sh. Pankaj Kumar, Joint Secretary ICAR-REC Sh. Pushapanayak, CAO Core Human Resource Management System (HRMS) – User Manual Version 20.0 DOCUMENT RELEASE NOTICE Core Human Resources Management System (HRMS)– User Training Manual Version no: 20.0 Release no: th Date of Release : 19 April 2013 Client : Indian Council of Agricultural Research Project : FMS & MIS Implementation Author : Sh. Pushpendu Kishore Roy Reviewer : Approved by : Date: Control Assurance by : Date: Date: 4 of 103 Core Human Resource Management System (HRMS) – User Manual Version 20.0 REVISION HISTORY Document Title: Core Human Resource Management System – User Training Manual Document No.: Version No. Issue Date Change Details Owner 1.0 29 Apr-2013 No Previous changes Pushpendu Roy 10.0 25-Nov-2014 1)Promotion Process; Page 29 Guneet Bagga - 2) Leave report Parameter added; Page 59 3) APAR Process; Page 30 20.0 23-May-2015 1)Login URL change; Page 2 2) Transfer process; Page 23 3) Training detail entry; Page 59 5 of 103 Guneet Bagga Approved by Remarks Core Human Resource Management System (HRMS) – User Manual Version 20.0 Table of Contents 1 LOGGING INTO ORACLE APPLICATIONS ..................................................................................................................................................................................... 8 1.1 BASICS OF ORACLE SCREENS ........................................................................................................................................................................................................ 13 1.2 CREATING A NEW EMPLOYEE ......................................................................................................................................................................................................... 15 1.2.1 Searching for Existing Employee ........................................................................................................................................................................................ 21 1.2.2 Back dated creation of Employees ..................................................................................................................................................................................... 22 1.2.3 Entering Employee Address ................................................................................................................................................................................................ 24 1.2.4 Entering Additional Personal Details .................................................................................................................................................................................. 26 1.2.5 Entering Passport Information ............................................................................................................................................................................................ 27 1.2.6 Entering Religion/ Category/ Height/ Identification Mark ................................................................................................................................................ 31 1.2.7 Entering Medical Assessment Details ............................................................................................................................................................................... 34 1.2.8 Entering Employee Phone Number .................................................................................................................................................................................... 37 1.2.9 Enter Educational Qualifications ......................................................................................................................................................................................... 39 1.2.10 Entering Employee Picture .................................................................................................................................................................................................. 41 1.3 ENTERING SERVICE DETAILS OF AN EMPLOYEE ............................................................................................................................................................................. 43 1.3.1 Entering Supervisor Details of an employee ..................................................................................................................................................................... 49 1.3.2 Entering Probation Details of an employee ....................................................................................................................................................................... 50 1.3.3 Entering Statutory Details of an employee ........................................................................................................................................................................ 51 1.3.4 Adding Salary Elements ....................................................................................................................................................................................................... 52 1.4 EDITING SERVICE SPECIFICATION OF AN EMPLOYEE...................................................................................................................................................................... 53 1.4.1 Employee Transfer ............................................................................................................................................................................................................... 56 1.4.2 Opted for Lien ........................................................................................................................................................................................................................ 62 1.4.3 Return from Lien .................................................................................................................................................................................................................. 63 1.4.4 Deputation outside ICAR ..................................................................................................................................................................................................... 64 1.4.5 Return from Deputation outside ICAR ............................................................................................................................................................................... 65 1.4.6 Suspension counted as Qualifying Service ....................................................................................................................................................................... 66 1.4.7 Suspension counted as Qualifying service ....................................................................................................................................................................... 67 1.5 ENTERING PROFESSIONAL INFORMATION................................................................................................................................. ERROR! BOOKMARK NOT DEFINED. 1.5.1 Entering Publication Details ................................................................................................................................................................................................ 68 1.5.2 Entering Program Details ..................................................................................................................................................................................................... 69 1.5.3 Entering Tour Program Details ........................................................................................................................................................................................... 70 1.5.4 Entering Employee Achievements ..................................................................................................................................................................................... 71 1.6 RETIREMENT .................................................................................................................................................................................................................................... 72 1.6.1 Retirement on Superannuation / Retirement on Medical Grounds / Compulsory Retirement.................................................................................. 73 1.6.2 Voluntary Retirement / Resignation ................................................................................................................................................................................... 74 1.7 LEAVES ............................................................................................................................................................................................................................................ 76 6 of 103 Core Human Resource Management System (HRMS) – User Manual Version 20.0 1.7.1 Applying Leave through Forms ........................................................................................................................................................................................... 77 1.8 ENTER DEPENDENT & NOMINEES DETAILS .................................................................................................................................................................................... 79 1.8.1 Enter Dependent/Nominee Address & Phone .................................................................................................................................................................. 80 1.8.2 Enter Nomination Details ..................................................................................................................................................................................................... 84 1.9 CREATING A VACANCY .................................................................................................................................................................................................................... 86 1.10 CREATING AN APPLICANT............................................................................................................................................................................................................ 88 1.10.1 Mapping Applicant to Vacancy ............................................................................................................................................................................................ 90 1.10.2 Hiring the Applicant ............................................................................................................................................................................................................... 93 2 REPORTS .............................................................................................................................................................................................................................................. 95 2.1 2.2 2.3 MANAGEMENT INFORMATION SYSTEM (MIS) REPORTS ................................................................................................................................................................ 95 EMPLOYEE SPECIFIC REPORTS ...................................................................................................................................................................................................... 98 OFFICE ORDERS............................................................................................................................................................................................................................ 100 7 of 103 Core Human Resource Management System (HRMS) – User Manual Version 20.0 1 Logging into Oracle Applications Navigation Open the link for the Oracle Instance icarerp.iasri.res.in 8 of 103 Core Human Resource Management System (HRMS) – User Manual Version 20.0 Screenshots Steps and Enter the Username and Password as provided (individual user name/password to be used). Password need to be changed on first time login. On logging into the application, a new page consisting of the responsibilities assigned to the user and the active notifications for the user will open up. User Name Password 9 of 103 Core Human Resource Management System (HRMS) – User Manual Version 20.0 10 of 103 Core Human Resource Management System (HRMS) – User Manual Version 20.0 11 of 103 Core Human Resource Management System (HRMS) – User Manual Version 20.0 Click here to enter Basic Details 12 of 103 Core Human Resource Management System (HRMS) – User Manual Version 20.0 1.1 Basics of Oracle Screens Menus Attachment New 1. 2. 3. 4. Find Save Clear Record Delete Record New: Use this icon to create a new invoice. Alternative navigation: File->New Find: Use this icon to invoke find (query) screen. The keyboard short cut is F11 key. Save: Use this icon to save the record. Alternative navigation: File->Save or press CTRL + S Clear Record: Use this icon to clear the current (selected) record. This however does not delete a record that has already been saved. Alternative navigation: Edit->Clear->Record 5. Delete Record: Use this icon to delete the current (selected) record. Alternative navigation: Edit->Delete 6. Attachment: Use this icon to attach text files or other files if required. Keyboard Shortcuts Important Keyboard shortcut Function/Purpose Enter into query mode Query with partial information Execute query Close/Exit screen Invoke List of Values Insert duplicate field Insert duplicate record To query the form: 13 of 103 Keyboard Shortcut F11 Prefix or suffix with % CTRL + F11 F4 CTRL + L SHIFT +F5 SHIFT +F6 Core Human Resource Management System (HRMS) – User Manual Version 20.0 1. For query, first press F11. 2. Give partial information on screen like partial employee name, and prefix or suffix with %. 3. Execute the query by pressing CTRL and F11. List of Value (LOV) LOV facilitates the completion of a text entry field when there are numerous values that may be assigned. LOVs are a useful alternative to drop-down lists, particularly in cases where displaying a long list of selections in a drop-down list would require excessive scrolling. Search within LOV list 1. 2. 3. 4. Click on the LOV icon. The list of LOV is displayed. If short list then scroll and select the required value. Press OK. If the LOV list is long, then enter any partial/full value and suffix with the ‘%’ in the Find field. The ‘%’ as prefix and suffix is also used where the subsequent word(s) of the total value is used for query. 5. Then click Find button. 6. This displays a shortened list of values that will match the query submitted. Select the value desired and click OK. The original text entry screen is populated. 14 of 103 Core Human Resource Management System (HRMS) – User Manual Version 20.0 1.2 Creating a New Employee Follow the simple steps as below 1. Click on the New button to create a new employee This section will help us to know the steps to create a new employee. The steps will also tell you what details need to be put and where they need to be put 15 of 103 Core Human Resource Management System (HRMS) – User Manual Version 20.0 2. Fill in the details as required ( PAN detail is mandatory and system wont save unless you put this correctly) 16 of 103 Core Human Resource Management System (HRMS) – User Manual Version 20.0 17 of 103 Core Human Resource Management System (HRMS) – User Manual Version 20.0 18 of 103 Core Human Resource Management System (HRMS) – User Manual Version 20.0 Click on Create Employment to create employee and generate id 19 of 103 Core Human Resource Management System (HRMS) – User Manual Version 20.0 3. Choose Action as – Create Employment 4. Click on Save Button Click on Save after you have finished entering. NOTE : Do not forget to click on save otherwise all your entries would be lost 20 of 103 Core Human Resource Management System (HRMS) – User Manual Version 20.0 1.2.1 Searching for Existing Employee You can search for employees in this window by two methods 1. You need to enter employee name. eg. Mr. Prajenshu S or %Prajenshu% (% is a wildcard that replaces all characters) 2. You need to type in the employee number. This will allow you to view various details of the employee as well as change details as required. You can see the following a) Name, Age, Marital Status, PAN, Contact No., Email etc. b) Permanent Address, Correspondence, Home Town Address c) Personal Information - Religion, Passport Information etc. d) Educational Qualification Details e) Dependent and Nominee Details f) Medical Assessment History Details. g) Old Employee ID, Service Book No., Personal File No. and much more 21 of 103 Core Human Resource Management System (HRMS) – User Manual Version 20.0 1.2.2 Back dated creation of Employees 1. Follow the simple steps as below 2. Click on the New button to create a new employee 3. Click on Date Track button on right corner of screen 4. Fill in the date for which you want to create back dated employee. Eg. 4-APR2001 5. Follow other steps as you created new employee in 1.1 above 22 of 103 Core Human Resource Management System (HRMS) – User Manual Version 20.0 Note: The effective date on the top left corner of next form appears and from that day onwards it is to be input 23 of 103 Core Human Resource Management System (HRMS) – User Manual Version 20.0 1.2.3 1. Click Address Entering Employee Address on the button 2. Choose the Date From which the Address is Active 3. Choose the type of Address as a. Current/Correspon dence Address b. Home Town Address c. Permanent Address 4. Click on the Address Field 5. Fill Address 6. Click Save Type of Address can be a. Current/Correspondence Address b. Home Town Address c. Permanent Address Note: You can fill three types of addresses for a person but only one out of them can be marked Primary(check the box) Button 24 of 103 Core Human Resource Management System (HRMS) – User Manual Version 20.0 Note: The fields marked yellow are mandatory and you cannot save data without filling them. 25 of 103 Core Human Resource Management System (HRMS) – User Manual Version 20.0 1.2.4 Entering Additional Personal Details Click on the box above the Leaves& Others and Enter Details as required 26 of 103 Core Human Resource Management System (HRMS) – User Manual Version 20.0 1.2.5 Entering Passport Information 1) Search for the employee on Enter& Maintain 2) Click on Personal Info 3) Choose Passport/Religion/Ca ste Details and press OK 4) Choose Passport Details and click on Details Box 5) Type the Name and Number as required 27 of 103 Core Human Resource Management System (HRMS) – User Manual Version 20.0 28 of 103 Core Human Resource Management System (HRMS) – User Manual Version 20.0 29 of 103 Core Human Resource Management System (HRMS) – User Manual Version 20.0 30 of 103 Core Human Resource Management System (HRMS) – User Manual Version 20.0 1.2.6 Entering Religion/ Category/ Height/ Identification Mark 1) Search for the employee on Enter& Maintain 2) Click on Personal Info 3) Choose Passport/Religion/Ca ste Details and press OK 4) Choose Religion/Category Information and click on Details Box 5) Type the Name and Number as required 31 of 103 Core Human Resource Management System (HRMS) – User Manual Version 20.0 32 of 103 Core Human Resource Management System (HRMS) – User Manual Version 20.0 33 of 103 Core Human Resource Management System (HRMS) – User Manual Version 20.0 1.2.7 Entering Medical Assessment Details 1) Search for the employee on Enter& Maintain screen 2) Click on Personal Info 3) Choose Medical Assessment Details and press OK 4) Enter Date of Assessment 5) Choose type of Assessment from the drop down menu, as applicable 6) Choose Consultation Result from drop down 7) Enter any other details in the Description section and press Save 34 of 103 Core Human Resource Management System (HRMS) – User Manual Version 20.0 35 of 103 Core Human Resource Management System (HRMS) – User Manual Version 20.0 36 of 103 Core Human Resource Management System (HRMS) – User Manual Version 20.0 1.2.8 Entering Employee Phone Number Click on Personal Info Button Select Phone Number and press OK Enter Type as Home, Home Fax, Mobile, Other etc. Enter Phone Number. Enter Date From. 37 of 103 Core Human Resource Management System (HRMS) – User Manual Version 20.0 38 of 103 Core Human Resource Management System (HRMS) – User Manual Version 20.0 1.2.9 1) Click On Personal Info Enter Educational Qualifications the 2) Click on Boards & University and select all universities/boards for which you want to input details 3) Click on Save 4) Press F4 5) Click On Personal Info the 6) Click on "Educational Qualifications" 39 of 103 Core Human Resource Management System (HRMS) – User Manual Version 20.0 40 of 103 Core Human Resource Management System (HRMS) – User Manual Version 20.0 1.2.10 Entering Employee Picture Click on the Picture button On the Enter& Maintain screen Click on Browse and select the appropriate picture file and click apply 1.2.11 Entering Disability You need to search for the employee. Click on Personal Info -> Disability. In Category you need to provide type of disability like Blind, Autism, Locomotor Disability etc., Choose Status as Active Choose the appropriate Reason by selecting from List Mention the Degree of Disability. Click on Information Further 41 of 103 Core Human Resource Management System (HRMS) – User Manual Version 20.0 Choose Yes Post this only employee can benefit under Section 80U 42 of 103 Core Human Resource Management System (HRMS) – User Manual Version 20.0 1.3 Entering Service Details of an employee After entering employee basic details click on Service Details tab The service details of an employee like his designation, institute working for, pay band and grade pay details are stored here. Apart from this the service type/category of the employee is given here like Scientist, Technical, Administrative or Casual Labour with Temporary status. 1) Enter Organization name which is the Name of the Institute 2) Enter Office Details as HQ/Institute, Division, Discipline/Func.Grp and Section After entering Institute Name enter the Office Details Office Details Example 1 – Administrative Staff 43 of 103 Core Human Resource Management System (HRMS) – User Manual Version 20.0 Office Details Example 2 – Scientific Staff Office Details Example 3 – Technical Staff 44 of 103 Core Human Resource Management System (HRMS) – User Manual Version 20.0 Choose Employee Category 3) Enter Employee Category – Scientific, Administrative ,Technical or Casual labour with Temporary Status 45 of 103 Core Human Resource Management System (HRMS) – User Manual Version 20.0 Choose Designation as required 4) Enter Designation Choose Pay Band and Grade Pay applicable to the designation you have chosen 5) Enter relevant Pay Band and Grade Pay 46 of 103 Core Human Resource Management System (HRMS) – User Manual Version 20.0 6) Enter relevant Payroll information eg. IASRI Monthly payroll for IASRI employees Note: - Payroll Information is updated automatically and you need not type anything Enter Location of Institute 47 of 103 Core Human Resource Management System (HRMS) – User Manual Version 20.0 7) Enter Work Location as appropriate MI – Main Institute RS – Regional Station 8) Enter Status from the Option Note : The naming convention of Institute location is MI – Main Institute, RS – Regional Station. Eg. IARI Delhi will be IARI (MI), New Delhi whereas its Wellington regional station will be IARI (RS), Wellington 48 of 103 Core Human Resource Management System (HRMS) – User Manual Version 20.0 1.3.1 Entering Supervisor Details of an employee Enter Supervisor Information 49 of 103 Core Human Resource Management System (HRMS) – User Manual Version 20.0 1.3.2 Entering Probation Details of an employee Enter Probation Notice period and 50 of 103 Core Human Resource Management System (HRMS) – User Manual Version 20.0 1.3.3 Entering Statutory Details of an employee Click on Statutory Info tab and press Control + L 1. GRE – It will be the institute name 2. PF Organisation ICAR GPF – 3. Professional Tax Organisation – ICAR PT Organisation <<State Name>> Note - Professional Tax Organisation – ICAR PT Organisation <<State Name>> where state name is the state where the employee’s place of work is. Eg. For IASRI employees it is Delhi (DL) 51 of 103 Core Human Resource Management System (HRMS) – User Manual Version 20.0 1.3.4 Adding Salary Elements Search for Employee on people Form Click on Service Details Click on Components Salary Refer Payroll Guide to learn how to add elements and input values 52 of 103 Core Human Resource Management System (HRMS) – User Manual Version 20.0 1.4 Editing Service Specification of an employee Two fields need to be updated This is one of the most important sections of the HRMS system. You can enter/edit service details of an employee from this screen. This screen is important to do transactions related to transfers, deputations, promotion, lien pay band or grade pay change, dies non, suspension and many others. This screen maps the service book into the system. Service Specification changes are done through two simple steps Change of Status 53 of 103 Core Human Resource Management System (HRMS) – User Manual Version 20.0 Change of ‘Service Change Reason’ 54 of 103 Core Human Resource Management System (HRMS) – User Manual Version 20.0 55 of 103 Core Human Resource Management System (HRMS) – User Manual Version 20.0 1.4.1 Employee Transfer Read the adjoining case to do this transaction Case: If any employee transferred from other institute to your institute then you have to transfer the same in ERP system also. 1. Go to “XXXX Establishment & Personnel Section” Responsibility. Click on “Open employee service record” search the employee by name or by user id -> Click on Service Detail. Click on Payroll related -> select Pay method -> change the effective date to last day in institute -> end date the pay method 2. Now go “ICAR Transfer” responsibility to transfer from one institute to another. Change the effective date to DOJ of employee in current institute. Go to Service Detail and update organization name, payroll, location and other relevant information and then save it. Case : Suppose an employee is to move from IASRI to IARI under following circumstances 1. Last day of service at IASRI – 19 Aug 2013 - To be done by IASRI admin/personnel staff 2. Joining Time for IARI – 20- Aug 2013 to 21 – Aug 2013 – To be done by IASRI admin/personnel Staff 3. Regular employee of IARI – 22 Aug 2013 – To be done by IARI admin/personnel staff NOTE : All transactions to be done in Update Mode and not Correction Mode Step 1 - To be done by IASRI admin/personnel staff 1. Date Track to 19 Aug 2013 2. Choose service change reason as Transfer on Own Request or Transfer on Public Interest as applicable 56 of 103 Core Human Resource Management System (HRMS) – User Manual Version 20.0 Step 2 – To be done by IASRI admin/personnel Staff 1. 2. 3. 4. 5. 6. 7. Date Track to 20 August 2013 Change Organisation to IARI Change Designation, Pay Band and Office Details as applicable. Change Payroll to IARI Monthly Payroll Change Location to IARI (MI), New Delhi Change Status to – Joining Time Change Service Change Reason to – Transfer Joining Time 57 of 103 Core Human Resource Management System (HRMS) – User Manual Version 20.0 58 of 103 Core Human Resource Management System (HRMS) – User Manual Version 20.0 59 of 103 Core Human Resource Management System (HRMS) – User Manual Version 20.0 Step 3 – To be done by IARI admin/personnel staff as on 22 Aug 2013 1. Date Track to 22 Aug 2013 2. Change Status to Regular 60 of 103 Core Human Resource Management System (HRMS) – User Manual Version 20.0 Thus the employee has been transferred to IARI 61 of 103 Core Human Resource Management System (HRMS) – User Manual Version 20.0 1.4.2 Opted for Lien On the People form, click on Service Details Tab. Click on the "Alter Effective Date" icon on the Toolbar and select the date from which the Employee's Lien is to be entered. On the "Service Details form", Navigate to the "Status" field and select the value "Opted for Lien" from the list of values. Select the "Update" option on the screen. 62 of 103 Core Human Resource Management System (HRMS) – User Manual Version 20.0 1.4.3 Return from Lien Navigate to "Status" field and select the value "Active Assignment" from the list of values. Navigate to "Service Change Reason" tab on the Assignment Form and select the value- Return from Lien. Click on Save button on the toolbar. 63 of 103 Core Human Resource Management System (HRMS) – User Manual Version 20.0 1.4.4 Deputation outside ICAR On the People form, click on Assignment Tab. Click on the Alter Effective Date icon on the Toolbar and select the date from which the Employee's Deputation outside is to be entered. On the Assignment form, Navigate to the Status field and select the value Deputation Outside ICAR from the list of values. Select the Update option on the screen. Navigate to Service Change Reason tabon the Assignment Form and select the value External Deputation and click on Save button on the toolbar. 64 of 103 Core Human Resource Management System (HRMS) – User Manual Version 20.0 1.4.5 Return from Deputation outside ICAR Click on the Alter Effective Date icon on the Toolbar and select the date on which the Employee returns. Navigate to Status field and select the value Regular from the list of values. Navigate to Service Change tab on the Assignment Form and select the valueReturn from External Deputation. Click on Save button on the toolbar. 65 of 103 Core Human Resource Management System (HRMS) – User Manual Version 20.0 1.4.6 Suspension counted as Qualifying Service On the People form, click on Assignment Tab. Click on the Alter Effective Date icon on the Toolbar and select the date from which the Employee's Suspension is to be tracked. On the Assignment form Navigate to the Status field and select the value Suspension counted as Qualifying Service from the list of values. Select the Update option on the screen. Navigate to Service Change tab on the Assignment Form and select the value Suspension counted as Qualifying Service and click on Save button on the toolbar. 66 of 103 Core Human Resource Management System (HRMS) – User Manual Version 20.0 1.4.7 Suspension counted as Qualifying service Click on the Alter Effective Date icon on the Toolbar and select the date on which the Employee will return. Navigate to Status field and select the value Active Assignment from the list of values. Navigate to Service Change Reason tab on the Assignment Form and select the value- Return from Suspension. Click on Save button on the toolbar. 67 of 103 Core Human Resource Management System (HRMS) – User Manual Version 20.0 1.4.8 Entering Government Quarter Details Enter Type of quarters. Enter application Date and allotment date Enter Owned By Enter other information. relevant Any Other Information Relevant 68 of 103 Core Human Resource Management System (HRMS) – User Manual Version 20.0 1.4.9 Entering Program Details Enter Program Type from drop down Enter Level of Participation from drop down Enter Program Name Enter Venue Enter Start Date Enter End Date Enter Duration Enter Program Conducted by Enter Approver Enter Funding agency Enter Cost Incurred Enter Program Status from drop down Enter Any Other Info 69 of 103 Core Human Resource Management System (HRMS) – User Manual Version 20.0 1.4.10 Entering Tour Program Details Enter Type of Visit from drop down Enter Purpose of Visit from drop down Enter Organization/Institute Visited Enter City Visited Enter Report Submission Date Enter Trip Start Date Enter Trip End Date Enter Trip Duration Enter Any Other info 70 of 103 Core Human Resource Management System (HRMS) – User Manual Version 20.0 1.4.11 Entering Employee Achievements Enter Number Reference Enter Name of the Particulars Enter Date Application Enter Accreditation Enter any) of the Date Co-owners (if Enter Any Other Relevant Information 71 of 103 Core Human Resource Management System (HRMS) – User Manual Version 20.0 1.5 Retirement On the People form, click on “Personal Info” Button. Select Details" "Retirement 72 of 103 Core Human Resource Management System (HRMS) – User Manual Version 20.0 1.5.1 Retirement on Superannuation / Retirement on Medical Grounds / Compulsory Retirement Click on Personal Info Click on Details Retirement Choose Leaving Reason as Voluntary Retirement or Resignation as applicable. Enter the Office Order Issue Date (O.O Issue Date), Superannuation Date and Actual Resignation Date Click button on "Retire" Click on Save button on the toolbar. 73 of 103 Core Human Resource Management System (HRMS) – User Manual Version 20.0 1.5.2 Voluntary Retirement / Resignation Click on Service Details Click on Probation & Notice Period and insert notice period details Press F4 Click on Personal Info Click on Details Retirement Choose Leaving Reason as Voluntary Retirement or Resignation as applicable. Enter the Office Order Issue Date (O.O Issue Date), Superannuation Date and Actual Resignation Date Click button on "Retire" Click on Save button on the toolbar. 74 of 103 Core Human Resource Management System (HRMS) – User Manual Version 20.0 75 of 103 Core Human Resource Management System (HRMS) – User Manual Version 20.0 1.6 Leaves Click on Establishment & Personnel section-> Personal info -> leave details. 76 of 103 Core Human Resource Management System (HRMS) – User Manual Version 20.0 1.6.1 Applying Leave through Forms Enter Leave Type as Adoption Leave, Casual Leave, Child Care Leave, Earned Leave, Half Pay Leave etc. Enter Leave Reason from list of values accordingly. Enter Projected Start Date and End Date. Enter Actual Start Date and Actual End Date. Duration would calculated automatically. be Click on Save. 77 of 103 Core Human Resource Management System (HRMS) – User Manual Version 20.0 In case you need to mention more details about the leave please click on the small box on the right down corner and the adjacent box will appear. Going Out of Station needs to be marked yes if person went away Details of Visit to include stopovers etc. Name of Family Members is relevant for LTC Block Year to be chosen appropriate to the year Prefix Dates & Suffix Dates to be chosen appropriately 78 of 103 Core Human Resource Management System (HRMS) – User Manual Version 20.0 1.7 Enter Dependent & Nominees Details On the People form, click on Personal Info Tab. Click on "Dependant and Nominee Details" Enter Details as required For minors please specify Guardian Details Press Save 79 of 103 Core Human Resource Management System (HRMS) – User Manual Version 20.0 1.7.1 Enter Dependent/Nominee Address & Phone Click on "New" icon on the toolbar. Enter the Last Name, First Name and Title as applicable. Enter the Birth Date,and Gender. On the Contact Relationship section, enter the RElationship type and the date from which it is applicable. 80 of 103 Core Human Resource Management System (HRMS) – User Manual Version 20.0 Click on Details Contact Click on Enter Address Fill Address and click Save Click on Enter Phone Numbers Fill in Phone Numbers and Click Save Enter Address of Dependent/Nominee 81 of 103 Core Human Resource Management System (HRMS) – User Manual Version 20.0 82 of 103 Core Human Resource Management System (HRMS) – User Manual Version 20.0 Enter Phone Numbers as applicable 83 of 103 Core Human Resource Management System (HRMS) – User Manual Version 20.0 1.7.2 Enter Nomination Details Click Nomination Details button In case employee has not specified Nominees through Self Service and the situation is such that Admin needs to specify Nominee Details ON the Contact Extra Information form, click on the Details field. Select the Benefit Type as Medical Insurance, ESI, Family Pension, Provident Fund, Percentage shares as applicable. Each benefit type has to be listed out as applicable. 84 of 103 Core Human Resource Management System (HRMS) – User Manual Version 20.0 Choose Benefit type and punch in details according to rules 85 of 103 Core Human Resource Management System (HRMS) – User Manual Version 20.0 1.8 Creating a Vacancy To input additional Details, click on the box next to Status column 86 of 103 Core Human Resource Management System (HRMS) – User Manual Version 20.0 Enter Additional Details as required 87 of 103 Core Human Resource Management System (HRMS) – User Manual Version 20.0 1.9 Creating an Applicant Click on people->Enter & Maintain. Choose Applicant Press New New open. Form would Enter Last Name, First Name. Enter Gender. Enter Date of Birth. Enter PAN (Mandatory) Number Click on Action and Select Create Applicant. Click on Save. Choose Empanelled Applicant 88 of 103 Core Human Resource Management System (HRMS) – User Manual Version 20.0 Press Save 89 of 103 Core Human Resource Management System (HRMS) – User Manual Version 20.0 1.9.1 Mapping Applicant to Vacancy Search for Applicant on People Screen Click on Personal Info Button Choose Application Vacancy Click on Vacancy and select the Vacancy Requisition just created 90 of 103 Core Human Resource Management System (HRMS) – User Manual Version 20.0 The details will be automatically filled directly from the vacancy details you had filled earlier 91 of 103 Core Human Resource Management System (HRMS) – User Manual Version 20.0 92 of 103 Core Human Resource Management System (HRMS) – User Manual Version 20.0 1.9.2 Hiring the Applicant Click on People-> Enter& Maintain. Find that Applicant for which you want to change Action. Change the date to future date from which he/ she was created as Applicant. Click on Personal Info Click on Application Vacancy Change Status Accepted to Click on Action. Select Hire Applicant. Applicant change employee. in would to Click on Save. Choose Mode of Recruitment Click on Accepted and then click OK. Click on Save 93 of 103 Core Human Resource Management System (HRMS) – User Manual Version 20.0 Come to People Screen and choose Hire Applicant from Action 94 of 103 Core Human Resource Management System (HRMS) – User Manual Version 20.0 2 Reports 2.1 Management Information System (MIS) Reports Click on View -Requests S. No. Report Name Report Description 1 ICAR HR Scientific Shows the Scientific Sanctioned Strength Sanctioned Strength in an Report Institute 2 ICAR HR Scientific In Position Breakup Report With Shows the Scientific InSpecially Abled position Strength in an Institute Details with disability counts 3 ICAR HR Scientific In Position Breakup Report - Without Shows the Scientific InSpecially Abled position Strength in an Institute Details without disability counts Click on Submit a New Request Click OK Type Name of Report Provide Parameters Click on Submit Click on No 95 of 103 Parameters Core Human Resource Management System (HRMS) – User Manual Version 20.0 4 ICAR HR NonScientific Sanctioned Gives Sanctioned strength Strength Report details for Non-Scientific staff 5 ICAR HR NonScientific In Position Report With Gives In position strength Specially Abled details for Non-Scientific staff Details with disability count 6 ICAR HR NonScientific In Position Report - Without Gives In position strength Specially Abled details for Non-Scientific staff Details without disability count 7 ICAR HR NonScientific Vacant Gives count of Non Scientific Report Vacant Positions 8 ICAR HR Scientific Gives details Vacant Report Vacancies of 96 of 103 Scientific Core Human Resource Management System (HRMS) – User Manual Version 20.0 9 ICAR HR Superannuation Gives details Report Superannuation 10 ICAR HR Religion / Gender based headcount Report- Gives Religion/Gender count Age wise based on age 11 ICAR HR Religion / Gender based headcount Report- Gives Religion/Gender count caste wise based on caste 12 ICAR HR Religion / Gender based headcount Report- Gives Religion/Gender count religion wise based on religion 13 ICAR HR Promotion Gives details of people Eligilbility Report eleigible for promotion 97 of 103 of Core Human Resource Management System (HRMS) – User Manual Version 20.0 2.2 15 ICAR HR Employees Gives details Qualificaton Report Qualificaions 17 ICAR HR due for Gives details of people whose probation completion probation is about to end 18 Give details of all HR related ICAR Employee details of all employees for the Detail Report specific insitute 19 ICAR HR Pending Approval of employee leave Lists where the leave of the for respective employee is pending Employee Specific Reports Click on View -Requests S. No. Report Name Report Description Click on Submit a New Request 98 of 103 Parameters Core Human Resource Management System (HRMS) – User Manual Version 20.0 Click OK 1 Gives the entire service details of ICAR HR Qualifying an employee and calcualtes Period of Service qualifying period of service 2 ICAR HR Employee Gives a summary of employee's Profile Report details during his service 3 ICAR HR Passport 4 ICAR HR Property Declaration Permission/Intimation of aquiring Transaction Report property 5 ICAR HR Annual Immovable Property Report Annual property returns 6 ICAR HR NOC for Higher Studies Noc for Higher Education Type Name of Report Provide Parameters Click on Submit Click on No Noc Noc for Passport Application 99 of 103 Core Human Resource Management System (HRMS) – User Manual Version 20.0 2.3 7 ICAR Employee Report APAR Rating 8 ICAR HR Proof Office Office Order Order Employment APAR ratings report for Proof of Office Orders Click on View -Requests S. No. Report Name 1 ICAR HR New Joinee Report Details of New Joinees 2 ICAR HR Transfer Report Details of Transfers done Report Description Click on Submit a New Request Click OK Type Name of Report Provide Parameters Click on Submit Click on No 100 of 103 Parameters Core Human Resource Management System (HRMS) – User Manual Version 20.0 3 ICAR HR Leave Report Details of Leaves taken 4 ICAR Probation Report 5 ICAR HR Category Wise Offer Templates Generates offer letter 6 ICAR HR Seniority gives details of employees based Report on seniority 7 ICAR Discipline Report HR Status Details of employees on Probation HR Wise gives discipline details wise 101 of 103 employee Core Human Resource Management System (HRMS) – User Manual Version 20.0 8 ICAR Promotion Order HR Office 9 ICAR HR Pay Fixation Report Office Order confirming pay fixation 10 ICAR HR Relieving Office Order for Foreign Training Office Order giving relieving order 11 ICAR Confirmation Office Order 12 ICAR HR Tenured Post Office Order Office Order for Tenured Posts 13 ICAR HR Transfer Order Office Order for Transfers Office Order confirming promotion HR Office Order iving confirmation to people on probation 102 of 103 Core Human Resource Management System (HRMS) – User Manual Version 20.0 14 ICAR HR Superannuation Office Order Office Order for Superannuation 15 ICAR HR Order Change 16 ICAR Leave Office Order Office Order for Leave 18 Generated after a vacancy is ICAR HR Vacancy created and carries specifications Creation Report of that vacancy Office Home Office Order for Home Change 103 of 103