1
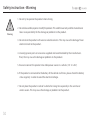
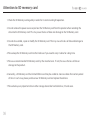
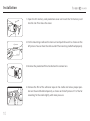
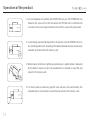
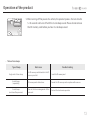
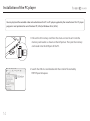
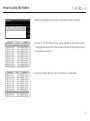
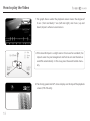
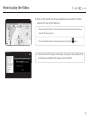
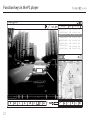
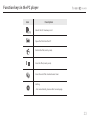
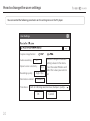
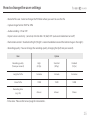
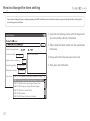
User Manual
ITB-70 / 70G User Manual
Vehicle Driving Recorder
Distinctive Feature of each model : ITB-70 has no GPS / ITB-70G has built-in GPS
<Warranty & Scope of Liability of Video Recording>
•
This product is supplementary device to bring a driver an awareness for safe driving and accident prevention, and
reference about the circumstance of an accident. So, this product and it’s recorded data can not be used to legally
judge any party’s liability of the accident.
•
If the level of impact is so light even in the case of an accident, the impact senor may not recognize it and fails to
sort out the data as event file automatically. In this case, press the event button manually.
•
The manufacturer shall not be liable for any damages due to the loss of data or any other malfunction occurred by
the use of this product.
• This user manual is applied to both ITB-70 and ITB-70G. If there is any sole feature corresponding to ITB-70G
only, a remark of ‘ITB-70G only’ is added on it.
Table of contents
Main features
02
Safety instruction – Warning
04
Safety instruction - Caution
05
Attention to SD memory card
06
Attention to GPS
07
Components
08
Name of the product details
09
Installation
10
Operation of the product
12
Installation of the PC player
14
How to play the video
16
Function keys in the PC player
20
How to change the user settings
24
How to change the time setting
26
How to manage the recorded files
28
how to update the product firmware
30
How to format the SD memory card
32
Product specifications
34
01
Main features
1. The video and audio data are continuously recorded by H.264 high efficiency data compression method.
Recording coverage is wide view angle 120 degree and recording resolution is 640x480.
2. When impact of collision, lightning acceleration or sudden brake is detected by the built-in impact sensor, the
recorded data is marked as event file and stored in SD memory card.
3. If a driver needs to record any specific view and press the event button, the recorded data is also marked as
event file and stored in SD memory card.
4. 3-axis log-in data captured by the built-in impact sensor is also recorded and a driver can see and analyze it in
the PC player.
5. When the memoty capacity of SD card has been filled, the lastest data overwrite the older files and continues
to record.
6. The audio ( in-vehicle sound or noise of collision) is also recorded along with video data and playback in the
PC player. In order to protect privacy , the audio recording can be also turned off.
7. The data stored in the SD memory card can be played back easily at the computer using the iPASS BLACK PC
player program.
02
Main features
8. The front-view camera lens can be tilting up to 180 degrees and record the inside of the vehicle if necessary.
9. This Product is certified by major worldwide type approvals such as CE, E11 (Europe), FCC (USA), VCCI ( Japan).
10. Compact round shape design and luxury SF coating on the product is harmonized with vehicle interior.
11. Built-in GPS ( ITB-70G only )
Built-in GPS records the driving speed and display it in the PC player. It records the driving coordinates
also and match it to the PC map.
03
Safety instruction - Warning
1. Do not try to operate the product when driving.
Warning
2. Do not disassemble, repair or modify the product. This void the warranty and the manufacturer
takes no responsibility for the damage or problems to the product.
3. Do not clean the product with water or volatile solvents. This may cause the damage, fire or
electrical shock to the product.
4. Use only genuine parts or accessories supplied and recommended by the manufacturer.
If not, this may cause the damage or problems to the product.
5. Ensure to connect the product into stable power source in a vehicle. ( DC 12~24V).
6. If the product is connected to the battery of the vehicle at all times, please check the battery
status regularly in order to avoid the electric discharge.
7. Do not place the product inside of a vehicle for a long time especially in the summer or
winter season. This may cause the damage or problems to the product.
04
Safety instruction - Caution
1. Please remove any excessive window tinting or obstacles of windshields. This may cause
poor recording quality.
Caution
2. Please clean the lens of camera regularly.
3. If you need to re-install or change the location of the product, please ensure of the direction
and angle of the camera lens for the proper recording position and confirm its recording
status on playback.
4. Make a routine check on the position and angle of the camera lens. Especially check these
items after driving on wild road or no use for a long time.
5. Recording quality is affected by lighting condition and may be poor or distorted under the
sudden change of brightness level ( ex : right after passing through the tunnel ), no light in
the night or against the light.
6. If the product is broken by huge impact like accident or disconnected from power source, it
may stop proper operation.
05
Attention to SD memory card
1. Check the SD Memory card regularly in order for its normal and right operation.
2. Do not remove the power source or pull out the SD Memory card from the product when recording the
data into the SD Memory card. This may cause the loss of data and damage to the SD Memory card.
3. Do not disassemble , repair or modify the SD Memory card. This may cause the loss of data and damage to
the SD Memory card.
4. Please keep the SD Memory card into the hard case if you need to carry it alone for a long time.
5. Please use recommended SD Memory cards by the manufacturer. If not, this cause the loss of data or
damage to the product.
6. Generally, a SD Memory card has limited lifetime and may be unable to store new data after certain period
of time. In such case, please purchase new SD Memory card and replace the old one.
7. Please back up any important data in other storage device like hard disk drive, CD and so on.
06
Attention to GPS (ITB-70G only)
1. A certain amount of time (minimum 5 minutes to maximum 30 minutes) may take until the GPS reception
starts. This is the processing time of the GPS receiver to communicate with GPS satellites floating in the
sky and may vary depending on weather condition and surrounding circumstances.
2. Even though the GPS reception signal is unstable, it is nothing to do with the basic function of the product
and you can continue to record normally.
3. Please make sure to keep the GPS receiver fully exposed through the windshield and avoid to install the
product to any position like tinted part of windshield.
4. If the camera lens tilts to backward for in-vehicle recording, the GPS reception may become poor. (The
built-in GPS receiver faces down to the ground and may be unstable to communicate with GPS satellite.)
Please revert back the direction of camera lens to the front after in-vehicle recording.
5. Do not use with other products that generate electromagnetic waves. This may interfere with a GPS and
reduce the performance of GPS reception.
07
Components
3M
3M
3M 3M
SDHC
Main unit
Mounting cradle
User Manual
SD memory card
Adhesive tape
(spare)
ITB-70 / 70G User Manual
MC
/M
SD
Vehicle Driving Recorder
Distinctive Feature of each model : ITB-70 has no GPS / ITB-70G has built-in GPS
Power cable
08
User manual
SD card reader
(Option)
Constant power source
connection cable
(Option)
Cable holder
Name of the product details
①
④
③
① Power-on LED Indicator
( common use for Event-recording,
formatting and GPS status indicator
button)
OPEN
REC
MIC
DC IN
DC IN
② Microphone
③ Sliding guide rail to mounting Cradle
②
④ SD memory card protection cover
⑤
⑤ Power connection port
⑦
⑥ SD memory card slot
⑦ Camera lens
⑧ Recording status LED Indicator
DC IN
⑨ Camera direction alignment guide
⑥
⑧
⑨
09
Installation
1. Open the SD memory card protection cover and insert the SD memory card
into the slot. Then close the cover.
2. Put the mounting cradle on the main unit and push forward it as shown on the
left picture. You can hear the click sound if the mounting cradle fixed properly.
3. Remove the protection film attached on the camera lens.
REC
10
4. Remove the film of the adhesive tape on the cradle and take a proper position on the windshield temporarily as shown on the left picture. If it is fine for
recording, fix the cradle tightly with more pressure.
Installation
5. Align the direction of camera lens to the front referring to the arrow mark
printed on the main unit.
6. Connect the power cable to the cigarette lighter jack of the vehicle.
7. Arrange the cable with cable holders. The installation is completed.
REC
11
Operation of the product
1. Turn on the power of a vehicle, the POWER LED turns on. The POWER LED also
indicates the status of the GPS connection for ITB-70G and it will blink with
2 seconds interval and stop to blink once the GPS is successfully connected.
REC
2. 3 scales beep sound will be heard after 10 seconds since the POWER LED turns
on, and the product starts recording. The video and audio data are continuously
recorded and stored into SD memory card.
REC
RE
3. When impact of collision, lightning acceleration or sudden brake is detected
by the built-in impact sensor, the recorded data is marked as event file and
stored in SD memory card.
C
4. If a driver needs to record any specific view and press the event button, the
recorded data is also marked as event file and stored in SD memory card.
REC
12
Operation of the product
5. When turning off the power of a vehicle, the product process the last data for
5~10 seconds and turns off with the 3 scale beep sound. Please do not remove
the SD memory card before you hear 3 scale beep sound.
REC
• Table of error beeps
Type of beep
Single scale 3 times beep
4 scales beep
( repeatedly )
2 scales beep
(one time after power on)
Root cause
No SD memory card detected in the SD
memory card slot
Trouble shooting
Insert the SD memory card
SD memory card related error
Format the SD memory card or replace with new one
Error in the time management of the
main unit
Contact the local service provider
13
Installation of the PC player
You can play back the recorded video and audio data on the PC via PC player supplied by the manufacturer. This PC player
program is most optimized to run in Windows XP (32 bit) or Windows Vista (32 bit).
1. Pull out the SD memory card from the main unit and insert it into the
memory card reader as shown on the left picture. Then put the memory
card reader into the USB port of the PC.
SD
/M
MC
2. Search the USB disc and double click the installer file named by
ITBPCPlayuerSetup.exe.
14
Installation of the PC player
3. Click the start button and the installation will start.
4. If the installation is finished, click the finish button.
5. If shortcut icon appears on desktop screen, the installation is
completed.
15
How to play the Video
1. Pull out the SD memory card from the main unit and insert it into
the memory card reader as shown on the left picture. Then put the
memory card reader into the USB port of the PC.
SD
/M
MC
2. Double-click the shortcut icon of the PC player.
3. Then, the PC player pops up.
16
How to play the Video
4. Select the appropriate SD memory card and click the OK button.
5. All files in the SD memory card will be loaded on the right window
and playback one by one in the sequential order of recording date and
time (older comes first ).
6. Just press the file directly if you want to move another file.
17
How to play the Video
7. The graph shown under the playback screen means the degree of
X axis ( front and back), Y axis (left and right), and Z axis ( up and
down) impacts when an event occurs.
Up & Down
Front &
Back
X
Z
1. X : Red
2. Y : Green
3. Z : Blue
Left &
Right
※ If the level of impact is so light even in the case of an accident, the
impact senor may not recognize it and fails to sort out the data as
event file automatically. In this case, press the event button manually.
Y
8. The driving speed and GPS status displays on the top of the playback
screen. (ITB-70G only)
18
How to play the Video
9. Built-in GPS records the driving coordinates and match it to the
internet PC map. (ITEB-70G only)
• Please note that the PC must be connected to Internet in order to use
internet PC map service.
• PC map window can be closed or open pressing the
icon.
※ Version of the PC player will display if you press the right button
of the mouse while the PC player runs on the PC.
19
Function keys in the PC player
km
128 Hour
FILE NAME
SIZE
DATE / TIME
11MB
2009-03-25 19:45
!
20090325_194518
20090325_194618
11MB
2009-03-25 19:46
!
20090325_194718
11MB
2009-03-25 19:47
20090325_194818
11MB
2009-03-25 19:48
!
20090325_194918
11MB
2009-03-25 19:49
!
!
20090325_195018
11MB
2009-03-25 19:50
20090325_195118
11MB
2009-03-25 19:51
20090325_195218
11MB
2009-03-25 19:52
?
0
20
$
AMP
SD
!!
Function keys in the PC player
Icon
Description
Go to previous or next file
Jump to 10 seconds previous or after image
Play
Pause
Play speed control
( 5 steps- frame by frame, x0.1 slow, x 0.5 slow, x1 normal, x2 fast)
Video brightness control
180 degree rotate for reversed images
Image capture
Audio volume control
Audio amplifier ( maximize the low level of audio volume)
21
Function keys in the PC player
km
128 Hour
FILE NAME
SIZE
DATE / TIME
11MB
2009-03-25 19:45
!
20090325_194518
20090325_194618
11MB
2009-03-25 19:46
!
20090325_194718
11MB
2009-03-25 19:47
20090325_194818
11MB
2009-03-25 19:48
!
20090325_194918
11MB
2009-03-25 19:49
!
!
20090325_195018
11MB
2009-03-25 19:50
20090325_195118
11MB
2009-03-25 19:51
20090325_195218
11MB
2009-03-25 19:52
?
0
22
$
AMP
SD
!!
Function keys in the PC player
Icon
Description
Select the SD memory card
Open the file from the PC
Delete the file (one by one)
Save the file (one by one)
Save all event files marked event icon
Setting
- For more details, please refer to next page
23
How to change the user settings
You can control the following parameters on the setting menu in the PC player.
User Settings
Capture image format
Audio recording :
OFF
Impact sensor sensitivity :
0.4
Recording quality :
High 24fps
Illumination control :
Standard
You can change the default
setting values in the menu.
Press the value Window and
select the value you want to
set.
Time Zone : (GMT+01:00) Belgrade, Bratislava, Budapest, Ljublja...
OK
24
Cancel
How to change the user settings
- Route for file save : Select or change the PC folder where you want to save the file.
- Capture image format : BMP or JPEG
- Audio recording : ON or OFF
- Impact sensor sensitivity : (sensitive) 0.4>0.6>0.8>1.0 (dull) OFF (auto event detection turns off )
- Illumination control : Standard or Bright (‘Bright’ is recommendable to record the better image in the night.)
- Recording quality : You can change the recording quality changing the fps(frame per second).
Item
Option
Recording quality
(frame per second)
High
(24 fps)
Standard
(30 fps)
Standard
(15 fps)
Length of a file
1 minute
1 minute
2 minutes
Size of a file
11MB
11MB
14MB
Recording time
(e.g.: 4G)
6 hours
6 hours
9 hours
- Time zone : Please refer to next page for more details.
25
How to change the time setting
If you need to change the time setting comparing the GMT world time zone or local summer time, you can change the time setting in the
user settings menu as follows.
1. Go to the User Settings menu in the PC player and
you can find the sub-title, ‘Time Zone”.
User Settings
2. Please click the block which lists the world wide
time zone.
Capture image format
Audio recording :
Set the Time zone.
OFF
Impact sensor sensitivity :
0.4
Recording quality :
High 24fps
Illumination control :
Standard
Time Zone : (GMT+01:00) Belgrade, Bratislava, Budapest, Ljublja...
(GMT+01:00) Belgrade, Bratislava, Budapest, Ljublja...
(GMT+01:00) Brussels,Copenhagen, Madrid, Paris
(GMT+01:00) Sarajevo, Skopje, Warsaw, Zagreb
(GMT+01:00) West Central Africa
(GMT+02:00) Amman
(GMT+02:00) Athens, Bucharest, Istanbul
26
3. Please select the time zone you want to set.
4. Then, press the OK button.
How to change the time setting
<World Time Zone>
International Date Line
International Date Line
-01
WEST
GMT
0
+01
EAST
+02
+03
+04
+05
+06
+07
+08
+09
+10
+11
+12 -12
-11
International Date Line
-10
-09
-08
-07
-06
-05
-04
-03
-02
WEST
27
How to manage the recorded files
This products records video/audio with always-recording mode and the recorded files are stored at SD memory card as per the resolution
of User Setting Menu. The list of files stored is shown as per sequential order of recorded date and time. The event recording files, out of all
recorded files, which record events such as impact sensing and/or manual-recording, should be easily identified by the event icon
to
be placed in front of the file name.
1. Ordinary recording files and event recording files are stored together as per the time sequence of recording from the
very beginning of recording start until SD memory capacity becomes full and the file list window will show the files
from the oldest.
Event recording files
Ordinary recording files
2. Once the memory capacity is full, event recording files are kept and newer ordinary recording files will be sequentially stores.
Delete the ordinary
recording files and
Event recording files
are kept
28
Newer ordinary
recording files
How to manage the recorded files
3. In case that all ordinary recording files are deleted and only the event recording files are left, the event recording files are also
deleted from the oldest after remaining 30 minutes of memory capacity for newer video recording. Thereafter, by repeating the
deletion of older files and the recording of newer files, it records the newest 30 minutes of video.
Newest 30 minutes of
video recording
4. If you do not manage the old event recording files for a long time and thereafter the recording mode is changed to accept
only 30 minutes of recording for the newest video/audio, you are unable to store the files which are over 30 minutes and it
may cause you an inconvenience. Please delete periodically the old files and the event files which are not necessary to keep
for a long term.
In case the event is happened within 5 seconds since the recording starts, the previous recorded file is event marked
together in order to show the before-event situation. Also, in case the event is happened in 5 seconds prior to the recording
ends, the post recorded file is event-marked in order to show the after-event situation.
The previous recorded
files is event-marked
together.
The post recorded
Within First 5 seconds
The file is event marked
Within last 5 seconds
files is event-marked
together.
29
How to update the product firmware
The firmware of the product can be updated easily if any new firmware is released for the purpose of improvement and / or
correction of the product firmware.
1. Download the new firmware from the web site of local service provider.
2. Unzip the file and you can find the file named “app.bin” from unzipped
folder.
MC
/M
SD
3. Pull out the SD memory card from the main unit and insert it into the
memory card reader as shown on the left picture. Then put the memory
card reader into the USB port of the PC.
4. The SD memory card will be detected as USB disc.
30
How to update the product firmware
5. Please copy the “app.bin” file into the root directory of SD memory card.
REC
6. Pull out the SD memory card from the PC and insert it into the product. Turn
on the power and then firmware update will start automatically with the starting
beep sound. It will take 10~15 seconds to complete the firmware update and
the REC button will blink while update is in progress. If the update is completed,
the product will boot again and start to record with 3 scale beep sounds.
• Please do not remove the SD memory card in the middle of firmware update. It may cause damage to the product.
• You can find the firmware version of the product as follows.
- Please insert the SD memory card into the PC and run the PC player.
- Push the right button on the PC mouse and click the version of firmware.
31
How to format the SD memory card- method 1
Generally, a SD memory card has limited lifetime and may be unable to store new data after certain period of time. In order to extend its
lifetime, we recommend you to format the SD memory card periodically. The recommendable format cycle is 2 times per week and the
method of format is as follows.
MC
/M
SD
1.Pull out the SD memory card from the main unit and insert it into the memory
card reader as shown on the left picture. Then put the memory card reader
into the USB port of the PC.
2. The SD memory card will be detected as USB disc.
3. Please select the USB disc and push the right button of the PC mouse. The
menu screen will pop up and please select the ‘format’.
4. Before starting the format, please select the allocation size referring to
memory capacity of SD memory card. (e.g. : 4G - 4096 Byte , 8G - 32 KB )
Click the start icon and the format will start.
• Please do not select the quick format.
32
How to format the SD memory card- method 2
1. Press the REC button longer than 5 seconds then format will start with
short beep sound.
REC
2. When formatting, 3 single scale beep will sound.
REC
REC
3. If the format is completed, the beep sound will stop and the product will
re-boot automatically.
• Once the format is completed, all data in SD memory card will be deleted. So, please make sure that all necessary files
to keep have to be backed up in another storage device.
• Even though SD memory card is formatted, all user setting values will remain same as before without change.
33
Specifications
Items
Camera
Recording
ITB-70
CMOS
Coverage / Pixels
120 degree / 0.3 Mil pixels
M i n i mum I llumination
0.9 LUX
D ata compression
H.264
3 a x is impac t sensor
Built-in
R esolution
640 x 480 (VGA)
S elec table fps
high(24fps) / Standard(30fps) / Standard(15fps)
GPS
Others
NO
YES(Built-in)
Power input
12 ~ 24v
Size
92mm(W ) x 42mm(H)
O p e rating temperature
Weight
34
ITB-70G
Type of sensor
-20 ~ 70 ℃
80g
85g
REV.100727-1
Vehicle Driving Recorder
Distinctive Feature of each model : ITB-70 has no GPS / ITB-70G has built-in GPS