1
User’s Manual
Copyright 1997 CACI Products Co.
August 1997
All rights reserved. No part of this publication may be reproduced by any means without written permission from CACI.
For product information or technical support contact:
In the US and Pacific Rim:
In Europe:
CACI Products Company
3333 North Torrey Pines Court
La Jolla, California 92037
Phone: (619) 824.5200
Fax: (619) 457-1184
CACI Products Division
Coliseum Business Centre
Riverside Way
Camberley, Surrey
GU15 3YL, UK
Phone: +44 (0) 1276.671.671
Fax: +44 (0) 1276.670.677
The information in this publication is believed to be accurate in all respects. However, CACI cannot assume the responsibility for any consequences resulting from the use thereof. The information contained herein is subject to change. Revisions to this publication or new editions of it may be issued to incorporate such change.
SIMGRAPHICS II and MODSIM III are registered trademarks of CACI Products Company.
Contents
PREFACE ....................................................................................................................................... a
THIS DOCUMENT ............................................................................................................................... a
MODSIM III DOCUMENTATION .......................................................................................................... a
FREE T RIAL & TRAINING ................................................................................................................... b
1. MSCOMP — MODSIM III DEVELOPMENT UNDER UNIX ....................................................... 1
1.1 BACKGROUND ......................................................................................................................... 1
1.2 MSCOMP'S CONFIGURATION FILE ........................................................................................... 2
1.3 FILES ...................................................................................................................................... 4
1.4 USING MSCOMP.................................................................................................................... 4
1.4.1 Other Options Menu ......................................................................................................... 5
1.4.2 Configuration Menu .......................................................................................................... 6
1.5 COMMAND LINE OPERATION ..................................................................................................... 7
1.6 PROJECT FILES ....................................................................................................................... 8
1.7 CHECKING OUT THE INSTALLATION ........................................................................................... 9
2. 2. MODSIM III DEVELOPMENT UNDER MICROSOFT WINDOWS ...................................... 11
2.1 OVERVIEW ............................................................................................................................ 11
2.2 HARDWARE AND S OFTW ARE REQUIREMENTS .......................................................................... 11
2.3 USING MODSIM III WORKBENCH TO MANAGE Y OUR PROJECTS ............................................. 11
2.4 ORGANIZING YOUR PROGRAM WITH A PROJECT ..................................................................... 11
2.5 CREATING A P ROGRAM .......................................................................................................... 12
2.6 COMPILING A PROGRAM ......................................................................................................... 12
2.7 RUNNING A P ROGRAM ........................................................................................................... 12
2.8 TEXT INPUT /OUTPUT .............................................................................................................. 12
2.9 PROJECT MENU ..................................................................................................................... 13
2.9.1 Project / New .................................................................................................................. 13
2.9.2 Project / Open ................................................................................................................ 15
2.9.3 Project / Close ................................................................................................................ 15
2.9.4 Project / Compile Module ............................................................................................... 15
2.9.5 Project / Build ... ............................................................................................................. 15
2.9.6 Project / Rebuild All ... .................................................................................................... 16
2.9.7 Project / Stop Build ......................................................................................................... 16
2.9.8 Project / Link ................................................................................................................... 16
2.9.9 Project / Execute ... ........................................................................................................ 16
2.9.10 Project / Debug ... ........................................................................................................... 16
2.10 PROJECT / SETTINGS ... ......................................................................................................... 17
2.10.1 Debug Tab ...................................................................................................................... 18
2.10.2 C++ Tab ......................................................................................................................... 20
2.10.3 Directories Tab ............................................................................................................... 21
2.10.4 Link Tab .......................................................................................................................... 22
2.11 OPTIONS MENU ..................................................................................................................... 23
2.11.1 Options / Directories... ................................................................................................... 23
2.11.2 Options / Editor... ........................................................................................................... 24
2.11.3 Options / Tools... ........................................................................................................... 25
2.11.4 Options / Font... ............................................................................................................. 25
2.11.5 Options / License Manager ........................................................................................... 25
2.12 VIEW MENU ........................................................................................................................... 26
2.13 FILE MENU ............................................................................................................................ 27
2.13.1 File / New ....................................................................................................................... 27
i
MODSIM III User’s Manual
2.13.2 File / Open... .................................................................................................................. 27
2.13.3 File / Close .................................................................................................................... 28
2.13.4 File / Save ..................................................................................................................... 28
2.13.5 File / Save As... ............................................................................................................. 29
2.13.6 File / Print... ................................................................................................................... 29
2.13.7 File / Print Setup... ......................................................................................................... 29
2.13.8 Recently Used File List .................................................................................................. 29
2.13.9 File / Exit ........................................................................................................................ 29
2.14 EDIT MENU ........................................................................................................................... 30
2.14.1 Edit / Undo ..................................................................................................................... 30
2.14.2 Edit / Cut ........................................................................................................................ 30
2.14.3 Edit / Copy ..................................................................................................................... 31
2.14.4 Edit / Paste .................................................................................................................... 31
2.14.5 Edit / Find... ................................................................................................................... 31
2.14.6 Edit / Find Next: ............................................................................................................. 31
2.14.7 Edit / Replace... ............................................................................................................. 32
2.14.8 Edit / Select All .............................................................................................................. 32
2.15 WINDOW MENU ..................................................................................................................... 33
2.15.1 Window / Cascade ........................................................................................................ 33
2.15.2 Window / Tile ................................................................................................................. 33
2.15.3 Window / Duplicate ........................................................................................................ 33
2.15.4 Window / Close All ........................................................................................................ 33
2.15.5 Window / Output ............................................................................................................ 33
2.16 HELP MENU ......................................................................................................................... 34
2.16.1 Help / MODSIM III Reference Manual ........................................................................... 34
2.16.2 Help / MODSIM III User’s Manual ................................................................................. 34
2.16.3 Help / MODSIM III Tutorial ............................................................................................ 34
2.16.4 Help / SIMGRAPHICS II Manual ................................................................................... 34
2.16.5 Help / About MODSIM III WorkBench ........................................................................... 35
2.17 THE WORKBENCH TOOLBAR .................................................................................................. 35
2.18 THE WORKBENCH S TATUS B AR AND GENERAL WINDOW COM MANDS ...................................... 36
2.19 COMMAND LINE INTERFACE TO MODSIM III WORKBENCH ...................................................... 39
2.20 CREATING MODSIM LIBRARIES ............................................................................................. 39
2.20.1 Creating a Static Library ............................................................................................... 39
2.20.2 Creating a Dynamic Link Library (DLL) ........................................................................ 42
3. THE MODSIM III DEBUGGER .................................................................................................
3.1 BASICS .................................................................................................................................
3.2 INTERFACING WITH THE DEBUGGER ........................................................................................
3.3 COMPILING FOR DEBUGGING ..................................................................................................
3.4 EXAMINING MEM ORY AND S IMULATION S TATISTICS .................................................................
3.5 RUNNING ...............................................................................................................................
3.6 SETTING BREAKPOINTS ..........................................................................................................
3.7 EXAMINING SOURCE CODE ....................................................................................................
3.8 EXAMINING VARIABLES ..........................................................................................................
3.9 EXAMINING THE STACK ..........................................................................................................
3.10 RECORDING AND PLAYING B ACK COMMANDS .........................................................................
3.11 SPECIFYING S OURCE FILE SEARCH P ATH ...............................................................................
3.12 ANIM ATING CODE EXECUTION ................................................................................................
3.13 DISPLAYING METHODS OF AN OBJECT TYPE ...........................................................................
3.14 DISPLAYING FIELDS OF AN OBJECT INSTANCE .........................................................................
3.15 COMM AND REFERENCE ..........................................................................................................
ii
43
44
45
47
48
50
51
51
52
52
53
53
54
54
54
55
Contents
4. COMMAND LINE INTERFACE TO MODSIM III COMPILER .................................................. 65
4.1 MODSIM III COMPILER COMMAND LINE OPTIONS ................................................................... 65
4.2 AN E XAMPLE OF COMMAND LINE COMPILATION ....................................................................... 66
INDEX............................................................................................................................................ 67
iii
MODSIM III User’s Manual
iv
Preface
This Document
This document provides documentation of MODSIM III as of August 1997 for all implementations. The MODSIM III Reference Manual was revised and republished at the same
time as this revision.
MODSIM III Documentation
There are four documents pertaining to MODSIM III:
•
MODSIM III Reference Manual - The language reference. Contains information
about the syntax and structure of MODSIM III as a programming language. Also
covers object-oriented programming, simulation, graphics and I/O.
•
MODSIM III Tutorial - Provides a broad overview of the language features of
MODSIM and then concentrates on the object-oriented programming and simulation capabilities in MODSIM.
•
MODSIM III User's Manual - This document. Contains information about:
mscomp, the compilation manager; MODBENCH, the development environment
under Windows; MODSIM compiler options; and debugging MODSIM.
•
SIMGRAPHICS II User’s Manual - This manual contains information about
SIMGRAPHICS II, the integrated graphics development and animation
environment for MODSIM III.
This manual is organized to discuss the following topics:
•
mscomp: The MODSIM III development environment under UNIX. How to configure and use it to simplify the compiling and linking of MODSIM executables.
•
MODBENCH: The MODSIM III development environment under Windows.
•
Debugger: The MODSIM III debugger under Windows and Unix.
•
Command Line Interface to MODSIM III Compiler: How to use the command
line interface.
•
Standard Modules: A listing of MODSIM III's standard modules.
Early MODSIM III users will note that some material which previously appeared in this
document has been moved to the Reference Manual.
a
MODSIM III User’s Manual
Free Trial & Training
MODSIM III is available exclusively from CACI Products Company. MODSIM III can be
sent to your organization for a free trial. We provide everything needed for a complete
evaluation on your computer: software, documentation, sample models, and immediate
support when you need it.
Training courses in MODSIM III are scheduled on a recurring basis in the following locations:
La Jolla, California
Washington, D.C.
London, United Kingdom
For information on free trials or training, please contact the following:
In the U.S. and Pacific Rim:
In Europe:
CACI Products Company
3333 N. Torrey Pines Ct.
La Jolla, CA 92037
(619) 824.5200
Fax (619) 457-1184
CACI Products Division
Coliseum Business Park
Riverside Way
Camberley, Surrey
United Kingdom
+44 (0) 1276.671.671
Fax +44 (0) 0276.670.677
b
1. MSCOMP — MODSIM III Development
Under UNIX
1.1 Background
mscomp is a program which manages the MODSIM compile process on UNIX operating
systems. This chapter describes how to use mscomp. If you are working under Microsoft
Windows, see the next chapter for more information on MODBENCH.
mscomp manages separate compilation of MODSIM programs consisting of multiple
modules by determining which modules have been edited since the last compilation and recompiling only those modules and any other modules which depend on them. This process
is accomplished automatically using information in the MODSIM program and the machine's file system without need for “make” or project files to describe the process.
A MODSIM executable program is produced in several distinct steps. In the simple case
of a single main module, the following must be done:
•
The MODSIM source code file, Mxx.mod, is given to the MODSIM compiler
which produces the following files:
Mxx.cpp
C++ code
Mxx.err
error file { optional }
Here xx is the name of the MAIN module. Naming conventions will be covered
more fully shortly.
•
The generated C++ code is compiled using the system's C++ compiler. This results
in a file Mxx.o.
•
The object file produced by the C ++ compiler is linked with the MODSIM III library producing an executable file. This is named xx .
If the program is composed of a number of modules, the process is more complex. Because
of the many steps involved in the C++ compile and link process and the need to perform
the C++ compile and link with particular options on each machine type, the mscomp compilation manager has been provided to automate these steps.
The current version of the MODSIM III environment has been designed to allow you to
keep each project in a separate subdirectory with its own mscomp.cfg configuration file,
if desired. Of course, you can also keep several projects in one subdirectory. mscomp will
not have any problems keeping track of projects. All MODSIM system files reside in their
own directories.
Note: File and subdirectory names are case sensitive on UNIX systems.
1
MODSIM User’s Manual
1.2 MSCOMP's Configuration File
A configuration file called mscomp.cfg must exist in any directory in which mscomp will
be used to perform compiles. If such a file does not exist, mscomp will offer to write a
default file into the directory.
The mscomp.cfg file contains configuration lines which determine where mscomp will
look for files needed to compile a project and which compile options will be in effect. Each
line starts with a keyword followed by a ">" and a space. This is followed by the information for that line. After a further space and a " ’" you can place any comments. Lines
which contain path information for directories follow these conventions:
•
A single period “.” indicates the current directory.
•
Two periods “..” indicate the directory above the current one.
•
Multiple paths can be indicated for libraries only. They are separated by a “+”. No
spaces are allowed.
•
The paths can end with or without a terminating forward or backward slash.
You should attempt to keep the path names short by using relative paths or by using short
directory names where possible. The paths mentioned in the configuration file are used to
build command lines for system utilities such as compilers and linkers.
Here is how the default version mscomp.cfg file looks on a Unix system:
x.x.x '- Version of 'mscomp' and MODSIM II Compiler
MSEXEC> /modsimx.x.x/bin '- MODSIM III system directory
MSLIB> /modsimx.x.x/lib/modsim '- MODSIM III library/import directory(s)
DEF> . '- Definition source module directory
IMP> . '- Implementation source module directory
OBJ> . '- Object file directory
VIEW> project '- database filename for debug
SR> ON '- Subrange and subscript checking
PTR> ON '- Pointer checking
REF> ON '- Reference variable checking
TB> OFF '- Runtime error traceback
DEBUG> OFF '- Generate debugger code
GRA> ON '- Link with graphics library
3D> OFF '- Link with 3D graphics library
SO> OFF '- Link with SimObject library
LIS> OFF '- Generate compilation listing
ERR> OFF '- Keep .err files, if any
BEEP> ON '- Audible prompts
The first line is the version number of the current release. This information is used by the
system to ensure that the configuration file is compatible with the current release.
The MSEXEC line contains the full path of the MODSIM system directory. The MSLIB line
contains the full path of the MODSIM library directory. This is the directory which con2
Chapter 1. MSCOMP — MODSIM III Development Under UNIX
tains the header, definition and library archive files for the MODSIM system. This can optionally be followed by zero or more additional directories containing other project's
libraries from which you are importing. These additional directories are separated by the
plus character '“+'”. No spaces should appear between (or within) directories.
The DEF and IMP lines are the directories which contain, respectively, the project's definition module source code and the implementation source code. These two directories
(which usually will be the same directory) may be thought of as the "current working directory". The OBJ line is the directory in which to place the object files generated from
the compilation. Each of these must be a single directory path. Only the library line allows
the '+' notation.
When mscomp generates the default mscomp.cfg file, it attempts to insert correct information about the current installation in the MSEXEC and MSLIB lines. It does this by searching the system's path looking for the MODSIM system files.
Following the path information in the mscomp.cfg file are a number of lines which describe system options. Note that the choices here are ON or OFF .
The SR option specifies whether the system will enable runtime checking to ensure that
subscripts and subranges are never assigned any value which would be out of bounds for
that type.
The PTR option is not used in MODSIM III.
The REF option specifies whether the system will check object and record reference values
when they are dereferenced (e.g. as ASK statement).
The TB option specifies whether the compiler generates code to print a traceback of the
current calling sequence when a runtime error occurs.
The DEBUG option specifies whether the compiler generates code to allow debugging.
The GRA option specifies whether the generated code will be linked with the
SIMGRAPHICS II libraries.
The 3-D option specifies whether the generated code will be linked to an Open GL compatible library.
The SO option specifies whether the generated code will be linked to a set of library routines specifically designed for simulation programming referred to as SimObject.
The LIS option is not used in MODSIM III.
The ERR option specifies whether the compiler will keep .err files, if any. These are files
which, for each module compiled, list the line number, column number and error message
for each compile time error encountered. These files can be used with configurable text
editors to place the cursor directly on indicated errors to be edited.
The BEEP option specifies whether mscomp will be silent or will emit warning beeps.
3
MODSIM User’s Manual
You may edit the entries in the file mscomp.cfg, as required, using any text editor, or use
mscomp to set the configuration options.
1.3 Files
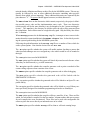
The following naming conventions are used by the MODSIM compilation manager. Note
file names are case sensitive. On all machines, module names are case sensitive:
Module Name
File Name
MAIN MODULE Alpha
MAlpha.mod
DEFINITION MODULE Beta
DBeta.mod
IMPLEMENTATION MODULE Beta
IBeta.mod
C++ code to support Beta
Beta.cpp
It is important that the above conventions are followed since they are used by the compilation manager to perform compiles and links.
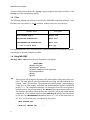
1.4 Using MSCOMP
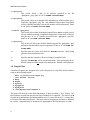
mscomp's Main Menu offers the most frequently used options:
MAIN MENU
(M)ake project
(E)valuate status
(O)ther compile/link options
(C)onfiguration
(H)elp
(Q)uit
(M)
This selection will prompt for the name of the main module of the project to be compiled. The name must be provided without the preceding “M ” and without the succeeding “.mod” file extension. The program may include simply a main module or
it may have a main module, definition and implementation modules (MODSIM
and/or C++). The compilation manager will determine which files are required to
build this project (based upon imports into MAIN and then their imports and so on).
The manager determines which modules are required by observing certain naming
conventions. If any module imports from a DEFINITION module, then the manager will see if an IMPLEMENTATION module and/or a C++ file of the same name exist. If so, it will assume they are required for the project.
MAIN MODULE abc;
...
FROM foo IMPORT bar, .... ;
...
4
Chapter 1. MSCOMP — MODSIM III Development Under UNIX
Upon examining main module abc, the manager knows that this project requires
definition module foo (assuming that foo is not a system library definition module - see below for explanation). The manager will see if Dfoo.mod exists, and
then it will check for the existence of Ifoo.mod and foo.cpp. If either or both
of these do exist, it assumes they are required for the project.
Once the required modules are identified, the compilation manager ascertains whether any
of these modules require compilation. A source code module will require compilation if:
•
Its date is later than the corresponding object file.
•
Any module on which it depends has a later object file date than the module's corresponding object file.
•
Any module on which it depends is going to be scheduled for recompilation at this
time. Once all modules which require recompilation have successfully compiled,
the manager will schedule a link of all modules required for the project. This final
step produces an executable program.
(E)
This selection will perform a project evaluation starting from a MAIN module. It
works exactly like the first option except that it merely reports to you which modules need to be compiled. It does not actually schedule any compiles.
(O)
Selecting “O” from the main menu will take you to the “OTHER OPTIONS MENU”.
The menu provides many compilation and linking variations that are useful in managing large and small projects. These are explained below.
(C)
Item “C” displays the “CONFIGURATION MENU” which allows you to view and
change the current configuration settings as specified in the configuration file.
The following describes the subsidiary menus of mscomp. Each menu page has a (H)elp
selection which briefly explains the options on that particular menu.
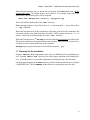
1.4.1
Other Options Menu
(C)
This selection will identify the modules required for a project from the MAIN module you specify. A full description is given under MAIN MENU option “M”. Once all
such modules are identified they will all be scheduled for compilation. No date
checking will be performed. This option forces compilation of all modules whether
or not they are out of date. This comes in handy if you have previously compiled
all or some of the modules with certain options switches set , but now want to have
them turned off to speed up code and reduce executable size. No link will be performed.
(S)
This item will compile an individual MAIN, DEFINITION , IMPLEMENTATION, C
module or C++ module. You will be required to specify which type of module is
to be compiled (“M”, “D”, “I ”, “C”, “P” respectively) and then provide the name of
the module without the preceding qualifier or the succeeding file extension. This
5
MODSIM User’s Manual
option can be used to compile one particular module with a different set of compile
options than the rest, or to simply check the module for syntax errors.
(P)
This selection will force the compilation of all modules specified in a project file.
This option functions much like item “C” except that the compilation manager will
not automatically determine which files are to be compiled. Instead, this information is taken from the modules listed in the project file whose name you specify.
The project file name should be entered without the succeeding file extension (all
such files must have a “.prj” file extension). The format for project files will be
explained below.
(L)
This selection will force a link of all modules required for a project. The list of
modules required will be determined as described in MAIN MENU option “M”.
(K)
The “K” option will also force a link of all project modules. These modules are
specified in a project file rather than being determined from a main module as in
“L ” above.
(M)
Option “M” performs like MAIN MENU option “M” except that the modules are specified in a project file rather than being determined from a main module. Dependency checking and date checking are also performed to ensure that all required
modules are re-compiled.
(A)
The “A” selection uses both a MAIN module and a project file. The compilation
manager will determine from the main module which modules are required for the
project and whether any of these modules require recompilation. All of these modules will be scheduled for linking into the executable. In addition to these modules
any modules specified in the project file by the “O ” or “L” modifier will also be
linked into the final project executable. This allows specification of object and/or
library files for use in projects. Items in the project file preceded with “D ”, “I”, “M”,
“C ” or "P" will also be checked and, if necessary, scheduled for compilation and/or
link.
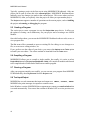
1.4.2
Configuration Menu
(V)
Option “V” displays the current configuration for this invocation of the compilation manager. Initially the configuration comes from the mscomp.cfg file in the
current directory. The various settings and directories may be temporarily changed
for an individual run or permanently edited by using options “C ” and “M ” described
below.
(C)
Option “C” allows you to change switch settings for compiler options such as reference checking, range checking, traceback, etc. These changes will persist only
for this invocation of the compilation manager unless you specify that they be
saved. If any options are changed, you are asked if the changes should be permanent (i.e., overwrite the configuration file in the current directory). If so, the current
settings will be saved. You may change these options as many times as necessary
during any particular session.
6
Chapter 1. MSCOMP — MODSIM III Development Under UNIX
(M)
The “M” selection allows you to modify the directory specifications for the compilation manager. These changes persist only for the current run of the manager unless you indicate that they be saved in the configuration file. If modifications are
not saved, these directories will revert to those specified in the configuration file
upon subsequent runs.
1.5 Command Line Operation
Most of mscomp's compile/link/evaluate menu options may be invoked from the command
line. If you will not need to use the menu options at all or will want to run the compiler in
batch mode, a flag may be given to mscomp to indicate this. In batch mode, compilation
will not stop upon errors or wait for keyboard input. Output will continue to go to the
screen unless redirected to a file or printer. The command line switches parallel the menu
selection keys as much as possible. In command line mode, mscomp uses the settings
specified in the mscomp.cfg file unless they are explicitly overridden by one of the command line options.
To use mscomp from the command line, invoke it followed by one or more of the following
options on the command line: mscomp
<main>
mscomp followed by the name of a main module (without the preceding
“M ” or the succeeding “.mod”) will determine the modules required to build
an executable from this named main module, determine which, if any, need
to be recompiled, schedule their compilation and finally perform a link, producing an executable program. This is identical to selecting option “M” from
the MAIN MENU.
-v
Performs an evaluation of which modules for a particular main module will
need recompilation and reports the result. Same as “E” from MAIN MENU.
-c <main>
Compile all modules required for the project specified by main module
<main>. Same as selecting “C” from OTHER OPTIONS MENU.
-s{m|d|i|c} <module name>
This switch (a “-s” followed by one of “m”,”d ”,”i” or “c”) will perform a
single module compilation of <module name>. Same as “S” item on OTHER
OPTIONS MENU.
-p <project>
The “-p ” switch followed by the name of a project file without the “.prj”
suffix will force compilation of all modules listed in <project>. Same as “P”
item on OTHER OPTIONS MENU .
-l <main>
“-l” switch forces a link of all modules required for the project specified by
<main> module. Same as “L ” on OTHER OPTIONS MENU .
7
MODSIM User’s Manual
-k <project>
This switch forces a link of all modules specified in the file
<project >.prj. Same as “K” on OTHER OPTIONS MENU.
-m <project>
This switch causes an evaluation of the dependencies of the modules specified in the <project>.prj file. Any modules which require compilation
will be scheduled and then a link on all modules will be performed. Same
as “M ” option of OTHER OPTIONS MENU.
-a <main> <project>
This switch will evaluate all modules required from <main > module, schedule any modules requiring compilation and perform a link of all such modules plus any “O” or “L” modules specified in the <project>.prj file.
Same as “A” on OTHER OPTIONS MENU.
-u <project>
This switch will assess the modules listed in project file <project>.prj
and report which modules require compilation. Same as “U” on OTHER OPTIONS MENU .
-e
Specifies that the system will check for NILOBJ reference values being
passed in formal parameter lists.
-l
Specifies that the compiler will emit a listing of compiled code.
-b
Specifies that mscomp will be run in batch mode. After performing the indicated actions it will not return to the main menu. Instead it will terminate.
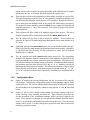
1.6 Project Files
A number of options are designed to be used with project or script files which contain a
script in the following format:
'
'
I
M
C
P
O
L
This is project file Alpha.prj
last edited 6/14/95
Beta
Alpha
mycfile
mycppfile
myobjfile
/usr/myname/lib/libMyLib.a
The project file must be in the following format., It does not allow a “free” format. The
first character on each line specifies the type of module to be compiled. The choices are M
for main, D for definition, I for implementation, C for C source files, P for C++ source files,
O for object files and L for libraries. The letter must be in uppercase and must be followed
by a space. Comments may be included if an apostrophe is the first character on a line.
8
Chapter 1. MSCOMP — MODSIM III Development Under UNIX
Where the first character is M, I, P or C , the second entry is the full module name, not the
truncated file name. The module name is case sensitive. For example, in the project file
shown above, the following files will be compiled:
IBeta.mod, MAlpha.mod, mycfile.c, mycppfile.cpp
These files will be searched for in the ’IMP>’ directory.
Note: mscomp requires C source files to have a ’.c’ extension and C++ source files to have
a ’.cpp ’ extension.
Where the first character is O, the second entry is the name of an object file (without the file
extension) which is to be linked into this executable. UNIX systems assume an “.o” extension. Object files will be searched for in the ’OBJ>’ directory.
Where the first character is L, mscomp expects the full path and extension for a library file.
The extension information is required since some systems will have several versions of system libraries whose names differ only in the extension.
mscomp expects project file names to end with the extension “.prj”.
1.7 Checking Out the Installation
Program “MErrors.mod” demonstrates how errors are handled by the compilation process. Program “Mhello.mod” can be used to verify proper operation of the compile process. It should produce an executable called hello which prints out a brief message.
See the sample programs in the demos directory of the distribution disk for more examples
of MODSIM code. The file README, in that directory, explains what each one does.
9
MODSIM User’s Manual
10
2. MODSIM III Development Under Microsoft
Windows
The chapter covers the following topics:
•
Overview of MODSIM III for Windows
•
Hardware and Software Requirements
•
Use of MODSIM III Workbench to Manage MODSIM III projects.
2.1 Overview
As in the previous release, full MODSIM III functionality is provided in the context of
Microsoft Windows for PC computers. MODSIM uses the virtual memory manager of
Microsoft Windows to run large models. When used with a fast PC, its performance for
both compilation and simulation runs is comparable with many Unix workstations.
MODSIM III system libraries have been compiled to take advantage of 32 bit memory
access.
2.2 Hardware and Software Requirements
MODSIM III can be run on a large number of PCs because it does not make special hardware demands beyond those of typical “high end” Windows systems.
•
486 processor or greater
•
16 MB of system memory minimum. 32 MB recommended
•
45 MB of available hard disk space recommended minimum
•
Microsoft Windows 95 or Windows NT 4.0
•
Microsoft Visual C++ 4.x or 5.0
•
On all systems, a larger monitor is preferred. It should be 17" or greater and have
a display card capable of operation at 1,024 x 768 resolution with 256 colors.
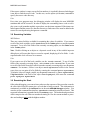
2.3 Using MODSIM III Workbench to Manage Your Projects
MODSIM III Workbench is an integrated program environment for conveniently organizing, creating, compiling, running and debugging your MODSIM III programs.
This overview follows the Workbench's menu choices. Where menu choices open dialog
boxes, these dialog boxes are described separately at the end of the walk through of the
main menu choices.
2.4 Organizing Your Program with a Project
The project is the basic organizing unit of MODSIM III Workbench. A project records all
of the relevant information about the program you are creating: its name, its location, what
files are used to build it, current compilation options, etc.
11
MODSIM User’s Manual
Typically, opening a project is the first step in using MODSIM III Workbench. Only one
project can be open at a time; this is the current project. MODSIM III Workbench automatically saves any changes you make to the current project. This occurs when you leave
MODBENCH, when you explicitly close the project or when you open another project.
The Project menu supports a number of operations on the current project, such as building
the project and running or debugging the program.
2.5 Creating a Program
The easiest way to create a program is to use the Project New menu choice. It offers you
the option of creating a new subdirectory for your project and of creating a new MAIN
Module.
Once this has been done, you can use the MODSIM III Workbench editor to edit, create, or
view program files.
The File menu offers commands to open an existing file for editing, to save changes to a
file, to create a new editing window, etc.
If you prefer to use the editor of your choice, you can use the Options menu Tools option
to install your own editor. The editor can then be launched from the Tools menu .
2.6 Compiling a Program
MODBENCH allows you to compile a single module, but usually it is easier to select
Project Build instead of Project Compile Module. Build will compile all modules which need
to be compiled and will then link to build an executable program.
2.7 Running a Program
After your program compiles successfully, you can execute your program from MODSIM
III Workbench by choosing Execute from the Project menu.
2.8 Text Input/Output
MODSIM has several statements that input and output text: INPUT, OUTPUT, PRINT.
MODSIM also prints messages in response to runtime errors.
In the Windows version of MODSIM, these statements are output to a console window that
is created automatically. You can use the scrollbar in Windows NT to review previous output.
12
Chapter 2. MODSIM III Development Under Microsoft Windows
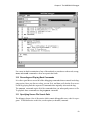
2.9 Project Menu
The Project menu offers commands for manipulating the current project.
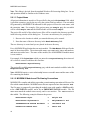
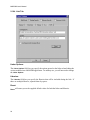
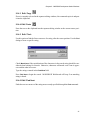
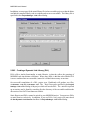
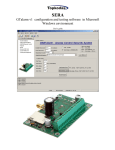
2.9.1
Project / New
Presents the New Project dialog, which lets you create a new project. After specifying the
new project and pressing OK, the new project becomes the current project. The project
which is currently open is automatically saved and closed.
13
MODSIM User’s Manual
Note: This dialog is derived from the standard Windows file browsing dialog box. Its use
and operation should be familiar to the Windows users.
2.9.1.1 Project Name
All project information is stored in a file specified by the project Project Name field, which
is given the extension .prj by the user or by the system if the user omits it. The executable
file generated by MODSIM III Workbench for this project will have the same name, with
the extension .exe. For example, if the project name was Sample.prj, the executable
will be called Sample.exe and the MAIN module will be named Sample .
The project file and all of the related source files will be created in the directory specified
in the browsing window of this dialog box. To create a new directory for your project:
1. Browse to the location in which you want the directory to be created.
2. Enter the name of the new directory in the New Subdirectory field.
The new directory is created and you are placed in the new directory.
Every MODSIM III application has one main module. The Main Module field specifies the
name of the main module. The main module name can contain only letters and numbers,
and must start with a letter. The name of the module, like all MODSIM III module names
is case sensitive.
For example, if the Project Name which was entered was VegetableSoup, the main module’s which is created would have this first line:
MAIN MODULE VegetableSoup;
The project file would be VegetableSoup.prj and the main module would be in the file
MVegetableSoup.mod.
Note: MODSIM requires a strict relationship between a module name and the name of the
file containing the module.
2.9.1.2 MODSIM III Module and File Naming Conventions
MODSIM III's compiler and utilities expect that a certain naming convention will be used for
files which contain modules. MODSIM source files are expected to have the extension .mod.
The file name is composed by preceding the module name with an M for a MAIN module,
D for a DEFINITION module, and I for an IMPLEMENTATION module. The file
name must match the module name exactly, and is case sensitive. The .mod extension is
then added. The following examples illustrate the process.
14
MAIN MODULE Alpha
➞
Malpha.mod
MAIN MODULE AlphaNumeric
➞
MAlphaNumeric.mod
IMPLEMENTATION MODULE BackRack
➞
IBackRack.mod
DEFINITION MODULE Beta
➞
DBeta.mod
Chapter 2. MODSIM III Development Under Microsoft Windows
2.9.1.3 Project Type
There are five project types to choose from:
•
Graphics Application
•
Text Application
•
Graphics Only Application
•
Static Library
•
Dynamic Link Library (DLL)
Choose Graphics Application if you want to use MODSIM’s graphics capability (i.e.
SIMGRAPHICS II) and need to use OUTPUT/INPUT statements. Choose Text Application
for text only applications which do not use graphics. This will make your executable
smaller. Choose Graphics Only Application if you want to use graphics and do not want to
use OUTPUT/INPUT statements.
Static and dynamic library project types will be discussed later in paragraph 2.20.
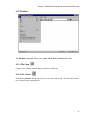
2.9.2
Project / Open
Presents a File Open dialog that lets you select the project to open; this becomes the current
project. Projects are stored in files with the .prj extension. The project which is currently
open is automatically saved and closed.
2.9.3 Project / Close
Closes the current project, saving its current state.
2.9.4 Project / Compile Module
Compiles the module displayed in the topmost editor window of MODBENCH’s editor.
2.9.5 Project / Build ...
Ensures that all modules used in the current project are compiled, and creates the executable. MODSIM III Workbench only recompiles a module if necessary. Build and Rebuild
will build an application in Debug or Release mode depending on the option currently selected in the Project Settings dialog. A project may be built of a mixture of modules which
were compiled with and without debugging.
If errors are found during the compilation phase of the build process, the errors will be noted in the output window and the system will continue to compile the remaining modules
which require building. The link will be canceled since at least one module had errors. To
view the source code which corresponds to the error, either double click on the specific error or press the F4 key to review each error. See View Next Error. See paragraph 2.12.
15
MODSIM User’s Manual
2.9.6 Project / Rebuild All ...
MODSIM III Workbench uses a sophisticated algorithm to detect when it can avoid recompiling a module. However, there are times when it is desirable to force a compile of all
modules. This might occur after program development and debugging when all modules
are compiled with error checking off. The Rebuild All command forces MODSIM III
Workbench to recompile all modules.
2.9.7 Project / Stop Build
Select this command to terminate a build in progress. The build process will stop at the end
of the current step, so there may be a delay between the time this option is selected and the
termination of the build process. An acknowledgment will be displayed in the output window when the build process terminates.
2.9.8 Project / Link
The Link command deletes the executable and performs a Build command. This command
is useful if you wish to relink your project against a set of dependent libraries which may
have changed.
2.9.9 Project / Execute ...
The Execute command runs the program, if it exists. If the program does not yet exist, you
will be asked if you would like to build the application.
2.9.10 Project / Debug ...
The Debug command runs the program in interactive debugging mode. The main module
and any module which you would like to debug must have been compiled with debugging
support enabled. The program will stop at the first executable line. From there, you can
examine variables and types, set breakpoints, execute the program line by line, or examine
the execution stack. For further information, see Introduction to Debugging with
MODSIM III in Chapter 3, use the Help option for debugging, or press the Help button
once you are in debugging mode.
16
Chapter 2. MODSIM III Development Under Microsoft Windows
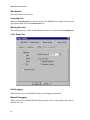
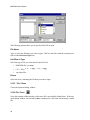
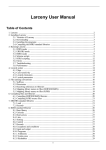
2.10 Project / Settings ...
Often, you want to use different settings while debugging than for the final release. For
example, during debugging you may want all checking turned on, to catch errors. For the
final release, you may want checking turned off, for speed.
There are a number of settings for controlling the compilation process. If Debug Specific
is selected, any change will apply to the debugging set of options; if Release Specific is
selected, any change will apply to the release set of options; if Common to Both is selected,
any change applies to both the debugging and release sets.
Debug Specific:
When checked, MODSIM III enables interactive debugging of a running application.
Release Specific:
When checked MODSIM III compiles MODSIM code for speed of execution.
Project Type:
Switch between different project types.
17
MODSIM User’s Manual
Main Module:
The main module of the project.
Command Line:
When the Project/Execute command is invoked, the MODSIM executable will be passed
any options entered into the Command Line box.
Working Directory:
The working directory which the MODSIM executable is started from on Project/Execute.
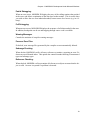
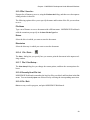
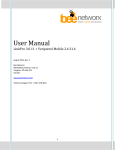
2.10.1 Debug Tab
No Debugging:
When an error occurs, MODSIM III displays no debugging information.
Minimal Debugging:
When an error occurs, MODSIM III displays the only a trace of the calling routine that resulted in the error.
18
Chapter 2. MODSIM III Development Under Microsoft Windows
Partial Debugging:
When an error occurs, MODSIM III displays the trace of the calling routines that resulted
in the error, and allows examination of the data local to that routine. This is useful when
you wish to allow the use of an inherited method, but not source level access (e.g. in a library).
Full Debugging:
When an error occurs, MODSIM III displays the sequence of calls that resulted in the error.
In addition, breakpoints can be set and stepping through source code is available.
Warning Messages:
Controls the emission of compiler warning messages.
Preserve Error Files:
If checked, error message files generated by the compiler are not automatically deleted.
Subrange Checking:
When checked, MODSIM verifies all array references at runtime, reporting an error if it
detects an out-of-bounds index. This option also controls bounds checking of enumerated
types and subrange types.
Reference Checking:
When checked, MODSIM verifies at runtime all references to objects to ensure that the object is valid. An error is reported if a problem is detected.
19
MODSIM User’s Manual
2.10.2 C++ Tab
Compiler Options:
In ordinary use, you will not need to change the C++ Compiler Options. In fact they should
normally not be changed since MODSIM III’s libraries expect that certain options are selected. Consult your C ++ compiler documentation for more information on these switches. The Reset button will reset the C++ compiler options to the original values for your
current version of MODSIM.
Preserve C++ Files:
MODSIM III works by compiling a MODSIM program into C++, and then compiling the
C ++ code into object code. Ordinarily, the intermediate C++ files are deleted after compilation, but if this option is checked the intermediate C++ files are retained.
Generate Indented C++ Code:
When checked, MODSIM produces C++ code which is indented.
20
Chapter 2. MODSIM III Development Under Microsoft Windows
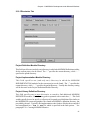
2.10.3 Directories Tab
Project Definition Module Directory:
This field specifies one (and only one) directory in which the MODSIM Definition modules
for the current project can be found. The “.” specifies the current directory, while “..”
specifies the parent directory.
Project Implementation Module Directory:
This f ield sp ecifies on e (and on ly one) d irectory in wh ich the MO DS IM
IMPLEMENTATION modules for the current project can be found. The “. ” specifies the
current directory, while “..” specifies the parent directory. Usually this directory setting
will be the same as the Project Definition Module Directory.
Project Library Definition Directory:
This field specifies one or more directories to search to find additional MODSIM
DEFINITION modules. Each directory path is separated with a semicolon ‘;’. This field
would typically be used to specify a collection of frequently used definition files similar to
the MODSIM III system and graphics files found in MODSIM’s definition directory, but
provided by the user. Typically, the implementation code for these files has been compiled
and consolidated in a .LIB or .DLL file which is specified in the link options. See
paragraph 2.20 - Creating MODSIM Libraries.
21
MODSIM User’s Manual
2.10.4 Link Tab
Linker Options:
The Linker Options field lets you specify the options passed to the linker when linking the
various modules into a MODSIM application. In ordinary use, you will not need to change
the Linker Options .
Libraries:
The Libraries field lets you specify the libraries that will be included during the link. If
there are multiple libraries, separate them by spaces.
Reset:
Reset will return
22
you to the supplied default values for both the linker and libraries.
Chapter 2. MODSIM III Development Under Microsoft Windows
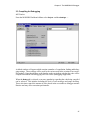
2.11 Options Menu
The Options Menu commands let you change options that affect the MODSIM III
Workbench in general. For example, you can change where MODSIM III Workbench
looks for the MODSIM installation, and you can change the configuration of the editor and
license manager.
The Options menu allows adjustment of the MODSIM III Workbench environment.
2.11.1 Options / Directories...
The directories listed here tell MODSIM III Workbench where to look for various
MODSIM files. The Executables directory gives the location of modsim3.exe, and other
MODSIM executables and dynamic link libraries.
The Include directory gives the location of the MODSIM header files.
The Link directory gives the location of the MODSIM runtime libraries (.lib files). Multiple directories may be specified separated with a semicolon ';'.
The Library Definition directory gives the location of the system definition modules
(D*.mod files) for MODSIM's runtime and SIMGRAPHICS II libraries.
23
MODSIM User’s Manual
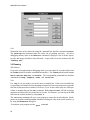
2.11.2 Options / Editor...
MODSIM III Workbench provides a simple editor that you can use to create, view, and update modules. Use this command to customize editor behavior. Use the Options/Editor
dialog to customize the editor's settings.
The Tab Stops field sets the number of positions between tab stops. It is not yet implemented. If Keep Tabs is selected, then when you type a tab it remains a tab. If Insert Spaces is
selected, a tab is converted into an equivalent number of spaces.
If you want scroll bars to help you move around a file, check the Vertical and Horizontal
Scroll Bars option. Otherwise, you must use the Page-Up, Page-Dn , and arrow keys to view
portions of the file that are off-screen.
The Save Before Running Tools option will ensure that your source files which have been
edited will be saved before any compile, build or program execution. If you want MODSIM III Workbench to prompt you before saving, check the Prompt Before Saving Files option.
24
Chapter 2. MODSIM III Development Under Microsoft Windows
2.11.3 Options / Tools...
This command allows you to install your own tools in the Tools menu.
2.11.4 Options / Font...
The Font option lets you choose the font face, style, and size to use in the editor windows.
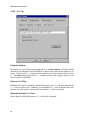
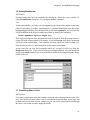
2.11.5 Options/License Manager
The License Manager dialog allows you to configure MODBENCH to use one of three
modes of license protection. If you are not sure which mode of license protection you
should be using, please contact CACI with your product serial number.
25
MODSIM User’s Manual
Single Machine License:
Use this option for a single machine software license. After selecting this option press the
Register Now button to obtain your host code. You will be prompted to enter a license key
which can be obtained from CACI.
Floating License:
Use this option if you intend to use a license server. The Getting Started manual contains
information on how to configure a license manager.
Hardware License (Dongle):
Use this option for hardware license protection using a dongle attached to your parallel
port. After selecting this option, press the Install Driver button to configure your computer
for the dongle. You must restart your computer after installing the driver software.
2.12 View Menu
Select Line to view a specific line in the topmost editing window.
Select Next Error to view the next error, after a MODSIM compile.
Select Previous Error to view the previous error, after a MODSIM compile.
Select Toolbar to toggle the display of the Toolbar.
Select Status Bar to toggle the display of the Status Bar.
26
Chapter 2. MODSIM III Development Under Microsoft Windows
2.13 File Menu
The File Menu commands allow you to Open, Close, Save , and Print source files.
2.13.1 File / New
Creates a new editing window that you can use to enter text.
2.13.2 File / Open...
Presents the File Open dialog, which you use to select a file to edit. The file does not have
to be related to the current project.
27
MODSIM User’s Manual
The following options allow you to specify which file to open:
File Name
Type or select the filename you want to open. This box lists files with the extension you
select in the List Files of Type box.
List Files of Type
Select the type of file you want listed in the Files list:
•
MODSIM files (*.mod)
•
C/C++ files (*.c, *.cpp, *.h, *.hpp)
•
any other files
Drives
Select the drive containing the file that you want to open.
2.13.3 File / Close
Closes the topmost editing window.
2.13.4 File / Save
Saves the topmost editing window in the same file it was initially loaded from. If the topmost editing window was created by New, it prompts for a file name for the newly created
file.
28
Chapter 2. MODSIM III Development Under Microsoft Windows
2.13.5 File / Save As...
Prompts for a filename to save to, using the File Save As dialog, and then saves the topmost
editing window in that file.
The following options allow you to specify the name and location of the file you are about
to save:
File Name
Type a new filename to save a document with a different name. MODSIM III Workbench
adds the extension you specify in the Save File As Type box.
Drives
Select the drive in which you want to store the document.
Directories
Select the directory in which you want to store the document.
2.13.6
File / Print...
The Print... dialog lets you specify how you want to print the document in the topmost editing window.
2.13.7 File / Print Setup...
The Print Setup dialog lets you change the current printer, and how the current printer behaves.
2.13.8 Recently Used File List
MODSIM III Workbench remembers the last four files you edited, and lists them in the File
menu. You can instantly Open one of these files by selecting the corresponding menu item.
2.13.9 File / Exit
Exit
saves any work in progress, and quits MODSIM III Workbench.
29
MODSIM User’s Manual
2.14 Edit Menu
The Edit menu provides the functionality available to all Windows programs.
2.14.1 Edit / Undo
If the last editing command is reversible, selecting Undo will reverse it.
2.14.2 Edit / Cut
If text is currently selected in the topmost editing window, this command deletes it and puts
it into the clipboard.
30
Chapter 2: MODSIM Development Under Windows
2.14.3 Edit / Copy
If text is currently selected in the topmost editing window, this command copies it and puts
it into the clipboard.
2.14.4 Edit / Paste
Paste the text on the clipboard into the topmost editing window at the current cursor position.
2.14.5 Edit / Find...
Use this option to find the first occurrence of a string, after the cursor position. Use the Find
dialog to locate a specific string.
Check Match Case if the capitalization of the characters in the search string should be considered when looking for a match. Otherwise, characters will match even if one is uppercase and the other lowercase.
Type the string to match in the Find What field.
Press Find Next to begin the search. MODSIM III Workbench will beep if no matching
string is found.
2.14.6 Edit / Find Next:
Finds the next occurrence of the string most recently specified through the Find command.
31
MODSIM User’s Manual
2.14.7 Edit / Replace...
Use this option to replace all occurrences of one string by another. The topmost editing
window is scanned, from the current cursor location to the end, to find text to replace.
Type the text to search for in the Find What field. Check Match Case if you want capitalization to be considered when searching.
Type the text to replace with in the Replace With field.
Find Next will select the first text after the current cursor position
which matches the search
text.
Pressing Replace will replace the selection with the replacement text. Pressing Replace All
will replace the selection, and all further matches, with the replacement text.
2.14.8 Edit / Select All
Selects all the text in the topmost editing window.
32
Chapter 2: MODSIM Development Under Windows
2.15 Window Menu
The Window menu offers the following commands, which enable you to arrange multiple
views of multiple documents in the application window:
2.15.1 Window / Cascade
Arranges the windows in an overlapping fashion, so that any window can be selected.
2.15.2 Window / Tile
Arranges the windows so that each is visible, but none overlap.
2.15.3 Window / Duplicate
Makes a new editing window onto the same file as the topmost window.
2.15.4 Window / Close All
Closes all open windows.
2.15.5 Window / Output
Displays the Output window, which captures the output of the MODSIM compiler, linker,
etc.
33
MODSIM User’s Manual
2.16 Help Menu
The Help menu offers the following commands, which provide help with MODSIM III
Workbench questions.
2.16.1 Help / MODSIM III Reference Manual
Displays the Adobe Acrobat version of the MODSIM Reference Manual. This manual is a
reference for the MODSIM language.
2.16.2 Help / MODSIM III User’s Manual
Displays the Adobe Acrobat version of the MODSIM III User’s Manual.
2.16.3 Help / MODSIM III Tutorial
Displays the Adobe Acrobat version of the MODSIM III Tutorial. This document provides
an overview and examples of the MODSIM language.
2.16.4 Help / SIMGRAPHICS II Manual
Displays the Adobe Acrobat version of the SIMGRAPHICS II User’s Manual. This manual
is a reference for using graphics in MODSIM programs with SIMGRAPHICS II.
34
Chapter 2: MODSIM Development Under Windows
2.16.5 Help / About MODSIM III WorkBench
Choosing About MODSIM III WorkBench from the Help menu, or selecting it from the
toolbar, brings up a dialog box that gives the version and copyright of MODSIM III
Workbench.
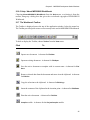
2.17 The Workbench Toolbar
The Toolbar is displayed across the top of the application window, below the menu bar.
The Toolbar provides quick mouse access to many tools used in MODSIM III Workbench.
To hide or display the Toolbar, choose Toolbar from the View menu.
Click
To
Open a new document. A shortcut for File/New.
Open an existing document. A shortcut for File/Open .
Save the active document or template with its current name. A shortcut for File/
Save.
Remove selected data from the document and stores it on the clipboard. A shortcut
for Edit/Cut.
Copy the selection to the clipboard. A shortcut for Edit/Copy.
Insert the contents of the clipboard at the insertion point. A shortcut for Edit/Paste.
Print the active document. A shortcut for File/Print.
Compile module.
A shortcut for the Project/Compile module.
35
MODSIM User’s Manual
Build Project.
Link Project.
Stop Build
Execute.
Debug.
A shortcut for Project/Build.
A shortcut for Project/Link.
at next opportunity. A shortcut for Project/Stop Build.
A shortcut for Project/Execute.
A shortcut for Project/Debug .
Displays the About box.
Type text into the Find box and press Enter or
push the Find button to search in the top window.
Find.
2.18 The Workbench Status Bar and General Window Commands
The status bar is displayed at the bottom of the MODSIM III Workbench window. To display or hide the status bar, use the Status Bar command in the View menu.
The left area of the status bar describes actions of menu items as you use the arrow keys to
navigate through menus. This area similarly shows messages that describe the actions of
toolbar buttons as you depress them, before releasing them. If after viewing the description
of the toolbar button command, and you wish not to execute the command, release the
mouse button while the pointer is off the toolbar button.
The right areas of the status bar indicate which of the following keys are latched down:
Indicator
CAPS
NUM
Description
The Caps Lock key is latched down.
The Num Lock key is latched down.
The rightmost windows indicate the line and column number of the active edit window.
36
Chapter 2: MODSIM Development Under Windows
Title Bar
The title bar is located along the top of a window. It contains the name of the application
and document.
To move the window, drag the title bar.
Note: You can also move dialog boxes by dragging their title bars. A title bar may contain
the following elements:
•
Application Control-menu button
•
Document Control-menu button
•
Maximize button
•
Minimize button
•
Name of the application
•
Name of the document
•
Restore button
Scroll Bars
Displayed at the right and bottom edges of the document window. The scroll boxes inside
the scroll bars indicate your vertical and horizontal location in the document. You can use
the mouse to scroll to other parts of the document.
Size Command (System Menu)
Use this command to display a four-headed arrow so you can size the active window
with the arrow keys. After the pointer changes to the four-headed arrow:
1. Press one of the DIRECTION keys (left-, right-, up-, or down- arrow key) to
move the pointer to the border you want to move.
2. Press a DIRECTION key to move the border.
3. Press Enter when the window is the size you want.
Note: This command is unavailable if you maximize the window.
Shortcut: Mouse:
Drag the size bars at the corners or edges of the window.
Move Command (System Menu)
Use this command to display a four-headed arrow so you can move the active window or dialog box with the arrow keys.
37
MODSIM User’s Manual
Note: This command is unavailable if you maximize the window.
Shortcut: Keys:
CTRL+F7
Minimize Command (System Menu)
Use this command to reduce the MODSIM III Workbench window to an icon.
Shortcut:
Mouse:
Click the minimize icon
Keys:
ALT+F9
on the title bar.
Maximize Command (System Menu)
Use this command to enlarge the active window to fill the available space.
Shortcut:
Mouse:
Click the maximize icon
click the title bar.
Keys:
CTRL+F10 enlarges a
on the title bar; or double-
document window.
Next Window Command (Document System Menu)
Use this command to switch to the next open document window. MODSIM III Workbench
determines which window is next according to the order in which you opened the windows.
Shortcut: Keys:
CTRL+F6
Previous Window Command (Document System Menu)
Use this command to switch to the previous open document window. MODSIM III
Workbench determines which window is previous according to the order in which you
opened the windows.
Shortcut: Keys:
SHIFT+CTRL+F6
Close Command (System Menu)
Use this command to close the active window or dialog box. Double-clicking a Systemmenu box is the same as choosing the Close command.
Shortcuts: Keys:
CTRL+F4 closes
ALT+F4
38
a document window.
closes the window or dialog box.
Chapter 2: MODSIM Development Under Windows
Restore Command (System Menu)
Use this command to return the active window to its size and position before you chose the
Maximize or Minimize command.
Switch to Command (Application System Menu)
Use this command to display a list of all open applications. Use this "Task List" to switch
to or close an application on the list. Shortcut: Keys: CTRL+ESC
2.19 Command Line Interface to MODSIM III Workbench
On invocation from the command line (DOS window) the MODSIM III Workbench accepts the following options:
-s
Run in silent mode. The graphical user interface is not used.
-b
Execute a build command.
-a
Execute a build all command.
<prjfile>
Open the project file.
When these options are combined it is possible to build MODSIM projects in batch mode,
e.g.
msbench3 -s -a test.prj
The command will build all of the modules in the project ’test.’
2.20 Creating MODSIM Libraries
In a addition to an executable project type, Workbench supports static and dynamic library
project types. In an exclusive executable project, all of the code is combined (linked) to
produce an executable. Libraries provide a mechanism where a collection of code can be
combined for later use by an executable. In this way you can divide your programs into
smaller functional subsets.
2.20.1 Creating a Static Library
Suppose we have the following MODSIM code modules in one executable project:
MTranSim.mod
DCar.mod
DBoat.mod
DPlane.mod
DFileIO.mod
DConfig.mod
ICar.mod
IBoat.mod
IPlane.mod
IFileIO.mod
IConfig.mod
39
MODSIM User’s Manual
After a period of developing code in a single project we find that FileIO and Config do
not depend on the other modules in the project and we would like to move them into a separate library. In this scenario we would move the FileIO and Config modules into a separate directory and create a new static library project. In addition we would create a
'dummy' MAIN module which imports something from each of the modules (FileIO and
Config) in our library.
The MAIN module is important as Workbench uses it to determine the modules which make
up your library. The directory structure would look something like this:
c:\modsimsrc\transim\MTranSim.mod
DCar.mod
ICar.mod
DBoat.mod
IBoat.mod
DPlane.mod
IPlane.mod
c:\modsimsrc\configio\Mconfigio.mod
- dummy module
DFileIO.mod
IFileIO.mod
DConfig.mod
IConfig.mod
We could then compile our library project and produce a library 'configio.lib'. We
then need to alter the executable project so that it knows about the library. To do this we
first need to specify the location of the libraries definition modules in the Project/Settings
- Directories tabbed dialog of the executable project.
40
Chapter 2: MODSIM Development Under Windows
This allows the MODSIM compiler to find the definition modules of the library upon which
our executable project is dependent. Note, it is possible to specify multiple paths (corresponding to multiple libraries) separated with semicolons.
41
MODSIM User’s Manual
In addition, we must specify the actual library file in the executable project so that the linker
can find the compiled library code to combine and create an executable. The library file is
specified in the Project/Settings - Link tabbed dialog.
2.20.2 Creating a Dynamic Link Library (DLL)
DLLs offer a similar functionality to static libraries, in that they allow the grouping of
MODSIM code into distinct collections. Where they differ, is that the code within a DLL
is never combined into an executable, instead it is loaded into memory at run time.
On successful compilation of a DLL project type, Workbench will produce two files,
<libname>.lib and <libname>.dll. The .lib file must be specified in the Project/
Settings - Link tabbed dialog of the project which will use the DLL. The .dll file is picked
up at run time and is found by searching first the directory of the executable and then the
directories of the PATH environment variable.
Static libraries and DLLs cannot be mixed in your MODSIM project. You must use DLLs
or static libraries exclusively. In addition, if you use DLLs, every project file must check
the Use Dynamic Link Libraries checkbox in Project/Settings - Link tabbed dialog.
42
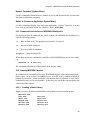
3. The MODSIM III Debugger
MODSIM III provides built-in debugging capabilities to your application. You can either
start up your application in debugging mode or execute it normally, allowing MODSIM to
drop you into debugging mode if a runtime error occurs. Unlike conventional debuggers,
it is not necessary to restart your application under control of a debugger to determine the
cause of an error. Once your application has entered debugging mode, you can examine
variables, browse up and down the execution stack, print simulation statistics, memory usage, etc. If you enter into debugging mode before a fatal error occurs, you have full control
of what points in the code you wish to stop at for more detailed examination, or set up automatic watching of chosen variables.
Enabling debugging support in your MODSIM III program has minimal impact to either
compile-time or runtime performance. It is convenient to leave debugging enabled
throughout the development phase of writing an application. Then when you are convinced
that the program is correct, you can recompile the entire application without debugging
support.
There are some differences between debugging on Microsoft Windows systems and on
Unix systems. On MS Windows systems you can enter debugging commands through
the graphical user interface. On Unix systems, you enter debugging commands at the
command line. These commands also work on MS Windows systems, and are entered
via a command line window at the bottom of the debugging window (see figure below).
In what follows, we distinguish between what applies to MS Windows systems only
(labelled MS Windows) and what applies everywhere (labelled Unix).
43
MODSIM User’s Manual
3.1 Basics
To debug your program:
1. Compile your main module and any other modules you desire with debugging support enabled. This procedure is described in detail in paragraph 3.3 below.
2. On systems running Microsoft Windows 95 or NT, select Debug from the Project
menu of MODSIM III Workbench. On other systems, you debug a program by giving it the argument "-msdebug" when you start it up . A DOS window may be
opened and the program name entered with -msdebug as a parameter; a Return
will then cause the program to execute with the debugger active. If your program
also has arguments, you can place the "-msdebug" flag before, after, or in the middle of the other arguments to your program. The flag will be stripped away before
your program sees it.
Your program will stop at the first executable statement in your code including the
ModInits (these may be stepped over with the “continue” command or stepped into using
the “step in” command, displaying the debugger graphical interface. You can either use
44
Chapter 3. The MODSIM III Debugger
the command line interface or, in Windows, use the Tool palette and dialogs to control the
debugger.
Essential commands for the command line interface are:
•
•
•
•
step : continue to next executable line, stepping into procedures
next : continue to next executable line, stepping over procedures
continue : continue to the next breakpoint
break : set a breakpoint at the current line, at a function entry, or at a specified line
number
•
•
•
•
traceback : show the calling chain that led to the current method or procedure
print <variable name> : print the value of a variable
locals : show all of the local variables
fields : show all of the fields of the object that is currently executing.
Most Microsoft Windows users will opt to use the Tool palette to control execution and to
set and clear breakpoints with the click of a mouse.
3.2 Interfacing with the Debugger
You can control the execution of your program and examine its state either through the
graphical interface (on MS Windows systems) or a command line interface (available on
all systems).
Unix
Most commands entered into the command line interface can be shortened or abbreviated.
The command reference provides details for each individual command. For instance,
disable breakpoint can be abbreviated as d or show modules can be shortened to
sh m.
All command line interface commands are terminated by a carriage return. A carriage return by itself has a special significance. Its general meaning is to do the next logical thing.
For instance, a carriage return entered by itself after a list command will cause additional
source code to be displayed from the source code line where the previous listing ended.
Typically, a carriage return by itself will repeat the previous command. For instance, after
entering a step command, additional step commands can be generated by pressing carriage returns.
MS Windows
The main dialog has one primary window and a movable Toolbar palette of debugger
commands. The MODSIM Debugger window (shown above) displays the code which is
currently executing, the currently selected stack frame, or code which you are navigating
through. A command line interface window appears at the bottom of the primary window
and allows entering commands directly. A trace log of all issued debugger commands and
their results is copied to the file msdebug.tra. This provides a log of the entire debugging
session.
45
MODSIM User’s Manual
The buttons Step In, Step Over, Step Out and Continue on the Toolbar palette (shown below) perform identically to entering the corresponding commands step, next, stepout
and continue from the command line interface.
46
Chapter 3. The MODSIM III Debugger
3.3 Compiling for Debugging
MS Windows
From the MODSIM Workbench Menu select Project and then Settings … .
A tabbed window will appear which contains a number of compilation, linking and debugging settings. These settings will be used by the various tools in the creation of an executable module. Note that the three radio buttons on the top indicate whether the code will be
compiled and linked with debugging on or for release (debugging suppressed).
When the Debug tab is selected, even more granularity regarding the code being compiled
can be selected. This includes including the level of error messages and range checking.
These selections control the amount of code placed in the executable as debugger runtime
libraries and may affect execution performance.
47
MODSIM User’s Manual
Unix
On other systems, enable debugging support with mscomp or edit the mscomp.cfg file to
turn debugging support on in mscomp.
To terminate your program use the quit command.
3.4 Examining Memory and Simulation Statistics
MS Windows
To browse the pending list of scheduled activities, select Info and then Pending List from
the main menu in the MODSIM III Debugger window.
48
Chapter 3. The MODSIM III Debugger
By selecting First, Next, Last, and GoTo, you can browse up and down the pending list. To
examine all of the fields of the object whose activity is being viewed, select View Object.
49
MODSIM User’s Manual
Unix
Simulation time can be printed by using the command line interface command simtime.
The pendinglist command prints the entire list of pending activities. An aid to
debugging memory leaks is the memstats command. It displays a list of all the objects,
records, and strings which have been allocated. A copy of the list is also written to the file
"msdebug.mem ".
3.5 Running
MS Windows
If you start your application in debugging mode, you can control its execution either from
the Toolbar palette or from the command line interface. The Toolbar palette has the buttons
Step In, Step Out, Step Over, and Continue. The corresponding command line interface
commands are step, stepout, next, and continue .
Unix
Use step if you just wish to execute the next executable line. If the next executable line
is a procedure or method call, then the step command will cause the program to stop at the
first line of that procedure or method. However, if you do not wish to stop in a called procedure or method, then use the next command. Both step and next will take an integer
argument which specifies how many lines to execute. For instance, you can stop at the fifth
line from the current location by using next 5.
The continue command will cause your program to stop at the next breakpoint. Breakpoints can be added with the break command, clicking on a line in the source window, or
by using the Breakpoints dialog box.
To terminate your program use the quit command.
50
Chapter 3. The MODSIM III Debugger
3.6 Setting Breakpoints
MS Windows
Setting a breakpoint can be accomplished by clicking on a line in the source window, by
using the Breakpoints dialog box, or by using the break command .
Unix
At the command line, you can create a breakpoint by specifying a line number or the entry
point of a procedure or method. Assuming there is a method named foo in an object type
myObjectType which has been defined in the module name myModule, you can explicitly
set the breakpoint at the first executable line of foo by entering the command :
break myModule.myObjectType.foo.
If an explicit description of the breakpoint location is not given, then the current context is
used to fill in the missing details. For instance, if you enter break foo, then a breakpoint
will be set at the method foo, if the currently executing object has such a method. If it
does not, then it will try to set a breakpoint at a procedure named foo.
At any time you can view the breakpoints which are currently in effect by using the
Breakpoints dialog box. If you want to delete an existing breakpoint, select the breakpoint
and press the Delete button. If you want to disable or enable an existing breakpoint, simply
double click on it.
3.7 Examining Source Code
MS Windows
Every time your program stops, the currently executing code is displayed in the source window. You can browse other source code by selecting the desired module, object type, and
method in the source code selector. Otherwise, you can use the cursor bar to scan through
the source code in the currently displayed module.
51
MODSIM User’s Manual
If the source window is empty except for line numbers, it is probably because the debugger
is not able to find the source code. In this case, use the option (or the dir) command to
specify the source code directory.
Unix
Every time your program stops, the debugging window will display the next MODSIM
statement that will be executed. In order to display the surrounding source code or to display source code in another module or procedure, use the list command. If the list command cannot find the source file, then the directory to find source files must be added to the
source file search path using the option command.
3.8 Examining Variables
MS Windows
There are various facilities available for examining the values of variables. If you want to
see all of the local variables, use the Locals button in the Toolbar palette or use the locals
command. To see all of the fields of the currently executing object, use the Fields button
in the Toolbar palette.
Note: Double clicking on an object or a dynamic record in any of the variable inspector
dialog boxes will cause that object or record to expand, displaying all of its fields. A subsequent double click will cause it to contract.
Unix
If you want to see all of the local variables, use the locals command. To see all of the
fields of the currently executing object, enter fields on the command line. If you want
to see all of the fields of an object which is not the currently executing object use the print
command. For instance, if there is an object named myInstance visible in the current
scope, then you can print all of its fields by entering the command print myInstance.
To print the value of a single variable, use the print command (i.e. print myVariable).
If myVariable is the field of the object named myObject, then enter the command
print myObject.myVariable .
3.9 Examining the Stack
Often when debugging, you want to know what was the sequence of the procedure or method calls which led to the current piece of code that is being executed. This information is
continuously available in the Call Stack box in the main MODSIM Debugger window. You
can also use the command line interface traceback command to print the call stack. This
requested information is appended to the file msdebug.tra . The methods and procedures
which comprise the call chain are numbered starting at 0 for the current method or procedure and ending at main with the highest number.
52
Chapter 3. The MODSIM III Debugger
For a more in-depth examination of any of the methods or procedures on the stack, use up,
down, and frame commands to focus on a particular frame.
3.10 Recording and Playing Back Commands
It is often a good idea to record all of the debugging commands that are entered in a debugging session. Once you discover a bug, you can fix it, and then verify that the fix was successful by playing back the sequence of commands that originally uncovered the bug.
The record command copies all of the commands that you subsequently enter to a file.
To playback these commands use the playback command.
3.11 Specifying Source File Search Path
The debugger keeps a list of directories which contain debuggable source code for a program. To add directories to this list, use the option (or the dir ) command.
53
MODSIM User’s Manual
3.12 Animating Code Execution
To watch source code as your program is executing, simply issue a step command with a
large argument (e.g. 1000). The debugging display window will indicate every context
change and each line of source code as it is being executed.
3.13 Displaying Methods of an Object Type
Use the print command to display all of the methods of an object type. For example, if
there is an object type myObjectType in your program, enter the command print
myObjectType.
3.14 Displaying Fields of an Object Instance
The fields window is constantly updated with the fields of the object that is currently executing or with the object which is in focus as a result of selecting another method on the
call stack. Use the show fields command to print all of the fields of an object instance
to the transcript window. The print command can be used to display the fields of an object that is in the scope of the current context. For example, print myObject will print
all of the fields of myObject, if it is a local variable, a field of the object that is currently
executing, or a global variable. print SELF will generate the same result as show
fields.
54
Chapter 3. The MODSIM III Debugger
3.15 Command Reference
Break
Synopsis:
Creates a breakpoint at a specified source location.
Abbreviations:
b, br, break, brkpt
Usage:
break
break <method or procedure name>
break <module name>.<procedure name>
break <module name>.<object type>.<method name>
break <line number>
break <module name> <line number>
Notes:
To set a breakpoint at the next executable line, use break without any arguments. If a line number is specified without any module name, then a break point
will be set in the module that has source code for the current context.
If the name of a procedure and method name is specified, then a break point will
be set at the first executable line of the method or procedure. You can forego a
complete specification of the module name and object type name if the method
that you want to break in is a member function of the currently executing object.
Continue
Synopsis:
Continues execution until the next breakpoint.
Abbreviations:
c, cont, continue
Usage:
continue
continue <number of breakpoints to ignore>
Notes:
The continue command will cause the program to stop at the next breakpoint
if no optional argument is given. Otherwise, the specified number of breakpoints
will be ignored.
55
MODSIM User’s Manual
Delete
Synopsis:
Deletes a breakpoint.
Abbreviations:
de, del, delete
Usage:
delete
delete all
delete <break point id>
Notes:
The delete command will permanently remove a breakpoint from the list of
breakpoints for your program. It cannot be restored with the enable command.
Entering delete or delete all will permanently remove all of breakpoints
which have been previously defined.
Disable
Synopsis:
Disables a breakpoint.
Abbreviations:
d, di, dis, disable
Usage:
disable
disable all
disable <breakpoint id>
Notes:
Entering disable or disable all will disable all of the breakpoints which
have been set in your program. To disable a particular breakpoint, find its id
using the show breakpoints or Show_Breakpoints command. Then give
the id as an argument to the disable command.
Down
Synopsis:
Moves the focus context forward in the calling chain towards the method or procedure that is currently executing.
Abbreviations:
dn, down
56
Chapter 3. The MODSIM III Debugger
Usage:
down
down <number of frames>
Notes:
Down moves the focus context forward in the calling chain toward the meth-
od or procedure that is currently executing. By giving an argument to the command, you can make larger jumps down the stack. Up is used in conjunction with
down to browse up and down the stack.
Enable
Synopsis:
Enables a particular breakpoint or all breakpoints.
Synonyms and Abbreviations
e, en, enable
Usage:
enable <breakpoint id>
enable
enable all
Notes:
To enable a particular breakpoint, you must use its breakpoint id. This can be
found by using show breakpoints (abbreviated to sh b, if desired). To enable
all breakpoints, just use enable by itself or append the keyword all (i.e. enable
all).
Fields
Synopsis:
Displays all the fields of the object which is currently executing.
Abbreviations and synonyms
fields, fi, sh fields, info fields, show fields
Usage:
fields
Notes:
If the current context is a method, then all of the fields of the object will be displayed. Otherwise, an error message will indicate that the current context is not
a method.
57
MODSIM User’s Manual
Frame
Synopsis:
Sets the focus context to a particular stack frame.
Abbreviations:
f, fr, frame
Usage:
frame
frame <frame number>
Notes:
Entering frame without any arguments, sets the focus context to frame 0 and
displays all of its local variables. Otherwise, by giving an argument to the frame
command, you can set the focus context to any particular frame.
Globals
Synopsis:
Displays all of the object types, record types, constants, free procedures, and
module level variables in your program.
Abbreviations:
g, gl, glo, globals, shg, info globals, show globals
Notes:
This command displays all of the outer level symbols visible in the modules
which have been compiled with debugging. If an object type that you are interested in debugging is not displayed in this list, then you must compile its module
with debugging before you will be able to examine its fields or step through its
methods.
List
Synopsis:
Lists source code.
Abbreviations:
l, li, list
Usage:
list
list <method or procedure name>
list <module name>.<procedure name>
list <module name>.<object type>.<method name>
list <line number>
list <starting line number> <ending line number>
58
Chapter 3. The MODSIM III Debugger
Notes:
Normally, the debugger looks for source code in the directory specified when the
module was compiled. If the program or the source files were moved to a different directory, then the debugger will not know where to find them. In this case
use the option command to add an additional search path for source files.
To list the source code that is currently being executed, simply use the list
command without any arguments. By specifying a procedure or method name,
the first twenty lines of that method or procedure will be listed. Entering a carriage return will cause the next twenty lines of source code to be displayed.
A line number can also be specified as the source location that you would like to
view. In this case, the display will be centered around the line you specified.
If you want to list the source code of the method that called the current procedure, first use the up command to move up one stack frame and then issue the
list command.
Locals
Synopsis:
Displays the values of local variables in the current context.
Abbreviations and synonyms
lo, locals, show locals, info locals
Usage:
locals
Notes:
Typically, show locals will display the local variables of the currently executing method or procedure (i.e. frame 0). More precisely, show locals will
display all of the local variables of whatever frame is in focus. If an up, down,
or frame command had been invoked prior to show locals, then the context
that is in focus may be something other than frame 0. Immediately after any code
has been executed, the focus always returns to frame 0.
Memstats
Synopsis:
Displays a list of the number of allocated instances of all object and record types,
strings, and arrays in your program.
Abbreviations:
me, mem, memstats
59
MODSIM User’s Manual
Notes:
This command is very useful in discovering memory leaks in your program. By
occasionally issuing this command and comparing results, it will become apparent if some objects are not being disposed of properly. A copy of this list will
automatically be saved in the file "msdebug.mem", so that you can study it later,
if necessary.
Next
Synopsis:
Stops program execution at the next executable line, stepping over procedures.
Abbreviations:
n,ne,nex,next
Usage:
next
next <number>
Notes:
Use the next command if you do not want to step into called methods or procedures.
Option
Synopsis:
Sets a debugging environment variable to a new value.
Abbreviations:
opt, option
Usage:
option <variable name> = <new value>
Debugging Environment Variables:
sourcedirectory
MODSIM keeps a list of directories which contain debuggable source code for
a program. Normally, the only directory in this list is the directory that you
specified in MODBENCH when you compiled your program. However, if you
changed the location of your source code or your program, then MODSIM may
not be able to find your source code. Setting the sourcedirectory variable
will add that directory as the first directory to search when looking for source
code modules. Make sure that the source modules have not changed since your
program was compiled. Otherwise, what MODSIM reports to be the next
executable line may not correspond with what your program is actually doing.
As a convenience, you can abbreviate the command string option
sourcedirectory = <new directory> to dir <new directory>.
60
Chapter 3. The MODSIM III Debugger
Pendinglist
Synopsis:
Displays a list of all of the objects which have activities scheduled on the pending list.
Abbreviations:
pe, pl, pending, pendinglist
Notes:
This command simply calls the MODSIM PendingListDump procedure. A
copy of the pending list is also copied to the file msdebug.pen for later viewing.
Playback
Synopsis:
Executes debugging commands from a file.
Abbreviations and Synonyms:
pl, play, playback, readcmd, readcmds, replay
Usage:
playback
playback <filename>
Notes:
If no filename is given, commands will be executed from the file msdebug.log,
if it exists. As soon as all of the commands in the file have been executed, you
can issue commands from the command line or by pressing one of the execute
buttons: Step, or Next.
Print
Synopsis:
Outputs the value of a variable or information about a type.
Abbreviations :
p, print
Usage:
print <identifier>
print <object or record instance>.<field identifier>.<field
identifier> etc.
print <object type name>
Notes:
The current context is used to identify the variable. The identifier is searched for
first in the local scope, then object scope, and finally in global scope. If the iden61
MODSIM User’s Manual
tifier is an object type, all of the methods of the object class will be displayed. If
the identifier is an object instance, then the values of all of the fields of the object
instance will be displayed.
To display the field of an object which is a field of another object which is a field
of yet another object use the . notation
(i.e. print object.anotherObject.field).
Quit
Synopsis:
Quits the program.
Abbreviations and Synonyms:
q, quit, bye, exit
Notes:
The quit command terminates your program. If there are breakpoints or
environmental variables that you would like to preserve over various debugging
sessions, you can save the appropriate commands in a file and use the
playback command to reinstall them for each debugging session.
Record
Synopsis:
Records all of the commands entered in a debugging session to a file.
Abbreviations and Synonyms:
rec, record, log
Usage:
record
record <filename>
Notes:
Recording a log of all commands issued in a debugging session is a convenient
way to return to the location of a previous bug. After you have fixed the bug,
simply play back the log file using the playback command. This will help verify that the fix was indeed successful.
Show Breakpoints
Synopsis:
Displays all of the breakpoints and their status.
Abbreviations and Synonyms:
shb, info breakpoints, show breakpoints
62
Chapter 3. The MODSIM III Debugger
Notes:
Breakpoints are given a unique id when they are created. The id is used to
specify a breakpoint that you wish to disable, enable, or delete.
If you wish to set certain breakpoints every time you debug a particular program,
you can create a command file with the name msdebug.ini in the working
directory. Each line of the command file should contain a break command with
an explicit description of where you want to break. This command file can be
created with a text editor or by using the record command.
Show Modules
Synopsis:
Displays all of the modules and the path names of the Implementation modules
in your program.
Abbreviations:
shm, sh modules, info modules, show modules
Usage:
show modules
Notes:
This command will display where MODSIM currently thinks the source code for
your program is located. If this is incorrect, you can specify where to find source
code with the option sourcedirectory option command.
Simtime
Synopsis:
Displays the current simulation time.
Abbreviations:
sim, time, simtime
Step
Synopsis:
Stops program execution at the next executable line, stepping into procedures.
Abbreviations:
s, st, ste, step
Usage:
step
step <number>
63
MODSIM User’s Manual
Notes:
Use the step command if you want to step into called methods or procedures.
Unlike the next command, the step command will cause the program to stop
in a called procedure. An integer argument after step instructs MODSIM to execute the step command <number> times. Giving a large number as an argument
to the step command creates an animation effect. This is particularly useful in
graphical simulation applications, since you can watch the graphics animation in
one window and the corresponding code being executed in another window.
Traceback
Synopsis:
Displays the program stack.
Abbreviations and Synonyms:
t,tb,bt,back,where,backtrace,stack,traceback,calls
Notes:
The traceback displays a list of the methods and procedures on the program execution stack. These frames are numbered starting at 0 with the method or procedure which is currently executing. The highest numbered frame is main which
is the code in the MAIN MODULE between BEGIN and END MODULE.
To display the values of local variables in a particular frame, use the frame command or up or down commands to focus on that frame. The fields command
will display all of the object fields if the frame is an object method.
Up
Synopsis:
Moves the focus context backwards in the calling chain towards main.
Abbreviations:
u, up
Usage:
up
up <number of frames>
Notes:
To find the procedure or method that called the current procedure or method, use
the up command. By giving an argument to the command, you can make larger
jumps up the stack. Up is used in conjunction with down to browse up and down
the stack.
64
4. Command Line Interface to MODSIM III
Compiler
The MODSIM III compiler was designed to be managed by the mscomp compilation manager. The manager provides a high level Graphical User Interface (GUI) user interface.
There may be occasions when the you require direct access to the MODSIM III compiler.
The procedure would be as follows:
•
Compile MODSIM source code to C++ using the command line interface to the
MODSIM compiler.
•
Using mscomp's Other option, perform a single-module compile of the C++ code.
•
Using mscomp's Other option, perform a "Link All" to build an executable.
You give up the interactive support of mscomp but gain the ability to operate on a machine
with limited memory availability.
4.1 MODSIM III Compiler Command Line Options
Usage: modsim <options> <imod>
Directory options:
-i <dir> = search this directory for local imp modules
-d <dir> = search this director for local def modules
-L <dir> = search this directory for def modules, this option can be repeated for
multiple directories.
Code Generation options:
-T
= generate indented code
-H
= generate header file only
Debugger options:
-t0
= no debugging
-t1
= minimal debugging (traceback only)
-t2
= partial debugging (library browse)
-t3
= full debugging
-s
= turn OFF subrange checking
-r
= turn OFF reference checking
65
MODSIM User's Manual
General options:
-W0
= no compiler warnings
-W1 to 5
= set compiler warning level
4.2 An Example of Command Line Compilation
To compile the MODSIM module ITank.mod which is located in a directory above the
current working directory.
On PC:
> modsim3 -t3 -T -L c:\modsim\def -d .. -i .. ITank.mod
On UNIX:
> modsim -t3 -T -L /installed/modsim3/lib -d .. -i .. ITank.mod
66
Index
A
L
Animating Code.................................................. 54
Libraries ..............................................................22
Library Definition Directory .............................. 21
library directory .....................................................2
library.................................................................... 1
Linker Options ....................................................22
link.................................................................... 1, 6
list ................................................................. 52, 58
LIS ........................................................................ 3
B
BEEP .................................................................... 3
Breakpoints ......................................................... 51
Break................................................................... 55
Build ...................................................................15
C
C ++ Files ........................................................... 20
case sensitive ........................................................ 1
Close ................................................................... 28
Close command ..................................................38
Command line operation of mscomp.................... 7
Command Reference ...........................................55
compilation ................................................... 5, 6, 7
Compiling ........................................................... 47
configuration file ...................................................1
Configuration Menu.............................................. 6
Continue...............................................................55
current working directory ..................................... 3
C++ .......................................................................1
C++ Compiler Options .......................................20
C............................................................................ 1
M
Main Menu ........................................................... 4
MAIN MODULE ................................................. 4
make files...............................................................1
Maximize Command .......................................... 38
Memory .............................................................. 48
Memstats..............................................................59
Methods of an Object Type ................................ 54
Minimize Command............................................38
MODSIM II compiler......................................... 65
modules............................................................. 1, 4
Move Command ................................................. 37
mscomp Main Menu............................................. 4
mscomp.cfg....................................................... 2, 4
MSEXEC .............................................................. 2
MSLIB.................................................................. 2
D
Debug ..................................................................16
debugging mode.................................................. 43
DEFINITION MODULE.................................4, 21
Delete ...................................................................56
directories ............................................................. 6
Disable ................................................................ 56
DLL .....................................................................42
E
Edit menu ............................................................30
error file ................................................................ 1
ERR .......................................................................3
F
Files ...................................................................... 4
H
help ........................................................................5
N
naming conventions.............................................. 4
New Project ........................................................ 13
O
Object Instance ................................................... 54
Open.................................................................... 27
Options/Editor .................................................... 24
Option ............................................................52, 60
Other Options Menu ............................................. 5
P
Pendinglist .......................................................... 61
playback.............................................................. 53
Print .....................................................................61
project evaluation ................................................. 5
project file............................................................. 6
project ................................................................1, 5
PTR....................................................................... 3
I
Implementation Module Directory ..................... 21
IMPLEMENTATION MODULE ....................... 4
installation ............................................................ 9
Q
Quit ..................................................................... 62
67
MODSIM III User’s Manual
R
Rebuild All ......................................................... 15
Recording and Playing Back Commands,........... 53
record ................................................................. 53
Reference Checking ........................................... 19
Reference Manual ................................................. a
REF ....................................................................... 3
Requirements ..................................................... 11
Restore Command .............................................. 39
S
sample programs .................................................. 9
Save .................................................................... 28
Scroll Bars .......................................................... 37
separate compilation ........................................... 1
Show Breakpoints .............................................. 62
Show Globals ..................................................... 58
Show Locals ........................................................ 59
Show Modules..................................................... 63
SIMGRAPHICS II Reference Manual.................. a
Simtime ......................................................... 50, 63
Simulation Statistics........................................... 48
source code...................................................... 1, 51
SR......................................................................... 3
Source File Search Path ...................................... 53
Stack................................................................... 52
Step................................................................ 54, 63
Stop Build .......................................................... 16
Subrange Checking ............................................ 19
Switch to Command ........................................... 39
system directory ................................................... 2
T
Tab ..................................................................... 21
TB.......................................................................... 3
Text Input/Output ............................................... 12
Tool Palette ........................................................ 45
Tools menu......................................................... 25
Traceback ........................................................... 64
Tutorial................................................................. 1
U
User's Manual........................................................ a
V
Variables ............................................................ 52
version number..................................................... 2
View Menu ......................................................... 26
W
Window Menu.................................................... 33
Workbench Status Bar ....................................... 36
Workbench Toolbar ........................................... 35
68