1
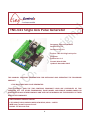
TNC-G11 Single Axis Pulse Generator Document: Operation Manual Document #: T11 Document Rev: 2.0 Product: TNC-G11 Single axis pulse generator Product Rev: 1.0 Created: March-2014 Updated: November-2015 THIS MANUAL CONTAINS INFORMATION FOR INSTALLING AND OPERATING THE FOLLOWING PRODUCT: TNC-G11 SINGLE AXIS PULSE GENERATOR “TINY CONTROLS” AND THE TINY CONTROLS COMPANY’S LOGO ARE COPYRIGHTS OF TINY CONTROLS PVT. LTD. OTHER TRADEMARKS, TRADE NAMES, AND SERVICE MARKS OWNED OR REGISTERED BY ANY OTHER COMPANY AND USED IN THIS MANUAL ARE THE PROPERTY OF THEIR RESPECTIVE COMPANIES. TINY CONTROLS PRIVATE LIMITED C-55, NISHAT PARK, KAKROLA MOR, NEW DELHI, INDIA – 110078 WEB: http://www.tinycontrols.com PHONE: +91-991-119-3210 1 CONTENTS 1. SINGLE AXIS PULSE GENERATOR INCLUDES 2. GENERAL DESCRIPTION 3. FEATURES 4. SINGLE AXIS PULSE GENERATOR SPECIFICATIONS 5. SINGLE AXIS PULSE GENERATOR TERMINALS 6. HARDWARE DESCRIPTION: CONNECTING INPUTS 7. CONNECTING OUTPUTS 8. POT 9. JUMPER SETTINGS 10. INPUTS AND OUTPUTS SPECIFICATIONS 11. OPERATING MODES 12. MANUAL MODE 13. AUTO MODE 14. SERIAL OFFLINE MODE 15. SERIAL ONLINE MODE 16. EXAMPLES 17. CONNECTION DIAGRAM FOR MANUAL MODE 18. CONNECTION DIAGRAM FOR AUTO MODE 3 3 4 4 5 6 6 6 7 8 8 8 10 10 12 14 15 16 2 SINGLE AXIS PULSE GENERATOR INCLUDES 1. Pulse generator board. 2. Serial cable with DB-9 (M) connector. GENERAL DESCRIPTION The Single Axis Step Pulse Generator (SPG) is a powerful and versatile step pulse generator capable of generating step pulse and direction signal output for stepper drives. It is a standalone as well as PC controlled linear ramping pulse generator designed to be used with stepper motor drives. It drives low jitter pulse train of 40 KHz frequency. The pulse train is smooth with linear ramps, preventing the motor stalling at high speeds. It accepts input in standalone/manual mode as well as RS-232 serial interface/ auto mode. Manual mode allows direct interface of sensors/switches to fed respective input signals at the input terminals according to sub modes selected. These are “Start/StopDir”, “Start Dir CW-Start Dir CCW” and “Start-Stop”. These signals are given to controller at their respective inputs. These sub-modes in manual mode are configured by using jumper settings. The SPG features an adjustable base speed/starting speed and independent adjustment of acceleration. Four ranges of speed are included and these ranges can be configured by jumper adjustments. Three potentiometers for base speed, maximum speed and acceleration are given on the board. The potentiometers for maximum speed gives a provision to set the maximum speed at any value according to range selected. The base speed always remains lower than the maximum speed. In auto/serial mode, SPG is a PC controlled serial step pulse generator which provides exceptionally smooth operation. In serial mode, SPG works in jumper configurable two modes, offline mode and online mode. In online/Run from serial mode, the commands are input serially and executed one by one. Whereas in offline mode/run from flash mode, the commands are first input serially and stored to flash and then the whole command block is executed. The serial operation is held on the baud rate of 9600 bps. SPG consists of three input terminals in which IN1 and IN2 are used in sub modes of manual mode as well as auto mode. The IN3 input terminal can be used for emergency/limit switch making the system flexible. All these inputs are opto-isolated for noise immunity. A 5V regulated output is also given on board for miscellaneous purposes. 3 FEATURES 1. Serial (RS-232) interface to microcontroller or computer. 2. Low jitter 40 KHz Pulse rate. 3. 16 bit Controller. 4. Continuously adjustable Max motor velocity (steps/sec). 5. Adjustable Acceleration (steps/sec/sec). 6. Smooth pulse train with linear ramps, no more motor stalls at high motor speeds. 7. Easy to use programming codes. 8. Program sequence is saved in internal flash. 9. Limit and Run/Pause/Resume inputs. 10. Manual mode available with preset settable velocity and acceleration. 11. Same supply as driver (up to 80V DC) can be given to this module, no need of separate low voltage or regulated power supply. 12. Single axis pulse generator works in two modes: Simple start/stop using external signals (switches/sensor inputs) with POT settable Start/Max freq and acceleration. Serial command input with live pulse generation or storing sequence of command for later playback. SINGLE AXIS STEP PULSE GENERATOR BOARD SPECIFICATIONS Contents Specifications Processor 16 bit processor Communication Terminal DB-9 for serial interface Max frequency of Step signal 40 KHz Digital outputs 2 Digital inputs 3 Supply voltage 18V-80V DC Ambient temperature range 0˚-55˚ Celsius Dimensions 70x40 (in mm) Weight 20g 4 TERMINAL DIAGRAM FIG:1 5 HARDWARE DESCRIPTION: CONNECTING INPUTS POWER SUPPLY: Connect a power supply of 18V-80V DC, check the polarity of pins. A red LED indicates the status of power supply on board. INPUTS: A provision for three inputs terminal IN1, IN2 and IN3 is given in stepper pulse generator board as shown in the figure FIG:1 . All these inputs are optoisolated for noise immunity. IN1 and IN2 are driven by external signals according to mode set in manual mode. Terminal IN3 can be used for connecting limit, emergency switch as per the requirement of the operator. These inputs are discussed in detail in the Auto and Manual mode section of the manual. CONNECTING OUTPUTS STEP: It is pulse output for step input of stepper drive. SPG can generate maximum 40,000 steps per second for drive. DIR: This output signal is fed to direction input of stepper drive. COM: It is the output for COM terminal of stepper drive. POT Three POTs are provided on the SPG board. These are used to manage the speeds in manual mode. MAX SPEED: This POT adjusts the maximum speed that the motor can achieve. A provision for four ranges of maximum speeds is given on this board. Set jumper settings for selecting speed range and adjust POT appropiately to set required speed as maximum speed. BASE SPEED: This POT adjusts base or start speed at which the user wants motor to start running. The base speed remains lesser than maximum speed. ACCELERATION: The acceleration range for step pulse generator is 1 to 15. Adjust acceleration by adjusting POT. Moreover, when motion stops, motor decelerates with the same value as the one used for ramping up/ accelerating. 6 JUMPER SETTINGS Jumper(JP) plays a crucial role in the functioning of the pulse generator. JP selects the mode of operation by positioning the jumpers at position JP1 and JP2 in different configurations. Similarly, different ranges of maximum speed can be achieved by positioning the jumpers at position JP3 and JP4 in different configurations. MODES CONFIGURATIONS: JP1 JP2 JP4 IN1 IN2 CONFIGURATION 0 0 - Start Stop Manual mode 1 0 1 - Start/ Stop Dir Manual mode 2 1 0 - Start Dir CW Start Dir CCW Manual mode 3 1 1 - - 0 Online Auto mode 1 Whereas, 0 means jumper removed and 1 means jumper mounted. SPEED RANGES: Offline There are four speed ranges for step pulse generator for manual mode. These speed ranges can be attained by positioning the jumper in different configurations. JP3 JP4 Frequency (in KHz) 0 0 1.7 0 1 6.6 1 0 16.7 1 1 40 Whereas, 0 means jumper removed and 1 means jumper mounted. 7 OUTPUTS INPUTS INPUTS AND OUTPUTS SPECIFICATIONS Terminal Name Type Pin Function IN1 Optoisolated Input Accepts the input signal driven according to the mode set. IN2 Optoisolated Input Accepts the input signal driven according to the mode set. IN3 Optoisolated Input Accepts the input signal driven. Step pulse Controller output Step pulse output terminal output voltage= 5V,current= 20mA Dir Signal Controller output Dir signal output terminal output voltage= 5V,current= 20mA OPERATING MODE Single axis step generator supports two operation modes named as manual mode and auto mode/RS-232 serial mode. The sub-modes for serial mode and manual mode can be selected by positioning the jumper at required place. MANUAL MODE Manual mode accompanies simple start/stop using external signals (switches/sensor inputs) with POT settable start/base and maximum frequency and acceleration. Switch for emergency/limit can be connected at IN3 input terminal. When the switch connected (to be connected by the user for emergency/limit or for other purposes) is triggered, motion of the motor stops and the control enters in alarm mode and LED starts blinking. Restart the system to bring it to normal state. The connection diagram for manual mode is shown in the Connection Diagram section. 8 Manual mode 1: Start-Stop: In start-stop mode, the motor runs when a start pulse is applied at IN1 terminal and continues to run in clockwise direction even after stopping pulses at terminal. The motion stops when a stop pulse is applied at the IN2 terminal. The motor decelerates to base speed with the set acceleration value and it finally stops. The ramping profile for Start-stop mode is shown below: C B A. IN1 terminal is pulled low to start motion in D E A clockwise direction. Start to base speed and run. IN1 is pulled high. B. Motor ramps up to the maximum speed. C. Max Speed is reached. Keep running at max speed. D. Terminal IN2 is pulled low. Motor ramps down to the base speed. IN2 terminal is pulled high. E. Base speed reached. Manual mode 2: Start/Stop-Dir: In Start/Stop-Dir sub mode, the motor runs when an input is received at Terminal IN1 and continues to run in clockwise direction until pulse remains on IN1. The direction of the motor run can be changed by applying Dir signal at IN2 terminal along with the application of input at IN1. When the external pulse at IN1 is discontinued, the motor decelerates with the same acceleration value and reaches to the base speed, and finally stops. Manual mode 3: Start DIR CW- Start DIR CCW: In Start DIR CW/Start DIR CCW mode, the motor runs clockwise as an input is received at the IN1 and keeps on running as signal remains continued to the IN1. When the input at IN1 pin is discontinued, motor decelerates with the same value of acceleration and finally stops. However, if an input is applied to the IN2 rather than IN1, the motor runs in counter clockwise direction and keeps on running until input signal is continued to the IN2. As input at IN2 pin stops, the motor decelerates with the same value of acceleration and finally stops. Note: It is required to restart the system if the user needs to switch from one mode to other. 9 AUTO MODE Auto mode accompanies RS-232 serial transmission to input the commands. The serial transmission is held on baud rate of 9600 bps, with 8 data bits, 1 Stop bit and none parity. Auto mode can be further used in two sub modes. These are serial offline mode and serial online mode. Runtime commands which can be used in both submodes are discussed, followed by the serial modes. RUNTIME COMMANDS: These commands utilize special symbols and give an external control when the motor is in motion. These are discussed below: STATUS REPORT: “?” Execution of this command displays the current mode, whether in serial online or in serial offline mode; current position count for motor, current speed and current acceleration value at which motor is running and the state of motor state, whether motor is running or paused or stopped. CYCLE START: “~” Cycle start command commences the motion if executed. This command can be used if the motor is in pause state. FEED HOLD: “!” This command if executed pauses the motor. Use cycle start command to put the machine in motion again. CYCLE STOP: “@” Cycle stop command execution stops the motor. When cycle start command is executed in Run from flash mode, whole the program stored in flash memory is executed again from start command and motion starts from same position count. If the control was working in Run from serial/online mode; then next serially fetched command is executed from same position count. RESET: “#” If reset command is executed, then position count sets to zero and the command execution remains the same. Note that reset can be done only if the system is in stop mode. Reset command isn’t executed when the controller is in run mode, a message of “Program can’t be reset at this time” appears. SERIAL OFFLINE MODE Serial offline mode accompanies serial commands input and stores the command for later playback. Serial offline mode is configured when jumper is mounted on JP1, JP2 and JP4. When SPG is used for first time and is in offline mode, the following message appears. “Tiny Controls Serial Offline mode No program in flash or Invalid Program” 10 However, if the system was working in the other mode previously, switch off the controller, arrange jumper settings for serial offline mode and restart system. Afterwards the following message appears. “Tiny Controls Serial Offline mode” The user needs to input the program serially on hyperterminal or any other interfacing media. A message “Successful” appears on successful acception of input, or else message “Unsuccessful” appears. If the program input is wrong or no program is stored in flash, the following message appears. “No program stored in flash or Invalid Program” Input terminal IN1 is start pulse and the motor continues to run until the input pulse remains on IN1 terminal. If the pulse is stopped, the motor stops. The command list of offline mode is discussed below: START: Start command commences the execution of the commands block stored in flash. Each program must have a start command at first, else the execution of program block can’t start. The Pulse input is driven on the IN1 terminal. ABS: This command is used when movement is required in absolute steps. INC: This command is used when movement is required in relative steps. This mode is set as the default mode. SPEED: This command is used to set the rate of number of steps per second the motor moves. The maximum value is 40,000 steps/second. If the speed input is greater than the highest speed, it is accepted by controller and a message for speed out of range appears, however, speed used for previous program is taken by default. ACC: This command sets the acceleration and the maximum value for acceleration is 1,50,000 steps per second. LOOP: This command is used for looping and it is a long value (0 to 2147483646). LOOPEND: This command is used to end the looping instruction and the program containing instruction must have loopend command. 11 MOV: The mov command sets the number of steps, the motor is required to move. It is a long value (0 to 2147483646). WAIT: When this command is used, next command execution takes place after an input is received on input IN2. LIMCW: When this command is executed, motor begins to run CW. The controller continuously scans the IN2 terminal. When an input pulse is applied at IN2 terminal, the controller executes the subsequent command in program. LIMCCW: When this command is executed, the motor begins to run CCW. The controller continuously scans the IN2 terminal. When an input pulse is applied at IN2 terminal, the controller executes the subsequent command in program. CANCEL: When cancel command is executed, the old program is loaded in flash and the new program input is cancelled. After loading completion, control exits. END: This command is used to end the program and every program must have End command at the last. The IN2 terminal is used if the wait command is executed in program. As the wait command is executed, the operation stops and waits for the pulse on IN2 terminal. The IN2 terminal is again used if the LIMCW or LIMCCW command is executed in the program sequence. If any of these commands is executed, the controller scans continuously for a pulse at IN2 terminal. On getting pulse at terminal, the next command is executed. Note: The user needs to input the loopend command if loop command has been used in progarm to terminate the program by itself. Absence of loopend command doesn’t show any error, however, it results in wrong execution of program. SERIAL ONLINE MODE Serial online mode accompanies the serial commands input with live pulse generation. Serial online mode is configured when the jumper is mounted on JP1 and JP.2, removed from JP4. If the system was working in any other mode previously, switch off the SPG, arrange the jumpers for serial online mode and restart the system. Afterwards the following message appears. Tiny Controls Serial Online mode 12 When a command is input to controller, it is executed first. When the execution of this command is completed, only then the next serial command is input and executed. On successful input and execution of each command input, a message “OK” appears on the hyper-terminal. If the command is input but not executed, a message “unsuccessful” appears on the terminal. Input terminal IN1 is start pulse and the motor continues to run until the input pulse remains on IN1 terminal. If the pulse is stopped, the motor stops. The command list of online mode is given below: ABS: This command is used when movement is required in absolute steps. INC: This command is used when movement is required in relative steps. This mode is set as the default mode. SPEED: This command is used to set the rate of number of steps per second the motor moves. The maximum value is 40,000 steps/second. ACC: This command sets the acceleration and the maximum value for acceleration is 1,50,000 steps per second. LIMCW: When this command is executed, the motor begins to run CW. The controller continuously scans the IN2 terminal. When an input pulse is applied at IN2 terminal, the controller executes the subsequent command fetched. LIMCCW: When this command is executed, the motor begins to run CCW. The controller continuously scans the IN2 terminal. When an input pulse is applied at IN2 terminal, the controller executes the subsequent command fetched. MOV: The mov command sets the number of steps the motor is required to move. It is long value (0 to 2147483646). MOVI/MOVIP: When this command is executed,the motor begins to run in CW direction for infinite time. MOVIN: When this command is executed,the motor begins to run CCW direction for infinite time. MOVIS: This command is used to stop the motor running in the infinite motion. Add ‘$’ symbol as prefix to the status variables to get the individual status reports. ( EXAMPLE : $SPEED,$POSITION,$STATE,$MODE ) 13 The IN2 terminal comes into play if the LIMCW or LIMCCW command is executed in the program sequence. If any of these commands is executed, the controller scans continuously for a pulse at IN2 terminal. On getting pulse at terminal, the next command is fetched and executed. When the switch connected (to be connected by user for emergency/limit or for other purpose) gets triggered, the motion of the motor stops and control enters in the alarm mode and LED starts blinking. Restart the system to bring it to normal state. Note: The user is required to restart the system to switch from one mode to other. EXAMPLE 1: Offline mode The following program sets the motor to move 10 times with 3000 steps each time with the speed of 20000 steps per second and acceleration of 60000 steps per second² in incremental mode. START INC SPEED 20000 ACC 6000 LOOP 10 MOV 3000 LOOPEND END EXAMPLE 2: Online mode The following program sets the motor to move in absolute mode with the speed of 10000 steps per second and acceleration of 20000 steps per second². ABS SPEED 10000 ACC 20000 MOV 5000 14 CONNECTION DIAGRAM (IN MANUAL MODE) Switch 1 NO NC COM Switch 2 NO NC COM Switch 3 NO NC COM Motor Jumper configurations Modes JP1 JP2 0 0 0 1 Start-Stop/ Dir 1 0 Start Dir-CW/ Start Dir-CCW Start-Stop Whereas, 0 means jumper removed and 1 means jumper mounted. 15 CONNECTION DIAGRAM (IN AUTO MODE) Switch 1 NO NC COM Switch 2 NO NC COM Switch 3 NO NC COM Motor Jumper configurations Mode JP1 JP2 JP4 1 1 0 ONLINE MODE 1 1 1 OFFLINE MODE Whereas, 0 means jumper removed and 1 means jumper mounted. 16


![BOS User`s Manual [v 1.00]](http://vs1.manualzilla.com/store/data/005878726_1-a93b95814f153b2994a972b38c1cdb16-150x150.png)