1
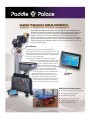
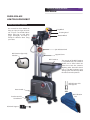
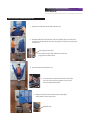
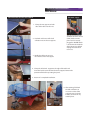
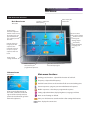
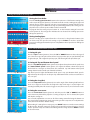
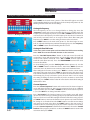
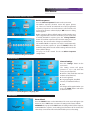
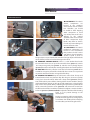
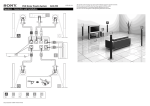
H2W TOUCH PRO ROBOT
User Manual
paddlepalace.com
1-800-547-5891
503-777-2266
H2W TOUCH PRO ROBOT
The Paddle Palace H2W Touch Pro Robot is a very versatile and user-friendly high-tech
robot. The new LCD Touch Screen makes operation and programming of all functions of
the robot very easy! Get started in seconds using one of the 30 built-in ball sequences
with just a few touches on the screen. Making your own custom sequences is also
simple, as the Touch Screen walks you step by step through the setup. You can save up
to nine of your own favorite custom sequences, and you can easily modify the 30 built-in
sequences. Whether you use built-in sequences or your own custom sequences, start-up
is easy every time you play.
Spin Indicator!
The new Spin Indicator Panel located just below the
shooting head on the robot shows you the spin for each ball
before it shoots. This makes playing with the robot more like
playing with a human partner, as you can visually anticipate
the spins on the upcoming balls.
The H2W Touch Pro Robot has two throw wheels with
independently programmed motors, allowing a great
variety and degree of spins, including
topspin, underspin, sidespin, and nospin. Plus the robot can seamlessly
shoot consecutive shots with different
spins. There are 22 possible landing
spots on the table including short and
long balls, making possible any combination
of spins and landing spots you choose. The
H2W Touch Pro Robot is designed for the player
who wants a high-quality long-lasting robot
that is easy to use, yet offers the sophisticated
technology for practicing the ideal training
patterns to take your game to the next level.
LCD Touch
Screen!
H2W Touch Pro Robot includes:
Net Collection and Ball Recycling System
Free 120 Nittaku training balls
Free Robot Training DVD
Free Shipping to contiguous USA
30-day money-back Guarantee
One year limited Warranty
Paddle Palace H2W Touch Pro Robot
User Manual
Table of Contents
4
Robot Components / Features
4
Capacity of the Ball Container
5
How to Assemble the Ball Collection Net
6
How to Position the Table Tennis Robot
6
What Power Supply to Use
7
Main Menu Functions Description
8
Landing Spots / Functions
8
Landing Spots / Functions (Spin and Top/Bottom Wheel Speed)
8
Landing Spots / Functions (Serve Count)
9
Frequency
9
Total Ball Counts / Timer
9
Custom Sequences
10 Built-In Sequences
10 General Settings
10 Reset Default
11 Robot Maintenance
12 Touchscreen Use and Maintenance
12 General Warning/Safety Issues
13 Troubleshooting
14 List of 30 Built-In Sequences
paddlepalace.com
1-800-547-5891
503-777-2266
page 3
Paddle Palace Table Top Pro Robot
page 4
User Manual
PADDLE PALACE
H2W TOUCH PRO ROBOT
Robot Components / Features
This manual has been written to
help you enjoy and get the most
out of your new Paddle Palace
Robot. Take time to read these
pages thoroughly and keep it
handy for reference when using
your robot.
Top Wheel
Shooting Head
Bottom Wheel
Spin Indicator Panel
Ball Container [top view]
Poke Bar
Support Frame
Ball Container
The capacity of the Ball Container
is 100, 40mm balls. The container
should not be filled above the
yellow line inside the container.
Anything other than table tennis
balls in the Ball Container may
damage parts and adversely affect
the robot’s normal operation.
Ball Collection Side
Net Supports
Power Switch
Touchscreen LCD
Control Panel
LCD Panel Support
Ball Collection
Net
Paddle Palace H2W Touch Pro Robot
User Manual
How to Assemble the Ball Collection Net
1. Open the lock buckles of the ball collection net.
1
2. Partially unfold the ball collection net and carefully slip it over the robot
head. Insert the double pin into the net support connector, located on the
robot frame.
Net Support Connector
3
3. Insert the pin in the ball collection net into the
support frame of the robot.
2
4. Spread out the ball collection net.
5. Insert the Spin Indicator Panel into the slot of the
net. If you need to disassemble the net, remove
the Spin Indicator Panel first.
5
4
6. Always unlock the robot wheels before moving the
robot. Roll the robot to the table.
Wheel Lock
6
page 5
Paddle Palace H2W Touch Pro Robot
page 6
User Manual
The Power Supply
How To Position the Table Tennis Robot
1. Clamp the net supports to both
sides of the table near the net.
1
The robot is powered by
standard US home current
(120V). Make sure the
power cord is securely
plugged in. On/Off switch
is located on the backside
of the robot. Turn off and
unplug the robot when
not in use.
2. Put both end sleeves of the ball
collection net on the net supports.
2
3. Buckle the rubber rings are to
the outsides of the net support.
3
4. Clamp the LCD Panel support to the edge of the table and
insert the Touchscreen LCD Panel into the support. Remove the
protective film before operating the panel.
4
5. Picture of a completed installation.
6. After training, fold back
the ball collection net
in a reverse order of the
original process, lock the
buckles, and store in any
suitable place.
6
5
page 7
Paddle Palace H2W Touch Pro Robot
User Manual
H2W Touchscreen LCD Panel
Main Menu Screen
Picture 1
Frequency: Adjust the
ball frequency .
Time: Display the
current time
Landing spots/
Functions: Adjust the
number of balls served,
the landing spots, the
type and amount of
spin, and the speed of
each shot.
Total ball counts/
Timer: Set the number
of balls to receive
or running time.
Settings: Adjust
the Volume,
Display brightness,
Language, and
Time
Custom sequences:
Program your own
sequences. The
robot will recall and
run up to 9 of your
sequences with one
touch.
Reset: reset all
settings to default.
Built-in sequences:
Select from 30 preprogrammed sequences.
Welcome Screen
Picture 2
Start: Press this button to start
the selected program.
Main menu functions
Landing spots/Functions: adjust all the Function of each ball.
Frequency: adjust the ball frequency .
Total ball counts/Timer: set the number of balls to receive/working time.
Custom sequences: program your own multifunctional sequence.
Build-in sequences: select the pre-programmed sequence.
A few seconds after turning on
the robot, a welcome screen will
appear on the control panel (see
picture 2). Press“Enter”to go to the
Main menu (picture 1).
Setting: adjust the Volume, Display brightness, Language, and Time.
Reset: reset all settings to default.
Start: press this button to start the machine after setting the functions.
Time: display the current time
Paddle Palace H2W Touch Pro Robot
page 8
User Manual
Setting Serve Order and Landing Spots
Setting the Serve Order:
Picture 3: Landing Spot/Function
Press the Landing spots/Function button on the main menu. The functions setting serve
order screen will appear (picture 3). The number of balls served, Landing Spots, type and
amount of spin, and the speed of each shot are programmed starting with this screen.
You can program up to 9 different serving sets (shot configurations). The serving sets are
played in order 1-9 then repeats until the robot is turned off.
To program the first serving set press button #1. on the Function setting of serve order
screen (picture 3). The orange color indicates the set selected. The Landing spot screen
will appear (picture 4).
Setting Landing Spots
Picture 4: Landing Spot Screen
Choose a landing spot location from the 11 short and 11 long location buttons. You
can choose only one spot for each serving set (press “Delete” to reselect a spot). After
pressing a landing spot button the Spins and Top/Bottom wheel speed screen will appear
(picture 5).
Spins and Top/Bottom Wheel Speed (4 steps)
1. Setting the spin.
Picture 5: Spins
Press the “Spins” button (picture 5). Press the “UP” or “DOWN” button to choose the type of
spin. There are 9 types of spin to choose from. Top spin, under spin, no spin (dead ball), left
or right side spin, left or right side spin/top spin, and left or right side spin/under spin.
2. Setting the Top and Bottom wheel speed.
Picture 6: Top Wheel Speed
Press the “Top-Wheel Speed“ button (picture 6) to adjust the top throw wheel speed. Press
the “Bottom-Wheel Speed“ button (picture 7) to adjust the bottom throw wheel speed.
Each wheel has 10 stages to choose from. The combined top and bottom wheel speed
settings determine the overall spin of the ball as follows.
Top wheel speed is higher than Bottom wheel speed = top spin. Bottom wheel speed is
higher than top wheel speed = under spin. Top and bottom wheels set close to each other =
less or no spin.
3. Setting the Loop (Arc)
Picture 7: Bottom Wheel Speed
Press the “Loop Level” button (picture 8). You set the angle of the shooting head from here.
There are 7 stages to choose from. The higher the loop level stage is set, the higher the
shooting head will point. This creates a bigger arc and, in most cases, an easier shot to return.
4. Setting the serve count.
Picture 8: Loop Level
Picture 9: Serve Count
Press the “Serve Count” button (picture 9) and then press the “UP” or “DOWN” buttons to
select how many balls will be played in a serving set (up to 9). If “0” is selected, the system
will skip this serving set.
You can make adjustments on some or all of the settings controlled using the buttons on
this screen before continuing on to the next serving set in the sequence. If no adjustment is
made, then it will show the default setting.
After making all settings for #1 serving set, press “BACK” button to save the current settings
for that set. The functions setting of serving order screen will re-appear. (picture 3). You can
use the previous 4 steps to set the second through ninth serving sets. Press “BACK” to return
to the main menu.
Paddle Palace H2W Touch Pro Robot
page 9
User Manual
Setting the Frequency / Total Ball Counts / Timer / Custom Sequences
Press “START” on the main menu ( picture 1) The robot will begin to serve balls
and the Working Interface screen will appear on the control panel (picture 10). The
Working Interface shows the current settings.
Setting the frequency
Picture 10: Working Interface Screen
The ball frequency can be set or changed before or during play. Press the
“Frequency” button on the main menu while the robot is in standby mode. The
Frequency screen will appear (picture 11) Press “UP” or “DOWN” buttons to increase
or decrease the ball frequency. The ball frequency for this robot is between 28
and 95 balls per minute. There are 10 stages to choose from. After setting the
frequency press “BACK” to save the setting and return to the main menu.
Press “START” button on the main menu (picture 1). The robot begins to serve
balls. To adjust the ball frequency without interupting play press the “Frequency”
“UP” or “DOWN” buttons from the Working Interface screen.
Setting the Total ball count
Picture 11: Frequency
Picture 12: Total Ball Count / Timer
In this menu you have two options to choose from: Total balls count or working
time. NOTE: You cannot make both selections at the same time.
Press the “Total Ball Counts/Timer” button on the main menu. The total ball
counts/Timer screen will appear (picture 12). The default setting for Total ball
counts is 000 ( “Infinite” serve/ball). Press “UP” or “DOWN” arrow to adjust the
total ball counts (from 001-999). Press the “RIGHT ARROW” to move from units
to tens and hundreds.
To select Working time, press the “Working Time” button (picture 12). Use the
“UP” or “DOWN” button to set the timer from 1-180 minutes. NOTE: the units are
in minutes (“001” sets the time to one minute). “000” means “Unlimited” time.
After setting the ball counts or timer, press “BACK” to save the current setting
and return to the main menu. Press “START” on the main menu, the robot serves
balls until the Total ball counts/Timer reaches 0. When the counter hits 0 the robot
will interupt play, “beeps” and returns you to the main menu You can repeat
the setting according the above procedure. If you do not want to set the Total
ball count, press “START” and the robot will revert back to the default setting of
infinite balls or time.
Custom Sequences
Picture 13: Custom Sequence Screen
Picture 14: Function Setting of Serve
Order
Press the “Custom Sequences” button on the main menu. The Custom Sequence
screen will appear (picture 13). Here you can program and save up to 9 different
sequeces for later use. Press “UP” or “DOWN” to choose from custom sequences
1-9, or select “OFF” for no setting. Start with custom 1.
Press “Set Function”. The Function Setting of Serve Order screen will appear
(picture 14). Set the serving set, landing spot, spin, top and bottom wheel speeds,
loop level and serve count. After setting the function of the first serving set press
the “BACK” button to return to the function screen (picture 14). Set the functions
for serving set 2-9 if needed. Press the “SAVE” button to save the current settings
and return to the main menu. Press the “START” button in the main menu to
start the routine. To recall and play any of your custom sequences at a later date,
press the “Custom Sequences” button from the main menu. Choose the “Custom
Number” of the program you wish to use. Press the “BACK” button to return to the
main menu then press “START”.
Paddle Palace H2W Touch Pro Robot
page 10
User Manual
Custom Sequences / Built-In Sequences
Built-in sequences
Picture 15: Built-In Sequences
Picture 16: Function Setting of Serve Order
Press the “Built-In Sequences” button on the main menu.
The Built-In sequence selection screen will appear (picture
15). There are a total of 30 numbered sets of pre-programmed
sequences. Sequences 1-10 are the easiest; 11-20 are harder; and
21-30 are for the more advanced player. “Off” means no setting
will be applied.
Built-in sequences all have default settings and the Landing spot,
Spin, Long/Short ball, and Serve count are pre-set. If you need
to modify the Built-in sequence, press the “Change Confirm”
button to load that sequence to the Function setting screen (see
Picture 16). You can now make changes on each function.
The modified Build-in sequences can only be used temporarily.
When you exit the sequence or press the “RESET” button, the
modified setting will be erased and the settings will revert to the
factory defaul settings.
See page 14 of this manual for the 30 Built-In Sequence
configurations.
General Settings
General settings
Pictures 17-20: Volume, Brightness, Language, Time
Press the “Settings” button on the
main menu.
The Setting screens will appear
(pictures 17, 18, 19, 20). From this
menu you can adjust the:
Volume (This model does not have
Volume control function)
Screen brightness
Language (English, Simplified
Chinese, or Traditional Chinese)
Time
All changes will be applied when you
press the “BACK” button and return
to the main menu.
Reset Default
Reset default
Press the “RESET” button on the Main Menu. The reset screen will appear (see
Picture 21). Press “YES” button to restore all settings to the factory default.
WARNING: when you press the “YES” button, all settings in the Custom sequence,
modified Build-in sequence, and Landing spots/Functions will be cleared. The
robot beeps several times when it has finished the process of resetting.
Picture 21: Reset Screen
Paddle Palace H2W Touch Pro Robot
page 11
User Manual
Robot Maintenance
1
2
5
6
ELECTRONICS: The robot’s
electric
components
are
located in the machine’s
circuit board and the control
box. Therefore, you should
be careful to avoid dropping
either component or avoid
3 any activity that would cause
damage to the internal
electronic units of one or both
of these components. Keep
liquids away from its surface,
in order to prevent damage to
internal electronic units.
MECHANICS: The robot’s
mechanical components are
located in the mechanisms
4 that produce the ball service
and delivery. Special attention
should be paid so that no
foreign objects are put into the ball container. Foreign objects will block the
robot’s delivery wheel and result in damage to the robot.
REMOVING FOREIGN OBJECTS: There is a view window fixed under
the removable door. You can open the removable door (picture 1), remove
the transparent guard plate (picture 2), and take out any foreign objects
(picture 3) that have entered, thus returning the robot to its normal operation.
POKE BAR: When the poke bar inside the ball container (picture 4) has
worked for a long time, it should be checked for loose screws so as to prevent
any trouble that would lead to an irregular ball delivery.
CLEANING THE ROBOT: Keep the table tennis robot clean. The top and
bottom friction wheels may become dirty after long use. To ensure a quality
serve, please clean the wheels often with a damp towel (picture 5). Always
turn off the robot’s power before cleaning. Under normal condition, the top
and bottom friction wheels are able to work for 5,000 hours or longer before
they need to be replaced. When performing the replacement, power off the
robot, remove the protective cover (picture 6) and remove the screws from
the friction wheel with a screwdriver (clockwise to tighten, counter-clockwise
to loosen) (picture 7). Do not use force to adjust the direction of the shooting
head, so as to prevent damage to the
internal parts.
During an operation and/or transportation,
protect the robot against any strong impact
or oscillation. Turn off the power and unplug
the robot after you finish using the robot.
7
Paddle Palace H2W Touch Pro Robot
page 12
User Manual
Touchscreen Use and Maintenance
1. The touchscreen panel is a precise device that requires careful operation. And the touchscreen is fragile, so any strong
impact or oscillation may damage the touchscreen. Do not press too hard on the display area of the touchscreen.
When using or storing the panel, please avoid any scratches caused by the hard objects on the surface of touchscreen.
2. Please use and store the touchscreen panel within the acceptable temperature range. The normal operating
temperature of the touchscreen panel is from 10 degrees C to 60 degrees C. The relative humidity for storing and
transporting is 20% to 80 %. If the touchscreen panel is used or stored below the acceptable temperature/relative
humidity, the surface may crystallize, leading to unrecoverable damage. If the touchscreen panel is used or stored
above the acceptable temperature/relative humidity, the liquid crystal on the touchscreen may liquefy, leading to
unrecoverable damage.
3. Do not open, disassemble, and reconfigure the panel. This may damage the touchscreen, and cause malfunction of
the control panel.
4. Keep the surface of touchscreen clean. The surface may change color or have spot/blot if water has been spilled and
sits on the surface for a long time. If the touchscreen has a spot or becomes dirty, please clean it with a pure cotton or
soft cloth. Do not use gasoline, alcohol or any chemical to wipe the surface.
5. If any reason that you need to store the touchscreen panel for a long period, we suggest you to do the following:
Place it in a dark area, keep away from the strong light.
Do not put anything on the surface of the panel.
Do not store it in an area that exceeds the acceptable temperature/relative humidity.
Warning
To prevent the danger of fire, electric shock, personal injury and product damage, children should be supervised
while operating the robot:
Instructive advice should be given when machine used by children.
Avoid windy and/or rainy days when using outdoors.
Use care when connecting and disconnecting the ball collecting net.
When robot is operating, please keep away from the shooting head to avoid being hit with a ball.
When robot is operating, if you observe something abnormal, such as smoke coming out of the robot, stop the
robot and unplug it immediately. Repair must be performed by a qualified repair person.
Do not remove the housing/cover of the robot without authorization.
Some places on the robot will heat up during operation. Please be careful and pay attention so as to avoid
burning yourself.
Turn the power switch off and unplug the robot after use.
If any damage or loss is incurred due to the fact that safety instructions and regulation were not followed, or the robot
was not properly used as instructed in this manual, our company will not take any responsibility.
Paddle Palace H2W Touch Pro Robot
User Manual
Troubleshooting
FAILURE
CAUSE
SOLUTION
Robot doesn’t work
Did not press Start button on the Main Menu
to start
Press “Enter” or “Start”
The plug is not connected properly to the electrical outlet.
Check the plug connected to the electrical outlet
Number in total ball count/timer has reached “0”.
Press “Start”
Malfunction on Touchscreen due to impact or oscillation
Replace Touchscreen Panel
The poke bar in ball container is loose
Fasten the poke bar
The ball duct is jammed by foreign object
Clear away the foreign object (see page 11)
The amount of balls in the container is not enough
The amount should be 50 to 100 balls
It takes time to transport the balls from container
to shooting head
Wait for a while
Did not remove the protective film from Touchscreen
Panel
Remove protective film
The cable connecting to motor is loose
Connect it with the original method
Touchscreen has spot or has become dirty
Clean it with a soft cloth
Dirt and wear on the top and bottom wheels after a
period of time in operation
Clean or replace the friction wheel
The long and short ball sequence mode is selected.
Cancel the long and short ball sequence mode
The shooting head is deflected by external force
Restart the robot
Robot works but does not release the balls
Pressed key failure
Landing spot is unstable
page 13
Paddle Palace H2W Touch Pro Robot
page 14
User Manual
List of Built-In Sequences
See page 10 for instructions for Built-In Sequences
Easy (Set 1-10)
1.
2.
3.
4.
5.
6.
7.
8.
9.
10.
2 short underspins to #10 spot; 2 long topspins to #2 spot
2 short underspins to #1 spot; 3 long topspins to #9 spot
2 short right-side topspins to #10 spot; 3 long topspins to #2 spot
2 short right-side underspins to #5 spot; 2 long topspins to #1 spot
2 short right-side topspins to #2 spot; 2 long topspins to #11 spot
2 short right-side underspins to #4 spot; 2 long topspins to #10 spot
2 short left-side topspins to #10 spot; 3 long topspins to #2 spot
2 short left-side underspins to #10 spot; 2 long topspins to #1 spot
2 short left-side topspins to #2 spot; 3 long topspins to #10 spot
2 short left-side underspins to #2 spot; 2 long topspins to #1 spot
Intermediate (Set 11-20)
11.
12.
13.
14.
15.
16.
17.
18.
19.
20.
2 short underspins to #11 spot; 1 long underspin to #2 spot; 2 long topspins to #1 spot
1 short underspin to #9 spot; 1 long underspin to #1 spot; 2 long topspins to #10 spot
2 short underspins to #10 spot; 1 long topspin to #2 spot; 1 long topspin to #11 spot
1 short underspin to #11 spot; 2 long underspins to #1 spot; 2 long topspins to #6 spot
1 long underspin to #6 spot; 1 short underspin to #11 spot; 3 long topspins to #2 spot
2 short right-side topspins to #10 spot; 1 long topspin to #11 spot; 2 long topspins to #1 spot
2 short left-side underspins to #2 spot; 2 long topspins to #11 spot; 1 long topspin to #2 spot
2 short left-side topspins to #10 spot; 3 long topspins to #2 spot; 1 long topspin to #11 spot
1 short right-side underspin to #2 spot; 1 long underspin to #10 spot; 2 long topspins to #11 spot
1 long right-side underspin to #2 spot; 1 long underspin to #11 spot; 2 long topspins to #3 spot
Advanced (Set 21-30)
21.
22.
23.
24.
25.
26.
27.
28.
29.
30.
1 short underspin to #10 spot; 1 long underspin to #1 spot; 1 long topspin to #5 spot
1 short underspin to #1 spot; 1 long underspin to #11 spot; 1 long topspin to #1 spot; 1 long topspin to #10 spot
1 short underspin to #11 spot; 1 short underspin to #7 spot; 1 long underspin to #1 spot; 2 long topspins to #9 spot
2 short underspins to #2 spot; 1 long underspin to #10 spot; 1 long topspin to #11 spot; 1 long topspin to #5 spot; 1 long
topspin to #1 spot; 2 long topspins to #9 spot
2 short underspins to #11 spot; 1 long underspin to #2 spot; 2 long topspins to #1 spot; 1 long topspin to #6 spot; 1 long
topspin to #11 spot
1 short right-side topspin to #10 spot; 1 long underspin to #2 spot; 2 long topspins to #10 spot; 1 long topspin to #6 spot
1 short right-side topspin to #2 spot; 1 long underspin to #3 spot; 1 long topspin to #8 spot; 2 long topspins to #11 spot
1 short underspin to #1 spot; 1 short underspin to #11 spot; 1 long topspin to #2 spot; 1 long topspin to #10 spot
1 short underspin to #1 spot; 1 short underspin to #9 spot; 1 long underspin to #2 spot; 1 long topspin to #3 spot; 1 long
topspin to #10 spot
2 short right-side underspins to #10 spot; 2 short underspins to #1 spot; 1 long underspin to #9 spot; 1 long topspin to
#11 spot; 1 long topspin to #2 spot