1
BACHELOROPPGAVE:
OurBox
FORFATTERE:
Gavin Thomas Garrad
Stepan Maluchev
DATO:
15.05.2015
OurBox
Sammendrag av Bacheloroppgaven
Tittel:
OurBox
Deltakere:
Gavin Thomas Garrad
Stepan Maluchev
Veiledere:
Erik Heljmås
Nr: Dato: 15.05.2015
Oppdragsgiver: Høgskolen i Gjøvik
Kontaktperson: Thommas Kimmerich
Stikkord
Norway, Norsk
Antall sider: 125
Antall vedlegg: 15 Tilgjengelighet: Åpen
Kort beskrivelse av bacheloroppgaven:
Cisco labben på HiG består per dags dato av gamle Windows 7 maskiner som er tilgjengelige
for alle som befinner seg på labben. Disse maskinene har studentene full administrator
rettigheter på, noe som tilsier at en student kan gjøre hva de vil på den, mens maskinenes
egentlige hensikt er kun å brukes sammen med Cisco utstyr for konfigurasjon og testing.
Prosjektets mål er å lage en prototype hvor studentene ikke har full administrator rettigeheter på selve maskinen, men heller administrator rettigheter på de virtuelle maskinene som
blir laget, slik at studentene har sin egen testomgivelse som ikke kan på virke andre studenter.
Rapportens innhold har blitt skrevet slik at de som skal videreutvikle prosjektet vil kunne forstå
våre valg og vurderinger utifra teoretiske og praktiske begrunnelser.
i
OurBox
Summary of Graduate Project
Title:
OurBox
Participants:
Gavin Thomas Garrad
Stepan Maluchev
Supervisor:
Erik Heljmås
Employer:
Høgskolen i Gjøvik
Nr: Date: 15.05.2015
Contact person: Thommas Kimmerich
Keywords
Pages: 125
Virtualisation, LDAP, Window Manager, Ubuntu
Appendixes: 15 Availability: Open
Short description of the main project:
The Cisco lab at HiG consist of old computers running on Windows 7 and is available for all
students who has access to the lab. On these machines students has full administrator rights,
which means that the students can do what ever they want on them, while the purpose of these
machines are to be used with Cisco equipment for configuration and testing.
The project’s goal is to make a prototype where the students does not have full administrative rights on the host machine, but rather on the virtual machines on the host. The students
will have their own test domains which will not effect the other students in any way.
The contents of the report has been written in such way that for those who are going to
further develop this project will understand our choices based on theoretical and practical
reasons.
ii
OurBox
Preface
This bachelor project has been a very interesting and challenging project. We have learned a lot
of new things and have now a much better understanding on how Ubuntu, virtualization, Virtualbox, KVM, Fluxbox, LDAP,AD and Google-Search works. The ability to find the specific
information that is needed online is an art, and this skill has improved a lot.
The most interesting subject throughout this project has been the authentication part. When
we first encountered this subject, we had absolutely no idea on how an authentication through a
Linux system worked. Now we can set up this system without any problems.
•
A huge thanks to our tutor Erik Hjelmås and Jon Langseth who has guided and helped us to
stay on the right path throughout this project.
•
Thanks to our employer Thomas Kimmerich who has given us this interesting project.
•
Thanks to our family who has been supportive and understandable that this has been a tough
semester with no time for mingling.
iii
OurBox
Contents
Preface . . . . . . . . . . . . . . . . . . . . . . .
Contents . . . . . . . . . . . . . . . . . . . . . .
List of Figures . . . . . . . . . . . . . . . . . . .
List of Tables . . . . . . . . . . . . . . . . . . . .
Listings . . . . . . . . . . . . . . . . . . . . . . .
1 Introduction . . . . . . . . . . . . . . . . . .
1.1 Problem . . . . . . . . . . . . . . . . . .
1.1.1 Demarcation . . . . . . . . . . .
1.1.2 Task description . . . . . . . . .
1.2 Target Group . . . . . . . . . . . . . . .
1.3 Subject . . . . . . . . . . . . . . . . . .
1.4 Our background . . . . . . . . . . . . . .
1.5 Framework . . . . . . . . . . . . . . . .
1.5.1 Development model . . . . . . .
1.5.2 Gantt-diagram . . . . . . . . . .
1.6 Roles . . . . . . . . . . . . . . . . . . .
1.7 Terminologi . . . . . . . . . . . . . . . .
2 Requirements . . . . . . . . . . . . . . . . . .
3 Theory . . . . . . . . . . . . . . . . . . . . .
3.1 LDAP . . . . . . . . . . . . . . . . . . .
3.2 PAM . . . . . . . . . . . . . . . . . . . .
3.2.1 What is PAM . . . . . . . . . . .
3.2.2 Advantages of PAM . . . . . . .
3.2.3 PAM configurations . . . . . . .
3.3 Explanation of the package libpam-ldapd
3.3.1 What is libpam-ldapd . . . . . . .
3.3.2 Packet’s content . . . . . . . . .
3.3.3 nslcd.conf . . . . . . . . . . . . .
3.4 Explanation of the package libpam-ldap .
3.4.1 Packet’s content . . . . . . . . .
3.4.2 ldap.conf . . . . . . . . . . . . .
iv
.
.
.
.
.
.
.
.
.
.
.
.
.
.
.
.
.
.
.
.
.
.
.
.
.
.
.
.
.
.
.
.
.
.
.
.
.
.
.
.
.
.
.
.
.
.
.
.
.
.
.
.
.
.
.
.
.
.
.
.
.
.
.
.
.
.
.
.
.
.
.
.
.
.
.
.
.
.
.
.
.
.
.
.
.
.
.
.
.
.
.
.
.
.
.
.
.
.
.
.
.
.
.
.
.
.
.
.
.
.
.
.
.
.
.
.
.
.
.
.
.
.
.
.
.
.
.
.
.
.
.
.
.
.
.
.
.
.
.
.
.
.
.
.
.
.
.
.
.
.
.
.
.
.
.
.
.
.
.
.
.
.
.
.
.
.
.
.
.
.
.
.
.
.
.
.
.
.
.
.
.
.
.
.
.
.
.
.
.
.
.
.
.
.
.
.
.
.
.
.
.
.
.
.
.
.
.
.
.
.
.
.
.
.
.
.
.
.
.
.
.
.
.
.
.
.
.
.
.
.
.
.
.
.
.
.
.
.
.
.
.
.
.
.
.
.
.
.
.
.
.
.
.
.
.
.
.
.
.
.
.
.
.
.
.
.
.
.
.
.
.
.
.
.
.
.
.
.
.
.
.
.
.
.
.
.
.
.
.
.
.
.
.
.
.
.
.
.
.
.
.
.
.
.
.
.
.
.
.
.
.
.
.
.
.
.
.
.
.
.
.
.
.
.
.
.
.
.
.
.
.
.
.
.
.
.
.
.
.
.
.
.
.
.
.
.
.
.
.
.
.
.
.
.
.
.
.
.
.
.
.
.
.
.
.
.
.
.
.
.
.
.
.
.
.
.
.
.
.
.
.
.
.
.
.
.
.
.
.
.
.
.
.
.
.
.
.
.
.
.
.
.
.
.
.
.
.
.
.
.
.
.
.
.
.
.
.
.
.
.
.
.
.
.
.
.
.
.
.
.
.
.
.
.
.
.
.
.
.
.
.
.
.
.
.
.
.
.
.
.
.
.
.
.
.
.
.
.
.
.
.
.
.
.
.
.
.
.
.
.
.
.
.
.
.
.
.
.
.
.
.
.
.
.
.
.
.
.
.
.
.
.
.
.
.
.
.
.
.
.
.
.
.
.
.
.
.
.
.
.
.
.
.
.
.
.
.
.
.
.
.
.
.
.
.
.
.
.
.
.
.
.
.
.
.
.
.
.
.
.
.
.
.
.
.
.
.
.
.
.
.
.
.
.
.
.
.
.
.
.
.
.
.
.
.
.
.
.
.
.
.
.
.
.
.
.
.
.
.
.
.
.
.
.
.
.
.
.
.
. iii
. iv
. vii
. viii
. ix
.
1
.
1
.
1
.
2
.
3
.
3
.
3
.
4
.
4
.
4
.
5
.
5
.
8
. 10
. 10
. 10
. 10
. 10
. 11
. 12
. 12
. 12
. 13
. 15
. 15
. 15
OurBox
3.5
nsswitch.conf . . . . . . . . . . . . . . . . . . . . . . . .
3.5.1 Line definition . . . . . . . . . . . . . . . . . . .
3.5.2 Example . . . . . . . . . . . . . . . . . . . . . .
3.6 Unity-greeter . . . . . . . . . . . . . . . . . . . . . . . .
3.6.1 Different commands . . . . . . . . . . . . . . . .
3.7 Fluxbox . . . . . . . . . . . . . . . . . . . . . . . . . . .
3.7.1 What is flux box? . . . . . . . . . . . . . . . . . .
3.7.2 Configuration files . . . . . . . . . . . . . . . . .
3.8 Hypervisor . . . . . . . . . . . . . . . . . . . . . . . . .
3.8.1 What is an hypervisor? . . . . . . . . . . . . . . .
3.8.2 KVM . . . . . . . . . . . . . . . . . . . . . . . .
3.8.3 Virtualbox . . . . . . . . . . . . . . . . . . . . .
3.9 Profile.d . . . . . . . . . . . . . . . . . . . . . . . . . . .
3.10 Image . . . . . . . . . . . . . . . . . . . . . . . . . . . .
3.10.1 Immutable . . . . . . . . . . . . . . . . . . . . .
3.10.2 Multi-attach . . . . . . . . . . . . . . . . . . . . .
3.10.3 Copy-On-Write . . . . . . . . . . . . . . . . . . .
3.10.4 Summary . . . . . . . . . . . . . . . . . . . . . .
4 Implementation . . . . . . . . . . . . . . . . . . . . . . . . .
4.1 Authentication . . . . . . . . . . . . . . . . . . . . . . . .
4.1.1 Prework . . . . . . . . . . . . . . . . . . . . . . .
4.1.2 Configuring LDAP - Basics . . . . . . . . . . . .
4.1.3 Configuring LDAP - Mapping . . . . . . . . . . .
4.1.4 Configuring LDAP - Mapping mounting directory
4.1.5 Home directory with a desktop environment . . . .
4.2 Desktop Environment . . . . . . . . . . . . . . . . . . . .
4.2.1 Unity-greeter . . . . . . . . . . . . . . . . . . . .
4.2.2 Window manager . . . . . . . . . . . . . . . . . .
4.3 TTY . . . . . . . . . . . . . . . . . . . . . . . . . . . . .
4.4 Hypervisor . . . . . . . . . . . . . . . . . . . . . . . . .
4.4.1 KVM implementation . . . . . . . . . . . . . . .
4.4.2 Virtualbox implementation . . . . . . . . . . . . .
4.5 Result . . . . . . . . . . . . . . . . . . . . . . . . . . . .
4.5.1 Conclusion of the KVM . . . . . . . . . . . . . .
4.5.2 Conclusion of the Virtualbox . . . . . . . . . . . .
5 Ending . . . . . . . . . . . . . . . . . . . . . . . . . . . . . .
v
.
.
.
.
.
.
.
.
.
.
.
.
.
.
.
.
.
.
.
.
.
.
.
.
.
.
.
.
.
.
.
.
.
.
.
.
.
.
.
.
.
.
.
.
.
.
.
.
.
.
.
.
.
.
.
.
.
.
.
.
.
.
.
.
.
.
.
.
.
.
.
.
.
.
.
.
.
.
.
.
.
.
.
.
.
.
.
.
.
.
.
.
.
.
.
.
.
.
.
.
.
.
.
.
.
.
.
.
.
.
.
.
.
.
.
.
.
.
.
.
.
.
.
.
.
.
.
.
.
.
.
.
.
.
.
.
.
.
.
.
.
.
.
.
.
.
.
.
.
.
.
.
.
.
.
.
.
.
.
.
.
.
.
.
.
.
.
.
.
.
.
.
.
.
.
.
.
.
.
.
.
.
.
.
.
.
.
.
.
.
.
.
.
.
.
.
.
.
.
.
.
.
.
.
.
.
.
.
.
.
.
.
.
.
.
.
.
.
.
.
.
.
.
.
.
.
.
.
.
.
.
.
.
.
.
.
.
.
.
.
.
.
.
.
.
.
.
.
.
.
.
.
.
.
.
.
.
.
.
.
.
.
.
.
.
.
.
.
.
.
.
.
.
.
.
.
.
.
.
.
.
.
.
.
.
.
.
.
.
.
.
.
.
.
.
.
.
.
.
.
.
.
.
.
.
.
.
.
.
.
.
.
.
.
.
.
.
.
.
.
.
.
.
.
.
.
.
.
.
.
.
.
.
.
.
.
.
.
.
.
.
.
.
.
.
.
.
.
.
.
.
.
.
.
.
.
.
.
.
.
.
.
.
.
.
.
.
.
.
.
.
.
.
.
.
.
.
.
.
.
.
.
.
.
.
.
.
.
.
.
.
.
.
.
.
.
16
16
16
17
18
18
18
19
20
20
21
22
23
23
23
23
24
24
25
25
25
27
29
31
32
33
33
33
36
36
36
39
41
41
42
44
OurBox
5.1
5.2
5.3
5.4
Requirements and their Results . . . . . . . . . . .
Critic to the thesis . . . . . . . . . . . . . . . . . .
Future work . . . . . . . . . . . . . . . . . . . . .
Evaluation . . . . . . . . . . . . . . . . . . . . . .
5.4.1 Introduction . . . . . . . . . . . . . . . . .
5.4.2 Organize . . . . . . . . . . . . . . . . . .
5.4.3 Project as work flow and work distribution
5.5 Conclusion . . . . . . . . . . . . . . . . . . . . .
Bibliography . . . . . . . . . . . . . . . . . . . . . . . . .
A Log . . . . . . . . . . . . . . . . . . . . . . . . . . . .
A.1 Meetings . . . . . . . . . . . . . . . . . . . . . .
B User Manual . . . . . . . . . . . . . . . . . . . . . . .
C Code . . . . . . . . . . . . . . . . . . . . . . . . . . . .
C.1 afterInstallation.sh . . . . . . . . . . . . . . . . .
C.2 runMe.sh . . . . . . . . . . . . . . . . . . . . . .
C.3 verifyNewOSes.sh . . . . . . . . . . . . . . . . .
C.4 installVirtualBox.sh . . . . . . . . . . . . . . . . .
C.5 defaultVMScript.sh . . . . . . . . . . . . . . . . .
D nslcd.conf . . . . . . . . . . . . . . . . . . . . . . . . .
E Fluxbox config . . . . . . . . . . . . . . . . . . . . . .
E.1 Fluxbox menu for admin . . . . . . . . . . . . . .
E.2 Fluxbox keys file . . . . . . . . . . . . . . . . . .
E.3 Fluxbox startup file . . . . . . . . . . . . . . . . .
E.4 Fluxbox User Menu . . . . . . . . . . . . . . . . .
F Read me file . . . . . . . . . . . . . . . . . . . . . . .
G Project agreement . . . . . . . . . . . . . . . . . . . .
vi
.
.
.
.
.
.
.
.
.
.
.
.
.
.
.
.
.
.
.
.
.
.
.
.
.
.
.
.
.
.
.
.
.
.
.
.
.
.
.
.
.
.
.
.
.
.
.
.
.
.
.
.
.
.
.
.
.
.
.
.
.
.
.
.
.
.
.
.
.
.
.
.
.
.
.
.
.
.
.
.
.
.
.
.
.
.
.
.
.
.
.
.
.
.
.
.
.
.
.
.
.
.
.
.
.
.
.
.
.
.
.
.
.
.
.
.
.
.
.
.
.
.
.
.
.
.
.
.
.
.
.
.
.
.
.
.
.
.
.
.
.
.
.
.
.
.
.
.
.
.
.
.
.
.
.
.
.
.
.
.
.
.
.
.
.
.
.
.
.
.
.
.
.
.
.
.
.
.
.
.
.
.
.
.
.
.
.
.
.
.
.
.
.
.
.
.
.
.
.
.
.
.
.
.
.
.
.
.
.
.
.
.
.
.
.
.
.
.
.
.
.
.
.
.
.
.
.
.
.
.
.
.
.
.
.
.
.
.
.
.
.
.
.
.
.
.
.
.
.
.
.
.
.
.
.
.
.
.
.
.
.
.
.
.
.
.
.
.
.
.
.
.
.
.
.
.
.
.
.
.
.
.
.
.
.
.
.
.
.
.
.
.
.
.
.
.
.
.
.
.
.
.
.
.
.
.
.
.
.
.
.
.
.
.
.
.
.
.
.
.
.
.
.
.
.
.
.
.
.
.
.
.
.
.
.
.
.
.
.
.
.
.
.
.
.
.
.
.
.
.
.
.
.
.
.
.
.
.
.
.
.
.
.
.
.
.
.
.
.
.
.
.
.
.
.
.
.
.
.
.
.
.
.
.
.
.
.
.
.
.
44
47
47
48
48
48
48
48
49
52
96
103
108
109
110
112
113
114
115
116
117
118
121
122
123
124
OurBox
List of Figures
1
2
3
4
5
6
7
8
9
PAM configuration syntax [1] . . . . . . . . . . . .
Example of scopes | [2] . . . . . . . . . . . . . . .
Unity greeter. . . . . . . . . . . . . . . . . . . . .
Fluxbox as desktop. . . . . . . . . . . . . . . . . .
Hypervisor - Management tool - User interface [3]
Binding error . . . . . . . . . . . . . . . . . . . .
Wireshark, Host sent . . . . . . . . . . . . . . . .
Wireshark, Host received . . . . . . . . . . . . . .
Changed the default session. . . . . . . . . . . . .
vii
.
.
.
.
.
.
.
.
.
.
.
.
.
.
.
.
.
.
.
.
.
.
.
.
.
.
.
.
.
.
.
.
.
.
.
.
.
.
.
.
.
.
.
.
.
.
.
.
.
.
.
.
.
.
.
.
.
.
.
.
.
.
.
.
.
.
.
.
.
.
.
.
.
.
.
.
.
.
.
.
.
.
.
.
.
.
.
.
.
.
.
.
.
.
.
.
.
.
.
.
.
.
.
.
.
.
.
.
.
.
.
.
.
.
.
.
.
.
.
.
.
.
.
.
.
.
.
.
.
.
.
.
.
.
.
11
14
17
19
22
28
30
30
34
OurBox
List of Tables
viii
OurBox
Listings
3.1
3.2
3.3
3.4
3.5
3.6
3.7
4.1
4.2
4.3
4.4
4.5
4.6
4.7
4.8
4.9
4.10
4.11
4.12
4.13
4.14
4.15
4.16
4.17
4.18
4.19
4.20
4.21
4.22
4.23
4.24
nslcd.conf basic . . . . . . . .
Mapping in nslcd.conf . . . .
Correct mapping . . . . . . .
Default nsswitch.conf . . . . .
lightDM.conf | [4] . . . . . . .
Fluxbox-menu syntax | [5] . .
VBoxManage commands | [6]
Note from the IT-department .
ldapsearch . . . . . . . . . . .
ldap.conf V.1 . . . . . . . . .
nsswitch.conf . . . . . . . . .
getent command . . . . . . . .
Mapping with AD- ldap.conf .
getent passwd 121088 . . . . .
getent passwd 121088 . . . . .
Mapping with AD- nslcd.conf
Make a home directory . . . .
lightdm.conf . . . . . . . . . .
Default session . . . . . . . .
Fluxbox changed . . . . . . .
Removed code in Keys . . . .
Fluxbox administrator . . . . .
Insert into startfluxbox . . . .
Move TTY consoles . . . . . .
Install KVM . . . . . . . . . .
Create a .img . . . . . . . . .
defaultLibvirtFile.sh . . . . .
Installation of Virtualbox-4.3 .
DefaultVMs.sh first edition . .
verifyNewOSes.sh . . . . . .
DefaultVMScript.sh . . . . . .
.
.
.
.
.
.
.
.
.
.
.
.
.
.
.
.
.
.
.
.
.
.
.
.
.
.
.
.
.
.
.
.
.
.
.
.
.
.
.
.
.
.
.
.
.
.
.
.
.
.
.
.
.
.
.
.
.
.
.
.
.
.
.
.
.
.
.
.
.
.
.
.
.
.
.
.
.
.
.
.
.
.
.
.
.
.
.
.
.
.
.
.
.
.
.
.
.
.
.
.
.
.
.
.
.
.
.
.
.
.
.
.
.
.
.
.
.
.
.
.
.
.
.
.
ix
.
.
.
.
.
.
.
.
.
.
.
.
.
.
.
.
.
.
.
.
.
.
.
.
.
.
.
.
.
.
.
.
.
.
.
.
.
.
.
.
.
.
.
.
.
.
.
.
.
.
.
.
.
.
.
.
.
.
.
.
.
.
.
.
.
.
.
.
.
.
.
.
.
.
.
.
.
.
.
.
.
.
.
.
.
.
.
.
.
.
.
.
.
.
.
.
.
.
.
.
.
.
.
.
.
.
.
.
.
.
.
.
.
.
.
.
.
.
.
.
.
.
.
.
.
.
.
.
.
.
.
.
.
.
.
.
.
.
.
.
.
.
.
.
.
.
.
.
.
.
.
.
.
.
.
.
.
.
.
.
.
.
.
.
.
.
.
.
.
.
.
.
.
.
.
.
.
.
.
.
.
.
.
.
.
.
.
.
.
.
.
.
.
.
.
.
.
.
.
.
.
.
.
.
.
.
.
.
.
.
.
.
.
.
.
.
.
.
.
.
.
.
.
.
.
.
.
.
.
.
.
.
.
.
.
.
.
.
.
.
.
.
.
.
.
.
.
.
.
.
.
.
.
.
.
.
.
.
.
.
.
.
.
.
.
.
.
.
.
.
.
.
.
.
.
.
.
.
.
.
.
.
.
.
.
.
.
.
.
.
.
.
.
.
.
.
.
.
.
.
.
.
.
.
.
.
.
.
.
.
.
.
.
.
.
.
.
.
.
.
.
.
.
.
.
.
.
.
.
.
.
.
.
.
.
.
.
.
.
.
.
.
.
.
.
.
.
.
.
.
.
.
.
.
.
.
.
.
.
.
.
.
.
.
.
.
.
.
.
.
.
.
.
.
.
.
.
.
.
.
.
.
.
.
.
.
.
.
.
.
.
.
.
.
.
.
.
.
.
.
.
.
.
.
.
.
.
.
.
.
.
.
.
.
.
.
.
.
.
.
.
.
.
.
.
.
.
.
.
.
.
.
.
.
.
.
.
.
.
.
.
.
.
.
.
.
.
.
.
.
.
.
.
.
.
.
.
.
.
.
.
.
.
.
.
.
.
.
.
.
.
.
.
.
.
.
.
.
.
.
.
.
.
.
.
.
.
.
.
.
.
.
.
.
.
.
.
.
.
.
.
.
.
.
.
.
.
.
.
.
.
.
.
.
.
.
.
.
.
.
.
.
.
.
.
.
.
.
.
.
.
.
.
.
.
.
.
.
.
.
.
.
.
.
.
.
.
.
.
.
.
.
.
.
.
.
.
.
.
.
.
.
.
.
.
.
.
.
.
.
.
.
.
.
.
.
.
.
.
.
.
.
.
.
.
.
.
.
.
.
.
.
.
.
.
.
.
.
.
.
.
.
.
.
.
.
.
.
.
.
.
.
.
.
.
.
.
.
.
.
.
.
.
.
.
.
.
.
.
.
.
.
.
.
.
.
.
.
.
.
.
.
.
.
.
.
.
.
.
.
.
.
.
.
.
.
.
.
.
.
.
.
.
.
.
.
.
.
.
.
.
.
.
.
.
.
.
.
.
.
.
.
13
14
16
16
18
20
22
25
25
27
27
29
30
31
31
32
32
33
33
34
35
35
36
36
36
37
37
39
40
42
42
OurBox
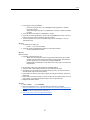
Summary
A short project description:
The Cisco lab at HiG consist of old computers running on Windows 7 and is available for all
students who has access to the lab. On these machines students has full administrator rights,
which means that the students can do what ever they want on them, while the purpose of these
machines are to be used with Cisco equipment for configuration and testing.
The project’s goal is to make a prototype where the students does not have full administrative rights on the host machine, but rather on the virtual machines on the host. The students will
have their own test domains which will not effect the other students in any way.
The contents of the report has been written in such way that for those who are going to further develop this project will understand our choices based on theoretical and practical reasons.
——————————————
Kort beskrivelse av bacheloroppgaven:
Cisco labben pÃě HiG bestÃěr per dags dato av gamle Windows 7 maskiner som er tilgjengelige for alle som befinner seg pÃě labben. Disse maskinene har studentene full administrator
rettigheter pÃě, noe som tilsier at en student kan gjÃÿre hva de vil pÃě den, mens maskinenes
egentlige hensikt er kun Ãě brukes sammen med Cisco utstyr for konfigurasjon og testing.
Prosjektets mÃěl er Ãě lage en prototype hvor studentene ikke har full administrator rettigeheter pÃě selve maskinen, men heller administrator rettigheter pÃě de virtuelle maskinene som
blir laget, slik at studentene har sin egen testomgivelse som ikke kan pÃěvirke andre studenter.
Rapportens innhold har blitt skrevet slik at de som skal videreutvikle prosjektet vil kunne
forstÃě vÃěre valg og vurderinger utifra teoretiske og praktiske begrunnelser.
Foreword
x
OurBox
1
1.1
Introduction
Problem
The way that the students work in the Cisco lab today, is not in a secure and responsible way.
Therefor, Thomas Kimmerich wants to do some upgrades and improve this. He also want it to
be possible to do different activities on those large networks, such as CTF (Capture the flag).
The way the Cisco lab is set up today does not give the possibility for making any large
network. There is about 12 computers in a room and they are not strong enough to run virtual
machines. These 12 machines are not connected together, and they all got a pod where they can
connect to the switches and routers. Also, when users log on to one of these 12 computers, there
is no kind of authentication, so every user has administrator rights on the host PC. Because of
this, there has been cases where the machines has been "destroyed" and Thomas had to reinstall
the OS on the computers. He wants HiG to have a similar system to what they got at his last
workplace in Germany, Bremen.
The system should be easy to configure and maintain through a management interface.
1.1.1
Demarcation
This project is only a little part of a big project, which will at the end be very usable and
helpful for solving many tasks, as mentioned in section 1.1. In this first part, we have some
demarcations. This is meant so we can be done with this part to the deadline in May, and
therefore we have some limits set:
•
No need for developing/creating a GUI for managing the hypervisor/VMs. This can be
done later by someone else. Our requirements will be to let the management be done by a
command-line interface.
•
We don’t need to set up and make all hosts be manageable from one manager-node or let
them be manageable through VPN. The important part here is to have in mind that this will
and should be possible at a later stage.
•
We only need to make this solution work on one host, but this is something that should be
easily done on many hosts, if not by the end of this project, then short time after.
1
OurBox
•
We are only going to create a prototype of this system.
1.1.2
Task description
This project has its main focus on the authentication part, however, several other important
aspects are included to form this project, and they are:
1. Only a hypervisor will be running.
2. Login-prompt for authentication.
3. Be able to connect to the internet and Cisco internal network.
4. Make a prototype running on one host.
Now lets fulfill those points and make them more detailed:
The first thing we will be doing, will be to make one host (PC) to boot directly into a hypervisor, without booting up an entirely OS (like windows 7). This way, we will not need to
waste resources of having an entirely OS running, and upon that a hypervisor. This will also
minimize the ability for users to ruin the host’s configuration settings.When we mention that no
OS will be started, only a hypervisor, we meant that this will be our goal. On the other hand, if
we cannot make this happen, a hypervisor running upon an OS will also be accepted.
Next step will be to make/create a login prompt. This way, the users/administrators must
enter a username and a password, this will be the same username and password as a user will
enter when logging into fronter.no/hig or into HiG‘s website. The purpose of this step is to make
a clear authority line between what an administrator can do and what a user can do inside the
hypervisor. To mention the differences, a user will be able to create, modify and delete virtual
machines, while an administrator can make changes on the hypervisor itself, and create, etc.
VMs. Also, a guest account will be created.
The third important thing will be to let the virtual machines have access to different networks. A host will be able to connect to the "internet" (HiG‘s backbone) and the intern Cisco
network (which will be the local Cisco network inside the Cisco-lab). This way, each VM will
have the ability to be connected on both networks, if necessary.
The fourth step, as mentioned above where we mentioned that this solution should be implemented on one host to begin with, will be our prototype solution. At a later stage, our prototype
should be implemented on 6 hosts. This will be done by project owner. Also another thing we
2
OurBox
should have in mind, is that those hosts should be able to be configured remotely. This will
allow an administrator to sit in front of one host (his/her own PC) and configure several hosts
simultaneously (e.g. creating mail servers).
1.2
Target Group
The target for this report will mainly be for those who are going to do further work on this
solution, and for those in general who is interested to learn about our system. This report should
help the other bachelor thesis to see what we have done and why we have done it as we have.
The actual project is targeted to the students/teachers who are going to use it, mainly Thomas
Kimmerich and the Cisco courses he does in the Cisco lab.
1.3
Subject
So why did we choose to write about this subject? Well, the topic of this thesis do we both
find very interesting, challenging and learnful, and afteral this topic is very relevant for our
background (see section 1.4). This thesis will not only let us be able to help and upgrade the
HiG’s Cisco-lab, but also if everything goes as planed and the Cisco-lab will take in use our
new solution, we will have our names in that lab, at least for some time.
1.4
Our background
We both have the same background from a three year experience at HIG. The course we are
taking is "Drift av nettverk og datasystemer" and contains the subjects:
•
Basics of programmering
•
Introduction to information security
•
Mathematics for information technology
•
Object oriented programming
•
Data communication and network security
•
IT Service Management
•
Statistics
•
Network administration
•
Data modeling og database design
•
Algorithmic methods
3
OurBox
•
System development
•
Operating systems
•
Database- og application running
•
System administration
•
Mainframe
•
Ethical Hacking and Penetration Testing (Stepan Maluchev)
•
IT leadership (Stepan Maluchev)
•
Software development (Gavin Garrad)
•
WWW-Technology
The highlighted subjects is what we have had most use of in our bachelor thesis.
1.5
Framework
How did we solve the planning and frameworks, and what did we have in mind for getting this
project done to the deadline? We are now going to take a closer look at what was needed to be
done before we could start working with the actual project.
1.5.1
Development model
We agreed right away that the system development model we are going to use is incremental
model. Since we think that this will benefit us the most, we could have gone for waterfall model,
but we feel that this is too rigid, we want to have the possibility to change previous steps. That
is why we think it will be easier for us to use the incremental model. Scrum and XP where out
of the question. We did not want to go with a very agile method development models, since we
have a deadline for when this project has to be finished. Basically why we chose incremental
model is because it will make it some what easier for us to just focus on getting one part of the
system to work, then check if it really is working and then integrate it with our system. This is
mainly why we want to use this method, since in this point of the model we feel we also can
make changes to the system and make it work better. Had we gone for the waterfall model we
could not have done that. After we have integrated it into our system, we will need to validate
that the whole system works.
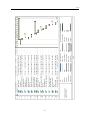
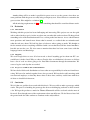
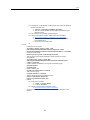
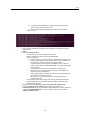
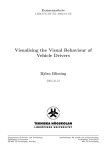
1.5.2
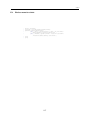
Gantt-diagram
To make and show our activities against time, we created a gantt-diagram (see Figure on page
6). On the left side of the diagram is the activities listed up, and on the right side is the time
scale we think will be suitable for each activity. Notice that there are 5 deadlines (marked with
4
OurBox
red), and those will be very important to not override. It’s also important to have in mind that
this gantt-diagram is a "working plan" we think will be the right way to work after. Often there
are problems which comes along the way, and therefor the schedule must be changed.
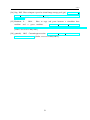
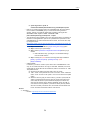
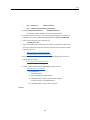
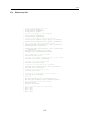
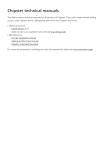
And yes, when we was half way in the project, we needed to create a new gantt-diagram
which was more specific and precise (see Figure on page 7). The new gantt-diagram shows that
our first "working plan" were relatively good structured when it comes to the time scope and
how much time we needed for getting those activities done. However, we spend more time then
we thought on testing and making the final decision on which hypervisor we are going to use.
1.6
Roles
In this project there will be four persons involved:
•
Employer: Is the one who have given us this project. He is the system’s owner.
Thomas Kemmrich
•
Tutor: He will be our tutor throughout this project. He will help us if we get something we
don’t know how to do. He is not responsible to give us the answer to the problems along the
way, but he can tell us a possibility how to solve a problem.
Erik Hjelm?s
•
Project leader:
Stepan Maluchev
•
Member: Team worker on this project.
Gavin Thomas Garrad
1.7
Terminologi
LDAP is a protocol used for accessing and maintaining information over the internet (see section 3.1).
PAM is a mechanism (framework) which makes it possible for applications to authenticate
against an LDAP-server and authenticate related activities (see section 3.2.1).
Cisco is basically a manufacture of network equipments and design. A Cisco-lab is referred to
a lab containing Cisco equipments where testing and learning is performed.
TTY is a shell/terminal where a user only get a CLI to work with.
OS is an operating system.
5
6
15
16
14
13
12
10
11
7
8
9
6
5
4
1
2
3
Task
Mode
Project: Gant diagram
Date: Wed 28.01.15
ID
Start
Finish
Wed 04.02.15 Tue 10.02.15
Tue 10.02.15 Tue 10.02.15
Wed 18.03.15 Wed 18.03.15
Wed 18.03.15 Tue 24.03.15
Inactive Milestone
Inactive Summary
Manual Task
Duration-only
Milestone
Summary
Project Summary
External Tasks
Page 1
Inactive Task
Split
Wed 15.04.15 Wed 22.04.15
Thu 30.04.15 Thu 30.04.15
Wed 15.04.15 Wed 15.04.15
Wed 08.04.15 Tue 14.04.15
Predecessors
December
External Milestone
8,13 days
0 days
0 days
7,13 days
14,13 days Wed 25.03.15 Tue 07.04.15
0 days
7,13 days
65,13 days Wed 25.02.15 Thu 30.04.15
7,13 days Wed 25.02.15 Tue 03.03.15
14,13 days Wed 04.03.15 Tue 17.03.15
14,13 days Wed 11.02.15 Tue 24.02.15
7,13 days
0 days
107,13 days Thu 29.01.15 Fri 15.05.15
22,13 days Wed 07.01.15 Wed 28.01.15
6,13 days Thu 29.01.15 Tue 03.02.15
Duration
Task
Make hypervisor rules
working with LDAP
User authenrication,
DONE
Test the system
Final prototype, DONE
Report writing
Pre-project
Information gathering
about hypervisors
Requirement
specifications DONE
Specific information
gathering
Test the chosen tools in
the test environment
Writing user manual
Creating VM Images
Setting rules on the
hypervisor
VM on hypervisor, DONE
Research
LDAP-integration
Testing LDAP-integration
Task Name
E
E
10.02
February
March
B M E B M
Progress
Deadline
Finish-only
Start-only
Manual Summary
Manual Summary Rollup
January
B M
April
B M
18.03
E
15.04
E
30.04
May
B M
E
OurBox
7
Work with the first-edition of the report
First-edition of the report
User-handling and group-creation
User-testing and fixes
Get the second-edition of the report done
Second-edition of the report!
Work with the final report
FINAL REPORT => DONE
4
5
6
7
8
9
10
11
Finish
Inactive Task
Inactive Milestone
Inactive Summary
Manual Task
Duration-only
Split
Milestone
Summary
Project Summary
External Tasks
Page 1
External Milestone
Fri 15.05.15
Fri 15.05.15
Wed 29.04.15 Thu 14.05.15
Wed 29.04.15 Wed 29.04.15
Wed 22.04.15 Tue 28.04.15
Wed 15.04.15 Tue 21.04.15
Wed 08.04.15 Tue 21.04.15
Tue 07.04.15 Tue 07.04.15
Wed 01.04.15 Tue 07.04.15
Tue 31.03.15 Tue 31.03.15
Wed 18.03.15 Tue 31.03.15
Wed 18.03.15 Thu 14.05.15
Start
Task
0 days
12 days
0 days
5 days
5 days
10 days
0 days
5 days
0 days
The LDAP-integration should be done!
2
3
Duration
Work with the report , every Thursday and
42 days
Friday
Integrate the LDAP-authentication + Fluxbox 10 days
Task Name
1
Task
Mode
Project: gant, last part
Date: Thu 26.03.15
ID
07.04
31.03
01 April
30.03
13.04
Progress
Deadline
Finish-only
Start-only
Manual Summary
Manual Summary Rollup
01 March
02.03
16.03
29.04
15.05
01 May
27.04
11.05
01 June
25.05
08.06
OurBox
OurBox
2
Requirements
To get a better understanding of our work and thesis, the requirements have been important for
us to understand what Thomas wants. It took some for us to understand what he really wanted.
Here is the requirements:
1. If possible no OS will be running on the hosts, only a hypervisor which boots up.
2. No access to the hypervisor by the users.
3. A list of virtual machines can be start by the users.
4. The virtual machines must be able to have accounts/users.
5. Connect with HIG LDAP for authentication.
6. Authorised by a local entity (cisco lab).
7. As a Guest user.
8. Groups has to exists.
9. Each group contains of one or more users.
10. They share one folder, where the VMs for the group will be stored.
11. Each user virtual machine will be store in the group folder.
12. Administrators will have full permission to change configuration settings on the hypervisor.
13. Students should be able to choose which NIC the virtual machine is going to use. Virtual
machines shall have access to the HW.
14. Students will be able to choose how much memory, etc. the virtual machine are going to
use. Within defined limits.
15. The student will not be able to make changes on the host, only make changes to running
virtual machine’s.
16. After a student has created a snapshot, the snapshot should be able to be stored on the host,
so that later, the student can find that virtual machine on the same host.
17. Each virtual machine must be separated, no shared folders, etc. (SF shall be possible)
18. Each host will run several virtual machine’s when the host is at full capacity.
8
OurBox
19. The administrator will be able to change how many virtual machine’s the host can run when
the host is at full capacity, but this will of course be restricted to the host’s hardware itself.
20. Configuration will be possible through command line or GUI.
21. A centralized management solution shall be possible.
9
OurBox
3
3.1
Theory
LDAP
The word "LDAP" ( Lightweight Directory Access Protocol) [7] is a protocol used for accessing and maintaining information over the internet. The main purpose of this protocol is that it
can send and retrieve records with a hierarchical structure, e.g. information about persons, mail
lists, phone lists, etc. This protocol can also be used when we want to compare an attributes
value against another value.
An "LDAP-server" is referred to a server running software like Active Directory (Windows)
or OpenLDAP (Linux) (supported list of LDAP softwares [8]), and these are servers that a
"client" can authenticate users against.
3.2
3.2.1
PAM
What is PAM
PAM (Pluggable authentication module)[9] is a mechanism (framework) which makes it possible for applications to authenticate against an LDAP-server and authenticate related activities.
While LDAP is the protocol where the information goes forth and back, PAM is a library
with all necessary code for an application to perform an authentication against an LDAP server.
"The core pieces of PAM are a library (libpam) and a collection of PAM modules, which are dynamically linked
libraries (.so) files in the folder /lib/security." | [1]
3.2.2
Advantages of PAM
1. It provides a common authentication scheme that can be used with a wide variety of applications.
2. It allows great flexibility and control over authentication for both the system administrator and application
developer.
3. It allows application developers to develop their program without implementing a particular authentication
scheme. Instead, they can focus purely on the details of their program.
| [10]
10
OurBox
3.2.3
PAM configurations
A service which wants to use PAM has to have its own PAM configuration in /etc/pam.d/, with
the service name as the name of the configuration file. There are four different default modules
which a service can include in its configuration file. The purpose of these modules are to avoid
that every service create its own way to e.g. authenticate itself, but rather include a module.
Short description of those four modules (taken from [1]):
•
common-auth: This module is the one which validate a user with valid credentials.
•
common-account: This decides if the user can get a valid account on the local machine or
not.
•
common-session: This adds all the necessary resources a user my be needing, e.g. displaying a message of the day or mounting the user into a homedirectory.
•
common-password: This module is used when a user is updating or changing their own
credentials, e.g. password.
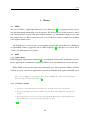
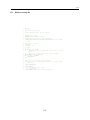
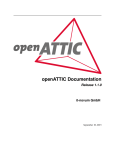
A PAM configuration file consists of a list of rules (see Figure 1).
Figure 1: PAM configuration syntax [1]
The first token tells PAM what kind of authentication type it will use, supports 4 types. The
second token is a control-flag which lets PAM choose what to do if the rule fails. It supports 4
different control types:
•
requisite: If the authentication fails via this module, the whole PAM authentication process
stops with an error.
•
required: If the authentication fails via this module, PAM will return an error to the application, but it will simultaneously call the other modules in the stack.
11
OurBox
•
sufficient: If the authentication succeeds via this module, PAM will stop trying other modules and grant the authentication.
•
optional: This is only important if it is defined one place while associated with a service
type.
On the third place there is the name of the PAM module the rule is going to use. For example
when a user is authenticating with a local password, then pam_unix.so is the standard PAM
module used. The last token is the argument parameter itself which will be sent to the module.
3.3
3.3.1
Explanation of the package libpam-ldapd
What is libpam-ldapd
This package is a management tool for Unix systems that allows Unix to perform remote authentication and authorization via an LDAP-server.
libpam-ldapd is an updated version of libpam-ldap 3.4. This is basically an update of the old
NSS module, but with some changes in the design structure.
The great thing with libpam-ldapd is that it uses daemons which caches and reuses the queries
and data, which will reduce the overall network traffic and improved performance. Without
those daemons, every service needs to set up its own LDAP connection and tear it back down.
3.3.2
Packet’s content
libpam-ldapd package consists of several other packages and modules which let a Unix system
to perform remote authentication and get its identity via an LDAP-server. The package consist
of:
1. ldap-utils: Contains all the client programs required to access an LDAP server. The most
common is ldapsearch, which is used to search and display entries (for a overview of all
tools available visit [11]).
2. libnss-ldapd:Contains NSS (Name Service Switch) module for using LDAP as a naming
service. This means that the LDAP-server can be used to retrieve the same information about
user account, group, host name, alias or netgroup which can be find in /etc/ (must be flat or
NIS files).
3. libpam-ldapd: This is a PAM module which provides password management, authorization
and authentication based on credentials stored in an LDAP-server [12].
4. nscd: Is a Name Service Cache Deamon which handles passwd, group and host lookups.
This deamon caches this information and uses it in other queries.
5. nslcd: Is a deamon for NSS and PAM lookups when used against an LDAP-server.
12
OurBox
3.3.3
nslcd.conf
All the necessary configurations for nslcd daemon is configured in /etc/nslcd.conf. The nslcd.conf
also consist of what information the nslcd daemon should retrieve from the LDAP-server.
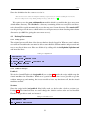
Basic configuration and explanation
There are six configuration attributes in the configuration file which must be configured for the
deamon to work (see figure: 4.3):
Listing 3.1: nslcd.conf basic
1
2
3
4
5
6
uri ldap : / / 1 2 8 . 3 9 . 1 4 0 . 1 0
b a s e ou= s t u d e n t , dc = h i g , dc =no
b i n d d n cn =120683 , ou =12HBWUA, ou= s t u d e n t , dc = h i g , dc =no
bindpw "PASSWORD"
scope sub
ldap_version 3
Attribute explanation:
uri ldap:// tells LDAP where the LDAP-server is located. Preferably with an IP-address as
shown in 4.3.
baseDN is where the search will start. In this example, the search will start in the folder student
and search through everything inside this folder.
bindDN is the DN of our user account in the HiG’s LDAP directory (where the user is located).
OU stands for Organization Unit and in practice is like a folder. The CN stands for
Common Name and is usually the "end user" or the last piece of the search string. We can
look at the DN as a tree with branches. Here we can see that this user 120683 is located
first from the root directory in the folder named student, then in another folder named
12HBWUA.
bindpw is the password that is needed to authenticate the bindDN.
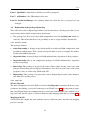
scope means how the data is structured inside the LDAP-database and how the ldapsearch will
perform the search. sub stands for subtree and indicate searching of all entries at all levels
under and including the specified baseDN[2] (see the different scopes in Figure 2).
ldap_version 3 is needed to tell the LDAP-server that the client want to use the newest version
of LDAP with all its new futures (a list over what’s new in version 3 [13]).
13
OurBox
Figure 2: Example of scopes | [2]
nslcd.conf mapping
This is how a mapping in Ubuntu may look like against an active directory server.
Listing 3.2: Mapping in nslcd.conf
1
2
3
4
5
6
7
8
9
10
f i l t e r passwd (&( o b j e c t C l a s s = u s e r ) )
map passwd u i d
sAMAccountName
map passwd gidNumber
primaryGroupID
map passwd h o m e D i r e c t o r y h o m e D i r e c t o r y
map passwd g e c o s
description
map passwd l o g i n S h e l l
" / bin / bash "
map passwd uidNumber
msSFU30UidNumber
f i l t e r shadow (&( o b j e c t C l a s s = u s e r ) )
map shadow u i d
sAMAccountName
map shadow s h a d o w L a s t C h a n g e p w d L a s t S e t
Line 1, 8: is a command for setting a search filter for a specific map. This sets the passwd/shadow
filter attribute to user (default this is set to postixAccount).
Line 2, 9: uid is the attribute which tells the username of the user.
Line 3: gidNumber is the ID of the group which the user will be a member of.
Line 4: homeDirectory is where the homedirectory will be mounted.
Line 5: gecos contains general information. Usually the name of the account owner.
14
OurBox
Line 6: loginShell is what kind of shell the user will be prompted.
Line 7: uidNumber is the UID number of the user.
Line 10: shadowLastShange is the attribute which tels when the user’s password was last
changed.
3.4
Explanation of the package libpam-ldap
This is the old version of libpam-ldapd with several inconveniences. For this project there is one
major inconvenience which is important to understand:
•
This package has all its necessary LDAP configuration stored in /etc/ldap.conf which is a
static file. This means that there is no possibility to add or assign variables dynamically.
3.4.1
Packet’s content
This package includes:
•
auth-client-config: A helping script which modify nsswitch and PAM configuration with
predefined configurations. This is meant to help and make it easier to configure the authentication and authorization parts.
•
ldap-auth-client: A meta package for LDAP authentication, dependent of other packages.
•
ldap-auth-config: This is the configuration package for LDAP authentication, dependent
on the meta package.
•
libnss-ldap: This package is in general the same as libnss-ldapd, but has some issues with
lookups when booting and serving host information. Also there are some issues with setuid
programs (sudo, su) when using LDAP with SSL.
•
libpam-ldap: This package is in general the same as libpam-ldapd, but has some unimportant differences for this project.
3.4.2
ldap.conf
What is ldap.conf
The main configuration file for LDAP is located in /etc/ldap.conf containing all the necessary
parameters for making a successful connection to an LDAP-server 4.3. It’s important to notice
that using libpam-ldapd, the configuration file is nslcd.conf containing the same attributes as in
ldap.conf, only that the syntax is a little bit different when mapping with AD (see Listing 3.2.
Mapping with AD
AD and Unix has roughly the same attributes, but uses different names, therefore the mapping
process is needed.
15
OurBox
In the ldap.conf file there are 10 commented default lines which is meant to help when setting
the mapping against AD. Those lines are:
Listing 3.3: Correct mapping
1
2
3
4
5
6
7
8
9
10
11
# RFC 2307 (AD) m a p p i n g s
# nss_map_objectclass posixAccount user
# n s s _ m a p _ o b j e c t c l a s s shadowAccount u s e r
# n s s _ m a p _ a t t r i b u t e u i d sAMAccountName
# n s s _ m a p _ a t t r i b u t e homeDirectory unixHomeDirectory
# n s s _ m a p _ a t t r i b u t e shadowLastChange pwdLastSet
# n s s _ m a p _ o b j e c t c l a s s posixGroup group
# n s s _ m a p _ a t t r i b u t e uniqueMember member
# p a m _ l o g i n _ a t t r i b u t e sAMAccountName
# p a m _ f i l t e r o b j e c t c l a s s =User
# pam_password ad
The syntax starts first with the mapping command followed by the Unix’s attribute name, and
then the AD’s name of the attribute. Mapping explanation:
•
nss_map_objectclass: Maps an objectClass which is a collection of attributes.
•
nss_map_attribute: Maps the attribute. An attribute contain data.
•
pam_login_attribute: The user ID attribute.
•
pam_filter: Filters PAM for user information.
•
pam_password: Creating unicode password and updating unicode password attribute.
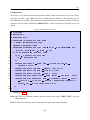
3.5
nsswitch.conf
This is the configuration file located in /etc/ which is a standard file in Debian where the configuration for NSS (Name Service Switch) should be defined. It tells the operating system where
information such as password, shadow, group, etc. should be gathered from.
3.5.1
Line definition
The focus here will only be on lines 3-5 (see Listing 3.4). As default, those three lines ends
with compat, which means that the information for password, group and shadow will only be
gathered from the local files in /etc/(password | group | shadow)[14].
3.5.2
Example
Listing 3.4: Default nsswitch.conf
16
OurBox
1
2
3
4
5
6
7
8
9
10
11
12
13
14
15
# / etc / nsswitch . conf
passwd :
group :
shadow :
compat
compat
compat
hosts :
f i l e s mdns4_minimal [NOTFOUND= r e t u r n ] d n s
networks :
files
protocols :
services :
ethers :
rpc :
db
db
db
db
netgroup :
nis
3.6
files
files
files
files
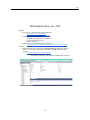
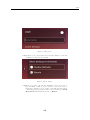
Unity-greeter
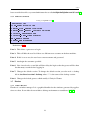
LightDM is a display manager and starts the sessions and the greeter (which is the login screen)
[15]. This section is going to explain how the greeter works in LightDM. Ubuntu uses LightDM
as its display manager and LightDM starts the unity-greeter and looks like this [4]:
Figure 3: Unity greeter.
This greeter can be configured to look differently, but will for the most part do the same thing,
which is logging in. The system configuration is in the path /usr/share/lightdm/lightdm.conf.d/*.conf,
17
OurBox
but to override these files a system administrator has to edit /etc/lightdm/lightdm.conf.d/*.conf[4].
3.6.1
Different commands
Listing 3.5: lightDM.conf | [4]
1 [ SeatDefaults ]
2 allow - guest = true / false
3 greeter - hide - users = true / false
4 greeter - show - manual - login = true / false
5 autologin - user = username
6 autologin - user - timeout = delay
7 user - session = name
8 greeter - session = name
Definition of 3.5:
Line 2: This allows a guest user to login.
Line 3: This will hide the user list if there are different user accounts on the host machine.
Line 4: If this is set to true, the user has to enter username and password.
Line 5: Autologin the username specified.
Line 6: Line 4 needs to be set and this will then delay the login so that the greeter will be show
for that many seconds before logging in.
Line 7: Changes the default session. To change the default session you also need a .desktop
file in /usr/share/xsession/*.desktop, where "*" is the name of the desktop session.
Line 8: Changes the default greeter, which usually is Unity in Ubuntu
3.7
3.7.1
Fluxbox
What is flux box?
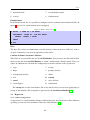
Fluxbox is a window manager. It is a graphical handler for the windows generated by applications on a host. It can either be run within a desktop environment or standalone. [16][17]
18
OurBox
Figure 4: Fluxbox as desktop.
Fluxbox as a window manager offers a lot of functionality, not only graphical handling of
the windows. Fluxbox has the possibility for different workspaces, a root menu and shortcut
keys. Both the root menu and shortcut keys are highly configurable and can run very specific
commands.
3.7.2
Configuration files
There are two ways of configuring fluxbox either in /etc/X11/fluxbox or
/home/"username"/.fluxbox. The difference between them is that /etc/X11/fluxbox is for the
whole system, so every new user who uses fluxbox will get this configuration, and the new user
may tailor his own style and functions in fluxbox in /home/"username"/.fluxbox.
Contents in /etc/X11/fluxbox
1. apps
3. fluxbox.menu-user
2. fluxbox-menu
4. keys
19
OurBox
5. menudefs.hook
7. system.fluxbox-menu
6. overlay
8. window.menu
Fluxbox-menu
In the fluxbox menu file, it is possible to configure how the standard menu should look like. In
figure 4 you can see a menu that has been configured.
Listing 3.6: Fluxbox-menu syntax | [5]
1 [ begin ]
2
3
4
5
( name of the menu )
[ submenu ] ( name of the submenu )
[ exec ] ( name ) { code }
[ end ]
[ end ]
Keys
The keys file is where an administrator can edit what keys shortcut the user shall have, such as
to open a terminal or even start an application of his choice.
Contents in /home/"username"/.fluxbox
This folder is very much like the one in /etc/X11/fluxbox, that is because the files only include
the necessary files from /etc/X11/fluxbox, so "menu" would include "fluxbox-menu". Here is it
where an administrator can make the configuration even more tailored to the specific user.
1. apps
7. overlay
2. keys
8. pixmaps (folder)
3. backgrounds (folder)
9. slitlist
4. init
10. startup
5. menu
11. styles (folder)
6. lastwallpaper
12. windowmeu
The startup file is whats start fluxbox, this is also the file where you can start applications at
startup of the machine. The startup file is generated by the /usr/bin/startfluxbox[18].
3.8
3.8.1
Hypervisor
What is an hypervisor?
A hypervisor is a virtual machine manager which manage the host hardware to allow different
operating systems on a host machine to share the same hardware [19].
20
OurBox
There are a lot of different hypervisors on the market, just to mention some:
1. KVM
2. Xen
3. VMware
4. Virtualbox
There are also different types of hypervisors, there are type-1 hypervisor also known as baremetal hypervisor. A type-1 hypervisor is running on the hardware itself where resources are
provided by the hypervisor, while type-2 is running on the host operating systems. [20]
3.8.2
KVM
KVM (Kernel-based Virtual Machene) is a virtualization solution that turns Linux into a hypervisor. KVM itself is a hypervisor which doesn’t perform any emulation, but what it does is that
it provide near native performance to the guest operating system. For making this hypervisor
to work with full power, processors with hardware virtualization extension is required. If the
processor doesn’t have the full virtualization support, KVM can still be used as a hypervisor,
but then the QEMU will be required. What QEMU does is to perform as an emulator which
binary translates the encoding between the hardware and the KVM. This will not let KVM to
perform at full power and will speed it down, but this is a workaround.
Since KVM is a pure hypervisor, the need of an API as a management tool is important. The
most widely used management tool for interacting with a hypervisor such as KVM is libvirt.
For a user to be able to interact with the hypervisor, a user interface is needed. There are many
different interfaces on the market, but the most common graphical interface used with libvirt is
Virtual Machine Manager (best known as virt-manager), while the most popular command
line interface is virsh.
KVM support different guest operating systems, such as Linux, BSD, Solaris, Windows,
Haiku, ReactOS, Plan 9, AROS Research Operating system and OS X.
An explanation of used commands in this project:
•
virt-install: Create a new container with defined attributes:
-n: A given name to the virtual machine.
–vcpu: How many virtual CPUs the guest OS will be able to use.
-r: How much memory will be allocated to the guest OS.
–disk: The path where the new .img container will be created.
21
OurBox
Figure 5: Hypervisor - Management tool - User interface [3]
–cdrom: What are going to be mounted in the CD-rom. Often a path to a .iso.
–accelerate: Use kernel acceleration capabilities.
–import: Used when an existing disk image is already made.
•
qemu-img create: Is used when a new image is created (e.g. create a qcow2 image of a
.img):
-f: Is used to specify the format of the source image.
-b: Defining the source image and the destination image (-b "path/to/source.img" "path/to/destination.qcow2").
3.8.3
Virtualbox
With Virtualbox the user get a user interface where users can create virtual machines, which
is easy to use and the administrator gets the possibility to make virtual machines trough CLI
(VBoxManage). The administrator also has the opportunity to restrict certain options for the
user interface with the CLI[21].
VBoxManage
Listing 3.7: VBoxManage commands | [6]
1 VBoxManage createvm
22
OurBox
2 VBoxManage modifyvm
3 VBoxManage storagectl
4 VBoxManage storageattach
createvm creates a virtual machine, so it is possible to see it in the GUI.
modifyvm an administrator can do a lot of different things to modify the virtual machines that
has been created.
storagectl attaches, removes or adds a storage controller.
storageattach attaches, removes or adds a media to the storage controller.
There are alot more information in the manual which is not mentioned here but these commands
are essential to this bachelor thesis.
3.9
Profile.d
/etc/profile.d is a collection of scripts which runs as a user logs in. The scripts in /etc/profile.d
helps to initialize and set up the environment [22].
3.10
Image
There are different types of images that can be used in virtualization, but in this project .vdi
and .img is used. .vdi is an abbreviation for Virtual Disk Image and is usually a standard image
type made by VirtualBox when a new image is created. .img is an image file created by KVM
when a new image is created. There are also some attributes which can be set on the images,
the immutable and multiattach.
3.10.1
Immutable
An immutable image acts like a normal image, but instead of storing its data on the original .vdi
it makes a differencing file which it stores the data on. This differencing file gets deleted every
time the virtual machine gets booted up. With this method a user can not do any damage to the
original image since it stores the difference in the differencing file. [23]
3.10.2
Multi-attach
The multi-attach method works the same as immutable (section 3.10.1), but it does not delete
the differencing file on boot up, so the users configuration is still the same next time the user
logs back on.
23
OurBox
3.10.3
Copy-On-Write
.qcow2 is an abbreviation for QEMU Copy-On-Write and is a storage created in our case by
KVM(QEMU)..qcow2 is created of images and is a storage container where all changes performed on the image will be saved. This way the original image file (.vdi) will not be changed.
The .qcow2 container can be set to immutable or multi-attach.
3.10.4
Summary
By using any of these methods mentioned in 3.10 it is possible to run multiple virtual machines
on a host without taking up much space. By doing this, the only space that is used is the original
images and their differencing file.
24
OurBox
4
4.1
4.1.1
Implementation
Authentication
Prework
A connection between the host and the HiG’s LDAP-server needed to be set up. We had a
slow start, since we tried to authenticate against the LDAP-server ldap.hig.no (128.39.41.128).
That server was an LDAP-server that only supported anonymous requests for student names,
pictures, e-mails and some other basic attributes, but stored no sensitive information. Later, the
IT-department gave us the needed parameters for establishing a connection to the right LDAPserver (recap and definitions of the attributes below, see subsection 3.3.3):
Listing 4.1: Note from the IT-department
1 hig1 . hig . no ( IP :128.39.140.7)
2 carol . hig . no ( IP :128.39.140.10)
3 rootDN : dc = hig , dc = no
4 bindDN : cn =120683 , ou =12 HBWUA , ou = student , dc = hig , dc = no
5 baseDN : ou = student , dc = hig , dc = no
6 scope : sub
HiG has 3 LDAP-servers of two types that a client can authenticate against. One of them is a
Linux server running OpenLDAP and the other two are Windows Servers running Active Directory (AD). From that point, we used carol.hig.no.
The first successful connection to the AD-server was made with the package libpam-ldap by
this ldapsearch request entered in the CLI:
Listing 4.2: ldapsearch
1
2
3
4
5
6
7
8
~$ l d a p s e a r c h −x −h 1 2 8 . 3 9 . 1 4 0 . 1 0 −b ou= s t u d e n t , dc = h i g , dc =no \
−p 389 −D cn =120683 , ou =12HBWUA, ou= s t u d e n t , dc = h i g , dc =no \
−W s a m a c c o u n t n a m e =120683
# 1 2 0 6 8 3 , 12HBWUA, S t u d e n t , h i g . no
dn : CN=120683 ,OU=12HBWUA,OU= S t u d e n t , DC= h i g , DC=no
objectClass : top
objectClass : person
25
OurBox
9
10
11
12
13
14
15
16
17
18
19
20
21
22
23
24
25
26
27
28
29
30
31
32
33
34
35
36
37
38
39
40
41
42
43
44
45
46
47
48
49
50
objectClass : organizationalPerson
objectClass : user
cn : 120683
s n : Maluchev
d e s c r i p t i o n : S t e p a n Maluchev
givenName : S t e p a n
d i s t i n g u i s h e d N a m e : CN=120683 ,OU=12HBWUA,OU= S t u d e n t , DC= h i g , DC=no
instanceType : 4
whenCreated : 20120807083100.0Z
whenChanged : 2 0 1 5 0 5 1 1 0 7 0 7 2 0 . 0 Z
d i s p l a y N a m e : S t e p a n Maluchev
u S N C r e a t e d : 12497131
memberOf : CN= hp_v2015_imt −i n _ o u r b o x ,OU= H o v e d p r o s j e k t e r ,OU= P r o s j e k t e r , DC= h i g
, DC
=no
memberOf : CN=SPK−BDR,OU= S t u d i e p r o g r a m m e r ,OU= S t u d e n t , DC= h i g , DC=no
memberOf : CN= H o v e d p r o s j e k t ,OU= H o v e d p r o s j e k t e r ,OU= P r o s j e k t e r , DC= h i g , DC=no
memberOf : CN=12HBDRA,OU=12HBDRA,OU= S t u d e n t , DC= h i g , DC=no
memberOf : CN=12HBWUA,OU=12HBWUA,OU= S t u d e n t , DC= h i g , DC=no
memberOf : CN= S t u d e n t ,OU= S t u d e n t , DC= h i g , DC=no
uSNChanged : 36325840
name : 120683
objectGUID : : M6Ooih6+lUSCOEAbG1OR0w==
u s e r A c c o u n t C o n t r o l : 512
badPwdCount : 0
codePage : 0
countryCode : 0
h o m e D i r e c t o r y : \ \ moa . s t u d . h i g . no \ home \ 1 2 0 6 8 3
homeDrive : H :
b a d P a s s w o r d T i m e : 130758073772686499
lastLogoff : 0
l a s t L o g o n : 130758074239599687
p w d L a s t S e t : 130715710708939558
p r i m a r y G r o u p I D : 513
p r o f i l e P a t h : \ \ moa . s t u d . h i g . no \ p r o f i l e $ \ 1 2 0 6 8 3
o b j e c t S i d : : AQUAAAAAAAUVAAAAtLfNIlKqyGgH5TsrKG4AAA==
a c c o u n t E x p i r e s : 9223372036854775807
l o g o n C o u n t : 30
sAMAccountName : 120683
sAMAccountType : 805306368
u s e r P r i n c i p a l N a m e : 120683 @hig . no
lockoutTime : 0
o b j e c t C a t e g o r y : CN= P e r s o n , CN=Schema , CN= C o n f i g u r a t i o n , DC= i n u , DC=no
26
OurBox
51
52
53
54
55
l a s t L o g o n T i m e s t a m p : 130758016306697411
m a i l : 120683 @hig . no
m o b i l e : 93217041
msSFU30UidNumber : 48157
msSFU30HomeDirectory : / s r v / s t u d / moa / home / 1 2 0 6 8 3
Definition of the ldapsearch command (see line 1-3 in listing 4.2):
•
-x: Use the basic authentication method, no SSL or certificate involved.
•
-h: The LDAP server.
•
-b: The baseDN (the base node where the search will start).
•
-p: Portnumber (default 389).
•
-D: The user (bindDN) that are going to perform the lookup, since the AD-server doesn’t
support unauthorized requests.
•
-W: Prompt the password instead of adding it in planetext with the search.
•
samaccountname: search for the student number.
The response from the AD-server returned many attributes followed by a value. Those attributes
can now be used for new queries when we start with mapping.
4.1.2
Configuring LDAP - Basics
The next step was to configure LDAP to automatically establish a connection to the AD-server
and authenticate the users. LDAP’s configuration file is located at /etc/ldap.conf, and this is
how the first configuration was (explanation of the configuration, see section 3.3.3):
Listing 4.3: ldap.conf V.1
1
2
3
4
5
6
uri ldap : / / 1 2 8 . 3 9 . 1 4 0 . 1 0
b a s e ou= s t u d e n t , dc = h i g , dc =no
b i n d d n cn =120683 , ou =12HBWUA, ou= s t u d e n t , dc = h i g , dc =no
bindpw "PASSWORD"
scope sub
ldap_version 3
Before the LDAP/PAM could work properly, the OS needed to know that authentication would
not only be done through the local files, but could also be done through the AD-server. That
was done in the /etc/nsswitch.conf by adding "ldap" at the end of the 3 lines which started with
password, group and shadow (explanation of the nsswitch.conf file, see section 3.5):
Listing 4.4: nsswitch.conf
1 # / etc / nsswitch . conf
27
OurBox
2
3
4
5
6
7
8
9
10
11
12
13
14
15
passwd :
group :
shadow :
compat
compat
compat
ldap
ldap
ldap
hosts :
f i l e s mdns4_minimal [NOTFOUND= r e t u r n ] d n s
networks :
files
protocols :
services :
ethers :
rpc :
db
db
db
db
netgroup :
nis
files
files
files
files
Now that the LDAP was configured with the basics and the OS knew that if the user cannot
be found locally, an search through the AD-directory would also be preformed. The way we
checked if the OS grants a user from the AD-server was through a TTY. When e.g. the username
120683 and the password was entered, the login prompted that this user or password was wrong.
To understand and locate what went wrong, we used the authentication log which is to be find
in /var/log/auth.log:
Figure 6: Binding error
The error log showed it couldn’t bind to the LDAP-server and that the bindDN didn’t work
either. This was very confusing to understand why the server couldn’t be reached, cause the
bindDN and password was correct, and an ldapsearch worked fine in the CLI.
After some extra research we managed to find some interesting parameters that haven’t been
added to the /etc/ldap.conf file. One of the parameters was bind_policy soft and was referring
to how PAM connects to the LDAP-server. As default, the value of bind_policy is set to hard,
which means that if it fails, it will retry connecting to the LDAP-server with a wait in between
with the same credentials multiple times. This would in practice not work for us. The reason was
28
OurBox
that when it tried to bind to the server the first time, it used root’s credentials and failed. Since
hard cannot unbind from the first credentials and then try with another credentials, PAM never
got to use our bindDN credential, even if the error message said that it tried our bindDN. With
this value set to soft, the host have the ability to unbind from the credentials it failed with and
try again with another credentials. This solved the binding problem, but still the user couldn’t
be granted permission to login.
4.1.3
Configuring LDAP - Mapping
For mapping attributes between Unix and AD (see definition of the attributes in section 3.4.2).
If the mapping is done correctly and LDAP is configured correct, all users in the AD will be
displayed via this command (see Listings 4.5).
Listing 4.5: getent command
1 getent passwd
The syntax of the output will first display the users from the local /etc/passwd and then it search
through AD and displays those users. We used Wireshark for identifying packets and checking
what attributes our host asks for and what the AD-server returns, this way we would get a better
understanding of what really happens and what attributes is needed to be correctly mapped.
In Figure 7 we can see that the host asked the AD-server for 10 attributes, but only got 5 of
them(see Figure 8).
29
OurBox
Figure 7: Wireshark, Host sent
Figure 8: Wireshark, Host received
Through analyzing the Wireshark we solved the mapping issue with this (see Listings 4.6):
30
OurBox
Listing 4.6: Mapping with AD- ldap.conf
1
2
3
4
5
6
7
8
9
10
11
12
13
n s s _ m a p _ a t t r i b u t e gidNumber p r i m a r y G r o u p I D
n s s _ m a p _ a t t r i b u t e uidNumber sAMAccountName
n s s _ o v e r r i d e _ a t t r i b u t e _ v a l u e l o g i n S h e l l / bin / bash
n s s _ m a p _ a t t r i b u t e gecos d e s c r i p t i o n
n s s _ m a p _ a t t r i b u t e homeDirectory unixHomeDirectory
nss_map_objectclass posixAccount user
n s s _ m a p _ a t t r i b u t e u i d sAMAccountName
n s s _ m a p _ a t t r i b u t e shadowLastChange pwdLastSet
n s s _ m a p _ o b j e c t c l a s s posixGroup group
n s s _ m a p _ a t t r i b u t e uniqueMember member
p a m _ l o g i n _ a t t r i b u t e sAMAccountName
p a m _ f i l t e r o b j e c t c l a s s =User
pam_password ad
Finally the getent passwd returned not only the local users, but also all the students in the AD.
For example a search for 121088 returned first the UID,*,the groups, name, mounting point and
shell:
Listing 4.7: getent passwd 121088
1 1 2 1 0 8 8 : ∗ : 1 2 1 0 8 8 : 5 1 3 : Gavin Thomas G a r r a d : \ \ moa . s t u d . h i g . no \ home \ 1 2 1 0 8 8 : / b i n /
bash
4.1.4
Configuring LDAP - Mapping mounting directory
Now that the loginshell has been specified to be /bin/bash, which is the default CLI, the user
got an empty shell containing nothing inside. The user must be mounted in the local /home/
directory with its own username and not the remote place as AD-server says. Therefor the
home directory attribute needed to be changed. First we tried overriding the attribute like this:
Listing 4.8: getent passwd 121088
1 n s s _ o v e r r i d e _ a t t r i b u t e _ v a l u e h o m e D i r e c t o r y / home / 1 2 1 0 8 8
This gave the user a shell in the specified directory, but if another user tried to log in, they too
will be granted to the same directory.
What we needed was to have a dynamic configuration file where we could use a variable to
store the username. This way every user would get its own home directory. Since the package
libpam-ldap (see section 3.4) had its main configuration file for LDAP in a non-dynamic file,
we upgraded the package to libpam-ldapd (see section 3.3) . This package used /etc/nslcd.conf
as its main configuration file.
31
OurBox
Listing 4.9: Mapping with AD- nslcd.conf
1
2
3
4
5
6
7
8
9
10
f i l t e r passwd (&( o b j e c t C l a s s = u s e r ) )
map passwd u i d
sAMAccountName
map passwd gidNumber
" 125 "
map passwd h o m e D i r e c t o r y " / home / $sAMAccountName "
map passwd g e c o s
description
map passwd l o g i n S h e l l
" / bin / bash "
map passwd uidNumber
msSFU30UidNumber
f i l t e r shadow (&( o b j e c t C l a s s = u s e r ) )
map shadow u i d
sAMAccountName
map shadow s h a d o w L a s t C h a n g e p w d L a s t S e t
Definition of attributes used in Listing 4.9 is defined in section 3.3.3:
Line 1, 8: This sets the passwd/shadow filter attribute to user (default this is set to postixAccount).
Line 2, 9: Sets the uid which is named in the AD as sAMAccountName.
Line 3: Sets the gidNumber to be 125 which is the GID for vboxusers. To be able to use the
extension pack on Virtualbox, the user must be a member of this group (see section 4.4.2).
Line 4: Sets the home directory to be /home/"studentnumber".
Line 5: The AD has an attribute named description which contains the full name of the user.
Line 6: There is no loginShell attribute on the AD, so we need to set it here.
Line 7: AD has an attribute named msSFU30UidNumber which is the user number.
Line 10: The AD’s name of this attribute is pwdLastSet.
The syntax of the mapping was just a little bit different from the ldap.conf (see Listing ??), but
this solved the mounting problem.
4.1.5
Home directory with a desktop environment
The last problem here is when a user logs in, they will be prompted to its home directory, but the
directory contains absolutely nothing. The solution was to create a new desktop environment
which contains a Desktop folder, Downloads folder etc. for every new user. This could be done
in the /etc/pam.d/common-session where we had to add this line:
Listing 4.10: Make a home directory
1 session required pam_mkhomedir . so skel =/ etc / skel / umask =0077
32
OurBox
Since the definition for the common-session is:
"Allocates the resources that a user might need during a login session, for example, mounting the user’s home
directory, setting resource usage limits, printing a message of the day, etc." | [1]
We require to use the pam_mkhomedir.so module which is a module that gives users new
default home directory. The /etc/skel is a directory containing all the necessary files and directories that will be copied automatically over to the new user’s home directory. The umask=0077
sets the privileges for the users, which in this case will prevent users from entering others home
directories (use 0022 for giving the users more access).
4.2
4.2.1
Desktop Environment
Unity-greeter
The original greeter will show a list of users that has already logged in. What we want is when a
user turns on a machine the user must be able to enter his/hers student number and password and
not see any list of other users. How we did this is by adding a file in /etc/lightdm/, lightdm.conf
and insert the lines:
Listing 4.11: lightdm.conf
1 [ SeatDefaults ]
2 greeter - hide - users = true
3 greeter - show - manual - login = true
4 allow - guest = false
4.2.2
Window manager
Profile.d
We tried to launch Fluxbox in /etc/profile.d (see section 3.9) inside the script which setup the
virtual machines for Virtualbox. Which was a partial success, since it was possible to get the
window manger up and running, but it was not able to have any function at all, but the virtual
machines worked.
Sessions
Since the script inside /etc/profile.d didn’t fully work, we had to take a look at sessions (see
Listing 3.5). We found out that we could change the default sessions after we had installed
Fluxbox. To get this to work, we inserted:
Listing 4.12: Default session
1 [ SeatDefaults ]
2 user - session = fluxbox
33
OurBox
in /usr/share/lightdm/lightdm.conf.d/50-ubuntu.conf, the result of this is Figure 9.
Figure 9: Changed the default session.
Configuration of Fluxbox
We needed to restrict what the user could do (see section 3.7.2), the way of doing that was to
change the config in /etc/X11/fluxbox:
Listing 4.13: Fluxbox changed
1 # This is an automatically generated file .
2 # Please see < file :/ usr / share / doc / menu / README > for
information .
3
4 # to use your own menu , copy this to ~/. fluxbox / menu , then
edit
5 # ~/. fluxbox / init and change the session . menuFile path to ~/.
fluxbox / menu
6
7 [ begin ] ( Fluxbox )
8
9 # Automatically generated file . Do not edit ( see / usr / share /
doc / menu / html / index . html )
10
11
[ submenu ] ( Applications ) {}
34
OurBox
12
13
14
15
16
17
[ submenu ] ( VirtualBox ) {}
[ exec ] ( VirtualBox ) {/ usr / bin / virtualbox } </ usr /
share / pixmaps / virtualbox . xpm >
[ end ]
[ end ]
[ restart ] ( Restart )
[ exit ] ( Exit )
18
19 [ end ]
We also had to change the keys file, where we removed the option for opening a terminal and
a dialog for running other programs.
Listing 4.14: Removed code in Keys
1 # open a terminal
2 Mod1 F1 : Exec x - terminal - emulator
3 # open a dialog to run programs
4 Mod1 F2 : Exec fbrun
The administrators Fluxbox includes the same files as a ordinary user, but there are two more
lines in the fluxbox-menu of the administrator /home/"username"/.fluxbox:
Listing 4.15: Fluxbox administrator
1 [ begin ] ( fluxbox )
2 [ include ] (/ etc / X11 / fluxbox / fluxbox - menu )
3 [ submenu ] ( Switch Environment )
[ exec ] ( Unity ) { gnome - terminal -x sudo mv / usr / share
/ ubuntu . desktop / usr / share / xsessions / }
[ exec ] ( Fluxbox ) { gnome - terminal -x sudo mv / usr /
share / xsessions / ubuntu . desktop / usr / share / }
4
5
6 [ end ]
7 [ end ]
Line 4 Moves ubuntu.desktop back to its original folder(/usr/share/xsessions). What this means
is that the administrator has the opportunity to go back to regular Ubuntu (Unity), so that
the administrator gets a familiar desktop to work with when he needs it.
35
OurBox
Line 5 What this does is move the ubuntu.desktop from the /usr/share/xsessions/ubuntu.desktop
to another location, what this does is that when a user logs onto the machine the user will
not have a choice between the two different desktop environments (see Figure9).
Startup file
As default Virtualbox also needs to start when the user logs into the system. That is where
the startup file comes in, as mentioned in section 3.7.2 that the startup file is generated by the
/usr/bin/startfluxbox. We had to edit this file to start Virtualbox in our installation script:
Listing 4.16: Insert into startfluxbox
1 sed
-i 's / exec fluxbox / exec virtualbox \&\ n exec fluxbox /g '
/ usr / bin / startfluxbox ;
This replaces the line in startfluxbox where it says exec fluxbox with exec virtualbox& exec
fluxbox. Where the "&" means, run in the background.
4.3
TTY
TTY consoles or Virtual consoles, needs to be removed from the /etc/init/ folder so that the
user cannot enter any CLI. We accomplished this by moving the /etc/init/tty*.conf files with
our installation script by adding:
Listing 4.17: Move TTY consoles
1 mv / etc / init / tty1 . conf / home / " username " / Desktop
2 mv / etc / init / tty2 . conf / home / " username " / Desktop
3 mv / etc / init / tty3 . conf / home / " username " / Desktop
4 mv / etc / init / tty4 . conf / home / " username " / Desktop
5 mv / etc / init / tty5 . conf / home / " username " / Desktop
6 mv / etc / init / tty6 . conf / home / " username " / Desktop
Where "Username" is the name of the administrator on the host machine.
4.4
Hypervisor
Our employer wanted it to cost as little as possible, so we where recommended by our tutor and
others to look at KVM and Virtualbox.
4.4.1
KVM implementation
First we installed the KVM package, libvirt and the desktop user interface virt-manager:
Listing 4.18: Install KVM
1 sudo apt - get install kvm libvirt - bin virt - manager
36
OurBox
Next we created an .img from a .iso file. We set the rx permission to the .img file because users
must be able to execute and read the file, to be able to create a personal .qcow2 image.
Listing 4.19: Create a .img
1 virt - install -n ubuntu -- vcpu =1 -r 1024
-- disk path =/ home /
ourbox / Desktop / libvirt / ubuntu . img , size =8 -- cdrom / home /
ourbox / Desktop / os / ubuntu -14.04.2 - desktop - amd64 . iso -accelerate
2 sudo chmod 755 / home / ourbox / Desktop / libvirt / ubuntu . img
Now a Ubuntu image was created and was read and executable of everyone, but only ourbox
(admin) could write to it. In the /etc/profile.d/ we created a script that created 5 .qcow2 images:
Listing 4.20: defaultLibvirtFile.sh
1
2
3
4
5
6
7
8
9
10
11
12
13
14
15
16
17
18
19
# ! / bin / bash
me=$ ( whoami ) ;
user =" " ;
i f [ [ $me ! = $ u s e r ] ] ; t h e n
i f [ [ ! −d ~ / V i r t u a l M a c h i n e s ] ] ; t h e n
mkdir ~/ V i r t u a l M a c h i n e s ;
fi
f o r i i n { 1 . . 5 } ; do
i f [ [ ! −f ~ / V i r t u a l M a c h i n e s / u b u n t u $ i . qcow2 ] ] ; t h e n
qemu−img c r e a t e −f qcow2 −b / home / o u r b o x / D e s k t o p / l i b v i r t / u b u n t u . img
~ / V i r t u a l M a c h i n e s / u b u n t u $ i . qcow2 ;
i f [ [ $ i <= 1 ] ] ; t h e n
v i r t − i n s t a l l −n u b u n t u $ i −−c o n n e c t qemu : / / / s e s s i o n −−vcpu =1 −r 1024
−−d i s k p a t h = ~ / V i r t u a l M a c h i n e s / u b u n t u $ i . qcow2 , f o r m a t =qcow2 −−
i m p o r t −− a c c e l e r a t e ;
v i r s h −−c o n n e c t qemu : / / / s e s s i o n d e s t r o y u b u n t u $ i ;
fi
fi
done
fi
Line definition:
Line 3 This script is executed as the user (not as root), therefore the username is stored in a
variable.
Line 4 The administrator username is stored in its own variable.
37
OurBox
Line 6 If the user is anyone else besides the ourbox (admin), then enter the if-statement.
Line 7 Checks if the default virtual machines folder exists. The virtual machines will be stored
in this folder.
Line 8 If the folder doesn’t exists, then create a new one in the user’s home directory.
Line 10 In this example we create a loop which will be executed 5 times and create virtual
machine containers.
Line 11 Checks if the .qcow2 image exists, if not then enter the statement.
Line 12 Creating a .qcow2 image of the original ubuntu.img which is found in the ourbox’s
home directory. The loop will create 5 .qcow images named ubuntu1.qcow2, ubuntu2.qcow2
,etc.
Line 13 Enter the statement only the first time the for-loop runs. This statement only creates
one default mapped VM that will automatically be displayed when the user logs in.
Line 14 Create a virtual image with the specific attributes. This image will be visible for the
user in the graphical user interface virt-manager. Since this is a user which isn’t running
this command as root, the user needs to start user session with the qemu/hypervisor.
Line 15 Line 14 created a new virtual image and automatically started the machine. If many
virtual machines will start simultaneously, the host will run slow. Therefor we force powering the virtual image off.
The step above is also possible to do in the virt-manager (GUI). The problem is that this is not
straightforward. (This is not a problem if the qcow2 file is in the folder /VirtualMachines). To
make a user be able to do this, we can follow this step by step guide [24]:
Step 1: Create a new VM from [Import existing disk image] option.
Step 2: Choose your qcow2 image.
Step 3: Select [Customize configuration before install] before you go forward (note: without
this step, you will got a non-bootable message from the virtual machine).
Step 4: Identify the qcow2 format to the image and begin installation [Disk1] – [Advanced options] –[Storage format]: qcow2 – [Begin Installation]
38
OurBox
4.4.2
Virtualbox implementation
Installation of Virtualbox
There are several versions of Virtualbox and extension packs which gives Virtualbox different
features. We needed to be able to bridge the USB-ports from the host machine to the virtual
machine. To accomplish this we had to install an extension pack on the host machine. Every
version of Virtualbox has its own extension pack, whereof the newest releases has a delay on
the extension pack. This means that we had to install a specific version of Virtualbox and the
correct extension pack to it. The result is the following script:
Listing 4.21: Installation of Virtualbox-4.3
1 # ! / bin / bash
2 admin = " " ;
3 s u d o e c h o ’ deb h t t p : / / download . v i r t u a l b o x . o r g / v i r t u a l b o x / d e b i a n t r u s t y
4
5
6
7
8
9
c o n t r i b ’ >> / e t c / a p t / s o u r c e s . l i s t ;
s u d o wget −q h t t p s : / / www. v i r t u a l b o x . o r g / download / o r a c l e _ v b o x . a s c −O− | s u d o
a p t −key add −;
s u d o a p t −g e t u p d a t e ;
s u d o a p t −g e t i n s t a l l −y v i r t u a l b o x − 4 . 3 ;
wget −O / tmp / e x t e n t i o n . vbox−e x t p a c k
h t t p : / / d l c −cdn . s u n . com / v i r t u a l b o x
/ 4 . 3 . 2 6 / O r a c l e _ V M _ V i r t u a l B o x _ E x t e n s i o n _ P a c k − 4 . 3 . 2 6 − 9 8 9 8 8 . vbox−e x t p a c k ;
s u d o VBoxManage e x t p a c k i n s t a l l / tmp / e x t e n t i o n . vbox−e x t p a c k ;
s u d o a d d u s e r $admin v b o x u s e r s ;
Line definition:
Line 2: Variable which tells the name of the administrator user. This will get a value when the
script is being executed.
Line 3: Get access to the repository where Virtualbox-4.3 will be downloaded from.
Line 4: Download the Oracle public key for apt-secure and automatically add the key.
Line 5: Update the host with the new key.
Line 6: Install Virtualbox 4.3.
Line 7: Download the extension pack for Virtualbox 4.3.26 into /tmp/ (after a reboot the downloaded extension file will be removed automatically).
Line 8: Make Virtualbox install the extension pack.
Line 9: The user must be added to the "vboxusers" group to get full use of the pack.
39
OurBox
Configuration
We made a script which went into the profile.d folder, which is meant to be run every time a
user logs on to the system. Where it made a virtual machine, from the .vdi image that was on
the administrators desktop. The problem we encountered was the restrictions of the .vdi image,
what was done to fix the problem was chmod 755 the .vdi file and add the .vdi image to our test
group.
Listing 4.22: DefaultVMs.sh first edition
1 # !/ bin / bash
2 os = ' Ubuntu ';
3 user = $ ( whoami ) ;
4 DIRECTORY =~/ VirtualBox \ VMs / $os ;
5 if [ $user != ' ourbox ']; then
osRegEx = '^\ ' $ { os }\ ' ';
knownVMs = $ ( VBoxManage list vms | grep -e ' $osRegEx '| awk
'{ print $1 } ' | cut -d '\' ' -f 2) ;
if [[ $knownVMs != $os ]]; then
if [[ -d $DIRECTORY ]]; then
rm -r ' DIRECTORY ';
fi
VBoxManage create -- name $os -- ostype Ubuntu_64 -register 2 >&1;
VBoxManage modifyvm $os -- memory 1024 2 >&1;
VBoxManage modifyvm $os -- vram 256 2 >&1;
VBoxManage modifyvm $os -- cpus 2 2 >&1;
VBoxManage storagectl $os -- name sata1 -- add sata 2 >&1;
VBoxManage storageattach $os -- storagectl sata1 -- port 0
-- device 0 -- type hdd -- medium / home / ourbox / Desktop /
Ubuntu . vdi -- mtype immutable 2 >&1;
fi
6
7
8
9
10
11
12
13
14
15
16
17
18
19 fi
Definition of 4.22:
Line 1-4: These are different variables that were used in the script. "DIRECTORY" is for the
differential files.
Line 5: If the user who logs in isn’t outbox then it makes the virtual machines
40
OurBox
Line 6: This is a regular expression for getting the name "Ubuntu" out of the VBoxManage
list.
Line 7: Gets the known VM which in this case will be "Ubuntu" as stated in line 2.
Line 8: Then it checks if the "knownVMs" is the same as "os" if they are not, then line 10-11
happens.
Line 9-10: Here it checks if there is a directory to the "os", since it may have been deleted in
Virtualbox, but the user might not have deleted everything, so the script guarantee that
everything is deleted.
Line 12: Now that the virtual image is created, this can be seen in the GUI, but you will not
yet be able to start the machine before line 18-19 has run.
Line 13 - 15: These lines modify the virtual machine which has just been made, and it tells
how much ram, cpu and video ram it should have.
Line 16: This modifies the storages it should use.
Line 17: This attaches it to that storage which was just created.
4.5
Result
4.5.1
Conclusion of the KVM
In advance we have to create n ∗ .qcow files in the " /VirtualMachines/" for each user. It is these
.qcow2 files the user can create virtual machines. The qcow2 file must be created first, which is
at minimum ca. 192K. The problem here is:
•
We have to pre-define how many VMs a user can create.
•
192K * (numb. of the particular OS a user can create) * (numb. of different OSes) * (numb.
of users on the system) = Too much unused and occupied space.
•
When the user choose a virtual machine, e.g. Ubuntu1.qcow2, this file will now be occupied. Next time the user want to choose and create a new Ubuntu virtual machine, the
Ubuntu1.qcow2 will still be displayed, but at the end, when the user presses âĂIJfinishâĂİ
with the installation of the new virtual machine, an error will occur and say that this .qcow2
file is already used by another virtual machine. This can easily confuse the user, and he/she
must remember and have an overview of what kind of files is used and not.
41
OurBox
4.5.2
Conclusion of the Virtualbox
DefaultVM.sh final
As mentioned in section 4.4.2 it is needed to change the permissions on the .vdi images. To
make it easier for the administrator, now all he as to do is to have a folder which is named
"os" on the administrators desktop. Then Listing 4.23 will take care of the permissions of every
image inside the folder. It will also change the permission for the "os" folder. The script runs
only one time and that is at installation, or if there are new .vdi images.
Listing 4.23: verifyNewOSes.sh
1 # !/ bin / bash
2
3 admin = " " ;
4
5 chmod 755 / home / $admin / Desktop / os ;
6
7 for file in $ ( ls -l / home / $admin / Desktop / os /*. vdi | awk '{
print $9 } ')
8 do
chmod 755 $file ;
9
10 done
Listing 4.24: DefaultVMScript.sh
1 # !/ bin / bash
2
3 admin = " " ;
4 me = $( whoami ) ;
5 os = "" ;
6
7 for oses in $ ( ls -l / home / $admin / Desktop / os / | awk '{ print $9
} ' | grep " . vdi " | cut -d " . " -f 1)
8 do
os = ' $os $oses ';
10 done
9
11
12 if [[ $me != $admin ]]; then
13
42
OurBox
for eachOS in $os ; do
osRegEx = " ^\ " $ { eachOS }\ " " ;
knownVMs = $ ( VBoxManage list vms | grep -e " $osRegEx " | awk
'{ print $1 } ' | cut -d " \' ' " -f 2) ;
DIRECTORY =~/ VirtualBox \ VMs / $eachOS ;
14
15
16
17
18
if [[ $knownVMs != $eachOS ]]; then
if [[ -d $DIRECTORY ]]; then
rm - fr " $DIRECTORY " ;
fi
VBoxManage createvm -- name $eachOS -- ostype Ubuntu_64
-- register ;
VBoxManage modifyvm $eachOS -- memory 1024 -- vram 256 -cpus 2 -- nic1 bridged -- bridgeadapter1 eth1 ;
VBoxManage storagectl $eachOS -- name sata1 -- add sata ;
VBoxManage storageattach $eachOS -- storagectl sata1 -port 0 -- device 0 -- type hdd -- medium / home / $admin /
Desktop / os / $eachOS . vdi -- mtype immutable ;
fi
done
19
20
21
22
23
24
25
26
27
28
29 fi
This script (Listing 4.24) does the same as (Listing4.22), but with some modifications. The
script (Listing 4.24) is a script which resides in the profile.d folder, and runs every time a user
logs on the machine.
Line 7 This for loop gets all the names of the .vdi images in the folder "os" which is on the
desktop of the administrator
Line 9 Puts the .vdi images name into an array which is later used in line 14.
Line 14 Goes through the array made in line 9, and makes a VM.
Line 24 Here it modify the virtual machine the same way it did in (Listing 4.22), but it adds
the "–nic1 bridged –bridgeadapater1 eth1" which sets the NIC into bridge mode.
43
OurBox
5
5.1
Ending
Requirements and their Results
Completed
Requirement
Summery
Partially
If possible no OS will be running on the hosts, only a hypervisor which boots up.
This is possible with KVM, since KVM turns
Linux into a hypervisor. We also tested Virtualbox, what we found was that KVM was not that
user friendly and that Virtualbox was a more
widely known software for virtual machines.
We had to make a choice which of them we
where going to use and went for Virtualbox, but
then we had to run it on an OS.
Yes
No access to the hypervisor
by the users.
Since we went for an OS which runs Virtualbox,
we used a Window manager (Fluxbox) and disabled all functions besides starting Virtualbox
and exiting. We mainly do not want the user to
have any access to a terminal, so we disabled the
TTY consoles ( or also known as Virtual consoles).
Yes
A list of virtual machines can
be start by the users.
This was possible with both hypervisors we
tested. Default when a user logs into the system, they will have a list of different virtual machines ready to be booted up. The user will also
be able to create their own virtual machines.
Yes
The virtual machines must be
able to have accounts/users.
This depends on the base image that is created.
The ones we have created has only one user,
which is also the administrator and will give the
students administrator rights on the virtual machine.
44
OurBox
Yes
Connect with HIG LDAP for
authentication.
Since the host’s OS is Ubuntu, we used LDAP/PAM to authenticate against HiG’s AD-server.
This was successful and gave the users the ability to be authenticated with their own user and
password they use at HiG.
Yes
Authorised by a local entity
(cisco lab).
The user will be able to enter their credentials
on the local machine and access the system.
No
As a Guest user.
Not at this time, and it does not exist any guest
session. This will have to be implemented in a
later project.
Partially
Groups has to exists.
At the moment users will automatically be assigned to group vboxusers (GID=125) which
will let them have advantages of the extension
pack which is installed with Virtualbox.
No
Each group contains of one or
more users.
This requirement was not implemented in the
thesis.
No
They share one folder, where
the VMs for the group will be
stored.
This requirement was not implemented in the
thesis.
No
Each user VM will be store in
the group folder.
This requirement was not implemented in the
thesis.
Yes
Administrators will have full
permission to change configuration settings on the hypervisor.
There is only one local administrator on the host
machine. The administrator will need to switch
the desktop environment before configuration
of either the hypervisor or the host.
Yes
Students should be able to
choose which NIC the virtual
machines is going to use. Virtual machines shall have access to the hardware.
Both hypervisors (KVM and VirtualBox) will
be able to satisfy the ability of choosing
the physical NIC. This is possible as default
through settings of the virtual machine.
Partially
Students will be able to
choose how much memory,
etc. the virtual machines are
going to use. Within defined
limits.
Both hypervisors (KVM and VirtualBox) will
be able to let the user choose how much memory, CPU, etc. each virtual machine will be able
to use (we haven’t looked at how the hypervisor
can create limits for the users).
45
OurBox
Yes
The student will not be able
to make changes on the host,
only make changes to running
VM’s
Student will only have administration rights on
their own virtual machines, nothing else.
Yes
After a student has created a
snapshot, the snapshot should
be able to be stored on the
host, so that later, the student
can find that VM on the same
host.
This works. The students are able to take snapshots on the immutable image. They are also
able to delete the snapshots which makes them
go back to the original immutable image.
Yes
Each virtual machines must
be separated, no shared folders, etc. (SF shall be possible)
Default, both VirtualBox and KVM will have
virtual machines separated from each other. It
is not possible to share a folder between virtual
machines.
Yes
Each host will run several virtual machines when the host
is at full capacity.
This depends on what kind of specifications that
are set on the virtual machine and that they
do not go over the limits of the host machine.
The specification of the host machine is: 32 GB
memory, quad-core 3.30 GHz i5-4590 CPU and
a 238 GB SSD.
No
The administrator will be able
to change how many virtual
machines the host can run
when the host is at full capacity, but this will of course be
restricted to the host’s hardware itself.
The administrator is not able to set restrictions
on the virtual machines.
Yes
Configuration will be possible through command line or
GUI.
An Administrator will have the ability to configure the host operating system and hypervisor
(VirtualBox) by changing the desktop environment to Ubuntu (Unity). From there you will
have a standard desktop with a terminal.
No
A centralized management
solution shall be possible.
The easiest way will be to have a management
host, with Puppet installed (we have not tried to
make this possible).
46
OurBox
There are some requirements we did not implement since we did not have enough time. That
is because we encountered a lot of problems with the authentication part, that took longer than
expected.
With the time we had left we tried to fix the ability for a user to copy and paste from host to
the VM and vica versa [25]. This seemed very unstable and did not work all the time.
Because the grouping was scheduled after the authentication part which took longer than
expected, there were no time left to research and implement it. We do have a theory of how it
could be implemented which is, every user gets their own group which they then administer and
can add users into. We do not know if this is possible or not, but it would be ideal if it was. Since
Thomas has mentioned he do not want to administer the grouping of the students. He wants a
"project leader" to be able to add other students into his group and they have access to the same
virtual machines.
5.2
Critic to the thesis
We tried to make the host machine as secure as we could with limiting the possibility for a user
to tamper with the host machine, but since the users has access to the hardware there are limits
to how secure we could make it. We have also mentioned to our employer that an authentication
through LDAP might not be the best way, since this means that the host machine always needs
to be connected to the network. As the user has access to the hardware this might not always
be the case, but the only downside is then that they will not be able to log into the machine. We
had set up a week for testing which we did not get to do since we used much of our time on the
authentication.
5.3
Future work
The continuance of this project would be to make the management of system centralized and
make it more secure. Our thought has been to develop a working prototype, there are still some
work to do before it is finished. E.g. encrypting the data going between the host and the ADserver. This is very critical and must be improved, which in theory can be solved by adding a
SSL-certificate to the host.
The "skeleton" of the system is done. An improvement might be that for the .vdi images you
might want to have them on a server so that the virtual machines does a pxe boot when creating
new virtual images.
47
OurBox
Another thing will be to make it possible for guest users to use the system, since there are
some problems with the guest user only being a temporary user. You will have to customize the
guest session. Here might be a solution [26].
All the missing requirements in 5.1 is also something that should be considered future work.
5.4
5.4.1
Evaluation
Introduction
Working with this project has been challenging and interesting. This project was our first pick
and we where lucky to get it. At first we where not sure what this task was about. We knew it had
something to do with virtualization and Cisco, so that peaked our interest. As we asked Thomas
more questions and learned more about what he wanted, we realized that we misunderstood
what the task was about. We had big plans of what we where going to make. We thought at
first he wanted to have everything centralized with a server that hosted all the virtual machines,
but this was not the case. We also want to mention that there has been some issues with the
language barrier and knowledge.
5.4.2
Organize
We used Google drive to store all of our work, so that if anything got lost from our PC’s we
would have it in the cloud. Why we choose Google drive over bitbucket is because we did not
have a lot of code we where going to do. But rather documents through documentation. We
wrote a log for each day that we worked.
5.4.3
Project as work flow and work distribution
We have had a fluid work distribution we have taken on responsibility for what we found interesting. We have also worked together if one of us got stuck. We have had weekly meetings with
our tutor and employer, so that they know what we have done, and they could come with ideas
of what we should look into next.
5.5
Conclusion
We feel that our goal has been reach with this thesis. We were able to make a prototype which
works. The process of making the prototype has been an challenging task and we have learned
a lot. We hope the product we made for Thomas Kimmerich will be used and satisfies most of
his needs. Even though some of the requirements where not fully met. We feel that we have laid
the ground work for other students to continue on the subject/thesis.
48
OurBox
Bibliography
[1] http://www.tuxradar.com/. 2015. Getting to know pam. http://www.tuxradar.com/
content/how-pam-works. [Online; accessed 14.05.15].
[2] Hunter, J.
2015.
Ldap search - setting the scope parameter.
http:
//www.idevelopment.info/data/LDAP/LDAP_Resources/SEARCH_Setting_
the_SCOPE_Parameter.shtml. [Online; accessed 09.05.15].
[3] Wikipedia. 2015. Libvirt — wikipedia, the free encyclopedia. http://en.wikipedia.
org/w/index.php?title=Libvirt&oldid=660801299. [Online; accessed 12-May2015].
[4] Neal-pippaluk. 2014. Lightdm. https://wiki.ubuntu.com/LightDM. [Online; accessed 27.04.15].
[5] Ramsay, J. 2015. fluxboxmenu. http://fluxbox.org/help/man-fluxbox-menu.php.
[Online; accessed 29.04.15].
[6] Oracle. 2015. Vboxmanage manual. https://www.virtualbox.org/manual/ch08.
html#vboxmanage-modifyvm. [Online; accessed 10.05.15].
[7] Wikipedia. 2015. ’lightweight directory access protocol. http://en.wikipedia.org/
wiki/Lightweight_Directory_Access_Protocol. [Online; accessed 25.04.15].
[8] Wikipedia. 2015. List of ldap softwares. http://en.wikipedia.org/wiki/List_of_
LDAP_software. [Online; accessed 25.04.15].
[9] Wikipedia. 2015. Pluggable authentication module. http://en.wikipedia.org/wiki/
Pluggable_authentication_module. [Online; accessed 27.04.15].
[10] Hat, R. 2015. Advantages of pam. http://www-uxsup.csx.cam.ac.uk/pub/doc/
redhat/redhat8/rhl-rg-en-8.0/ch-pam.html. [Online; accessed 29.04.15].
[11] wolfric. 2015. ldap-utils. https://wiki.debian.org/LDAP/LDAPUtils. [Online;
accessed 10.05.15].
49
OurBox
[12] de Jong, A. 2015. Package: libpam-ldapd. https://packages.debian.org/sid/
libpam-ldapd. [Online; accessed 10.05.15].
[13] microsoft.com. 2015. Differences between ldap 2 and ldap 3. https://msdn.
microsoft.com/en-us/library/aa366099%28v=vs.85%29.aspx. [Online; accessed
29.04.15].
[14] and/or its affiliates, O. C. 2015. Format of the nsswitch.conf file. http://docs.
oracle.com/cd/E19683-01/817-4843/a12swit-84565/index.html. [Online; accessed 28.04.15].
[15] Archlinux. 2015. Display manager. https://wiki.archlinux.org/index.php/
Display_manager. [Online; accessed 08.05.15].
[16] Archlinux. 2015. Window manager. https://wiki.archlinux.org/index.php/
Window_manager. [Online; accessed 08.05.15].
[17] Dunn, S. 2015. What is a window manger? https://www.media.mit.edu/wearables/
mithril/anduin/window_manager.html. [Online; accessed 10.05.15].
[18] Boetes, H. 2015. startfluxbox(1) manual page. http://www.fluxbox.org/help/
man-startfluxbox.php. [Online; accessed 01.05.15].
[19] Rouse, M. 2015. hypervisor. http://searchservervirtualization.techtarget.
com/definition/hypervisor. [Online; accessed 11.05.15].
[20] Vanover, R.
2015.
Type 1 and type 2 hypervisors explained.
https:
//virtualizationreview.com/blogs/everyday-virtualization/2009/06/
type-1-and-type-2-hypervisors-explained.aspx. [Online; accessed 05.05.15].
[21] Oracle. 2015. Oracle vm virtualbox. https://www.virtualbox.org/manual/
UserManual.html. [Online; accessed 01.05.15].
[22] linuxfromscratch.org.
2015.
The bash shell startup files.
linuxfromscratch.org/blfs/view/6.3/postlfs/profile.html.
cessed 13.05.2015].
http://www.
[Online; ac-
[23] Oracle. 2015. Chapter 5.4: Special image write. https://www.virtualbox.org/
manual/ch05.html. [Online; accessed 10.05.2015].
50
OurBox
[24] Jing. 2015. How to import a qcow2 to virtual image storage pool (gui). https://docs.
google.com/document/d/1X8TaBP1v_rh8e2QXDGFmkmzoPB13Pvp2V0FQ630VCsU/
edit?pli=1. [Online; accessed 12-May-2015].
[25] Kaufman, L.
2014.
How to copy and paste between a virtualbox host
machine and a guest machine.
http://www.howtogeek.com/187535/
how-to-copy-and-paste-between-a-virtualbox-host-machine-and-a-guest-machine/.
[Onlne; accessed 13-May-2015].
[26] gunnarhj. 2015. Customizeguestsession. https://help.ubuntu.com/community/
CustomizeGuestSession. [Onlne; accessed 13-May-2015].
51
OurBox
A
Log
LOGG 12.01.2015: Vi har blitt enige om arbeids tider, noe form for utviklingsmodell(En blanding mellom inkrementell, fossefall med tidsfrister). Vi har sendt forespørsel til Thomas om møte Vi venter med å sette opp møte med Erik H, til etter at vi har vært i møte med Thomas. Vi skal bruke latex for selve oppgaven. Samt prosjektplan. Vi skal bruke Trello for en todo list. Vi ønsker å bruke git bucket som sammarbeids metode. Vi kunne tenke oss ca 1 møte i uken, så vi har ca annenhver uke med veileder og annenhver uke med Oppdragsgiver. Hvor ett møte i måneden er mer likt ett større status møte. (Kan være at vi ønsker ett møte hver uke med veileder) Vi har begynt å sett på bruken av latex for å skrive prosjektplanen. Vi har bestemt oss for at prosjektlederen skal være Stepan. Vi har i “lekse” å lese pdf som er i fronter rommet ang Latex (The not so short introduction to latex) til i morgen. 13.01.2015 Diskusjon om aktuell struktur løsninger. Usikkerhet om hva Thomas egentlig ønsker, men en konkret Vi har ikke startet med Prosjektplan enda, vi vil vite eksakt hva det er Thomas vil først før så vi begynner etter møtet med Thomas i morgen å jobbe med Prosjektplanen. Vi har fortsatt igjen å sette opp “Hjemmesiden våres”. 52
OurBox
Spm: 1. Hva ønsker han av de 6 innkjøpte maskinene, er det noe elevene skal ha fysisk tilgang til. 2. Hvordan ønsker han at elevene skal ha tilgang til VMen (SSH, Remote Desktop,etc.). 3. Er det skyløsning han er ute etter? 4. Disse servicene som allerede skal være lagt opp, skal det være en virtuell maskin som da vil være inne i den evt skyløsningen? 5. Ønsker han å ha en deleløsning mellom PC0 og resten av “dummyPCne”(PC16), som kommer til å foregå på en egen intern LAN?(2 forskjellige VLAN). Blir bare brukt for f.eks deling av filer (f.eks. oppgaver). 14.01.2015 Referat fra møtet med Thomas (09:3010:15): Snapshot skal være mulig for alle elevene Hva elevene skal møte på nr PCen booter opp er ikke gitt, kom med forslag. Ikke nødvendig, men til slutt hadde det vært fint om det hadde vært muig å boote opp en VM via VPN. snakk med John, han har ideen bak dette. Mulighet med virtualbox. Alt handler om selve Supervisoren og begrensningene der. Søk nettet om fordeler og ulemper, tilfredstiller løsningen kravene? Til slutt skal det være mulig at læreren skal kunne sitte på et sted og fyre opp VMer fra en PC, dette er for å spare tid med å installere et VM fysisk på hver PC (tidsfordriv). Noen andre kan lage interfacet. Hva slags supervisor? hver gang eleven starter PCen, skal alt være base configurert? trenger ikke “hostellernoeslikt”, ved mindre det har større fordeler. På slutten av Bachelor oppgaven, skal det være alle de andre stegene som kreves for å fortsette for å få systemet 100% opp og fungerende. 4 february etter kl. 13 er det ikke mulig å komme inn. 9:30 onsdager blir det faste møter med Thomas. Uken før og etter påsken. skrive kravspesifisering til neste gang. (Gavin søk: KVM > http://serverfault.com/questions/23738/runvirtualmachineswithoutahost
) KVM or Kernelbased Virtual Machine basically turns the Linux kernel into a hypervisor. It’s been around since 2007 and it’s awesome at using your hardwares virtualization extensions like Intel’s VTx or AMDV. It’s great for running multiple Operating Systems like OSX and FreeBSD and Linux and Windows all on top of this one VM infrastructure. 20.01.2015 Worked with the specification of the system. 53
OurBox
We have discussed about how we are supposed to set up the hosts. How the memory and cpu should be divided Stepan thoughts: The default value for minimum running VMs is set to 4, and f.eks. we have 100 resources. Before the first VM can be created, the resources will be divided into 4, so the new VM can at a maximum use 25% av the resources. When the first VM is created and is running, then there are 80% of the resources left. The next VM will then have access to 75/3 =25% of the resources, and so on. This way, the first VM cannot be a large VM (use more then 25%), however, if the user would like to create one powerfull VM and 4 less powerfull, this can be done this way: First VM Gavin thoughts:
Have a max cpu usage and max ram usage. So that we can guarantee that you have atleast so many VM’s running on the Hosts. e.g You have a bottle of soda that is 1.5 L and you want to regulate how many glass of soda you get. Lets say you want a minimum of three glasses of soda then you will get a 0.5 L glass. So you can make more glass of soda but none of your soda is above 0.5 L but it can be anything between 0.1 L and 0.5 L. The admin can ofcourse change this if he wants it to be 0.6L glass but then it wont be 3 glasses. But the main thought is that we set the max limit for each VM so that we know how many VM we can run with full capacity on each VM. 54
OurBox
55
OurBox
21.01.2015 Referat fra møtet med Thomas: ● Gå gjennom spec. krav og se hva slags programvarer som oppfyller hva slags krav. ● Send spec. krav til Thomas. ● Hvis noe KOSTER NOEN TUSEN KRON ER FO REN LISENS, SÅ GÅR DET GREIT. MEN ELLER NEI. ● 12 ukene: Lag pros/cons av programvare ○ lage timetable ○ Søke gjennom hva som finnes på markedet ○ start på sammenligning ● Vi må ta også hensyn til om servisen komme rtil å være ● slutten av april skal vi være ferdig med det fysiske, også skal vi bruke 2 uker til å skrive ferdg rapporten. ● Når vi skriver på en ting, men plutselig str vi fast, så skriv på noe annet, og fordele oppgaven. ● Før påske burde vi prøve og feil, så etter det må vi skrive en del og få ting til å funke i rapporten. ● VI må finne ut en løsning for hvordan vi skla a i bruk LDAP til authorisering. ● Authoriseringen hadde vært fint om det var mulig med med gjeste grupper, slik at folk som ikke er studenter her, får også tilgang. ● John sier (mener Thomas) at VirtualBox kan tilfredstille mange av kravene. ● I løpet av februar, så burde vi være ferdig med hvordan alt skal være, og klare til å starte med å jobbe fysisk. ● Thomas sier at vi minimum skla ha 2 NIC, men hvis flere trengs, så er ikke det et problem. ● 802.1q (Cisco standard ta no slag) se hva det innebærer, for han ønsker at NIC kommer til å ha støtte for det. Logg: ● Vi har snakket med Erik ang møte dag, og han kan onsdager fra kl 10.15 så vi er nødt til å høre med Thomas om det er mulig for ham også. vi snakker med ham i morgen/sender mail. ● Erik nevnte at vi burde sjekk ut
Virsh
og
Libvirt
sammen med
KVM
. KVM er det som blir brukt i skyhig. ● Han mente også at denne autentiseringen og gruppering/brukere sammen med LDAP vil også bli vanskelig. ● Vi møtes i morgen for å skrive prosjektplan, vi vurderer også å jobbe i helga slik at vi får gitt den så tidlig som mulig til Erik. 22.01.2015 ● Vi har laget ordentlige gruppe regler. 56
OurBox
● Vi har begynt å skrive prosjektplan. ○ Gavin har begynt på punkt 1 av prosjektplanen “Mål og Rammer”, fortsetter med dette i morgen. ○ Stepan har begynt på punkt 2 av prosjektplanen “Omfang”, fortsetter med dette i morgen. ● Vi har skal skrive store deler av prosjektplanen i morgen. ● Vi har fått en ønsket oppdatering av Thomas på kravspesifikasjonene som vi fra før av hadde sendt til han. Han har sendt det videre til Tyskland. ● Thomas og Erik kommer nå til å ha et felles møte med oss onsdager kl. 10:15 på Thomas sitt kontor. 23.01.15 ● Vi fortsatte der vi slapp i går. ○ Punkt 1, 2, 3 og 4 er snart ferdig. ● Vi har fått mail ang prosjektavtale og dette må vi få ordnet på møtet. ○ Vi må få underskrift av Thomas. 28.01.15 Referat fra møte: ● Angående 1.del innleveringen vår: ○ Målet med denne oppgaven er ikke å bygge store nettverk, men til en senere anledning skal det være mulig (Second step). Hoved poenget i dette stedet er så ha en hypervisor som er avgrenset med grupperettigheter. ○ taskdescription as bulletpoints. Frode skulle vist ha noen lynkurs i hvordan man laget kravspec. ● Det må være mulig å copy paste mellom de forskjellige VMene. ● 10.februar skal vi være ferdig med kravspec og hvordan det skal være. ● det enkleste er hvis vi bruker linux og KVM, local group policy, så kommer det policy rules bli kopiert videre til alle andre hostene. ● Erik foreslår at vi heller har egen policy grupper som blir gitt ut til elevene, passord og brukernavn. ● Erik foreslår at jo fortere jo bedre at vi prøver å sette opp det fysiske og ser hva som er mulig og ikke, og hvordan teknologien fungerer, eller hvor grensene går. ● Bridge mode mellom VMene. 30.01.15 ● uname:
ourbox
pwd:
our555box ● First we install Ubuntu 14.04.1 LTD with LXDECore with Virsh, via tutorial: http://www.howtogeek.com/117635/howtoinstallkvmandcreatevirtualmachineson
ubuntu/ ● Chack if the CPU is a 64 og 32 bit: ~$ uname m ● https://help.ubuntu.com/community/KVM/Installation 57
OurBox
● We started to surf the internett and we found out what we mainly want is a type1 hypervisor aka baremetal hypervisor (
http://en.wikipedia.org/wiki/Hypervisor
). We found one that is called Xen (
http://wiki.xenproject.org/wiki/Xen_Overview#What_is_the_Xen_Project_Hypervisor.3
F
) Gavin started to read about this. https://www.youtube.com/watch?v=n3POmlMNzvw ● Problem: ○ When we booted up Ubuntu, we got a timeout message like this: [65.456035] mei_me 0000:00:03.0: reset: connect/disconnect timeout. Solution:
Add “rmmod meime” into the startup fil: /etc/rc.local Source:
https://bbs.archlinux.org/viewtopic.php?id=168403 02.02.15 ● Trying to find more information about different hypervisors. We have three hypervisors which we will take a closer look at, which are: ○ KVM ■ A lot of good definition around virtualization, KVM, libvirt and virsh: http://www.linuxnix.com/2013/02/kvmgethypervisorandguestvirtual
machinedetails.html ■ Libvirt has several permission/authentication rules: ● https://wiki.archlinux.org/index.php/libvirt#User_permissions ● https://www.suse.com/documentation/sles11/book_kvm/data/sec
_libvirt_connect_auth.html ● A default install of libvirt will typically use
polkit
to authenticate
the initial user connection to libvirtd. This is a very coarse
grained check though, either allowing full read-write access to all
APIs, or just read-only access. The polkit access control driver in
libvirt builds on this
capability to allow for fine grained
control over the operations a user may perform on an
object.
https://libvirt.org/aclpolkit.html ○ VMware ESX ○ Xen 04.02.14 ● Møte ○ Fortalt litt om kvm med libvirt til begge. 58
OurBox
○ Libvirt know alot of about how this work in general. ○ libvirt.org/apps ○ There should be a mechanisem in libvirt to differ Admin and Users. ○ Snakke med Jon. ASAP the brenner på dass. ○ Erik recommends Kvm ■ libvirt deamon as a service on the host ■ user loggs in and gets a interface from libvirt ● virtmangeager talks to the libvirt deamon ● user has to be added to the virt manager on. ● Virsh CCi ■ The quemkvm package is more like a binary translator, which will not let KVM to talk directly with the HW, and this will slow down the VMs. Not cool.
http://wiki.qemu.org/Index.html ■ Kiosk mode er hva vi vil ha opp. ● hvordan skal man stoppe fra en bruker fra å krysse ut bilde når kiosk mode er oppe. ■ Describe it when we test it. the test. ■ Dont think much about HPV men mer om hvordan løsningen med libvirt og virtmanges (GUI) ■ Do a sruvay on the managment managment part. ■ google : “local libvirt root group” ○ Next week: ■ Jon alt solutions ■ end of week new pc ? ■ reaserched more on the manger Møte med Jon: 59
OurBox
● Han mener at vi kan engelt bruke virtual box. ○ I virtual box kan man lage en virtual maskin som er en clone av en virtual maskin. ○ Da kan vi lage en root VM som da kan bli clonet som kan brukes. ○ Dropp VM ware fra tankene. ○ VM vil skape mer problemer og en del mer vedlikehold. ● Imutable disk images. ● Vi stilte dette spørsmålet om Kiosk mode med virtualbox ○ Han tror det ikke egentlig det ikke finnes. ○ Han sier at det kan være mulig å hacke det til. ● Nevnes i forhold til sikkerhet at de har tilgang til HW så sikkerhet. ● Hvorfor skal man kunne måtte starte en VM for å tilgang til putty. ● Lillemyk skal være med så må vi ha virtualisering. ● Hvis host oset er en for for linux. tre valg av teknologier. Xen og kvm og en til han ikke vil nevne. ● Utfordringen der er at de forskjellige virt mangagerne er lite standardisert de trenger som oftest mye rettiheter. ● Virtualbox er det siste valget om pakker mangerer hypwerviser og etc i en pakke. ● Xen via xem full controll gjennom ccl, libvirt med xen mister du mye funksjonalitet. ● Virtualbox du får gui og kan bruke ccl og du kan scripte. ● En vanlig måte er å lage disk imge er å bruke quem (dette er for xen og kvm) ● hvis det er sånn som at vi gjøre det som vi er nå så finnes det vm ware lab manager som har tatt 12 år og utvikle. ● Logge på med forskjellige så må vi kopiere imges til deres hjemme områder. ● Det er en viktig ting å kunne bruke hosten som en workstation. ● hvis host os er windows så funger virtual box fungerer det veldig bra. https://www.virtualbox.org/manual/UserManual.html 05.02.15 ● More info about Libvirt: ○ A libvirt forum:
https://www.redhat.com/archives/libvirtusers/index.html ○ Can use
SASL
, which is used to provide authentication. This will encrypt (MD5) all information going between the hypervisor and libvirt. After sasl is active, you will be prompted by libvirt to provide a user account and password each time an operation is performed. http://prefetch.net/blog/index.php/2009/06/16/createsaslaccountsforlibvirt/ ■ It’s possible to use SASL authentication using
LDAP
db: ● http://blog.toxa.de/archives/493 60
OurBox
○ WebVirtMgr
is a libvirtbased Web interface for managing virtual machines ■ Screenshots:
https://github.com/retspen/webvirtmgr/wiki/Screenshots ■ http://retspen.github.io/ ■ https://github.com/retspen/webvirtmgr/ ○ Usermanual:
https://libvirt.org/html/ ● VirtualBox ○ VBoxManage is the commandline interface to VirtualBox. https://www.virtualbox.org/manual/ch08.html 09.02.15 ● VirtualBox: ○ You can absolutely choose what the user is available to do or not to do. with hideing different menu choices. ● Libvirt ○ Polkit reference manual: http://www.freedesktop.org/software/polkit/docs/latest/index.html ○ A brief guide to PolicyKit: http://scarygliders.net/2012/06/20/abriefguidetopolicykit/ ■ Same guy as also made a basic GUI of polkit: https://github.com/scarygliders/PolkitExplorer 11.02.15 Møte: ● Vi trenger ikke å tenke på at kabelen skal bli dratt ut, etc. ● Hver PC skal være tilkoblet til pod ● 12 hosts totalt sa thomas (2 per pod). ● Vi må tegne opp et nettverkskart ● Elevene skal kunne copy paste mellom VMene ● Viktig at John godkjenner nettstrukturen. Der alle PCene er koblet sammen til HIGbackbone ● Ikke at det er en del av oppgaven vår, men han ønsker at det skal være mulig til senere å configurere VMene remote. ● Hver PC må ha en trunk med VLANS (Forskjellige subnet): 61
OurBox
● Viktig at vi har med imutualimages. ● Erik sier at det er viktig å gjøre hostene selv maintable, så de kommer f.eks til å slette temp. filer etter en vis tid, og updaterer seg selv, etc. ● PCene kommer til å ha 32GB ram. De har 15 000kr per PC å bruke ● Erik påstår at vi “burde” ha en SSD! ○ Erik synes det kan være også mulig å heller bestille PCer via komplett, men da har de ikke 3 års garanti avtaler med DELL. ● Det skal burde være forskjellige images fr de forskjellige service. ● Erik sier at det er bedre å bruke libvirt enn VirtualBox, fordi det kan være lettere å sette grenser og teste når du kan bruke commandline og prøve å teste via libvirt, istedenfor en hel applikasjon. ● Vi burde også fokusere på åbruke CLI når vi skal konfiguere og prøve KVM. Da lærer man mer og får en bedre oversikt over hva som er mulig og ikke. ● Til neste uke skal vi lage et nettverkskart ○ Snakke med john og få det godkjent ○ Finn ut hvordan vi via CLI kan foreta configurasjon på KVM. ○ Finn John og spør han hvorfor han foretrekker VirtualBox. For erik ser ikke hvorfor det er bedre enn å bruke libvirt og KVM. ○ Viktig at i oppgaven å sette klare linjer for hvorfor vi gjør og velger det vi gjør. ○ Vi må få installert KVM og Libvirt. Så skal en rootbruker opprette en VM. Deretter skal en user kunne logge seg på og starte opp den VMen, men alle endringene skal bli lagret i en egen fil. Så nestegang når en annen bruker logger seg inn, skal de kunne starte VMen, men da fra sin egen scratch, og 62
OurBox
endringene skal bli lagret til en egen fil. Slik vil alle brukere kunne starte og jobbe med et baseOS, med sine egene endringer på. ● Erik tegnet et oversikt hvordan nettverket kan se ut: Fikk mail av Erik: Jeg har snakka med Jon, og er enig med han i at vi prøver virtualbox først. 16.02.15 ● VirtualBox: ○ Testet dette med VirtualBox og immutable images. ○ Samt om vi får bootet det samme image med en annen bruker ■ Det fikk vi til, men den andre brukeren sitt image var ikke immutable. ○ Men på “admin” brukeren våres så måtte vi sette imaget til en gruppe og gi read and write muligheter for at vi skulle få det til at en annen bruker kunne bruke samme image. ○ Vi fikk til at den ene brukeren kunne ha normal og gjøre endringer som da den som hadde immutable kunne se. 63
OurBox
○ Vi Gikk mye frem og tilbake for å teste forskjellige måter. Men det gikk ikke så bra med ihvertfall kun Read rettigheter. ○ Vi måtte også sette oss litt inn i group policy for å få det til å funke med det første. ○ Vi har en annen vi også kan se på og det er multi attach mode. 17.02.15 ● Ble nødt til å installere alt på nytt igjen på PCen. Knota litt med å få installert virtualbox4.3.22. ○ Oppretter en admin bruker “ourbox” og en standard bruker “me”. ○ La begge til i gruppen “aaa”
usermod a G aaa ourbox; usermod a G aaa me ○ Oppretter en VM som (Ubuntu 14.04.1 Desktop) på ourbox brukeren. Den plasserte vi i
/home/ourbox/Desktop/ub.vdi ○ Gjorde den read and executeable av grupper:
chmod 755 ub.vdi ○ La filen til gruppen:
chggrp aaa ub.vd
i
○ Kommandoer for å opprette en ny VM i student/me bruker: ■ http://www.electricmonk.nl/log/2011/09/24/multiplevirtualboxvmsusing
onebaseimagecopyonwrite/ ■ VBoxManage create name Ubuntu ostype
Ubuntu_64
register ■ VBoxManage modifyvm Ubuntu memory
1024 ■ VBoxManage modifyvm Ubuntu vram
256 ■ VBoxManage modifyvm Ubuntu cpus
2 ■ VBoxManage storagectl Ubuntu name
sata1
add
sata ● Setter storage til å bruke sata. ■ VBoxManage storageattach Ubuntu storagectl sata1 port
0
device 0
type
hdd
medium
/home/ourbox/Desktop/Ubuntu.vdi
mtype immutabl ● Legger til originale VMen og setter den til immutable. ○ Kommandoene over har vi lagt inn i en executable bash fil. Tanken er å la den bli kjørt hver gang kontoen blir besøkt. ○ Multiattach mode fungerer veldig likt som Immutable, den største forskjellen er at når du restarter maskinen så blir ikke differansen slettet. Dette medfører man kan kjøre to VM av samme image men den lager seg en snapshot som da inneholder forskjellen. ○ Vi kan også begrense hva som skal være tilgjengelig for brukere av management toolsen, mer info: https://www.virtualbox.org/manual/ch09.html#guitweaks ● Problemer: ○ Hvis en student har tatt snapshot eller lagret endringene sine, og admin må gjøre en endring på originalen, så vil dette føre til at alle lagringene hos brukerne vil bli ødelagt. I teorien. Dette må vi teste ut. 64
OurBox
● Oversikt over kabling i CISCO labben per dags dato: 18.02.15 Referat fra møtet: ● Til neste gang skal vi ferdiglage en liten presentasjon for å demonstrere hvordan immutable, osv. fungerer med VirtualBox og KVM. ● Johns årsak til å bruke VirtualBox: ○ Virtualbox client is known interface for students ○ har funksjonalitet for immutable ● Gjør en “
lsattr
” på immutable disken til virtualbox ○ chattr +i
> make the file imutable ○ i ● Om to uker skal vi ha klar: ○ Noen eks. av hvordan nettverkskjema kan/ser ut i cisco rommet ■ Bruk fancy program, slik at vi har en original under, og vi kan tegne endringe rog forslag med farger oppå. ■ Google this for inspiration: “Network lab diagram” 65
OurBox
○ Sett opp kapittler og lag struktur for hele bacheloroppgaven. ■ lag bulletpoints hvor skal hva, og sett inn diagrammer ● Hvis erik hadde satt opp systemet, ville han ha satt en manager med Forman ○ Vi kan ta en tur til terje og få visning om hvordan forman fungerer ● Thomas sa at hvis elevene selv setter opp grupperinger på PCene selv, så vil ikke det være verden undergang heller. 20.02.15 ● FIkk tips om en side ang. ldap:
http://www.stud.hig.no/~131284/it/hig.html ● A startup script have been set up, so everytime a user (not ourbox user) logs in, the script for creating a default Ubuntu vm will automatically be run. All scripts which ends with
.sh
in /etc/profile.d/ will be executed every time a user logs in. Therefore we created a script there named
defaultVMs.sh
with the content: #!/bin/bash os=”Ubuntu”; user=$(whoami); DIRECTORY=~/VirtualBox\ VMs/$os; if [ $user != “ourbox” ]; then osRegEx =”^\”${os}\””; knownVMs=$(VBoxManage list vms | grep e “$osRegEx“| awk ‘{print $1}’ | cut d “\”” f 2); if [[ $knownVMs != $os ]]; then if [[ d $DIRECTORY ]];then rm r “DIRECTORY”; fi VBoxManage create name $os ostype
Ubuntu_64
register 2>&1; VBoxManage modifyvm $os memory
1024
2>&1; VBoxManage modifyvm $os vram
256
2>&1; VBoxManage modifyvm $os cpus
2
2>&1; VBoxManage storagectl $os name
sata1
add
sata
2>&1; VBoxManage storageattach $os storagectl sata1 port
0
device
0 type
hdd
medium
/home/ourbox/Desktop/Ubuntu.vdi mtype
immutable
2>&1; fi fi ○ Cause when the VM is already there, the script will try to create a new VM, but p ● We have been set up a IF to make the script more reliable, and now we are trying to make the script flexible by getting regex to use variables but it seems we can not make it work yet. 66
OurBox
● Now we got it to work, how we do not know, but now when every user logs on the machine will create 1 default VM in virtualbox, and if it allready got it, it will not create a new VM. 23.02.15 ● http://kashyapc.com/2012/09/14/externalandlivesnapshotswithlibvirt/ ● http://serverfault.com/questions/240701/cankvmrollbackchangestovirtualdisksaut
omatically ● http://linux.die.net/man/1/qemuimg ● https://www.suse.com/documentation/sles11/book_kvm/data/cha_qemu_guest_inst_q
emuimg.html ● http://en.wikibooks.org/wiki/QEMU/Images ● We followed this guide to install QEMUKVM: ○ http://www.howtogeek.com/117635/howtoinstallkvmandcreatevirtualmachi
nesonubuntu/ ○ We also had to install qemusystem package ■ aptget install qemusystem ● We searched the internet for a smart solution with this Immutable image: ○ http://kashyapc.com/2012/09/14/externalandlivesnapshotswithlibvirt/ ○ http://serverfault.com/questions/240701/cankvmrollbackchangestovirtualdi
sksautomatically ■ We found a possible solution with ● http://linux.die.net/man/1/qemuimg ■ Which means that we need to make a script which then takes a snapshot of an image and then we need to delete that snapshot after it has been used. ● we did not go for this solution ○ We found COW(Copy on write) which we then thought was better ■ http://en.wikibooks.org/wiki/QEMU/Images ■ We found out that COW works like this, that you have a base image which then you make an image from, which we make it possible to make as Copy on write mode, so that the base image doesnt get touch but every change we make will be done to the copy on write img. But it seems like then we have to make a COW image for every user that is going to have a VM, and we are not sure yet on how we are going to make it “immutable like” it seems like we still need to either take a snapshot of the image and then delete the snapshot or we need to delete the COW img and make a new one every time. ■ Creating a new image with all changes made from the original image: ● qemu-img create -f qcow2 -b Ubuntu.img test.qcow2
○ Now we need to create and map this test.img to virshmanager: ■ We can do that with virtinstall: > virtinstall n test vcpu=1 r 1024
disk path=/var/lib/libvirt/images/test.qcow2 import accelerate 67
OurBox
■ https://acidborg.wordpress.com/2010/02/18/howtocreatevirtualmachi
nesusingkvmkernelbasedvirtualmachine/ ○ Listing up all linked VMs:
virt list all 24.02.15 ● We got the admin user (ourbox) to run a VM with the qcow2, but when we tried to use the same ubuntuu.img to make a new qcow2 as another user, we where allowed to do so. But it seems like it doesnt have any disk space which is a problem ○ We did some digging and we found this: ■ http://unix.stackexchange.com/questions/159069/howcanicreateakv
mguest100asanonrootuser ○ Not sure if this is true or not but just putting it here. ● Found an alternative to starting virtualbox: ○ http://askubuntu.com/questions/310671/startubuntuwithoutadesktopenviron
mentbutstartanxapplication ● We also found out that when we run the virtualbox in our defaultVMs.sh in profile.d we run the application without a window manager, so we need to found out how to start a window manager with virtualbox. ○ is it possible to do this though xsessions instead? 02.03.15 ● We have created two groups,
immutable
and
multiattach
: > groupadd immutable 04.03.15 Referat fra møtet: ● Finn ut hvorfor vi ikke velger libvirt/kvm, men heller velger VirtualBox. ● Virtualbox har en mer “mature” brukergrensesnitt og er mer kjent for studentene. KVM er mye bedre og moden når det komme rtil hypervisor, men i vårt tilfelle, så vil virtualbox være mer egnet. ● Lag linux server, mailserver,(windows) og ha det tilgjengelig når Virtualbox starter. ● FInn ut om virtualbox tilfredsstiller alle kravene våre. Hvis ikke, så evt. fortelle hvorfor ikke, og hva som kan gjøres for å få det til. ● 12.april, til da burde vi ha en viss utgave av bacheloroppgaven. ● 23 uker før innlevering skal vi også ha en fornyet utgave som erik skal se på. ● Skaff automatic spell check for TexWorks. 09.03.15 ● Virtualbox, var rar. Den ville ikke la guest få stort bilde. Den var bare 600x400 eller noe. Så jeg prøver å installere fra internett. ○ Virtualbox vil ikke la guest få bilde i sitt egent vindu. ■ http://www.ubuntugeek.com/virtualboxandubuntu1404displayissue.
html 68
OurBox
■ Prøvde dette, og det fungerte, vet ikke helt om det var det som gjørde at den ikke viste bilde men. ● “Devices > Insert Guest Additions CD image” ● This also mad the desktop window bigger and possible to go in fullscreen mode. ■ How to make a user see libvirt (next paragraph). ■ Looking at the solution of makin “kiosk mode” out of virtualbox. ● https://forums.virtualbox.org/viewtopic.php?f=7&t=52974 ● Seems to old, it was made in 2012 and it seems like it hasn’t been updated since. ● Gonna try it to see what it does. ■ ● Libvirt: ○ Install ubuntu to an img file: virtinstall n ubuntu vcpu=1 r 1024 disk path=/home/ourbox/Desktop/libvirt/ubuntu.img,size=8 cdrom /home/ourbox/Desktop/os/ubuntu14.04.2desktopamd64.iso accelerate ○ Create an qcow2 image: qemuimg create f qcow2 b ubuntu.img test.qcow2 ○ Take in use the qcow2 image (important to specify that this is a qcow2 formatted file): virtinstall n test vcpu=1 r 1024 disk path=/home/ourbox/Desktop/libvirt/test.qcow2,size=8,format=qcow2 import accelerate ○ Create a student (“multiattach”) and a guest (“immutable”) group: groupadd student groupadd guest ○ Create a student user: useradd d /home/student1 m student1 ○ Add a user to a group: usermod G student a student1 ○ Add the ubuntu.img file to group student ourbox setfacl m g:student:rx ubuntu.img setfacl m g:ourbox:rwx ubuntu.img ○ NOTES: ■ Libvirt service is called: ● In RHEL or CentOS:
libvirtd
. ● In Ubuntu:
libvirtbin ■ Compact info about how to use libvirt + virsh: ● https://wiki.archlinux.org/index.php/Libvirt ○ On the user
student1
, we first create a file a qcow2 image and put it on the desktop: 69
OurBox
■ qemuimg create f qcow2 b /home/ourbox/Desktop/libvirt/ubuntu.img ~/Desktop/test.qcow2 ○ Now we can create (map) this ubuntu as a (multiattached). Since the student isn’t a member of the
libvirtd
group, no root access to the hypervisor is granted. Therefor, we make the student start a session to the hypervisor: virtinstall n test vcpu=1 r 1024 accelerate disk path=~/Desktop/test.img,format=qcow2 import ○ The step above is also possible to do in the virtmanager (GUI). The problem is that this is not straightforward. (This is not a problem if the qcow2 file is in the /VirtualMachines) To make a student be able to do this, we need to add a step by step guid (source: https://docs.google.com/document/d/1X8TaBP1v_rh8e2QXDGFmkmzoPB13Pv
p2V0FQ630VCsU/edit?pli=1
): ■ Step
1: Create a new VM from
[Import existing disk image]
option. ■ Step
2: Choose your qcow2 image. ■ Step
3: Select
[Customize configuration before install]
before you go forward ● note
: without this step, you will got a nonbootable message from the virtual machine. ■ Step
4: Identify the
qcow2
format to the image and begin installation [
Disk1
] > [
Advanced options
] >[
Storage format
]:
qcow2 [
Begin Installation
] ○ CONCLUSION: In forehand, you have to create X qcow2 files in the ~/VirtualMachines/. This way, we can create and take in use copyonwrite VMs. Otherwise, we cannot create VMs, the qcow2 file must be created first, which is at minimum ca. 192K. The problem here is: ■ We have to predefine how many VMs a user can create. ■ 192K * numb. of the particular OS a user can create * numb. of different OSes * numb. of users on the system = Too much unused and occupied space. ■ When the user are going to choose a VM, e.g. Ubuntu1.qcow2, this file will be occupied. Next time the user want to choose and create a new ubuntu VM, the Ubuntu1.qcow2 will still be displayed, but at the end, when the user presses “finish” with the installation of the new VM, an error will occur and say that this .qcow2 file is already used by another VM. This can easily confuse the user, and he/she must remember and has an overview of what kind of files is used and not. 10.03.15 ● Virtualbox: ‘ ○ Fluxbox:
https://help.ubuntu.com/community/Fluxbox 70
OurBox
■ Tried fluxbox again, but we had a tip from Magnus the student assistent, instead of: ● fluxbox&; ● virtualbox; ■ he said that we should try: ● fluxbox& virtualbox; ■ on the same line which then works. ■ The next we need to do is make sure that you cannot access anything through fluxbox and the virtual consoles. ■ How to deactive the tty (virtual consoles) ● http://ubuntuforums.org/showthread.php?t=1400893 ● https://help.ubuntu.com/community/RemoveTTY ● sudo mv tty1.conf /home/ourbox/Desktop ○ It says you can either remove them or just move them from the “
/etc/init
” folder. ○ This should work when i restart the pc. ○ It WORKS ○ Just move/remove all the tty*.conf files from /etc/init folder and restart the comp. ● Tried this: http://linuxpoison.blogspot.no/2008/08/howtodisablevirtualcon
solesaltf1.html ○ /etc/inittab doesnt exists on ubnuntu ■ Custumize fluxbox: ● https://help.ubuntu.com/community/Fluxbox/customize ● It seems like it make a menu for each user, so i need find the file that custumize for all users. ○ http://fluxbox.org/help/manfluxboxmenu.php ■ it seems to be around
@pkgdatadir@/menu ● how to find this type “
fluxbox i” ○ nano /etc/X11/fluxbox/fluxboxmenu ■ I just delete everythin execpt restart and exit choices in the menu. ● How to set up a menu: ○ [submenu] (Application) {} [submenu] (Accesibiluty) {} [exec] (Xmag) {xmag} <>
//this should be a line up. end ● [restart] (Restart) ■ we have a problem that it seems like it wont execute commands, because we are trying to 71
OurBox
make a command that shutsdown virtualbox so that you log ut, but fluxbox wont run that command ● pkill VirtualBox ○ i tried to remove som of the componets in the toolbar in etc/X11/fluxbox/init file, but i doesnt seem to work. 11.03.15 REFERAT: ● En innlevering til erik 7.april (rett etter påsken), 12 before handin (rødpen) ● lage en plan for 9 ukene framover, så vi dekker alt vi skal ha med, ● Spør erik hvorfor vi har probemer med fluxbox når vi starter det i profile.d/, vi får ikke kjørt eller eksekvert noen programmer. ● Finn ut om vi trenger home directory, eller ikke. Ta hensyn til så ikke vilene blir opprettet i homedirectory på loke sin servere, men på lokale PC ● powerbroker
for administrasjonskontrol!!!!! ● stay away of mounting the homefolder inside the cp ● Kanskje ha mulighet så en VM / mappe kan ha flere brukere, og ikke bare en (lage grupperinger på en måte). ● Husk at hvis det vil være nødvendig for at en bruker skal kunne sette grupper selv, så vil det være godkjent ● lag et skript som vil ta inn parametere, som lager og gjør at vmene kommer til å bli delt mellom de og de brukerne. Det eneste ved siden av virtualbox vinduet som skal være tilgjengelig for brukeren. ● umask
command: setting the default access mode. Kan være til hjelp. ● Finne en måte så en bruker kan ha mulighet til å sette grupperinger selv. For egentlig så må enn være root bruker for å gjøre det. ● Brukere kan ha tilgang og setter en fil i en shared directory, der filen inneholder brukernavn som de ønsker gruppering på. Så er det crontab som kjører og sjekker hvert 5 min og exekverer filene ● MAP, enkleste måte med LDAP er “PADL software pty ltd” (
PAM_LDAP
). Spør John og få han til å gi oss LDAP mulighet. Hvis ikke, så må vi gjøre det lokalt ○ Hver PC som starter får ● Lag en presentasjon og visning til thomas om hva som fungerer og tilfredstiller kravene våre, og hva ikke, (13. april og ut burde vi ha det lagt opp klar for visning) ● Erik 21.mars 10.april 26.mars tilgjengelig på email) ● Uke 12 er det møte. LOGG: ● Vi snakket med ITavdelingen (ikke John) om å få lov til å koble oss opp mot LDAP på skolen, og det fikk vi lov til. 72
OurBox
### Authentication, etc. ###
12.03.15 ● How to setup + basic information about LDAP/PAM: ○ https://wiki.debian.org/LDAP/PAM ○ http://www.padl.com/OSS/pam_ldap.html ●
sudo aptget install libpamlpdap ○ skriver inn: ldap://ldap.hig.no som addresse ○ ou og dc ble ciscolab og local. ○ I removed it again. ● Started to work on why fluxbox wont run commands. ○ http://gotoanswer.stanford.edu/?q=Fluxbox+Menu+and+root+command
s 13.03.15 ● Windows tool for LDAP authentication
LDAP Administrator 2015.1
(can find info about users, but cannot verify passwords or users. Looks like we need a admin account): ○ http://www.ldapbrowser.com/download.htm ■ My DN in the ldap.hig.no: uid=120683,ou=Avdeling for informatikk og medieteknik,dc=hig,dc=no 73
OurBox
● OpenLDAP setup: ○ https://wiki.archlinux.org/index.php/OpenLDAP ○ https://wiki.archlinux.org/index.php/LDAP_authentication 16.03.15 ● http://www.linuxquestions.org/questions/slackware14/howdoistartfluxbox52
159/ ○ Sett på det å få startet fluxbox kanskje fra et annet sted, årøver å finne litt ut om hvordan startx fungerer helt og holdent. ● https://wiki.ubuntu.com/CustomXSession ● LDAP: ○ Find who you are, as a response from the LDAPDB: ldapwhoami h 128.39.41.128 x D ""
// Return “Anonymous” ○ If we want to check a username and retrieve some basic information about the user, we do this with this syntax (source for the script syntax): ldapsearch x h 128.39.41.128 b dc=hig,dc=no p 389 '(uid=120683)' > # extended LDIF > # > # LDAPv3 > # base <dc=hig,dc=no> with scope subtree > # filter: (uid=120683) > # requesting: ALL > # > # 120683, Avdeling for informatikk og medieteknik, hig.no > dn: uid=120683,ou=Avdeling for informatikk og medieteknik,dc=hig,dc=no > uid: 120683 > objectClass: top > objectClass: person > objectClass: organizationalPerson > objectClass: inetOrgPerson > sn: Maluchev > cn: Stepan Maluchev > ou: Avdeling for informatikk og medietekniklabeled > URI: http://www.stud.hig.no/~120683/ > mail: [email protected] > title: Studentgiven > Name: Stepan > # search result > search: 2 > result: 0 Success > # numResponses: 2 > # numEntries: 1 74
OurBox
■ If we want also to add another search parameter, e.g. we want to search for a username under “Avdeling for informatikk og medieteknik”, we would to this: ldapsearch x h 128.39.41.128 b dc=hig,dc=no p 389 '(&(uid=120683)(ou=Avdeling for informatikk og medieteknik))' 18.03.15 Møtereferat: ● Vi må ha testing på planen. ● Følger det gant skjemaet opp kravspecc? (Spør Erik). ● Les om user acceptance før vi gjør testing og før vi skriver om det. ○ Det burde være i henhold til kravspec. ■ Bruk Thomas, de assistentene og 2 andre random. (Maks 5) ■ 15 20. April. burde vi gjør det. ● Vi kan ikke nå 27 mars 10 april. Thomas. ● Møte med Erik den 10 april og møte med Thomas den 15 april. hvor vi snakker om hvordan vi skal teste. 20.03.15 ● Started working a little bit on the report. ● LDAP: ○ If we want to check a user with uid
120683
and compare the username Maluchev,
we can compare this by first specifying the full DN, and then the sn: ldapcompare x h 128.39.41.128 'uid=120683,ou=Avdeling for informatikk og medieteknik,dc=hig,dc=no' sn:Maluchev > TRUE This will return true,false or an error message. ○ If we have an account in the ldap directory, we can try this link: http://www.unixmen.com/configurelinuxclientsauthenticateusingopenldap/ 23.03.15 ● Some nice general information around PAM: ○ https://www.digitalocean.com/community/tutorials/howtousepamtoconfigure
authenticationonanubuntu1204vps ● Some nice information on how to authenticate with ldap using libpam_ldap: ○ https://www.digitalocean.com/community/tutorials/howtoauthenticateclientco
mputersusingldaponanubuntu1204vps REFERAT FRA MØTET MED JOHN: ● Fant ut at ldap.hig.no er en server for enkle oppslag om brukere, som email, bilde og navn. Så vi har hittil prøvd å vertifisere passordet mot feil server de siste ukene. Årsaken var at etter et besøk hos ITavdelingen, fikk vi beskjed om at vi bare skulle prøve oss fram. Dermed har vi klart å bruke opp 2 uker på lite fornuftig framdrift. 75
OurBox
● Fikk to lapper: ○ 1.note: Server we should connect to:
hig1.hig.no
(IP:128.39.140.7) or
carol.hig.no
(IP:128.39.140.10) My user account we will authenticate with: 120683 bindDN:
cn=120683,ou=12HBWUA,ou=student,dc=hig,dc=no ● Han sa det var to muligheter å autentisere seg, enten mot den vi fikk som gjør at vi skal bruke PAM mot Active Directory, dette betyr at vi må skreddersy PAM mye mer enn om vi da skulle ha brukt den andre servern som vi kunne koble oss i mot. Den bruker da Poisix. ● Vi kan også få mulighet til å gjøre dette med ansatte også, men da må vi filtere mer. ○ Vi fikk da gitt “treet” for studenter, så om vi skal gjøre det med ansatte også så er vi nødt til å gå tilbake til jon. LOG: 76
OurBox
● After our meeting with Jon Langseth, we were told to configure pam to talk with AD, here is a link which is going to be read: ○ https://technet.microsoft.com/enus/magazine/2008.12.linux.aspx ● 24.03.15 ● Tried this tutorial for ldap with AD: ○ http://thejoyofstick.com/blog/2012/03/31/authenticatinglinuxusersagainstmicr
osoftactivedirectory/ ○ host carol.hig.no
base ou=student,dc=hig,dc=no
ldap version 3
binddn cn=120683,ou=12HBWUA,ou=student,dc=hig,dc=no
bindpw “MY PWD”
pam_login_attribute sAMAccountName
■ THE TUTORIAL ABOVE DID NOT WORK!
● https://wiki.samba.org/index.php/Local_user_management_and_authentication/nslcd 27.03.15 ● Tryed to follow this link:
https://help.ubuntu.com/community/LDAPClientAuthentication But something went wrong with the authentication of my account. Will work with this later on. ○ Couldn’t get this to work either… 30.03.15 ● Tried this video:
https://www.youtube.com/watch?v=kSCx3tzC0cA ○ Couldn’t get this to work either… ● Trying this tutorial: http://naidutrk.blogspot.de/2012/03/settingupldapclientauthentication.html ○ Couldn’t get this to work either… Nothing happens besides the usual login prompt to ourbox local user. ● NOTE: To check the log when we cannot log in with an account, visit /var/log/auth.log
. I have authentication problems with my own connection to LDAP, with error message: >nss_ldap: could not connect to any LDAP server as cn=120683,ou=12HBWUA,ou=student,dc=hig,dc=no Can't contact LDAP server >nss_ldap: failed to bind to LDAP server ldap://128.39.140.10: Can't contact LDAP serourever When we boot up the host, the host tries to set up an connection with the LDAP server, but fails: 77
OurBox
○ First I tried to make an ldapsearch with the same binddn, and I got an connection: l
dapsearch x h 128.39.140.10 b ou=student,dc=hig,dc=no p 389 D cn=120683,ou=12HBWUA,ou=student,dc=hig,dc=no W samaccountname=120683 ■ How to make an ldapsearch: http://blogs.splunk.com/2009/07/30/ldapsearchisyourfriend/ ● NOTE: file: /etc/nsswitch.conf let us set where the credentials like password, groups, shadow will be gathered from. The default is
compat
or
files
, which means that the information is to be find on the local machine. In our case, we must set
ldap
after the files
. This way, if the user is not found on the local machine, it will try to authenticate through the ldapserver. For now, we cannot get the connection with the LDAPserver with our username. ○ More info about nsswitch.conf: http://searchitchannel.techtarget.com/feature/UsingnsswitchconftofindLinux
systeminformation ● People say that we should use
sssd
rather than nss_ldap, pam_ldap or nscd (
http://serverfault.com/questions/626527/clientauthenticationinvalidcredentialsldap
) ○ When installing sssd on ubuntu server 14.04, there are no default sssd.conf file in /etc/sssd/, but there are one located in /usr/share/doc/sssdcommon/examples/sssdexample.conf. Now we need to copy that one into /etc/sssd/sssd.conf: cp /usr/share/doc/sssdcommon/examples/sssdexample.conf /etc/sssd/sssd.conf ■ http://askubuntu.com/questions/247763/whyismysssdconffilemissin
gafterinstallingsssd ○ Trying to follow this tutorial: http://linuxrackers.com/doku.php?id=ubuntu_13.04__set_up_ldap_client_using
_sssd_for_auth_and_identity ■ Noop, didn’t do anything new as I can see… ● Trying to see what this does for us: ○ http://people.skolelinux.org/pere/blog/Caching_password__user_and_group_on
_a_roaming_Debian_laptop.html 07.04.15 ● Writing on the report and talking with John for help with the authentication part. ● John found out our problem in the config file /etc/ldap.conf, he adde: 78
OurBox
○ bind_policy soft As default, it’s
bind_policy hard
, which means that if the host tries to connect to the AD server but fails the first time, then the whole LDAPauthentication fails. With this set to
soft
, the host have the ability to reestablish the connection several times. (Not sure why this fails the first time). ○ The next thing we haven’t looked at, was how the host maps to the AD server. As default, all of the below lines was commented out, while John enabled every of them besides the homedirectory line (we won’t mount the user’s homedirectory at our host anyway): # RFC 2307 (AD) mappings nss_map_objectclass posixAccount user nss_map_objectclass shadowAccount user nss_map_attribute uid sAMAccountName #nss_map_attribute homeDirectory unixHomeDirectory nss_map_attribute shadowLastChange pwdLastSet nss_map_objectclass posixGroup group nss_map_attribute uniqueMember member pam_login_attribute sAMAccountName pam_filter objectclass=User pam_password ad ○ Jon mentioned maybe why the user logs out instantly is because it doesnt have a homedirectory and it doesnt know what shell the user is using. 08.04.15 ● Writing on the analyse part on the report. ● Now when we log in with our student number and right password, we will be authenticated through the AD, but since the host don’t know where the home directory is, we will automatically log out. In the log file it looks like this: The log says that the user cannot be found, but it opens a session for the user. Not sure why we get this error message, but John said that the error came because a missing knowledge of what homedirectory to mount. ● Trying to understand how we can use the UID from the AD to create a user on the host with a new local homedirectory. ○ Cannot figure out this... ● TIPS: If we need to reinstall the OS, we only need to install those package to setup ldap: sudo aptget install libnssldap ldaputils ○ Update the pam files:
pamauthupdate 79
OurBox
10.04.15 ● Reading this, which is the RFC for AD mappings in ldap. ○ http://www.rfcbase.org/txt/rfc2307.txt ○ http://manpages.ubuntu.com/manpages/quantal/man8/pam_mkhomedir.8.html ○ https://cdc.iseage.org/tutorialpamldapauthenticationactivedirectorydebianu
buntu/ ● When we try to SSH into the host, we get this error msg: 13.04.15 ● Meeting with Erik. We need help with LDAP mounting: ○ /etc/pam.d/ ■ we added line for making home directory, we tried differen files. commonauth, commonaccount, commonsession and login file ● session required pam_mkhomedir.so skel=/etc/skel/ umask=0077 ○ etc/ldap.conf ■ Changed: ● Base ou=student, dc=hig,dc=no ● uri ldap ● ldap version 3 ● binddn ● scope ● bind policy ● RFC 2307 (AD) mappings ○ We just removed the hashtag in front of everyone. except home directory. ○
○ Our problem is that when you login you just log back out. 80
OurBox
■ Jon said this had something to do with that you don't have a home directory and it doesn't know your shell. ■ And he also mentioned something about UID from the AD server. ○ This is our error: ● pam_winbindd vedlikeholder enlokal db for UID. (kanskje nss_ldap ikke vil fungere riktig mot AD) ● getent ● A
fter the meeting with Erik: ○ We found out that we have configure most of it right. ○ We can contact the AD server and we get authenticated. ○ What our problem is: ■ When you log in you don’t stay logged in, Erik thinks the problem is with how we do the mappings. Since we don’t find the user in “Getent” and we need to find out what is getting sent over the network. Also the local host cant fin the user in PASSWD, which we think is a result of that we find the SAMACOUNTNAME on the ad but that isnt the one we want (?). And we need to check what pam_mkhomedir.so excactly does. Since when we log in we get unkown user, when it tries different .so files such as pam_mkhomedir.so. Since “getent passwd” will contain the user entry in the passwd file with the useranme, user id and home dir. But our user on the AD is not in this file, so he thinks that it can’t catalog/find the user ○ We are going to check what is being sendt over the network with wireshark. ○ We also might have to install another package, winbind. Check pam_ldap winbind and nss winbind. ● Wireshark:
(ip.src==10.10.0.239 || ip.dst==10.10.0.239) && tcp.port==389 ● If we enter:
getent passwd 121088
, we get no results. the search is for uidNumber=121088
. There are no attributes named uidNumber in the AD, but there is one named
msSFU30UidNumber
. If we only could get passed to search for this sAMAccountName
instead. 81
OurBox
● ● ● Wireshark: ● But when we enter:
getent shadow 121088
, we get 1 result. the search is for sAMAccountName=121088: CLI returns:
121088:*:15578::99999::::0 Wireshark: 82
OurBox
14.04.15 ● Interesting: When we enter
id 121088
, the PC takes a LDAP search sAMAccountName=121088
, and the LDAP server response is successful with alot of information about this user. However, the prompt returns that there are no users with id=121088
. ● https://cdc.iseage.org/tutorialpamldapauthenticationactivedirectoryfreebsd/ ○ override ○ #Uncomment the following line to override the default login shell
#nss_override_attribute_value loginShell /usr/local/bin/bash
● John said that we need to figure out how we can map the uidNumber on the host to get it’s value from
msSFU30UidNumber
in the AD. ○ This could be done in the ldap.conf file. ○ Also we need to override the loginShell: ● Repport: ○ http://en.wikipedia.org/wiki/Virtualization
Research. 15.04.15 83
OurBox
● How PAM perform an authentication and the steps alongside: http://en.wikipedia.org/wiki/Linux_PAM 16.04.15 ● Trying to map the right attributes in ldap.conf when using
getent passwd 120683 ○ Interesting, when we write
getent passwd ourbox
, then it searches locally for the username, but when we search in the LDAP directory, then this attribute is named
uidNumber
. ○ In the ldap.conf we added this line nss_map_attribute uidNumber sAMAccountName and now using Wireshark, we get success with the lookup! However, the command returns nothing. The request we send with the
getent passwd 120683
command is asking the LDAP server for 10 items, will we only receive 5 attributes: ○ So there are some attributes the command needs that it’s not getting. We can check if a command was run successful or had any errors by entering
$?
in the CLI. 84
OurBox
In the man page for error code for getent, the code 2 indicates: “2 One or more supplied key could not be found in the database.” ○
http://www.davidpashley.com/articles/ldapbasics/ ■ an article about ldap basics, this is where we read that
“Another common use for LDAP is authentication of user accounts. For this, we can use theposixAccount class. This is an auxiliary class and adds cn, uid, uidNumber, gidNumber andhomeDirectory mandatory attributes and userPassword, loginShell, gecos and description as optional attributes. Because posixAccount is auxiliary, we can add it to our person object for people we want to be able to authenticate.” ● Password: When we use no encryption when we authenticating a user against the LDAP server, the password is sent in plaintext, on hexadecimal form. ●
We got getent to return some values: ○ we also commented something out such as: ■ homeDirectory ■ shadowLastChange ■ posixGroup 85
OurBox
■ uniqueMember ○ what we put in was what getent was asking for in our RFC 2307 (AD) mappings ■ nss_map_attribute gidNumber primaryGroupID ■ nss_map_attribute gecos description ■ nss_override_attribute_value loginShell /bin/bash ○ when we did our getent passwd 121088 we got back: ■ 121088:*:121088:513:Gavin Thomas Garrad:\\moa.stud.hig.no\home\121088:/usr/local/bin/bash ○ When we added the nss_map_attribute we got the host to create the “\\moa.stud.hig.no\home\121088” folder in / folder. 17.04.15 ● If we must reinstall the OS: # RFC 2307 (AD) mappings nss_map_attribute gidNumber primaryGroupID nss_map_attribute uidNumber sAMAccountName nss_override_attribute_value loginShell /bin/bash nss_map_attribute gecos description nss_override_attribute_value homeDirectory /home/ nss_map_objectclass posixAccount user #nss_map_objectclass shadowAccount user nss_map_attribute uid sAMAccountName #nss_map_attribute homeDirectory unixHomeDirectory nss_map_attribute shadowLastChange pwdLastSet nss_map_objectclass posixGroup group nss_map_attribute uniqueMember member pam_login_attribute sAMAccountName pam_filter objectclass=User pam_password ad ● To get the login screen (lightdm) to not show a list of users, which it will do as a standard for ubuntu, we need to add some customization: ○ We need to add a file in /etc/lightdm/ ■ just add lightdm.conf there. ● Then put in the lines: 86
OurBox
○ [SeatDefaults] greeterhideusers=true greetershowmanuallogin=true ○ greeterhideusers=true ■ This makes so that you don't get a list of users as you usually do. ○ greetershowmanuallogin=true ■ this makes it possible to enter a username and a password. ○ Sources: ■ http://www.tejasbarot.com/2014/04/25/hideusersloginasotheruserfro
mloginscreenubuntu1404ltstrustytahr/#axzz3XYz25uaI ■ https://wiki.ubuntu.com/LightDM ● Trying to reconfigure everything with
libpamldapd ○ which contains packages ldaputils libnssldapd libpamldapd nscd nslcd ■ http://arthurdejong.org/nsspamldapd/nslcd.conf.5 ■ http://linux.web.cern.ch/linux/docs/accountmgmt.shtml ■ 20.04.15 ● Got NSLCD to work(This is the /etc/nslcd.conf.conf), with: ○ # /etc/nslcd.conf ○ # nslcd configuration file. See nslcd.conf(5) ○ # for details. ○ ○ # The user and group nslcd should run as. ○ uid nslcd ○ gid nslcd ○ ○ # The location at which the LDAP server(s) should be reachable. ○ uri ldap://128.39.140.10/ ○ ○ # The search base that will be used for all queries. ○ base ou=student,dc=hig,dc=no ○ # The LDAP protocol version to use. 87
OurBox
○ #ldap_version 3 ○ ○ # The DN to bind with for normal lookups. ○ binddn cn=120683,ou=12HBWUA,ou=student,dc=hig,dc=no ○ bindpw Ourbox92 ○ ○ # The DN used for password modifications by root. ○ #rootpwmoddn cn=admin,dc=example,dc=com ○ ○ # SSL options ○ ssl off ○ #tls_reqcert never ○ ○ # The search scope. ○ scope sub ○ ○ # Mappings for Active Directory ○ pagesize 1000 ○ ○ ○ filter passwd (&(objectClass=user)) ○ map
passwd uid sAMAccountName ○ map
passwd gidNumber primaryGroupID ○ map
passwd homeDirectory
"/home/$sAMAccountName" ○ map
passwd gecos ○ map
passwd loginShell "/bin/bash" ○ map
passwd uidNumber description msSFU30UidNumber ○ filter shadow (&(objectClass=user)) 88
OurBox
○ map
shadow uid sAMAccountName ○ map
shadow shadowLastChange pwdLastSet ● Changed
mappasswd uidNumber msSFU30UidNumber ○ so that i takes sAMAccountName so that we also get the getent. ● If we want to let LDAP execute our own bash scripts and sending the username as a parameter, we can use e.g.
auth require pam_exec.so “/script.sh” $PAM_USER ● Create a group with group ID 513 and name 513: groupadd g 513 513 ● Trying to find another way to start fluxbox, since when you start fluxbox from the login menu and choose it the fuctions work. But what i want is that fluxbox window manager starts when you log in. ○ https://wiki.ubuntu.com/CustomXSession ○ http://www.fluxbox.org/help/manfluxbox.php ● Been checking those sides, and it says something about changing the .xinitrc file, or make it, but it did not work. ○ http://vsido.org/index.php?topic=852.0 ■ this might be an intresting read. ● i found out how to make fluxbox the default display manger, with this ○ https://wiki.ubuntu.com/LightDM ■ [SeatDefaults] usersession=name ■ There is something to do with this also: ■ updatealternatives install “/usr/bin/xsessionmanager” “xwindowmanager” “/usr/binstartfluxbox” 2 ■ updatealternatives config xwindowmanager 21.04.15 89
OurBox
● Removed some functonality in fluxbox, in the folder /etc/X11/fluxbox and in files “keys” and fluxboxmenu. ○ in keys i removed the functionality to open terminal in “keys” ■ # open a terminal ■ Mod1 F1 :Exec xterminalemulator ■ # open a dialog to run programs ■ Mod1 F2 :Exec fbrun ○ in fluxboxmenu i removed most of the applications so that nothing other than virtualbox can be opened. ● How to change the startup script is in /usr/bin/startfluxbox ● remove unity: ○ sudo aptget remove unitylensmusic unitylensapplications unitygreeter unitycommon unityassetpool unity2dlauncher unity2d libunitymisc4 libunity2dprivate0 gir1.2unity4.0 ■ Not sure if this totaly works yet. ● http://www.geek.com/chips/dontuninstallubuntujustchangethe
interface1542514/2/ ■ This did not fully work ○ trying this also: sudo aptget remove unity unityassetpool unitycontrolcenter unitycontrolcentersignon unitygtkmodulecommon unitylens* unityservices unitysettingsdaemon unitywebapps* unityvoiceservice ■ #####################################################################
# 90
OurBox
● Install everything: ○ echo "ourbox ALL=(ALL) NOPASSWD:ALL" >> /etc/sudoers; ○ aptget install y
virtualbox
fluxbox
; aptget upgrade y; aptget install y libpamldapd; ■ Full in the needed param + copy the
/etc/nslcd.conf
conf file from below: # /etc/nslcd.conf # nslcd configuration file. See nslcd.conf(5) # for details. # The user and group nslcd should run as. uid nslcd gid nslcd # The location at which the LDAP server(s) should be reachable. uri ldap://128.39.140.10/ # The search base that will be used for all queries. base ou=student,dc=hig,dc=no # The LDAP protocol version to use. #ldap_version 3 # The DN to bind with for normal lookups. binddn cn=120683,ou=12HBWUA,ou=student,dc=hig,dc=no bindpw Ourbox92 # The DN used for password modifications by root. #rootpwmoddn cn=admin,dc=example,dc=com # SSL options ssl off #tls_reqcert never # The search scope. scope sub # Mappings for Active Directory pagesize 1000 filter passwd (&(objectClass=user)) map
passwd uid sAMAccountName map
passwd gidNumber primaryGroupID map
passwd homeDirectory
"/home/$sAMAccountName" map
passwd gecos description map
passwd loginShell "/bin/bash" 91
OurBox
map
passwd uidNumber msSFU30UidNumber filter shadow (&(objectClass=user)) map
shadow uid map
shadow shadowLastChange pwdLastSet
sAMAccountName ○ echo "
session required pam_mkhomedir.so skel=/etc/skel/ umask=0077
" >> /etc/pam.d/commonsession ○ echo e
"[SeatDefaults]\n greeterhideusers=true\n greetershowmanuallogin=true
" > /etc/lightdm/lightdm.conf ○ Create a group with group ID 513 and name 513: groupadd g 513 513 ○ Install a ubuntu.vdi and make the group 513 RX permissions: setfacl m g:513t:rx ubuntu.vdi ○ Download the defaultstartupscript and put it in /etc/profile.d/ 22.04.15 ● Creating a demo! ● The OS files in Desktop/os/ folder must not contain any white spaces. Cause when we search for every OS.vdi file, we search for the 9th column (a new column would be created for every white space): ○ Get the fullname of the file: ls l /home/ourbox/Desktop/os/*.vdi | awk '{print $9}' ○ Only get the name of the file: ls l /home/ourbox/Desktop/os/ | awk '{print $9}' | grep ".vdi" ○ Only display the image name without .vdi: ls l /home/ourbox/Desktop/os/ | awk '{print $9}' | grep ".vdi" | cut d "." f 1 ● Get input from the user in bash script: admin=$(zenity entry text="What is the hostname of the administrator?"); ● Using sed to change the value of the admin variable in a file: admin=$(zenity entry text="What is the hostname of the administrator?"); sed i "/admin=/c\admin=\"$admin\";" verifyNewOSes.sh 92
OurBox
23.04.15 ● First we had the script which goes inside the /etc/profil.d/ inside the runMe.sh file, but for making it more easyer to read (we need alot of “\” when the script is in the runMe.sh for escaping variables), we puted this code inside a separate file named defaultVMScript.sh. When we copy this file over into /etc/profile.d/, the script will not be run (has nothing to do with making it executable). It’s like the file is corrupt in some way, but I tried to create another file and pass the code into that one, but it just won’t work. ○ After the installation of the runMe.sh script, if i take
cat /etc/profile.d/defaultVMScript.sh > /etc/profile.d/defaultVMs.sh
, then it works. It’s like there are some format error or a corrupt file(but I can perform rw), no idea what’s wrong… ○ SOLUTION:
It doesn’t work to use “cp $path/defaultVMScript.sh /etc/profile.d/;” We must use: cat $path/defaultVMScript.sh > /etc/profile.d/defaultVMScript.sh; ● What we need to do: ○ Let every created VM be created with NIC configured to
bridged mode. ○ Take in use
Kerberos
and make LDAP authentication encrypted. ● Bridge mode: ○ List a lot of detailed information about the VM’s configuration: VBoxManage showvminfo “name” ○
https://forums.virtualbox.org/viewtopic.php?f=7&t=45911 ■ Her sto det noe som kanskje kan være nyttig. ● Jepp, det gjorde det! :D 24.04.15 ● Let every created VM be created with NIC configured to
bridged mode. ○ This is done by adding this line: VBoxManage modifyvm “NAME nic1 bridged bridgeadapter1 eth1 93
OurBox
■ Notice that when configuring the VM to bridged mode, we must use eth1
or higher, eth0 will not work. ● Installing VirtualBox4.3 version with extentson pack. A script has been made. Source: ○ Install VirtuallBox:
https://www.virtualbox.org/wiki/Linux_Downloads ○ Install extension pack: https://www.howtoforge.com/vboxheadlessrunningvirtualmachineswithvirtua
lbox4.3onaheadlessubuntu14.04ltsserver ● VBoxManage modifyvm “navnpåvm” draganddrop bidirectional ● VBoxManage modifyvm “navnpåvm” clipboard bidirectional clipboard needs guest additions installed on the vm. 27.04.15 ● Continuing writing the report. ○ Stepan
: Authentication. ○ Gavin
: Desktop Environment ● http://texblog.org/2011/06/11/latexsyntaxhighlightingexamples/
for code. in the latex. 29.04.15 ● Continuing writing on the report ○ Stepan:
Authentication:Understanding LDAP files ○ Gavin:
Desktop Environment, Hypervisor 30.04.15 ● Continuing writing on the report ○ Stepan:
Authentication: Understanding LDAP files ○ Gavin:
Desktop Environment, Hypervisor 01.05.15 ● Continuing writing on the report ○ Stepan:
Authentication: Understanding LDAP files 94
OurBox
○ Gavin:
Desktop Environment, hypervisor. 95
OurBox
A.1
Meetings
14.01.2015
Referat fra møtet med Thomas (09:30-10:15):
Snapshot skal være mulig for alle elevene
Hva elevene skal møte på nr PCen booter opp er ikke gitt, kom med forslag.
Ikke nødvendig, men til slutt hadde det vært fint om det hadde vært muig å boote
opp en VM via VPN.
snakk med John, han har ideen bak dette. Mulighet med virtualbox.
Alt handler om selve Supervisoren og begrensningene der.
Søk nettet om fordeler og ulemper, tilfredstiller løsningen kravene?
Til slutt skal det være mulig at læreren skal kunne sitte på et sted og fyre opp
VMer fra en PC, dette er for å spare tid med å installere et VM fysisk på hver PC
(tidsfordriv).
Noen andre kan lage interfacet.
Hva slags supervisor?
hver gang eleven starter PCen, skal alt være base configurert?
trenger ikke “host-eller-noe-slikt”, ved mindre det har større fordeler.
På slutten av Bachelor oppgaven, skal det være alle de andre stegene som
kreves for å fortsette for å få systemet 100% opp og fungerende.
4 february etter kl. 13 er det ikke mulig å komme inn.
9:30 onsdager blir det faste møter med Thomas. Uken før og etter påsken.
skrive kravspesifisering til neste gang.
21.01.2015
Referat fra møtet med Thomas:
Gå gjennom spec. krav og se hva slags programvarer som oppfyller hva slags
krav.
Send spec. krav til Thomas.
Hvis noe KOSTER NOEN TUSEN KRON ER FO REN LISENS, SÅ GÅR DET
GREIT. MEN ELLER NEI.
1-2 ukene: Lag pros/cons av programvare
o lage timetable
o Søke gjennom hva som finnes på markedet
o start på sammenligning
Vi må ta også hensyn til om servisen komme rtil å være
slutten av april skal vi være ferdig med det fysiske, også skal vi bruke 2 uker til å
skrive ferdg rapporten.
Når vi skriver på en ting, men plutselig str vi fast, så skriv på noe annet, og fordele
oppgaven.
Før påske burde vi prøve og feil, så etter det må vi skrive en del og få ting til å
funke i rapporten.
VI må finne ut en løsning for hvordan vi skla a i bruk LDAP til authorisering.
Authoriseringen hadde vært fint om det var mulig med med gjeste grupper, slik at
folk som ikke er studenter her, får også tilgang.
John sier (mener Thomas) at VirtualBox kan tilfredstille mange av kravene.
I løpet av februar, så burde vi være ferdig med hvordan alt skal være, og klare til
å starte med å jobbe fysisk.
Thomas sier at vi minimum skla ha 2 NIC, men hvis flere trengs, så er ikke det et
problem.
96
OurBox
802.1q (Cisco standard ta no slag) se hva det innebærer, for han ønsker at NIC
kommer til å ha støtte for det.
28.01.15
Referat fra møte:
Angående 1.del innleveringen vår:
o Målet med denne oppgaven er ikke å bygge store nettverk, men til en
senere anledning skal det være mulig (Second step). Hoved poenget i
dette stedet er så ha en hypervisor som er avgrenset med
grupperettigheter.
o taskdescription as bulletpoints. Frode skulle vist ha noen lynkurs i hvordan
man laget kravspec.
Det må være mulig å copy paste mellom de forskjellige VMene.
10.februar skal vi være ferdig med kravspec og hvordan det skal være.
det enkleste er hvis vi bruker linux og KVM, local group policy, så kommer det
policy rules bli kopiert videre til alle andre hostene.
Erik foreslår at vi heller har egen policy grupper som blir gitt ut til elevene,
passord og brukernavn.
Erik foreslår at jo fortere jo bedre at vi prøver å sette opp det fysiske og ser hva
som er mulig og ikke, og hvordan teknologien fungerer, eller hvor grensene går.
Bridge mode mellom VMene.
04.02.14
Møte
o
o
o
o
o
o
Fortalt litt om kvm med libvirt til begge.
Libvirt know alot of about how this work in general.
libvirt.org/apps
There should be a mechanisem in libvirt to differ Admin and Users.
Snakke med Jon. ASAP the brenner på dass.
Erik recommends Kvm
libvirt deamon as a service on the host
user loggs in and gets a interface from libvirt
virtmangeager talks to the libvirt deamon
user has to be added to the virt manager on.
Virsh CCi
The quem-kvm package is more like a binary translator, which will not let KVM to
talk directly with the HW, and this will slow down the VMs. Not cool.
http://wiki.qemu.org/Index.html
Kiosk mode er hva vi vil ha opp.
hvordan skal man stoppe fra en bruker fra å krysse ut bilde
når kiosk mode er oppe.
Describe it when we test it. the test.
Dont think much about HPV men mer om hvordan løsningen med libvirt og
virtmanges (GUI)
Do a sruvay on the managment managment part.
google : “local libvirt root group”
Next week:
Jon alt solutions
97
OurBox
end of week new pc ?
reaserched more on the manger
Møte med Jon:
Han mener at vi kan engelt bruke virtual box.
o I virtual box kan man lage en virtual maskin som er en clone av en virtual
maskin.
o Da kan vi lage en root VM som da kan bli clonet som kan brukes.
o Dropp VM ware fra tankene.
o VM vil skape mer problemer og en del mer vedlikehold.
Imutable disk images.
Vi stilte dette spørsmålet om Kiosk mode med virtualbox
o Han tror det ikke egentlig det ikke finnes.
o Han sier at det kan være mulig å hacke det til.
Nevnes i forhold til sikkerhet at de har tilgang til HW så sikkerhet.
Hvorfor skal man kunne måtte starte en VM for å tilgang til putty.
Lillemyk skal være med så må vi ha virtualisering.
Hvis host oset er en for for linux. tre valg av teknologier. Xen og kvm og en til han
ikke vil nevne.
Utfordringen der er at de forskjellige virt mangagerne er lite standardisert de
trenger som oftest mye rettiheter.
Virtualbox er det siste valget om pakker mangerer hypwerviser og etc i en pakke.
Xen via xem full controll gjennom ccl, libvirt med xen mister du mye funksjonalitet.
Virtualbox du får gui og kan bruke ccl og du kan scripte.
En vanlig måte er å lage disk imge er å bruke quem (dette er for xen og kvm)
hvis det er sånn som at vi gjøre det som vi er nå så finnes det vm ware lab
manager som har tatt 12 år og utvikle.
Logge på med forskjellige så må vi kopiere imges til deres hjemme områder.
Det er en viktig ting å kunne bruke hosten som en workstation.
hvis host os er windows så funger virtual box fungerer det veldig bra.
11.02.15
Møte:
Vi trenger ikke å tenke på at kabelen skal bli dratt ut, etc.
Hver PC skal være tilkoblet til pod
12 hosts totalt sa thomas (2 per pod).
Vi må tegne opp et nettverkskart
Elevene skal kunne copy paste mellom VMene
Viktig at John godkjenner nettstrukturen. Der alle PCene er koblet sammen til
HIG-backbone
98
OurBox
Ikke at det er en del av oppgaven vår, men han ønsker at det skal være mulig til
senere å configurere VMene remote.
Hver PC må ha en trunk med VLANS (Forskjellige subnet):
Viktig at vi har med imutual-images.
Erik sier at det er viktig å gjøre hostene selv maintable, så de kommer f.eks til å
slette temp. filer etter en vis tid, og updaterer seg selv, etc.
PCene kommer til å ha 32GB ram. De har 15 000kr per PC å bruke
Erik påstår at vi “burde” ha en SSD!
o Erik synes det kan være også mulig å heller bestille PCer via komplett,
men da har de ikke 3 års garanti avtaler med DELL.
Det skal burde være forskjellige images fr de forskjellige service.
Erik sier at det er bedre å bruke libvirt enn VirtualBox, fordi det kan være lettere å
sette grenser og teste når du kan bruke commandline og prøve å teste via libvirt,
istedenfor en hel applikasjon.
Vi burde også fokusere på åbruke CLI når vi skal konfiguere og prøve KVM. Da
lærer man mer og får en bedre oversikt over hva som er mulig og ikke.
Til neste uke skal vi lage et nettverkskart
o Snakke med john og få det godkjent
o Finn ut hvordan vi via CLI kan foreta configurasjon på KVM.
o Finn John og spør han hvorfor han foretrekker VirtualBox. For erik ser ikke
hvorfor det er bedre enn å bruke libvirt og KVM.
o Viktig at i oppgaven å sette klare linjer for hvorfor vi gjør og velger det vi
gjør.
o Vi må få installert KVM og Libvirt. Så skal en root-bruker opprette en VM.
Deretter skal en user kunne logge seg på og starte opp den VMen, men
alle endringene skal bli lagret i en egen fil. Så nestegang når en annen
bruker logger seg inn, skal de kunne starte VMen, men da fra sin egen
scratch, og endringene skal bli lagret til en egen fil. Slik vil alle brukere
kunne starte og jobbe med et base-OS, med sine egene endringer på.
Erik tegnet et oversikt hvordan nettverket kan se ut:
99
OurBox
Fikk mail av Erik:
Jeg har snakka med Jon, og er enig med han i at vi prøver virtualbo
18.02.15
Referat fra møtet:
Til neste gang skal vi ferdiglage en liten presentasjon for å demonstrere hvordan
immutable, osv. fungerer med VirtualBox og KVM.
Johns årsak til å bruke VirtualBox:
o Virtualbox client is known interface for students
o har funksjonalitet for immutable
Gjør en “lsattr” på immutable disken til virtualbox
o chattr +i -> make the file imutable
o ----i-- Om to uker skal vi ha klar:
o Noen eks. av hvordan nettverkskjema kan/ser ut i cisco rommet
Bruk fancy program, slik at vi har en original under, og vi kan tegne
endringe rog forslag med farger oppå.
Google this for inspiration: “Network lab diagram”
o Sett opp kapittler og lag struktur for hele bacheloroppgaven.
lag bulletpoints hvor skal hva, og sett inn diagrammer
Hvis erik hadde satt opp systemet, ville han ha satt en manager med Forman
o Vi kan ta en tur til terje og få visning om hvordan forman fungerer
Thomas sa at hvis elevene selv setter opp grupperinger på PCene selv, så vil ikke
det være verden undergang heller.
04.03.15
Referat fra møtet:
Finn ut hvorfor vi ikke velger libvirt/kvm, men heller velger VirtualBox.
100
OurBox
Virtualbox har en mer “mature” brukergrensesnitt og er mer kjent for studentene.
KVM er mye bedre og moden når det komme rtil hypervisor, men i vårt tilfelle, så
vil virtualbox være mer egnet.
Lag linux server, mailserver,(windows) og ha det tilgjengelig når Virtualbox starter.
FInn ut om virtualbox tilfredsstiller alle kravene våre. Hvis ikke, så evt. fortelle
hvorfor ikke, og hva som kan gjøres for å få det til.
12.april, til da burde vi ha en viss utgave av bacheloroppgaven.
2-3 uker før innlevering skal vi også ha en fornyet utgave som erik skal se på.
Skaff automatic spell check for TexWorks.
11.03.15
REFERAT:
En innlevering til erik 7.april (rett etter påsken), 1-2 before handin (rødpen)
lage en plan for 9 ukene framover, så vi dekker alt vi skal ha med,
Spør erik hvorfor vi har probemer med fluxbox når vi starter det i profile.d/, vi får
ikke kjørt eller eksekvert noen programmer.
Finn ut om vi trenger home directory, eller ikke. Ta hensyn til så ikke vilene blir
opprettet i homedirectory på loke sin servere, men på lokale PC
powerbroker for administrasjonskontrol!!!!!
stay away of mounting the homefolder inside the cp
Kanskje ha mulighet så en VM / mappe kan ha flere brukere, og ikke bare en
(lage grupperinger på en måte).
Husk at hvis det vil være nødvendig for at en bruker skal kunne sette grupper
selv, så vil det være godkjent
lag et skript som vil ta inn parametere, som lager og gjør at vmene kommer til å
bli delt mellom de og de brukerne. Det eneste ved siden av virtualbox vinduet som
skal være tilgjengelig for brukeren.
umask command: setting the default access mode. Kan være til hjelp.
Finne en måte så en bruker kan ha mulighet til å sette grupperinger selv. For
egentlig så må enn være root bruker for å gjøre det.
Brukere kan ha tilgang og setter en fil i en shared directory, der filen inneholder
brukernavn som de ønsker gruppering på. Så er det crontab som kjører og
sjekker hvert 5 min og exekverer filene
MAP, enkleste måte med LDAP er “PADL software pty ltd” (PAM_LDAP). Spør
John og få han til å gi oss LDAP mulighet. Hvis ikke, så må vi gjøre det lokalt
o Hver PC som starter får
Lag en presentasjon og visning til thomas om hva som fungerer og tilfredstiller
kravene våre, og hva ikke, (13. april og ut burde vi ha det lagt opp klar for visning)
Erik 21.mars - 10.april 26.mars tilgjengelig på email)
Uke 12 er det møte.
18.03.15
Møtereferat:
Vi må ha testing på planen.
Følger det gant skjemaet opp kravspecc? (Spør Erik).
Les om user acceptance før vi gjør testing og før vi skriver om det.
o Det burde være i henhold til kravspec.
Bruk Thomas, de assistentene og 2 andre random. (Maks 5)
15 -20. April. burde vi gjør det.
Vi kan ikke nå 27 mars - 10 april. Thomas.
101
OurBox
Møte med Erik den 10 april og møte med Thomas den 15 april. hvor vi snakker
om hvordan vi skal teste.
23.03.15
REFERAT FRA MØTET MED JOHN:
Fant ut at ldap.hig.no er en server for enkle oppslag om brukere, som email,
bilde og navn. Så vi har hittil prøvd å vertifisere passordet mot feil server de
siste ukene. Årsaken var at etter et besøk hos IT-avdelingen, fikk vi beskjed
om at vi bare skulle prøve oss fram. Dermed har vi klart å bruke opp 2 uker
på lite fornuftig framdrift.
Fikk to lapper:
o 1.note:
Server we should connect to: hig1.hig.no (IP:128.39.140.7) or
carol.hig.no
(IP:128.39.140.10)
My user account we will authenticate with: 120683
bindDN: cn=120683,ou=12HBWUA,ou=student,dc=hig,dc=no
Han sa det var to muligheter å autentisere seg, enten mot den vi fikk som gjør at
vi skal bruke PAM mot Active Directory, dette betyr at vi må skreddersy PAM mye
mer enn om vi da skulle ha brukt den andre servern som vi kunne koble oss i mot.
Den bruker da Poisix.
Vi kan også få mulighet til å gjøre dette med ansatte også, men da må vi filtere
mer.
o Vi fikk da gitt “treet” for studenter, så om vi skal gjøre det med ansatte
også så er vi nødt til å gå tilbake til jon.
102
OurBox
B
User Manual
Ourbox Manual
Stepan Maluchev
Gavin Thomas Garrad
May 15, 2015
Contents
1 Some instructions at first
1.1 Users . . . . . . . . . . . . . . . . . . . . . . . . . . . . . . . .
1.2 Virtualbox . . . . . . . . . . . . . . . . . . . . . . . . . . . . .
1
1
2
2 Installation
2
3 Switch the Desktop
4
4 Semester maintenance
4
5 How to make an image
5
1
Some instructions at first
Once you have made an .vdi image, remember to turn of the auto update,
since if there is a change to the original .vdi image that resides on the desktop
of the administrator and other users have work saved to the differential file.
The differential file will be broken, so when you need to do an update on the
original .vdi image, you have to remove all of the users differential files.
1.1
Users
All the user will have a home folder residing in the /home/”studentnumber”.
Within their home folder there will be a Virtualbox folder which then contains all of their differential files.
1
103
OurBox
1.2
Virtualbox
If the user is unlucky and deletes the VMs that are standard for the system
this won’t be any problem they just need to relog, but all their work will be
lost.
2
Installation
1. Step Configure your .vdi images in a hypervisor preferably Virtualbox.
Configure them with the necessary applications you want. Set the .vdi
images in a folder named os
2. Step Have the folder which contains the script to run and the necessary
files to go with and the os folder on a flashdrive.
3. Step Install ubuntu on the host machine.
4. Step Copy these two folder into the desktop of the administrator. On
the host machine you want the system.
5. Step Open a terminal and run: chmod +x /path/to/runMe.sh.
Where the ”/path/to” is the path to the script.
6. Step Type in terminal ./path/to/runMe.sh. Where the ”/path/to”
is the path to the script.
7. Step Wait until it reboots, after reboot you should see something like
2
104
OurBox
Figure 1: Unity greeter.
8. Step Before you log in, press the circle, and select ”Fluxbox”. Left click
on Fluxbox, even if it is set as default.
Figure 2: Valg av desktop.
9. Step Now you can log in with the administrator and you are able to
have the Fluxbox desktop. Now you need to remove the choice of
having the possibility to choose ”Unity”. Just right click the desktop,
a menu should pop up and there will be a choice which says: Switch
Environment enter that menu and choose Fluxbox.
3
105
OurBox
Now you have fully installed the system, you won’t be able to log into
the ”Unity” aka Ubuntu but only Fluxbox. Same with the users.
3
Switch the Desktop
If there is anything you as an administrator needs to be done, what you do
to get back to the regular Ubuntu desktop.
1. Step Log on as the administrator.
2. Step Right click on the desktop
3. Step Enter the submenu Switch Environment
4. Step Select the Unity
5. Step Log out.
6. Step Left click the circle in the login prompt, it should be in the top
right. See figure 1
7. Step Select Ubuntu. See figure 2
8. Step Now you you got the regular ubuntu, here you can do your configuration.
9. Step Now that you are done with what you needed to do, log out.
10. Step Do the same you did in step 6-7 except you choose Fluxbox.
11. Step Do the same in step 3-4 except you choose Fluxbox.
4
Semester maintenance
Our recommendation is to just redo section 2 installation. Since there will
probably be a lot of user that has logged onto the system and then they also
will have a home folder on the machine, and their user will be in the accounts
on the system.
4
106
OurBox
5
How to make an image
1. Step Download the desired operating system.
2. Step Open Virtualbox.
3. Step Select ”New”.
4. Step Enter desired name for the image and OS version. Click ”Next”.
5. Step Select how much memory. Preferably 2048 MB. Click ”Next”.
6. Step Select ”Create a Virtual hard drive now”. Click ”Create”.
7. Step Select ”VDI (VirtualBox Disk Image)”. Click ”Next”.
8. Step Select ”Dynamically allocated”. Click ”Next”.
9. Step Choose how much disc space the Virtual drive should have. Preferably 8 GB if it is Ubuntu or more than 30 GB if Windows.
10. Step Now you have created a .vdi image. Now you need to install the
desired OS into that image. Right click VM in Virtualbox.
11. Step Choose ”Settings”.
12. Step Choose ”Storage”.
13. Step Select the option ”Controller: IDE”, when this option is selected
you should see two icons, a CD with a plus icon and a hard drive with
a plus icon. Select the CD with a plus icon.
14. Step A window should appear, Click ”Choose Disk”.
15. Step Navigate to the operating system you want to install. Should be
a .iso file. Select it and click ”Open”.
16. Step Now you should see a new option under Controller: IDE. If you
see that just Click ”ok” in the bottom right.
17. Step Now run your VM by click the arrow which says ”start”.
18. Step Install your OS.
19. Step Now that you have made the image it should be in /home/”your
folder”/Virtualbox VMs/”name of the image you made”/”name”.vdi
This is the image you should use in 2
5
107
OurBox
C
Code
108
OurBox
C.1
afterInstallation.sh
1
2
3
4
5
6
7
8
9
#!/bin/bash
#This has to be run as a the user, not root.
echo -e "[begin] (fluxbox)
[include] (/etc/X11/fluxbox/fluxbox-menu)
[submenu] (Switch Environment)
[exec] (Unity) {gnome-terminal -x sudo mv /usr/share/
ubuntu.desktop /usr/share/xsessions/ }
[exec] (Fluxbox) {gnome-terminal -x sudo mv /usr/share
/xsessions/ubuntu.desktop /usr/share/ }
[end]
[end]" > ˜/.fluxbox/menu
109
OurBox
C.2
runMe.sh
1
#!/bin/bash
2
3
4
admin=$(zenity --entry --text="What is the username of the
administrator?");
path="/home/$admin/Desktop/firstRun";
5
6
7
apt-get -y update;
apt-get -y upgrade;
8
9
10
11
12
13
14
# Put in the admin name into the "admin" variable in the file
installVirtualBox.sh
# This script will install virtualbox-4.3 and the extention
pack:
s e d -i "/admin=/c\admin=\"$admin\";" $path/installVirtualBox.
sh;
# making installVirtualBox.sh executable
chmod +x $path/installVirtualBox.sh;
$path/installVirtualBox.sh;
15
16
apt-get install -y fluxbox;
17
18
19
20
21
22
23
24
# Configure fluxbox:
c a t $path/fluxbox-menu > /etc/X11/fluxbox/fluxbox-menu;
c a t $path/keys > /etc/X11/fluxbox/keys;
s e d -i ’s/ e x e c fluxbox/ e x e c virtualbox\&\n e x e c fluxbox/g’ /
usr/bin/startfluxbox;
echo -e "[SeatDefaults]\nuser-session=fluxbox" > /usr/share/
lightdm/lightdm.conf.d/50-ubuntu.conf;
# Script adds the ability to switch from between unity and
fluxbox environments
cp -r $path/.fluxbox /home/$admin/;
25
26
27
# Configure the greeter, which hides users and allows manual
login:
echo -e "[SeatDefaults]\n greeter-hide-users=true\n greetershow-manual-login=true \n allow-guest=false" > /etc/
lightdm/lightdm.conf;
28
29
30
31
32
33
34
# Install LDAP + Conf:
DEBIAN_FRONTEND=noninteractive apt-get install -y libpam-ldapd
;
s e d -i ’s/compat/compat ldap/’ /etc/nsswitch.conf;
c a t $path/nslcdConfigFile > /etc/nslcd.conf;
service nslcd restart;
echo "session required pam_mkhomedir.so skel=/etc/skel/ umask
=0077" >> /etc/pam.d/common-session;
35
36
37
38
39
40
41
42
#Move tty (virtual consoles)
mv /etc/init/tty1.conf /home/$admin/Desktop
mv /etc/init/tty2.conf /home/$admin/Desktop
mv /etc/init/tty3.conf /home/$admin/Desktop
mv /etc/init/tty4.conf /home/$admin/Desktop
mv /etc/init/tty5.conf /home/$admin/Desktop
mv /etc/init/tty6.conf /home/$admin/Desktop
110
OurBox
43
44
45
46
47
48
49
# Put in the admin name into the "admin" variable in the file
verifyNewOSes.sh
# verifyNewOSes.sh will give all .vdi files 755 permisions.
s e d -i "/admin=/c\admin=\"$admin\";" $path/verifyNewOSes.sh;
# making verifyNewOSes.sh executable
chmod +x $path/verifyNewOSes.sh;
$path/verifyNewOSes.sh;
50
51
52
53
54
# Copying the ...
s e d -i "/admin=/c\admin=\"$admin\";" $path/defaultVMScript.sh
;
#cp $path/defaultVMScript.sh /etc/profile.d/;
c a t $path/defaultVMScript.sh > /etc/profile.d/defaultVMScript.
sh;
55
56
reboot;
111
OurBox
C.3
verifyNewOSes.sh
1
#!/bin/bash
2
3
admin="";
4
5
chmod 755 /home/$admin/Desktop/os;
6
7
8
9
10
f o r file i n $(ls -l /home/$admin/Desktop/os/*.vdi | awk ’{
print $9}’)
do
chmod 755 $file;
done
112
OurBox
C.4
installVirtualBox.sh
1
#!/bin/bash
2
3
admin="";
4
5
6
# Get access to the repository where Virtualbox-4.3 can be
downloaded from:
sudo echo "deb http://download.virtualbox.org/virtualbox/
debian trusty contrib" >> /etc/apt/sources.list;
7
8
9
# Download the Oracle public key for apt-secure and
automatically add the key:
sudo wget -q https://www.virtualbox.org/download/oracle_vbox.
asc -O- | sudo apt-key add -;
10
11
12
# Update that host with the new key:
sudo apt-get update;
13
14
15
# Install virtualbox 4.3:
sudo apt-get install virtualbox-4.3;
16
17
18
19
20
21
# Install the extension pack for VirtualBox 4.3.26. This is
needed for get access to the USB ports
# on the guest hosts, etc. (This is not the same as guest
edition). First we redirect to /tmp/
# and download the extention pack (after a reboot, the
downloaded extention file will be removed
# automatically):
wget -O extention.vbox-extpack http://dlc-cdn.sun.com/
virtualbox/4.3.26/Oracle_VM_VirtualBox_Extension_Pack
-4.3.26-98988.vbox-extpack;
22
23
24
# Make VirtualBox install the extension pack:
sudo VBoxManage extpack install extention.vbox-extpack;
25
26
27
# The user must be added to the "vboxusers" group to get full
use of the pack:
sudo adduser $admin vboxusers;
113
OurBox
C.5
defaultVMScript.sh
1
#!/bin/bash
2
3
4
5
admin="";
me=$(whoami);
os="";
6
7
8
9
10
f o r oses i n $(ls -l /home/$admin/Desktop/os/ | awk ’{print $9
}’ | grep ".vdi" | cut -d "." -f 1)
do
os="$os $oses";
done
11
12
i f [[ $me != $admin ]]; t h e n
13
f o r eachOS i n $os;do
osRegEx="ˆ\"${eachOS}\"";
knownVMs=$(VBoxManage list vms | grep -e "
$osRegEx" | awk ’{print $1}’ | cut -d "\""
-f 2);
DIRECTORY=˜/VirtualBox\ VMs/$eachOS;
14
15
16
17
18
if [[ $knownVMs != $eachOS ]];then
if [[ -d $DIRECTORY ]]; then
rm -fr "$DIRECTORY";
fi
VBoxManage createvm --name $eachOS -ostype Ubuntu_64 --register;
VBoxManage modifyvm $eachOS --memory
1024 --vram 256 --cpus 2 --usb on
--nic1 bridged --bridgeadapter1
eth1;
VBoxManage storagectl $eachOS --name
sata1 --add sata;
VBoxManage storageattach $eachOS -storagectl sata1 --port 0 --device
0 --type hdd --medium /home/
$admin/Desktop/os/$eachOS.vdi -mtype immutable;
fi
19
20
21
22
23
24
25
26
27
done
28
29
fi
114
OurBox
D
1
2
3
nslcd.conf
# /etc/nslcd.conf
# nslcd configuration file. See nslcd.conf(5)
# for details.
4
5
6
7
# The user and group nslcd should run as.
uid nslcd
gid nslcd
8
9
10
# The location at which the LDAP server(s) should be reachable
.
uri ldap://128.39.140.10/
11
12
13
14
15
# The search base that will be used for all queries.
base ou=student,dc=hig,dc=no
# The LDAP protocol version to use.
ldap_version 3
16
17
18
19
# The DN to bind with for normal lookups.
binddn cn=120683,ou=12HBWUA,ou=student,dc=hig,dc=no
bindpw Ourbox92
20
21
22
# The DN used for password modifications by root.
#rootpwmoddn cn=admin,dc=example,dc=com
23
24
25
26
# SSL options
ssl off
#tls_reqcert never
27
28
29
# The search scope.
scope sub
30
31
32
# Mappings for Active Directory
pagesize 1000
33
34
35
36
37
38
39
40
41
42
43
44
filter
map
map
map
map
map
map
filter
map
map
passwd
passwd
passwd
passwd
passwd
passwd
passwd
shadow
shadow
shadow
(&(objectClass=user))
uid
sAMAccountName
gidNumber
"125"
homeDirectory
"/home/$sAMAccountName"
gecos
description
loginShell
"/bin/bash"
uidNumber
msSFU30UidNumber
(&(objectClass=user))
uid
sAMAccountName
shadowLastChange pwdLastSet
115
OurBox
E
Fluxbox config
116
OurBox
E.1
Fluxbox menu for admin
1
2
3
4
5
6
7
[begin] (fluxbox)
[include] (/etc/X11/fluxbox/fluxbox-menu)
[submenu] (Switch Environment)
[ e x e c ] (Unity) {gnome-terminal -x sudo mv /usr/share/
ubuntu.desktop /usr/share/xsessions/ }
[ e x e c ] (Fluxbox) {gnome-terminal -x sudo mv /usr/share
/xsessions/ubuntu.desktop /usr/share/ }
[end]
[end]
117
OurBox
E.2
Fluxbox keys file
1
2
3
4
# click on the desktop to get menus
OnDesktop Mouse1 :HideMenus
OnDesktop Mouse2 :WorkspaceMenu
OnDesktop Mouse3 :RootMenu
5
6
7
8
# scroll on the desktop to change workspaces
OnDesktop Mouse4 :PrevWorkspace
OnDesktop Mouse5 :NextWorkspace
9
10
11
12
# scroll on the toolbar to change current window
OnToolbar Mouse4 :PrevWindow {static groups} (iconhidden=no)
OnToolbar Mouse5 :NextWindow {static groups} (iconhidden=no)
13
14
15
16
# alt + left/right click to move/resize a window
OnWindow Mod1 Mouse1 :MacroCmd {Raise} {Focus} {StartMoving}
OnWindowBorder Move1 :StartMoving
17
18
19
20
OnWindow Mod1 Mouse3 :MacroCmd {Raise} {Focus} {StartResizing
NearestCorner}
OnLeftGrip Move1 :StartResizing bottomleft
OnRightGrip Move1 :StartResizing bottomright
21
22
23
# alt + middle click to lower the window
OnWindow Mod1 Mouse2 :Lower
24
25
26
# control-click a window’s titlebar and drag to attach windows
OnTitlebar Control Mouse1 :StartTabbing
27
28
29
# double click on the titlebar to shade
OnTitlebar Double Mouse1 :Shade
30
31
32
33
# left click on the titlebar to move the window
OnTitlebar Mouse1 :MacroCmd {Raise} {Focus} {ActivateTab}
OnTitlebar Move1 :StartMoving
34
35
36
# middle click on the titlebar to lower
OnTitlebar Mouse2 :Lower
37
38
39
# right click on the titlebar for a menu of options
OnTitlebar Mouse3 :WindowMenu
40
41
42
43
# alt-tab
Mod1 Tab :NextWindow {groups} (workspace=[current])
Mod1 Shift Tab :PrevWindow {groups} (workspace=[current])
44
45
46
47
# cycle through tabs in the current window
Mod4 Tab :NextTab
Mod4 Shift Tab :PrevTab
48
49
50
51
52
53
# go
Mod4
Mod4
Mod4
Mod4
to a specific tab in the current window
1 :Tab 1
2 :Tab 2
3 :Tab 3
4 :Tab 4
118
OurBox
54
55
56
57
58
Mod4
Mod4
Mod4
Mod4
Mod4
5
6
7
8
9
:Tab
:Tab
:Tab
:Tab
:Tab
5
6
7
8
9
59
60
61
# open a terminal
#Mod1 F1 :Exec x-terminal-emulator
62
63
64
# open a dialog to run programs
#Mod1 F2 :Exec fbrun
65
66
67
68
69
70
# volume settings, using common keycodes
# if these don’t work, use xev to find out your real keycodes
176 :Exec amixer sset Master,0 1+
174 :Exec amixer sset Master,0 1160 :Exec amixer sset Master,0 toggle
71
72
73
74
75
76
77
# current window commands
Mod1 F4 :Close
Mod1 F5 :Kill
Mod1 F9 :Minimize
Mod1 F10 :Maximize
Mod1 F11 :Fullscreen
78
79
80
# open the window menu
Mod1 space :WindowMenu
81
82
83
# exit fluxbox
Control Mod1 Delete :Exit
84
85
86
87
# change to previous/next workspace
Control Mod1 Left :PrevWorkspace
Control Mod1 Right :NextWorkspace
88
89
90
91
# send the current window to previous/next workspace
Mod4 Left :SendToPrevWorkspace
Mod4 Right :SendToNextWorkspace
92
93
94
95
# send the current window and follow it to previous/next
workspace
Control Mod4 Left :TakeToPrevWorkspace
Control Mod4 Right :TakeToNextWorkspace
96
97
98
99
100
101
102
103
104
105
106
# change to a specific workspace
Control F1 :Workspace 1
Control F2 :Workspace 2
Control F3 :Workspace 3
Control F4 :Workspace 4
Control F5 :Workspace 5
Control F6 :Workspace 6
Control F7 :Workspace 7
Control F8 :Workspace 8
Control F9 :Workspace 9
119
OurBox
107
108
109
Control F10 :Workspace 10
Control F11 :Workspace 11
Control F12 :Workspace 12
110
111
112
113
114
115
116
117
118
119
120
121
122
123
# send the current window to a specific workspace
Mod4 F1 :SendToWorkspace 1
Mod4 F2 :SendToWorkspace 2
Mod4 F3 :SendToWorkspace 3
Mod4 F4 :SendToWorkspace 4
Mod4 F5 :SendToWorkspace 5
Mod4 F6 :SendToWorkspace 6
Mod4 F7 :SendToWorkspace 7
Mod4 F8 :SendToWorkspace 8
Mod4 F9 :SendToWorkspace 9
Mod4 F10 :SendToWorkspace 10
Mod4 F11 :SendToWorkspace 11
Mod4 F12 :SendToWorkspace 12
124
125
126
127
128
129
130
131
132
133
134
135
136
137
# send the current window and change to a specific workspace
Control Mod4 F1 :TakeToWorkspace 1
Control Mod4 F2 :TakeToWorkspace 2
Control Mod4 F3 :TakeToWorkspace 3
Control Mod4 F4 :TakeToWorkspace 4
Control Mod4 F5 :TakeToWorkspace 5
Control Mod4 F6 :TakeToWorkspace 6
Control Mod4 F7 :TakeToWorkspace 7
Control Mod4 F8 :TakeToWorkspace 8
Control Mod4 F9 :TakeToWorkspace 9
Control Mod4 F10 :TakeToWorkspace 10
Control Mod4 F11 :TakeToWorkspace 11
Control Mod4 F12 :TakeToWorkspace 12
120
OurBox
E.3
Fluxbox startup file
1
2
3
4
5
#!/bin/sh
#
# fluxbox startup-script:
#
# Lines starting with a ’#’ are ignored.
6
7
8
# Change your keymap:
xmodmap "/home/ourbox/.Xmodmap"
9
10
11
12
13
14
15
16
17
18
19
20
21
22
23
24
# Applications you want to run with fluxbox.
# MAKE SURE THAT APPS THAT KEEP RUNNING HAVE AN ’’&’’ AT THE
END.
#
# unclutter -idle 2 &
# wmnd &
# wmsmixer -w &
# idesk &
#
# Debian-local change:
#
- fbautostart has been added with a quick hack to check to
see if it
#
exists. If it does, we’ll start it up by default.
which fbautostart > /dev/null
i f [ $? -eq 0 ]; t h e n
fbautostart
fi
25
26
27
# And last but not least we start fluxbox.
# Because it is the last app you have to run it with ’’exec’’
before it.
28
29
30
31
32
33
e x e c virtualbox&
e x e c fluxbox
# or if you want to keep a log:
# exec virtualbox&
e x e c fluxbox -log "/home/ourbox/.fluxbox/log"
121
OurBox
E.4
Fluxbox User Menu
1
2
# This is an automatically generated file.
# Please see <file:/usr/share/doc/menu/README> for information
.
3
4
5
# to use your own menu, copy this to ~/.fluxbox/menu, then
edit
# ~/.fluxbox/init and change the session.menuFile path to ~/.
fluxbox/menu
6
7
[begin] (Fluxbox)
8
9
# Automatically generated file. Do not edit (see /usr/share/
doc/menu/html/index.html)
10
11
12
13
14
15
16
17
[submenu] (Applications) {}
[submenu] (VirtualBox) {}
[ e x e c ] (VirtualBox) {/usr/bin/virtualbox} </usr/share
/pixmaps/virtualbox.xpm>
[end]
[end]
[restart] (Restart)
[ e x i t ] (Exit)
18
19
[end]
122
OurBox
F
1
2
3
4
Now that you have
need to
make the runMe.sh
Also, remember to
desktop,
this is where the
Read me file
installed ubuntu on the machine, now you
executable.
make a folder which is called "os" in your
.vdi images are going to be.
5
6
7
Open a terminal and run:
sudo chomd +x /path/to/runMe.sh
8
9
10
11
Now that you have done that, you need to execute runMe.sh,
in terminal run:
/path/to/runMe.sh
12
13
14
15
16
17
18
19
this will install, virtualbox, fluxbox and libpam-ldapd,
it will configure the default for the different services.
This may take a minute, but the machine will reboot afterwards
.
When the machine boots up again you need to login as the user
you made
in fluxbox.
Then you can log out and log in again into the unity, and then
run
afterInstallation.sh
20
21
22
open terminal and run:
/path/to/afterinstallation.sh
23
24
25
26
What afterInstallation does, is configure the admin users
fluxbox to have
some extra functionality. So that you can lock so that the
other users can not
log in into ubuntu but only fluxbox.
123
OurBox
G
Project agreement
124
OurBox
125