1
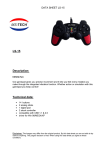
Viswall Usage Guide
by
Andrew A. Ray
This guide is meant to detail the operation of the VisWall system in all aspects. It will cover how to
actually turn on and operate the system, to how to run demos on the system, and finally how to develop
applications on the system. Please read the entire guide before using the system for the first time.
To obtain an account for usage on th system, please obtain permission from Dr. Bowman. Once this
has been obtained, send your PID and full name to anray2 @ vt . edu or rymcmaha @ vt . edu and they
will create an account for you. This login will only work on the viswall system. In order to use the
HMD system contact shpatric @ vt . edu for a login to that system. To use the gigapixel displays
(visblocks or the big lcd panel) contact Dr. Quek.
Outline:
1) Physical usage of the Viswalls
•
Quick Checklist
•
Turning on the projectors
•
Turning off the projectors
•
Window manager recommendation
•
Gamepad operation
2) Software
1. Running demos
•
Demo usage
•
Using the gamepad to control the system
2. Custom application creation
•
Creating Applications
•
Building Applications
•
Running Applications
•
Using the gamepad in your application
Physical Usage of the Viswall system
Quick Checklist for Usage
-Rule of the thumb – Leave it in the same state you found it in
-Make sure someone else hasn't reserved the system before you use it
-Log in
-Turn on the projectors
-Turn on the gamepad
-Use system
-Turn off the gamepad
-Turn off the projectors
-Log out
Do NOT for any reason:
-Modify any projector settings.
-Unplug any cables from the Viswall computer or projectors.
-Turn off the computer, it can be and often will be used remotely.
-Walk behind the screens. This is a sensitive area and you can easily cause thousands of dollars
of damage if you are not careful.
-Leave the projectors on if you are not using them. They have a limited lifespan, and replacing
bulbs is not in the budget in the foreseeable future.
-Leave fingerprints on the lenses of the glasses. Handle them by the frames only.
Turning on the projectors
Log into the VisWall system first.
Take the remote control from the desk where the console is, stand in the middle of the two viswall
screens, point the remote at a particular wall, and press the power button. You should hear one to two
beeps indicating that the projectors have been turned on. Return the remote to the desk where you got
it after this has happened.
It will take around a minute for an image to show up on the walls, so be patient.
Turning off the projectors
BEFORE logging out, take the remote from the desk, stand in the middle of the two walls, point the
remote at one of the two walls and press the power button. You should see a message asking for
confirmation to power down. Press the power button again and the projectors will turn off. Repeat for
the wall you did not point at.
If you log out before you turn of the projectors you may not be able to guarantee the projectors have
been turned off.
Window manager recommendation
Before logging into the Viswall system choose session types at the bottom left of the screen and select
Fluxbox for your session. This will prevent menu bars at the top and bottom of the two viswalls from
appearing.
You are welcome to figure out how to custom configure Gnome to hide the bars from displays :0.1 and
:0.2, and are encouraged to send the information on how to do this to Dr. Bowman for inclusion to this
document.
Gamepad operation
The gamepad needs to be turned on before it can be used to control applications on the Viswall system.
To turn on the gamepad, hold it with the buttons and joysticks facing the floor. Press the switch from
the left most position to the right most position. To turn off the gamepad, hold it so that the buttons and
joysticks are facing the floor and move the switch all the way from the right to the left.
If you leave the gamepad unused for a period of time, it may turn itself off. To turn it back on, turn the
gamepad off. Wait 5 seconds, then turn the gamepad back on.
Software usage on the Viswall System
This section is broken down into two different parts. One is how to use pre-existing demos on the
system, and the other part is how to develop applications on the system.
Demo operation
When using flux box simply right click and click xterm to start a terminal application. Once this is
done, then you can type one of the three following commands (and hit enter afterwards) to start one of
the demos for the system.
demo-Cluny – A model fly-through of the Cluny cathedral
demo-StMaria – A model fly-through of the Santa Maria Church
demo-curia – A model fly-through of one room in a cathedral
Gamepad usage
To control the visualization you are seeing on the Viswall system you must use the wireless gamepad.
It is designed to allow for full control of 3D scenes with a 2D display device.
First, stand in the middle of the Viswall system and orient yourself towards to looking at the area where
the two viswalls intersect. This is the origin of the navigation, and is where all of the controls listed
below are relative to.
There are four main control areas to pay attention to on the gamepad. They are the upper left joy pad ,
the bottom left control stick, the bottom right control stick, and the upper right set of buttons labeled
1,2,3,4.
The upper left joypad will make the visualization operate like a globe. It will turn left, right, up, and
down with the respective presses of the gamepad device.
The lower left control stick will allow for moving straight into the visualization, moving away from the
visualization, strafing left, and strafing right.
The lower right control stick will make you fly straight up or down in the visualization.
The upper right set of buttons provides three major operations. Pressing one will slow down the
navigation speed, pressing three will speed it up. Pressing buttons one and two together will reset the
navigation location to the initial location.
Custom application creation
The only supported software for the VisWall system at this time is DIVERSE. You will need to use the
correct DSOs to get the proper configuration and usage of this. If you aren't using the provided DSOs
and the system doesn't work for you, you will have to fix it yourself. Only the installed configuration is
supported.
Installed software information:
The current software installed on the system is:
Open Scene Graph 1.2 – In /usr/local
Latest version of OpenGL supported by the NVIDIA drivers
DGL – In /usr/local/diverse/dgl
DTK – In /usr/local/diverse/dtk
Developing your own applications
When developing your own application there is one major decision that needs to be made with regards
to DIVERSE development. Is this going to be a stand alone application, or is this going to be a DSO
that can work with any DIVERSE application.
This document and the user manual for DGL (Use oowriter to view it) are located in
/usr/local/demos/docs. The user manual for DGL contains extensive information about how to code
applications using DGL.
Creating applications and DSO's
Example code is the easiest way to start developing on the system. The easiest path of development is
pure OpenGL or Open Scene Graph. It is very simple to integrate these display components with
DIVERSE. With OpenGL, all that is necessary is to call OpenGL in a specified callback. With Open
Scene Graph, all that is necessary is the addition of your top most node to DOSG::getWorld()>addChild(yourNodeHere).
An functioning example application, along with a Makefile is located in
/usr/local/demos/codeExamples/testApp
An functioning example DSO, along with a Makefile is located in
/usr/local/demos/codeExamples/testDSO
Building applications
To build an application the dgl-config program is the recommended method. This program can be
called with different arguments and prints out information required to build the application.
List of commands that can be used with dgl-config:
dgl-config --compiler
//Gives the compiler to use
dgl-config --cflags
//Gives the flags necessary to compile
dgl-config --include
//Gives the the include directories necessary for DGL compilation
dgl-config --libs
//Gives the flags to the compiler necessary for linking DGL applications
dgl-config --osg-include //Gives the compiler includee flags on how to incorporate Open Scene Graph
into the application
dgl-config --osg-libs
//Gives flags to the compiler necessary for linking Open Scene Graph into
the application
Running applications
To use an application that uses this as a foundation on the Viswall system do the following:
dtk-shutdownServer
dtk-server visPad&
export DGL_DSO_FILES=visWallGroup
./applicationName
To use a DSO on the Viswall system do the following:
dtk-shutdownServer
dtk-server visPad&
export DGL_DSO_FILES=visWallGroup:testDSO
./applicationName
[Note, testDSO and applicationName have to exist in the same directory].
Summary:
To use the Viswall system with your application:
export DGL_DSO_FILES=visWallGroup
./yourApp
To start the gamepad tracker for your application:
dtk-shutdownServer
dtk-server visPad&
Using the gamepad in your program:
The gamepad writes to shared memory just like the wand does.
The gamepad memory segment (/tmp/gamepad) is the size of 4 floats, and contains the x/y position of
the bottom two control sticks. Array index 0/1 are for the left stick, and 2/3 are for the right stick.
The button memory segment is the size of a character and contains information about the four buttons
on the gamepad. The other four buttons on the top of the gamepad aren't supported.
The hat memory segment is the size of two characters and contains the information about the upper left
gamepad. It contains -1, 0, 1 for (left|up / neutral / right|down). The first character is left/right, the
second is up/down. Use charBuffer[0] == 1/-1/0 in your code.