1
Adobe
Systems’
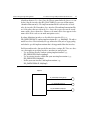
ADOBE® INDESIGN® 2
PROGRAMMING
GUIDE
documentation
on how to
use the
Application
Programming
Interfaces for
our next
generation
publishing
product.
Adobe Developer Support
345 Park Avenue
San Jose, CA 95110-2704
408-536-9000
http://partners.adobe.com
Ë
2
Adobe InDesign Programming Guide
Copyright 1997–2003 Adobe Systems Incorporated.
All Rights Reserved.
The information in this document is furnished for informational use only, is
subject to change without notice, and should not be construed as a
commitment by Adobe Systems Incorporated. Adobe Systems Incorporated
assumes no responsibility or liability for any errors or inaccuracies that may
appear in this document. The software described in this document is furnished
under license and may only be used or copied in accordance with the terms of
such license.
Adobe, Adobe After Effects, Adobe InDesign, Adobe PhotoDeluxe, Adobe
Premiere, Adobe Photoshop, Adobe Illustrator, Adobe Type Manager, ATM and
PostScript are trademarks of Adobe Systems Incorporated that may be
registered in certain jurisdictions. Macintosh and Apple are registered
trademarks, and Mac OS is a trademark of Apple Computer, Inc. Microsoft,
Windows, Windows 95, Windows 98, and Windows NT are registered
trademarks of Microsoft Corporation. All other products or name brands are
trademarks of their respective holders.
Adobe InDesign Programming Guide
3
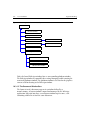
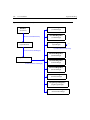
1. Overview . . . . . . . . . . . . . . . . . . . . . . . . . . . . . . . . . . . . . . . . . . . . . . . . . . . . . . . . . 23
1.0. Introduction . . . . . . . . . . . . . . . . . . . . . . . . . . . . . . . . . . . . . . . . . . . . . . . . 23
1.1. Goals. . . . . . . . . . . . . . . . . . . . . . . . . . . . . . . . . . . . . . . . . . . . . . . . . . . . . . . 23
1.2. Chapter-at-a-glance . . . . . . . . . . . . . . . . . . . . . . . . . . . . . . . . . . . . . . . . . . 24
1.3. API Plug-ins Furnished by the SDK . . . . . . . . . . . . . . . . . . . . . . . . . . . . . 25
1.4. Plug-in Environment . . . . . . . . . . . . . . . . . . . . . . . . . . . . . . . . . . . . . . . . . 25
1.4.1. Object Model . . . . . . . . . . . . . . . . . . . . . . . . . . . . . . . . . . . . . . . . . . . . . . . . . . . . . . . . . .27
1.4.2. Base Class for All Interfaces (IPMUnknown). . . . . . . . . . . . . . . . . . . . . . . . . . . . . . . .27
1.4.3. InDesign Session and Workspace . . . . . . . . . . . . . . . . . . . . . . . . . . . . . . . . . . . . . . . . .27
1.5. Programming Considerations . . . . . . . . . . . . . . . . . . . . . . . . . . . . . . . . . . 29
1.5.1. UI . . . . . . . . . . . . . . . . . . . . . . . . . . . . . . . . . . . . . . . . . . . . . . . . . . . . . . . . . . . . . . . . . . .29
1.5.2. Commands . . . . . . . . . . . . . . . . . . . . . . . . . . . . . . . . . . . . . . . . . . . . . . . . . . . . . . . . . . .32
1.5.3. Messaging. . . . . . . . . . . . . . . . . . . . . . . . . . . . . . . . . . . . . . . . . . . . . . . . . . . . . . . . . . . . .33
1.5.4. Tools. . . . . . . . . . . . . . . . . . . . . . . . . . . . . . . . . . . . . . . . . . . . . . . . . . . . . . . . . . . . . . . . .34
1.5.5. Common Data (Persistence) . . . . . . . . . . . . . . . . . . . . . . . . . . . . . . . . . . . . . . . . . . . . .35
1.5.6. Documents. . . . . . . . . . . . . . . . . . . . . . . . . . . . . . . . . . . . . . . . . . . . . . . . . . . . . . . . . . . .36
1.5.7. Page Items . . . . . . . . . . . . . . . . . . . . . . . . . . . . . . . . . . . . . . . . . . . . . . . . . . . . . . . . . . . .38
1.5.8. Graphics and Images. . . . . . . . . . . . . . . . . . . . . . . . . . . . . . . . . . . . . . . . . . . . . . . . . . . .39
1.5.9. Color. . . . . . . . . . . . . . . . . . . . . . . . . . . . . . . . . . . . . . . . . . . . . . . . . . . . . . . . . . . . . . . . .40
1.5.10. Service Providers . . . . . . . . . . . . . . . . . . . . . . . . . . . . . . . . . . . . . . . . . . . . . . . . . . . . . .41
1.5.11. Import/Export . . . . . . . . . . . . . . . . . . . . . . . . . . . . . . . . . . . . . . . . . . . . . . . . . . . . . . . .41
1.5.12. Data Exchange. . . . . . . . . . . . . . . . . . . . . . . . . . . . . . . . . . . . . . . . . . . . . . . . . . . . . . . .43
1.5.13. Data Links . . . . . . . . . . . . . . . . . . . . . . . . . . . . . . . . . . . . . . . . . . . . . . . . . . . . . . . . . . .43
1.5.14. Text. . . . . . . . . . . . . . . . . . . . . . . . . . . . . . . . . . . . . . . . . . . . . . . . . . . . . . . . . . . . . . . . .44
1.5.15. PDF. . . . . . . . . . . . . . . . . . . . . . . . . . . . . . . . . . . . . . . . . . . . . . . . . . . . . . . . . . . . . . . . .47
1.5.16. Printing . . . . . . . . . . . . . . . . . . . . . . . . . . . . . . . . . . . . . . . . . . . . . . . . . . . . . . . . . . . . .48
1.5.17. Scripting. . . . . . . . . . . . . . . . . . . . . . . . . . . . . . . . . . . . . . . . . . . . . . . . . . . . . . . . . . . . .48
1.5.18. Events . . . . . . . . . . . . . . . . . . . . . . . . . . . . . . . . . . . . . . . . . . . . . . . . . . . . . . . . . . . . . . .49
1.5.19. Exceptions . . . . . . . . . . . . . . . . . . . . . . . . . . . . . . . . . . . . . . . . . . . . . . . . . . . . . . . . . . .49
1.5.20. Streams. . . . . . . . . . . . . . . . . . . . . . . . . . . . . . . . . . . . . . . . . . . . . . . . . . . . . . . . . . . . . .49
1.5.21. Strings . . . . . . . . . . . . . . . . . . . . . . . . . . . . . . . . . . . . . . . . . . . . . . . . . . . . . . . . . . . . . .49
1.5.22. Measurement Systems . . . . . . . . . . . . . . . . . . . . . . . . . . . . . . . . . . . . . . . . . . . . . . . . .49
1.5.23. Main Data Types . . . . . . . . . . . . . . . . . . . . . . . . . . . . . . . . . . . . . . . . . . . . . . . . . . . . . .50
1.6. Summary . . . . . . . . . . . . . . . . . . . . . . . . . . . . . . . . . . . . . . . . . . . . . . . . . . . 56
1.7. Review . . . . . . . . . . . . . . . . . . . . . . . . . . . . . . . . . . . . . . . . . . . . . . . . . . . . . 57
1.8. References . . . . . . . . . . . . . . . . . . . . . . . . . . . . . . . . . . . . . . . . . . . . . . . . . . 57
2. Architecture . . . . . . . . . . . . . . . . . . . . . . . . . . . . . . . . . . . . . . . . . . . . . . . . . . . . . . 59
2.0. Overview . . . . . . . . . . . . . . . . . . . . . . . . . . . . . . . . . . . . . . . . . . . . . . . . . . . 59
2.1. Goals. . . . . . . . . . . . . . . . . . . . . . . . . . . . . . . . . . . . . . . . . . . . . . . . . . . . . . . 59
2.2. Chapter-at-a-glance . . . . . . . . . . . . . . . . . . . . . . . . . . . . . . . . . . . . . . . . . . 59
2.3. Introduction . . . . . . . . . . . . . . . . . . . . . . . . . . . . . . . . . . . . . . . . . . . . . . . . 60
2.4. Object Models . . . . . . . . . . . . . . . . . . . . . . . . . . . . . . . . . . . . . . . . . . . . . . . 60
4
2.5. Managers . . . . . . . . . . . . . . . . . . . . . . . . . . . . . . . . . . . . . . . . . . . . . . . . . . . 61
2.6. Model-View-Controller (MVC) . . . . . . . . . . . . . . . . . . . . . . . . . . . . . . . . 61
2.7. Adobe InDesign’s Object Model Implementation . . . . . . . . . . . . . . . . . 62
2.7.1. Bosses. . . . . . . . . . . . . . . . . . . . . . . . . . . . . . . . . . . . . . . . . . . . . . . . . . . . . . . . . . . . . . . . 63
2.8. InDesign Managers. . . . . . . . . . . . . . . . . . . . . . . . . . . . . . . . . . . . . . . . . . . 80
2.8.1. Manager Implementation . . . . . . . . . . . . . . . . . . . . . . . . . . . . . . . . . . . . . . . . . . . . . . . 80
2.8.2. Commonly Used InDesign Managers. . . . . . . . . . . . . . . . . . . . . . . . . . . . . . . . . . . . . . 81
2.9. MVC in InDesign . . . . . . . . . . . . . . . . . . . . . . . . . . . . . . . . . . . . . . . . . . . . 81
2.9.1. MVC Process in InDesign . . . . . . . . . . . . . . . . . . . . . . . . . . . . . . . . . . . . . . . . . . . . . . . 82
2.9.2. Observers. . . . . . . . . . . . . . . . . . . . . . . . . . . . . . . . . . . . . . . . . . . . . . . . . . . . . . . . . . . . . 83
2.9.3. Responders . . . . . . . . . . . . . . . . . . . . . . . . . . . . . . . . . . . . . . . . . . . . . . . . . . . . . . . . . . . 86
2.9.4. Commands . . . . . . . . . . . . . . . . . . . . . . . . . . . . . . . . . . . . . . . . . . . . . . . . . . . . . . . . . . . 87
2.10. Summary . . . . . . . . . . . . . . . . . . . . . . . . . . . . . . . . . . . . . . . . . . . . . . . . . . 88
2.11. Review . . . . . . . . . . . . . . . . . . . . . . . . . . . . . . . . . . . . . . . . . . . . . . . . . . . . 88
2.12. Reference . . . . . . . . . . . . . . . . . . . . . . . . . . . . . . . . . . . . . . . . . . . . . . . . . . 88
3. Document Structure . . . . . . . . . . . . . . . . . . . . . . . . . . . . . . . . . . . . . . . . . . . . . . . 91
3.0. Overview . . . . . . . . . . . . . . . . . . . . . . . . . . . . . . . . . . . . . . . . . . . . . . . . . . . 91
3.1. Goals . . . . . . . . . . . . . . . . . . . . . . . . . . . . . . . . . . . . . . . . . . . . . . . . . . . . . . 91
3.2. Chapter-at-a-glance . . . . . . . . . . . . . . . . . . . . . . . . . . . . . . . . . . . . . . . . . . 91
3.3. Introduction . . . . . . . . . . . . . . . . . . . . . . . . . . . . . . . . . . . . . . . . . . . . . . . . 92
3.4. Class Diagram . . . . . . . . . . . . . . . . . . . . . . . . . . . . . . . . . . . . . . . . . . . . . . . 94
3.5. Application Document Structure . . . . . . . . . . . . . . . . . . . . . . . . . . . . . . . 96
3.6. Navigation Diagram . . . . . . . . . . . . . . . . . . . . . . . . . . . . . . . . . . . . . . . . . 100
3.7. Interface Diagram. . . . . . . . . . . . . . . . . . . . . . . . . . . . . . . . . . . . . . . . . . . 102
3.7.1. IDocument . . . . . . . . . . . . . . . . . . . . . . . . . . . . . . . . . . . . . . . . . . . . . . . . . . . . . . . . . . 102
3.7.2. ISpread. . . . . . . . . . . . . . . . . . . . . . . . . . . . . . . . . . . . . . . . . . . . . . . . . . . . . . . . . . . . . . 103
3.7.3. ISpreadList . . . . . . . . . . . . . . . . . . . . . . . . . . . . . . . . . . . . . . . . . . . . . . . . . . . . . . . . . . 103
3.7.4. IMasterSpread. . . . . . . . . . . . . . . . . . . . . . . . . . . . . . . . . . . . . . . . . . . . . . . . . . . . . . . . 104
3.7.5. IMasterSpreadList. . . . . . . . . . . . . . . . . . . . . . . . . . . . . . . . . . . . . . . . . . . . . . . . . . . . . 104
3.7.6. IMasterPage. . . . . . . . . . . . . . . . . . . . . . . . . . . . . . . . . . . . . . . . . . . . . . . . . . . . . . . . . . 105
3.7.7. ILayerList. . . . . . . . . . . . . . . . . . . . . . . . . . . . . . . . . . . . . . . . . . . . . . . . . . . . . . . . . . . . 105
3.7.8. IDocumentLayer. . . . . . . . . . . . . . . . . . . . . . . . . . . . . . . . . . . . . . . . . . . . . . . . . . . . . . 106
3.7.9. ISpreadLayer . . . . . . . . . . . . . . . . . . . . . . . . . . . . . . . . . . . . . . . . . . . . . . . . . . . . . . . . . 106
3.8. Working With Document Structure. . . . . . . . . . . . . . . . . . . . . . . . . . . . 107
3.8.1. The DocumentStructure Snippet . . . . . . . . . . . . . . . . . . . . . . . . . . . . . . . . . . . . . . . . 107
3.8.2. Get All Page Items On A Page . . . . . . . . . . . . . . . . . . . . . . . . . . . . . . . . . . . . . . . . . . . 107
3.8.3. Finding The Spread Layer . . . . . . . . . . . . . . . . . . . . . . . . . . . . . . . . . . . . . . . . . . . . . . 107
3.9. Application Measurement Systems. . . . . . . . . . . . . . . . . . . . . . . . . . . . . 108
3.9.1. Introduction . . . . . . . . . . . . . . . . . . . . . . . . . . . . . . . . . . . . . . . . . . . . . . . . . . . . . . . . . 108
3.9.2. IUnitOfMeasure . . . . . . . . . . . . . . . . . . . . . . . . . . . . . . . . . . . . . . . . . . . . . . . . . . . . . . 109
3.9.3. IMeasurementSystem. . . . . . . . . . . . . . . . . . . . . . . . . . . . . . . . . . . . . . . . . . . . . . . . . . 109
3.9.4. IUnitOfMeasureSettings . . . . . . . . . . . . . . . . . . . . . . . . . . . . . . . . . . . . . . . . . . . . . . . 110
Adobe InDesign Programming Guide
5
3.9.5. Rulers . . . . . . . . . . . . . . . . . . . . . . . . . . . . . . . . . . . . . . . . . . . . . . . . . . . . . . . . . . . . . . .110
3.9.6. Custom Unit Of Measure. . . . . . . . . . . . . . . . . . . . . . . . . . . . . . . . . . . . . . . . . . . . . . .111
3.10. Application Coordinate Spaces . . . . . . . . . . . . . . . . . . . . . . . . . . . . . . . 111
3.10.1. Geometry Data Types . . . . . . . . . . . . . . . . . . . . . . . . . . . . . . . . . . . . . . . . . . . . . . . . .111
3.10.2. Coordinate Systems . . . . . . . . . . . . . . . . . . . . . . . . . . . . . . . . . . . . . . . . . . . . . . . . . .112
3.10.3. Working With Coordinate Spaces. . . . . . . . . . . . . . . . . . . . . . . . . . . . . . . . . . . . . . .115
3.11. Summary . . . . . . . . . . . . . . . . . . . . . . . . . . . . . . . . . . . . . . . . . . . . . . . . . 117
3.12. Review . . . . . . . . . . . . . . . . . . . . . . . . . . . . . . . . . . . . . . . . . . . . . . . . . . . 117
3.13. Exercises. . . . . . . . . . . . . . . . . . . . . . . . . . . . . . . . . . . . . . . . . . . . . . . . . . 117
3.13.1. Find The Objects That Exist In An Document. . . . . . . . . . . . . . . . . . . . . . . . . . . . .117
3.13.2. Create A Horizontal Guide Item . . . . . . . . . . . . . . . . . . . . . . . . . . . . . . . . . . . . . . . .118
4. Plug-ins . . . . . . . . . . . . . . . . . . . . . . . . . . . . . . . . . . . . . . . . . . . . . . . . . . . . . . . . . 119
4.0. Overview . . . . . . . . . . . . . . . . . . . . . . . . . . . . . . . . . . . . . . . . . . . . . . . . . . 119
4.1. Goals. . . . . . . . . . . . . . . . . . . . . . . . . . . . . . . . . . . . . . . . . . . . . . . . . . . . . . 119
4.2. Chapter-at-a-glance . . . . . . . . . . . . . . . . . . . . . . . . . . . . . . . . . . . . . . . . . 119
4.3. The Anatomy of a Plug-in . . . . . . . . . . . . . . . . . . . . . . . . . . . . . . . . . . . . 120
4.3.1. What is a Plug-in? . . . . . . . . . . . . . . . . . . . . . . . . . . . . . . . . . . . . . . . . . . . . . . . . . . . . .120
4.3.2. General Plug-in Anatomy . . . . . . . . . . . . . . . . . . . . . . . . . . . . . . . . . . . . . . . . . . . . . .121
4.3.3. Detailed Plug-in Anatomy . . . . . . . . . . . . . . . . . . . . . . . . . . . . . . . . . . . . . . . . . . . . . .125
4.4. The Life-Cycle of a Plug-in . . . . . . . . . . . . . . . . . . . . . . . . . . . . . . . . . . . 130
4.4.1. InDesign Startup Sequence . . . . . . . . . . . . . . . . . . . . . . . . . . . . . . . . . . . . . . . . . . . . .130
4.4.2. The Sequence of Instantiation in InDesign . . . . . . . . . . . . . . . . . . . . . . . . . . . . . . . .130
4.5. The InDesign Plug-in Development Environment . . . . . . . . . . . . . . . . 133
4.5.1. ODFRC: The Framework Resource Compiler . . . . . . . . . . . . . . . . . . . . . . . . . . . . . .133
4.5.2. Plug-in Development on the Windows and Macintosh Platforms . . . . . . . . . . . . .134
4.6. Code Re-Use . . . . . . . . . . . . . . . . . . . . . . . . . . . . . . . . . . . . . . . . . . . . . . . 134
4.6.1. Default Implementations . . . . . . . . . . . . . . . . . . . . . . . . . . . . . . . . . . . . . . . . . . . . . . .134
4.6.2. InDesign Implementation Classes . . . . . . . . . . . . . . . . . . . . . . . . . . . . . . . . . . . . . . . .135
4.6.3. Boss Inheritance . . . . . . . . . . . . . . . . . . . . . . . . . . . . . . . . . . . . . . . . . . . . . . . . . . . . . .135
4.6.4. Adding Interfaces to Existing Bosses . . . . . . . . . . . . . . . . . . . . . . . . . . . . . . . . . . . . . .136
4.6.5. PluginDependency Resource Statement . . . . . . . . . . . . . . . . . . . . . . . . . . . . . . . . . . .136
4.7. Summary . . . . . . . . . . . . . . . . . . . . . . . . . . . . . . . . . . . . . . . . . . . . . . . . . . 136
4.8. Review . . . . . . . . . . . . . . . . . . . . . . . . . . . . . . . . . . . . . . . . . . . . . . . . . . . . 136
4.9. Exercises. . . . . . . . . . . . . . . . . . . . . . . . . . . . . . . . . . . . . . . . . . . . . . . . . . . 137
4.9.1. Create a Project . . . . . . . . . . . . . . . . . . . . . . . . . . . . . . . . . . . . . . . . . . . . . . . . . . . . . . .137
4.9.2. Look at BasicDialog . . . . . . . . . . . . . . . . . . . . . . . . . . . . . . . . . . . . . . . . . . . . . . . . . . .137
4.10. References . . . . . . . . . . . . . . . . . . . . . . . . . . . . . . . . . . . . . . . . . . . . . . . . 137
5. Commands . . . . . . . . . . . . . . . . . . . . . . . . . . . . . . . . . . . . . . . . . . . . . . . . . . . . . . 139
5.0. Overview . . . . . . . . . . . . . . . . . . . . . . . . . . . . . . . . . . . . . . . . . . . . . . . . . . 139
5.1. Chapter Goals . . . . . . . . . . . . . . . . . . . . . . . . . . . . . . . . . . . . . . . . . . . . . . 139
5.2. Chapter-at-a-Glance . . . . . . . . . . . . . . . . . . . . . . . . . . . . . . . . . . . . . . . . . 139
6
5.3. How Commands Fit into the Application Architecture . . . . . . . . . . . . 140
5.3.1. Review of the Model-View-Controller (MVC) . . . . . . . . . . . . . . . . . . . . . . . . . . . . . 141
5.3.2. How Application Requirements Affect Implementation of MVC . . . . . . . . . . . . . . 141
5.3.3. How Commands Meet the Application’s MVC Requirements . . . . . . . . . . . . . . . . 143
5.3.4. The Application Architecture . . . . . . . . . . . . . . . . . . . . . . . . . . . . . . . . . . . . . . . . . . . 143
5.3.5. The Architecture in Action . . . . . . . . . . . . . . . . . . . . . . . . . . . . . . . . . . . . . . . . . . . . . 145
5.3.6. Interface Categories . . . . . . . . . . . . . . . . . . . . . . . . . . . . . . . . . . . . . . . . . . . . . . . . . . . 149
5.3.7. Application Architecture Summary . . . . . . . . . . . . . . . . . . . . . . . . . . . . . . . . . . . . . . 151
5.3.8. Application Architecture Review . . . . . . . . . . . . . . . . . . . . . . . . . . . . . . . . . . . . . . . . 151
5.4. Where to Find Command Reference Documentation . . . . . . . . . . . . . 151
5.5. When to Use a Command as a client . . . . . . . . . . . . . . . . . . . . . . . . . . . 152
5.6. How to Use a Command as a Client. . . . . . . . . . . . . . . . . . . . . . . . . . . . 152
5.6.1. Instantiate the Command Boss . . . . . . . . . . . . . . . . . . . . . . . . . . . . . . . . . . . . . . . . . . 153
5.6.2. Specify Input Arguments and Get Output Arguments . . . . . . . . . . . . . . . . . . . . . . . 154
5.6.3. Process the Command . . . . . . . . . . . . . . . . . . . . . . . . . . . . . . . . . . . . . . . . . . . . . . . . . 155
5.6.4. Handle Any Errors . . . . . . . . . . . . . . . . . . . . . . . . . . . . . . . . . . . . . . . . . . . . . . . . . . . . 155
5.7. How to Use a Command Sequence . . . . . . . . . . . . . . . . . . . . . . . . . . . . 156
5.7.1. Create and Carry Out a Command Sequence . . . . . . . . . . . . . . . . . . . . . . . . . . . . . . 156
5.7.2. Handle Errors in a Command Sequence . . . . . . . . . . . . . . . . . . . . . . . . . . . . . . . . . . 157
5.7.3. Using SequenceContext . . . . . . . . . . . . . . . . . . . . . . . . . . . . . . . . . . . . . . . . . . . . . . . . 157
5.8. Protecting Documents Against Corruption . . . . . . . . . . . . . . . . . . . . . . 158
5.9. Setting a Command Target . . . . . . . . . . . . . . . . . . . . . . . . . . . . . . . . . . . 158
5.10. How to Implement a Custom Command . . . . . . . . . . . . . . . . . . . . . . 161
5.10.1. Define a Command Boss . . . . . . . . . . . . . . . . . . . . . . . . . . . . . . . . . . . . . . . . . . . . . . 161
5.10.2. Reuse or Implement Data Interfaces . . . . . . . . . . . . . . . . . . . . . . . . . . . . . . . . . . . . 162
5.10.3. Implement ICommand . . . . . . . . . . . . . . . . . . . . . . . . . . . . . . . . . . . . . . . . . . . . . . . 163
5.11. How to Design Commands . . . . . . . . . . . . . . . . . . . . . . . . . . . . . . . . . . 166
5.11.1. Define Undoability . . . . . . . . . . . . . . . . . . . . . . . . . . . . . . . . . . . . . . . . . . . . . . . . . . . 167
5.11.2. Classifying Commands as Atomic, Macro, or Hybrid . . . . . . . . . . . . . . . . . . . . . . 167
5.11.3. Command Destructors . . . . . . . . . . . . . . . . . . . . . . . . . . . . . . . . . . . . . . . . . . . . . . . 170
5.11.4. Error Handling Inside Commands . . . . . . . . . . . . . . . . . . . . . . . . . . . . . . . . . . . . . . 170
5.11.5. Rules for Implementing New Commands . . . . . . . . . . . . . . . . . . . . . . . . . . . . . . . . 170
5.12. Summary . . . . . . . . . . . . . . . . . . . . . . . . . . . . . . . . . . . . . . . . . . . . . . . . .
5.13. Review . . . . . . . . . . . . . . . . . . . . . . . . . . . . . . . . . . . . . . . . . . . . . . . . . . .
5.14. Exercises . . . . . . . . . . . . . . . . . . . . . . . . . . . . . . . . . . . . . . . . . . . . . . . . .
5.15. References . . . . . . . . . . . . . . . . . . . . . . . . . . . . . . . . . . . . . . . . . . . . . . . .
171
171
171
171
6. Persistence . . . . . . . . . . . . . . . . . . . . . . . . . . . . . . . . . . . . . . . . . . . . . . . . . . . . . . . 173
6.0. Overview . . . . . . . . . . . . . . . . . . . . . . . . . . . . . . . . . . . . . . . . . . . . . . . . . . 173
6.1. Goals . . . . . . . . . . . . . . . . . . . . . . . . . . . . . . . . . . . . . . . . . . . . . . . . . . . . . 173
6.2. Chapter-at-a-glance . . . . . . . . . . . . . . . . . . . . . . . . . . . . . . . . . . . . . . . . . 173
6.3. Introduction to Persistence . . . . . . . . . . . . . . . . . . . . . . . . . . . . . . . . . . . 174
6.3.1. Persistence . . . . . . . . . . . . . . . . . . . . . . . . . . . . . . . . . . . . . . . . . . . . . . . . . . . . . . . . . . . 174
Adobe InDesign Programming Guide
7
6.3.2. Databases . . . . . . . . . . . . . . . . . . . . . . . . . . . . . . . . . . . . . . . . . . . . . . . . . . . . . . . . . . . .174
6.4. Persistent Objects . . . . . . . . . . . . . . . . . . . . . . . . . . . . . . . . . . . . . . . . . . . 176
6.4.1. Using Persistent Objects . . . . . . . . . . . . . . . . . . . . . . . . . . . . . . . . . . . . . . . . . . . . . . . .176
6.4.2. Implementing Persistent Objects. . . . . . . . . . . . . . . . . . . . . . . . . . . . . . . . . . . . . . . . .181
6.5. Streams. . . . . . . . . . . . . . . . . . . . . . . . . . . . . . . . . . . . . . . . . . . . . . . . . . . . 183
6.5.1. StreamUtil . . . . . . . . . . . . . . . . . . . . . . . . . . . . . . . . . . . . . . . . . . . . . . . . . . . . . . . . . . .183
6.5.2. The IPMStream Methods . . . . . . . . . . . . . . . . . . . . . . . . . . . . . . . . . . . . . . . . . . . . . . .184
6.5.3. Implementing a New Stream . . . . . . . . . . . . . . . . . . . . . . . . . . . . . . . . . . . . . . . . . . . .184
6.6. Missing Plug-ins . . . . . . . . . . . . . . . . . . . . . . . . . . . . . . . . . . . . . . . . . . . . 186
6.6.1. Critical, Default, and Ignore . . . . . . . . . . . . . . . . . . . . . . . . . . . . . . . . . . . . . . . . . . . .186
6.6.2. Updating Data in a Changed Document . . . . . . . . . . . . . . . . . . . . . . . . . . . . . . . . . .188
6.7. Data Conversion . . . . . . . . . . . . . . . . . . . . . . . . . . . . . . . . . . . . . . . . . . . . 189
6.7.1. Two Different Approaches . . . . . . . . . . . . . . . . . . . . . . . . . . . . . . . . . . . . . . . . . . . . . .189
6.7.2. Conversion without the ConversionManager . . . . . . . . . . . . . . . . . . . . . . . . . . . . . .205
6.8. Summary . . . . . . . . . . . . . . . . . . . . . . . . . . . . . . . . . . . . . . . . . . . . . . . . . . 207
6.9. Review . . . . . . . . . . . . . . . . . . . . . . . . . . . . . . . . . . . . . . . . . . . . . . . . . . . . 208
6.10. References . . . . . . . . . . . . . . . . . . . . . . . . . . . . . . . . . . . . . . . . . . . . . . . . 208
7. Service Providers . . . . . . . . . . . . . . . . . . . . . . . . . . . . . . . . . . . . . . . . . . . . . . . . . 209
7.0. Overview . . . . . . . . . . . . . . . . . . . . . . . . . . . . . . . . . . . . . . . . . . . . . . . . . . 209
7.1. Goals. . . . . . . . . . . . . . . . . . . . . . . . . . . . . . . . . . . . . . . . . . . . . . . . . . . . . . 209
7.2. Chapter-at-a-glance . . . . . . . . . . . . . . . . . . . . . . . . . . . . . . . . . . . . . . . . . 209
7.3. Architecture . . . . . . . . . . . . . . . . . . . . . . . . . . . . . . . . . . . . . . . . . . . . . . . . 210
7.3.1. What is a service provider . . . . . . . . . . . . . . . . . . . . . . . . . . . . . . . . . . . . . . . . . . . . . .210
7.3.2. What is the service registry? . . . . . . . . . . . . . . . . . . . . . . . . . . . . . . . . . . . . . . . . . . . . .210
7.3.3. What is a service ID? . . . . . . . . . . . . . . . . . . . . . . . . . . . . . . . . . . . . . . . . . . . . . . . . . . .211
7.3.4. Interaction between service provider and application. . . . . . . . . . . . . . . . . . . . . . . .211
7.4. Implementation details. . . . . . . . . . . . . . . . . . . . . . . . . . . . . . . . . . . . . . . 212
7.4.1. Types of service providers . . . . . . . . . . . . . . . . . . . . . . . . . . . . . . . . . . . . . . . . . . . . . .212
7.4.2. Methods of IK2ServiceProvider. . . . . . . . . . . . . . . . . . . . . . . . . . . . . . . . . . . . . . . . . .226
7.4.3. Methods of IK2ServiceRegistry . . . . . . . . . . . . . . . . . . . . . . . . . . . . . . . . . . . . . . . . . .227
7.4.4. Getting to a service provider . . . . . . . . . . . . . . . . . . . . . . . . . . . . . . . . . . . . . . . . . . . .227
7.5. Recipes for common service providers . . . . . . . . . . . . . . . . . . . . . . . . . . 227
7.5.1. Implementing string register and panel register service providers. . . . . . . . . . . . . .228
7.5.2. Implementing an import filter service provider. . . . . . . . . . . . . . . . . . . . . . . . . . . . .229
7.5.3. Implementing an export filter service provider . . . . . . . . . . . . . . . . . . . . . . . . . . . . .231
7.5.4. Implementing a scripting service provider . . . . . . . . . . . . . . . . . . . . . . . . . . . . . . . . .232
7.5.5. Implementing a startup/shutdown service provider . . . . . . . . . . . . . . . . . . . . . . . . .233
7.5.6. Implementing a responder service provider. . . . . . . . . . . . . . . . . . . . . . . . . . . . . . . .234
7.6. Summary . . . . . . . . . . . . . . . . . . . . . . . . . . . . . . . . . . . . . . . . . . . . . . . . . . 236
7.7. Review . . . . . . . . . . . . . . . . . . . . . . . . . . . . . . . . . . . . . . . . . . . . . . . . . . . . 236
7.8. References . . . . . . . . . . . . . . . . . . . . . . . . . . . . . . . . . . . . . . . . . . . . . . . . . 236
8
8. Tools . . . . . . . . . . . . . . . . . . . . . . . . . . . . . . . . . . . . . . . . . . . . . . . . . . . . . . . . . . . . 237
8.0. Overview . . . . . . . . . . . . . . . . . . . . . . . . . . . . . . . . . . . . . . . . . . . . . . . . . . 237
8.1. Goals . . . . . . . . . . . . . . . . . . . . . . . . . . . . . . . . . . . . . . . . . . . . . . . . . . . . . 237
8.2. Chapter-at-a-glance . . . . . . . . . . . . . . . . . . . . . . . . . . . . . . . . . . . . . . . . . 237
8.3. Key concepts . . . . . . . . . . . . . . . . . . . . . . . . . . . . . . . . . . . . . . . . . . . . . . . 238
8.3.1. The toolbox and the layout view . . . . . . . . . . . . . . . . . . . . . . . . . . . . . . . . . . . . . . . . . 238
8.3.2. Tools . . . . . . . . . . . . . . . . . . . . . . . . . . . . . . . . . . . . . . . . . . . . . . . . . . . . . . . . . . . . . . . 239
8.3.3. Cursors . . . . . . . . . . . . . . . . . . . . . . . . . . . . . . . . . . . . . . . . . . . . . . . . . . . . . . . . . . . . . 239
8.3.4. Tool tips. . . . . . . . . . . . . . . . . . . . . . . . . . . . . . . . . . . . . . . . . . . . . . . . . . . . . . . . . . . . . 240
8.3.5. Trackers . . . . . . . . . . . . . . . . . . . . . . . . . . . . . . . . . . . . . . . . . . . . . . . . . . . . . . . . . . . . . 240
8.3.6. The tracker factory, tracking and event handling . . . . . . . . . . . . . . . . . . . . . . . . . . . 240
8.3.7. Beyond the toolbox . . . . . . . . . . . . . . . . . . . . . . . . . . . . . . . . . . . . . . . . . . . . . . . . . . . 242
8.3.8. Drawing and sprites . . . . . . . . . . . . . . . . . . . . . . . . . . . . . . . . . . . . . . . . . . . . . . . . . . . 242
8.3.9. Documents, page items and commands. . . . . . . . . . . . . . . . . . . . . . . . . . . . . . . . . . . 243
8.3.10. Line tool use scenario. . . . . . . . . . . . . . . . . . . . . . . . . . . . . . . . . . . . . . . . . . . . . . . . . 243
8.3.11. Trackers with multiple behaviors . . . . . . . . . . . . . . . . . . . . . . . . . . . . . . . . . . . . . . . 246
8.3.12. The tool manager . . . . . . . . . . . . . . . . . . . . . . . . . . . . . . . . . . . . . . . . . . . . . . . . . . . . 247
8.3.13. Toolbox utilities . . . . . . . . . . . . . . . . . . . . . . . . . . . . . . . . . . . . . . . . . . . . . . . . . . . . . 247
8.3.14. Tool type . . . . . . . . . . . . . . . . . . . . . . . . . . . . . . . . . . . . . . . . . . . . . . . . . . . . . . . . . . . 248
8.4. Custom tools . . . . . . . . . . . . . . . . . . . . . . . . . . . . . . . . . . . . . . . . . . . . . . . 251
8.4.1. Introduction . . . . . . . . . . . . . . . . . . . . . . . . . . . . . . . . . . . . . . . . . . . . . . . . . . . . . . . . . 251
8.4.2. Class diagram . . . . . . . . . . . . . . . . . . . . . . . . . . . . . . . . . . . . . . . . . . . . . . . . . . . . . . . . 251
8.4.3. Partial implementation classes . . . . . . . . . . . . . . . . . . . . . . . . . . . . . . . . . . . . . . . . . . 253
8.4.4. Default implementations . . . . . . . . . . . . . . . . . . . . . . . . . . . . . . . . . . . . . . . . . . . . . . . 256
8.4.5. ToolDef ODFRez type . . . . . . . . . . . . . . . . . . . . . . . . . . . . . . . . . . . . . . . . . . . . . . . . . 257
8.4.6. Icons and Cursors. . . . . . . . . . . . . . . . . . . . . . . . . . . . . . . . . . . . . . . . . . . . . . . . . . . . . 260
8.4.7. InDesign’s trackers . . . . . . . . . . . . . . . . . . . . . . . . . . . . . . . . . . . . . . . . . . . . . . . . . . . . 260
8.5. Sample code . . . . . . . . . . . . . . . . . . . . . . . . . . . . . . . . . . . . . . . . . . . . . . . 265
8.5.1. WaveTool . . . . . . . . . . . . . . . . . . . . . . . . . . . . . . . . . . . . . . . . . . . . . . . . . . . . . . . . . . . 265
8.5.2. ShapeSelector . . . . . . . . . . . . . . . . . . . . . . . . . . . . . . . . . . . . . . . . . . . . . . . . . . . . . . . . 265
8.5.3. Snapshot . . . . . . . . . . . . . . . . . . . . . . . . . . . . . . . . . . . . . . . . . . . . . . . . . . . . . . . . . . . . 265
8.5.4. Dolly tool template. . . . . . . . . . . . . . . . . . . . . . . . . . . . . . . . . . . . . . . . . . . . . . . . . . . . 265
8.6. Frequently asked questions(FAQs) . . . . . . . . . . . . . . . . . . . . . . . . . . . . . 265
8.6.1. What is the layout view?. . . . . . . . . . . . . . . . . . . . . . . . . . . . . . . . . . . . . . . . . . . . . . . . 265
8.6.2. What is the toolbox?. . . . . . . . . . . . . . . . . . . . . . . . . . . . . . . . . . . . . . . . . . . . . . . . . . . 265
8.6.3. What is a tool?. . . . . . . . . . . . . . . . . . . . . . . . . . . . . . . . . . . . . . . . . . . . . . . . . . . . . . . . 265
8.6.4. What is a tracker? . . . . . . . . . . . . . . . . . . . . . . . . . . . . . . . . . . . . . . . . . . . . . . . . . . . . . 265
8.6.5. Where can I find sample code for tools? . . . . . . . . . . . . . . . . . . . . . . . . . . . . . . . . . . 265
8.6.6. How do I catch a mouse click or mouse drag on a document? . . . . . . . . . . . . . . . . 266
8.6.7. How do I implement a custom tool? . . . . . . . . . . . . . . . . . . . . . . . . . . . . . . . . . . . . . 266
8.6.8. How do I display a tool options dialogue? . . . . . . . . . . . . . . . . . . . . . . . . . . . . . . . . . 266
8.6.9. How do I find the spread nearest the mouse position? . . . . . . . . . . . . . . . . . . . . . . . 266
8.6.10. How do I change spreads? . . . . . . . . . . . . . . . . . . . . . . . . . . . . . . . . . . . . . . . . . . . . . 266
8.6.11. How do I perform a page item hit test? . . . . . . . . . . . . . . . . . . . . . . . . . . . . . . . . . . 267
Adobe InDesign Programming Guide
9
8.6.12. How do I set/get the active tool? . . . . . . . . . . . . . . . . . . . . . . . . . . . . . . . . . . . . . . . .267
8.6.13. How do I observe when the active tool changes? . . . . . . . . . . . . . . . . . . . . . . . . . . .268
8.6.14. How do I change the toolbox appearance from normal to skinny? . . . . . . . . . . . .268
8.6.15. Can I use the default implementations for trackers? . . . . . . . . . . . . . . . . . . . . . . . .268
8.7. Summary . . . . . . . . . . . . . . . . . . . . . . . . . . . . . . . . . . . . . . . . . . . . . . . . . . 268
8.8. Review . . . . . . . . . . . . . . . . . . . . . . . . . . . . . . . . . . . . . . . . . . . . . . . . . . . . 268
8.9. Exercises. . . . . . . . . . . . . . . . . . . . . . . . . . . . . . . . . . . . . . . . . . . . . . . . . . . 269
8.9.1. Exercise 1 . . . . . . . . . . . . . . . . . . . . . . . . . . . . . . . . . . . . . . . . . . . . . . . . . . . . . . . . . . . .269
8.9.2. Exercise 2 . . . . . . . . . . . . . . . . . . . . . . . . . . . . . . . . . . . . . . . . . . . . . . . . . . . . . . . . . . . .269
8.9.3. Exercise 3 . . . . . . . . . . . . . . . . . . . . . . . . . . . . . . . . . . . . . . . . . . . . . . . . . . . . . . . . . . . .269
8.9.4. Exercise 4 . . . . . . . . . . . . . . . . . . . . . . . . . . . . . . . . . . . . . . . . . . . . . . . . . . . . . . . . . . . .269
8.10. References . . . . . . . . . . . . . . . . . . . . . . . . . . . . . . . . . . . . . . . . . . . . . . . . 270
9. Page Items . . . . . . . . . . . . . . . . . . . . . . . . . . . . . . . . . . . . . . . . . . . . . . . . . . . . . . . 271
9.0. Overview . . . . . . . . . . . . . . . . . . . . . . . . . . . . . . . . . . . . . . . . . . . . . . . . . . 271
9.1. Goals. . . . . . . . . . . . . . . . . . . . . . . . . . . . . . . . . . . . . . . . . . . . . . . . . . . . . . 271
9.2. Chapter-at-a-glance . . . . . . . . . . . . . . . . . . . . . . . . . . . . . . . . . . . . . . . . . 271
9.3. Class Diagram . . . . . . . . . . . . . . . . . . . . . . . . . . . . . . . . . . . . . . . . . . . . . . 272
9.4. Example Of Page Items. . . . . . . . . . . . . . . . . . . . . . . . . . . . . . . . . . . . . . . 273
9.4.1. Spline And Image Item . . . . . . . . . . . . . . . . . . . . . . . . . . . . . . . . . . . . . . . . . . . . . . . . .274
9.4.2. Guide Item. . . . . . . . . . . . . . . . . . . . . . . . . . . . . . . . . . . . . . . . . . . . . . . . . . . . . . . . . . .275
9.5. Page Items . . . . . . . . . . . . . . . . . . . . . . . . . . . . . . . . . . . . . . . . . . . . . . . . . 277
9.5.1. What Is A Page Item? . . . . . . . . . . . . . . . . . . . . . . . . . . . . . . . . . . . . . . . . . . . . . . . . . .277
9.5.2. kPageItemBoss. . . . . . . . . . . . . . . . . . . . . . . . . . . . . . . . . . . . . . . . . . . . . . . . . . . . . . . .278
9.5.3. kDrawablePageItemBoss . . . . . . . . . . . . . . . . . . . . . . . . . . . . . . . . . . . . . . . . . . . . . . .280
9.5.4. Path. . . . . . . . . . . . . . . . . . . . . . . . . . . . . . . . . . . . . . . . . . . . . . . . . . . . . . . . . . . . . . . . .281
9.5.5. kSplineItemBoss . . . . . . . . . . . . . . . . . . . . . . . . . . . . . . . . . . . . . . . . . . . . . . . . . . . . . .282
9.6. Interface Diagram . . . . . . . . . . . . . . . . . . . . . . . . . . . . . . . . . . . . . . . . . . . 283
9.7. Working With Page Items . . . . . . . . . . . . . . . . . . . . . . . . . . . . . . . . . . . . 288
9.7.1. Detecting Frame Content . . . . . . . . . . . . . . . . . . . . . . . . . . . . . . . . . . . . . . . . . . . . . . .288
9.7.2. Create A Page Item At The Page’s Origin . . . . . . . . . . . . . . . . . . . . . . . . . . . . . . . . . .290
9.7.3. Which Page Does The Page Item Lie On?. . . . . . . . . . . . . . . . . . . . . . . . . . . . . . . . . .291
9.7.4. Get a rotated page item’s bounding box . . . . . . . . . . . . . . . . . . . . . . . . . . . . . . . . . . .292
9.7.5. Place PDF Into A Page Item . . . . . . . . . . . . . . . . . . . . . . . . . . . . . . . . . . . . . . . . . . . . .295
9.8. Specifiers . . . . . . . . . . . . . . . . . . . . . . . . . . . . . . . . . . . . . . . . . . . . . . . . . . 297
9.8.1. Definition. . . . . . . . . . . . . . . . . . . . . . . . . . . . . . . . . . . . . . . . . . . . . . . . . . . . . . . . . . . .297
9.8.2. Specifier Bosses . . . . . . . . . . . . . . . . . . . . . . . . . . . . . . . . . . . . . . . . . . . . . . . . . . . . . . .297
9.8.3. Interface Diagram . . . . . . . . . . . . . . . . . . . . . . . . . . . . . . . . . . . . . . . . . . . . . . . . . . . . .299
9.9. Standoff Page Items . . . . . . . . . . . . . . . . . . . . . . . . . . . . . . . . . . . . . . . . . 300
9.9.1. Introduction . . . . . . . . . . . . . . . . . . . . . . . . . . . . . . . . . . . . . . . . . . . . . . . . . . . . . . . . .300
9.9.2. IStandOff . . . . . . . . . . . . . . . . . . . . . . . . . . . . . . . . . . . . . . . . . . . . . . . . . . . . . . . . . . . .301
9.9.3. IStandOffData . . . . . . . . . . . . . . . . . . . . . . . . . . . . . . . . . . . . . . . . . . . . . . . . . . . . . . . .301
9.9.4. ITextInset. . . . . . . . . . . . . . . . . . . . . . . . . . . . . . . . . . . . . . . . . . . . . . . . . . . . . . . . . . . .301
10
9.9.5. IStandOffItemData. . . . . . . . . . . . . . . . . . . . . . . . . . . . . . . . . . . . . . . . . . . . . . . . . . . . 301
9.9.6. Working With StandOffs . . . . . . . . . . . . . . . . . . . . . . . . . . . . . . . . . . . . . . . . . . . . . . . 302
9.9.7. Local StandOffs. . . . . . . . . . . . . . . . . . . . . . . . . . . . . . . . . . . . . . . . . . . . . . . . . . . . . . . 303
9.10. Commands For Page Items . . . . . . . . . . . . . . . . . . . . . . . . . . . . . . . . . . 304
9.10.1. Create Page Item. . . . . . . . . . . . . . . . . . . . . . . . . . . . . . . . . . . . . . . . . . . . . . . . . . . . . 304
9.10.2. Modify Page Item . . . . . . . . . . . . . . . . . . . . . . . . . . . . . . . . . . . . . . . . . . . . . . . . . . . . 306
9.10.3. Delete Page Item . . . . . . . . . . . . . . . . . . . . . . . . . . . . . . . . . . . . . . . . . . . . . . . . . . . . . 313
9.11. Summary . . . . . . . . . . . . . . . . . . . . . . . . . . . . . . . . . . . . . . . . . . . . . . . . . 314
9.12. Review . . . . . . . . . . . . . . . . . . . . . . . . . . . . . . . . . . . . . . . . . . . . . . . . . . . 314
9.13. Exercises . . . . . . . . . . . . . . . . . . . . . . . . . . . . . . . . . . . . . . . . . . . . . . . . . 314
9.13.1. Create Custom Page Item . . . . . . . . . . . . . . . . . . . . . . . . . . . . . . . . . . . . . . . . . . . . . 314
9.13.2. Find The Selected Page Item’s Children And Parents. . . . . . . . . . . . . . . . . . . . . . . 314
9.13.3. Place An EPS Into A Page Item . . . . . . . . . . . . . . . . . . . . . . . . . . . . . . . . . . . . . . . . . 315
10. Page Item Drawing . . . . . . . . . . . . . . . . . . . . . . . . . . . . . . . . . . . . . . . . . . . . . . 317
10.0. Overview . . . . . . . . . . . . . . . . . . . . . . . . . . . . . . . . . . . . . . . . . . . . . . . . . 317
10.1. Goals . . . . . . . . . . . . . . . . . . . . . . . . . . . . . . . . . . . . . . . . . . . . . . . . . . . . 317
10.2. Chapter-at-a-glance . . . . . . . . . . . . . . . . . . . . . . . . . . . . . . . . . . . . . . . . 317
10.3. Foundation . . . . . . . . . . . . . . . . . . . . . . . . . . . . . . . . . . . . . . . . . . . . . . . 319
10.3.1. InDesign Windows . . . . . . . . . . . . . . . . . . . . . . . . . . . . . . . . . . . . . . . . . . . . . . . . . . . 319
10.3.2. The Layout Hierarchy . . . . . . . . . . . . . . . . . . . . . . . . . . . . . . . . . . . . . . . . . . . . . . . . 322
10.3.3. The InDesign Graphics Context . . . . . . . . . . . . . . . . . . . . . . . . . . . . . . . . . . . . . . . . 326
10.4. Drawing the Layout . . . . . . . . . . . . . . . . . . . . . . . . . . . . . . . . . . . . . . . . 331
10.4.1. Invalidating a View. . . . . . . . . . . . . . . . . . . . . . . . . . . . . . . . . . . . . . . . . . . . . . . . . . . 331
10.4.2. Window Updates . . . . . . . . . . . . . . . . . . . . . . . . . . . . . . . . . . . . . . . . . . . . . . . . . . . . 332
10.4.3. Layout Draw Order . . . . . . . . . . . . . . . . . . . . . . . . . . . . . . . . . . . . . . . . . . . . . . . . . . 334
10.5. The Context for Page Item Drawing. . . . . . . . . . . . . . . . . . . . . . . . . . . 339
10.5.1. IShape Flags. . . . . . . . . . . . . . . . . . . . . . . . . . . . . . . . . . . . . . . . . . . . . . . . . . . . . . . . . 339
10.5.2. GraphicsData Class. . . . . . . . . . . . . . . . . . . . . . . . . . . . . . . . . . . . . . . . . . . . . . . . . . . 339
10.5.3. IGraphicsPort . . . . . . . . . . . . . . . . . . . . . . . . . . . . . . . . . . . . . . . . . . . . . . . . . . . . . . . 340
10.5.4. Detecting the Device Context for Drawing . . . . . . . . . . . . . . . . . . . . . . . . . . . . . . . 342
10.6. Page Item Drawing . . . . . . . . . . . . . . . . . . . . . . . . . . . . . . . . . . . . . . . . . 344
10.6.1. Overview of Page Item Interfaces for Drawing . . . . . . . . . . . . . . . . . . . . . . . . . . . . 344
10.6.2. IShape Interface . . . . . . . . . . . . . . . . . . . . . . . . . . . . . . . . . . . . . . . . . . . . . . . . . . . . . 344
10.6.3. The IPathPageItem Interface. . . . . . . . . . . . . . . . . . . . . . . . . . . . . . . . . . . . . . . . . . . 352
10.6.4. The IHandleShape Interface . . . . . . . . . . . . . . . . . . . . . . . . . . . . . . . . . . . . . . . . . . . 352
10.7. Summary . . . . . . . . . . . . . . . . . . . . . . . . . . . . . . . . . . . . . . . . . . . . . . . . . 356
10.8. Review . . . . . . . . . . . . . . . . . . . . . . . . . . . . . . . . . . . . . . . . . . . . . . . . . . . 356
10.9. Exercises . . . . . . . . . . . . . . . . . . . . . . . . . . . . . . . . . . . . . . . . . . . . . . . . . 357
11. Page Item Adornments. . . . . . . . . . . . . . . . . . . . . . . . . . . . . . . . . . . . . . . . . . . 359
11.0. Overview . . . . . . . . . . . . . . . . . . . . . . . . . . . . . . . . . . . . . . . . . . . . . . . . . 359
11.1. Goals . . . . . . . . . . . . . . . . . . . . . . . . . . . . . . . . . . . . . . . . . . . . . . . . . . . . 359
Adobe InDesign Programming Guide
11
11.2. Chapter-at-a-glance . . . . . . . . . . . . . . . . . . . . . . . . . . . . . . . . . . . . . . . . 359
11.3. Page Item Adornments. . . . . . . . . . . . . . . . . . . . . . . . . . . . . . . . . . . . . . 360
11.3.1. IPageItemAdornmentList. . . . . . . . . . . . . . . . . . . . . . . . . . . . . . . . . . . . . . . . . . . . . .361
11.3.2. Adornments vs. DrawEventHandlers . . . . . . . . . . . . . . . . . . . . . . . . . . . . . . . . . . . .361
11.4. Adornment Interfaces. . . . . . . . . . . . . . . . . . . . . . . . . . . . . . . . . . . . . . . 362
11.4.1. Interface Diagram . . . . . . . . . . . . . . . . . . . . . . . . . . . . . . . . . . . . . . . . . . . . . . . . . . . .362
11.4.2. IAdornmentShape. . . . . . . . . . . . . . . . . . . . . . . . . . . . . . . . . . . . . . . . . . . . . . . . . . . .362
11.5. Creating Custom Page Item Adornments . . . . . . . . . . . . . . . . . . . . . . 365
11.5.1. Adornment Definition . . . . . . . . . . . . . . . . . . . . . . . . . . . . . . . . . . . . . . . . . . . . . . . .366
11.5.2. Adornment Boss Implementation. . . . . . . . . . . . . . . . . . . . . . . . . . . . . . . . . . . . . . .367
11.6. Add Or Remove Adornments . . . . . . . . . . . . . . . . . . . . . . . . . . . . . . . . 370
11.6.1. AddPageItemAdornmentCmd. . . . . . . . . . . . . . . . . . . . . . . . . . . . . . . . . . . . . . . . . .370
11.6.2. RemovePageItemAdornmentCmd . . . . . . . . . . . . . . . . . . . . . . . . . . . . . . . . . . . . . .370
11.6.3. Example . . . . . . . . . . . . . . . . . . . . . . . . . . . . . . . . . . . . . . . . . . . . . . . . . . . . . . . . . . . .370
11.7. Summary . . . . . . . . . . . . . . . . . . . . . . . . . . . . . . . . . . . . . . . . . . . . . . . . . 372
11.8. Review . . . . . . . . . . . . . . . . . . . . . . . . . . . . . . . . . . . . . . . . . . . . . . . . . . . 372
11.9. Exercises. . . . . . . . . . . . . . . . . . . . . . . . . . . . . . . . . . . . . . . . . . . . . . . . . . 372
11.9.1. Implement Your Own Custom Page Item Adornment. . . . . . . . . . . . . . . . . . . . . .372
11.9.2. Add Two Or More Adornments To Multiple Page Items . . . . . . . . . . . . . . . . . . . .372
11.9.3. Use Context Menu To Turn On & Off The Dimension Label . . . . . . . . . . . . . . . .373
12. Text . . . . . . . . . . . . . . . . . . . . . . . . . . . . . . . . . . . . . . . . . . . . . . . . . . . . . . . . . . . . 375
12.0. Introduction . . . . . . . . . . . . . . . . . . . . . . . . . . . . . . . . . . . . . . . . . . . . . . 375
12.1. Goals. . . . . . . . . . . . . . . . . . . . . . . . . . . . . . . . . . . . . . . . . . . . . . . . . . . . . 375
12.2. Chapter-at-a-glance . . . . . . . . . . . . . . . . . . . . . . . . . . . . . . . . . . . . . . . . 375
12.3. Terminology and Definitions . . . . . . . . . . . . . . . . . . . . . . . . . . . . . . . . 376
12.4. Class Diagram . . . . . . . . . . . . . . . . . . . . . . . . . . . . . . . . . . . . . . . . . . . . . 377
12.5. Roadmap . . . . . . . . . . . . . . . . . . . . . . . . . . . . . . . . . . . . . . . . . . . . . . . . . 380
12.6. Features . . . . . . . . . . . . . . . . . . . . . . . . . . . . . . . . . . . . . . . . . . . . . . . . . . 383
12.7. Interface Diagram . . . . . . . . . . . . . . . . . . . . . . . . . . . . . . . . . . . . . . . . . . 385
12.8. Navigation Diagram . . . . . . . . . . . . . . . . . . . . . . . . . . . . . . . . . . . . . . . . 386
12.9. Data Types . . . . . . . . . . . . . . . . . . . . . . . . . . . . . . . . . . . . . . . . . . . . . . . . 387
12.9.1. Basic Types. . . . . . . . . . . . . . . . . . . . . . . . . . . . . . . . . . . . . . . . . . . . . . . . . . . . . . . . . .387
12.9.2. Unicode Character Constants . . . . . . . . . . . . . . . . . . . . . . . . . . . . . . . . . . . . . . . . . .387
12.9.3. WideString. . . . . . . . . . . . . . . . . . . . . . . . . . . . . . . . . . . . . . . . . . . . . . . . . . . . . . . . . .387
12.9.4. RangeData . . . . . . . . . . . . . . . . . . . . . . . . . . . . . . . . . . . . . . . . . . . . . . . . . . . . . . . . . .387
12.9.5. TextRange . . . . . . . . . . . . . . . . . . . . . . . . . . . . . . . . . . . . . . . . . . . . . . . . . . . . . . . . . .388
12.10. Utilities. . . . . . . . . . . . . . . . . . . . . . . . . . . . . . . . . . . . . . . . . . . . . . . . . . 388
12.10.1. TextIterator . . . . . . . . . . . . . . . . . . . . . . . . . . . . . . . . . . . . . . . . . . . . . . . . . . . . . . . .388
12.10.2. TextCharBuffer . . . . . . . . . . . . . . . . . . . . . . . . . . . . . . . . . . . . . . . . . . . . . . . . . . . . .389
12.10.3. RunToString . . . . . . . . . . . . . . . . . . . . . . . . . . . . . . . . . . . . . . . . . . . . . . . . . . . . . . .389
12.10.4. TextAttributeRunIterator. . . . . . . . . . . . . . . . . . . . . . . . . . . . . . . . . . . . . . . . . . . . .389
12
12.10.5. Character Set Conversion . . . . . . . . . . . . . . . . . . . . . . . . . . . . . . . . . . . . . . . . . . . . 390
12.10.6. ITextUtils. . . . . . . . . . . . . . . . . . . . . . . . . . . . . . . . . . . . . . . . . . . . . . . . . . . . . . . . . . 391
12.10.7. ITextAttrUtils . . . . . . . . . . . . . . . . . . . . . . . . . . . . . . . . . . . . . . . . . . . . . . . . . . . . . . 391
12.10.8. IWaxIterator . . . . . . . . . . . . . . . . . . . . . . . . . . . . . . . . . . . . . . . . . . . . . . . . . . . . . . . 391
12.11. Summary . . . . . . . . . . . . . . . . . . . . . . . . . . . . . . . . . . . . . . . . . . . . . . . . 391
12.12. Review . . . . . . . . . . . . . . . . . . . . . . . . . . . . . . . . . . . . . . . . . . . . . . . . . . 392
13. The Text Model. . . . . . . . . . . . . . . . . . . . . . . . . . . . . . . . . . . . . . . . . . . . . . . . . . 393
13.0. Overview . . . . . . . . . . . . . . . . . . . . . . . . . . . . . . . . . . . . . . . . . . . . . . . . . 393
13.1. Goals . . . . . . . . . . . . . . . . . . . . . . . . . . . . . . . . . . . . . . . . . . . . . . . . . . . . 393
13.2. Chapter-at-a-glance . . . . . . . . . . . . . . . . . . . . . . . . . . . . . . . . . . . . . . . . 394
13.3. Key concepts . . . . . . . . . . . . . . . . . . . . . . . . . . . . . . . . . . . . . . . . . . . . . . 394
13.3.1. Introduction . . . . . . . . . . . . . . . . . . . . . . . . . . . . . . . . . . . . . . . . . . . . . . . . . . . . . . . . 394
13.3.2. Stories . . . . . . . . . . . . . . . . . . . . . . . . . . . . . . . . . . . . . . . . . . . . . . . . . . . . . . . . . . . . . 396
13.3.3. Lifecycle of a story . . . . . . . . . . . . . . . . . . . . . . . . . . . . . . . . . . . . . . . . . . . . . . . . . . . 397
13.3.4. Story accessibilty. . . . . . . . . . . . . . . . . . . . . . . . . . . . . . . . . . . . . . . . . . . . . . . . . . . . . 398
13.3.5. The text model . . . . . . . . . . . . . . . . . . . . . . . . . . . . . . . . . . . . . . . . . . . . . . . . . . . . . . 398
13.3.6. Strands . . . . . . . . . . . . . . . . . . . . . . . . . . . . . . . . . . . . . . . . . . . . . . . . . . . . . . . . . . . . . 398
13.3.7. Runs . . . . . . . . . . . . . . . . . . . . . . . . . . . . . . . . . . . . . . . . . . . . . . . . . . . . . . . . . . . . . . . 399
13.3.8. Story threads . . . . . . . . . . . . . . . . . . . . . . . . . . . . . . . . . . . . . . . . . . . . . . . . . . . . . . . . 399
13.3.9. The paragraph and character attribute strands . . . . . . . . . . . . . . . . . . . . . . . . . . . . 403
13.3.10. Text attributes. . . . . . . . . . . . . . . . . . . . . . . . . . . . . . . . . . . . . . . . . . . . . . . . . . . . . . 406
13.3.11. Text attribute catalogue . . . . . . . . . . . . . . . . . . . . . . . . . . . . . . . . . . . . . . . . . . . . . . 407
13.3.12. AttributeBossList . . . . . . . . . . . . . . . . . . . . . . . . . . . . . . . . . . . . . . . . . . . . . . . . . . . 411
13.3.13. Text styles . . . . . . . . . . . . . . . . . . . . . . . . . . . . . . . . . . . . . . . . . . . . . . . . . . . . . . . . . 411
13.3.14. Text formatting overview . . . . . . . . . . . . . . . . . . . . . . . . . . . . . . . . . . . . . . . . . . . . 415
13.3.15. Owned items . . . . . . . . . . . . . . . . . . . . . . . . . . . . . . . . . . . . . . . . . . . . . . . . . . . . . . . 416
13.3.16. Story thread dictionaries . . . . . . . . . . . . . . . . . . . . . . . . . . . . . . . . . . . . . . . . . . . . . 417
13.3.17. Text focus . . . . . . . . . . . . . . . . . . . . . . . . . . . . . . . . . . . . . . . . . . . . . . . . . . . . . . . . . 420
13.3.18. Text selection . . . . . . . . . . . . . . . . . . . . . . . . . . . . . . . . . . . . . . . . . . . . . . . . . . . . . . 421
13.3.19. Virtual Object Store (VOS) . . . . . . . . . . . . . . . . . . . . . . . . . . . . . . . . . . . . . . . . . . . 422
13.4. Interfaces . . . . . . . . . . . . . . . . . . . . . . . . . . . . . . . . . . . . . . . . . . . . . . . . . 423
13.4.1. Class Diagram . . . . . . . . . . . . . . . . . . . . . . . . . . . . . . . . . . . . . . . . . . . . . . . . . . . . . . . 423
13.4.2. IStoryList . . . . . . . . . . . . . . . . . . . . . . . . . . . . . . . . . . . . . . . . . . . . . . . . . . . . . . . . . . . 425
13.4.3. ITextModel . . . . . . . . . . . . . . . . . . . . . . . . . . . . . . . . . . . . . . . . . . . . . . . . . . . . . . . . . 425
13.4.4. ITextStoryThread . . . . . . . . . . . . . . . . . . . . . . . . . . . . . . . . . . . . . . . . . . . . . . . . . . . . 426
13.4.5. ITextStoryThreadDict . . . . . . . . . . . . . . . . . . . . . . . . . . . . . . . . . . . . . . . . . . . . . . . . 427
13.4.6. ITextStoryThreadDictHier . . . . . . . . . . . . . . . . . . . . . . . . . . . . . . . . . . . . . . . . . . . . 427
13.4.7. IStoryOptions . . . . . . . . . . . . . . . . . . . . . . . . . . . . . . . . . . . . . . . . . . . . . . . . . . . . . . . 427
13.4.8. IComposeScanner . . . . . . . . . . . . . . . . . . . . . . . . . . . . . . . . . . . . . . . . . . . . . . . . . . . 428
13.4.9. ITextReferences . . . . . . . . . . . . . . . . . . . . . . . . . . . . . . . . . . . . . . . . . . . . . . . . . . . . . 428
13.4.10. IDataLinkReference, ILinkState . . . . . . . . . . . . . . . . . . . . . . . . . . . . . . . . . . . . . . . 428
13.4.11. ITextLockData . . . . . . . . . . . . . . . . . . . . . . . . . . . . . . . . . . . . . . . . . . . . . . . . . . . . . 428
13.4.12. ITextFocus/ITextFocusManager . . . . . . . . . . . . . . . . . . . . . . . . . . . . . . . . . . . . . . . 428
Adobe InDesign Programming Guide
13
13.4.13. IFocusCache . . . . . . . . . . . . . . . . . . . . . . . . . . . . . . . . . . . . . . . . . . . . . . . . . . . . . . .429
13.4.14. IStrand . . . . . . . . . . . . . . . . . . . . . . . . . . . . . . . . . . . . . . . . . . . . . . . . . . . . . . . . . . . .429
13.4.15. ITextStrand . . . . . . . . . . . . . . . . . . . . . . . . . . . . . . . . . . . . . . . . . . . . . . . . . . . . . . . .430
13.4.16. IAttributeStrand . . . . . . . . . . . . . . . . . . . . . . . . . . . . . . . . . . . . . . . . . . . . . . . . . . . .431
13.4.17. IStyleInfo . . . . . . . . . . . . . . . . . . . . . . . . . . . . . . . . . . . . . . . . . . . . . . . . . . . . . . . . . .432
13.4.18. ITextAttributes . . . . . . . . . . . . . . . . . . . . . . . . . . . . . . . . . . . . . . . . . . . . . . . . . . . . .432
13.5. Frequently asked questions(FAQ). . . . . . . . . . . . . . . . . . . . . . . . . . . . . 432
13.5.1. What is a story? . . . . . . . . . . . . . . . . . . . . . . . . . . . . . . . . . . . . . . . . . . . . . . . . . . . . . .432
13.5.2. What is the text model? . . . . . . . . . . . . . . . . . . . . . . . . . . . . . . . . . . . . . . . . . . . . . . .432
13.5.3. What is a strand? . . . . . . . . . . . . . . . . . . . . . . . . . . . . . . . . . . . . . . . . . . . . . . . . . . . . .433
13.5.4. What is a run? . . . . . . . . . . . . . . . . . . . . . . . . . . . . . . . . . . . . . . . . . . . . . . . . . . . . . . .433
13.5.5. What is a story thread? . . . . . . . . . . . . . . . . . . . . . . . . . . . . . . . . . . . . . . . . . . . . . . . .433
13.5.6. What is a text attribute? . . . . . . . . . . . . . . . . . . . . . . . . . . . . . . . . . . . . . . . . . . . . . . .433
13.5.7. What is an AttributeBossList? . . . . . . . . . . . . . . . . . . . . . . . . . . . . . . . . . . . . . . . . . .433
13.5.8. What is a style? . . . . . . . . . . . . . . . . . . . . . . . . . . . . . . . . . . . . . . . . . . . . . . . . . . . . . .433
13.5.9. What is an owned item? . . . . . . . . . . . . . . . . . . . . . . . . . . . . . . . . . . . . . . . . . . . . . . .433
13.5.10. What is text focus? . . . . . . . . . . . . . . . . . . . . . . . . . . . . . . . . . . . . . . . . . . . . . . . . . .433
13.5.11. What is text selection? . . . . . . . . . . . . . . . . . . . . . . . . . . . . . . . . . . . . . . . . . . . . . . .433
13.5.12. How do I access the stories in a document? . . . . . . . . . . . . . . . . . . . . . . . . . . . . . .433
13.5.13. How do I create or delete a story? . . . . . . . . . . . . . . . . . . . . . . . . . . . . . . . . . . . . . .433
13.5.14. How do I navigate from the text model to a strand? . . . . . . . . . . . . . . . . . . . . . . .434
13.5.15. How do I access the characters in a story? . . . . . . . . . . . . . . . . . . . . . . . . . . . . . . .434
13.5.16. How do I count the number of paragraphs in a story? . . . . . . . . . . . . . . . . . . . . .435
13.5.17. How do I find the point size at a given TextIndex in a story?. . . . . . . . . . . . . . . .435
13.5.18. How do I access the formatting of a story? . . . . . . . . . . . . . . . . . . . . . . . . . . . . . . .435
13.5.19. How do I access the text attributes for a story or a range of text? . . . . . . . . . . . .435
13.5.20. How do I access the text selection? . . . . . . . . . . . . . . . . . . . . . . . . . . . . . . . . . . . . .436
13.5.21. How do I create a text selection? . . . . . . . . . . . . . . . . . . . . . . . . . . . . . . . . . . . . . . .436
13.5.22. How do I insert text into a story? . . . . . . . . . . . . . . . . . . . . . . . . . . . . . . . . . . . . . .437
13.5.23. How do I delete text from a story? . . . . . . . . . . . . . . . . . . . . . . . . . . . . . . . . . . . . .439
13.5.24. How do I replace a range of text in a story? . . . . . . . . . . . . . . . . . . . . . . . . . . . . . .439
13.5.25. How do I copy and paste text in and between stories? . . . . . . . . . . . . . . . . . . . . .440
13.5.26. How do I apply a style to text in a story? . . . . . . . . . . . . . . . . . . . . . . . . . . . . . . . .440
13.5.27. How do I apply text attribute overrides? . . . . . . . . . . . . . . . . . . . . . . . . . . . . . . . .440
13.5.28. How do I clear text attribute overrides? . . . . . . . . . . . . . . . . . . . . . . . . . . . . . . . . .444
13.5.29. How do I know if a text atribute is a paragraph or a character attribute? . . . . . .444
13.5.30. How do I create an inline graphic in a text frame? . . . . . . . . . . . . . . . . . . . . . . . .444
13.5.31. How do I access owned items like inline graphics? . . . . . . . . . . . . . . . . . . . . . . . .444
13.5.32. How do I directly manipulate the text model? . . . . . . . . . . . . . . . . . . . . . . . . . . . .444
13.5.33. How do I find the text foci that apply to a text model? . . . . . . . . . . . . . . . . . . . .445
13.5.34. How do I create a text focus? . . . . . . . . . . . . . . . . . . . . . . . . . . . . . . . . . . . . . . . . . .446
13.5.35. How do I access the IStrand runs on each strand?. . . . . . . . . . . . . . . . . . . . . . . . .448
13.5.36. Can I add a custom data interface to kTextStoryBoss? . . . . . . . . . . . . . . . . . . . . .450
13.5.37. Can I get called when stories are created and deleted? . . . . . . . . . . . . . . . . . . . . .451
13.5.38. Can I lock a story? . . . . . . . . . . . . . . . . . . . . . . . . . . . . . . . . . . . . . . . . . . . . . . . . . . .451
14
13.6. Summary . . . . . . . . . . . . . . . . . . . . . . . . . . . . . . . . . . . . . . . . . . . . . . . . . 452
13.7. Review . . . . . . . . . . . . . . . . . . . . . . . . . . . . . . . . . . . . . . . . . . . . . . . . . . . 452
13.8. Exercises . . . . . . . . . . . . . . . . . . . . . . . . . . . . . . . . . . . . . . . . . . . . . . . . . 453
13.8.1. Manipulate the text of a story . . . . . . . . . . . . . . . . . . . . . . . . . . . . . . . . . . . . . . . . . . 453
13.8.2. Manipulate character attributes . . . . . . . . . . . . . . . . . . . . . . . . . . . . . . . . . . . . . . . . 453
14. Text Layout . . . . . . . . . . . . . . . . . . . . . . . . . . . . . . . . . . . . . . . . . . . . . . . . . . . . . 455
14.0. Overview . . . . . . . . . . . . . . . . . . . . . . . . . . . . . . . . . . . . . . . . . . . . . . . . . 455
14.1. Goals . . . . . . . . . . . . . . . . . . . . . . . . . . . . . . . . . . . . . . . . . . . . . . . . . . . . 455
14.2. Section-at-a-glance. . . . . . . . . . . . . . . . . . . . . . . . . . . . . . . . . . . . . . . . . 455
14.3. Key concepts . . . . . . . . . . . . . . . . . . . . . . . . . . . . . . . . . . . . . . . . . . . . . . 456
14.3.1. Text layout. . . . . . . . . . . . . . . . . . . . . . . . . . . . . . . . . . . . . . . . . . . . . . . . . . . . . . . . . . 456
14.3.2. Parcels . . . . . . . . . . . . . . . . . . . . . . . . . . . . . . . . . . . . . . . . . . . . . . . . . . . . . . . . . . . . . 457
14.3.3. Text frames . . . . . . . . . . . . . . . . . . . . . . . . . . . . . . . . . . . . . . . . . . . . . . . . . . . . . . . . . 458
14.3.4. Span . . . . . . . . . . . . . . . . . . . . . . . . . . . . . . . . . . . . . . . . . . . . . . . . . . . . . . . . . . . . . . . 461
14.3.5. Text frame drawing . . . . . . . . . . . . . . . . . . . . . . . . . . . . . . . . . . . . . . . . . . . . . . . . . . 464
14.3.6. Text frame geometry . . . . . . . . . . . . . . . . . . . . . . . . . . . . . . . . . . . . . . . . . . . . . . . . . 464
14.3.7. Text inset . . . . . . . . . . . . . . . . . . . . . . . . . . . . . . . . . . . . . . . . . . . . . . . . . . . . . . . . . . . 465
14.3.8. Text wrap. . . . . . . . . . . . . . . . . . . . . . . . . . . . . . . . . . . . . . . . . . . . . . . . . . . . . . . . . . . 467
14.3.9. Text on a path . . . . . . . . . . . . . . . . . . . . . . . . . . . . . . . . . . . . . . . . . . . . . . . . . . . . . . . 469
14.4. Interfaces . . . . . . . . . . . . . . . . . . . . . . . . . . . . . . . . . . . . . . . . . . . . . . . . . 471
14.4.1. Class Diagram . . . . . . . . . . . . . . . . . . . . . . . . . . . . . . . . . . . . . . . . . . . . . . . . . . . . . . . 471
14.4.2. IFrameList . . . . . . . . . . . . . . . . . . . . . . . . . . . . . . . . . . . . . . . . . . . . . . . . . . . . . . . . . . 472
14.4.3. ITextFrame . . . . . . . . . . . . . . . . . . . . . . . . . . . . . . . . . . . . . . . . . . . . . . . . . . . . . . . . . 474
14.4.4. IParcelList . . . . . . . . . . . . . . . . . . . . . . . . . . . . . . . . . . . . . . . . . . . . . . . . . . . . . . . . . . 474
14.4.5. IParcel . . . . . . . . . . . . . . . . . . . . . . . . . . . . . . . . . . . . . . . . . . . . . . . . . . . . . . . . . . . . . 475
14.4.6. IParcelShape . . . . . . . . . . . . . . . . . . . . . . . . . . . . . . . . . . . . . . . . . . . . . . . . . . . . . . . . 475
14.4.7. ITextParcelList . . . . . . . . . . . . . . . . . . . . . . . . . . . . . . . . . . . . . . . . . . . . . . . . . . . . . . 476
14.4.8. ITextParcelListData . . . . . . . . . . . . . . . . . . . . . . . . . . . . . . . . . . . . . . . . . . . . . . . . . . 476
14.4.9. ITiler . . . . . . . . . . . . . . . . . . . . . . . . . . . . . . . . . . . . . . . . . . . . . . . . . . . . . . . . . . . . . . 476
14.4.10. ITextColumnSizer . . . . . . . . . . . . . . . . . . . . . . . . . . . . . . . . . . . . . . . . . . . . . . . . . . 476
14.4.11. IGraphicFrameData . . . . . . . . . . . . . . . . . . . . . . . . . . . . . . . . . . . . . . . . . . . . . . . . . 477
14.4.12. ITextInset . . . . . . . . . . . . . . . . . . . . . . . . . . . . . . . . . . . . . . . . . . . . . . . . . . . . . . . . . 477
14.4.13. IStandOffData and IStandOff . . . . . . . . . . . . . . . . . . . . . . . . . . . . . . . . . . . . . . . . . 478
14.5. Frequently asked questions (FAQ) . . . . . . . . . . . . . . . . . . . . . . . . . . . . 479
14.5.1. What is text layout? . . . . . . . . . . . . . . . . . . . . . . . . . . . . . . . . . . . . . . . . . . . . . . . . . . 479
14.5.2. What is a parcel? . . . . . . . . . . . . . . . . . . . . . . . . . . . . . . . . . . . . . . . . . . . . . . . . . . . . . 479
14.5.3. What is a parcel list? . . . . . . . . . . . . . . . . . . . . . . . . . . . . . . . . . . . . . . . . . . . . . . . . . . 479
14.5.4. What is a text frame? . . . . . . . . . . . . . . . . . . . . . . . . . . . . . . . . . . . . . . . . . . . . . . . . . 479
14.5.5. What is a frame list? . . . . . . . . . . . . . . . . . . . . . . . . . . . . . . . . . . . . . . . . . . . . . . . . . . 479
14.5.6. What is text inset?. . . . . . . . . . . . . . . . . . . . . . . . . . . . . . . . . . . . . . . . . . . . . . . . . . . . 479
14.5.7. What is text wrap, what is a stand off? . . . . . . . . . . . . . . . . . . . . . . . . . . . . . . . . . . . 479
14.5.8. What is text on a path?. . . . . . . . . . . . . . . . . . . . . . . . . . . . . . . . . . . . . . . . . . . . . . . . 479
14.5.9. How do I detect if a page item is a text frame? . . . . . . . . . . . . . . . . . . . . . . . . . . . . 479
Adobe InDesign Programming Guide
15
14.5.10. How do I create a text frame? . . . . . . . . . . . . . . . . . . . . . . . . . . . . . . . . . . . . . . . . .480
14.5.11. How do I change the default text frame options? . . . . . . . . . . . . . . . . . . . . . . . . .481
14.5.12. How do I add and remove columns in a text frame?. . . . . . . . . . . . . . . . . . . . . . .481
14.5.13. How do I modify text frame options? . . . . . . . . . . . . . . . . . . . . . . . . . . . . . . . . . . .481
14.5.14. How do I link text frames? . . . . . . . . . . . . . . . . . . . . . . . . . . . . . . . . . . . . . . . . . . . .482
14.5.15. How do I find the range of characters displayed by a text frame? . . . . . . . . . . . .482
14.5.16. How do I detect when a story is overset? . . . . . . . . . . . . . . . . . . . . . . . . . . . . . . . .483
14.5.17. How do I detect when a text frame is overset? . . . . . . . . . . . . . . . . . . . . . . . . . . . .483
14.5.18. How do I manipulate text wrap? . . . . . . . . . . . . . . . . . . . . . . . . . . . . . . . . . . . . . . .483
14.6. Summary . . . . . . . . . . . . . . . . . . . . . . . . . . . . . . . . . . . . . . . . . . . . . . . . . 483
14.7. Review . . . . . . . . . . . . . . . . . . . . . . . . . . . . . . . . . . . . . . . . . . . . . . . . . . . 483
14.8. Exercises. . . . . . . . . . . . . . . . . . . . . . . . . . . . . . . . . . . . . . . . . . . . . . . . . . 484
14.8.1. Test for a text frame . . . . . . . . . . . . . . . . . . . . . . . . . . . . . . . . . . . . . . . . . . . . . . . . . .484
14.8.1. Manipulate Text Frame Options . . . . . . . . . . . . . . . . . . . . . . . . . . . . . . . . . . . . . . . .484
15. The Wax . . . . . . . . . . . . . . . . . . . . . . . . . . . . . . . . . . . . . . . . . . . . . . . . . . . . . . . . 485
15.0. Overview . . . . . . . . . . . . . . . . . . . . . . . . . . . . . . . . . . . . . . . . . . . . . . . . . 485
15.1. Goals. . . . . . . . . . . . . . . . . . . . . . . . . . . . . . . . . . . . . . . . . . . . . . . . . . . . . 485
15.2. Chapter-at-a-glance . . . . . . . . . . . . . . . . . . . . . . . . . . . . . . . . . . . . . . . . 485
15.3. The Wax. . . . . . . . . . . . . . . . . . . . . . . . . . . . . . . . . . . . . . . . . . . . . . . . . . 486
15.4. Examples of The Wax . . . . . . . . . . . . . . . . . . . . . . . . . . . . . . . . . . . . . . . 487
15.4.1. Single Line with no Formatting Changes . . . . . . . . . . . . . . . . . . . . . . . . . . . . . . . . .487
15.4.2. Single Line With Formatting Changes . . . . . . . . . . . . . . . . . . . . . . . . . . . . . . . . . . .489
15.4.3. Multiple Lines in a Single Frame . . . . . . . . . . . . . . . . . . . . . . . . . . . . . . . . . . . . . . . .490
15.4.4. Single Frame with Two Columns . . . . . . . . . . . . . . . . . . . . . . . . . . . . . . . . . . . . . . .492
15.4.5. Text Frame Geometry. . . . . . . . . . . . . . . . . . . . . . . . . . . . . . . . . . . . . . . . . . . . . . . . .493
15.4.6. Overset Text. . . . . . . . . . . . . . . . . . . . . . . . . . . . . . . . . . . . . . . . . . . . . . . . . . . . . . . . .494
15.4.7. A Story Displayed over Two Text Frames. . . . . . . . . . . . . . . . . . . . . . . . . . . . . . . . .495
15.4.8. Irregular Frame Shape . . . . . . . . . . . . . . . . . . . . . . . . . . . . . . . . . . . . . . . . . . . . . . . .496
15.4.9. Text Wrap . . . . . . . . . . . . . . . . . . . . . . . . . . . . . . . . . . . . . . . . . . . . . . . . . . . . . . . . . .497
15.5. The Wax Interfaces . . . . . . . . . . . . . . . . . . . . . . . . . . . . . . . . . . . . . . . . . 500
15.5.1. Class Diagram . . . . . . . . . . . . . . . . . . . . . . . . . . . . . . . . . . . . . . . . . . . . . . . . . . . . . . .500
15.5.2. Interface Diagram . . . . . . . . . . . . . . . . . . . . . . . . . . . . . . . . . . . . . . . . . . . . . . . . . . . .502
15.5.3. Navigation Diagram . . . . . . . . . . . . . . . . . . . . . . . . . . . . . . . . . . . . . . . . . . . . . . . . . .503
15.5.4. IWaxStrand . . . . . . . . . . . . . . . . . . . . . . . . . . . . . . . . . . . . . . . . . . . . . . . . . . . . . . . . .504
15.5.5. IWaxIterator . . . . . . . . . . . . . . . . . . . . . . . . . . . . . . . . . . . . . . . . . . . . . . . . . . . . . . . .504
15.5.6. IWaxLine . . . . . . . . . . . . . . . . . . . . . . . . . . . . . . . . . . . . . . . . . . . . . . . . . . . . . . . . . . .504
15.5.7. IWaxLineShape/IWaxRunText . . . . . . . . . . . . . . . . . . . . . . . . . . . . . . . . . . . . . . . . .505
15.5.8. IWaxHitTest . . . . . . . . . . . . . . . . . . . . . . . . . . . . . . . . . . . . . . . . . . . . . . . . . . . . . . . .505
15.5.9. IWaxLineHilite . . . . . . . . . . . . . . . . . . . . . . . . . . . . . . . . . . . . . . . . . . . . . . . . . . . . . .506
15.5.10. IWaxRun . . . . . . . . . . . . . . . . . . . . . . . . . . . . . . . . . . . . . . . . . . . . . . . . . . . . . . . . . .506
15.5.11. IWaxRenderData . . . . . . . . . . . . . . . . . . . . . . . . . . . . . . . . . . . . . . . . . . . . . . . . . . .506
15.5.12. IWaxGlyphs . . . . . . . . . . . . . . . . . . . . . . . . . . . . . . . . . . . . . . . . . . . . . . . . . . . . . . . .506
15.6. Working With The Wax. . . . . . . . . . . . . . . . . . . . . . . . . . . . . . . . . . . . . 507
16
15.6.1. Iterating the Wax for a Story . . . . . . . . . . . . . . . . . . . . . . . . . . . . . . . . . . . . . . . . . . . 507
15.6.2. Estimating the Depth of Text in a Frame . . . . . . . . . . . . . . . . . . . . . . . . . . . . . . . . . 509
15.6.3. Creating Wax Lines and Wax Runs . . . . . . . . . . . . . . . . . . . . . . . . . . . . . . . . . . . . . 509
15.7. Summary . . . . . . . . . . . . . . . . . . . . . . . . . . . . . . . . . . . . . . . . . . . . . . . . . 510
15.8. Review . . . . . . . . . . . . . . . . . . . . . . . . . . . . . . . . . . . . . . . . . . . . . . . . . . . 510
15.9. Exercises . . . . . . . . . . . . . . . . . . . . . . . . . . . . . . . . . . . . . . . . . . . . . . . . . 511
15.9.1. Reporting the Widest Line in a Frame . . . . . . . . . . . . . . . . . . . . . . . . . . . . . . . . . . . 511
16. Text Composition . . . . . . . . . . . . . . . . . . . . . . . . . . . . . . . . . . . . . . . . . . . . . . . 513
16.0. Overview . . . . . . . . . . . . . . . . . . . . . . . . . . . . . . . . . . . . . . . . . . . . . . . . . 513
16.1. Goals . . . . . . . . . . . . . . . . . . . . . . . . . . . . . . . . . . . . . . . . . . . . . . . . . . . . 513
16.2. Chapter-at-a-glance . . . . . . . . . . . . . . . . . . . . . . . . . . . . . . . . . . . . . . . . 513
16.3. Key concepts . . . . . . . . . . . . . . . . . . . . . . . . . . . . . . . . . . . . . . . . . . . . . . 514
16.3.1. Text composition . . . . . . . . . . . . . . . . . . . . . . . . . . . . . . . . . . . . . . . . . . . . . . . . . . . . 514
16.3.2. The phases of text composition. . . . . . . . . . . . . . . . . . . . . . . . . . . . . . . . . . . . . . . . . 516
16.3.3. Damage . . . . . . . . . . . . . . . . . . . . . . . . . . . . . . . . . . . . . . . . . . . . . . . . . . . . . . . . . . . . 518
16.3.4. Recomposition . . . . . . . . . . . . . . . . . . . . . . . . . . . . . . . . . . . . . . . . . . . . . . . . . . . . . . 519
16.3.5. The wax strand . . . . . . . . . . . . . . . . . . . . . . . . . . . . . . . . . . . . . . . . . . . . . . . . . . . . . . 520
16.3.6. Paragraph composers . . . . . . . . . . . . . . . . . . . . . . . . . . . . . . . . . . . . . . . . . . . . . . . . . 520
16.3.7. Shuffling . . . . . . . . . . . . . . . . . . . . . . . . . . . . . . . . . . . . . . . . . . . . . . . . . . . . . . . . . . . 521
16.3.8. Vertical justification . . . . . . . . . . . . . . . . . . . . . . . . . . . . . . . . . . . . . . . . . . . . . . . . . . 521
16.3.9. Background composition. . . . . . . . . . . . . . . . . . . . . . . . . . . . . . . . . . . . . . . . . . . . . . 521
16.3.10. Recomposition transactional model. . . . . . . . . . . . . . . . . . . . . . . . . . . . . . . . . . . . 522
16.3.11. Recomposition notification. . . . . . . . . . . . . . . . . . . . . . . . . . . . . . . . . . . . . . . . . . . 522
16.4. Interfaces . . . . . . . . . . . . . . . . . . . . . . . . . . . . . . . . . . . . . . . . . . . . . . . . . 522
16.4.1. Damage . . . . . . . . . . . . . . . . . . . . . . . . . . . . . . . . . . . . . . . . . . . . . . . . . . . . . . . . . . . . 522
16.4.2. Recomposition . . . . . . . . . . . . . . . . . . . . . . . . . . . . . . . . . . . . . . . . . . . . . . . . . . . . . . 523
16.5. Frequently asked questions (FAQ) . . . . . . . . . . . . . . . . . . . . . . . . . . . . 524
16.5.1. What is text composition? . . . . . . . . . . . . . . . . . . . . . . . . . . . . . . . . . . . . . . . . . . . . . 524
16.5.2. What is damage? . . . . . . . . . . . . . . . . . . . . . . . . . . . . . . . . . . . . . . . . . . . . . . . . . . . . . 524
16.5.3. What is recomposition? . . . . . . . . . . . . . . . . . . . . . . . . . . . . . . . . . . . . . . . . . . . . . . . 524
16.5.4. What is the wax strand? . . . . . . . . . . . . . . . . . . . . . . . . . . . . . . . . . . . . . . . . . . . . . . . 524
16.5.5. What is a paragraph composer? . . . . . . . . . . . . . . . . . . . . . . . . . . . . . . . . . . . . . . . . 525
16.5.6. What is background composition? . . . . . . . . . . . . . . . . . . . . . . . . . . . . . . . . . . . . . . 525
16.5.7. How do I recompose text? . . . . . . . . . . . . . . . . . . . . . . . . . . . . . . . . . . . . . . . . . . . . . 525
16.5.8. How do I recompose all stories in a document? . . . . . . . . . . . . . . . . . . . . . . . . . . . 527
16.5.9. Can I be notified when text is recomposed?. . . . . . . . . . . . . . . . . . . . . . . . . . . . . . . 527
16.5.10. Can I observe changes that affect text? . . . . . . . . . . . . . . . . . . . . . . . . . . . . . . . . . . 527
16.6. Summary . . . . . . . . . . . . . . . . . . . . . . . . . . . . . . . . . . . . . . . . . . . . . . . . . 528
16.7. Review . . . . . . . . . . . . . . . . . . . . . . . . . . . . . . . . . . . . . . . . . . . . . . . . . . . 528
16.8. Exercises . . . . . . . . . . . . . . . . . . . . . . . . . . . . . . . . . . . . . . . . . . . . . . . . . 529
16.8.1. Find the text frame that displays a given TextIndex . . . . . . . . . . . . . . . . . . . . . . . . 529
Adobe InDesign Programming Guide
17
17. Paragraph Composers . . . . . . . . . . . . . . . . . . . . . . . . . . . . . . . . . . . . . . . . . . . 531
17.0. Overview . . . . . . . . . . . . . . . . . . . . . . . . . . . . . . . . . . . . . . . . . . . . . . . . . 531
17.1. Goals. . . . . . . . . . . . . . . . . . . . . . . . . . . . . . . . . . . . . . . . . . . . . . . . . . . . . 531
17.2. Chapter-at-a-glance . . . . . . . . . . . . . . . . . . . . . . . . . . . . . . . . . . . . . . . . 531
17.3. Key concepts . . . . . . . . . . . . . . . . . . . . . . . . . . . . . . . . . . . . . . . . . . . . . . 532
17.3.1. Paragraph composers . . . . . . . . . . . . . . . . . . . . . . . . . . . . . . . . . . . . . . . . . . . . . . . . .532
17.3.2. HnJ . . . . . . . . . . . . . . . . . . . . . . . . . . . . . . . . . . . . . . . . . . . . . . . . . . . . . . . . . . . . . . . .533
17.3.3. Roman typography basics . . . . . . . . . . . . . . . . . . . . . . . . . . . . . . . . . . . . . . . . . . . . .533
17.3.4. Japanese typography basics . . . . . . . . . . . . . . . . . . . . . . . . . . . . . . . . . . . . . . . . . . . .535
17.3.5. A paragraph composer’s environment . . . . . . . . . . . . . . . . . . . . . . . . . . . . . . . . . . .538
17.3.6. The scanner and drawing style. . . . . . . . . . . . . . . . . . . . . . . . . . . . . . . . . . . . . . . . . .539
17.3.7. Fonts and glyphs . . . . . . . . . . . . . . . . . . . . . . . . . . . . . . . . . . . . . . . . . . . . . . . . . . . . .540
17.3.8. Tiles . . . . . . . . . . . . . . . . . . . . . . . . . . . . . . . . . . . . . . . . . . . . . . . . . . . . . . . . . . . . . . .541
17.3.9. First baseline offset . . . . . . . . . . . . . . . . . . . . . . . . . . . . . . . . . . . . . . . . . . . . . . . . . . .542
17.3.10. Control characters. . . . . . . . . . . . . . . . . . . . . . . . . . . . . . . . . . . . . . . . . . . . . . . . . . .543
17.3.11. In-line frames . . . . . . . . . . . . . . . . . . . . . . . . . . . . . . . . . . . . . . . . . . . . . . . . . . . . . .544
17.3.12. Table frames . . . . . . . . . . . . . . . . . . . . . . . . . . . . . . . . . . . . . . . . . . . . . . . . . . . . . . .544
17.3.13. Creating Wax. . . . . . . . . . . . . . . . . . . . . . . . . . . . . . . . . . . . . . . . . . . . . . . . . . . . . . .545
17.3.14. Adobe paragraph composers . . . . . . . . . . . . . . . . . . . . . . . . . . . . . . . . . . . . . . . . . .546
17.4. Interfaces . . . . . . . . . . . . . . . . . . . . . . . . . . . . . . . . . . . . . . . . . . . . . . . . . 547
17.4.1. Class diagram . . . . . . . . . . . . . . . . . . . . . . . . . . . . . . . . . . . . . . . . . . . . . . . . . . . . . . .547
17.4.2. IParagraphComposer . . . . . . . . . . . . . . . . . . . . . . . . . . . . . . . . . . . . . . . . . . . . . . . . .548
17.4.3. IComposeScanner . . . . . . . . . . . . . . . . . . . . . . . . . . . . . . . . . . . . . . . . . . . . . . . . . . . .549
17.4.4. IDrawingStyle . . . . . . . . . . . . . . . . . . . . . . . . . . . . . . . . . . . . . . . . . . . . . . . . . . . . . . .551
17.4.5. ICompositionStyle . . . . . . . . . . . . . . . . . . . . . . . . . . . . . . . . . . . . . . . . . . . . . . . . . . .551
17.4.6. IHyphenationStyle . . . . . . . . . . . . . . . . . . . . . . . . . . . . . . . . . . . . . . . . . . . . . . . . . . .552
17.4.7. IJustificationStyle . . . . . . . . . . . . . . . . . . . . . . . . . . . . . . . . . . . . . . . . . . . . . . . . . . . .552
17.4.8. IPMFont. . . . . . . . . . . . . . . . . . . . . . . . . . . . . . . . . . . . . . . . . . . . . . . . . . . . . . . . . . . .552
17.4.9. IFontInstance. . . . . . . . . . . . . . . . . . . . . . . . . . . . . . . . . . . . . . . . . . . . . . . . . . . . . . . .552
17.4.10. ITiler. . . . . . . . . . . . . . . . . . . . . . . . . . . . . . . . . . . . . . . . . . . . . . . . . . . . . . . . . . . . . .553
17.5. Scenarios . . . . . . . . . . . . . . . . . . . . . . . . . . . . . . . . . . . . . . . . . . . . . . . . . 554
17.5.1. Simple text composition. . . . . . . . . . . . . . . . . . . . . . . . . . . . . . . . . . . . . . . . . . . . . . .554
17.5.2. Change in text height on line . . . . . . . . . . . . . . . . . . . . . . . . . . . . . . . . . . . . . . . . . . .557
17.5.3. Text wrap . . . . . . . . . . . . . . . . . . . . . . . . . . . . . . . . . . . . . . . . . . . . . . . . . . . . . . . . . . .559
17.5.4. Frame too narrow or not deep enough . . . . . . . . . . . . . . . . . . . . . . . . . . . . . . . . . . .561
17.6. Sample code. . . . . . . . . . . . . . . . . . . . . . . . . . . . . . . . . . . . . . . . . . . . . . . 561
17.6.1. SingleLineComposer. . . . . . . . . . . . . . . . . . . . . . . . . . . . . . . . . . . . . . . . . . . . . . . . . .561
17.6.2. ComposerJ . . . . . . . . . . . . . . . . . . . . . . . . . . . . . . . . . . . . . . . . . . . . . . . . . . . . . . . . . .561
17.6.3. Hyphenator . . . . . . . . . . . . . . . . . . . . . . . . . . . . . . . . . . . . . . . . . . . . . . . . . . . . . . . . .562
17.6.4. Other samples . . . . . . . . . . . . . . . . . . . . . . . . . . . . . . . . . . . . . . . . . . . . . . . . . . . . . . .562
17.7. Frequently asked questions (FAQ) . . . . . . . . . . . . . . . . . . . . . . . . . . . . 562
17.7.1. What is a paragraph composer?. . . . . . . . . . . . . . . . . . . . . . . . . . . . . . . . . . . . . . . . .562
17.7.2. What is typography? . . . . . . . . . . . . . . . . . . . . . . . . . . . . . . . . . . . . . . . . . . . . . . . . . .562
17.7.3. What is text composition? . . . . . . . . . . . . . . . . . . . . . . . . . . . . . . . . . . . . . . . . . . . . .562
18
17.7.4. Where does a paragraph composer fit into the text architecture? . . . . . . . . . . . . . 562
17.7.5. What is the compose scanner?. . . . . . . . . . . . . . . . . . . . . . . . . . . . . . . . . . . . . . . . . . 562
17.7.6. What is drawing style? . . . . . . . . . . . . . . . . . . . . . . . . . . . . . . . . . . . . . . . . . . . . . . . . 562
17.7.7. What is a font and what is a glyph?. . . . . . . . . . . . . . . . . . . . . . . . . . . . . . . . . . . . . . 562
17.7.8. What is a tile? . . . . . . . . . . . . . . . . . . . . . . . . . . . . . . . . . . . . . . . . . . . . . . . . . . . . . . . 562
17.7.9. What is an intrusion? . . . . . . . . . . . . . . . . . . . . . . . . . . . . . . . . . . . . . . . . . . . . . . . . . 562
17.7.10. What is HnJ? . . . . . . . . . . . . . . . . . . . . . . . . . . . . . . . . . . . . . . . . . . . . . . . . . . . . . . . 563
17.7.11. Can I do my own HnJ?. . . . . . . . . . . . . . . . . . . . . . . . . . . . . . . . . . . . . . . . . . . . . . . 563
17.7.12. How do I implement a paragraph composer? . . . . . . . . . . . . . . . . . . . . . . . . . . . . 563
17.7.13. How do I control the paragraph composer used to compose text? . . . . . . . . . . . 563
17.7.14. How do I scan text? . . . . . . . . . . . . . . . . . . . . . . . . . . . . . . . . . . . . . . . . . . . . . . . . . 563
17.7.15. How do I estimate the width of text? . . . . . . . . . . . . . . . . . . . . . . . . . . . . . . . . . . . 563
17.7.16. How do I measure composed width or depth more accurately? . . . . . . . . . . . . . 566
17.8. Summary . . . . . . . . . . . . . . . . . . . . . . . . . . . . . . . . . . . . . . . . . . . . . . . . . 567
17.9. Review . . . . . . . . . . . . . . . . . . . . . . . . . . . . . . . . . . . . . . . . . . . . . . . . . . . 567
17.10. Exercises . . . . . . . . . . . . . . . . . . . . . . . . . . . . . . . . . . . . . . . . . . . . . . . . 567
17.10.1. Vertical Scale. . . . . . . . . . . . . . . . . . . . . . . . . . . . . . . . . . . . . . . . . . . . . . . . . . . . . . . 567
17.10.2. Paragraph Alignment . . . . . . . . . . . . . . . . . . . . . . . . . . . . . . . . . . . . . . . . . . . . . . . . 567
17.10.3. Justification . . . . . . . . . . . . . . . . . . . . . . . . . . . . . . . . . . . . . . . . . . . . . . . . . . . . . . . . 567
17.11. References . . . . . . . . . . . . . . . . . . . . . . . . . . . . . . . . . . . . . . . . . . . . . . . 567
18. Text Attributes and Adornments . . . . . . . . . . . . . . . . . . . . . . . . . . . . . . . . . 569
18.0. Introduction . . . . . . . . . . . . . . . . . . . . . . . . . . . . . . . . . . . . . . . . . . . . . . 569
18.1. Goals . . . . . . . . . . . . . . . . . . . . . . . . . . . . . . . . . . . . . . . . . . . . . . . . . . . . 569
18.2. Chapter-at-a-glance . . . . . . . . . . . . . . . . . . . . . . . . . . . . . . . . . . . . . . . . 569
18.3. Text Attributes . . . . . . . . . . . . . . . . . . . . . . . . . . . . . . . . . . . . . . . . . . . . 570
18.4. TextAttributeRunIterator . . . . . . . . . . . . . . . . . . . . . . . . . . . . . . . . . . . 571
18.5. Text Adornments . . . . . . . . . . . . . . . . . . . . . . . . . . . . . . . . . . . . . . . . . . 571
18.5.1. Normal Text Adornments . . . . . . . . . . . . . . . . . . . . . . . . . . . . . . . . . . . . . . . . . . . . . 572
18.5.2. Global Text Adornments . . . . . . . . . . . . . . . . . . . . . . . . . . . . . . . . . . . . . . . . . . . . . . 573
18.6. Text Attribute and Text Adornment Interfaces. . . . . . . . . . . . . . . . . . 575
18.6.1. Interface Diagram. . . . . . . . . . . . . . . . . . . . . . . . . . . . . . . . . . . . . . . . . . . . . . . . . . . . 575
18.6.2. IAttrReport . . . . . . . . . . . . . . . . . . . . . . . . . . . . . . . . . . . . . . . . . . . . . . . . . . . . . . . . . 575
18.6.3. ITextAttr*** . . . . . . . . . . . . . . . . . . . . . . . . . . . . . . . . . . . . . . . . . . . . . . . . . . . . . . . . 576
18.6.4. IAttrImportExport . . . . . . . . . . . . . . . . . . . . . . . . . . . . . . . . . . . . . . . . . . . . . . . . . . . 576
18.6.5. ITextAdornment. . . . . . . . . . . . . . . . . . . . . . . . . . . . . . . . . . . . . . . . . . . . . . . . . . . . . 576
18.6.6. IGlobalTextAdornment . . . . . . . . . . . . . . . . . . . . . . . . . . . . . . . . . . . . . . . . . . . . . . . 578
18.6.7. ITextAdornmentData. . . . . . . . . . . . . . . . . . . . . . . . . . . . . . . . . . . . . . . . . . . . . . . . . 578
18.6.8. ITextAdornment***Data . . . . . . . . . . . . . . . . . . . . . . . . . . . . . . . . . . . . . . . . . . . . . . 579
18.6.9. IK2ServiceProvider. . . . . . . . . . . . . . . . . . . . . . . . . . . . . . . . . . . . . . . . . . . . . . . . . . . 579
18.7. Working with Text Attributes and Text Adornments. . . . . . . . . . . . . 579
18.8. Summary . . . . . . . . . . . . . . . . . . . . . . . . . . . . . . . . . . . . . . . . . . . . . . . . . 579
18.9. Review . . . . . . . . . . . . . . . . . . . . . . . . . . . . . . . . . . . . . . . . . . . . . . . . . . . 579
Adobe InDesign Programming Guide
19
18.10. Appendix . . . . . . . . . . . . . . . . . . . . . . . . . . . . . . . . . . . . . . . . . . . . . . . . 579
19. Working with Text Styles. . . . . . . . . . . . . . . . . . . . . . . . . . . . . . . . . . . . . . . . . 581
19.0. Overview . . . . . . . . . . . . . . . . . . . . . . . . . . . . . . . . . . . . . . . . . . . . . . . . . 581
19.1. Goals. . . . . . . . . . . . . . . . . . . . . . . . . . . . . . . . . . . . . . . . . . . . . . . . . . . . . 581
19.2. Chapter-at-a-glance . . . . . . . . . . . . . . . . . . . . . . . . . . . . . . . . . . . . . . . . 582
19.3. Text Styles . . . . . . . . . . . . . . . . . . . . . . . . . . . . . . . . . . . . . . . . . . . . . . . . 583
19.4. Style Name Tables. . . . . . . . . . . . . . . . . . . . . . . . . . . . . . . . . . . . . . . . . . 584
19.5. Text Attribute Descriptions . . . . . . . . . . . . . . . . . . . . . . . . . . . . . . . . . . 585
19.6. Style Relationships . . . . . . . . . . . . . . . . . . . . . . . . . . . . . . . . . . . . . . . . . 585
19.7. Creating Styles. . . . . . . . . . . . . . . . . . . . . . . . . . . . . . . . . . . . . . . . . . . . . 590
19.8. Applying Styles . . . . . . . . . . . . . . . . . . . . . . . . . . . . . . . . . . . . . . . . . . . . 590
19.9. Editing styles . . . . . . . . . . . . . . . . . . . . . . . . . . . . . . . . . . . . . . . . . . . . . . 590
19.10. Default Styles. . . . . . . . . . . . . . . . . . . . . . . . . . . . . . . . . . . . . . . . . . . . . 591
19.11. Deleting Styles . . . . . . . . . . . . . . . . . . . . . . . . . . . . . . . . . . . . . . . . . . . . 591
19.12. Summary . . . . . . . . . . . . . . . . . . . . . . . . . . . . . . . . . . . . . . . . . . . . . . . . 592
19.13. Review . . . . . . . . . . . . . . . . . . . . . . . . . . . . . . . . . . . . . . . . . . . . . . . . . . 592
19.14. Exercises. . . . . . . . . . . . . . . . . . . . . . . . . . . . . . . . . . . . . . . . . . . . . . . . . 593
19.14.1. Creating styles . . . . . . . . . . . . . . . . . . . . . . . . . . . . . . . . . . . . . . . . . . . . . . . . . . . . . .593
19.14.2. Deleting styles . . . . . . . . . . . . . . . . . . . . . . . . . . . . . . . . . . . . . . . . . . . . . . . . . . . . . .593
19.14.3. Style Tree Walker . . . . . . . . . . . . . . . . . . . . . . . . . . . . . . . . . . . . . . . . . . . . . . . . . . .593
20. Fonts . . . . . . . . . . . . . . . . . . . . . . . . . . . . . . . . . . . . . . . . . . . . . . . . . . . . . . . . . . . 595
20.0. Overview . . . . . . . . . . . . . . . . . . . . . . . . . . . . . . . . . . . . . . . . . . . . . . . . . 595
20.1. Goals. . . . . . . . . . . . . . . . . . . . . . . . . . . . . . . . . . . . . . . . . . . . . . . . . . . . . 595
20.2. Chapter-at-a-glance . . . . . . . . . . . . . . . . . . . . . . . . . . . . . . . . . . . . . . . . 595
20.3. Key concepts . . . . . . . . . . . . . . . . . . . . . . . . . . . . . . . . . . . . . . . . . . . . . . 596
20.3.1. Terminology and definitions . . . . . . . . . . . . . . . . . . . . . . . . . . . . . . . . . . . . . . . . . . .596
20.3.2. The font manager . . . . . . . . . . . . . . . . . . . . . . . . . . . . . . . . . . . . . . . . . . . . . . . . . . . .596
20.3.3. Cooltype. . . . . . . . . . . . . . . . . . . . . . . . . . . . . . . . . . . . . . . . . . . . . . . . . . . . . . . . . . . .597
20.3.4. Documents and fonts . . . . . . . . . . . . . . . . . . . . . . . . . . . . . . . . . . . . . . . . . . . . . . . . .597
20.3.5. Font names . . . . . . . . . . . . . . . . . . . . . . . . . . . . . . . . . . . . . . . . . . . . . . . . . . . . . . . . .597
20.4. Interfaces . . . . . . . . . . . . . . . . . . . . . . . . . . . . . . . . . . . . . . . . . . . . . . . . . 598
20.5. Frequently asked questions (FAQ) . . . . . . . . . . . . . . . . . . . . . . . . . . . . 600
20.5.1. How do I iterate available fonts? . . . . . . . . . . . . . . . . . . . . . . . . . . . . . . . . . . . . . . . .600
20.5.2. How do I find a given font? . . . . . . . . . . . . . . . . . . . . . . . . . . . . . . . . . . . . . . . . . . . .600
20.5.3. How do I find the font used to display a story’s text? . . . . . . . . . . . . . . . . . . . . . . .600
20.5.4. How do I change the font used to display a story’s text?. . . . . . . . . . . . . . . . . . . . .601
20.5.5. How do I get the name of a font from the UID of that font. . . . . . . . . . . . . . . . . .601
20.6. Summary . . . . . . . . . . . . . . . . . . . . . . . . . . . . . . . . . . . . . . . . . . . . . . . . . 602
20.7. Review . . . . . . . . . . . . . . . . . . . . . . . . . . . . . . . . . . . . . . . . . . . . . . . . . . . 602
20.8. Exercises. . . . . . . . . . . . . . . . . . . . . . . . . . . . . . . . . . . . . . . . . . . . . . . . . . 602
20
20.8.1. Find the name of the font that displays text at a given TextIndex . . . . . . . . . . . . . 602
20.9. References . . . . . . . . . . . . . . . . . . . . . . . . . . . . . . . . . . . . . . . . . . . . . . . . 602
21. Printing . . . . . . . . . . . . . . . . . . . . . . . . . . . . . . . . . . . . . . . . . . . . . . . . . . . . . . . . 603
21.0. Overview . . . . . . . . . . . . . . . . . . . . . . . . . . . . . . . . . . . . . . . . . . . . . . . . . 603
21.1. Goals . . . . . . . . . . . . . . . . . . . . . . . . . . . . . . . . . . . . . . . . . . . . . . . . . . . . 603
21.2. Chapter-at-a-glance . . . . . . . . . . . . . . . . . . . . . . . . . . . . . . . . . . . . . . . . 604
21.3. The Major Concepts of Printing . . . . . . . . . . . . . . . . . . . . . . . . . . . . . . 604
21.3.1. Printing is Simply Drawing to the Printer . . . . . . . . . . . . . . . . . . . . . . . . . . . . . . . . 604
21.3.2. Control is Provided by the Application API . . . . . . . . . . . . . . . . . . . . . . . . . . . . . . 605
21.4. The Major Components of Printing . . . . . . . . . . . . . . . . . . . . . . . . . . . 605
21.4.1. Highlights of the SDK BasicPrint Plug-in . . . . . . . . . . . . . . . . . . . . . . . . . . . . . . . . 605
21.4.2. Commonly-used Print Structures. . . . . . . . . . . . . . . . . . . . . . . . . . . . . . . . . . . . . . . 607
21.4.3. Commonly-used Print Interfaces . . . . . . . . . . . . . . . . . . . . . . . . . . . . . . . . . . . . . . . 607
21.4.4. Commonly-used Print Command Bosses . . . . . . . . . . . . . . . . . . . . . . . . . . . . . . . . 608
21.5. PrintSetup Service Provider. . . . . . . . . . . . . . . . . . . . . . . . . . . . . . . . . . 608
21.5.1. Registering as a PrintSetup Service provider . . . . . . . . . . . . . . . . . . . . . . . . . . . . . . 608
21.5.2. Participating in the print process . . . . . . . . . . . . . . . . . . . . . . . . . . . . . . . . . . . . . . . 608
21.6. Print Event Handling . . . . . . . . . . . . . . . . . . . . . . . . . . . . . . . . . . . . . . . 609
21.6.1. Draw Events . . . . . . . . . . . . . . . . . . . . . . . . . . . . . . . . . . . . . . . . . . . . . . . . . . . . . . . . 609
21.6.2. Registering and Unregistering. . . . . . . . . . . . . . . . . . . . . . . . . . . . . . . . . . . . . . . . . . 609
21.6.3. Handling Draw Events . . . . . . . . . . . . . . . . . . . . . . . . . . . . . . . . . . . . . . . . . . . . . . . . 610
21.6.4. Print Events. . . . . . . . . . . . . . . . . . . . . . . . . . . . . . . . . . . . . . . . . . . . . . . . . . . . . . . . . 611
21.7. Summary . . . . . . . . . . . . . . . . . . . . . . . . . . . . . . . . . . . . . . . . . . . . . . . . . 612
21.8. Review . . . . . . . . . . . . . . . . . . . . . . . . . . . . . . . . . . . . . . . . . . . . . . . . . . . 612
21.9. References . . . . . . . . . . . . . . . . . . . . . . . . . . . . . . . . . . . . . . . . . . . . . . . . 612
22. Scripting Architecture . . . . . . . . . . . . . . . . . . . . . . . . . . . . . . . . . . . . . . . . . . . 613
22.0. Overview . . . . . . . . . . . . . . . . . . . . . . . . . . . . . . . . . . . . . . . . . . . . . . . . . 613
22.1. Goals . . . . . . . . . . . . . . . . . . . . . . . . . . . . . . . . . . . . . . . . . . . . . . . . . . . . 614
22.2. Document-at-a-glance . . . . . . . . . . . . . . . . . . . . . . . . . . . . . . . . . . . . . . 614
22.3. Architecture . . . . . . . . . . . . . . . . . . . . . . . . . . . . . . . . . . . . . . . . . . . . . . 615
22.3.1. The document object model . . . . . . . . . . . . . . . . . . . . . . . . . . . . . . . . . . . . . . . . . . . 615
22.3.2. Script libraries and script IDs . . . . . . . . . . . . . . . . . . . . . . . . . . . . . . . . . . . . . . . . . . 615
22.3.3. One script object, one InDesign boss . . . . . . . . . . . . . . . . . . . . . . . . . . . . . . . . . . . . 616
22.3.4. The script provider . . . . . . . . . . . . . . . . . . . . . . . . . . . . . . . . . . . . . . . . . . . . . . . . . . . 617
22.3.5. Tying it all together . . . . . . . . . . . . . . . . . . . . . . . . . . . . . . . . . . . . . . . . . . . . . . . . . . 618
22.3.6. Examples in the SDK and test scripts . . . . . . . . . . . . . . . . . . . . . . . . . . . . . . . . . . . . 619
22.4. Summary . . . . . . . . . . . . . . . . . . . . . . . . . . . . . . . . . . . . . . . . . . . . . . . . . 619
22.5. Review . . . . . . . . . . . . . . . . . . . . . . . . . . . . . . . . . . . . . . . . . . . . . . . . . . . 619
22.6. Exercises . . . . . . . . . . . . . . . . . . . . . . . . . . . . . . . . . . . . . . . . . . . . . . . . . 620
22.6.1. Adding a property. . . . . . . . . . . . . . . . . . . . . . . . . . . . . . . . . . . . . . . . . . . . . . . . . . . . 620
22.6.2. Implementing a new script object. . . . . . . . . . . . . . . . . . . . . . . . . . . . . . . . . . . . . . . 620
Adobe InDesign Programming Guide
21
22.6.3. Extracting data . . . . . . . . . . . . . . . . . . . . . . . . . . . . . . . . . . . . . . . . . . . . . . . . . . . . . .620
22.6.4. Returning data. . . . . . . . . . . . . . . . . . . . . . . . . . . . . . . . . . . . . . . . . . . . . . . . . . . . . . .620
22.7. References . . . . . . . . . . . . . . . . . . . . . . . . . . . . . . . . . . . . . . . . . . . . . . . . 620
Index . . . . . . . . . . . . . . . . . . . . . . . . . . . . . . . . . . . . . . . . . . . . . . . . . . . . . . . . . . . . . . 621
22
1.
Overview
1.0. Introduction
This chapter introduces you to the application program interface (API) plugins (source code) furnished with the SDK and the InDesign plug-in
environment. It also describes the basic operations of the application,
presented as programming considerations. If you understand the application,
which itself consists of plug-ins, it will be easier for you to write plug-ins using
or enhancing InDesign’s functionalities.
At the end of the chapter, loading instructions and brief descriptions for the
example plug-ins included in the SDK are provided. After you’ve read about the
InDesign environment and operational information in this chapter, it is
suggested you load the plug-ins and experiment.
1.1. Goals
The goals of this chapter are to:
• Acquaint you with the plug-in environment furnished by InDesign.
• Briefly describe the SDK-furnished API plug-ins.
• Provide programming considerations describing the basic InDesign
operations.
• Provide loading instructions and brief descriptions for the example plugins.
23
24
1.2. Chapter-at-a-glance
Overview
1.2. Chapter-at-a-glance
“1.3. API Plug-ins Furnished by the SDK” on page 25 lists the plug-in code
installed in the Adobe InDesign 2.0 SDK/Api/Implementation/ directory.
This code is useful when writing a plug-in.
“1.4. Plug-in Environment” on page 25 introduces the development
environment supported by InDesign and the SDK.
“1.5. Programming Considerations” on page 29 provides InDesign details to be
aware of when developing plug-ins.
“1.6. Summary” on page 56 recaps the material presented in this chapter.
“1.7. Review” on page 57 presents some review questions you can answer to
check your knowledge before proceeding on to the next chapter.
“1.8. References” on page 57 lists reference material supporting the information
in this chapter.
table 1.2.a. version history
Rev
Date
2.0
23-Oct-02
0.1
2000
Author
Lee Huang
Notes
Update content for InDesgn 2.x API
First Draft
Adobe InDesign Programming Guide
1.3. API Plug-ins Furnished by the SDK
25
1.3. API Plug-ins Furnished by the SDK
The following table summarizes the API plug-ins provided by the SDK. These
are found in Adobe InDesign 2.0 SDK/Api/Implementation/, with associated
interfaces defined in Adobe InDesign 2.0 SDK/Api/Interfaces/.
table 1.3.a. sdk-supplied plug-ins
Plug-In Set
Description
Commands
Code supporting the development of commands. See “1.5.2.
Commands” on page 32.
Common Data
Code supporting object persistence. See “1.5.5. Common Data
(Persistence)” on page 35.
Data Exchange
Code supporting data transfer using the operating system
clipboard. See “1.5.12. Data Exchange” on page 43.
Document
Code supporting documents. See “1.5.6. Documents” on page 36.
Events
Code supporting event handling. See “1.5.18. Events” on page 49.
Graphics
Code supporting graphics and images. See “1.5.8. Graphics and
Images” on page 39.
Localization
Code supporting customization for various locales. See “1.5.14.
Text” on page 44.
Measurement Systems
Code supporting measurement systems.
Menus
Code supporting menus and menu components. See “1.5.1.3.
Menus” on page 32.
Messaging
Code supporting messaging. See “1.5.3. Messaging” on page 33.
Page Items
Code for preparation of document page items. See “1.5.7. Page
Items” on page 38.
Strings
Code supporting string handling. See “1.5.21. Strings” on page 49.
Trackers
Code to allow development of trackers for tools. See “1.5.4. Tools”
on page 34.
Utilities
Code supporting various utilities that apply to plug-in
development.
Widgets
Code assisting in development of plug-ins that implement
widgets. See “1.5.1.1. Widgets” on page 29.
1.4. Plug-in Environment
When writing a plug-in to use or extend the functionality of InDesign, you are
building on the basic features of the application itself. InDesign is packaged as a
small core executable with the bulk of the feature set implemented as required
plug-ins, a number of interfaces, helper classes, and commands. There is also a
set of plug-ins that are not required, but it is part of the application. All the
26
1.4. Plug-in Environment
Overview
application modules are hierarchically represented by an object model having
its own interface.
Each plug-in can support a number of classes, either new ones or classes
inheriting from the application-provided interfaces and helper classes. To
support the distributed objects (class instantiations) associated with it’s plugins, InDesign introduces the concept of a boss, with a boss object being an
instantiation of a boss. The boss (for example, kDocumentBoss) is essentially a
class providing a mapping between interfaces and implementation classes for a
particular functional area of a plug-in. Each plug-in can support one or more
bosses, depending on the functionality it provides.
figure 1.4.a. operating environment
Your Plug-In
Boss
InDesign
Plug-In
Plug-In
Boss
Plug-In
Boss
Boss
Platform-Specific Code
Your plug-in will consist of new functionality you write, inheriting from the
applicable classes within the application. Of course, you can also create
implementations of the InDesign interfaces to use the internal application
classes as they are. For example, you can add to InDesign menu components,
Adobe InDesign Programming Guide
1.4. Plug-in Environment
27
palettes, commands, and document-persistent data. All these elements will be
available to other plug-ins at application run time.
1.4.1. Object Model
As mentioned above, InDesign uses an object model to control classes and
implementations for all plug-ins. The interface for the object model is
IObjectModel. For details, see the chapter “Architecture.”
1.4.2. Base Class for All Interfaces (IPMUnknown)
InDesign provides a base class called IPMUnknown. It is inherited by all class
objects exporting functionality to the object model. IPMUnknown supports
methods allowing for querying interfaces and maintaining reference counts for
pointers handed out to interfaces.
1.4.3. InDesign Session and Workspace
An InDesign session is considered the period between application startup and
application shutdown. Its environment is set up by an IEnvironment interface
that initializes and shuts down system software, accesses system settings, and
Menu Bar
Menu
Palette
28
1.4. Plug-in Environment
Overview
accesses version numbers. The session itself (ISession interface) supplies plugins with key resources of the InDesign environment. These resources include
the active context, the application itself, the work area for the application, and
the application’s command processor.
InDesign creates a work area (application workspace) for the session. The
basic interface for this workspace is IWorkspace, which provides startup and
shutdown methods. It also keeps track of plug-ins implementing workspaces
(for example, a document workspace). The application workspace presents
general information for the application, and data pertaining to entire
workspace, but not specific to a particular document.
figure 1.4.3.a. application workspace
Be aware the application workspace is a container with several main elements,
including a menu bar, menus, and palettes. The menu bar at the top of the area
presents menus for each of the main functions of the application, including
one for the example plug-ins furnished with the SDK. The controlling interface
for menus is IMenuManager. For more about menus, see “1.5.1.3. Menus” on
page 32.
InDesign offers a number of palettes, with a controlling interface called
IPaletteMgr. Each palette is a window that presents information arranged in
icons or panels. The toolbox is an example of a palette presenting it’s
information in icons, each of which activates a particular tool (“1.5.4. Tools”
on page 34). Palettes are accessible from the application’s Window menu. Some
palettes come up by default when the application starts.
Other main InDesign operations associated with the session and workspace
include those in the list below. Each operation is associated with one or more
controlling interfaces.
• Management of clipboard, dialogs, cursors, plug-ins, keyboard, mouse,
color, measurement systems, and memory
Adobe InDesign Programming Guide
•
•
•
•
•
•
•
•
1.5. Programming Considerations
29
Command processing
Maintenance of preferences and defaults
Document open, close, save, and recovery
Maintenance of views
Event handling
Exception handling
Provision of a service registry, used at startup to automatically locate all
service provider plug-ins and find out what services they support
Localization
1.5. Programming Considerations
This section briefly discusses programming considerations for developing plugins to operate with InDesign. If you have questions about the referenced user
interface (UI) components, refer to the InDesign 2.0 User Guide.
Remember from the previous section that API source code furnished with the
SDK is located in Adobe InDesign 2.0 SDK/Api/ in the Implementation and
Includes directories. Interfaces are defined in header files in Adobe InDesign
2.0 SDK/Api/Interfaces/. You can find detailed interface, helper class, and
command references in Adobe InDesign 2.0 SDK/Documentation/. See “1.8.
References” on page 57. A lot of the headers are also available in the html
format. To get started, go to the index.html in the SDK. You will see a list of
browseable documents.
1.5.1. UI
This section discusses the main elements and operations of the application UI
that you can affect through a plug-in.
1.5.1.1. Widgets
InDesign defines a basic UI control element called widget. Examples of
widgets are dialogs, panels, and items these elements contain, such as buttons
and checkboxes. The application implements each widget for a plug-in as a
boss object useing a number of control interfaces.
30
1.5. Programming Considerations
Overview
figure 1.5.1.1.a. examples of widgets in indesign
Panel
Dialog
Button
Plug-ins use widgets for providing views on content (such as the clipboard) and
text frames. As well as using the core set of widget interfaces, a widget can
contain a number of other interfaces, depending on it’s complexity.
Note: InDesign provides a set of interfaces allowing you to factor each widget.
Factoring the widgets affords a number of advantages, including code reuse,
smaller pieces to allow simpler development, etc.
Adobe InDesign Programming Guide
1.5. Programming Considerations
31
In general, a widget does not have it’s own coordinate system. All methods for
specifying and retrieving the size and position of a widget are specified in
window coordinates. This means all drawing and hit testing use window
coordinates.
1.5.1.2. Dialogs
InDesign defines a dialog as a standard dialog window with sections indicating
divisions in functionality, along with other widgets. The application supports
the dialog types defined in the next table.
Table 1.5.1.a. indesign dialog types
Dialog Type
Description
Modal
Takes over from the application and must be exited using a
button widget. A modal dialog can have a preview checkbox or
button to allow the user to see the immediate effect on a
document of modifying a document control.
Movable modal
Specifies a modal dialog that can be moved.
Modeless
Does not take over from the application; can have multiple
windows up at one time within the application.
Selectable
Manages a group of panels. The user navigates the selectable
dialog using a list pane or tabs.
Native platform-supplied
Specifies dialogs supplied by the platform. Examples are standard
file dialogs, the page setup dialog, and the print dialog.
You can use any of the supported dialogs in your plug-in. It is possible to create
new dialogs or add panels to existing selectable dialogs.
1.5.1.2. Panels
An InDesign panel is a functional division of a selectable palette or dialog. A
panel can contain controls and widgets. Note: The InDesign architecture
provides many panel implementation “freebies” for you. Some of these are: a
tabbed panel dragged and dropped into any other panel; palette targeting to
determine which dialog or palette the panel will appear in; and a placeholder
panel menu.
When designing a plug-in, you can use any of the basic panels InDesign
provides. You can also implement a panel creator. Your plug-in will implement
a panel as a service provider (IK2ServiceProvider interface) returning a unique
service ID to its containing dialog or palette. Usually you will attach an
observer (IObserver) to each widget in the panel. When the user manipulates a
32
1.5. Programming Considerations
Overview
widget, the object must notify the observer, which fires off a command to bring
about the desired change (see “1.5.3. Messaging” on page 33).
1.5.1.3. Menus
Adobe InDesign furnishes several interfaces to support menu development for
your plug-ins. Using the basic interface IMenuManager, you can add and remove
menus. Also there is an IActionManager that is responsible for enabling and
disabling menu items, as well as executing them. You will use MenuDef and
ActionDef framework resource to add menus and menu components at any
time InDesign is running. You can find more information about menus in the
MenuChanges.pdf (technote #10014) inside Adobe InDesign 2.0 SDK/
Documentation/.
The application allows menu components additions to the main menu, a
popup menu, a right mouse menu, a pop-up panel, or a context-sensitive
menu. Additionally, the architecture supports removal of menus and menu
components you create.
1.5.2. Commands
For InDesign, a command (ICommand interface) is described as a set of changes
to a document kept as a transaction in a database. This section introduces the
command architecture used by the application. For details of developing a
plug-in implementing commands, see the chapter “Commands.” You can find
detailed command references in the InDesign Command Reference described in
“References” on page 57.
An InDesign document contains many items must be kept in sync with each
other. The best way to do this is to use commands with execution controlled by
a command processor (ICommandProcessor). The application maintains a
command stack it uses in executing (doing), undoing, and redoing these
commands. It also uses the standard Model-View-Controller (MVC) concept
to connect changed items (model) with their views and controllers.
Adobe InDesign Programming Guide
1.5. Programming Considerations
33
Every command has one target, which is a command manager object
(ICommandMgr) executing the command inside a transaction on it’s associated
database (IDataBase). The default target of most commands is the command
manager used by the active document (IDocument). The actual changes made by
the command act on data in the targeted database (model). The data must
support a subject (ISubject interface), to which observers (IObserver
interface) attach so they can be notified of changes made by the command.
Your plug-in should use a command if any of the following is true:
• The action being performed changes any document page item.
• The plug-in needs to be able to undo the changes.
• There are observers needing to be informed of the changes.
If it is necessary to bundle more than one command together, InDesign
supports command sequences. A sequence is a set of commands all done,
undone, and redone together, as for a single command.
A special type of command is the dynamic command, which supports
dynamic command execution, bypassing undo/redo stack. Trackers use
dynamic command execution to provide visual feedback when in “patient
user” mode. A typical dynamic command boss aggregates the interface
IDynamicUpdate, it broadcasts the object being tracked has been modified and
CmdUtils::ExecuteDynamicCommand is used to execute the command.
Dynamic commands are used for interactive changes in a window. Such page
item operations as resizing, rotating, and dragging use dynamic commands.
For instance, the move tracker catches mouse moves and translates them into
commands that move page items in the document. For more information on
commands, see the “Commands” chapter.
1.5.3. Messaging
InDesign uses messages to provide notification to observers and responders
for changes as they occur. In this section, the messaging architecture for the
application will be summarized. See also the information about commands in
the previous section.
The application issues notifications of changes concerning a particular subject
(usually a data model, such as a document database). The observers and
responders are the objects interested in changes information (receive
notifications at methods in their interfaces). All page items and everything in a
34
1.5. Programming Considerations
Overview
document hierarchy are potential subjects because changes are always being
made to them. For example, you would probably implement a panel containing
a button as an observer, with the button as it’s subject.
An observer (IObserver) can be tailored to recognize almost any type of
change, after it has registered it’s interest directly with the subject. It uses the
notification to update its views. An observer can register its interest in an object
in a data model or with an item in a view, such as a button on a panel. It can
register and unregister interest at any point during run time.
Like an observer, a responder (IResponder) must register it’s interest in a
subject. However, the subject can only be a data model (for example, a new
document or a new page item in a document). Another difference between
observer and responder is the latter is tailored to a specific predefined set of
changes, instead of just any change.
The responder registers it’s interest in a change type during application startup,
and remains in effect until the application shuts down. It is signaled during the
change type for which it is registered (for example, creation of a new
document).
1.5.4. Tools
InDesign defines a tool as an addition to it’s toolbox, which contains several
icons used to access individual tools. This section introduces the tool
architecture for the application.
Most application tools create, select, edit, and transform document page items
in a layout view (“1.5.6.2. Layout” on page 38). Tools are also provided to
control the layout view itself. In summary, a tool does the following:
• Uses keyboard and mouse events to create and manipulate page items.
• Provides a visual cue of the selected tool (a cursor).
• Provides a tool tip to explain it’s purpose.
Adobe InDesign Programming Guide
•
•
•
1.5. Programming Considerations
35
Uses a tracker to follow mouse movements and implement active tool
operation. The tracker uses commands to apply changes to the items being
manipulated.
Provides an icon in the toolbox (and, optionally, a keyboard shortcut) to
allow tool selection.
Optionally provides other tools accessed through the tool icon.
1.5.5. Common Data (Persistence)
InDesign objects exist at run time as data stored in memory. Application
databases, described in the next table, are storage areas on disk. They are
managed by a database engine runing in the application core.
Note: Objects can be either persistent (capable of being stored in a database to
last beyond the end of a session) or nonpersistent (lasting only until memory is
freed when the destructor for the object is invoked). However, only persistent
objects are stored in databases.
Each record in a database is identified by a unique identifier (UID), which is a
32-bit integer. When it allocates a UID for a record, InDesign stores the
corresponding class ID for the object in a table associating the two identifiers.
This storage method allows the database to respond to a later request to
instantiate the object.
Table 1.5.5.a. application databases
Database Type
Description
Saved data
Represents the application object model. This database contains
data about the plug-ins, the objects that they define, interfaces,
etc. The application uses this information for loading and keeping
track of plug-ins.
InDesign defaults
Contains default settings for the application and all plug-ins. You
can add defaults for your plug-in by setting preferences.
Document
Represents a document as data (“1.5.6. Documents” on page 36).
The application creates one database per document. Each
document database maintains a list of UIDs (UIDList)
representing the items that make up the document. The first UID,
pointing to the document itself, is the root object for the
document.
Scrap
Supports the application interfaces dealing with the operating
system clipboard.
36
1.5. Programming Considerations
Database Type
Alternate scrap
Overview
Description
Serves as a holding area for data being transferred to or from an
external data store. Such a database can also be called an
“additional third-party database.”
For a document database, InDesign stores individual document items as
variable length database records, each record having one segment per
supported interface. The records exist initially in memory. Certain events, such
as a user’s request to save a document, trigger the writing of records to disk.
Other events trigger the reading of records. This strategy is different from many
other applications, which store or retrieve an entire document at one time,
holding all the data in memory for as long as the document is open.
Your plug-in supports persistence by including InDesign’s IPMPersist
interface. The plug-in can obtain UID information about other objects through
the object interfaces and the utilities for persistent objects (Adobe InDesign
2.0 SDK/Api/Includes/PersistUtils.h).
1.5.6. Documents
InDesign defines a document (IDocument interface) as a collection of related
page items (text and graphics) that can be saved, opened, and deleted as a set.
This section discusses basic document layout and the document hierarchy
used for arrangement of items within the document (with the document itself
as the root object).
InDesign accesses a document through its File»New or File»Open menu. A new
document is opened as a blank spread on the workspace.
1.5.6.1. Document Hierarchy
An InDesign document has a logical structure called the document hierarchy
(IHierarchy interface). If one document component contains another, the first
Adobe InDesign Programming Guide
1.5. Programming Considerations
37
is said to be the parent of the second (the child). Except for layers, document
elements are all page items.
Text and graphics are threaded throughout the document in spreads (ISpread
interface), each consisting of pages automatically created as required.
Alternatively, the user can use a manual threading technique to minutely
control text placement in strands (ITextStrand). For any of the pages, the user
can apply a master page to control formatting features, such as headers and
footers. A document can also be divided into sections as needed.
The spread is the root of the page item structure within the document. For
each document layer, there are two spread layers on each spread, one for
content, one for guide. Each spread layer can contain other page items, either
individual or grouped, in the corresponding document layer.
Note: The page items in the layer can also be parents, for instance, if they are
groups or frames.
The basic document components are defined in the following table.
Table 1.5.6.a. basic document components
Component
Description
Document layer
A container for page items, maintained in a layer list. An empty
document with one document layer will have a total of
four spread layers. Your plug-in can add non-pages layers to the
layer list as needed. These layers can be shown, hidden, locked,
unlocked, and rearranged in their z order.
Guide layer
Layer for guides only. Each document layer has a corresponding
guide layer.
Master page
Layout page that can be applied to one or more document pages.
Page
Division of a spread governed by page size settings.
Page item
Text or graphics placed in frames in the document. Different page
items can be assigned to different document layers, so that your
plug-in can work selectively on the different sets of items. See
“1.5.7. Page Items” on page 38.
Spread
Grouping of pages that the user can view simultaneously. Each
spread (ISpread interface) is unique (has its own UID) and
supports an IHierarchy interface with its children being
spread layers. A set of spread layers is used to represent each
document layer in the document.
38
1.5. Programming Considerations
Component
Spread layer
Overview
Description
Child of a spread. One spread layer is used for the pages
document layer that controls document pages. For each of the
non-pages document layers, there are two spread layers:
guides spread layer represents document layer guides; and
content spread layer representing the content for the document
layer.
1.5.6.2. Layout
Layout refers to the arrangement of page items in a document. To assist in
layout of text and graphics in the document, InDesign supports a layout view
(ILayoutControlData, IControlView interfaces) that can be manipulated. You
can use the toolbox tools to work with text and graphics in this view, and apply
changes to the view itself.
Specific layout-related features of the application include:
• Grids and guides
• Data links (“1.5.13. Data Links” on page 43)
• Position locking
• Page markers
• Column setup and modification
• Automatic layout adjustment
• Coordinate systems
1.5.7. Page Items
As discussed in “1.5.6.1. Document Hierarchy” on page 36, page items are part
of the document hierarchy. A page item is a spread or anything placed on a
page of the spread. Each page item you define for a plug-in must aggregate a
geometry interface (IGeometry) specifying the geometric points comprising the
item. Most page items use further interfaces, such as a shape interface (IShape)
for drawing the item and a shape handling interface (IHandleShape) for
drawing and hit-testing the selection handles.
Adobe InDesign Programming Guide
1.5. Programming Considerations
39
To provide page item access, a plug-in must also use the hierarchy interface
(IHierarchy) to represent the document hierarchy for the particular page item.
For example, use of the hierarchy allows a draw command to be targeted
initially at the spread, and then filter from there to the actual page item
affected. The plug-in must implement a command to join it’s page item to the
appropriate spread.
1.5.8. Graphics and Images
This section provides an overview of the graphics and image architecture of
InDesign. Note: Computer graphics are classified as either vector graphics or
bitmap images (also called raster images). Some of the many interfaces used
for graphics and images are: IGeometry (used for all page items);
IGraphicStateDefinition (defines the state of the graphic); ITransform
(controls transformation, such as rotation); IRenderingObject (controls color,
gradient, and color tint); IGraphicsPort (controls drawing to an output
medium).
Note: Your plug-in calls the Adobe Graphics Manager (AGM) through the API
methods defined in IGraphicsPort and GraphicsExternal.h. The FrameLabel
example plug-in illustrates calls to AGM. The IAdornmentShape
implementation defined by this plug-in uses AGM to draw text over the top of a
page item.
Note: The application provides support for DCS 2.0 (except for in-rip
separations). For example, a 6-color file can be created in PhotoShop, saved as a
DCS 2.0 file, then placed (imported) in an InDesign document. In this case, the
fifth and sixth colors will be ouptut in a separated workflow, resulting in CMYK
and XY separations.
Note: The application can also place an indexed color image into the
document, just place it like the regular image file.
1.5.8.1. Vector Graphics
Vector graphics are drawings composed of lines and curves defined by vectors.
A vector graphic is not converted to pixels until it is displayed or printed. Thus,
it is resolution-independent, because the resolution of the printer or monitor
controls the number of pixels used in it’s display. EPS format is widely used to
store vector based graphic, although you can also embed bitmap image in a EPS
file.
40
1.5. Programming Considerations
Overview
For composing and manipulating vector graphics, InDesign uses the tools in its
toolbox to control shape, stroke (outline), and fill. You can draw a path, which
is considered an independent graphic. You can also draw a text frame to
contain text or a graphic frame for a graphic. The graphics tools apply to any
path or frame you draw in the application. For particulars of drawing features
in InDesign, see the InDesign 2.0 User Guide described in “References” on
page 57.
1.5.8.2. Bitmap Images
In contrast to vector graphics, bitmap images are composed of pixels. These
images serve as the most common electronic medium for continuous-tone
pictures. A bitmap image is resolution-dependent, since it comprises a fixed
number of pixels. Such an image can require a lot of storage and the associated
file formats often use compression (in the originating application) to reduce
bitmap file size. TIFF format is an example of bitmap image.
InDesign allows you to import, export, and manage a number of different types
of bitmap images. It provides options for linking graphics, storing frequently
used objects in libraries, and exporting pages as EPS graphics. To find out more
about handling of bitmap images in InDesign, see the InDesign 2.0 User Guide.
1.5.9. Color
InDesign allows you to apply color (IColorAttributes, IColorData,
ISwatchList, etc.) to the paths, frames, and types used in text and graphics. In
summary, the application supports:
• LAB, RGB, and CMYK color spaces, corresponding to the standard L*a*b,
RGB, and CMYK color models for describing and reproducing color.
• Treatment of all colors as global colors.
• Color application through tools in the toolbox.
• Color and Swatches panels to reflect chosen colors and allow color
application and refinement.
• Application of gradients to strokes and to type.
Adobe InDesign Programming Guide
•
1.5. Programming Considerations
41
A color management system (CMS) to keep color consistent throughout
a workflow (from scanning source images to creating final output).
For more about the way the application handles color, see the InDesign 2.0 User
Guide.
Note: The application supports spot colors (also known as "custom colors").
The application can print halftones for spot colors at print time. You can
specify halftones during a print job. For methods retrieving spot colors, take a
look at the IInkData and IInkMgrUtils interface.
1.5.10. Service Providers
In InDesign, a service provider offers a particular service, such as import
filtering. This section describes the basics of service provider architecture.
Each service provider plug-in must implement an IK2ServiceProvider
interface, along with other interfaces supportive of the specific service being
provided. The service provider interface implementation returns a specific
service ID. When InDesign starts up, the service registry automatically finds all
plug-ins with a service provider interface and uses their IDs to check for
information, for example, what services they support.
Your plug-in can implement several boss objects all returning the same service
ID. In this case, the plug-in must also use a service manager interface to iterate
over all the boss objects and implement the services as needed. The
implementation for this interface should utilizes IK2ServiceRegistry to get a
list of service provider that support the service id, and the same interface also
provides method to get to the service provider’s IK2ServiceProvider interface.
For more information on service providers, see the “Service Provider” chapter.
1.5.11. Import/Export
InDesign handles import and export (both text and graphics) by means of
import and export providers aggregated by filter bosses and bosses providing
other services. This section describes import and export architectures
supported by the application. See the InDesign Interfaces Reference (described
in “References” on page 57) for details of the import/export interfaces.
42
1.5. Programming Considerations
Overview
1.5.11.1. Import
InDesign allows you to write an import service (for example, a filter) for
importing a particular text or image type. The service you design for import
aggregates both the IImportProvider and IK2ServiceProvider interfaces, with
IImportProvider supporting stream handling and the display of import
preferences.
In its UI, the application uses File»Place for importing information. When the
user selects this function, the application calls a method in each import
provider to ascertain the types of importable files. The application lists the
categories in the Files of type dropdown list in the Place dialog. Based on the
category currently selected by the user, the application lists all the files in the
directory targeted by the dialog and have one of the extensions belonging to the
category. The default category is Importable Files.
Note: Macintosh file types and Windows NT/98 extensions are not used later in
the import process.
1.5.11.2. Export
InDesign also provides a UI for export of text and graphics. Thus it can support
an export service (for example, an export filter) for a certain data type. The
service aggregates both the IExportProvider and IK2ServiceProvider
interfaces. It is IExportProvider that supports stream handling and the display
of export preferences.
For exporting files, the InDesign UI uses File»Export. The application lists the
export categories in the Save as type drop down list in the Export dialog. Based
on the category currently selected by the user, the application lists all the files in
the directory targeted by the dialog and have one of the extensions that belong
to the category. The default category is Adobe PDF.
Adobe InDesign Programming Guide
1.5. Programming Considerations
43
1.5.12. Data Exchange
In InDesign, data exchange refers to the movement of information into and
out of the application. To share information with other applications, InDesign
uses the clipboard, drag and drop, and a special library. Additionally, it uses a
particular manager object for each type of data to copy.
The application allows the user to drag a text file to a document page, which
essentially imports the file. You can use the drag and drop functionality to
enable drag and drop capability on both Macintosh and Windows (OLE drag
and drop). The functionality allows your plug-in to perform a variety of tasks,
including tracking drags, supporting feedback, accepting drops, etc. If your
plug-in puts up a window, palette, or view, the application allows it to be either
a drag source (IDragDropSource), a drop target (IDragDropTarget), or both,
monitored by a controller deriving from IDragDropController.
1.5.13. Data Links
InDesign provides data links (IDataLink) allowing the user to identify and
monitor document page items originating with external files or data. The links
feature helps the user avoid the redundant storage of large amounts of data in a
document. This section provides an overview of data links.
Links store image-related information, OLE-specific data, filter hints, and file
system flags. The links feature is accessible through File»Links. It does the
following:
• Lists links.
• Identifies missing and modified links.
• Enables the user to find missing links.
• Lets the user reimport the data to update a modified link.
• Provides information about each link, such as format type, size, date, full
path name, etc.
• Allows the user to replace a low-resolution placeholder image with a highresolution version through the Display Performance Dialog from the
Preferences.
• Provides link options storing an internal copy (always done for text),
update automatically, and alert before updating.
• Manages files using WebDAV, it lets you check-in/out files on the WebDAV
server and manage the links.
44
1.5. Programming Considerations
Overview
1.5.14. Text
In InDesign, all text (characters and paragraphs) is placed in a text frame in a
document or graphic. Adobe InDesign renders text through lists of stories and
frames (IFrameList) included in the document. Once text is placed as required
in a document, the application allows the user to manipulate it in many ways,
such as selection, adjustment of text frames, preference selection, application of
character and paragraph styles, etc.
1.5.14.1. Text Attributes and Styles
InDesign applies attributes (for example, kTextAttrPointSizeBoss) to both
characters and paragraphs. The application defines each attribute as a
persistent boss object (not UID-based). An attribute for a character or a
paragraph implements a particular text attribute interface describing it’s data
type (for example, ITextAttrRealNumber) and an attribute report
(IAttrReport) to provide a designator.
The application applies text styles through the session workspace
(kWorkspaceBoss) or the document workspace (kDocWorkspaceBoss). The
workspace maintains one table of character styles and another of paragraph
styles. Each style is represented as a boss (kStyleBoss) implementing
IStyleInfo, ITextAttributes, and IPMPersist.
Note: InDesign maintains separate name spaces for character and paragraph
styles. It might be possible to derive character styles from paragraph styles, or
vice versa. However, you should not do it.
1.5.14.2. Text Story
The application maintains a list of text stories (IStoryList) for each document.
For each story, a strand list (IStrandList) is used to represent associated text
strands (ITextStrand), with a strand treated as a separate class with its own ID.
Individual strands defined for text are:
• Text data strand: Stores characters.
Adobe InDesign Programming Guide
•
•
•
•
•
1.5. Programming Considerations
45
Character attribute strand: Provides character formatting information.
Paragraph attribute strand: Provides paragraph formatting information.
Owned item strand: Stores information about inline graphics.
Wax strand: Describes composed/rendered text.
Story thread strand: Describes a range of text in the text model that
represents a flow of text content.
The strand list is rendered as a wax strand (IWaxStrand) and applied to the
particular story flow. One strand is accessible by strand list index or unique
class ID through calls to ITextStrand.
For strand and text frame management, a text story uses a text model
(ITextModel) as the data repository. It implements various interfaces for view
and control functions.
Note: Another interface required by a text story is IComposeScanner, an
extensible interface querying data and attributes.
1.5.14.3. Text Storage
The Virtual Object Store (VOS) is the low-level storage mechanism the
application uses for text. This includes Unicode code points, character
attributes, paragraph attributes, and composition data. VOS is only used for
storing text-related data.
An IVOSDiskPage interface manages the virtual memory paging InDesign uses
for text storage. The application stores a text story in a list of VOS disk page
objects, each representing a document page. Each page stores a list of VOS
objects, which are instantiations of abstract VOS classes (for example,
VOSAllSavedData) representing data blocks. If enough VOS objects are added to
a single page, the page splits in two.
A VOS object has a virtual length indicating the number of characters the
object represents. This is not a key, but rather a length of text with which the
object is associated. The sum of the virtual lengths of all the VOS objects is the
text index of the VOS object in a story. Each page is aware of the virtual lengths
of its VOS objects. It applies these lengths in setting and getting data strands,
finding text, and setting next and previous pages.
46
1.5. Programming Considerations
Overview
Note: Access to VOS objects should be at a higher level of abstraction, either
through the IFocusCache interface of a text focus (kTextFocusBoss), the
IComposeScanner interface of a story (kTextStoryBoss), or the IxxxStrand
interface of a particular text strand.
1.5.14.4. Localization
Localization capabilities included in InDesign allow you to create localizable
plug-ins. The main interface associated with a particular language is ILanguage.
The application furnishes a locale ID class (PMLocaleId) you can use to specify a
locale ID. In InDesign 2.0, localization can be classified into 2 different
categories, one is user interface localization, the other is the locale specific
feature set. PMLocaleId has methods to set and get both IDs. The class
implements two simple, abstract long integer data type that represent these IDs
and are defined in PMLocaleTypes.h.
is an interface used by the application workspace to store the
current locale setting. A plug-in can change the global setting by implementing
a change locale command. Plug-ins observing the change observers to receive a
message when the locale changes. For example, the application’s palette
manager watches for a change of locale. In response to a locale change message,
it closes the current palette set and opens a new one for the indicated locale.
ILocaleSetting
Your localizable plug-in needs to use a LocaleIndex resource to index a resource
based on locale ID. The resource shell in InDesign uses the LocaleIndex
resource when reading resources. Then, when an indexed resource is requested,
the shell can retrieve the resource for the current locale, as specified in the
locale index resource.
Another part of the application related to localization is the workspace
interface IStringDataBase. This interface provides access to a database of all
strings used by application plug-ins. The database stores string-locale ID pairs
Adobe InDesign Programming Guide
1.5. Programming Considerations
47
for the various supported locales. These are used in the actual translations
necessary for localization.
Your plug-in can add entries to the string database programmatically, but will
typically load them using a StringTable resource. The first time InDesign
executes, it will load the string database from resources. Subsequently the string
data is stored in and loaded from the saved data database.
Note: A plug-in adding strings to the string database must implement the
IStringRegister interface. The first time InDesign switches to a locale, it looks
for plug-ins implementing this interface. When it finds one, it instantiates the
associated implementation class and calls its RegisterStrings() method,
passing the locale ID. The plug-in is then responsible for registering
translations for the specified locale for all strings it uses.
1.5.14.5. Font Handling
Text fonts are stored in a Font folder. The application uses this folder to store
any font supported by CoolType.
IUsedFontList constructs a used font list of the fonts used in the text of a
document. This list includes fonts for imported PDF images, but does not
collect the fonts used in graphic frames, EPS images, etc.
Note: The only bitmap fonts supported by the application are OCF fonts.
1.5.15. PDF
This section provides a brief summary of InDesign’s portable document format
(PDF) architecture, with text using the default source profile specified in
File»Preferences.
InDesign provides support for PDF import into a document. Using this feature,
you can convert a selected PDF file into the native document objects of the
application. This results in a new, untitled document you can edit as needed.
The PDF import feature is accessed through the File»Place menu.
Note: InDesign lists PDF documents on Windows NT/2000 with a .pdf
extension. On Macintosh, these documents have a file type of PDF or TEXT.
48
1.5. Programming Considerations
Overview
The application also supports PDF export, allowing you to save one or more
pages of a document as a PDF file. This export feature is available through
File»Export for an open document (saved or unsaved).
1.5.16. Printing
This section discusses the way InDesign handles printing. InDesign prints by
initializing and drawing pages, using the methods for drawing to the screen.
The actual printing is done by means of calls to internal API functions
furnished by another provider. These API functions generate all print UIs and
the Postscript output.
The application implements several printing commands. You can use some or
all of these commands to implement printing in your plug-ins.
Note: InDesign supports Postscript level 3, but not n-color. However, the
application has the ability to pass through EPS files supporting n-color.
1.5.17. Scripting
InDesign employs a scripting architecture with three main divisions:
• Interface with the operating system (Macintosh or Windows NT/98/2000).
• Code to execute in response to a method call or property request.
• Interface with the script for error handling.
Every scripting language supported by the application implements the
IScriptManager interface. An IScript interface must be aggregated by a
scriptable application object, while the actual services between the script
itself and the script object (IScript) are furnished by a script provider
(IScriptProvider).
See the chapter “Scripting Architecture” for an introduction to the application
scripting architecture. The Adobe InDesign Scripting Guide provides detailed
development steps to use in extending this architecture. See “References” on
page 57.
Adobe InDesign Programming Guide
1.5. Programming Considerations
49
1.5.18. Events
InDesign maintains events in an internal event loop, with an event dispatcher
interface controling the circulation of events among its plug-ins. Each plug-in
wanting to send and receive events must implement the IEventHandler
interface.
1.5.19. Exceptions
The application does not use exceptions. Your plug-in must provide its own
exception handling mechanisms.
1.5.20. Streams
InDesign handles streams using the IPMStream class, defined in IPMStream.h.
To help you handle streams in your plug-ins, you can use the static methods of
the helper class StreamUtil.
1.5.21. Strings
InDesign provides platform-independent support for string handling. The
application designates strings through string tables using the PMString class
(PMString.h). You can incorporate strings into a resource script identifying the
strings by keys that are the English versions of the strings.
Note: Your plug-in must register the strings so the platform resource manager
can search the resources for your plug-in instead of the application-specific
resources.
The application uses Unicode internally, but the data that PMString holds in
RAM is in platform encoding, not Unicode. When the application reads or
writes a string, it converts the string to or from Unicode. There is no way to get
access to the Unicode character codes for a PMString without first converting to
platform encoding.
Note: Although the application supports Unicode internally, it does not use the
UNICODE preprocessor symbol for strings.
1.5.22. Measurement Systems
InDesign currently supports the following measurement systems (for both
application and document workspaces). In addition, it provides a custom
system you can modify for a plug-in and install in the application.
• Points
50
1.5. Programming Considerations
•
•
•
•
•
•
•
•
•
Overview
Picas
Inches
Inches decimal
Millimeters
Centimeters
Ciceros
HA (Japanese feature set)
Q (Japanese feature set)
American Points (Japanese feature set)
The IMeasurementSystem interface is used to represent a measurement system.
IMeasurementType defines the measurement unit to use, and preference panel
settings are made using IUnitOfMeasureSettings. Since both the application
workspace boss and the document workspace boss aggregate
IUnitOfMeasureSettings, your plug-in can set the unit of measure preference
for the application in general (applies to all documents) or for the current
document only.
Note: Measurement systems are commonly used for widgets. For more about
measurement system implementations, see the EditBox and ComboBoxWidget
specifics in the Adobe InDesign UI Reference described in “References” on
page 57.
1.5.23. Main Data Types
This section describes a number of the main data types used by the application.
1.5.23.1. ANSI-Based Types
This section defines simple ANSI C built-in data types used by the application.
These data types are somewhat machine and compiler-neutral. See
AnsiBasedTypes.h.
Adobe InDesign Programming Guide
1.5. Programming Considerations
51
Table 1.5.23.a. ansi-based data types
Data Type
Description
bool8
uint8; explicit Boolean type
bool16
int16; explicit Boolean type
bool32
uint32; explicit Boolean type
Bool8
uint8; provided for Adobe Graphics Manager (AGM) compatibility
Bool16
int16; provided for AGM compatibility
Bool32
uint32; provided for AGM compatibility
int8
Signed character
int16
16-bit signed short integer
int32
32-bit signed long integer
int64
64-bit integer for Windows NT/98; 64-bit long long integer for
Macintosh (Metrowerks)
uchar
Unsigned character
uchar16
16-bit unsigned character
uint8
Unsigned character
uint16
16-bit unsigned short integer
uint32
32-bit unsigned long integer
uint64
64-bit unsigned integer for Windows NT/98; 64-bit unsigned long
long integer for Macintosh (Metrowerks)
1.5.23.2. Real Data Types
InDesign represents real numbers as defined in the PMReal.h file. It uses a
PMReal type defined as either as a double or a class with several constructors.
You will want to use the class if it is necessary to hide the epsilon comparisons
behind operator definitions.
1.5.23.3. String Data Types
The application defines a PMString class to use as a string data type. This class
has several constructors to use for various sorts of strings. The definitions are
provided in PMString.h.
InDesign also defines a WideString class to represent a 16-bit character string.
See WideString.h.
52
1.5. Programming Considerations
Overview
1.5.23.4. RECT Data Types
The application uses a PMRect class as a RECT data type, used primarily in
parameter lists to aid in determining coordinate space. The definitions are
provided in PMRect.h.
Other RECT data types (such as SysRect) that the application defines can be
found in WSysType.h (Windows NT/98) and MSysType.h (Macintosh). See
“1.5.23.9. Operating System Types” on page 53.
1.5.23.5. Point Data Types
InDesign uses a PMPoint class as a POINT data type to designate point
coordinates. The definitions are provided in PMPoint.h.
Other POINT data types (such as SysPoint) the application defines can be
found in WSysType.h (Windows NT/98) and MSysType.h (Macintosh). See
“1.5.23.9. Operating System Types” on page 53.
1.5.23.6. Object Model Types (IDs)
InDesign 2.0 defined a template class IDType; all the object model types listed
below are different types of IDType. Instead of defining them as simple data
types, we can now prevent unintended typecast. This design gives you code that
is maximally type safe. See OMTypes.h.
Table 1.5.23.g. om data types
Data Type
Description
ClassID
used as the class ID for the class related to a persistent object
record in a database
ImplementationID
used as the ID for an implementation of an interface
PluginID
used as the ID for a plug-in
PMIID
used to identify an interface ID
ServiceID
used to identify a service
UID
used as a unique ID for a persistent object record in a database
Adobe InDesign Programming Guide
1.5. Programming Considerations
Data Type
53
Description
WidgetID
used to identify a widget
ActionID
used to identify an action
KitViewID
used to identify a KitViewID
FileTypeInfoID
used to identify a FileTypeInfoID
1.5.23.8. Base Types (BaseType.h, PMTypes.h)
In BaseType.h, you will find a set of base data types for use by all InDesignbased applications. Examples of simple data types described in this file are
PString, ConstWString, and TextIndex.
PMTypes.h is also provided to define a full set of InDesign application types.
This file includes BaseType.h and other system files as applicable for the
operating environments.
1.5.23.9. Operating System Types
Operating system data types are largely platform-specific. Types for Windows
NT/98/2000 are placed in WSysType.h, and the comparable types for
Macintosh in MSysType.h. The table below explains a few of the simple data
types used frequently, indicating platform-specific differences as necessary. The
files also define some useful complex data types, such as the FileInfo structure.
Table 1.5.23.j. selected operating system data types
Data Type
Description
FileInfo
Structure including creator and type information for a system file;
structure is defined differently for the two platforms; see
“1.5.23.12.3. FileInfo” on page 55
GSysPoint
POINT structure describing global cursor position; see “1.5.23.5.
Point Data Types” on page 52
GSysRect
RECT structure describing global screen or device coordinates for
the platform; see “1.5.23.4. RECT Data Types” on page 52
OSType
32-bit unsigned long integer that defines the operating system
(defined in WSysType.h)
RsrcID
A uint32 resource ID
RsrcName
Pointer to the resource name (Macintosh only)
RsrcType
A uint32 resource type on Windows NT98; a ResType value on
Macintosh
54
1.5. Programming Considerations
Overview
Data Type
Description
SysConnection
Type defining connection information for loading and unloading
DLLs; instance handle (HINSTANCE) on Windows NT/98;
CFragConnectionID class on Macintosh
SysFile
Type defining a system file for a database; a string class on
Windows NT/98; an FSSpec type on Macintosh
SysFileInfo
FileInfo structure
SysFileRef
16-bit signed short integer identifying an open file reference
(Macintosh only)
SysPoint
POINT structure describing cursor location; see “1.5.23.5. Point
Data Types” on page 52
SysRect
RECT structure describing rectangular coordinates for the
platform; see “1.5.23.4. RECT Data Types” on page 52.
WSysPoint
POINT structure describing “window” global cursor position; see
“1.5.23.5. Point Data Types” on page 52
WSysRect
RECT structure describing “window” screen or device coordinates
for the platform; see “1.5.23.4. RECT Data Types” on page 52
1.5.23.11. Cross-Platform Data Types
For help with defining resources for your plug-in, you will find
CrossPlatformTypes.h useful. This file defines data types used with the C++
compiler and ODFRC. An example is RezLong, which generates a macro when
you invoke ODFRC. For more about resource generation, see the chapter
“Plug-Ins.”
1.5.23.12. Complex Data Types
This section defines some of the global structures, enumerations, and other
complex data types supplied by InDesign.
1.5.23.12.1. UIFlags
The UIFlags enumeration defines flags indicating how much UI to show during
an operation. See “1.5.23.8. Base Types (BaseType.h, PMTypes.h)” on page 53.
Adobe InDesign Programming Guide
1.5. Programming Considerations
55
typedef enum
{
kSuppressUI,
kMinimalUI,
kFullUI
} UIFlags;
1.5.23.12.2. ErrorCode
The ErrorCode enumeration defines basic error codes used by the application.
See “1.5.23.8. Base Types (BaseType.h, PMTypes.h)” on page 53.
typedef int32 ErrorCode;
enum { kSuccess = 0, kFailure = 1, kCancel = 2 };
1.5.23.12.3. FileInfo
FileInfo is an operating system-specific structure defining a file. For Windows
NT/98, in WSysType.h, it is defined as follows:
...............................................................
struct FileInfo
{
OSType creator;
OSType type;
};
For Macintosh, in MSysType.h, FileInfo is defined this way:
struct FileInfo
{
ScriptCode script;
OSType creator;
OSType type;
};
script
creator
type
An int16 value representing a Macintosh script or a Windows language
ID; see SString.h
File creator; see OSType in “1.5.23.9. Operating System Types” on
page 53
File type; see OSType in “1.5.23.9. Operating System Types” on page 53
1.5.23.13. Errors
InDesign uses two error handling techniques, as demonstrated in the SDK
sample code.
56
1.6. Summary
•
•
Overview
Technique 1. Apply a local ErrorCode variable, a lof of API will return an
ErrorCode as return value, you should always check that value before you
proceed to next line of code.
Technique 2. Get/Set global error state using PMGetGlobalErrorCode and
PMSetGlobalErrorCode in ErrorUtils class. Please refer to ErrorUtils.h for
more information
A plug-in localizes error strings through string tables defined in .fr files, one for
each language the application supports. For example, in BasicDialog sample,
BscDlg_jaJP.fr contains localized japanese strings, which are used when
Japenese locale is in use, while BscDlg_enUS.fr is used when the roman locale is
used. For each error message, your plug-in should provide a complete text
string. It is recommended you don’t build messages from substrings in the
resource files.
1.5.23.14. Registers
InDesign uses registers to represent the following component types. Note: Each
register must be a service provider.
• Panels. Each panel register boss (IPanelRegister) needs an
IK2ServiceProvider interface supporting kPanelRegisterService.
• Strings. Each string register boss (IStringRegister) needs an
IK2ServiceProvider interface supporting kStringRegisterService.
• Tools. Each tool register boss (IToolRegister) needs an
IK2ServiceProvider interface supporting kToolRegisterService.
• Trackers. Each tracker register boss (ITrackerRegister) needs an
IK2ServiceProvider interface supporting kTrackerRegisterService.
1.6. Summary
In this chapter, the InDesign plug-in environment and the API plug-ins
provided for you in the SDK were described. The basics of InDesign
components and operations were also discussed. The chapter has also
introduced the various example plug-ins furnished with the SDK.
Adobe InDesign Programming Guide
1.7. Review
57
1.7. Review
You should be able to answer these questions:
1. How does InDesign define a plug-in? (2.4, page 35)
2. What is a boss? How many bosses can be associated with a plug-in? (2.4,
page 35)
3. What is a widget? (2.5.1.1, page 39)
4. How does InDesign define a command? (2.5.2, page 41)
5. How do you load the example plug-ins into InDesign? (2.6.1, page 67)
6. What example plug-in provides code to help write a basic dialog? (2.6.12.3,
page 91)
1.8. References
•
•
•
•
•
Adobe User Education. InDesign 2.0 User Guide, 2001.
Adobe InDesign SDK. InDesign 2.0 Scripting Guide, 2001. See InDesign
Scripting Guide.pdf on your installation disk.
Adobe InDesign SDK. Technical Note #10070 Command Reference, 2002.
Adobe InDesign SDK. Technical Note #10050 User Interface Programming
Model, 2002.
Adobe InDesign SDK. Technical Note #10056 User Interface Widgets, 2002.
58
1.8. References
Overview
2.
Architecture
2.0. Overview
Adobe InDesign is a small host application with features that are implemented
through client plug-ins. The application defines an architecture that
determines how a plug-in interacts with the host, and also provides the
building blocks from which each plug-in is made.
This chapter will discuss the abstract ideas of InDesign’s architecture, and then
discuss the implementations of these ideas.
2.1. Goals
The goals of this chapter are to:
• Provide you with an overview of each abstract idea of the architecture.
• Show how each abstract idea is implemented in the architecture.
• Provide tables of implemented architectural components.
2.2. Chapter-at-a-glance
“2.3.Introduction” on page 60 introduces you to the sections in this chapter.
“2.4.Object Models” on page 60 is a high-level discussion of object models.
“2.5.Managers” on page 61 is another high-level discussion, but of managers
this time.
table 2.1.a. version history
Rev
Date
Author
Notes
4.0
17-Sep-02
Paul Norton
Update for InDesign 2.01
3.0
29-Feb-00
Allison Feliciano
Edits and roll in of base camp materials
2.0
2-Jul-1999
Jeff Gehman
First draft.
59
60
2.3. Introduction
Architecture
“2.6.Model-View-Controller (MVC)” on page 61 is a final high-level
discussion, about the Model-View-Controller (MVC) architecture.
“2.7.Adobe InDesign’s Object Model Implementation” on page 62 gives the
nuts and bolts information about InDesign’s object model.
“2.8.InDesign Managers” on page 80 explains what InDesign managers are.
“2.9.MVC in InDesign” on page 81 is a discussion of how MVC maps onto
InDesign.
“2.10.Summary” on page 88 wraps up the chapter for you.
“2.11.Review” on page 88 hits you with some review questions.
“2.12.Reference” on page 88 gives you some tips and pointers on where to look
for additional information.
2.3. Introduction
This chapter is divided into two sections. The first section presents the theories
and architectural concepts used in the InDesign application. The second
section discusses the implementation of those theories. Each section covers
Object Models, Managers, and Model-View-Controller (MVC).
The “InDesign’s MVC Implementation” section describes how this concept is
used to factor InDesign’s user interface. “Managers” discusses how managers
are implemented in InDesign, and also lists commonly used managers in a
table. In the “InDesign’s Object Model Implementation” section, the bedrock
ideas of how InDesign describes and processes objects is explored in depth.
The “MVC” section gives a generic overview of this architecture. “Managers”
discusses the theory behind application managers, and the “Object Models”
section presents a high-level discussion of the parts and purpose of an object
model.
2.4. Object Models
Conceptually, an object model is a set of rules or conventions that describe how
objects will be created and handled within a system. The C++ language
implements an object model, describing an object as a contiguous block of
Adobe InDesign Programming Guide
2.5. Managers
61
memory (at its most basic level) and defining how that object will be
instantiated, behave during its lifetime, and be destroyed.
Object models can be used to map out how large, complex systems will behave.
Microsoft’s COM (Component Object Model) defines objects with
functionality that is accessible through interfaces, making it possible to have
distributed components.
2.5. Managers
A Manager is responsible for a specific functionality in an application, and
keeps track of that functionality’s state. Managers have methods for getting and
setting the state of that functionality.
As an example, an application could have a Window Manager that is used to
create and destroy windows, and keeps a list of the currently open windows. A
client of this Manager could query it to find the window that is currently active,
or to find a window with a specific name and bring it to the front.
2.6. Model-View-Controller (MVC)
MVC is a concept borrowed from SmallTalk, an object-oriented language quite
different from C++. Using this architecture, an application is divided into a
user interface and a data-and-processing module. The latter is the model. The
former is subdivided into a part that handles input (the controller) and a part
that handles output (the view). Note: "Application," with respect to MVC, is
used in a very general sense; what in ordinary parlance is called a "software
application" may consist of many smaller "applications."
One way of thinking about MVC is that it formalizes the relationships between
input, output, and data processing. If you have constructed a view of your
model (which could be a window displaying a document), it is a small step to
realize that you can easily have multiple views of the same model.
62
2.7. Adobe InDesign’s Object Model Implementation
Architecture
figure 2.6.a. model-view-controller
Views
Controller
Model
2.7. Adobe InDesign’s Object Model Implementation
The InDesign object model consists of two components: a description of
objects, and a runtime manager of them. The object model describes an object
as a “boss.” Just as a C++ class encapsulates data and member functions that
produces an object at runtime, a boss can be thought of as an InDesign class
that produces a boss object. Access to bosses is provided through interfaces.
The InDesign application itself has a very small footprint. There is platformcentric code that executes on startup during launch, and the rest of the
application is the implementation of the plug-in architecture. All of the
application’s features and functionality are implemented through plug-ins.
A plug-in defines bosses. Interfaces provide access to bosses. A plug-in can
provide implementations for interfaces on a boss that perform some new
Adobe InDesign Programming Guide
2.7. Adobe InDesign’s Object Model Implementation
63
functionality. A plug-ins boss is available to the plug-in, or to any other plug-in
that knows about the boss and its interfaces.
At runtime, plug-ins don’t call other plug-ins, but they can gain access to bosses
that other plug-ins define through interfaces. In fact, it’s possible to access any
boss that’s known to the object through its interfaces. A list of API bosses and
interfaces is available in InterfaceList.txt.
figure 2.7.a. plug-in
Plug-in
Interface
Interface
Boss
Interface
2.7.1. Bosses
Understanding what a boss is and how it behaves is key to programming
InDesign plug-ins. Bosses are the fundamental building blocks of a plug-in. A
boss is a class in the InDesign Object Model. It is not a C++ class, but is made
up of a group of C++ classes. A boss object is the instantiation of a boss. Any
boss that is defined will have a set of protocols or interfaces that establish how
a user interacts with that boss. A boss also has, for each of it’s interfaces, an
implementation that defines the bosses behavior for a given interface. The
interfaces are abstract C++ classes and implementations are concrete C++
classes. Boss objects are reference counted. Each reference to the boss
increments the count when it’s created, and decrements the count when it is
released. The reference count controls the lifetime of the object. Any boss
object with a reference count of zero is subject to destruction.
A table could be used to represent the document boss
64
2.7. Adobe InDesign’s Object Model Implementation
Architecture
figure 2.7.a. kDocBoss represented as a table
kDocBoss (kDocBoss has no parent boss)
Interface ID
Associated Implementation ID
IID_IDOCUMENT
kDocumentImpl
IID_IWINDOWLIST
kDocWindowListImpl
IID_ICOMMANDMGR
kCommandMgrImpl
IID_ISUBJECT
kCSubjectImpl
...
...
The boss is kDocBoss, or the entire table. IID_IDOCUMENT is one of the
interfaces on kDocBoss, and kDocumentImpl is an implementation of
IID_IDOCUMENT.
At runtime, the object model adds your boss to a list of bosses that it keeps for
all of the plug-ins. It also builds a table of interfaces that your boss aggregates.
Both of these tables are lists of unique IDs. To access the functionality that your
boss provides, you will query for an interface on your boss, and then call the
methods of that interface.
figure 2.7.1.a. boss
Boss
Interface
Adobe InDesign Programming Guide
2.7. Adobe InDesign’s Object Model Implementation
65
2.7.1.1. Unique IDs
The InDesign application keeps tables of the bosses, interfaces, and
implementations made available by your plug-in. Each boss, interface, and
implementation has an unique ID that identifies it within the space of all
InDesign bosses, interfaces, or implementations. The boss, interface and
implementation ID spaces are separate spaces, and so your plug-in may use the
same number for an interface and a boss safely, but there should be no overlap
of bosses with other bosses, or interfaces with other interfaces. The IDs are
defined as 32 bit values, and so to ensure unique IDs are used in each plug-in
you need to request a 24 bit prefix from InDesign Developer Support. There is a
request form on http://partners.adobe.com. The 24 bit prefix that you recieve
will be reserved for your use in your plug-in -- giving a maximum value of 256
values for boss, interface, or any other prefix based IDs. Typically this is more
than enough for any single, or sometimes a set of plug-ins.
InterfaceList.txt is the current catalog of all of the public bosses and interfaces
available to third-party developers. InterfaceList.txt contains the rest of the
definition of kDocBoss. In InterfaceList.txt, you will see examples of naming
conventions used for boss, interface, and implemntation constants. The
convention for bosses is to prefix the name with “k” and suffix it with “Boss”.
Interface IDs are prefixed with “IID_” and implementation IDs are prefixed
with “k” and suffixed with “Impl”.
You can use the same naming conventions for the bosses and interfaces that
make up your plug-in. This will help you to quickly differentiate between
bosses and interfaces, and help you keep those separate from the other groups
of unique IDs you will learn about in subsequent chapters.
66
2.7. Adobe InDesign’s Object Model Implementation
Architecture
figure 2.7.1.1.a. boss and interface ids
kMyBoss
IID_IMYINTERFACE
2.7.1.2. Resources
Bosses are defined in a plug-ins resource. For each plug-in project there are as
set of resource files that are compiled by the ODFRC compiler. Within one of
these files is a table of bosses. Since bosses are InDesign Classes they are called
classes in this table. An entry from one of the sample plug-ins is below. This file
is where your boss is given a name, unique ID, and where the interfaces on the
boss are listed. InDesign will look in your plug-in’s resource to find this
information as it builds the boss and interface tables.
Class{
kDocBoss,
kInvalidClass,{
IID_IDOCUMENT, kDocumentImpl,
IID_IWINDOWLIST, kDocWindowListImpl,
IID_ICOMMANDMGR, kCommandMgrImpl,
IID_ISUBJECT, kCSubjectImpl,
...
}
}
As was noted before, kDocBoss doesn’t inherit from another boss, the way this
is shown in the resource is that it inherits from the invalid boss, “kInvalidClass”.
This boss has a list of interfaces, and the ID for each interface is given in the
definition. IID_IDOCUMENT is an interface ID, or 32 bit value that is used to
Adobe InDesign Programming Guide
2.7. Adobe InDesign’s Object Model Implementation
67
identify an abstract C++ class. Since the IDs are named after the classes, we can
deduce that the interface that IID_IDOCUMENT represents is IDocument
(found in IDocument.h). The implementation ID for each interface is listed
after the interface ID. Remember, these interface IDs and implementation IDs
are 32 bit values that are tied to the C++ classes they represent, not the actual
names of the classes themselves. (However, the name of the class appears in the
name of the ID in each case to make navigation easier.)
In a boss definition, interfaces are listed by their interface ID (e.g.,
IID_IMYINTERFACE), and an implementation ID (e.g., kMyImpl). The object
model uses these IDs to identify the type of interface that you are aggregating,
and also the specific implementation that is being provided for that interface.
Each boss and interface that you define must have a unique ID. There are three
cases that apply to specifying interfaces on a boss in your plug-in:
• Use an existing interface and an existing implementation (e.g.,
IID_IINDESIGN, kInDesignImpl).
• Use an existing interface and define your own implementation (e.g.,
IID_IINDESIGN, kMyImpl).
• Define your own interface and implementation (e.g.,
IID_IMYINTERFACE, kMyImpl).
figure 2.7.1.2.a. boss definition
kMyBoss
IID_IINDESIGN, kInDesignImpl
IID_IINDESIGN, kMyImpl
IID_IMYINTERFACE, kMyImpl
68
2.7. Adobe InDesign’s Object Model Implementation
Architecture
Bosses can inherit from other bosses. Boss inheritance is specified in the boss
definition. As might be expected, if you inherit from a boss, you also inherit the
interfaces that the parent boss aggregates. Inheritance is additive, and derived
bosses may override base bosses.
The advantages to this approach are numerous. In the case of developing your
own page item, you can inherit from an existing page item that knows how to
draw itself, hold text frames, and be part of a group. You can add your own
interfaces to this boss and provide implementations that customize the page
item to behave as you want it to.
As you will see in the “Plug-ins” chapter, it is also possible to add interfaces to
an existing InDesign boss in your boss definition file. This is a common
practice, but as an external developer, you should only add interface IDs that
are defined in the ID space for your plug-in. (In other words, only use IIDs that
are based on your assigned prefix.) The InDesign team could add an interface
of the same type in a future release.
figure 2.7.1.2.b. boss inheriting from parent
kParentBoss
kMyBoss
IID_IINDESIGN, kInDesignImpl
IID_IINDESIGN, kMyImpl
IID_IMYINTERFACE, kMyImpl
2.7.1.3. Interfaces
A boss is an InDesign class that is defined in a resource, has a unique ID, and is
managed by the object model at runtime. An interface on a boss provides
Adobe InDesign Programming Guide
2.7. Adobe InDesign’s Object Model Implementation
69
access to the boss, and it is the implementation of an interface’s methods that
provides the functionality of the boss.
You can gain access to a boss by querying for an interface on it. If your query is
successful, you can use the interface in two ways: you can call the methods of
the interface, and you can query for another interface on the same boss. Once
you have an interface on a boss, you can query for any other interface on that
boss.
Interfaces are defined as abstract C++ classes. In your implementation of an
interface, you can specify additional member functions as part of the derived
class, but you can only directly call the methods that have been exposed at the
abstract level.
All but a few InDesign interfaces inherit from IPMUnknown, which has three
methods: QueryInterface(), AddRef(), and Release(). Interfaces are bound to
implementations at runtime through the CREATE_PMINTERFACE macro.
InterfacePtr is a templated utility class that performs a QueryInterface() and
returns an interface pointer.There are many default implementations for
interfaces available to third-party developers.
figure 2.7.1.3.a. interface inheritance
IPMUnknown
IMyInterface
70
2.7. Adobe InDesign’s Object Model Implementation
Architecture
IPMUnknown. This is the parent interface for nearly all of InDesign’s
interfaces. In order for InDesign’s object model to function correctly, interfaces
must inherit from IPMUnknown, and support QueryInterface(), AddRef(),
and Release(). You can query a boss for an interface pointer of type
IPMUnknown and get back a valid interface pointer.
There are a few special cases where an interface does not subclass from
IPMUnknown (e.g., IDatabase).
Querying for interfaces. QueryInterace() is used to query for an interface on a
boss. This function returns a pointer to an interface, or nil if an instance of the
interface is not available. QueryInterface() automatically performs an
AddRef(), which increments the refcount on the interface. The object model
keeps track of the refcount for interfaces on bosses. If all of the interfaces on a
boss have a refcount of zero, the boss can be marked for deletion.
If you have used QueryInterface() to obtain an interface pointer, it is necessary
to call the Release() method when you are through with the interface, so that
the refcount for the interface is decremented correctly.
figure 2.7.1.3.b. refcounting interfaces
IPMUnknown
IMyInterface
QueryInterface()
AddRef()
Release()
Interface instantiation. The object model keeps a table of interface instances.
An instance in this table is a pointer to the instantiated C++ implementation of
the interface. When QueryInterface() is called, it looks in the table to see if
Adobe InDesign Programming Guide
2.7. Adobe InDesign’s Object Model Implementation
71
there’s an instance associated with the ID being passed in. If there is, a pointer
to the interface is returned by QueryInterface(). If not, the object model tries to
instantiate one.
figure 2.7.1.3.c. queryinterface() flow
QueryInterface()
Is there
an
instance?
No.
Instantiate C++
implentation, and
add pointer to
instance in list.
Yes.
Return
IFace.
The object model will return a valid interface pointer, or nil. You should test for
nil before you call the methods of the interface.
Interface implementations are created on the fly as they are needed. It is quite
possible to have a boss object that has some interfaces that have been
instantiated, and some that have not. If you are querying for an interface on a
boss from another interface on the same boss, the above flow takes place, and
the second interface’s implementation is pulled into memory.
72
2.7. Adobe InDesign’s Object Model Implementation
Architecture
figure 2.7.1.3.d. interface implementation not in memory
kMyBoss
IMyFirstInterface
IMySecondInterface
Binding implementations to interfaces. In a plug-ins resource, a boss
definition lists interfaces with the Interface ID (PMIID) and implementation
ID of each interface aggregated by a boss (e.g., IID_IMYINTERFACE,
kMyInterfaceImpl). As we’ve seen, interfaces and implementations can be from
the API or ones that you design. An implementation is provided by a C++ class
that derives from the abstract definition of that interface (e.g., IMyInterface.h).
The CREATE_PMINTERFACE macro is used to bind an implementation to an
interface. This macro appears before the constructor of an interface
implementation class, and passes the name of the implementation class with
the implementation ID as parameters.
creates an InterfaceFactory object that has methods for
creating and destroying an instance of the interface implementation. These
methods are called by the object model to create an instance of the interface. If
QueryInterface() is called on an interface implementation that is not
instantiated, the class factory object gets created, and its methods are available
to the object model. The “Plug-ins” chapter will walk you through the
CREATE_PMINTERFACE macro in depth.
CREATE_PMINTERFACE
Adobe InDesign Programming Guide
2.7. Adobe InDesign’s Object Model Implementation
73
HelperInterface. This class is used to map the QueryInterface(), AddRef(),
and Release() methods of IPMUnknown to an interface implementation.
There are three macros that are used to declare, define, and initialize these
methods that perform substitution for the name of the interface
implementation class. The “Plug-ins” chapter will give a detailed view of this
class and how it’s used for interfaces.
InterfacePtr. InterfacePtr (InterfacePtr.h) is a class that wraps
QueryInterface(). In addition to the AddRef() that is automatically performed
by QueryInterface(), InterfacePtr performs a Release() when the pointer
goes out of scope. This ensures that Release() is called on an interface, and
prevents memory leaks.
InterfacePtr is a templated class that calls QueryInterface() in its constructor,
and Release() in its destructor. There are several different constructors you can
use, depending on your situation:
• You have an interface on a boss, and want to get another on the same boss.
• You want to instantiate an interface from a database.
• You have an interface pointer that already has a refcount, and you want to
make sure that Release() will be called for it.
To handle scoping issues, declare an InterfacePtr without initializing it:
InterfacePtr<IMyInterface> iMyInterface;
More typically, you will declare and initialize simultaneously:
InterfacePtr<IMyInterface> IMyInterface(kMyBoss, IID_IMYINTERFACE);
UseDefaultIID(). Many interfaces in the API support UseDefaultIID. This is a
dummy class that is used only to drive the type system. You can pass
UseDefaultIID() as the trailing parameter in one of the InterfacePtr
constructors:
InterfacePtr<IMyInterface> iMyInterface(kMyBoss, UseDefaultIID());
This approach can lead to cleaner code, and fewer “copy paste” mistakes, but
keep in mind that not every interface supports UseDefaultIID. Both
InterfacePtr and ConstInterfacePtr support this class.
74
2.7. Adobe InDesign’s Object Model Implementation
Architecture
2.7.1.4. Boss instantiation
(see CreateObject.h) is the class used to instantiate bosses. In
general, a plug-in instantiates the bosses it defines. For example, if you defined
a kMyBoss in your plug-in, you would use one of the CreateObject
constructors, and pass in the class ID (kMyBoss) as one of the parameters.
CreateObject
CreateObject asks the object model to create a new boss object of
the class that
you specify. The object model returns an IPMUnknown interface pointer that
you can cast to the type you have aggregated on the boss. You can wrap a call to
CreateObject in an InterfacePtr:
InterfacePtr<IMyInterface>
IMyInterface((IMyInterface*)::CreateObject(kMyBoss,
IID_IMYINTERFACE));
figure 2.7.1.4.a. boss defined, but not instantiated
Plug-in
Boss
Interface
Adobe InDesign Programming Guide
2.7. Adobe InDesign’s Object Model Implementation
75
figure 2.7.1.4.b. boss after createobject called
Plug-in
Boss
Interface
In general, it is not necessary to create a new boss object of a type that is
provided by the API. This is not always true (e.g., applying text attributes, see
the Text chapter), but you can usually safely assume that there is an instance of
an API boss that you are trying to access.
CreateObject creates both persistent and non-persistent boss objects (see the
Persistence chapter). There are three constructors you can use, depending on
the type of boss object you are trying to create:
• Create a new non-persistent boss object of the type specified by the class ID.
• Create either a persistent object if a valid database pointer is passed in, or a
non-persistent object if the database pointer is nil.
• Create a persistent object from the resource boss definition, in the database
passed in (the database pointer parameter must be valid).
2.7.1.5. Boss object hierarchy
InDesign’s boss objects are arranged in a hierarchy. The gSession object is the
root of the application boss tree, and you can navigate to any boss object in the
hierarchy.
76
2.7. Adobe InDesign’s Object Model Implementation
Architecture
figure 2.7.1.5.a. conceptual view of boss object hierarchy
gSession
Palettes
Workspace
Document(s)
Colors
Doc Workspace
Styles
Story(ies)
Defaults
Layers
Spread(s)
Frame(s)
Adobe InDesign Programming Guide
2.7. Adobe InDesign’s Object Model Implementation
77
The relationships between parent and child in the boss object tree is established
by interfaces on a boss that have methods for obtaining an interface on another
boss. ISession, for example, has a method, QueryApplication(), that returns an
IApplication interface pointer:
InterfacePtr<IApplication> theApp(ISession->QueryApplication());
ISession (see ISession.h) has several query methods that you should be aware of
to help you traverse the object tree:
• IActiveContext* GetActiveContext() - This object holds the active
selection, active view, active doc, etc.
• IChangeManager* GetChangeManager() - Return the global change manager.
• IWorkspace* QueryWorkspace() - Return a reference to the global
workspace.
• ICommandProcessor* QueryCommandProcessor() - Return a reference to the
global command processor.
78
2.7. Adobe InDesign’s Object Model Implementation
Architecture
figure 2.7.1.5.b. boss object hierarchy
kSessionBoss
ISession
kWorkspaceBoss
kDocBoss
ICharStyleNameTable
IDocument
IParaStyleNameTable
ISpreadList
kSpreadBoss
IInkList
IStoryList
ISpread
IColorList
ILayerList
IHierarchy
kStyleBoss
kSplineItem
IStyleInfo
IHierarchy
ITextAttributes
IGraphicFrameData
As a plug-in developer, you can create boss object hierarchies for the bosses in
your plug-ins. This provides a consistent, documented way to access a boss,
helps eliminate multiple instantiations of the same boss, and helps you refcount
your bosses correctly. Boss hierarchies are not required for every plug-in, but
an obvious opportunity for this approach is the case of implementing plug-ins
with functionality that will be accessed by other plug-ins.
To create a boss hierarchy where kMyFirstBoss is the parent of kMySecondBoss,
you can use the following recipe (we will assume that kMyFirstBoss aggregates
IMyFirstInterface, and kMySecondBoss aggregates IMySecondInterface):
• Define a method in IMyFirstInterface, “QuerySecondBoss()”.
• Create an implementation class for IMyFirstInterface. This is a C++ class
that inherits from IMyFirstInterface. We’ll call it, “ImplementedFirst.”
Adobe InDesign Programming Guide
•
•
•
•
•
2.7. Adobe InDesign’s Object Model Implementation
79
Add a private interface pointer data member to your implementation of
IMyFirstInterface, fMySecondInterface.
In ImplementedFirst::QuerySecondBoss(), test fMySecondInterface for nil.
If fMySecondInterface is nil, use CreateObject to create an instance of
kMySecondBoss, and fMySecondInterface gets the IPMUnkown cast as
IMySecondInterface.
Call AddRef() on fMySecondInterface, and return fMySecondInterface.
In the destructor for ImplementedFirst, call Release().
Note the use of AddRef() and Release(). Any method starting with “Query” or
“Create” is required to return a pointer to the interface with it’s reference count
already incremented -- but it is up to the client code to ensure that release is
called. Using the outline above, the code calls CreateObject once, and therefore
has ownership of a single interface pointer, and must release it. The
QuerySecondBoss() method also does an AddRef(), but it is the responsibility
of the client code to release those references.
Typically, management of references is delegated to InterfacePtr:
InterfacePtr<IMySecondInterface>
second(first, IID_IMYSECONDINTERFACE);
2.7.1.6. InDesign’s Object Model Implementation Summary
Bosses are classes in InDesign, that are defined in a resource, and produce a
boss object at runtime. A boss aggregates interfaces. Both a boss and its
interfaces have unique 32-bit IDs.
You can query for an interface on a boss, and receive back an interface pointer.
QueryInterface() causes an interface to be instantiated, if an instance doesn’t
already exist. Querying for an interface causes the interface to increment the
boss’ refcount.
Interface implementations are C++ classes that derive from the pure virtual
methods of an interface class. Interface implementations are instantiated as
they are needed by QueryInterface(). Interface implementations are bound to
interfaces by CREATE_PMINTERFACE.
80
2.8. InDesign Managers
Architecture
You must call Release() before an interface pointer goes out of scope. The
InterfacePtr class wraps QueryInterface() and automates decrementing the
refcount on an interface when a pointer to it goes out of scope.
The CreateObject class is used to instantiate boss objects. It returns an
IPMUnknown pointer that you cast to the interface you have queried for. Boss
objects are arranged in a hierarchy, of which gSession is the root. To navigate
the boss object hierarchy, you call accessor methods of interfaces that have
knowledge of another boss.
2.8. InDesign Managers
As we’ve seen, a manager is a logical grouping of functionality. InDesign uses
managers to keep track of the state of specific functionality, provide access to
the functionality, and do any housekeeping that’s required by the functionality.
Managers are single points of control for their functional areas.
InDesign’s API managers must be available to all other plug-ins that need access
to their functionality. A manager must be instantiated before it is required, and
deleted during shutdown.
2.8.1. Manager Implementation
A manager is an interface on a boss with public methods for providing access to
the manager’s functionality. Manager interfaces also have methods that are
used privately to keep track of the state, or do other housekeeping tasks for
their functional area. These methods are exposed because they are abstract, but
should not be called by your plug-in.
Manager interfaces are aggregated by bosses that define managed functionality.
Managers have accessor methods for obtaining an interface pointer to the
manager so that you can use it’s methods. The IMenuManager interface, for
example, is aggregated by the kMenuManagerBoss, which defines InDesign’s
menu system. You can access it from the IApplication interface through
QueryMenuManager().
Adobe InDesign Programming Guide
2.9. MVC in InDesign
81
figure 2.8.a. manager interface
kBoss
IID_IMANAGER
As an InDesign plug-in developer, you will commonly use several managers to
perform certain tasks (adding and deleting menu items, drawing page items,
etc.).
2.8.2. Commonly Used InDesign Managers
The following table displays commonly used managers, and has a brief
description for each.
Figure 2.8.2.a.
Manager
Description
IMenuManager
Provides access to InDesign’s menu system.
ICommandMgr
Manages processing of commands.
IDialogMgr
Methods for creating and manipulating dialogs.
IPanelMgr
Methods for getting the state of a panel and changing it.
IDrawMgr
Used to draw page items.
ISignalMgr
Used by Responders as part of InDesign’s messaging.
2.9. MVC in InDesign
InDesign uses the mode-view-controller (MVC) architecture from SmallTalk to
factor its user interface.The model manages the behavior and data of the
application domain, delivers information about its state to the view and makes
changes to its state as directed by the controller. The view manages the GUI,
including the onscreen representation of the model. The controller interprets
the mouse gestures and keyboard input from the user, commanding the model
and or view to change as appropriate. Mapped onto InDesign, a model,is a
82
2.9. MVC in InDesign
Architecture
document, the text on a page, an image, or any of the data that makes up
InDesign documents, a view is a window opened on the document, and a
controller is an object that facilitates communication between the model and
the view (dialog controller, event handler, and others.)
figure 2.9.a. mvc in indesign
Windows
Input
Document
The model communicates with the view through messages. The view
communicates with the model through commands.
2.9.2. MVC Process in InDesign
When a user of InDesign causes a change to occur using the user interface, it
responds by creating command objects. Commands cause a change to occur in
the document, and then send out a message notifying any interested parties
(usually views) that the change has occurred. The views then update to reflect
the change to the model.
Adobe InDesign Programming Guide
2.9. MVC in InDesign
83
This is different than non-MVC applications, in which the change to the model
is made directly from the view, and the model makes changes directly to the
view. For example, a user enters input into a dialog, the dialog code directly
changes something in the document, and then the document directly updates
the dialog with the change.
When you are developing your plug-ins, you should try to implement your user
interface in one plug-in, and any model changes (commands) in another. This
will allow you to easily change your UI without changing the functionality of
your plug-in.
2.9.3. Observers
Observers are a class of InDesign objects that receive information when certain
events occur. They are used extensively in user interface elements such as
dialogs and panels. Observers are the mechanism that InDesign API uses to
broadcast events such as when an InDesign command saves or closes a file.
Observers register their interest with bosses that have subject interfaces. For
example, the document boss is shown in figure 2.9.3.0.a., which has an
IID_ISUBJECT interface. An instantiation kDocBoss exists for each open
document. Observers register their interest in the document by calling a
method of the IID_ISUBJECT interface called AttachObserver(). The
implementation of this interface, kCSubjectImpl, is derived from ISubject.
AttachObserver() registers the observer with a change manager that records:
• a pointer to the object that’s being observed
• a pointer to the object (observer) that is observing
• the interface ID of the observing object
• the interface ID of the object being observed
figure 2.9.3.0.a. indesign’s document boss
Class{
kDocBoss,
kInvalidClass,{
IID_IDOCUMENT, kDocumentImpl,
IID_IWINDOWLIST, kDocWindowListImpl,
IID_ICOMMANDMGR, kCommandMgrImpl,
IID_ISUBJECT, kCSubjectImpl,
IID_IOBSERVER, kDocObserverImpl,
IID_IPMPERSIST, kPMPersistImpl,
IID_ICLASSIDDATA, kClassIDDataImpl, // the doc file handler
IID_ICONTENTMGRACCESS, kContentMgrAccessImpl,
IID_IDOCUMENTLOG, kDocumentLogImpl,
84
2.9. MVC in InDesign
Architecture
IID_IPMLOCKFILEDATA, kPMLockFileDataImpl,
}
};
There are more methods of ISubject, but most are for use by the agents
changing the subject. The other method important to observers is the
ISubject::DetachObserver() method that is used to discontinue interest in a
particular subject.
Once an observer is attached, InDesign will call a method of the observer when
changes in the observed object occur. So what does an observer look like? figure
2.9.3.0.b. shows a minimal observer boss that has only one interface,
IID_IOBSERVER. The implementation for this interface, kExampleObserverImpl,
would be derived from CObserver, a public implementation of IObserver. The
class kExampleObserverImpl is written to override methods of CObserver and
perform whatever actions are desired when the event occurs. This observer
interface does not have to be isolated on a separate boss, and observers can be
used to observe more than one subject.
figure 2.9.3.0.b. a simple observer boss
Class{
kExampleObserverBoss,
kInvalidClass, {
IID_IOBSERVER, kExampleObserverImpl,
}
};
The methods for the IObserver object are:
• AutoAttach() Attaches the observer to a subject.
• AutoDetach() Detaches the observer.
• Update() Respond to a change in an observed subject. A call to this method
is how the observer receives “notification” of change.
• SetAttachIID() Set unique IID rather than IID_IOBSERVER.
• GetAttachIID() Get the IID of this observer
• SetEnabled() Enable or disable the observer.
• IsEnabled() Accessor for enabled state
The kExampleObserverImpl implementation of the observer needs to override
the method for Update(), AutoAttach(), and AutoDetach() methods. The
‘auto’ methods of the observer are a bit misleading in name. Except in the case
of panels, InDesign doesn’t automatically call them, and so in general observers
Adobe InDesign Programming Guide
2.9. MVC in InDesign
85
are not automatically attached or detached! This means that some other code in
the plug-in must attach and detach the observer.
By convention, the attach and detach code is placed in the “auto” routines if the
object has enough information to perform the attach and detach operations.
The attach process involves the following steps:
• Acquire the IID_ISUBJECT interface of the object being observed
• Call the AttachObserver() method of the IID_ISUBJECT interface.
And the detach process involves:
• Acquire the IID_ISUBJECT interface of the object being observed
• Call the DetachObserver() method of the IID_ISUBJECT interface.
The observer registers its interest by attaching to the subject. When a subject
changes, it notifies any attached observers. This is done through the observer’s
Update() method.
The observer’s Update() method contains the code to take action based on the
subject’s change. The Update() method receives the ClassID of the change,
which is usually the ClassID of a command. Typically, an Update() method will
use a switch construct to take action based on the ClassID of the change.
Now that we have all the pieces, let’s review the sequence of how observers and
subjects work.
• Objects exist (or are created by a plug-in programmer) that aggregate an
IID_ISUBJECT interface with an implementation that derives from ISubject.
• Observers are created as a stand-alone boss or added to an existing boss.
These observers aggregate an IID_IOBSERVER interface with an
implementation that derives from IObserver.
• The observer is attached to the IID_ISUBJECT interface of an object of
interest. This is done by an explicit call to subject’s AttachObserver()
method.
• Some time later, an agent of change (usually a command) effects some
change in the object being observed. The agent calls the Change() method
of the subject interface, triggering notification of the observers. For
example, this is typically done by the DoNotify() method of a command.
• The change manager calls the Update() method of the observer, which is
the act of notification. The Update() method performs what ever actions
are desired.
86
2.9. MVC in InDesign
•
Architecture
Sometime later the observer is detached from the IID_ISUBJECT interface of
an object of interest. This is done by an explicit call to subject’s
DetachObserver() method.
Observers are a very versatile construct. One observer can observe many
subjects, and any given subject may have many observers. They are a good
solution in an environment where the developer has no control over what other
plug-ins may be loaded at a given time. In the case of file actions, they work
particularly well because they can support the parallel actions of many plugins. However, if a developer has control over the system configuration, a
simpler construct can perform custom file actions: the document file handler.
2.9.4. Responders
Responders are a class of objects that can receive predefined InDesign signals
when certain events or conditions occur. InDesign defines a set of events and
corresponding signals, and events like before, during and after file-open and
before, during and after file-new are examples.
A boss object for a minimal responder would look like figure 2.9.4.a.
figure 2.9.4.a. an example boss for a responder
Class {
kExampleNewDocResponderBoss,
kInvalidClass, {
IID_IK2SERVICEPROVIDER, kDuringNewDocSignalRespServiceImpl,
IID_IRESPONDER, kExampleResponderImpl
}
};
This boss has two interfaces: a standard InDesign API service provider and an
InDesign responder that has a custom implementation.
On start-up, InDesign builds a service registry that catalogs every class that
supports the IID_IK2SERVICEPROVIDER interface. The registry contains the:
• Class ID (e.g. kExampleNewDocResponderBoss) which identifies the boss that
contains the service provider interface.
• Interface ID (e.g. IID_IK2SERVICEPROVIDER) which identifies the interface
on this boss that is a service provider. The methods in the implementation
for this interface describe its type of service.
Adobe InDesign Programming Guide
2.9. MVC in InDesign
87
•
Service ID (e.g. kDuringNewDocSignalResponderService) which tells
InDesign what type of service this boss provides.
When InDesign builds the service registry, kExampleNewDocResponderBoss is
effectively registered as wanting to receive signals for new document events,
and the methods of the second interface on the boss will field those signals. The
signals themselves are actually calls to a method in this second interface.
The service provider implementation (kDuringNewDocSignalRespServiceImpl)
on this boss is a standard InDesign implementation.
is the ID for the interface class that will respond to the new
document event. The specific implementation for the responder,
kExampleResponderImpl, is derived from IResponder which has two methods:
• Respond(), which is called when the event of interest occurs. Calling this
method is the “signal” InDesign sends this responder.
• SignalFailed(), which is called if an error is posted while InDesign is
signalling all the responders for an event.
IID_IRESPONDER
The Respond() method is where you insert code to perform whatever special
task needs to be done. For example, this is where an observer (see next section)
might be attached to a new document.
The SignalFailed() method is where you insert code to perform the tasks
needed to recover should a signal fail. You should override SignalFailed() if
your responder does something (other than execute a command) that would
need to be undone if the operation is aborted. For example, you may need to
detach an observer.
Both methods receive a pointer to a signal manager interface so that they can
find out information about the event. Typically Respond() and SignalFailed()
would question the service manager using the GetServiceID() method to verify
the ID of the service that has occurred. This allows one responder
implementation to be used for more than one type of service. For example,
Document Watch sample plug-in uses the same responder to service file-open
and file-new events.
2.9.5. Commands
A command encapsulates changes to an InDesign document (see the
“Commands” chapter). A command is called to act on elements in a document.
88
2.10. Summary
Architecture
It is processed by the Command Manager, and has three methods, Do(), Undo(),
and Redo(). Commands broadcast notifications on the subject that they change
so that observers can update the view.
2.10. Summary
InDesign is its own programming environment. It has an object model that
defines a boss as a class. Bosses define the functionality of plug-ins. Bosses are
accessed through interfaces.
InDesign managers provide access to areas of functionality. A manager keeps
track of the state of the functionality, and updates it as needed. A manager is
usually accessed by calling an accessor method that has knowledge of it from an
interface.
Model/View/Controller is used by InDesign to factor its user interface. MVC
formalizes the relationship between the document, user interface, and
commands and messages that pass between them.
Observers are a class of InDesign objects that receive information when certain
events occur, and responders are a class of objects that can receive predefined
InDesign signals when certain events or conditions occur. Observers are the
mechanism that InDesign API uses to broadcast events such as when an
InDesign command saves or closes a file.
2.11. Review
You should be able to answer these questions:
1. What is a boss?
2. How do you access a boss?
3. When should you use InterfacePtr?
4. How do you get your unique prefix for your plug-in?
5. What is a manager?
6. How can your plug-ins reflect the MVC architecture?
7. Why should you not make changes to the model directly from the view?
2.12. Reference
•
•
•
Microsoft, Com Spec.pdf, 1995.
Rogerson, D. Inside COM. 1997: Microsoft Press. Microsoft’s Component
Object Model.
Box, D. Essential COM. 1998: Addison-Wesley. More on Microsoft’s
Component Object Model.
Adobe InDesign Programming Guide
•
•
•
2.12. Reference
Gamma, E., et.al. Design Patterns. 1995: Addison-Wesley. Elements of
reusable object-oriented software.
Adobe InDesign SDK. InDesign Command Reference, 1999. See Adobe
InDesign SDK/Documentation/CommandReference.pdf.
Adobe InDesign SDK. InDesign Interfaces Reference, 1999. See Adobe
InDesign SDK/Documentation/InterfaceReference.pdf.
89
90
2.12. Reference
Architecture
3.
Document Structure
3.0. Overview
This chapter describes the structure and geometry of an InDesign document.
The application’s measurement systems and coordinate systems are also
discussed.
3.1. Goals
The questions this chapter addresses are:
1. What is an empty InDesign document structure?
2. Which object owns the content of a document?
3. What coordinate systems does the application support?
4. What is the application’s measurement systems? How do you add your own
custom unit of measure?
3.2. Chapter-at-a-glance
“3.3.Introduction” on page 92 shows an example of an InDesign document.
“3.4.Class Diagram” on page 94 shows the major objects in the document
structure and their association.
“3.5.Application Document Structure” on page 96 illustrates the hierarchy
structure of an empty document and with added content.
table 3.2.a. version history
Rev
Date
Author
Notes
2.0
23-Oct-02
Lee Huang
Update content for InDesgn 2.x API
1.1
12-Dec-02
Jane Zhou
Second Draft
1.0
16-Oct-02
Jane Zhou
First Draft
91
92
3.3. Introduction
Document Structure
“3.6.Navigation Diagram” on page 100 shows the major navigation paths
among the objects in an empty document.
“3.7.Interface Diagram” on page 102 iterates through the major interfaces in
the document structure.
“3.8.Working With Document Structure” on page 107 gives examples on how
to traverse the document hierarchy tree and obtain the information, such as the
page items on a page and the spread layer.
“3.9.Application Measurement Systems” on page 108 describes the
application’s measurement systems and provides pointer for implementing
custom units of measure.
“3.10.Application Coordinate Spaces” on page 111 shows various geometric
data types and coordinate spaces. Examples are given to demonstrate how to
create a text frame and a guide item with the right specified coordinates.
“3.11.Summary” on page 117 provides a summary of the material covered in
this chapter.
“3.12.Review” on page 117 poses questions to test your understanding of the
chapter.
“3.13.Exercises” on page 117 gives some exercises you might want to try after
finish reading the chapter.
3.3. Introduction
From the user’s point of view, a document is the final product that stores both
layout and contents. Its content may be composed of frames, text and images. A
document can be laid out on spreads that can have one or more pages. Content
can be layered using document wide layers. From the developer’s point of view,
a document is the database which stores a tree of objects. Each object is owned
by another object with a reference between them.
A document is represented by the boss class named kDocBoss which aggregates
the interface IDocument, which provides the basic file operation. There are other
interfaces that kDocBoss aggregates, for example, IWindowList maintains a list
of windows (IWindow) that are associated with the document.
Adobe InDesign Programming Guide
3.3. Introduction
93
figure 3.3.a. shows a sample document. In this document, there are three pages,
two pages per spread. By default in the Roman version of InDesign, the first
page is a right page numbered 1. Odd-numbered pages always appear on the
right. For the Japanese version, the first page if a left page numbered 1, oddnumbered pages always appear on the left by default.
Each document includes at least one named layer. Pages and spreads are
manipulated by the end-user via the Pages panel while layers are manipulated
using the Layers panel. You as an end-user can add more layers to the
document so that you can create and edit specific areas or types of content in
your document without affecting other areas or types of content.
94
3.4. Class Diagram
Document Structure
figure 3.3.a. Sample Document
Spread 1 of a default document in
the Roman version of InDesign.
The first page is at the right side..
The space outside the page bound
is the pasteboard.
3.4. Class Diagram
figure 3.4.a. shows the class diagram that illustrates the relationship between
the document, spreads, document layers, spread layers, pages and page items.
Adobe InDesign Programming Guide
3.4. Class Diagram
95
figure 3.4.a. Document Structure Class Diagram
kMasterPagesBoss
1
1..m
kDocBoss
1
1
1
1..10
1..m
1..m
kPageBoss
kSpreadLayerBoss
2
1..m
1
1 kDocumentLayerBoss
1
2
kSpreadBoss
1
1
1..m
1..10
kSpreadLayerBoss
1
1
0..m
0..m
Any Master Page Item
kPageBoss
Any Page Item
Each document (kDocBoss) is made up of one or more spreads (kSpreadBoss)
and a global pasteboard. The spread is the root of the contents. Each spread
contains one or more pages (kPageBoss).
A document has a list of document layers (kDocumentLayerBoss). Document
Layer are document-wide. Individual layers may be renamed, hidden, locked
programmatically or by an end user through application UI. The user may
assign the color to be used for selection handles of items in a particular layer.
Layers may be added, removed, and moved within the document’s layer list.
Changes to layers are document wide. They affect all spreads, including master
spreads in the document.
The layer’s z-order determines the drawing sequence. Layer one draws first,
layer n draws last. For each document layer, there are two spread layers on each
spread, one for content and one for guides. The spread has a tree structure
whose children are spread layers. The children of each of the spread layers are
the page items. The same rules apply to the master spread.
When the end-user creates a new spread, first the kSpreadBoss is created in the
document database, and the document’s (kDocBoss) ISpreadList is updated
with the newly created, then spread layers (kSpreadLayerBoss) are added into
the kSpreadBoss's IHierarchy. It is done by looping through each document
layer (ILayerList of the kDocBoss) and add two spread layers
(kSpreadLayerBoss) for each one, one is the normal spread layer, one is the
guides spread layer. If guides are in back, all the guides spread layers come first,
96
3.5. Application Document Structure
Document Structure
followed by the regular spread layers. The next section will provide more details
on how the spread layers are structured in the spread. After the spread layer is
created, the pages are inserted into the page layer, the first kSpreadLayerBoss of
the document (read more about page layer in the next section).
3.5. Application Document Structure
figure 3.5.a. shows objects that exist in a single page empty document with a
single page spread. The UID of each object is shown in gray. Note the UID is just
the number that representing the boss object in the database, it does not have
any special meaning in this context; it is similar to a a record ID in a database,
and the UID would depend on the exact document composition.
figure 3.5.a. Empty Document Boss Object Tree
kDocBoss
0x01
kDocumentLayerBoss
0x34
Page Layer
0x35
Layer 1
kSpreadBoss
0x36
Spread1
kSpreadLayerBoss
0x37
Pages Layer
0x38
Pages Layer (empty)
0x39
Layer 1 Content
0x3aLayer 1 Guides
kPageBoss
0x3b
Page1
kMasterPagesBoss
0x42
A-Master
kPageBoss
0x47
Page1
kSpreadLayerBoss
0x43
Pages Layer
0x44
Pages Layer (empty)
0x45
Layer 1 Content
Layer 1 Guides0x46
The overall structure is implemented by mixture of lists and trees. An object of
kDocBoss is at the hierarchy. kSpreadBoss is where kDocBoss hierarchy resides.
The diagram also shows that each document layer has two spread layers, one for
content and one for guides. The first document layer is the pages layer. It is
associated with two spread layers, one contains the kPageBoss object and one
layer is always empty. Page (kPageBoss) doesn’t own the content that lies on it,
kSpreadLayerBoss does. kPageBoss is responsible for drawing the page outline,
margins, columns and drop shadow, and have knowledge of its master page.
Adobe InDesign Programming Guide
3.5. Application Document Structure
97
The empty layer is kept as a placeholder to reinforce that each document layer
has two spread layers. The master spread is structured in a similar manner.
For example, an empty document with one document layer will have a total of
four spread layers. The spread layer list will look like this:
index[0] pages layer where the pages live
index[1] pages layer for guides (always empty)
index[2] layer 1 contents
index[3] layer 1 guides
Suppose you add a new document layer to this empty document. Then the total
of spread layers will be six. The sample snippet, SnipInspectSpreadLayer.cpp
will produce output similar to the following if there are 2 layers in the front
document.
index[0] pages layer where the pages live
index[1] pages layer for guides (always empty)
index[2] layer 1 content
index[3] layer 2 content
index[4] layer 1 guides
index[5] layer 2 guides
There are couple observations from the above example. First, guides are kept as
a separate layer rather than being combined into the content layer. The benefit
for this is to be able to draw guides either in front of, or behind the content, or
even turn them off completely. Second, all guide layers and all content layers are
continuous in the hierarchy, except for the pages layer. Third, the following
formulas exist if the guide is in front.
(1) index for content spread layer = index for document layer + 1;
(2) index for guide spread layer = total number of document layers + index
for document layer;
If the guide is in back (the default setting is in front), the spread layer list for
above example looks slightly different. Note that you can change the “guide in
back” setting from the application preferences dialog, if you run the
98
3.5. Application Document Structure
Document Structure
SnipInspectSpreadLayer.cpp snippet after doing so, you will get the result
similar to the following:
index[0] pages layer where the pages live
index[1] pages layer for guides (always empty)
index[2] layer 1 guides
index[3] layer 2 guides
index[4] layer 1 content
index[5] layer 2 content
In this case, the formulas are different for the content and guide spread layer
indexes.
(1) index for content spread layer = total number of document layers + index
for document layer;
(2) index for guide spread layer = index for document layer +1;
Now we are going to add some content to this empty document. Page one
contains one image and one vertical guide. The master page contains one text
frame and two horizontal guides. figure 3.5.b. shows the sample document.
figure 3.5.b. Sample Document
Adobe InDesign Programming Guide
3.5. Application Document Structure
99
Which object is going to own each piece of content we added to the empty
document? figure 3.5.c. reveals the objects layout for this example. Note in the
following diagram, we assume that the guides are in front.
figure 3.5.c. Sample Document Boss Object Tree
kDocBoss
0x01
kDocumentLayerBoss
0x34
Page Layer
0x35
Layer 1
kSpreadBoss
0x36
Spread1
kSpreadLayerBoss
0x37
Pages Layer
0x38
Pages Layer (empty)
0x39
Layer 1 Content
0x3aLayer 1 Guides
kGuideItemBoss
0x84
Vertical Guide
kPageBoss
0x3b
Page1
kSplineItemBoss
0x8a
Graphic Frame
kImageItem
0x85
LeePen.tif
kMasterPagesBoss
0x42
A-Master
kPageBoss
0x47
Page1
kSpreadLayerBoss
0x43
Pages Layer
0x44
Pages Layer (empty)
0x45
Layer 1 Content
kSplineItemBoss
0x72
Text Frame
kMultiColumnItemBoss
0x74
Layer 1 Guides0x46
kGuideItemBoss
0x82
Horizontal Guide
0x83
Horizontal Guide
kFrameItemBoss
0x7e
The key point here is that the tree grows as content is added to the document.
Content is associated with a spline which is a frame that owns its content.
Spread layers (kSpreadLayerBoss) own the splines (kSplineItemBoss) and guide
items (kGuideItemBoss), we call the spread layers the parents. Spreads
(kSpreadBoss) implement the parent and child relationship on interface
IHierarchy.
100
3.6. Navigation Diagram
Document Structure
3.6. Navigation Diagram
You can navigate from one boss object to another boss object in the document
object tree via the appropriate interface. is the navigation diagram for the
above empty sample document. Its objects tree is shown in figure 3.5.a.
Adobe InDesign Programming Guide
3.6. Navigation Diagram
figure 3.6.a. Navigation Diagram
kDocumentLayerBoss
kDocBoss
kDocumentLayerBoss
GetLayer()
ILayerList
IMasterSpreadList
ISpreadList
IDocumentLayer
GetNthSpreadUID()
kSpreadBoss
QueryChild()
QueryPagesLayer()
GetNthMasterSpreadUID()
kMasterPagesBoss
IHierarchy
ISpread
IHierarchy
IMasterSpread
ISpread
QueryLayer()
QueryChild()
QueryPagesLayer()
QueryLayer()
kSpreadLayerBoss
IHierarchy
Pages Layer
GetMasterPageUID()
QueryChild()
kPageBoss
IMasterPage
kSpreadLayerBoss
kSpreadLayerBoss
IHierarchy
QueryChild()
Pages Layer (empty)
IHierarchy
Pages Layer
kSpreadLayerBoss
IHierarchy
Layer 1 Content
kSpreadLayerBoss
IHierarchy
Layer 1 Guides
kPageBoss
IMasterPage
kSpreadLayerBoss
IHierarchy
Pages Layer (empty)
kSpreadLayerBoss
IHierarchy
Layer 1 Content
kSpreadLayerBoss
IHierarchy
Layer 1 Guides
101
102
3.7. Interface Diagram
Document Structure
Notice that the special pages layer contains the kPageBoss, which points back
to its master spread via the interface IMasterPage.
3.7. Interface Diagram
figure 3.7.a. shows the major interfaces involved in document structure.
figure 3.7.a. Document Structure Interface Diagram
kDocBoss
kSpreadBoss
IDocument
IMasterSpreadList
ISpreadList
ILayerList
ISpread
IHierarchy
IGeometry
IShape
kGuideItemBoss
IGuideData
IHierarchy
IGeometry
ITransform
IShape
kMasterPagesBoss
IMasterSpread
IHierarchy
IGeometry
ISpread
IShape
kDocumentLayerBoss
kSpreadLayerBoss
ISpreadLayer
IHierarchy
IDocumentLayer
kPageBoss
IMasterPage
IHierarchy
IGeometry
ITransform
IShape
kSplineItemBoss
IPathGeometry
IHierarchy
IGeometry
ITransform
IShape
3.7.1. IDocument
This interface represents a document. It also provides the basic file operations
and method to access the document work space.
Figure 3.7.1.a. Major IDocument Methods
// Return the name associated with the document. The name is used for
// the default window title, and for the default "save-to" file the
// first time it is saved.
// Do not use the document's name to make assumptions about the
// name of the actual publication file in the file system.
virtual void GetName(PMString& name) const = 0;
// Get the document level workspace.
virtual UIDRef GetDocWorkSpace() = 0;
Adobe InDesign Programming Guide
3.7. Interface Diagram
103
3.7.2. ISpread
InDesign documents are laid out as a set of spreads where each spread contains
one or more pages. Via this interface, you can query different spread layer for
the specified document layer.
Figure 3.7.2.a. Major ISpread Methods
// Return the spread layer associated with the given document layer.
// If pPos is not nil, it's filled in with the position of the spread
// layer within the spread. If wantGuideLayer is kFalse, the spread
// content layer is returned. This is the default. If wantGuideLayer
// is kTrue, the corresponding spread guide layer is returned.
virtual ISpreadLayer * QueryLayer(IDocumentLayer * docLayer, int32 *
pPos = nil, bool16 wantGuideLayer = kFalse) = 0;
// Returns the spread layer for pages. It is at index 0 position of the
// spread hierarchy.
virtual IHierarchy * QueryPagesLayer() = 0;
// Returns the items on the page. By default, the returned item UIDList
// will include the UID of the page itself, but not the items on the
// pasteboard.
virtual void GetItemsOnPage(int32 pgPos, UIDList * items, bool16
bIncludePage = kTrue, bool16 bIncludePasteboard = kFalse) = 0;
virtual
virtual
virtual
virtual
int32 GetNumPages() = 0;
IGeometry * QueryNthPage(int32 n) = 0;
UID GetNthPageUID(int32 n) = 0;
int32 GetPageIndex(UID pageID) = 0;
// Returns a pasteboard bounding box that tightly encloses
// all the pages on the spread.
virtual PBPMRect GetPagesBounds() = 0;
3.7.3. ISpreadList
This interface maintains a persistent UID list of spreads in a given document.
Figure 3.7.3.a. Major ISpreadList Methods
//Return the IGeometry associated with the 'spreadIndex' spread. This
//will add a ref count, and will instantiate the spread if necessary.
virtual IGeometry * QueryNthSpread(int32 spreadIndex) = 0;
virtual
virtual
virtual
virtual
UID GetNthSpreadUID(int32 spreadIndex) = 0;
int32 GetSpreadCount() const = 0;
int32 GetSpreadIndex(IGeometry * spread) = 0;
int32 GetSpreadIndex(UID spreadUID) = 0;
104
3.7. Interface Diagram
Document Structure
3.7.4. IMasterSpread
A master spread is like a template background that you can quickly apply to any
pages in the document. In most cases, as you can see from figure 3.5.c, master
spreads are similar to spreads in structure. They form their own hierarchy in a
document database. In addition, you can apply one master to another master.
Or you can create a new master spread based on another master spread.
Suppose you've got two master spreads A and B with a different set of
boilerplate items on each. When you drag master spread B onto master spread
A in the Pages panel, master spread B formats the master spread A. All the
master page items on master spread B will be applied onto master spread A.
However, those master page items on master spread B are still owned by master
spread B, not master spread A. If you later alter master spread B, the change
applies to master spread A. But master spread A can override those items on a
per attribute basis, just like you can override the master page items applied on
the spread in the document.
contains the incremental information beyond what is already
contained in a regular spread. This information includes the name of the
master spread, the layout spread UID to which the master spread is applied,
and the offset position that has been applied to the view in order to draw the
page.
IMasterSpread
Figure 3.7.4.a. Major IMasterSpread Methods
// The name is the combination of the single character prefix and the
// base name (separated by a '-'). e.g. for the first/default master
// spread, the base name will be 'Master', the prefix will be 'A', and
// the name returned by GetName will be 'A-Master'.
virtual void GetName(PMString *pName) = 0;
// Get and Set the spread that is being drawn (i.e. the UID of
// the layout spread to which the master spread is applied).
// Do NOT call SetCurrentLayoutSpreadUID directly. It is called by the
// drawing code.
// If you need to set the current spread, use kSetSpreadCmd instead.
virtual const UID& GetCurrentLayoutSpreadUID() = 0;
virtual void SetCurrentLayoutSpreadUID(const UID &newSpread) = 0;
3.7.5. IMasterSpreadList
The interface contains a persistent UID list of master spreads.
Figure 3.7.5.a. Major IMasterSpreadList Methods
// Return the master spread at index spreadIndex. This will add a ref
Adobe InDesign Programming Guide
3.7. Interface Diagram
105
// count to the object.
virtual IGeometry * QueryNthMasterSpread(int32 spreadIndex) = 0;
virtual UID GetNthMasterSpreadUID(int32 spreadIndex) = 0;
virtual int32 GetMasterSpreadCount() = 0;
virtual int32 GetMasterSpreadIndex(IGeometry * spread) = 0;
virtual int32 GetMasterSpreadIndex(UID spreadUID) = 0;
3.7.6. IMasterPage
Each page (kPageBoss) aggregates an IMasterPage interface, this interface keeps
track of the master spread (kMasterPagesBoss) associated with the page and the
index within the master spread that this page has assigned to.
figure 3.7.6.a. Major IMasterPage Methods
// Get and set the UID of the master spread assigned to the page.
// Note: the UID returned is the master spread UID.
virtual UID GetMasterPageUID() = 0;
virtual void SetMasterPageUID(UID mpUID, uint16 mpIndex =
IMasterPage::kPositionDependant) = 0;
// Get and set the index within the master spread that this page has
// assigned to. This is to allow, for example, a single page to have
// the right-most page of a master spread assigned to it (rather than
// the left-most as would be the default without these methods). By
// default, the kPositionDependant is assigned - this allows the
// master to change based on where within a spread the page falls.
virtual uint16 GetMasterIndex() = 0;
virtual void SetMasterIndex(uint16) = 0;
3.7.7. ILayerList
The document’s ILayerList maintains a list of document layer
(kDocumentLayerBoss) UIDs. It supports adding, moving, and deleting layers.
Figure 3.7.7.a. Major ILayerList Methods
// Returns the number of layers in this document.
virtual int32 GetCount() const = 0;
// Return the UID of the document layer with the specified name
virtual UID FindByName(const PMString& name) = 0;
virtual IDocumentLayer * GetLayer(int32 n) = 0;
virtual int32 GetLayerIndex(IDocumentLayer * docLayer) = 0;
virtual int32 GetLayerIndex(UID layerUID) = 0;
//
//
//
//
Returns the next candidate for an active layer. It looks for the
first visible, unlocked layer in front of the given one, then behind
this one, then the next visible, but perhaps locked (in front and
behind), then the next UI layer in front and behind this one.
106
3.7. Interface Diagram
Document Structure
// Returns nil, if there are no other layers.
virtual IDocumentLayer * GetNextActiveLayer(IDocumentLayer * docLayer)
= 0;
// This version is useful if the old layer has already been removed and
// you know its index.
virtual IDocumentLayer* GetNextActiveLayer(int32 layerIndex) = 0;
Document layers are the layers the user sees in the Layers panel. In addition
there is a special layer, the pages layer, which is not displayed in the Layers
panel. It is always the first entry in the document layer list. It can not be made
writable or moved in the z-order. It also has two corresponding spread layers.
One layer contains the kPageBoss, another is always empty.
3.7.8. IDocumentLayer
This interface describes the attributes of a document-wide layer attributes like
name, color, etc. And it has an associated content spread-layer and guide
spread-layer as explained in the “Class Diagram” on page 94 and “Application
Document Structure” on page 96
Figure 3.7.8.a. Major IDocumentLayer Methods
// Get and set the name of the layer.
virtual void GetName(PMString * pName) const = 0;
virtual const PMString& GetName() const = 0;
virtual void SetName(const PMString& newName) = 0;
// return TRUE if the layer appears in the Layers Panel. Pages layer is
// not in the Layers panel, so it is not a UI layer.
virtual bool16 IsUILayer() = 0;
3.7.9. ISpreadLayer
ISpreadLayer is aggregated onto kSpreadLayerBoss. A spread layer
(kSpreadLayerBoss) is the container for all the page item in that layer through
the IHierarchy interface on the kSpreadLayerBoss. ISpreadLayer interface
maintains a relationship back to the corresponding document layer boss.
(kDocumentLayerBoss).
Figure 3.7.9.a. Major ISpreadLayer Methods
// Returns a pointer to the associated document layer.
// The caller is responsible to release the pointer when it is done!
virtual IDocumentLayer * QueryDocLayer() const = 0;
// Return the UID of the associated document layer.
virtual UID GetDocLayerUID() const = 0;
Adobe InDesign Programming Guide
3.8. Working With Document Structure
107
The default implementation of this interface actually forwards all methods to
the document layer associated with the spread layer. It only allows the name
and other attributes of a spread layer to be queried, but not changed. Any
changes must be made directly to the document layer.
3.8. Working With Document Structure
3.8.1. The DocumentStructure Snippet
The SnipDocumentStructure.cpp in the SDK is very useful to examine the
structure of a document. The snippet can be found in the folder
SampleCode\CodeSnippets in the SDK. For information on how to run the
SnippetRunner plug-in, please refer to SnippetRunnerDesign.html available
from the SDK. The snippet is a great way to discover what lives inside a
document. It is also a great debugging tool, for example, an often encountered
problem in the InDesign plug-in development is a page item is not created in
the desired location. This snippet’s ReportDocumentGeometry() function will
report a page item’s geometry and transformation matrix so you can gain some
insight into a page item.
3.8.2. Get All Page Items On A Page
Page items are held in spread layers (kSpreadLayerBoss) and can be accessed
through the IHierarchy interface on an instance of a kSpreadLayerBoss. There
is a method that provides you a way to get all the items on a specified page. It is
ISpread::GetItemsOnPage(). The prototype is as following:
figure 3.8.2.a. ISpread::GetItemsOnPage() Prototype
virtual void GetItemsOnPage(int32 pgPos, UIDList * items, bool16
bIncludePage = kTrue, bool16 bIncludePasteboard = kFalse) = 0;
The code snippet SnipInspectItemsOnPage.cpp shows a sample usage of the
function GetItemsOnPage.
3.8.3. Finding The Spread Layer
For each document layer, there are two corresponding spread layers. One is for
content and the other one is for guides. Sometimes, we call the spread layer that
holds the content a regular spread layer. The snippet
SnipInspectSpreadLayer.cpp shows how to iterate through the front doc's
spreads and its associated spread layers.
108
3.9. Application Measurement Systems
Document Structure
3.9. Application Measurement Systems
3.9.1. Introduction
InDesign’s internal unit of measure is points, although it also supports other
units of measure, such as centimeters, inches, picas, ciceros etc. Points were
chosen because AGM (Adobe Graphics Manager) uses points as its unit of
measure. Using the same unit of measure as AGM reduces one source of
potential round-off error. Points are stored as PMReal, which is type double.
There are seven default units of measure that Roman feature InDesign supports
in its Preferences panel. You can add your own units of measure to the panel
too. They are available as service providers. They are shown in the following
boss diagram.
figure 3.9.1.a. Seven Units Of Measure Bosses
kPointsBoss
kInchesBoss
IK2ServiceProvider
IUnitOfMeasure
IK2ServiceProvider
IUnitOfMeasure
kMillimetersBoss
IK2ServiceProvider
IUnitOfMeasure
kCentimetersBoss
IK2ServiceProvider
IUnitOfMeasure
kPicasBoss
IK2ServiceProvider
IUnitOfMeasure
kInchesDecimalBoss
IK2ServiceProvider
IUnitOfMeasure
kCicerosBoss
IK2ServiceProvider
IUnitOfMeasure
kYourUnitOfMeasureBoss
IK2ServiceProvider
IUnitOfMeasure
Each unit of measure boss class aggregates two interfaces, IK2ServiceProvider
and IUnitOfMeasure.
A unit of measure boss is a boss class that aggregates the IUnitOfMeasure. Plugins can add new units of measure to the application by simply constructing a
unit of measure boss and registering it with the measurement system as a
service provider. The sample CustomUnits demonstrates the technique to create
such a customized unit. In addition, a plug-in needs to provide a resource
description of how the ruler tick markers are specified for the custom units.
CustomRuler.fr from the sample shows an example of ruler resource for inches
Adobe InDesign Programming Guide
3.9. Application Measurement Systems
109
from the CustomUnits sample. For a complete explanation of each parameter,
please refer to RulerType.fh in API:Includes.
3.9.2. IUnitOfMeasure
IUnitOfMeasure is an interface responsible for converting between the unit of
measure and the internal unit of measure (points). It also has methods for
producing a formatted string representation from units and for tokenizing a
string to produce a formatted number from the string.
figure 3.9.2.a. Major IUnitOfMeasure Methods
virtual void GetName(PMString * pName) = 0;
virtual PMReal UnitsToPoints(const PMReal& units) = 0;
virtual PMReal PointsToUnits(const PMReal& points) = 0;
virtual void Format(const PMReal& units, PMString& str) = 0;
virtual bool16 Parse(const PMString& str, PMReal& points) = 0;
// Get the ruler resource spec for the specific unit of measure
virtual RsrcSpec GetRulerSpecRsrcSpec() const = 0;
3.9.3. IMeasurementSystem
figure 3.9.3.a. Class Diagram
kSessionBoss
IMeasurementSystem
is an interface of the session that is used to manage the
available units of measure within the application. Units of measure can be
referred to by either their ClassID or an index which the measurement system
hands out. The index is used while referring to a unit of measure in memory.
But it should be converted into the ClassID when writing or reading from a
stream.
IMeasurementSystem
Figure 3.9.3.b. Major IMeasurementSystem Methods
// Return the index of the measurement system whose class id
// is specified in 'classId'.
virtual int32 Location(const ClassID& classId) = 0;
// Query the unit of measure for the specified index.
virtual IUnitOfMeasure* QueryUnitOfMeasure(int32 index) = 0;
// Get the number of unit of measure the application available.
110
3.9. Application Measurement Systems
Document Structure
virtual int32 GetNumberOfUnits() = 0;
Since the unit of measure was loaded by iterating over the object model, this
interface only has methods for accessing units of measure.
3.9.4. IUnitOfMeasureSettings
figure 3.9.4.a. Class Diagrams
kWorkspaceBoss
kDocWorkspaceBoss
IUnitOfMeasureSettings
IUnitOfMeasureSettings
The interface IUnitOfMeasureSettings is aggregated into the session workspace
(kWorkspaceBoss) and document workspace (kDocWorkspaceBoss). It
provides the ability to set and get the unit of measure for text, and the x and y
dimensions. You can change the unit of measure setting via the Preferences
dialog. When a new document is created it inherits its default unit of measure
settings from the session. The snippet SnipInspectUnitOfMeasure.cpp shows
how to get the unit of measure that is currently used.
3.9.5. Rulers
The ruler widget is used to display rulers. The layout of the ruler is completely
determined by the data defined in the ruler resource description (resource type
of RulerDataType). A ruler resource description (RulerDataType) contains a
postscript font name, font size, units of measure boss ID, major division length,
flags for fraction and decimal, and a list of tick marks within a major division.
See RulerType.fh for more details. A tick mark is specified by the number of
subdivisions of the previous sub-tick level, and the tick mark's length as a
percentage of the full tick length. If the workspace is scaled smaller than the
specified scaling limit, the ticks will not show in the workspace.
Typically a ruler is associated with a particular unit of measure object. The
resource description for the ruler is in the same plug-in as the unit of measure.
The unit of measure object will return the resource ID of the ruler description
in its override of GetRulerSpecRsrcSpec in the implementation of interface
IUnitOfMeasure.
When a new view is created on a document, the unit of measure is retrieved
from the unit of measure settings interface on the document. The unit of
Adobe InDesign Programming Guide
3.10. Application Coordinate Spaces
111
measure is then queried for the resource ID of a ruler description. If one exists,
that description is used to create a new ruler as part of the new view of the
document.
3.9.6. Custom Unit Of Measure
Third party developers can add their own unit of measure if there is a need.
Your plug-in needs to do three things to make your custom unit of measure
appear in the Units & Increments drop down list in the application Preferences
dialog.
1. Derive your custom unit of measure class from CUnitOfMeasure and
provide an implementation for IUnitOfMeasure.
2. Provide implementation for interface IK2ServiceProvider, the helper
implementation kUnitOfMeasureService, which will register the custom
unit with the application measurement system can be used as default
implementation.
3. Include a ruler resource description of the type RulerDataType for your
custom unit of measure in the resource file on each platform. For a
complete sample, please see the plug-in CustomUnits in the SDK under
ServiceProviders\CustomUnits.
3.10. Application Coordinate Spaces
3.10.1. Geometry Data Types
The application supports various geometry data types, such as PMReal, PMPoint,
PMRect, PMMatrix, etc., see their corresponding headers for details. For example,
PMReal.h would have the class declaration for PMReal.
There are also a set of data types that are designed primarily for use to indicate
the expected coordinate system of input parameters or the coordinate system of
output values. Those data types are shown in figure 3.10.1.a.
figure 3.10.1.a. Synonyms For Geometry Data Types
// The following types are synonyms of PMPoint
typedef PMPoint PBPMPoint; // point in pasteboard coordinate
typedef PMPoint IPMPoint; // point in inner coordinate of page item
typedef K2Vector<PMPoint> PMPointList;
typedef K2Vector<PMPointList*> PMPointListCollection;
// The following types are synonyms of PMRect
typedef PMRect PBPMRect; // rectangle in pasteboard coordinate
typedef PMRect IPMRect; // rectangle in inner coordinate of page item
typedef K2Vector<PMRect> PMRectCollection;
112
3.10. Application Coordinate Spaces
Document Structure
typedef K2Vector<PMMatrix> PMMatrixCollection;
3.10.2. Coordinate Systems
There are at least four coordinate systems InDesign supports. When you try to
describe a page item’s location, you can specify it in terms of the pasteboard
geometry, the spread geometry, the page geometry or the page item’s own
geometry. figure 3.10.2.a. shows their geometry arrangement inside the
application workspace.
Adobe InDesign Programming Guide
3.10. Application Coordinate Spaces
113
figure 3.10.2.a. Application Coordinate Systems
center of the
first spread
X pb
X pi
Y pi
Xs
Ys
Yp
Xp
Y pb
In this diagram, the document has four pages. The master spread has two
pages, hence each spread contains two pages. There is also a page item, a black
square with dimension of 100 points at the origin of the page two.
•
Pasteboard Geometry - The pasteboard encloses all the spread in the
document, The origin of the pasteboard is the center of the first spread in
114
3.10. Application Coordinate Spaces
•
•
•
Document Structure
the document. In the figure above, the pasteboard coordinates is
represented by the red axes (Xpb, Ypb). The x axis is right increasing, the y
axis is down increasing. Page items with locations outside the bounds of the
pasteboard will be clipped and will not be drawn.
Spread Geometry - Each spread is enclosed by its own spread geometry. Its
origin is the center of the spread. In the figure above, the spread coordinates
is represented by the blue axes (Xs, Ys).
Page Geometry - Each page is enclosed by its own page geometry. Its origin
is the top left corner of the page. In the figure above, the spread coordinates
is represented by the magenta axes (Xp, Yp).
Page Item Geometry - Finally, page item has its own coordinate system, the
origin is at the item’s center. In the figure above, the spread coordinates is
represented by the black axes (Xpi, Ypi).The square’s inner bounds are saved
in interface IGeometry. A transform to position the square in its parent's
coordinate space is saved in interface ITransform. In this case the square
spline item is positioned relative to the geometry of its parent, the second
spread.
It is important to note that when creating a spline item, it is necessary to specify
its location in the global pasteboard coordinates. InnerToPasteboard method of
the TransformUtils can be used to get the pasteboard coordinate. If you try to
specify a location in the above figure, depends on which origin you use as the
reference point, the locations are different. Therefore, to correctly describe a
location, not only you need to know the (X, Y) coordinates, you also need to
know which geometry this coordinates based upon. When you use the function
InnerToPasteboard, you have to let the method know which geometry
(IGeometry) the point you are trying to convert is based upon. Most of the
InDesign objects that can be manipulated by the end-user, including spread
(kSpreadBoss), page (kPageBoss), spline item (kSplinItemBoss) all aggregate an
IGeometry interface. So when you try to use the
TransformUtils::InnerToPasteboard method, you have to ask yourself which
geometry my new page item will lie upon, if you are thinking about the
location in terms of the current page, then you have to get to the IGeometry
interface of the corresponding kPageBoss, if you are thinking about the location
in terms of spread, then you have to get to the IGeometry interface of the
corresponding kSpreadBoss. The snippet SnipCreateFrame.cpp demonstrates
the difference when you specify the same coordinates with different geometry, a
spline item will be created at different locations in the document.
Adobe InDesign Programming Guide
3.10. Application Coordinate Spaces
115
As briefly noted above, the interface ITransform is used to transform a
coordinate from its own geometry to its parent’s geometry. In fact,
TransformUtils::InnerToPasteboard will first try to get to the ITransform
interface pointer from the same boss object that aggregates the IGeometry, The
ITransform has a method that would return a transformation matrix that
transforms the inner coordinates of the item all the way to the pasteboard by
walking up the page item’s hierarchy. Then this transformation matrix is used
to convert the point from coordinate you pass in the InnerToPasteboard to the
pasteboard coordinate. The snippet SnipDocumentStructure has an option for
you to explore the relationship between a page item’s geometry and
transformation matrix.
It is also interesting to note that, when you use the rectangular (or other) tool
to create a shape in the document, the transformation matrix is 1:1 which
means inner and parent are the same. That is because the tool tracker converts
the global mouse points directly into the pasteboard coordinates when it is
doing the tracking. Each tracker decides if its going to change the IGeometry,
the IPathGeometry or the ITransform.
The important things about coordinate systems are:
1. The coordinates within interface IPathGeometry and IGeometry are stored
in inner coordinates.
2. Different page items can have different coordinate systems.
3. A page item's ITransform can be used to transform a page item to its
parent's inner coordinates.
4. To compare coordinates between two or more page items, the coordinates
should first be transformed to a common coordinate space. The pasteboard
space is often used for this purpose and some transformation utilities are
defined in TransformUtils.h, which can be used to transform from an
object's inner coordinates to its pasteboard coordinates.
3.10.3. Working With Coordinate Spaces
3.10.3.1. Create A Text Frame
When creating a spline page item, you define its bounding box in pasteboard
space. The item itself stores its inner bounds in interface IGeometry and a
transform matrix in interface ITransform to position itself in its parent’s
116
3.10. Application Coordinate Spaces
Document Structure
coordinate space. For items that are not contained within other items, the
parent would be the spread.
The snippet SnipCreateTextFrame.cpp illustrates how to create a simple text
frame.
3.10.3.2. Create A Guide Item
Guides are different from the page items. Unlike page items, guides are not
defined by a list of points. A guide is instead defined by the IGuideData
interface. When you are creating them, you specify the coordinates in their
parent’s space, normally a spread, not the pasteboard space.
figure 3.10.3.2.a. demonstrates how to create a vertical guide item on the first
page of the active spread. Again, error checking is omitted for code simplicity.
figure 3.10.3.2.a. Create A Vertical Guide Item
InterfacePtr<ILayoutControlData>
layoutData(::QueryFrontLayoutData());
// Get the active document layer
InterfacePtr<IDocumentLayer> docLayer(layoutData->
QueryActiveDocLayer());
InterfacePtr<ISpread> spread(layoutData->GetSpread(), IID_ISPREAD);
IDataBase *db = ::GetDataBase(spread);
// Get the guide spread layer for the active spread.
InterfacePtr<ISpreadLayer> spreadLayer(spread->QueryLayer(docLayer,
nil, kTrue));
// The parent for the new guide is the guide spread layer.
UID parent = ::GetUID(spreadLayer);
UIDRef parentUIDRef(db, parent);
// Get the first page UID. Each page owns its guides.
UID ownerUID = spread->GetNthPageUID(0);
// Note: The parent for the guide we are to create is the spread. Each
// page owns its guides. We need to convert the guide coordinates
// to its parent space - spread space.
// Get the bounding box of the page in spread space.
InterfacePtr<IGeometry> geometry(db, ownerUID, IID_IGEOMETRY);
PBPMRect bBox = geometry->
GetStrokeBoundingBox(::InnerToParentMatrix(geometry));
Adobe InDesign Programming Guide
3.11. Summary
117
InterfacePtr<ICommand>
newGuideCmd(CmdUtils::CreateCommand(kNewGuideCmdBoss));
InterfacePtr<INewGuideCmdData> newGuideCmdData(newGuideCmd,
IID_INEWGUIDECMDDATA);
// The distance the guide is located at.
PMReal distance = bBox.Left() + bBox.GetHCenter();
// Ge the default guide preference
InterfacePtr<IGuidePrefs>
iGuideDefault((IGuidePrefs*)::QueryPreferences(IID_IGUIDEPREFERENCES,
kGetFrontmostPrefs));
// Get the guide threshold amd the color index
PMReal guideThreshold = iGuideDefault->GetGuidesThreshold();
int32 guideColorIndex = iGuideDefault->GetGuidesColorIndex();
newGuideCmdData->Set(parentUIDRef, kFalse, distance, ownerUID, kTrue,
guideThreshold, guideColorIndex);
if (CmdUtils::ProcessCommand(newGuideCmd) != kSuccess)
// Report process command failure.
3.11. Summary
This chapter outlines the document’s structure, built-in measurement systems,
and different coordinate systems. Related bosses and interfaces are examined.
3.12. Review
You should be able to answer the following questions:
1. Where are the origins for the pasteboard and the spread? How does the
pasteboard relate to a spread?
2. Give two ways you can extend an InDesign document?
3. How do you add a custom unit of measure to the application?
4. What is the relationship between the document layer and the spread layer?
5. What object owns page items?
6. Which coordinate space should you use to specify the bounding box when
creating a new page item or a guide item?
3.13. Exercises
3.13.1. Find The Objects That Exist In An Document
Run the debugger version of InDesign with the Diagnostic plug-in provided in
the SDK. Create an empty InDesign document. Go to the Diagnostic panel and
118
3.13. Exercises
Document Structure
choose the fly-out menu Report Document Hierarchy. This will output the
document hierarchy information into the trace window. Try the other two
menus: Report Document Layers and Report Document Geometry. Then add
some page items to the document and try the different menus to see the output.
3.13.2. Create A Horizontal Guide Item
After studying the sample code in section “3.10.3.2.Create A Guide Item” on
page 116, write a sample code to create a horizontal guide item.
4.
Plug-ins
4.0. Overview
This document covers the basic architecture and components of a plug-in. The
BasicMenu plug-in supplied with the SDK is used here to demonstrate
programming principles. We dissect this plug-in file-by-file and discuss the way
in which its bosses, interfaces, and implementations interact with the InDesign
object model.
Once you understand the plug-in components, this document describes:
• how InDesign uses plug-ins.
• the tools for creating a plug-in.
• the development environment for building plug-ins.
In this document, you are repeatedly directed to look at the BasicMenu plug-in;
so now is a good time to open either the Windows or Macintosh project file
using your compiler.
4.1. Goals
The questions this chapter answers are:
1. What is in a plug-in?
2. How do I add functionality to InDesign by implementing a plug-in?
3. What special-purpose macros are used to build an InDesign plug-in?
4. How does InDesign locate and load a plug-in?
5. What development tools should I use to make an InDesign plug-in?
4.2. Chapter-at-a-glance
“4.3.The Anatomy of a Plug-in” on page 120 discusses the components of a
plug-in and how they are combined to provide new functionality in InDesign.
“4.4.The Life-Cycle of a Plug-in” on page 130 discusses how InDesign locates,
catalogs, loads, and unloads a plug-in.
119
120
4.3. The Anatomy of a Plug-in
Plug-ins
“4.5.The InDesign Plug-in Development Environment” on page 133 describes
the development tools, settings, and build procedures for making InDesign
plug-ins on the Macintosh and Windows platforms.
“4.6.Code Re-Use” on page 134 discussed specific opportunities for sharing
and reusing code.
“4.7.Summary” on page 136 wraps up the chapter for you.
“4.9.Exercises” on page 137 gives you review questions.
“4.10.References” on page 137 shows you where to look for additional
information.
4.3. The Anatomy of a Plug-in
If you’ve browsed the sample plug-ins, you know they’re made up of lots of
different kinds of files and they all seem to hold a piece of the puzzle but not the
whole picture. This section discusses the components of a plug-in using the
BasicMenu plug-in as our example. In cases where BasicMenu does not contain
an example of a topic, you are directed to look at other example plug-ins in the
InDesign SDK.
4.3.1. What is a Plug-in?
A plug-in is a library that extends or changes the behavior of the application.
For Windows, a plug-in is physically built as a DLL. The DLL must have the file
type “.pln”. For example, a DLL could be named “BasicMenu.pln”.
For Macintosh, a plug-in is physically built as a shared library. The shared
library must have the type “InD3” and creator “InDn”. For example, a shared
library could be named “BasicMenu”
Later we describe how to create a plug-in on each platform. But first, let’s look
at the files that make up a plug-in project, and then we’ll see what’s in them.
Using your compiler now, open the BasicMenu project and in FileView look at
the component files.
Adobe InDesign Programming Guide
4.3. The Anatomy of a Plug-in
121
4.3.2. General Plug-in Anatomy
This section covers the basic types of files. The specific contents of these files
are covered in later sections, as are the detailed project and compiler settings for
a plug-in project.
122
4.3. The Anatomy of a Plug-in
Plug-ins
4.3.2.1. Project files
A plug-in project is contained in a VisualC++ .dsp file for Windows and in a
CodeWarrior .mcp file for Macintosh. Note: The plug-in project file includes
both developer-supplied and SDK-supplied files.
4.3.2.2. Resource vs. C++ Files
InDesign plug-ins are programmed as both C++ source and header files and
resource files. It is generally understood what a C++ file is, but what is a
resource? A resource is data of any kind stored in a structured format. That's a
pretty general statement so let's get a little more specific.
Much of the information that the application program needs are definable as
small pieces of data that can be stored in standard formats. The information
required to draw a window, create a menu or display a dialog box has constant
elements. The data in those elements may vary depending upon what the
window looks like, how the menu operates or the contents of the dialog box.
However, each of these items has certain features that can be defined and stored
in a standard format. Any data organized and stored in such a structured
format can be a resource.
Key abstractions within a plug-in are: boss classes, interfaces, and
implementations.
• A boss class (at its simplest) is a resource with a table that maps interfaces to
implementations by their numeric identifiers (IID_<whatever> to
k<whatever>Impl). Each boss class has a unique numeric identifier
(k<whatever>Boss).
• An interface is an abstract C++ class that extends IPMUnknown. The abstract
C++ class named IPMUnknown is at the root of the inheritance hierarchy for
most interfaces defined in the API. Each interface has a unique numeric
identifier (IID_<whatever>).
• An implementation is the C++ class that implements an interface. Each
implementation has a unique numeric identifier (k<whatever>Impl).
4.3.2.3. General Description of the Files that Make an InDesign Plug-in
Let’s start with the kinds of files that are used to make a plug-in. A general
diagram of the files contained in a plug-in is shown below.
• Open BscMnuID.h now. At the top of the figure is the ID definitions file.
This file contains the unique numeric identifiers for the plug-in, bosses,
Adobe InDesign Programming Guide
•
•
•
•
•
4.3. The Anatomy of a Plug-in
123
and implementations. This file is included in most of the other types of files
because these unique identifiers are used throughout the plug-in.
The files in the group on the left side of the diagram contain
implementation code for the plug-in and its interfaces. (See
BscMnuActionComponent, as well as files contained under the Plugin
subdirectory.) These are exclusively *.h and *.cpp files and are compiled
through the C++ compiler along with the header files for the InDesign API.
The files in the middle group contain the native (platform-dependent)
resource definitions. (There are no examples of this in the BasicMenu plugin.) For example, icon resource definitions are contained in a *.r file. These
files are compiled through the native resource compiler for the integrated
development environment.
The files in the right group are the ODFRez (platform-independent)
resource definitions. (See BscMnu.fr.) Typically these files include boss class
definitions, string tables, and definitions for panels, dialogs, and menus.
Additionally, localized strings are supplied. (See BscMnu_enUS.fr and
BscMnu_jaJP.fr.) These files are of the types *.fr and *.fh, and are compiled
through the OpenDoc Framework Resource Compiler (ODFRC) compiler
supplied with the SDK.
The output of the Windows resource compiler is concatenated and then
linked with the output of the C++ compiler and the InDesign API library
files. On the Macintosh, the output information from the Native and
Framework resources are sent separately to the linker.
There is a fourth type of compiler: the scripting compiler, but discussion of
that compiler is deferred to the scripting guide. For more information on
scripting compilers, please refer to Scripting Your InDesign Plug-in
(described in References).
124
4.3. The Anatomy of a Plug-in
Plug-ins
figure 4.3.2.3.a. the basic file types in a plug-in.
Plug-in ID Definitions File
C/C++ Source Files:
(*.h, *.cpp)
Implementations of:
Plug-ins
Interfaces
Native Resource
Files:
(*.r, *.rc, *.ico)
Definitions of:
AETE
Icons
Framework
Resource Files:
(*.fh, *.fr)
Definitions of:
Panels,
Strings
Dialogs,
Menus,
Bosses
InDesign
API Headers
C++ Compiler
InDesign
API Libraries
Native Resource
Compiler
Framework
Resource Compiler
(ODFRC)
Concat Res
(Win only)
Linker
Plug-in
Three compilers just to make a plug-in seems complex, but it maximizes the
amount of code that can be shared across platforms. The ODFRC compiler
allows plug-in developers to use platform-independent definitions for things
like menus and dialogs.
Adobe InDesign Programming Guide
4.3. The Anatomy of a Plug-in
125
4.3.3. Detailed Plug-in Anatomy
The previous section generally described the types of files in a plug-in and
provided an overview of how they are compiled. But what’s really in those files,
and why? This section examines the contents of each file.
4.3.3.1. ID Space - BscMnuID.h
Open BscMnuID.h now. It defines the IDs needed for a plug-in, its bosses,
interfaces and implementations. The application uses these IDs to organize and
manage objects. Later, we describe how they are cataloged by InDesign during
initialization.
The IDs are all keyed from the globally-unique prefix, here kBscMnuPrefix.
The value of this prefix is assigned by Adobe and defines a unique ID space for
each developer. You must ensure that each ID you allocate based on this prefix
is within your assigned ID space. You are free to define 256 globally-unique IDs
per prefix.
Notice that IDs of different types belong to different ID sub-spaces and may
share the same values. For example, kBscMnuPluginID,
kBscMnuActionComponentBoss, kBscMnuActionComponentImpl,
kBscMnuAboutActionID, and kBscMnuPanelWidgetID all resolve to the same
numerical value (0x57200), but since these IDs are never used together they
won’t conflict.
The ID definition file BscMnuID.h defines the prefix kBscMnuPrefix as a base
for the other ID numbers used in the plug-in. The file also defines:
• The plug-in name.
• The plug-in ID
• The boss, interface, widget, service, and implementation IDs
• It could also define some constants.
This file is used by all three groups of files: C++ source, native resources, and
framework resources. Next, you’ll see how these constants and IDs are used.
4.3.3.2. Bosses and Other Resource Definitions - BscMnu.fr
Open BscMnu.fr now. This file contains boss classes and the non-localized
definitions for other resources. Notice that the statements are enclosed in a
conditional compilation block indicating they are only meaningful to ODFRC.
126
4.3. The Anatomy of a Plug-in
Plug-ins
4.3.3.2.1. Plug-in Version Definition
The PluginVersion statement defines the plug-in identity and the version of the
application with which it is compatible. The parts of this definition are
described below:
• The plug-in identification number, defined in BscMnuID.h.
• The version of the plug-in, defined in SDKDef.h. The first number is the
major version of the plug-in and the second is the minor version, in the case
of dot releases.
• The version of InDesign that the plug-in expects to run against, defined in
SDKDef.h. The first of these two numbers is the InDesign major version
number and the second is the InDesign minor version number.
• The persistent data format version for the plug-in. These format numbers
get stored in databases (documents and defaults). The application
determines the need for conversion by comparing the format numbers
stored in a database for each plug-in to the format numbers declared by
currently loaded plug-ins. If you change the persistent data format version
and don't provide a converter you won't be able to open documents
containing a different format. SDKDef.h provides some default values for
these but if you store data persistently it is recommended that you change
these to suit..
• The last entry (kWildFS) specifies that settings apply to all feature sets.
4.3.3.2.2. Boss Class Definition
Examine the ClassDescriptionTable. A plug-in provides functionality through
its boss classes and their aggregated interfaces. BasicMenu implements the
following boss classes: kBscMnuActionComponentBoss,
kBscMnuStringRegisterBoss, kBscMnuMenuRegisterBoss,
kBscMnuActionRegisterBoss.
The ClassDescriptionTable statement defines each boss class provided by the
plug-in. The parts of any boss class definition are contained within a Class
statement and are described below:
• Globally-unique boss ClassID the application uses to refer to the boss.
• The globally-unique parent boss ClassID (or kInvalidClass if no parent).
• Pairs of aggregated InterfaceIDs with each’s ImplementationID. The block
contains a list of the interfaces that provide functionality to a boss. The ID
pair maps an interface onto an implementation.
Adobe InDesign Programming Guide
4.3. The Anatomy of a Plug-in
127
4.3.3.2.3. Implementation Definition
The FactoryList statement #includes the plug-in’s FactoryList.h, which contains
macros that allow the application’s object model to create and destroy instances
of the implementation through factory classes.
4.3.3.2.4. Menu Definition
The MenuDef statement defines the characteristics of each menu item. See
comments in the first definition for a description of the elements.
4.3.3.2.5. Action Definition
The ActionDef statement defines the action characteristics of each menu item.
See comments in the first definition for a description of the elements.
4.3.3.2.6. String LocaleIndex
The LocaleIndex statement describes string localizations for various feature sets
and languages.
4.3.3.3. Implementations - BscMnuActionComponent.cpp
Open BscMnuActionComponent.cpp now. It is here in the implementations
section that functionality is finally applied to resources such as the boss classes.
This file contains the C++ code that implements the action that happens when
the when the plug-in’s menu is used. This section examines the relationship
between IDs, abstract classes, and resources. IDs of current discussion are bold.
IActionComponent
CActionComponent
BscMnuActionComponent
In BscMnuActionComponent.cpp, we connect an implementation to an
ImplementationID defined in BscMnuID.h:
CREATE_PMINTERFACE(BscMnuActionComponent, kBscMnuActionComponentImpl)
...and in the Constructor, we derive our class from an application-supplied
concrete class.
BscMnuActionComponent::BscMnuActionComponent(IPMUnknown* boss)
: CActionComponent(boss)
...which had provided an implementation for an abstract base class
class PUBLIC_DECL CActionComponent : public IActionComponent
In BscMnu.fr, we connect IActionComponent to kBscMnuActionComponentImpl
in resource form:
Class
128
4.3. The Anatomy of a Plug-in
Plug-ins
{
kBscMnuActionComponentBoss,
kInvalidClass,
{
IID_IACTIONCOMPONENT, kBscMnuActionComponentImpl,
IID_IPMPERSIST, kPMPersistImpl,
}
},
4.3.3.3.1. CPMUnknown
Open CstPrf.cpp in the CustomPrefs sample plug-in in the InDesign SDK now
and look at the constructor declaration and implementation. CPMUnknown is a
base class template to replace the DEFINE_HELPER_METHODS macro and is the
preferred implementation to add the objects and QueryInterface(), AddRef(),
and Release() methods needed to initialize and use an interface.
Open CPMUnknown.h now to view its methods.
4.3.3.3.2. Macros
Open WaveTrackerRegister.cpp in the WaveTool sample plug-in in the
InDesign SDK now. Although CPMUnknown is the preferred implementation to
add the objects and methods needed to initialize and use an interface, you can
use the following macros:
• The macro DECLARE_HELPER_METHODS() adds declarations to an interface.
• DEFINE_HELPER_METHODS() adds the implementations of the methods
declared by the DECLARE_HELPER_METHODS() macro.
• The constructor definition uses HELPER_METHODS_INIT(), which initializes
a member variable for this interface.
• CREATE_PMINTERFACE() creates an association between the implementation
class and its ImplementationID. This association allows InDesign to use the
right construct and destruct functions for this interface.
• Look at HelperInterface.h now. HelperInterface makes it easier to define
the functions from IPMUnknown that are required for every interface. The
HelperInterface class implements QueryInterface(), AddRef(), and
Release(). HelperInterface is designed to be included in the
implementation class of an interface as a member variable -- it defines a set
of macros that allow a mapping from the QueryInterface(), AddRef(), and
Release() in the implementation class to the ones in HelperInterface.
Adobe InDesign Programming Guide
4.3. The Anatomy of a Plug-in
129
4.3.3.4. Preventing Dead-Stripping - BscMnuNoStrip.cpp
Open BscMnuNoStrip.cpp now. This file prevents the C++ compiler
optimizations from “dead stripping” -- removing what appears to the compiler
as unreferenced code. BscMnuNoStrip.cpp is created with a dummy function
DontDeadStrip() that includes BscMnuFactoryList.h. This header file contains
REGISTER_PMINTERFACE macros that allow the object model to create and
destroy instances of the implementations through factory classes.
4.3.3.5. GetPlugIn - SDKPlugInEntrypoint.cpp
Open SDKPlugInEntrypoint.cpp now. By convention, a plug-in for InDesign
must provide an exported function named GetPlugIn(), and it must be an
implementation of the C++ class IPlugIn.
GetPlugIn() is the initial entry point from the application into the plug-in. The
application calls this function when the plug-in is registered or loaded into
memory. The GetPlugIn() function should not be confused with the Main()
function in a C or C++ program. All calls into plug-in code do not pass through
GetPlugIn(). Once these implementation classes are installed, they are
instantiated and called directly via the object model when needed.
The API class PlugIn provides the default implementation of IPlugIn. You can
specialize PlugIn to change the behaviour of your plug-in when loading or
unloading. Note: if you set conditions under which your plug-in should not
load, then you will need to make sure your menus and panels do not load
either.
For a demonstration of providing your own implementation of PlugIn, see
CPScrPlugInEntrypoint.cpp in the CustomPrefsScript sample plug-in in the
InDesign SDK.
4.3.3.6. BasicMenu Plug-in: A Summary
The BasicMenu plug-in illustrates the necessities of any plug-in:
• Defines IDs for the plug-in and how they are associated with the
implementations.
• Defines plug-in and boss resources.
• Declares interfaces.
• Defines interface implementations.
130
4.4. The Life-Cycle of a Plug-in
•
•
•
Plug-ins
Derives from a base class to include interface boilerplate objects and
methods. Note: otherwise, CPMUnknown or helper macros would have
been required.
Contains macro to prevent dead-stripping by the linker.
Defines plug-in object itself.
We now discuss the life-cycle of a plug-in and the development environment
required to compile the files into a plug-in.
4.4. The Life-Cycle of a Plug-in
The first subsection describes the stages of starting-up InDesign: the process of
finding, registering, and loading plug-ins. The second subsection describes the
details of what happens when a boss inside a plug-in is instantiated.
4.4.1. InDesign Startup Sequence
Note: Observe the stages on the application’s splash screen during start-up.
• InDesign registers all plug-ins when it starts for the first time and again
when you add, remove, or modify plug-ins. During registration, the bosses
in the plug-in and the interfaces they aggregate are registered in the object
model and resource data describing elements such as menus are saved.
Subsequent start-ups skip this registration step and the application is
initialized from the saved state. If you remove and re-add plug-ins, the
application will re-register them.
• Plug-ins are loaded through a call to GetPlugIn().
• The Service Registry is started and start-up services such as trackers,
menus, tools, panels, etc. are registered and instantiated.
4.4.2. The Sequence of Instantiation in InDesign
Imagine you wanted to call a method from within InDesign code. Before the
application can call a method on a boss interface, its implementation class must
be instantiated. Below is hypothetical code to instantiate and call the method.
void MyFun()
{
IPMUnknown *boss = CreateObject(kFooBoss);
IFoo *foo = static_cast<IFoo*>(boss->QueryInterface(IID_IFOO));
foo->Bar();
foo->Release();
boss->Release();
}
Adobe InDesign Programming Guide
4.4. The Life-Cycle of a Plug-in
131
The code above creates a Foo boss object, acquires an IFoo interface, calls a
method of IFoo called Bar(), and releases the interfaces it holds. This code is
shown as a sequence diagram below and illustrates how InDesign loads the
plug-in, queries for the Foo interface, calls the Foo::Bar() method, and then
cleans up. In particular, the diagram shows the details of how C++’s new and
delete operators are called by the object model to instantiate the
implementation class for the interface.
132
4.4. The Life-Cycle of a Plug-in
figure 4.4.2.a. foo plug-in and boss lifecycle sequence diagram
Plug-ins
Adobe InDesign Programming Guide
4.5. The InDesign Plug-in Development Environment
133
The load stage is triggered by a request to create a kFooBoss object. InDesign
calls the GetPlugIn() method for the Foo plug-in. InDesign then calls the
PlugIn::LoadFactories() method which in turn calls the InstallInterfaces()
method of the IntefaceFactory object that has been created for the Foo class.
The InstallInterfaces() method installs the class factories for Foo in the
InDesign object model using the AddInterfaceFactory() method of
IObjectModel. Once this installation is complete, the Foo plug-in is loaded, and
a kFooBoss object is instantiated by the InDesign object model.
Once the boss has been created, the code fragment queries for the IFoo
interface, causing the object model to create a Foo class object on the boss using
the Foo class factories registered with the object model. Now that the Foo
interface has been created, the Foo::Bar() method is called and then the
Foo::Release method is called.
Once the Foo interface is released, the boss can also be released. If the reference
count for the Foo interface is zero, then the object model destroys Foo using the
method registered for the Foo class. When the boss has no more interfaces, then
it too is destroyed.
The last step is to unload the plug-in. First the Unload() method for the plug-in
is called, then the plug-in itself is unloaded by InDesign.
4.5. The InDesign Plug-in Development Environment
Now that we have examined how plug-ins are constructed and how InDesign
manages them, it’s time to look more closely at the details of setting up a
project and then compiling and linking a plug-in on a specific platform.
As a starting point, the specifications for the integrated development
environment on each platform will be described, including how to set-up the
ODFRC compiler. Sample projects and wizards will also be discussed.
4.5.1. ODFRC: The Framework Resource Compiler
User interface elements such as menus, palettes, panels, dialogs and string
translation tables are defined in a platform independent form: the ODFRez
(.fr) format.
Adobe supplies a compiler called ODFRC as part of the SDK that compiles
framework files. ODFRC stands for OpenDoc Framework Resource Compiler.
134
4.6. Code Re-Use
Plug-ins
ODFRC generates platform specific resources (Windows or Macintosh) from a
platform independent *.fr file. The compiled resources are then built into the
plug-in.
The Adobe ODFRC is supplied in the Adobe InDesign SDK/Tools/ directory.
There you will find another important tool, ConcatRes (Windows platform
only). This second tool is used for concatenating the output of the resource
compilers before linking with the compiled C++ code.
4.5.2. Plug-in Development on the Windows and Macintosh Platforms
This section describes how to set up and create an InDesign plug-in project on
a Windows and Macintosh platforms. The following topics are covered:
• The specifications for the development environment.
• Installing software tools particular to InDesign plug-in development.
• Using the Dolly plug-in project wizard to create an InDesign plug-in.
The descriptions in this section assume that you are familiar with the VC++
and CodeWarrior environments. Sources for further information on each
development environment are available in References below.
4.5.2.1. IDE and Platform Specifications
InDesign plug-ins use Microsoft Visual C++ for the PC and Metrowerks
CodeWarrior for the Macintosh. For specific details on the recommended
platforms and development environments, see “Development Environments”
in the Readme.txt for the SDK you are using.
4.5.2.2. Dolly Wizard for Creating Plug-in Projects
The easiest way to create a new plug-in project is to use the Dolly wizard. The
Adobe InDesign SDK includes the Dolly wizard to automatically generate your
plug-in. For full instructions on the use of this wizard and any platformspecific operations, see “Dolly User Manual” in this SDK.
4.6. Code Re-Use
This section discusses specific opportunities for sharing and reusing code.
4.6.1. Default Implementations
The application provides many default implementations that can be re-used
directly in your plug-ins without writing any C++. See the InterfaceList.txt
document in Adobe InDesign SDK/Documentation/ for descriptions of the
Adobe InDesign Programming Guide
4.6. Code Re-Use
135
default implementation classes. Look at BscMnu.fr now to help understand the
discussion below.
To use a default implementation, simply reference the default implementation
by its ImplementationID in the boss definition. For example, in
kBscMnuActionComponentBoss, notice that kPMPersistImpl provides the
default implementation for IPMPersist interface. Notice also that this example
plug-in provides the implementation for IActionComponent interface, as
discussed below.
4.6.2. InDesign Implementation Classes
InDesign implementation classes (Adobe InDesign SDK/API/
Implementation/ directory) provide the bulk of the C++ implementation for
an interface. To use these you write some C++ to subclass and specialize a few
methods to complete the implementation. Some prominent examples are:
• BscMnuActionComponent inherits from CActionComponent, which
implements interface IActionComponent. By specializing some of the
methods, you quickly provide a complete implementation for a new menu.
• Similarly, Command.h/.cpp implements interface ICommand. By inheriting
from this implementationa and specializing some methods, you quickly
provide a complete implementation for a new command.
4.6.3. Boss Inheritance
Look at BscDlg.fr now in the BasicDialog example plug-in in the InDesign SDK
to help understand the discussion below.
In the Class resource statement for kBscDlgDialogBoss, notice that a boss may
subclass another boss -- in this case kDialogBoss. This allows you to define an
inheritance hierarchy in your boss definition rather than in your C++
implementation code. When a boss defines an interface it also inherits the local
definition, overriding the parent’s. This mechanism is used extensively by the
user interface code.
The bulk of the behavior of the drop down list is provided by kDialogBoss. To
specialize the behavior, this example overrides the interfaces with its own
implementation classes. See BscDlgDialogController.cpp and
BscDlgDialogObserver.cpp to see how this was done.
136
4.7. Summary
Plug-ins
4.6.4. Adding Interfaces to Existing Bosses
Look at FrmLbl.fr now in the FrameLabel example plug-in in the InDesign
SDK to help understand the discussion below.
In the AddIn resource statement for kDrawablePageItemBoss, notice that you
can extend this existing boss by adding a IFrmLabelData interface to those it
already aggregates. This mechanism allows a developer to add new code to
existing objects in the object model.
4.6.5. PluginDependency Resource Statement
Look at HidTxtEd.fr now in the HiddenTextEditor example plug-in in the
InDesign SDK to help understand the discussion below.
In the PluginDependency statement, notice that this plug-in declares that it is
dependent on the HiddenText plug-in. If the HiddenText plug-in is not loaded,
then HiddenTextEditor plug-in would not be loaded either.
4.7. Summary
This chapter described the anatomy of plug-ins, how InDesign uses them, and
the development environments for building them. Although nearly all plug-ins
are more complicated than the BasicMenu example, they’re still composed of
the same types of files, treated the same way by InDesign, and are built using
the same development environment.
You’ve seen the basic architecture and components of an InDesign plug-in,
their file types, and what compilers are needed to build them. The interaction
between InDesign and a plug-in was also presented in the form the plug-in life
cycle -- the messages on the InDesign splash page will have new significance in
terms of the plug-in life-cycle.
Given the foundation presented in this chapter, you are now ready to look at a
plug-in that does more.
4.8. Review
You should be able to answer the following questions.
1. What are the three general groups of source files that comprise a plug-in?
2. True or False: The easiest way to create a new plug-in project is to use the
Dolly wizard.
Adobe InDesign Programming Guide
4.9. Exercises
137
3. Name the four macros used in declaring and defining implementations in
InDesign plug-ins.
4. True or False: Plug-in registration occurs every time registration starts.
5. Name three common resource keywords used in a *.fr resource file (Can
you name a fourth?)
4.9. Exercises
4.9.1. Create a Project
Create a project by following the Dolly User Manual.
4.9.2. Look at BasicDialog
Preview the BasicDialog example plug-in. It’s similar to the BasicMenu plug-in
presented in this chapter. Can you identify the components?
4.10. References
•
•
•
•
•
•
Adobe InDesign SDK. InDesign Plug-In Cookbook, 2002.
Adobe InDesign SDK. Dolly User Manual, 2002.
Ivor, Horton. Beginning Visual C++ 5. 1999: WROX Press Ltd. Good
introduction to the Microsoft Visual C++ development environment. http:/
/www.microsoft.com.
Metrowerks, et al. Inside CodeWarrior. 1999: Metrowerks Corporation.
Introduction to the Metrowerks CodeWarrior programming environment.
http://www.metrowerks.com.
Apple, et al. Develop Magazine. 1980-1999: Apple Corporation. Details
about all Apple internals. http://www.apple.com.
Adobe InDesign SDK. Adobe InDesign Scripting Guide, 1999. See
InDesignScriptingGuide.pdf on your installation disk.
138
4.10. References
Plug-ins
5.
Commands
5.0. Overview
In this chapter, you will learn what commands are, how commands fit into the
application architecture, how to find and use the commands provided by the
application, and how to implement new commands of your own. This lesson
continues to build on what you have learned in previous chapters.
5.1. Chapter Goals
The questions this chapter answers are:
1. How do commands fit into the application architecture?
2. What are commands?
3. What commands are provided for me to use?
4. How do I call an existing command?
5. How do I pass parameters in/out of commands?
6. What is a command sequence?
7. How do I create and use command sequences?
8. How do I design and write new commands of my own?
5.2. Chapter-at-a-Glance
“5.3.How Commands Fit into the Application Architecture” on page 140
reviews portions of the application architecture and shows where commands fit
in that architecture.
table 5.1.a. version history
Rev
Date
Author
Notes
3.1
11/27/2002
Ken Sadahiro
Incorporated review comments from Paul Norton.
3.0
09/29/2002
Ken Sadahiro
Revised content for InDesign 2.0 SDK. First review.
2.0
4/15/99
Rodney Cook
Second draft.
1.0
3/17/99
Rodney Cook
First draft.
139
140
5.3. How Commands Fit into the Application Architecture
Commands
“5.4.Where to Find Command Reference Documentation” on page 151
describes how to use the command reference documentation contained in the
SDK.
“5.5.When to Use a Command as a client” on page 152 describes when to use
the commands provided by the application.
“5.6.How to Use a Command as a Client” on page 152 describes how to use a
command as a client. arguments to and from commands.
“5.7.How to Use a Command Sequence” on page 156 describes how commands
can be combined into a single undoable step.
“5.8.Protecting Documents Against Corruption” on page 158 describes tools
for error handling in your code.
“5.9.Setting a Command Target” on page 158 describes the operation of the
Command Processor and command managers.
“5.10.How to Implement a Custom Command” on page 161 describes how to
implement your own command.
“5.11.How to Design Commands” on page 166 describes important
consideration in designing a command.
“5.12.Summary” on page 171 recaps the material presented in this chapter.
“5.13.Review” on page 171 provides some questions and answers so you can
review what you learned.
“5.14.Exercises” on page 171 provides suggestions for other areas to explore
related to these topics.
“5.15.References” on page 171 provides sources for additional information
related to the topics of this chapter.
5.3. How Commands Fit into the Application Architecture
This topic reviews portions of the application architecture covered in previous
chapters and shows where commands fit in this architecture.
Adobe InDesign Programming Guide
5.3. How Commands Fit into the Application Architecture
141
5.3.1. Review of the Model-View-Controller (MVC)
As described in chapter 3, the MVC design pattern is based upon the concept
that there be a clear separation of internal and external object representations
within an application.
• The internal representation is the model.
• The external representation is the view.
• Any source manipulating the model is a controller.
5.3.1.1. Model
The model is the internal representation of objects within the application. The
actual form this takes is of little consequence to external elements. Users of the
model do not need to understand how a square is represented. Within the
application, the term “subject” is used to indicate an object whose state is of
interest to other objects.
5.3.1.2. View
The view describes the projection of the model from the application domain
onto the user domain. This view can be a graphical representation of the object,
or it could be in the form of meta-information. As you would expect, multiple
views of a model can co-exist. Views within the application are extended to
include the notion of any object interested in the state of another. As such,
objects interested in the state of other objects are termed “observers”.
5.3.1.3. Controller
Manipulation of the model can be performed by controllers. These perform
operations on the model, the model publishes its new state and any views of the
model are updated to reflect this new state. The views are made aware of the
new state by notification. A model can be manipulated by multiple controllers
within the application.
5.3.2. How Application Requirements Affect Implementation of
MVC
The application is not implemented in terms of the pure MVC model because
of the following application requirements:
• Control of notification granularity - the number of times observers are
updated should be controllable to prevent many lightweight changes
causing a flurry of observer updates.
• Undoability - changes to the model should be undoable.
142
5.3. How Commands Fit into the Application Architecture
•
Commands
Atomicity - if one step in a complicated sequence of operations fails, it is
essential that all preceding steps are rewound and the operation as a whole
is aborted.
5.3.2.1. Control of Notification Granularity
With traditional MVC, manipulation of the model is immediately reflected in
any corresponding view. If many fine-grained manipulations are applied to the
model, it may be cumbersome to propagate each to the observers.
In the application, a change in a model can be propagated through to an
observer which itself is the subject of other observers. It is wholly undesirable to
propagate every change of the model to the observers because it could cause a
cascade of model updates throughout the application. Conversely, not every
observer is interested in all updates to the model.
The application requires a mechanism to indicate when it wants a model to
publish its new state (that is, to control the update of the observers).
5.3.2.2. Undoability
All actions manipulating the model should also have the ability to revert the
model to its previous state. This adds a timing element to the application
architecture; the model-state history becomes important.
The application requires the information necessary to revert the model to a
previous state be maintained.
5.3.2.3. Atomicity
In order for the consistent global state of the application to be maintained, a
mechanism is required to ensure any operation affecting multiple models is
atomic. For example, imagine moving an object from one spread to another
(this is necessarily a multi-step process).
The application requires that if one step in the operation fails, all preceding
steps are rewound and the operation as a whole is aborted. The analogy with a
transactional model is obvious.
Adobe InDesign Programming Guide
5.3. How Commands Fit into the Application Architecture
143
5.3.3. How Commands Meet the Application’s MVC Requirements
The requirements introduced above are implemented using commands. The
command architecture is responsible for encapsulating compound
modifications to the model(s), supporting the undo/redo protocol, and
indicating to the model when it should republish its state to the observers.
5.3.3.1. Commands Support for Undoability
As well as encapsulating a series of manipulations on the model, commands
also encapsulate the changes required to revert the model back to its previous
state. They are responsible for maintaining the information required to do this.
The application supports course-grained undoability by providing a history of
the most recent commands executed.
5.3.3.2. Commands Support for Notification
Because commands provide the mechanism to encapsulate multiple
manipulations of the model, it is essential they also determine when the
changes to the model propagate through to the views. When a command
wishes to do this, the command’s DoNotify() method invokes the Change()
method on the model’s ISubject interface. (Note that all models wishing to be
observed must support this interface.)
5.3.3.3. Model Support for Notification
After the model is informed of a Change() by the command, the model is
responsible for notifying its observers, if any. Objects interested in a model
register their interest using the AttachObserver() method on the ISubject
interface of the model. This allows a list of dependencies between models and
observers to be maintained (along with the particular interests of the
observers).
When a command indicates a model has changed, the model propagates this
change to observers by invoking the Update() method of the IObserver
interface. (Note that all observers must support this interface.)
5.3.4. The Application Architecture
The figure below (figure 5.3.4.a.) shows the relationship between views,
models, controllers and commands. Both the controller and view can see the
model. A controller can have a view of the model it is manipulating (indicated
144
5.3. How Commands Fit into the Application Architecture
Commands
by the line between controller and view). Commands are particular to
controllers, and are used by controllers to manipulate the state of the model.
figure 5.3.4.a. relationship between view, model, controller and commands.
The figure below (figure 5.3.4.b.) shows the series of activities that might occur
between the different components of the application:
1. A view registers interest in a model, by calling the AttachObserver()
method of the ISubject interface of the model.
2. A view can directly see the model (through an interface provided by the
model).
3. A controller can manipulate the model using commands, gaining all the
advantages given above.
4. The controller (using a command) explicitly informs the model its state has
been updated (through the Change() method of the model’s ISubject
interface).
5. The model informs interested views that its state has changed (through
their Update() method on the IObserver interface).
Adobe InDesign Programming Guide
5.3. How Commands Fit into the Application Architecture
145
figure 5.3.4.b. system events
5.3.5. The Architecture in Action
Lets take a look at an example of how the architecture works in practice.
figure 5.3.5.a. below shows the model for a layer (the document layer boss). The
model exposes its values through an interface - in this case IDocumentLayer. In
order to be observed by other parts of the application, the model must become
a subject. To do this, it provides an implementation for interface ISubject.
146
5.3. How Commands Fit into the Application Architecture
Commands
figure 5.3.5.a. a model
D ocu m en tL ayerB oss
ID ocum entLayer
ISubject
class IDocumentLayer : public IPMUnknown
{
public:
virtual void GetName(PMString * pName) = 0 ;
virtual const PMString& GetName() = 0 ;
virtual void SetName(const PMString& newName) = 0 ;
//...other methods...
virtual bool16 IsLocked()
= 0;
virtual void SetLocked(bool16 visible) = 0 ;
};
The figure below (figure 5.3.5.b.) shows a view onto the model, which is the
layer panel view. The view can read values from a suitable interface (in this case,
IDocumentLayer). Rather than the view interrogating the model, it is more
desirable for the model to inform the view when it changes (that is, rather than
the view polling the model synchronously to detect a change, the model
asynchronously informs the view when a change occurs). In order for this to
work, the view must become an observer. To do this, it provides an
implementation for the interface IObserver.
The observer (in this case, the layer panel pencil boss) registers its interest with
the subject (through the ISubject interface), as shown in figure 5.3.5.b.
(NOTE: The actual architecture for detecting changes to the lock state of the
layer involves an intermediate observer that invalidates the view, however, the
architecture has been simplified for illustrative purposes.)
It is entirely possible to have more than one observer of a model. In fact, the
overall layer panel shown has a number of observers all watching document
layers; though for simplicity, these are not shown here.
Adobe InDesign Programming Guide
5.3. How Commands Fit into the Application Architecture
147
figure 5.3.5.b. request for notification
LayerPanelPencilBoss
IBoolData
IObserver
DocumentLayerBoss
IDocumentLayer
ISubject
AttachObserver()
The figure below (figure 5.3.5.c.) shows another view onto the model - the layer
options dialog (for simplicity, the boss implementing the dialog is left out).
This modal dialog is being used to lock the layer. On clicking the OK button,
the dialog uses a command to update the model (commands are implemented
as bosses as well -- in this case, the LockLayerCmdBoss). The modification can
occur through any interface supported by the model. In this example, the
interface used by the command to modify the model is IDocumentLayer.
148
5.3. How Commands Fit into the Application Architecture
Commands
figure 5.3.5.c. modification of model
LockLayerCmdBoss
Do()
ICommand
IBoolData
DocumentLayerBoss
IDocumentLayer
ISubject
SetLocked(kTrue)
Finally, as shown in figure 5.3.5.d., the notification process is performed, the
command boss indicates to the model its state changed using the ISubject
interface, and the model propagates this signal through to the observers using
their IObserver interface.
Adobe InDesign Programming Guide
5.3. How Commands Fit into the Application Architecture
149
figure 5.3.5.d. notification
DoNotify()
LockLayerCmdBoss
LayerPanelPencilBoss
ICommand
IBoolData
IBoolData
IObserver
DocumentLayerBoss
IDocumentLayer
Update()
ISubject
Change()
5.3.6. Interface Categories
To support undo, every modification of the model must occur within the scope
of an undoable command. Does this mean you have to use commands every
time you want to modify the model? Different rules and restrictions apply
dependent on where your interface lies within the application architecture.(See
“5.3.4.The Application Architecture” on page 143.)
The application provides many interfaces and these can be categorized as
belonging to:
• Model
• Commands
• View/controller
150
5.3. How Commands Fit into the Application Architecture
Commands
The model implements the interfaces making up the document and session
workspace (for example, IDocument, IDocumentLayer, IFrame, ISpread and
IBaselineGridPrefs).
Commands implement the interface ICommand and are the glue allowing the
view/controller to modify the model.
The view/controller implements the remaining interfaces (for example, panels,
menu components, keyboard actions, observers, import providers and script
providers). This category combines the manifestation of the model to the user
(the view) and any source manipulating the model (a controller).
To successfully implement your plug-in within the application architecture,
you must be aware that:
• New interfaces you implement must lie in one and only one of these
categories.
• If you wish to be a legitimate client of another interface you must know the
category it lies in.
• Different restrictions apply dependent on whether the interface method
you want to call simply reads values or causes modification.
The rules governing whether you may use an interface in another category are
tabulated in figure 5.3.6.a. below. To use the table, read along the row for your
category and look upwards to see what access is allowed.
figure 5.3.6.a. Interface Access Rules
Access
Category
Can Read
Can Modify
View/Controller
Can Use
Can Read
Commands
Can Modify
Model
View/Controller
yes
yes
yes
yes
no
Commands
yes
yes
yes
yes
yes
Model
no
no
no
yes
yes
You can see from figure 5.3.6.a.:
• Interfaces in the view/controller category must process commands to
modify the model (of course, they are free to call model interfaces that
simply read values).
Adobe InDesign Programming Guide
•
•
5.4. Where to Find Command Reference Documentation
151
Commands can call model interface methods that cause modification to
occur and/or can delegate their work to other commands (care must be
exercised when a command does both).
Interfaces in the model can only use other interfaces that are within the
model. They must not use commands or call any interfaces that use
commands.
5.3.7. Application Architecture Summary
This section presented key concepts in the application architecture:
• The implementation of MVC by the application is described.
• The role of commands and notification using subjects and observers is
explained.
• An example showing how these elements interact when a model is
manipulated by a command is reviewed.
• The rules governing access between different categories of interface in the
application architecture is outlined.
5.3.8. Application Architecture Review
After reading this section the reader should be able to contemplate the
following questions (and answer most).
1. Why does the application require atomicity?
2. What object supports the undoability protocol?
3. What are the differences between the application architecture and the MVC
architecture?
4. What are the two main interfaces used to implement the notification
mechanism within the application architecture?
5. Is it possible for a model (subject) to update a view (observer) without
being prompted by a command?
6. What are the implications of the above?
5.4. Where to Find Command Reference Documentation
The application provides a vast set of commands for you to use. These
commands offer building blocks from which you can create your plug-ins.
They manipulate model interfaces on your behalf, saving time and effort. You
should always check whether a command is available that performs the
function you are looking for before embarking on implementing new
commands of your own.
152
5.5. When to Use a Command as a client
Commands
You can use the following references in the InDesign SDK to look for references
on command bosses (commands generally take the boss name k***CmdBoss):
• InDesign Object Model references (InterfaceList.txt, IObjectModel*.txt/xls,
• Browsable HTML documentation) for a listing of commands available in
InDesign
• InterfaceListViewer (Macintosh only)
The InDesign Command Reference describes and provides sample code for each
command. See the description in “5.15.References” on page 171.
The browsable HTML documentation included with the InDesign SDK
describes the interfaces used by the commands. See the description in
“5.15.References” on page 171.
5.5. When to Use a Command as a client
Commands provide:
• A mechanism for encapsulating changes as a single transaction
• A powerful undo and redo mechanism
• Notification that changes have taken place
Therefore, you should use commands to make changes if any of the following
are true:
• Any item in the model (document or workspace) is to be changed in an
atomic manner.
• The user must be able to undo/redo the changes.
• There may be observers needing to be informed of the changes.
5.6. How to Use a Command as a Client
To use a command as a client, you must:
• Instantiate the command boss (with the command boss ID)
• Specify necessary input arguments
• Call the method the process the command
• Handle any errors
• If necessary, get output arguments
This general recipe is illustrated below:
figure 5.6.a. using a command
void MyPlugInClass::CreateAndProcessZoomToCmd
(IControlView *view,
Adobe InDesign Programming Guide
5.6. How to Use a Command as a Client
153
PMReal scaleFactor,
const PMPoint& centerPoint)
{
// Create the command with the command boss ID kZoomToCmdBoss
InterfacePtr<ICommand>
zoomCmd(CmdUtils::CreateCommand(kZoomToCmdBoss));
// Specify its input arguments (see InterfaceList.txt)
InterfacePtr<IZoomCmdData> zoomData(zoomCmd, IID_IZOOMCMDDATA);
zoomData->Set(view, scaleFactor, centerPoint);
// Process the command
ErrorCode err = CmdUtils::ProcessCommand(zoomCmd);
// Handle any errors
if (err !=kSuccess)
{
//your error handling code goes here...
}
}
5.6.1. Instantiate the Command Boss
Commands are implemented bosses that aggregate the ICommand interface (See
{SDK}/API/Interfaces/Architecture/ICommand.h). The first step in using a
command is to instantiate the command boss with the command boss ID. Use
the CmdUtils::CreateCommand() method to do this. Also, don’t forget to
include the API header file that declares the command boss ID.
5.6.1.1. About CmdUtils
The application provides a set of utility functions to manage commands,
CmdUtils. Most CmdUtils methods return an ErrorCode to indicate their status.
The functions you want to use to process a command are:
• CmdUtils::CreateCommand() creates the specified command boss.
• CmdUtils::ProcessCommand() passes the command to the command
processor for execution.
Below are other methods that will be discussed later in this chapter.
• CmdUtils::ScheduleCommand() passes the command to the command
processor for execution at a later time.
• CmdUtils::BeginCommandSequence() creates and starts a new sequence.
• CmdUtils::EndCommandSequence() commits, closes, and deletes your
sequence.
• CmdUtils::AbortCommandSequence() rolls back (undoes) all commands in
the sequence and deletes it.
154
5.6. How to Use a Command as a Client
•
•
Commands
defines a point you may want roll back to
later (there is no limit to the number of marks per sequence).
CmdUtils::RollBackCommandSequence() rolls back to a state you marked
using SetSequenceMark().Commands processed after the mark are undone
and released. The mark you set is deleted.
CmdUtils::SetSequenceMark()
5.6.2. Specify Input Arguments and Get Output Arguments
Arguments can be passed to and from commands in two ways:
• Using the ItemList methods on ICommand
• Using data interfaces on the command boss
ItemList is accessed using the ICommand methods SetItemList() and
GetItemList(). On input, you can call SetItemList() to specify the persistent
objects on which the command should operate. After a command has been
processed successfully, you can call GetItemList() to obtain output objects
acted on or newly created by the command. Objects in ItemList are passed
using their UID. (See the chapter titled "Persistence" for more information on
UIDs.)
Data interfaces can also be used to pass arguments into and out of the
command. They are implemented as additional interfaces on the command
boss. Just a few of the data interfaces provided by the application are tabulated
below. You can find the header files for these interfaces in {SDK}/API/
Interfaces/Architecture/. Alternatively, commands can implement new data
figure 5.6.2.a. data interfaces for basic types
Type
Interface
PMIID
ImplementationID
bool16
IBoolData
IID_IBOOLDATA
kBoolDataImpl
int32
IIntData
IID_IINTDATA
kIntDataImpl
PMReal
IRealNumberData
IID_IREALNUMBERDATA
kRealNumberDataImpl
PMString
IStringData
IID_ISTRINGDATA
kStringDataImpl
UID
IUIDData
IID_IUIDDATA
kUIDDataImpl
interfaces of their own. Refer to InterfaceList.txt for details on which command
aggregates what data interface.
Adobe InDesign Programming Guide
5.6. How to Use a Command as a Client
155
5.6.3. Process the Command
Once you have specified the necessary input arguments to the command, you
can use CmdUtils::ProcessCommand() to process the command.
On occasions where you don’t need to process the command immediately, or
don’t know how long the command will take to process but you need to
proceed, you can use CmdUtils::ScheduleCommand(). Refer to {SDK}/API/
Includes/CmdUtils.h for more information.
5.6.4. Handle Any Errors
The CmdUtils::ProcessCommand() method returns an ErrorCode value. Make
sure you check that the return value is kSuccess. If it is not kSuccess, you must
make sure to handle the error in an appropriate way.
If you called CmdUtils::ScheduleCommand(), the return code indicates whether
the command was successfully scheduled. Since you don’t know when exactly
the command will be called, you won’t be able to check the return status of the
command.
5.6.4.1. Provide Error Handling
In addition to checking the status returned by CmdUtils::ProcessCommand(),
the application maintains a global error state you can access using the methods
in ErrorUtils.h (in {SDK}/API/Includes/):
figure 5.6.4.1.a. data interfaces for basic types
static void PMSetGlobalErrorCode (ErrorCode errCode, bool16
isPlatform = kFalse, const PMString* errString = nil, IPMUnknown*
errInfo = nil, const PMString* contextInfo = nil);
static ErrorCode PMGetGlobalErrorCode();
If you encounter an error you have two choices:
• Tidy up and stop
• Deal with the error and continue
If you tidy up and stop, you should not clear the global error state before
returning to the code that called you. Your caller may deal with the error or, if it
does not, the application will bring up an alert.
156
5.7. How to Use a Command Sequence
Commands
If you deal with the error and continue, you should clear the global error state
before processing any more commands. If you continue to process commands
without clearing the global error state, you will get an assert, followed by a
protective shutdown. (See “Protecting Documents Against Corruption” on
page 158.) To deal with the error, you could notify the user with an alert, fix the
underlying problem, or retry your operation using a different strategy.
5.7. How to Use a Command Sequence
Command sequences combine several commands into a single undoable step.
They are similar to the concept of a transaction on a database; that is, a
command sequence represents a logical unit of work. A command sequence is
therefore a series of several commands transforming a consistent state of the
model into another consistent state (without necessarily preserving consistency
at all intermediate points).
Here are some features of command sequences. Command sequences:
• Are nestable.
• Can affect more than one document. To do this requires a knowledge of
targets (see “5.9.Setting a Command Target” on page 158).
• Assimilate any commands processed by observers. Note that this means if
notification triggers an observer to execute another command then this
command will be assimilated into the sequence.
5.7.1. Create and Carry Out a Command Sequence
To create and carry out a command sequence, you must:
• Begin the sequence using CmdUtils::BeginCommandSequence()
• Give the seqeunce a name
• Process multiple commands
• Handle errors
• If an error was returned, abort the sequence using
CmdUtils::AbortCommandSequence(), or end the sequence using
CmdUtils::EndCommandSequence().
This general recipe is illustrated below:
figure 5.7.1.a. Writing a Command Sequence
// Begin the sequence
ErrorCode err = kFailure;
Adobe InDesign Programming Guide
5.7. How to Use a Command Sequence
157
ICommandSequence* seq = nil;
do {
seq = CmdUtils::BeginCommandSequence();
if (seq == nil) break; //out of do-while loop
// Name the sequence
seq->SetName(PMString("My Command Sequence"));
// Execute first command
InterfacePtr<ICommand> foo(CmdUtils::CreateCommand(kFooCmdBoss);
err = CmdUtils::ProcessCommand(foo);
if (err != kSuccess) break; //out of do-while loop
// Execute next command
InterfacePtr<ICommand> bar(CmdUtils::CreateCommand(kBarCmdBoss);
err = CmdUtils::ProcessCommand(bar);
} while(false);
// End the sequence
if (seq != nil)
{
if (err == kSuccess)
CmdUtils:: EndCommandSequence(seq);
else
CmdUtils:: AbortCommandSequence(seq);
}
5.7.2. Handle Errors in a Command Sequence
If you encounter an error after processing a command within a command
sequence, call CmdUtils::AbortCommandSequence() rather than
CmdUtils::EndCommandSequence(). Commands processed before you
encountered the error will be undone.
5.7.3. Using SequenceContext
If you implement a method of a view/controller interface that processes
commands (or calls other methods that process commands), you should wrap
these commands in a command sequence.
A lightweight way to do this is to define a local CmdUtils::SequenceContext
object at the beginning of your method. If a command sequence already exists,
your commands will join it. Otherwise, SequenceContext begins a new
sequence for you and ends it when the local object goes out of scope.
SequenceContext does not give you the ability to abort or partly roll back the
command sequence. If you need this support, you should begin your own
command sequence.
158
5.8. Protecting Documents Against Corruption
Commands
5.8. Protecting Documents Against Corruption
Protective shutdown is a built-in safety feature protecting documents against
corruption. It exits the application without saving or closing any files when
unresolved or unhandled problems are detected. This is the safest way to
prevent document corruption and, since the application supports an
automated recovery process, the document will be re-opened when the
application is restarted with a minimal loss of work.
A protective shutdown will occur when:
• Client code continues to process commands in the face of an error
condition flagged by the global error state (See “Handle Any Errors” on
page 155.)
• Rollback fails
• Undo fails
• The application fails to allocate a vital resource while it is in a command or
a command sequence
Protective shutdown dumps out a status log that can be used to help trace the
cause of the shutdown. The file name for the log is “ProtectiveShutdownLog”
and it is stored in the application’s document recovery folder.
5.9. Setting a Command Target
The target of a command is important in the following situations inside your
command implementation:
• If you need to call unusual commands like CopyCmd that work on multiple
targets
• If you implement a command that needs to be directed at a specific target
To explain what a command target is, we must examine what the application
does when it processes a command. Figure 5.9.a on page 159 shows an internal
view of this:
3
End Transaction: the command manager ends the
transaction on the database
7
Push Command: the Command Manager pushes
the command onto the Undo Stack
Do Command: the Command Manager calls the
Do() method of the command
6
8
Start Transaction: the Command Manager starts
a transaction on the database
5
Execute Command: the Command Processor
passes the command to the target Command
Manager for execution
Find Command Manager: the Command
Processor determines the target
2
4
Process Command: client code passes the
command for processing
1
Cmd
2
3
Global
Command
Processor
Create Command: client code creates the
command
Client
Code
1
Cmd
4
Command
Manager
Command
Manager
Cmd
6
Command
Manager
Target
Cmd
8
7
5
SavedData
Database
Undo
Stack
Defaults
Database
Undo
Stack
Document
Database
Adobe InDesign Programming Guide
5.9. Setting a Command Target
figure 5.9.a. Processing a Command
159
160
5.9. Setting a Command Target
Commands
Each database shown in Figure 5.9.a on page 159 has a command manager.
The command manager handles transaction management and maintains an
undo stack. Now a command can change data in one database and one database
only. Note that this important restriction applies to all commands (it does not
apply to command sequences however). The command manager of this
database is called the target of the command.
The target is accessed using the ICommand::GetTarget() and
Command::SetUpTarget() and methods, which are shown below:
figure 5.9.b. ICommand::GetTarget() and Command::SetUpTarget()
// ICommand.h
typedef UIDRef Target;
virtual const Target& GetTarget() = 0;
// Command.h:
// Override this if your command has a target that is not known at
// construction time and that is not equivalent to the command
// manager of the database of the item list at the time of execution.
virtual void SetUpTarget();
As shown in Figure 5.9.a on page 159, the command processor must select the
command manager it passes the command to for execution. In order to do this,
it calls the command’s GetTarget() method. Default behavior for a command
(unless overridden) is for the GetTarget() Method to use SetUpTarget() to
establish the command's target. SetUpTarget() uses the itemlist’s IDataBase* to
establish the command's target.
Some typical signs of a command being directed at the wrong target are as
follows:
• An assert that says “Database change outside of a transaction”
• An assert that says "CmdBehaviorMonitor: Command kFooCmdBoss
changes data in a database other than its target database".
• Commands showing up in the wrong undo stack.
Note regarding changes from InDesign 1.x: Command Targetting changed in a
significant, but subtle way. All the SetTarget() methods in Command are still
there but aren't used the same way. All responsibility for setting the command
target has been effectively delgated to the command. SetTarget() is no longer
called by the application (you would need to do so explicitely in either
Adobe InDesign Programming Guide
5.10. How to Implement a Custom Command
161
or your command's constructor.) The application’s Command
Processor now just calls GetTarget() and marches on using the result -- so a nil
result from a command is now considered an error (one that will crash the
application, unfortunately.) The default implementation of GetTarget() calls
SetUpTarget() and the default implementation of SetUpTarget() sets the
command’s target to the database given in the itemlist. A good change, since it
reduces those situations where a command is targetted to one database, but
subtle in that it there were no significant changes to the API.
SetUpTarget()
5.10. How to Implement a Custom Command
The general recipe for implementing your own custom command is as follows:
• Define the command boss.
• Reuse or implement data interfaces.
• Implement the ICommand interface.
5.10.1. Define a Command Boss
5.10.1.1. Define a Command Boss with no Data Interfaces
You can define a minimal command boss with no data interfaces, as command
bosses are not required to have any data interfaces. This is shown below. In this
case, the only way to pass an argument into or out of such a command is using
the ItemList.
figure 5.10.1.1.a. Command Boss definition - no data interfaces
Class
{
kFooCmdBoss,
kInvalidClass,
{
IID_ ICOMMAND, kFooCmdImpl,
}
}
5.10.1.2. Define a Command Boss Using Existing Data Interfaces
You can define a command boss that uses a data interface. The example shown
below passes a boolean flag, which is a data interface with an implementation
provided by the application:
figure 5.10.1.2.a. Command Boss definition - standard data interfaces
Class
{
kFooCmdBoss,
162
5.10. How to Implement a Custom Command
Commands
kInvalidClass,
{
IID_ICOMMAND, kFooCmdImpl,
IID_IBOOLDATA, kBoolDataImpl,
}
}
5.10.1.3. Define a Command Boss Using Custom Data Interfaces
You can define a command boss with a custom data interface you defined. The
example below passes an IFooData object carrying the data you want into and
out of the command:
figure 5.10.1.3.a. command boss definition - custom data interface
Class
{
kFooCmdBoss,
kInvalidClass,
{
IID_ICOMMAND, kFooCmdImpl,
IID_IFOODATA, kFooDataImpl,
}
}
5.10.2. Reuse or Implement Data Interfaces
5.10.2.1. Reuse an Existing Data Interface
There are a number of data interfaces provided by the application. Some of
these are tabulated in Table 5.6.2.a on page 154. These generally have an
implementation you can reuse as well. The boss definition for this case was
illustrated in 5.10.1.2.
5.10.2.2. Implement a Custom Data Interface
Alternatively, you can implement your own custom data interface carrying the
data you want in and out of your command. The boss definition for this case
was illustrated in 5.10.1.3. To do this, you must define the interface and provide
an implementation for it as shown below for the hypothetical interface
IFooData:
figure 5.10.2.2.a. implementing a custom data interface
//Interface Definition
class IFooData : public IPMUnknown
{
Adobe InDesign Programming Guide
5.10. How to Implement a Custom Command
163
public:
virtual void Set(const PMReal& myReal, const PMPoint& myPoint) = 0;
virtual const PMReal& GetMyReal() const = 0;
virtual const PMPoint& GetMyPoint() const = 0;
};
//Implementation
class FooData : public CPMUnknown<IFooData>
{
public:
FooData(IPMUnknown *boss) : CPMUnknown<IFooData>(boss) {}
virtual ~FooData(void) {}
virtual const PMPoint& GetPMPoint() const
{ return fPoint; }
virtual void Set(const PMReal& myReal, const PMPoint& myPoint)
{ fMyReal = myReal; fMyPoint = myPoint; }
virtual const PMReal& GetMyReal() const
{ return fMyReal; }
virtual const PMPoint& GetMyPoint() const
{ return fMyPoint; }
private:
PMReal fMyReal;
PMPoint fMyPoint;
};
CREATE_PMINTERFACE(FooData, kFooDataImpl)
5.10.3. Implement ICommand
The majority of the implementation of the ICommand interface is provided for
you by the helper implementation class Command (See {SDK}/API/Includes/
Command.h). By specializing a few methods, you can implement a new
command. Sample code demonstrating how to do this is shown below for the
hypothetical command FooCmd:
figure 5.10.3.a. foocmd implementation
class FooCmd : public Command
{
public:
FooCmd(IPMUnknown *boss);
virtual ~FooCmd();
protected:
virtual PMString *CreateName();
virtual void Do();
virtual void Undo();
virtual void Redo();
virtual void DoNotify();
private:
164
5.10. How to Implement a Custom Command
Commands
ErrorCode VerifyArguments();
};
CREATE_PMINTERFACE(FooCmd, kFooCmdImpl)
5.10.3.1. Command Constructor
The constructor must call the constructor of the Command class. Also, if your
Command implementation contains any member variables that need to be
initialized, you can do that in this constructor.
figure 5.10.3.1.a. FooCmd::FooCmd() Constructor
FooCmd::FooCmd(IPMUnknown *boss) : Command(boss)
{
}
5.10.3.2. CreateName()
Every undoable command has a name is uses to identify the command to users.
A command provides a default name using the ICommand::CreateName()
method (Note that the name must have a translation in the string translation
database so it can be displayed to users in a localized form). Client code can
override this name with one of its own choosing by calling the
ICommand::SetName() method:
figure 5.10.3.2.a. FooCmd::CreateName()
PMString* FooCmd::CreateName()
{
PMString *str = new PMString("Foo");
return str;
}
5.10.3.3. Do()
Do() is called to execute the command. This is where you would put the heart
of your command’s implementation:
figure 5.10.3.3.a. FooCmd::Do()
void FooCmd::Do()
{
InterfacePtr<IFooData> fooData(this, IID_IFOODATA);
if(VerifyArguments(fooData) == kSuccess)
{
// Implement the Foo command action here...
}
Adobe InDesign Programming Guide
5.10. How to Implement a Custom Command
165
else
{
ErrorUtils::PMSetGlobalErrorCode(kInvalidFooDataErr);
}
}
5.10.3.4. Undo()/Redo()
Undo() is called to reverse the command. Redo() is called to reapply the
command:
figure 5.10.3.4.a. FooCmd:Undo()/Redo()
void FooCmd::Undo()
{
// Undo the Foo command
}
void FooCmd::Redo()
{
// Redo the Foo command
}
5.10.3.5. DoNotify()
DoNotify() is called after a successful call to Do(),
notification:
Undo() or Redo() to initiate
figure 5.10.3.5.a. FooCmd:DoNotify()
void FooCmd::DoNotify()
{
//Get the list of objects we’ve changed
const UIDList *items = this->GetItemList();
//Iterate over the list...
for (int32 i = (items->Length()-1); i >= 0; i--)
{
//...and call the change method on each ISubject interface...
InterfacePtr<ISubject> subject(items->GetRef(i), UseDefaultIID());
if (subject != nil)
{
//...this will cause observers to be notified of the change
subject->Change(kFooCmdBoss, IID_IFOO, this);
}
}
}
166
5.11. How to Design Commands
Commands
Some commands call DoNotify() themselves at the beginning of their Do(),
Undo(), or Redo() methods in order to pre-notify observers about changes
they are going to apply. You must not call DoNotify() in the middle of Do(),
Undo(), or Redo() because the observers may process commands as a result of
the notification.
Beware if you are implementing a specialized version of an existing command.
The parameters in the call to the ISubject::Change() method create a
dependency between the observer and notifier. For example, an observer
interested in the movement of page items may be looking for the ClassID of the
MoveRelativeCmd. If you implement your own specialized version of
MoveRelativeCmd, then you should be careful to use the ClassID of the original
(kMoveRelativeCmdBoss in this case) as the first parameter ClassID theChange
in the ISubject::Change() method, since this is the one existing observers will
be looking out for.
5.10.3.6. VerifyArguments()
To complete our implementation, we use a private method to check command
arguments:
figure 5.10.3.6.a. FooCmd::VerifyArguments
ErrorCode FooCmd::VerifyArguments(IFooData *fooData)
{
//Check arguments passed via ItemList or data interfaces here...
if( fooData == nil || fooData->GetMyReal() <=0)
return kFailure;
return kSuccess;
}
5.11. How to Design Commands
You now have an empty shell for a new command (see “5.10.How to
Implement a Custom Command” on page 161).
So, what shall you put in your Do() method?
You may want to do some document manipulation using existing commands.
You may wish to call existing model interfaces directly. Perhaps you need to do
both of these to achieve what you want. Or, you may be implementing
commands that manage a new model implemented by your own plug-in.
Adobe InDesign Programming Guide
5.11. How to Design Commands
167
To do these things successfully, you need to understand how to design
commands.
5.11.1. Define Undoability
There are four different types of undoability of interest:
•
•
•
•
kRegularUndo
kUndoNotRequired
kAutoUndoWithPrevious (or kAutoUndo)
kAutoUndoWithNext
The majority of commands are undoable (kRegularUndo), which is the default
behavior. A few commands are not undoable and have type kUndoNotRequired.
A few commands are auto-undoable and have type kAutoUndo,
kAutoUndoWithPrevious, or kAutoUndoWithNext.
If your command changes the model, it must be undoable. What does this mean?
Well, the model supports interface methods allowing modification to occur. If
one of these methods is called directly within the scope of your command, you
must make your command undoable.
The undoability is accessed using the ICommand methods shown below:
figure 5.11.1.a. ICommand::GetUndoability() and SetUndoability()
virtual Undoability GetUndoability() = 0;
virtual void SetUndoability(Undoability newUndoability) = 0;
If your command is not undoable, it should call
SetUndoability(kUndoNotRequired) in its constructor. Commands of this type
do not need to specialize the ICommand::Undo() and Redo() methods.
OpenFileCmd and SetActiveLayerCmd are examples of commands that are not
undoable. These commands do not change the model.
Note that the ICommand::GetUndoability() and SetUndoability() should only
be called from within the implementation of a command, not from a client.
5.11.2. Classifying Commands as Atomic, Macro, or Hybrid
Commands can be classified according to how they implement Do(),
and Redo() as:
• Atomic commands
• Macro commands
Undo(),
168
5.11. How to Design Commands
•
Commands
Hybrid commands
5.11.2.1. Atomic Commands
Atomic commands call model interface methods that cause modification to
occur. They store data about what they have changed and use this data in
Undo() and Redo() in order to reverse or to reapply these changes.
5.11.2.2. Macro Commands
Macro commands create and process commands (or call interfaces that do this)
to modify the model. They delegate their work completely to these commands.
Macro commands must have empty implementations of their Undo() and
Redo() methods. They are undoable but Undo() and Redo() are provided by the
underlying “sub-commands”.
5.11.2.3. Hybrid Commands
Hybrid commands do both direct modification and indirect modification, that
is, they:
• Call model interface methods that cause modification
• Create and process commands (or call interfaces that do this) to modify the
model
There are some important guidelines to follow in order to make hybrid
commands undoable:
1. In their Undo()/Redo() methods, hybrid commands should only reverse/
reapply the direct modifications they have made to the model (the
following rule is useful “You must not process a command in Undo() or in
Redo()”).
2. Beware of the order in which the direct modifications and indirect
modifications occur.
We can differentiate the order according to the following patterns:
• Type 1: PC-DM
• Type 2: DM-PC or PC-DM-PC
• Type 3: DM-PC-DM, PC-DM-PC-DM, or any other order with multiple
occurrences of DM (not supported by the application)
where:
• PC represents indirect modification of the model through the processing of
commands
• DM represents any sequence of direct modification of the model.
Adobe InDesign Programming Guide
5.11. How to Design Commands
169
A Type 1 Hybrid Command pattern is undoable and no further special action is
required.
A Type 2 Hybrid Command pattern requires you to do two things to make it
undoable:
1. Let the command processor know when you are done with your direct
changes. Do this by calling the ICommand::DirectChangesAreDone()
method immediately after you have done your direct changes and before
you process any command (or call a method that might process a
command). This ensures these subsequent commands will be pushed to the
undo stack after your command. If you fail to do so, you will get an assert
like “CmdBehaviorMonitor: FooCmd processes cmds after having done
changes to the model. Please call DirectChangesAreDone.”
2. Wrap the commands you process after your direct model modifications in a
command sequence so you have control over error handling.
Figure 5.11.2.3.a on page 169 shows how to implement this pattern:
figure 5.11.2.3.a. Type 2 Hybrid Command Code Sample
void FooCmd::Do()
{
// 1. process some commands
ErrorCode error = this->ProcessSubCmds1();
// 2. direct modification
if(error == kSuccess)
error = this->DoDirectModification();
/ / 3. let the command processor know that you are done with your direct
// changes so the following commands are pushed to the undo stack
// in the right order
if(error == kSuccess)
this->DirectChangesAreDone();
// 4. process more commands wrapped in a command sequence
if(error == kSuccess) {
ICommandSequence *cmdSeq = CmdUtils::BeginCommandSequence();
error = this->ProcessSubCmds2();
if(error == kSuccess)
CmdUtils::EndCommandSequence(cmdSeq);
else
CmdUtils::AbortCommandSequence(cmdSeq);
}
// 5. error handling
if(error != kSuccess && this->AreDirectChangesDone())
170
5.11. How to Design Commands
Commands
this->UndoDirectModification();
}
void FooCmd::Undo()
{
this->UndoDirectModification(); // reverse direct modification
}
void FooCmd::Redo()
{
this->RedoDirectModification(); // reapply direct modification
}
A Type 3 Hybrid Command pattern is not supported. It is very important that
the direct modifications done by the command (or any method called by the
command) occur as one uninterrupted block. If not, you will get an assert like
“CmdBehaviorMonitor: FooCmd’s direct changes to the model are intermitted
by commands (action: Delete UID)”. Basically, this assert indicates a source of
publication corruption. If one of your commands triggers this assert, follow
these strategies to make it undoable:
1. Try to rearrange the code so the direct modifications are bundled and the
command falls into one of the other patterns described above.
2. If this is not possible, you must either make the command into an atomic
command or create new commands encapsulating the direct modifications.
5.11.3. Command Destructors
The destructor of a command should normally be empty. If you do need one,
for instance, to delete variables allocated on the heap, then take care not to
change the model within the destructor. Changes to the model in the destructor
are not supported, and would represent changes outside a transaction. (This
would break the required atomicity of commands.)
5.11.4. Error Handling Inside Commands
If you are implementing the Do() method of a command and you encounter an
error, you must undo any direct modifications you have done to the model
before you return to your caller.
5.11.5. Rules for Implementing New Commands
Here are some rules you need to know:
Adobe InDesign Programming Guide
5.12. Summary
171
1. Commands that change the model must be undoable (see “5.11.1.Define
Undoability” on page 167).
2. A command can change data in only one database (see “5.9.Setting a
Command Target” on page 158).
3. Don’t process any commands in your Undo() and Redo() methods (see
“5.11.2.Classifying Commands as Atomic, Macro, or Hybrid” on page 167).
4. Don’t modify the model in your command’s destructor (see
“5.11.3.Command Destructors” on page 170).
5.12. Summary
This section gives you an introduction to commands and the command
documentation. It outlines general recipes for calling commands, command
sequences and implementing new commands. Finally, it describes the issues
you must consider when designing new commands.
5.13. Review
You should be able to answer these questions:
1. What is a command?
2. Describe the two mechanisms for passing arguments into and out of
commands?
3. What is the general recipe for calling a command?
4. What is the general recipe for writing a command sequence?
5. Which interface does every command boss implement?
6. What is the general recipe for implementing a new command?
7. What helper implementation class do you use to implement a new
command? Also, which methods would you have to specialize to complete
the implementation?
5.14. Exercises
1. Look up NewLayerCmd in the InDesign Command Reference or
InterfaceList.txt.
2. Write someclient code to process NewLayerCmd.
5.15. References
•
•
•
Buschmann. A System of Patterns, 1996.
Gamma, E., et.al. Design Patterns. 1995: Addison-Wesley. Elements of
reusable object-oriented software.
Adobe InDesign SDK. InDesign Command Reference, Revised 2002. See
{SDK}/Documentation/CommandReference.pdf (filename may be different).
172
5.15. References
•
Adobe InDesign SDK. Browsable HTML documentation.
Commands
6.
Persistence
6.0. Overview
This chapter looks at how persistence is implemented in the application and
how it can be used in plug-ins to store object data.
6.1. Goals
The questions this chapter answers are:
1. How does the application store its data?
2. How is an object made persistent?
3. How is a persistent object referenced?
4. What is a stream?
5. How do I create a new stream?
6.2. Chapter-at-a-glance
“6.3.Introduction to Persistence” on page 174 introduces the concept of
persistence in InDesign.
“6.4.Persistent Objects” on page 176 discusses how persistence object is created,
deleted, manipulated.
“6.5.Streams” on page 183 discusses how streams are used to move information
in and out of InDesign document..
table 6.2.a. version history
Rev
Date
2.0
23-Oct-02
0.1
2000
Author
Lee Huang
Notes
Update content for InDesgn 2.x API
First Draft
173
174
6.3. Introduction to Persistence
Persistence
“6.6.Missing Plug-ins” on page 186 details how to handle the situation when a
plug-in is missing while you try to open a document that contains data saved by
that plug-in.
“6.7.Data Conversion” on page 189 provides different approaches to convert
data in an old document so it can be opened in a newer version of InDesign.
“6.8.Summary” on page 207 recaps everything presented in this chapter.
6.3. Introduction to Persistence
6.3.1. Persistence
For the purposes of this guide, persistence is defined as the ability of an object
to remain unchanged while it is removed from main memory and returned
again. A persistent object may be part of a document, like a spread or a page
item, or part of the application, such as a dialog, a menu item, or a default
settings.
6.3.2. Databases
The Adobe InDesign application uses light weight databases as the stores for
the persistent objects. The host creates a database for each document created.
The host also creates a database for the scrap (the clipboard storage space), the
ObjectModel information (the SavedData file), and the workspace information
(the Defaults file).
Each document is contained in its own database. The database has two major
parts, a table with the object classes and a stream with the object data. The table
of object classes [figure 6.3.2.a.] contains UIDs and ClassIDs. A UID is a unique
identifier for an object in the database, and a ClassID gives us the class (boss) of
the associated object.
Adobe InDesign Programming Guide
6.3. Introduction to Persistence
175
figure 6.3.2.a. persistent objects and their classids
UID (Object ID)
ClassID (Type information for the Object)
0
kDocBoss
1
kFooBoss
2
kCodeHawgsBoss
3
kPageBoss
4
kSpreadBoss
The stream with the object data [figure 6.3.2.b.] contains a series of records
which correspond to the persistent object. The object’s UID is stored with the
object as a key for the record. The object records are variable length records
consisting of one segment for each persistent interface. Every segment has the
same structure:
ImplementationID tag
int32 length
<data>
The format and content of the <data> is determined by the implementation of
the interface. See “6.4.2.3.Reading and Writing Persistent Data” on page 182
about the ReadWrite() method.
figure 6.3.2.b. conceptual diagram of an object’s data
kFooBoss Object Persistent Data Record:
UID
ImplID Length Data ImplID Length Data
ImplID
Length
The figures above (“Persistent Objects and Their ClassIDs” and “Conceptual
diagram of an Object’s Data” ) are conceptual diagrams of the database
contents, and do not represent the actual contents of any database.
An important issue to note is for each object, the ClassID is stored in the table
and the ImplementationIDs are stored in the stream, but the InterfaceID is not
stored with either, so adding an existing (SDK supplied) Implementation to an
existing boss is dangerous, and can cause problems if another developer adds
176
6.4. Persistent Objects
Persistence
the same implementation to the boss. For this reason it is strongly recommends
creating a new implementation for any persistent interface added to a boss
(using AddIn).
6.4. Persistent Objects
6.4.1. Using Persistent Objects
The host stores persistent objects in a database and each object has an identifier
unique within the database. The methods used for creating, instantiating, and
using a persistent object are different from the methods used for non-persistent
objects. When a persistent object is created its record exists in memory. Certain
events, such as a user’s request to save the document, trigger the writing of the
record out to the storage. Persistent objects, as boss objects, are reference
counted. If the reference count for any persistent object reaches zero, the object
may be asked to write itself to its database, and could then be deleted from
memory. Any object with a reference count greater than zero will remain active
in memory. Other events, like drawing or manipulating the object, requiring
access to the object, trigger the host to read the object back into memory. This
strategy allows individual objects to load into or purge from memory, so the
host does not have to load the entire document into memory at one time.
Adobe InDesign Programming Guide
6.4. Persistent Objects
177
figure 6.4.1.a. creating and storing persistent objects
Host
Main Memory
Storage
NewUID
Instantiate
(No Storage)
Dirty
ReadWrite
Reference count
reaches zero
Instantiate
(With Storage)
6.4.1.1. Instantiating a New Object
A new instance of a persistent boss is created differently than a non-persistent
object is.
A new instance of a non-persistent boss can be created using CreateObject():
IPMUnknown *CreateObject(const ClassID clsID, const PMIID iid =
IIDIUNKNOWN)
This method takes the ClassID (boss) for the object created and an interface ID
for one of the interfaces on the boss, and returns an interface pointer to a newly
created boss object. The interface pointer points to the interface identified by
the IID. There is a new inline CreateObject2 function in InDesign 2.0 that calls
the CreateObject under the hood, but you can omit the interface ID if the
kDefaultIID is deinfed in the interface. Either CreateObject or CreateObject2 is
sufficient for a non-persistent object, but to create a persistent object requires a
little more. The new object is going to need a UID to associate the object with
its record in the database.
178
6.4. Persistent Objects
Persistence
6.4.1.1.1. Creating a New UID
Any persistent object instantiated, must be instantiated for a specific database.
To instantiate a new object, you must first have a pointer to the database. The
most common way to get a database pointer is to use a PersistUtils:
IDataBase *GetDataBase(const IPMUnknown *obj);
The GetDataBase() method takes an interface (IPMUnknown), this can be an
interface from any object in the database, so if you already have an interface on
the document you can get the database from that:
// theDocument is an IDocument* but could be any IPMUnknown
IDataBase *docDatabase = GetDataBase(theDocument);
Note that IDataBase itself is not an IPMUnknown, and therefore is not refcounted,
does not appear in any boss objects, and cannot be wrapped in an
InterfacePtr.
Once you’ve got the database pointer, you can use the IDatabase::NewUID
method shown below. Creating a new UID in the database adds an entry into
the database relating the UID to the class of the object being created, but the
object has not been instantiated yet, and no other information about it exists in
the database.
UID NewUID(ClassID clsID);
6.4.1.1.2. Instantiating the Object
To instantiate a new object, use the InterfacePtr template to retrieve one of the
object’s interfaces:
InterfacePtr<IFace> facePtr(IDatabase*, UID, InterfaceID);
This takes a pointer to the database, the UID of the object to instantiate, and
the interface on the boss which is to be returned. The InterfacePtr calls the
database to instantiate the object using the Instantiate() method:
IPMUnkown* IDatabase::Instantiate(UID id, PMIID interfaceID)
This method will actually check to see if the object is already in memory, and
only if it is missing does it instantiate the object. When an object is instantiated,
the application first checks for previously stored data in the database, if it is
found the object is instantiated from this data, otherwise the object is
instantiated from the object’s constructors (every implementation has a
constructor so the boss and all its implementations are instantiated.) Only
when the object is changed, and thus marked “dirty” will it then need to be
Adobe InDesign Programming Guide
6.4. Persistent Objects
179
written to the database (via the interfaces’ ReadWrite() methods.) For more
information on Dirty() and ReadWrite(), see “6.4.2.Implementing Persistent
Objects” on page 181.
Whether it instantiates an object from the database, or returns a reference to an
object previously instantiated, the IDatabase::Instantiate() method
increments the reference count on the object and returns an IPMUnknown* to the
requested interface (if the interface is available).
6.4.1.1.3. Use the Commands
Commands are used to encapsulate changes to the model, and since creating a
new object is a change to the model, there are commands for creating new
objects of many of the existing classes (kNewDocCmdBoss, kNewPageItemCmdBoss,
kNewStoryCmdBoss, etc.) The command architecture provides a level of
protection for the database as the commands are transaction based changes,
and any command attempting to process when the application is already in an
error state will cause the application to perform a “Protective Shutdown”
which quits the application rather than permit a potentially corrupting change
being made to the document. The commands also provide notification for the
changes to the model, allowing observers to be updated when the change is
made (and at undo or redo). When the commands are available they should be
used to create the objects, and the objects should not be created manually.
If you are implementing a new type of persistent object, you will need to
implement a command creating objects of your new type (using the methods
outlined in this section).
6.4.1.2. Instantiating an Object from a Database
Instantiating an object already existing in the database is done in exactly the
same way a new object is instantiated (see “6.4.1.1.2.Instantiating the Object”
on page 178). To the plug-in, the two functions are the same. A single object
could potentially exist and be used in several user sessions without ever being
written to the database since an object only stores data to the database if it has
been changed (making the default object data no longer applicable). Persistent
objects not having data stored in the database are constructed from the object’s
constructors.
180
6.4. Persistent Objects
Persistence
6.4.1.3. References to an Object
There are several types of references to a persistent object: InterfacePtrs, UIDs,
UIDRefs, and UIDLists. Each type of reference serves a different purpose and
understanding these references will make working with persistent objects much
easier.
A UID is a unique identifier within the scope of a database. The UID by itself is
not sufficient to identify the object outside the scope of the database. Like a
record number, it only has meaning within the database. UIDs are useful for
storing, passing, and otherwise referring to a boss object because they have no
runtime dependencies (no pointers are involved) and there is an instance cache
ensuring fast access to the instantiated objects. There is a value used to identify
a UID not pointing at a valid object, kInvalidUID. Any time a UID is retrieved
and needs testing for a valid object, the UID should be compared to
kInvalidUID.
A UIDRef represents two pieces of information, a pointer to a database, and the
UID of an object within this database. A UIDRef is useful for referring to
objects because it identifies both the database and the object. UIDRefs are a
common method for referring to a persistent object, especially when they are to
be passed around or stored, since a UIDRef does not require the object it points
at to be instantiated. UIDRefs cannot be persistent data because they have a
runtime dependency, the database pointer. An ‘empty’ or invalid UIDRef will
give kInvalidUID for its UID and a nil pointer for its database pointer.
An InterfacePtr holds a pointer to an interface (on any type of boss object) it
identifies an instantiated object in main memory. While an InterfacePtr on the
boss is necessary for working with the boss, they shouldn’t be used to track a
reference to a persistent object, as this forces the object to stay in memory. In
many cases a nil pointer returned from InterfacePtr is not an error state, but
simply means the requested interface does not exist on the boss indicated.
A UIDList contains a list of UIDs and a single pointer to a database. All of the
objects identified by a UIDList must be objects within the same database. A
UIDList is a class object containing a list of UIDs and the database pointer and
should be used any time a list of objects is needed (selections and commands
use UIDList objects).
Adobe InDesign Programming Guide
6.4. Persistent Objects
181
6.4.1.4. Destroying an Object
Similar to creating them, deleting persistent objects is done through commands
and the DeleteUID() method is not called directly. Deleting an object from the
database using DeleteUID() does not take care of all the references to the object
or items the object contains references too.
If you are implementing a command to delete a persistent object, and you’ve
removed the references to the object and need to delete the object from the
database, then the database method DeleteUID() is the method to use. It looks
like this:
IDataBase::DBResultCode dbResult = database->DeleteUID(uid);
6.4.2. Implementing Persistent Objects
A boss is made persistent by adding the IPMPersist interface. Any boss having
an IPMPersist interface, is persistent, and when an object of the boss is created
the object is assigned a UID. If you’ve added the IPMPersist interface to a boss,
then any persistent interface on the boss can save data into the database.
6.4.2.1. Add the IPMPersist Interface to the Boss
For a boss to be persistent you must add the IPMPersist interface, and since all
instances of this interface can and should use the same implementation kPMPersistImpl, adding the interface is simply a matter of making sure you’ve
got it as an interface on your boss. The following boss definition is an example
of a boss with the IPMPersist interface.
figure 6.4.2.1.a. the definition of a persistent boss
Class
{
kFooBoss,
kInvalidClass,
{
IID_IBARDATA, kBarDataImpl,
IID_IPMPERSIST, kPMPersistImpl,
}
},
Once the interface is added to the boss, any objects of the boss will get a UID
assigned when the object is instantiated. Though the object will have a UID, and
this UID has an entry in the ClassID/UID pairings in a database, the object may
182
6.4. Persistent Objects
Persistence
not yet be storing any data. It is up to the interfaces to store the data they need.
This is done by adding the ReadWrite() method to the interface and making
sure when the information is changed the Dirty() method is called.
6.4.2.2. Use the CREATE_PERSIST_PMINTERFACE Macro
As mentioned earlier in this guide, when an interface is implemented the
CREATE_PMINTERFACE macro is used to create an InterfaceFactory, or a set of
classes used to create and destroy instances of the implementation class. For a
persistent implementation, there are some additional requirements, so the
CREATE_PERSIST_PMINTERFACE is used.
6.4.2.3. Reading and Writing Persistent Data
Any interface you want to store data for, must support the ReadWrite()
method. This method does the actual reading and writing of the persistent
data. The ReadWrite() method is called with a stream and uses this stream to
read or write its data. The IPMStream methods for reading and writing data have
been generalized, so that they are the same for both cases. In other words, if you
have a read stream, the XferBool() method will read a boolean value. If you
have a write stream, its XferBool() method will write out a boolean method.
The read and write stream methods are generalized in this way so a single
ReadWrite() method handles both situation and reduces the possibility of bugs
due to discrepancies in reading and writing methods.
figure 6.4.2.3.a. implementing a readwrite method
void BarData::ReadWrite(IPMStream *stream, ImplementationID
implementation)
{
stream->XferInt32(fWidth);
stream->XferInt32(fHeight);
}
6.4.2.4. Marking Changed Data
When the data for a persistent object residing in memory is changed, there is a
difference between the current version of the object, and the object as it exists
in the database’s storage. When this happens the object in memory is said to be
“dirty,” meaning it doesn’t match the version in storage. Any object made
“dirty” needs to have its Dirty() method called (so that it can notify the
database of the difference).
Adobe InDesign Programming Guide
6.5. Streams
183
figure 6.4.2.4.a. marking data as dirty
void FooCountData:: SetFooCount( int32 newFooCount )
{
if( fFooCount != newFooCount)
{
fFooCount = newFooCount;
Dirty();
}
}
The Dirty() method is implementation independent, and therefore
you won’t
need to implement it yourself, but simply rely on the version provided by the
HELPER_METHODS macros defined in HelperInterface.h
(DECLARE_HELPER_METHODS, DEFINE_HELPER_METHODS, and
HELPER_METHODS_INIT).
Note if you add an interface to an existing boss, and this boss is persistent, the
interface may also be persistent. To make such an interface persistent, you
would follow the same steps in the implementation as if the interface were on a
boss you have defined (use the CREATE_PERSIST_PMINTERFACE, create the
ReadWrite(), call Dirty() when changes are made)
6.5. Streams
Streams are used by persistent objects to store their information to a database.
Streams are also used by the host application to move information around
whether it be images placed into the document, copying information to the
clipboard, or objects being stored in the database. The public interface to the
streams in the IPMStream interface. Implementations of the IPMStream interface
typically use the IXferBytes interface to move data.
The first part of this section (“6.5.1.StreamUtil” on page 183 and “6.5.2.The
IPMStream Methods” on page 184)covers information needed any time you’re
working with a stream. The rest of this section (“6.5.3.Implementing a New
Stream” on page 184) is not normally needed.
6.5.1. StreamUtil
The StreamUtil methods (StreamUtil.h) are helper methods for creating all of
the common types of streams you may need when moving information around
within or between InDesign databases.
184
6.5. Streams
Persistence
6.5.2. The IPMStream Methods
IPMStream is a generalized class of both reading and writing streams. In other
words, the IPMStream methods gives you access to streams both reading
information and writing information. Any particular stream implementation
will be either a reading or a writing stream, and the type of stream can be
determined by using the IPMStream::IsReading() and
IPMStream::IsWriting() methods.
Any persistent implementation will have a ReadWrite() method, as mentioned
above. The ReadWrite() method will use a stream, and in particular a set of
data transferring methods on the stream, to read and write its own data. The
methods are used for transferring data in or out of a stream are all the same
regardless of which direction the data is moved. The IPStream methods starting
with the Xfer prefix are used for transferring the data type identified in the
method name. XferByte() will transfer a byte, XferInt16(), a 16 bit integer,
XferBool(), a boolean value, and so forth. All of the transferring methods are
overloaded, so they can take a single item, or an array of items. (The
XferByte(uchar, int32) version is typically used for buffers.)
The streams will also handle byte swapping, if required. The default, if
swapping is not set (SetSwapping(bool16)), is to not do byte order swapping.
At times it is not bytes, ints or bools you’re interested in, but boss objects and
references to objects. IPMStream has a couple of methods specifically for these
cases XferObject() and XferReference(). XferObject() is used to transfer an
owned object, and XferReference() is used to transfer a reference to an object
not owned by the object using the stream. One way to decide which method to
use is to think about what should happen to the object if the owning object
were deleted. Should the object still be available (like a Color a PageItem refers
to), then XferReference() should be used. If the item is actually owned by the
object (like a Page a Document refers to) then XferObject() should be used.
6.5.3. Implementing a New Stream
There may come times when the existing streams are not sufficient, and you
find you need to create a new type of stream. This would happen any time you
want to read or write to a location the host application doesn’t recognize.
Importing and exporting files stored on an ftp site or in a database storage
would require a new stream.
Adobe InDesign Programming Guide
6.5. Streams
185
6.5.3.1. Stream Boss
The first step in implementing a new stream would be to define the boss.
Typically a stream boss will contain IPMStream and any interface required to
identify either the type of information in the stream, the target/source of the
stream, or both. The following is a hypothetic datalink boss
figure 6.5.3.1.a. simplelinkreadstream - for importing files from an external database
Class
{
kSimpleLinkStreamReadBoss,
kInvalidClass,
{
IID_IPMSTREAM, kSimpleLinkStreamReadImpl,
IID_IDATALINK, kSimpleLinkImpl,
IID_IFORMATTYPE, kFormatTypeImpl,
}
};
The IPMStream is the only interface all stream bosses have in common. In the
example above, the IDataLink interface identifies the source of the data in the
stream and the IFormatType interface gives creator, type, and file extension
information about the data in the stream. A stream that is commonly used in
importing is the kFileStreamReadBoss.
figure 6.5.3.1.b. filestreamread
Class
{
kFileStreamReadBoss,
kInvalidClass,
{
IID_IPMSTREAM, kFileStreamReadLazyImpl,
IID_IFILESTREAMDATA, kFileStreamDataImpl,
}
};
6.5.3.2. IPMStream Interface and the IXferBytes Class
When implementing your own stream there are a couple of classes you’ll want
to take advantage of. There are a couple of default implementations of
IPMStream making writing new implementations easier, CStreamRead and
CStreamWrite. The default implementations (CStreamRead and CStreamWrite)
of IPMStream use an abstract base class, IXferBytes to do the actual reading and
writing, so most of the work in creating a new data source is in creating an
IXferBytes that can read and write to the data source.
186
6.6. Missing Plug-ins
Persistence
6.6. Missing Plug-ins
The plug-ins you create can add data to the document. When the plug-in is
there to open and interpret the data, everything is fine, but what happens when
the user removes the plug-in, or gives the document to someone else?
There are a couple of ways to handle these situations. First, you have control
over what happens when the user without the plug-in opens the document
(what sort of warning is shown). Second, you can implement code to “fix-up”
or update the data when the plug-in is available again. This section outlines
how both these methods are used.
6.6.1. Critical, Default, and Ignore
If the user opens a document containing data created by any plug-in now
missing, the application can give a warning. There are three warning levels:
critical, default, and ignore. A critical warning tells the user the document
contains data from missing plug-ins, and strongly advises the user not to open
the document. The user may continue the open, and it will open as an untitled
document (a copy of the original) to try to preserve the document. A default
warning tells the user the document contains data from missing plug-ins, and
asks if they want to continue the open, if they continue the open, the original
document is opened. An ignore warning puts up no warning message at all, but
proceeds with the open as if there were no missing plug-ins. These warnings
can be set to trigger on ClassID or ImplementationID. This is useful if your
plug-in both creates new bosses, and adds interfaces to existing ones, as the
warnings for each can be established.
Plug-ins store two sorts of data in a document: ClassIDs, and
ImplementationIDs (see “6.3.2.Databases” on page 174). The plug-in can
specify how important a ClassID or ImplementationID is. All data is
considered to be default priority unless otherwise specified. You can override
the setting, and make it either critical or ignored. You do this by adding a
resource to the plug-in's boss definition file. For example, to make data in the
PersistentList plug-in as ignored, you would add the following two resources to
PstLst.fr:
figure 6.6.1.a. marking implementation ids as ignored
Adobe InDesign Programming Guide
6.6. Missing Plug-ins
187
resource IgnoreTags(1)
{
kImplementationIDSpace,
{
kPstLstDataPersistImpl,
kPstLstUIDListImpl,
}
};
figure 6.6.1.b. marking boss classes as ignored
resource IgnoreTags(2)
{
kClassIDSpace,
{
kPstLstDataBoss,
}
};
CriticalTags are used if you want the data marked critical. To mark it ignore,
you would use the exact same resource format, but start it out as IgnoreTags.
The ID kImplementationIDSpace specifies the IDs following are
ImplementationIDs, not ClassIDs (conversely, use kClassIDSpace if the IDs in
the list are ClassIDs). You can put any number of IDs in the list, but all the IDs
must be of the same type. You can have a second resource, as shown, to mark
IDs of another type. You do not need to mark any IDs not appearing in the
document (for instance, data only written out to saved data, or
implementations that are not persistent). You do not need to mark IDs if the
default behavior is desired.
If there is data that is currently stored in the document by your plug-in, and the
data does not reference objects supplied by other plug-ins, and the user will not
be able to see any difference in the document because your plug-in is missing,
then consider marking the data ignore. For instance, your plug-in may store
preference information in every document. If the preference data is in the
document, but no objects are, then the user does not need a warning when
your plug-in is missing. You can make this happen by marking the preference
data ignore.
188
6.6. Missing Plug-ins
Persistence
6.6.2. Updating Data in a Changed Document
What should happen when a document is opened, and the document contains
data placed there by a plug-in not on the system? Many times there is no
problem with this. But if the plug-in's data is dependent on anything else in the
document, the data could get stale if the document is edited without the plugin. For instance, suppose there is a hyperlink attribute linked to another frame.
Double click on the link to go to the frame, etc. Your plug-in supplies an
observer, so if the frame is deleted, the link will be severed. Now lets suppose
you give your document, with the hyperlinks, to someone else who does not
have the hyperlink plug-in. The other person edits the document, deletes the
frame, saves, and then hands the document back to you. You open the
document and double click on the frame. Disaster, right? In fact, the other
person may also think the document looks pretty strange, since the hyperlinks
aren't showing up.
Suppose the user decides to edit the document, even though the hyperlink
plug-in is missing, and deletes the frame. There is still a problem, because the
hyperlink didn't get updated when the frame was deleted. When you open the
document later, and double click on the hyperlink, the host could crash looking
for the frame which was deleted. The fix for this is for the plug-in to override
the IPlugIn::FixUpData() method. FixUpData() will be called when the
document is opened, if the plug-in was used to store data in the document, and
if the document was edited (and saved) without the plug-in. The hyperlinks
plug-in could override FixUpData() to scan all its objects checking to see if the
linked frame UIDs were deleted. Then when the document opened, the links
are severed correctly by FixUpData().
So, here are some guidelines for what you need to do in your plug-in:
• Do nothing if your plug-in does not store data in documents.
• Mark data as ignore if it doesn't reference other data in the document, and
if it doesn't appear visually in the document.
• Mark data as critical if you believe editing the document without your plugin could corrupt the document.
• Supply a FixUpData() method if there are checks your plug-in could do on
opening a document edited without the plug-in, to bring its data back in
sync.
Adobe InDesign Programming Guide
6.7. Data Conversion
189
6.7. Data Conversion
Converting data from an old document to a new one is complex because each
plug-in may independently store data in the document. When the host opens a
document made with an older version of the application, or an older version of
any of the plug-ins used in the document, then the older data must be
converted and updated to match the new format. Additionally there are
multiple methods available for handling the data conversion process.
6.7.1. Two Different Approaches
There are two approaches to converting persistent data. One approach to data
conversion is to use the host’s ConversionManager to manage the conversion
process. The second method is to for the owning plug-in to manage when and
how data should be converted, using version information or other data
embedded with the object data.
6.7.1.1. Using the Host’s ConversionManager
Each document contains some header information about the content in the
document. The header includes a list of all the plug-ins supplying data to the
document and the version number of the plug-in last used to write the data.
When a document is opened, the application checks to see if any of the plug-ins
are missing or out of date. If a plug-in is missing it may put up an alert (see
“6.6.Missing Plug-ins” on page 186). If a plug-in is out of date then the
information stored by the old plug-in must be updated to match the format
required by the currently running plug-in before the document can be opened.
A plug-in may register a conversion service doing this. InDesign contains a
ConversionMgr checking to see what conversions are required for opening the
document, and calls the appropriate plug-in to do the conversion
There are two things you have to do when making a format change in order to
maintain backwards compatibility with the old format. First, you have to
update the version number of the plug-in(s) whose data format you have
changed. This is required so the host can detect the data format has changed.
Second, you must provide a converter that can convert between the previous
format and the new format.
6.7.1.2. When is a Converter Necessary?
A converter is necessary anytime the document format is changed. When the
persistent data for any plug-in changes it is a document format change.
190
6.7. Data Conversion
Persistence
Any of the following can change the document format:
6.7.1.2.1. Changes to ReadWrite()
If the ReadWrite() method is used to stream data to the pub, then changing the
ReadWrite() method will change the document format. An implementation
may have a ReadWrite() which doesn’t work with the document, but some
other database or other data source. Widgets, for instance, have a ReadWrite()
method used for streaming to/from resources and to/from the SavedData file.
Changes to a method that does not work with the document database do not
require any special conversion.
6.7.1.2.2. Changes to an Object’s Definition
If you add or remove an implementation from the definition of a persistent
boss in the .r file, then you have changed how the object will be streamed out. If
you add a new implementation then you would stream in an old version of the
object, but it will not contain the data normally appearing for the
implementation you’ve added. This is fine if the data can be initialized
adequately from the implementation’s constructor - otherwise, you may need
to add a converter. If you change the implementation of an interface from one
ImplementationID to another then you must convert the data. If you remove
an ImplementationID from a class, you should add a converter to strip the old
data from the object, since the data would otherwise be carried around with the
object indefinitely.
6.7.1.2.3. Renumbering an ImplementationID or ClassID
If an ImplementationID or ClassID changes, then you must register a converter
so occurrences of the ImplementationID or ClassID in old documents can be
updated. In practice, renumbering ClassIDs and ImplementationIDs is a source
of a lot of bugs, and typically leads to corrupt documents, so we strongly
recommend against renumbering.
6.7.1.3. Version Numbers
Every plug-in has a plug-in version resourceof the type PluginVersion. The
PluginVersion resource appears in the boss definition file. The first entry of
this resource describes the application's build number, on the realese build, it is
the final release version number. The second entry of the resource is the plugin's ID. Then it is followed by three sets of version numbers, then finally is an
array of feature set IDs, If any one of the ids in this list matches the current
feature set id, then the plug-in is loaded. For an example of the PluginVersion,
Adobe InDesign Programming Guide
6.7. Data Conversion
191
open any sample code .fr file, there is one defined for every plug-in. Each
version number has a major number and a minor number. The first version
number is the version of the plug-in, and gets updated for every release of the
plug-in. The second version number appearing in the version resource is the
version of the application the plug-in expects to run against. The application
version number is used to make sure the user doesn’t drop in a plug-in
compiled for the 1.0 application into installation of the 2.0 application. The last
version number is called the format version, and it is the version of the plug-in
last having a change to the file format. This is the version number written into
the document, and it is the number the ConversionMgr will check to see if
conversion is required.
The third version number (the format version) will not always match the plugin’s version number, and in many cases will not change as often as the plug-in
version number. The plug-in version number will change for every release of a
plug-in, but the format version will only change if the data the plug-in stores in
the document has changed and the ConversionManager is required to convert
the data.
6.7.1.4. Adding a Converter
InDesign supports 2 types of service provider based data conversion, where
converters are implemented as conversion services. The first type of InDesign
converters is Schemas-based provider, the second type is code-based. Each
plug-in may supply a conversion service, and the service is responsible for all
conversions done by the plug-in. So a converter might be set up and at first only
handle a single conversion (the conversion from the first format to the second).
Later on, it may be necessary to change the format again, so another conversion
would be added to the converter, to support converting from the second format
to the third.
It is important to point out the Schemas-based converters are configured
through resources, it is much easier to use schemas converters and it covers
majority of format change need that a regular plug-in would require. The
Schemas-based data conversion is discussed in great detail in the Technical
Note #10021, Schema-based Data Conversion. Schema-based converison
should be used whenever possible until it can’t handle the special need of your
plug-in.
192
6.7. Data Conversion
Persistence
Suppose you are working on a plug-in having persistent data, a “date-stamp”
for instance. Imagine you had two releases - version 1 and 2 - of the date-stamp
plug-in without changing the format. Now the available versions of the plug-in
are version 1 and version 2, but both versions of the plug-in have the same
format version - version 1. (Note the examples in this section all use a change in
the minor version only, but the principles would remain the same for a change
in major version number as well.) For the third version of the plug-in you need
to add additional information - say a time stamp. So you would update the
“format version number,” or the last version numbers in the plug-in resource,
to match the current plug-in number. For plug-in version 3 the format version
would be 3 as well. Because you’ve made a change to the format version
number, you need to create a converter that would convert from version 1 to
version 3.
figure 6.7.1.4.a. versions of the date-stamp plug-in
Plug-in Version
Format Change
Format Version
1
New
1
2
No
1
3
Yes
3
4
Yes
4
For the fourth version of the plug-in, you again change the format (allowing a
date-stamp to be “signed”). you then change the plug-in and format versions to
version 4 and would add an additional converter capable of converting from
version 3 to version 4. Conversions from version 1 to version 4 can now be done
by the ConversionManager which would chain the converters together. (Use the
first to convert from 1 to 3 and the second to convert 3 to 4.)
If you’re working with the first format change for a plug-in you will have to add
a converter (either schema or code based) to your plug-in (there can only be
one converter per plug-in). This means adding a new boss, having two
interfaces, IK2ServiceProvider, and IConversionProvider.
IK2ServiceProvider should be implemented with kConversionServiceImpl,
which is provided by the system. IConversionProvider is the part you will have
to write. Here’s an example boss:
Adobe InDesign Programming Guide
6.7. Data Conversion
193
/**
This boss provides conversion service to the conversion manager
to use the schema-based implementation.
*/
Class
{
kCstPrfConversionProviderBoss,
kInvalidClass,
{
/** Manages file format conversions between different versions
of plug-ins. Implementation provided by the API.
*/
IID_ICONVERSIONPROVIDER,
kSchemaBasedConversionImpl,
/** Identify this boss as a conversion service.
Implementation provided by the API.
*/
IID_IK2SERVICEPROVIDER,
kConversionServiceImpl,
}
},
Most of the work is done in the conversion provider. The interface for
conversion provider provided in IConversionProvider.h
and GetNthConversion() are used by the conversion
manager to find out what conversions are supported by the converter. If you are
implementing a new converter, you would want CountConversions() to return
1, and GetNthConversion() would return with fromVersion set to the old
version before your change, and toVersion set to the new build having your
change in it. VersionID is a data type in the Public library, it consists of the
pluginID, the major format version number, and the minor format version
number.
CountConversions()
So for a new converter, the fromVersion should be VersionID(yourPlugInID,
kOldPersistMajorVersionNumber, kOldPersistMinorVersionNumber). The
toVersion should be the new format version number.
Your new conversion is added as conversion index 0. So, for a new converter, it
would look like this:
194
6.7. Data Conversion
Persistence
int32 TextConversionProvider::CountConversions() const
{
return 1;
}
void TextConversionProvider::GetNthConversion(int32 i, VersionID
*fromVersion, VersionID *toVersion) const
{
*fromVersion = VersionID(kTextPluginID,
kOldPersistMajorVersionNumber, kOldPersistMinorVersionNumber);
*toVersion = VersionID(kTextPluginID, kNewPersistMajorVersionNumber,
kNewPersistMinorVersionNumber);
}
If you are adding it on to some existing change, the change numbers should
chain together so the conversion manager can do changes across multiple
formats. So if your plug-in has had three format changes, starting with build 1,
then changed in 3 and 5, it should register a conversion handling 1 to 3, and a
second handling 3 to 5. If necessary, the conversion manager can chain them
together to convert a document from version 1 to version 5. So then the same
two method would look as follows:
Adobe InDesign Programming Guide
6.7. Data Conversion
195
const int32 kFirstFormatVersion = 1;
const int32 kSecondFormatVersion = 3;
const int32 kThirdFormatVersion = 5;
const int32 kFirstChange = 0;
const int32 kNewChange = 1;
int32 TextConversionProvider::CountConversions() const
{
return 2;
}
void TextConversionProvider::GetNthConversion(int32 i, VersionID
*fromVersion, VersionID *toVersion) const
{
if (i == kFirstChange)
{
*fromVersion = VersionID(kTextPluginID, kMajorVersionNumber,
kFirstPersistMinorVersionNumber);
*toVersion = VersionID(kTextPluginID, kMajorVersionNumber,
kSecondPersistMinorVersionNumber);
}
else if (i == kNewChange)
{
*fromVersion = VersionID(kTextPluginID, kMajorVersionNumber,
kSecondPersistMinorVersionNumber);
*toVersion = VersionID(kTextPluginID, kMajorVersionNumber,
kThirdPersistMinorVersionNumber);
}
}
Next, you have to tell the conversion manager which information you have
actually changed. The ConversionMgr will call ShouldConvertImplementation()
with each implementation in the document supplied by your plug-in. Depends
on the data status of the implementation, you need to return kMustConvert
when the content will be modified, kMustRemove when the data is obsolete and
must be removed, or kMustStrip when the content will be stripped., and
kNothingToConvert for all the rest. Let’s suppose for this example it was
kTextFrameImpl. You need to define a method for
ShouldConvertImplementation() returning kMustConvert when the tag is
kTextFrameImpl, and kNothingToConvert for all others. You want to do this
when the conversion manager is doing your conversion, and not some other, so
you need to check the conversion index and make sure it is the one you added.
Here’s how it might look:
196
6.7. Data Conversion
Persistence
IConversionProvider::ConversionStatus
TextConversionProvider::ShouldConvertImplementation(
ImplementationID tag, ClassID context,
int32 conversionIndex) const
{
IConversionProvider::ConversionStatus status =
IConversionProvider::kNothingToConvert;
switch (conversionIndex)
{
case 0:
if (tag == kTextFrameImpl)
status = IConversionProvider::kMustConvert;
break;
default:
break;
}
return status;
}
Next, you will need to implement ConvertTag() to do the actual conversion.
Let’s suppose TextFrame’s ReadWrite() is used to write an int and a real, and
you are adding a boolean. It might look like this:
ImplementationID TextConversionProvider::ConvertTag(
ImplementationID tag, ClassID forClass, int32 conversionIndex, int32
inLength,
IPMStream *inStream, IPMStream *outStream,
IterationStatus whichIteration)
{
ImplementationID outTag = tag;
switch (conversionIndex)
{
case 0:
if (tag == kTextFrameImpl)
{
if (inLength > 0)
{
int32 passThruInt;
inStream->XferInt32(passThruInt);
outStream->XferInt32(passThruInt);
int32 passThruReal;
inStream->XferInt32(passThruReal);
outStream->XferInt32(passThruReal);
// Adding the new field
Adobe InDesign Programming Guide
6.7. Data Conversion
197
bool16 smartQuotes = kTrue;
outStream->XferInt32(smartQuotes);
}
}
break;
default:
break;
}
return outTag;
}
This is what most converters will look like. If the converter needs to convert a
class, then it can implement ShouldConvertClass() and ConvertClass(). This
is necessary only if the class is being deleted, or it is a container for some other
data (see section on containers below).
6.7.1.4.1. Removing Classes or Implementations
If you are removing a classID or an implementationID, then it needs to be
removed from the documents as they are converted also. This can be done by
converting to invalid, and the conversion manager will do the deletion for you.
For example, to remove a tag, you could implement ConvertTag() as follows:
ImplementationID TextConversionProvider::ConvertTag(
ImplementationID tag, ClassID forClass, int32 conversionIndex, int32
inLength,
IPMStream *inStream, IPMStream *outStream,
IterationStatus whichIteration)
{
ImplementationID outTag = tag;
switch (conversionIndex)
{
case 0:
if (tag == kTagToRemove)
// kInvalidImpl is defined in the SDK
outTag = kInvalidImpl;
break;
default:
break;
}
return outTag;
}
Deleting a class is similar, just make ConvertClass return kInvalidClass.
198
6.7. Data Conversion
Persistence
6.7.1.4.2. Changing an Implementation in a Single Class
Let’s suppose there is a boss defined which has an IBoolData interface,
implemented as kPersistBoolTrue, meaning it defaults to true. You have
changed it to kPersistBoolFalse. When you read in an old document with the
new boss, you want it to use the new implementation. You can write a converter
to take the data now stored out as kPersistBoolTrue, and switch it to be marked
as kPersistBoolFalse. Then when you access the boss, it will have the old value.
If you do not make a converter, the boss will not read in the old data, since there
is no interface in the new boss using the kPersistBoolTrue ImplementationID.
Instead, it will look for kPersistBoolFalse, but it won’t find it because the old
boss didn’t have it. So the value, instead of being the old value, will be false
because it is the default value.
To change the ImplementationID of the data in the pub, you have to make a
conversion to catch the old ImplementationID, and change it to the new one.
You want to do it for your boss only -- you don’t want to change other bosses
using kPersistBoolTrue, which means the ConvertData might look as follows:
ImplementationID TextConversionProvider::ConvertTag(
ImplementationID tag, ClassID forClass, int32 conversionIndex, int32
inLength,
IPMStream *inStream, IPMStream *outStream,
IterationStatus whichIteration)
{
ImplementationID outTag = tag;
switch (conversionIndex)
{
case 0:
if (tag == kPersistBoolTrue && forClass == kMyBoss)
outTag = kPersistBoolFalse;
bool16 theBool;
inStream->XferBool(theBool);
outStream->XferBool(theBool);
break;
default:
break;
}
return outTag;
}
forClass is the boss the data was found in. The conversion should be done only
if forClass is the one you want changed.
Adobe InDesign Programming Guide
6.7. Data Conversion
199
You will also have to implement ShouldConvertImplementation. forClass is the
class the data was found in, or it is kInvalidClass if any class should match. So
the implementation of ShouldConvertImplementation is:
IConversionProvider::ConversionStatus
TextConversionProvider::ShouldConvertImplementation(
ImplementationID tag, ClassID forClass,
int32 conversionIndex) const
{
IConversionProvider::ConversionStatus status =
IConversionProvider::kNothingToConvert;
switch (conversionIndex){
case 0:
if (tag == kTextFrameImpl &&
(forClass == kMyBoss || forClass == kInvalidClass))
status = IConversionProvider::kMustConvert;
break;
default:
break;
}
return status;
}
6.7.1.4.3. Containers and Embedded Data
Any plug-in having implementations embeding data from other plug-ins must
call the content tracker, so the data embedded is registered with the content
manager. It must register a container conversion, so converters for the
embedded data have a chance to get activated.
InDesign does not have very many instances of containers. One example of
where the host uses containers is in the text attribute code. A text style is a UIDbased boss object containing an implementation called TextAttributeList. A
TextAttributeList contains a list of attribute bosses (these could be Bold, Point
Size, Leading, etc.). These attribute bosses are not UID-based bosses: instead,
TextAttributeList streams out the ClassID for a boss, followed by the boss’s
data, then streams out the next boss in the list. TextAttributeList therefore must
call the stream’s content tracker to notify the content manager a new class was
added to the pub. Why is this important?
200
6.7. Data Conversion
Persistence
Let’s suppose a new “red-line text” plug-in adds an attribute to the style, and
the text will not compose correctly if “red-line” is pulled out. “Red-line” can list
the attribute as critical, so the host will put up a strongly worded warning when
the user tries to open up the document without the “red-line” plug-in. But if
TextAttributeList doesn’t register the attribute boss with the content manager,
the application will never know that the attribute is in the pub, and it will not
be able to warn the user. Or suppose the “red-line” plug-in is updated, and the
attribute boss in particular is updated to store its data differently. The “redline” registers a converter handling the format change. If the host doesn’t know
the attribute appears in the pub, “red-line” will never be called to convert. The
document will appear to open correctly, but will crash on the attribute’s
ReadWrite() method the first time the style is read in.
In fact, in order for the “red-line” attribute to be converted, TextAttributeList
must register a converter. If the content manager was notified when the
attribute was streamed out, the ConversionMgr will know that the attribute
needs to be converted. It will even know that the attribute was streamed out by
TextAttributeList. But the conversion manager has no way of knowing where
the attribute is, inside the data streamed out by TextAttributeList. So
TextAttributeList should register a converter which calls back to the conversion
manager to convert each piece of embedded data. Otherwise the embedded
data will not be converted.
6.7.1.5. Content Manager
The host has a content manager that keeps track of what data is stored in the
document, which plug-in stored it, and the format version number of the plugin that was last used to write the data.
Think of this as a table that is attached to the root of the document:
figure 6.7.1.5.a. version information table
ImplementationID
Plug-in ID
Format version number
(Only showing minor #)
kSpreadImpl
kSpreadPluginID
0
kSpreadLayerImpl
kLayerPluginID
0
kTextAttrAlignJustImpl
kTextAttrPluginID
1
kCMSProfileListImpl
kColorMgmtPluginID
3
...
Adobe InDesign Programming Guide
6.7. Data Conversion
201
Every ImplementationID part of the document appears in the table.
This table also includes all the ClassIDs in the document:
figure 6.7.1.5.b. class ids
ClassID
Plug-in ID
Format version number
(Only showing minor #)
kSpreadBoss
kSpreadPluginID
1
kSpreadLayerBoss
kLayerPluginID
1
kTextAttrAlignBodyBoss
kTextAttrPluginID
3
kDocBoss
kDocFrameworkPluginID
1
When an object is streamed to a document, the document receives the classID
of the object, and the data streamed out by each of the object’s ReadWrite()
methods. The data written out by a ReadWrite() method is marked with the
ImplementationID of the ReadWrite(), so when it is later read in, the system will
know what C++ class to instantiate in order to read in the data. The
ContentMgr maintains an overall list of the ClassIDs and ImplementationIDs
used in the document. When a new ClassID or ImplementationID is added to
the document, the ContentMgr looks to see what plug-in supplied the ClassID
or ImplementationID, notes the plug-in ID and the format version number,
and adds the new entry to the table.
The plug-in supplying a ClassID is the one supplying the class definition. Only
the plug-in supplying the original class definitions is considered: add-in classes
do not count. The plug-in supplying an ImplementationID is the one that
registered a factory for the ImplementationID (by using the
CREATE_PMINTERFACE macro).
This data is used for detecting missing plug-ins, and for managing document
conversion. When the user opens a document containing data supplied by a
missing plug-in, the host puts up an alert warning the user the document
contains data from a missing plug-in . The host can detect missing plug-ins by
looking in the content manager to see which plug-ins supplied data to the
document, and then it can check this list against the list of currently running
plug-ins to see if any are missing.
202
6.7. Data Conversion
Persistence
It is also used for document conversion. When the user opens a document, the
ConversionMgr checks the format version number of the plug-ins supplying
data to the document, and compares it against the format version number of
the currently running plug-ins. Any mismatch, as noted above, means a
conversion is required before the pub can be opened. If there is a format
version change without a supplied data converter, then the document will not
open.
The ContentMgr also keeps track of where the data appears in the document.
For every ImplementationID, the ContentMgr keeps a list of the classes the
ImplementationID appears in. This way, if an ImplementationID updates, the
ConversionMgr can quickly identify all the objects in the pub needing
convertion, rather than converting the entire document for a single change.
figure 6.7.1.5.c.
ImplementationID
Containing ClassID
kSpreadImpl
kSpreadBoss,kMasterPagesBoss
kSpreadLayerImpl
kSpreadLayerBoss
kTextAttrAlignJustImpl
kTextAttrAlignSingleBoss
kCMSProfileListImpl
kWorkspaceBoss, kDocWorkspaceBoss
6.7.1.6. Content Tracker
The content tracker is an interface attached to the database write stream. It
keeps track of the classes and implementations streamed out to the database,
and calls back to the content manager. This is how the content manager is
notified of additions to the document.
Most additions to the document are registered automatically by either the
database or PMPersist. The database registers the ClassID of every UID created
in the document with the content tracker. PMPersist, for example, is the
interface handling persistence for UID-based objects. It calls each interface in
turn to stream out, and as part of this process, it calls the content manager to let
it know each implementation is streamed out.
If an object streams out a ClassID or ImplementationID in its ReadWrite, then
it also has to call the content tracker to register the ClassID or
ImplementationID streamed out. Most objects do not do this. However, for
Adobe InDesign Programming Guide
6.7. Data Conversion
203
those that do, it is critical they call the content tracker to register the data with
the content manager. If it is not done, then the host will not notice when the
plug-in is missing or needs to be converted.
There aren’t many places in the application streaming out ClassIDs or
ImplementationIDs. But, for instance, the attribute streaming code does it
when a boss is streamed out as part of an attribute boss list. The attribute list
streams out the ClassID, the number of interfaces, the ImplementationID,
length, and data for each interface. The ClassID and ImplementationID
streamed out are registered with the content manager.
As another example, let’s suppose there is an object having a ClassID as part of
its data, and the ClassID is an algorithm necessary for redrawing the object.
The object must register the ClassID with the content manager, so users are
warned when they open the document the plug-in is missing (and therefore
some objects may not redraw correctly).
Here’s an example of how to do this:
void Foo::ReadWrite(IPMStream* stream, ImplementationID prop)
{
InterfacePtr<IContentTracker> contentTracker(stream,
IID_ICONTENTTRACKER);
//________________________________________________________________
//Write out the render object meta data.
//________________________________________________________________
stream->XferInt32 ((int32&)fFillRenderObjectClass);
stream->XferInt32 ((int32&)fStrokeRenderObjectClass);
if (contentTracker != nil)
{
contentTracker->AddClass(fFillRenderObjectClass, kFooImpl);
contentTracker->AddClass(fStrokeRenderObjectClass, kFooImpl);
}
}
It is important to check for a nil contentTracker, since the only stream having
one now is the database write stream. For streaming to memory, for instance,
there is no content tracker.
204
6.7. Data Conversion
Persistence
In fact, the XferID() method of the IPMStream call the content tracker to
register the class ID for you, which effectively does the above exactly for you.
For details, please refer to CStreamWrite::XferID() of the CStreamWrite.cpp in
the SDK
6.7.1.7. Conversion Manager
When a document is opened, the conversion manager is called to check to see if
any of the data in the pub requires conversion. If it does, then the pub is
converted, and opens as untitled. If a converter cannot be found, the host puts
up an alert warning the user the pub cannot be opened because it cannot be
converted.
This initial check, implemented in ConversionMgr::GetStatus(), happens very
early in the open, before any of the objects in the pub are accessed (i.e., before
any of their ReadWrite() methods are called). This is critical, because the
ReadWrite() will not succeed if the object needs to be converted. The
conversion manager accesses the content manager (converting it if necessary),
and uses the content manager to find out what plug-ins supplied data to the
document. If any of the plug-ins used in the document have different formats
than the formats of the currently running plug-ins, conversion will be
necessary. Then the conversion manager looks to see if there is a conversion
service to convert from the format in the document to the currently running
format. If there is, then conversion is possible. At this time, the document may
be closed, and opened again as untitled.
If GetStatus() returns stating the conversion is not necessary, the open
proceeds without calling the conversion manager again. If GetStatus() returns
stating the conversion is not possible, the open is aborted. If GetStatus()
returns conversion is required, then the conversion manager’s
ConvertDocument() method is called to actually do the conversion.
The first thing ConvertDocument() does is to compile a list of the actual classes
and implementations in the document needing to be converted. A plug-in may
have many different implementations that added data to the pub, but it may be
that only one of these requires conversion. The conversion manager uses the
content manager to iterate over classes and implementations supplied by the
plug-in, and calls the converter to find out which ones require conversion. Any
class or implementation in the pub, and that the converter says must be
Adobe InDesign Programming Guide
6.7. Data Conversion
205
converted, is added to the list of classes or implementations to be
converted.Other data added by the plug-in is ignored by the converter: it will
not be converted.
The next step is to iterate over the UIDs in the pub. For each UID, the
conversion manager gets the class of the UID. If the class is on the list of classes
to be converted, then the conversion manager calls a converter for the class. If,
as is more common, the class contains an implementation needing to be
converted, then the conversion manager opens up an input stream on the UID,
and iterates through the implementations in the UID. If there is any
implementation in the UID requiring conversion, an output stream is opened
on the UID. The conversion manager uses the input stream to iterate over the
implementations in the UID. Any implementation not requiring conversion, is
copied to the output stream. If an implementation does require conversion, its
converter is called. The converter gets passed the input stream and the output
stream. It reads from the input stream in the old format, and writes to the
output stream in the new format.
Once the UID iteration is completed, then the content manager is called to
update the format numbers for all the plug-ins that were outdated, to show
their data was converted and is up to date. It is now safe for ReadWrite()
methods to be called on objects in the document.
If any converter requires access to another object in order to do its conversion,
it is called now in the last phase of conversion. For example, suppose up to now,
there was a single document wide preference for whether text in frames has
smart quotes turned on, but we would like to make this a per frame setting. The
text frame needs to store a new flag for smart quotes on/off. The converter adds
a new flag in the first phase of conversion, but it can’t set the correct value for
the flag until the preferences is converted. So the converter needs to get called
once again, after the first phase is complete and it is safe to instantiate the
preferences, to get the value of the document-wide smart quotes setting so it
can set the frame’s new smart setting correspondingly.
6.7.2. Conversion without the ConversionManager
It is possible to do conversion without the ConversionManager, and to gain
forward compatibility at the same time by using the persistent data itself to
identify which version of the plug-in had written the information.
206
6.7. Data Conversion
Persistence
Since the ConversionManager won’t be used with this method, there still needs
to be some method of determining which version of the plug-in last wrote the
data to the database. The recommended way to do this is to add a version
number to the implementation classes, so the first thing written out by the
ReadWrite() method would be the version number.
figure 6.7.2.a. persistent data with version number
kFooBoss Persistent Data Record:
ID
Length
Data
Vers. | Other
ID
Length
Data
Vers. | Other
Using this approach the ReadWrite() method would be implemented in the
first version of a plug-in to have a version number.
Imagine you have written a plug-in needing to store two byte values, fOne and
fTwo. Additionally you have chosen to use a byte value to store the data’s version
number. The ReadWrite() method for this implementation would be much like
seen in the following code.
figure 6.7.2.b. readwrite method supporting multiple versions (version 1 of the plug-in)
FooStuff::ReadWrite(IPMStream * stream, ImplementationID
implementation)
{
stream->XferByte(0x01);
stream->XferByte(fOne);
stream->XferByte(fTwo);
}
For the second version of the same plug-in, you need to add a 16 bit integer
value (fThree). In the second version of the plug-in, what you are trying to
accomplish is to read either the version one or version two information, but
always write the version two information.
figure 6.7.2.c. readwrite method supporting multiple versions (version 2 of the plug-in)
Adobe InDesign Programming Guide
6.8. Summary
207
FooStuff::ReadWrite(IPMStream * stream, ImplementationID
implementation)
{
uchar version = 0x02; //Always *write* version 2 data
stream->XferByte(version);
if (version == 0x01)
{
stream->XferByte(fOne);
stream->XferByte(fTwo);
}
else
{
stream->XferByte(fOne);
stream->XferByte(fTwo);
stream->XferInt16(fThree);
}
}
Notice the code above still does the work for both reading and writing all of the
data for this implementation. It would, of course, be possible to check whether
the stream is a reading or writing stream, and then to proceed based on this
information - but the code above is actually simpler, and accomplishes the
same thing. If the stream is a ReadStream, then version is initialized as 0x02,
but it is immediately replaced by the contents of the first byte in the stream, and
the rest of the stream is processed according to the version number found. If
this plug-in should encounter data claiming a version number of greater than 2,
then only the data it understands (processed by the else-clause) would be read.
This method allows the version 2 plug-in to work with data from both versions
before it and after. Each new version of the plug-in using this methodology
must preserve the portion of the stream previous versions created and only add
new information to the end.
When using this approach the plug-in’s “data version number”will not change
between versions of the plug-in. The data version number should only change
if a data converter is being supplied to convert the data from one version to
another.
6.8. Summary
This chapter outlined how persistence is implemented in the application and
how it can be used in plug-ins to store object data. The application’s databases
are discussed, and how objects in those databases are used and manipulated.
208
6.9. Review
Persistence
6.9. Review
You should be able to answer these questions:
1. How does the application store its data? (6.3.2., page 174)
2. How is an object made persistent? (6.4.2., page 181)
3. How is a persistent object referenced? (6.4.1.3., page 180)
4. What is a stream? (6.5., page 183)
5. How do I create a new stream? (6.5.3., page 184)
6.10. References
Adobe InDesign SDK. Technical Note #10021, Schema-based Data Conversion.
See Adobe InDesign SDK/Documentation/Documentation/DataConversion.pdf.
7.
Service Providers
7.0. Overview
This chapter describes the service provider architecture of Adobe InDesign and
shows how to use it.
7.1. Goals
The questions this chapter answers are:
1. What are the major components of the service provider architecture?
2. What is the interaction between a service provider and the application?
3. How do you implement a service provider for your plug-in?
7.2. Chapter-at-a-glance
“7.3.Architecture” on page 210 defines the service provider mechanism and
describes the interaction between a service provider and the application.
“7.4.Implementation details” on page 212 lists the types of service providers
and discusses some of the interfaces used to implement them.
“7.5.Recipes for common service providers” on page 227 provides sample code
for selected service providers.
“7.6.Summary” on page 236 recaps everything presented in this chapter.
table 7.2.a. version history
Rev
Date
Author
Notes
2.0
23-Oct-02
Lee Huang
Update content for InDesgn 2.x API
0.1
1-Jan-00
Rodney Cook
First Draft
209
210
7.3. Architecture
Service Providers
“7.7.Review” on page 236 presents some questions to determine whether you
have assimilated the information adequately to progress.
“7.8.References” on page 236 cites sources of additional information.
7.3. Architecture
The service provider architecture supplies a mechanism by which functionality
(a service) created in one plug-in can be made readily available to all plug-ins at
runtime.
7.3.1. What is a service provider
The feature distinguishing a boss as a service provider is it does not just provide
functionality, but it follows InDesign procedures for categorizing, storing,
finding and implementing this functionality.
As a service provider, a boss registers at startup as providing a category of
functionality. This information is recorded in a central location. At runtime, a
plug-in needing a particular type of functionality (for example, the ability to
import and place a TIFF) can quickly look to this central location to see
whether the service it needs is available.
Briefly, the components of the service provider mechanism are:
• the categories of service providers are specified by service IDs (ServiceID)
• the central location is the service registry (IK2ServiceRegistry)
• the services identified by service ID are provided by the service provider
(IK2ServiceProvider).
• the controlling mechanism is the service manager (IK2ServiceMgr)
In the following sections, the components of the service provider mechanism
are discussed in detail
7.3.2. What is the service registry?
The application service registry provides a globally accessible container for any
boss object registered as providing a service (for example, an import filter),
through a service provider (IK2ServiceProvider).
During startup of the application, the service registry automatically finds and
registers all services. This is done by iterating through the object model and
registering every boss having an IK2ServiceProvider interface.
Adobe InDesign Programming Guide
7.3. Architecture
211
7.3.3. What is a service ID?
ServiceIDs have the same form as all other application ID-space values
(ClassIDs, IIDs, etc.). A ServiceID is unique to a type of service (for example,
kTextEngineService), not to a particular service provider. There can be multiple
objects providing the same type of service.
7.3.4. Interaction between service provider and application
The session has an IK2ServiceRegistry interface, which gives access to all service
provider bosses. At startup, each service provider is registered with the service
registry using a call iterating through the object model and collects these
service providers into a list.
Each IK2ServiceProvider interface is instantiated to determine what ServiceID
the boss supports, whether it should be the default provider, and whether the
service provider should be instantiated once per session and shared by
subsequent request or whether a new instantiation should be created for each
request.
Nothing further happens then until a service user asks for either a particular
service or the default service. Then, the service manager retrieves the boss for
the requested service.
212
7.4. Implementation details
Service Providers
figure 7.3.4.a. life cycle diagram
Plug-in
implementing
service
Host launches.
Host loads resources.
Host calls RegisterServiceProvider().
Plug-in returns ServiceID
Plug-in requests service
Host provides implementation
7.4. Implementation details
This section lists the types of service providers and discusses some of the
interfaces used to implement them.
7.4.1. Types of service providers
SnipInspectServiceProviders.cpp generate a list of service IDs supported by
InDesign. It also output useful information like the name of the service
provider boss, interfaces on the boss, instantiation policy.
Listed below are service IDs used by InDesign. Indented below each service ID
are the implementation IDs for each service provider returning the service ID.
figure 7.4.1.a. service IDs and the implementation IDs returning them.
kActionFilterService
Used where...
kActionFilterProviderImpl
kActionRegisterService
Adobe InDesign Programming Guide
Used where...
kActionRegisterProviderImpl
kAddEmbedUndoRedoSignalResponderService
Used where...
kAddEmbedUndoRedoSignalRespServiceImpl
kAddExtraLinkUndoRedoSignalResponderService
Used where...
kAddExtraLinkUndoRedoSignalRespServiceImpl
kAddLinkUndoRedoSignalResponderService
Used where...
kAddLinkUndoRedoSignalRespServiceImpl
kAddLinksUndoRedoSignalResponderService
Used where...
kAddLinksUndoRedoSignalRespServiceImpl
kAfterAddEmbedSignalResponderService
Used where...
kAfterAddEmbedSignalRespServiceImpl
kAfterAddExtraLinkSignalResponderService
Used where...
kAfterAddExtraLinkSignalRespServiceImpl
kAfterAddLinkSignalResponderService
Used where...
kAfterAddLinkSignalRespServiceImpl
kAfterAddLinksSignalResponderService
Used where...
kAfterAddLinksSignalRespServiceImpl
kAfterAttachDataLinkSignalResponderService
Used where...
kAfterAttachDataLinkSignalRespServiceImpl
kAfterCloseDocSignalResponderService
Used where...
kAfterCloseDocSignalRespServiceImpl
kAfterMoveLinkSignalResponderService
Used where...
kAfterMoveLinkSignalRespServiceImpl
kAfterNewDocSignalResponderService
Used where...
kAfterNewDocSignalRespServiceImpl
7.4. Implementation details
213
214
7.4. Implementation details
kAfterOpenDocSignalResponderService
Used where...
kAfterOpenDocSignalRespServiceImpl, kMetaDataResponderImpl
kAfterRefreshLinkSignalResponderService
Used where...
kAfterRefreshLinkSignalRespServiceImpl
kAfterRemoveEmbedSignalResponderService
Used where...
kAfterRemoveEmbedSignalRespServiceImpl
kAfterRemoveLinksSignalResponderService
Used where...
kAfterRemoveLinksSignalRespServiceImpl
kAfterRestoreLinkSignalResponderService
Used where...
kAfterRestoreLinkSignalRespServiceImpl,
kXMLLinksChangedResponderImpl
kAfterRevertDocSignalResponderService
Used where...
kAfterRevertDocSignalRespServiceImpl
kAfterSaveACopyDocSignalResponderService
Used where...
kAfterSaveACopyDocSignalRespServiceImpl
kAfterSaveAsDocSignalResponderService
Used where...
kAfterSaveAsDocSignalRespServiceImpl
kAfterSaveDocSignalResponderService
Used where...
kAfterSaveDocSignalRespServiceImpl
kAfterSetLinkURLSignalResponderService
Used where...
kAfterSetLinkURLSignalRespServiceImpl,
kXMLLinksChangedResponderImpl,
kXMLWFSignalRespServiceImpl
kAfterUpdateLinkSignalResponderService
Used where...
kAfterUpdateLinkSignalRespServiceImpl
kAlertHandlerService
Used where...
Service Providers
Adobe InDesign Programming Guide
7.4. Implementation details
kCAlertHandlerProviderImpl
kAppStartupShutdownService
Used where...
kCStartupShutdownProviderImpl, kDrawServiceImpl,
kServiceRegistryImpl, kIMEServiceProvider,
kACEStartupServiceImpl, kGradGfxStateServiceProviderImpl,
kGraphicStateServiceProviderImpl, kAutoLayoutServiceProviderImpl,
kLibraryPanelMgrSSServiceImpl, kXPPrintSetupServiceImpl
kApplyMasterSignalResponderService
Used where...
kApplyMasterSignalRespServiceImpl
kAttachDataLinkUndoRedoSignalResponderService
Used where...
kAttachDataLinkUndoRedoSignalRespServiceImpl
kBeforeAddEmbedSignalResponderService
Used where...
kBeforeAddEmbedSignalRespServiceImpl
kBeforeAddExtraLinkSignalResponderService
Used where...
kBeforeAddExtraLinkSignalRespServiceImpl
kBeforeAddLinkSignalResponderService
Used where...
kBeforeAddLinkSignalRespServiceImpl
kBeforeAddLinksSignalResponderService
Used where...
kBeforeAddLinksSignalRespServiceImpl
kBeforeAttachDataLinkSignalResponderService
Used where...
kBeforeAttachDataLinkSignalRespServiceImpl
kBeforeCloseDocSignalResponderService
Used where...
kBeforeCloseDocSignalRespServiceImpl, kMetaDataResponderImpl
kBeforeMoveLinkSignalResponderService
Used where...
kBeforeMoveLinkSignalRespServiceImpl
kBeforeNewDocSignalResponderService
Used where...
kBeforeNewDocSignalRespServiceImpl, kWFOpenDocResponderImpl
215
216
7.4. Implementation details
kBeforeOpenDocSignalResponderService
Used where...
kBeforeOpenDocSignalRespServiceImpl, kWFOpenDocResponderImpl
kBeforeRefreshLinkSignalResponderService
Used where...
kBeforeRefreshLinkSignalRespServiceImpl
kBeforeRemoveEmbedSignalResponderService
Used where...
kBeforeRemoveEmbedSignalRespServiceImpl
kBeforeRemoveLinksSignalResponderService
Used where...
kBeforeRemoveLinksSignalRespServiceImpl
kBeforeRestoreLinkSignalResponderService
Used where...
kBeforeRestoreLinkSignalRespServiceImpl
kBeforeRevertDocSignalResponderService
Used where...
kBeforeRevertDocSignalRespServiceImpl
kBeforeSaveACopyDocSignalResponderService
Used where...
kCompFontSaveACopyDocResponderImpl,
kBeforeSaveACopyDocSignalRespServiceImpl,
kMetaDataResponderImpl
kBeforeSaveAsDocSignalResponderService
Used where...
kBeforeSaveAsDocSignalRespServiceImpl, kMetaDataResponderImpl
kBeforeSaveDocSignalResponderService
Used where...
kBeforeSaveDocSignalRespServiceImpl, kMetaDataResponderImpl
kBeforeSetLinkURLSignalResponderService
Used where...
kBeforeSetLinkURLSignalRespServiceImpl
kBeforeUpdateLinkSignalResponderService
Used where...
kBeforeUpdateLinkSignalRespServiceImpl
kBeginXReferenceSessionRespService
Used where...
kBeginStyleRefConvSessionRespServiceImpl
Service Providers
Adobe InDesign Programming Guide
7.4. Implementation details
kCMSService
Used where...
kACECMSManagerServiceImpl
kCMSStartupSignalRespService
Used where...
kCMSPrintServiceImpl
kColorPickerPanelService
Used where...
kColorPickerPanelImpl, kColorPickerWidgetServiceImpl,
kLabColorPickerWidgetService
kColorSpaceMgrService
Used where...
kACEColorSpaceMgrServiceImpl
kContentIteratorRegisterService
Used where...
kContentIteratorRegisterServiceImpl
kConversionService
Used where...
kConversionServiceImpl
kDUDCopyConverterService
Used where...
kDUDCopyConverterProviderImpl
kDeleteCleanupService
Used where...
kDeleteCleanupProviderImpl
kDeleteParaStyleRespService
Used where...
kDeleteParaStyleRespServiceImpl
kDeleteStoryRespService
Used where...
kDeleteStoryRespServiceImpl
kDeleteTextRespService
Used where...
kDeleteTextRespServiceImpl
kDocIterationService
Used where...
kDocIterationServiceImpl
kDrawEventService
217
218
7.4. Implementation details
Service Providers
Used where...
kCJKGridPrintingDrawServiceImpl, kCJKLayoutGridDrawServiceImpl,
kColorMapDrwEvtServiceImpl, kHyperlinkDrawEventServiceImpl,
kPreviewNonPrintDrawServiceImpl, kReferencePointDrawServiceImpl,
kMasterPageDrawEventServiceImpl, kMasterPageHitTestServiceImpl,
kMasterPageInvalServiceImpl, kMasterPageIterateServiceImpl,
kColumnGuideHitTestServiceImpl, kPageShapeDrawServiceImpl,
kTaggedFramesDrawServiceImpl, kFrameThreadDrawServiceImpl,
kXPDrwEvtServiceImpl
kDuplicateSpreadSignalResponderService
Used where...
kDuplicateSpreadSignalRespServiceImpl
kDuringNewDocSignalResponderService
Used where...
kDuringNewDocSignalRespServiceImpl, kAutoLayoutDocResponderImpl,
kMetaDataResponderImpl, kHyphExceptionDocResponderImpl,
kScotchRulesNewDocResponderImpl, kTOCNewDocResponderImpl,
kWFOpenDocResponderImpl
kDuringNewScrapDocSignalResponderService
Used where...
kDuringNewScrapDocSignalRespServiceImpl
kDuringOpenDocSignalResponderService
Used where...
kDuringOpenDocSignalRespServiceImpl, kAutoLayoutDocResponderImpl,
kHyphExceptionDocResponderImpl, kScotchRulesNewDocResponderImpl,
kWFOpenDocResponderImpl
kDuringSaveACopyDocSignalResponderService
Used where...
kDuringSaveACopyDocSignalRespServiceImpl
kEasterEggService
Used where...
kSVGExportTestMenuImpl, kMandelbrotEggImpl,
kTextWalkerServiceProviderImpl
kEdgeAlignmentService
Used where...
kKFKerningOnTheFlyImpl, kPairKernOffServiceImpl
kEditCmdPostProcessService
Used where...
kTextPreProcessService
kEditCmdPreProcessService
Used where...
Adobe InDesign Programming Guide
7.4. Implementation details
kPageNumEvenOddnessChangeResponderImpl
kEncodingConverterService
Used where...
kEuropeanEncodingMacToWinServiceProviderImpl,
kEuropeanEncodingWinToMacServiceProviderImpl
kEndPDFDocumentSignalResponderService
Used where...
kEndPDFDocumentSignalResponderServiceImpl
kEndPDFPageSignalResponderService
Used where...
kEndPDFPageSignalResponderServiceImpl
kEndXReferenceSessionRespService
Used where...
kEndStyleRefConvSessionRespServiceImpl
kErrorStringService
Used where...
kErrorStringProviderImpl
kExportBookService
Used where...
kExportBookServiceImpl
kExportProviderService
Used where...
kExportServiceImpl
kFindChangeParaDlgService
Used where...
kFindChangeParaDlgService
kGenStlEdtEditorService
Used where...
kRomanOnlyPairKernServiceImpl
kGenericDataLinkService
Used where...
kIndexDataLinkProviderImpl, kIndexDataLinkServiceImpl,
kTOCDataLinkProviderImpl, kTOCDataLinkServiceImpl
kGlobalTextAdornmentService
Used where...
kStripCharServiceProviderImpl
kIDataLinkService
Used where...
219
220
7.4. Implementation details
Service Providers
kDataLinkServiceImpl
kISuiteRegisterService
Used where...
kCSuiteRegisterProviderImpl
kImageReadFormatService
Used where...
kDIBImageReadFormatServiceImpl, kGIFImageReadFormatServiceImpl,
kJPEGImageReadFormatServiceImpl, kPCXImageReadFormatServiceImpl,
kPNGImageReadFormatService, kPSImageReadFormatService,
kSCTImageReadFormatServiceImpl, kTIFFImageReadFormatServiceImpl,
kDfltImageReadFormatService
kImageWriteFormatService
Used where...
kGIFImageWriteFormatServiceImpl, kJPEGImageWriteFormatServiceImpl,
kSCTImageWriteFormatServiceImpl, kTIFFImageWriteFormatServiceImpl
kImportManagerService
Used where...
kImportMgrServiceImpl
kImportProviderService
Used where...
kTaggedTextImportServiceProvider, kMultiLinkPlaceServiceImpl,
kImportServiceImpl, kDCSPlaceServiceImpl, kEPSPlaceServiceImpl
kIndexingHeaderSetHandlerService
Used where...
kIndexDataLinkServiceImpl
kKerningOnTheFlyService
Used where...
kKFPairKernServiceImpl
kKitRegisterService
Used where...
kKitRegisterProviderImpl
kLayoutActionService
Used where...
kLayoutActionProviderImpl
kLayoutDDSrcContentHelperService
Used where...
kLayoutDDSrcHelperProviderImpl
kLayoutDDTargetFlavorHelperService
Used where...
Adobe InDesign Programming Guide
7.4. Implementation details
kLayoutDDTargHelperProviderImpl
kLibraryItemGridDDTargetFlavorHelperService
Used where...
kLibraryItemGridDDTHelperProviderImpl
kLibraryNewButtonDDTargetFlavorHelperService
Used where...
kLibraryNewButtonDDTHelperProviderImpl
kLibraryServiceID
Used where...
kLibraryServiceProviderImpl
kLinguisticManagerService
Used where...
kLinguisticMgrServiceImpl
kLinguisticService
Used where...
kCJKLinguisticProviderImpl, kLinguisticMgrImpl,
kLinguisticServiceProviderImpl, kProxServiceProvider
kLinksChangedSignalService
Used where...
kLinksChangedSignalServiceImpl, kXMLLinksChangedResponderImpl
kMangleObjectServiceID
Used where...
kMangleObjectServiceProviderImpl
kMenuFilterService
Used where...
kMenuFilterProviderImpl
kMenuRegisterService
Used where...
kMenuRegisterProviderImpl
kMergeStoriesSignalService
Used where...
kDeleteTextRespServiceImpl
kMetaDataOpsService
Used where...
kMetaDataOpsProviderImpl, kMetaDataResponderImpl
kMoveLinkUndoRedoSignalResponderService
Used where...
kMoveLinkUndoRedoSignalRespServiceImpl
221
222
7.4. Implementation details
kNewPISignalResponderService
Used where...
kNewPISignalRespServiceImpl
kNewStorySignalResponderService
Used where...
kJSingleServiceImpl, kNewStorySignalRespServiceImpl
kNewWorkspaceSignalResponderService
Used where...
kNewWorkspaceSigRespServiceImpl
kOpenLayoutSignalServiceID
Used where...
kLayoutSelectFilterServiceImpl
kOpenManagerService
Used where...
kOpenMgrServiceImpl
kOpenProviderService
Used where...
kOpenServiceImpl
kPageItemDDTargetFlavorHelperService
Used where...
kPageItemDDTargetHelperProviderImpl
kPageItemDataExchHandlerHelperService
Used where...
kPageItemDataExchHandlerHelperProviderImpl
kPageItemScrapSuitePasteHelperService
Used where...
kPageItemScrapSuitePasteHelperProviderImpl
kPageNumEvenOddnessChangeSignalResponderService
Used where...
kNewStorySignalRespServiceImpl
kPairKerningService
Used where...
kTextAttrPairKernMethodBossImpExpImpl,
kTIFFImageWriteFormatServiceImpl,
kIndexingHSHandlerServiceImpl,
kGlobalTextAdornmentServiceImpl
kPaletteFactoryService
Used where...
Service Providers
Adobe InDesign Programming Guide
7.4. Implementation details
kFloatingTabPaltFactoryServImpl, kPaletteFactoryServiceImpl
kPaletteMgrService
Used where...
kBookPanelPaletteServiceProviderImpl,
kDTTPaletteServiceProviderImpl
kPanelRegisterService
Used where...
kCPanelRegisterProviderImpl
kPathCornerService
Used where...
kPathCornerServiceProviderImpl
kPathEndStrokerService
Used where...
kPathEndStrokerServiceProviderImpl
kPathStrokerService
Used where...
kPathStrokerServiceProviderImpl
kPhase2ConversionSignalResponderService
Used where...
kPhase2ConvSignalRespServiceImpl
kPlaceGunServiceID
Used where...
kPlaceGunServiceImpl
kPrintInsertPSProcService
Used where...
kInsertPSProcServiceImpl
kPrintSetupService
Used where...
kCMSPrintServiceImpl, kPrintGradientSetupServiceImpl,
kThumbnailServiceImpl, kPreflightButtonServiceImpl,
kXPDrwEvtServiceImpl
kRasterPortSetupService
Used where...
kACERasterPortSetupServiceImpl
kReferenceConverterService
Used where...
kReferenceConverterProviderImpl
kRemoveEmbedUndoRedoSignalResponderService
223
224
7.4. Implementation details
Used where...
kRemoveEmbedUndoRedoSignalRespServiceImpl
kRemoveLinksUndoRedoSignalResponderService
Used where...
kRemoveLinksUndoRedoSignalRespServiceImpl
kRenderingObjectService
Used where...
kRenderClassProviderImpl
kRestoreLinkUndoRedoSignalResponderService
Used where...
kRestoreLinkUndoRedoSignalRespServiceImpl
kScriptMgrProviderService
Used where...
kScriptManagerServiceImpl
kScriptProviderService
Used where...
kScriptServiceImpl
kSelectionFilterService
Used where...
kLayoutSelectFilterServiceImpl
kSelectionService
Used where...
kSelectionServiceProviderImpl
kService_PageSizes
Used where...
kPageSizesService
kService_SectionStyles
Used where...
kSectionStylesService
kService_UnitOfMeasure
Used where...
kAPUnitOfMeasureServiceImpl, kHaUnitOfMeasureServiceImpl,
kQUnitOfMeasureServiceImpl, kDfltUnitOfMeasureServiceImpl,
kUnitOfMeasureService, kCustomUnitOfMeasureServiceImpl
kSetLinkURLUndoRedoSignalResponderService
Used where...
kSetLinkURLUndoRedoSignalRespServiceImpl
kShortcutContextService
Service Providers
Adobe InDesign Programming Guide
Used where...
kShortcutContextProviderImpl
kShutdownNotificationService
Used where...
kShutdownNotificationProviderImpl
kSnapToService
Used where...
kSnapToServiceProviderImpl
kStartPDFDocumentSignalResponderService
Used where...
kStartPDFDocumentSignalResponderServiceImpl
kStartPDFPageSignalResponderService
Used where...
kStartPDFPageSignalResponderServiceImpl
kStringRegisterService
Used where...
kCStringRegisterProviderImpl
kStripCharService
Used where...
kStripCharServiceProviderImpl
kStyleSyncService
Used where...
kStyleSyncProviderImpl
kSysFileDataExchHandlerHelperService
Used where...
kSysFileDataExchHandlerHelperProviderImpl
kTableDataExchHandlerHelperService
Used where...
kTableDataExchHandlerHelperProviderImpl
kTableScrapSuitePasteHelperService
Used where...
kTableScrapSuitePasteHelperProviderImpl
kTablesDDTargetFlavorHelperService
Used where...
kTablesDDTargetHelperProviderImpl
kTextDataExchHandlerHelperService
Used where...
kTextDataExchHandlerHelperProviderImpl
7.4. Implementation details
225
226
7.4. Implementation details
Service Providers
kTextEngineService
Used where...
kTextAttrComposerBossImpExpImpl, kTCSimpleEggServiceImpl
kTextOffscreenService
Used where...
kTextOffscreenServiceImpl
kTextScrapSuitePasteHelperService
Used where...
kTextScrapSuitePasteHelperProviderImpl
kTextWalkerService
Used where...
kTextOffscreenServiceImpl
kTipRegisterService
Used where...
kTipRegisterProviderImpl
kToolRegisterService
Used where...
kCToolRegisterProviderImpl
kTrackerRegisterService
Used where...
kCTrackerRegisterProviderImpl
kUpdateLinkUndoRedoSignalResponderService
Used where...
kUpdateLinkUndoRedoSignalRespServiceImpl
kUserEditTextCmdResponder
Used where...
kUserEditTextCmdRespServiceImpl
kWFServiceProvider
Used where...
kScriptServiceImpl, kWFOpenDocResponderImpl
kXMLParserService
Used where...
kXMLParserServiceImpl
7.4.2. Methods of IK2ServiceProvider
The methods of IK2ServiceProvider are documented in IK2ServiceProvider.h
in the SDK.
Adobe InDesign Programming Guide
7.5. Recipes for common service providers
227
7.4.3. Methods of IK2ServiceRegistry
The methods of IK2ServiceRegistry are documented in IK2ServiceRegistry.h.
7.4.4. Getting to a service provider
There are a couple ways to get to a service provider via the IK2ServiceRegistry,
which is part of the session boss that you can access through the gSession.
InterfacePtr<IK2ServiceRegistry> sRegistry(gSession, UseDefaultIID());
Once you have the pointer to IK2ServiceRegistry, you can find a service
provider by
1. iterate thru all service providers of a certain service ID via the method
IK2ServiceRegistry::QueryNthServiceProvider(). Usually there is some
companion interface aggregated in the same boss that you can use to
narrow down the available providers. For example, the service provider
that supports kImportProviderService will aggregate the interface
IImportProvider, which has a method called CanImportThisStream() to let
you find a provider that supports the type of file.
2. find a specific service provider using service ID and class ID via the
method IK2ServiceRegistry::QueryServiceProviderByClassID().
Note that when you use the above method 2, it implies your code is coupled
with some class ID across different components, and you should be aware that
Class ID can be changed or removed in the future. However, there is some
usage in InDesign API does require the use of method 2, for example,
kSelectableDialogBoss is implemented as a service provider with service ID
kSelectableDialogServiceImpl (with the implementation ID doubled as service
ID), if you are implementing your own selectable dialog based on
kSelectableDialogBoss, you will need to use method 2 if you are indeed
accessing the dialog boss through the IK2ServiceRegistry.
7.5. Recipes for common service providers
This section demonstrates common uses and implementations of service
providers. Developers can use this material as an aid to determining whether
they can use an existing service provider or must create their own service
provider.
The following code segments are taken from sample plug-ins located in the
InDesign SDK.
228
7.5. Recipes for common service providers
Service Providers
7.5.1. Implementing string register and panel register service providers
The ResizablePanel plug-in demonstrates the use of InDesign APIs for creating
two resizable panels within one plug-in; one of which incorporates splitter and
scroll bars.
Here is an example from the ResizablePanel plug-in of how an existing service
provider implementation is used. ResizablePanel uses the supplied
CPanelRegisterProvider and CStringRegisterProvider implementations, as
shown in the code fragment below.
Figure 7.5.1.a. using default implementations of IK2ServiceProvider
/**
This boss class registers all the panel for this plug-in.
*/
Class
{
kRezPnlPanelRegisterBoss,
kInvalidClass,
{
/**
Register panels with the application.
*/
IID_IPANELREGISTER, kAutoPanelRegisterImpl,
/**
Identify this boss as a panel register service.
Implementation provided by the API.
*/
IID_IK2SERVICEPROVIDER, kCPanelRegisterProviderImpl,
}
},
/**
This boss class registers all the strings for this plug-in.
*/
Class
{
kRezPnlStringRegisterBoss,
kInvalidClass,
{
/**
Register string with the application.
Implementation provided by the API.
*/
IID_ISTRINGREGISTER, kAutoStringRegisterImpl,
/**
Identify this boss as a string register service.
Implementation provided by the API.
Adobe InDesign Programming Guide
7.5. Recipes for common service providers
229
*/
IID_IK2SERVICEPROVIDER, kCStringRegisterProviderImpl,
}
},
See RezPnl.fr for the string and panel definitions.
7.5.2. Implementing an import filter service provider
The TextImportFilter plug-in is a simple filter allowing .cpp files to be placed
into the InDesign application. The filter places .cpp files so they won't interfere
with the application's text-only import filter. The plug-in is provided as an
example implementation of IImportProvider.
230
7.5. Recipes for common service providers
Service Providers
Here is an example from the TextImportFilter plug-in on how an existing
service provider implementation is used. TextImportFilter uses the supplied
ImportService implementation, as shown below.
Figure 7.5.2.a. using a default implementation of IK2ServiceProvider
Class
{
kTxtImpFilterBoss,
kInvalidClass,
{
/**
Register import provider with application.
Implementation provided by the API.
*/
IID_IK2SERVICEPROVIDER, kImportServiceImpl,
/**
Identify this boss as an import provider.
Implementation provided in this sample in TxtImpFilter.cpp.
*/
IID_IIMPORTPROVIDER, kTxtImpFilterImpl,
// .. other interfaces
}
},
TextImportFilter supplies a full implementation for the IImportProvider
interface, which defines an import provider importing (placing) text or
graphics of a particular format into a document. The provider is aggregated,
along with IK2ServiceProvider, by a service boss (for example, a filter). The
service furnishes service IDs through IK2ServiceProvider, under the guidance
of the service manager (IK2ServiceMgr).
IImportProvider identifies the formats it can import, presents any preferences
UI, and actually imports text or graphics. If the service is an image import
filter for a particular format (for example, TIFF), your code must include an
image format reader boss aggregating IImageReadFormat and
IImageReadFormatInfo. TxtImpFilter.cpp from the TextImportFilter provides
an example of IImportProvider implementation.
CHMLImportFilter sample in the SDK also shows how to implemnt a
kOpenProviderService based service provider.
Adobe InDesign Programming Guide
7.5. Recipes for common service providers
231
7.5.3. Implementing an export filter service provider
The Text Export Filter is a filter registering the format, "SDK Text only" in the
Export dialog's list of formats. If this format is chosen for a range of selected
text, the filter exports plain text.
The following resource definition shows how the export service boss is defined.
Figure 7.5.3.a. resources
/**
This boss class provides the export filter provider.
*/
Class
{
kTxtExpFilterBoss,
kInvalidClass,
{
/**
Register our text export filter with the export registry.
Implementation provided by the API.
*/
IID_IK2SERVICEPROVIDER, kExportServiceImpl,
/**
232
7.5. Recipes for common service providers
Service Providers
Identify this boss as an export provider.
Implementation provided in this sample in TxtExpFilter.cpp.
*/
IID_IEXPORTPROVIDER, kTxtExpFilterImpl,
// ... other interface
}
},
The default kExportServiceImpl is used to provide default implementation for
IK2ServiceProvider, it identifies this boss as a service provider that provides
service along with kExportProviderService ID. TxtExpFilter supplies a full
implementation for the IExportProvider interface, which defines an export
provider exporting text or graphics of a particular format from a document.
The provider is aggregated, along with IK2ServiceProvider, by a service boss
(for example, a shape support boss). The service furnishes service IDs through
IK2ServiceProvider, under the guidance of the service manager
(IK2ServiceMgr).
IExportProvider identifies the formats it can export, presents any preferences
UI, and actually exports text or graphics. If the service is an export filter for a
particular format (for example, GIF), your code must include an image format
writer boss aggregating IImageWriteFormat, IImageWriteFormatInfo.
TxtExpFilter.cpp from the TextExportFilter provides an example of
IExportProvider implementation.
7.5.4. Implementing a scripting service provider
Here is an example from the CustomPrefsScript plug-in, demonstrating how to
implement a new script object and how to add events and properties to
application-supplied script objects.
Figure 7.5.4.a. resource
/** This boss class aggregates interfaces related
to handling events or properties on a scripting object.
*/
Class
{
kCPScrScriptProviderBoss,
kInvalidClass,
{
/** Identifies this boss as a script service.
Implemented by the API.
*/
IID_IK2SERVICEPROVIDER, kScriptServiceImpl,
/** Handles one or more specific events or properties
Adobe InDesign Programming Guide
7.5. Recipes for common service providers
233
on a specific exposed scripting object.
*/
IID_ISCRIPTPROVIDER, kCPScrScriptProviderImpl,
#ifdef MACINTOSH
/** On Macintosh ONLY: Holds an AEDesc of type typeAETE
representing an aete resource. It is added to a script
manager that implements AppleScript.
*/
IID_IAETE, kCPScrAETEImpl,
#endif
#ifdef WINDOWS
/** On Windows ONLY: Added to a script manager that
implements OLE Automation and is used to set and get
OLE-specific information.
Implemented by the API.
*/
IID_IOLETYPELIB, kOLETypeLibImpl,
/** On Windows ONLY: Holds an ITypeInfo interface which
holds Visual Basic type information for an object.
Implemented by the API.
*/
IID_IOLETYPEINFO, kOLETypeInfoImpl,
#endif
}
},
CustomPrefsScript needs to supply an implementation for the IScriptProvider
interfaces. Here, default implementations can be used to help implement our
own. By deriving from RepresentScriptProvider, CustomPrefsScript needs only
implement certain methods as shown in the CPScrScriptProvider.h.
Which of the methods needing implementation is determined by whether the
script provider creates a script object and whether events and properties are
created.
7.5.5. Implementing a startup/shutdown service provider
The PanelTreeView plug-in displays a tree view widget that reflects the contents
of an OS folder set by the user. Since the folder contents maybe changed
anytime by the user, PanelTreeView installed an IIdleTask during application
start up so the application will notify the plug-in perodically so the plug-in can
check the contents of the folder for updates. In order to install the IIdleTask at
application start up time, PanelTreeView implemented a
kPnlTrvStartupShutdownBoss, the purpose of this boss is to tell the application
234
7.5. Recipes for common service providers
Service Providers
that this plug-in would like to get a chance to do something while the
application is starting up or shuttong down.
Here, an existing implementation of IK2ServiceProvider is used.
PanelTreeView uses the supplied CStartupShutdownProvider implementation,
as shown below. The implementation of CStartupShutdownProvider identifies
kPnlTrvStartupShutdownBoss as a service provider who will participate in the
event when kAppStartupShutdownService is being broadcasted by the service
manager.
figure 7.5.5.a.
Class
{
kPnlTrvStartupShutdownBoss,
kInvalidClass,
{
IID_IAPPSTARTUPSHUTDOWN, kPnlTrvStartupShutdownImpl,
IID_IK2SERVICEPROVIDER, kCStartupShutdownProviderImpl,
}
},
PanelTreeView supplies a full implementation for the IStartupShutdownService
interface, which defines code needing to be run when InDesign starts up and/or
shuts down. A service provider registers for the kAppStartupShutdownService
service ID (defined in ShuksanID.h). They must provide the
IID_IAPPSTARTUPSHUTDOWN interface, which contains implementations
of the Startup() and Shutdown() methods.
The PnlTrvStartupShutdown.cpp from the PanelTreeView sample provides an
example of IStartupShutdownService implementation.
7.5.6. Implementing a responder service provider
The DocWatch plug-in shows how to catch document file actions using a
responder. When the responder is invoked through the plug-in menu, Alert
boxes will appear at each stage of a document file action, such as new, open,
close, etc.
The responder is implemented in a single boss,
kDocWchResponderServiceBoss, as shown below. Here, DocWatch provides an
implementation of IK2ServiceProvider, kDocWchServiceProviderImpl, with
Adobe InDesign Programming Guide
7.5. Recipes for common service providers
235
the help of CServiceProvider. In this implementation, DocWchServiceProvider
registers as providing the service of responding to a group of document file
action signals such as kBeforeNewDocSignalResponderService.
Figure 7.5.6.a.
/**
This boss provides the service of responding to document file actions.
It has two interfaces: one that tells InDesign what kind of service is
provided, and a second to provide the service.
*/
Class
{
kDocWchResponderServiceBoss,
kInvalidClass,
{
/**
An impl. of this plug-in to identify this boss as providing a
responder service for multiple document actions, such as for doc open,
close, etc.
If only one service was needed, then we'd reuse an API-defined
implementation ID
listed in DocumentID.h.
*/
IID_IK2SERVICEPROVIDER,kDocWchServiceProviderImpl,
/**
An impl. of this plug-in to perform the responder service. This
implementation
will deliver every service promised by the IK2ServiceProvider
implementation.
*/
IID_IRESPONDER,kDocWchResponderImpl,
}
},
DocWatch needs only supply an implementation for the IResponder interface.
Here too, helper implementations can be used. By deriving from CResponder,
DocWatch needs only implement certain methods shown in the
DocWchResponder.cpp. The method Respond of IResponder provides the
plug-in a chance to respond to the signals it registers in the
kDocWchServiceProviderImpl. In the sample’s case, it pops up a dialog
showing what kind of signal has just arrived. In summary, you can respond to
the signals that were stated in your implementation of IK2ServiceProvider of
your responder service provider boss, since those signals will be sent along the
IResponder.
236
7.6. Summary
Service Providers
7.6. Summary
This chapter has described the Adobe InDesign service provider architecture.
Implementation issues, including the basics of either using, adapting, or
creating a service provider for your plug-in are also covered.
7.7. Review
You should be able to answer these questions:
1. What is a service provider?
2. What is the purpose of the service registry?
3. What do you need to implement if creating a service provider?
7.8. References
•
Adobe InDesign SDK. InDesign Command Reference, 2000. See Adobe
InDesign SDK/Documentation/CommandReference.pdf.
8.
Tools
8.0. Overview
The tools palette can be customized to add new tools that manipulate the
objects in a document. This chapter describes how tools work and how to
program your own tools and add them to the toolbox.
8.1. Goals
The questions this chapter answers are:
1. What is a tool?
2. What is a tracker?
3. What is the toolbox?
4. What is the layout view?
5. How do tools work?
6. How do I track the user’s mouse gestures?
7. How do I implement a new tool?
8. What building blocks does the API provide to help me?
8.2. Chapter-at-a-glance
“8.3.Key concepts” on page 238 explains what tools do and the architecture that
surrounds them.
“8.4.Custom tools” on page 251 explains the objects that constitute a tool,
describes how they collaborate, presents the resources needed to describe a
tool’s user interface and describes the implementation classes the API provides
and on which new tools are built.
table 8.1.a. version history
Rev
Date
Author
Notes
2.1
21-Oct-2002
Seoras Ashby
Revised based on feedback from Lee Huang.
2.0
14-Oct-2002
SeorasAshby
Update content for InDesgn 2.x API and revise .
0.3
09-Apr-1999
Seoras Ashby
Revised based on Andy’s edit and Adrian’s feedback
237
238
8.3. Key concepts
Tools
“8.5.Sample code” on page 265 directs the reader to relevant sample code on
the SDK.
“8.6.Frequently asked questions(FAQs)” on page 265 provides answers to some
often asked questions.
“8.7.Summary” on page 268 summarizes the material presented in this chapter.
“8.8.Review” on page 268 provides a set of questions to test the user’s
understanding of tools.
“8.9.Exercises” on page 269 provides some tasks the reader could undertake to
gain practical experience of tools.
“8.10.References” on page 270 provides further pertinent reading material.
8.3. Key concepts
8.3.1. The toolbox and the layout view
Tools are presented via a palette called the toolbox. Document content is
presented in the layout view. Tools create and manipulate document objects
via keyboard and mouse events in the layout view. The general arrangement is
illustrated in figure 8.3.1.a.
figure 8.3.1.a. The toolbox and the layout view
Toolbox
Layout
View
Tool
Button
Tool
Cursor
The layout view is a widget in which a document is presented and edited by the
user. It implemented by boss class kLayoutWidgetBoss. The layout view is
Adobe InDesign Programming Guide
8.3. Key concepts
239
concise way of saying “the IControlView interface on boss object
kLayoutWidgetBoss”. Tools commonly use interfaces on kLayoutWidgetBoss to
discover the context they are working in. For example the spread being
manipulated can be found via ILayoutControlData and hit testing can be done
using ILayoutControlViewHelper. The toolbox contains a tool button icon for
each tool and, optionally, a hidden tools panel containing other tools as shown
in figure 8.3.1.b.
figure 8.3.1.b. Hidden tools panel
8.3.2. Tools
Tools (see interface ITool) provide a button icon in the toolbox and, optionally,
a keyboard shortcut. They can provide a cursor as a visual cue to the user of the
active tool and a tool tip to help the user understand the purpose of the tool.
To track mouse gestures when the tool is being used tools provide a tracker.
8.3.3. Cursors
Cursors (see interface ICursorProvider) provide a visual cue to the user of the
active tool. Tools wishing to provide their own cursor must become cursor
providers. Cursor providers set the mouse cursor and provide contextsensitive cursors for different areas of the screen.
figure 8.3.3.a. Cursors
Direct Select
Path Creation
Grabber Hand
Zoom In
240
8.3. Key concepts
8.3.4. Tool tips
Tool tips (see interface ITip) reveal a string with the name of the tool and its
keyboard shortcut when the mouse pointer is over the tool icon in the toolbox.
The strings displayed are declared as ODFRez string resources in the plug-in’s
.fr file. The mechanics of the registration process will be explained later. Once
the appropriate strings are registered the revealing of the tool tip is taken care of
automatically by the application.
figure 8.3.4.a. Tool tip
8.3.5. Trackers
Trackers (see interface ITracker) monitor mouse movement while an object is
being manipulated by a tool and can provide visual feedback to the user. They
makes the changes to the objects being manipulated using commands. A tool
may have one or more trackers but only a single tracker will be active at a time.
8.3.6. The tracker factory, tracking and event handling
The tracker factory (see interface ITrackerFactory) allows the introduction of
new trackers. It is used to manufacture the tracker required for a particular
context. ITrackerFactory is aggregated on the session boss, kSessionBoss. The
tracker factory maintains a table associating a tracker with a given widget and
tool by ClassID. When the tool is used in the context of the widget the
associated tracker is created and receives control. Trackers for tools that appear
in the toolbox register themselves as being associated with the layout widget,
kLayoutWidgetBoss. The code shown in figure 8.3.6.a. adds the highlighted
entry to the tracker factory.
figure 8.3.6.a. Line tracker registration in the tracker factory
void LineTrackerRegister::Register(ITrackerFactory *factory)
{
factory->InstallTracker(kLayoutWidgetBoss,
kLineToolBoss,
kLineTrackerBoss);
}
Tools
Adobe InDesign Programming Guide
Widget ClassID
8.3. Key concepts
Tool ClassID
241
Tracker ClassID
kLayoutWidgetBoss
kPointerToolBoss
kPointerTrackerBoss
kLayoutWidgetBoss
kRectFrameToolBoss
kRectangleFrameTrackerBoss
kLayoutWidgetBoss
kRectToolBoss
kRectangleTrackerBoss
kLayoutWidgetBoss
kGrabberHandToolBoss
kGrabberHandTrackerBoss
kLayoutWidgetBoss
kZoomToolBoss
kZoomToolTrackerBoss
kLayoutWidgetBoss
kLineToolBoss
kLineTrackerBoss
The framework maintains an event handler stack it uses to dispatch events
(mouse, keyboard and system events). Many event handlers (see interface
IEventHandler) are associated with a widget. The widget having the user
interface focus will be on top of the stack and will receive and process events.
When a mouse down occurs in a layout view and the active tool is
kLineToolBoss the layout view’s event handler asks the tracker factory to
manufacture the tracker for this context by making the call below which creates
kLineTrackerBoss and return its ITracker interface.
ITrackerFactory::QueryTracker(kLayoutWidgetBoss, kLineToolBoss)
The tracker is then focussed on the layout view and then asked to begin
tracking. A simplified version of the layout event handler code involved is
shown in figure 8.3.6.b.
figure 8.3.6.b. Layout event handler
bool16 LayoutEventHandler::LButtonDn(IEvent* e)
{
ITracker* theTracker = nil;
InterfacePtr<ITrackerFactory> factory(gSession,IID_ITRACKERFACTORY);
InterfacePtr<ITool> theTool(Utils<IToolboxUtils>()>QueryActiveTool());
if(theTool)
{
ClassID contextID = ::GetClass(this);
ClassID toolID = ::GetClass(theTool);
theTracker = factory->QueryTracker(contextID, toolID);
}
if (theTracker != nil)
{
242
8.3. Key concepts
Tools
InterfacePtr<IControlView> pControlView(this, IID_ICONTROLVIEW);
theTracker->Set(pControlView);
if (!theTracker->BeginTracking(e))
theTracker->Release();
}
}
To follow mouse movement a tracker must handle events for the duration of
the tracking process. To do this the tracker pushes its event handler interface
onto the stack when tracking begins and pops when tracking ends. For example
when the line tool is used to drag the end points of a line its tracker pushes and
pops its event handler as shown in figure 8.3.6.c.
figure 8.3.6.c. Event dispatching
Event
Event
Event
LineTrackerEventHandler
LayoutEventHandler
LayoutEventHandler
Push
Event Handler Stack
Before Tracking
LayoutEventHandler
Pop
Event Handler Stack
During Tracking
Event Handler Stack
After Tracking
All tracker boss classes that want to follow the mouse as it is dragged aggregate an IEventHandler interface.
When the LayoutEventHandler receives a mouse down event it calls the tracker’s ITracker::BeginTracking
method which is normally implemented by CTracker::BeginTracking. If the mouse is to be tracked this
method calls CTracker::EnableTracking which calls CTracker::PushEventHandler to push the tracker’s event
handler (interface IEventHandler) onto the event handler stack using IEventDispatcher::Push. Please
examine the implementation source code for CTracker.cpp on the SDK for further details.
8.3.7. Beyond the toolbox
Tools do not have to appear in the toolbox. For example the place tool is
activated after selecting a file using the File»Place menu. Trackers are also used
extensively in mouse dragging features such in the user interface. Examples of
this are setting the layout zero point and dragging guides from rulers.
8.3.8. Drawing and sprites
To provide visual feedback while an object is undergoing manipulation a
tracker can draw to the screen.
Adobe InDesign Programming Guide
8.3. Key concepts
243
Page items can be hard to draw when they are being changed dynamically. To
ensure objects are drawn on screen smoothly and efficiently without flickering
the application provides a sprite API. A sprite (see interface ISprite) is a
graphic object that can be moved around on screen causing no disturbance to
the background.
8.3.9. Documents, page items and commands
Tools allow the manipulation of documents by the user. Please refer to the
“Document Structure” and “Page Items” chapters for more information on
how documents are organized and how page items are arranged. Tools use
commands to make changes to a document.
8.3.10. Line tool use scenario
To show how the objects in a tool collaborate a scenario describing the line tool
is given below.
The scenario is divided into three sections: control; dispatch and behavior.
Control is concerned with the registration of the tool with the application and
the mechanism allowing the user to select the tool. Dispatch is concerned with
how the application launches active use of the tool. Behavior is concerned with
what the tool does to create a line. Some of the objects mentioned have not yet
been introduced however they will be described later in this chapter.
Figure 8.3.10.a shows how the line tool registers with the application and is
used to create a line between two points in a document. A legend explaining the
steps in each section is shown in figure 8.3.10.b.
244
8.3. Key concepts
Tools
figure 8.3.10.a. Line tool scenario
Control
LineTrackerRegister
Tracker Factory
C1
Toolbox
LineToolRegister
Widget
C2
Tool
Tracker
...
...
...
kLayoutWidgetBoss
k LineToolBoss
kLineTrackerBoss
...
...
...
C3
Dispatch
LineTool
D3
D2
LayoutWidget/LayoutView
LayoutEventHandler
D4
Mouse
Down
Event
Mouse
Down
Event
D1
B1
LineTracker
Behavior
B6
B3
Cmd
B2
Drag &
Other
Events
B5
Document
Legend: See figure 8.3.10.b. for an explanation of labelled steps C, D and B
B4
Mouse
Up
Event
Adobe InDesign Programming Guide
8.3. Key concepts
245
figure 8.3.10.b. Legend for the line tool scenario
Control
C1) The tool’s tracker is registered with the application’s tracker factory.
C2) The tool is registered with the application and its tool button icon in the
toolbox is initialized.
C3) The user clicks the tool’s button icon (kLineToolBoss becomes the active
tool).
Dispatch
D1) The user clicks in the layout view (a mouse down event is passed to the
LayoutEventHandler).
D2) The LayoutEventHandler looks at the active tool (kLineToolBoss) and the
context of the event (mouse down over an empty page area). The association
identifies the tracker that should be created for the context (kLineTrackerBoss).
D3) The appropriate tracker is manufactured via the tracker factory.
D4) The tracker is asked to begin tracking the mouse from the original mouse
down event.
Behavior
B1) The tracker pushes its own event handler onto the application’s event
handler stack so that it can receive events and track the mouse.
B2) The user drags the mouse (events are passed into the tracker).
B3) The tracker provides appropriate dynamic visual feedback to the user of the
tool behavior (a line is drawn between the location of the original mouse down
event and the current mouse position).
B4) The user releases the mouse (a mouse up event is passed into the tracker).
B5) The tracker implements an appropriate action (creation of a page item
describing the line between start and end points) using a command.
B6) The tracker pops its event handler from the application’s event handler
stack and tracking is complete.
The scenario described above is typical of a tool that creates items. The item
itself is created by the tracker using a command once the user releases the
mouse button. However other categories of tool may dynamically execute
commands while tracking the mouse. For example the pointer tool dynamically
executes commands when moving or resizing items.
246
8.3. Key concepts
Tools
8.3.11. Trackers with multiple behaviors
If a tracker needs to exhibit more than one behavior it can create another
tracker dependent on the context. The selection tool for example exhibits
multiple behaviors. When it is active and a mouse down occurs in a layout view
the pointer tracker (kPointerTrackerBoss) is created. The pointer tracker
considers the context of the click then creates and dispatches control to another
tracker. Once the pointer tracker has examined the context and created an
appropriate tracker its job is done. The trackers used by kPointerTrackerBoss to
move and resize page items are illustrated in figure 8.3.11.a. The IDs under
which they are registered in the tracker factory are shown in figure 8.3.11.b.
Note the figures do not show all the behaviors of kPointerTrackerBoss.
figure 8.3.11.a. Pointer tracker move and resize behavior
PointerTracker::BeginTracking()
Page item bounding box
Mouse Down On
Page item resize handle
Empty Area
Create move tracker to
move the page item as the
user drags.
Create Layout Selection
Tracker to draw a marquee
selection as the user drags
and set the selection on
mouse up.
Create resize tracker to
resize the page item as the
user drags. Each page item
registers its own resize
tracker.
CRectResizeTracker::BeginTracking()
MoveTracker::BeginTracking()
LayoutSelectionTracker::BeginTracking()
PointerTracker complete
figure 8.3.11.b. Trackers used by pointer tracker to move and resize page items
Widget ClassID
kLayoutWidgetBoss
Tool ClassID
kPointerToolBoss
Tracker ClassIDa
kPointerTrackerBoss
Adobe InDesign Programming Guide
8.3. Key concepts
Widget ClassID
Tool ClassID
Tracker ClassIDa
kPageItemBoss
kMoveToolBoss
kMoveTrackerBoss
kLayoutWidgetBoss
kLayoutSelectionToolImpl
kLayoutSelectionTrackerBoss
kPlacedPDFItemBoss
b
kBBoxResizeTrackerBoss
kEPSItem
kResizeToolBoss
kBBoxResizeTrackerBoss
kEPSTextItemBoss
kResizeToolBoss
kBBoxResizeTrackerBoss
kDCSItemBoss
kResizeToolBoss
kBBoxResizeTrackerBoss
kWMFItem
kResizeToolBoss
kBBoxResizeTrackerBoss
kPICTItem
kResizeToolBoss
kBBoxResizeTrackerBoss
kGroupItemBoss
kResizeToolBoss
kBBoxResizeTrackerBoss
kImageItem
kResizeToolBoss
kBBoxResizeTrackerBoss
kSplineItemBoss
kResizeToolBoss
kBBoxResizeTrackerBoss
kFrameItemBoss
kResizeToolBoss
kBBoxResizeTrackerBoss
kFrameItemBoss
kILGMoveToolImpl
kILGMoveTrackerBoss
kResizeToolBoss
247
a. Note the figures above do not show all kPointerTrackerBoss behaviors. For
example text frame link tracking via in and out port handles
(kPrePlaceTrackerBoss), tracking when the layer on which the item lies is
locked (kLockTrackerBoss), tracking of text on a path handle manipulation
(kTOPResizeTrackerBoss, kTOPMoveTrackerBoss) and others are not shown.
b. Note that the each page item can registers its own resize tracker though
as you can see they all use the same one.
8.3.12. The tool manager
Tools are managed by the tool manager, kToolManagerBoss. You can navigate
to the IToolManager interface as shown below:
InterfacePtr<IApplication> app(gSession->QueryApplication());
InterfacePtr<IToolManager> toolMgr(app->QueryToolManager());
8.3.13. Toolbox utilities
Interface IToolBoxUtils provides a facade which should, in most situations, save
you from having to program to the IToolManager interface. It’s a utility
interface on kUtilsBoss accessed in the standard way. For example the code
below queries the active tool of type kPointerToolBoss. The tool type in this
context identifies a group of tools within which only one tool can be active:
const ClassID toolType = kPointerToolBoss;
InterfacePtr<ITool> currentTool(
Utils<IToolBoxUtils>()->QueryActiveTool(toolType));
248
8.3. Key concepts
Tools
8.3.14. Tool type
Tools are categorized as belonging to one or more of the categories given by
ITool::ToolType. This identifies what the tool does and how the selection in the
layout view reacts when that tool becomes active (see interface
IToolChangeSuite). Tools identify this type in their CTool constructor via
parameter toolInfo.
ITool::ToolType can easily be confused the ClassID parameter called toolType
defined by the tool’s ToolDef statement (see “ToolDef ODFRez type” on
page 257) and used by ITool::GetToolType and other APIs. This ClassID is used
to identify a group of mutually exclusive tools, i.e. only one tool of a given tool
type can be selected in the toolbox at any one time.
To illustrate the distinction between these two different “tool types” their
values have been tabulated below in figure 8.3.14.
figure 8.3.14.a. Tool categories (see ITool::ToolType)
Tool
Tool Boss
ITool::ToolType
ClassID toolType
Selection
kPointerToolBoss
kLayoutSelectionTool
kPointerToolBoss
Direct
Selection
kDirectSelectToolBoss
kLayoutSelectionTool
kPathManipulationTool
kPointerToolBoss
Pen
kSplinePenToolBoss
kLayoutCreationTool
kLayoutManipulationTool
kPathManipulationTool
kPointerToolBoss
Add
Anchor
Point
kSplineAddPointToolBoss
kLayoutManipulationTool
kPathManipulationTool
kPointerToolBoss
Delete
Anchor
kSplineRemovePointToolBoss
kLayoutManipulationTool
kPathManipulationTool
kPointerToolBoss
Convert
Direction
kSplineDirectionToolBoss
kLayoutManipulationTool
kPathManipulationTool
kPointerToolBoss
Type
kIBeamToolBoss
kTextSelectionTool
kTableSelectionTool
kTextManipulationTool
kTableManipulationTool
kTextCreationTool
kTableCreationTool
kPointerToolBoss
Adobe InDesign Programming Guide
8.3. Key concepts
figure 8.3.14.a. Tool categories (see ITool::ToolType) (continued)
Tool
Tool Boss
ITool::ToolType
ClassID toolType
Horizontal
text on a
path
kTOPHorzToolBoss
kTextSelectionTool
kTableSelectionTool
kTextManipulationTool
kTableManipulationTool
kTextCreationTool
kTableCreationTool
kPointerToolBoss
Vertical
text on a
path
(available
under the
Japanese
feature set)
kTOPVertToolBoss
kTextSelectionTool
kTableSelectionTool
kTextManipulationTool
kTableManipulationTool
kTextCreationTool
kTableCreationTool
kPointerToolBoss
Pencil
kPencilToolBoss
kLayoutCreationTool
kLayoutManipulationTool
kPathManipulationTool
kPointerToolBoss
Smooth
kSmoothToolBoss
kLayoutCreationTool
kLayoutManipulationTool
kPathManipulationTool
kPointerToolBoss
Erase
kEraseToolBoss
kLayoutCreationTool
kLayoutManipulationTool
kPathManipulationTool
kPointerToolBoss
Line
kLineToolBoss
kLayoutCreationTool
kPointerToolBoss
Rectangle
kRectToolBoss
kLayoutCreationTool
kPointerToolBoss
Rectangle
Frame
kRectFrameToolBoss
kLayoutCreationTool
kPointerToolBoss
Oval
kOvalToolBoss
kLayoutCreationTool
kPointerToolBoss
Oval Frame
kOvalFrameToolBoss
kLayoutCreationTool
kPointerToolBoss
Regular
Polygon
kRegPolyToolBoss
kLayoutCreationTool
kPointerToolBoss
Regular
Polygon
Frame
kRegPolyFrameToolBoss
kLayoutCreationTool
kPointerToolBoss
Horizontal
frame grid
(available
under the
Japanese
feature set)
private
kLayoutCreationTool
kPointerToolBoss
249
250
8.3. Key concepts
Tools
figure 8.3.14.a. Tool categories (see ITool::ToolType) (continued)
Tool
Tool Boss
ITool::ToolType
ClassID toolType
Vertical
frame grid
(available
under the
Japanese
feature set)
private
kLayoutCreationTool
kPointerToolBoss
Place
kPlaceToolBoss
kNone
The place tool creates page
items and is in theory a layout
creation tool but because it
does not appear in the
toolbox it has no category as
such.
not applicable
Rotate
kRotateToolBoss
kLayoutSelectionTool
kLayoutManipulationTool
kPointerToolBoss
Scale
kScaleToolBoss
kLayoutSelectionTool
kLayoutManipulationTool
kPointerToolBoss
Shear
kShearToolBoss
kLayoutSelectionTool
kLayoutManipulationTool
kPointerToolBoss
Free
transform
tool
kFreeTransformToolBoss
kLayoutManipulationTool
kPointerToolBoss
Eye
dropper
private
kLayoutManipulationTool
kTextManipulationTool
kTableManipulationTool
kPointerToolBoss
Gradient
kGradientToolBoss
kLayoutManipulationTool
kTextManipulationTool
kTableManipulationTool
kPointerToolBoss
Scissors
kScissorsToolBoss
kLayoutManipulationTool
kPathManipulationTool
kPointerToolBoss
Zoom
kZoomToolBoss
kViewModificationTool
kPointerToolBoss
Hand
kGrabberHandToolBoss
kViewModificationTool
kPointerToolBoss
Fill stroke
kStrokeFillProxyToolBoss
kNone
Apply color kBoss_ApplyCurrentColorTool
kNone
kBoss_ClearFillStrokeTool
Apply
gradient
kNone
kBoss_ClearFillStrokeTool
Apply none kBoss_ClearFillStrokeTool
kNone
kBoss_ClearFillStrokeTool
Normal
view mode
kNone
kNormalViewModeToolBos
s
kBoss_ApplyCurrentGradientT
ool
kNormalViewModeToolBoss
Adobe InDesign Programming Guide
8.4. Custom tools
251
figure 8.3.14.a. Tool categories (see ITool::ToolType) (continued)
Tool
Preview
mode
Tool Boss
kPreviewModeToolBoss
ITool::ToolType
kNone
ClassID toolType
kNormalViewModeToolBos
s
8.4. Custom tools
8.4.1. Introduction
This section describes the boss classes, interfaces and resources you need to
implement to add a new tool. The APIs using which custom tools are built are
catalogued and described.
Plug-ins that implement tools typically provide:
1. A tool register boss class.
2. A tracker register boss class.
3. A tool boss class per tool.
4. A tracker boss class per tool.
5. Resources controlling how the tool is displayed.
8.4.2. Class diagram
The classes typically found in a custom tool are shown in figure 8.4.2.a:
252
8.4. Custom tools
Tools
figure 8.4.2.a. Custom tool class diagram
kYourToolRegisterBoss
kYourTrackerRegisterBoss
IToolRegister
ITrackerRegister
IK2ServiceProvider
IK2ServiceProvider
kYourToolBoss
kYourTrackerBoss
ITool
ITracker
ICursorProvider
IEventHandler
IPMPersist
kGenericToolBoss
IControlView
IEventHandler
kYourToolRegisterBoss registers the plug-in’s tool with the tool manager using
the IToolRegister interface. If your tool does not appear in the toolbox don’t
implement this boss class.
kYourTrackerRegisterBoss registers the plug-in’s tracker(s) with the tracker
factory using the ITrackerRegister interface.
kYourToolBoss allows the tool manager to control the tool using the ITool
interface. It specifies information about a tool, gets called when the tool is
selected and deselected by the user and when a tool options dialog should be
Adobe InDesign Programming Guide
8.4. Custom tools
253
popped. ICursorProvider allows the tool to customize the cursor when the tool
is active. IPMPersist allows information such as the tool’s name and icon to be
saved persistently. kGenericToolBoss is the parent boss class for toolbox tools.
The control view it provides displays the tool's buttons and its event handler
handles clicks on the tool’s buttons in the toolbox.
kYourTrackerBoss responds to mouse gestures in the layout view when your
tool is being used. You will have at least one tracker boss for each tool in your
plug-in. The interfaces on a tracker boss class collaborate to provide the active
behavior of the tool. ITracker is the interface to which control is passed so the
mouse can be tracked. It manages and controls the other interfaces on the boss
object. The tracker pushes its event handler to the top of the event handler
stack when tracking begins. During tracking IEventHandler forwards events
into the ITracker interface. When tracking ends the event handler is popped
from the stack and the tracker is finished. Standard tracker event handler
implementations are provided by the API. It is common for tracker boss classes
to have other interfaces particular to their needs. For example trackers that
create splines aggregate ISprite and IPathGeometry. However if a tracker only
needs to handle a single mouse click it does not require an IEventHandler.
8.4.3. Partial implementation classes
The API provides helper classes that partially implement interfaces relevant to
building tools.
figure 8.4.3.a. Partial implementation classes
Interface
Class
Description
IToolRegister
none
Normally the default implementation
kAutoToolRegisterImpl is used.
ITrackerRegister
none
Implemented by all tools to install the
tool’s trackers in the tracker factory
using ClassIDs you choose. Use IDs
meaningful to your context. See “The
tracker factory, tracking and event
handling” on page 240.
254
8.4. Custom tools
Tools
figure 8.4.3.a. Partial implementation classes
Interface
ITool
Class
CTool
Description
Implemented by all tools. A couple of
the methods are worthy of note.
Override IsCreationTool to return kTrue if
your tool creates or modify items. Your
tool will not be allowed to be activated
when the active layer is locked or the
document is read only. Also
IToolboxUtils::QueryMostRecentCreation
Tool may return your tool. The CTool
implementation returns the flag set in
the constructor.
Override IsSelectionTool to return kTrue
if you implement a tool that selects
objects.
IToolboxUtils::QueryMostRecentSelectio
nTool may return your tool. The CTool
implementation returns the flag set by
the constructor.
Override IsTextTool to return kTrue if the
text editor should not be deactivated
when your tool is selected. Tools like
Zoom and Grabber Hand also use this
ability so they can be used without
deactivating the text editor.
ICursorProvider
CToolCursorProvider
Implement if you want your own cursor.
Adobe InDesign Programming Guide
8.4. Custom tools
255
figure 8.4.3.a. Partial implementation classes
Interface
ITracker
Class
CTrackera
Description
Implemented by all tools.
Override DoBeginTracking to start
tracking the mouse. Handle the mouse
click and return kFalse if you don’t want
to continue. Return kTrue to track the
mouse which will result in CTracker
pushing your tracker’s IEventHandler
interface onto the event handler stack.
Override ContinueTracking to be called
repeatedly even when the mouse is not
moving.
Override DoEndTracking to tidy up and
end tracking. The standard tracker event
handler (CTrackerEventHandler/
kCTrackerEventHandlerImpl) will pop
your tracker’s IEventHandler from the
event handler stack. So you only need to
do this yourself if you have specialized
this implementation.
ITracker
CPathCreationTrackerb
The base for a tracker that creates new
path based page items. Your tracker boss
class must aggregate an IPathGeometry
interface and an ISprite interface to use
this class.
CPathCreationTracker repeatedly calls
your MakePath method so you can
define the points making up your
path(s). The path is stored in an
IPathGeometry interface.
CPathCreationTracker uses the ISprite
interface to draw the path to the screen
as the mouse is dragged. On mouse up it
processes commands to create your
page item.
ITracker
CLayoutTrackerc
See CLayoutTracker.cpp
256
8.4. Custom tools
Tools
figure 8.4.3.a. Partial implementation classes
Interface
IEventHandler
a.
b.
c.
d.
Class
CTrackerEventHandlerd
Description
The default implementation,
kCTrackerEventHandlerImpl, should
normally be used. Specialize
CTrackerEventHandler only if absolutely
necessary.
The C++ source code for this implementation is provided on the SDK.
The C++ source code for this implementation is provided on the SDK.
The C++ source code for this implementation is provided on the SDK.
The C++ source code for this implementation is provided on the SDK.
8.4.4. Default implementations
The API provides default implementations that completely implement some
interfaces involved in building tools. If these meet your needs you can re-use
them in your boss class definition and avoid writing the C++ code.
figure 8.4.4.a. Default implementations
Interface
ImplementationID
Description
IToolRegister
kAutoToolRegisterImpl
Reads the resource definition for your
tool and instantiates your tool in the
application’s toolbox.
IK2ServiceProvider
kCToolRegisterProviderImpl
Causes a boss class to be recognized as a
tool register service.
IK2ServiceProvider
kCTrackerRegisterProviderImpl
Causes a boss class to be recognized as a
tracker register service.
IEventHandler
kCTrackerEventHandlerImpl
Standard tracker event handler
implementation that forwards events
into an ITracker.
Adobe InDesign Programming Guide
8.4. Custom tools
257
figure 8.4.4.a. Default implementations
Interface
ImplementationID
Description
ICursorProvider
kCreationCursorProviderImpl
kDirectSelectCursorProviderImpl
kRotateCursorProviderImpl
kGrabberHandCursorProviderImpl
kScaleCursorProviderImpl
kShearCursorProviderImpl
kCreationCursorProviderImpl
kSplineAddCursorProviderImpl
kSplineRemoveCursorProviderImpl
kSplineDirectionCursorProviderImpl
kScissorsCursorProviderImpl
kHorizontalIBeamCrsrProviderImpl
kVerticalIBeamCrsrProviderImpl
kZoomToolCursorProviderImpl
kSelectCursorProviderImpl
kPlaceGunCursorProviderImpl
kSplineCreationCursorProviderImpl
kPencilCursorProviderImpl
kSmoothCursorProviderImpl
kEraseCursorProviderImpl
kTOPHorzToolCursorProviderImpl
kTOPVertToolCursorProviderImpl
Cursors provided by the application’s
tools.
ISprite
kNoHandleSpriteImpl
kGradientToolSprite
kFreeTransformSpriteImpl
kCSpriteImpl
kNoHandleAndCrossSpriteImpl
kLayoutSpriteImpl
kPencilSpriteImpl
kStandOffSpriteImpl
kTableResizeSpriteImpl
kTextOffscreenSpriteImpl
Used by trackers to draw to the screen as
the user drags the mouse.
IPathGeometry
kPathGeometryImpl
Used by path creation trackers to
describe the path points of the spline.
8.4.5. ToolDef ODFRez type
ODFRez provides a type called ToolDef that controls how a tool is displayed
within the toolbox. The order in which tools are displayed, the way in which
they are grouped and other properties are controlled using it as shown in figure
8.4.5.a.. A sample ToolDef resource data statement is given in figure 8.4.5.b.
258
8.4. Custom tools
Tools
figure 8.4.5.a. Tool display in the toolbox
Hidden tools panel
Group Numbers
Parent Tool
kFirstAdobeToolsGroup
kSecondAdobeToolsGroup
Sub-tools
Shortcut
kThirdAdobeToolsGroup
kFourthAdobeToolsGroup
kFifthAdobeToolsGroup
kSeventhAdobeToolsGroup
kNinthAdobeToolsGroup
kTenthAdobeToolsGroup
Selected tools
Only one tool of a given tool-type
can be selected at any one time in
the toolbox. Since four tools are
shown as selected this toolbox has
four distinct tool-types.
figure 8.4.5.b. Sample ToolDef resource statement
#ifdef __ODFRC__
resource ToolDef (135)
{
// 1) Tool ClassID; your tool’s boss class.
kYourToolBoss,
// 2) Tool-type ClassID; your tool’s tool-type. Tools of a given tool-type are
// mutually exclusive, only one tool of a given tool-type can be selected at any
// one time in the toolbox. The majority of tools (selection, creation,
// transformation) set this to kPointerToolBoss. See “Tool type” on page 248 for
// further documentation.
kPointerToolBoss,
// 3) Parent tool ClassID; if your tool is to be displayed by default in the main
// toolbox this should be kDoesNotApply. Otherwise your tool is a sub-tool that is
Adobe InDesign Programming Guide
8.4. Custom tools
259
// displayed in a hidden tools panel. A sub-tool specifies the ClassID of its parent
// tool boss class in whose hidden tools panel the sub-tool is to be displayed.
kDoesNotApply,
// 4) Group number (See ToolboxDefs.h); the group number or kDoesNotApply.
// Grouped tools appear together in the toolbox within a bordered area.
kSixthAdobeToolsGroup,
// 5) Tool number (See ToolboxDefs.h); the tool number that determines the
// order of tools within a group or kDoesNotApply. If two or more tools give the
same group number and tool number, their positioning will be arbitrary.
kFirstAdobeTool,
// 6) Sub-tool number; the sub-tool number that determines the order of
// sub-tools in a hidden tools panel or kDoesNotApply.
kDoesNotApply,
// 7) ActionID; ID from your plug-in’s ID space that can be used to assign a
shortcut to your tool or kInvalidActionID if don’t want your tool to support a
shortcut. Sub-tools get the shortcut for their parent’s tool. If tools have the same
shortcut, using that shortcut will cyclically select the tools with that shortcut. If
you use kInvalidActionID the keyboard shortcut editor won’t be able to assign a
shortcut for your tool.
kYourToolActionID,
// 8) Icon Identity; the icon PMSysRsrcID determines the icon bitmap used for
// the tool’s button. The resourceID for the icon and the ID for the plug-in are
// required to specify the icon resource.
kIconMyTool, kMyPluginID
}; // End, ToolDef.
ToolDef resources are localizable, so you can define different resources for
different locales, and have a tool show up in a different place, or with a different
icon. An example of the use of tool localization would be a currency stamp tool.
A tool icon could be provided for each locale (e.g., dollar, yen) and the icon for
the current locale would be shown in the toolbox. To localize your ToolDef
resources add a locale index to your plug-in’s .fr file and define a ToolDef
resource in the .fr file for each specific locale:
figure 8.4.5.c. ToolDef localization
resource LocaleIndex (kYourToolsRsrcID)
{
kToolRsrcType,
{
k_enUS, kShapeSelectorToolsRsrcID + index_enUS
k_jaJP, kShapeSelectorToolsRsrcID + index_jaJP
}
260
8.4. Custom tools
Tools
}
8.4.6. Icons and Cursors
Icons and cursors are created in their native platform resource form.
Macintosh icons need resources of type icl4, icl8 and ICN#. Cursors need
resources of type CURS.
Windows icons need an icon bitmap .ico file and an ICON resource declaration
in your plug-in project’s .rc file. Cursors need a cursor bitmap .cur file and a
CURSOR resource declaration in your plug-in project’s .rc file.
figure 8.4.6.a. Windows .rc file for icons and cursors
#include "YourTool.r"
135 ICON "YourIcon.ico"
6001 CURSOR DISCARDABLE
"YourCursor.cur"
Tool button icons come in two sizes, standard and mini. Normally you will use
the standard size, kStandardToolRect. CTool specifies the widget rects involved
and in your CTool::Init implemention you control the size to be used by calling
CTool::InitWidget passing in the mini tool rects:
figure 8.4.6.b. CTool Tool Widget Rects
const PMRect kStandardToolRect(0,0,26,22 );
const PMRect kMiniToolRect(0,0, 18,18);
const PMRect kMiddleMiniToolRect(0,0,17,18);
8.4.7. InDesign’s trackers
The API provides many trackers and you may wish to dispatch control to one of
them. These can be generally divided into trackers used by tools to manipulate
document content (show in figure 8.4.7.a) and trackers used by user interface
widgets to manipulate controls (shown in figure 8.4.7.b). The ClassID’s needed
by ITrackerFactory to make one of these trackers are given below.
figure 8.4.7.a. Tool related trackers
Widget ClassID
Tool ClassID
Tracker ClassID
kDCSItemBoss
kPathResizeToolBoss
kSplinePathResizeTrackerBoss
kDCSItemBoss
kResizeToolBoss
kBBoxResizeTrackerBoss
kDCSItemBoss
kScissorsToolBoss
kSplineScissorsTrackerBoss
kDCSItemBoss
kSplineAddPointToolBoss
kSplineAddPointTrackerBoss
Adobe InDesign Programming Guide
8.4. Custom tools
261
figure 8.4.7.a. Tool related trackers
Widget ClassID
Tool ClassID
Tracker ClassID
kDCSItemBoss
kSplineDirectionToolBoss
kSplineDirectionTrackerBoss
kDCSItemBoss
kSplineRemovePointToolBoss
kSplineRemovePointTrackerBoss
kEPSItem
kPathResizeToolBoss
kSplinePathResizeTrackerBoss
kEPSItem
kResizeToolBoss
kBBoxResizeTrackerBoss
kEPSItem
kScissorsToolBoss
kSplineScissorsTrackerBoss
kEPSItem
kSplineAddPointToolBoss
kSplineAddPointTrackerBoss
kEPSItem
kSplineDirectionToolBoss
kSplineDirectionTrackerBoss
kEPSItem
kSplineRemovePointToolBoss
kSplineRemovePointTrackerBoss
kEPSTextItemBoss
kResizeToolBoss
kBBoxResizeTrackerBoss
kFrameItemBoss
kILGMoveToolImpl
kILGMoveTrackerBoss
kFrameItemBoss
kILGRotateToolImpl
kILGRotateTrackerBoss
kFrameItemBoss
kResizeToolBoss
kBBoxResizeTrackerBoss
kGenericToolBoss
kPrePlaceToolBoss
kPrePlaceTrackerBoss
kGroupItemBoss
kResizeToolBoss
kBBoxResizeTrackerBoss
kGuideItemBoss
kMoveToolBoss
kGuideMoveTrackerBoss
kHorzRulerWidgetBoss
kGuideToolImpl
kGuideCreationTrackerBoss
kIBeamToolBoss
kFrameToolBoss
kFrameTrackerBoss
kIBeamToolBoss
kTextSelectionToolBoss
kTextSelectionTrackerBoss
kIBeamToolBoss
kVerticalTextToolBoss
kVerticalFrameTrackerBoss
kImageItem
kPathResizeToolBoss
kSplinePathResizeTrackerBoss
kImageItem
kResizeToolBoss
kBBoxResizeTrackerBoss
kImageItem
kScissorsToolBoss
kSplineScissorsTrackerBoss
kImageItem
kSplineAddPointToolBoss
kSplineAddPointTrackerBoss
kImageItem
kSplineDirectionToolBoss
kSplineDirectionTrackerBoss
kImageItem
kSplineRemovePointToolBoss
kSplineRemovePointTrackerBoss
kLayoutWidgetBoss
kDirectSelectToolBoss
kDirectSelectTrackerBoss
kLayoutWidgetBoss
kEraseToolBoss
kEraseTrackerBoss
kLayoutWidgetBoss
kFreeTransformMoveToolBoss
kFreeTransformMoveTrackerBoss
kLayoutWidgetBoss
kFreeTransformRotateToolBoss
kFreeTransformRotateTrackerBoss
kLayoutWidgetBoss
kFreeTransformScaleToolBoss
kFreeTransformScaleTrackerBoss
kLayoutWidgetBoss
kFreeTransformToolBoss
kFreeTransformTrackerBoss
kLayoutWidgetBoss
kGrabberHandToolBoss
kGrabberHandTrackerBoss
kLayoutWidgetBoss
kGradientToolBoss
kGradientToolTrackerBoss
262
8.4. Custom tools
Tools
figure 8.4.7.a. Tool related trackers
Widget ClassID
Tool ClassID
Tracker ClassID
kLayoutWidgetBoss
kGroupSelectToolImpl
kGroupSelectTrackerBoss
kLayoutWidgetBoss
kIBeamToolBoss
kIBeamTrackerBoss
kLayoutWidgetBoss
kLayoutLockToolImpl
kLockTrackerBoss
kLayoutWidgetBoss
kLayoutSelectionToolImpl
kLayoutSelectionTrackerBoss
kLayoutWidgetBoss
kLineToolBoss
kLineTrackerBoss
kLayoutWidgetBoss
kOvalFrameToolBoss
kOvalFrameTrackerBoss
kLayoutWidgetBoss
kOvalToolBoss
kOvalTrackerBoss
kLayoutWidgetBoss
kPencilToolBoss
kPencilCreationTrackerBoss
kLayoutWidgetBoss
kPlaceToolBoss
kPlaceTrackerBoss
kLayoutWidgetBoss
kPointerToolBoss
kPointerTrackerBoss
kLayoutWidgetBoss
kRectFrameToolBoss
kRectangleFrameTrackerBoss
kLayoutWidgetBoss
kRectToolBoss
kRectangleTrackerBoss
kLayoutWidgetBoss
kReferencePointToolImpl
kReferencePointTrackerBoss
kLayoutWidgetBoss
kRegPolyFrameToolBoss
kRegPolyFrameTrackerBoss
kLayoutWidgetBoss
kRegPolyToolBoss
kRegPolyTrackerBoss
kLayoutWidgetBoss
kRotateToolBoss
kRotateTrackerBoss
kLayoutWidgetBoss
kScaleToolBoss
kScaleTrackerBoss
kLayoutWidgetBoss
kScissorsToolBoss
kScissorsTrackerBoss
kLayoutWidgetBoss
kShearToolBoss
kShearTrackerBoss
kLayoutWidgetBoss
kSmoothToolBoss
kSmoothTrackerBoss);"
kLayoutWidgetBoss
kSplineAddPointToolBoss
kAddPointTrackerBoss
kLayoutWidgetBoss
kSplineDirectionToolBoss
kConvertDirectionTrackerBoss
kLayoutWidgetBoss
kSplinePenToolBoss
kSplineCreationTrackerBoss
kLayoutWidgetBoss
kSplineRemovePointToolBoss
kRemovePointTrackerBoss
kLayoutWidgetBoss
kTOPHorzToolBoss
kTOPHorzToolTrackerBoss
kLayoutWidgetBoss
kTOPVertToolBoss
kTOPVertToolTrackerBoss
kLayoutWidgetBoss
kVerticalTextToolBoss
kVerticalTextTrackerBoss
kLayoutWidgetBoss
kZoomToolBoss
kZoomToolTrackerBoss
kMultiColumnItemBoss
kPlaceToolBoss
kPlacePITrackerBoss
kPageBoss
kMoveToolBoss
kColumnGuideTrackerBoss
kPageItemBoss
kMoveToolBoss
kMoveTrackerBoss
kPageItemBoss
kPlaceToolBoss
kPlacePITrackerBoss
kPICTItem
kPathResizeToolBoss
kSplinePathResizeTrackerBoss
Adobe InDesign Programming Guide
8.4. Custom tools
263
figure 8.4.7.a. Tool related trackers
Widget ClassID
Tool ClassID
Tracker ClassID
kPICTItem
kResizeToolBoss
kBBoxResizeTrackerBoss
kPICTItem
kScissorsToolBoss
kSplineScissorsTrackerBoss
kPICTItem
kSplineAddPointToolBoss
kSplineAddPointTrackerBoss
kPICTItem
kSplineDirectionToolBoss
kSplineDirectionTrackerBoss
kPICTItem
kSplineRemovePointToolBoss
kSplineRemovePointTrackerBoss
kPlacedPDFItemBoss
kPathResizeToolBoss
kSplinePathResizeTrackerBoss
kPlacedPDFItemBoss
kResizeToolBoss
kBBoxResizeTrackerBoss
kPlacedPDFItemBoss
kScissorsToolBoss
kSplineScissorsTrackerBoss
kPlacedPDFItemBoss
kSplineAddPointToolBoss
kSplineAddPointTrackerBoss
kPlacedPDFItemBoss
kSplineDirectionToolBoss
kSplineDirectionTrackerBoss
kPlacedPDFItemBoss
kSplineRemovePointToolBoss
kSplineRemovePointTrackerBoss
kSplineItemBoss
kPathResizeToolBoss
kSplinePathResizeTrackerBoss
kSplineItemBoss
kResizeToolBoss
kBBoxResizeTrackerBoss
kSplineItemBoss
kScissorsToolBoss
kSplineScissorsTrackerBoss
kSplineItemBoss
kSplineAddPointToolBoss
kSplineAddPointTrackerBoss
kSplineItemBoss
kSplineDirectionToolBoss
kSplineDirectionTrackerBoss
kSplineItemBoss
kSplineRemovePointToolBoss
kSplineRemovePointTrackerBoss
kSplitterWidgetBoss
kSplitterWidgetBoss
kSplitterTrackerBossMessage
kStandOffPageItemBoss
kMoveToolBoss
kStandOffMoveTrackerBoss
kStandOffPageItemBoss
kPathResizeToolBoss
kStandOffResizeTrackerBoss
kStandOffPageItemBoss
kResizeToolBoss
kStandOffResizeTrackerBoss
kStandOffPageItemBoss
kSplineAddPointToolBoss
kStandOffAddPointTrackerBoss
kStandOffPageItemBoss
kSplineDirectionToolBoss
kStandOffDirectionTrackerBoss
kStandOffPageItemBoss
kSplineRemovePointToolBoss
kStandOffRemovePointTrackerBoss
kTOPSplineItemBoss
kTOPMoveToolBoss
kTOPMoveTrackerBoss
kTOPSplineItemBoss
kTOPResizeToolBoss
kTOPResizeTrackerBoss
kWMFItem
kPathResizeToolBoss
kSplinePathResizeTrackerBoss
kWMFItem
kResizeToolBoss
kBBoxResizeTrackerBoss
kWMFItem
kScissorsToolBoss
kSplineScissorsTrackerBoss
kWMFItem
kSplineAddPointToolBoss
kSplineAddPointTrackerBoss
kWMFItem
kSplineDirectionToolBoss
kSplineDirectionTrackerBoss
kWMFItem
kSplineRemovePointToolBoss
kSplineRemovePointTrackerBoss
264
8.4. Custom tools
Tools
figure 8.4.7.b. User interface widget related trackers
Widget ClassID
Tool ClassID
Tracker ClassID
kCmykColorSliderWidgetBoss
kCmykColorSliderWidgetBoss
kCmykColorSliderTrackerBoss
kColorSliderWidgetBoss
kColorSliderWidgetBoss
kColorSliderTrackerBoss
kGradientSliderWidgetBoss
kGradientSliderWidgetBoss
kGradientSliderTrackerBoss
kGroupItemBoss
kResizeToolBoss
kBBoxResizeTrackerBoss
kGuideItemBoss
kMoveToolBoss
kGuideMoveTrackerBoss
kHorzRulerWidgetBoss
kGuideToolImpl
kGuideCreationTrackerBoss
kHorzTabRulerBoss
kTabCreationToolImpl
kTabCreationTrackerBoss
kHorzTabRulerBoss
kTabMoveToolImpl
kTabMoveTrackerBoss
kHorzTextDocRulerBoss
kTabCreationToolImpl
kDocRulerTrackerBoss
kLabColorSliderWidgetBoss
kLabColorSliderWidgetBoss
kLabColorSliderTrackerBoss
kPencilFidelitySliderWidgetBoss
kPencilFidelitySliderWidgetBoss
kPencilSliderTrackerBoss
kPencilSmoothnessSliderWidget kPencilSmoothnessSliderWidget kPencilSliderTrackerBoss
Boss
Boss
kPencilWithinSliderWidgetBoss
kPencilWithinSliderWidgetBoss
kPencilSliderTrackerBoss
kRasterSliderCntrlViewBoss
kRasterSliderCntrlViewBoss
kRasterSliderTrackerBoss
kRgbColorSliderWidgetBoss
kRgbColorSliderWidgetBoss
kColorSliderTrackerBoss
kSpectrumWidgetBoss
kSpectrumWidgetBoss
kSpectrumTrackerBoss
kSplitterWidgetBoss
kSplitterWidgetBoss
kSplitterTrackerBossMessage
kStrokeParamsSliderBoss
kStrokeParamsSliderBoss
kStrokeParamsSliderTrackerBoss
kStructureSplitterWidgetBoss
kStructureSplitterWidgetBoss
kXorSplitterTrackerBoss
kThresholdSliderWidgetBoss
kThresholdSliderWidgetBoss
kThresholdSliderTrackerBoss
kTintSliderWidgetBoss
kTintSliderWidgetBoss
kColorSliderTrackerBoss
kToleranceSliderWidgetBoss
kToleranceSliderWidgetBoss
kThresholdSliderTrackerBoss
kTransparencySliderCntrlViewB
oss
kTransparencySliderCntrlViewBo kXPSliderTrackerBoss
ss
kVectorSliderCntrlViewBoss
kVectorSliderCntrlViewBoss
kVectorSliderTrackerBoss
kVertRulerWidgetBoss
kGuideToolImpl
kGuideCreationTrackerBoss
kVertTabRulerBoss
kTabCreationToolImpl
kTabCreationTrackerBoss
kVertTabRulerBoss
kTabMoveToolImpl
kTabMoveTrackerBoss
kVertTextDocRulerBoss
kTabCreationToolImpl
kDocRulerTrackerBoss
kZeroPointWidgetBoss
kGuideToolImpl
kGuideCreationTrackerBoss
kZeroPointWidgetBoss
kZeroPointToolImpl
kZeroPointTrackerBoss
Adobe InDesign Programming Guide
8.5. Sample code
265
8.5. Sample code
8.5.1. WaveTool
WaveTool shows how to implement two layout creation tools that track the
mouse drag and create spline page items. It also shows how to implement a
hidden tools panel.
8.5.2. ShapeSelector
ShapeSelector shows how to implement a layout selection tool that performs a
hit test and selects items of similar shape to the clicked item.
8.5.3. Snapshot
Snapshot shows how to implement a layout manipulation tool that creates an
image of a clicked spread using the SnapshotUtils API. It also shows how to
implement a tool options dialog to specify the image format (JPEG, TIFF etc.)
to be used and other parameters.
8.5.4. Dolly tool template
Dolly has a template that generates the boilerplate code for a custom tool that
can handle a single button click in the layout view.
8.6. Frequently asked questions(FAQs)
8.6.1. What is the layout view?
See “The toolbox and the layout view” on page 238.
8.6.2. What is the toolbox?
See “The toolbox and the layout view” on page 238.
8.6.3. What is a tool?
See “Tools” on page 239.
8.6.4. What is a tracker?
See “Trackers” on page 240.
8.6.5. Where can I find sample code for tools?
See “Sample code” on page 265.
266
8.6. Frequently asked questions(FAQs)
8.6.6. How do I catch a mouse click or mouse drag on a document?
The answer depends on the experience you want users have. If you want users
to recognise you are going to handle the event you’ll want a custom cursor in
which case implement a custom tool, set your tool as the active tool then
handle the mouse in your tracker (See “The toolbox and the layout view” on
page 238.). Otherwise you likely wish to handle the event behind the scenes
without the user receiving any visual cue. In this case you will use some other
stimulus, for example a change in selection, to push an event handler onto the
event handler stack. If in doubt which to choose use a tool and tracker, it’s the
recommended way to catch mouse events in a layout view on a document.
8.6.7. How do I implement a custom tool?
For the theory read “Key concepts” on page 238, for the design read “Custom
tools” on page 251, for the code use Dolly’s tool template to generate the
boilerplate and add the functionality you want. Or study one of the sample tool
plug-ins on the SDK and adapt it to your needs (see “Sample code” on
page 265).
8.6.8. How do I display a tool options dialogue?
Specialize the DisplayOptions and/or DisplayAltOptions methods in your
ITool implementation.
8.6.9. How do I find the spread nearest the mouse position?
When implementing a tracker you need to handle the fact that the user can
click on any spread in a layout view and your tracker will need to find which
spread has been clicked on. To do this transform the position from the system
to pasteboard co-ordinate system then use one of the methods you’ll find on
IPasteboardUtils as illustrated in figure 8.6.9.a.
figure 8.6.9.a. Finding the spread nearest the mouse location
PMPoint currentPoint = Utils<ILayoutUtils>()->
GlobalToPasteboard(layoutView, where);
InterfacePtr<ISpread> targetSpread(Utils<IPasteboardUtils>()->
QueryNearestSpread(layoutView, currentPoint));
8.6.10. How do I change spreads?
When implementing a tracker you need to handle the fact that the user can
click on any spread in a layout view. A layout view caches the current spread in
interface ILayoutControlData and your tracker may need to change this if the
Tools
Adobe InDesign Programming Guide
8.6. Frequently asked questions(FAQs)
267
spread that has been clicked on is different. Process kSetSpreadCmdBoss to
change to another spread.
8.6.11. How do I perform a page item hit test?
ILayoutControlViewHelper provides page item hit testing methods that can be
used as illustrated in figure 8.6.11.a.
figure 8.6.11.a. Performing a hit test
bool16 HitTest(IControlView* layoutView, const PMPoint& location)
{
InterfacePtr<ILayoutControlViewHelper> iLVCHelper
(
layoutView,
UseDefaultIID()
);
if (iLVCHelper == nil)
return kFalse;
InterfacePtr<IGeometry> iPageItem
(
static_cast<IGeometry *>
(
iLCVHelper->QueryHitTestPageItemNew(location,
kPtrHitTestHandlerBoss)
)
);
return iPageItem != nil ? kTrue : kFalse;
}
8.6.12. How do I set/get the active tool?
IToolBoxUtils provides methods that do this that you can use as illustrated in
figure 8.6.12.a.
figure 8.6.12.a. Getting and setting the active tool
ClassID toolType = kPointerToolBoss;
InterfacePtr<ITool> currentTool(
Utils<IToolBoxUtils>()->QueryActiveTool(toolType));
InterfacePtr<ITool> targetTool(
Utils<IToolBoxUtils>()->QueryTool(kRegPolyToolBoss));
if (targetTool && currentTool != targetTool) {
Utils<IToolBoxUtils>()->SetActiveTool(targetTool, toolType);
}
268
8.7. Summary
8.6.13. How do I observe when the active tool changes?
Attach an observer (see interface IObserver) to kToolManagerBoss and in your
Update method detect the IID_ITOOLMANAGER protocol for the change
kSetToolCmdBoss.
8.6.14. How do I change the toolbox appearance from normal to skinny?
Use kSetToolboxPrefsCmdBoss to change the IToolboxPreferences.
8.6.15. Can I use the default implementations for trackers?
Yes, your tracker can create and dispatch control to one of the trackers supplied
by the application. For example to perform a marquee selection you could
create and dispatch control to a kLayoutSelectionTrackerBoss. For a complete
listing of all the trackers provided by the API see figure 8.4.7.a.
8.7. Summary
Tools manipulate objects in a document by tracking the mouse, providing
dynamic user feedback and processing commands. To add a new tool you must
write the code for the boss classes, the interface implementations and the
resources that make up a tool. The API provides basic building blocks to start
from in the form of helper implementations and default implementations.
There are several reference tool samples on the SDK that show how these can be
used.
8.8. Review
You should be able to answer these questions:
1. Which boss objects would you expect to see in a typical tool? (8.4.2., page 251)
2. Give the purpose of the following interfaces: IToolRegister, ITool,
ICursorProvider. (8.4.2., page 251)
3. What does the generic tool boss do for you? (8.4.2., page 251)
4. What is a tracker? (8.3.5., page 240)
5. What is the tracker factory? (8.3.6., page 240)
6. What is the purpose of the IEventHandler interface on a tracker boss class?
(8.4.2., page 251)
7. Can a tracker have more than one behavior e.g. move and resize? (8.3.11., page
246)
8. Which IToolboxUtils method is used to set the active tool? (8.6.12., page 267)
9. If you wanted your tool to appear in a hidden tools panel what would you
set the parent tool of the ToolDef resource to be? (8.4.5., page 257)
Tools
Adobe InDesign Programming Guide
8.9. Exercises
269
10. Which ToolDef resource controls the grouping of tools in the toolbox?
(8.4.5., page 257)
11. Are icons and cursors specified in a cross platform format? (8.4.6., page 260)
12. Which ITool method would you specialize if you wanted to display a tool
options dialogue? (8.6.8., page 266)
13. Which ITracker method is called to start tracking the mouse? (figure 8.4.3.a.,
page 253)
14. Which CPathCreationTracker method would you specialize to identify the
path describing the page item to be created? (figure 8.4.3.a., page 253)
15. What would the side effects be of a tool that creates or modifies document
content returning kFalse to a call to ITool::IsCreationTool()? (figure 8.4.3.a.,
page 253)
8.9. Exercises
8.9.1. Exercise 1
Run the WaveTool sample plug-in under the control of the debugger with the
following breakpoints set:
• WaveTrackerRegister::Register
• SawWaveTool::Init
• SineWaveTool::Init
• SawWaveTracker::MakePath
• SineWaveTracker::MakePath
8.9.2. Exercise 2
Modify the WaveTool’s SawWaveTracker implementation to create a rectangle
oriented along the line on which the user is dragging the mouse.
Hint: there’s code in SawWaveTracker.cpp to get you started.
8.9.3. Exercise 3
Modify the ShapeSelector sample’s tracker to select shapes which do not match
the shape chosen by the user.
8.9.4. Exercise 4
Modify the ShapeSelector’s tracker to draw a marquee selection and select all
shapes matching the shapes touched by the marquee.
270
8.10. References
Hint: the API provides a default tracker implementation that does this,
kLayoutSelectionTrackerBoss.
8.10. References
•
•
•
•
•
•
•
Abrash, Michael. Graphics Programming Black Book Special, The Coriolis
Group.
Foley, James D. Introduction to Computer Graphics, Addison-Wesley.
Foley, James D. et al. Computer Graphics : Principles and Practice, AddisonWesley.
Adobe User Education. Adobe InDesign User Guide, 2001.
Adobe InDesign SDK. Technical Note #10070 Command reference, 2002.
Adobe InDesign SDK. Technical Note #10050 User interface programming
model, 2002.
Adobe InDesign SDK. Technical Note #10056 User interface widgets, 2002.
Tools
9.
Page Items
9.0. Overview
This chapter introduces page items, the building-block elements for an
InDesign document. It covers the detailed information about page items,
important interfaces for page item objects, creating and manipulating them in
your plugins.
9.1. Goals
The questions this chapter addresses are
1. What is a page item?
2. What are the required interfaces for a page item?
3. What are the native page item bosses InDesign supports?
4. What are the commands to manipulate page items?
5. What are the content fitting settings and how can you use commands to
control them?
6. What are page item standoffs?
9.2. Chapter-at-a-glance
“9.3.Class Diagram” on page 272 shows the native page item objects in
InDesign.
“9.4.Example Of Page Items” on page 273 gives a couple examples of page
items, spline item, image item and guide item along with their interface
diagrams.
table 9.1.a. version history
Rev
Date
Author
Notes
1.0
8/28/2000
Jane Zhou
First Draft
1.1
10/10/2000
Jane Zhou
Second Draft
1.2
10/26/2000
Paul Norton
Add section for Specifier
1.3
10/29/2002
Jane Zhou
update to InDesign 2.0
271
272
9.3. Class Diagram
Page Items
“9.5.Page Items” on page 277 explains what a page item is.
“9.6.Interface Diagram” on page 283 illustrates the interface diagrams for
InDesign supported native page items and provides a summary of each
important interface.
“9.7.Working With Page Items” on page 288 provides some sample codes for
working with page items.
“9.8.Specifiers” on page 297 explains the specifier and related interfaces and
suite interfaces.
“9.9.Standoff Page Items” on page 300 explains what the standoff page item is.
“9.10.Commands For Page Items” on page 304 summarizes the set of
commands to manipulate page items.
“9.11.Summary” on page 314 provides a summary of the content covered in
this chapter.
“9.12.Review” on page 314 provides some questions to test your basic
understanding about page items.
“9.13.Exercises” on page 314 gives three exercises you might want to try after
finish reading the chapter.
9.3. Class Diagram
In the "Document Structure" chapter we talked about page items as being part
of the document content. They are the children of the spread layers. figure
9.3.a. shows the inheritance relationships between the page item objects in
InDesign.
figure 9.3.a. Page Items Class Diagram
Adobe InDesign Programming Guide
9.4. Example Of Page Items
273
kPageItemBoss
kYourPageItemBoss
kGuideItemBoss
kGroupItemBoss
kSpreadBoss
kImageBaseItem
kImageItem
kSpreadLayerBoss
kSplineItemBoss
kTOPSplineItemBoss
kDrawablePageItemBoss
kEPSTextItemBoss
kInlineBoss
kPlacedPDFItemBoss
kMultiColumnItemBoss
kDisplayListPageItemBoss
kFrameItemBoss
kEPSItem
kDCSItemBoss
kWMFItem
kPICTItem
is the root of all InDesign page item boss classes.
is the parent of all the drawable page items in a
document. The InDesign object model is extensible so you can add your
custom page item object to this diagram. For exampe, kYourPageItemBoss in
figure 9.3.a.
kPageItemBoss
kDrawablePageItemBoss
9.4. Example Of Page Items
In the application, a page item could be a text frame, an image, a spline item, a
guide, or a graphic frame with or without content. It is drawn in the document
layout view window.
274
9.4. Example Of Page Items
Page Items
9.4.1. Spline And Image Item
The spline item and image item are two types of page items. figure 9.4.1.a. is a
document that contains one spread and one page with an image. There is only
one document layer in this sample document. To be more precise, there are two
document layers (one page layer and the layer 1), but the page layer is not
shown in the UI. The right hand view is the cropped frame so that you can see
the image item is contained within a spline item. We set 10 points inset for the
graphic frame just so you can see them.
figure 9.4.1.a. A Document Contains A Single Page With An Image
Spline Item
Image Item
10 points inset
figure 9.4.1.b. shows the boss object tree. The layer one content is the layer on
which the spline item (kSplineItemBoss) and image item (kImageItem) reside.
The relationship between the spline item and the image item is maintained via
the IHierarchy interface. You can navigate down from the spline to its
associated image item using QueryChild() method in IHierarchy interface. On
the other hand, you can navigate up from the image item to the spline item
using QueryParent() method in IHierarchy interface. The hexadecimal
number is the object UID for each boss in figure 9.4.1.b.
Adobe InDesign Programming Guide
9.4. Example Of Page Items
275
figure 9.4.1.b. Boss Object Tree For figure 9.4.1.a.
kSpreadBoss
0x49
kSpreadLayerBoss
IHierarchy
::QueryChild()
0x4a
kPageBoss
0x4e
Pages Layer Content
kSpreadLayerBoss
IHierarchy
::QueryChild()
0x4c
Layer 1 Content
kSpreadLayerBoss
0x4b
Pages Layer Guide
IHierarchy
::QueryChild()
kSplineItemBoss
0x6c
IHierarchy
::QueryChild()
kImageItem
0x6d
the object UID
kSpreadLayerBoss
0x4d
Layer 1 Guide
9.4.2. Guide Item
Guides can be positioned freely on a page or on a pasteboard. They are another
type of page items. You can create two kinds of ruler guides: page guides, which
appear only on the page on which you create them, or pasteboard guides, which
span all pages and the pasteboard of a multiple-pages spread. When you add a
ruler guide, it appears on the current target layer. The guide can be displayed or
hidden with the layer on which it was created. figure 9.4.2.a. shows an example
of both page guide and pasteboard guide.
276
9.4. Example Of Page Items
Page Items
figure 9.4.2.a. Guide Items Example
page guide
pasteboard guide
(a) One page per spread
(b) Two pages per spread
The left hand side screen shot is a page guide, while the right hand side is a
pasteboard guide. There is only one layer in both examples. figure 9.4.2.b.
shows the guide item is a child of the last spread layer, which is the guide layer
for the spread’s only content layer. For this specific example shown in figure
11.4.2.b, it’s UID is 0x4d. Here interface IHierarchy maintains the relationship
between the guide layer and the guide item.
Adobe InDesign Programming Guide
9.5. Page Items
277
figure 9.4.2.b. Boss Object Tree For figure 9.4.2.a. (a)
kSpreadBoss
0x49
kSpreadLayerBoss
IHierarchy
::QueryChild()
0x4a
Pages Layer Content
kPageBoss
0x4e
kSpreadLayerBoss
IHierarchy
::QueryChild()
0x4c
Layer 1 Content
kSpreadLayerBoss
0x4b
Pages Layer Guide
kSpreadLayerBoss
0x4d
IHierarchy
::QueryChild()
kGuideItemBoss
0x57
Layer 1 Guide
9.5. Page Items
9.5.1. What Is A Page Item?
Visually, a page item is a text frame, a spline item, an image, etc. Abstractly, in
InDesign’s object model a page item is a boss class, an object. Page items are the
children of a spread within a document. Page items are defined in the resource
definition just like you would define other objects in your plugin.
figure 9.3.a shows, all page items inherit from kPageItemBoss which is the
root of all page item objects. kDrawablePageItemBoss is a child of
kPageItemBoss, which is the parent of all drawable page item objects, such as
kGroupItemBoss, kSplineItemBoss, and kPlacedPDFItemBoss. In general, most
page items are derived from either kPageItemBoss or kDrawablePageItemBoss.
Through inheritance, there are a set of common interfaces that all the derived
objects aggregate, as shown in figure 1.5.1.a.
As
278
9.5. Page Items
Page Items
figure 9.5.1.a. Common Interfaces
kPageItemBoss
IHierarchy
ITransform
ISubject
IPMPersist
IPageItemCache
IPageItemAdornmentList
kDrawablePageItemBoss
IHandleShape
ILockPosition
IScrapItem
IPlaceBehavior
IDragDropTarget
IControlViewCmdData
As you can see from the above interface diagram, the parent page item objects,
such as kPageItemBoss and kDrawablePageItemBoss, do not aggregate interface
IShape and IGeometry. This is because for those objects, there is no meaningful
generic implementations for them. Interface IGeometry is used to specify the
points that make up a page item, IShape is for drawing the page item. Those
interfaces must be aggregated directly to the individual, meaningful page item
objects, such as kSplineItemBoss and kGuideItemBoss. Hence, the set of
interfaces required for a page item depends on the type of page item.
9.5.2. kPageItemBoss
A set of common interfaces aggregated by kPageItemBoss is illustrated in figure
9.5.1.a.
Page item objects form a part of the document hierarchy tree structure.
Interface IHierarchy stores a persistent, UID-based structure that describes the
page item's position in the document hierarchy. This interface provides
methods to navigate between the parent and its children. The document
hierarchy is used for storing page items in a tree structure. However, a page
item, even one that aggregates the IHierarchy, need not be in the document
hierarchy. This is not recommened if you are going to create your own custom
page item. Otherwise, you would not be able to access all the page items on the
spread while you are enumerating them. For example, in-line images are not on
the page item hierarchy like the other page items. The root for the in-line
images is not the spread layer, but rather itself, kInlineBoss. The object that
owns the in-line image is part of the text model, kOwnedItemStrandBoss.
Adobe InDesign Programming Guide
9.5. Page Items
279
is a persistant interface containing transformation data for a page
item. The transformation data is provided in the transform matrix and the type
of the transformation, which could be the combination of moving, rotating,
scaling and skewing. Each page item has it's own coordinate space, called inner
coordinates. Points in that coordinate space can be translated to the containing
parent coordinate space using the matrix obtained from ITransform. In other
words, the transformation matrix is a conversion between the page item's inner
coordinate space and its parent's coordinate space. If you take the information
from a page item’s IGeometry and apply the matrix from the page item’s
ITransform, you would have the page item’s geometry data in its parent’s
coordinate space, either a group item, or a spline item or a spread layer, or even
another page item.
ITransform
There are couple of useful functions in TransformUtils.h that help to get the
transform matrix. See the header file for more details. If you want to convert
from one coordinate space to another, you need to combine the conversions
step-by-step from the page item to the desired space.
When applying a transformation to a page item, you can choose to transform
either the item only or the item and its children. All most all the transform
methods provide this option. See ITransform.h for TransformAction enum
definition.
ISubject defines the “subject” of a change, part of the application’s MVC
notification mechanism. The inclusion of interface IPMPersist makes the page
item object a persistent object. Any change to the object should be done
through a command.
The purpose of IPageItemCache is to provide cache invalidation notifications
for the page item. The default implementation for this interface forwards the
changes to the appropriate interface, such as interface IGeometry,
IPathGeometry, and IShape.
maintains a list of adornments the page item object may
have. Please refer to “Page Item Adornments” for more information.
IPageItemAdornment
For a page item that has standoff, the following interfaces were added to
kPageItemBoss. See figure 9.5.2.a. We will cover those four interfaces in section
“Standoff Page Items” on page 300.
280
9.5. Page Items
Page Items
figure 9.5.2.a. Added Interfaces For kPageItemBoss
kPageItemBoss
IStandOff
IStandOffData
IPolygonConverter
ITextInset
9.5.3. kDrawablePageItemBoss
Many InDesign page item objects share several additional interfaces that have
useful generic implementations. kDrawablePageItemBoss, which is derived from
kPageItemBoss, is the most frequently used object. In fact, except for text
frames, guide items and inline images, all other InDesign page item objects are
derived from kDrawablePageItemBoss.
figure 9.5.3.a. Interface Diagram For kDrawablePageItemBoss
kDrawablePageItemBoss
IScrapItem
ILockPosition
IPlaceBehavior
IDragDropTarget
IControlViewCmdData
IHandleShape
IControllingPageItem
IControlledPageItems
The interface IScrapItem is the clipboard interface for all selectable objects.
This interface is used to get a command that can delete, copy, or paste the item.
It supports generic commands for page items, such as DeleteCmd, PasteCmd,
CopyCmd.
There is also a utility class, IScrapUtils, which provides a set of copy page item
objects functions. For example, if you want to copy a page item, including its
children, into a different database, you could use
IScrapUtils::CopyPageItemObject(), or IScrapUtils::CopyPageItemObjects().
All selectable page items should include interface ILockPosition. This will
allow you to lock or unlock a page item position on the page. The interface
Adobe InDesign Programming Guide
9.5. Page Items
281
specifies the placement behavior for a page item. It deals with
placement of graphics, images, splines, and multiple frames. It includes the
methods to support both the source of a placement operation and the target
page item.
IPlaceBehavior
IDragDropTarget and IControlViewCmdData are for dragging and dropping to
create new page items, such as from external applications.
is used by master page overrides. It controls whether
certain changes on a master page item are forwarded to overrides of that item.
It is used in conjunction with IControlledPageItems, which is for keeping a list
of dependent page items for a master page item.
IControllingPageItem
9.5.4. Path
A path defines shapes and regions of all sorts. You can use paths to draw lines,
specify boundaries of filled area, and define templates for clipping other
graphics. A path is composed of straight and/or curved line segments. These
segments may connect to one another by a control point or they may be
disconnected. A path is either open or closed.
You can put text or graphics inside a path. When you put contents inside an
open or closed path, we also call the path as a frame. Paths are spline items.
figure 9.5.4.a. Example Paths
A
B
A. open path B. Imported image inside a frame (close path)
282
9.5. Page Items
Page Items
9.5.5. kSplineItemBoss
9.5.5.1. Introduction
When using the tools in the tool palette to draw paths such as lines, rectangles,
ellipses, and regular polygons on a page, the end user creates spline items, also
called frames. Frames are identical to paths, with only one difference -- they
can be containers for text or other objects. A frame can also be a placeholder
when it is a container without content. See figure 9.5.5.1.a. Frames are the basic
containers in a document’s layout.
figure 9.5.5.1.a. Sample Spline Items
placeholder rectangle
container rectangle frame
is derived from kDrawablePageItemBoss, with a set of extra
aggregated interfaces, such as IShape and IGraphicFrameData, as shown in
figure 9.5.5.1.b.
kSplineItemBoss
figure 9.5.5.1.b. Interface Diagram For kSplineItemBoss
kSplineItemBoss
IGeometry
IShape
IHandleShape
IGraphicFrameData
IPathGeometry
IPlaceBehavior
is used for keeping track of the page item’s dimensions. It calculates
the bounding box of the page item. However, it makes no assumption about the
shape of the item. It is designed to be a "geometry independent" way of defining
an object. The data that IGeometry contains is all in inner coordinate space. The
IGeometry
Adobe InDesign Programming Guide
9.6. Interface Diagram
283
origin for the page item inner coordinate space is coincident with the origin of
its parent’s coordinate space at the time the page item is created. Thereafter,
IGeometry does not take into account the rotation, translation, shearing, or
scaling of a page item.
Page items are defined by one or more points. It is up to the implementer of the
page item to decide how to interpret these points in order to get its bounding
box. Hence, there are two sets of methods, one for bounding box with stroke
(also known as geometry bounding box) and one for bounding box without
stroke (also known as path bounding box). For some page items, such as
images, the path bounds and stroke bounds are the same.
When setting the page item’s stroke or path bounding box, you could specify
whether or not you want to resize its related children. This is defined in
IGeometry.h SetAction enum type. Those values are hints to the
implementation on how to set the bounds of the item and its children though.
is a required interface for spline type page items. It is designed
to support geometric data. It encapsulates the points and segments that make
up a spline. Path geometry can contain multiple paths. Each path is either open
(the default) or closed. The relationship between the paths is only that they
exist as part of the same object.
IPathGeometry
When an image that has a clipping path defined is placed into a frame, the path
of the frame (kSplineItemBoss) is set to be the clipping path from the image.
However, the clipping path is not a separate entity associated with the image.
IShape is for drawing the spline item. It encapsulates the functions for drawing,
hit testing, and iterating page items. See the “Page Item Drawing” chapter for
more information.
is also a required interface for spline items. It specifies the
content in the graphic frame. A specific example of using this interface is
presented in section “9.7.1.Detecting Frame Content” on page 288.
IGraphicFrameData
9.6. Interface Diagram
figure 11.6.a shows the interface diagrams for various application page item
objects. Interfaces IHierarchy, IShape, IGeometry and ITransform are common
284
9.6. Interface Diagram
Page Items
to all page items. They are shown in a light gray color. Interfaces that are
specific to that page item object are shown in black.
figure 9.6.a. Interface Diagrams For Page Items
kSpreadBoss
ISpread
IGeometry
IShape
IHierarchy
kFrameItemBoss
ITextFrame
IHierarchy
IShape
IGeometry
ITransform
kSpreadLayerBoss
kMultiColumnItemBoss
ITextColumnSizer
ITextFrame
IHierarchy
IShape
IGeometry
ITransform
ISpreadLayer
IHierarchy
kGuideItemBoss
IGuideData
IHierarchy
IGeometry
IShape
ITransform
kPageItemBoss
IHierarchy
ITransform
IPMPersist
ISubject
IPageItemCache
kInlineBoss
IInlineData
IHierarchy
IShape
IGeometry
ITransform
kSplineItemBoss
kGroupItemBoss
IPathGeometry
IGraphicFrameData
IHierarchy
IGeometry
IShape
ITransform
kTOPSplineItemBoss
ITOPSplineData
IHierarchy
IGeometry
IShape
ITransform
IHandleShape
IHierarchy
IGeometry
IShape
ITransform
kImageItem
IImageAttributes
IHierarchy
IGeometry
IShape
ITransform
kEPSItem
IEPSTagTable
IHierarchy
IGeometry
IShape
ITransform
kPlacedPDFItem
IPDFAttributes
IHierarchy
IGeometry
IShape
ITransform
Adobe InDesign Programming Guide
9.6. Interface Diagram
285
figure 11.6.b shows the navigation map between document, spreads, layers and
spline items. The continuing figure shows how to navigate from spline item to
the various content objects via the method IHierarchy::QueryChild().
286
9.6. Interface Diagram
Page Items
figure 9.6.b. Navigation Between Objects
kDocBoss
IDocument
ISpreadList
ILayerList
GetNthSpreadUID()
QueryNthSpread()
kSpreadBoss
ISpread
IGeometry
IShape
IHierarchy
QueryChild()
kSpreadLayerBoss
IHierarchy
ISpreadLayer
kPageBoss
QueryChild()
IHierarchy
IShape
kSpreadLayerBoss
QueryChild()
IHierarchy
ISpreadLayer
kSplineItemBoss
QueryChild()
IHierarchy
IShape
IGeometry
kSpreadLayerBoss
IHierarchy
ISpreadLayer
QueryChild()
QueryChild()
kSpreadLayerBoss
QueryChild()
kGuideItemBoss
IHierarchy
IShape
IGuideData
IGeometry
GetLayerUID()
GetLayerUID()
IHierarchy
ISpreadLayer
Adobe InDesign Programming Guide
9.6. Interface Diagram
(continued) figure 9.6.2.0. Navigation Between Page Item Objects
kSplineItemBoss
IHierarchy* QueryChild()
IGraphicFrameData
IPathGeometry
IHierarchy
IShape
IGeometry
ITransform
kEPSItem
IEPSTagTable
IHierarchy
IGeometry
IShape
ITransform
kDCSItem
IDCSInfo
IHierarchy
IGeometry
IShape
ITransform
kImageItem
IImageAttributes
IHierarchy
IGeometry
IShape
ITransform
kMultiColumnItemBoss
ITextColumnSizer
ITextFrame
IHierarchy
IShape
IGeometry
ITransform
IHierarchy* QueryChild()
kSplineItemBoss
IGraphicFrameData
IPathGeometry
IHierarchy
IShape
IGeometry
ITransform
IHierarchy* QueryChild()
kGroupItemBoss
IHandleShape
IHierarchy
IGeometry
IShape
ITransform
kWMFItem
IIntData (IID_IGRAPHICITEM)
IHierarchy
IShape
IGeometry
ITransform
kPlacedPDFItemBoss
IPDFAttributes
IHierarchy
IShape
IGeometry
ITransform
kPICTItem
IIntData (IID_IGRAPHICITEM)
IHierarchy
IShape
IGeometry
ITransform
287
288
9.7. Working With Page Items
Page Items
9.7. Working With Page Items
9.7.1. Detecting Frame Content
figure 9.7.1.a. shows a code snippet that detects the content of a frame. Suppose
the UIDRef for the page item is itemRef in this example. IGraphicFrameData is
an interface for spline page items. The code uses this interface to determine the
content for the specified page item.
figure 9.7.1.a. Detect The Graphic Frame Content
// Get the UID for the page item
InterfacePtr<IPMUnknown> item(itemRef, IID_IUNKNOWN);
UID uid = ::GetUID(item);
InterfacePtr<IHierarchy> itemHier(itemRef, IID_IHIERARCHY);
InterfacePtr<IGraphicFrameData> frameData(itemRef,
IID_IGRAPHICFRAMEDATA);
if (frameData)
{
if (!frameData->HasContent())
{
if (frameData->IsGraphicFrame())
{
// empty graphic frame created by frame tools
TRACE("UID %u is an empty graphic frame.\n", uid);
} else {
InterfacePtr<IPathGeometry> pathGeo(itemRef, IID_IPATHGEOMETRY);
if (!pathGeo)
return;
PMPageItemType itemType = Utils<IPathUtils>()>WhichKindOfPageItem(pathGeo);
if (itemType == kIsLine)
TRACE("UID %u is a line.\n", uid);
else if (itemType == kIsRectangle)
TRACE("UID %u is a rectangle.\n", uid);
else if (itemType == kIsCircle)
TRACE("UID %u is a circle.\n", uid);
// Other shapes
......
}
} else {
// This frame contains an embeded or linked image, or a placed pdf
// or eps, PICT, WMF etc.
ReportGraphicType(itemHier->QueryChild(0));
}
} else {
if (itemHier->GetChildCount() > 1)
TRACE("UID %u is a group item.\n", uid);
else
Adobe InDesign Programming Guide
9.7. Working With Page Items
// the graphic item is selected via the Direct Selection tool
ReportGraphicType(itemHier);
}
// implementation of ReportGraphicType
void ReportGraphicType(IHierarchy* graphicHier)
{
if (graphicHier == nil)
return;
if (Utils<IImageUtils> -> IsRasterImage(graphicHier))
{
if (Utils<IImageUtils> -> IsEmbeddedImage(graphicHier))
TRACE("an embedded ");
else
TRACE("a linked ");
TRACE("raster image.\n");
} else if (Utils<IImageUtils> -> IsVectorGraphic(graphicHier)) {
if (Utils< IImageUtils> -> IsEmbeddedImage(graphicHier))
TRACE("an embedded ");
else
TRACE("a linked ");
ClassID id = ::GetClass(graphicHier);
if (id == kWMFItem)
{
TRACE("WMF file.\n");
return;
} else if (id == kPICTItem)
{
TRACE("PICT file.\n");
return;
}
// Does it contain a placed PDF??
InterfacePtr<IPDFAttributes> pdfData(graphicHier,
IID_IPDFATTRIBUTES);
if (pdfData)
{
TRACE("PDF file.\n");
return;
}
// Does it contain an EPS??
K2::scoped_ptr<UIDList> descendents(new
UIDList(::GetDataBase(graphicHier)));
if (!descendents)
return; //out of memory
289
290
9.7. Working With Page Items
Page Items
graphicHier->GetDescendents(descendents, IID_IEPSTAGTABLE2);
// the length should be 1 if it contains eps
if (descendents->Length() == 1)
{
TRACE("EPS file.\n");
return;
}
// Does it contains DCS file??
InterfacePtr<IDCSInfo> dcsInfo(graphicHier, IID_IDCSINFO);
if (dcsInfo)
{
TRACE("DCS file.\n");
return;
}
TRACE("unknow file type.\n");
} else {
// Recursive call
ReportGraphicType(graphicHier->QueryChild(0));
}
}
9.7.2. Create A Page Item At The Page’s Origin
When creating a page item, its coordinates are specified in pasteboard space.
The item itself stores its inner bounds in IGeometry. figure 9.7.2.a. shows a code
snippet which uses the transformation to create a page item, 100 by 100 square,
at the page’s origin. First we create the square at the page’s origin. Then we
transform it to the pasteboard space, and use CreateRectangleSpline to create
the page item.
figure 9.7.2.a. Create A Square At The Page’s Origin
// Get the active layer and the database
InterfacePtr<ILayoutControlData>
layoutControlData(::QueryFrontLayoutData());
InterfacePtr<IHierarchy> layerHier(layoutControlData->
QueryActiveLayer());
UIDRef layerRef(::GetUIDRef(layerHier));
IDataBase* db = layerRef.GetDataBase();
// Get the current page and its geometry
UIDRef pageUIDRef = UIDRef(db, layoutControlData->GetPage());
InterfacePtr<IGeometry> pageGeom(pageUIDRef, IID_IGEOMETRY);
// a 100 point square at the page origin
PMRect squareBBox(0, 0, 100, 100);
Adobe InDesign Programming Guide
9.7. Working With Page Items
291
// When creating a page item, we specify its coordinates in pasteboard
// space, so we need to do the transformation from page to pasteboard.
PBPMRect squareBBoxPasteboard(squareBBox);
InnerToPasteboard(pageGeom, &squareBBoxPasteboard);
// create the item
UIDRef itemUIDRef = Utils<IPathUtils> ->
CreateRectangleSpline(layerRef, squareBBoxPasteboard,
INewPageItemCmdData::kGraphicFrameAttributes);
9.7.3. Which Page Does The Page Item Lie On?
The page item’s parent is not the page (kPageBoss) it lies on. It is the spread
layer. Often times we would like to know which page the page item is on.
Unfortunately, there is no utility function that would answer this question
directly for a given page item.
There are couple ways to get the page number for a specified page item. Here is
a recommended way to do this. Page items are the children of a spread layer.
Use ISpread::GetItemsOnPage() to build a data structure that maps each page
item UID to a page. When you iterate through the page items, you can look up
each item you visit in your data structure and determine the page.
Another way to look at the problem is through the calculation of an item's
geometry since InDesign looks at the geometry of an item in relation to the
pages on a spread to determine its page. The rule is: if a page item whose
bounding box most overlaps the page’s bounding box, then that is the page the
item lies on. Or if the item overlaps each page equally, then we consider the left
page is the page the page item lies on. This applies when the binding is set to the
left side of the publication, which is the default setting.
Figure 9.7.3.a. shows you the third way. Note the itemRef in the code is the
UIDRef for the page item.
Figure 9.7.3.a. Get The Page Number For A Specified Page Item
IDocument* document = GetFrontDocument();
// Get the list of all pages in the document
InterfacePtr<IPageList> pageList(document, IID_IPAGELIST);
InterfacePtr<IHierarchy> itemHier(itemRef, IID_IHIERARCHY);
if (!itemHier)
return;
//Get the pageIndex for this item
292
9.7. Working With Page Items
Page Items
UID pageUID = ::GetOwnerPageUID(itemHier);
PMString pageString;
InterfacePtr<IPageNumberPrefs> iPageNumberPrefs((IPageNumberPrefs*)
::QueryPreferences(IID_IPAGENUMBERPREFS, kGetSessionPrefs));
bool16 bOrdinal = iPageNumberPrefs &&
iPageNumberPrefs->GetOrdinalNumbering();
if (bOrdinal)
pageList->GetPageString(pageUID, &pageString, kFalse, kTrue,
kOrdinalType, kTrue);
else
pageList->GetPageString(pageUID, &pageString, kTrue, kTrue,
kActualType, kTrue);
// the pageString now has the page number for this item.
9.7.4. Get a rotated page item’s bounding box
Each page item has three bounding boxes: path bounding box, geometry
bounding box and painted bounding box. The path bounding box includes
only the path and is only for path-based page items. Objects that don’t have
paths, such as images, won’t have a path bounding box. The geometry
bounding box, also known as the stroke bounding box, encompasses
everything about the object, including corner styles, stroke weight, and line
endings. For images, the geometry bounding box is the image’s bounds. For
group items, it will be the conglomeration of all its children. The painted
bounding box is the bounds used for invalidation of page items.
Since interface IGeometry is a required interface for all page items, there are
helper functions that help you to get the stroke bounds and path bounds of a
specific page item, or even for a list of page items. See PageItemUtils.h for the
various helper methods.
The following example shows how to get the bounding box for a rotated page
item. In figure 9.7.4.a., an oval page item is selected and its bounding box is
labeled as A, B, C, and D. On the right hand side is the snap shot of the
Transform panel for the oval item.
Adobe InDesign Programming Guide
9.7. Working With Page Items
293
figure 9.7.4.a. Page Item And Its Transform Panel Before The Rotation
Now suppose we rotate the oval item 45 degrees anti-clockwise, the page item
and its bounding box would look like this:
figure 9.7.4.1.a. Page Item And Its Transform Panel After Rotating 45 Degree
Suppose we want to get the coordinates of the bounding box, specifically the
coordinates for points A, B, C and D after the rotation. Note, the reference
point in this example is at the top left corner, which is the default for the
application. Since the bounds we get from GetStrokeBoundingBox() is in page
item’s inner coordinate space, we need a transform matrix to translate those
bounds into the proper coordinate space. The ITransform interface would give
294
9.7. Working With Page Items
Page Items
us the appropriate matrix if we need to get the page item’s parent. However,
there are cases where the parent’s coordinate space isn’t helpful by itself, for
example group page items. In those cases, we need the transformation that
would translate the points to the spread coordinate space, and
InnerToArbitraryParentMatrix from TransformUtils.h can do that.
The following code snippet will show you how to get the coordinates for points
A, B, C, and D after the rotation.
figure 9.7.4.1.a. Get The Coordinates For A. B. C. and D
InterfacePtr<ISelection> selection (::QuerySelection());
if (!selection)
return; // Handle error
UIDList uidList = selection->GetUIDList();
// For simplicity, we only consider one item selected in this example
if (uidList.Length() == 1)
{
InterfacePtr<IGeometry> itemGeom(uidList.GetRef(0), IID_IGEOMETRY);
if (!itemGeom)
return;
// Get the inner bounding box for the selected item
PMRect innerBBox = itemGeom->GetStrokeBoundingBox();
PMPoint A(innerBBox.LeftBottom());
PMPoint B(innerBBox.Right(), innerBBox.Bottom());
PMPoint C(innerBBox.RightTop());
PMPoint D(innerBBox.Left(), innerBBox.Top());
InterfacePtr<IHierarchy> itemHier(uidList.GetRef(0),
IID_IHIERARCHY);
if (!itemHier)
return;
InterfacePtr<ILayoutControlData>
layoutData(::QueryFrontLayoutData());
if (!layoutData) // This should not happen.
return;
IDocument* document = layoutData->GetDocument();
IDataBase* database = ::GetDataBase(document);
UID pageUID = GetOwnerPageUID(itemHier);
InterfacePtr<IGeometry> pageGeom(database, pageUID, IID_IGEOMETRY);
if (!pageGeom)
Adobe InDesign Programming Guide
9.7. Working With Page Items
295
return;
// Get the spread hierarchy
InterfacePtr<IHierarchy> spreadHier(itemHier->QueryRoot());
if (!spreadHier)
return;
PMMatrix page2Spread;
::InnerToArbitraryParentMatrix(&page2Spread, pageGeom, spreadHier);
PMMatrix item2Spread;
::InnerToArbitraryParentMatrix(&item2Spread, itemGeom, spreadHier);
PMMatrix item2Page = item2Spread;
PMMatrix spread2Page = page2Spread;
spread2Page.Invert();
item2Page.PostConcat(spread2Page); // item2Spread * spread2Page
// Get the coordinates for A, B, C, and D relative to the pageÕs
// origin.
item2Page.Transform(A);
item2Page.Transform(B);
item2Page.Transform(C);
item2Page.Transform(D);
// Get
PMRect
PMReal
PMReal
the width and height for the bounding box
strokeDim = PageItemUtils::GetStrokeDimensions(uidList);
width = strokeDim.Width();
height = strokeDim.Height();
// Get
PMReal
PMReal
PMReal
PMReal
the rotation, skew, and scale
rotation = item2Spread.GetRotationAngle();
xSkew = item2Spread.GetXSkewAngle();
xScale = item2Spread.GetXScale();
yScale = item2Spread.GetYScale();
// If you are using debugger version of InDesign, you could dump
// those information into the trace window.
}
9.7.5. Place PDF Into A Page Item
There are two ways to place a PDF file or a file of any other format into a page
item. You can use either the ImportFileCmd or the PDFPlaceCmd.
If you choose to use ImportFileCmd, you will need to manipulate the PDF place
preferences for the session. Temporarily store the old value of the session
preferences, then set your new preferences using the kSetPDFPlacePrefsCmd.
296
9.7. Working With Page Items
Page Items
This command has a data interface IPDFPlacePrefs with methods to set each
preference value. After the execution of the kSetPDFPlacePrefsCmd, you could
call ImportFileCmd. Then you can restore the preferences you saved before
using the kSetPDFPlacePrefsCmd. It would be a good idea to wrap the three
commands’ in a command sequence. If any one fails, the code could abort
gracefully.
Using PDFPlaceCmd has more flexibility, but you need to do more work. In order
to create a link between the page item and the original PDF file, you need to
attach a data link after the file is imported into the page item. This is because
the application puts a rasterized image of the file into the page item. When the
high resolution file is needed, such as at the printing time, it will locate the
original high resolution file via the data link to replace the low resolution one.
If you use ImportFileCmd or other import service providers, the appropriate
data link will be created for you.
The information about a data link for a page item is not stored in the page item
itself. Instead, it is stored in a separate boss object. For file links, the boss is a
kDataLinkBoss. Page items store the UID of their associated kDataLinkBoss in
their IDataLinkReference interface.
The GetUID() method returns the UID of the data link boss associated with this
page item. For example, suppose you have a pointer to an object
kPlacedPDFItemBoss, you would do this:
figure 9.7.5.a. Get The Data Link From The Associated Page Item
InterfacePtr<IDataLinkReference> itemDataLinkRef(placedPDFItem,
IID_IDATALINKREFERENCE);
UID dataLinkUID = itemDataLinkRef->GetUID();
if (dataLinkUID != kInvalidUID)
{
InterfacePtr<IDataLink>
dataLink(UIDrRef(::(GetDataBase(placedPDFItem), dataLinkUID),
IID_IDATALINK);
PMString* fileName = dataLink->GetFullName();
}
The data link boss also stores the UID of the page item it references:
figure 9.7.5.b. Get The Page Item From The Attached Data Link
// suppose the dataLink is a boss of type kDataLinkBoss.
InterfacePtr<IDataLinkReference> dataLinkRef(dataLink,
IID_IDATALINKREFERENCE);
Adobe InDesign Programming Guide
9.8. Specifiers
297
UID pageItemUID = dataLinkRef->GetUID();
There is a utility class IDataLinkHelper which provides methods to create, add
and remove data link.
Figure 9.7.5.c. How to Use IDataLinkHelper
InterfacePtr<IDataLinkHelper> linkHelper((IDataLinkHelper*)::CreateObject(kDataLinkHelperBoss,
IID_IDATALINKHELPER));
InterfacePtr<IDataLink> iDL(linkHelper->CreateDataLink(sysFile));
There is a reason that you would want to use the IDataLinkHelper. Page items
store the UID of their data link bosses, but not ref-counted pointers. Therefore,
just storing the UID of a data link boss in the page item boss does not preserve
the data link boss. For this reason, DataLinkHelper::CreateDataLink()
purposely calls AddRef() on the data link boss. The
DataLinkHelper::RemoveDataLink() does the equivalent of calling Release(). If
you choose not to use the helper utility, you will be responsible for maintaining
the ref-count of the data link boss.
9.8. Specifiers
We used specifiers in our old selection architecture. In the new selection
architecture, this is no longer needed. So this section information is for
supporting the old 1.x architecture and it will not be valid once the new
selection architecture is completed in our code during InDesign 3.x time.
9.8.1. Definition
A specifier is a boss that aggregates an ISpecifier, and a set of suite interfaces.
Both ISpecifier and the suite interfaces are data independent. A suite interface
is a set of methods that perform operations on the specified data. A specifier
boss also has a data dependent interface, such as IPageItemSelector, for setting
the range of data specified by the boss.
9.8.2. Specifier Bosses
There are six specifier bosses defined in the application. They are:
• kPageItemSpecifierBoss
• kTextFocusBoss
• kNoPageItemSpecifierBoss
• kPathPointSpecifierBoss
• kGuideSpecifierBoss
• kInlineSpecifierBoss
298
9.8. Specifiers
Page Items
kPageItemSpecifierBoss, as its name implies, this specifier has a list of page
items. IPageItemSelector has the methods for creating and returning the list of
page items. IPageItemSelector does not do a UI selection of the page items, it
is really just a data interface.
kTextFocusBoss is a specifier aggregates the ITextFocus, which identifies a text
location and range. Text focus is unique, in that the boss objects should not be
created using CreateObject, but by using the ITextFocusManager, which is
aggregated by kTextStoryBoss. See figure 9.8.2.a for an example. And “The Text
Model” chapter for more information.
figure 9.8.2.a. Create A Text Focus Object
// Here model is a pointer to ITextModel
InterfacePtr<ITextFocusManager> focusMgr(model,
IID_ITEXTFOCUSMANAGER);
//a focus that identifies the first 'len' characters in a story.
InterfacePtr<ITextFocus> newFocus(focusMgr->NewFocus(0, len));
kNoPageItemSpecifierBoss is for the "empty specifier" case. Its most common
use is in paste operations. The contents of the scrap are to be pasted, but you
still need a specifier in the document that will receive the page items, that is
what the kNoPageItemSpecifierBoss is for. This boss has an
IPageItemSelector. In addition to calling ISpecifier::Initialize, client code
must also supply
IPageItemSelector::Select(UIDList) with an empty UIDList.
kPathPointSpecifierBoss is for identifying one or more path points.
IPageItemSelector identifies the page item(s) whose points are specified.
IPathSelectionList identifies the page items and the path points on those page
items which are indicated. The client code is required to keep the two lists in
sync. kPathPointSpecifierBoss is a subclass of kPageItemSpecifierBoss.
kGuideSpecifierBoss is the specifier for guides. You can copy, paste, transform,
and manipulate guides, you can specify them for these operations too.
kInlineSpecifierBoss is actually much like the specifier for page items, but it
also provides IBoundsConstraintSuite, since the range of movement is limited
for an inline graphic.
Adobe InDesign Programming Guide
9.8. Specifiers
299
9.8.3. Interface Diagram
The interface diagrams for the six specifiers are shown in figure 9.8.3.a.
Interfaces that are common for all bosses are shown in a gray color.
figure 9.8.3.a. Interface Diagrams For Specifier Bosses
kPageItemSpecifierBoss
ISpecifier
IPageItemSelector
IScrapSuite
IGeometrySuite
ITransformSuite
IReferencePointSuite
IPathInfo
kTextFocusBoss
ITextFocus
IFocusCache
ISpecifier
IScrapSuite
ISubject
IPlaceBehavior
IScript
IScriptObjectParent
kInlineSpecifierBoss
IBoundsConstraintSuite
IPageItemSelector
IScrapSuite
IGeometrySuite
ITransformSuite
IReferencePointSuite
ISpecifier
IPathInfo
kNoPageItemSpecifierBoss
ISpecifier
IPageItemSelector
IScrapSuite
kPathPointSpecifierBoss
kGuideSpecifierBoss
ISpecifier
IPageItemSelector
IScrapSuite
IGeometrySuite
ITransformSuite
IReferencePointSuite
IPathSelectionList
IPageItemSelector
ISpecifier
IScrapSuite
IGeometrySuite
ITransformSuite
IReferencePointSuite
IPathInfo
9.8.3.1. ISpecifier And IPageItemSelector
ISpecifier isn't completely data independent. It does hold a UIDRef for the
document that contains the data that is specified. In fact, client code that
creates a specifier boss (of any type) is required to call
ISpecifier::Initialize(IDocument*) before it can use any of the suite
interfaces on the specifier.
IPageItemSelector is an interface for specifying a set of page items. It is used in
conjuntion with the specifier metaphore.
300
9.9. Standoff Page Items
Page Items
9.8.3.2. Common Suite Interfaces
There are some suite interfaces that are common to most or all of the specifiers.
When you have a specifier, you can use those interfaces to manipulate the range
of data.
IScrapSuite provides the funtionality for copying the contents of the specifier
to the scrap document, or pasting the contents of the scrap document to the
user document identified by the specifier. Note: All InDesign Implementations
of IScrapSuite require a front document and a front view. IScrapSuite doesn't
work if you open a document without a window.
ITransformSuite provides methods for skewing , scaling, and rotating page
items. This suite needs a reference point for those operations. The default
reference point can be retrieved from IReferencePointSuite.
IGeometrySuite manipulates the X, Y location and width and height of the
specified data. It also provides the commands to resize and move page items.
IReferencePointSuite has the reference point related information. For page
items, changing the reference point can only be done if the specifier is
associated with a selection. For an in-line graphic, the reference point can not
be changed, It is always the center point.
9.9. Standoff Page Items
9.9.1. Introduction
The standoff page item is similar in nature to a page item, it has a path
geometry that represents the standoff path. Both frames and its content can
have separate standoffs. For example, group items. But they are not hooked
into the document hierarchy, even though they support the IHierarchy. They
are connected to the text model by the page item which has the standoff.
When a stand off is created for a page item using the command
StandOffModeCmd or the Text Wrap panel, a kStandOffPageItemBoss object is
created and connected to the main page item in two ways. First, it is set as the
standoff page item through IStandOffData::SetStandOffUID(). Second, it is
registered as the main item’s secondary scrap item through
IScrapItem::RegisterScrapItem(). This is necessary to support cut, copy and
paste the main page item along with their standoffs.
Adobe InDesign Programming Guide
9.9. Standoff Page Items
301
InDesign describes "text wrap type" as a mode, and "offset" as a margin. The
various modes the application supports are defined in IStandOff.h. Methods to
get and set the mode and margin are defined in interface IStandOffData.
How does the text composition engine know about the text wrap? The text
composer asks the SpreadOverlapManager for the closest rectangle that is
available for the next line of text. The SpreadOverlapManager tracks every page
item that has a standoff and calls its IStandOff::GetTilesByHeight(). Then the
text is flowed into those tiles.
The page item interfaces IStandOff, IStandOffData and ITextInset are used to
manage standoffs. The StandOffPageItem object aggregates IStandOffItemData
that is used to get the information about its main page item.
9.9.2. IStandOff
This interface does two things. It calculates the rectangles that will hold the
text, called text tiles, and it also calculates the shape of the standoff. The
standoff geometry is different from the page item’s geometry.
9.9.3. IStandOffData
This data interface manipulates only the data for the standoff, such as mode,
form, and margin. You can also get the UID for the standoff via this interface.
9.9.4. ITextInset
ITextInset sets and gets the inset for the drawable page items. You can also get
the geometry of the inset and its UID. Basically, you can consider the text inset
as an internal “standoff ” for a page item. But you cannot select the text inset,
nor can you modify the inset polygon anchor points like you could for a
normal standoff. You can, however, use SetTextInsetCmd to set the insets of a
drawable page item.
Notice that QueryInsetGeometry() and GetInset() are independent. You could
get an inset geometry even if the inset value was 0.0.
9.9.5. IStandOffItemData
IStandOffItemData is aggregated by boss class named kStandOffPageItemBoss.
This is the interface that you can use to get the information about the main
page item for this standoff item.
302
9.9. Standoff Page Items
Page Items
9.9.6. Working With StandOffs
When you resize a page item, what would happen to its standoff? It would resize
as its main page item does, providing the standoff polygon has not been
changed by you. If you modify the standoff polygon, resizing the main page
item will have no impact on the modified standoff.
Transformations applied to the main item, such as moving, scaling, skewing
and rotation, is immediately applied to the standoffs. This is done in the
implementation for ITransform interface (kStandOffTransformImpl). It
redirects all the transformations to the main item’s transformations. The
SpreadOverlapManager gets notification and calculates the areas of the text
frames that need to be recomposed.
Deletion, cut, copy and paste of main page items will cause their standoffs to
follow wherever the main page items go. These operations are observed by the
SpreadOverlapManager. It also invalidates those text frames that intersect with
the standoffs for recomposition. When you resize and transform the main page
items, the standoffs usually “follow” their main items in a user expected way.
The majority of the synchronization is accomplished by the kMainItemObserver
that observes the main item’s geometry changes.
As an end user, you can also delete the anchor points of a standoff polygon just
like you do for the frame paths using the pen tool.
There are three public commands that allow you to create a standoff, change its
form and margin. They are used by Text Wrap panel. They are:
kStandOffModeCmdBoss, kStandOffFormCmdBoss, and kStandOffMarginCmdBoss.
See figure 9.9.6.a and figure 9.9.6.b for code examples.
figure 9.9.6.a. Use StandOffModeCmd To Set The Mode
// Create a StandOffModeCmd
InterfacePtr<ICommand>
standOffModeCmd(CmdUtils::CreateCommand(kStandOffModeCmdBoss));
if (!standOffModeCmd)
return;
// Set the StandOffModeCmd ItemList
InterfacePtr<ISelection> selection(QuerySelection());
if (!selection)
return;
const UIDList& selectionList = selection->GetUIDList();
standOffModeCmd->SetItemList(selectionList);
Adobe InDesign Programming Guide
9.9. Standoff Page Items
303
// Get IStandOffModeCmdData Interface for the StandOffModeCmd
InterfacePtr<IStandOffModeCmdData> standOffModeData(standOffModeCmd,
IID_ISTANDOFFMODECMDDATA);
// Set mode: kAutoContour, text follows the shape
standOffModeData->SetMode(IStandOff::kAutoContour);
// Process the StandOffModeCmd
error = CmdUtils::ProcessCommand(standOffModeCmd);
// Report any error, if error != kSuccess
figure 9.9.6.b. Use StandOffMarginCmd To Set The Margin
ErrorCode CreateAndProcessStandOffMarginCmd(const UIDRef& itemList,
PMRect::PointIndex nWhichPoint, PMReal nMargin)
{
// Create a StandOffMarginCmd
InterfacePtr<ICommand>
standOffMarginCmd(CmdUtils::CreateCommand(kStandOffMarginCmdBoss));
if (!standOffMarginCmd)
return;
// Set the StandOffMarginCmd ItemList
standOffMarginCmd->SetItemList(itemList);
// Get IStandOffMarginCmdData interface fro the StandOffMarginCmd
InterfacePtr<IStandOffMarginCmdData>
standoffMarginData(standOffMarginCmd, IID_ISTANDOFFMARGINCMDDATA);
standoffMarginData->SetMargin(nWhichPoint, nMargin);
// Process the StandOffMarginCmd
return CmdUtils::ProcessCommand(standOffMarginCmd);
}
Note that you need to call StandOffMarginCmd once for each margin,
kMiddleTop, kMiddleBottom, kLeftMiddle and kRightMiddle.
9.9.7. Local StandOffs
Local standoffs are used for drop caps, baseline grid and inline graphics. Text
composition relies on the SpreadOverlapManager for space to reflow the text. In
the case of drop caps and inline graphics, the SpreadOverlapManager requests
the “local standoffs” of the text frame to modify the list of text tiles. The main
idea for the ILocalStandOffs interface is that you can register standoffs that are
“local” and only in effect for a particular text frame.
304
9.10. Commands For Page Items
Page Items
9.10. Commands For Page Items
There are a set of commands for manupilating page items.
9.10.1. Create Page Item
kNewPageItemCmdBoss is used to create a new page item. The newly created
page item can be any simple rectangular page item that supports the IGeometry
interface. All the attributes for the new page item are stored in
INewPageItemCmdData interface. The UID of the new page item is returned in
the command’s item list. If the parent is supplied, the new page item will be
added to the hierarchy. The following code shows how to create a new page
item using this command.
figure 9.10.1.a. Create a new kYourPageItemBoss object
PMPoint firstPt(0,0);
PMPoint lastPt(100,100);
PMPointList points(2);
points.Append(firstPt);
points.Append(lastPt);
InterfacePtr<IControlView> theView(::QueryFrontView());
if (theView == nil)
return;
InterfacePtr<ILayoutControlData> viewLayerMgr(theView,
IID_ILAYOUTCONTROLDATA);
UID parent = viewLayerMgr->GetActiveLayerUID();
IDataBase *db = ::GetDataBase(::GetFrontDocument());
InterfacePtr<ICommand>
cmd(CmdUtils::CreateCommand(kNewPageItemCmdBoss));
InterfacePtr<INewPageItemCmdData> data(cmd, IID_INEWPAGEITEMCMDDATA);
data->Set(db, kYourPageItemBoss,
INewPageItemCmdData::kDefaultGraphicAttributes, parent, points);
ErrorCode status = CmdUtils::ProcessCommand(cmd);
The data associated with this command is defined in the INewPageItemCmdData
interface.
The parent is set to the current spread layer in this case. The ClassID is the boss
ID of the page item you want to create. The initialPoints are the points that
define the position and size - and possibly the shape - of a particular instance of
the page item. The GraphicAttrType refers to the set of graphical attributes that
Adobe InDesign Programming Guide
9.10. Commands For Page Items
305
would be applied to the page item when it is created. The default value is often
enough, but the full set of values is listed in INewPageItemCmdData.h:
figure 9.10.1.b. GraphicAttrType defined in INewPageItemCmdData
enum GraphicAttrType
{
kNoGraphicAttributes= 0,
kDefaultGraphicAttributes,
kGraphicFrameAttributes,
kTextFrameAttributes
};
kCreateMultiColumnItemCmdBoss creates a new text frame.
kPlacePICmdBoss places a page item. This command does not create a new
page item. Instead, it takes an already created page item either from the
command’s item list, or from the place gun, and places it into the page item
hierarchy.
kPlaceGraphicFrameCmdBoss creates a graphic frame and then places an
image item into it. The item to be placed can be passed through the command’s
item list, or it can be placed from the place gun. To use the place gun, set the
usePlaceGunContents parameter on the IPlacePIData interface to kTrue, and
don't set the command's item list. When passing the UID of the placed item via
the command's item list, set the usePlaceGunContents parameter kFalse.
kPlaceItemInGraphicFrameCmdBoss places a page item into an existing
graphic frame. The page item can be passed into the command’s item list, or it
can be placed from the place gun. The UID of the graphic frame is returned on
the command’s item list.
kReplaceCmdBoss replaces one page item with another. Both the old page item
and the new page item are specified in the IReplaceCmdData interface.
kLoadPlaceGunCmdBoss loads the item specified on the command’s item list
into the place gun. Only one item can be loaded by this command.
kImportPIFromFileCmdBoss imports the file first. If what was imported is a
story, a multicolumn item is created; if what was imported is not in a graphic
frame, a new graphic frame is created and the imported file is put into the
frame. The UID of the new item is returned on the command’s item list.
306
9.10. Commands For Page Items
Page Items
kImportAndLoadPlaceGunCmdBoss is the combination of
kImportPIFromFileCmdBoss and kLoadPlaceGunCmdBoss.
kImportAndPlaceCmdBoss is the combination of kImportPIFromFileCmdBoss
and kPlacePICmdBoss.
9.10.2. Modify Page Item
9.10.2.1. Add/Remove Page Item To/From The Hierarchy
kAddToHierarchyCmdBoss adds the page item in the command’s item list to
the parent specified in the IHierarchyCmdData interface. The index position for
the page item is also specified on the IHierarchyCmdData interface.
For example, when a new page item is created, it will call this command if the
new item’s parent was supplied.
figure 9.10.2.1.a. AddToHierarchyCmd
// newItem is the UIDRef of the newly created page item, parent is the
// UIDRef of its parent, it could be the layer or another page item.
InterfacePtr<ICommand> addToCmd(CmdUtils::CreateCommand(
kAddToHierarchyCmdBoss));
if(addToCmd)
{
InterfacePtr<IHierarchyCmdData> cmdData(addToCmd,
IID_IHIERARCHYCMDDATA );
cmdData->SetParent(parent);
cmdData->SetIndexInParent(IHierarchy::kAtTheEnd);
addToCmd->SetItemList(UIDList(newItem));
ErrorCode status = CmdUtils::ProcessCommand (addToCmd);
}
kRemoveFromHierarchyCmdBoss removes a page item from its parent when a
page item is deleted or when detaching the imported content from the
imported frame.
9.10.2.2. Position Page Items
kCenterItemsInViewCmdBoss moves a set of page items so that they appear
centered in the current view. This command is not undoable.
kFitPageItemInWindowCmdBoss is used to make the current selected page
items fit in a window. This command is not undoable.
Adobe InDesign Programming Guide
9.10. Commands For Page Items
307
kAlignCmdBoss aligns the page items in the command’s item list to the
alignment type specified in the IIntData interface. The command itself is a
compound command made up of a set of move relative commands. It is not
undoable. However, since the move commands are undoable, the align
command is undoable too.
kMoveToLayerCmdBoss moves the page items specified on the command’s
item list to the document layer specified on the IUIDData interface. The page
items will appear in the same z-order as before, vis-a-vis each others in the
front of the new layer. This command does not move the items that are children
of a group or a graphic frame. Nor does it move standoffs.
kMoveToSpreadCmdBoss is similar to kMoveToLayerCmdBoss, except it moves
the page items from one spread to another.
9.10.2.3. Content Fitting
Sometimes, after the replace command or paste into operation, the graphic
frame content, such as the placed image, PDF or EPS does not fit into the frame
or certain position you want inside the frame. Unfortunately, there is no
graphic attribute nor helper function that can determine the fitting mode for a
page item. One way to determine this is to compare the bounding boxes for the
content (for example the image item) and the parent (the frame) to decide
whether the content should position in the center or fit into the frame, or the
corner of the frame. Based on that, you can use one of the fitting commands to
set the desired fitting mode for the page item. However, these commands have
to be executed again if you resize the page items. i.e. they aren't attributes,
rather they are one-time actions.
kAlignContentInFrameCmdBoss aligns the contents in the command’s item
list to one of the corners of their respective frames. The corner, which is the
same for all items, is specified on the IAlignContentInFrameCmdData interface.
This command will ignore frames that do not have content. The command’s
item list holds the UIDs of the contents, not the UIDs of the frames that
contain the contents. This command will send out a notification to the
content’s subject that it has changed.
kCenterContentInFrameCmdBoss positions the contents to the center of their
respective frames. The content UIDs are stored in the command’s item list.
308
9.10. Commands For Page Items
Page Items
The following code snippet compares the bounding boxes for the content and
its parent and calls the kCenterContentInFrameCmdBoss if their center is not
aligned. Assuming that you have the UIDRef for the frame, called frameRef.
figure 9.10.2.3.a. kCenterContentInFrameCmdBoss
//Get the geometry for the frame
InterfacePtr<IGeometry> frameGeo(frameRef, IID_IGEOMETRY);
//Get the bounding box for the frame in inner space
PMRect frameBounds = frameGeo->GetStrokeBoundingBox();
InterfacePtr<IHierarchy> frameHier(frameGeo, IID_IHIERARCHY);
// Get the frame's child geometry
InterfacePtr<IHierarchy> childHier(frameHier->QueryChild(0));
InterfacePtr<IGeometry> childGeo(childHier, IID_IGEOMETRY);
// Get the transform matrix from the child's inner space to the
// parent space
PMMatrix inner2Parent = ::InnerToParentMatrix(childGeo);
// Get the bounding box for the child in the frame's space
PMRect childBoundsInParent =
childGeo-> GetPathBoundingBox(inner2Parent);
// Compare the frameBounds and childBoundsInParent to determine which
// command to call, FitFrameToContent, FitContentToFrame,
// CenterContentInFrame or AlignContentInFrame, etc.
PMPoint frameCenter = frameBounds.GetCenter();
PMPoint imageCenter = imageBoundsInParent.GetCenter();
if (frameBounds.GetCenter() != imageBoundsInParent.GetCenter())
{
InterfacePtr<ICommand> centerCmd = CmdUtils::CreateCommand(
kCenterContentInFrameCmdBoss ) ;
if (!centerCmd)
return;
// Set the command item list to the UIDList of the content
centerCmd->SetItemList(UIDList(childHier));
ErrorCode error = CmdUtils::ProcessCommand(centerCmd);
// check the return error here
} else {
// try other commands here!
}
kFitContentPropCmdBoss takes a list of frame content and modifies the
content size and tansformation to fit the frames and maintain the content’s
proportions.
Adobe InDesign Programming Guide
9.10. Commands For Page Items
309
kFitContentToFrameCmdBoss modifies the content bounding boxes to fit into
their parent frames. The command’s item list holds the UIDs of the contents.
kFitFrameToContentCmdBoss resizes each frame in the command’s item list
to fit its content’s path bounding box. This command takes a list of selected
items and filters out the empty frame and non-graphical frame, then
transforms the frame's path geometry. Note, the text frames are still in the
command’s item list, even though they are not affected by this and other
commands.
Now, suppose that you have a selection of page items and you want to call
kFitFrameToContentCmdBoss to modify the sizes for the frames to fit their
content. figure 9.10.2.d. illustrates how to use kFitFrameToContentCmdBoss.
figure 9.10.2.d. kFitFrameToContentCmdBoss
ErrorCode error = kSuccess;
InterfacePtr<ISelection> selection (::QuerySelection());
if (!selection)
break;
UIDList pageItemList = selection->GetUIDList();
InterfacePtr<ICommand> fitFrameCmd = CmdUtils::CreateCommand(
kFitFrameToContentCmdBoss ) ;
if (!fitFrameCmd)
{
fitFrameCmd->SetItemList(pageItemList);
error = CmdUtils::ProcessCommand(fitFrameCmd);
// handle error here
}
9.10.2.5. Conversions Between Frames And Items
kConvertFrameToItemCmdBoss takes a list of graphic frames and text frames
with no content and converts them to graphic items (unassigned), which is
neither a text frame nor graphic frame. This command sets the graphic frame
attribute of the specified page items to kFalse.
kConvertItemToFrameCmdBoss is the opposite of
kConvertFrameToItemCmdBoss. It sets the graphic frame attribute of the
specified page items to kTrue, and converts unassigned graphic items to empty
text frames or graphic frames. This command will also convert empty text
frames to empty graphic frames.
310
9.10. Commands For Page Items
Page Items
kConvertItemToTextCmdBoss converts unassigned page items and empty
graphic frames to empty text frames.
9.10.2.6. Copy And Paste Commands
kCopyCmdBoss is a generic command for copying page items from one
document to another. This command applies for any page item that supports
the IScrapItem interface.
kCopyPageItemCmdBoss copies one or more page items to the specified parent
object, if any. A UIDList of the page items created is returned in the command’s
item list.
kCopyImageItemCmdBoss copies the specified image item to the specified
target. Both the image item and the target are specified in the ICopyCmdData
interface.
kDuplicateCmdBoss duplicates the items specified in the command’s item list.
The page items in the command's item list are duplicated if the command is
successfully processed.
kPasteCmdBoss pastes one or more page items to the specified database in the
command’s ICopyCmdData. The UIDList of the items to paste are passed to the
command in the ICopyCmdData interface.
kPasteGraphicItemCmdBoss is used for pasting EPS, image, and PDF into the
destination database. The difference between kPasteGraphicItemCmdBoss and
kCopyPageItemCmdBoss is that if the specified parent is a graphic frame, the
graphic item (EPS, image, PDF) is created as a child of the frame. If no frame
was specified as the parent, then kPasteGraphicItemCmdBoss creates a new
rectangular frame as its parent and applies all its transformation values to the
frame so that it appears in the correct location.
kPasteInsideCmdBoss pastes the specified content into a frame, deleting
previous content if needed. The content is aligned to the top left.
9.10.2.7. Select And Deselect Commands
The following set of commands are not undoable.
Adobe InDesign Programming Guide
9.10. Commands For Page Items
311
kSelectPageItemCmdBoss selects one or more page items. The new selection
will either replace the current selection or be added to the current selection
depending on the defined selection type.
kDeselectPageItemCmdBoss deselects the items specified on the command’s
item list.
kDeselectAllCmdBoss deselects the selection passed on the ISelectCmdData
interface.
kSelectStandOffCmdBoss selects the standoff pageitem.
kDeselectStandOffCmdBoss deselects the standoff pageitem.
There are also a set of helper functions to create these commands for you. They
are defined in ISelectUtils.h.
9.10.2.8. Transform Commands
kMoveAbsoluteCmdBoss moves the page items specified on the command’s
item list to the coordinate location specified on the IPointListData interface.
All locations are in pasteboard space.
kMoveRelativeCmdBoss moves the page items specified in the command’s
item list to the position specified in the command’s IMoveRelativeCmdData
interface. The IMoveRelativeCmdData interface also specifies the transform
action as whether the children of the item should share any transformation of
their parent.
kResizeItemsCmdBoss resizes a set of items by a given factor in x and y
direction. This command is used when changing width or height in the
Transform panel. The IResizeItemsCmdData interface provides the horizontal
and vertical resize factor, the reference point and the enum value for SetAction
that is defined in IGeometry.
There are another set of commands that allow you to set the width and height
of a page item individually. The commands are CreateDefaultSetWidthCommand
and CreateDefaultSetHeightCommand in IPageItemUtils.h,
CreateSetWidthCommand and CreateSetHeightCommand in IGeometrySuite.h.
312
9.10. Commands For Page Items
Page Items
kSetDimensionsCmdBoss sets a set of items to a given width or height (or
both). This command is useful when changing a width or height of 0, which
kResizeItemsCmdBoss fails to do.
kSetBoundingBoxCmdBoss changes the bounding boxes for a set of page items
specifed in the command’s item list. The ISetBoundingBoxCmdData interface
holds the new bounding boxes, indicates whether bounds are in pasteboard or
inner coordinates, and sets the action that the page item should take for this
command. It is used by the resize tracker. Since it requires a bounding box for
each item to be resized, it is less convenient for multiple selections.
kRotateItemCmdBoss rotates a set of items by a specified angle around a given
reference point. The IRotateCmdData interface specifies the transform context
(relative to pasteboard or to parent) , the rotation reference point and the
transform action.
kScaleItemCmdBoss scales a set of items by a specified percentage with respect
to a given reference point. The IScaleItemCmdData interface specifies the
horizontal and vertical scale value, the reference point, scale context (relative to
inner, parent or pasteboard), and the transform action.
kSkewItemCmdBoss performs a horizontal shear transformation on a set of
items with respect to a given reference point. The ISkewItemCmdData interface
provides skew angle, rotation angle, reference point, transform context and
transform action.
9.10.2.9. Group Page Items
kGroupCmdBoss groups the selected items in the list, and creates a new page
item consisting of the group. The parent for the group is the same as the parent
of the last item in the sorted selected item list. The UID of the new page item,
the group, is returned in the command’s item list. This command requires that
the items to be grouped have valid parents because only the items at the same
level in the hierarchy can form a group. For instance, it is invalid to attempt to
group an image with the spline item that contains it, or any other splines not at
the same level of the document hierarchy.
kUngroupCmdBoss ungroups the items specified in the command’s item list.
The parent of the group becomes the parent of all the ungrouped items.
Adobe InDesign Programming Guide
9.10. Commands For Page Items
313
9.10.2.10. Lock Page Item
kSetLockPositionCmdBoss is used to lock the current selected page items.
kUnLockCmdBoss is used to unlock the current selected page items.
These two commands both modify the IID_ILOCKPOSITION interface.
9.10.3. Delete Page Item
kDeleteCmdBoss deletes the page items specified in the command’s item list.
Any groups left empty by the deletions are deleted too.
kDeleteFrameCmdBoss deletes both the frame and its contents. In general, you
should avoid directly calling this command. Instead use the GetDeleteCmd()
method of the IScrapItem interface to delete the frame.
kDeletePageItemCmdBoss deletes the page items specified in the command’s
item list, and removes the items from the hierarchy. In general, don’t create this
command directly, instead use the GetDeleteCmd() method of the IScrapItem
interface to delete the page item.
kDeleteImageItemCmdBoss is a sub-class of kDeletePageItemCmdBoss. The
purpose of this command is to release an image object when the page item is
deleted. This command deletes the image items on the command’s item list. If
the ClassID of any item is not kImageItem, it is not deleted.
kDeleteLayerCmdBoss deletes the layer specified on the command’s item list.
The layers in the item list must be in the same document. After this operation,
all page items on the layer list are deleted too.
kDeletePageCmdBoss deletes the pages specified on the command’s item list.
Page items on the pages are also deleted. If the spread is left without pages by
this command, it is also deleted. If page reshuffling is specified on the
IBoolData interface, the remaining pages in the affected spread and pages in the
spreads
that follow are reallocated so that each spread has the number of pages specified
in the page setup preferences for the document.
kDeleteSpreadCmdBoss deletes one or more spreads and all their pages and
page items. If the deletion would leave the document without spreads, the
314
9.11. Summary
Page Items
command is aborted and nothing is deleted. The list of spreads to delete is
specified in the command’s item list.
kDeleteUIDsCmdBoss deletes the UIDs specified on the command’s item list.
kRemoveInternalCmdBoss is used when you delete a page item with
embedded data. It removes the embedded data from the publication.
9.11. Summary
This chapter outlined page items and the overall object inheritance related to
the page item objects. The bosses and interfaces involved were described. We
also showed some practical examples related to page items, such as rotation,
transformation and creation. In this chapter we also discussed the commands
to manipulate the page items and standoff page items.
9.12. Review
You should be able to answer the following questions:
1. What is a page item?
2. What is a standoff page item?
3. What are the important interfaces that a spline item must aggregate?
4. Which interface stores the UID-based tree structure for page items within a
document?
5. What are the three bounding boxes for each page item? How to get them?
6. How do you detect which page a page item lies on?
7. What are the commands that delete page items?
9.13. Exercises
9.13.1. Create Custom Page Item
InDesign object model is extensible. In figure 9.3.a, we added
kYourPageItemBoss to the inheritance diagram. How would you create your
own custom page item?
9.13.2. Find The Selected Page Item’s Children And Parents
In order to understand the interface IHierarchy and various page item objects,
try writing some sample code to explore the methods it supports to find out the
selected page item’s children and parents, if any. What are their ClassIDs and
UIDs?
Adobe InDesign Programming Guide
9.13. Exercises
9.13.3. Place An EPS Into A Page Item
Implement this as an exercise after reading “Place PDF Into A Page Item” on
page 295.
315
316
9.13. Exercises
Page Items
10.
Page Item Drawing
10.0. Overview
A layout is a view of a document. It is displayed in an InDesign window, and
provides the infrastructure for drawing the document. In the context of
InDesign, the term “drawing” can mean rendering objects to the screen, to
print, or to other devices.
Drawing to the screen really means drawing to an InDesign window, which is a
platform-independent construct containing layout widgets that display the
contents of the document. Each item in the document is responsible for
drawing itself and requesting each of it’s children to draw themselves.
Document items such as spreads, layers, and page items draw themselves by
receiving messages (calls) on one or more of their interfaces. See the Page Items
and Document Structure chapters for more information about page item
interfaces and the document hierarchy.
10.1. Goals
The questions this guide answers are:
1. How are documents displayed?
2. What objects in InDesign are responsible for drawing?
3. How is drawing managed within InDesign?
4. What drawing primitives are supported?
5. What causes my page item to draw?
10.2. Chapter-at-a-glance
This chapter explains how page items draw and the context in which they draw.
Several foundation concepts are first presented to define the elements involved
in displaying a view of a document. These concepts include:
• A description of InDesign windows in “10.3.1.InDesign Windows” on
page 319.
• How a document is represented as the layout in “10.3.2.The Layout
Hierarchy” on page 322.
317
318
10.2. Chapter-at-a-glance
•
Page Item Drawing
InDesign’s drawing context in “10.3.3.The InDesign Graphics Context” on
page 326.
Building on the foundation concepts, the sequence of drawing the layout is
presented. This sequence description includes:
• Invalidating a view, and the role of the underlying platform in
“10.4.1.Invalidating a View” on page 331.
• The high-level steps of updating a window are presented in “10.4.2.Window
Updates” on page 332,
• The detailed steps of the layout draw order are then presented in
“10.4.3.Layout Draw Order” on page 334.
When page items are called to draw, they receive information about how they
should draw, and the specific context for their draw. This includes:
• The drawing control flags in “10.5.1.IShape Flags” on page 339
• The collection of information about the context in “10.5.2.GraphicsData
Class” on page 339
• The InDesign drawing interface in “10.5.3.IGraphicsPort” on page 340
• Determining the destination of the draw in “10.5.4.Detecting the Device
Context for Drawing” on page 342
Given the draw order and the context, the details of how a page item draws is
presented. This includes:
• The relevant interfaces in “10.6.1.Overview of Page Item Interfaces for
Drawing” on page 344
• The main drawing interface in “10.6.2.IShape Interface” on page 344
• A specialized interface for path drawing in “10.6.3.The IPathPageItem
Interface” on page 352
• The selection drawing interface in “10.6.4.The IHandleShape Interface” on
page 352
Adobe InDesign Programming Guide
10.3. Foundation
319
10.3. Foundation
Documents can contain a variety of objects: text, graphics, and images. While
the document hierarchy provides a framework for storing these objects,
displaying these objects is the responsibility of the layout hierarchy. It is the
layout’s job to draw the document to the screen, printer, or to other devices.
This section describes the objects that comprise the layout hierarchy: a window
boss, layout widgets, and the document hierarchy. Drawing the layout requires
a graphics context, and this section also describes the graphics context
associated with the layout window.
10.3.1. InDesign Windows
The layout hierarchy has an InDesign window object at it’s root. InDesign
represents a window as a platform-independent object called a kWindowBoss.
10.3.1.1. Window Bosses
Window bosses provide core interfaces for performing common operations
such as creating, resizing, and drawing windows, as well as handling events and
describing cursor regions. As shown in figure 10.3.1.a., the InDesign API
generalizes window bosses for a variety of uses: palettes, the document, tips,
and dialogs.
Typically, InDesign windows for palettes and dialogs are not created and
managed directly by a plug-in, but instead are specified and instantiated as a
part of widgets. For example, a plug-in might define a palette as a localized
widget resource, then open it at run-time. Behind the scenes, InDesign creates
and manages the associated window for the palette. Similarly, windows for
displaying the document are created and managed by InDesign as part of
creating a new view on the document.
table 10.3.a. version history
Rev
Date
Author
Notes
1.0
10/27/00
John Hake
First Release
0.1
8/1/2000
John Hake
First Draft
0.0
6/29/2000
John Hake
Initial Outline.
320
10.3. Foundation
Page Item Drawing
figure 10.3.1.a. InDesign Window Boss Hierarchy
kWindowBoss
kDocWindowBoss
kTipsWindowBoss
kPaletteBoss
kToolBoxPaletteBoss
kTabAwarePaletteBoss
kSwatchLibPaletteBoss
kTablessPaletteBoss
kDialogWindowBoss
kModalWindowBoss
kMovableModalWindowBoss
kModelessWindowBoss
Under the hood, InDesign windows have a corresponding platform window.
The InDesign window is responsible for creating, managing, and destroying the
associated platform window. The platform window is the basis for the graphics
context used for drawing to the InDesign window.
10.3.1.2. The Document Window Boss
The layout view of a document appears in a window defined by a
kDocWindowBoss. A layout window is owned and managed by the InDesign
application. InDesign may have several layout windows open at once, each
containing a different view of the same document.
Adobe InDesign Programming Guide
10.3. Foundation
321
As with all window bosses, kDocWindowBoss has several interfaces of particular
interest for drawing, as shown in figure 10.3.1.a.. The IWindow interface
figure 10.3.1.a. Window Boss Interfaces
Interface
Function
IWindow
Used for manipulating the window.
IEventHandler
Used for handling events directed at the window: mouse clicks,
update events, etc.
IControlView
Used for drawing the Window, Content to Local transformations
IPanelControlData
Used for managing child widgets in hierarchy
provides methods for common window operations such as creating, opening,
resizing, and closing them. The implementation behind the interface is
designed to be a thin layer of core APIs that sit over the platform-provided
window functions.
Drawing support in the IWindow interface is considerably less direct than calls
to the platform. The IWindow interface is responsible for creating and
maintaining the structures used for drawing by IControlView and other
interfaces. These structures include the underlying platform-dependent
window and the view port boss. The view port boss provides a platformindependent, high performance interface for drawing to the platform window.
View port bosses are discussed in greater depth in “10.3.3.1. View Port Bosses” .
The remaining interfaces are familiar from widget bosses. The IEventHandler
interface receives events directed at the window, and provides a platformindependent API for fielding the events. Methods on this interface are called to
handle events such as mouse clicks, activation events, and key events. Methods
on a window’s event handler interface are called automatically by InDesign’s
event dispatcher to handle events targeted at that window. The role of a
window’s event handler in drawing a view is discussed further in “10.4.2.
Window Updates” .
The IControlView interface on the window boss has two important roles with
respect to drawing: it is the starting point for the window drawing sequence
and it maintains the geometric relationship of the window to it’s contents. The
322
10.3. Foundation
Page Item Drawing
sequence of drawing window contents is described in “10.4.3. Layout Draw
Order” .
The IPanelControlData interface is responsible for maintaining a list of
kDocWindowBoss' child widgets. It’s role is analogous to the role of the
IHierarchy interface for page items. The kDocWindowBoss and it’s child widgets
constitute the layout hierarchy.
10.3.2. The Layout Hierarchy
Drawing a document in a window is the responsibility of the layout hierarchy.
The layout is comprised of kDocWindowBoss and it’s child widgets. A document
has one kDocWindowBoss (InDesign window) for each view of the document. As
shown in figure 10.3.2.a., the views are accessed by using methods on the
IWindowList interface of the kDocBoss.
Arranged under kDocWindowBoss is a hierarchy of widgets that represent the
view of the document. Typically, the widgets use an IPanelControlData
interface to list their children, and an IWidgetParent interface to point at their
immediate parent.
The kDocWindowBoss has an IPanelControlData interface that stores a reference
to it’s only child: a kLayoutPanelBoss. The kLayoutPanelBoss defines the toplevel widget used for representing a view of a document. The children of the
kLayoutPanelBoss comprise the visible elements of the view: the document
layout, scroll bars, rulers, and navigation buttons. When a window draws, the
children of the kLayoutPanelBoss draw in the top-to-bottom order shown in
figure 10.3.2.a.. Among those child widgets is the kLayoutWidgetBoss.
The visible portion of the document is represented by the LayoutWidget,
defined by the kLayoutWidgetBoss. The LayoutWidget has the responsibility for
causing all the visible document elements to draw. It does this by iterating the
document hierarchy to get the visible spreads and calling each spread to draw.
The LayoutWidget navigates the document hierarchy through kDocBoss, as
shown in figure 10.3.2.b.. In this example the document has “n” spreads of “m”
content layers. The layout widget uses its ILayoutControlData interface to get to
its associated document boss. The ISpreadList interface on the document boss
provides access to any particular spread. As discussed in the previous chapter,
the IHierarchy interface can be used to access children of the spread.
Adobe InDesign Programming Guide
10.3. Foundation
323
For reasons of efficiency, navigation of the layout hierarchy during a window
draw is somewhat more selective than shown in figure 10.3.2.b.. Spreads or
elements of spreads that aren’t visible in a window are not called to draw.
InDesign also discriminates between redrawing an entire window and only
drawing the region that changed. These two strategies mean that page items are
not guaranteed to be called to draw during every window draw.
324
10.3. Foundation
Page Item Drawing
figure 10.3.2.a. The Layout Hierarchy
kDocBoss
(Document)
IWindowList::GetNthWindow()
kScrollBarWidgetBoss
(ScrollBarWidget)
kScrollBarWidgetBoss
(ScrollBarWidget)
kDocWindowBoss
(Layout Window)
kLayoutWidgetBoss
(LayoutWidget)
...
LayoutUtils::GetVisibleSpreads()
IPanelControlData::GetWidget()
kHorzRulerWidgetBoss
(HorzRulerWidget)
kLayoutPanelBoss
kVertRulerWidgetBoss
(VertRulerWidget)
IPanelControlData::GetWidget()
kZeroPointWidgetBoss
(ZeroPointWidget)
kScaleStatusWidgetBoss
(ScaleStatusWidget)
kPageNavigateWidgetBoss
(PageNavigateWidget)
kWindowSizeBoxWidgetBoss
WindowSizeBoxWidget
Adobe InDesign Programming Guide
10.3. Foundation
figure 10.3.2.b. Navigating the Layout Hierarchy for a Document
kLayoutWidgetBoss
IControlView
ILayoutControlData
GetDocument()
kDocBoss
IDocument
ISpreadList
QueryNthSpread(0..n)
kSpreadBoss
QueryChild(0)
kSpreadLayerBoss
IGeometry
IHierarchy
IShape
IHierarchy
IShape
kPageBoss
QueryChild()
IHierarchy
IShape
kSpreadLayerBoss
QueryChild(1..m)
kSplineItemBoss
IHierarchy
IShape
QueryChild()
IHierarchy
IShape
kSpreadLayerBoss
QueryChild(m+1)
QueryChild(m+2 .. 2m+1)
IHierarchy
IShape
kSpreadLayerBoss
IHierarchy
IShape
kGuideItemBoss
IHierarchy
IShape
QueryChild()
325
326
10.3. Foundation
Page Item Drawing
10.3.3. The InDesign Graphics Context
Drawing requires a graphics context. When page items are called to draw they
are provided a GraphicsData object, which contains pointers to the objects that
comprise an InDesign graphics context. Using InDesign’s graphics context,
page items can perform platform-independent drawing to a variety of device
contexts: the screen, print, or PDF. This section will illustrate drawing to the
screen.
figure 10.3.3.a. shows the relationships between the bosses and classes that
provide the InDesign graphics context for a window. The window boss is
responsible for creating, maintaining, and destroying it’s associated (platform)
SysWindow. A SysWindow is a wrapper class for a platform window object.
figure 10.3.3.a. Graphics Context for InDesign Windows
kDocWindowBoss
IControlView
kWindowViewPortBoss
IViewPort
IWindowPort
IGraphicsPort
SysWindow
IGraphicsContext
InDesign’s platform-independent API for drawing is provided by the view port
boss. Page items use the IGraphicsPort interface on the view port boss for
drawing. Behind the scenes, the view port boss doesn’t actually draw directly to
the platform window. Instead, it draws through the Adobe Graphics Manager
(AGM), which has been specialized for the type of drawing device. (The device
type describes PostScript printing, the Screen, etc.) The specialization is
transparent to clients of the graphics context and the view port boss.
Adobe InDesign Programming Guide
10.3. Foundation
327
10.3.3.1. View Port Bosses
View port bosses provide a platform independent interface for drawing. A view
port boss operates as a wrapper between the drawing client (often a page item)
and the underlying AGM code that defines the graphics context for the output
device. There are eight different types of view port bosses, each tailored to a
particular type of drawing output:
• kWindowViewPortBoss - for InDesign window bosses
• kAGMImageViewPortBoss - general image port
• kOffscreenViewPortBoss - offscreen port for screen draws
• kHTMLViewPortBoss - for drawing HTML output
• kPDFViewPortBoss - for drawing PDF output
• kPrintPSViewPortBoss - for drawing to a PostScript port.
• kPrintNonPSViewPortBoss - for drawing to a non-PostScript port.
• kSVGViewPortBoss - for drawing SVG outpout.
For example, the kWindowViewPortBoss is used for drawing to InDesign
windows. The interfaces on kWindowViewPortBoss are shown in figure
10.3.3.1.a..
figure 10.3.3.1.a. kWindowViewPortBoss Interfaces
Interface
Function
IViewPort
A generic "handle" to a viewport boss, stores focus state
IViewPortAttributes
Settings for the view port
IWindowPort
Invalidation, screen to window coordinate transforms
IWindowPortData
Stores SysWindow and Port data
IGraphicsPort
Provides shell over AGM’s drawing API
IRasterPort
Provides shell over AGM’s rasterport specific API
IAGMPortData
Stores AGM port
The IGraphicsPort interface is used extensively for drawing. This interface
provides methods that draw to the associated graphics port. The methods are
similar to PostScript graphics operators. More information about using the
IGraphicsPort interface for drawing is presented in “10.5.3. IGraphicsPort” .
On the Macintosh platform a single view port boss is created for the lifetime of
the (platform) SysWindow. On the PC the view port boss only exists during
drawing. Page items are supplied a reference to the view port boss as part of the
GraphicsData object when they are asked to draw.
328
10.3. Foundation
Page Item Drawing
10.3.3.2. IGraphicsContext
The graphics context for InDesign drawing is described by an object derived
from IGraphicsContext, an abstract data container interface. This interface
does not reside on a boss, nor is it derived from IPMUnknown. Instead,
implementations of IGraphicsContext are specialized for different drawing
devices.
A graphics context is instantiated based on a view port boss, an IControlView
interface pointer, and an update region. Several important pieces of
information are stored in the graphics context object:
• the current rectangular clip region for the drawing port,
• the transform for mapping content to drawing device coordinates.
Screen draws do not paint the entire document and then copy only a portion of
it to the window. Instead, only the invalid region of the window is redrawn. The
clip region stored in the graphics context is applied like a mask, discarding any
drawing outside the clip bounds. During a draw sequence the clip represents
the update region in the window, and is stored in window coordinates. The
window coordinate system is described in the next section.
The transform describes the relationship of the content coordinates to the
drawing device coordinates. For screen drawing, the drawing device is a
window. The transform is based on the IControlView implementation supplied
at the time of the graphics context instantiation. During a normal screen draw
sequence, it is the IControlView implementation on the kLayoutWidgetBoss
that instantiates the graphics context, so the transform is initialized to be
pasteboard to InDesign window coordinates. During the draw sequence this
transform is modified to represent parent to window coordinates.
For drawing to the screen, AGM is used to provide the graphics context. Under
the hood an offscreen context is used for drawing to facilitate a smooth, flicker
free screen update. The drawing code renders offscreen and the completed
draw is subsequently copied to the screen. The use of offscreen contexts is
transparent to page items when they draw. The graphics context provided to
the page item hides these implementation details.
10.3.3.3. The Window Coordinate System
The relationships between coordinate systems for the pasteboard, document
spreads, layers, and page items are described in detail by the Document
Structure chapter. In summary, for any document:
Adobe InDesign Programming Guide
10.3. Foundation
329
•
the pasteboard coordinate system is the parent for all spread coordinate
systems,
• the origin of the pasteboard coordinate system is coincident with the origin
of the coordinates for the first spread in the document.
Those relationships still hold in the context of drawing into an InDesign
window.
The introduction of InDesign windows raises a new question: what is the
relationship between an InDesign window and the pasteboard coordinate
system? This question is illustrated in figure 10.3.3.3.a., which shows a single
page, two pages per spread document. The relationship between the window,
LayoutPanelWidget, and LayoutWidget coordinates systems are relatively static
and described by their IControlView implementations. The term “relatively
static” refers to the change that occurs when the user hides the rulers and the
layout widget coordinate system becomes coincident with the
LayoutPanelWidget and window coordinate systems.
figure 10.3.3.3.a. Window, Layout, and Document Coordinates
ö
xw ≡ ö
x lp
ö
xl
ö
yw ≡ ö
y lp
kLayoutWidgetBoss IControlView::
GetContentToWindowTransform()
ö
xs ≡ ö
x pb
ö
yl
ö
ys ≡ ö
y pb
330
10.3. Foundation
Page Item Drawing
As the user zooms and scrolls the view, the relationship between the
LayoutWidget coordinates and the pasteboard coordinates changes. The
LayoutWidget’s boss has an IPanorama interface to track the scroll and zoom
changes. The relationship between the pasteboard and LayoutWidget
coordinate system is stored in the LayoutWidget’s IControlView
implementation. The LayoutWidget’s
IControlView::GetContentToWindowTransform() method returns the
transform to map a region in pasteboard coordinates to window coordinates.
This relationship is also stored in the GraphicsContext object. By using the
known coordinate relationships in the document hierarchy, a region described
in any page item’s coordinates can be mapped to the window coordinate
system.
The window coordinate system can be mapped to the screen coordinate system
by using methods of the IWindowPort interface on the view port boss. For
example, event handlers often return mouse hit locations in screen coordinates.
The code shown in figure 10.3.3.3.b. shows how to perform this conversion.
The code is the functional equivalent of
ILayoutUtils::ComputePasteboardPoint(). (See ILayoutUtils.h.)
figure 10.3.3.3.b. Screen to Window Coordinate Conversion
// Get the interface that stores the content to window xform
InterfacePtr<IControlView> myView(this, IID_ICONTROLVIEW);
// Get the interface that provides screen to local coord conversion
ViewPortAccess<IWindowPort> myCanvas (myView, IID_IWINDOWPORT);
AcquireViewPort aqViewPort(myCanvas)
// Convert the screen (global) coordinates to window (local)
PMPoint winLoc = myCanvas->GlobalToLocal(screenLoc);
// Convert window to 'this' IControlView's (widget) coordinate system.
myView->GetContentToWindowTransform()->InverseTransform(&winLoc);
The example code assumes that it resides on a boss that aggregates the
IControlView interface, such as the kLayoutWidgetBoss. Assuming that we start
with a screen location called screenLoc, we need to covert it to window
coordinates. The implementation of the IWindowPort interface on the view port
boss will do this conversion. (See figure 10.3.3.a..) Access to the view port boss
is through the ViewPortAccess template and AcquireViewPort class. However,
access to the view port boss is also possible by:
Adobe InDesign Programming Guide
•
•
10.4. Drawing the Layout
331
Given a graphics context, use IGraphicsContext:::GetViewPort()
Given a GraphicsData*, use GraphicsData::GetGraphicsPort()
Once the IViewPort interface is acquired on the view port boss, the
IWindowPort interface can be queried. The IWindowPort method
GlobalToLocal() will convert the location to window coordinates. If the
example code resides on a boss that aggregates an IControlView interface, then
the location can be converted to the widget coordinates stored in the
IControlView implementation.
10.4. Drawing the Layout
InDesign drawing occurs in response to invalidation of a view, window, or
region. Although InDesign provides the platform-independent APIs for
invalidating a view, the APIs simply forward the invalidation to the platform.
The invalidation state is maintained by the platform, which generates update
events to InDesign.
10.4.1. Invalidating a View
Invalidation can be caused by changes to the model (persistent data in a
document) or by direct invalidation. Both use the same mechanism for
invalidating a view.
Changes to the model are broadcast through the change manager to observers
of interest. For example, InDesign uses an observer on the LayoutWidget to
monitor changes to page items in the layout. When the observer receives
notification of a change, it asks the subject of the change to invalidate a region
based on its stroke bounding box.
Views can be directly invalidated by using the LayoutUtils method
InvalidateViews(). figure 10.4.1.a.. shows the SDK HelloWorld plug-in source
file HelloWorld.cpp modified to invalidate all views of the front document.
figure 10.4.1.a. Client Code to invalidate the document
#include "LayoutUtils.h"
int32 HelloWorld::ShowMsg()
{
IDocument* fntDoc = ::GetFrontDocument();
if (fntDoc != nil)
332
10.4. Drawing the Layout
Page Item Drawing
Utils<ILayoutUtils>()->InvalidateViews( fntDoc );
return 0;
}
When compiled and run, the code causes the collaboration shown in figure
10.4.1.b.. The ILayoutUtils function InvalidateViews() uses the document
pointer to locate the views for a document. For each view it gets the
ILayoutController interface on the kLayoutWidgetBoss and calls
InvalidateContent(), which creates an invalidation region equal to the view’s
window. The invalidation region is passed to the InvalRect() method on the
IWindowPort interface of the kWindowViewPortBoss corresponding to the
window. The InvalRect() method then passes the invalidation region to the
platform.
figure 10.4.1.b. Boss Collaboration for Invalidation
kHelloWorldBoss
1 : InvalidateViews( fntDoc )
ILayoutUtils
IHelloWorld
2 : InvalidateContent()
kLayoutWidgetBoss
2.1 : InvalRect()
ILayoutController
kWindowViewPortBoss
IWindowPort
2.2 : InvalidateRect()
InvalRect()
Platform
The invalidation region is then accumulated by the platform and generates a
paint message directed at that window. The next section describes how
InDesign receives and processes the update message.
10.4.2. Window Updates
Drawing in InDesign is a response to an update event aimed at a specific
window. In response to such an event, the window draws (or causes to draw) all
Adobe InDesign Programming Guide
10.4. Drawing the Layout
333
it’s visible content. figure 10.4.2.a. shows the collaboration involved in
initiating a window draw. The platform is responsible for accumulating the
window regions that have previously been marked as invalid. The platform
sends an update message (event) to InDesign’s event dispatcher, where it is
wrapped in a platform-independent class and routed to the event handler on
the kDocWindowBoss for the appropriate window.
The window’s event handler calls the Update() method on its IWindow interface,
which in turn calls the Draw() method on its IControlView interface. At that
point the drawing sequence begins following the pattern for drawing a widget
hierarchy: Draw() uses the IPanelControlData interface to locate each of its
children and call Draw() on the child’s IControlView interface. This means the
kLayoutPanelBoss is called to draw, and it iterates each of it’s child widgets:
scroll bars, the LayoutWidget, rulers, etc.
figure 10.4.2.a. Boss Collaboration for Redrawing the Layout
InDesign
Event Dispatcher
Platform
1.1 : Update()
kDocWindowBoss
1 : Platform Event
2 : Update()
2.1 : Draw()
kLayoutPanelBoss
IControlView
IPanelControlData
2.2 : Draw()
IEventHandler
IWindow
IControlView
IPanelControlData
2.3 : Draw()
kDocBoss
kLayoutWidgetBoss
IControlView
ILayoutControlData
3 : GetVisibleSpreads()
ILayoutUtils
IDocument
ISpreadList
3.1 : GetNthSpreadUID()
The kLayoutWidgetBoss’ IControlView uses ILayoutUtils to determine which
of the document’s spreads are visible in the window’s invalid region. Each
visible spread is then called to draw it’s contents and any decoration features for
selected items. The details of the actual draw sequence are more involved, and
are described in the next section.
334
10.4. Drawing the Layout
Page Item Drawing
The drawing sequence concludes with validating the contents of the window.
This completes the update cycle, from invalidation to redraw.
10.4.3. Layout Draw Order
Layout windows are updated in several steps that allow better performance and
the opportunity to interrupt the draw. Good performance is achieved by
specializing the drawing operations according to: the view’s z-order, whether
the invalidation is due to a selection change, or whether all objects have
changed.
10.4.3.1. Foreground and Background Draws
At the level of the kLayoutWidgetBoss, several decisions are made behind the
scenes for the sake of drawing performance. The IControlView implementation
on the kLayoutWidgetBoss chooses what to draw based on the window’s zorder, the selection, and the update region.
If the window is the front view, then two views may be drawn behind the
scenes: a background view containing all the objects and a foreground view that
contains only the decorations for the selection. Offscreen graphics contexts are
created and cached for both views. If the update region overlaps the window, or
if the current front view was not the last view to have drawn, the background
view is redrawn. If the selection is not empty, then the foreground view is
redrawn as well.
Based on the above rules, kLayoutWidgetBoss’ IControlView filters the visible
spreads and calls their IShape::Draw() methods through InDesign’s Draw
Manager. This filtering means that page items aren’t guaranteed to be called for
a screen draw. The background draw then propagates through the document
hierarchy as described in section “10.4.3.3. Drawing the Background” .
When the background draw is complete, the
IID_IBACKGROUNDOFFSCREENCHANGED notification is sent to InDesign’s change
manager. If the selection is empty the background image is copied to the
window and the draw is complete. If the selection is not empty then the
foreground draw starts by copying the background image to the foreground
offscreen context. The selection is drawn by iterating the selection list calling
the IHandleShape::Draw() method for each item. The foreground image is then
copied to the screen.
Adobe InDesign Programming Guide
10.4. Drawing the Layout
335
The use of foreground and background draws means that a page item could be
called twice during a redraw. The first call to IShape::Draw() in the order of the
document hierarchy for the background draw, and the second call to
IHandleShape::Draw() in the order of the selection list for the foreground draw.
If the window is not the front view, then a more abbreviated draw takes place.
Both the document items and the selection are drawn to a foreground offscreen
context, and it is copied to the screen.
10.4.3.2. Introduction to the Draw Manager
Until now, document drawing has implied the kLayoutWidgetBoss is directly
calling each spread to draw. In fact, kLayoutWidgetBoss calls through InDesign’s
Draw Manager facility. The Draw Manager is a session level interface through
which all drawing for the screen, PDF, and print passes. As described above,
drawing in InDesign occurs on a spread-by-spread basis, and is hierarchical.
Without a service like the draw manager, it would be difficult to change the
behavior of drawing a sub hierarchy.
Funneling all drawing activity through the Draw Manager provides three
important features for changing the behavior of draws:
• Clipping of areas to be drawn
• Filtering of items to be drawn
• Interrupting a draw sequence
Clipping and filtering provide a means to select items for the draw based on
regions. The draw manager maintains the current values for the clip and filter
regions. Interruption of the drawing sequence relies on a broader mechanism
called draw events. As items draw they broadcast standard messages that
announce the beginning and end of discrete drawing operations. Draw events
are received by special handlers that register interest in particular types of
messages, and each draw event handler has the opportunity to abort the draw
at that point. Clients of the Draw Manager (such as the LayoutWidget) install a
default draw event handler.
The Draw Manager provides services for hit testing and iterating the draw
order as well as drawing. More information about all of its functions is available
in the Draw Events chapter.
336
10.4. Drawing the Layout
Page Item Drawing
10.4.3.3. Drawing the Background
Once the kLayoutWidgetBoss’ IControlView implementation has obtained a list
of the visible spreads, it has to ask each spread to draw through InDesign’s
Draw Manager. This section describes the overall sequence for drawing the
document hierarchy.
The collaboration for drawing the document hierarchy is shown in figure
10.4.3.a.. The IControlView implementation on the kLayoutWidgetBoss calls
the Draw Manager once for each visible spread in the window’s view. The Draw
Manager is responsible for creating a GraphicsData object that describes the
graphics context for the spread’s draw. Specifically, it sets the transformation
matrix in the graphics port to support drawing in the spread’s parent
coordinate system, which is the pasteboard. The Draw Manager then calls the
spread’s IShape::Draw() method to initiate the sequence of drawing that
spread.
When an item’s IShape::Draw() method is called, it has the responsibility to
draw itself and then draw its children. This action is analogous to the
mechanism used for the IControlView interface on widgets. The IShape
implementation provides methods for drawing an object and iterating the
object’s children, asking each of them to draw. Before drawing, the IShape
implementation sets the transformation matrix in the graphics port to the
item’s inner coordinates. This establishes the convention:
• Each drawing object expects to receive the graphics port set to its parent’s
coordinate system,
• Each drawing object sets the graphics port to its inner coordinates before
drawing itself or calling its children to draw,
• Each drawing object reverts the graphics port to its parent’s coordinate
system before returning to the caller.
The IShape class, its methods for drawing, and the coordinate system
manipulations are described in greater detail later in this chapter.
Iterating the object’s children is accomplished by using the IHierarchy interface
on each page item. This interface provides methods for iterating the document
hierarchy. For more information about the IHierarchy interface, see the
chapter about page items.
Once called by the Draw Manager, spread drawing always follows the document
hierarchy. Users can control whether the guides appear in front of the content
Adobe InDesign Programming Guide
10.4. Drawing the Layout
337
or behind it and this affects the hierarchy. Assuming guides are behind the
content: page layers are drawn first followed by the content layers, and then the
guide layers. If the guide layers appear in front of the content, then the guides
draw before the content. All of the content on a given layer is drawn before
proceeding to the next layer. Embedded children of a page item are called to
draw before that item completes its draw. For example, when the
kSplineItemBoss is called to draw in step 2.2.1 of figure 10.4.3.a., if it had
children they would be called to draw as step 2.2.1.1, 2.2.1.2, etc. before
returning to the kSpreadLayerBoss.
338
10.4. Drawing the Layout
Page Item Drawing
figure 10.4.3.a. Boss Collaboration for Drawing the Layout
kLayoutWidgetBoss
1. : DrawWithTimedUpdate()
IControlView
ILayoutControlData
kSessionBoss
IDrawMgr
2 : Draw()
kSpreadBoss
IGeometry
IHierarchy
IShape
2.1 : Draw()
kSpreadLayerBoss
IHierarchy
IShape
kPageBoss
IHierarchy
IShape
2.1.1 : Draw()
kSpreadLayerBoss
2.2 : Draw()
IHierarchy
IShape
kSplineItemBoss
2.2.1 : Draw()
IHierarchy
IShape
kSpreadLayerBoss
2.3 : Draw()
IHierarchy
IShape
kSpreadLayerBoss
2.4 : Draw()
IHierarchy
IShape
kGuideItemBoss
IHierarchy
IShape
2.4.1 : Draw()
Adobe InDesign Programming Guide
10.5. The Context for Page Item Drawing
339
10.5. The Context for Page Item Drawing
When page items are called to draw, they receive two arguments that describe
the context for their draw:
• IShape drawing flags stored in an int32
• A pointer to a GraphicsData object.
Page items use these inputs to perform their drawing operations.
10.5.1. IShape Flags
The IShape class defines an enumeration of flags that describe the requested
mode of drawing. figure 10.5.1.a. shows these flags and their interpretation.
figure 10.5.1.a. IShape Drawing Flags
Flag
Use
kUseXOR
For wire frame drawing; used for dynamic updates. Set
IRasterPort::SetXORMode(kTrue)
kDrawResizeDynamic
kDrawRotateDynamic
kDrawScaleDynamic
kDrawMoveDynamic
kDrawCreateDynamic
A dynamic draw is taking place. Page items may optionally draw
abbreviated shapes during dynamic draws.
kPatientUser
Set if PatientUserMode timer has expired. (Trackers clear this bit
when they restart their timers.) Abbreviate the draw if set.
kPrinting
Indicates PDF or Print. (Don’t draw guides, grids or selection
handles.)
kDrawFrameEdge
Reflects settings of Frame Edge Preferences. (Triggers
TextFrameEdgesAdornment.)
kPreviewMode
Drawing a preview of the kPrinting mode.
10.5.2. GraphicsData Class
The GraphicsData class has pointers to the important bosses and interfaces for
drawing. figure 10.5.2.a. shows a summary of the methods for the
GraphicsData class when instantiated for screen drawing.
figure 10.5.2.a. Graphics Data Object Methods for Screen Drawing
Method
Use
GetGraphicsPort()
Returns the IID_IGRAPHICPORT interface on the
kWindowViewPortBoss.
GetRasterPort()
Returns the IRasterPort interface on the kWindowViewPortBoss.
May be nil if not drawing to the screen.
GetDrawEventDispatcher()
Returns IDrwEvtDispatcher interface on kSessionBoss
340
10.5. The Context for Page Item Drawing
Page Item Drawing
figure 10.5.2.a. Graphics Data Object Methods for Screen Drawing
Method
Use
GetDrawManager()
Returns IDrawMgr interface on kSessionBoss
GetView()
Returns IControlView interface on the boss that instantiated the
graphics context. (For normal screen draws, this is
kLayoutWidgetBoss.) May be nil if not drawing to the screen.
GetViewPort()
Returns IViewPort interface on the kWindowViewPortBoss
GetViewPortAttributes()
Returns IViewPortAttributes on the kWindowViewPortBoss
GetLayoutController()
Returns the ILayoutController interface on the
kLayoutWidgetBoss for the window. May be nil, except during
invalidation.
GetTransform()
GetInverseTransform()
Returns the IGraphicsContext object transformation matrix
GetGraphicsContext()
Returns a pointer to the IGraphicsContext object for the view port
boss
As the figure shows, the GraphicsData object can return pointers to important
interfaces on the view port boss (see 10.3.3.1., page 327) and the current
graphics context. In general, getting access to the IGraphicsPort interface, the
draw event manager, and the transforms for the window are the most
commonly used methods.
10.5.3. IGraphicsPort
The IGraphicsPort interface is the InDesign interface for drawing. It is used by
all of the drawing interfaces on a page item, regardless of the output device.
The IGraphicsPort implementations provide methods that are very similar to
PostScript graphics operators. The methods support drawing primitives, port
transformation manipulation, and changing the port clip settings. The
following sections describe how to acquire and use the port.
10.5.3.1. Getting IGraphicsPort from GraphicsData
The GraphicsData class provides the GetGraphicsPort() method to directly
access the graphics port in preparation for drawing. figure 10.5.3.1.a. shows an
example code snippet.
Adobe InDesign Programming Guide
10.5. The Context for Page Item Drawing
341
figure 10.5.3.1.a. Getting the Graphics Port from GraphicsData
void MyShape::DrawShape(GraphicsData* gd, int32 flags)
{
// default DrawShape draws an XBox
IGraphicsPort* gPort = gd->GetGraphicsPort();
// Draw to port...
}
10.5.3.2. Drawing with IGraphicsPort
The methods of IGraphicsPort are very similar to PostScript graphics
operators. A complete list of the methods are in IGraphicsPort.h. Line drawing
methods such as lineto(), moveto(), curveto(), closepath(), fill(), and
stroke() are available. If a path is currently defined in the port it can be
discarded using the newpath() method. These methods are demonstrated in the
page item drawing section. Control over the color space, color values, gradient,
and blending modes is also available through IGraphicsPort methods.
10.5.3.3. Controlling the IGraphicsPort settings
The port settings can be modified using IGraphicsPort methods. The gsave()
and grestore() methods effectively push the current port settings on a stack,
and pop the old settings when desired. These methods are used to save the
current port settings when setting the port’s transform to a new space. For
example, when a page item is called to draw, it should save the port settings, set
the port to it’s inner coordinate space, draw, then restore the port before
returning.
The port’s transform can be modified by translations, scale factors, rotations,
or a new transform can be concatenated to the existing port. Concatenation is
most commonly used when page items draw: it’s how a page item sets the port
to draw to its inner coordinates. figure 10.5.3.3.a. shows example code
demonstrating this operation.
342
10.5. The Context for Page Item Drawing
Page Item Drawing
figure 10.5.3.3.a. Manipulating the Graphics Port Settings
// Get the graphics port from gd, a GraphicsData*
IGraphicsPort* gPort = gd->GetGraphicsPort();
if ( gPort == nil ) return;
// Save the current port settings
gPort->gsave();
// Get this page item's ITransform interface
InterfacePtr<ITransform> xform(this, IID_ITRANSFORM);
// Concatenate the inner to parent matrix to the port
gPort->concat(xform->CurrentMatrix());
// Draw a rectangle around the item
InterfacePtr<IGeometry> geo (this, IID_IGEOMETRY);
const PMRect r = geo->GetStrokeBoundingBox();
gPort->rectpath(r);
gPort->stroke();
// Restore the previous port settings
gPort->grestore();
10.5.4. Detecting the Device Context for Drawing
In theory, page items shouldn’t care whether they are drawing to print, PDF, or
screen. The fact that the graphics port is specialized for different devices in the
three cases is transparent to the drawing code. However, there may be
situations where the context determines how an item draws. For example,
guides draw to the screen but not to print.
10.5.4.1. Detecting the Drawing Device Using Drawing Flags
The IShape class defines an enumeration of bit masks for the drawing flag
argument supplied to IShape::Draw() from InDesign’s Draw Manager. The
IShape::kPrinting mask indicates that printing or PDF is taking place, as
shown in figure 10.5.4.1.a..
figure 10.5.4.1.a. Detecting Drawing Device Using IShape Drawing Flags
void MyShape::DrawShape(GraphicsData* gd, int32 flags)
{
if (flags & IShape::kPrinting)
{
// Device is PDF or print...
}
}
Adobe InDesign Programming Guide
10.5. The Context for Page Item Drawing
343
10.5.4.2. Detecting the Drawing Device Using the View Port Boss
The GraphicsData class can provide finer detail about the drawing device. As
figure 10.5.4.2.a. indicates, the graphics data class provides an accessor to the
view port attribute interface, which resides on the view port boss associated
with the current drawing operation. From the view port attribute interface the
code queries for the IPDFDocPort interface. Its presence means the view port
boss is a kPDFViewPortBoss, indicating PDF output. If it’s not PDF output, the
next step is to test for printing. This is done using a method on the view port
attribute interface of the window port boss. The GetViewPortIsPrintingPort()
method will reflect the value of the IShape drawing flag value for printing. If it
is printing, the IPrintObject interface verifies that it is PostScript printing.
Otherwise, the window port corresponds to a screen draw.
figure 10.5.4.2.a. Determining Port Type
// From a GraphicsData* gd, get an interface on the window port boss
IViewPortAttributes* iViewPortAtt = gd->GetViewPortAttributes();
// Is this a PDF?
InterfacePtr<IPDFDocPort> pdfDocPort(iViewPortAtt, IID_IPDFDOCPORT);
if (pdfDocPort != nil)
{
// PDF export...
}
else
{
// Is it printing?
if (iViewPortAtt->GetViewPortIsPrintingPort())
{
// Ok, it's printing. But what kind? Ask the print object.
// See PrintID.h, GraphicsExternal.h
IGraphicsPort* gPort = gd->GetGraphicsPort();
InterfacePtr<IPrintPort> iPrintPort (gPort, IID_IPRINTPORT);
InterfacePtr<IPrintObject> iPrtObj
(iPrintPort->GetPrintObject(), IID_IPRINTOBJECT);
AGMDeviceType devType = kAGMPPostScript;
iPrtObj->GetObject(kAGMPrtObjectItmsDeviceType, nil, &devType);
if (devType == kAGMPPostScript)
{
// PS output
}
}
else
{
// Screen drawing...
}
}
344
10.6. Page Item Drawing
Page Item Drawing
10.6. Page Item Drawing
Ultimately, it is every page item’s responsibility to draw itself and call it’s
children to draw. This responsibility falls on a handful of interfaces, each
tailored to draw in a particular circumstance. This section describes these
interfaces and provides greater detail about the expected sequence during the
draw.
10.6.1. Overview of Page Item Interfaces for Drawing
The relevant interfaces for basic page item drawing are shown in Table 10.6.1.a.
The first three interfaces in the table are directly involved in drawing a page
item. The IShape interface is the main interface for drawing the page item, and
is called when the entire page item needs to be rendered. The IHandleShape
interface is called when a page item is in the selected state and is used for
drawing the decorations that denote selection. Path-based items such as spline
bosses also have the IPathPageItem interface to handle the details of drawing
their paths.
table 10.6.1.a. page item interfaces for drawing
Interface
Function
IShape
Renders path, fill, stroke. Called during background drawing.
IHandleShape
Renders selection handles, called during foreground drawing
IPathPageItem
Low-level draws for path, fill, stroke
IGraphicStyleDescriptor
Graphics Attributes
IPageItemAdornmentList
List of Adornments for Page Item
The IPageItemAdornmentList maintains a list of adornments for the page item.
The IGraphicStyleDescriptor interface is one of several that maintain the
graphics attributes for the page item. The details of these two interfaces are
covered in separate chapters. However, they are mentioned here because of
their important role in drawing.
Other, more specialized page items have additional interfaces for drawing.
However, those more specialized cases are deferred to their own chapters.
10.6.2. IShape Interface
The IShape interface is responsible for providing the drawing, hit testing, draw
order iteration, and invalidation functions for page items. This interface is
Adobe InDesign Programming Guide
10.6. Page Item Drawing
345
defined in the abstract base class IShape.h. This section will describe the
drawing responsibilities of the class. The Draw Events chapter discusses the
other functions.
The IShape class is responsible for rendering a page item. It is used during
background draws to create the path, fill, and stroke of an object.
10.6.2.1. Shape Class Structure
The InDesign API provides the IShape abstract base class as well as the CShape
concrete implementation. New implementations of a shape class can be based
on CShape. The CGraphicFrameShape implementation is used by
kSplineItemBoss, and serves as a good example of how to extend the CShape
default implementation.
The class structure for the concrete shape classes used by a kSplineItemBoss is
shown in figure 10.6.2.1.a.. The implementation (*.cpp) files for all the classes
shown in this figure are included in the SDK API directory. The CShape class
provides the default implementations for the drawing functions, such as the
Draw() method. The CShape class also adds protected methods that should be
specialized in the child classes. The CPathShape class specializes CShape for page
items that have only a path but are not filled. The CPathShape class is then
further specialized to produce the CGraphicFrameShape class, which is a more
general class for splines that supports both stroke and fill.
The CShape class has a default implementation of Draw() that calls the protected
method DrawShape(). Specializing a shape class for drawing is done primarily
through the DrawShape() method. The CGraphicFrameShape class specializes
DrawShape() to set the path, fill it, then call CShape::DrawHierachy(). The
DrawHierachy() method simply iterates the children of the page item, calling
the IShape::Draw() method for each. When DrawHierachy() is finished,
CGraphicFrameShape::DrawShape() completes drawing the spline.
The CGraphicFrameShape class queries for and attempts to cache a pointer to its
IGraphicFrameData interface. This interface is used to determine if the page
item is a graphic frame. Some of the details of drawing a spline are delegated
from the CGraphicFrameShape::DrawShape() method to methods on the
IPathPageItem interface of the page item. The CPathShape class caches a pointer
to this interface. The methods on this interface are discussed below. The CShape
346
10.6. Page Item Drawing
Page Item Drawing
class also caches pointers to the IHierarchy, IGeometry, and
IPageItemAdornmentList interfaces of the page item.
figure 10.6.2.1.a. Class Diagram for CGraphicFrameShape
IShape
CShape
# fHierarchy : IHierarchy*
# fGeometry : IGeometry*
# FAdornmentList : IPageItemAdornmentList*
...
+ Draw() : void
# DrawHierarchy() : void
# DrawPageItemAdornments() : void
...
CPathShape
# fPathPageItem : IPathPageItem*
- fPaintedBounds : PMRect
...
...
CGraphicFrameShape
# fGraphicFrameData : IGraphicFrameData*
...
# DrawShape() : void
...
10.6.2.2. Shape Class Drawing Sequence
The IShape class drawing sequence involves more than just the drawing
instructions. Extensibility points are built into the sequence in the form of draw
Adobe InDesign Programming Guide
10.6. Page Item Drawing
347
events and adornments. As mentioned in the previous chapter, adornments are
a way to enhance or decorate a page item’s appearance. A second extensibility
option is to use draw events, which are briefly introduced in this section for the
purposes of explaining their role in the shape class drawing sequence.
More detailed information about draw events and adornments is left to other
chapters. The remainder of this section describes the activities expected of a
shape class implementation during drawing.
10.6.2.2.1. Draw Event Primer
Draw events are messages that are broadcast at specific points in the draw
order. Each signals the beginning or end of a phase of drawing. Draw events
provide extensibility points in that drawing operations can be modified or
cancelled in response to the event.
Draw event types are defined in DocumentContextID.h. Some of the generic
draw event types associated with shape drawing are shown in Table 10.6.2.2.1.a.
There are other, more specific event types that signal the beginning and end of
spread, layer, and page drawing.
table 10.6.2.2.1.a. generic draw events
Draw Event
Use
kAbortCheckMessage
Opportunity to abort entire item draw
kFilterCheckMessage
Opportunity to filter draw based on object type
kDrawShapeMessage
Shape drawing is about to begin.
kBeginShapeMessage
Start of shape drawing
kEndShapeMessage
End of shape drawing
Draw event handlers can be a type of service provider. If so, they are
automatically registered at startup. Draw event handlers register their
prioritized interest in particular types of draw events. If a draw event handler
returns kTrue in response to a draw event, the drawing at that step ceases. If it
returns kFalse the drawing event is considered as not handled, and the drawing
step proceeds. A draw event handler that modifies or decorates the drawing of
an object, but does not replace it, would return kFalse.
348
10.6. Page Item Drawing
Page Item Drawing
10.6.2.2.2. Shape Class Drawing Sequence
figure 10.6.2.2.a. shows the activity in Draw() and DrawShape() for drawing a
page item. When a page item begins drawing, three draw events are broadcast.
No IShape drawing activities occur between the broadcasts.
In preparation for drawing the graphics port state is saved, then set to draw in
the page item’s inner coordinate system. A kBeginShapeMessage drawing event
is broadcast. As before, if any draw event handler returns kTrue the activity
ends. The next step is an example of the second type of extensibility: the
kBeforeShape page item adornments are asked to draw.
The next step in the sequence is shows the standard AGM imaging model for
graphics operators:
• define the item’s path
• fill the path
• set the port to clip to the path
• draw the item’s children
• stroke the path
Note the use of port saves and restores in the diagram. Their use allows the
adornments and child drawing routines to modify the port as needed and still
have it return to a known state for the next drawing step. As an example,
adornments that draw subsequent to the definition of the path have the
opportunity to redefine the path in the port.
From figure 10.6.2.2.a. we can see that the details of drawing a kSplineItemBoss
are delegated to the IPathPageItem implementation. Behind the scenes, the
IPathPageItem methods make use of the graphics attributes defined for the
page item in order to draw the details of the path, fill, and stroke. The figure
also shows the step for drawing the children of the page item. In the case of a
kSplineItemBoss, the child might be a kMulticolumnItemBoss for a text frame
or a kImageItem for a graphic.
Adobe InDesign Programming Guide
10.6. Page Item Drawing
figure 10.6.2.2.a. IShape::Draw Activity for Spline Items
kSplineItem
IShape
Dispatch kAbortCheckMessage
Dispatch kFilterCheckMessage
Dispatch kDrawShapeMessage
kTrue
Set-up GraphicsPort: save, newpath,
Concatenate Item’s InnerToParent
Transform to Port’s Transform
Save Port’s State
Set Port’s Clip to Fill Path
Draw Child Page Items by Calling
IShape::Draw for Each
Restore the Port’s State
Dispatch kBeginShapeMessage
kTrue
Draw kBeforeStroke P.I. Adornments
Draw kBeforeShape P.I. Adornments
Save Port’s State
Copy Outline Geometry into Port by
Calling IPathPageItem::CopyPath()
Draw the Stroke by Calling
IPathPageItem::Stroke()
Save Port’s State
Restore the Port’s State
Draw kAfterStroke P.I. Adornments
Command Port to Fill by Calling
IPathPageItem::Fill()
Draw kAfterShape P.I. Adornments
Draw kAfterFill P.I. Adornments
Dispatch kEndShapeMessage
Restore the Port’s State
Restore the Port’s State
349
350
10.6. Page Item Drawing
Page Item Drawing
10.6.2.2.2. Drawing Example
The default implementation of CShape::DrawShape() provides an example of
using GraphicsData and IGraphicsPort to draw a simple figure. This brings
together the drawing activity discussed in “10.4. Drawing the Layout” and the
drawing context concepts from “10.5. The Context for Page Item Drawing” .
As an example, we can create a new type of page item called kMyPIBoss that is
based on kSplineItemBoss. As shown in figure 10.6.2.2.a., this new page item
will simply override the IShape implementation with one called MyShape.
figure 10.6.2.2.a. Overriding the IID_ISHAPE implementation of kSplineItemBoss
Class
{
kMyPIBoss,
kSplineItemBoss,
{
IID_ISHAPE, kMyShapeImpl,
}
},
The MyShape implementation is a subclass of CGraphicFrameShape, and
overrides only the DrawShape() method. The MyShape::DrawShape() method
will be based on the CShape::DrawShape() method. As figure 10.6.2.2.b. shows,
this implementation simply draws a rectangle and cross. The DrawShape()
method assumes the IGraphicPort interface has been set to Inner coordinates
by the Draw() method.
First, a pointer to the IGraphicsPort interface on the view port boss is acquired
from the GraphicsData pointer. Next, a rectangle describing the stroke
bounding box is acquired from the page item’s IGeometry interface. This
bounding box is returned in Inner coordinates.
Using the stroke bounds and IGraphicsPort, the remainder of the code draws a
rectangle with an X through it. The fill operations write the rectangular path to
the port, set a grey color, and command a fill. The X is drawn with discrete line
segments. The final operation is to stroke the path.
Adobe InDesign Programming Guide
10.6. Page Item Drawing
351
figure 10.6.2.2.b. Drawing Example
void MyShape::DrawShape(GraphicsData* gd, int32 flags)
{
// default DrawShape draws an XBox
IGraphicsPort* gPort = gd->GetGraphicsPort();
// Get the geometry for this item in inner coords
const PMRect r = fGeometry->GetStrokeBoundingBox();
// Fill the item boundary and draw kAfterFill adornments
gPort->rectpath(r);
gPort->gsave();
gPort->setgray(0.5);
gPort->fill();
DrawPageItemAdornments(gd, flags, IAdornmentShape::kAfterFill);
gPort->grestore();
// Skip drawing child items, draw the 'X' instead
gPort->moveto(r.Left(), r.Top());
gPort->lineto(r.Right(), r.Bottom());
gPort->moveto(r.Right(), r.Top());
gPort->lineto(r.Left(), r.Bottom());
// Draw kBeforeStroke Adornments
DrawPageItemAdornments(gd, flags, IAdornmentShape::kBeforeStroke);
// Stroke the boundry and 'X'
gPort->setlinewidth(0);
gPort->stroke();
// Draw kAfterStroke Adornments
DrawPageItemAdornments(gd, flags, IAdornmentShape::kAfterStroke);
}
If this page item is created to be 300 points square at (0,396) in page
coordinates, it will appear as shown in figure 10.6.2.2.c..
352
10.6. Page Item Drawing
Page Item Drawing
figure 10.6.2.2.c. Simple Drawing Example - Results
10.6.3. The IPathPageItem Interface
The IPathPageItem interface encapsulates the specialized drawing functions for
path-based page items. The class provides methods for operations such as
stroke, fill, clip, and copying a path to the graphics port. The
CGraphicFrameShape class (discussed above) delegates these specific draw
operations to the IPathPageItem class.
Behind the scenes in this class, graphics attributes are used to control the
appearance. The PathPageItem::Stroke() method first calls
PathPageItem::Setup() which initializes a set of default stroke properties, then
attempts to get the stroke graphic attributes such as stroke weight and a
ClassID for a path stroker. The path stroker is a service provider that delivers
the kPathStrokerService. The PathPageItem::Stroke() method then uses the
stroke graphic attributes and path stroker to actually create the stroke.
10.6.4. The IHandleShape Interface
The IHandleShape interface is responsible for drawing and hit-testing for a page
item’s selection handles. This interface is defined in the abstract base class
IHandleShape.h. The drawing responsibilities are described in this section.
10.6.4.1. The IHandleShape Class Structure
The InDesign API provides the IHandleShape base class and the CHandleShape
concrete implementation. The CHandleShape class provides a public Draw()
method that is called by the LayoutWidget’s IControlView implementation
during a foreground draw. The Draw() method calls two protected methods of
Adobe InDesign Programming Guide
10.6. Page Item Drawing
353
the class: DrawPathImmediate() and DrawHandlesImmediate(). The former
strokes a selection highlight and the latter draws the selection handles.
Specializing the drawing functions of the class is done through these two
methods.
10.6.4.2. The IHandleShape Drawing Sequence
As with the IShape class, the IHandleShape drawing sequence includes
extensibility points in the form of adornment calls.
figure 10.6.4.2.a. shows the activity involved in the CHandleShape::Draw()
method, and it follows a familiar pattern from the IShape class. The graphics
port is acquired, saved, and set to draw in the page item’s inner coordinates.
The IShape drawing flag kUseXOR is tested, and if set the IRasterPort interface is
commanded to draw in XOR mode to produce wire frame outlines. Next, the
port’s color is set to one corresponding to the page item’s layer. This will
highlight the selected items in colors that correspond to their layer. Then the
kBeforeShape adornments are called to draw. The selection path, handles, and
possible text frame handles are then drawn by other methods of CHandleShape.
The kAfterShape adornments are called to draw, and the port is restored.
The IHandleShape::DrawPathImmediate() method is conceptually very simple.
It’s job is to stroke the object with a line that denotes selection. figure 10.6.4.2.b.
illustrates example code for this function. As always, the first step is to acquire
the graphics port from the GraphicsData object. Once acquired, the object’s
stroke bounding box is used to set a new path in the graphics port. Here the
cached pointer CHandleShape::fGeometry is used to simplify getting the
bounding box, which is returned in Inner coordinates. Now that the geometry
is defined, the only remaining operations are to set the line width and stroke
the path.
The IHandleShape::DrawHandlesImmediate() method simply adds symbols to
the selection path. figure 10.6.4.2.c. demonstrates the code for adding these
symbols. The first step is to use the GraphicsData object to get access to the
IGraphicsPort interface of the view port boss. In this case the IRasterPort
interface is acquired as well.
354
10.6. Page Item Drawing
Page Item Drawing
figure 10.6.4.2.a. CHandleShape::Draw() Activity
CHandleShape::Draw()
Set-up GraphicsPort: save, newpath,
Concatenate Item’s InnerToParent
Transform to Port’s Transform
If kUseXOR flag set,
Set IRasterPort to XOR mode
Set Handle Color in Port
Per Layer UID
Draw kBeforeShape Adornments
DrawPathImmediate()
DrawHandlesImmediate()
If a text frame,
DrawTextFrameHandles()
Draw kAfterShape Adornments
Restore the Port’s State
The existing path in the port is cleared, and a nine new paths are generated
using the GraphicsUtils method CreateAnchorPointPath() . The loop creates a
rectangular path centered on each location obtained from the bounding box
data: each corner and midpoint. The ninth point is generated at the midpoint
of the bounding box. Once created, the paths are filled using the port’s existing
color.
Adobe InDesign Programming Guide
10.6. Page Item Drawing
355
figure 10.6.4.2.b. DrawPathImmediate() Method
void MyHandleShape::DrawPathImmediate(GraphicsData *gd, int32 )
{
// Get the graphics port from GraphicsData
IGraphicsPort* gPort = gd->GetGraphicsPort();
// Set the path in the port to the item's bounding box
gPort->rectpath(fGeometry->GetStrokeBoundingBox());
// Stroke the bounding box path to the color in the port
gPort->setlinewidth(0);
gPort->stroke();
}
figure 10.6.4.2.c. DrawHandlesImmediate() Method
void MyHandleShape::
DrawHandlesImmediate(GraphicsData *gd, IPathSelection* , int32 flags)
{
PMPoint point;
// Get pointers to the ports
IGraphicsPort* graphPort = gd->GetGraphicsPort();
IRasterPort* rasPort = gd->GetRasterPort();
// Get the item's bounding box
PMRectmyBounds = fGeometry->GetStrokeBoundingBox();
// Create the handle paths: corners, mid points, center
graphPort->newpath();
for (int32 i = 0; i < 8; i++)
{
point = myBounds.GetPoint(PMRect::IndexToPointIndex(i));
GraphicsUtils::CreateAnchorPointPath(rasPort,
graphPort, point, 4, kFalse);
}
point = myBounds.GetCenter();
GraphicsUtils::CreateAnchorPointPath(rasPort,
graphPort, point, 4, kFalse);
// Fill the handles
graphPort->fill();
}
The DrawHandlesImmediate() code for kSplineItemBoss adds a bit fancier
handles based on whether or not the spline contains any content. It tests for the
356
10.7. Summary
Page Item Drawing
presence of content using the CHandleShape::HasContent() method. If so, it
makes the handles 5 points in size. After the fill operation it uses
IGraphicsPort::moveto() and lineto() instructions to add a white pixel in the
middle of each handle. It sets the white color with the
IGraphicsPort::setrgbcolor() method, and restores the selection color using
the CHandleShape handle color properties.
The kSplineItem code also handles some special cases. Vertical and horizontal
lines are handled by choosing only the endpoints and midpoints of the line for
selection handles. Rectangles of zero height and width are handled by placing
only one handle at the center of the rectangle.
10.7. Summary
Documents are displayed in InDesign windows, which are cross-platform
representations of the underlying platform windows. InDesign windows use
view port bosses to define the graphics port for drawing in the window.
Page items have the responsibility to draw themselves and to call their direct
children to draw. Screen draws only call the page items that are visible in a
window.
During a draw, page items receive calls to their IShape and IHandleShape
interfaces. The former is used for drawing the object, the latter for drawing the
decorations for selection. Page items are called through their IShape interface as
part of a sequence that follows the document hierarchy. If a page item is part of
the current selection, it will be called again on its IHandleShape interface.
The GraphicsData object provides information about the graphics context to
the methods of a page item’s drawing interfaces. It is passed into the drawing
methods as an argument, and contains pointers to the relevant interfaces in the
graphics context.
10.8. Review
You should be able to answer the following questions:
1. What is the function of an InDesign window? (“Window Bosses” on
page 319)
2. What items comprise the layout hierarchy? (“The Layout Hierarchy” on
page 322)
Adobe InDesign Programming Guide
10.9. Exercises
357
3. What is the sequence of drawing in InDesign? (“Drawing the Background”
on page 336)
4. How is the GraphicsData object used in drawing? (“GraphicsData Class” on
page 339)
5. What is the draw sequence for a page item? (“Shape Class Drawing
Sequence” on page 346)
6. What methods are responsible for drawing the features that denote an item
is selected? (“The IHandleShape Interface” on page 352)
10.9. Exercises
1. Derive a new IShape class based on CShape that only draws a circle of
diameter equal to its smallest bounding box dimension.
2. Add code to the example in figure 10.6.4.2.c. to handle the special case of
drawing selection handles on a line.
358
10.9. Exercises
Page Item Drawing
11.
Page Item Adornments
11.0. Overview
The adornment is for customizing the appearance of the page item on the page.
A page item adornment is associated with a page item. It gets drawn based on
the drawing order you specified for the adornment when a page item is being
rendered. There are two adornment types in the application, for text and page
items. This chapter will cover the details about page item adornments. The
chapter “Adding Text Attributes and Adornments” will cover text adornments.
11.1. Goals
The questions this chapter addresses are:
1. What is a page item adornment? When do you need it?
2. What are the necessary interfaces to define a page item adornment?
3. How do you create a page item adornment?
4. How do you add or remove a page item adornment?
You should already know what a page item is and how page item drawing works
in the application. Please refer to the “Page Item” and “Page Item Drawing” for
more information.
11.2. Chapter-at-a-glance
“11.3.Page Item Adornments” on page 360 explains page item adornments and
the relation with page items.
“11.4.Adornment Interfaces” on page 362 introduces the interfaces related to
page item adornments.
table 11.1.a. version history
Rev
Date
Author
Notes
2.0
18-Oct-02
Paul Norton
Update for the 2.x SDK
1.0
11-Sep-00
Jane Zhou
Initial draft
359
360
11.3. Page Item Adornments
Page Item Adornments
“11.5.Creating Custom Page Item Adornments” on page 365 shows an example
how to create custom page item adornments.
“11.6.Add Or Remove Adornments” on page 370 describes how to add or
remove a page item adornment.
“11.7.Summary” on page 372 provides a summary of the content covered in
this chapter.
“11.8.Review” on page 372 provides questions to test your understanding of the
material in this chapter.
“11.9.Exercises” on page 372 provides suggestions for further study.
11.3. Page Item Adornments
Page item adornments customize the appearance of a page item. They give a
plug-in the chance to add additional drawing when the page item is rendered.
For example, you want to add a drop shadow or label for specified page items,
page item adornment is one way to add those extra drawings.
The page item draws itself, and in the process calls each adornment’s
IAdornmentShape::Draw() method based on their drawing order. You need to
add the custom adornment to the page item adornment list attached to the
page item in order for this to happen.
Examples of page item adornments in InDesign are the text overset indicator
for text frames, the graphic frame outline path and empty graphic frame
indicator (The X inside the frame). See figure 11.3.a. for illustrations.
figure 11.3.a. Adornments Example In InDesign
text overset
indicator
adornments for this empty frame
Adobe InDesign Programming Guide
11.3. Page Item Adornments
361
11.3.1. IPageItemAdornmentList
IPageItemAdornmentList manages a list of the page item’s adornments. This
interface is aggregated on the page item boss (i.e. kDrawablePageItemBoss)
Each adornment in the list is called to draw, in order, according to the
AdornmentDrawOrder value. For page item adornments, there are nine
oportunities within the draw order to draw. The order of events within the
draw order are defined in IAdornmentShape.h. These values represent when
the adornment is to be drawn. Upon calling the AddPageItemAdornmentCmd, the
adornment is inserted into the list based on the drawing order. Think about the
page item adornment list as nine linked lists.
figure 11.3.b. AdornmentDrawOrder For Page Item Adornment
enum AdornmentDrawOrder
{
// kBeforeShape and kAfterShape are for graphic frames
kBeforeShape = 1,
// kAfterFill, kBeforeStroke and kAfterStroke are for spline items
kAfterFill = 2,
// the following four flags are for text frames only
kBeforeTextBackground = 4,
kBeforeText= 8,
kBeforeTextForeground = 16,
kAfterTextForeground = 32,
// for spline items
kBeforeStroke = 64,
kAfterStroke = 128,
kAfterShape = 256,
kAllAdornmentFlags = 511
};
To add an adornment to a page item, you need to first define the adornment as
a boss that aggregates the IAdornmentShape interface. In a more complex case,
you might want to use more than one adornment to adorn a single page item.
The implementation for interface IAdornmentShape will vary. You can choose
to provide hit testing and invalidating the view if needed. However, you are
required to draw the adornment.
11.3.2. Adornments vs. DrawEventHandlers
Basically, page item adornments add extra visual information for the page
items they decorate. DrawEventHandlers provide the similar functionality. A
DrawEventHandler is a boss that aggregates IDrwEvtHandler.
362
11.4. Adornment Interfaces
Page Item Adornments
The DrawEventHandlers do their work in response to drawing event messages.
You can find all the messages in DocumentContextID.h. The handlers can be
built as service providers, or can register and unregister themselves directly
with the session (IDrwEvtDispatcher is on the kSessionBoss.) This will require
more work, but is also more flexible.
The DrawEventHandlers are typically registered at start-up, before any drawing
is done. The adornments are ‘attached’ to specific page items while draw event
handlers are tied to the action of drawing and are not particular to an
individual item.
PageItemAdornments enhance the way an item is drawn. A DrawEventHandler
can completely replace the drawing of a page item.
11.4. Adornment Interfaces
11.4.1. Interface Diagram
figure 11.4.1.a. Adornment Interface Diagram
kPageItemBoss
IPageItemAdornmentList
kYourAdornmentBoss
AddAdornment()
IAdornmentShape
11.4.2. IAdornmentShape
Bosses that aggregate IAdornmentShape are considered page item adornments.
figure 11.4.2.a. shows the native page item adornments used by InDesign.
figure 11.4.2.a. Application Page Item Adornments
Adornment ClassID
Drawing Order
Description
kGraphicFrameEdgeAdornmentBoss kAfterStroke
Draws graphic frame edges, draws “X” for
empty graphic frames, draws overset
marker for text on path
kTextFrameEdgesAdornmentBoss
kBeforeShape
Draws the gutters between columns
kTextOversetMarkerAdornmentBoss
kAfterShape
Invalidates the overset marker for last
column of the text frame when the number
of columns is changed or multi-column
item is created
Adobe InDesign Programming Guide
11.4. Adornment Interfaces
363
Page item adornments are bosses that are attached by ClassID to individual
page items they adorn. When a page item is drawn, each attached adornment is
called to draw via the interface IAdornmentShape. A page item adornment tells
the drawing manager whether it should be drawn after the frame shape
(kAfterShape), or before the text foreground (kBeforeTextForeground), or at
one of the other events defined in the adornment objects. The drawing order
controls when the adornment is called to draw. The following diagram shows
the drawing sequences for a single rectangle spline item. From this diagram,
you can see when the adornments drawing methods get called depending on
the draw order. For detailed information on page item drawing, please refer to
the “Page Item Drawing” chapter.
figure 11.4.2.b. Drawing Sequences For A Rectangle Spline Item
DrawMgr
Draw kBeforeShape adornments
Draw Children by calling
IShape::Draw() for each child
Set fill path by calling
IPathPageItem::CopyPath()
Draw kBeforeStroke Adornments
Fill shape by calling
IPathPageItem::Fill()
Stroke by Calling
IPathPageItem::Stroke()
Draw kAfterFill Adornments
Draw kAfterStroke Adornments
Set Port’s Clip to Fill Path
Draw kAfterShape Adornments
Continue other drawings
364
11.4. Adornment Interfaces
Page Item Adornments
not only handles drawing the adornment for the page item, it
also handles the hit testing and invalidation of the adornment, when it is
needed.
IAdornmentShape
figure 11.4.2.c. Major IAdornmentShape Methods
virtual AdornmentDrawOrder GetDrawOrderBits() = 0;
virtual void Draw (
IShape* iShape,// owning page item
AdornmentDrawOrderdrawOrder,// for items that registered for more
than one order
GraphicsData*gd,
int32flags
);
virtual PMRect GetPaintedBBox
(
IShape*iShape,
AdornmentDrawOrderdrawOrder,
const PMRect&itemBounds, // This is the painted bounds of the owing
page item
const PMMatrix&innertoview// NOTE: this is inner to view not pb to
view
);
// AddToContentInkBounds:
// Takes as input a rectangle representing the bounds of some content
which
// has changed its inkinkg in some way. The adornment will modify that
bounds
// if necessary to reflect the change in inking that it would want as
a result.
// This is only used by adornments for which the inking bounds are
based on
// the content. Adornments for which inking bboxes are based solely on
the
// frame do not need to implement this routine.
// Note: The bounds are based on inner coordinates.
virtual void AddToContentInkBounds(IShape* iShape, PMRect*
inOutBounds) = 0;
virtual PMReal GetPriority() = 0;
// This method is provided for completeness. When the owning shape is
inval'd it
// includes the adornment in it's bounding box.
Under most
circumstances the
// adornment need do nothing in its inval method.
Adobe InDesign Programming Guide
11.5. Creating Custom Page Item Adornments
365
// There are times, however, when specific page items will get a
specific reasonFoInval,
// and an adornment may want to know about that inval. This provides
a mechanism
// to respond to such an event.
virtual void Inval
(
IShape*iShape,
AdornmentDrawOrderdrawOrder,
GraphicsData*gd,
ClassID reasonForInval,
int32 flags
);
virtual bool16 WillDraw
(
IShape* iShape,// owning page item
AdornmentDrawOrderdrawOrder,// for items that registered for more
than one order
GraphicsData*gd,
int32flags
) ;
11.5. Creating Custom Page Item Adornments
A boss that aggregates IAdornmentShape is considered to be a page item
adornment. For example, suppose you want to show the width and height of
each selected page item, you could provide an adornment for the selected page
items to do that. See the screen shot in figure 11.5.a. The adornment which is
the dimension string was drawn in magenta for each selected item.
figure 11.5.a. Add Adornment To The Selected Page Items
Before add adornments
After add adornments
366
11.5. Creating Custom Page Item Adornments
Page Item Adornments
11.5.1. Adornment Definition
The class definition for the above custom adornment,
FrameDimensionAdornment, is shown in figure 11.5.1.a.
figure 11.5.1.a. Definition For FrameDimensionAdornment
class FrameDimensionAdornment : public IAdornmentShape
{
public:
FrameDimensionAdornment(IPMUnknown *boss);
~FrameDimensionAdornment();
virtual AdornmentDrawOrder GetDrawOrderBits();
virtual void Draw(IShape* iShape, AdornmentDrawOrder drawOrder,
GraphicsData* gd, int32flags);
virtual PMRect GetPaintedBBox(IShape* iShape, AdornmentDrawOrder
drawOrder, const PMRect& itemBounds, const PMMatrix& innertoview);
virtual bool16 HitTest(IShape* iShape, AdornmentDrawOrder drawOrder,
GraphicsData* gd, const PMRect& r, int32 flags, UIDRef*thingsHit)
{ return kFalse; }
virtual bool16 HitTest(IShape* iShape, AdornmentDrawOrder drawOrder,
GraphicsData* gd, const PMRect& r, int32 flags, UIDList* thingsHit)
{ return kFalse; }
virtual void Inval(IShape* iShape, AdornmentDrawOrder drawOrder,
GraphicsData* gd, ClassID reasonForInval, int32 flags);
private:
DECLARE_HELPER_METHODS()
};
The adornment, as defined above, is not persistent, and it is generic to the page
items (i.e. it doesn’t cache information about the page item it is attached too.)
There is a macro that recycles non-persistent bosses. That means unreferenced
instances of these bosses are not deleted. They are collected in a repository.
When the boss’s factory is asked to construct a new instance, it will first look in
it’s repository if there is a reusable instance. See BossRecycler.h for details. In
our example, we are going to create FrameDimensionAdornment as a recycle boss.
In fact, all the native page item adornment bosses are recyclable bosses.
Adobe InDesign Programming Guide
11.5. Creating Custom Page Item Adornments
367
// Here the maximum, minimum and chunk size are 1 set to 1, the
// instance check proc is set to nil.
RECYCLE_BOSS(kFrameDimensionAdornmentBoss, 1, 1, 1,
"FrameDimensionAdornment", nil)
11.5.2. Adornment Boss Implementation
In providing the implementation on the adornment boss, you determine how
the adornment is drawn and how the painted bounding box is calculated.
Adornments are supplied with a GraphicsData object from which you can get
the graphics port. The graphics port allows you to call the AGM drawing
primitives (see IGraphicsPort.h). The following code snippet shows the Draw()
code for our example. This custom adornment intentionally doesn't print.
Most page item adornments in the application do not print. The passed in
flags value defines the drawing context. You can find the different values for
flags in IShape.h.
(Note: Supporting methods have been left out of this example, for a compilable
working sample take a look at FrameLabel in the InDesign SDK.)
figure 11.5.2.a. Implementation For FrameDimensionAdornment
// Implementation for Draw()
void FrameDimensionAdornment::Draw(IShape* shape,
AdornmentDrawOrder drawOrder, GraphicsData* gd, int32 flags)
{
// The graphics port is the port that the page item is currently
// drawing to. That could be the screen, a printer, a PDF, or some
// other port.
if (!gd)
return;
if (!(flags & IShape::kDrawFrameEdge))
return;
if (flags & IShape::kPrinting)
return;
do {
// use the default font for dimension string
InterfacePtr<IFontMgr> fontMgr(gSession, IID_IFONTMGR);
if (fontMgr == nil)
break;
368
11.5. Creating Custom Page Item Adornments
Page Item Adornments
InterfacePtr<IPMFont> theFont(fontMgr->QueryFont(fontMgr
->GetDefaultFontName()));
InterfacePtr<IGeometry> itemGeometry(shape, IID_IGEOMETRY);
if (!theFont || !itemGeometry)
return;
IGraphicsPort * gPort = gd->GetGraphicsPort();
if (gPort == nil)
return;
PMRect dimension = Utils<IPageItemUtils>()>GetStrokeDimensions(UIDList(shape));
// Create the frame dimension string
PMReal width = dimension.Width();
PMReal height = dimension.Height();
PMString label;
label.SetTranslatable(kFalse);
label.Append("(");
label.AppendNumber(width, 2, kFalse, kTrue);
label.Append(", ");
label.AppendNumber(height, 2, kFalse, kTrue);
label.Append(")");
// Calculate the width & height of the label string. We chose 12 as
// the font size for example here.
PMMatrix matrix(12, 0.0, 0.0, 12, 0.0, 0.0);
InterfacePtr<IFontInstance> fontInst(fontMgr
->QueryFontInstance(theFont, matrix));
Fixed labelWidth, labelHeight;
fontInst->MeasureWText((const textchar*) label.GrabWString(),
label.WCharLength(), &labelWidth, &labelHeight);
gPort->gsave();
// Set the color to magenta
gPort->setrgbcolor(255, 0, 255);
// The font size is fixed, 12 points in this example.
gPort->selectfont(theFont, 12);
PMRect fontBB = theFont->GetFontBBox();
PMReal fontHeight = fontBB.Height();
// 12 is the font size
PMReal heightOfText = fontHeight * 12;
PMRect bBox = itemGeometry->GetPathBoundingBox();
// The label (adornment) is shown at the lower right corner
PMReal x, y;
x = bBox.Right() - ::ToPMReal(labelWidth);
y = bBox.Bottom() + heightOfText;
Adobe InDesign Programming Guide
11.5. Creating Custom Page Item Adornments
369
gPort->show(x, y, label.Length(), label.GrabWString());
gPort->grestore();
} while (0);
}
// implementation for GetPaintedBBox
PMRect MyFrameAdornment::GetPaintedBBox(IShape* shape,
AdornmentDrawOrder drawOrder, const PMRect& itemBounds,
const PMMatrix& innertoview)
{
PMRect dim = Utils<IPageItemUtils>()>GetStrokeDimensions(UIDList(shape));
PMReal frameWidth = dim.Width();
PMReal frameHeight = dim.Height();
PMString label;
label.SetTranslatable(kFalse);
label.Append("(");
label.AppendNumber(frameWidth, 2, kFalse, kTrue);
label.Append(", ");
label.AppendNumber(frameHeight, 2, kFalse, kTrue);
label.Append(")");
// 12 is the font size
PMMatrix matrix(12, 0.0, 0.0, 12, 0.0, 0.0);
InterfacePtr<IFontMgr> fontMgr(gSession, IID_IFONTMGR);
InterfacePtr<IPMFont> font(fontMgr->QueryFont(fontMgr->
GetDefaultFontName()));
InterfacePtr<IFontInstance> fontInst(fontMgr->
QueryFontInstance(font, matrix));
Fixed labelWidth, labelHeight;
fontInst->MeasureWText((const textchar*) label.GrabWString(),
label.WCharLength(), &labelWidth, &labelHeight);
if(labelHeight == 0)
// in order to have some gap between the frame bounds and the
// adornment, we multiply the font size with 1.2 (heuristic number)
labelHeight = ::ToFixed(1.2 * 12);
PMRect adornRect;
adornRect.Right(itemBounds.Right());
adornRect.Top(itemBounds.Bottom());
adornRect.Left(adornRect.Right() - ::ToPMReal(labelWidth));
adornRect.Bottom(adornRect.Top() + ::ToPMReal(labelHeight));
innertoview.Transform(&adornRect);
return adornRect;
}
370
11.6. Add Or Remove Adornments
Page Item Adornments
11.6. Add Or Remove Adornments
Adornment is part of the drawing for the decorated page items, so to add or
remove an adornment for the specified page item, using appropriate
commands is required. Any page item onto which an adornment may be
attached has interface IPageItemAdornmentList. This interface provides the
methods for adding and removing adornments.
11.6.1. AddPageItemAdornmentCmd
This command adds the adornment’s ClassID to the page item’s adornment list.
11.6.2. RemovePageItemAdornmentCmd
This command removes the adornment’s ClassID from the page item’s
adornment list.
11.6.3. Example
In the example showed above, a dialog was used to choose adding or removing
adornments for the selected page items.
figure 11.6.3.a. Dialog For Adding & Removing Adornment
When the OK button is clicked, in the dialog controller ApplyFields(), the
following code is executed.
figure 11.6.3.b. Adding & Removing Adornment Commands
// Here we assume the selectUIDList is the selected page item list.
// If the check box is checked, fchecked = kTrue.
int32 itemCount = selectUIDList.Length();
if (fchecked)
{
// add the adornment to the items that don't already have one
while (itemCount-- > 0)
{
Adobe InDesign Programming Guide
11.6. Add Or Remove Adornments
371
InterfacePtr<IPageItemAdornmentList> iPageItemAdornmentList
(selectUIDList.GetRef(itemCount), IID_IPAGEITEMADORNMENTLIST);
iPageItemAdornmentList->ResetIterator(
IAdornmentShape::kAfterShape);
while (kTrue)
{
InterfacePtr<IAdornmentShape> adornShape(iPageItemAdornmentList
->QueryNextAdornment());
if (!adornShape)
// does not have the adornment, leave it in the list for adding
break;
if (::GetClass(adornShape) == kFrameDimensionAdornmentBoss)
{
// this item has the adornment, remove it from the list
selectUIDList.Remove(itemCount);
break;
}
}
}
InterfacePtr<ICommand>cmd((ICommand*)
::CreateObject(kAddPageItemAdornmentCmdBoss, IID_ICOMMAND));
cmd->SetItemList(selectUIDList);
InterfacePtr<IClassIDData>classIDData(cmd, IID_ICLASSIDDATA);
classIDData->Set(kFrameDimensionAdornmentBoss);
CmdUtils::ProcessCommand(cmd);
} else {
// the check box is unchecked, remove the adornment from the page
// items that have it
while (itemCount-- > 0) //take them off the back of the list
{
InterfacePtr<IPageItemAdornmentList> iPageItemAdornmentList
(selectUIDList.GetRef(itemCount), IID_IPAGEITEMADORNMENTLIST);
iPageItemAdornmentList->ResetIterator(
IAdornmentShape::kAfterShape );
while (kTrue)
{
InterfacePtr<IAdornmentShape> adornShape(iPageItemAdornmentList
->QueryNextAdornment());
if (!adornShape)
{
// no adornment for this item, so remove it from the list since
// there is no adornment for removing
selectUIDList.Remove(itemCount);
break;
}
if (::GetClass(adornShape) == kFrameDimensionAdornmentBoss)
// it has the adornment, keep it in the list for removing cmd
break;
}
}
372
11.7. Summary
Page Item Adornments
// create removing page item adornment cmd
InterfacePtr<ICommand>cmd((ICommand*)
::CreateObject(kRemovePageItemAdornmentCmdBoss, IID_ICOMMAND));
cmd->SetItemList(selectUIDList);
InterfacePtr<IClassIDData>classIDData(cmd, IID_ICLASSIDDATA);
classIDData->Set(kFrameDimensionAdornmentBoss);
CmdUtils::ProcessCommand(cmd);
}
Again, for a complete sample, see
{SDK}\samplecode\graphics\framelabel\
11.7. Summary
This chapter described how to create a page item adornment, attach and detach
the adornment to the specified page items using the commands. The bosses and
interfaces relevant were described. We also provides an example on how to
create a custom page item adornment.
11.8. Review
You should be able to answer the following questions:
1. Why might you want to add an adornment to a page item?
2. Why is the adornment a preferred way to draw the extra information for
page items?
3. What is a page item adornment? How do you create a custom adornment?
4. What are the drawing orders for the adornment?
5. How do you add or remove an adornment?
11.9. Exercises
11.9.1. Implement Your Own Custom Page Item Adornment
Figuring out how to draw the extra information for specified page items and
implement your own custom adornment using AGM drawing primitives
provided in IGraphicPort interface.
11.9.2. Add Two Or More Adornments To Multiple Page Items
Moving beyond the previous exercise, enhance the example we showed in this
chapter so it can add two adornments to a set of selected page items.
Adobe InDesign Programming Guide
11.9. Exercises
373
11.9.3. Use Context Menu To Turn On & Off The Dimension Label
Currently, we have to invoke the plugin dialog to turn on and off the dimension
label for the selected page items. It would be more convenient if this could be
done through a right click context menu to toggle the label on and off.
374
11.9. Exercises
Page Item Adornments
12.
Text
12.0. Introduction
This chapter introduces the text architecture. It provides a roadmap of the subsystems that implement the text API and directs you to the programming guide
chapters related to text.
12.1. Goals
The questions this chapter answers are:
1. What are the different sub-systems that implement the text architecture?
2. What is the text model?
3. What is text layout?
4. What is the wax?
5. What is text composition?
6. What is text import/export?
12.2. Chapter-at-a-glance
“12.3.Terminology and Definitions” on page 376 describes the terminology and
definitions used throughout the chapters that are related to the Text
Architecture.
table 12.1.a. version history
Rev
Date
Author
Notes
1.1
16-Oct-2002
Ken Sadahiro
Incorporated Review Comments from Lee Huang.
1.0
30-Sep-2002
Ken Sadahiro
Updated contents for InDesign 2.0 SDK.
0.3
14-Jul-2000
Seoras Ashby
Adrian O’Lenskie
Third Draft
0.2
15-May-2000 Seoras Ashby
Adrian O’Lenskie
Second Draft
0.1
01-May-2000 Seoras Ashby
Adrian O’Lenskie
First Draft
375
376
12.3. Terminology and Definitions
“12.4.Class Diagram” on page 377 describes the major objects in the text
architecture and shows their associations.
“12.5.Roadmap” on page 380 describes the sub-systems that implement the
text architecture.
“12.6.Features” on page 383 describes major features provided by the text API.
“12.7.Interface Diagram” on page 385 shows the major interfaces in the text
API.
“12.8.Navigation Diagram” on page 386 shows the major navigation paths
between objects.
“12.9.Data Types” on page 387 describes the core data types that are related to
text.
“12.10.Utilities” on page 388 describes utility classes related to text.
“12.11.Summary” on page 391 provides a summary of the material covered in
this chapter.
“12.12.Review” on page 392 provides questions to test your understanding of
the material covered in this chapter.
12.3. Terminology and Definitions
This section describes some terms that are used in the InDesign Text
Architecture.
• Text Model: Holds the textual content of a story, i.e. the character codes,
their formatting and other associated data, as separate but related strands.
• Story: A piece of textual content.
• Story Thread: A range of text in the text model that represents a flow of
text content. With the introduction of tables there are multiple flows of text
content stored in the text model, the main flow and a flow per table cell for
the tables embedded in the story.
• Primary Story Thread: The main flow of text that is not for table cells or
other features that store text in the story.
Text
Adobe InDesign Programming Guide
•
•
•
•
•
•
•
•
•
•
•
12.4. Class Diagram
377
Text Attribute: A property of text such as point size, font, color, left indent.
Identified by ClassID (e.g. kTextAttrPointSizeBoss)
Style: A collection of text attributes. There are two types (paragraph and
character). Defined as a hierarchy. The root style contains a value for all
attributes. Leaf styles define differences from their parent.
AttributeBossList: Handy container for text attributes that allows lookup
by index or ClassID.
Text composition: Flows textual content in story threads into a layout
represented by parcels in a parcel list, creating the wax as output.
Wax: The output of text composition that draws text.
Parcel: A light weight container associated with at most one text frame,
into which text can be flowed for layout purposes. Think of it as a
lightweight text frame. It has geometry information, however, it is not a
page item, nor is it UID-based.
Parcel List: The parcels associated with the story thread.
Text Frame: A container in which parcels of text can be displayed.
Frame List: Lists the text frames that are displayed.
Strand: Parallel sets of information that, when combined, provided a
complete description of the text content in a story.
• Text Data Strand: Stores characters in Unicode encoding.
• Paragraph Attributes Strand: Stores paragraph boundaries and
formatting information for ranges of paragraphs.
• Character Attributes Strand: Maintains formatting information for
ranges of characters.
• Owned Item strand: Maintains information on objects inserted into
the text flow (i.e. inline frames).
• Wax Strand: Stores the composed representation of text that can be
drawn and selected. The wax strand is the result of composition.
• Story Thread Strand: Stores the content boundaries of story threads
within a story.
Run: Strands are subdivided into runs. Run lengths are different dependent
on the strand. For example, the text data strand uses runs to split the
character data into manageable chunks, the character attribute strand uses
runs to indicate formatting changes.
12.4. Class Diagram
Figure 12.4.a shows the associations between the major objects concerned with
text.
378
12.4. Class Diagram
Text
figure 12.4.a. Text Class Diagram
1
1
kSessionBoss
1
1
1
1
kWorkspaceBoss
1
kDocWorkspaceBoss
m
1..m
1
1
(Frame) 0..m
kTextStoryBoss
1
1
1
kParaAttrStrandBoss
1
kCharAttrStrandBoss
1
0..1
kTableModelBoss
1
0..m
1
(XML)
0..1
1
kWaxLineBoss 0..m
1
1..m
kWax*RunBoss
(TextOnPath)
1
1
1..m kTOPFrameItemBoss
1
(Text Attributes)
1
1
kTextAttr*Boss
1
1
kTA*Boss
(ServiceRegistry)
1..m
1..m
1..m kFrameItemBoss
0..1
(Column)
kTOPSplineItemBoss 1
kTextIndexIDListStrandBoss 1
kCellStrandBoss
1
1
0..m
0..1
kMultiColumnItemBoss
kFrameListBoss
(Wax Strand)
1
kTableFrameBoss
kTextXMLElementBoss
1
1
kStoryThreadStrandBoss 1
kHLTableStrandBoss
kSplineItemBoss
1 1
1
(Table) 0..m
kTextAttr*Boss
kXMLStrandBoss
kSpreadLayerBoss
1
0..m
kStyleBoss
kRubyAttrStrandBoss
1..m
1
1
kSpreadBoss
1
1
kXMLDocumentBoss
m
kTextDataStrandBoss
1
kDocBoss
1
0..m
(Text Services)
Paragraph Composers
Hyphenation & Spelling
Text Import/Export
Text Pre/Post-Process
Fonts
Adobe InDesign Programming Guide
12.4. Class Diagram
379
The session (kSessionBoss) has documents (kDocBoss) which have stories
(kTextStoryBoss) and spreads (kSpreadBoss).
Stories have strands that describe different properties of the text: characters
(kTextDataStrandBoss); text attributes (kParaAttrStrand, kCharAttrStrand)
in-line objects (kOwnedItemStrand, which may refer to kTableFrameBoss,
kInlineBoss, kIndexPageEntryBoss, kHyperlinkTextMarkerBoss,
kHyperlinkTextSourceEndMarkerBoss, or
kHyperlinkTextDestinationMarkerBoss), story threads
(kStoryThreadStrandBoss), table related content (kCellStrandBoss,
kHLTableStrandBoss), XML tags (kTextIndexIDListStrandBoss,
kXMLStrandBoss), and ruby attributes (kRubyAttrStrandBoss, created only
when the first ruby attribute is applied).
Both the session and the document have a workspace (kWorkspaceBoss and
kDocWorkspaceBoss) that contains paragraph and character styles. Styles
(kStyleBoss) are collections of text attributes that are collectively applied to
text to give its appearance. A text attribute describes a single property of the
text such as point size or colour. There are many different text attributes
denoted here as kTextAttr*Boss, where * is replaced with the specific attribute
name for example kTextAttrPointSizeBoss or kTextAttrColorBoss. The
paragraph and character attribute strands refer to the styles and text attributes
(this relationship has not been modelled in the diagram).
Spreads have layers (kSpreadLayerBoss) and layers have frames
(kSplineItemBoss). All content is contained inside a spline. When a spline
contains text, it has a multi-column (kMultiColumnItemBoss) object. The multicolumn object is the column controller that manages the columns
(kFrameItemBoss) of text in the frame. When a text-on-a-path (TOP) item
contains text, it has a kTOPSplineItemBoss, with a kTOPFrameItemBoss as a child
in the hierarchy. The ITextFrame interface is aggregated in kFrameItemBoss and
kTOPFrameItemBoss.
The story and the parcels in which it is displayed are the inputs that drive text
composition to create the composed representation of the text, the wax. The
wax draws, hit-tests and selects text.
A story, its layout and the process of text composition connect at the frame list
(kFrameListBoss). The wax (kWaxLineBoss and kWaxRunBoss), is owned by and
380
12.5. Roadmap
managed by the wax strand (the wax strand is an interface on kFrameListBoss).
The frame list references the columns that display the text of the story. The
columns reference the lines they display.
The story also may own 0 or more tables (kTableModelBoss, introduced in
InDesign 2.0). Each table is laid out as 0 or more table frames
(kTableFrameBoss). The contents of the tables are managed by a cell content
boss (kTextCellContentBoss - InDesign 2.0 tables only support text content).
The story may also have a reference to an XML element boss
(kTextXMLElementBoss), which provides a connection to the XML tags that are
applied to parts of the story. You can access the XML element boss for the text
story via the IXMLReferenceData interface.
The type faces in which characters are displayed are provided by fonts. The boss
objects involved in fonts and their various associations have not been modelled
in figure 12.4.a.
The session also has a service registry that contains various service providers
required by text, such as paragraph composers, hyphenation and spelling
providers, import/export providers, etc.
These objects will be described in more detail and new objects will be revealed
as each sub-system is explored in subsequent chapters.
12.5. Roadmap
The text architecture can be divided into the sub-systems listed below. The
roadmap in figure 12.5.a shows the sub-systems that the text objects lie within:
• The Text Model,
• Text Layout,
• The Wax,
• Text Composition,
• Fonts,
• Text Import and Export, and
• The Text Editor.
Text
Adobe InDesign Programming Guide
12.5. Roadmap
381
figure 12.5.a. Text Sub-system Roadmap
The Text Model
kStyleBoss
kTextAttrXBoss
(Text Attributes)
kTextDataStrandBoss
kParaAttrStrandBoss
kCharAttrStrandBoss
kOwnedItemStrandBoss
kStoryThreadStrandBoss
kTextStoryBoss
Paragraph
Composers
kFrameListBoss
kSplineItemBoss
kFrameItemBoss
kMultiColumnItemBoss
kTOPFrameItemBoss
kTOPSplineItemBoss
kWaxLineBoss
Text Layout
kWaxRunBoss
The Wax
Text Composition
Fonts
The Text Editor
Text Import
Text Export
The text model manages the content of a story. It stores the characters and the
text attributes that control their appearance. “The Text Model” chapter
describes this sub-system and explains how your plug-ins can manipulate the
content of a story. The “Working with Text Styles” chapter describes how you
can program text styles.
Text layout manages the frames that display a story. A frame is a visual
container for text. Visually, a story is displayed through a linked set of one or
more frames. (Internally, the text content is presented in parcels in a parcel list,
382
12.5. Roadmap
which are associated with a frame list. This allows for text cells to act as if they
are mini text frames, each with its own story direction.) The frames have
properties, such as the number of columns, column width and text inset, that
control where text flows. Text wrap settings on overlapping frames may affect
this flow. The “Text Layout” chapter describes this sub-system and explains
how your plug-ins can manipulate text frames. The SDK plug-ins FrameGridJ
({SDK}/SampleCode/Text/FrameGridJ), and VerticalTextFrameJ ({SDK}/
SampleCode/Text/VerticalTextFrameJ),provide examples of how to add extra
frame grid data and to change story direction.
The wax is used to draw text. “The Wax” chapter describes this sub-system and
how your plug-ins can scan the wax for information on composed text.
Text composition flows text in story threads into a layout represented by
parcels in a parcel list. Fonts provide text composition with the glyph
dimensions it needs to arrange glyphs into lines of a given width. The “Text
Composition” chapter describes this sub-system and explains how your plugins can recompose text or add new typographical features. The SDK plug-ins
SingleLineComposer ({SDK}/SampleCode/Text/SingleLineComposer),and
ComposerJ ({SDK}/SampleCode/Text/ComposerJ) are examples of custom
composers.
Fonts provide the various type faces in which characters are displayed. To avoid
confusion the term glyph is used to indicate a member of a font instead of the
term character which normally denotes a member of an alphabet or character
set.
The text editor manages the input and editing of text from the keyboard. On
the Japanese version of InDesign, this involves an extra component called the
Input Method Editor (IME), which allows for inline editing of multibyte
(Japanese) text.
A text import provider brings text from an external format into the
application and allows you to control the translation process. A text export
provider exports text from the application’s internal representation to an
external format and allows you to control the translation process. There are
three examples on the SDK that can be used as a guide: TextImportFilter,
CHMLImportFilter and TextExportFilter (all located in {SDK}/SampleCode/
ServiceProviders.)
Text
Adobe InDesign Programming Guide
12.6. Features
383
12.6. Features
There are a number of text features that are of particular interest to you as a
plug-in developer.
Your plug-in can add new text attributes either to control the appearance of
text or to store data that it needs to associate with a range of characters. Text
attributes are introduced in “The Text Model” chapter. A description of how to
add new text attributes is given in the “Text Attributes and Adornments”
chapter. In addition, you can refer to the BasicTextAdornment sample plug-in
({SDK}/SampleCode/Text/BasicTextAdornment), which adds a boolean text
attribute (to help enable/disable a regular text adornment), and the
CHDataMerger sample plug-in ({SDK}/SampleCode/Text/CHDataMerger),
which adds a text attribute for storing hidden text. There are also several plugins in the {SDK}/SampleCode/Text folder (such as TextStyler ,
PointSizeMutator, KentenCreatorJ and RubyModifyJ), and code snippets in
the {SDK}/SampleCode/CodeSnippets folder that show how to get and set a
variety of text attributes.
Your plug-in can add a text adornment to highlight or adorn the text in some
other way. Text adornments provide a hook that calls your plug-in when text is
drawn. A description of how to add text adornments is given in the “Text
Attributes and Adornments” chapter. In addition, you can refer to the
BasicTextAdornment sample plug-in ({SDK}/SampleCode/Text/
BasicTextAdornment), which adds a regular text adornment.
Your plug-in can implement new typographical features by implementing a
paragraph composer. A paragraph composer takes up to a paragraph worth
of characters along with the attributes that define their appearance and
arranges the characters into lines of glyphs that fit the layout. It is responsible
for the positioning of glyphs and deciding where lines should be broken. The
“Text Composition” chapter describes this. In addition, you can refer to the
SingleLineComposer sample plug-in ({SDK}/SampleCode/Text/
SingleLineComposer) and the ComposerJ sample plug-in ({SDK}/SampleCode/
Text/ComposerJ).
You can add hyphenation and spelling services by implementing a linguistic
plug-in. The CHLinguistic sample plug-in ({SDK}/SampleCode/Text/
CHLinguistic) shows how to implement a spelling service, and the
384
12.6. Features
Hyphenator sample plug-in ({SDK}/SampleCode/Text/Hyphenator) shows how
to implement a hyphenation service.
Text-on-a-Path (or “TOP”, available from Adobe InDesign 1.5 and 2.0J) flows
text along a spline (a path made up of a number of straight line or curved
segments). This feature integrates a number of new bosses and interfaces into
the core text architecture described in figure 12.4.a.
Text
Adobe InDesign Programming Guide
12.7. Interface Diagram
385
12.7. Interface Diagram
Figure 12.7.a shows the major interfaces involved with text. The interfaces are
described in the following text chapters.
figure 12.7.a. Text Sub-system Interface Diagram
kDocBoss
kStyleBoss
kStoryThreadStrandBoss
IStoryList
ITextAttributes
kOwnedItemStrandBoss
kCharAttrStrandBoss
kTextStoryBoss
ITextModel
IComposeScanner
ITextStoryThreadDictHier
ITextStoryThreadDict
ITextStoryThread
ITableModelList
kFrameListBoss
IFrameList
IWaxStrand
IStrand
IFrameListComposer
IRecomposedFrames
IParcelList
ITextParcelList
ITextParcelListData
ITiler
kParaAttrStrandBoss
kTextDataStrandBoss
IStrand
IWaxLine
IWaxDamageRecorder
IWaxShape
IWaxHitTest
IWaxHilite
IWaxlineRuleAbove
IWaxLineRuleBelow
kTextAttrFontStyleBoss
(Text Attributes)
kTextAttrFontUIDBoss
IAttrReport
IAttrImportExport
ITextAttrUID
kFrameItemBoss
ITextFrame
ITextTiler
IFrameComposer
IFrameDamageRecorder
IParcel
IParcelShape
ITextGrid
IWaxIterator
kWaxLineBoss
kTAKentenKindBoss
kWax*RunBoss
IWaxRun
IWaxRunText
IWaxHitTest
IWaxRunText
IWaxRunShape
(IWaxGlyphs)
kSplineItemBoss
IGraphicFrameData
ITextInset
IStandOff
kMultiColumnItemBoss
ITextFrame
ITextColumnSizer
kSingleLineComposerBoss
(Paragraph Composers)
kParagraphComposerBoss
IParagraphComposer
IK2ServiceProvider
386
12.8. Navigation Diagram
Text
12.8. Navigation Diagram
Figure 12.7.a shows interfaces used to navigate between key text objects.
figure 12.8.a. Navigation
kDocBoss
ISpreadList
IStoryList
UID GetNthSpreadUID()
UIDRef GetNthUserAccessibleStoryUID()
kSpreadBoss
IPMUnknown* QueryStrand()
kTextStoryBoss
ITextModel
IHierarchy
ITextModel* QueryTextModel()
kSpreadLayerBoss
kStoryThreadStrandBoss
IHierarchy
kOwnedItemStrandBoss
IFrameList* QueryFrameList()
kCharAttrStrandBoss
kParaAttrStrandBoss
kSplineItemBoss
kTextDataStrandBoss
IHierarchy
IStrand
kFrameListBoss
IFrameList
IWaxStrand
IWaxLine* IWaxIterator::GetFirstWaxLine()
kWaxLineBoss
IWaxLine
kMultiColumnItemBoss
IHierarchy
ITextFrame
IFrameList* QueryFrameList()
kFrameItemBoss
IHierarchy
ITextFrame
IWaxRun* QueryRun()
kWax*RunBoss
IWaxRun
ITextFrame* QueryNthFrame()
UID GetFrameUID()
Adobe InDesign Programming Guide
12.9. Data Types
387
12.9. Data Types
12.9.1. Basic Types
BaseType.h . . . . . . . . . . . . . . . . . . . . . . . . . . . . . . . . . . . . . . . . . . . . . . . . . . . . . . . {SDK}/API/Includes
CTextEnum.h . . . . . . . . . . . . . . . . . . . . . . . . . . . . . . . . . . . . . . . . . . . . . . . . . . . . . {SDK}/API/Includes
The basic text data types shown in figure 12.9.1.a are defined in BaseType.h and
CTextEnum.h. Refer to the actual header files for comments.
figure 12.9.1.a. Basic Text Data Types & Constants
typedef uchar16 textchar;
typedef int32 TextIndex;
const TextIndex kInvalidTextIndex = -1;
typedef int32 GlyphID;
const Text::GlyphID kInvalidGlyphID = -1;
12.9.2. Unicode Character Constants
TextChar.h . . . . . . . . . . . . . . . . . . . . . . . . . . . . . . . . . . . . . . . . . . . . . . . . . . . . . . . . {SDK}/API/Includes
defines 16 bit Unicode character constant definitions as well as
special control characters, such as kTextChar_ReplacementCharacter,
kTextChar_Inline, and kTextChar_PageNumber.
TextChar.h
figure 12.9.2.a. TextChar.h Unicode Character Constant Definition File
const
const
const
const
const
const
const
const
textchar
textchar
textchar
textchar
textchar
textchar
textchar
textchar
kTextChar_Null= 0x0000;
kTextChar_IndentToHere= 0x0007;
kTextChar_RightAlignedTab= 0x0008;
kTextChar_Tab= 0x0009;
kTextChar_LF= 0x000A;
kTextChar_CR= 0x000D;
kTextChar_SoftCR=kTextChar_LF;
kTextChar_Space= 0x0020;
// other constants...
12.9.3. WideString
WideString.h . . . . . . . . . . . . . . . . . . . . . . . . . . . . . . . . . . . . . . . . . . . . . . . . . . . . . {SDK}/API/Includes
supports dynamic strings of 16-bit characters and is used to insert
and access characters stored in the text model.
WideString
12.9.4. RangeData
RangeData.h. . . . . . . . . . . . . . . . . . . . . . . . . . . . . . . . . . . . . . . . . . . . . . . . . . . . . . {SDK}/API/Includes
388
12.10. Utilities
is a class that is used to hold a range of text indices. It is used in a
variety of interfaces where you specify a range of text (selection, model, etc.).
This class is often used in places where you not only need to specify a start and
an end TextIndex, but also need to determine if there is overlap with another
range of text specified in a RangeData object. RangeData does not keep a
reference to the text model it refers to, so it is a light weight container.
RangeData
12.9.5. TextRange
TextRange.h . . . . . . . . . . . . . . . . . . . . . . . . . . . . . . . . . . . . . . . . . . . . . . . . . . . . . . {SDK}/API/Includes
Unlike RangeData, TextRange keeps the reference to the text object for which it
is maintaining the range. Use this in tandem with RangeData. TextRange is
defined in the namespace “InDesign”.
12.10. Utilities
The text API is complicated. However, there are a number of utilities designed
to make programming with it simpler.
12.10.1. TextIterator
TextIterator.h . . . . . . . . . . . . . . . . . . . . . . . . . . . . . . . . . . . . . . . . . . . . . . . . . . . . . {SDK}/API/Includes
is a useful API that makes accessing characters in the text model
of a story very easy. TextIterator is pretty much as efficient for character acces
as you can get. It keeps track of text runs in the text strand, and only gets a new
run when necessary. Also, unlike IComposeScanner, itdoesn’t involve the other
strands.
TextIterator
You can iterate through text in a story like this, one character at a time:
TextIterator iter(textModel, startIndex);
TextIterator end(textModel, startIndex + length);
while(iter != end) {
TextChar tc = *iter;
// examine tc...
iter++; }
Or you can use it to grab a chunk of text as a WideString.
WideString ws;
TextIterator begin(textModel, startIndex);
TextIterator end(textModel, startIndex + length);
ws.reserve(length);
std::copy(begin, end, std::back_inserter(ws));
Text
Adobe InDesign Programming Guide
12.10. Utilities
389
To convert the WideString to a platform specific encoding (e.g. ShiftJIS), you
can use the WideString::GetAsSystemString() method.
The TextIterator operator++ is very fast and trivial until you cross a run
boundary. See the code snippet SnipInspectStoryCharacters.cpp for an
example of how it can be used to examine a range of characters from a text
model.
12.10.2. TextCharBuffer
TextCharBuffer.h . . . . . . . . . . . . . . . . . . . . . . . . . . . . . . . . . . . . . . . . . . . . . . . . . . {SDK}/API/Includes
TextCharBuffer is a light weight container class for textchar. Initialize it with a
WideString or a pointer to a textchar with a length, and you can use the begin
and end methods for boundary checks:
const textchar* textCharArray = {... /* fill this out */};
TextCharBuffer buf(textCharArray, sizeof(textCharArray)/
sizeof(textchar));
for(const textchar *iter = buf.begin(); iter < buf.end(); ++iter)
{
// *iter is the current textchar
}
12.10.3. RunToString
TextIterator.h . . . . . . . . . . . . . . . . . . . . . . . . . . . . . . . . . . . . . . . . . . . . . . . . . . . . . {SDK}/API/Includes
can be used under the debug build of InDesign to verify the text
model contains character data you expect:
RunToString
void CheckString(
InterfacePtr<ITextModel> textModel, const TextIndex& startTextIndex,
const TextIndex& endTextIndex, const WideString& expectedString)
{
#ifdef DEBUG
std::auto_ptr<WideString> text(RunToString(textModel,
startTextIndex, endTextIndex));
ASSERT(*text == expectedString);
#endif
}
Note that RunToString is not available under the release build of InDesign.
12.10.4. TextAttributeRunIterator
TextAttributeRunIterator.h . . . . . . . . . . . . . . . . . . . . . . . . . . . . . . . . . . . . . . . . {SDK}/API/Includes
390
12.10. Utilities
can iterate over multiple ranges of text and find a
given set of text attributes. It can also apply attributes to its current text range.
Before you can use it you need two things:
• You need to have a K2Vector<InDesign::TextRange> identifying the ranges
of text to be searched.
• You need a K2Vector<ClassID> identifying the text attribute(s) to be
searched for.
TextAttributeRunIterator
Once you have these you use a TextAttributeRunIterator something like this:
K2Vector<InDesign::TextRange> TextRanges; //use push_back to add items
K2Vector<ClassID> attributeClasses; // use push_back to add items
TextAttributeRunIterator runIter(textRanges->begin(),
textRanges->end(), attributeClasses.begin(),
attributeClasses.end());
while (runIter)
{
// add code to get text attribute(s) out of runIter.
++runIter;
}
is an unusual iterator. To access its results you can
dereference the iterator, which gives you the AttributeBossList object that
contains the results you asked for. You can also use the -> operator to get a
pointer to the AttributeBossList. You might use it like this if searching for
point size:
TextAttributeRunIterator
InterfacePtr<const ITextAttrRealNumber>(static_cast
<const ITextAttrRealNumber*> (
runIter->QueryByClassID(
kTextAttrPointSizeBoss, ITextAttrRealNumber:: kDefaultIID)));
You can learn more about Text Attributes in the “Text Attributes and
Adornments” chapter.
12.10.5. Character Set Conversion
CTUnicodeTranslator.h . . . . . . . . . . . . . . . . . . . . . . . . . . . . . . . . . . . . . . . . . . . . {SDK}/API/Includes
IEncodingUtils.h . . . . . . . . . . . . . . . . . . . . . . . . . . . . . . . . . . . . . . . . . . . .{SDK}/API/Interfaces/Utils
CTUnicodeTranslator and IEncodingUtils provide translation services that map
other character encodings schemes onto Unicode. You can use it to bring text
encoded in another character set into the application or to export text from the
application into a different character set.
Text
Adobe InDesign Programming Guide
12.11. Summary
391
12.10.6. ITextUtils
ITextUtils.h . . . . . . . . . . . . . . . . . . . . . . . . . . . . . . . . . . . . . . . . . . . . . . . . . {SDK}/API/Interfaces/Text
provides mechanism that:
Create stories.
Generate commands to copy stories.
Generate commands to move stories.
Determine whether a selection is a text selection.
Return the current view’s text editor.
Return the text caret (the icon representing the cursor point).
Return the raw text from the model.
Return the frames over which a selection applies.
Mechanisms for defining what a word is.
ITextUtils
•
•
•
•
•
•
•
•
•
See the header file for more details. Use this with the Utils ({SDK}/API/
Includes/Utils.h) adapter class to invoke the methods.
12.10.7. ITextAttrUtils
ITextAttrUtils.h . . . . . . . . . . . . . . . . . . . . . . . . . . . . . . . . . . . . . . . . . . . . . {SDK}/API/Interfaces/Text
provides higher level mechanisms to manage text attributes,
specifically, a method to build commands for the application of attributes to a
range of text within a story, and a method to build a command that clears the
attributes from a range of text within a story.
ITextAttrUtils
See the header file for more details. Use this with the Utils ({SDK}/API/
Includes/Utils.h) adapter class to invoke the methods.
12.10.8. IWaxIterator
IWaxIterator . . . . . . . . . . . . . . . . . . . . . . . . . . . . . . . . . . . . . . . . . . . . . . . . {SDK}/API/Interfaces/Text
An iterator class, IWaxIterator, is provided to simplify access to wax lines. It is
described fully in “The Wax” chapter. Note that the name does start with a
capital “I”, however, this is not an interface.
12.11. Summary
This chapter introduced the text architecture and gave you a roadmap of the
programming guide chapters related to text. It also described the core data
types and utility classes used for text.
392
12.12. Review
12.12. Review
You should be able to answer the following questions:
1. Which programming guide chapter would you read to find out how to
insert text into a story? (12.5., page 380)
2. Which programming guide chapter would you read to find out how you
can change the layout of a story? (12.5., page 380)
3. Which programming guide chapter would you read to find out more about
the composed representation of text? (12.5., page 380)
4. Which programming guide chapter would you read to find out more about
how text is composed? (12.5., page 380)
Text
13.
The Text Model
13.0. Overview
The text architecture separates text content (the characters and the formatting
that describes their desired appearance) from the containers that display text in
its composed form. This chapter describes how text content is represented and
explains how plug-ins can access, insert, delete and alter the appearance of text.
13.1. Goals
The goals for the section:
1. To introduce the fundamentals of the text model, specifically:
• stories.
• story threads.
• strands.
• text attributes.
• styles.
2. To describe the mechanisms available for the manipulation of text:
• inserting text.
• deleting text.
• replacing text.
• altering the appearance of text
3. To show the different mechanisms for data retrieval:
• extracting character codes and information regarding the formatting
applied to text.
4. To describe how text information is stored.
table 13.0.a. version history
Rev
Date
Author
Notes
2.0
18-Dec-02
Seoras Ashby
Update content for InDesign 2.x API
0.3
14-Jul-00
Adrian O’Lenskie
Seoras Ashby
Third Draft
393
394
13.2. Chapter-at-a-glance
The Text Model
13.2. Chapter-at-a-glance
“Key concepts” on page 394 begins with a description of the structure of the
text model.
“Interfaces” on page 423 describes the APIs used to program with the text
model.
“Frequently asked questions(FAQ)” on page 432 provides some practical
insights of programming with the text model.
“Summary” on page 452 provides a summary of the topics covered in this
chapter.
“Review” on page 452 provides questions to test your understanding of the
material covered in this chapter.
“Exercises” on page 453 provides suggestions for other tasks you might want to
attempt.
13.3. Key concepts
13.3.1. Introduction
figure 13.3.1.a. The Text Model
Text Layout
frames/
parcels
The Wax
wax lines
Text Composition
story thread
characters and text attributes
The Text Model
Adobe InDesign Programming Guide
13.3. Key concepts
395
The text model maintains the character and formatting information for a
story. This information is split into one or more story threads that each
repesent an independent flow of text content. Text layout defines the shape and
form of the visual containers in which text is composed and displayed. Text
composition flows text content from a story thread into its visual containers
creating wax that fits their layout. Text layout in turn displays the wax. This is
depicted in figure 13.3.1.a. The key concepts described in this chapter explain
the structure of the text model.
For example, figure 13.3.1.b shows an example of some text within a document.
figure 13.3.1.b. Example text frame with two columns
The characters and the formatting information applied to the them (for
example, the font and the fact that the words “Aliens and Earth” are bold) are
text content that is maintained through the text model and is described in this
chapter.
The position on the page, the number of columns, size of text frame and other
properties to do with the layout of the text is described in the "Text Layout"
chapter. The composition of text is described in the "Text Composition"
396
13.3. Key concepts
The Text Model
chapter. The composed "ready to draw" representation of text is described in
"The Wax" chapter.
13.3.2. Stories
Text in a document is maintained as a list of stories (see interface IStoryList).
A story (kTextStoryBoss) represents the textual content. A document can
contain several stories, usually a story contains text associated with a particular
topic.
For example, figure 13.3.2.a shows a document containing two stories, each
displayed in its own frame. Text manipulations in one frame do not affect the
other frame.
figure 13.3.2.a. Two stories over two frames
Figure 13.3.2.b shows the same text, but now it is part of the same story. The
two frames have been linked (the out port of the first frame is connected to the
in port of the second - as we have selected the “Show text threads” option of the
drop down “View” menu, we can see the connection by the line between
outport and inport). The characters have automatically flowed from the first
frame to the second, this shows us that there is a flexible relationship between
the individual characters and the frame they are contained in. To put this a
different way, the frame a particular character ends up in can be affected by the
other characters within the story.
Adobe InDesign Programming Guide
13.3. Key concepts
397
figure 13.3.2.b. One story over two linked frames
Now manipulations on the text within the first frame are likely to have a chain
reaction on the text in the second frame (figure 13.3.2.c). The text that has been
added not only automatically overflows from the first text frame into the
second, it also re-positions the text following (which would either overfill the
frame, or flow into any linked text frame).
The story abstraction has responsibility for managing the text content.
Although, as we will see, the architecture is split into several components, most
of the interactions will occur through this abstraction. It also provides facilities
for the management of text foci, and external links to imported text files.
figure 13.3.2.c. Story updates over two frames
13.3.3. Lifecycle of a story
In general, stories are not created or deleted directly, but as a side effect of some
other action. If a text frame is created, a story is created as part of this process. If
two text frames are linked (as in figure 13.3.2.b), one of the stories is deleted
leaving one story shared between the two frames. If the last text frame
398
13.3. Key concepts
The Text Model
associated with a story is deleted, the story itself is then deleted as a direct
consequence.
It is possible to control the existential behaviour of a story directly. Commands
exist that allow the creation and deletion of a story, however if you wish to do
this, you must be aware that these stories are still subject to the usual side effects
of text frame manipulations.
13.3.4. Story accessibilty
Some stories in a document are not accessible to the user. For example the
XML feature creates a story for its own use that is never displayed in a frame.
Stories are said to be user accessible or not user accessible as identified by their
TextStory_StoryAccess in the story list (IStoryList). User accessible stories
are scanned by features like Find/Change and Spelling and they are considered
when the fonts and colours used by a document needs to be determined. Non
user accessible stories are ignored by these types of operation. Note that both
types of stories are updated when colours or styles are deleted since they may
reference them internally.
13.3.5. The text model
Every story in a document is represented by an instance of the text model (see
interface ITextModel). The length of the text model is the number of
characters in the story and is given by method ITextModel::TotalLength.
When a story is created a terminating kTextChar_CR character is inserted in its
text model. The text model therefore has a minimum length of one and its final
character is always a kTextChar_CR character.
The text model comprises several strands that hold the various components of
the story such as the character code data, character formatting, paragraph
organisation and formatting. Each strand in the text model has the same overall
length equal to the number of characters in the story.
13.3.6. Strands
The text model is further decomposed into individual strands - parallel sets of
information that each hold a component of the story. The strand paradigm is
based on the idea of a rope consisting of intertwined strands. The strands of the
text model intertwine to give a complete description of the text in a story.
Adobe InDesign Programming Guide
13.3. Key concepts
399
Each strand in the text model has the same overall length equal to the number
of characters in the story. As characters get added or removed from the story
each strand is notified by the text model and they expand or contract to stay the
same length. The major strands are:• Text (kTextDataStrandBoss) - holds character code data for the story
encoded in Unicode,
• Story thread (kStoryThreadStrandBoss) - represents the story threads in
the story,
• Paragraph attributes (kParaAttrStrandBoss) - maintains length and
formatting information that is applicable to paragraphs,
• Character attributes (kCharAttrStrandBoss) - maintains formatting
information that is applicable to ranges of characters,
• Owned items (kOwnedItemStrandBoss) - maintains information on objects
inserted into the text stream (e.g. inline frames, table frames).
• Wax (kFrameListBoss) - composed representation of text that can be
drawn, hit-tested and selected. The wax strand is the result of composition.
It is discussed in full detail in "The Wax" chapter and the "Text
Composition" chapter. However, it displays the properties that are
common to all strands in a story.
13.3.7. Runs
A strand is further decomposed into runs. A run represents something about a
range of text in the text model. On the text data strand runs are used to divide
the character code data into chunks of a manageable size (the number of
characters in a story is potentially very large). On the character attribute strand
runs signify a change in character formatting. The semantics of the information
represented by a run is defined by the strand.
13.3.8. Story threads
A story thread (see interface ITextStoryThread) represents a flow of text
content and is associated with range of text in the text model. A story can
contain multiple flows of text content that can be composed independently or
not composed at all. Story threads have a minimum length of 1 and their last
character is always a kTextChar_CR character.
Prior to InDesign 2.x there was one flow of text content in a story. All of the
text was flowed through the frames that displayed the story. InDesign 2.x
introduced the ability to store multiple flows of text content in a story. This
400
13.3. Key concepts
The Text Model
allows features such as tables to embed text that gets flowed into table cells
inside a story.
The primary story thread is the main flow of text that is displayed by the
frames associated with the story. Within the text model the text for the primary
story thread is stored starting from a text index of zero up to
ITextModel::GetPrimaryStoryThreadSpan-1. A story always has a primary
story thread.
Text content for features that embed text in the story is stored after the primary
story thread. It is the text in the range
ITextModel::GetPrimaryStoryThreadSpan..ITextModel::TotalLength-1.
Other story threads are present only if the story has a feature that has
embedded its text, such as a table.
For example a text frame displaying the characters "abc" is shown in figure
13.3.8.a along with the underlying text model that stores the text content. The
text data strand (kTextDataStrandBoss) stores the character codes. The range of
text in each story thread is represented by runs on the story thread strand
(kStoryThreadStrandBoss). Since there are no tables or other features present
that embed their text in a story there is only one story thread, the primary story
thread. The total length of the story and the length of the primary story thread
are the same, 4 characters.
Adobe InDesign Programming Guide
13.3. Key concepts
401
figure 13.3.8.a. Sample primary story thread
4EXTFRAME
ABC
4EXT-ODEL2EPRESENTATION
4EXT K4EXT$ATA3TRAND"OSS
)NDEX )4EXT3TRAND
K3TORY4HREAD3TRAND"OSS
)3TRAND
A
0RIMARYSTORYTHREAD
B
STORYTHREAD;=
C
K4EXT#HAR?#2
)4EXT-ODEL4OTAL,ENGTH
)4EXT-ODEL'ET0RIMARY3TORY4HREAD3PAN
K/WNED)TEM3TRAND"OSS
))TEM3TRAND
K)NVALID5)$
K)NVALID5)$
K)NVALID5)$
K)NVALID5)$
If a table with two rows and one column is inserted between the a and the b
characters in the text frame shown in figure 13.3.8.a the displayed text frame
and underlying text model would be as shown in figure 13.3.8.b. The first table
cell contains the character "d" and the second cell contains the character "e".
Notice that some extra characters required by the tables feature are added to the
primary story thread and two new story threads are added to the story thread
strand, one for the flow of text in each table cell. The story threads for the table
are held after the primary story thread. The frame and table cell background
color has been color coded to indicate the story thread in the underlying text
model that stores the text.
402
13.3. Key concepts
The Text Model
figure 13.3.8.b. Sample primary story thread and table cell story threads
4EXTFRAME
4ABLE
A
D
E
BC
4EXT-ODEL2EPRESENTATION
4EXT K4EXT$ATA3TRAND"OSS
)NDEX )4EXT3TRAND
A
K4EXT#HAR?4ABLE
K4EXT#HAR?4ABLE#ONTINUED
B
C
K4EXT#HAR?#2
D
K4EXT#HAR?#2
E
K4EXT#HAR?#2
K3TORY4HREAD3TRAND"OSS
)3TRAND
0RIMARYSTORYTHREAD
STORYTHREAD;=
4ABLECELL
STORYTHREAD;=
4ABLECELL
STORYTHREAD;=
K/WNED)TEM3TRAND"OSS
))TEM3TRAND
K)NVALID5)$
5)$XK4ABLE&RAME"OSS
K)NVALID5)$
K)NVALID5)$
K)NVALID5)$
K)NVALID5)$
K)NVALID5)$
K)NVALID5)$
K)NVALID5)$
K)NVALID5)$
)4EXT-ODEL4OTAL,ENGTH
)4EXT-ODEL'ET0RIMARY3TORY4HREAD3PAN
The text model method ITextModel::QueryStoryThread is a helper method
that returns the story thread (see interface ITextStoryThread) associated with
any index in the text model(TextIndex). Under the hood this method uses runs
on the story thread strand kStoryThreadStrandBoss to locate the range of text
in the story thread.
Adobe InDesign Programming Guide
13.3. Key concepts
403
13.3.9. The paragraph and character attribute strands
Th paragraph attribute strand (kParaAttrStrandBoss) holds the range of text in
each paragraph and paragraph formatting. The character attribute strand
(kCharAttrStrandBoss) holds character formatting.
For example, the text shown in figure 13.3.9.a has two paragraphs and the
second word of the first paragraph is in a bold typeface. We will use this to
describe the runs that represent this internally.
figure 13.3.9.a. Paragraph and character runs
The text in figure 13.3.9.a is maintained as one run on the text data strand that
holds the character codes for all 48 characters present. The character
formatting is maintained as three runs on the character attribute strand. The
first is the word “Aliens ” (including the space), the second is the word “and”
being set to a bold face. The third run is the rest of the text starting with the
space after the “and” and ending with the return character that all stories have
hard coded in them (this is represented by the “#” character found at the end of
the story which you can view by turning on hidden characters). This third run
is set to have a normal face again. The paragraph information is maintained as
two runs in the paragraph attribute strand’s IStrand interface and one run in
its IAttributeStrand interface. The runs given by its IStrand interface
represents the range of text in each paragraph. The runs given by its
IAttributeStrand interface represent paragraph formatting changes and since
ther are no changes there is only one run.
Figure 13.3.9.b shows a single text frame that has formatting information
applied. We will use this to describe the way internal formatting works in more
detail.
404
13.3. Key concepts
The Text Model
figure 13.3.9.b. Sample text
run a
run b
run c
The text model that backs this text has 17 characters in it, one for each of the
characters contained within the frame, and another for the hard coded return
character all stories have. There is a single paragraph, with the paragraph style
“pStyle” applied. This style merely sets the point size to some value. There is
also extra formatting information applied to the whole paragraph that sets the
justification to be centered (this is actually maintained as two attributes, one
controlling the justification of the body, and the other controlling the
justification of the last line). The first six characters (run a) do not have any
other extra formatting information. The next 3 characters (run b) have been set
to bold, and the remaining characters (run c) have the character style cStyle
applied (which underlines the text).
Without exposing the internal mechanisms of styles, what does the model look
like? Figure 13.3.9.c gives an abstract view.
Adobe InDesign Programming Guide
13.3. Key concepts
405
figure 13.3.9.c. The text model representation of formatting
Story
length = 17
0
kTextDataStrandBoss
1
A l
2
3
4
5
i e n s
kParaAttrStrandBoss
6
7
8
9
a n d
Start: 0
End: 16
UID: pStyle
10
11
12
13
14
15
16
E a r t h #
Overrides: + last: centered + body: centered
kCharAttrStrandBoss
Start: 0
End: 6
UID: root
Start: 7
End: 9
UID: root
Start: 10
End: 16
UID: cStyle
Overrides: None
Overrides: +bold
Overrides: None
The story is maintained as strands. The character data is maintained on the
kTextDataStrand boss. The kParaAttrStrandBoss holds paragraph formatting
information. It does this as a set of runs. Overall this strand contains objects
that hold a collection a paragraph lengths (in interface IStrand) along with a
collection of paragraph formatting runs (in interface IAttributeStrand). There
is only one paragraph, so there is only one run on the paragraph attribute
strand. The kCharAttrStrandBoss holds character formatting information. As
with the paragraph attribute strand, it does this as a set of runs. Each set of text
with the same contiguous formatting information is represented by a different
run. In this case three runs are needed, from position 0 to 6 to indicate that no
extra formatting information is being applied, then from 7 to 9 to indicate
there is a local override (bold is applied), and finally from position 10 to the
end to indicate that there is no extra formatting, and a character style (cStyle)
is applied.
406
13.3. Key concepts
The Text Model
It is interesting to consider the direction formatting information is applied to
the text. As we may apply character formatting information to whole
paragraphs (via paragraph styles), then to ranges of text within paragraphs (via
character styles) and finally, locally to text, overriding any formatting currently
set, there is room for confusion.
Again, with reference to figure 13.3.9.c the formatting information is applied in
a top down approach. Imagine there is a set of formatting information that will
be applied to the text (we’ll call it the effective value of formatting). First, the
current paragraph style makes up the effective value of the list of attributes to
be applied (we will discuss styles more later). If there are any paragraph
formatting overrides specified, these override the formatting information
currently defined in the effective value. Any formatting information defined by
the character style will override that defined in the effective value, before any
character attribute strand formatting information is taken into account. This
will also override the formatting information specified in the effective value. We
now have the set of formatting information that is applicable for a particular
point in the text.
To give a more concrete example, by default no underline is applied to text. If
the current style being applied indicates there is to be a single underline, this
replaces the default setting for underline. If there is a local (paragraph
attribute) override indicating for underline to be off again, this overrides the
paragraph style for underline. If the current character style being used turns
underline back on, this overrides the paragraph override. Finally, if there is a
local character override of turning underline off, this overrides the setting
defined by the character style.
The story in figure 13.3.9.c is maintained using kTextStoryBoss. This boss
provides a reference to each of the strand bosses, and facilities for manipulating
the model. This is described in more detail in the practical section below.
13.3.10. Text attributes
A text attribute (see interface IAttrReport) describes a single text property.
Attributes define all aspects of how the text should appear when composed.
Text attributes can apply either to a range of characters (such as the colour or
point size of characters) or to a paragraph (such as paragraph alignment or the
drop-cap being applied). Paragraph attributes are applied to the paragraph
Adobe InDesign Programming Guide
13.3. Key concepts
407
strand and character attributes are applied to the character attribute strand.
For a list of many of the currently supported attributes see figure 13.3.11.a.
Figure 13.3.10.a shows two text attribute bosses. The kTextAttrPointSizeBoss
is an example of a boss that represents a character attribute, while the
kTextAttrAlignBodyBoss represents a paragraph attribute.
figure 13.3.10.a. Text attribute boss classes
kTextAttrPointSizeBoss
kTextAttrAlignBodyBoss
ITextAttrRealNumber
IAttrReport
IAttrImportExport
ITextAttrAlign
IAttrReport
IAttrImportExport
Attributes are implemented as boss classes that support the IAttrReport
interface. This interface describes the attribute to the application. It also has the
ability to describe their value in text (see AppendDescription() of IAttrReport),
so the attribute for the middle run in the character attribute strand (figure
13.3.9.c) which sets the text to bold, describes itself as “+bold”.
Not all attributes have this behaviour; there are a number defined to be internal
to the application and are never represented to the user through the UI. They
have no need to describe themselves (for example attributes defined by the
composition mechanisms to control the scaling of hyphens).
The role of composing text so that it gets drawn as described by its text
attributes is the job of a paragraph composer (see the "Text Composition"
chapter).
You can add your own custom text attributes. For details on how to do this see
the "Text Attributes and Adornments" chapter. However you should be aware
that Adobe’s paragraph composers will be ignorant of your custom text
attribute. It will therefore not affect where lines are broken or characters are
positioned unless you implement a custom paragraph composer aswell.
13.3.11. Text attribute catalogue
Figure 13.3.11.a shows the main text attributes used in the application. The
example setting given is that for the root style. The type of attribute details
whether the attribute is a character or paragraph attribute. There are other
408
13.3. Key concepts
The Text Model
attributes within the application, however these are intended for internal use
for the composition subsystem so we do not describe them here.
figure 13.3.11.a. Text attribute catalogue
Class Name
Example Setting
Type
Description
kTextAttrColorBoss
kTextAttrFontStyleBoss
+ color: [Black]
+ Regular
Char
Char
kTextAttrPointSizeBoss
kTextAttrXGlyphScaleBoss
+ size: 12 pt
+ char width: 100%
Char
Char
kTextAttrPairKernMethodBoss
+ pair kern method:
Metrics
+ ligatures
current
Char
+ stroke: 1 pt
+ tracking: 0
Char
Char
kTextAttrBLShiftBoss
+ not shifted
Char
kTextAttrCapitalModeBoss
kTextAttrStrokeColorBoss
kTextAttrPairKernBoss
- caps
+ stroke color: [None]
+ pair kern: auto
Char
Char
Char
kTextAttrYGlyphScaleBoss
+ char height: 100%
Char
kTextAttrLeadBoss
kTextAttrLanguageBoss
Char
Char
kTextAttrNoBreakBoss
+ leading: auto
+ language: English:
USA
- no break
kTextAttrUnderlineBoss
kTextAttrFontUIDBoss
kTextAttrOldStyleFiguresBoss
kTextAttrILGShiftBoss
kTextAttrPositionModeBoss
- underline
+ font: Times
- old style figures
(null)
+ position: normal
Char
Char
Char
Char
Char
kTextAttrStrikethruBoss
kTextAttrCharacterHangBoss
kTextAttrAlternateCharBoss
kTextAttrStrokeTintBoss
kTextAttrTintBoss
kTextAttrStrokeOverprintBoss
kTextAttrOverprintBoss
kTextAttrStrokeGradAngleBoss
- strikethrough
+ alt: 0%
+ stroke tint: 100%
+ tint: 100%
- stroke overprint
- overprint
+ stroke gradient angle:
0°
+ gradient angle: 0°
Char
Char
Char
Char
Char
Char
Char
Char
Whether line breaks are allowed over
the range of the attribute or not
Underline on or not
Font being used
Determines if old style figures are used
TBD
Position of text (subscript, superscript,
normal)
Strikethrough on or off
Hanging punctuation?
TBD
Stroke tint
Character tint
Overprint character stroke or not
Overprint character fill or not
Stroke gradient angle
Char
gradient angle
kTextAttrLigaturesBoss
0x1b09 (null)
kTextAttrPageNumberTypeBoss
kTextAttrOutlineBoss
kTextAttrTrackKernBoss
kTextAttrGradAngleBoss
Char
Char
Char
The Colour applied to text
The face given to text (I.e. bold, regular
etc)
The point size of text
The scale of the glyph (width) as a
percentage
Method of kerning, optical, metrics or
none
Use ligatures or not
Defines the style of page number
Defines the stroke of the text
Defines the value of the tracking/
kerning of the text
Indicates whether there is a baseline
shift or not
Defines whether caps mode is on or not
Defines the stroke colour for text
Defines the type of kerning used
(automatic or manual)
The scale of the glyph (height) as a
percentage
Autoleading mode
Language currently being used
Adobe InDesign Programming Guide
13.3. Key concepts
409
figure 13.3.11.a. Text attribute catalogue
Class Name
Example Setting
kTextAttrStrokeGradLengthBoss
Type
Description
+ stroke gradient
length: -1 pt
kTextAttrGradLengthBoss
+ gradient length: -1 pt
kTextAttrStrokeGradCenterBoss (null)
kTextAttrGradCenterBoss
(null)
kTextAttrSkewAngleBoss
+ skew angle: 0°
kTextAttrSpecialGlyphBoss
+ special glyph
kTextAttrHiliteAngleBoss
+ highlight angle: 0°
kTextAttrHiliteLengthBoss
+ highlight length: 1 pt
kTextAttrStrokeHiliteAngleBoss
+ stroke highlight
angle: 0°
kTextAttrStrokeHiliteLengthBoss + stroke highlight
length: 1 pt
kTextAttrRotateGlyphBoss
+ rotate glyph
kTextAttrStrikeoutBoss
+ strikeout
kTextAttrGotoNextXBoss
(null)
kTextAttrAlignLastBoss
+ last: flush left
Char
stroke gradient length
Char
Char
Char
Char
Char
Char
Char
Char
gradient length
Stroke gradient center
Gradient center
Skew angle
TBD
Highlight angle
Highlight length
Stroke highlight angle
Char
Stroke highlight length
Char
Char
Char
Para
kTextAttrAlignBodyBoss
+ body: flush left
Para
kTextAttrComposerBoss
kTextAttrDropCapLinesBoss
+ composer: Adobe
Para
Multi-line Composer
+ drop cap characters: Para
0
+ drop cap lines: 0
Para
kTextAttrBaselineGridBoss
- align to grid
Para
kTextAttrHyphenLadderBoss
+ consecutive hyphens:
2
+ left indent: 0p0
+ right indent: 0p0
+ first indent: 0p0
+ autoleading: 120%
- auto quad:
+ hyphenation
+ min before: 3
Para
Rotate glyph or not
Strikeout value
Next style to goto on return
The alignment of the last line of a
paragraph (center, right, left, justified)
The alignment of all bar the last line of a
paragraph (center, right, left, justified)
Specifies which composer to use for the
composition of text
Indicates the number of characters
affected by a drop cap
Indicates the number of lines a drop cap
will extend by
Defines whether the text is aligned to a
baseline grid or not
Sets hyphen limit
kTextAttrDropCapCharsBoss
kTextAttrIndentBLBoss
kTextAttrIndentBRBoss
kTextAttrIndent1LBoss
kTextAttrAutoLeadBoss
kTextAttrAutoQuadBoss
kTextAttrHyphenModeBoss
kTextAttrMinBeforeBoss
kTextAttrMinAfterBoss
kTextAttrHyphenCapBoss
kTextAttrShortestWordBoss
kTextAttrHyphenZoneBoss
Para
Para
Para
Para
Para
Para
Para
kTextAttrSpaceBeforeBoss
+ min after: 3
Para
+ hyphenate capitalized Para
+ shortest word: 7
Para
+ hyphenation zone:
Para
3p0
+ space before: 0p0
Para
kTextAttrSpaceAfterBoss
+ space after: 0p0
Para
Amount of left indent
Amount of right indent
Indent applied to the first line
Setting for autoleading
TBD
Hyphenation on or off
Minimum characters to hyphenate
before
Minimum characters to hyphenate after
Hyphenate capitalised words or not
Minimum word length to hyphenate
Size of the hyphenation zone
Vertical space before the paragraph
starts
Vertical space after the paragraph ends
410
13.3. Key concepts
The Text Model
figure 13.3.11.a. Text attribute catalogue
Class Name
kTextAttrTabsBoss
kTextAttrWordspaceDesBoss
kTextAttrWordspaceMaxBoss
kTextAttrWordspaceMinBoss
kTextAttrLetterspaceDesBoss
Example Setting
+ tabs: none
+ desired wordspace:
100%
+ max. wordspace:
133%
+ min. wordspace: 80%
Type
Para
Para
Para
Para
kTextAttrLetterspaceMaxBoss
+ desired letterspace: Para
0%
+ max. letterspace: 0% Para
kTextAttrLetterspaceMinBoss
+ min. letterspace: 0%
Para
kTextAttrGlyphscaleDesBoss
+ desired glyph scaling:
100%
+ max. glyph scaling:
100%
+ min. glyph scaling:
100%
- start anywhere
Para
Para
kTextAttrKeepWithNextBoss
kTextAttrKeepFirstNLinesBoss
+ keep at start/end of
paragraph
+ keep next: 0
+ keep first: 2
kTextAttrKeepLastNLinesBoss
+ keep last: 2
Para
kTextAttrKeepLinesBoss
- keep lines
Para
kTextAttrPRAColorBoss
+ rule above color: (Text Para
Color)
+ rule above stroke: 1 pt Para
+ rule above tint: -1% Para
+ rule above offset: 0p0 Para
+ rule above left indent: Para
0p0
+ rule above right
Para
indent: 0p0
+ column width rule
Para
above
+ rule below color: (Text Para
Color)
+ rule below stroke: 1 pt Para
+ rule below tint: -1% Para
+ rule below offset: 0p0 Para
kTextAttrGlyphscaleMaxBoss
kTextAttrGlyphscaleMinBoss
kTextAttrBreakBeforeBoss
kTextAttrKeepTogetherBoss
kTextAttrPRAStrokeBoss
kTextAttrPRATintBoss
kTextAttrPRAOffsetBoss
kTextAttrPRAIndentLBoss
kTextAttrPRAIndentRBoss
kTextAttrPRAModeBoss
kTextAttrPRBColorBoss
kTextAttrPRBStrokeBoss
kTextAttrPRBTintBoss
kTextAttrPRBOffsetBoss
Para
Para
Para
Para
Para
Description
Control of tabs
Determines the desired wordspace to
use
Determines the maximum wordspace
to use
Determines the minimum wordspace to
use
Determines the desired letterspace to
use
Determines the maximum letterspace
to use
Determines the minimum letterspace to
use
Specifies the desired glyph scaling to
use
Specifies the maximum glyph scaling to
use
Specifies the minimum glyph scaling to
use
Defines where to start the paragraph,
e.g. next column, frame page etc.
Whether lines should be kept together
or not
How many lines to keep together
Lines at start of paragraph to be kept
together
Lines at end of paragraph to be kept
together
Defines wether all lines of the
paragraph are kept together
Paragraph rule above color
Paragraph rule above stroke weight
Paragraph rule above tint
Paragraph rule above offset
Paragraph rule above left indent
Paragraph rule above right indent
Paragraph rule above mode boss
(column or text)
Paragraph rule below color
Paragraph rule below stroke weight
Paragraph rule below tint
Paragraph rule below offset
Adobe InDesign Programming Guide
13.3. Key concepts
411
figure 13.3.11.a. Text attribute catalogue
Class Name
kTextAttrPRBIndentLBoss
Example Setting
Type
Description
Para
Paragraph rule below left indent
Para
Paragraph rule below right indent
Para
kTextAttrPRAOverprintBoss
+ rule below left indent:
0p0
+ rule below right
indent: 0p0
+ column width rule
below
- rule above overprint
kTextAttrPRBOverprintBoss
- rule below overprint
Para
kTextAttrPRARuleOnBoss
kTextAttrPRBRuleOnBoss
0x1b6b (null)
kTextAttrAlignSingleBoss
- rule above
Para
- rule below
Para
+ single: force-justified Para
Paragraph rule below mode boss
(column or text)
Paragraph rule above overprint stroke
or not
Paragraph rule below overprint stroke
or not
Paragraph rule above on or not
Paragraph rule below on or not
TBD
kTextAttrPRBIndentRBoss
kTextAttrPRBModeBoss
Para
13.3.12. AttributeBossList
An AttributeBossList is a persistent container for text attributes (you can
consider them as a list of attribute ClassIDs) . An AttributeBossList is either
referenced from a style (each style references a list of attributes that the style
applies), or can exist within paragraph or character attribute strands directly
(providing a list of local overrides).
An
references attributes by ClassID. This implies that an
AttributeBossList can have at most one association with a particular attribute
(for example kTextAttrPointSizeBoss), and hence one attribute value of that
type (for example a point size of 12 points).
AttributeBossList
Attributes can exist within the AttributeBossList that corresponds to a
specific run on the paragraph or character attribute strand. Attributes that exist
here are termed local attribute overrides. However, they are more often found
within the AttributeBossList that corresponds to a specific style.
13.3.13. Text styles
This section introduces the text style concepts you need to know to understand
the text model. The "Working with Text Styles" chapter describes the practical
aspects of programming text styles. As you are reading this section, you might
find it useful to flip forward to the practical chapter for concrete examples of
the styles API.
412
13.3. Key concepts
The Text Model
A style (see boss class kStyleBoss) is a collection of text attributes that are
collectively applied to some text. The application supports paragraph styles
and character styles, paragraph styles contain both paragraph and character
attributes, while character styles only contain character attributes. All elements
of formatting required for text can be described by a paragraph style. By
default, all text has the root paragraph style applied to it. This is a hard coded
style, with the full set of text attributes required for composition, each set to
some predefined value. Paragraph styles apply to ranges of characters at the
granularity of individual paragraphs.
There is also a root character style applied to text as the default. Character
styles apply to ranges of characters at the granularity of individual characters.
The root character style has no attributes associated with it. This indicates that
composition should use the set of attributes defined by the current paragraph
style (along with any local overrides) to fully describe the appearance of text.
The user can define their own styles, but they must be based on the root styles
and only the difference from these root styles is recorded.
Paragraph styles can only be applied to complete paragraphs. Character styles
contain only character attributes and may be applied to any range of characters.
Figure 13.3.13.a shows a simple set of styles.
figure 13.3.13.a. Generating new styles
kStyleBoss
root paragraph style
All attributes contained here
kStyleBoss
root character style
No attributes contained here
attributes of the current paragraph
style are used as a base
based on
based on
pStyle 1
pStyle 2
cStyle 1
cStyle 2
+underline
+size: 24pt
+underline
-underline
kStyleBoss
kStyleBoss
kStyleBoss
kStyleBoss
There are both character and paragraph root styles. The root paragraph style
contains every attribute required to describe composition. The styles that are
Adobe InDesign Programming Guide
13.3. Key concepts
413
based on this root (pStyle1 and pStyle2) record only how they differ from it.
pStyle1 turns underline on, and pStyle2 sets the point size of text to 24.
The root character style contains no formatting information. It exists to
provide a root for a hierarchy of character styles. There are two character styles
defined here (cStyle1 and cStyle2). These styles indicate how the formatting
should differ from the current set of styles that are being applied (as the parent
of these styles is root, we are only really concerned with the current paragraph
style being applied).
We can expand figure 13.3.9.c to give a more complete picture of the formatting
that applies to text. Figure 13.3.13.b shows how the information on the
attribute strands relate to the style and attribute bosses that maintain the
formatting information. Each attribute strand run maintains a reference to the
style applicable. Each style maintains a reference to the style it is based on. As
well as the character style information, the character attribute strand maintains
a reference to the kTextAttrFontStyleBoss that provides the local override that
sets the text to bold. We have also shown the existence of the attribute bosses
that each of the two derived styles use. Although each attribute is shown
individually within the styles and strands, they exist as part of an
AttributeBossList.
414
13.3. Key concepts
The Text Model
figure 13.3.13.b. Styles and text attribute boss classes
Story
length = 17
0
kTextDataStrandBoss
1
A l
2
3
4
5
i e n s
kParaAttrStrandBoss
6
7
8
9
10
a n d
Start: 0
End: 16
UID: pStyle
11
12
13
14
15
16
E a r t h #
Overrides: + last: centered + body: centered
kCharAttrStrandBoss
Start: 0
End: 6
UID: root
Start: 7
End: 9
UID: root
Start: 10
End: 16
UID: cStyle
Overrides: None
Overrides: +bold
Overrides: None
kTextAttrFontStyleBoss
+bold
kStyleBoss
name: root
based on: none
AttributeBossList
always empty
kStyleBoss
name: cStyle
kTextAttrAlignBodyBoss
kTextAttrAlignLastBoss
+ body: centered
+ last: centered
based on: root
AttributeBossList
kTextAttrUnderlineBoss
+underline
kStyleBoss
name: root
based on: none
AttributeBossList
all attributes
described here
kTextAttrPointSizeBoss
kStyleBoss
name: pStyle
based on: root
AttributeBossList
+size: 24 pt
Within each workspace (either the global workspace or document workspaces)
there exists a nametable (see interface IStyleNameTable) for both the paragraph
and character styles. These nametables provide easy and convenient access to all
styles within the application. An example of this is shown in figure 13.3.13.c.
Adobe InDesign Programming Guide
13.3. Key concepts
415
figure 13.3.13.c. Style name tables (style sheets)
kWorkspaceBoss/kDocWorkspaceBoss
IID_IPARASTYLENAMETABLE
IStyleNameTable
kStyleBoss
root paragraph style
All attributes contained here
root
pStyle1
kStyleBoss
pStyle 1
pStyle2
+underline
kStyleBoss
pStyle 2
+size: 24pt
IID_ICHARSTYLENAMETABLE
IStyleNameTable
root
cStyle1
cStyle2
kStyleBoss
root character style
No attributes contained here
attributes of the current paragraph
are used as a base
kStyleBoss
cStyle 1
+underline
kStyleBoss
cStyle 2
-underline
13.3.14. Text formatting overview
Text attributes give us the basic building block for maintaining formatting
information for text. Each attribute describes a particular aspect of text. Some
attributes are designed to operate on individual paragraphs (for example, those
controlling justification) while others are designed for use over specific ranges
of text (for example the kTextAttrPointSizeBoss which controls the point size
of text).
Text attribute bosses are unlikely to be found on their own, they exist in
AttrributeBossLists which provide persistence. The AttributeBossList is the
collection class used for attributes.
All text has both a paragraph and character style associated with it. Unless
otherwise specified, these styles will be the roots maintained within the
application. The root paragraph style defines all the formatting information
416
13.3. Key concepts
The Text Model
required to drive composition. Character styles operate over ranges of
characters, paragraph styles operate over ranges of paragraphs. Character styles
can only contain character attributes, while paragraph styles can contain both
paragraph and character attributes.
Note that a story also provides a helper interface, ITextReferences, that lets
you ascertain the styles, colors and fonts it uses without having to delve into the
text model.
13.3.15. Owned items
Owned items (see interface IOwnedItem) allow objects to be associated with a
character in the text model. Owned items are held on the owned item strand
(kOwnedItemStrandBoss) and are referenced by UID via its IItemStrand
interface. The in-line frame, table, hyperlink and index features all create and
associate owned items.
For example when an in-line frame (kInlineBoss) is embedded in the text flow
it behaves as if it were a single character of text and moves along with the flow
when the text is recomposed. The character
kTextChar_ObjectReplacementCharacter in inserted into the text data strand to
anchor the owned item in the flow. Similarly table frames (kTableFrameBoss)
are owned items that are anchored on a kTextChar_Table character.
Some features insert a special character in the text to anchor the owned item
on. Others associate the owned item with an existing character. Examples of the
approach used by some features is shown in figure 13.3.15.a. Note that when a
special character is inserted that character must have significant meaning to the
paragraph composer.
figure 13.3.15.a. Types of owned items and their use of special anchor characters
Owned Item
Boss Class
Special characters
Inline
kInlineBoss
kTextChar_ObjectReplacementCharacter
Table
kTableFrameBoss
kTextChar_Table
Hyperlink
kHyperlinkTextMarkerBoss
kHyperlinkTextSourceEndMarkerBoss
None (uses the first and last characters of the
hyperlink)
Index
kIndexPageEntryBoss
kTextChar_ZeroSpaceNoBreak
Adobe InDesign Programming Guide
13.3. Key concepts
417
13.3.16. Story thread dictionaries
Story threads were introduced on page 399. In this section we will examine
how they are organised in a little more detail for those interested in developing
a custom feature that, like tables and notes (InCopy), embeds text inside a story
using story threads. A complete description of how this is done is beyond the
scope of this chapter.
To implement a feature that embeds text in a story using a custom story thread
you need to provide boss classes that implement interfaces
IITextStoryThreadDict and ITextStoryThread. To allow your embedded text
to be anchored on a character in the text model you must also implement
interfaces IOwnedItem and ITextModelMemento. You will also need to implement
commands that manage your boss classes and insert story threads into the text
model.
Story threads are managed by a persistent (UID based) boss class that aggregates
a story thread dictionary (see interface ITextStoryThreadDict). Currently
dictionary implementations are provided by stories (kTextStoryBoss),
tables(kTableModelBoss) and notes(kNoteDataBoss/InCopy). You may wish to
study the organisation of these boss classes. The interface
ITextStoryThreadDictHier aggregated on a story (kTextStoryBoss) is a
collection of all the dictionaries embedded in the story. A story has a story
thread dictionary for the primary story thread, a dictionary per table and a
dictionary per other feature that embeds story threads.
The story thread (ITextStoryThread) implementation can be aggregated on a
boss class that is not persistent. This is possible because text flow it represents is
kept persistently by the text model and because the dictionary that manages the
story threads is persistent.
Dictionaries can be anchored into the text model or not. For example the
primary story thread dictionary is not anchored but the dictionary for a table is
anchored. An anchor is created by associating an owned item at a text index.
Anchored dictionaries can interact with copy and paste thus allowing the text
represented by the dictionary to be copied and pasted.
All the story threads managed by a dictionary must be stored contiguously in
the text model. This is known as the dictionary's thread block. The location of
this thread block must be consistent with the hierarchical location of where the
418
13.3. Key concepts
The Text Model
dictionary is anchored. For example, if you insert a table, the embedded table’s
thread block will follow the thread block in which the table has been anchored.
ITextStoryThreadDictHier on the story (kTextStoryBoss) is used to determine
what the dictionary next to the one being inserted is. You determine where your
thread block should go by inserting it at the beginning of the next dictionary's
thread block or at the end of the story (ITextModel::TotalLength) if there is no
next dictionary.
The story has a dictionary (ITextStoryThreadDict) that describes the primary
story thread. Its thread block starts at a text index of zero and spans to
ITextModel:GetPrimaryStoryThreadSpan-1.
To explore the arrangement of thread blocks in more detail we will look at an
example relating to tables.
Figure 13.3.16.a shows a text frame containing the text "abc" and three
embedded tables. A table (labelled Table 1) with two cells lies between the "a"
and the "b" character. A second table (labelled Table 2) also with two cells lies
between the "b" and the "c" character. A third table (labelled Table3) containing
a single cell has been embedded in the lower cell in Table 1. A diagram showing
how this arrangement is represented in the underlying text model is shown
below the frame. The frame and table cell background color has been color
coded to indicate the story thread in the underlying text model that stores the
text.
Adobe InDesign Programming Guide
13.3. Key concepts
419
figure 13.3.16.a. Sample text frame with three tables
4EXTFRAME
A
4ABLE
4ABLE
D
H
4ABLE
E
B
F
G
C
4EXT-ODEL2EPRESENTATION
4EXT K4EXT$ATA3TRAND"OSS
)NDEX )4EXT3TRAND
A
K4EXT#HAR?4ABLE
K4EXT#HAR?4ABLE#ONTINUED
B
K4EXT#HAR?4ABLE
K4EXT#HAR?4ABLE#ONTINUED
C
K4EXT#HAR?#2
D
K4EXT#HAR?4ABLE
K4EXT#HAR?#2
E
K4EXT#HAR?#2
H
K4EXT#HAR?#2
F
K4EXT#HAR?#2
G
K4EXT#HAR?#2
K3TORY4HREAD3TRAND"OSS
)3TRAND
0RIMARYSTORYTHREAD
STORYTHREAD;=
4ABLECELL
STORYTHREAD;=
4ABLECELL
STORYTHREAD;=
4ABLECELL
STORYTHREAD;=
4ABLECELL
STORYTHREAD;=
4ABLECELL
STORYTHREAD;=
K/WNED)TEM3TRAND"OSS
))TEM3TRAND
K)NVALID5)$
5)$XK4ABLE&RAME"OSS
K)NVALID5)$
K)NVALID5)$
5)$XAK4ABLE&RAME"OSS
K)NVALID5)$
K)NVALID5)$
K)NVALID5)$
K)NVALID5)$
5)$XCK4ABLE&RAME"OSS
K)NVALID5)$
K)NVALID5)$
K)NVALID5)$
K)NVALID5)$
K)NVALID5)$
K)NVALID5)$
K)NVALID5)$
K)NVALID5)$
K)NVALID5)$
)4EXT-ODEL4OTAL,ENGTH
)4EXT-ODEL'ET0RIMARY3TORY4HREAD3PAN
Figure 13.3.16.b shows the organisation of the dictionary thread blocks for the
sample introduced in figure 13.3.16.a. There is a dictionary
(ITextStoryThreadDict) maintained by the story (kTextStoryBoss) for the
primary story thread. There is a dictionary maintained by each table
(kTableModelBoss) for the story threads that represent each cell’s text. The
diagram shows the thread block for the primary story thread and the thread
420
13.3. Key concepts
The Text Model
block for each of the three tables, giving four thread blocks in total. Notice that
because table 3 is embedded inside table1 its thread block follows table 1’s. The
collection of all dictionaries embedded in the story is managed by
ITextStoryThreadDictHier on kTextStoryBoss. The frame and table cell
background color has been color coded to indicate the dictionary and thread
block with which the characters are associated.
figure 13.3.16.b. Dictionary thread block organisation for sample text frame with three tables
4EXTFRAME
4ABLE
4ABLE
A
D
H
4ABLE
E
B
F
G
C
4EXT-ODEL2EPRESENTATION
4EXT K4EXT$ATA3TRAND"OSS
)NDEX )4EXT3TRAND
A
K4EXT#HAR?4ABLE
K4EXT#HAR?4ABLE#ONTINUED
B
K4EXT#HAR?4ABLE
K4EXT#HAR?4ABLE#ONTINUED
C
K4EXT#HAR?#2
D
K4EXT#HAR?4ABLE
K4EXT#HAR?#2
E
K4EXT#HAR?#2
H
K4EXT#HAR?#2
F
K4EXT#HAR?#2
G
K4EXT#HAR?#2
K3TORY4HREAD3TRAND"OSS
)3TRAND
0RIMARYSTORYTHREAD
STORYTHREAD;=
4ABLECELL
STORYTHREAD;=
4ABLECELL
STORYTHREAD;=
4ABLECELL
STORYTHREAD;=
4ABLECELL
STORYTHREAD;=
4ABLECELL
STORYTHREAD;=
K/WNED)TEM3TRAND"OSS
)/WNED)TEMS
K)NVALID5)$
5)$XK4ABLE&RAME"OSS
K)NVALID5)$
K)NVALID5)$
5)$XAK4ABLE&RAME"OSS
K)NVALID5)$
K)NVALID5)$
K)NVALID5)$
K)NVALID5)$
5)$XCK4ABLE&RAME"OSS
K)NVALID5)$
K)NVALID5)$
K)NVALID5)$
K)NVALID5)$
K)NVALID5)$
K)NVALID5)$
K)NVALID5)$
K)NVALID5)$
K)NVALID5)$
K4EXT3TORY"OSS
)4EXT3TORY4HREAD$ICT(IER
4HREAD"LOCK;=
)4EXT3TORY4HREAD$ICT
K4EXT3TORY"OSS
)4EXT3TORY4HREAD$ICT
K4ABLE-ODEL"OSS
)4EXT3TORY4HREAD$ICT
K4ABLE-ODEL"OSS
)4EXT3TORY4HREAD$ICT
K4ABLE-ODEL"OSS
4HREAD"LOCK;=
4HREAD"LOCK;=
4HREAD"LOCK;=
4HETHREADBLOCKFORANEMBEDDEDTABLEFOLLOWS
THETHREADBLOCKINWHICHTHETABLEISEMBEDDED
13.3.17. Text focus
The application supports the notion of a text focus. This is an abstraction that
represents a range of text in a story by the boss class kTextFocusBoss. There are
two different types of text focus, range and caret.
A range focus encompasses one or more of the characters in a story, up to the
maximum of the length of the story. The range focus has a start, end and
Adobe InDesign Programming Guide
13.3. Key concepts
421
length. This focus can contain many different sets of formatting information as
the style of the text changes across the range of the focus.
A caret focus is based on an insertion point only. You can view this type of
focus as a subset of the range focus, it has a length of 0, the start is equal to the
end and there is only one set of formatting information that applies.
13.3.18. Text selection
You get a handle on the current text caret or selected text range through the
selection abstraction. InDesign 2.x introduced major changes to selection.
Prior to InDesign 2.x the ISelection and ISpecifier interfaces were used to
interact with selection. InDesign 2.x introduced a new layer known as suites.
Suites decouple user interface code from knowledge of the underlying data
model being manipulated. So instead of using the ISelection and ISpecifier
to accessing the underlying text model, the user interface code uses a suite
interface such as ITextAttributeSuite and ITextEditSuite.
The ISelection and ISpecifier interfaces remain available under InDesign 2.x
and you can continue to use them. Code like that shown in figure 13.3.18.a still
works. However you should be aware that this will change in the future. If you
need to manipulate text from your user interface it is best to wrap your features
in a custom suite. Please read Technical Note #10006 "InDesign 2.0 Selection
Architecture" for more information.
figure 13.3.18.a. Discovering the text model from ISelection
// The ISelection and ISpecifier interfaces remain available under InDesign 2.x
// and you can continue to use them for now. However you should be aware that
// this will change in the future.
InterfacePtr<ISelection>
if(selection==nil) {
return;
}
InterfacePtr<ISpecifier>
if(specifier==nil) {
return;
}
InterfacePtr<ITextFocus>
if(textFocus==nil) {
return;
}
InterfacePtr<ITextModel>
selection(::QuerySelection());
specifier(selection->QuerySpecifier());
textFocus(specifier, UseDefaultIID());
textModel(textFocus->QueryModel());
422
13.3. Key concepts
The Text Model
13.3.19. Virtual Object Store (VOS)
This section discusses the lower level mechanisms used to store text objects.
This is provided for information only, we strongly discourage developers from
using these mechanisms directly.
The text architecture stores and manages text differently from the normal
mechanisms used with InDesign objects. Due to the large number of objects
involved (characters and attributes), and the demands these objects would
place on memory, the text model uses a virtual object store - an abstract layer
that provides a virtual memory paging scheme to the text storage subsystem.
The virtual object store maintains a strand as a list of VOS “disk page” objects
(kVOSDiskPageBoss). Each of these disk page objects store a list of VOSObjects abstract data classes that represent a single block of data - this is likely to be a
run.
Figure 13.3.19.a shows an example of the VOS abstraction. A strand will
maintain VOSObjects of only one type. Each VOSObject has a virtual length that
indicates the number of characters the VOS object represents (so the
summation of virtual lengths of all VOS objects will equal the number of
characters held in a particular story). As with most virtual memory systems,
there is a cache abstraction that maintains a view onto the memory sub-system,
This is used with a VOSCursor abstraction that provides fast, convenient,
sequential access to the objects maintained within the VOS structure.
The strand (which by its very definition is sequential) is maintained in a nonsequential manner allowing efficiency when manipulating the strand. Imagine
what happens when updates are made near the beginning of a strand. There is a
rippling effect, as these updates cause the elements through to the end of the
strand to be disturbed. By implementing the strand in the manner shown,
individual groups of data can be decoupled with the time taken to update the
strand being more or less constant over the length of the strand. The VOSCursor
abstraction translates this structure back into a sequential form. It provides the
ability to iterate through the structure and perform certain operations on it.
Developers should not attempt to use the VOS subsystem directly. We provide
higher level abstractions that allow the management and manipulation of the
strand content.
Adobe InDesign Programming Guide
13.4. Interfaces
423
The Vos_SavedData abstraction is a utility class that provides a buffering
mechanism for the basic VOS objects. It is frequently used for copy and paste
operations.
figure 13.3.19.a. VOS structure
VOS Disk
Page
VOS Disk
Page
VOS Disk
Page
VOS
Object
VOS
Object
VOS
Object
VOS
Object
VOS
Object
nil
VOS
Object
nil
nil
VOS
Object
nil
13.4. Interfaces
13.4.1. Class Diagram
The major boss classes in the text model and their relationships are shown in
figure 13.4.1.a. Documents have stories (kTextStoryBoss). Stories have strands
that describe different aspects of text. Attribute strands have styles
(kStyleBoss) associated with them that describe the formatting context to be
applied to the text. The owned item strand associates owned items that
represent an object associated with a character in the text model. Ranges of text
in the text model can be represented by a text focus (kTextFocusBoss).
424
13.4. Interfaces
The Text Model
figure 13.4.1.a. Text model class diagram
kDocBoss
IStoryList
kTextFocusBoss
UIDRef GetNthStoryUID()
ITextFocus
IFocusCache
kTextStoryBoss
ITextFocus *QueryNthFocus( int32 nAt )
ITextFocusManager
ITextStoryThread
IStoryThreadDict
IStoryThreadDictHier
ITextModel
IPMUnknown* QueryStrand(ClassID clsID, PMIID faceID)
kTextDataStrandBoss
IStrand
ITextStrand
kStoryThreadStrandBoss
IStrand
kParaAttrStrandBoss
kStyleBoss
kStyleBoss
IStyleInfo
UID GetStyleUID
ITextAttributes
kStyleBoss
IStyleInfo
ITextAttributes
IStyleInfo
ITextAttributes
UID GetStyleUID
kTableFrameBoss
Other owned
item boss
IStyleInfo
ITextAttributes
kInlineBoss
IStyleInfo
ITextAttributes
IOwnedItem
IStrand
IAttributeStrand
kCharAttrStrandBoss
IStrand
IAttributeStrand
kOwnedItemStrandBoss
IStrand
IItemStrand
UID GetNthOwnedUID
Adobe InDesign Programming Guide
13.4. Interfaces
425
13.4.2. IStoryList
kDocBoss . . . . . . . . . . . . . . . . . . . . . . . . . IStoryList
The stories contained in a document are listed in interface IStoryList.
13.4.3. ITextModel
kTextStoryBoss . . . . . . . . . . . . . . . . . . . . . . ITextModel
ITextModel is the primary interface for manipulating the content of a story. It is
used to generate commands that insert characters, delete characters, replace
characters, apply text attributes to characters and to navigate to the underlying
strands.
The methods that return the number of characters in the story and the number
of characters in the primary story thread are shown in figure 13.4.3.a.
figure 13.4.3.a. ITextModel methods that return the number of characters stored
// Returns the total number of characters in the text model
// (including any characters in embedded tables or other features that embed text).
virtual int32 TotalLength() const = 0;
// Returns the total number of characters in the primary story thread.
// (excluding characters in embedded tables or other features that embed text).
virtual int32 GetPrimaryStoryThreadSpan() const = 0;
ITextModel provides convenient methods for a finding the associated frame list
as shown in figure 13.4.3.b.
figure 13.4.3.b. ITextModel methods that navigate to the asociated frame list
virtual UID GetFrameListUID() const = 0;
virtual IFrameList * QueryFrameList() const = 0;
ITextModel supports the generation of commands that perform common tasks.
The methods that perform this are listed in figure 13.4.3.c. Each of these
methods, when called with the appropriate data, builds a command that will,
when executed, update the text model.
figure 13.4.3.c. ITextModel methods that generate commands for common tasks
virtual ICommand* InsertCmd(TextIndex position, WideString* data,
bool16 copyData, const ILanguage *language = nil ) = 0;
virtual ICommand* DeleteCmd(TextIndex start, int32 length) = 0;
virtual ICommand* ReplaceCmd(TextIndex start,
426
13.4. Interfaces
The Text Model
int32 length,
WideString *insert,
bool16 copyData,
const ILanguage *language = nil,
bool16 clearNonContinuingAttrs = kTrue) = 0;
virtual ICommand* ApplyCmd(TextIndex start, int32 length,
const AttributeBossList *list, ClassID whichStrand) = 0;
virtual ICommand* ApplyCmd( const RangeData& range,
const AttributeBossList *list, ClassID whichStrand) = 0;
virtual ICommand* ApplyStyleCmd(TextIndex start, int32 length,
UID stylerefid, ClassID whichStrand,
bool16 replaceOverrides = kTrue) = 0;
virtual ICommand* UnapplyStyleCmd(TextIndex start, int32 length,
ClassID whichStrand) = 0;
virtual ICommand* ClearOverridesCmd(TextIndex start, int32 length,
const AttributeBossList *these, ClassID whichStrand) = 0;
Figure 13.4.3.d shows the methods provided for strand navigation and figure
13.4.3.e shows how to use these to get to the paragraph attribute strand.
figure 13.4.3.d. ITextModel methods that navigate to strands
virtual UID GetStrandFromClass(ClassID klass) = 0;
virtual IPMUnknown *QueryStrand(ClassID clsID, PMIID faceID) = 0;
virtual IPMUnknown *QueryNthStrand(int32 n, PMIID faceID) = 0;
figure 13.4.3.e. Navigating to the paragraph attribute strand
InterfacePtr<IAttributeStrand> iAttributeStrand ((iTextModel>QueryStrand(kParaAttrStrandBoss, IID_IATTRIBUTESTRAND)));
13.4.4. ITextStoryThread
kTextStoryBoss . . . . . . . . . . . . . . . . . . . . ITextStoryThread
kTextCellContentBoss . . . . . . . . . . . . . . . . . ITextStoryThread
kNoteDataBoss . . . . . . . . . . . . . . . . . . . . ITextStoryThread
represents a flow of text content. The interface provides
access to the range of text in the text model that holds the actual text. It also
links to the list of parcels (IParcelList) in which the text is displayed and to the
dictionary (ITextStoryThreadDict) that manages the story thread.
ITextStoryThread
The text model method ITextModel::QueryStoryThread is a helper method
that returns the story thread associated with any index in the text
model(TextIndex). Under the hood this method uses runs on the story thread
strand kStoryThreadStrandBoss to locate the range of text in the story thread.
Adobe InDesign Programming Guide
13.4. Interfaces
427
13.4.5. ITextStoryThreadDict
kTextStoryBoss . . . . . . . . . . . . . . . . . ITextStoryThreadDict
kTableModelBoss . . . . . . . . . . . . . . . . . ITextStoryThreadDict
kNoteDataBoss . . . . . . . . . . . . . . . . . . ITextStoryThreadDict
The ITextStoryThreadDict interface manages a collection of associated story
threads. A story’s dictionary (kTextStoryBoss) only contains one story thread,
the primary story thread. A table’s dictionary (kTableModelBoss) contains a
story thread per table cell. A note’s (kNoteDataBoss/InCopy) dictionary
contains one story thread for the note’s text.
13.4.6. ITextStoryThreadDictHier
kTextStoryBoss . . . . . . . . . . . . . . . ITextStoryThreadDictHier
The ITextStoryThreadDictHier interface manages the collection of story
thread dictionaries that are embedded in the story.
13.4.7. IStoryOptions
kTextStoryBoss . . . . . . . . . . . . . . . . . . . . . IStoryOptions
The IStoryOptions interface allows certain characteristics of the text to be
controlled. Specifically:
• Whether the text is to flow horizontally or vertically.
• Optical alignment.
The SetEdgeAlignMethod(ClassID algo) is used to define whether optical
margin alignment (otherwise known as hanging punctuation) is used for a
story. This method call results in a direct change to the database, therefore it
must be made within the scope of a command. The
kOpticalMarginAlignmentCmdBoss has been provided for this purpose (see the
command reference manual for more details).
The SetParagraphBodySize(PMReal b) method provides a mechanism to alter
the amount of overhang present with optical margin alignment enabled.
Ideally, this will be the same value as the font size that is being used, but as a
story might have several fonts of different sizes, a compromise may have to be
reached. As with the previous two methods, the manipulation of this value
should be done through the provided kOpticalMarginAlignmentSizeCmdBoss
(see the command reference manual for more details).
428
13.4. Interfaces
The Text Model
13.4.8. IComposeScanner
kTextStoryBoss . . . . . . . . . . . . . . . . . . . . IComposeScanner
The IComposeScanner interface provides powerful, higher level mechanisms for
the extraction of information from the text model. It is described in the
"Paragraph composers" chapter.
13.4.9. ITextReferences
kTextStoryBoss . . . . . . . . . . . . . . . . . . . . ITextReferences
Helper interface that provides information regarding to font, style and color
usage within the story that saves you delving into the text model.
13.4.10. IDataLinkReference, ILinkState
kTextStoryBoss . . . . . . . . . . . . . . . . . . . IDataLinkReference
kTextStoryBoss . . . . . . . . . . . . . . . . . . . . . . . ILinkState
These two interfaces provide the mechanisms required to create a link to some
external source (e.g. a file from the filesystem, or a database). Their use is not
unique to text so we will discuss them no further here. For more information
see the "Links" chapter.
13.4.11. ITextLockData
kTextStoryBoss . . . . . . . . . . . . . . . . . . . . . ITextLockData
See “Can I lock a story?” on page 451.
13.4.12. ITextFocus/ITextFocusManager
kTextFocusBoss . . . . . . . . . . . . . . . . . . . . . . . ITextFocus
kTextStoryBoss . . . . . . . . . . . . . . . . . . . ITextFocusManager
The text focus (ITextFocus) abstraction describes a range of text in story and
was introduced in “Text focus” on page 420. Each story supports the
ITextFocusManager interface which allows for the creation of text foci, and
maintains a list of current text foci associated with a particular story.
The ITextFocusManager (kTextStoryBoss) contains methods to automatically
update all text foci for that particular story. For example, if we had a text focus
that encompassed a whole story (from first to last character), and we inserted
text into the middle of the story we would like the length of the text focus to be
Adobe InDesign Programming Guide
13.4. Interfaces
429
the new length of the story (i.e. the focus should still range from the first to the
last characters).
The ITextFocusManager provides the mechanism to achieve this; in this case we
indicate how many character we insert, and the insertion point
(Inserted(TextIndex start, int32 count)). The implementation of
ITextFocusManager takes care of updating the foci that are affected by an edit.
The other mechanisms provided by the text model to manipulate text content
will take care of the updating of text foci for you (i.e. by manipulating content
through the ITextModel interface of the kTextStoryBoss, the updating of all text
foci held for the story is automatically done).
13.4.13. IFocusCache
kTextFocusBoss . . . . . . . . . . . . . . . . . . . . . . IFocusCache
For performance reasons, the kTextFocusBoss also implements a cache of
formatting information associated with the focus, access to this cache is
provided through the IFocusCache interface. Some methods are shown in
figure 13.4.13.a.
figure 13.4.13.a. Some IFocusCache methods
virtual int32 CountParagraphStyles() = 0;
// Returns the number of paragraph styles in this text focus
virtual int32 CountCharacterStyles() = 0;
// Returns the number of character styles in this text focus
virtual UID GetNthParagraphStyle(int32 n) = 0;
// Returns the nth paragraph style
virtual UID GetNthCharacterStyle(int32 n) = 0;
// Returns the nth character style
virtual bool16 IsStyleOverridden(UID style) = 0;
// Returns kTrue if there are overrides to the style
Invalidation of the focus cache is handled through the text focus manager
(ITextFocusManager) through the normal update actions on the
kTextStoryBoss. Each focus cache is timestamped to indicate when the cache
was built.
13.4.14. IStrand
kTextDataStrandBoss . . . . . . . . . . . . . . . . . . . . . . IStrand
kParaAttrStrandBoss . . . . . . . . . . . . . . . . . . . . . . IStrand
kCharAttrStrandBoss . . . . . . . . . . . . . . . . . . . . . . IStrand
430
13.4. Interfaces
The Text Model
kOwnedItemStrandBoss . . . . . . . . . . . . . . . . . . . . . IStrand
The IStrand interface is supported by all boss objects implementing a strand. It
provides lower level mechanisms for accessing and manipulating the text model
information.
All strands support only one “type” of object (for example, paragraph attribute,
character attribute, character code data or owned items). The type of object
supported by a particular strand is reported through the GetObjectClass()
method. The GetRunLength() method returns the length of the individual runs
defined on the strand. The summation of all run lengths within a strand should
equal the length returned by the TotalLength method supported by the
ITextModel interface on the kTextStoryBoss.
The IStrand interface supports methods DoInsert, DoDelete and DoReplace,
these methods return undo information to allow commands to be
automatically undone. There are methods that allow for the copying and
pasting of objects on the strand, along with the ability to generate a command
that will delete the strand. There are also mechanisms for manipulating the
VOS objects that are the fundamental storage mechanisms used for the text
subsystem. Manipulation of these structures by developers is strongly
discouraged.
Although the mechanisms provide manipulation of individual strand content,
they do not help manage the overall story. Adding or removing information
from a single strand is a difficult activity, the state of all other strands have to be
considered, if each strand is not updated and synchronised against each other,
the text model could become corrupt. It is hard for the application to recover
from this. Therefore it is strongly suggested that manipulations should occur
through the mechanisms provided by ITextModel.
13.4.15. ITextStrand
kTextDataStrandBoss . . . . . . . . . . . . . . . . . . . ITextStrand
The ITextStrand interface on the kTextDataStrandBoss provides a mechanism
to retrieve character codes from the text model. Its prototype is given below.
figure 13.4.15.0.a. ITextStrand
class ITextStrand : public IPMUnknown
{
Adobe InDesign Programming Guide
13.4. Interfaces
431
public:
virtual DataWrapper<textchar> FindChunk(TextIndex begin,
int32 *len, TextIndex *chunkstart = nil) = 0;
};
The DataWrapper template allows the persistent text objects that hold the raw
text to be properly reference counted. It ensures that an addref() and
release() are performed and a pointer to the raw data is returned.
13.4.16. IAttributeStrand
kParaAttrStrandBoss . . . . . . . . . . . . . . . . . IAttributeStrand
kCharAttrStrandBoss . . . . . . . . . . . . . . . . . IAttributeStrand
The attribute strand interface (IAttributeStrand) allows for management and
manipulation of style information on the paragraph and character attribute
strands. The character and paragraph attribute strand boss classes share this
abstract IAttributeStrand interface although they employ different
implementations.
The characters have a certain style applied - this style defines the way the text
will appear. There is the concept of a root style (that is, text with no explicit
style information added). For example, with no other style information added,
the user may type text in an eight point Times New Roman font, with no
underline, bold or italic face being applied. You can also define your own styles,
for example for headlines or the main body of text. We will cover this in the
styles section. As well as being able to define styles for text, you can allow for
deviation from these styles, for example, although the headline style might be
18 point Times New Roman, you might want to underline the whole
paragraph, or even just make a single word bold font.
The method UnhookParagraphStyle gives us the ability to disassociate a
particular paragraph of text from its associated style. All style information for
that text is maintained, but rather as a style it becomes a set of overrides from
the root style, and will be maintained within a single AttributeBossList. The
user can force this behaviour by selecting ranges of text then applying “No
Paragraph Style” (or “No Character Style”) to it. The current style that is being
applied is deselected but the formatting of text does not change. Everything is
maintained as a list of overrides. The connection between the text and style is
broken, altering the style will no longer have any effect on the text.
432
13.5. Frequently asked questions(FAQ)
The Text Model
13.4.16.1. IItemStrand
kOwnedItemStrandBoss . . . . . . . . . . . . . . . . . . . IItemStrand
The owned item strand is used to maintain information on the objects that are
placed directly into (“inline”) the text model. Owned items are maintained as a
list of uids, along with their type and the text index they are associated with.
13.4.17. IStyleInfo
kStyleBoss . . . . . . . . . . . . . . . . . . . . . . . . . IStyleInfo
Styles are accessed and manipulated through the IStyleInfo interface on the
kStyleBoss. This interface is described in figure 13.4.17.a. For further details of
this interface, please see the "Working With Text Styles" chapter.
figure 13.4.17.a. Major IStyleInfo methods
// get the UID of the style this style is based on
virtual UID GetBasedOn() const = 0;
// Get the style we revert to on new paragraph
virtual UID GetNextStyle() const = 0;
//
virtual UID GetCharStyle() const = 0;
// get the name of the style
virtual const PMString& GetName() const = 0;
// are we a paragraph style
virtual bool16 IsParagraphStyle() const = 0;
13.4.18. ITextAttributes
kStyleBoss . . . . . . . . . . . . . . . . . . . . . . ITextAttributes
The ITextAttributes interface allows control of the text attributes associated
with a style. For further details of this interface, please see the "Working With
Text Styles" chapter.
13.5. Frequently asked questions(FAQ)
13.5.1. What is a story?
See “Stories” on page 396.
13.5.2. What is the text model?
See “The text model” on page 398.
Adobe InDesign Programming Guide
13.5. Frequently asked questions(FAQ)
433
13.5.3. What is a strand?
See “Strands” on page 398.
13.5.4. What is a run?
See “Runs” on page 399.
13.5.5. What is a story thread?
See “Story threads” on page 399.
13.5.6. What is a text attribute?
See “Text attributes” on page 406.
13.5.7. What is an AttributeBossList?
See “AttributeBossList” on page 411.
13.5.8. What is a style?
See “Text styles” on page 411.
13.5.9. What is an owned item?
See “Owned items” on page 416.
13.5.10. What is text focus?
See “Text focus” on page 420.
13.5.11. What is text selection?
See “Text selection” on page 421.
13.5.12. How do I access the stories in a document?
A document is represented by boss class kDocBoss. Text within a document is
maintained as a list of stories represented by the IStoryList interface on the
kDocBoss. See the ReportStories method in code snippet SnipTextModel for
sample code.
13.5.13. How do I create or delete a story?
Stories are rarely created and deleted in their own right. Normally they are
created as a side effect of creating a text frame (See the "Text layout" chapter
and the kCreateMultiColumnItemCmdBoss command). The same holds for
deletion, normally the story is deleted as a side effect of deleting the last text
frame that displays its text. See “Lifecycle of a story” on page 397 for more
background information.
434
13.5. Frequently asked questions(FAQ)
The Text Model
However should you really need to create or delete a story the API commands
provided are kNewStoryCmdBoss and kDeleteStoryCmdBoss.
13.5.14. How do I navigate from the text model to a strand?
To navigate from a story to a strand use ITextModel::QueryStrand to get an
interface on the strand boss class you are interested in. See code snippet
SnipUpdateCurrentParaStyle for sample code.
13.5.15. How do I access the characters in a story?
If you only require access to character code data of a story use is the
TextIterator class to iterate over each character. See the code snippet
SnipInspectStoryCharacters for sample code.
To process the character data in larger chunks rather than character by
character you can use IComposeScanner::QueryDataAt. See the SDK plug-in
TextExportFilter for sample code.
Alternatively you can directly access the ITextStrand interface on
kTextDataStrandBoss that actually stores the character data. Figure 13.5.15.a
extracts character data from the strand and dumps it to trace.Each text "chunk"
that is returned relates to the raw text as held by an underlying VOS_Object,
described in “Virtual Object Store (VOS)” on page 422.
figure 13.5.15.a. Direct access to character data in ITextStrand
// This is by far the hardest way to access the character data in a story.
// For an easier life use one of the other options described above instead.
void DumpTextStrand(ITextModel* iTextModel)
{
int32 storyLength = iTextModel->TotalLength();
InterfacePtr<ITextStrand> iTextStrand (((ITextStrand*)
iTextModel->QueryStrand(kTextDataStrandBoss, IID_ITEXTSTRAND)));
int32 chunkLength=0;
int32 currentPoint = 0;
while (currentPoint+1 < storyLength) {
DataWrapper<textchar> textString(iTextStrand->FindChunk(
currentPoint, &chunkLength));
for (int32 i = 0; i < chunkLength; i++) {
TRACE("0x%x", textString[i]);
}
currentPoint+=chunkLength;
}
TRACE("\n");
}
Adobe InDesign Programming Guide
13.5. Frequently asked questions(FAQ)
435
13.5.16. How do I count the number of paragraphs in a story?
For each paragraph a run will exist on the IStrand interface on the paragraph
attritbute strand (kParaAttrStrandBoss). The number of runs is equal to the
number of paragraphs. See code snippet SnipCountStoryParagraphs for
sample code.
13.5.17. How do I find the point size at a given TextIndex in a story?
See “How do I access the text attributes for a story or a range of text?” on
page 435.
13.5.18. How do I access the formatting of a story?
See “How do I access the text attributes for a story or a range of text?” on
page 435.
13.5.19. How do I access the text attributes for a story or a range of text?
Styles and overrides that apply to paragraphs are found from the
IAttributeStrand interface on kParaAttrStrandBoss. Styles and overrides that
apply to characters are found from the IAttributeStrand interface on
kCharAttrStrandBoss. You can access the information directly via these
interfaces. See code snippet SnipUpdateCurrentParaStyle for sample code.
Resolving the value of a particular text attribute, the point size say, at a given
index into the text model by direct strand access as described above can be
hard. You need to account for the hierarchical nature of text styles and any
overrides that apply. There are APIs that make this easier to deal with.
If you want to know the values of a particular set of text attributes that are
present in a range of text the TextAttributeRunIterator class can be used. See
code snippet SnipInspectStoryPointSizes for sample code. Alternatively you can
use IComposeScanner::QueryAttributeAt yourself, it is the API
TextAttributeRunIterator uses.
If you want to scan the styled runs in a range of text you can use
IComposeScanner::QueryDataAt to determine the drawing style (interface
IDrawingStyle). See the EstimateTextWidth sample code presented in the
"Paragraph composers" chapter for an example of this.
Finally if you already have a text focus (interface ITextFocus) that describes a
range of text or if you create a new new text focus you can query this interface
436
13.5. Frequently asked questions(FAQ)
The Text Model
for its associated focus cache (interface IFocusCache). Then you can use
IFocusCache to examine the formatting that applies to the text.
13.5.20. How do I access the text selection?
Please read “Text selection” on page 421 for background information.
If you are implementing a suite on the text concrete selection boss class
(kTextISuiteBoss) you can use its interface ITextTarget interface. See the SDK
sample plug-in TextInsetMutator for sample code.
If you are using ISelection and ISpecifier you can use them to find the text
focus (ITextFocus) that describes the selection. The method QueryTextFocus in
code snippet SnipOldSelection shows how to do this. Please note that the
availability of the ISelection and ISpecifier interfaces will be subject to change
in the future.
13.5.21. How do I create a text selection?
Please read “Text selection” on page 421 for background information.
A text selection can be created using one of the commands generated by
interface ISelectUtils. See the SelectText method in code snippet
SnipTextModel for sample code(included below).
figure 13.5.21.a. SnipTextModel::SelectText
// The ISelectUtils interface remains available under InDesign 2.x
// and you can continue to use it for now. However you should be aware that
// this will change in the future.
ErrorCode SnipTextModel::SelectText(ITextFocus* textFocus)
{
ErrorCode status = kFailure;
do {
InterfacePtr<ITextModel> textModel(textFocus->QueryModel());
ASSERT(textModel);
if (!textModel) {
break;
}
// Clear the current selection of necessary.
ISelection* selection = Utils<ISelectUtils>()>GetActiveSelection();
if (selection) {
InterfacePtr<ICommand> deselectAllCmd(Utils<ISelectUtils>()-
Adobe InDesign Programming Guide
13.5. Frequently asked questions(FAQ)
437
>DeselectAll(selection, kTrue));
ASSERT(deselectAllCmd);
if (!deselectAllCmd) {
break;
}
if (CmdUtils::ProcessCommand(deselectAllCmd) != kSuccess) {
break;
}
}
// To display a text selection the text tool must be active.
// Change to the text tool if necessary.
InterfacePtr<ITool> activeTool(Utils<IToolBoxUtils>()>QueryActiveTool());
if (activeTool == nil || activeTool->IsTextTool() == kFalse) {
InterfacePtr<ITool> textTool(Utils<IToolBoxUtils>()>QueryTool(kIBeamToolBoss));
ASSERT(textTool);
if (!textTool) {
break;
}
if (Utils<IToolBoxUtils>()->SetActiveTool(textTool) == kFalse) {
ASSERT_FAIL("IToolBoxUtils::SetActiveTool failed to change to
kIBeamToolBoss");
break;
}
}
// Select text from the given text focus.
InterfacePtr<ICommand> selectText(Utils<ISelectUtils>()>SelectTextRange(textFocus->GetCurrentRange(),
::GetUIDRef(textModel)));
ASSERT(selectText);
if (!selectText) {
break;
}
status = CmdUtils::ProcessCommand(selectText);
} while(false);
return status;
}
13.5.22. How do I insert text into a story?
To insert characters at the selection’s text caret use ITextEditSuite.
To insert characters at an arbitrary position in a story use the command
generated by ITextModel::InsertCmd. See the InsertText method in code
snippet SnipTextModel for sample code(included below).
438
13.5. Frequently asked questions(FAQ)
The Text Model
figure 13.5.22.a. SnipTextModel::InsertText
/**Insert text into a story using ITextModel::InsertCmd.
@param textModel of story to be changed.
@param position index at which insertion to be made.
@param text to be inserted.
@return kSuccess on success, other ErrorCode otherwise.
*/
ErrorCode SnipTextModel::InsertText(ITextModel* textModel,
const TextIndex position, const WideString& data)
{
ErrorCode status = kFailure;
do {
ASSERT(textModel);
if (!textModel) {
break;
}
if (position < 0 || position >= textModel->TotalLength()) {
ASSERT_FAIL("position invalid");
break;
}
InterfacePtr<ICommand> insertCmd(textModel->InsertCmd(position,
const_cast<WideString*>(&data),
kTrue)); // make a copy of the string.
ASSERT(insertCmd);
if (!insertCmd) {
break;
}
status = CmdUtils::ProcessCommand(insertCmd);
} while(false);
return status;
}
Note if you have allocated the WideString to be inserted on the heap you can
ask the command to assume ownership of the data by setting the copyData
parameter to kFalse. The command will delete it when it is no longer required.
Otherwise you should always set the copyData parameter to kTrue in which case
the command will make a copy of the WideString you are inserting.
Typed characters can be inserted using the command generated by
ITextModel::TypeTextCmd . A difference between this command and
ITextModel::InsertCmd is that it respects text locking. If the text content is
locked (see ITextLockData), the method returns nil, if it is not locked the
method returns a valid command.
Adobe InDesign Programming Guide
13.5. Frequently asked questions(FAQ)
439
13.5.23. How do I delete text from a story?
To delete selected text use ITextEditSuite.
To delete an arbitrary range of text use the command generated by
ITextModel::DeleteCmd. All strands are updated to reflect the deletion. See the
DeleteText method in code snippet SnipTextModel for sample code(included
below).
figure 13.5.23.a. SnipTextModel::DeleteText
/**Delete text from a story using ITextModel::DeleteCmd.
@param textModel of story to be changed.
@param position index first character to be deleted.
@param length number of characters to be deleted.
@return kSuccess on success, other ErrorCode otherwise.
*/
ErrorCode SnipTextModel::DeleteText(ITextModel* textModel,
const TextIndex position, const int32 length)
{
ErrorCode status = kFailure;
do {
ASSERT(textModel);
if (!textModel) {
break;
}
if (position < 0 || position >= textModel->TotalLength()) {
ASSERT_FAIL("position invalid");
break;
}
if (length < 1 || length >= textModel->TotalLength()) {
ASSERT_FAIL("length invalid");
break;
}
InterfacePtr<ICommand> deleteCmd(textModel->DeleteCmd(position,
length));
ASSERT(deleteCmd);
if (!deleteCmd) {
break;
}
status = CmdUtils::ProcessCommand(deleteCmd);
} while(false);
return status;
}
13.5.24. How do I replace a range of text in a story?
To replace selected text use ITextEditSuite.
440
13.5. Frequently asked questions(FAQ)
The Text Model
To replace an arbitrary range of text use the command generated by
ITextModel::ReplaceCmd. See the ReplaceText method in code snippet
SnipTextModel for sample code.
13.5.25. How do I copy and paste text in and between stories?
To copy text around within and between stories the command
kCopyStoryRangeCmdBoss can be used as shown by code snippet SnipCopyStory.
Note that the utility interface ITextUtils provides a facade onto this command
that can be used rather than programming the command directly.
At a lower level characters that are copied using ITextModel::CopyRange are
pasted using the command generated by ITextModel::PasteCmd. See the
CopyAndPasteText method in code snippet SnipTextModel for sample code.
13.5.26. How do I apply a style to text in a story?
To change the style of selected text use ITextAttributeSuite::ApplyStyle. See
the TextStyler plug-in for sample code.
To change the style of an arbitrary range of text use the command generated by
ITextModel::ApplyStyleCmd. Note that the replaceOverrides parameter
indicates whether formatting overrides that exist on given range of text should
remain or be removed. See code snippet SnipApplyParaStyle for sample code.
13.5.27. How do I apply text attribute overrides?
To apply text attribute overrides to selected text use ITextAttributeSuite. See
code snippet SnipChangeTextAttr for sample code.
To apply text attribute overrides to an arbitratry range of text use the command
generated by ITextModel::ApplyCmd. See the ApplyOverrides method in code
snippet SnipTextModel for sample code (included below).
figure 13.5.27.a. SnipTextModel::ApplyOverrides
/**Apply paragraph alignment, the point size, leading and underline overrides
using ITextModel::ApplyCmd.
@param textModel of story to be changed.
@param position index of first character to be formatted.
@param length number of characters to be formatted.
@return kSuccess on success, other ErrorCode otherwise.
*/
Adobe InDesign Programming Guide
13.5. Frequently asked questions(FAQ)
441
ErrorCode SnipTextModel::ApplyOverrides(ITextModel* textModel, const
TextIndex position, const int32 length)
{
ErrorCode status = kFailure;
do {
ASSERT(textModel);
if (!textModel) {
break;
}
if (position < 0 || position >= textModel->TotalLength()) {
ASSERT_FAIL("position invalid");
break;
}
if (length < 1 || length >= textModel->TotalLength()) {
ASSERT_FAIL("length invalid");
break;
}
// Wrap the changes to be made in a command sequence.
CmdUtils::SequenceContext seq;
// First set the paragraph alignment.
// Create a container for the paragraph attribute to be applied.
AttributeBossList* paraAttributeBossList = new
AttributeBossList();
ASSERT(paraAttributeBossList);
if (!paraAttributeBossList) {
break;
}
// Create an alignment attribute.
InterfacePtr<ITextAttrAlign>
textAttrAlign(::CreateObject2<ITextAttrAlign>(kTextAttrAlignBodyBo
ss));
ASSERT(textAttrAlign != nil);
if(textAttrAlign==nil) {
break;
}
textAttrAlign->Set(ICompositionStyle::kTextAlignCenter);
paraAttributeBossList->ApplyAttribute(textAttrAlign);
// Create a command to apply the attribute. We are applying a paragraph
// attribute, so we indicate kParaAttributeStrand.
InterfacePtr<ICommand> applyParaAttrCmd(textModel>ApplyCmd(position,
length,
442
13.5. Frequently asked questions(FAQ)
The Text Model
paraAttributeBossList,
kParaAttrStrandBoss));
ASSERT(applyParaAttrCmd);
if(applyParaAttrCmd == nil) {
break;
}
// Apply the paragraph attribute.
status = CmdUtils::ProcessCommand(applyParaAttrCmd);
if (status != kSuccess) {
ASSERT_FAIL("ITextModel::ApplyCmd failed to apply paragraph
attributes");
break;
}
// Now set the point size, leading and underline for the characters.
status = kFailure;
// Create a container for the character attributes to be applied.
AttributeBossList* charAttributeBossList = new
AttributeBossList();
ASSERT(charAttributeBossList);
if (!charAttributeBossList) {
break;
}
// Create a point size, leading and underline attributes.
InterfacePtr<ITextAttrRealNumber>
textAttrPointSize(::CreateObject2<ITextAttrRealNumber>(kTextAttrPo
intSizeBoss));
ASSERT(textAttrPointSize != nil);
if(textAttrPointSize==nil) {
break;
}
textAttrPointSize->Set(PMReal(18.0));
charAttributeBossList->ApplyAttribute(textAttrPointSize);
InterfacePtr<ITextAttrRealNumber>
textAttrLeading(::CreateObject2<ITextAttrRealNumber>(kTextAttrLead
Boss));
ASSERT(textAttrLeading != nil);
if(textAttrLeading==nil) {
break;
}
textAttrLeading->Set(PMReal(24.0));
charAttributeBossList->ApplyAttribute(textAttrLeading);
InterfacePtr<ITextAttrUnderlineMode>
textAttrUnderlineMode(::CreateObject2<ITextAttrUnderlineMode>(kTex
tAttrUnderlineBoss));
Adobe InDesign Programming Guide
13.5. Frequently asked questions(FAQ)
443
ASSERT(textAttrUnderlineMode);
if (!textAttrUnderlineMode) {
break;
}
textAttrUnderlineMode->SetMode(IDrawingStyle::kUnderlineSingle);
charAttributeBossList->ApplyAttribute(textAttrUnderlineMode);
// Create a command to apply the attribute. We are applying character
// attributes, so we indicate kCharAttrStrandBoss.
InterfacePtr <ICommand> applyCharAttrCmd(textModel>ApplyCmd(position,
length,
charAttributeBossList,
kCharAttrStrandBoss));
ASSERT(applyCharAttrCmd);
if(applyCharAttrCmd == nil) {
break;
}
// Apply the character attributes.
status = CmdUtils::ProcessCommand(applyCharAttrCmd);
if (status != kSuccess) {
ASSERT_FAIL("ITextModel::ApplyCmd failed to apply character
attributes");
break;
}
} while(false);
return status;
}
Note that this command always assumes ownership of the AttributeBossList
passed in the list parameter that contains the overrides to be applied, so you
should always allocate your AttributeBossList on the heap. It is important to
apply attributes to the correct strand: paragraph attributes should be applied
to the paragraph attribute strand, and character attributes should be applied to
the character attribute strand. For example, it would make no sense to attempt
to set the justification of text on the character attribute strand as this is a
paragraph attribute. Likewise, it would not be a good idea to set the point size
of text on a paragraph strand, as this attribute is a character attribute. Note,
although you cannot apply character attribute overrides directly to the
paragraph attribute strand, you can do so indirectly be defining a paragraph
style with the character attribute override defined, this style is itself applied to
the paragraph attribute strand. Text attributes overrides can also be applied
using ITextModel::UserApplyCmd. A difference between this command and
444
13.5. Frequently asked questions(FAQ)
The Text Model
is that it respects text locking. If the text content is
locked (see ITextLockData), the method returns nil, if it is not locked the
method returns a valid command.
ITextModel::ApplyCmd
13.5.28. How do I clear text attribute overrides?
To clear text attribute overrides on an arbitrary range of text use
ITextModel::ClearOverridesCmd. Recall, overrides are local deviations from
the style that is applied. See the ClearOverrides method in code snippet
SnipTextModel for sample code.
13.5.29. How do I know if a text atribute is a paragraph or a character
attribute?
All attributes support the IAttrReport interface which has the method
IsParagraphAttribute. This method returns kTrue for paragraph attributes,
kFalse for character attributes.
13.5.30. How do I create an inline graphic in a text frame?
Insert a kTextChar_ObjectReplacementCharacter character into the text model
at the index you want the inline to be anchored in the text flow. Then process
kChangeILGCmdBoss to make the page item into an inline graphic in the text
flow. See code snippet SnipTextInsertInline for sample code.
13.5.31. How do I access owned items like inline graphics?
Owned items can be discovered by accessing the owned item strand
(IItemStrand). See code snippet SnipCountStoryOwnedItems for sample code.
13.5.32. How do I directly manipulate the text model?
ITextModel also supplies low level mechanisms that allow you to directly
update the text model. You should leave these methods alone unless you have a
specific need to work at this level. The command generation API’s provided by
ITextModel (e.g. InsertCmd) should suffice for most situations.
Most operations directly support undo-ability by returning the information
required to undo the modification. These methods, while not providing the
transactional mechanisms to update the text model, maintain the integrity of
the individual strands, i.e. all strands are kept in synchronisation with each
other.
Adobe InDesign Programming Guide
13.5. Frequently asked questions(FAQ)
445
figure 13.5.32.a. ITextModel methods that manipulate the model directly
virtual UndoInfo* DoInsert(TextIndex start, const WideString* data,
const ILanguage *language = nil ) = 0;
virtual UndeleteInfo* DoDelete( TextIndex start, int32 len) = 0;
virtual UndeleteInfo* DoDelete( const RangeData& range) = 0;
virtual UnreplaceInfo* DoReplace(TextIndex start,
int32 len,
const WideString *data,
const ILanguage *language = nil,
bool16 clearNonContinuingAttrs = kTrue) = 0;
virtual void DoPaste(TextIndex start, VOSAllSavedData *data,
K2Vector<ICommand*>* cmdList = nil) = 0;
virtual UndoInfo* DoApplyStyle(TextIndex start, int32 len, UID
styleref, ClassID which, bool16 destroyAll, bool16 getUndoInfo) = 0;
virtual UndoInfo* DoApplyOverrides(TextIndex start, int32 len, const
AttributeBossList *these, ClassID which, bool16 getUndoInfo) = 0;
virtual UndoInfo* DoClearOverrides(TextIndex start, int32 length,
const AttributeBossList *these, ClassID which, bool16 getUndoInfo) =
0;
virtual
0;
virtual
0;
virtual
oldLen,
void UndoDelete(UndoInfo* undo, TextIndex start, int32 len) =
void UndoApply(UndoInfo* undo, TextIndex start, int32 len) =
void UndoReplace(UndoInfo* undelIn, TextIndex start, int32
int32 newLen) = 0;
13.5.33. How do I find the text foci that apply to a text model?
Figure 13.5.33.a shows how you would navigate from a story to the text foci
that apply to the story. Figure 13.5.33.b details code that displays to trace all the
text foci associated with a particular story.
446
13.5. Frequently asked questions(FAQ)
The Text Model
figure 13.5.33.a. Navigating from the story to a text focus
kTextStoryBoss
ITextFocusManager
ITextFocus* QueryNthFocus( )
kTextFocusBoss
ITextFocus
IFocusCache
figure 13.5.33.b. Displaying text foci
void DumpFoci(ITextFocusManager* forThis)
{
int32 foc = forThis->GetFocusCount();
for (int loopCnt=0; loopCnt < numOfFoc; loopCnt++)
{
InterfacePtr<ITextFocus> nthFocus(forThis->QueryNthFocus(
loopCnt));
int32 start,end;
nthFocus->GetRange(&start, &end);
Trace("Text focus %d starts %d ends %d\n",loopCnt,start,end);
}
}
13.5.34. How do I create a text focus?
A text focus can be created using the ITextFocusManager::NewFocus method.
The lifetime of a text focus is managed by reference counting the ITextFocus
interface. Once its reference count becomes 0 it is deleted (if it still exists in the
list maintained by the ITextFocusManager interface, it is removed before it is
deleted).
See the QueryTextFocus method in code snippet SnipTextModel for sample
code that shows how to create a text focus that describes the range of characters
displayed in a text frame(included below).
Adobe InDesign Programming Guide
13.5. Frequently asked questions(FAQ)
447
figure 13.5.34.a. SnipTextModel::QueryTextFocus
/**Return text focus describing the range of characters displayed in the given
frame.
@param textFrame
@return text focus describing the range of characters displayed in the frame.
*/
ITextFocus* SnipTextModel::QueryTextFocus(ITextFrame* textFrame)
{
ITextFocus* result = nil;
do {
ASSERT(textFrame);
if (!textFrame) {
break;
}
InterfacePtr<ITextModel> textModel(textFrame->QueryTextModel());
ASSERT(textModel);
if (!textModel) {
break;
}
// Check if the story contains any characters.
// Note that when a story is created it has a terminating
// character and length of 1 characters. We never
// want to include the terminating character in our focus.
int32 charactersInPrimaryStoryThread =
textModel->GetPrimaryStoryThreadSpan();
// Number of characters in the story including the terminating character
if (charactersInPrimaryStoryThread <= 1) {
break; // the story has no significant characters
}
// Check if this text frame displays any characters.
int32 span = textFrame->TextSpan();
if (span <= 0) {
break; // the text frame is empty
}
// Get the range of characters displayed in the frame.
TextIndex startIndex = textFrame->TextStart();
// Index into the text model of the first character in the frame.
TextIndex finishIndex = startIndex + span;
// Index into the text model of the last character in the frame.
// Check if this frame displays the story's terminating character.
448
13.5. Frequently asked questions(FAQ)
The Text Model
if (finishIndex >= charactersInPrimaryStoryThread) {
// This frame contains the story's terminating character.
// Exclude the terminating character from the range of
// characters described by the text focus being created.
span--;
finishIndex--;
}
// Don't make a text focus if the frame only displays
// the story's terminating character.
if (span <= 0) {
break;
}
// Create a new text focus to describe the range
// of characters displayed in the text frame...
InterfacePtr<ITextFocusManager> textFocusManager(textModel,
UseDefaultIID());
ASSERT(textFocusManager);
if (!textFocusManager) {
break;
}
result = textFocusManager->NewFocus(RangeData(startIndex,
finishIndex, RangeData::kLeanForward), kInvalidClass);
ASSERT(result != nil);
} while(false);
return result;
}
13.5.35. How do I access the IStrand runs on each strand?
Consider the text shown in figure 13.5.35.a. Hidden characters and text frame
threads are shown for clarity. With this text, what information is held on the
individual strands? There are a total number of 26 characters held in this story
(all stories have at least one character - a kTextChar_CR). There are two
paragraphs, and the “s” of the second paragraph is defined to be superscript.
We can use the IStrand interface of each strand boss class to examine the
constitution of the individual strands. Recall, the strands are broken up into a
sequence of runs. Runs for each of the strands do not run in parallel, i.e. run
lengths are different depending on the strand.
Adobe InDesign Programming Guide
13.5. Frequently asked questions(FAQ)
449
figure 13.5.35.a. IStrand runs in a text model
Actual Text
A l i en s
l i k e
i t .
26
kTextDataStrand
16
kParaAttrStrand
6
10
26
kOwnedItemStrand
kFrameList
(The Wax Strand)
s p a c e . #
1
19
kCharAttStrand
In
7
9
10
/* See method ReportStrands in code snippet SnipTextModel for sample code. For
figure 13.5.35.a this code yields the results below under the debug build:TextModel strands
IStrand runs on ITextModel of TotalLength=26
strandBossClassID, run, textIndex, runLength
kFrameListBoss, 0, 0, 7
kFrameListBoss, 1, 7, 9
kFrameListBoss, 2, 16, 10
kParaAttrStrandBoss, 0, 0, 16
kParaAttrStrandBoss, 1, 16, 10
kCharAttrStrandBoss, 0, 0, 19
kCharAttrStrandBoss, 1, 19, 1
kCharAttrStrandBoss, 2, 20, 6
kTextDataStrandBoss, 0, 0, 26
kOwnedItemStrandBoss, 0, 0, 26
kStoryThreadStrandBoss, 0, 0, 26
kTextIndexIDListStrandBoss (no runs on IStrand)
kXMLStrandBoss (no runs on IStrand)
0x2025 (no runs on IStrand)
ok
*/
450
13.5. Frequently asked questions(FAQ)
The Text Model
As can be seen by the above results, the first thing the code reports is
information from the IStrand interface on the kFrameListBoss. This is
detailing the wax strand. The IStrand interface on kFrameListBoss reports the
length of wax lines, i.e. the number of characters in each line of composed text.
The IStrand interface on kParaAttrStrandBoss has a run per paragraph. The
length of the run represents the number of characters in the paragraph. Note
that the run lengths on the IAttributeStrand interface on
kParaAttrStrandBoss do not run in parallel with its IStrand runs.
IAttributeStrand represents formatting changes and groups paragraphs with
the same style and overrides into runs. Overall the strand contains objects that
hold a collection a paragraph lengths (IStrand) along with a collection of
paragraph formatting runs (IAttributeStrand). The IAttributeStrand runs are
not shown in the diagram above.
The kCharAttrStrandBoss holds the run information for sequences of
characters. If there are no local character overrides the character attribute
strand will contain one run, the length of the story. As we have a character
override (the 20th character is set to be superscript), the character attribute
strand is split into three runs, the first has no overrides applied, the second has
the superscript override, and the third has no overrides.
The kTextDataStrandBoss reports that it has all the text in one 26 character
block. Larger stories would be split into different runs.
As we have no owned items there is only one run identified by the
kOwnedItemStrandBoss.
13.5.36. Can I add a custom data interface to kTextStoryBoss?
There are some caveats to be aware of when considering adding custom data
interfaces to stories. Although you can directly control the lifespan of a
kTextStoryBoss object, it is affected by other commands (either directly, or
through other user interaction). For example, if two stories are merged (the
outport box of a text frame is connected to an inport box of an as-yet
unconnected text frame), one of the stories are deleted. This behaviour has
serious implications if a custom interface is added to the kTextStoryBoss and it
is desirable to maintain the information this interface represents. You need to
copy your data from the story being deleted to the other story.
Adobe InDesign Programming Guide
13.5. Frequently asked questions(FAQ)
451
13.5.37. Can I get called when stories are created and deleted?
Yes. To be called when a story is created implement a new story signal
responder (IResponder) boss class. The ServiceID is
kNewStorySignalResponderService and the API provides a default
implemention for the required
IK2ServiceProvider(kNewStorySignalRespServiceImpl). To be called when a
story is deleted implement a delete story responder. The ServiceID is
kDeleteStoryRespService and the API provides a default implemention for the
required IK2ServiceProvider(kDeleteStoryRespServiceImpl).
13.5.38. Can I lock a story?
The short answer is "no". The long answer is "kind of " and depends on the
application, InCopy or InDesign. Simply stated support for story locking is
currently inadequate. Under InCopy most changes (but not all) to a story can
be locked out. Under InDesign alone story locking is not really supported.
Interface ITextLockData was originally added to kTextStoryBoss for InCopy.
The methods the interface supports are listed in figure 13.5.38.a.
figure 13.5.38.a. ITextLockData methods
virtual
virtual
virtual
virtual
void SetInsertLock(bool8 lock) = 0;
bool8 GetInsertLock() = 0;
void SetAttributeLock(bool8 lock) = 0;
bool8 GetAttributeLock() = 0;
The InCopyShared plug-in provides a command
(kSetStoryLockStateCmdBoss) to set the lock state of a list of stories. If
InCopyShared is not present you could write your own command. However we
advise you to do this with caution because ITextLockData doesn't lock out as much
as you would like. There are gaps in the support for story lock state. Known gaps
include, but are not limited to:
• Changing the text model through ITextModel methods other than
ReplaceCmd, DeleteCmd, UserApplyCmd, UserApplyCmdRegularUndo, PasteCmd,
TypeTextCmd. The methods named will return nil for the command if the
story is locked.
• Changing the text model through commands such as kReplaceTextCmdBoss,
kDeleteTextCmdBoss, kInsertTextCmdBoss.
• Other plug-ins or scripts that make direct changes to the text model.
452
13.6. Summary
The Text Model
For InCopy the gaps have been plugged by adding user interface code to check
the story lock state and disable/enable the UI control accordingly. However, this
approach is problematic in that some of the controls, like the swatch list, can
still apply/change colors in locked stories because no funnel could be found at
which the story’s lock state could be checked.
Note that the text lock adornment that is added to text frames for locked stories
is implemented in the InCopyShared plug-in so you would have to implement
your own if you don't have InCopy plug-ins.
13.6. Summary
This chapter described stories (kTextStoryBoss), the fundamental abstraction
through which text content is accessed and managed. We examined its text
model (interface ITextModel) that provides services for manipulating the
textual content. We discussed the strands used to hold separate components of
the text. We discussed the mechanisms used to provide formatting of text
through text attributes, AttributeBossLists and styles.
After an examination of these key concepts we presented information on the
APIs and gave answers to some frequently asked questions.
13.7. Review
You should be able to answer the following questions:
1. Which boss object represents the textual content abstraction? (13.3.2., page
396)
1. What is a story thread? (13.3.8., page 399)
2. What basic element is used to hold a single item of formatting information
for text? (13.3.10., page 406)
3. What boss object deals with formatting at a paragraph level? (13.3.8., page 399)
4. What boss object deals with formatting at a character level? (13.3.8., page 399)
5. What is the maximum size of a run on the text strand? (13.3.9., page 403)
6. What attributes are maintained by the root character style? (13.3.13., page 411)
7. Why does an attribute boss not support IPMPersist? (13.3.12., page 411)
8. What is the difference between a style and an AttributeBossList? (13.3.13.,
page 411)
9. What is recorded in non-root styles? (13.3.13., page 411)
10. What interface on what boss manages text foci? (13.4.12., page 428)
11. How should you perform updates on the data held on a particular strand?
(13.4.3., page 425)
Adobe InDesign Programming Guide
13.8. Exercises
453
12. When adding an attribute to an AttributeBossList, there is an opportunity
to take a copy of the attribute, why? (13.5.26., page 440)
13. Why not directly update the text model through the VOS abstractions?
(13.3.19., page 422)
13.8. Exercises
13.8.1. Manipulate the text of a story
Write the code required to reverse the ordering of a story (so "Aliens and Earth"
would become "htraE dna sneilA"). Grab the characters in the story by iterating
the text using TextIterator. Use ITextModel::ReplaceCmd to change the text in
the story.
13.8.2. Manipulate character attributes
Using the ApplyCmd method from the ITextModel interface to create the
command, change all the text in a story to have 8 point text.
454
13.8. Exercises
The Text Model
14.
Text Layout
14.0. Overview
This chapter describes the visual containers in which text is laid out and
displayed in its composed form. It explains how plug-ins can layout text.
14.1. Goals
The questions this section answers are:
1. What is text layout?
2. What is a parcel?
3. What is a text frame?
4. What is a text inset?
5. What is a standoff?
6. What is text on a path?
7. What are the interfaces and commands related to text layout?
8. How can I create and manipulate text frames?
14.2. Section-at-a-glance
“Key concepts” on page 456 explains the architecture involved in the layout and
display of text.
“Interfaces” on page 471 describes the bosses and interfaces provided by text
layout.
“Frequently asked questions (FAQ)” on page 479 answers often asked questions
concerning the layout of text.
table 14.0.a. version history
Rev
Date
Author
Notes
2.0
18-Dec-2002
Seoras Ashby
Update content for InDesign 2.x API
0.3
14-Jul-00
Adrian O’Lenskie
Seoras Ashby
Third Draft
455
456
14.3. Key concepts
Text Layout
“Summary” on page 483 provides a summary of the material covered in this
chapter.
“Review” on page 483 provides questions to test your understanding of the
material covered in this chapter.
“Exercises” on page 484 provides suggestions for other tasks you might want to
attempt.
14.3. Key concepts
14.3.1. Text layout
figure 14.3.1.a. Text layout
Text Layout
frames/
parcels
The Wax
wax lines
Text Composition
story thread
The Text Model
Text layout defines the shape and form of the visual containers in which text is
composed and displayed. The text model maintains the character and
formatting information for a story. This information is split into one or more
story threads that each repesent an independent flow of text content (see “The
Text Model” chapter and interface ITextStoryThread). Text composition flows
text content from the story thread into its visual containers creating wax that
fits their layout. Text layout in turn displays the wax. When the layout is
updated text must be recomposed to reflect the change. This is depicted in
figure 14.3.1.a.
Adobe InDesign Programming Guide
14.3. Key concepts
457
14.3.2. Parcels
The abstraction that represents the visual container for text is the parcel(see
interface IParcel). The text of a story thread (ITextStoryThread) is flowed into
a list of parcels (IParcel) in a parcel list (IParcelList) for layout and display.
For example a text frame is one kind of parcel and a table cell is another and
other new kinds of parcel may be introduced in the future.
The text for the primary story thread (see “The Text Model” chapter) is
displayed through the parcels given by the parcel list (IParcelList) on the
frame list (kFrameListBoss). These parcels are the text frames
(kFrameItemBoss). The arrangement is illustrated in figure 14.3.2.a:
figure 14.3.2.a. Text layout parcel APIs
kFrameListBoss
IParcelList
ITextParcelList
ITextParcelListData
ITiler
kFrameItemBoss
IParcel
IParcelShape
ITextTiler
ITextGrid
kTextStoryBoss
ITextStoryThread
ITextModel
ITextStoryThreadDict
ITextStoryThreadDictHier
The text for the story thread of a table cell (kTextCellContentBoss) is displayed
through the parcels given by its parcel list. These parcels are table cell parcels
(kTextCellParcelBoss). The arrangement is illustrated in figure 14.3.2.b.
Please read Technical Note #10005 “Essentials for the Table API” for more
information on tables:
figure 14.3.2.b. Tables parcel APIs
kTextCellContentBoss
ITextStoryThread
IParcelList
ITextParcelList
ITextParcelListData
ITiler
kTextCellParcelBoss
IParcel
IParcelShape
ITextTiler
ITextGrid
kTableModelBoss
ITextStoryThreadDict
458
14.3. Key concepts
Text Layout
14.3.3. Text frames
The fundamental abstraction used to layout and display text is the text frame.
It is a represented by a number of associated page items and to gain an
understanding of the items involved we will look at an example.
Figure 14.3.3.b shows an example of a text frame with two columns, an inset
and a gutter. Text frames have properties, such as the number of columns,
column width and text inset, that control where text flows.
figure 14.3.3.a. Sample text frame
text frame
10 point inset
15 point gutter
in port
out port
column 1
column 2
Figure 14.3.3.b annotates the text frame shown in figure 14.3.3.a with the boss
classes that represent it internally. The text frame is represented by a hierarchy
of page items. The overall frame is a spline item (kSplineItemBoss) and the
columns within it are controlled by a multicolumn item
(kMultiColumnItemBoss). Each column is represented by a frame item
(kFrameItemBoss), the object that displays the text.
Adobe InDesign Programming Guide
14.3. Key concepts
459
figure 14.3.3.b. Sample text frame page item representation
Spline Item (kSplineItemBoss)
Frame Item (kFrameItemBoss)
Multicolumn Item (kMultiColumnItemBoss)
Frame Item (kFrameItemBoss)
Figure 14.3.3.c shows the interfaces used to navigate from between objects.
Interfaces IHierarchy, IShape, IGeometry, ITransform , IPathGeometry are not
specific to the text architecture so they are shown is a different colour.
460
14.3. Key concepts
Text Layout
figure 14.3.3.c. Sample text frame page item relationships
kSplineItemBoss
IGraphicFrameData
IPathGeometry
IHierarchy
IShape
IGeometry
ITransform
kMultiColumnItemBoss
ITextColumnSizer
ITextFrame
IHierarchy
IShape
IGeometry
ITransform
kFrameItemBoss
kFrameItemBoss
IHierarchy* QueryChild()
ITextFrame
IHierarchy
IShape
IGeometry
ITransform
Interface IGraphicFrameData is the signature interface that identifies a frame. It
provides a helper method, GetTextContentUID, that will return the UID of the
underlying multicolumn item or kInvalidUID if the frame does not have textual
content.
The relationship between the frame(kSplineItemBoss) and its contents is
maintained by the IHierarchy interface. You can navigate down from the spline
to its associated multicolumn item and then onto individual columns, the
frame items, using the QueryChild() method on the IHierarchy interface.
Conversely you can navigate up from a single column (kFrameItemBoss) to the
multicolumn item and on up to the spline item using the QueryParent()
method on the IHierarchy interface.
The multicolumn item (kMultiColumnItemBoss) is the controller for a text
frame. The interface that controls its properties is ITextColumnSizer.
The frame item (kFrameItemBoss) represents a single column.
Interface ITextFrame provides access to the story and the range of text displayed
by the item (either the spline in the case of the multicolumn item, or the
column in the case of the frame item).
Adobe InDesign Programming Guide
14.3. Key concepts
461
Figure 14.3.3.d shows how you can navigate between the layout and its
asociated story. For simplicity many of the navigational paths have been
omitted. From the story (kTextStoryBoss) you can navigate to the frame list
(kFrameListBoss). From the frame list you can navigate to each of the
associated columns (kFrameItemBoss). From either the multicolumn item
(kMultiColumnItemBoss), or the individual columns (both support different
implementations of the ITextFrame interface) you can navigate to the framelist
or the story.
figure 14.3.3.d. Navigating between the story and its layout
kTextStoryBoss
ITextModel
IFrameList * QueryFrameList()
kFrameListBoss
IFrameList
kSplineItemBoss
IHierarchy
ITextModel * QueryTextModel()
kMultiColumnItemBoss
IHierarchy
ITextFrame
ITextColumnSizer
IFrameList * QueryFrameList()
ITextFrame* QueryNthFrame(int32 n)
kFrameItemBoss
IHierarchy
ITextFrame
14.3.4. Span
The range of text displayed by a frame or parcel is known as the span
(sometimes it is called the frame span or text span or thread span). Each object
that displays text is associated with a story thread and following composition
knows the index into the text model of the first character it displays and the
total number of characters it shows. The range of text displayed is available on
several different interfaces (ITextFrame, IFrameList, ITextParcelList,
462
14.3. Key concepts
Text Layout
ITextParcelListData). Note that these ranges will only be accurate if the text in
the object is fully composed. You should check for damage before relying on
these methods. If necessary you can force the object to recompose. The “Text
Composition” chapter describes how this is done.
For example, say you have a story displayed across two linked frames as shown
in figure 14.3.4.a. The first frame contains two columns and the second a single
column giving three columns in total. The range of text displayed in each
column is illustrated in figure 14.3.4.a.
Adobe InDesign Programming Guide
14.3. Key concepts
463
figure 14.3.4.a. Accessing the range of text displayed in a frame via ITextFrame
Note only the layout objects
representing the columns
(kFrameItemBoss) are shown.
The frames (kSplineItemBoss)
and multicolumn items
(kMultiColumnItemBoss) have
been deliberately omitted.
kTextStoryBoss
ITextModel
kFrameListBoss
IFrameList
UID=0x65
kFrameItemBoss
ITextFrame
TextStart()=0
TextSpan() = 17
kFrameItemBoss
ITextFrame
TextStart()=17
TextSpan() = 23
UID=0x66
UID=0xad
kFrameItemBoss
ITextFrame
TextStart()=40
TextSpan() = 68
Aliens and Earth¶Aliens would rather be aliens. Ask an alien and he says, “Who knows what an alien knows?”.¶
kTextDataStrandBoss
IStrand
ITextStrand
The characters are stored on the text data strand
under the text model. If you want to access them use
the TextIterator class.
464
14.3. Key concepts
Text Layout
14.3.5. Text frame drawing
When the spline is asked to draw the interfaces shown in figure 14.3.5.a come
into play. The request to draw propogates down the hierarchy to the
kFrameItemBoss which locates the wax lines it displays using ITextFrame and
IWaxStrand and then requests them to draw. Each wax line requests its wax run
to draw (in the general case a wax line could have more than one wax run).
figure 14.3.5.a. Text frame drawing
Draw()
kSplineItemBoss
IHierarchy
IShape
kFrameListBoss
IWaxStrand
kWaxLineBoss
kWaxLineBoss
kWaxLineBoss
IWaxLine
IWaxLine
IWaxLine
IWaxLineShape
kMultiColumnItemBoss
IHierarchy
IShape
kFrameItemBoss
IHierarchy
ITextFrame
IShape
kWaxTextRunBoss
kWaxTextRunBoss
kWaxTextRunBoss
IWaxRun
IWaxRun
IWaxRun
IWaxRunText
14.3.6. Text frame geometry
The geometries the page items that make up the text frame shown in figure
14.3.6.a are tabulated in inner co-ordinates of the spline.
Adobe InDesign Programming Guide
14.3. Key concepts
465
figure 14.3.6.a. Text frame geometry
-100,-15
0,0
100,15
Item
Left
Top
Right
Bottom
kSplineItemBoss
-100.00
-15.00
100.00
15.00
kMultiColumnItemBoss
-100.00
-15.00
100.00
15.00
kFrameItemBoss (left column)
-100.00
-15.00
-5.00
15.00
5.00
-15.00
100.00
15.00
kFrameItemBoss (right column)
From this table you can see that the geometries of the multi-column and
column items are expressed in the co-ordinate space of their parent, the spline.
Effectively they share a common co-ordinate space as shown.
14.3.7. Text inset
A text inset can be associated with a page item, this is an internal area between
the area text flows in and the containing spline. Text inset is represented by the
kTextInsetPageItemBoss abstraction. Please refer to “Text layout class
diagram” on page 471 for a description of the relationships involved.
Figure 14.3.7.a shows text frame with a text inset of 2 points set on both the
right and bottom sides.
466
14.3. Key concepts
Text Layout
figure 14.3.7.a. A text frame with text inset
top inset = 0 points
left inset = 0 points
right inset = 2 points
bottom inset = 2 points
If the containing spline is regular in shape you can specify the inset
independently for each side of the text frame, however with irregular shapes the
inset follows the contour of the spline, i.e. there is only one inset value for the
object. This is shown in figure 14.3.7.b.
figure 14.3.7.b. Irregular text frame with inset
inset = 2 points
Adobe InDesign Programming Guide
14.3. Key concepts
467
14.3.8. Text wrap
The flow of text in a text frame can be affected by other page items that have
text wrap set. Text wrap is represented by the stand off
abstraction(kStandOffPageItemBoss). A stand off describes whether there
should be text wrap, and if so, to what degree (i.e. the boundary of the page
item that is to repel text). Please refer to “Text layout class diagram” on
page 471 for a description of the internal representation.
Figure 14.3.8.a shows a spline object with text wrap set to flow outside a 0p4
border around the object. The figure also includes a text frame with some
content, however, the image is totally independent from it.
figure 14.3.8.a. A text frame next to a spline with text wrap set
If this spline object overlaps a text frame, the text within that frame is forced to
wrap around the object. The spline object is said to repel the text. Figure
14.3.8.b shows the same object overlapping a text frame.
468
14.3. Key concepts
Text Layout
figure 14.3.8.b. Text wrap affecting a text frame
By inverting the text wrap, a page item can indicate it is to be used to totally
enclose text on the horizontal plane. This is shown in figure 14.3.8.c. We have a
simple spline that has inverted text wrap set. Now text flows within the set
boundaries.
Adobe InDesign Programming Guide
14.3. Key concepts
469
figure 14.3.8.c. Inverted text wrap
14.3.9. Text on a path
The abstraction that allows text to flow along the edge of any spline
(kSplineItemBoss) is text on a path. The internal representation of this
abstraction is described in the “Text layout class diagram” on page 471.
Text on a path has an in port and an out port just like other text frames, so you
can link text in other frames to and from it as illustrated in figure 14.4.10.a. .
470
14.3. Key concepts
Text Layout
figure 14.3.9.a. Sample text on a path
A
B
C
At the Do
or o
f
the
Pa
lac
e
D
E
A. Start bracket B. In port C. Center bracket D. End bracket E. Out port indicating threaded text
Adobe InDesign Programming Guide
14.4. Interfaces
471
14.4. Interfaces
14.4.1. Class Diagram
Figure 14.4.1.a shows the associations between major objects involved in text
layout.
figure 14.4.1.a. Text layout class diagram
Text Layout
IMainItemTOPData::GetTOPSplineItemUID
0..1
ITOPSplineData::GetMainSplineItemUID
1
IStandOffData::GetStandOffUID
kStandOffPageItemBoss
0..1
1
kSplineItemBoss
IStandOffItemData::QueryPageItem 1
kTOPSplineItemBoss
1
ITextInset::QueryInsetGeometry
0..1
kTextInsetPageItemBoss
1
IHierarchy::QueryParent
IHierarchy::QueryParent
IHierarchy::QueryChild
IHierarchy::QueryChild
1
kMultiColumnItemBoss
1
kMultiColumnItemBoss
1
1
ITextFrame::QueryFrameList
IParcel::QueryParcelList
kFrameListBoss
IHierarchy::QueryParent
IHierarchy::QueryParent
IHierarchy::QueryChild
IHierarchy::QueryChild
1..m
kFrameItemBoss
1
kTOPFrameItemBoss
1
1..m
IFrameList::QueryNthFrame
IParcelList::QueryNthParcel
0..1
ITextModel::QueryFrameList
0..1
IWaxLine::GetFrameUID
1 IWaxIterator::GetStrandIterating
1
IFrameList::QueryTextModel
ITextParcelListData::GetTextModelUID
ITextParcelList::QueryStoryThread
IWaxIterator::GetFirstWaxLine
IWaxIterator::GetNextWaxLine
0..m
IWaxIterator
0..m
kTextStoryBoss
kWaxLineBoss
New IParcel features
Tables
472
14.4. Interfaces
Text Layout
A text frame is represented by the hierarchy of page items shown in the centre
of figure 14.3.1.a. A spline (kSplineItemBoss) can display text if it has an
associated multicolumn item. Multicolumn items (kMultiColumnItemBoss) are
column controllers for text frames, as such they can hold one or more frame
items (kFrameItemBoss), one frame item for each column. A frame item
(kFrameItemBoss) is the fundamental visual container for text. The boss class
supports the ITextFrame interface (as does kMultiColumnItemBoss) that
describes the range of text displayed. The frame list (kFrameListBoss) maps a
story onto the set of parcels through which the primary story thread flows.
A spline (kSplineItemBoss) can optionally have text on a path associated with
it. A spline that has text on a path has a similar hierarchy of page items to that
of a normal text frame described above. However these page items lie off to one
side of the main hierarchy so you won’t find these objects if you navigate the
kSplineItemBoss’s IHierarchy interface. You navigate from the spline to the
text on a path spline (kTOPSplineItemBoss) using interface IMainItemTOPData.
You navigate back using interface ITOPSplineData. Once you have an interface
on the kTOPSplineItemBoss you can navigate to the text on a path frame item
(kTOPFrameItemBoss) that display the text using IHierarchy.
A spline (kSplineItemBoss) can optionally have a text inset item
(kTextInsetPageItemBoss), if an inset is applied. A page item (a containing
frame or its image content) can optionally have a stand off
item(kStandOffPageItemBoss) if text wrap is applied. The text inset item and
stand off item represent the contour of the inset or stand-off.
The layout of text in tables has not been shown explicitly in figure 14.4.1.a. For
more information take a look at figure 14.3.2.b and read Technical Note #10005
“Essentials for the Table API”. Note also that in the future new features that
support the architecture described in “Parcels” on page 457 may be introduced
and used to layout and display text.
14.4.2. IFrameList
kFrameListBoss . . . . . . . . . . . . . . . . . . . . . . . IFrameList
lists the frames that display the primary story thread. It provides
accessors to determine the associated story, the frames that display its text and
the range of characters displayed in each frame. The major methods are shown
IFrameList
Adobe InDesign Programming Guide
14.4. Interfaces
473
in figure 14.4.3.a. To navigate from a story to its frame list use
ITextModel::GetFrameListUID or ITextModel::QueryFrameList.
figure 14.4.2.a. Major IFrameList methods
// Access to the story associated with frame list.
virtual UID GetTextModelUID() = 0;
virtual ITextModel * QueryTextModel() = 0;
// Access to the frames in the frame list.
virtual
virtual
virtual
virtual
int32 GetFrameIndex(UID frameUID) = 0;
int32 GetFrameCount() = 0;
UID GetNthFrameUID(int32 n) = 0;
ITextFrame * QueryNthFrame(int32 n) = 0;
// Access to the multi-column item associated with the frame list.
virtual UID FindMultColParentFrameUID(const UIDRef& frameRef) = 0;
// Determine whether all frames in the list are fully composed.
// Returns -1 if the entire frame list is fully composed.
virtual int32 GetFirstDamagedFrameIndex() = 0;
// Provide information about the ranges of text shown in a frame.
// Returns the first text index shown in the given frame.
virtual TextIndex GetFrameStart(UID frameUID) = 0;
// Returns the number of characters shown in the given this frame.
// Note this value can be zero (if the frame is too small for any glyphs)
// and for damaged text this value can be negative.
virtual int32 GetFrameSpan(UID frameUID) = 0;
// Returns the frame showing the given text index if leanLeftSide is kFalse.
// Returns the first frame that touches the given text index if leanLeftSide is kTrue.
// If in doubt use leanLeftSide = kFalse, that way you are guaranteed the frame
// returned displays the TextIndex of interest.
// Returns the frame’s index in the frame list if frameIndex is not nil.
// Return's nil and a frameIndex of -1 if the textIndex is not displayed in any
// frame.
// NOTE: This call will cause the text to compose up to the textIndex,
// if it wasn't already composed.
virtual ITextFrame* QueryFrameContaining
(
TextIndex textIndex, int32 *frameIndex,
474
14.4. Interfaces
Text Layout
bool16 leanLeftSide
) = 0;
14.4.3. ITextFrame
kMultiColumnItemBoss . . . . . . . . . . . . . . . . . . . . ITextFrame
kFrameItemBoss . . . . . . . . . . . . . . . . . . . . . . . ITextFrame
kTOPFrameItemBoss . . . . . . . . . . . . . . . . . . . . . ITextFrame
provides accessors to determine the text model for the associated
story, the frame list for the associated story and the range of characters
displayed. Some major methods are shown in figure 14.4.3.a.
ITextFrame
figure 14.4.3.a. Major ITextFrame methods
// Access to the story the frame is associated with.
virtual UID GetTextModelUID() = 0;
virtual ITextModel * QueryTextModel() = 0;
// Access the frame list the frame is contained in.
virtual UID GetFrameListUID() = 0;
virtual IFrameList * QueryFrameList() = 0;
// Returns the text index of the first character in this frame.
virtual TextIndex TextStart() = 0;
// Returns the number of characters shown in the frame.
// When the frame is fully composed this number may be zero.
// (this could happen when no glyphs would fit in the frame
// perhaps because of large point size text or large indents)
// If the frame is not fully recomposed, in some cases this number
// may be negative.
virtual int32 TextSpan() = 0;
14.4.4. IParcelList
kFrameListBoss . . . . . . . . . . . . . . . . . . . . . . IParcelList
kTextCellContentBoss . . . . . . . . . . . . . . . . . . . IParcelList
manages the parcels associated with a story
thread(ITextStoryThread). A story thread has a list of parcels associated with it
in which the text is composed.
IParcelList
Adobe InDesign Programming Guide
14.4. Interfaces
475
The parcel list on the frame list boss class (kFrameListBoss) manages the
parcels that display the primary story thread. The parcels listed by it are those
for the text frames (kFrameItemBoss).
The parcel list on a table cell (kTextCellContentBoss) manages the parcels that
display the cells story thread.The parcels listed by it are those for the table cell
parcels (kTextCellParcelBoss).
14.4.5. IParcel
kFrameItemBoss . . . . . . . . . . . . . . . . . . . . . . . . IParcel
kTOPFrameItemBoss . . . . . . . . . . . . . . . . . . . . . . . IParcel
kTextCellParcelBoss . . . . . . . . . . . . . . . . . . . . . . IParcel
A parcel is a container into which the text of a story thread (ITextStoryThread)
is flowed for composition and display.
A parcel is associated with zero or one text frame (kFrameItemBoss) as indicated
by IParcel::GetFrameUID. If there is no associated text frame then the parcel is
overset and is not displayed. For example the parcel on a text frame
(kFrameItemBoss) will always have an associated text frame, i.e. itself. Parcels
for table cells on the other hand may sometimes not be displayed if there is not
sufficient room in the text frame. In this case their parcel may not have an
associated text frame.
provides rectangular geometric bounds. For example the bounds for a
parcel on a text frame(kFrameItemBoss) give the bounds of the frame (this is the
same as the bounds given by its IGeometry interface). The bounds for a table
cell parcel give the bounds of the cell.
IParcel
The boss classes IParcelList and IParcel are aggregated on are not assumed to
be UID based.
14.4.6. IParcelShape
kFrameItemBoss . . . . . . . . . . . . . . . . . . . . . IParcelShape
kTOPFrameItemBoss . . . . . . . . . . . . . . . . . . . . IParcelShape
kTextCellParcelBoss . . . . . . . . . . . . . . . . . . . IParcelShape
Draws and hit tests a parcel.
476
14.4. Interfaces
Text Layout
14.4.7. ITextParcelList
kFrameListBoss . . . . . . . . . . . . . . . . . . . . . . IParcelList
kTextCellContentBoss . . . . . . . . . . . . . . . . . . . IParcelList
Maintains the range of text displayed by parcels in the parcel list once the text
has been composed. It gives the text index(TextIndex) in the text model of the
first character and the number of characters (span) displayed.
14.4.8. ITextParcelListData
kFrameListBoss . . . . . . . . . . . . . . . . . . . . . . IParcelList
kTextCellContentBoss . . . . . . . . . . . . . . . . . . . IParcelList
Maintains various properties associated with parcels in a parcel list.
14.4.9. ITiler
kFrameListBoss . . . . . . . . . . . . . . . . . . . . . . . . . ITiler
kTextCellContentBoss . . . . . . . . . . . . . . . . . . . . . . ITiler
ITiler manages the tiles for a parcel list and is used by paragraph composers to
determine the areas on a line into which text can flow.
An IParcelList and ITextParcelList must be aggregated on the boss class that
aggregates ITiler.
14.4.10. ITextColumnSizer
kMultiColumnItemBoss . . . . . . . . . . . . . . . . . ITextColumnSizer
is the key interface that controls the properties of a
multicolumn item (kMultiColumnItemBoss). Figure 14.4.10.a shows some of its
methods.
ITextColumnSizer
figure 14.4.10.a. Major ITextColumnSizer methods
// Use command kChangeNumberOfColumnsCmdBoss to mutate.
// Methods for columns and gutters.
virtual
virtual
virtual
virtual
void SetNumberOfColumns(int32 columns = 1) = 0;
int32 GetNumberOfColumns() = 0;
PMReal GetGutterWidth() = 0;
void SetGutterWidth(PMReal width) = 0;
// Methods to use if column size is fixed.
virtual void UseFixedColumnSizing(int16 fixedSize = kTrue) = 0;
Adobe InDesign Programming Guide
14.4. Interfaces
477
virtual int16 IsFixedColumnSizing() = 0;
virtual void SetFixedWidth(const PMReal &width) = 0;
virtual PMReal GetFixedWidth() = 0;
// Information about frame UIDs of column frames.
virtual
virtual
virtual
virtual
virtual
virtual
virtual
ITextFrame *QueryTextFrame(const PBPMPoint& pPt) = 0;
void SetFirstTextFrameUID(UID firstUID) = 0;
UID GetFirstTextFrameUID() = 0;
void SetLastTextFrameUID(UID lastUID) = 0;
UID GetLastTextFrameUID() = 0;
int32 GetFirstFrameIndex() = 0;
int32 GetLastFrameIndex() = 0;
// Information about text inset.
virtual PMReal GetInset(WhichInset which) = 0;
14.4.11. IGraphicFrameData
IGraphicFrameData . . . . . . . . . . . . . . . . . . . kSplineItemBoss
is the signature interface for a frame(kSplineItemBoss) in
which content can be laid out. It provides a helper method,
GetTextContentUID, that wraps up the IHierarchy calls you need to use to
navigate from the spline to its underlying multicolumn item. If this method
returns a valid UID then the kSplineItemBoss has text content.
IGraphicFrameData
14.4.12. ITextInset
ITextInset . . . . . . . . . . . . . . . . . . . . . . kSplineItemBoss
The ITextInset interface provides methods for manipulating text inset. Use
kSetTextInsetCmdBoss to change it. Note that the ITextInset interface is
aggregated onto all page items so it is important you access the right one, the
interface on the containing frame, kSplineItemBoss. The interface on the
containing frame gets populated with data that describes the text inset. When a
text inset exists a text inset page item, kTextInsetPageItemBoss, will be
associated with the containing frame. The boss classes and interfaces are shown
in figure 14.4.12.a and major ITextInset major methods are show in figure
14.4.12.b.
478
14.4. Interfaces
Text Layout
figure 14.4.12.a. Boss classes and interfaces that represent text inset
kSplineItemBoss
IGraphicFrameData
ITextInset
kTextInsetPageItemBoss
IGeometry
IPathGeometry
figure 14.4.12.b. Major ITextInset methods
// Use kSetTextInsetCmdBoss to mutate.
// Methods that get/set the associated kTextInsetPageItemBoss.
// The inset can be a rect or it can be a path.
virtual void SetInsetGeometry( UID nInsetGeo ) = 0;
virtual IGeometry* QueryInsetGeometry() = 0;
virtual UID GetInsetGeometry() const = 0;
// Methods that get/set the inset.
virtual
virtual
virtual
virtual
void SetInset( PMReal nInset ) = 0;
PMReal GetInset() const = 0;
bool16 SetRectInset( const PMRect &insetRect
const PMRect&GetRectInset() const = 0;
) = 0;
14.4.13. IStandOffData and IStandOff
IStandOffData . . . . . . . . . . . . . . . . . . . . kSplineItemBoss
IStandOffData . . . . . . . . . . . . . . . . . . . . other page items
The IStandOffData interface provides methods for manipulating text wrap.
The type of text wrap applied can be obtained from IStandOffData::GetMode.
The offsets can be obtained from IStandOffData::GetMargin.
When a text wrap is applied to a page item a standoff page item,
kStandOffPageItemBoss, will be associated with it. Frames (kSplineItemBoss)
and their content (e.g. kImageItem) can have their own standoff. The standoff is
not part of the page item hierarchy (you don't navigate to it via IHierarchy). The
kStandOffPageItemBoss object will be returned if you call IStandOffData::
QueryStandOffGeometry. It is similar in nature to a spline, it has a path
geometry (IPathGeometry) that represents the standoff path.
Adobe InDesign Programming Guide
14.5. Frequently asked questions (FAQ)
figure 14.4.13.a. Boss classes and interfaces that represent text wrap.
kSplineItemBoss
kStandOffPageItemBoss
IGraphicFrameData
IStandOff
IStandOffData
IStandOff
IStandOffData
IStandOffItemData
14.5. Frequently asked questions (FAQ)
14.5.1. What is text layout?
See “Text layout” on page 456.
14.5.2. What is a parcel?
See “Parcels” on page 457.
14.5.3. What is a parcel list?
See “Parcels” on page 457.
14.5.4. What is a text frame?
See “Text frames” on page 458.
14.5.5. What is a frame list?
See “IFrameList” on page 472.
14.5.6. What is text inset?
See “Text inset” on page 465.
14.5.7. What is text wrap, what is a stand off?
See “Text wrap” on page 467.
14.5.8. What is text on a path?
See “Text on a path” on page 469.
14.5.9. How do I detect if a page item is a text frame?
Call IPageItemTypeUtils as shown in figure 14.5.9.a.
figure 14.5.9.a. Testing a page item for text content
// Returns kTrue if the page item is frame with text content, kFalse otherwise.
479
480
14.5. Frequently asked questions (FAQ)
Text Layout
bool16 IsTextFrame(const UIDRef& pageItemUIDRef)
{
return Utils<IPageItemTypeUtils>()->IsTextFrame(pageItemUIDRef);
}
Under the hood the IPageItemTypeUtils::IsTextFrame method navigates the
hierarchy (IHierarchy) to determine if the content of the page item is textual.
Figure 14.5.9.b shows the code you might write if you wanted to examine the
content of the page item yourself.
figure 14.5.9.b. Testing a page item for text content (under the hood)
// Returns kTrue if the page item is frame with text content, kFalse otherwise.
bool16 IsTextFrame(const UIDRef& pageItemUIDRef)
{
// Make sure the page item has associated children (i.e. kMultiColumnItemBoss)
InterfacePtr<IHierarchy> theItem(pageItemUIDRef, IID_IHIERARCHY);
int32 numberOfChildren = theItem->GetChildCount();
if (numberOfChildren < 1) {
// Page item is not a frame with text content.
return kFalse;
}
// Navigate down the hierarchy to the child object.
InterfacePtr<IHierarchy> multicolumnitem(theItem->QueryChild(0));
// The signature interface that identifies a kMultiColumItemBoss is
// ITextColumnSizer. If the child aggregates this interface the frames
// content is textual.
InterfacePtr<ITextColumnSizer> myTextColumnSizer(multicolumnitem,
UseDefaultIID());
if (myTextColumnSizer == nil) {
// Page item is not a frame with text content.
return kFalse;
}
// If we reach here the page item is a frame with text content.
return kTrue;
}
14.5.10. How do I create a text frame?
Process the kCreateMultiColumnItemCmdBoss command. You can control
columns and gutters for the frame by populating the command’s
IMultiColumnItemData interface. You can control orientation of the frame by
populating ICreateFrameData. If you don’t populate these data interfaces the
text frame options will be picked up from defaults in the workspace. You have
Adobe InDesign Programming Guide
14.5. Frequently asked questions (FAQ)
481
to process other commands after creating the text frame if the option you want
to set is not available on kCreateMultiColumnItemCmdBoss.
The BasicTextFrame plug-in and the SnipCreateTextFrame code snippet show
how create frames for horizontal text. The VerticalTextFrameJ plug-in shows
how create a text frame for vertical text.
14.5.11. How do I change the default text frame options?
Text frame options not expicitly stated by your commands will be set to default
values picked up from workspace interfaces IColumnPrefs and ITextOptions.
The defaults can be changed by processing kSetColumnPrefsCmdBoss and
kSetFramePrefsCmdBoss.
14.5.12. How do I add and remove columns in a text frame?
Process the kChangeNumberOfColumnsCmdBoss command. The code snippets
SnipNudgeNumTextCols and SnipCmdChangeNumberOfCols show how it
can be used.
There is no need to specify every option when using this command, for
example, it can be used to change the number of columns without referering to
the gutter width or fixed column value. Dependencies exist between the
properties, for example, if youask for two columns and specify fixed column
widths (without setting the value of the column width), the frame width will
change to twice its original (plus the gutter width).
Any option not expicitly stated by your command will pick up a default value
for the workspace.
14.5.13. How do I modify text frame options?
Figure 14.5.13.a shows the text frame options dialogue and indicates the
interfaces that store these options and the commands used to change them.
482
14.5. Frequently asked questions (FAQ)
Text Layout
figure 14.5.13.a. Interfaces that store text frame options and commands that mutate them
kMultiColumnItemBoss
ITextColumnSizer
kChangeNumberOfColumnsCmdBoss
kSplineItemBoss
ITextInset
kSetTextInsetCmdBoss
kMultiColumnItemBoss
ITextFrame
kSetFrameFirstLineOffsetMetricCmdBoss
kSetFrameMinFirstLineOffsetCmdBoss
kMultiColumnItemBoss
ITextFrame
kSetFrameVertJustifyCmdBoss
kSetMaxVJInterParaSpaceCmdBoss
kMultiColumnItemBoss
IID_IIGNOREWRAP(IBoolData)
kSetIgnoreWrapCmdBoss
14.5.14. How do I link text frames?
Process the kTextLinkCmdBoss command. See code snippet SnipTextLinkCmd
for sample code.
Note you can link a text on a path frame(kTOPSplineItemBoss) by navigating to
its kMultiColumnItemBoss and passing this item into kTextLinkCmdBoss.
14.5.15. How do I find the range of characters displayed by a text frame?
Use the span stored in ITextFrame to figure this out. For the theory on this read
“Span” on page 461. See the QueryTextFocus method in code snippet
SnipTextModel for sample code that shows how to create a text focus that
describes the range of characters displayed in a text frame.
Adobe InDesign Programming Guide
14.6. Summary
483
14.5.16. How do I detect when a story is overset?
When the frames that display a story are not large enough to show all of its text,
a story is said to be overset. To detect this condition call
ITextUtils::IsOverset. See code snippet SnipIsStoryOverset for sample code.
14.5.17. How do I detect when a text frame is overset?
When a text frame is not large enough to display the remaining text of a story it
is said to be overset. Under this condition the characters overflow into the next
text frame. You can detect if a text frame is overset by checking if the frame
displays the final character in the story’s primary story thread. See code snippet
SnipIsTextFrameOverset for sample code.
14.5.18. How do I manipulate text wrap?
Figure 14.5.18.a shows the text wrap panel and indicates the page item interface
that store these options and the commands used to change the text wrap
properties. Text wrap can be set for the containing frame (kSplineItemBoss) or
its content (e.g. kImageItem).
figure 14.5.18.a. Interfaces that store text wrap properties and commands that change them
IStandOffData
kStandOffModeCmdBoss
IStandOffData
kStandOffFormCmdBoss
IStandOffData
kStandOffMarginCmdBoss
You need to call the command once for
each offset.
14.6. Summary
This chapter described text layout. The parcel abstraction that represents the
core visual container for text was described. The anatomy of a text frame was
examined and the boss classes and interfaces involved were described. Finally
some practical examples of the use of the text layout API were presented.
14.7. Review
You should be able to answer the following questions:
484
14.8. Exercises
1.
2.
3.
4.
Text Layout
What is text layout? (14.3.1., page 456)
What is a text frame? (14.3.3., page 458)
Name the three major objects that implement a text frame? (14.3.3., page 458)
Which interface stores the properties of a text frame such as the number of
columns and the gutter width? (14.4.10., page 476)
14.8. Exercises
14.8.1. Test for a text frame
Test the current selection to see if it contains a valid text frame.
14.8.1. Manipulate Text Frame Options
Extend your solution to the exercise above to set the selected text frame to a
single column, variable width frame.
15.
The Wax
15.0. Overview
This chapter describes the wax and how your plug-ins can access the
information it stores.
15.1. Goals
The questions this chapter answers are:
1. What is the wax?
2. What is the wax strand (IWaxStrand)?
3. What is a wax line (kWaxLineBoss)?
4. What is a wax run (kWaxRunBoss)?
5. How can a plug-in access the wax?
The wax is created by text composition and you may want to know more about
how this is done. If so you should read this chapter first and then read the “Text
Composition” chapter. You should have a working knowledge of the role and
organisation of the wax before you proceed onto text composition.
15.2. Chapter-at-a-glance
“The Wax” on page 486 describes the wax and how it is organised.
“Examples of The Wax” on page 487 illustrates the wax generated by text
composition for different scenarios.
table 15.1.a. version history
Rev
Date
Author
Notes
1.1
5-Nov-02
Paul Norton
Adobe InDesign 2.x updates
0.3
14-Jul-00
Seoras Ashby
Adrian O’Lenskie
Third Draft
0.2
15-May-00
Seoras Ashby
Adrian O’Lenskie
Second Draft
0.1
01-May-00
Seoras Ashby
Adrian O’Lenskie
First Draft
485
486
15.3. The Wax
The Wax
“The Wax Interfaces” on page 500 describes the bosses and interfaces provided
by the wax.
“Working With The Wax” on page 507 provides some practical examples of
code that accesses the wax.
“Summary” on page 510 provides a summary of the material covered in this
chapter.
“Review” on page 510 provides questions to test your understanding of the
material covered in this chapter.
“Exercises” on page 511 provides suggestions for other tasks you might want to
attempt.
15.3. The Wax
The output of text composition is called the wax. The wax is responsible for
drawing, hit testing, and selecting the text of a story.
The wax metaphor comes from the manual pasteup process that was
traditionally used to create magazine and newspaper pages in the days before
the advent of interactive pagination software. In the traditional process typeset
columns of text, known as galleys, were received from the typesetter, run
through a waxer, then cut into sections and positioned on an art board. Wax
was used as an adhesive to stick the sections on the art board.
The art board in InDesign is a spread and the galleys can be thought of as text
frames. The typeset columns of text can be seen as the wax that is generated by
text composition. The wax adheres, or fixes, the position of a line of text within
a frame.
The wax is organised as a tree of lines and runs. A wax line is created for each
line of text in a frame. A wax run is created each time the appearance of the text
changes within the line. Examples of this are when the point size or font
changes or when the flow of text in a line is interrupted because text wrap
makes text flow around another frame. (NOTE: The text layout inner
coordinate system rotates clockwise by 90 degrees when the text frame is
vertical.)
Adobe InDesign Programming Guide
15.4. Examples of The Wax
487
15.4. Examples of The Wax
This section describes the wax that is generated for some example text frames.
If you want to re-create these examples you should use the Text Tool to create
the frames. If you use another tool, such as the Place Gun or a graphic frame
tool, the inner co-ordinate spaces for the frames will be different from those
illustrated.To keep things simple, a sample page size 200 points wide and100
points deep is used and the text is formatted using 8 point type, the Times
Regular font, and 10 point leading. All text is composed by the Adobe Roman
Multi-line composer in a horizontal text frame.
15.4.1. Single Line with no Formatting Changes
The wax generated for a single line text with no formatting changes is shown in
figure 15.4.1.a. This example has a frame 200 points wide and 30 points deep,
containing one line of 8 point Times Regular text with 10 point leading. The
first baseline offset setting for the frame has been set to Leading. This forces the
baseline of the first line of text in the frame to be offset from the top of the
frame by a distance equal to the leading value for the text (i.e. 10 points).
figure 15.4.1.a. Wax for a Single Line with No Formatting Changes
left=-100, top=-15
leading
-5
width
WaxLine
X=-100
Y=-5
Width=55.76
Origin=0
Span=17
WaxRun
X=0
Y=0
Width=55.76
Origin=0
Span=17
right=100, bottom= 15
488
15.4. Examples of The Wax
The Wax
Each node in the wax tree records its position, width and a reference to the
characters in the text model it describes. The origin records the index into the
text model to the first character in the node. The span records the number of
characters in the node.
Wax lines record their position in the inner coordinate space of the frame in
which they are displayed (the exact meaning of this will become obvious as we
progress through the examples below). Wax runs record their position as an
offset relative to the position of the wax line. Additional information is stored
specific to the type of node - wax line or wax run.
figure 15.4.1.b. Information Stored in The Wax
-100,-15
100,15
WaxLine
X=-100
Y=-5
Width=55.76
Origin=0
Span=17
Leading=10
WaxRun
X=0
Y=0
Width=55.76
Transformation matrix
Origin=0
for 8 point text
Span=17
FontName=Times-Roman
FontMatrix=[8 0 0 8 0 0]
GlyphIDs=[0x24 0x4f 0x4c 0x48 0x51 0x56 0x3 0x44 0x51 0x47 0x3 0x28 0x44 0x55 0x57 0x4b 0xffffffff ]
GlyphWidths=[5.78 2.22 2.22 3.55 4.00 3.11 2.00 3.55 4.00 4.00 2.00 4.89 3.55 2.66 2.22 4.00 2.00]
Adobe InDesign Programming Guide
15.4. Examples of The Wax
489
Figure 15.4.1.b exposes some of the additional data in the wax. A wax line stores
the leading for the line. A wax run stores font name, a font transformation
matrix, glyph1 information and other data necessary to describe how the text
should be drawn.
When a character2 is composed, its character code is mapped to its
corresponding GlyphID from the font being used to display the character. The
font gives the initial width of a glyph at a particular point size. This width may
be adjusted by composition to account for letter spacing, word spacing and
kerning. The GlyphIDs and their widths after composition are stored in the wax
run as shown in figure 15.4.1.b.
15.4.2. Single Line With Formatting Changes
This example looks at the effect of applying text attributes that change the
formatting of the text.
1. The term glyph is used to refer to an element of a font.
2. The term character denotes a member of an alphabet or a character code (Unicode,
ASCII)
490
15.4. Examples of The Wax
The Wax
figure 15.4.2.a. Wax for Single Line With Formatting Changes
-100,-15
100,15
WaxLine
X=-100
Y=-5
Width=60.33
Origin=0
Span=17
WaxRun
X=0
Y=0
Width=22.89
Origin=0
Span=7
FontName=Times-Roman
FontMatrix=[8 0 0 8 0 0]
WaxRun
X=22.89
Y=0
Width=16.12
Origin=7
Span=3
FontName=Times-Bold
FontMatrix=[10 0 0 10 0 0]
WaxRun
X=39.01
Y=0
Width=21.32
Origin=10
Span=7
FontName=Times-Roman
FontMatrix=[8 0 0 8 0 0]
UnderlineMode=kUnderlineSingle
A wax run is created each time the text attributes specify that the appearance of
the text should change as illustrated in figure 15.4.2.a. The arrows show the
correspondence between the text drawn in the frame and the wax run that
describes its appearance and location.
15.4.3. Multiple Lines in a Single Frame
This example looks at how wax lines are organised within a single frame.
Adobe InDesign Programming Guide
15.4. Examples of The Wax
491
figure 15.4.3.a. Wax for Multiple Lines in a Single Frame.
-100,-15
100,15
Wax
Line
#
X
1
Run
Line
-100.00
1
2
Run
Line
-100.00
1
3
Run
0.00
0.00
-100.00
1
0.00
Y
-5.00
0.00
5.00
0.00
15.00
0.00
Width
Origin
55.76
0
55.76
199.28
99.53
17
0
17
199.28
99.53
Span
10.00
17
62
17
79
10.00
62
29
79
Leading
10.00
29
Rather than show the wax as a tree the wax information has been flattened into
the table shown in figure 15.4.3.a. A wax line is created for each line of text in
the frame and each wax line has at least one corresponding wax run. In this case
there are no formatting changes so there is one wax run per line. The arrows
indicate the wax line that corresponds to each line of text drawn in the frame.
492
15.4. Examples of The Wax
The Wax
15.4.4. Single Frame with Two Columns
This example shows how wax is organised in a frame with two columns of text.
The text frame shown in figure 15.4.4.a is 200 points wide and 30 points deep
overall. It has two columns of width 95 points and a 10 point gutter.
figure 15.4.4.a. Wax for a Single Frame With Two Columns
-100,-15
100,15
Wax
#
X
Y
Width
Origin
Span
Leading FrameUID
Line
1
-100.00
-5.00
55.76
0
17
10.00
0x65
Line
2
-100.00
5.00
75.09
17
23
10.00
0x65
Line
3
-100.00
15.00
87.31
40
28
10.00
0x65
Line
1
5.00
-5.00
88.87
68
25
10.00
0x66
Line
2
5.00
5.00
49.54
93
15
10.00
0x66
The wax for a story is managed as a single tree. A flattened representation of
some of the wax information is shown as a table in figure 15.4.4.a. The wax
lines are associated with the column1 of text in which they are displayed. Each
wax line stores a reference to its column.
1. A column is sometimes described as a frame which can be confusing - the word frame is
heavily overloaded.
Adobe InDesign Programming Guide
15.4. Examples of The Wax
493
15.4.5. Text Frame Geometry
Content is laid out on a spread within a frame which is implemented as a
kSplineItemBoss. A kSplineItemBoss that contains text always has a
kMultiColumnItemBoss and one kFrameItemBoss per column of text as children
on its hierarchy. This is described in detail in the “Text Layout” chapter.
The geometries the page items that make up the text frame shown in figure
15.4.4.a are shown below in inner co-ordinates.
figure 15.4.5.a. Stroke Bounds for Sample Text Frame
Item
Left
Top
Right
Bottom
kSplineItemBoss
-100.00
-15.00
100.00
15.00
kMultiColumnItemBoss
-100.00
-15.00
100.00
15.00
kFrameItemBoss
(left column)
-100.00
-15.00
-5.00
15.00
kFrameItemBoss
(right column)
5.00
-15.00
100.00
15.00
From figure 15.4.5.a you can see that the geometries of the multi-column and
column items are expressed in the co-ordinate space of their parent - the spline.
Effectively they share a common co-ordinate space as shown below.
figure 15.4.5.b. Text Frame Geometry
0,0
494
15.4. Examples of The Wax
The Wax
15.4.6. Overset Text
This example examines what happens when the area within a frame is not large
enough to display all of the story’s text.
figure 15.4.6.a. Overset Story
-100,-15
100,15
Wax
#
X
Y
Width
Origin
Span
Leading FrameUID
Line
1
-90.00
5.00
55.76
0
17
10.00
0x65
Line
1
5.00
5.00
75.09
17
23
10.00
0x66
In the example shown in figure 15.4.6.a the area within the frame where text
can flow is reduced by setting the stroke weight of the frame to 5 points and
applying a 5 point text inset on all sides. There is now more text in the story
than can fit in the frame. Conceptually the story overflows the frames through
which it is displayed and the story is said to be overset. In the case illustrated
the story has an overall length of 108 characters. 40 characters fit in the frame
and 68 characters are not displayed.
figure 15.4.6.b. The Overset Text
aliens. Ask an alien and he says, “Who knows what an alien knows?”.#
Adobe InDesign Programming Guide
15.4. Examples of The Wax
495
15.4.7. A Story Displayed over Two Text Frames
This example describes how wax is organised when a story flows through two
text frames. In figure 15.4.7.a a new 100 point wide by 60 point deep frame has
been created and linked to the outport of the story shown in figure 15.4.6.a.
figure 15.4.7.a. Wax For A Story Displayed over Two Text Frames
-100,-15
100,15
-50, -30
50,30
Wax
#
X
Y
Width
Origin
Span
Leading FrameUID
Line
1
-90.00
5.00
55.76
0
17
10.00
0x65
Line
1
5.00
5.00
75.09
17
23
10.00
0x66
Line
1
-50.00
-24.00
87.31
40
28
10.00
0xad
Line
2
-50.00
-14.00
88.87
68
25
10.00
0xad
Line
3
-50.00
-4.00
49.54
93
15
10.00
0xad
The previously overset text now flows into the new frame and composition
creates the new wax. Each wax line refers to its column as shown in figure
15.4.7.a.
496
15.4. Examples of The Wax
The Wax
15.4.8. Irregular Frame Shape
The shape of the frame also effects where text can flow. Figure 15.4.8.a shows
how wax is organised in non-rectangular frames.
figure 15.4.8.a. Wax for an Irregular Frame Shape
Wax
#
X
Y
Width
Origin
Span
Leading FrameUID
Line
1
-32.00
0.00
22.89
0
7
10.00
0x65
Line
2
-22.00
10.00
13.55
7
4
10.00
0x65
Line
1
7.84
5.00
19.32
11
6
10.00
0x66
Line
1
-111.00
-10.88
65.54
17
20
10.00
0xad
Line
2
-144.00
-0.88
158.63
37
48
10.00
0xad
Line
3
-129.00
9.12
76.64
85
23
10.00
0xad
The text is flowed within the contour of each frame’s shape and new wax is
generated as shown in figure 15.4.8.a.. The arrows indicate the x, y position of
each wax line within its frame.
The inner bounds of the upper and lower text frames are shown in figure
15.4.8.b. The upper frame is 200 points wide and 50 points deep and the lower
frame is 200 points wide and 45 points deep. The bounds shown include the
object’s stroke.
Adobe InDesign Programming Guide
15.4. Examples of The Wax
497
figure 15.4.8.b. Stroke Bounds of Each Frame Shown in Figure 15.4.8.a
Item
Left
Top
Right
Bottom
upper frame
-97.16
-24.00
102.84
26.00
lower frame
-149.94
-16.88
50.06
28.12
15.4.9. Text Wrap
This example looks at the affect of text wrap settings. If a graphic is added to
the arrangement shown in “figure 15.4.8.a.” on page 496 the text flows over it as
illustrated in figure 15.4.9.a.
figure 15.4.9.a. Text Wrap Off
Figure 15.4.9.b shows the effect of turning text wrap on for the graphic frame..
When you apply a text wrap to the graphic frame, the application creates a
boundary around the object that repels text and causes the text to flow around
it. This boundary is known as a stand-off and is discussed in the “Text Layout”
chapter.
498
15.4. Examples of The Wax
The Wax
figure 15.4.9.b. Text Wrap On
The wax runs from which the text shown in figure 15.4.9.b was rendered is
illustrated in figure 15.4.9.c. The wax line that corresponds to the text selection
shown in figure 15.4.9.c is highlighted in the tabulated wax. Notice that the wax
line has two wax runs to describe the part of the line that lies to the left and to
the right of the text wrap. Wax runs are created when text wrap interrupts the
flow of glyphs in a line.
Adobe InDesign Programming Guide
15.4. Examples of The Wax
499
figure 15.4.9.c. Wax for Text Wrap On
Wax
Line
#
1
Run
Line
2
1
Line
0.00
7.84
1
1
Run
0.00
-22.00
1
Run
Line
-32.00
1
Run
Line
X
0.00
-111.00
1
2
0.00
-144.00
Y
0.00
0.00
10.00
0.00
5.00
0.00
-10.88
0.00
-0.88
Width
Origin TextSpan
22.89""
0
22.89
"Aliens "
13.55""
7
13.55
"and "
19.32""
7
0
7
6
17
22.89
"Aliens "
158.99
""
17
37
1
0.00
0.00
71.00
"would rather
24be aliens. 24
"
Run
2
117.00
0.00
41.99
"Ask an alien48
"
3
-129.00
9.12
174.00
""
61
10.00
0x65
10.00
0x66
10.00
0xad
10.00
0xad
10.00
0xad
7
Run
Line
0x65
6
7
24
10.00
4
19.32
"Earth<0xd>"11
22.89""
FrameUID
7
4
11
Leading
13
32
Run
1
0.00
0.00
54.00
"and he says,61
"
Run
2
105.00
0.00
69.00
"<0x201c>Who
74 knows what
19 an "
Line
4
-93.00
19.12
99.99""
93
13
15
93
10.00
Run
1
0.00
0.00
19.00
"alien "
6
Run
2
68.00
0.00
31.99
"knows?<0x201d>.<0xd>"
99
9
0xad
500
15.5. The Wax Interfaces
The Wax
15.5. The Wax Interfaces
This section covers the bosses and interfaces that are used in both constructing
(or building) and transversing (also called walking) the wax data. While all the
bosses and interfaces in this section are used by the application in building the
wax, it’s important to note that most solutions will use IWaxIterator and
IWaxRunIterator to do most of the work. IWaxIterator and IWaxRunIterator
are not children of IPMUnknown, but helper classes that make walking through
the wax easier.
15.5.1. Class Diagram
The bosses related to wax are shown in figure 15.5.1.a.
figure 15.5.1.a. The Wax Class Diagram
kTextStoryBoss
kFrameItemBoss
1
1
0..1
The Wax
kFrameListBoss
1
IWaxStrand
0..m
Collection (kWaxLineBoss)
1
0..m
kWaxILGRunBoss
1
0..m
1
0..m
0..m
kWaxTextRunBoss
Collection
(TCY, WarichuuSet, etc.)
kWaxLeaderRunBoss
kWaxLeaderTextRunBoss
manages the wax for a story. The wax is organised as a
hierarchy of collections and leaf runs. The most common case is a series of wax
lines each with a collection of wax runs. A wax line is created for each line of
text in a frame. A wax run is created each time the appearance of the text
kFrameListBoss
Adobe InDesign Programming Guide
15.5. The Wax Interfaces
501
changes within the line. Examples of this are when the point size or font
changes or when the flow of text in a line is interrupted because text wrap
makes text flow around another frame.
Interface IWaxStrand on kFrameListBoss owns all of the wax lines for a story
and is the root of the wax tree.
typically represents the wax for a single line of text. (Warichuu is
an exception to this, where the Warichuu Set contains multiple lines. All of the
lines within the Warichuu set relate to a single kWaxLineBoss object.) Each line
owns its wax runs, collections of wax runs, or combination of runs and
collections of runs. kWaxLineBoss provides access to is children through the
IWaxCollection interface.
kWaxLineBoss
Any Boss that supports the IWaxCollection interface is a parent, in the wax
hierarchy, to boss objects that support the IWaxRun interface. A boss can
support both the IWaxCollection and IWaxRun interfaces, creating levels in the
hierarchy.
kWaxTextRunBoss is the object that represents the wax for ordinary text. It stores
the information needed to render the glyphs and provides the interfaces that
draw, hit-test and select the text.
represents the wax for in-line frames. In-line frames allow
frames to be embedded in the text flow. An in-line frame behaves as if it were a
single character of text and moves along with the text flow when the text is
recomposed. kWaxILGRunBoss provides the drawing, hit testing and selection
behaviour for in-line frames.
kWaxILGRunBoss
502
15.5. The Wax Interfaces
The Wax
15.5.2. Interface Diagram
The interfaces related to wax are shown in figure 15.5.1.a.
figure 15.5.2.a. The Wax Interface Diagram
kFrameListBoss
IWaxStrand
IWaxIterator
kWaxLineBoss
IWaxLine
IWaxLineShape
IWaxHitTest
IWaxHilite
IWaxCollection
Iterator classes, IWaxIterator and
IWaxRunIterator are provided to
simplify access to wax lines and wax runs.
kWaxTCYLineBoss
kWaxWarichuSetBoss
kWaxWarichuLineBoss
IWaxRunIterator
kWaxTextRunBoss
IWaxRun
IWaxHitTest
IWaxRunShape
IWaxRunText
IWaxCollection
IWaxRun
IWaxHitTest
IWaxRunShape
IWaxRunText
IWaxGlyphs
IWaxRenderData
IWaxGlyphsTOPTransform
Additional wax runs, such as kWaxILGRunBoss and
kWaxLeaderTextRun have been left out of this
diagram. Those classes can be found in the object model
reference documentation, see the API index in the
browsable HTML-based SDK documentation
Adobe InDesign Programming Guide
15.5. The Wax Interfaces
15.5.3. Navigation Diagram
The methods used to navigate between a story or a frame and the wax are
shown in figure 15.5.d.
figure 15.5.d. Navigating from a Story or a Text Frame to The Wax
kTextStoryBoss
kSplineItemBoss
ITextModel
IHierarchy
QueryStrand(kFrameListBoss, IID_IWAXSTRAND)
kFrameListBoss
kMultiColumnItemBoss
IFrameList
IHierarchy
IWaxStrand
UID GetNthFrameUID(int32 n)
or
ITextFrame* QueryNthFrame(int32 n)
IWaxLine* IWaxIterator::GetFirstWaxLine()
kWaxLineBoss
IWaxLinekWaxLineBoss
IWaxLine
IWaxLine
kFrameItemBoss
IHierarchy
ITextFrame
IWaxRun* IWaxRunIterator::GetFirstRun()
QueryFrameList()
UID GetFrameUID()
kWaxTextRunBoss
†
IWaxRun
kWaxTextRunBoss
IWaxRun
IWaxRun
† IWaxLine* IWaxRun::GetWaxLine()
IWaxGlyphIterator (from IWaxLine) is an alternative to IWaxRunIterator which walks
the glyphs. IWaxGlyphIterator skips runs that don’t have glyphs.
503
504
15.5. The Wax Interfaces
The Wax
Interface IFrameList on kFrameListBoss provides the range of characters
displayed in each frame (kFrameItemBoss). Accessor methods on this interface
give the index into the text model of the first character displayed along with the
total number of characters shown in each frame.Similar accessors are provided
on interface ITextFrame. These accessors allow your plug-in to determine the
wax lines being displayed by a frame. You can find sample code showing how
this is done in “Working With The Wax” on page 507.
15.5.5. IWaxStrand
kFrameListBoss . . . . . . . . . . . . . . . . . . . . . . . IWaxStrand
owns the wax for a story. A callback interface is provided to allow
the wax for a story to be iterated over.
IWaxStrand
IWaxStrand also implements the
core composition engine, known as the frame
composer, that flows the story’s text into frames.
Detailed interface reference for each of the interfaces can be found in the
browesable API reference.
15.5.6. IWaxIterator
heap allocated C++ object . . . . . . . . . . . . . . . . . . IWaxIterator
wraps up the raw callback based iterator exposed by IWaxStrand
giving a simple class that can be used to iterate wax lines. Note that
IWaxIterator does not derive from IPMUnknown. It is allocated on the heap so
the caller is responsible for deleting the object once it is no longer required.
IWaxIterator
Sample code showing how to use IWaxIterator can be found in “Iterating the
Wax for a Story” on page 507. IWaxIterator method documentation can be
found in the browsable API documentation (at
{SDK}\documentation\webdocs\iw\IWaxIterator.h)
15.5.7. IWaxLine
kWaxLineBoss . . . . . . . . . . . . . . . . . . . . . . . . . IWaxLine
manages the hierarchy for the line. It references the frame that
displays the line, the origin and span of the text model characters displayed and
provides methods to add and remove wax runs. It also stores the position of the
line and many other properties such as leading.
IWaxLine
Adobe InDesign Programming Guide
15.5. The Wax Interfaces
505
15.5.8. IWaxLineShape/IWaxRunText
kWaxLineBoss . . . . . . . . . . . . . . . . . . . . . . IWaxLineShape
kWaxTextRunBoss . . . . . . . . . . . . . . . . . . . . . . IWaxRunText
kWaxILGRunBoss . . . . . . . . . . . . . . . . . . . . . . IWaxRunText
IWaxLineShape and IWaxRunText draw wax lines and runs respectively and
store the ink bounds of the object. The ink bounds is a rectangle within which
the object draws its contents.
The implementation of IWaxLineShape on a wax line requests each of its wax
runs, its children if you like, to draw their wax. IWaxLineShape also provides
methods for the accessing the text adornments that are attached to the wax (see
the “Adding Text Attributes and Adornments” chapter).
15.5.9. IWaxHitTest
kWaxLineBoss . . . . . . . . . . . . . . . . . . . . . . . IWaxHitTest
kWaxTextRunBoss . . . . . . . . . . . . . . . . . . . . . . IWaxHitTest
kWaxILGRunBoss . . . . . . . . . . . . . . . . . . . . . . IWaxHitTest
provides methods for hit testing the wax. Each boss listed above
provides an implementation to hit test data of its own particular kind i.e. a line,
a run of normal text or an in-line frame.
IWaxHitTest
Hit testing of the wax involves the translation of a point in the inner coordinate space of a frame into the index1 of the closest glyph within a wax line
or run. If the point cannot be found one of the constants shown in figure
15.5.9.a will be returned.
figure 15.5.9.a. IWaxHitTest::HitTest()Return Values
enum {kHitBefore=-1, kHitToTheRight=0x7FFFFFFE, kHitBelow=0x7FFFFFFF};
Hit testing text in general involves the translation of a point in user interface
space to a unique TextIndex in the text model. A related interface,
ITextFrame::HitTest(), wraps up the hit testing of wax within a frame and in
most cases removes the need to call IWaxHitTest directly.
1. Note that this is not a TextIndex into the text model. It’s the index of a glyph within the
wax line or run.
506
15.5. The Wax Interfaces
The Wax
15.5.10. IWaxLineHilite
kWaxLineBoss . . . . . . . . . . . . . . . . . . . . . . IWaxLineHilite
IWaxLineHilite provides methods that hilite the wax.
Hiliting in general involves drawing a text selection on a range of text indicated
by the TextIndex of the first character wanted and the number of characters to
be selected. A related interface, ITextFrame::DrawHilite(), wraps up
highlighting of characters within a frame and in many cases removes the need
to call IWaxHilite directly.
15.5.11. IWaxRun
{Leaf Runs}
kWaxTextRunBoss . .
kWaxILGRunBoss . . .
kWaxAnchorRunBoss .
{Collections}
kWaxWarichuSetBoss .
kWaxWarichuLineBoss
kWaxTCYLineBoss . .
. . . . . . . . . . . . . . . . . . . . . IWaxRun
. . . . . . . . . . . . . . . . . . . . . IWaxRun
. . . . . . . . . . . . . . . . . . . . . IWaxRun
. . . . . . . . . . . . . . . . . . . . . IWaxRun
. . . . . . . . . . . . . . . . . . . . . IWaxRun
. . . . . . . . . . . . . . . . . . . . . IWaxRun
IWaxRun represents a node in the wax heirarcy. The node will represent a run of
similarly formatted text (a leaf run) or a group of such runs (a collection).
manages a reference to the collection that owns the run (a reference to
its parent) and maintains the TextIndex of the first character in the wax run.
The position of the run stored as an offset relative to the position of the parent
wax line.
IWaxRun
15.5.12. IWaxRenderData
kWaxRunBoss . . . . . . . . . . . . . . . . . . . . . . IWaxRenderData
stores properties that control the appearance of the glyphs in
the run. Paragraph composers use the drawing style,
IDrawingStyle::FillOutRenderData(IWaxRenderData * data), to populate this
interface with information. This is described in the “Text Composition”
chapter.
IWaxRenderData
15.5.13. IWaxGlyphs
kWaxRunBoss . . . . . . . . . . . . . . . . . . . . . . . . IWaxGlyphs
kWaxILGRunBoss . . . . . . . . . . . . . . . . . . . . . . . IWaxGlyphs
Adobe InDesign Programming Guide
15.6. Working With The Wax
507
The following method is not implemented for character glyphs (only ILG
glyphs have a reasonable response to this query) :
PMRect GetStrokeBoundingBox(const PMMatrix *pMatrix=nil) const=0;
IWaxGlyphs stores the identifier (GlyphID) and width of each glyph in the run
and maintains the number of characters, or span, held by the run.
15.6. Working With The Wax
This section provides practical examples of how to program using the wax API.
15.6.1. Iterating the Wax for a Story
The sample code in figure 15.6.1.a iterates over each wax line and returns the
sum total of the leading for all the lines of text in a story.
figure 15.6.1.a. Iterating the Wax for a Story
static PMReal GetTotalLeading(ITextModel* textModel)
{
PMReal totalLeading = 0.0;
do
{
InterfacePtr<IWaxStrand> waxStrand (((IWaxStrand*)
textModel->QueryStrand(kFrameListBoss, IID_IWAXSTRAND)));
if (waxStrand == nil)
break;
InterfacePtr<IFrameList> frameList(waxStrand, UseDefaultIID());
if (frameList == nil)
break;
const int32 kNoDamage = -1;
if (frameList->GetFirstDamagedFrameIndex() != kNoDamage)
break;
K2::scoped_ptr<IWaxIterator> waxIterator = waxStrand>NewWaxIterator();
if (waxIterator == nil)
break;
TextIndex start = 0;
IWaxLine* waxLine = waxIterator->GetFirstWaxLine(start);
while (waxLine != nil)
{
totalLeading += waxLine->GetTOFLineHeight();
waxLine = waxIterator->GetNextWaxLine();
}
} while (false);
return totalLeading;
}
508
15.6. Working With The Wax
The Wax
Note how the code checks that the wax is not damaged before using the data.
Since all the wax lines for the story are being scanned IFrameList is used to
check that there are no damaged frames. You can find more information about
damage in the “Text Composition” chapter.
K2::scoped_ptr is used to make sure the IWaxIterator is deleted automatically
when it goes out of scope.
You must keep your IWaxIterator in scope to keep an IWaxLine interface
pointer valid. The code sample shown in figure 15.6.1.b does not work.
figure 15.6.1.b. Common error caused when IWaxIterator is not kept in scope
static IWaxLine* QueryWaxLineContaining
(
IWaxStrand* waxStrand,
const TextIndex& textIndex
)
{
IWaxLine* line = nil;
do
{
K2::scoped_ptr<IWaxIterator> waxIterator =
waxStrand->NewWaxIterator();
if (waxIterator == nil)
break;
IWaxLine* waxLine = waxIterator->GetFirstWaxLine(textIndex);
if (waxLine == nil)
break;
line = waxLine;
line->AddRef();
//Associated IWaxLine is no longer valid when IWaxIterator
// is destructed.
} while(false);
return line; // Not
a valid IWaxLine
}
If you want to maintain references to several different wax lines simultaneously
you should keep a wax iterator in scope for each wax line. The sample code
discussed in “Estimating the Depth of Text in a Frame” on page 509 shows how
to do this.
Adobe InDesign Programming Guide
15.6. Working With The Wax
509
15.6.2. Estimating the Depth of Text in a Frame
The depth of the text in a frame, for horizontal text, can be roughly estimated
as the y position of the last line of wax in the frame minus the y position of the
first line plus the leading for the first line. The estimate is illustrated for a
simple text frame in figure 15.6.2.a.
figure 15.6.2.a. Estimating the Depth of Text In A Frame
y position of first line
first line leading
y position of last line
Note that this estimate does not account for other factors which affect the
position of the baseline for the first line of text in the frame (for example first
baseline offset setting for the frame or text wrap settings on overlapping
frames). However this estimate works well for many situations and allows the
depth to be calculated solely from information available from the wax.
The code sample in the SnipTextEstimateDepth.cpp showshow to scan the wax
lines for a frame to calculate the estimate.
The method IParcelList::RecomposeThruNthParcel() is used to ensure that
the text is fully composed. If it is not the wax may be inaccurate and should not
be relied upon.
ITextFrame
and IFrameList are described in the “Text Composition” chapter.
15.6.3. Creating Wax Lines and Wax Runs
Wax lines and wax runs are created by the paragraph composer. Each object is
created using CreateObject() and then filled out with the appropriate
information and tied into the wax hierarchy by the composer. The samples
found in {SDK}\samplecode\text\singlelinecomposer\ and
510
15.7. Summary
The Wax
{SDK}\samplecode\text\composerj\ are paragraph composers that work on a
single line at a time. The samples demonstrate the construction of wax lines
and wax runs.
15.7. Summary
This chapter described the output of text composition - the wax. It showed how
the wax represents fully formatted text. It illustrated how wax is organised and
showed how plug-ins can access the data it holds. It described the bosses
involved and the interfaces used to draw, hit test and select text. Finally it
presented some practical samples of code that uses the wax.
You may want to know more about how the wax gets created. If so you need to
read the “Text Composition” chapter.
15.8. Review
You should be able to answer the following questions:
1. What is wax? (15.3., page 486)
2. What is a wax line and what type of information does it store? (15.4.1., page
487)
3. What is a wax run and what type of information does it store? (15.4.2., page
489)
4. What is a character? (15.4.1., page 487)
5. What is a glyph? (15.4.1., page 487)
6. Each time the appearance of text changes in a line a wax run is created to
describe the location, metrics and appearance of the glyphs. Give another
reason why new wax runs are created. (15.4.9., page 497)
7. What is a wax iterator? (15.5.6., page 504)
8. Which interface would you use to find the composed width of a line? (15.5.7.,
page 504)
9. Which interface would you use to find the composed width of a run?
(15.5.11., page 506)
10. Which interface would you use to find the composed width of a glpyh?
(15.5.13., page 506)
11. Which interface would you use to find the composed style of a glyph?
(15.5.12., page 506)
Adobe InDesign Programming Guide
15.9. Exercises
511
15.9. Exercises
15.9.1. Reporting the Widest Line in a Frame
Write a code sample that examines the selection to see if it is a text frame. Then
scan the wax lines for the frame and report the width of the widest line.
512
15.9. Exercises
The Wax
16.
Text Composition
16.0. Overview
This chapter describes the process by which text gets composed and explains
how plug-ins can recompose text.
16.1. Goals
The questions this chapter answers are:
1. What is text composition?
2. What is damage?
3. What is recomposition?
4. What is a paragraph composer?
5. When does composition occur?
6. How is the text composed?
7. How can a plug-in control recomposition?
8. How can a plug-in discover that text has been recomposed?
16.2. Chapter-at-a-glance
“Key concepts” on page 514 explains the architecture involved in the
composition of text.
“Interfaces” on page 522 describes the interfaces that control text composition.
“Frequently asked questions (FAQ)” on page 524 answers often asked questions
concerning the composition of text.
“Summary” on page 528 provides a summary of the material covered in this
chapter.
table 16.1.a. version history
Rev
Date
Author
Notes
2.0
18-Dec-02
Seoras Ashby
Update content for InDesign 2.x API
0.3
14-Jul-00
Seoras Ashby
Adrian O’Lenskie
Third Draft
513
514
16.3. Key concepts
Text Composition
“Review” on page 528 provides questions to test your understanding of the
material covered in this chapter.
“Exercises” on page 529 provides suggestions for other tasks you might want to
attempt.
16.3. Key concepts
16.3.1. Text composition
figure 16.3.1.a. Text composition
Text Layout
frames/
parcels
The Wax
wax lines
Text Composition
Fonts
glyphs
story thread
characters and text attributes
The Text Model
Text composition is the process that converts text content into its composed
representation, the wax. It flows text content from a story thread into a layout
representated by parcels in a parcel list. Specifically, composition maps the
character1 code data and the attributes that describe the desired appearance of
the text into glyphs2 and arranges them into words, lines and paragraphs. It
uses the parcels associated with the story thread’s text as containers that define
the areas where text can flow. As output composition generates a wax line for
each line of text. The process is illustrated in figure 16.3.1.a. Story threads are
described in the “Text model” chapter, parcels in the “Text layout” chapter and
1. The term character denotes a member of an alphabet or a character code (Unicode,
ASCII)
2. The term glyph indicates a member of a font.
Adobe InDesign Programming Guide
16.3. Key concepts
515
the wax in “The wax” chapter. Please refer to these chapter for more
information on these topics.
An example text frame with no formatting changes is shown in figure 16.3.1.b.
Without exposing the details of how the text actually gets composed the objects
that represent the story, the frame and the composed text are shown in figure
16.3.1.b. Text composition creates the wax lines (kWaxLineBoss) and their
associated wax runs (kWaxRunBoss) using the primary story thread’s content
and layout as input. The wax lines are added to the wax strand (IWaxStrand).
Text composition also maintains the range of characters displayed in each
parcel/frame (see the “Span” section in the “Text layout” chapter for more
information).
516
16.3. Key concepts
Text Composition
figure 16.3.1.b. Sample text frame with no formatting changes representation
kTextStoryBoss
ITextModel
ITextStoryThread
kSplineItemBoss
IHierarchy
kFrameListBoss
IFrameList
IParcelList
ITextParcelList
ITextParcelListData
ITiler
IWaxStrand
kWaxLineBoss
kWaxLineBoss
IWaxLinekWaxLineBoss
IWaxLine
IWaxLine
kWaxTextRunBoss
kWaxTextRunBoss
kWaxTextRunBoss
IWaxRun
IWaxRun
kMultiColumnItemBoss
IHierarchy
kFrameItemBoss
IHierarchy
IParcel
ITextTiler
ITextGrid
ITextFrame
16.3.2. The phases of text composition
There are two distinct phases of text composition, damage and recomposition.
The term damage refers to changes that invalidate the wax for a range of
composed text. Inserting text and modifying frame size are examples of
changes that cause damage. The term recomposition refers to the process that
repairs the damage and updates the wax to reflect the change.
Adobe InDesign Programming Guide
16.3. Key concepts
517
Text composition toggles the wax between the states shown in figure 16.3.2.a.
The flow of damage and recomposition is shown in figure 16.3.2.b.
figure 16.3.2.a. The wax state
Start
Recomposition completed
Damaged
Do Recomposition
Not Damaged
The text model or text layout is updated
figure 16.3.2.b. Damage and recomposition, the phases of text composition
Plug-in
Update
The Text Model
MarkDamage
characters
+
text attributes
Update
Recompose
MarkDamage
Fonts
glyphs
Text
Composition
Text Layout
parcels/
frames
MarkDamage
wax lines
The Wax
DetectDamage
Recompose
Background
Composition
Figure 16.3.2.b shows that a plug-in can update the text model or text layout.
These updates cause the wax, the composed representation of the text, to be
damaged.
Text composition exposes interfaces that mark the damaged story, frame
parcels and wax. The damage recording flow is represented by the dotted lines
518
16.3. Key concepts
Text Composition
in figure 16.3.2.b. Text composition also exposes interfaces that allow text to be
recomposed. The recomposition flow is represented by the solid lines.
Background composition (see “Background composition” on page 521) is a
separate process that drives text composition. It runs as an idle task when the
application has no higher priority tasks.
For example say the plug-in illustrated in figure 16.3.2.b is the text editor. In
response to typing the plug-in processes a command to insert the typed
characters into the text model. This command calls text composition interfaces
that record the damage caused. Background composition detects the damage
and recomposes the affected text.
16.3.3. Damage
The term damage refers to changes that invalidate the wax for a range of
composed text. Damage is recorded by marking the affected stories, parcels,
frames and wax. The damage indicates where recomposition is required and
the type of damage that has to be repaired.
The change counter on the frame list is incremented any time something
happens that causes damage. No notification is broadcast when the change
counter is incremented, so you can't immediately catch the change. However
the method shown in figure 16.3.3.a provides a very useful indication that a
change that affects text has occurred.
figure 16.3.3.a. IFrameList::GetChangeCounter
//Returns a counter which is incremented (and eventually rollover)
// each time any Parcel in any Frame in the FrameList goes from
// undamaged to damaged. It is thus a useful indication of when some
// Text in the FrameList has been damaged and will be re-composed.
virtual uint32 GetChangeCounter() const = 0;
Damage drives and optimises the recomposition process. For example
recomposition might be able to shuffle existing wax lines around between
frames to repair damage and avoid recomposing the text from scratch. Damage
is categorised based on the action that caused it:
• Insert damage occurs when text is inserted.
• Delete damage occurs when a range of text is deleted.
Adobe InDesign Programming Guide
•
•
•
•
•
16.3. Key concepts
519
Change damage occurs when a range of text is replaced or when the text
attributes that apply to a range of text are modified.
Resize damage occurs when a frame is resized.
Rect damage occurs when text wrap or text inset is applied.
Move damage occurs when a frame is moved.
Keeps damage occurs when a line must be pushed to the start of a new
frame to eliminate orphans and widows. These are words or single lines of
text that become separated from the other lines in a paragraph as depicted
in figure 16.3.3.b. An orphan is said to occur when the first line of a
paragraph becomes separated from the rest of the paragraph body. A widow
is said to occur when the last line of a paragraph becomes separated from
the rest of the paragraph body.
figure 16.3.3.b. Orphans(left) and Widows(right)
•
Destroyed damage occurs when some combination of the above types of
damage occurs. When this happens the existing wax for the affected range
must be recomposed.
You should check for damage before relying on the information stored in the
wax or the frame spans (see interface ITextFrame in the “Text Layout” chapter).
If your plug-in detects damage it can either stop with a suitable error or it can
recompose the text.
16.3.4. Recomposition
Recomposition is the process by which text is converted from a sequence of
characters and attributes into the wax i.e. fully formatted paragraphs ready for
display. The control and the functional aspects of recomposition can be
separated into:
• Interfaces that control text composition(see “Interfaces” on page 522);
520
16.3. Key concepts
•
•
Text Composition
The wax strand that manages the wax for the story;
Paragraph composers that create the wax for a line or paragraph.
16.3.5. The wax strand
The wax strand (IWaxStrand) manages the wax for a story and is responsible for
updating the wax to reflect changes in the text model or text layout. It, rather
than a paragraph composer, controls the existing wax and determines when
and where a paragraph composer needs to be used to create new wax. It also
manages the overall damage recording process.
The main text recomposition methods1 are IWaxStrand::RecomposeThisFrame
and IWaxStrand::RecomposeThisParcel. The recomposition methods on
interfaces like IFrameList, IFrameListComposer delegate the actual work to
these IWaxStrand methods. The life cycle of the wax can be described as:
1. The wax strand is informed that a range in the text model has been
changed. In response the wax strand locates the wax lines that represent this
range and marks them damaged.
2. On the next recomposition pass the wax strand
(IWaxStrand:RecomposeThisParcel) finds the first damaged wax line in the
story and asks a paragraph composer to recompose.
3. The paragraph composer creates new wax lines and applies them to the wax
strand (IWaxStrand::ApplyComposedLine) thus destroying any existing wax
lines that represent the same range in the text model.
4. The wax strand repeats this process till it finds no more damaged wax lines
or it reaches the end of the frame.
16.3.6. Paragraph composers
A paragraph composer (IParagraphComposer) takes up to a paragraph worth
of text and arranges it into lines to fit a layout. It creates the wax that represents
the composed text. Plug-ins can introduce new paragraph composers. See the
“Paragraph composers” chapter for more information.
The text composition architecture is designed for paragraph-based
composition. The most significant implication of this design decision is that
any change to text or attributes results in at least one paragraph’s composition
information being re-evaluated. For example, inserting a single character into a
1. These methods are not called directly by third party plug-ins.
Adobe InDesign Programming Guide
16.3. Key concepts
521
paragraph can potentially result in changes to any or all of the line breaks in the
paragraph, even those preceeding the inserted character.
16.3.7. Shuffling
The process of avoiding recomposing text and simply moving existing wax lines
up or down is called shuffling. The performance improvement gained by
shuffling is very significant.
The wax strand can determine if a wax line was was damaged because of
something that occurred around the wax line and not because the range of text
it represents changed. If this is true then the wax strand knows that the net
result of recomposing the text would simply move the wax line up or down.
The content of the wax line after recomposition would be identical to its
current content.
Consider the example of selecting an entire paragraph of text and deleting it.
The following paragraph has not changed so it does not need to be
recomposed. By pulling the following paragraph up to the position occupied by
the deleted paragraph the wax strand is able to avoid the cost of recomposition
while still achieving the same outcome.
When shuffling the wax strand has to implement some of the behaviours of a
paragraph composer. For example it has to deal with space before and after
paragraph attributes.
16.3.8. Vertical justification
Vertical justification moves wax lines up and down within the container that
displays them according to some rules. For example the lines can gravitate to
the top, the centre, the bottom or be justified to fill the available space. The wax
strand is responsible for vertical justification and this mechanism is not
extensible by third party plug-ins.
16.3.9. Background composition
Background composition looks for damage and fixes it by calling for
recomposition. It runs in the background as an idle task
(IID_ICOMPOSITIONTHREAD on kSessionBoss) and recomposes text. Each time it
is called the task the following actions listed in order of priority:
1. recompose visible frames of damaged stories in the frontmost document;
2. recompose other damaged stories in the frontmost document;
522
16.4. Interfaces
Text Composition
3. recompose damaged stories in other open documents.
The actions are performed until the time slice allocated for background text
composition expires. Background composition requests recomposition by
calling the method shown in figure 16.3.9.a.
figure 16.3.9.a. IFrameListComposer::RecomposeUntil
virtual bool16 RecomposeUntil( TextIndex index, UIDRef frame,
IdleTimer *timeCheck);
16.3.10. Recomposition transactional model
Plug-ins use commands to update the input data that drives text composition
(the text model and text layout). The commands cause damage to occur.
Recomposition subsequently recomposes the text and generates the wax to
reflect the changes. However, recomposition does not execute within the scope
of a command. Instead a database transaction is begun and ended by the wax
strand around the recomposition process. This means that recomposition is
not directly undoable. However the commands used to update the input data
are. Undo causes damage and recomposition repairs it to ensure the wax (i.e.
the text displayed) reflects the state of the text model and text layout.
16.3.11. Recomposition notification
Interface IRecomposedFrames on the frame list (kFrameListBoss) keeps track of
which frames have been recomposed so that text frame observers can be
notified when recomposition completes. When the
BroadcastRecompositionComplete method is called each affected column
(kFrameItemBoss) receives notification that it has been recomposed. Observers
need to attach to the kFrameItemBoss in which they are interested and watch for
the Update() method being called with theChange == kRecomposeBoss and
protocol==IID_IFRAMECOMPOSER.
16.4. Interfaces
16.4.1. Damage
Use the interface methods shown in figure 16.4.1.a to detect damage. The
damage bookkeeping methods used to record the damage are not called directly
by third party plug-ins. The text subsystem calls these methods as necessary in
response to changes that affect text.
Adobe InDesign Programming Guide
16.4. Interfaces
523
figure 16.4.1.a. Damage enquiry interfaces and methods
Interface
Method
IStoryList
GetLastDamagedStory
CountDamagedStories
GetNthDamagedTextModelUID
IFrameList
GetFirstDamagedFrameIndex
IFrameDamageRecorder
GetCompState
IWaxLine
IsDamaged
IsGeometryDamaged
IsKeepsDamaged
IsContentDamaged
IsDestroyed
IParcelList
GetFirstDamagedParcelIndex
ITextParcelListData
GetIsDamaged
GetFirstDamagedParcelIndex
ITextParcelList
GetIsDamaged
GetFirstDamagedParcelIndex
Notes
16.4.2. Recomposition
Use the interface methods shown in figure 16.4.2.a to request recomposition.
figure 16.4.2.a. Recomposition interfaces and methods
Interface
Method
Notes
IFrameList
QueryFrameContaining
Helper method that causes
recomposition. Set the leanLeftSide
parameter to kFalse if you want the
frame returned to contain the given text
index or range.
IFrameListComposer
RecomposeThruNthFrame
RecomposeThruTextIndex
Controls recomposition of frames in the
frame list (kFrameListBoss). The methods
delegate to the parcel list composer
(ITextParcelListComposer).
IFrameComposer
RecomposeThruThisFrame
IFrameComposer controls
recomposition of a frames. The methods
delegate to the wax strand (IWaxStrand)
which does the real work.
524
16.5. Frequently asked questions (FAQ)
Interface
ITextParcelListComposer
Text Composition
Method
RecomposeThruNthParcel
RecomposeThruTextIndex
IGlobalRecompose
Notes
Controls recomposition of parcels in a
parcel list. The methods delegate to the
wax strand (IWaxStrand) which does the
real work.
Provides methods that can be used to
force all stories to recompose. The
interface marks damage that forces
recomposition to recompose the
damaged elements even though they
have not really been changed
The interfaces and methods below are not normally called by third party plugins but play a central role in the control of recomposition.
figure 16.4.2.b. Recomposition interfaces and key methods
Interface
IWaxStrand
Method
RecomposeThisFrame
RecomposeThisParcel
Notes
See “The wax strand” on page 520.
IRecomposedFrames
See “Recomposition notification” on
page 522.
IParagraphComposer
See “Paragraph composers” on
page 520.
16.5. Frequently asked questions (FAQ)
If you do not find your question in the list below please check the FAQ in the
“Paragraph composers” chapter. It contains more answers to questions relating
to the composition of text.
16.5.1. What is text composition?
See “Text composition” on page 514.
16.5.2. What is damage?
See “Damage” on page 518.
16.5.3. What is recomposition?
See “Recomposition” on page 519.
16.5.4. What is the wax strand?
See “The wax strand” on page 520.
Adobe InDesign Programming Guide
16.5. Frequently asked questions (FAQ)
525
16.5.5. What is a paragraph composer?
See “Paragraph composers” on page 520.
16.5.6. What is background composition?
See “Background composition” on page 521.
16.5.7. How do I recompose text?
There are several ways to do this but first you should ask your self “Why should
I need to recompose text in a story?”. Damaged text requiring recomposition is
normally fixed up by background composition. However your code may find
the text it is interested in is damaged and if so it may need to force
recomposition to fix up this damage. For example you should always check for
damage before scanning the wax or relying on any spans that indicate the range
of text stored in a frame or parcel.
You can recompose text within a story either by the index ito the text model
(TextIndex), or by the visual container used to display the text (a frame or
parcel). The most general purpose approach is to use the parcel list composer
(ITextParcelListComposer) which will work for any text that can be composed.
It will work regardless of whether the text is displayed in frame or a table cell for
example. Note that you must not assume that all text in the text model can be
composed. Some features may store text in the text model that is never
composed for display. An example of this might be hidden text.
The figures below show the most common approaches used to force the
recompistion of text.
figure 16.5.7.a. Recomposing story text by TextIndex using ITextParcelListComposer
// Recompose text up to a given TextIndex. By using the parcel list composer
// you can compose text that is displayed in frames, tables or any
// other feature supports text composition.
static void RecomposeThruTextIndex(ITextModel* textModel,
TextIndex at)
{
if (at >= 0 && at < textModel->TotalLength()) {
526
16.5. Frequently asked questions (FAQ)
Text Composition
InterfacePtr<ITextParcelList> textParcelList(
textModel->QueryTextParcelList(at));
InterfacePtr<ITextParcelListComposer> textParcelListComposer(
textParcelList, UseDefaultIID());
if (textParcelListComposer) {
textParcelListComposer->RecomposeThruTextIndex(at);
}
}
}
figure 16.5.7.b. Recomposing by parcel using ITextParcelListComposer
// Recompose text in the given parcel, and preceeding damaged parcels.
static void RecomposeThruParcel(IParcel* parcel)
{
InterfacePtr<IParcelList> parcelList(parcel->QueryParcelList());
InterfacePtr<ITextParcelList> textParcelList(parcelList,
UseDefaultIID());
InterfacePtr<ITextParcelListComposer> textParcelListComposer(
textParcelList, UseDefaultIID());
if (textParcelListComposer) {
textParcelListComposer->RecomposeThruNthParcel(
parcel->GetParcelIndex());
}
}
figure 16.5.7.c. Recomposing story text by TextIndex using IFrameListComposer
// Recompose text in the primary story thread up to a given TextIndex.
static void RecomposeThruTextIndexByFrameList(ITextModel* textModel,
TextIndex at)
{
if (at >= 0 && at < textModel->GetPrimaryStoryThreadSpan()) {
InterfacePtr<IFrameList> frameList(
textModel->QueryFrameList());
InterfacePtr<IFrameListComposer> frameListComposer(
frameList, UseDefaultIID());
if (frameListComposer) {
frameListComposer->RecomposeThruTextIndex(at);
}
}
}
figure 16.5.7.d. Recomposing by text frame using IFrameComposer
// Recompose text in the given frame, and preceeding damaged frames.
static void RecomposeThruFrame(ITextFrame* textFrame)
{
InterfacePtr<IFrameComposer> frameComposer(textFrame,
Adobe InDesign Programming Guide
16.5. Frequently asked questions (FAQ)
527
UseDefaultIID());
if (frameComposer != nil) {
frameComposer->RecomposeThruThisFrame();
}
}
16.5.8. How do I recompose all stories in a document?
IGlobalRecompose provides methods that can be used to force all stories to
recompose. The interface marks damage that forces recomposition to
recompose the damaged elements even though they have not really been
changed. The code in figure 16.5.8.a shows IGlobalRecompose can be used.
figure 16.5.8.a. Recompose all stories ina document
static void RecomposeAllStories(IDocument* document)
{
InterfacePtr<IGlobalRecompose> globalRecompose(document,
UseDefaultIID());
if (globalRecompose != nil) {
globalRecompose->RecomposeAllStories();
globalRecompose->ForceRecompositionToComplete();
}
}
16.5.9. Can I be notified when text is recomposed?
The notification involved is described in section “Recomposition notification”
on page 522. Observing this is difficult since you’d need to maintain an
observer on each frame (kFrameItemBoss). Check out “Can I observe changes
that affect text?” on page 527for a suggested alternative approach.
16.5.10. Can I observe changes that affect text?
This quickly becomes complex as there are many types of change that affect
text. For example changes to the geometry of the text layout (e.g. resize and text
inset) could be observed using a document observer. Changes to character and
text attributes could be observed by attaching an observer to each text model or
interest. Changes to text styles could be observed by attaching observers to the
style name tables in the workspace. But you get the idea, it quickly becomes
difficult to arrange.
The trick is not to try and observe everything, but instead to be aware that
recomposition has occurred. Any change to text, attributes, styles, layout, etc.
that may affect lines breaks will cause damage. The change counter on the
frame list (IFrameList::GetChangeCounter) is incremented any time something
528
16.6. Summary
Text Composition
happens that means recomposition is needed. No notification is broadcast
when the change counter is incremented, so you can't immediately catch the
change, but in general immediate feedback isn't needed. Usually the fact a
something has changed in a way that affects text only needs to be determined at
fixed points in time.
For example you may wish to export a story from InDesign to a copy editor
application. When the story is re-imported you want to tell the user about
changes to the layout or text styling that have been made through InDesign.
You can arrange this by caching the value of IFrameList::GetChangeCounter at
the time you export the story and compare this cached value to the actual value
when you re-import. If you really have to notify users when layout changes are
made that affect text you could check IFrameList::GetChangeCounter using an
idle task.
16.6. Summary
This chapter described text composition. It showed how it is divided into two
distinct phases: damage and recomposition. The overall relationship between
stories and the containers that display the wax created by text composition was
described. The purpose and function of major interfaces involved in text
composition were documented.
16.7. Review
You should be able to answer the following questions:
1. What is text composition? (16.3., page 514)
2. What is the wax? (16.3., page 514)
3. What is a character? (16.3., page 514)
4. What is a glyph? (16.3., page 514)
5. There are two major phases to composition. What are they called and what
is the purpose of each phase? (16.3.2., page 516)
6. What does the wax strand do? (16.3.5., page 520)
7. What does a paragraph composer do? (16.3.6., page 520)
8. Which interface would you use to recompose a parcel, a frame, a story, a
complete document? (16.5.7., page 525)
Adobe InDesign Programming Guide
16.8. Exercises
529
16.8. Exercises
16.8.1. Find the text frame that displays a given TextIndex
Use IFrameList::QueryFrameContaining to find the text frame that displays the
character with a given index (TextIndex) in the text model.
530
16.8. Exercises
Text Composition
17.
Paragraph Composers
17.0. Overview
This chapter describes paragraph composers, the components responsible for
breaking text into lines and generating its composed representation, the wax.
The chapter also explains how you can develop your own paragraph composer
plug-in. You should have an understanding of the wax before reading this
chapter (see “The Wax” chapter). You also need to understand where
paragraph composers fit into the overall text composition architecture (see the
“Text Composition” chapter).
17.1. Goals
The questions this chapter answers are:
1. What is a paragraph composer?
2. How can I implement a paragraph composer?
3. Can I introduce a new line breaking algorithm?
4. What is the compose scanner (IComposeScanner)?
5. What is drawing style (IDrawingStyle)?
6. What is composition style (kComposeStyleBoss/ICompositionStyle)?
7. How is wax created?
17.2. Chapter-at-a-glance
“Key concepts” on page 532 explains where paragraph composers fit into the
text composition architecture and describes the basics involved in typography.
“Interfaces” on page 547 describes interfaces of interest to paragraph
composers.
table 17.1.a. version history
Rev
Date
2.0
18-Dec-2002
Author
Seoras Ashby
Notes
New chapter. Content on paragraph composers extracted
from InDesign 1.x Text composition chapter and updated
for InDesign 2.x API.
531
532
17.3. Key concepts
Paragraph Composers
“Scenarios” on page 554 describes some basic situations faced when composing
text within this application.
“Sample code” on page 561 describes code assets provided on the SDK you
should refer to for reference implementations.
“Frequently asked questions (FAQ)” on page 562 provides answers to some
often asked questions related to paragraph composers and the composition of
text in general.
“Summary” on page 567 provides a summary of the material covered in this
chapter.
“Review” on page 567 provides questions to test your understanding of the
material covered in this chapter.
“Exercises” on page 567 provides suggestions for other tasks you might want to
attempt.
“References” on page 567 provides suggestions for further reading.
17.3. Key concepts
17.3.1. Paragraph composers
A paragraph composer (IParagraphComposer) takes up to a paragraph worth
of text and arranges it into lines to fit a layout. It creates the wax that represents
the text it has composed. Plug-ins can introduce new paragraph composers.
The user selects the composer to be used for a paragraph via the popout menu
on the Paragraph panel as shown in figure 17.3.1.a or by using the paragraph
style dialog (not shown). This sets paragraph attribute kTextAttrComposerBoss
to indicate the paragraph composer to be used.
Adobe InDesign Programming Guide
17.3. Key concepts
533
figure 17.3.1.a. Setting the paragraph composer
17.3.2. HnJ
The acronym HnJ stands for “hyphenation and justification”. The term is often
used in computer systems to mean the breaking of text into lines and the
spacing of text so that it aligns with the margins. You won’t find the term HnJ
used in this application’s API or documentation. However the role performed
by HnJ is similar to the role of a paragraph composer. Hyphenation is
intimately associated with line breaking. In this application the role is split out
and implemented by a hyphenation service (IHyphenationService). When a
paragraph composer requires to hyphenate a word it will use a hyphenation
service.
17.3.3. Roman typography basics
You need a good understanding of typography to attempt the task of
implementing a paragraph composer. The basics involved are introduced
below.
Roman typography uses a baseline on which the base of most glyphs are
aligned. Glyphs ascend above the baseline and some glyphs have descenders
that pierce through the baseline. The distance between successive baselines is
the line leading which is the largest leading value of all runs in the line. These
metrics are illustrated in figure 17.3.3.a.
534
17.3. Key concepts
Paragraph Composers
Note that in this application the distance between the top of a frame and the
baseline of the first line is a special case that is controlled by a property of the
parcel called first baseline offset. This is described in more detail in “First
baseline offset” on page 542.
figure 17.3.3.a. Roman typography metrics
Top of parcel/frame
Roman metrics
Ascent
My first line,
my second line.
wax line 1 yPosition (first baseline offset is a special case)
Baseline
Descent
Leading
wax line 2 yPosition
Roman text composition involves choosing places to break text into individual
lines and justifying these lines to a fixed width. The objective of line breaking
is to split text into lines so that the space between words is well balanced. The
appearance of the text will be disturbed if the text is too loose (too much space)
or too tight (too little space). Line justification involves tuning various factors
to increase or decrease the width of a line to a target width. The key factor is the
addition and removal of space between words. There are several other factors,
notably kerning, hyphenation and ligatures. Justification is heavily dependent
on line breaking. When line breaking is done well justification should not have
to adjust inter word spacing significantly.
The evaluation of possible line breaks and the choice of those that give the best
looking text can be a sophisticated process. The line-based approach composes
text one line at a time. The Adobe single-line composer uses this approach. The
paragraph-based approach considers a network of line breaks for a paragraph
and chooses those such that no one line is overly stretched or compressed. The
Adobe Multi-line composer uses this approach. Figure 17.3.3.b contrasts the
results of the Adobe Single-line composer and the Adobe Multi-line composer.
Adobe InDesign Programming Guide
17.3. Key concepts
535
figure 17.3.3.b. Results of line-based approach(left) versus paragraph based approach(right)
Single line text composition.
Paragraph text composition.
17.3.4. Japanese typography basics
The em-box is fundamental to Japanese typography. It is a square that is equal
in dimension to the point size of the font as illustrated in figure 17.3.4.a.
figure 17.3.4.a. The em-box
Em-box
In Japanese typography line leading is the distance between the top of the
current line and the top of the next line. The line leading is equal to the line
536
17.3. Key concepts
Paragraph Composers
height plus the line aki where the line height is the largest em-box on the line
and line aki is the space between lines. Japanese designers work in terms of line
leading (gyou-okuri), and line aki (gyou-aki) interchangeably and both ways
must be supported.
figure 17.3.4.b. Japanese leading, line height and aki
Leading
Aki
Line height
Traditional Japanese typography is based around three em-box baselines, embox top, em-box centre and em-box bottom as illustrated in figure 17.3.4.c.
figure 17.3.4.c. Japanese em-box baselines
Em-box top
Em-box centre
Em-box bottom
In addition the ideographic character face, introduces two further baselines
for text. The ICF box is the bounding box that encloses the largest stroked
ideographic glyph in a font. It is closer to the actual glyph bounds than the embox and the top and the bottom ICF box baselines.
Japanese typography metrics are contrasted with Roman typography metrics in
figure 17.3.3.a.
Adobe InDesign Programming Guide
17.3. Key concepts
537
figure 17.3.e. Japanese and Roman typography metrics
Japanese
Roman
Em-box top
Ascent
ICF box top
Em-box centre
ICF box bottom
Em-box bottom
Baseline
Descent
The API provides roman, em-box and ICF box font metrics that allow a
composer to compose text on one of the six possible baselines (em-box top,
em-box centre, em-box bottom, ICF box top, ICF box bottom and roman).
Kinsoku shori, or kinsoku for short, is the process of identifying a character in
Japanese text where a line may be broken. Some characters are not allowed to
start a line, close parenthesis for example. Others are not allowed to end a line,
open parentheses for example. The application allows the user to edits sets of
such characters. A composer can use these to implement a variety of line break
strategies. The simplest approach is push-out. Push-out means the character at
the end of the line is pushed out to the next line. A more complex approach is
push-in. Push-in means the line is compressed so that the character is made to
fit in the line. In addition some characters are optionally allowed to hang
outside the margin while other non-separable characters should not be broken
across lines, ellipses for example. Typically all of these characters are some form
of Japanese punctuation.
Mojikumi is a set of rules used for Japanese text composition. The rules control
the amount of aki (space) that appears between characters depending on their
JISx40511 character classes. The rules also controls how that extra space is
expanded or compressed during full justification and push-in kinsoku.
Tsume controls the compression of an individual character, or more exactly,
the corresponding glyph in the font from which the character is displayed.
1. A Japanese Industrial Standards committee standard.for line composition.
538
17.3. Key concepts
Paragraph Composers
17.3.6. A paragraph composer’s environment
Paragraph composers are called by text composition (see the “Text
composition” chapter). When text is to be recomposed the wax strand
examines the paragraph attribute kTextAttrComposerBoss that specifies the
paragraph composer to be used and locates it via the service registry. To
recompose text the IParagraphComposer::Recompose method shown in figure
17.3.6.a must be called. This call gives the paragraph composer a context in
which to work.
figure 17.3.6.a. IParagraphComposer::Recompose
/** Determines line position and where text in the line should be broken. As output
adds a wax line(IWaxLine) to the wax strand which calls the RebuildLineToFit
method to add wax runs(IWaxRun) for the line.
@param composeScanner IN for the story being composed.
@param startingIndex IN index into the text model of first character to compose.
@param textTiler IN determines areas in the line where text can flow.
@param parcelIndex IN index into IParcelList of parcel in which yPosition lies.
@param yPosition IN top of area to flow text into (y position of preceeding line
or top of parcel if first line in parcel).
@param waxStrand IN/OUT strand to apply composed wax line (IWaxLine) to.
@result kTrue if wax line added to wax strand, kFalse otherwise.
*/
virtual bool16 Recompose(IComposeScanner* composeScanner,
TextIndex startingIndex,
ITiler* textTiler,
int32 parcelIndex,
PMReal yPosition,
IWaxStrand* waxStrand);
For example when a paragraph composer is called to compose the text shown
by the frame in figure 17.3.6.b. the context it works in is as shown. The
paragraph composer composes the text and create at least one wax line. It
accesses the character code and text attribute data for the story using the
IComposeScanner interface. It determines the areas in a line where glyphs can
flow using the ITiler interface. Finally the wax lines are applied to the
IWaxStrand interface by calling ApplyComposedLine. Note: both yPosition and
tiles are specified in the inner bounds (co-ordinate system).
Adobe InDesign Programming Guide
17.3. Key concepts
539
figure 17.3.6.b. Paragraph composer environment
-100,-15
100,15
kFrameListBoss
IWaxStrand
ApplyComposeLine
wax lines and runs
Other parcel list boss
kTextCellContentBoss
kTextStoryBoss
IComposeScanner
Recompose
IParagraphComposer
characters and effective attribute values
characters=”Aliens “
fontName=Times-Roman,
pointSize=8 point,
leading= 10 points
kFrameListBoss
ITiler
tiles
firstBaselineOffset=leading
tile [0] = [-100, -15, 100, -5]
Paragraph Composer Boss Class
17.3.7. The scanner and drawing style
The scanner (interface IComposeScanner) provides access to both the the
character and formatting (the text attributes) information from the text model
as shown in figure 17.3.7.a. The drawing style (interface IDrawingStyle)
represents the effective value of text attributes at a given index in the text
model. The drawing style cached by interfaces on kComposeStyleBoss
considerably simplifies accessing text attribute values. These interfaces remove
the need to resolve text attribute values from their representation in the text
model and the text styles it references. A drawing style applies to at least one
character. The range of characters it applies to is known as a run. For more
information on styles and overrides please read “The Text Model” chapter.
540
17.3. Key concepts
Paragraph Composers
figure 17.3.7.a. The scanner and drawing style
kTextDataStrandBoss
kParaAttrStrandBoss
kCharAttrStrandBoss
kStyleBoss
kTextStoryBoss
kStyleBoss
text attributes
IComposeScanner
kComposeStyleBoss
IDrawingStyle
ICompositionStyle
IHyphenationStyle
IJustificationStyle
drawing style (effective attribute values)
characters
Paragraph Composer Boss Class
IParagraphComposer
17.3.8. Fonts and glyphs
Fonts contain the glyphs that display characters for a typeface at a particular
size. Paragraph composers use the drawing style (IDrawingStyle) to find the
font to be used as shown in figure 17.3.8.a. The font APIs provide the metrics
required to compose the text into lines composed of a run of glyphs for each
stylistic run of text.
A font represents a typeface with a given size and style. A typeface is the letters,
numbers, and symbols that make up a design of type, Times for example. A
glyph is a shape in a font that is used to represent a character code on screen or
paper. The most common example of a glyph is a letter, but the symbols and
shapes in a font like ITC Zapf Dingbats are also glyphs. For more information
on fonts read the “Fonts” chapter.
Adobe InDesign Programming Guide
17.3. Key concepts
541
figure 17.3.8.a. Accessing a font
kComposeStyleBoss
QueryFont()
IPMFont
IDrawingStyle
QueryFontInstance()
IFontInstance
17.3.9. Tiles
Tiles (see interface ITiler/ITextTiler) represent the areas on a line into which
text can flow. Normally there .will only be one tile on a line. However text wrap
may cause intrusions which breaks up the places in the line text can go. The
tiler takes care of this as well as accounting for the effect of irregularly shaped
text containers.
Intrusions are the counterparts of tiles. Note they are not their inverse, i.e. they
do not specify the areas in the line where text cannot be flowed. From the
perspective of ITiler an intrusion is a horizontal band within a frame in which
text flow within the bounding box of the frame may be interrupted. Intrusions
can be used to optimise recomposition. They are a flag that indicates text
cannot be flowed into the entire width of a line.Intrusions are caused by text
wrap and non-rectangular frames.
It is important to recognise that the tiles returned for a line depend on the y
position at which they are requested, their depth and minimum width. The
intrusions and tiles for some sample text frames are illustrated in figure 17.3.9.a
through figure 17.3.9.e.
figure 17.3.9.a. Text frame with no intrusions
Frame
Intrusions(none)
Tiles
542
17.3. Key concepts
Paragraph Composers
figure 17.3.9.b. Effect of image frame with text wrap
Frame
Intrusions
Tiles
figure 17.3.9.c. Effect of two images with text wrap
Frame
Intrusions
Tiles
figure 17.3.9.d. Effect of text inset
Frame
Intrusions
Tiles
Intrusions
Tiles
figure 17.3.9.e. Effect of non rectangular frame
Frame
17.3.10. First baseline offset
The distance between the top of a parcel/frame and the baseline of the first line
of text it displays is controlled by the first baseline offset setting. Some
example settings are illustrated in figure 17.3.10.a.
Adobe InDesign Programming Guide
17.3. Key concepts
543
figure 17.3.10.a. First baseline offset examples
The setting controls the distance between
the top inset of the frame and the baseline
of the first line.
Use the largest leading on the line.
Leading
Use the largest ascent on the line. This
makes the top of the tallest glyph fall
below the top inset of the frame.
Ascent
Use the largest Cap Height on the line. This
makes the top of upper case letters touch
the top inset of the frame.
Cap height
17.3.11. Control characters
There are many control characters to which a paragraph composer can apply an
appropriate behaviour to correctly implement the character’s semantic intent.
Some major control characters are tabulated in figure 17.3.11.a.
figure 17.3.11.a. Control characters
Character codea
Meaning
kTextChar_CR
End of paragraph
kTextChar_SoftCR
Soft end of line
kTextChar_Space
Space.
kTextChar_Tab
kTextChar_HyphenMinus
kTextChar_DiscretionaryHyphen
kTextChar_UnicodeHyphen
Different kinds of hyphens.
544
17.3. Key concepts
Paragraph Composers
figure 17.3.11.a. Control characters
Character codea
Meaning
kTextChar_EnSpace
kTextChar_EmSpace
kTextChar_FigureSpace
kTextChar_PunctuationSpace
kTextChar_ThinSpace
kTextChar_HairSpace
kTextChar_ZeroSpaceBreak
kTextChar_ZeroSpaceNoBreak
kTextChar_FlushSpace
Special space characters.
kTextChar_ReplacementCharacter
kTextChar_Substitute
Describes a glyph that has no corresponding Unicode
character code. The GlyphID for such a character is obtained
from the drawing style (IDrawingStyle).
kTextChar_Table
kTextChar_TableContinued
Embed table. Paragraph composers shoud return control to
their caller which will handle these characters.
kTextChar_ObjectReplacementCharacter
Compose an in-line frame.
a. See TextChar.h for a full listing of control character codes.
17.3.12. In-line frames
In-line frames (kInlineBoss) allow frames to be embedded in the text flow. An
in-line frame behaves as if it were a single character of text and moves along
with the text flow when the text is recomposed. The character
kTextChar_ObjectReplacementCharacter in inserted into the text data strand to
mark the position of the in-line in the text. The in-line frames are owned by the
owned item strand (kOwnedItemStrandBoss) in the text model. Paragraph
composers use ITextModel to access this strand directly to obtain the geometry
of the frame associated with the kInlineBoss. In-line frames are represented in
the wax by their own type of wax run, kWaxILGRunBoss.
17.3.13. Table frames
Table frames (kTableFrameBoss) are owned items that are anchored on a
kTextChar_Table character embedded in the text flow. Paragraph composers
can and do compose text displayed in table cells. However they never compose
( i.e. never create wax for) the character codes related to tables,
kTextChar_Table and kTextChar_TableContinued. When a paragraph
composer encounters either of these characters it should create wax for any
buffered text and return control to its caller.
Adobe InDesign Programming Guide
17.3. Key concepts
545
17.3.14. Creating Wax
During the process of building lines a paragraph composer would normally use
some intermediate representation of the glyphs so it can evaluate potential line
break points and adjust glyph widths. The specific arrangement used will
depend on the overall feature set of the paragraph composer and is beyond the
scope of this chapter. However once the line break decisions have been made
the paragraph composer will want to create wax lines and runs.
Details on the mechanics of the creation of wax lines and runs can be found in
“The Wax” chapter. Once created the new wax lines are added to the wax strand
by calling the method shown in figure 17.3.14.a.
figure 17.3.14.a. IWaxStrand::ApplyComposedLine
virtual void ApplyComposedLine(TextIndex at, IWaxLine * newLine) = 0;
// Called by paragraph composers to add a new wax line to the wax for a story
The wax generated by a paragraph composer for the text shown in figure
17.3.6.b is depicted in figure 17.3.14.b.
546
17.3. Key concepts
Paragraph Composers
figure 17.3.14.b. Wax for single line with formatting changes
-100,-15
100,15
WaxLine
X=-100
Y=-5
Width=60.33
Origin=0
Span=17
WaxRun
X=0
Y=0
Width=22.89
Origin=0
Span=7
FontName=Times-Roman
FontMatrix=[8 0 0 8 0 0]
WaxRun
X=22.89
Y=0
Width=16.12
Origin=7
Span=3
FontName=Times-Bold
FontMatrix=[10 0 0 10 0 0]
WaxRun
X=39.01
Y=0
Width=21.32
Origin=10
Span=7
FontName=Times-Roman
FontMatrix=[8 0 0 8 0 0]
UnderlineMode=kUnderlineSingle
17.3.15. Adobe paragraph composers
The composers provided by the application under the Roman feature set are
shown in figure 17.3.15.a and under the Japanese feature set in figure 17.3.15.b.
Paragraph composers are implemented as service providers
(IK2ServiceProvider) and can be located via the service registry. The
ServiceID used to identify paragraph composers is kTextEngineService.
Adobe InDesign Programming Guide
17.4. Interfaces
547
figure 17.3.15.a. Roman paragraph composers
kParagraphComposerBoss
IParagraphComposer
IK2ServiceProvider
GetServiceID=kTextEngineService
GetName="HL Composer"
kSingleLineComposerBoss
IParagraphComposer
IK2ServiceProvider
GetServiceID=kTextEngineService
GetName="HL Single"
figure 17.3.15.b. Japanese paragraph composers
kJParagraphComposerBoss
IParagraphComposer
IK2ServiceProvider
GetServiceID=kTextEngineService
GetName="HL Composer J"
kJSingleLineComposerBoss
IParagraphComposer
IK2ServiceProvider
GetServiceID=kTextEngineService
GetName="HL Single J"
17.4. Interfaces
17.4.1. Class diagram
Paragraph composers are boss classes that implement IParagraphComposer, the
interface called by the application to compose text. To be recognised as a text
composer the boss class must also implement a text engine service
(IK2ServiceProvider) with a ServiceID of kTextEngineService. The service
must also provide a name, a translatable string, for the paragraph composer
that will be displayed in the user interface. As output composers generate wax
lines (IWaxLine) and associated wax runs (IWaxRun) for up to one paragraph of
text at a time. The class diagram of a custom paragraph composer is shown in
figure 17.4.1.a.
548
17.4. Interfaces
Paragraph Composers
figure 17.4.1.a. Custom paragraph composers class diagram
kYourParagraphComposerBoss
IParagraphComposer
IK2ServiceProvider
GetServiceID=kTextEngineService
GetName=”Your Composer"
17.4.2. IParagraphComposer
There are two distinct phases to text composition and IParagraphComposer
reflects these roles:
1. Positioning the line and, if necessary, deciding where text in the line should
break. This information is represented persistently in the wax line. Features
that affect line break decisions belong here. This is the role of the Recompose
method.
2. Positioning glyphs that represent the characters in the line and, if necessary,
adjusting their width. This information is represented by a set of wax runs
associated with the wax line. Wax runs are not persistent and must be
rebuilt for display when a wax line is read from disc. Features that affect
glyph position (paragraph alignment, justification, letter spacing, word
spacing and kerning) belong here. This is the role of the RebuildLineToFit
method.
is called when text needs to be fully recomposed. Each time this
method is called it should compose at least one line and, at most, one
paragraph of text. Recompose creates wax starting from the character in the
story indicated by startingIndex. The top of the area into which text should be
flowed is given by yPosition and composition is done using the supplied
scanner and tiler. The wax lines generated as a result are applied to the given
wax strand. Note that you are expected to create at least one wax line each time
this method is called. This holds even when it turns out that you are composing
overset text.
Recompose
figure 17.4.2.0.a. IParagraphComposer::Recompose
/** Determines line position and where text in the line should be broken. As output
adds a wax line(IWaxLine) to the wax strand which calls the RebuildLineToFit
Adobe InDesign Programming Guide
17.4. Interfaces
549
method to add wax runs(IWaxRun) for the line.
@param composeScanner IN for the story being composed.
@param startingIndex IN index into the text model of first character to compose.
@param textTiler IN determines areas in the line where text can flow.
@param parcelIndex IN index into IParcelList of parcel in which yPosition lies.
@param yPosition IN top of area to flow text into (y position of preceeding line
or top of parcel if first line in parcel).
@param waxStrand IN/OUT strand to apply composed wax line (IWaxLine) to.
@result kTrue if wax line added to wax strand, kFalse otherwise.
*/
virtual bool16 Recompose(IComposeScanner* composeScanner,
TextIndex startingIndex,
ITiler* textTiler,
int32 parcelIndex,
PMReal yPosition,
IWaxStrand* waxStrand);
is called to regenerate the wax runs for a wax line.No line
breaking or line positioning need be done here.
RebuildLineToFit
figure 17.4.2.0.b. IParagraphComposer::RebuildLineToFit
/** Positions glyphs in the line and adds wax runs(IWaxRun) to the line.
Called when a wax line is added to the wax strand by Recompose and
when a wax line is restored from disc and must be rebuilt for
display.
@param rebuildMe line to be rebuilt.
@param startingIndex index into the text model of first character in this line.
@param composeScanner for story being composed.
@param textTiler not used in this implementation, the wax line gives the tiles.
@result kTrue if wax runs successfully rebuilt for this line, kFalse otherwise.
*/
virtual bool16 RebuildLineToFit(IWaxLine* rebuildMe,
TextIndex startingIndex,
IComposeScanner* composeScanner,
ITiler* textTiler);
17.4.3. IComposeScanner
kTextStoryBoss . . . . . . . . . . . . . . . . . . . . IComposeScanner
IComposeScanner provides methods that help access character and text attribute
information from the text model.
550
17.4. Interfaces
Paragraph Composers
Figure 17.4.3.a shows QueryDataAt which gets a chunk of data from the text
model starting from a given TextIndex. It returns a pointer to the raw character
data (textchar*) and, optionally, to the drawing style and the length of the
chunk of data returned.It is recommended practice always to ask for the length
of the chunk. It is the only way you can safely know how to use the textchar*
the call returns. Sample code showing how to use QueryDataAt is given in
“Frequently asked questions (FAQ)” on page 562.
figure 17.4.3.a. IComposeScanner::QueryDataAt
virtual const textchar* QueryDataAt
(
TextIndex position,
// TextIndex you want the run to start
IDrawingStyle **newstyle,
// output: drawing style at the given position. The caller must
// release the returned interface pointer. nil if not required.
int32 *length
// output: length of the chunk of text returned. Should only be nil if the
// caller is only interested in the character or drawing style at the given position
) = 0;
// Returns a pointer to the first character in the chunk of data , nil otherwise.
The drawing style can also be acquired by one of the methods listed in figure
17.4.3.b.
figure 17.4.3.b. Acquiring IDrawingStyle from IComposeScanner
virtual IDrawingStyle* GetCompleteStyleAt
(
TextIndex position,
int32 *lenleft = nil
) = 0;
virtual IDrawingStyle* GetParagraphStyleAt
(
TextIndex position,
int32 *lenleft = nil,
TextIndex *paragraphStart = nil
) = 0;
// Returns the drawing style at a given TextIndex.
// lenleft can be used to find how many more characters the
// drawing style applies to.
Adobe InDesign Programming Guide
17.4. Interfaces
551
Figure 17.4.3.c shows QueryAttributeAt which allows callers to query the
effective value of a particular text attribute at a given TextIndex. It checks if a
text attribute applies at the given position and returns its IAttrReport interface.
Optionally it calculates the combined run length of the attribute over the range
of text between startPosition and endPosition and passes it back to the caller
in argument length. So if startPosition is 5 and endPosition is 20 and the
attribute you query for applies to a run of 3 characters and a further run of 4
characters within the given range the combined run length would be 7.
figure 17.4.3.c. IComposeScanner::QueryAttributeAt
virtual IAttrReport* QueryAttributeAt
(
int32 startPosition,
// TextIndex at which you want to look for the text attribute
int32 endPosition,
// = startPosition if you don't want to find combined run length
// of the attribute over the range startPosition:endPosition
ClassID typeAttribute,
// attribute to look for e.g. kTextAttrPointSizeBoss
int32 *length
// output: combined run length of the attribute over range
// startPosition:endPosition. nil if not required
) = 0;
17.4.4. IDrawingStyle
kComposeStyleBoss . . . . . . . . . . . . . . . . . . . . IDrawingStyle
provides access to the effective values of major text attributes
such as font, point size and leading. If the text property you are interested in is
not in IDrawingStyle you will find it in one of the other style interfaces on
kComposeStyleBoss.
IDrawingStyle
figure 17.4.4.a. Some IDrawingStyle methods
virtual
virtual
virtual
virtual
virtual
const =
IPMFont* QueryFont() = 0;
IFontInstance* QueryFontInstance(bool16 vertical) = 0;
PMReal GetPointSize() const = 0;
PMReal GetLeading() = 0;
void FillOutRenderData(IWaxRenderData* data, bool16 vertical)
0;
17.4.5. ICompositionStyle
kComposeStyleBoss . . . . . . . . . . . . . . . . . . ICompositionStyle
552
17.4. Interfaces
Paragraph Composers
provides access to indent, space before/after, keep with
next, paragraph rule and the effective value of othet text attributes.
ICompositionStyle
figure 17.4.5.a. Some ICompositionStyle methods
virtual
virtual
virtual
virtual
virtual
PMReal
PMReal
PMReal
PMReal
PMReal
IndentLeftBody() const = 0;
IndentRightBody() const = 0;
IndentLeftFirst() const = 0;
SpaceBefore() const = 0;
SpaceAfter() const = 0;
17.4.6. IHyphenationStyle
kComposeStyleBoss . . . . . . . . . . . . . . . . . IHyphenationStyle
provides access to the language and other effective
attributes values related to hyphenation.
IHyphenationStyle
17.4.7. IJustificationStyle
kComposeStyleBoss . . . . . . . . . . . . . . . . IJustificationStyle
provides access to letter and word spacing and the
effective values of other text attributes related to justification.
IJustificationStyle
17.4.8. IPMFont
. . . . . . . . . . . . . . . . . . . . . . . . . . . . . . . IPMFont
IPMFont encapsulates the CoolType font API. It represents a typeface and can
generate instances (IFontInstance) of it at various point sizes. Note IPMFont is
not an IPMUnknown but it is reference counted and can be used with InterfacePtr.
17.4.9. IFontInstance
. . . . . . . . . . . . . . . . . . . . . . . . . . . . IFontInstance
encapsulates the CoolType font instance API. It represents an
instance of a typeface at a given size. Note IPMFontInstance is not an
IPMUnknown. but it is reference counted and can be used with InterfacePtr.
IFontInstance
IFontInstance controls the mapping from a character code (textchar) into the
identifier of its corresponding glyph (GlyphID). The methods available are
shown in figure 17.4.9.a.
figure 17.4.9.a. Some IFontInstance methods
Adobe InDesign Programming Guide
virtual
virtual
Fixed
virtual
virtual
virtual
virtual
virtual
17.4. Interfaces
553
GlyphID GetGlyphID(textchar charCode) = 0;
void GetGlyphWidth(Text::GlyphID glyphID, Fixed *xWidth,
*yWidth, Fixed *bbox = nil) const = 0;
PMReal GetAscent() = 0;
PMReal GetDescent() = 0;
PMReal GetCapHeight() = 0;
PMReal GetXHeight() = 0;
PMReal GetEmBoxHeight() const = 0;
17.4.10. ITiler
kFrameListBoss . . . . . . . . . . . . . . . . . . . . . . . . ITiler
kTextCellContentBoss . . . . . . . . . . . . . . . . . . . . . ITiler
ITiler manages the tiles for a parcel list and is used by paragraph composers to
determine the areas on a line into which text can flow (see “Tiles” on page 541).
It controls the width of each line.
The GetTiles method shown in figure 17.4.10.a. is used to get the tiles . Note
that if GetTiles cannot find large enough tiles in the current parcel it will
return kFalse and should be called again to see if the next parcel in the list can
meet the request. If no parcel can meet the request the tiler will return tiles into
which to flow overset text.
figure 17.4.10.a. ITextTiler::GetTiles
virtual bool16 GetTiles(PMReal minWidth,
PMReal height, PMReal TOPHeight,
Text::GridAlignmentMetric gridAlignment,
PMReal gridAlignmentAdj,
TextIndex nCurrentPosition,
int32*pParcelIndex,
PMReal *pYOffset,
Text::FirstLineOffsetMetric *pTOPHeightMetric,
PMRectCollection& tiles,
bool16 *pAtTOP,
bool16 *pVisible,
bool16 *pParcelPositionDependent,
PMReal *pLeftMargin,
PMReal *pRightMargin) = 0;
is a complex call to set up and you should study the API
documentation and the text composer samples provided on the SDK to
understand fully how to use it. The “TOP” abbreviation used in many of the
parameter names is short for “top of parcel” since when a line falls at the top of
GetTiles
554
17.5. Scenarios
Paragraph Composers
a parcel special rules apply that govern its height (see “First baseline offset” on
page 542).
The essential parameters are the minimum tile width (minWidth), the
minimum tile height (height) and the y position (pYOffset).
For Roman composers a tile must be wide enough to receive one glyph plus any
left and right line indents that are active. A heuristic is often used that
approximates the minimum glyph width to be the same as the leading. The
minimum tile height depends on the metric being used to compose the line.
This will normally be leading but the first line in a parcel is a special case where
the metric used may vary dependent on the first baseline offset (ascent, cap
height, leading) associated with the parcel. The yOffset indicates the top of the
area into which text is to be flowed. It is actually a position rather than an offset
from the top of the parcel. It will initially be the yPosition passed when the
IParagraphComposer::Recompose method is called.
17.5. Scenarios
This section describes scenarios that illustrate how text gets recomposed. These
will be of interest if you are considering implementing your own paragraph
composer since they show some basic situations you’ll need to cope with. To
reduce complexity it is assumed the paragraph composer being called just
generates one line each call i.e. we are looking at a single line composer.
17.5.1. Simple text composition
Figure 17.5.1.a shows a composed text frame 200 points wide and 30 points
deep with its baseline grid shown. The text is 8 point Times-Regular with 10
point leading and the first baseline offset for the frame is set to leading.
figure 17.5.1.a. Simple text composition
left = -100, top = -15
baseline
-5
5
15
right = 100, bottom = 15
Adobe InDesign Programming Guide
17.5. Scenarios
555
When text of the same appearance is flowed into the frame the distance
between the baselines of succeeding lines of text is set to the leading as
illustrated in figure 17.5.1.a.
The wax strand examines the paragraph attribute that specifies the paragraph
composer to be used, locates it via the service registry. The paragraph composer
is then asked to recompose the story from the beginning and to flow text into
the frame starting from the top as shown in figure 17.5.1.b.
figure 17.5.1.b. IParagraphComposer::Recompose() Call
bool16 waxCreated = paragraphComposer->Recompose
(
composeScanner, // scanner for story being composed
// =0, TextIndex of first character to be composed
tiler, // interface to determine areas to compose into
parcelIndex // =0, index into IParcelList of parcel in which yPosition lies
yPosition, // = -15, top of area to compose into
waxStrand // strand to apply composed lines to
startingIndex,
);
The yPosition passed indicates the top of the area into which glyphs can be
flowed. This will be the baseline of the preceeding line or the top of the parcel.
The paragraph composer acquires the drawing style from the compose scanner.
and extracts the effective values of the text attributes it can handle. Please refer
to SDK sample code to see how this is done.
The composer examines the drawing style and its associated font and calculates
the depth and width of the tiles it needs. The example uses 8 point TimesRegular text with 10 point leading and no line indents so the minimum height
and width would be 10 points.The tiler is then requested for tiles of the
required depth and minimum width at the given yPosition and returns the tile
shown in figure 17.5.1.c.
556
17.5. Scenarios
Paragraph Composers
figure 17.5.1.c. Tiles for the first line
yPosition
Tile for Line 1
baseline
-15
-5
The paragraph composer then scans the text using IComposeScanner and flows
text into the tile until the tile is full or an end of line character is encoutered. It
chooses where the line should be broken and creates a wax line for the range of
text the line will display. The wax line is applied to the IWaxStrand and as a side
effect the composer’s IParagraphComposer::RebuildLineToFit method gets
called to generate wax runs for the line. Following this the
IParagraphComposer::Recompose method is finished its work and returns
control to its caller.
The wax strand then successively asks the paragraph composer to recompose
the second and third lines with yPositions of -5 and 5 respectively until the text
is fully composed as shown in figure 17.5.1.d.
Adobe InDesign Programming Guide
17.5. Scenarios
557
figure 17.5.1.d. Tiles for the second and third lines
yPosition
Tile for Line 2
baseline
-5
5
Tile for Line 3
5
15
Composed frame with baseline grid displayed
-15
-5
-5
5
5
15
15
17.5.2. Change in text height on line
As a line is composed attributes that control the height of the line, point size
and leading for example, may change. The baseline of the text must be set to
reflect the largest value of the metric (leading, ascent etc.) that is being used to
compose the text.
To achieve this the tiler is asked for tiles deep enough to take text of a given
height. If an increase in text height is encountered as composition proceeds
along a line the tiler needs to be asked for deeper tiles to accommodate the text
i.e. the composer must ensure the parcel can receive the deeper text.
For example if the point size for the word “Ask” is changed to 16 points and its
leading to 20 points the text suffers change damage. The resulting sequence of
recomposition is illustrated in figure 17.5.2.a.
558
17.5. Scenarios
Paragraph Composers
figure 17.5.2.a. Change point size and leading
Change Pointsize and Leading of selected text
The text suffers change damage and the paragraph composer is called
yPosition
Initial tile for Line 2
baseline
-5
5
Leading increased - get deeper tile
-5
15
Recomposed frame
-15
-5
-5
5
5
15
15
Initially the composer encounters 8 point text on 10 point leading so it requests
tiles of an appropriate depth. Then it hits the style change to 16 point text and
20 point leading. It goes back to the tiler and gets a deeper tile. Then the style
changes back to the smaller point size. The composer already has a tile deep
enough to take this text so it fills the tile with glyphs and breaks the line. Note
how the baseline is set to reflect the largest leading value encountered in the
line.
Adobe InDesign Programming Guide
17.5. Scenarios
559
17.5.3. Text wrap
The text wrap settings on other page items or a change to the shape of the
frame may become significant during recomposition depending on the
yPosition and depth of the tiles needed. To illustrate this a graphic with text
wrap as shown in figure 17.5.3.a. is added to the simple text frame
arrangement.
figure 17.5.3.a. Simple text wrap
Frame
Tiles
text frame with 8 point times-regular text, 10 point leading
Add graphic frame with text wrap set to wrap tightly around bounding box
Figure 17.5.3.a shows the text frame and the tiles into which the 8 point text is
flowed with 10 point leading. Note that the third line in the frame is affected by
the text wrap and flows around the bounding box of the graphic.
The sequence below illustrates what happens when the point size for the word
“Ask” is changed to 12 points and its leading to 14 points. The initial situation
is shown in figure 17.5.3.b.
figure 17.5.3.b. Change the selection to 12 point text, 14 point leading
560
17.5. Scenarios
Paragraph Composers
The wax strand picks up the change damage and asks the paragraph composer
to recompose the first line of the second paragraph. The baseline of the first line
of text in the frame, -5 points, is passed in as the yPosition.
figure 17.5.3.c. Composer begins to recompose
yPosition
baseline
-5
5
The paragraph composer gets tiles deep enough to take the initial leading value
(10 points) it encounters on the line as shown in figure 17.5.3.c. Then it comes
across the run of text with the changed point size and leading. Since the text is
deeper than the tiles it has obtained the composer goes back to the tiler and
asks for a new set of tiles to receive the deeper text as shown in figure 17.5.3.d.
figure 17.5.3.d. Composer asks for deeper tiles
yPosition
baseline
-5
9
In this example the request for deeper tiles brings the text wrap setting on the
graphic into play. The tiler returns the two tiles shown in figure 17.5.3.e so that
text tightly wraps to the bounding box of the graphic.
figure 17.5.3.e. Deeper tiles
yPosition
baseline
-5
9
Adobe InDesign Programming Guide
17.6. Sample code
561
The paragraph composer now flows glyphs into the deeper tiles generating a
wax line with four wax runs, one for the tile to the left of the graphic and three
in the tile to the right of the graphic. In this case the change means that all of
the text for the story cannot be displayed in the frame so the story is overset as
shown in figure 17.5.3.f.
figure 17.5.3.f. Fully recomposed frame
yPosition
baseline
-5
-5
9
9
An important lesson this scenario reinforces is that the tiles that are returned by
the tiler depend on the yPosition within the frame for which they are
requested and the depth asked for by the caller.
17.5.4. Frame too narrow or not deep enough
It is entirely possible that a frame is too narrow to accomodate any text when
the indent settings for a paragraph are large or the text has a large point size.
However the IParagraphComposer::Recompose method must return a wax line
each time it is called. When this happens you are going to get overset text. The
tiler (ITiler) should be called repeatedly until it turns a result kTrue. It will
iterate over all the parcels and if none of them can accommodate the text it will
return a tile overset text can be flowed into.
17.6. Sample code
17.6.1. SingleLineComposer
The SingleLineComposer plug-in shows how to add a new paragraph composer
that composes Roman text one line at a time.
17.6.2. ComposerJ
The ComposerJ plug-in shows how to add a new paragraph composer that
composes Japanese text one line at a time.
562
17.7. Frequently asked questions (FAQ)
Paragraph Composers
17.6.3. Hyphenator
The Hyphenator plug-in shows how integrate a custom hyphenation package
into the application as a hyphenation service (IHyphenationService).
17.6.4. Other samples
The TextExportFilter plug-in shows how to scan characters using
IComposeScanner.
17.7. Frequently asked questions (FAQ)
17.7.1. What is a paragraph composer?
See “Paragraph composers” on page 532.
17.7.2. What is typography?
See “Roman typography basics” on page 533, “Japanese typography basics” on
page 535and “References” on page 567.
17.7.3. What is text composition?
See the “Text composition” chapter.
17.7.4. Where does a paragraph composer fit into the text architecture?
See “A paragraph composer’s environment” on page 538 and the “Text
composition” chapter.
17.7.5. What is the compose scanner?
“The scanner and drawing style” on page 539.
17.7.6. What is drawing style?
“The scanner and drawing style” on page 539.
17.7.7. What is a font and what is a glyph?
See “Fonts and glyphs” on page 540.
17.7.8. What is a tile?
See “Tiles” on page 541.
17.7.9. What is an intrusion?
See “Tiles” on page 541.
Adobe InDesign Programming Guide
17.7. Frequently asked questions (FAQ)
563
17.7.10. What is HnJ?
See “HnJ” on page 533.
17.7.11. Can I do my own HnJ?
Yes, implement your line breaking breaking algorithm and justification in a
paragraph composer. Integrate your hyphenation algorithm by making it
available as a hyphenation service to and use it from your paragraph composer.
17.7.12. How do I implement a paragraph composer?
Study this chapter and use the referenced sample code as a starting point.
17.7.13. How do I control the paragraph composer used to compose text?
See “Paragraph composers” on page 532 for how this is controlled using the
user interface. Programatically you need to set the paragraph attribute
kTextAttrComposerBoss to reference the paragraph composer to be used.
17.7.14. How do I scan text?
If you only require access to character code data of a story the simplest API to
use is the TextIterator class. There are many code snippets that show how it is
used (e.g. SnipInspectStoryCharacters). If you don’t like processing character
by character you can use IComposeScanner to access the characters in a story in
larger chunks. Check out the SDK plug-in TextExportFilter for a fully worked
example.
If you requireto access styled runs of text you should use IComposeScanner. See
“How do I estimate the width of text?” on page 563 for an example.
17.7.15. How do I estimate the width of text?
You can estimate of the width of a character string in a given horizontal font
using IFontInstance::MeasureWText. The code in figure 17.7.15.a shows how
this is done.
figure 17.7.15.a. EstimateStringWidth
/** Return width of the string in the given horizontal font. To measure the width of
a character string in a vertical font you use IFontInstance::GetGlyphWidth.
@param text string to be measured.
@param fontInstance horizontal font
@return width of the string in the given font.
*/
564
17.7. Frequently asked questions (FAQ)
Paragraph Composers
static PMReal EstimateStringWidth(const WideString& text,
IFontInstance* fontInstance)
{
Fixed width;
Fixed height;
fontInstance->MeasureWText((textchar *)text.GrabX16String(),
text.Length(),
&width,
&height);
return ::ToPMReal(width);
} // EstimateStringWidth
To apply this estimate to a range of text in a story you can use IComposeScanner
to access runs of characters that have the same drawing style. The code in figure
17.7.15.b illustrates this.
figure 17.7.15.b. EstimateTextWidth
/** Returns estimated width of a given text range by scanning the text using
IComposeScanner and estimating width using IFontInstance.
@param textModel text model to be scanned.
@param startingIndex of the first character to be measured.
@param span the number of characters to be measured.
@return total estimated width of a given text range.
*/
static PMReal EstimateTextWidth(ITextModel* textModel,
const TextIndex& startingIndex,
const int32& span
)
{
// Use the story's compose scanner to access the text.
InterfacePtr<IComposeScanner> composeScanner(textModel,
UseDefaultIID());
ASSERT(composeScanner);
if (!composeScanner){
return PMReal(0.0);
}
// Width of the given text range.
PMReal totalWidth = ::ToPMReal(0.0);
// Drawing style for the current run.
InterfacePtr<IDrawingStyle> drawingStyle(nil);
// Font for the current run.
InterfacePtr<IFontInstance> fontInstance(nil);
// Current index into the text model.
TextIndex index = startingIndex;
Adobe InDesign Programming Guide
17.7. Frequently asked questions (FAQ)
// Number of characters still to be processed
int32 length = span;
// Number of characters returned by the compose scanner.
int32 chunkLength = 0;
// Character buffer.
WideString run;
// The compose scanner may not return all the text
// in one call. So call it in a loop.
while (length > 0) {
// Drawing style for the next run.
IDrawingStyle* nextDrawingStyle = nil;
// Get a chunk of text.
const textchar* text = composeScanner->QueryDataAt(index,
&nextDrawingStyle,
&chunkLength);
if (text == nil || chunkLength == 0){
break; // no more text.
}
ASSERT(nextDrawingStyle);
if (!nextDrawingStyle) {
break;
}
// If the drawing style changes measure the width of
// buffered text and switch to the new style and font.
if (nextDrawingStyle != drawingStyle) {
if (run.Length() > 0) {
totalWidth += EstimateStringWidth(run, fontInstance);
run.Clear();
}
drawingStyle.reset(nextDrawingStyle);
fontInstance.reset(drawingStyle->QueryFontInstance(
kFalse)); // assume horizontal text.
ASSERT(fontInstance);
if (!fontInstance) {
break;
}
} // end drawing style change
else {
// No change to drawing style but we still need to release.
nextDrawingStyle->Release();
nextDrawingStyle = nil;
}
// Buffer the characters returned by the compose scanner.
565
566
17.7. Frequently asked questions (FAQ)
Paragraph Composers
if (chunkLength < length) {
// Add all the characters to the run
run.Append(text, chunkLength);
}
else {
// Add only the characters we want to the run.
// The compose scanner may more data than we need.
run.Append(text, length);
}
// Prepare for next interation
index += chunkLength;
length -= chunkLength;
}
// end while
// Process any buffered text.
if (run.Length() > 0 && fontInstance != nil) {
totalWidth += EstimateStringWidth(run, fontInstance);
}
return totalWidth;
}
// EstimateTextWidth
17.7.16. How do I measure composed width or depth more accurately?
To measure the composed width and depth of text more accurately you can
flow the text into a story that has a layout (text frames) and compose it with
whatever paragraph composer you want. You can then scan the wax generated
to find the width and depth measurement you are interested in. This is the only
way you can account for the many properties that affect the composed text (the
paragraph composer’s line breaking agorithm, hyphenation, text style changes
such as font, point size and leading etc.) and the effect of layout properties such
as text wrap and first baseline offset. An example of the wax scanning part of
this is given by the SnipTextEstimateDepth code snippet on the SDK.
Estimating the width or depth of text without flowing the text of a story into a
layout is much more difficult. But in principle you can use the scanner and
drawing style (IComposeScanner and IDrawingStyle) to scan the text and apply
your own line breaking rules. This will quickly become a sort of mini paragraph
composer and you’ll need some of the code you will find in sample plug-in’s
like SingleLineComposer. Check out this sample’s SLCTileComposer class for
the kind of code you might use.
Adobe InDesign Programming Guide
17.8. Summary
567
17.8. Summary
This chapter described paragraph composers, the component that creates the
wax lines that represent the composed text of a line or paragraph. The
environment in which a paragraph composer works was described in detail.
The concepts and interfaces you need to know to write a new paragraph
composer were explained and sample code available for further reference was
introduced. The mechanisms used to create the wax were described. Finally
some frequently asked questions were answered.
17.9. Review
You should be able to answer the following questions:
1. What is a paragraph composer? (17.3.1., page 532)
2. What is drawing style? (17.3.7., page 539)
3. What is the scanner? (17.3.7., page 539)
4. What is a tile? (17.3.9., page 541)
17.10. Exercises
17.10.1. Vertical Scale
Investigate the various scale methods on IDrawingStyle and enhance the
SingleLineComposer plug-in on the SDK to apply the character attribute that
controls vertical scale.
17.10.2. Paragraph Alignment
Investigate the various paragraph alignment methods in ICompositionStyle
and enhance the SingleLineComposer plug-in on the SDK to be able to align
left, right and centre.
17.10.3. Justification
Following on from the previous exercise enhance the SingleLineComposer
plug-in so it can justify lines using whatever mixture of letter and word spacing
you want.
17.11. References
•
•
Modern digital typography topics
http://www.adobe.com/type/topics/main.html
A glossary of typographic terms
http://www.adobe.com/type/topics/glossary.html
568
17.11. References
Paragraph Composers
18.
Text Attributes and Adornments
18.0. Introduction
This chapter describes how your plug-ins can add custom text attributes to
store custom properties you want to associate with a range of text. It also shows
how your plug-in can adorn composed text by drawing when the wax is being
drawn.
18.1. Goals
The questions this chapter answers are:
1. When would you want a custom text attribute?
2. How do you add a custom text attribute?
3. What is a text adornment?
4. How do you add a text adornment?
You should know what a text attribute is and have a working knowledge of the
text model before trying to add new text attributes and text adorments. If you
need more information on these topics you should read “The Text Model”
chapter.
18.2. Chapter-at-a-glance
“Text Attributes” on page 570 describes why you might want to add a new text
attribute.
“Text Adornments” on page 571 introduces adornments and how they work.
table 18.1.a. version history
Rev
Date
Author
Notes
0.1
15-May-00
Seoras Ashby
First Draft
0.2
9-Sep-02
Jane Zhou
Update to InDesign 2.0.x content
569
570
18.3. Text Attributes
Text Attributes and Adornments
“Text Attribute and Text Adornment Interfaces” on page 575 describes the
interfaces involved in adding text attributes and adornments.
“Working with Text Attributes and Text Adornments” on page 579 describes
some practical examples of adding text attributes and adornments.
“Summary” on page 579 provides a summary of the material covered in this
chapter.
“Review” on page 579 provides questions to test your understanding of the
material covered in this chapter.
18.3. Text Attributes
Text attributes were introduced in “The Text Model” chapter as follows:
A text attribute describes a single text property. It can apply either to a range of characters (such
as the color or point size of characters) or to a paragraph (such as paragraph alignment or the
drop-cap being applied).
You can add a custom text attribute to store a property you wish to associate
with a range of characters or paragraphs.
Your text attribute could store a property that affects how text is formatted. The
majority of the text attributes provided by the application are used for this
purpose. For example, kTextAttrFontUIDBoss and kTextAttrPointSizeBoss are
text attributes used to store the font and point size of characters. Such
attributes need to be processed by the text composer. So in this situation you
would need to add a new paragraph composer to apply your properties (please
read the “Text Composition” chapter for more information on implementing a
new paragraph composer). You could also choose to extend the application’s
New Style..., Style Options... and Find/Change... selectable dialogues to add
new dialogues that manipulate your text attributes.
Alternatively you might want to associate some data with a range of characters,
and you don’t want the text in your attribute styled. To achieve this you would
add a new custom text attribute to store the text. See our SDK samples
CHDataMerger and BasicTextAdornment for implementation details.
Adobe InDesign Programming Guide
18.4. TextAttributeRunIterator
571
Text attribute boss usually inherits from kAttrBossReferencingBoss, which is
only for debug purpose to hold the number of attribute boss lists that a
particular attribute boss is part of it.
If you want to know a specific text attribute that InDesign supports, please
check out the appendix that lists all text attributes provided by the application.
18.4. TextAttributeRunIterator
TextAttributeRunIterator can iterate over multiple ranges of text and access a
specified set of text attributes. It can also apply attributes to the current text
range.
This is a special iterator. To access the results, you don’t need to dereference the
iterator. Instead, you could use the overloaded -> operator to query the result
you are looking for. For example, you want to search for the point size within a
range of text. Here is what you would do:
// textRanges is the range of text to be searched, ItÕs
K2Vector<InDesign::TextRange>
// attributeClasses is the text attributes to be looked for, ItÕs
K2Vector<ClassID>
TextAttributeRunIterator runIter(textRanges->begin(), textRanges>end(),
attributeClasses.begin(), attributeClasses.end());
while (runIter)
{
InterfacePtr<const ITextAttrRealNumber> pointSizeAttr
(
static_cast<const ITextAttrRealNumber *>
(
runIter->QueryByClassID(kTextAttrPointSizeBoss,
ITextAttrRealNumber::kDefaultIID)
)
);
PMReal pointSize = pointSizeAttr->Get();
++runIter;
}
18.5. Text Adornments
Text adornments provide a way for plug-ins to adorn the wax, i.e. composed
text. They give a plug-in the opportunity to do additional drawing when the
wax in a frame is drawn. The wax draws the text and also calls the text
572
18.5. Text Adornments
Text Attributes and Adornments
adornments that it is aware of to draw. You need to arrange for your text
adornment to be attached to the wax in order for this to happen.
Text Adornments are bosses that are "attached" by ClassID to individual wax
run. When the run is drawn, they are given control via interface
ITextAdornment.
Adornment Draw() method gets called by the priority value it returns via its
GetDrawPriority() method. Higher priorities (smaller numbers) are called
before lower priorities (larger numbers).
Text adornments do not have the ability to influence how text is composed (i.e.
how characters are built into wax lines and wax runs by text composition).
Instead text adornments can augment the appearance of the text. A text
adornment can control whether it is drawn in front of or behind the text.
There are two types of text adornments, normal text adornments and global
text adornments.
18.5.1. Normal Text Adornments
A normal text adornment is controlled by one or more text attributes. It can
provide visual feedback of the text to which the text attributes apply. For
example, an adornment could highlight the background on which the text is
drawn or strike out text by drawing a line in the foreground.
The text attribute controls the process by interacting with text composition and
associating the adornment with a drawing style (see interface IDrawingStyle in
the “Text Composition” chapter). This causes the text composer to attach the
adornment to a wax run(see interface IWaxRenderData in “The Wax” chapter).
Figure 18.5.1.a shows the main text adornments used by the application and
the text attributes that control them.
figure 18.5.1.a. Application Text Adornment Descriptions
Adornment ClassID
Attribute ClassID
Description
kTextAdornmentStrikeoutBoss
kTextAttrStrikeoutBoss
Strikes out text
kTextAdornmentStrikethruBoss
kTextAttrStrikethruBoss
Strikes through text
kTextAdornmentUnderlineBoss
kTextAttrUnderlineBoss
Underlines text
Adobe InDesign Programming Guide
18.5. Text Adornments
573
figure 18.5.1.a. Application Text Adornment Descriptions
Adornment ClassID
Attribute ClassID
Description
kTextHyperlinkAdornmentBoss
kHyperlinkAttributeBoss
Hyper link mark
kTextAdornmentIndexMarkBoss
kTAIndexMarkBoss
Index mark
kTextAdornmentKentenBoss
kTAKentenSizeBoss, etc.
Adorns text for the purpose of emphasis
kTextAdornmentRubyBoss
kTARubyPointSizeBoss, etc.
Annotates base text
To add a normal text adornment, you first need to add a new text attribute. In
more complex situations you might use more than one text attribute to control
a single text adornment. For example, kTAKentenSizeBoss,
kTAKentenRelatedSizeBoss, kTAKentenFontFamilyBoss, and
kTAKentenFontStyleBoss, etc. control collectively the kenten adornment
implemented by the kTextAdornmentKentenBoss.
Normal text adornments are attached to a drawing style and subsequently to an
individual wax run. These adornments are always called to draw. However, they
may choose whether or not to draw anything.
18.5.2. Global Text Adornments
Global text adornments are considered to be attached to all wax runs, with the
exception that they never have run specific adornment data. They provide the
ability to draw something without requiring the text to be recomposed. Unlike
the normal text adornments described above, they do not need to be attached
to individual wax runs in order to draw. They will, however, be asked if they are
active before they are called to draw.
For example the Show Hidden Characters feature is implemented using a
global text adornment named kTextAdornmentShowInvisiblesBoss. The
adornment can have the behavior as if was attached to all the runs, but only get
called when it says so by having its GetIsActive() method query the state of the
menu pick.
The global text adornments used by the application are listed in figure 18.5.2.a.
figure 18.5.2.a. Application Global Text Adornment Descriptions
Adornment Boss
kTextAdornmentHJKeepsVBoss
Description
Highlight keeps violations
574
18.5. Text Adornments
Text Attributes and Adornments
figure 18.5.2.a. Application Global Text Adornment Descriptions
Adornment Boss
Description
kTextAdornmentMissingFontBoss
Highlight missing fonts
kTextAdornmentMissingGlyphsBoss
Highlight missing glyphs
kTextAdornmentShowInvisiblesBoss
Show hidden characters
kDynamicSpellCheckAdornmentBoss
Squiggle line to mark the spell checks
kTextAdornmentShowKinsokuBoss
Show Japanese character line break
kTextAdornmentShowCustomCharWidthsBoss
Mark character width as a filled rectangle
kXMLMarkerAdornmentBoss
XML marker
Global text adornments are service providers. The ServiceID is
kGlobalTextAdornmentService. They aggregate the IK2ServiceProvider
interface and use the default implementation
kGlobalTextAdornmentServiceImpl.
Adobe InDesign Programming Guide
18.6. Text Attribute and Text Adornment Interfaces
575
18.6. Text Attribute and Text Adornment Interfaces
18.6.1. Interface Diagram
figure 18.6.1.a. Text Attribute and Normal Text Adornment Interface Diagram
Text Attribute
kTextAttr***Boss
IAttrReport
ITextAttr***
IAttrImportExport
kComposeStyleBoss
IDrawingStyle
Normal Text Adornment
kTextAdornment***Boss
ITextAdornment
kWaxRunBoss
IWaxRenderData
Text Adornment Data
kTextAdornment***
DataBoss
ITextAdornmentData
ITextAdornment***Data
figure 18.6.1.b. Global Text Adornment Interface Diagram
kTextAdornment***
GlobalBoss
kWaxLineBoss
IWaxShape
IGlobalTextAdornment
IK2ServiceProvider
18.6.2. IAttrReport
kTextAttr***Boss . . . . . . . . . . . . . . . . . . . . . IAttrReport
All text attributes provide an implementation of interface IAttrReport. Bosses
that support this interface are recognized by the application as text attributes.
576
18.6. Text Attribute and Text Adornment Interfaces
Text Attributes and Adornments
describes the attribute to the application and provides the
mechanism for controlling a text adornment.
IAttrReport
18.6.3. ITextAttr***
kTextAttr***Boss . . . . . . . . . . . . . . . . . . . . . ITextAttr***
represents the interface where you store the value of your text
attribute. The interface must have a persistent implementation with a
ReadWrite() method (see the “Persistence” chapter).
ITextAttr***
There are a number of existing interfaces that may be suitable for storing the
value you want to maintain in your text attribute. These are shown in figure
18.6.3.a. For their persistent implementation IDs, please see TextAttrImplID.h.
figure 18.6.3.a. Text Attribute Value Interfaces
Interface
PMIID
Description
ITextAttrRealNumber
IID_ITEXTATTRREALNUMBER
real number value
ITextAttrBoolean
IID_ITEXTATTRBOOLEAN
boolean flag value
ITextAttrInt16
IID_ITEXTATTRINT16
int16 value
ITextAttrUID
IID_ITEXTATTRUID
UID value to reference another object
ITextAttrWideString
IID_ITEXTATTRWIDESTRING
double byte string value
Alternatively you can create a new interface that stores the data you need. You
need to provide your own persistent implementation for it though.
18.6.4. IAttrImportExport
kTextAttr***Boss . . . . . . . . . . . . . . . . . . IAttrImportExport
allows your text attribute to interact with the Adobe
InDesign Tagged Text filter. Implementation of this interface is optional.
IAttrImportExport
If you choose to implement this interface, it will be called when Adobe
InDesign Tagged Text files are exported and imported, which will give the
opportunity to write tags on export and to apply tags on import, respectively.
18.6.5. ITextAdornment
kTextAdornment***Boss . . . . . . . . . . . . . . . . . ITextAdornment
Adobe InDesign Programming Guide
18.6. Text Attribute and Text Adornment Interfaces
577
Normal text adornments are bosses that are attached by ClassID to individual
wax runs. This happens in two stages:
1. the text adornment must be controlled by a text attribute. When the text
attribute’s TellComposition() method is called it attaches the adornment to
the drawing style it is given (see method AddTextAdornment() on interface
IDrawingStyle in the “Text Composition” chapter).
2. text composition will subsequently attach the adornment to the wax run it
creates (see interface IWaxRenderData in “The Wax” chapter).
When a wax run is drawn, each attached text adornment is called via the
ITextAdornment interface.
The wax in a frame is drawn in a number of passes. A text adornment tells the
application whether it should be drawn behind the glyphs (i.e. in the
background), in front of the glyphs (i.e. the foreground) or somewhere in
between. The draw priority returned by their GetDrawPriority() method
controls when the adornment is called to draw. Higher draw priorities (smaller
numbers) are called to draw before lower draw priorities (larger numbers).
Furthermore, draw priority is a real number that breaks down into two pieces:
• pass (the whole part of the draw priority value).
• run (the fractional part of the draw priority value).
For each unique pass value across all the active adornments in a frame, a full
iteration of the wax runs will be made calling all the adornments which share
that pass value. Then, within each wax run, the adornments will be called based
on their run priority. Some predefined pass priorities are listed in
TextDrawPriority.h.
For performance reasons, it is important to minimize the number of passes that
are made over the wax. Try to piggyback your drawing on an existing pass,
such as kTAPassPriBackground, kTAPassPriText or kTAPassPriForeground. If
drawing your adornment on a particular run will be negatively affected by
some other adornment drawn on another run within the same pass, you may
need to define its own pass. This is usually the case with fill type operations.
These types of adornments usually require their own pass.
gives you the opportunity to adjust the ink bounds of the
wax. The ink bounds passed into the method are empty. If the adornment
GetInkBounds()
578
18.6. Text Attribute and Text Adornment Interfaces
Text Attributes and Adornments
draws within the ink bounds of the wax line, then it doesn't have to modify the
ink bounds (see interface IWaxShape in “The Wax” chapter). The text composer
will set the ink bounds when it creates the wax. You only need to set the
inkBounds argument if your adornment needs to draw outside of the ink
bounds of the wax line.
If you want to know the bounds of the wax line that owns the wax run you can
navigate to it using the methods found in IWaxRun. You can find the ink bounds
of the wax line in interface IWaxShape.
18.6.6. IGlobalTextAdornment
kTextAdornment***GlobalBoss . . . . . . . . . . . IGlobalTextAdornment
Global text adornments are special kinds of text
adornments in that they are treated as if they were
attached to every wax run, with the exception that
they never have run specific adornment data.
is invoked at the start of each draw pass and allows a global text
adornment indicate that its Draw() method should or should not be called. A
typical implementation would check a flag stored in the plug-in’s preferences to
see whether or not the adornment is active. The purpose of this method is to
give the parcel a chance to avoid passes and calling adornments that aren't
needed. For example, if a particular adornment was the only one needing to be
called on a particular pass and the adornment wouldn't be drawing because of
some global state, the pass could be avoided by returning kFalse.
GetIsActive()
Some known Adobe global adornments draw priorities are predefined in
IGlobalTextAdornment.h.
is called at the end of each pass through the elements in a
parcel. The parcelShape passed into this method may not be a UID based
object.
EndOfParcelDraw()
18.6.7. ITextAdornmentData
kTextAdornment***DataBoss . . . . . . . . . . . . . ITextAdornmentData
Adobe InDesign Programming Guide
18.7. Working with Text Attributes and Text Adorn-
579
Your text adornment can optionally have a text adornment data boss associated
with it. All text adornment data bosses must support the ITextAdornmentData
interface.
The key concept here is that even though the drawing style has the adornment
attached to it, it won't actually get attached to the wax run unless the
adornment data says it is active.
18.6.8. ITextAdornment***Data
kTextAdornment***DataBoss . . . . . . . . . . . . ITextAdornment***Data
Your text adornment data boss can support whatever interface, or interfaces
you need, to maintain the properties needed to control what your text
adornment draws.
18.6.9. IK2ServiceProvider
kTextAdornment***Boss . . . . . . . . . . . . . . . IK2ServiceProvider
Global text adornments must support the IK2ServiceProvider interface. You
should use the default implementation kGlobalTextAdornmentServiceImpl
provided by the application for this interface.
18.7. Working with Text Attributes and Text Adornments
See our sample plug-ins BasicTextAdornment and CHDataMerger in the SDK
for how to add custom text attributes and adornments.
18.8. Summary
This chapter described how to add custom text attributes and text adornments.
18.9. Review
You should be able to answer the following questions:
1. When would you want to add a custom text attribute?
2. What is a text adornment?
3. Name different types of text adornments InDesign supports?
18.10. Appendix
Below is a table of text attributes supported by InDesign 2.0.x.
580
18.10. Appendix
Text Attributes and Adornments
19.
Working with Text Styles
19.0. Overview
This chapter describes how to program with text styles. The theory behind text
styles is explained and sample code showing how a plug-in can manipulate
text styles is presented.
19.1. Goals
The goals for the section:
1. To introduce the practical aspects of styles, specifically:
• What is a text style.
• How to get information about text styles.
• How to expose the values of a particular text style.
2. How to gain access to the styles through the StyleNameTables.
3. How to get information about the value of a particular text attribute.
4. The relationships between styles.
5. Using styles
• Creating styles.
• Editing styles.
• Applying styles to ranges of text.
• Deleting styles.
581
582
19.2. Chapter-at-a-glance
Working with Text Styles
19.2. Chapter-at-a-glance
“Text Styles” on page 583 discusses the definition of paragraph and character
styles.
“Style Name Tables” on page 584 discusses how styles are accessed through
name tables in the workspace.
“Text Attribute Descriptions” on page 585 shows how attributes can be asked to
describe themselves.
“Style Relationships” on page 585 provides code that allows the natural parent child relationships between styles to be investigated.
“Creating Styles” on page 590 shows the steps necessary to create a style.
“Applying Styles” on page 590 details how to apply a style to text.
“Editing styles” on page 590 provides an example of how to edit an existing
style.
“Default Styles” on page 591 discusses the concept of the default style, and how
to programmatically set it.
“Deleting Styles” on page 591 shows how a style can be deleted, and discusses
some associated issues.
table 19.2.a. version history
Rev
Date
Author
Notes
2.0
23-Oct-02
Lee Huang
Update content for InDesgn 2.x API
0.3
14-Jul-00
Adrian O’Lenskie
Seoras Ashby
Third Draft
0.2
15-May-00
Adrian O’Lenskie
Seoras Ashby
Second Draft
0.1
01-May-00
Adrian O’Lenskie
Seoras Ashby
First Draft
Adobe InDesign Programming Guide
19.3. Text Styles
583
“Review” on page 592 provides questions to test your understanding of the
material covered in this chapter.
“Exercises” on page 593 provides suggestions for other tasks you might want to
attempt.
19.3. Text Styles
A text style can be considered as a container that holds a set of text attributes.
There are two types, one for paragraphs and the other for ranges of characters.
Paragraph styles hold both paragraph and character attributes, allowing total
control of the formatting of paragraphs. For example, the paragraph style
“quote” might be used to represent inline quotes. We might want this text to be
centre justified, have a certain left and right offset, and a particular set of rules
to govern hyphenation. All these are determined by paragraph level attributes.
It is also likely that we want to define character level attributes to be associated
with the style, for example the type face being italic, leading or even the colour.
Character styles hold only character attributes. They are used to control
ranges of characters and provide a subset of the functionality of paragraph
attributes (albeit at a per character granularity rather than per paragraph).
We will consider paragraph styles in the first instance, as they contain a
superset of attributes allowed. Imagine we have the styles set up as described in
figure 19.3.a. As is shown, all styles derive from the root style. The styles record
deltas from their parent’s style. So, style 1 is identical to the root style, except
justification is right. Style 4 is the same as style 1, except it uses the single line
composer rather than the multi-line composer. Of course, style 4 has two
differences from the root style, the composer and its justification (which it
inherits from style 1 to be right justified). We are going to use this example to
demonstrate how styles information can be extracted and manipulated with
InDesign.
584
19.4. Style Name Tables
Working with Text Styles
figure 19.3.a. Set of Paragraph styles within a document.
root style
style 3
style 1
right justification
drop cap (1 char 2 lines)
style 2
centre justification
style 4
single line composer
style 5
drop cap (1 char 3 lines)
centre justification
19.4. Style Name Tables
Styles
are maintained within workspaces (kWorkspaceBoss and
kDocWorkspaceBoss). Specifically they are accessed through the
IStyleNameTable interface (one exists for both the paragraph styles and
character styles in each workspace). The prototype for this interface is given in
IStyleNameTable.h
The snippet SnipInspectTextStyles.cpp dumps the names of all the paragraph
styles supported by the front-most document to the SnippetRunner’s Log
window. The snippet uses IWorkspace to get to the paragraph or characther’s
IStyleNameTable, then calls the IStyleNameTable::GetRootStyleUID() method to get
to the root of the style name table, from there, we can recursively get to all the
children of the root style.
One thing worth special attention is how we get to either paragraph or
character style name table by querying the interface (IStyleNameTable) with a
different interface IID (IID_ICHARSTYLENAMETABLE or
IID_IPARASTYLENAMETABLE).
For paragraph style name table:
InterfacePtr<IStyleNameTable>
iParaStyleNameTable(iWorkspace,IID_IPARASTYLENAMETABLE);
and for character style name table:
Adobe InDesign Programming Guide
19.5. Text Attribute Descriptions
585
InterfacePtr<IStyleNameTable>
iCharStyleNameTable(iWorkspace,IID_ICHARSTYLENAMETABLE);
By examing kDocWorkspaceBoss in the InterfaceList.txt, we can see both IIDs
are part of the kDocWorkspaceBoss, both implementation are based on
IStyleNameTable, this is so we can use different IID to get to different
implementation of the same interface, namely, IStyleNameTable.
Executing the snippet with the styles as set in figure 19.3.a yields similiar output
as shown in figure 19.4.a.
figure 19.4.a. Extracting style names from the stylenametables
[No paragraph style] has parent:Root
Paragraph Style 1has parent: [No paragraph style]
Paragraph Style 4 has parent: Paragraph Style 1
Paragraph Style 3 has parent: [No paragraph style]
Paragraph Style 2 has parent: Paragraph Style 3
Paragraph Style 5 has parent: Paragraph Style 3
19.5. Text Attribute Descriptions
Before we continue much further into examining styles, we should look at the
basic building block -the text attribute and how we can get diagnostic
information from it. The code in SnipInspectTextStyles:reportAttribute()
in SnipInspectTextStyles.cpp will return in the parameter Description a string
representing the current value of the text attribute (if the text attribute boss
supports this feature).
This code asks the attribute to describe itself (the AppendDescription() method
of IAttrReport allows the attribute to indicate what it is set to, for example the
kTextAttrPointSize boss might indicate it is set to “+size: 6pt”). Not all
attributes report their status, so in this case we attempt to get the attribute
name from the object model. Not all boss objects register a name with the
object model, so in this case we display the ClassID of the boss. Attributes that
do not report their "current" value are designed for internal use, and can be
ignored by developers.
19.6. Style Relationships
The relationships between styles can be investigated programmatically. What
we will do now is dissecting the SnipInspectTextStyles class of the
SnipInspectTextStyles.cpp in more details to show how you can interrogate
the application to determine the relationships the styles have with each other,
586
19.6. Style Relationships
Working with Text Styles
and the text model in general. The code snippet illustrated in this section were
extracted from the SnipInspectTextStyles.cpp, for simplicity, some error
checkings were omitted.
We are attempting to display information regarding the relationships between
all styles in a workspace. The first thing to do would be to decide the workspace
we were concerned with. As shown in figure 19.6.a.
ILayoutUtils::QueryActiveWorkspace() can be used to get the current active
workspace. When there is a document opened, the active workspace will be the
front most document’s workspace, represented by the IWorkspace of the
kDocWorkspaceBoss. If there is no opened document, the active workspace
would be the the IWorkspace of the kWorkspaceBoss.
figure 19.6.a. Getting the active workspace
InterfacePtr<IWorkspace> iWorkspace(Utils<ILayoutUtils>()>QueryActiveWorkspace());
Now we have identified the workspace we wish to examine, assuming we are
concerned with the paragraph styles. This being so, we need to get the root style
for the paragraph style table, and dump information regarding that. This is
shown in figure 19.6.b.
figure 19.6.b. Getting the root paragraph style
// dumps paragraph style information for the active workspace
InterfacePtr<IStyleNameTable>
iParaStyleNameTable(iWorkspace,IID_IPARASTYLENAMETABLE);
UID rootStyleUID = iParaStyleNameTable->GetRootStyleUID();
status = helperInspectStylesRecurse(iParaStyleNameTable, rootStyleUID,
0, stream);
The helperInspectStylesRecurse method is recursive, it takes a name table, a
node within that name table, an indication of the level in the hierarchy it exists
in (for text formatting purposes) and a file stream that we will output the result
to. From this, it recurses down the table until it has displayed all nodes in order
(i.e. children are displayed within the scope of their parent rather than the
ordering of the table). For details, please refer to the
helperInspectStylesRecurse method in the SnipInspectTextStyles.cpp.
displays the information about the current style
before iterating through the style name table. Whenever it finds a node that has
helperInspectStylesRecurse
Adobe InDesign Programming Guide
19.6. Style Relationships
587
a parent that is the current style (i.e. a child of the current style), it dumps the
node (and its children).
The next task to perform is the display of the diagnostic information, the code
that does this is shown in
SnipInspectTextStyles::helperDisplayStyleInformation().
The helperDisplayStyleInformation() method gets information regarding
this style’s parent before determining how it differs from that parent. For every
attribute that is different, it calls the method (described above) to generate the
diagnostic information. The output of the style information is streamed to an
external file called style.log because the information is too much to fit into
the SnippetRunner window.
If we iterate through all styles in the document displaying this diagnostic
information with the set of styles as described in figure 19.3.a, we would see
output looking like that shown in figure 19.6.c.
figure 19.6.c. Example trace when tracing through all styles in a document
588
19.6. Style Relationships
Working with Text Styles
-----------------[No paragraph style] -- Based on Root-----------------Number of bosses is 196
-:Description:+ color: [Black] + Roman + size: 12 pt + last: flush left + body: flush left
+ char width: 100% + pair kern method: Metrics + ligaturescurrent + stroke: 1 pt
+ tracking: 0 + composer: Adobe Paragraph Composer + drop cap characters: 0 + drop
cap lines: 0 + not shifted
- caps + stroke color: [None] + pair kern: auto + consecutive hyphens: 3 + char
height: 100%
+ left indent: 0p0 + right indent: 0p0 + first indent: 0p0 + autoleading: 120% +
leading: auto
+ language: English: USA + hyphenation + min before: 2 + min after: 2 + hyphenate
capitalized
+ shortest word: 5 - no break + hyphenation zone: 3p0 + space before: 0p0 + space
after: 0p0
+ tabs: none - underline + Times + default figure style + desired wordspace: 100%
+ max. wordspace: 133% + min. wordspace: 80% + desired letterspace: 0% + max.
letterspace: 0% + min. letterspace: 0%
+ desired glyph scaling: 100% + max. glyph scaling: 100% + min. glyph scaling:
100%~ Boss 0x1b36(6966) - start anywhere
+ keep at start/end of paragraph + keep next: 0 + keep first: 2 + keep last: 2 +
position: normal
- strikethrough + em center hang + alt: 0% - keep lines + stroke tint: 100%
+ tint: 100% - stroke overprint - overprint + stroke gradient angle: 0Á + gradient
angle: 0Á
+ stroke gradient length: -1 pt + gradient length: -1 pt~ Boss 0x1b49(6985) ~ Boss
0x1b4a(6986) + skew angle: 0Á
+ rule above color: (Text Color) + rule above stroke: 1 pt + rule above tint: -1% +
rule above offset: 0p0 + rule above left indent: 0p0
+ rule above right indent: 0p0 + column width rule above + rule below color: (Text
Color) + rule below stroke: 1 pt + rule below tint: -1%
+ rule below offset: 0p0 + rule below left indent: 0p0 + rule below right indent:
0p0 + column width rule below - rule above overprint
- rule below overprint - rule above - rule below~ Boss 0x1b5e(7006) + highlight
angle: 0Á
+ highlight length: 1 pt + stroke highlight angle: 0Á + stroke highlight length: 1
pt~ Boss 0x1b63(7011) + strikeout
~ Boss 0x1b6a(7018) + single: force-justified - OT ordinal - OT fractions - OT
discretionary ligatures
- OT titling~ Boss 0x1b7a(7034) + hyphen weight: 5 + OT contextual alternates - OT
swash
+ Tsume: 0% + Mojikumi:
+ Aki before char: automatic + Aki after char:
automatic + Kinsoku: No Kinsoku
+ Kinsoku Type: KinsokuPushInFirst + Hang Type: KinsokuNoHang + Bunri-Kinshi~
Boss 0x4228(16936) - Ruby Open Type Pro
~ Boss 0x422d(16941) ~ Boss 0x422e(16942) + Ruby Point Size: Str_Auto~ Boss
0x4230(16944) + Ruby Alignment: 1-2-1 (JIS) rule
+ Ruby Type: Per-Character Ruby + Ruby Font:
+ Roman + Spacing:1-2-1 aki + Ruby
X Scale: 100%
+ Ruby Y Scale: 100% + Ruby X Offset: 0 pt + Ruby Y Offset: 0 pt + Ruby Position:
Above/Right - Ruby Auto Align
+ Ruby Overhang: Up to 1 Ruby Character - Ruby Overhang - Ruby Auto Scaling + Ruby
AutoScale Min: 66% + Ruby Color: Str_Auto
+ Ruby Tint: Str_Auto + Ruby Fill OverprintAuto + Ruby Stroke Color: Str_Auto +
Ruby Stroke Tint: Str_Auto + Ruby Stroke OverprintAuto
+ Ruby Outline: Str_Auto + Kenten Kind: None + Kenten Size: Str_Auto + Kenten
Related Size: 1 pt + Kenten Font:
~ Boss 0x424b(16971) + Kenten X Scale: 100% + Kenten Y Scale: 100% + Kenten
Placement: 0 pt + Kenten Alignment: Center
+ Kenten Position: Above/Right + Kenten Character:
~ Boss 0x4253(16979) + Kenten
Color: Str_Auto + Kenten Tint: Str_Auto
Kenten OverprintAuto + Kenten Stroke Color: Str_Auto + Kenten Stroke Tint:
Str_AutoKenten Stroke OverprintAuto + Kenten Outline: Str_Auto
- Tatechuyoko + Tatechuyoko X Offset: 0 pt + Tatechuyoko Y Offset: 0 pt + Kumi
Number: 0 - Kumi Number with Roman
+ Jidori: 0 + Grid Gyoudori: 0 - Grid Align First Line + Grid Alignment: None +
Character Rotation: 0Á
- Rotate Roman~ Boss 0x4269(17001) ~ Boss 0x426a(17002) ~ Boss 0x426b(17003) +
Adobe InDesign Programming Guide
19.6. Style Relationships
589
Rensuuji
+ Shatai Percentage: 0% + Shatai Angle: 45Á + Shatai Adjust Tsume - Shatai Adjust
Rotation - Warichu
+ Warichu lines: 2 + Warichu size: 50% + Warichu line gap: 0 pt + Warichu:AlignLeft
+ Alternate Glyph: Default form
+ Warichu minimum characters before: 2 + Warichu minimum characters after: 2 + OTF Use H or V Kana - OTF Use Proportional Metrics
- OTF Use Roman Italics + Leading Model: Aki Below~ Boss 0x429f(17055) - Index
Marker~ Boss 0x13516(79126)
~ Boss 0x13549(79177)
-----------------Paragraph Style 1 -- Based on [No paragraph style]----------------Number of bosses is 2
-:Description:+ last: flush right + body: justified
-----------------Paragraph Style 4 -- Based on Paragraph Style 1-----------------Number of bosses is 1
-:Description:+ composer: Adobe Single-line Composer
-----------------Paragraph Style 3 -- Based on [No paragraph style]----------------Number of bosses is 2
-:Description:+ drop cap characters: 1 + drop cap lines: 2
-----------------Paragraph Style 2 -- Based on Paragraph Style 3-----------------Number of bosses is 2
-:Description:+ last: centered + body: justified
-----------------Paragraph Style 5 -- Based on Paragraph Style 3-----------------Number of bosses is 3
-:Description:+ last: centered + body: justified + drop cap lines: 3
The above code shows all the information maintained within the styles of the
frontmost document. It also shows the relationships between styles. A style that
is based on another style is shown below that style. The description of the style
overrides that given for the particular attribute in the parent style.
As you can see, the output shows all the default values of the attributes
supported within the application. The root style (named "[No Paragraph
Style]") maintains the whole list of attributes (along with attributes never seen
in the UI). The styles derived from this root style record only the differences.
So, Style 3 is based on this default style, but rather than having 0 drop
characters over 0 lines as defined in the root style, it defines a single drop
character to be dropped two lines.
Style 2 is based on Style 3, so as well as defining the text to be center justified
(the body of the text and the last line of the text to be centered) as opposed to
left justified as set in the root style, it inherits the attributes the changes made to
the root style by Style 3 (i.e. the single drop char spread over two lines).
590
19.7. Creating Styles
Working with Text Styles
Style 5 is also based on Style 3, and like Style 2 it also defines the text to be
center justified. This style also defines a drop cap of a single character over
three lines, this attribute replaces that defined in Style 3.
19.7. Creating Styles
Before we can create a style (we chose to create a paragraph style here), we need
to have a set of attributes we wish the style to have (attributes that are different
from the style it will be based on). We need to set the style’s name and indicate
which style this new style is to be based on (i.e. where it fits in to the style
hierarchy). The CreateStyle() method in the snippet
SnipCreateParaStyle.cpp shows how to create a new paragraph style, based on
the text attributes of a text selection.
In this case, we apply two lists of attributes, one representing the local overrides
on the character attribute strand, and the other representing the local overrides
on the paragraph attribute strand. The style that is created is represented by the
string name it is assigned. This will be the name that it is known as in the
paragraph styles panel and more generally, the paragraph style name table for
this workspace. The sample goes on to apply the style to the paragraphs
touched by the text selection.
19.8. Applying Styles
The snippet SnipApplyParaStyle.cpp shows how we can retrieve and apply a
style from its name. paraStyleNameTable is the paragraph style name table for
the workspace. We first retrieve the style we want to apply from the front
document’s workspace, we must also know the range of text we want the style
to apply to. We use the command generation mechanisms of the text story boss
to return us a command that will perform this task for us. We strongly suggest
developers make use of these mechanisms rather than create the command
directly. The command generation mechanisms handle a lot of the grungy,
error-prone details in the initialisation of the command.
19.9. Editing styles
You can edit a current style, effectively changing the attributes that are
associated with it. The code snippet SnipUpdateCurrentParaStyle.cpp in SDK
gives an example of how to do this.Basically, the effect is to add the local
overrides defined in the attribute boss list of an IAttributeStrand associated
with an ITextModel to the attribute boss list within the style. We duplicate the
attribute boss list because we anticipate that we will want to clear the list of
Adobe InDesign Programming Guide
19.10. Default Styles
591
overrides that are currently being applied. As part of this operation the current
AttributeBossList is deleted. To see this function in action: create a style, then
create some text with this style, then override some of the attributes from the
Paragraph panel, you should see a plus sign next to the style name. then run
the snippet, the + sign disappeared, then examine the style, the override should
now be part of the style (thus no +).
19.10. Default Styles
There is the concept of default styles. These are the paragraph and character
styles that are used by default when creating a new story. If you always want
stories to begin with a certain style you can set this programmatically. The
snippet SnipSetDefaultParaStyle.cpp sets the default style to the one that the
current text selection is based on. The command used to set the default is
kDefaultTextStyleCmdBoss. The command’s target (its item list) should be
pointed to the current workspace.
19.11. Deleting Styles
A named style can be deleted from the application. The snippet
SnipDeleteParaStyle.cpp in SDK deletes the style whose name matches the
one supplied by the user from the front most workspace.
kDeleteParaStyleCmdBoss is used to delete a style from the active workspace.
There is an obvious question regarding what happens to text that is formatted
with a style that is being deleted. The formatting of that text, i.e. how it appears
must not change. The AttributeBossList that applies to the style that is about
to be deleted is copied directly to the attribute strand as a local override.
In the case that the style that is about to be deleted is not a leaf in the styles
hierarchy (i.e. there exists styles that are based on it), all styles based on the
candidate for deletion, become based on the style’s parent, and the attributes
within the style’s attributeBossList are added to the attributeBossLists of
the “child” styles. This is shown in figure 19.11.a. When we delete “style 3”,
both “style 2” and “style 5” are based on the root style. “style 2” has the
attribute that defines the drop cap added to its AttributeBossList. As “style 5”
was overriding the setting of this attribute in “style 3”, it does not need the
attribute.
592
19.12. Summary
Working with Text Styles
figure 19.11.a. Deletion of a style
before deletion
root style
style 3
style 1
right justification
style 4
single line composer
drop cap (1 char 2 lines)
style 2
style 5
centre justification
drop cap (1 char 3 lines)
centre justification
after deletion
root style
style 1
right justification
style 2
style 5
centre justification
drop cap (1 char 3 lines)
drop cap (1 char 2 lines)
centre justification
style 4
single line composer
19.12. Summary
This chapter described the practical elements of programming with text styles.
It showed the natural hierarchical relationships that styles possess with each
other and gave examples showing how to create, edit and delete styles.
19.13. Review
You should be able to answer the following questions:
1. Which interface on an attribute describes its current setting? (19.5., page 585)
2. What style holds the default formatting information for text? (19.10., page 591)
3. What formatting information does the root character style hold? (19.3., page
583)
4. What is an override? (19.6., page 585)
Adobe InDesign Programming Guide
19.14. Exercises
593
5. If you delete a style, what happens to its children? (19.11., page 591)
6. What happens to text that is formatted using a style when that style is
deleted? (19.11., page 591)
19.14. Exercises
19.14.1. Creating styles
Starting with the root style, programmatically create 6 new styles, each new
style 2 points greater in size than the previous one.
19.14.2. Deleting styles
Write a method that deletes every style apart from the root style from a
document
19.14.3. Style Tree Walker
Write a method that will create a new style based on every other style in a
document. Where a particular "leaf " attribute overlaps, the override should be
based on the rightmost, lowest style in the style hierarchy.
594
19.14. Exercises
Working with Text Styles
20.
Fonts
20.0. Overview
This chapter describes the fonts API and how it relates to the text sub-system.
20.1. Goals
The questions this chapter answers are:
1. What is a font?
2. What is the font manager?
3. What is a font group?
4. What is a font family?
5. How can I find the font used to display text from a story?
20.2. Chapter-at-a-glance
“Key concepts” on page 596 explains the architecture involved in fonts.
“Interfaces” on page 598 describes the interfaces that control fonts.
“Frequently asked questions (FAQ)” on page 600 answers often asked questions
concerning fonts.
“Summary” on page 602 provides a summary of the material covered in this
chapter.
table 20.1.a. version history
Rev
2.0
Date
17-Dec-02
Author
Seoras Ashby
Notes
New chapter initial release.
595
596
20.3. Key concepts
“Review” on page 602 provides questions to test your understanding of the
material covered in this chapter.
“Exercises” on page 602 provides suggestions for other tasks you might want to
attempt.
20.3. Key concepts
20.3.1. Terminology and definitions
This section introduces the terms needed to understand this document.
• glyph; a shape used to represent a character code on screen or in print.
• font; a collection of glyphs that were designed together and intended to be
used together. See interface IPMFont.
• font group; a collection of fonts that were designed together and intended
to be used together. Within a group there may be a number of different
stylistic variants. See interface IFontGroup.
• font family; a font group used within a document. See interface
IFontFamily.
• group name; name of a font group e.g. “Times”, “Courier”, “Times New
Roman”.
• family name; the name of a font family e.g. “Times”, “Courier”, “Times
New Roman”. The group name and the family name are always the same.
• stylistic variant; a variant of a font in a font group.
• style name; the name of a stylistic variant. Typically, the “Roman” or
“Plain” or “Regular” member of a font group is the base font, the actual
name varies from group to group. The group may include variants such as
“Bold”, “Semibold”, “Italic”, and “Bold Italic”.
The terms font group and font family are used interchangeably in the API and
in this document. From the perspective of the API a key distinction between font
group and font family is this.
• font groups describe all the fonts available to the application.
• font families describe the fonts used by a document.
20.3.2. The font manager
The font manager (IFontMgr) on the session (kSessionBoss) provides access to
all the font groups (IFontGroup) available to the application. The font group
will allow you to access each font (IPMFont) in the group.
Fonts
Adobe InDesign Programming Guide
20.3. Key concepts
597
20.3.3. Cooltype
Cooltype is the core technology through which fonts are accessed. The API
provides interfaces IFontGroup, IPMFont and IFontInstance as shells through
which Cooltype is called. These are not standard interfaces, i.e. they do not
derive from IPMUnknown. So you cannot create them using CreateObject or
query them for other interfaces because they are not aggregated on a boss class.
However these interfaces are reference counted and their lifetime can be
managed using InterfacePtr.
In addition to the fonts made available by your operating system Cooltype can
load fonts directly from the common Adobe fonts folder and from the Fonts
folder inside the application’s folder.
20.3.4. Documents and fonts
When a font is used by a document an object is created within the document to
refer to it. The abstraction used is the font family (interface IFontFamily) on
boss class kFontGroupBoss.
The document font manager (IDocFontMgr) manages the font families within a
document. When a font is used for the first time in a document this interface is
used to create the boss object.
The text attributes that refer to the font in which text appears are:
• kTextAttrFontUIDBoss; interface ITextAttrUID gives the UID of the font
family (IFontFamily).
• kTextAttrFontStyleBoss; interface ITextAttrFont gives the name of the
stylistic variant.
Text attributes are introduced and described fully in the “Text model” chapter.
20.3.5. Font names
Internally the application uses Postscript font names. The name returned by
IPMFont::AppendFontName is the Postscript font name. If you know the
Postscript name of the font you want you can get the IPMFont for it using
IFontMgr::QueryFont. Several other names are made available on IPMFont and
IFontFamily. For example if you use IFontMgr::QueryFont to instantiate the
Postscript font “AGaramond-Italic” interface IPMFont can give you the names
shown in figure 20.3.5.a.
598
20.4. Interfaces
Fonts
figure 20.3.5.a. Font names
Name
Method
Example
Postscript font name
IPMFont::AppendFontName
AGaramond-Italic
Family name
IPMFont::AppendFamilyName
Adobe Garamond
Style name
IPMFont::AppendStyleName
Italic
IPMFont::AppendFullName
Adobe Garamond Italic
IPMFont::AppendFamilyNameNative
Adobe Garamond
IPMFont::AppendStyleNameNative
Italic
IPMFont::AppendFullNameNative
Adobe Garamond Italic
If you do not have the Postscript font name but you know the name of the
typeface on a given platform, i.e. the typeface name on Windows or a family
name on Mac, you can use IFontMgr::QueryFontPlatform to get the
corresponding IPMFont.
20.4. Interfaces
figure 20.4.a. Font interfaces
Interface
IFontMgr
Notes
Provides access to all fonts
available to the application.
Aggregated on kSessionBoss.
Navigation
Via session
InterfacePtr<IFontMgr>
fontMgr(gSession, UseDefaultIID());
Adobe InDesign Programming Guide
20.4. Interfaces
Interface
IFontGroup
Notes
Shell above the CoolType API
that represents a font group.
599
Navigation
Via IFontMgr::QueryFontGroup
Via FontGroupIteratorCallBack.
Not aggregated onto any boss
class i.e. not an IPMUnkown.
Does not have a UID. Ref counted
for convenience so you can
manage scope using
InterfacePtr.
IPMFont
IFontInstance
Shell above the CoolType API
that represents a font. Provides
font name mapping calls. and
access to font metrics at a given
point size.
Via IFontMgr::QueryFont.
Not aggregated onto any boss
class i.e. not an IPMUnkown.
Does not have a UID. Ref counted
for convenience so you can
manage scope using
InterfacePtr.
Via text attributes kTextAttrFontUIDBoss
and kTextAttrFontStyleBoss
Shell above the CoolType API
that represents an instance of a
font of a given point size. Not
generally of interest unless you
need to write a paragraph
composer or need to map
character codes to GlyphIDs.
Via IFontMgr.
Via IFontMgr::QueryPlatformFont.
Via IFontFamily.
Via IDrawingStyle.
Via IDrawingStyle.
Not aggregated onto any boss
class i.e. not an IPMUnkown.
Does not have a UID. Ref counted
for convenience so you can
manage scope using
InterfacePtr.
IFontFamily
Represents a font group within a
document. Each font group used
by a document has a
kFontGroupBoss object.
Managed by IDocFontMgr.
Is an IPMUnknown.
Has a UID.
Via IDocFontMgr
Via text attribute kTextAttrFontUIDBoss
(gives UID of IFontFamily boss object).
600
20.5. Frequently asked questions (FAQ)
Interface
IDocFontMgr
Fonts
Notes
Manages font families
(IFontFamily) within a document.
When a font is used for the first
time in a document this interface
is used to create the font family.
Processes underlying commands
to create/delete font families.
Navigation
Via document workspace.
InterfacePtr<IDocFontMgr>
docFontMgr(document>GetDocWorkSpace(), UseDefaultIID());
If you are changing the font used
by text you should be calling
IDocFontMgr::GetFontGroupUID
to get the UID to put in your
kTextAttrFontUIDBoss.
IDocumentFontUsage
Manages used and missing font
information for a document.
Via IDocument.
InterfacePtr<IDocumentFontUsage>
docFonts(document, UseDefaultIID());
20.5. Frequently asked questions (FAQ)
20.5.1. How do I iterate available fonts?
Code snippet SnipFontMgr shows how to iterate all fonts available to the
application by calling IFontMgr directly.
Code snippet SnipFontGroupIterator shows how to implement a
FontGroupIteratorCallBack (see IFontMgr.h) to iterate all fonts.
20.5.2. How do I find a given font?
This depends on what information you have that identifies the font. Read “Font
names” on page 597 and check out code snippet SnipFontMgr for a variety of
approaches.
Code snippet SnipFontFindIterator implements a FontGroupIteratorCallBack
that finds the name of the postscript font given the full name of the font as
returned by IPMFont::AppendFullName. For example if you search for “Courier
Bold” it will give you back the name of the Postscript font “Courier-Bold”.
20.5.3. How do I find the font used to display a story’s text?
One way is to use the values of text attributes kTextAttrFontUIDBoss and
kTextAttrFontStyleBoss. The UID in kTextAttrFontUIDBoss’s ITextAttrUID
interface gives you can be used to instantiate an IFontFamily object.The
PMString in kTextAttrFontStyleBoss’s ITextAttrFont interface will give you
Adobe InDesign Programming Guide
20.5. Frequently asked questions (FAQ)
601
the stylistic variant (e.g. regular or bold). From these you can find the name of
the font as shown in figure 20.5.3.a.
figure 20.5.3.a. Finding the font name from text attributes.
static PMString FindFontName
(
IDataBase* db,
ITextAttrUID* fontUID,
ITextAttrFont* fontStyle
)
{
InterfacePtr<IFontFamily> family(db, fontUID->GetUIDData(),
UseDefaultIID());
InterfacePtr<IPMFont> font(family->QueryFace(
fontStyle->GetFontName());
PMString fontName = font->AppendFontName(fontName);
return fontName;
}
The second way is to use IComposeScanner to get the drawing style
(IDrawingStyle) at a particular index in the text model as shown in figure
20.5.3.b.
figure 20.5.3.b. Finding the font from the drawing style
InterfacePtr<IComposeScanner> scanner(textModel, UseDefaultIID());
IDrawingStyle* style = scanner->GetCompleteStyleAt(textIndex);
InterfacePtr<IPMFont> font(style->QueryFont());
20.5.4. How do I change the font used to display a story’s text?
To set the font used to display a range of text in a story override text attributes
kTextAttrFontUIDBoss and kTextAttrFontStyleBoss in the text model. See the
“Text model” chapter for information on overriding text attributes.
The set the font for a text style add or change the value of text attributes
kTextAttrFontUIDBoss and kTextAttrFontStyleBoss in the style. See the
“Working with text styles” chapter for more information.
20.5.5. How do I get the name of a font from the UID of that font.
Use the UID to instantiate an IFontFamily interface and get the name from
there. The UID of a font is typically obtained from text attribute
kTextAttrFontUIDBoss, from IDocFontMgr or from IDocumentFontUsage.
602
20.6. Summary
20.6. Summary
This chapter described the fonts API and answered some often asked questions
about how to use it.
20.7. Review
You should be able to answer the following questions:
1. What is a font group? (20.3.1., page 596)
2. What is a font family? (20.3.1., page 596)
3. What is a font? (20.3.1., page 596)
20.8. Exercises
20.8.1. Find the name of the font that displays text at a given TextIndex
Use one of the approaches described in “How do I find the font used to display
a story’s text?” on page 600 to find the font used to display the text of a story at
a given text index.
20.9. References
•
•
•
Modern digital typography topics
http://www.adobe.com/type/topics/main.html
A glossary of typographic terms
http://www.adobe.com/type/topics/glossary.html
Adobe type technology overview
http://partners.adobe.com/asn/developer/type/main.html
Fonts
21.
Printing
21.0. Overview
In this document, you will become familiar with the InDesign commands,
interfaces, structures, services and event-handling mechanisms used to print.
You will learn how to interject your own code into the printing process using
the IPrintSetupProvider interface. The PrintSelection sample plug-in found
in the SDK demonstrates how to do this and you will be directed to look at that
example later in this document.
Note that it is this interjection into the printing process that makes for a
valuable third-party plug-in, rather than modifying the application’s printing
plug-in. The printing process is described here to explain the environment into
which a third-party plug-in based on IPrintSetupProvider enters.
To demonstrate details of the printing process, this document makes extensive
references to the BasicPrint sample plug-in found in the SDK. If it is available,
locate that plug-in now -- you will be directed to portions of it shortly.
21.1. Goals
The goals of this chapter are to:
1. Acquaint the reader with the major concepts and components of printing.
2. Demonstrate the use of those components for the reader who wants a
deeper understanding of the extensibility of the print subsystem.
table 21.0.a. version history
Rev
Date
Author
Notes
0.3
7-Nov-2002
Rodney Cook
Update for 2.x.
0.2
9-Jun-1999
Andrew Coven
Edits for Beta 3.5.
0.1
24-Apr-1999
Rodney Cook
First draft.
603
604
21.2. Chapter-at-a-glance
Printing
3. Describe how third-party developers are expected to participate in the
printing process.
4. Familiarize the reader with other printing-related SDK documentation for
further understanding.
21.2. Chapter-at-a-glance
“21.3.The Major Concepts of Printing” on page 604 discusses how printing is
achieved and controlled.
“21.4.The Major Components of Printing” on page 605 discusses the
commands, interfaces, and structures used to print.
“21.5.PrintSetup Service Provider” on page 608 describes the mechanisms used
to participate in the printing process as a PrintSetup service.
“21.6.Print Event Handling” on page 609 discusses the mechanisms used to
register and unregister for handling draw events.
“21.7.Summary” on page 612 recaps the highlights of the chapter.
“21.8.Review” on page 612 hits you with some questions to determine if you
have assimilated the information adequately to progress.
“21.9.References” on page 612 provides sources for additional information
related to the topics in this chapter.
21.3. The Major Concepts of Printing
Adobe InDesign prints similarly to Adobe Photoshop and Adobe Illustrator.
The look and feel of its user interface is also similar.
21.3.1. Printing is Simply Drawing to the Printer
With the exception of EPS, images, and PDF, printing from the application
entails drawing part or all of a publication to a printer rather than the screen.
The application uses a concept called Display Postscript, thanks to the Adobe
Graphics Manager (AGM) to draw graphics primitives to both the screen and
printer.
Adobe InDesign Programming Guide
21.4. The Major Components of Printing
605
Because each object can delegate the drawing of children down the document
hierarchy, the entire document can be drawn with a single call to the
IDrawMgr::Draw() method of the topmost object.
Throughout the traversal of this hierarchy, draw events are generated. A draw
event handler can register for and receive these events, providing access to every
level of the object hierarchy and every application object as it is drawn to either
the screen or printer.
21.3.2. Control is Provided by the Application API
The tasks of printing from the InDesign application are shared between:
• AGM, which is responsible for PostScript generation.
• The InDesign Print plug-in, which is responsible for user interface,
initialization of print settings and drawing the pages.
• Plug-ins that register with the application as print setup providers, which
are invited to assume control of the print process at regular intervals.
As a developer, you don’t have direct access to AGM; InDesign provides the
user interface, commands, interfaces, and data structures you need and
provides all available external control over printing. Orderly opportunities are
provided along the way for print setup provider plug-ins to break into the
printing process -- either momentarily or for the balance of the printing
process.
21.4. The Major Components of Printing
This section discusses the public commands, interfaces, and structures used by
the application’s own print plug-in and provided to external developers to help
create their own printing solutions.
21.4.1. Highlights of the SDK BasicPrint Plug-in
The BasicPrint plug-in supplied with the InDesign SDK demonstrates all the
major printing components and, unlike the application code, is available to the
reader for inspection.
This section examines highlights of the BasicPrint plug-in to put these printing
components in a context that makes them easier to understand. A more
complete description of each component is provided later in this chapter.
606
21.4. The Major Components of Printing
Printing
If you are following along in the BasicPrint plug-in project, look now at
BscPrnActionComponent.cpp for Step 1 and and then at
BscPrnPrintActionCmd.cpp for the remainder of the print process.
Hint: Look for instances of kPrintSetupService inthe Steps below for
opportunities for third-party developers to participate in the printing process.
The highlights of the application-supplied print plug-in are as follows:
1. Client code, usually in the form of either a menu action or script event, gets
two pieces of information: an IDocument pointer for the document to be
printed and a flag indicating whether the print UI should be displayed. The
client code then creates and executes a kBscPrnPrintActionCmdBoss.
2. Inside the BscPrnPrintActionCmd::Do() method, a series of supporting print
commands are started. (Note: All subsequent steps originate from inside
this command.)
3. A print command data interface (IPrintCmdData) used by all the print
commands gets the IDocument interface pointer supplied by the client code.
The IDocument pointer is then used to get pointers for the ink list and trap
style manager, as well as UIDRefs for the document and print style.
4. Now, the service registry polls kPrintSetupService providers to determine
whether any plug-in wants to break into the print process at
StartPrintPub(). A provider that has registered for this entry point can
either take over the process at this point or perform some action and return
control to the application’s print plug-in.
5. If control returns to the print plug-in, a duplicate copy of print data
(IPrintData) is made.
6. Now, the service registry polls kPrintSetupService providers to determine
whether any plug-in wants to break into the print process at
BeforePrintUI(). A provider that has registered for this entry point can
vote on whether to show the print UI before returning control to the
application’s print plug-in. If the print UI is to be shown, a
kPrintDialogCmdBoss is created and processed.
7. Now, the service registry polls kPrintSetupService providers to determine
whether any plug-in wants to break into the print process at
AfterPrintUI(). A provider that has registered for this entry point can vote
on whether to show the Save dialog and whether to return control to the
application’s print plug-in. If the Save dialog is to be shown, a
kSaveFileDialogBoss is created and processed.
Adobe InDesign Programming Guide
21.4. The Major Components of Printing
607
8. If control returns to the print plug-in, the print data (IPrintData) is saved
to the document.
9. Next, data is gathered for the print job -- a kPrintGatherDataCmdBoss is
created but not yet processed.
10. Now, the service registry polls kPrintSetupService providers to determine
whether any plug-in wants to break into the print process at
BeforePrintGather(). A provider that has registered for this entry point
can vote on whether to process the kPrintGatherDataCmdBoss created
earlier and whether to return control to the application’s print plug-in.
11. If control returns to the print plug-in, the service registry polls
kPrintSetupService providers to determine whether any plug-in wants to
break into the print process at AfterPrintGather(). A provider that has
registered for this entry point can vote on whether to quit here or return
control to the application’s print plug-in.
12. If control returns to the print plug-in, a kNewPrintCmdBoss is created and
processed. It is here that printing occurs.
13. After saving the print data again (in case it changed during printing) the
print process ends.
In the following sections, each of the major components mentioned in the
sequence above are described in greater detail.
21.4.2. Commonly-used Print Structures
The main structure for getting and setting printing information is contained
within a class based on IPrintData. For additional information, see
IPrintData.h.
21.4.3. Commonly-used Print Interfaces
The main interfaces used in the print process are:
• IPrintCmdData -- command data interface for InDesign printing
commands.
• IOutputPages -- used with export commands to output multiple pages
from multiple open publications -- basically a UIDRef list for outputing
pages from multiple open pubs (probably from a book).
• IPrintSetupProvider -- used for setting up or changing the print
parameters, prior to and during the printing process.
• IPrintData -- used to get and set print data.
• IPrintJobData -- used for managing list of inks.
608
21.5. PrintSetup Service Provider
Printing
21.4.4. Commonly-used Print Command Bosses
The main command bosses used in the print process are:
• kPrintDialogCmdBoss -- used to put up the print dialog.
• kPrintSavePrintDataCmdBoss -- used to save the print data.
• kPrintGatherDataCmdBoss -- used to gather print data.
• kNewPrintCmdBoss -- used to control the print process.
21.5. PrintSetup Service Provider
A plug-in can register as a print setup service (kPrintSetupService) by
providing an implementation for IK2ServiceProvider. It will then be called at
strategic points during the execution of application print commands. The
implementation for IPrintSetupProvider interface provides methods to setup
or change print parameters prior to and during the printing process.
Open the PrintSelection SDK sample plug-in now and follow along.
21.5.1. Registering as a PrintSetup Service provider
Look now in PrnSel.fr at kPrnSelPrintSetupProviderBoss. Notice that this
boss aggregates IK2ServiceProvider and provides an implementation
represented by kPrnSelSetupServiceImpl.
Now, look at PrnSelSetupService.cpp, which registers this plug-in with the
application as providing a kPrintSetupService.
21.5.2. Participating in the print process
Look again in PrnSel.fr at kPrnSelPrintSetupProviderBoss. Notice that this
boss aggregates IPrintSetupProvider and provides an implementation
represented by kPrnSelSetupProviderImpl.
Now, look at PrnSelSetupProvider.cpp, which contains methods to participate
in the printing process at various places. For example, StartPrintPub() is
called from BscPrnPrintActionCmd::Do() before printing a single publication
and sets the value for bReturn, which specifies to the Do() method whether to
continue printing.
Additional methods, such as BeforePrintUI() and AfterPrintUI(), provide
control over the print process during the print process.
Adobe InDesign Programming Guide
21.6. Print Event Handling
609
21.6. Print Event Handling
The application uses AGM to draw graphics primitives to both the screen and
printer. Since each application object draws its own children, the entire
document can be drawn with a single call to the IPrintMgr::Draw() method of
the topmost object in the hierarchy.
Throughout the traversal of this hierarchy, draw messages are generated. There
are several types of draw messages generated: Draw, FilterCheck, AbortCheck,
HitTest, and Inval. They are defined in DocumentContextID.h. Printing is only
concerned with the Draw message. A draw event handler can register for and
receive these events, providing access to every level of the object hierarchy, and
every application object as it is drawn to either the screen or printer.
Now, look at PrnSelDrawHandler.cpp, which contains methods to: install/
uninstall themselves into the draw event dispatcher, get called when the event
they've register for happens, and define the event data passed to HandleEvent().
21.6.1. Draw Events
Draw events are defined in DocumentContextID.h. In general, three draw events
are generated for each Draw() method in the hierarchy: kBeginXXXMessage,
kEndXXXMessage, and kDrawXXXMessage.
The kBeginXXXMessage is generated just before the call to the next level of the
hierarchy (after any transformation is applied to the object). The
kEndXXXMessage is generated just after execution returned from the
hierarchy. Important Note: The kDrawXXXMessage is considered superflous
and should no longer be used; it is scheduled to be eliminated.
21.6.2. Registering and Unregistering
There are two ways to register/unregister for draw events: as a service provider,
or direct registration through the IDrwEvtDispatcher interface. The call to
RegisterHandler() takes three parameters: the event being registered for, a
pointer to the handler, and the priority of the event handler. For more
information about the events and priorities, see the sections below.
21.6.2.1. Registering/Unregistering Using a Service Provider
A boss can register as a service provider, using the IK2ServiceProvider
interface, and the kDrawEventService service ID. It must provide an
implementation of the IDrwEvtHandler interface. When the application starts,
610
21.6. Print Event Handling
Printing
the Register() method in the draw event handler is called. The handler
registers itself for the draw events it wishes to receive.
Unregistering is similar to the registering comments above, except the
Unregister() method is called in the IDrwEvtHandler interface.
21.6.2.2. Direct Registration/Unregistration
A second method of registering for events is to instantiate the
IDrwEvtDispatcher interface and call the RegisterHandler() method directly.
Look now at kPrnSelDrawServicesBoss in PrnSel.fr. Notice that this boss does
not provide an implementation for IK2ServiceProvider. This is because this
sample uses the direct registration method. Look now at the Update() method
in PrnSelDialogObserver.cpp.
Unregistration is similar to the registering comments above, except use the
UnRegisterHandler() method in the IDrwEvtDispatcher interface.
21.6.2.3. Draw Event Handling Priorities
Priorities are defined in IDrwEvtDispatcher.h. When a handler registers for an
event, it must pass a priority to the RegisterHandler() method. Currently,
there are five defined priorities: kDEHLowestPriority, kDEHLowPriority,
kDEHMediumPriority, kDEHHighPriority, and kDEHInitialization.
As each event is processed, the handlers are called from the
kDEHInitialization priority down to kDEHLowestPriority, in order. If two
handlers have the same priority for the same event, the handler registered first
will be called first. The return code for handlers registered using the
kDEHInitialization priority is ignored. For additional information about
return codes for the other priorities, see the section below.
21.6.3. Handling Draw Events
21.6.3.1. Parameters
The draw event handler’s HandleEvent() method takes two parameters: a
ClassID which is the eventID (defined in DocumentContextID.h), and a void
pointer to a class containing the event data. For Draw events, this pointer
should be cast to the DrawEventData class (defined in IDrwEvtHandler.h) to
access the data.
Adobe InDesign Programming Guide
21.6. Print Event Handling
611
21.6.3.2. Return Code
Look now at the HandleEvent() method in PrnSelDrawHandler.cpp. If the event
handler returns kTrue to the kBeginXXXMessage, it is assumed the event was
properly handled, and no other event handlers are called for the event. Also, the
default code in the application will not be executed. The normal return code
from draw events is kFalse. The kEndXXXMessage does not look at the return
code from the event handler. (It would not make sense to, since the draw
operation has already occurred.)
21.6.4. Print Events
Since InDesign uses the AGM drawing commands to print (it just sets up a
different graphics port to draw to), print events are the same as draw events.
One important distinction should be mentioned here. Draw events are
normally registered when the application starts and unregistered when the
application ends. Print events are registered just before printing starts and
unregistered when printing finishes.
21.6.4.1. Service Provider
To aid in registering only for print events, a Service Provider mechanism is
used. A boss can register as a service provider, using the IK2ServiceProvider
interface, and the kPrintEventService service ID. It must implement the
IDrwEvtHandler interface.
When the application sets up to start printing, the Register() method in the
draw event handler is called. The handler registers itself for the draw (print)
events it wishes to receive.
When printing is finished, the Unregister() method is called in the
IDrwEvtHandler interface, giving the handler the opportunity to unregister for
each draw event it previously registered for.
21.6.4.2. Keeping an Instance of the Draw Event Handler Notes
Since the registering of an event handler involves saving off a pointer to the
handler into a table, it is very important the handler remains instantiated for as
long as the handler is registered. When the handler is registered, an AddRef() is
performed on it in an attempt to ensure this.
Similarly, a corresponding Release() is called when the handler is unregistered
from the dispatcher.
612
21.7. Summary
Printing
21.6.4.3. Events Generated
Draw events are defined in DocumentContextID.h.
21.7. Summary
In this chapter, you learned printing from the application is drawing part or all
of a publication to a printer rather than the screen. You became familiar with
the InDesign commands, interfaces, structures, and event-handling
mechanisms used to print, and also learned to distinguish between the tasks
performed by AGM and those performed by InDesign APIs.
You were led through 2 plug-ins: BasicPrint, which behaves much like the
application’s own Print plug-in, to show you the flow of print operations and
PrintSelection, which shows you how you can participate in the print process
as a print setup provider. Detailed study of these two plug-in will help you write
your own print setup provider.
Finally, you were directed to additional sources of information on the topics
discussed in this chapter.
21.8. Review
You should be able to answer these questions:
1. What role does object hierarchy play in printing?
2. How are the tasks of printing divided between the application API and
AGM?
3. What are the major structures used in printing?
4. What are the major interfaces used in printing?
5. In which two printing commands does registration for draw events occur?
6. Why is it a bad idea to use the kDrawXXXMessage?
7. Name two ways to register/unregister for draw events.
21.9. References
•
•
•
Adobe. Postscript Language Reference Manual, 1990.
Stroustrup. The C++ Programming Language, 1997.
Adobe InDesign SDK. Command Reference, 2002. See Adobe
Documentation/CommandReference.pdf.
InDesign SDK/
22.
Scripting Architecture
22.0. Overview
Scripting support in Adobe InDesign allows users to exert virtually the same
control of Adobe InDesign from a script as is available from the user interface.
This functionality may be used for purposes as simple as automating repetitive
tasks or as involved as controlling the application from a remote database.
The extensibility of the Adobe InDesign scripting architecture allows you to
provide scripting support for either new functionality added by your
application plug-ins or for Adobe InDesign functionality not yet exposed to
scripting. The architecture largely provides a platform-independent and
scripting language-independent foundation upon which you can build. It
abstracts and provides implementations for the common elements of scripting.
You only have the comparatively small task of adding implementations for the
functionality you are exposing.
Note: Adobe InDesign currently supports scripts written in Visual Basic for
Object Linking and Embedding (OLE) Automation (Windows NT/2000/XP)
or AppleScript (Macintosh OS9.x/OS10.x).
The pieces of the Adobe InDesign scripting architecture your plug-in needs to
implement are:
• A script provider - IScriptProvider.
• A script library for each scripting language. Note: A script library under
Windows is the OLE Type Library and under the Macintosh is the Apple
Event Terminology Extension (AETE) Resource Library.
• If you are exposing a new script object - IScript and (Windows only)
IAutomationRefCount.
This document describes how the scripting architecture of Adobe InDesign
works and directs you to documents that show you how you can expose your
functionality to scripting.
613
614
22.1. Goals
Scripting Architecture
Note: For a detailed explanation of adding scripting support to an InDesign
plug-in, see Scripting Your InDesign Plug-in described in References.
22.1. Goals
The questions this chapter answers are:
1. What are the major components of the scripting architecture?
2. What are script properties and events?
3. What’s involved in adding an event/property to an existing script provider?
4. What is involved in providing scripting support for a new object?
5. What platform-specific and scripting language-specific issues are there?
22.2. Document-at-a-glance
“22.3.Architecture” on page 615 introduces the scripting architecture. It gives a
high-level overview and describes the architectural elements. You should
understand this material before attempting your own script provider.
“22.4.Summary” on page 619 recaps everything presented in this chapter.
“22.5.Review” on page 619 presents some questions to determine whether you
have assimilated the information adequately to progress.
“22.6.Exercises” on page 620 gives suggestions for other areas to explore related
to these topics.
“22.7.References” on page 620 cites sources of additional information.
table 22.1.a. version history
Rev
Date
Author
Notes
0.3
8/21/02
Rodney Cook
Update for InDesign 2.x
0.2
1/3/00
Peter Boctor
Second draft.
0.1
6/21/99
Rodney Cook
First draft.
Adobe InDesign Programming Guide
22.3. Architecture
615
22.3. Architecture
22.3.1. The document object model
The Adobe InDesign scripting architecture supports scripting languages
through a Document Object Model (DOM) -- an object-oriented model where
objects contain properties and methods and an object hierarchy determines the
relationship between objects.
figure 22.3.b. document object model
Application
'null'
Document
'docu'
Color
'colr'
Spread
'sprd'
Figure 1
For example, the figure above shows a simple DOM in which an application
contains a document, which in turn contains a color and a spread.
Scripts are basically limited to two actions on objects: getting or setting a
property and executing an event. A script wanting to do either of these actions
first needs to find the right object to operate on and then execute the action.
For example, if the Color object exposed a “mode” property, a script wanting to
set the mode to CMYK would first need to find the right color object. It does
this by starting with the application object, finding the right document, and
then finding the right color. Once the right color is found, then the script can
tell the object to change its mode property to CMYK. For a more detailed
explanation of getting or setting a property and executing an event, see the
Scripting Your InDesign Plug-in technote described in References.
22.3.3. Script libraries and script IDs
The way in which a DOM is presented to the scripting user is up to the
environment of the scripting language. AppleScript provides the user the ability
to open a dictionary which displays an AETE resource. Visual Basic provides the
616
22.3. Architecture
Scripting Architecture
user with an Object Browser displaying an Object Document Language (ODL)
type library resource.
In these environments, objects, properties, methods and enumerations are
associated by name. Additionally, these resources contain a mapping between
these names and an integer which is composed of 4 characters, such as ‘docu’.
A script might use the string “document” to use the document object, the
string “delete” to execute the delete method and the string “name” to access the
name property, but what is sent to Adobe InDesign is the appropriate 4character value defined in the AETE resource and the ODL type library.
You need to create a unique four-character IDs for each new object, property,
method and enumeration you expose. A list of currently-used InDesign IDs
can be found in the file “ScriptingDefs.h”. Note that if you create your own
four-character ID, it is your responsibility to determine that it is unique.
22.3.4. One script object, one InDesign boss
Each of the objects in the DOM figure above is an object available to a script. A
script writer can utilize these objects to control Adobe InDesign. Each of these
objects has one and only one corresponding boss in Adobe InDesign.
For example, to expose a document script object, the Adobe InDesign scripting
architecture needs an equivalent Adobe InDesign document boss. This
association is done using the IScript and (Windows only)
IAutomationRefCount interfaces.
If you are exposing a property or method on an already-exposed object, then a
boss has already been associated with this scripting object. If, however, you are
exposing a new object, then you need to create new implementations of both
the IScript and IAutomationRefCount (Windows only) interfaces and add
them to the boss you are exposing. If this boss is one you created in your plugin, then you can edit your .fr file directly. If this boss exists within Adobe
InDesign, then you will need to create an add-in to the boss.
Any new objects you expose need to fit somewhere in the DOM -- specifically,
they need to have a container. Just as a spread is below the document in the
DOM figure above (a document contains a spread), you need to determine
where your objects fit in the hierarchy.
Adobe InDesign Programming Guide
22.3. Architecture
617
22.3.5. The script provider
The three basic functionalities your plug-in can expose to scripting are: objects,
properties and events. The actual code implementing this functionality lives in
a script provider, IScriptProvider. A script provider is an Adobe InDesign
service provider -- it provides the service of scripting for one or more objects.
22.3.5.1. Key Methods
The key methods on IScriptProvider are: GetObject(), AccessProperties() and
HandleEvent(). These map to the three functionalities your plug-in can expose:
objects, properties and events. More than one provider can provide property
and method functionality to a script object. This means you can create a script
provider handling your own property on the document object even though
Adobe InDesign already exposes a document object. GetObject() however can
only be implemented by the original script provider exposing the object to
scripting. This provider is said to represent the object.
GetObject() is called when a script is finding the object it needs to operate on.
For example, if a script wants to delete a color stop, it first finds the right color
(which Adobe InDesign handles). But then it needs to find the right color stop
in that color. So it calls your script provider, passes in the color and asks you to
find a specific color stop (by index or by name are the most common ways of
finding an object).
AccessProperty() and HandleEvent() are called when a script is trying to get/set
a property or execute an event, respectively, on an object. For example, if a
script is trying to get the property “location” on your color stop object, it calls
your provider’s AccessProperty() and passes the color stop you provide,
whether it is a get or set operation and expects you to do the right thing. Or, if a
script is trying to delete one of the color stop objects you provided, it calls your
provider’s HandleEvent(), passes you the color stop, and expects you to do the
right thing.
22.3.5.2. What you need to do in the key methods
The code in your provider’s GetObject(), AccessProperty() and HandleEvent()
are largely specific to what you are exposing. However, there are three common
tasks you will need to do:
• extract data from a script
• return data to a script
• return an error to a script.
618
22.3. Architecture
Scripting Architecture
For errors, you can create an error string in your plug-in’s string table, associate
an error number with the string in you plug-in’s ID.h file, and return the error
number. The error string is then returned to the script.
For extracting/returning data, all three methods pass in an IScriptEventData
interface abstracting this functionality from the scripting language. This means
your code can extract data, return data and return an error without having to
know the scripting language of the script controlling Adobe InDesign. The two
main methods of IScriptEventData handling these tasks are
ExtractEventData() and SetReturnData(). These methods accept and return a
ScriptData object -- a C++ class holding any data type supported by the Adobe
InDesign scripting architecture.
22.3.6. Tying it all together
The figure below shows all the pieces necessary for exposing objects, properties
and methods to scripting, as well as the basic flow of control:
• A script requests either finding an object, getting/setting a property or
executing a method.
• If the object in question is an object you expose, then the scripting
architecture responds by calling your script provider, passing in an
IScriptEventData.
• Your code handles the request using IScriptEventData to extract/return
data from/to the script.
figure 22.3.g. necessary pieces and flow-of-control
Adobe InDesign boss
IScript
IScriptManager
IAutomationRefCount
IScriptEventData
IScriptProvider
Script
Scripting architecture
Your plug-in
The gray boxes are the pieces you need to implement. An IScriptProvider is always
needed. An IScript and IAutomationRefCount (Windows only) are needed if you expose
a new scripting object.
Adobe InDesign Programming Guide
22.4. Summary
619
Adobe InDesign scripting uses four main interfaces to provide scripting
support:
IScript
IScriptManager
IScriptProvider
IScriptEventData
A marker to distinguish an object from other kinds of objects.
Creates a scripting language-specific script manager for the user
script. Enables communication between the script editor (OLE
Automation or AppleScript) and an IScriptProvider implementation.
Functional details of this interface are provided in IScriptManager.h.
Responds to events, method calls, or property requests routed from
the user script by the applicable script manager. Functional details
of this interface are provided in the helpers document in Adobe
InDesign SDK/Documentation/CommandReference/.
Manages language-specific script event data (and possibly error
information) passed between the script and the corresponding
script provider. Functional details of this interface are provided in
the helpers document in Adobe InDesign SDK/Documentation/
CommandReference/.
22.3.8. Examples in the SDK and test scripts
Test scripts for both Windows and Macintosh platforms are provided with the
SDK CustomPrefsScript plug-in.
For a discussion of how to create your own script using either AppleScript or
Visual Basic, see the “Scripting Basics” chapter of the Adobe InDesign Scripting
Guide described in “22.7.References” on page 620.
For a discussion of system requirements for either AppleScript or Visual Basic,
see the “Introduction” chapter of the Adobe InDesign Scripting Guide.
22.4. Summary
This chapter describes the Adobe InDesign scripting architecture. The basics of
providing scripting support for your plug-ins is also covered. For more detailed
explanations, see Scripting Your InDesign Plug-in described in References.
22.5. Review
You should be able to answer these questions:
1. What is a script object?
2. What is a script provider? What does a provider do with a script object?
3. How is scripting data handled?
4. What script provider methods are necessary to add events and properties to
an application object?
620
22.6. Exercises
Scripting Architecture
5. What do you need to implement if introducing a new application object to
the scripting architecture?
22.6. Exercises
22.6.1. Adding a property
How would you add a property to a script provider?
Hint: see the CustomPrefsScript sample plug-in in the SDK.
22.6.2. Implementing a new script object
What is involved in creating a script object?
Hint: see the CustomPrefsScript sample plug-in in the SDK.
22.6.3. Extracting data
How does a script provider obtain data from a script?
Hint: see the CustomPrefsScript sample plug-in in the SDK.
22.6.4. Returning data
How does a script provider return data to a script?
Hint: see the CustomPrefsScript sample plug-in in the SDK.
22.7. References
•
•
•
Adobe InDesign SDK. Scripting Your InDesign Plug-in, 2002. See
ScriptingYourPlug-in.pdf on your installation disk.
Adobe User Education. Adobe InDesign User Guide, 1999.
Adobe InDesign SDK. Adobe InDesign Scripting Guide, 1999. See
InDesignScriptingGuide.pdf on your installation disk.
Adobe InDesign Programming Guide
621
Index
A
B
C
AbortCommandSequence() . . . . . . . . . . . . . . . . . . . . . . . . . . . . . . . . . . . . . . . . . . . . . . . . 153
Adobe 1.0 Scripting Guide . . . . . . . . . . . . . . . . . . . . . . . . . . . . . . . . . . . . . . . . . . . . . . . . . . 619
Adobe Graphics Manager (AGM) . . . . . . . . . . . . . . . . . . . . . . . . . . . . . . . . . . . . . . . . . . 326
aki . . . . . . . . . . . . . . . . . . . . . . . . . . . . . . . . . . . . . . . . . . . . . . . . . . . . . . . . . . . . . . . . . . . . . . . . . . 537
Application . . . . . . . . . . . . . . . . . . . . . . . . . . . . . . . . . . . . . . . . . . . . . . . . . . . . . . . . . . . . . . . . . 151
Application Architecture . . . . . . . . . . . . . . . . . . . . . . . . . . . . . . . . . . . . . . . . . . . . . . . . . . . 143
Arguments . . . . . . . . . . . . . . . . . . . . . . . . . . . . . . . . . . . . . . . . . . . . . . . . . . . . . . . . . . . . . . . . . . 154
Atomic Commands . . . . . . . . . . . . . . . . . . . . . . . . . . . . . . . . . . . . . . . . . . . . . . . . . . . . . . . . . 168
Atomicity . . . . . . . . . . . . . . . . . . . . . . . . . . . . . . . . . . . . . . . . . . . . . . . . . . . . . . . . . . . . . . . . . . . 142
AttributeBossList . . . . . . . . . . . . . . . . . . . . . . . . . . . . . . . . . . . . . . . . . . . . . . . . . . . . . . . . . . . 413
BeginCommandSequence() . . . . . . . . . . . . . . . . . . . . . . . . . . . . . . . . . . . . . . . . . . . . . . . . 153
CGraphicFrameShape . . . . . . . . . . . . . . . . . . . . . . . . . . . . . . . . . . . . . . . . . . . . . . . . . . . . . . 345
DrawShape() . . . . . . . . . . . . . . . . . . . . . . . . . . . . . . . . . . . . . . . . . . . . . . . . . . . . . . . . . . . . . . 345
CHandleShape . . . . . . . . . . . . . . . . . . . . . . . . . . . . . . . . . . . . . . . . . . . . . . . . . . . . . . . . . . . . . . 352
Draw() . . . . . . . . . . . . . . . . . . . . . . . . . . . . . . . . . . . . . . . . . . . . . . . . . . . . . . . . . . . . . . . . . . . . 353
character styles . . . . . . . . . . . . . . . . . . . . . . . . . . . . . . . . . . . . . . . . . . . . . . . . . . . . . . . . . . . . . . 412
ClassID . . . . . . . . . . . . . . . . . . . . . . . . . . . . . . . . . . . . . . . . . . . . . . . . . . . . . . . . . . . . . . . . 174, 181
ClassIDs . . . . . . . . . . . . . . . . . . . . . . . . . . . . . . . . . . . . . . . . . . . . . . . . . . . . . . . . . . . . . . . . . . . . 174
CLayoutTracker . . . . . . . . . . . . . . . . . . . . . . . . . . . . . . . . . . . . . . . . . . . . . . . . . . . . . . . . . . . . 255
closepath() . . . . . . . . . . . . . . . . . . . . . . . . . . . . . . . . . . . . . . . . . . . . . . . . . . . . . . . . . . . . . . . . . . 341
command . . . . . . . . . . . . . . . . . . . . . . . . . . . . . . . . . . . . . . . . . . . . . . . . . . . . . . . . . 143, 147, 150
Command Boss . . . . . . . . . . . . . . . . . . . . . . . . . . . . . . . . . . . . . . . . . . . . . . . . . . . . . . . . . . . . . 161
Command Documentation . . . . . . . . . . . . . . . . . . . . . . . . . . . . . . . . . . . . . . . . . . . . . . . . . 151
Command Reference . . . . . . . . . . . . . . . . . . . . . . . . . . . . . . . . . . . . . . . . . . . . . . . . . . . . . . . 152
Command Sequence . . . . . . . . . . . . . . . . . . . . . . . . . . . . . . . . . . . . . . . . . . . . . . . . . . . . . . . . 156
Commands . . . . . . . . . . . . . . . . . . . . . . . . . . . . . . . . . . . . . . . . . . . . . . . . . . . . . . . . . . . . . . . . . 179
ComputePasteboardPoint . . . . . . . . . . . . . . . . . . . . . . . . . . . . . . . . . . . . . . . . . . . . . . . . . . 330
Constructor . . . . . . . . . . . . . . . . . . . . . . . . . . . . . . . . . . . . . . . . . . . . . . . . . . . . . . . . . . . . . . . . . 164
constructors . . . . . . . . . . . . . . . . . . . . . . . . . . . . . . . . . . . . . . . . . . . . . . . . . . . . . . . . . . . . . . . . 178
controller . . . . . . . . . . . . . . . . . . . . . . . . . . . . . . . . . . . . . . . . . . . . . . . . . . . . . . . . . . . . . . 141, 143
CPathCreationTracker . . . . . . . . . . . . . . . . . . . . . . . . . . . . . . . . . . . . . . . . . . . . . . . . . . . . . . 255
CPathShape . . . . . . . . . . . . . . . . . . . . . . . . . . . . . . . . . . . . . . . . . . . . . . . . . . . . . . . . . . . . . . . . . 345
CREATE_PERSIST_PMINTERFACE . . . . . . . . . . . . . . . . . . . . . . . . . . . . . . . . . . . . . . 182
CREATE_PMINTERFACE . . . . . . . . . . . . . . . . . . . . . . . . . . . . . . . . . . . . . . . . . . . . . . . . . 182
622
CreateAnchorPointPath() . . . . . . . . . . . . . . . . . . . . . . . . . . . . . . . . . . . . . . . . . . . . . . . . . . 354
CreateCommand() . . . . . . . . . . . . . . . . . . . . . . . . . . . . . . . . . . . . . . . . . . . . . . . . . . . . . . . . . 153
CreateName() . . . . . . . . . . . . . . . . . . . . . . . . . . . . . . . . . . . . . . . . . . . . . . . . . . . . . . . . . . . . . . 164
CreateObject . . . . . . . . . . . . . . . . . . . . . . . . . . . . . . . . . . . . . . . . . . . . . . . . . . . . . . . . . . . . . . . . 177
CShape . . . . . . . . . . . . . . . . . . . . . . . . . . . . . . . . . . . . . . . . . . . . . . . . . . . . . . . . . . . . . . . . . . . . . 345
DrawHierarchy() . . . . . . . . . . . . . . . . . . . . . . . . . . . . . . . . . . . . . . . . . . . . . . . . . . . . . . . . . 345
CTool . . . . . . . . . . . . . . . . . . . . . . . . . . . . . . . . . . . . . . . . . . . . . . . . . . . . . . . . . . . . . . . . . . . . . . . 254
CToolCursorProvider . . . . . . . . . . . . . . . . . . . . . . . . . . . . . . . . . . . . . . . . . . . . . . . . . . . . . . 254
CTracker . . . . . . . . . . . . . . . . . . . . . . . . . . . . . . . . . . . . . . . . . . . . . . . . . . . . . . . . . . . . . . . . . . . 255
CTrackerEventHandler . . . . . . . . . . . . . . . . . . . . . . . . . . . . . . . . . . . . . . . . . . . . . . . . . . . . . 256
cursor
CToolCursorProvider . . . . . . . . . . . . . . . . . . . . . . . . . . . . . . . . . . . . . . . . . . . . . . . . . . . . 254
cursor providers . . . . . . . . . . . . . . . . . . . . . . . . . . . . . . . . . . . . . . . . . . . . . . . . . . . . . . . . . . . . 239
cursors . . . . . . . . . . . . . . . . . . . . . . . . . . . . . . . . . . . . . . . . . . . . . . . . . . . . . . . . . . . . . . . . . . . . . . 239
curveto() . . . . . . . . . . . . . . . . . . . . . . . . . . . . . . . . . . . . . . . . . . . . . . . . . . . . . . . . . . . . . . . . . . . 341
D
E
Data Interfaces . . . . . . . . . . . . . . . . . . . . . . . . . . . . . . . . . . . . . . . . . . . . . . . . . . . . . . . . . 154, 155
Databases . . . . . . . . . . . . . . . . . . . . . . . . . . . . . . . . . . . . . . . . . . . . . . . . . . . . . . . . . . . . . . . . . . . 174
DECLARE_HELPER_METHODS . . . . . . . . . . . . . . . . . . . . . . . . . . . . . . . . . . . . . . . . . . 183
default settings . . . . . . . . . . . . . . . . . . . . . . . . . . . . . . . . . . . . . . . . . . . . . . . . . . . . . . . . . . . . . . 174
DEFINE_HELPER_METHODS . . . . . . . . . . . . . . . . . . . . . . . . . . . . . . . . . . . . . . . . . . . . 183
DeleteUID . . . . . . . . . . . . . . . . . . . . . . . . . . . . . . . . . . . . . . . . . . . . . . . . . . . . . . . . . . . . . . . . . . 181
Destroy . . . . . . . . . . . . . . . . . . . . . . . . . . . . . . . . . . . . . . . . . . . . . . . . . . . . . . . . . . . . . . . . . . . . . 181
Dirty . . . . . . . . . . . . . . . . . . . . . . . . . . . . . . . . . . . . . . . . . . . . . . . . . . . . . . . . . . . . . . . . . . . 182, 183
dirty . . . . . . . . . . . . . . . . . . . . . . . . . . . . . . . . . . . . . . . . . . . . . . . . . . . . . . . . . . . . . . . . . . . . . . . . 178
Do() . . . . . . . . . . . . . . . . . . . . . . . . . . . . . . . . . . . . . . . . . . . . . . . . . . . . . . . . . . . . . . . . . . . . . . . . 164
DoNotify() . . . . . . . . . . . . . . . . . . . . . . . . . . . . . . . . . . . . . . . . . . . . . . . . . . . . . . . . . . . . . . . . . 165
Draw events . . . . . . . . . . . . . . . . . . . . . . . . . . . . . . . . . . . . . . . . . . . . . . . . . . . . . . . . . . . . . . . . 347
Draw Manager . . . . . . . . . . . . . . . . . . . . . . . . . . . . . . . . . . . . . . . . . . . . . . . . . . . . . . . . . . . . . . 335
DrawHandlesImmediate() . . . . . . . . . . . . . . . . . . . . . . . . . . . . . . . . . . . . . . . . . . . . . . . . . . 353
DrawPathImmediate() . . . . . . . . . . . . . . . . . . . . . . . . . . . . . . . . . . . . . . . . . . . . . . . . . . . . . 353
em-box . . . . . . . . . . . . . . . . . . . . . . . . . . . . . . . . . . . . . . . . . . . . . . . . . . . . . . . . . . . . . . . . . . . . . 535
Em-box Character Baselines . . . . . . . . . . . . . . . . . . . . . . . . . . . . . . . . . . . . . . . . . . . . . . . . 536
EndCommandSequence() . . . . . . . . . . . . . . . . . . . . . . . . . . . . . . . . . . . . . . . . . . . . . . . . . . 153
Error Handling . . . . . . . . . . . . . . . . . . . . . . . . . . . . . . . . . . . . . . . . . . . . . . . . . . . . . . . . 158, 170
Exercises . . . . . . . . . . . . . . . . . . . . . . . . . . . . . . . . . . . . . . . . . . . . . . . . . . . . . . . . . . . . . . . . . . . . 171
Adobe InDesign Programming Guide
F
G
H
I
623
fill() . . . . . . . . . . . . . . . . . . . . . . . . . . . . . . . . . . . . . . . . . . . . . . . . . . . . . . . . . . . . . . . . . . . . . . . . . 341
FooCountData . . . . . . . . . . . . . . . . . . . . . . . . . . . . . . . . . . . . . . . . . . . . . . . . . . . . . . . . . . . . . . 183
GetContentToWindowTransform . . . . . . . . . . . . . . . . . . . . . . . . . . . . . . . . . . . . . . . . . . 330
GetDrawEventDispatcher() . . . . . . . . . . . . . . . . . . . . . . . . . . . . . . . . . . . . . . . . . . . . . . . . . 339
GetDrawManager() . . . . . . . . . . . . . . . . . . . . . . . . . . . . . . . . . . . . . . . . . . . . . . . . . . . . . . . . . 340
GetGraphicsContext() . . . . . . . . . . . . . . . . . . . . . . . . . . . . . . . . . . . . . . . . . . . . . . . . . . . . . . 340
GetGraphicsPort . . . . . . . . . . . . . . . . . . . . . . . . . . . . . . . . . . . . . . . . . . . . . . . . . . . . . . . . . . . . 331
GetGraphicsPort() . . . . . . . . . . . . . . . . . . . . . . . . . . . . . . . . . . . . . . . . . . . . . . . . . . . . . . . . . . 339
GetInverseTransform() . . . . . . . . . . . . . . . . . . . . . . . . . . . . . . . . . . . . . . . . . . . . . . . . . . . . . 340
GetLayoutController() . . . . . . . . . . . . . . . . . . . . . . . . . . . . . . . . . . . . . . . . . . . . . . . . . . . . . . 340
GetRasterPort() . . . . . . . . . . . . . . . . . . . . . . . . . . . . . . . . . . . . . . . . . . . . . . . . . . . . . . . . . . . . . 339
GetTransform() . . . . . . . . . . . . . . . . . . . . . . . . . . . . . . . . . . . . . . . . . . . . . . . . . . . . . . . . . . . . . 340
GetUndoability() . . . . . . . . . . . . . . . . . . . . . . . . . . . . . . . . . . . . . . . . . . . . . . . . . . . . . . . . . . . 167
GetView() . . . . . . . . . . . . . . . . . . . . . . . . . . . . . . . . . . . . . . . . . . . . . . . . . . . . . . . . . . . . . . . . . . 340
GetViewPort . . . . . . . . . . . . . . . . . . . . . . . . . . . . . . . . . . . . . . . . . . . . . . . . . . . . . . . . . . . . . . . . 331
GetViewPort() . . . . . . . . . . . . . . . . . . . . . . . . . . . . . . . . . . . . . . . . . . . . . . . . . . . . . . . . . . . . . . 340
GetViewPortAttributes() . . . . . . . . . . . . . . . . . . . . . . . . . . . . . . . . . . . . . . . . . . . . . . . . . . . 340
GetViewPortIsPrintingPort() . . . . . . . . . . . . . . . . . . . . . . . . . . . . . . . . . . . . . . . . . . . . . . . 343
Goals . . . . . . . . . . . . . . . . . . . . . . . . . . . . . . . . . . . . . . . . . . . . . . . . . . . . . . . . . . . . . . . . . . . 569, 595
graphics context . . . . . . . . . . . . . . . . . . . . . . . . . . . . . . . . . . . . . . . . . . . . . . . . . . . . . . . . . . . . 326
GraphicsData . . . . . . . . . . . . . . . . . . . . . . . . . . . . . . . . . . . . . . . . . . . . . . . . . . . . . . . . . . . . . . . 326
GraphicsUtils . . . . . . . . . . . . . . . . . . . . . . . . . . . . . . . . . . . . . . . . . . . . . . . . . . . . . . . . . . . . . . . 354
grestore() . . . . . . . . . . . . . . . . . . . . . . . . . . . . . . . . . . . . . . . . . . . . . . . . . . . . . . . . . . . . . . . . . . . 341
gsave() . . . . . . . . . . . . . . . . . . . . . . . . . . . . . . . . . . . . . . . . . . . . . . . . . . . . . . . . . . . . . . . . . . . . . . 341
HELPER_METHODS_INIT . . . . . . . . . . . . . . . . . . . . . . . . . . . . . . . . . . . . . . . . . . . . . . . . 183
hidden tools . . . . . . . . . . . . . . . . . . . . . . . . . . . . . . . . . . . . . . . . . . . . . . . . . . . . . . . . . . . . . . . . 239
History . . . . . . . . . . . . . . . . . . . . . . . . . . . . . . . . . . . . . . . . . . . . . . . . . . . . . . . . . . . . . . . . . 569, 595
How to Design Commands . . . . . . . . . . . . . . . . . . . . . . . . . . . . . . . . . . . . . . . . . . . . . . . . . 166
Hybrid Commands . . . . . . . . . . . . . . . . . . . . . . . . . . . . . . . . . . . . . . . . . . . . . . . . . . . . . . . . . 168
IAGMPortData . . . . . . . . . . . . . . . . . . . . . . . . . . . . . . . . . . . . . . . . . . . . . . . . . . . . . . . . . . . . . 327
ICommand . . . . . . . . . . . . . . . . . . . . . . . . . . . . . . . . . . . . . . . . . . . . . . . . . . . . . . . . . . . . 153, 163
IControlView . . . . . . . . . . . . . . . . . . . . . . . . . . . . . . . . . . . . . . . . . . . . . . . . . . . . . . . . . . . . . . . 321
ICursorProvider . . . . . . . . . . . . . . . . . . . . . . . . . . . . . . . . . . . . . . . . . . . . . .239, 253, 254, 257
IEventHandler . . . . . . . . . . . . . . . . . . . . . . . . . . . . . . . . . . . . . . . . . . . . . . . . . . . . 253, 256, 321
IGraphicsContext . . . . . . . . . . . . . . . . . . . . . . . . . . . . . . . . . . . . . . . . . . . . . . . . . . . . . . . . . . . 328
624
IGraphicsPort . . . . . . . . . . . . . . . . . . . . . . . . . . . . . . . . . . . . . . . . . . . . . . . . . . . . . . . . . . . . . . 327
IGraphicStyleDescriptor . . . . . . . . . . . . . . . . . . . . . . . . . . . . . . . . . . . . . . . . . . . . . . . . . . . . 344
IHandleShape . . . . . . . . . . . . . . . . . . . . . . . . . . . . . . . . . . . . . . . . . . . . . . . . . . . . . . . . . . . . . . 344
Draw() . . . . . . . . . . . . . . . . . . . . . . . . . . . . . . . . . . . . . . . . . . . . . . . . . . . . . . . . . . . . . . . . . . . . 334
IID_IBACKGROUNDOFFSCREENCHANGED . . . . . . . . . . . . . . . . . . . . . . . . . . . 334
IK2ServiceProvider . . . . . . . . . . . . . . . . . . . . . . . . . . . . . . . . . . . . . . . . . . . . . . . . . . . . . . . . . 256
ILayoutControlData . . . . . . . . . . . . . . . . . . . . . . . . . . . . . . . . . . . . . . . . . . . . . . . . . . . . . . . . 239
ILayoutControlViewHelper . . . . . . . . . . . . . . . . . . . . . . . . . . . . . . . . . . . . . . . . . . . . . . . . 239
Implementing a New Command . . . . . . . . . . . . . . . . . . . . . . . . . . . . . . . . . . . . . . . . . . . 161
InDesign window . . . . . . . . . . . . . . . . . . . . . . . . . . . . . . . . . . . . . . . . . . . . . . . . . . . . . . . . . . . 319
Instantiate . . . . . . . . . . . . . . . . . . . . . . . . . . . . . . . . . . . . . . . . . . . . . . . . . . . . . . . . . . . . . 178, 179
Interface Access Rules . . . . . . . . . . . . . . . . . . . . . . . . . . . . . . . . . . . . . . . . . . . . . . . . . . . . . . 150
Interface Categories . . . . . . . . . . . . . . . . . . . . . . . . . . . . . . . . . . . . . . . . . . . . . . . . . . . . . . . . 149
InterfaceFactory . . . . . . . . . . . . . . . . . . . . . . . . . . . . . . . . . . . . . . . . . . . . . . . . . . . . . . . . . . . . 182
InterfacePtr . . . . . . . . . . . . . . . . . . . . . . . . . . . . . . . . . . . . . . . . . . . . . . . . . . . . . . . . . . . . 178, 180
InterfacePtrs . . . . . . . . . . . . . . . . . . . . . . . . . . . . . . . . . . . . . . . . . . . . . . . . . . . . . . . . . . . . . . . . 180
IObserver . . . . . . . . . . . . . . . . . . . . . . . . . . . . . . . . . . . . . . . . . . . . . . . . . . . . . . . . . . . . . . 146, 148
IPageItemAdornmentList . . . . . . . . . . . . . . . . . . . . . . . . . . . . . . . . . . . . . . . . . . . . . . . . . . . 344
IPanelControlData . . . . . . . . . . . . . . . . . . . . . . . . . . . . . . . . . . . . . . . . . . . . . . . . . . . . . . . . . 321
IPathGeometry . . . . . . . . . . . . . . . . . . . . . . . . . . . . . . . . . . . . . . . . . . . . . . . . . . . . . . . . 253, 257
IPathPageItem . . . . . . . . . . . . . . . . . . . . . . . . . . . . . . . . . . . . . . . . . . . . . . . . . . . . . . . . . . . . . . 344
IPMPersist . . . . . . . . . . . . . . . . . . . . . . . . . . . . . . . . . . . . . . . . . . . . . . . . . . . . . . . . . . . . . . . . . . 181
IPMStream . . . . . . . . . . . . . . . . . . . . . . . . . . . . . . . . . . . . . . . . . . . . . . . . . . . . . . . .182, 183, 184
IsReading . . . . . . . . . . . . . . . . . . . . . . . . . . . . . . . . . . . . . . . . . . . . . . . . . . . . . . . . . . . . . . . . . 184
IsWriting . . . . . . . . . . . . . . . . . . . . . . . . . . . . . . . . . . . . . . . . . . . . . . . . . . . . . . . . . . . . . . . . . 184
methods . . . . . . . . . . . . . . . . . . . . . . . . . . . . . . . . . . . . . . . . . . . . . . . . . . . . . . . . . . . . . . . . . . 184
SetSwapping . . . . . . . . . . . . . . . . . . . . . . . . . . . . . . . . . . . . . . . . . . . . . . . . . . . . . . . . . . . . . . 184
XferByte . . . . . . . . . . . . . . . . . . . . . . . . . . . . . . . . . . . . . . . . . . . . . . . . . . . . . . . . . . . . . . . . . . 184
XferObject . . . . . . . . . . . . . . . . . . . . . . . . . . . . . . . . . . . . . . . . . . . . . . . . . . . . . . . . . . . . . . . . 184
XferReference . . . . . . . . . . . . . . . . . . . . . . . . . . . . . . . . . . . . . . . . . . . . . . . . . . . . . . . . . . . . . 184
IPMUnknown . . . . . . . . . . . . . . . . . . . . . . . . . . . . . . . . . . . . . . . . . . . . . . . . . . . . . . . . . . . . . . 328
IPrintObject . . . . . . . . . . . . . . . . . . . . . . . . . . . . . . . . . . . . . . . . . . . . . . . . . . . . . . . . . . . . . . . . 343
IRasterPort . . . . . . . . . . . . . . . . . . . . . . . . . . . . . . . . . . . . . . . . . . . . . . . . . . . . . . . . . . . . . . . . . 327
IShape . . . . . . . . . . . . . . . . . . . . . . . . . . . . . . . . . . . . . . . . . . . . . . . . . . . . . . . . . . . . . . . . . . . . . . 344
Draw() . . . . . . . . . . . . . . . . . . . . . . . . . . . . . . . . . . . . . . . . . . . . . . . . . . . . . . . . . . . . . . . . . . . . 334
ISprite . . . . . . . . . . . . . . . . . . . . . . . . . . . . . . . . . . . . . . . . . . . . . . . . . . . . . . . . . . . . .243, 253, 257
ISubject . . . . . . . . . . . . . . . . . . . . . . . . . . . . . . . . . . . . . . . . . . . . . . . . . . . . . . . . . . . . . . . . 145, 146
ItemList . . . . . . . . . . . . . . . . . . . . . . . . . . . . . . . . . . . . . . . . . . . . . . . . . . . . . . . . . . . . . . . . . . . . . 154
ITip . . . . . . . . . . . . . . . . . . . . . . . . . . . . . . . . . . . . . . . . . . . . . . . . . . . . . . . . . . . . . . . . . . . . . . . . . 240
Adobe InDesign Programming Guide
625
ITool . . . . . . . . . . . . . . . . . . . . . . . . . . . . . . . . . . . . . . . . . . . . . . . . . . . . . . . . . . . . . . 239, 252, 254
IToolBoxUtils . . . . . . . . . . . . . . . . . . . . . . . . . . . . . . . . . . . . . . . . . . . . . . . . . . . . . . . . . . . . . . . 247
IToolChangeSuite . . . . . . . . . . . . . . . . . . . . . . . . . . . . . . . . . . . . . . . . . . . . . . . . . . . . . . . . . . 248
IToolManager . . . . . . . . . . . . . . . . . . . . . . . . . . . . . . . . . . . . . . . . . . . . . . . . . . . . . . . . . . . . . . 247
IToolRegister . . . . . . . . . . . . . . . . . . . . . . . . . . . . . . . . . . . . . . . . . . . . . . . . . . . . . 252, 253, 256
ITracker . . . . . . . . . . . . . . . . . . . . . . . . . . . . . . . . . . . . . . . . . . . . . . . . . . . . . . . . . . 240, 253, 255
ITrackerFactory . . . . . . . . . . . . . . . . . . . . . . . . . . . . . . . . . . . . . . . . . . . . . . . . . . . . . . . . . . . . . 240
ITrackerRegister . . . . . . . . . . . . . . . . . . . . . . . . . . . . . . . . . . . . . . . . . . . . . . . . . . . . . . . 252, 253
IViewPort . . . . . . . . . . . . . . . . . . . . . . . . . . . . . . . . . . . . . . . . . . . . . . . . . . . . . . . . . . . . . . . . . . . 327
IViewPortAttributes . . . . . . . . . . . . . . . . . . . . . . . . . . . . . . . . . . . . . . . . . . . . . . . . . . . . . . . . 327
IWindow . . . . . . . . . . . . . . . . . . . . . . . . . . . . . . . . . . . . . . . . . . . . . . . . . . . . . . . . . . . . . . . . . . . 321
IWindowPort . . . . . . . . . . . . . . . . . . . . . . . . . . . . . . . . . . . . . . . . . . . . . . . . . . . . . . . . . . . . . . . 327
IWindowPortData . . . . . . . . . . . . . . . . . . . . . . . . . . . . . . . . . . . . . . . . . . . . . . . . . . . . . . . . . . 327
IXferBytes . . . . . . . . . . . . . . . . . . . . . . . . . . . . . . . . . . . . . . . . . . . . . . . . . . . . . . . . . . . . . . . . . . . 183
K
kAbortCheckMessage . . . . . . . . . . . . . . . . . . . . . . . . . . . . . . . . . . . . . . . . . . . . . . . . . . . . . . . 347
kAGMImageViewPortBoss . . . . . . . . . . . . . . . . . . . . . . . . . . . . . . . . . . . . . . . . . . . . . . . . . 327
kAutoToolRegisterImpl . . . . . . . . . . . . . . . . . . . . . . . . . . . . . . . . . . . . . . . . . . . . . . . . . . . . . 256
kBeginShapeMessage . . . . . . . . . . . . . . . . . . . . . . . . . . . . . . . . . . . . . . . . . . . . . . . . . . . . . . . 347
kCharAttrStrandBoss . . . . . . . . . . . . . . . . . . . . . . . . . . . . . . . . . . . . . . . . . . . . . . . . . . . . . . . 405
kCToolRegisterProviderImpl . . . . . . . . . . . . . . . . . . . . . . . . . . . . . . . . . . . . . . . . . . . . . . . 256
kCTrackerEventHandlerImpl . . . . . . . . . . . . . . . . . . . . . . . . . . . . . . . . . . . . . . . . . . . . . . . 256
kCTrackerRegisterProviderImpl . . . . . . . . . . . . . . . . . . . . . . . . . . . . . . . . . . . . . . . . . . . . 256
kDocWindowBoss . . . . . . . . . . . . . . . . . . . . . . . . . . . . . . . . . . . . . . . . . . . . . . . . . . . . . 320, 322
kDrawCreateDynamic . . . . . . . . . . . . . . . . . . . . . . . . . . . . . . . . . . . . . . . . . . . . . . . . . . . . . . 339
kDrawFrameEdge . . . . . . . . . . . . . . . . . . . . . . . . . . . . . . . . . . . . . . . . . . . . . . . . . . . . . . . . . . . 339
kDrawMoveDynamic . . . . . . . . . . . . . . . . . . . . . . . . . . . . . . . . . . . . . . . . . . . . . . . . . . . . . . . 339
kDrawResizeDynamic . . . . . . . . . . . . . . . . . . . . . . . . . . . . . . . . . . . . . . . . . . . . . . . . . . . . . . 339
kDrawRotateDynamic . . . . . . . . . . . . . . . . . . . . . . . . . . . . . . . . . . . . . . . . . . . . . . . . . . . . . . 339
kDrawScaleDynamic . . . . . . . . . . . . . . . . . . . . . . . . . . . . . . . . . . . . . . . . . . . . . . . . . . . . . . . . 339
kDrawShapeMessage . . . . . . . . . . . . . . . . . . . . . . . . . . . . . . . . . . . . . . . . . . . . . . . . . . . . . . . 347
kEndShapeMessage . . . . . . . . . . . . . . . . . . . . . . . . . . . . . . . . . . . . . . . . . . . . . . . . . . . . . . . . . 347
kFilterCheckMessage . . . . . . . . . . . . . . . . . . . . . . . . . . . . . . . . . . . . . . . . . . . . . . . . . . . . . . . 347
kFrameListBoss . . . . . . . . . . . . . . . . . . . . . . . . . . . . . . . . . . . . . . . . . . . . . . . . . . . . . . . . . . . . . 399
kGenericToolBoss . . . . . . . . . . . . . . . . . . . . . . . . . . . . . . . . . . . . . . . . . . . . . . . . . . . . . . . . . . 253
kHTMLViewPortBoss . . . . . . . . . . . . . . . . . . . . . . . . . . . . . . . . . . . . . . . . . . . . . . . . . . . . . . 327
kImageItem . . . . . . . . . . . . . . . . . . . . . . . . . . . . . . . . . . . . . . . . . . . . . . . . . . . . . . . . . . . . . . . . . 348
kinsoku . . . . . . . . . . . . . . . . . . . . . . . . . . . . . . . . . . . . . . . . . . . . . . . . . . . . . . . . . . . . . . . . . . . . . 537
kLayoutPanelBoss . . . . . . . . . . . . . . . . . . . . . . . . . . . . . . . . . . . . . . . . . . . . . . . . . . . . . . . . . . 322
626
kLayoutWidgetBoss . . . . . . . . . . . . . . . . . . . . . . . . . . . . . . . . . . . . . . . . . . . . . . . . . . . 238, 322
kMulticolumnItemBoss . . . . . . . . . . . . . . . . . . . . . . . . . . . . . . . . . . . . . . . . . . . . . . . . . . . . 348
kOffscreenViewPortBoss . . . . . . . . . . . . . . . . . . . . . . . . . . . . . . . . . . . . . . . . . . . . . . . . . . . 327
kParaAttrStrandBoss . . . . . . . . . . . . . . . . . . . . . . . . . . . . . . . . . . . . . . . . . . . . . . . . . . . . . . . 405
kPatientUser . . . . . . . . . . . . . . . . . . . . . . . . . . . . . . . . . . . . . . . . . . . . . . . . . . . . . . . . . . . . . . . . 339
kPDFViewPortBoss . . . . . . . . . . . . . . . . . . . . . . . . . . . . . . . . . . . . . . . . . . . . . . . . . . . . 327, 343
kPrinting . . . . . . . . . . . . . . . . . . . . . . . . . . . . . . . . . . . . . . . . . . . . . . . . . . . . . . . . . . . . . . . . . . . 339
kPrintNonPSViewPortBoss . . . . . . . . . . . . . . . . . . . . . . . . . . . . . . . . . . . . . . . . . . . . . . . . . 327
kPrintPSViewPortBoss . . . . . . . . . . . . . . . . . . . . . . . . . . . . . . . . . . . . . . . . . . . . . . . . . . . . . 327
kSplineItemBoss . . . . . . . . . . . . . . . . . . . . . . . . . . . . . . . . . . . . . . . . . . . . . . . . . . . . . . . . . . . . 345
kTextDataStrand . . . . . . . . . . . . . . . . . . . . . . . . . . . . . . . . . . . . . . . . . . . . . . . . . . . . . . . . . . . 405
kTextStoryBoss . . . . . . . . . . . . . . . . . . . . . . . . . . . . . . . . . . . . . . . . . . . . . . . . . . . . . . . . . . . . . 406
kToolManagerBoss . . . . . . . . . . . . . . . . . . . . . . . . . . . . . . . . . . . . . . . . . . . . . . . . . . . . . . . . . 247
kUseXOR . . . . . . . . . . . . . . . . . . . . . . . . . . . . . . . . . . . . . . . . . . . . . . . . . . . . . . . . . . . . . . . . . . . 339
kWindowViewPortBoss . . . . . . . . . . . . . . . . . . . . . . . . . . . . . . . . . . . . . . . . . . . . . . . 327, 332
L
layout hierarchy . . . . . . . . . . . . . . . . . . . . . . . . . . . . . . . . . . . . . . . . . . . . . . . . . . . . . . . . . . . . 319
layout view . . . . . . . . . . . . . . . . . . . . . . . . . . . . . . . . . . . . . . . . . . . . . . . . . . . . . . . . . . . . . . . . . 238
LayoutUtils . . . . . . . . . . . . . . . . . . . . . . . . . . . . . . . . . . . . . . . . . . . . . . . . . . . . . . . . . . . . . . . . . 332
LayoutWidget . . . . . . . . . . . . . . . . . . . . . . . . . . . . . . . . . . . . . . . . . . . . . . . . . . . . . . . . . . . . . . 322
lineto() . . . . . . . . . . . . . . . . . . . . . . . . . . . . . . . . . . . . . . . . . . . . . . . . . . . . . . . . . . . . . . . . . . . . . 341
M Macro Commands . . . . . . . . . . . . . . . . . . . . . . . . . . . . . . . . . . . . . . . . . . . . . . . . . . . . . . . . . . 168
model . . . . . . . . . . . . . . . . . . . . . . . . . . . . . . . . . . . . . . . . . . . . . . . . . . . . . . . . . 141, 143, 145, 150
mojikumi . . . . . . . . . . . . . . . . . . . . . . . . . . . . . . . . . . . . . . . . . . . . . . . . . . . . . . . . . . . . . . . . . . . 537
moveto() . . . . . . . . . . . . . . . . . . . . . . . . . . . . . . . . . . . . . . . . . . . . . . . . . . . . . . . . . . . . . . . . . . . 341
MVC . . . . . . . . . . . . . . . . . . . . . . . . . . . . . . . . . . . . . . . . . . . . . . . . . . . . . . . . . . . . . . . . . . . . . . . 141
N
O
P
nametable . . . . . . . . . . . . . . . . . . . . . . . . . . . . . . . . . . . . . . . . . . . . . . . . . . . . . . . . . . . . . . . . . . 414
newpath() . . . . . . . . . . . . . . . . . . . . . . . . . . . . . . . . . . . . . . . . . . . . . . . . . . . . . . . . . . . . . . . . . . 341
NewUID . . . . . . . . . . . . . . . . . . . . . . . . . . . . . . . . . . . . . . . . . . . . . . . . . . . . . . . . . . . . . . . . . . . . 178
Notification . . . . . . . . . . . . . . . . . . . . . . . . . . . . . . . . . . . . . . . . . . . . . . . . . . . . . . . .141, 143, 149
observer . . . . . . . . . . . . . . . . . . . . . . . . . . . . . . . . . . . . . . . . . . . . . . . . . . . . . . . . . . . . . . . 141, 146
Offscreen graphics contexts . . . . . . . . . . . . . . . . . . . . . . . . . . . . . . . . . . . . . . . . . . . . . . . . . 334
Overview . . . . . . . . . . . . . . . . . . . . . . . . . . . . . . . . . . . . . . .375, 455, 485, 513, 531, 569, 595
paragraph styles . . . . . . . . . . . . . . . . . . . . . . . . . . . . . . . . . . . . . . . . . . . . . . . . . . . . . . . . . . . . 412
Adobe InDesign Programming Guide
627
Parent tool . . . . . . . . . . . . . . . . . . . . . . . . . . . . . . . . . . . . . . . . . . . . . . . . . . . . . . . . . . . . . . . . . . 258
Persistence . . . . . . . . . . . . . . . . . . . . . . . . . . . . . . . . . . . . . . . . . . . . . . . . . . . . . . . . . . . . . . . . . . 174
Persistent Objects . . . . . . . . . . . . . . . . . . . . . . . . . . . . . . . . . . . . . . . . . . . . . . . . . . . . . . . . . . . 176
PersistUtils . . . . . . . . . . . . . . . . . . . . . . . . . . . . . . . . . . . . . . . . . . . . . . . . . . . . . . . . . . . . . . . . . . 178
ProcessCommand() . . . . . . . . . . . . . . . . . . . . . . . . . . . . . . . . . . . . . . . . . . . . . . . . . . . . . . . . 153
Processing a Command . . . . . . . . . . . . . . . . . . . . . . . . . . . . . . . . . . . . . . . . . . . . . . . . . . . . . 159
profile . . . . . . . . . . . . . . . . . . . . . . . . . . . . . . . . . . . . . . . . . . . . . . . . . . . . . . . . . . . . . . . . . . . . . . . 283
Protective Shutdown . . . . . . . . . . . . . . . . . . . . . . . . . . . . . . . . . . . . . . . . . . . . . . . . . . . . . . . . 179
push-in kinsoku . . . . . . . . . . . . . . . . . . . . . . . . . . . . . . . . . . . . . . . . . . . . . . . . . . . . . . . . . . . . 537
push-out kinsoku . . . . . . . . . . . . . . . . . . . . . . . . . . . . . . . . . . . . . . . . . . . . . . . . . . . . . . . . . . . 537
R
S
Reading and Writing . . . . . . . . . . . . . . . . . . . . . . . . . . . . . . . . . . . . . . . . . . . . . . . . . . . . . . . . 182
ReadWrite . . . . . . . . . . . . . . . . . . . . . . . . . . . . . . . . . . . . . . . . . . . . . . . . . . . . . . . . . . . . . . . . . . 182
Redo() . . . . . . . . . . . . . . . . . . . . . . . . . . . . . . . . . . . . . . . . . . . . . . . . . . . . . . . . . . . . . . . . . . . . . . 165
reference count . . . . . . . . . . . . . . . . . . . . . . . . . . . . . . . . . . . . . . . . . . . . . . . . . . . . . . . . . . . . . 176
References . . . . . . . . . . . . . . . . . . . . . . . . . . . . . . . . . . . . . . . . . . . . . . . . . . . . . . . . . . . . . . . . . . 171
References to an object . . . . . . . . . . . . . . . . . . . . . . . . . . . . . . . . . . . . . . . . . . . . . . . . . . . . . 180
Review . . . . . . . . . . . . . . . . . . . . . . . . . . . . . . . . . . . . . . . . . . . . . . . . . . . . . . . . . . . . . . . . . . . . . . 171
review . . . . . . . . . . . . . . . . . . . . . . . . . . . . . . . . . . . . . . . . . . . . . . . . . . . . . . . . . . . . . . . . . . . . . . . 283
RollBackCommandSequence() . . . . . . . . . . . . . . . . . . . . . . . . . . . . . . . . . . . . . . . . . . . . . 154
Roman baseline . . . . . . . . . . . . . . . . . . . . . . . . . . . . . . . . . . . . . . . . . . . . . . . . . . . . . . . . . . . . . 536
root character style . . . . . . . . . . . . . . . . . . . . . . . . . . . . . . . . . . . . . . . . . . . . . . . . . . . . 412, 413
root paragraph style . . . . . . . . . . . . . . . . . . . . . . . . . . . . . . . . . . . . . . . . . . . . . . . . . . . . . . . . 412
ScheduleCommand() . . . . . . . . . . . . . . . . . . . . . . . . . . . . . . . . . . . . . . . . . . . . . . . . . . . . . . . 153
scrap . . . . . . . . . . . . . . . . . . . . . . . . . . . . . . . . . . . . . . . . . . . . . . . . . . . . . . . . . . . . . . . . . . . . . . . . 174
SetSequenceMark() . . . . . . . . . . . . . . . . . . . . . . . . . . . . . . . . . . . . . . . . . . . . . . . . . . . . . . . . . 154
SetUndoability . . . . . . . . . . . . . . . . . . . . . . . . . . . . . . . . . . . . . . . . . . . . . . . . . . . . . . . . . . . . . . 167
ShapeSelector . . . . . . . . . . . . . . . . . . . . . . . . . . . . . . . . . . . . . . . . . . . . . . . . . . . . . . . . . . . . . . . 265
Snapshot . . . . . . . . . . . . . . . . . . . . . . . . . . . . . . . . . . . . . . . . . . . . . . . . . . . . . . . . . . . . . . . . . . . . 265
sprite . . . . . . . . . . . . . . . . . . . . . . . . . . . . . . . . . . . . . . . . . . . . . . . . . . . . . . . . . . . . . . . . . . . . . . . . 243
stores . . . . . . . . . . . . . . . . . . . . . . . . . . . . . . . . . . . . . . . . . . . . . . . . . . . . . . . . . . . . . . . . . . . . . . . 174
Strands . . . . . . . . . . . . . . . . . . . . . . . . . . . . . . . . . . . . . . . . . . . . . . . . . . . . . . . . . . . . . . . . . . . . . . 398
Stream . . . . . . . . . . . . . . . . . . . . . . . . . . . . . . . . . . . . . . . . . . . . . . . . . . . . . . . . . . . . . . . . . . . . . . 183
Helper methods . . . . . . . . . . . . . . . . . . . . . . . . . . . . . . . . . . . . . . . . . . . . . . . . . . . . . . . . . . . 183
stroke() . . . . . . . . . . . . . . . . . . . . . . . . . . . . . . . . . . . . . . . . . . . . . . . . . . . . . . . . . . . . . . . . . . . . . 341
subject . . . . . . . . . . . . . . . . . . . . . . . . . . . . . . . . . . . . . . . . . . . . . . . . . . . . . . . . . . . . . . . . . 141, 145
Sub-tool . . . . . . . . . . . . . . . . . . . . . . . . . . . . . . . . . . . . . . . . . . . . . . . . . . . . . . . . . . . . . . . . . . . . 259
Summary . . . . . . . . . . . . . . . . . . . . . . . . . . . . . . . . . . . . . . . . . . . . . . . . . . . . . . . . . . . . . . . . . . . 171
628
SysWindow . . . . . . . . . . . . . . . . . . . . . . . . . . . . . . . . . . . . . . . . . . . . . . . . . . . . . . . . . . . . . . . . . 326
T
tag . . . . . . . . . . . . . . . . . . . . . . . . . . . . . . . . . . . . . . . . . . . . . . . . . . . . . . . . . . . . . . . . . . . . . . . . . . 175
Target . . . . . . . . . . . . . . . . . . . . . . . . . . . . . . . . . . . . . . . . . . . . . . . . . . . . . . . . . . . . . . . . . . 156, 158
tool
category . . . . . . . . . . . . . . . . . . . . . . . . . . . . . . . . . . . . . . . . . . . . . . . . . . . . . . . . . . . . . . . . . . . 248
CTool . . . . . . . . . . . . . . . . . . . . . . . . . . . . . . . . . . . . . . . . . . . . . . . . . . . . . . . . . . . . . . . . . . . . . 254
cursor . . . . . . . . . . . . . . . . . . . . . . . . . . . . . . . . . . . . . . . . . . . . . . . . . . . . . . . . . . . . . . . . . . . . . 260
group . . . . . . . . . . . . . . . . . . . . . . . . . . . . . . . . . . . . . . . . . . . . . . . . . . . . . . . . . . . . . . . . . . . . . 259
hidden tools . . . . . . . . . . . . . . . . . . . . . . . . . . . . . . . . . . . . . . . . . . . . . . . . . . . . . . . . . . . . . . 239
icon . . . . . . . . . . . . . . . . . . . . . . . . . . . . . . . . . . . . . . . . . . . . . . . . . . . . . . . . . . . . . . . . . . . . . . . 260
ICursorProvider . . . . . . . . . . . . . . . . . . . . . . . . . . . . . . . . . . . . . . . . . . . . . . . . . . . . . . . . . . 253
ITool . . . . . . . . . . . . . . . . . . . . . . . . . . . . . . . . . . . . . . . . . . . . . . . . . . . . . . . . . . . . . . . . . . . . . . 252
localisation . . . . . . . . . . . . . . . . . . . . . . . . . . . . . . . . . . . . . . . . . . . . . . . . . . . . . . . . . . . . . . . 259
manager . . . . . . . . . . . . . . . . . . . . . . . . . . . . . . . . . . . . . . . . . . . . . . . . . . . . . . . . . . . . . . . . . . 247
number . . . . . . . . . . . . . . . . . . . . . . . . . . . . . . . . . . . . . . . . . . . . . . . . . . . . . . . . . . . . . . . . . . . 259
overview . . . . . . . . . . . . . . . . . . . . . . . . . . . . . . . . . . . . . . . . . . . . . . . . . . . . . . . . . . . . . . . . . . 239
parent . . . . . . . . . . . . . . . . . . . . . . . . . . . . . . . . . . . . . . . . . . . . . . . . . . . . . . . . . . . . . . . . . . . . . 258
registration . . . . . . . . . . . . . . . . . . . . . . . . . . . . . . . . . . . . . . . . . . . . . . . . . . . . . . . . . . . . . . . 252
shortcut . . . . . . . . . . . . . . . . . . . . . . . . . . . . . . . . . . . . . . . . . . . . . . . . . . . . . . . . . . . . . . . . . . . 259
sub-tool . . . . . . . . . . . . . . . . . . . . . . . . . . . . . . . . . . . . . . . . . . . . . . . . . . . . . . . . . . . . . . . . . . . 259
tips . . . . . . . . . . . . . . . . . . . . . . . . . . . . . . . . . . . . . . . . . . . . . . . . . . . . . . . . . . . . . . . . . . . . . . . . 240
tracker . . . . . . . . . . . . . . . . . . . . . . . . . . . . . . . . . . . . . . . . . . . . . . . . . . . . . . . . . . . . . . . . . . . . 240
tracker factory . . . . . . . . . . . . . . . . . . . . . . . . . . . . . . . . . . . . . . . . . . . . . . . . . . . . . . . . . . . . 240
type . . . . . . . . . . . . . . . . . . . . . . . . . . . . . . . . . . . . . . . . . . . . . . . . . . . . . . . . . . . . . . . . . . 248, 258
utilities . . . . . . . . . . . . . . . . . . . . . . . . . . . . . . . . . . . . . . . . . . . . . . . . . . . . . . . . . . . . . . . . . . . . 247
tool manager . . . . . . . . . . . . . . . . . . . . . . . . . . . . . . . . . . . . . . . . . . . . . . . . . . . . . . . . . . . . . . . 247
toolbox . . . . . . . . . . . . . . . . . . . . . . . . . . . . . . . . . . . . . . . . . . . . . . . . . . . . . . . . . . . . . . . . . . . . . 238
ToolDef . . . . . . . . . . . . . . . . . . . . . . . . . . . . . . . . . . . . . . . . . . . . . . . . . . . . . . . . . . . . . . . . . . . . . 257
tracker . . . . . . . . . . . . . . . . . . . . . . . . . . . . . . . . . . . . . . . . . . . . . . . . . . . . . . . . . . . . . . . . . . . . . . 240
CLayoutTracker . . . . . . . . . . . . . . . . . . . . . . . . . . . . . . . . . . . . . . . . . . . . . . . . . . . . . . . . . . 255
CPathCreationTracker . . . . . . . . . . . . . . . . . . . . . . . . . . . . . . . . . . . . . . . . . . . . . . . . . . . . 255
CTracker . . . . . . . . . . . . . . . . . . . . . . . . . . . . . . . . . . . . . . . . . . . . . . . . . . . . . . . . . . . . . . . . . . 255
CTrackerEventHandler . . . . . . . . . . . . . . . . . . . . . . . . . . . . . . . . . . . . . . . . . . . . . . . . . . . 256
event handler . . . . . . . . . . . . . . . . . . . . . . . . . . . . . . . . . . . . . . . . . . . . . . . . . . . . . . . . . . . . . 242
factory . . . . . . . . . . . . . . . . . . . . . . . . . . . . . . . . . . . . . . . . . . . . . . . . . . . . . . . . . . . . . . . . . . . . 240
IEventHandler . . . . . . . . . . . . . . . . . . . . . . . . . . . . . . . . . . . . . . . . . . . . . . . . . . . . . . . . . . . . 253
IPathGeometry . . . . . . . . . . . . . . . . . . . . . . . . . . . . . . . . . . . . . . . . . . . . . . . . . . . . . . . . . . . 253
ISprite . . . . . . . . . . . . . . . . . . . . . . . . . . . . . . . . . . . . . . . . . . . . . . . . . . . . . . . . . . . . . . . . . . . . 253
Adobe InDesign Programming Guide
629
ITracker . . . . . . . . . . . . . . . . . . . . . . . . . . . . . . . . . . . . . . . . . . . . . . . . . . . . . . . . . . . . . . . . . . 253
registration . . . . . . . . . . . . . . . . . . . . . . . . . . . . . . . . . . . . . . . . . . . . . . . . . . . . . . . . . . . . . . . 252
tracker factory . . . . . . . . . . . . . . . . . . . . . . . . . . . . . . . . . . . . . . . . . . . . . . . . . . . . . . . . . . . . . . 240
tsume . . . . . . . . . . . . . . . . . . . . . . . . . . . . . . . . . . . . . . . . . . . . . . . . . . . . . . . . . . . . . . . . . . . . . . . 537
U
V
UID . . . . . . . . . . . . . . . . . . . . . . . . . . . . . . . . . . . . . . . . . . . . . . . . . . . . . . . . . . . . . . . 174, 180, 181
UIDList . . . . . . . . . . . . . . . . . . . . . . . . . . . . . . . . . . . . . . . . . . . . . . . . . . . . . . . . . . . . . . . . . . . . . 180
UIDLists . . . . . . . . . . . . . . . . . . . . . . . . . . . . . . . . . . . . . . . . . . . . . . . . . . . . . . . . . . . . . . . . . . . . 180
UIDRef . . . . . . . . . . . . . . . . . . . . . . . . . . . . . . . . . . . . . . . . . . . . . . . . . . . . . . . . . . . . . . . . . . . . . 180
UIDRefs . . . . . . . . . . . . . . . . . . . . . . . . . . . . . . . . . . . . . . . . . . . . . . . . . . . . . . . . . . . . . . . . . . . . 180
UIDs . . . . . . . . . . . . . . . . . . . . . . . . . . . . . . . . . . . . . . . . . . . . . . . . . . . . . . . . . . . . . . . . . . . . . . . . 180
Undoability . . . . . . . . . . . . . . . . . . . . . . . . . . . . . . . . . . . . . . . . . . . . . . . . . . . . . . . . . . . . 142, 143
Undoable . . . . . . . . . . . . . . . . . . . . . . . . . . . . . . . . . . . . . . . . . . . . . . . . . . . . . . . . . . . . . . 141, 149
Using . . . . . . . . . . . . . . . . . . . . . . . . . . . . . . . . . . . . . . . . . . . . . . . . . . . . . . . . . . . . . . . . . . . . . . . 157
Version . . . . . . . . . . . . . . . . . . . . . . . . . . . . . . . . . . . . . . . . . . . . . . . . . . . . . . . . . . . . . . . . 569, 595
view . . . . . . . . . . . . . . . . . . . . . . . . . . . . . . . . . . . . . . . . . . . . . . . . . . . . . . . . . . . . . . . . . . . . 141, 143
view port boss . . . . . . . . . . . . . . . . . . . . . . . . . . . . . . . . . . . . . . . . . . . . . . . . . . . . . . . . . . . . . . 326
view/controller . . . . . . . . . . . . . . . . . . . . . . . . . . . . . . . . . . . . . . . . . . . . . . . . . . . . . . . . . . . . . 150
W WaveTool . . . . . . . . . . . . . . . . . . . . . . . . . . . . . . . . . . . . . . . . . . . . . . . . . . . . . . . . . . . . . . . . . . . 265
window boss . . . . . . . . . . . . . . . . . . . . . . . . . . . . . . . . . . . . . . . . . . . . . . . . . . . . . . . . . . . . . . . . 326
Window bosses . . . . . . . . . . . . . . . . . . . . . . . . . . . . . . . . . . . . . . . . . . . . . . . . . . . . . . . . . . . . . 319
X
XferBool . . . . . . . . . . . . . . . . . . . . . . . . . . . . . . . . . . . . . . . . . . . . . . . . . . . . . . . . . . . . . . . . . . . . 182