1
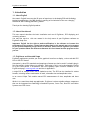
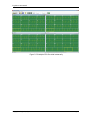
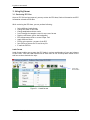
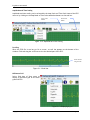
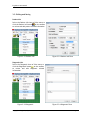
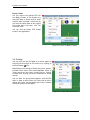
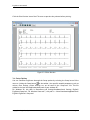
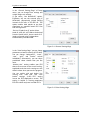
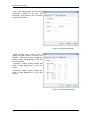
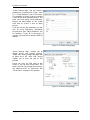
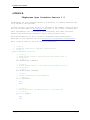
EcgSoft®
EcgViewer
USER MANUAL
Basic, Advanced and Embedded Versions
Innovative ECG Software
www.ecg-soft.com - e-mail: [email protected]
User Manual Ver.1.1
EcgViewer User Manual
This page is intentionally left blank
Copyright © EcgSoft, July 2010
Page 2
EcgViewer User Manual
Contents
1. Introduction.………………….………………………………………………………………………………………….….4
1.1. About EcgSoft
4
1.2. About User Manual
4
1.3. EcgViewer and Intended Usage
4
2. Getting Started-.............................…………………….………….……………………………...5
2.1. Language Settings
2.2. Installing the Software
2.3. Starting the application
2.4. Opening a single ECG file
2.5. Opening multiple ECG files
5
6
6
6
8
3. Using the EcgViewer…………………………………….…...............…….……………………………..10
3.1. Reviewing ECG files
10
3.2. Editing and Saving
14
3.3. Printing
17
3.4. Setup Options
18
Appendix A: 12 Leads Binary ECG Data Format
22
Appendix B: IEcgAccess Open Interface for the EcgViewer
23
Index
28
Copyright © EcgSoft, July 2010
Page 3
EcgViewer User Manual
1. Introduction
1.1. About EcgSoft
Our team in EcgSoft has more than 20 years of experience in developing ECG and Cardiology
Monitoring applications. Our R&D division is working to find solutions to the ever changing
demands of the Cardiology Monitoring market.
Thank you for choosing EcgSoft products.
.
1.2. About User Manual
This user manual describes the basic installation and use of EcgViewer, ECG displaying and
reviewing software.
You may also reach to
EcgViewer Help files.
this user manual in the help menu of your EcgViewer software as
Important: EcgSoft has the right to make modifications in the software to increase the
performance of the product. Certain features described in this manual may not be present
in your product depending on the version of software. Please consult EcgSoft or your dealer
for your questions about the differences between this User Manual and the program version
you use.
1.3. EcgViewer and Intended Usage
EcgViewer application provides you with a graphical interface to display, review and edit ECG
files in SCP-ECG format.
Alternatively, other ECG standards and proprietary formats can also be used if a suitable plug in
DLL (Dynamically Linked Library) is available. These plug in DLL’s can be developed by EcgSoft
or by the third parties in accordance with the EcgViewer Open Interface available on the
EcgSoft web page, www.ecg-soft.com and also in Appendix B .
A single ECG or multiple ECG’s can be loaded at a time. The ECG can be visualized in various
formats, including various combination of leads, selectable time and amplitude scales.
An on screen Caliper Tool enables manual ECG measurements of time, amplitude and heart
rate.
Whilst it is a stand alone desk top application, EcgViewer is also a suitable software component
that can be integrated into Cardiology Information Systems, Stress Test, Rest ECG and Holter
Systems as an ECG viewer.
Copyright © EcgSoft, July 2010
Page 4
EcgViewer User Manual
2. Getting Started
2.1. Language Settings
Default language of EcgViewer application is in English. Depending on the version of your
software, other languages may also be supported by the EcgViewer application. To check the
availability of support for a particular language, you need to change your regional and language
settings to that particular language.
Use the “Control panel” to change “Regional and language options” as shown in Figure 2.1.
Figure 2.1 Language Settings
Copyright © EcgSoft, July 2010
Page 5
EcgViewer User Manual
2.2. Installing the Software
To start installation, double-click on the downloaded file “EcgViewerInstall.msi”.
IMPORTANT: In order to operate, EcgViewer application needs to have Microsoft .NET
Framework Version 2.0 environment installed in your computer. If not already installed,
you can download this software from the Microsoft web site, www.microsoft.com .
After the installation is completed, the program files are placed under the folder path
C:\Program Files\EcgSoft\EcgViewer.
A demo SCP-ECG file, demo.scp, is also placed under the folder path C:\ProgramData\
EcgSoft\EcgViewer for Microsoft Vista & Windows 7 operating systems and C:\Document and
Settings\All Users\Application Data\Ecgsoft\EcgViewer for Microsoft Windows XP operating
system.
2.3. Starting the application
To start EcgViewer application, the user can click on the EcgViewer link in the Start Menu or
double-click on the shortcut on the desktop. When the application is launched, after the brief
splash screen, main window in Figure 2.3 with a MenuBar and a Toolbar will be displayed.
Figure 2.3 EcgViewer Main Window
2.4. Opening a single ECG file
To load and open an ECG file, you can either click on the Open item in the File Menu or click on
the Open toolbar button
. You can also use short-cut function keys assigned to menu items
and toolbar buttons (i.e. “F3” to Open an ECG file). A demo file, demo.scp, can be opened and
displayed for test purposes as shown in Figures 2.4.1 and 2.4.2.
Copyright © EcgSoft, July 2010
Page 6
EcgViewer User Manual
Figure 2.4.1 Opening a single ECG file
Figure 2.4.2 Single ECG file opened
Copyright © EcgSoft, July 2010
Page 7
EcgViewer User Manual
2.5. Opening multiple ECG files
You may open more than one ECG file with the EcgViewer. This is especially useful when you
need to compare former ECG recordings of a person with the present one. To open multiple
ECG files, repeat the “Opening a single ECG file” sequence until all files are opened.
Figure 2.5.1 Multiple ECG files opened and cascaded
After multiple ECG files are opened, you may arrange them on the screen using Window menu
items “Cascade”, “Tile Horizontal” and “Tile Vertical” as shown in Figures 2.5.1 and 2.5.2
respectively.
Copyright © EcgSoft, July 2010
Page 8
EcgViewer User Manual
Figure 2.5.2 Multiple ECG files tiled horizontally
Copyright © EcgSoft, July 2010
Page 9
EcgViewer User Manual
3. Using EcgViewer
3.1. Reviewing ECG files
After an ECG file has been opened, you may review the ECG data, Patient Information and ECG
Information related to ECG data.
While reviewing the ECG data, you can perform following:
•
•
•
•
•
•
•
•
•
•
Select different leads format
Change the order of the leads
Change amplitude and time scales
Scroll through the complete record in any screen format
Display a millimeter grid on the background
ECG measurements with on screen Caliper Tool
Apply different filters
Print or print-preview any part of the ECG
Save ECG as a picture file or as a binary file
E-mail the ECG file
Leads Format
Leads format enable you to group the ECG leads in various combinations of rows and columns
on the screen. Click the Leads Format item of View menu or the view drop-down button on the
tool bar to select desired view style.
View dropdown button
Figure 3.1.1 Leads format
Copyright © EcgSoft, July 2010
Page 10
EcgViewer User Manual
Amplitude and Time Scaling
Amplitude and time scaling can be selected by the Amp.Scale and Time Scale items of the ECG
menu or by clicking on the Amplitude or Time scale combo box buttons on the tool bar.
Amp. scale
button
Time scale
button
Figure 3.1.2 Amplitude and Time scaling
Scrolling
When the ECG file is too long to fit on screen, a scroll bar appears at the bottom of the
window. Click and drag the scroll bar to view the desired part of the ECG.
Scroll bar for
long records
Figure 3.1.3 Scroll bar
Millimetre Grid
Select Grid item of View menu to
display a millimetre grid on the back
ground of ECG.
Figure 3.1.4 Displaying a grid
Copyright © EcgSoft, July 2010
Page 11
EcgViewer User Manual
Caliper Tool
Cross shaped cursor of on screen caliper tool
indicates the start point of measurement.
To complete the measurement, click and drag the
mouse to the stop point. Measurement results are
displayed in the measurement box.
First row shows the time reference of the start
point in the hour:minutes:seconds:milliseconds
format.
Second row is the time difference in milliseconds
and the third row is the amplitude difference in
milivolts.
Figure 3.1.5 On screen caliper tool
Last row is the heart rate measurement between start and stop points in beats per minute.
Results of measurement are automatically saved to the clipboard so that you may paste the
results in another application such as Microsoft Word or Excel.
ECG Filters
You may apply different filters on the ECG data to reduce noise and baseline wandering.
Available filters are EMG (Low Pass), baseline wander (High Pass) and 50/60 Hz line
interference filters.
These three filters support most common ECG sampling rates. If a particular sampling rate is
not supported by a filter, menu item and toolbar button corresponding to that filter shall be
disabled and inactive.
Baseline Filter
EMG Filter
50/60 Hz
Line Filter
Figure 3.1.6 ECG Filters
Copyright © EcgSoft, July 2010
Page 12
EcgViewer User Manual
E-Mail
You can email an ECG file to a recipient by selecting the “Send To -> E-Mail Recipient” item of
File menu. An E-Mail form, similar to an E-Mail program, will pop-up where you can attach an
ECG file and write a message to the recipient.
Important: To be able to use the E-Mail feature, you need to have “SMTP Service” software
installed in your Windows Operating System. In Windows XP, SMTP service is a subcomponent of the IIS (Internet Information Services). For Windows 7 and Vista, you need to
install a suitable “SMTP Service” software.
Figure 3.1.7 E-Mail Menu
Figure 3.1.8 E-Mail Form
Copyright © EcgSoft, July 2010
Page 13
EcgViewer User Manual
3.2. Editing and Saving
Patient Info
Select the Patient Info item of View menu or
click the Patient Info button
on the toolbar
to review and edit patient related information.
Figure 3.2.1 Patient Info
Figure 3.2.2 Patient Info Form
Diagnostic Info
Select the Diagnostic item of View menu or
click the Diagnostic button
on the toolbar
to review and edit diagnostic related
information.
Figure 3.2.3 Diagnostic
Copyright © EcgSoft, July 2010
Figure 3.2.4 Diagnostic Form
Page 14
EcgViewer User Manual
ECG Info
Select the ECG Info item of the View menu or click the ECG Info button
on the tool bar to
review information related to the ECG signal. Note that all of the fields are read only. They can
not be modified since they represent the inherent characteristics of the recorded ECG signal.
Leads field shows the lead names in the ECG file. In this example only 8 leads are indicated.
The remaining four leads are derived by the EcgViewer software using the 8 leads.
ADU refers to the Analog-to-Digital conversion number corresponding to 1 mV ECG signal at the
patient cable inputs.
Tag 14 group relates to the SCP-ECG fields as documented in SCP-ECG standard.
Filters group indicates any filtering applied on the ECG signal. If this group is empty, it can be
assumed that raw ECG data is stored in this particular ECG file.
Figure 3.2.5 ECG Info Form
Copyright © EcgSoft, July 2010
Page 15
EcgViewer User Manual
Save ECG
If you have made any changes to the currently open ECG file, you can save the ECG file with
the same name or with another name. Select the Save item of the File menu or click Save
button
(F3) on the tool bar. A Save dialogue box will pop-up where you can specify the path
and name of the file to be saved.
Figure 3.2.6 Save ECG
Figure 3.2.7 Save Dialogue Box
Save ECG as a picture
You can save a shot of the screen as a picture file in
bitmap, JPEG, PNG or GIF formats. Select the Save
Picture As item of the File menu and then select the
format type you wish on the popping Save As dialog
box.
Figure 3.2.8 Save ECG as a picture
Copyright © EcgSoft, July 2010
Page 16
EcgViewer User Manual
Binary Format
You can convert the opened ECG file
into Binary Format. In this format, only
pure ECG data is stored with all other
non-ECG data excluded. Converted file
will have the same name as the original
file except that it will have “.bin” file
extension name.
You can find the Binary ECG format
syntax in the Appendix A.
Figure 3.2.9 Send To Binary Format
3.3. Printing
You can print out the ECG data on a printer paper by
selecting the Print item of File menu or by clicking on
the Print button
(F5).
Depending on the settings of Setup menu print options,
printouts have either fixed time/amplitude scales or
“what you see on the screen is what you get” scaling.
Printout filter settings can also be selected in a similar
manner.
You can have the grid printed together with the ECG
data. In order to save printer ink /toner and to have a
shorter print time, we recommend you to use a suitable
millimeter grid A4/A5 size paper.
Figure 3.3.1 Print and Print Preview
Copyright © EcgSoft, July 2010
Page 17
EcgViewer User Manual
Click the Print Preview item of the File menu to preview the printout before printing.
Figure 3.3.2 Print Preview
3.4. Setup Options
You can customize EcgViewer thorough the Setup options by selecting the Setup item of View
menu or clicking the Setup button
on the toolbar. User specific settable parameters, such as
colours, filter settings, printer settings, etc. are all saved in the “Setup.xml” file. This file
resides in the local user application data path of your windows PC.
For Windows XP, this path is..\Documents and Settings\UserName\Local Settings \EcgSoft\
EcgViewer\Setup.xml. For Windows Vista and 7, this path is ..\Users\UserName\AppData\Local\
EcgSoft\ EcgViewer\ Setup.xml.
Copyright © EcgSoft, July 2010
Page 18
EcgViewer User Manual
In the “General Settings Page” of Setup
menu, you can change filter settings and
weight/height unit settings.
If you select “Use OemLib.dll” option,
EcgViewer will use the external plug in
OemLib.dll (Dynamically Linked Library)
instead of the built in SCP-ECG dll. This
option enables third parties to use their
proprietary or standard based ECG files
with the EcgViewer.
“Derive 12 leads from 8” option allows
Leads III, aVR, aVL, aVF leads to be derived
from the Leads I and II, hence a total of 12
leads are formed using 8 independent
simultaneously recorded leads.
Figure 3.4.1 General Settings Page
In the “View Settings Page” you can change
parameters related to viewing of ECG data.
You can change “background”, “trace”,
“text”, “grid”, and “border” colours
individually. Alternatively, you can select
predefined colour themes that you like
most.
“Monitor size” setting enables your ECG
data to fit on screen at the correct scaling.
Amplitude and time scale settings are the
default values when you start the program.
You can enable grid and border line
viewing with “view grid” and “view
border” settings. “Invert ECG” setting
inverts the ECG displayed on screen. This
setting is helpful in viewing proprietary
ECG files which may have inverted ECG’s.
Figure 3.4.2 View Settings Page
Copyright © EcgSoft, July 2010
Page 19
EcgViewer User Manual
In the “User Settings Page” you may setup
parameters related to the user and
institution. These settings will be printed
on the ECG printouts.
Figure 3.4.3 User Settings Page
“Leads Settings Page” enables you to
change the order of leads in certain view
formats. “Strip Lead” setting changes the
longer rhythm lead displayed in 6x2 and
3x4 view formats.
“Selected 3 Leads” setting changes the
order of leads displayed in 3 rows view
format.
“Selected 6 Leads” setting changes the
order of leads displayed in 6 rows view
format.
Figure 3.4.4 Leads Settings Page
Copyright © EcgSoft, July 2010
Page 20
EcgViewer User Manual
“E-Mail Settings Page” lets you create a
template for e-mailing ECG’s from “Send
To -> E-mail Recipient” item of File menu.
This template is useful if you are sending
e-mails to the same specified persons. This
saves you from typing e-mail addresses,
subject and body header of the e-mail
each time an e-mail is sent to these
persons.
If you are running the application on your
own PC using IIS(Internet Information
Services) then your “SMTP IP Address” will
be "localhost". If your PC is running on a
network, you may have a different SMTP IP
Address.
Figure 3.4.5 E-Mail Settings Page
“Prints Settings Page” enables you to
change printer and printout settings.
“Paper Size” setting changes the paper size
to either A4 or A5. “Print Grid” setting
enables you to print the grid on the
printout.
Printer can print the ECG same as the
screen or you can have fixed scales. The
same is true for the printout filter settings.
Use “Same as screen” or “Fixed scale” and
“Fixed filters” settings for this purpose.
Figure 3.4.6 Prints Settings Page
Copyright © EcgSoft, July 2010
Page 21
EcgViewer User Manual
APPENDIX A:
12 Leads Binary ECG Data Storage Format declared in Microsoft C# syntax
// first sample for 12 leads
short int
I;
// 2 bytes signed integer
short int
II;
// 2 bytes signed integer
short int
III;
// 2 bytes signed integer
short int
aVR;
// 2 bytes signed integer
short int
aVL;
// 2 bytes signed integer
short int
aVF;
// 2 bytes signed integer
short int
V1;
// 2 bytes signed integer
short int
V2;
// 2 bytes signed integer
short int
V3;
// 2 bytes signed integer
short int
V4;
// 2 bytes signed integer
short int
V5;
// 2 bytes signed integer
short int
V6;
// 2 bytes signed integer
// Second sample for 12 leads
short int
I;
// 2 bytes signed integer
short int
II;
// 2 bytes signed integer
short int
III;
// 2 bytes signed integer
short int
aVR;
// 2 bytes signed integer
short int
aVL;
// 2 bytes signed integer
short int
aVF;
// 2 bytes signed integer
short int
V1;
// 2 bytes signed integer
short int
V2;
// 2 bytes signed integer
short int
V3;
// 2 bytes signed integer
short int
V4;
// 2 bytes signed integer
short int
V5;
// 2 bytes signed integer
short int
V6;
// 2 bytes signed integer
// Nth sample
.
.
.
Copyright © EcgSoft, July 2010
Page 22
EcgViewer User Manual
APPENDIX B:
IEcgAccess Open Interface Version 1.2
Implementing the open interface enables a proprietary or standard based ECG data
to be viewed by the EcgViewer.
A sample solution for binary ECG data is provided in the “OEMEcg” sample solution
that can be downloaded at www.ecg-soft.com.Output of the project is “OemLib.dll”.
After implementing your own solution, go to EcgViewer setup menu and select
General->ECG Formats->Use OemLib.dll option view proprietary data.
Detailed information can also be found at “EcgViewer-Software-DevelopersGuide.pdf” at the EcgViewer web site www.ecg-soft.com/ecgviewer/ecgviewer.htm
Below is the C# code for the open interface IEcgAccess:
/// <summary>
/// IEcgAccess Interface to implement read/write API
/// </summary>
public interface IEcgAccess
{
/// <summary>
/// Reads entire record at the given path and returns true if
/// successfull
/// </summary>
bool Read(string fileName);
/// <summary>
/// Writes entire record to the given path and returns true if
/// successfull
/// </summary>
bool Write(string fileName);
/// <summary>
/// Patient related info is grouped here
/// </summary>
Person PatientInfo
{
get;
set;
}
/// <summary>
/// ECG related info, excluding ecg data, is grouped here
/// </summary>
SignalInfo EcgInfo
{
get;
set;
}
Copyright © EcgSoft, July 2010
Page 23
EcgViewer User Manual
/// <summary>
/// Diagnose related info is grouped here
/// </summary>
Diagnostic DiagnoseInfo
{
get;
set;
}
/// <summary> gets or sets ECG data as specified by IEcgAccess
/// interface
/// </summary>
ArrayList EcgData
{
get;
set;
}
}
/// <summary>
/// Simple DateTime structure
/// </summary>
public struct DateAndTime
{
public int Year;
public int Month;
public int Day;
public int Hour;
public int Minute;
public int Second;
}
/// <summary>
/// Personal Details of the patient.
/// </summary>
public struct Person
{
/// <summary>Patient Identification Number, reasonable length
/// 40 characters
/// </summary>
public string ID;
/// <summary>First Name </summary>
public string FirstName;
/// <summary>Second Last Name </summary>
public string SecondLastName;
/// <summary>Last Name </summary>
public string LastName;
/// <summary>
/// 0.Not known 1.Male, 2.Female, 9.Unspecified
/// </summary>
public int Sex;
Copyright © EcgSoft, July 2010
Page 24
EcgViewer User Manual
/// <summary>
/// 0.Unspecified, 1.Caucasian, 2.Black, 3.Oriental
/// </summary>
public byte Race;
/// <summary> Weight in specified units </summary>
public int Weight;
/// <summary>
/// 0.Unspecified, 1.Kilogram, 2.Gram, 3.Pound, 4.Ounce
/// </summary>
public byte WeightUnit;
/// <summary> Height in specified units </summary>
public int Height;
/// <summary>
/// 0.Unspecified, 1.Centimeters, 2.Inches, 3.Millimeters
/// </summary>
public byte HeightUnit;
/// <summary>
/// Date of birth specified in DateAndTime structure
/// </summary>
public DateAndTime Birth;
/// <summary> Age in years </summary>
public int Age;
}
///
///
///
///
<summary>
Details related to ECG signal characteristics and data
acquisition
</summary>
public struct SignalInfo
{
/// <summary>
/// Enter Lead names EXACTLY as decribed in Lead
/// Identification Codes table.
/// Do not put extra spaces or characters in between.
/// Example: "I,II,III,aVR,aVL,aVF,V1,V2,V3,V4,V5,V6"
/// </summary>
public string Leads;
/// <summary>
/// If all lead recording lengths are not same, create and
/// set this array to specify lead lengths in samples.
/// If same, no need to use this field.
/// </summary>
public uint[] LeadLengths;
/// <summary>
/// A/D value corresponding to 1 mv at the input
/// </summary>
public double ADU;
/// <summary> Sampling rate in samples per second </summary>
public double SRATE;
Copyright © EcgSoft, July 2010
Page 25
EcgViewer User Manual
/// <summary> Date and Time of Acquisition in DateAndTime
/// structure
/// </summary>
public DateAndTime Acq;
/// <summary>
/// "cut-off" frequency (-3 db) of the high pass baseline
/// filter in Hz
/// </summary>
public double BaseLineFilter
/// <summary>
/// "cut-off" frequency (-3db) of the low pass filter in Hz
/// </summary>
public double LowPassFilter;
/// <summary>
/// if other filters, which were not defined above, indicated
/// here.
/// Bit 0:60 Hertz notch filter, Bit 1:50 Hertz notch filter
/// Bit 2:Artifact filter Bit 3:Baseline filter (e.g.
/// adaptive filter or spline filter)
/// </summary>
public byte FilterBitMap;
/// <summary>
/// Text model description. Up to 5 bytes of text
/// </summary>
public string TextModel;
/// <summary>
/// Language Support Code (one byte). This bit map indicates
/// the supported character sets.
/// Refer to SCP-ECG standart for the explanation of codes
/// </summary>
public byte LanguageCode;
/// <summary>
/// Capabilities of the ECG Device (one byte bit map).
/// Bit 0-3 reserved, 4 printing, 5 analysis, 6 storage, 7
/// acquisition
/// </summary>
public byte CapabilitiesBitMap;
/// <summary>
/// Specifies frequency of the AC Mains
/// 0: unspecified, 1: 50Hz, 2: 60Hz
/// </summary>
public byte ACMainsFrequency;
/// <summary> Serial Number of Acquisition Device </summary>
public string DeviceSN;
/// <summary> Acquisition device SCP implementation software
/// identifier (maximum 24 characters) </summary>
public string DeviceSCP;
Copyright © EcgSoft, July 2010
Page 26
EcgViewer User Manual
/// <summary> Manufacturer of Acquisition Device </summary>
public string DeviceMF;
}
/// <summary>
/// Details related to Diagnosis and Medical history
/// </summary>
public struct Diagnostic
{
/// <summary> Systolic blood pressure in mmHg </summary>
public ushort Systolic;
/// <summary> Diastolic blood pressure in mmHg </summary>
public ushort Diastolic;
/// <summary> Acquiring Institution Description
public string AcquiringInstitute;
</summary>
/// <summary> Referring Physician </summary>
public string ReferringPhysician;
/// <summary> Diagnosis or the referral indication</summary>
public string Diagnosis;
/// <summary> Medical History</summary>
public string MedicalHistory;
/// <summary> Remarks and free text</summary>
public string FreeText;
}
Copyright © EcgSoft, July 2010
Page 27
EcgViewer User Manual
.
.NET Framework, 5
L
Language, 3, 4, 26
leads format, 10
A
M
amplitude, 4, 10, 12, 17
B
Binary
Data, 3, 17, 22
button, 6, 10, 12, 14, 15, 16, 17, 18
C
caliper, 12
colour, 19
conversion, 15
menu, 4, 6, 8, 10, 11, 12, 13, 14, 15, 16, 17, 18, 19, 21, 23
multiple, 3, 4, 8
P
paper, 17, 21
Patient
cable, 14, 15, 24
info, 10, 14, 23, 24
printer, 17, 18, 21
printout, 18, 21
R
D
default, 19
E
record, 10, 23
review, 4, 10, 14, 15
rhythm, 20
running, 21
S
edit, 4, 14
E-mail, 10, 21
F
filters, 10, 12, 21, 26
G
sampling, 12
save, 16, 17
scales, 4, 10, 17, 21
scroll, 11
settings, 4, 17, 18, 19, 20, 21
storage, 26
T
grid, 10, 11, 17, 19, 21
H
time, 4, 10, 11, 12, 17, 19, 21
toolbar, 6, 12, 14, 18
heart rate, 4, 12
help, 4
V
İ
view, 10, 11, 19, 20, 23
W
installation, 4, 5
Windows, 5, 13, 18
Copyright © EcgSoft, July 2010
Page 28