1
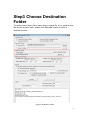
Media Converter V2.0
User Manual
www.smartec-security.eu
Table of Contents
STEP 1. SELECT FUNCTION ........................................... 4
CONVERT RAW FILE TO AVI FILE ....................................................................... 4
CONVERT RAW FILE TO MULTIPLE JPG FILE ...................................................... 4
CONVERT TO RAW FILE ..................................................................................... 4
CONVERT MP4 FILE TO JPG FILE ....................................................................... 4
STEP2. SELECT SOURCE ............................................... 6
CONVERT SINGLE FILE ........................................................................................ 6
CONVERT ALL FILES IN SELECTED FOLDER .......................................................... 7
STEP3 CHOOSE DESTINATION FOLDER...................... 8
STEP 4. SELECT A PERIOD OF TIME ............................ 9
STEP 5. SELECT PROCESS .......................................... 10
Select Add OSD ........................................................................................ 10
Use Channel ID ......................................................................................... 10
Add User-Defined Text .............................................................................. 10
Add Date Time........................................................................................... 10
STEP 6. START CONVERT ............................................ 13
Start convert when source and process are set ....................................... 13
2
Table of Figures
FIGURE 1 FORMAT CONVERT .............................................................................................. 5
FIGURE 2 BROWSE SINGLE RAW FILE ................................................................................ 6
FIGURE 3 BROWSE SINGLE MP4 FILE .................................................................................. 6
FIGURE 4 BROWSE A FOLDER TO CONVERT ........................................................................ 7
FIGURE 5 DESTINATION FOLDER ........................................................................................ 8
FIGURE 6 SPECIFY BEGIN TIME AND END TIME ................................................................... 9
FIGURE 7 OVERLAY MECHANISM ...................................................................................... 11
FIGURE 8 THE RESULT OF OVERLAY ................................................................................. 12
FIGURE 9 CONVERT RESULT .............................................................................................. 14
3
Step 1. Select Function
There are four formats you can use media converter to convert file.
Convert RAW file to AVI file
If you want to convert RAW file to AVI file, select first radio button.
Convert RAW file to Multiple JPG file
If you want to convert RAW file to multiple JPG file, select second radio
button.
Convert to RAW file
If you want to convert to RAW file, select third radio button.
Convert MP4 file to JPG file
If you want to convert MP4 file to JPG file, select second radio button.
4
Figure 1 Format Convert
5
Step2. Select Source
Convert single file
Browse a single file and select it.
Files of type will depend on function selected in step 1
Figure 2 Browse single RAW file
Figure 3 Browse single MP4 file
6
Convert all files in selected folder
Figure 4 Browse a folder to convert
7
Step3 Choose Destination
Folder
The default save folder will be same as the original file. If you need to save
the file into another folder, please click “Save as” button to select a
destination folder.
Figure 5 Destination Folder
8
Step 4. Select a period of time
After you browse a file, the system will automatically search the begin time
and end time of the selected file.
Please manually set the specify begin time and end time as you need.
Figure 6 Specify Begin time and end time
9
Step 5. Select Process
The process mailly perform overlay mechanism, included channel ID,
user-defined text and date time.
Select Add OSD
If you want to add OSD on video frames, select the check box “Add OSD
Overlay”.
Notice:This action will take more CPU and time to finish the task.
Use Channel ID
If you need to know the coverted file come from, you can add Channel ID on
the overlay of playback file. Click the “Use Channel ID” box to add into.
Notice: we do not recommend to change your file name after you recorded
from network recorder.
Add User-Defined Text
If need to add text, please select the “User-Defined Text” check box. And fill in
the text you need in the space e.g. Traffic Accident
Notice: The maximum characters you can fill in the space is 20.
Add Date Time
Select the “Add Date Time” check box to add date time into the overlay of file. There
are three time format you can choose.
1. Date Time format 1: YYYY/MM/DD HH:MM:SS:MMM (eg: 2008-12-20 13:20:47:123).
2. Date Time format 2: MM/DD/YYYY HH:MM:SS:MMM (eg: 12-20-2008 13:20:47:123).
3. Date Time format 3: DD/MM/YYYY HH:MM:SS:MMM (eg: 20-12-2008 13:20:47:123).
10
Figure 7 Overlay Mechanism
11
Figure 8 The Result of overlay
12
Step 6. Start Convert
Start convert when source and process are set
Click “Convert” button to start convert file process. If you need to interrupt
convert process, please click the stop button.
The process will also show the result and some information about video.
1. Show how many files are converted.
2. Show how many I Frames converted when convert RAW file.
3. Show how many P Frames converted when convert RAW file.
4. Show how many Audio Frame converted when convert RAW file
5. Information about convert result.
13
Figure 9 Convert Result
14