1
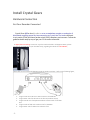
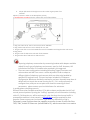
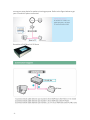
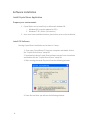
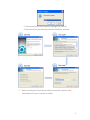
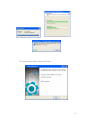
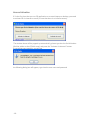
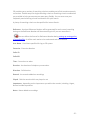
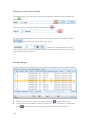
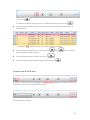
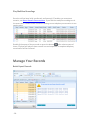
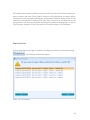
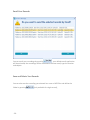
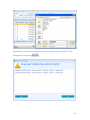
Crystal Gear User Manual V2 Table of Contents Quick Guide ................................................................................................................. - 1 Install Crystal Gears .................................................................................................... - 2 Hardware Connection ................................................................................................. - 2 Get Your Recorder Connected ................................................................................ - 2 How to configure CG VoIP Box for Mirroring purpose ........................................... - 5 System Requirements ................................................................................................. - 5 Software Installation ................................................................................................... - 6 Install Crystal Gears Application ............................................................................. - 6 Prepare your environment: .................................................................................... - 6 Install CG Software.................................................................................................. - 6 License Activation ................................................................................................. - 10 Setting Up Your Recorder ......................................................................................... - 12 About Crystal Gears Floating Bar .......................................................................... - 12 Setting up System Parameters .............................................................................. - 14 CG Running Profile ................................................................................................ - 19 VoIP Phone Analysis .............................................................................................. - 21 Record Your Communication .................................................................................... - 23 Searching & Playback ................................................................................................ - 24 Find Recorded Audio/Screen Clips........................................................................ - 24 Define your own search criteria............................................................................ - 26 Play Recordings ..................................................................................................... - 26 Counter time & Clock time ................................................................................... - 27 Play Multiline Recordings ..................................................................................... - 28 Manage Your Records ............................................................................................... - 28 Batch Export Records ............................................................................................ - 28 Export to Excel ...................................................................................................... - 29 Email Your Records ............................................................................................... - 30 Save and Delete Your Records .............................................................................. - 30 Annotation ............................................................................................................ - 32 Appendix ................................................................................................................... - 33 What is CG VoIP Box?............................................................................................ - 33 What is Port Mirroring .......................................................................................... - 35 About Scenario Reconstruction ............................................................................ - 36 Innovative Folder Structure and File Naming ....................................................... - 37 - Welcome to V2 It is our great honor to present you the new epoch-making communication logging and monitoring products - Crystal Gear, a highly scalable, portable and centralised governable recorder. Combined with its support for Voice over IP (VoIP), comprehensive TDM telephony environment, and Screen Activities Capturing capability, Crystal Gears V 2.00 sets new standards in logging & monitoring mobility, scalability and flexibility. Now getting started to learn how to manage your Crystal Gear Quick Guide Get Your Recorder Connected Setting Up Your Recorder Searching, Playback Manage Your Recordings Record Your Communications Appendix -1- Install Crystal Gears Hardware Connection Get Your Recorder Connected Crystal Gears (CG as short) is able to act as a standalone recorder or end point of distributed recording system by interconnecting to Crystal Live® for both traditional circuit switch (TDM) and latest packet switch (VoIP) telephony environment. Follow the guideline below step by step to get your CG recorder connected: In digital phone recording scenario or any other VoIP excluded in CG Support Matrix, please connect the CG TDM Box to your handset firstly, regarding the details for CG TDM Box, Please refer to use manual CG TDM Box inside the product package. Refer to the following figure, 1. 2. 3. 4. 5. -2- Plug one side of RJ-09 Jack to Out terminal of CG TDM Box Plug another side of RJ-09 Jack to the Phone (Handset socket) Plug the RJ-09 Jack of telephone Handset to IN terminal of CG TDM Box Plug one side of USB Jack to USB Jack of CG TDM Box Plug another side of USB Jack to USB Jack of PC 6. Adjust A/B switch till the light turns red in order to gain power from Handset Adjust 1/2 switch in order to set Microphone polarity In Analog phone recording scenario, please refer to the figure below: 1. Plug one side of RJ-11 Jack to Line terminal of CG TDM Box 2. Plug another side of RJ-11 Jack to PSTN/C.O. Line Jack 3. Plug one side of RJ-11 Jack to PHONE terminal of CG TDM Box and Plug the other side to the analog phone 4. Plug one side of USB Jack to USB Jack of CG TDM Box 5. Plug another side of USB Jack to USB Jack of PC Capturing telephony conversation by connecting handset with adapter would be widely fit to all type of telephony environment, even for VoIP. However, Call information like Caller ID is unable to be captured in this approach There are some configurations including Recording Trigger/Terminate and volume value and Idle Time out etc. can be adjusted in order to adapt to different kinds of telephony environment which are able to be handled by qualified CIS engineers only. This part has been included in CG Advance Configuration Window to avoid any confuse for end user. Normally keep them in default will not impair the normal running for CG, if it is really necessary to configure them, and you are not quite sure about the meaning of those parameters, please contact your local distributor for assistance. In analog phone recording scenario, Different from other Portable recorders, CG is able to detect and decode the VoIP call control protocol packets. By using the “sniffing” approach, all call information including caller ID, Call direction etc. will be retrieved. It is the fact that the mirrored traffic is prerequisite condition in that scenario; a CG VoIP Box would be required for that purpose. Please contact your local vendor if you have any difficulties to find it. Fortunately, some IP phones have the capability to monitor its own IP traffic like Cisco 7970, 7941, Yealink SIP Phone etc. (called SPAN to PC), which means there is no need to -3- connect an extra device for packet mirroring purpose. Refer to the figure below to get your CG and VoIP phone connected Recording of PoE/Non-PoE IP Phone CG VoIP Box -4- How to configure CG VoIP Box for Mirroring purpose Before reading this topic, you may check also following questions: What is a CG VoIP Box? What is Port Mirroring? There is no configuration available on hub, just make sure that the network cable is properly connected System Requirements CG is a unique product which can run as standalone recorder or Multi-site distributed logging and monitoring system. Minimum Requirement: 350MHz Intel Pentium II processor or equivalent 64MB of RAM(128MB on Windows XP or above) 1 GB available disk space 10M/100M base-T Nic card X1 Windows XP SP3 or later Internet Explorer 5.01 or above SilverLight 4.0 or above Recommended system requirement 500 MHz Intel Pentium III processor or greater (supports simultaneous record/playback features) 128MB of RAM 10 GB available disk space for writing Records and Database 100M base-T Nic card X2 Windows XP SP4 Internet Explorer 6.0 or above .NET Framework 4.0 or above WinPcap 4.0 or above -5- Software Installation Install Crystal Gears Application Prepare your environment: 1. Crystal Gears can be install only on Microsoft windows OS: i. Windows XP ( must be updated to SP3 ) ii. Windows 7 32 \ 64 bits ( all versions ) 2. User must have Local Administrator permissions prior to the installation. Install CG Software Starting Crystal Gears installation can be done in 2 ways : 1. Enter your Crystal Gears CD into your computer and double click on the "Crystal Gears V2.exe" setup file. 2. Download the latest Crystal Gears software version from our website and double click the "Crystal Gears V2.exe" setup file. 3. After running the setup file you will see the following window: 4. Press Run and then you will see the following window: -6- 5. Choose your preferred installation language and press Ok. 6. Now you will see the following software installation windows: 7. Before installing the Crystal Gears software setup will install the .Net Framework 4 into your computer as follow: -7- 8. Setup will now continue to install the Crystal Gears software into your computer. 9. After installing the Crystal Gears software setup will install the Visual C++ 2010 and the Visual C++2008 into your computer as follow: -8- 10. Setup has been finish, please click Finish: -9- License Activation If it's the first time that you run CG application on a certain laptop or desktop, you need to activate CG via internet or email (in case that there is no internet access). The window above will be popped up automatically, please type into the Serial Number (find the sticker on the CG disk cover) and press the "Activate via Internet" button. If everything goes smoothly, you will see the following dialog box will appear, type into the user name and password - 10 - If your CG runs as standalone recorder, please type default user name: User name: admin Password: admin You can select “Remember Me”, if you want to save your user name and password in CG system. Once you select "Auto Login", CG will automatically start every time windows is started. Regarding CG login as "Online" mode, please refer to Crystal Live® User Guide After log on your CG system, the following windows will pop up: - 11 - Please go to System Parameters Setting to understand how to setup your CG recorder. Setting Up Your Recorder About Crystal Gears Floating Bar Crystal Gears Tool bar provides you a quick access to all the CG functionalities, please refer to the following description for each button: - 12 - Player The core interface enables you quickly search and play (continuously play or play one by one )both recorded audios and captured screen clips, in addition, you can export recordings into Microsoft Excel, even email it as well as Save As, delete the records. User A module dedicated to access System Parameters Setting Up, CG Running Profile and User Password Help Access CG Online Help Language Select the language of your CG system Status Window in CG Toolbar: all information including phone status, caller/called ID, Reference Number, Call duration will be shown in this window. Furthermore, you can press the button to pause recording during the telephone conversation start/stop instant replay - Immediately start/stop to replay the telephone conversation from the beginning even it is not finished yet to add Notes during the voice conversation And to start recording manually during the telephone conversation. Only valid if you select Manually Start Mode in Recording Start Type Minimize to system tray Exit CG application ( please be cautious that recording will be terminated after existing CG application ) - 13 - Setting up System Parameters All CG system running parameters can be configured in the windows above-shown. After installing CG application, the Crystal Gear Configuration window will appear or you can select User--> Configuration to open it later. Or you can even set it as always shown after login CG application. See - Profile Record Type - CG supports tap recording for both VoIP and TDM environment, choose which telephony environment you are going to run CG in VoIP – setting system parameters for recording of IP Phone, USB Phone or Soft Phone Handset – Setting system parameters for recording of Digital phone (PBX Extension), "recording from the Handset" by using AD130 recording adapter - 14 - Analog – Setting system parameters for recording of analog phone or analog line by using AD130 recording adapter For each Record type the system parameters are divided to 2 sections, basic and advanced At the bottom of each setting section you will find explanation on each setting In the following chapters, Marked items dedicated to VoIP recording setting Marked items dedicated to Handset recording setting Basic Setting Record Type- CG supports tap recording for both VoIP and TDM environment, choose which telephony environment you are going to run CG in. VoIP – VoIP recording controlled by D-channel raw information (all of call information) Handset – for all types of phone set including digital, analog and VoIP triggered by energy detection (without CLID) Analog – Analog recording controlled by on-off hook detection (all of call information) Network Adapter - the NIC card used for VoIP packet sniffer VoIP Information - This part is dedicated to VoIP recording scenario VoIP Protocol - You can select the VoIP protocol like SIP, Skinny, MGCP etc. or leave it for automatically detected by CG application Port - Port dedicated to VoIP packets transmission, normally leave it in default User Information - This part is dedicated to the phone setting for VoIP recording Extension - Extension Number of the phone you want to record Phone Address - IP address of IP phone, if you have no idea about your Phone IP address or MAC address, the CG toolkit - VoIP Phone Analysis helps you get it automatically, or you can even leave it blank for automatically detection by CG (only available for SIP and Cisco Skinny) Recording Start Type - You can select that voice recording will be triggered by VoIP call information automatically or manually - 15 - Save Directory- The folder that you want to save the recorded audios or video clips Advanced Settings Multiline Mode - You can select Recorded into one file - Save all those call segments into one recording file Or Recorded into several files - Cut those calls into individual recording files, if you often handle different matters during one telephony conversation or you need to differentiate whom those calls belong to. You can still play all those related recordings simultaneously Call on hold - it is specialized for call hold, transfer, conference call scenarios. To enables you to retrieve a complete telephony conversation no matter how many times this call has been held, transferred, or conferenced into, CG application provides you an innovated technology - Scenario Reconstruction. CG enables you to reconstruct the scenario. You can select Stop recording when pause - to deduct recording of music on hold or silence once you hold the call Or Generate Silence when hold - to generate a part of silence in recording file once you hold the call Digits Priority in Caller/Called ID - CG is applicable for all kinds of VoIP telephony environment worldwide. Sometimes, not only digits will be shown in your VoIP telephony screen for Caller/Called ID. Different code with different language might be results in clobbers in Caller/Called ID. It can be avoided by select On/Off in this option. Please check the table below regarding the meaning of On/Off: Digits Priority in Caller/Called ID On Off - 16 - There are both characters and digits shown in Caller/Caller ID Show digits only Show both characters and digits There is digits only shown in Caller/Called ID Show digits only Show digits only There is characters only shown in Caller/Called ID Show characters only Show characters only Recording files encryption – CG’s supported recording file encryption since V.1.17. Once you select “Enable File Encryption”, the recordings can only be played by CG/CM player. Setting record length - You can self-define the time scale for your recording files Minimum record length - you can define the Min. voice recordings length to avoid any useless recording files like silence or unknown call events Maximum record length - you can define the Max. voice recordings length to avoid any unexpected long recording files or even system crush (the unit is Second) "0" means this function is disabled Encoder – Four kinds of audio digitizing format File Save Information - User is able to define which path, what kind of format (normally predefined during system installation) they want to save the recorded audio as. You will preview what it would be when making the configuration. Simply drag and drop the criteria left listed, you will make the recording folder and naming in an order File Naming- You can defined the naming policy for your recording files by yourself, a plenty of call information like Caller/Called ID, Start Date etc. can be shown in that name depending on your settings. Normally it can be predefined during system installation. Moreover, you can also define your folder structure here, see Innovative Folder Structure and File Naming Folder Structure - see Innovative Folder Structure and File Naming - 17 - Archive Directory - CG duplicates recording files in both Save Directory and Archive Directory, define your destination for recording files archiving If it's digital phones or any other VoIP phone set has not been supported by CG yet, you can choose Handset mode to capture voice conversation without CLID. Please find the configuration which is dedicated to CG Handset recording part as shown by windows below. Record Type –Since Handset Recording Solution can only be triggered by volume/energy detection, you can select “Automatically controlled by volume” or “Manually”. Different communication environment might be resulted in unexpected errors for starting/terminating recording, CG provides a dedicated interface to enables a qualified CG engineer to solve that problem in CG Advanced Configuration Window. Normally keep them in default will not impair the normal running for CG, if it is really necessary to configure them, and you are not quite sure about the meaning of those parameters, please contact your local distributor for assistance. In this approach, you might be experienced the unbalance volume between two parties, which is normal and will not impair the voice quality If you are using Analog phone set, please choose "Analog" mode, all call information will be automatically captured and the configuration is remained the same as VoIP environment. - 18 - Voice Prompt – This setting is only available for Analog Mode. Volume – sometimes the recording sounds a little bit lower, you can adjust the volume you want. Voice prompt for incoming call – choose the option and upload the pre-recorded voice, once an incoming call connected, it will automatically remind that call is recorded. Voice prompt for outgoing call - choose the option and upload the pre-recorded voice, once an outgoing call is connected, click the “speak” button of the Popup Box on the bottom right corner first, and then it will still remind that call is recorded. CG Running Profile - 19 - To be more flexible and appropriate to different purposes in different market segments, CG enables you self-define the System Running Profile by click User --> Profile on CG Toolbar. Auto Login - every time you login CG system, the configuration windows will be popped up, which is more convenient for the user who keeps changing the running environment Start CG when login to Windows – once you login to Windows, CG will be started automatically Always show popup when recording status changed - there would be a small popup window shows you the current running status CG recorder Always show annotate window after recording started - which is extremely useful for outsourcing contact center environment Hide on Startup - You can configure your CG recording application running as hidden background application - 20 - Notice! Once you choose Auto Hide Mode, the following situations might be experienced: 1. All unexpected system errors would not be shown anymore, please check your CG player frequently 2. No more multiple users permission for single CG client is available 3. You need to disable Auto Hide mode firstly in order to reconfigure CG since no prompt will be shown any more 4. You can only re-login CG as administrator 5. If CG is running in online mode, any failures on server side might be resulted in Access Denied, Non-recording, and Invalid User Switch till server is recovered. You need to be very careful if you are going to run CG in Auto Hide mode. Change User - Once administrator sets CG to run in Auto Hide mode, any users except for Administrator would not be able to see any windows or prompts from CG anymore, unless re-login CG as administrator. With default Shortcut - Ctrl+Alt+Shift+X, you can switch to different user to re-login CG application. The Shortcut can be user defined. VoIP Phone Analysis It's a matter of fact that CG is able to self-detect IP address, port No. etc. in both SIP and Cisco Skinny environment, however, those parameters still need to be type into manually for H.323 environment like Avaya, Siemens etc. CG PA - VoIP Phone Analysis acts as your personal assistant to get IP Phone IP address/MAC address and Protocol by ignoring your acquaintance with your telephony environment. Press the button , the following window will appears: - 21 - Make sure that you press the button “Start Analysis” before you start to make phone call. Extension: the extension will be recorded with CG, your extension Number in another word Dialed Number: the number will be dialed Network Interface Card: the NIC will be used for network sniffer Protocol: the VoIP protocol, leave it in "Detect Automatically" if you don't know it Port: the port for VoIP data traffic, there is no needs to input here is you select "Detect Automatically" in Protocol field After filling in all the above information and click "Start Analysis" button, you must pick up the extension and make a call (dial the specified number). The PA will show the found protocol, IP address and MAC, if the PA works. The end user can choose either IP address or MAC and click "Confirm" button to fill into the phone address of the Option dialog. - 22 - Record Your Communication Real-time Caller/Called ID Real-time running status Immediate Replay from the beginning of telephony conversation even it is finished yet Unique Reference Number to differentiate each call Call duration Pause and resume recording Annotate the recording s in real-time Call direction The way to trigger/terminate call recording Once you finish all parameters setting for your CG recorder, the above-shown Toolbar will appear. If there is any Voice conversation has been detected, CG will start to record the conversation automatically, when you defined the Recording Start Type as "Automatically controlled by D-Channel" in Crystal Gears Configuration Window or "Record Manually". CG Toolbar is the main interface to enable you access all CG functions and control, You can: 1. Manually control recording 2. Access all CG functionalities and configurations 3. Retrieval the telephone conversation from the beginning during the call 4. Have a glance at all relevant call information and system running status in realtime - 23 - Searching & Playback Find Recorded Audio/Screen Clips List of Search Criteria provided by CG - 24 - CG provides you a number of searching criteria to enable you to find records extremely convenient. Flexible ways like single searching criteria or Searching criteria combination are provided to help you execute your own query flexibly. You can even save your frequently used searching criteria combination for quick search. A plenty of searching criteria can be specified for Instant Search: Reference - A unique Reference Number will be generated for each record, searching basing on the Reference Number will be extremely quick if you can remember it. You can define the format for Reference Number during setting up naming policy of recording files, it will be much easier to be understood and remembered User Name - User Name specified for log on CG system Extension - Extension Number Caller ID Called ID Time – from when to when Duration - the duration of telephony conversation Direction - Call direction Remark - the remarks added on recordings Played - find the records which are played or not Importance - depending on the importance you add to the records, including: Urgent, Normal and No importance Notes - Notes added to recordings - 25 - Define your own search criteria CG supports up to five searching conditions combination, add searching condition by press on And remove any searching condition by pressing on on . For all of frequently used searching criteria combination, you can save them by press for repeat searching in the future. Go to , select your saved searching criteria, press “Show” button, you can quickly locate the records without define the searching criteria combination anymore. Play Recordings Once the query is successfully executed, records will be listed in the area shown below: Double click on record or select a record and press to replay the record you can also select multiple records by press Ctrl/shift + left button of mouse, and press to replay the records one by one (only if the button on bottom - 26 - turns into ) Or replay the records circularly (only if the button on bottom turns into ) During playing multiple records, you will see the status buttons listed in front of those records the button shows you which record was played currently You can play the next/former record by press during playing multiple records) Or you can pause anytime when you press You can mute/unmute during playing record by press and (only available Counter time & Clock time As shown in the above-mentioned figure, Counter Time means the current time on your computer as well as time length of this record. As shown in the above-mentioned figure, Clock Time shows you the actual time when this record was recorded. - 27 - Play Multiline Recordings Once the call has been held, transferred, conferenced, CG enables you reconstruct scenario, see About Scenario Reconstruction. If you find that multiple recordings are in the same color, it means those records are belong to one telephony conversation at one tapping point. Double click anyone of those records or press the button after select anyone of them, CG player will play all those records in actual sequence. A complete telephony conversation will be retrieved Manage Your Records Batch Export Records - 28 - CG enables you to export multiple records one-off time, select all of those records you want to export, and press "Batch Export" button or click right button on mouse, define the location in the new opened dialog box and proceed. Please be aware of that all the relevant call informations including CLID, time, date, call direction, call duration etc. will be saved also, and you can play those recordings with windows media player as well as CG/CM player, however, all call information can only be shown in CG/CM player. Export to Excel You can also export the single or multiple recordings you select into Excel by pressing , the following window will appear: Press "Yes" to proceed. - 29 - Email Your Records You can email your recordings by pressing , your default email application will be activated, the recordings will be attached on the new email, type the receiver and subject. Save and Delete Your Records You can also save the recording you selected into .wav or MP3 files and define the folder by pressing - 30 - (only available for single record), and delete the selected recordings (must be authorized the user privilege in CG ser Management) by pressing - 31 - Annotation You can annotate a record at any time even during the recording by pressing , the following window appears Type the notes into the Annotate field, and press the button , the Notes will be added into database immediately. You can also remove the Notes from directly by pressing " - 32 - ". Appendix What is CG VoIP Box? In passive mode VoIP recording scenario, a network tapping device which is dedicated to Mirror the network IP traffic like Hub, Switch etc. is prerequisite. Considering the feature - tapping on client side provided by Crystal Gears, a Hub would be necessary unless that's VoIP soft phone environment or SPAN to PC (like Cisco) is empowered. A common connection point for devices in a network. Hubs are commonly used to connect segments of a LAN. A hub contains multiple ports. When a packet arrives at one port, it is copied to the other ports so that all segments of the LAN can see all packets. A passive hub serves simply as a conduit for the data, enabling it to go from one device (or segment) to another. So-called intelligent hubs include additional features that enable an administrator to monitor the traffic passing through the hub and to configure A network hub is a "dumb" multi-port repeater. When HUB receives a packet on one port, it sends out a copy of that packet to all other ports. In contrast, a network switch is capable of inspecting data packets as they are received, determining the source and destination device of every packet. A network switch forwards packets between the specified sender and receiver ports only. Traditionally, Power source would be definitely prerequisite for a hub in order to make sure that there is no attenuation for the copied data. Unfortunately, this will not applicable for the VoIP communication environment nowadays, because - 33 - too many power supplies results in the mass in your companies' infrastructure recording will be stopped due to any accident power loss on Hub there is no way to use traditional Hub in PoE environment CG VoIP Box is a unique network tapping device provided by CIS Ltd. by connecting your desktop/laptop USB interface, it required a dedicated power supply no more. The 5V power comes with the common USB interface is enough to make it running smoothly, and specialized for PoE environment, you don't even need USB connection any more. About "PoE" - Power over Ethernet or PoE technology describes a system to safely pass electrical power, along with data, on Ethernet cabling. Some of vendors mark their products as "HUBs", but in fact these devices are "Switches". Before you purchase a HUB, please, check your HUB model to see if it is a real HUB or not. In general, if you find something with "full-duplex" in the device description, this is in fact a switch and not a hub. This is often the case with 100Mbit Ethernet devices. If you have a 10MBit HUB, and it's stated to be a HUB, it will be a HUB. Only devices, that are real HUBs, are convenient for recording VoIP calls. - 34 - What is Port Mirroring Port mirroring, also known as a roving analysis port, is a method of monitoring network traffic that forwards a copy of each incoming and outgoing packet from one port of a network switch to another port where the packet can be studied. A network administrator uses port mirroring as a diagnostic tool or debugging feature, especially when fending off an attack. It enables the administrator to keep close track of switch performance and alter it if necessary. Port mirroring can be managed locally or remotely. - 35 - About Scenario Reconstruction In Contact Center, Agents make and receive tons calls every day to handle customers requests regarding complain, consulting, operation processing etc. Even the well-trained one will probably encounter some intractable issues which critically needs assistance from their superior. In that case or any others, agents have to hold customers' calls for a couple of seconds, and make a call to their superiors or even conference them into the customers' calls. The traditional call recording solution will cut this conversation into multiple recordings, which is hard to be bundled together for a complete conversation retrieval. CG provides you Scenario Reconstruction technology to enable you to retrieve the multi-calls from the beginning to the end. No matter how many times the call has been held or transferred, CG marks all of those calls with the same color, see below: Double click anyone of those records or press the button after select anyone of them, CG player will play all those records in actual sequence. A complete telephony conversation will be retrieved. - 36 - Innovative Folder Structure and File Naming Disordered or simple storing management generally results in bad system performance or even unexpected system crash if there are too much records have to be stored per day. CG provides you the innovative folder structure and file naming function to make it's easy to maintain your system and ensure it's stability. During the first running CG application, you can define your own folder structure to lay out your way to store records as well as file naming strategy to make it easy to locate the records. Or You can press --> Configuration, to open it Simply drag and drop the items listed in All Formats window into Folder Structure window, you will see the contents in File Naming dialog box is changed consequently OK! Let's illustrate how to do it in an example below: You would like save the recordings in the format as StartDate + StartTime.wav, Just drag "StartDate" from the Format window at right side to Folder Structure window and drop it, then do the same thing on "StartTime", - 37 - meanwhile, you want the recording files to be saved into root directory c:\Records\StartDate\StartTime\CallerID\, just drag CallerID from the Format window and drop into Folder Structure window Now you have a voice recording captured at 09:28:36, 2009.06.30, called from 33393833, the recording file will be saved into C:\records\20090630\092836\33393833\20090630092836.wav Later, you want to name your recordings as "StartDateStartTimeCallerID", Simply Select "CallerID" listed in Format window, and press to add it into File Naming dialog box. There is another record made at 10:38:20, 2009.06.30, called from 51907878 the recording file will be saved into C:\records\20090630\103820\51907878\2009063010382051907878.wav - 38 -