1
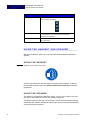
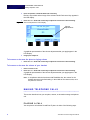
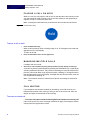
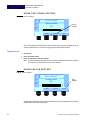
TELEPHONE USER GUIDE
...................................
....
SOUNDPOINT IP PHONE FOR SPHERICALL
...........................................................
SoundPoint IP (400 & 500) phones for Sphericall are full-featured desktop phones.
Figure 1 Polycom SoundPoint IP phone
Handset
Speaker
Call Buttons
1,2, 3
Alert
LED Indicator
150 x 80
LCD Display
Audio Path
Control Keys
(1-3)
Display
Control
Keys
Call Status Icons
1,2,3
Keys
Hold
Key
Feature Keys
(1-6)
SoundPoint IP Phone Integration Manual
Dial
Pad
Softkeys
(Park,Pickup,PIN)
Feature
Keys (7-9)
1
TE L E P H O N E U S E R G U I D E
SoundPoint IP Phone for Sphericall
Table 1
SoundPoint IP Phone Features
Features
Functions
Basic Features
Call Buttons
Each Call button represents a line. The IP phone is
equipped with 3 lines. The Call buttons manage multiple
calls.
Dial pad
These 12 keys provide the 10 digits, the 26 alphabetic
characters as well as the # and * keys. In alphanumeric
entry mode, press the same key repeatedly to cycle
through the number and letters associated with that key.
Feature keys
Your organization’s Sphericall system Administrator
determines the use for each of these keys. The three top,
left keys may be associated with indicators on the display
to select call appearances. The feature keys include:
• Conference (IP phone 3-party conferencing)
• Forward
• Transfer
• Call Lists (this feature is not presently supported)
• Speed Dial (this feature is not presently supported)
• Redial
• Menu
• Voice Mail
• Do Not Disturb
Note: Future software releases of Sphericall will include
more features for the SoundPoint IP phone. Feature keys
that are inoperable will display Not Available.
Note: Star code commands may be applied from the
SoundPoint IP phone. Refer to the Sphericall Desktop
User Manual for a complete list of star code commands.
Hold feature key
Places active calls on hold.
Note: The Hold button places calls on hold. It does not
take calls off of hold.
Soft Features
2
SoundPoint IP Phone Integration Manual
.....
TE L E P H O N E U S E R G U I D E
SoundPoint IP Phone for Sphericall
Features
Softkeys
Functions
The LCD screen displays labels (Park, Pickup, and Pin or
these keys to identify their context-sensitive functions.
Note: Softkey order may change in future Sphericall
releases.
7 :3 7 a .m . T u e , Ju l 7
S h a w n F ra d in
271
PARK
P IC K U P
P IN
Information Features
LCD display
Displays information about your calls, your messages, the
softkeys, the time and date, the phone, and other relevant
data.
Call Status Icons
Provide call appearance information (hold, ringing, offhook, on-hook).
Display control keys
Use the arrow keys to scroll through the displayed
information.
Note: Future software releases of Sphericall will include
more features for the SoundPoint IP phone. Display
control keys that are inoperable will display Not
Available.
Press Sel to select a field of displayed data.
Press Del to delete a field of displayed data.
Alert LED indicator
The LED indicator alerts you to incoming calls.
Audio Features
Audio Path volume keys
SoundPoint IP Phone Integration Manual
Adjusts the volume of the handset, headset, speaker, and
ringer.
3
TE L E P H O N E U S E R G U I D E
Using the Handset and Speaker
Features
Functions
Audio Path control keys
Use these keys to hear via the speaker or the headset,
and to mute the microphone.
Speaker
The speaker will sound equally clear when the handset is
on the switchhook. The IP 500 phone has full duplex
speaker phone capability.
Microphone
The microphone works best when the telephone is on a
hard, flat surface.
USING THE HANDSET AND SPEAKER
...........................................................
With the Soundpoint IP phone, you can place calls with the telephone handset or
speaker.
USING THE HANDSET
Figure 2 Speaker Audio Path Control Key
To place and answer calls with the telephone handset, lift the handset. To change
from handset to speaker, press the Speaker Audio Path control key and hang up
the handset.
USING THE SPEAKER
The speaker is designed for “hands-free” dialing. You can use it to place a call, and
then pick up the handset if the other party answers the phone.
The speaker allows for two-way communication. You can have the handset off-hook
with the speaker enabled, enabling the caller party to hear you over the handset while
you listen through the speaker.
4
SoundPoint IP Phone Integration Manual
.....
TE L E P H O N E U S E R G U I D E
Using the Handset and Speaker
To place calls using the speaker
1
Press the Speaker Audio Path control key.
Dial tone is provided and an image of a speaker appears in the LCD display.
2
Dial the desired number or extension.
When the party answers:
3
Pick up the handset or speak towards the telephone.
Note: The handset does not have to be in the cradle to enable speaker functionality.
When finished with the call:
4
Press the Speaker key to hang up.
USING THE HEADSET
The SoundPoint IP phone has the ability to integrate with many headsets.
Note: For information regarding setup and functionality of a particular headset, refer
to the headsets documentation.
Figure 3 Headset Audio Path Control Key
To place calls using the headset
1
Press the Headset Audio Path control key.
Dial tone is provided and an image of a headset appears in the LCD display.
2
Dial the desired number or extension.
When the party answers:
3
Speak in to the headset’s microphone.
When finished with the call:
4
Press the Headset key to hang up.
ADJUSTING THE VOLUME
Figure 4 Audio Path Volume Keys
Audio Path volume keys adjust the volume of the speaker, handset, and headset.
To increase or decrease the volume of your speaker or headset
1
Take the telephone off-hook.
SoundPoint IP Phone Integration Manual
5
TE L E P H O N E U S E R G U I D E
Making Telephone Calls
2
Press the speaker or headset Audio Path control key.
Dial tone is provided and an image of the selected Audio Path control key appears in
the LCD display.
3
Press the + or - Audio Path volume key to adjust the volume to the desired setting.
Figure 5 Volume Adjustment LCD Display
Volume
Adjustments
7:37 a.m. Tue, Jul 7
Shawn Fradin
271
PARK
PICKUP
PIN
A graphical representation of the volume adjustments that you apply appear in the
LCD display.
4
Hang up the telephone.
To increase or decrease the phone’s ringing volume
1
Press the + or - Audio Path volume key to adjust the volume to the desired setting.
To increase or decrease the volume of your handset
1
Place or answer a call.
2
Press the + or - Audio Path volume key to adjust the volume to the desired setting.
A graphical representation of the volume adjustments that you apply appear in the
LCD display.
Note: In compliance with the Americans with Disabilities Act, the volume for the
handset returns to its default setting, in the middle of the volume scale, once
the phone is on-hook.
MAKING TELEPHONE CALLS
...........................................................
This section describes how you can place, answer, or otherwise manage a telephone
call.
PLACING A CALL
You can place a call with the SoundPoint IP phone in either of the following ways.
6
SoundPoint IP Phone Integration Manual
.....
TE L E P H O N E U S E R G U I D E
Making Telephone Calls
To place a call
•
Lift the handset and dial the desired number.
or
•
Press the Speaker Audio Path control key and dial the desired number.
ANSWERING A CALL
You can answer calls coming to your telephone extension or to others in your group.
To answer a call coming to you directly, lift the handset.
When a new call arrives, a flashing image of a bell will appear next to that call
appearance in the LCD display.
ENDING A CALL
To end a call
If using the handset:
•
Hang up the handset.
or
If using the speaker:
•
Press the Speaker Audio Path control key.
MUTING A CALL
While on a call, you can mute the handset, preventing the party you are speaking to
from hearing what you or someone else in the room is saying. When using the
speaker, your call is automatically muted if the handset is in the cradle.
Figure 6 Mute Audio Path Control Key
IP 400
IP 500
To mute a call
1
Press the Mute Audio Path control key.
When the Mute feature is enabled, a flashing image of a microphone will appear in
the LCD display.
To disengage mute:
2
Press the Mute Audio Path control key again.
The flashing icon will disappear.
SoundPoint IP Phone Integration Manual
7
TE L E P H O N E U S E R G U I D E
Making Telephone Calls
PLACING A CALL ON HOLD
While on a call, you can place the call on hold, so that the caller cannot hear you and
you cannot hear the caller. Placing a call on hold also allows you the opportunity to
originate, accept, or conference other calls.
Note: Pressing the Hold feature key a second time does not take the call off hold.
Figure 7 Hold Feature Key
Hold
To place a call on hold
1
Press the Hold feature key.
When a call is placed on hold, a flashing image of an “H” will appear next to that call
appearance in the LCD display.
To return to the call:
2
Press the Call button next to its call appearance.
MANAGING MULTIPLE CALLS
If multiple calls are on hold:
3
Scroll to see call information by using the up and down (arrow) display control keys.
A call can be placed on hold explicitly by pressing the Hold feature key or implicitly by
selecting a different Call button. The process of switching to a new call will place the
previous call on hold. When a call is placed on hold, a flashing “H” will appear next to
that call appearance in the LCD display. If multiple calls are placed on hold, each call
icon will present the flashing “H”.
Note: The maximum number of calls that an IP phone can manage is restricted to
three.
CALL WAITING
If your telephone set has been enabled for call waiting, a tone will sound in your
handset when another call is coming in while you are on the current call. Also, the
display will update to indicate that a call is waiting.
To access a second call
• Press the Call button beside the flashing Bell that indicates an incoming call.
If the call is ignored, the user’s coverage conditions will apply. Accessing the second
call will place the original caller on hold.
8
SoundPoint IP Phone Integration Manual
.....
TE L E P H O N E U S E R G U I D E
Making Telephone Calls
To access a third call
• Press the Call button beside the flashing Bell that indicates an incoming call.
Accessing the third call places the other two calls on hold.
FORWARD A CALL
How do I forward my calls to another extension?
Forwarding, or the temporary "follow me" feature of the Sphericall system, rings both
your extension and the other internal extension where the call is forwarded.
To set forwarding conditions
1
Press the Forward feature key.
You do not need to have dial tone to forward calls.
2
Enter the extension (or outside number) to which you want calls forwarded.
Note: Calls can be forwarded to external numbers, however, the phone will only ring
once at your extension.
The forwarding conditions that you applied will be confirmed with:
• tone notification
• The extension (or outside number) to which you forwarded calls will continually
flash in the LCD display.
To remove forwarding conditions
1
Press the Forward feature key.
You do not need to have dial tone to remove forwarding conditions.
TRANSFER A CALL
Once I have answered a call, how do I transfer it to another extension?
Blind Transfer
Immediate transfer to other extension.
Attended Transfer
Allows you to announce the call prior to the
transfer. When using attended transfer, the caller
being transferred does not hear you announce
the call. If your organization’s Sphericall system
has Music-on-Hold, the caller hears music
during the transfer.
To transfer a call using blind transfer
While on the call:
1
Press the Transfer feature key.
You will hear dial tone.
2
Dial the number to which you want to transfer the call.
3
Hang up the handset.
SoundPoint IP Phone Integration Manual
9
TE L E P H O N E U S E R G U I D E
Making Telephone Calls
To transfer a call using attended transfer
While on the call:
1
Press the Transfer feature key.
You will hear dial tone.
2
Dial the number to which you want to transfer the call.
3
Once the call is answered, announce to the caller that you will be transferring a call.
4
Hang up the handset.
CONFERENCE A CALL
Once I have an active call, how do I conference in another party?
To conference in an incoming call
1
Press the hard key adjacent to the call appearance of the incoming call.
2
Press the Conference feature key.
All parties are now in conference.
or
3
Press one of the available hard keys (to access dial tone) to dial an internal/external
caller to bring into the conference.
Once the call is answered:
4
Press the Conference feature key.
Note: As of this release, the SoundPoint IP phone supports a maximum of three
parties on a conference call.
To initiate a conference call
While on the call:
1
Press the Conference feature key.
This places the original call on hold. A flashing image of an “H” will appear next to that
call appearance in the LCD display. Also, dial tone is provided.
2
Dial the number to which you want to include in the conference call.
3
Once the call is answered, press the Conference feature key.
All parties are now conferenced.
REDIALING THE LAST NUMBER DIALED
To redial the most recently dialed number, lift the handset and press the Redial
Feature key.
DO NOT DISTURB
The Do Not Disturb Feature key on the SoundPoint IP phone allows you to "silence"
your phone: the phone will not ring at your desk. All calls go directly to your
forwarding and coverage options.
10
SoundPoint IP Phone Integration Manual
.....
TE L E P H O N E U S E R G U I D E
SoundPoint IP Softkeys
When the Do Not Disturb feature is enabled, a flashing icon (in the form of a bell) will
appear.
If no forwarding and coverage options are set, the phone will ring busy.
CAUTION!
EVEN THOUGH, WHEN ACTIVATED, A DO NOT DISTURB IMAGE
APPEARS ON THE LCD DISPLAY, IT IS EASY TO FORGET THAT YOU
HAVE DO NOT DISTURB ACTIVATED. REMEMBER TO DEACTIVATE
IT TO RESUME NORMAL CALL ACTIVITY.
SOUNDPOINT IP SOFTKEYS
...........................................................
USING THE PARK SOFTKEY
Figure 8 Park Softkey
7:37 a.m. Tue, Jul 7
Park
Softkey
Shawn Fradin
271
PARK
PICKUP
PIN
Park zones place calls in “hold” parking lots where user’s can retrieve these calls from
any phone on the Sphericall system.
To place a call into a park zone
Once a call is established:
1
Press the Park softkey.
2
Enter the desired extension to park the call.
3
Hang up the phone.
To retrieve a call from a park zone
1
Go off-hook.
2
Press the Pickup softkey.
3
Enter the extension number to which the call has been parked.
Note: For more information on park zones, refer to the Sphericall Desktop User
Manual.
SoundPoint IP Phone Integration Manual
11
TE L E P H O N E U S E R G U I D E
SoundPoint IP Softkeys
USING THE PICKUP SOFTKEY
Figure 9 Pickup Softkey
7:37 a.m. Tue, Jul 7
Shawn Fradin
271
PARK
Pickup
Softkey
PICKUP
PIN
The Pickup softkey of SoundPoint IP phone allows you to answer a ringing phone at
someone else’s desk. If you hear a ringing phone, follow this procedure.
To pickup a call
1
Go off-hook.
2
Press the Pickup sofkey.
3
Enter the appropriate extension number.
Note: The Pickup softkey also allows users to retrieve calls from park zones. Refer to
the Using The Park Softkey section of this chapter.
USING THE PIN SOFTKEY
Figure 10 PIN Softkey
7:37 a.m. Tue, Jul 7
Shawn Fradin
271
PARK
PIN
Softkey
PICKUP
PIN
Authorization PINs allow you to apply permissions from your assigned user profile to
initiate calls from a restricted phone.
12
SoundPoint IP Phone Integration Manual
.....
TE L E P H O N E U S E R G U I D E
SoundPoint IP Softkeys
To use authorization PINs
1
Go off-hook.
2
Press the PIN softkey.
3
Enter your PIN code.
4
Dial the desired number.
Note: For more information on Authorization PINs, refer to the Sphericall Desktop
User Manual.
ADJUSTING DISPLAY CONTRAST
You can adjust the display contrast on the SoundPoint phone to the desired setting.
To adjust the display contrast
1
Press the following keys simultaneously:
• + and - Audio Path volume keys
• 0 key
A contrast bar appears.
2
Press the + or - Audio Path volume key to adjust the contrast to the desired setting.
The contrast bar appears temporarily. After a few seconds, the normal display will
resume.
SoundPoint IP Phone Integration Manual
13
TE L E P H O N E U S E R G U I D E
SoundPoint IP Softkeys
14
SoundPoint IP Phone Integration Manual